Samsung Electronics Co 05DRAGON Digital Video Camcorder User Manual Dragon eng 1 25
Samsung Electronics Co Ltd Digital Video Camcorder Dragon eng 1 25
UserManual.wiki
>
Samsung Electronics Co
>
05DRAGON User Manual
>
Users Manual 2
Contents
1.
Users Manual 1
2.
Users Manual 2
Users Manual 2
Navigation menu
Upload a User Manual
Namespaces
Wiki Guide
HTML
PDF
Info
Views
User Manual
Discussion / Help
Navigation
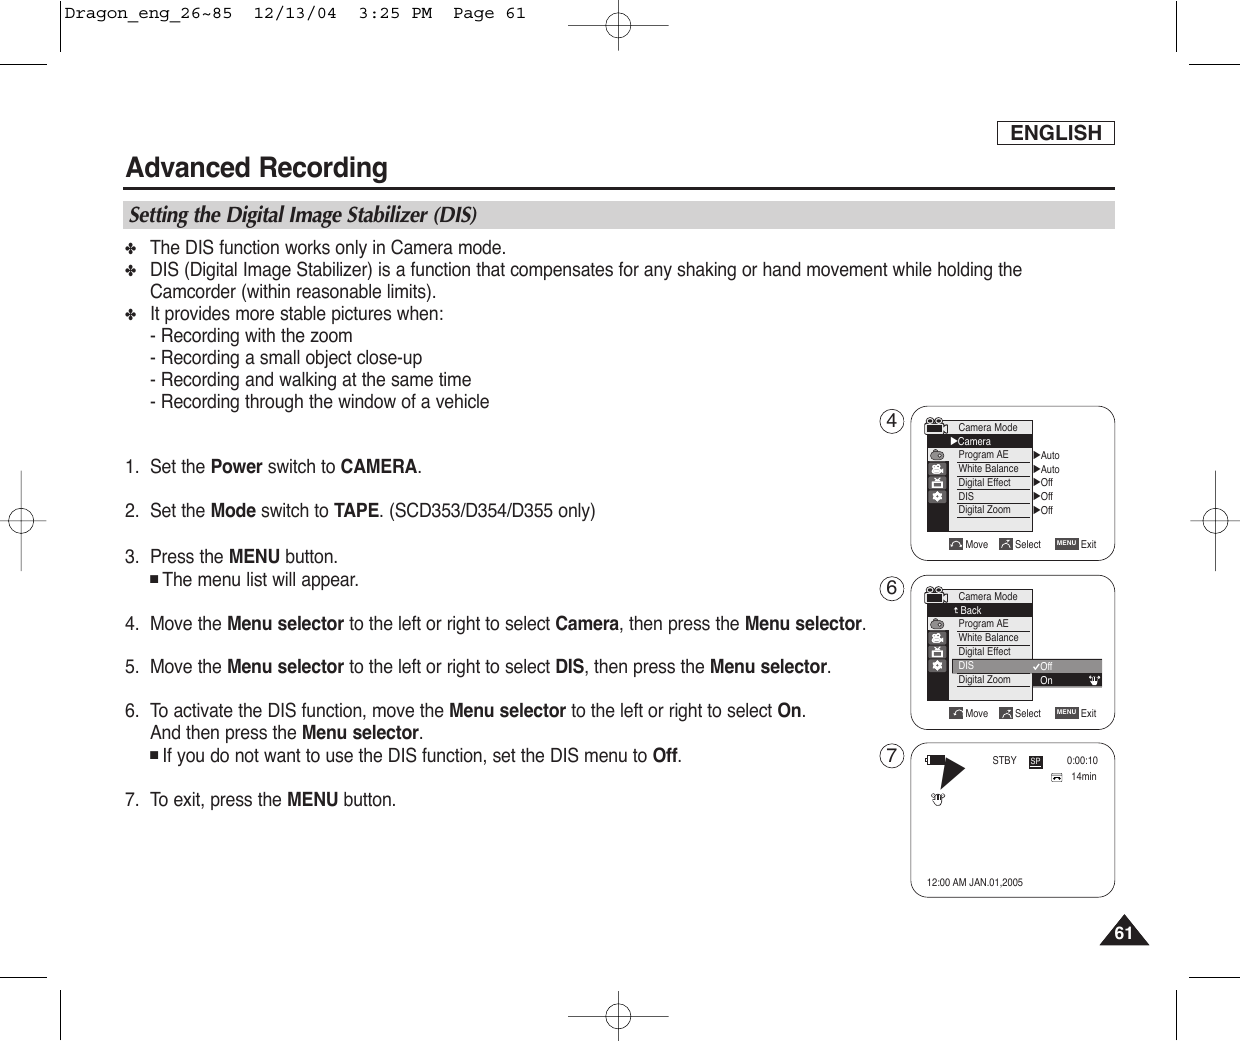
![ENGLISH6262Advanced Recording✤Quick menu is used to access Camcorder functions by simply using the Menu selector.✤Quick menu provides easier access to the frequently used menus without using the Menu button.1. Press the Menu selector and press the Menu selector again.2. Move the Menu selector to the left or right to select On or Off, then press the Menu selector.[ Notes ]■It is recommended that you deactivate the DIS function when using a tripod.■If you use the DIS function, the picture quality may deteriorate.■EASY Q mode automatically sets the DIS to On.Using Quick Menu: DIS (Digital Image Stabilizer)14min0:00:10SPSTBYExitMENUDISProgram AEWhite BalanceShutterExposureManual Focus…†On14min0:00:10SPSTBYExitMENUOffDISProgram AEWhite BalanceShutterExposureManual Focus1214min0:00:1012:00 AM JAN.01,2005SPSTBYœDragon_eng_26~85 12/13/04 3:25 PM Page 62](https://usermanual.wiki/Samsung-Electronics-Co/05DRAGON.Users-Manual-2/User-Guide-501868-Page-2.png)
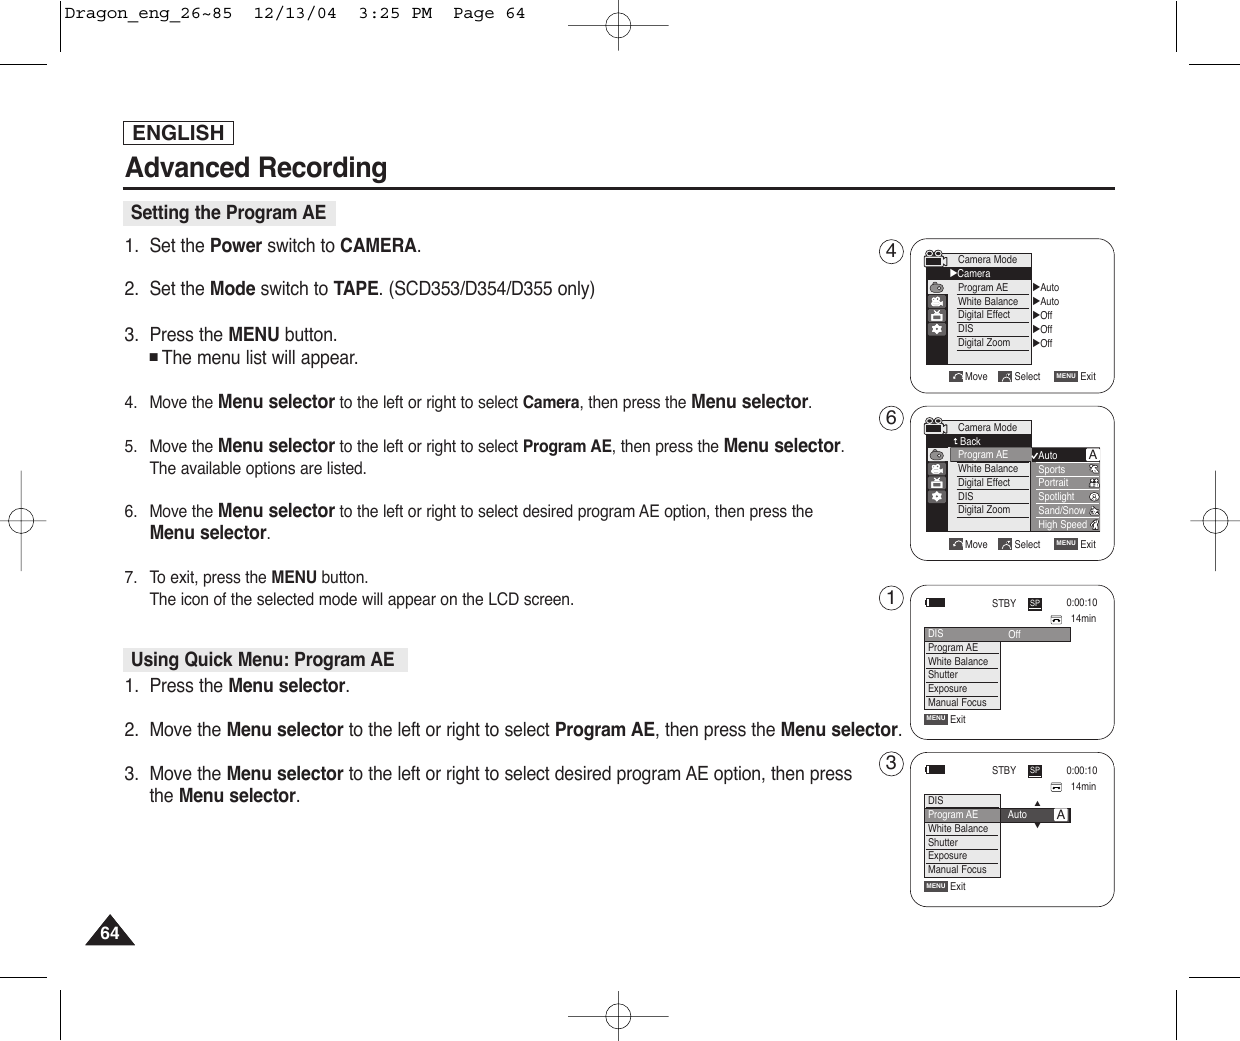
![ENGLISHAdvanced Recording6363✤The Program AE function works only in Camera mode.✤The Program AE mode allows you to adjust shutter speeds and apertures to suit different recording conditions.✤They give you creative control over the depth of field.■Auto mode ( )-Auto balance between the subject and the background.-To be used in normal conditions.-The shutter speed automatically varies from 1/60 to 1/250 per second, depending on the scene.■Sports mode ( )For recording people or objects moving quickly.■Portrait mode ( )-For focusing on the background of the subject, when the background is out of focus.-The Portrait mode is most effective when used outdoors.-The shutter speed automatically varies from 1/60 to 1/1000 per second.■Spotlight mode ( )For recording correctly when there is only light on the subject and not the rest of the picture.■Sand/Snow mode ( )For recording when people or objects are darker than the background because of reflected light from sand or snow.■High Speed(High Shutter Speed) mode ( )For recording fast-moving subjects such as players in golf or tennis games.[ Notes ]■While setting the NITE PIX to ON, the Program AE function does not work. (SCD352/D354/D355 only) ■The Program AE function will not operate in EASY Q mode.■No indicator will appear on the LCD screen when Auto mode is selected.AProgram AE(Programed Automatic Explore Modes)14min0:00:1012:00 AM JAN.01,2005SPSTBYœDragon_eng_26~85 12/13/04 3:25 PM Page 63](https://usermanual.wiki/Samsung-Electronics-Co/05DRAGON.Users-Manual-2/User-Guide-501868-Page-3.png)
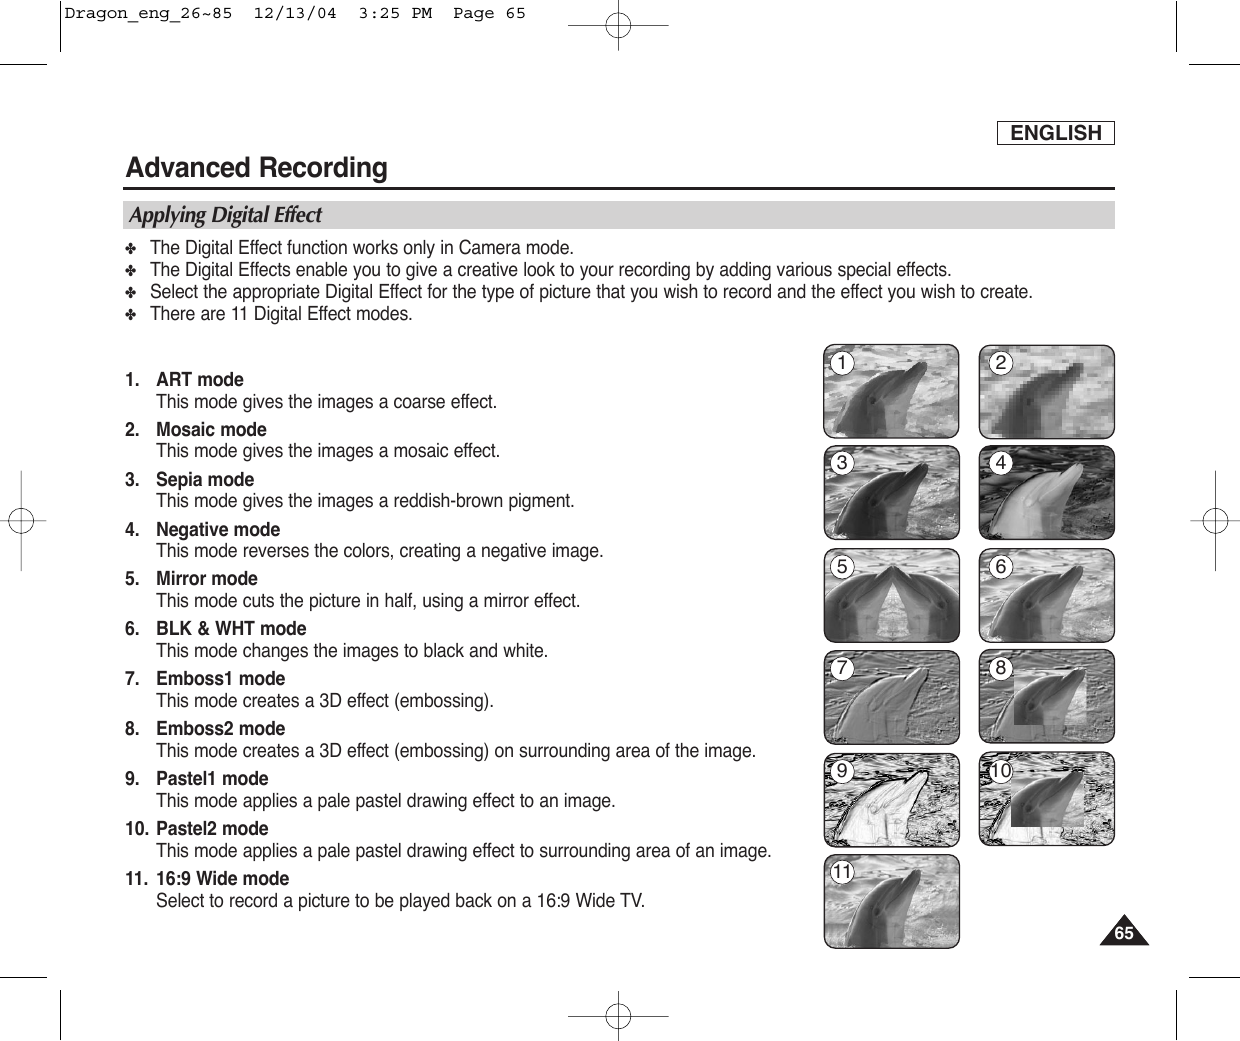
![ENGLISHAdvanced Recording6666Selecting the Digital Effect1. Set the Power switch to CAMERA.2. Set the Mode switch to TAPE. (SCD353/D354/D355 only)3. Press the MENU button.■The menu list will appear.4. Move the Menu selector to the left or right to select Camera, then press the Menu selector.5. Move the Menu selector to the left or right to select Digital Effect, then press the Menu selector. 6. Move the Menu selector to the left or right to select desired Digital Effect mode,then press the Menu selector.■The selected mode is applied. 7. To exit, press the MENU button.[ Notes ]■While setting the NITE PIX to ON, the Digital Effect function does not work. (SCD352/D354/D355 only)■The Digital Effect function will not operate in EASY Q mode.Move Select ExitMENUCamera ModeBackProgram AEWhite BalanceDigital EffectDISDigital ZoomOffArtMosaicSepiaNegativeMirror▼√Auto√Auto√Off√Off√OffMove Select ExitMENUCamera Mode√CameraProgram AEWhite BalanceDigital EffectDISDigital Zoom461Dragon_eng_26~85 12/13/04 3:25 PM Page 66](https://usermanual.wiki/Samsung-Electronics-Co/05DRAGON.Users-Manual-2/User-Guide-501868-Page-6.png)
![✤Zoom works only in Camera mode.✤Zooming more than 20x is achieved digitally, up to 900x when combined with optical zoom.✤The picture quality may deteriorate depending on how much you zoom in on the subject.✤We recommend that you use the DIS feature with Digital Zoom for picture stability. (see page 61)1. Set the Power switch to CAMERA.2. Set the Mode switch to TAPE. (SCD353/D354/D355 only)3. Press the MENU button.■The menu list will appear.4. Move the Menu selector to the left or right to select Camera, then press the Menu selector.5. Move the Menu selector to the left or right to select Digital Zoom, then press the Menuselector. 6. Move the Menu selector to the left or right to select desired zoom mode(Off, 100x,200x,400x or 900x), then press the Menu selector.7. To exit, press the MENU button.[ Notes ]■Using the DIS function (see page 61) to obtain a more stable, clearer image when recording using the deep zoom.■Maximum zooming may result in lower picture quality.ENGLISHAdvanced Recording67671Zooming In and Out with Digital ZoomDigital ZoomMove Select ExitMENUCamera ModeBackProgram AEWhite BalanceDigital EffectDISDigital ZoomOff100x200x400x900x√Auto√Auto√Off√Off√OffMove Select ExitMENUCamera Mode√CameraProgram AEWhite BalanceDigital EffectDISDigital Zoom46Dragon_eng_26~85 12/13/04 3:25 PM Page 67](https://usermanual.wiki/Samsung-Electronics-Co/05DRAGON.Users-Manual-2/User-Guide-501868-Page-7.png)
![1. Set the Power switch to CAMERA.2. Set the Mode switch to TAPE. (SCD353/D354/D355 only)3. Press the PHOTO button.■The still picture is recorded for about 6~7 seconds. 4. After the PHOTO has been recorded, the Camcorder returns to STBY mode.✤The Photo Search works only in Player mode. 1. Set the Power switch to PLAYER.2. Set the Mode switch to TAPE. (SCD353/D354/D355 only)3. Press the MENU button.The menu list will appear.4. Move the Menu selector to the left or right to select Tape, then press the Menu selector.5. Move the Menu selector to the left or right to select Photo Search, then press the Menuselector.6. Press the / (REW/FF) buttons to select the photo. ■The photo search process appears on LCD screen while you are searching.■After completing the search, the Camcorder displays the still image.7. To exit, press the (STOP) button.[ Notes ]■Pressing the PHOTO button while recording stops the recording and saves the still image capturedat that moment.It takes approx. 6 ~7 seconds to save the image and then resumes the recording.■You can use the remote control to take a photo by using the PHOTO button on the remote control.Pressing the PHOTO button on the remote control records the still image at once with automaticfocusing. (SCD354/D355 only)■When there are no still images recorded on the tape, it will be fully rewound or forwarded.ENGLISHAdvanced Recording6868Searching for a Photo PicturePhoto Image Recording√Sound[1]Move Select ExitMENUPlayer Mode√TapePhoto SearchPhoto CopyAudio SelectSearch Cancel ExitMENUœœœœ /√√√√SP25minPhoto searching...0:44:38:03Search Cancel ExitMENUœœœœ /√√√√SP 0:41:56:1025minPhoto Search46Photo SearchDragon_eng_26~85 12/13/04 3:25 PM Page 68](https://usermanual.wiki/Samsung-Electronics-Co/05DRAGON.Users-Manual-2/User-Guide-501868-Page-8.png)
![ENGLISHPlayback6969✤You can monitor the playback picture on the LCD screen.✤Make sure that the Battery pack is in place.1. Set the Power switch to PLAYER.2. Set the Mode switch to TAPE. (SCD353/D354/D355 only)3. Insert the tape you wish to view. (see page 36)4. Open the LCD screen. ■Adjust the angle of the LCD screen and set the brightness or color if necessary.5. Press the (REW) button to rewind the tape to the starting point.■To stop rewinding, press the (STOP) button.■The Camcorder stops automatically after rewinding is complete.6. Press the (PLAY/STILL) button to start playback.■You can view the picture you recorded on the LCD screen.■To stop the play operation, press the (STOP) button.✤You can adjust the LCD Bright/Color during playback.✤The adjustment method is the same procedure as used in Camera mode. (see page 32) [ Notes ]■You can also view the picture on a TV screen, after connecting the Camcorder to a TV or VCR. (see page 71~72) ■Various functions are available in Player mode. (see page 73) ■For searching and viewing still images recorded onto tape. (see page 68)Playing back a tape you have recorded on the LCD screenAdjusting the LCD Bright/Color during Playback135Dragon_eng_26~85 12/13/04 3:25 PM Page 69](https://usermanual.wiki/Samsung-Electronics-Co/05DRAGON.Users-Manual-2/User-Guide-501868-Page-9.png)
![ENGLISHPlayback7070✤The Speaker works only in Player mode.✤When you use the LCD screen for playback, you can hear recorded sound from the built-in Speaker.-Follow the instructions below to decrease or mute speaker volume in the Player mode. -Take the following steps to lower the volume or mute the sound while playing a tape on the Camcorder.1. Set the Power switch to PLAYER.2. Set the Mode switch to TAPE. (SCD353/D354/D355 only)3. Press the (PLAY/STILL) to play the tape.4. When you hear sounds once the tape is in play, use the Menu selector to adjust the volume.■Avolume level display will appear on the LCD screen. Levels may be adjusted from anywhere between 00 to 19 and you will not hear any sound when the volume is set on 00.■If you close the LCD screen while playing, you will not hear sound from the speaker.[ Notes ]■When the AV cable is connected to the Camcorder, you cannot hear sound from the Built-In Speakerand cannot adjust the volume.■The sound will return when you remove the connected AV cable from the jack of your Camcorder.Controlling Sound from the Speaker14min0:46:00:11†…SP√[05]24Dragon_eng_26~85 12/13/04 3:25 PM Page 70](https://usermanual.wiki/Samsung-Electronics-Co/05DRAGON.Users-Manual-2/User-Guide-501868-Page-10.png)
![ENGLISHPlayback7171✤The playback function works only in Player mode.✤It is practical to view a tape using the LCD screen when in a car or outdoors.✤To play back a tape, the television must have a compatible color system. ✤We recommend that you use the AC Power adapter as the power source for the Camcorder.1. Connect the Camcorder and TV with the Audio/Video cable.■The yellow jack: Video■The white jack: Audio(L)-mono■The red jack: Audio(R) If you connect to a monaural TV, connect the yellow jack (Video) to the video input of the TV and the white jack (Audio L) to the audio input of the TV. 2. Set the Power switch to PLAYER.3. Set the Mode switch to TAPE. (SCD353/D354/D355 only)4. Turn on the TV and set the TV/VIDEO selector on the TV to Video.Refer to the TV user’s manual.5. Play the tape.[ Notes ]■You may use an S-Video (optional) cable to obtain better quality pictures if you have a S-Video connector on your TV.■Even if you use an S-Video (optional) cable, you need to connect an audio cable.■If you connect the cable to the Audio/Video jack, you will not hear sound from the Camcorder's speakers.■If only a mono audio input is available on the TV set, use the audio cable with the white jack. (Audio L)Playback on the LCD screenPlayback on a TV monitorConnecting to a TV which has Audio/Video input jacksTape PlaybackCamcorderAudio/VideoS-VideoVideo input-YellowAudio input(left)-WhiteS-Video inputAudio input(right)-RedTVDragon_eng_26~85 12/13/04 3:25 PM Page 71](https://usermanual.wiki/Samsung-Electronics-Co/05DRAGON.Users-Manual-2/User-Guide-501868-Page-11.png)
![ENGLISHPlayback7272✤You can connect your Camcorder to a TV through a VCR.1. Connect the Camcorder and VCR with the Audio/Video cable.■The yellow jack: Video■The white jack: Audio(L) - Mono■The red jack: Audio(R) 2. Connect a TV to the VCR.3. Set the Power switch to PLAYER.4. Set the Mode switch to TAPE. (SCD353/D354/D355 only)5. Turn on both the TV and VCR.■Set the input selector on the VCR to Line.■Select the channel reserved for your VCR on the TV set.6. Play the tape.✤You can play the recorded tape in Player mode.1. Connect a power source and set the Power switch to PLAYER.2. Set the Mode switch to TAPE. (SCD353/D354/D355 only)3. Insert the tape you wish to play back.4. Using the / (REW/FF) buttons, find the first position you wish to play back.5. Press the (PLAY/STILL) button.■The images you recorded will appear on the TV after a few seconds.■If a tape reaches its end while being played back, the tape will rewind automatically.[ Notes ]■The playback mode (SP/LP) is selected automatically.■If the VCR has an S-VIDEO input terminal, you may use S-VIDEO for better quality.■The S-VIDEO terminal transmits video only. Connect AUDIO cables for sound.■If only a mono audio input is available on the TV set, use the audio cable with the white jack.Connecting to a TV which has no Audio and Video Input JacksPlaybackAntennaS-Video inputAudio/VideoS-VideoTVVCRCamcorderVideo input-YellowAudio input(left)-WhiteAudio input(right)-RedDragon_eng_26~85 12/13/04 3:25 PM Page 72](https://usermanual.wiki/Samsung-Electronics-Co/05DRAGON.Users-Manual-2/User-Guide-501868-Page-12.png)
![ENGLISHPlayback7474■Press the F.ADV button on the remote control while in still mode. -Video sequence advances frame by frame each time you press the F.ADV button.-The F.ADV function works in still mode only.■To resume normal playback, press the (PLAY/STILL) button.-Forward frame advancePress the F.ADV button on the remote control in still mode.-Reverse frame advancePress the (-) button on the remote control to change the direction in F.ADV mode.Press the F.ADV button on the remote control.■Forward X2 playback-Press the X2 button on the remote control during playback.-To resume normal playback, press the (PLAY/STILL) button.■Reverse X2 playback-Press the (-) button during during forward X2 playback.-To resume normal playback, press the (PLAY/STILL) button.■To playback in reverse at normal speed, press the (-) button during normal forward playback.■Press the (PLAY/STILL) or (+) button to return to normal forward playback.[ Notes ]■Mosaic shaped distortion may appear on the screen while in some of the various playback modes.Mosaic shaped distortion or noise may be experienced when you play back tapes recorded in LP which contain various playbackfunctions.■Sound will only be heard during normal SP or LP playback.Frame Advance (To play back frame by frame) (SCD354/D355 only)X2 Playback (Forward/Reverse) (SCD354/D355 only)Reverse Playback (SCD354/D355 only)œœ<SCD354/D355 only>Dragon_eng_26~85 12/13/04 3:25 PM Page 74](https://usermanual.wiki/Samsung-Electronics-Co/05DRAGON.Users-Manual-2/User-Guide-501868-Page-14.png)
![ENGLISHPlayback7575Zooming during Playback (PB ZOOM)✤The Playback Zoom function works in Player mode.✤The Playback Zoom function enables you to magnify playback or still image. 1. Set the Power switch to PLAYER.2. Set the Mode switch to TAPE. (SCD353/D354/D355 only)3. Press the PB ZOOM button in playback mode or in still mode.4. The image is magnified starting from the center of image.5. You can zoom in from 1.2x to 8.0x by moving the Zoom lever.■Zoom ratio is not displayed on the screen.6. To cancel the playback Zoom function, press the PB ZOOM or (STOP) button.[ Notes ]■The PB ZOOM function enlarges center of the screen only.■You cannot apply the Playback Zoom function to pictures which are being input from an external video source.■The Playback Zoom image cannot be imported to your PC from the Camcorder’s DV jack.■The PB ZOOM images cannot be exported to a PC.■OSD will not be displayed on the LCD screen while the PB ZOOM function is operating.To display OSD, press the PB ZOOM button once to stop operating PB ZOOM function or press the (STOP) button tostop playing back.35Dragon_eng_26~85 12/13/04 3:25 PM Page 75](https://usermanual.wiki/Samsung-Electronics-Co/05DRAGON.Users-Manual-2/User-Guide-501868-Page-15.png)
![ENGLISHPlayback7676✤AV In/Out function works only in Player mode. ✤AV in/out setting enables you to record signal from external sources and display it on LCD screen. Also, you can direct your video or image to external devices to record or play back.1. Connect the Camcorder and VCR or TV with the Audio/Video cable. (See page 71~72)2. Set the Mode switch to TAPE. (SCD353/D354/D355 only)3. Set the Power switch to PLAYER.4. Turn on the VCR or TV.5. Insert the blank tape with protection tab closed into the Camcorder.■ If you want to record from a connected VCR, insert a recorded VHS tape into the VCR.6. Press the MENU button.■ The menu list will appear.7. Move the Menu selector to the left or right to select Record, then press the Menu selector.8. Move the Menu selector to the left or right to select AV In/Out, then press theMenu selector. 9. Move the Menu selector to the left or right to select In or Out, then press the Menu selector.10. To exit, press the MENU button.11. Press the Start/Stop button to set the Camcorder to REC PAUSE mode.■ PAUSE on the LCD screen.12. Select the TV program or playback the VHS tape.13. Press the Start/Stop button to start recording.■ If you want to pause recording for a while, press the Start/Stop button again.14. To stop recording, press the (STOP) button.[ Notes ]■When you record the images being played back on analog VCR, if they are not being played back innormal speed, (for example, more than double speed or slow playback), only gray image appears on the Camcorder.■If you want to see the Camcorder picture with a TV, set AV In/Out menu to Out.AV In/Out (SCD355 only)√SP√12Bit√Off√OutMove Select ExitMENUPlayer Mode√RecordRec ModeAudio ModeWind CutAV In/OutMove Select ExitMENUOutInPlayer ModeBackRec ModeAudio ModeWind CutAV In/Out168Dragon_eng_26~85 12/13/04 3:25 PM Page 76](https://usermanual.wiki/Samsung-Electronics-Co/05DRAGON.Users-Manual-2/User-Guide-501868-Page-16.png)
![ENGLISHPlayback7777✤The Audio Dubbing function works only in Player Mode. ✤You can not dub sound on a pre-recorded tape in LP mode or 16 bit mode.✤You can add sound to the original sound on a pre-recorded tape recorded in SP mode with 12bit sound.✤Use the internal and external microphones or other audio equipment.✤The original sound will not be erased.1. Set the Power switch to PLAYER. ■If you want to use an external microphone, connect the microphone to the external MIC input jack on the Camcorder.2. Set the Mode switch to TAPE. (SCD353/D354/D355 only)3. Press the (PLAY/STILL) button and find the timeframe of the scene to be dubbed. 4. Press the (PLAY/STILL) button to pause the scene.5. Press the A.DUB button on the remote control.■Audio Dubbing icon ( ) will be displayed on the LCD screen.■The Camcorder is in a ready-to-dub state for dubbing. 6. Press the (PLAY/STILL) button to start dubbing.Press the (STOP) button to stop the dubbing.[ Notes ]■You can not use the Audio Dubbing function while playing a write protected video tape.■To utilize an external MIC or sound source, connect a microphone to the MIC jack or use the AV cable forexternal sound source input.■To dub an external sound source, set the AV In/Out function to AV In (SCD355 only). (see to page 76).Dubbing SoundAudio Dubbing (SCD354/D355 only)DVUSBAVMIC√13 4 5Dragon_eng_26~85 12/13/04 3:25 PM Page 77](https://usermanual.wiki/Samsung-Electronics-Co/05DRAGON.Users-Manual-2/User-Guide-501868-Page-17.png)
![ENGLISHPlayback78781. Set the Power switch to PLAYER.2. Set the Mode switch to TAPE. (SCD353/D354/D355 only)3. Insert the dubbed tape and press the MENU button.4. Move the Menu selector to the left or right to select Tape, then press the Menu selector.5. Move the Menu selector to the left or right to select Audio Select, then press the Menuselector.6. Move the Menu selector to the left or right to select audio playback channel.■Sound[1]: play the original sound.■Sound[2]: play the dubbed sound.■MIX[1+2]: play back sound1 and 2 equality mixed.7. To exit, press the MENU button.8. Press the (PLAY/STILL) button to playback the dubbed tape.[ Note ]When you playback added sound (Sound 2 or MIX mode), you may experience loss of sound quality.Dubbed audio PlaybackMove Select ExitMENUPlayer ModeBackPhoto SearchPhoto CopyAudio Select√Sound[1]Move Select ExitMENUPlayer Mode√TapePhoto SearchPhoto CopyAudio SelectSound[1]Sound[2]MIX[1+2]20min0:01:53:10SP√Sound[2]467Dragon_eng_26~85 12/13/04 3:25 PM Page 78](https://usermanual.wiki/Samsung-Electronics-Co/05DRAGON.Users-Manual-2/User-Guide-501868-Page-18.png)
![ENGLISHIEEE 1394 Data Transfer7979■Connecting with other DV standard products.Astandard DV connection is quite simple. If a product has a DV port, you can transfer data by connecting to the DV port using the correct cable. !!! Please be careful since there are two types of DV ports, (4pin, 6pin). This Camcorder has a 4pin terminal.■With a digital connection, video and audio signals are transmitted in digital format, allowing high quality images to be transferred.■If you want to transmit data to a PC, you must install a IEEE 1394 add-on card onto the PC. (not supplied)■The frame rate recorded for video capturing is dependent on the capacity of the PC.[ Notes ]■When you transmit data from the Camcorder to another DV device, some functions may not work. If this occurs, please reconnect the DV cable or turn the power OFF and ON again.■When you transmit data from the Camcorder to PC, PC function button is not available in M.Player mode.■Do not use the Camcorder and IEEE1394 together as this will cause IEEE1394 to shut off.■Do not connect the Camcorder to a PC using both DV and USB cables. It may not operate properly.■Operation is not guaranteed for all computer environments recommended above.■The IEEE1394 cable (DV cable)is sold separately.■Video Capture software is commercially available.■Most DV enabled PCs have a 6 pin socket. In this case, a 6-4 cable is required for the connection.■Most DV enabled Notebooks and Laptops have a 4 pin socket. Use a 4-4 cable for the connection.Connecting to a PCConnecting to a DV DeviceTransferring IEEE1394 (i.LINK)-DV standard data connectionsDragon_eng_26~85 12/13/04 3:25 PM Page 79](https://usermanual.wiki/Samsung-Electronics-Co/05DRAGON.Users-Manual-2/User-Guide-501868-Page-19.png)
![ENGLISHIEEE 1394 Data Transfer8080■CPU: faster Intel®Pentium III™ 450MHz compatible. ■Operating system: Windows®98SE, ME, XP, Mac OS (9.1~10.2)■Main memory: more than 64 MB RAM■IEEE1394 add-on card or built in IEEE1394 card1. Set the Power switch to PLAYER.2. Set the Mode switch to TAPE. (SCD353/D354/D355 only)3. Connect the DV cable (not supplied) from the DV jack of the Camcorder to the DV jack of the other DV device. Make sure that DV IN appears on the screen.4. Press the Start/Stop button to begin REC PAUSE mode.PAUSE is displayed on the OSD.5. Start playback on the other DV device while you monitor the picture.6. Press the Start/Stop button to start recording.If you want to pause recording momentarily, press the Start/Stop button again.7. To stop recording, press the (STOP) button.[ Notes ]■When using this Camcorder as a recorder, the pictures that appear on a monitor may seem uneven, however recorded pictures will not be affected.■Operations are not guaranteed for all the recommended computer environments mentioned above.Recording with a DV Connection CableSystem RequirementsDVUSBAVMICDVUSBAVMICDragon_eng_26~85 12/13/04 3:25 PM Page 80](https://usermanual.wiki/Samsung-Electronics-Co/05DRAGON.Users-Manual-2/User-Guide-501868-Page-20.png)
![ENGLISHUSB interface (SCD352/D353/D354/D355 only)8181✤The camcorder supports both USB 1.1 and 2.0 standards. (Depends on the PC specification)✤You can easily transfer a image from a Memory card to a PC without additional add-on cards via a USB connection.✤You can transfer an image to a PC via a USB connection. (SCD353/D354/D355 only)✤If you transfer data to a PC, you need to install the software (Driver, DVC Media 5.1, Windows Media Player 9.0, DirectX 9.0a) supplied with the Camcorder.High speed USB connection is supported by Microsoft (Windows) device drivers only.■Windows 98SE/ME - Full Speed USB■Windows 2000 - High speed USB on a system with Service Pack 4 or later installed.■Windows XP - High speed USB on a system with Service Pack 1 or later installed.■It is not available for Macintosh systems.[ Notes ]■On a slower PC than recommended, movie playback may not be smooth or video editing may take a long time.■On a slower PC than recommended, movie playback may skip frames or operate unexpectedly.■Intel® Pentium III™ is a trademark of the Intel Corporation.■Windows® is a registered trademark of the Microsoft® Corporation.■All other brands and names are property of their respective owners.■Operations are not guaranteed for all of the recommended computer environments mentioned above.■Do not connect the Camcorder to a PC using both DV and USB cables. It may not operate properly.■In CAMERA mode, be sure that the Memory card is inserted into camera before connecting USB cable. No Memory card or an unformatted Memorycard is inserted, PC will not recognize your camera as a removable disk. (SCD353/D354/D355 only)■USB Streaming transfers video in MPEG4 format and it requires DVC Media 5.1, DirectX 9.0a,Windows Media Player 9.0.■If you disconnect the USB cable from the PC or the Camcorder during the data transfer, the data transfer will stop and the data may be damaged.■If you connect the USB cable to a PC using a USB HUB or with other devices at the same time, it might cause conflict and may not work properly. If this occurs, remove all other USB devices and try the connection again.USB Connection speed depending on the SystemSystem RequirementsTransferring a Digital Image through a USB ConnectionCPU Intel®Pentium III™, 600MHz Intel®Pentium IV™ , 2GHzOS Windows®98SE/ME Windows®2000/XPMemory 128MB 512MBHDD capacity 1GB or more 2GB or moreResolution 1024 x 768 dots 1024 x 768 dots24bit Color 24bit ColorUSB USB1.1 USB2.0 High SpeedWindows SystemMinimum RecommendedDragon_eng_26~85 12/13/04 3:25 PM Page 81](https://usermanual.wiki/Samsung-Electronics-Co/05DRAGON.Users-Manual-2/User-Guide-501868-Page-21.png)
![ENGLISH8282✤To ensure proper communication between the camcorder and a PC, please set the USB Version before connecting thecamcorder to a PC.✤USB Version is accessible in every mode.1. Set the Power switch to CAMERA or PLAYER.2. Set the Mode switch to TAPE or MEMORY CARD.3. Press the MENU button.■The menu list will appear.4. Move the Menu selector to the left or right to select System, then press the Menu selector.5. Move the Menu selector to the left or right to select USB Version, then press the Menu selector.■Set the USB Version to USB 2.0 when it is supported by both PC and its OS.■If either the PC or OS does not support USB 2.0, set the USB Version to USB 1.1.6. To exit, press the MENU button.[ Note ]When USB Version is not set properly, USB connection may fail to establish.Setting the USB Communication SpeedM.Player Mode√SystemClock SetRemoteBeep SoundUSB VersionUSB ConnectLanguage√On√On√USB 1.1√Computer√EnglishMove Select ExitMENUMove Select ExitMENU2USB 1.1USB 2.0M.Player ModeBackClock SetRemoteBeep SoundUSB VersionUSB ConnectLanguageDragon_eng_26~85 12/13/04 3:25 PM Page 82](https://usermanual.wiki/Samsung-Electronics-Co/05DRAGON.Users-Manual-2/User-Guide-501868-Page-22.png)

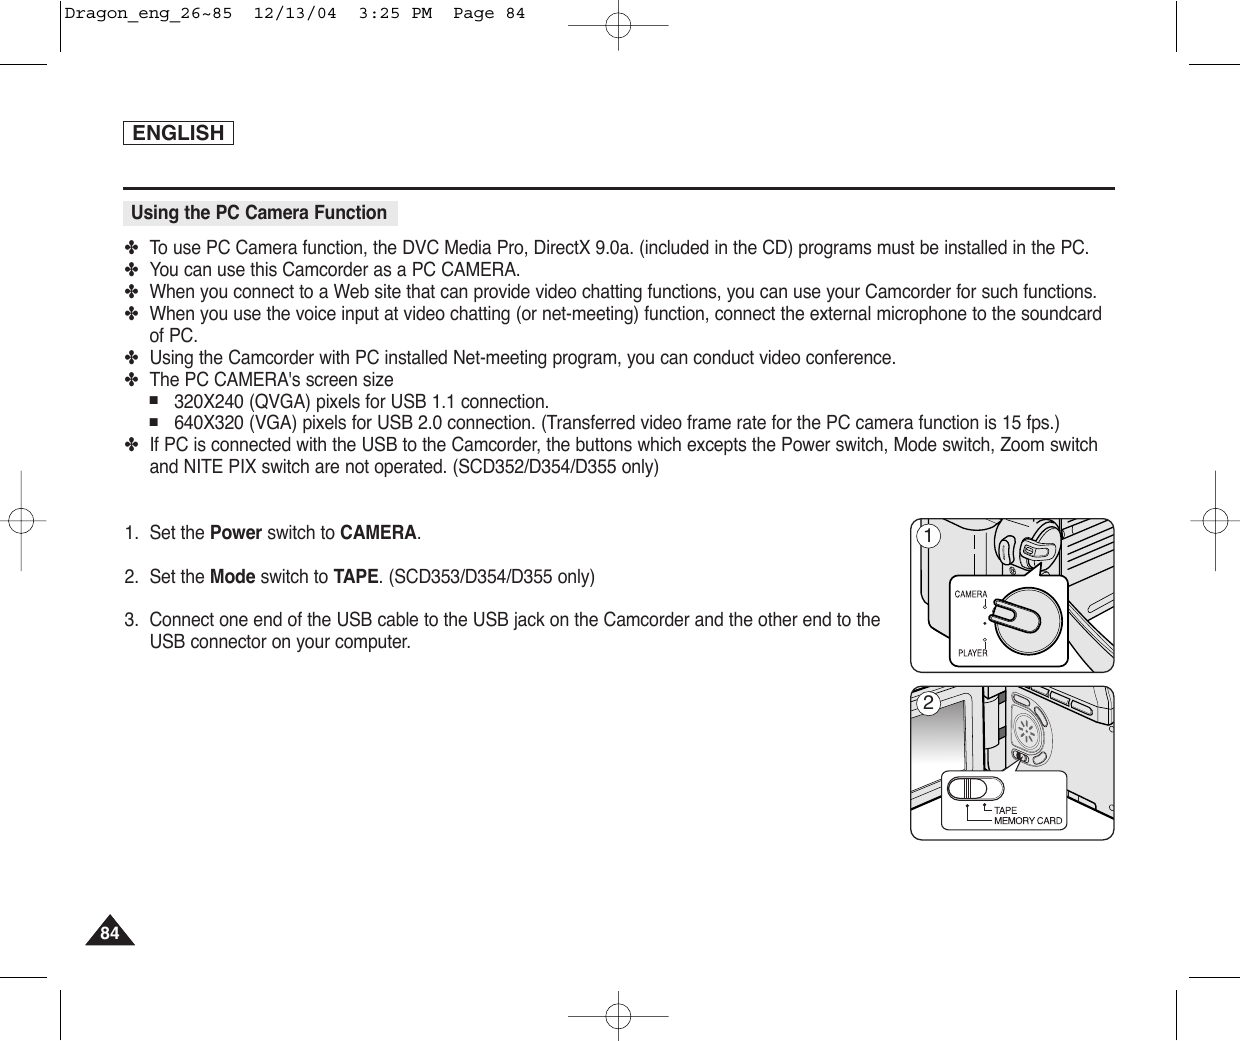
![ENGLISHUSB interface (SCD352/D353/D354/D355 only)8585✤USB streaming data type is MPEG✤To use USB streaming, the DVC Media Pro, DirectX 9.0a. (included in the CD) programs must be installed in the PC.✤You can view Camcorder video on your PC using USB streaming.✤You can also store it as a moving picture in the "avi" file format, or as a still image in the "jpg" file format on a PC.1. Set the Mode switch to TAPE(SCD353/D354/D355 only), set the Power switch to CAMERA or PLAYER.2. Connect one end of the USB cable to the USB jack on the Camcorder and the other end to the USB port on your computer.3. Execute the DVC Media 5.1 program.If you want the detailed description of USB streaming, refer to the DVC Media Pro User's Manual.✤You can easily transfer data from a Memory card to a PC without additional add-on cards via a USB connection.1. Set the Mode switch to MEMORY CARD(SCD353/D354/D355 only), set the Power switch to CAMERA or PLAYER.2. Connect one end of the USB cable to the USB jack on the Camcorder and the other end to the USB port on your computer.1. Connect a USB cable to the USB port on the PC.2. Connect the other end of the USB cable into the proper terminal on the Camcorder. (USB jack)If a PC is connected to the Camcorder with a USB cable only, the Power switch, Zoom switch and NITE PIX operate.(SCD352/D354/D355 only)✤After completing the data transmission, you must disconnect the cable in thefollowing way:1. Select the removable disc icon and click the right mouse button to select [Eject].2. Select [Confirm] and disconnect the USB cable when the Windows Splash screenappears.[ Notes ]■If you disconnect the USB cable from the PC or the Camcorder while transferring, the data transmission will stop and the data maybe damaged. ■If you connect the USB cable to a PC via a USB HUB or simultaneously connect the USB cable along with other USB devices, the Camcorder may not work properly.If this occurs, remove all USB devices from the PC and reconnect the Camcorder. Using the USB Streaming FunctionUsing the removable Disk FunctionConnecting to a PCDisconnecting the USB CableDVUSBAVMICDVUSBAVMICUSB CableDragon_eng_26~85 12/13/04 3:25 PM Page 85](https://usermanual.wiki/Samsung-Electronics-Co/05DRAGON.Users-Manual-2/User-Guide-501868-Page-25.png)
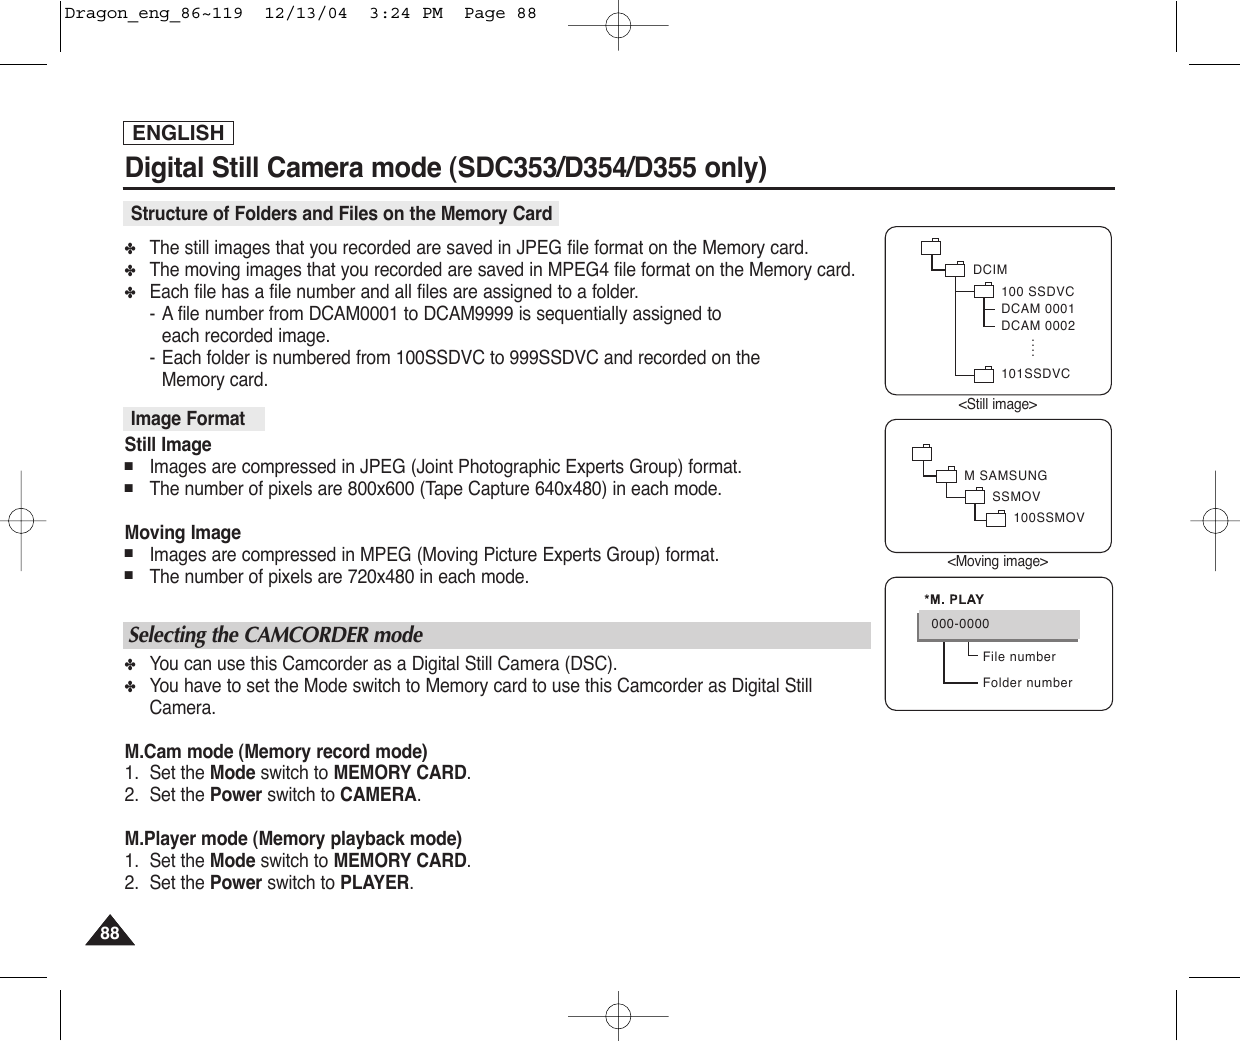
![ENGLISH8686Digital Still Camera mode (SDC353/D354/D355 only)✤The Memory Stick stores and manages images recorded by the camera.■Recording still images and MPEG4 movie■Viewing still images and MPEG4 movie-Single-Slide show (Still images only)■Multi display■Protecting images against accidental erasure■Deleting images recorded on a Memory Stick■Print marking still images■Formatting a Memory Stick[ Notes ]■You can use most of the camera’s functions when recording to the Memory Stick.■appears on the screen while recording to the Memory Stick.■While recording or loading an image, do not eject or insert the Memory Stick.Inserting or ejecting a Memory Stick while recording or loading an image can cause data damage.■If you want to save all images on the Memory Stick, set the write protect tab on the Memory Stick to LOCK.Memory Stick (Optional Accessory)Memory Stick Functions TMTMTerminalProtection tab■“Memory Stick” and are trademarks of Sony Corporation.■All other product names mentioned herein may be the trademarks or registered trademarks of their respectivecompanies.Furthermore, “™” and “®” are not mentioned in each case in this manual.■“Memory Stick PRO” can be used with the SCD354/D355 model only.Dragon_eng_86~119 12/13/04 3:24 PM Page 86](https://usermanual.wiki/Samsung-Electronics-Co/05DRAGON.Users-Manual-2/User-Guide-501868-Page-26.png)
![ENGLISH8787Digital Still Camera mode (SDC353/D354/D355 only)Inserting and Ejecting the Memory Card Inserting the Memory card1. Set the Power switch to Off.2. Open the Memory card cover.3. Insert the Memory card in the direction of the arrow into the Memory card slotlocated on the bottom of the Camcorder.Ejecting the Memory card1. Set the Power switch to Off.2. Open the Memory card cover.3. Push the Memory card, then it comes out of the Camcorder automatically.4. Pull out the Memory card.Do not attempt to pull the Memory card out without first pushing it in.[ Notes ]■Memory Stick Duo type or RS-MMC (SCD355 only) should be inserted by using the Adaptor (not supplied).■If you set the Camcorder to M.Play mode, the last recorded still image appears.If there are no recorded images on the Memory card, No image! will display on thescreen.■While recording, loading, erasing or formatting, do not turn off the power or change themode.■Please turn the power off before you insert or eject the Memory card.You could lose data on the Memory card.■Do not allow metal substances to come in contact with the terminals of the Memory card.■Do not bend, drop or apply strong shock to Memory card.■After pulling the Memory card out from the Camcorder, please keep the Memory card in a soft case to prevent static shock.■The stored contents may be changed or lost as a result of misuse, static electricity, electric noise or repair. Save important images separately.■Samsung is not responsible for data loss due to misuse.(Usable Memory card)SCD353 onlyMemory StickSCD355 onlyMemory StickMemory Stick PROSD/MMCSCD354 onlyMemory StickMemory Stick PRODragon_eng_86~119 12/13/04 3:24 PM Page 87](https://usermanual.wiki/Samsung-Electronics-Co/05DRAGON.Users-Manual-2/User-Guide-501868-Page-27.png)
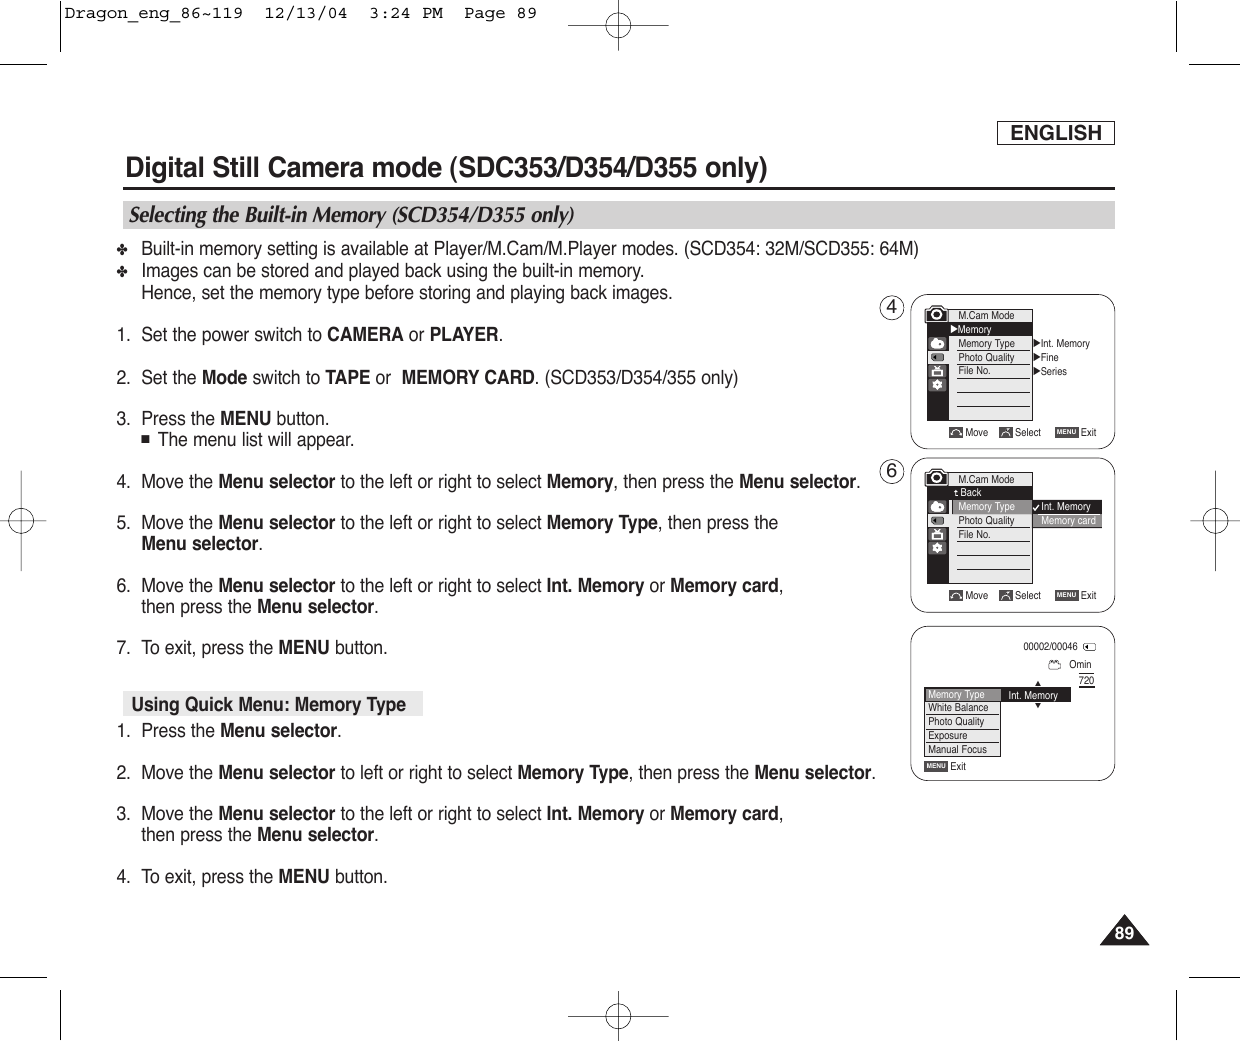
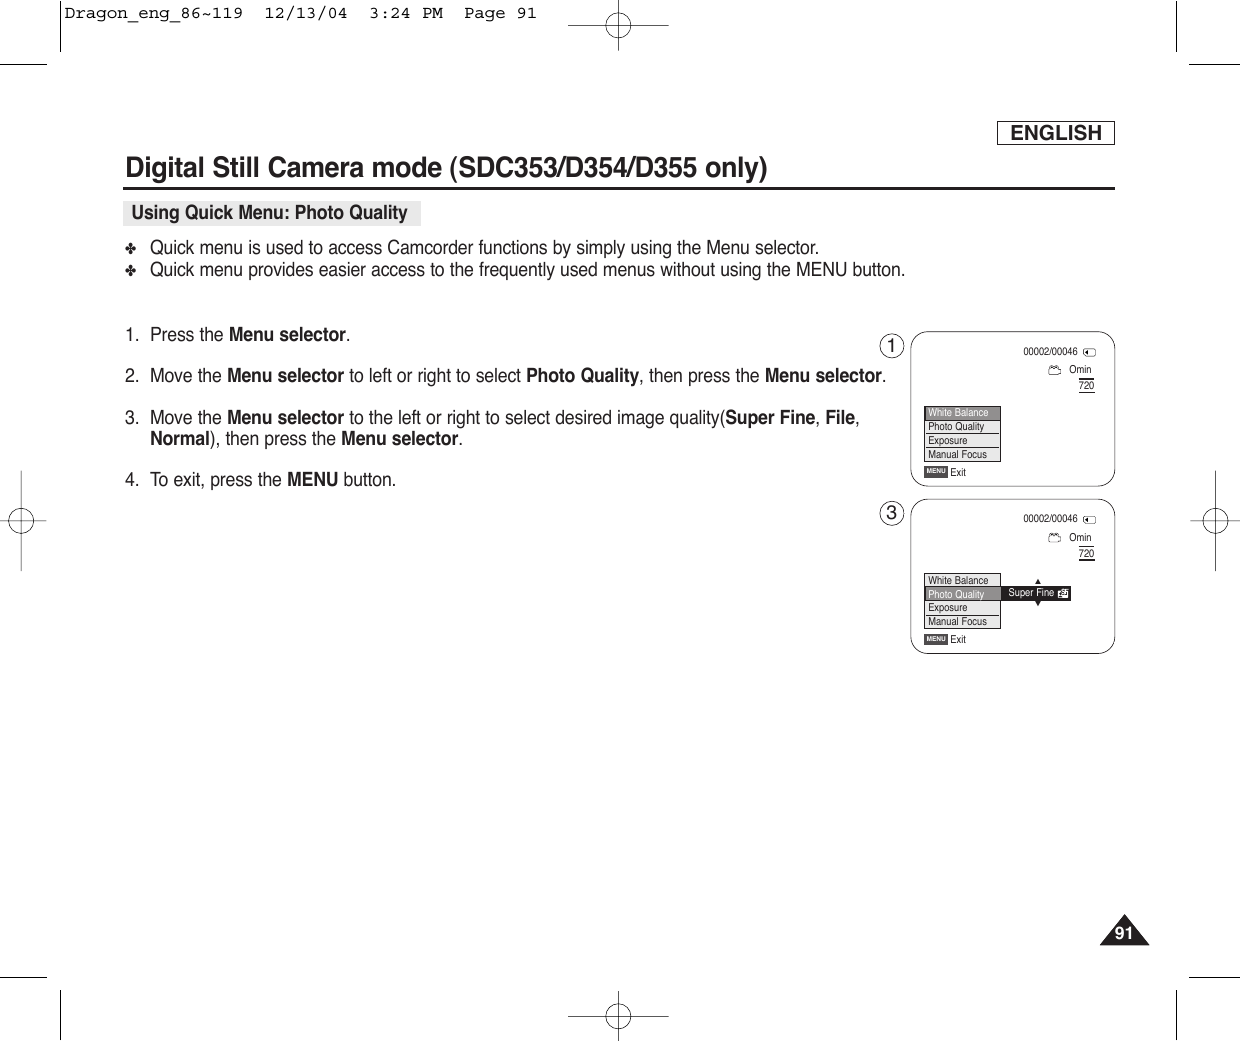
![ENGLISH9090Digital Still Camera mode (SDC353/D354/D355 only)✤You can select the quality of a still images to be recorded.1. Set the Power switch to CAMERA.2. Set the Mode switch to MEMORY CARD.3. Press the MENU button.■The menu list will appear.4. Move the Menu selector to the left or right to select Memory, then press the Menu selector.5. Move the Menu selector to the left or right to select Photo Quality, then press the Menuselector.6. Move the Menu selector to the left or right to select desired image quality(Super Fine, File,Normal), then press the Menu selector.7. To exit, press the MENU button.The actual number that you can record varies depending on the image size.[ Notes ]■The above approximation is based on a 16MB memory stick under normal recording conditions.■The number of pictures that can be stored on a memory card depends on various conditions.Select the image qualityNumber of Images on the Memory CardQUALITY 8MB 16MBSuper Fine Approx. 50 Approx. 100Fine Approx. 62 Approx. 125Normal Approx. 82 Approx. 167Selecting the image qualityMove Select ExitMENUM.Cam ModeBackPhoto QualityFile No.√Fine√SeriesMove Select ExitMENUM.Cam Mode√MemoryPhoto QualityFile No.Super FineFineNormal245Dragon_eng_86~119 12/13/04 3:24 PM Page 90](https://usermanual.wiki/Samsung-Electronics-Co/05DRAGON.Users-Manual-2/User-Guide-501868-Page-30.png)
![ENGLISH9292Digital Still Camera mode (SDC353/D354/D355 only)✤File numbers will be given to images in order of recording when still images are stored on the Memory card.✤Memory file numbers may be set as follows:■Series: When there are existing files, the new image will be named as the next number in the sequence.■Reset-When there are no files stored on the Memory card: The file numbering starts from 0001-When there are files stored on the Memory card: File numbering will continue after the last file's number1. Set the Power switch to the CAMERA.2. Set the Mode switch to MEMORY CARD.3. Press the MENU button.■The menu list will appear.4. Move the Menu selector to the left or right to select Memory, then press the Menu selector.5. Move the Menu selector to the left or right to select File No., then press the Menu selector.6. Move the Menu selector to the left or right to select desired option(Series or Reset), then press the Menu selector.7. To exit, press the MENU button.[ Notes ]■When using a Memory card that contains image files from another device, numbering the file will begin after the largest number that is memorized whether in the camera or the Memory card.■Numbering the file starts from 0001 again when 9999 files have been saved.Memory File NumberMove Select ExitMENUM.Cam ModeBackPhoto QualityFile No.√Fine√SeriesMove Select ExitMENUM.Cam Mode√MemoryPhoto QualityFile No.SeriesReset46Dragon_eng_86~119 12/13/04 3:24 PM Page 92](https://usermanual.wiki/Samsung-Electronics-Co/05DRAGON.Users-Manual-2/User-Guide-501868-Page-32.png)
![ENGLISH9393Digital Still Camera mode (SDC353/D354/D355 only)✤You may take still images while in M.Cam mode and store the images on the Memory card.This function is useful when you want to take a snapshot of a subject while you are using the Camcorder.✤You can take photos using the remote control.✤Audio Cam not be recorded with a Still image on to the Memory Card.1. Set the Power switch to CAMERA.2. Set the Mode switch to MEMORY CARD.3. After framing your object to record, fully press the PHOTO button to take the picture.■The picture is taken and saved into the Memory card within few seconds.■Taking another picture within this interval is not possible.■The indicator appears LCD screen during the time it takes to save the image.[ Notes ]■Still images are saved in the Memory card in an 800x600 format.■The number of still images can be stored depends on the quality of the image.Taking PhotosOmin00002/0004672013Dragon_eng_86~119 12/13/04 3:24 PM Page 93](https://usermanual.wiki/Samsung-Electronics-Co/05DRAGON.Users-Manual-2/User-Guide-501868-Page-33.png)
![ENGLISH9494Digital Still Camera mode (SCD353/D354/D355 only) ✤You can playback and view still images recorded on the Memory card.✤There are 3 ways to view recorded images.-Single: To view an image frame by frame.-Slide show: To view all images automatically and in consecutive order.-Multi display: To view 6 images at once.1. Set the Mode switch to MEMORY CARD.2. Set the Power switch to PLAYER.■The last recorded image appears.■If there are no recorded images on the Memory card, No image! will display on thescreen.3. Using the / (REV/FWD) buttons, search for the desired still image.■To view the next image: press the (FWD) button.■To view the previous image: press the (REV) button.■Pressing (FWD) when you are on the last image will take you to the first image and pressing (REV) when you are on the first image will take you to the last image.■Keep pressing (FWD) or (REV) to search for an image quickly.1. Set the Mode switch to MEMORY CARD.2. Set the Power switch to PLAYER.■The last recorded image appears.3. Press the (S.SHOW) button.■All images will be played back consecutively for 3~4 seconds each.■The “Slide” will be display on the LCD screen.4. To stop the slide show, press the (S.SHOW) button again.[ Notes ]■Loading time may vary depending on the image size.■The Slide Show will start from the current picture.■Any large sized image taken with another device will be displayed as a thumbnail image.To view a Slide ShowTo view a Single imageViewing Still imagesREV FWD S.SHOW MULTI DISP.00002/00046slide800x600100-00013Dragon_eng_86~119 12/13/04 3:24 PM Page 94](https://usermanual.wiki/Samsung-Electronics-Co/05DRAGON.Users-Manual-2/User-Guide-501868-Page-34.png)
![ENGLISH9595Digital Still Camera mode (SCD353/D354/D355 only) To view the Multi Display1. Set the Mode switch to MEMORY CARD.2. Set the Power switch to PLAYER■The last recorded image appears.3. To view six stored images on single screen, press the MULTI DISP. button.■Aselection mark ( ) appears under the image.■Press /(REV/FWD) button to select a image.4. To return to single playback mode, press the MULTI DISP. button again.■Selected picture is displayed in full screen mode.[ Notes ]■To display the previous six images, press and hold the (REV) button for about 3 seconds.■To display the next six images, press the (FWD) button for about 3 seconds.REV FWD S.SHOW MULTI DISP.√√œ√00007/00025œœ100-0006Dragon_eng_86~119 12/13/04 3:24 PM Page 95](https://usermanual.wiki/Samsung-Electronics-Co/05DRAGON.Users-Manual-2/User-Guide-501868-Page-35.png)
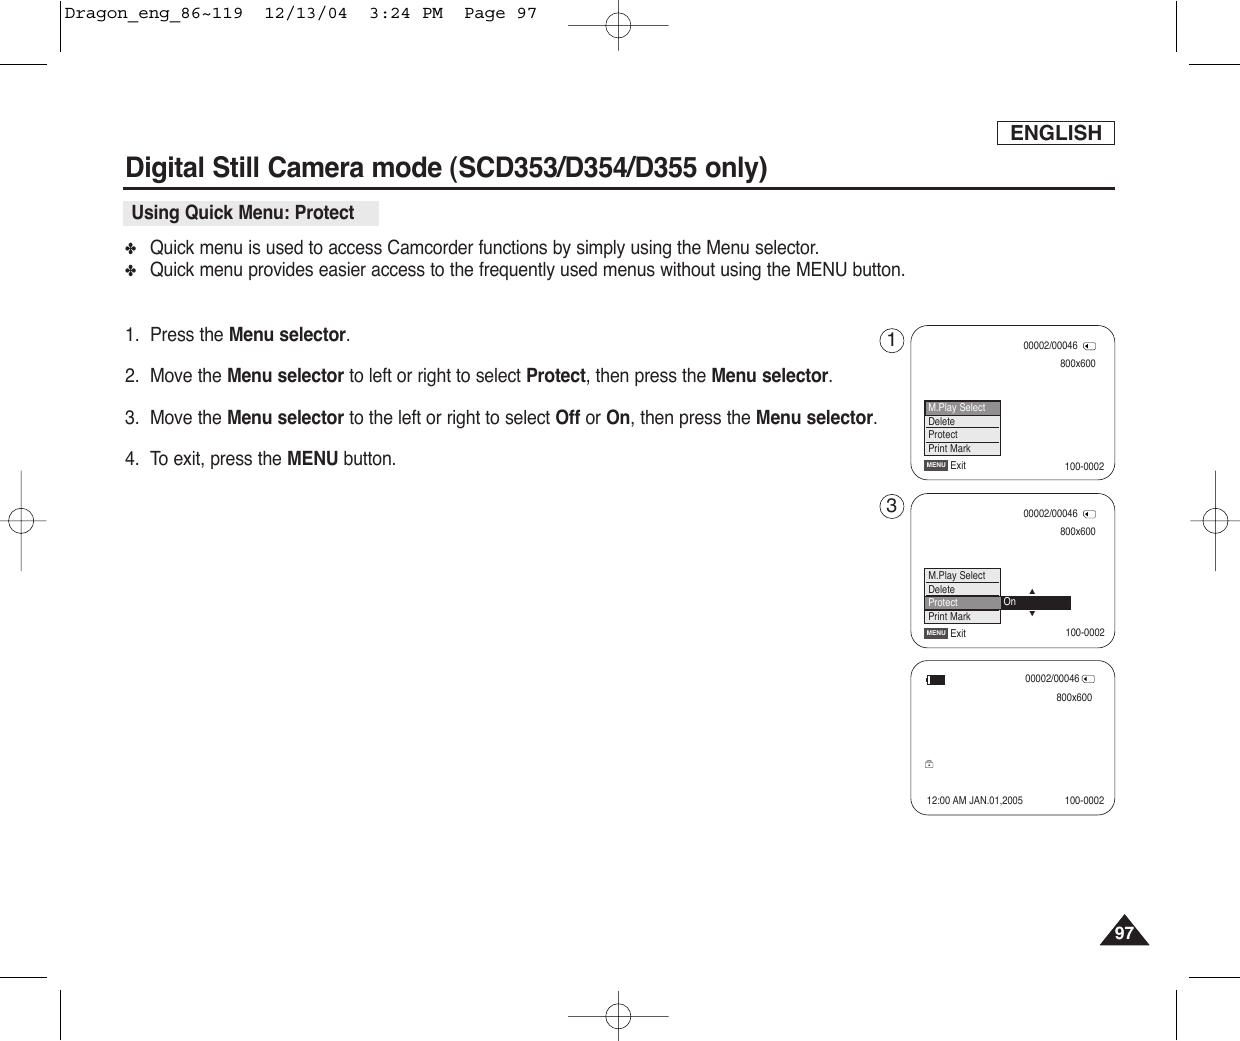
![ENGLISH9696Digital Still Camera mode (SCD353/D354/D355 only) ✤You can protect important images from accidental erasure.If you execute format, all images including protected images will be erased.1. Set the Mode switch to MEMORY CARD.2. Set the Power switch to PLAYER.■The last recorded image appears.■If there are no recorded images on the Memory card, No image! will display on the screen.3. Using the / (REV/FWD) buttons, search for the still image that you want to protect.4. Press the MENU button.■The menu list will appear.5. Move the Menu selector to the left or right to select Memory, then press the Menu selector.6. Move the Menu selector to the left or right to select Protect, then press the Menu selector.7. Move the Menu selector to the left or right to select On, then press the Menu selector.The protection () appears.8. To exit, press the MENU button.[ Notes ]■Protected pictures will show the ( ) mark when they are displayed.■If the write protection tab on the Memory card is set to LOCK, you cannot set image protection.Protection from accidental ErasureMove Select ExitMENUM.Player ModeBackM.Player SelectDeleteDelete AllProtectPrint MarkFormat√Photo√OffMove Select ExitMENUM.Player Mode√MemoryM.Player SelectDeleteDelete AllProtectPrint MarkFormatOffOn00002/00046800x60012:00 AM JAN.01,2005 100-0001578Dragon_eng_86~119 12/13/04 3:24 PM Page 96](https://usermanual.wiki/Samsung-Electronics-Co/05DRAGON.Users-Manual-2/User-Guide-501868-Page-36.png)
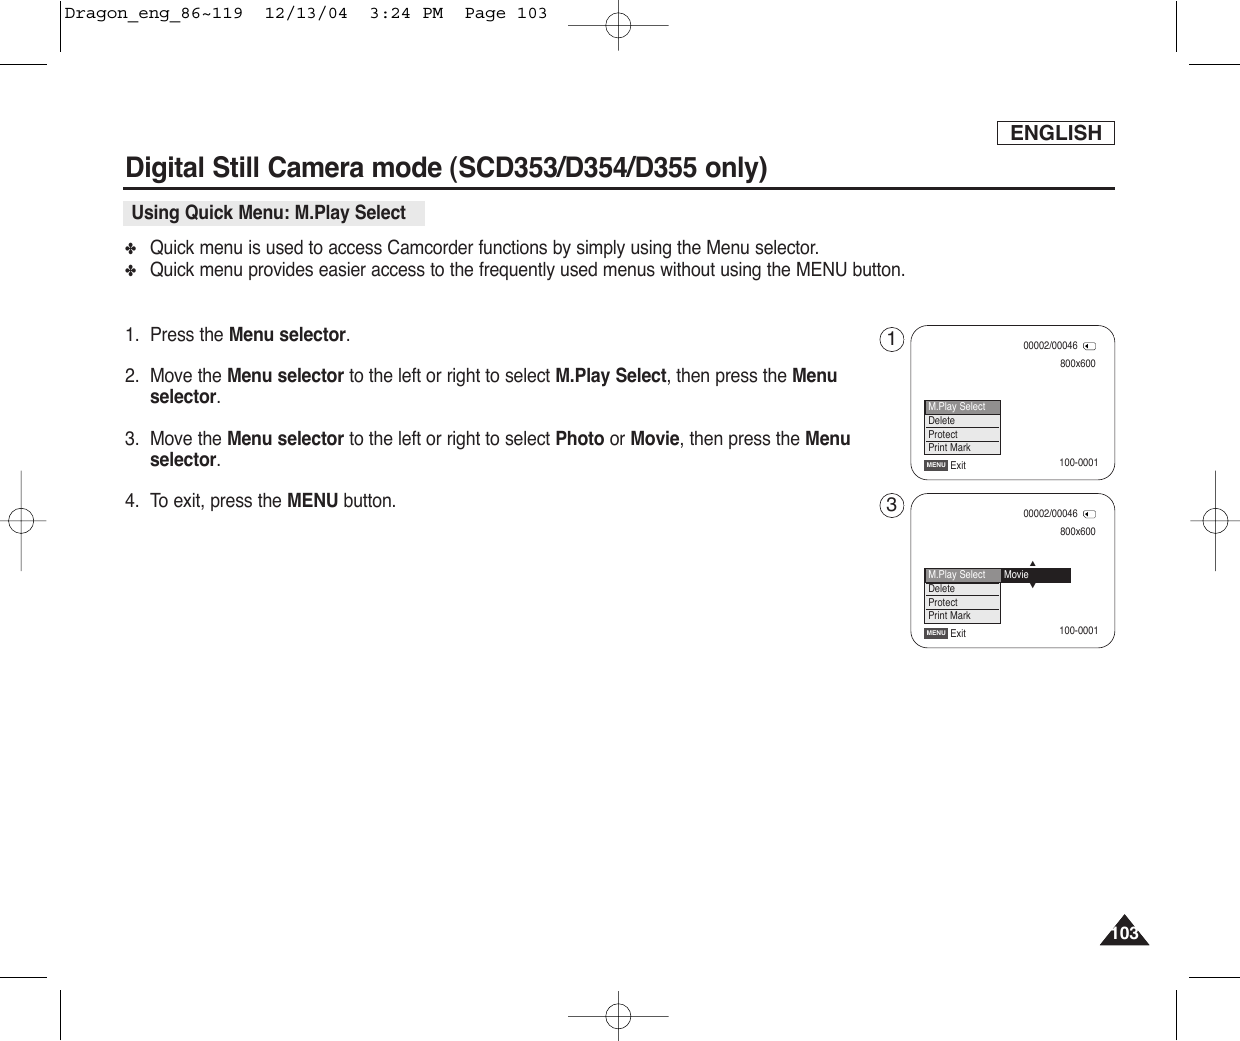
![ENGLISH9999✤Quick menu is used to access Camcorder functions by simply using the Menu selector.✤Quick menu provides easier access to the frequently used menus without using the MENU button.1. Press the Menu selector.2. Move the Menu selector to left or right to select Delete, then press the Menu selector.3. Move the Menu selector to the left or right to select Cancel or Delete, then press the Menu selector.4. To exit, press the MENU button.[ Notes ]■When there is no stored picture on the Memory card, the message No image! will be displayed.■If an erroneous Memory card format is found on the Memory card, the message Card error! will bedisplayed.■If an erroneous image file is found on the Memory card, the message File Error will be displayed.It may be caused by copying images from different digital devices.■Formatting the Memory card will delete all the stored images. (See page 100.) ■To protect important picture from accidental deletion, activate the image protection (refer to page 96).Digital Still Camera mode (SCD353/D354/D355 only) Using Quick Menu: Delete800x60000002/00046ExitMENU100-0001100-0001M.Play SelectDeleteProtectPrint Mark800x60000002/00046ExitMENU…†M.Play SelectDeleteProtectPrint MarkDelete13Dragon_eng_86~119 12/13/04 3:24 PM Page 99](https://usermanual.wiki/Samsung-Electronics-Co/05DRAGON.Users-Manual-2/User-Guide-501868-Page-39.png)
![ENGLISH100100✤You can use the memory format functions to completely delete all images and options on the Memory card, including protected images.✤The format function restores the Memory card to its initial state.✤The Memory card supplied with this Camcorder has been formatted already.✤If you execute the memory format function, all images will be erased completely and erasedimages cannot be recovered.1. Set the Power switch to PLAYER.2. Set the Mode switch to MEMORY CARD.3. Press the MENU button.■The menu list will appear.4. Move the Menu selector to the left or right to select Memory, then press the Menu selector.5. Move the Menu selector to the left or right to select Format, then press the Menu selector.6. Move the Menu selector to the left or right to select desired option(Int. Memory or Memorycard), then press the Menu selector. (SCD354/D355 only)■If you want to select Int. Memory card or Memory, a message All files are deleted! Do you want to format? appears.7. Move the Menu selector to the left or right to select Yes or No, then press the Menu selector.■Complete! appears when the format is completed.8. To exit, press the MENU button.[ Notes ]■If you want to format the Memory Stick on your PC, use only the “MS formatter” supplied with thesoftware CD.■The MS formatter is exclusive program of the Memory Stick.■If you execute the Format function,all still images/motion clips will be erased completely anderased still images/motion clips cannot be recovered.■Formatting the Memory card using a different device will cause Memory card read errors.■Formatting the Memory card deletes all the stored data in the Memory card.■Do not turn the power off in the middle of the formatting.■AMemory Stick with the protection tab set to save, will not be formatted. (see page 86)Digital Still Camera mode (SCD353/D354/D355 only) AttentionFormatting the Memory cardMove Select ExitMENU√Photo√OffMove Select ExitMENUM.Player Mode√MemoryM.Player SelectDeleteDelete AllProtectPrint MarkFormat800x600All files are delete!Do you want to format?0001/00110100-0001Yes No467M.Player Mode√MemoryM.Player SelectDeleteDelete AllProtectPrint MarkFormatDragon_eng_86~119 12/13/04 3:24 PM Page 100](https://usermanual.wiki/Samsung-Electronics-Co/05DRAGON.Users-Manual-2/User-Guide-501868-Page-40.png)
![ENGLISH101101Digital Still Camera mode (SCD353/D354/D355 only) ✤You can record moving picture images with audio on the Memory card. ✤The screen format of the moving picture to be recorded is 720x480.1. Check whether Memory card is inserted into the Camcorder. If it is not in the Camcorder, insert it into the slot.2. Set the Power switch to CAMERA.3. Set the Mode switch to MEMORY CARD.4. Press the Start/Stop button, the images are recorded on the Memory card in MPEG4. You can record a camera still image on Memory card by pressing the PHOTO button instead of the Start/Stop button.5. Press the Start/Stop button to stop the recording.[ Notes ]■MENU button and Menu selector are not available while MPEG recording.To use MENU button and Menu selector, stop recording.MPEG recording is not available when a menu or navigation menu is displayed on the screen.To start recording, stop displaying OSD by pressing the MENU button.■Before using the MPEG REC function, check whether the Memory card is inserted into the Camcorder.■Moving images that you recorded are saved in *.avi(avi 1.0) file format on the Memory card.■The file that you recorded are saved in a following folder.■The moving picture images on a Memory card are smaller size and lower definition than one on tape.■The sound is recorded in type of stereo.■The following functions are not allowed in M.Cam Mode.DIS (Digital Image Stabilizer), Digital Zoom, Fade, Program AE, Digital Effect, Slow Shutter.■While you record in Memory card, don’t insert or eject the tape as it may record noise.■While you record in Memory card, don’t eject Memorye card or it might break the data on the Memory card or Memory card itself.Saving the Pictures captured by a Camera as a Moving Picture File on Memory CardMPEG RecordingM SAMSUNGSSMOV100SSMOV√<Moving image>243Dragon_eng_86~119 12/13/04 3:24 PM Page 101](https://usermanual.wiki/Samsung-Electronics-Co/05DRAGON.Users-Manual-2/User-Guide-501868-Page-41.png)
![ENGLISH102102Digital Still Camera mode (SCD353/D354/D355 only) ✤The MPEG Playback function works only in M. Player mode.✤You can play the moving picture images on the Memory card.Stereo audio is played back at the same time.1. Set the Power switch to PLAYER.2. Set the Mode switch to MEMORY CARD.3. Press the MENU button.■The menu list will appear.4. Move the Menu selector to the left or right to select Memory, then press the Menu selector.5. Move the Menu selector to the left or right to select M.Play Select, then press the Menuselector.6. Move the Menu selector to the left or right to select Movie, then press the Menu selector.7. To exit the menu, push the MENU button.8. Using the / (REV/FWD) buttons, search for the moving picture that you want to playback.9. Press the (PLAY/STILL) button.■The moving pictures recorded on the Memory card are playing back.■You can control playback using the (PLAY/STILL) / (REV/FWD)/ (STOP) buttons.[ Notes ]■MENU button and Menu selector are not available while MPEG playback.To use MENU button and Menu selector, stop playback.MPEG playback is not available when a menu or navigation menu is displayed on the screen.To start playback, stop displaying OSD by pressing the MENU button.■There could be any broken or mosaic pictures while playing the MPEG4 moving picture images,but it is not malfunction.■The moving picture images that you recorded on the Memory card might not be allowed to play by theCamcorder of another brands.■The MPEG4 file recorded by another Camcorder might not be allowed to play by this Camcorder.-You need Microsoft Windows Media Player Version 9 or higher version in order to play MPEG4 file on the Memory card on yourPC. (Microsoft Windows Media Player Version 9 (Eng) is included in the CD that is supplied.)-You can download the Microsoft Windows Media Player applied each languages on Microsoft Website,“http://www.microsoft.com/windows/windowsmedia/download/ default.asp”.■To playback MPEG4 moving picture on a PC, the DVC Media Pro (in the CD provided with the camcorder) should be installed.■DVC Media Pro contains the dedicated video Codec for playing back the moving picture recorded by this camcorder.■Moving picture of MPEG4 format recorded by other device may not playback with this CamcrderMPEG PlaybackMove Select ExitMENUM.Player ModeBackM.Player SelectDeleteDelete AllProtectPrint MarkFormat√Photo√OffMove Select ExitMENUM.Player Mode√MemoryM.Player SelectDeleteDelete AllProtectPrint MarkFormat†PhotoMovie246Dragon_eng_86~119 12/13/04 3:24 PM Page 102](https://usermanual.wiki/Samsung-Electronics-Co/05DRAGON.Users-Manual-2/User-Guide-501868-Page-42.png)
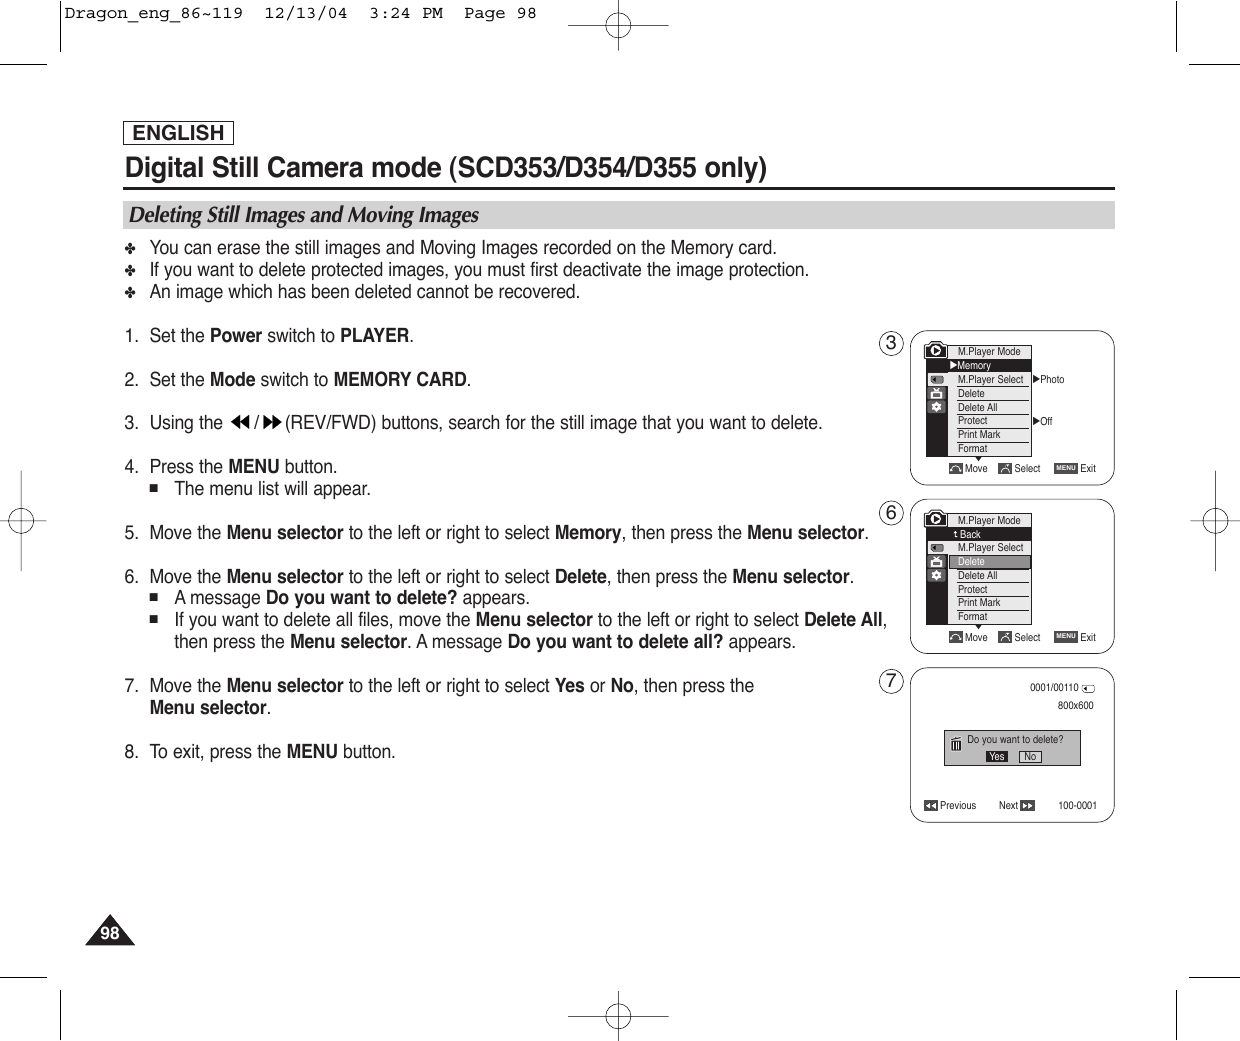
![ENGLISHDigital Still Camera mode (SCD353/D354/D355 only) 104104Digital Still Camera mode Recording an Image from a Cassette as a Still Image✤You can record still image from a cassette on a Memory card.✤If you want to move recorded multiple still images from a cassette to a Memory card, use theCOPY function.1. Set the Power switch to PLAYER.2. Set the Mode switch to TAPE.3. Playback the cassette.4. Press the PHOTO button.■The still image is recorded on the Memory card.■The indicator appears LCD screen during the time it takes to save the image.[ Notes ]■Still images copied from the cassette to the memory card are saved in a 640x480 format.■Number of images you can save varies depending on the image resolution.48min0:46:00:11SP214Dragon_eng_86~119 12/13/04 3:24 PM Page 104](https://usermanual.wiki/Samsung-Electronics-Co/05DRAGON.Users-Manual-2/User-Guide-501868-Page-44.png)
![105105ENGLISHDigital Still Camera mode (SCD353/D354/D355 only) ✤You can copy still images recorded with photo function on a cassette into a Memory card.✤Rewind the tape to the point which you wants.1. Set the Power switch to PLAYER.2. Set the Mode switch to TAPE.3. Press the MENU button.■The menu list will appear.4. Move the Menu selector to the left or right to select Tape, then press the Menu selector.5. Move the Menu selector to the left or right to select Photo Copy, then press the left or right.All still images that recorded on a cassette will be copied into a Memory card.6. The Camcorder automatically performs the photo search to find still images and copy starts.7. Press the (STOP) button to stop copying.Copy stops when the cassette is finished or Memory card is full.[ Note ]Still images copied from the cassette to the memory card are saved in a 640x480 format.Copying Still Images from a Cassette to Memory cardMove Select ExitMENUPlayer ModeBackPhoto SearchPhoto CopyAudio SelectBack ExitMENUSP25minPhoto searching...0:44:38:03SP25min0:44:38:03√Sound[1]Move Select ExitMENUPlayer Mode√TapePhoto SearchPhoto CopyAudio SelectNow copying...456Dragon_eng_86~119 12/13/04 3:24 PM Page 105](https://usermanual.wiki/Samsung-Electronics-Co/05DRAGON.Users-Manual-2/User-Guide-501868-Page-45.png)


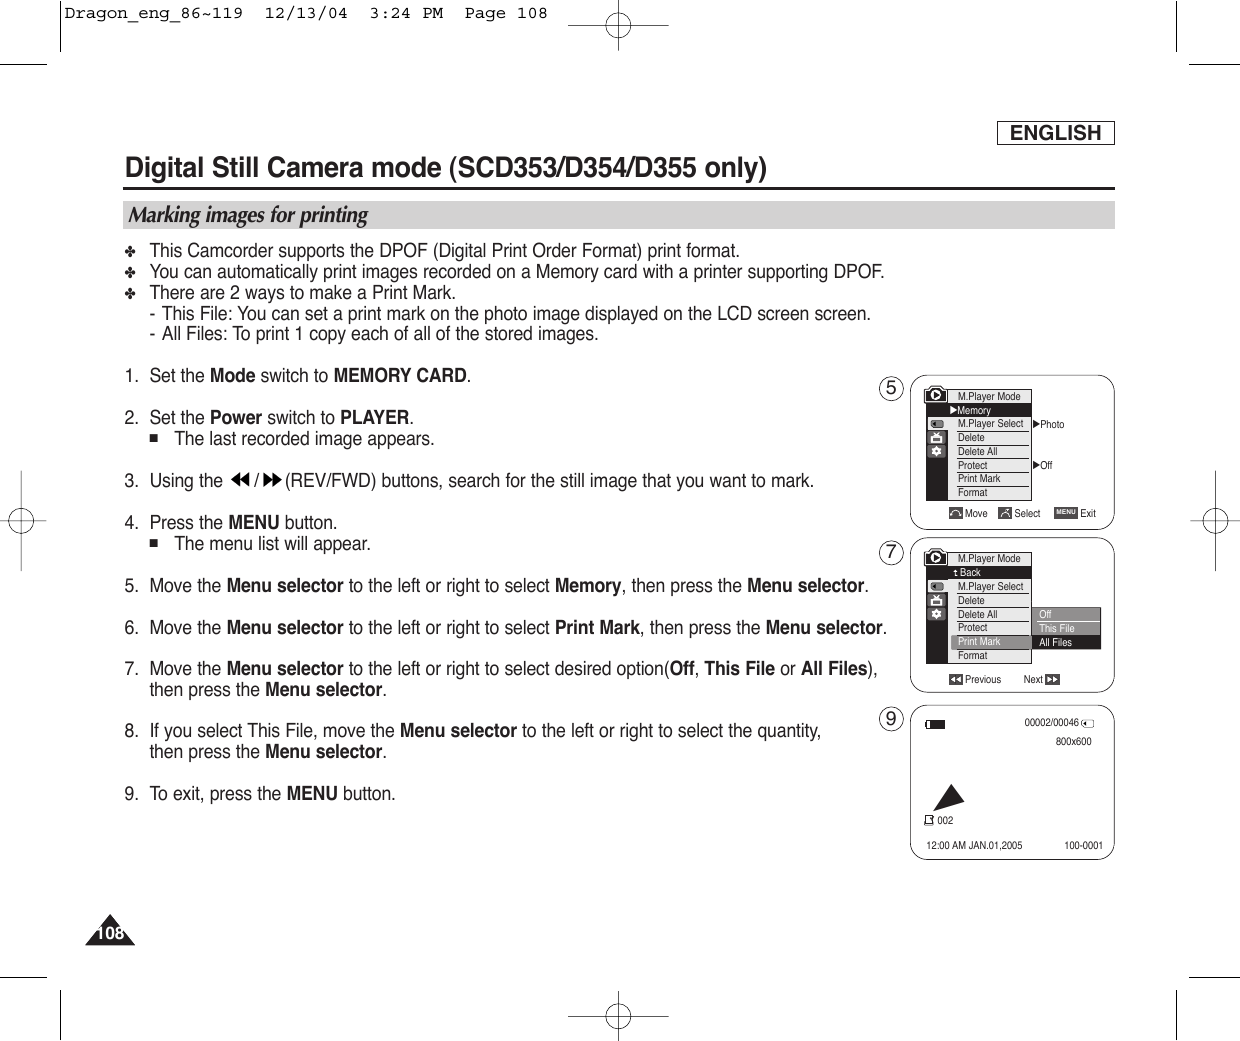
![109109ENGLISH✤Quick menu is used to access Camcorder functions by simply using the Menu selector.✤Quick menu provides easier access to the frequently used menus without using the MENU button.1. Press the Menu selector.2. Move the Menu selector to left or right to select Print Mark, then press the Menu selector.3. Move the Menu selector to the left or right to select the quantity, then press the Menu selector.4. To exit, press the MENU button.[ Notes ]■When you setup the Print Mark option to All Files, 999 files from the current file are set to 1 or 0.■The All Files option may require extended operation time depending on the number of stored images.■DPOF supporting printers are commercially available.■Use the USB cable provided with the Camcorder.Digital Still Camera mode (SCD353/D354/D355 only) Using Quick Menu: Print Mark800x60000002/00046ExitMENUM.Play SelectDeleteProtectPrint Mark800x60000002/00046ExitMENU…†M.Play SelectDeleteProtectPrint Mark 00200002/00046800x60012:00 AM JAN.01,2005002100-0001√13Dragon_eng_86~119 12/13/04 3:24 PM Page 109](https://usermanual.wiki/Samsung-Electronics-Co/05DRAGON.Users-Manual-2/User-Guide-501868-Page-49.png)
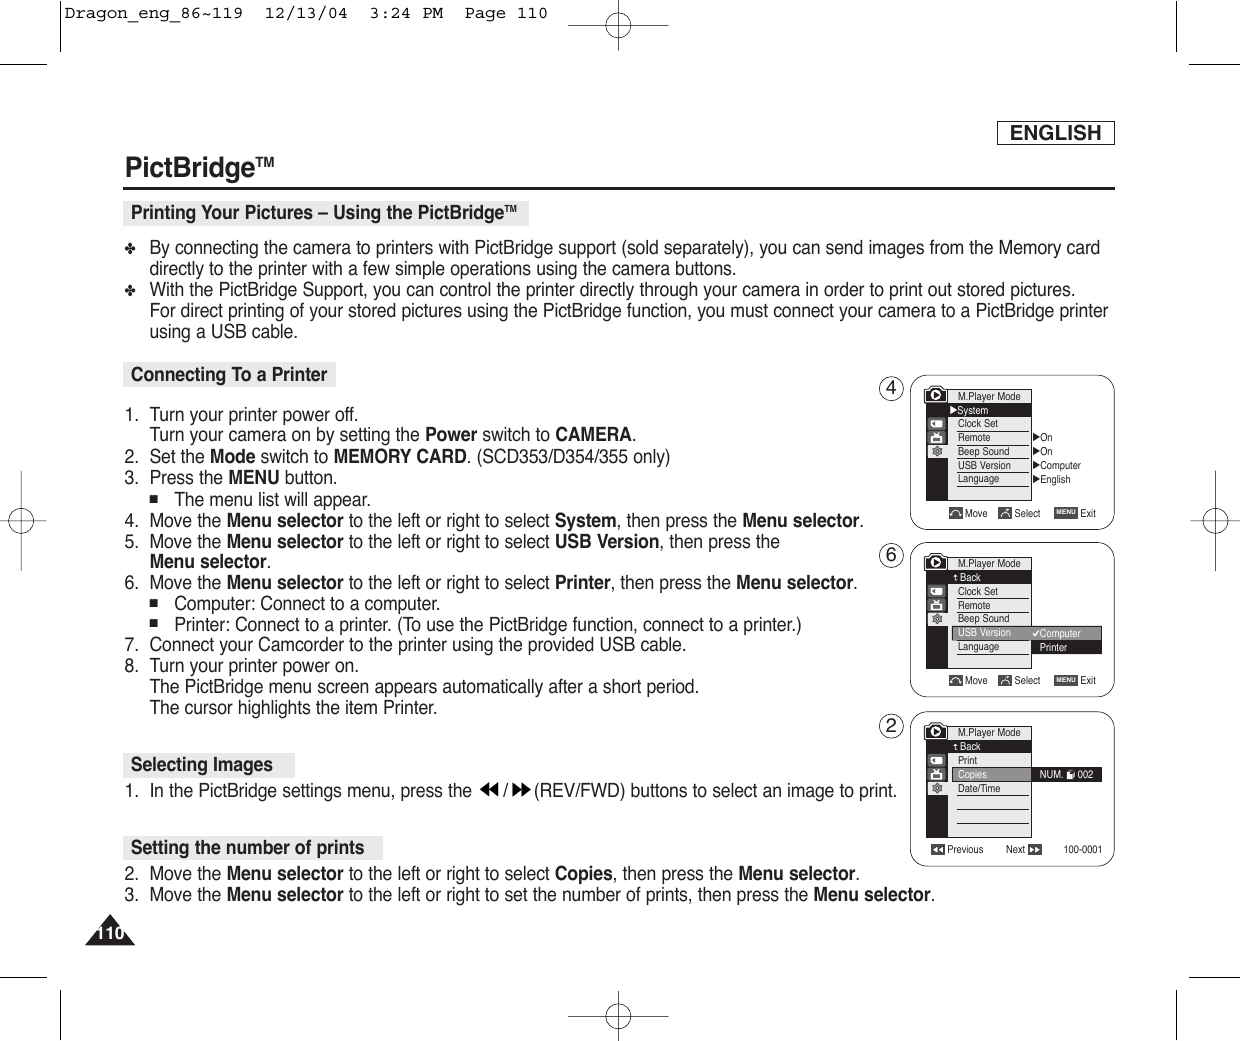
![111111ENGLISHPictBridgeTM4. Move the Menu selector to the left or right to select Date/Time, then press theMenu selector.5. Move the Menu selector to the left or right to select the display type of the Date/Time, then pressthe Menu selector.■Display type of Date/Time: Off, Date, Time, Date/Time6. Move the Menu selector to the left or right to select Print, then press the Menu selector.Prints out selected image files.✤Quick menu is used to access Camcorder functions by simply using the Menu selector.✤Quick menu provides easier access to the frequently used menus without using the MENU button. 1. Press the Menu selector.2. To print selected image files, press the Menu selector again.To print multiple copies of an image, move the Menu selector to the left or right to select Copies, then press the Menu selector.3. Move the Menu selector to the left or right to set the number of copies, then press the Menu selector.4. Move the Menu selector to the left or right to select Print, then press the Menu selector.5. To exit, press the MENU button.[ Notes ]■The PictBridgeTM is a registered trademark of CIPA(Camera & Imaging Products Association), an image transfer standarddeveloped by Canon, Fuji, HP, Olympus, Seiko Epson, and Sony.■PictBridge supporting printers are commercially available.■Use the USB cable provided with the Camera.■Use the AC power adapter for your camera during PictBridge Direct Printing. Turning your camera off during the printingmight damage data on the Memory card.■Printing still images is supported. Motion clips are not available for printing.■You can set various printing options depending on the printer.■Please refer to the user’s manual of the printer. Setting the Date/Time Imprint OptionPrinting ImagesUsing Quick Menu: Printing Your PicturesPrevious Next 100-0001Previous Next 100-0001M.Player ModeBackPrintCopiesDate/TimeM.Player ModeBackPrintCopiesDate/Time OffDateTimeDate/Time800x60000002/00046ExitMENUPrintCopiesDate/Time564Dragon_eng_86~119 12/13/04 3:24 PM Page 111](https://usermanual.wiki/Samsung-Electronics-Co/05DRAGON.Users-Manual-2/User-Guide-501868-Page-51.png)
![113113ENGLISHMaintenanceCleaning the Video HeadsTo ensure normal recording and clear pictures, clean the video heads when the playback pictures display square block-shapednoise or distortion, or a blue screen appears.1. Set the Power switch to PLAYER.2. Insert the cleaning tape.3. Press the (PLAY/STILL) button.4. Press the (STOP) button after 10 seconds.[ Notes ]■Check the quality of the picture using a videocassette. -If the picture quality has not improved, repeat the operation.-If the problem continues, contact your local authorized service center.■Clean the video heads with a dry type cassette cleaner.■Some cleaning cassette products stop automatically. Refer to the cleaning cassette’s instructions for detailed information.If the problem continues after the cleaning, consult your nearest Samsung dealer or Authorized Service Center.Cleaning and Maintaining the Camcorder(blue screen)Dragon_eng_86~119 12/13/04 3:24 PM Page 113](https://usermanual.wiki/Samsung-Electronics-Co/05DRAGON.Users-Manual-2/User-Guide-501868-Page-53.png)
![ENGLISH114114Maintenance✤Each country or region has its own electric and color systems.✤Before using your Camcorder abroad, check the following items.■You can use your Camcorder in any country or area with the supplied AC Power adapter within 100V to 240V, 50/60 Hz.■Use a commercially available AC jack adapter, if necessary, depending on the design of the local wall outlet.You can view your recording in the Viewfinder. However, to view it on a television or copy it to a videocassette recorder, the television or VCR must be NTSC-compatible andhave the appropriate audio/video jacks.Otherwise, you may need to use a transcoder.PAL-compatible Countries/RegionsAustralia, Austria, Belgium, Bulgaria, China, CIS, Czech Republic, Denmark, Egypt, Finland, France, Germany, Greece, Great Britain, Holland, Hong Kong, Hungary, India, Iran, Iraq, Kuwait, Libya, Malaysia, Mauritius, Norway, Romania, Saudi Arabia, Singapore, Slovak Republic, Spain, Sweden, Switzerland, Syria, Thailand, Tunisia, etc.NTSC-compatible Countries/RegionsBahamas, Canada, Central America, Japan, Korea, Mexico, Philippines, Taiwan, United States of America, etc.[ Note ] You can make recordings with your Camcorder and view pictures on the LCD screen from anywhere in the world.Color systemPower sourcesUsing Your Camcorder AbroadDragon_eng_86~119 12/13/04 3:24 PM Page 114](https://usermanual.wiki/Samsung-Electronics-Co/05DRAGON.Users-Manual-2/User-Guide-501868-Page-54.png)