Samsung Electronics Co 05DRAGON Digital Video Camcorder User Manual Dragon eng 1 25
Samsung Electronics Co Ltd Digital Video Camcorder Dragon eng 1 25
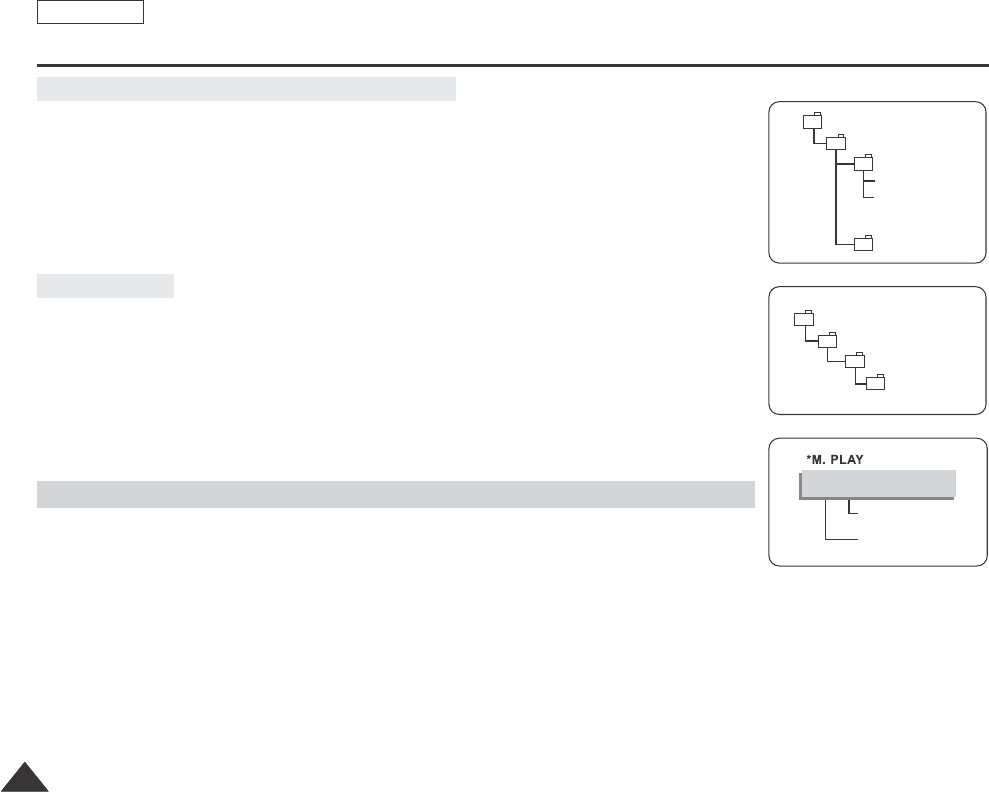
Contents
- 1. Users Manual 1
- 2. Users Manual 2
Users Manual 2
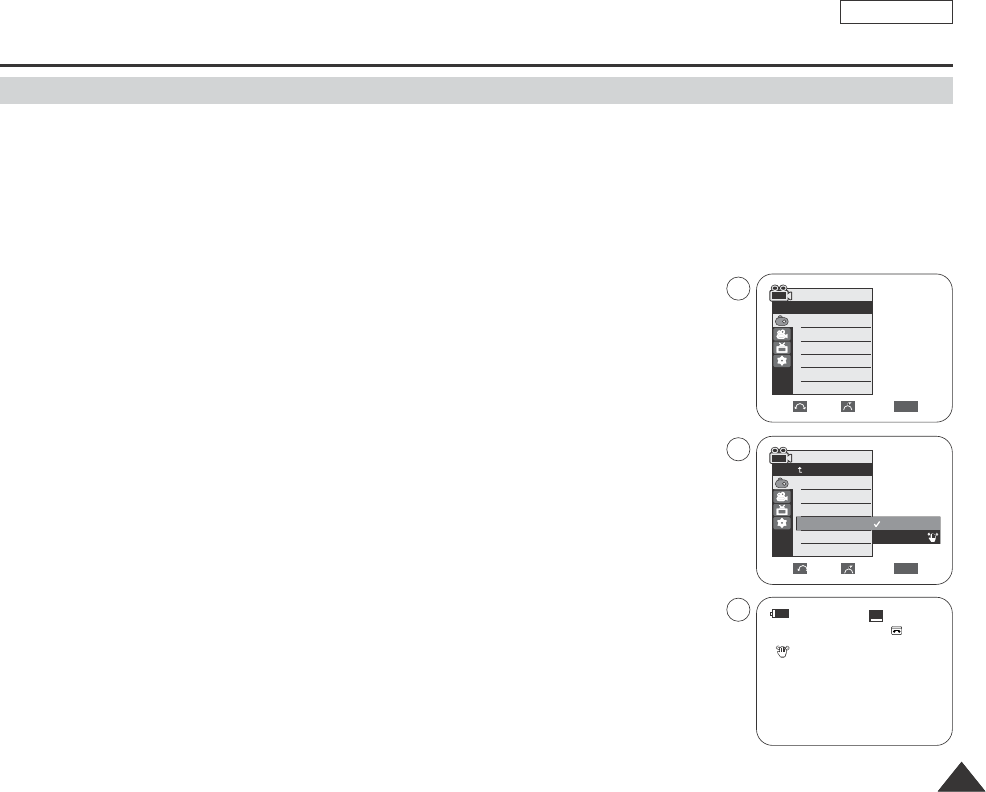
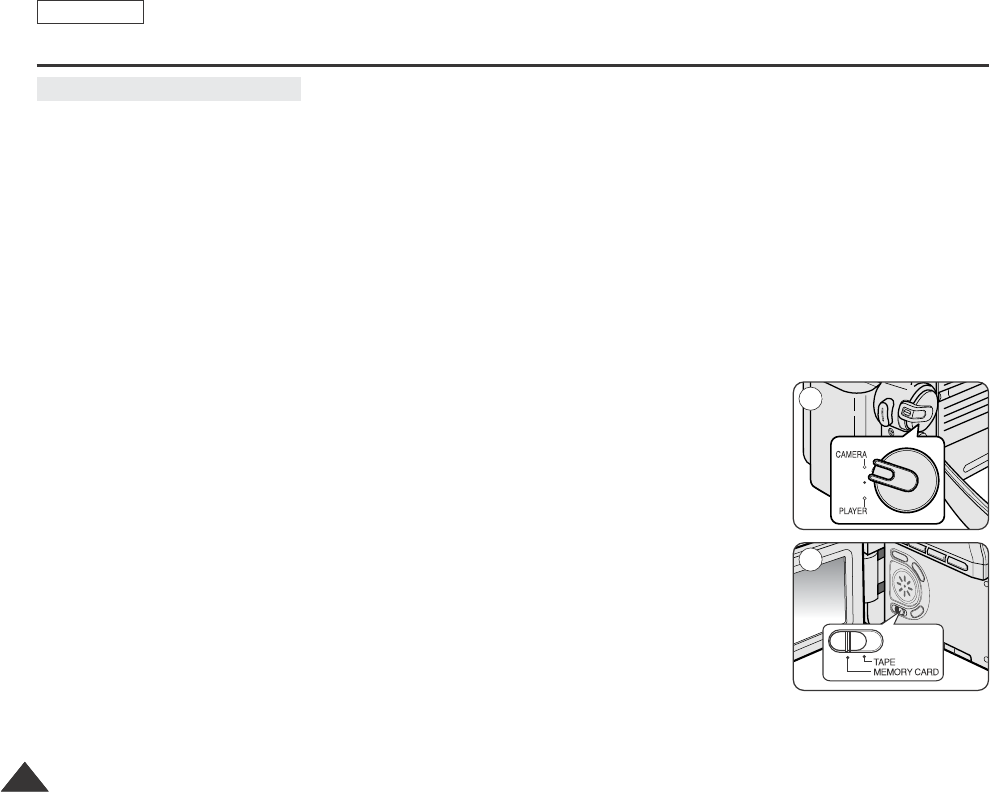
✤The DIS function works only in Camera mode.
✤DIS (Digital Image Stabilizer) is a function that compensates for any shaking or hand movement while holding the
Camcorder (within reasonable limits).
✤It provides more stable pictures when:
- Recording with the zoom
- Recording a small object close-up
- Recording and walking at the same time
- Recording through the window of a vehicle
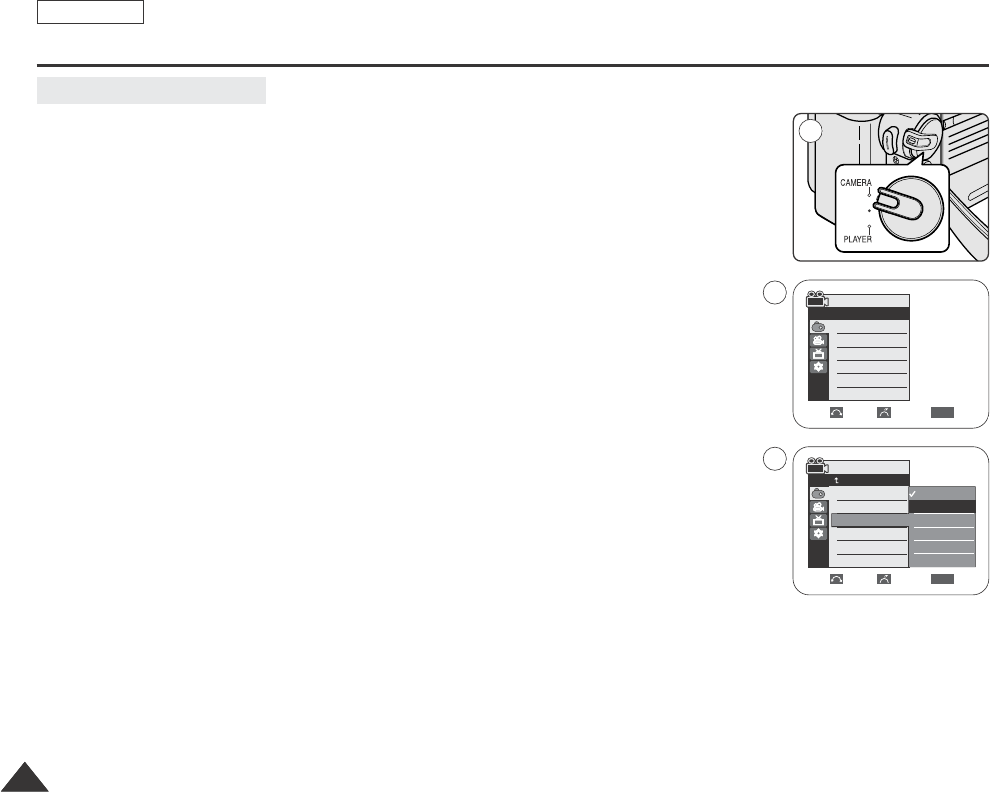
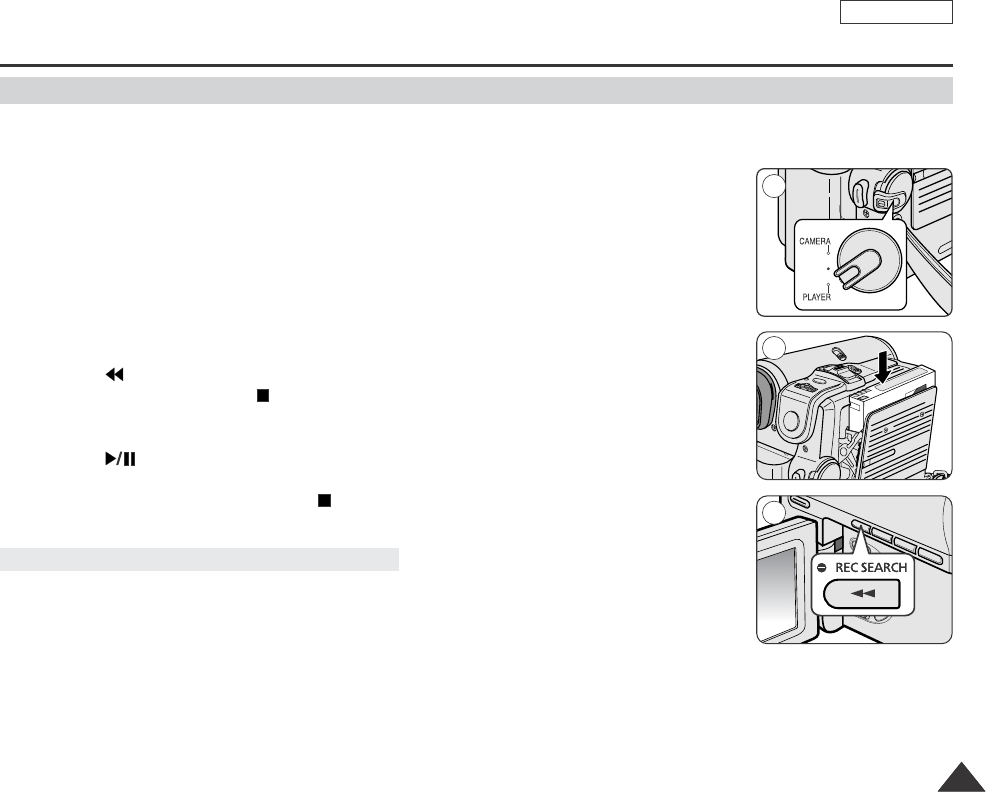
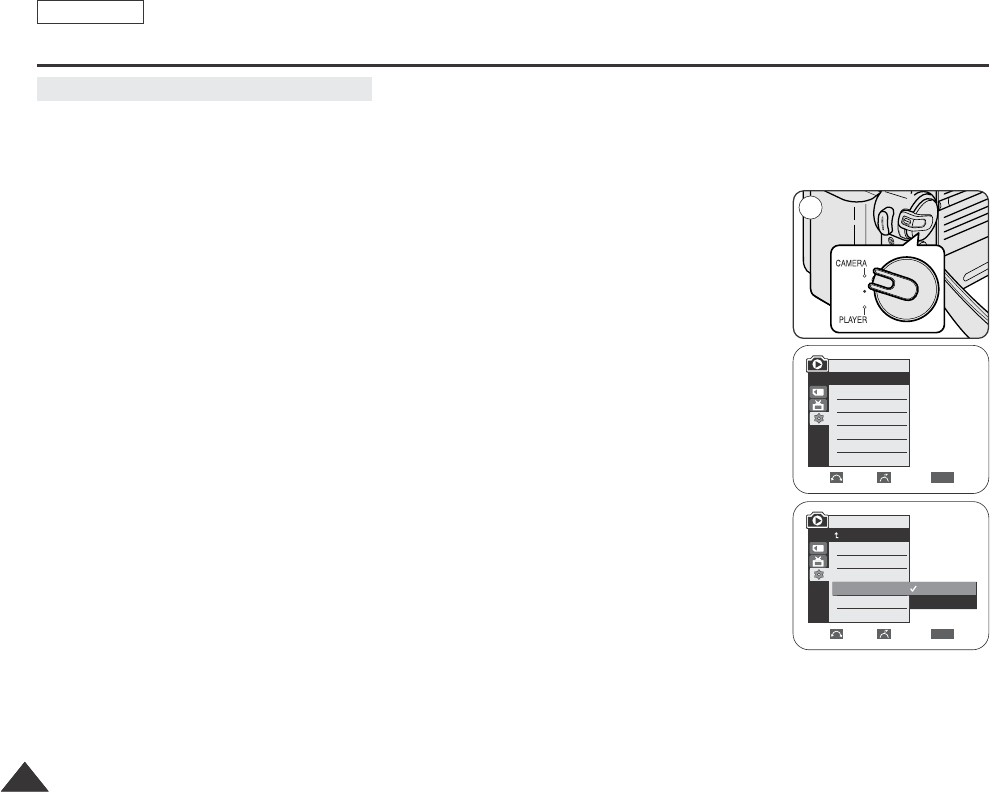
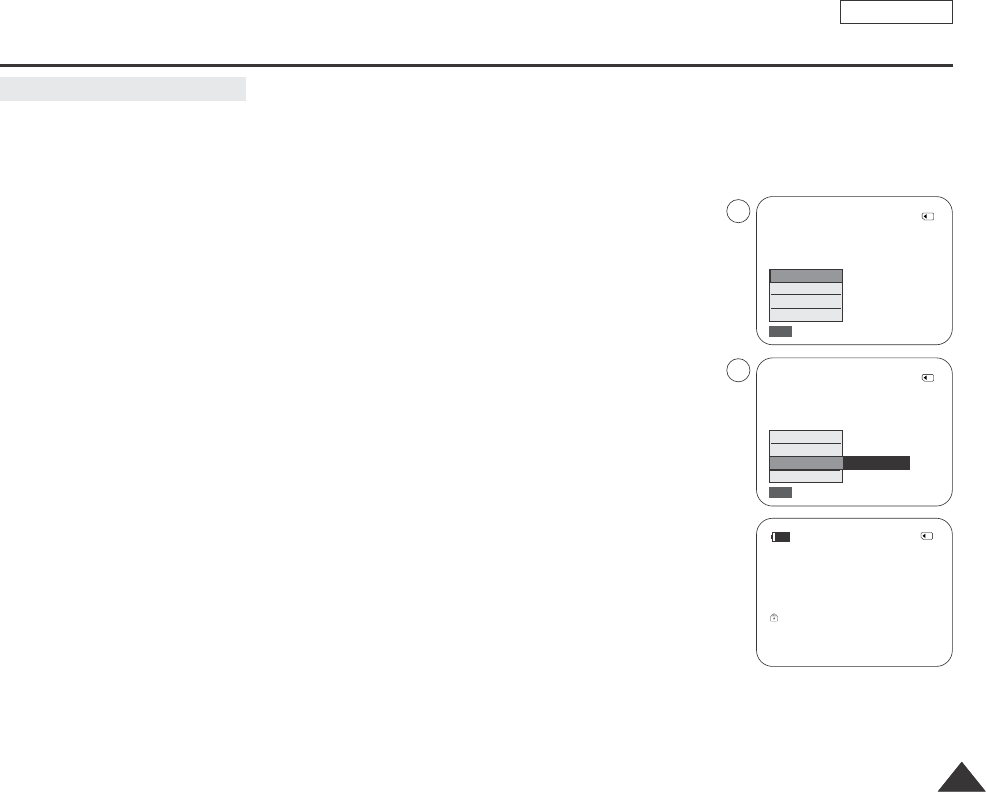
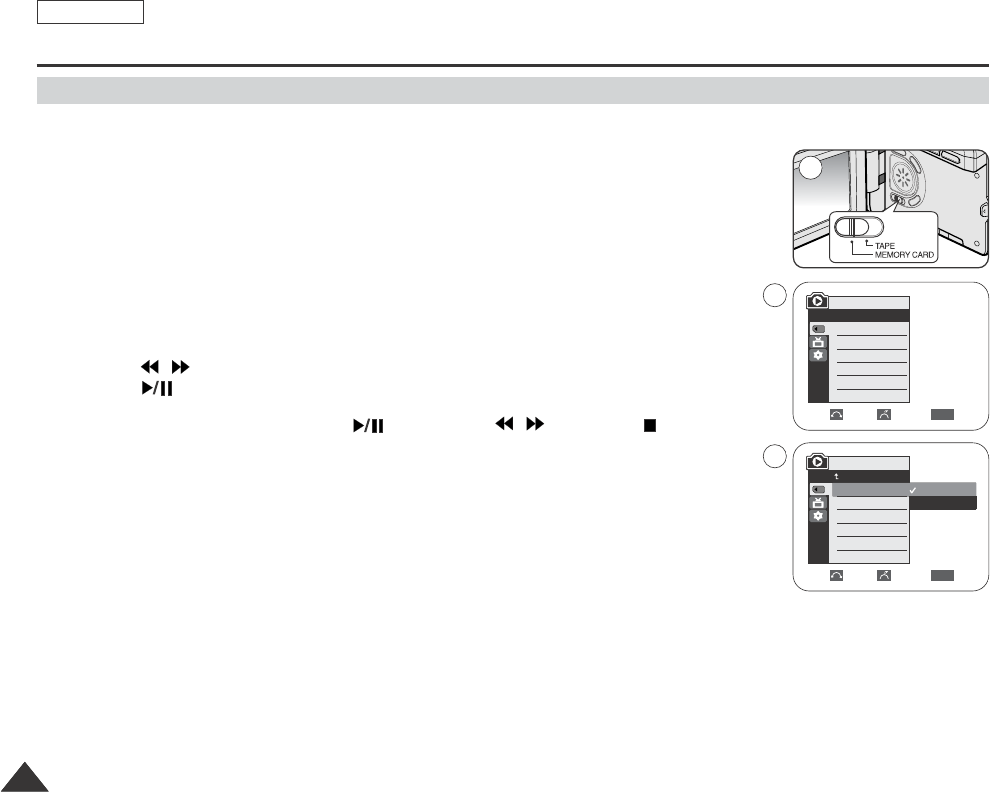
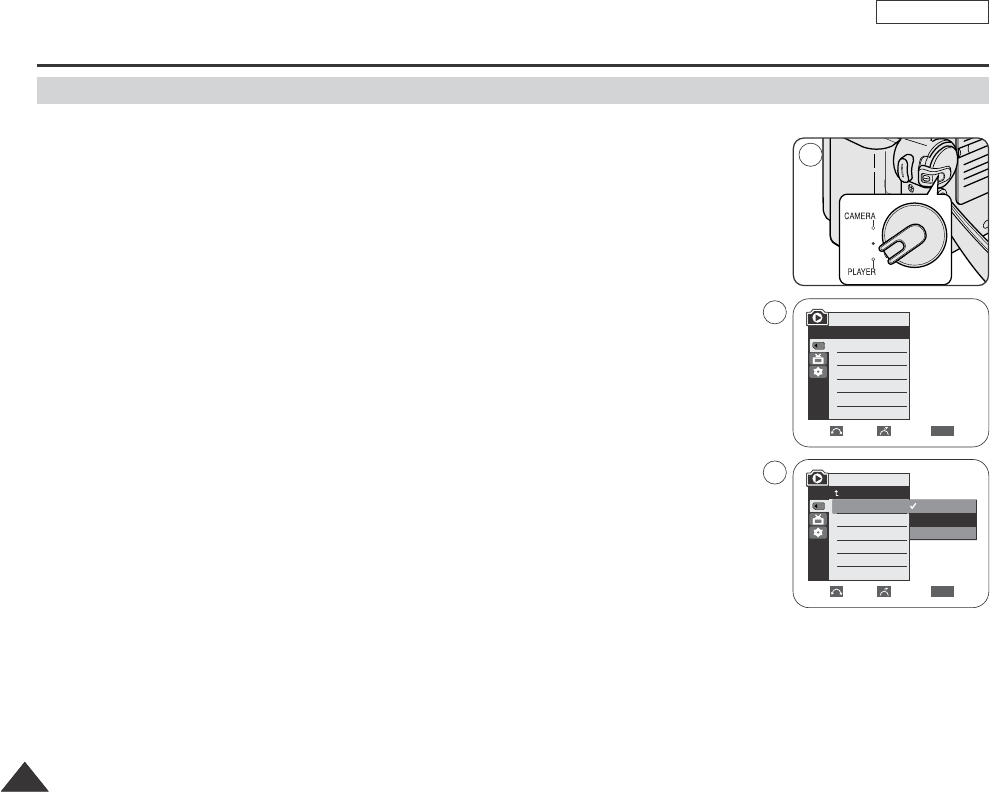
1. Set the Power switch to CAMERA.
2. Set the Mode switch to TAPE. (SCD353/D354/D355 only)
3. Press the MENU button.
■
The menu list will appear.
4. Move the Menu selector to the left or right to select Camera, then press the Menu selector.
5. Move the Menu selector to the left or right to select DIS, then press the Menu selector.
6. To activate the DIS function, move the Menu selector to the left or right to select On.
And then press the Menu selector.
■
If you do not want to use the DIS function, set the DIS menu to Off.
7. To exit, press the MENU button.
ENGLISH
6161
Advanced Recording
Setting the Digital Image Stabilizer (DIS)
Move Select Exit
MENU
Camera Mode
Back
Program AE
White Balance
Digital Effect
DIS
Digital Zoom
Off
On
√Auto
√Auto
√Off
√Off
√Off
Move Select Exit
MENU
Camera Mode
√Camera
Program AE
White Balance
Digital Effect
DIS
Digital Zoom
4
6
14min
0:00:10
12:00 AM JAN.01,2005
SP
STBY
7
œ
Dragon_eng_26~85 12/13/04 3:25 PM Page 61
ENGLISH
6262
Advanced Recording
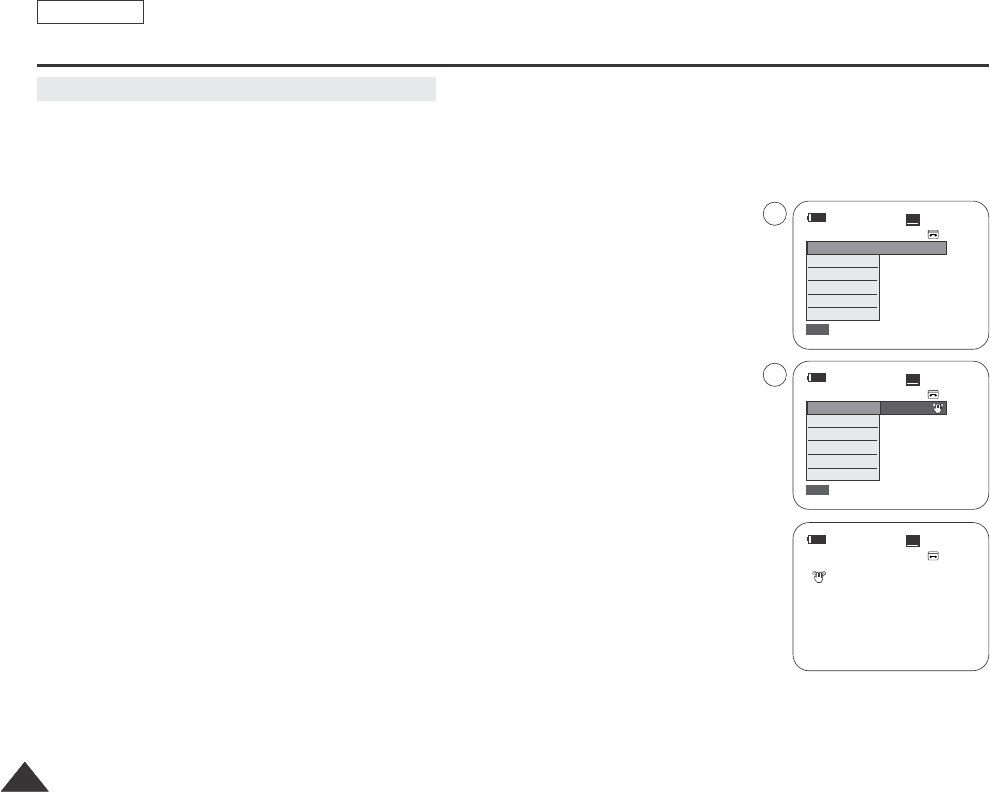
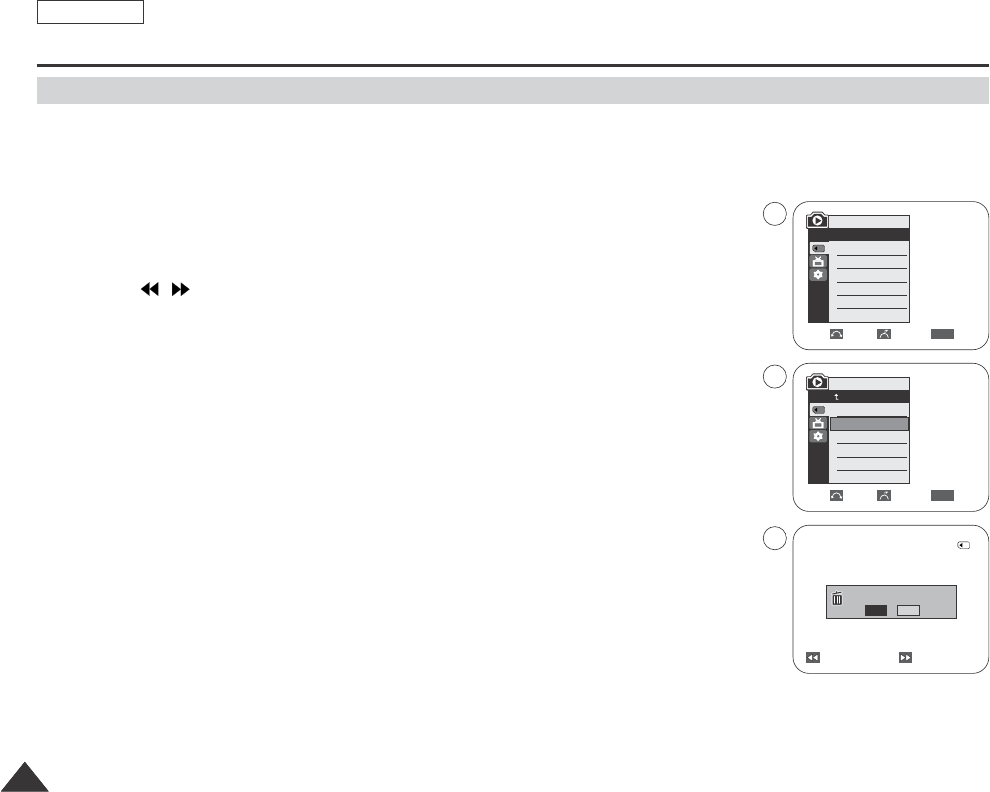
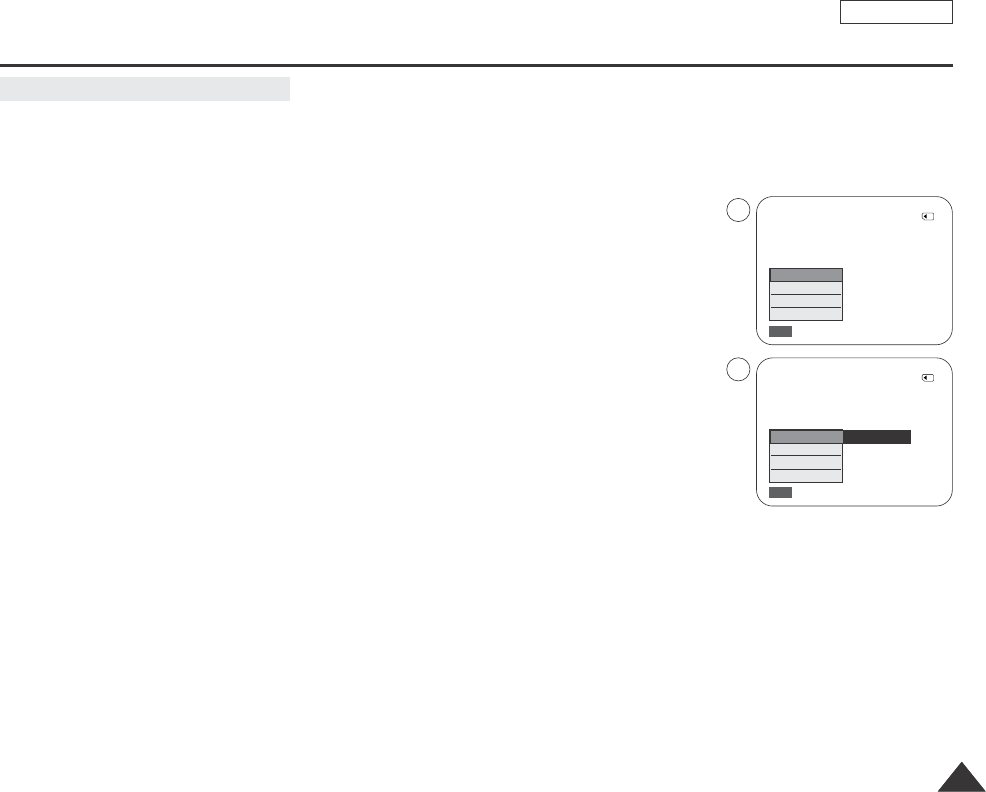
✤Quick menu is used to access Camcorder functions by simply using the Menu selector.
✤Quick menu provides easier access to the frequently used menus without using the Menu button.
1. Press the Menu selector and press the Menu selector again.
2. Move the Menu selector to the left or right to select On or Off, then press the Menu selector.
[ Notes ]
■
It is recommended that you deactivate the DIS function when using a tripod.
■
If you use the DIS function, the picture quality may deteriorate.
■
EASY Q mode automatically sets the DIS to On.
Using Quick Menu: DIS (Digital Image Stabilizer)
14min
0:00:10
SP
STBY
Exit
MENU
DIS
Program AE
White Balance
Shutter
Exposure
Manual Focus
…
†
On
14min
0:00:10
SP
STBY
Exit
MENU
Off
DIS
Program AE
White Balance
Shutter
Exposure
Manual Focus
1
2
14min
0:00:10
12:00 AM JAN.01,2005
SP
STBY
œ
Dragon_eng_26~85 12/13/04 3:25 PM Page 62
ENGLISH
Advanced Recording
6363
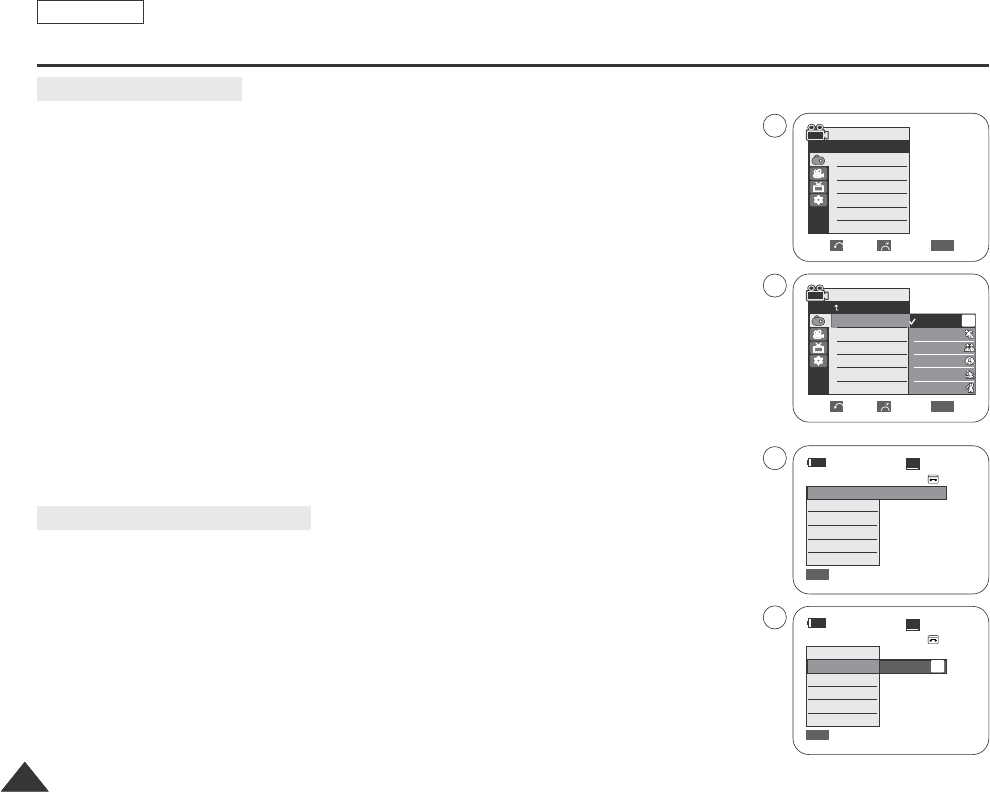
✤The Program AE function works only in Camera mode.
✤The Program AE mode allows you to adjust shutter speeds and apertures to suit different recording conditions.
✤They give you creative control over the depth of field.
■
Auto mode ( )
-Auto balance between the subject and the background.
-To be used in normal conditions.
-The shutter speed automatically varies from 1/60 to 1/250 per second, depending on the scene.
■
Sports mode ( )
For recording people or objects moving quickly.
■
Portrait mode ( )
-For focusing on the background of the subject, when the background is out of focus.
-The Portrait mode is most effective when used outdoors.
-The shutter speed automatically varies from 1/60 to 1/1000 per second.
■
Spotlight mode ( )
For recording correctly when there is only light on the subject and not the rest of the picture.
■
Sand/Snow mode ( )
For recording when people or objects are darker than the background because of reflected light from sand or snow.
■
High Speed(High Shutter Speed) mode ( )
For recording fast-moving subjects such as players in golf or tennis games.
[ Notes ]
■
While setting the NITE PIX to ON, the Program AE function does not work. (SCD352/D354/D355 only)
■
The Program AE function will not operate in EASY Q mode.
■
No indicator will appear on the LCD screen when Auto mode is selected.
A
Program AE(Programed Automatic Explore Modes)
14min
0:00:10
12:00 AM JAN.01,2005
SP
STBY
œ
Dragon_eng_26~85 12/13/04 3:25 PM Page 63
ENGLISH
6464
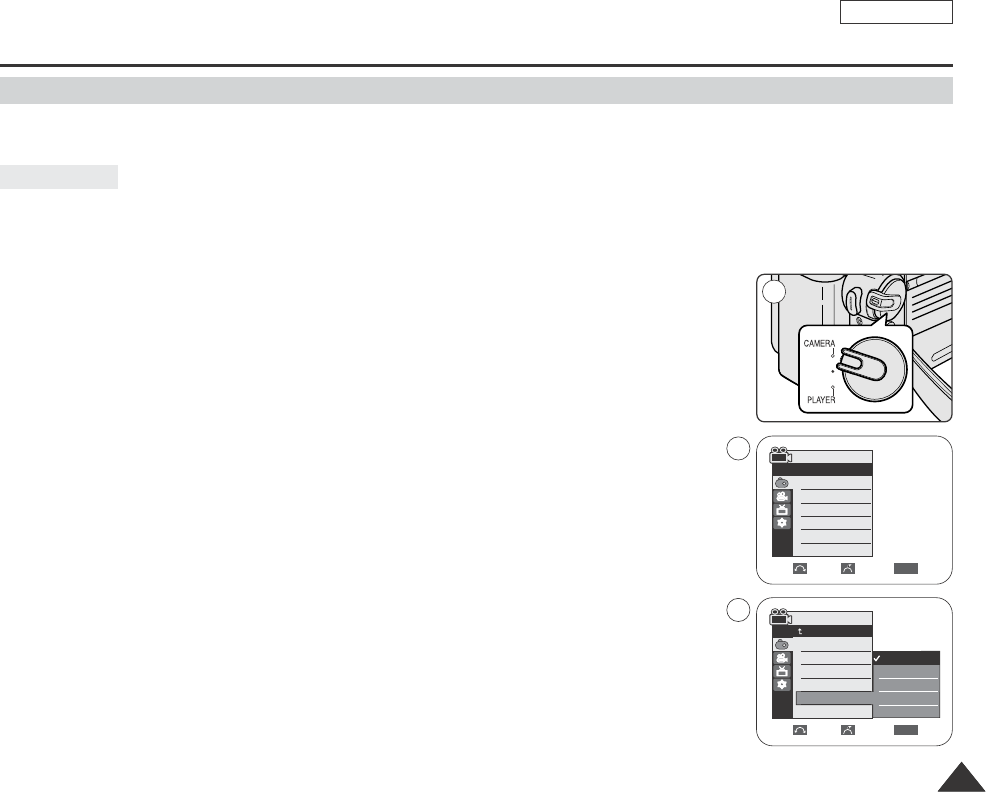
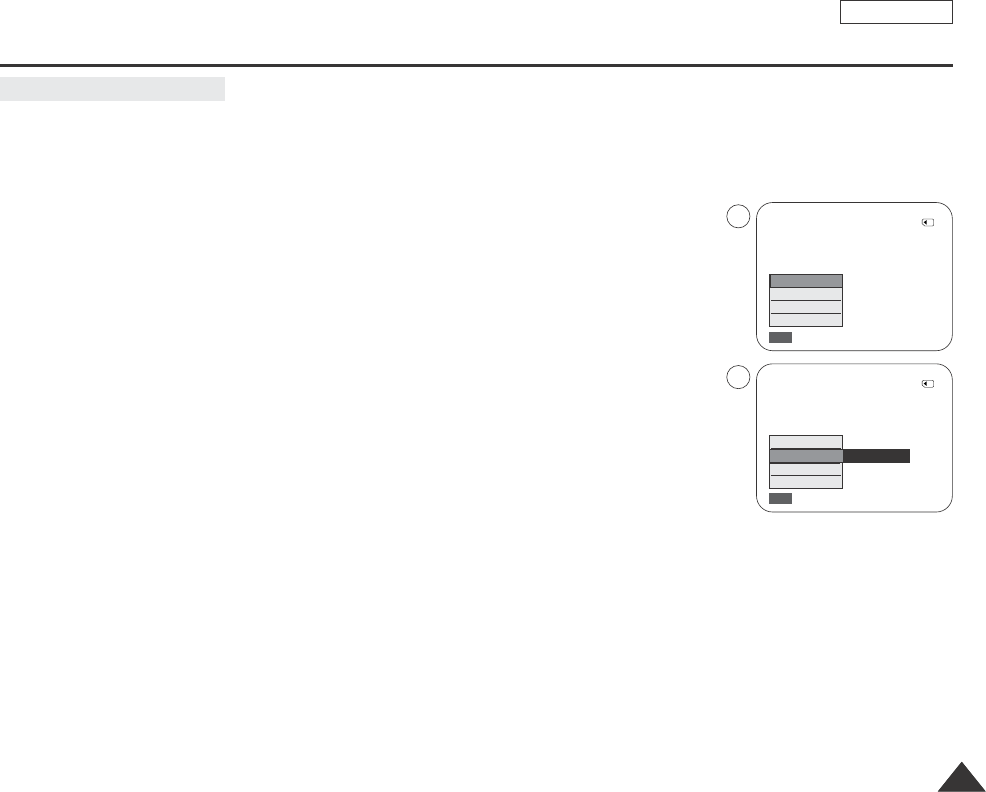
1. Set the Power switch to CAMERA.
2. Set the Mode switch to TAPE. (SCD353/D354/D355 only)
3. Press the MENU button.
■
The menu list will appear.
4. Move the Menu selector to the left or right to select Camera, then press the Menu selector.
5. Move the Menu selector to the left or right to select Program AE, then press the Menu selector.
The available options are listed.
6. Move the Menu selector to the left or right to select desired program AE option, then press the
Menu selector.
7. To exit, press the MENU button.
The icon of the selected mode will appear on the LCD screen.
1. Press the Menu selector.
2. Move the Menu selector to the left or right to select Program AE, then press the Menu selector.
3. Move the Menu selector to the left or right to select desired program AE option, then press
the Menu selector.
Advanced Recording
Setting the Program AE
√Auto
√Auto
√Off
√Off
√Off
Move Select Exit
MENU
Camera Mode
√Camera
Program AE
White Balance
Digital Effect
DIS
Digital Zoom
Move Select Exit
MENU
Camera Mode
Back
Program AE
White Balance
Digital Effect
DIS
Digital Zoom
Auto
Sports
Portrait
Spotlight
Sand/Snow
High Speed
A
Using Quick Menu: Program AE
14min
0:00:10
SP
STBY
Exit
MENU
DIS
Program AE
White Balance
Shutter
Exposure
Manual Focus
…
†
Auto
14min
0:00:10
SP
STBY
Exit
MENU
Off
DIS
Program AE
White Balance
Shutter
Exposure
Manual Focus
A
4
6
1
3
Dragon_eng_26~85 12/13/04 3:25 PM Page 64
ENGLISH
Advanced Recording
6565
Applying Digital Effect
✤The Digital Effect function works only in Camera mode.
✤The Digital Effects enable you to give a creative look to your recording by adding various special effects.
✤Select the appropriate Digital Effect for the type of picture that you wish to record and the effect you wish to create.
✤There are 11 Digital Effect modes.
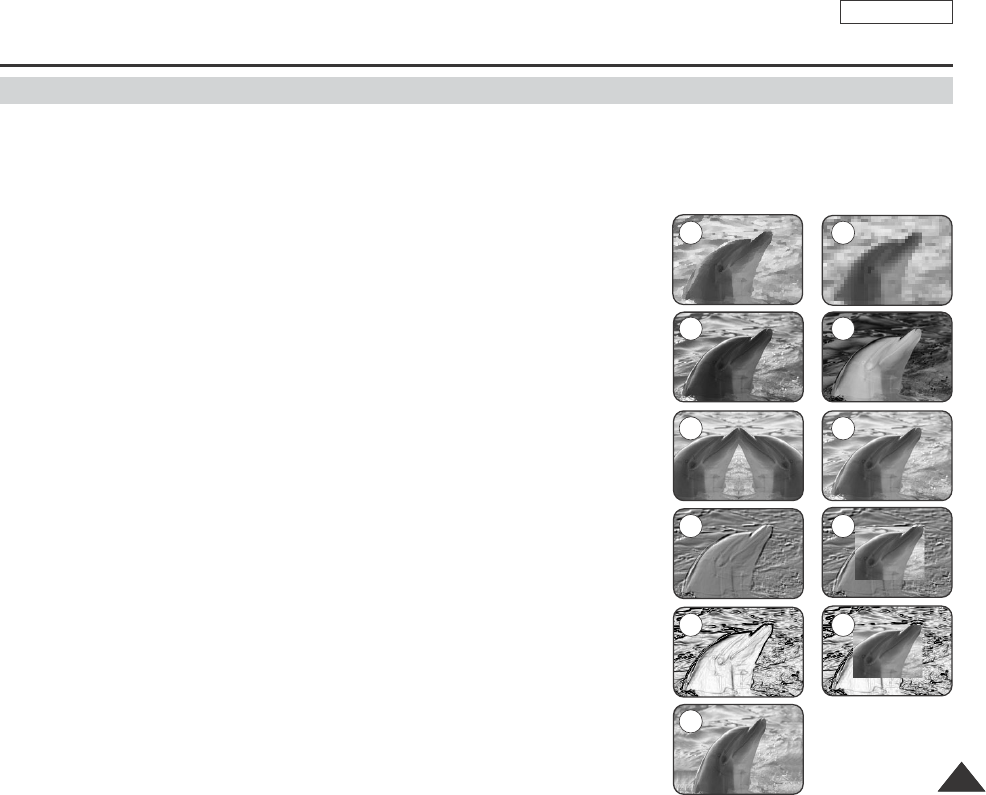
1. ART mode
This mode gives the images a coarse effect.
2. Mosaic mode
This mode gives the images a mosaic effect.
3. Sepia mode
This mode gives the images a reddish-brown pigment.
4. Negative mode
This mode reverses the colors, creating a negative image.
5. Mirror mode
This mode cuts the picture in half, using a mirror effect.
6. BLK & WHT mode
This mode changes the images to black and white.
7. Emboss1 mode
This mode creates a 3D effect (embossing).
8. Emboss2 mode
This mode creates a 3D effect (embossing) on surrounding area of the image.
9. Pastel1 mode
This mode applies a pale pastel drawing effect to an image.
10. Pastel2 mode
This mode applies a pale pastel drawing effect to surrounding area of an image.
11. 16:9 Wide mode
Select to record a picture to be played back on a 16:9 Wide TV.
1 2
3 4
5 6
7 8
9
11
10
Dragon_eng_26~85 12/13/04 3:25 PM Page 65
ENGLISH
Advanced Recording
6666
Selecting the Digital Effect
1. Set the Power switch to CAMERA.
2. Set the Mode switch to TAPE. (SCD353/D354/D355 only)
3. Press the MENU button.
■
The menu list will appear.
4. Move the Menu selector to the left or right to select Camera, then press the Menu selector.
5. Move the Menu selector to the left or right to select Digital Effect, then press the
Menu selector.
6. Move the Menu selector to the left or right to select desired Digital Effect mode,
then press the Menu selector.
■
The selected mode is applied.
7. To exit, press the MENU button.
[ Notes ]
■
While setting the NITE PIX to ON, the Digital Effect function does not work.
(SCD352/D354/D355 only)
■
The Digital Effect function will not operate in EASY Q mode.
Move Select Exit
MENU
Camera Mode
Back
Program AE
White Balance
Digital Effect
DIS
Digital Zoom
Off
Art
Mosaic
Sepia
Negative
Mirror
▼
√Auto
√Auto
√Off
√Off
√Off
Move Select Exit
MENU
Camera Mode
√Camera
Program AE
White Balance
Digital Effect
DIS
Digital Zoom
4
6
1
Dragon_eng_26~85 12/13/04 3:25 PM Page 66
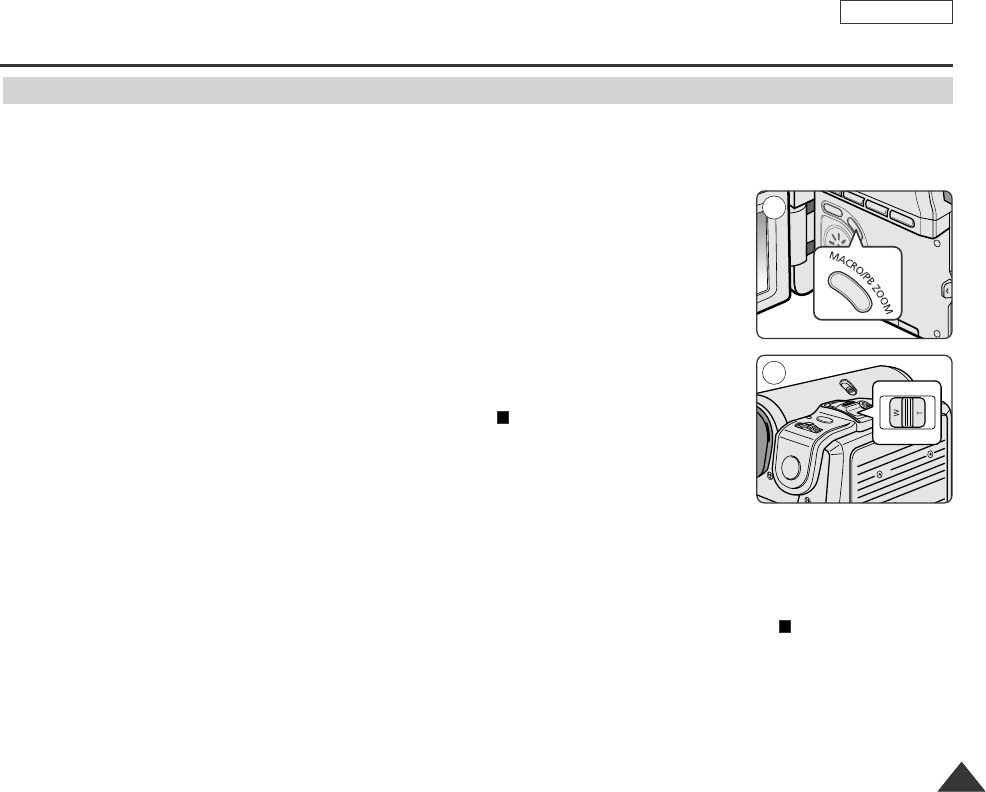
✤Zoom works only in Camera mode.
✤Zooming more than 20x is achieved digitally, up to 900x when combined with optical zoom.
✤The picture quality may deteriorate depending on how much you zoom in on the subject.
✤We recommend that you use the DIS feature with Digital Zoom for picture stability. (see page 61)
1. Set the Power switch to CAMERA.
2. Set the Mode switch to TAPE. (SCD353/D354/D355 only)
3. Press the MENU button.
■
The menu list will appear.
4. Move the Menu selector to the left or right to select Camera, then press the Menu selector.
5. Move the Menu selector to the left or right to select Digital Zoom, then press the Menu
selector.
6. Move the Menu selector to the left or right to select desired zoom mode(Off, 100x,200x,
400x or 900x), then press the Menu selector.
7. To exit, press the MENU button.
[ Notes ]
■
Using the DIS function (see page 61) to obtain a more stable, clearer image
when recording using the deep zoom.
■
Maximum zooming may result in lower picture quality.
ENGLISH
Advanced Recording
6767
1
Zooming In and Out with Digital Zoom
Digital Zoom
Move Select Exit
MENU
Camera Mode
Back
Program AE
White Balance
Digital Effect
DIS
Digital Zoom
Off
100x
200x
400x
900x
√Auto
√Auto
√Off
√Off
√Off
Move Select Exit
MENU
Camera Mode
√Camera
Program AE
White Balance
Digital Effect
DIS
Digital Zoom
4
6
Dragon_eng_26~85 12/13/04 3:25 PM Page 67
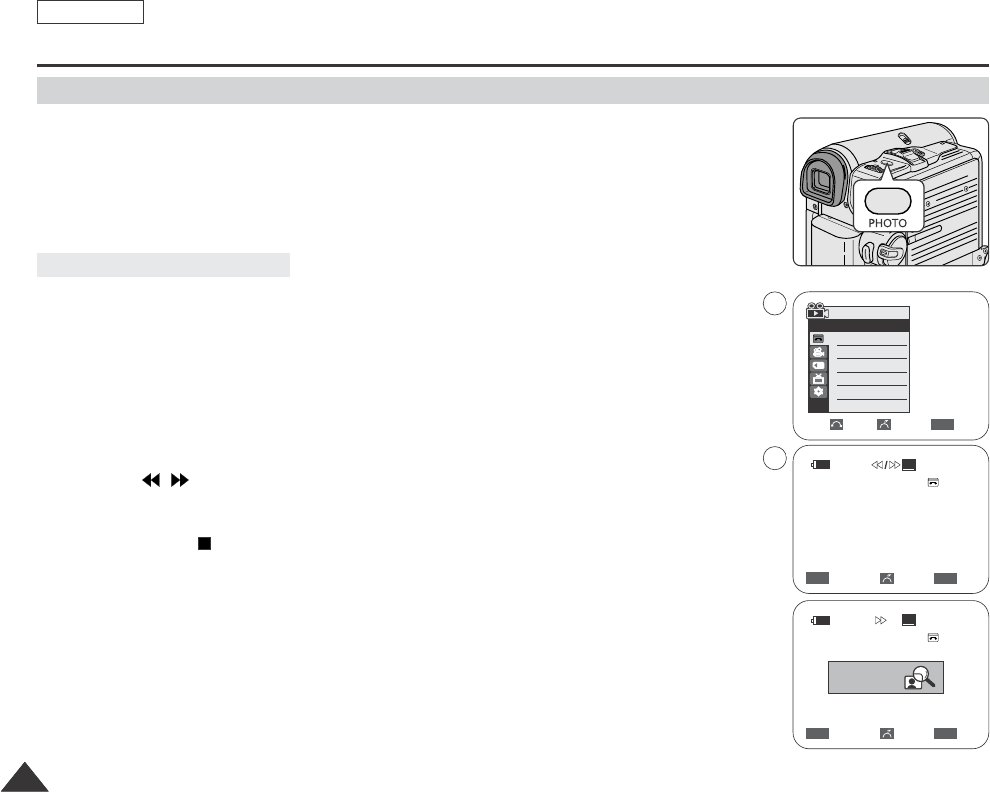
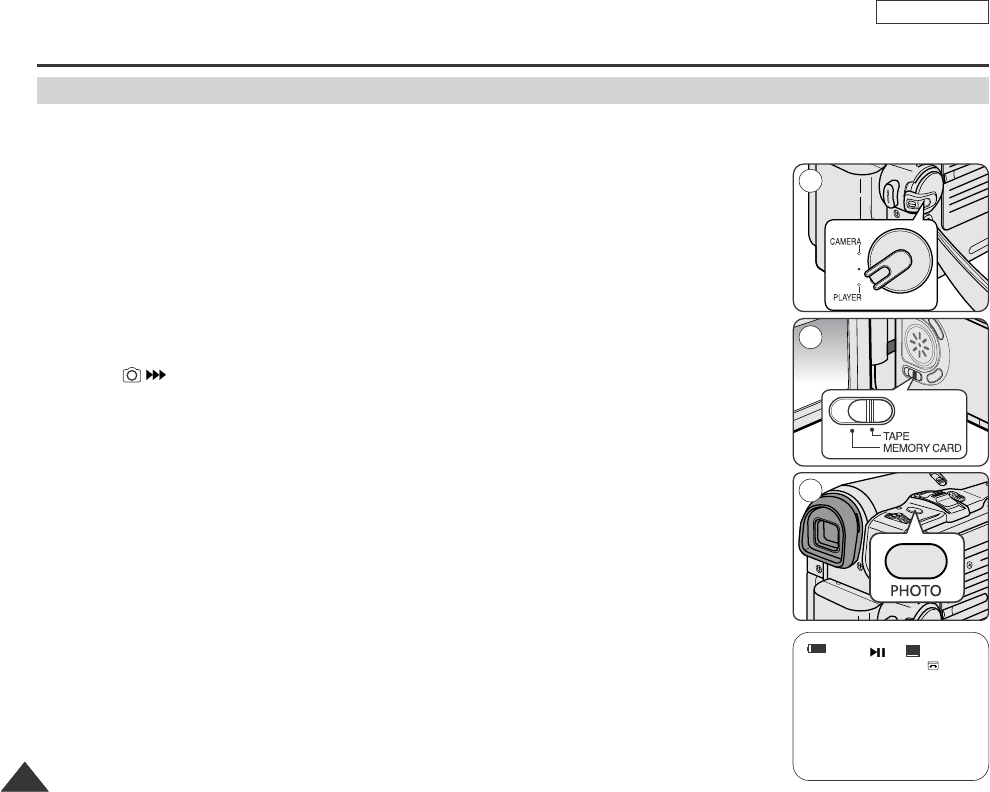
1. Set the Power switch to CAMERA.
2. Set the Mode switch to TAPE. (SCD353/D354/D355 only)
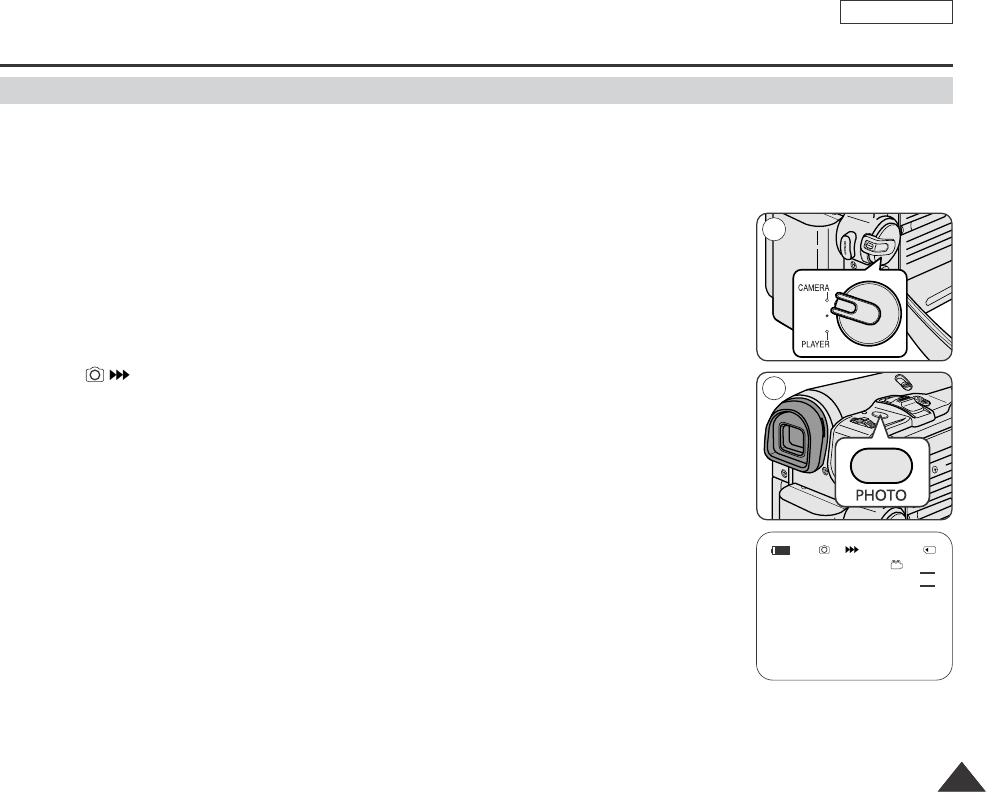
3. Press the PHOTO button.
■
The still picture is recorded for about 6~7 seconds.
4. After the PHOTO has been recorded, the Camcorder returns to STBY mode.
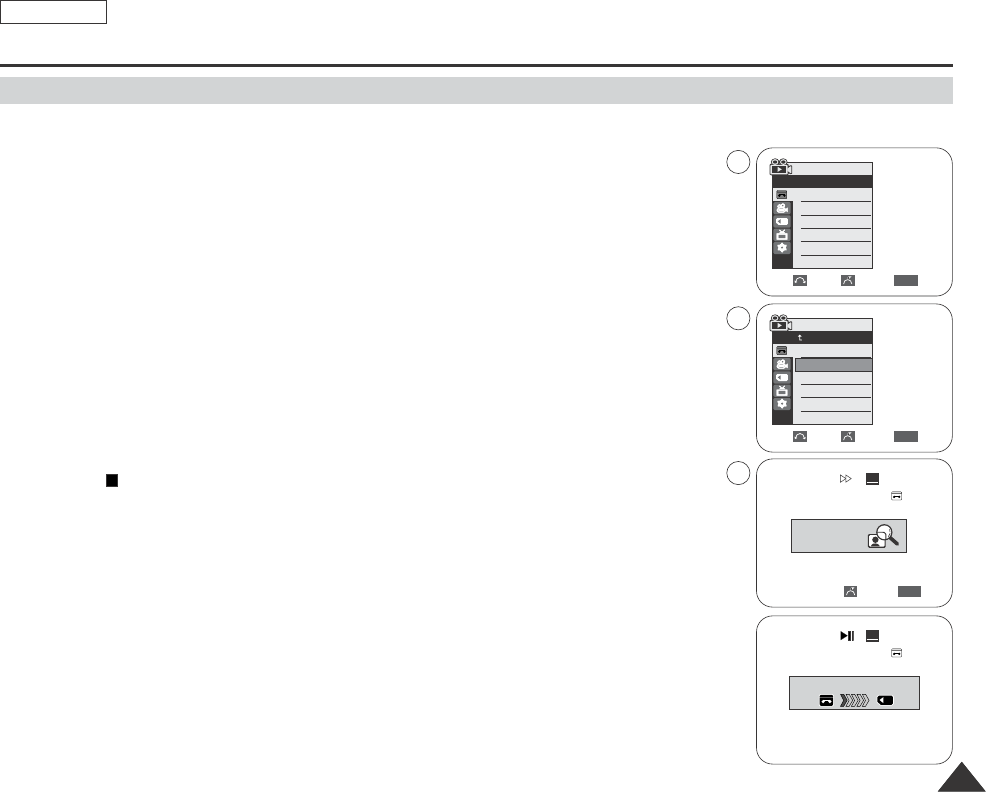
✤The Photo Search works only in Player mode.
1. Set the Power switch to PLAYER.
2. Set the Mode switch to TAPE. (SCD353/D354/D355 only)
3. Press the MENU button.
The menu list will appear.
4. Move the Menu selector to the left or right to select Tape, then press the Menu selector.
5. Move the Menu selector to the left or right to select Photo Search, then press the Menu
selector.
6. Press the / (REW/FF) buttons to select the photo.
■
The photo search process appears on LCD screen while you are searching.
■
After completing the search, the Camcorder displays the still image.
7. To exit, press the (STOP) button.
[ Notes ]
■
Pressing the PHOTO button while recording stops the recording and saves the still image captured
at that moment.It takes approx. 6 ~7 seconds to save the image and then resumes the recording.
■
You can use the remote control to take a photo by using the PHOTO button on the remote control.
Pressing the PHOTO button on the remote control records the still image at once with automatic
focusing. (SCD354/D355 only)
■
When there are no still images recorded on the tape, it will be fully rewound or forwarded.
ENGLISH
Advanced Recording
6868
Searching for a Photo Picture
Photo Image Recording
√Sound[1]
Move Select Exit
MENU
Player Mode
√Tape
Photo Search
Photo Copy
Audio Select
Search Cancel Exit
MENU
œœœœ /√√√√
SP
25min
Photo searching...
0:44:38:03
Search Cancel Exit
MENU
œœœœ /√√√√
SP 0:41:56:10
25minPhoto Search
4
6
Photo Search
Dragon_eng_26~85 12/13/04 3:25 PM Page 68
ENGLISH
Playback
6969
✤You can monitor the playback picture on the LCD screen.
✤Make sure that the Battery pack is in place.
1. Set the Power switch to PLAYER.
2. Set the Mode switch to TAPE. (SCD353/D354/D355 only)
3. Insert the tape you wish to view. (see page 36)
4. Open the LCD screen.
■
Adjust the angle of the LCD screen and set the brightness or color if necessary.
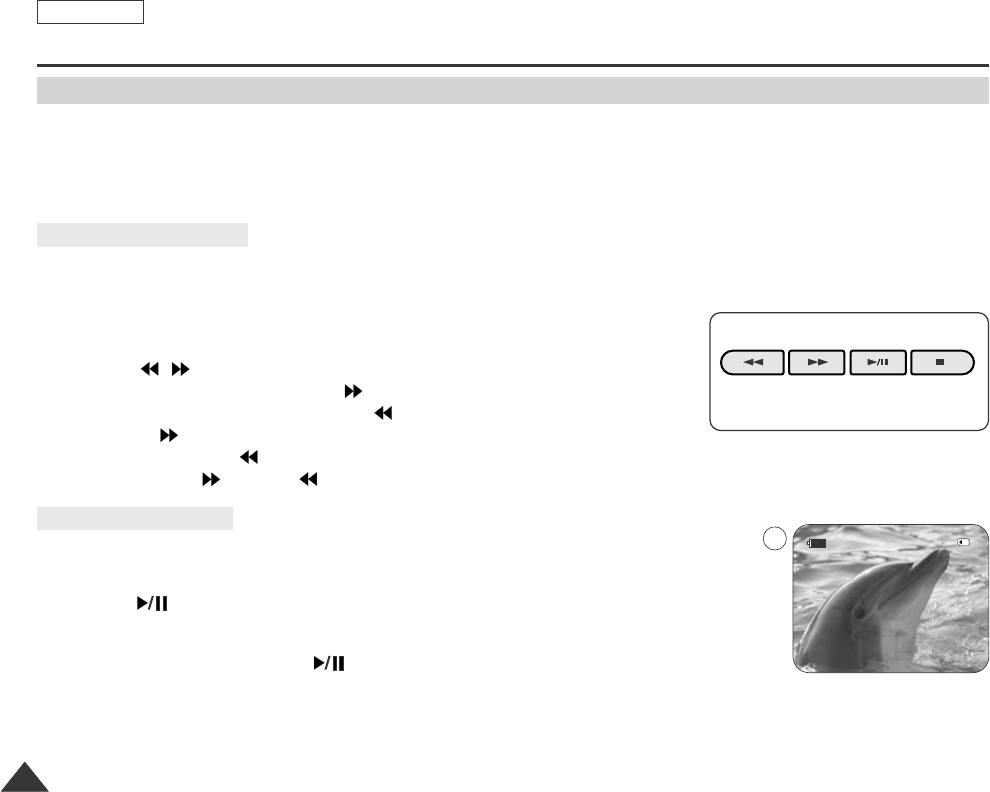
5. Press the (REW) button to rewind the tape to the starting point.
■
To stop rewinding, press the (STOP) button.
■
The Camcorder stops automatically after rewinding is complete.
6. Press the (PLAY/STILL) button to start playback.
■
You can view the picture you recorded on the LCD screen.
■
To stop the play operation, press the (STOP) button.
✤You can adjust the LCD Bright/Color during playback.
✤The adjustment method is the same procedure as used in Camera mode. (see page 32)
[ Notes ]
■
You can also view the picture on a TV screen, after connecting the Camcorder to a TV or VCR. (see page 71~72)
■
Various functions are available in Player mode. (see page 73)
■
For searching and viewing still images recorded onto tape. (see page 68)
Playing back a tape you have recorded on the LCD screen
Adjusting the LCD Bright/Color during Playback
1
3
5
Dragon_eng_26~85 12/13/04 3:25 PM Page 69
ENGLISH
Playback
7070
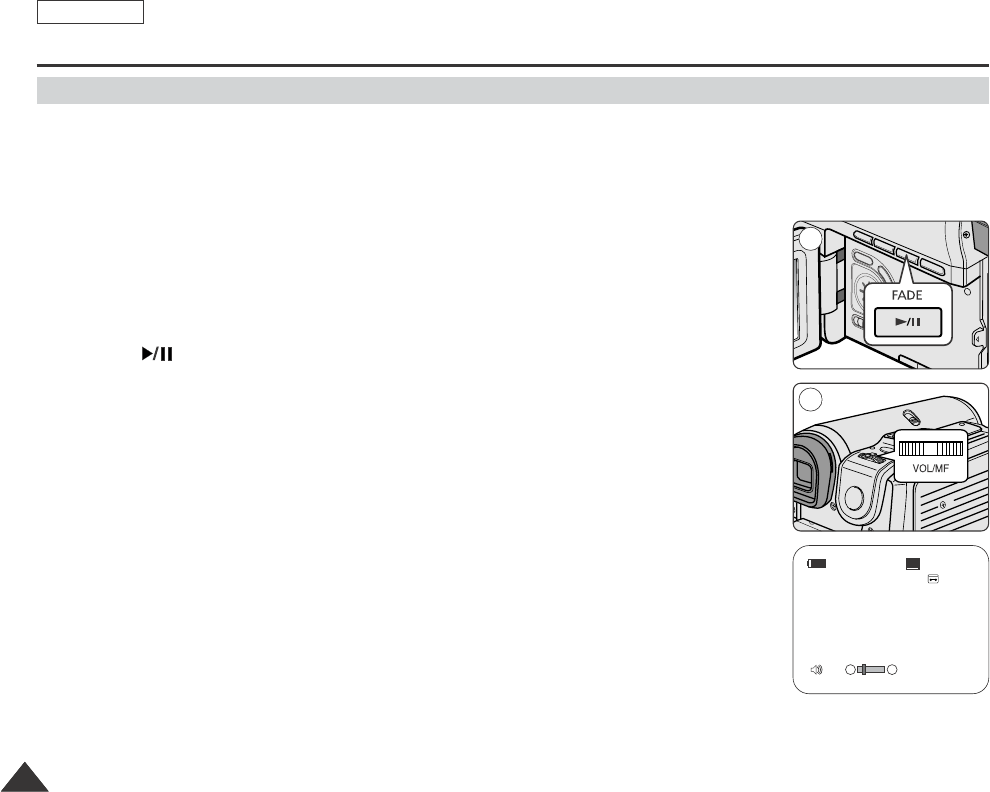
✤The Speaker works only in Player mode.
✤When you use the LCD screen for playback, you can hear recorded sound from the built-in Speaker.
-Follow the instructions below to decrease or mute speaker volume in the Player mode.
-Take the following steps to lower the volume or mute the sound while playing a tape
on the Camcorder.
1. Set the Power switch to PLAYER.
2. Set the Mode switch to TAPE. (SCD353/D354/D355 only)
3. Press the (PLAY/STILL) to play the tape.
4. When you hear sounds once the tape is in play, use the Menu selector to adjust the volume.
■
Avolume level display will appear on the LCD screen.
Levels may be adjusted from anywhere between 00 to 19 and you will not hear any sound
when the volume is set on 00.
■
If you close the LCD screen while playing, you will not hear sound from the speaker.
[ Notes ]
■
When the AV cable is connected to the Camcorder, you cannot hear sound from the Built-In Speaker
and cannot adjust the volume.
■
The sound will return when you remove the connected AV cable from the jack of your Camcorder.
Controlling Sound from the Speaker
14min
0:46:00:11
†…
SP
√
[05]
2
4
Dragon_eng_26~85 12/13/04 3:25 PM Page 70

ENGLISH
Playback
7171
✤The playback function works only in Player mode.
✤It is practical to view a tape using the LCD screen when in a car or outdoors.
✤To play back a tape, the television must have a compatible color system.
✤We recommend that you use the AC Power adapter as the power source for the Camcorder.
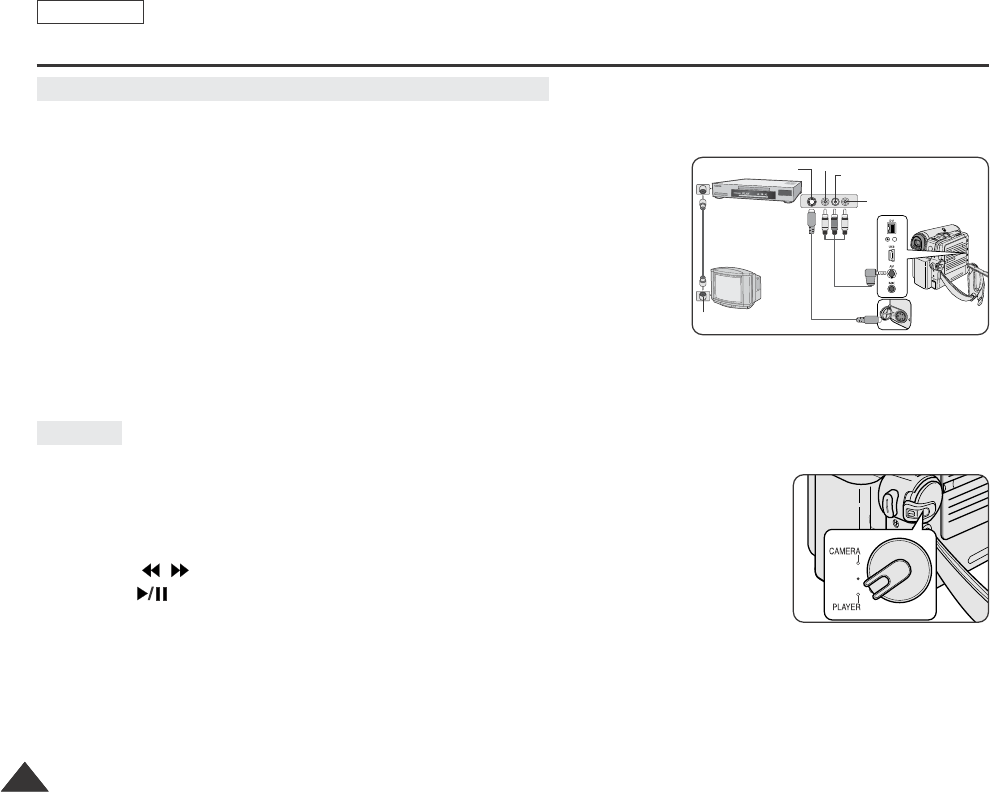
1. Connect the Camcorder and TV with the Audio/Video cable.
■
The yellow jack: Video
■
The white jack: Audio(L)-mono
■
The red jack: Audio(R)
If you connect to a monaural TV, connect the yellow jack (Video)
to the video input of the TV and the white jack (Audio L) to the audio input
of the TV.
2. Set the Power switch to PLAYER.
3. Set the Mode switch to TAPE. (SCD353/D354/D355 only)
4. Turn on the TV and set the TV/VIDEO selector on the TV to Video.
Refer to the TV user’s manual.
5. Play the tape.
[ Notes ]
■
You may use an S-Video (optional) cable to obtain better quality pictures if you have a S-Video connector on your TV.
■
Even if you use an S-Video (optional) cable, you need to connect an audio cable.
■
If you connect the cable to the Audio/Video jack, you will not hear sound from the Camcorder's speakers.
■
If only a mono audio input is available on the TV set, use the audio cable with the white jack. (Audio L)
Playback on the LCD screen
Playback on a TV monitor
Connecting to a TV which has Audio/Video input jacks
Tape Playback
Camcorder
Audio/Video
S-Video
Video input-Yellow
Audio input
(left)-White
S-Video input
Audio input
(right)-Red
TV
Dragon_eng_26~85 12/13/04 3:25 PM Page 71
ENGLISH
Playback
7272
✤You can connect your Camcorder to a TV through a VCR.
1. Connect the Camcorder and VCR with the Audio/Video cable.
■
The yellow jack: Video
■
The white jack: Audio(L) - Mono
■
The red jack: Audio(R)
2. Connect a TV to the VCR.
3. Set the Power switch to PLAYER.
4. Set the Mode switch to TAPE. (SCD353/D354/D355 only)
5. Turn on both the TV and VCR.
■
Set the input selector on the VCR to Line.
■
Select the channel reserved for your VCR on the TV set.
6. Play the tape.
✤You can play the recorded tape in Player mode.
1. Connect a power source and set the Power switch to PLAYER.
2. Set the Mode switch to TAPE. (SCD353/D354/D355 only)
3. Insert the tape you wish to play back.
4. Using the / (REW/FF) buttons, find the first position you wish to play back.
5. Press the (PLAY/STILL) button.
■
The images you recorded will appear on the TV after a few seconds.
■
If a tape reaches its end while being played back, the tape will rewind automatically.
[ Notes ]
■
The playback mode (SP/LP) is selected automatically.
■
If the VCR has an S-VIDEO input terminal, you may use S-VIDEO for better quality.
■
The S-VIDEO terminal transmits video only. Connect AUDIO cables for sound.
■
If only a mono audio input is available on the TV set, use the audio cable with the white jack.
Connecting to a TV which has no Audio and Video Input Jacks
Playback
Antenna
S-Video input
Audio/Video
S-Video
TV
VCR
Camcorder
Video input-Yellow
Audio input
(left)-White
Audio input
(right)-Red
Dragon_eng_26~85 12/13/04 3:25 PM Page 72
ENGLISH
Playback
7373
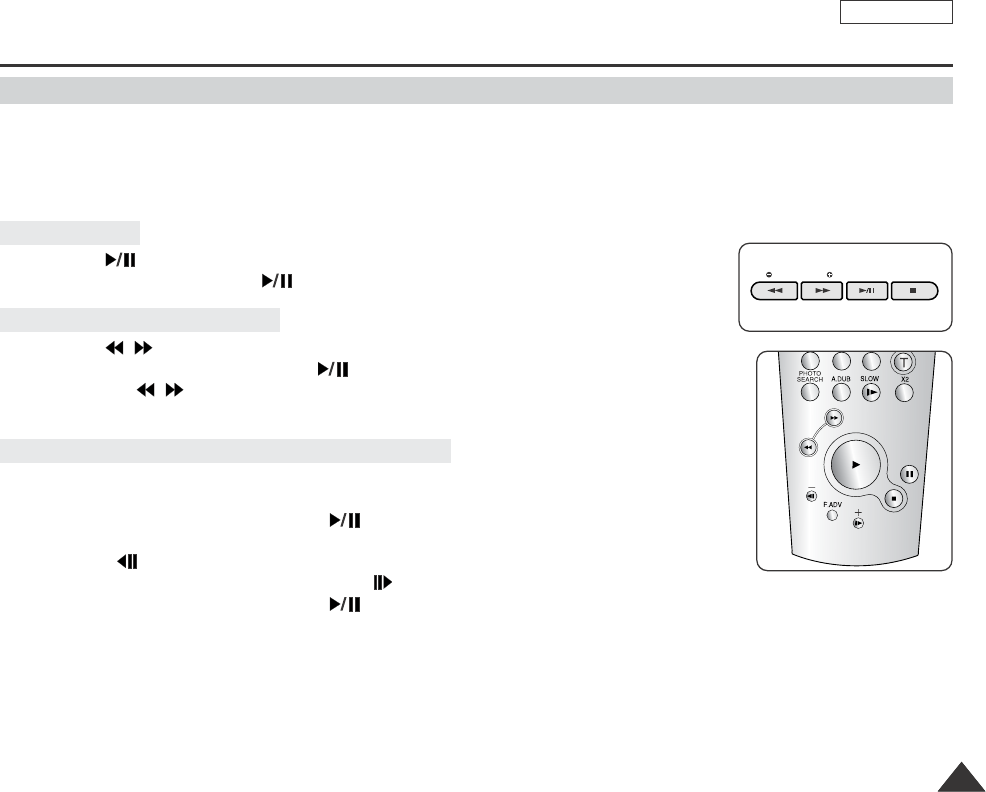
✤The PLAY, STILL, STOP, FF, REW buttons are located on the Camcorder and the remote control. (SCD354/D355 only)
✤The F.ADV(Frame advance), X2, SLOW buttons are located on the remote control only. (SCD354/D355 only)
✤To prevent tape and head-drum wear, your Camcorder will automatically stop if it is left in still or slow modes for more than
5 minutes. (SCD354/D355 only)
■
Press the (PLAY/STILL) button during playback.
■
To resume playback, press the (PLAY/STILL) button.
■
Press the / (REW/FF) buttons during playback or still mode.
To resume normal playback, press the (PLAY/STILL) button.
■
Keep pressing / (REW/FF) buttons during playback or still mode.
To resume normal playback, release the button.
■
Forward Slow playback
-Press the SLOW button on the remote control during playback.
-To resume normal playback, press the (PLAY/STILL) button.
■
Reverse Slow Playback
-Press the (-) button during forward slow play back.
-To resume forward slow playback, press the (+) button.
-To resume normal playback, press the (PLAY/STILL) button.
Slow Playback (Forward/Reverse) (SCD354/D355 only)
Picture Search (Forward/Reverse)
Playback Pause
Various Functions while in PLAYER mode
REC SEARCH FADE BLC
œ
œ
<SCD354/D355 only>
œ
Dragon_eng_26~85 12/13/04 3:25 PM Page 73
ENGLISH
Playback
7474
■
Press the F.ADV button on the remote control while in still mode.
-Video sequence advances frame by frame each time you press the F.ADV button.
-The F.ADV function works in still mode only.
■
To resume normal playback, press the (PLAY/STILL) button.
-Forward frame advance
Press the F.ADV button on the remote control in still mode.
-Reverse frame advance
Press the (-) button on the remote control to change the direction in F.ADV mode.
Press the F.ADV button on the remote control.
■
Forward X2 playback
-Press the X2 button on the remote control during playback.
-To resume normal playback, press the (PLAY/STILL) button.
■
Reverse X2 playback
-Press the (-) button during during forward X2 playback.
-To resume normal playback, press the (PLAY/STILL) button.
■
To playback in reverse at normal speed, press the (-) button during normal forward playback.
■
Press the (PLAY/STILL) or (+) button to return to normal forward playback.
[ Notes ]
■
Mosaic shaped distortion may appear on the screen while in some of the various playback modes.
Mosaic shaped distortion or noise may be experienced when you play back tapes recorded in LP which contain various playback
functions.
■
Sound will only be heard during normal SP or LP playback.
Frame Advance (To play back frame by frame) (SCD354/D355 only)
X2 Playback (Forward/Reverse) (SCD354/D355 only)
Reverse Playback (SCD354/D355 only)
œ
œ
<SCD354/D355 only>
Dragon_eng_26~85 12/13/04 3:25 PM Page 74
ENGLISH
Playback
7575
Zooming during Playback (PB ZOOM)
✤The Playback Zoom function works in Player mode.
✤The Playback Zoom function enables you to magnify playback or still image.
1. Set the Power switch to PLAYER.
2. Set the Mode switch to TAPE. (SCD353/D354/D355 only)
3. Press the PB ZOOM button in playback mode or in still mode.
4. The image is magnified starting from the center of image.
5. You can zoom in from 1.2x to 8.0x by moving the Zoom lever.
■
Zoom ratio is not displayed on the screen.
6. To cancel the playback Zoom function, press the PB ZOOM or (STOP) button.
[ Notes ]
■
The PB ZOOM function enlarges center of the screen only.
■
You cannot apply the Playback Zoom function to pictures which are being input from
an external video source.
■
The Playback Zoom image cannot be imported to your PC from the Camcorder’s DV jack.
■
The PB ZOOM images cannot be exported to a PC.
■
OSD will not be displayed on the LCD screen while the PB ZOOM function is operating.
To display OSD, press the PB ZOOM button once to stop operating PB ZOOM function or press the (STOP) button to
stop playing back.
3
5
Dragon_eng_26~85 12/13/04 3:25 PM Page 75

ENGLISH
Playback
7676
✤AV In/Out function works only in Player mode.
✤AV in/out setting enables you to record signal from external sources and display it on LCD screen.
Also, you can direct your video or image to external devices to record or play back.
1. Connect the Camcorder and VCR or TV with the Audio/Video cable. (See page 71~72)
2. Set the Mode switch to TAPE. (SCD353/D354/D355 only)
3. Set the Power switch to PLAYER.
4. Turn on the VCR or TV.
5. Insert the blank tape with protection tab closed into the Camcorder.
■
If you want to record from a connected VCR, insert a recorded VHS tape into the VCR.
6. Press the MENU button.
■
The menu list will appear.
7. Move the Menu selector to the left or right to select Record, then press the Menu selector.
8. Move the Menu selector to the left or right to select AV In/Out, then press the
Menu selector.
9. Move the Menu selector to the left or right to select In or Out, then press the Menu selector.
10. To exit, press the MENU button.
11. Press the Start/Stop button to set the Camcorder to REC PAUSE mode.
■
PAUSE on the LCD screen.
12. Select the TV program or playback the VHS tape.
13. Press the Start/Stop button to start recording.
■
If you want to pause recording for a while, press the Start/Stop button again.
14. To stop recording, press the (STOP) button.
[ Notes ]
■
When you record the images being played back on analog VCR, if they are not being played back in
normal speed, (for example, more than double speed or slow playback), only gray image appears on
the Camcorder.
■
If you want to see the Camcorder picture with a TV, set AV In/Out menu to Out.
AV In/Out (SCD355 only)
√SP
√12Bit
√Off
√Out
Move Select Exit
MENU
Player Mode
√Record
Rec Mode
Audio Mode
Wind Cut
AV In/Out
Move Select Exit
MENU
Out
In
Player Mode
Back
Rec Mode
Audio Mode
Wind Cut
AV In/Out
1
6
8
Dragon_eng_26~85 12/13/04 3:25 PM Page 76
ENGLISH
Playback
7777
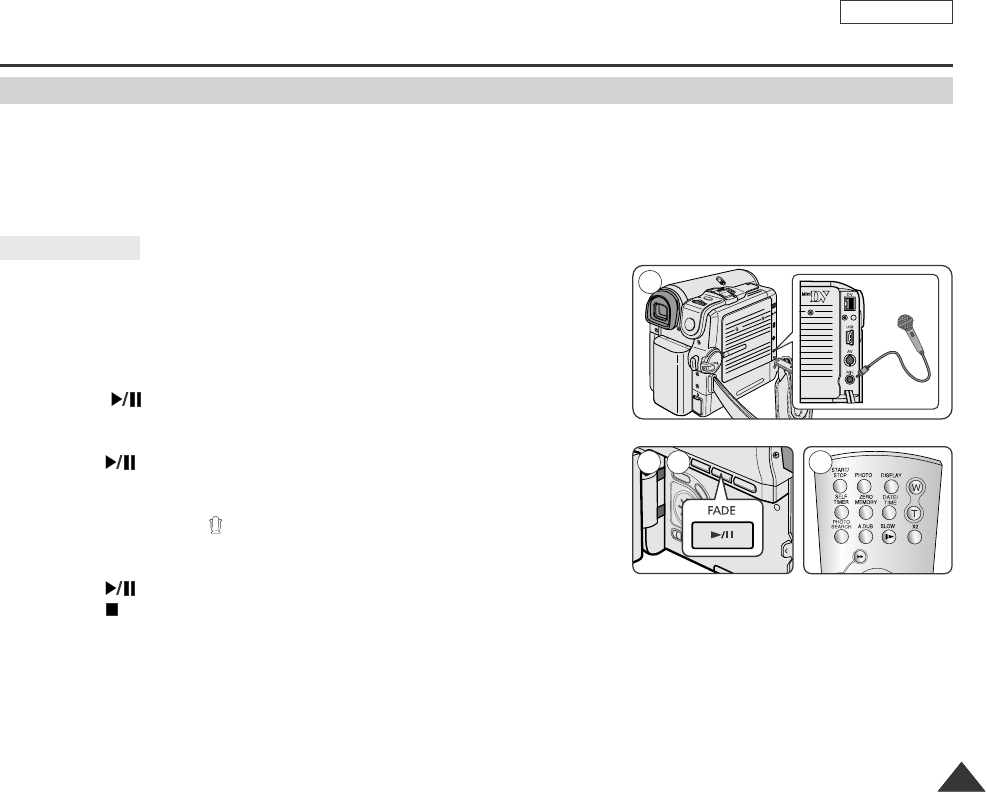
✤The Audio Dubbing function works only in Player Mode.
✤You can not dub sound on a pre-recorded tape in LP mode or 16 bit mode.
✤You can add sound to the original sound on a pre-recorded tape recorded in SP mode with 12bit sound.
✤Use the internal and external microphones or other audio equipment.
✤The original sound will not be erased.
1. Set the Power switch to PLAYER.
■
If you want to use an external microphone, connect the microphone to
the external MIC input jack on the Camcorder.
2. Set the Mode switch to TAPE. (SCD353/D354/D355 only)
3. Press the (PLAY/STILL) button and find the timeframe of the scene to
be dubbed.
4. Press the (PLAY/STILL) button to pause the scene.
5. Press the A.DUB button on the remote control.
■
Audio Dubbing icon ( ) will be displayed on the LCD screen.
■
The Camcorder is in a ready-to-dub state for dubbing.
6. Press the (PLAY/STILL) button to start dubbing.
Press the (STOP) button to stop the dubbing.
[ Notes ]
■
You can not use the Audio Dubbing function while playing a write protected video tape.
■
To utilize an external MIC or sound source, connect a microphone to the MIC jack or use the AV cable for
external sound source input.
■
To dub an external sound source, set the AV In/Out function to AV In (SCD355 only). (see to page 76).
Dubbing Sound
Audio Dubbing (SCD354/D355 only)
DV
USB
AV
MIC
√
1
3 4 5
Dragon_eng_26~85 12/13/04 3:25 PM Page 77
ENGLISH
Playback
7878
1. Set the Power switch to PLAYER.
2. Set the Mode switch to TAPE. (SCD353/D354/D355 only)
3. Insert the dubbed tape and press the MENU button.
4. Move the Menu selector to the left or right to select Tape, then press the Menu selector.
5. Move the Menu selector to the left or right to select Audio Select, then press the Menu
selector.
6. Move the Menu selector to the left or right to select audio playback channel.
■
Sound[1]: play the original sound.
■
Sound[2]: play the dubbed sound.
■
MIX[1+2]: play back sound1 and 2 equality mixed.
7. To exit, press the MENU button.
8. Press the (PLAY/STILL) button to playback the dubbed tape.
[ Note ]
When you playback added sound (Sound 2 or MIX mode), you may experience loss of sound quality.
Dubbed audio Playback
Move Select Exit
MENU
Player Mode
Back
Photo Search
Photo Copy
Audio Select
√Sound[1]
Move Select Exit
MENU
Player Mode
√Tape
Photo Search
Photo Copy
Audio Select
Sound[1]
Sound[2]
MIX[1+2]
20min
0:01:53:10
SP
√
Sound[2]
4
6
7
Dragon_eng_26~85 12/13/04 3:25 PM Page 78

ENGLISH
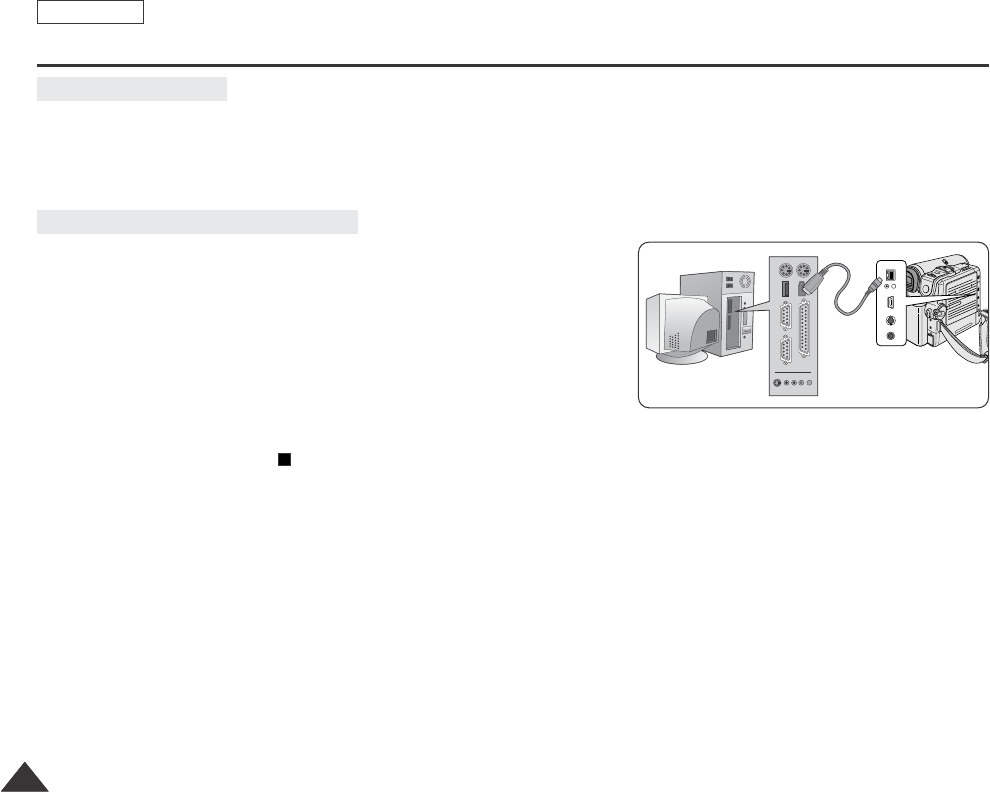
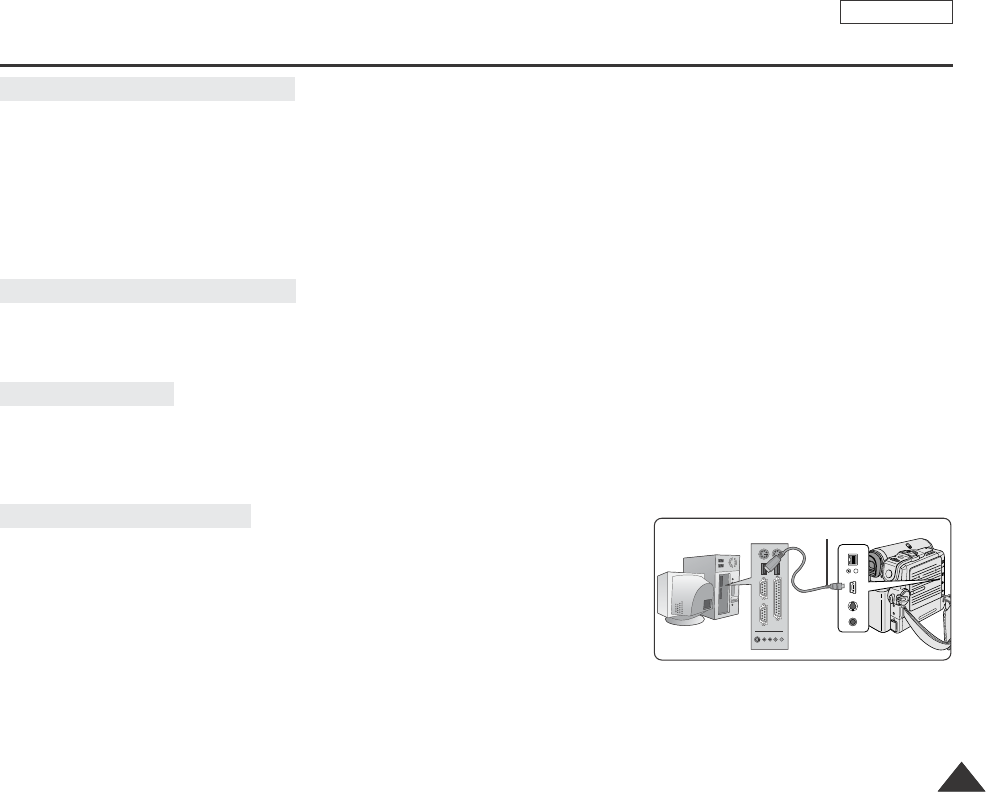
IEEE 1394 Data Transfer
7979
■
Connecting with other DV standard products.
Astandard DV connection is quite simple.
If a product has a DV port, you can transfer data by connecting to the DV port using the correct cable.
!!! Please be careful since there are two types of DV ports, (4pin, 6pin). This Camcorder has a 4pin terminal.
■
With a digital connection, video and audio signals are transmitted in digital format, allowing high quality images
to be transferred.
■
If you want to transmit data to a PC, you must install a IEEE 1394 add-on card onto the PC. (not supplied)
■
The frame rate recorded for video capturing is dependent on the capacity of the PC.
[ Notes ]
■
When you transmit data from the Camcorder to another DV device, some functions may not work.
If this occurs, please reconnect the DV cable or turn the power OFF and ON again.
■
When you transmit data from the Camcorder to PC, PC function button is not available in M.Player mode.
■
Do not use the Camcorder and IEEE1394 together as this will cause IEEE1394 to shut off.
■
Do not connect the Camcorder to a PC using both DV and USB cables. It may not operate properly.
■
Operation is not guaranteed for all computer environments recommended above.
■
The IEEE1394 cable (DV cable)is sold separately.
■
Video Capture software is commercially available.
■
Most DV enabled PCs have a 6 pin socket. In this case, a 6-4 cable is required for the connection.
■
Most DV enabled Notebooks and Laptops have a 4 pin socket. Use a 4-4 cable for the connection.
Connecting to a PC
Connecting to a DV Device
Transferring IEEE1394 (i.LINK)-DV standard data connections
Dragon_eng_26~85 12/13/04 3:25 PM Page 79
ENGLISH
IEEE 1394 Data Transfer
8080
■
CPU: faster Intel®Pentium III™ 450MHz compatible.
■
Operating system: Windows®98SE, ME, XP, Mac OS (9.1~10.2)
■
Main memory: more than 64 MB RAM
■
IEEE1394 add-on card or built in IEEE1394 card
1. Set the Power switch to PLAYER.
2. Set the Mode switch to TAPE. (SCD353/D354/D355 only)
3. Connect the DV cable (not supplied) from the DV jack of the Camcorder
to the DV jack of the other DV device.
Make sure that DV IN appears on the screen.
4. Press the Start/Stop button to begin REC PAUSE mode.
PAUSE is displayed on the OSD.
5. Start playback on the other DV device while you monitor the picture.
6. Press the Start/Stop button to start recording.
If you want to pause recording momentarily, press the Start/Stop button again.
7. To stop recording, press the (STOP) button.
[ Notes ]
■
When using this Camcorder as a recorder, the pictures that appear on a monitor may seem uneven,
however recorded pictures will not be affected.
■
Operations are not guaranteed for all the recommended computer environments mentioned above.
Recording with a DV Connection Cable
System Requirements
DV
USB
AV
MIC
DV
USB
AV
MIC
Dragon_eng_26~85 12/13/04 3:25 PM Page 80
ENGLISH
USB interface (SCD352/D353/D354/D355 only)
8181
✤The camcorder supports both USB 1.1 and 2.0 standards. (Depends on the PC specification)
✤You can easily transfer a image from a Memory card to a PC without additional add-on cards via a USB connection.
✤You can transfer an image to a PC via a USB connection. (SCD353/D354/D355 only)
✤If you transfer data to a PC, you need to install the software (Driver, DVC Media 5.1, Windows Media Player 9.0,
DirectX 9.0a) supplied with the Camcorder.
High speed USB connection is supported by Microsoft (Windows) device drivers only.
■
Windows 98SE/ME - Full Speed USB
■
Windows 2000 - High speed USB on a system with Service Pack 4 or later installed.
■
Windows XP - High speed USB on a system with Service Pack 1 or later installed.
■
It is not available for Macintosh systems.
[ Notes ]
■
On a slower PC than recommended, movie playback may not be smooth or video editing may take a long time.
■
On a slower PC than recommended, movie playback may skip frames or operate unexpectedly.
■
Intel® Pentium III™ is a trademark of the Intel Corporation.
■
Windows® is a registered trademark of the Microsoft® Corporation.
■
All other brands and names are property of their respective owners.
■
Operations are not guaranteed for all of the recommended computer environments mentioned above.
■
Do not connect the Camcorder to a PC using both DV and USB cables. It may not operate properly.
■
In CAMERA mode, be sure that the Memory card is inserted into camera before connecting USB cable. No Memory card or an unformatted Memory
card is inserted, PC will not recognize your camera as a removable disk. (SCD353/D354/D355 only)
■
USB Streaming transfers video in MPEG4 format and it requires DVC Media 5.1, DirectX 9.0a,Windows Media Player 9.0.
■
If you disconnect the USB cable from the PC or the Camcorder during the data transfer, the data transfer will stop and the data may be damaged.
■
If you connect the USB cable to a PC using a USB HUB or with other devices at the same time, it might cause conflict and may not work properly.
If this occurs, remove all other USB devices and try the connection again.
USB Connection speed depending on the System
System Requirements
Transferring a Digital Image through a USB Connection
CPU Intel
®
Pentium III™, 600MHz Intel
®
Pentium IV™ , 2GHz
OS Windows®98SE/ME Windows®2000/XP
Memory 128MB 512MB
HDD capacity 1GB or more 2GB or more
Resolution 1024 x 768 dots 1024 x 768 dots
24bit Color 24bit Color
USB USB1.1 USB2.0 High Speed
Windows System
Minimum Recommended
Dragon_eng_26~85 12/13/04 3:25 PM Page 81
ENGLISH
8282
✤To ensure proper communication between the camcorder and a PC, please set the USB Version before connecting the
camcorder to a PC.
✤USB Version is accessible in every mode.
1. Set the Power switch to CAMERA or PLAYER.
2. Set the Mode switch to TAPE or MEMORY CARD.
3. Press the MENU button.
■
The menu list will appear.
4. Move the Menu selector to the left or right to select System, then press the Menu selector.
5. Move the Menu selector to the left or right to select USB Version, then press the Menu selector.
■
Set the USB Version to USB 2.0 when it is supported by both PC and its OS.
■
If either the PC or OS does not support USB 2.0, set the USB Version to USB 1.1.
6. To exit, press the MENU button.
[ Note ]
When USB Version is not set properly, USB connection may fail to establish.
Setting the USB Communication Speed
M.Player Mode
√System
Clock Set
Remote
Beep Sound
USB Version
USB Connect
Language
√On
√On
√USB 1.1
√Computer
√English
Move Select Exit
MENU
Move Select Exit
MENU
2
USB 1.1
USB 2.0
M.Player Mode
Back
Clock Set
Remote
Beep Sound
USB Version
USB Connect
Language
Dragon_eng_26~85 12/13/04 3:25 PM Page 82
ENGLISH
8383
USB interface (SCD352/D353/D354/D355 only)
✤To play back MPEG moving picture recorded by the camcorder or streaming data transferred through the USB connection on
a PC, the DVC Media Pro program should be installed.
✤DVC Media Pro User's Manual is included on the accompanying CD(D:\help\) in adobe's Portable Document
Format(PDF) The user's manual can be viewed using Acrobat Reader software, which is also included on the CD.
(The Acrobat Reader is a freeware product of AdobeSystems,Inc.)
✤Do not connect the Camcorder to PC before installing the program.
✤If another camera or scanner is connected, please disconnect it in advance.
✤This explanation is based on Windows®98SE OS.
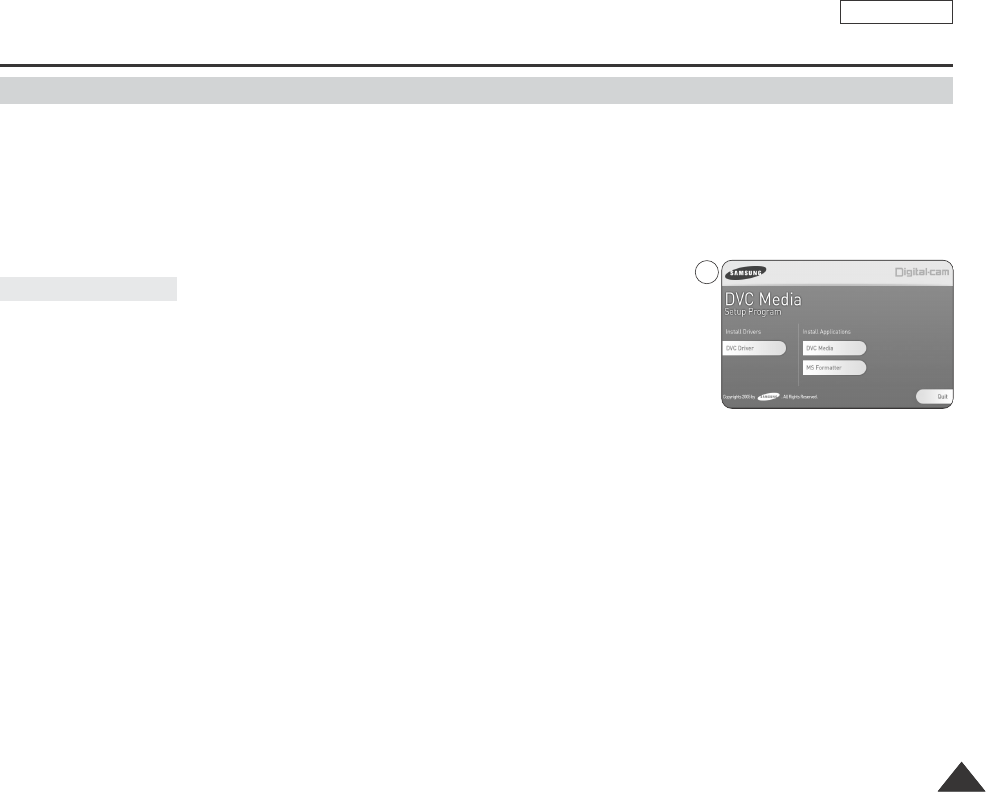
1. Insert the software CD into CD-ROM drive.
Installation selection screen appears on the monitor.
2. If the installation selection screen does not appear after inserting the CD click “Run”
on the Windows “Start” menu and execute SETUP.EXE file to begin installation.
When CD-ROM drive is set to “D:drive”, type “D:/setup.exe” and press Enter.
3. Click the icons listed below to install the selected software.
■
DVC Driver Click
USB removable Disk Driver (Windows®98SE only)
USB PC CAMERA & STREAMING Driver (VIDEO CODEC installed)
■
DirectX 9.0a Click
■
DVC Media Click
AVideo Codec for playing back MPEG moving picture recorded by the camcorder or streaming data transferred through
the USB connection on a PC is installed. (A file recorded by another device cannot be played back.)
■
MS Formatter Click
Adedicated formatter for the Memory Stick only.
Program Installation
Installing DVC Media Pro Program
3
Dragon_eng_26~85 12/13/04 3:25 PM Page 83
ENGLISH
8484
✤To use PC Camera function, the DVC Media Pro, DirectX 9.0a. (included in the CD) programs must be installed in the PC.
✤You can use this Camcorder as a PC CAMERA.
✤When you connect to a Web site that can provide video chatting functions, you can use your Camcorder for such functions.
✤When you use the voice input at video chatting (or net-meeting) function, connect the external microphone to the soundcard
of PC.
✤Using the Camcorder with PC installed Net-meeting program, you can conduct video conference.
✤The PC CAMERA's screen size
■
320X240 (QVGA) pixels for USB 1.1 connection.
■
640X320 (VGA) pixels for USB 2.0 connection. (Transferred video frame rate for the PC camera function is 15 fps.)
✤If PC is connected with the USB to the Camcorder, the buttons which excepts the Power switch, Mode switch, Zoom switch
and NITE PIX switch are not operated. (SCD352/D354/D355 only)
1. Set the Power switch to CAMERA.
2. Set the Mode switch to TAPE. (SCD353/D354/D355 only)
3. Connect one end of the USB cable to the USB jack on the Camcorder and the other end to the
USB connector on your computer.
Using the PC Camera Function
1
2
Dragon_eng_26~85 12/13/04 3:25 PM Page 84
ENGLISH
USB interface (SCD352/D353/D354/D355 only)
8585
✤USB streaming data type is MPEG
✤To use USB streaming, the DVC Media Pro, DirectX 9.0a. (included in the CD) programs must be installed in the PC.
✤You can view Camcorder video on your PC using USB streaming.
✤You can also store it as a moving picture in the "avi" file format, or as a still image in the "jpg" file format on a PC.
1. Set the Mode switch to TAPE(SCD353/D354/D355 only), set the Power switch to CAMERA or PLAYER.
2. Connect one end of the USB cable to the USB jack on the Camcorder and the other end to the USB port on your computer.
3. Execute the DVC Media 5.1 program.
If you want the detailed description of USB streaming, refer to the DVC Media Pro User's Manual.
✤You can easily transfer data from a Memory card to a PC without additional add-on cards via a USB connection.
1. Set the Mode switch to MEMORY CARD(SCD353/D354/D355 only), set the Power switch to CAMERA or PLAYER.
2. Connect one end of the USB cable to the USB jack on the Camcorder and the other end to the USB port on your computer.
1. Connect a USB cable to the USB port on the PC.
2. Connect the other end of the USB cable into the proper terminal on the Camcorder. (USB jack)
If a PC is connected to the Camcorder with a USB cable only, the Power switch, Zoom switch and NITE PIX operate.
(SCD352/D354/D355 only)
✤After completing the data transmission, you must disconnect the cable in the
following way:
1. Select the removable disc icon and click the right mouse button to select [Eject].
2. Select [Confirm] and disconnect the USB cable when the Windows Splash screen
appears.
[ Notes ]
■
If you disconnect the USB cable from the PC or the Camcorder while transferring, the data transmission will stop and the data may
be damaged.
■
If you connect the USB cable to a PC via a USB HUB or simultaneously connect the USB cable along with other USB devices,
the Camcorder may not work properly.
If this occurs, remove all USB devices from the PC and reconnect the Camcorder.
Using the USB Streaming Function
Using the removable Disk Function
Connecting to a PC
Disconnecting the USB Cable
DV
USB
AV
MIC
DV
USB
AV
MIC
USB Cable
Dragon_eng_26~85 12/13/04 3:25 PM Page 85
ENGLISH
8686
Digital Still Camera mode (SDC353/D354/D355 only)
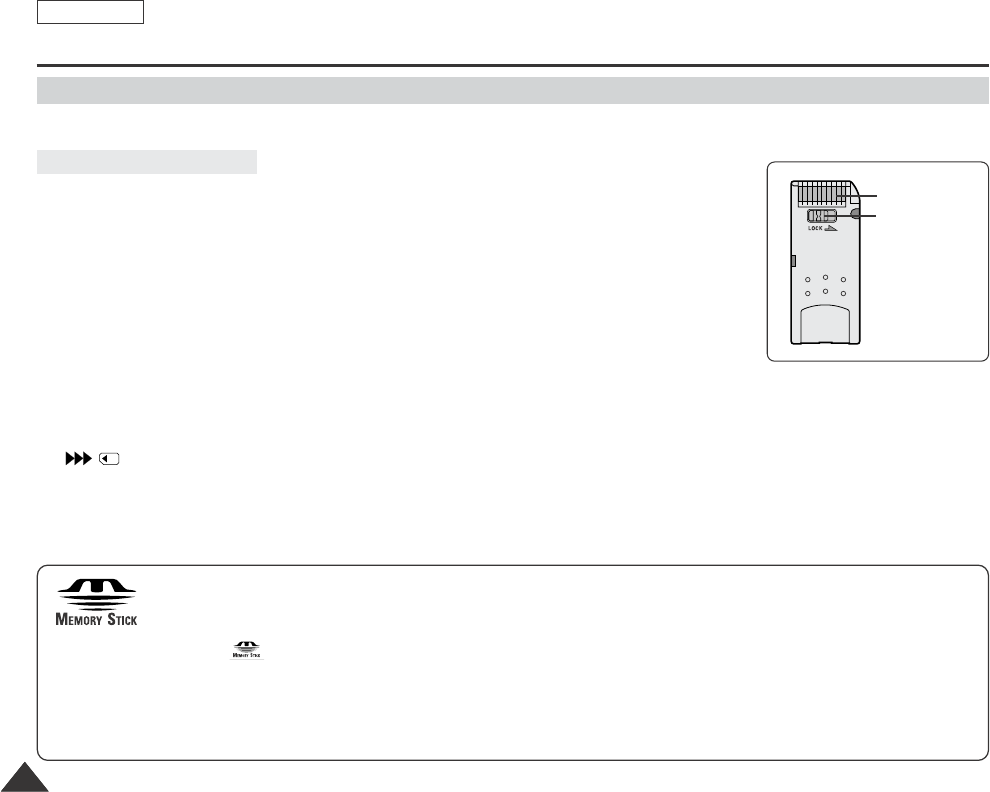
✤The Memory Stick stores and manages images recorded by the camera.
■
Recording still images and MPEG4 movie
■
Viewing still images and MPEG4 movie
-Single
-Slide show (Still images only)
■
Multi display
■
Protecting images against accidental erasure
■
Deleting images recorded on a Memory Stick
■
Print marking still images
■
Formatting a Memory Stick
[ Notes ]
■
You can use most of the camera’s functions when recording to the Memory Stick.
■
appears on the screen while recording to the Memory Stick.
■
While recording or loading an image, do not eject or insert the Memory Stick.
Inserting or ejecting a Memory Stick while recording or loading an image can cause data damage.
■
If you want to save all images on the Memory Stick, set the write protect tab on the Memory Stick to LOCK.
Memory Stick (Optional Accessory)
Memory Stick Functions
TM
TM
Terminal
Protection tab
■
“Memory Stick” and are trademarks of Sony Corporation.
■
All other product names mentioned herein may be the trademarks or registered trademarks of their respective
companies.
Furthermore, “™” and “®” are not mentioned in each case in this manual.
■
“Memory Stick PRO” can be used with the SCD354/D355 model only.
Dragon_eng_86~119 12/13/04 3:24 PM Page 86
ENGLISH
8787
Digital Still Camera mode (SDC353/D354/D355 only)
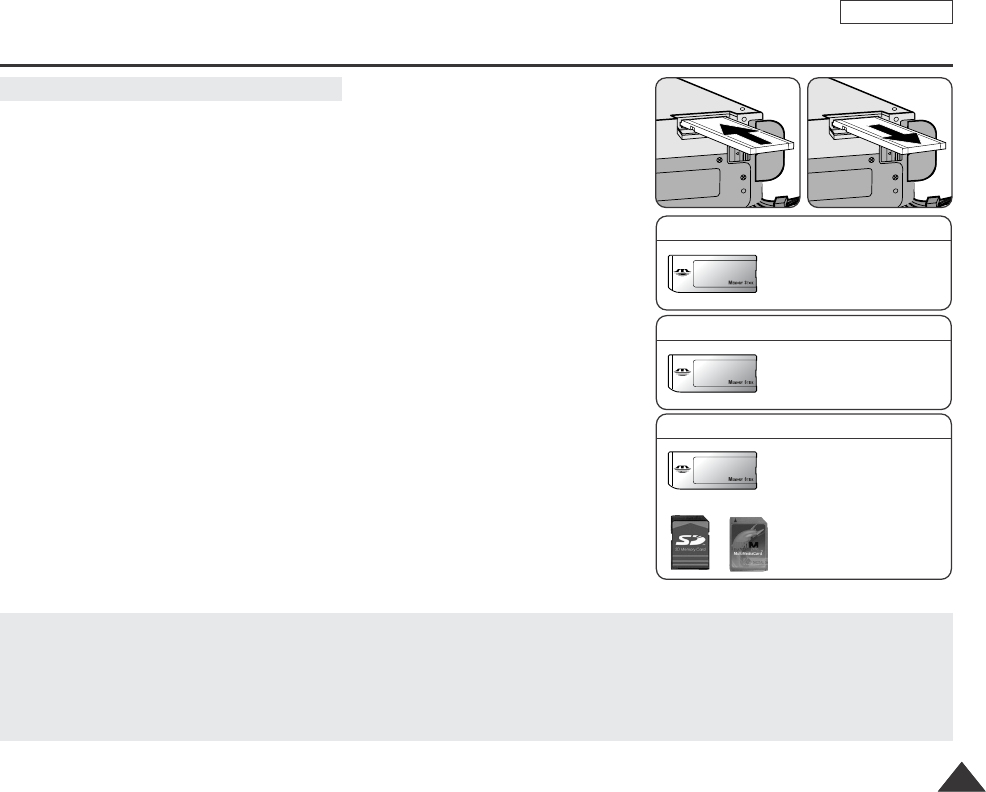
Inserting and Ejecting the Memory Card
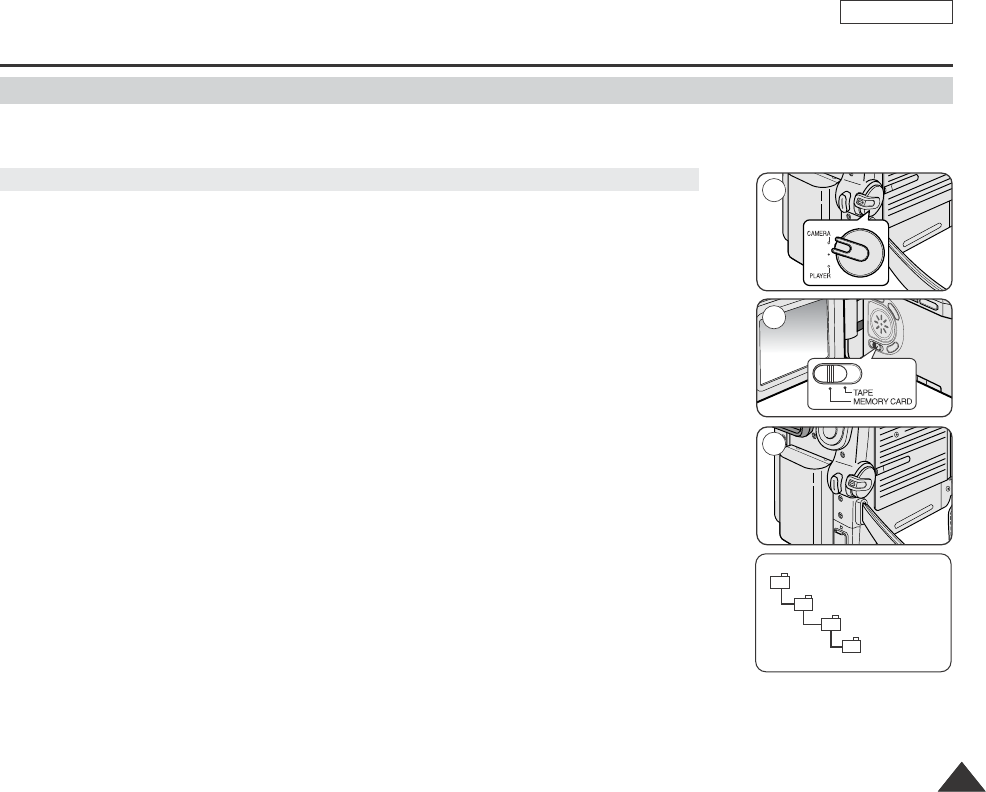
Inserting the Memory card
1. Set the Power switch to Off.
2. Open the Memory card cover.
3. Insert the Memory card in the direction of the arrow into the Memory card slot
located on the bottom of the Camcorder.
Ejecting the Memory card
1. Set the Power switch to Off.
2. Open the Memory card cover.
3. Push the Memory card, then it comes out of the Camcorder automatically.
4. Pull out the Memory card.
Do not attempt to pull the Memory card out without first pushing it in.
[ Notes ]
■
Memory Stick Duo type or RS-MMC (SCD355 only) should be inserted by using
the Adaptor (not supplied).
■
If you set the Camcorder to M.Play mode, the last recorded still image appears.
If there are no recorded images on the Memory card, No image! will display on the
screen.
■
While recording, loading, erasing or formatting, do not turn off the power or change the
mode.
■
Please turn the power off before you insert or eject the Memory card.
You could lose data on the Memory card.
■
Do not allow metal substances to come in contact with the terminals of the Memory card.
■
Do not bend, drop or apply strong shock to Memory card.
■
After pulling the Memory card out from the Camcorder, please keep the Memory card in a soft case to prevent static shock.
■
The stored contents may be changed or lost as a result of misuse, static electricity, electric noise or repair.
Save important images separately.
■
Samsung is not responsible for data loss due to misuse.
(Usable Memory card)
SCD353 only
Memory Stick
SCD355 only
Memory Stick
Memory Stick PRO
SD/MMC
SCD354 only
Memory Stick
Memory Stick PRO
Dragon_eng_86~119 12/13/04 3:24 PM Page 87
ENGLISH
8888
Digital Still Camera mode (SDC353/D354/D355 only)
✤The still images that you recorded are saved in JPEG file format on the Memory card.
✤The moving images that you recorded are saved in MPEG4 file format on the Memory card.
✤Each file has a file number and all files are assigned to a folder.
-Afile number from DCAM0001 to DCAM9999 is sequentially assigned to
each recorded image.
-Each folder is numbered from 100SSDVC to 999SSDVC and recorded on the
Memory card.
Still Image
■
Images are compressed in JPEG (Joint Photographic Experts Group) format.
■
The number of pixels are 800x600 (Tape Capture 640x480) in each mode.
Moving Image
■
Images are compressed in MPEG (Moving Picture Experts Group) format.
■
The number of pixels are 720x480 in each mode.
✤You can use this Camcorder as a Digital Still Camera (DSC).
✤You have to set the Mode switch to Memory card to use this Camcorder as Digital Still
Camera.
M.Cam mode (Memory record mode)
1. Set the Mode switch to MEMORY CARD.
2. Set the Power switch to CAMERA.
M.Player mode (Memory playback mode)
1. Set the Mode switch to MEMORY CARD.
2. Set the Power switch to PLAYER.
Image Format
Structure of Folders and Files on the Memory Card
Selecting the CAMCORDER mode
DCIM
100 SSDVC
DCAM 0001
DCAM 0002
101SSDVC
.
.
.
.
M SAMSUNG
SSMOV
100SSMOV
File number
Folder number
000-0000
<Still image>
<Moving image>
Dragon_eng_86~119 12/13/04 3:24 PM Page 88
ENGLISH
8989
✤Built-in memory setting is available at Player/M.Cam/M.Player modes. (SCD354: 32M/SCD355: 64M)
✤Images can be stored and played back using the built-in memory.
Hence, set the memory type before storing and playing back images.
1. Set the power switch to CAMERA or PLAYER.
2. Set the Mode switch to TAPE or MEMORY CARD.(SCD353/D354/355 only)
3. Press the MENU button.
■
The menu list will appear.
4. Move the Menu selector to the left or right to select Memory, then press the Menu selector.
5. Move the Menu selector to the left or right to select Memory Type, then press the
Menu selector.
6. Move the Menu selector to the left or right to select Int. Memory or Memory card,
then press the Menu selector.
7. To exit, press the MENU button.
1. Press the Menu selector.
2. Move the Menu selector to left or right to select Memory Type, then press the Menu selector.
3. Move the Menu selector to the left or right to select Int. Memory or Memory card,
then press the Menu selector.
4. To exit, press the MENU button.
Digital Still Camera mode (SDC353/D354/D355 only)
Selecting the Built-in Memory (SCD354/D355 only)
Move Select Exit
MENU
M.Cam Mode
Back
Memory Type
Photo Quality
File No.
Using Quick Menu: Memory Type
√Int. Memory
√Fine
√Series
Move Select Exit
MENU
M.Cam Mode
√Memory
Memory Type
Photo Quality
File No.
Int. Memory
Memory card
Omin
00002/00046
720
Exit
MENU
Memory Type
White Balance
Photo Quality
Exposure
Manual Focus
Int. Memory
On
…
†
4
6
Dragon_eng_86~119 12/13/04 3:24 PM Page 89

ENGLISH
9090
Digital Still Camera mode (SDC353/D354/D355 only)
✤You can select the quality of a still images to be recorded.
1. Set the Power switch to CAMERA.
2. Set the Mode switch to MEMORY CARD.
3. Press the MENU button.
■
The menu list will appear.
4. Move the Menu selector to the left or right to select Memory, then press the Menu selector.
5. Move the Menu selector to the left or right to select Photo Quality, then press the Menu
selector.
6. Move the Menu selector to the left or right to select desired image quality(Super Fine, File,
Normal), then press the Menu selector.
7. To exit, press the MENU button.
The actual number that you can record varies depending on the image size.
[ Notes ]
■
The above approximation is based on a 16MB memory stick under normal recording conditions.
■
The number of pictures that can be stored on a memory card depends on various conditions.
Select the image quality
Number of Images on the Memory Card
QUALITY 8MB 16MB
Super Fine Approx. 50 Approx. 100
Fine Approx. 62 Approx. 125
Normal Approx. 82 Approx. 167
Selecting the image quality
Move Select Exit
MENU
M.Cam Mode
Back
Photo Quality
File No.
√Fine
√Series
Move Select Exit
MENU
M.Cam Mode
√Memory
Photo Quality
File No.
Super Fine
Fine
Normal
2
4
5
Dragon_eng_86~119 12/13/04 3:24 PM Page 90
ENGLISH
9191
Digital Still Camera mode (SDC353/D354/D355 only)
✤Quick menu is used to access Camcorder functions by simply using the Menu selector.
✤Quick menu provides easier access to the frequently used menus without using the MENU button.
1. Press the Menu selector.
2. Move the Menu selector to left or right to select Photo Quality, then press the Menu selector.
3. Move the Menu selector to the left or right to select desired image quality(Super Fine, File,
Normal), then press the Menu selector.
4. To exit, press the MENU button.
Using Quick Menu: Photo Quality
Omin
00002/00046
720
Exit
MENU
White Balance
Photo Quality
Exposure
Manual Focus
Omin
00002/00046
720
Exit
MENU
White Balance
Photo Quality
Exposure
Manual Focus
Super Fine
…
†
1
3
Dragon_eng_86~119 12/13/04 3:24 PM Page 91
ENGLISH
9292
Digital Still Camera mode (SDC353/D354/D355 only)
✤File numbers will be given to images in order of recording when still images are stored on the Memory card.
✤Memory file numbers may be set as follows:
■
Series: When there are existing files, the new image will be named as the next number in the sequence.
■
Reset
-When there are no files stored on the Memory card: The file numbering starts from 0001
-When there are files stored on the Memory card: File numbering will continue after the last file's number
1. Set the Power switch to the CAMERA.
2. Set the Mode switch to MEMORY CARD.
3. Press the MENU button.
■
The menu list will appear.
4. Move the Menu selector to the left or right to select Memory, then press the Menu selector.
5. Move the Menu selector to the left or right to select File No., then press the Menu selector.
6. Move the Menu selector to the left or right to select desired option(Series or Reset),
then press the Menu selector.
7. To exit, press the MENU button.
[ Notes ]
■
When using a Memory card that contains image files from another device, numbering the file will
begin after the largest number that is memorized whether in the camera or the Memory card.
■
Numbering the file starts from 0001 again when 9999 files have been saved.
Memory File Number
Move Select Exit
MENU
M.Cam Mode
Back
Photo Quality
File No.
√Fine
√Series
Move Select Exit
MENU
M.Cam Mode
√Memory
Photo Quality
File No.
Series
Reset
4
6
Dragon_eng_86~119 12/13/04 3:24 PM Page 92
ENGLISH
9393
Digital Still Camera mode (SDC353/D354/D355 only)
✤You may take still images while in M.Cam mode and store the images on the Memory card.
This function is useful when you want to take a snapshot of a subject while you are using the Camcorder.
✤You can take photos using the remote control.
✤Audio Cam not be recorded with a Still image on to the Memory Card.
1. Set the Power switch to CAMERA.
2. Set the Mode switch to MEMORY CARD.
3. After framing your object to record, fully press the PHOTO button to take the picture.
■
The picture is taken and saved into the Memory card within few seconds.
■
Taking another picture within this interval is not possible.
■
The indicator appears LCD screen during the time it takes to save the image.
[ Notes ]
■
Still images are saved in the Memory card in an 800x600 format.
■
The number of still images can be stored depends on the quality of the image.
Taking Photos
Omin
00002/00046
720
1
3
Dragon_eng_86~119 12/13/04 3:24 PM Page 93
ENGLISH
9494
Digital Still Camera mode (SCD353/D354/D355 only)
✤You can playback and view still images recorded on the Memory card.
✤There are 3 ways to view recorded images.
-Single: To view an image frame by frame.
-Slide show: To view all images automatically and in consecutive order.
-Multi display: To view 6 images at once.
1. Set the Mode switch to MEMORY CARD.
2. Set the Power switch to PLAYER.
■
The last recorded image appears.
■
If there are no recorded images on the Memory card, No image! will display on the
screen.
3. Using the / (REV/FWD) buttons, search for the desired still image.
■
To view the next image: press the (FWD) button.
■
To view the previous image: press the (REV) button.
■
Pressing (FWD) when you are on the last image will take you to the first
image and pressing (REV) when you are on the first image will take you to the last image.
■
Keep pressing (FWD) or (REV) to search for an image quickly.
1. Set the Mode switch to MEMORY CARD.
2. Set the Power switch to PLAYER.
■
The last recorded image appears.
3. Press the (S.SHOW) button.
■
All images will be played back consecutively for 3~4 seconds each.
■
The “Slide” will be display on the LCD screen.
4. To stop the slide show, press the (S.SHOW) button again.
[ Notes ]
■
Loading time may vary depending on the image size.
■
The Slide Show will start from the current picture.
■
Any large sized image taken with another device will be displayed as a thumbnail image.
To view a Slide Show
To view a Single image
Viewing Still images
REV FWD S.SHOW MULTI DISP.
00002/00046slide
800x600
100-0001
3
Dragon_eng_86~119 12/13/04 3:24 PM Page 94
ENGLISH
9595
Digital Still Camera mode (SCD353/D354/D355 only)
To view the Multi Display
1. Set the Mode switch to MEMORY CARD.
2. Set the Power switch to PLAYER
■
The last recorded image appears.
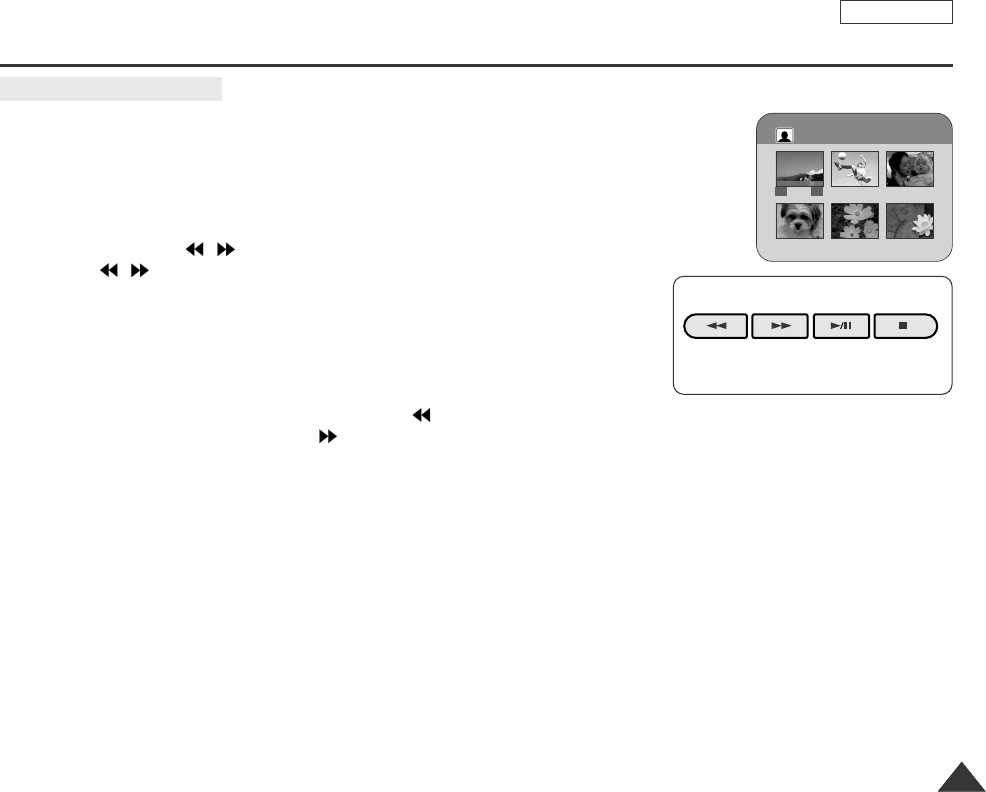
3. To view six stored images on single screen, press the MULTI DISP. button.
■
Aselection mark ( ) appears under the image.
■
Press /(REV/FWD) button to select a image.
4. To return to single playback mode, press the MULTI DISP. button again.
■
Selected picture is displayed in full screen mode.
[ Notes ]
■
To display the previous six images, press and hold the (REV) button for about 3 seconds.
■
To display the next six images, press the (FWD) button for about 3 seconds.
REV FWD S.SHOW MULTI DISP.
√√
œ
√
00007/00025
œœ
100-0006
Dragon_eng_86~119 12/13/04 3:24 PM Page 95
ENGLISH
9696
Digital Still Camera mode (SCD353/D354/D355 only)
✤You can protect important images from accidental erasure.
If you execute format, all images including protected images will be erased.
1. Set the Mode switch to MEMORY CARD.
2. Set the Power switch to PLAYER.
■
The last recorded image appears.
■
If there are no recorded images on the Memory card, No image! will display on the screen.
3. Using the / (REV/FWD) buttons, search for the still image that you want to protect.
4. Press the MENU button.
■
The menu list will appear.
5. Move the Menu selector to the left or right to select Memory, then press the Menu selector.
6. Move the Menu selector to the left or right to select Protect, then press the Menu selector.
7. Move the Menu selector to the left or right to select On, then press the Menu selector.
The protection () appears.
8. To exit, press the MENU button.
[ Notes ]
■
Protected pictures will show the ( ) mark when they are displayed.
■
If the write protection tab on the Memory card is set to LOCK, you cannot set image protection.
Protection from accidental Erasure
Move Select Exit
MENU
M.Player Mode
Back
M.Player Select
Delete
Delete All
Protect
Print Mark
Format
√Photo
√Off
Move Select Exit
MENU
M.Player Mode
√Memory
M.Player Select
Delete
Delete All
Protect
Print Mark
Format
Off
On
00002/00046
800x600
12:00 AM JAN.01,2005 100-0001
5
7
8
Dragon_eng_86~119 12/13/04 3:24 PM Page 96
ENGLISH
9797
Digital Still Camera mode (SCD353/D354/D355 only)
✤Quick menu is used to access Camcorder functions by simply using the Menu selector.
✤Quick menu provides easier access to the frequently used menus without using the MENU button.
1. Press the Menu selector.
2. Move the Menu selector to left or right to select Protect, then press the Menu selector.
3. Move the Menu selector to the left or right to select Off or On, then press the Menu selector.
4. To exit, press the MENU button.
Using Quick Menu: Protect
800x600
00002/00046
Exit
MENU
M.Play Select
Delete
Protect
Print Mark
800x600
00002/00046
Exit
MENU
…
†
M.Play Select
Delete
Protect
Print Mark
On
00002/00046
800x600
12:00 AM JAN.01,2005 100-0002
100-0002
100-0002
1
3
Dragon_eng_86~119 12/13/04 3:24 PM Page 97
ENGLISH
9898
Digital Still Camera mode (SCD353/D354/D355 only)
✤You can erase the still images and Moving Images recorded on the Memory card.
✤If you want to delete protected images, you must first deactivate the image protection.
✤An image which has been deleted cannot be recovered.
1. Set the Power switch to PLAYER.
2. Set the Mode switch to MEMORY CARD.
3. Using the / (REV/FWD) buttons, search for the still image that you want to delete.
4. Press the MENU button.
■
The menu list will appear.
5. Move the Menu selector to the left or right to select Memory, then press the Menu selector.
6. Move the Menu selector to the left or right to select Delete, then press the Menu selector.
■
Amessage Do you want to delete? appears.
■
If you want to delete all files, move the Menu selector to the left or right to select Delete All,
then press the Menu selector. A message Do you want to delete all? appears.
7. Move the Menu selector to the left or right to select Yes or No, then press the
Menu selector.
8. To exit, press the MENU button.
Deleting Still Images and Moving Images
Move Select Exit
MENU
M.Player Mode
Back
M.Player Select
Delete
Delete All
Protect
Print Mark
Format
Previous Next
800x600
Do you want to delete?
0001/00110
100-0001
Yes No
√Photo
√Off
Move Select Exit
MENU
M.Player Mode
√Memory
M.Player Select
Delete
Delete All
Protect
Print Mark
Format
†
†
3
6
7
Dragon_eng_86~119 12/13/04 3:24 PM Page 98
ENGLISH
9999
✤Quick menu is used to access Camcorder functions by simply using the Menu selector.
✤Quick menu provides easier access to the frequently used menus without using the MENU button.
1. Press the Menu selector.
2. Move the Menu selector to left or right to select Delete, then press the Menu selector.
3. Move the Menu selector to the left or right to select Cancel or Delete, then press the
Menu selector.
4. To exit, press the MENU button.
[ Notes ]
■
When there is no stored picture on the Memory card, the message No image! will be displayed.
■
If an erroneous Memory card format is found on the Memory card, the message Card error! will be
displayed.
■
If an erroneous image file is found on the Memory card, the message File Error will be displayed.
It may be caused by copying images from different digital devices.
■
Formatting the Memory card will delete all the stored images. (See page 100.)
■
To protect important picture from accidental deletion, activate the image protection (refer to page 96).
Digital Still Camera mode (SCD353/D354/D355 only)
Using Quick Menu: Delete
800x600
00002/00046
Exit
MENU
100-0001
100-0001
M.Play Select
Delete
Protect
Print Mark
800x600
00002/00046
Exit
MENU
…
†
M.Play Select
Delete
Protect
Print Mark
Delete
1
3
Dragon_eng_86~119 12/13/04 3:24 PM Page 99

ENGLISH
100100
✤You can use the memory format functions to completely delete all images and options on the Memory card,
including protected images.
✤The format function restores the Memory card to its initial state.
✤The Memory card supplied with this Camcorder has been formatted already.
✤If you execute the memory format function, all images will be erased completely and erased
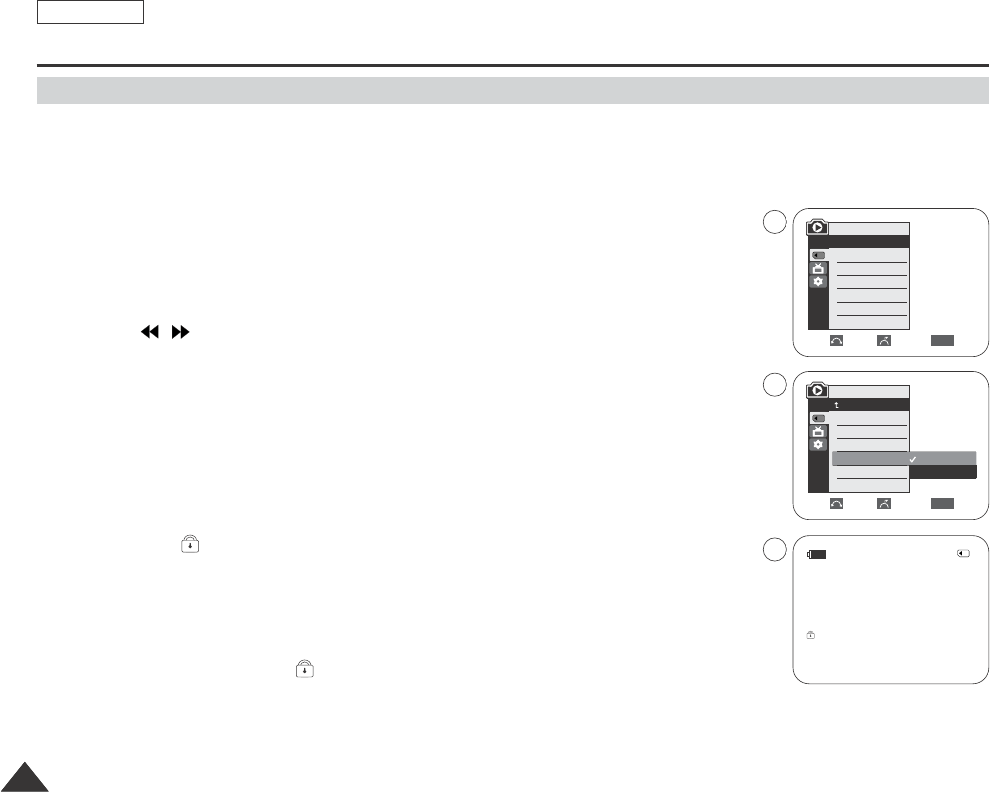
images cannot be recovered.
1. Set the Power switch to PLAYER.
2. Set the Mode switch to MEMORY CARD.
3. Press the MENU button.
■
The menu list will appear.
4. Move the Menu selector to the left or right to select Memory, then press the Menu selector.
5. Move the Menu selector to the left or right to select Format, then press the Menu selector.
6. Move the Menu selector to the left or right to select desired option(Int. Memory or Memory
card), then press the Menu selector. (SCD354/D355 only)
■
If you want to select Int. Memory card or Memory, a message All files are deleted! Do you
want to format? appears.
7. Move the Menu selector to the left or right to select Yes or No, then press the Menu selector.
■
Complete! appears when the format is completed.
8. To exit, press the MENU button.
[ Notes ]
■
If you want to format the Memory Stick on your PC, use only the “MS formatter” supplied with the
software CD.
■
The MS formatter is exclusive program of the Memory Stick.
■
If you execute the Format function,all still images/motion clips will be erased completely and
erased still images/motion clips cannot be recovered.
■
Formatting the Memory card using a different device will cause Memory card read errors.
■
Formatting the Memory card deletes all the stored data in the Memory card.
■
Do not turn the power off in the middle of the formatting.
■
AMemory Stick with the protection tab set to save, will not be formatted. (see page 86)
Digital Still Camera mode (SCD353/D354/D355 only)
Attention
Formatting the Memory card
Move Select Exit
MENU
√Photo
√Off
Move Select Exit
MENU
M.Player Mode
√Memory
M.Player Select
Delete
Delete All
Protect
Print Mark
Format
800x600
All files are delete!
Do you want to format?
0001/00110
100-0001
Yes No
4
6
7
M.Player Mode
√Memory
M.Player Select
Delete
Delete All
Protect
Print Mark
Format
Dragon_eng_86~119 12/13/04 3:24 PM Page 100
ENGLISH
101101
Digital Still Camera mode (SCD353/D354/D355 only)
✤You can record moving picture images with audio on the Memory card.
✤The screen format of the moving picture to be recorded is 720x480.
1. Check whether Memory card is inserted into the Camcorder.
If it is not in the Camcorder, insert it into the slot.
2. Set the Power switch to CAMERA.
3. Set the Mode switch to MEMORY CARD.
4. Press the Start/Stop button, the images are recorded on the Memory card in MPEG4.
You can record a camera still image on Memory card by pressing the PHOTO button
instead of the Start/Stop button.
5. Press the Start/Stop button to stop the recording.
[ Notes ]
■
MENU button and Menu selector are not available while MPEG recording.
To use MENU button and Menu selector, stop recording.
MPEG recording is not available when a menu or navigation menu is displayed on the screen.
To start recording, stop displaying OSD by pressing the MENU button.
■
Before using the MPEG REC function, check whether the Memory card is inserted into the Camcorder.
■
Moving images that you recorded are saved in *.avi(avi 1.0) file format on the Memory card.
■
The file that you recorded are saved in a following folder.
■
The moving picture images on a Memory card are smaller size and lower definition
than one on tape.
■
The sound is recorded in type of stereo.
■
The following functions are not allowed in M.Cam Mode.
DIS (Digital Image Stabilizer), Digital Zoom, Fade, Program AE, Digital Effect, Slow Shutter.
■
While you record in Memory card, don’t insert or eject the tape as it may record noise.
■
While you record in Memory card, don’t eject Memorye card or it might break the data on the Memory card or Memory card itself.
Saving the Pictures captured by a Camera as a Moving Picture File on Memory Card
MPEG Recording
M SAMSUNG
SSMOV
100SSMOV
√
<Moving image>
2
4
3
Dragon_eng_86~119 12/13/04 3:24 PM Page 101
ENGLISH
102102
Digital Still Camera mode (SCD353/D354/D355 only)
✤The MPEG Playback function works only in M. Player mode.
✤You can play the moving picture images on the Memory card.
Stereo audio is played back at the same time.
1. Set the Power switch to PLAYER.
2. Set the Mode switch to MEMORY CARD.
3. Press the MENU button.
■
The menu list will appear.
4. Move the Menu selector to the left or right to select Memory, then press the Menu selector.
5. Move the Menu selector to the left or right to select M.Play Select, then press the Menu
selector.
6. Move the Menu selector to the left or right to select Movie, then press the Menu selector.
7. To exit the menu, push the MENU button.
8. Using the / (REV/FWD) buttons, search for the moving picture that you want to playback.
9. Press the (PLAY/STILL) button.
■
The moving pictures recorded on the Memory card are playing back.
■
You can control playback using the (PLAY/STILL) / (REV/FWD)/ (STOP) buttons.
[ Notes ]
■
MENU button and Menu selector are not available while MPEG playback.
To use MENU button and Menu selector, stop playback.
MPEG playback is not available when a menu or navigation menu is displayed on the screen.
To start playback, stop displaying OSD by pressing the MENU button.
■
There could be any broken or mosaic pictures while playing the MPEG4 moving picture images,
but it is not malfunction.
■
The moving picture images that you recorded on the Memory card might not be allowed to play by the
Camcorder of another brands.
■
The MPEG4 file recorded by another Camcorder might not be allowed to play by this Camcorder.
-You need Microsoft Windows Media Player Version 9 or higher version in order to play MPEG4 file on the Memory card on your
PC. (Microsoft Windows Media Player Version 9 (Eng) is included in the CD that is supplied.)
-You can download the Microsoft Windows Media Player applied each languages on Microsoft Website,
“http://www.microsoft.com/windows/windowsmedia/download/ default.asp”.
■
To playback MPEG4 moving picture on a PC, the DVC Media Pro (in the CD provided with the camcorder) should be installed.
■
DVC Media Pro contains the dedicated video Codec for playing back the moving picture recorded by this camcorder.
■
Moving picture of MPEG4 format recorded by other device may not playback with this Camcrder
MPEG Playback
Move Select Exit
MENU
M.Player Mode
Back
M.Player Select
Delete
Delete All
Protect
Print Mark
Format
√Photo
√Off
Move Select Exit
MENU
M.Player Mode
√Memory
M.Player Select
Delete
Delete All
Protect
Print Mark
Format
†
Photo
Movie
2
4
6
Dragon_eng_86~119 12/13/04 3:24 PM Page 102
ENGLISH
103103
✤Quick menu is used to access Camcorder functions by simply using the Menu selector.
✤Quick menu provides easier access to the frequently used menus without using the MENU button.
1. Press the Menu selector.
2. Move the Menu selector to the left or right to select M.Play Select, then press the Menu
selector.
3. Move the Menu selector to the left or right to select Photo or Movie, then press the Menu
selector.
4. To exit, press the MENU button.
Digital Still Camera mode (SCD353/D354/D355 only)
Using Quick Menu: M.Play Select
800x600
00002/00046
Exit
MENU
100-0001
100-0001
M.Play Select
Delete
Protect
Print Mark
800x600
00002/00046
Exit
MENU
…
†
M.Play Select
Delete
Protect
Print Mark
Movie
1
3
Dragon_eng_86~119 12/13/04 3:24 PM Page 103
ENGLISH
Digital Still Camera mode (SCD353/D354/D355 only)
104104
Digital Still Camera mode
Recording an Image from a Cassette as a Still Image
✤You can record still image from a cassette on a Memory card.
✤If you want to move recorded multiple still images from a cassette to a Memory card, use the
COPY function.
1. Set the Power switch to PLAYER.
2. Set the Mode switch to TAPE.
3. Playback the cassette.
4. Press the PHOTO button.
■
The still image is recorded on the Memory card.
■
The indicator appears LCD screen during the time it takes to save the image.
[ Notes ]
■
Still images copied from the cassette to the memory card are saved in a 640x480 format.
■
Number of images you can save varies depending on the image resolution.
48min
0:46:00:11
SP
2
1
4
Dragon_eng_86~119 12/13/04 3:24 PM Page 104
105105
ENGLISH
Digital Still Camera mode (SCD353/D354/D355 only)
✤You can copy still images recorded with photo function on a cassette into a Memory card.
✤Rewind the tape to the point which you wants.
1. Set the Power switch to PLAYER.
2. Set the Mode switch to TAPE.
3. Press the MENU button.
■
The menu list will appear.
4. Move the Menu selector to the left or right to select Tape, then press the Menu selector.
5. Move the Menu selector to the left or right to select Photo Copy, then press the left or right.
All still images that recorded on a cassette will be copied into a Memory card.
6. The Camcorder automatically performs the photo search to find still images and copy starts.
7. Press the (STOP) button to stop copying.
Copy stops when the cassette is finished or Memory card is full.
[ Note ]
Still images copied from the cassette to the memory card are saved in a 640x480 format.
Copying Still Images from a Cassette to Memory card
Move Select Exit
MENU
Player Mode
Back
Photo Search
Photo Copy
Audio Select
Back Exit
MENU
SP
25min
Photo searching...
0:44:38:03
SP
25min
0:44:38:03
√Sound[1]
Move Select Exit
MENU
Player Mode
√Tape
Photo Search
Photo Copy
Audio Select
Now copying...
4
5
6
Dragon_eng_86~119 12/13/04 3:24 PM Page 105
ENGLISH
106106
✤The Copy to function works only in M.Player mode.
✤You can copy selected or all images stored in the Memory card to the built-in memory.
1. Set the Power switch to PLAYER.
2. Set the Mode switch to MEMORY CARD.
3. Press the MEMU button.
■
The menu list will appear.
4. Move the Menu selector to the left or right to select Memory, then press the Menu selector.
5. Move the Menu selector to the left or right to select Copy to, then press the Menu selector.
6. Move the Menu selector to the left or right to select options(Back,This File or All Files),
then press Menu selector.
To go back to the previous mode, select Back.
If This File or All Files was selected, Now copying… is displayed on the screen and copying
starts.
7. To exit, press the MENU button.
Digital Still Camera mode (SCD353/D354/D355 only)
Copy to (Copies files from the Memory Card to the built-in Memory) (SCD354/D355 only)
√Int. Memory
√Photo
√Off
Move Select Exit
MENU
M.Player Mode
√Memory
Memory Type
M.Player Select
Delete
Delete All
Protect
Print Mark
†
Move Select Exit
MENU
M.Player Mode
Back
Copy to
Format
†
Back
This File
All Files
1
4
6
Dragon_eng_86~119 12/13/04 3:24 PM Page 106

107107
ENGLISH
Digital Still Camera mode (SCD353/D354/D355 only)
✤USB Select function works only in M.Player mode.
✤Using the USB cable, you can connect your Camcorder to a computer to copy your movies and images from the Memory
card (or built-in memory;SCD354/D355), or to a printer to print your images.
1. Set the Power switch to PLAYER.
2. Set the Mode switch to MEMORY CARD.
3. Press the MENU button.
■
The menu list will appear.
4. Move the Menu selector to the left or right to select System, then press the Menu selector.
5. Move the Menu selector to the left or right to select USB Version, then press the Menu selector.
6. Move the Menu selector to the left or right to select Computer or Printer, then press the
Menu selector.
7. To exit, press the MENU button.
USB Select
Move Select Exit
MENU
M.Player Mode
Back
Clock Set
Remote
Beep Sound
USB Version
Language
M.Player Mode
√System
Clock Set
Remote
Beep Sound
USB Version
Language
√On
√On
√Computer
√English
Move Select Exit
MENU
Computer
Printer
1
Dragon_eng_86~119 12/13/04 3:24 PM Page 107
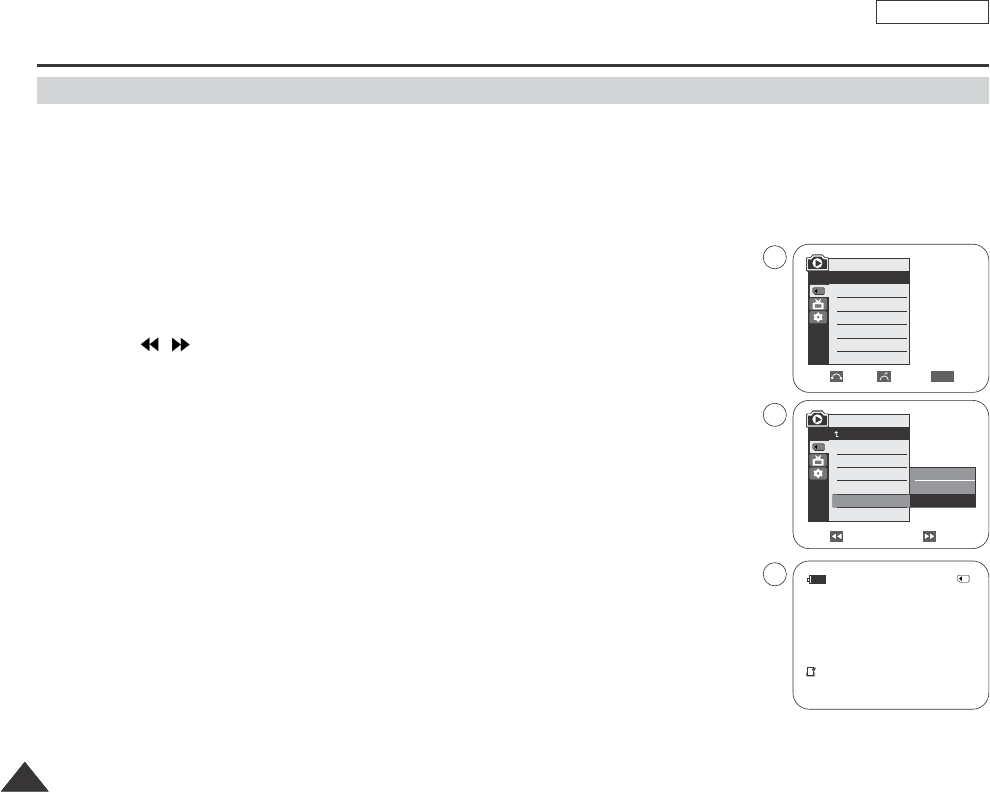
ENGLISH
108108
✤This Camcorder supports the DPOF (Digital Print Order Format) print format.
✤You can automatically print images recorded on a Memory card with a printer supporting DPOF.
✤There are 2 ways to make a Print Mark.
-This File: You can set a print mark on the photo image displayed on the LCD screen screen.
-All Files: To print 1 copy each of all of the stored images.
1. Set the Mode switch to MEMORY CARD.
2. Set the Power switch to PLAYER.
■
The last recorded image appears.
3. Using the / (REV/FWD) buttons, search for the still image that you want to mark.
4. Press the MENU button.
■
The menu list will appear.
5. Move the Menu selector to the left or right to select Memory, then press the Menu selector.
6. Move the Menu selector to the left or right to select Print Mark, then press the Menu selector.
7. Move the Menu selector to the left or right to select desired option(Off, This File or All Files),
then press the Menu selector.
8. If you select This File, move the Menu selector to the left or right to select the quantity,
then press the Menu selector.
9. To exit, press the MENU button.
Digital Still Camera mode (SCD353/D354/D355 only)
Marking images for printing
Previous Next
M.Player Mode
Back
M.Player Select
Delete
Delete All
Protect
Print Mark
Format
√Photo
√Off
Move Select Exit
MENU
M.Player Mode
√Memory
M.Player Select
Delete
Delete All
Protect
Print Mark
Format
Off
This File
All Files
00002/00046
800x600
12:00 AM JAN.01,2005
002
100-0001
√
5
7
9
Dragon_eng_86~119 12/13/04 3:24 PM Page 108
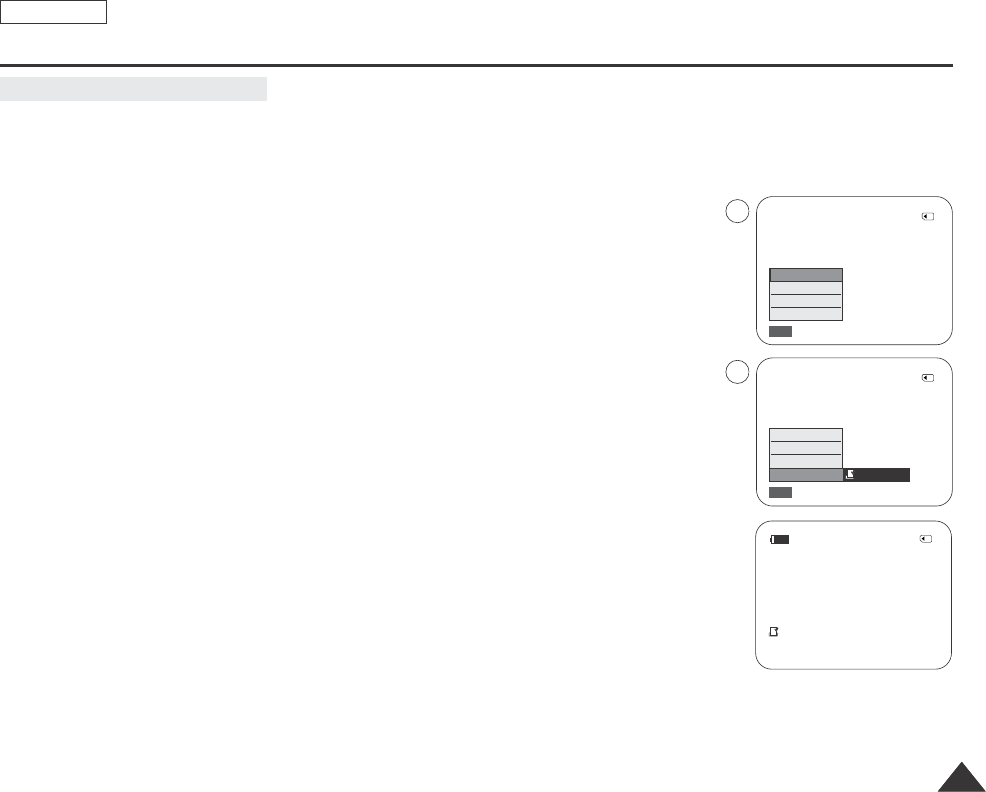
109109
ENGLISH
✤Quick menu is used to access Camcorder functions by simply using the Menu selector.
✤Quick menu provides easier access to the frequently used menus without using the MENU button.
1. Press the Menu selector.
2. Move the Menu selector to left or right to select Print Mark, then press the Menu selector.
3. Move the Menu selector to the left or right to select the quantity, then press the Menu selector.
4. To exit, press the MENU button.
[ Notes ]
■
When you setup the Print Mark option to All Files, 999 files from the current file are set to 1 or 0.
■
The All Files option may require extended operation time depending on the number of stored images.
■
DPOF supporting printers are commercially available.
■
Use the USB cable provided with the Camcorder.
Digital Still Camera mode (SCD353/D354/D355 only)
Using Quick Menu: Print Mark
800x600
00002/00046
Exit
MENU
M.Play Select
Delete
Protect
Print Mark
800x600
00002/00046
Exit
MENU
…
†
M.Play Select
Delete
Protect
Print Mark 002
00002/00046
800x600
12:00 AM JAN.01,2005
002
100-0001
√
1
3
Dragon_eng_86~119 12/13/04 3:24 PM Page 109
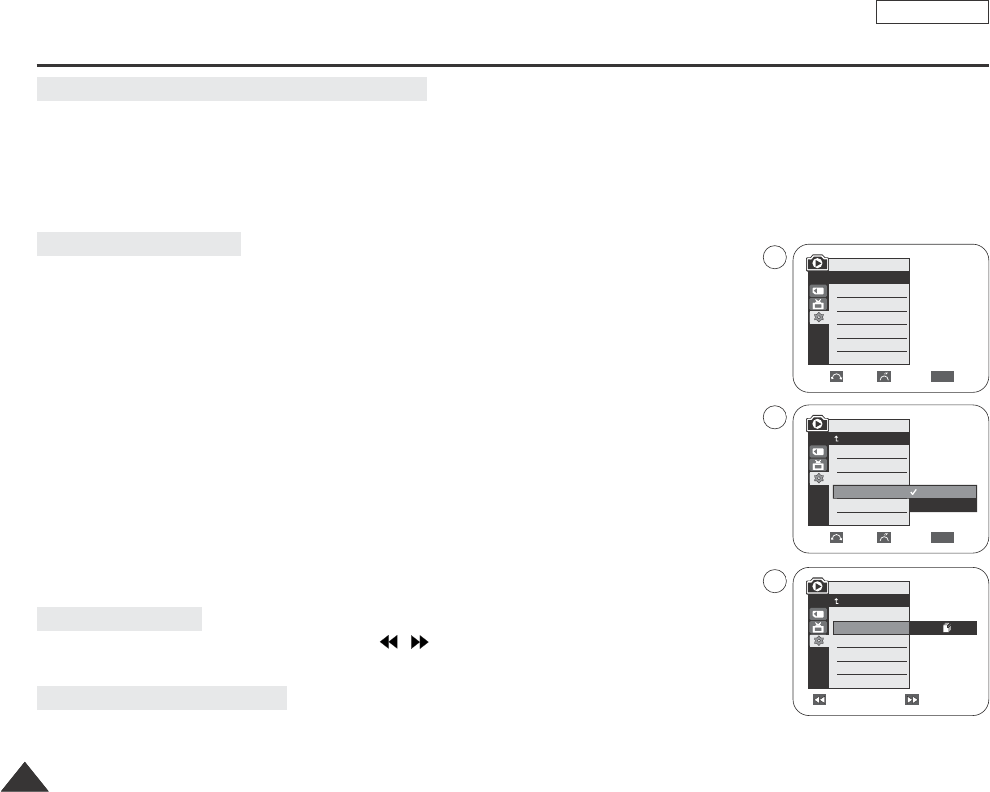
110110
✤By connecting the camera to printers with PictBridge support (sold separately), you can send images from the Memory card
directly to the printer with a few simple operations using the camera buttons.
✤With the PictBridge Support, you can control the printer directly through your camera in order to print out stored pictures.
For direct printing of your stored pictures using the PictBridge function, you must connect your camera to a PictBridge printer
using a USB cable.
1. Turn your printer power off.
Turn your camera on by setting the Power switch to CAMERA.
2. Set the Mode switch to MEMORY CARD.(SCD353/D354/355 only)
3. Press the MENU button.
■
The menu list will appear.
4. Move the Menu selector to the left or right to select System, then press the Menu selector.
5. Move the Menu selector to the left or right to select USB Version, then press the
Menu selector.
6. Move the Menu selector to the left or right to select Printer, then press the Menu selector.
■
Computer: Connect to a computer.
■
Printer: Connect to a printer. (To use the PictBridge function, connect to a printer.)
7. Connect your Camcorder to the printer using the provided USB cable.
8. Turn your printer power on.
The PictBridge menu screen appears automatically after a short period.
The cursor highlights the item Printer.
1. In the PictBridge settings menu, press the / (REV/FWD) buttons to select an image to print.
2. Move the Menu selector to the left or right to select Copies, then press the Menu selector.
3. Move the Menu selector to the left or right to set the number of prints, then press the Menu selector.
ENGLISH
PictBridge
TM
Printing Your Pictures – Using the PictBridgeTM
Connecting To a Printer
Selecting Images
Setting the number of prints
M.Player Mode
√System
Clock Set
Remote
Beep Sound
USB Version
Language
√On
√On
√Computer
√English
Move Select Exit
MENU
Move Select Exit
MENU
M.Player Mode
Back
Clock Set
Remote
Beep Sound
USB Version
Language
Computer
Printer
Previous Next 100-0001
M.Player Mode
Back
Print
Copies
Date/Time
NUM. 002
4
6
2
Dragon_eng_86~119 12/13/04 3:24 PM Page 110
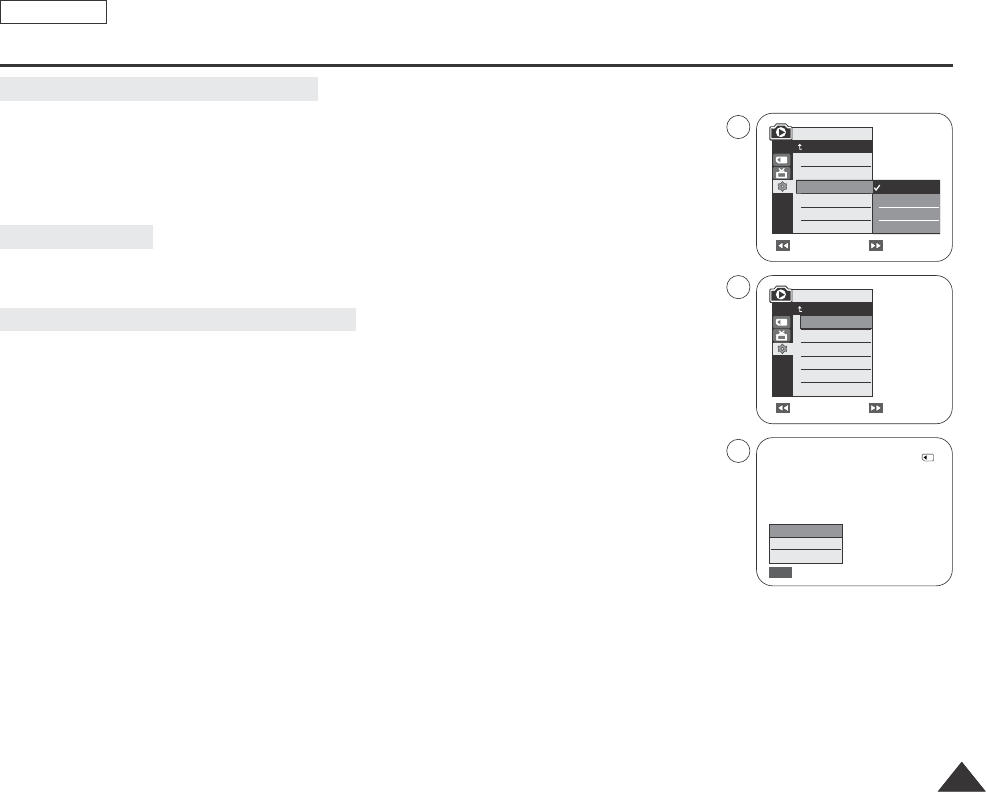
111111
ENGLISH
PictBridge
TM
4. Move the Menu selector to the left or right to select Date/Time, then press the
Menu selector.
5. Move the Menu selector to the left or right to select the display type of the Date/Time, then press
the Menu selector.
■
Display type of Date/Time: Off, Date, Time, Date/Time
6. Move the Menu selector to the left or right to select Print, then press the Menu selector.
Prints out selected image files.
✤Quick menu is used to access Camcorder functions by simply using the Menu selector.
✤Quick menu provides easier access to the frequently used menus without using the MENU button.
1. Press the Menu selector.
2. To print selected image files, press the Menu selector again.
To print multiple copies of an image, move the Menu selector to the left or right to select
Copies, then press the Menu selector.
3. Move the Menu selector to the left or right to set the number of copies, then press the
Menu selector.
4. Move the Menu selector to the left or right to select Print, then press the Menu selector.
5. To exit, press the MENU button.
[ Notes ]
■
The PictBridgeTM is a registered trademark of CIPA(Camera & Imaging Products Association), an image transfer standard
developed by Canon, Fuji, HP, Olympus, Seiko Epson, and Sony.
■
PictBridge supporting printers are commercially available.
■
Use the USB cable provided with the Camera.
■
Use the AC power adapter for your camera during PictBridge Direct Printing. Turning your camera off during the printing
might damage data on the Memory card.
■
Printing still images is supported. Motion clips are not available for printing.
■
You can set various printing options depending on the printer.
■
Please refer to the user’s manual of the printer.
Setting the Date/Time Imprint Option
Printing Images
Using Quick Menu: Printing Your Pictures
Previous Next 100-0001
Previous Next 100-0001
M.Player Mode
Back
Print
Copies
Date/Time
M.Player Mode
Back
Print
Copies
Date/Time Off
Date
Time
Date/Time
800x600
00002/00046
Exit
MENU
Print
Copies
Date/Time
5
6
4
Dragon_eng_86~119 12/13/04 3:24 PM Page 111
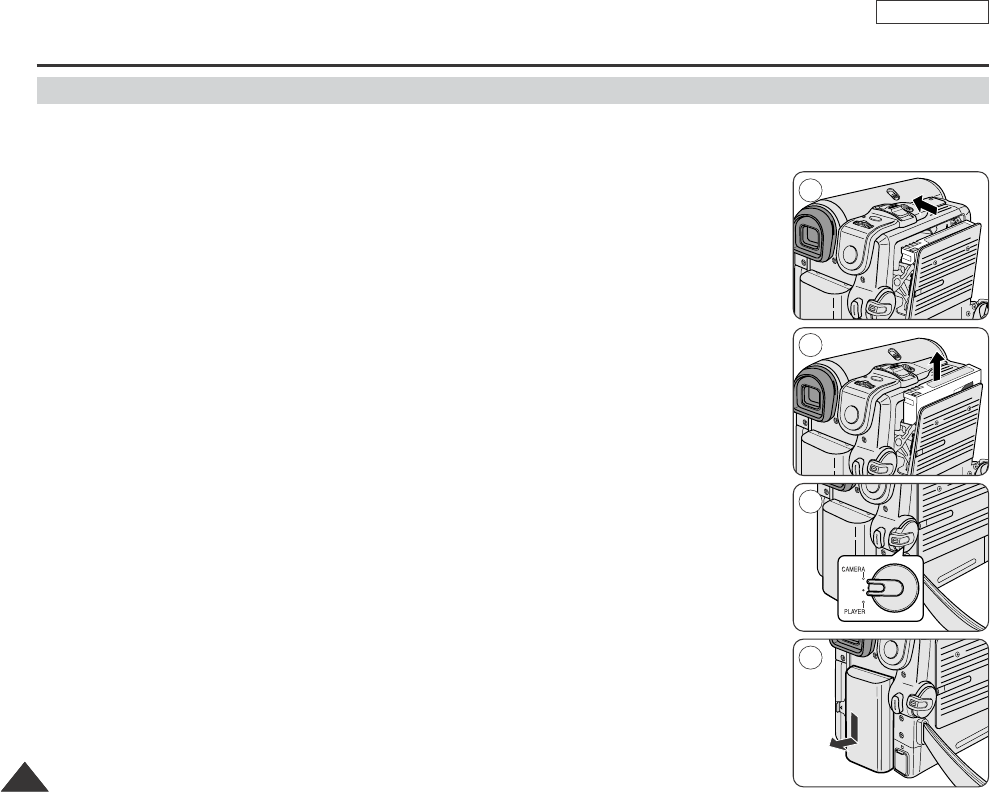
ENGLISH
112112
Maintenance
✤At the end of a recording you must remove the power source.
✤When recording with a lithium ion Battery pack, leaving the pack on the Camcorder can reduce the life span of the battery.
Hence, it should be removed from the Camcorder.
1. Slide the TAPE EJECT switch in the direction of the arrow.
■
Opening the cassette door ejects the tape automatically.
■
Please wait while the tape is completely ejected.
2. After removing the tape, close the door and store the Camcorder in a dust free environment.
Dust and other foreign materials can cause square-shaped noise or jerky images.
3. Set the Power switch to the Off.
4. Disconnect the power source or remove the lithium ion Battery pack.
Press the BATTERY RELEASE button and slide the Battery pack in the direction of the arrow.
After finishing a recording
1
2
3
4
Dragon_eng_86~119 12/13/04 3:24 PM Page 112
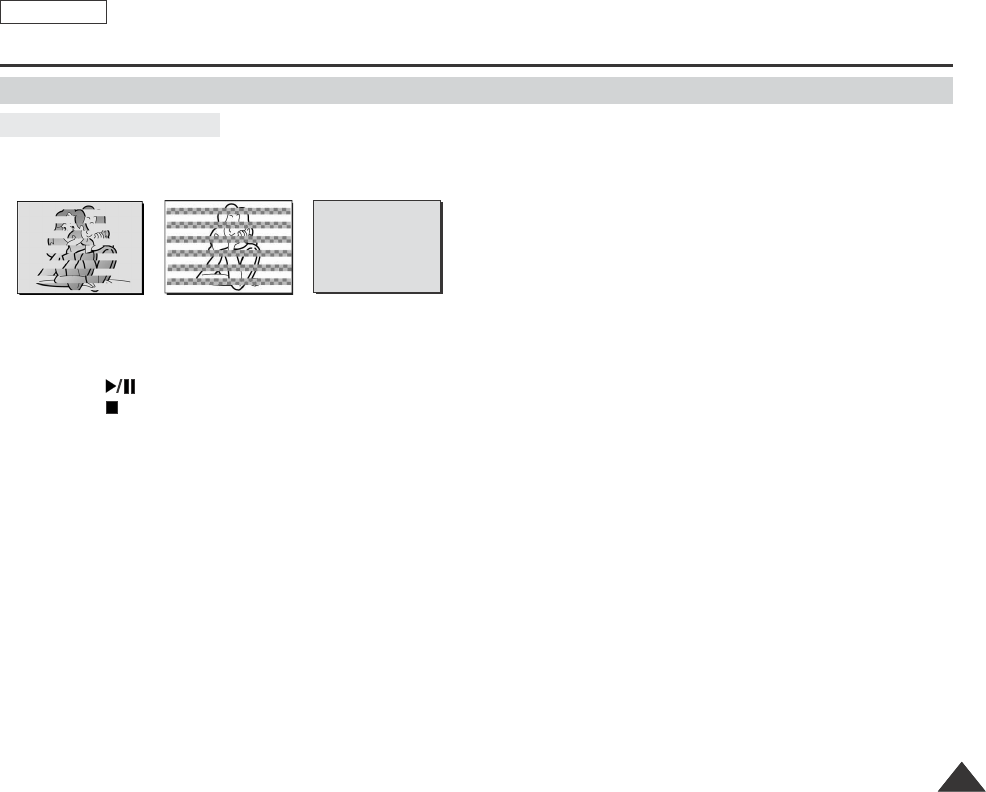
113113
ENGLISH
Maintenance
Cleaning the Video Heads
To ensure normal recording and clear pictures, clean the video heads when the playback pictures display square block-shaped
noise or distortion, or a blue screen appears.
1. Set the Power switch to PLAYER.
2. Insert the cleaning tape.
3. Press the (PLAY/STILL) button.
4. Press the (STOP) button after 10 seconds.
[ Notes ]
■
Check the quality of the picture using a videocassette.
-If the picture quality has not improved, repeat the operation.
-If the problem continues, contact your local authorized service center.
■
Clean the video heads with a dry type cassette cleaner.
■
Some cleaning cassette products stop automatically. Refer to the cleaning cassette’s instructions for detailed information.
If the problem continues after the cleaning, consult your nearest Samsung dealer or Authorized Service Center.
Cleaning and Maintaining the Camcorder
(blue screen)
Dragon_eng_86~119 12/13/04 3:24 PM Page 113

ENGLISH
114114
Maintenance
✤Each country or region has its own electric and color systems.
✤Before using your Camcorder abroad, check the following items.
■
You can use your Camcorder in any country or area with the supplied AC Power adapter within 100V to 240V, 50/60 Hz.
■
Use a commercially available AC jack adapter, if necessary, depending on the design of the local wall outlet.
You can view your recording in the Viewfinder.
However, to view it on a television or copy it to a videocassette recorder, the television or VCR must be NTSC-compatible and
have the appropriate audio/video jacks.
Otherwise, you may need to use a transcoder.
PAL-compatible Countries/Regions
Australia, Austria, Belgium, Bulgaria, China, CIS, Czech Republic, Denmark, Egypt, Finland, France, Germany, Greece,
Great Britain, Holland, Hong Kong, Hungary, India, Iran, Iraq, Kuwait, Libya, Malaysia, Mauritius, Norway, Romania,
Saudi Arabia, Singapore, Slovak Republic, Spain, Sweden, Switzerland, Syria, Thailand, Tunisia, etc.
NTSC-compatible Countries/Regions
Bahamas, Canada, Central America, Japan, Korea, Mexico, Philippines, Taiwan, United States of America, etc.
[ Note ]
You can make recordings with your Camcorder and view pictures on the LCD screen from anywhere in the world.
Color system
Power sources
Using Your Camcorder Abroad
Dragon_eng_86~119 12/13/04 3:24 PM Page 114
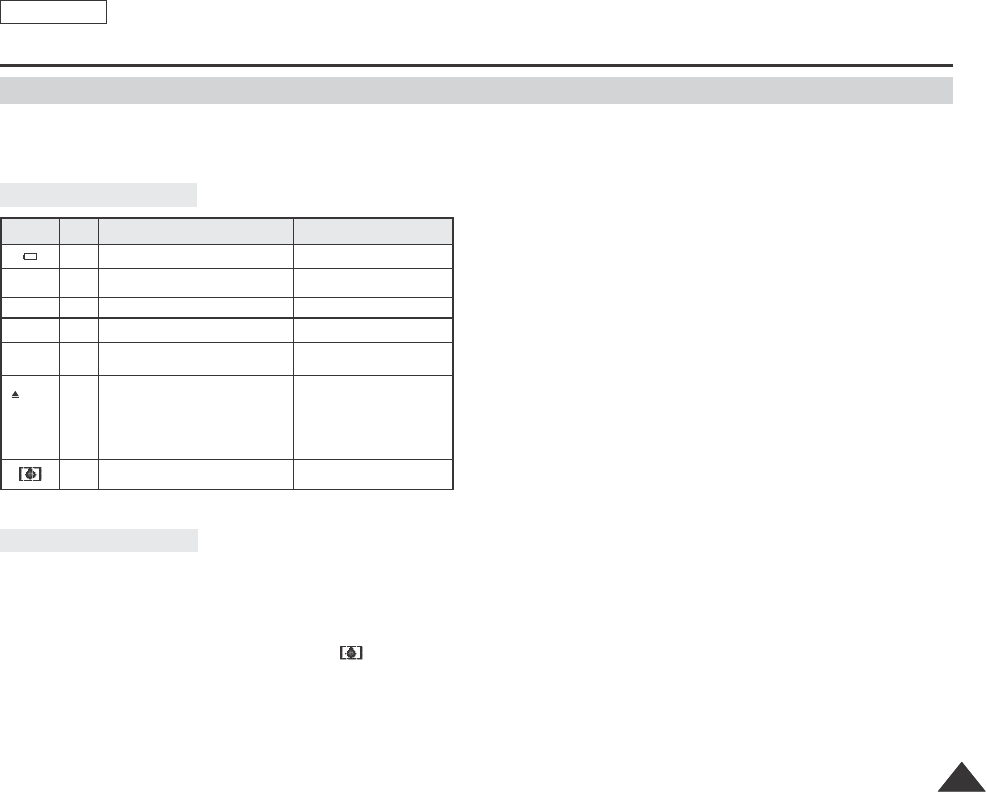
115115
ENGLISH
Troubleshooting
Moisture Condensation
Self Diagnosis Display
✤Before contacting a Samsung authorized service center, perform the following simple checks.
They may save you the time and expense of an unnecessary call.
✤If the Camcorder is brought directly from a cold place to a warm place, moisture may condense inside the Camcorder,
on the surface of the tape, or on the lens. In this condition, the tape may stick to the head drum and be damaged or the unit
may not operate correctly.
To prevent possible damage under these circumstances, the Camcorder is fitted with a moisture sensor.
✤If there is moisture inside the Camcorder, (DEW) is displayed. If this happens, none of the functions except cassette
ejection will work.
Open the cassette compartment and remove the battery.
Leave the Camcorder for at least two hours in a dry warm room.
slow
slow
no
slow
slow
slow
slow
the Battery pack is almost discharged. Change to a charged one.
When the remaining time on the tape
is about 2 minutes Prepare a new one.
the tape reached its end. Change to a new one.
there is no tape in Camcorder. Insert a tape.
the tape is protected from recording. If you want to record, release
the protection.
moisture condensation has formed in
the Camcorder. see below.
the Camcorder has some mechanical
fault. 1. Eject the tape.
2. Set to OFF.
3. Detach the battery.
4. Reattach the battery.
* If unresolved contact your
local service representative.
Tape end!
Tape end!
No Tape!
Protection!
....D
L
C
R
Display Blinking Informs that... Action
Troubleshooting
Dragon_eng_86~119 12/13/04 3:24 PM Page 115

ENGLISH
116116
Self Diagnosis Display in M.Cam/M.Player modes (SCD353/D354/D355 only)
slow There is no Memory card in
the Camcorder. Insert a Memory card.
No Memory Cord!
slow There is not enough memory
to record.
Change to a new Memory
card. Erase recorded image.
Memory Full!
slow There are no images recorded
on the Memory card. Record new images.
No image!
slow The Memory card is record
protected.
Release the write protect tab
on the Memory card.
Write protect!
slow When you try to delete to
protected image.
Cancel the protection of
image.
Protect!
slow The camera can not playback.
Format a Memory card or
insert Memory card recorded
on this Camcorder.
Read error!
slow The camera can not record. Format a Memory card or
change to a new Memory card.
Write error!
slow The Memory card needs to
format.
Format a Memory card.
(see page 98)
Not Formatted!
slow When progressing file delete. Wait until delete has been
finished.
Now delete...
slow When progressing memory
format.
Wait until format has been
finished.
Now formatting...
slow When progressing file copy.
Wait until copy has been
finished.
Or press the stop button.
Now copying...
Display Blinking Informs that... Action
Troubleshooting
Dragon_eng_86~119 12/13/04 3:24 PM Page 116

117117
ENGLISH
Troubleshooting
✤If these instructions do not solve your problem, contact your nearest Samsung authorized service center.
You cannot switch the
Camcorder on.
Start/Stop button
does not operate
while recording.
The Camcorder goes
off automatically.
The Battery pack is
quickly exhausted.
When you see a blue
screen during
playback.
Avertical strip appears
on the screen when
recording a dark
background.
Auto focus does not
work.
Play, FF or REW
button does not work.
Check the Battery pack or the AC Power adapter.
Check the Power switch is set to CAMERA.
You have reached the end of the cassette.
Check the record protection tab on the cassette.
You have left the Camcorder set to STBY for more
than 5 minutes without using it.
The Battery pack is fully exhausted.
The atmospheric temperature is too low.
The Battery pack has not been charged fully.
The Battery pack is completely dead, and cannot be
recharged, Use another Battery pack.
The video heads may be dirty.
Clean the head with a cleaning tape.
The contrast between the subject and the background
is too great for the Camcorder to operate normally.
Make the background bright to reduce the contrast or
use the BLC function while you are recording brighter.
The image in the
Viewfinder is blurred.
The Viewfinder lens has not been adjusted.
Adjust the Viewfinder control lever until the indicators
displayed on the Viewfinder come into sharp focus.
Check the Manual Focus menu.
Auto focus does not work in the Manual Focus mode.
Check the Power switch. Set the Power switch to PLAYER.
You have reached the beginning or end of the cassette.
When you see a
broken block image
during the record
search.
This is normal operation and it is not a failure or
defect.
Explanation/Solution
Symptom
Dragon_eng_86~119 12/13/04 3:24 PM Page 117

ENGLISH
118118
-These technical specifications and design may be changed without notice.
System
Video signal
Video recording system
Audio recording system
Usable cassette
Tape speed
Tape recording time
FF/REW time
Image device
Lens
Filter diameter
LCD screen/Viewfinder
Size/dot number
LCD screen Method
Viewfinder
Connectors
Video output
S-video output
Audio output
DV input/output
USB output
External mic
NTSC
2 rotary heads, Helical scanning system
Rotary heads, PCM system
Digital video tape (6.35mm width): Mini DV cassette
SP: approx. 18.81mm/s LP: approx. 12.56mm/s
SP: 60 minutes (when using DVM 60), LP: 90 minutes (when using DVM 60)
Approx. 150 sec. (using DVM60 tape)
CCD (Charge Coupled Device)
F1.4 20x(Optical), 900x(Digital) Electronic zoom lens
Ø30
2.5inchs 112k
TFT LCD
B/W LCD (SCD351/D352/D353/D354 only), Color LCD (SCD355 only)
1Vp-p (75Ωterminated)
Y: 1Vp-p, 75Ω, C: 0. 286Vp-p, 75Ω
-7.5dBs (600Ωterminated)
4pin special in/out connector
Mini-B type connector
Ø3.5 stereo
General
Power source
Power source type
Power consumption
(Recording)
Operating temperature
Storage temperature
External dimension
Weight
Built-in MIC
Remote control
(SCD354/D355 only)
DC 8.4V, Lithium Ion Battery Pack 7.4V
Lithium Ion Battery Pack, Power supply (100V~240V) 50/60Hz
4.3W(LCD), 4.1W(Viewfinder)
0˚~40˚C (32˚F~104˚F)
-20˚C ~ 60˚C (-4˚F ~ 140˚F)
Height 3.62inches(92mm), Length 4.63inches(117.5mm), Width 2.52inches(64mm)
410g (Except for Lithium Ion Battery Pack and tape)
Omni-directional stereo condenser microphone
Indoors: greater than 49ft(15m) (straight line), Outdoors: about 16.4ft(5m) (straight line)
Model name: SCD351/D352/D353/D354/D355
Specifications
Dragon_eng_86~119 12/13/04 3:24 PM Page 118

119119
ENGLISH
Index
Accessories ................................................................................................12
AF/MF ....................................................................................................... 58
Audio Dubbing .......................................................................................... 77
Audio Mode................................................................................................ 55
Battery Pack .............................................................................................. 21
BLC ........................................................................................................... 46
Cassette .................................................................................................... 36
Cleaning .................................................................................................. 111
Clock Set.................................................................................................... 27
Connecting ................................................................................................ 71
Date/Time .................................................................................................. 33
DC Cable .................................................................................................. 30
Deleting ..................................................................................................... 96
Demonstration............................................................................................ 31
DIS ............................................................................................................. 61
Digital Effect .............................................................................................. 65
DV ........................................................................................................ 79, 80
EASY Q Mode .......................................................................................... 40
Exposure ................................................................................................... 57
Fade .......................................................................................................... 45
Formatting ................................................................................................. 98
Frame advance ......................................................................................... 74
Functions buttons ..................................................................................... 13
Hand Strap ................................................................................................ 18
IEEE1394 .................................................................................................. 79
LCD ........................................................................................................... 32
Memory card ............................................................................................. 85
Memory Stick ............................................................................................ 84
MPEG Recording....................................................................................... 99
OSD .................................................................................................... 24, 25
Photo Copy ............................................................................................. 103
Photo Quality ............................................................................................ 88
Photo Search ............................................................................................. 68
Program AE ............................................................................................... 63
Protection .................................................................................................. 94
Rec Mode .................................................................................................. 54
Rec Search ............................................................................................... 41
Remote control ................................................................................... 17, 43
Shutter Speed ........................................................................................... 57
Sound ........................................................................................................ 70
Speaker ..................................................................................................... 70
Still images ................................................................................................ 91
Tele MACRO ............................................................................................. 44
TV Display.................................................................................................. 34
USB ........................................................................................................... 81
Viewfinder ..................................................................................................35
White Balance............................................................................................ 59
Wind Cut .................................................................................................... 56
WL. Remote .............................................................................................. 28
ZERO MEMORY ....................................................................................... 42
Zoom ......................................................................................................... 44
- A - - O -
- P -
- R -
- S -
- T -
- U -
- V -
- W -
- Z -
- B -
- C -
- D -
- E -
- F -
- H -
- I -
- L -
- M -
Dragon_eng_86~119 12/13/04 3:24 PM Page 119

ENGLISH
120120
Warranty (SEA users only)
SAMSUNG
LIMITED WARRANTY
SAMSUNG Electronics America Inc. (SEA), warrants that this product is free from defective material and workmanship.
SEA further warrants that if product fails to operate properly within the specified warranty period and the failure is due
to improper workmanship or defective material, SEA will repair or replace the product at it’s option.
All warranty repairs must be performed by a SEA authorized service center. The name and address of the location
nearest you can be obtained by calling toll free: 1-800 SAMSUNG (1-800-726-7864).
Labor
90 days carry-in
Parts
1 year
On carry-in models, transportation to and from the service center is the customer’s responsibility.
The original dated sales receipt must be retained by the customer and is the only acceptable proof of purchase.
It must be presented to the authorized service center.
EXCLUSIONS (WHAT IS NOT COVERED)
This warranty does not cover damage due to accident, fire, flood and/or other acts of God; misuse, incorrect line
voltage, improper installation, improper or unauthorized repairs, commercial use, or damage that occurs in shipping.
Exterior and interior finish, lamps, and glass are not covered under this warranty.
Customer adjustments which are explained in the instruction manual are not covered under the terms of this warranty.
This warranty will automatically be voided for any unit found with a missing or altered serial number. This warranty is
valid only on products purchased in the United States and Puerto Rico.
Some States do not allow the exclusions or limitations of incidental or consequential damages, or allow limitations on
how long an implied warranty lasts, so the above limitations or exclusions may not apply to you.
This warranty gives you specific legal rights, and you may also have other rights which vary from State to State.
Dragon_eng_86~119 12/13/04 3:24 PM Page 120

ENGLISH
*Samsung Electronics’ Internet Home Page
http://www.samsungusa.com
AD68-000839B
THIS CAMCORDER IS MANUFACTURED BY:
SERVICE DIVISION
400 Valley Road, Suite 201, Mt. Arlington N.J. 07856
Tel: 1-800-SAMSUNG
(1-800-726-7864)
Dragon_eng_1~25 12/13/04 3:23 PM Page 100