Samsung Electronics Co 06MM2MX2 Digital Camcorder User Manual SC X205 00994A 001 007
Samsung Electronics Co Ltd Digital Camcorder SC X205 00994A 001 007
UserManual.wiki
>
Samsung Electronics Co
>
06MM2MX2 User Manual
>
Users Manual 1
Contents
1.
Users Manual 1
2.
Users Manual 2
Users Manual 1
Navigation menu
Upload a User Manual
Namespaces
Wiki Guide
HTML
PDF
Info
Views
User Manual
Discussion / Help
Navigation
![ENGLISH1313Getting to Know Your Sports Camcorder✤Make sure that the following basic accessories are supplied with your Sports Camcorder.1. Lithium Polymer Battery pack2. AC Power Adapter3. Audio/Video Cable4. USB Cable5. Earphones6. Hand Strap7. Instruction Book/Quick Guide8. Software CD9. Lens Cover10. External Camera Module (SC-X205L/X210L/X220L only)11. Rubber Mount (SC-X205L/X210L/X220L only)12. Long Mount Band (SC-X205L/X210L/X220L only)13. Carrying Case 14. Extended life Battery pack[ Notes ]✤A carrying case is supplied as a basic accessory for SC-X210L/X220L. And it is supplied as an optional accessory for SC-X205L.✤Parts and accessories are available at your local Samsung dealer and service center.✤You can download programs, the latest driver software, and audio/video CODECs from the Samsung Electronics webpage.Accessories Supplied with the Sports Camcorder3. Audio/Video Cable2. AC Power Adapter1. Lithium Polymer Battery pack5. Earphones4. USB Cable9. Lens Cover8. Software CD14. Extended life Battery pack 7. Instruction Book/Quick Guide6. Hand StrapBasic AccessoriesOptional Accessories13. Carrying Case AD43-00164AAD44-00105BAD39-00001BAD39-00073DAD30-00006AAD81-00010AAD43-00170AAD69-00804AAD46-00061A / AD46-00082AAD97-11231AAD97-11230A10. External Camera ModuleAD73-00189A11. Rubber MountAD61-02541A12. Long Mount BandSC-X205 00994A 008~036 2006.1.27 8:23 PM 페이지13 001 PagePro 9100](https://usermanual.wiki/Samsung-Electronics-Co/06MM2MX2.Users-Manual-1/User-Guide-626615-Page-17.png)
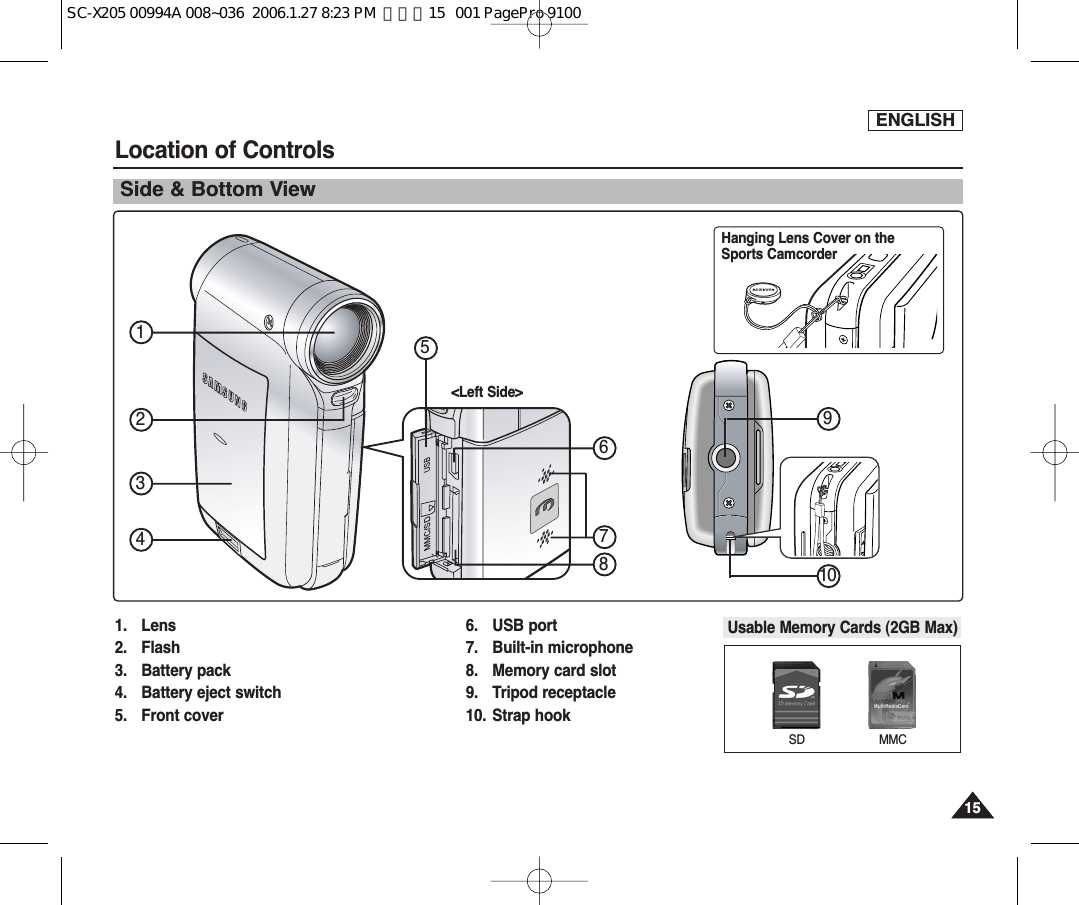
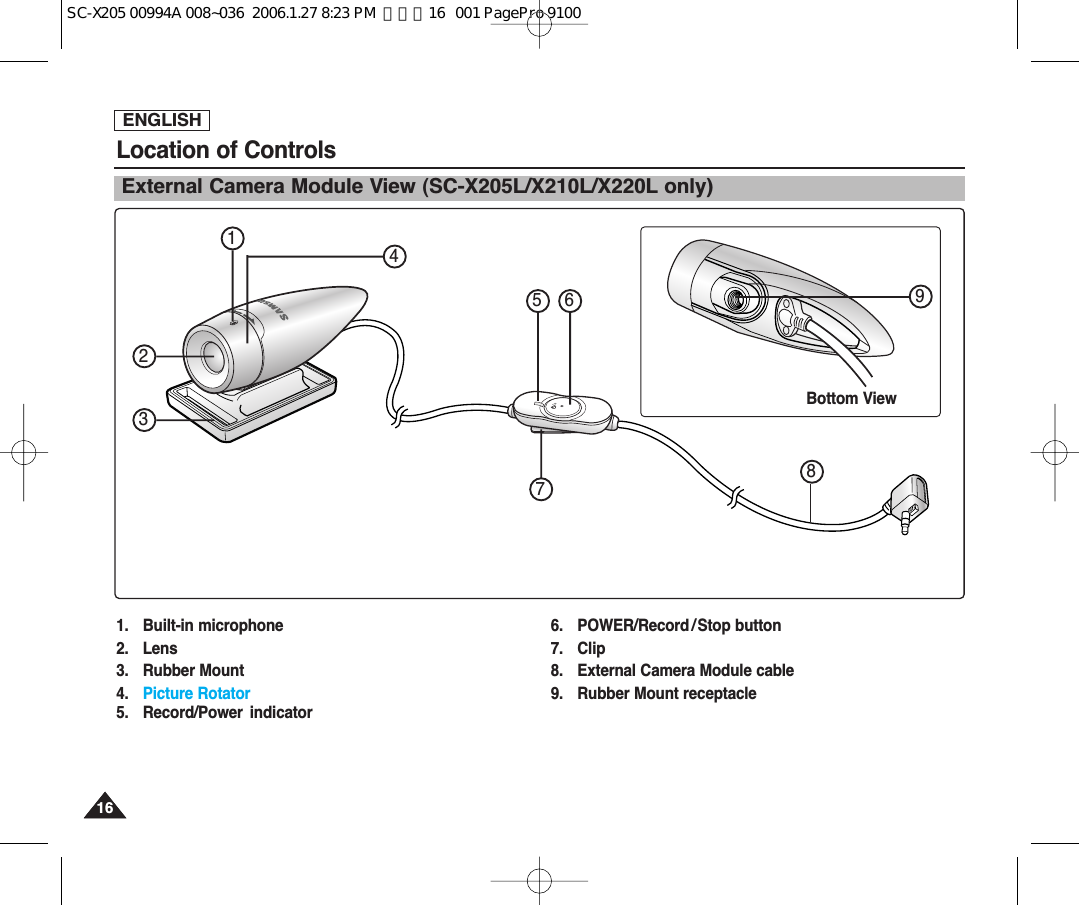
![Rear & Left View1. LCD monitor2. DELETE button3. DISPLAY button4. Built-in speaker5. POWER button6. MP3/ *External Camera Module HOLD switch7. Record / Power /Charging indicator8. PLAY button9. Record /Stop button10. [W/T] switch11. Joystick (Up, Down, Left, Right, OK)12. MENU button13. MODE button14. DC IN jack15. Multi jackENGLISH1414Location of ControlsMENUMODEDC INWTHOLDDISPLAYDELETE13287910111213141554 6MENUMODEDC INWTHOLDDISPLAY DELETEHow to ConnectEarphonesConnect theearphones to themulti jack as shownin the figure.[ Notes ]✤Multi jack is a unified Earphones, AV Input/Output and *External Camera Module jack. ✤* Items apply to the SC-X205L/X210L/X220L models only.SC-X205 00994A 008~036 2006.1.27 8:23 PM 페이지14 001 PagePro 9100](https://usermanual.wiki/Samsung-Electronics-Co/06MM2MX2.Users-Manual-1/User-Guide-626615-Page-18.png)
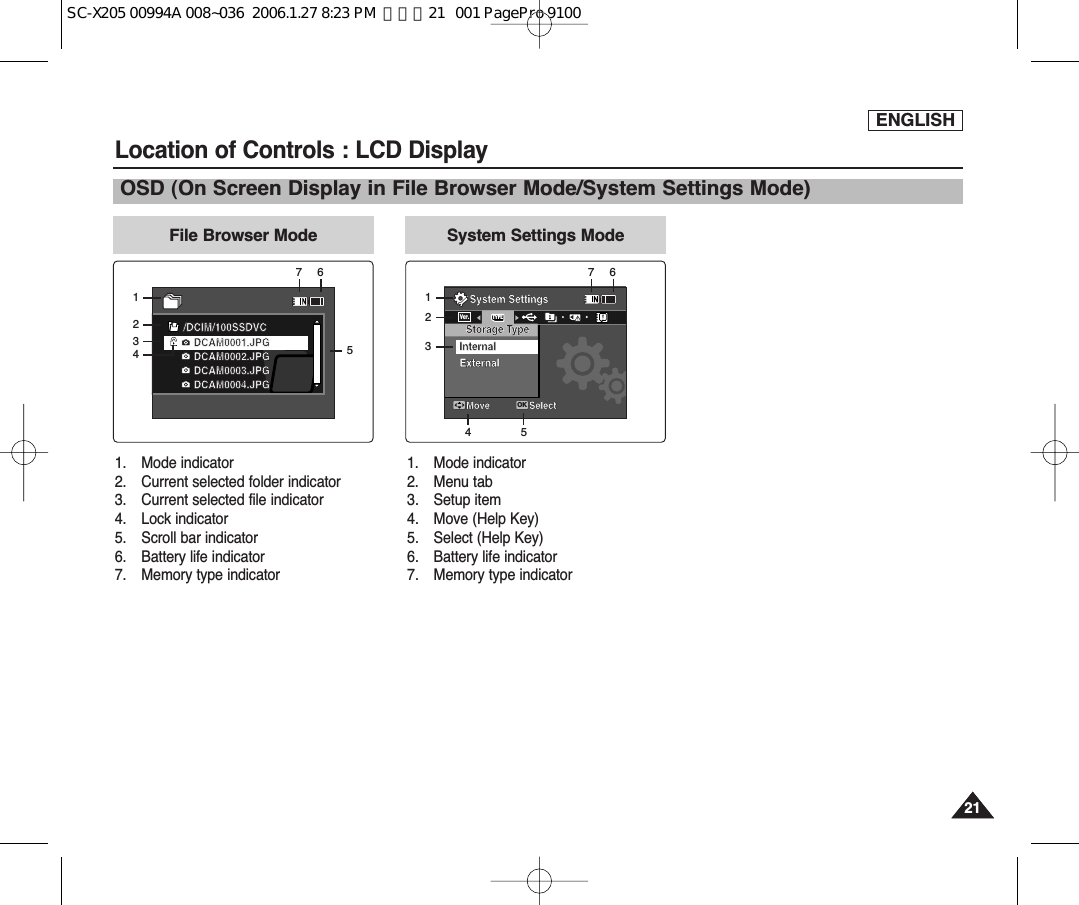
![ENGLISHLocation of Controls : LCD Display1717OSD (On Screen Display in Movie Record Mode/ Movie Play Mode)Movie Record Mode1. Mode indicator2. Image size indicator3. Image quality indicator4. White balance indicator5. Program AE indicator6. Date/Time indicator7. Effect indicator8. BLC indicator *9. Focus indicator *10 EIS indicator11. Battery life indicator12. Memory type indicator13. Counter (Elapsed time / Remaining time)14. Warning and note indicator15. Record/Stop indicator16. Optical zoom indicator17. Digital zoom indicator1. Mode indicator2. Lock indicator3. Current display indicator4. Move (Help Key)5. Play (Help Key)6. Damaged file indicator7. Scroll bar8. Multi selection indicator9. Battery life indicator10. Memory type indicator 11. Image counter (Current image)12. Image size indicator13. Date/Time indicator14. Volume indicator15. Counter (Elapsed time / Recorded time)SSFF SepiaRecording...STBY12:00AM 2006.01.01Move Play00:00:00/00:40:05100-000112:00AM 2006.01.01720X48000:00:15/00:05:20100-0001720iWT1X10XWT1X10X132456717981011121315 14Movie Play ModeSFSepiaRecording...STBY12:00AM 2006.01.01Move Play00:00:00/00:40:05100-000112:00AM 2006.01.01720X48000:00:15/00:05:20OK?ERROR100-0001WT1X10XWT1X10X1327891011Movie Play ModeSFSepiaRecording...STBY12:00AM 2006.01.01Move Play00:00:00/00:40:05100-0001 12:00AM 2006.01.01720X48000:00:15/00:05:20100-0001WT1X10XWT1X10X124 5 13 116142[ Notes ]✤Settings indicated with * will not be retained when the Sports Camcorder isturned off. ✤The OSD indicators of this product are based on model SC-X210(L).✤The OSD indicators are based on internal memory.15SFSepiaRecording...STBY12:00AM 2006.01.01Move Play00:00:00/00:40:05100-000112:00AM 2006.01.01720X48000:00:15/00:05:20100-0001WT1X10XWT1X1X10X10X16SC-X205 00994A 008~036 2006.1.27 8:23 PM 페이지17 001 PagePro 9100](https://usermanual.wiki/Samsung-Electronics-Co/06MM2MX2.Users-Manual-1/User-Guide-626615-Page-21.png)
![OSD (On Screen Display in Photo Capture Mode /Photo View Mode)ENGLISH1818Location of Controls : LCD Display1. Mode indicator 2. Lock indicator3. Current display indicator4. Move (Help Key)5. View (Help Key)6. Scroll bar indicator 7. Multi selection indicator8. Battery life indicator9. Memory type indicator 10. Image counter indicator (Current image)11. DPOF indicator12. Date/Time indicatorPhoto Capture Mode Capturing...12:00AM 2006.01.01Move View100-000112:00AM 2006.01.01100-000111SepiaWT1X10XWT1X10X13267810 91213 11Photo View ModeCapturing...12:00AM 2006.01.01Move View100-000112:00AM 2006.01.01OK100-000111SepiaWT1X10XWT1X10X67Photo View ModeCapturing...12:00AM 2006.01.01Move View100-0001 12:00AM 2006.01.01100-000111SepiaWT1X10XWT1X10X[ Notes ]✤Settings indicated with * will not be retained when the Sports Camcorder is turned off. ✤The OSD indicators are based on internal memory.4 5 15132891010111. Mode indicator2. White balance indicator 3. Program AE indicator4. Date/Time indicator5. Effect indicator6. BLC indicator * 7. Focus indicator * 8. EIS indicator9. Battery life indicator10. Memory type indicator11. Warning and note indicator12. Multi shot indicator13. Flash indicator14. Optical zoom indicator15. Digital zoom indicatorCapturing...12:00AM 2006.01.01Move View100-000112:00AM 2006.01.01100-000111SepiaWT1X10XWT1X1X10X10X145124211SC-X205 00994A 008~036 2006.1.27 8:23 PM 페이지18 001 PagePro 9100](https://usermanual.wiki/Samsung-Electronics-Co/06MM2MX2.Users-Manual-1/User-Guide-626615-Page-22.png)
![ENGLISH1919Location of Controls : LCD DisplayOSD (On Screen Display in MP3 Mode)MP3 Mode1. Mode indicator 2. File name indicator 3. Lock indicator4. Move (Help Key)5. Play (Help Key)6. Scroll bar indicator 7. Battery life indicator8. Memory type indicator9. Counter(Elapsed time) 10. Repeat indicator1. Mode indicator 2. File name indicator 3. Artist indicator4. Sampling rate/Bit rate5. Operation indicator6. Progress bar indicator 7. Search (Help Key)8. Counter(Elapsed time/Full time)9. List (Help Key)10. Play/Pause (Help Key)11. Volume indicator12. Equalizer indicator13. Lock indicator14. Battery life indicator15. Memory type indicator16. File number indicator (Current / Total)Move Play00:12OKLife is cool.mp3Everytime.mp3Toxic.mp3Don't push me.mp3Love you.mp3Search1/10PauseListLife is cool.mp3SweetboxPOP123MP3 ModeMove Play00:12Life is cool.mp3Everytime.mp3Toxic.mp3Don't push me.mp3Love you.mp3Search1/10PauseOKListLife is cool.mp3Sweetbox00:01:07/00:03:27Stereo 44.1KHz 192KbpsPOPPOPPOP810 9 7 1516 14657 8 91041234561113[ Notes ]✤Settings will be retained when the Sports Camcorder is turned off.✤The MP3 file with tag information will display the artist name.MP3 files with no tag information will leave the item blank.12SC-X205 00994A 008~036 2006.1.27 8:23 PM 페이지19 001 PagePro 9100](https://usermanual.wiki/Samsung-Electronics-Co/06MM2MX2.Users-Manual-1/User-Guide-626615-Page-23.png)
![ENGLISH2020Location of Controls : LCD DisplayOSD (On Screen Display in Voice Record Mode/Voice Play Mode)Voice Record Mode1. Mode indicator 2. File name indicator 3. Date/Time indicator 4. Sampling rate/Bit rate 5. Operation indicator6. Counter (Elapsed Time / Remaining Time)7. Battery life indicator8. Memory type indicatorStop2006/01/01 12:00:00 AMSWAV0001.WAV00:00:12/34:59:482006/01/01 12:00:00 AMSWAV0001.WAV00:00:02/00:00:121/3Search PauseListMove Play1/32006/01/01 12:00:00 AM2006/01/01 12:00:10 AM2006/01/01 12:00:20 AM00:12Stereo 8.0KHz 64Kbps123456[ Note ]✤Settings will be retained when the Sports Camcorder is turned off.1. Mode indicator 2. Date/Time indicator 3. Lock indicator4. Move (Help Key)5. Play (Help Key)6. Scroll bar indicator 7. Battery life indicator8. Memory type indicator9. File number indicator (Current / Total)10. Counter(Elapsed time) 11. Repeat indicatorVoice Play ModeStop2006/01/01 12:00:00 AMSWAV0001.WAV00:00:12/34:59:482006/01/01 12:00:00 AMSWAV0001.WAV00:00:02/00:00:121/3Search PauseListMove Play1/3OK2006/01/01 12:00:00 AM2006/01/01 12:00:10 AM2006/01/01 12:00:20 AM00:1218 71. File name indicator 2. Date/Time indicator 3. Operation indicator4. Progress bar indicator5. Search (Help Key)6. List (Help Key)7. Counter (Elapsed time / Recorded time)8. Play/Pause/Stop (Help Key)9. Volume indicator10. Lock indicator11. File Number (Current / Total)Voice Play ModeStop2006/01/01 12:00:00 AMSWAV0001.WAV00:00:12/34:59:482006/01/01 12:00:00 AMSWAV0001.WAV00:00:02/00:00:1211/3Search PauseOKListMove Play1/32006/01/01 12:00:00 AM2006/01/01 12:00:10 AM2006/01/01 12:00:20 AM00:12Stereo 8.0KHz 64Kbps5678341291011123891011 7654SC-X205 00994A 008~036 2006.1.27 8:23 PM 페이지20 001 PagePro 9100](https://usermanual.wiki/Samsung-Electronics-Co/06MM2MX2.Users-Manual-1/User-Guide-626615-Page-24.png)
![ENGLISH2222How to Use the Battery PackBattery Pack Installation / EjectionIt is recommended you purchase one or more additional battery packs to allow continuous use of your Sports Camcorder.Slide the battery pack into the groove until it clicks.To insert the battery packPull the Battery eject switch to eject the batterypack.To eject the battery pack[ Notes ]✤Clean the terminals to remove foreign substances before inserting the battery pack.✤If the Sports Camcorder will not be in use for a while, remove the battery pack from the Sports Camcorder.SB-P120A (1200mAh) SB-P190A (1900mAh)Battery <Insert> <Eject>12SC-X205 00994A 008~036 2006.1.27 8:23 PM 페이지22 001 PagePro 9100](https://usermanual.wiki/Samsung-Electronics-Co/06MM2MX2.Users-Manual-1/User-Guide-626615-Page-26.png)
![ENGLISH2323How to Use the Battery PackMaintaining the Battery Pack✤The battery pack should be recharged in an environment of between 32°F(0°C) and 104°F(40°C).✤The battery pack should never be charged in a room temperature that is below 32°F(0°C).✤The life and capacity of the battery pack will be reduced if it is used in temperatures below 32°F(0°C) or left in temperatures above 104°F(40°C) for a long period. ✤Do not put the battery pack near any heat sources (fire or flames, for example).✤Do not disassemble, process, press or heat the Battery Pack.✤Do not allow the + and - terminals of the battery pack to be short-circuited. It may cause leakage, heat generation,induce fire and overheating.✤It is recommended that you use the original Samsung Battery Pack that is available at the retailer where you purchased theSports Camcorder.[ Warning ]✤When you eject the battery pack from the Sports Camcorder, hold the battery pack to prevent it from dropping to the floor.[ Notes ]✤Prepare an extra battery if you use the Sports Camcorder outdoors.✤Contact a Samsung retailer to purchase a new battery pack.✤If you zoom in or out, the recording time becomes shorter.✤‘The Continuous Recording Time' listed is approximate and is affected by functions such as zooming.If you close the LCD screen, it switches off automatically.The continuous recording times given in the table below are approximations. Actual recording time depends on usage.Continuous recording time based on battery typeContinuous Recording TimeLCD ON Backlight OFFSB-P120A (1200mAh) SB-P190A (1900mAh)Approx. 1 hr. 20 min.Approx. 2 hr. 30 min.Approx. 1 hr. 40 min.Approx. 2 hr. 50 min.Battery TimeSC-X205 00994A 008~036 2006.1.27 8:23 PM 페이지23 001 PagePro 9100](https://usermanual.wiki/Samsung-Electronics-Co/06MM2MX2.Users-Manual-1/User-Guide-626615-Page-27.png)
![ENGLISH2424Battery Level DisplayThe Battery Level Display shows the amount of battery power remaining in the Battery Pack.Tips for Battery IdentificationCharging time based on battery typeIf the battery has been fully charged, the charge indicator is green. If you are charging the battery, the color of the charge indicator is orange. The charge indicator flickers if the battery is abnormal.[ Notes ]✤You may charge your Sports Camcorder by connecting it to a PC with the USB cable.✤You may not charge via USB if the power is on.✤The charging time with the USB cable may differ depending on the PC.Battery Level Indicator State MessageFully charged20~40% used40~60% used60~80% used80~95% usedExhausted(flickers)The device will soon turn off. Change the Battery Pack as soon as possible.(flickers)The device will be forced toturn off after 5 seconds.------“Low battery”12:00AM 2006/01/0112:00AM 2006/01/01 SepiaSepiaRecording...Recording...SSFF STBYSTBY 00:00:00:00:40:05720iSB-P120A (1200mAh) SB-P190A (1900mAh)CapacityChargeindicator How to Use the Battery PackApprox. 1 hr. 50 minApprox. 3 hr. 20 minusing AC Power AdapterApprox. 3hr. 40 minApprox. 6hr. 20 minusing USB cableSC-X205 00994A 008~036 2006.1.27 8:23 PM 페이지24 001 PagePro 9100](https://usermanual.wiki/Samsung-Electronics-Co/06MM2MX2.Users-Manual-1/User-Guide-626615-Page-28.png)
![ENGLISH2525How to Use the Battery PackCharging the Battery Pack[ Note ]✤You may use the Sports Camcorder powered by the AC PowerAdapter indoors where available.[ Warning ]✤It is recommended you fully charge the battery pack before use.✤You should only charge the battery in an environment between32°F and 104°F.✤If ambient temperature is too low when charging, it may take longto fully charge or may not fully charge the battery, which results thegreen indicator will not turn on.✤Before connecting the cable, make sure that you don’t have anyforeign substances between connectors.Connecting the AC Power AdapterConnecting the USB CableUSBMMC/SDDC IN jackUSB port1. Turn off the Sports Camcorder by pressing the[POWER] button.2. Insert the Battery Pack to the unit.3. Open the connector cover of the unit.4. Charge the battery pack with using AC Power Adapteror USB Cable.AC Power Adapter Connect the AC Power Adapter with the SportsCamcorder properly and plug the AC Power Adapterto the wall outlet.USB Cable Connect the USB Cable with the Sports Camcorderproperly and connect the other side to a USB port ofa PC. USBSDUSBDSC-X205 00994A 008~036 2006.1.27 8:23 PM 페이지25 001 PagePro 9100](https://usermanual.wiki/Samsung-Electronics-Co/06MM2MX2.Users-Manual-1/User-Guide-626615-Page-29.png)
![ENGLISH2626Getting StartedThe LED ColorThe LED Color indicates the power or charge status.LED ColorBluePowerOnDC INRecording /Charging IndicatorLED ColorRedOrangeGreenDuring RecordingRecording <Movie and Voice Recorder Mode>--During Charging-ChargingFully ChargedRecording / Charging IndicatorPower IndicatorBefore You Start Operating the Sports CamcorderBefore using the Sports Camcorder, refer to this page for easy operation. The memory card is not supplied.1. Insert the Battery Pack and insert a memory card into the Memory Card slot. ➥page 342. Charge the Battery Pack by directly connecting the AC Power Adapter to the Sports Camcorder.➥page 253. Press the [POWER] button to turn on the Sports Camcorder.4. Select the desired mode by pressing the [MODE] button.5. Press the [Record / Stop] button to take a picture, start recording movie / voice.6. When finished, press the [POWER] button to turn the Sports Camcorder off.SC-X205 00994A 008~036 2006.1.27 8:23 PM 페이지26 001 PagePro 9100](https://usermanual.wiki/Samsung-Electronics-Co/06MM2MX2.Users-Manual-1/User-Guide-626615-Page-30.png)
![ENGLISH2727Getting StartedUsing the MODE buttonThe Mode button is used to change the Sports Camcorder mode. Available modes are Movie, Photo, MP3, Voice Recorder, File Browser and System Settings.Set the desired mode by pressing the [MODE] button.The Sports Camcorder switches to the designated mode.Movie modeYou can record and play movie files.Photo modeYou can take and view photo files.MP3 modeYou can play back mp3 files.Voice Recorder modeYou can record and listen to voice files.File Browser modeYou can delete, lock, copy the file and viewfile information.System Settings modeUsing this mode, you can set / adjust settingsregarding the LCD display, Date / Time,Reset and Memory management.Setting the ModeFunctions of Each ModeMP3Voice RecorderGameSystem SettingsMoviePhotoPower Saving FunctionThe LCD monitor is turned off after a certain period of time has passed in each mode in order to prevent unnecessary batterypower consumption. Press any button to go back and turn on the LCD monitor.Video10 min.ModeTimePhoto3 min.MP330 sec.Voice30 sec.File Browser30 sec.System Settings60 sec.USB60 sec.SC-X205 00994A 008~036 2006.1.27 9:32 PM 페이지27 001 PagePro 9100](https://usermanual.wiki/Samsung-Electronics-Co/06MM2MX2.Users-Manual-1/User-Guide-626615-Page-31.png)
![ENGLISH2828Getting StartedUsing the Function buttonUsing the Function buttonZoom out (▲)Zoom in (▼)Change from Record/Capture to Play/ViewRecordingMulti-Play screen / List-Play/PauseChange from Play/View toRecord/CaptureButton Recording /Capturing Playing/ViewingMove UpwardsFunction buttonConfirm SelectionSelect menuMove LeftMoveDownwardsMove RightUsing the MENU button1.Set the desired mode by pressing the [MODE] button.2. Press the [MENU] button.3. Move the cursor by moving the [Joystick] up / down / left / right to select desired menu item, and thenpress the [Joystick(OK)] to confirm.4. Press the [MENU] button to finish. ✤The joystick is used to make a selection, move the cursor, selectfunctions, and exit from the menu.1. Move the cursor left / right by moving the [Joystick].2. Move the cursor up / down by moving the [Joystick].◆You can adjust the volume by moving the [Joystick] (up / down)in Movie / MP3 / Voice Recorder playback modes3. Confirm your selection by pressing the [Joystick(OK)].Using the JoystickThe Function button is used to make a selection, move the cursor, select the functions and exit from the menu.SC-X205 00994A 008~036 2006.1.27 8:23 PM 페이지28 001 PagePro 9100](https://usermanual.wiki/Samsung-Electronics-Co/06MM2MX2.Users-Manual-1/User-Guide-626615-Page-32.png)
![ENGLISH2929Getting StartedUsing the DISPLAY buttonUsing the DELETE buttonEach press of the [DISPLAY] button toggles the OSD indicator on and off.1. Open the LCD monitor.2. Press the [POWER] button to turn on the Sports Camcorder. ◆The movie screen appears.◆You can select Movie mode or Previous mode as the start-up mode in System Settings. ➥page 1093. Press the [DISPLAY] button.The [DELETE] button is used to delete saved files. ◆<OK>: The selected file is deleted.◆<Multi Select>: The selected files will be deleted.◆<All>: All files will be deleted.◆<Cancel>: Cancels deletion.HOLDDISPLAYDELETE✤Once : All indicators will disappear on the screen.✤Twice : The backlight turns off.✤3 times : It returns to the initial screen.[ Note ]✤Above description applies to the Movie and Photo mode.If you press the [DISPLAY] button in Movie and Photo modes✤Once : The back light turns off.✤Twice : It returns to the initial screen.[ Note ]✤Above description applies to the MP3/Voice Recorder/File Browser/SystemSettings mode.If you press the [DISPLAY] button in another modeDISPLAYbuttonDELETEbuttonMove Play100-0001Move Select100-0003OK?ERRORCancelOKMulti SelectAllSC-X205 00994A 008~036 2006.1.27 8:23 PM 페이지29 001 PagePro 9100](https://usermanual.wiki/Samsung-Electronics-Co/06MM2MX2.Users-Manual-1/User-Guide-626615-Page-33.png)
![ENGLISH3030Getting StartedStructure of the Folders and FilesThe movie files and photo files are stored in internal memory or on a memory card as shown below.[ Notes ]✤Refer to page 33 for details about memory card.✤You can store general data in files and folders of the SportsCamcorder.✤You can store up to 9,999 files and 999 folders.✤DCAM✽✽✽✽.JPG: Photo fileSMOV✽✽✽✽.AVI: Movie fileSWAV✽✽✽✽.WAV: Voice file✽✽✽✽✽✽✽✽.MP3: MP3 file✤MISC: DPOF files are stored.✤You can freely change the file or folder names in the Musicfolder.✤Movie files made on other manufacturers' equipment may notplay on this Sports Camcorder.[ Warning ]✤Do not turn the power off while recording, playing, erasingfiles or formatting.✤Turn the power off before you insert or eject the memorycard to avoid losing data.✤Save important files separately.✤Memory cards are made with precision technology. Theyare sensitive and vulnerable to electric shock, temperatureand humidity. Be cautious with handling them to avoidlosing data.✤Damaged data may not be recovered, and SAMSUNG isnot responsible for lost data. Make sure to back upimportant files on your PC separately.Photo fileMoviefileMP3 fileVoicefileSC-X205 00994A 008~036 2006.1.27 8:23 PM 페이지30 001 PagePro 9100](https://usermanual.wiki/Samsung-Electronics-Co/06MM2MX2.Users-Manual-1/User-Guide-626615-Page-34.png)
![ENGLISH3131Getting StartedRecording Time and Capacity[ Notes ]✤The recording time and capacity is an approximation.✤The recording time shown are maximum figures based on using one function. In actual use, using more than one function will reduce the capacity of each.✤The compressibility is changed automatically depending on the recorded images. The maximum recording time and capacity can be changed in ‘Movie Record’. ✤The Sports camcorder supports 2GB memory cards and lower. Any card above 2GB may not record or play properly.✤If you record movie files at Normal(352/720) quality to the internal memory or a memory card, the recording time increasesbut the movie may have lower quality than other levels.✤The recording time and capacity may vary if a bad sector(section) is generated when you record movie files to a memory card.Movie Record TimeMediaInternalMemorySD/MMCCapacity512MB (SC-X205(L))1GB (SC-X210(L))2GB (SC-X220(L))32MB64MB128MB256MB512MB1GB2GBSuper Fine352papprox. 21min.approx. 43min.approx. 86min.approx. 1min. 20sec.approx. 3min.approx. 4min.approx. 11min.approx. 21min.approx. 43min.approx. 86min.720i/720papprox. 14min.approx. 29min.approx. 58min.approx. 50sec.approx. 2min.approx. 3min.approx. 7min.approx. 14min.approx. 29min.approx. 58min.Fine352papprox. 32min.approx. 65min.approx. 130min.approx. 2min.approx. 4min.approx. 7min.approx. 17min.approx. 32min.approx. 65min.approx. 130min.720i/720papprox. 21min.approx. 43min.approx. 86min.approx. 1min. 20sec.approx. 3min.approx. 4min.approx. 11min.approx. 21min.approx. 43min.approx. 86min.Normal352papprox. 65min.approx. 131min.approx. 262min.approx. 4min.approx. 7min.approx. 17min.approx. 32min.approx. 65min.approx. 131min.approx. 262min.720i/720papprox. 32min.approx. 65min.approx. 130min.approx. 2min.approx. 4min.approx. 7min.approx. 17min.approx. 32min.approx. 65min.approx. 130min.SC-X205 00994A 008~036 2006.1.27 8:23 PM 페이지31 001 PagePro 9100](https://usermanual.wiki/Samsung-Electronics-Co/06MM2MX2.Users-Manual-1/User-Guide-626615-Page-35.png)
![ENGLISH3232Getting StartedNumber of Photos that can be takenVoice Record Time[ Notes ]✤Number of MP3 files that can be saved is based on 128Kbpssampling / 4MB size.✤Capacity may vary depending on file size.✤You must only format the memory card on the Sports Camcorder. ➥page 100✤Do not format the memory card on your PC.✤If you set the light on, the number of photos that can be taken willbe reduced.✤The recordable time and number of files are maximum figuresbased on using one function.In actual use, using more than one function will reduce the capacityof each.✤While saving to a Memory Card, recording may stop and a messagewill appear saying <Low speed card. Please record at lowerquality.> It is because the writing speed of the Memory Card is slow.We recommended using a Memory Card of 1.25MB/sec or greater.MediaInternalMemorySD/MMCCapacity512MB (SC-X205(L))1GB (SC-X210(L))2GB (SC-X220(L))32MB64MB128MB256MB512MB1GB2GBQuality640x480approx. 2875approx. 5754approx. 11511 approx. 177approx. 357approx. 716 approx. 1436 approx. 2875approx. 5754 approx. 11511 MediaInternalMemorySD/MMCCapacity512MB (SC-X205(L))1GB (SC-X210(L))2GB (SC-X220(L))32MB64MB128MB256MB512MB1GB2GBMP3 filesapprox. 128filesapprox. 256filesapprox. 512filesapprox. 8filesapprox. 16filesapprox. 32filesapprox. 64filesapprox. 128filesapprox. 256filesapprox. 512filesMediaInternalMemorySD/MMCCapacity512MB (SC-X205(L))1GB (SC-X210(L))2GB (SC-X220(L))32MB64MB128MB256MB512MB1GB2GBTimeapprox. 17hr.approx. 35hr.approx. 70hr.approx. 1hr.approx. 2hr.approx. 4hr.approx. 8hr.approx. 17hr.approx. 35hr.approx. 70hr.Number of MP3 files that can be savedSC-X205 00994A 008~036 2006.1.27 8:23 PM 페이지32 001 PagePro 9100](https://usermanual.wiki/Samsung-Electronics-Co/06MM2MX2.Users-Manual-1/User-Guide-626615-Page-36.png)
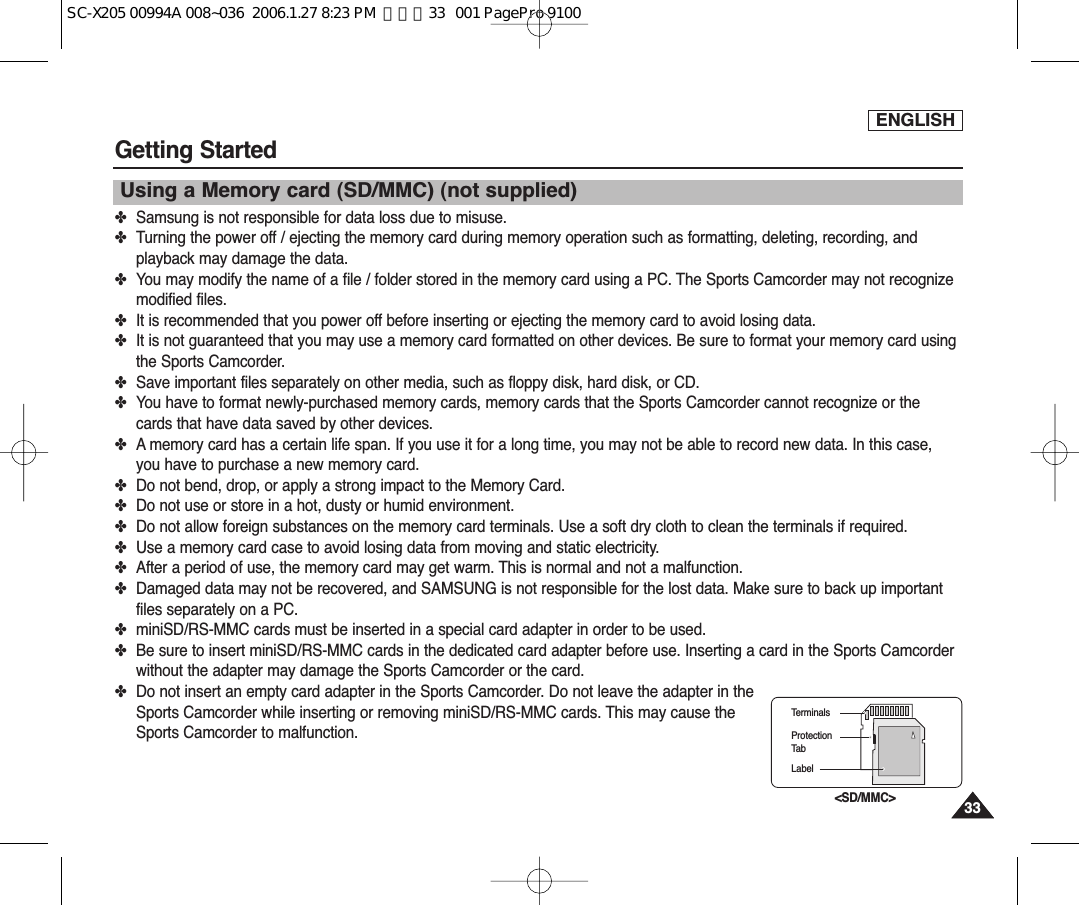
![ENGLISH3434USBMMC/SDSFSTBY 00:00:00/00:40:05External memory inserted.Do you want to changememory to external?SD Memory CardInserting / Ejecting the memory card (SD/MMC) (not supplied)1. Open the Front cover.2. Insert the memory card into the memory card slot until it softly clicks.3. Close the Front cover.Caution: This screen will appear if the memory card is inserted with the power on.◆If you select <OK>, the memory type changes to ‘External’ and if you select <Cancel>, files are stored in internal memory.◆If you insert a locked memory card, the [ ] icon is displayed next to the memory type indicator. Inserting a memory card1. Open the Front cover.2. Slightly push the memory card inwards to pop it out.3. Pull the memory card out of the memory card slot and close theFront cover.Ejecting a memory cardSSFF STBYSTBY 00:00:00/00:40:0500:00:00/00:40:05720iExternal memory inserted.External memory inserted.Do you want to changeDo you want to changememory to external?memory to external?CancelOKUSBMMC/SDSFSTBY 00:00:00/00:40:05External memory inserted.Do you want to changememory to external?SD Memory CardGetting StartedLabel pasting portionSC-X205 00994A 008~036 2006.1.27 8:23 PM 페이지34 001 PagePro 9100](https://usermanual.wiki/Samsung-Electronics-Co/06MM2MX2.Users-Manual-1/User-Guide-626615-Page-38.png)
![3535Movie Mode11Recording........................................................................................36Recording ..................................................................................36Zooming In and Out ..................................................................37Playing .............................................................................................38Playing Movie Files on the LCD monitor..................................38Playing Multiple Movie Files .....................................................39Setting the Recording Options.....................................................41Setting the Movie Size ..............................................................41Setting the Movie Quality..........................................................42Setting the White Balance ........................................................43Setting the Program AE (Programmed Auto Exposure) ..........44Setting the Effects.....................................................................45Setting the EIS (Electronic Image Stabilizer) ...........................46Setting the Focus ......................................................................47Setting the BLC (Backlight Compensation)..............................48Setting the Digital Zoom ...........................................................49Setting the Record Mode ..........................................................50Setting the Line In/Out ..............................................................51Setting the Viewing Options .........................................................52Deleting Movie Files..................................................................52Setting the Play Mode...............................................................53Locking Movie Files ..................................................................54Copying Movie Files..................................................................55◆Save important data / recordings separately on other media, toavoid accidental loss due to a system failure or other reasons.How to set toMovie modeHow to set toMovie mode12:00AM 2006/01/01 SepiaRecording...SSFF STBYSTBY 00:00:00:00:40:0500:00:00:00:40:05720iMENUMODEHOLDPowerbutton2. The Movie Record screenappears.1. Press the [POWER] button toturn on the Sports Camcorder.ENGLISHSC-X205 00994A 008~036 2006.1.27 8:23 PM 페이지35 001 PagePro 9100](https://usermanual.wiki/Samsung-Electronics-Co/06MM2MX2.Users-Manual-1/User-Guide-626615-Page-39.png)
![ENGLISH3636Movie Mode : RecordingRecordingYou can record video and store it in memory.Refer to the page 119 for recording video using the External Camera Module. (SC-X205L/X210L/X220L only)1. Press the [POWER] button to turn on the Sports Camcorder.◆The Movie Record screen appears.◆You can select Movie mode or Previous mode as the start-up mode in System Settings.➥page 1092. Press [Record/Stop] button to start recording.◆[●] indicator displays on LCD.◆The elapsed and remaining times are displayed and the Sports Camcorder startsrecording.3. Press the [Record/Stop] button again to stop recording.◆The Sports Camcorder stops recording.4. After recording, press the [POWER] button to turn off the Sports Camcorder toprevent battery power consumption.◆The timestamp will be recorded along with the movie to enable faster searching.◆[ Notes ]✤If the Auto Shut Off is set, the Sports Camcorder turns off automatically after 5 minutes. ✤Detach the Battery Pack when you finish recording to prevent unnecessary battery power consumption.✤To adjust the LCD screen brightness, set the <LCD Brightness> in System Settings mode. ➥page 102✤The LCD monitor brightness will not affect the brightness of the recording.Reading the Counter12312:00AM 2006/01/01 SepiaRecording...SSFF STBY 00:00:00:00:40:0512:00AM 2006/01/01 SepiaRecording...SFSTBY 00:00:02:00:40:0312:00AM 2006/01/01 SepiaSF00:00:02:00:40:03 Recording...720i12:00AM 2006/01/01 SepiaRecording...SFSTBY 00:00:00:00:40:0512:00AM 2006/01/01 SepiaRecording...SFSTBY 00:00:02:00:40:0312:00AM 2006/01/01 SepiaSSFF 00:00:02:00:40:03 Recording...720i12:00AM 2006/01/01 SepiaRecording...SFSTBY 00:00:00:00:40:0512:00AM 2006/01/01 SepiaRecording...SSFF STBY 00:00:02:00:40:0312:00AM 2006/01/01 SepiaSF00:00:02:00:40:03 Recording...720i12:00AM 2006/01/01 SepiaRecording...SFSTBY 00:00:00:00:40:0512:00AM 2006/01/01 SepiaRecording...SFSTBY 00:00:02:00:40:0312:00AM 2006/01/01 SepiaSF00:00:02:00:40:03 00:00:02:00:40:03 Recording...Elapsed time Remaining timeSC-X205 00994A 008~036 2006.1.27 8:23 PM 페이지36 001 PagePro 9100](https://usermanual.wiki/Samsung-Electronics-Co/06MM2MX2.Users-Manual-1/User-Guide-626615-Page-40.png)
![ENGLISH3737Movie Mode : RecordingZooming In and OutZooming allows you to change the size of the subject captured in a scene.You can take advantage of the 10x optical electro motion zoom lens.1. Press the [POWER] button to turn on the Sports Camcorder. ◆The Movie Record screen appears.◆You can select Movie mode or Previous mode as the start-up mode in System Settings. ➥page 1092. Press the [Record/Stop] button to start recording.12:00AM 2006/01/0112:00AM 2006/01/01 SepiaSepiaSS720iFF 00:00:00/00:40:0500:00:00/00:40:05WT1X1X10X10X12:00AM 2006/01/01 SepiaSF00:00:02/00:40:03WT1X10X12:00AM 2006/01/01 SepiaSF00:00:04/00:40:01WT1X10X12:00AM 2006/01/01 SepiaSF00:00:00/00:40:05WT1X10X12:00AM 2006/01/0112:00AM 2006/01/01 SepiaSepiaSS720iFF 00:00:02/00:40:0300:00:02/00:40:03WT1X1X10X10X12:00AM 2006/01/01 SepiaSF00:00:04/00:40:01WT1X10X12:00AM 2006/01/01 SepiaSF00:00:00/00:40:05WT1X10X12:00AM 2006/01/01 SepiaSF00:00:02/00:40:03WT1X10X12:00AM 2006/01/0112:00AM 2006/01/01 SepiaSepiaSS720iFF 00:00:04/00:40:0100:00:04/00:40:01WT1X1X10X10XZoom InZoom Out[ Notes ]✤Frequent use of zooming may result in higher battery power consumption.✤Optical zoom preserves the image quality.✤Refer to page 49 to read about Digital Zoom.Slide the [W/T] switch up to zoom out.●The shot subject’s size is reduced, and you can recordmovies as if you were far away from the subject.●On the zoom indicator in the LCD screen, the arrowmoves to W.●The smallest rate of zoom out is the default rate (originalresolution of the subject).Slide the [ W/T] switch down to zoom in.●The subject is larger, and you can record movies as if youwere close to the subject.●On the zoom indicator the arrow moves to T.●The largest optical zoom ratio is 10x.SC-X205 00994A 037~057 2006.1.27 8:23 PM 페이지37 001 PagePro 9100](https://usermanual.wiki/Samsung-Electronics-Co/06MM2MX2.Users-Manual-1/User-Guide-626615-Page-41.png)
![ENGLISH3838Movie Mode : PlayingPlaying Movie Files on the LCD monitorYou can view playback of movie files on the LCD monitor.1. Press the [POWER] button to turn on the Sports Camcorder.◆The Movie Record screen appears.2. Press the [PLAY] button or [Joystick(OK)].◆Switches to Movie Play mode.3. Move the [Joystick] left/right to find the movie file you want to view.◆Each movement of the [Joystick] goes to the previous/next movie.4. Press the [PLAY]button or [Joystick(OK)] to play the movie file you want. Each time you press the [PLAY] button or [Joystick(OK)], play or pause isselected repeatedly.[ Note ]✤If there is no file stored to view, the message <No Files...> appears.2312:00AM 2006/01/01720X48000:00:00/00:05:20100-0001SepiaRecording...12:00AM 2006/01/01SFSTBY 00:00:00/00:40:05720X48000:00:15/00:16:15100-0004112:00AM 2006/01/01720X48000:00:00/00:05:20100-0001SepiaRecording...12:00AM 2006/01/01SS720iFF STBY 00:00:00/00:40:05720X48000:00:15/00:16:15100-000412:00AM 2006/01/01 720X48000:00:00/00:05:20100-0001SepiaRecording...12:00AM 2006/01/01SFSTBY 00:00:00/00:40:05720X48000:00:15/00:16:15100-0004412:00AM 2006/01/01720X48000:00:00/00:05:20100-0001SepiaRecording...12:00AM 2006/01/01SFSTBY 00:00:00/00:40:05 720X48000:00:15/00:16:15100-0004PLAYbuttonSC-X205 00994A 037~057 2006.1.27 8:24 PM 페이지38 001 PagePro 9100](https://usermanual.wiki/Samsung-Electronics-Co/06MM2MX2.Users-Manual-1/User-Guide-626615-Page-42.png)
![ENGLISH3939Using the [W/T] switch in Movie Play mode, you can display multiple images on the LCD monitor.You can also select and play the desired movie file in a multi-view screen.1. Press the [POWER] button to turn on the Sports Camcorder.◆The Movie Record screen appears.2. Press the [PLAY] button or [Joystick(OK)] and move the [W/T] switch toW(WIDE).◆The Multi-view screen appears.3. Move the [Joystick] to left/right/up/down to find the movie file you want to play.4. Press the [PLAY] button or [Joystick(OK)] to play the movie file you want.◆Each time you press the [PLAY] button or [Joystick(OK)], play or pause is selectedrepeatedly.5. Press the [PLAY] button or [Joystick(OK)] again to pause. [ Notes ]✤If there is no file stored to view, the message <No Files...> appears.✤When the earphones, Audio / Video cable or * External Camera Module is connected to theSports Camcorder, the built-in speaker will automatically turn off. ( * Items apply to SC-X205L/X210L/X220L only.)Movie Mode : PlayingPlaying Multiple Movie Files12312:00AM 2006/01/01720X48000:00:05/00:05:20100-0001720X48000:00:00/00:05:20100-0001SepiaRecording...12:00AM 2006/01/01SS720iFF STBY 00:00:00/00:40:05Move Play100-000112:00AM 2006/01/01720X48000:00:05/00:05:20100-0001 720X48000:00:00/00:05:20100-0001SepiaRecording...12:00AM 2006/01/01SFSTBY 00:00:00/00:40:05Move Play100-000112:00AM 2006/01/01720X48000:00:05/00:05:20100-0001720X48000:00:00/00:05:20100-0001SepiaRecording...12:00AM 2006/01/01SFSTBY 00:00:00/00:40:05Move Play100-0001OK?ERROR412:00AM 2006/01/01 720X48000:00:05/00:05:20100-0001720X48000:00:00/00:05:20100-0001SepiaRecording...12:00AM 2006/01/01SFSTBY 00:00:00/00:40:05Move Play100-0001SC-X205 00994A 037~057 2006.1.27 8:24 PM 페이지39 001 PagePro 9100](https://usermanual.wiki/Samsung-Electronics-Co/06MM2MX2.Users-Manual-1/User-Guide-626615-Page-43.png)
![ENGLISH4040Movie Mode : Playing[PLAY] button or [Joystick(OK)]: Play or pause the movie file[W] switch: The Multi-play screen appears.[Joystick](left): In Movie Play mode: Press it to move to previous file.Press and hold it to use RPS (Reverse Playback Search) function. (RPS rate: 2x➝4x➝8x➝16x➝32x➝64x➝128x)[Joystick](right): In Movie Play mode: Press it to move to next file.Press and hold it to use FPS (Forward Playback Search) function.(FPS rate: 2x➝4x➝8x➝16x➝32x➝64x➝128x)In Movie Play mode: Press and hold it to play slowly when paused.Press it to move to the next frame when paused.Controls used to play the movie fileAdjusting the Sound 1. Press the [PLAY] button or [Joystick(OK)] to play the movie file in Movie playmode.2. Move the [Joystick] up to increase the volume.◆ Each time you move the [Joystick] up, the volume bar increases and the sound level willget louder.◆ The volume bar disappears after 1~2 seconds.3. Move the [Joystick] down to decrease the volume.◆ Each time you move the [Joystick] down, the volume bar decreases and the sound level willget quieter.◆ The volume bar disappears after 1~2 seconds.[ Notes ]✤You can adjust the volume up to 10 steps.✤You can also play the movie file on a TV screen by connecting the Sports Camcorder to a TV. ➥page 127✤A video codec is required to play the movie files recorded on the Sports Camcorder on a computer.Install the software provided in the Software CD to have the CODEC automatically installed in the system. If you do not havethe CD, search the product model name in the Download Center on the Samsung Electronics home page(www.samsung.com) to get the CODEC installation file. ➥page 1241312:00AM 2006/01/01 720X48000:00:00/00:05:20100-000112:00AM 2006/01/01720X48000:00:05/00:05:15100-000112:00AM 2006/01/01720X48000:00:00/00:05:20100-000112:00AM 2006/01/01 720X48000:00:05/00:05:15100-0001SC-X205 00994A 037~057 2006.1.27 8:24 PM 페이지40 001 PagePro 9100](https://usermanual.wiki/Samsung-Electronics-Co/06MM2MX2.Users-Manual-1/User-Guide-626615-Page-44.png)
![ENGLISH4141Movie Mode : Setting the Recording OptionsSetting the Movie SizeYou can set the movie files size. The file storage capacity depends on the memory capacity andmovie file size.1. Press the [POWER] button to turn on the Sports Camcorder.◆The Movie Record screen appears.2. Press the [MENU] button.Move the [Joystick] left / right to select <Size>.3. Move the [Joystick] up / down to select an option, and then press the [Joystick(OK)].◆Available options are: <720x480> / <352x240>4. Press the [MENU] button to exit the menu.◆The selected function icon is displayed.[ Notes ]✤If <TV> is selected in <Record Mode>, the size is set to 720i only.If <PC> is selected in <Record Mode>, the size is set to 720p or 352p.✤Regarding detailed image capacity. ➥page 31.✤Higher resolution requires more memory space, which results in shorter maximum recordingtime.✤When the screen size is set to 352(352x240), it is played back in smaller size than720(720x480) on PC.✤While the menu screen is displayed, pressing the [Record / Stop] button will move to Movierecord mode.1234SepiaRecording...12:00AM 2006/01/01SS720iFF STBY 00:00:00/00:40:05SepiaRecording...12:00AM 2006/01/01SFSTBY 00:00:00/01:00:07MovieMove ExitSelectSize352x240720x480MovieMove ExitSelectSize352x240720x480SepiaRecording...12:00AM 2006/01/01SFSTBY 00:00:00/00:40:05SepiaRecording...12:00AM 2006/01/01SFSTBY 00:00:00/01:00:07MovieMove ExitMENUSelectOKSizeAE352x240720x480MovieMove ExitSelectSize352x240720x480SepiaRecording...12:00AM 2006/01/01SFSTBY 00:00:00/00:40:05SepiaRecording...12:00AM 2006/01/01SFSTBY 00:00:00/01:00:07MovieMove ExitSelectSize352x240720x480MovieMove ExitMENUSelectOKSizeAE352x240720x480SepiaRecording...12:00AM 2006/01/01SFSTBY 00:00:00/00:40:05SepiaRecording...12:00AM 2006/01/01SS352pFF STBY 00:00:00/01:00:07MovieMove ExitSelectSize352x240720x480MovieMove ExitSelectSize352x240720x480SC-X205 00994A 037~057 2006.1.27 8:24 PM 페이지41 001 PagePro 9100](https://usermanual.wiki/Samsung-Electronics-Co/06MM2MX2.Users-Manual-1/User-Guide-626615-Page-45.png)
![ENGLISH4242Movie Mode : Setting the Recording OptionsSetting the Movie QualityYou can set the movie file's quality. The files storage capacity depends on the memorycapacity and movie file quality.1. Press the [POWER] button to turn on the Sports Camcorder.◆The Movie Record screen appears.2. Press the [MENU] button.Move the [Joystick] left / right to select <Quality>.3. Move the [Joystick] up / down to select an option, and then press the [Joystick(OK)].◆Available options are: <Super Fine> / <Fine> / <Normal>4. Press the [MENU] button to exit the menu.◆The selected function icon is displayed.[ Notes ]✤Regarding detailed image capacity. ➥page 31.✤You can record video files with size of 720i/Normal, 720p/Normal, 352p/Fine and352p/Normal onto a Memory Card but the quality is not guaranteed.✤While the menu screen is displayed, pressing the [Record / Stop] button will move toMovie record mode.1234SepiaRecording...12:00AM 2006/01/01SS720iFF STBY 00:00:00/00:40:05SepiaRecording...12:00AM 2006/01/01SSTBY 00:00:00/00:26:43MovieMove ExitSelectQualityFineSuper FineNormalNFSFSFMovieMove ExitSelectQualityFineSuper FineNormalNFSFSepiaRecording...12:00AM 2006/01/01SFSTBY 00:00:00/00:40:05SepiaRecording...12:00AM 2006/01/01SSTBY 00:00:00/00:26:43MovieMove ExitMENUSelectOKQualityAEFineSuper FineNormalNNFFSFSFSFMovieMove ExitSelectQualityFineSuper FineNormalNFSFSepiaRecording...12:00AM 2006/01/01SFSTBY 00:00:00/00:40:05SepiaRecording...12:00AM 2006/01/01SSTBY 00:00:00/00:26:43MovieMove ExitSelectQualityFineSuper FineNormalNFSFSFMovieMove ExitMENUSelectOKQualityAEFineSuper FineNormalNNFFSFSFSepiaRecording...12:00AM 2006/01/01SFSTBY 00:00:00/00:40:05SepiaRecording...12:00AM 2006/01/01SS720i STBY 00:00:00/00:26:43MovieMove ExitSelectQualityFineSuper FineNormalNFSFSFSFMovieMove ExitSelectQualityFineSuper FineNormalNFSFSC-X205 00994A 037~057 2006.1.27 8:24 PM 페이지42 001 PagePro 9100](https://usermanual.wiki/Samsung-Electronics-Co/06MM2MX2.Users-Manual-1/User-Guide-626615-Page-46.png)
![ENGLISH4343The White Balance may vary depending on the lighting conditions. The White Balance is used to preserve natural colors under different lighting conditions.1. Press the [POWER] button to turn on the Sports Camcorder.◆The Movie Record screen appears.2. Press the [MENU] button.Move the [Joystick] left / right to select <White Balance>.3. Move the [Joystick] up / down to select an option, and then press the [Joystick(OK)].◆To set Custom, frame your Sports Camcorder on a white area (such as a wall), filling the LCD monitor with white color. Press the [Joystick(OK)] to set.Movies recorded after the Custom set will be affected by the setting.4. Press the [MENU] button to exit the menu.◆The selected function icon is displayed.◆If <Auto> is selected, no icon will be displayed.[ Notes ]✤When recording outdoors, the <Auto> setting will allow you to achieve the best results.✤As the lighting conditions change, set the appropriate white balance before recording.✤The subject used for <Custom> should be white color. If not, the color balance will not be natural. ✤While the menu screen is displayed, pressing the [Record / Stop] button will move to Movierecord mode.1234Movie Mode : Setting the Recording OptionsSetting the White BalanceSFSepiaRecording...12:00AM 2006/01/01SFSTBY 00:00:00/00:40:05SepiaRecording...12:00AM 2006/01/01SSTBY 00:00:00/00:40:05MovieMove ExitMENUSelectOKWhite BalanceAEAutoFADaylightFluorescentMovieMove ExitSelectWhite BalanceAutoFluorescentDaylightSFSepiaRecording...12:00AM 2006/01/01SFSTBY 00:00:00/00:40:05SepiaRecording...12:00AM 2006/01/01SSTBY 00:00:00/00:40:05MovieMove ExitSelectWhite BalanceAutoFDaylightFluorescentMovieMove ExitMENUSelectOKWhite BalanceAEAutoFluorescentDaylightSFSFSepiaRecording...12:00AM 2006/01/01SFSTBY 00:00:00/00:40:05SepiaRecording...12:00AM 2006/01/01SS720i STBY 00:00:00/00:40:05MovieMove ExitSelectWhite BalanceAutoFFDaylightFluorescentMovieMove ExitSelectWhite BalanceAutoFluorescentDaylightSFSepiaRecording...12:00AM 2006/01/01SS720iFF STBY 00:00:00/00:40:05SepiaRecording...12:00AM 2006/01/01SSTBY 00:00:00/00:40:05MovieMove ExitSelectWhite BalanceAutoFDaylightFluorescentMovieMove ExitSelectWhite BalanceAutoFluorescentDaylightAutoDaylightFluorescentTungstenCustomAutomatically sets according to the recording environment. Adjusts the color according to daylight/indoor, outdoor lightSuitable for a fluorescent light environment.Suitable for an incandescent light environment. You can adjust the white balance as you wish based on the recording environment. SC-X205 00994A 037~057 2006.1.27 8:24 PM 페이지43 001 PagePro 9100](https://usermanual.wiki/Samsung-Electronics-Co/06MM2MX2.Users-Manual-1/User-Guide-626615-Page-47.png)
![ENGLISH4444Program AE modes are preset automatic exposure modes based upon an internal computerprogram. It allows you to adjust the aperture setting to suit different conditions.1. Press the [POWER] button to turn on the Sports Camcorder.◆The Movie Record screen appears.2. Press the [MENU] button.Move the [Joystick] left / right to select <Program AE>.3. Move the [Joystick] up / down to select an option, and then press the[Joystick(OK)].4. Press the [MENU] button to exit the menu.◆The selected function icon is displayed.◆If <Auto> is selected, no icon will be displayed.[ Note ]✤While the menu screen is displayed, pressing the [Record / Stop] button will move to Movierecord mode.Movie Mode : Setting the Recording Options1234Setting the Program AE (Programmed Auto Exposure)SFSepiaRecording...12:00AM 2006/01/01SFSTBY 00:00:00/00:40:05SepiaRecording...12:00AM 2006/01/01SSTBY 00:00:00/00:40:05MovieMove ExitMENUSelectOKProgram AEAESportsAutoSpotlightFAEAUTOMovieMove ExitSelectProgram AESportsAutoSpotlightSFSepiaRecording...12:00AM 2006/01/01SFSTBY 00:00:00/00:40:05SepiaRecording...12:00AM 2006/01/01SSTBY 00:00:00/00:40:05MovieMove ExitSelectProgram AESportsAutoSpotlightFMovieMove ExitMENUSelectOKProgram AEAESportsAutoSpotlightSFSFSepiaRecording...12:00AM 2006/01/01SFSTBY 00:00:00/00:40:05SepiaRecording...12:00AM 2006/01/01SS720i STBY 00:00:00/00:40:05MovieMove ExitSelectProgram AESportsAutoSpotlightFFMovieMove ExitSelectProgram AESportsAutoSpotlightSFSepiaRecording...12:00AM 2006/01/01SS720iFF STBY 00:00:00/00:40:05SepiaRecording...12:00AM 2006/01/01SSTBY 00:00:00/00:40:05MovieMove ExitSelectProgram AESportsAutoSpotlightFMovieMove ExitSelectProgram AESportsAutoSpotlightAutoSportsSpotlightSand/SnowAuto balances between the subject and background to get the best result. The shutter speed automatically varies from 1/60 to 1/250 per second dependingon the scene.For recording fast-moving people or objects. It is suitable for sports events and recording outside in the car.Compensates for a subject that appears too bright under strong direct light such as spotlight. It is suitable for concerts and school performances. Use when the light is very strong such as on the beach or in the snow.SC-X205 00994A 037~057 2006.1.27 8:24 PM 페이지44 001 PagePro 9100](https://usermanual.wiki/Samsung-Electronics-Co/06MM2MX2.Users-Manual-1/User-Guide-626615-Page-48.png)
![ENGLISH4545Movie Mode : Setting the Recording Options1234Setting the EffectsYou can apply various digital effects to your recording.1. Press the [POWER] button to turn on the Sports Camcorder.◆The Movie Record screen appears.2. Press the [MENU] button.Move the [Joystick] left / right to select <Effect>.3. Move the [Joystick] up / down to select an option, and then press the[Joystick(OK)].4. Press the [MENU] button to exit the menu.◆The selected effect and icon are displayed.◆If <Off> is selected, no icon will be displayed.[ Note ]✤While the menu screen is displayed, pressing the [Record / Stop] button will move to Movierecord mode.Recording...12:00AM 2006/01/01SSFSepiaRecording...12:00AM 2006/01/01SFSTBY 00:00:00/00:40:05STBY 00:00:00/00:40:05MovieMove ExitMENUSelectOKEffectAEArtOffMosaicFMovieMove ExitSelectEffectMirrorMirrorNegrtiveB&WRecording...12:00AM 2006/01/01SSFSepiaRecording...12:00AM 2006/01/01SFSTBY 00:00:00/00:40:05STBY 00:00:00/00:40:05MovieMove ExitSelectEffectArtOffMosaicFMovieMove ExitMENUSelectOKEffectAEMirrorMirrorNegrtiveB&WRecording...12:00AM 2006/01/01SSSFSFSepiaRecording...12:00AM 2006/01/01SFSTBY 00:00:00/00:40:05720i STBY 00:00:00/00:40:05MovieMove ExitSelectEffectArtOffMosaicFFMovieMove ExitSelectEffectMirrorMirrorNegrtiveB&WRecording...12:00AM 2006/01/01SSFSepiaRecording...12:00AM 2006/01/01SS720iFF STBY 00:00:00/00:40:05STBY 00:00:00/00:40:05MovieMove ExitSelectEffectArtOffMosaicFMovieMove ExitSelectEffectMirrorMirrorNegrtiveB&WOffArtMosaicSepiaNegativeMirrorB&WCancels the <Effect>.Adds artistic effects to your movie file.A mosaic overlay appears on your movie file.The picture is displayed in sepia color similar to that of an old photograph.Reverses the colors, creating the look of a negative.This mode cuts the picture in half using a Mirror effect.Changes the images into Black and White.SC-X205 00994A 037~057 2006.1.27 8:24 PM 페이지45 001 PagePro 9100](https://usermanual.wiki/Samsung-Electronics-Co/06MM2MX2.Users-Manual-1/User-Guide-626615-Page-49.png)
![ENGLISH4646Movie Mode : Setting the Recording Options1234Setting the EIS (Electronic Image Stabilizer)The Electrical Image Stabilizer is a function that compensates for hand shake and othermovements while recording. EIS provides a more stable image when:◆ Recording with zoom◆ Recording small objects◆ Recording while walking or moving◆ Recording through the window in a vehicle1. Press the [POWER] button to turn on the Sports Camcorder.◆ The Movie Record screen appears.2. Press the [MENU] button.Move the [Joystick] left / right to select <EIS>.3. Move the [Joystick] up / down to select an option, and then press the[Joystick(OK)].◆ <On>: Set the EIS function.◆ <Off >: Cancel the EIS function.4. Press the [MENU] button to exit the menu.◆If you select <On>, the EIS icon is displayed.◆If you select <Off>, no icon is displayed.[ Note ]✤While the menu screen is displayed, pressing the [Record / Stop] button will move to Movierecord mode.SFSepiaRecording...12:00AM 2006/01/01SFSTBY 00:00:00/00:40:05SepiaRecording...12:00AM 2006/01/01SSTBY 00:00:00/00:40:05MovieMove ExitMENUSelectOKEISOffOnFMovieMove ExitSelectEISOffOnTVPCSFSepiaRecording...12:00AM 2006/01/01SFSTBY 00:00:00/00:40:05SepiaRecording...12:00AM 2006/01/01SSTBY 00:00:00/00:40:05MovieMove ExitSelectEISOffOnFMovieMove ExitMENUSelectOKEISOffOnTVPCSFSFSepiaRecording...12:00AM 2006/01/01SFSTBY 00:00:00/00:40:05SepiaRecording...12:00AM 2006/01/01SS720i STBY 00:00:00/00:40:05MovieMove ExitSelectEISOffOnFFMovieMove ExitSelectEISOffOnSFSepiaRecording...12:00AM 2006/01/01SS720iFF STBY 00:00:00/00:40:05SepiaRecording...12:00AM 2006/01/01SSTBY 00:00:00/00:40:05MovieMove ExitSelectEISOffOnFMovieMove ExitSelectEISOffOnSC-X205 00994A 037~057 2006.1.27 8:24 PM 페이지46 001 PagePro 9100](https://usermanual.wiki/Samsung-Electronics-Co/06MM2MX2.Users-Manual-1/User-Guide-626615-Page-50.png)
![ENGLISH47471234Movie Mode : Setting the Recording OptionsSetting the FocusYou can set the focus depending on the subject or environment. In most situations, it is best to use the AF(Auto Focus).1. Press the [POWER] button to turn on the Sports Camcorder.◆ The Movie Record screen appears.2. Press the [MENU] button.Move the [Joystick] left / right to select <Focus>.3. Move the [Joystick] up / down to select an option, and then press the[Joystick(OK)].◆ <AF>: Set the focus automatically.◆ <MF>: Set the focus manually.4. Press the [MENU] button to exit the menu.◆The selected function icon is displayed.◆If you select <AF>, no icon is displayed.Manual Focus <MF>Adjust the focus using the [Joystick] up/down to zoom in or out manually.◆When a picture contains objects that are both close and far away from the SportsCamcorder.◆When a person is enveloped in fog or surrounded by snow.[ Notes ]✤The focus is set to <AF> automatically when the Sports Camcorder is turned off.✤While the menu screen is displayed, pressing the [Record / Stop] button will move to Movierecord mode.SepiaRecording...12:00AM 2006/01/01SS720iFF STBY 00:00:00/00:40:05MovieMove ExitSelectFocusMFAFSepiaRecording...12:00AM 2006/01/01SFSTBY 00:00:00/00:40:05MovieMove ExitSelectFocusMFAFSepiaRecording...12:00AM 2006/01/01SFSTBY 00:00:00/00:40:05MovieMove ExitMENUSelectOKFocusMFAFSepiaRecording...12:00AM 2006/01/01SFSTBY 00:00:00/00:40:05MovieMove ExitSelectFocusMFAFTVPCSepiaRecording...12:00AM 2006/01/01SFSTBY 00:00:00/00:40:05MovieMove ExitSelectFocusMFAFSepiaRecording...12:00AM 2006/01/01SFSTBY 00:00:00/00:40:05MovieMove ExitMENUSelectOKFocusMFAFTVPCSepiaRecording...12:00AM 2006/01/01SFSTBY 00:00:00/00:40:05MovieMove ExitSelectFocusMFAFSepiaRecording...12:00AM 2006/01/01SS720iFF STBY 00:00:00/00:40:05MovieMove ExitSelectFocusMFAFSC-X205 00994A 037~057 2006.1.27 8:24 PM 페이지47 001 PagePro 9100](https://usermanual.wiki/Samsung-Electronics-Co/06MM2MX2.Users-Manual-1/User-Guide-626615-Page-51.png)
![ENGLISH48481234Movie Mode : Setting the Recording OptionsSetting the BLC (Backlight Compensation)The Backlight Compensation function helps to make the subject brighter when the subject is in front of a window or the subject is too dark to distinguish. You can use this function when using the Sports Camcorder in bright or snowy backgrounds.1. Press the [POWER] button to turn on the Sports Camcorder.◆ The Movie Record screen appears.2. Press the [MENU] button.Move the [Joystick] left / right to select <BLC>.3. Move the [Joystick] up / down to select an option, and then press the[Joystick(OK)].◆ <On>: Set the BLC function.◆ <Off>: Cancel the BLC function.4. Press the [MENU] button to exit the menu.◆The selected function icon is displayed.◆If you select <Off>, no icon is displayed.[ Notes ]✤The BLC is set to <Off> when the Sports Camcorder is turned off.✤While the menu screen is displayed, pressing the [Record / Stop] button will move to Movierecord mode.SepiaRecording...12:00AM 2006/01/01SFSTBY 00:00:00/00:40:05MovieMove ExitMENUSelectOKBLCOffOnSepiaRecording...12:00AM 2006/01/01SFSTBY 00:00:00/00:40:05MovieMove ExitSelectBLCOffOnTVPCSepiaRecording...12:00AM 2006/01/01SFSTBY 00:00:00/00:40:05MovieMove ExitSelectBLCOffOnSepiaRecording...12:00AM 2006/01/01SFSTBY 00:00:00/00:40:05MovieMove ExitMENUSelectOKBLCOffOnTVPCSepiaRecording...12:00AM 2006/01/01SFSTBY 00:00:00/00:40:05MovieMove ExitSelectBLCOffOnSepiaRecording...12:00AM 2006/01/01SS720iFF STBY 00:00:00/00:40:05MovieMove ExitSelectBLCOffOnSepiaRecording...12:00AM 2006/01/01SS720iFF STBY 00:00:00/00:40:05MovieMove ExitSelectBLCOffOnSepiaRecording...12:00AM 2006/01/01SFSTBY 00:00:00/00:40:05MovieMove ExitSelectBLCOffOnSC-X205 00994A 037~057 2006.1.27 8:24 PM 페이지48 001 PagePro 9100](https://usermanual.wiki/Samsung-Electronics-Co/06MM2MX2.Users-Manual-1/User-Guide-626615-Page-52.png)
![ENGLISH49491234Movie Mode : Setting the Recording OptionsSetting the Digital ZoomZooming more than 10x is achieved digitally, up to 100X when combined with optical zoom. The Digital Zoom processes data to enlarge the center portion of the image to fill the frame. It may produce a less detailed and slightly grainy picture.1. Press the [POWER] button to turn on the Sports Camcorder.◆The Movie Record screen appears.2. Press the [MENU] button.Move the [Joystick] left / right to select <Digital Zoom>.3. Move the [Joystick] up / down to select an option, and then press the[Joystick(OK)].◆<On>: Enables digital zoom. Attempts to zoom in more than 10x will automaticallyapply digital zooming. (up to 100x)◆<Off>: Disables digital zoom. Only optical zoom 10x will be supported for zooming4. Press the [MENU] button to exit the menu.◆When using the digital zoom switch, a digital zoom indicator appears on the screen.[ Note ]✤While the menu screen is displayed, pressing the [Record / Stop] button will move toMovie record mode.SepiaRecording...12:00AM 2006/01/01SFSTBY 00:00:00/00:40:05MovieMove ExitMENUSelectOKDigital ZoomOffOnSepiaRecording...12:00AM 2006/01/01SFSTBY 00:00:00/00:40:05MovieMove ExitSelectDigital ZoomOffOnWT1X10XTVPCSepiaRecording...12:00AM 2006/01/01SFSTBY 00:00:00/00:40:05MovieMove ExitSelectDigital ZoomOffOnSepiaRecording...12:00AM 2006/01/01SFSTBY 00:00:00/00:40:05MovieMove ExitMENUSelectOKDigital ZoomOffOnWT1X10XTVPCSepiaRecording...12:00AM 2006/01/01SFSTBY 00:00:00/00:40:05MovieMove ExitSelectDigital ZoomOffOnSepiaRecording...12:00AM 2006/01/01SS720iFF STBY 00:00:00/00:40:05MovieMove ExitSelectDigital ZoomOffOnWT1X1X10X10XSepiaRecording...12:00AM 2006/01/01SS720iFF STBY 00:00:00/00:40:05MovieMove ExitSelectDigital ZoomOffOnSepiaRecording...12:00AM 2006/01/01SFSTBY 00:00:00/00:40:05MovieMove ExitSelectDigital ZoomOffOnWT1X10XSC-X205 00994A 037~057 2006.1.27 8:24 PM 페이지49 001 PagePro 9100](https://usermanual.wiki/Samsung-Electronics-Co/06MM2MX2.Users-Manual-1/User-Guide-626615-Page-53.png)
![ENGLISH5050123Movie Mode : Setting the Recording OptionsSetting the Record ModeYou can set the proper record mode before starting movie file recording..1. Press the [POWER] button to turn on the Sports Camcorder.◆The Movie Record screen appears.2. Press the [MENU] button.Move the [Joystick] left / right to select <Record Mode>.3. Move the [Joystick] up / down to select an option, and then press the[Joystick(OK)].◆<TV>: The system generates clear images when played back on TV.◆<PC>: The system generates clear images when played back on PC.◆We recommend copying the file onto a PC or connecting the Sports Camcorder to aTV for a better playback picture.4. Press the [MENU] button to exit the menu.◆If you select <TV>, <i> is displayed with size icon.◆If you select <PC>, <p> is displayed with size icon.[ Notes ]✤If <TV> is selected as the Record Mode, the size is set to 720i only.✤If <PC> is selected as the Record Mode, the size is set to 720p or 352p.✤When the size is set to <352>, <PC> is automatically selected for movie files recording.✤While the menu screen is displayed, pressing the [Record / Stop] button will move toMovie record mode.SepiaRecording...12:00AM 2006/01/01SFSTBY 00:00:00/00:40:05SepiaRecording...12:00AM 2006/01/01SFSTBY 00:00:00/00:40:05MovieMove ExitMENUSelectOKRecord ModePCTVMovieMove ExitSelectRecord ModePCTVTVPCSepiaRecording...12:00AM 2006/01/01SFSTBY 00:00:00/00:40:05SepiaRecording...12:00AM 2006/01/01SFSTBY 00:00:00/00:40:05MovieMove ExitSelectRecord ModePCTVMovieMove ExitMENUSelectOKRecord ModePCTVTVPC4SepiaRecording...12:00AM 2006/01/01SFSTBY 00:00:00/00:40:05SepiaRecording...12:00AM 2006/01/01SS720pFF STBY 00:00:00/00:40:05MovieMove ExitSelectRecord ModePCTVMovieMove ExitSelectRecord ModePCTVSepiaRecording...12:00AM 2006/01/01SS720iFF STBY 00:00:00/00:40:05SepiaRecording...12:00AM 2006/01/01SFSTBY 00:00:00/00:40:05MovieMove ExitSelectRecord ModePCTVMovieMove ExitSelectRecord ModePCTVSC-X205 00994A 037~057 2006.1.27 8:24 PM 페이지50 001 PagePro 9100](https://usermanual.wiki/Samsung-Electronics-Co/06MM2MX2.Users-Manual-1/User-Guide-626615-Page-54.png)
![ENGLISH5151You can record or play back the contents of the Sports Camcorder onto an external deviceand vice versa. ➥page 128, 1291. Press the [POWER] button to turn on the Sports Camcorder.◆The Movie Record screen appears.2. Press the [MENU] button.Move the [Joystick] left / right to select <Line In/Out>.3. Move the [Joystick] up / down to select an option, and then press the[Joystick(OK)].◆<In>: Select this when recording the contents of an external device into the SportsCamcorder.◆<Out>: Select this when recording or playing back the contents of the SportsCamcorder onto an external device.4. Press the [MENU] button to exit the menu.◆The Sports Camcorder is set to the selected setting.[ Note ]✤While the menu screen is displayed, pressing the [Record / Stop] button will move toMovie record mode.Movie Mode : Setting the Recording OptionsSetting the Line In/Out123MovieMove ExitSelectLine In/OutInOutMovieMove ExitSelectInOutSepiaRecording...12:00AM 2006/01/01SS720iFF STBY 00:00:00/00:40:05Line In/OutMovieMove ExitMENUSelectOKLine In/OutInAEOutMovieMove ExitSelectInOutSepiaRecording...12:00AM 2006/01/01SFSTBY 00:00:00/00:40:05Line In/OutTVPCMovieMove ExitSelectLine In/OutInOutMovieMove ExitMENUSelectOKInAEOutSepiaRecording...12:00AM 2006/01/01SFSTBY 00:00:00/00:40:05Line In/OutTVPCSC-X205 00994A 037~057 2006.1.27 8:24 PM 페이지51 001 PagePro 9100](https://usermanual.wiki/Samsung-Electronics-Co/06MM2MX2.Users-Manual-1/User-Guide-626615-Page-55.png)
![ENGLISH525223Movie Mode : Setting the Viewing OptionsDeleting Movie FilesYou can delete saved movie files.1. Press the [POWER] button to turn on the Sports Camcorder.◆The Movie Record screen appears.2. Press the [PLAY] button or [Joystick(OK)].◆Switches to Movie Play mode.◆Move to desired movie file, using the [Joystick].3. Press the [DELETE] button on the LCD monitor.4. Select an option by moving the [Joystick] up / down and then press the[Joystick(OK)]. ◆<OK>: Deletes the selected movie file.◆<Cancel>: Cancels the deletion.3. Move the [W/T] switch to W (WIDE).◆The screen switches to multi-view.4. Press the [DELETE] button on the LCD monitor.5. Select an option by moving the [Joystick] up / down and then press the[Joystick(OK)].◆<OK>: Deletes the selected movie file using the [Joystick(OK)].◆<Multi Select>: Multiple movie files can be selected using the [Joystick(OK)]. < ✔ > indicator appears on the selected files. Press the [PLAY] button to delete.◆<All>: All movie files will be deleted.◆<Cancel>: Cancels the deletion.[ Note ]✤While the menu screen is displayed, pressing the [Record / Stop] button will move to Movierecord mode.00:00:00/00:10:40720X480100-0001Move Select00:00:00/00:10:40720X480100-0001Move SelectOKCancelOK34Move Play100-0001OK?ERRORMove Select100-0003Move Play100-0001Move Select100-0003OK?ERRORCancelOKMulti SelectAllDeleting Movie Files in Full Screen-ViewDeleting Movie Files in Multi-ViewPLAYbutton[Joystick(OK)]SC-X205 00994A 037~057 2006.1.27 8:24 PM 페이지52 001 PagePro 9100](https://usermanual.wiki/Samsung-Electronics-Co/06MM2MX2.Users-Manual-1/User-Guide-626615-Page-56.png)
![ENGLISH5353You can play all files continuously or play the selected file only. You can also set the repeat option for all files.1. Press the [POWER] button to turn on the Sports Camcorder.◆The Movie Record screen appears.2. Press the [PLAY] button or [Joystick(OK)].◆Switches to Movie Play mode.3. Press the [MENU] button.Move the [Joystick] left / right to select <Play Mode>.4. Move the [Joystick] up / down to select an option, and then press the [Joystick(OK)].◆<Play One>: The selected movie file will be played.◆<Play All>: All movie files will be played.◆<Repeat One>: The selected movie file will be played repeatedly.◆<Repeat All>: All movie files will be played repeatedly.5. Press the [MENU] button to exit the menu. Press the [PLAY] button.◆ The selected option will be applied.[ Note ]✤While the menu screen is displayed, pressing the [Record / Stop] button will move to Movierecord mode.34Movie Mode : Setting the Viewing OptionsSetting the Play Mode720X48000:00:00/00:10:40100-0001720X48000:00:10/00:10:30100-0001MovieMove ExitMENUSelectOKPlay ModePlay AllPlay OneRepeat One 1MovieMove ExitSelectPlay ModePlay AllPlay OneRepeat One 1720X48000:00:00/00:10:40100-0001720X48000:00:10/00:10:30100-0001MovieMove ExitSelectPlay ModePlay AllPlay OneRepeat One 1MovieMove ExitMENUSelectOKPlay ModePlay AllPlay OneRepeat One 12 720X48000:00:00/00:10:40100-0001720X48000:00:10/00:10:30100-0001MovieMove ExitSelectPlay ModePlay AllPlay OneRepeat One 1MovieMove ExitSelectPlay ModePlay AllPlay OneRepeat One 15720X48000:00:00/00:10:40100-0001 720X48000:00:10/00:10:30100-0001MovieMove ExitSelectPlay ModePlay AllPlay OneRepeat One 1MovieMove ExitSelectPlay ModePlay AllPlay OneRepeat One 1SC-X205 00994A 037~057 2006.1.27 8:24 PM 페이지53 001 PagePro 9100](https://usermanual.wiki/Samsung-Electronics-Co/06MM2MX2.Users-Manual-1/User-Guide-626615-Page-57.png)
![ENGLISH5454Movie Mode : Setting the Viewing OptionsLocking Movie FilesYou can protect saved important movie files from accidental deletion. Protected files will not bedeleted unless you release the protection or format the memory.1. Press the [POWER] button to turn on the Sports Camcorder.◆The Movie Record screen appears.2. Press the [PLAY] button or [Joystick(OK)].◆Switches to Movie Play mode.◆Move to desired movie file, using the [Joystick].3. Press the [MENU] button.Move the [Joystick] left / right to select <Lock>.4. Press the [Joystick(OK)] to lock.◆The selected movie file is locked.3. Move the [W/T] switch to W (WIDE).◆The screen switches to multi-view.4. Press the [MENU] button.Move the [Joystick] left / right to select <Lock>.5. Move the [Joystick] up / down to select an option, and then press the[Joystick(OK)].◆<Lock>: Locks the selected movie file using the [Joystick(OK)].◆<Multi Select>: Multiple movie files can be selected using the [Joystick(OK)]. < > indicator appears on the selected files. Press the [PLAY] button to lock.◆<Lock All>: All movie files are locked.◆<Unlock All>: Unlocking all movie files.[ Notes ]✤The < > icon is displayed on the locked file.✤While the menu screen is displayed, pressing the [Record / Stop] button will move to Movierecord mode.Locking Movie Files in Full Screen-ViewLocking Movie Files in Multi-View34720X48000:00:00/00:10:40100-0001MovieMove ExitMENUSelectOKLockLock 720X48000:00:00/00:10:40100-0001MovieMove ExitSelectLockLock34Move Play100-0002OK?ERRORMovieMove ExitSelectLockLockLock AllMulti Select100-0002Move Play100-0002?ERRORMovieMove ExitMENUSelectOKLockLockLock AllMulti Select100-0002SC-X205 00994A 037~057 2006.1.27 8:24 PM 페이지54 001 PagePro 9100](https://usermanual.wiki/Samsung-Electronics-Co/06MM2MX2.Users-Manual-1/User-Guide-626615-Page-58.png)
![ENGLISH5555Movie Mode : Setting the Viewing OptionsCopying Movie FilesYou can copy saved files from the internal memory to a memory card and vice versa.1. Insert a memory card in the memory card slot on Sports Camcorder.2. Press the [POWER] button to turn on the Sports Camcorder.◆The Movie Record screen appears.3. Press the [PLAY] button or [Joystick(OK)].◆Switches to Movie Play mode.◆Move to desired movie file, using the [Joystick].4. Press the [MENU] button.Move the [Joystick] left / right to select <Copy To>.5. Press the [Joystick(OK)] to copy.◆Copies the selected movie file.4. Move the [W/T] switch to W (WIDE).◆The screen switches to multi-view.5. Press the [MENU] button.Move the [Joystick] left / right to select <Copy To>.6. Move the [Joystick] up / down to select an option, and then press the[Joystick(OK)].◆<OK>: Copies the selected movie file.◆<Multi Select>: Multiple movie files can be selected using the [Joystick(OK)]. < ✔ > indicator appears on the selected files. Press the [PLAY] button to copy.◆<All>: Cancel copying movie file.[ Notes ]✤The Sports Cam copies from the currently-used memory to another. If the internal memory wasused, it copies to a memory card.✤If the memory card is not inserted, you cannot perform the <Copy To> function.✤While the menu screen is displayed, pressing the [Record / Stop] button will move to Movie record mode.Copying Movie Files in Full Screen-ViewCopying Movie Files in Multi-View45MovieMove ExitMENUSelectOKCopy ToOKMovieMove ExitSelectCopy ToOKCopying file(s)...SMOV0005.AVIPress OK to cancel.MovieMove ExitSelectCopy ToOKMovieMove ExitMENUSelectOKCopy ToOKCopying file(s)...SMOV0005.AVIPress OK to cancel.Cancel45Move Play100-0001OK?ERRORMovieMove ExitSelectCopy ToOKMulti SelectAll100-0001Move Play100-0001?ERRORMovieMove ExitMENUSelectOKCopy ToOKMulti SelectAll100-0001SC-X205 00994A 037~057 2006.1.27 8:24 PM 페이지55 001 PagePro 9100](https://usermanual.wiki/Samsung-Electronics-Co/06MM2MX2.Users-Manual-1/User-Guide-626615-Page-59.png)
![Photo Mode22Capturing.........................................................................................57Capturing Images......................................................................57Zooming In and Out ..................................................................58Viewing ............................................................................................59Viewing Photo Files on the LCD monitor .................................59Viewing Multiple Photo Files.....................................................60Setting the Capturing Options......................................................61Setting the White Balance ........................................................61Setting the Program AE (Programmed Auto Exposure) ..........62Setting the Effects.....................................................................63Setting the Flash .......................................................................64Setting the Continuous Shot.....................................................65Setting the EIS (Electronic Image Stabilizer) ...........................66Setting the Focus ......................................................................67Setting the BLC (Backlight Compensation)..............................68Setting the Digital Zoom ...........................................................69Setting the Viewing Options .........................................................70Deleting Photo Files..................................................................70Setting the Slide show ..............................................................71Setting the DPOF (Digital Print Order Format) Function .........72Locking Photo Files...................................................................73Copying Photo Files..................................................................74◆Save important data / recordings separately on other media, toavoid accidental loss due to a system failure or other reasons.How to set to Photo modeHow to set to Photo modePhoto2. Set the Photo mode bypressing the [MODE] button.MENUMODEDC INHOLDPowerbutton1. Press the [POWER] button toturn on the Sports Camcorder.ENGLISH5656SC-X205 00994A 037~057 2006.1.27 8:24 PM 페이지56 001 PagePro 9100](https://usermanual.wiki/Samsung-Electronics-Co/06MM2MX2.Users-Manual-1/User-Guide-626615-Page-60.png)
![ENGLISH5757Photo Mode : CapturingCapturing ImagesYou can take still photo images.1. Press the [POWER] button to turn on the Sports Camcorder.◆The Movie Record screen appears.2. Set the Photo mode by pressing the [MODE] button.◆The Photo Capture screen appears.3. Press the [Record / Stop] button to take a picture.4. After capturing, press the [POWER] button to turn off the Sports Camcorderto prevent battery power consumption.[ Notes ]✤If the battery is low, the flash will not operate automatically.✤In order to take pictures on the memory card, insert a memory card and then set the storagetype to <External>. ➥page 973SSCapturing...Sepia12:00AM 2006/01/01SSSSSepia12:00AM 2006/01/01 Capturing...2SSSSCapturing...Sepia12:00AM 2006/01/01 SSSepia12:00AM 2006/01/01Capturing...1SSCapturing...Sepia12:00AM 2006/01/01SSSepia12:00AM 2006/01/01Capturing...MENUMODEC INHOLDPOWERbuttonSC-X205 00994A 037~057 2006.1.27 8:24 PM 페이지57 001 PagePro 9100](https://usermanual.wiki/Samsung-Electronics-Co/06MM2MX2.Users-Manual-1/User-Guide-626615-Page-61.png)
![ENGLISH5858Photo Mode : CapturingZooming In and OutZooming lets you change the size of the subject captured in a scene.You can take advantage of the 10x optical electro motion zoom lens.1. Press the [POWER] button to turn on the Sports Camcorder.◆The Movie Record screen appears.2. Set the Photo mode by pressing the [MODE] button.◆The Photo Capture screen appears.[ Notes ]✤Frequent use of zooming may result in higher battery power consumption.✤You can take advantage of 10x digital zoom as well as 10x optical zoom for atotal of 100x zoom.✤Optical zoom preserves the image quality.S100Sepia12:00AM 2006/01/01SSWT1X1X10X10X Sepia12:00AM 2006/01/01SWT1X10XSepia12:00AM 2006/01/01WT1X10XS100Sepia12:00AM 2006/01/01SWT1X10XSepia12:00AM 2006/01/01SSWT1X1X10X10X Sepia12:00AM 2006/01/01WT1X10XSS100Sepia12:00AM 2006/01/01SWT1X10XSepia12:00AM 2006/01/01SWT1X10XSepia12:00AM 2006/01/01WT1X1X10X10X Zoom InZoom OutSlide the [W/T] switch up to zoom out.●The shot subject’s size is reduced, and you can take apicture as if you were far away from the subject.●On the zoom indicator in the LCD screen, the arrowmoves to W.●The smallest rate of zoom out is the default rate(original resolution of the subject).Slide the [W/T] switch down to zoom in.●The subject is larger, and you can take a picture as ifyou were close to the subject.●On the zoom indicator the arrow moves to T.●The largest optical zoom ratio is 10x, which is thebiggest among the basic zoom.SC-X205 00994A 058~075 2006.1.27 8:24 PM 페이지58 001 PagePro 9100](https://usermanual.wiki/Samsung-Electronics-Co/06MM2MX2.Users-Manual-1/User-Guide-626615-Page-62.png)
![ENGLISH5959Photo Mode : ViewingViewing Photo Files on the LCD monitorIt is handy and practical to view pictures using the LCD monitor in locations such as in a car,indoors, or outdoors.1. Press the [POWER] button to turn on the Sports Camcorder.◆The Movie Record screen appears.2. Set the Photo mode by pressing the [MODE] button.◆The Photo Capture screen appears.3. Press the [PLAY] button or [Joystick(OK)].◆Switches to Photo View mode.4. Move the [Joystick] left / right to find the photo you want to view.◆Each movement of the joystick goes to the previous / next photo.[ Notes ]✤If there is no file stored to view, the message <No Files...> appears.✤Moving the [Joystick] right at the last photo will move to the first photo.✤Moving the [Joystick] left at the first photo will move to the last photo.✤Moving the [Joystick] left / right for more than 1 second will start fast search.✤While the menu screen is displayed, pressing the [Record / Stop] button will move to PhotoCapture mode.213100Sepia12:00AM 2006/01/0101Sepia12:00AM 2006/01/0101Capturing...Sepia12:00AM 2006/01/01SS 100-0001100-0002100Sepia12:00AM 2006/01/0101Sepia12:00AM 2006/01/0101Capturing...Sepia12:00AM 2006/01/01S 100-0001100-00024100Sepia12:00AM 2006/01/0101Sepia12:00AM 2006/01/0101Capturing...Sepia12:00AM 2006/01/01S100-0001 100-0002MENUMODENHOLDPowerbuttonSC-X205 00994A 058~075 2006.1.27 8:24 PM 페이지59 001 PagePro 9100](https://usermanual.wiki/Samsung-Electronics-Co/06MM2MX2.Users-Manual-1/User-Guide-626615-Page-63.png)
![ENGLISH6060Photo Mode : ViewingViewing Multiple Photo FilesUsing the [W/T] switch in Photo View mode, you can display multiple images on one LCD screen.1. Press the [POWER] button to turn on the Sports Camcorder.◆The Movie Record screen appears.2. Set the Photo mode by pressing the [MODE] button.◆The Photo Capture screen appears.3. Press the [PLAY] button or [Joystick(OK)] and slide the [W/T] switch toW(WIDE).◆The Multi-view screen appears.4. Move the [Joystick] to the left / right / up or down to find the photo file youwant to View.5. Press [PLAY] button or [Joystick(OK)] to view the photo file you want.◆The full screen is displayed.[ Notes ]✤If there is no file stored to view, the message <No Files...> appears.✤Display time may vary depending on the picture size.✤The image edited or turned in Image Viewer program on your PC may not be displayed.234100720X480SS12:00AM 2006/01/0101Sepia01Move View100-0001100-0001Capturing...Sepia12:00AM 2006/01/01 100720X480S12:00AM 2006/01/0101Sepia01Move View100-0001 100-0001Capturing...Sepia12:00AM 2006/01/01100720X480S12:00AM 2006/01/0101Sepia01Move View100-0001OK100-0001Capturing...Sepia12:00AM 2006/01/01SC-X205 00994A 058~075 2006.1.27 8:24 PM 페이지60 001 PagePro 9100](https://usermanual.wiki/Samsung-Electronics-Co/06MM2MX2.Users-Manual-1/User-Guide-626615-Page-64.png)
![ENGLISH6161Photo Mode : Setting the Capturing OptionsSetting the White Balance345SSSSCapturing...Sepia12:00AM 2006/01/01PhotoMove ExitMENUSelectOKWhite BalanceFluorescentDaylightAutoCapturing...Sepia12:00AM 2006/01/01PhotoMove ExitSelectWhite BalanceFluorescentAutoADaylightSSSSCapturing...Sepia12:00AM 2006/01/01PhotoMove ExitSelectWhite BalanceFluorescentDaylightAutoCapturing...Sepia12:00AM 2006/01/01PhotoMove ExitMENUSelectOKWhite BalanceFluorescentAutoADaylightSSSSSSCapturing...Sepia12:00AM 2006/01/01PhotoMove ExitSelectWhite BalanceFluorescentDaylightAutoCapturing...Sepia12:00AM 2006/01/01 PhotoMove ExitSelectWhite BalanceFluorescentAutoDaylightThe White Balance allows calibration of the picture for accurate color display in different lightingconditions. We recommended setting the white balance prior to any photo capturing.1. Press the [POWER] button to turn on the Sports Camcorder.◆The Movie Record screen appears.2. Set the Photo mode by pressing the [MODE] button.◆The Photo Capture screen appears.3. Press the [MENU] button.Move the [Joystick] left / right to select <White Balance>.4. Move the [Joystick] up / down to select an option, and then press the [Joystick(OK)].◆To set Custom, frame your Sports Camcorder on a white area (such as a wall), filling theLCD monitor with white color. Press the [Joystick(OK)] to set.5. Press the [MENU] button to exit the menu.◆The selected function icon is displayed.◆If <Auto> is selected, no icon will be displayed.[ Notes ]✤When taking pictures outdoors, <Auto> setting will allow you to obtain the best results.✤As the lighting condition changes, set the appropriate white balance before taking a picture.✤The subject used for <Custom> should be white color. If not, the color balance will not benatural. ✤While the menu screen is displayed, pressing the [Record / Stop] button will move to PhotoCapture mode.2SSSSSSCapturing...Sepia12:00AM 2006/01/01 PhotoMove ExitSelectWhite BalanceFluorescentDaylightAutoCapturing...Sepia12:00AM 2006/01/01PhotoMove ExitSelectWhite BalanceFluorescentAutoDaylightAutoDaylightFluorescentTungstenCustomAutomatically sets according to the shooting environment. Adjusts the color according to daylight/indoor, outdoor light.Suitable for a fluorescent light environment.Suitable for an incandescent light environment. Adjusts the white balance based on the shooting environment.SC-X205 00994A 058~075 2006.1.27 8:24 PM 페이지61 001 PagePro 9100](https://usermanual.wiki/Samsung-Electronics-Co/06MM2MX2.Users-Manual-1/User-Guide-626615-Page-65.png)
![ENGLISH6262Photo Mode : Setting the Capturing OptionsSetting the Program AE (Programmed Auto Exposure)2345100100SSSSSSCapturing...Sepia12:00AM 2006/01/01 PhotoMove ExitSelectProgram AESpotlightSportsAutoCapturing...Sepia12:00AM 2006/01/01PhotoMove ExitSelectProgram AESpotlightAutoSports100100SSSSCapturing...Sepia12:00AM 2006/01/01PhotoMove ExitMENUSelectOKProgram AESpotlightSportsAutoCapturing...Sepia12:00AM 2006/01/01PhotoMove ExitSelectProgram AESpotlightAutoSports100100SSSSCapturing...Sepia12:00AM 2006/01/01PhotoMove ExitSelectProgram AESpotlightSportsAutoCapturing...Sepia12:00AM 2006/01/01PhotoMove ExitMENUSelectOKProgram AESpotlightAutoSports100100SSSSSSCapturing...Sepia12:00AM 2006/01/01PhotoMove ExitSelectProgram AESpotlightSportsAutoCapturing...Sepia12:00AM 2006/01/01 PhotoMove ExitSelectProgram AESpotlightAutoSportsProgram AE modes are preset automatic exposure modes based upon an internal computerprogram. Program AE allows allows you to adjust the aperture setting to suit different conditions.1. Press the [POWER] button to turn on the Sports Camcorder.◆The Movie Record screen appears.2. Set the Photo mode by pressing the [MODE] button.◆The Photo Capture screen appears.3. Press the [MENU] button.Move the [Joystick] left / right to select <Program AE>.4. Move the [Joystick] up / down to select an option, and then press the [Joystick(OK)].5. Press the [MENU] button to exit the menu.◆The selected function icon is displayed.◆If you select <Auto>, no icon is displayed.[ Note ]✤While the menu screen is displayed, pressing the [Record / Stop] button will move to PhotoCapture mode.AutoSportsSpotlightSand/SnowAuto balances between the subject and background to get the best result. The shutter speed automatically varies from 1/60 to 1/250 per second dependingon the scene.For recording fast-moving people or objects. It is suitable for sports events and recording outside in the car.Compensates for a subject that appears too bright under strong direct light such as spotlight. It is suitable for concerts and school performances. Use when the light is very strong such as on the beach or in the snow.SC-X205 00994A 058~075 2006.1.27 8:24 PM 페이지62 001 PagePro 9100](https://usermanual.wiki/Samsung-Electronics-Co/06MM2MX2.Users-Manual-1/User-Guide-626615-Page-66.png)
![ENGLISH6363Photo Mode : Setting the Capturing OptionsSetting the Effects345Mirror100SSCapturing...Sepia12:00AM 2006/01/01PhotoMove ExitMENUSelectOKMosaicArtOffPhotoMove ExitSelectSepiaNegativeMirrorEffectEffectMirror100SSCapturing...Sepia12:00AM 2006/01/01PhotoMove ExitSelectMosaicArtOffPhotoMove ExitMENUSelectOKSepiaNegativeMirrorEffectEffectMirror100SSCapturing...Sepia12:00AM 2006/01/01PhotoMove ExitSelectMosaicArtOffPhotoMove ExitSelectSepiaNegativeMirrorEffectEffectYou can apply various digital effects to your photos.1. Press the [POWER] button to turn on the Sports Camcorder.◆The Movie Record screen appears.2. Set the Photo mode by pressing the [MODE] button.◆The Photo Capture screen appears.3. Press the [MENU] button.Move the [Joystick] left / right to select <Effect>.4. Move the [Joystick] up / down to select an option, and then press the [Joystick(OK)].5. Press the [MENU] button to exit the menu.◆The selected effect and icon are displayed.◆If you select <Off>, no icon is displayed.[ Note ]✤While the menu screen is displayed, pressing the [Record / Stop] button will move to PhotoCapture mode.2Mirror100SSSSCapturing...Sepia12:00AM 2006/01/01 PhotoMove ExitSelectMosaicArtOffPhotoMove ExitSelectSepiaNegativeMirrorEffectEffectOffArtMosaicSepiaNegativeMirrorB&WCancels the <Effect>.Adds artistic effects to your photo file.A mosaic overlay appears on your photo file.The picture is displayed in sepia color similar to that of an old photograph.Reverses the colors, creating the look of a negative.This mode cuts the picture in half using a mirror effect.Changes the images into Black and White.SC-X205 00994A 058~075 2006.1.27 8:24 PM 페이지63 001 PagePro 9100](https://usermanual.wiki/Samsung-Electronics-Co/06MM2MX2.Users-Manual-1/User-Guide-626615-Page-67.png)
![ENGLISH6464Photo Mode : Setting the Capturing OptionsSetting the Flash345100SS100SSCapturing...Sepia12:00AM 2006/01/01Capturing...Sepia12:00AM 2006/01/01PhotoMove ExitSelectFlashOffPhotoMove ExitMENUSelectOKFlashOffOnAutoOnAuto100SS100SSCapturing...Sepia12:00AM 2006/01/01Capturing...Sepia12:00AM 2006/01/01PhotoMove ExitMENUSelectOKFlashOffPhotoMove ExitSelectFlashOffOnAutoOnAuto100SSSS100SSCapturing...Sepia12:00AM 2006/01/01Capturing...Sepia12:00AM 2006/01/01 PhotoMove ExitSelectFlashOffPhotoMove ExitSelectFlashOffOnAutoOnAutoFlash is very useful not only for brighter subjects at night, but also in daytime when there is notenough lighting on the subject, such as in a shadow, indoors, and in backlight situations. 1. Press the [POWER] button to turn on the Sports Camcorder.◆The Movie Record screen appears.2. Set the Photo mode by pressing the [MODE] button.◆The Photo Capture screen appears.3. Press the [MENU] button.Move the [Joystick] left / right to select <Flash>.4. Move the [Joystick] up / down to select an option, and then press the [Joystick(OK)].◆<On>: Flash will go on.◆<Auto>: Flash will be set automatically according to lighting conditions.◆<Off>:Flash will not come on. Select this option when you cannot use the flash in locations such as a museum.5. Press the [MENU] button to exit the menu.◆The selected function icon is displayed.[ Notes ]✤If the battery is low, the flash will not operate automatically.✤While the menu screen is displayed, pressing the [Record / Stop] button will move to PhotoCapture mode.2100SS100SSSSCapturing...Sepia12:00AM 2006/01/01 Capturing...Sepia12:00AM 2006/01/01PhotoMove ExitSelectFlashOffPhotoMove ExitSelectFlashOffOnAutoOnAutoSC-X205 00994A 058~075 2006.1.27 8:24 PM 페이지64 001 PagePro 9100](https://usermanual.wiki/Samsung-Electronics-Co/06MM2MX2.Users-Manual-1/User-Guide-626615-Page-68.png)
![ENGLISH6565Photo Mode : Setting the Capturing OptionsSetting the Continuous Shot345SS100100SSCapturing...Sepia12:00AM 2006/01/01Capturing...Sepia12:00AM 2006/01/01PhotoMove ExitSelectContinuous ShotOff3 shotsPhotoMove ExitMENUSelectOK3 shotsOffContinuous ShotSS100100SSCapturing...Sepia12:00AM 2006/01/01Capturing...Sepia12:00AM 2006/01/01PhotoMove ExitMENUSelectOKContinuous ShotOff3 shotsPhotoMove ExitSelect3 shotsOffContinuous ShotSSSS100100SSCapturing...Sepia12:00AM 2006/01/01Capturing...Sepia12:00AM 2006/01/01 PhotoMove ExitSelectContinuous ShotOff3 shotsPhotoMove ExitSelect3 shotsOffContinuous ShotYou can take a series of pictures continuously with just one press of the shutter.1. Press the [POWER] button to turn on the Sports Camcorder.◆The Movie Record screen appears.2. Set the Photo mode by pressing the [MODE] button.◆The Photo Capture screen appears.3. Press the [MENU] button.Move the [Joystick] left / right to select <Continuous Shot>.4. Move the [Joystick] up / down to select an option, and then press the [Joystick(OK)].◆<Off>: Disables Continuous Shot and takes one photo at a time.◆<3 shots>: Enables Continuous shot and takes 3 photos in a row.5. Press the [MENU] button to exit the menu.◆The selected function icon is displayed.◆If <Off> is selected, no icon will be displayed.[ Notes ]✤When you set <Continuous Shot>, you cannot use the flash.✤While the menu screen is displayed, pressing the [Record / Stop] button will move to PhotoCapture mode.2SS100100SSSSCapturing...Sepia12:00AM 2006/01/01 Capturing...Sepia12:00AM 2006/01/01PhotoMove ExitSelectContinuous ShotOff3 shotsPhotoMove ExitSelect3 shotsOffContinuous ShotSC-X205 00994A 058~075 2006.1.27 8:24 PM 페이지65 001 PagePro 9100](https://usermanual.wiki/Samsung-Electronics-Co/06MM2MX2.Users-Manual-1/User-Guide-626615-Page-69.png)
![ENGLISH6666Photo Mode : Setting the Capturing OptionsSetting the EIS (Electronic Image Stabilizer)345SS100100SSCapturing...Sepia12:00AM 2006/01/01Capturing...Sepia12:00AM 2006/01/01Photo Move ExitSelectEISOffOnPhoto Move ExitMENUSelectOKEISOffOnSS100100SSCapturing...Sepia12:00AM 2006/01/01Capturing...Sepia12:00AM 2006/01/01Photo Move ExitMENUSelectOKEISOffOnPhoto Move ExitSelectEISOffOnSSSS100100SSCapturing...Sepia12:00AM 2006/01/01Capturing...Sepia12:00AM 2006/01/01 Photo Move ExitSelectEISOffOnPhoto Move ExitSelectEISOffOnThe Electronic Image Stabilizer is a function that compensates for hand shake and othermovements while taking pictures.EIS provides more stable photo when:◆Capturing with zooming◆Capturing small objects◆Capturing while walking or moving◆Capturing through the window in moving vehicle1. Press the [POWER] button to turn on the Sports Camcorder.◆The Movie Record screen appears.2. Set the Photo mode by pressing the [MODE] button.◆The Photo Capture screen appears.3. Press the [MENU] button.Move the [Joystick] left / right to select <EIS>.4. Move the [Joystick] up / down to select an option, and then press the [Joystick(OK)].◆<On>: Enables EIS function.◆<Off>: Disables EIS function.5. Press the [MENU] button to exit the menu.◆If you select <On>, the EIS icon ( ) is displayed.◆If you select <Off>, no icon is displayed.[ Note ]✤While the menu screen is displayed, pressing the [Record / Stop] button will move to PhotoCapture mode.2SS100100SSSSCapturing...Sepia12:00AM 2006/01/01 Capturing...Sepia12:00AM 2006/01/01Photo Move ExitSelectEISOffOnPhoto Move ExitSelectEISOffOnSC-X205 00994A 058~075 2006.1.27 8:24 PM 페이지66 001 PagePro 9100](https://usermanual.wiki/Samsung-Electronics-Co/06MM2MX2.Users-Manual-1/User-Guide-626615-Page-70.png)
![ENGLISH6767Photo Mode : Setting the Capturing OptionsSetting the Focus345Select an appropriate focus method for the best results.1. Press the [POWER] button to turn on the Sports Camcorder.◆The Movie Record screen appears.2. Set the Photo mode by pressing the [MODE] button.◆The Photo Capture screen appears.3. Press the [MENU] button.Move the [Joystick] left / right to select <Focus>.4. Move the [Joystick] up / down to select an option, and then press the [Joystick(OK)].◆<AF>: Set the focus automatically.◆<MF>: Set the focus manually.5. Press the [MENU] button to exit the menu.◆If you select the <MF>, the icon ( ) is displayed.◆If you select the <AF>, no icon is displayed.[ Note ]✤While the menu screen is displayed, pressing the [Record / Stop] button will move to PhotoCapture mode.100SSSS100Capturing...Sepia12:00AM 2006/01/01Capturing...Sepia12:00AM 2006/01/01Photo Move ExitMENUSelectOKFocusMFAFPhoto Move ExitSelectFocusMFAF100SSSS100Capturing...Sepia12:00AM 2006/01/01Capturing...Sepia12:00AM 2006/01/01Photo Move ExitSelectFocusMFAFPhoto Move ExitMENUSelectOKFocusMFAF100SSSSSS100Capturing...Sepia12:00AM 2006/01/01Capturing...Sepia12:00AM 2006/01/01 Photo Move ExitSelectFocusMFAFPhoto Move ExitSelectFocusMFAF2100SSSSSS100Capturing...Sepia12:00AM 2006/01/01 Capturing...Sepia12:00AM 2006/01/01Photo Move ExitSelectFocusMFAFPhoto Move ExitSelectFocusMFAFAdjust the focus moving [Joystick] up/down to zoom in or out manually.◆When a picture has subjects close or distant to the Sports Camcorder◆When a person is enveloped in fog or surrounded by snowManual Focus <MF>SC-X205 00994A 058~075 2006.1.27 8:25 PM 페이지67 001 PagePro 9100](https://usermanual.wiki/Samsung-Electronics-Co/06MM2MX2.Users-Manual-1/User-Guide-626615-Page-71.png)
![Photo Mode : Setting the Capturing OptionsSetting the BLC (Backlight Compensation)ENGLISH6868345100SSSS100Capturing...Sepia12:00AM 2006/01/01Capturing...Sepia12:00AM 2006/01/01Photo Move ExitSelectBLCOffOnPhoto Move ExitMENUSelectOKBLCOffOn100SSSS100Capturing...Sepia12:00AM 2006/01/01Capturing...Sepia12:00AM 2006/01/01Photo Move ExitMENUSelectOKBLCOffOnPhoto Move ExitSelectBLCOffOn100SSSSSS100Capturing...Sepia12:00AM 2006/01/01Capturing...Sepia12:00AM 2006/01/01 Photo Move ExitSelectBLCOffOnPhoto Move ExitSelectBLCOffOnThe Backlight Compensation function helps to make the subject brighter when the subject is in front of a window or the subject is too dark to distinguish. You can use this function when using the Sports Camcorder in the bright backgrounds including snow scenes.1. Press the [POWER] button to turn on the Sports Camcorder.◆The Movie Record screen appears.2. Set the Photo mode by pressing the [MODE] button.◆The Photo Capture screen appears.3. Press the [MENU] button.Move the [Joystick] left /right to select <BLC>.4. Move the [Joystick] up / down to select an option, and then press the [Joystick(OK)].◆<On>: Set the BLC function.◆<Off>: Cancel the BLC function.5. Press the [MENU] button to exit the menu.◆The selected function icon ( ) is displayed.◆If you select <Off>, no icon is displayed.[ Notes ]✤The BLC is set to <Off> when the Sports Camcorder is turned off.✤While the menu screen is displayed, pressing the [Record / Stop] button will move to PhotoCapture mode.2100SSSSSS100Capturing...Sepia12:00AM 2006/01/01 Capturing...Sepia12:00AM 2006/01/01Photo Move ExitSelectBLCOffOnPhoto Move ExitSelectBLCOffOnSC-X205 00994A 058~075 2006.1.27 8:25 PM 페이지68 001 PagePro 9100](https://usermanual.wiki/Samsung-Electronics-Co/06MM2MX2.Users-Manual-1/User-Guide-626615-Page-72.png)
![ENGLISH6969Photo Mode : Setting the Capturing OptionsSetting the Digital Zoom345SepiaWT1X10XSS100Capturing...Sepia12:00AM 2006/01/01Photo Move ExitMENUSelectOKDigital ZoomOffOnPhoto Move ExitSelectDigital ZoomOffOnSepiaWT1X10XSS100Capturing...Sepia12:00AM 2006/01/01Photo Move ExitSelectDigital ZoomOffOnPhoto Move ExitMENUSelectOKDigital ZoomOffOnSepiaWT1X1X10X10XSS100Capturing...Sepia12:00AM 2006/01/01Photo Move ExitSelectDigital ZoomOffOnPhoto Move ExitSelectDigital ZoomOffOnAs well as the 10x optical zoom, this Sports Camcorder supports 10x digital zoom whichproduces a total of 100x zoom. Exceeding the optical zoom limit will automatically engage thedigital zoom when available. Digital zoom may produce a grainy picture.1. Press the [POWER] button to turn on the Sports Camcorder.◆The Movie Record screen appears.2. Set the Photo mode by pressing the [MODE] button.◆The Photo Capture screen appears.3. Press the [MENU] button.Move the [Joystick] left /right to select <Digital Zoom>.4. Move the [Joystick] up / down to select an option, and then press the [Joystick(OK)].◆<On>: Enables digital zoom. Attempts to zoom in more than 10x will automatically applydigital zooming.(up to 100x)◆<Off>: Disables digital zoom. Only optical zoom 10x will be supported for zooming5. Press the [MENU] button to exit the menu.◆When using the digital zoom switch, an indicator appears on the screen.[ Note ]✤While the menu screen is displayed, pressing the [Record / Stop] button will move to PhotoCapture mode.2SepiaWT1X10XSSSS100Capturing...Sepia12:00AM 2006/01/01 Photo Move ExitSelectDigital ZoomOffOnPhoto Move ExitSelectDigital ZoomOffOnSC-X205 00994A 058~075 2006.1.27 8:25 PM 페이지69 001 PagePro 9100](https://usermanual.wiki/Samsung-Electronics-Co/06MM2MX2.Users-Manual-1/User-Guide-626615-Page-73.png)
![ENGLISH7070Photo Mode : Setting the Viewing Options445Sepia12:00AM 2006/01/0101 100-0001Move SelectOKCancelOKMove View100-0001OKMove Select100-0001Move View100-0001Move Select100-0001OKCancelOKMulti SelectAllDeleting Photo Files3Sepia12:00AM 2006/01/0101100-0001Move SelectYou can delete saved Photo files.1. Press the [POWER] button to turn on the Sports Camcorder.◆The Movie Record screen appears.2. Set the Photo mode by pressing the [MODE] button.◆The Photo Capture screen appears.3. Press the [PLAY] button or [Joystick(OK)].◆Switches to Photo View mode.◆Move to desired photo file, using the [Joystick].4. Press the [DELETE] button on the LCD monitor.5. Select an option by moving the [Joystick] up / down and then press the[Joystick(OK)].◆<OK>: Deletes the selected photo file using the [Joystick(OK)].◆<Cancel>: Cancels the deletion.6. Press the [MENU] button to exit the menu.4. Slide the [W/T] switch to W (WIDE).◆The screen switches to multi-view.5. Press the [DELETE] button on the LCD monitor.6. Select an option by moving the [Joystick] up / down and then press the[Joystick(OK)].◆<OK>: Deletes the selected photo file.◆<Multi Select>: Multiple photo files can be selected using the [Joystick(OK)]. < ✔ > indicator appears on the selected files. Press the [PLAY] button todelete.◆<All>: All Photo files will be deleted.◆<Cancel>: Cancels the deletion.[ Note ]✤While the menu screen is displayed, pressing the [Record / Stop] button will move to PhotoCapture mode.Deleting Photo Files in Full Screen-ViewDeleting Photo Files in Multi-ViewPLAYbutton[Joystick(OK)]SC-X205 00994A 058~075 2006.1.27 8:25 PM 페이지70 001 PagePro 9100](https://usermanual.wiki/Samsung-Electronics-Co/06MM2MX2.Users-Manual-1/User-Guide-626615-Page-74.png)
![ENGLISH7171Photo Mode : Setting the Viewing OptionsSetting the Slide showYou can set a slide show, and also set the interval and repetition options for the slide show.1. Press the [POWER] button to turn on the Sports Camcorder.◆ The Movie Record screen appears.2. Set the Photo mode by pressing the [MODE] button.◆The Photo Capture screen appears.3. Press the [PLAY] button or [Joystick(OK)].◆Switches to Photo View mode.4. Press the [MENU] button.Move the [Joystick] left / right to select <Slide>.5. Select <Interval (sec.)> by moving the [Joystick] up / down and then press the[Joystick(OK)].6. Set the interval by moving the [Joystick] up / down and then press the [Joystick(OK)].◆Interval range: 1 ~ 10 seconds.7. Select <Repeat> by moving the [Joystick] up / down and then press the[Joystick(OK)].8. Set the repeat option by moving the [Joystick] up / down and then press the[Joystick(OK)].◆<Off>: Sets not to repeat the slide show.◆<On>: Sets to repeat the slide show.9. Select <Start> by moving the [Joystick] up / down and then press the[Joystick(OK)].◆Slide show starts. To stop the slide show, press the [Joystick(OK)].[ Notes ]✤The interval between photos may vary depending on the size of the photo.✤Slide show starts from the current photo displayed.✤Slide show cannot start from a damaged photo file. Damaged photos wiill be skipped during theslide show.✤While the menu screen is displayed, pressing the [Record / Stop] button will move to Photo Capture mode.57Sepia01100-0001Sepia01100-0001Photo Move ExitMENUStopSelectOKSlideRepeatInterval (sec.) 1OffStart100-0001Photo SlideMove ExitSelectSlideInterval (sec.) 1OffStart100-0001RepeatSepia01100-0001Sepia01100-0001Photo Move ExitStopSelectSlideRepeatInterval (sec.) 1OffStart100-0001Photo SlideMove ExitMENUSelectOKSlideInterval (sec.) 1OffStart100-0001RepeatSepia01100-0001Sepia01 100-0001Photo Move ExitStopSelectSlideRepeatInterval (sec.) 1OffStart100-0001Photo SlideMove ExitSelectOKSlideInterval (sec.) 1OffStart100-0001Repeat3Sepia01 100-0001OKSepia01100-0001Photo Move ExitStopSelectSlideRepeatInterval (sec.) 1OffStart100-0001Photo SlideMove ExitSelectSlideInterval (sec.) 1OffStart100-0001Repeat9SC-X205 00994A 058~075 2006.1.27 8:25 PM 페이지71 001 PagePro 9100](https://usermanual.wiki/Samsung-Electronics-Co/06MM2MX2.Users-Manual-1/User-Guide-626615-Page-75.png)
![ENGLISH7272Photo Mode : Setting the Viewing OptionsSetting the DPOF (Digital Print Order Format) FunctionYou can automatically print a photo file recorded with a printer that supports DPOF.Setting the DPOF is only available when using a memory card.1. Insert the memory card into the memory card slot on the Sports Camcorder.2. Press the [POWER] button to turn on the Sports Camcorder.◆The Movie Record screen appears.3. Set the Photo mode by pressing the [MODE] button.◆The Photo Capture screen appears.4. Press the [PLAY] button.◆Switches to Photo View mode.◆Move to desired photo file, using the [Joystick].5. Press the [MENU] button.Move the [Joystick] left / right to select <DPOF>.6. Select an option by moving the [Joystick] up / down and then press the [Joystick(OK)].◆<Copies>: Move the [Joystick] up / down to select the number of copies you want to print and press the [Joystick(OK)]. (copy range: 0 ~ 30)◆<Off>: Cancels DPOF printing.7. Press the [MENU] button to exit the menu.5. Slide the [W/T] switch to W (WIDE).◆The screen switches to multi-view.6. Press the [MENU] button.Move the [Joystick] left / right to select <DPOF>.7. Select an option by moving the [Joystick] up / down and then press the [Joystick(OK)].◆<Copies>: Move the [Joystick] up / down to select the number of copies you want to print and pressthe [Joystick(OK)]. (copy range: 0 ~ 30)◆<Set All>: All photo files will be marked with DPOF printing.◆<Reset All>: All photo files will be resetted.8. Press the [MENU] button to exit the menu.[ Notes ]✤< > icon is displayed on the photos with DPOF setup.✤While the menu screen is displayed, pressing the [Record / Stop] button will move to Photo Capture mode.Setting the DPOF in Full Screen-ViewSetting the DPOF in Multi-View7Sepia01100-0001Sepia 100-0001OK1Photo Move ExitSelectDPOFOff1100-0001Copies5Sepia01100-0001Sepia100-00011Photo Move ExitMENUSelectOKDPOFOff1100-0001Copies68Sepia100-0001Photo Move ExitMENUSelectOKDPOFSet AllReset All1100-0001Copies1Sepia01100-0001Sepia 100-0001OKPhoto Move ExitSelectDPOFSet AllReset All1100-0001Copies1Sepia01100-0001SC-X205 00994A 058~075 2006.1.27 8:25 PM 페이지72 001 PagePro 9100](https://usermanual.wiki/Samsung-Electronics-Co/06MM2MX2.Users-Manual-1/User-Guide-626615-Page-76.png)
![ENGLISH7373Photo Mode : Setting the Viewing OptionsLocking Photo FilesYou can protect important saved photo files from accidental erasure. Protected files will not bedeleted unless you release the protection or format the memory.1. Press the [POWER] button to turn on the Sports Camcorder.◆The Movie Record screen appears.2. Set the Photo mode by pressing the [MODE] button.◆The Photo Capture screen appears.3. Press the [PLAY] button.◆Switches to Photo View mode.◆Move to desired photo file, using the [Joystick].4. Press the [MENU] button.Move the [Joystick] left / right to select <Lock>.5. Press the [Joystick(OK)].◆Locks the selected photo file.◆Press the [MENU] button once again to set unlock.4. Slide the [W/T] switch to W (WIDE).◆The screen switches to multi-view.5. Press the [MENU] button.Move the [Joystick] left / right to select <Lock>.6. Select an option by moving the [Joystick] up / down and then press the[Joystick (OK)].◆<Lock>: Locks the selected photo file using the [Joystick(OK)].◆<Multi Select>: Multiple photo files can be selected using the [Joystick(OK)]. < > indicator appears on the selected files.◆<Lock All>: All photo files are locked.◆<Unlock All>: Unlocking all photo files.[ Notes ]✤The < > icon is displayed on the locked file.✤While the menu screen is displayed, pressing the [Record / Stop] button will move to PhotoCapture mode.Locking Photo Files in Full Screen-ViewLocking Photo Files in Multi-View451Sepia100-0001Photo Move ExitMENUSelectOKLock100-0001LockSepia01100-00011Sepia 100-0001OKPhoto Move ExitSelectLock100-0001LockSepia01100-0001561Sepia100-0001Photo Move ExitMENUSelectOKLock100-0001Lock AllUnlock AllMulti Select1Sepia 100-0001OKPhoto Move ExitSelectLock100-0001Lock AllUnlock AllMulti SelectSC-X205 00994A 058~075 2006.1.27 8:25 PM 페이지73 001 PagePro 9100](https://usermanual.wiki/Samsung-Electronics-Co/06MM2MX2.Users-Manual-1/User-Guide-626615-Page-77.png)
![ENGLISH7474Photo Mode : Setting the Viewing OptionsCopying Photo FilesYou can copy saved files from the internal memory to a memory card and vice versa.1. Insert the memory card into the memory card slot on the Sports Camcorder.2. Press the [POWER] button to turn on the Sports Camcorder.◆The Movie Record screen appears.3. Set the Photo mode by pressing the [MODE] button.◆The Photo Capture screen appears.4. Press the [PLAY] button.◆Switches to Photo View mode.◆Move to desired photo file, using the [Joystick].5. Press the [MENU] button.Move the [Joystick] left / right to select <Copy To>.6. Press the [Joystick(OK)].◆Copies the selected Photo file.5. Slide the [W/T] switch to W (WIDE).◆The screen switches to multi-view.6. Press the [MENU] button.Move the [Joystick] left / right to select <Copy To>.7. Select an option by moving the [Joystick] up / down and then press the[Joystick (OK)].◆<OK>: Copies the selected Photo file.◆<Multi Select>: Multiple Photo files can be selected using the [Joystick(OK)]. < ✔ > indicator appears on the selected files. Press the [PLAY] button tocopy.◆<All>: Cancel copying Photo file.[ Notes ]✤The Sports Cam copies from the currently-used memory to another. If the internal memorywas used, it copies to a memory card.✤If the memory card is not inserted, you cannot perform the <Copy To> function.✤While the menu screen is displayed, pressing the [Record / Stop] button will move to PhotoCapture mode.Copying Photo Files in Full Screen-ViewCopying Photo Files in Multi-View45Sepia01 100-0001OKPhoto Move ExitSelectCopy To100-0001OKPhoto Move ExitSelectDPOF100-0001OKCopying file(s)...SMOV0001.JPGPress OK to cancel.Sepia01100-0001Photo Move ExitMENUSelectOKCopy To100-0001OKPhoto Move ExitSelectDPOF100-0001OKCopying file(s)...SMOV0001.JPGPress OK to cancel.57Sepia01100-0001Photo Move ExitMENUSelectOKMove ExitSelectMove ExitSelectCopy To100-0001Photo DPOF100-0001OKCopying file(s)...SMOV0001.JPGPress OK to cancel.Photo DPOF100-0001OKCopying file(s)...Press OK to cancel.OKMulti SelectAllSepia01100-0001Photo Move ExitSelectMove ExitMENUSelectOKMove ExitSelectCopy To100-0001Photo DPOF100-0001OKCopying file(s)...SMOV0001.JPGPress OK to cancel.CancelPhoto DPOF100-0001OKCopying file(s)...Press OK to cancel.OKMulti SelectAllSC-X205 00994A 058~075 2006.1.27 8:25 PM 페이지74 001 PagePro 9100](https://usermanual.wiki/Samsung-Electronics-Co/06MM2MX2.Users-Manual-1/User-Guide-626615-Page-78.png)
![7575MP3 Mode33Storing MP3 in the Sports Camcorder ........................................76Copying MP3 Files to the Sports Camcorder ..........................76Playing .............................................................................................77Playing MP3 Files .....................................................................77Setting the MP3 Play Options.......................................................78Deleting MP3 Files....................................................................78Setting the Repeat Play ............................................................79Setting the Equalizer.................................................................80Locking MP3 Files.....................................................................81Copying MP3 Files....................................................................82◆Save important data / recordings separately on other media, toavoid accidental loss due to a system failure or other reasons.How to set to MP3 modeHow to set to MP3 modeMP32. Set the MP3 mode by pressingthe [MODE] button.MENUMODEDC INHOLDPowerbutton1. Press the [POWER] button toturn on the Sports Camcorder.ENGLISHSC-X205 00994A 058~075 2006.1.27 8:25 PM 페이지75 001 PagePro 9100](https://usermanual.wiki/Samsung-Electronics-Co/06MM2MX2.Users-Manual-1/User-Guide-626615-Page-79.png)