Samsung Electronics Co CLP350N Laser Printer User Manual CLP 350 Series EN
Samsung Electronics Co Ltd Laser Printer CLP 350 Series EN
UserManual.wiki
>
Samsung Electronics Co
>
CLP350N User Manual
>
Users Manual 1
Contents
1.
Users Manual 1
2.
Users Manual 2
Users Manual 1
Navigation menu
Upload a User Manual
Namespaces
Wiki Guide
HTML
PDF
Info
Views
User Manual
Discussion / Help
Navigation

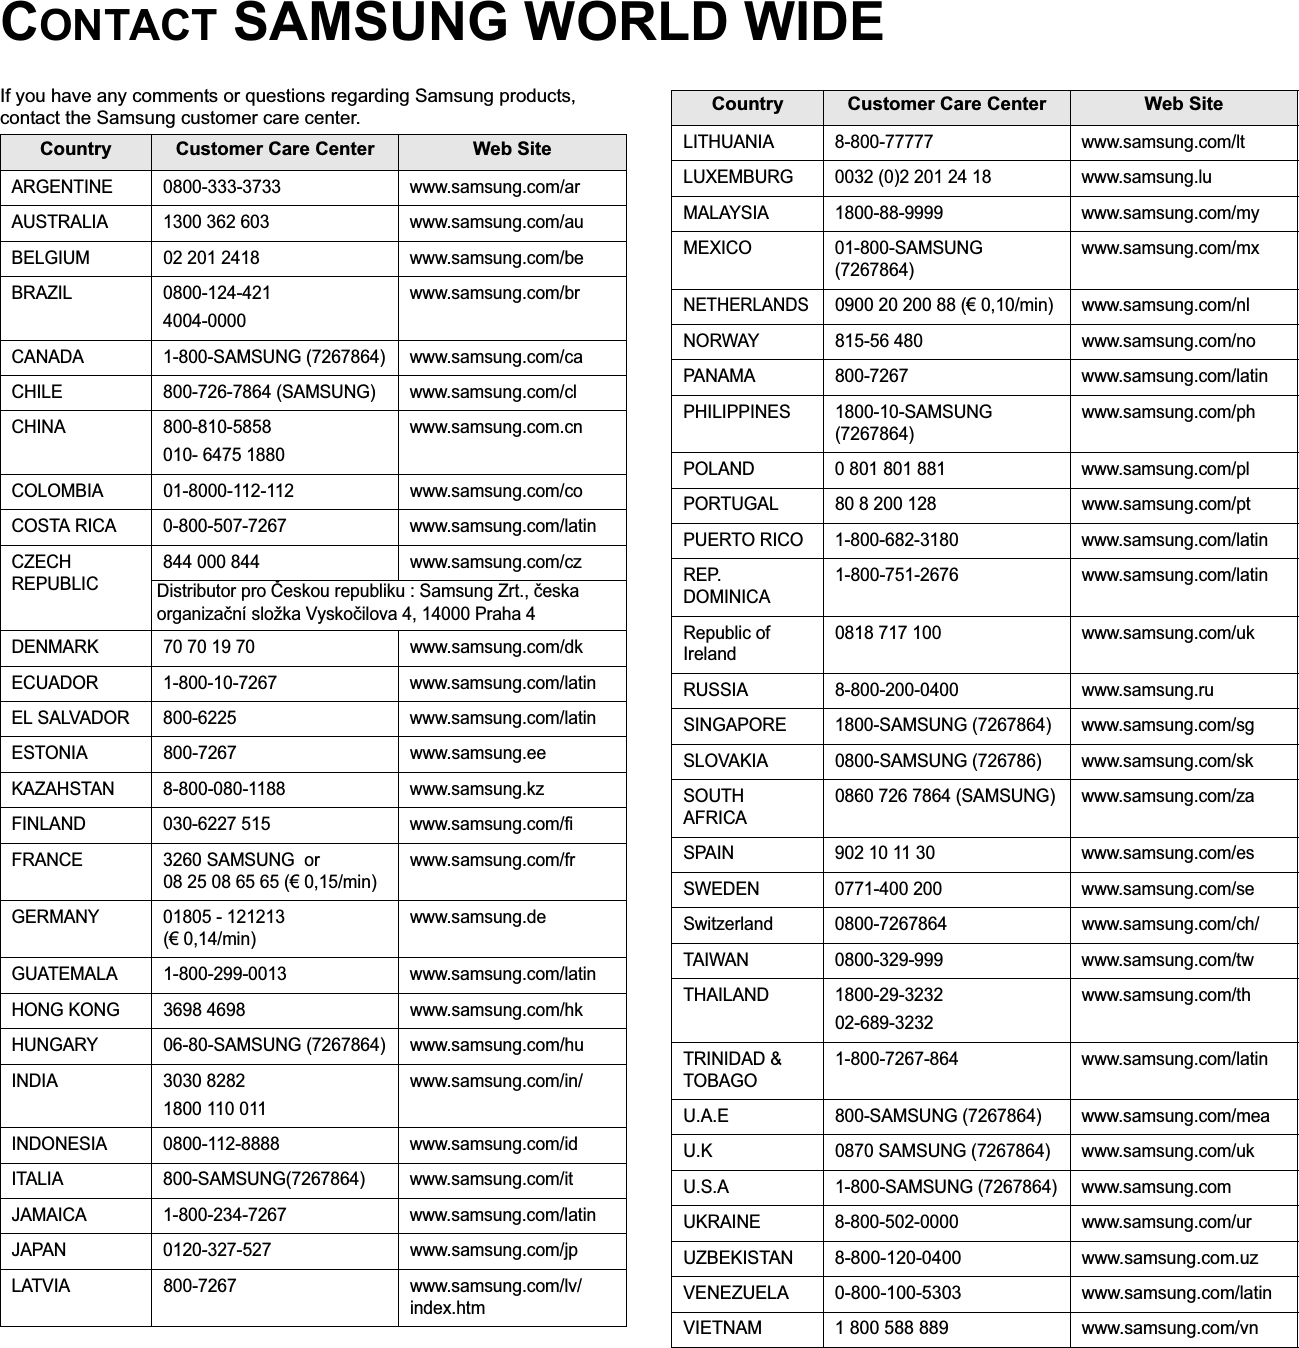


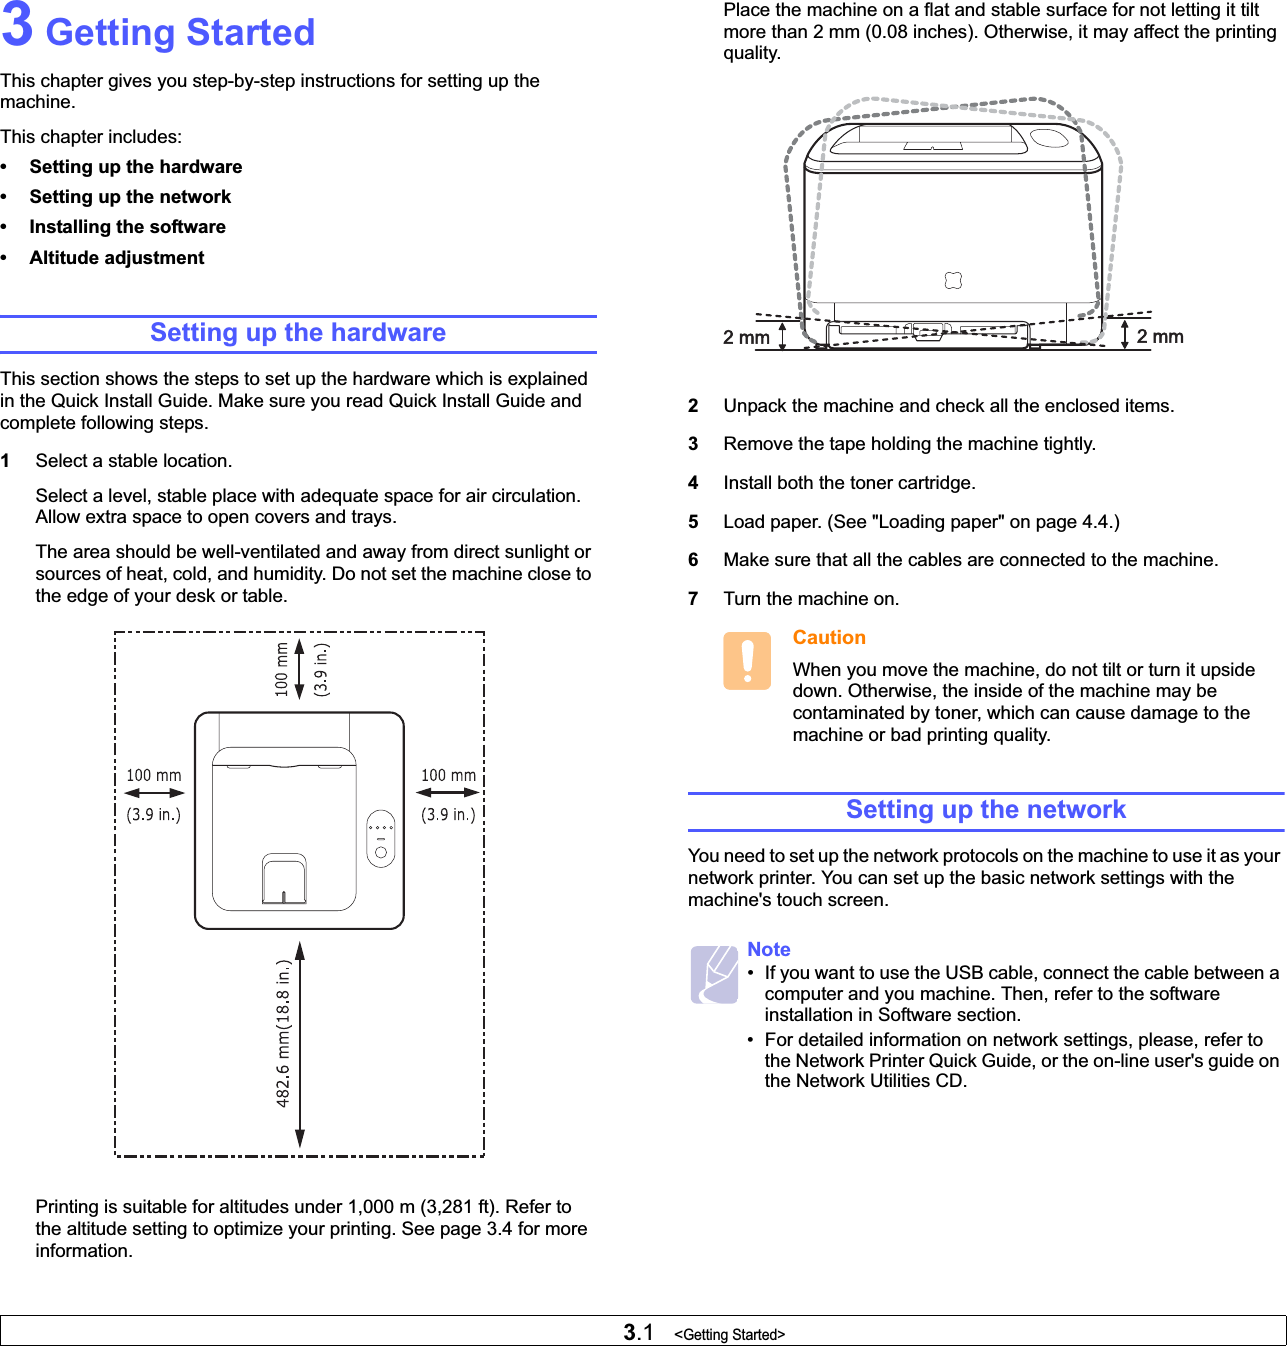
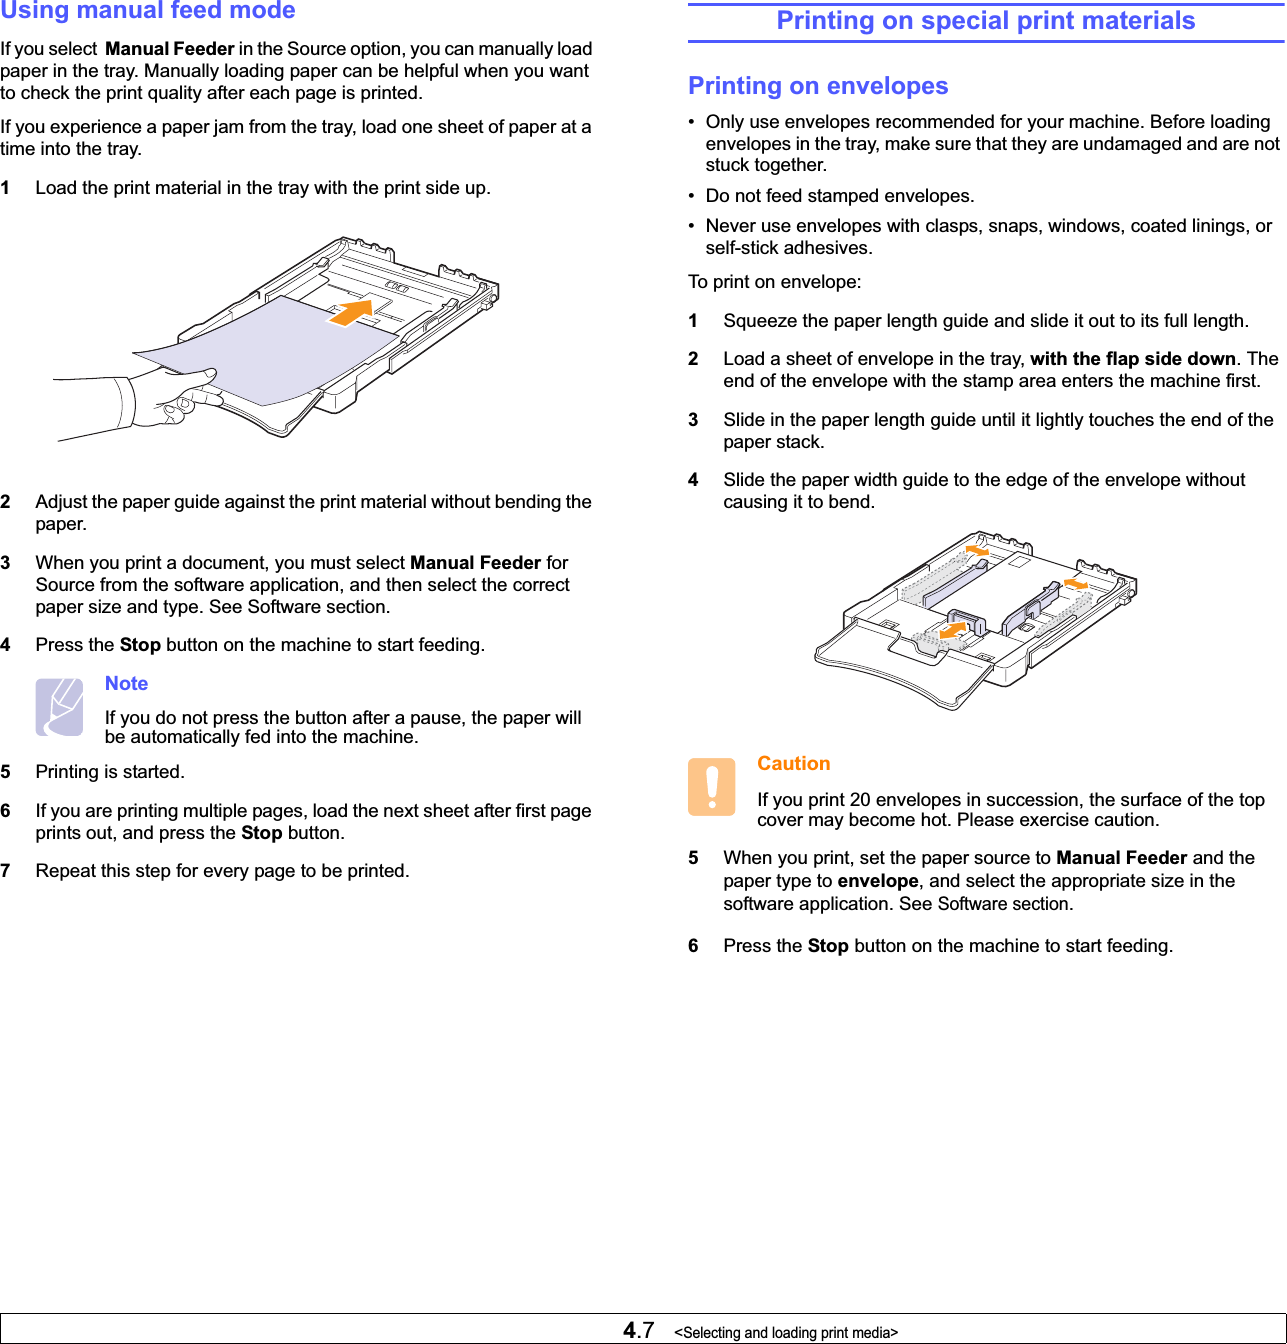
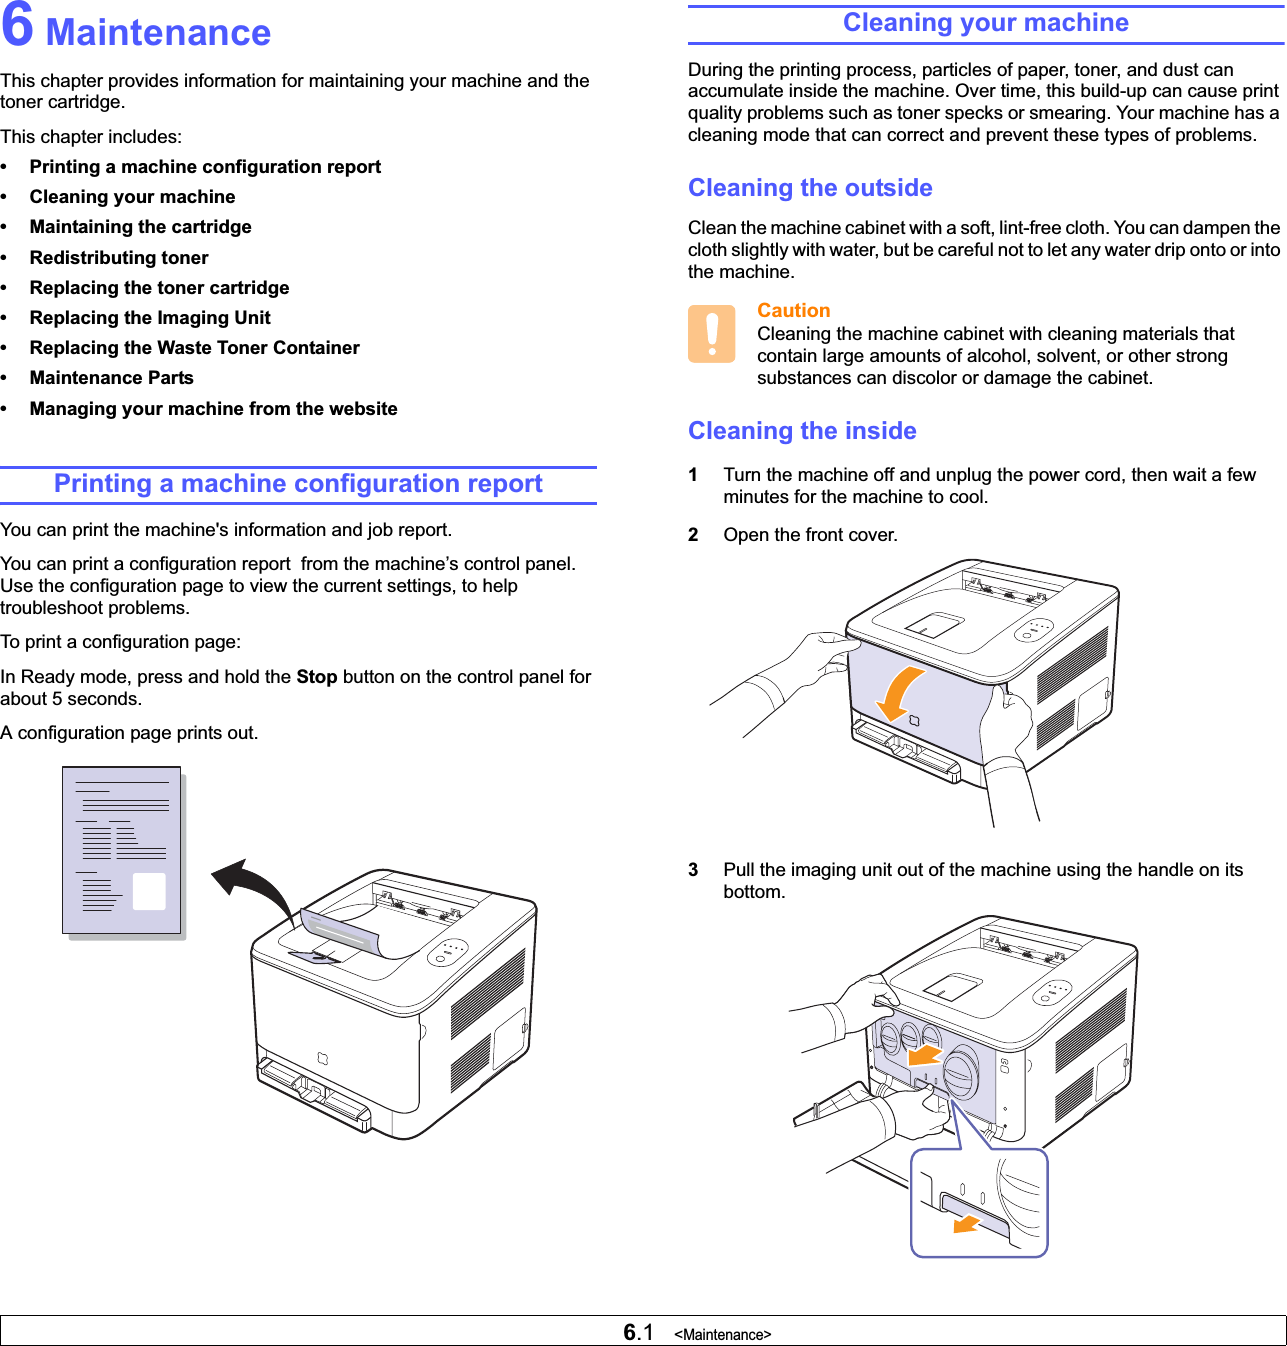
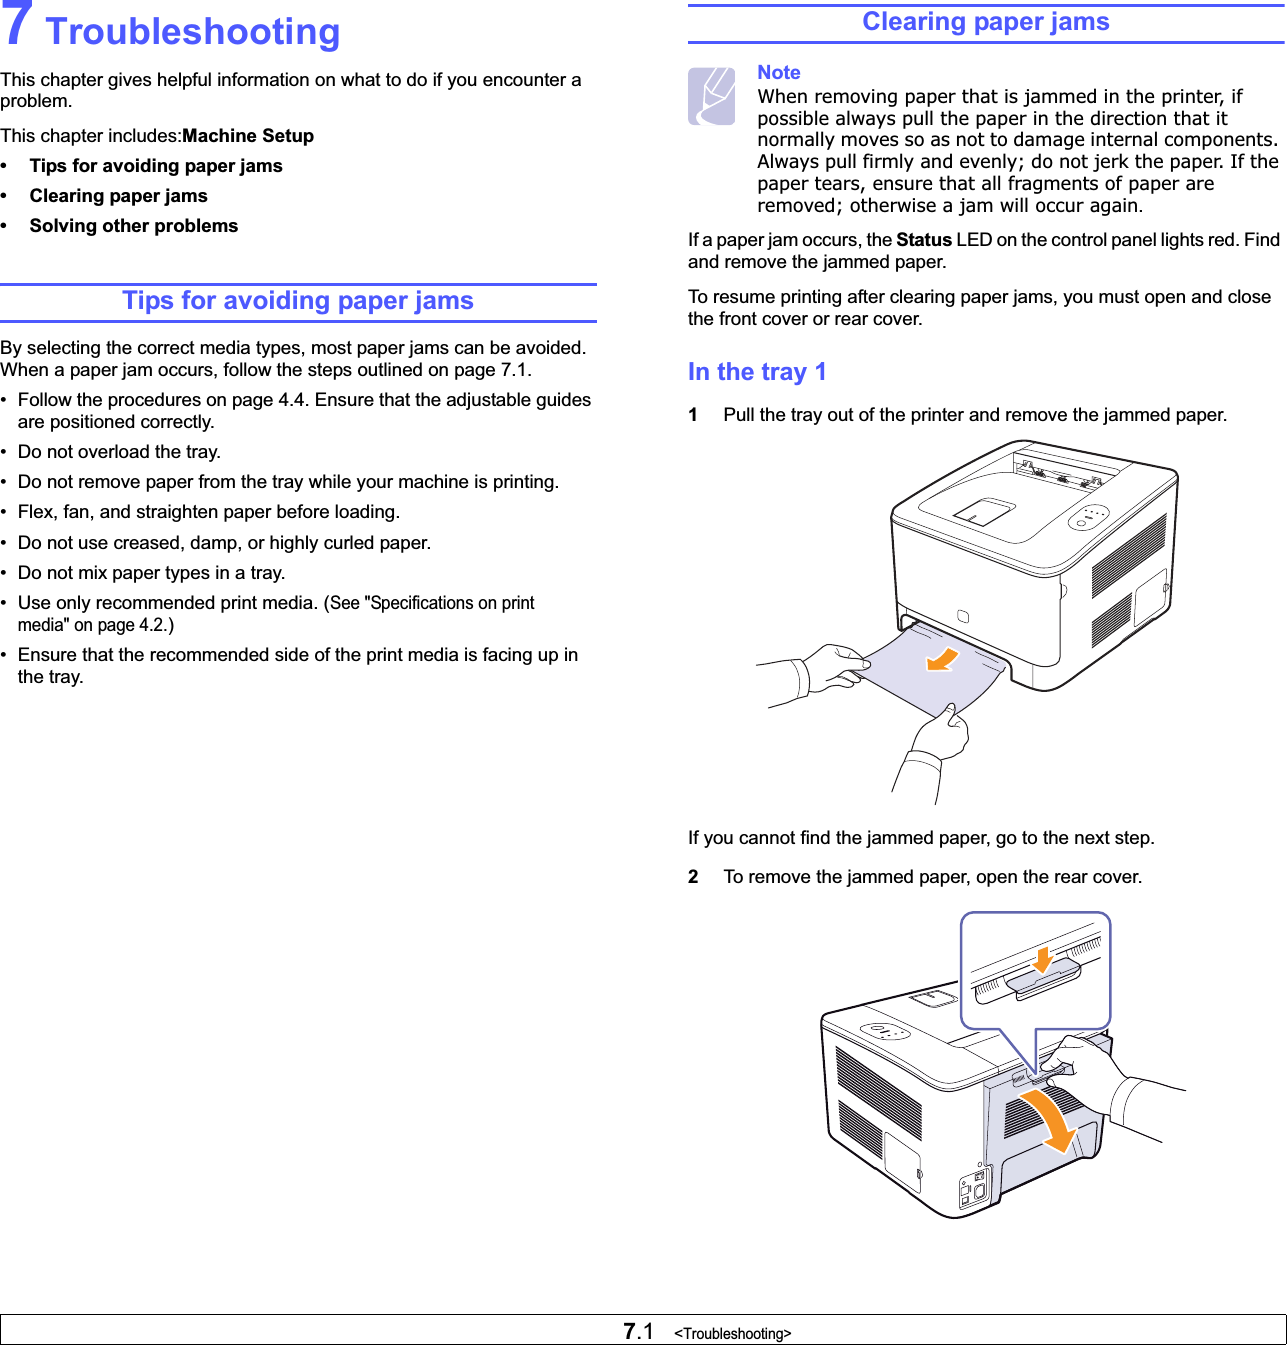
![3.3 <Getting Started>4Select Typical installation for a network printer, and then click Next.5The list of machines available on the network appears. Select the printer you want to install from the list and then click Next.• If you do not see your machine on the list, click Update to refresh the list, or select Add TCP/IP Port to add your machine to the network. To add the machine to the network, enter the port name and the IP address for the machine.To verify your machine’s IP address or the MAC address, print a Network Configuration page. (See "Printing a machine configuration report" on page 6.1.)• To find a shared network printer (UNC Path), select SharedPrinter [UNC] and enter the shared name manually or find a shared printer by clicking the Browse button.NoteIf you are not sure of the IP address, contact your network administrator or print network information. (See "Printing a machine configuration report" on page 6.1.)6After the installation is finished, a window appears asking you to print a test page and to register yourself as a user of Samsung machines in order to receive information from Samsung. If you so desire, select the corresponding checkbox(es) and click Finish.NoteIf your machine does not work properly after the installation, try to reinstall the printer driver. See Software section.](https://usermanual.wiki/Samsung-Electronics-Co/CLP350N.Users-Manual-1/User-Guide-818886-Page-21.png)
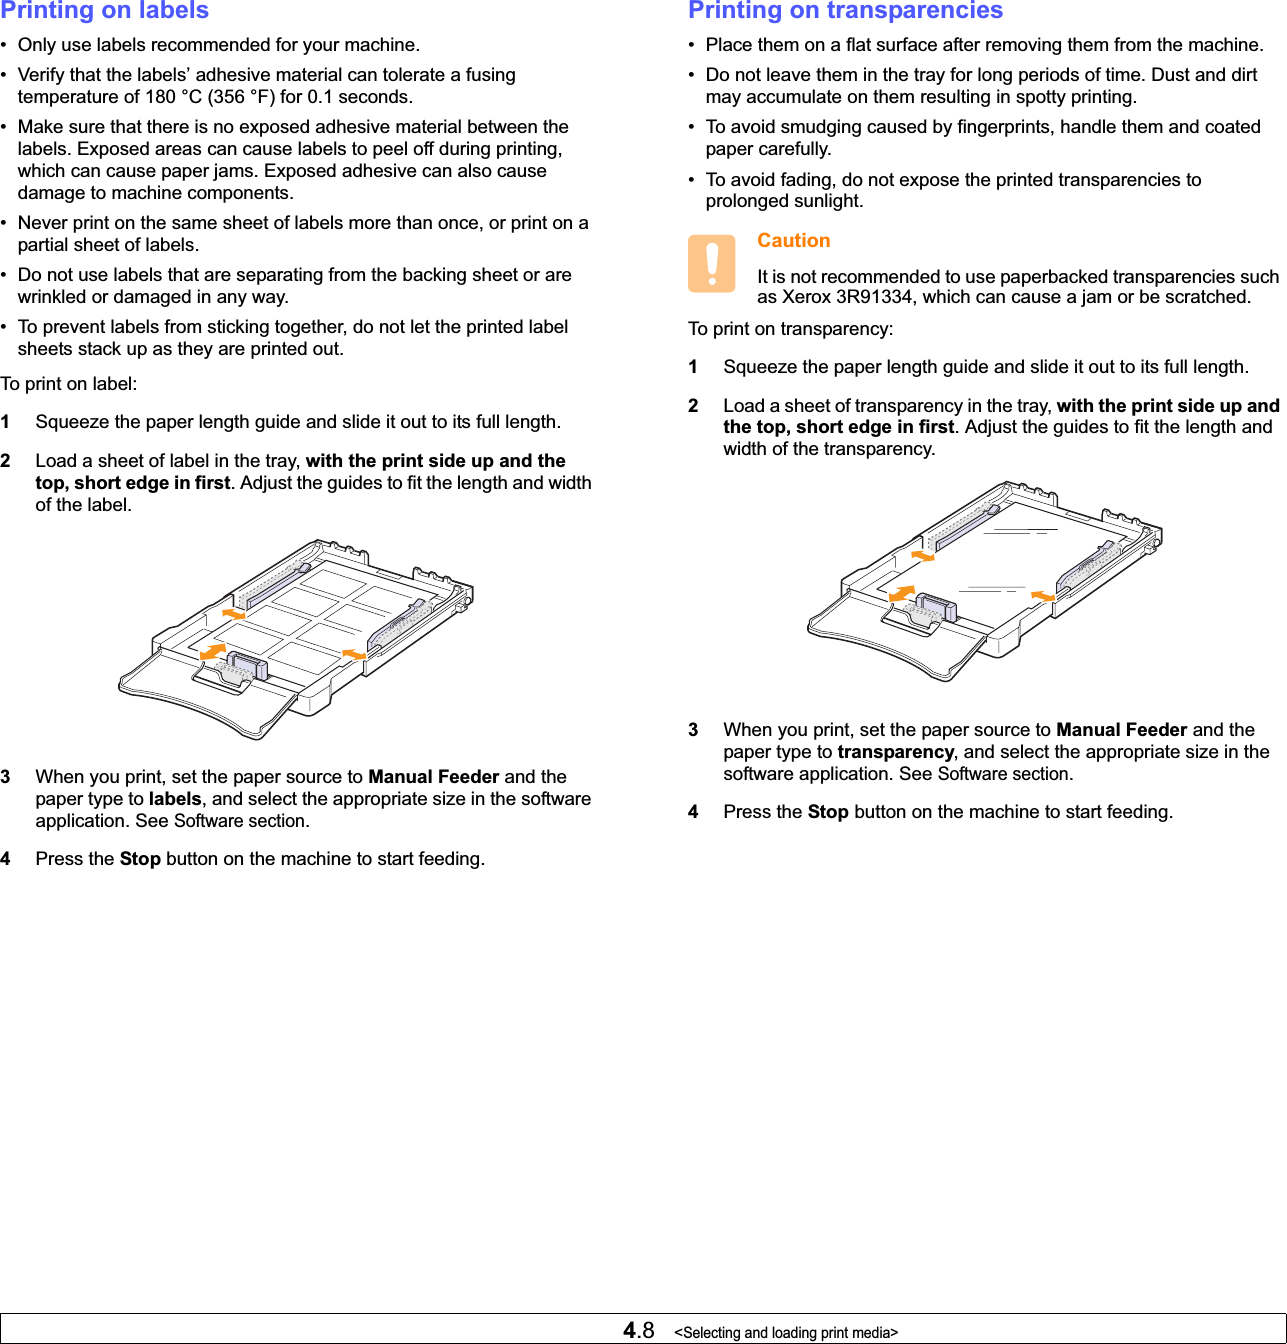
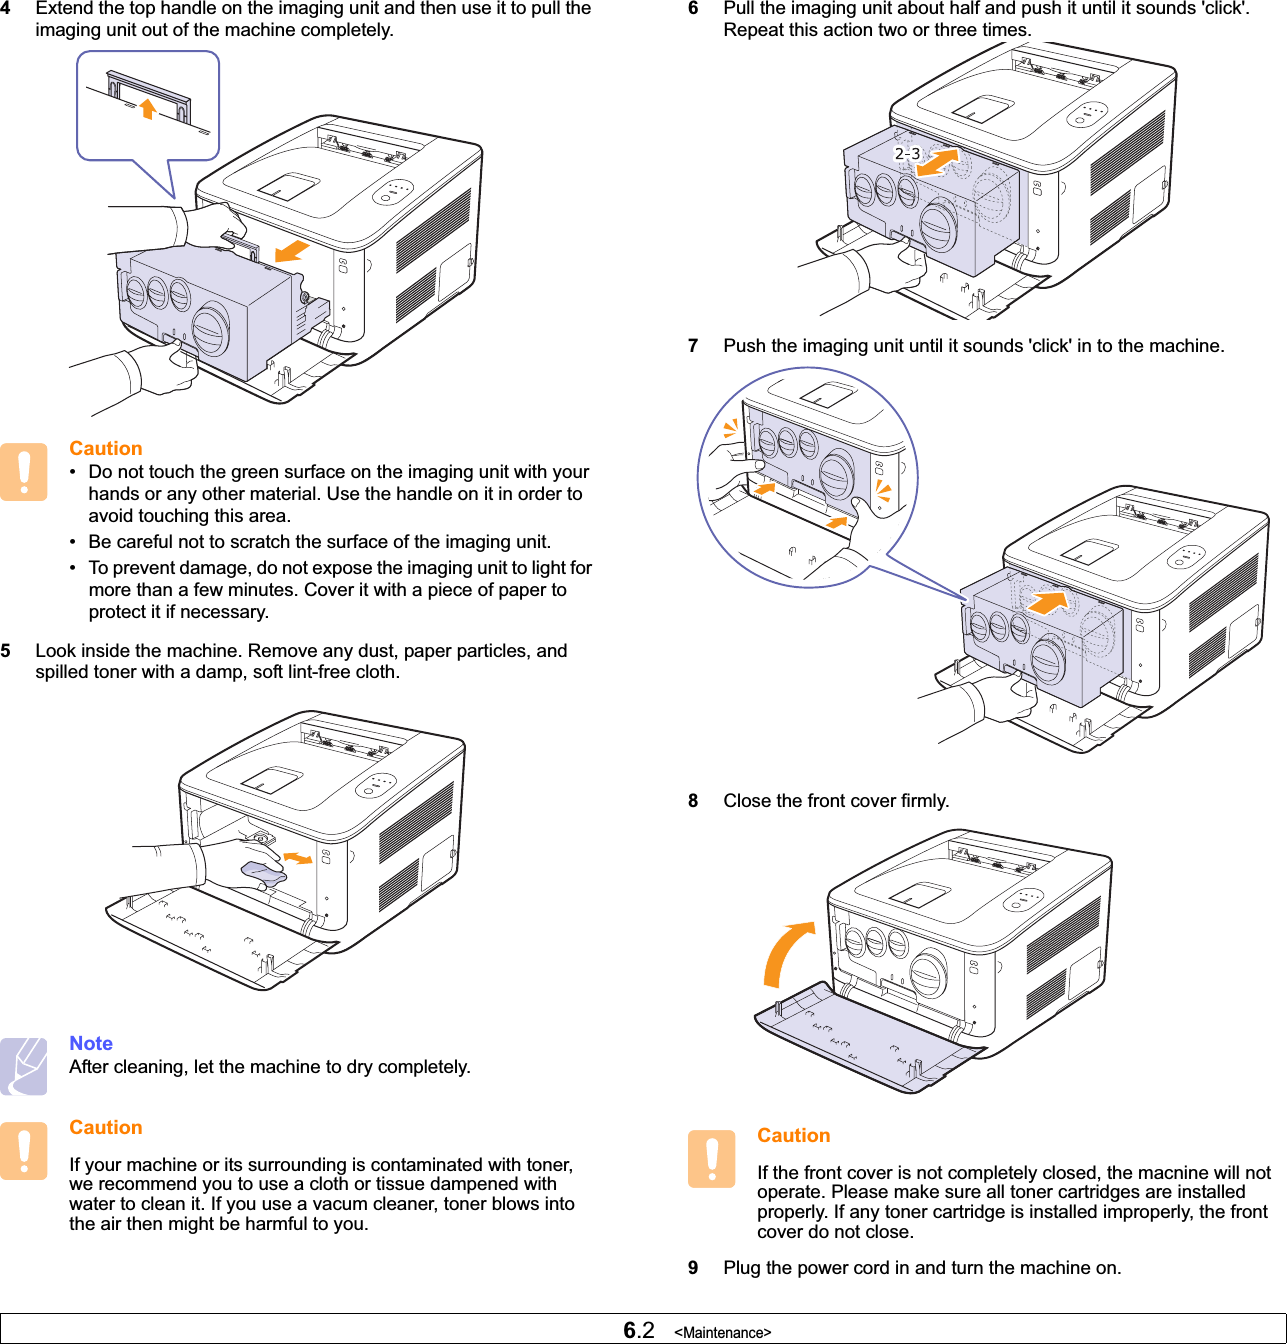
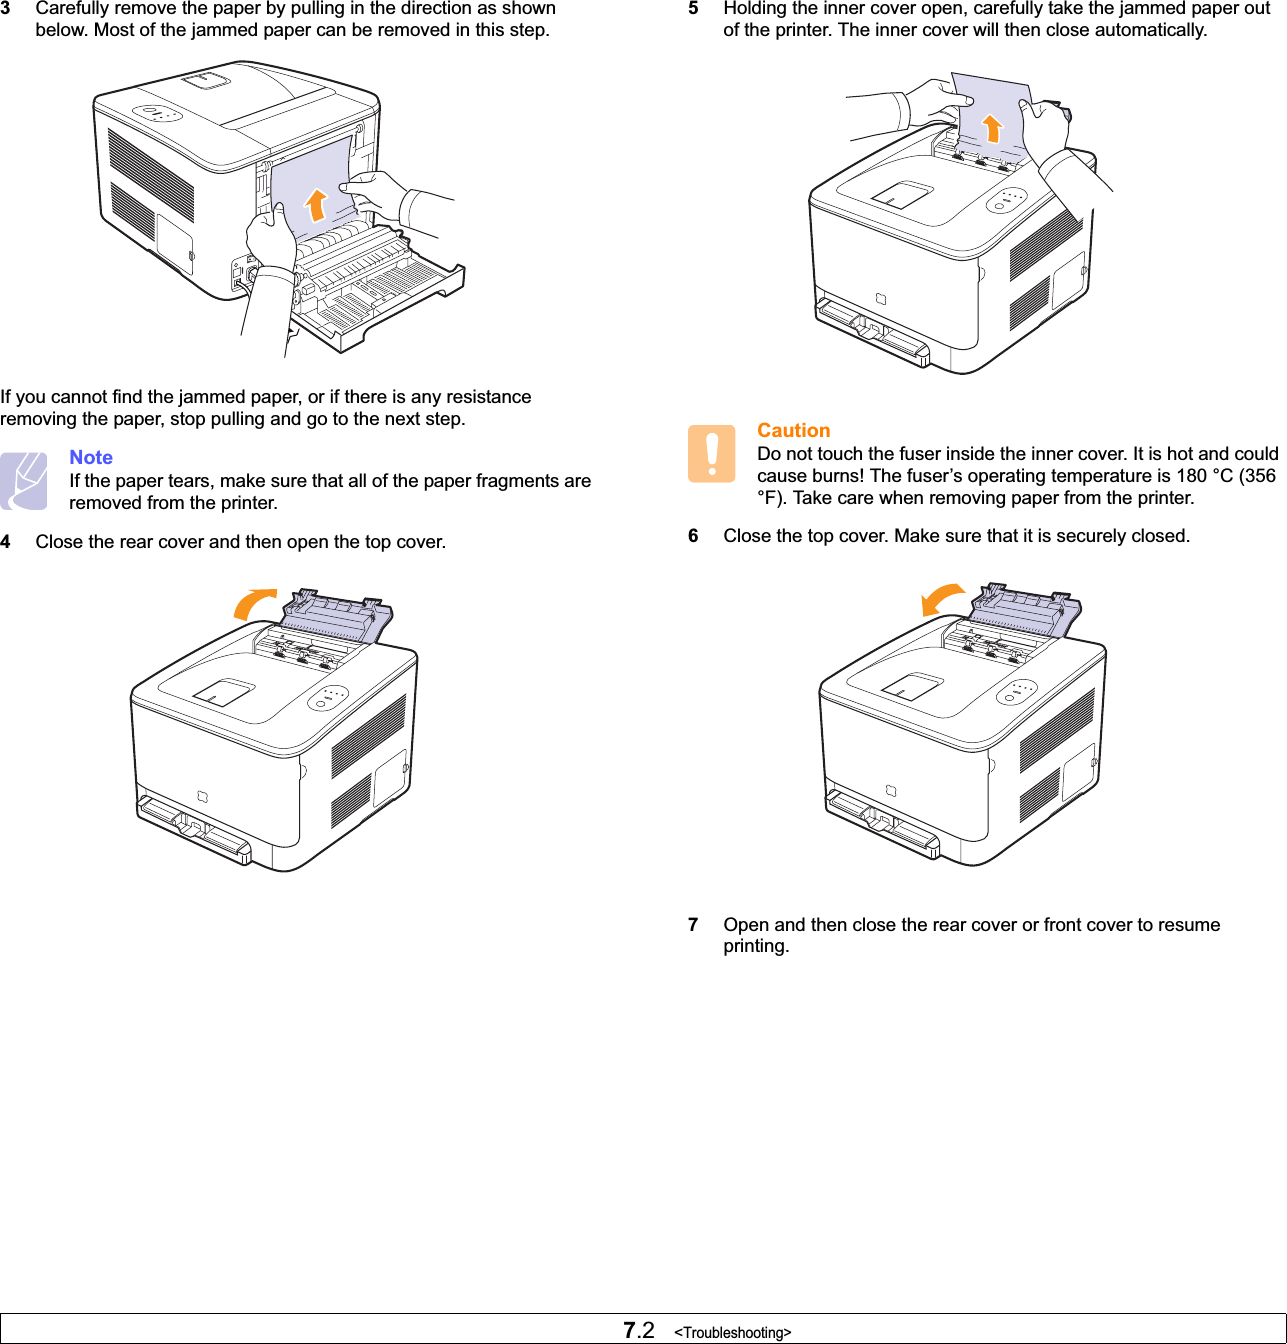
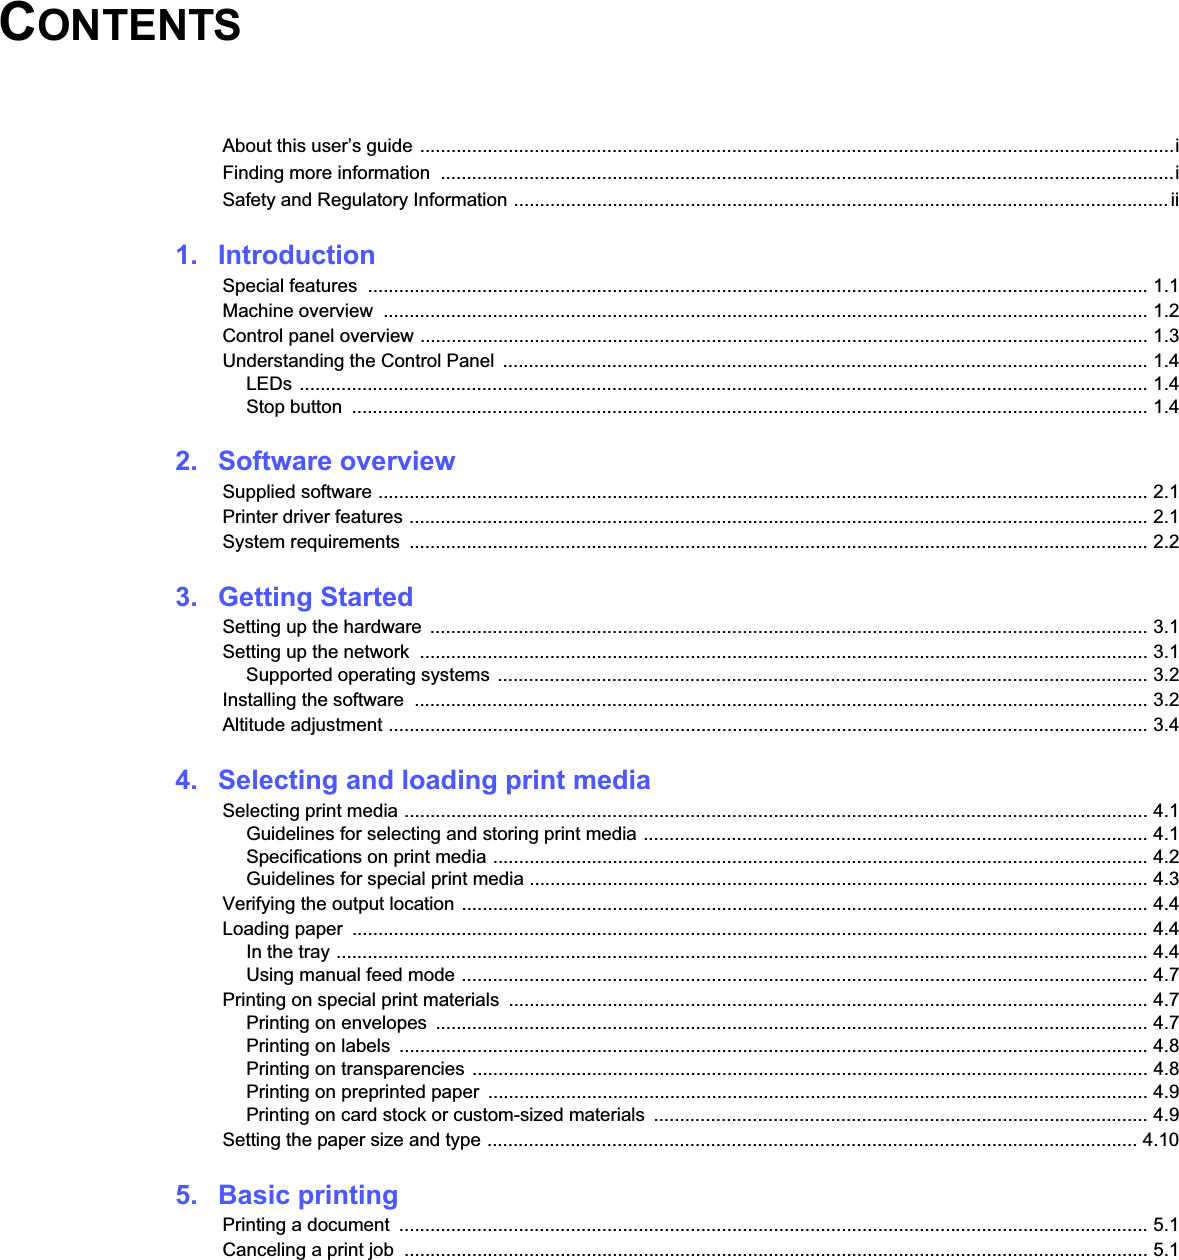
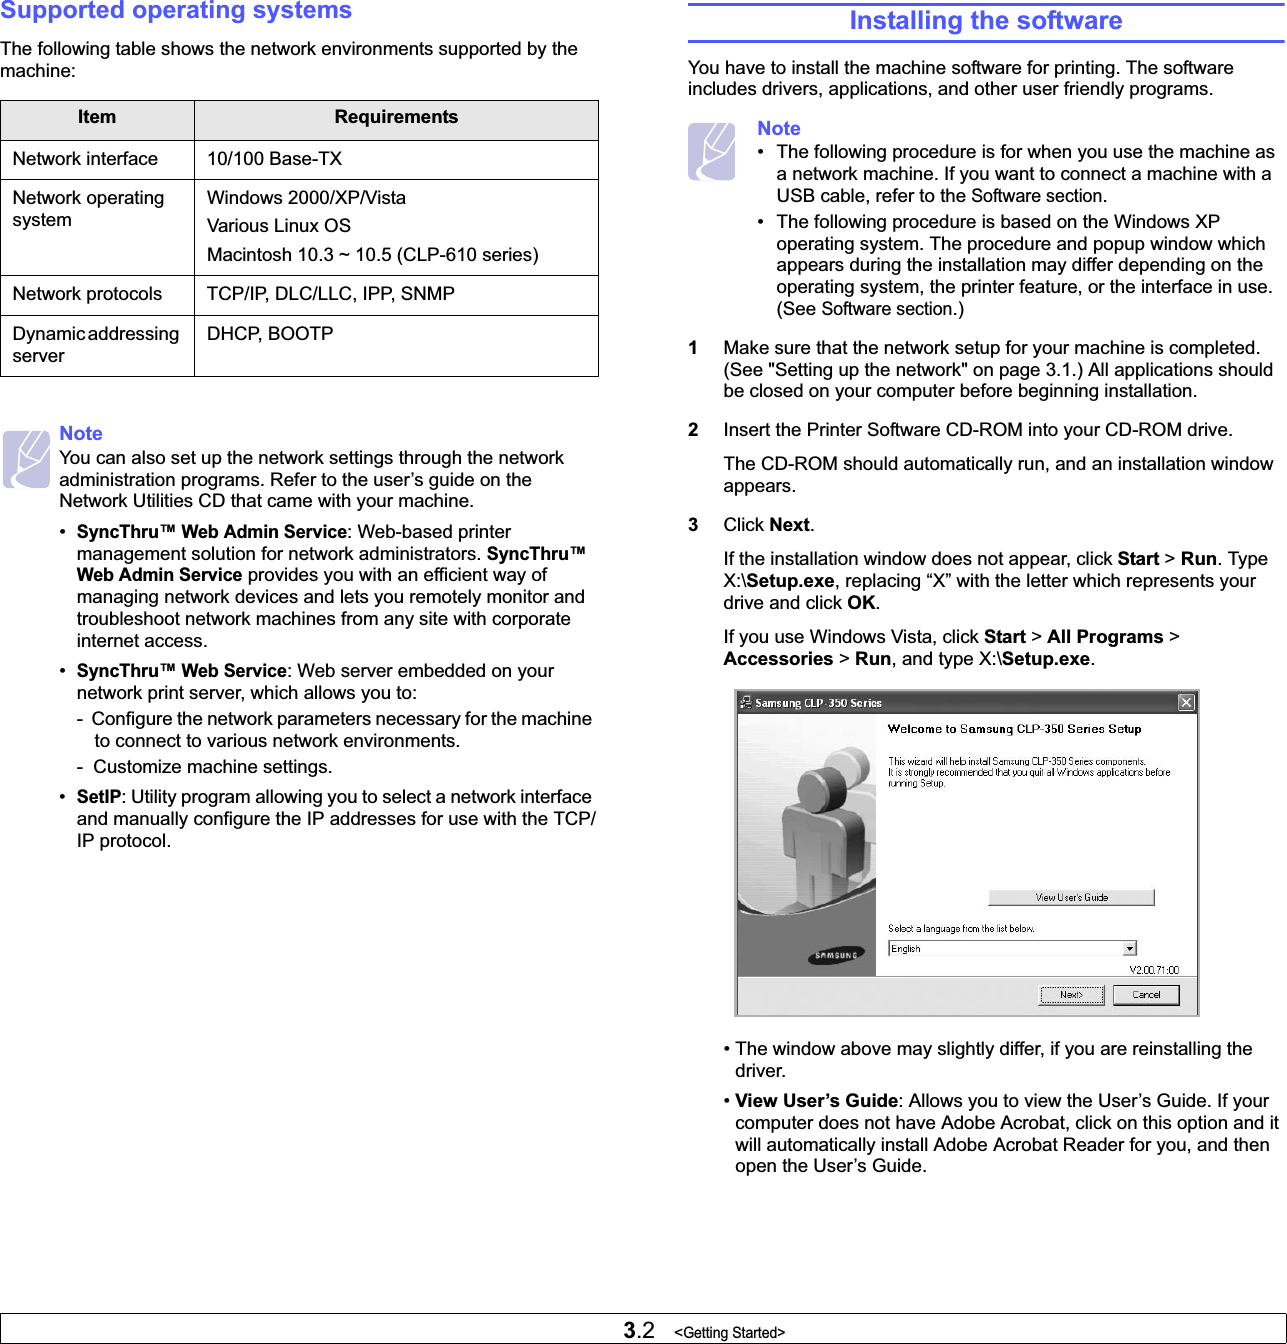
![4.2 <Selecting and loading print media>Specifications on print mediaTypeaa. The printer supports a wide range of media sizes.Size Dimensions Weight Capacitybb. Maximum capacity may differ depending on media weight, thickness, and environmental conditions.Plain paper Letter 216 x 279 mm (8.5 x 11 inches) • 60 to 90 g/m2 (16 to 24 lb bond) for the tray 1• 60 to 105 g/m2 (16 to 28 lb bond) for manual feeding in the tray 1• 150 sheets of 75 g/m2(20 lb bond) paper for the tray 1• 1 sheet for manual feeding in the tray 1• 250 sheets of 75 g/m2(20 lb bond) paper for optional trayLegal 216 x 356 mm (8.5 x 14 inches)Folio 216 x 330 mm (8.5 x 13 inches)A4 210 x 297 mm (8.26 x 11.69 inches)Oficio 216 x 343 mm (8.5 x 13.5 inches)JIS B5 182 x 257 mm (7.16 x 10.11 inches)Executive 184 x 267 mm (7.25 x 10.5 inches)Statement 140 x 216 mm (5.50 x 8.50 inches)A5 148 x 210 mm (5.82 x 8.26 inches)A6 105 x 148 mm (4.13 x 5.82 inches)Envelope Monarch 98 x 191 mm (3.87 x 7.5 inches) 75 to 90 g/m2 (20 to 24 lb bond)1 sheet for manual feeding in the tray 1No. 10 105 x 241 mm (4.12 x 9.5 inches)DL 110 x 220 mm (4.33 x 8.66 inches)C5 162 x 229 mm (6.37 x 9.01 inches)C6 114 x 162 mm (4.48 x 6.38 inches)No.9 98 x 225 mm (3.87 x 8.87 inches)6 3/4 92 x 165 mm (3.62 x 6.5 inches)Thick paper Refer to the Plain paper sectionRefer to the Plain paper section 90 to 1W\ g/m2 (24 to 28 lb bond)1 sheet for manual feeding in the tray 1Thin paper Refer to the Plain paper sectionRefer to the Plain paper section ]W toG^W g/m2 (1]Gto 19 lb bond)1 sheet for manual feeding in the tray 1Labelscc. Smoothness: 100 to 250 (sheffield)Letter, A4 Refer to the Plain paper section 120 to 150 g/m2 (32 to 40 lb bond)1 sheet for manual feeding in the tray 1Transparencydd. Recommended media: Transparency for a color laser printer by 3M such as PP2500.Letter, A4 Refer to the Plain paper section 138 to 146 g/m2 (37 to 39 lb bond)Card stock Post card 101.6 x 152.4 mm (4 x 6 inches) 105 to 163 g/m2 (28 to 43 lb bond)Photo paper Letter, A4 Refer to the Plain paper section 120 to 220 g/m2 (32 to 58.6 lb bond)Minimum size (custom) 76 x 127 mm (3 x 5 inches) 60 to 163 g/m2 (16 to43 lb bond)Maximum size (custom) 216 x 356 mm (8.5 x 14 inches)](https://usermanual.wiki/Samsung-Electronics-Co/CLP350N.Users-Manual-1/User-Guide-818886-Page-25.png)