Samsung Electronics Co CLP350N Laser Printer User Manual CLP 350 Series EN
Samsung Electronics Co Ltd Laser Printer CLP 350 Series EN
UserManual.wiki
>
Samsung Electronics Co
>
CLP350N User Manual
>
Users Manual 2
Contents
1.
Users Manual 1
2.
Users Manual 2
Users Manual 2
Navigation menu
Upload a User Manual
Namespaces
Wiki Guide
HTML
PDF
Info
Views
User Manual
Discussion / Help
Navigation
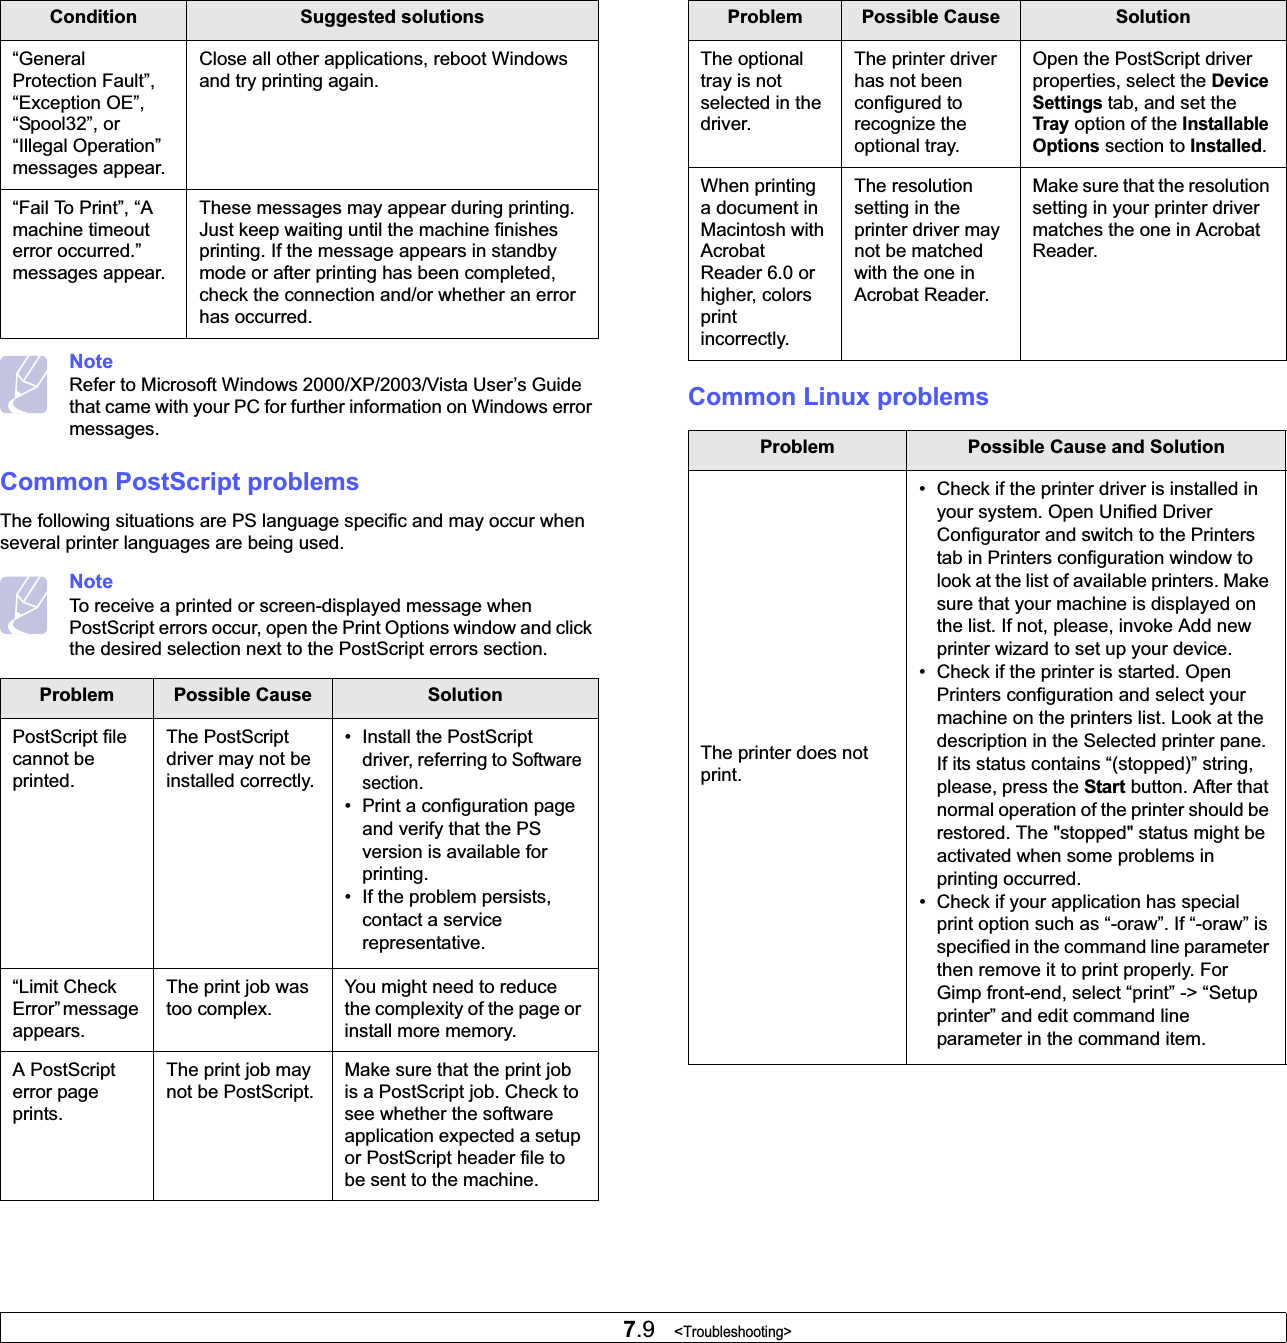
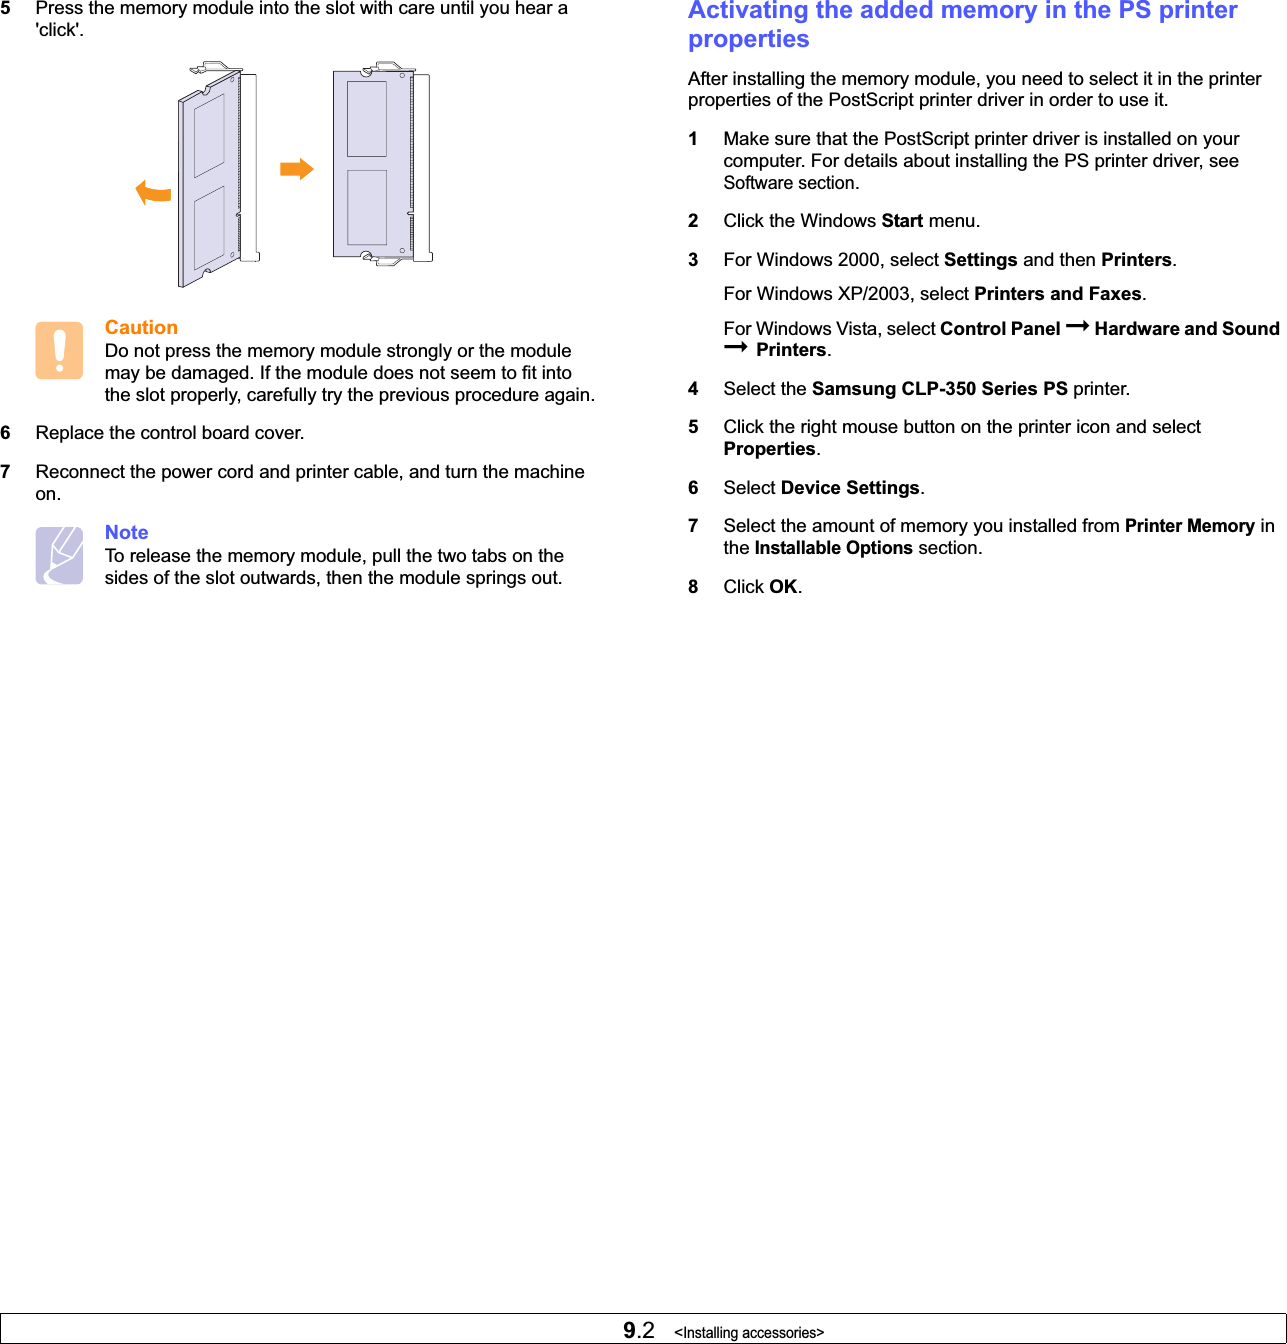


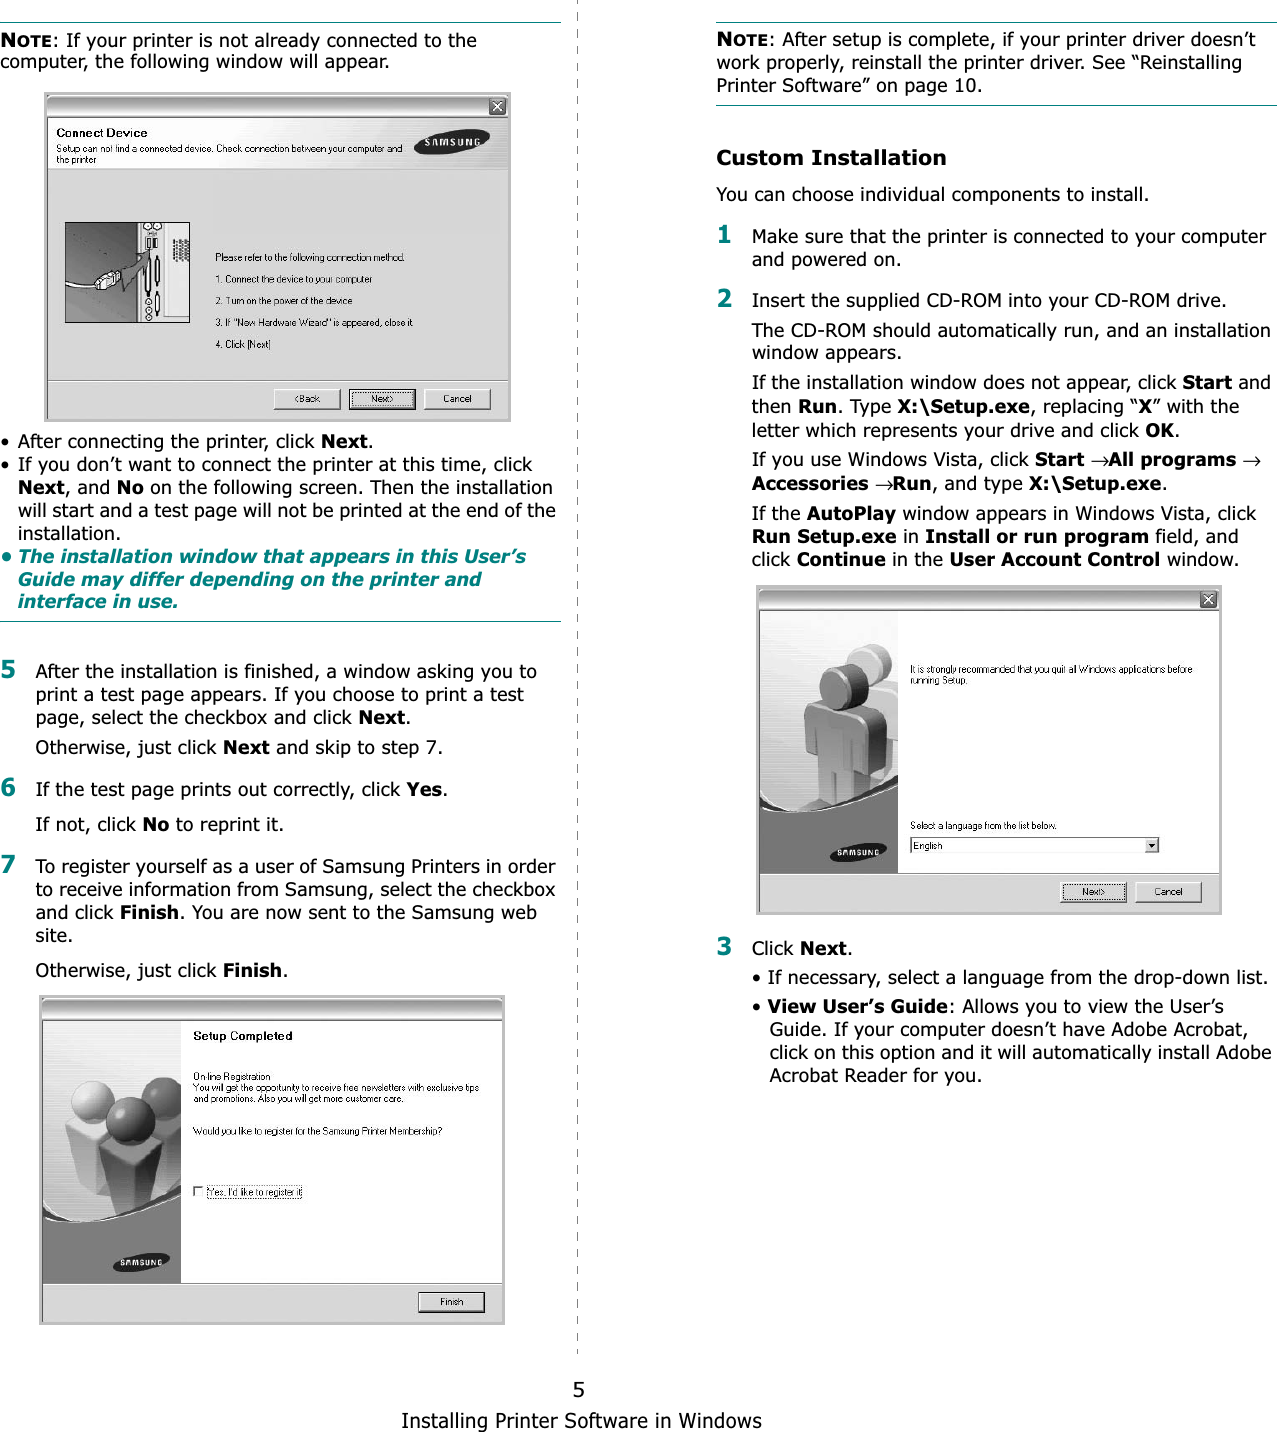
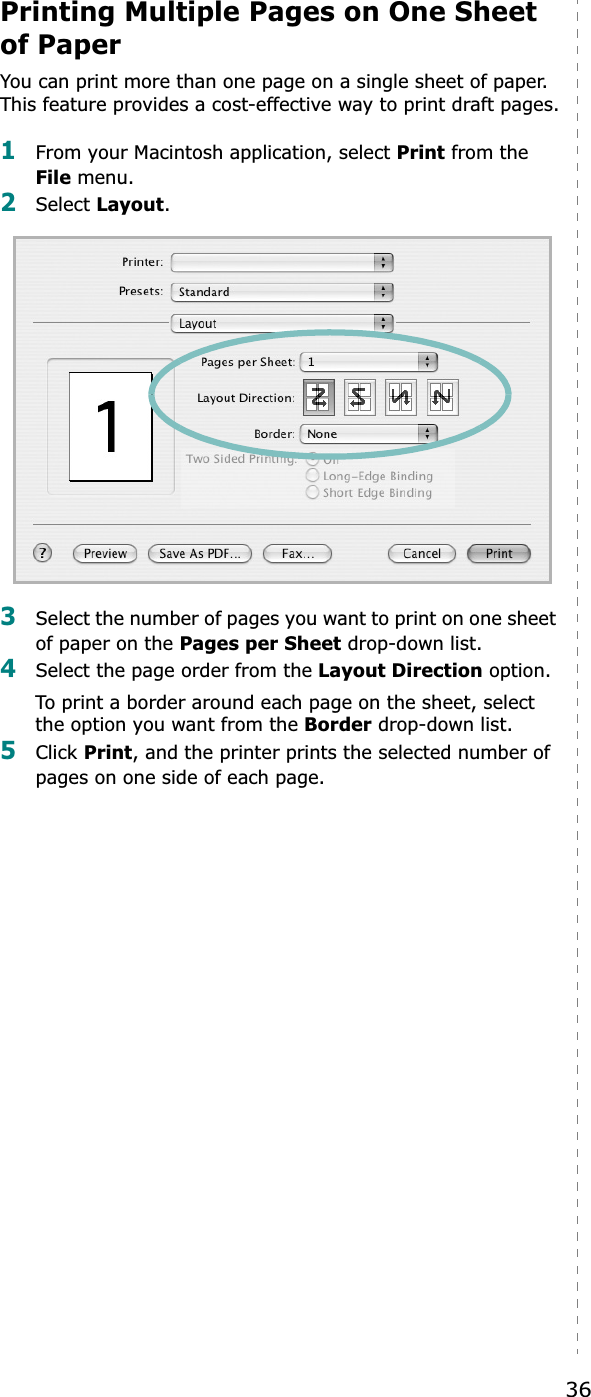
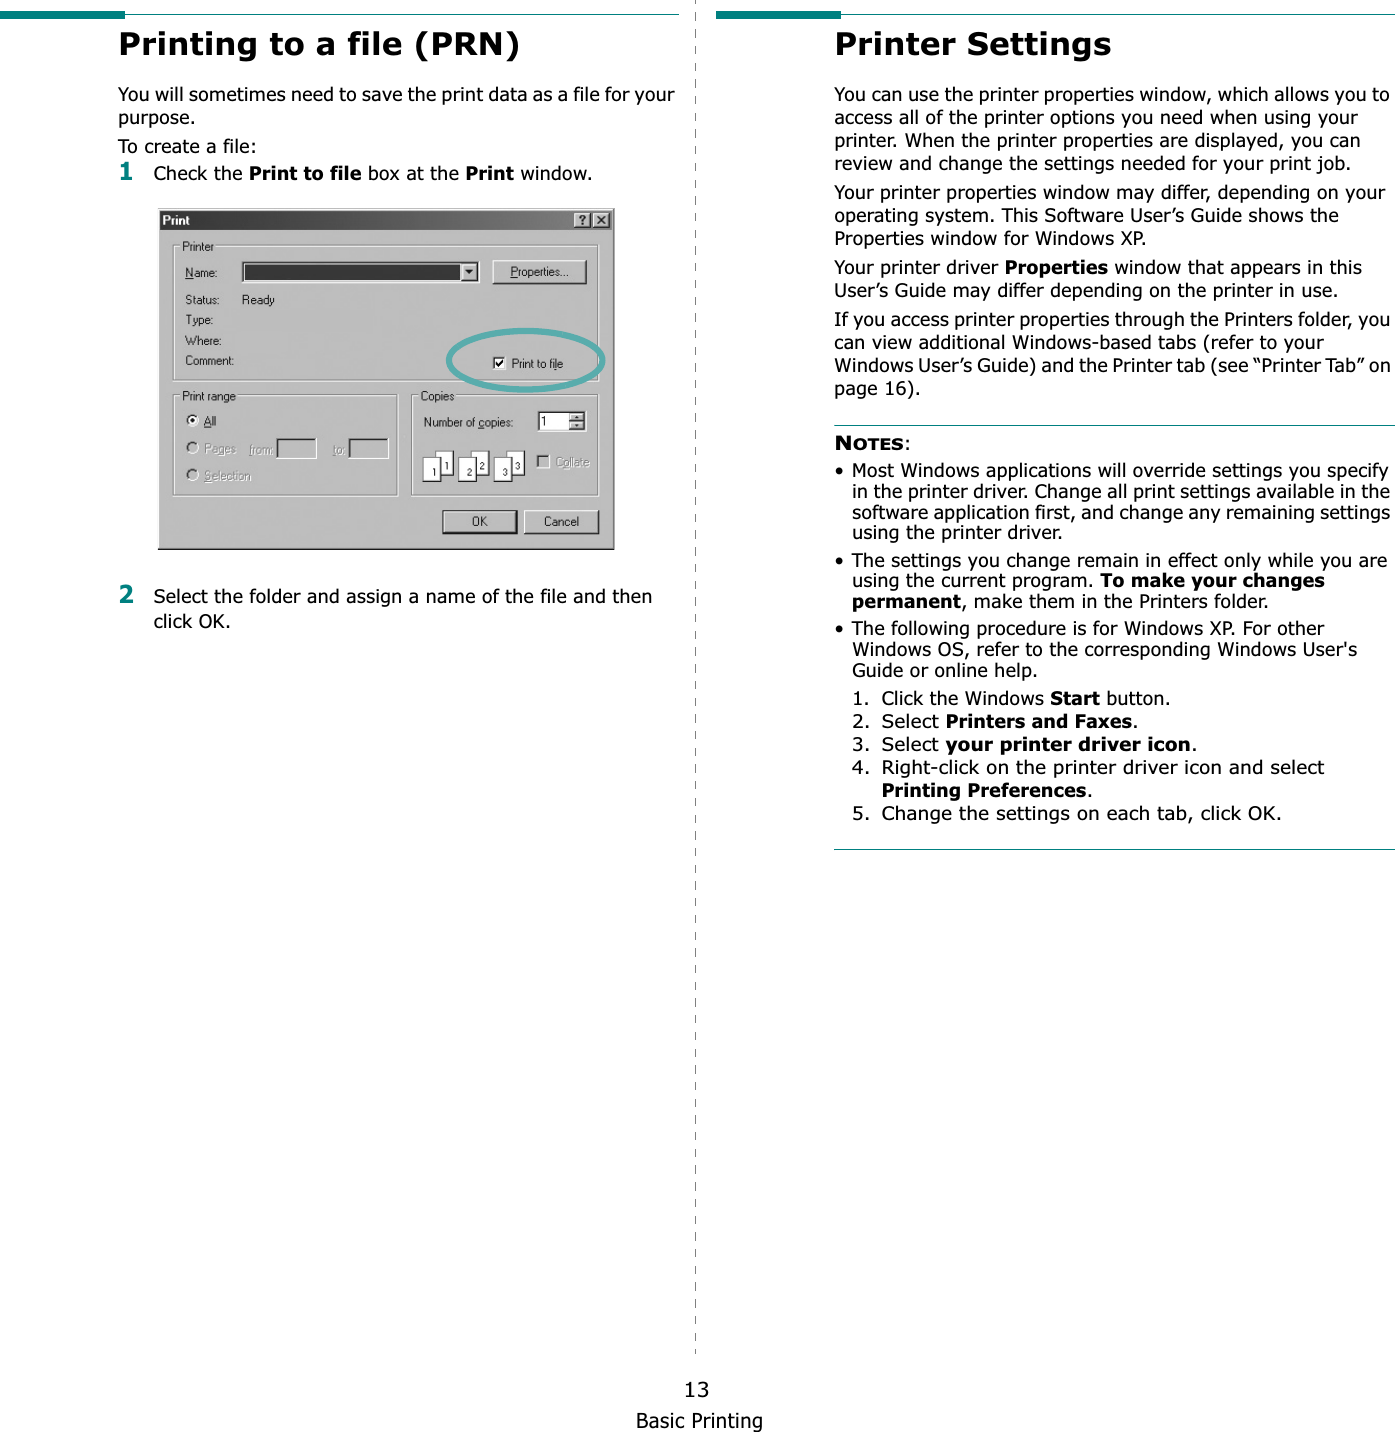
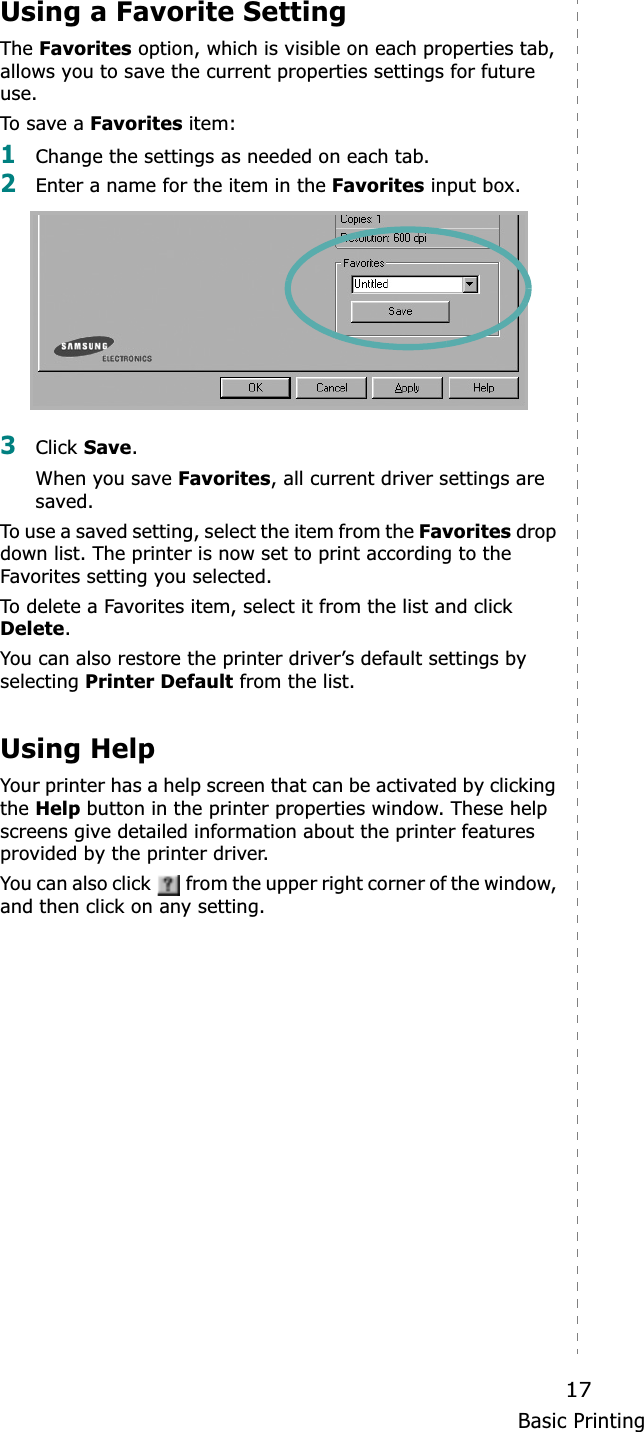
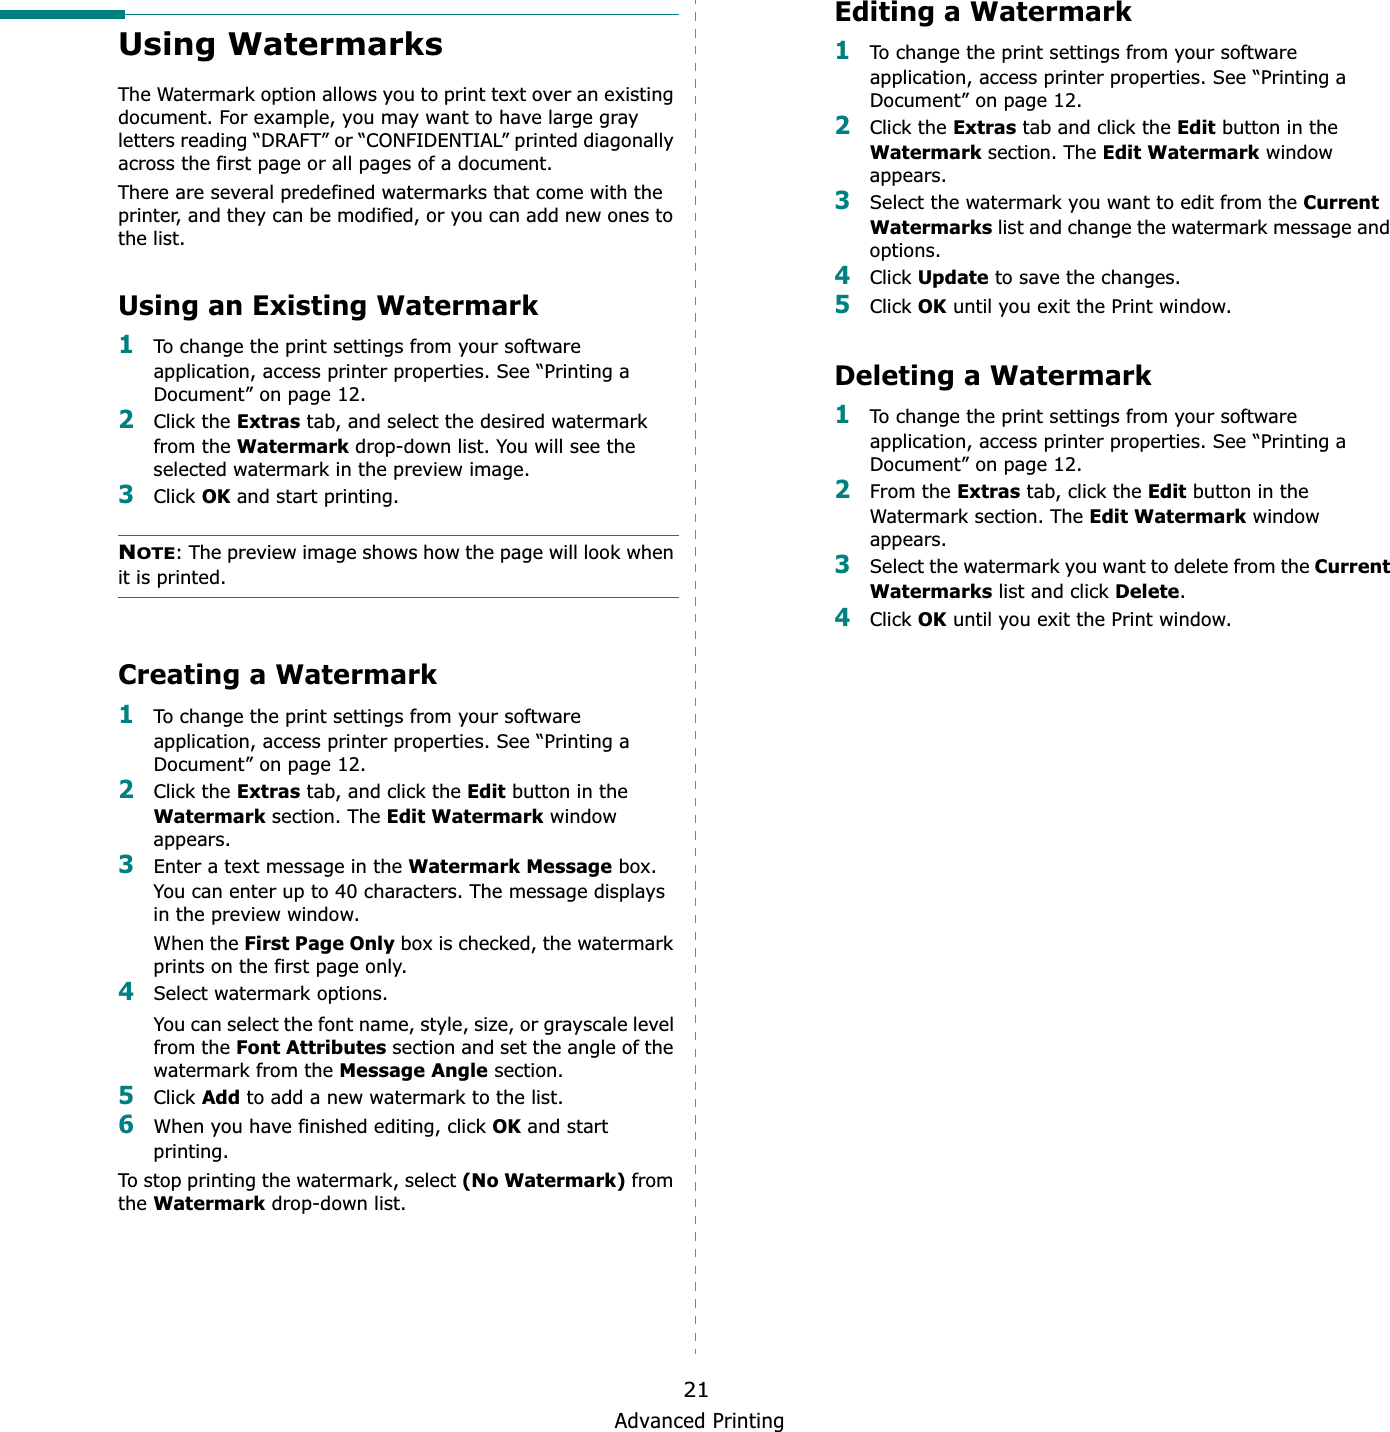
![Installing Printer Software in Windows64Select Custom installation. Click Next.5Select your printer and click Next.NOTE: If your printer is not already connected to the computer, the following window will appear.• After connecting the printer, click Next.• If you don’t want to connect the printer at this time, click Next, and No on the following screen. Then the installation will start and a test page will not be printed at the end of the installation.• The installation window that appears in this User’s Guide may differ depending on the printer and interface in use.6Select the components to be installed and click Next.NOTE: You can change the desired installation folder by clicking [Browse].7After the installation is finished, a window asking you to print a test page appears. If you choose to print a test page, select the checkbox and click Next.Otherwise, just click Next and skip to step 9.8If the test page prints out correctly, click Yes.If not, click No to reprint it.9To register yourself as a user of Samsung Printers in order to receive information from Samsung, select the checkbox and click Finish. You are now sent to the Samsung web site.Otherwise, just click Finish.](https://usermanual.wiki/Samsung-Electronics-Co/CLP350N.Users-Manual-2/User-Guide-818887-Page-16.png)
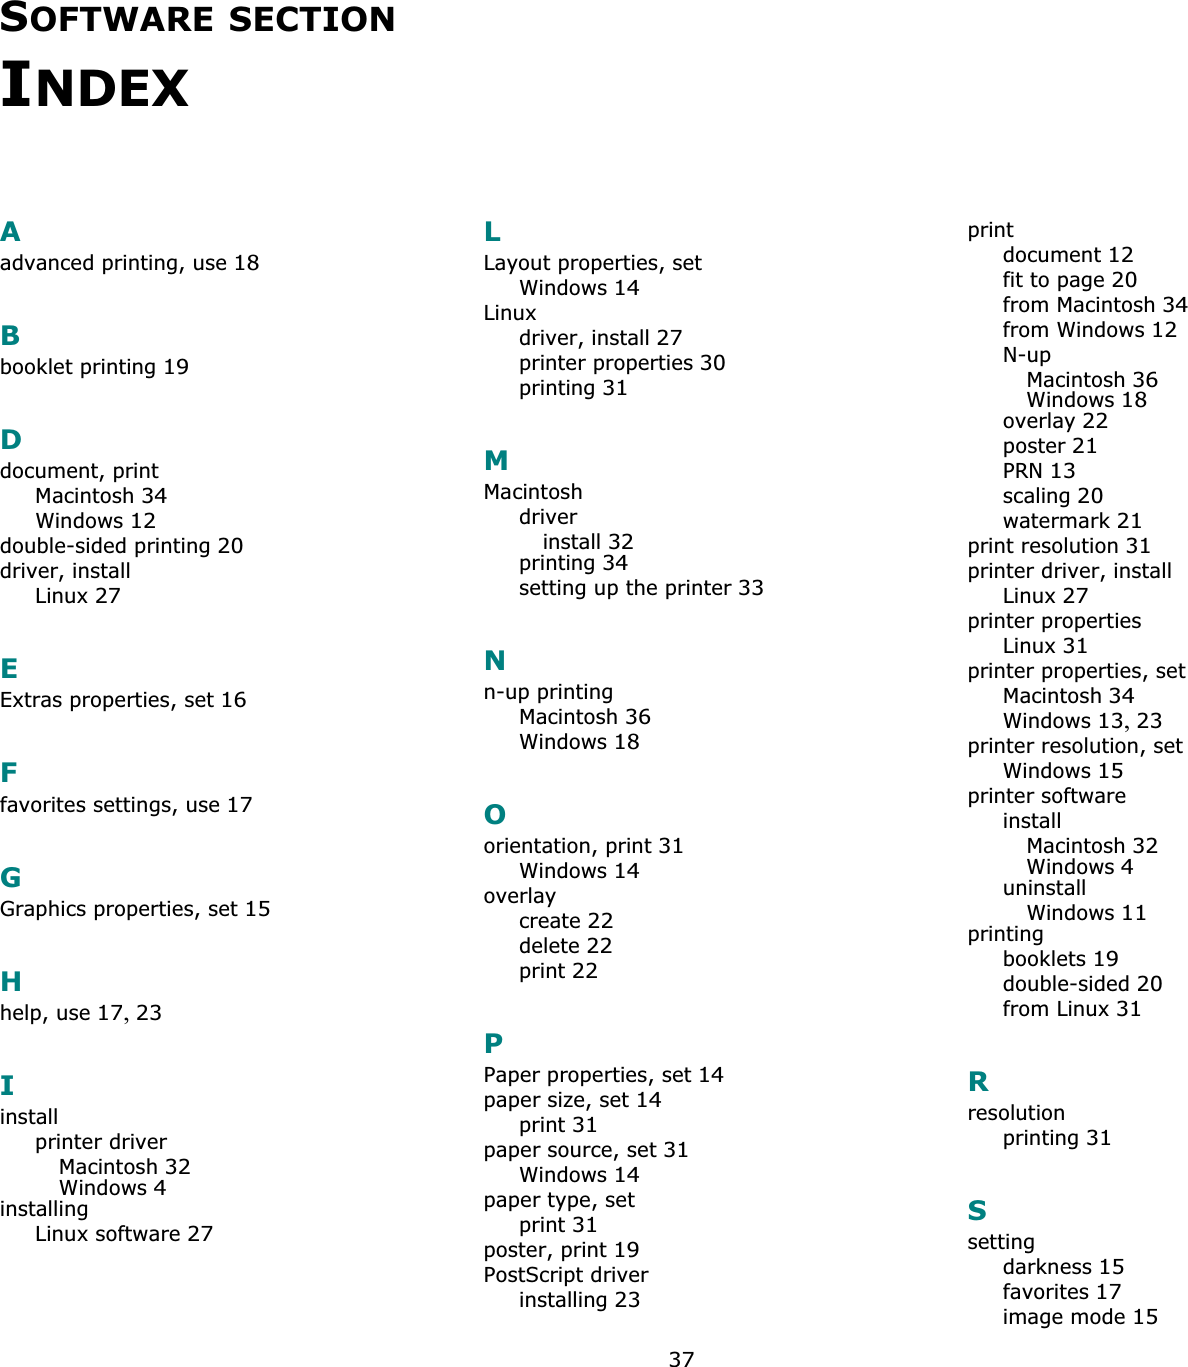
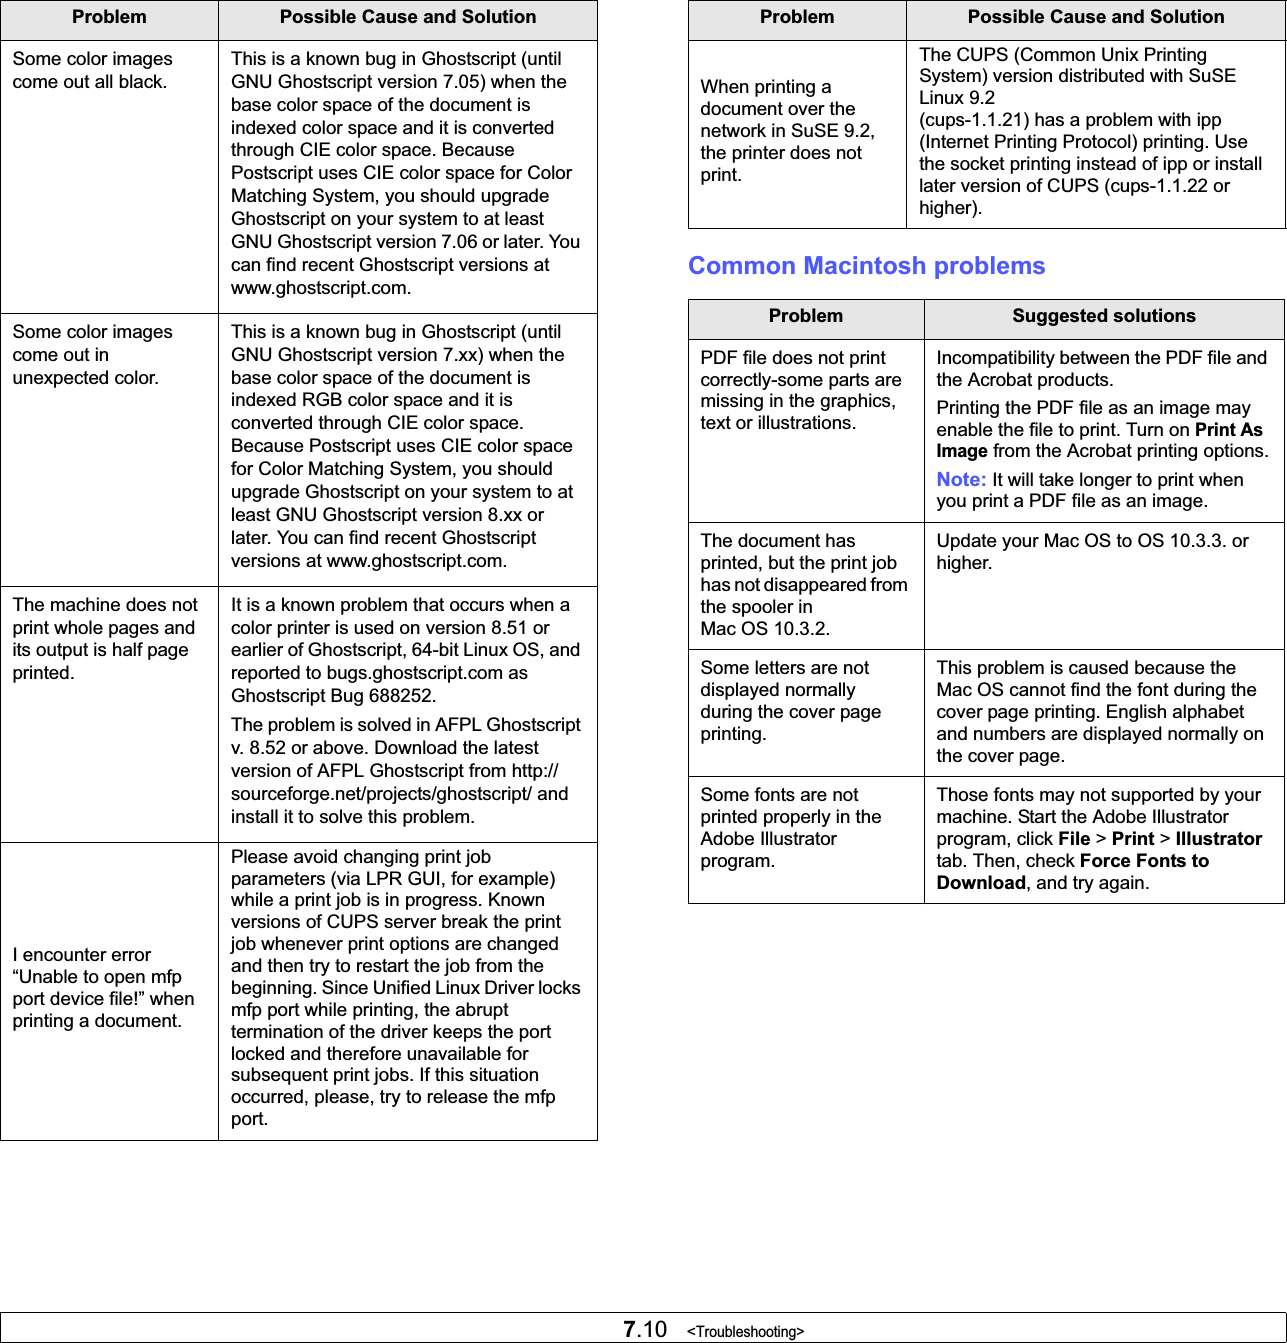
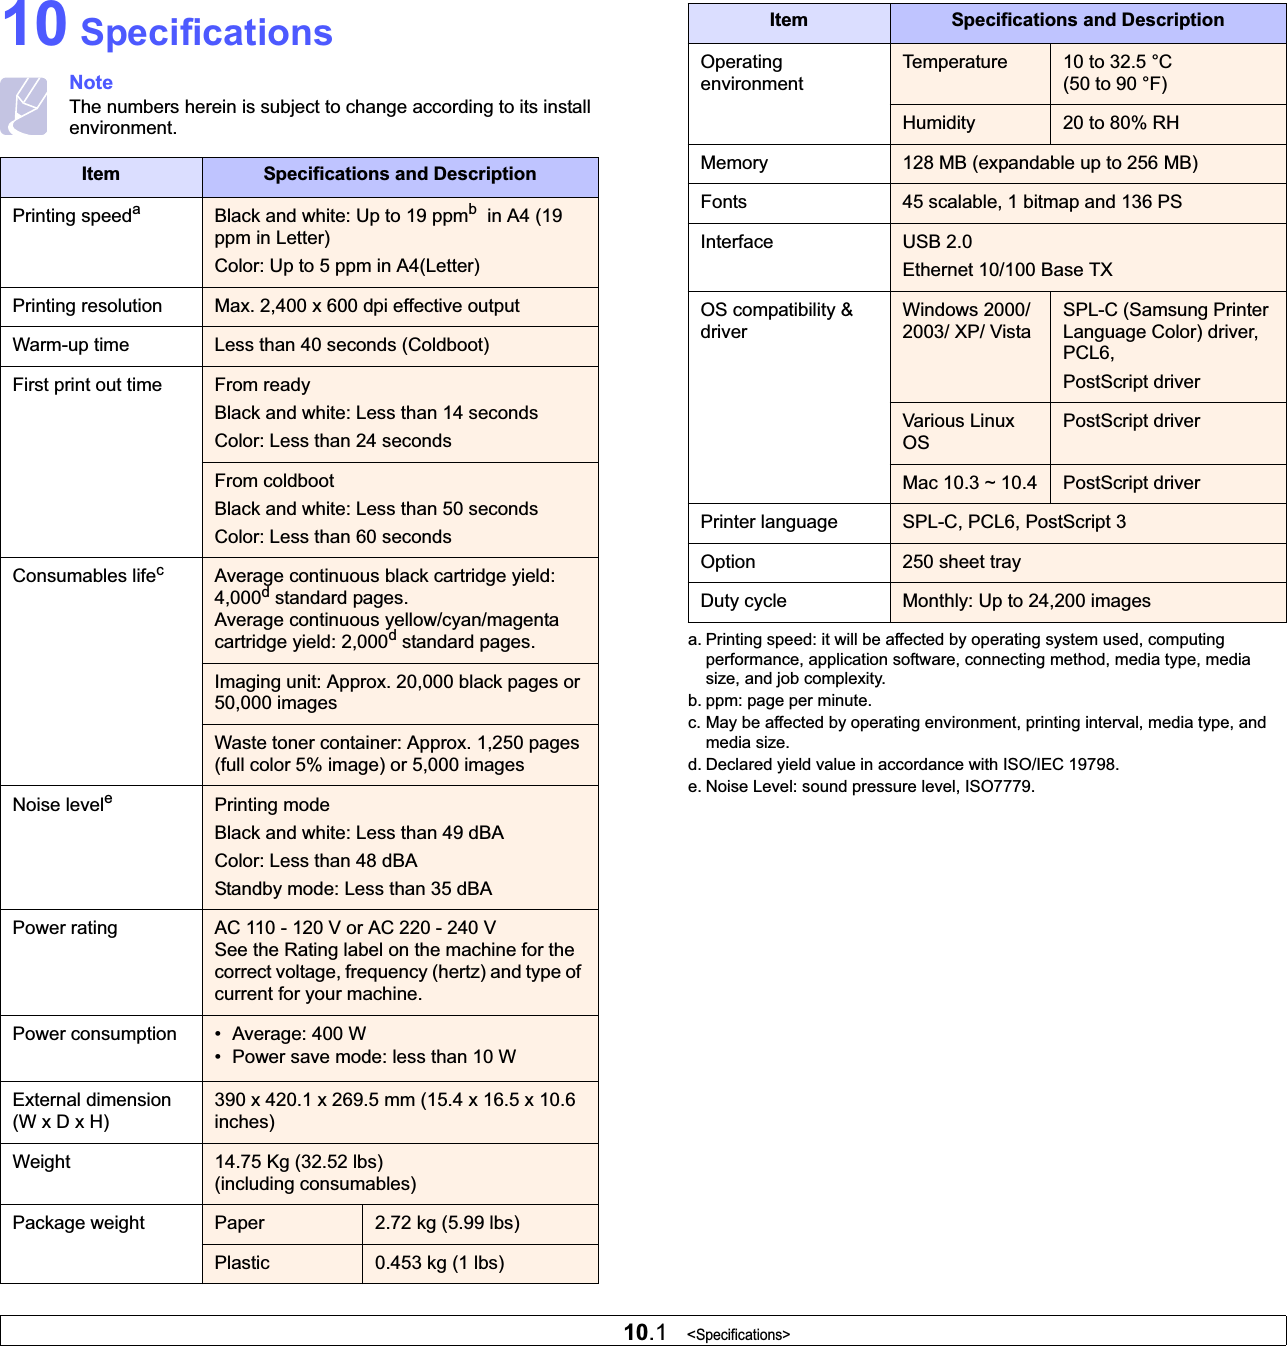
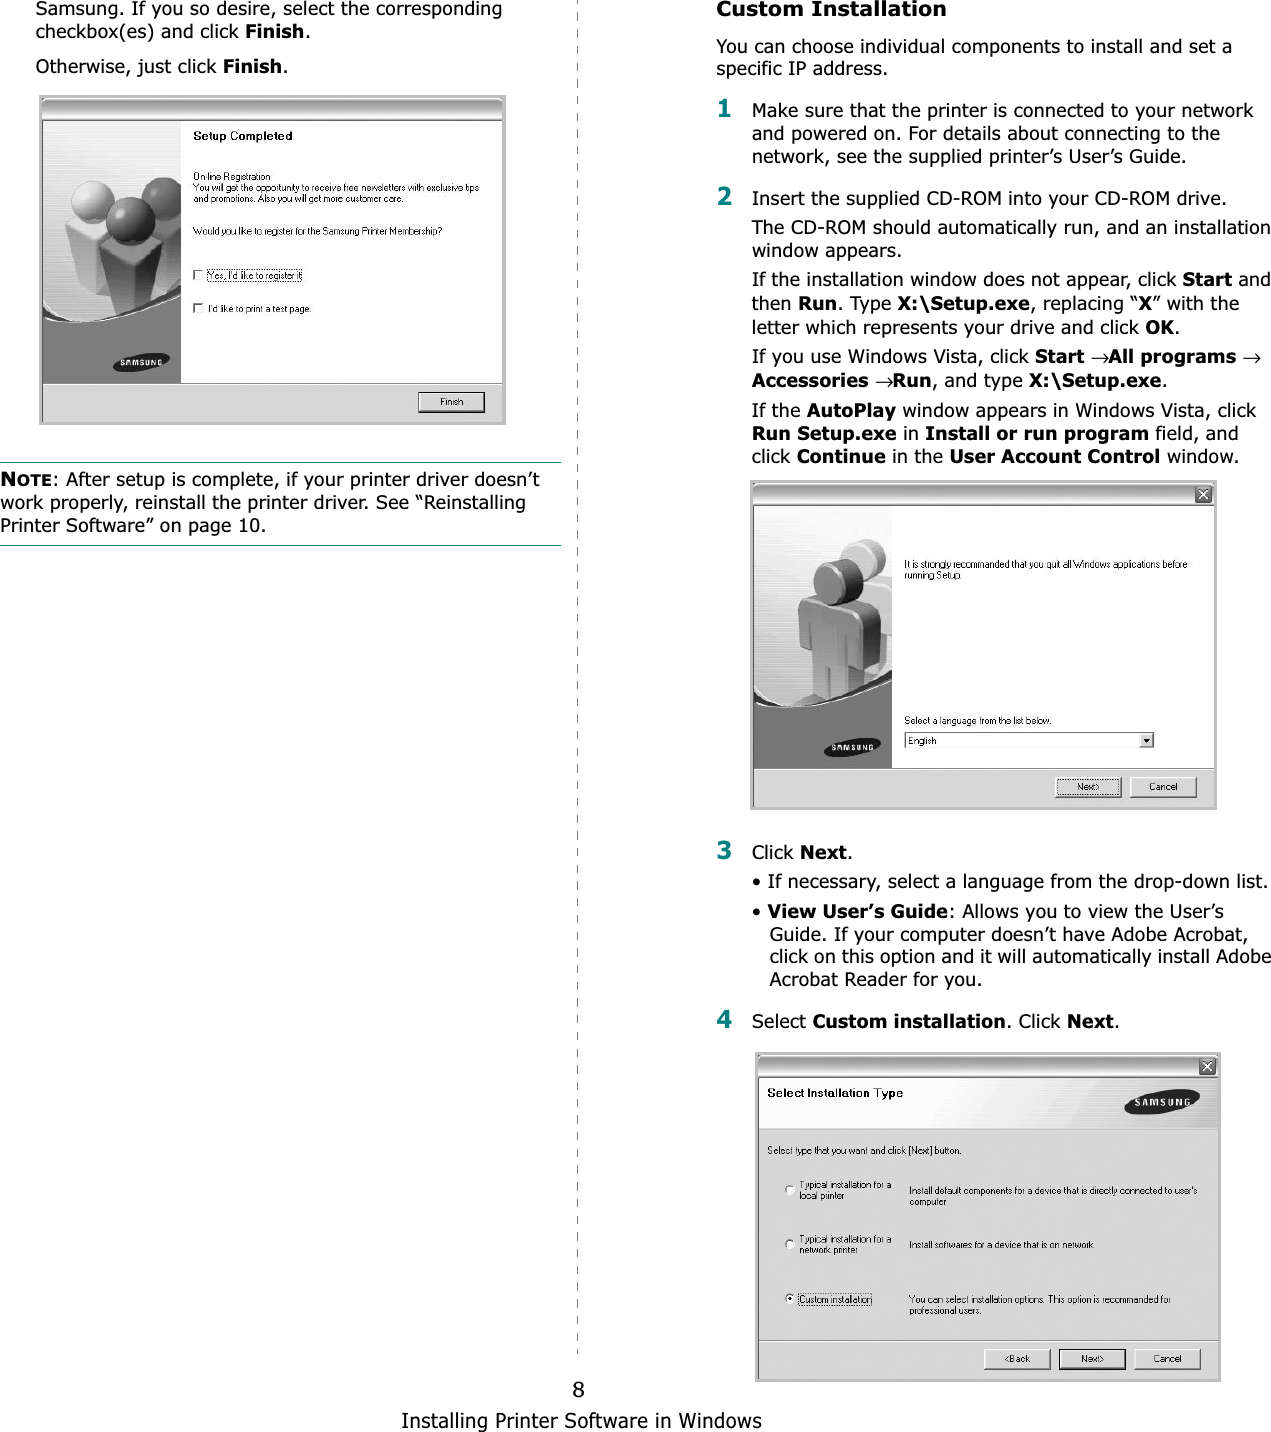
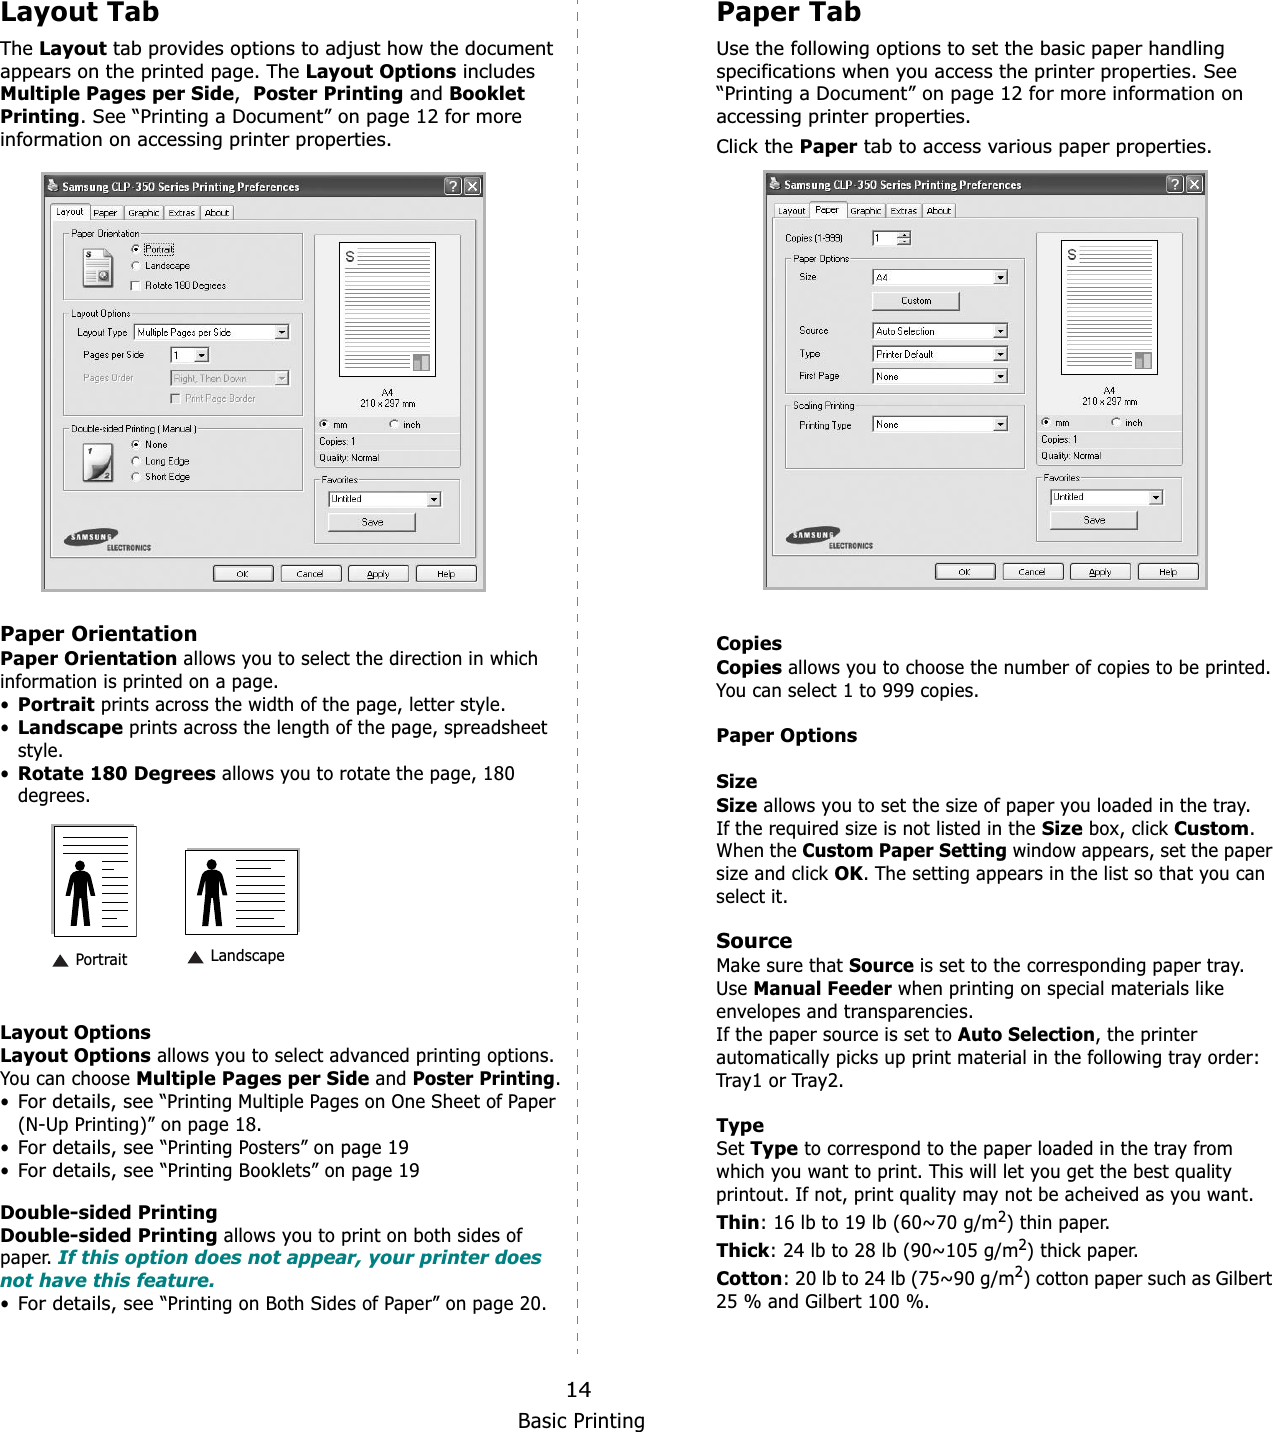
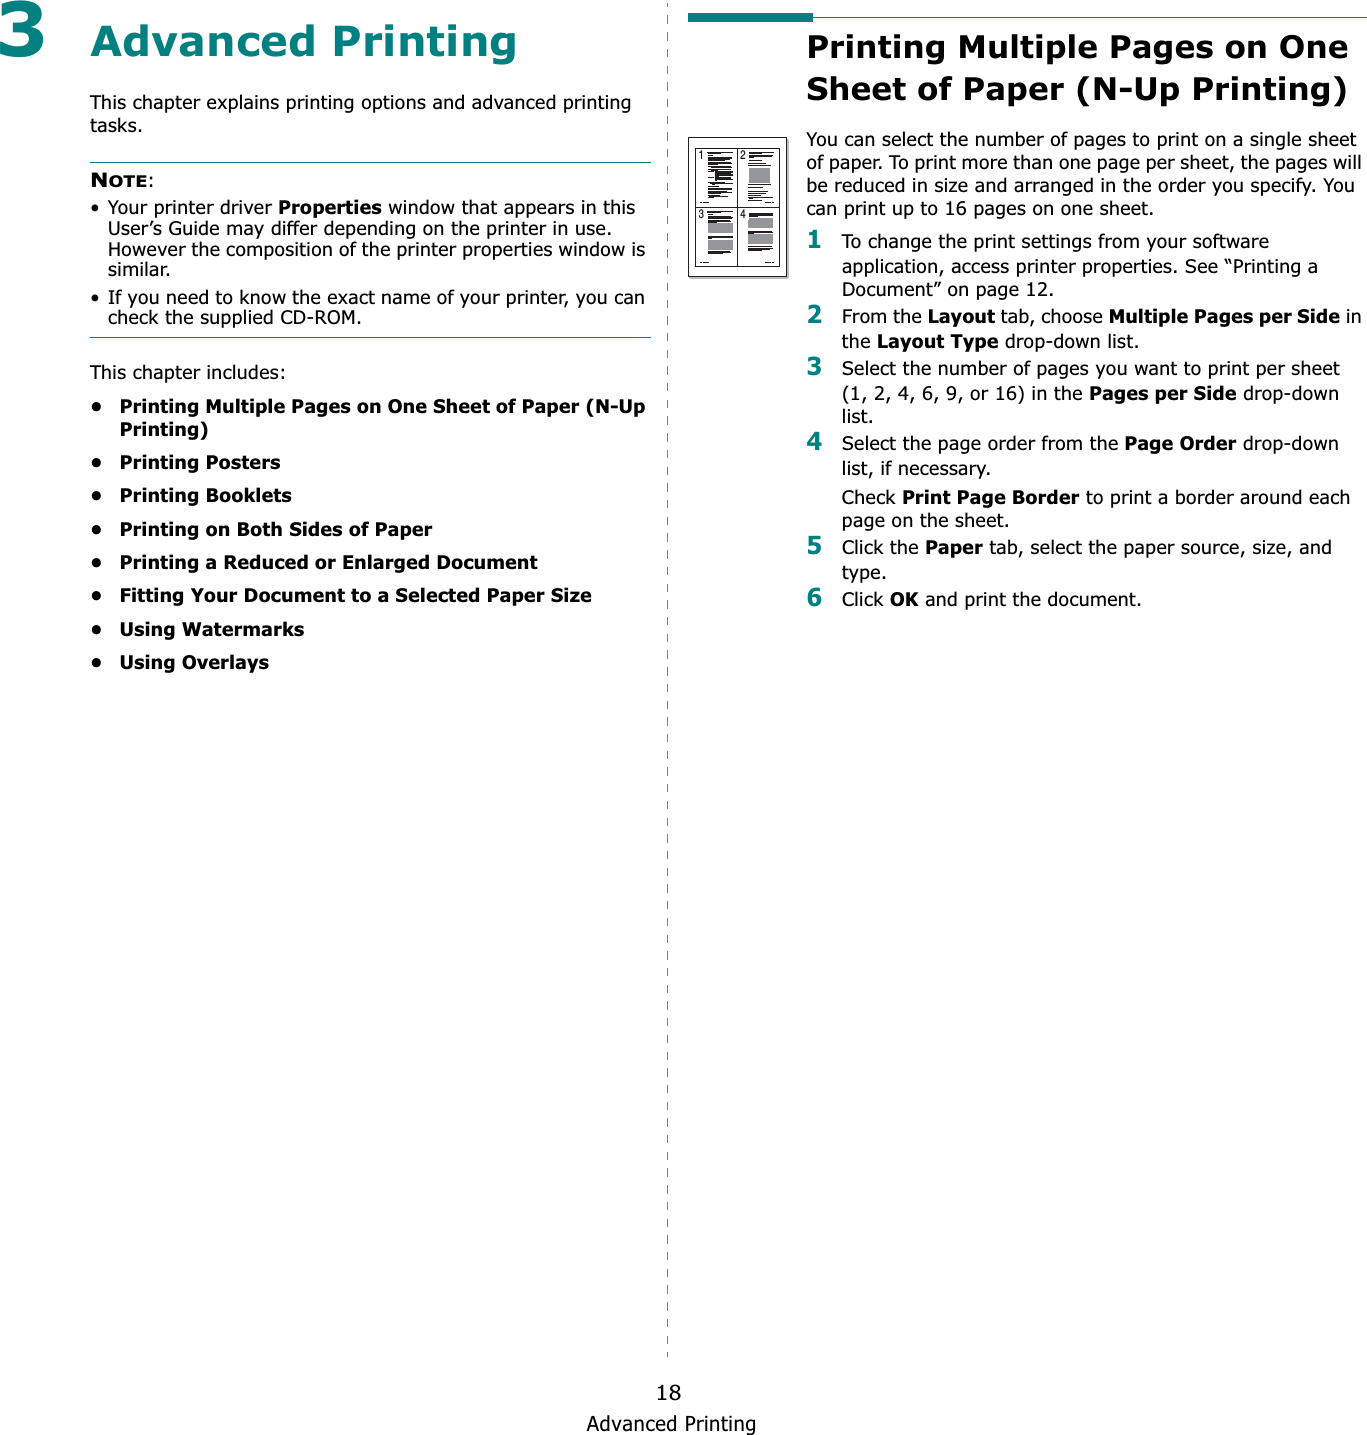
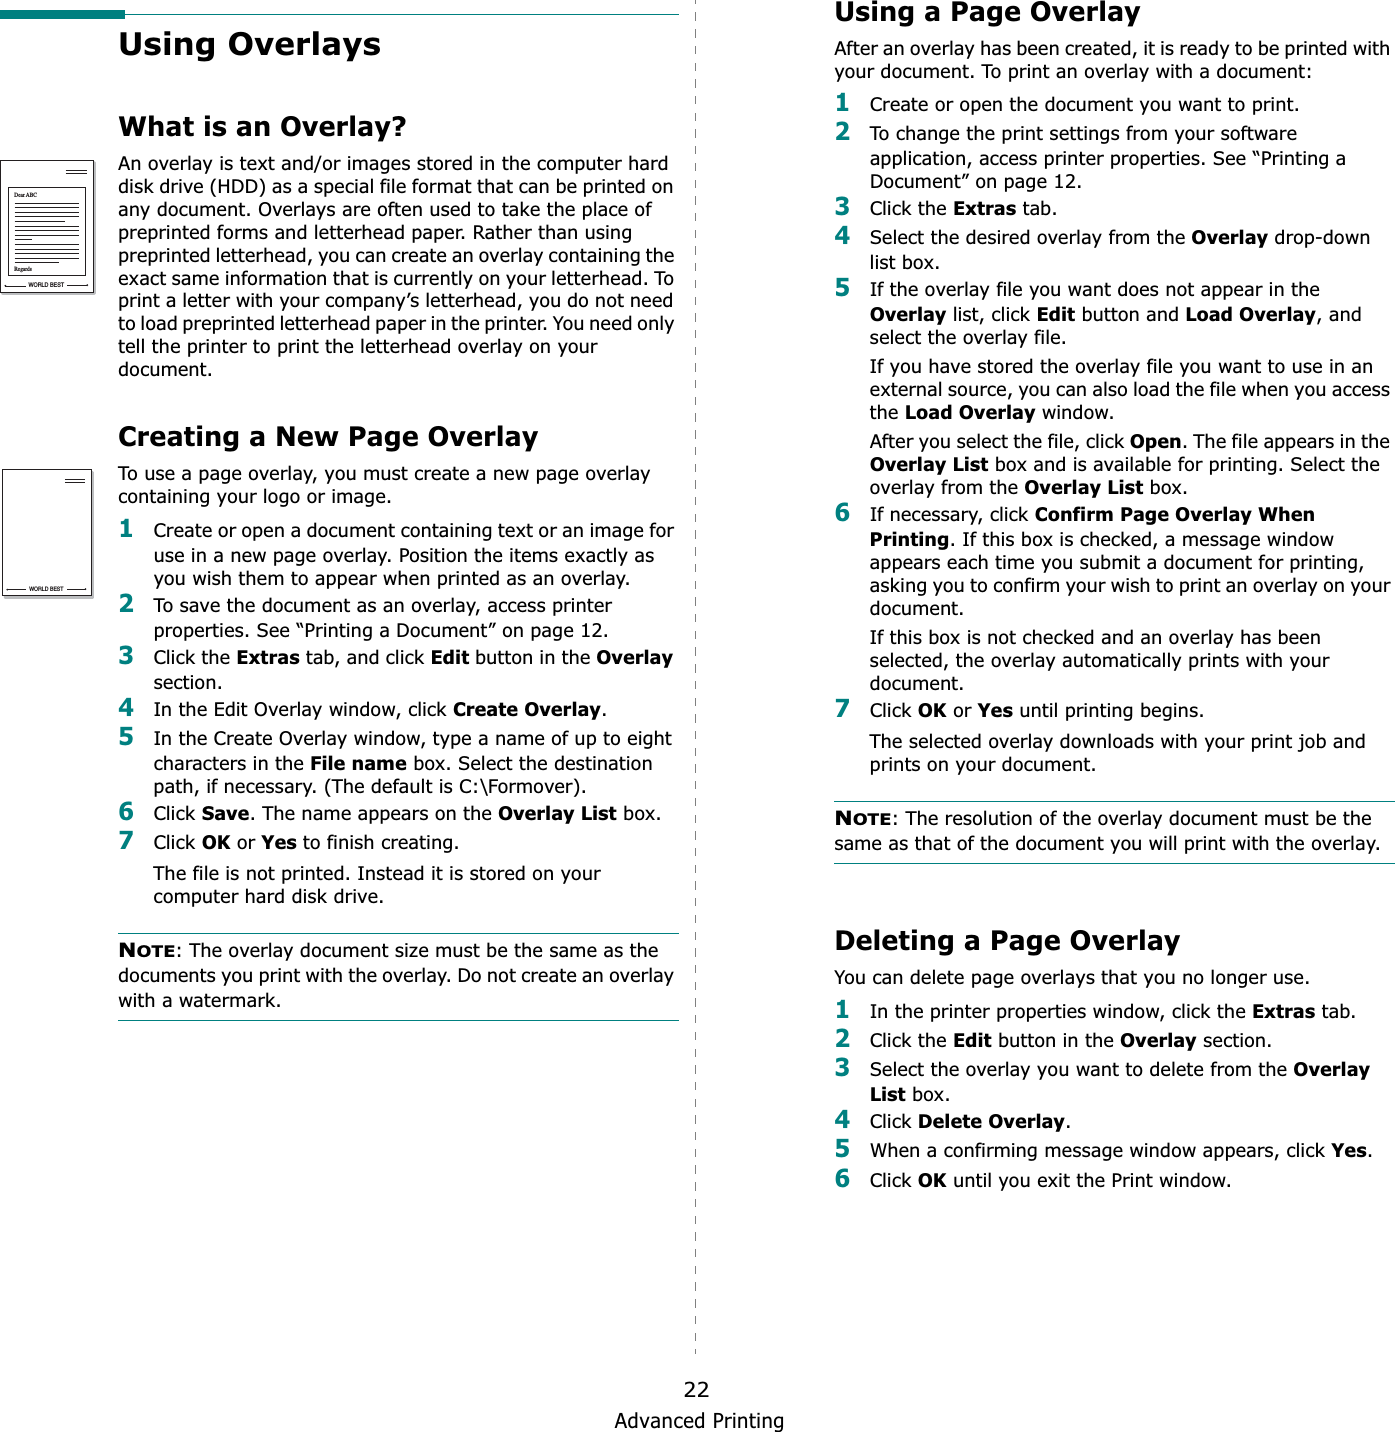
![Installing Printer Software in Windows7Installing Software for Network PrintingWhen you connect your printer to a network, you must first configure the TCP/IP settings for the printer. After you have assigned and verified the TCP/IP settings, you are ready to install the software on each computer on the network.You can install the printer software using the typical or custom method.Typical InstallationThis is recommended for most users. All components necessary for printer operations will be installed.1Make sure that the printer is connected to your network and powered on. For details about connecting to the network, see the supplied printer’s User’s Guide.2Insert the supplied CD-ROM into your CD-ROM drive.The CD-ROM should automatically run, and an installation window appears.If the installation window does not appear, click Start and thenRun. Type X:\Setup.exe, replacing “X” with the letter which represents your drive and click OK.If you use Windows Vista, click Start→All programs→ Accessories→Run, and type X:\Setup.exe.If the AutoPlay window appears in Windows Vista, click Run Setup.exe in Install or run program field, and click Continue in the User Account Control window.3Click Next.• If necessary, select a language from the drop-down list.•View User’s Guide: Allows you to view the User’s Guide. If your computer doesn’t have Adobe Acrobat, click on this option and it will automatically install Adobe Acrobat Reader for you.4Select Typical installation for a network printer. Click Next.5The list of printers available on the network appears. Select the printer you want to install from the list and then clickNext.• If you do not see your printer on the list, click Update to refresh the list, or select Add TCP/IP Port to add your printer to the network. To add the printer to the network, enter the port name and the IP address for the printer.To verify your printer’s IP address or the MAC address, print a Network Configuration page.• To find a shared network printer (UNC Path), select Shared Printer [UNC] and enter the shared name manually or find a shared printer by clicking the Browsebutton.NOTE: If you cannot find your machine in network, please turn off the firewall and click Update.6After the installation is finished, a window appears asking you to print a test page and to register yourself as a user of Samsung Printers in order to receive information from](https://usermanual.wiki/Samsung-Electronics-Co/CLP350N.Users-Manual-2/User-Guide-818887-Page-17.png)
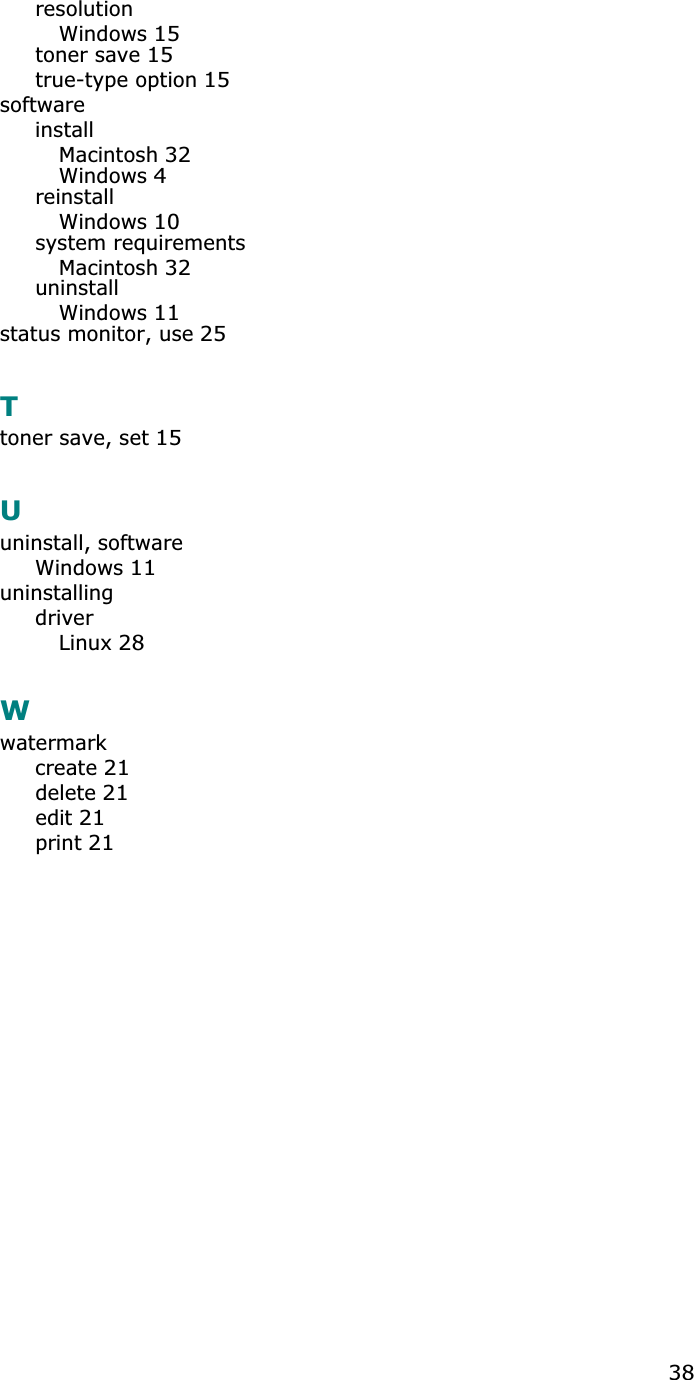
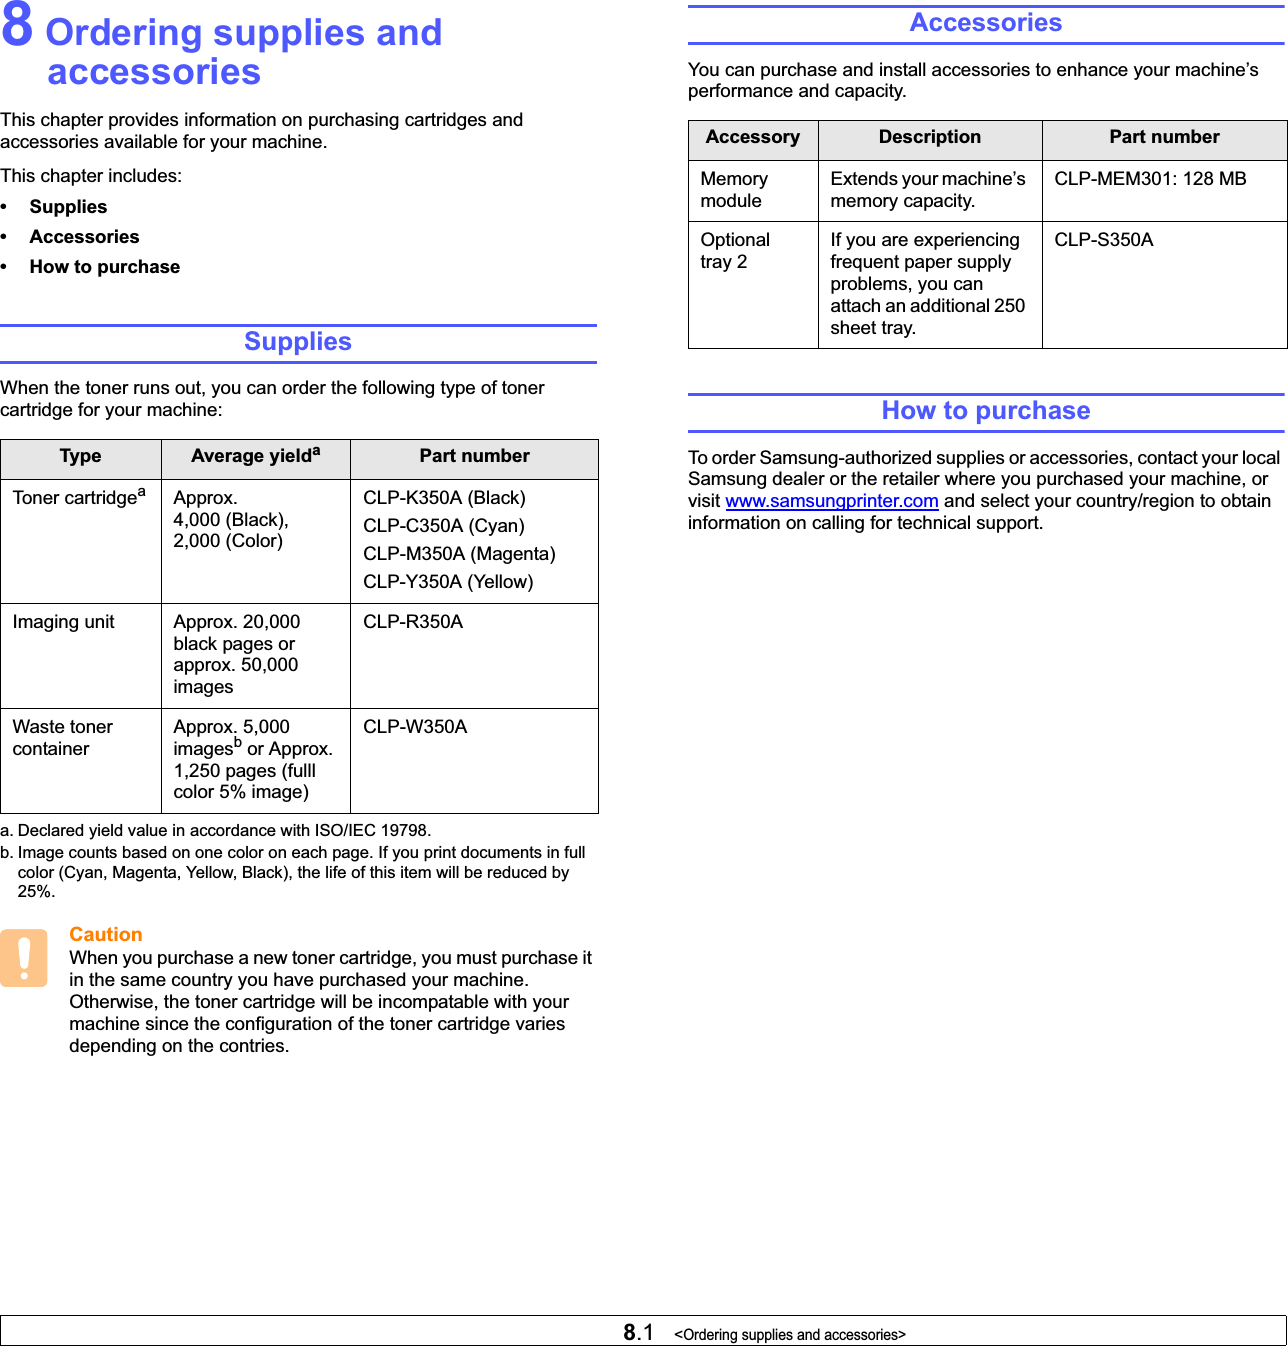
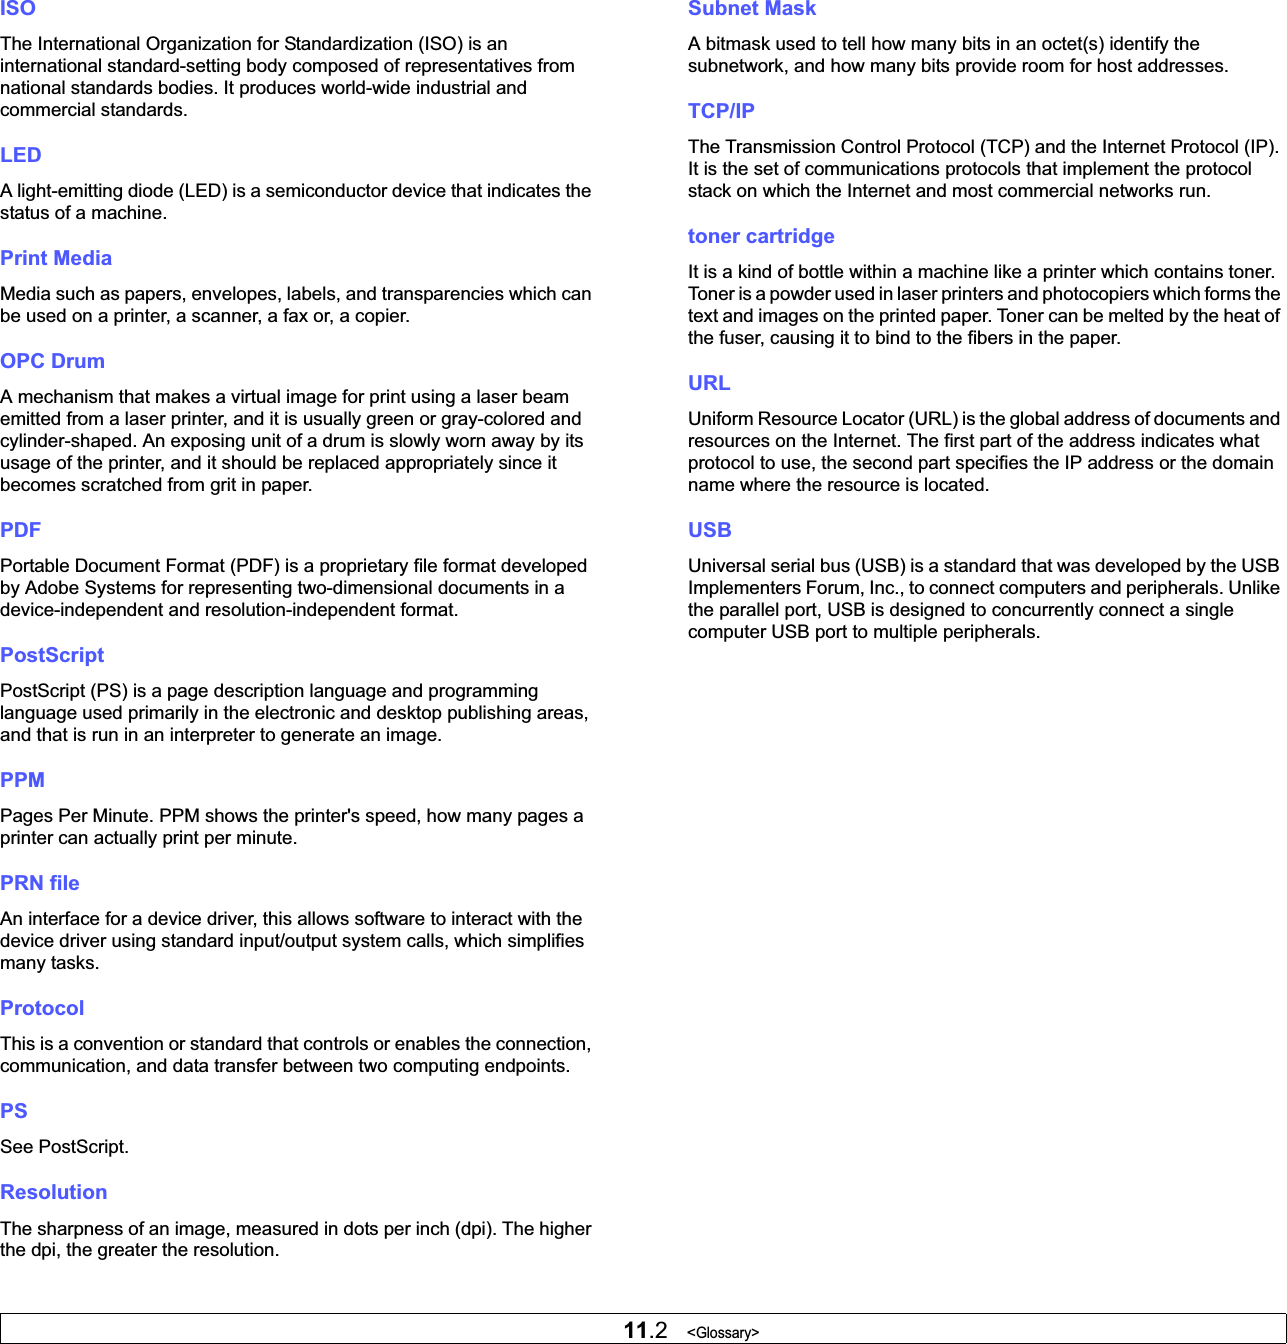
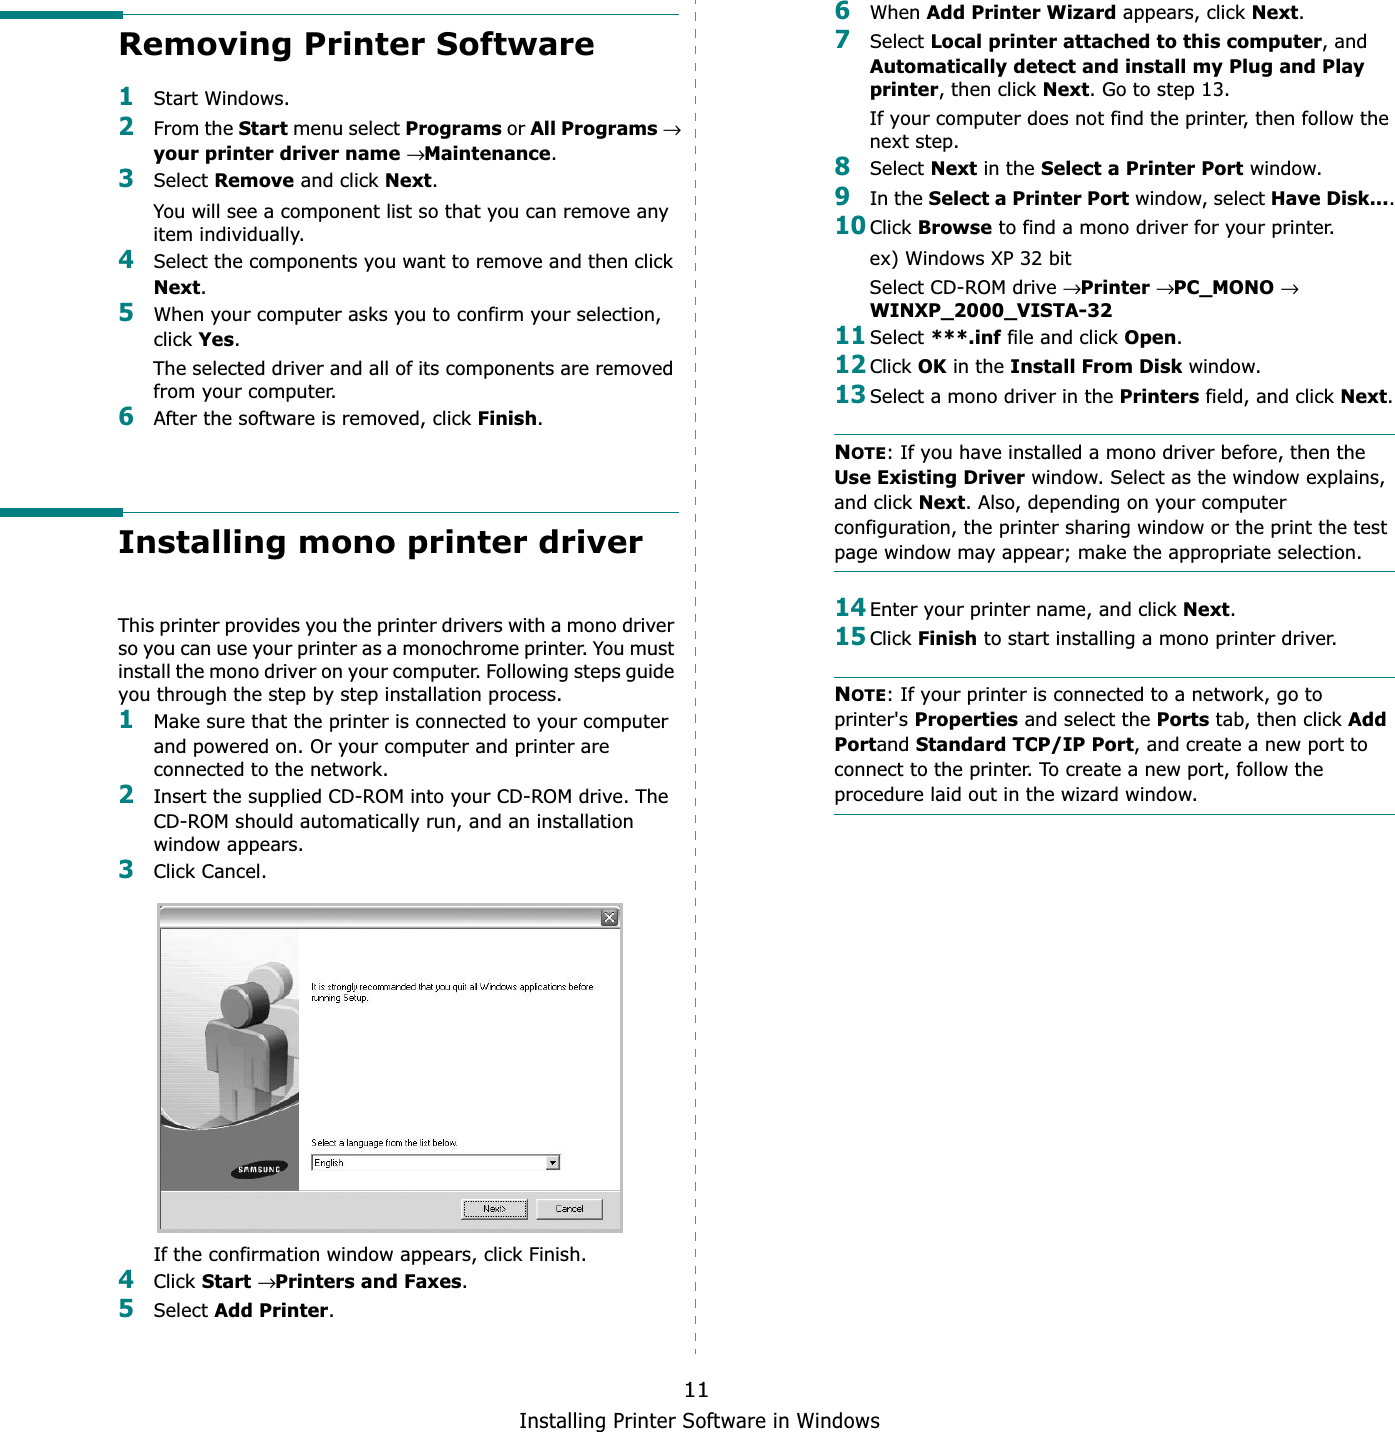
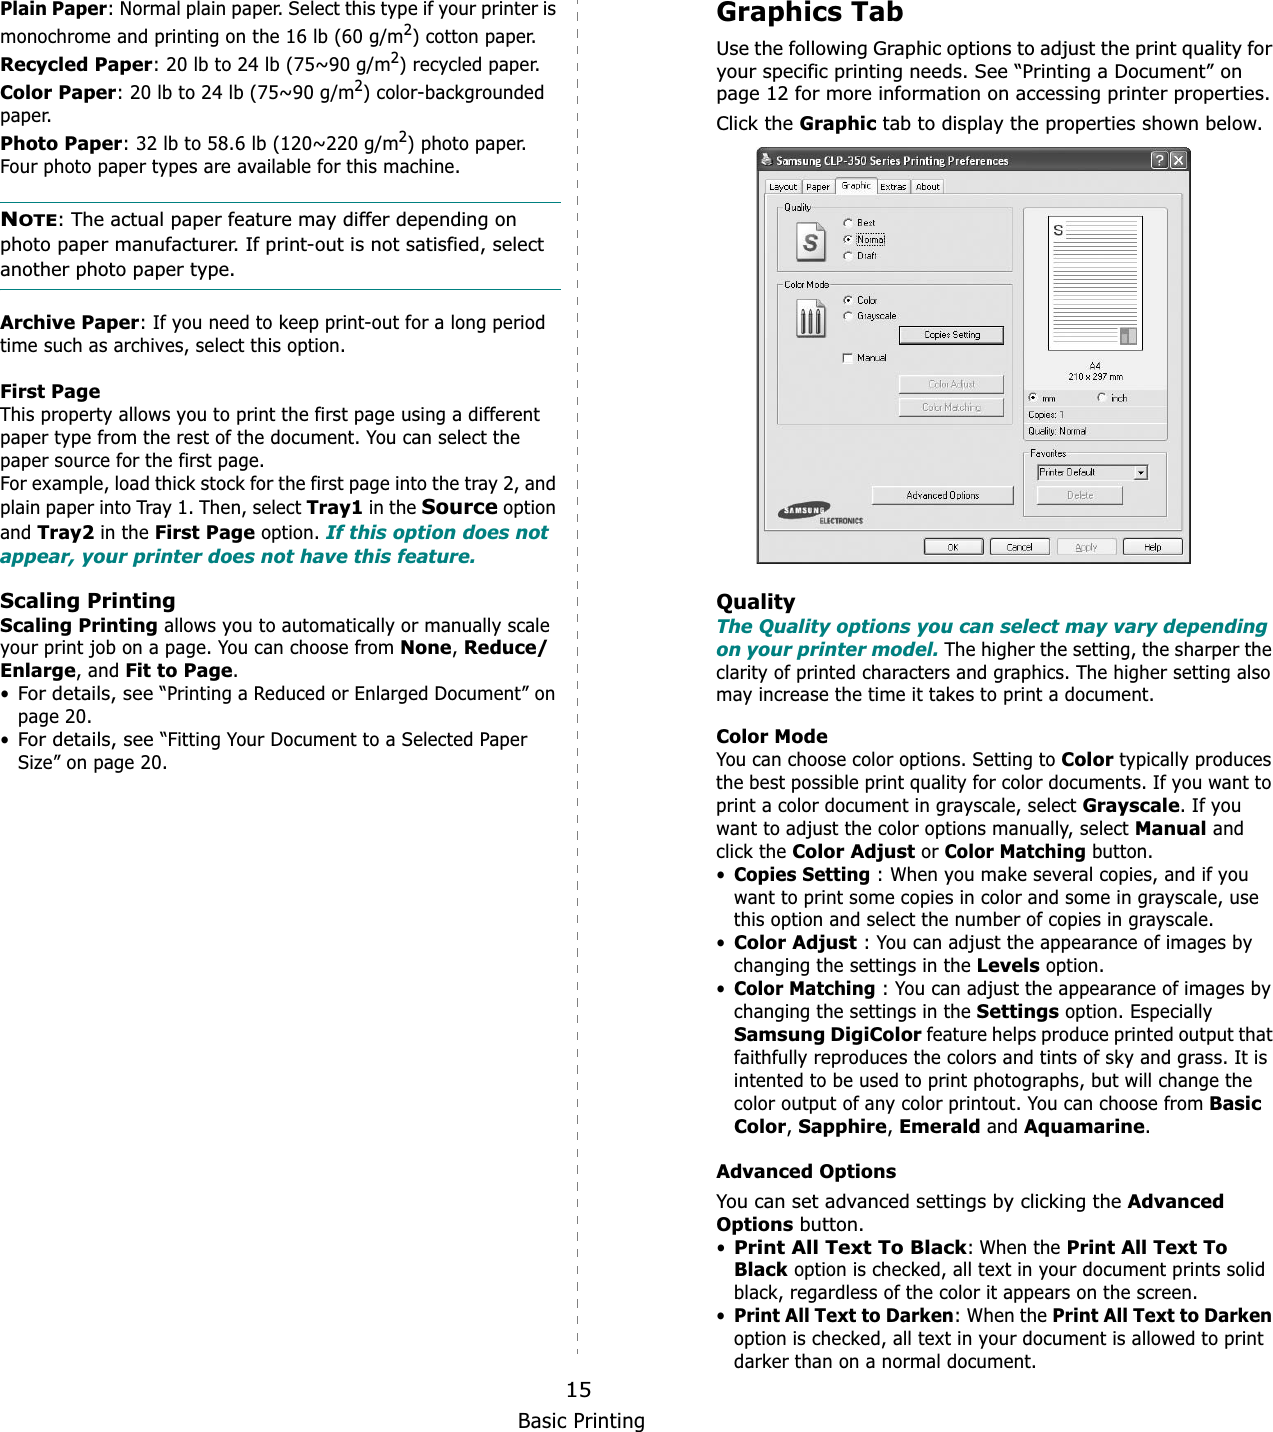
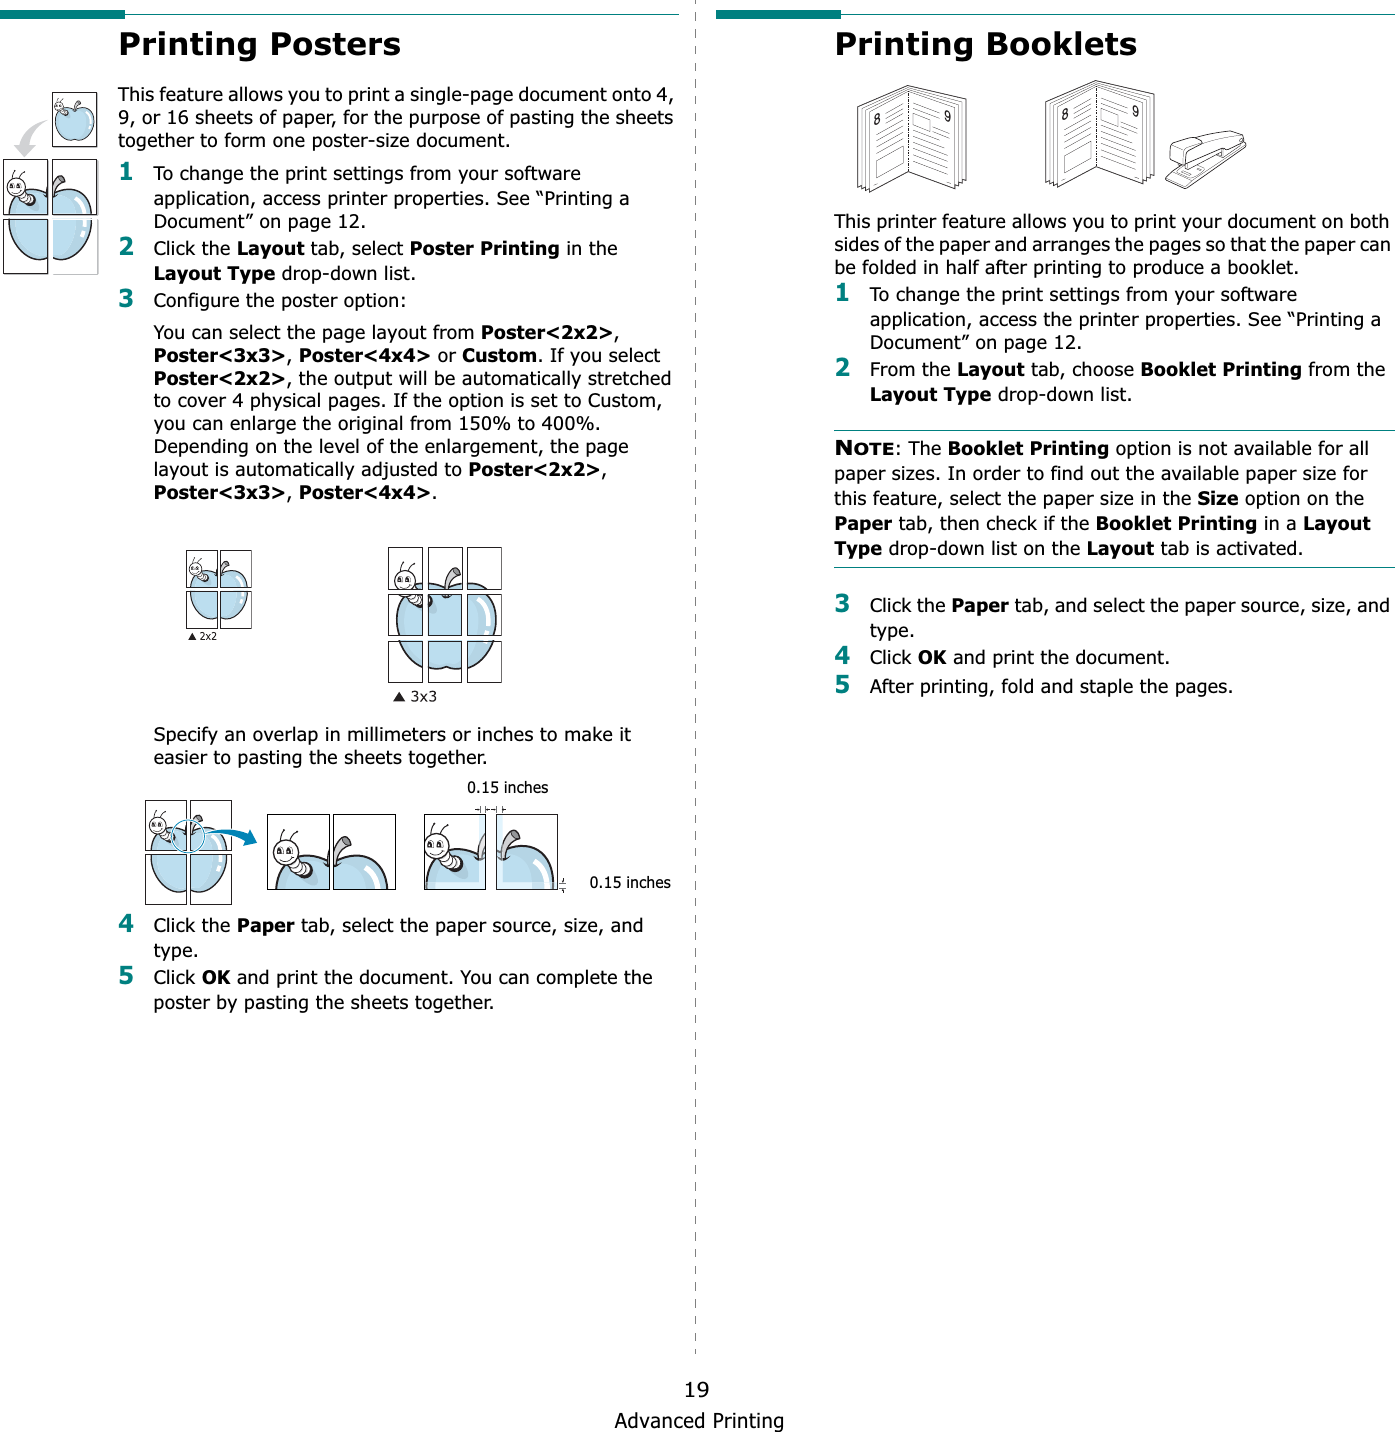
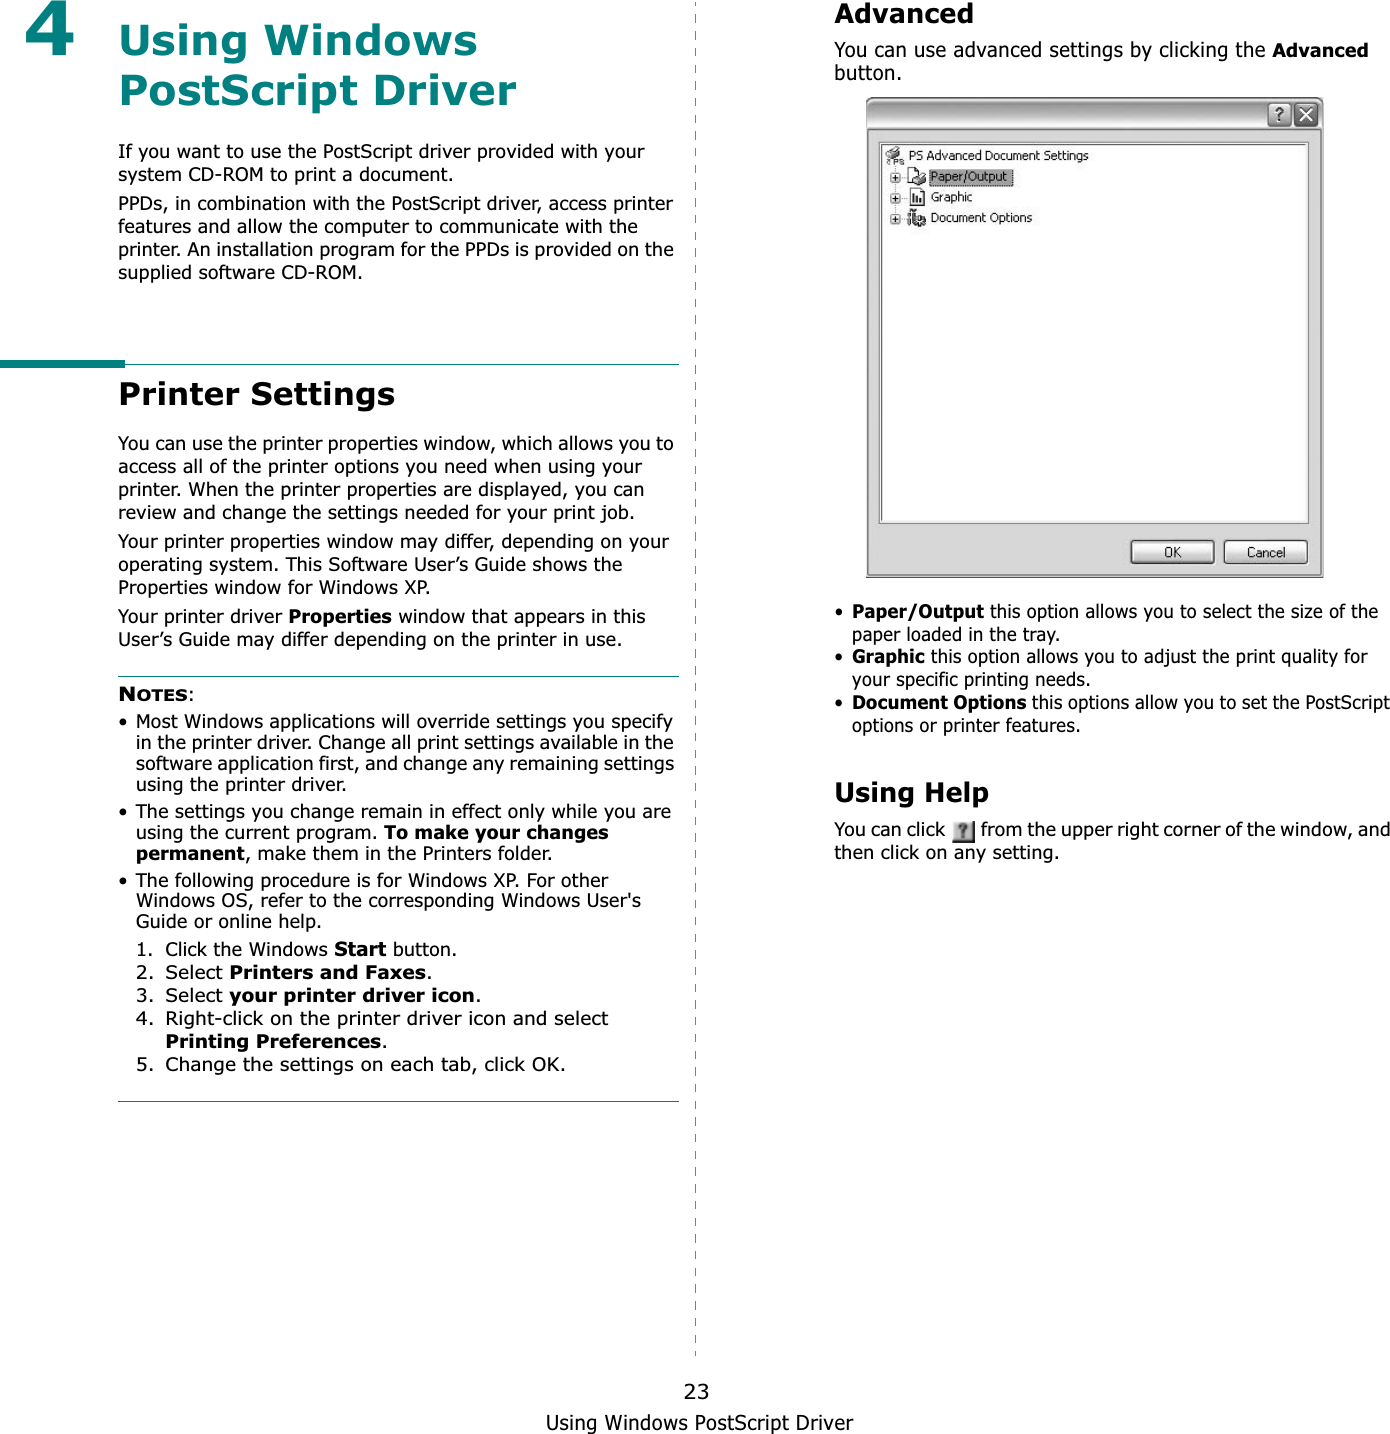
![Installing Printer Software in Windows95The list of printers available on the network appears. Select the printer you want to install from the list and then click Next.• If you do not see your printer on the list, click Update to refresh the list, or select Add TCP/IP Port to add your printer to the network. To add the printer to the network, enter the port name and the IP address for the printer.To verify your printer’s IP address or the MAC address, print a Network Configuration page.• To find a shared network printer (UNC Path), select Shared Printer [UNC] and enter the shared name manually or find a shared printer by clicking the Browsebutton.NOTE: If you cannot find your machine in network, please turn off the firewall and click Update.TIP: If you want to set a specific IP address on a specific network printer, click the Set IP Address button. The Set IP Address window appears. Do as follows:a. Select a printer to be set with a specific IP address from the list.b. Configure an IP address, subnet mask, and gateway for the printer manually and click Configure to set the specific IP address for the network printer.c. Click Next.6Select the components to be installed. After selecting the components, the following window appears. You can also change the printer name, set the printer to be shared on the network, set the printer as the default printer, and change the port name of each printer. Click Next.To install this software on a server, select the Setting up this printer on a server checkbox.7After the installation is finished, a window appears asking you to print a test page and to register yourself as a user of Samsung Printers in order to receive information from Samsung. If you so desire, select the corresponding checkbox(es) and click Finish.Otherwise, just click Finish.NOTE: After setup is complete, if your printer driver doesn’t work properly, reinstall the printer driver. See “Reinstalling Printer Software” on page 10.](https://usermanual.wiki/Samsung-Electronics-Co/CLP350N.Users-Manual-2/User-Guide-818887-Page-19.png)
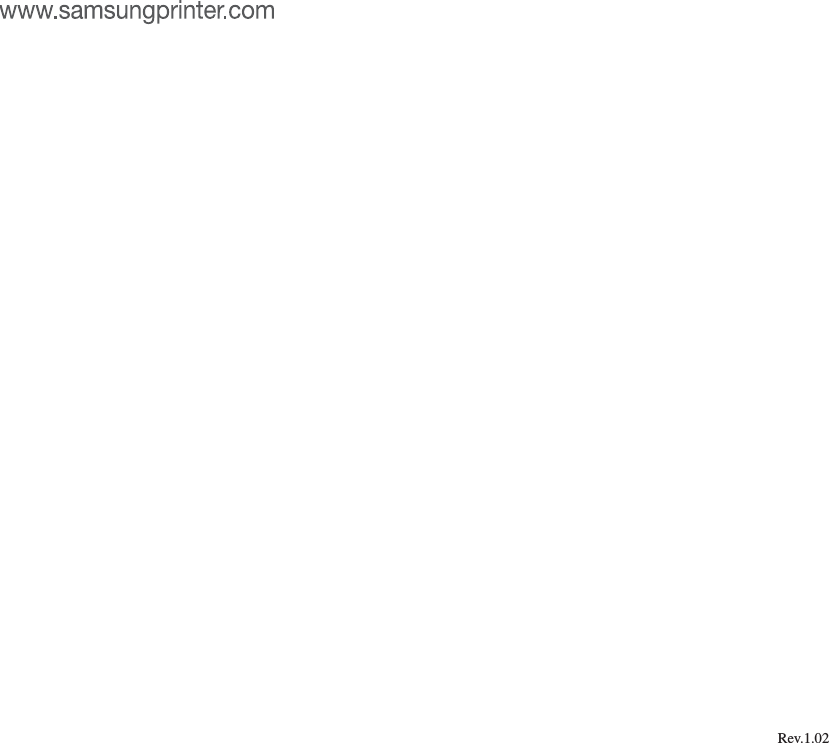
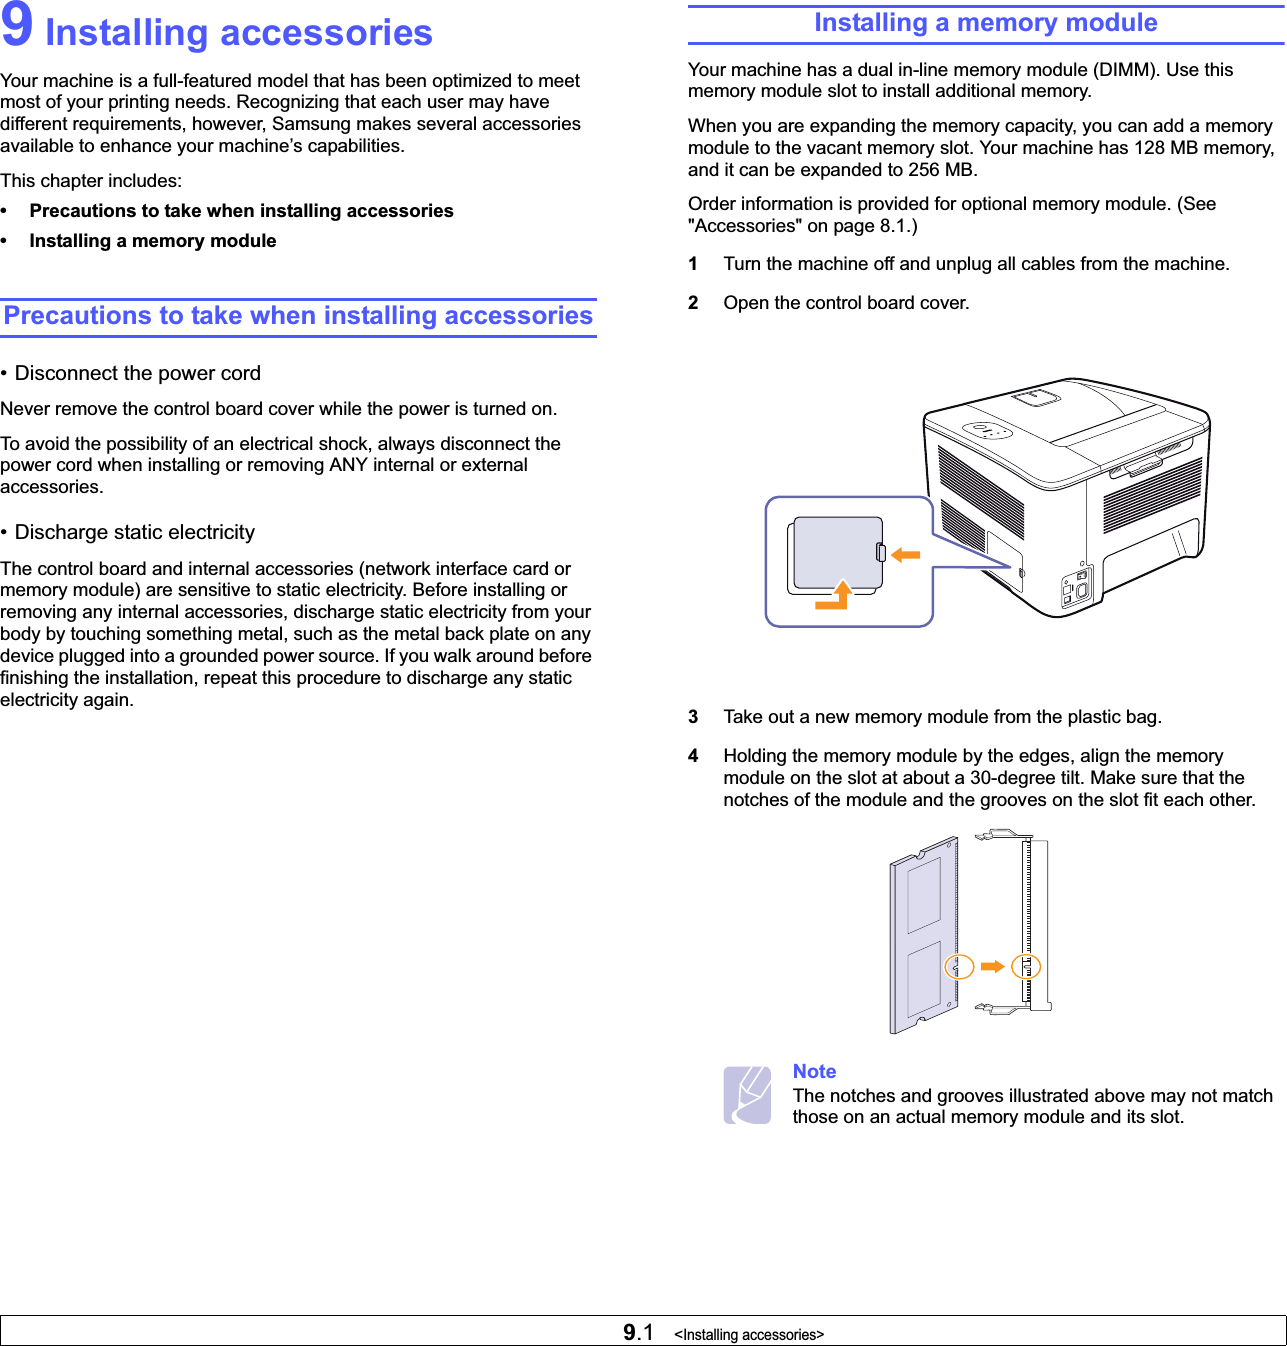
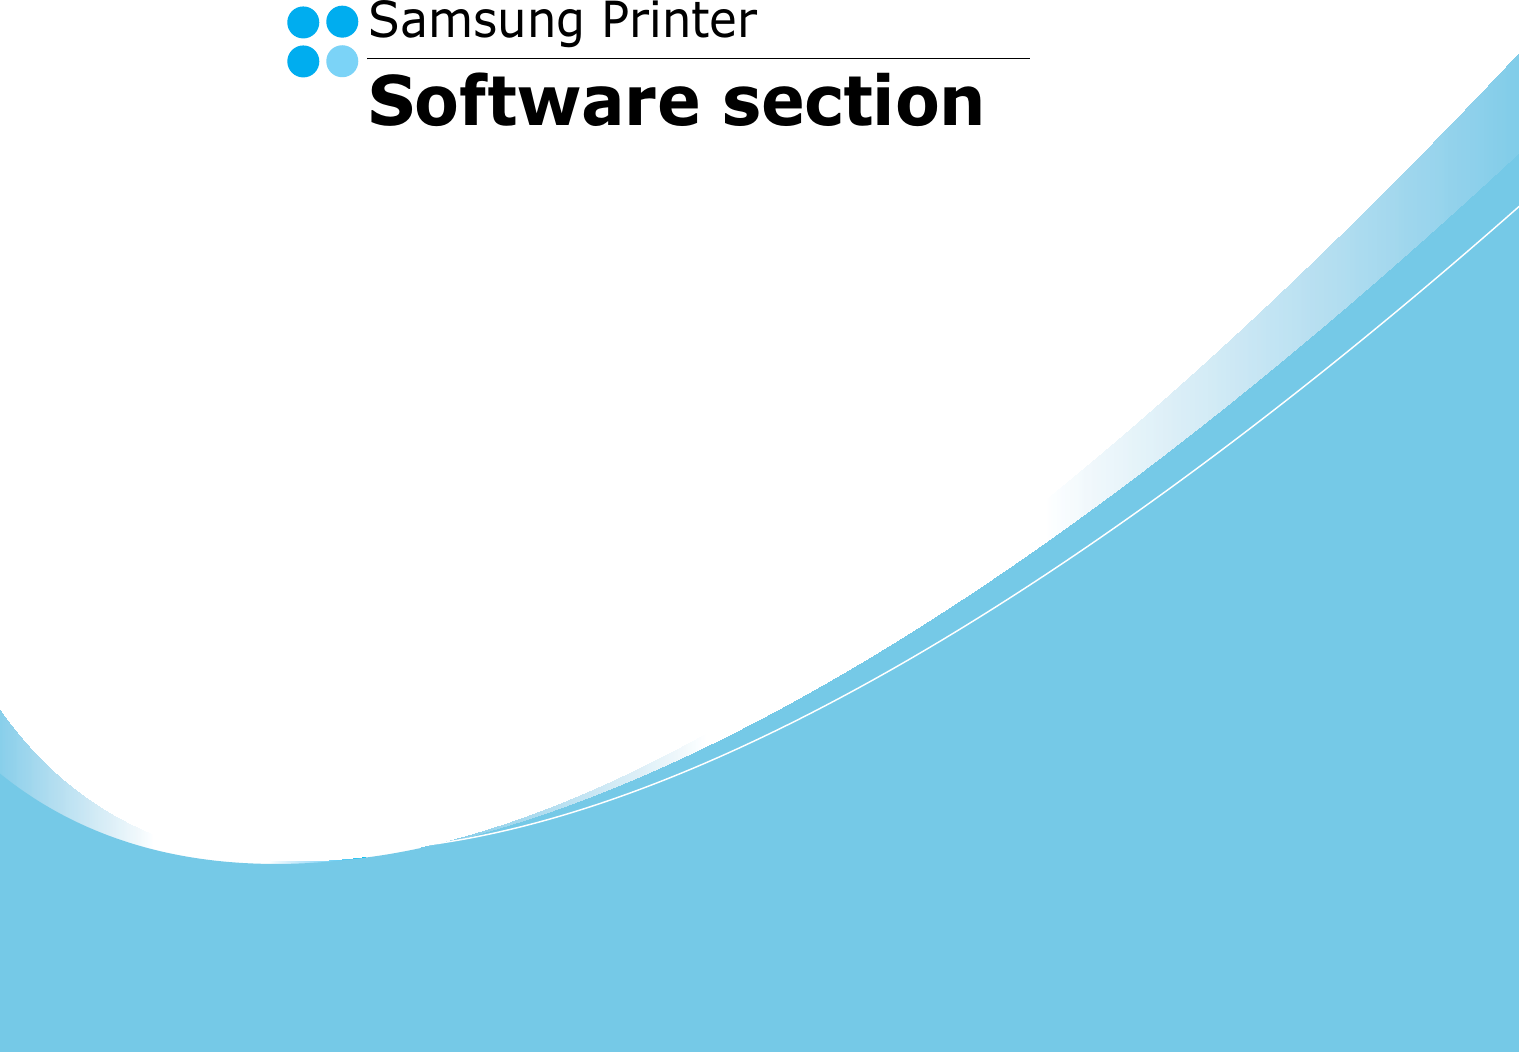
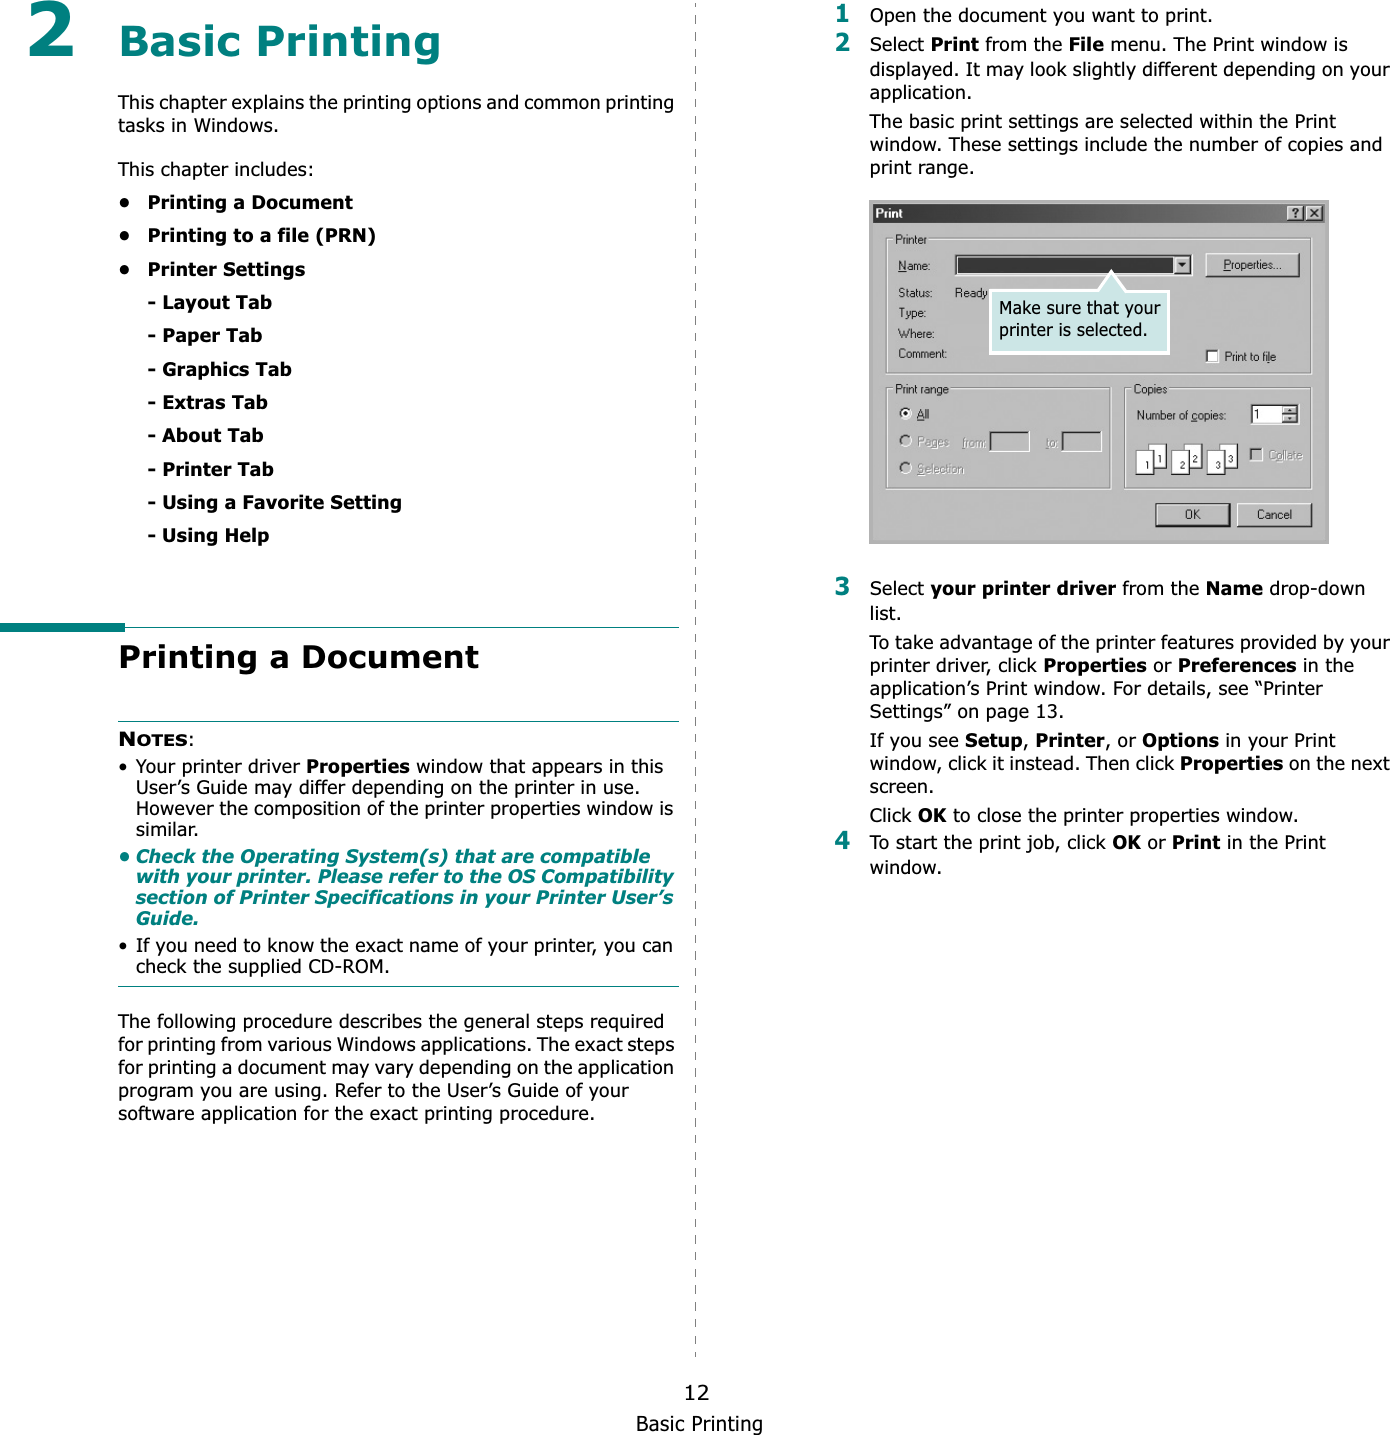
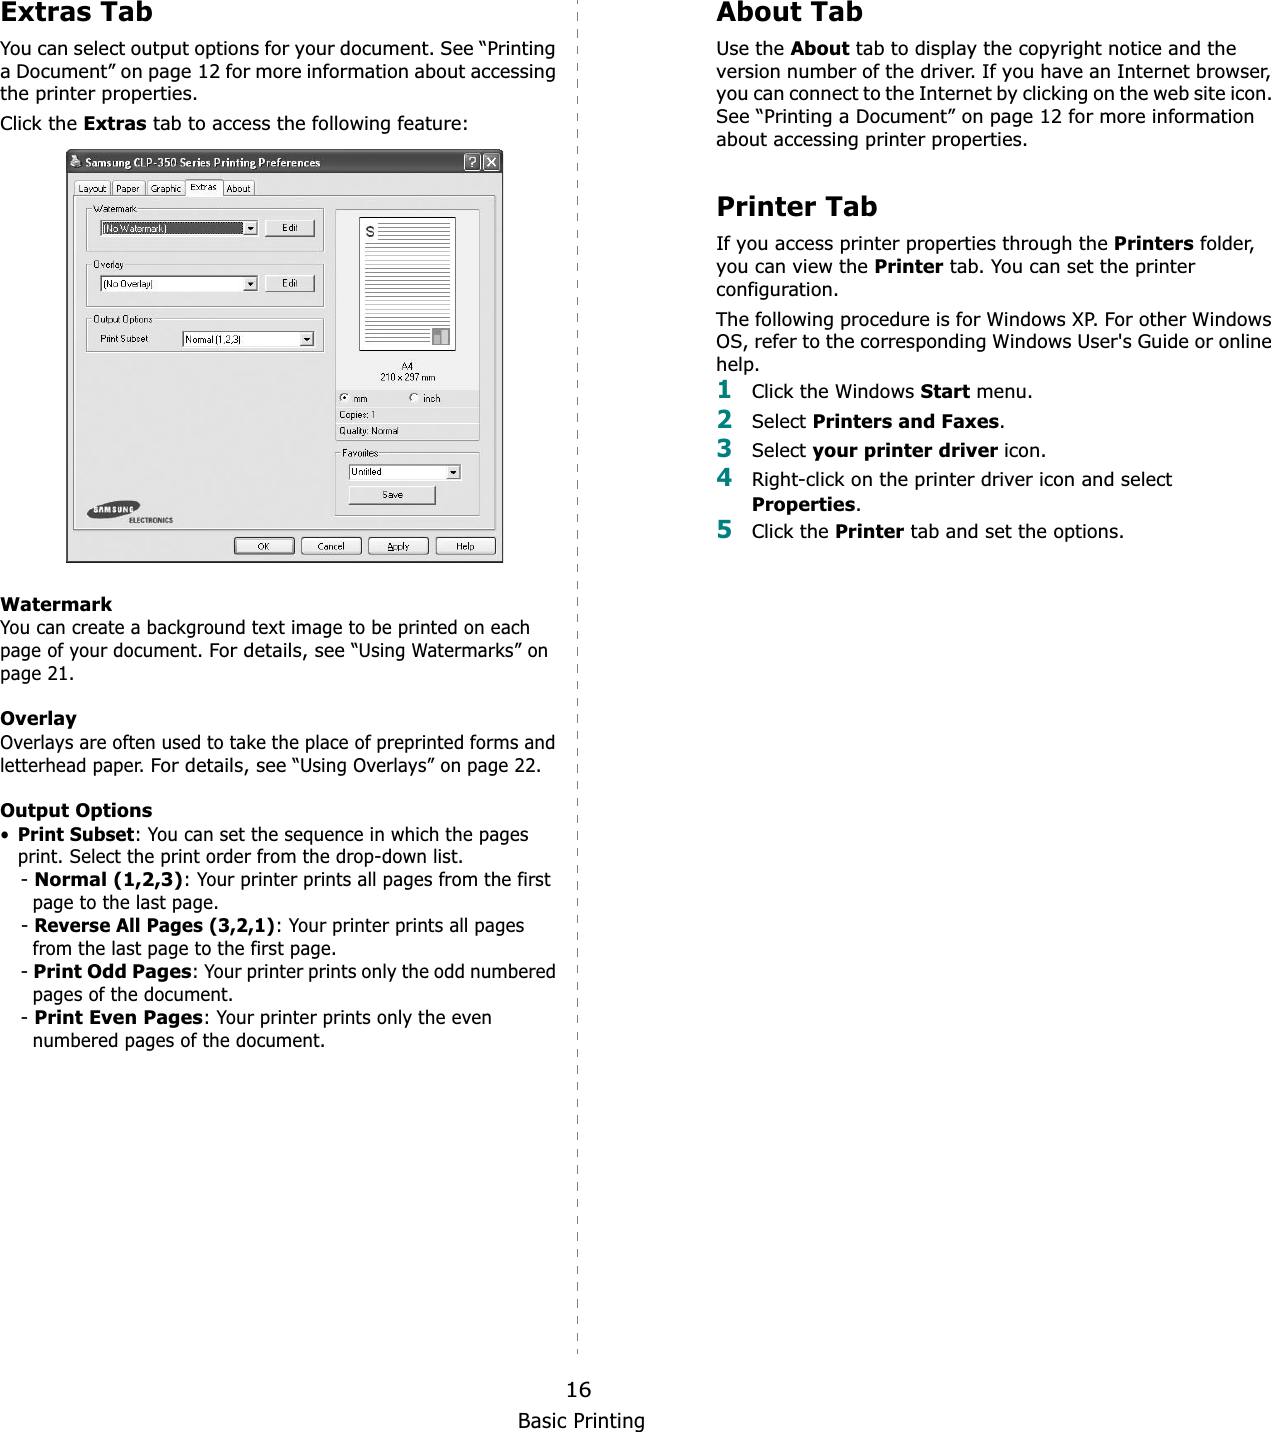
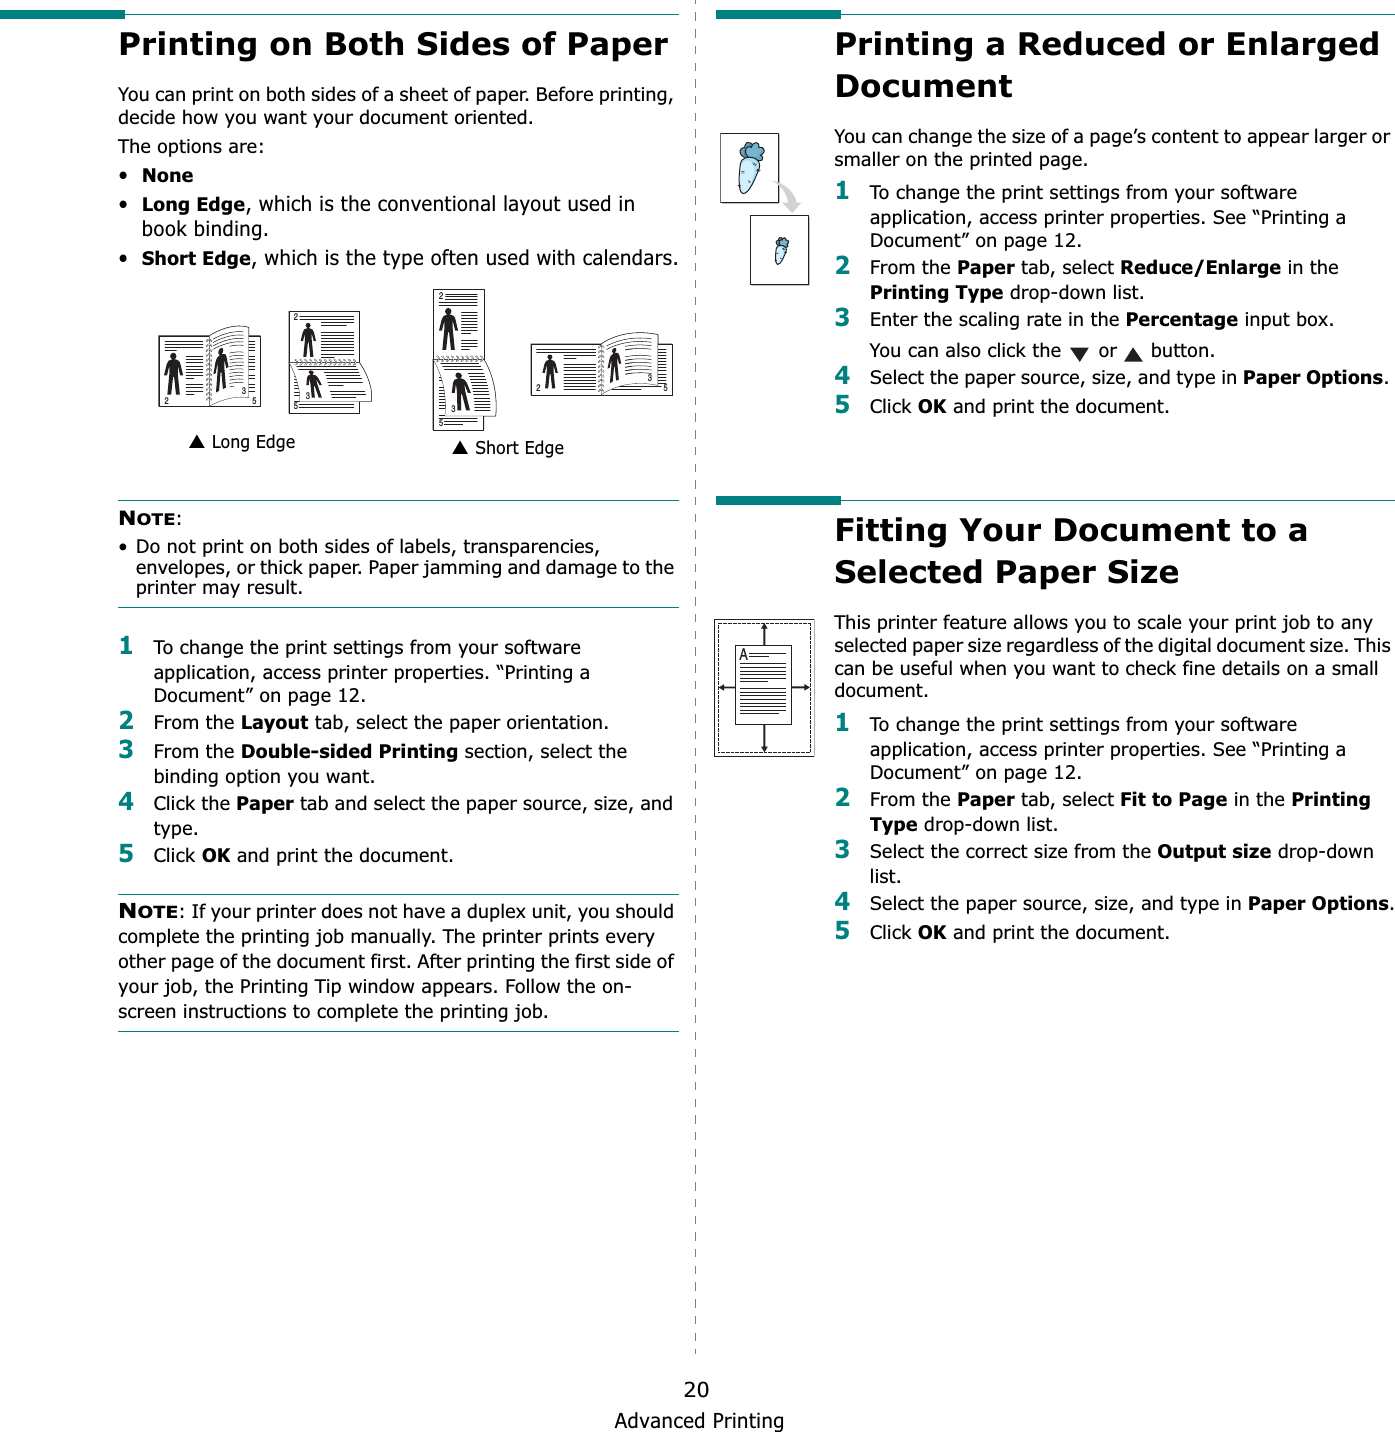
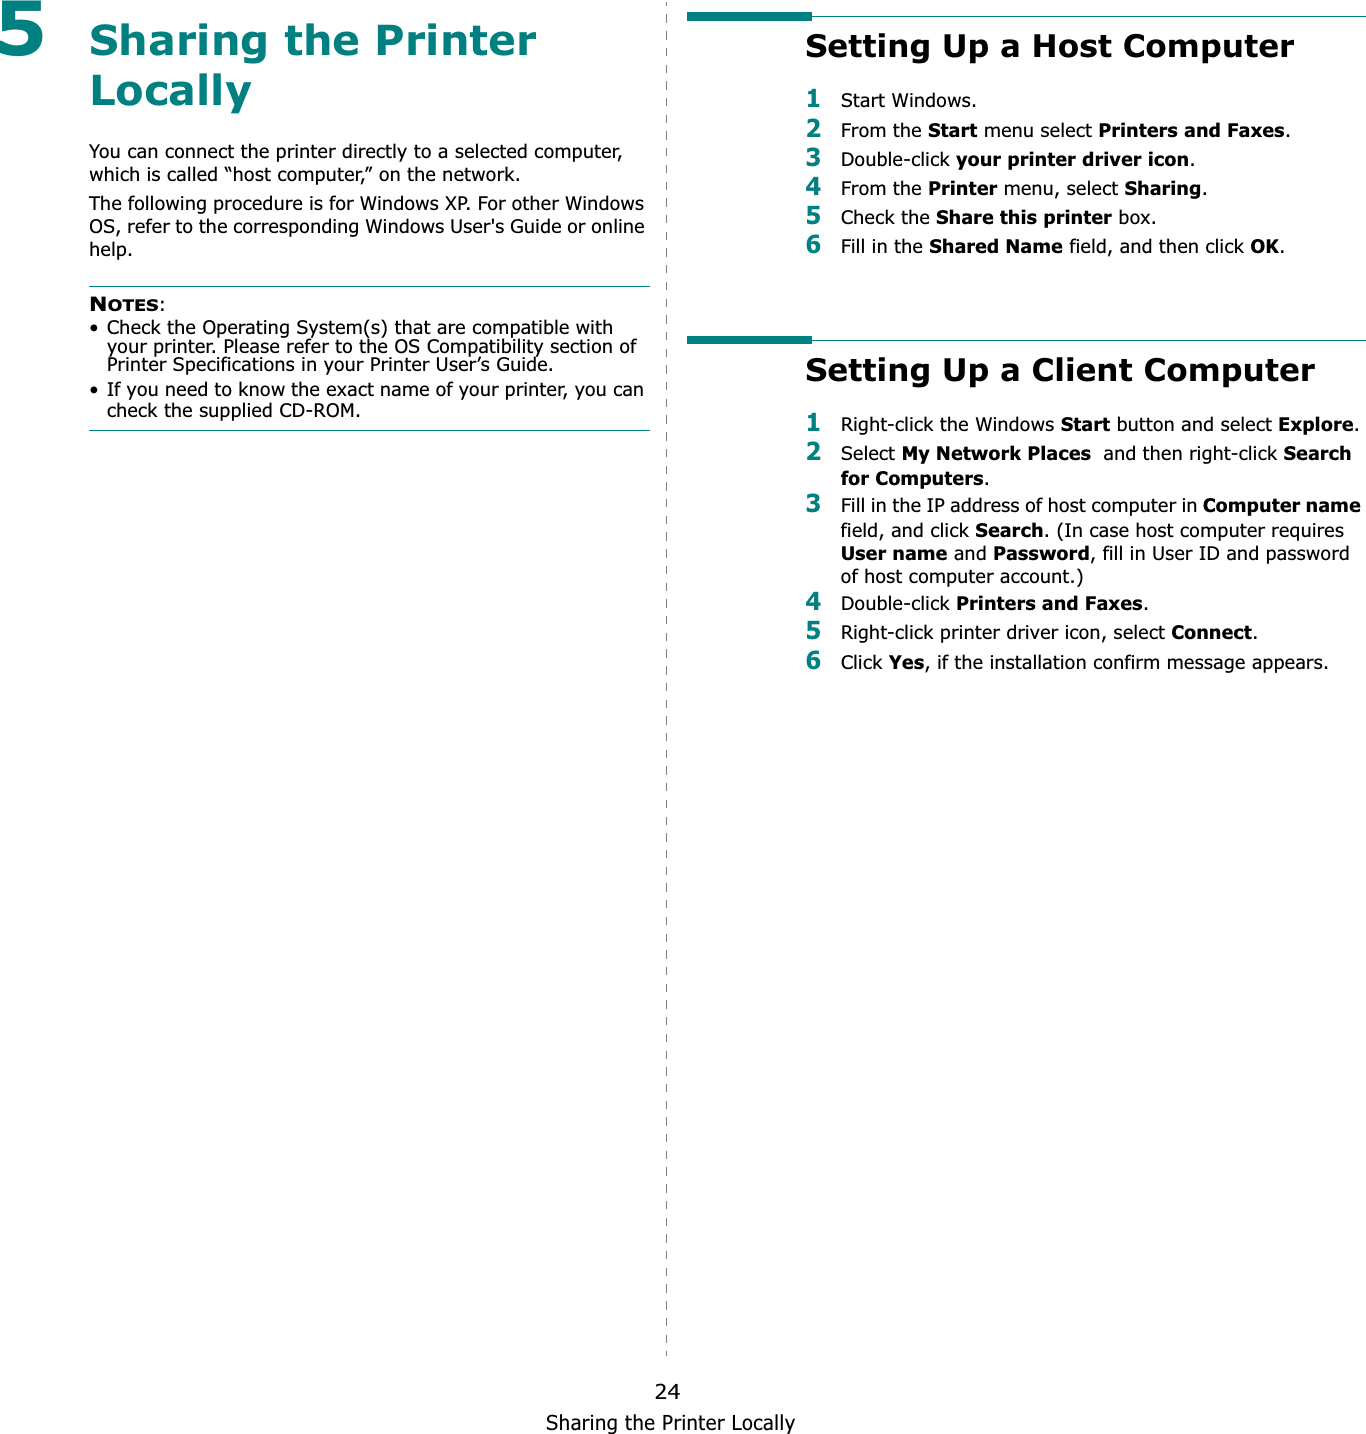
![Installing Printer Software in Windows10Reinstalling Printer SoftwareYou can reinstall the software if installation fails.1Start Windows.2From the Start menu select Programs or All Programs→your printer driver name → Maintenance.3Select Repair and click Next.4The list of printers available on the network appears. Select the printer you want to install from the list and then click Next.• If you do not see your printer on the list, click Update to refresh the list, or select Add TCP/IP Port to add your printer to the network. To add the printer to the network, enter the port name and the IP address for the printer.• To find a shared network printer (UNC Path), select Shared Printer [UNC] and enter the shared name manually or find a shared printer by clicking the Browsebutton.You will see a component list so that you can reinstall any item individually.NOTE: If your printer is not already connected to the computer, the following window will appear.• After connecting the printer, click Next.• If you don’t want to connect the printer at this time, click Next, and No on the following screen. Then the installation will start and a test page will not be printed at the end of the installation.• The reinstallation window that appears in this User’s Guide may differ depending on the printer and interface in use.5Select the components you want to reinstall and click Next.If you installed the printer software for local printing andyou select your printer driver name, the window asking you to print a test page appears. Do as follows:a. To print a test page, select the check box and click Next.b. If the test page prints out correctly, click Yes.If it doesn’t, click No to reprint it.6When the reinstallation is done, click Finish.](https://usermanual.wiki/Samsung-Electronics-Co/CLP350N.Users-Manual-2/User-Guide-818887-Page-20.png)
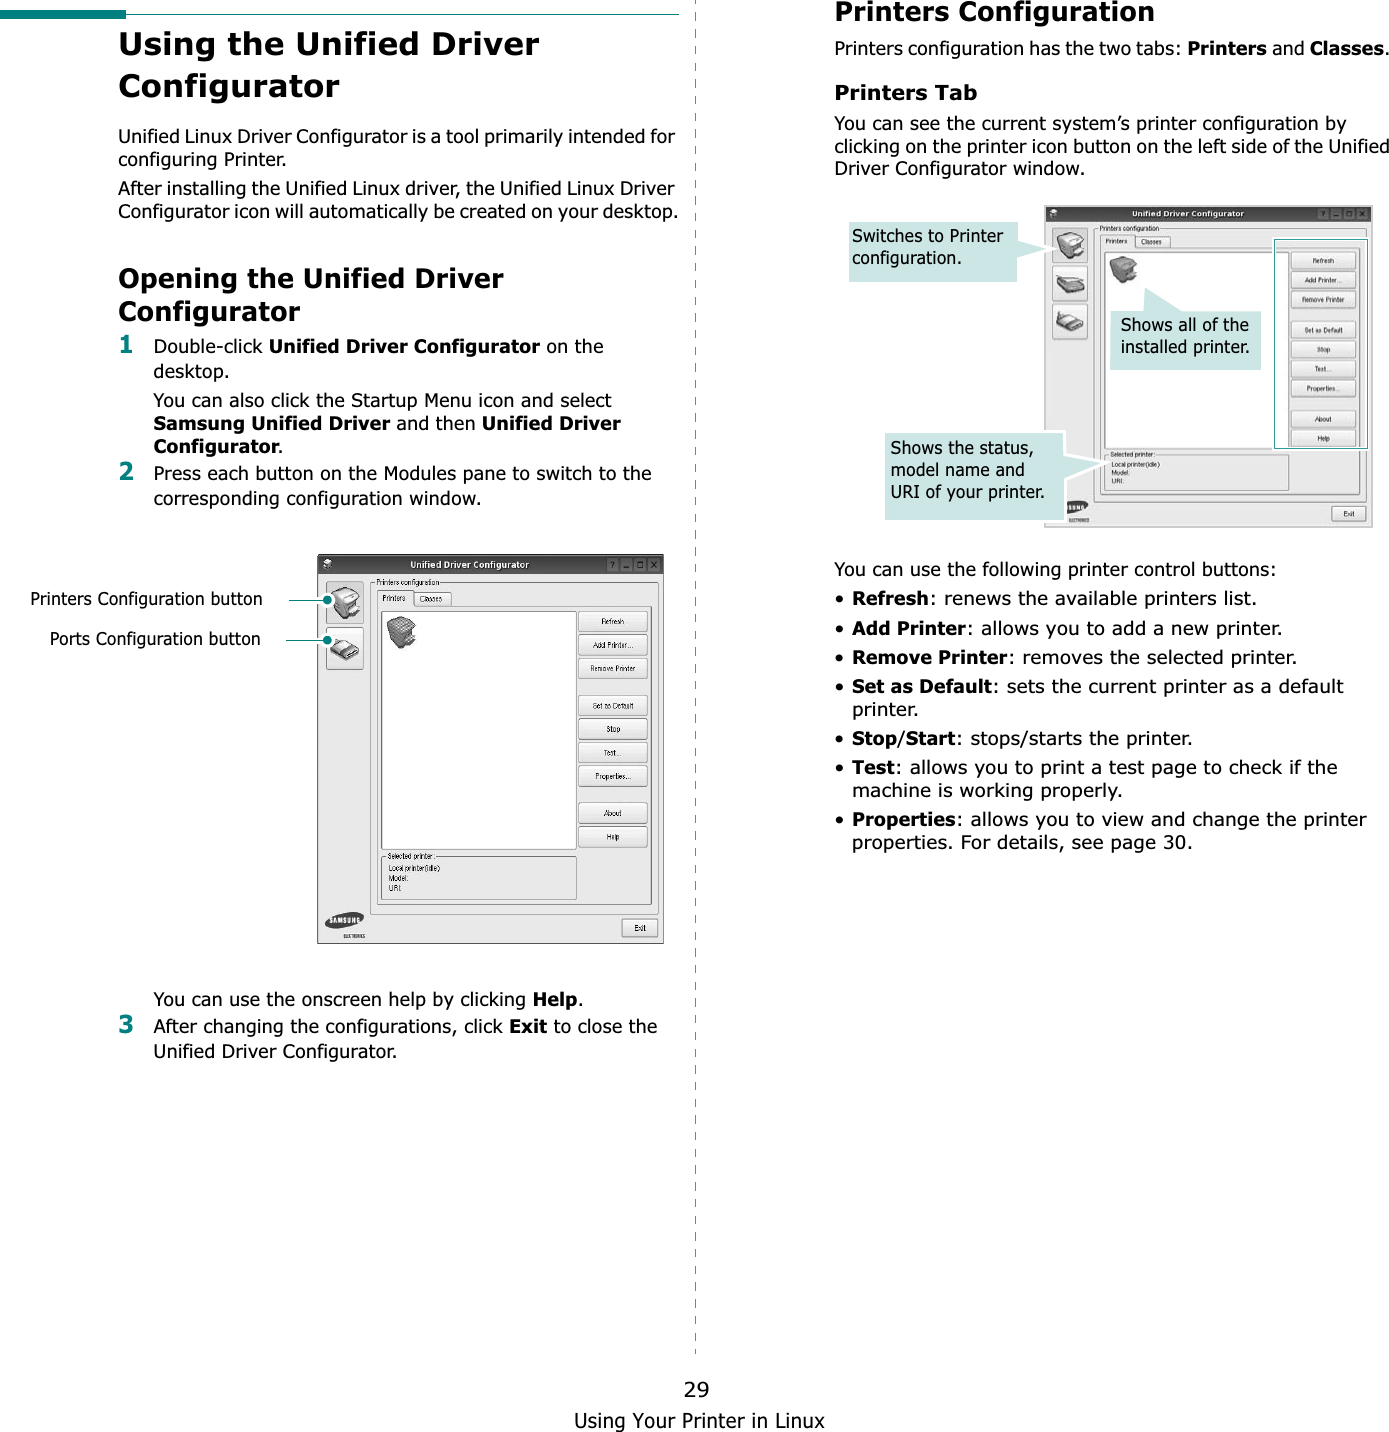
![Using Your Printer in Linux277Using Your Printer in LinuxYou can use your machine in a Linux environment. This chapter includes:• Getting Started• Installing the Unified Linux Driver• Using the Unified Driver Configurator• Configuring Printer Properties• Printing a DocumentGetting StartedThe supplied CD-ROM provides you with Samsung’s Unified Linux Driver package for using your machine with a Linux computer.After the driver is installed on your Linux system, the driver package allows you to monitor a number of machine devices via fast ECP parallel ports and USB simultaneously. The Unified Linux Driver package is supplied with a smart and flexible installation program. You don't need to search for additional components that might be necessary for the Unified Linux Driver software: all required packages will be carried onto your system and installed automatically; this is possible on a wide set of the most popular Linux clones.Installing the Unified Linux DriverInstalling the Unified Linux Driver1Make sure that you connect your machine to your computer. Turn both the computer and the machine on.2When the Administrator Login window appears, type in root in the Login field and enter the system password.NOTE: You must log in as a super user (root) to install the printer software. If you are not a super user, ask your system administrator.3Insert the printer software CD-ROM. The CD-ROM will automatically run.If the CD-ROM does not automatically run, click the icon at the bottom of the desktop. When the Terminal screen appears, type in:If the CD-ROM is secondary master and the location to mount is /mnt/cdrom,[root@localhost root]#mount -t iso9660 /dev/hdc /mnt/cdrom[root@localhost root]#cd /mnt/cdrom/Linux[root@localhost root]#./install.sh NOTE: The installation program runs automatically if you have an autorun software package installed and configured.4When the welcome screen appears, click Next.](https://usermanual.wiki/Samsung-Electronics-Co/CLP350N.Users-Manual-2/User-Guide-818887-Page-37.png)
![Using Your Printer in Linux285When the installation is complete, click Finish.The installation program has added the Unified Driver Configurator desktop icon and Samsung Unified Driver group to the system menu for your convenience. If you have any difficulties, consult the onscreen help that is available through your system menu or can otherwise be called from the driver package windows applications, such as Unified Driver Configurator.Uninstalling the Unified Linux Driver1When the Administrator Login window appears, type in root in the Login field and enter the system password.NOTE: You must log in as a super user (root) to install the printer software. If you are not a super user, ask your system administrator.2Insert the printer software CD-ROM. The CD-ROM will automatically run.If the CD-ROM does not automatically run, click the icon at the bottom of the desktop. When the Terminal screen appears, type in:If the CD-ROM is secondary master and the location to mount is /mnt/cdrom,[root@localhost root]#mount -t iso9660 /dev/hdc /mnt/cdrom[root@localhost root]#cd /mnt/cdrom/Linux[root@localhost root]#./uninstall.shNOTE: The installation program runs automatically if you have an autorun software package installed and configured.3Click Uninstall.4Click Next.5Click Finish.](https://usermanual.wiki/Samsung-Electronics-Co/CLP350N.Users-Manual-2/User-Guide-818887-Page-38.png)