Samsung Electronics Co CLP350N Laser Printer User Manual CLP 350 Series EN
Samsung Electronics Co Ltd Laser Printer CLP 350 Series EN
Contents
- 1. Users Manual 1
- 2. Users Manual 2
Users Manual 2
7.9 <
Troubleshooting>
Note
Refer to Microsoft Windows 2000/XP/2003/Vista User’s Guide
that came with your PC for further information on Windows error
messages.
Common PostScript problems
The following situations are PS language specific and may occur when
several printer languages are being used.
Note
To receive a printed or screen-displayed message when
PostScript errors occur, open the Print Options window and click
the desired selection next to the PostScript errors section.
“General
Protection Fault”,
“Exception OE”,
“Spool32”, or
“Illegal Operation”
messages appear.
Close all other applications, reboot Windows
and try printing again.
“Fail To Print”, “A
machine timeout
error occurred.”
messages appear.
These messages may appear during printing.
Just keep waiting until the machine finishes
printing. If the message appears in standby
mode or after printing has been completed,
check the connection and/or whether an error
has occurred.
Problem Possible Cause Solution
PostScript file
cannot be
printed.
The PostScript
driver may not be
installed correctly.
• Install the PostScript
driver, referring to
Software
section
.
• Print a configuration page
and verify that the PS
version is available for
printing.
• If the problem persists,
contact a service
representative.
“Limit Check
Error” message
appears.
The print job was
too complex.
You might need to reduce
the complexity of the page or
install more memory.
A PostScript
error page
prints.
The print job may
not be PostScript.
Make sure that the print job
is a PostScript job. Check to
see whether the software
application expected a setup
or PostScript header file to
be sent to the machine.
Condition Suggested solutions
Common Linux problems
The optional
tray is not
selected in the
driver.
The printer driver
has not been
configured to
recognize the
optional tray.
Open the PostScript driver
properties, select the
Device
Settings
tab, and set the
Tray
option of the
Installable
Options
section to
Installed
.
When printing
a document in
Macintosh with
Acrobat
Reader 6.0 or
higher, colors
print
incorrectly.
The resolution
setting in the
printer driver may
not be matched
with the one in
Acrobat Reader.
Make sure that the resolution
setting in your printer driver
matches the one in Acrobat
Reader.
Problem Possible Cause and Solution
The printer does not
print.
• Check if the printer driver is installed in
your system. Open Unified Driver
Configurator and switch to the Printers
tab in Printers configuration window to
look at the list of available printers. Make
sure that your machine is displayed on
the list. If not, please, invoke Add new
printer wizard to set up your device.
• Check if the printer is started. Open
Printers configuration and select your
machine on the printers list. Look at the
description in the Selected printer pane.
If its status contains “(stopped)” string,
please, press the Start button. After that
normal operation of the printer should be
restored. The "stopped" status might be
activated when some problems in
printing occurred.
• Check if your application has special
print option such as “-oraw”. If “-oraw” is
specified in the command line parameter
then remove it to print properly. For
Gimp front-end, select “print” -> “Setup
printer” and edit command line
parameter in the command item.
Problem Possible Cause Solution
7.10 <
Troubleshooting>
Some color images
come out all black.
This is a known bug in Ghostscript (until
GNU Ghostscript version 7.05) when the
base color space of the document is
indexed color space and it is converted
through CIE color space. Because
Postscript uses CIE color space for Color
Matching System, you should upgrade
Ghostscript on your system to at least
GNU Ghostscript version 7.06 or later. You
can find recent Ghostscript versions at
www.ghostscript.com.
Some color images
come out in
unexpected color.
This is a known bug in Ghostscript (until
GNU Ghostscript version 7.xx) when the
base color space of the document is
indexed RGB color space and it is
converted through CIE color space.
Because Postscript uses CIE color space
for Color Matching System, you should
upgrade Ghostscript on your system to at
least GNU Ghostscript version 8.xx or
later. You can find recent Ghostscript
versions at www.ghostscript.com.
The machine does not
print whole pages and
its output is half page
printed.
It is a known problem that occurs when a
color printer is used on version 8.51 or
earlier of Ghostscript, 64-bit Linux OS, and
reported to bugs.ghostscript.com as
Ghostscript Bug 688252.
The problem is solved in AFPL Ghostscript
v. 8.52 or above. Download the latest
version of AFPL Ghostscript from http://
sourceforge.net/projects/ghostscript/ and
install it to solve this problem.
I encounter error
“Unable to open mfp
port device file!” when
printing a document.
Please avoid changing print job
parameters (via LPR GUI, for example)
while a print job is in progress. Known
versions of CUPS server break the print
job whenever print options are changed
and then try to restart the job from the
beginning. Since Unified Linux Driver locks
mfp port while printing, the abrupt
termination of the driver keeps the port
locked and therefore unavailable for
subsequent print jobs. If this situation
occurred, please, try to release the mfp
port.
Problem Possible Cause and Solution
Common Macintosh problems
When printing a
document over the
network in SuSE 9.2,
the printer does not
print.
The CUPS (Common Unix Printing
System) version distributed with SuSE
Linux 9.2
(cups-1.1.21) has a problem with ipp
(Internet Printing Protocol) printing. Use
the socket printing instead of ipp or install
later version of CUPS (cups-1.1.22 or
higher).
Problem Suggested solutions
PDF file does not print
correctly-some parts are
missing in the graphics,
text or illustrations.
Incompatibility between the PDF file and
the Acrobat products.
Printing the PDF file as an image may
enable the file to print. Turn on
Print As
Image
from the Acrobat printing options.
Note: It will take longer to print when
you print a PDF file as an image.
The document has
printed, but the print job
has not disappeared from
the spooler in
Mac OS 10.3.2.
Update your Mac OS to OS 10.3.3. or
higher.
Some letters are not
displayed normally
during the cover page
printing.
This problem is caused because the
Mac OS cannot find the font during the
cover page printing. English alphabet
and numbers are displayed normally on
the cover page.
Some fonts are not
printed properly in the
Adobe Illustrator
program.
Those fonts may not supported by your
machine. Start the Adobe Illustrator
program, click File > Print > Illustrator
tab. Then, check Force Fonts to
Download, and try again.
Problem Possible Cause and Solution
8.1 <
Ordering supplies and accessories>
8 Ordering supplies and
accessories
This chapter provides information on purchasing cartridges and
accessories available for your machine.
This chapter includes:
• Supplies
• Accessories
• How to purchase
Supplies
When the toner runs out, you can order the following type of toner
cartridge for your machine:
Caution
When you purchase a new toner cartridge, you must purchase it
in the same country you have purchased your machine.
Otherwise, the toner cartridge will be incompatable with your
machine since the configuration of the toner cartridge varies
depending on the contries.
Type Average yielda
a. Declared yield value in accordance with ISO/IEC 19798.
Part number
Toner cartridgeaApprox.
4,000 (Black),
2,000 (Color)
CLP-K350A (Black)
CLP-C350A (Cyan)
CLP-M350A (Magenta)
CLP-Y350A (Yellow)
Imaging unit Approx. 20,000
black pages or
approx. 50,000
images
CLP-R350A
Waste toner
container
Approx. 5,000
imagesb or Approx.
1,250 pages (fulll
color 5% image)
b. Image counts based on one color on each page. If you print documents in full
color (Cyan, Magenta, Yellow, Black), the life of this item will be reduced by
25%.
CLP-W350A
Accessories
You can purchase and install accessories to enhance your machine’s
performance and capacity.
How to purchase
To order Samsung-authorized supplies or accessories, contact your local
Samsung dealer or the retailer where you purchased your machine, or
visit www.samsungprinter.com and select your country/region to obtain
information on calling for technical support.
Accessory Description Part number
Memory
module
Extends your machine’s
memory capacity.
CLP-MEM301: 128 MB
Optional
tray 2
If you are experiencing
frequent paper supply
problems, you can
attach an additional 250
sheet tray.
CLP-S350A
9.1 <
Installing accessories>
9 Installing accessories
Your machine is a full-featured model that has been optimized to meet
most of your printing needs. Recognizing that each user may have
different requirements, however, Samsung makes several accessories
available to enhance your machine’s capabilities.
This chapter includes:
• Precautions to take when installing accessories
• Installing a memory module
Precautions to take when installing accessories
• Disconnect the power cord
Never remove the control board cover while the power is turned on.
To avoid the possibility of an electrical shock, always disconnect the
power cord when installing or removing ANY internal or external
accessories.
• Discharge static electricity
The control board and internal accessories (network interface card or
memory module) are sensitive to static electricity. Before installing or
removing any internal accessories, discharge static electricity from your
body by touching something metal, such as the metal back plate on any
device plugged into a grounded power source. If you walk around before
finishing the installation, repeat this procedure to discharge any static
electricity again.
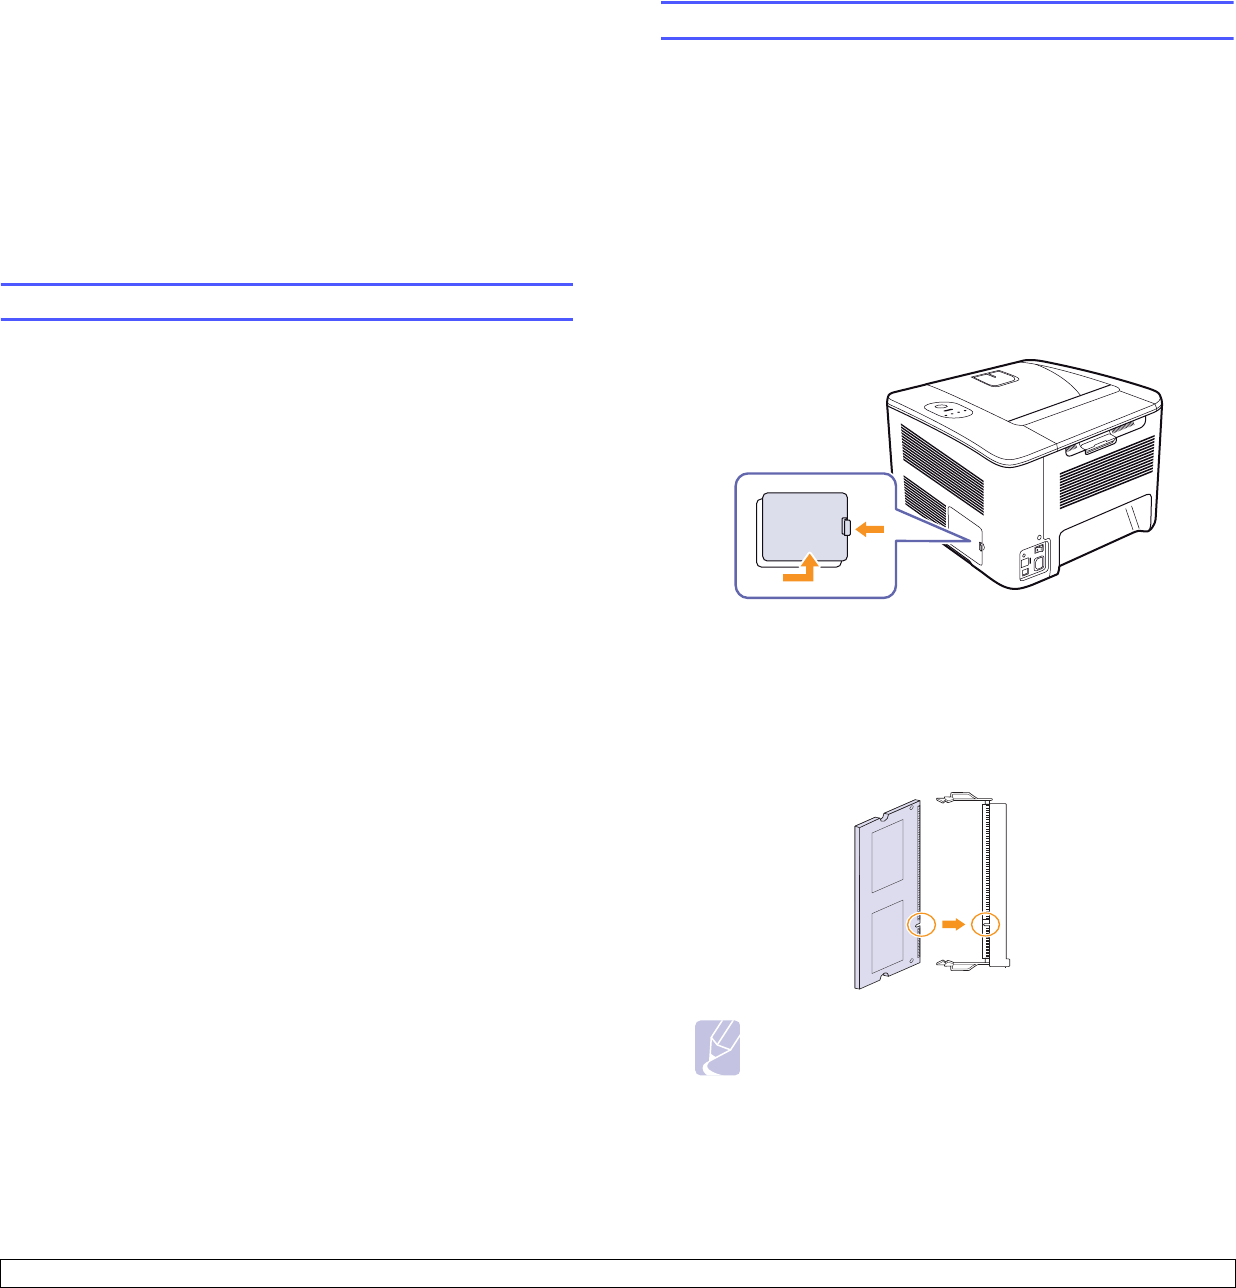
Installing a memory module
Your machine has a dual in-line memory module (DIMM). Use this
memory module slot to install additional memory.
When you are expanding the memory capacity, you can add a memory
module to the vacant memory slot. Your machine has 128 MB memory,
and it can be expanded to 256 MB.
Order information is provided for optional memory module. (See
"Accessories" on page 8.1.)
1Turn the machine off and unplug all cables from the machine.
2Open the control board cover.
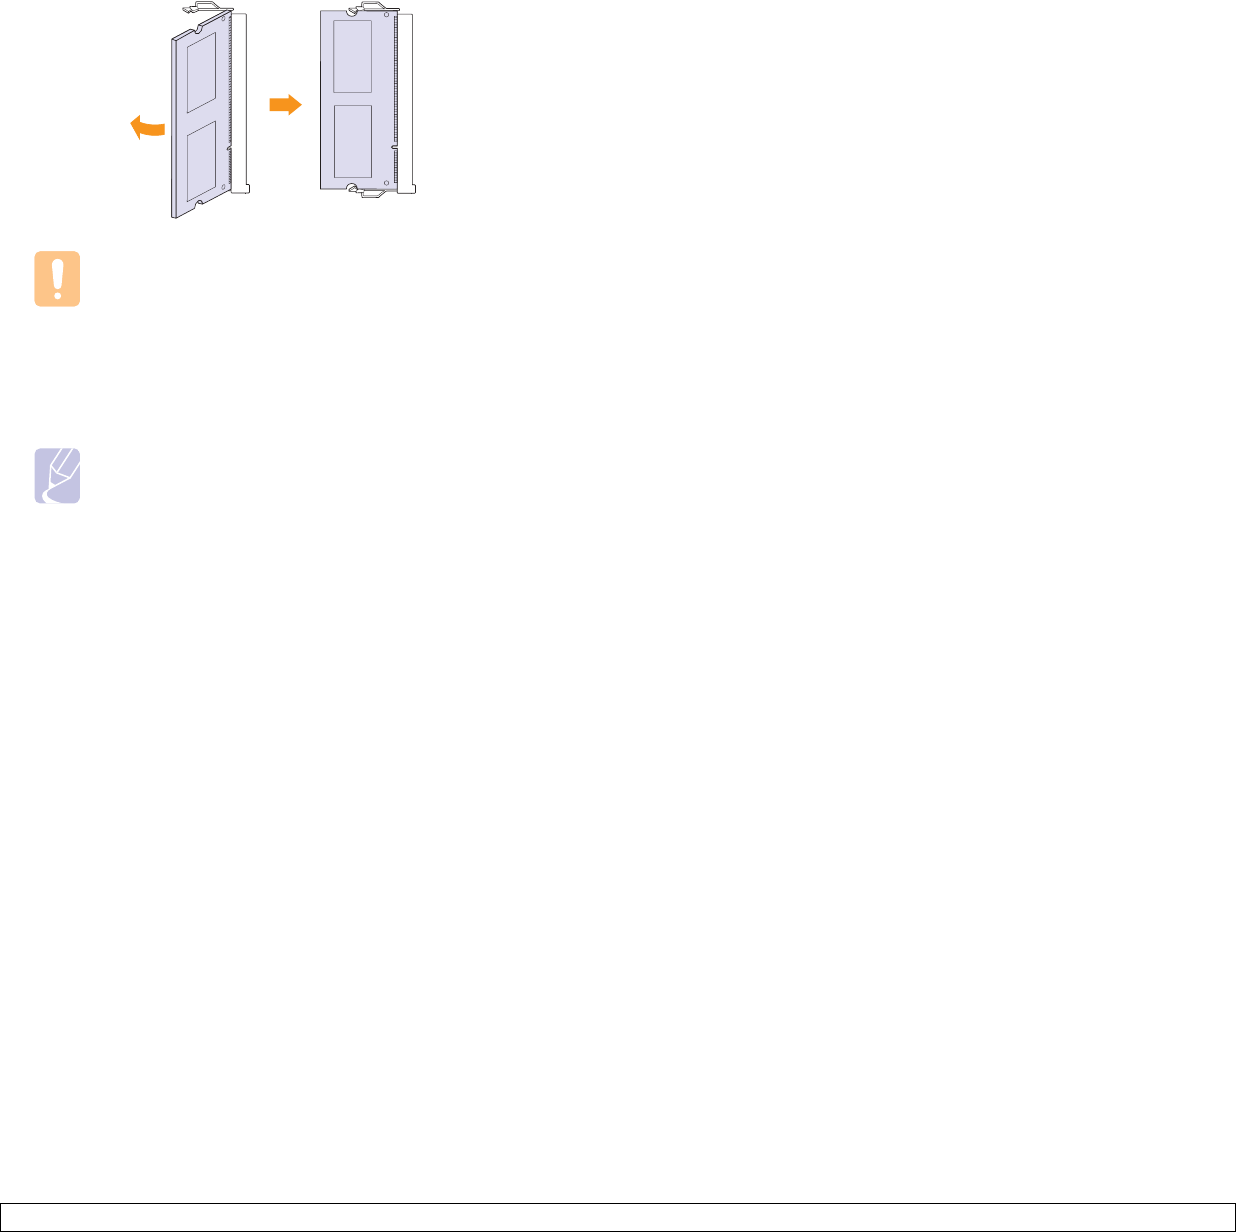
3Take out a new memory module from the plastic bag.
4Holding the memory module by the edges, align the memory
module on the slot at about a 30-degree tilt. Make sure that the
notches of the module and the grooves on the slot fit each other.
Note
The notches and grooves illustrated above may not match
those on an actual memory module and its slot.
9.2 <
Installing accessories>
5Press the memory module into the slot with care until you hear a
'click'.
Caution
Do not press the memory module strongly or the module
may be damaged. If the module does not seem to fit into
the slot properly, carefully try the previous procedure again.
6Replace the control board cover.
7Reconnect the power cord and printer cable, and turn the machine
on.
Note
To release the memory module, pull the two tabs on the
sides of the slot outwards, then the module springs out.
Activating the added memory in the PS printer
properties
After installing the memory module, you need to select it in the printer
properties of the PostScript printer driver in order to use it.
1Make sure that the PostScript printer driver is installed on your
computer. For details about installing the PS printer driver, see
Software section
.
2Click the Windows Start menu.
3For Windows 2000, select Settings and then Printers.
For Windows XP/2003, select Printers and Faxes.
For Windows Vista, select Control Panel ➞Hardware and Sound
➞ Printers.
4Select the Samsung CLP-350 Series PS printer.
5Click the right mouse button on the printer icon and select
Properties.
6Select Device Settings.
7Select the amount of memory you installed from
Printer Memory
in
the
Installable Options
section.
8Click OK.
10.1 <
Specifications>
10 Specifications
Note
The numbers herein is subject to change according to its install
environment.
Item Specifications and Description
Printing speedaBlack and white: Up to 19 ppmb in A4 (19
ppm in Letter)
Color: Up to 5 ppm in A4(Letter)
Printing resolution Max. 2,400 x 600 dpi effective output
Warm-up time Less than 40 seconds (Coldboot)
First print out time From ready
Black and white: Less than 14 seconds
Color: Less than 24 seconds
From coldboot
Black and white: Less than 50 seconds
Color: Less than 60 seconds
Consumables lifecAverage continuous black cartridge yield:
4,000d standard pages.
Average continuous yellow/cyan/magenta
cartridge yield: 2,000d standard pages.
Imaging unit: Approx. 20,000 black pages or
50,000 images
Waste toner container: Approx. 1,250 pages
(full color 5% image) or 5,000 images
Noise levelePrinting mode
Black and white: Less than 49 dBA
Color: Less than 48 dBA
Standby mode: Less than 35 dBA
Power rating AC 110 - 120 V or AC 220 - 240 V
See the Rating label on the machine for the
correct voltage, frequency (hertz) and type of
current for your machine.
Power consumption • Average: 400 W
• Power save mode: less than 10 W
External dimension
(W x D x H)
390 x 420.1 x 269.5 mm (15.4 x 16.5 x 10.6
inches)
Weight 14.75 Kg (32.52 lbs)
(including consumables)
Package weight Paper 2.72 kg (5.99 lbs)
Plastic 0.453 kg (1 lbs)
Operating
environment
Temperature 10 to 32.5 °C
(50 to 90 °F)
Humidity 20 to 80% RH
Memory 128 MB (expandable up to 256 MB)
Fonts 45 scalable, 1 bitmap and 136 PS
Interface USB 2.0
Ethernet 10/100 Base TX
OS compatibility &
driver
Windows 2000/
2003/ XP/ Vista
SPL-C (Samsung Printer
Language Color) driver,
PCL6,
PostScript driver
Various Linux
OS
PostScript driver
Mac 10.3 ~ 10.4 PostScript driver
Printer language SPL-C, PCL6, PostScript 3
Option 250 sheet tray
Duty cycle Monthly: Up to 24,200 images
a. Printing speed: it will be affected by operating system used, computing
performance, application software, connecting method, media type, media
size, and job complexity.
b. ppm: page per minute.
c. May be affected by operating environment, printing interval, media type, and
media size.
d. Declared yield value in accordance with ISO/IEC 19798.
e. Noise Level: sound pressure level, ISO7779.
Item Specifications and Description

11.1 <
Glossary>
11 Glossary
BOOTP
It stands for Bootstrap Protocol, a network protocol used by a network
client to obtain its IP address automatically. This is usually done in the
bootstrap process of computers or operating systems running on them.
The BOOTP servers assign the IP address from a pool of addresses to
each client.
Control Panel
A control panel is a flat area where control or monitoring instruments are
displayed. They are typically found in top or front of the machine.
Coverage
This is the printing term used for toner usage measurement on printing
and generally used as 5% coverage. 5% coverage means that an A4
sided paper has about 5% image or text on it. So, if the paper or original
has complicated images or lots of text on it, the coverage will be over 5%
and at the same time, toner usage will be as much as the coverage.
Default
The first set values.
DHCP
A Dynamic Host Configuration Protocol (DHCP) is a client-server
networking protocol. A DHCP server provides configuration parameters
specific to the DHCP client host requesting, generally, information
required by the client host to participate on an IP network.
DIMM
Dual Inline Memory Module, a small circuit board that holds memory.
DIMM stores all the data within the machine like printing data, received
fax data, or scanned data.
DNS
The Domain Name Server (DNS) is a system that stores information
associated with domain names in a distributed database on networks.
DPI
This is the measurement of resolution which is used for printing or
scanning. Generally, more dots per inch result in a higher resolution,
more visible detail in the image, and a larger file size.
Duplex
This is a mechanism which automatically flips over a sheet of paper so
that the machine can print (or scan) on both sides of the paper. A printer
equipped with a Duplex can print double-sided.
Duty Cycle
Duty cycle is the page quantity which does not affect printer performance
for a month. Generally the printer has the lifespan limitation such as
pages per year. The lifespan means the average capacity of print-outs,
usually within the warranty period. For example, if the duty cycle is 48,000
pages per month assuming 20 working days, a printer limits 2,400 pages
a day, which is not small amount.
Ethernet
Ethernet is a frame-based computer networking technology for local area
networks (LANs). It defines wiring and signaling for the physical layer,
and frame formats and protocols for the media access control (MAC)/data
link layer of the OSI model. It has become the most widespread LAN
technology in use presently.
Fuser Unit
This is the part of a laser printer that melts the toner onto the print media.
It consists of two hot rollers. After toner is transferred onto the paper, the
fuser unit applies heat and pressure to ensure that the toner stays on the
paper permanently, which is why paper is warm when it comes out of a
laser printer.
Gateway
This is a connection between computer networks, or between a computer
network and a telephone line. And it is very popular, as it is a computer
or a network that allows access to another computer or network.
Grayscale
Shades of gray that represent light and dark portions of an image when
color images are converted to grayscale; colors are represented by
various shades of gray.
Halftone
This is an image type that simulates grayscale by varying the number of
dots. Highly colored areas consist of a large number of dots, while lighter
areas consist of a smaller number of dots.
Intranet
This is a private network that uses Internet Protocols, network
connectivity, and possibly the public telecommunication system to
securely share part of an organization's information or operations with its
employees. Sometimes the term refers only to the most visible service,
the internal website.
IP address
An Internet Protocol address (IP address) is a unique number that
devices use in order to identify and communicate with each other on a
network utilizing the Internet Protocol standard (IP).
IPM
The Images Per Minute.

11.2 <
Glossary>
ISO
The International Organization for Standardization (ISO) is an
international standard-setting body composed of representatives from
national standards bodies. It produces world-wide industrial and
commercial standards.
LED
A light-emitting diode (LED) is a semiconductor device that indicates the
status of a machine.
Print Media
Media such as papers, envelopes, labels, and transparencies which can
be used on a printer, a scanner, a fax or, a copier.
OPC Drum
A mechanism that makes a virtual image for print using a laser beam
emitted from a laser printer, and it is usually green or gray-colored and
cylinder-shaped. An exposing unit of a drum is slowly worn away by its
usage of the printer, and it should be replaced appropriately since it
becomes scratched from grit in paper.
PDF
Portable Document Format (PDF) is a proprietary file format developed
by Adobe Systems for representing two-dimensional documents in a
device-independent and resolution-independent format.
PostScript
PostScript (PS) is a page description language and programming
language used primarily in the electronic and desktop publishing areas,
and that is run in an interpreter to generate an image.
PPM
Pages Per Minute. PPM shows the printer's speed, how many pages a
printer can actually print per minute.
PRN file
An interface for a device driver, this allows software to interact with the
device driver using standard input/output system calls, which simplifies
many tasks.
Protocol
This is a convention or standard that controls or enables the connection,
communication, and data transfer between two computing endpoints.
PS
See PostScript.
Resolution
The sharpness of an image, measured in dots per inch (dpi). The higher
the dpi, the greater the resolution.
Subnet Mask
A bitmask used to tell how many bits in an octet(s) identify the
subnetwork, and how many bits provide room for host addresses.
TCP/IP
The Transmission Control Protocol (TCP) and the Internet Protocol (IP).
It is the set of communications protocols that implement the protocol
stack on which the Internet and most commercial networks run.
toner cartridge
It is a kind of bottle within a machine like a printer which contains toner.
Toner is a powder used in laser printers and photocopiers which forms the
text and images on the printed paper. Toner can be melted by the heat of
the fuser, causing it to bind to the fibers in the paper.
URL
Uniform Resource Locator (URL) is the global address of documents and
resources on the Internet. The first part of the address indicates what
protocol to use, the second part specifies the IP address or the domain
name where the resource is located.
USB
Universal serial bus (USB) is a standard that was developed by the USB
Implementers Forum, Inc., to connect computers and peripherals. Unlike
the parallel port, USB is designed to concurrently connect a single
computer USB port to multiple peripherals.

1
C
card stock, printG4.9
cleaning
insideG6.1
outsideG6.1
configuration reportG6.1
control board coverG1.2
control panelG1.2SG1.3
custom-sized materials, printG4.9
D
DisplayG1.3
driver
featureG2.1
installationG3.2
E
envelopes, printG4.7
F
from the websiteG6.8
front coverG1.2
H
handleG1.2
J
jam
tips for avoiding paper jamsG7.1
L
labels, printG4.8
LED
StatusG1.4
Linux
problemsG7.9
requirementsG2.2
M
Macintosh
problemsG7.10
requirementsG2.2
MaintenanceG6.1
maintenance partsG6.8
toner cartridgeG6.3
manual feed, useG4.6
memory module
installingG9.1
orderingG8.1
N
network
requirementsG3.2
setting upG3.1
network portG1.2
O
optional trayG1.2SG8.1
ordering suppliesG8.1
output supportG1.2
Output trayG1.2
P
paper
changing the sizeG4.5
clearing jamG7.1
loading in the optional trayG4.4
loading in the tray1G4.4
paper feeding problemsG7.4
setting the paper size of the trayG4.10
PostScript
problemsG7.9
power receptacleG1.2
power switchG1.2
preprinted paper, printG4.9
print media
guidelinesG4.1
selecting print mediaG4.1
specificationG4.2
Printer software CDG2.1
printingG5.1
problem solvingG7.4
problems
LinuxG7.9
MacintoshG7.10
paper feederG7.4
PostScriptG7.9
printingG7.4
printing qualityG7.6
WindowsG7.8
Q
quality
solving the printing problemG7.6
R
rear coverG1.2
replacing components
toner cartridgeG6.4
S
specificationsG10.1
StatusG1.3
StopG1.3
supplied softwareG2.1
supplies
expected toner cartridge lifeG6.3
ordering suppliesG8.1
SyncThru Web ServiceG6.8
T
top coverG1.2
transparency, printG4.8
tray
adjusting the width and lengthG4.5
optional trayG1.2
tray1G1.2
troubleshootingG7.1
U
usb portG1.2
W
Windows
problemsG7.8
requirementsG2.2
INDEX

Samsung Printer
Software section
1
SOFTWARE SECTION
CONTENTS
Chapter 1:
INSTALLING PRINTER SOFTWARE IN WINDOWS
Installing Printer Software ........................................................................................................ 4
Installing Software for Local Printing ................................................................................. 4
Installing Software for Network Printing ............................................................................. 7
Reinstalling Printer Software ................................................................................................... 10
Removing Printer Software ..................................................................................................... 11
Installing mono printer driver .................................................................................................. 11
Chapter 2:
BASIC PRINTING
Printing a Document .............................................................................................................. 12
Printing to a file (PRN) .......................................................................................................... 13
Printer Settings ..................................................................................................................... 13
Layout Tab .................................................................................................................. 14
Paper Tab .................................................................................................................... 14
Graphics Tab ............................................................................................................... 15
Extras Tab ................................................................................................................... 16
About Tab ................................................................................................................... 16
Printer Tab .................................................................................................................. 16
Using a Favorite Setting ................................................................................................ 17
Using Help ................................................................................................................... 17
Chapter 3:
ADVANCED PRINTING
Printing Multiple Pages on One Sheet of Paper (N-Up Printing) ..................................................... 18
Printing Posters ..................................................................................................................... 19
Printing Booklets .................................................................................................................. 19
Printing on Both Sides of Paper ............................................................................................... 20
Printing a Reduced or Enlarged Document ................................................................................ 20
Fitting Your Document to a Selected Paper Size ......................................................................... 20
2
Using Watermarks ................................................................................................................. 21
Using an Existing Watermark ......................................................................................... 21
Creating a Watermark ................................................................................................... 21
Editing a Watermark ..................................................................................................... 21
Deleting a Watermark ................................................................................................... 21
Using Overlays ...................................................................................................................... 22
What is an Overlay? ...................................................................................................... 22
Creating a New Page Overlay ......................................................................................... 22
Using a Page Overlay .................................................................................................... 22
Deleting a Page Overlay ................................................................................................ 22
Chapter 4:
USING WINDOWS POSTSCRIPT DRIVER
Printer Settings ..................................................................................................................... 23
Advanced
.................................................................................................................. 23
Using Help ................................................................................................................... 23
Chapter 5:
SHARING THE PRINTER LOCALLY
Setting Up a Host Computer ................................................................................................... 24
Setting Up a Client Computer .................................................................................................. 24
Chapter 6:
USING SMART PANEL
Understanding Smart Panel .................................................................................................... 25
Opening the Troubleshooting Guide ......................................................................................... 26
Using Printer Settings Utility ................................................................................................... 26
Using Onscreen Help File ............................................................................................... 26
Changing the Smart Panel Program Settings ............................................................................. 26
Chapter 7:
USING YOUR PRINTER IN LINUX
Getting Started ..................................................................................................................... 27
Installing the Unified Linux Driver ............................................................................................ 27
Installing the Unified Linux Driver ................................................................................... 27
Uninstalling the Unified Linux Driver ............................................................................... 28
Using the Unified Driver Configurator ....................................................................................... 29
Opening the Unified Driver Configurator .......................................................................... 29
3
Printers Configuration ................................................................................................... 29
Ports Configuration ....................................................................................................... 30
Configuring Printer Properties ................................................................................................. 30
Printing a Document .............................................................................................................. 31
Printing from Applications .............................................................................................. 31
Printing Files ................................................................................................................ 31
Chapter 8:
USING YOUR PRINTER WITH A MACINTOSH
Installing Software ................................................................................................................ 32
Printer driver ............................................................................................................... 32
Setting Up the Printer ............................................................................................................ 33
For a Network-connected ............................................................................................... 33
For a USB-connected .................................................................................................... 33
Printing ................................................................................................................................ 34
Printing a Document ..................................................................................................... 34
Changing Printer Settings .............................................................................................. 34
Printing Multiple Pages on One Sheet of Paper .................................................................. 36
Installing Printer Software in Windows
4
1Installing Printer
Software in Windows
This chapter includes:
• Installing Printer Software
• Reinstalling Printer Software
•Removing Printer Software
• Installing mono printer driver
NOTE
: The following procedure is based on Windows XP, for
other operating systems, refer to the corresponding Windows
user's guide or online help.
Installing Printer Software
You can install the printer software for local printing or network
printing. To install the printer software on the computer,
perform the appropriate installation procedure depending on
the printer in use.
A printer driver is software that lets your computer
communicate with your printer. The procedure to install drivers
may differ depending on the operating system you are using.
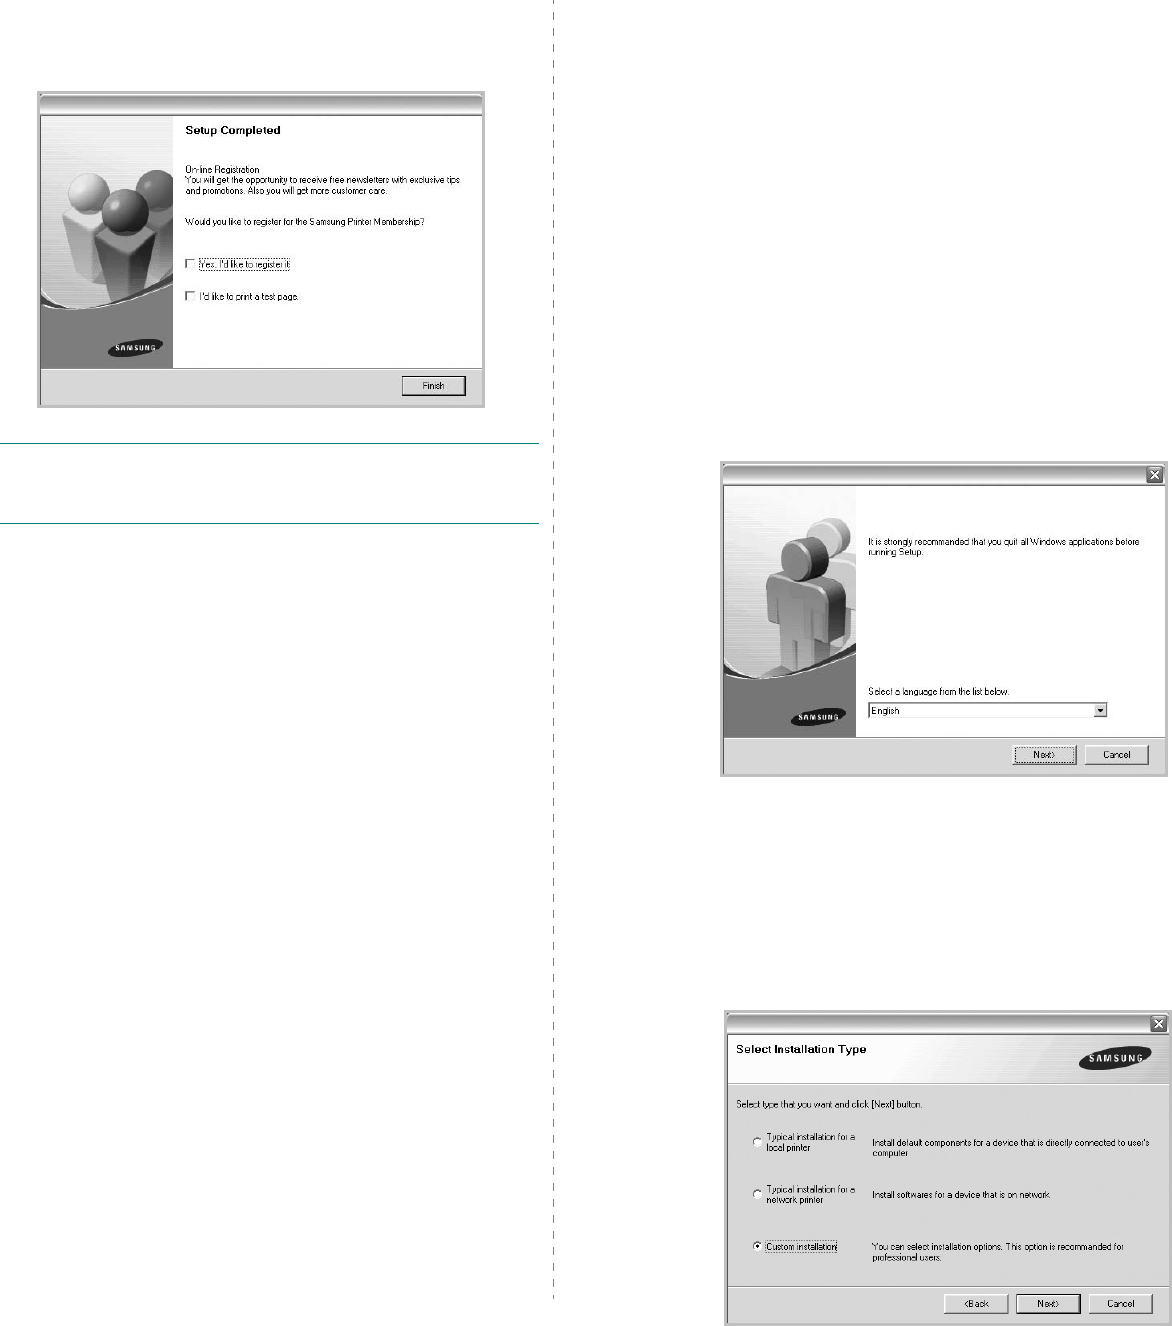
All applications should be closed on your PC before beginning
installation.
Installing Software for Local Printing
A local printer is a printer directly attached to your computer
using the printer cable supplied with your printer, such as a USB
or parallel cable. If your printer is attached to a network, skip
this step and go to “Installing Software for Network Printing” on
page 7.
You can install the printer software using the typical or custom
method.
NOTE
: If the “New Hardware Wizard” window appears during
the installation procedure, click in the upper right corner of
the box to close the window, or click
Cancel
.
Typical Installation
This is recommended for most users. All components necessary
for printer operations will be installed.
1
Make sure that the printer is connected to your computer
and powered on.
2
Insert the supplied CD-ROM into your CD-ROM drive.
The CD-ROM should automatically run, and an installation
window appears.
If the installation window does not appear, click
Start
and
then
Run
. Type
X:\Setup.exe
, replacing “
X
” with the
letter which represents your drive and click
OK
.
If you use Windows Vista, click
Start
→
All programs
→
Accessories
→
Run
, and type
X:\Setup.exe
.
If the
AutoPlay
window appears in Windows Vista, click
Run Setup.exe
in
Install or run program
field, and
click
Continue
in the
User Account Control
window.
3
Click
Next
.
• If necessary, select a language from the drop-down list.
4
Select
Typical installation for a local printer
. Click
Next
.
Installing Printer Software in Windows
5
NOTE
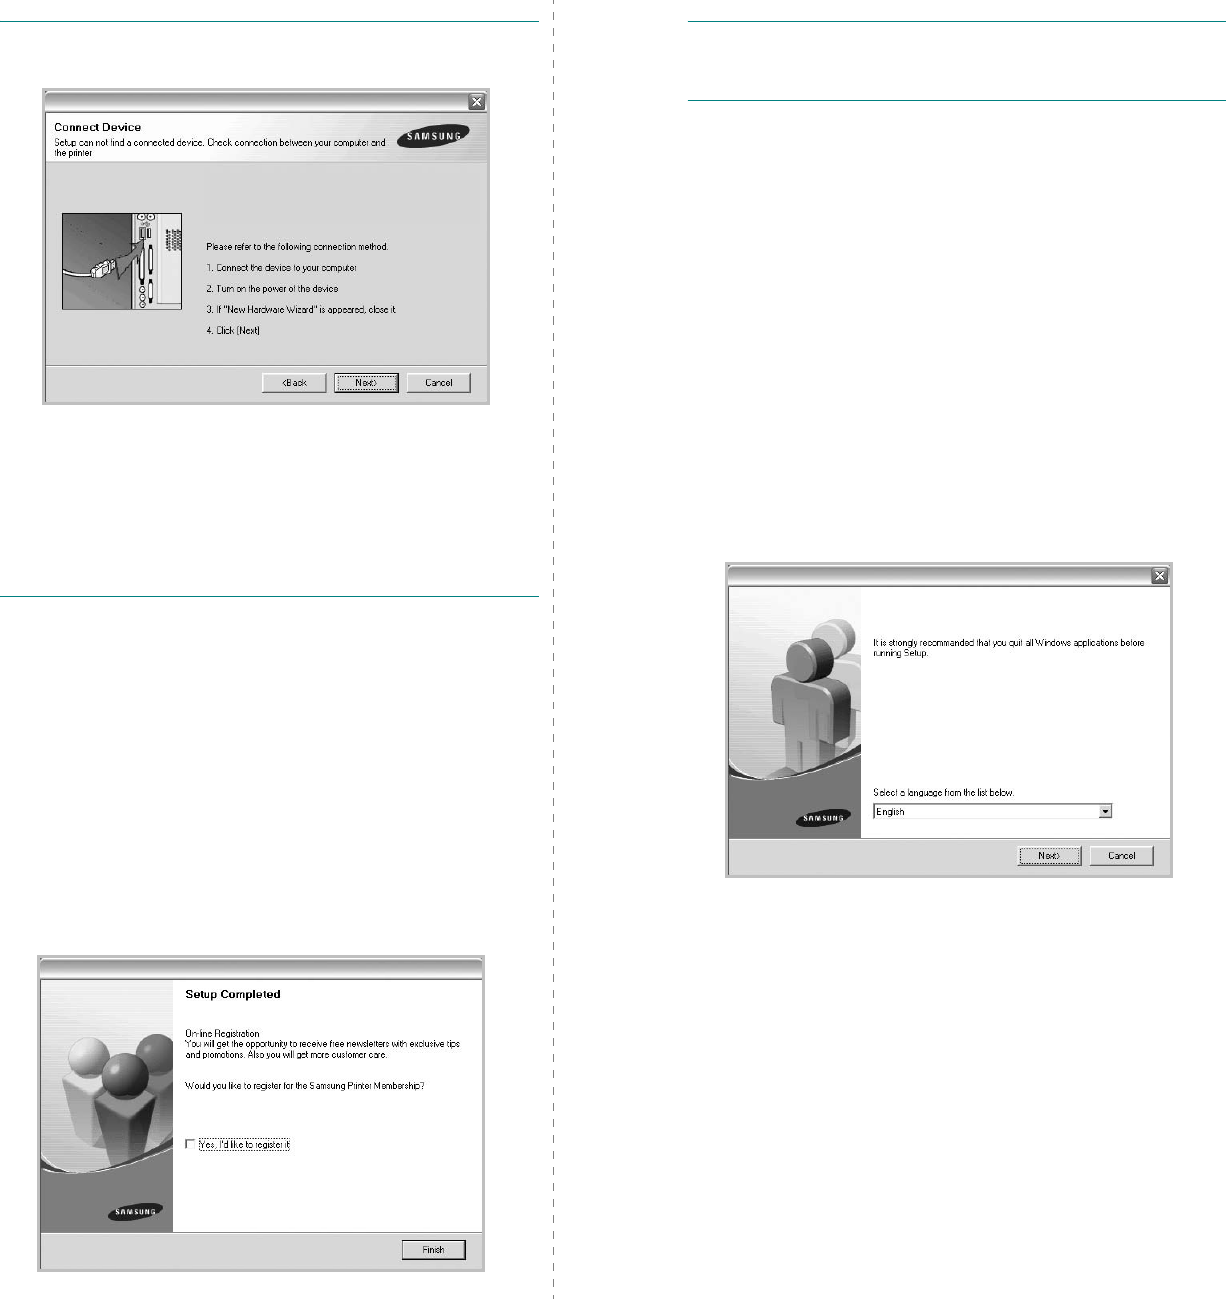
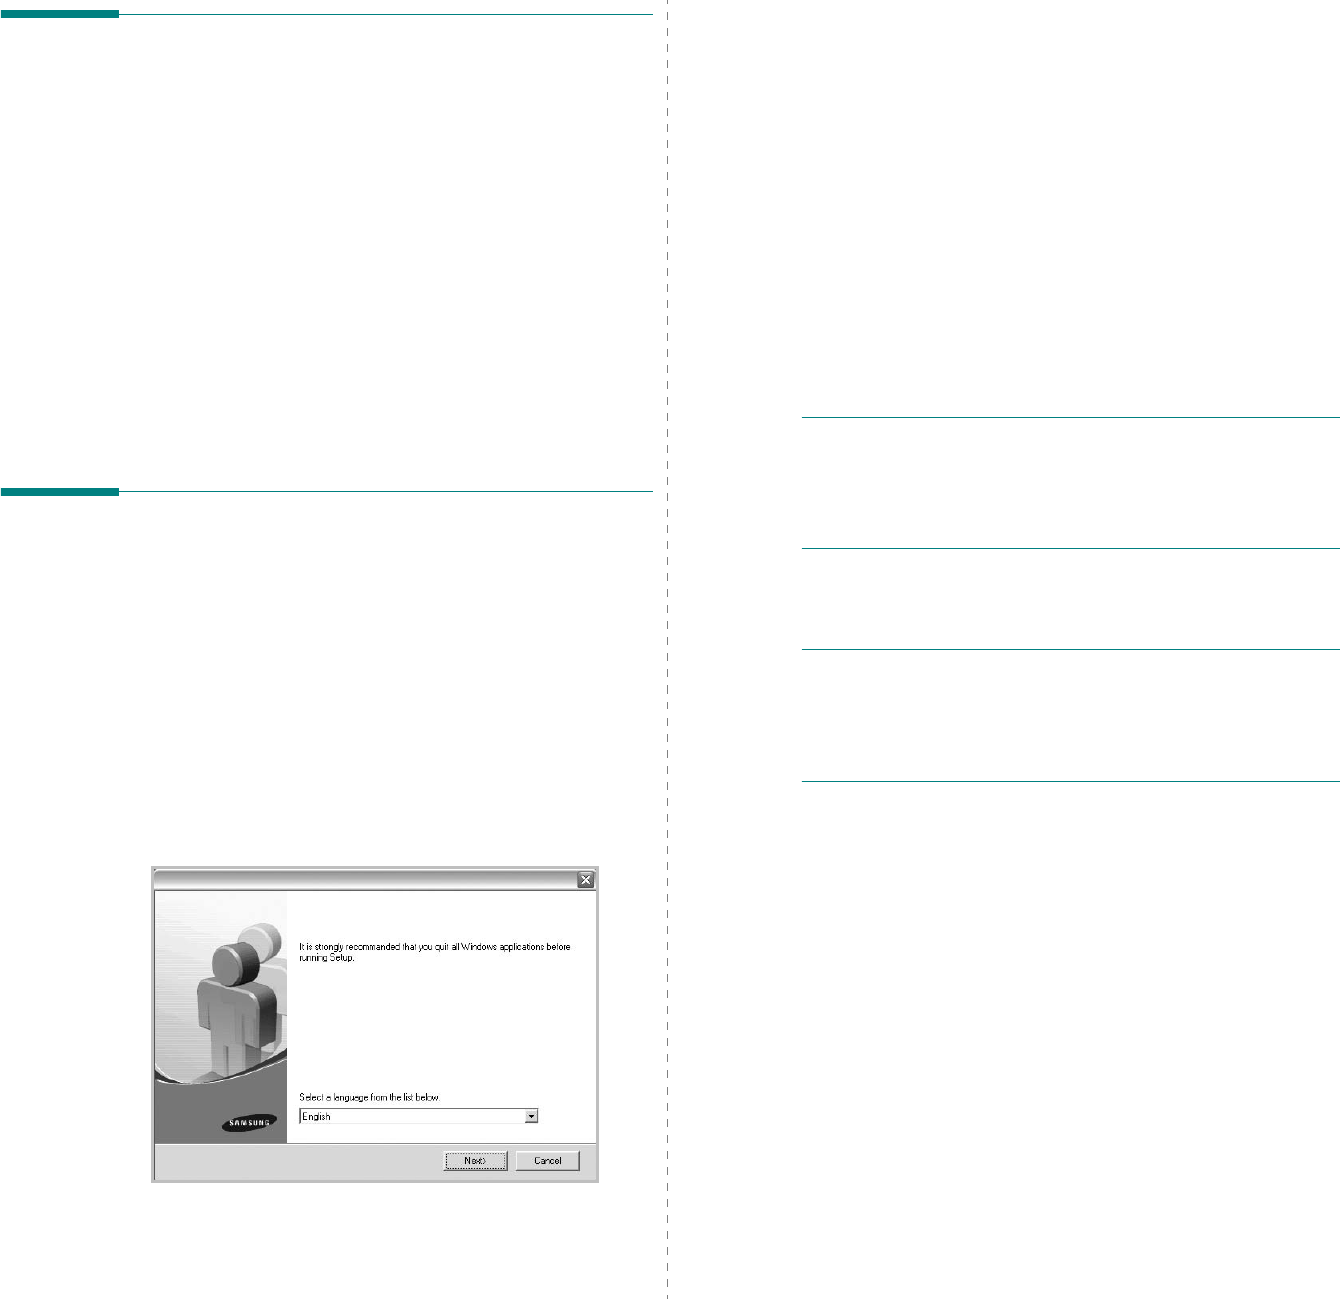
: If your printer is not already connected to the
computer, the following window will appear.
• After connecting the printer, click
Next
.
• If you don’t want to connect the printer at this time, click
Next
, and
No
on the following screen. Then the installation
will start and a test page will not be printed at the end of the
installation.
• The installation window that appears in this User’s
Guide may differ depending on the printer and
interface in use.
5
After the installation is finished, a window asking you to
print a test page appears. If you choose to print a test
page, select the checkbox and click
Next
.
Otherwise, just click
Next
and skip to step 7.
6
If the test page prints out correctly, click
Yes
.
If not, click
No
to reprint it.
7
To register yourself as a user of Samsung Printers in order
to receive information from Samsung, select the checkbox
and click
Finish
. You are now sent to the Samsung web
site.
Otherwise, just click
Finish
.
NOTE
: After setup is complete, if your printer driver doesn’t
work properly, reinstall the printer driver. See “Reinstalling
Printer Software” on page 10.
Custom Installation
You can choose individual components to install.
1
Make sure that the printer is connected to your computer
and powered on.
2
Insert the supplied CD-ROM into your CD-ROM drive.
The CD-ROM should automatically run, and an installation
window appears.
If the installation window does not appear, click
Start
and
then
Run
. Type
X:\Setup.exe
, replacing “
X
” with the
letter which represents your drive and click
OK
.
If you use Windows Vista, click
Start
→
All programs
→
Accessories
→
Run
, and type
X:\Setup.exe
.
If the
AutoPlay
window appears in Windows Vista, click
Run Setup.exe
in
Install or run program
field, and
click
Continue
in the
User Account Control
window.
3
Click
Next
.
• If necessary, select a language from the drop-down list.
•
View User’s Guide
: Allows you to view the User’s
Guide. If your computer doesn’t have Adobe Acrobat,
click on this option and it will automatically install Adobe
Acrobat Reader for you.
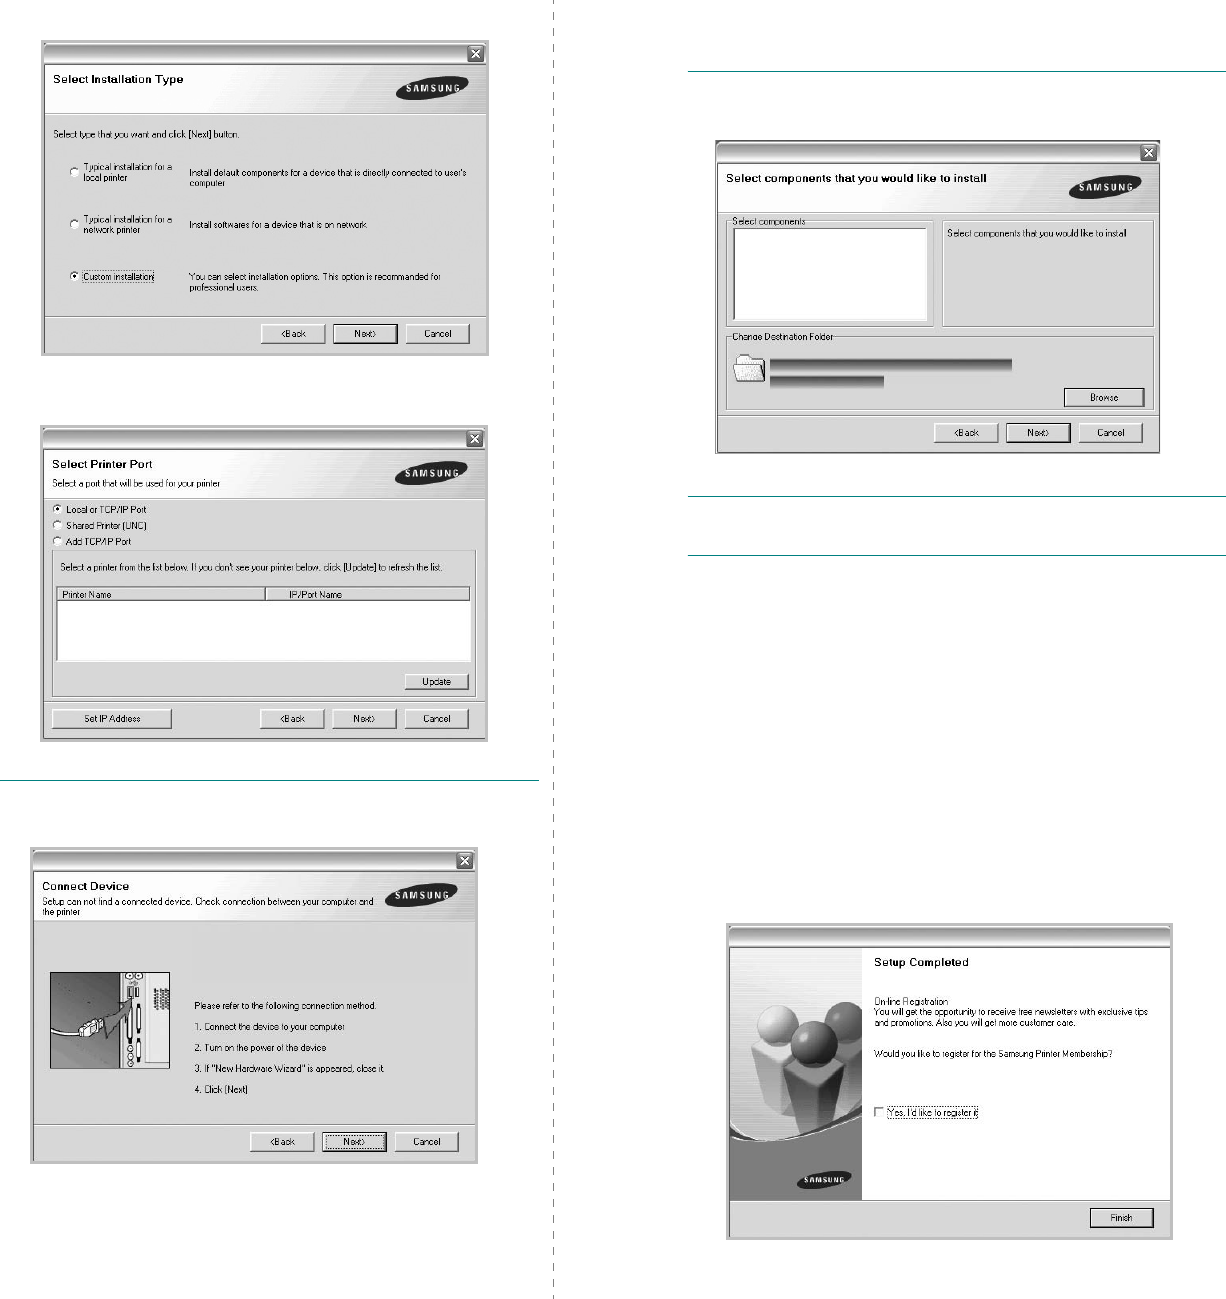
Installing Printer Software in Windows
6
4
Select
Custom installation
. Click
Next
.
5
Select your printer and click
Next
.
NOTE
: If your printer is not already connected to the
computer, the following window will appear.
• After connecting the printer, click
Next
.
• If you don’t want to connect the printer at this time, click
Next
, and
No
on the following screen. Then the installation
will start and a test page will not be printed at the end of the
installation.
• The installation window that appears in this User’s
Guide may differ depending on the printer and
interface in use.
6
Select the components to be installed and click
Next
.
NOTE
: You can change the desired installation folder by
clicking [
Browse
].
7
After the installation is finished, a window asking you to
print a test page appears. If you choose to print a test
page, select the checkbox and click
Next
.
Otherwise, just click
Next
and skip to step 9.
8
If the test page prints out correctly, click
Yes
.
If not, click
No
to reprint it.
9
To register yourself as a user of Samsung Printers in order
to receive information from Samsung, select the checkbox
and click
Finish
. You are now sent to the Samsung web
site.
Otherwise, just click
Finish
.
Installing Printer Software in Windows
7
Installing Software for Network
Printing
When you connect your printer to a network, you must first
configure the TCP/IP settings for the printer. After you have
assigned and verified the TCP/IP settings, you are ready to
install the software on each computer on the network.
You can install the printer software using the typical or custom
method.
Typical Installation
This is recommended for most users. All components necessary
for printer operations will be installed.
1
Make sure that the printer is connected to your network
and powered on. For details about connecting to the
network, see the supplied printer’s User’s Guide.
2
Insert the supplied CD-ROM into your CD-ROM drive.
The CD-ROM should automatically run, and an installation
window appears.
If the installation window does not appear, click
Start
and
then
Run
. Type
X:\Setup.exe
, replacing “
X
” with the
letter which represents your drive and click
OK
.
If you use Windows Vista, click
Start
→
All programs
→
Accessories
→
Run
, and type
X:\Setup.exe
.
If the
AutoPlay
window appears in Windows Vista, click
Run Setup.exe
in
Install or run program
field, and
click
Continue
in the
User Account Control
window.
3
Click
Next
.
• If necessary, select a language from the drop-down list.
•
View User’s Guide
: Allows you to view the User’s
Guide. If your computer doesn’t have Adobe Acrobat,
click on this option and it will automatically install Adobe
Acrobat Reader for you.
4
Select
Typical installation for a network printer
. Click
Next
.
5
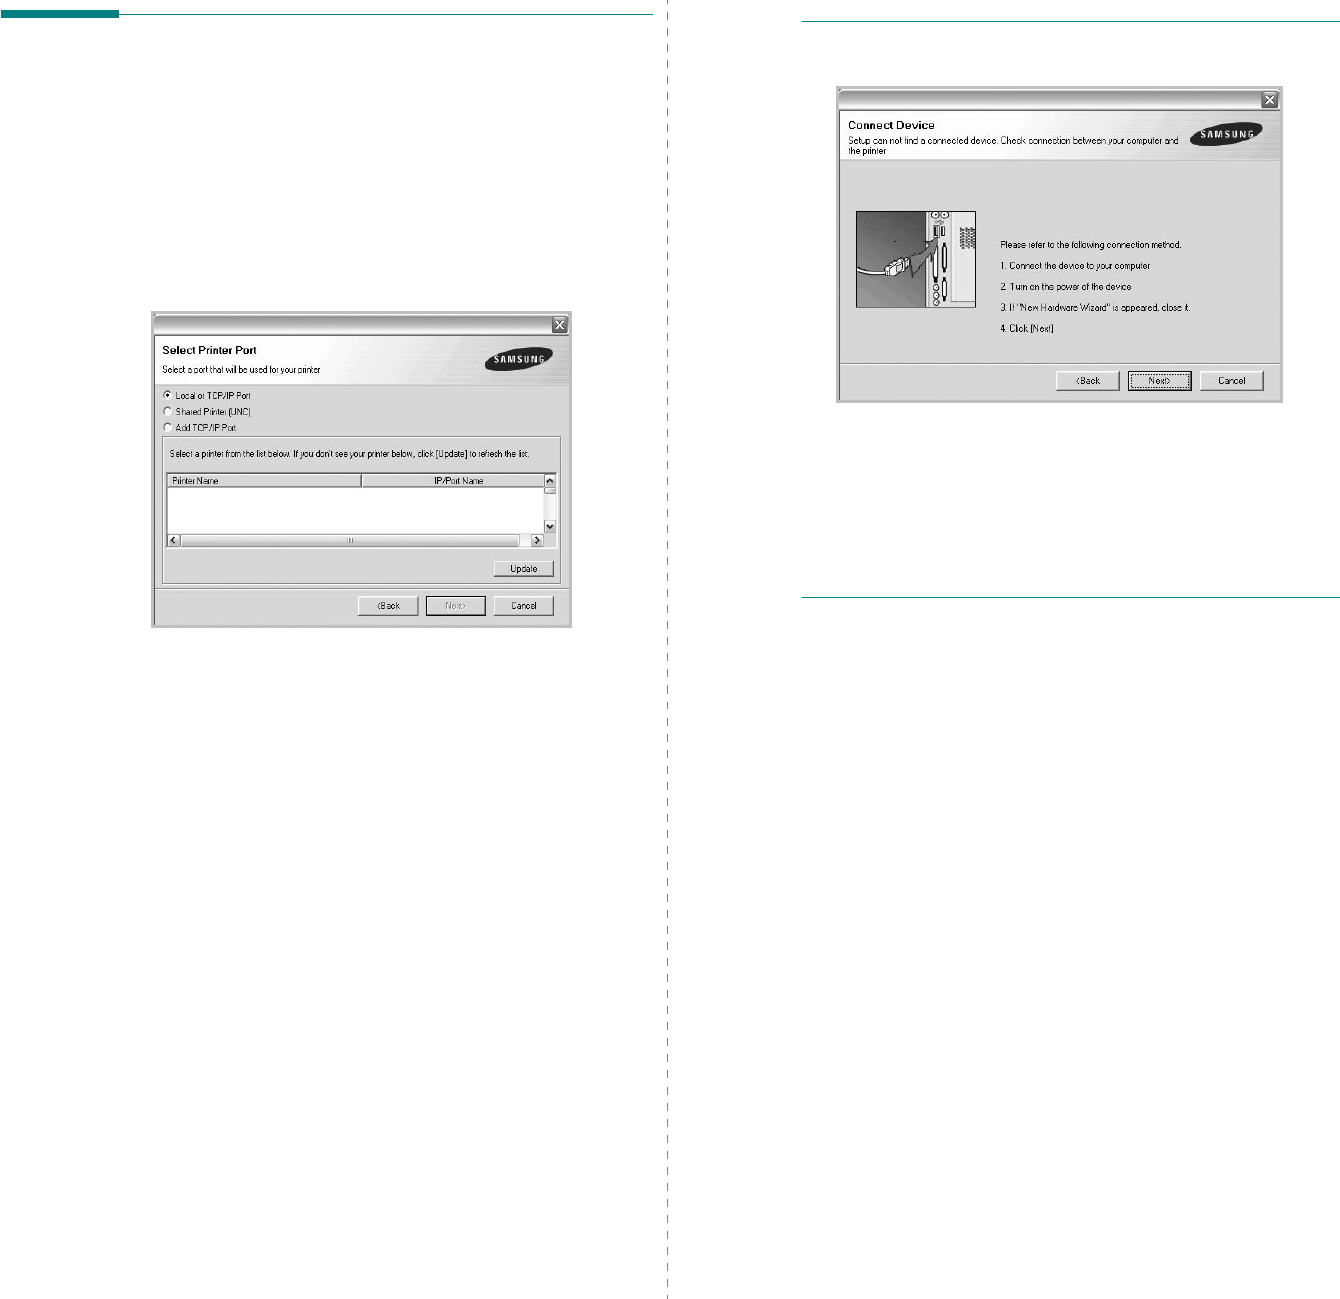
The list of printers available on the network appears.
Select the printer you want to install from the list and then
click
Next
.
• If you do not see your printer on the list, click
Update
to
refresh the list, or select
Add TCP/IP Port
to add your
printer to the network. To add the printer to the
network, enter the port name and the IP address for the
printer.
To verify your printer’s IP address or the MAC address,
print a Network Configuration page.
• To find a shared network printer (UNC Path), select
Shared Printer [UNC]
and enter the shared name
manually or find a shared printer by clicking the
Browse
button.
NOTE
: If you cannot find your machine in network, please
turn off the firewall and click
Update
.
6
After the installation is finished, a window appears asking
you to print a test page and to register yourself as a user
of Samsung Printers in order to receive information from
Installing Printer Software in Windows
8
Samsung. If you so desire, select the corresponding
checkbox(es) and click
Finish
.
Otherwise, just click
Finish
.
NOTE
: After setup is complete, if your printer driver doesn’t
work properly, reinstall the printer driver. See “Reinstalling
Printer Software” on page 10.
Custom Installation
You can choose individual components to install and set a
specific IP address.
1
Make sure that the printer is connected to your network
and powered on. For details about connecting to the
network, see the supplied printer’s User’s Guide.
2
Insert the supplied CD-ROM into your CD-ROM drive.
The CD-ROM should automatically run, and an installation
window appears.
If the installation window does not appear, click
Start
and
then
Run
. Type
X:\Setup.exe
, replacing “
X
” with the
letter which represents your drive and click
OK
.
If you use Windows Vista, click
Start
→
All programs
→
Accessories
→
Run
, and type
X:\Setup.exe
.
If the
AutoPlay
window appears in Windows Vista, click
Run Setup.exe
in
Install or run program
field, and
click
Continue
in the
User Account Control
window.
3
Click
Next
.
• If necessary, select a language from the drop-down list.
•
View User’s Guide
: Allows you to view the User’s
Guide. If your computer doesn’t have Adobe Acrobat,
click on this option and it will automatically install Adobe
Acrobat Reader for you.
4
Select
Custom installation
. Click
Next
.
Installing Printer Software in Windows
9
5
The list of printers available on the network appears.
Select the printer you want to install from the list and then
click
Next
.
• If you do not see your printer on the list, click
Update
to
refresh the list, or select
Add TCP/IP Port
to add your
printer to the network. To add the printer to the
network, enter the port name and the IP address for the
printer.
To verify your printer’s IP address or the MAC address,
print a Network Configuration page.
• To find a shared network printer (UNC Path), select
Shared Printer [UNC]
and enter the shared name
manually or find a shared printer by clicking the
Browse
button.
NOTE
: If you cannot find your machine in network, please turn
off the firewall and click
Update
.
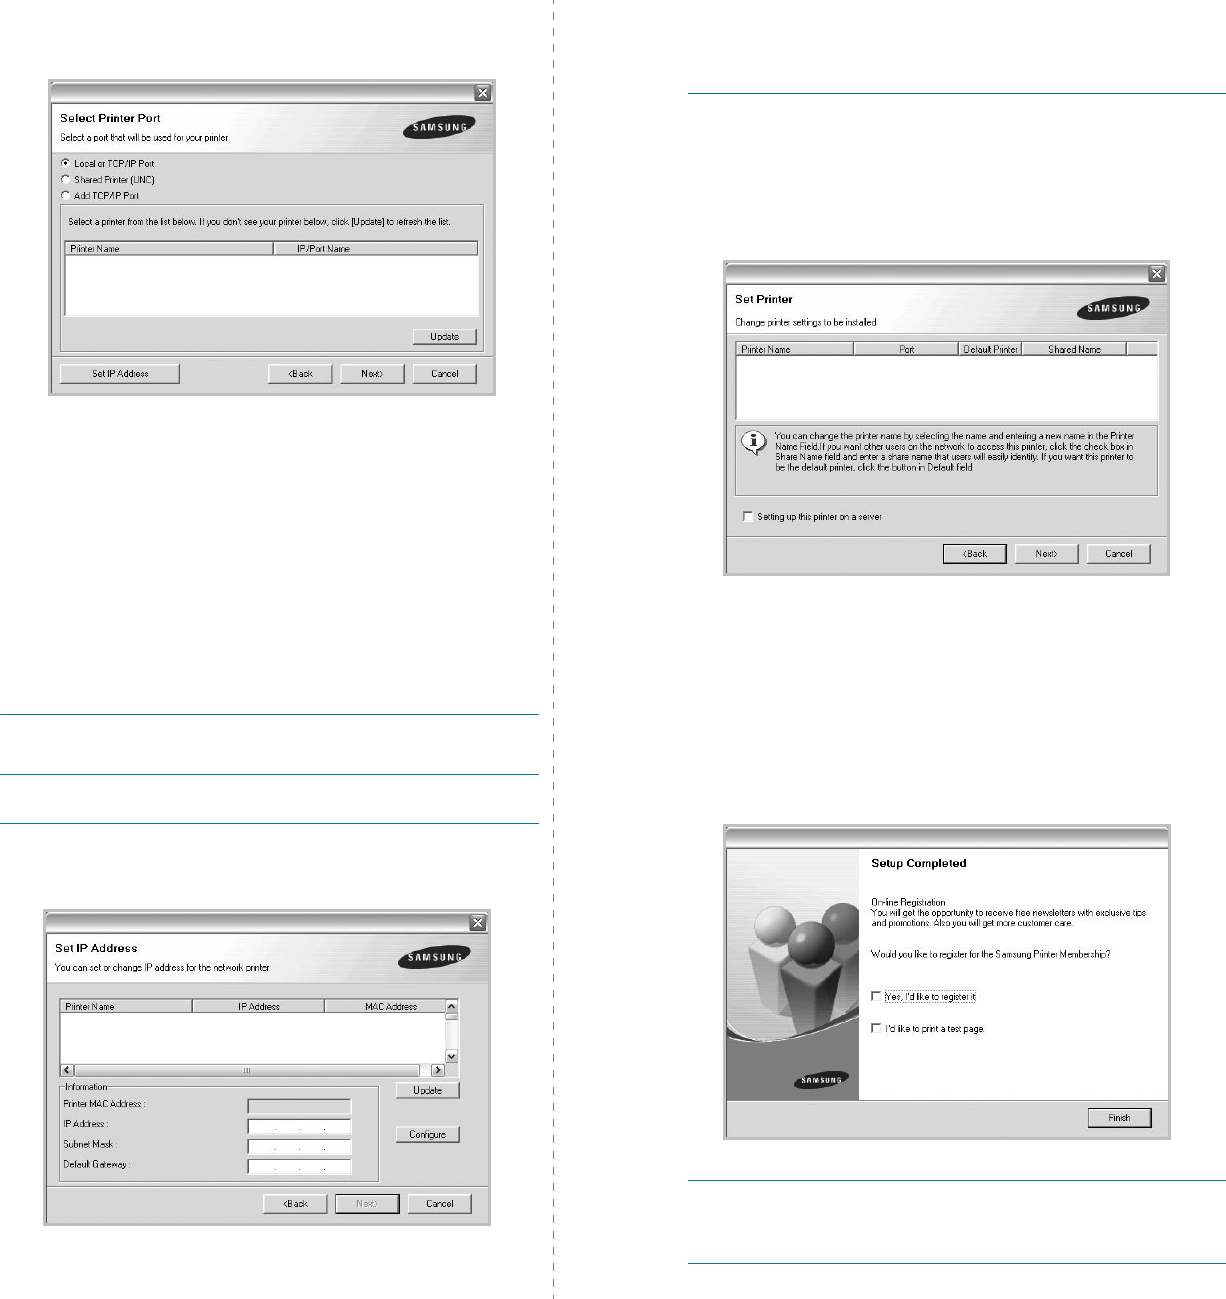
TIP
: If you want to set a specific IP address on a specific
network printer, click the
Set IP Address
button. The Set IP
Address window appears. Do as follows:
a. Select a printer to be set with a specific IP address from the
list.
b. Configure an IP address, subnet mask, and gateway for the
printer manually and click
Configure
to set the specific IP
address for the network printer.
c. Click
Next
.
6
Select the components to be installed. After selecting the
components, the following window appears. You can also
change the printer name, set the printer to be shared on
the network, set the printer as the default printer, and
change the port name of each printer. Click
Next
.
To install this software on a server, select the
Setting up
this printer on a server
checkbox.
7
After the installation is finished, a window appears asking
you to print a test page and to register yourself as a user
of Samsung Printers in order to receive information from
Samsung. If you so desire, select the corresponding
checkbox(es) and click
Finish
.
Otherwise, just click
Finish
.
NOTE
: After setup is complete, if your printer driver doesn’t
work properly, reinstall the printer driver. See “Reinstalling
Printer Software” on page 10.
Installing Printer Software in Windows
10
Reinstalling Printer Software
You can reinstall the software if installation fails.
1
Start Windows.
2
From the
Start
menu select
Programs
or
All Programs
→
your printer driver name
→
Maintenance
.
3
Select
Repair
and click
Next
.
4
The list of printers available on the network appears.
Select the printer you want to install from the list and then
click
Next
.
• If you do not see your printer on the list, click
Update
to
refresh the list, or select
Add TCP/IP Port
to add your
printer to the network. To add the printer to the
network, enter the port name and the IP address for the
printer.
• To find a shared network printer (UNC Path), select
Shared Printer [UNC]
and enter the shared name
manually or find a shared printer by clicking the
Browse
button.
You will see a component list so that you can reinstall any
item individually.
NOTE
: If your printer is not already connected to the
computer, the following window will appear.
• After connecting the printer, click
Next
.
• If you don’t want to connect the printer at this time, click
Next
, and
No
on the following screen. Then the installation
will start and a test page will not be printed at the end of the
installation.
• The reinstallation window that appears in this User’s
Guide may differ depending on the printer and
interface in use.
5
Select the components you want to reinstall and click
Next
.
If you installed the printer software for local printing
and
you select
your printer driver name
, the window
asking you to print a test page appears. Do as follows:
a. To print a test page, select the check box and click
Next
.
b. If the test page prints out correctly, click
Yes
.
If it doesn’t, click
No
to reprint it.
6
When the reinstallation is done, click
Finish
.
Installing Printer Software in Windows
11
Removing Printer Software
1
Start Windows.
2
From the
Start
menu select
Programs
or
All Programs
→
your printer driver name
→
Maintenance
.
3
Select
Remove
and click
Next
.
You will see a component list so that you can remove any
item individually.
4
Select the components you want to remove and then click
Next
.
5
When your computer asks you to confirm your selection,
click
Yes
.
The selected driver and all of its components are removed
from your computer.
6
After the software is removed, click
Finish
.
Installing mono printer driver
This printer provides you the printer drivers with a mono driver
so you can use your printer as a monochrome printer. You must
install the mono driver on your computer. Following steps guide
you through the step by step installation process.
1
Make sure that the printer is connected to your computer
and powered on. Or your computer and printer are
connected to the network.
2
Insert the supplied CD-ROM into your CD-ROM drive. The
CD-ROM should automatically run, and an installation
window appears.
3
Click Cancel.
If the confirmation window appears, click Finish.
4
Click
Start
→
Printers and Faxes
.
5
Select
Add Printer
.
6
When
Add Printer Wizard
appears, click
Next
.
7
Select
Local printer attached to this computer
, and
Automatically detect and install my Plug and Play
printer
, then click
Next
. Go to step 13.
If your computer does not find the printer, then follow the
next step.
8
Select
Next
in the
Select a Printer Port
window.
9
In the
Select a Printer Port
window, select
Have Disk...
.
10
Click
Browse
to find a mono driver for your printer.
ex) Windows XP 32 bit
Select CD-ROM drive
→
Printer
→
PC_MONO
→
WINXP_2000_VISTA-32
11
Select
***.inf
file and click
Open
.
12
Click
OK
in the
Install From Disk
window.
13
Select a mono driver in the
Printers
field, and click
Next
.
NOTE
: If you have installed a mono driver before, then the
Use Existing Driver
window. Select as the window explains,
and click
Next
. Also, depending on your computer
configuration, the printer sharing window or the print the test
page window may appear; make the appropriate selection.
14
Enter your printer name, and click
Next
.
15
Click
Finish
to start installing a mono printer driver.
NOTE
: If your printer is connected to a network, go to
printer's
Properties
and select the
Ports
tab, then click
Add
Port
and
Standard TCP/IP Port
, and create a new port to
connect to the printer. To create a new port, follow the
procedure laid out in the wizard window.
Basic Printing
12
2Basic Printing
This chapter explains the printing options and common printing
tasks in Windows.
This chapter includes:
• Printing a Document
• Printing to a file (PRN)
•Printer Settings
- Layout Tab
- Paper Tab
- Graphics Tab
- Extras Tab
- About Tab
- Printer Tab
- Using a Favorite Setting
- Using Help
Printing a Document
N
OTES
:
• Your printer driver
Properties
window that appears in this
User’s Guide may differ depending on the printer in use.
However the composition of the printer properties window is
similar.
• Check the Operating System(s) that are compatible
with your printer. Please refer to the OS Compatibility
section of Printer Specifications in your Printer User’s
Guide.
• If you need to know the exact name of your printer, you can
check the supplied CD-ROM.
The following procedure describes the general steps required
for printing from various Windows applications. The exact steps
for printing a document may vary depending on the application
program you are using. Refer to the User’s Guide of your
software application for the exact printing procedure.
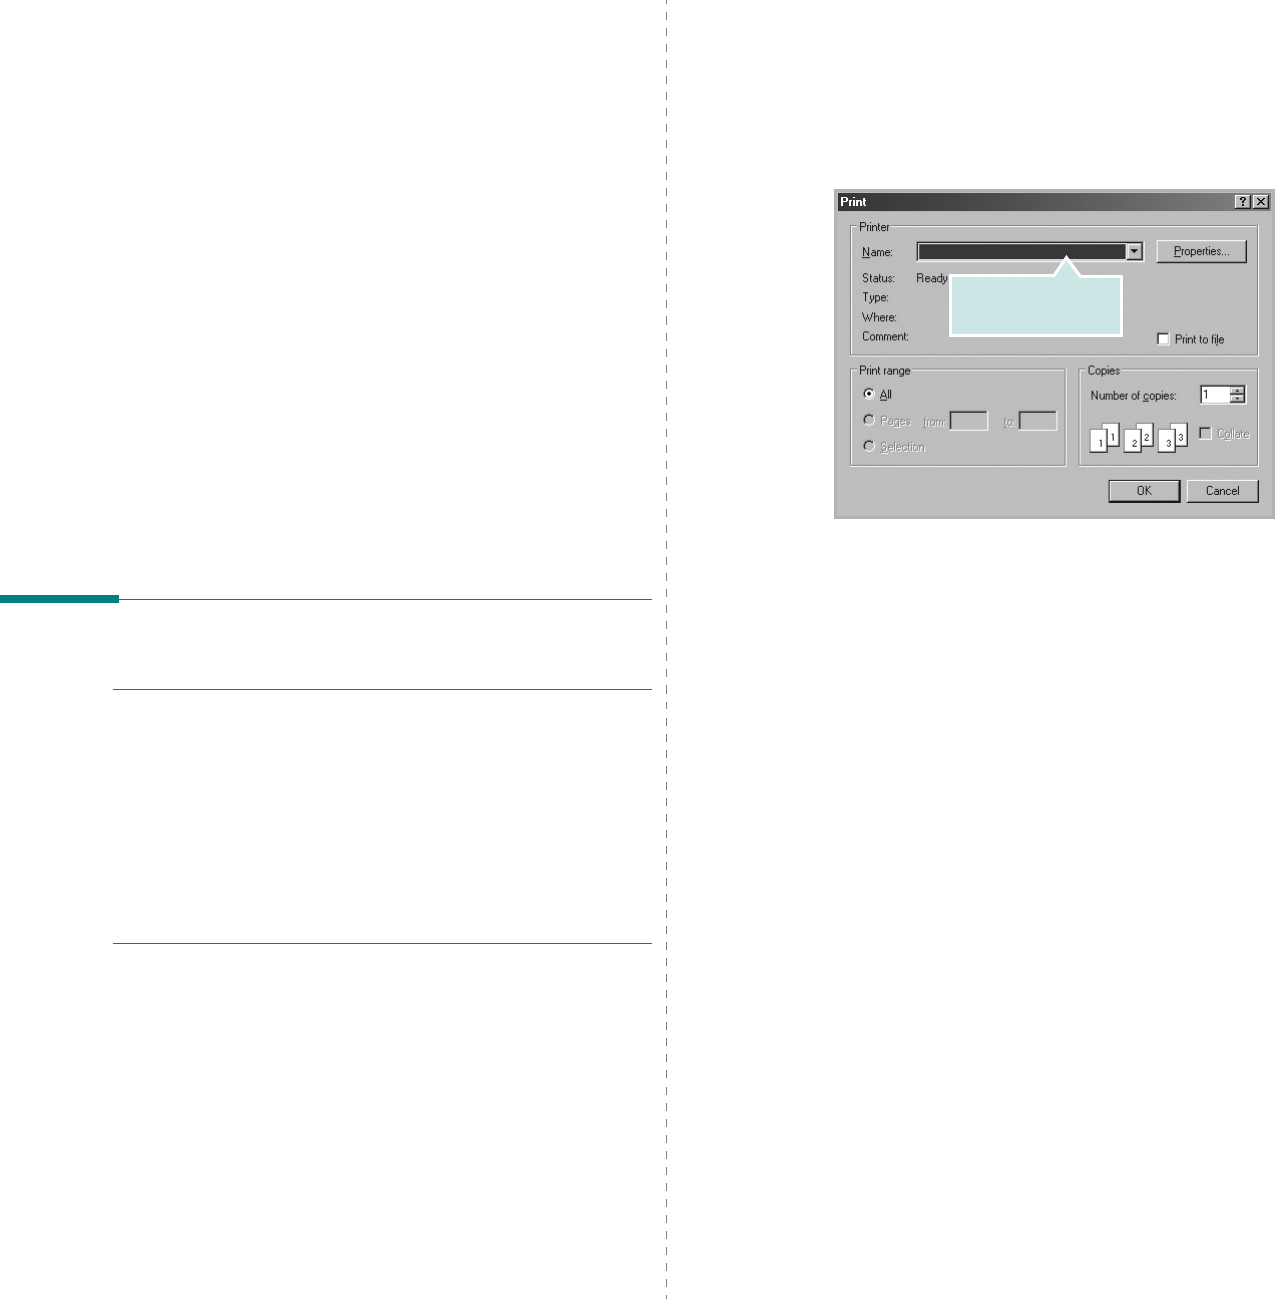
1
Open the document you want to print.
2
Select
Print
from the
File
menu. The Print window is
displayed. It may look slightly different depending on your
application.
The basic print settings are selected within the Print
window. These settings include the number of copies and
print range.
3
Select
your printer driver
from the
Name
drop-down
list.
To take advantage of the printer features provided by your
printer driver, click
Properties
or
Preferences
in the
application’s Print window. For details, see “Printer
Settings” on page 13.
If you see
Setup
,
Printer
, or
Options
in your Print
window, click it instead. Then click
Properties
on the next
screen.
Click
OK
to close the printer properties window.
4
To start the print job, click
OK
or
Print
in the Print
window.
Make sure that your
printer is selected.
Basic Printing
13
Printing to a file (PRN)
You will sometimes need to save the print data as a file for your
purpose.
To create a file:
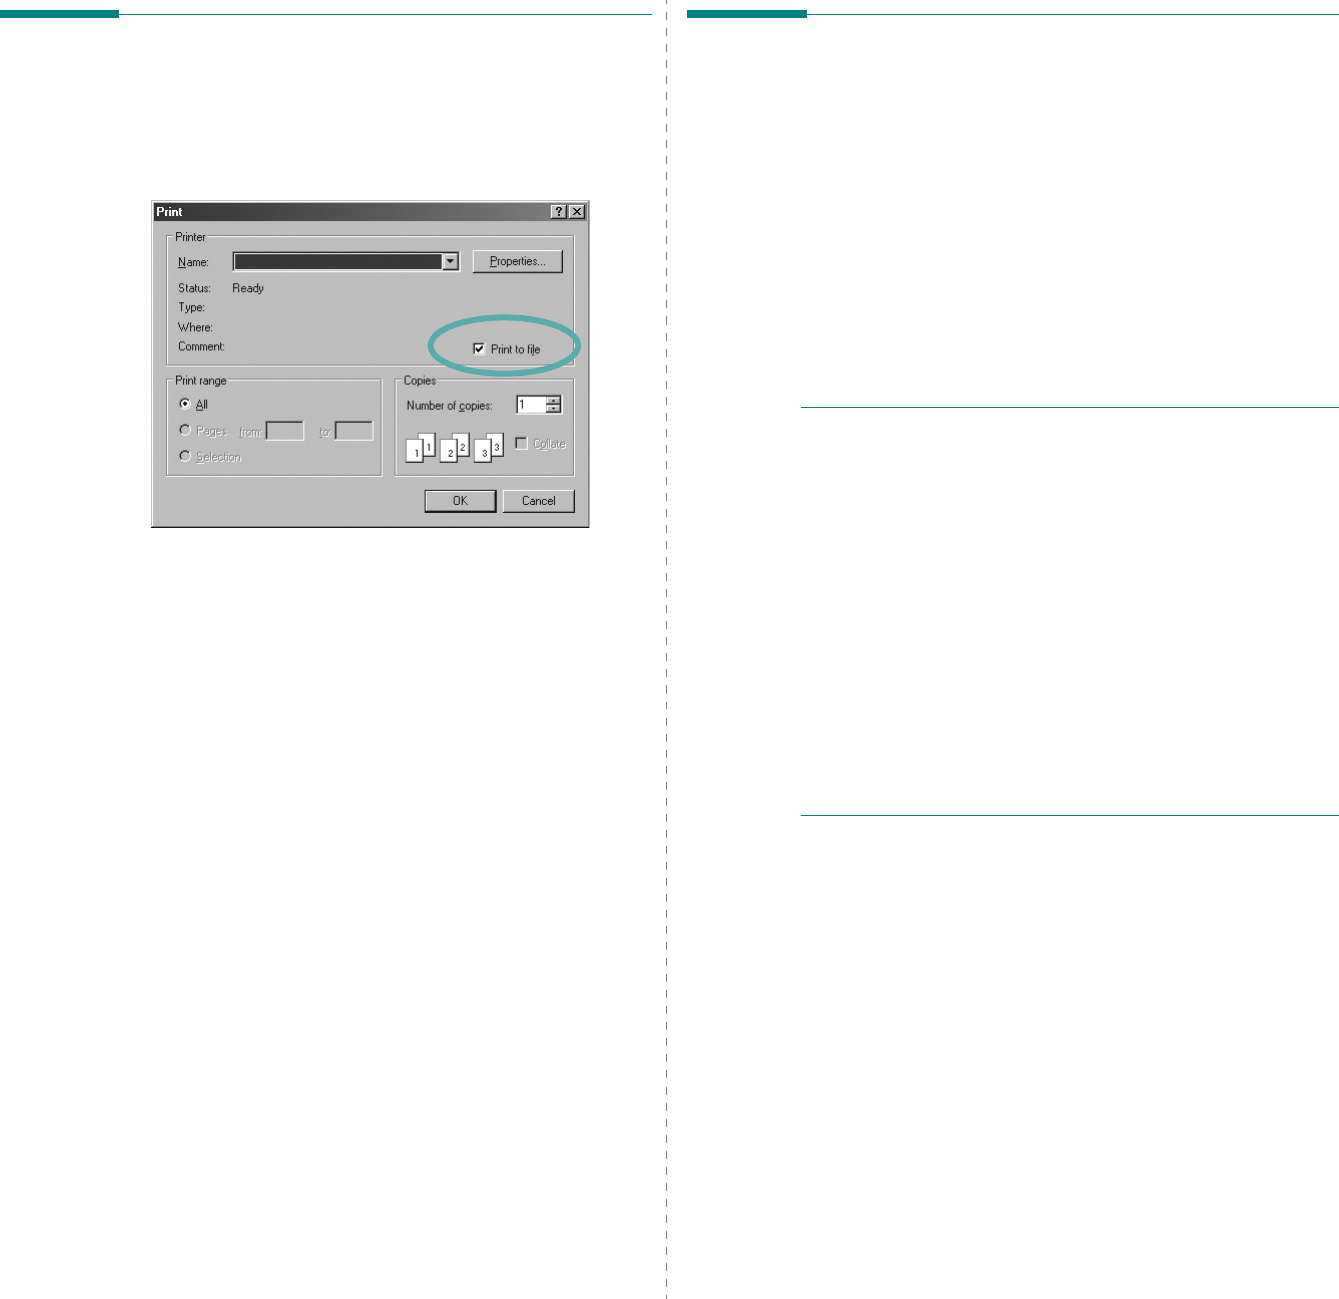
1
Check the
Print to file
box at the
Print
window.
2
Select the folder and assign a name of the file and then
click OK.
Printer Settings
You can use the printer properties window, which allows you to
access all of the printer options you need when using your
printer. When the printer properties are displayed, you can
review and change the settings needed for your print job.
Your printer properties window may differ, depending on your
operating system. This Software User’s Guide shows the
Properties window for Windows XP.
Your printer driver
Properties
window that appears in this
User’s Guide may differ depending on the printer in use.
If you access printer properties through the Printers folder, you
can view additional Windows-based tabs (refer to your
Windows User’s Guide) and the Printer tab (see “Printer Tab” on
page 16).
N
OTES
:
• Most Windows applications will override settings you specify
in the printer driver. Change all print settings available in the
software application first, and change any remaining settings
using the printer driver.
• The settings you change remain in effect only while you are
using the current program.
To make your changes
permanent
, make them in the Printers folder.
• The following procedure is for Windows XP. For other
Windows OS, refer to the corresponding Windows User's
Guide or online help.
1. Click the Windows
Start
button.
2. Select
Printers and Faxes
.
3. Select your printer driver icon.
4. Right-click on the printer driver icon and select
Printing Preferences
.
5. Change the settings on each tab, click OK.
Basic Printing
14
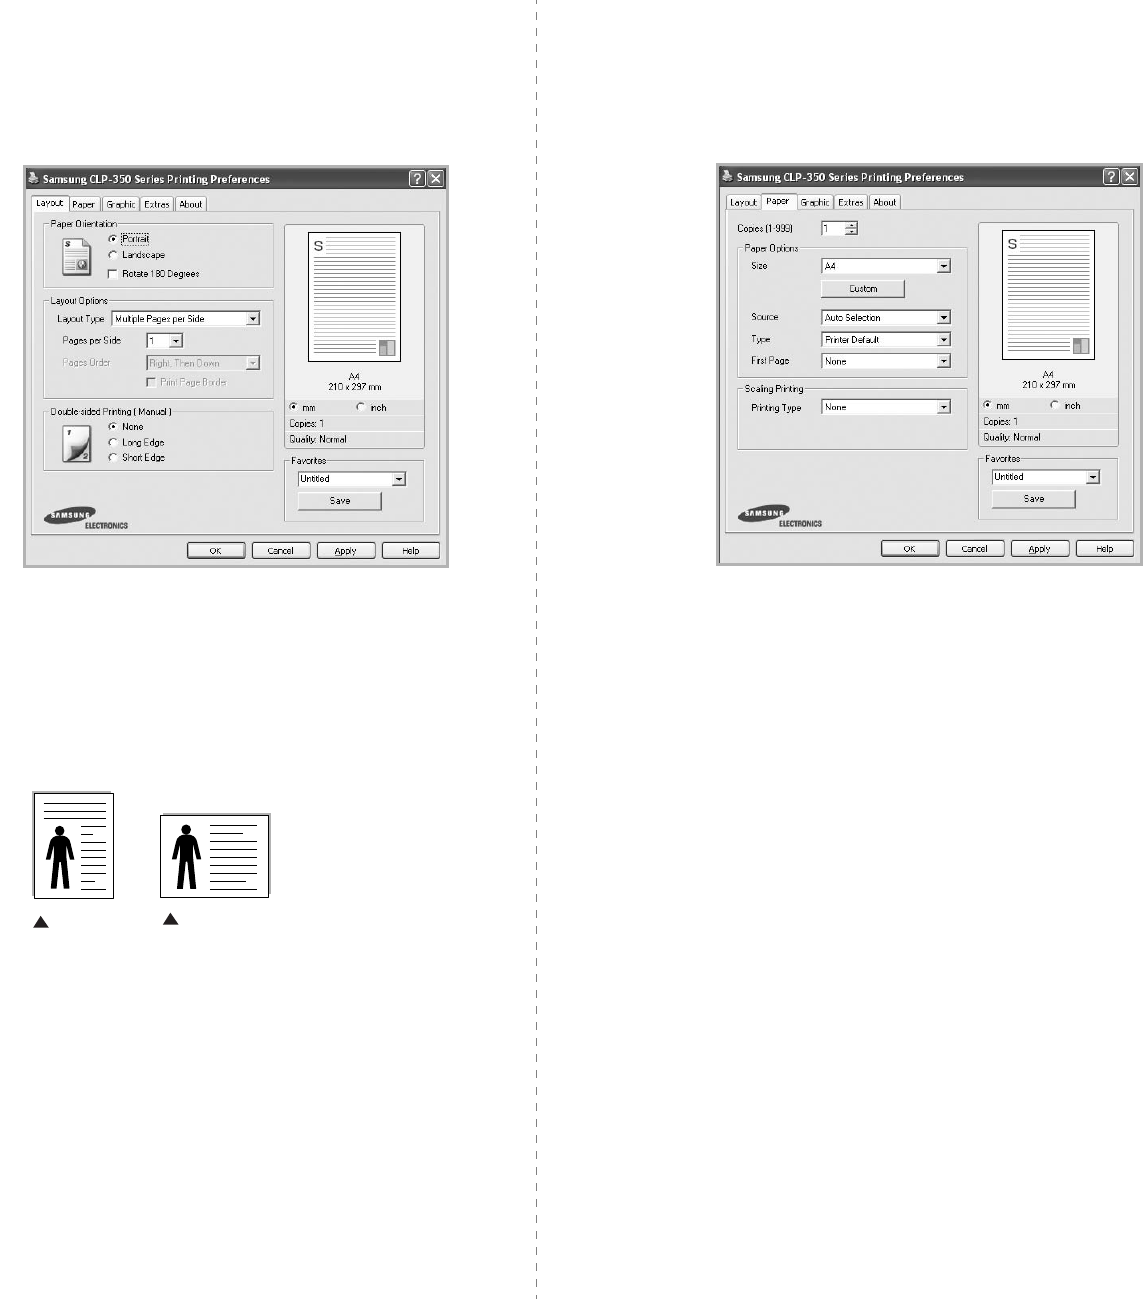
Layout Tab
The
Layout
tab provides options to adjust how the document
appears on the printed page. The
Layout Options
includes
Multiple Pages per Side
,
Poster Printing
and
Booklet
Printing
. See “Printing a Document” on page 12 for more
information on accessing printer properties.
Paper Orientation
Paper Orientation
allows you to select the direction in which
information is printed on a page.
•
Portrait
prints across the width of the page, letter style.
•
Landscape
prints across the length of the page, spreadsheet
style.
•
Rotate 180 Degrees
allows you to rotate the page, 180
degrees.
Layout Options
Layout Options
allows you to select advanced printing options.
You can choose
Multiple Pages per Side
and
Poster Printing
.
•
For details, see
“Printing Multiple Pages on One Sheet of Paper
(N-Up Printing)” on page 18.
•
For details, see
“Printing Posters” on page 19
•
For details, see
“Printing Booklets” on page 19
Double-sided Printing
Double-sided Printing
allows you to print on both sides of
paper.
If this option does not appear, your printer does
not have this feature.
•
For details, see
“Printing on Both Sides of Paper” on page 20.
Landscape
Portrait
Paper Tab
Use the following options to set the basic paper handling
specifications when you access the printer properties. See
“Printing a Document” on page 12 for more information on
accessing printer properties.
Click the
Paper
tab to access various paper properties.
Copies
Copies
allows you to choose the number of copies to be printed.
You can select 1 to 999 copies.
Paper Options
Size
Size
allows you to set the size of paper you loaded in the tray.
If the required size is not listed in the
Size
box, click
Custom
.
When the
Custom Paper Setting
window appears, set the paper
size and click
OK
. The setting appears in the list so that you can
select it.
Source
Make sure that
Source
is set to the corresponding paper tray.
Use
Manual Feeder
when printing on special materials like
envelopes and transparencies.
If the paper source is set to
Auto Selection
, the printer
automatically picks up print material in the following tray order:
Tray1 or Tray2.
Type
Set
Type
to correspond to the paper loaded in the tray from
which you want to print. This will let you get the best quality
printout. If not, print quality may not be acheived as you want.
Thin
: 16 lb to 19 lb (60~70 g/m
2
) thin paper.
Thick
: 24 lb to 28 lb (90~105 g/m
2
) thick paper.
Cotton
: 20 lb to 24 lb (75~90 g/m
2
) cotton paper such as Gilbert
25 % and Gilbert 100 %.
Basic Printing
15
Plain Paper
: Normal plain paper. Select this type if your printer is
monochrome and printing on the 16 lb (60 g/m
2
) cotton paper.
Recycled Paper
: 20 lb to 24 lb (75~90 g/m
2
) recycled paper.
Color Paper
: 20 lb to 24 lb (75~90 g/m
2
) color-backgrounded
paper.
Photo Paper
: 32 lb to 58.6 lb (120~220 g/m
2
) photo paper.
Four photo paper types are available for this machine.
N
OTE
: The actual paper feature may differ depending on
photo paper manufacturer. If print-out is not satisfied, select
another photo paper type.
Archive Paper
: If you need to keep print-out for a long period
time such as archives, select this option.
First Page
This property allows you to print the first page using a different
paper type from the rest of the document. You can select the
paper source for the first page.
For example, load thick stock for the first page into the tray 2, and
plain paper into Tray 1. Then, select
Tray1
in the
Source
option
and
Tray2
in the
First Page
option.
If this option does not
appear, your printer does not have this feature.
Scaling Printing
Scaling Printing
allows you to automatically or manually scale
your print job on a page. You can choose from
None
,
Reduce/
Enlarge
, and
Fit to Page
.
•
For details, see
“Printing a Reduced or Enlarged Document” on
page 20.
•
For details, see
“Fitting Your Document to a Selected Paper
Size” on page 20.
Graphics Tab
Use the following Graphic options to adjust the print quality for
your specific printing needs. See “Printing a Document” on
page 12 for more information on accessing printer properties.
Click the
Graphic
tab to display the properties shown below.
Quality
The Quality options you can select may vary depending
on your printer model.
The higher the setting, the sharper the
clarity of printed characters and graphics. The higher setting also
may increase the time it takes to print a document.
Color Mode
You can choose color options. Setting to
Color
typically produces
the best possible print quality for color documents. If you want to
print a color document in grayscale, select
Grayscale
. If you
want to adjust the color options manually, select
Manual
and
click the
Color Adjust
or
Color Matching
button.
•
Copies Setting
: When you make several copies, and if you
want to print some copies in color and some in grayscale, use
this option and select the number of copies in grayscale.
•
Color Adjust
: You can adjust the appearance of images by
changing the settings in the
Levels
option.
•
Color Matching
: You can adjust the appearance of images by
changing the settings in the
Settings
option. Especially
Samsung DigiColor
feature helps produce printed output that
faithfully reproduces the colors and tints of sky and grass. It is
intented to be used to print photographs, but will change the
color output of any color printout. You can choose from
Basic
Color
,
Sapphire
,
Emerald
and
Aquamarine
.
Advanced Options
You can set advanced settings by clicking the
Advanced
Options
button.
•
Print All Text To Black
: When the
Print All Text To
Black
option is checked, all text in your document prints solid
black, regardless of the color it appears on the screen.
•
Print All Text to Darken
: When the
Print All Text to Darken
option is checked, all text in your document is allowed to print
darker than on a normal document.
Basic Printing
16
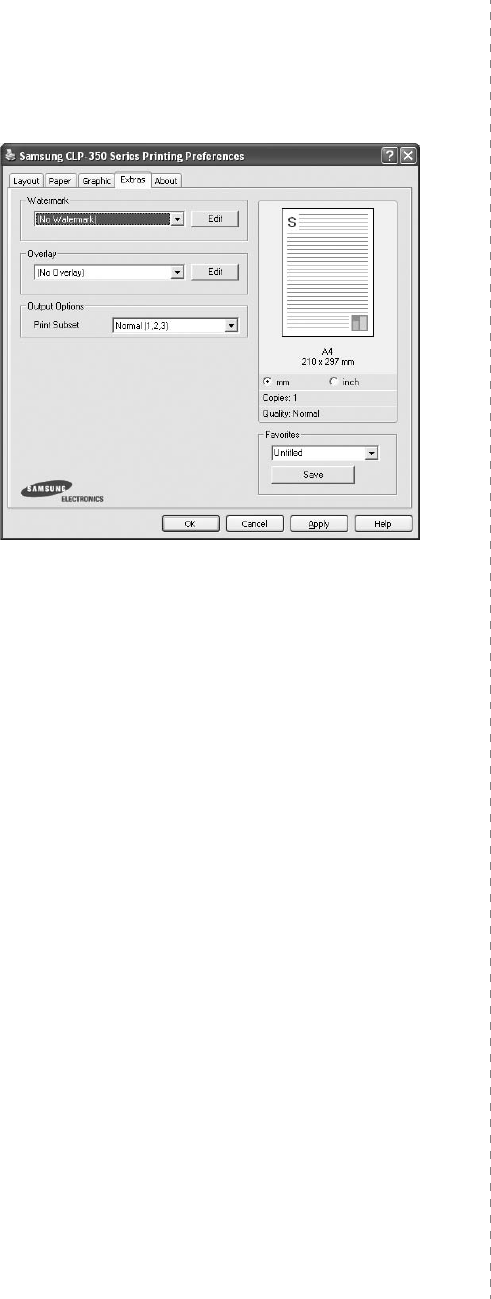
Extras Tab
You can select output options for your document. See “Printing
a Document” on page 12 for more information about accessing
the printer properties.
Click the
Extras
tab to access the following feature:
Watermark
You can create a background text image to be printed on each
page of your document.
For details, see
“Using Watermarks” on
page 21.
Overlay
Overlays are often used to take the place of preprinted forms and
letterhead paper.
For details, see
“Using Overlays” on page 22.
Output Options
•
Print Subset
: You can set the sequence in which the pages
print. Select the print order from the drop-down list.
-
Normal (1,2,3)
: Your printer prints all pages from the first
page to the last page.
-
Reverse All Pages (3,2,1)
: Your printer prints all pages
from the last page to the first page.
-
Print Odd Pages
: Your printer prints only the odd numbered
pages of the document.
-
Print Even Pages
: Your printer prints only the even
numbered pages of the document.
About Tab
Use the
About
tab to display the copyright notice and the
version number of the driver. If you have an Internet browser,
you can connect to the Internet by clicking on the web site icon.
See “Printing a Document” on page 12 for more information
about accessing printer properties.
Printer Tab
If you access printer properties through the
Printers
folder,
you can view the
Printer
tab. You can set the printer
configuration.
The following procedure is for Windows XP. For other Windows
OS, refer to the corresponding Windows User's Guide or online
help.
1
Click the Windows
Start
menu.
2
Select
Printers and Faxes
.
3
Select
your printer driver
icon.
4
Right-click on the printer driver icon and select
Properties
.
5
Click the
Printer
tab and set the options.
Basic Printing
17
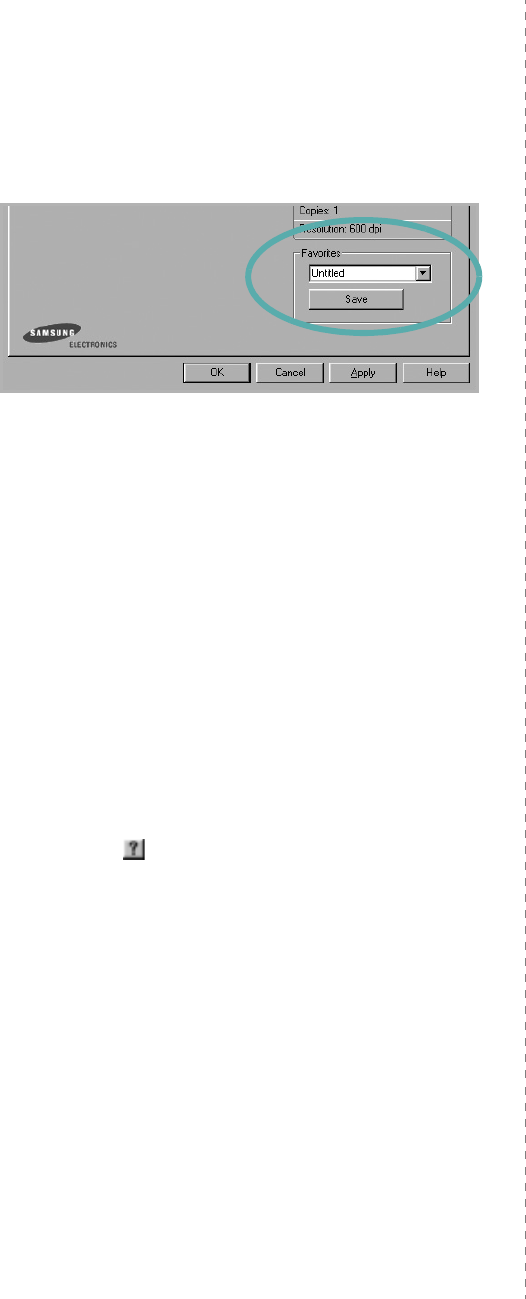
Using a Favorite Setting
The
Favorites
option, which is visible on each properties tab,
allows you to save the current properties settings for future
use.
To sa ve a
Favorites
item:
1
Change the settings as needed on each tab.
2
Enter a name for the item in the
Favorites
input box.
3
Click
Save
.
When you save
Favorites
, all current driver settings are
saved.
To use a saved setting, select the item from the
Favorites
drop
down list. The printer is now set to print according to the
Favorites setting you selected.
To delete a Favorites item, select it from the list and click
Delete
.
You can also restore the printer driver’s default settings by
selecting
Printer Default
from the list.
Using Help
Your printer has a help screen that can be activated by clicking
the
Help
button in the printer properties window. These help
screens give detailed information about the printer features
provided by the printer driver.
You can also click from the upper right corner of the window,
and then click on any setting.
Advanced Printing
18
3Advanced Printing
This chapter explains printing options and advanced printing
tasks.
N
OTE
:
• Your printer driver
Properties
window that appears in this
User’s Guide may differ depending on the printer in use.
However the composition of the printer properties window is
similar.
• If you need to know the exact name of your printer, you can
check the supplied CD-ROM.
This chapter includes:
• Printing Multiple Pages on One Sheet of Paper (N-Up
Printing)
•Printing Posters
•Printing Booklets
• Printing on Both Sides of Paper
• Printing a Reduced or Enlarged Document
• Fitting Your Document to a Selected Paper Size
• Using Watermarks
• Using Overlays
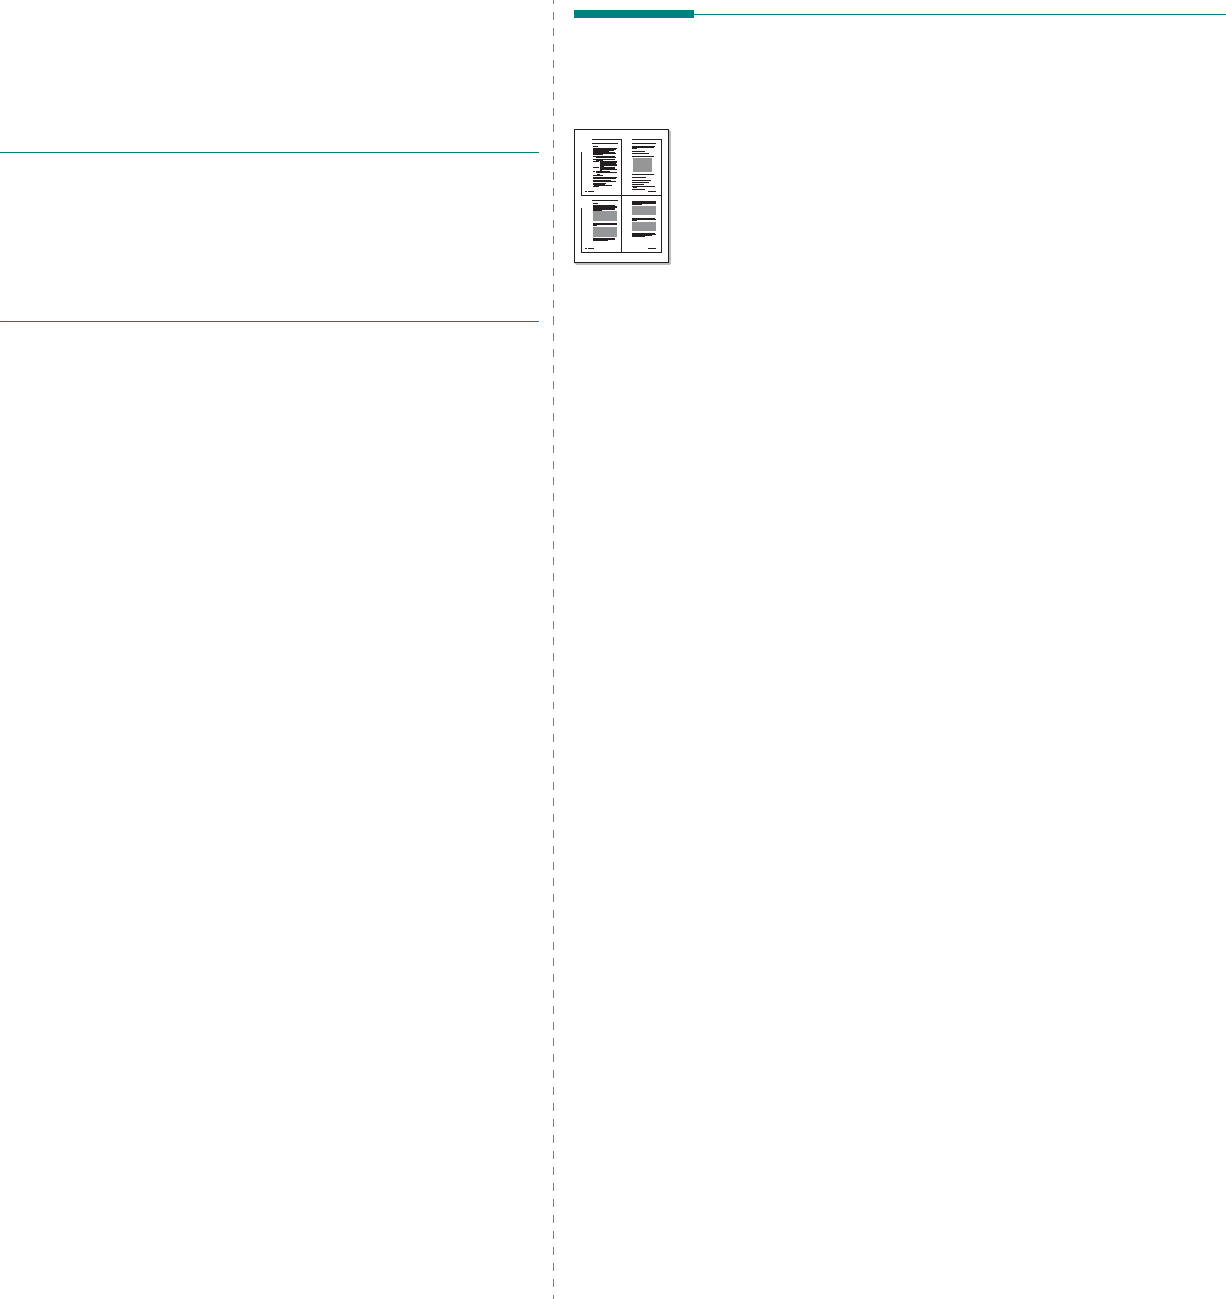
Printing Multiple Pages on One
Sheet of Paper (N-Up Printing)
You can select the number of pages to print on a single sheet
of paper. To print more than one page per sheet, the pages will
be reduced in size and arranged in the order you specify. You
can print up to 16 pages on one sheet.
1
To change the print settings from your software
application, access printer properties. See “Printing a
Document” on page 12.
2
From the
Layout
tab, choose
Multiple Pages per Side
in
the
Layout Type
drop-down list.
3
Select the number of pages you want to print per sheet
(1, 2, 4, 6, 9, or 16) in the
Pages per Side
drop-down
list.
4
Select the page order from the
Page Order
drop-down
list, if necessary.
Check
Print Page Border
to print a border around each
page on the sheet.
5
Click the
Paper
tab, select the paper source, size, and
type.
6
Click
OK
and print the document.
1 2
3 4

Advanced Printing
19
Printing Posters
This feature allows you to print a single-page document onto 4,
9, or 16 sheets of paper, for the purpose of pasting the sheets
together to form one poster-size document.
1
To change the print settings from your software
application, access printer properties. See “Printing a
Document” on page 12.
2
Click the
Layout
tab, select
Poster Printing
in the
Layout Type
drop-down list.
3
Configure the poster option:
You can select the page layout from
Poster<2x2>
,
Poster<3x3>
,
Poster<4x4>
or
Custom
. If you select
Poster<2x2>
, the output will be automatically stretched
to cover 4 physical pages. If the option is set to Custom,
you can enlarge the original from 150% to 400%.
Depending on the level of the enlargement, the page
layout is automatically adjusted to
Poster<2x2>
,
Poster<3x3>
,
Poster<4x4>
.
Specify an overlap in millimeters or inches to make it
easier to pasting the sheets together.
4
Click the
Paper
tab, select the paper source, size, and
type.
5
Click
OK
and print the document. You can complete the
poster by pasting the sheets together.
0.15 inches
0.15 inches
Printing Booklets
This printer feature allows you to print your document on both
sides of the paper and arranges the pages so that the paper can
be folded in half after printing to produce a booklet.
1
To change the print settings from your software
application, access the printer properties. See “Printing a
Document” on page 12.
2
From the
Layout
tab, choose
Booklet Printing
from the
Layout Type
drop-down list.
N
OTE
: The
Booklet Printing
option is not available for all
paper sizes. In order to find out the available paper size for
this feature, select the paper size in the
Size
option on the
Paper
tab, then check if the
Booklet Printing
in a
Layout
Type
drop-down list on the
Layout
tab is activated.
3
Click the
Paper
tab, and select the paper source, size, and
type.
4
Click
OK
and print the document.
5
After printing, fold and staple the pages.
8
9
8
9
Advanced Printing
20
Printing on Both Sides of Paper
You can print on both sides of a sheet of paper. Before printing,
decide how you want your document oriented.
The options are:
•
None
•
Long Edge
, which is the conventional layout used in
book binding.
•
Short Edge
, which is the type often used with calendars.
N
OTE
:
• Do not print on both sides of labels, transparencies,
envelopes, or thick paper. Paper jamming and damage to the
printer may result.
1
To change the print settings from your software
application, access printer properties. “Printing a
Document” on page 12.
2
From the
Layout
tab, select the paper orientation.
3
From the
Double-sided Printing
section, select the
binding option you want.
4
Click the
Paper
tab and select the paper source, size, and
type.
5
Click
OK
and print the document.
N
OTE
: If your printer does not have a duplex unit, you should
complete the printing job manually. The printer prints every
other page of the document first. After printing the first side of
your job, the Printing Tip window appears. Follow the on-
screen instructions to complete the printing job.
Long Edge
▲
Short Edge
▲
25
3
2
5
3
25
3
2
5
3
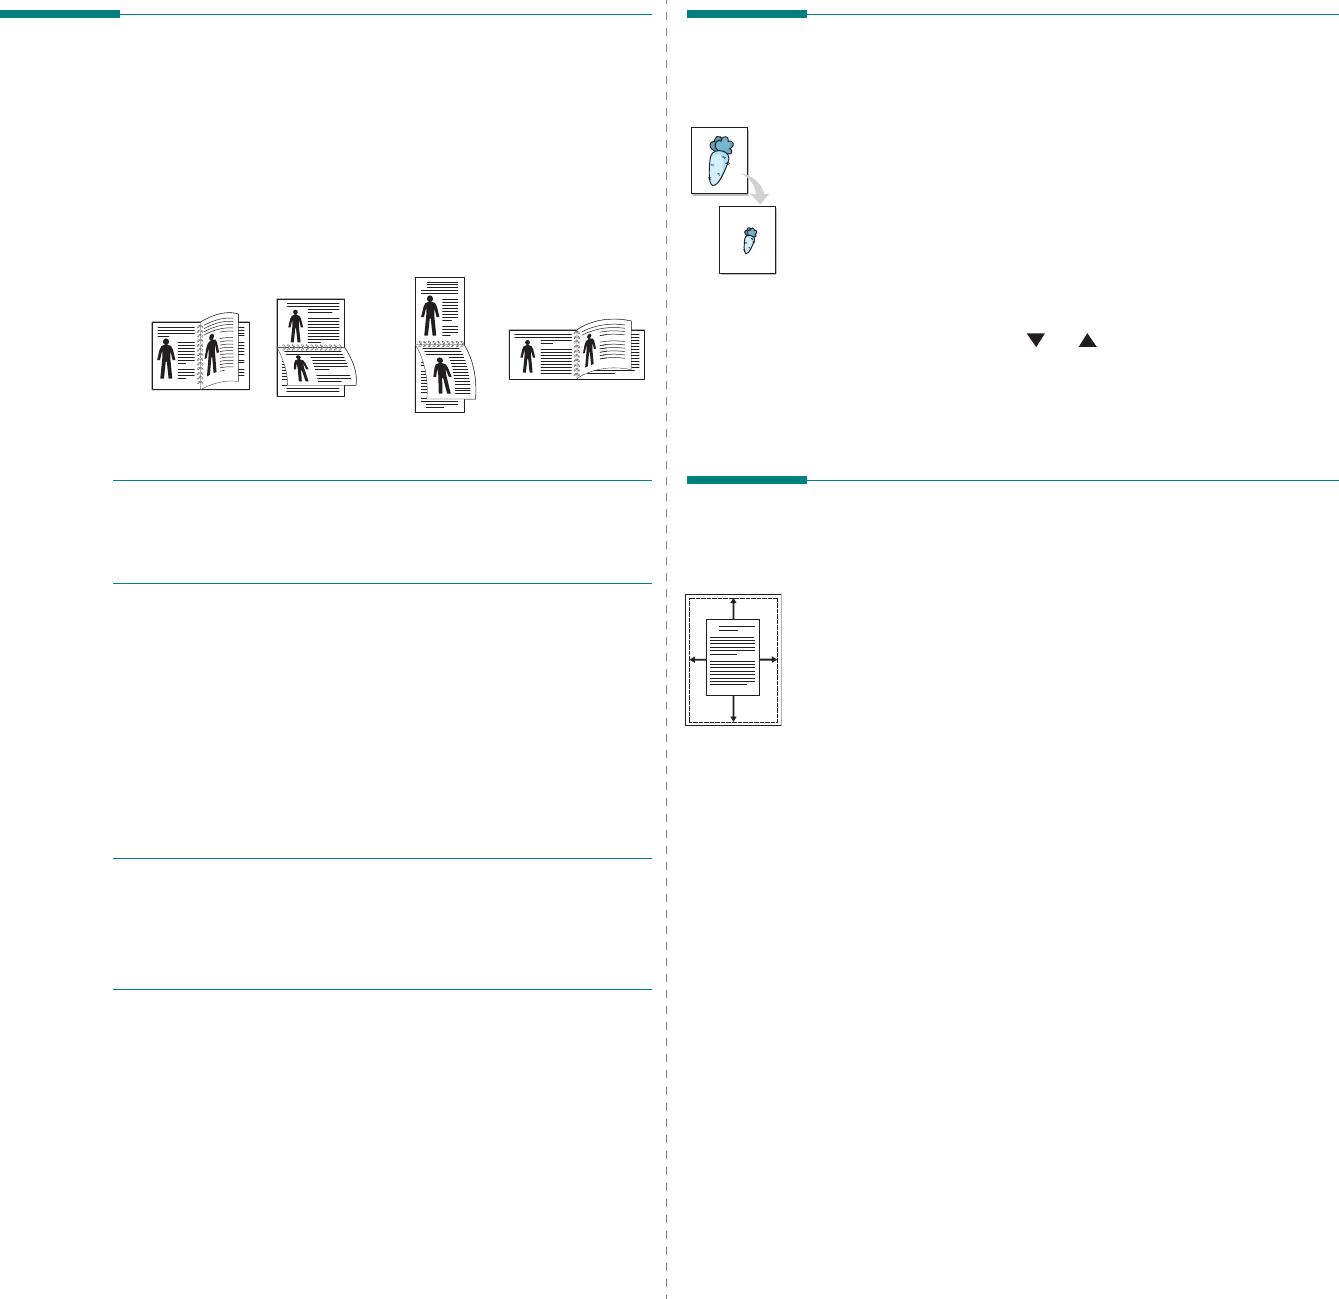
Printing a Reduced or Enlarged
Document
You can change the size of a page’s content to appear larger or
smaller on the printed page.
1
To change the print settings from your software
application, access printer properties. See “Printing a
Document” on page 12.
2
From the
Paper
tab, select
Reduce/Enlarge
in the
Printing Type
drop-down list.
3
Enter the scaling rate in the
Percentage
input box.
You can also click the or button.
4
Select the paper source, size, and type in
Paper Options
.
5
Click
OK
and print the document.
Fitting Your Document to a
Selected Paper Size
This printer feature allows you to scale your print job to any
selected paper size regardless of the digital document size. This
can be useful when you want to check fine details on a small
document.
1
To change the print settings from your software
application, access printer properties. See “Printing a
Document” on page 12.
2
From the
Paper
tab, select
Fit to Page
in the
Printing
Type
drop-down list.
3
Select the correct size from the
Output size
drop-down
list.
4
Select the paper source, size, and type in
Paper Options
.
5
Click
OK
and print the document.
A

Advanced Printing
21
Using Watermarks
The Watermark option allows you to print text over an existing
document. For example, you may want to have large gray
letters reading “DRAFT” or “CONFIDENTIAL” printed diagonally
across the first page or all pages of a document.
There are several predefined watermarks that come with the
printer, and they can be modified, or you can add new ones to
the list.
Using an Existing Watermark
1
To change the print settings from your software
application, access printer properties. See “Printing a
Document” on page 12.
2
Click the
Extras
tab, and select the desired watermark
from the
Watermark
drop-down list. You will see the
selected watermark in the preview image.
3
Click
OK
and start printing.
N
OTE
: The preview image shows how the page will look when
it is printed.
Creating a Watermark
1
To change the print settings from your software
application, access printer properties. See “Printing a
Document” on page 12.
2
Click the
Extras
tab, and click the
Edit
button in the
Watermark
section. The
Edit Watermark
window
appears.
3
Enter a text message in the
Watermark Message
box.
You can enter up to 40 characters. The message displays
in the preview window.
When the
First Page Only
box is checked, the watermark
prints on the first page only.
4
Select watermark options.
You can select the font name, style, size, or grayscale level
from the
Font Attributes
section and set the angle of the
watermark from the
Message Angle
section.
5
Click
Add
to add a new watermark to the list.
6
When you have finished editing, click
OK
and start
printing.
To stop printing the watermark, select
(No Watermark)
from
the
Watermark
drop-down list.
Editing a Watermark
1
To change the print settings from your software
application, access printer properties. See “Printing a
Document” on page 12.
2
Click the
Extras
tab and click the
Edit
button in the
Watermark
section. The
Edit Watermark
window
appears.
3
Select the watermark you want to edit from the
Current
Watermarks
list and change the watermark message and
options.
4
Click
Update
to save the changes.
5
Click
OK
until you exit the Print window.
Deleting a Watermark
1
To change the print settings from your software
application, access printer properties. See “Printing a
Document” on page 12.
2
From the
Extras
tab, click the
Edit
button in the
Watermark section. The
Edit Watermark
window
appears.
3
Select the watermark you want to delete from the
Current
Watermarks
list and click
Delete
.
4
Click
OK
until you exit the Print window.
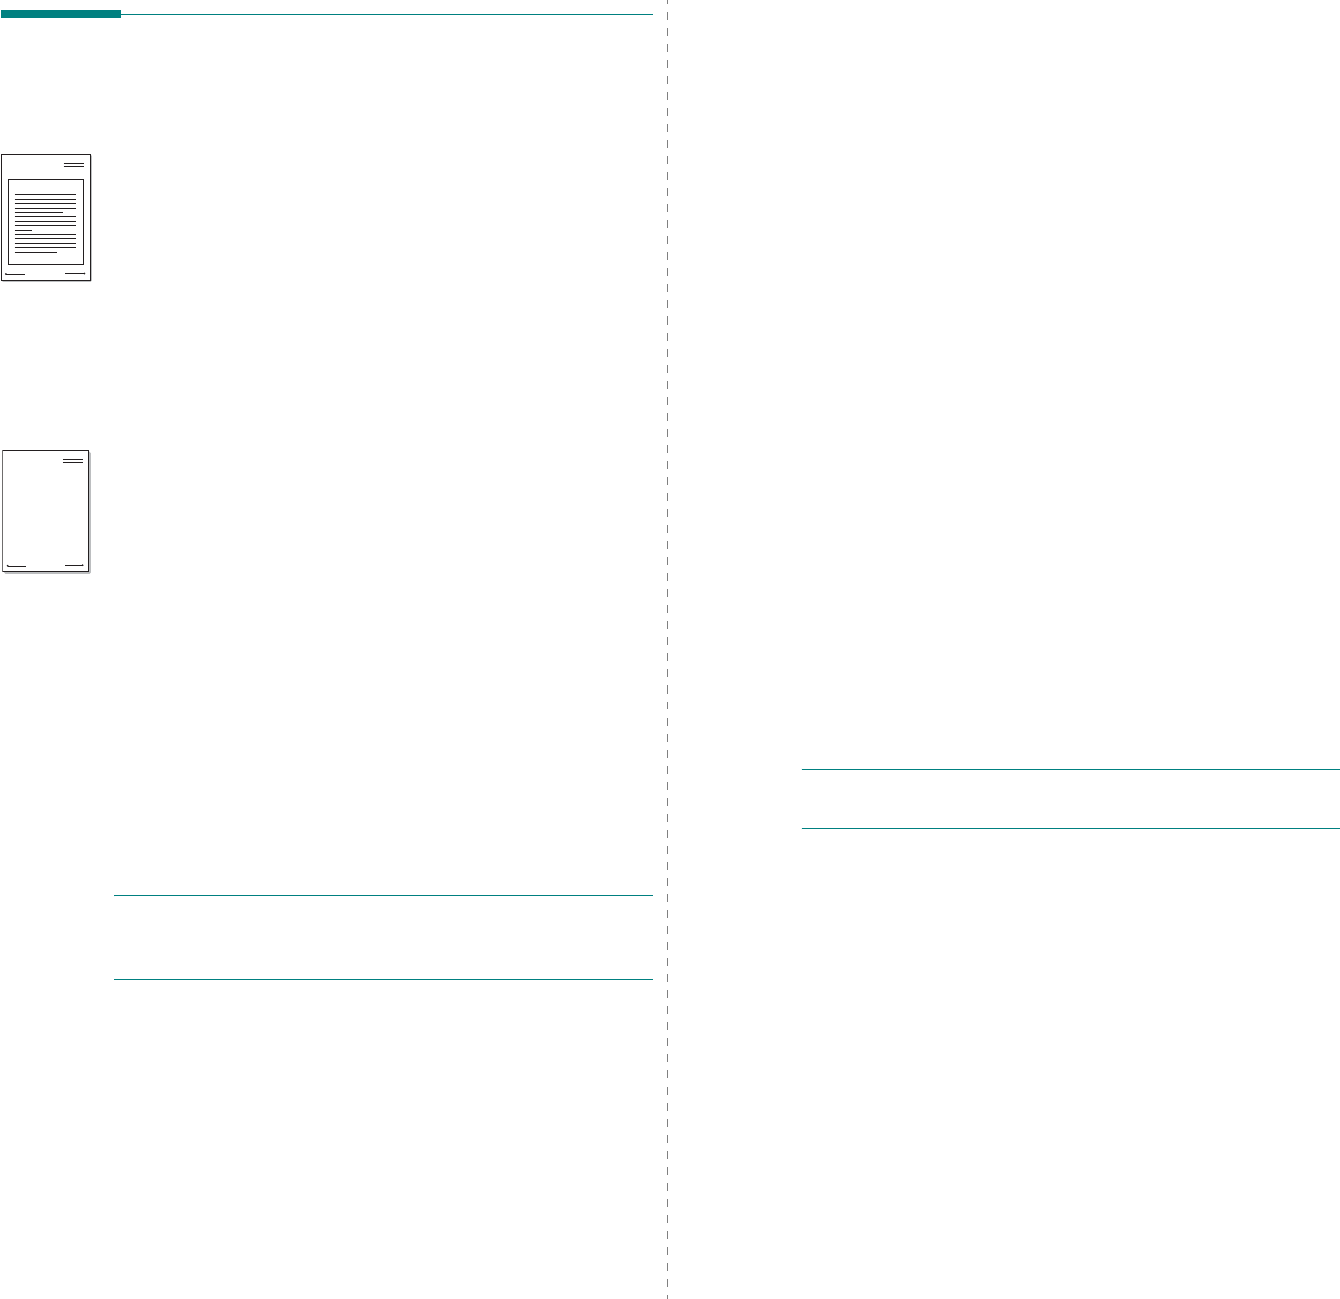
Advanced Printing
22
Using Overlays
What is an Overlay?
An overlay is text and/or images stored in the computer hard
disk drive (HDD) as a special file format that can be printed on
any document. Overlays are often used to take the place of
preprinted forms and letterhead paper. Rather than using
preprinted letterhead, you can create an overlay containing the
exact same information that is currently on your letterhead. To
print a letter with your company’s letterhead, you do not need
to load preprinted letterhead paper in the printer. You need only
tell the printer to print the letterhead overlay on your
document.
Creating a New Page Overlay
To use a page overlay, you must create a new page overlay
containing your logo or image.
1
Create or open a document containing text or an image for
use in a new page overlay. Position the items exactly as
you wish them to appear when printed as an overlay.
2
To save the document as an overlay, access printer
properties. See “Printing a Document” on page 12.
3
Click the
Extras
tab, and click
Edit
button in the
Overlay
section.
4
In the Edit Overlay window, click
Create Overlay
.
5
In the Create Overlay window, type a name of up to eight
characters in the
File name
box. Select the destination
path, if necessary. (The default is C:\Formover).
6
Click
Save
. The name appears on the
Overlay List
box.
7
Click
OK
or
Yes
to finish creating.
The file is not printed. Instead it is stored on your
computer hard disk drive.
N
OTE
: The overlay document size must be the same as the
documents you print with the overlay. Do not create an overlay
with a watermark.
WORLD BEST
Dear ABC
Regards
WORLD BEST
Using a Page Overlay
After an overlay has been created, it is ready to be printed with
your document. To print an overlay with a document:
1
Create or open the document you want to print.
2
To change the print settings from your software
application, access printer properties. See “Printing a
Document” on page 12.
3
Click the
Extras
tab.
4
Select the desired overlay from the
Overlay
drop-down
list box.
5
If the overlay file you want does not appear in the
Overlay
list, click
Edit
button and
Load Overlay
, and
select the overlay file.
If you have stored the overlay file you want to use in an
external source, you can also load the file when you access
the
Load Overlay
window.
After you select the file, click
Open
. The file appears in the
Overlay List
box and is available for printing. Select the
overlay from the
Overlay List
box.
6
If necessary, click
Confirm Page Overlay When
Printing
. If this box is checked, a message window
appears each time you submit a document for printing,
asking you to confirm your wish to print an overlay on your
document.
If this box is not checked and an overlay has been
selected, the overlay automatically prints with your
document.
7
Click
OK
or
Yes
until printing begins.
The selected overlay downloads with your print job and
prints on your document.
N
OTE
: The resolution of the overlay document must be the
same as that of the document you will print with the overlay.
Deleting a Page Overlay
You can delete page overlays that you no longer use.
1
In the printer properties window, click the
Extras
tab.
2
Click the
Edit
button in the
Overlay
section.
3
Select the overlay you want to delete from the
Overlay
List
box.
4
Click
Delete Overlay
.
5
When a confirming message window appears, click
Yes
.
6
Click
OK
until you exit the Print window.
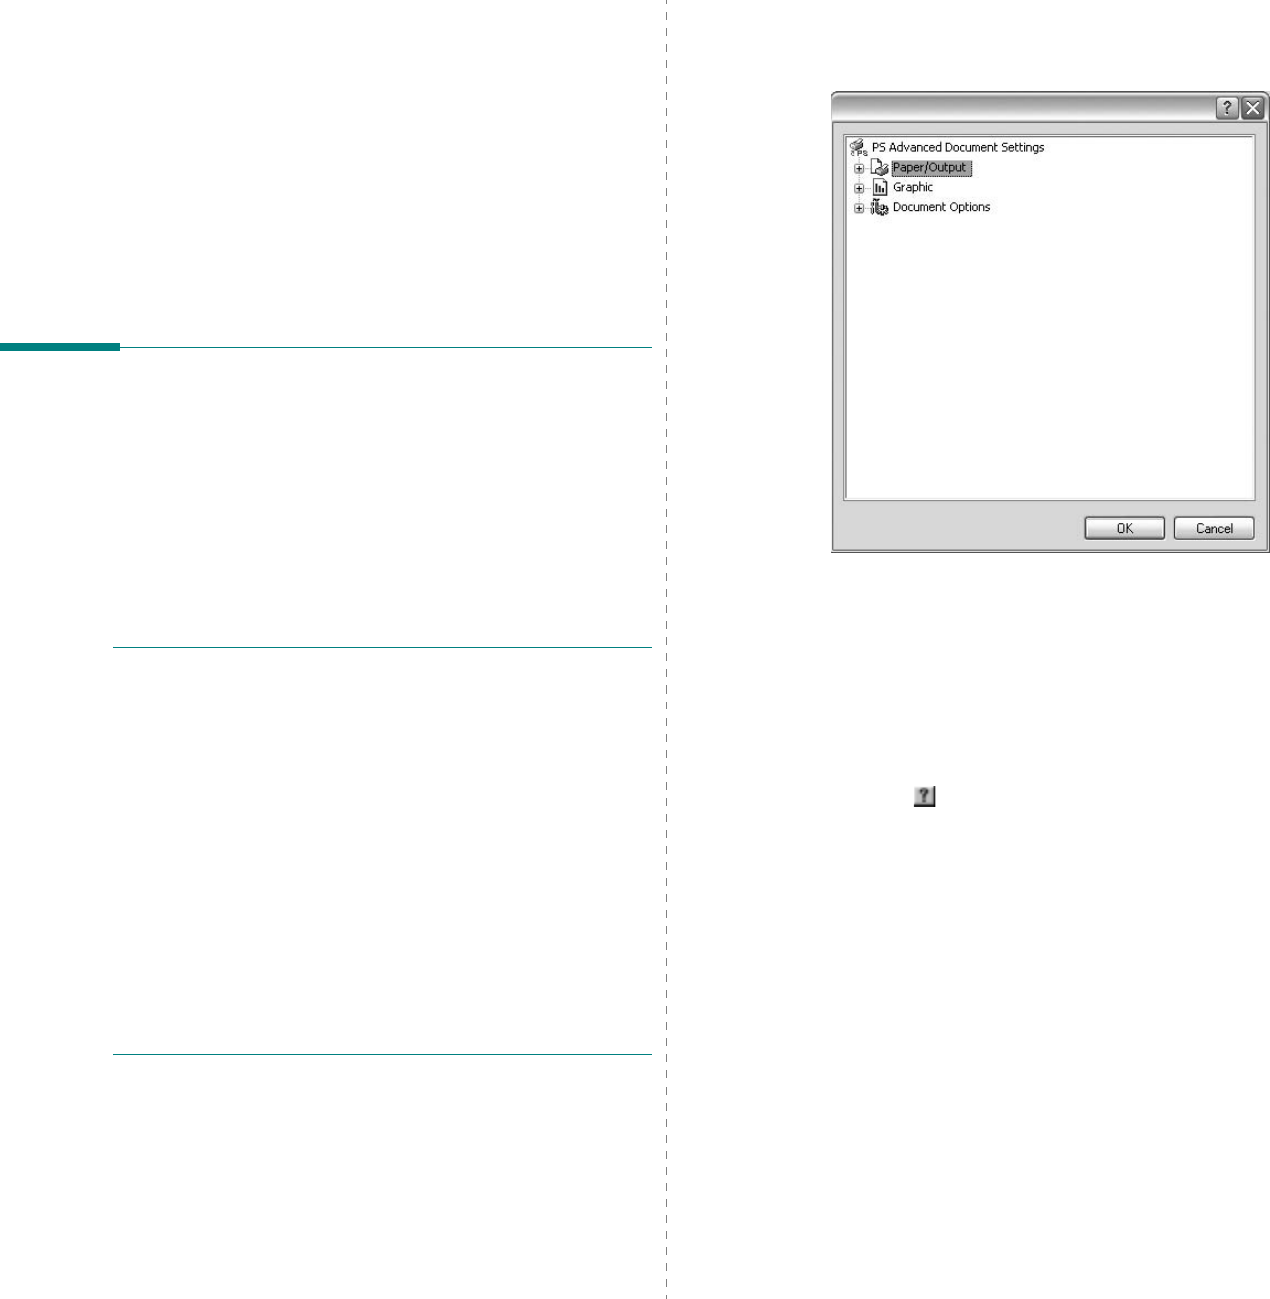
Using Windows PostScript Driver
23
4Using Windows
PostScript Driver
If you want to use the PostScript driver provided with your
system CD-ROM to print a document.
PPDs, in combination with the PostScript driver, access printer
features and allow the computer to communicate with the
printer. An installation program for the PPDs is provided on the
supplied software CD-ROM.
Printer Settings
You can use the printer properties window, which allows you to
access all of the printer options you need when using your
printer. When the printer properties are displayed, you can
review and change the settings needed for your print job.
Your printer properties window may differ, depending on your
operating system. This Software User’s Guide shows the
Properties window for Windows XP.
Your printer driver
Properties
window that appears in this
User’s Guide may differ depending on the printer in use.
N
OTES
:
• Most Windows applications will override settings you specify
in the printer driver. Change all print settings available in the
software application first, and change any remaining settings
using the printer driver.
• The settings you change remain in effect only while you are
using the current program.
To make your changes
permanent
, make them in the Printers folder.
• The following procedure is for Windows XP. For other
Windows OS, refer to the corresponding Windows User's
Guide or online help.
1. Click the Windows
Start
button.
2. Select Printers and Faxes.
3. Select your printer driver icon.
4. Right-click on the printer driver icon and select
Printing Preferences.
5. Change the settings on each tab, click OK.
Advanced
You can use advanced settings by clicking the
Advanced
button.
•
Paper/Output
this option allows you to select the size of the
paper loaded in the tray.
•
Graphic
this option allows you to adjust the print quality for
your specific printing needs.
•
Document Options
this options allow you to set the PostScript
options or printer features.
Using Help
You can click from the upper right corner of the window, and
then click on any setting.

Sharing the Printer Locally
24
5Sharing the Printer
Locally
You can connect the printer directly to a selected computer,
which is called “host computer,” on the network.
The following procedure is for Windows XP. For other Windows
OS, refer to the corresponding Windows User's Guide or online
help.
N
OTES
:
• Check the Operating System(s) that are compatible with
your printer. Please refer to the OS Compatibility section of
Printer Specifications in your Printer User’s Guide.
• If you need to know the exact name of your printer, you can
check the supplied CD-ROM.
Setting Up a Host Computer
1
Start Windows.
2
From the
Start
menu select
Printers and Faxes
.
3
Double-click
your printer driver icon
.
4
From the
Printer
menu, select
Sharing
.
5
Check the
Share this printer
box.
6
Fill in the
Shared Name
field, and then click
OK
.
Setting Up a Client Computer
1
Right-click the Windows
Start
button and select
Explore
.
2
Select
My Network Places
and then right-click
Search
for Computers
.
3
Fill in the IP address of host computer in
Computer name
field, and click
Search
. (In case host computer requires
User name
and
Password
, fill in User ID and password
of host computer account.)
4
Double-click
Printers and Faxes
.
5
Right-click printer driver icon, select
Connect
.
6
Click
Yes
, if the installation confirm message appears.
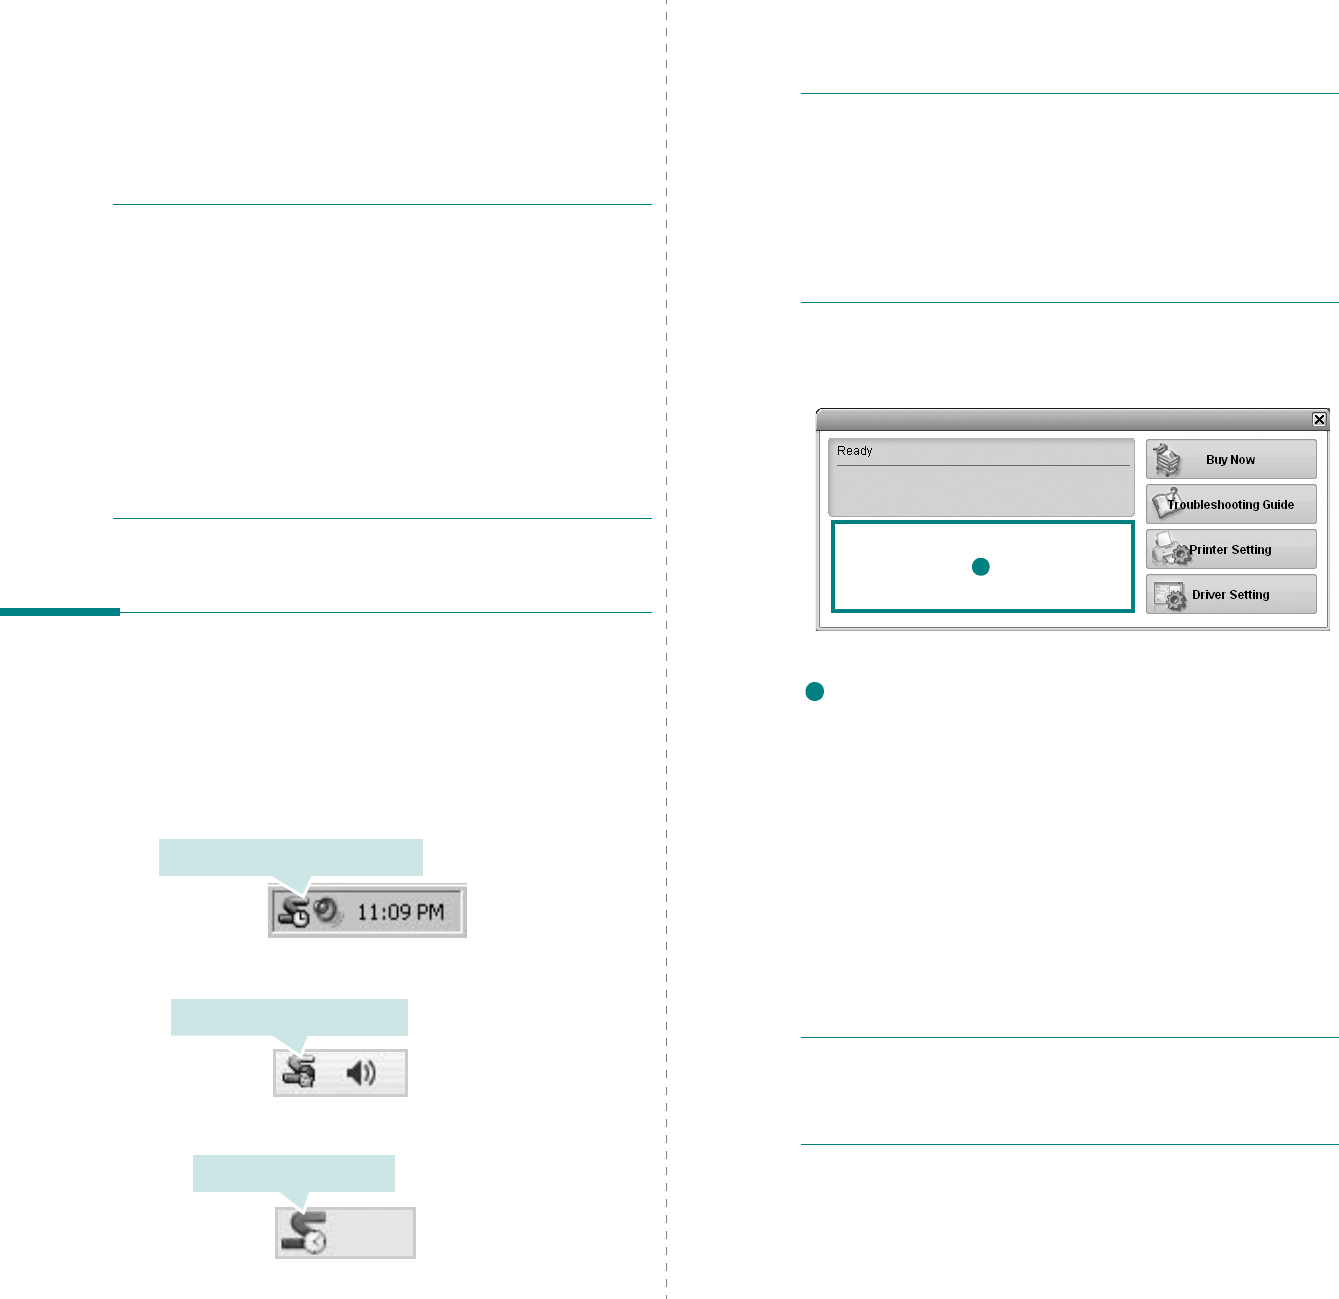
Using Smart Panel
25
6Using Smart Panel
Smart Panel is a program that monitors and informs you of the
status of the printer, and allows you to customize the printer’s
settings.
Smart Panel
is installed automatically when you
install the printer software.
N
OTES
:
• To use this program, you need:
- To check for Operating System(s) that are compatible with
your printer, refer to Printer Specifications in your Printer
User’s Guide.
- Mac OS X 10.3 or higher
- Linux. To check for Linux systems that are compatible with
your printer, refer to Printer Specifications in your Printer
User’s Guide.
- Internet Explorer version 5.0 or higher for flash animation
in HTML Help.
• If you need to know the exact name of your printer, you can
check the supplied CD-ROM.
Understanding Smart Panel
If an error occurs while printing, Smart Panel appears
automatically, showing the error.
You can also launch Smart Panel manually. Double-click the
Smart Panel icon on the Windows task bar (in Windows), or
Notification Area (in Linux). You can also click it on the status
bar (in Mac OS X).
Double-click this icon in Windows.
Click this icon in Mac OS X.
Click this icon in Linux.
If you are a Windows user, from the
Start
menu, select
Programs
or
All Programs
→
your printer driver name
→
Smart Panel
.
N
OTES
:
• If you have already installed more than one Samsung
printer, first select the printer model you want in order to
use the corresponding Smart Panel. Right-click (in Windows
or Linux) or click (in Mac OS X) the Smart Panel icon and
select
your printer name
.
• The Smart Panel window and its contents shown in this
Software User’s Guide may differ depending on the printer or
Operating System in use.
The Smart Panel program displays the current status of the
printer, the level of toner remaining in the toner cartridge(s)
and various other information. You can also change settings.
Toner Level
You can view the level of toner remaining in the toner
cartridge(s). The printer and the number of toner cartridge(s)
shown in the above window may differ depending on the printer in
use. Any printers do not have this feature.
Buy Now
You can order replacement toner cartridge(s) online.
Troubleshooting Guide
You can view Help to solve problems.
Printer Setting
You can configure various printer settings in the Printer Settings
Utility window. Any printers do not have this feature.
N
OTE
:
If your printer is connected to a network and you are a
Windows and Mac OS X user, the
SyncThru Web Service
window appears instead of the Printer Settings Utility window.
Linux does not support network environments.
Driver Setting (Only for Windows)
You can use the printer properties window, which allows you to
access all of the printer options you need for using your
printer.
For details,
See “
Printer Settings” on page 13.
1
1
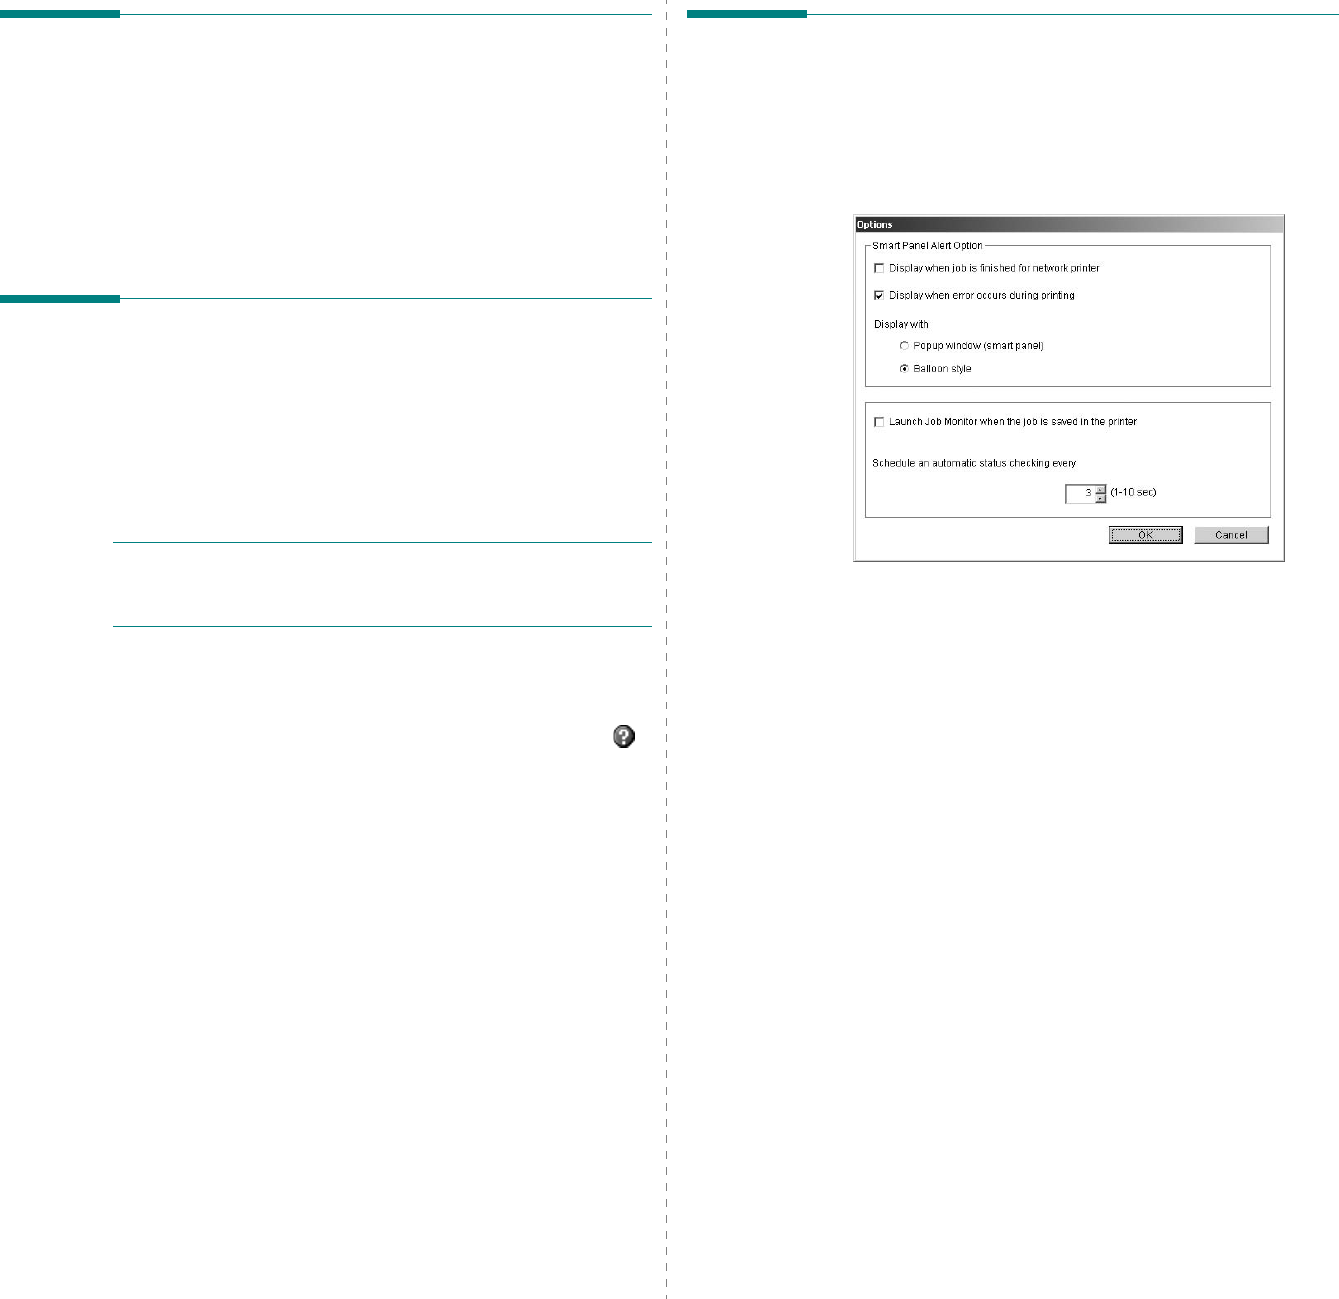
Using Smart Panel
26
Opening the Troubleshooting
Guide
Using the troubleshooting guide, you can view solutions for
error status problems.
Right-click (in Windows or Linux) or click (in Mac OS X) the
Smart Panel icon and select
Troubleshooting Guide
.
Using Printer Settings Utility
Using the Printer Settings Utility, you can configure and check
print settings.
1
Right-click (in Windows or Linux) or click (in Mac OS X) the
Smart Panel icon and select
Printer Setting
.
2
Change the settings.
3
To send the changes to the printer, click the
Apply
button.
N
OTES
:
If your printer is connected to a network, the
SyncThru Web Service
window appears instead of the
Printer Settings Utility window.
Using Onscreen Help File
For more information about
Printer Settings Utility
, click .
Changing the Smart Panel
Program Settings
Right-click (in Windows or Linux) or click (in Mac OS X) the
Smart Panel icon and select
Options
.
The following window opens.
•
Display when job is finished for network printer
: The
computer shows the Smart Panel popup window or
balloon when your job is complete in Windows.
(Only for
Windows and Mac OS x network-supported printers.)
•
Display when error occurs during printing
: The
computer shows the Smart Panel popup window or
balloon when an error occurs during printing.
•
Display with
: You can select how the computer shows
you a message. If you select
Popup window (smart
panel)
, the message appears in the Smart Panel popup
window in Windows.
•
Launch Job Monitor when the job is saved in the
printer
: If you store print jobs on the printer’s hard disk,
the computer opens the Job Monitor window in Windows.
(Only for Windows network-supported printers with
built-in hard disks.)
•
Schedule an automatic status checking every
: The
computer updates the printer status regularly. Setting the
value close to 1 second causes the computer to check the
printer status more frequently, thereby allowing a faster
response to any printer error.
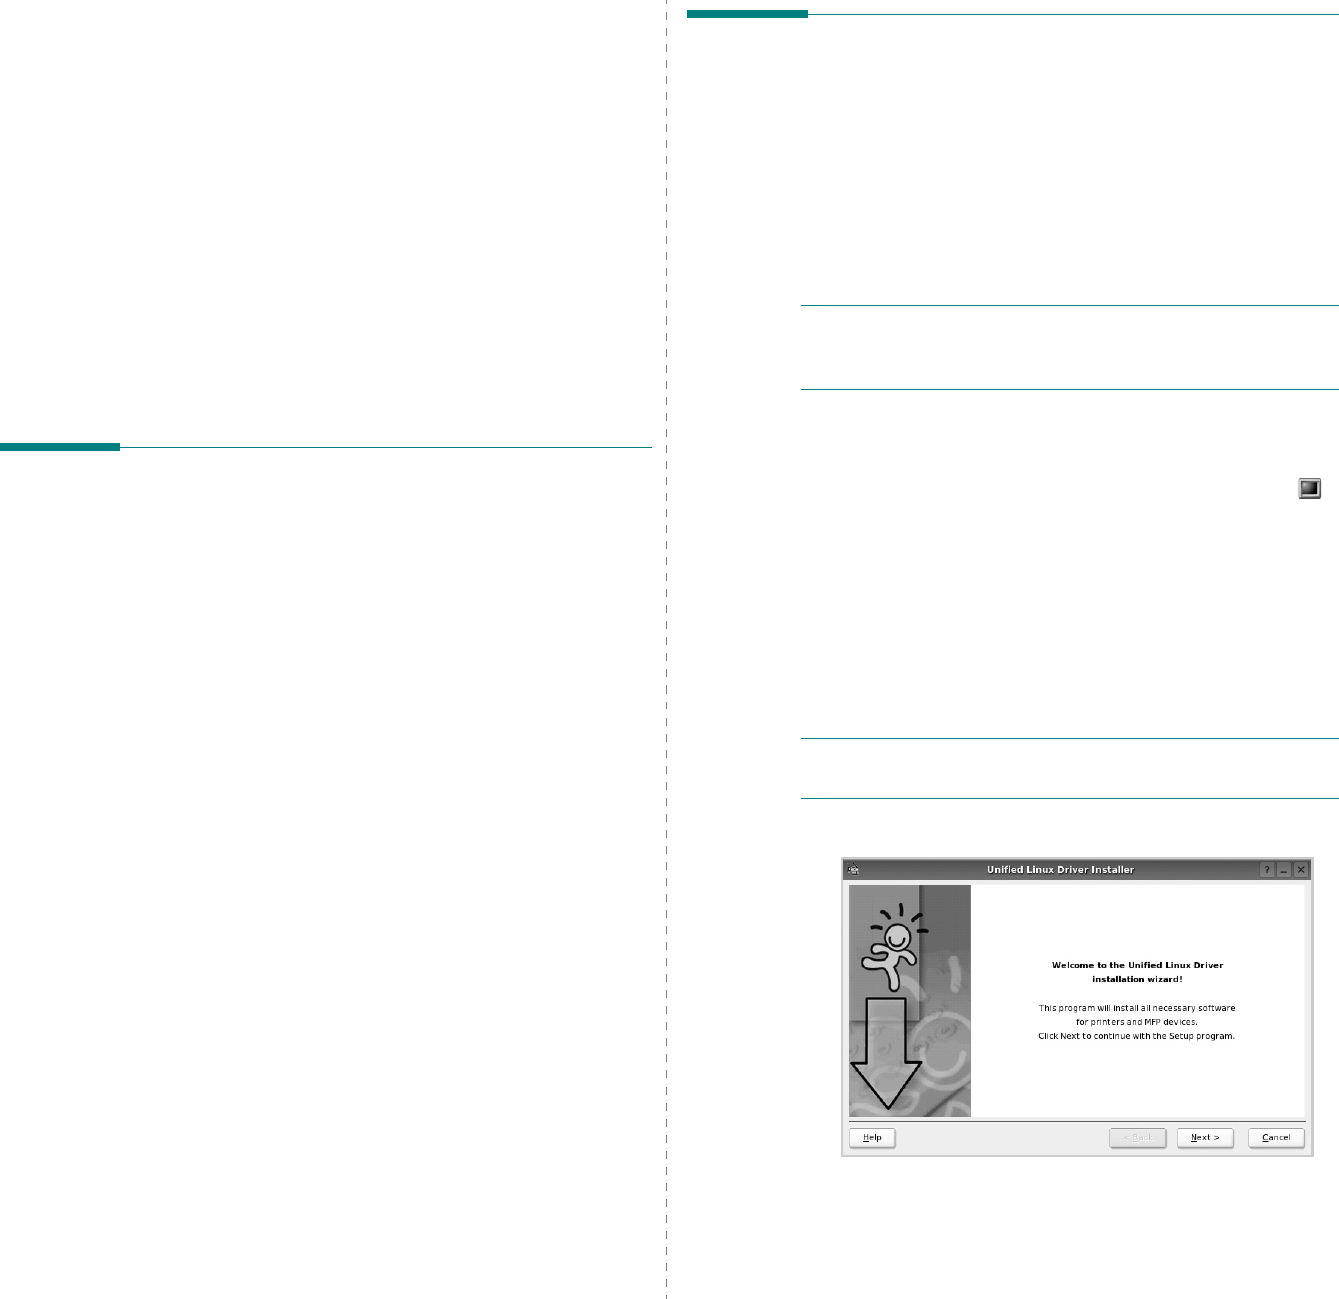
Using Your Printer in Linux
27
7Using Your Printer in
Linux
You can use your machine in a Linux environment.
This chapter includes:
• Getting Started
• Installing the Unified Linux Driver
• Using the Unified Driver Configurator
• Configuring Printer Properties
• Printing a Document
Getting Started
The supplied CD-ROM provides you with Samsung’s Unified
Linux Driver package for using your machine with a Linux
computer.
After the driver is installed on your Linux system, the driver
package allows you to monitor a number of machine devices via
fast ECP parallel ports and USB simultaneously.
The Unified Linux Driver package is supplied with a smart and
flexible installation program. You don't need to search for
additional components that might be necessary for the Unified
Linux Driver software: all required packages will be carried onto
your system and installed automatically; this is possible on a
wide set of the most popular Linux clones.
Installing the Unified Linux
Driver
Installing the Unified Linux Driver
1
Make sure that you connect your machine to your
computer. Turn both the computer and the machine on.
2
When the Administrator Login window appears, type in
root
in the Login field and enter the system password.
N
OTE
: You must log in as a super user (root) to install the
printer software. If you are not a super user, ask your system
administrator.
3
Insert the printer software CD-ROM. The CD-ROM will
automatically run.
If the CD-ROM does not automatically run, click the
icon at the bottom of the desktop. When the Terminal
screen appears, type in:
If the CD-ROM is secondary master and the location to
mount is /mnt/cdrom,
[root@localhost root]#mount -t iso9660 /dev/hdc /mnt/
cdrom
[root@localhost root]#cd /mnt/cdrom/Linux
[root@localhost root]#./install.sh
N
OTE
: The installation program runs automatically if you
have an autorun software package installed and configured.
4
When the welcome screen appears, click
Next
.
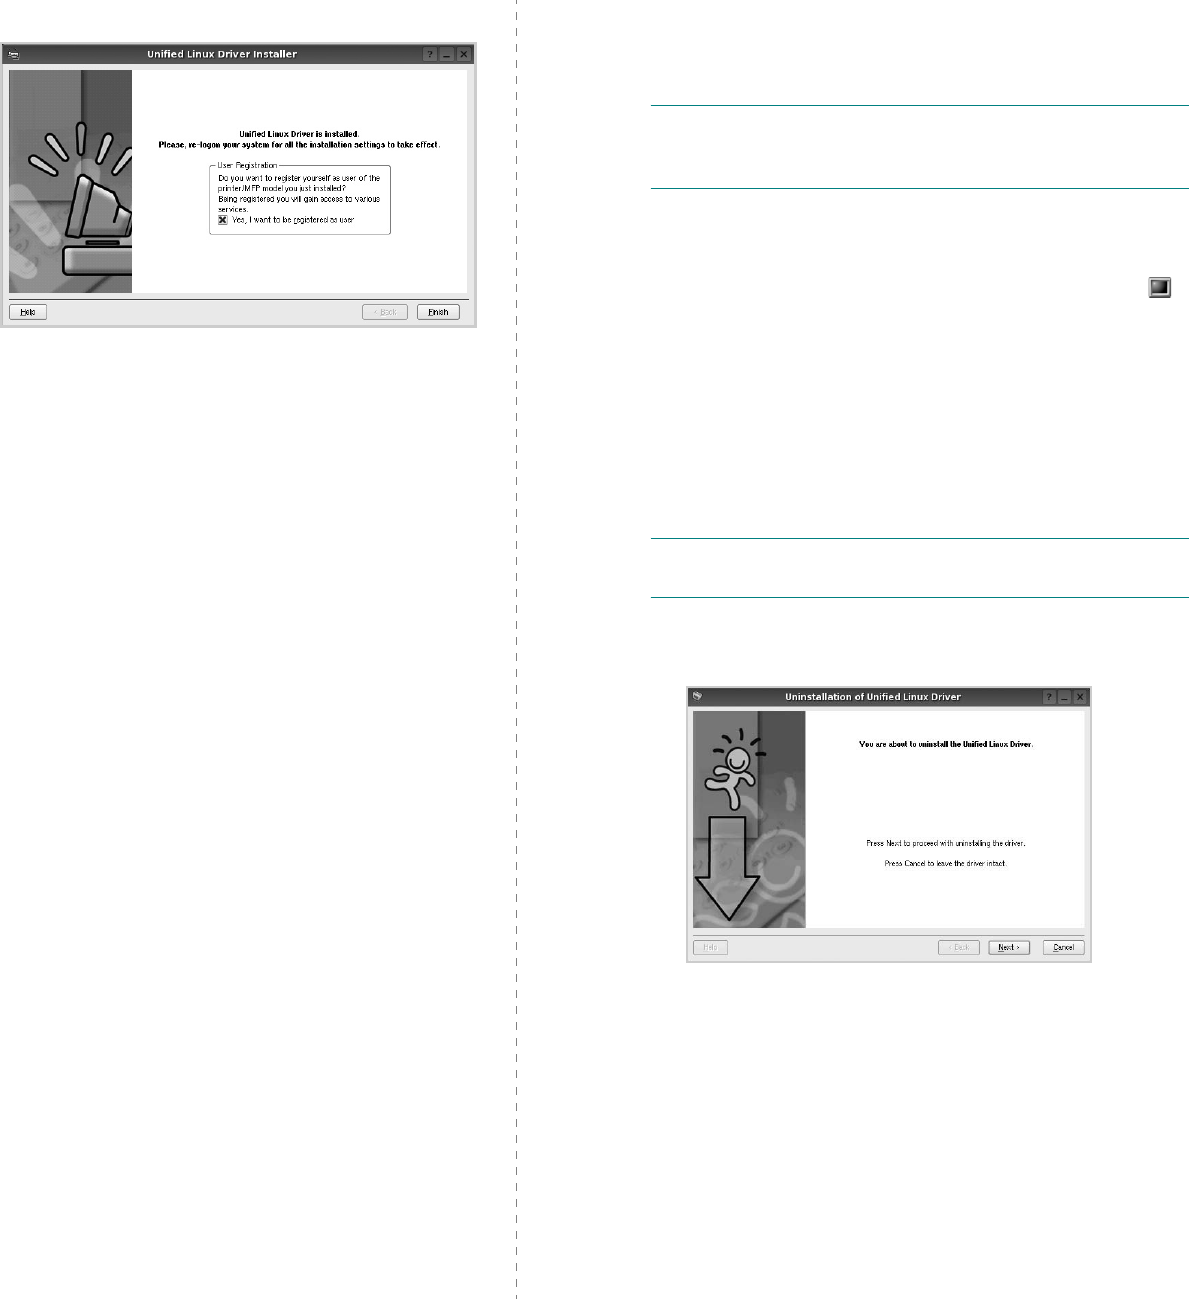
Using Your Printer in Linux
28
5
When the installation is complete, click
Finish
.
The installation program has added the Unified Driver
Configurator desktop icon and Samsung Unified Driver
group to the system menu for your convenience. If you
have any difficulties, consult the onscreen help that is
available through your system menu or can otherwise be
called from the driver package windows applications,
such as
Unified Driver Configurator
.
Uninstalling the Unified Linux Driver
1
When the Administrator Login window appears, type in
root
in the Login field and enter the system password.
N
OTE
: You must log in as a super user (root) to install the
printer software. If you are not a super user, ask your system
administrator.
2
Insert the printer software CD-ROM. The CD-ROM will
automatically run.
If the CD-ROM does not automatically run, click the
icon at the bottom of the desktop. When the Terminal
screen appears, type in:
If the CD-ROM is secondary master and the location to
mount is /mnt/cdrom,
[root@localhost root]#mount -t iso9660 /dev/hdc /mnt/
cdrom
[root@localhost root]#cd /mnt/cdrom/Linux
[root@localhost root]#./uninstall.sh
N
OTE
: The installation program runs automatically if you
have an autorun software package installed and configured.
3
Click
Uninstall
.
4
Click
Next
.
5
Click
Finish
.
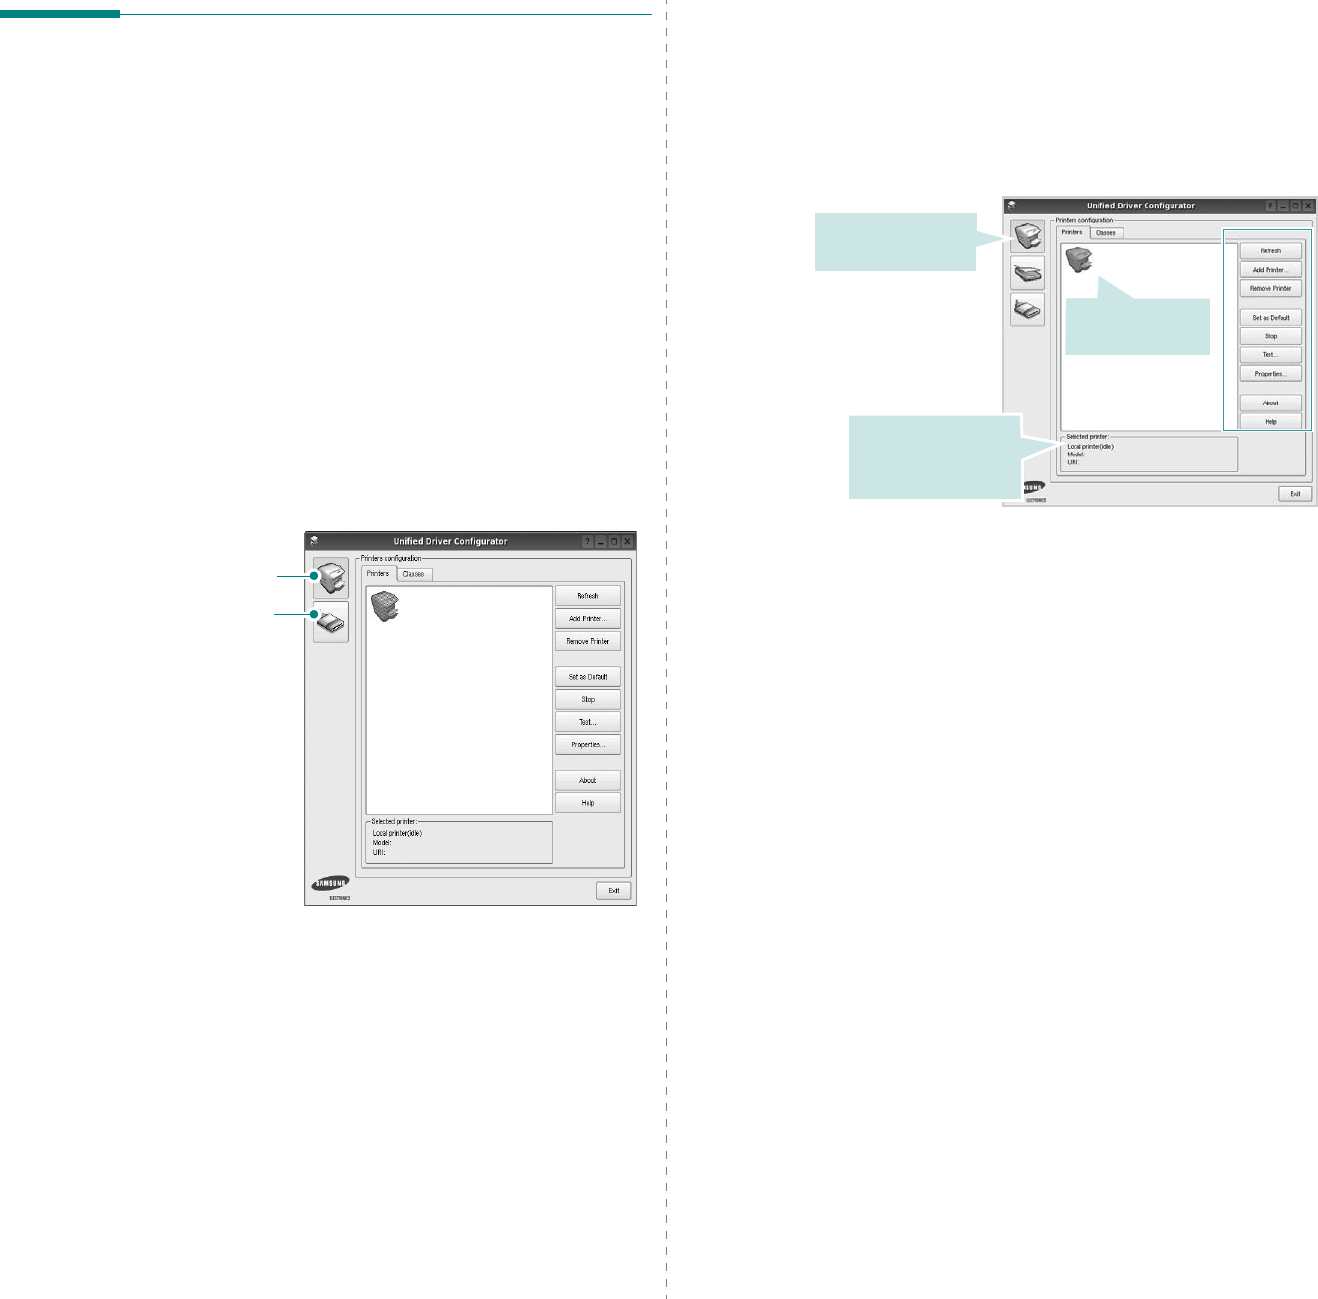
Using Your Printer in Linux
29
Using the Unified Driver
Configurator
Unified Linux Driver Configurator is a tool primarily intended for
configuring Printer.
After installing the Unified Linux driver, the Unified Linux Driver
Configurator icon will automatically be created on your desktop.
Opening the Unified Driver
Configurator
1
Double-click
Unified Driver Configurator
on the
desktop.
You can also click the Startup Menu icon and select
Samsung Unified Driver
and then
Unified Driver
Configurator
.
2
Press each button on the Modules pane to switch to the
corresponding configuration window.
You can use the onscreen help by clicking
Help
.
3
After changing the configurations, click
Exit
to close the
Unified Driver Configurator.
Printers Configuration button
Ports Configuration button
Printers Configuration
Printers configuration has the two tabs:
Printers
and
Classes
.
Printers Tab
You can see the current system’s printer configuration by
clicking on the printer icon button on the left side of the Unified
Driver Configurator window.
You can use the following printer control buttons:
•
Refresh
: renews the available printers list.
•
Add Printer
: allows you to add a new printer.
•
Remove Printer
: removes the selected printer.
•
Set as Default
: sets the current printer as a default
printer.
•
Stop
/
Start
: stops/starts the printer.
•
Test
: allows you to print a test page to check if the
machine is working properly.
•
Properties
: allows you to view and change the printer
properties. For details, see page 30.
Shows all of the
installed printer.
Switches to Printer
configuration.
Shows the status,
model name and
URI of your printer.

Using Your Printer in Linux
30
Classes Tab
The Classes tab shows a list of available printer classes.
•
Refresh
: Renews the classes list.
•
Add Class... :
Allows you to add a new printer class.
•
Remove Class :
Removes the selected printer class.
Ports Configuration
In this window, you can view the list of available ports, check
the status of each port and release a port that is stalled in busy
state when its owner is terminated for any reason.
•
Refresh
: Renews the available ports list.
•
Release port :
Releases the selected port.
Shows the status of the
class and the number of
printers in the class.
Shows all of the
printer classes.
Switches to
ports
configuration.
Shows the port type,
device connected to
the port and status
Shows all of the
available ports.
Configuring Printer Properties
Using the properties window provided by the Printers
configuration, you can change the various properties for your
machine as a printer.
1
Open the Unified Driver Configurator.
If necessary, switch to Printers configuration.
2
Select your machine on the available printers list and click
Properties
.
3
The Printer Properties window opens.
The following five tabs display at the top of the window:
•
General
: allows you to change the printer location and
name. The name entered in this tab displays on the
printer list in Printers configuration.
•
Connection
: allows you to view or select another port. If
you change the printer port from USB to parallel or vice
versa while in use, you must re-configure the printer port
in this tab.
•
Driver
: allows you to view or select another printer
driver. By clicking
Options
, you can set the default
device options.
•
Jobs
: shows the list of print jobs. Click
Cancel job
to
cancel the selected job and select the
Show completed
jobs
check box to see previous jobs on the job list.
•
Classes
: shows the class that your printer is in. Click
Add to Class
to add your printer to a specific class or
click
Remove from Class
to remove the printer from the
selected class.
4
Click
OK
to apply the changes and close the Printer
Properties Window.
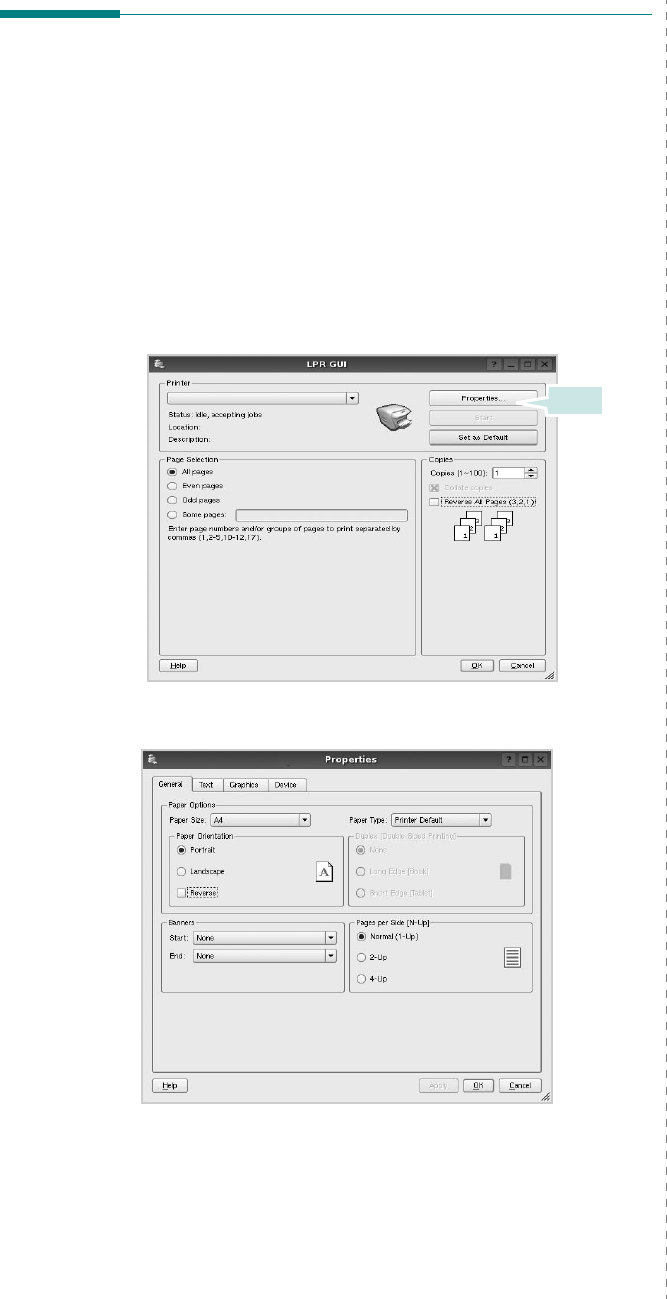
Using Your Printer in Linux
31
Printing a Document
Printing from Applications
There are a lot of Linux applications that you are allowed to
print from using Common UNIX Printing System (CUPS). You
can print on your machine from any such application.
1
From the application you are using, select
Print
from the
File
menu.
2
Select
Print
directly using
lpr
.
3
In the LPR GUI window, select the model name of your
machine from the Printer list and click
Properties
.
4
Change the printer and print job properties.
Click.
The following four tabs display at the top of the window.
•
General
- allows you to change the paper size, the paper
type, and the orientation of the documents, enables the
duplex feature, adds start and end banners, and changes
the number of pages per sheet.
•
Text
- allows you to specify the page margins and set the
text options, such as spacing or columns.
•
Graphics
- allows you to set image options that are used
when printing images/files, such as color options, image
size, or image position.
•
Device
: allows you to set the print resolution, paper
source, and destination.
5
Click
Apply
to apply the changes and close the Properties
window.
6
Click
OK
in the LPR GUI window to start printing.
7
The Printing window appears, allowing you to monitor the
status of your print job.
To abort the current job, click
Cancel
.
Printing Files
You can print many different types of files on the Samsung
machine device using the standard CUPS way - directly from
the command line interface. The CUPS lpr utility allows you do
that. But the drivers package replaces the standard lpr tool by
a much more user-friendly LPR GUI program.
To print any document file:
1
Type
lpr <file_name>
from the Linux shell command
line and press
Enter
. The LPR GUI window appears.
When you type only
lpr
and press
Enter
, the Select
file(s) to print window appears first. Just select any files
you want to print and click
Open
.
2
In the LPR GUI window, select your printer from the list,
and change the printer and print job properties.
For details about the properties window, see page 31.
3
Click
OK
to start printing.

Using Your Printer with a Macintosh
32
8Using Your Printer with
a Macintosh
Your machine supports Macintosh systems with a built-in USB
interface or a 10/100 Base-TX network interface card. When
you print a file from a Macintosh computer, you can use the
PostScript driver by installing the PPD file.
N
OTE
:
Some printers do not support a network
interface. Make sure that your printer supports a
network interface by referring to Printer Specifications
in your Printer User’s Guide.
This chapter includes:
• Installing Software
• Setting Up the Printer
•Printing
Installing Software
The Printer software CD that came with your machine provides
you with the PPD file to use the PS driver, Apple LaserWriter
driver, for printing on a Macintosh computer.
Printer driver
Installing the printer driver
1
Connect your machine to the computer using the USB
cable or the Ethernet cable.
2
Turn on your computer and the machine.
3
Insert the PostScript driver CD-ROM which came with your
machine into the CD-ROM drive.
4
Double-click the
Samsung_CLP
on your Macintosh
desktop.
5
Double-click the
MAC_Installer
folder.
6
Double-click the
MAC_Printer
folder.
7
Double-click the
Samsung CLBP Installer OSX
icon.
8
Click
Continue
.
9
Click
Install
.
10
After the installation is finished, click
Quit
.
Uninstalling the printer driver
1
Insert the CD-ROM which came with your printer into the
CD-ROM drive.
2
Double-click
CD-ROM icon
that appears on your
Macintosh desktop.
3
Double-click the
Samsung_CLP
on your Macintosh
desktop.
4
Double-click the
MAC_Installer
folder.
5
Double-click the
MAC_Printer
folder.
6
Double-click the
Samsung CLBP Installer OSX
icon.
7
Select
Uninstall
and then click
Uninstall
.
8
Click
Continue
.
9
When the uninstallation is done, click
Quit
.

Using Your Printer with a Macintosh
33
Setting Up the Printer
Set up for your printer will be different depending on which
cable you use to connect the printer to your computer—the
network cable or the USB cable.
For a Network-connected
N
OTE
:
Some printers do not support a network
interface. Before connecting your printer, make sure
that your printer supports a network interface by
referring to Printer Specifications in your Printer User’s
Guide.
Mac OS 10.3 or higher
1
Follow the instructions on “Installing Software” on page 32
to install the PPD file on your computer.
2
Open
Print Center
or
Printer Setup Utility
from the
Utilities folder.
3
Click
Add
on the Printer List.
4
Select the
AppleTalk
tab.
The name of your machine appears on the list. Select
SEC000xxxxxxxxx
from the printer box, where the
xxxxxxxxx
varies depending on your machine.
5
Click
Add
.
6
If Auto Select does not work properly, select
Samsung
in
Printer Model
and
your printer name
in
Model Name
.
Your machine appears on the Printer List and is set as the
default printer.
For a USB-connected
Mac OS 10.3 or higher
1
Follow the instructions on “Installing Software” on page 32
to install the PPD file on your computer.
2
Open
Print Center
or
Printer Setup Utility
from the
Utilities folder.
3
Click
Add
on the Printer List.
4
Select the
USB
tab.
5
Select
your printer name
and click
Add
.
6
If Auto Select does not work properly, select
Samsung
in
Printer Model
and
your printer name
in
Model Name
.
Your machine appears on the Printer List and is set as the
default printer.
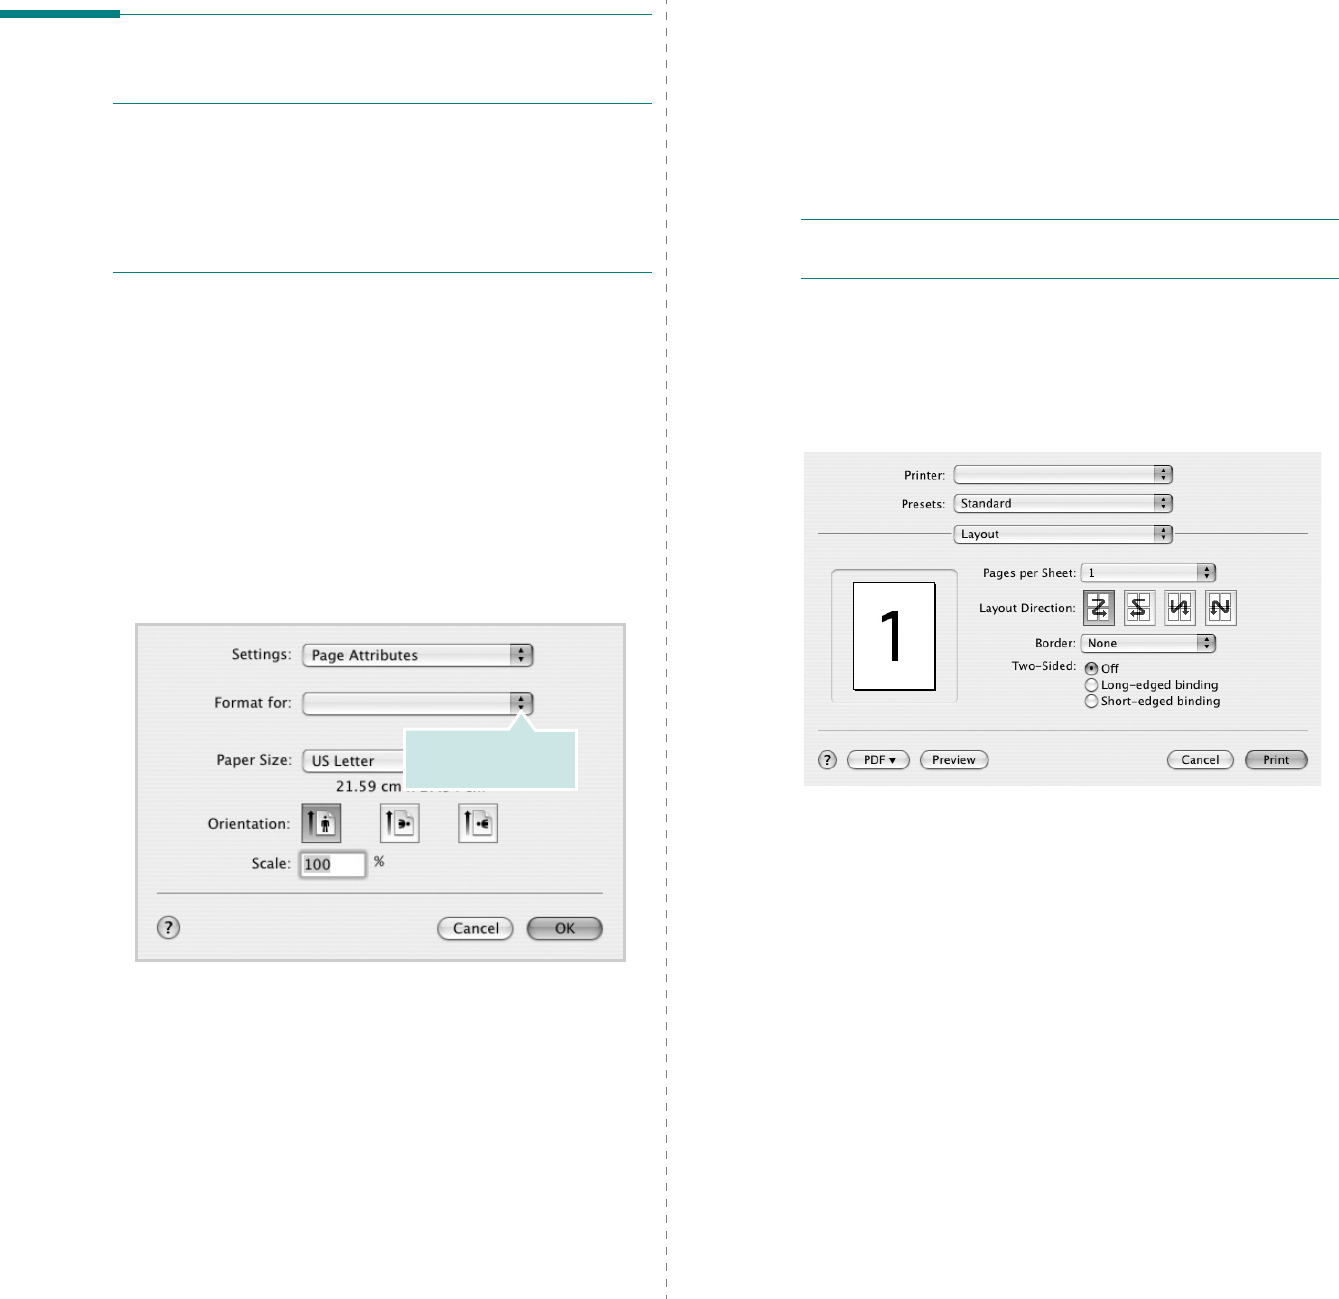
34
Printing
N
OTES
:
• The Macintosh printer’s properties window that appears in
this User’s Guide may differ depending on the printer in use.
However the composition of the printer properties window is
similar.
• You can check your printer name in the supplied CD-
ROM.
Printing a Document
When you print with a Macintosh, you need to check the printer
software setting in each application you use. Follow these steps
to print from a Macintosh.
1
Open a Macintosh application and select the file you want
to print.
2
Open the
File
menu and click
Page Setup
(
Document
Setup
in some applications).
3
Choose your paper size, orientation, scaling, and other
options and click
OK
.
4
Open the
File
menu and click
Print
.
5
Choose the number of copies you want and indicate which
pages you want to print.
6
Click
Print
when you finish setting the options.
Make sure that your
printer is selected.
Changing Printer Settings
You can use advanced printing features when using your
printer.
From your Macintosh application, select
Print
from the
File
menu. The printer name which appears in the printer properties
window may differ depending on the printer in use. Except for
the name, the composition of the printer properties window is
similar.
N
OTES
: The setting options may differ depending on printers
and Macintosh OS version.
Layout
The
Layout
tab provides options to adjust how the document
appears on the printed page. You can print multiple pages on
one sheet of paper. Select
Layout
from the
Presets
drop-down
list to access the following features.
•
Pages per Sheet
: This feature determines how many
pages printed on one page. For details, see "Printing
Multiple Pages on One Sheet of Paper" on the next
column.
•
Layout Direction
: You can select the printing direction
on a page as like the examples on UI.
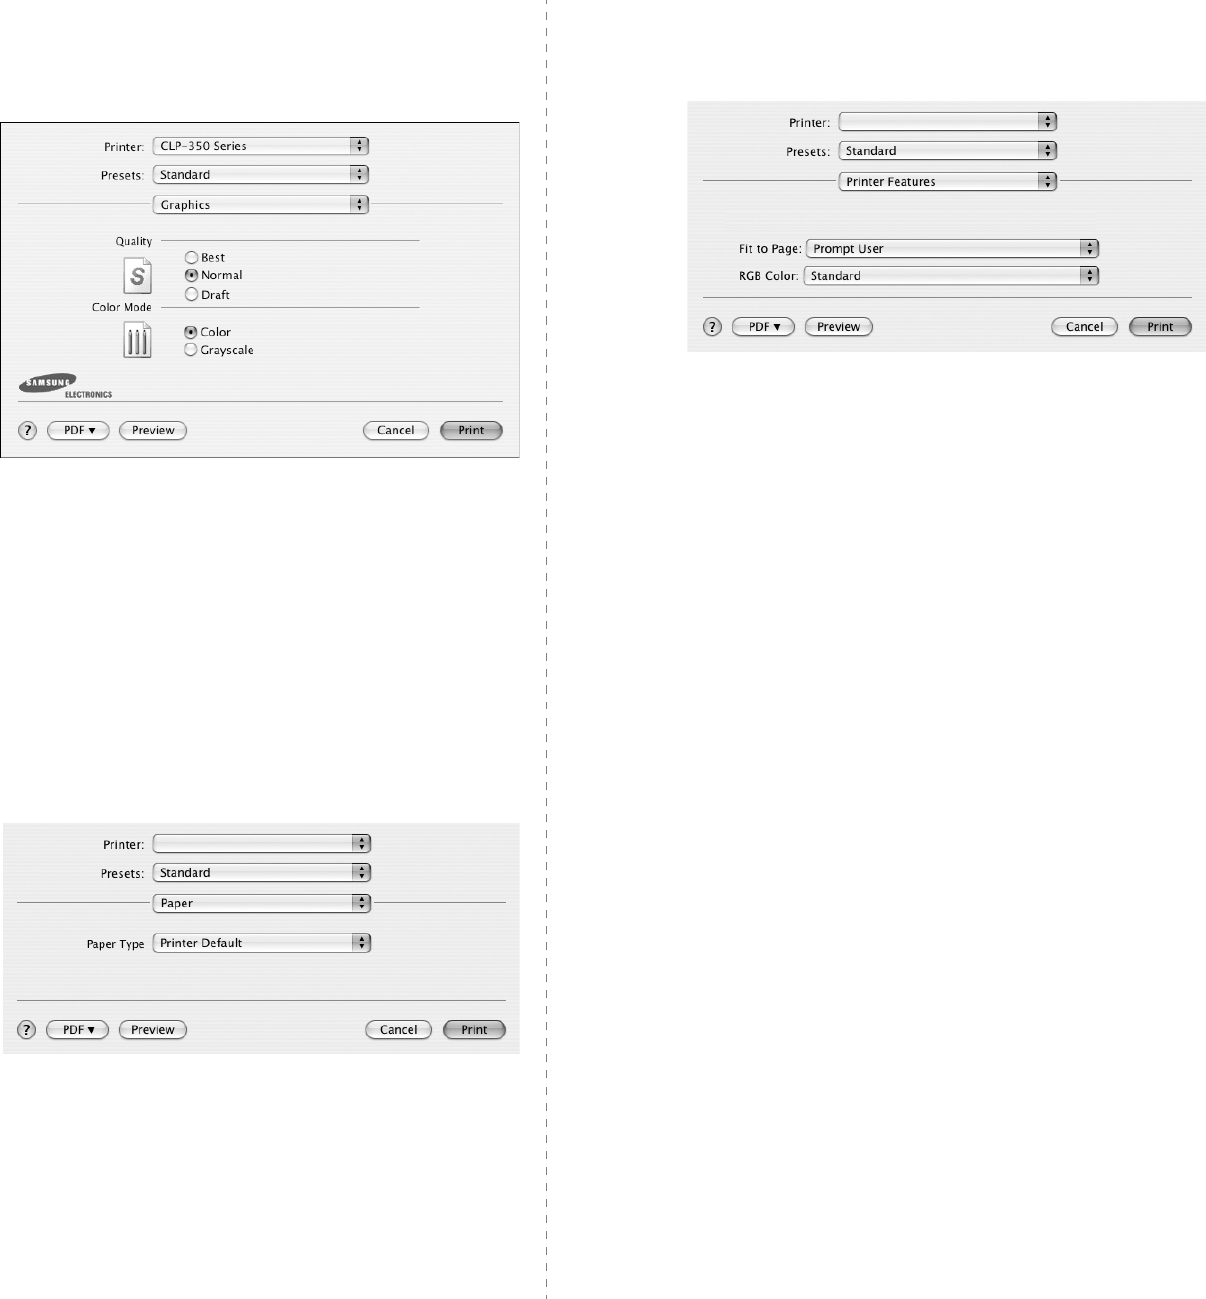
35
Graphics
The
Graphics
tab provides options for selecting
Resolution(Quality)
and
Color Mode
. Select
Graphics
form the
Presets
' drop-down list to access the graphic
features.
•
Resolution(Quality)
: You can select the printing
resolution. The higher the setting, the sharper the clarity
of printed characters and graphics. The higher setting
also may increase the time it takes to print a document.
•
Color Mode
: You can set the color options. Setting to
Color
typically produces the best possible print quality
for color documents. If you want to print a color
document in grayscale, select
Grayscale
.
Paper
Set
Paper Type
to correspond to the paper loaded in the tray
from which you want to print. This will let you get the best
quality printout. If you load a different type of print material,
select the corresponding paper type.
Printer Features
This tab provides options for selecting the paper type and
adjusting print quality. Select
Printer Features
from the
Presets
' drop-down list to access the following features:
•
Fit to Page
: This setting allows you to scale your print
job to any selected paper size regardless of the digital
document size. This can be useful when you want to
check fine details on a small document.
•
RGB Color
: This setting determines how colors are
rendered.
Standard
is the most widely used setting
which the color tone of this mode is the closest to that of
standard monitor (sRGB Monitor).
Vivid
mode is
appropriate for printing presentation data and charts.
The color tone of Vivid mode produces more
Vivid
color
images than that of Standard mode.
Device
mode is best
used for printing fine lines, small characters and color
drawings. The color tone of
Device
mode may be
different from that of monitor, the pure toner colors are
used for printing Cyan, Magenta and Yellow colors.
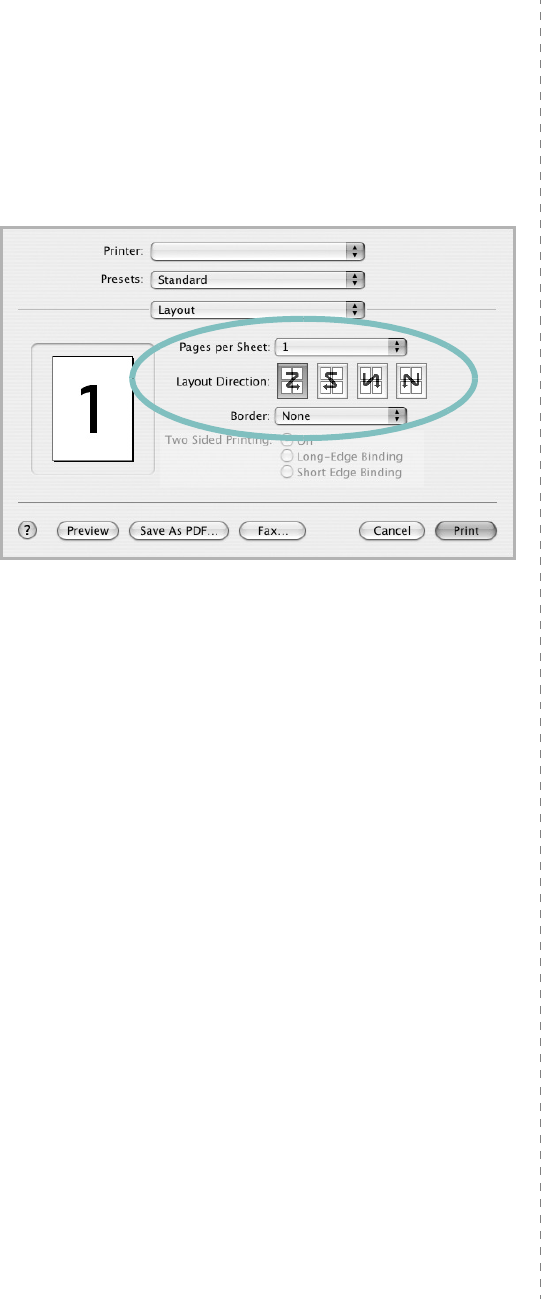
36
Printing Multiple Pages on One Sheet
of Paper
You can print more than one page on a single sheet of paper.
This feature provides a cost-effective way to print draft pages.
1
From your Macintosh application, select
Print
from the
File
menu.
2
Select
Layout
.
3
Select the number of pages you want to print on one sheet
of paper on the
Pages per Sheet
drop-down list.
4
Select the page order from the
Layout Direction
option.
To print a border around each page on the sheet, select
the option you want from the
Border
drop-down list.
5
Click
Print
, and the printer prints the selected number of
pages on one side of each page.
37
SOFTWARE SECTION
INDEX
A
advanced printing, use
18
B
booklet printing
19
D
document, print
Macintosh
34
Windows
12
double-sided printing
20
driver, install
Linux
27
E
Extras properties, set
16
F
favorites settings, use
17
G
Graphics properties, set
15
H
help, use
17,23
I
install
printer driver
Macintosh
32
Windows
4
installing
Linux software
27
L
Layout properties, set
Windows
14
Linux
driver, install
27
printer properties
30
printing
31
M
Macintosh
driver
install
32
printing
34
setting up the printer
33
N
n-up printing
Macintosh
36
Windows
18
O
orientation, print
31
Windows
14
overlay
create
22
delete
22
print
22
P
Paper properties, set
14
paper size, set
14
print
31
paper source, set
31
Windows
14
paper type, set
print
31
poster, print
19
PostScript driver
installing
23
print
document
12
fit to page
20
from Macintosh
34
from Windows
12
N-up
Macintosh
36
Windows
18
overlay
22
poster
21
PRN
13
scaling
20
watermark
21
print resolution
31
printer driver, install
Linux
27
printer properties
Linux
31
printer properties, set
Macintosh
34
Windows
13,23
printer resolution, set
Windows
15
printer software
install
Macintosh
32
Windows
4
uninstall
Windows
11
printing
booklets
19
double-sided
20
from Linux
31
R
resolution
printing
31
S
setting
darkness
15
favorites
17
image mode
15
38
resolution
Windows
15
toner save
15
true-type option
15
software
install
Macintosh
32
Windows
4
reinstall
Windows
10
system requirements
Macintosh
32
uninstall
Windows
11
status monitor, use
25
T
toner save, set
15
U
uninstall, software
Windows
11
uninstalling
driver
Linux
28
W
watermark
create
21
delete
21
edit
21
print
21

Rev.1.02