Samsung Electronics Co DV180F Digital Camera User Manual DV150F UM ENG 121112
Samsung Electronics Co Ltd Digital Camera DV150F UM ENG 121112
UserManual.wiki
>
Samsung Electronics Co
>
DV180F User Manual
>
User manual 3 of 3
Contents
1.
User manual 1 of 3
2.
User manual 2 of 3
3.
User manual 3 of 3
User manual 3 of 3
Navigation menu
Upload a User Manual
Namespaces
Wiki Guide
HTML
PDF
Info
Views
User Manual
Discussion / Help
Navigation
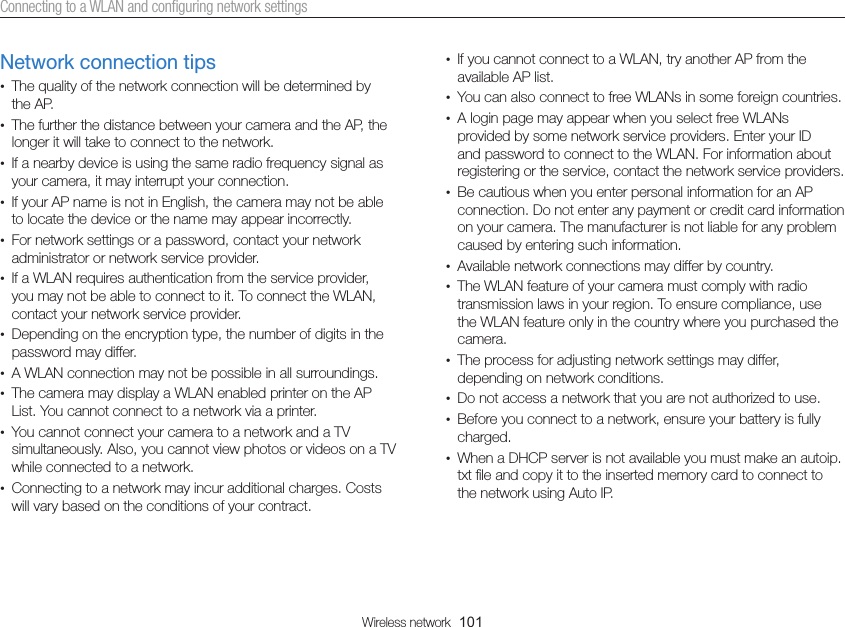
![Wireless network 100Connecting to a WLAN and configuring network settingsUsing the login browserYou can enter your login information via the login browser when connecting to some APs, sharing sites, or cloud servers.Button Description[D/c/F/t]Move to an item or scroll the page.[o] Select an item.[m]Access the following options:• Previous Page: Move to the previous page.• Next Page: Move to the next page.• Reload: Reload the page.• Stop: Stop loading the page.• Exit: Close the login browser.[f] Close the login browser.• You cannot select some items depending on the page you connected to. This does not indicate a malfunction.• The login browser may not close automatically after you log into some pages. If this occurs, close the login browser by pressing [f], and then proceed with the desired operation.• It may take longer to load the login page due to the page size or network speed. If this occurs, wait until the login information input window appears. Setting network options1 In the Wi-Fi Setting screen, move to an AP, and then press [t].2 Select each option, and then enter the required information.Option DescriptionAuthentication Select a network authentication type.Data Encryption Select an encryption type.Network Password Enter the network password.IP Setting Set the IP address manually.Manually setting the IP address1 In the Wi-Fi Setting screen, move to an AP, and then press [t].2 Select IP Setting Manual.3 Select each option, and then enter the required information.Option DescriptionIP Enter the static IP address.Subnet Mask Enter the subnet mask.Gateway Enter the gateway.DNS Server Enter the DNS address.](https://usermanual.wiki/Samsung-Electronics-Co/DV180F.User-manual-3-of-3/User-Guide-2466962-Page-1.png)
![Wireless network 102Connecting to a WLAN and configuring network settingsEntering textLearn how to enter text. The icons in the table below let you move the cursor, change the case, etc. Press [D/c/F/t] to move to a desired key, and then press [o] to enter the key.Back BackspaceDoneIcon DescriptionDelete the last letter.Move the cursor.In ABC mode, change the case.Enter ".com".Icon DescriptionSwitch between Symbol mode and ABC mode.Enter a space.Done Save the displayed text.View the entering text guide.• You can use only the English alphabet, regardless of the display language.• To move to Done directly, press [P].• You can enter up to 64 characters.](https://usermanual.wiki/Samsung-Electronics-Co/DV180F.User-manual-3-of-3/User-Guide-2466962-Page-3.png)
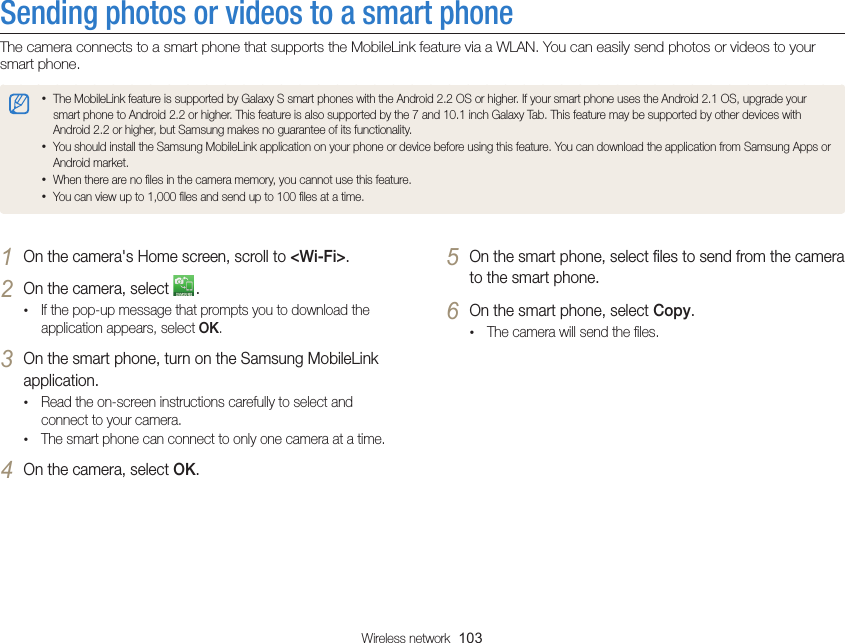
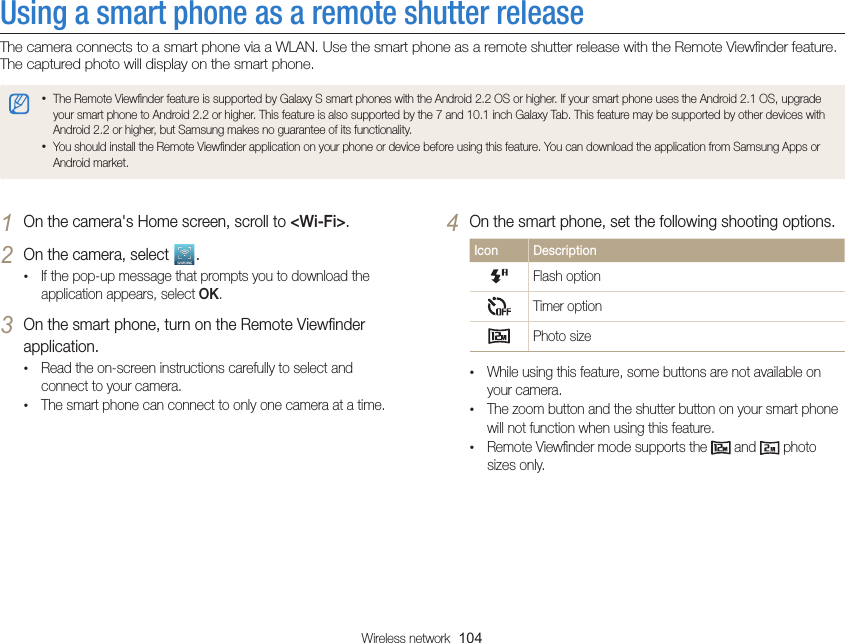
![Wireless network 106Using photo or video sharing websitesUpload your photos or videos to file sharing websites. Available websites will be displayed on your camera.Uploading photos or videos1 Access the website with your camera.2 Scroll to the files you want to upload, and then press [o].• You can select up to 20 files. The total size must be 10 MB or less.3 Select Upload.• If you connected to Facebook, select Upload Upload.• If you connected to Facebook, you can enter your comments by selecting the Comment box. For information about entering text, refer to "Entering text". (p. 111)Accessing a website1 On the Home screen, scroll to <Wi-Fi>.2 Select .3 Select a website.• The camera will automatically attempt to connect to a WLAN via the most recently connected AP device. • If the camera has not previously been connected to a WLAN, it will search for available AP devices. (p. 108)4 Enter your ID and password, and then select Login.• For information about entering text, refer to "Entering text". (p. 111)• To select an ID from the list, select an ID.• If you have previously logged in to the website, you may be logged in automatically.You must have an existing account on the file sharing website to use this feature.](https://usermanual.wiki/Samsung-Electronics-Co/DV180F.User-manual-3-of-3/User-Guide-2466962-Page-7.png)
![Wireless network 107Using photo or video sharing websites• The maximum photo resolution you can upload is 2M, and the longest video you can upload is 30 seconds at resolution or a video recorded using . If the selected photo resolution is higher than 2M, it will be automatically resized to a lower resolution.• The method of uploading photos or videos may differ depending on the selected website.• If you cannot access a website because of firewall or user authentication settings, contact your network administrator or network service provider.• Uploaded photos or videos may be automatically titled with the date they were captured.• The speed of your internet connection may affect how quickly photos upload or web pages open.• When there are no files in the camera memory, you cannot use this feature.• You can also upload photos or videos to file sharing websites in Playback mode by pressing [m], and then selecting Share(Wi-Fi) a desired website.](https://usermanual.wiki/Samsung-Electronics-Co/DV180F.User-manual-3-of-3/User-Guide-2466962-Page-8.png)
![Wireless network 108Sending photos or videos via emailYou can change settings in the email menu, and send photos or videos stored on the camera via email.6 Select the Email box, enter your email address, and then select Done.7 Select OK to save your changes.• To delete your information, select Reset.Setting an email password1 On the Home screen, scroll to <Wi-Fi>.2 Select .3 Press [m].4 Select Setting Password On.• To deactivate the password, select Off.5 When the pop-up appears, press [o].• The pop-up disappears automatically even if you do not press [o].6 Enter a 4-digit password.7 Enter the password again.8 When the pop-up appears, press [o].• The pop-up disappears automatically even if you do not press [o].Changing email settingsIn the email menu, you can change settings for storing your information. You can also set or change the email password. For information about entering text, refer to "Entering text". (p. 111)Storing your information1 On the Home screen, scroll to <Wi-Fi>.2 Select .3 Press [m].4 Select Sender Setting.5 Select the Name box, enter your name, and then select Done.NameEmailBackOK ResetSender Setting](https://usermanual.wiki/Samsung-Electronics-Co/DV180F.User-manual-3-of-3/User-Guide-2466962-Page-9.png)
![Wireless network 109Sending photos or videos via emailIf you lost your password, you can reset it by selecting Reset on the password setting screen. When you reset the information, previously saved user’s setting information, email address, and recently sent email list will be deleted.Changing the email password1 On the Home screen, scroll to <Wi-Fi>.2 Select .3 Press [m].4 Select Change Password.5 Enter your current 4-digit password.6 Enter a new 4-digit password.7 Enter the new password again.8 When the pop-up appears, press [o].• The pop-up disappears automatically even if you do not press [o].Sending photos or videos via emailYou can send photos or videos stored on the camera via email. For information about entering text, refer to "Entering text". (p. 111)1 On the Home screen, scroll to <Wi-Fi>.2 Select .3 Select the Name(Email) box, enter your email address, and then select Done.• If you have previously saved your information, it will be inserted automatically. (p. 117)• To use an address from the list of previous senders, select an address.4 Select the Receiver box, enter an email address, and then select Done.• To use an address from the list of previous recipients, select an address.• Select to add additional recipients. You can input up to 30 recipients.• Select to delete an address from the list.5 Select Next.](https://usermanual.wiki/Samsung-Electronics-Co/DV180F.User-manual-3-of-3/User-Guide-2466962-Page-10.png)
![Wireless network 110Sending photos or videos via email• Even if a photo appears to have transferred successfully, errors with the recipient’s email account may cause the photo to be rejected or recognized as spam.• You may not be able to send an email if no network connection is available or if your email account settings are incorrect.• The maximum photo resolution you can send is 2M and the longest video you can upload is 30 seconds at resolution or a video recorded using . If the selected photo resolution is higher than 2M, it will be automatically resized to a lower resolution.• If you cannot send an email because of firewall or user authentication settings, contact your network administrator or network service provider.• When there are no files in the camera memory, you cannot use this feature.• You can also send an email in Playback mode by pressing [m], and then selecting Share(Wi-Fi) Email.6 Scroll to files to send, and then press [o].• You can select up to 20 files. The total size must be 10 MB or less.7 Select Next.8 Select the Comment box, enter your comments, and then select Done.9 Select Send.• The camera will automatically attempt to connect to a WLAN via the most recently connected AP device and send the email.• If the camera has not previously been connected to a WLAN, it will search for available AP devices. (p. 108)](https://usermanual.wiki/Samsung-Electronics-Co/DV180F.User-manual-3-of-3/User-Guide-2466962-Page-11.png)
![Wireless network 111Using Auto Backup to send photos or videos You can send photos or videos that you captured with the camera to a PC wirelessly. The Auto Backup feature works only with the Windows OS.Sending photos or videos to a PC1 On the camera's Home screen, scroll to <Wi-Fi>.2 Select .• You must configure the backup PC information to use the Auto Backup feature. For more details, refer to “Installing the program for Auto Backup on your PC”. (p. 121)3 Press [m] to set options.• To turn off your PC automatically after the transfer is complete, select Shut down PC after backup On.4 Press [o] to start the backup.• To cancel sending, press [o].• You cannot select individual files to backup. This function backs up only new files on the camera.• The backup's progress will be shown on the PC monitor.• When the transfer is completed, the camera will turn off automatically in approximately 30 seconds. Select Cancel to return to the previous screen and prevent the camera from turning off automatically.Installing the program for Auto Backup on your PC1 Install Intelli-studio on the PC. (p. 101)2 Connect the camera to the PC with the USB cable.3 Click OK on the pop-up window.• The Auto Backup program is installed on the PC. Follow the on-screen instructions to complete the installation4 Remove the USB cable.5 Connect the camera to the PC again with the USB cable.• The camera stores information about the PC, so that the camera can send files to the PC.Before installing the program, ensure that the PC is connected to a network. If no internet connection is available, you must install the program from the provided CD.](https://usermanual.wiki/Samsung-Electronics-Co/DV180F.User-manual-3-of-3/User-Guide-2466962-Page-12.png)
![Wireless network 112Using Auto Backup to send photos or videos • If the PC supports the Wake on LAN (WOL) feature, you can turn on the PC automatically by searching for the PC from your camera. (p. 126)• When you connect the camera to the WLAN, select the AP that is connected to the PC.• The camera will search for available access points even if you are connecting to the same access point again.• If you turn off the camera or remove the battery while sending files, the file transfer will be interrupted.• While you are using this feature, only [POWER] is available on your camera.• You can connect only one camera to the PC at a time for sending files.• The backup may be canceled due to network conditions.• Photos or videos can be sent to a PC one time only. Files cannot be sent again even if you reconnect your camera to another PC.• When there are no files in the camera memory, you cannot use this feature.• You must turn off Windows Firewall and any other firewalls before using this feature.• You can send up to 1,000 files.• On the PC software, the server name must be entered in the Latin alphabet and can contain no more than 48 characters.• When multiple file types are created at once, only the image files (JPG) will be sent to the PC with this feature.](https://usermanual.wiki/Samsung-Electronics-Co/DV180F.User-manual-3-of-3/User-Guide-2466962-Page-13.png)
![Wireless network 113Viewing photos or videos on a TV Link-enabled TVTV Link is a technology for sharing media files between a camera and TV connected to the same AP device. With this technology, you can view your photos or videos on a widescreen TV.4 On the TV, search for the camera and browse the shared photos or videos.• For information about searching for the camera and browsing the photos or videos on the TV, refer to the TV user manual.• Videos may not play smoothly depending on the type of TV or network condition. If this happens, re-record the video in or quality and play it again. If videos do not play smoothly on your TV over the wireless connection, try connecting the camera to the TV with an A/V cable.AP1 On the Home screen, scroll to <Wi-Fi>.2 Select .• If the guide message appears, press [o].• The camera will automatically attempt to connect to a WLAN via the most recently connected AP device. • If the camera has not previously been connected to a WLAN, it will search for available AP devices. (p. 108)3 Connect your TV to a wireless network via an AP device.• Refer to your TV’s user manual for more information.](https://usermanual.wiki/Samsung-Electronics-Co/DV180F.User-manual-3-of-3/User-Guide-2466962-Page-14.png)
![Wireless network 115Sending photos using Wi-Fi DirectWhen the camera connects via a WLAN to a device that supports the Wi-Fi Direct function, you can send photos to the device. This feature may not be supported on some devices.1 On the device, turn on the Wi-Fi Direct option.2 On the camera, in Playback mode, scroll to a photo.3 Press [m], and then select Share(Wi-Fi) Wi-Fi Direct.• When in the single image view, you can send only one photo at a time.• When in the thumbnails view, you can select multiple photos by scrolling to thumbnails, and then pressing [o]. Select Next when you are finished selecting photos.4 Select the device from the camera’s list of Wi-Fi Direct devices.• Ensure that the device's Wi-Fi Direct option is turned on.• You can also select your camera from the device's list of Wi-Fi Direct devices.5 On the device, allow the camera to connect to the device.• The photo will be sent to the device.• When there are no photos in the camera memory, you cannot use this feature.• If you cancel the connection attempt before it is complete, the camera may not be able to reconnect to the device. In this case, update your device with the latest firmware.](https://usermanual.wiki/Samsung-Electronics-Co/DV180F.User-manual-3-of-3/User-Guide-2466962-Page-16.png)

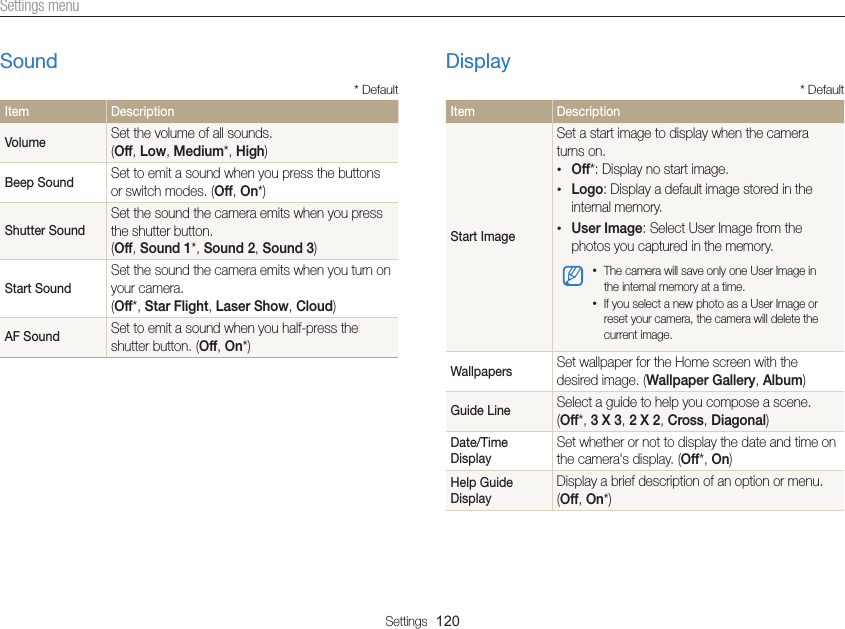
![Settings 119Settings menuLearn to configure your camera's settings.4 Select an item.Back SelectMediumOnSound 1OffOnVolumeBeep SoundShutter SoundStart SoundAF SoundSound5 Select an option.Back SelectOffLowMediumHighVolume6 Press [m] to return to the previous screen.Accessing the settings menu1 On the Home screen, scroll to <Basic>.2 Select .3 Select a menu.SettingsSoundDisplayConnectivityGeneralOption DescriptionUSound: Set various camera sounds and the volume. (p. 130)YDisplay: Customize the display settings. (p. 130)Connectivity: Set the connection options. (p. 131)General: Change the settings for the camera system such as memory format and default file name. (p. 132)](https://usermanual.wiki/Samsung-Electronics-Co/DV180F.User-manual-3-of-3/User-Guide-2466962-Page-20.png)
![Settings 121Settings menu* DefaultItem DescriptionDisplay BrightnessAdjust the brightness of the screen. (Auto*, Dark, Normal, Bright)Normal is fixed in Playback mode even if you have selected Auto. Quick View Set whether or not to review a captured image before returning to the Shooting mode. (Off, On*)Power SaveIf you perform no operations for 30 seconds, the camera automatically switches to Power save mode. (Off*, On)• In Power save mode, press any button other than [POWER] to resume using the camera.• Even if you do not set the Power save mode, the screen will dim 30 seconds after the last operation to save power.Connectivity* DefaultItem DescriptionVideo OutSet the video signal output for your region.• NTSC: USA, Canada, Japan, Korea, Taiwan, Mexico• PAL (supports only BDGHI): Australia, Austria, Belgium, China, Denmark, England, Finland, France, Germany, Italy, Kuwait, Malaysia, Netherlands, New Zealand, Norway, Singapore, Spain, Sweden, Switzerland, ThailandUSBSelect the mode to use when you connect the camera to a computer or printer with a USB cable.• Computer*: Connect your camera to a computer for transferring files.• Printer: Connect your camera to a printer for printing files.• Select Mode: Manually select the USB mode when you connect your camera to a device.PC Software Set Intelli-studio to launch automatically when you connect your camera to your computer. (Off, On*)](https://usermanual.wiki/Samsung-Electronics-Co/DV180F.User-manual-3-of-3/User-Guide-2466962-Page-22.png)
![Appendixes 147Correct Disposal of This Product (Waste Electrical & Electronic Equipment) (Applicable in countries with separate collection systems)This marking on the product, accessories or literature indicates that the product and its electronic accessories (e.g. charger, headset, USB cable) should not be disposed of with other household waste at the end of their working life. To prevent possible harm to the environment or human health from uncontrolled waste disposal, please separate these items from other types of waste and recycle them responsibly to promote the sustainable reuse of material resources.Household users should contact either the retailer where they purchased this product, or their local government office, for details of where and how they can take these items for environmentally safe recycling.Business users should contact their supplier and check the terms and conditions of the purchase contract. This product and its electronic accessories should not be mixed with other commercial wastes for disposal.PlanetFirst represents Samsung Electronics' commitment to sustainable development and social responsibility through eco-driven business and management activities. Correct disposal of batteries in this product (Applicable in countries with separate collection systems)This marking on the battery, manual or packaging indicates that the batteries in this product should not be disposed of with other household waste at the end of their working life. Where marked, the chemical symbols Hg, Cd or Pb indicate that the battery contains mercury, cadmium or lead above the reference levels in EC Directive 2006/66. If batteries are not properly disposed of, these substances can cause harm to human health or the environment.To protect natural resources and to promote material reuse, please separate batteries from other types of waste and recycle them through your local, free battery return system.This Class [B] digital apparatus complies with Canadian ICES-003.Dispose unwanted electronics through an approved recycler. To find the nearest recycling location, go to our website: www.samsung.com/recyclingdirect Or call, (877) 278 - 0799](https://usermanual.wiki/Samsung-Electronics-Co/DV180F.User-manual-3-of-3/User-Guide-2466962-Page-48.png)