Samsung Electronics Co EM7700-W Cellular/PCS WCDMA and LTE Band 04/17 Model User Manual T Mobile SGH T779 Galaxy Tab
Samsung Electronics Co Ltd Cellular/PCS WCDMA and LTE Band 04/17 Model T Mobile SGH T779 Galaxy Tab
Contents
- 1. User Manual (Host) Part 1
- 2. User Manual (Host) Part 2
- 3. User Manual (Host) Part 3
- 4. User Manual (Host) Part 4
- 5. User Manual (Host) Part 5
User Manual (Host) Part 2
DRAFT
Internal Use Only
Multimedia 102
Section 7: Multimedia
This section explains how to use the multimedia features of
your device, including the Camera/Camcorder, Music Player,
and how to manage your photos, images and sounds.
You can take photographs and shoot video by using the
built-in camera functionality. Your camera produces photos in
JPEG format.
Important!
Do not take photos of people without their
permission.
Do not take photos in places where cameras are
not allowed.
Do not take photos in places where you may
interfere with another person’s privacy.
Camera
Use your device’s built-in camera and camcorder to take
photos and record videos.
From a Home screen, tap
Apps
➔
Camera
.
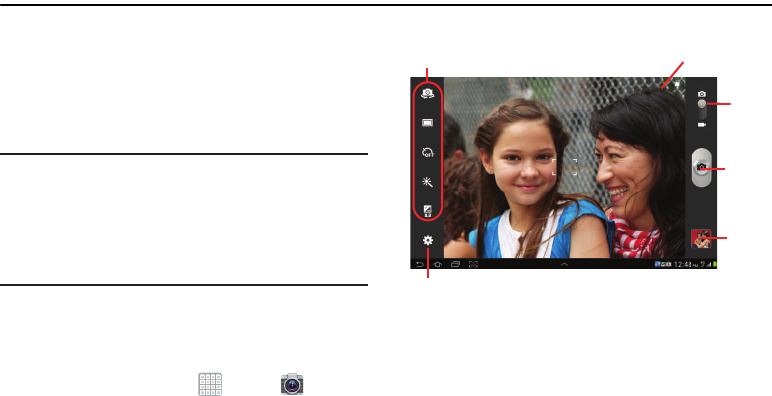
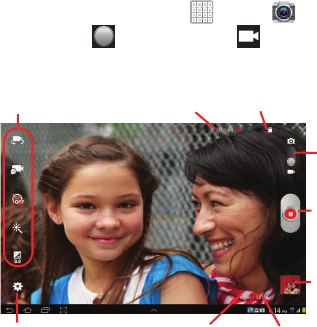
The Camera screen displays.
Settings
Image
Mode
Camera
Viewer
Storage
Indicator
Settings
Shortcuts
For PRA Only, Printing NOT approved by Technical Writing Team
DRAFT
Internal Use Only
103
Taking Photos
Taking pictures with your device’s built-in camera is as
simple as choosing a subject, pointing the camera, then
pressing the camera key.
1. From a Home screen, tap
Apps
➔
Camera
.
2. Using the display as a viewfinder, compose your photo
by aiming the lens at the subject. To configure settings,
see “Camera Settings” on page 105.
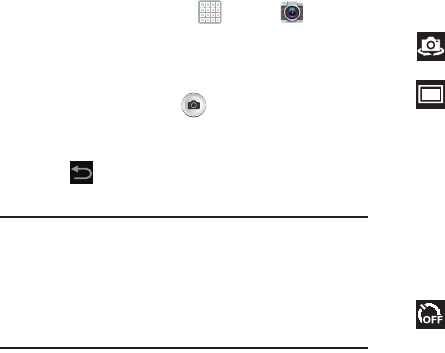
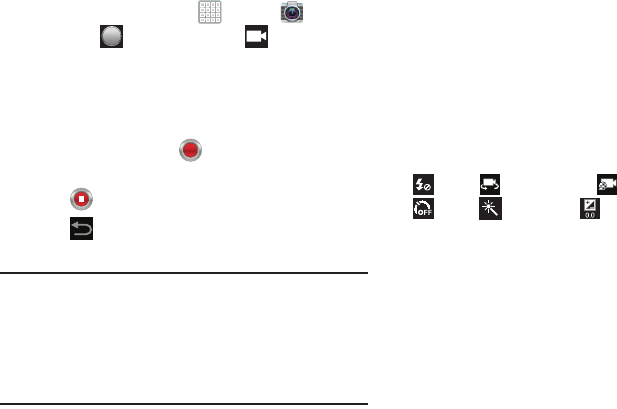
3. To take the photo, tap (
Camera
key) until the
shutter sounds. (The picture is automatically stored
within your designated storage location.
4. Tap
Back
to leave the Camera and display the
previous screen.
Important!
Do not take photos of people without their
permission.
Do not take photos in places where cameras are
not allowed.
Do not take photos in places where you may
interfere with another person’s privacy.
Camera Options
Before you start taking photos, use the camera options to
configure the camera for best results. Camera options are
represented by icons on the left side of the screen. While in
Camera mode, tap the following icons to set camera options:
Self shot
: Tap to switch to the front-facing camera lens
and take a photo of yourself.
Shooting mode
: Choose an automatic shooting mode,
from:
•
Single shot
: Take a single photo.
•
Smile shot
: Tap the Camera button to
automatically focus on the subject’s face and
take the photo.
•
Panorama
: Tap the Camera button to take a
photo, then use the on-screen guideline to move
the viewfinder and take the next 7 shots
automatically.
Timer
: Set a timer for how long to wait before
taking a photo. Options are: Off, 2 sec, 5 sec, and
10 sec.
For PRA Only, Printing NOT approved by Technical Writing Team
DRAFT
Internal Use Only
Multimedia 104
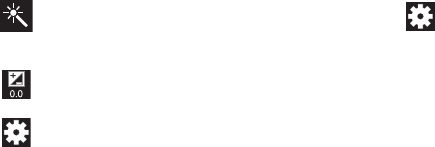
Effects
: allows you to change the color tone or
apply special effects to the photo. Options include:
No effect, Negative, Black and white, or Sepia.
Exposure value
: Use the slider to set the exposure
value from -2.0 to +2.0.
Settings
:
•
Edit shortcuts
: Allows you to replace the position
of the main camera shortcuts with other features
or functions.
•
Self-portrait
: Tap to switch to the front-facing
camera lens and take a photo of yourself.
•
Shooting mode
: Set the shooting mode.
•
Scene mode
: Choose an automatic scene mode
from None, Landscape, Night, Sports,
Party/Indoor, Sunset, Dawn, Text, or Candlelight.
•
Exposure value
: Set the brightness of the photo.
Settings (Continued)
:
•
Timer
: Set a timer for how long to wait before
taking a photo. Options are: Off, 2 sec, 5 sec, and
10 sec.
•
Effects
: Apply an effect to photos. Options are: No
effect, Negative, Black and white, or Sepia.
•
Resolution
: Set a size for the image. Options
are: 3.2M (2048x1536), W2.3M (2048x1104),
2M (1600x1200), W1.3M (1536x864),
1.3M (1280x960), W0.9M (1280x720), or
0.3M (640x480).
•
White balance
: Set the light source. Options are:
Auto, Daylight, Incandescent, Fluorescent, or
Cloudy.
•
Metering
: Set how the camera measures or
meters the light source: Center-weighted, Spot,
or Matrix.
•
Guidelines
: Activates/deactivates on-screen
guidelines so you can frame your picture.
For PRA Only, Printing NOT approved by Technical Writing Team
DRAFT
Internal Use Only
105
Camera Settings
Before you start taking photos, use the camera settings to
configure the camera for best results. Camera settings are
represented by icons on the left side of the screen.
Editing Camera Settings Shortcuts
The first five icons are actually shortcuts to camera settings.
These five shortcuts can be customized to fit your
preference.
Flash
,
Self-portrait
,
Shooting mode
,
Timer
,
Effects,
and
Exposure value
are default
settings shortcuts.
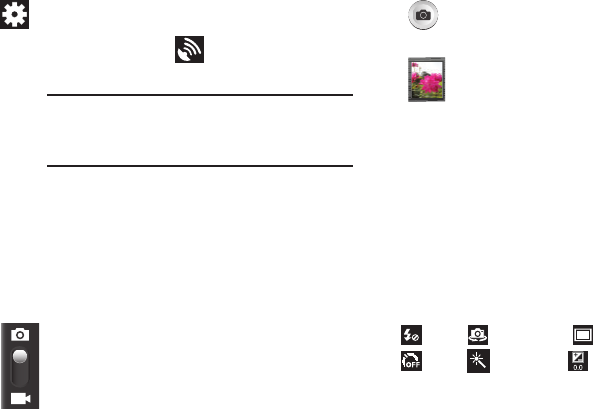
Settings (Continued)
:
•
GPS tag
: Enable or disable tagging of photos with
your GPS location. displays on the screen
when this option is active.
Caution!
Be aware that your location may be
present on a photo when posting your
photos on the internet.
•
Shutter sound
: Activates/deactivates the sound
associated with the shutter activation.
•
Storage
: Sets the default storage location as
either Device or Memory card.
•
Reset
: Sets all the camera settings back their
factory default values.
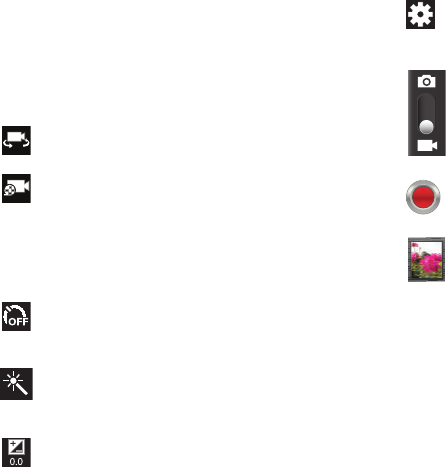
Camera / Camcorder Mode
: allows you to take a
photo in various modes. Once you change the
mode, the corresponding indicator appears at the
top left of the display. Slide the button up for
Camera, or down for Camcorder.
Camera button
: takes a photo when tapped in Camera
mode.
Image viewer
: allows you to access the Image viewer
and the various viewing options for a selected picture.
The last picture you took, will be displayed as a
thumbnail in the Image viewer icon.
For PRA Only, Printing NOT approved by Technical Writing Team

DRAFT
Internal Use Only
Multimedia 106
To customize these shortcuts:
1. Tap
Settings
➔
Edit shortcuts
.
– or –
Touch and hold any of the shortcut icons to edit them.
2. Touch and hold a setting, then drag and drop it on one
of the five settings shortcuts to the left. The replaced
setting shortcut displays in the edit list.
Viewing Photos with the Image Viewer
After taking a photo, use the Image Viewer to view, share,
delete, or edit photos.
1. Tap the
Image Viewer
to view the photo.
2. Tap the screen to show or hide Image Viewer options.
3. With the image active, tap the screen with two fingers
or double-tap on the screen to zoom all the way in or
out. For more information, refer to “Pinch” on
page 31.
4. Sweep across the screen to display the next or
previous photo. The current photo is outlined in the
thumbnails at the bottom of the screen. Tap a
thumbnail to view the photo it represents.
5. Tap
Share via
to use Group Cast, Picasa, Photo
editor, Google+, Bluetooth, Wi-Fi Direct, Messaging,
Gmail, or Email to share the photo. For more
information, refer to “AllShare Play” on page 164.
6. To delete the photo being displayed, tap
Delete
➔
OK
to delete the photo or
Cancel
to exit.
7. Tap
Slideshow
to display a slide show of the
available pictures and videos.
8. Tap
Menu
to select
Set picture as
to assign the
photo as a Contact photo, Home and lock screens,
Home screen wallpaper, or Lock screen wallpaper.
For more information, refer to “Viewing Photos and
Videos” on page 117. Additional functions include:
• Face tag
: Activate/deactivate face tag technology for people in
your photo.
•Copy to clipboard
: Copies the current image to your device’s
clipboard.
•Rotate left
: Allows you to rotate the picture counterclockwise
90 degrees.
•Rotate right
: Allows you to rotate the picture clockwise 90
degrees.
For PRA Only, Printing NOT approved by Technical Writing Team

DRAFT
Internal Use Only
107
•Crop
: Allows you to crop the image. Tap and drag the crop box
or the sides or corners of the crop box to create the crop area,
then tap
Ok
. Tap
X
to stop without cropping the picture.
•Edit
: Launches the Photo Editor with the current image
selected.
•Show on map
: This option displays if a Location exists for the
photo. A Location is added to the photo if
GPS tag
is set
On
in
the Camera settings. Tap this option to open the Map app and
display the Location where the photo was taken. For more
information, refer to
“Camera Settings”
on page 105.
•Set as
: allows you to assign the current image as a Contact
photo, Home screen, Lock screen, or Home and lock screens.
• Buddy photo share
: allows you to share the current image
with detected person in the photo. The subject tag can be
added or deleted.
•Print
: Print the current photo to a compatible Samsung printer.
•Rename
: Changes the filename associated to the current
image.
•Details
: Displays the file information such as Title, Time, etc...
Note:
Photos are stored in the /Root/DCIM/Camera folder as
jpg files. For more information, refer to “My Files” on
page 182.
9. Tap
Back
to return to the Camera to take more
photos.
Assigning an Image as a Contact Icon
1. From a Home screen, tap
Apps
➔
Gallery
.
2. Select a folder location and tap a file to open it.
3. With the image displayed, tap
Menu
➔
Set as
➔
Contact photo
.
4. Tap a contact to make a selection.
5. Crop the image and tap
Done
.
Assigning an Image as a Wallpaper
1. From a Home screen, tap
Apps
➔
Gallery
.
2. Select a folder location and tap a file to open it.
3. With the image displayed, tap
Menu
➔
Set as
.
For PRA Only, Printing NOT approved by Technical Writing Team
DRAFT
Internal Use Only
Multimedia 108
4. Select one of the three options:
• Home and lock screens wallpaper
assigns the current image
as both the home screen and lock screen backgrounds. This
image is spread across all available screens.
• Home screen wallpaper
assigns the current image to the
home screen background. This image is spread across all
available screens.
• Lock screen wallpaper
assigns the selected image to the
background for the lock screen.
5. Touch and drag the crop box anywhere on the picture.
Touch and drag the sides of the crop box to zoom in or
out to create a cropped area.
6. Tap
Done
to assign the wallpaper image.
– or –
Tap
Cancel
to stop without updating the wallpaper
image.
Camcorder
Use your device’s built-in Camcorder to record
high-definition video.
1. From a Home screen, tap
Apps
➔
Camera
.
2. Slide the
Mode
button to the
Camcorder
setting. The Camcorder screen displays.
Record
Current or
Elapsed Time
Settings
Shortcuts
Settings
Image
Viewer
Mode
Storage
Indicator
File Size Available Storage
For PRA Only, Printing NOT approved by Technical Writing Team
DRAFT
Internal Use Only
109
Recording Videos
1. From a Home screen, tap
Apps
➔
Camera
.
2. Slide the
Mode
button to the
Camcorder
setting.
3. Using the display as a viewfinder, compose your shot
by aiming the lens at the subject. For more information,
refer to “Camcorder Settings” on page 109.
4. To start recording, tap
Record
.
During recording, the
Record
button flashes.
5. Tap
Stop recording
to stop recording.
6. Tap
Back
to leave the Camcorder and display the
previous screen.
Important!
Do not take videos of people without their
permission.
Do not take videos in places where cameras are
not allowed.
Do not take videos in places where you may
interfere with another person’s privacy.
Camcorder Settings
Before you start taking videos, use the camcorder settings to
configure the camcorder for best results. Camcorder settings
are represented by icons on the left side of the screen.
Editing Camcorder Settings Shortcuts
As with the camera, the first five icons are actually shortcuts
to camcorder settings and recording lengths (Normal, Limit
for MMS, and Limit for email). These five shortcuts can be
customized to fit your preference.
Flash
,
Self-recording
,
Recording mode
,
Timer
,
Effects,
and
Exposure value
are default
shortcuts.
To customize these shortcuts, see “Editing Camera Settings
Shortcuts” on page 105.
For PRA Only, Printing NOT approved by Technical Writing Team
DRAFT
Internal Use Only
Multimedia 110
Camcorder Options
Before you start recording videos, use the camcorder options
to configure the camcorder for best results. Camcorder
options are represented by icons on the left side of the
screen. While in Camcorder mode, tap the following icons to
set camcorder options:
Self shot
: Tap to switch to the front-facing camera lens
and record a video of yourself.
Recording mode
: allows you to set the recording
mode to: Normal, which is limited only by available
space on the destination location, Limit for
MMS, which is limited by MMS size restrictions, and
Limit for email which restricts the file size so ti can
easily be attached to a new outgoing email.
Timer
: Set a timer for how long to wait before
recording a video. Options are: Off, 2 sec, 5 sec, and
10 sec.
Effects
: allows you to change the color tone or
apply special effects to the video. Options include:
No effect, Negative, Black and white, or Sepia.
Exposure value
: Set the brightness of the video.
Settings
• For more information, refer to “Configuring
Camcorder Settings” on page 111.
Camera / Camcorder Mode
: allows you to take a photo
in various modes. Once you change the mode, the
corresponding indicator appears at the top left of the
display. Slide the button up for Camera, or down for
Camcorder.
Camcorder button
: shoots or stops video recording
when tapped in Camcorder mode.
Image viewer
: allows you to access the Image viewer
and the various viewing options for a selected video.
The last video you shot, will be displayed as a
thumbnail in the Image viewer icon.
For PRA Only, Printing NOT approved by Technical Writing Team

DRAFT
Internal Use Only
111
Configuring Camcorder Settings
To configure Camcorder settings:
While in Camcorder mode, tap a settings shortcut or
tap
Settings
to configure the following Camcorder
settings:
• Edit shortcuts
: Customize your settings shortcuts. For more
information, refer to
“Editing Camera Settings
Shortcuts”
on page 105.
• Self-recording
: Tap to switch to the front-facing camera lens
and record a video of yourself.
• Recording mode
: Set a recording mode. Options are: Normal,
Limit for MMS, and Limit for email, which limits the size of the
video to 50 megabytes.
•Exposure value
: Use the slider to set the exposure value from
-2.0 to +2.0.
•Timer
: Set a timer for how long to wait before recording a
video. Options are: Off, 2 sec, 5 sec, and 10 sec.
• Effects
: Apply an effect to videos. Options are: No effect,
Negative, Black and white, or Sepia.
•Resolution
: Set a size for the video. Options are: 1280x720,
720x480, 640x480, or 320x240.
• White balance
: Set the light source. Options are: Auto,
Daylight, Cloudy, Incandescent, or Fluorescent.
Note:
What you see on screen will not correspond to the
luminance of the actual video taken.
• Guidelines
: Enable or disable an on-screen grid to aid in video
composition.
•Storage
: Sets the default video storage location. Choose from
Device or Memory card.
• Reset
: Set all Camera settings to the defaults.
Viewing Videos with the Image Viewer
After recording a video, use the Image Viewer to play, share,
or delete your video.
1. Tap the
Image Viewer
to view the video.
2. Tap the screen to show or hide Image Viewer options.
3. Sweep across the screen to display the next or
previous video. The current video is outlined in the
thumbnails at the bottom of the screen. Tap a
thumbnail to view the video it represents.
For PRA Only, Printing NOT approved by Technical Writing Team
DRAFT
Internal Use Only
Multimedia 112
4. Tap
Share via
to use Google+, Bluetooth,
Wi-Fi Direct, Messaging, YouTube, gmail, or Email to
share the video.
5. To delete the video being displayed, tap
Delete
➔
OK
to delete the video or
Cancel
to exit.
6. Tap
Slideshow
to display a slide show of the
available pictures and videos.
Note:
Videos are stored in the /Root/DCIM/Camera folder as
mp4 files. For more information, refer to “My Files” on
page 182.
7. As the videos plays, tap
Menu
to select additional
options such as:
•Share via
: Shares that current video via Google+, Bluetooth,
Wi-Fi DIrect, Messaging, YouTube, or Gmail.
• Chapter preview
: Displays an on-screen picon preview of the
various available chapters of the video (broken down in
increments based on length).
•Trim
: Allows you to edit the length and content of the current
video.
• Via Bluetooth
: Shares the current via directly via a current
Bluetooth connection to an external device.
•Video Maker
: Launches the Video Maker application.
•Details
: displays file information for the current video.
•Settings
: Provides access to the video player settings. Choose
from: Play speed or Subtitles.
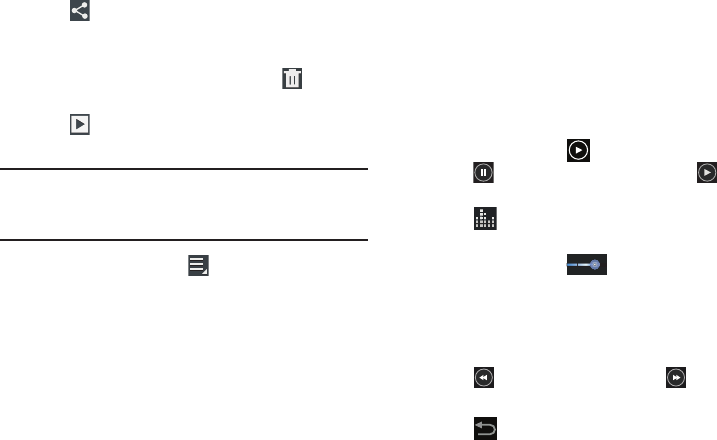
8. To play a video, tap
Play
.
Tap
Pause
to pause the video and tap
Resume
to resume playing the video.
9. Tap
SoundAlive
to set the sound quality to Normal,
Voice, Movie, or 5.1 ch.
10. Touch and drag the white dot on the progress
bar to fast forward or rewind the video. Tap the left end
of the progress bar to restart the video. Tap the right
end of the progress bar to end the video playback.
– or –
Tap
Rewind
to restart the video or
Fast Forward
to end the video.
11. Tap
Back
to return to the Camcorder.
For PRA Only, Printing NOT approved by Technical Writing Team
DRAFT
Internal Use Only
113
Video Player
Your device’s large LCD screen provides playback of videos.
Use Video to view and manage videos stored on your tablet.
This device is able to playback DivX videos.
1. From a Home screen, tap
Apps
➔
Video Player
.
2. Tap the
Thumbnails
,
List
, or
Folders
tab.
3. Tap
Search
and use the keyboard to enter a search
term. The current folder is searched and results are
displayed. Tap
X
to remove the search field.
4. While viewing the list, tap
Menu
for options:
•List by
: Display videos by Name (default), Date, Size, or Type.
•Share via
: Share the video with Google+, Bluetooth, Wi-Fi
Direct, Messaging, YouTube, Gmail, or Email.
•Delete
: Tap videos to select them for deletion or tap
Select all
to delete all videos. Tap
Delete
to deleted the selected videos.
• Auto play next
: Tap to enable or disable automatic playing of
videos in the order they appear.
5. Tap a video to play it. While playing a video, tap the
screen to display or hide on-screen playback controls.
6. Tap the icon in the upper left corner of the display
screen
while the video is playing
to change the Display
Mode from original size to full screen in ratio or full
screen.
• Original Size
( ): Changes the display mode to the original
size.
• Full-Screen in Ratio View
( ): Changes the display mode
to the full-screen in ratio option. The video is enlarged as much
as possible without becoming distorted.
• Full-Screen View
( ): Changes the display mode to full
screen. That is, the entire screen is used, which may cause
some minor distortion.
7. Tap
SoundAlive
to set the sound quality to Normal,
Voice, Movie, or 5.1 ch.
8. While the video is playing, tap
Bookmark
to mark
your favorite areas of the video. A yellow mark displays
on the progress bar.
For PRA Only, Printing NOT approved by Technical Writing Team

DRAFT
Internal Use Only
Multimedia 114
9. During playback, tap
Menu
for options:
•Share via
: Shares that current video via Google+, Bluetooth,
Wi-Fi DIrect, Messaging, YouTube, or Gmail.
• Chapter preview
: Displays an on-screen picon preview of the
various available chapters of the video (broken down in
increments based on length).
•Trim
: Allows you to edit the length and content of the current
video.
• Via Bluetooth
: Shares the current via directly via a current
Bluetooth connection to an external device.
•Video Maker
: Launches the Video Maker application.
•Details
: displays file information for the current video.
•Settings
: Tap this option to view the following:
–
Play speed
: Touch and drag the slider to decrease or increase
play speed.
–
Subtitles
: View subtitles for the video, if available.
–
Auto play next
: Enable or disable auto play of the next video.
For more information, refer to “Playing Videos” on page 120.
DivX Overview
This device is able to playback DivX videos. DivX Certified to
play DivX video up to HD 1080pXX??, including premium
content. If you try to play DivX VOD content not authorized for
your device, the message “Authorization Error” will be
displayed and your content will not play.] Learn more at
www.divx.com/vod
.
Your device must first be registered to playback protected or
purchased DivX content. DRM-free or unprotected content
does not required DivX VOD registration.
Locating Your VOD Registration Number
1. From a Home screen, tap
Apps
➔
Settings
➔
About device
➔
Legal Information
➔
License
settings
➔
DivX® VOD > Register
.
2. Write down your Registration code.
3. Tap
OK
.
For PRA Only, Printing NOT approved by Technical Writing Team
DRAFT
Internal Use Only
115
Register Your DivX Device for VOD Playback of
Purchased Movies
To play purchased DivX movies on your device, you will first
need to complete a one-time registration using both your
device and your computer.
1. Write down the DivX registration code that appears
on-screen. Copy this 8 or 10-digit number down.
2. Verify you have the latest DivX software running on
your computer. Download the free player (for your
computer) from
www.divx.com
.
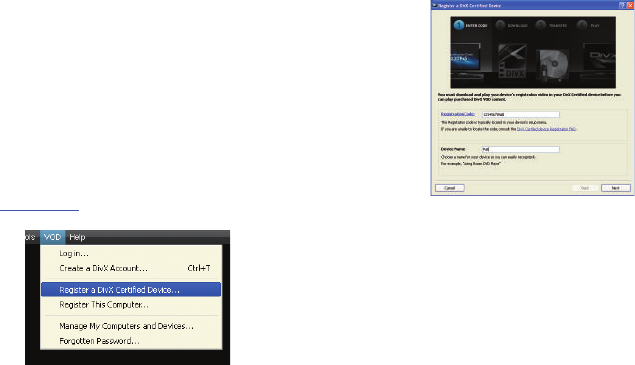
3. Open the DivX
Player on your
computer and
from within the
VOD
menu, select
Register a DivX
Certified Device.
..
4. You are prompted
to log in or create a DivX account if your account
information has not already been saved in DivX Player.
5. Follow the
instructions in
DivX Player to
enter the
registration code
from step 2 and
create a device
nickname (ex:
“Pat or Pat’s
Device”).
6. Select a location on your computer to download the
DivX registration video with the same title as your
device nickname (ex: Pat.divx).
7. Follow the on-screen instructions to download the file
and initiate the transfer process. You will need to place
this video file onto your device and play it back.
8. Connect your device to the computer via USB and
transfer this video.
For PRA Only, Printing NOT approved by Technical Writing Team
DRAFT
Internal Use Only
Multimedia 116
9. From the
Registration
screen (Transfer), click T
ransfer
Video now
and select the location of the internal
storage or
USB
(the device) as the target destination for
the registration video (created in step 6) and click
Start
.
– or –
Locate the created file, copy and paste it into the new
drive letter corresponding to your device’s storage
location.
10. From a Home screen, tap
Apps
➔
My Files
.
11. Locate your registration DivX video file and tap the file
to play it. Once you play the registration file on your
device, your registration is complete.
12. Return to the DivX VOD Manager screen (from within
your computer’s DivX Player) and confirm both your
computer and your new device appears in the list of
registered DivX devices.
Important!
There is no special registration or configuration
necessary to playback DRM-free DivX movies.
Registration of your device is only required for
playback of protected DivX material.
Gallery
Your large LCD screen provides high-resolution display of
photos and videos. Use the Gallery to view, capture, and
manage photos and videos.
Selecting Photos and Videos to View
1. From a Home screen, tap
Apps
➔
Gallery
.
All albums display.
2. Tap
Albums
to display other ways to group your photos
and videos. Options are:
•Albums
: Based on the folder in which they are stored.
•Locations
: Based on where taken.
•Time
: Based on the time taken.
•Person
: Based on face tags applied.
•Group
: Based on group tags applied.
3. Tap
Camera
to launch the Camera app.
4. Tap
Menu
to display the following options:
• Select album / Select group:
Tap one or more albums or
groups that you want to share, stream to another device, or
delete.
For PRA Only, Printing NOT approved by Technical Writing Team
DRAFT
Internal Use Only
117
Viewing Groups of Photos and Videos
1. From a Home screen, tap
Apps
➔
Gallery
.
2. Tap a category and then a group to view it.
Thumbnails for each photo and video in the group
display.
3. Tap
Slideshow
to view a slideshow of the available
pictures and videos.
4. Tap
Menu
for these options:
• Select item:
Tap one or more items that you want to share,
stream to another device, or delete.
• Group by
: Further group this group by Location, Time, or Tags,
depending on the way you chose the group.
Viewing Photos and Videos
1. From a Home screen, tap
Apps
➔
Gallery
.
2. Select a category and then a group to view it, and then
tap a photo or video thumbnail.
3. Tap the screen to show or hide Gallery options.
4. Tap the screen with two fingers or double-tap on the
screen to zoom all the way in or out. For more
information, refer to “Pinch” on page 31.
5. Sweep across the screen to display the next or
previous photo or video. (Videos are indicated by the
Play
button.) The current photo or video is
outlined in the thumbnails at the bottom of the screen.
Tap a thumbnail to view the photo or video it
represents.
6. Tap
Share
to use Group Cast, Picasa (photos),
Photo editor (photos), Google+, Bluetooth, Wi-Fi Direct,
Messaging, Gmail, Email, or YouTube (videos) to share
the photo or video.
7. Tap
Delete
to delete the photo or video being
displayed. Tap
OK
to delete the photo or video or
Cancel
to exit.
8. Tap
Slideshow
to view a slideshow of photos and
video thumbnails in the category. Tap the screen to
stop the slideshow and view the photo or video being
displayed.
9. Tap
Menu
to display the following options for
photos:
• Face tag
: Activate/deactivate face tag technology for people in
your photo.
For PRA Only, Printing NOT approved by Technical Writing Team

DRAFT
Internal Use Only
Multimedia 118
•Copy to clipboard
: Copies the current image to your device’s
clipboard.
•Rotate left
: Allows you to rotate the picture counterclockwise
90 degrees.
•Rotate right
: Allows you to rotate the picture clockwise 90
degrees.
•Crop
: Allows you to crop the image. Tap and drag the crop box
or the sides or corners of the crop box to create the crop area,
then tap
Ok
. Tap
X
to stop without cropping the picture.
•Edit
: Launches the Photo Editor with the current image
selected.
•Show on map
: This option displays if a Location exists for the
photo. A Location is added to the photo if
GPS tag
is set
On
in
the Camera settings. Tap this option to open the Map app and
display the Location where the photo was taken. For more
information, refer to
“Camera Settings”
on page 105.
Caution!
Be aware that your location may be present on a
photo when posting your photos on the internet.
•Set as
: allows you to assign the current image as a Contact
photo, Home screen, Lock screen, or Home and lock screens.
• Buddy photo share
: allows you to share the current image
with detected person in the photo. The subject tag can be
added or deleted.
•Print
: Print the current photo to a compatible Samsung printer.
•Rename
: Changes the filename associated to the current
image.
•Details
: Displays the file information such as Title, Time, etc...
Note:
Photos are stored in the /Root/DCIM/Camera folder as
jpg files. For more information, refer to “My Files” on
page 182.
For PRA Only, Printing NOT approved by Technical Writing Team
DRAFT
Internal Use Only
119
There are only two options for videos that are not
playing:
•Rename
: Enter an new file name.
•Details
: Provides details about the video such as Title, Time,
Duration, File Size, and so on. Tap
Close
to close the pop-up.
For menu options while a video is playing and other
video options, see “Video Player” on page 113.
Note:
Videos are stored in the /Root/DCIM/Camera folder as
mp4 files. For more information, refer to “My Files” on
page 182.
10. Tap
Back
to return to the category screen.
Setting a Picture As
You can use the photos you take as a contact’s photo or as
wallpaper for the Home or Lock screen:
1. From a Home screen, tap
Apps
➔
Gallery
.
2. Select a category and then a group to view it, and then
tap a photo to select it.
3. Tap
Menu
➔
Set as
.
4. Tap
Contact photo
and then tap a contact entry.
– or –
Tap
Home and lock screens
,
Home screen wallpaper
, or
Lock screen wallpaper
.
The
Crop picture
screen displays.
5. Touch and drag the crop box or the sides or corners of
the crop box to create the crop area, then tap
Done
to
save the cropped photo as the contact’s icon or
wallpaper. Tap
Cancel
to stop without cropping the
photo.
Tip:
To remove a contact photo, see “Updating Contacts” on
page 67.
For PRA Only, Printing NOT approved by Technical Writing Team
DRAFT
Internal Use Only
Multimedia 120
Tip:
To change wallpaper, see “Wallpapers” on page 42.
Playing Videos
1. From a Home screen, tap
Apps
➔
Gallery
.
2. Select a category and then a group to view it, and then
tap a video thumbnail to play the video.
Note:
Videos are marked with a
Play
button.
3. Tap
Pause
to pause the video.
4. Tap
Resume
to resume playing the video.
5. Touch and drag the white dot on the progress
bar to fast forward or rewind the video. Tap the left end
of the progress bar to restart the video. Tap the right
end of the progress bar to end the video playback.
– or –
Tap
Rewind
to restart the video or
Fast Forward
to end the video.
Sharing Photos and Videos
To share photos and videos with your friends:
1. From a Home screen, tap
Apps
➔
Gallery
.
2. Select a category and then a group to display
thumbnails.
3. Tap
Menu
➔
Select item
.
4. Select one or more photos and videos to highlight them
for sharing.
5. Tap
Share
.
6. Tap
Deselect all
in the Selected drop-down to
unhighlight photos and videos.
7. Tap
Group Cast
,
Picasa
(photos only),
Google+
,
Bluetooth
,
Wi-Fi Direct, Messaging
,
YouTube
(videos
only),
Gmail
, or
Email
then follow the prompts.
For PRA Only, Printing NOT approved by Technical Writing Team
DRAFT
Internal Use Only
121
Photo Editor
The Photo editor application provides basic editing functions
for photos that you take on your device. Along with basic
image tuning like brightness, contrast, and color, it also
provides a wide variety of effects used for editing the photo.
1. From a Home screen, tap
Apps
➔
Photo editor
.
2. Tap
Select picture
to edit a picture in your Gallery.
– or –
Tap
Take a picture
to take a picture with the camera.
3. Tap the picture and it is loaded into the Photo editor.
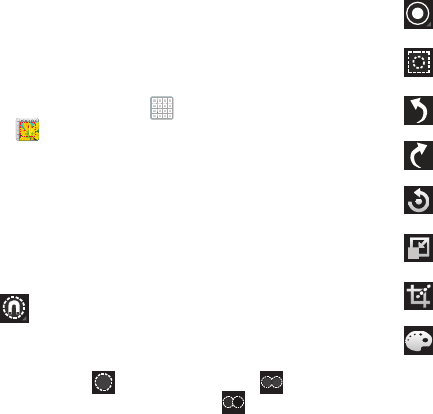
4. Use the following Photo editor controls to edit your
photo:
Selection
: Tap the selection icon and then
tap
Magnetic
,
Lasso
,
Brush
,
Round
, or
Square
to set how to mark an area for cropping,
rotating, and so on.
• Tap to select a single area, to
add to a selected area, or to remove
part of a selected area.
Selection Size
: Set the size of the Grab selection
area. Drag the slider from small to large.
Inverse
: Select the entire picture except for the
selected area.
Undo
: Remove the last change.
Redo
: Restore a removed change.
Rotate
: Rotate a photo to the left or to the right
or create a mirror image of the photo.
Resize
: Touch and then drag the corners of the
photo to resize it.
Crop
: Tap to crop (cut-out) an area of a photo.
Color
: Set the
Auto adjustment
,
Exposure
,
Saturation
,
Contrast
,
Brightness
, and
Hue
of a
photo. You can also make it
Grey-scale
or add
a
Temperature
effect.
For PRA Only, Printing NOT approved by Technical Writing Team
DRAFT
Internal Use Only
Multimedia 122
5. When all updates to the photo have been made, tap
Save
. Use the keyboard to name the edited photo
and tap
OK
to save it.
6. While editing a photo, tap
Menu
to display the
following options:
• Select picture
: Open a new photo for editing.
• Take picture
: Open the Camera and take a new photo.
•Share via
: Send photos to another device or another person.
Options are: Bluetooth, Email, Gmail, Google+, Group Cast,
Messaging, Picasa, or Wi-Fi Direct.
•Set as
: Use this photo as a
Contact photo
, a
Home and lock
screens
,
Home screen wallpaper
, or
Lock screen wallpaper
image.
Media Hub
Samsung Media Hub is your one stop for the hottest movie
and TV content. With hundreds of titles available at your
fingertips, entertaining on the go has never been easier. You
can rent or purchase your favorite content and conveniently
watch anywhere. Featuring the stunning viewing quality
Samsung is known for, Samsung Media Hub is your gateway
to mobile video like you have never experienced it before.
Tip:
A shortcut to Media Hub appears on the main Home
screen by default.
Note:
Media Hub service requires a Samsung account and
depends on service availability.
1. From a Home screen, tap
Apps
➔
Media Hub
.
2. Read the End-User License Agreement (EULA), tap
I agree to the Terms and Conditions
, and then select
Accept
to continue or
Decline
to exit.
The Media Hub screen displays.
Effects
: Add various effects to your photo, such
as
Blur
,
Motion
,
Distortion
,
Filter
, or
Frames
.
Tools
: Copy and Paste to another image or to
the original image. You can use the Spot
healing option.
For PRA Only, Printing NOT approved by Technical Writing Team

DRAFT
Internal Use Only
123
3. To rent or buy media, you must have a Samsung
account. Tap
Menu
➔
My Profile
to sign in to your
Samsung account or to create an account. Follow the
prompts to complete log-in.
4. Browse content using these options:
•What’s New
: Recently-added titles for rent or purchase.
•Movies
: Movies you can rent or purchase.
• TV Shows
: TV shows you can rent or purchase.
•My Media
: Content you have previously purchased or rented.
5. When you find media you want to view, use these
options:
•View trailer
: View a short clip from the movie or show.
•Buy
: Purchase the media for unlimited viewing on your device.
Follow the prompts to enter payment details.
•Rent
: Purchase a time-limited download of the media. Follow
the prompts to enter payment details.
6. For additional information about Media Hub, tap
Menu
➔
Help
.
Media Hub Notices
•
Any media item (Media Content) may be rented or purchased after
you create an account in Media Hub.
•
Media Content that is downloaded may be viewed concurrently on
up to five (5) devices with Media Hub that are also registered to
the same account.
•
You may choose to remove a device from your account no more
than once every 90 days.
•
You may remove Media Content from a device as many times as
you like. You will have the ability to re-download the Media
Content at a later point in time subject to content re-download
availability and studio permissions.
•
You MUST be in network coverage to license Media Content you
have acquired through the Service.
•
You can use 3G, 4G, or Wi-Fi connectivity in order to download
Media Content.
•
Unlike purchased Media Content, rented Media Content will be
viewable on only 1 device in your account.
•
Media Content is downloaded and saved onto the SD card.
For PRA Only, Printing NOT approved by Technical Writing Team

DRAFT
Internal Use Only
Multimedia 124
•
Your Media Content may pause/stop or not download in networks
where there is a weak signal.
•
You may begin watching downloaded Media Content as soon as
a) license acquisition has occurred and b) sufficient amount of the
Media Content has been buffered.
•
You must finish watching rented Media Content within 24
consecutive hours of start of playback.
–
Stopping, pausing, or restarting rented Media Content does not
extend the available viewing time.
–
In no event will rented Media Content be available for a period
of more than thirty (30) days (or shorter on a title-by-title basis)
after the Media Content has been rented (e.g., if you begin
viewing rented Media Content on the 29th day after the rental
transaction, but do not finish viewing the entire title, that rented
Media Content may not be available for the entire twenty-four
(24) consecutive hour period if such period would extend the
viewable time beyond the thirty (30) day rental window).
•
You cannot play any media content downloaded from Media Hub
through any output on your mobile device, including All Share.
Play Movies & TV
This application allows you to connect to the Play Store,
download a movie and then watch it instantly.
Choose from thousands of movies, including new releases and
HD titles in the Play Store and stream them instantly on your
Android device or tablet.
Movies, previously rented via the Play Store are automatically
added to your My Movies library across your devices.
Learn more about Google Play Movies at:
http://play.google.com/about/movies
.
1. From a Home screen, tap
Apps
➔
Play Movies & TV
.
2. Log on to your Google account if you have not already
done so. A list of videos sorted on the SD card displays
in the Video list.
3. Following the on-screen instructions for renting and
viewing movies.
4. Tap the
MOVIES
tab to view movies you have rented.
5. Tap the
TV SHOWS
tab to view shows you have rented.
6. Tap the
PERSONAL VIDEOS
tab to view movies you have
on your device or memory card.
For PRA Only, Printing NOT approved by Technical Writing Team
DRAFT
Internal Use Only
125
Play Music
Also known as Google Music, allows you to browse, shop,
and playback songs purchased from the Play Store. The
music you choose is automatically stored in your Google
Music library and instantly ready to play or download.
Access the new music tab from within your Play Store
application.
The Music application contains a music player that plays
music and other audio files that you copy from your computer.
Accessing the Music App
1. From a Home screen, tap
Apps
➔
Play Music
.
The Play Music app searches your online library and
your device’s internal storage for music and playlists.
This can take from a few seconds to several minutes,
depending on the amount of new music added since
you last opened the application.
2. If prompted, follow the on-screen instructions to link
your current account to Google Play Music.
3. Tap an on-screen account to add it or select
Add
account
to use a new account.
4. At the free songs screen, select either
Get free songs
or
Skip
.
•
Get free songs are downloaded via either the Internet or Play
Store.
•
Follow the on-screen download and installation instructions.
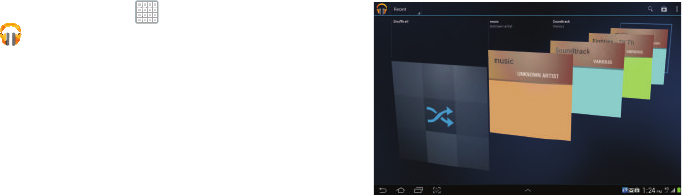
5. Swipe left or right to browse through your new and
available music. Music, albums, and artists are
grouped into categories.
It then displays a carousel view of your new and recent
music, organized by album.
6. Swipe left or right to spin the carousel and browse
through your new and recent music.
For PRA Only, Printing NOT approved by Technical Writing Team
DRAFT
Internal Use Only
Multimedia 126
7. Tap an album to open it.
8. Return to the Library screen from most other screens
in the Music application by tapping the Music
application icon
Music notification icon
at the
bottom-left of the screen.
Changing Library View
You can change the way you view the contents of your
library.
1. From a Home screen, tap
Apps
➔
Play Music
.
2. While in a selection or screen, tap (near the
top-left of the Application bar) or the tab name to back
up to the main Music App menu.
3. Tap the name of the current view, such as
Recent
, near
the top-left of the Application bar.
4. Tap an option to set how you view your library.
The choices are:
Recent
,
Albums
,
Artists
,
Songs
,
Playlists
, or
Genres
.
Tab Options
There are various options available from the various tabs:
1. From a Home screen, tap
Apps
➔
Play Music
.
2. From the upper-left of the application window, tap
Options
to access an available option.
• Recent:
to display the most recently played songs and albums
•Albums:
Play, Add to queue, Add to playlist, More by artist,
Shop for artist, or Search.
•Artists:
Play, Add to queue, Add to playlist, Shop for artist, or
Search.
•Songs:
Play, Add to queue, Add to playlist, Shop for artist,
Delete, or Search.
• Playlist:
Play, Add to queue, Rename, or Delete.
•Genres:
Play, Add to queue, or Search.
Note:
The contents of your library display in a scrolling grid,
list, or carousel, depending on the view.
For PRA Only, Printing NOT approved by Technical Writing Team
DRAFT
Internal Use Only
127
Searching for Music
1. From a Home screen, tap
Apps
➔
Play Music
.
2. Tap
Search
.
3. Type the name of an artist, album, song, or playlist.
4. Tap a matching song to play it, tap a matching album,
artist or playlist to view a list of its’ songs.
– or –
Tap
Options
next to an item in the list to play it,
add to queue, add it to a playlist, or shop for other
music by the artist online.
Changing Music Settings
1. From a Home screen, tap
Apps
➔
Play Music
.
2. Tap
Menu
. The following options display
depending on the library view:
•Shuffle all
: Play all songs in a random order.
• Hide now playing bar / Show now playing bar
: Hide or show
the Now Playing bar that displays at the bottom of the screen.
You can return to the
Now playing
screen from other Music
screens by tapping the name of the current song in the Now
Playing bar.
• Choose on-device music
: In addition to playing the music that
you add to your online library, you can play music stored on
your device’s internal storage. Then you can listen to music
when you have no Internet connection. To do this, make some
of your online music available offline.
For more information, refer to
“Making Online Music
Available Offline”
on page 132.
• On device only
: Display only the music that is available offline
and only on the device.
For PRA Only, Printing NOT approved by Technical Writing Team

DRAFT
Internal Use Only
Multimedia 128
• Hide labels / Show labels
: Hide or show labels. This option is
not available in all library views.
•Settings
: Provides access to the Play Music settings.
•Help
: Displays application help information.
Listening to Music
You can listen to music by using your device’s built-in
speakers, through a wired headset, or through a wireless
Bluetooth stereo headset. For more information, refer to
“Bluetooth” on page 154.
Press the
Volume Key
on the side of the device
to activate on-screen volume control, then touch and drag on
the scale to set volume. You can also press the Volume Key
to adjust playback volume.
Options While Selecting a Song
The following options are available for playing songs,
albums, or playlist, finding more information about artists,
finding more music, and deleting songs:
1. From a Home screen, tap
Apps
➔
Play Music
.
2. Select an album or song.
3. Tap the label area
Options
under an item.
The following options display depending on the item
view:
•Play
: Plays the selected song, album, or playlist.
•Add to queue
: Add the song to a new playback queue.
•Add to playlist
: Add the song to a new playlist or an existing
playlist.
•More by artist
: Searches for more songs by the same artist.
• Shop for artist
: Launches Google to search for more songs by
the selected artist.
• Delete
: Delete the song.
•Search
: Search Internet, Music player, Play Music, or YouTube
for an artist, album, or song.
For PRA Only, Printing NOT approved by Technical Writing Team
DRAFT
Internal Use Only
129
Playing Music
1. From a Home screen, tap
Apps
➔
Play Music
.
2. Tap a song in your library to listen to it.
– or –
While viewing a list of songs, tap
Options
next to a
song and select
Play
.
– or –
While viewing a list of albums, artists, playlists, or
genres, locate the label area
Options
under an
item and tap
Play
.
The
Now playing
screen opens and the song you
selected or the first song in the album or playlist starts
to play. The tracks in the current list play in order until
you reach the end of the list (unless you choose a
repeat option). Otherwise, playback stops only if you
stop it, even when you switch applications.
Note:
If you navigate away from the
Now playing
screen in the
Music application, the Now Playing bar displays at the
bottom of the screen. You can use this to control
playback or tap
Menu
➔
Hide now playing bar
.
Displaying the Now Playing Screen
If you navigate away from the
Now playing
screen, to return
to the
Now playing
screen from other Music screens:
Tap the name of the current song in the Now Playing
bar.
– or –
Tap the Music notification icon in the System Bar
(bottom-right of screen), and from the Status Details
panel, select the song title.
You can also pause and resume playback and skip to
the next or previous song in the Status Details panel.
For more information, refer to “Notifications” on
page 32.
For PRA Only, Printing NOT approved by Technical Writing Team
DRAFT
Internal Use Only
Multimedia 130
Options While Playing a Song
When you play a song, the
Now playing
screen displays.
There are various options and controls available while a song
is playing:
1. From a Home screen, tap
Apps
➔
Play Music
.
2. Tap an album or song. For more information, refer to
“Playing Music” on page 129.
The
Now playing
screen displays.
3. Tap the
SONG
title to add the song to a playlist.
4. Tap the
ARTIST
name to view information about the
artist associated with this song.
5. Tap
ALBUM
to list and play the songs on the album.
6. Tap
Menu
to display the following options:
•Clear queue
: Erases the current playback queue.
•Save queue
: Stores the current playback queue.
•Settings
: Displays the Music settings screen.
•Help
: Displays the application’s Help information.
7. Tap
Options
➔
Add to playlist
to add the song to a
playlist.
8. The
Now playing
screen contains several buttons that
you can tap to control the playback of songs, albums,
and playlists:
Tap Thumbs up or Thumbs down to add the
song to a Thumbs up or Thumbs down playlist.
Tap to go back to the previous song. Touch and
hold to scan backward through the current
song.
Tap to pause playback.
Tap to resume playback
For PRA Only, Printing NOT approved by Technical Writing Team
DRAFT
Internal Use Only
131
Creating a Playlist
1. From a Home screen, tap
Apps
➔
Play Music
.
2. Tap the
Playlists
library view.
3. Tap
Menu
➔
New playlist
. The New playlist pop-up
displays.
4. Tap the
NAME
field to enter a name for the playlist.
5. Tap
OK
to save the new playlist.
Adding Songs To a Playlist
To add a song to a new or existing playlist while the song is
playing:
1. From a Home screen, tap
Apps
➔
Play Music
.
2. Tap an album or song list and play a song.
3. Tap ➔
Options
➔
Add to playlist
field (at the
left of the screen).
•
If the
Add to new playlist
pop-up displays, tap the
NAME
field
to enter a name for the playlist.
4. Select the existing playlist. The playlist is saved with
the song added to it.
Tap to advance to the next song. Touch and hold
to scan forward through the current song.
When Shuffle mode is enabled, songs play in
random order. When disabled, songs play in the
order they appear in List view.
Tap to repeat the current song,
repeat all songs, or disable repeat mode.
For PRA Only, Printing NOT approved by Technical Writing Team
DRAFT
Internal Use Only
Multimedia 132
Playing, Renaming, or Deleting a Playlist
To play, rename, or delete a playlist:
1. From a Home screen, tap
Apps
➔
Play Music
.
2. Display the
Playlists
library view.
3. Tap next to a playlist title.
•
Tap
Play
to play the songs in the playlist.
Note:
Renaming and Deleting is only available with end-user
created playlists and not the device default entries.
•
Tap
Add to queue
to add the current playlist files to the queue.
•
Tap
Rename
and use the keyboard to enter a new name for
the playlist.
•
Tap
Delete
and then tap
OK
to delete the playlist. Only the
playlist is deleted. To delete individual songs, see
“Options
While Selecting a Song”
on page 128.
Shopping for Music at the Play Store
To visit the Google Play
TM
Store where you can find and buy
music:
1. From a Home screen, tap
Apps
➔
Play Music
.
2. Tap
Play Store
in the Application Bar.
The Google Play Store music section displays.
– or –
Tap
Menu
➔
Help
➔
Music
to view information
about finding and buying music.
Making Online Music Available Offline
In addition to playing the music that you add to your online
library, you can play music stored on your device’s internal
storage. Then you can listen to music when you have no
Internet connection. To do this, make some of your online
music available offline.
Tip:
You can also copy music directly from your computer to
your device. For more information, refer to “Synchronizing
with Windows Media Player” on page 160.
For PRA Only, Printing NOT approved by Technical Writing Team
DRAFT
Internal Use Only
133
To make your online music available offline on your device:
1. From a Home screen, tap
Apps
➔
Play Music
.
2. Change your library view to Albums, Artists, or
playlists. For more information, refer to “Changing
Library View” on page 126.
3. Tap
Menu
➔
Choose on-device music
and tap the
album or playlist you want to make available offline.
A green pin indicates that the item is already
available offline.
Gray pins appear next to the items you can make
available offline. A bar at the bottom of the screen
shows how much space is available on your device for
music and other files.
Dim green pins indicate songs or albums that you
copied directly from a computer to your device.
4. Tap the gray pin next to each item you want to make
available offline or tap a green pin to stop making it
available offline. You can switch to other views of your
library to make other kinds of items available offline as
well.
5. Tap
Done
in the bar at the bottom of the screen.
The Music application starts downloading the items to
your device.
Music Player
The Music Player plays
music and other audio files that you copy
from your computer.
The Music Player is an application that
can play music files. The music player supports files with
extensions AAC, AAC+, eAAC+, MP3, WMA, 3GP, MP4, and
M4A. Launching the Music Player allows you to navigate
through your music library, play songs, and create playlists
(music files bigger than 300 KB are displayed).
Playing Music
1. From a Home screen, tap
Apps
➔
Music Player
.
The Music Player application searches your device’s
internal storage for music and playlists. This can take
from a few seconds to several minutes, depending on
the amount of new music added since you last opened
the application. It then displays your music in several
ways.
For PRA Only, Printing NOT approved by Technical Writing Team
DRAFT
Internal Use Only
Multimedia 134
2. Tap
Songs
,
Playlists
,
Albums
,
Artists
,
Genres
,
Folders
,
Composers
,
Years
, or
Music square
from the left of the
screen to change the way you view the contents of
your library.
3. Scroll through the list and tap an entry to begin
playback.
4. Tap the Music application icon at the top-left of
the Application bar to return to the previous Music
screen.
Note:
The 5.1 channel sound effect works when earphones or
sound is connected through the headset jack only.
Managing Your Music
Searching for Music
1. From a Home screen, tap
Apps
➔
Music Player
.
2. Tap
Search
.
3. Type the name of an artist, album, or song.
Matching songs are displayed in a list below the search
box.
4. Tap a matching song to play it. Select a matching
album, or artist to view a list of its songs.
Making a Song a Ringtone
1. From a Home screen, tap
Apps
➔
Music Player
.
2. Tap
Menu
➔
Set as alarm tone
.
3. Tap the desired song.
4. Tap
Set
to assign the new ringtone.
Creating a Playlist
1. From a Home screen, tap
Apps
➔
Music Player
➔
Playlists
.
2. Tap
➔
New playlist
.
3. Select the name field to enter a name for the playlist.
4. Tap
OK
to save the new playlist.
For PRA Only, Printing NOT approved by Technical Writing Team
DRAFT
Internal Use Only
135
Renaming a Playlist
1. From a Home screen, tap
Apps
➔
Music Player
.
2. Tap
Playlists
, select a playlist, and then tap
Menu
➔
Rename playlist
.
3. Tap the name field to enter a new name for the playlist.
4. Tap
OK
to save the new playlist.
Adding Songs to Playlists
1. From a Home screen, tap
Apps
➔
Music Player
.
2. Tap
and select a playlist.
– or –
Tap
Playlists
, select a playlist, and then tap
Add music
.
All songs are displayed.
3. Tap
next to each song you want to add or next to
Add all
to add all songs to the playlist.
The songs appear under the playlist to the right of the
songs list.
4. Tap
Done
to save the playlist.
Removing Songs from Playlists
1. From a Home screen, tap
Apps
➔
Music Player
.
2. Tap
and select a playlist.
All songs are displayed to the left of the playlist and the
songs in the playlist are displayed on the right, under
the playlist name.
3. Tap
to remove a song from the playlist.
4. Tap
Done
to save the playlist.
Changing the Order of a Playlist
1. From a Home screen, tap
Apps
➔
Music Player
.
2. Tap
Playlists
and select a playlist.
3. Tap
Reorder
to change the order of the songs.
Tap the grid on an entry and drag the entry to a
new position in the list.
4. Tap
Done
to change the order and save the playlist.
For PRA Only, Printing NOT approved by Technical Writing Team

DRAFT
Internal Use Only
Multimedia 136
Playing a Playlist
1. From a Home screen, tap
Apps
➔
Music Player
.
2. Display the
Playlists
library view.
3. Tap
Favorites
,
Most played
,
Recently added
, or tap a
playlist title that you created.
4. Select a song to start playing the playlist at that song.
Deleting a Playlist
1. From a Home screen, tap
Apps
➔
Music Player
.
2. Tap
Playlists
and select a playlist.
3. Tap
Delete
in the Application bar.
4. Tap the box next to a playlist title. A check mark
indicates the playlist is to be deleted.
5. Tap
Remove
➔
OK
to delete the selected playlist.
Changing Music Settings
1. From a Home screen, tap
Apps
➔
Music Player
.
2. Tap
Menu
to display the following options:
• Delete
: Tap the box for any song or album you want to delete or
tap the box for
Select all
to select every song or album. A
check mark indicates the song or album is to be deleted.
Tap
Delete
to delete the selected items.
•Share via
: Share your music by using Group Cast, Bluetooth,
Wi-Fi Direct, Messaging, Gmail, or Email. Select the songs you
want to share and tap
Share
.
• Set as alarm tone
: Choose a song and tap
Set
to use the song
as an alarm tone.
•Settings
: The following settings display:
Advanced
–
Sound settings
: Choose
SoundAlive
and
Play speed
settings.
–
Lyrics
: Display the lyrics of the song, if available.
–
Music auto off
: Set the option Off or set your music to turn off
automatically After 15 mins, After 30 mins, After 1 hour,
After 1 hour 30 mins, or After 2 hours.
For PRA Only, Printing NOT approved by Technical Writing Team

DRAFT
Internal Use Only
137
Music menu
–
Music menu
: Enable or disable the music display options that
appear on the main music screen. A check mark
next to
an option means that it is enabled.
Listening to Music
You can listen to music by using your device’s built-in
speakers, through a wired headset or through a wireless
Bluetooth stereo headset. For more information, refer to
“Bluetooth” on page 154.
Press the
Volume Key
on the side of the device
to activate on-screen volume control, then touch and drag on
the scale to set volume. You can also press the Volume Key
to adjust playback volume.
Playing Music
To play a song:
1. From a Home screen, tap
Apps
➔
Music Player
.
2. Select a song in your library to listen to it.
– or –
While viewing a list of albums or genres, tap the album
thumbnail and then tap a song in the list of songs on
the album.
The song you tap starts to play. The tracks in the
current list play in order until you reach the end of the
list (unless you choose a repeat option). Otherwise,
playback stops only if you stop it, even when you
switch applications.
Accessing the Music Player
If you navigate away from the Music Player application and
music is playing, you can change songs or easily return to
the Music Player:
1. Tap the Music notification icon in the System Bar
(bottom-right of the screen).
2. In the Status Details, tap the song title to display the
Music Player. You can also pause and resume playback
and skip to the next or previous song in the panel. For
more information, refer to “Notifications” on page 32.
For PRA Only, Printing NOT approved by Technical Writing Team
DRAFT
Internal Use Only
Multimedia 138
Music Player Options
Music Player plays
music and other audio files that you copy from
your computer.
1. From a Home screen, tap
Apps
➔
Music Player
.
2. Tap a song or playlist to begin playback.
The music player displays below (portrait mode) or to
the right (landscape mode) of the music listing.
3. Tap the music player to enlarge it and tap the screen to
display the sound and playlist controls.
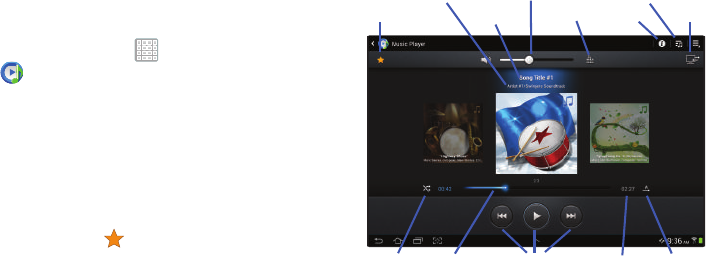
4. During playback, use the sound and playlist controls:
•Favorite
: Tap the star to mark the current song as a
favorite.
•Volume
: Tap to toggle Vibration or Silent mode and Sound
mode, then touch and drag on the scale to set volume. You can
also press the Volume Key on the side of the device to adjust
playback volume.
• SoundAlive
: Tap to view and set SoundAlive options.
•Info
: Tap to view information about the current song.
•List
Mode
: Tap to switch to the list of songs.
• Select Device
: Use AllShare to stream music to another
device. For more information, refer to
“AllShare Play”
on
page 164.
Info
List Mode
Song Title
Artist / Album
Favorite
Volume
SoundAlive
Shuffle Playback Repeat
Progress
Bar Time
Indicators
Select
Device
Controls
For PRA Only, Printing NOT approved by Technical Writing Team
DRAFT
Internal Use Only
139
• Shuffle
: When enabled, songs play in random order. When
disabled, songs play in the order they appear in List view.
•Progress Bar
: Touch and drag the end of the progress bar to
scan forward or backward through the current song.
• Playback Controls
: These buttons control the playback of
songs:
–
Tap to advance to the next song. Touch and hold to
scan forward through the current song.
–
Tap to go back to the previous song. Touch and hold
to scan backward through the current song.
–
Tap to pause playback. Tap to resume playback.
• Time Indicators
: The time indicators show, in minutes and
seconds, how much of the song has played (left) and the length
of the song (right).
• Repeat
: Tap to repeat the current song, repeat all songs, or
disable repeat mode.
Options While Playing a Song
There are various options and controls available while a song
is playing:
1. From a Home screen, tap
Apps
➔
Music Player
, tap a song or an album, and then
a song.
2. Tap the music player to enlarge it.
3. Tap
Menu
to display the following options:
• Add to playlist
: Add the song to a new playlist or an existing
playlist.
• Via Bluetooth
: Play the current song by using a Bluetooth
device.
•Share via
: Share the current song by using Group Cast,
Bluetooth, Wi-Fi Direct, Messaging, Gmail, or Email.
• Set as alarm tone
: Use the current song as an alarm tone.
• Settings
: Displays Music Player settings.
For more information, refer to
“Changing Music Settings”
on page 136.
For PRA Only, Printing NOT approved by Technical Writing Team
DRAFT
Internal Use Only
Multimedia 140
T-Mobile TV
T-Mobile TV is an application that allows you to get live TV
and Video on Demand.
1. From a Home screen, tap
Apps
➔
(
T-Mobile TV
). The T-Mobile Terms and Conditions
page displays.
Note:
A data plan is required to use this feature. Charges may
apply. Please contact your service provider for further
details.
2. Tap
Accept
if you accept the Terms and Conditions.
– or –
Tap
Exit
to close the application.
Note:
T-Mobile TV must be initialized over a cellular network
before it can be used. During this initial registration
process, any current Wi-Fi connections must be
disabled.
3. Tap
Disable Wi-Fi
if you currently have an active Wi-Fi
connection.
4. Follow the on-screen setup instructions.
5. Tap any of the following categories to begin viewing:
Live TV
,
On Demand
,
My Media
,
More Info
,
Browse
, or
Live Channels
.
For PRA Only, Printing NOT approved by Technical Writing Team