Samsung Electronics Co GTY3300 Cellular/ PCS WCDMA/ GSM/ EDGE Module User Manual 4
Samsung Electronics Co Ltd Cellular/ PCS WCDMA/ GSM/ EDGE Module 4
Contents
User Manual 4
80
81
Chapter 3
Settings and Upgrade
Battery
Usage Mode of Samsung Battery Manager•
- The maximum battery mode optimizes the system
operation speed to increase the battery run time, so the
program execution time may get longer.
- If you change the power settings, the properties in Power
Options window will also be changed.
- Complete, install Samsung Battery Manager using the
System Software Media in order to use the general
mode.
Extending the Battery Life (Optional)
The Battery Life Extender is a battery power management
program that enables extending the battery life. Users can change
the settings depending on their requirements.
The Battery Life Extender is optional and may not be supplied
depending on the model.
1 Click Start > All Programs > Samsung > Battery Life
Extender > Battery Life Extender.
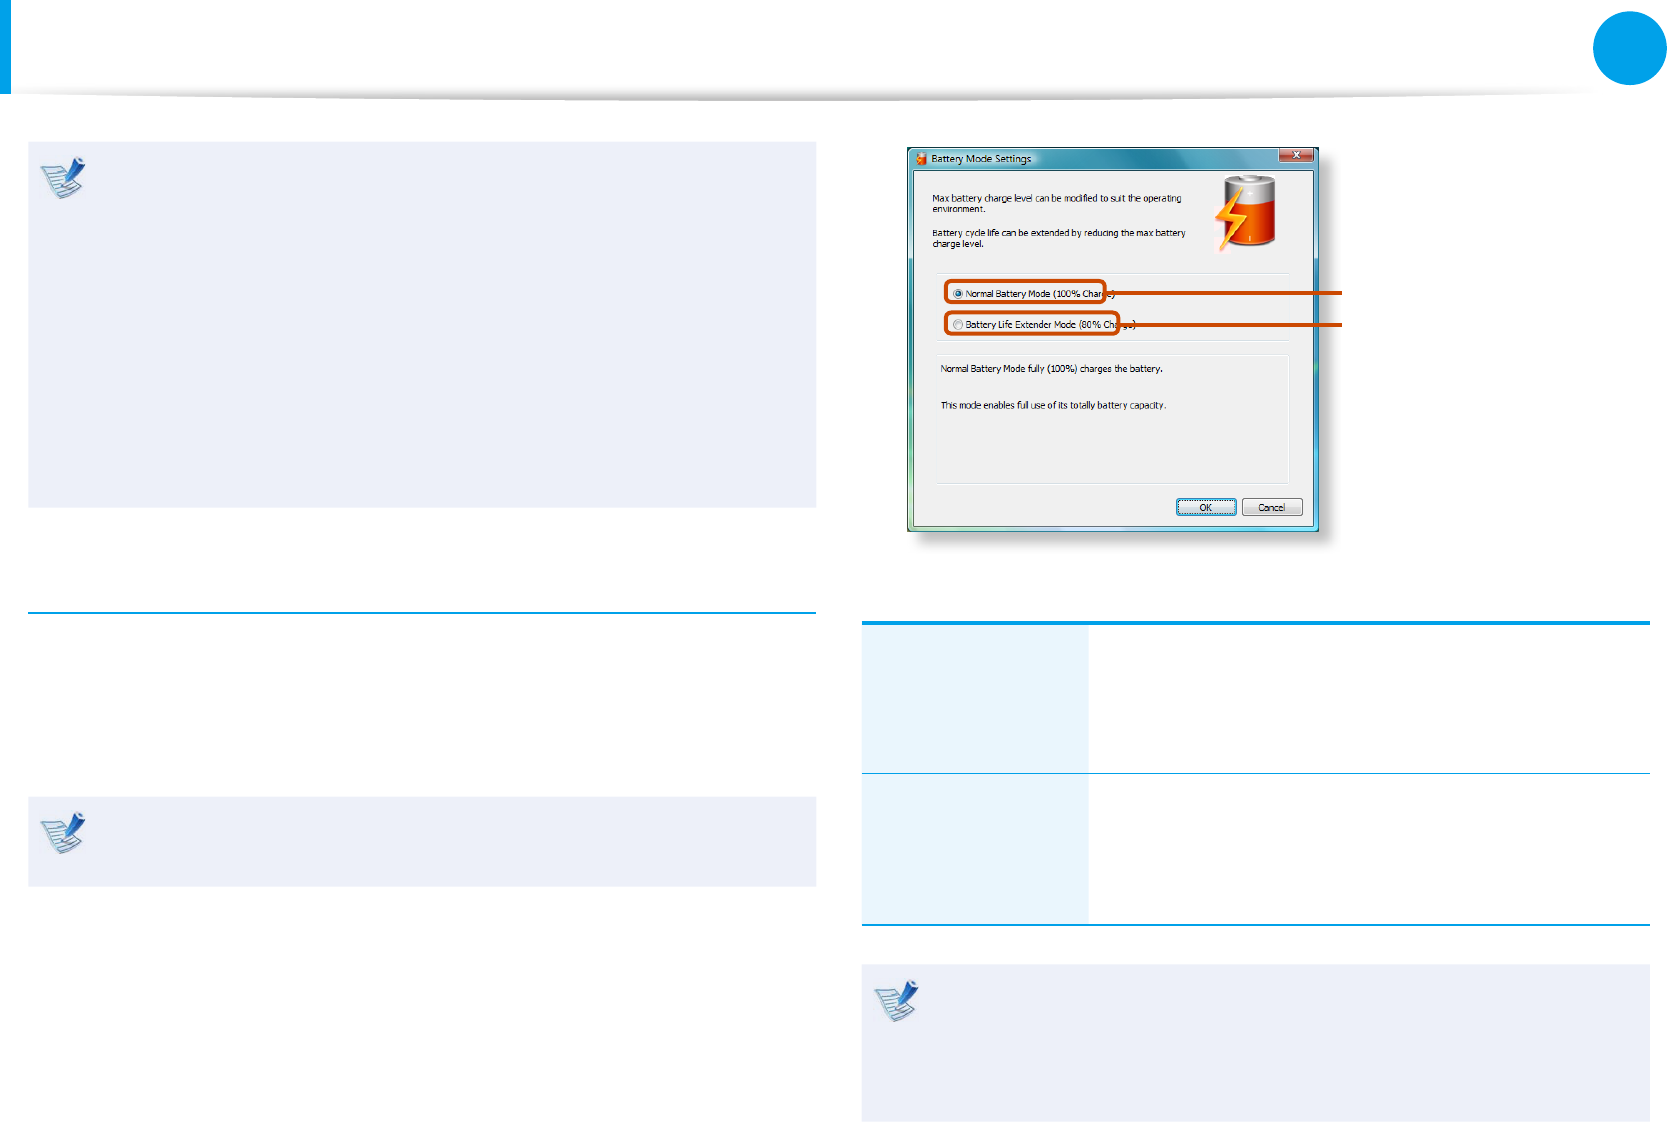
2 When the following screen appears, select a mode and click
the OK button. You can use the battery in the selected mode.
Battery Normal Mode
Battery Life
Extension Mode
(Battery Life Extension Mode)
Battery Normal
Mode
This mode maintains 100% of the battery
charge when using the computer on AC power.
In this case, although the battery use time
increases, the battery life is reduced.
Battery Life
Extension Mode
This mode maintains 80% of the battery charge
when using the computer on AC power. In this
case, although the battery use time decreases,
the battery life is extended.
Press the F2 key when the Samsung logo appears in the
booting sequence to enter the BIOS Setup, select Advanced
> Battery Life Cycle Extension, and set it to Enable. Then
you can use the battery life cycle extension mode.
82
Chapter 3
Settings and Upgrade
Battery
Using the Battery Calibration Function
When charging/discharging the battery repeatedly for a short time
only, the battery usage time may be reduced by the dierence
between the actual battery charge and the remaining charge
display.
In this case, the actual battery charge and the remaining charge
display will be the same by discharging the battery completely
using the Battery Calibration function, and then recharging it
again.
1 Disconnect the AC power adapter after turning o the
computer.
2 Restart your computer and press the F2 button when the
Samsung logo appears, to start the BIOS Setup.
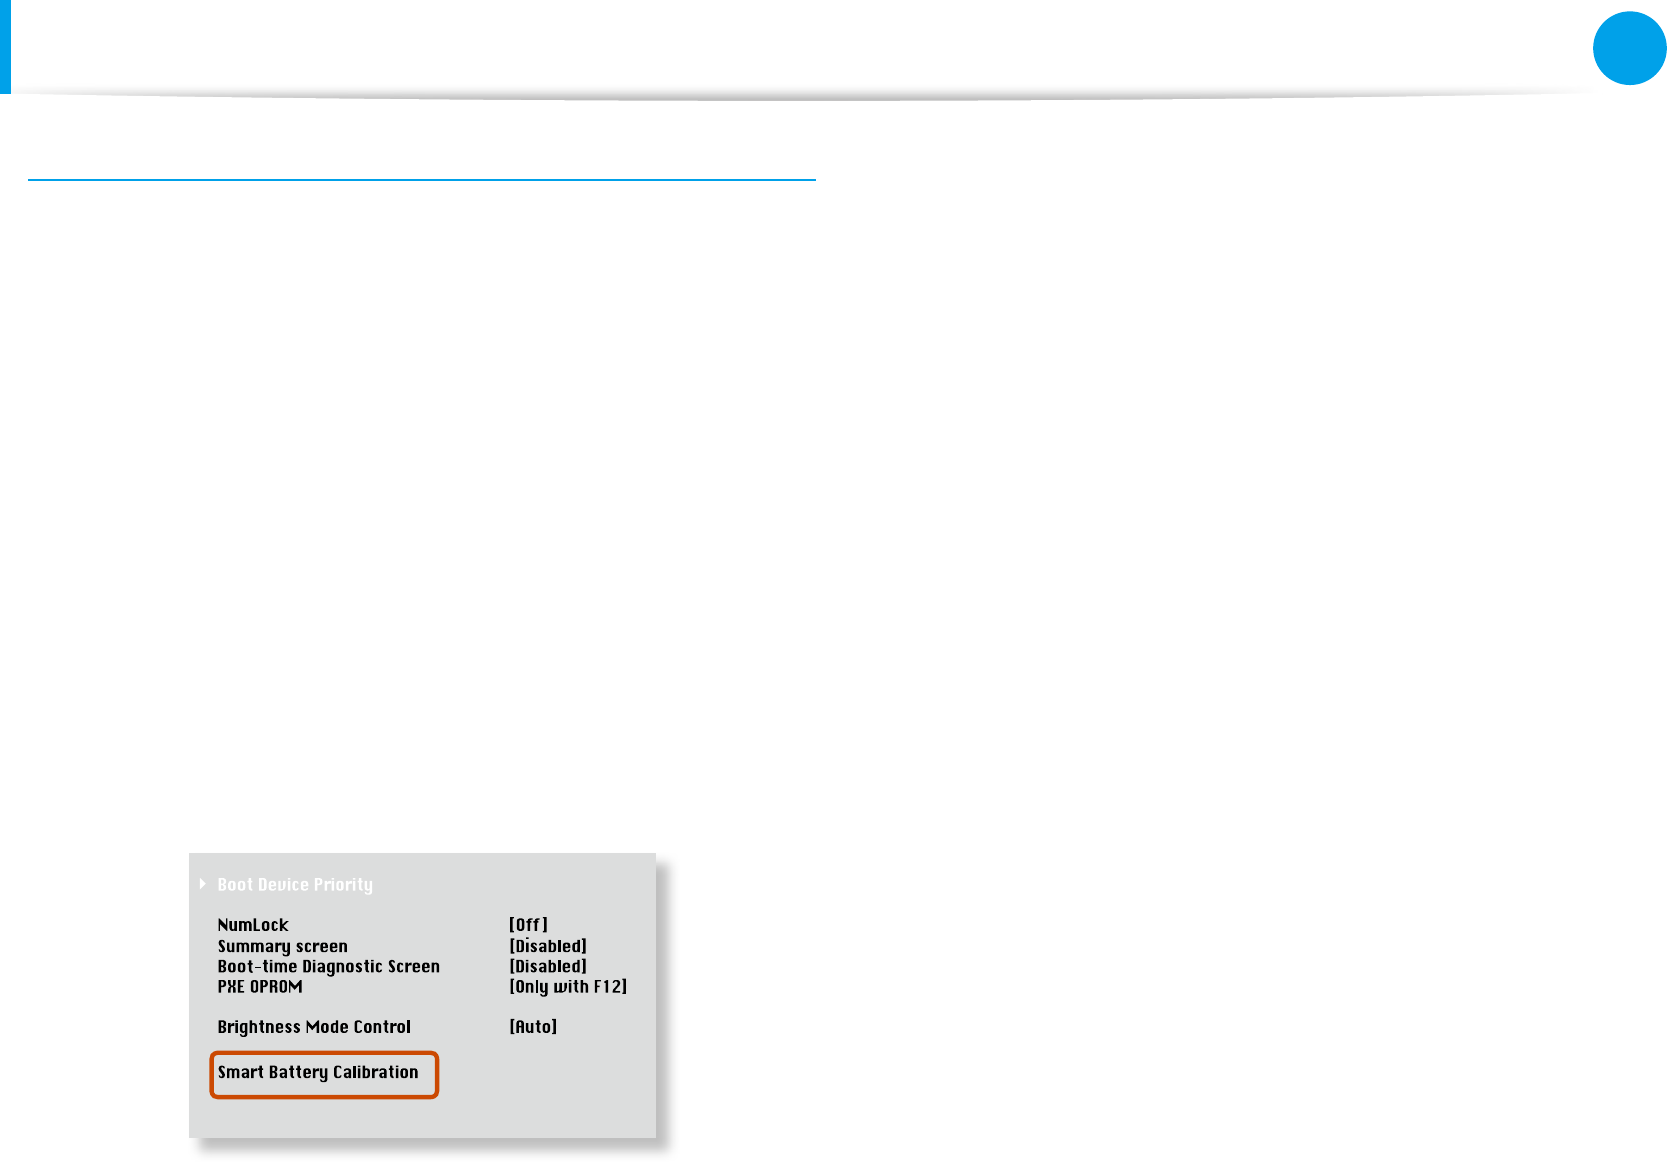
3 Move to the Boot > Smart Battery Calibration item using
the direction keys and press <Enter>.
XXXXXXXX
4 Highlight Yes in the Battery Calibration Conrmation
window and press <Enter>.
The Battery Calibration function is activated and the battery
is forcefully discharged. To stop the operation, press the
<Esc> button.
This operation requires 3~5 hours depending on the battery
capacity and the remaining battery charge.
82
83
Chapter 3
Settings and Upgrade
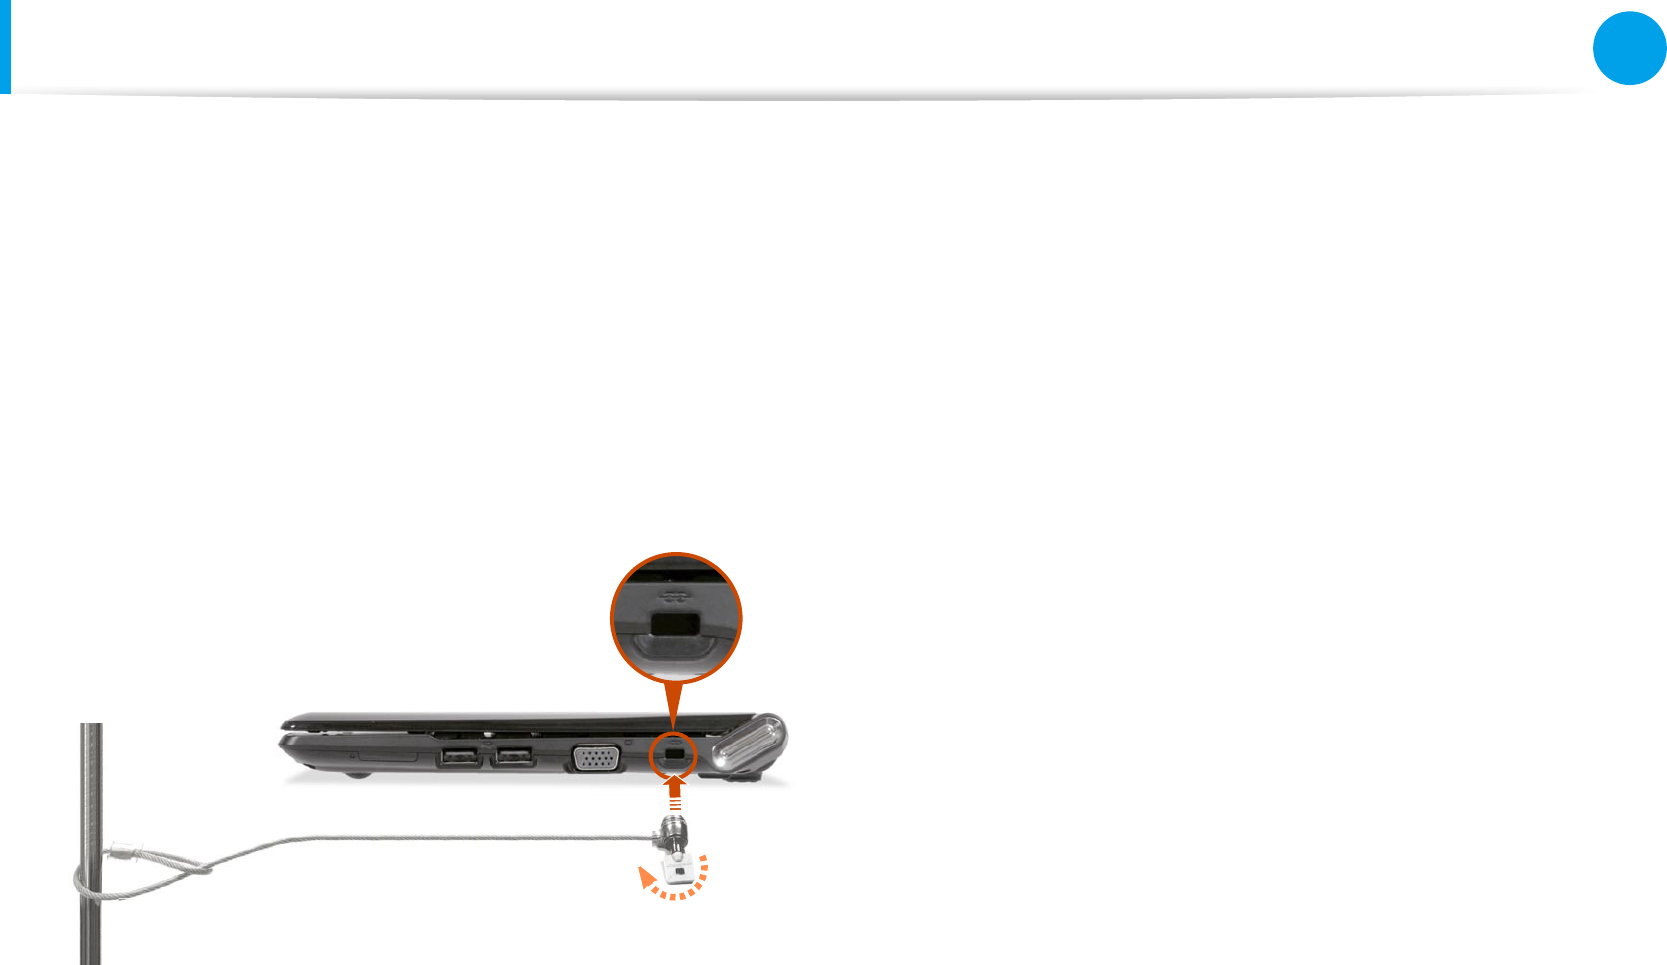
Using the Security Lock Port
You can connect a Kensington lock to the Security Lock port to
prevent your computer from being stolen when you have to use
the computer in a public place.
To use this feature, you have to purchase the Kensington lock
additionally. To use the Kensington lock, refer to the product
manual.
Tie the Kensington lock cable to a xed object and install the
other end of the cable to the Security Lock port.

Chapter 4.
Troubleshooting
Computer Backup/Restoration
(Samsung Recovery Solution /
For supported models only) 85
Browse Q&A 96
Q & A 98
Display Related 98
Sound Related 100
Wireless Network (WLAN) Related 102
Game and Program Related 102
Bluetooth (Optional) 104
Easy Content Share Related 106

85
Chapter 4
Troubleshooting
Computer Backup/Restoration
(Samsung Recovery Solution / For supported models only)
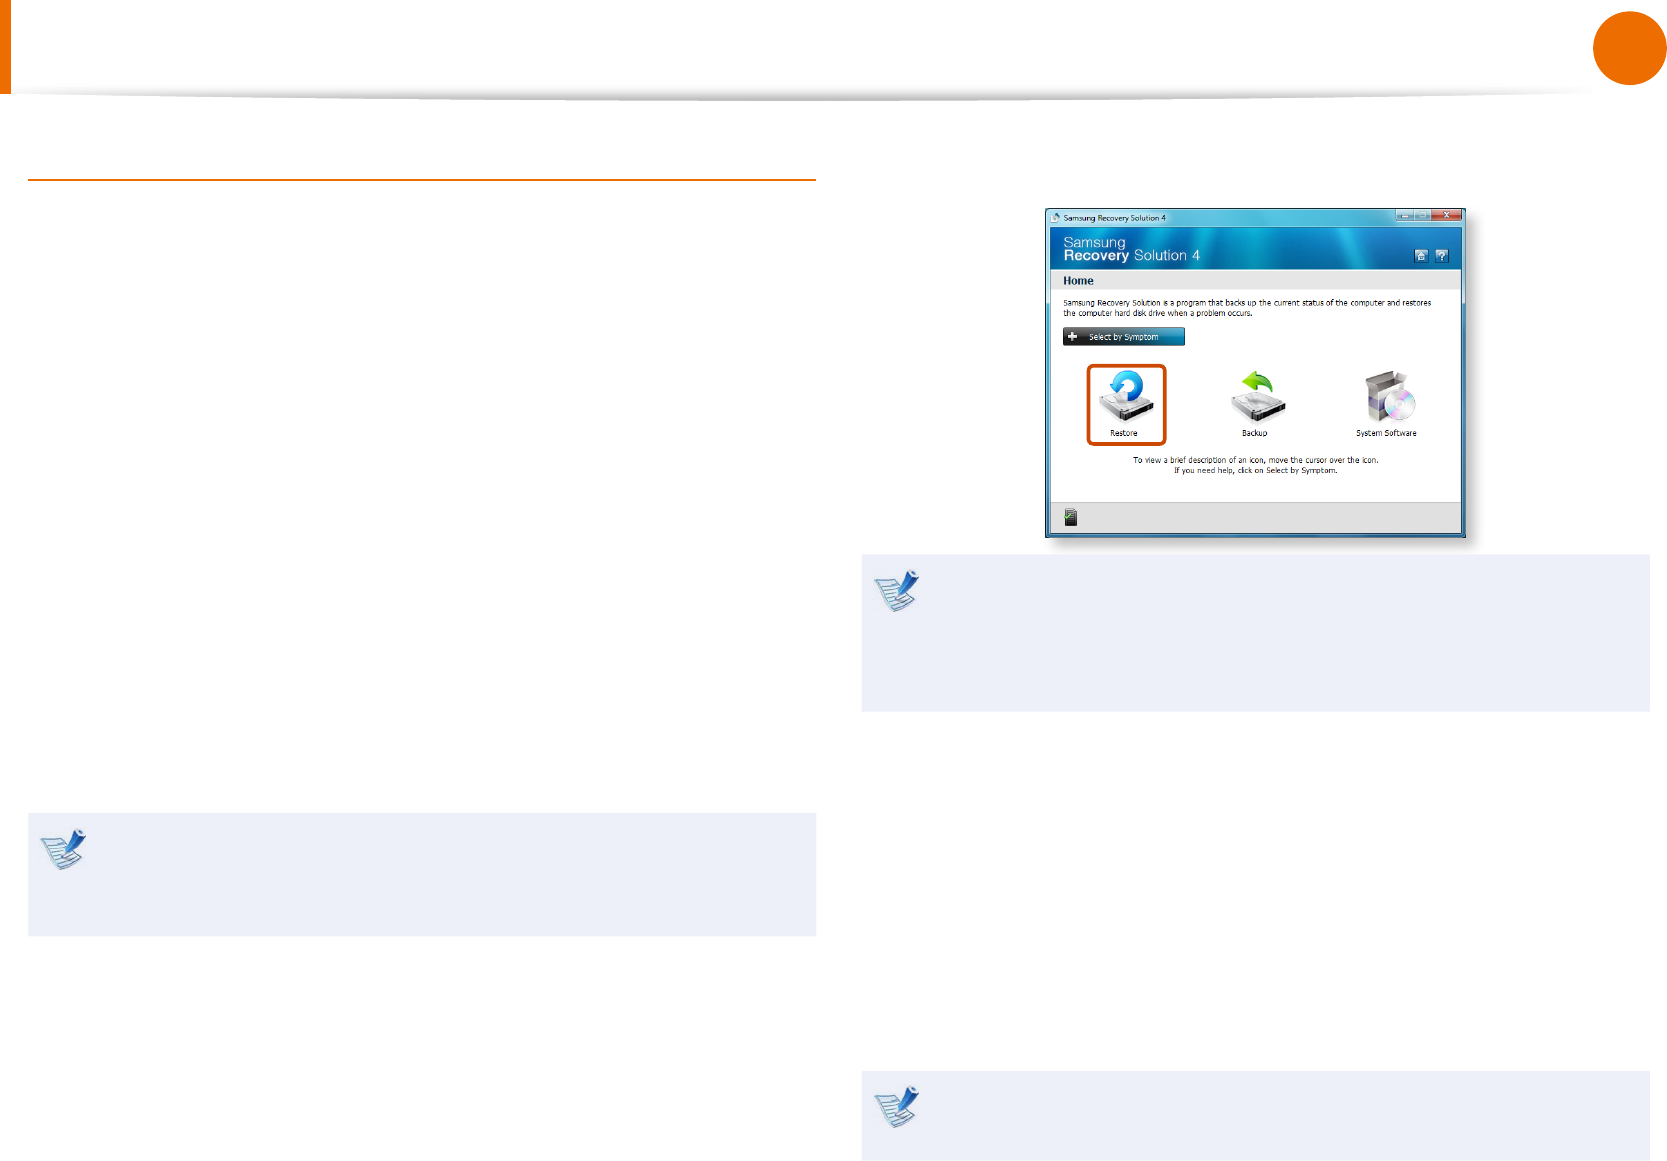
Samsung Recovery Solution is a program that enables restoring
or backing up the hard disk drive for when a problem occurs with
the computer.
Samsung Recovery Solution may not be provided or the •
version may dier depending on the model. In addition,
some functions may not be provided or may dier
depending on the version.
For more information on using Samsung Recovery
Solution, please refer to the online help of the program.
The screen images in this document may dier from actual •
product.
If your computer does not have an internal ODD, you need •
an external ODD connected to your computer to use the
Backup Function or Restore Function using DVDs.
The System Software function may not be provided •
depending on the program version.
Samsung Recovery Solution Functions
Backup/Restore Functions
Backup Function
Backs up drive C or required folders and les.
Complete Backup•
Backs up drive C.
Data Backup•
Backs up important folders and les.
A problem
occurs
V I R U S
Restore Function
Restores major Windows les, drive C, or
folders and les to the previous state.
Basic Restore•
Restores only major Windows les in a short
time.
Complete Restore•
Restores drive C to the previous, normal
state.
Data Restore•
Restores important les or folders to the
previously backed up state.

86
Chapter 4
Troubleshooting
System Software Functions
Samsung Recovery Solution provides system software so that
you can reinstall or copy the device drivers and system software
necessary for normal operations onto a separate storage device.
Restore Function
Not only can you use Samsung Recovery Solution when Windows
is running, but also when you are unable to boot up into Windows.
Let’s learn how to use Samsung Recovery Solution.
Optional functions such as Initial State Image, Initial Status Backup,
and Partitioning are only available in some models.
Partition Setup & Initial Status Backup
If you turn your computer on for the rst time, the Initial Status
Backup function is performed after registering Windows. This
function saves an image of the Initial Status of the C drive to a
secure location so that users can restore the computer to the
Initial Status using the Complete Restore function. An Initial Status
Backup is only performed once immediately after the computer is
purchased.
1 If you turn the power on for the rst time, the Register
Windows screen appears. If you register Windows according
to the instructions on the screen, the computer will be
restarted.
2 After the computer has been restarted, the Partition Setup
screen appears.
To resize the C and D drives, adjust the partition size using
the slide bar and the click Next.
The Partition Setup function is only available when the
computer is turned on for the rst time and will not
be available afterwards. Once you have completed the
partitioning, it cannot be resized. Partition the disk carefully.
3 The Initial Status Backup screen appears.
To continue the Initial Status Backup, click Restart Now. The
computer will restart.
4 The Initial Status Backup is performed to backup the initial
status of the C drive to a secure location. This backup image
is used for the Complete Restore function that restores your
computer to the initial status.
5 When the Initial Status Backup is complete, restart Windows.
Computer Backup/Restoration
(Samsung Recovery Solution / For supported models only)
86
87
Chapter 4
Troubleshooting
Restoring the computer
Restore is a function that enables restoring the computer to a
saved point when the computer was purchased or a user-saved
point.
The Restore function provides the Basic Restore and Complete
Restore options.
1 – When Windows is running:
Click Start > All Programs > Samsung > Samsung
Recovery Solution > Samsung Recovery Solution.
– When Windows does not start:
Turn the computer on and press the F4 key when the boot
screen (SAMSUNG logo) appears. After a moment, the
computer boots up in Restoration mode and the Samsung
Recovery Solution screen appears.
For computers supporting the touch screen function, the
touch screen function does not work during Restore Mode. In
this case, please use the touchpad or mouse.
2 If the initial menu screen appears, click Restore.
If you click Select by Symptom, the Select by Symptom
menu appears. If you select a symptom, a recommended
restoration option will blink. Click the restoration option to
continue.
3 Select either Basic Restore or Complete Restore from the
Restore menu.
● A Basic Restore restores the major Windows les only
while maintaining the user conguration and data on the C
drive in a short time.
● A Complete Restore deletes the entire C drive and then
restores the contents of the C drive.
Run Complete Restore if the computer does not work even
after Basic Restore has been completed.
Computer Backup/Restoration
(Samsung Recovery Solution / For supported models only)

88
Chapter 4
Troubleshooting
To restore the computer to the initial state, click Computer
Initial State and perform the restoration process according
to the instructions that appear on the screen.
In the Advanced menu, you can change the size of the hard
drive partitions (e.g. C: and D:).
Make sure to backup your data in advance, as all data will •
be deleted after the partition size is changed.
The • Advanced menu is only activated when the computer
boots up in the restoration area. (by pressing the F4 key
during the booting sequence.)
Since a Complete Restore deletes all user data as well
as additionally installed programs, please backup your
important data rst using the Data Backup function, before
running Complete Restore.
4 The computer boots up into restoration mode and the
restoration progress message appears. If you click OK, the
restoration begins. The restoration may take some time,
please wait for a moment.
5 When the ‘Restart the System’ message appears after the
restoration is complete, click OK to restart the system.
Make sure that the power cord is connected while the
restoration is in process. The rst time the computer boots
up after a Complete Restore has been performed, the speed
of the boot process may be slowed down due to the system
optimization process. At this time, do not shut the computer
down by force.
Computer Backup/Restoration
(Samsung Recovery Solution / For supported models only)
88
89
Chapter 4
Troubleshooting
Backup Function
Complete Backup/Restore
A Complete Backup saves the complete image of the C drive
onto another drive or DVD. A Complete Restore restores the
image le saved by the Complete Backup onto the C drive.
► Complete Backup
If you run Complete Backup using a DVD, you can restore the
computer even when a problem occurs with the hard disk or
when the restoration area is removed.
1 In the Samsung Recovery Solution start screen, click Backup.
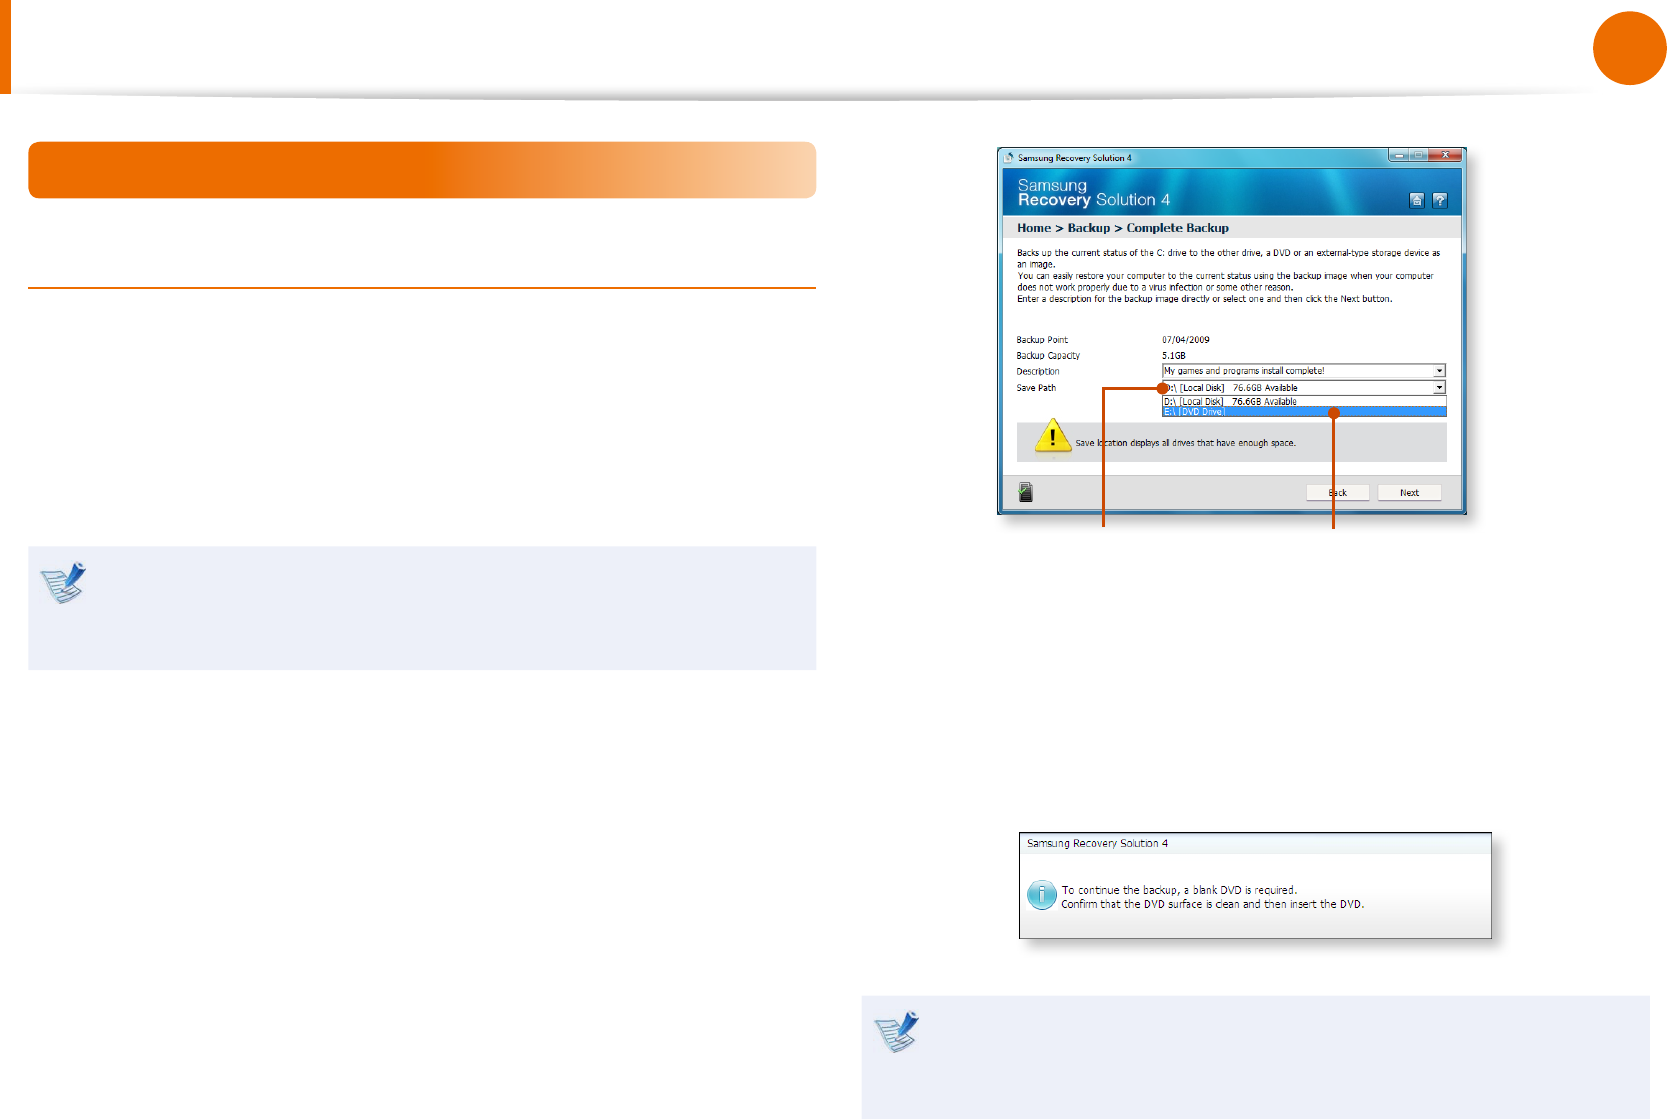
2 Click Complete Backup in the backup menu.
3 Enter a description for the backup regarding the current
computer status in the Description eld so that you can easily
recognize it later, and specify the Save Path. If your computer
has a DVD-Writer, you can specify the DVD drive as the Save
Path.
Select Drive D. Select the DVD drive.
4 If you click the Next button, the system restarts in restoration
mode and the Complete Backup begins. If you have
selected the DVD drive as the Save Path, the “Insert a blank
DVD” message appears. Insert a blank DVD and click the OK
button.
Samsung Recovery Solution supports DVD+R, DVD-R,
DVD+RW, and DVD-RW, but does not support CD-R, CD-RW,
DVD-RAM, DVD-DL (Dual Layer), HD-DVD, and Blu-Ray.
Computer Backup/Restoration
(Samsung Recovery Solution / For supported models only)
90
Chapter 4
Troubleshooting
5 The Complete Backup begins. If multiple DVDs are required,
the expected number of DVDs is displayed in the progress
screen. Whenever burning a DVD is completed, the “Insert
the next DVD” message will appear. Continue the backup
according to the instructions.
6 When the ‘Restart the System’ message appears after the
backup is complete, click OK to restart the system.
► Complete Restore
1 – When backing up onto DVD
Turn the computer on and insert the backup DVD into the
DVD drive.
If there are multiple backup DVDs, insert the rst DVD.
– When backing up to another drive
Proceed to Step 2.
2 When the Samsung Recovery Solution start screen appears,
click Restore and then click Complete Restore.
3 Select a Complete Backup restoration point in the
restoration point selection screen and click the Next button.
The system is restarted.
Computer Backup/Restoration
(Samsung Recovery Solution / For supported models only)
90
91
Chapter 4
Troubleshooting
4 The restoration progress message appears after the computer
boots up in restoration mode. If you click OK, the restoration
begins.
If multiple DVDs have been used for a Complete Backup,
whenever burning a DVD is completed, the “Insert the next
DVD” message will appear.
5 When the ‘Restart the System’ message appears after the
restoration is complete, click OK to restart the system. The
Complete Restore has been completed.
Data Backup/Restore
Data Backup enables you to save specic les or folders onto
another drive or DVD. Data Restore enables you to restore data
using the data saved by a Data Backup when data is lost. This
guide describes the Backup and Restore procedures on the basis
of backing up and restoring by using DVD.
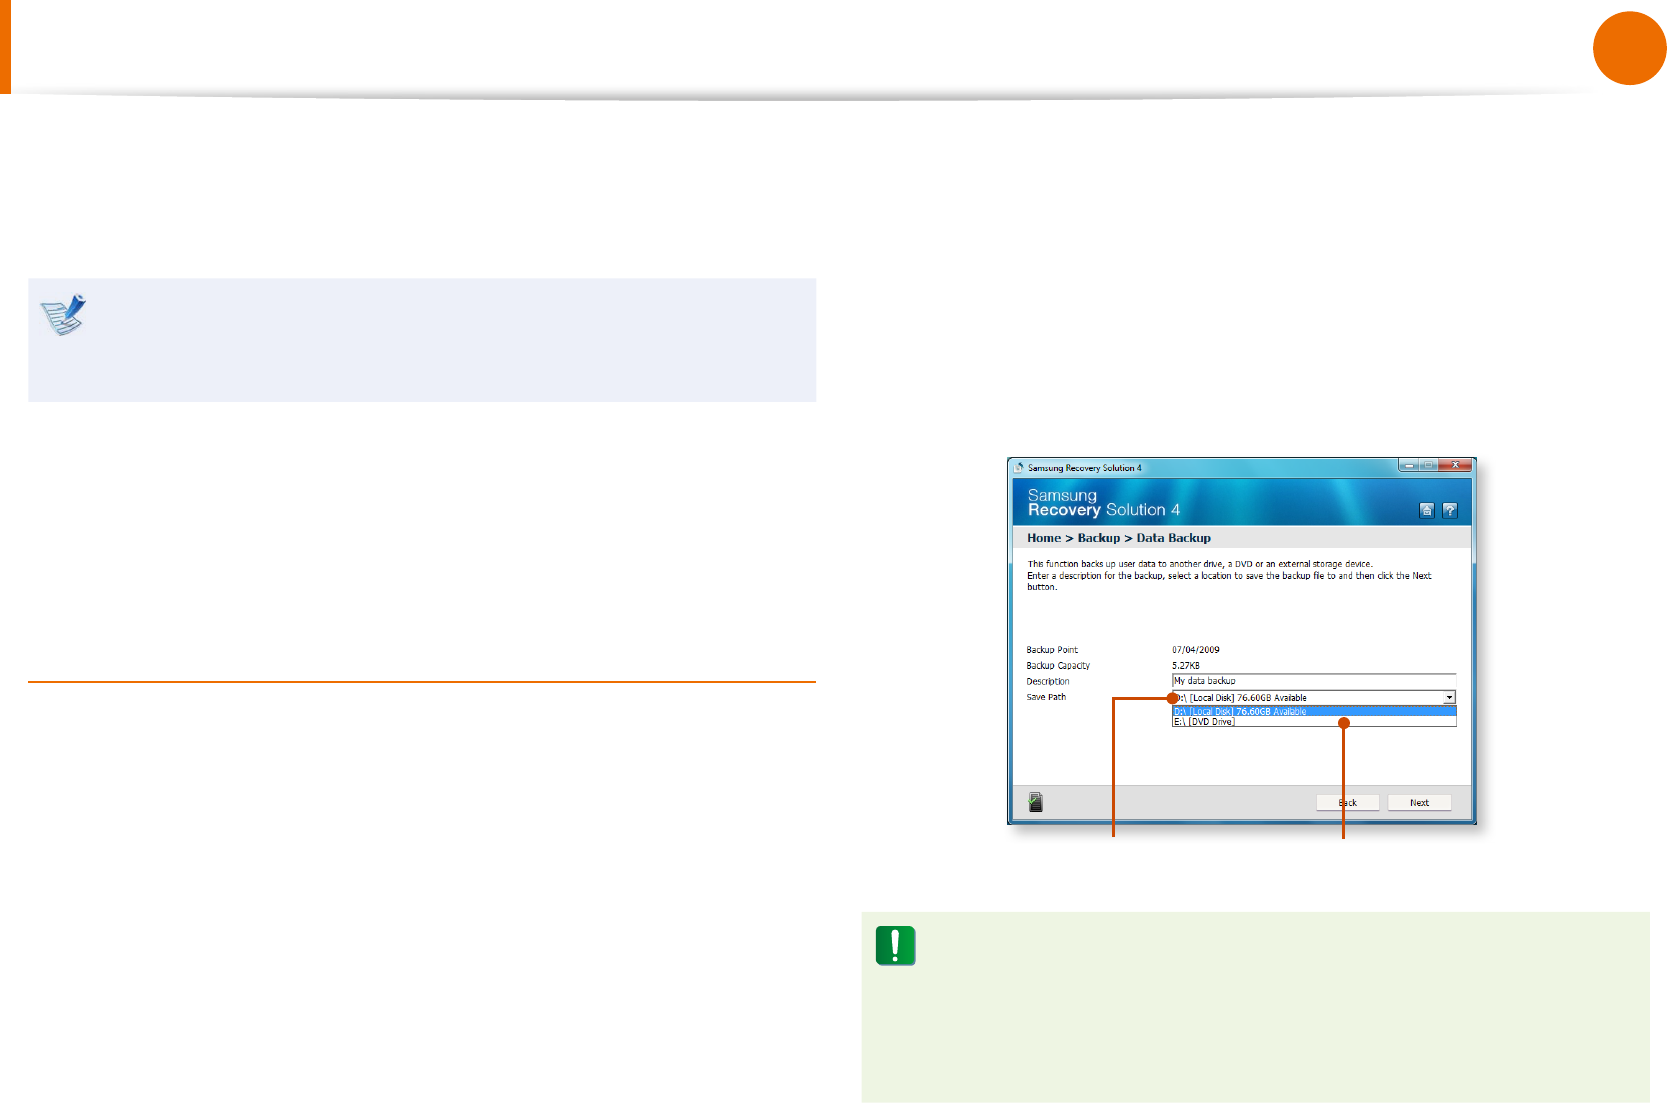
► Data Backup
1 When the Samsung Recovery Solution start screen appears,
click Backup and then click Data Backup.
2 In the data selection screen, select either Basic Selection or
Select from all, select a folder or le to be backed up, and
then click the Next button.
3 Enter a description for the backup in the Description eld
so that you can easily recognize it later and specify the Save
Path. If your computer has a DVD-Writer, you can specify the
DVD drive as the Save Path.
Select Drive D. Select the DVD drive.
If you have specied a hard disk drive or a removable disk as
the Save Path, the SamsungRecovery\SamsungData folder
is created on the corresponding drive (e.g. D:\) and the data
is saved to the folder. Take care to not delete the folder by
mistake or on purpose.
Computer Backup/Restoration
(Samsung Recovery Solution / For supported models only)
92
Chapter 4
Troubleshooting
4 If you click the Next button, the Data Backup begins. If you
have selected the DVD drive as the Save Path, the “Insert a
blank DVD” message appears. Insert a blank DVD and click
the OK button.
5 The “Backup is completed” message appears.
► Data Restore
1 – When backing up onto DVD
Turn the computer on and insert the backup DVD into the
DVD drive.
– When backing up to another drive
Proceed to Step 2.
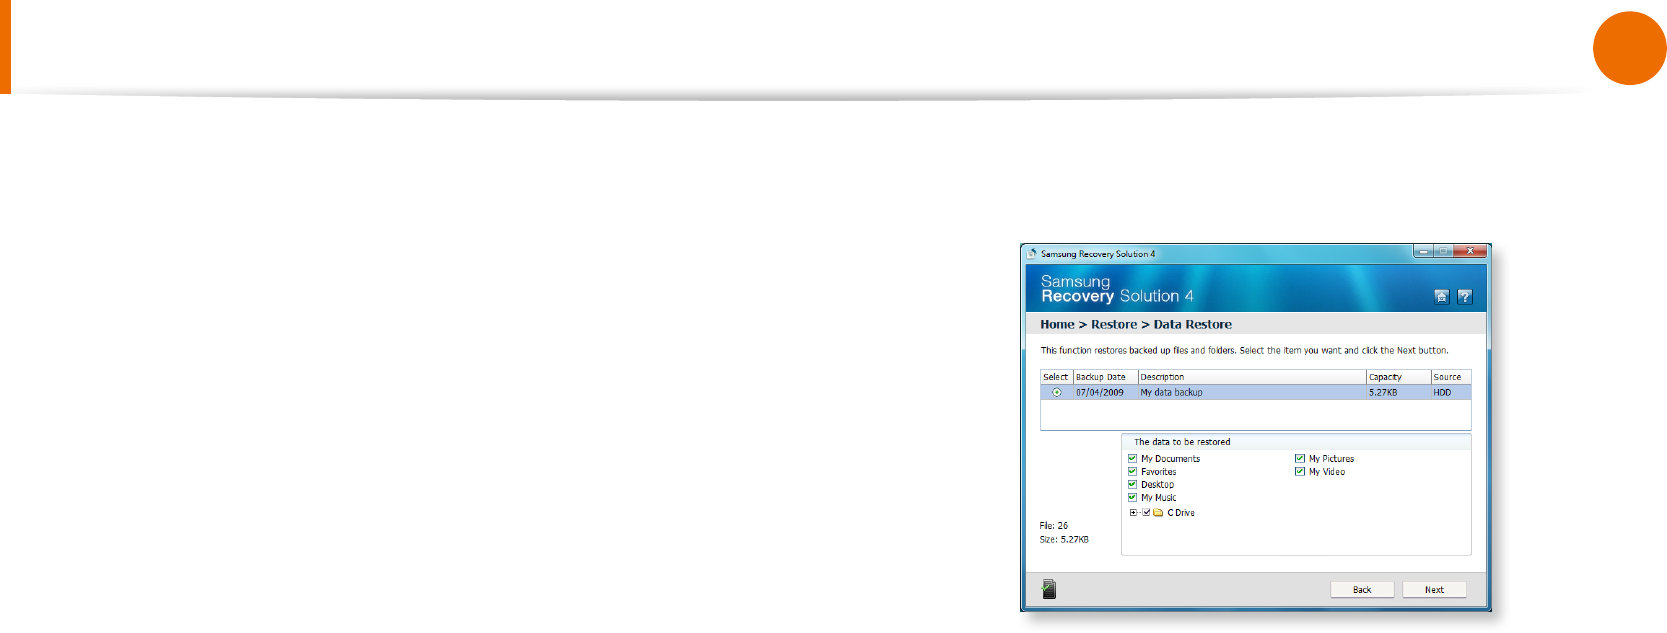
2 When the initial menu screen appears, click Restore and then
click Data Restore.
3 Select a backup item to be restored in the backup list and
click the Next button.
4 Select a folder for the restoration and click the Next button.
Data Restore begins.
5 When Data Restore is completed, check if the data has been
restored to the specied folder.
Computer Backup/Restoration
(Samsung Recovery Solution / For supported models only)
92
93
Chapter 4
Troubleshooting
System Software Function
Using System Software
The System Software function is a function that enables you to
reinstall device drivers and System Software Programs or back up
those programs.
The system software function is supported by Samsung
Recovery Solution version 4 or later. Therefore, the
function may not be supported depending on the version.
The System Software Installation Function only works in
Microsoft Windows.
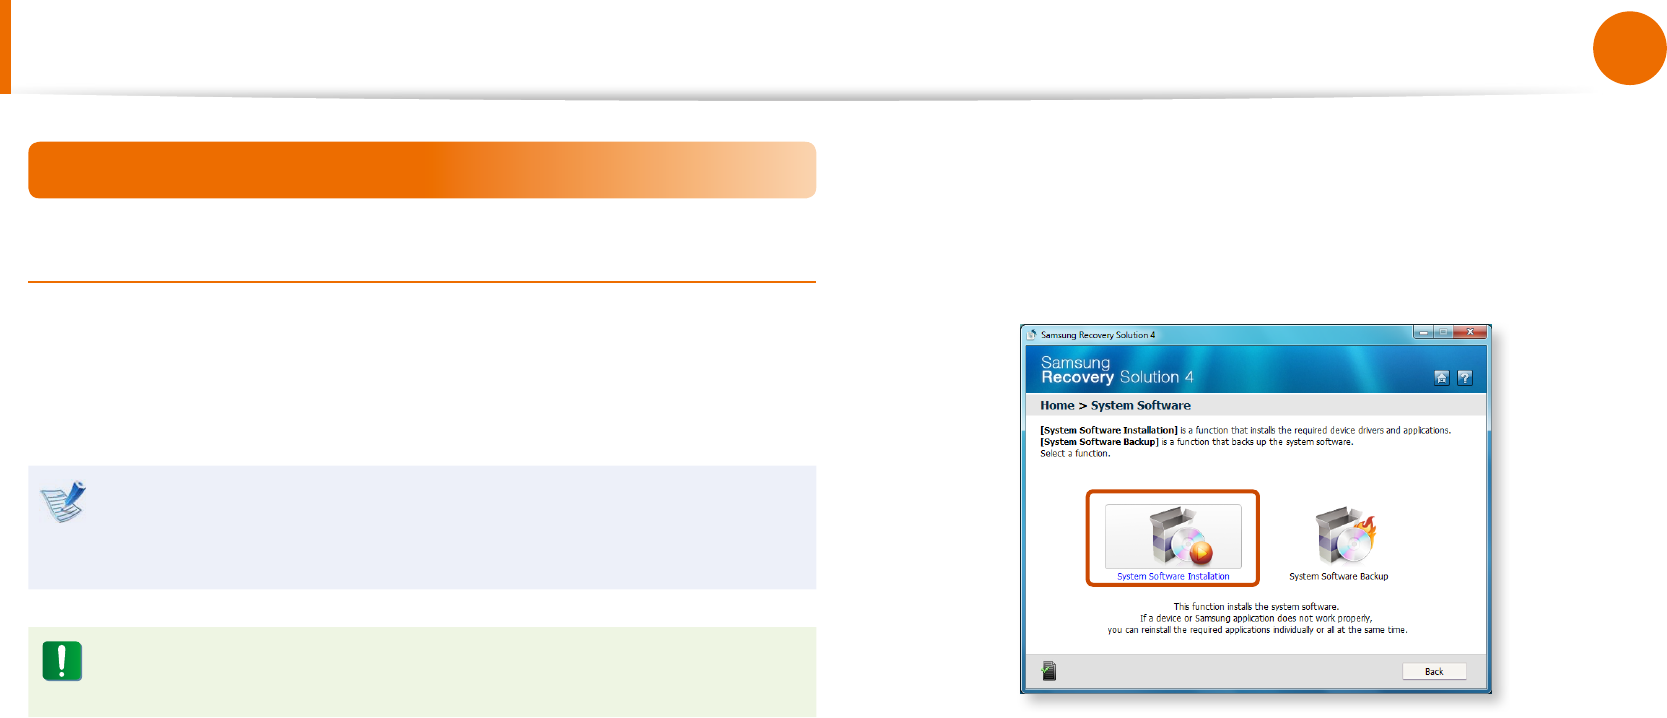
► Installing System Software
1 When the initial menu screen appears, click System Software
> System Software Installation.
2 When the Samsung System Software screen appears, check
all the device drivers and application programs you want to
install and then click Install Now.
3 After the installation is complete, the computer will restart.
Computer Backup/Restoration
(Samsung Recovery Solution / For supported models only)
94
Chapter 4
Troubleshooting
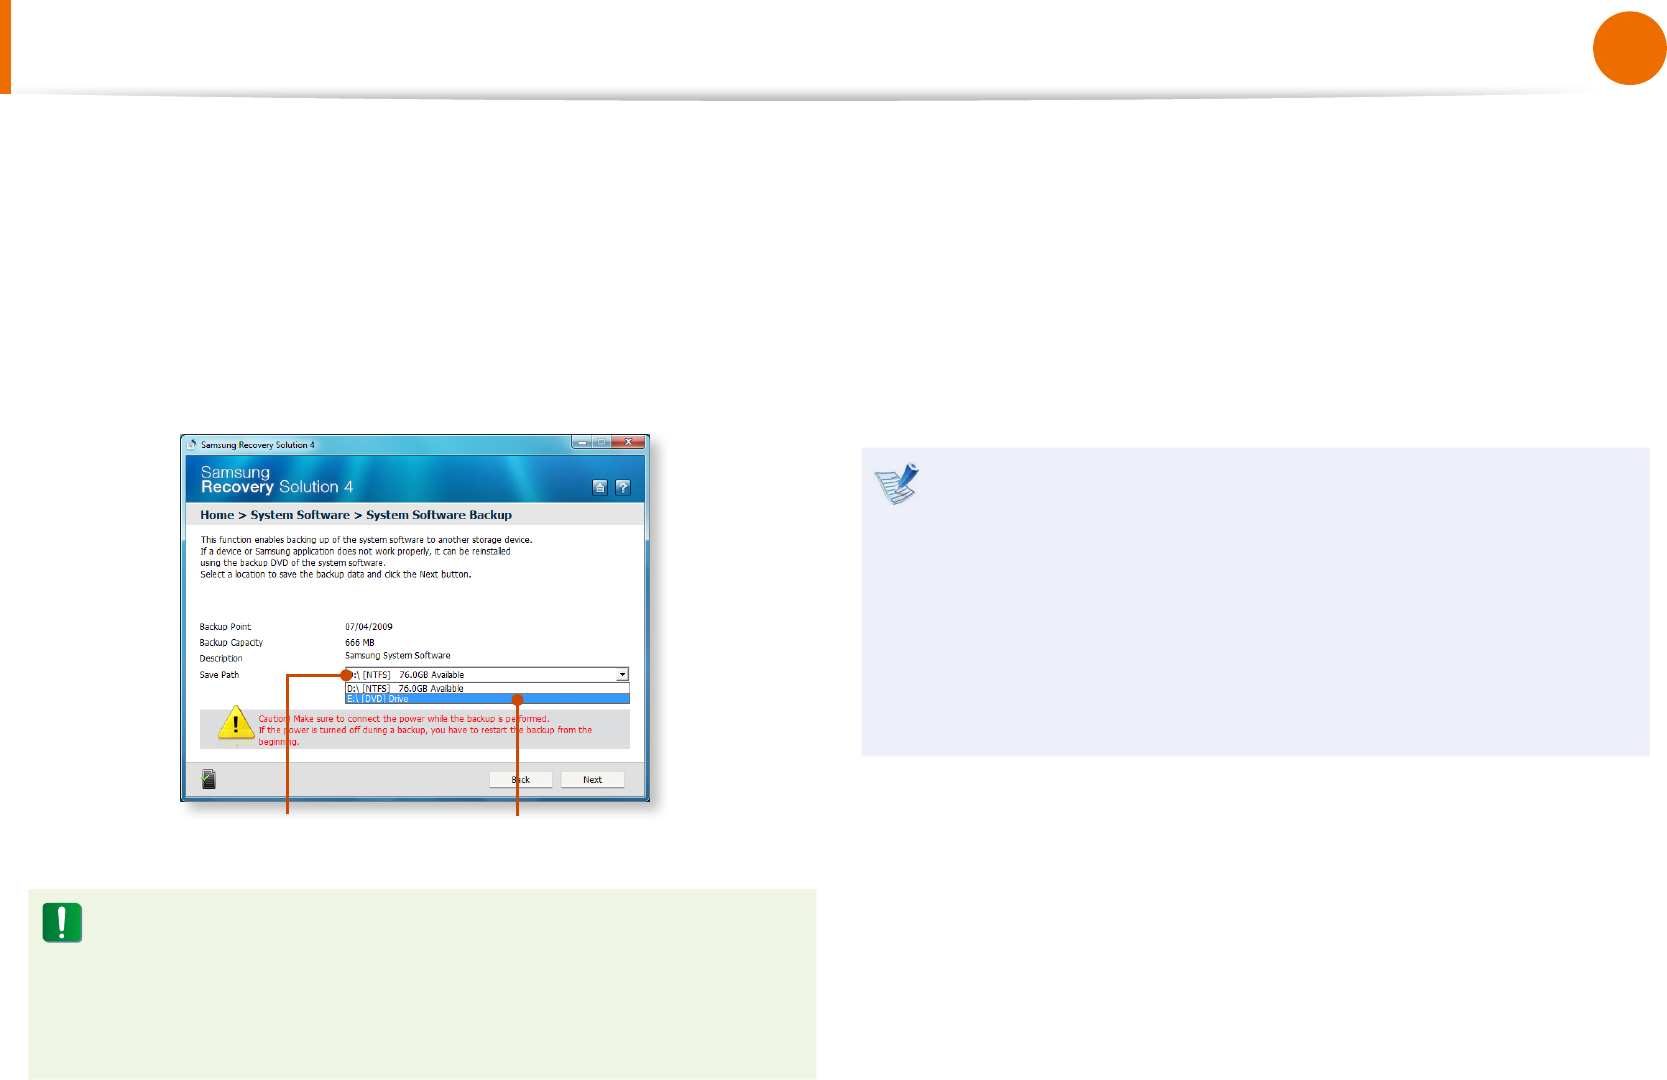
► System Software Backup
1 When the initial menu screen appears, click System Software
> System Software Backup.
2 Specify the Save Path. If your computer has a DVD-Writer, you
can specify the DVD drive as the Save Path.
Select Drive D. Select the DVD drive.
If you have specied a hard disk drive or a removable disk as
the Save Path, the SamsungSoftware folder is created on
the corresponding drive (e.g. D:\) and the system software
programs are saved to that folder. Take care to not delete the
folder.
3 If you click the Next button, the Software Backup begins. If
you have selected the DVD drive as the Save Path, the “Insert
a blank DVD” message appears. Insert a blank DVD and click
the OK button.
4 After the backup, the System Software Backup is
completed message appears.
If you want to install the System Software Programs backed •
up on the drive, run the SoftwareMediaXX.exe le in the
SystemSoftware folder.
When installing System Software Programs from the •
backed-up DVD, insert the DVD and follow the System
Software Installation directions.
To delete Samsung Recovery Solution, refer to the Help •
section of the program.
Computer Backup/Restoration
(Samsung Recovery Solution / For supported models only)

94
95
Chapter 4
Troubleshooting
Recovery Solution Representation (Optional)
What is a Recovery Area?
Samsung computers have an additional partition to recover •
computers or save backup les.
(Only for models with the Samsung Recovery Solution.)
This partition is called a Recovery Area and it includes a recovery
image that comprises of the OS and application programs.
You can either double-click the Samsung Recovery Solution icon •
on the desktop or press F4 while booting the computer to enter
the Recovery Area. Then you can back up the present computer
state or recover the computer from backed up images.
For deleting the Recovery Area, you need to use an additional •
Recovery Area Removal Tool. After deleting the recovery area,
you can use the newly created partition for other uses, such as
for saving personal data. Be careful that once the recovery area is
deleted, the Samsung Recovery Solutions will not work anymore.
The capacity representation of the hard disk drive(HDD)
in Windows is dierent from the product specications.
The capacity of the storage device (HDD) of the manufacturer is •
calculated assuming that 1KB=1,000 Bytes. However, the operating
system (Windows) calculates the storage device capacity assuming
that 1KB=1,024 Bytes, and therefore the capacity representation of
the HDD in Windows is smaller than the actual capacity.
This is due to the dierence in capacity calculation and does
not mean the installed HDD is dierent from the product
specications.
The capacity representation in Windows may be smaller than the •
actual capacity because some programs occupy a certain area of
the HDD outside of Windows.
For models with Samsung Recovery Solution, the HDD capacity •
representation in Windows may be smaller than the actual
capacity because Samsung Recovery Solution uses a hidden area
of about 5~20GB of the HDD to save the recovery image, and
that hidden area is not counted towards the total size available to
Windows.
The size of Samsung Recovery Solution varies by models because
of the dierent size of applied programs.
Computer Backup/Restoration
(Samsung Recovery Solution / For supported models only)

96
Chapter 4
Troubleshooting
Display Related
1-1
1-2
1-3
1-4
1-5
1-6
1-7
1-8
The LCD screen is too dark or too bright.
In the following cases, the screen blinks or there is noise for
a short time.
When I connect a projector, and change the settings to
display the screen image on both the LCD and the projector
by pressing the + , the screen is not displayed
properly.
When I connect a projector, the taskbar at the bottom of the
screen is not displayed on the projector.
The shortcut icons are not displayed on the screen even if I
press the shortcut key.
I have connected a monitor(or projector) to the computer,
but the colors on the monitor are abnormally displayed.
I am trying to view the screen through a TV by connecting
it through the HDMI port, but the edge of the screen is not
displayed.
I cannot congure the Image Sharpness in the NVIDIA
Control Panel of <NVIDIA Graphics>.
Sound Related
2-1
2-2
2-3
2-4
How can I congure the sound for video or audio chatting?
I cannot hear my voice with the internal microphone.
Sound is recorded abnormally when I select the Acoustic
Echo Cancellation option, connect an external microphone,
select the Play Device > Speaker > Level tab and then
deselect Mute for the Microphone.
How can I congure the Recording Mixer while broadcasting
music in WinAMP?
(for the Windows XP operating system only)
Wireless Network (WLAN) Related
3-1 I cannot nd an AP.
Browse Q&A
96
97
Chapter 4
Troubleshooting
Game and Program Related
4-1
4-2
4-3
4-4
4-5
4-6
4-7
4-8
4-9
The video stops playing in some games.
The image is broken in some games.
When I run a game immediately after installing it, the game
does not run.
The + key combination does not work.
The + key combination does not work or displays
the screen abnormally during a game.
The game speed is too slow or too fast (Windows XP only)
Some part of the screen is cut or displayed in black in some
games.
The screen is displayed abnormally in some games.
The battery does not charge when the charge level is
96%~99%.
Bluetooth (Optional)
5-1
5-2
5-3
How to view the Bluetooth help information.
When no headset is found or cannot be connected
Usage Instructions
Easy Content Share Related
6-1
6-2
6-3
6-4
6-5
No connected device is shown in Easy Content Share.
My TV which has been used successfully with Easy Content
Share is suddenly not shown in the list.
Subtitles are not displayed when viewing videos on my TV.
No screen is displayed when I try to view a video on my TV.
Do only the PC and TV have the DLNA function?
Browse Q&A

98
Chapter 4
Troubleshooting
Q & A
This section provides information on possible problems, solutions
and other references for using the system.
Since these descriptions are written on the basis of the •
latest operating system, Windows 7, some of the content
and the gures of the descriptions may dier depending
on the operating system.
Since the procedures for other Windows operating
systems are similar, use the computer referring to these
descriptions.
The path may dier depending on the operating system.•
Display Related
Q
The LCD screen is too dark or too bright.
A Turn the LCD backlight on or adjust the LCD brightness.
Press + to turn the LCD backlight on or
press + or + to adjust the LCD brightness.
Q
In the following cases, the screen blinks or there is noise
for a short time.
Click the Graphics Related tab, Change Resolution,
Change Display Device, Remove the AC Adapter, Restart
the System, Change Power Scheme.
A This may happen while the video driver is examining the
connected device.
While the detection process is busy, any connected display
devices may blink or some noise may occur.
Q
When I connect a projector, and change the settings
to display the screen image on both the LCD and the
projector by pressing the + , the screen is not
displayed properly.
A Press the + keys again.
If the problem continues even after pressing the key
combination, this is because the current resolution is too high
and is not supported by the projector. In this case, change the
resolution to 1024x768 pixels.

98
99
Chapter 4
Troubleshooting
Q & A
Q
When I connect a projector, the taskbar at the bottom of
the screen is not displayed on the projector.
A This occurs because a WXGA LCD supports a resolution of
1280×800 pixels but the resolution is not supported by the
projector. In this case, change the resolution to 1024x768
pixels (recommended).
Q
The shortcut icons are not displayed on the screen even
if I press the shortcut key.
A The shortcut icons only appear when the Easy Display
Manager program is installed.
Q
I have connected a monitor(or projector) to the
computer, but the colors on the monitor are abnormally
displayed.
A Check if the monitor and computer are properly connected
with the signal cable and reconnect the cable if necessary.
Q
I am trying to view the screen through a TV by
connecting it through the HDMI port, but the edge of
the screen is not displayed.
A It is recommended using a notebook computer screen or
monitor for documents and Internet pages.
Although HDMI is good for watching videos, the edges may
be cut or the text may be blurred on a HDMI TV.
Q
I cannot congure the Image Sharpness in the NVIDIA
Control Panel of <NVIDIA Graphics>.
A The NVIDIA Control Panel > Adjust desktop Color Settings
> Image Sharpening item is set to None and will not be
congurable. This is normal.
This function is only available for old graphic chipsets.

100
Chapter 4
Troubleshooting
Q & A
Sound Related
Q
How can I congure the sound for video or audio
chatting?
A1 Conguring the Realtek HD Audio Manager
1 Select Control Panel > Realtek HD Audio Manager.
2 Select the Mic tab.
3 Select the Noise Suppression and the Acoustic Echo
Cancellation items and click the OK button.
►
For Windows 7/Vista
When using the Remove sound echo option, select the Play
Device > Speaker > Level tab and set the Microphone to
Mute.
►
For Windows XP
Using Acoustic Echo Cancellation option keeps the
Microphone Volume muted in the Playback Mixer.
A2 Playback Mixer Settings (Windows XP only)
1 Double-click the Volume icon in the Taskbar and select
Options > Properties from the menu.
2 Select Realtek HD Audio Input in the Mixer device eld,
conrm that the Microphone is selected in the Show the
following volume controls eld, and click the OK button.
3 Select the Microphone item in the Record Control window
and close the window.
Q
I cannot hear my voice with the internal microphone.
A This is because the sound from the internal microphone is
removed so that the sound is not delivered to the speaker and
causes feedback from the internal microphone.
However, you can record the sound from the microphone
normally.
► For Windows 7/Vista
When using an external microphone, select the Play Device >
Speaker > Level tab and deselect Mute for the Microphone.
Then you can listen to the sound from the external
microphone through the speakers.
► For Windows XP
When using an external microphone, if you disable the
microphone channel mute function of the play mixer, you can
hear the sound input into the external microphone through
the speaker.

100
101
Chapter 4
Troubleshooting
Q & A
Q
Sound is recorded abnormally when I select the
Acoustic Echo Cancellation option, connect an external
microphone, select the Play Device > Speaker > Level tab
and then deselect Mute for the Microphone.
A This occurs because the algorithm used to remove the echo
sound regards some of the sound as an echo and removes
this, as the recording is done by playing the sound from the
external microphone.
► For Windows 7/Vista
After selecting the Acoustic Echo Cancellation option, please
select the Play Device > Speaker > Level tab and select
Mute for the Microphone for a normal recording.
► For Windows XP
In this case, select Mute in the Microphone Volume of the
Playback Mixer after selecting Acoustic Echo Cancellation
item.
Q
How can I congure the Recording Mixer while
broadcasting music in WinAMP? (Windows XP only)
A1 Playback Mixer Settings
1 Double-click the Volume icon in the Taskbar and select
Options > Properties from the menu.
2 Select Realtek HD Audio Input in the Mixer device eld,
select Stereo Mix in the Show the following volume
controls eld, and click the OK button.
3 Select the Stereo Mix item in the Record Control window
and close the window.
A2 Realtek HD Sound Eect Manager Settings
1 Click Start > Control Panel > Sounds, Speech, and Audio
Devices > Realtek HD Sound Eect Manager.
2 Click Microphone tab.
3 Unselect Noise Suppression and Acoustic Echo
Cancellation and click OK.

102
Chapter 4
Troubleshooting
Q & A
Wireless Network (WLAN) Related
Q
I cannot nd an AP.
A1 Verify whether the Wireless LAN LED is on.
If it is turned o, turn it on by pressing the Wireless LAN On/
O button ( + ).
A2 For the Windows 7 operating system, click the network
connection icon and then click Troubleshooting in the
Taskbar.
You can resolve a temporary wireless network problem.
A3 If there is no wireless network to connect to, it will not scan
for wireless networks.
In tine case, move to a location where a wireless network is
available or install an AP or wireless sharer to scan for wireless
networks.
Game and Program Related
Windows may not provide some functions properly when
performing some applications especially games, or may cause
a problem due to a device driver compatibility issue. For the
latest device drivers and bug xes, please refer to the respective
company’s website.
Q
The video stops playing in some games.
A 3D games save texture data that is necessary to implement
the 3D images to the system memory.
In this case, if there is insucient system memory, the game
saves the data to the hard disk drive and then loads the data
to the memory when the data is required. At this time, the
video may stop playing in some games.
In this case, to resolve the problem, lower the resolution of
the game or the screen.
Q
The image is broken in some games.
A Some parts of the picture may be broken in some games that
require a high-performance graphics card.
Set the 3D setting of the game to a level lower than the
default or lower the game resolution.

102
103
Chapter 4
Troubleshooting
Q & A
Q
When I run a game immediately after installing it, the
game does not run.
A This happens when the game is not compatible with
Windows. However, if you run the game again, the game will
run normally.
Q
The + key combination does not work.
A You cannot switch the display device while playing a video CD
or MPEG video or the computer is in Dual View mode.
In addition, if the NetWare Client32 program has been
installed, the + key combination may not work.
Q
The + key combination does not work or
displays the screen abnormally during a game.
A Since some games and 3D applications take control of the
display device, pressing the + key combination may
terminate the program or cause the screen to be displayed
abnormally.
Therefore, use the + key combination before using
the program and do not use the key combination while the
program is running.
Q
The game speed is too slow or too fast
(Windows XP only)
A Set the Power schemes to Always On.
(Click Start > Control Panel > Performance and
Maintenance > Power Options > Power schemes.)
Q
Some part of the screen is cut or displayed in black in
some games.
A This problem may occur in some games developed for DirectX
8.1 or in the 024x768 resolution.
(NHL 2003, MVP Baseball 2003, Special Force, Hangame,
pmang, etc.)
Q
The screen is displayed abnormally in some games.
A The screen may not be displayed normally in some games
when the resolution is set to 1024x600 and the color quality is
set to 32 bit.
For these games, set the screen resolution to 1024x600 or
800x600 and the color quality to 16 bit.

104
Chapter 4
Troubleshooting
Q & A
Q
The battery does not charge when the charge level is
96%~99%.
A In general, the computer is designed so that the battery is
recharged only when the remaining battery charge is 95% or
less to secure the stability and lifetime of the battery.
Therefore, in this case, even if the charge LED of the computer
is lit green, it is normal.
Bluetooth (Optional)
Q
How to view the Bluetooth help information.
► For Windows 7/Vista
A Press the Windows + F1 key combination to launch Windows
Help and search for Bluetooth related items in the Help
section.
► For Windows XP
A Double-click the My Bluetooth Environment shortcut icon
on the Desktop to launch the program, and then press the F1
key to view the help information.
Q
When no headset is found or cannot be connected
A1 If the headset is already connected to another device, you
will not be able to nd the headset and cannot connect to
the headset even if the headset is found. Disconnect the
connection to the other device and then start the search
again.
A2 If the headset is connected to a power adapter, you cannot
make a Bluetooth connection.
Disconnect the power adapter and then retry.

104
105
Chapter 4
Troubleshooting
A3 A Bluetooth headset provides two operating modes, On/O
mode and Pairing mode. To connect the headset to another
Bluetooth device such as a PC or mobile phone, the headset
should be in Pairing mode.
● Entering Pairing mode
For more information about entering Pairing mode, refer
to the user manual of the headset. In this section, we will
describe the general method to enter Pairing mode.
- Power button type headsets
(headsets that are turned on by pressing the power button)
If you press and hold the power button for 1~3 seconds, the
power is turned on. If you do not release the button even
after the power is turned on, the headset enters Pairing mode.
- On/O switch type headsets
(headsets that are turned on or o by sliding the power
switch to the corresponding position.)
Turn the headset on by sliding the power switch to the on
position while holding down the Call button.
The headset is turned on in Pairing mode. Check if the
headset is in Pairing mode through the headset LED.
After switching to Pairing mode, search for the headset in the
Bluetooth device window on the computer.
In general, Pairing mode automatically turns to On/O mode
after a predetermined period of time. In this case, you have to
turn the headset o and then on and make the headset enter
Pairing mode again to connect to the computer.
Usage Instructions
Generally, Bluetooth devices deliever stable performance while •
connected within a 3m(10 ft.) distance.
For Bluetooth to operate smoothly, use the computer in an open •
environment with no walls or obstacles in the way and having low
radio interference.
You can connect to only one Bluetooth device at a time for •
a phone connection, data syncing, electronic business card
exchange, FAX transmission/reception, sound related functions,
and serial port functions.
It is recommended using only one Bluetooth device at a time as •
connecting multiple Bluetooth or other wireless devices at the
same time may slow or destabilize the Bluetooth connection.
Data communications via Bluetooth may be poor when the CPU •
load is at full capacity or there are insucient system resources.
The Bluetooth function of a Bluetooth PDA, mobile phone, mouse •
or keyboard may be turned o. To use them in connection with a
Samsung computer supporting Bluetooth, you must check if the
Bluetooth function of the device to connect to is turned on.
For the procedures on turning on the Bluetooth function of a
device, refer to the relevant device manual.
The services provided by Bluetooth devices may vary depending •
on their capabilities. For the services provided by the Bluetooth
device, refer to the device manual.
Q & A
106
Chapter 4
Troubleshooting
Easy Content Share Related
Q
No connected device is shown in Easy Content Share.
If no connected device is shown, check the following.
A1 Check whether your TV supports DLNA. For more information
on this, refer to the User Manual of your TV.
A2 Check whether all devices connected to the access point are
turned on.
A3 Check whether your PC and TV are connected to the access
point correctly.
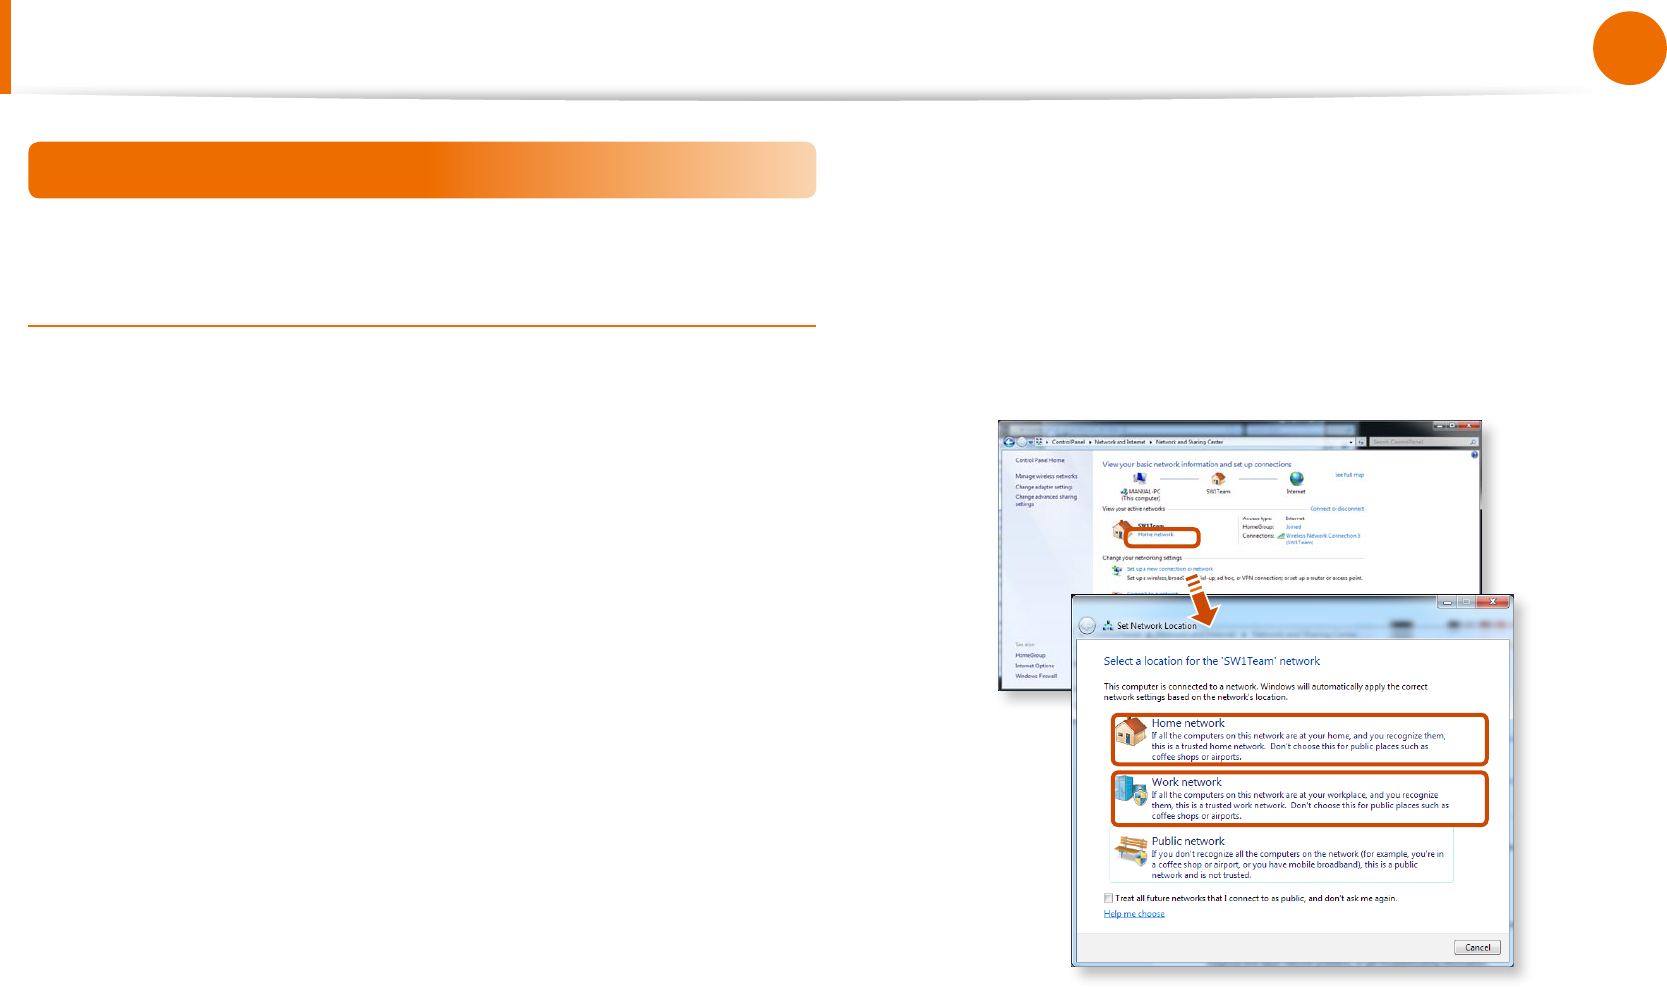
A4 Check whether the network location of your PC is set to
Home network or Work network.
If not, click Control Panel > All Control Panel Items >
Network and Sharing Center > Public Network.
Change the network location to Home network or Work
network.
Q & A
106
107
Chapter 4
Troubleshooting
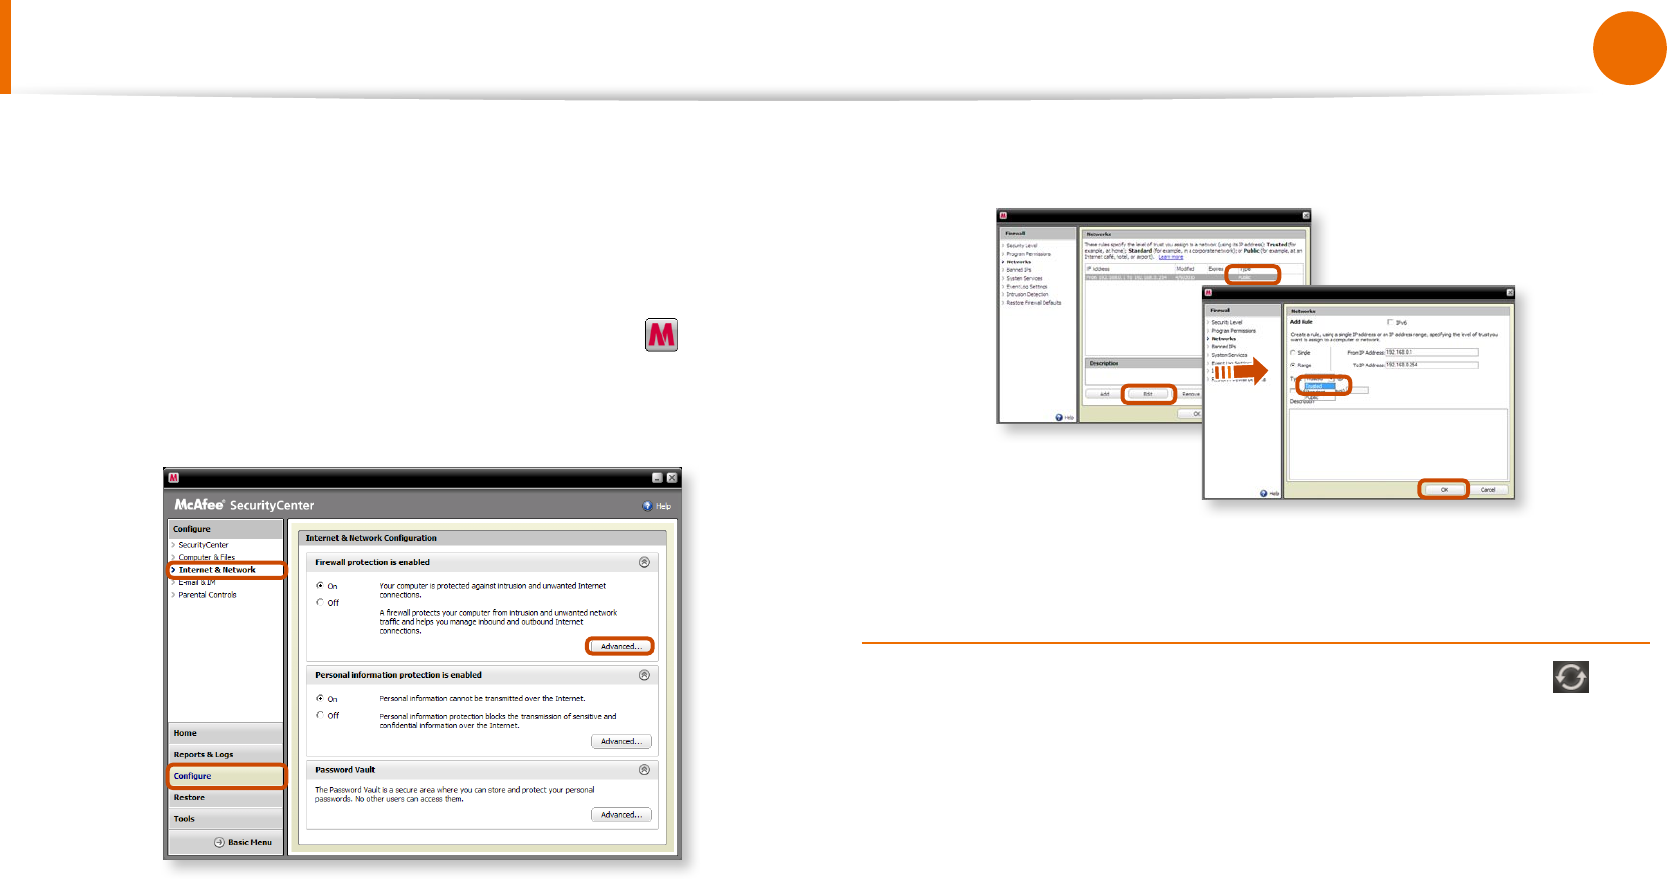
A5 This problem may occur due to a vaccine program. (This is
only applicable to models where McAfee Security Center is
installed).
In this case, change the settings by following the steps below.
1 Double-click the McAfee Security Center icon to launch
it.
Click Congure > Internet & Network > Advanced.
2 Select the Network menu item. In the Network pane to the
right of the window, check whether the Type is set to Trusted.
If it is not set to Trusted, change it to Trusted by performing
these operations:
Click Edit > Change the type to Trusted > Click OK.
Q
My TV which has been used successfully with Easy
Content Share is suddenly not shown in the list.
A1 This is because the network is unstable. Click Refresh to
update the list of devices connected to the access point.
A2 This problem may occur due to a vaccine program. (This is
only applicable to models where McAfee Security Center is
installed).
Q. Refer to answer A5 for the question Q. No connected
devices are shown in Easy Content Share.
Q & A

108
Chapter 4
Troubleshooting
Q
Subtitles are not displayed when viewing videos on my
TV.
A Easy Content Share does not support subtitles due to DLNA
constraints. To enjoy videos with subtitles, you should install
Samsung TV’s bundled DLNA S/W (applicable to Samsung TVs
only).
1 Install the DLNA S/W bundled with your Samsung TV on your
computer.
2 Share the les you want to play using the Samsung TV’s
bundled DLNA S/W.
(For more information on how to use Samsung TV’s bundled
DLNA S/W, refer to the User Manual of your TV.)
3 Run Easy Content Share. If the Samsung TV’s bundled DLNA
S/W you installed is listed in the remote server list of Easy
Content Share, the sharing settings have been congured
successfully.
4 In Easy Content Share, add the shared content of the Samsung
TV’s bundled DLNA S/W to the playlist. Now you can enjoy
subtitles.
Q
No screen is displayed when I try to view a video on my
TV.
A If the format of the video is not supported by your TV, no
screen will be output.
The same symptom also occurs when other playback devices
except for your TV do not support the video format.
Q
Do only the PC and TV have the DLNA function?
A Some cell phones, printers, photo frames and refrigerators,
etc. support the DLNA function.
Devices supporting the DLNA function can share les with
each other. Depending on each product, a product may only
support sharing photos or music les. For detailed information
on the DLNA functions, refer the user manual of each product.
Q & A

Chapter 5.
Appendix
Important Safety Information 110
Replacement Parts and Accessories 112
Regulatory Compliance Statements 114
WEEE SYMBOL INFORMATION 128
Product Specications 129
Glossary 131
Index 135

110
Chapter 5
Appendix
Safety Instructions
Your system is designed and tested to meet the latest standards
for safety of information technology equipment. However, to
ensure safe use of this product, it is important that the safety
instructions marked on the product and in the documentation are
followed.
Always follow these instructions to help guard against
personal injury and damage to your system.
Setting Up your System
Read and follow all instructions marked on the product and in •
the documentation before you operate your system. Retain all
safety and operating instructions for future use.
Do not use this product near water or a heat source such as a •
radiator.
Set up the system on a stable work surface.•
The product should be operated only with the type of power •
source indicated on the rating label.
Ensure that the electrical outlet you are using to power your •
equipment is easily accessible in case of re or short circuit.
If your computer has a voltage selector switch, make sure that •
the switch is in the proper position for your area.
Openings in the computer case are provided for ventilation. •
Do not block or cover these openings. Make sure you provide
adequate space, at least 6 inches (15 cm), around the system
for ventilation when you set up your work area. Never insert
objects of any kind into the computer ventilation openings.
Ensure that the fan vents on the bottom of the casing are clear •
at all times. Do not place the computer on a soft surface, doing
so will block the bottom vents.
If you use an extension cord with this system, make sure •
that the total power rating on the products plugged into the
extension cord does not exceed the extension cord power
rating.
Important Safety Information