Samsung Electronics Co GTY3300 Cellular/ PCS WCDMA/ GSM/ EDGE Module User Manual 3
Samsung Electronics Co Ltd Cellular/ PCS WCDMA/ GSM/ EDGE Module 3
Contents
User Manual 3
50
51
Chapter 2
Using the computer
● Music : Select to listen to music.
WOW HD technology has been used.
● Movie : Select to watch a movie.
TruSurround XT technology has been used.
● When using a Headphone plugged in the Headphone
jack : Some of the setting details under each menu will
change.
CS Headphone technology has been used.
► For Windows XP
1 Click Control Panel > Sound, Voice and Audio Device >
Sound and Audio Devices.
2 Click the audio tab, select SRS Premium Sound in Play >
Default Device (D):, and then click the OK button at the
bottom.
In this case, although you can change the volume in the SRS
Mixer, you can also change the volume in the Master Volume
of the Realtek HD Audio Output Mixer.
Therefore, when SRS is selected, you can set the Master
Volume of the Realtek HD Audio Output Mixer to the
maximum value and then set the actual volume using the
SRS Mixer.
This operation may not be required depending on the type
of SRS driver.
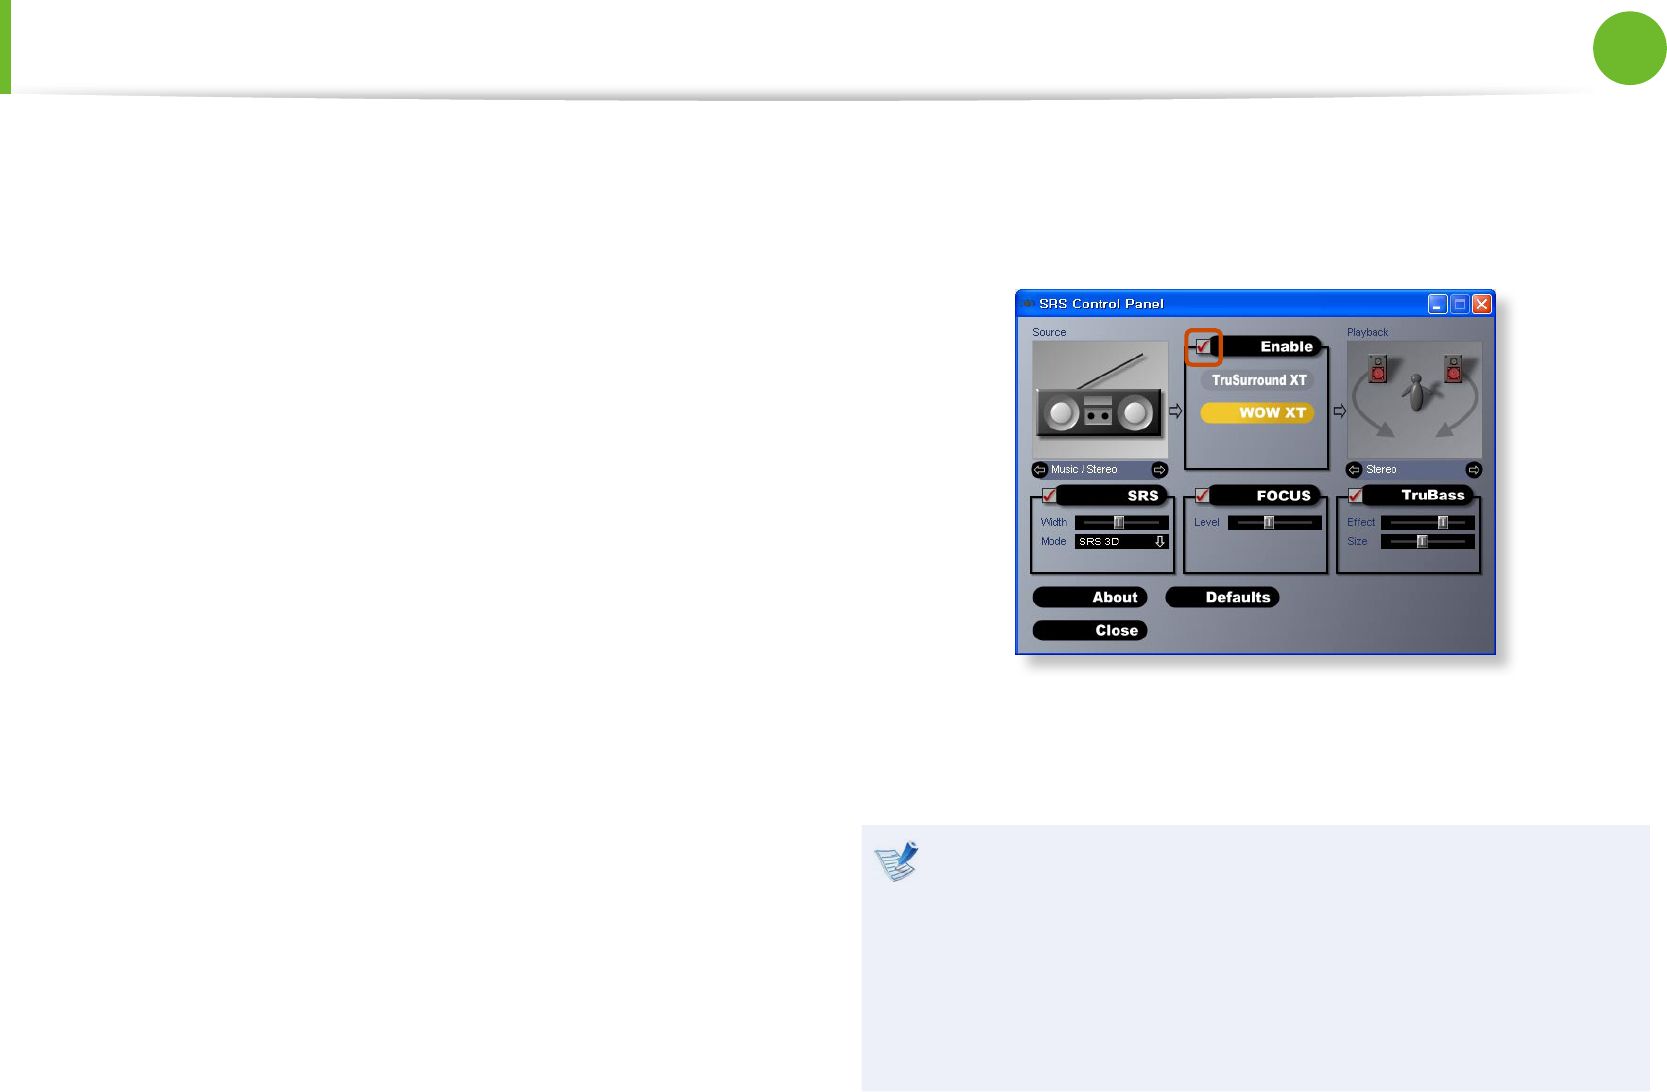
3 Click on Control Panel > Sound, Voice and Audio Device >
SRS Control Panel.
Select the Enable checkbox and select a mode.
● WOW XT (Music) : Select to listen to music.
● TruSurround XT (Movie/Video) : Select to watch a movie.
The SRS function is only supported for a computer’s built-•
in speakers or headphones.
It is recommended unchecking the SRS option before •
recording, and checking it before playing sound. This is to
prevent sound distortion due to the double application of
the SRS eect when a user plays the recorded le by using
stereo mix.
Adjusting the Volume
52
Chapter 2
Using the computer
Wired Network
A wired network is a network environment used for a company
network or broadband internet connection at home.
Since these descriptions are written on the basis of the •
latest operating system, Windows 7, some of the content
and the gures of the descriptions may dier depending
on the operating system. Since the procedures for other
Windows operating systems are similar, use the computer
referring to these descriptions.
The gures used for the description are of a representative •
model. Therefore the gures may dier from the real ones.
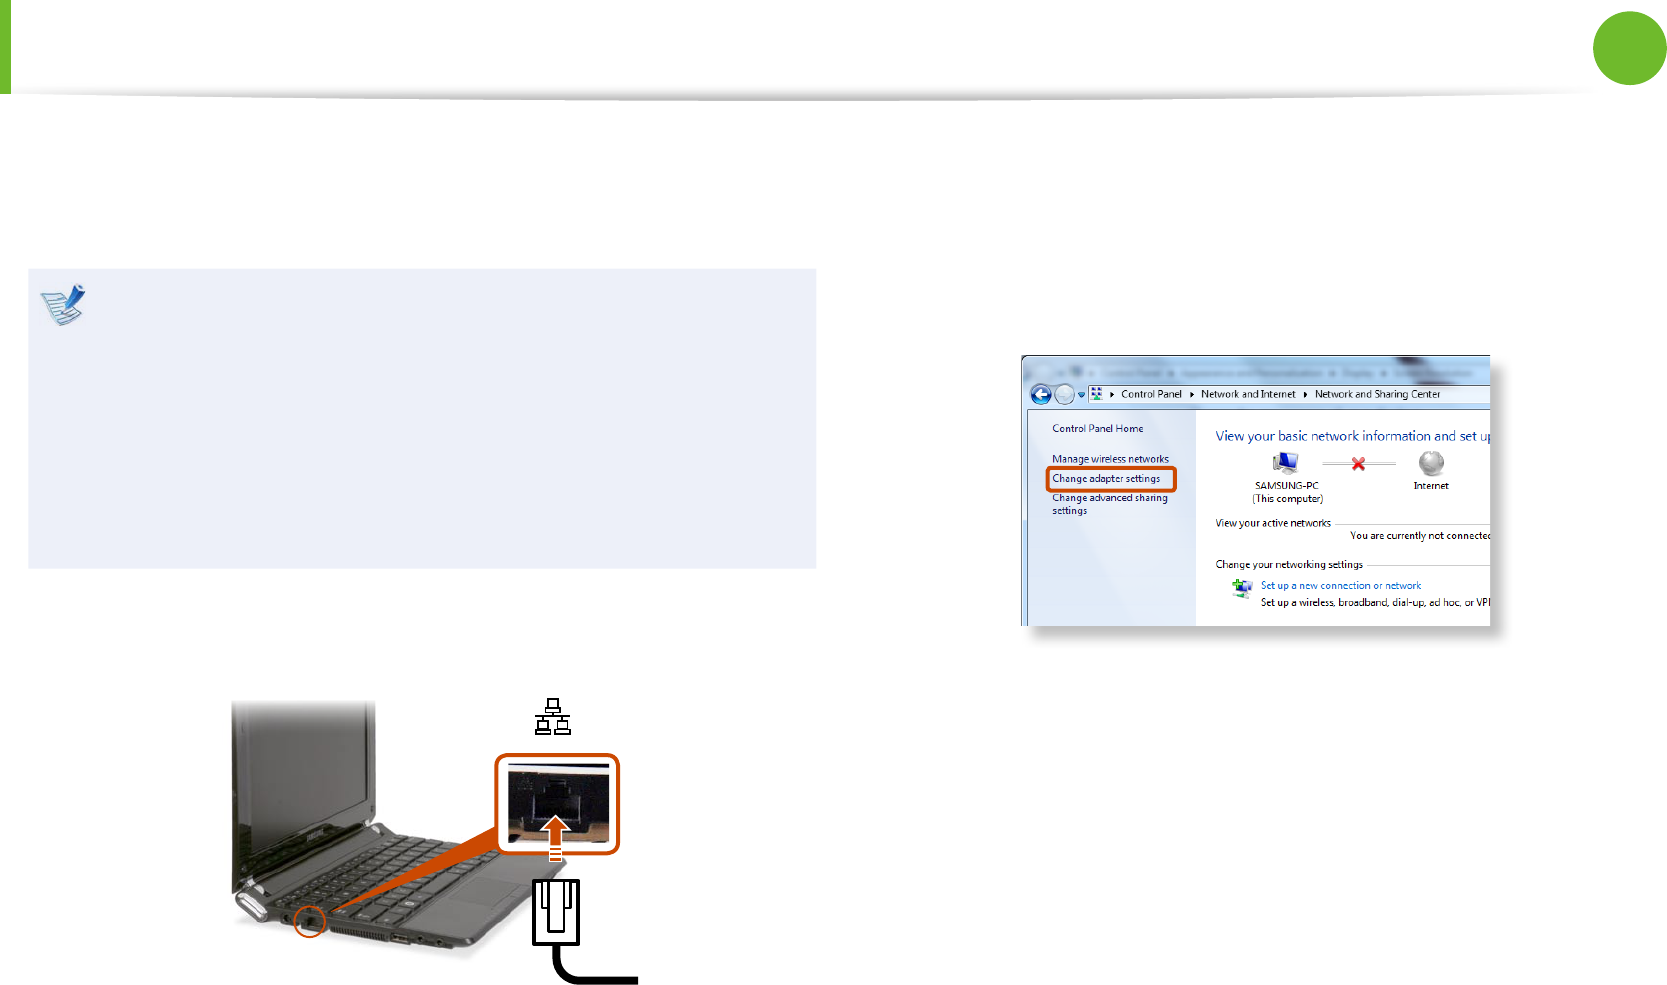
1 Connect a LAN cable to the computer’s LAN port.
2 ► For Windows 7
Click Start > Control Panel > Network and Internet >
Network and Sharing Center and click on Change adapter
settings in the left menu pane.
► For Windows XP
Click Start > Control Panel > Network and Internet
Connections > Network Connection.
52
53
Chapter 2
Using the computer
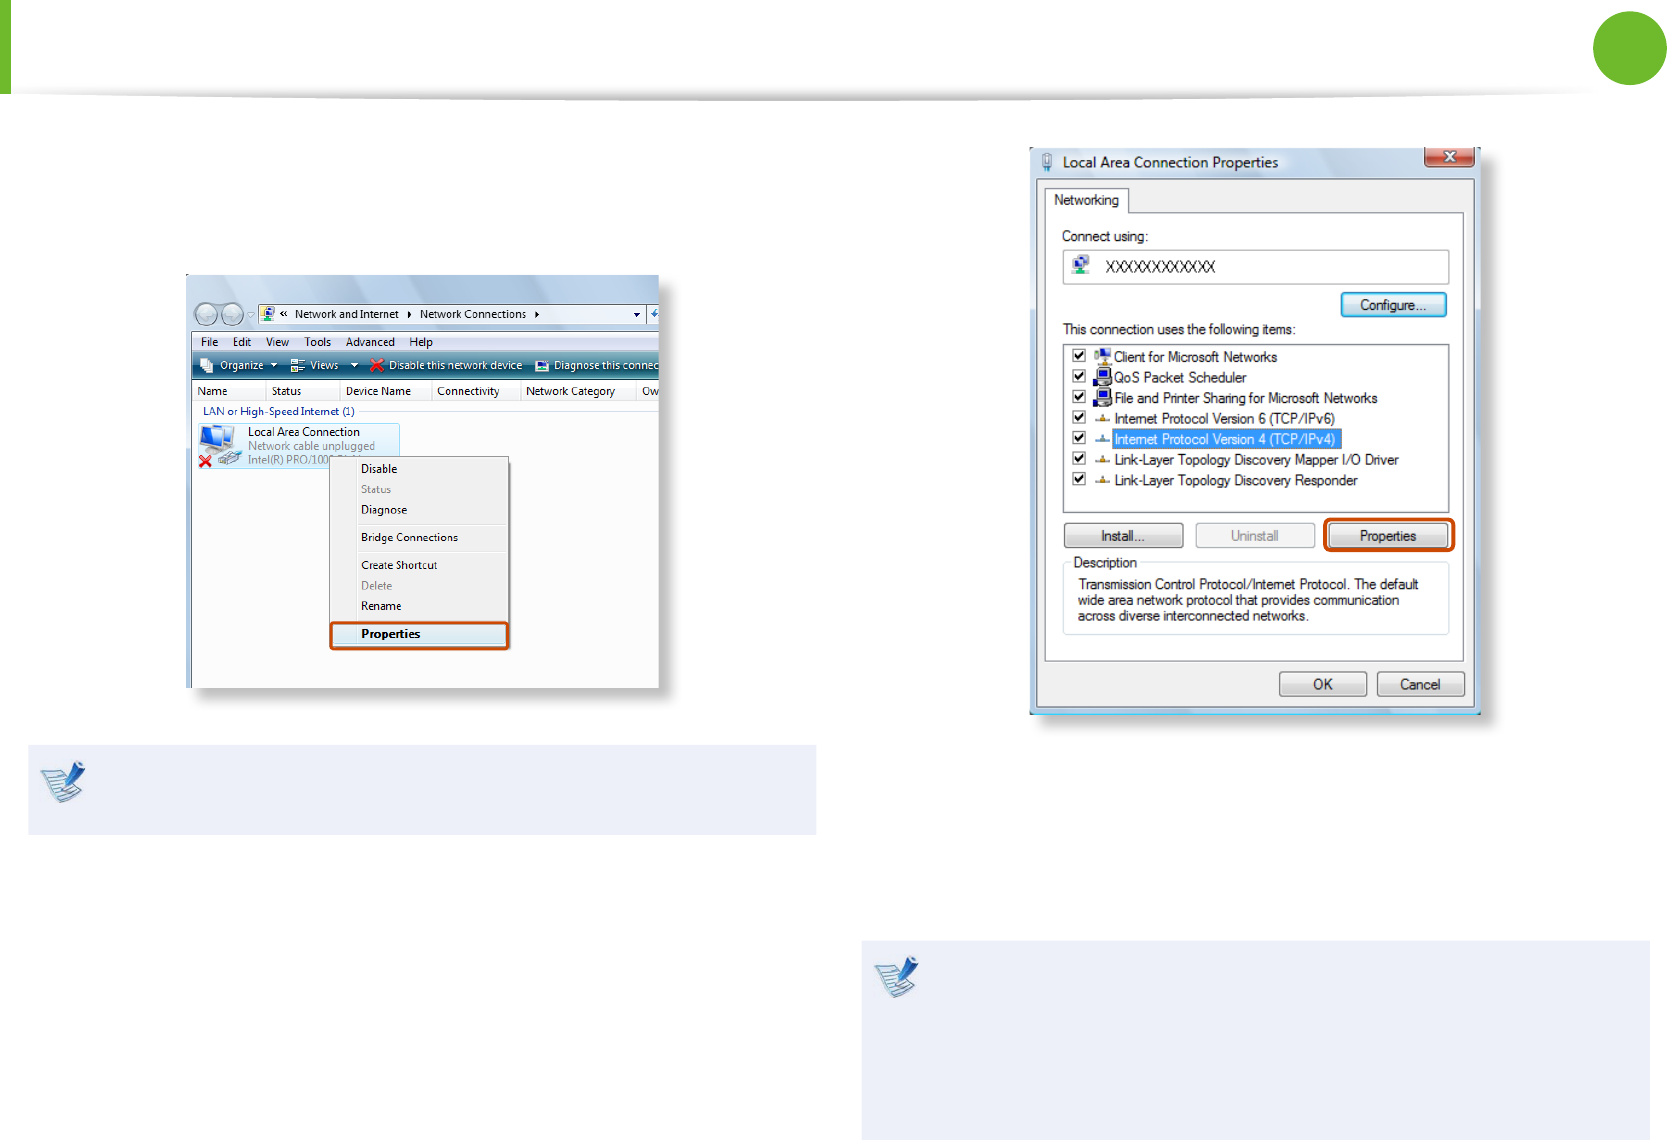
3 Select Local Area Connection and click the right button of
the touch pad and select Properties.
The LAN Device name may dier depending on your
computer’s Network Device.
4 ► For Windows 7
Select Internet Protocol Version 4(TCP/IPv4) from the list
of Network Components and click Properties.
► For Windows XP
Click General tab and select a LAN driver from Connect
using:. Select Internet Protocol(TCP/IP) and click
Properties.
The Network Component name may dier depending on •
the Operating System Installed.
To add a network component, click • Install in the screen
shown in the gure above. You can add clients, services,
and protocols.
Wired Network
54
Chapter 2
Using the computer
Wired Network
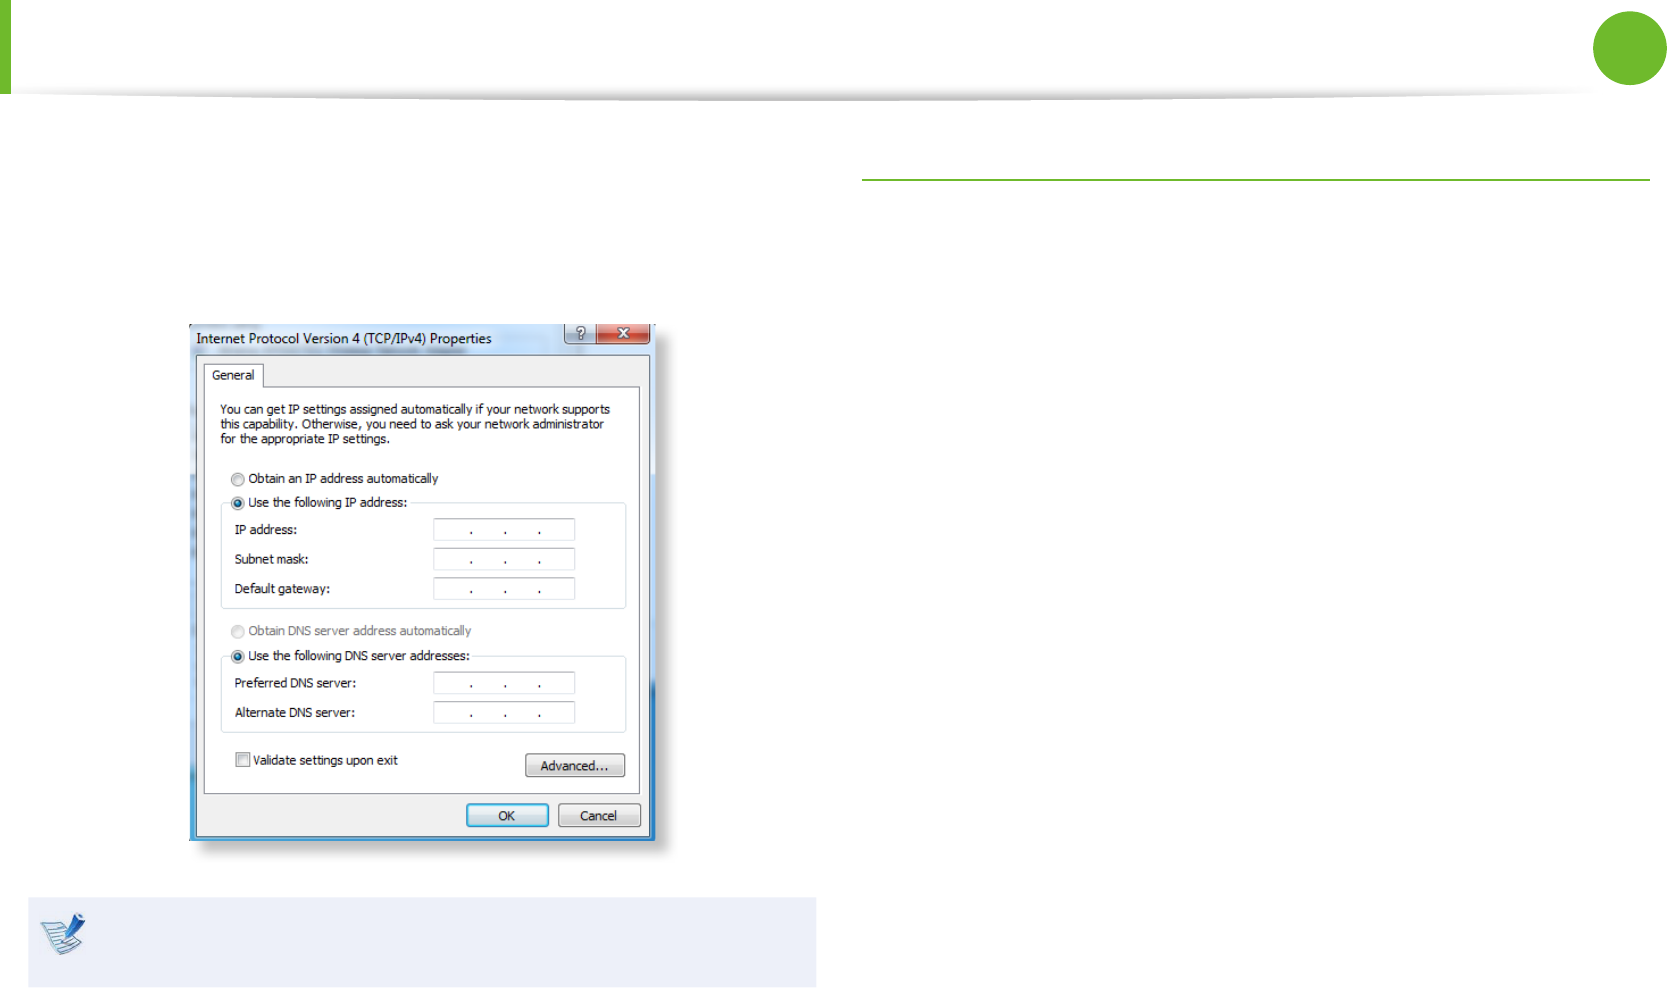
5 Congure the IP settings.
When using DHCP, select Obtain an IP address
automatically. To use a static IP address, select Use the
following IP address, and set the IP address manually.
When not using DHCP, ask your network administrator for the
IP address.
6 When you have completed the settings, click the OK button.
The network settings have been completed.
Using the <Wake On LAN> Function
<Wake On LAN> is a function that activates the system from Sleep
mode when a signal (such as a ping or magic packet command)
arrives over the network (wired LAN).
1► For Windows 7
Click Start > Control Panel > Network and Internet >
Network and Sharing Center and click on Change adapter
settings in the left menu pane.
► For Windows XP
Click Start > Control Panel > Network and Internet
Connections > Network Connections.
2Right-click on the Local Area Connection and select
Properties.

54
55
Chapter 2
Using the computer
Wired Network
3Click Congure > Power Management tab. Select Allow
this device to bring the computer out of standby, then
click OK. Restart the system.
- If the system wake up from Sleep mode even though there
is no received signal, use the system after disabling the
<Wake On LAN> function.
- The LAN LED may not be turned o if System is shutdown
without disabling the WOL <Wake on LAN> option.
- Connecting a wired LAN while using a wireless LAN may not
activate the <Wake On LAN> function. Set the Wireless LAN
to Disable to use the <Wake On LAN> function.
- <Wake On LAN> feature may not work while using Hybrid
power saving feature.
For Windows 7, Wake On LAN is not supported Ping.
Other features for reference
When connected to a 100Mbps/1Gbps wired LAN and the
computer exits Sleep/hibernation mode, a message appears
informing you of a connection to a 10Mbps/100Mbps
wired LAN. This happens because when the computer exits
standby/hibernate mode, restoring the network takes about
3 seconds. When the network is restored, it operates at
100Mbps/1Gbps.
When system is running on battery, some time it takes about
20sec after inserting LAN cable to be able to connect to
internet. This symptom happen as a result of power saving
feature to reduce battery consumption.
When system is running on battery, the Wired LAN speed
is decreased automatically to reduce battery consumption.
In such case, a 1Gbps /100Mbps LAN would function at
100Mbps/10Mbps speed.
56
Chapter 2
Using the computer
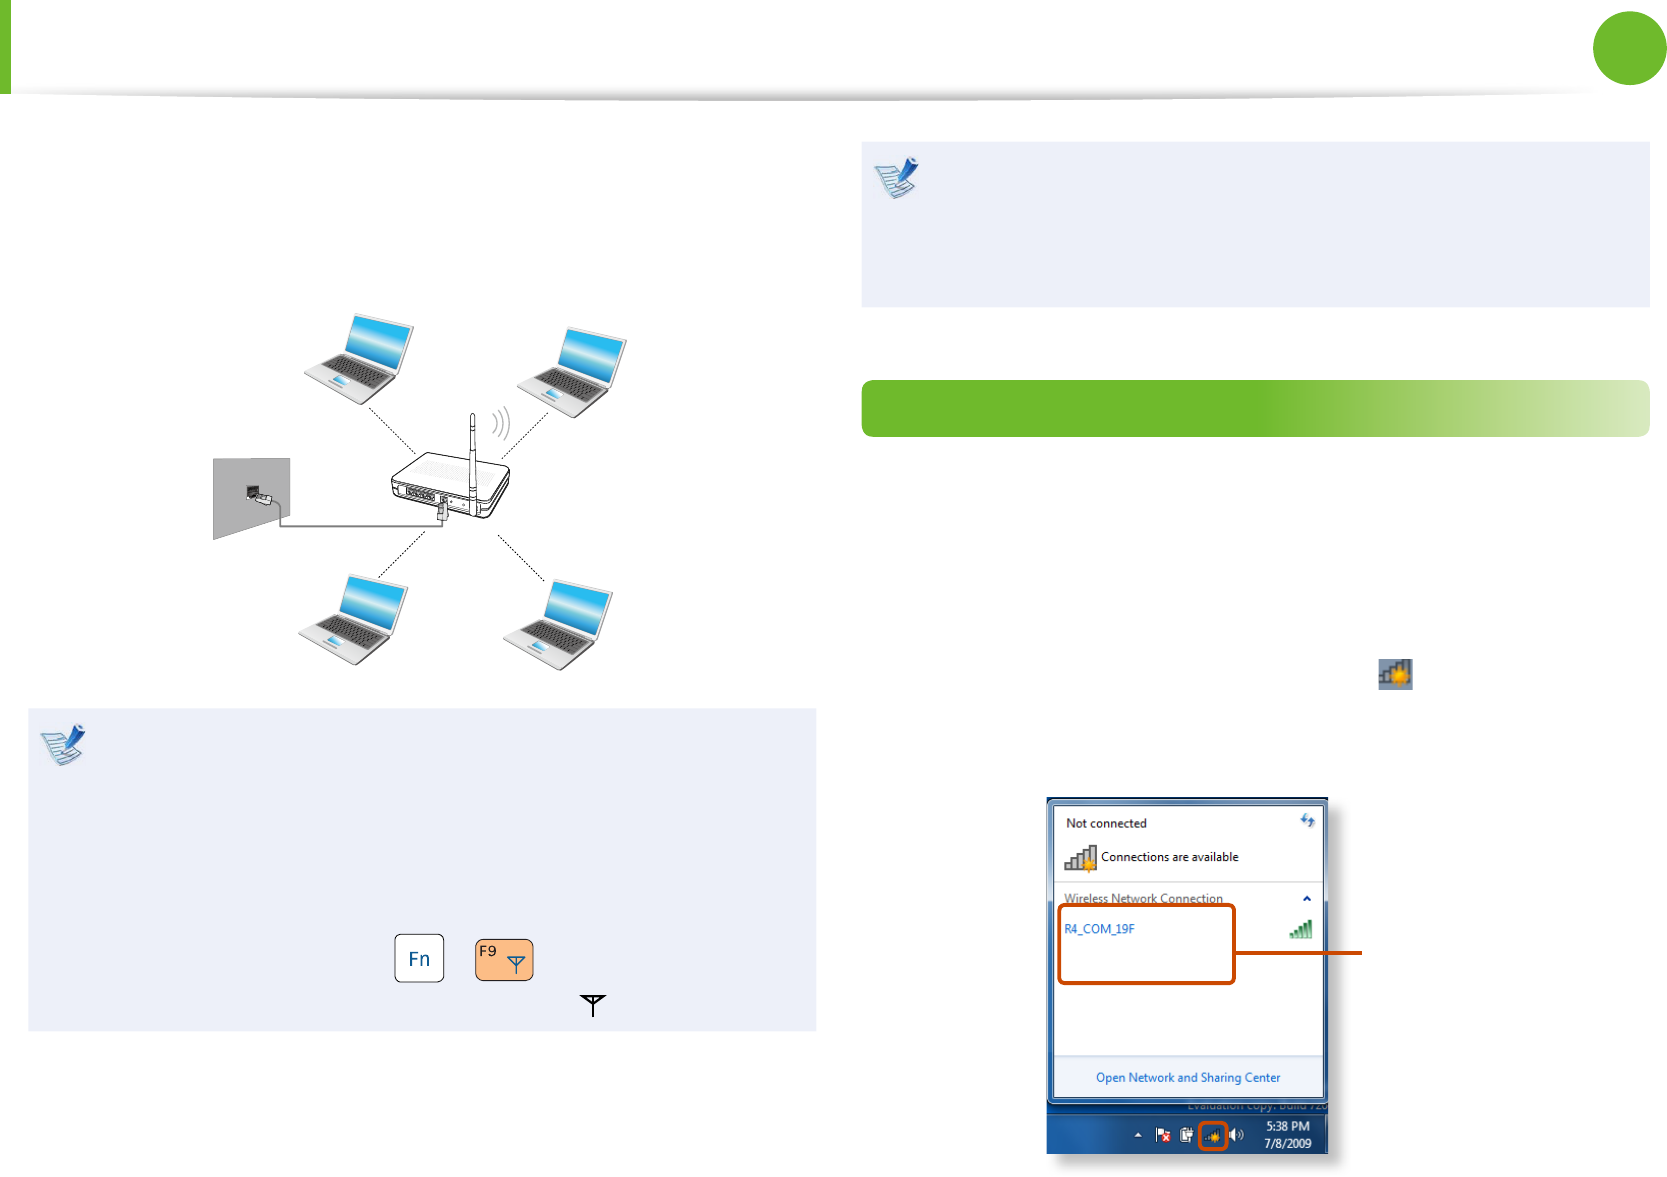
A wireless network (Wireless LAN) environment is a network
environment that enables communicating between multiple
computers at home or a small-size oce through wireless LAN
devices.
The descriptions below are for computer models with •
a Wireless LAN card or device. A Wireless LAN device is
optional.
The pictures in this manual may dier from the actual
product depending on your wireless LAN device model.
To use the wireless LAN, you have to turn the wireless LAN •
on rst by pressing the + keys. If the wireless
LAN is turned on, the Wireless LAN LED is lit.
What is an Access Point (AP)?
An AP is a network device that bridges wired and wireless LANs,
and corresponds to a wireless hub in a wired network. You can
connect multiple wireless LAN installed computers to an AP.
Connecting to a Wireless LAN
If there is an AP, you can connect to the Internet via the AP using
the Wireless LAN connection method provided by Windows.
► For Windows 7
1 If you click the Network Connections icon in the system
tray, a list of available APs appears. If you select an AP to
connect to, the Connect button appears.
AP List
Wireless Network (Optional)
56
57
Chapter 2
Using the computer
Wireless Network (Optional)
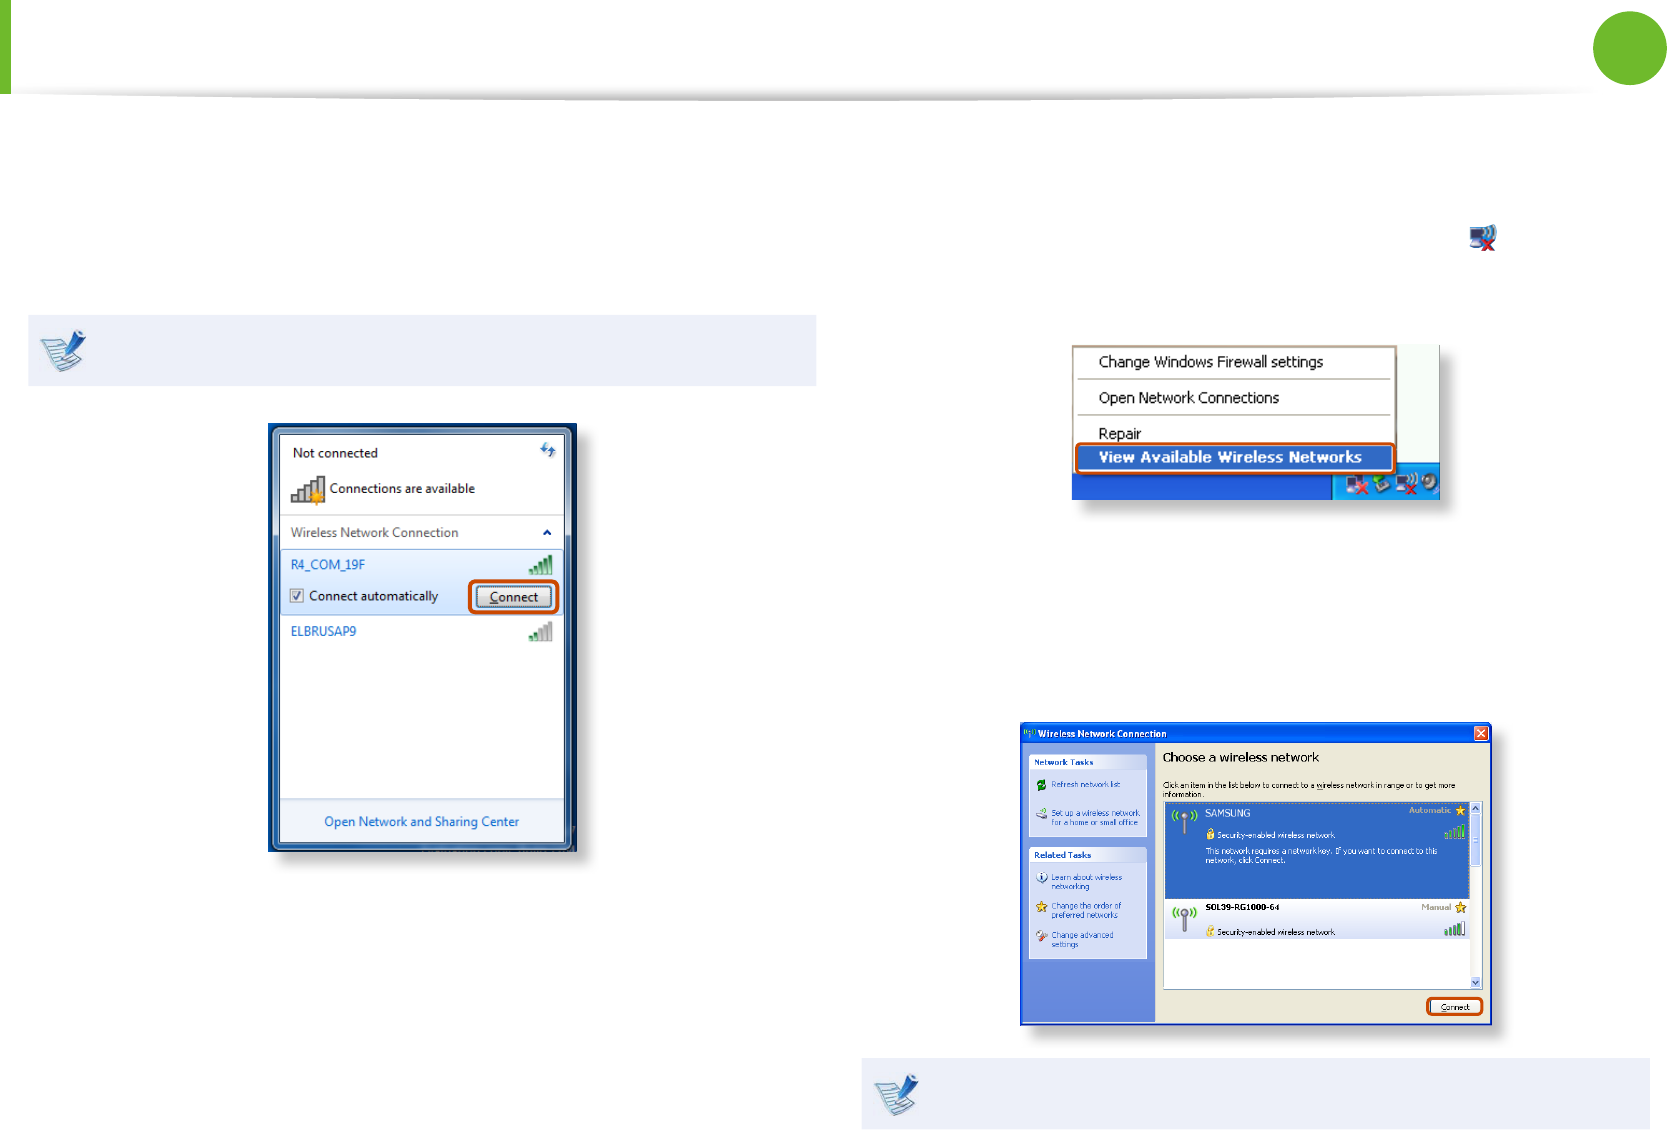
2 Click Connect.
If a network key is set for the AP, enter the network key and
then click Connect.
For the network key, please ask your network administrator.
3 When Connected to the AP is displayed, click the Close
button.
You can access the network.
► For Windows XP
1 Click the Wireless Network Connection icon from the
Taskbar using the right button of the touch pad. Then, click
View Available Wireless Networks.
2 Select an AP to be connected and click Connect.
If a network key is set in the AP, the network key input
window will appear. Enter the network key in the input
window and click OK.
For a network key, contact the network administrator.
58
Chapter 2
Using the computer
Wireless Network (Optional)
3 Once Connected to AP is displayed, you can use a wireless
network.
Checking the network connection status
Move the mouse pointer over the Wireless Network Connection
icon on the taskbar, and the connection status is displayed.
Windows 7 Windows XP

58
59
Chapter 2
Using the computer
Sharing Content in a Home Network (Easy Content Share) (Optional)
Easy Content Share is a DLNA application that allows you to play
photos, videos and music les on your TV.
These descriptions are for Windows 7 and for supported •
models only.
The Digital Living Network Alliance (DLNA) aligns industry •
leaders in the CE, mobile, and PC industries through digital
interoperability, and DLNA-certied devices allow users to
play videos, photos and music les stored on a computer
on a TV.
To play content using DLNA technology, both your •
computer and TV must be DLNA certied.
For information on whether a product supports DLNA,
refer to the respective user manuals.
To play videos, photos and music les stored on a computer,
congure the settings in the order as shown below.
1. Conguring the network settings for your computer and
TV
2. Adding shared content on your computer
3. Playing content on your TV using your computer
Conguring the network settings for your
computer and TV
To share content, all shared devices must be connected to the
same access point.
Congure the network settings by following the steps below.
1 Connect your computer and TV to an access point through
a wired or wireless LAN connection, as shown in the gure
below.
[Network connection diagram]
2 Congure the IP address settings for your computer and TV.
You must check the Obtain an IP address automatically
(DHCP) checkbox.

60
Chapter 2
Using the computer
For more information on how to congure the IP address •
for your computer, refer to Chapter 2. Using the
Computer > Network.
For more information on how to congure the IP address •
for your TV, refer to the user manual of your TV.
3 To check whether the network settings have been congured
correctly, double-click the Easy Content Share icon on the
your computer’s Desktop to run the program.
(If the program icon does exist on the Windows Desktop,
select the corresponding program from Start > All Programs
> Samsung.)
If the connected computer and TV are shown in the program
window, the network settings have been congured
successfully.
Devices that can share content
If a connected device is not displayed, refer to Chapter 4.
Troubleshooting > Q&A > Easy Content Share Related.
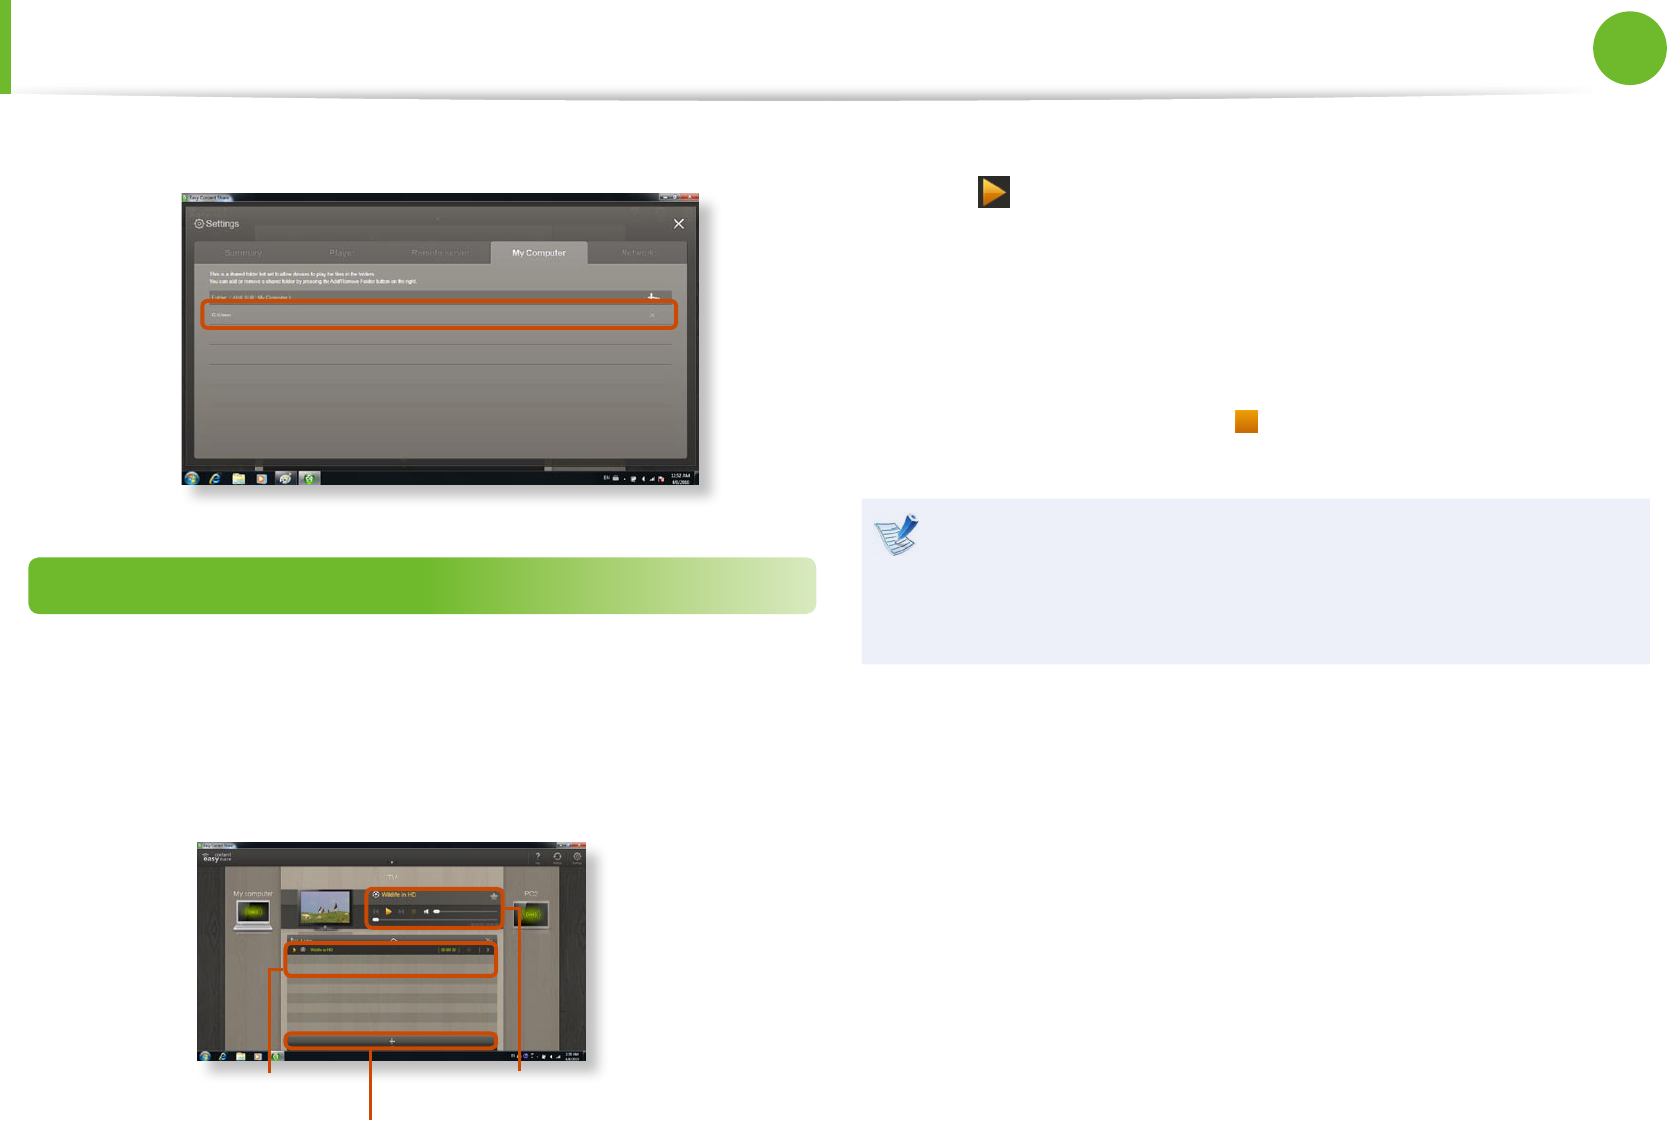
Adding shared content on your computer
Add the videos, photos and music les that you want to play on
your TV as shared items.
You can only play shared items on your TV.
1 Click Settings at the top right of Easy Content Share.
2 Click My computer > Add Folder . The Browse For
Folder window appears. Select a folder to share and click OK.
Sharing Content in a Home Network (Easy Content Share) (Optional)
60
61
Chapter 2
Using the computer
3 The selected folder is added to the shared list.
Playing content on your TV using your computer
After you have set photos, videos and music les as shared items,
you can play them on your TV using your computer.
1 In Easy Content Share, select the TV you want to use to play
content.
Playlist
Add content to play
Play control panel
2 Select the item you want to play in the playlist, and then click
Play .
3 The selected le is played on the TV.
Using the Play Control panel, you can control the item being
played on the TV.
4 To stop playing, click Stop .
Easy Content Share does not support subtitles due to DLNA
constraints.
To use subtitles, refer to Chapter 4. Troubleshooting > Q&A
> Easy Content Share Related.
Sharing Content in a Home Network (Easy Content Share) (Optional)
62
Chapter 2
Using the computer
Adding a video, photo or music le to the playlist
1 Click Add Content in the Playlist screen. The shared
content list is displayed.
2 In the shared content list, check the checkbox in front of the
item you want to add to the playlist, and then click Add to
playlist .
Add the selected
item to the playlist
Shared content list
Return to the
playlist screen
3 Click Return to playlist screen .
In the playlist screen, you can nd that the selected item has
been added to the playlist.
Playing the content stored on a computer when
Easy Content Share is not installed
You can also play the videos, photos and music les stored on a
computer when Easy Content Share is not installed on your TV
by using Windows Media Player.
As described in the steps below, congure the content sharing
settings to play content on your TV.
The computer containing the shared content (when Easy
Content Share is not installed) must be connected to the
same access point to which the computer where Easy
Content Share is installed and the TV is connected to.
► For Windows Media Player 12
1 Click Start > All Programs > Windows Media Player.
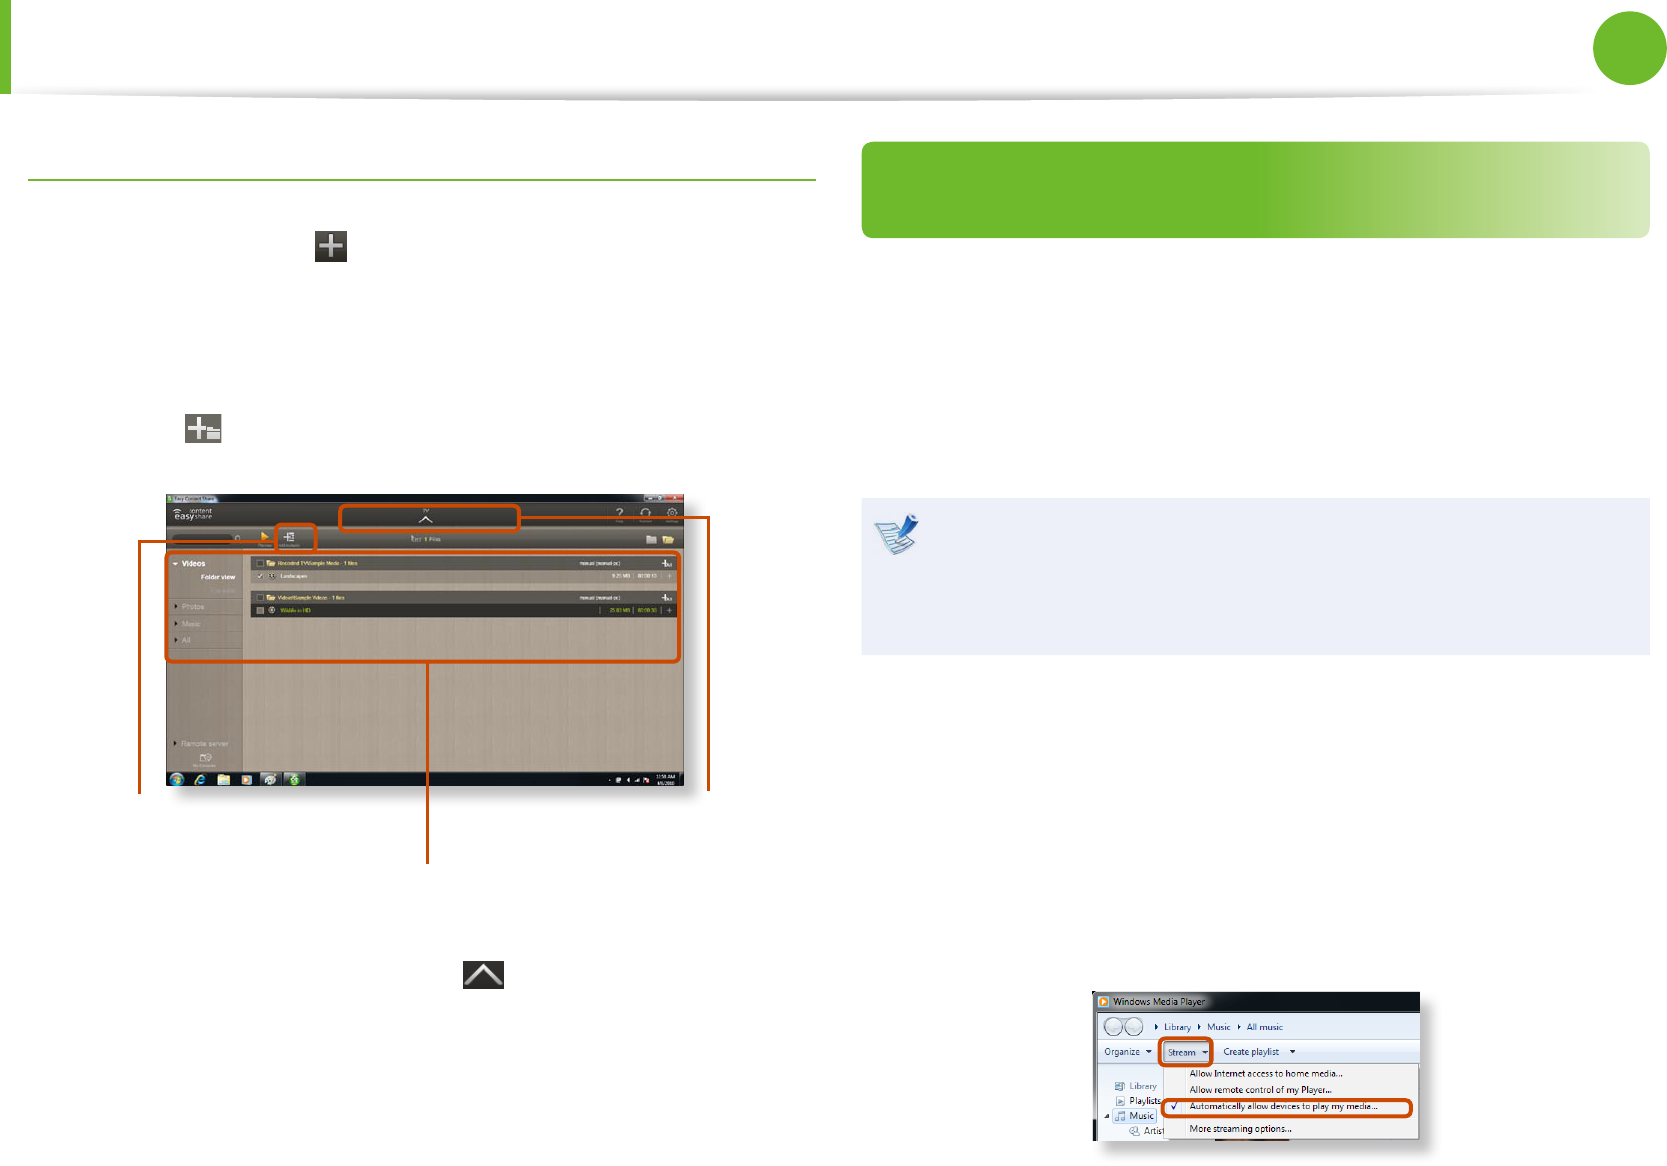
2 Click Stream and check the Automatically allow devices to
play my media... menu item.
Sharing Content in a Home Network (Easy Content Share) (Optional)
62
63
Chapter 2
Using the computer
3 Click Start > All Programs > Accessories > Windows
Explorer.
4 Right-click the folder to share. From the menu displayed,
point to Include in library.
Click Videos, Photos or Music in the displayed sub menu,
according to the type of content contained in the selected
folder.
If the selected folder contains two or more types of content,
you must click each corresponding menu item (Videos,
Photos or Music) to register each type of content.
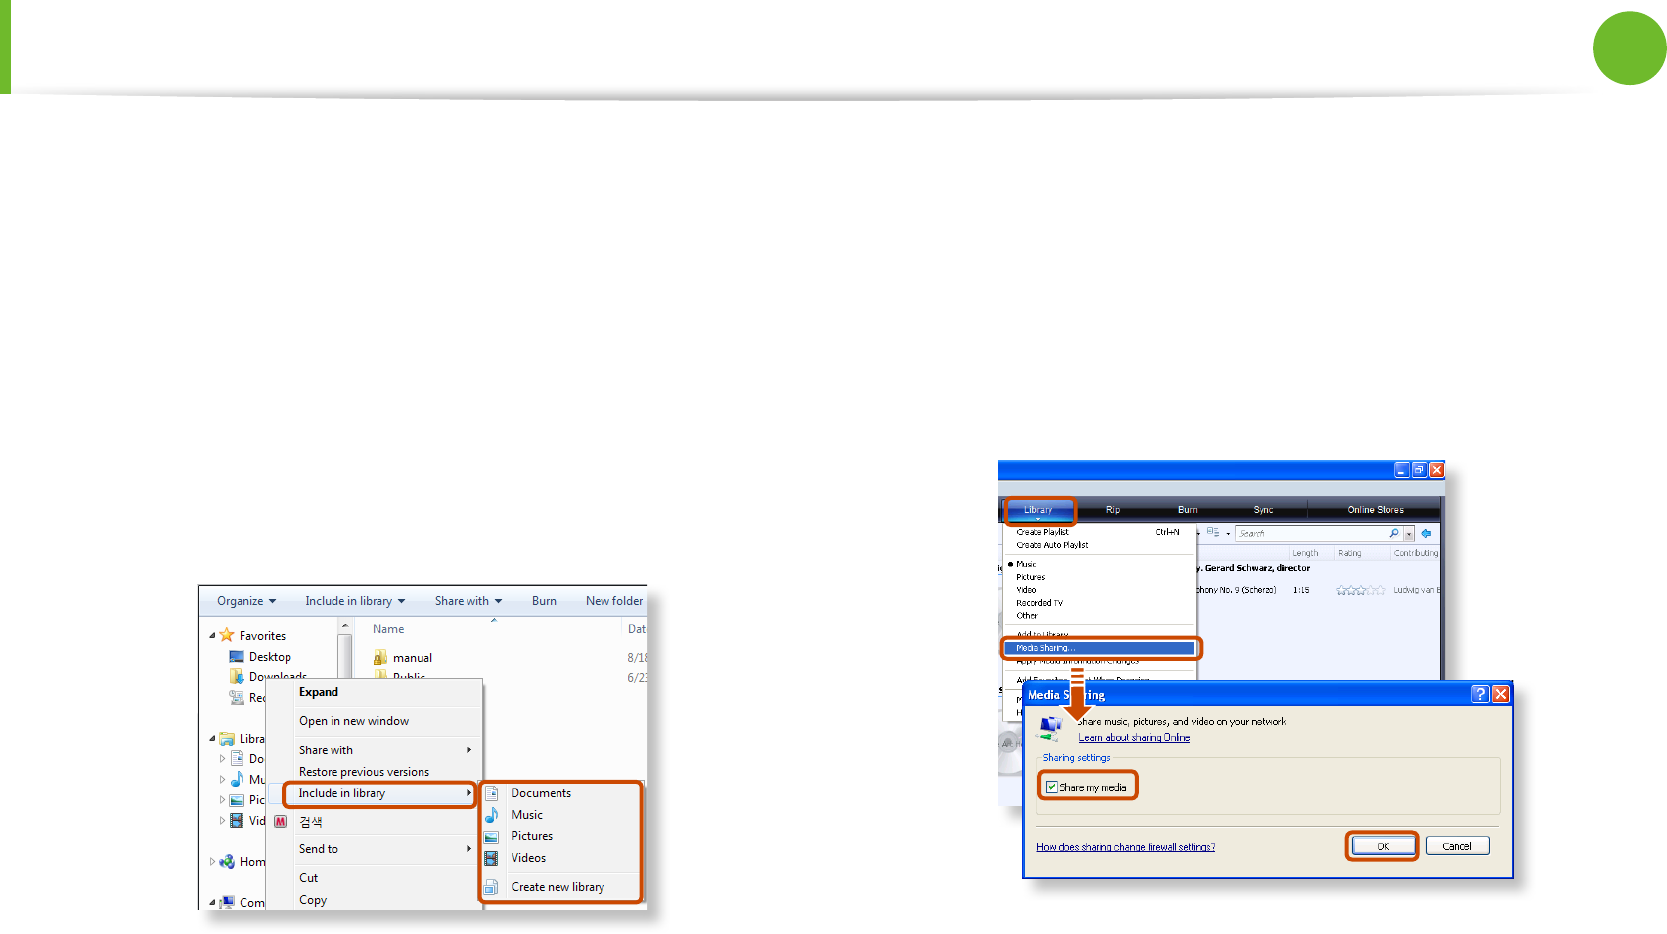
► For Windows Media Player 11
1 Click Start > All Programs > Windows Media Player.
2 Click Library > Media Sharing.
The Media Sharing window is displayed. Check the Share
my media checkbox and then click OK.
3 In the Media Sharing window, click Settings.... The Media
Sharing - Default Settings window is displayed. Check the
Allow new devices and computers automatically (not
recommended) checkbox.
Sharing Content in a Home Network (Easy Content Share) (Optional)
64
Chapter 2
Using the computer
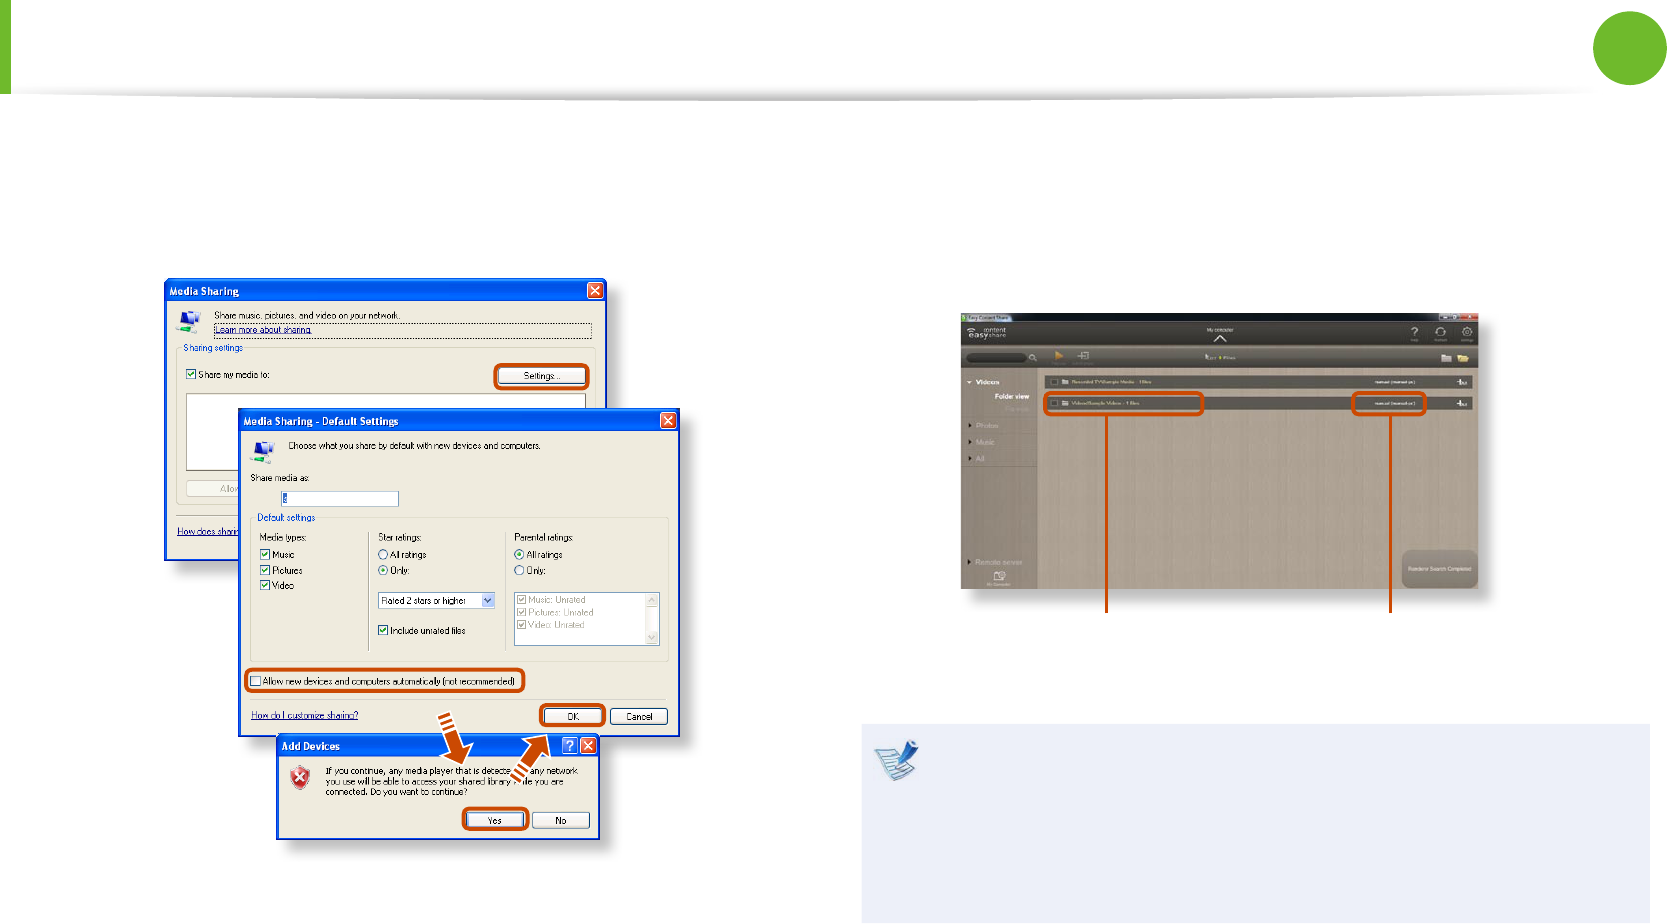
A popup window is displayed. Click Yes. Then click OK in the
Media Sharing- Default Settings window and in the Media
Sharing window.
After the registration has been nished, you can nd the
added folder is listed in the shared content list of Easy
Content Share.
For a shared content item, the name of the computer where
the item is stored is displayed next to it, allowing you to
identify the computer. This is useful when multiple computers
are providing content.
A folder added as a
shared item
The name of the PC where
the content is stored
Content sharing is only available with Windows Media
Player 11 or later.
If your Windows Media Player is earlier than Windows
Media Player 11, download and install Windows Media
Player 11 or later from the Microsoft website.
Sharing Content in a Home Network (Easy Content Share) (Optional)

LCD Brightness Control 66
BIOS Setup 68
Setting a Boot Password 71
Changing the Boot Priority 74
Upgrading Memory 75
Battery 77
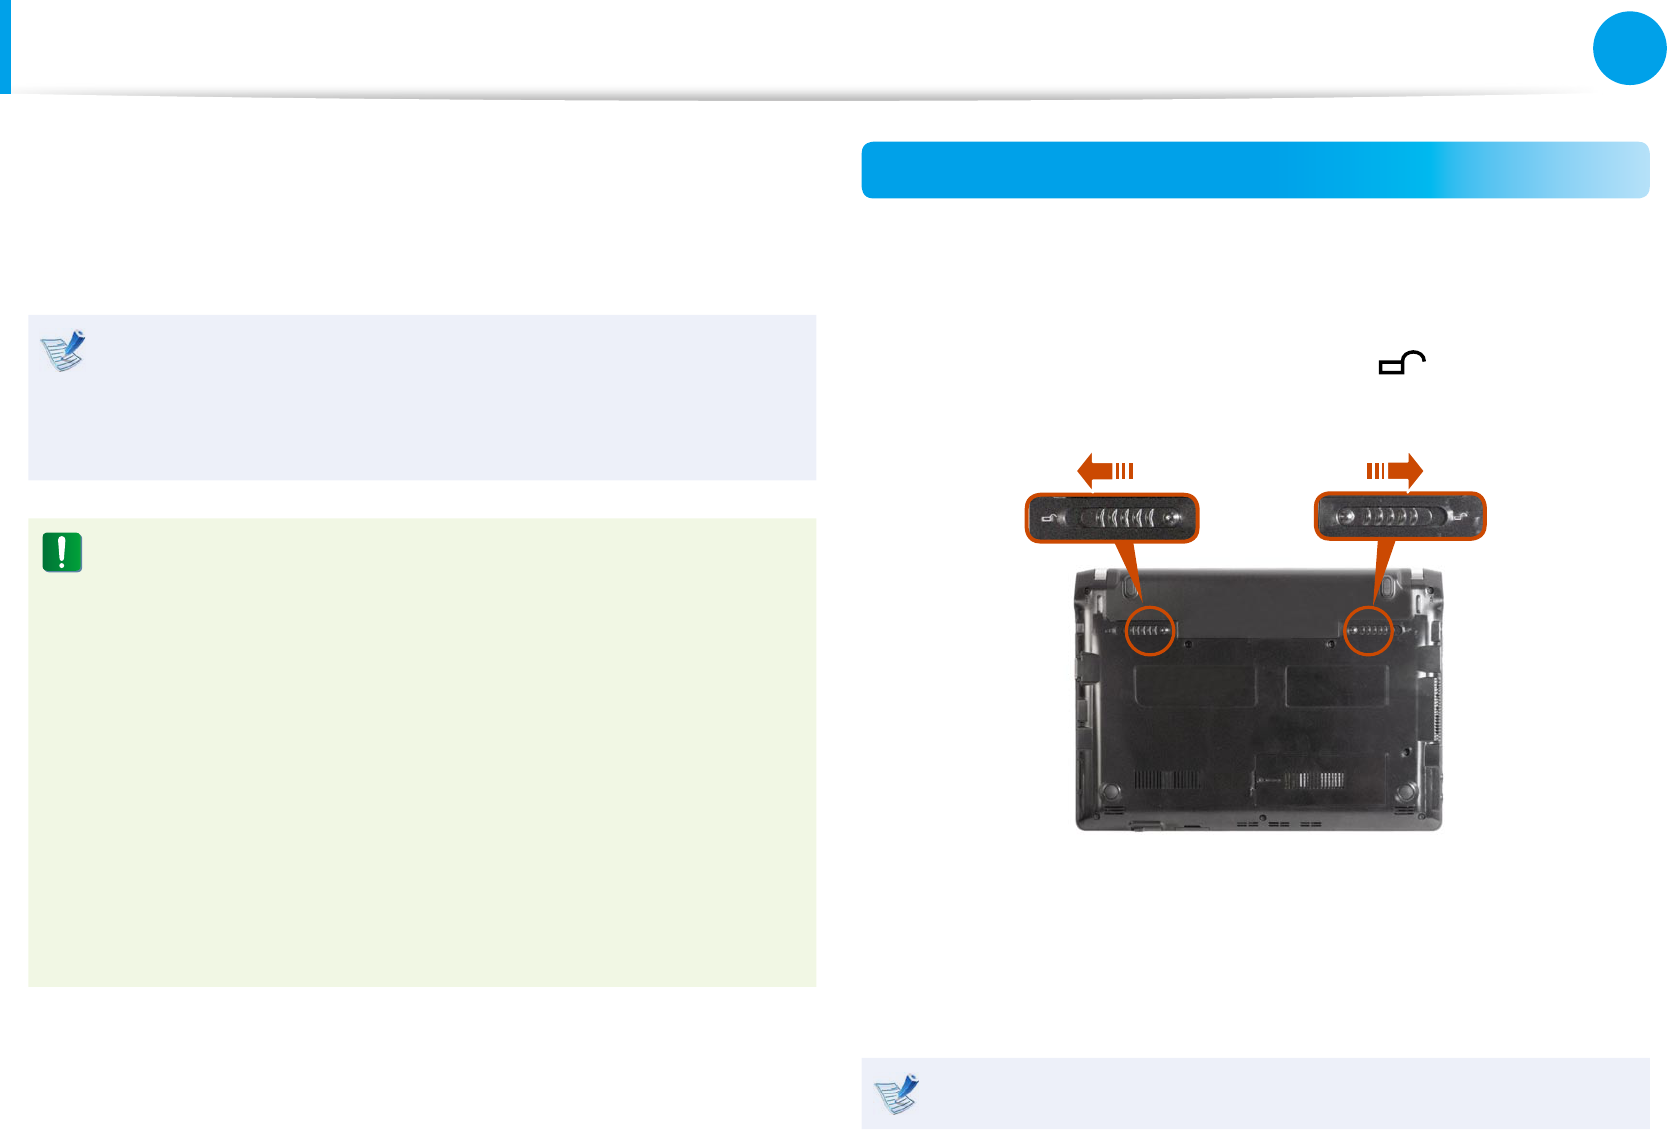
Using the Security Lock Port 83
Chapter 3.
Settings and Upgrade
66
Chapter 3
Settings and Upgrade
LCD Brightness Control
You can adjust the LCD brightness in 8 levels.
The screen brightness is automatically set to the brightest
level (brightness level 8) when AC power is connected and the
brightness is automatically set dimmer when the computer
runs on battery power to extend the battery use time.
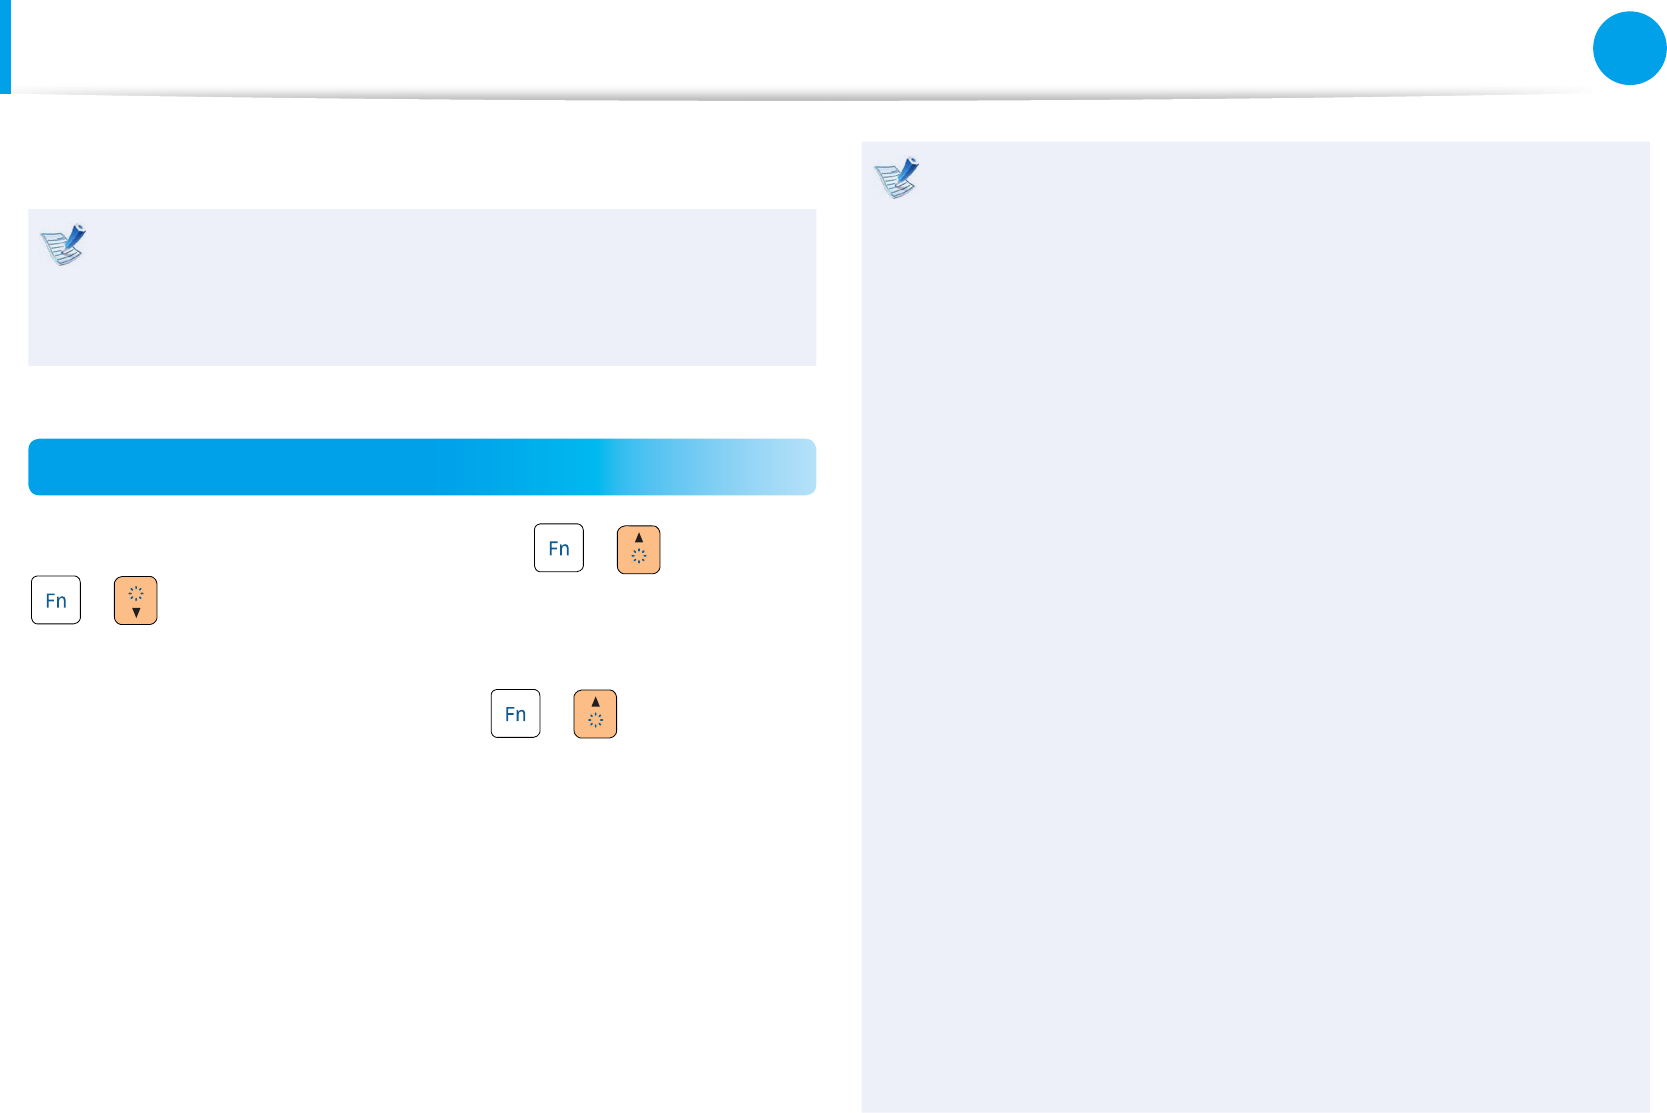
Controlling the Brightness Using the Keyboard
Adjust the LCD brightness by pressing the + key or the
+ key.
The LCD brightness can change up to 8 levels and the brightness
increases by 1 level when pressing the + key once.
Maintaining the changed LCD brightness even after •
turning the computer on again
To maintain the LCD brightness set by using the brightness
control keys or through the Power Options, follow the
procedures below.
► For Windows 7
1. Click Control Panel > Hardware and Sound > Power
Options.
2. Click Change the settings of the currently congured
mode.
3. Adjust the display brightness adjustment menu bar and
click the Save the changes button.
► For Windows XP
1. Turn the computer on and press the F2 key when the
SAMSUNG logo appears on the screen to enter the BIOS
Setup.
2. Select the Boot menu and set the Brightness Mode
Control item to User Control.
3. Press the F10 key to save the settings and exit Setup.
Saving battery power consumption•
Decreases the LCD brightness when the computer
is running on battery power to save battery power
consumption.

66
67
Chapter 3
Settings and Upgrade
LCD Brightness Control
LCD bad pixels principle of laptop computer•
Samsung observes the specications regarding strict
quality and reliability of LCD. But in spite of that, it is
inevitable that there might be a small number of bad
pixels. A large number of bad pixels can cause problems in
appearance, but a small number of pixels doesn’t aect the
computer performance.
Therefore Samsung observes and manages the following
dot principles:
- Bright dot : 2 or less
- Black dot : 4 or less
- Combination of Bright and Dark : 4 or less
Instructions for Cleaning the LCD
Clean the LCD panel with a soft cloth lightly moistened with
computer cleansing detergent moving in one direction.
Cleaning the LCD panel with excessive force can damage the
LCD.

68
Chapter 3
Settings and Upgrade
BIOS Setup
The BIOS Setup enables you to congure your computer hardware
according to your needs.
Use the BIOS setup to dene a boot password, change the •
booting priority, or add a new device.
Since incorrect settings may cause your system to •
malfunction or crash, take care when conguring the BIOS.
The functions of the BIOS setup are subject to change for •
product function enhancement purposes.
The BIOS Setup menus and items may dier depending on •
your computer model.
Entering the BIOS Setup
1 Turn the computer on.
2 When the booting screen (SAMSUNG logo) appears, press the
F2 key to enter the BIOS Setup.
Press the F12 key while the booting screen(SAMSUNG logo)
appears, the system will try to boot from the network.
3 After a moment, the BIOS setup screen appears.
The items in the BIOS setup may dier depending on the
product.
68
69
Chapter 3
Settings and Upgrade
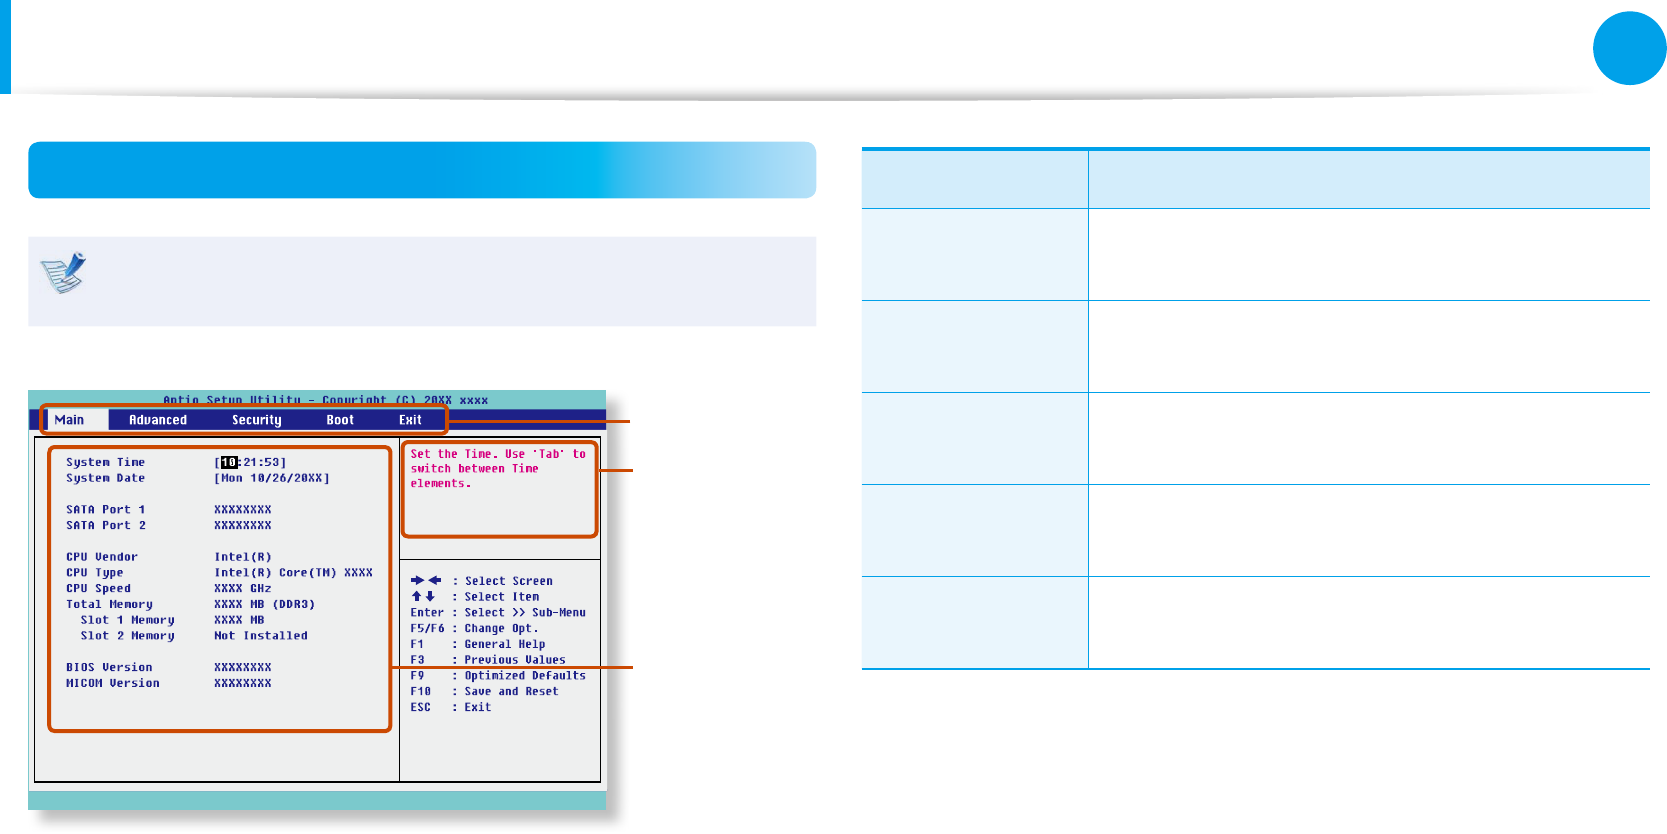
The BIOS Setup Screen
The BIOS Setup menus and items may dier depending on
your computer model.
Setup Menu
Setup Items
Help
Help for the
selected
item appears
automatically.
Setup Menu Description
Main Used to change the basic system and
environment settings.
Advanced Used to congure advanced functions on your
computer for devices and chipsets.
Security Used to congure security functions, including
passwords.
Boot Used to set the boot priority and other boot
options.
Exit Used to exit the Setup either saving the
changes or not.
BIOS Setup
70
Chapter 3
Settings and Upgrade
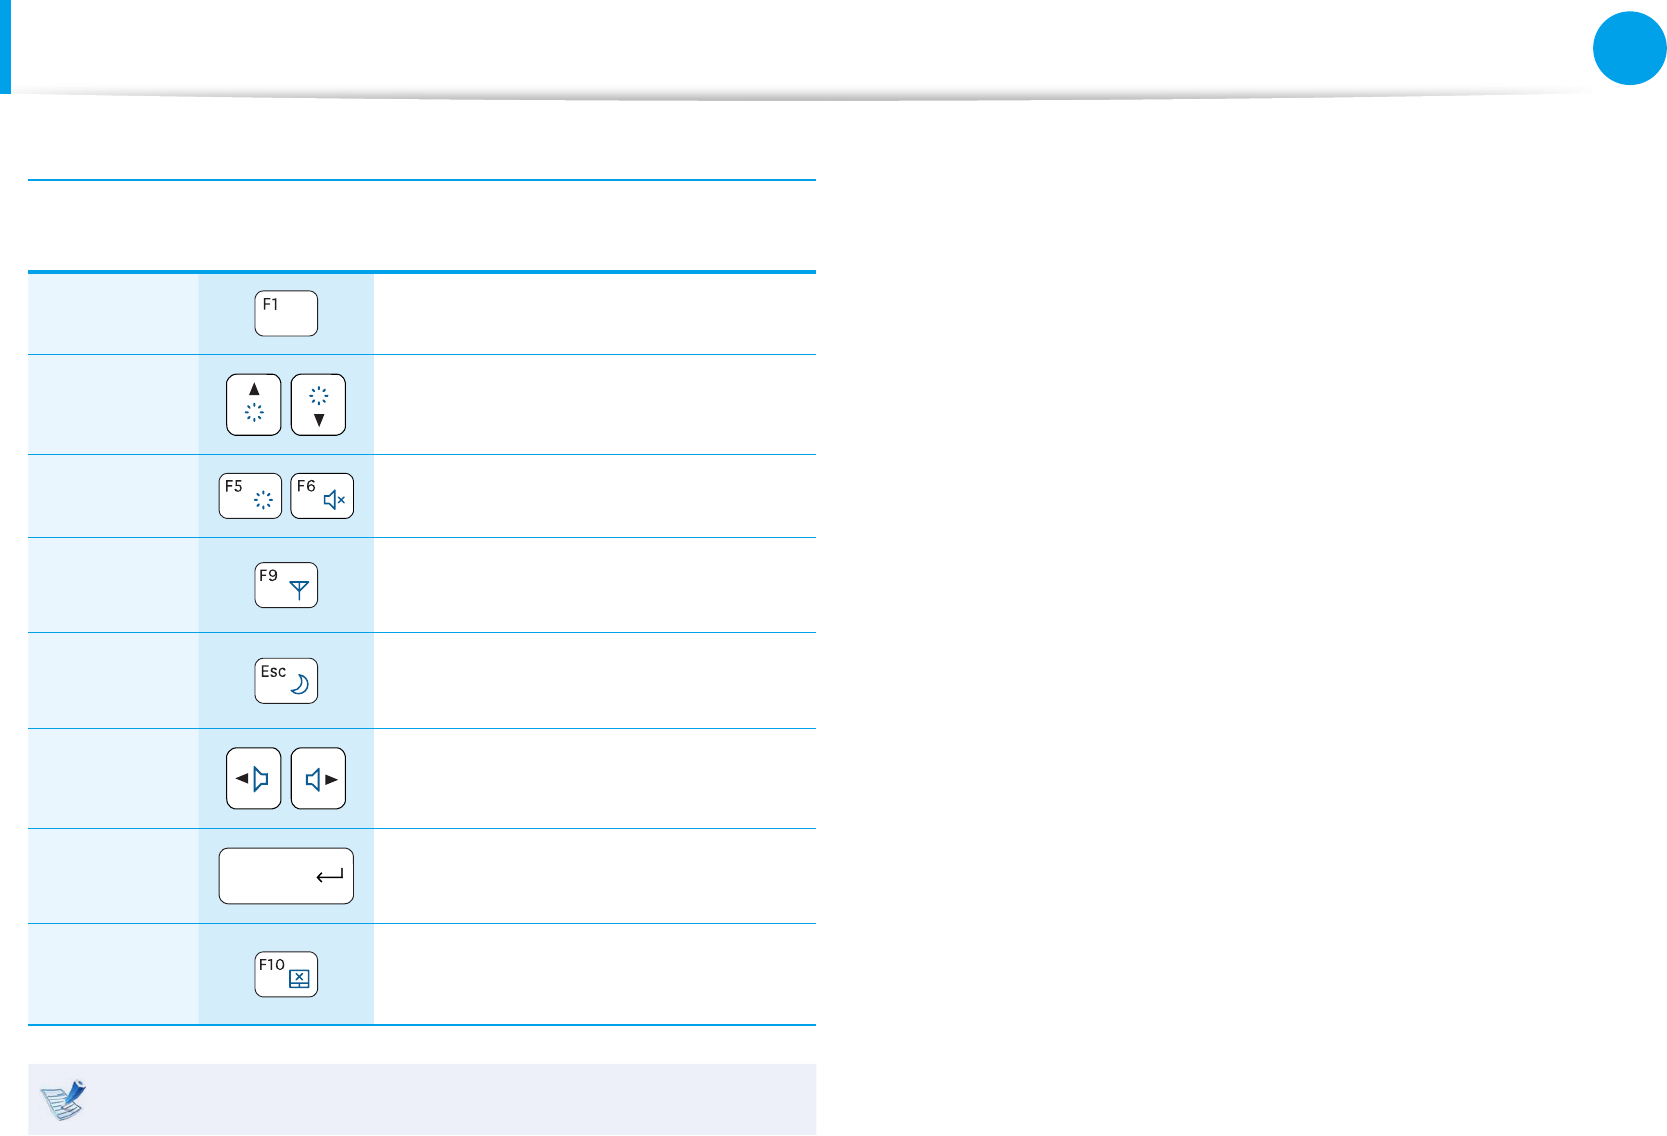
System Setup Keys
In the Setup, you have to use the keyboard.
F1 Press to view the Setup Help.
Up & Down
Keys Press to move up and down.
F5/F6 Press to change the item value.
F9 Press to load the default Setup
settings.
ESC Press to return to a higher level
menu or to move to the Exit menu.
Left & Right
Keys Press to move to another menu.
Enter Press to select an item or to enter a
sub menu.
F10 Press to save the changes and exit
Setup.
The keyboard image may dier from the actual keyboard.
BIOS Setup
70
71
Chapter 3
Settings and Upgrade
Setting a Boot Password
When setting a password, you have to enter a password to use the
computer or enter the BIOS Setup.
By conguring a password, you can restrict system access to
authorized users only and protect data and les saved on the
computer.
Do not lose or forget your password. •
If you have forgotten your password, contact a Samsung •
service center. In this case, a service fee will be charged.
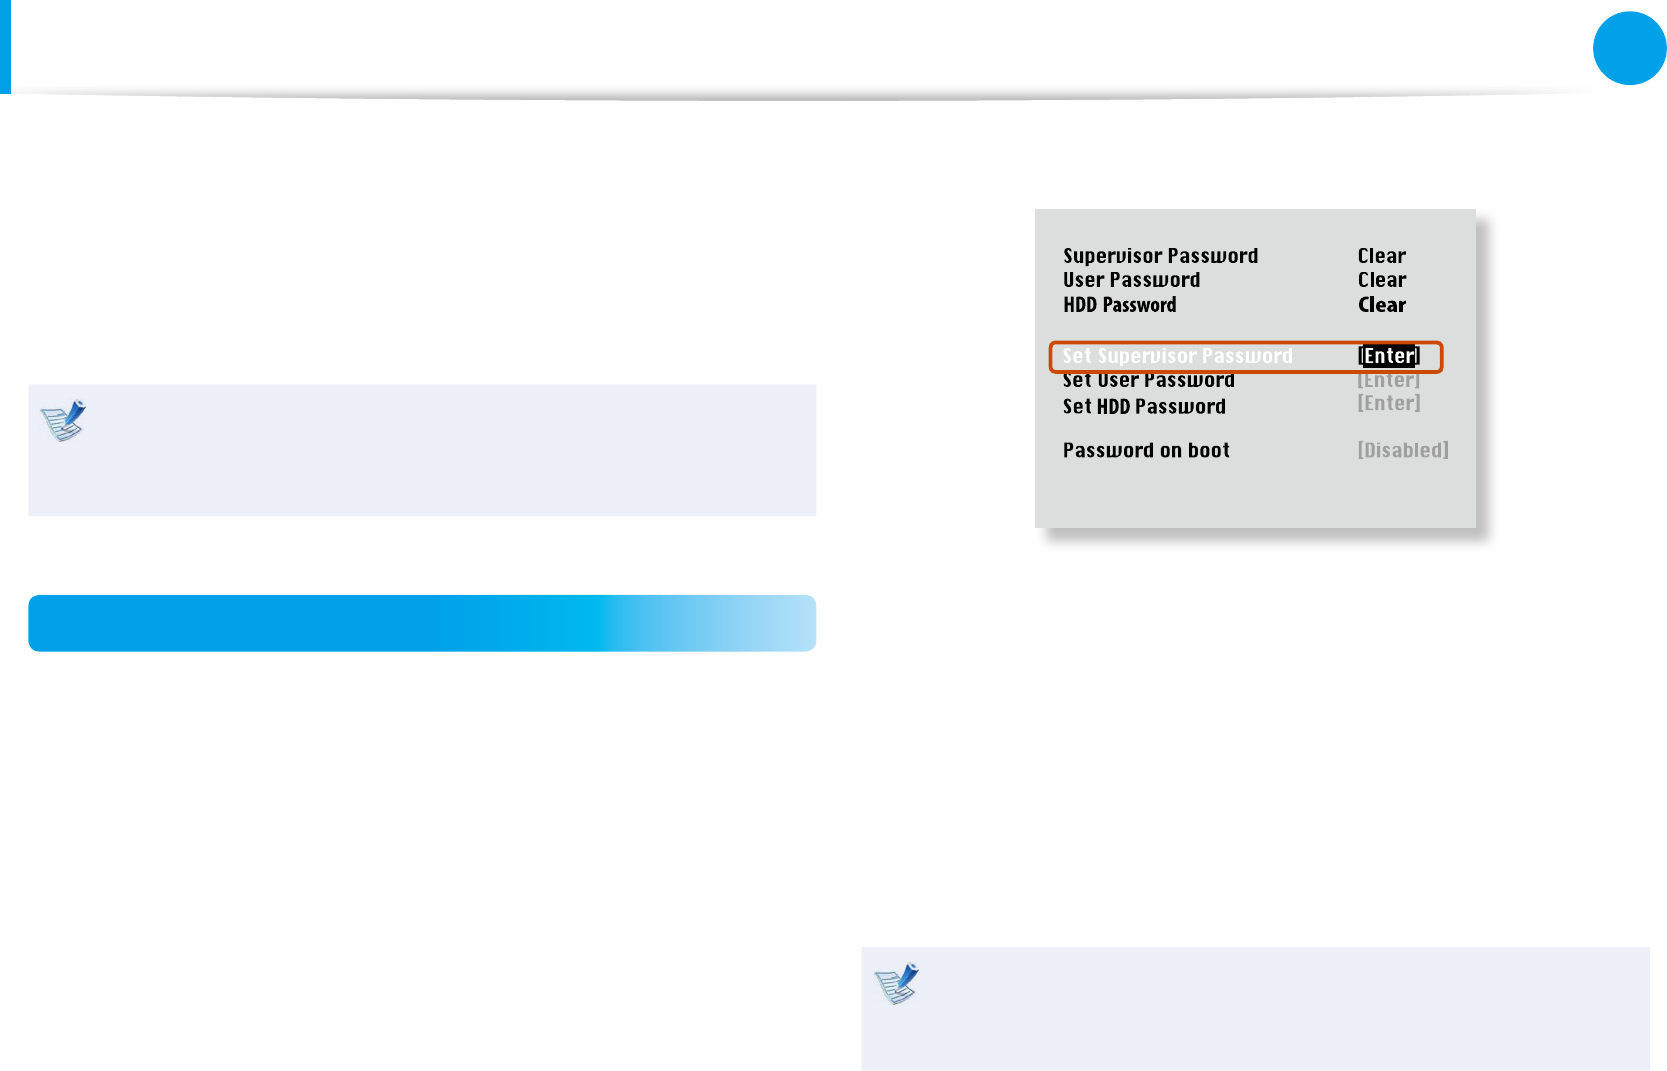
Setting a Supervisor Password
A Supervisor Password is required to turn the computer on or to
start the System Setup.
When setting a Supervisor Password, users other than a supervisor
cannot use the computer.
1 Select the Security menu in the BIOS Setup.
2 In the Set Supervisor Password item, press <Enter>.
XXXXXXXX
3 Enter a password, press <Enter>, re-enter the password for
conrmation, and press <Enter> again.
The password can be up to 8 alphanumeric characters.
Special characters are not allowed.
4 The supervisor password has been set.
The supervisor password is required to turn the computer on
or to enter the BIOS Setup.
For some models, if the password entered message appears
in the Setup Notice window, the settings are not complete
until the <Enter> key is pressed.

72
Chapter 3
Settings and Upgrade
Setting a Boot Password
Setting a User Password
Users can start the system with a user password, but cannot enter
the System Setup. By doing this, you can prevent other users from
entering Setup.
Before conguring a user password, a supervisor password must
have been congured. Deactivating the supervisor password also
deactivates the user password.
In the Set User Password item, press <Enter> and complete the
procedures from Step 3 of Setting a Supervisor Password.
Setting Up a Boot Password
To setup a boot password, the administrator password (Set
Supervisor Password) should be set in advance.
Set the Password on boot item to Enabled.
Once a boot password is set, you have to enter a password to boot
up the computer.
Setting up a Hard Disk Drive Password
(Optional)
A supervisor password must be set using the Set Supervisor
Password menu.
If you set a password for a hard disk drive, it cannot be accessed
from another computer.
Press <Enter> in the Set HDD Password item and dene a
password as described in Step 3 of the Setting up the Supervisor
Password.
The hard disk drive password setting function is not •
provided for some models.
Changing the hard disk drive password•
For security purposes, you can only change a hard disk
drive password after restarting the computer by pressing
the computer Power button.
If you cannot change the hard disk drive password or the
HDD Password Frozen message appears when entering
the BIOS Setup and then selecting Security > HDD
Password, press the Power button to turn the computer
on again.

72
73
Chapter 3
Settings and Upgrade
Setting a Boot Password
Deactivating the Password
1 Press <Enter> on the password to be deactivated. For
example, to deactivate a supervisor password in the Set
Supervisor Password item, press <Enter>.
2 In the Enter Current Password item, enter the currently
congured password and press <Enter>.
3 Leave the Enter New Password item eld empty, and press
<Enter>.
4 Leave the Conrm New Password eld empty, and press
<Enter>.
The password is deactivated.
For some models the password is only canceled if the
<Enter> key is pressed in the Setup Notice window.
74
Chapter 3
Settings and Upgrade
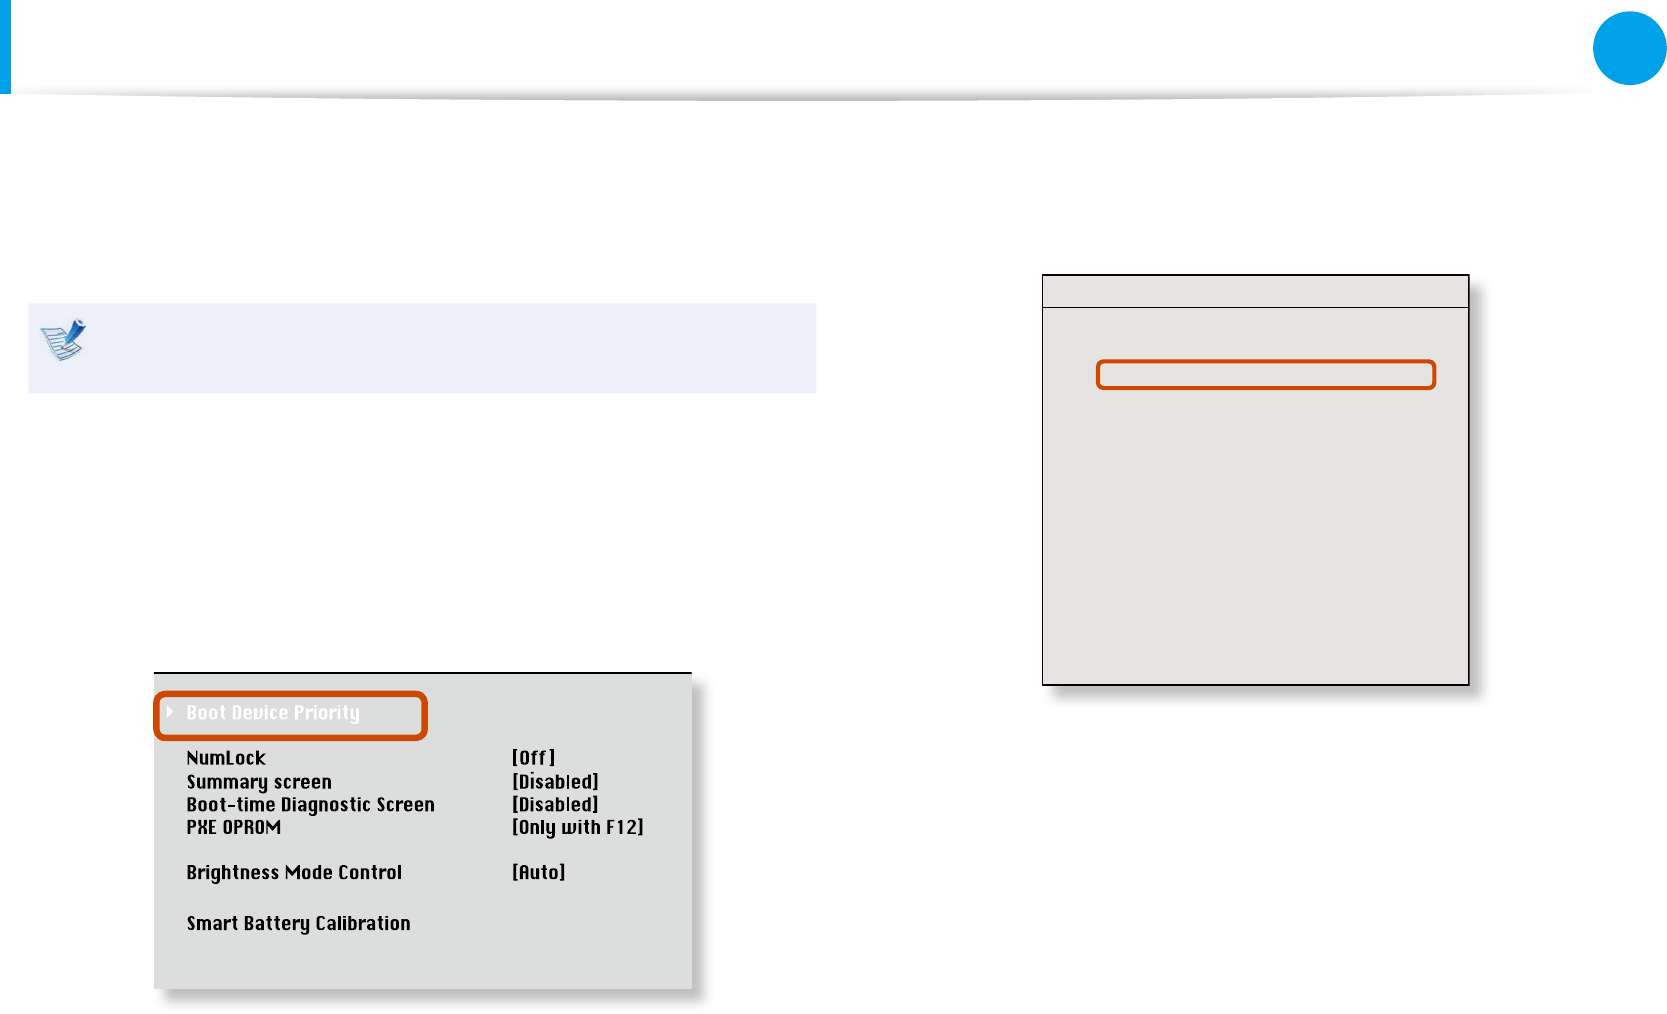
Changing the Boot Priority
This computer is congured to boot from an external-type ODD
rst. As an example, the procedures to change the highest boot
priority device to the hard disk drive are described below.
The screen images in this document may dier from actual
product.
1 Select the Boot menu in the BIOS Setup.
2 Press <Enter> on the Boot Device Priority item.
XXXXXXXX
3 Press the down key (↓) to move to the AHCI HDD itemand
press the F6 key to move up to the top item.
Boot Device Priority
[Boot priority order]
1. AHCI CD : N/A
2. AHCI HDD : XXXXXXXXXXXXXXXX
3. USB KEY : N/A
4. USB CD : XXXXXXXXXXXXXX
5. USB FDD : N/A
6. USB HDD : N/A
7. PCI BEV : N/A
8.
- PCI SCSI : N/A
- USB ZIP : N/A
- USB LS120 : N/A
- Legacy Network Card
- Legacy
[Excluded from boot order]
4 Press the F10 key to save the settings and exit Setup.
The highest boot priority device is now set to the Hard Drive.
74
75
Chapter 3
Settings and Upgrade
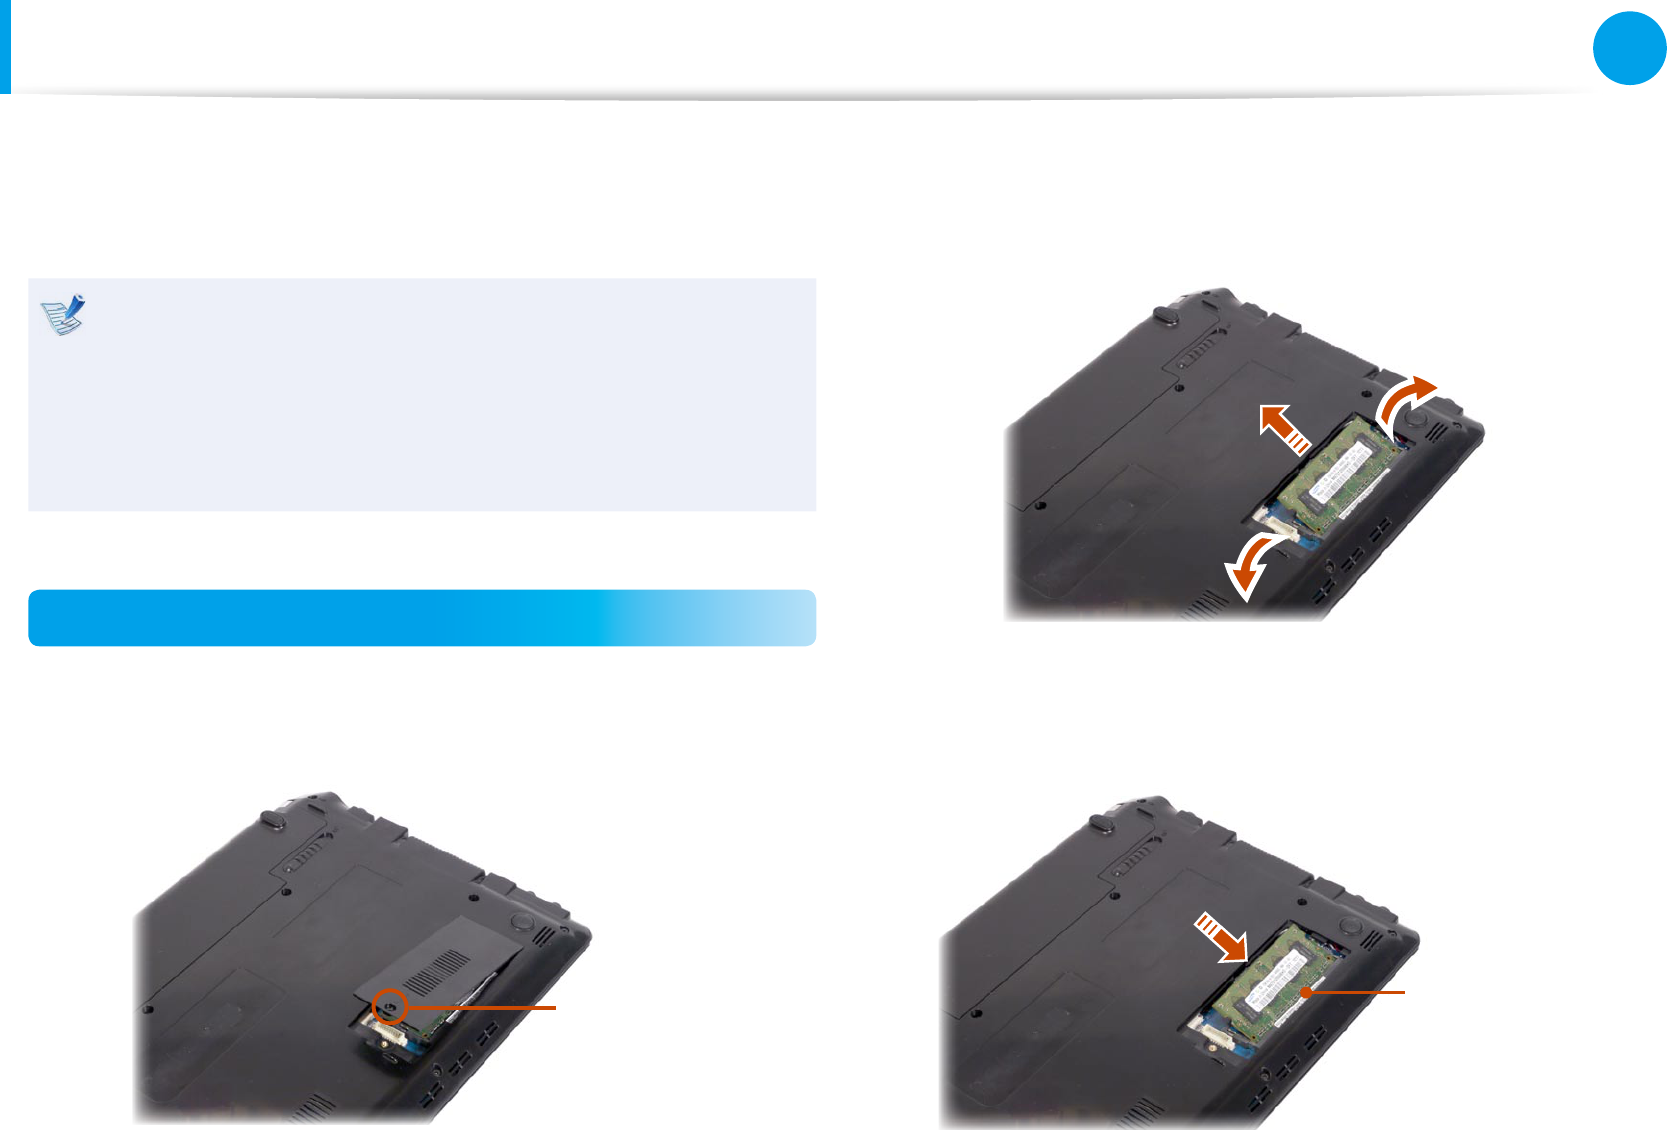
Upgrading Memory
A memory is installed in the memory slot at the bottom of this
computer. The procedures to replace the memory are described
below.
Replace new memory only after shutting the computer •
down completely. Do not replace memory when the
computer is in Sleep mode. Disconnect main power plug
and remove the battery before continuing.
The memory compartment cover may dier from the •
gure below.
Replacing the Memory
1 Remove the screw on the memory compartment cover at the
bottom of the computer using a screw driver.
Fixing Screw
2 Pull the memory module latches outward. The memory
module will pop up.
Remove the memory module out at an angle of 30 degrees.
3 Insert a new memory module into the memory slot at an
angle of approximately 30 degrees aligning it to the angle of
the memory slot.
Memory Slot
76
Chapter 3
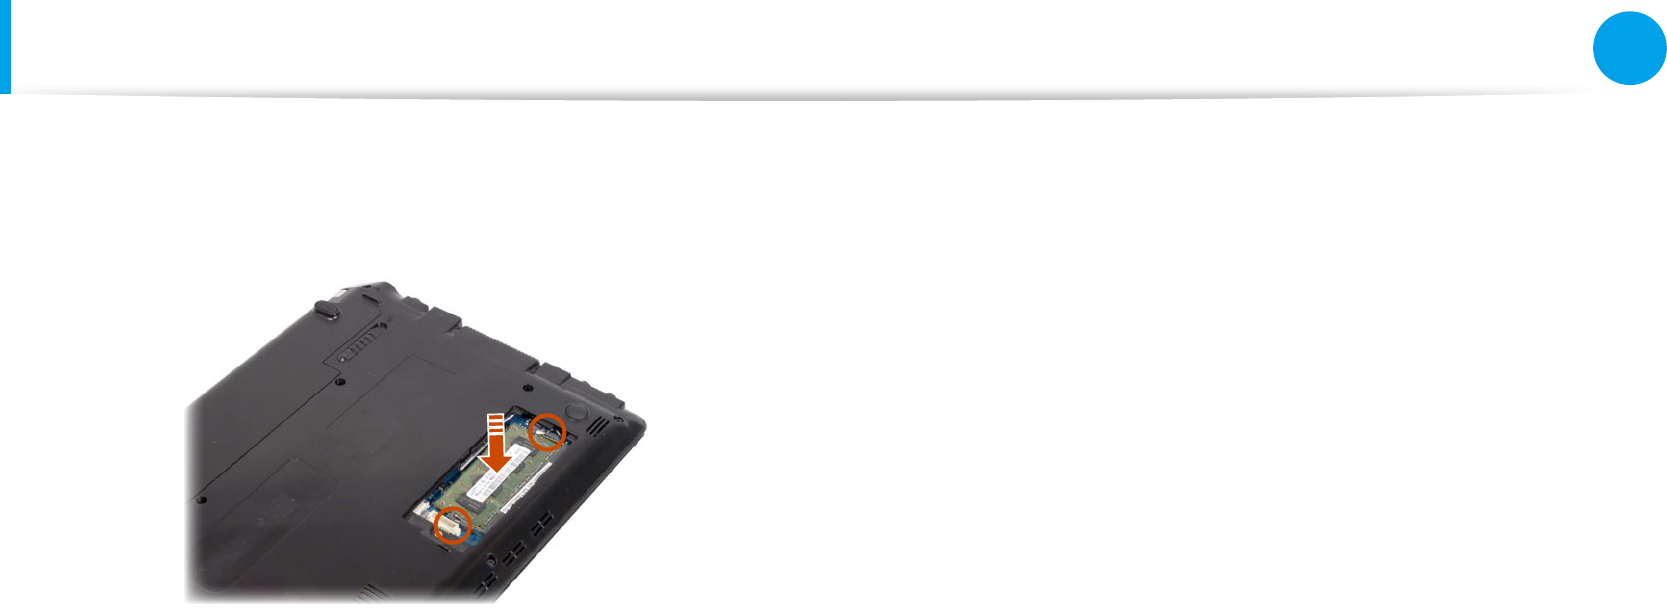
Settings and Upgrade
Upgrading Memory
4 Push the memory module down so that it is completely xed.
If the memory does not t easily, push the memory module
down while pulling the memory module latches outward.
5 Close the memory compartment cover and fasten the screw.
76
77
Chapter 3
Settings and Upgrade
Battery
Please refer to the following instructions when running the
computer on battery power without connecting the AC power.
A Lithium-Ion smart battery is supplied with this computer.
Carefully read and follow the precautions printed on the •
battery before using the battery.
Before using your computer for the rst time after •
purchasing it, charge the battery completely.
Precautions
Use only chargers specied in the User Manual.•
Never heat the battery pack, put it near or in a re or use at •
a temperature higher than 60°C, as this may cause re.
Never cause a short circuit between the battery pack •
terminals or disassemble the battery pack.
Carefully read and follow the precautions printed on the •
battery and the safety instructions in the User Manual
before using the battery.
Please refer to the system operation environment of •
this manual and operate and store the battery at room
temperature.
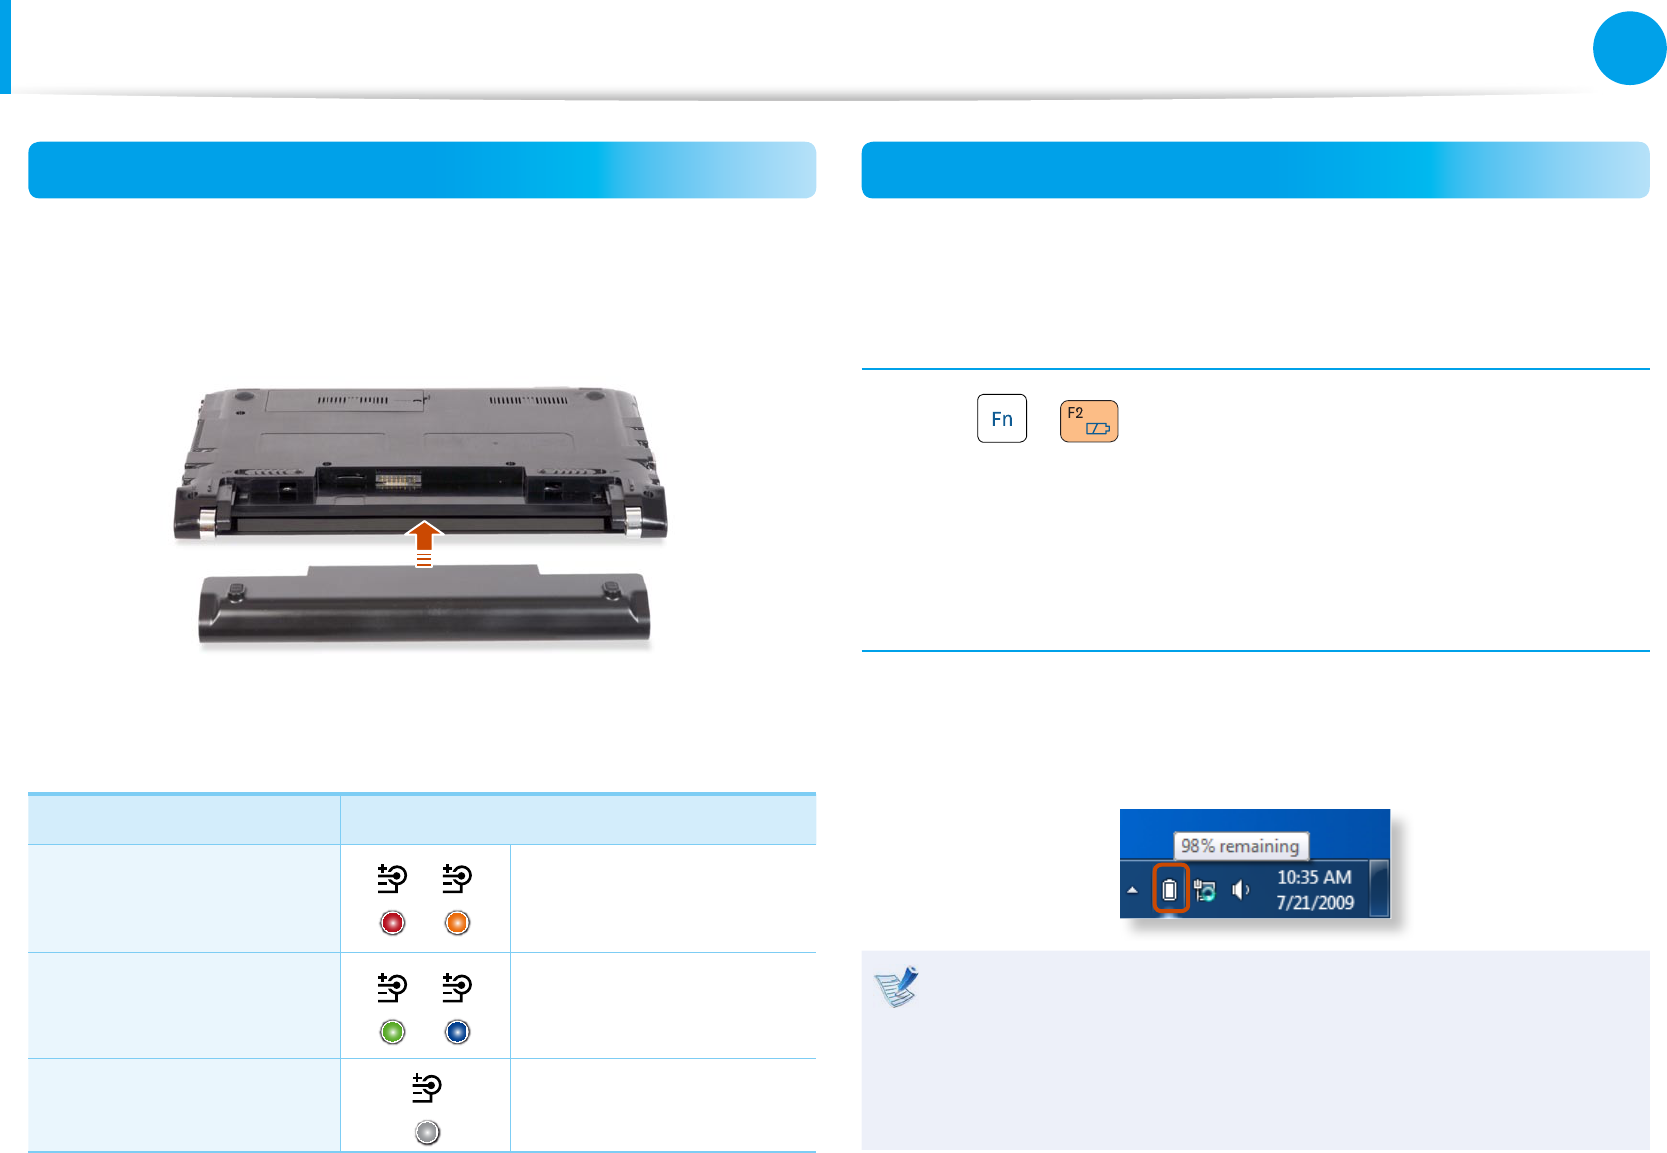
Installing/Removing the Battery
1 Shutdown the system, close the LCD panel and place the
computer upside down on a at surface.
2 Pull the two battery latches outwards , then remove the
battery.
3 To install the battery again, slide the battery into the system.
The battery latches move inwards and x the battery
automatically.
Check if the battery latch has been moved inwards.
78
Chapter 3
Settings and Upgrade
Battery
Charging the Battery
1 Attach the battery and connect the AC adapter to the DC-in
jack of the computer.
The battery will then start charging.
2 When charging is complete, the Charge LED turns green.
Status Charge LED
Charging Red or Orange
Charging complete Green or Blue
AC adapter not
connected O
Measuring the Remaining Battery Charge
You can view the battery charge status by completing the
following procedures.
To use the shortcut key to view
Press the + keys on the keyboard. The remaining
battery charge (%) will displayed for a moment.
You can only view the charge status in this way when Easy Display
Manager is installed on your computer.
Conrming the battery charge in the Taskbar
Disconnect the AC adapter and move the mouse cursor over
the battery icon in the system tray of the Taskbar to conrm the
remaining battery charge.
Battery Warning
If the battery residual amount is 3~5%, the computer
automatically shuts down after saving the data. The battery
residual amount may vary depending on the computer
model.
78
79
Chapter 3
Settings and Upgrade
Battery
Battery Usage Time Information
A battery is an expendable supply, so when using it over a long
time, the capacity/battery life is shortened. If the battery life is
reduced to under half of its initial time, we recommend purchasing
a new battery.
When not using the battery for a long time, store the battery after
charging it to 30-40% of its capacity. This extends the battery life
time.
Extending the Battery Usage Time
Decreasing the LCD Brightness
Press the + keys on the keyboard to decrease the LCD
brightness to extend the battery usage time.
Using Battery Manager (Optional)
Battery Manager is a power management program that enables
using the battery power eciently. You can select an optimized
power mode according to your requirements.
Battery Manager is optional and may not be supported
depending on your model.
► For Windows 7/Vista
1 Click Start > Control Panel > Hardware and Sound >
Power Options.
Alternatively, right-click the power measuring device icon in
the notication area of the taskbar and select Power Options.
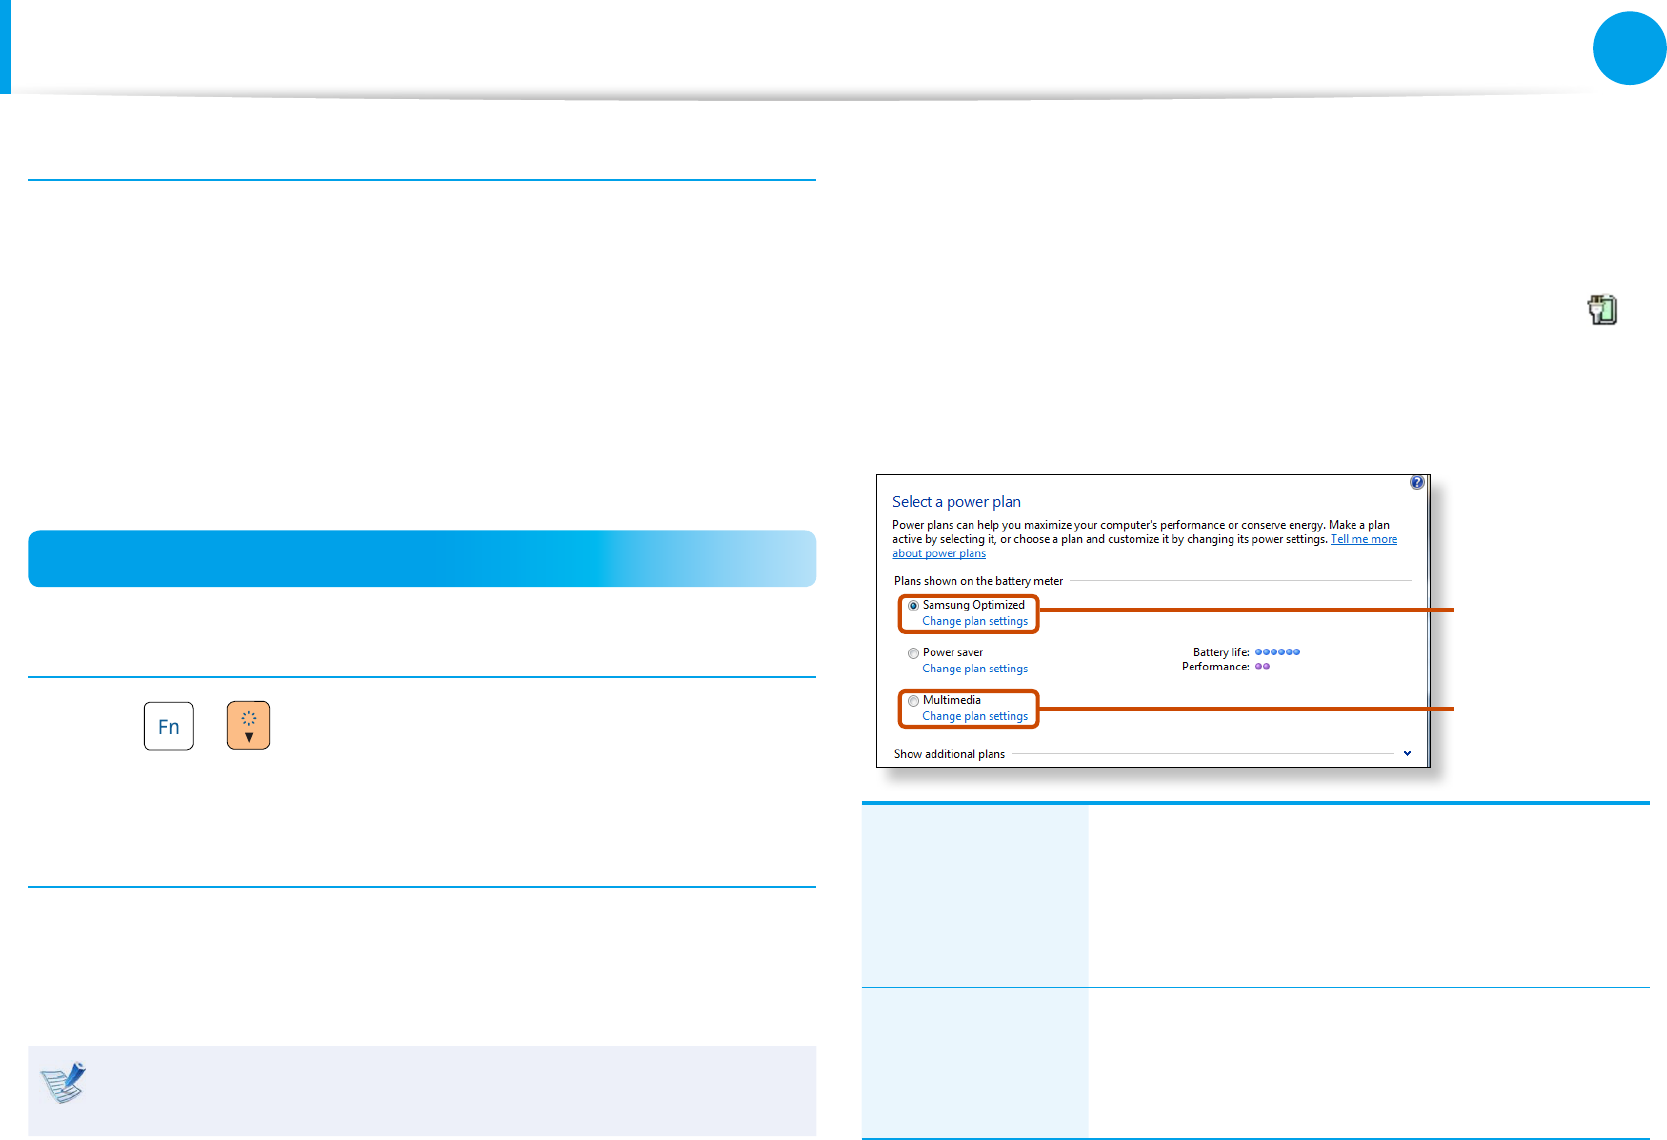
2 If the following screen appears, select one of the modes.
Multimedia
Samsung
Optimized
Samsung
Optimized
This mode is appropriate for normal conditions.
It maximizes the system performance when
the computer is running on AC power while
maximizing the battery usage time when the
computer is running on battery power.
Multimedia
This mode is appropriate for a multimedia
environment that requires maximum system
performance. Therefore, the battery usage
time may be reduced in this mode.
80
Chapter 3
Settings and Upgrade
Battery
Multimedia mode is only supported in Windows Vista.
Using the Easy Battery Manager power options
To use the Easy Battery Manager power options after
reinstalling Windows, you have to install the Easy Battery
Manager manually using the system software media.
Since power options in Easy Battery Manager aim at
maximizing the battery usage time, programs requiring high
performance may slow down when using the battery.
In this case, it is recommended connecting the AC adapter or
selecting Power Saver.
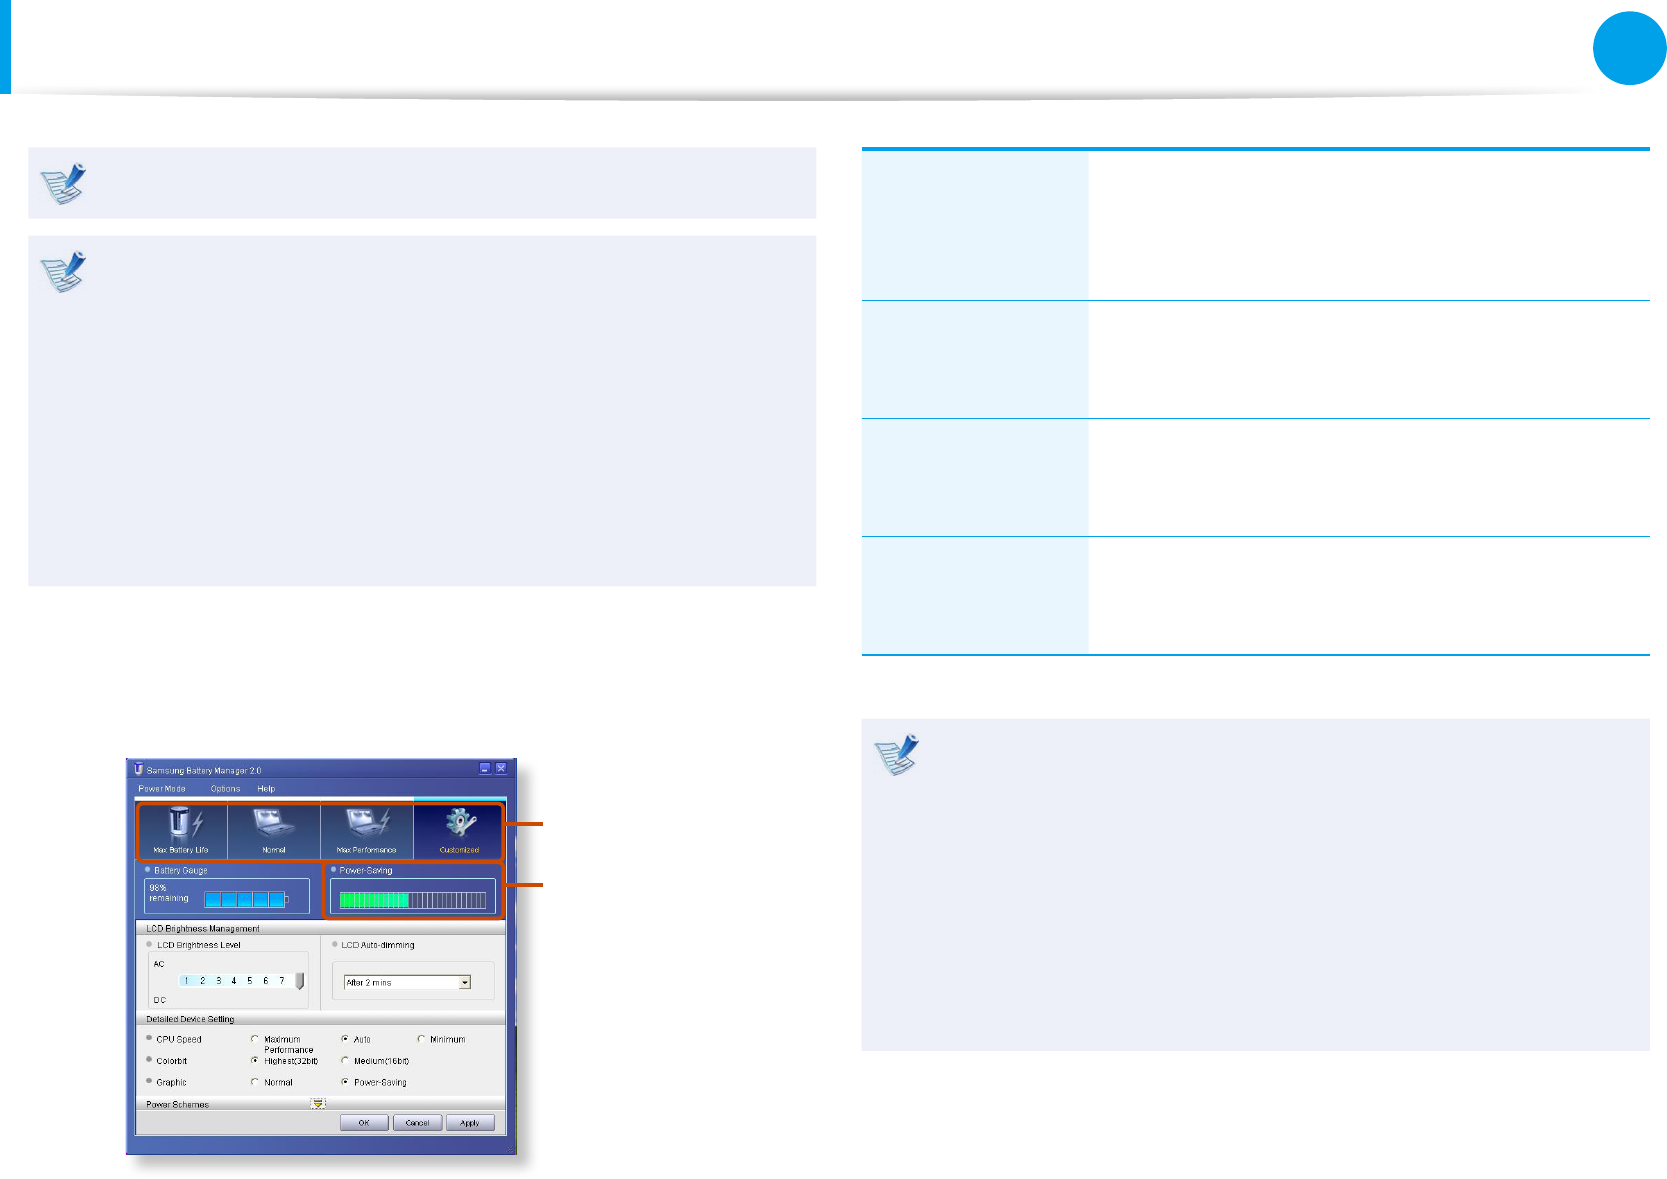
► For Windows XP
Click Start > All Programs > Samsung > Samsung Battery
Manager > Samsung Battery Manager.
Select Power
Mode
Power-saving
Eect
Maximum
Battery Mode
This mode is appropriate for the environment
that requires maximum battery lifetime. The
system performance may be degraded in this
mode.
General Mode
This mode is appropriate for the regular
environment and it optimizes the performance
of the system and battery.
Maximum
Performance
Mode
This mode is appropriate for the environment
that requires maximum system performance.
The battery life may get shorter in this mode.
User Settings
Mode
This mode allows you to congure the detailed
settings. You can set LCD brightness, power
status, and color quality.
What is the Power-saving Eect?•
This product displays the battery life in each power mode.
The higher the power saving eect increases, the longer
the graph bar is displayed.
When Using Games or Multimedia•
The system may not operate properly in maximum battery
mode. It is recommended to connect the AC adapter to the
system or to use the system in general mode.