Samsung Electronics Co HMXQF20BN Digital Camcorder User Manual
Samsung Electronics Co Ltd Digital Camcorder
Contents
- 1. User manual 1 of 3
- 2. User manual 2 of 3
- 3. User manual 3 of 3
User manual 2 of 3
Using the Manual modes
47
Extended functions
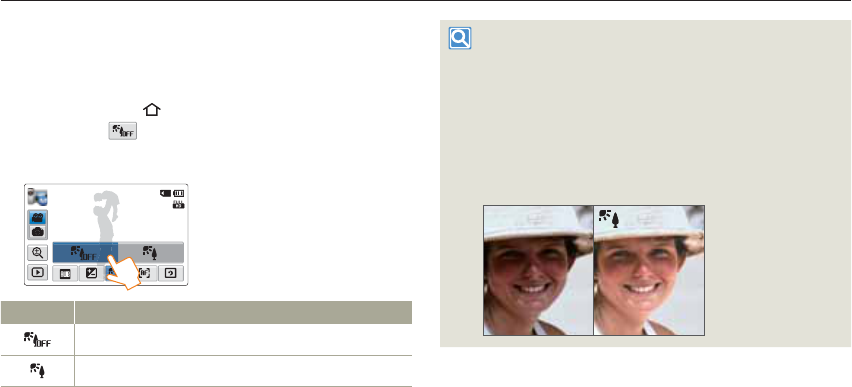
Back Light
When a subject is lit from behind, this function compensates for back
lighting so that the subject does not appear too dark.
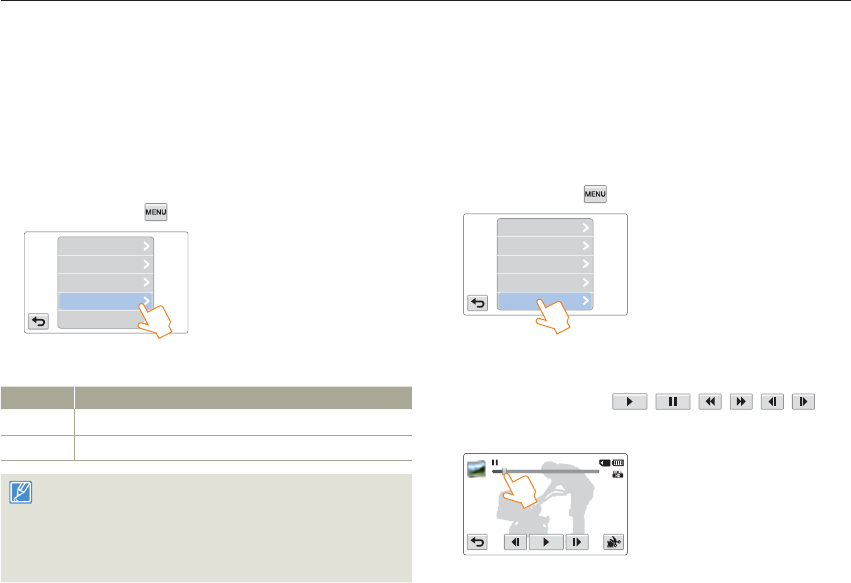
1 Press the [Home ( )] button p touch Manual p
Back Light ( ) tab.
2 Touch the desired submenu item.
STBY 00:00:00 [253Min]
Back Light : Off
Icon Description
Off: Disables the function.
On: Backlight compensation brightens the subject.
Back lighting causes the subject to be darker than the
background
It typically occurs when:
The subject is in front of a window.
The person you want to record is wearing white or shiny clothes and
is placed against a bright background. The person’s face is too dark
to distinguish his/her features.
The subject is outdoors and the background is overcast.
The light sources are too bright.
The subject is in front of a snowy background.
•
•
•
•
•
Using the Manual modes
48
Extended functions
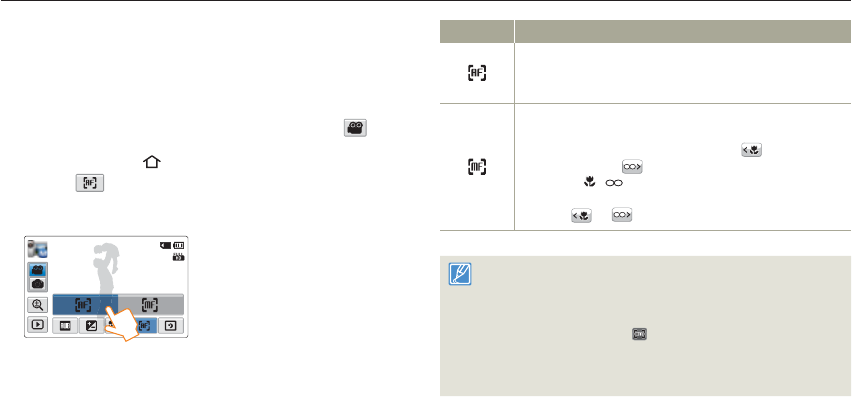
Focus
The camcorder usually focuses on a subject automatically (auto focus).
When you turn the camcorder on, focus is always set to automatic.
You can also set the focus manually.
1 In STBY mode, touch the Video recording mode ( ) tab.
2 Press the [Home ( )] button p touch Manual p
Focus ( ) tab.
3 Touch the desired submenu item.
STBY 00:00:00 [253Min]
Focus : Auto
Icon Description
Auto: In most situations, it is better to use the automatic focus
feature, as it lets you concentrate on the creative side of your
recording.
Manual: You may need to focus manually under conditions
in which automatic focusing is difficult or unreliable. To adjust
the focus, place and hold your finger on the for a nearer
subject, and on the tab for a farther subject. The nearer or
farther icon ( / ) appears when focus adjustment reaches
the end. The camcorder applies the adjusted value right after you
touch the or tab.
The Auto Focus (AF) setting is useful when you operate the zoom
function because you might not be able to keep accurate focus after
the zoom ratio has been changed.
In the manual focus setting menu screen, you can access auto
focus by touching the AF ( ) tab on the screen. You can return to
manual focus by touching the manual focusing tabs.
When the camcorder exits from Manual mode or switch to the photo
recording mode, the Focus function is automatically set to Auto.
•
•
•
Using the Manual modes
49
Extended functions
Super C.Nite
You can adjust shutter speed when recording a slow moving object, or
record a brighter image in dark places without a compromise in colors.
1 In STBY mode, touch the Video recording mode ( ) tab.
2 Press the [Home ( )] button p touch Manual p
Super C.Nite ( ) tab.
3 Touch the desired submenu item.
STBY 00:00:00 [253Min]
Super C.Nite : Normal
Icon Description
Off: Disables the function.
Normal: The shutter opens for 1/60 of a second in the normal
mode and automatically switches to open for 1/30 of a second
in a dark place. Use this function to get bright images in a dark
place.
Super: The shutter opens for 1/15 of a second regardless of
surrounding conditions. Use this function to get bright images in
a darker place.
The images may not seem smoothly because the camcorder has
recorded them with the low shutter speed when using Super C.Nite.
Using the Manual modes
50
Extended functions
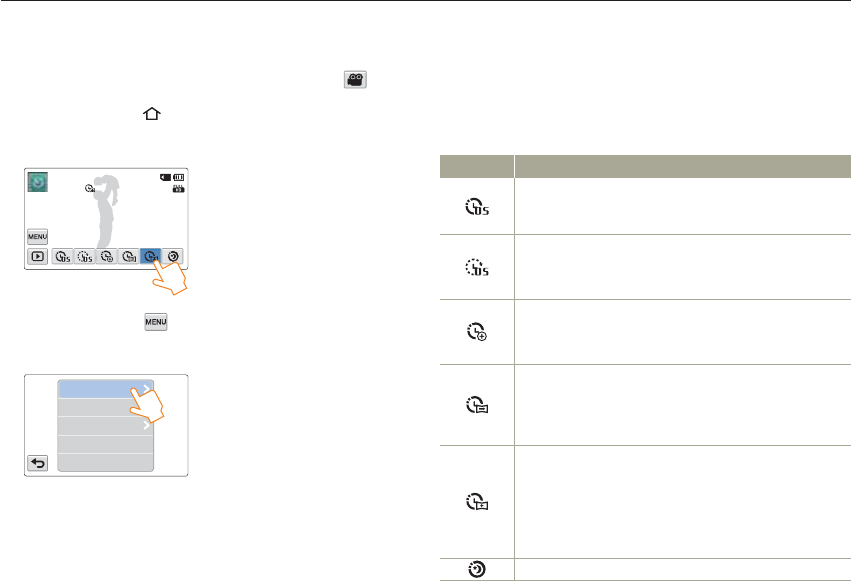
Self Timer
When the self-timer is enabled, there is a time delay of 10 seconds
before recording starts. You can take photos of yourself.
1 In STBY mode, touch the Photo recording mode ( ) tab.
2 Press the [Home ( )] button p touch Manual p
Self Timer ( ) tab.
3 Touch the desired submenu item.
9999
Self Timer : Off
Icon Description
Off: Disables the function.
On: There is a time delay of 10 seconds after you press the
[Recording Start/Stop] button.
The camcorder automatically turns the Self Timer function off after it
has been used once. You must turn it on each time you want to use it.
When the camcorder exits from Manual mode, the Self Timer
function is automatically set to Off.
•
•
Cont. Shot
The Continuous Shot function lets you capture up to eight photos in
rapid.
1 In STBY mode, touch the Photo recording mode ( ) tab.
2 Press the [Home ( )] button p touch Manual p
Cont. Shot ( ) tab.
3 Touch the desired submenu item.
9999
Cont. Shot : Off
Icon Description
Off: The camcorder records only one photo image.
On: When you press the [Recording start/stop] button, the
camcorder can take up to 8 photos in one second.
When an error occurs (Card Full, etc.) during continuous shot, the
recording stops and an error message appears.
When the Cont. Shot is On, the photo resolution is fixed to
2M 1920x1080.
When the camcorder exits from Manual mode, the Cont. Shot
function is automatically set to Off.
•
•
•
51
Extended functions
Using the Art Film modes
Fader
You can give your recording a professional look by using special
effects such as fade in at the beginning of a sequence or fade out at
the end of a sequence.
1 In STBY mode, touch the Video recording mode ( ) tab.
2 Press the [Home ( )] button p touch Art Film p
Fader ( ) tab.
3 Touch the desired submenu item.
STBY 00:00:00 [253Min]
Fader : Off
Icon Description
Off: Disables the function.
On: When you start or stop recording, the recording fades in or
fades out accordingly.
Recording a video with Fade effect
Fade Out (Approx. 3 seconds)
Fade In (Approx.3 seconds)
Fade in
With Fader set to On, press the [Recording start/stop] button. The
recording starts with a dark screen, and then the image and sound fade
in.
Fade out
With Fader set to On, press the [Recording start/stop] button to stop
recording. The image and sound fade out, the screen goes black, and
then the recording stops.
The camcorder automatically turns the Fader function off after it has
been used once. You must reset it each time you want to use it.
When the camcorder sets the Art Time Lapse mode or exits from the
Art Film mode, the Fader function is automatically set to Off.
•
•
Using the Art Film modes
52
Extended functions
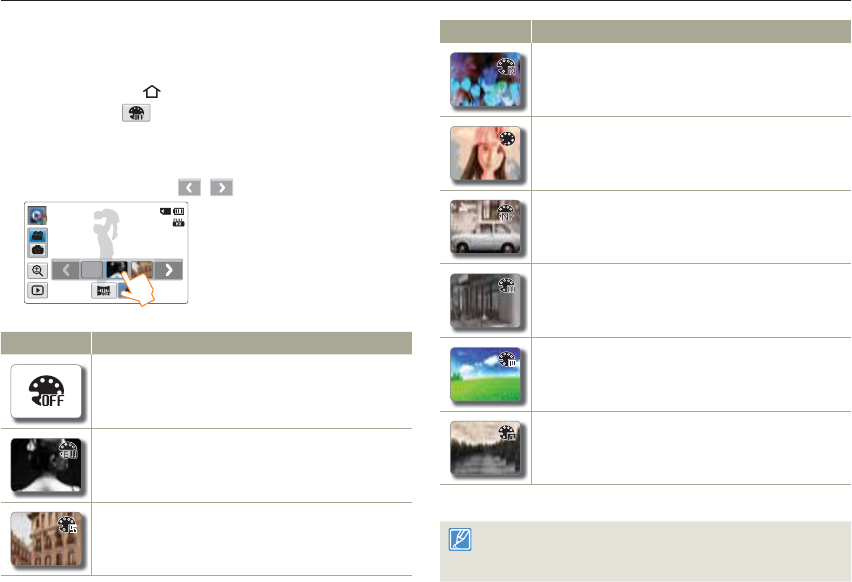
Digital Effect
Using the Digital Effect function gives your recording a creative look.
1 Press the [Home ( )] button p touch Art Film p
Digital Effect ( ) tab.
2 Touch the desired submenu item.
You can view the hidden items by dragging the LCD screen left
or right or touching the / tab.
STBY 00:00:00 [253Min]
Digital Effect : Black & White
OFF
Icon Description
Off: Without any Digital Effect, a normal, natural image is
displayed during recording or playback.
Black & White: This mode changes the image to black and
white.
Sepia: This mode gives the image a reddish brown look.
•
Icon Description
Negative: This mode reverses the colors, creating a negative
image.
Art: This mode helps adjust for facial imperfections.
Noir: This mode creates a stronger image by increasing
contrast.
Western: This mode creates a faded and old film vintage look.
Dazzle: This mode creates a brighter image by increasing
color saturation.
Ghost: This mode creates a drawn out image effect like an
apparition or ghost. (Video recording mode only)
You can also apply random digital effects easily by shaking the
camcorder in the Art Film and Art Time Lapse modes. You do not need
to set the Digital Effect function manually. ¬page 96
53
Extended functions
Using the Art Time Lapse mode
1 In STBY mode, touch the Video recording mode ( ) tab.
2 Press the [Home ( )] button p touch Art Time Lapse.
3 Touch the desired menu.
STBY 00:00:00 [253Min]
Zoom + Panning
0.5 Sec
4 Touch the MENU ( ) tab.
5 Touch the desired submenu.
Direction
Zoom
Interval
6 Touch the desired submenu item.
7 After setting the Art Time Lapse mode, press the [Recording
start/stop] button.
The Art Time Lapse recording starts.
•
In Art Time Lapse mode, you can record videos in 1920x1080/
30p resolution only.
Press the [Recording start/stop] button if you want to stop
the Art Time Lapse mode.
Icon Description
Normal: Set to record frames at an interval that you define.
Interval: An image of a scene is captured once every 0.1, 0.5,
1, 3, or 5 seconds.
•
Jumping: Set to record a jumping time lapse video at interval that
you define.
Interval: An image of a scene is captured once every 0.1, 0.5,
1, 3, or 5 seconds.
•
Zooming: Set a zoom effect for a time lapse video.
Interval: An image of a scene is captured once every 0.1, 0.5,
1, 3, or 5 seconds.
Zoom: Adds the zoom in/out effect to a time lapse video.
•
•
Panning: Set a panning effect for a time lapse video.
Interval: An image of a scene is captured once every 0.1, 0.5,
1, 3, or 5 seconds.
Direction: Adds the panning effect (left/right/up/down) to a
time lapse video.
•
•
Zooming + Panning: Set a zoom and panning effect to add
them simultaneously.
Interval: An image of a scene is captured once every 0.1, 0.5,
1, 3, or 5 seconds.
Direction: Adds the panning effect (left/right/up/down) to a
time lapse video.
Zoom: Adds the zoom in/out effect to a time lapse video.
•
•
•
Night: Set the night motion for a time lapse video.
•
•
Using the Art Time Lapse function, you can set the camcorder to add emotion and something different experience on a dry and boring time lapse
video.
Using the Art Time Lapse mode
54
Extended functions
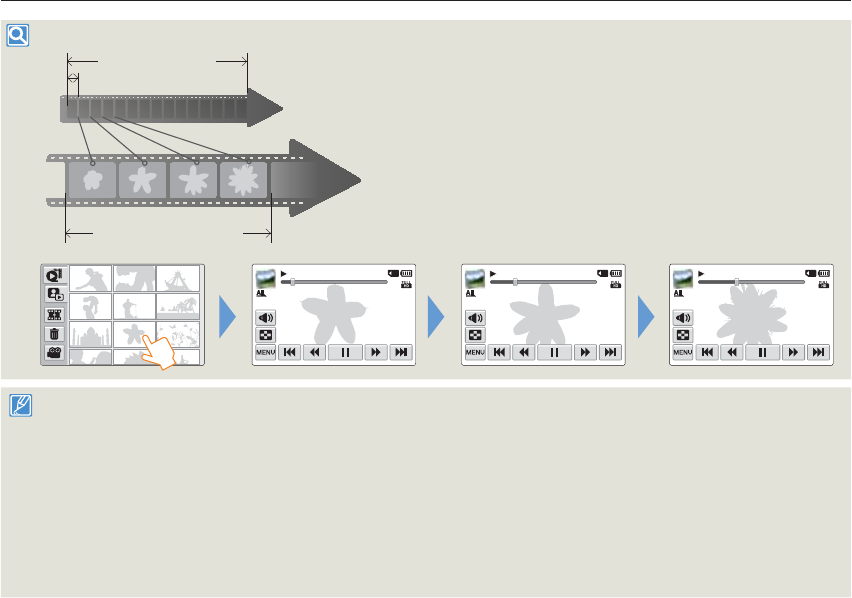
Example of Art Time Lapse recording
Timeline
Total time for recording
Recording interval
Time for recording on the
storage media (a video clip of
Art Time Lapse REC)
The Art Time Lapse function records image frames at a predefined
interval over the total recording time to produce a
time-lapse video.
Art Time Lapse is useful for filming the following subjects:
Blooming flowers
A bird building a nest
Clouds rolling by in the sky
•
•
•
00:00:20/00:01:03 100_0001 00:00:25/ 00:01:03 100_0001 00:00:25/ 00:01:03 100_0001
During Art Time Lapse recording, the Super C.Nite function does not work.
Art Time Lapse recording is released once recording has been finished. To start another Art Time Lapse mode, repeat steps 1 to 7.
30 captured images compose a video of 1 second length. Since the minimum length of a video that your camcorder can save is one second, the interval
defines the total minimum recording time for the Art Time Lapse mode. For example, if you set the interval to 5 Sec, you need to set the recording time for
the Art Time Lapse mode to at least 3 minutes to record a minimum video length of 1 second (30 images).
The Art Time lapse function lets the camcorder record up to 72 hours until you stop recording or turn the camcorder’s power off.
You cannot pause recording during Time lapse recording.
Audio is not recorded during Art Time Lapse recording.
The maximum video file size is 1.8GB. When a video file exceeds 1.8GB, a new video file is created automatically.
We recommend using the power adaptor instead of the battery for Art Time Lapse.
If the battery charge is exhausted during Art Time Lapse recording, the camcorder saves recording up to that point and switches to standby mode. After a
while, it displays a warning message, and then turns off automatically.
If the storage media becomes full during Art Time Lapse recording, the camcorder switches to the standby mode after saving the recording up to the
maximum memory available.
•
•
•
•
•
•
•
•
•
•

Playback/Editing
Learn how to play back and edit videos and photos.
Viewing videos or photos in playback mode....................... 56
Starting the playback mode ..................................................... 56
Playing back videos ................................................................ 57
Tagging great moments during playback .................................. 60
Viewing photos ....................................................................... 61
Editing videos or photos ..................................................... 63
Delete .................................................................................... 63
Like It ..................................................................................... 64
Protect ................................................................................... 65
Smart BGM Option ................................................................. 66
Divide ..................................................................................... 66
Combine ................................................................................ 67
File Info................................................................................... 68

56
Playback/Editing
Starting the playback mode
You can switch to the playback mode by selecting Album on the Home screen. You can also switch the operation mode directly into the playback thumbnail display by
touching the Playback ( ) tab on the LCD screen.
The most recently created file is highlighted in the thumbnail view.
The camcorder selects the thumbnail display options based on the standby mode that was last used. However, you can choose the video or photo thumbnail view
display options by touching the Video thumbnail view ( ) or Photo thumbnail view ( ) tab on the LCD screen.
•
•
<Video thumbnail view>
Using the Playback ( ) tab
<Photo thumbnail view>
<Video thumbnail view>
<Home screen>
Using the [Home ( )] button
Smart Auto Manual Art Film
Art Time
Lapse Vertical HD
Recording Album
1•
STBY 00:00:00 [253Min]
You can choose the thumbnail display type you want by selecting Thumbnail in the Settings menu. ¬page 96
You can switch the playback mode to the recording mode by pressing the [Recording start/stop] button.
•
•
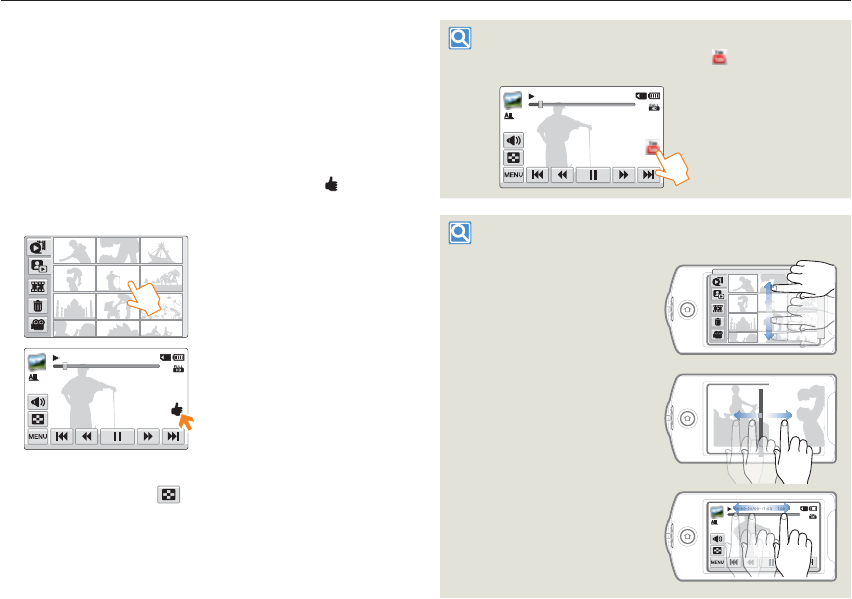
Viewing videos or photos in playback mode
Viewing videos or photos in playback mode
57
Playback/Editing
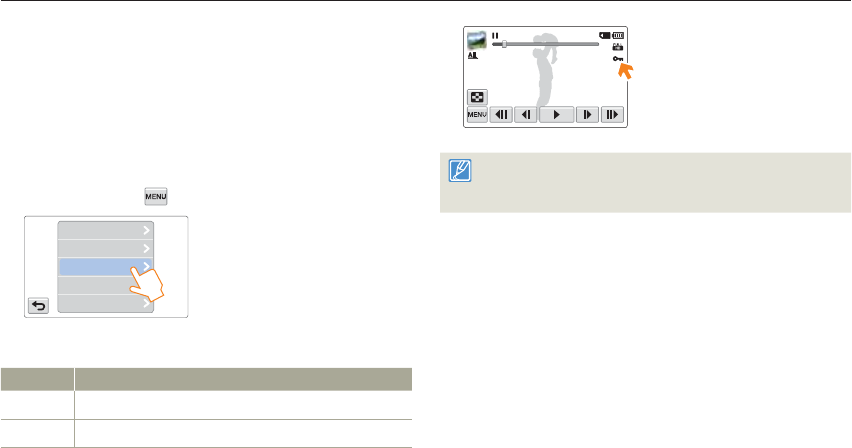
Playing back videos
You can preview recorded videos in the thumbnail view, find and play
your desired video directly.
1 Select the video playback mode. ¬page 56
2 Touch the thumbnail of the desired video clip.
The camcorder plays the video you selected.
If you select a video tagged as Like It, the Like It ( ) icon on the
LCD screen appears. The color of the Like It icon is changed
while playing back the tagged scenes for 8 seconds.
00:00:20/00:01:03 100_0001
3 To stop playback and return to the thumbnail view, touch
the Thumbnail view ( ) tab.
•
•
Sharing videos on YouTube (HMX-QF20 only)
During a video playback, touch the YouTube ( ) tab and then access
YouTube. ¬page 74 You can share videos on YouTube only.
00:00:20/00:01:03 100_0001
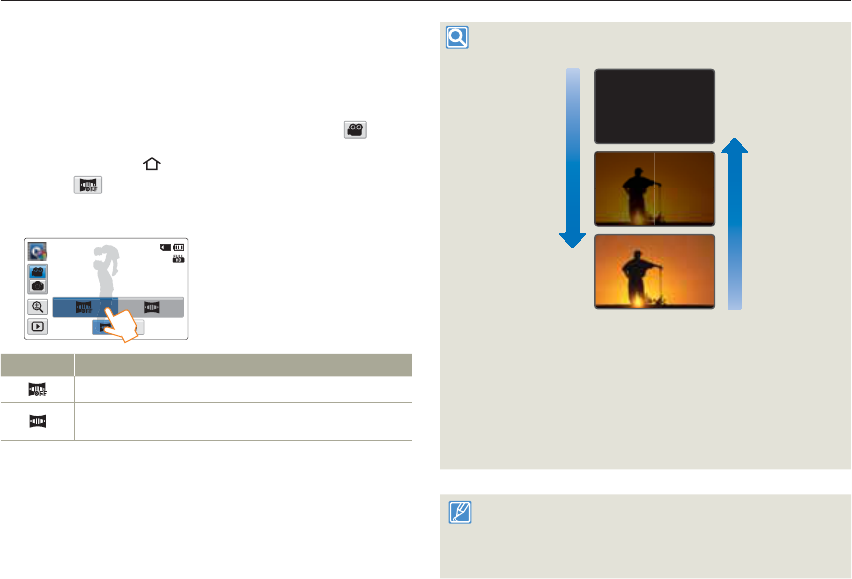
Find videos in various ways
Drag the thumbnails to up or
down on the LCD screen to
search the thumbnails you want.
When playback is paused,
drag the image to left or right
on the LCD screen to go to the
previous or next file.
Touch a point or drag the pointer
to left or right in the playback
progress bar on the LCD screen
to move directly to the section of
the video you want.
00:00:20/00:01:03 100_0001

Viewing videos or photos in playback mode
58
Playback/Editing
Do not power off or eject the memory card during photo playback.
Doing so may damage the recorded data.
It may take some time to start playback, depending on the size and
quality of the selected video.
The camcorder may not play back the following video files:
- A video recorded on another device.
- A video whose file format is not supported by the camcorder.
You can use various playback options during the video playback.
¬page 59
You can set playback settings using the Video Play Option menu.
¬page 96
You can play back the recorded videos on a TV or PC.
¬pages 80~82, 86~92
If you touch the MENU ( ) tab or press the [Home ( )] button
during playback, the video playback is paused and the menu screen
appears.
•
•
•
•
•
•
To adjust the volume during video playback
You can hear the sound through the internal speaker of the camcorder
while the video is playing back on the LCD screen.
1 Touch the Volume ( ) tab on the LCD screen.
00:00:20/00:01:03 100_0001
2 Touch the
/ tab to increase or decrease audio
volume.
00:00:20/ 00:01:03 100_0001
10
The sound level is adjusted between 0~19. When the level is at 0,
you cannot hear sound.
When the camcorder is connected to a TV, you will not hear the
sound from the speaker on the camcorder.
•
•
Viewing videos or photos in playback mode
59
Playback/Editing
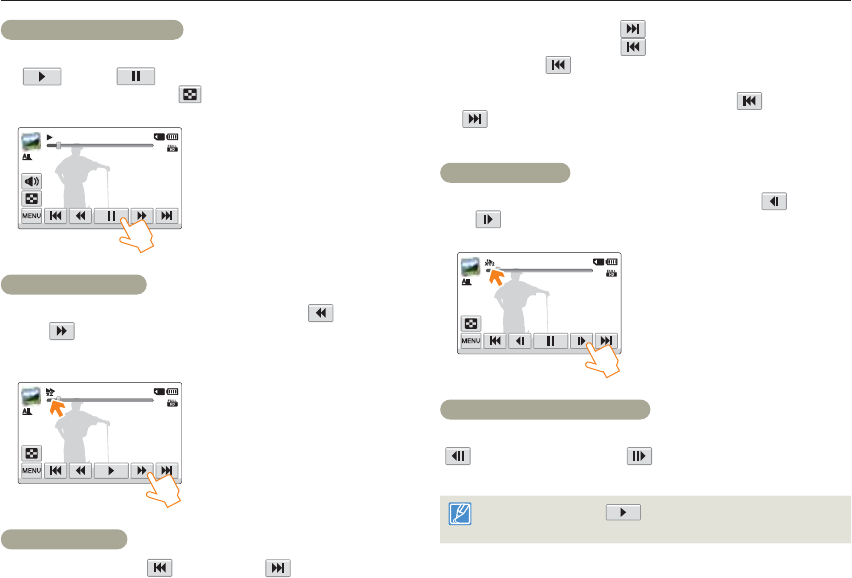
Playback/Pause/Stop
Playback and pause alternate when you touch the Playback
( )/Pause ( ) tab during playback.
Touch the Thumbnail view ( ) tab to stop playback and return to
the thumbnail.
00:00:20/00:01:03 100_0001
Search playback
During playback, each touch of the Reverse search ( )/Forward
search ( ) tab increases the playback speed:
RPS (Reverse Playback Search)/FPS (Forward Playback Search)
rate: x2 t x4 t x8 t x2
00:00:20/00:01:03 100_0001
Skip playback
Touch the Reverse skip ( )/Forward skip ( ) tab during
playback.
•
•
•
Touching the Forward skip ( ) tab plays the next video.
Touching the Reverse skip ( ) plays the beginning of the scene.
If reverse skip ( ) is touched within 3 seconds from the start of
the file, the previous video plays.
Place and hold your finger on the Reverse skip ( )/Forward skip
( ) tab to search for a video quickly. When you lift off your finger,
the selected video plays.
Slow playback
When playback is paused, touching the Reverse slow ( )/Forward
slow ( ) tab reduces the playback speed:
Reverse/forward playback slow rate: 1/x2 t 1/x4 t 1/x8 t 1/x2
00:00:20/00:01:03 100_0001
Frame by frame playback
When playback is paused, touching the Reverse frame advance
( )/Forward frame advance ( ) tab makes playback go reverse
or forward one frame at a time.
Touch the Playback ( ) tab to play back in normal speed.
You can hear sound only when the playback is in normal speed.
•
•
•
•
•
•
Viewing videos or photos in playback mode
60
Playback/Editing
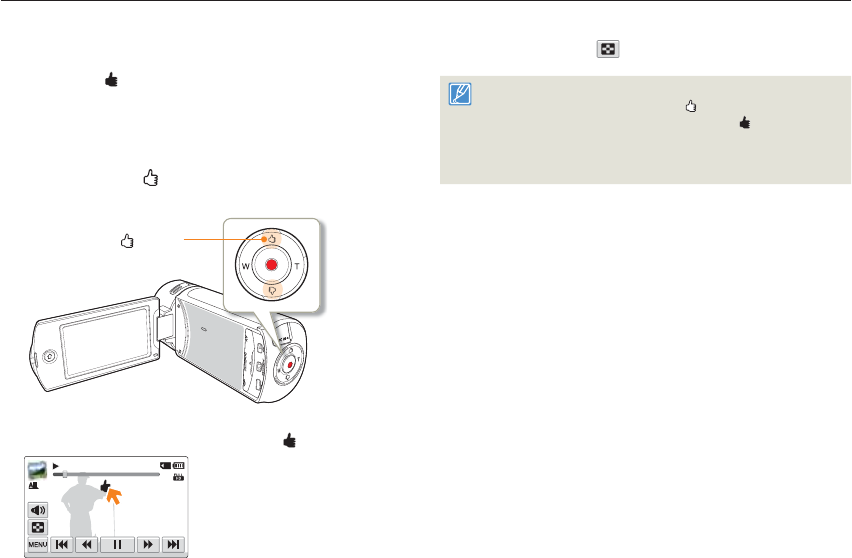
Tagging great moments during playback
You can tag good scenes during playback to enjoy the only scenes
tagged as Like It ( ).
1 Select the video playback mode. ¬page 56
2 Touch the thumbnail of the desired video clip.
3 Press the [Like It ( )] button every great moment during
playback.
[Like It ( )] button
The camcorder tags the scene as Like It ( ).
00:00:20/00:01:03 100_0001
•
4 To stop playback and return to the thumbnail view, touch
the Thumbnail view ( ) tab.
The camcorder tags a scene between before 3 seconds and after 5
seconds when pressing the [Like It ( )] button.
When the Like It function completes, the Like It ( ) icon on the LCD
screen disappears after 3 seconds.
To skip boring parts of a video and enjoy exciting parts, you can
combine the tagged scenes sequentially ¬page 64
•
•
•
Viewing videos or photos in playback mode
61
Playback/Editing
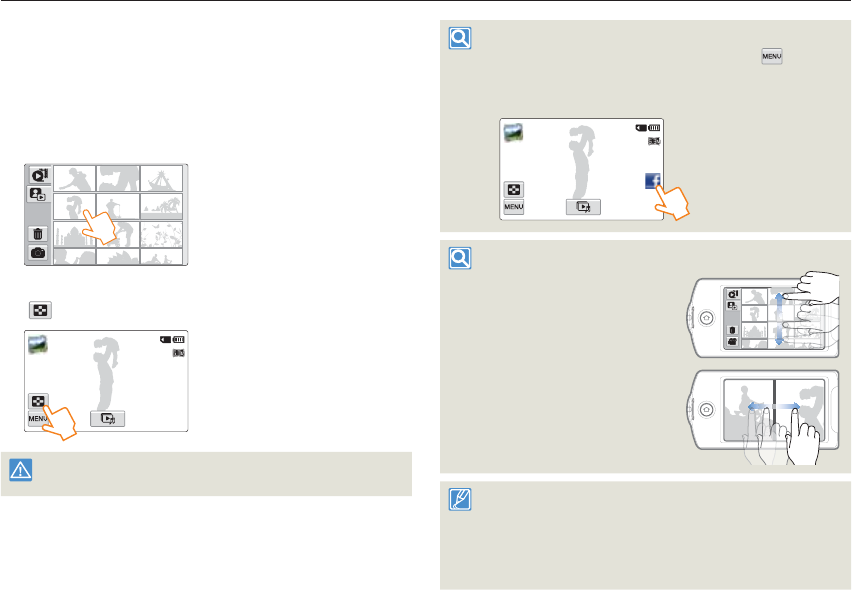
Viewing photos
You can view recorded photos by using various playback functions.
1 Select the photo playback mode. ¬page 56
2 Touch the thumbnail of the desired photo.
The camcorder displays the photo you selected in full screen.
3 To return to the thumbnail view, touch the Thumbnail view
( ) tab.
1/12 100_0001
Do not power off or eject the memory card during photo playback.
Doing so may damage the recorded data.
•
Sharing photos on Facebook or Picasa (HMX-QF20 only)
During a photo playback or slide show, touch the MENU ( ) tab p
Share p Facebook or Picasa, and then access the web site. ¬page 74
Or touch the last accessed web site tab. You cannot share photos on
YouTube.
1/12 100_0001
Find photos in various ways
Drag the thumbnails to up or down
on the LCD screen to search the
thumbnails you want.
Drag the image to left or right on the
LCD screen to go to the previous or
next file.
Loading time may vary depending on the size and quality of the
photo you selected.
Your camcorder may not play back the following photo files normally:
- A photo recorded on another device.
- A photo with a file format not supported by this camcorder. (One
that does not conform to DCF standards.)
•
•
Viewing videos or photos in playback mode
62
Playback/Editing
Viewing a slide show
You can view a photo slide show with background music.
1 Touch the Slide show ( ) tab during photo playback.
The slide show starts from the current selected photo.
To pause the slide show, touch the LCD screen anywhere.
1/12 100_0001
2 To stop the slide show, touch the Return ( ) tab.
1/12 100_0001
All photos are played back depending on the slide show option
function. ¬page 97
You can adjust the background music’s volume level using the
Volume ( ) tab.
•
•
•
•
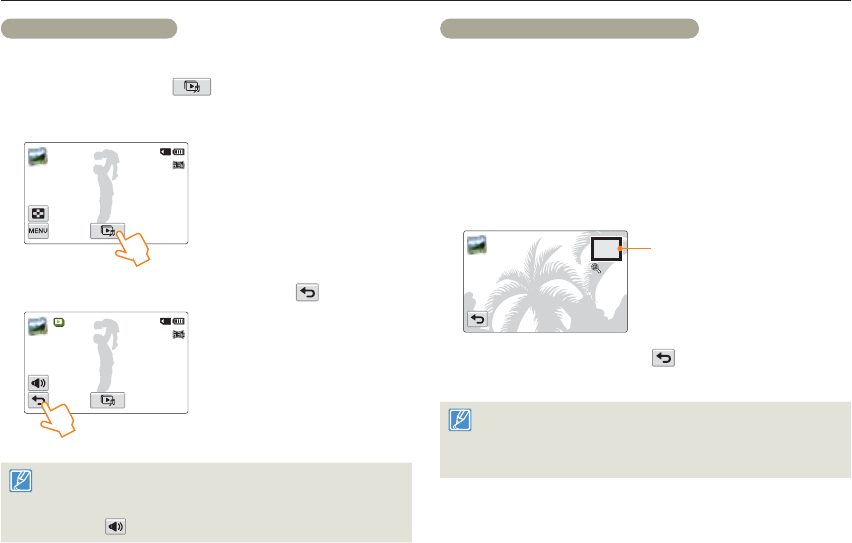
Zooming during photo playback
You can magnify a playback image.
1 Touch the desired photo.
2 Adjust the magnification with the [T/W] button.
Magnification starts from the center of the photo.
You can zoom in from X1.1 to X8.0.
3 Drag the LCD screen up/down/left/right to view the area you
want on the magnified photo.
X 1.3
Magnified part
4 To cancel, touch the Return ( ) tab.
Photos recorded on other devices or those edited on a PC cannot
be magnified.
While the playback zoom is in use, the other images cannot be
selected.
•
•
•
•
63
Playback/Editing
Editing videos or photos
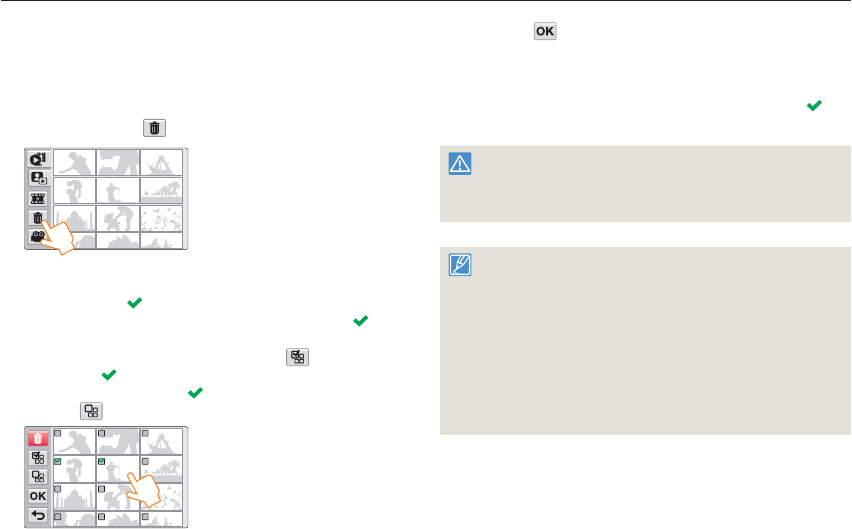
Delete
You can erase your recordings one by one or all at once.
1 Select the video or photo playback mode. ¬page 56
2 Touch the Delete ( ) tab on the thumbnail view.
3 Touch thumbnails.
The selection ( ) indicator appears on the selected files.
Whenever you touch the thumbnail file, the selection ( ) and
release alternate.
To delete all the files, touch the Select all ( ) tab. The
selection ( ) indicator appears on all the thumbnails.
To release the selection ( ) indicator all at once, touch the
Clear ( ) tab.
•
•
•
4 Touch the tab.
A message appears asking for your confirmation.
5 Touch Yes.
The camcorder deletes all the files having the selection ( )
indicator.
Deleted images cannot be recovered.
Do not eject a memory card or power off while deleting videos
recorded on the storage media. Doing so may damage the storage
media or data.
•
•
You can also operate this function in the full and single image display
mode.
To protect important images from accidental erasure, activate the
image protection function in advance. ¬page 65
You cannot delete protected files. Cancel the protect function first.
¬page 65
If the write protection tab on the memory card is set to lock, you
cannot delete the images. ¬page 17
The delete function does not work if battery charge is insufficient. It
is recommended to use AC power to continue power supply during
the deletion.
•
•
•
•
•
•
•
Editing videos or photos
64
Playback/Editing
Like It
You can extract the exciting scenes tagged as ‘Like It’ from a video
and create one file with them. You can also delete the tags from a
video tagged as ‘Like It’.
Like It Create
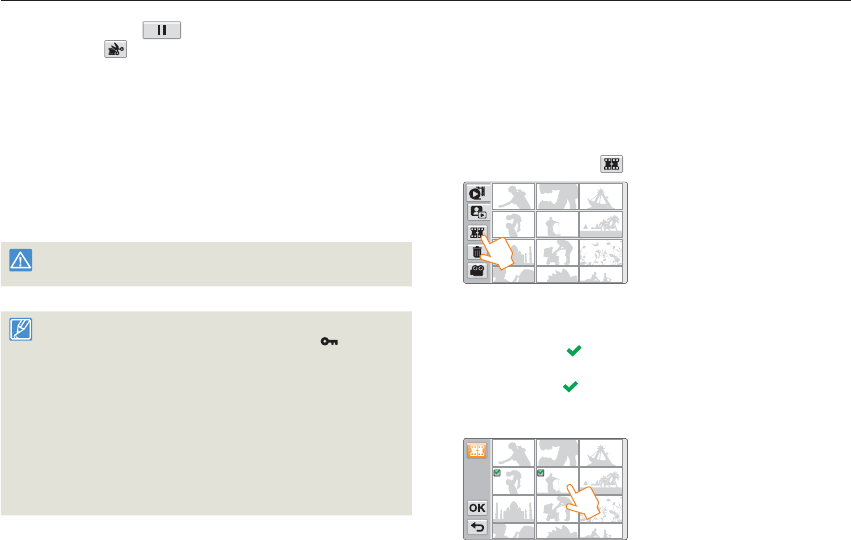
1 Select the video playback mode. ¬page 56
2 Press the [Like It ( )] button on the video thumbnail view
or while playing back a video tagged as Like It ( ).
[Like It ( )] button
3 Touch the desired submenu item.
Creation Start
Preview
Like It
Cancel
Item Description
Creation
Start
Combines the tagged scenes sequentially, saves and locates it
as a video at the last file position on the video thumbnail view.
Preview Previews the tagged scenes sequentially.
On the video thumbnail view, the camcorder combines the tagged
scenes from all videos tagged as ‘Like It’ and creates one file. In the
video single view, the camcorder creates one file from a tagged video.
On the video thumbnail view, the camcorder can create one file from
videos in the same resolution format.
While previewing the scenes tagged as ‘Like It’, you cannot drag the
progressive bar on the LCD screen.
•
•
•
Like It Delete
1 Select the video playback mode. ¬page 56
2 Touch a thumbnail tagged as Like It ( ).
3 Touch the MENU ( ) tab p Like It Delete.
Delete
Divide
Protect
Smart BGM Option
Like It Delete
4 Touch Yes.
The camcorder will delete all tags from the video.
This function is available in the video single view only.
•
Editing videos or photos
65
Playback/Editing
Protect
You can protect important recordings from accidental erasure.
The protected videos and photos cannot be deleted unless you format
the memory card or cancel the protection.
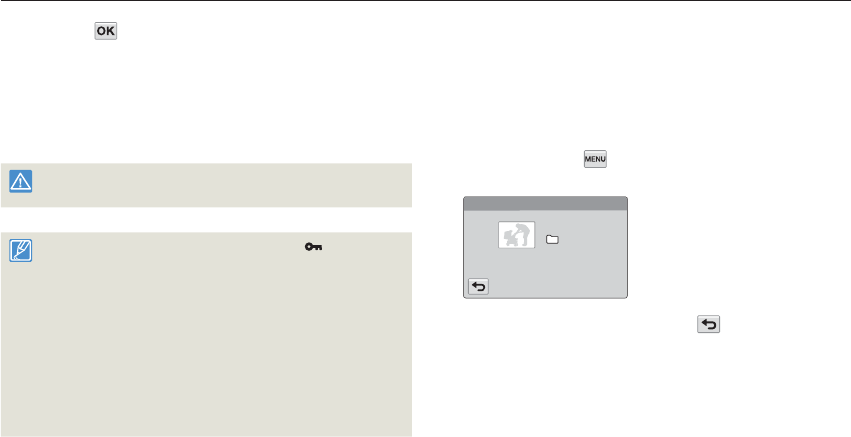
1 Select the video or photo playback mode. ¬page 56
2 Touch a thumbnail to protect.
3 Touch the MENU ( ) tab p Protect.
Delete
Like It Delete
Smart BGM Option
Divide
Protect
4 Touch the desired submenu item.
Item Description
Off Turns off protection on protected image.
On Protects the selected image.
00:00:20/00:01:03 100_0001
You can operate this function in the single view only.
If the write protection tab on the memory card is set to lock, you
cannot apply this function. ¬page 17
•
•
Editing videos or photos
66
Playback/Editing
Smart BGM Option
You can enjoy music during video playback. If the original sound in the
video is big, the background music will be decreased naturally. On the
other hand, if the original sound in the video is small, the background
music will be increased naturally.
1 Select the video playback mode. ¬page 56
2 Touch a video thumbnail.
3 Touch the MENU ( ) tab p Smart BGM Option.
Delete
Like It Delete
Divide
Protect
Smart BGM Option
4 Touch the desired submenu item.
Item Description
Off Turns off the background music.
On Turns on the background music.
This function is available in the video single view only.
You can also apply background music easily by shaking the
camcorder during playback. You do not need to set the Smart BGM
Option function manually. ¬page 97
You can change the desired background music in the Settings
menu. ¬page 96
•
•
•
Divide
You can divide a video into two, and easily delete a section you no
longer need. As this function edits the original file, make sure to back
up the original before dividing it.
1 Select the video playback mode. ¬page 56
2 Touch a video thumbnail.
3 Touch the MENU ( ) tab p Divide.
Delete
Like It Delete
Protect
Smart BGM Option
Divide
4 Find the point of division by touching the playback control
tabs.
Playback control tabs: / / / / /
Drag the playback progress bar left or right to move directly to
the division point.
00:00:20/ 00:01:03 100_0001
Divide
•
•
Editing videos or photos
67
Playback/Editing
5 Touch the Pause ( ) tab at the point of division p
the Cutting ( ) tab.
A message appears asking for your confirmation.
6 Touch Yes.
The video is divided into two video clips.
The second portion of the divided video is displayed as the last
thumbnail.
After the division, you can partially delete unnecessary sections
of the divided videos or combine them with other videos.
¬page 67
Do not eject a memory card or power off while editing a video recorded
on the storage media. Doing so may damage the storage media or data.
You can operate this function in the single view only.
You cannot divide files that display the protect icon ( ). Cancel the
protect function first. ¬page 65
The beginning or end of the divided videos may drift by approx. 2
seconds before or after the division point.
The Divide function is not available under the following conditions:
- If the total recorded time of the video is less than 6 seconds.
- If you trying to divide sections without leaving 3 seconds at the
beginning and the end.
- If the remaining section of the memory space is less than 15MB.
- When the number of files reaches 9999.
This function is available in the video single view only.
•
•
•
•
•
•
•
•
•
Combine
You can combine two different videos. As this function edits the
original files, make sure to back up the original files before combining
them.
1 Select the video playback mode. ¬page 56
2 Touch the Combine ( ) tab on the thumbnail view.
3 Touch the video thumbnails to combine in the order you
want them combined.
The selection ( ) indicator and the order number appear on
the selected videos. Whenever you touch the video thumbnail,
the selection ( ) and release alternate.
The checkbox on the video thumbnail does not appear if the
video files have different resolutions.
12
•
•
Editing videos or photos
68
Playback/Editing
4 Touch the tab.
A message appears asking for your confirmation.
5 Touch Yes.
The camcorder combines the video files you selected in the
order you designated, and then stores the combined videos as
a single video file.
Do not eject a memory card or power off while editing a video recorded
on the storage media. Doing so may damage the storage media or data.
You cannot combine the files that are protected ( ). Cancel the
protect function first. ¬page 65
The original videos are not preserved.
The Combine function is not available under the following conditions:
- If the Videos are in different resolution formats. For example, videos
recorded at Video Resolution: Full HD 1080/60i and Video
Resolution: HD 720/60p cannot be combined.
- If the file size of the combined videos exceeds 1.8 GB.
- If the remaining memory space on your memory card is less than
15MB.
- If a video file format is not supported by the camcorder.
- When the camcorder is playing a video file.
•
•
•
•
•
File Info
You can see image information for each image.
1 Select the video or photo playback mode. ¬page 56
2 Touch a thumbnail.
3 Touch the MENU ( ) tab p File Info.
The information of the selected file appears.
File Info
Date : JAN.01.2012
Duration : 00:00:05
Size : 9.56 MB
Resolution : HD 1080 60i
HDV_0008.MP4
100VIDEO
4 To exit the menu, touch the Return ( ) tab.
•

Wireless network
(HMX-QF20 only)
Learn to connect to wireless local area networks (WLANs) and
use functions.
Connecting to a WLAN and configuring network settings .. 70
Connecting to a WLAN ........................................................... 70
Configuring the network settings .............................................. 71
Manually setting the IP address ............................................... 72
Network connection tips ......................................................... 73
Entering text ........................................................................... 73
Using video or photo sharing web sites .............................. 74
Accessing a web site .............................................................. 74
Uploading videos or photos..................................................... 74
Viewing videos or photos on an AllShare-enabled TV ........ 75
Using Auto Backup to send videos or photos .................... 76
Installing the program for Auto backup on your PC ................... 76
Sending photos or videos to a PC ........................................... 76
About the Wakeup on LAN (WOL) feature ................................ 77