Samsung Electronics Co HPN5039 50-inch PDP TV Monitor User Manual 2
Samsung Electronics Co Ltd 50-inch PDP TV Monitor Users Manual 2
Contents
- 1. Users Manual 1
- 2. Users Manual 2
- 3. Users Manual 3
Users Manual 2
1716
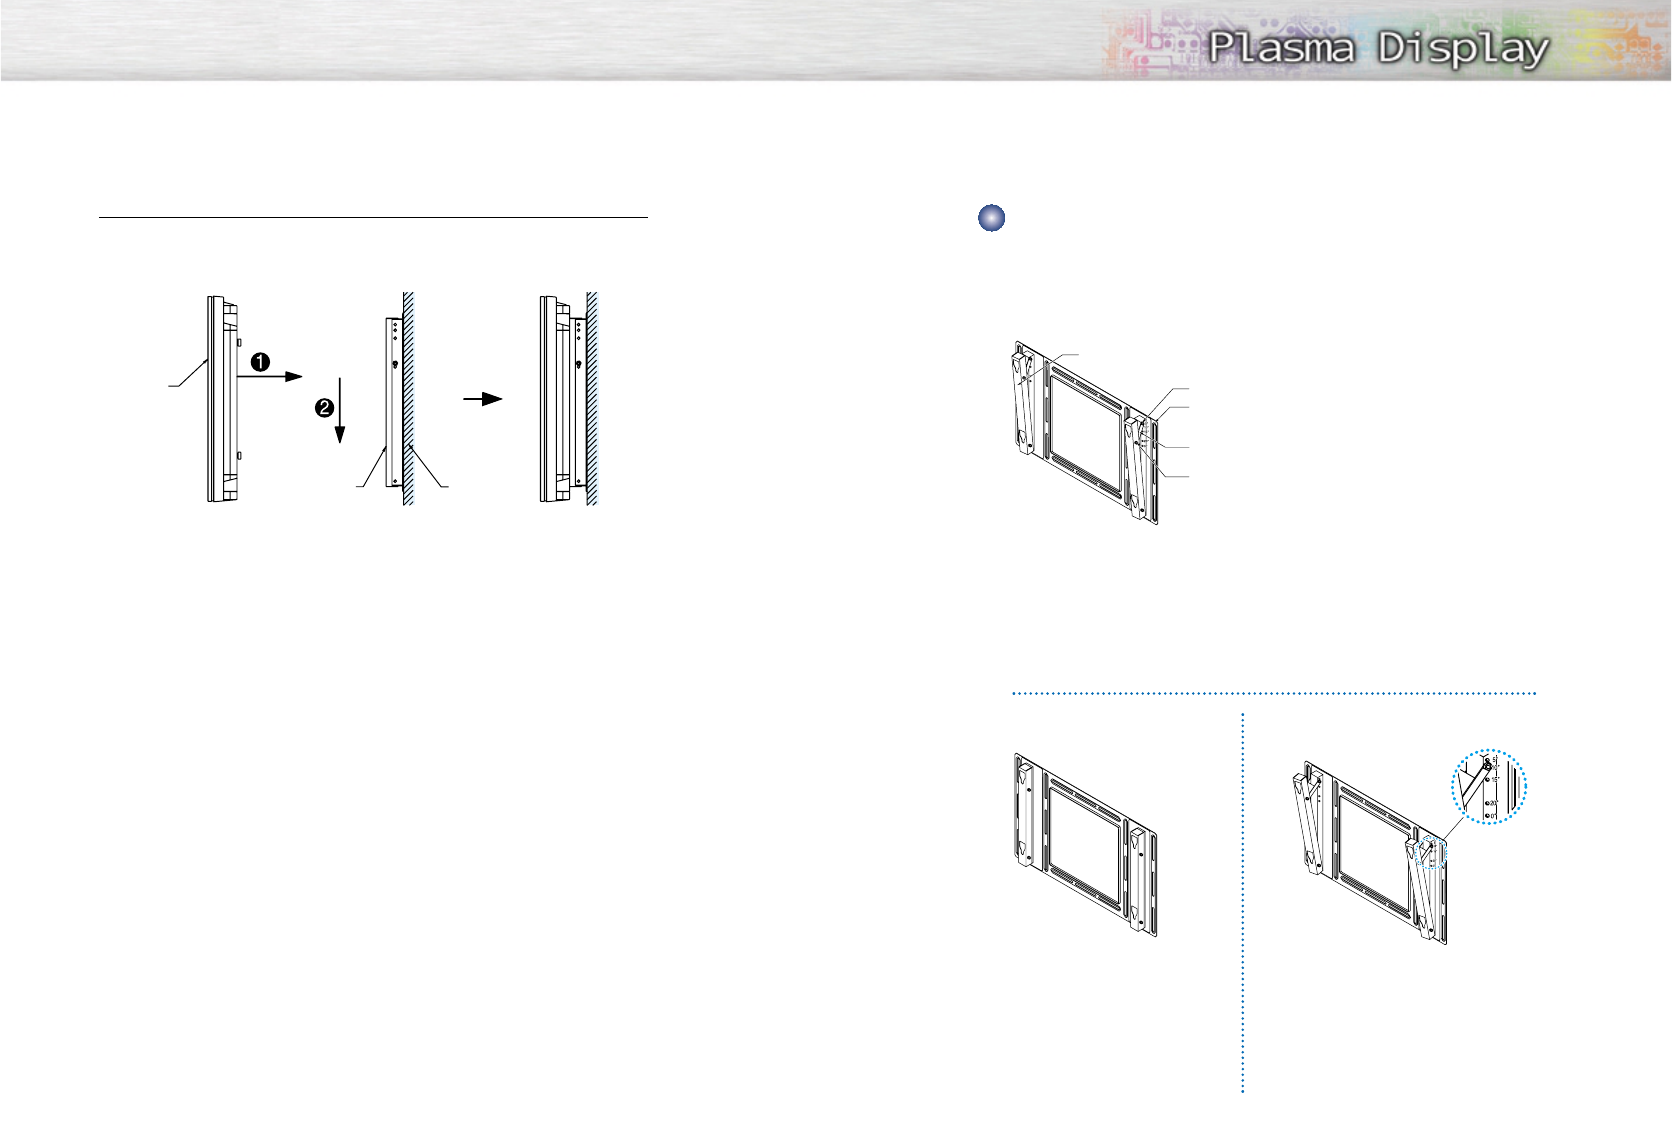
4 After inserting the plastic hangers of the PDP panel into the groove of the wall attach-
ment panel(Œ), lift down (´) and tightly hang the PDP panel on the wall attachment
panel.
Adjusting the angle of the wall attachment panel
Adjust the angle you want before installing the wall attachment panel on the wall.
Notice
Notice : The factory default angle is 5 degrees.
Changing the angle to 0 degree
PDP panel
Wall attachment
panel bracket
Bracket for hanging the PDP display
Bolt "A" for angle adjustment
Bracket for wall attachment panel
Bracket for adjusting the angle
of the wall attachment panel
Bolt"B"for angle adjustment
Wall
1Loosen the screws for adjusting the wall attachment panel, “A” and “B”.
2Remove the bracket for adjusting the angle of the wall attachment panel.
3Fit the bracket for hanging the PDP display into the hole on the PDP display.
4Fit the screw for adjusting the wall attachment panel into the hole indicated
by 0 degree and tighten it again.
1Loosen the screw for adjusting the wall
attachment panel, “A”.
2Fit the bracket for angle adjustment to the
hole indicated by 10 degrees on the wall
attachment panel.
3Fit the screw “A” for adjusting the wall
attachment panel to the hole indicated by
0 degree and tighten it again.
Factory default
The factory default angle of wall
attachment panel is 5 degrees.
• Change the angle to 15 degrees, 20 degrees and other degrees
in the same methods as 10 degrees.
Changing the angle to 10 degrees

PLASMA DISPLAY PANEL
Connections
Connecting VHF and UHF Antennas ..............................................20
Connecting Cable TV....................................................................21
Connecting Speakers....................................................................23
Connecting a VCR........................................................................24
Connecting a Camcorder..............................................................25
Connecting a DVD Player..............................................................26
Connecting a DTV Receiver ..........................................................27
21
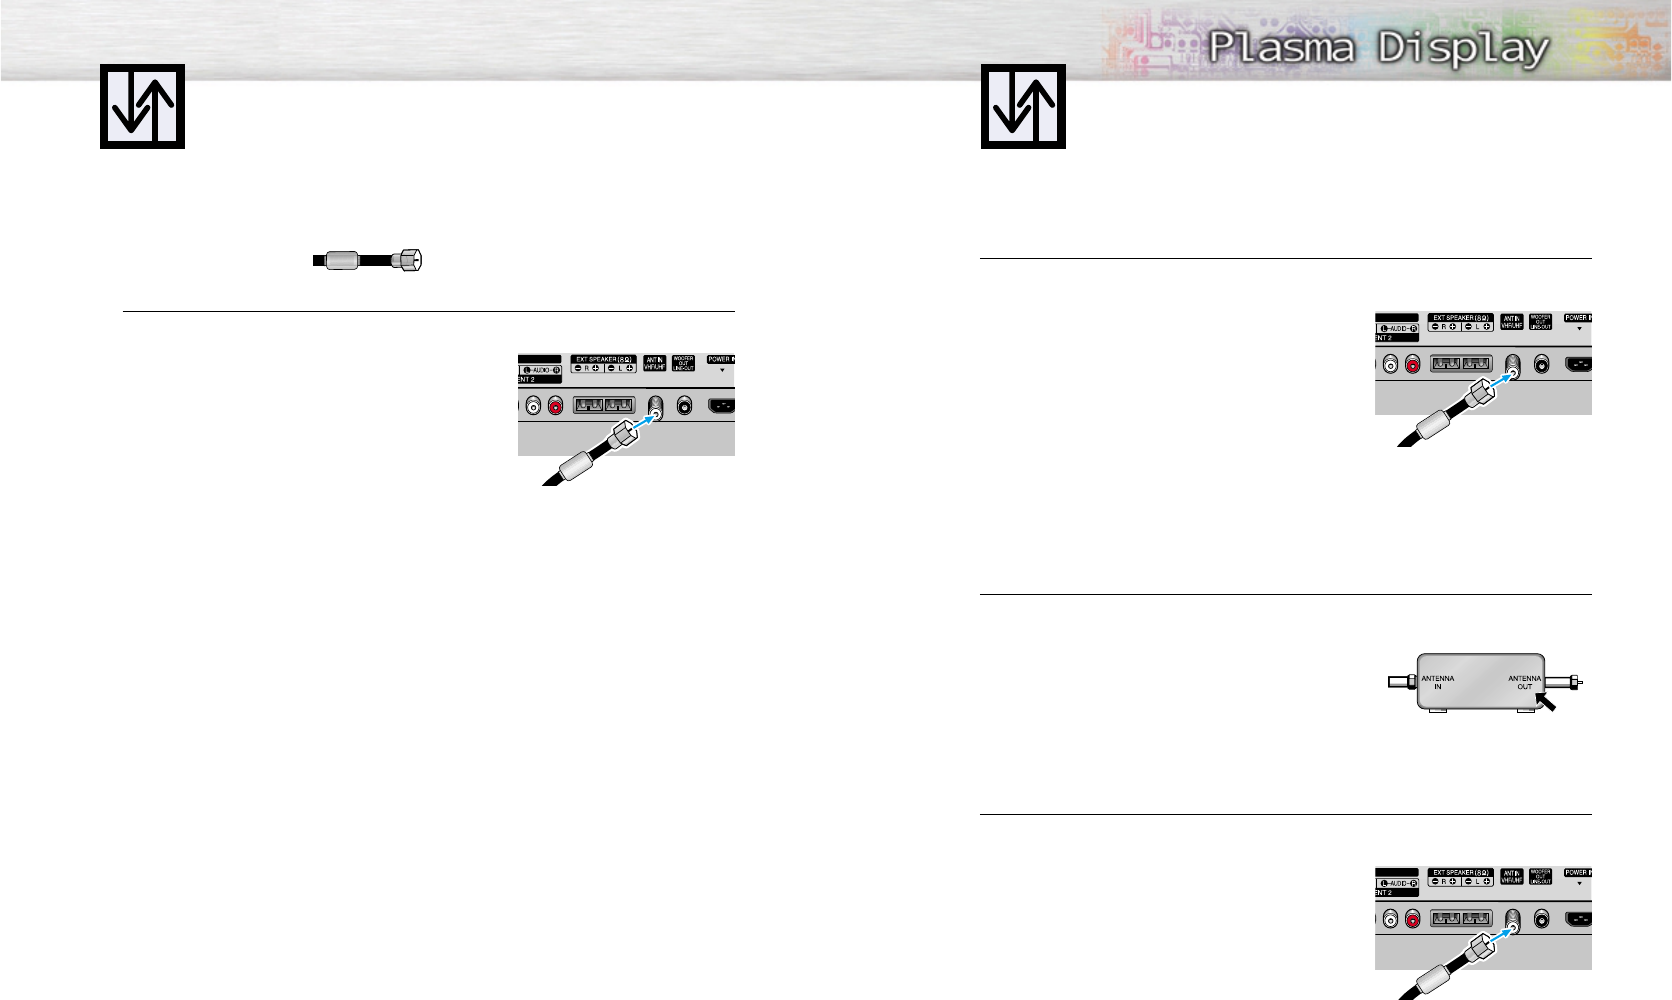
Connecting VHF and UHF Antennas
20
Antennas with 75-ohm Round Leads
If your antenna looks like this: it has 75-ohm round leads.
1Plug the antenna lead into the VHF/UHF terminal on the PDP.
Use the Antenna Cable (BN39-00333A), an accessory
included in the product package.
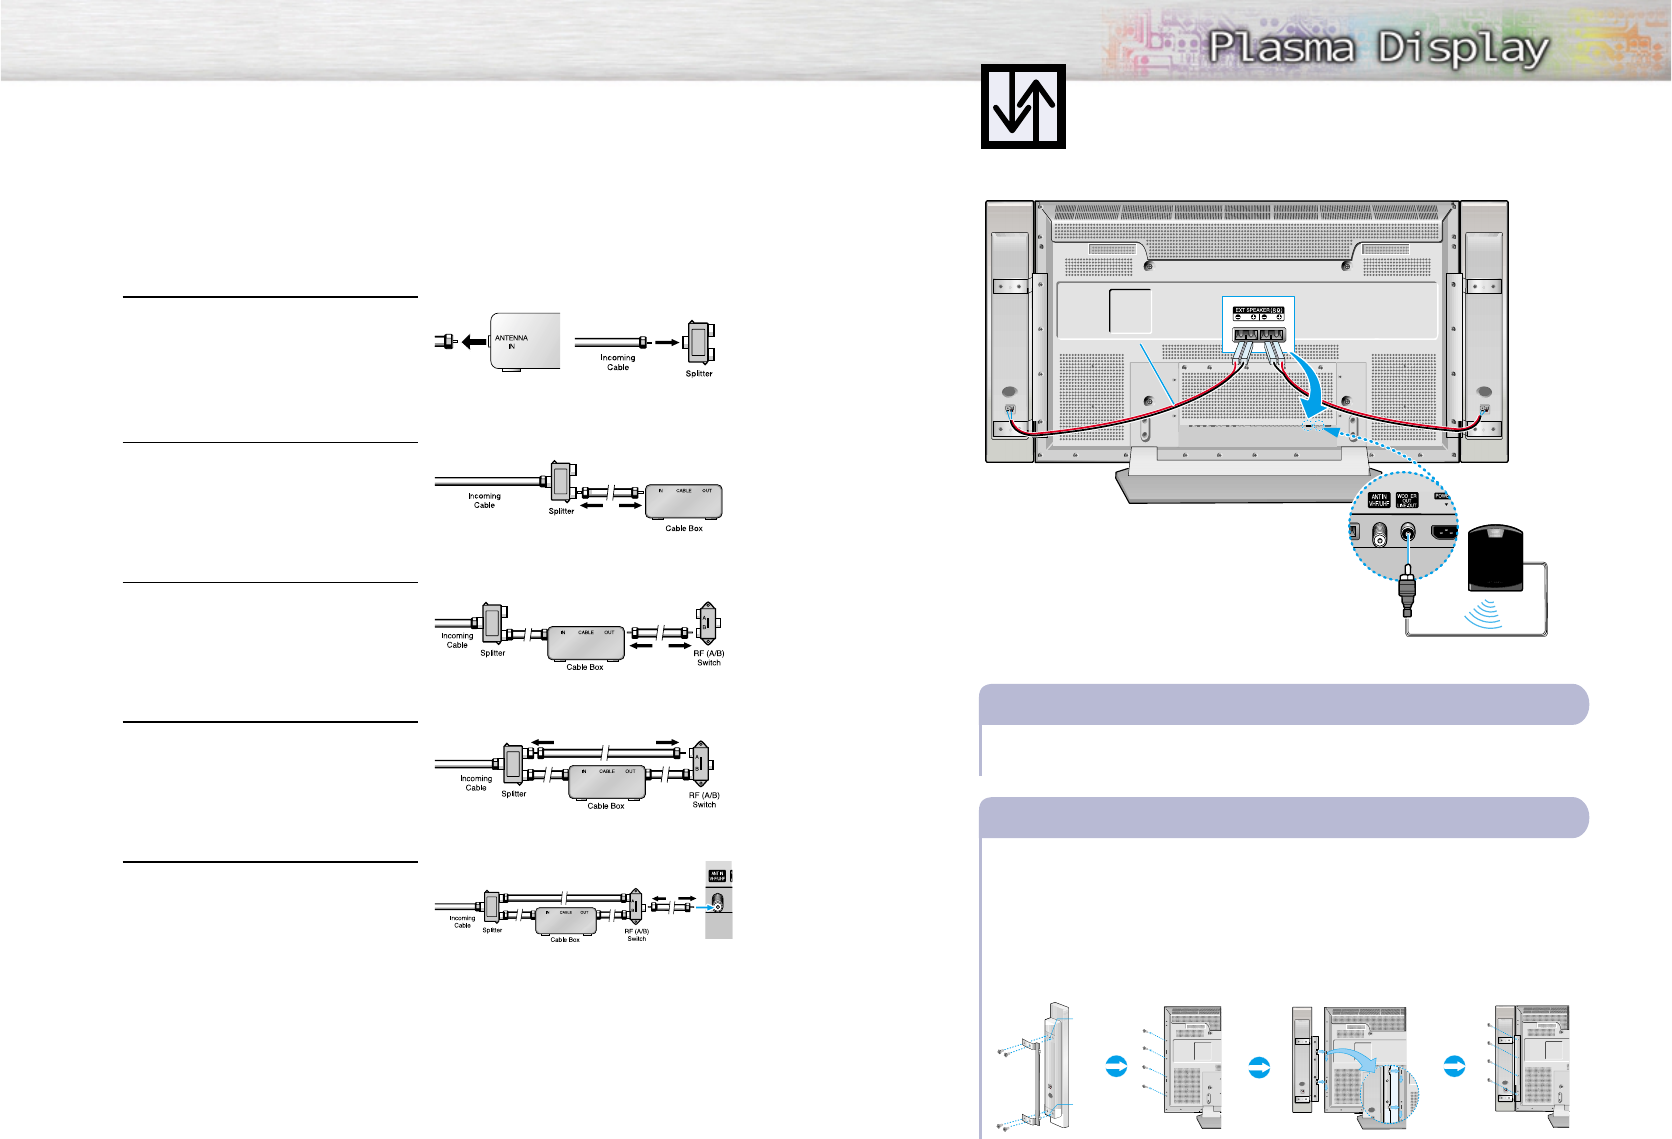
Connecting Cable TV
You can connect different cable systems to your PDP, including cable without a cable box,
and cable with a cable box that descrambles some or all channels.
Cable without a Cable Box
1 Plug the incoming cable into the VHF/UHF terminal on the PDP.
Use the Antenna Cable (BN39-00333A), an accessory
included in the product package.
Cable with a Cable Box that Descrambles All Channels.
1 Find the cable connected to the ANTENNA OUT terminal on your cable box. This terminal
might be labeled "ANT OUT", "VHF OUT", or simply "OUT".
2 Connect the cable to the VHF/UHF terminal on the PDP.
Use the Antenna Cable (BN39-00333A), an accessory
included in the product package.
22
Cable with a Cable Box that Descrambles Some (But Not All) Channels
To complete this connection you will need a two-way splitter, a RF (A/B) switch, and four coaxial
cables (which you can buy from your Samsung dealer or any electronics store).
1Find and disconnect the cable that is con-
nected to the ANTENNA IN terminal of
your cable box.
This terminal might be labeled "ANT IN",
"VHF IN", or simply, "IN". Connect this
cable to a two-way splitter.
2Connect a coaxial cable between an OUT-
PUT terminal of the splitter and the IN termi-
nal of the cable box.
3Connect a coaxial cable between the
ANTENNA OUT terminal of the cable box
and the B-IN terminal of the A/B switch.
4Connect a coaxial cable between the
ANTENNA OUT terminal of the cable box
and the B-IN terminal of the A/B switch.
5Connect the last coaxial cable between the
OUT terminal of the RF (A/B) switch and
the VHF/UHF ter-minal on the PDP.
After you've made this connection, set the A/B switch to the "A" position for normal viewing.
Set the A/B switch to the "B" position to view scrambled channels. (When you set the A/B switch
to "B", you will need to tune your Set-Top Box to the cable box's output channel, which is usually
channel 3 or 4.)
23
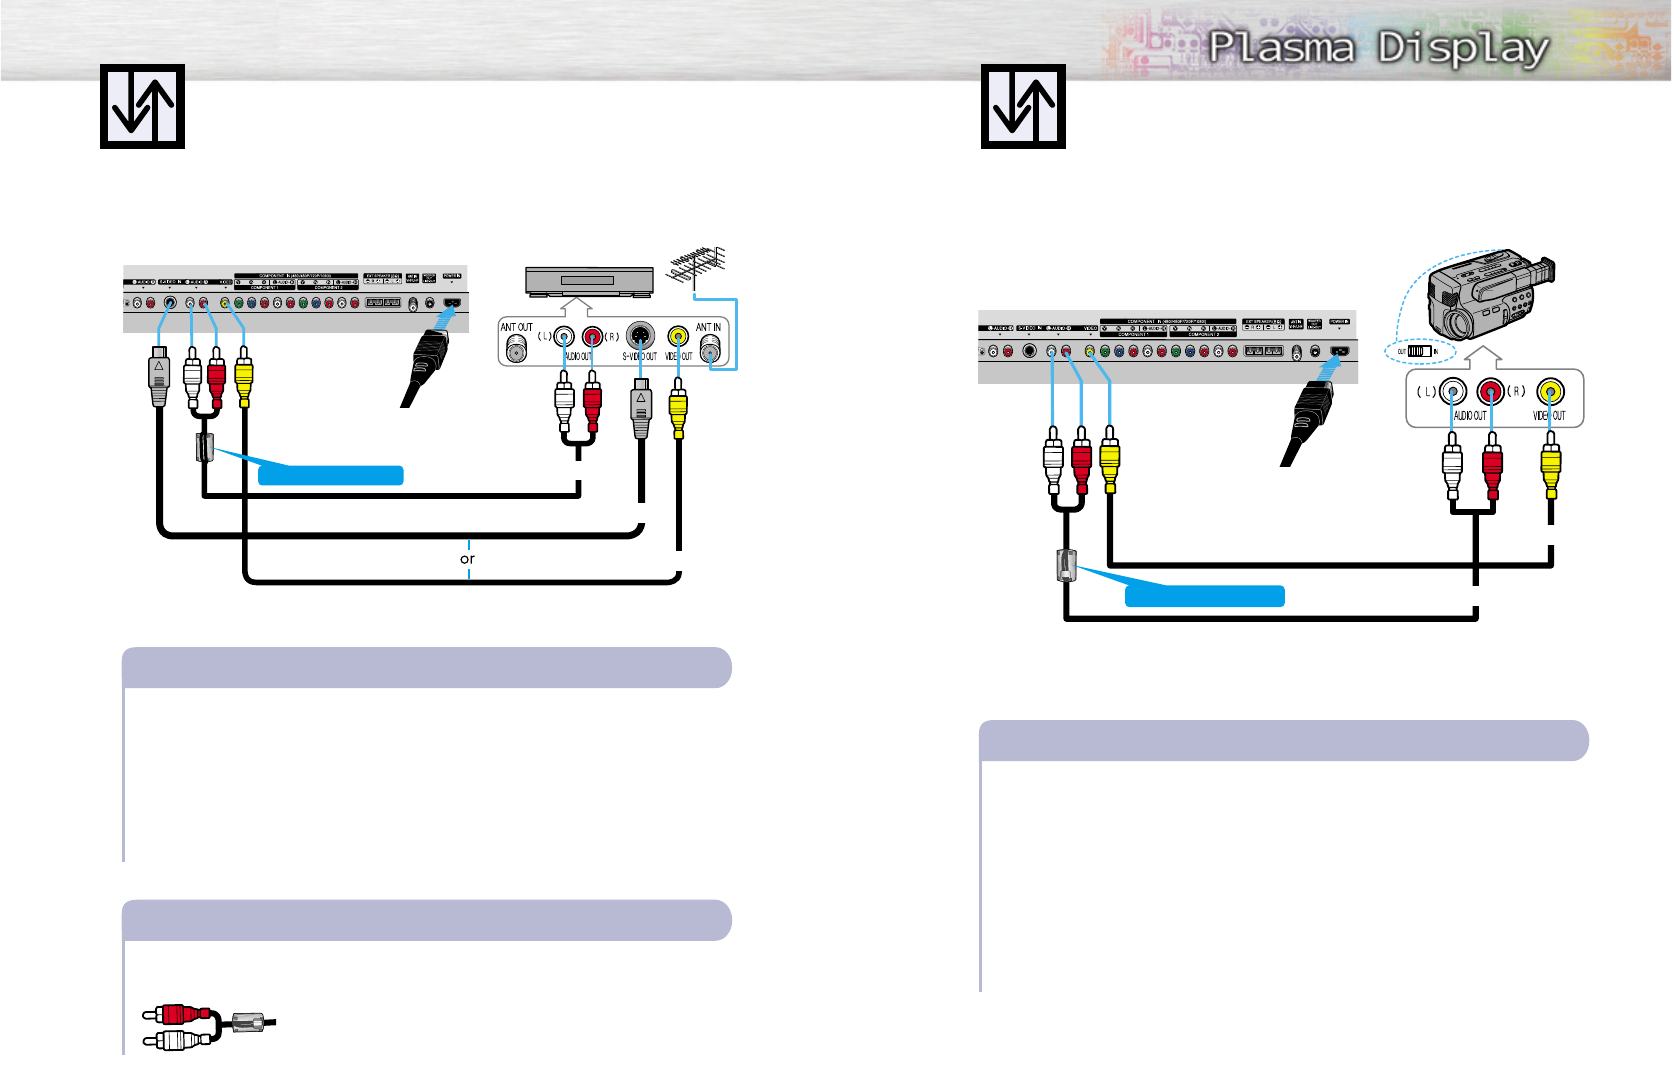
Connecting Speakers
External speakers are sold saparately. Check with your dealer.
Speaker Audio Cable
(BN39-00315A)
Connect the speaker audio cable to the external speaker output jack on the PDP matching the
“+” and “-” ends of the cable with the diagram on the PDP.
How to Connect
Fix the bracket onto the guide pole located on the rear of speaker and fasten the screws.
After removing the four screws on the rear of PDP.
As shown in figure, insert the loop on a speaker into the groove on the PDP.
Clamp the speaker and the PDP together and fasten the screws.
Connecting PDP and Speakers
1
2
3
4
Guide
pole
Guide
pole
✱External speakers MUST have to a power handling
capability of 10 watts minimum (impedance 8 ohm).
Speaker AudioCable
(BN39-00315A)
Subwoofer Speaker
(Option)
25
Connecting a Camcorder
24
Connecting a VCR to the Video or S-Video/Audio jack
S-Video Cable
Audio Cable
Video Cable
Power Plug
Connect the Video/Audio cables between the AUDIO(L/R)/VIDEO jacks on the PDP and
AUDIO/VIDEO OUT jacks on the VCR. (Note: For better video, you can use an S-Video cable.)
Videotape Playback:
1. Turn on your PDP, and press the SOURCE button on the remote control.
2. Move the joystick up or down to select “Video” or “S-Video”, then press the joystick to enter.
3. Turn on your VCR, insert a videotape and press the play button.
How to Connect
The ferrite cores are used to attenuate undesired signals. When connecting audio cable (PC, DVI,
S-Video, Video) , attach one of these ferrite cores to the cable near the connector.
When you connect the audio cable (PC, DVI, S-Video, Video) to the
connectors, first bind round the ferrite core to secure it.
Ferrite Cores
(3301-001110)
Connecting a VCR
Audio Cable
Video Cable
Power Plug
Connect a Video/Audio cable between the AUDIO(L/R)/VIDEO jacks on the PDP and the
VIDEO/AUDIO OUTPUT jacks on the camcorder.
Viewing Tapes
1. Turn on your PDP, and press the SOURCE button on the remote control.
2. Move the joystick up or down to select the “Video”, then press the joystick to enter.
3. Turn on your camcorder and set it to Video Mode. (For details, refer to your camcorder
owner's instructions.)
4. Set the IN/OUT switch on your camcorder to OUT.
5. Insert the tape into the camcorder and press the Play button.
How to Connect
Viewing camcorder tapes
Ferrite Cores
(3301-001110)
Ferrite Cores
(3301-001110)
PDP VCR
PDP
Camcorder
27
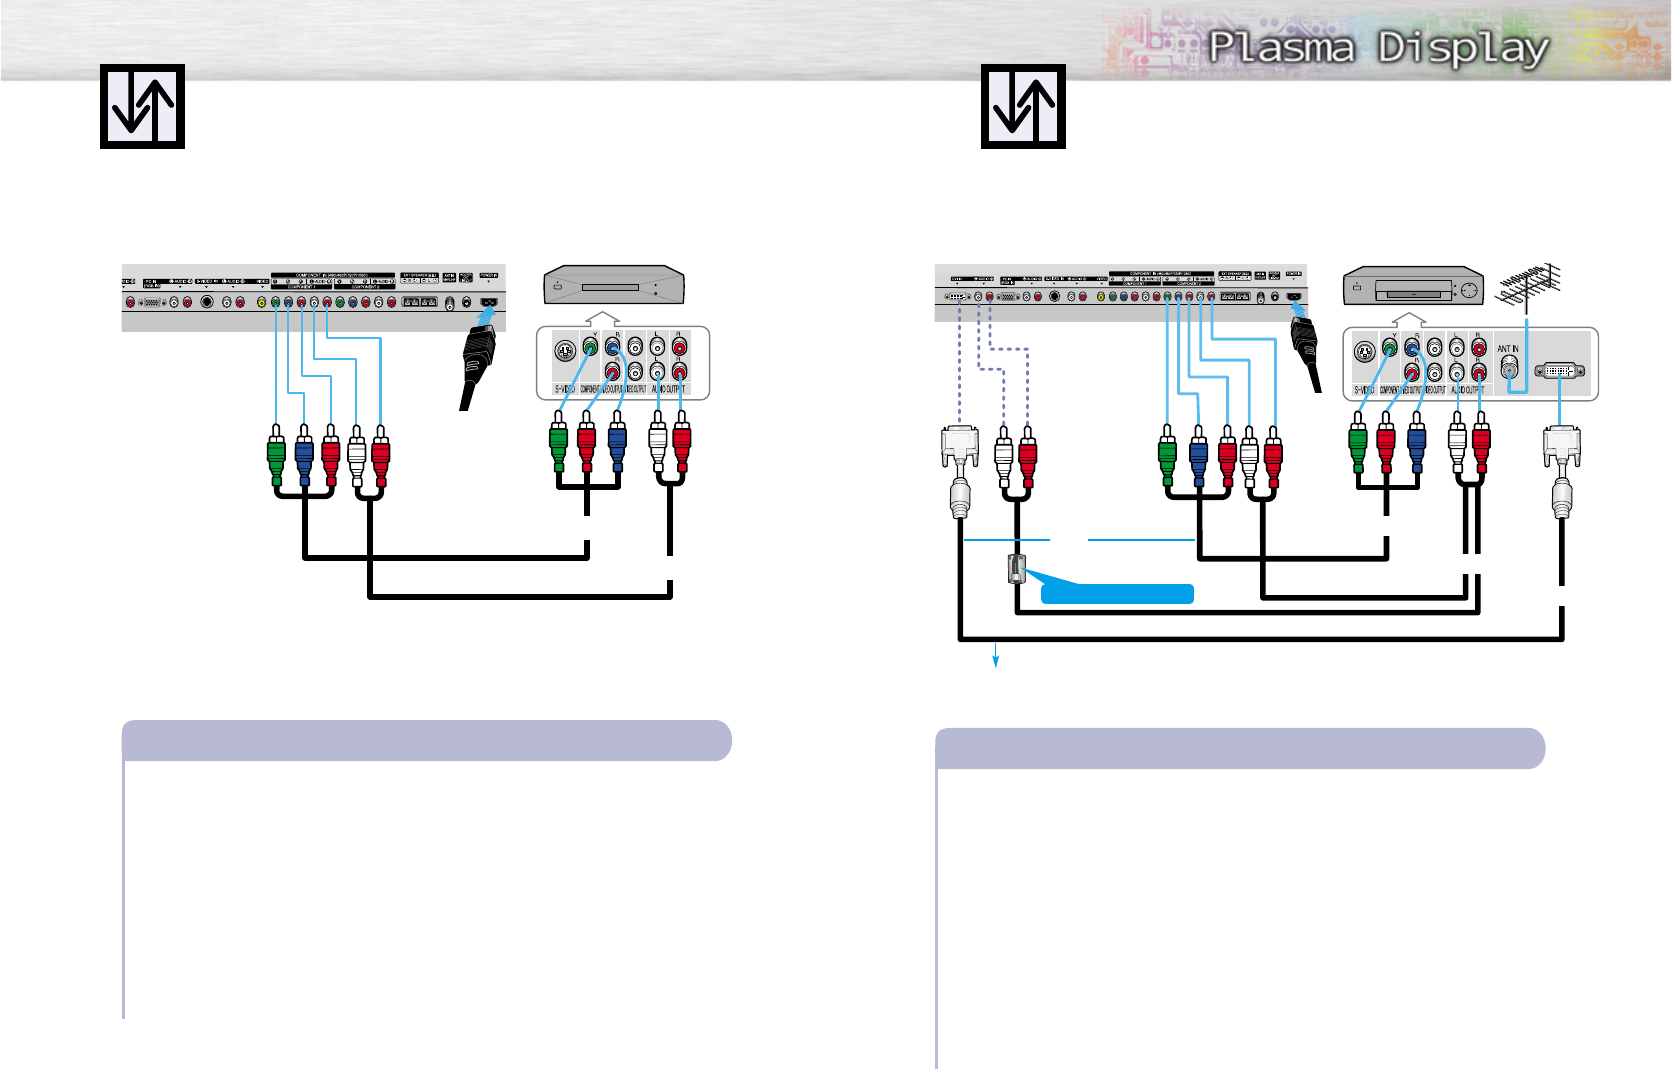
Connecting a DVD Player (480i, 480p)
26
Playing DVD
Audio Cable
Video Cable
Power Plug
Connect a Video Cable between the Y, Pb, Pr (COMPONENT1, 2) input jacks on the PDP
and Y/PB/PRoutput jacks on the DVD players.
Connect a Audio Cable between the AUDIO L/R(COMPONENT1, 2) input jacks on the PDP
and the AUDIO OUT jacks on the DVD player.
To Play DVD:
1. Turn on your PDP, and press the SOURCE button on the remote control.
2. Move the joystick up or down to select the “COMPONENT1” or “COMPONENT2”,
then press the joystick to enter.
3. Turn on your DVD player, insert a DVD disc and press the Play button.
• For an explanation of Component video, see your DVD owner’s instructions.
How to Connect
1
2
PDP DVD Player
Watching DTV
Video Cable
Audio Cable
DVI Cable
or
Power
Plug
Connect the cable or antenna to the antenna input jack on the DTV.
Connect a Video cable between the Y, Pb, Pr (COMPONENT 1, 2) or DVI jack on the PDP
and the Y, PB, PR(VIDEO OUTPUT JACKS) on the DTV receiver.
Connect an Audio cable between the COMPONENT 1, 2 (L/R AUDIO) or DVI jacks on the
PDP and the AUDIO OUTPUT jacks on the DTV.
To Watch DTV:
1. Turn on your PDP, and press the SOURCE button on the remote control.
2. Move the joystick up or down to select the “COMPONENT1 ”, “COMPONENT2” or
“DVI”, then press the joystick to enter.
3. Turn on your DTV receiver.
• For an explanation of Component video, see your DTV receiver owner’s instructions.
How to Connect
1
2
3
Connecting a DTV Receiver
(480p, 720p, 1080i)
Use the DVI-D connection cable. (sold separately)
Ferrite Cores
(3301-001110)
PDP
DTV Receiver

PLASMA DISPLAY PANEL
Operation
Turning the PDP On and Off ..........................................................30
Memorizing the Channels..............................................................32
Setting Up Your Remote Control ....................................................36
Turning the PDP On and Off
30 31
Turning the PDP On and Off
Press the Power button on the remote control.
The PDP will be turned on and you will be ready to use it’s
features.
You can also use the Power button on the front of the
PDP.
Notes:
• If your PDP isn’t turned on when the power button is
pressed: Press the MODE button to check if the TV mode
has been chosen ( ).
Viewing the Menus and Displays
Your PDP has a simple, easy-to-use menu system that appears on the PDP screen. This system makes it con-
venient and fast to use features on the PDP. Your PDP also lets you display the status of many of your PDP’s
features.
Viewing the Menus
1 With the power on, press the Menu button on the
remote control. The main menu appears on the screen.
The Picture menu is selected.
2 Use the joystick (up, down) button to move items in the
menu. Use the joystick (left, right) button to display,
change, or use the selected items.
Use the joystick ( ) button to enter items in the menu.
On screen menus disappear from the screen
automatically after about thirty seconds, or you can
press the Menu button on your remote control to exit the
menu.
Picture
Mode
Adjust
Color Tone
Move Enter Exit
Custom
Normal
Displaying Status Information
Press the Display button on the remote control. The PDP will
display the Picture mode, Sound mode, MTS, Signal and
Caption.
Picture : Custom
Sound : Custom
MTS : Mono
Signal : Mono
Caption : Off
Ant 6

Memorizing the Channels
Your PDP can memorize and store all of the available channels for both “off-air” (antenna)
and cable channels. After the available channels are memorized, use the CH and CH
buttons to scan through the channels. This eliminates the need to change channels by entering
the channel digits. There are three steps for memorizing channels: selecting a broadcast
source, memorizing the channels (automatic) and adding and deleting channels (manual).
32 33
Selecting the Video Signal-source
Before your television can begin memorizing the available channels, you must specify the type of
signal source that is connected to the PDP (i.e., an antenna or a cable system).
1 Press the Menu button. Move the joystick up or
down to select “Channel”, then press the joystick
to enter.
2 Move the joystick left or right to select “Ant”,
“STD”, “HRC” or “IRC”.
•If you are connected to an antenna, leave "Ant"
displayed. If you connected cable, Move the
joystick left or right to the display the type of cable
system: "STD", "HRC", or "IRC".
(If you are not sure which type of cable system you
have, contact your cable company).
3 Press the Menu button to exit.
Note
• STD, HRC and IRC identify various types of cable TV systems. Contact your local cable company
to identify the type of cable system that exists in your particular area.
At this point the signal source has been selected. Proceed to “Storing Channels in Memory”
(next page).
Channel
Ant/ CATV
Auto Program
Fine Tune
LNA
Move Select Exit
Ant
Off
0
Channel
Ant/ CATV
Auto Program
Fine Tune
LNA
Move Select Exit
STD
Off
0
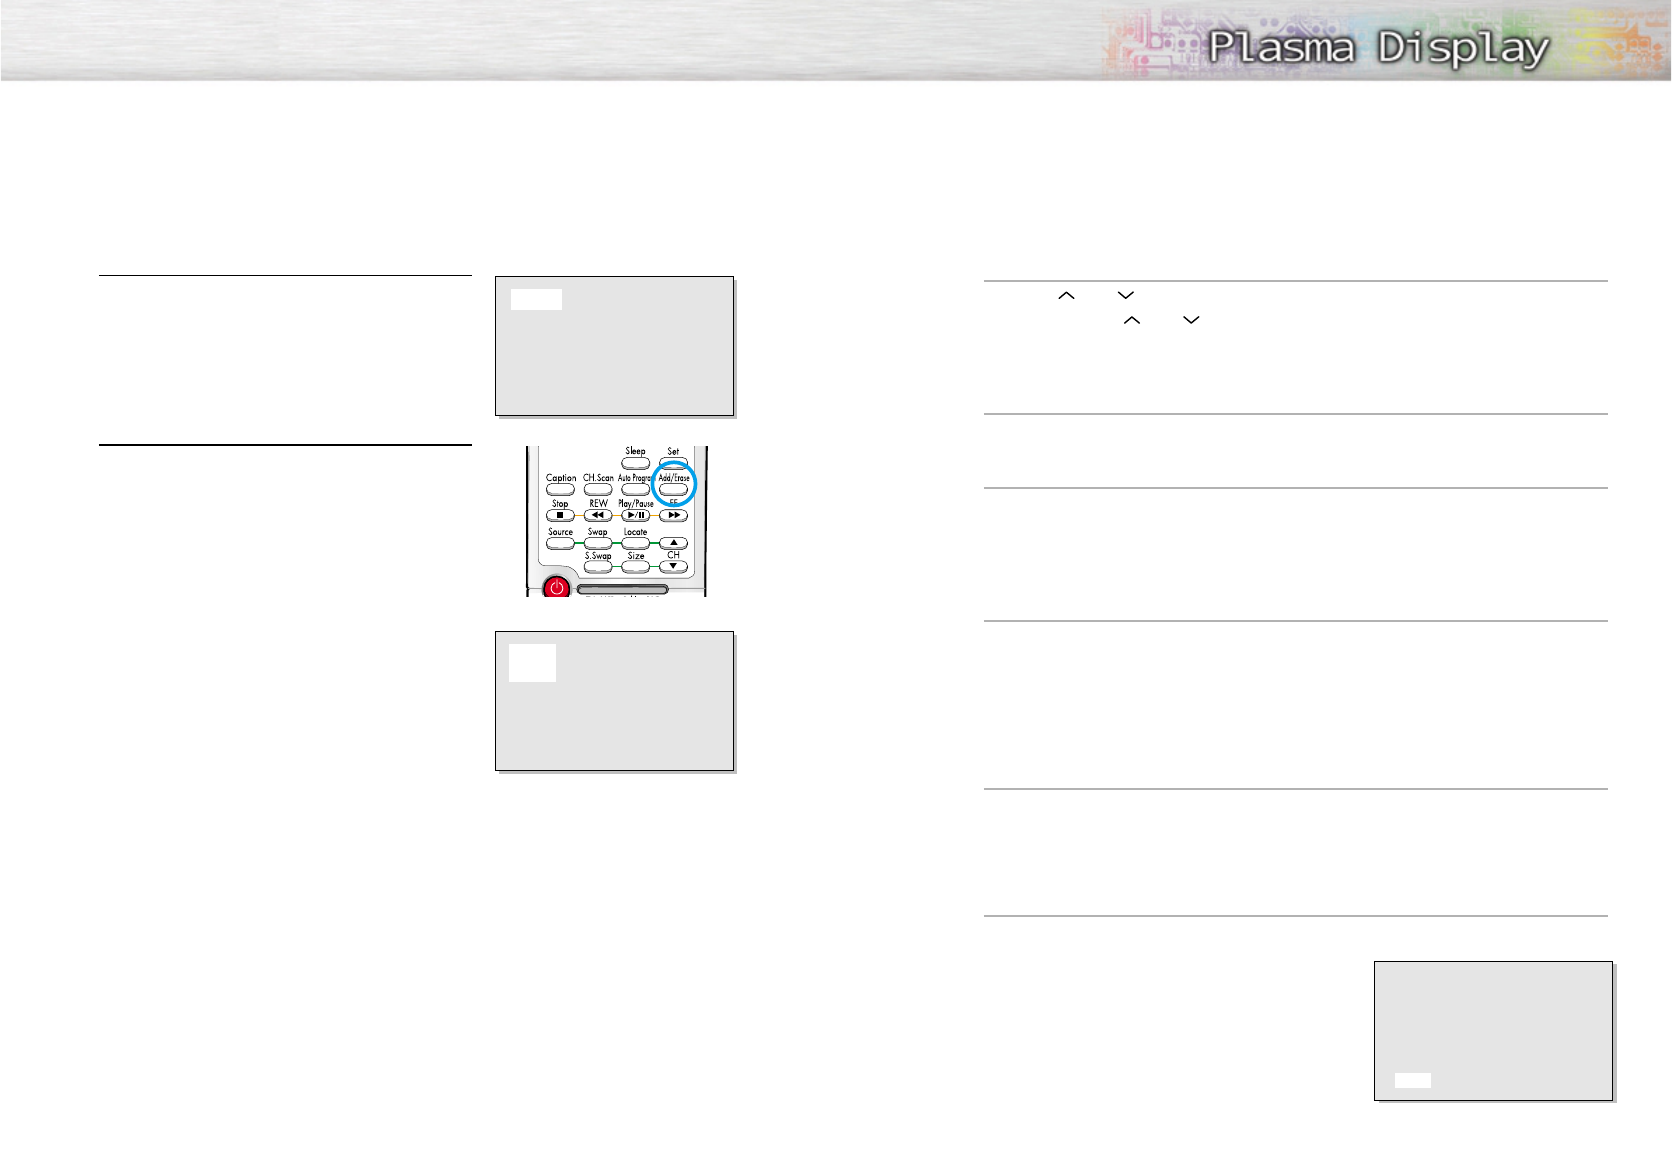
Storing Channels in Memory (Automatic Method)
1 First, select the correct signal source (Ant, STD, HRC,
IRC). See steps on previous page.
Press the Menu button. Move the joystick up or down to
select the “Channel”, then press the joystick to enter.
2 Move the joystick up or down to select “Auto Program”,
then press the joystick to enter.
3The PDP will begin memorizing all of the available
channels.
After all the available channels are stored, the
Auto program menu reappears. Move the joystick right
to exit.
Note
• The PDP automatically cycles through all of the available channels and stores them in memory.
This takes about one to two minutes.
Channel
Ant/ CATV
Auto Program
Fine Tune
LNA
Move Select Exit
Ant
Off
0
Channel
Ant / CATV
Auto Program
Fine Tune
LNA
Move Enter Exit
Ant
Off
0
Ant 50
Auto Program
: Stop
Quick way to access the Automatic Channel Setting :
Just press the “Auto Program”button on the remote control.
!
Changing Channels
Using the Channel Buttons
Press the CH or CH buttons to change channels.
When you press the CH or CH buttons, the PDP changes channels in sequence. You will see all the
channels that the PDP has memorized. (The PDP must have memorized at least three channels.)
You will not see channels that were either erased or not memorized.
To View Memorized Channel
Press the CH.Scan button or the Channel button. Only the memorized channels are chosen.
Directly Accessing Channels
Press the number buttons to go directly to a channel. For example, to select channel 27, press “2” then “7”.
The TV will change channels when you press the second number.
When you use the number buttons, you can directly select channels that were either erased or not memorized. To
change to single-digit channels (0~9) faster, press “0” before the single digit. (For channel “4” press “0” then “4”.
Using the Pre-CH button to select the previous channel
Press the Pre-CH button. The TV will switch to the fast channel viewed.
To quickly switch between two channels that are far apart, tune to one channel, then use the number button
to select the second channel. Then, use the Pre-CH button to quickly alternate between them.
Adjusting the Volume
Using the Volume Buttons
Press the VOL + or VOL – buttons to increase or decrease the volume.
Using Mute
Using the Mute Buttons
At any time, you can temporarily cut off the sound using the Mute button.
1 Press the Mute button and the sound cuts off.
The word “Mute” will appear in the lower-left
corner of the screen.
2 To turn mute off, press the Mute button again, or
simply press either the VOL + or VOL – button.
Mute
34 35
Adding and Erasing Channels (Manual Method)
1 Use the number buttons to directly select the channel that
will be added or erased.
Ex) Channel “4”
2 Press the Add/Erase button:
Repeatedly pressing this button will alternate between
“Added” and “Erased.”
Note
• You can view any channel (including an erased channel) by using the number buttons on the remote
control.
Ant 4
Ant 4
Added
36 37
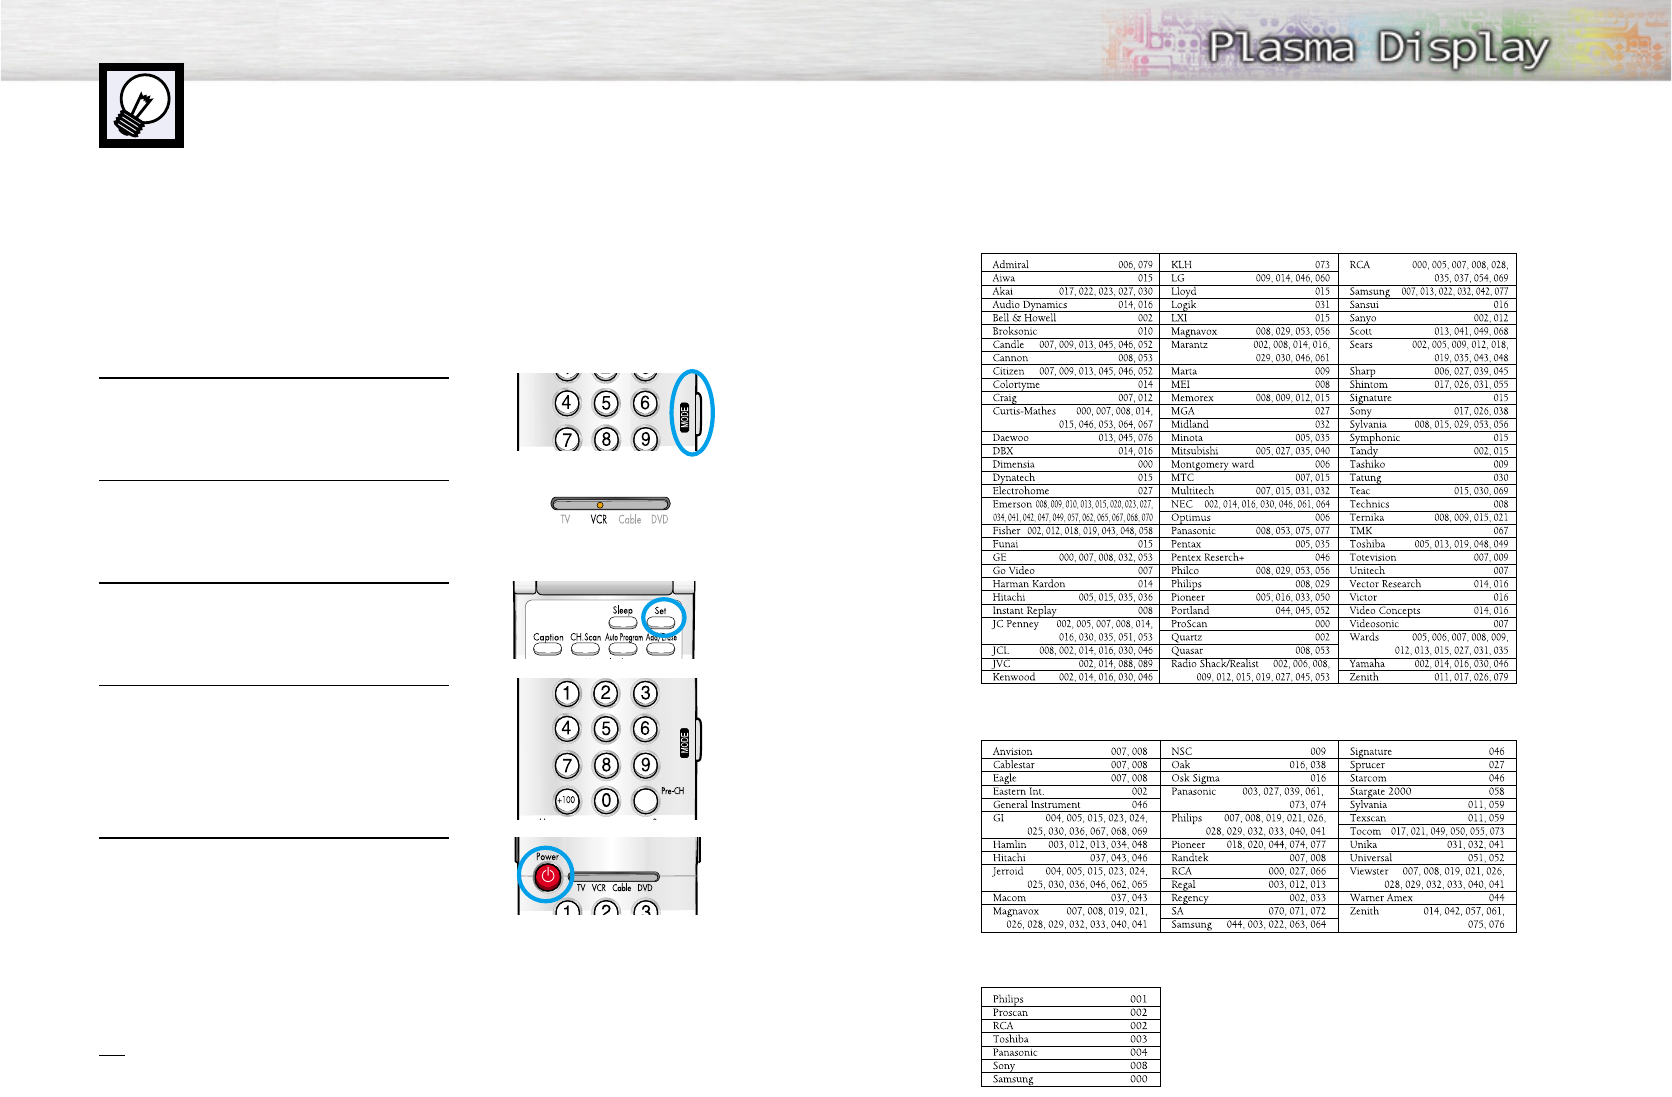
Setting Up Your Remote Control
This PDP's remote control can operate almost any VCR, cable box, or DVD. After it has been set up
properly, your remote control can operate in four different modes :TV, VCR, Cable, or DVD.
Pressing the corresponding button on the remote control allows you to switch between these modes,
and control whichever piece of equipment you choose.
Note:The remote control may not be compatible with all DVD Players, VCRs, and Cable boxes.
Setting Up the Remote to Operate Your VCR, Cable box, or DVD player
1 Turn off your VCR. (or Cable box, DVD player.)
2 Press the MODE button and make sure that the VCR
(or Cable box, DVD) LED is illuminated.
3 Press the Set button on your TV's remote control.
4 Using the number buttons on your remote control,
enter three digits of the VCR (or Cable box, DVD)
code listed on page 37 of this manual for your
brand of VCR (or Cable box, DVD player). Make
sure you enter three digits of the code, even if the
first digit is a "0".
(If more than one code is listed, try the first one.)
5 Press the Power button on the remote control.
Your VCR (or Cable box, DVD player) should turn
on if your remote is set up correctly. If your VCR (or
Cable box, DVD player) does not turn on after set
up, repeat steps 2, 3, and 4, but try one of the other
codes listed for your brand of VCR (or Cable box,
DVD player).
If no other codes are listed, try each code, 000
through 089 (or Cable box: 000 through 077,
DVD player: 000 through 008).
Notes
• When your remote control is in “VCR” mode, the VCR control buttons (Stop, REW, Play/Pause, FF)
still operate your VCR.
• When your remote control is in “Cable box” or “DVD” mode, the VCR control buttons (Stop, REW,
Play/Pause, FF) still operate your VCR.
Remote Control Codes
VCR Codes
Cable Box Codes
DVD Codes