Samsung Electronics Co ML1210 Laser Printer User Manual Part1a
Samsung Electronics Co Ltd Laser Printer Users Manual Part1a
Contents
- 1. Users Manual2
- 2. Users Manual Part1a
- 3. Users Manual Part1b
Users Manual Part1a

This manual is provided for information purposes only. All information included herein is
subject to change without notice. Samsung Electronics is not responsible for any damages, direct
or indirect, arising from or related to use of this manual.
© 2001 Samsung Electronics Co., Ltd. All rights reserved.
• ML-1200 Series and Samsung logo are trademarks of Samsung Electronics Co., Ltd.
• Centronics is a trademark of Centronics Data Computer Corporation.
• IBM and IBM PC are trademarks of International Business Machines Corporation.
• Microsoft, Windows, Windows 9x, Windows Me, Windows NT and Windows 2000 are
trademarks of Microsoft Corporation.
• GNU Ghostscript software, Copyright (C) 1999. Aladdin Enterprise, Menlo Park, California,
and other authors as indicated in its documentation.
• Apple, Macintosh, Power Macintosh, iMac and iBook are trademarks of Apple Computer, Inc.
• Adobe and Adobe Acrobat Reader are trademarks of Adobe Systems.
• All other brand or product names are trademarks of their respective companies or
organizations.
I
Special Features
–––––––––––––––––––––––––––––––––
1.1
Printer Components
––––––––––––––––––––––––––––––
1.3
Control Panel Buttons –––––––––––––––––––––––––––––– 3.1
Control Panel Lights ––––––––––––––––––––––––––––––– 3.3
Contents
Introduction
STEP 1:Unpack Your Printer –––––––––––––––––––––––––– 2.1
STEP 2:Install the Toner Cartridge ––––––––––––––––––––– 2.2
STEP 3:Load Paper ––––––––––––––––––––––––––––––––– 2.4
STEP 4:Connect to the Computer with a Parallel Cable ––––– 2.6
STEP 5:Turn on the Printer ––––––––––––––––––––––––––– 2.7
STEP 6:Print a Demo Page! ––––––––––––––––––––––––––– 2.7
STEP 7:Install the Printer Software ––––––––––––––––––––– 2.8
Installing Software from Diskette –––––––––––––––––––– 2.13
Choosing Paper and Other Media ––––––––––––––––––––– 4.1
Selecting the Output Location ––––––––––––––––––––––– 4.4
Loading Paper –––––––––––––––––––––––––––––––––––– 4.5
Printing on Envelopes –––––––––––––––––––––––––––––– 4.7
Printing on Heavy Paper –––––––––––––––––––––––––––– 4.9
Printing on Labels –––––––––––––––––––––––––––––––– 4.10
Printing on Transparencies ––––––––––––––––––––––––– 4.11
Printing on Preprinted Paper ––––––––––––––––––––––– 4.12
Printing on Card Stocks –––––––––––––––––––––––––––– 4.13
1
2
Setting Up Your Printer
3
Using Control Panel
4
Print Media
II
Maintaining Toner Cartridge ––––––––––––––––––––––––– 6.1
Cleaning the Printer ––––––––––––––––––––––––––––––– 6.4
Maintaining Your Printer
6
Printing a Document ––––––––––––––––––––––––––––––– 5.1
Using Toner Save Mode –––––––––––––––––––––––––––– 5.6
Printing Multiple Pages on One Sheet of Paper
––––––––––
5.7
Fitting Your Document to a selected Paper Size
–––––––––
5.8
Printing Posters
––––––––––––––––––––––––––––––––
5.9
Setting Graphic Properties ––––––––––––––––––––––––– 5.11
Printing Watermarks –––––––––––––––––––––––––––––– 5.13
Using Page Overlay ––––––––––––––––––––––––––––––– 5.16
Reprinting the Last Page –––––––––––––––––––––––––– 5.20
Printing on a Network Environment ––––––––––––––––––– 5.21
Printing Tasks
5
Troubleshooting Checklist ––––––––––––––––––––––––––– 7.1
Solving General Printing Problems –––––––––––––––––––– 7.2
Clearing Paper Jams ––––––––––––––––––––––––––––––– 7.6
Solving Print Quality Problems –––––––––––––––––––––– 7.11
Troubleshooting Error Messages ––––––––––––––––––––– 7.17
Common Windows Problems –––––––––––––––––––––––– 7.19
Problem Solving
7
Printer Specifications ––––––––––––––––––––––––––––––– A.1
Paper Specifications –––––––––––––––––––––––––––––––– A.2
Using Your Printer with a USB cable –––––––––––––––––– A.10
Using Your Printer with Macintosh –––––––––––––––––––– A.16
Linux Driver Installation ––––––––––––––––––––––––––– A.23
Appendix
INDEX
III
Environmental and Safety Consideration
The printer is certified in the U.S. to conform to the requirements of DHHS 21 CFR, chapter 1
Subchapter J for Class I(1) laser products, and elsewhere is certified as a Class I laser product
conforming to the requirements of IEC 825.
Class I laser products are not considered to be hazardous. The laser system and printer are
designed so there is never any human access to laser radiation above a Class I level during
normal operation, user maintenance, or prescribed service condition.
WARNING
Never operate or service the printer with the protective cover removed from Laser/Scanner
assembly. The reflected beam, although invisible, can damage your eyes.
CAUTION - INVISIBLE LASER RADIATION WHEN THIS COVER OPEN. DO
NOT OPEN THIS COVER.
VORSICHT - UNSICHTBARE LASERSTRAHLUNG, WENN ABDECKUNG GEÖFFNET. NICHT
DEM STRAHL AUSSETZEN.
ATTENTION - RAYONNEMENT LASER INVISIBLE EN CAS D’OUVERTURE.EXPOSITION DAN
GEREUSE AU FAISCEAU.
ATTENZIONE -RADIAZIONE LASER INVISIBILE IN CASO DI APERTURA.
EVITARE L’ESPOSIZIONE AL FASCIO.
PRECAUCION -RADIACION LASER IVISIBLE CUANDO SE ABRE. EVITAR EXPONERSE AL
RAYO.
ADVARSEL. - USYNLIG LASERSTRÅLNING VED ÅBNING NÅR SIKKERHEDSBRYDERE ER
UDE AF FUNKTION. UNDGÅ UDSAETTELSE FOR STRÅLNING.
ADVARSEL. - USYNLIG LASERSTRÅLNING NÅR DEKSEL ÅPNES. STIRR IKKE INN I
STRÅLEN. UNNGÅ EKSPONERING FOR STRÅLEN.
VARNING - OSYNLIG LASERSTRÅLNING NÄR DENNA DEL ÄR ÖPPAND OCH SPÄRREN ÄR
URKOPPLAD. BETRAKTA EJ STRÅLEN. STRÅLEN ÄR FARLIG.
VARO! - AVATTAESSA JA SUOJALUKITUS OHITETTAESSA OLET ALTTIINA
NÄKYMÄTTÖMÄLLE LASERSÄTEILYLLE ÄLÄ KATSO SÄTEESEEN.
Laser Safety Statement

IV
Ozone Safety
Power Saver
During normal operation, the Samsung ML-1200 Series printer
produces ozone. the ozone produced does not present a hazard to
the operator. However, it is advisable that the machine be operated
in a well ventilated area.
If you need additional information about ozone, please request
your nearest Samsung dealer.
This printer contains advanced energy conservation technology
that reduces power consumption when it is not in active use.
When the printer does not receive data for an extended period of
time, power consumption is automatically lowered.
The energy star emblem does not represent EPA endorsement of
any product or service.
Environmental and Safety Consideration

V
Do not make any changes or modifications to the equipment unless otherwise specified in the
manual. If such changes or modifications should be made, you must first stop operation of the
equipment.
Use of shielded cable is required to comply with Class B limits in Subpart B of Part 15 of FCC
Rules.
This digital apparatus does not exceed the Class B limits for radio noise emissions from digital
apparatus as set out in the interference-causing equipment standard entitled “Digital
Apparatus”, ICES-003 of the Industry and Science Canada.
Cet appareil numérique respecte les limites de bruits radioélectriques applicables aux appareils
numériques de Classe B prescrites dans la norme sur le matériel brouilleur: “Appareils
Numériques”, ICES-003 édictée par l’Industrie et Sciences Canada.
Canadian Radio Interference Regulations
Environmental and Safety Consideration
CAUTION: Changes or modifications not expressly approved by the manufacture
responsible for compliance could void the user’s authority to operate the
equipment.
This equipment has been tested and found to comply with the limits for a Class B digital
device, pursuant to Part 15 of the FCC Rules. These limits are designed to provide reasonable
protection against harmful interference in a residential installation. This equipment generates,
uses and can radiate radio frequency energy and, if not installed and used in accordance with
the instructions, may cause harmful interference to radio communications. However, there is
no guarantee that interference will not occur in a particular installation.
If this equipment does cause harmful interference to radio or television reception, which can
be determined by turning the equipment off and on, the user is encouraged to try to correct
the interference by one or more of the following measures:
• Reorient or relocate the receiving antenna.
• Increase the separation between the equipment and receiver.
• Connect the equipment into an outlet on a circuit different from that to which the receiver
is connected.
• Consult the dealer or an experienced radio/TV technician for help.
Fcc Regulations
Radio Frequency Emissions

VI
We,
SAMSUNG ELECTRONICS CO., LTD.
#259, Gong Dan-Dong, Gumi-City, Kyung Buk, Korea
or
SHANDONG SAMSUNG TELECOMMUNICATIONS CO., LTD
Jinzhou Road, Weihai Hi-Tech. IDZ Shandong Province, China
declare sole responsibility that the
Samsung ML-1200 Series Laser printer
meets the intent of Directive 89/336/EEC for Electromagnetic Compatibility and Low Voltage
Directive 73/23/EEC.
Compliance was demonstrated to the following specifications as listed in the official journal of
the European Communities:
EN 50081-Emissions:
EN 55022 Radiated, Class B
EN 55022 Conducted, Class B
EN 61000-3-2 Power Harmonics
EN 61000-3-3 Voltage Fluctuations and Flicker
EN 55024-EMS:
EN 6100-4-2 Electrostatic Discharge
EN 6100-4-3 RF EM Field
EN 6100-4-4 Fast Transient
EN 6100-4-5 Surges
EN 6100-4-6 RF Common mode
EN 6100-4-8 Power Frequency Magnetic Field
EN 6100-4-11 Voltage Dips and Interruptions
EN 60950-Safety
EC Declaration of Conformity
Environmental and Safety Consideration

chapter
Congratulations on the purchase of Samsung ML-1200
Series printer! This chapter provides information on the
following topics:
◆ Special Features
◆ Printer Components
1
1
Special Features
INTRODUCTION
1.1
Samsung ML-1200 Series is a versatile, productive printer
equipped with special features that improve print quality,
giving you a competitive edge. You can:
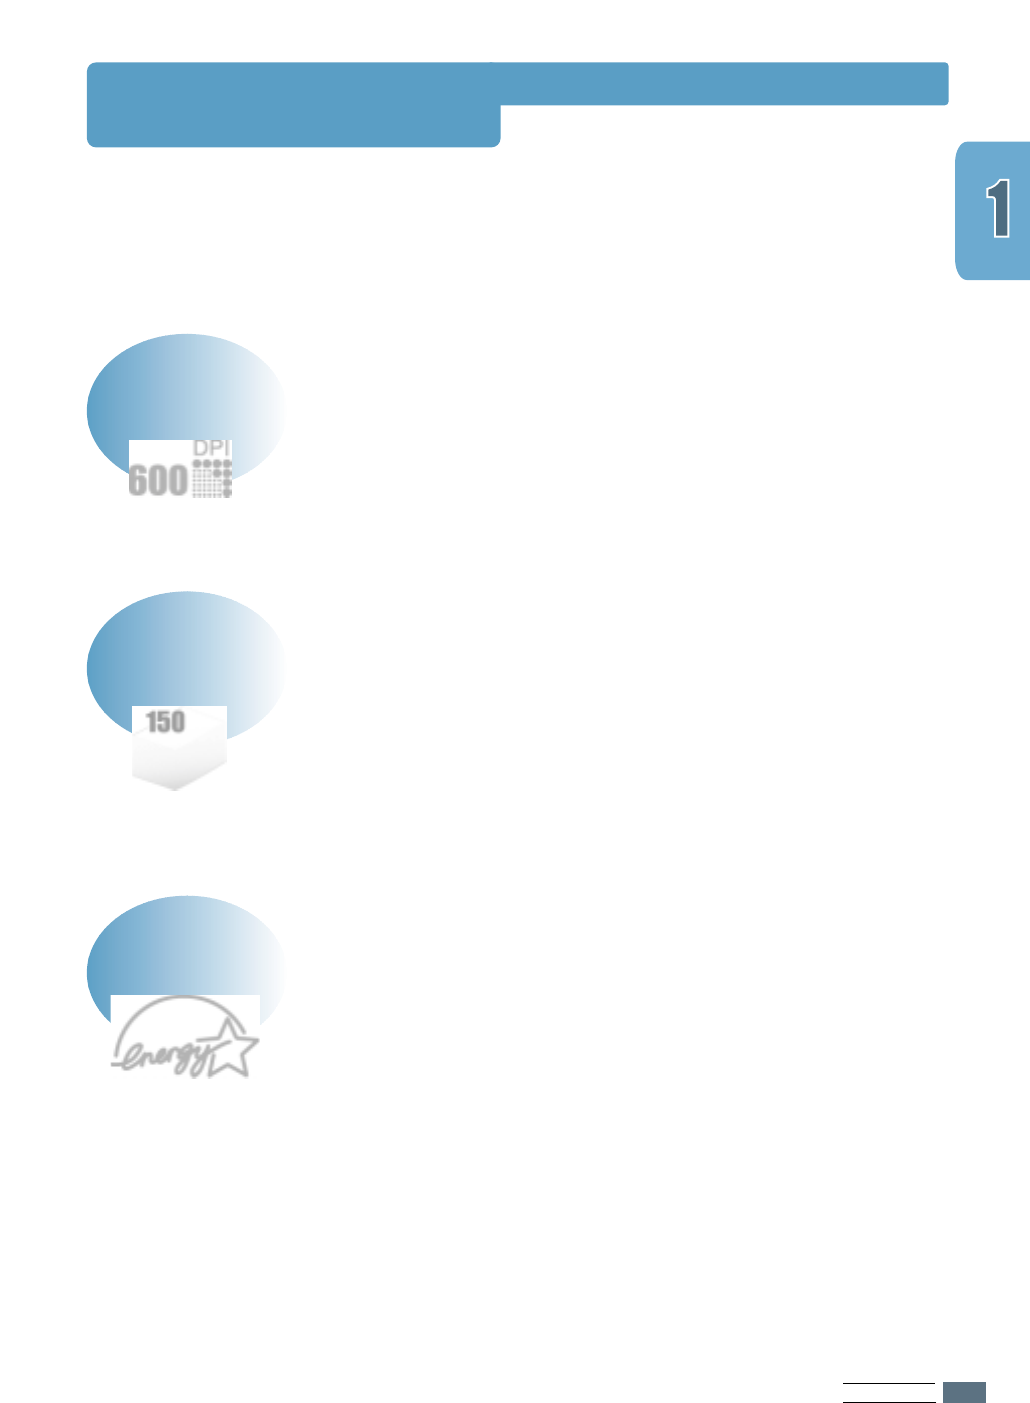
• You can print at 600 dots per inch (dpi). See page 5.11.
• Your printer prints 12 pages-per-minute.
Print with excellent quality and high speed
• Standard 150-sheet automatic input tray and a 1-sheet
manual input tray support various sizes and types of paper.
• Two output locations: Select either the face-down output
tray or the face-up output slot for the most convenient
access.
Handle paper flexibly
• You can use Toner Save mode to use less toner. See page
5.6.
• Print multiple pages on a single sheet of paper to save paper
(N-up printing). See page 5.7.
• One-touch last page printing is allowed in the Ready mode.
See page 5.20.
• The printer automatically conserves electricity by
substantially reducing power consumption when not printing.
• This product meets Energy Star guidelines for energy
efficiency.
Save your time and money
INTRODUCTION
1.21.2
• You can print in Window 95/98/Me/NT 4.0/2000.
• Your printer is compatible with the Linux system.
Print in various environments
Special Features
• You can customize your documents by using Watermarks
such as “Confidential.” See page 5.13.
• Preprinted forms and letterheads can be printed on plain
paper. See page 5.16.
• Print Posters. The text and pictures of each page of your
document are magnified and printed across the selected
sheet of paper. After the document has printed, trim off the
white edges of each sheet. Tape the sheets together to form
a poster. See page 5.9.
Create professional documents
• You can print in Windows 95/98/Me/NT 4.0/2000.
• Your printer is compatible with Linux and Macintosh.
• The ML-1200 Series printer comes with both Parallel
(ML-1210 Only) and USB interfaces.
Print in various environments
INTRODUCTION
1.3
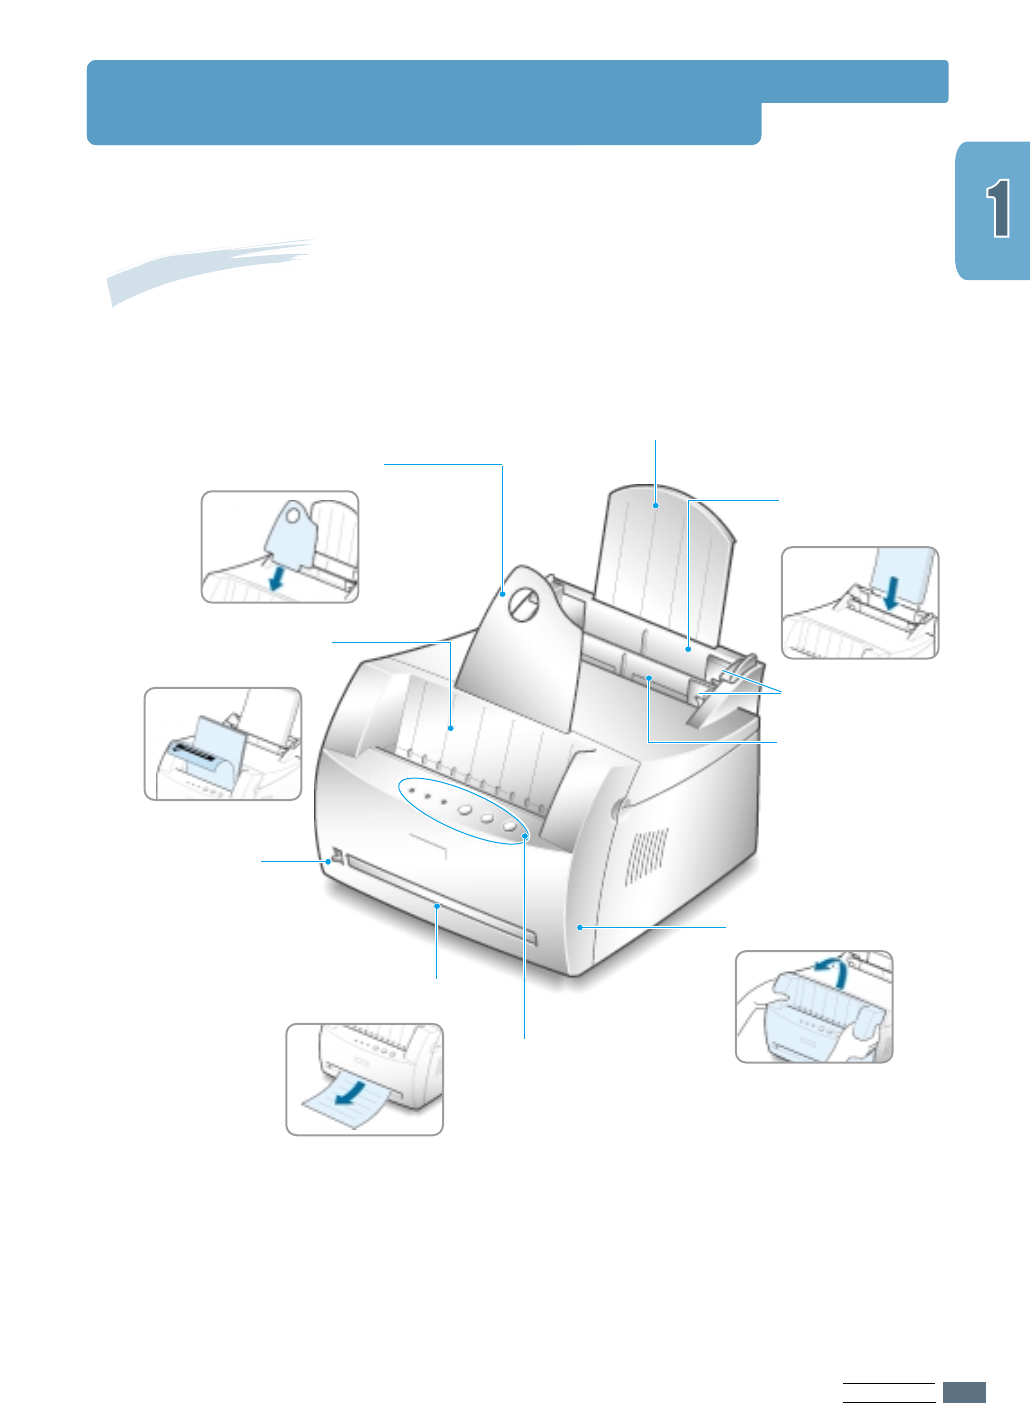
Printer Components
Front View
Paper support
Face-down output
tray
Output lever
Paper output support
Front cover
Face-up output slot
Control panel
Automatic input
tray
Manual input
tray
Paper guides
INTRODUCTION
1.4
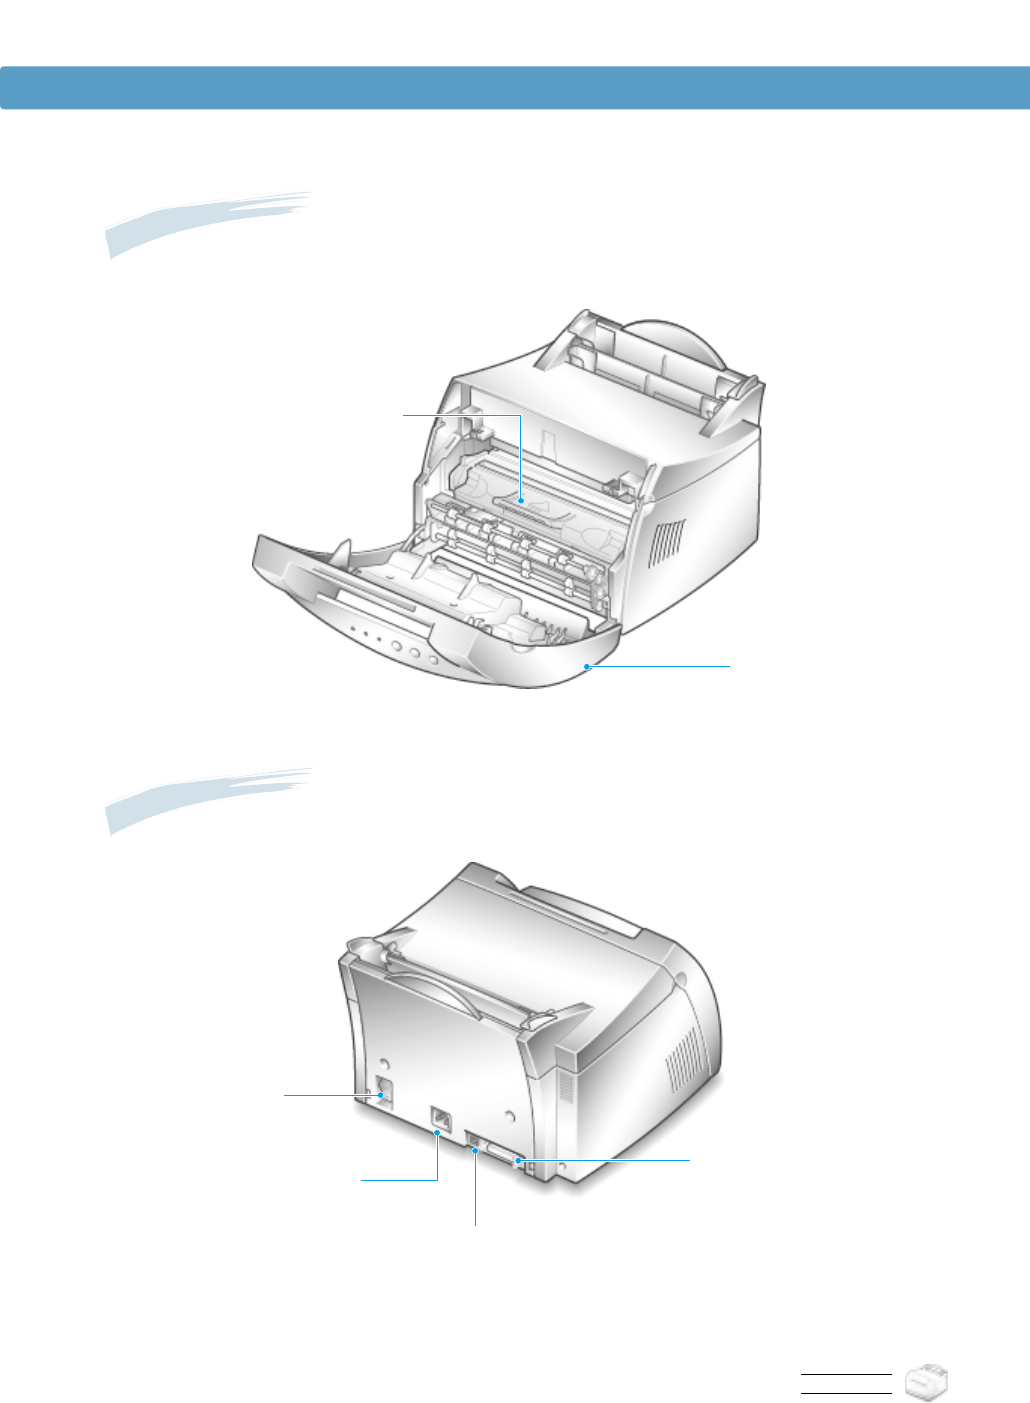
Inside View
Rear View
Power switch
Power receptacle Parallel port
(ML-1210 Only)
USB port
Toner cartridge
Printer Components
Front cover
chapter
This chapter provides step by step information on setting up
your printer. Topics included in this chapter are:
◆STEP 1:Unpack Your Printer
◆STEP 2:Install the Toner Cartridge
◆STEP 3:Load Paper
◆STEP 4:Connect to the Computer with a Parallel Cable
(ML-1210 Only)
◆STEP 5:Turn on the Printer
◆STEP 6:Print a Demo Page!
◆STEP 7:Install the Printer Software
◆Installing Software from Diskette
2
2
SETTING UPYOUR PRINTER
2.1
Unpack Your Printer
1
Remove the printer and all accessories
from the packing carton. Make sure
that your printer has been packed with
the following items:
Toner cartridge Power cord
Paper Output Support
CD-ROM*
USB Cable
(ML-1220M Only)
2
Carefully remove all packing tapes from
the printer.
3
Attach the supplied paper output
support as shown.
Setup Guide
Notes:
• If any items are missing or damaged,
notify your dealer immediately.
• Components may differ from one
country to another.
• The CD-ROM contains the printer
driver, the User’s Guide, the Adobe
Acrobat Reader program and the Make
Your Own Diskette setup software.
SETTING UPYOUR PRINTER
2.2
1
Grasp the front cover by both sides of
the cover and pull it toward you to
open.
2
Remove the toner cartridge from its bag
and remove the paper covering the toner
cartridge completely out of the cartridge.
Discard the paper.
3
Gently shake the cartridge from side to
side to distribute the toner evenly inside
the cartridge.
CAUTION:
To prevent damage, do not expose the
toner cartridge to light for more than a few
minutes. Cover it with a piece of paper, if
left exposed for more than a few minutes.
If toner gets on your clothing, wipe it off
with a dry cloth and wash clothing in cold
water. Hot water sets toner into fabric.
Install the Toner Cartridge
SETTING UPYOUR PRINTER
2.3
Note: When printing text at 5% coverage, you can expect a toner cartridge life of approximately
2,500 pages (1,000 pages for the toner cartridge that is shipped with the printer).
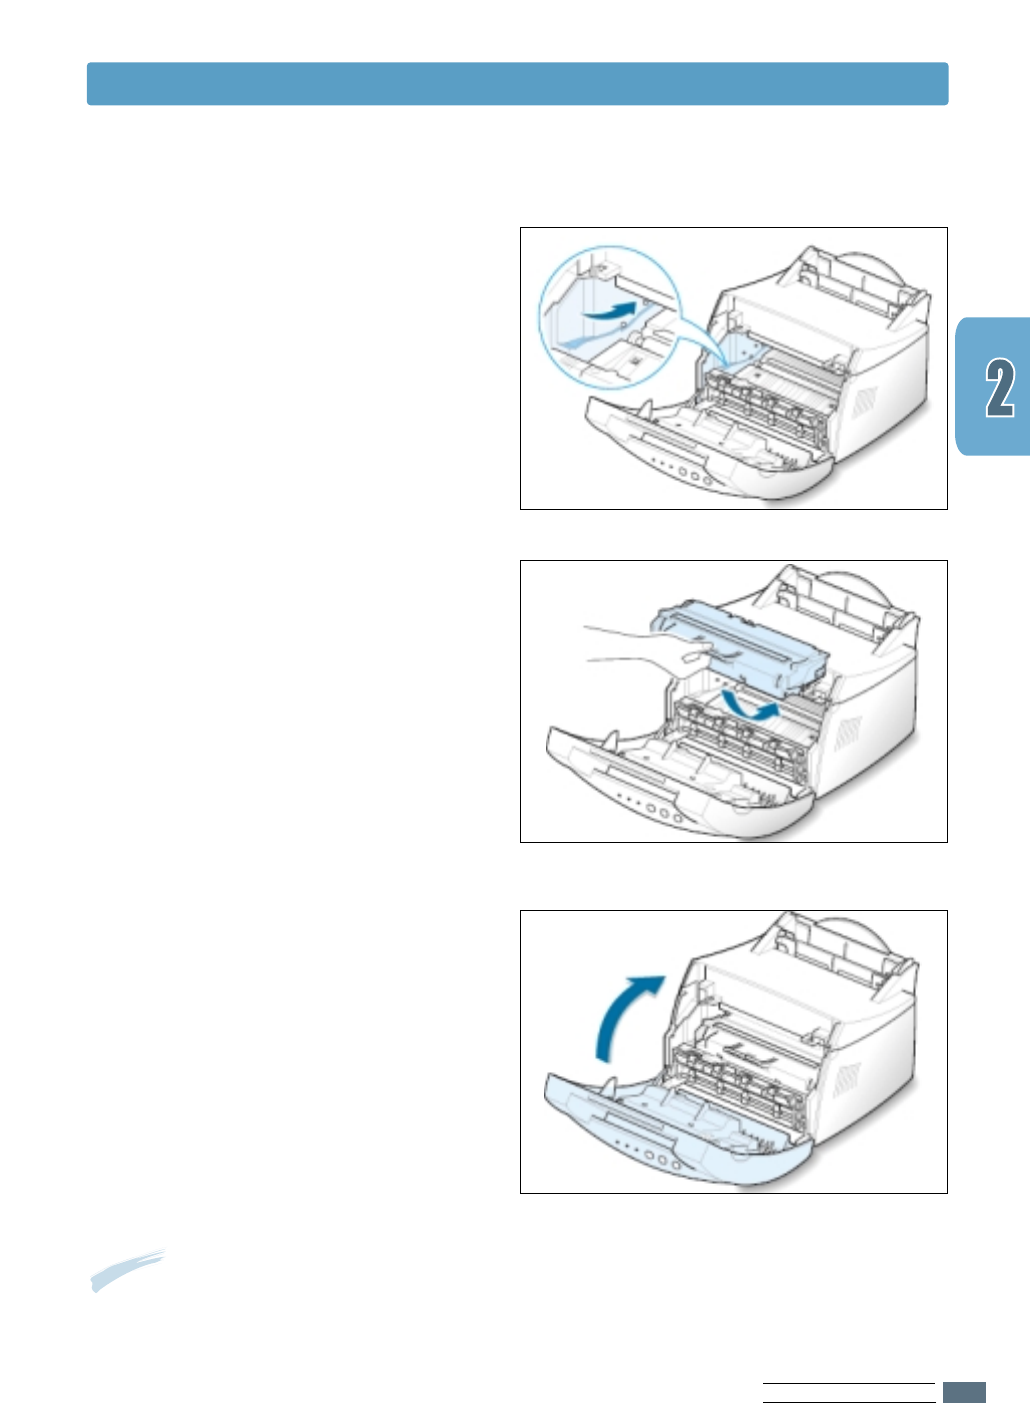
5
Grasp the handle and insert the
cartridge in the printer until it snaps
into place.
6
Close the front cover. Make sure that
the cover is securely closed.
4
Locate the cartridge slots inside the
printer, one on each side.
Install the Toner Cartridge
SETTING UPYOUR PRINTER
2.4
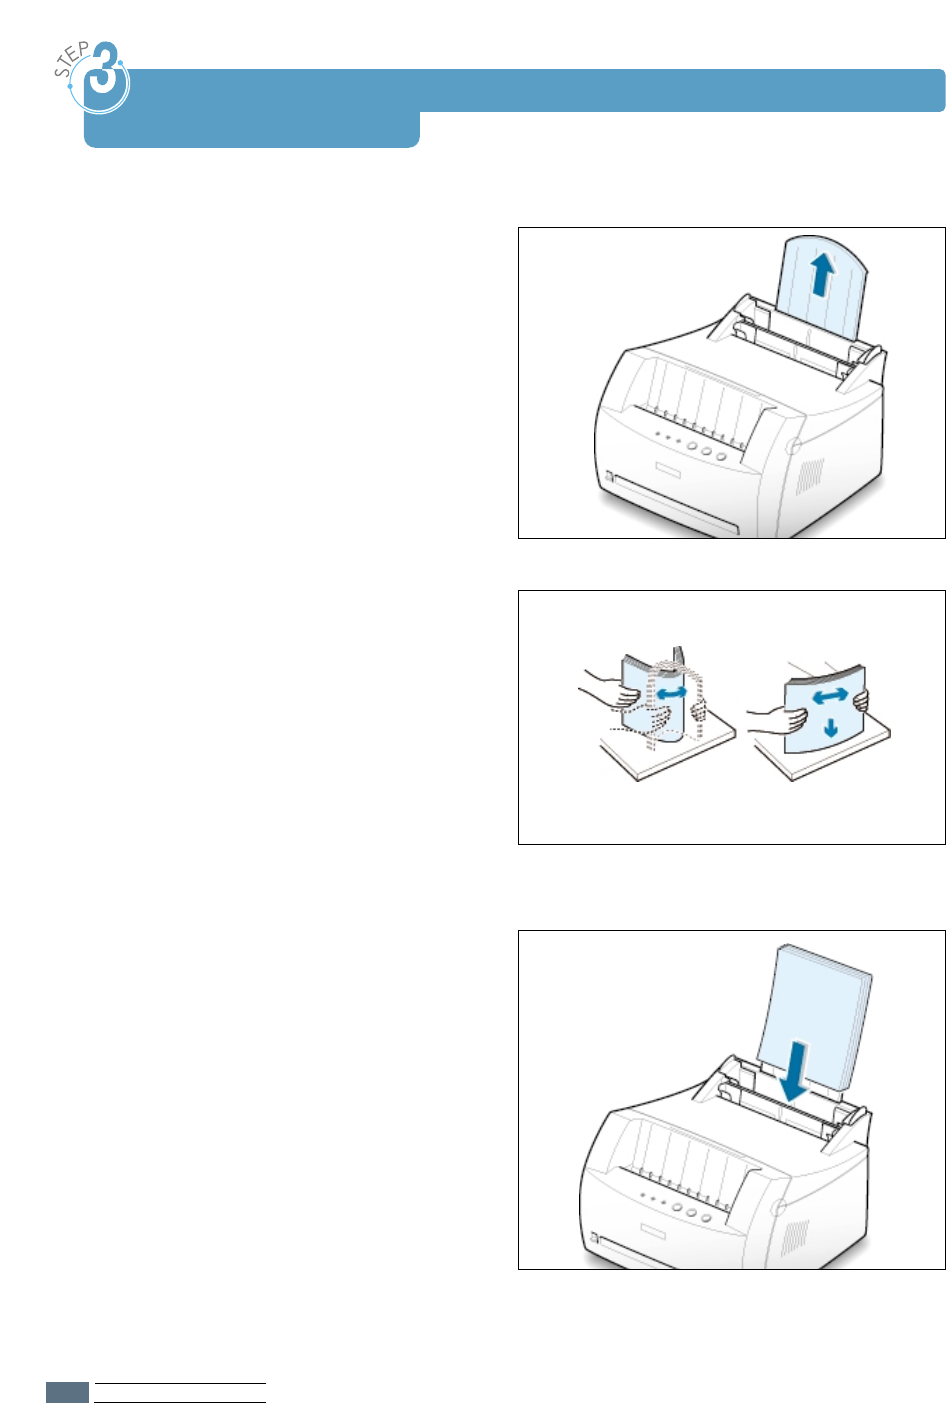
1
Pull the paper support on the automatic
input tray up, until it stops.
2
Before loading the paper, flex the sheets
back and forth to loosen them, then fan
them.
Tap the edges of the stack on a table top
to straighten them to prevent paper
jams.
3
Load a stack of paper into the automatic
input tray with the print side facing
up.
Load Paper
SETTING UPYOUR PRINTER
2.5
5
Adjust the paper guides to the width of
the paper stack.
4
Do not load too much. This tray
holds up to 150 sheets.
Keep the paper below this height
mark.
Load Paper
Notes:
• Do not push the width guide far enough to cause the media to warp.
• If you do not adjust the width guide, it may cause paper jam.
• If you are needed to add more sheets of paper while printing, remove the
remaining paper from the tray at first. Then, reinsert them with the new
paper. Note that adding new paper into the remains in the tray may cause
paper jams or multiple feeding.
SETTING UPYOUR PRINTER
2.6
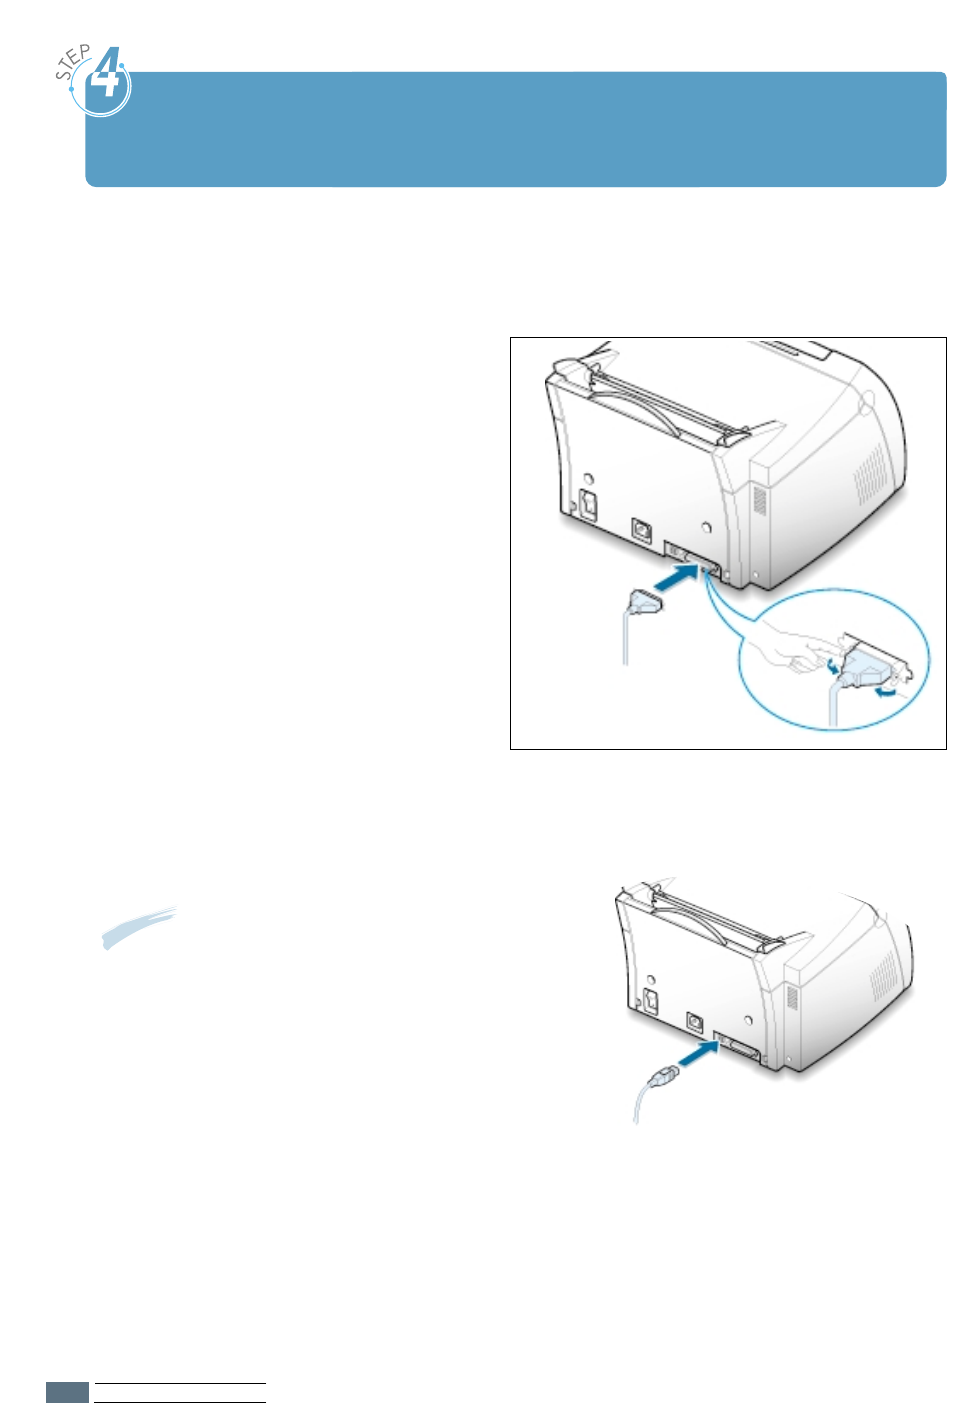
Connect to the Computer with a
Parallel Cable (ML-1210 Only)
1
Make sure both the printer and the computer are turned off.
2
Plug the parallel printer cable into the
connector on the back of the printer.
Push the metal clips down to fit
inside the notches on the cable plug.
3
Connect the other end of the cable to
the parallel interface port on your
computer, and tighten the screws.
See your computer documentation if
you need help.
To the parallel
port on PC
➜
If you are using a USB interface
Go to “Using Your Printer with a USB Cable” on
page A.10.
SETTING UPYOUR PRINTER
2.7
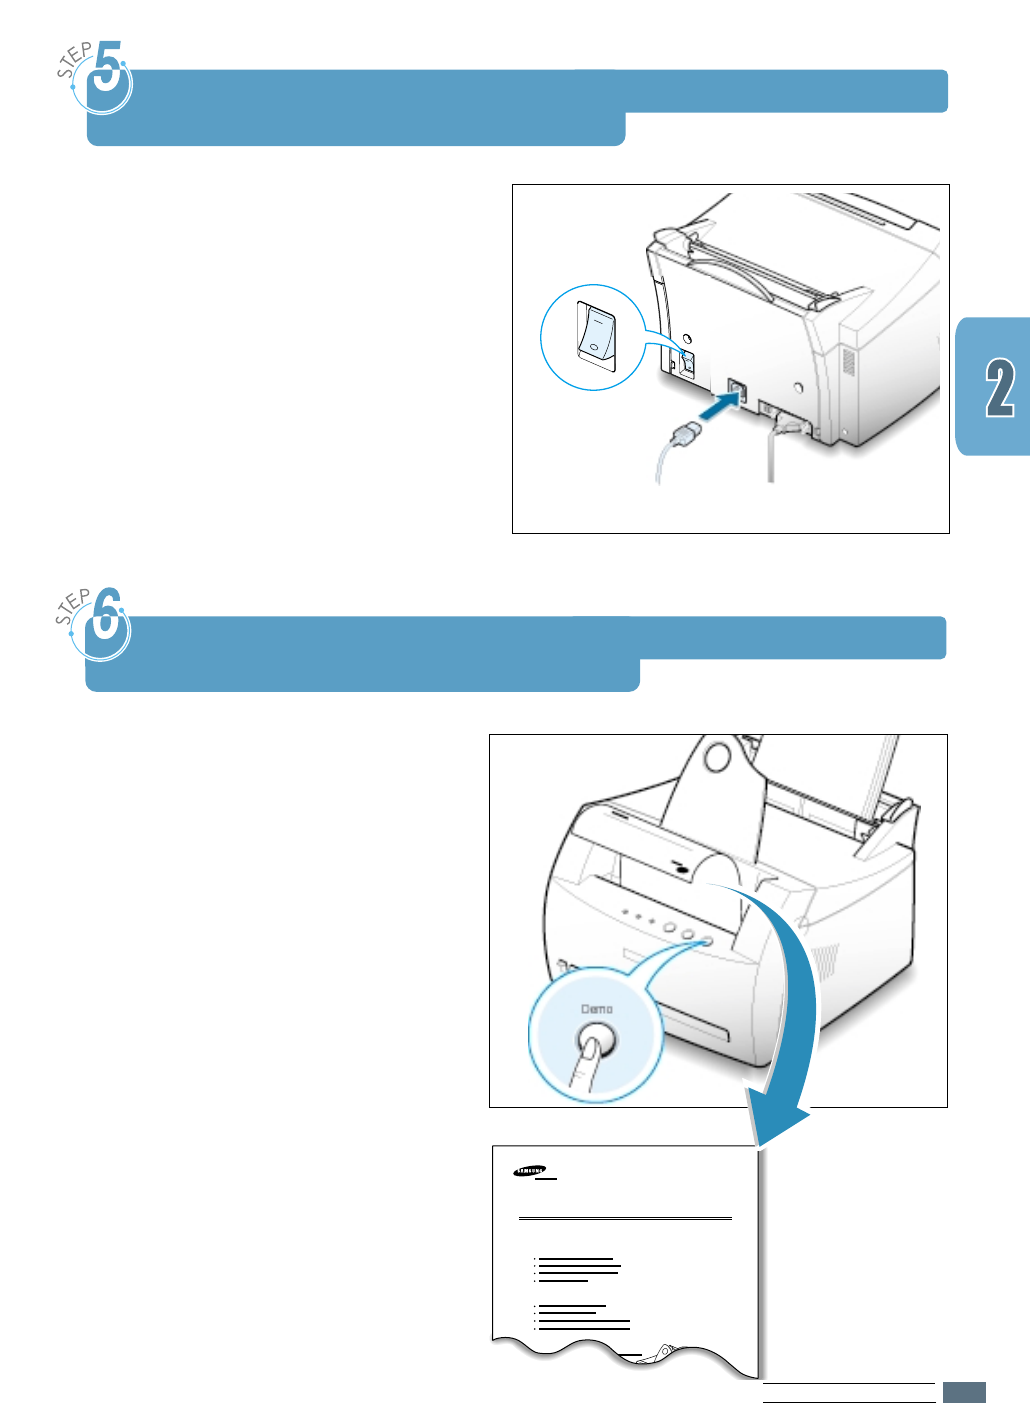
1
Plug the power cord into the power
receptacle on the back of the printer.
2
Plug the other end into a properly
grounded AC outlet.
3
Turn on the power.
Turn on the Printer
To AC outlet
As the printer powers up, all the printer
control panel lights turn on briefly. When
only the Data light remains on, press and
hold the Demo button.
Hold down the button for about 2 seconds
until all lights blink slowly, then release,
the demo page will print.
Laser Beam Printer
Excellent Performance
Saving & Convenience
Compatibility
ML-1210 / ML-1220M / ML-210
The demo page provides a sample of the
print quality and helps you verify the
printer is printing correctly.
Print a Demo Page!
➜

SETTING UPYOUR PRINTER
2.8
Install the Printer Software
Included with your printer is a CD-ROM containing the printer
driver for some of the most popular Windows software
applications. To operate your printer, you must install a printer
driver, which translates data from your application into data
that the printer understands.
If you are printing with a parallel interface (ML-1210 Only)
Go to page 2.9 for information on installing the print software
on a computer that is attached directly to the printer with a
parallel cable.
If you are printing with a USB interface
Go to “Using Your Printer with a USB Cable” on page A.10, for
information on installing the print software on a USB-enabled
computer.
If you are printing from Macintosh
Go to “Using Your Printer with a Macintosh” on page A.16, for
information on installing the print software and printing from
Macintosh.
If you are printing in Linux
Go to “Linux Driver Installation” on page A.23, for information
on installing the Linux driver.
Verify the following:
• At least 16 MB or more of RAM is installed on your PC.
• There is at least 50 MB of free disk space on your PC.
• All applications are closed on your PC before beginning
installation.
• Windows 95, Windows 98, Windows Me, Windows NT 4.0 or
Windows 2000.
Before Installing the Printer Software
SETTING UPYOUR PRINTER
2.9
1
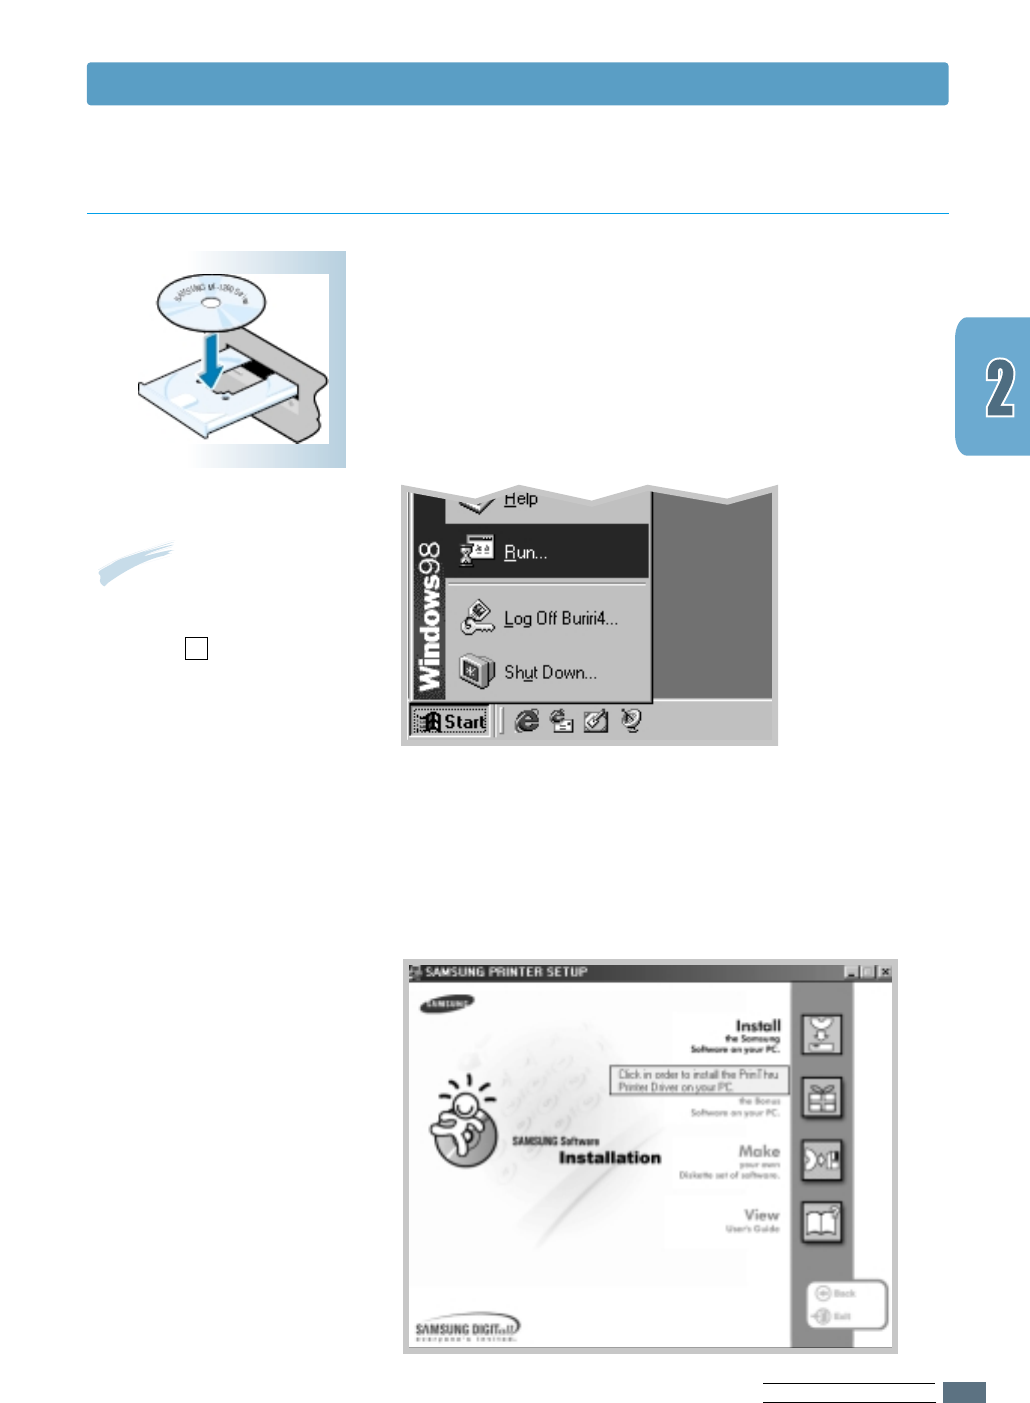
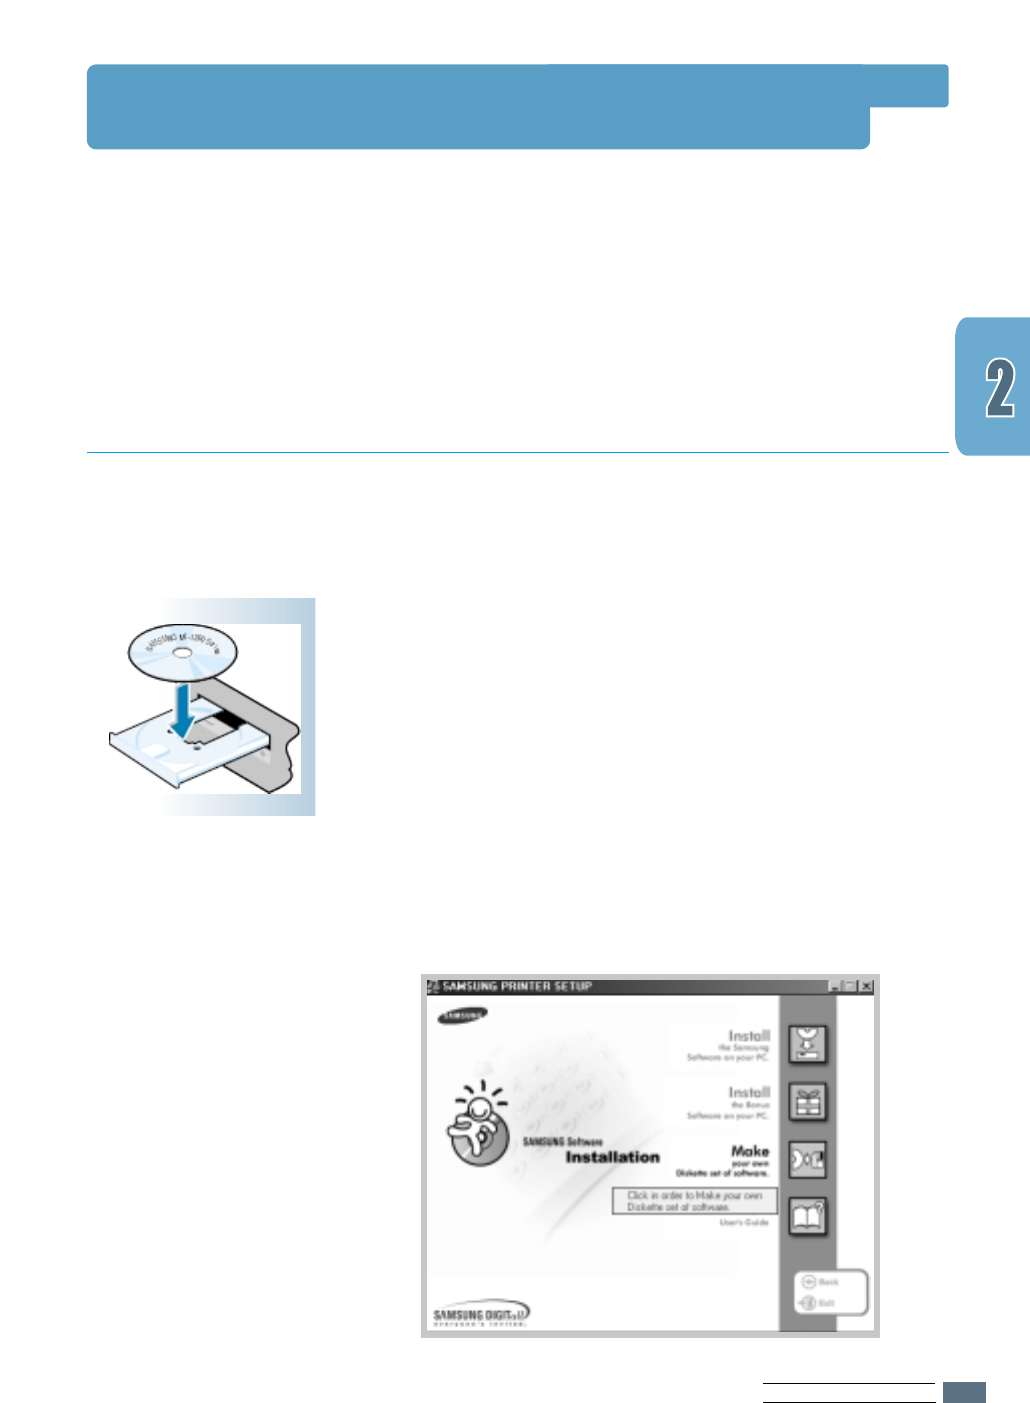
Place the CD-ROM in the CD-ROM drive. Installation will
start automatically.
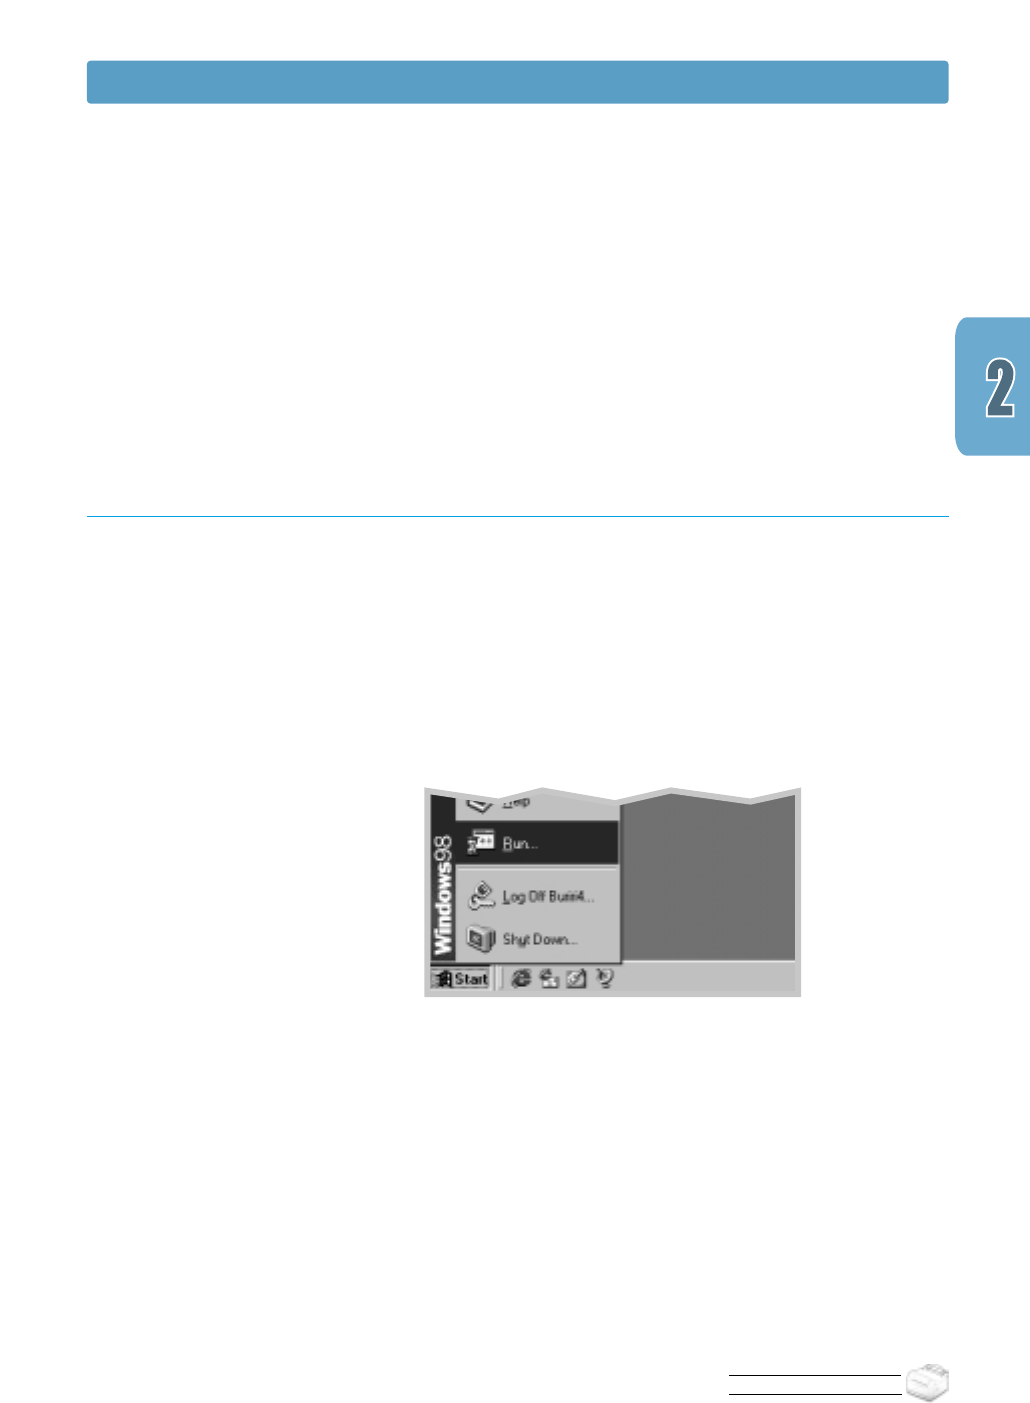
If the CD-ROM drive does not automatically run:
Select Run from the Start menu, and type x:\cdsetup.exe
in the Open box (where xis the drive letter for the CD-ROM
drive), then click OK.
Installing the Printer Software from the CD-ROM
Note: If the New Hardware
Found box appears during
the installation procedure,
click the x in the upper
right corner of the box,
or click Cancel.
2
When the opening screen appears, select the appropriate
language.
3
Click Install the Samsung Software on your PC.
Install the Printer Software
SETTING UPYOUR PRINTER
2.10
Install the Printer Software
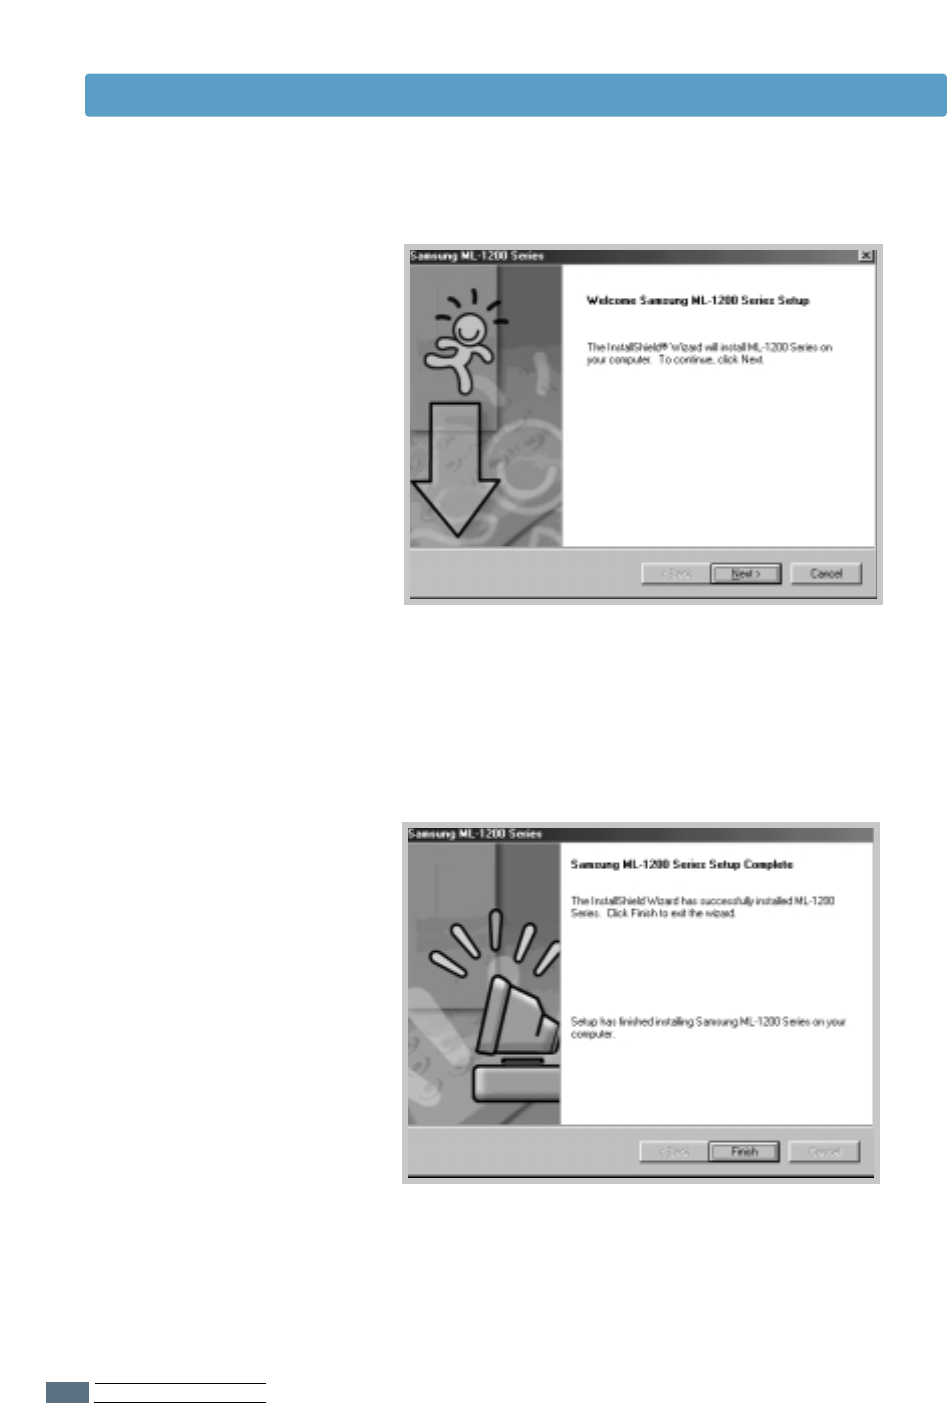
4
The Welcome window opens. Click Next.
5
The files are copied into the appropriate directory.
6
Click Finish.
SETTING UPYOUR PRINTER
2.11
Install the Printer Software
If you have access to another computer with a CD-ROM drive,
you can use Make diskette utility in Windows to create the
disks you need for the installation. Go to “Installing Software
from Diskette” on page 2.13.
Some printer features, such as paper size and page
orientation, may be available through your application settings.
Use application settings, if available, because they override
printer driver settings.
Access advanced printer features through your printer driver.
See the chapter 5, “Printing Tasks” for instructions on using
your printer driver features.
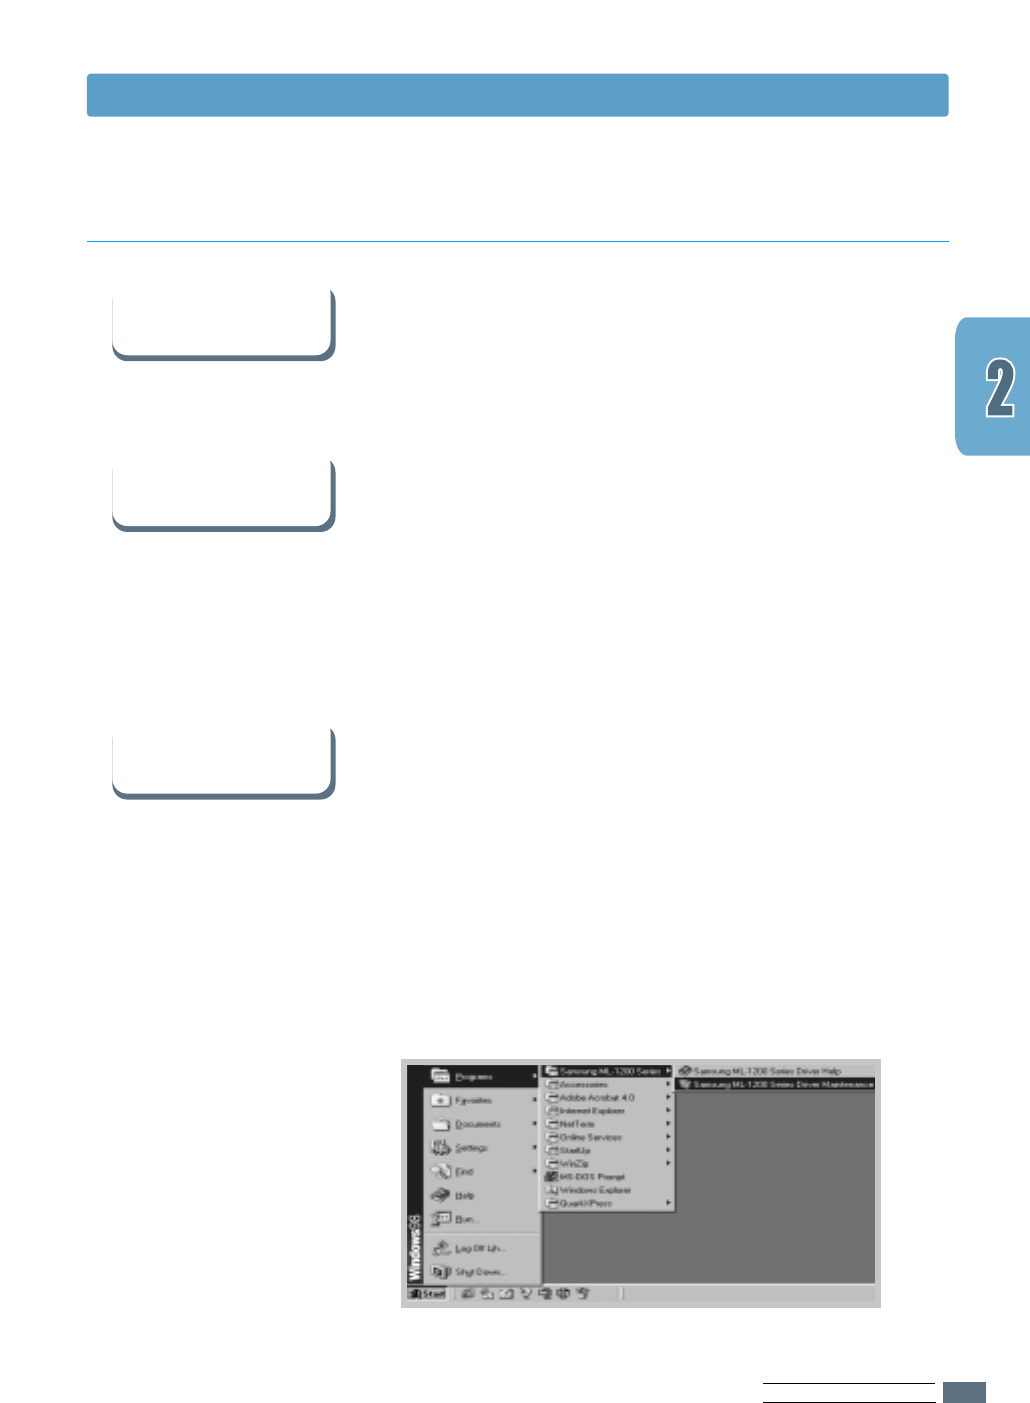
In Windows, after installation, the Uninstall icon in the
Samsung ML-1200 Series program group allows you to select
and remove any or all of the Samsung ML-1200 Series printing
system components. If you are upgrading the printer driver, or
if your installation fails, uninstall the driver doing as the
following instructions.
1
From the Start menu, select Programs.
2
Select Samsung ML-1200 Series, and then Samsung
ML-1200 Series Driver Maintenance.
Software Installation Tips
I do not have a
CD-ROM drive
How do I access
printer features ?
How do I remove the
printing software ?
SETTING UPYOUR PRINTER
2.12
• Exit your software programs. Then turn off the computer and
the printer. Turn on the printer, then turn on the computer.
• Close any virus protection programs that are running on your
computer.
• Uninstall the printer software using the instruction above,
then repeat the installation procedure.
The Samsung ML-1200 Series Printer supports the Linux
system. Go to “Linux Driver Installation” on page A.23 for
information on installing the Linux driver.
If you have installing
problems
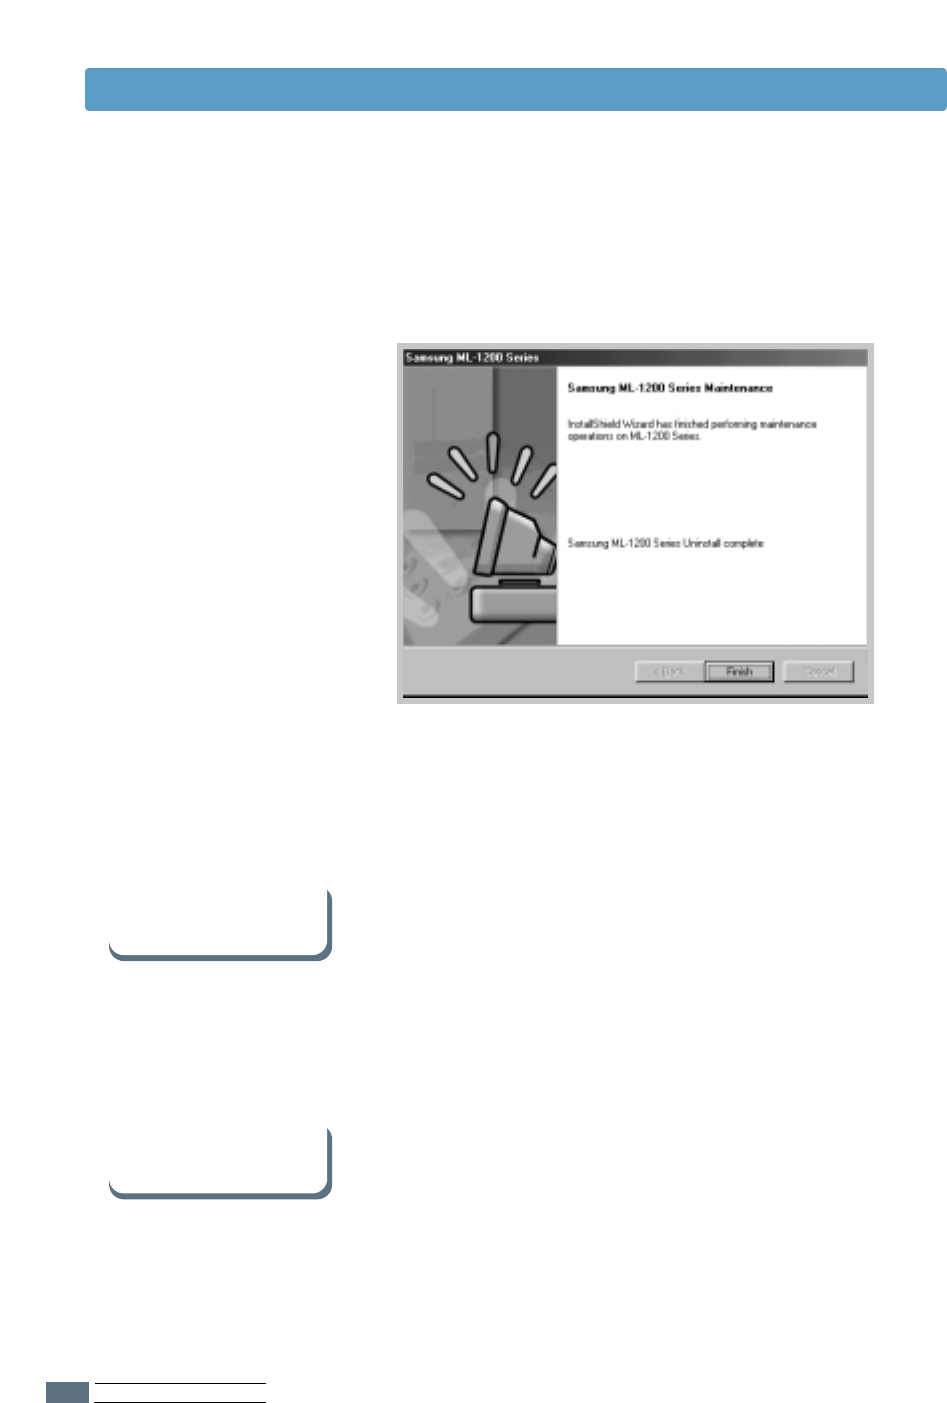
5
Click Finish.
3
When your computer confirms your selection, click OK.
4
The Samsung ML-1200 Series printer driver and all of its
components are removed from your computer.
Can I use this printer in
the other OS?
Install the Printer Software
SETTING UPYOUR PRINTER
2.13
Installing Software from Diskette
If you do not have a CD-ROM drive and if you have access
to another computer with a CD-ROM drive, you can copy
software installation files from your printer software
CD-ROM onto floppy diskettes, then use the diskettes
instead of the CD-ROM to install the software.
You can make the installation diskettes for Samsung
ML-1200 Series printer driver. Make sure that you have
several formatted diskettes ready, then follow these steps:
1
Insert the CD-ROM shipped with your printer into the
CD-ROM drive. Installation will start automatically.
If the CD-ROM drive does not automatically run:
Select Run from the Start menu, and type
x:\cdsetup.exe in the Open box (where xis the drive
letter for the CD-ROM drive), then click OK.
2
When the opening screen appears, select the appropriate
language.
3
Click Make your own Diskette set of software.
Making Installation Diskettes

SETTING UPYOUR PRINTER
2.14
4
The Copy to Floppy dialog box appears.
Select the floppy disk drive you will use to insert the
diskette.
5
Click Copy all disk images.
If you want to copy a portion of the selected component,
select the disk you want to copy in the Disk Images
window, then click Copy selected disk image.
6
When prompted, insert a blank, formatted diskette into
the floppy drive, and click Yes to copy the first diskette.
For multiple diskettes, when the first diskette is finished,
you are prompted to insert disk 2.
Make sure you label each diskette in order as you create
it: Samsung ML-1200 Series driver, disk 1 of 2, etc.
Shows the path of
the selected
component.
Shows the number of
disks required to copy
the selected component.
Select the floppy
drive you will use.
Installing Software from Diskettes
SETTING UPYOUR PRINTER
Installing Software from Diskettes
7
If you have more than one disk, insert the next disk and
click Yes.
8
When copying to diskettes has been completed, click
Close in the Copy to Floppy dialog box. Then click Exit in
the SAMSUNG PRINTER SETUP dialog box.
To install the printer driver from the diskettes, take the
following steps:
1
Insert the first diskette (if the selected software diskettes
are more than one).
2
From the Start menu, select Run.
3
Type A:\setup.exe in the Open box and click OK. (if
your floppy drive is not A, substitute the correct letter.)
4
Follow the on-screen instruction to complete the
installation.
Installing Software
2.15