Samsung Electronics Co ML1210 Laser Printer User Manual Part1b
Samsung Electronics Co Ltd Laser Printer Users Manual Part1b
Contents
- 1. Users Manual2
- 2. Users Manual Part1a
- 3. Users Manual Part1b
Users Manual Part1b
chapter
This chapter describes how to use the printer’s control
panel. It provides information on the following topics:
◆Control Panel Buttons
◆Control Panel Lights
3
3

USING CONTROL PANEL
3.1
Control Panel Buttons
The printer has three buttons: Toner Save, Cancel/Reprint and Demo.
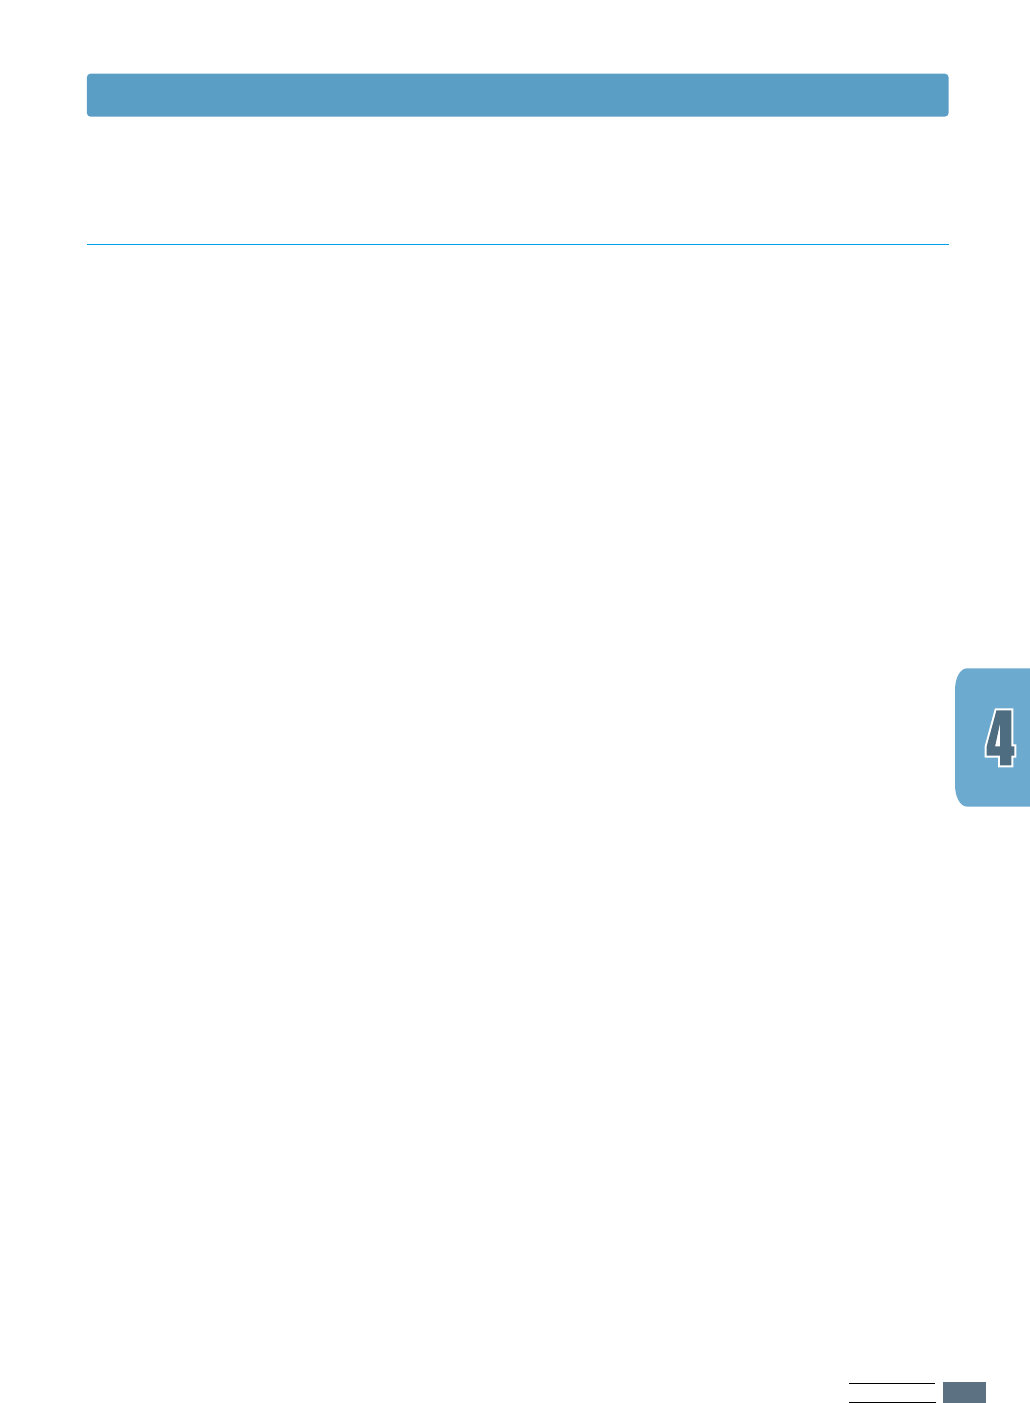
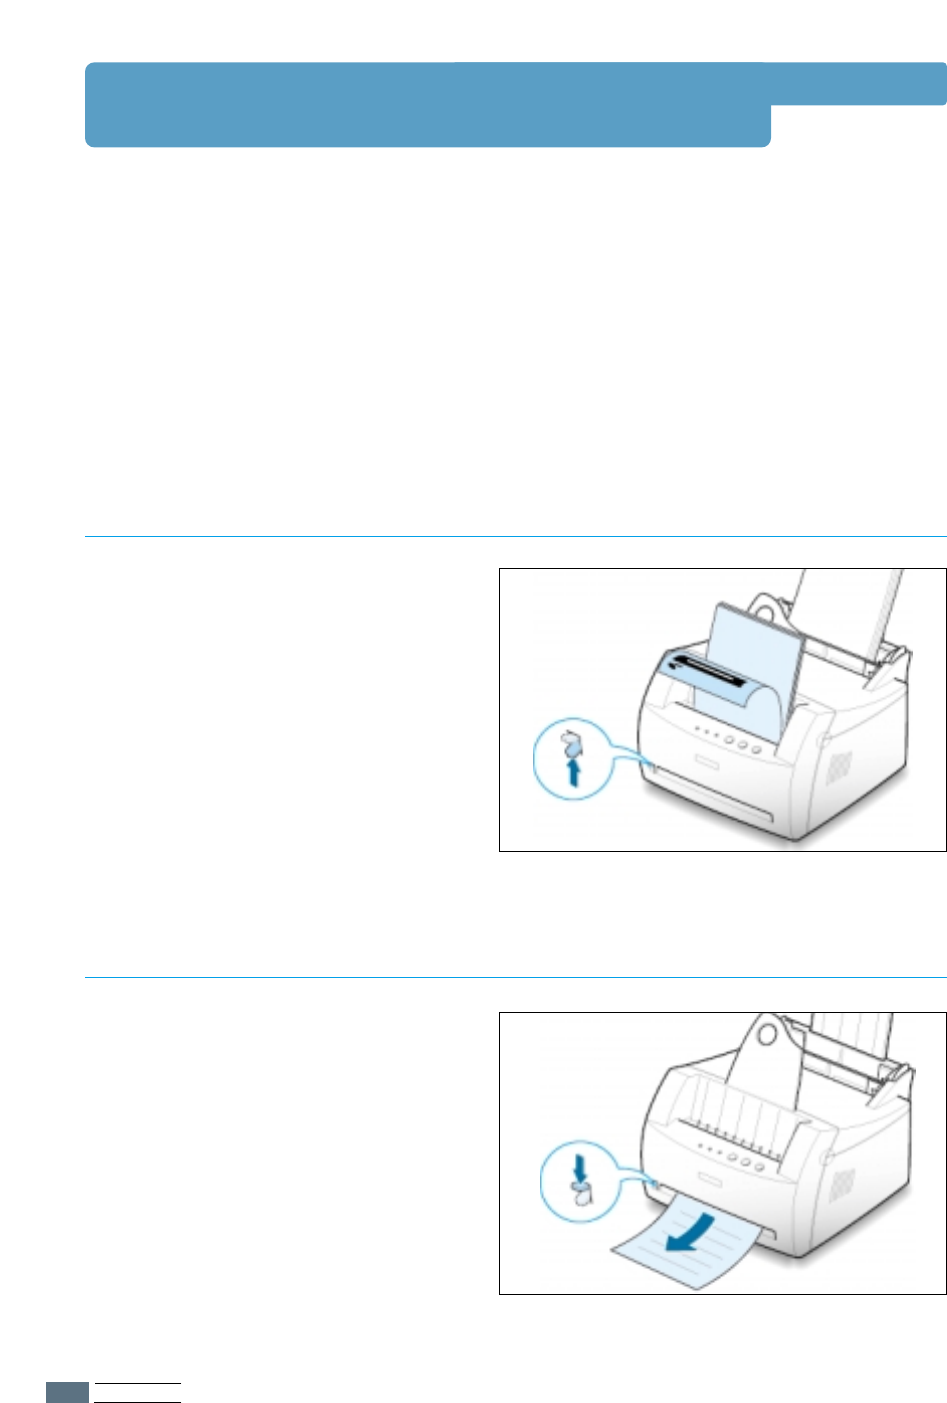
Demo
Clean the inside of the printer
Press and hold Demo for about 2 seconds until the
control panel lights blink slowly to print a demo page.
The printer must be in the Ready mode.
Press and hold Demo for about 10 seconds until the
control panel lights remain lit. After cleaning the
printer, one cleaning sheet prints. For further
information, see page 6.5.
Print demo page
Start manual feeding
When you select Manual for Paper Source from your
software application, you should press Demo each
time you load a sheet of paper manually. For further
information, see “Using the Manual Input tray” on
page 4.5.

USING CONTROL PANEL
3.2
Control Panel Buttons
Cancel/Reprint
Reprint last page of the job
Press Cancel/Reprint and hold until the control panel
lights blink to cancel a job the printer is currently
printing. The Error light will blink while the print job
is cleared from both the printer and the computer, and
then return to the Ready mode. This may take some
time, depending on the size of the print job.
Note: If the Cancel/Reprint button is accidentally
pushed, the job must be reprinted. There is no undo
function.
If you press Cancel/Reprint in the Ready mode, the
printer prints the last page of the last print job. See
page 5.20.
Cancel job
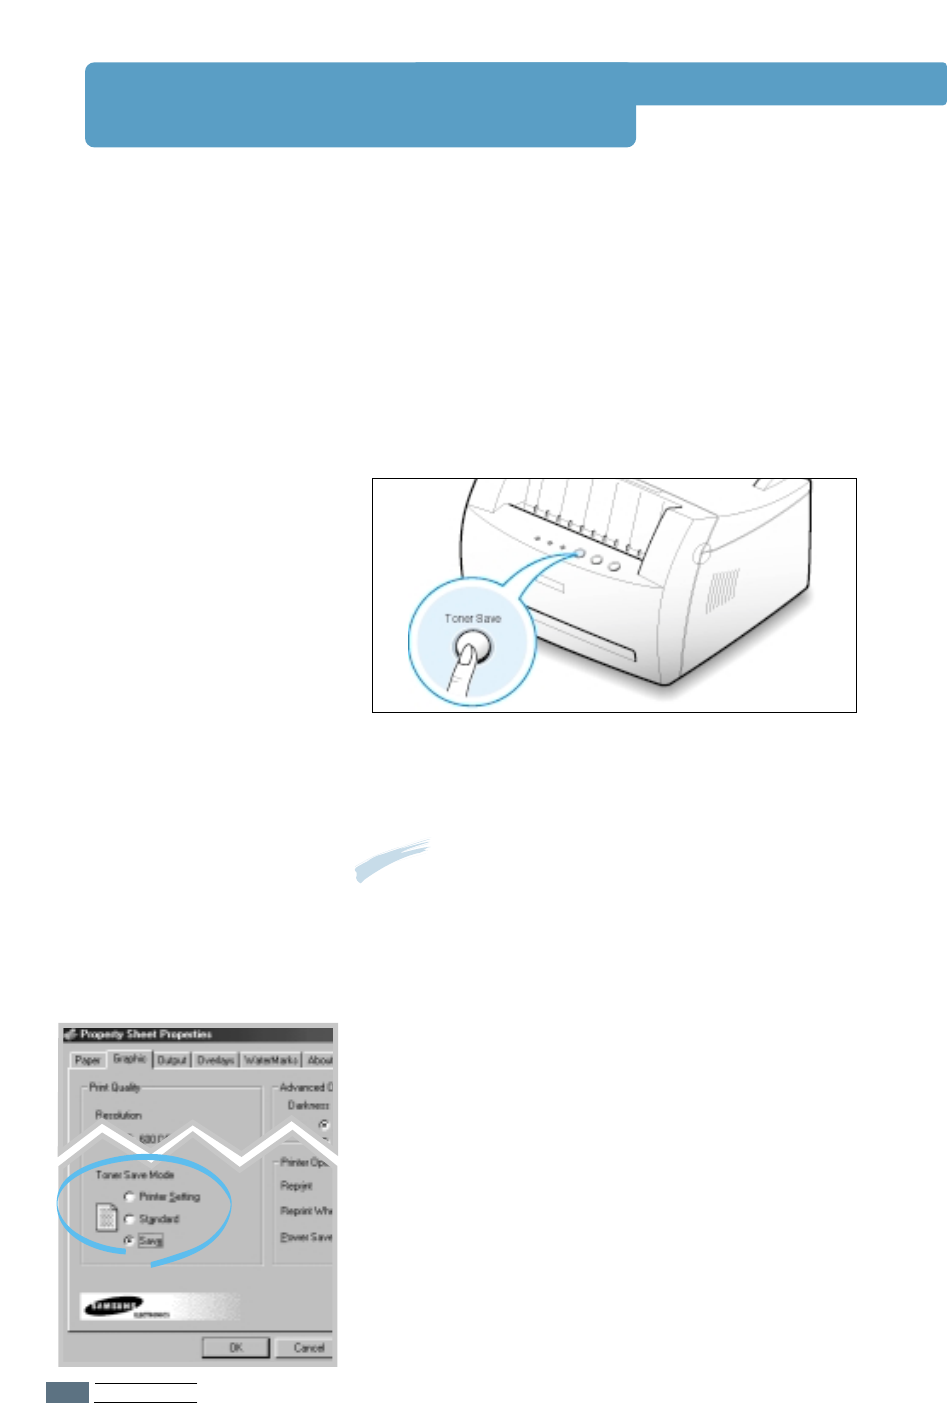
Toner Save
Toner Save
Press Toner Save to turn the Toner save mode on or
off. The printer must be in the Ready mode.
• If the button backlight is on, toner save mode
activates and the printer uses less toner to print a
document.
• If the button backlight is off, toner save mode is
disabled and you will print in normal quality.
To enable or disable the Toner Save mode using this
button, the Toner Save Mode option in the printer
driver must be set to Printer Setting.
For further information on the Toner Save mode,
see page 5.6.
(on)
(off)
Turn the Toner Save Mode on/off
USING CONTROL PANEL
Control Panel Lights
The control panel lights indicate the status of your printer. If the Error light is on, the printer
is experiencing an error. See “Troubleshooting Error Messages” on page 7.17.
Control Panel Light Message
The Data light is on and the printer is ready to print.
No action is needed. If you press and hold the Demo button for about 2
seconds, a demo page will print.
Ready mode
Error Paper Data
The printer is out of paper.
Load paper into the printer. For the automatic tray, there is no need to press
any button to reset. For the manual tray, press the Demo button after loading.
Paper out
Data
Error Paper
In the Manual Feed mode, the printer is waiting the Demo button to be pressed.
Press the Demo button to start printing. You must press the button to print
each page after loading paper into the manual input tray.
Waiting the Demo button to be pressed
Data
Error Paper
The printer is receiving or processing data. Wait for the job to print.
Pressing the Cancel/Reprint button cancels the current job. One or two pages
may print as the printer clears the print job. The printer will return to the
Ready mode after the job has been canceled.
Processing
Data
Error Paper
3.3
chapter
This chapter will help you understand what kind of paper
you can use with the Samsung ML-1200 Series printer and
how to properly load paper in the different paper input
trays for the best print quality.
Topics included in this chapter are:
◆ Choosing Paper and Other Media
◆ Selecting the Output Location
◆ Loading Paper
◆ Printing on Envelopes
◆ Printing on Heavy Paper
◆ Printing on Labels
◆ Printing on Transparencies
◆ Printing on Preprinted Paper
◆ Printing on Card Stocks
4
4

PRINT MEDIA
4.1
Choosing Paper and Other Media
You can print on a variety of print media, such as plain paper,
envelopes, labels, transparencies, card stocks, and so on. See
“Paper Specification” on page A.2. To get the best possible
print quality, use only high-quality copier-grade paper.
When you choose print media, consider the followings:
• Desired outcome: The paper you choose should be
appropriate for the project.
• Size: You can use any size paper that fits easily within the
paper adjusters of the paper tray.
• Weight : Your printer supports paper weight as follows:
• 16~24 lbs bond for the automatic input tray
• 16~43 lbs bond for the manual input tray
• Brightness: Some papers are whiter than others and
produce sharper, more vibrant images.
• Surface smoothness: The smoothness of the paper affects
how crisp the printing looks on the paper.
Always test a sample of paper before purchasing large
quantities.
CAUTION:Using media that does not confirm to the
specification listed in the paper specification can cause
problems that may require service. This service is not covered
by the warranty or service agreements.
PRINT MEDIA
4.2
Choosing Paper and Other Media
Plain Paper
Letter (8.5 x 11 in.)
Legal (8.5 x 14 in.)
Executive (7.25 x 10.5 in.)
A4 (210 x 297 mm)
A5 (148 x 210 mm)
A6 (105 x 148 mm)
Folio (8.5 x 13 in.)
B5 (182 x 257 mm)
Envelopes
No. 10 (4.12 x 9.5 in.)
DL (110 x 220 mm)
C5 (162 x 229 mm)
C6 (114 x 162 mm)
B5 (176 x 250 mm)
Monarch (3.87 x 7.5 in.)
Labels
Letter (8.5 x 11 in.)
A4 (210 x 297 mm)
Transparency films
Letter (8.5 x 11 in.)
A4 (210 x 297 mm)
Card stocks
Bond
Automatic Input Tray
150
150
150
150
150
50
150
–
5
5
5
5
5
5
5
5
5
5
5
5
Manual Input Tray
1
1
1
1
1
1
1
1
1
1
1
1
1
1
1
1
1
1
1
1
Media Sizes and Capacities
Input Source/Capacity*
Media Size
*
Depending on paper thickness, maximum capacity may be reduced.
When selecting or loading paper, envelopes, or other special
media, keep these guidelines in your mind:
• Attempting to print on damp, curled, wrinkled, or torn paper
can cause paper jams and poor print quality.
• Use cut-sheet paper only. You cannot use multi-part paper.
• Use only high-quality, copier grade paper.
• Do not use paper that has been already printed on or that
has been fed through a photocopier.
• Do not use paper with irregularities, such as tabs or
staples.
• Do not attempt to load any tray during printing and never
overfill the tray. This could cause a paper jam.
• Avoid paper with embossed lettering, perforations, or
texture that is too smooth or too rough.
• Colored paper should be of the same high quality as white
photocopy paper. The pigments must withstand the printer’s
fusing temperature of 400°F (205°C) for 0.1 second without
deterioration. Do not use paper with a colored coating that
was added after the paper was produced.
• Preprinted forms must be printed with nonflammable, heat-
resistant inks that do not melt, vaporize, or release
hazardous emissions when subject to the printer’s
approximately 400°F (205°C) fusing temperature for 0.1
second.
• Store paper in its ream wrapper until ready to use. Place
cartons on pallets or shelves, not on the floor.
• Do not place heavy objects on top of the paper, whether it
is packaged or unpackaged.
• Keep paper away from moisture, direct sunlight or other
conditions that can cause it to wrinkle or curl.
PRINT MEDIA
4.3
Choosing Paper and Other Media
Paper Guidelines
PRINT MEDIA
4.4
Selecting the Output Location
The printer has two output locations: the face-up output slot and the face-down output
tray. You can select the output location by changing the position of the output lever on the
front of the printer. To use the face-down output tray, be sure the output lever is in upper
(normal) position. To use the face-up output slot, push it down to open the slot.
• If paper coming out of the face-down output tray has problems, such as excessive curl, try
printing to the face-up output slot.
• To avoid paper jams, do not change the position of the output lever while the printer is
printing.
The face-down output tray collects paper
face-down, in correct order. Make
sure that the output lever is in the upper
position. (If not, push it up)
The face-down output tray should be
used for most print jobs and is
recommended for printing over 100
sheets of paper, continuously.
The printer prints to the face-up output
slot if it is open. Push the output lever
down to open the slot. Paper comes out
of the printer face-up.
Using the face-up output slot might
improve output quality with the following:
• envelopes
• labels
• paper heavier than 24 lb (90 g/m
2
)
Printing to the Face-Down Output Tray
Printing to the Face-Up Output Slot
PRINT MEDIA
4.5
Loading Paper
The automatic input tray holds 150 sheets of plain paper and
5 sheets of special media. See “Media Sizes and Capacities” on
page 4.2 for acceptable paper size and capacities for each
input trays.
Load a stack of paper into the automatic input tray and print.
For details on loading paper in the automatic input tray, see
“Load Paper” on page 2.4.
Note: Before using the automatic input tray, you must remove
paper from the manual input tray.
Proper paper loading helps prevent paper jams and ensure
trouble-free printing. Do not remove paper from the tray(s)
while a job is printing. Doing so may cause a paper jam.
Using the Automatic Input Tray
When you change the print settings, if you select Manual in the Paper Source option, you
can manually load paper in the manual
input tray
. Manually loading paper can be helpful
when you want to check the print quality after each page is printed.
If you experience a paper jam from the automatic
input tray,
load a sheet of paper at a time
into the manual
input tray
.
Note: To avoid a paper jam, use the manual tray with the automatic input tray loaded with paper.
Using the Manual Input Tray
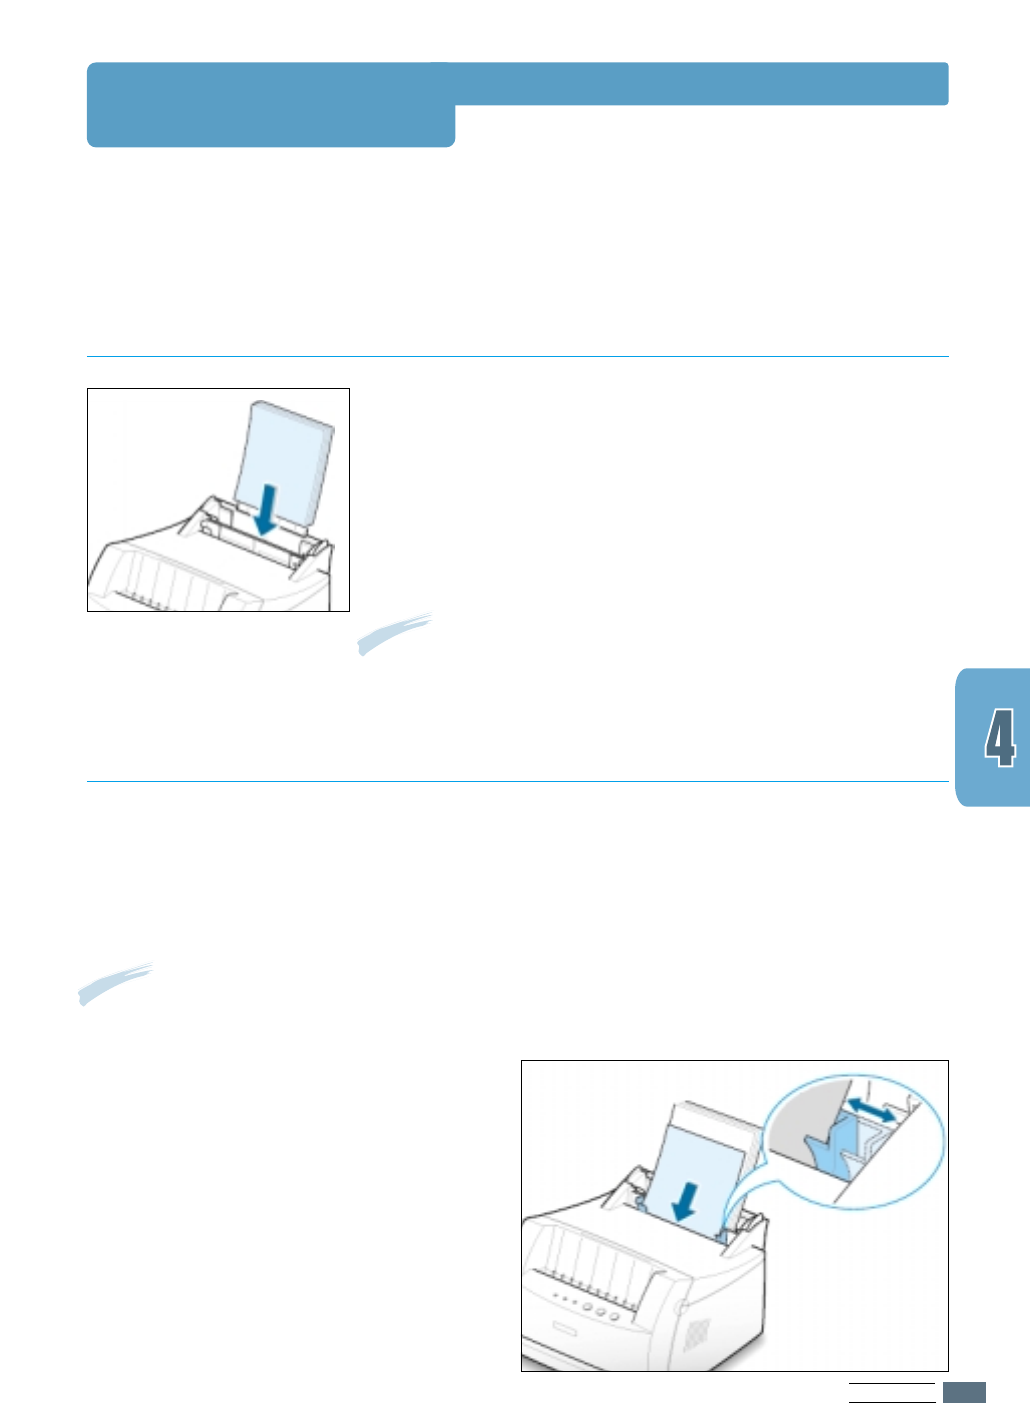
1
Load the print media in the manual
input tray with the print side up.
Adjust the paper guide against the
stack of print media without bending.
PRINT MEDIA
4.6
Loading Paper
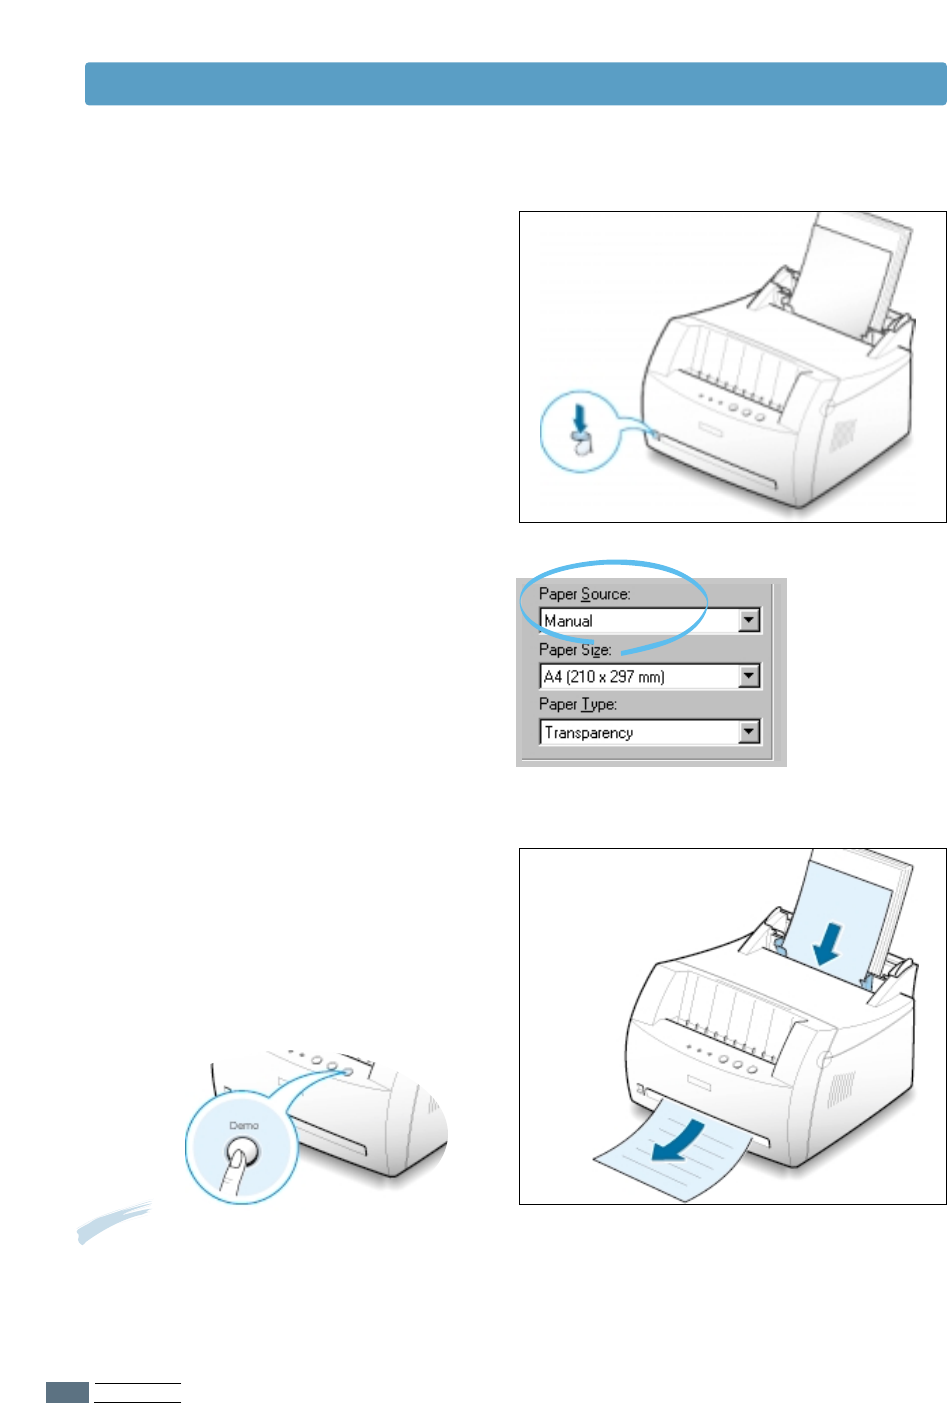
4
Print the document.
3
When you print a document, you must
select Manual for Paper Source from
the software application, and then
select the correct paper size and type.
For details, see page 5.3.
5
If you are printing multiple pages, load
next sheet after the first page prints
out.
6
Press Demo to start feeding.
Notes:
• The face-up output slot may not hold the printed pages properly.
• The printed pages will not stack in the face-down output tray unless you change output lever
position. After you finish using the face-up output slot, you must change the position of the
output lever to the normal position. Push it up.
2
Push the output lever down to open the
face-up output slot.
PRINT MEDIA
4.7
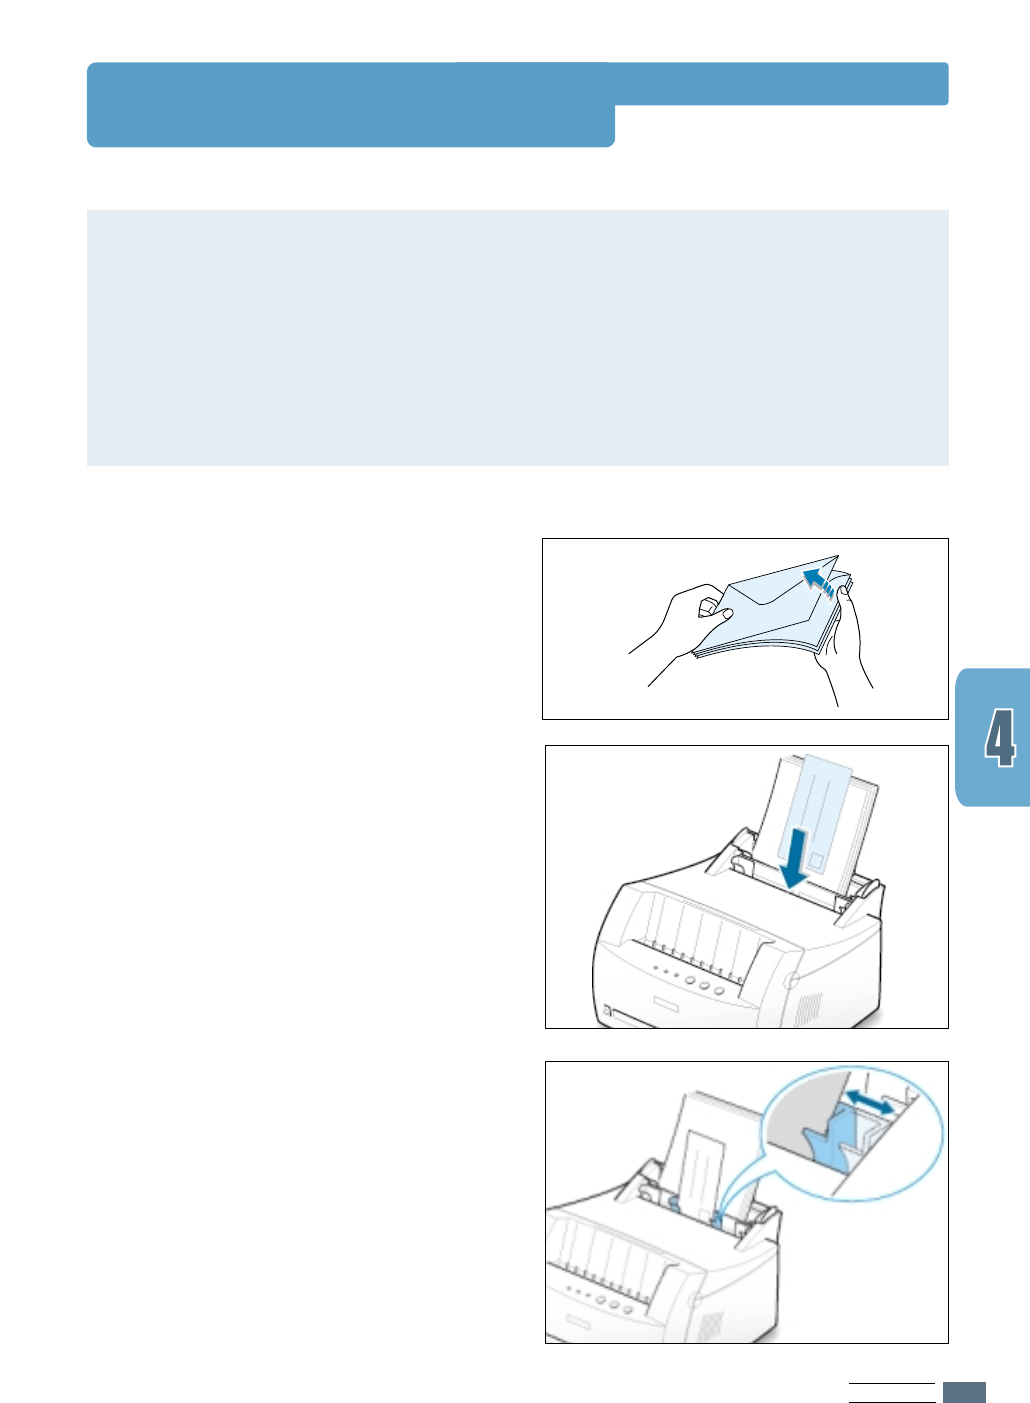
Printing on Envelopes
Guidelines
• Only use envelopes recommended for laser printers. Before you load envelopes in the
input tray, make sure that they are undamaged and are not stuck together.
• Do not feed stamped envelopes.
• Never use envelopes with clasps, snaps, windows, coated lining, or self-stick adhesives.
These envelopes may severely damage the printer.
2
Load the envelopes into the input tray
you want to use with the flap side
down.
The stamp area is on the right side
and the end of the envelope with the
stamp area enters the tray first.
1
Flex or fan
the envelopes to supply air
through them for loading.
3
Adjust the guide to the edge of the
envelope stack.

PRINT MEDIA
4.8
4
Push the output lever down.
5
When you print on envelopes, configure
the paper source, type and size
properly in the software application. For
details, see page 5.3.
7
After printing, push the output lever up.
6
Print the document.
Printing on Envelopes
PRINT MEDIA
4.9
Printing on Heavy Paper
Guidelines
• Heavy paper is any paper heavier than 24 lb (90 g/m
2
). For cotton papers, you can use
24 lb paper. The maximum paper weight available for your printer is 43 lb (163g/m
2
).
• Do not use extremely heavy paper stock (greater than 43 lb, or 163 g/m
2
bond).
Misfeeds, mis-stacking, media jams, poor toner fusing, poor print quality, and excessive
mechanical wear can result.
2
Push the output lever down.
1
Load paper in the input tray you want
to use with print side up.
Adjust the guide to fit the width of the
labels.
3
When you print on heavy paper, select
Bond in the Paper Type section, and
then configure the paper source, and
size in the software application. For
details, see page 5.3.
PRINT MEDIA
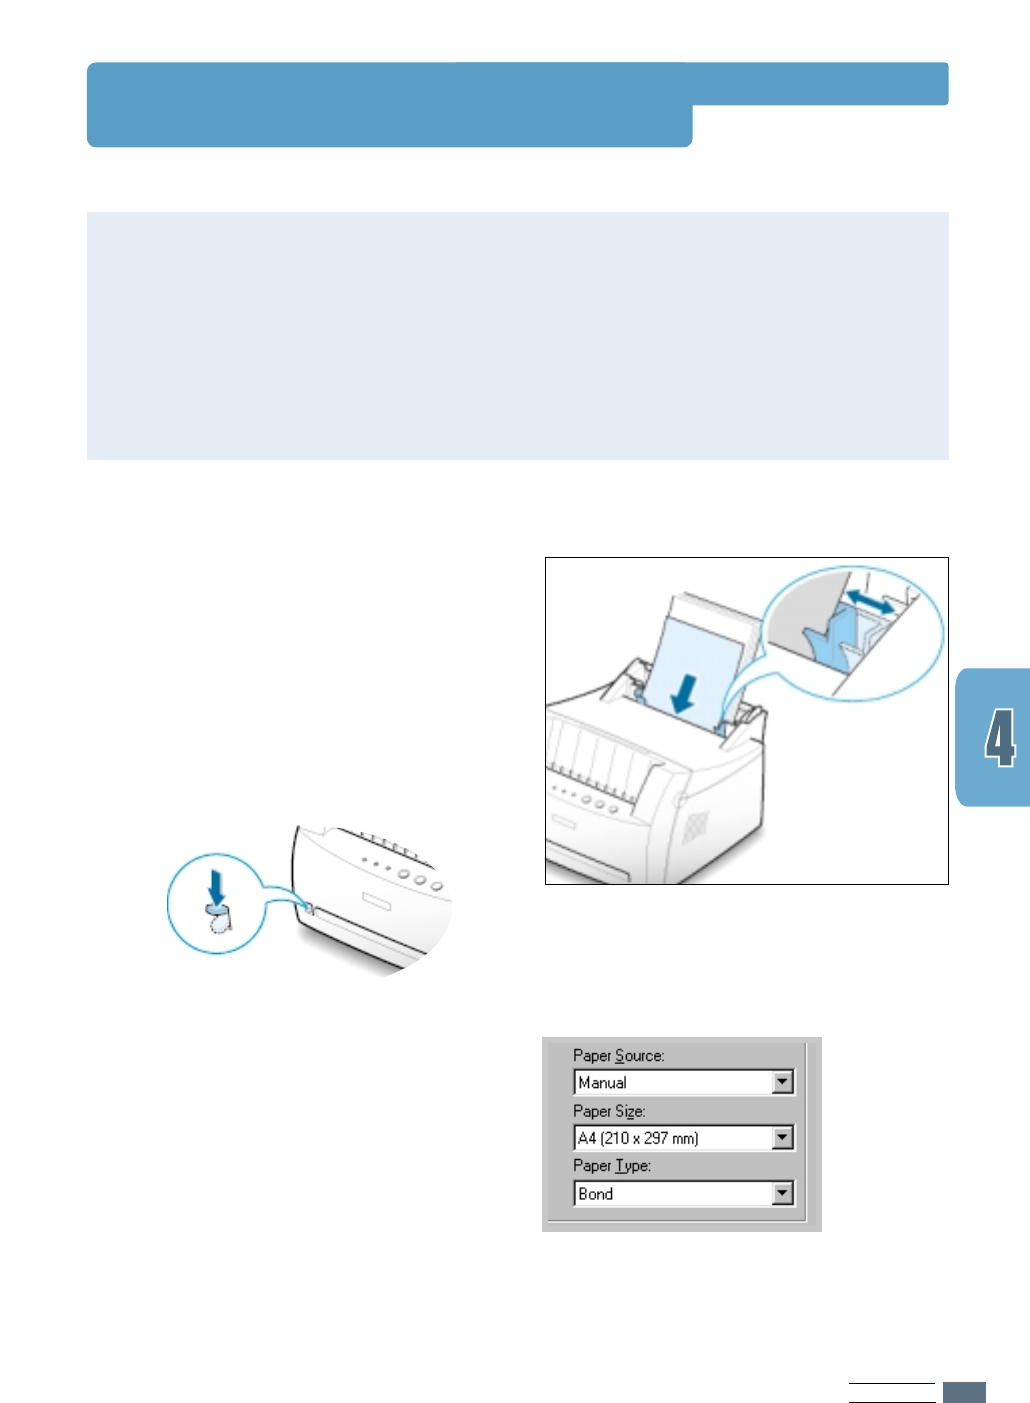
4.10
Printing on Labels
Guidelines
• Only use labels recommended for laser printers.
• Verify that the labels’ adhesive material can tolerate fusing temperature of 200°C
(392°F) for 0.1 second.
• Make sure that there is no exposed adhesive material between the labels. Exposed areas
can cause labels to peel off during printing, which can cause paper jams. Exposed
adhesive can also cause damage to printer components.
• Do not feed a sheet of labels through the printer more than once. The adhesive backing
is designed for one pass through the printer.
• Do not use labels that are separating from the backing sheet or are wrinkled, bubbled, or
otherwise damaged.
2
Push the output lever down.
1
Load labels in the input tray you want
to use with print side up.
Adjust the guide to fit the width of the
labels.
3
When you print on labels, configure the
paper source, type and size in the
software application. For details, see
page 5.3.
Note: To prevent them from sticking
together, do not let the printed label
sheets stack up as they are printed out.

PRINT MEDIA
4.11
Printing on Transparencies
Guidelines
• Only use transparencies recommended for use in laser printers.
• Make sure that the transparencies are not wrinkled or curled, and that they do not have
any torn edge.
• Hold the transparencies by the edges and avoid touching the print side. Oils from your
fingers that are deposited on the transparency can cause print quality problems.
• Be careful not to scratch or leave fingerprints on the print side.
1
Load transparencies in the input tray
you want to use with print side up,
and the top with the adhesive strip
going first.
Adjust the guide to fit the width of the
transparencies.
3
When you print on transparencies,
configure the paper source, type and
size in the software application. For
details, see page 5.3.
Notes:
• To prevent transparencies from sticking
together, do not let the printed sheets stack
up as they are printed out.
• Place transparencies on a flat surface after
removing them from the printer.
2
Push the output lever down.

PRINT MEDIA
4.12
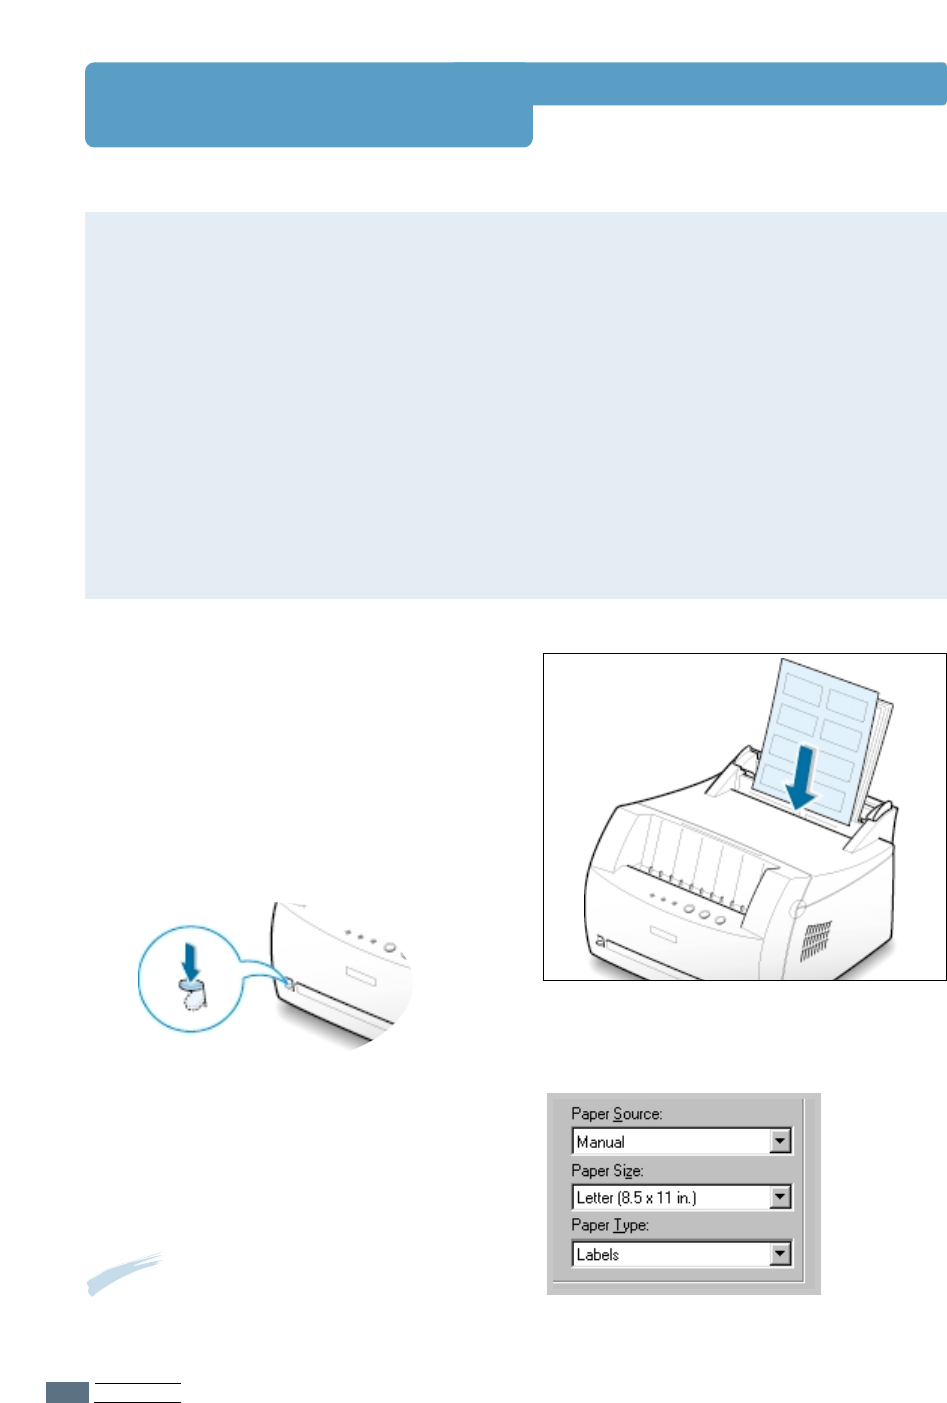
Printing on Preprinted Paper
1
Load letter-heads into the input tray
you want to use with the design face
up, bottom edge toward the
printer.
Adjust the guide to fit the width of the
paper stack.
2
When you print on the preprinted
paper, configure the paper source, type
and size in the software application. For
details, see page 5.3.
Preprinted paper is a form with some type of printing on them before they are sent through
the printer, such as a letterhead having preprinted logo or text located at the top of the page.
Guidelines
• Letterheads must be printed with heat-resistant ink that will not melt, vaporize, or
release hazardous emissions when subjected to the printer’s fusing temperature of 400°F
(205°C) for 0.1 second.
• Ink on letterhead must be non-flammable and should not adversely affect any printer
rollers.
• Forms and letterheads should be sealed in a moisture-proof wrapping to prevent changes
during storage.
• Before you load preprinted paper as forms and letterheads, verify that the ink on the
paper is dry. During the fusing process, wet ink can come off preprinted paper.
PRINT MEDIA
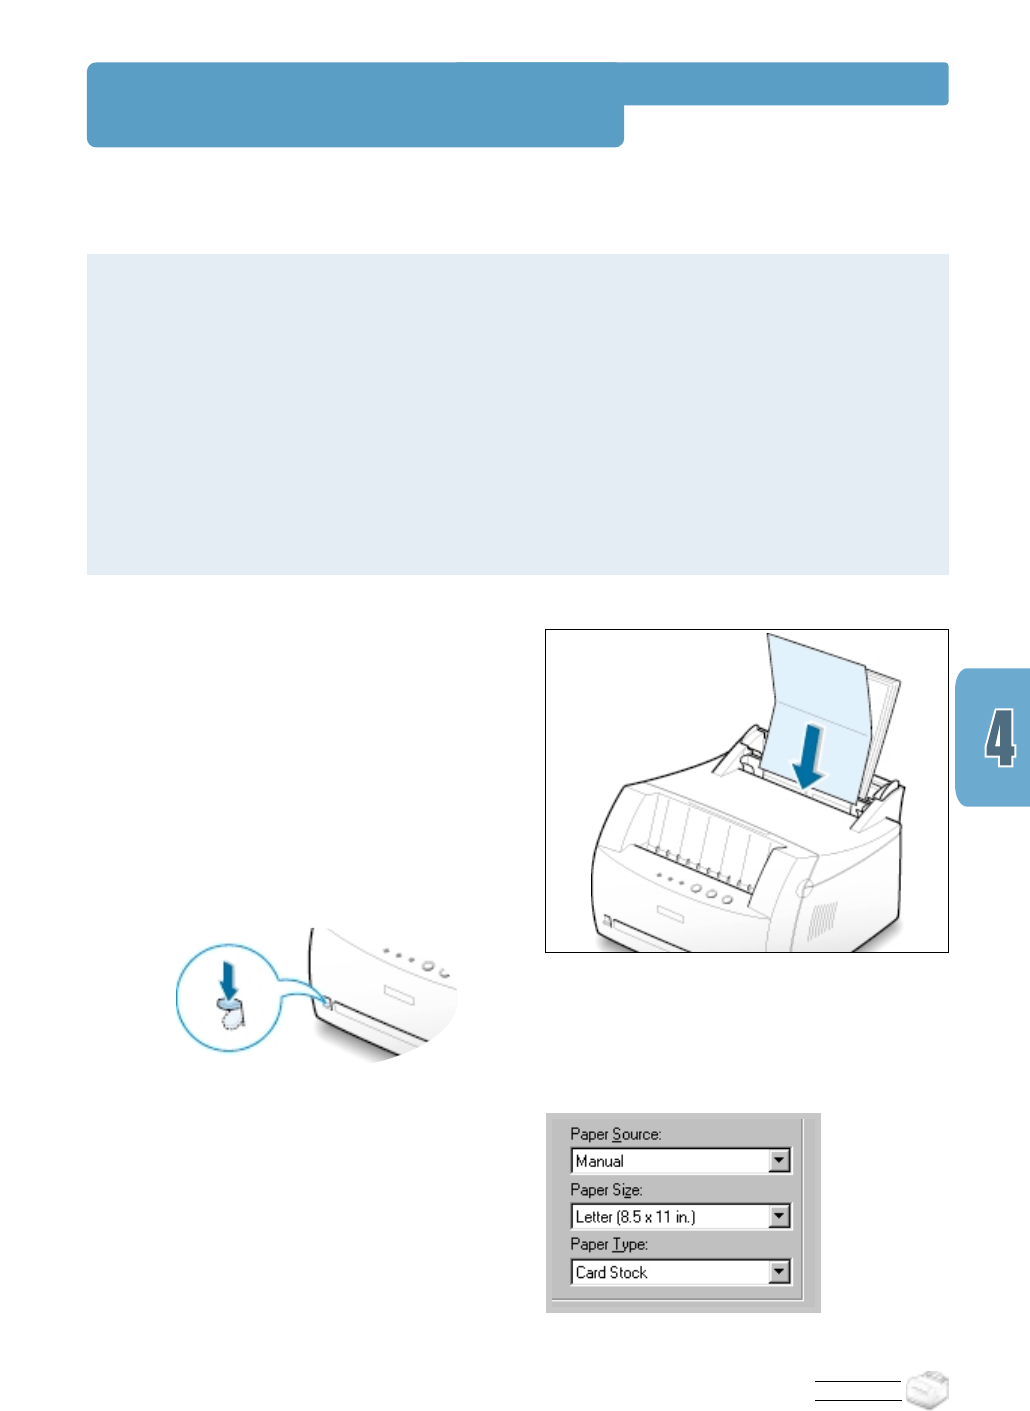
Printing on Card Stocks
2
Push the output lever down.
1
Load print media in the input tray you
want to use with print side up, short
edge first .
Adjust the guide to fit the width of the
media.
3
Configure the paper source, type in the
printer driver’s properties (see page
5.3) and print.
Postcards, 3 by 5 in.(index) cards can be printed with the Samsung ML-1200 Series printer.
Guidelines
• Always insert the short-edge first into the
input tray
. If you want to print in landscape
mode, make this selection through your software. Inserting paper long-edge first may
cause a paper jam.
• Do not print on the card stocks that is too small or too large. The minimum size is 76 by
127 mm (3 by 5 in.) for the manual input tray and 95 by 127 mm (3.8 by 5 in.) for the
automatic input tray, and the maximum size is 216 by 356 mm (8.5 by 14 in.).
• Set margins at least 6.4 mm (0.25 in.) away from the edges of the media in the software
application.
4.13

chapter
This chapter explains your printing options and gives common
printing tasks.
Topics included in this chapter are:
◆
Printing a Document
◆
Using Toner Save Mode
◆
Printing Multiple Pages on One Sheet of Paper (N-Up Printing)
◆
Fitting Your Document to a Selected Paper Size
◆
Printing Posters
◆
Setting Graphic Properties
◆
Printing Watermarks
◆
Using Page Overlay
◆
Reprinting the Last Page
◆
Printing on a Network Environment
5
5
PRINTING TASKS
5.1
Printing a Document
The following procedure describes the steps required for
printing from various Windows applications. The exact steps
for printing a document may vary depending on the
application program. Refer to your software application’s
documentation for the exact printing procedure.
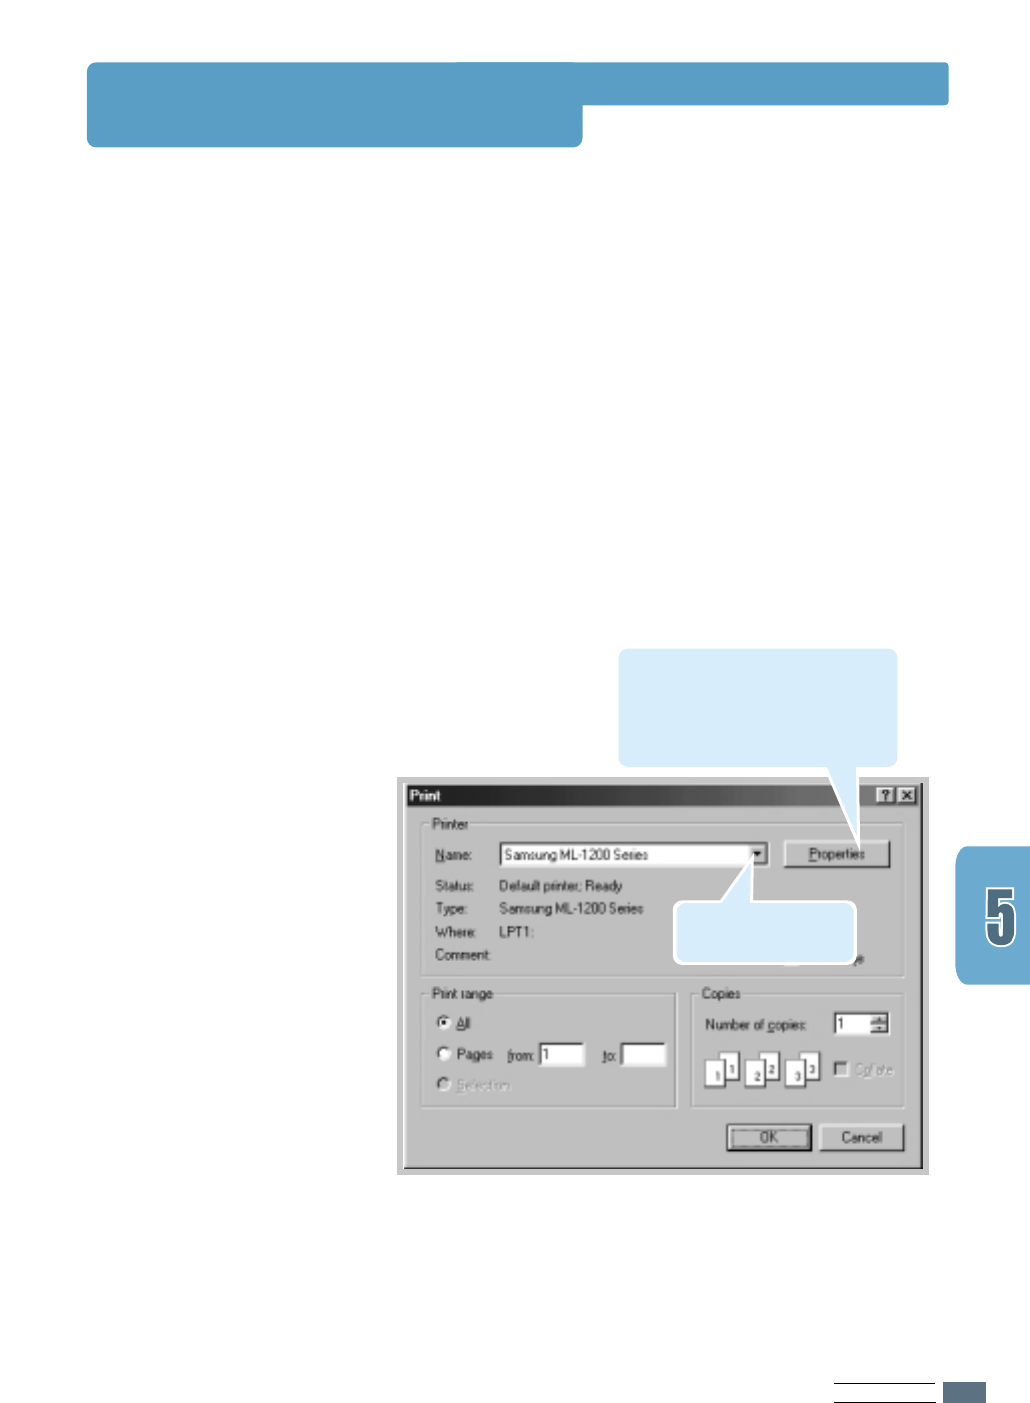
1
Open the document you want to print.
2
Select Print from the File menu. The Print dialog box for
your application will be displayed (the Print dialog box for
your application may look slightly different).
The basic print settings you require are usually selected
within this Print dialog box. These settings include the
number of copies, paper size, and page orientation.
If you see a Properties button,
click it. If you see Setup,
Printer, or Options, click that
button instead; then click
Properties in the next screen.
Make sure that your
printer is selected.
PRINTING TASKS
5.2
Printing a Document
3
To take advantage of the printer features provided by your
ML-1200 Series printer, click Properties in the application’s
Print dialog box and go to step 4.
If you see Setup, Printer, or Options, click that button
instead. Then click Properties in the next screen.
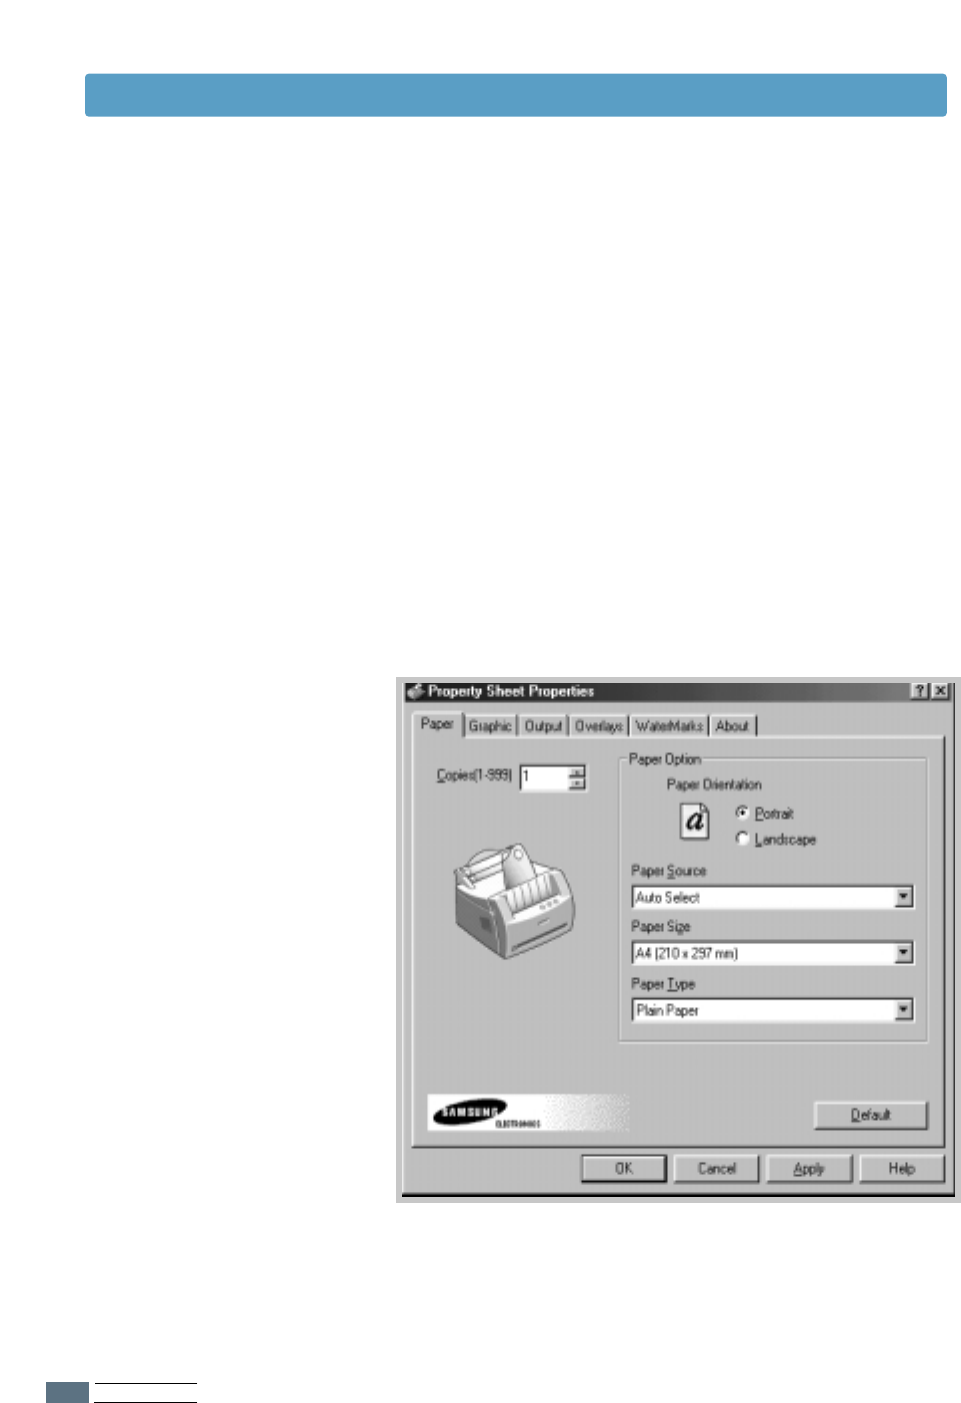
4
The Samsung ML-1200 Series Properties dialog box allows
you to access and change printer settings.
If necessary, click the Paper tab to display the settings
shown below. The Paper tab allows you to access and
change the settings for basic paper handling.
PRINTING TASKS
5.3
Printing a Document
4
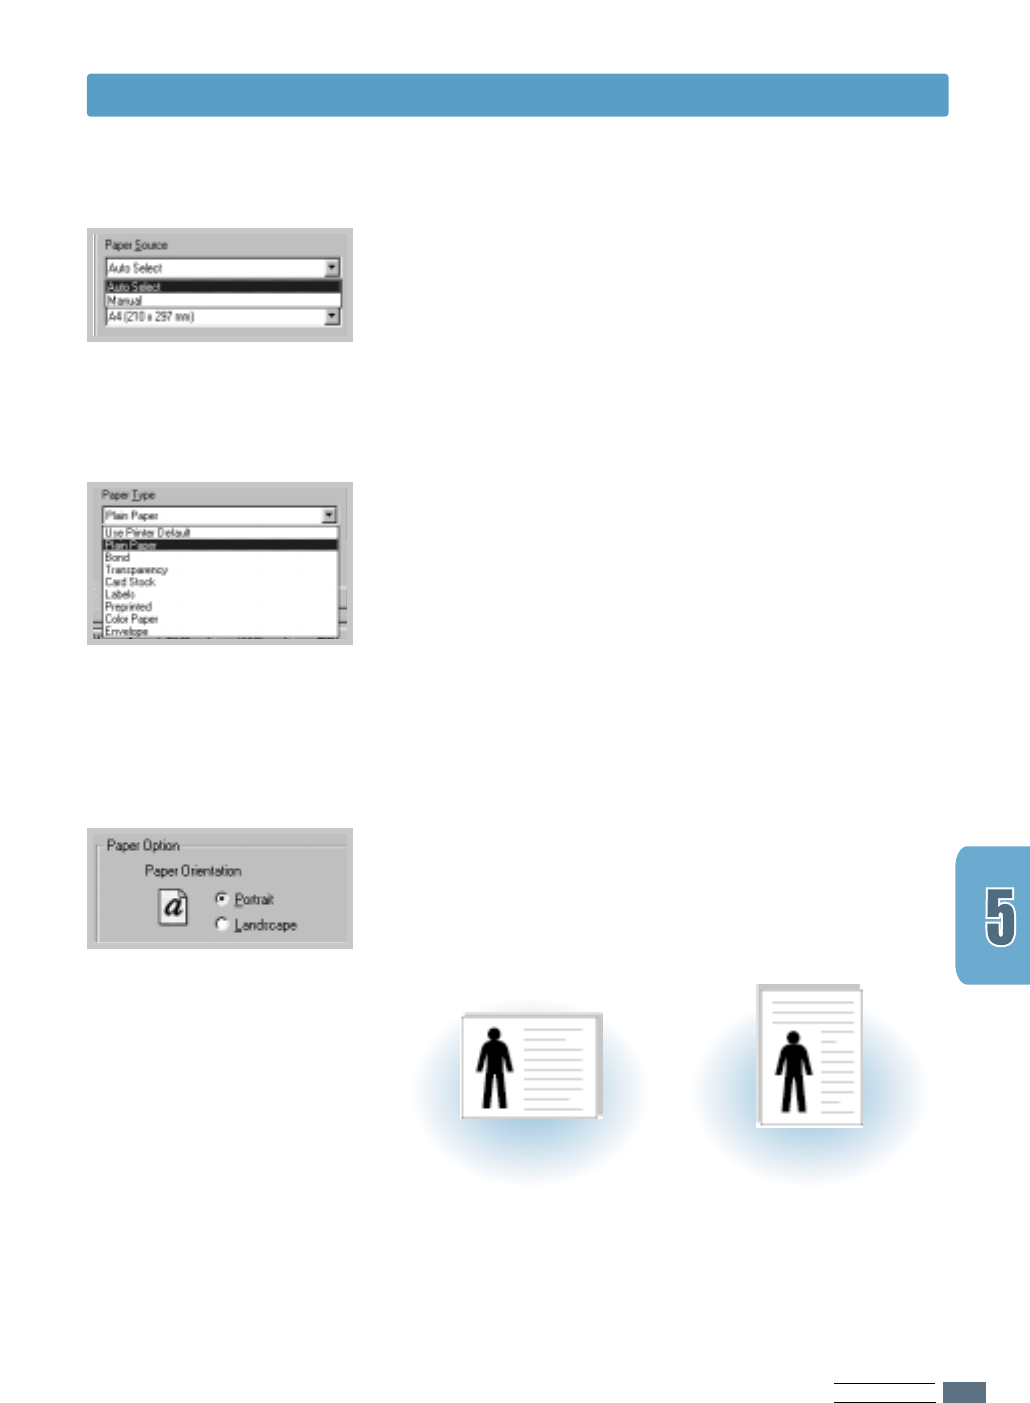
Select Auto Select from the Paper Source options box
unless you are printing with special media. To print with
special media, select Manual and feed one sheet at a time
into the printer. See page 4.5.
4
Select Plain Paper from the Paper Type options box
unless you want to use a different kind of print media. To
use a different kind of media, select the corresponding print
media name in the Paper Type options box. For more
information, please refer to Chapter 4 ‘Print Media’.
4
Select the paper size you have loaded in your printer.
4
You can also see the printable area.
4
The Paper Orientation option allows you to select the
direction in which information is printed on a page.
Portrait prints across the width of the page, letter style.
Landscape prints across the length of the page,
spreadsheet style.
➐➐
➐➐
Landscape
➐➐
➐➐
Portrait

PRINTING TASKS
5.4
5
Click the other tabs on the top of the Properties dialog box
to access other features, if needed.
6
When you complete the print settings, click OK until the
Print dialog box is displayed.
7
Click OK to start printing.
• Most Windows applications will override settings you specify
in the printer driver. Change all print settings available in the
software application first, and then any remaining settings
using the printer driver.
• The settings you change remain in effect only while you are
using the current program. To make your changes permanent,
make them in the Printers folder as follows:
1. Click the Windows Start button.
2. Select Settings, and then Printers to open the Printers
window.
Notes:
3. Select the Samsung ML-1200 Series printer icon.
4. Click the right mouse button and select Properties to open
the properties window.
Printing a Document
PRINTING TASKS
5.5
Printing a Document
There are two ways to cancel a print job.
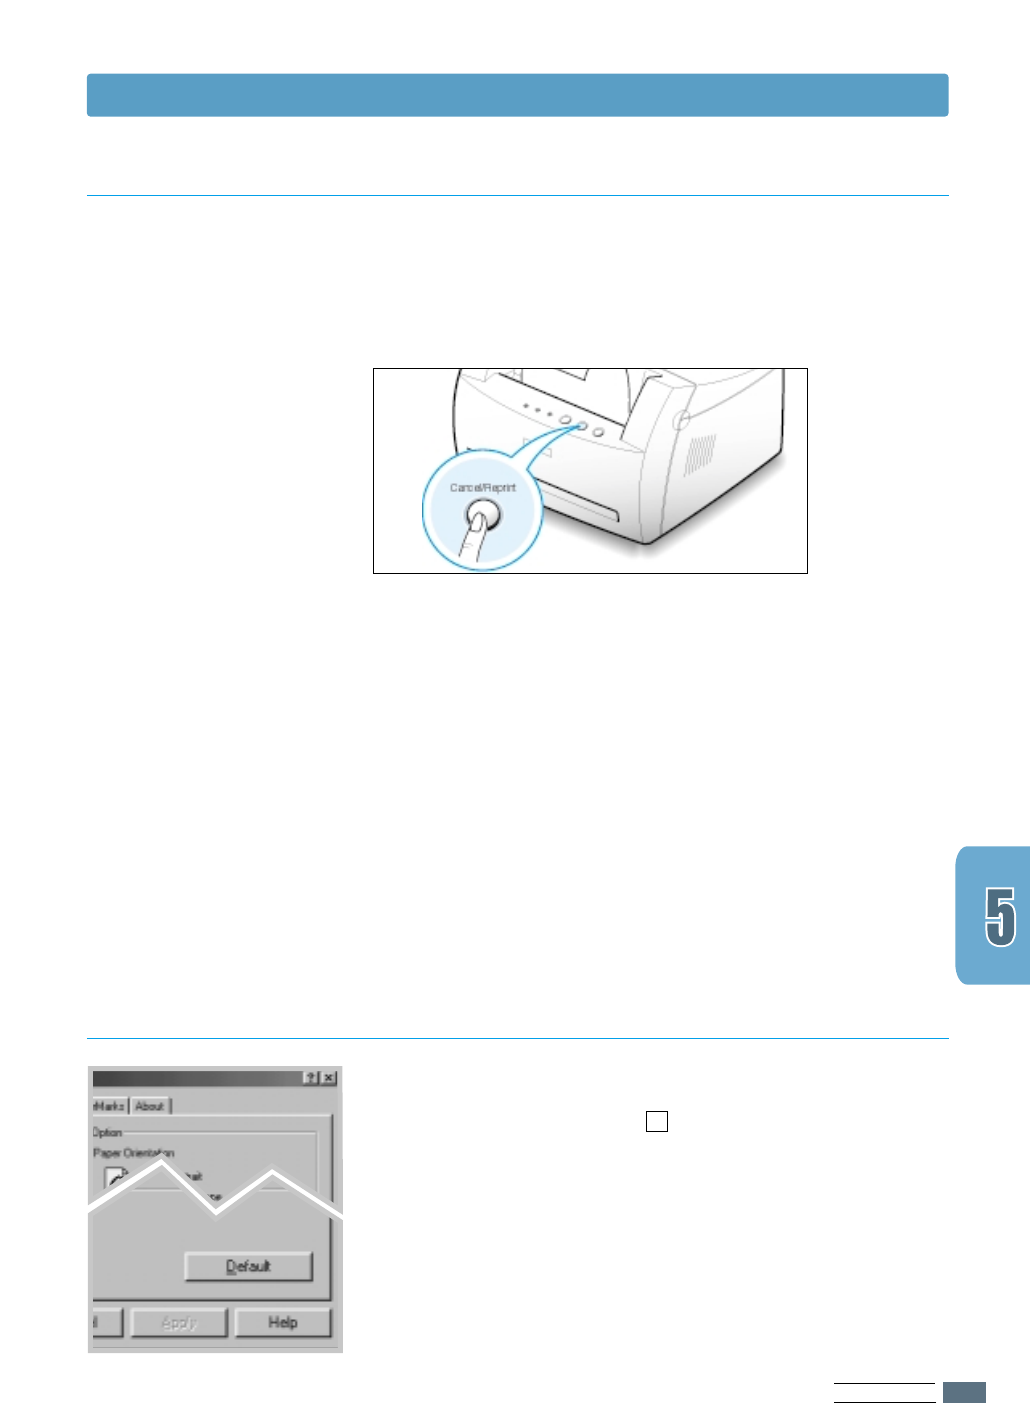
To stop a print job from your printer
Press the Cancel/Reprint and hold until the control panel
light blink to cancel job the printer is currently printing.
The printer will finish printing the page that is moving through
the printer and delete the rest of the print job while the Error
light is blinking. Pressing Cancel/Reprint cancels only the
current job in the printer. If more than one print job is in
printer memory, Cancel/Reprint must be pressed once for
each job.
To stop a print job from the Printers folder
1. From the Start menu, select Settings.
2. Select Printers to open the Printers window, then double-
click the Samsung ML-1200 Series icon.
3. From the Document menu, select Cancel Printing
(Windows 9x/Me) or Cancel (Windows NT 4.0/2000).
The Samsung ML-1200 Series printer has a help screen that
can be activated by the Help button in the printer’s properties
dialog box. You can also click ? from the upper right hand
corner, and then click on any setting.
These help screens give detailed information about the printer
features provided by the Samsung ML-1200 Series printer
driver.
To restore the default printer properties setting when you
change the print settings, click Defaults in the Samsung
ML-1200 Series Properties dialog box.
Canceling a Print Job
Using Help
PRINTING TASKS
5.6
Using Toner Save Mode
Toner Save mode allows the printer to use less toner on each
page. Selecting this option will extend the life of your toner
cartridge and reduce your cost per page, but will reduce print
quality.
There are two ways to enable the Toner Save mode.
To enable this feature from your printer
Press the Toner Save button on the control panel. The printer
must be in Ready mode (Data light is on).
• If the button backlight is on, toner save mode activates and
the printer uses less toner to print a page.
• If the button backlight is off, toner save mode is disabled
and the printer prints in a normal mode.
Note: To enable or disable the Toner Save mode from the control
panel, the Toner Save Mode option in the printer driver must be
set to Printer Setting. See below.
To enable this feature from the software application
1
When you change the print settings from your software
application, access the printer properties. See page 5.1 to
access the printer properties.
2
Click the Graphic tab, and then select the Toner Save
Mode option. You can select from:
• Printer Setting: If you select this option, this feature is
determined by the setting you’ve made on the control
panel of the printer.
• Standard: If you don’t need to save toner to print a
document, select this option.
• Save: Select this option to allow the printer to use less
toner on each page.
3
Click OK.
PRINTING TASKS
5.7
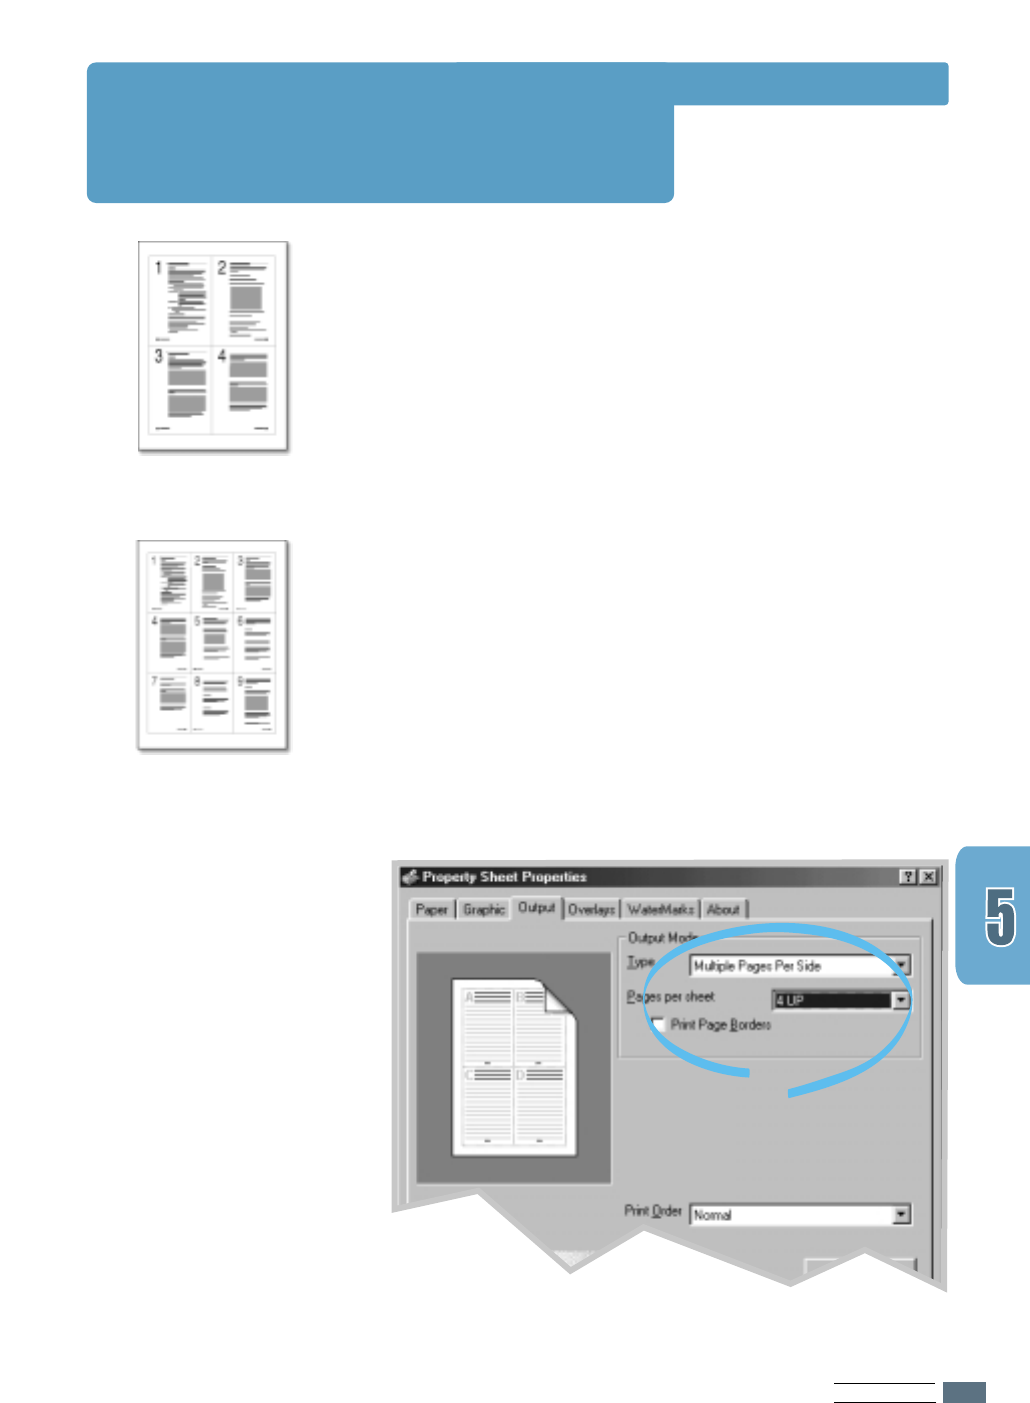
You can select the number of pages you want to print on a
single sheet of paper. If you choose to print more than one
page per sheet, the pages will appear decreased in size and
arranged on the sheet. You can specify up to 16 pages.
1
When you change the print settings from your software
application, access the printer properties. See page 5.1 to
access the printer properties.
From the Paper tab, select the paper orientation, source,
size and type.
2
Click the Output tab, and choose Multiple Pages per
Side in the Type drop-down list. Then select the number of
pages you want to print per sheet (1, 2, 4, 9 or 16) in the
Pages per Sheet drop-down list.
3
Click Print Page Borders if you want to print a border
around each page on the sheet. Print Page Borders is
enabled only if Pages per Sheet is 2, 4, 9, or 16.
➐☎
➐☎4 pages per sheet
➐☎
➐☎9 pages per sheet
Printing Multiple Pages on
One Sheet of Paper
(N-Up Printing)
4
Click OK, then start printing.
PRINTING TASKS
5.8
4
Click OK, then start printing.
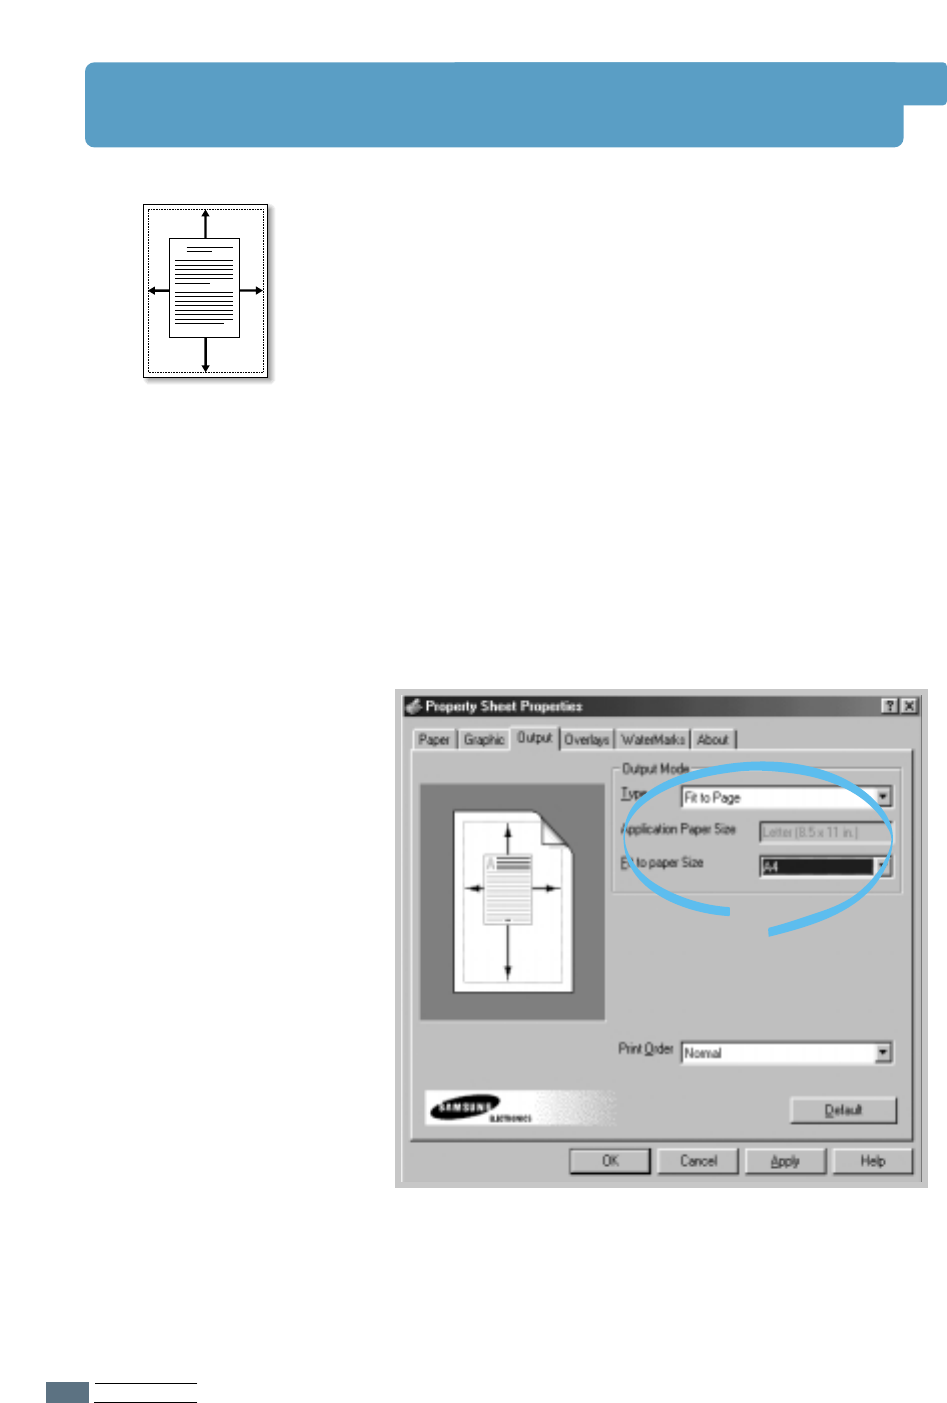
Fitting Your Document To a Selected Paper Size
This printer feature allows you to scale your print job to any
selected paper size regardless of the digital document size.
This can be useful when you want to check fine details on a
small document.
1
When you change the print settings from your software
application, access the printer properties. See page 5.1 to
access the printer properties.
2
Click the Output tab, and select Fit to Page in the Type
drop-down list.
3
You’ll see the Application page size and be prompted to
select the Fit to Paper Size. Select the correct size from
the drop-down list.
A
PRINTING TASKS
5.9
Printing Posters
This feature allows you to print a single-page document onto
4, 9, or 16 sheets of paper, which can be pasted together to
form one poster-size document.
1
When you change the print settings from your software
application, access the printer properties. See page 5.1 to
access the printer properties.
From the Paper tab, select the paper orientation, source,
size and type.
2
Click the Output tab, and select Poster in the Type
drop-down list.
➐➐
➐➐
Poster printing
with 2x2 style
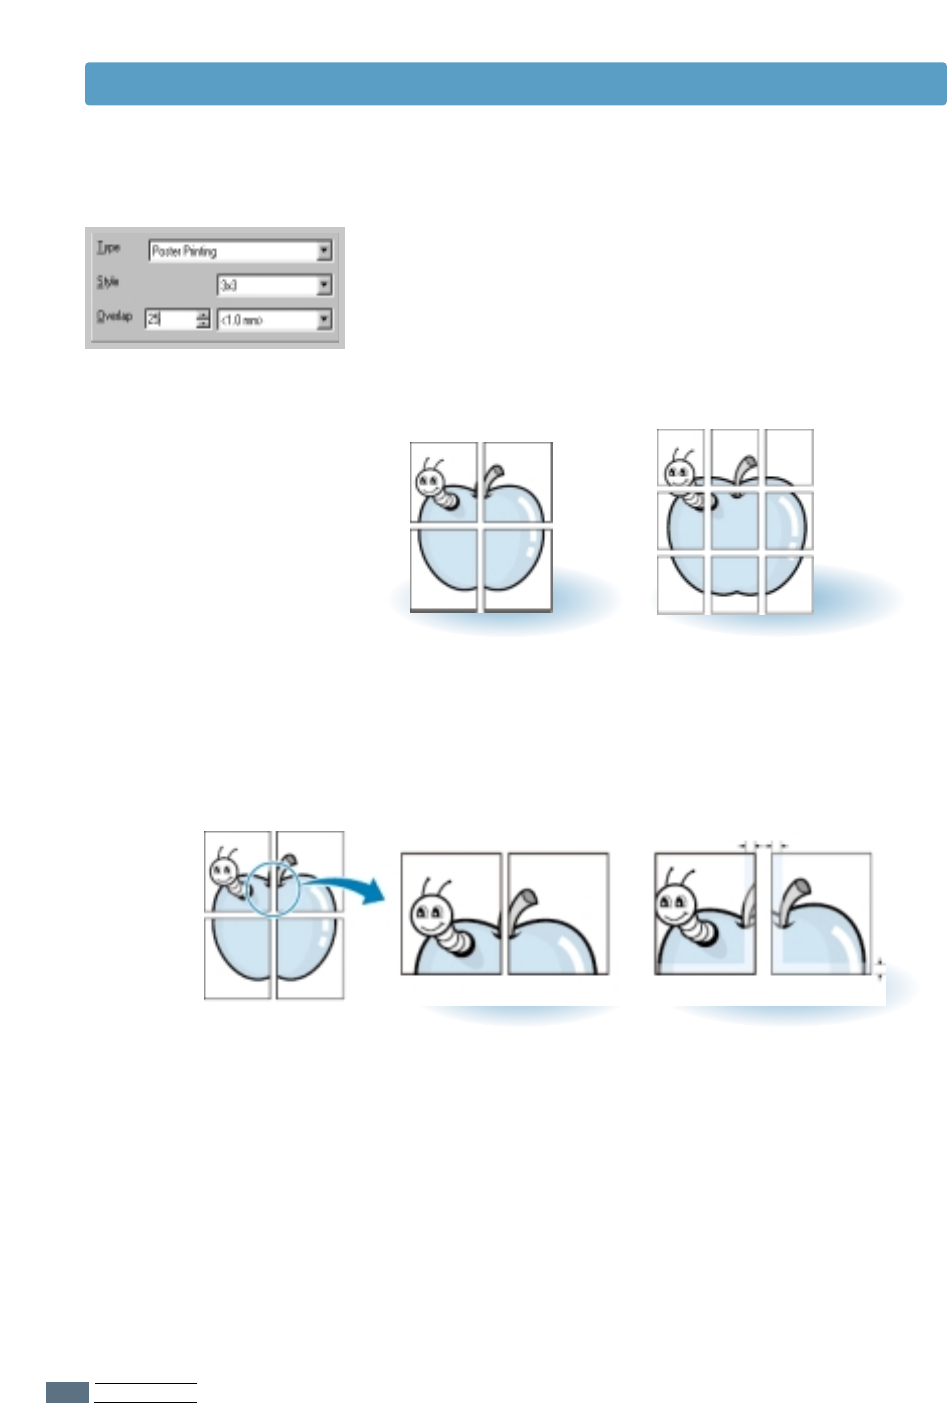
PRINTING TASKS
5.10
➛➛☎☎☎☎
➛➛☎☎☎☎2 x 2
➐➐☎☎☎☎
➐➐☎☎☎☎Overlap=0 ➐➐☎☎☎☎
➐➐☎☎☎☎Overlap=25
25 pixels
➛➛☎☎☎☎
➛➛☎☎☎☎3 x 3
5
Click OK, then start printing.
3
To determine the scaling factor, select the Style; 2x2, 3x3,
4x4, 5x5 or 6x6.
For example, if you select 2x2, the output will be
automatically stretched to cover 4 physical pages.
4
You may specify an overlap in pixel to make it easier to
reconstruct the resulting poster.
Printing Posters
PRINTING TASKS
5.11
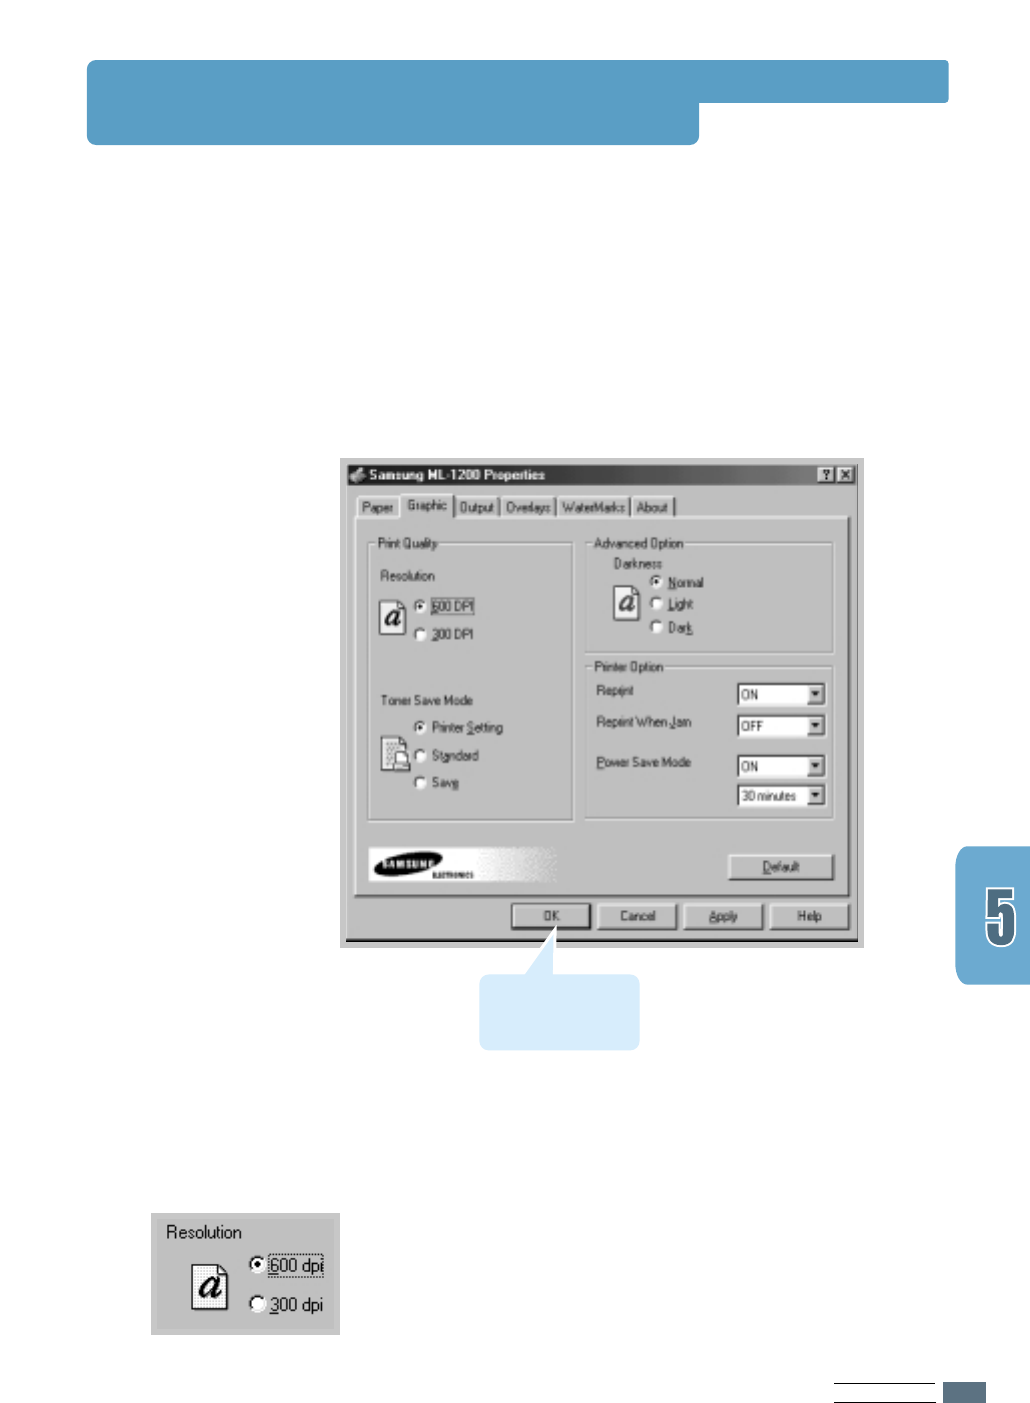
You can select the printing resolution by choosing either
300 dpi or 600 dpi. The higher the setting, the sharper the
clarity of printed characters and graphics. Higher settings may
increase the time it takes to print a document.
Resolution
Use the following options to adjust the print quality for your
specific printing needs when you access the printer properties.
See page 5.1 for more information on accessing printer
properties.
If necessary, click the Graphic tab to display the settings shown
below.
Setting Graphic Properties
Click here to save
the changes when
setting is done.
PRINTING TASKS
5.12
Setting Graphic Properties
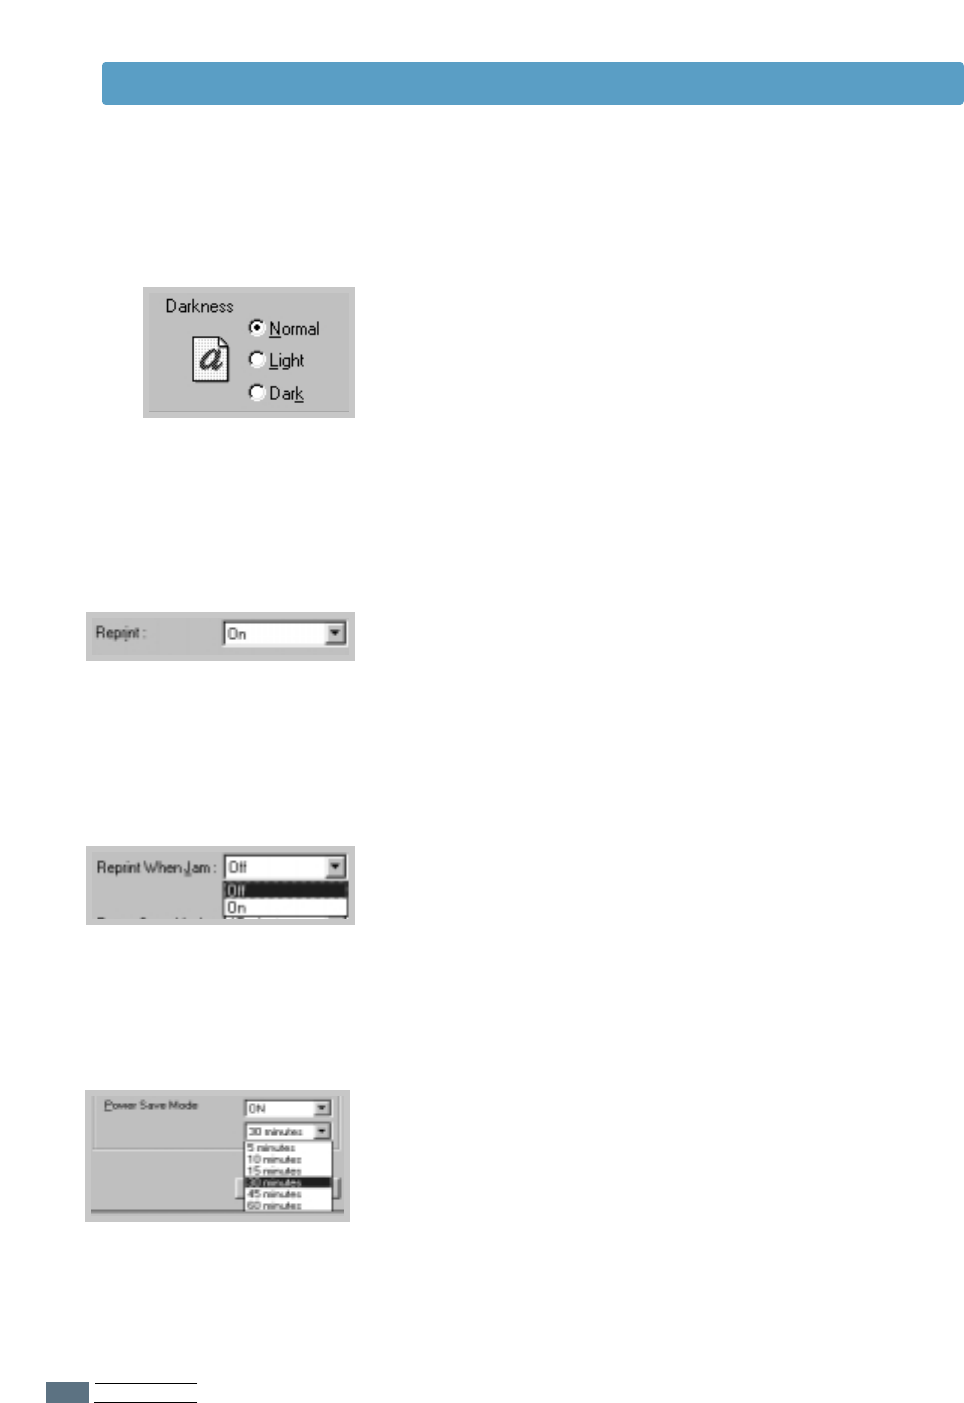
Use this option to lighten or darken the image appearance in
your print jobs.
• Normal – This setting is for normal documents.
• Light – This setting is for bolder line widths or darker gray-
scale images.
• Dark – This setting is for finer line width, higher definition in
graphics, and lighter gray-scale images.
Darkness
With this option On, the printer keeps the image for a printed
page until the printer signals that the page has successfully
exited the printer. If a paper jam occurs, the printer will
automatically reprint all jammed pages after the jam is
cleared.
Reprint When Jam
You can set the printer not to print the last page of the last job
when the Cancel/Reprint button is pressed. For details, see
‘Reprinting the Last Page’ on page 5.20.
Reprint
To conserve power when a printer is idle, you can set the
printer to enter a reduced power state after completing a print
job, according to a time specified by you in the Power save
Mode box.
Select the desired length of time from the drop-down list.
If your printer is constantly used, select OFF to keep the
printer ready to print with the minimum warm-up time. This
uses more energy to keep the printer warm and ready to print.
Power Save Mode
PRINTING TASKS
5.13
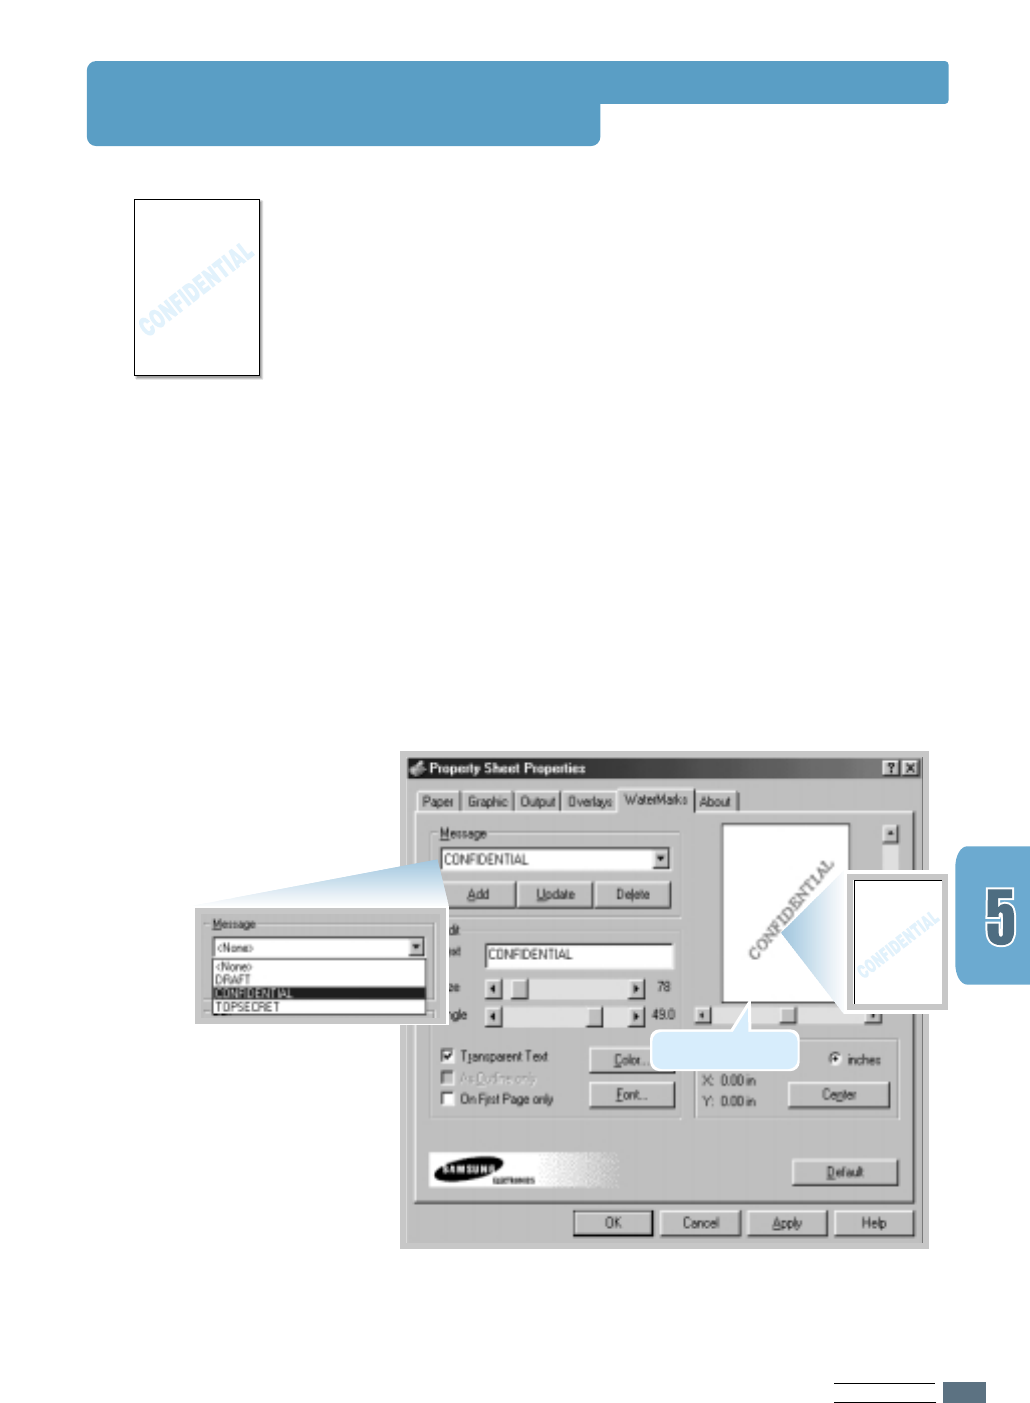
Printing Watermarks
The Watermark option allows you to print text over an existing
document. For example, you may want to have large gray
letters reading “Draft” or “Confidential” printed diagonally
across the first page or all pages of a document.
There are several predefined watermarks that come with the
ML-1200 Series printer, and they can be modified or you can
add new ones to the list.
1
When you change the print settings from your software
application, access the printer properties. See page 5.1
to access the printer properties.
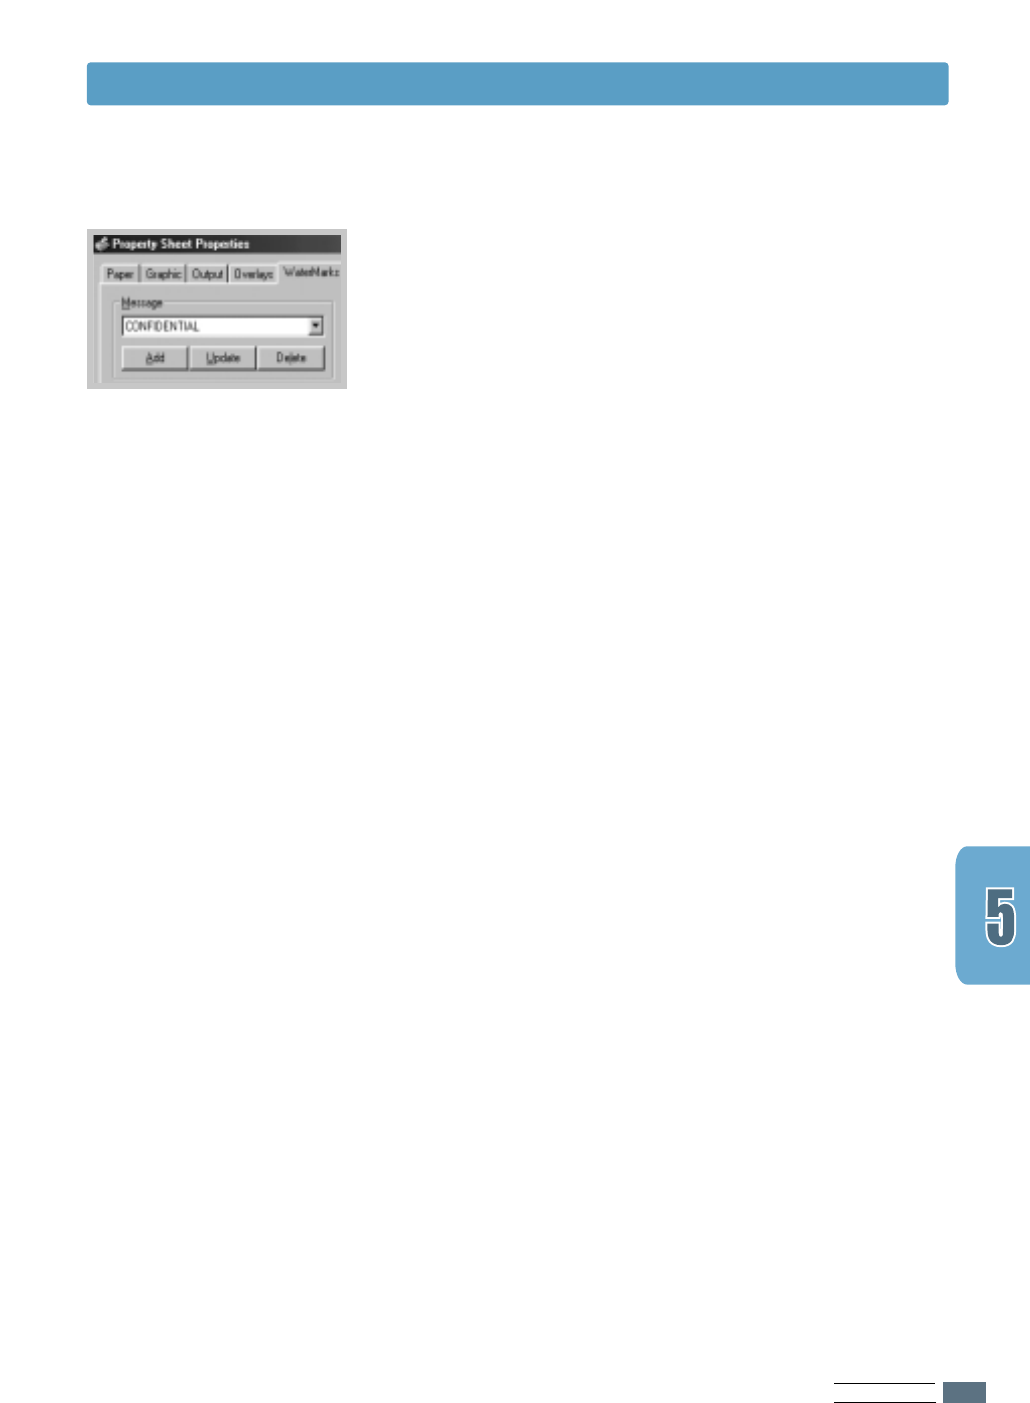
2
Click the Watermark tab, and select the desired
watermark in the Message drop-down list. You will see
the selected watermark in the preview window.
3
Click OK, then start printing.
To use an existing
watermark
preview window
PRINTING TASKS
5.14
1
When you change the print settings from your software
application, access the printer properties. See page 5.1 to
access the printer properties.
2
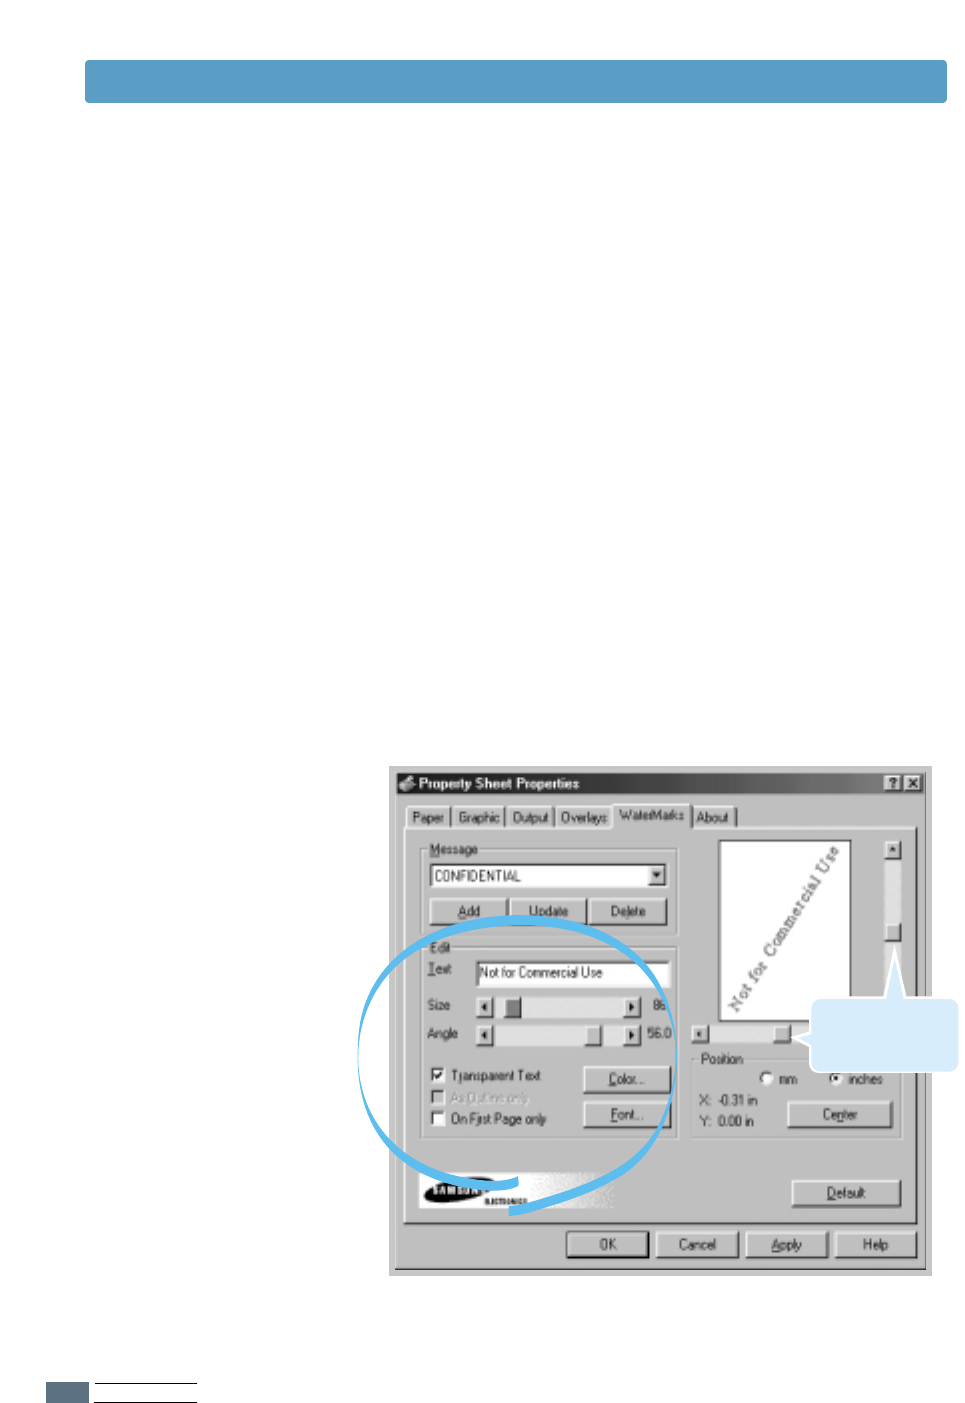
Click the Watermark tab, and enter the desired text
message in the Text field. This will be displayed in the
preview window. The preview window is provided so that you
can see how the watermark will appear on the printed page.
3
Select the desired watermark options. You can select the
font type and size, color and angle. There are three
checkboxes at the bottom of the dialog box:
• Transparent Text – Allows the document to show
through the watermark.
• As Outline Only – Prints the text outline of the
watermark. This setting globally effects
all watermarks in the list.
• On First Page Only – Prints the watermark only on the
first page.
To create or edit a
watermark
Printing Watermarks
Use these scroll
bars to adjust the
position.
PRINTING TASKS
5.15
4
If you have created a new or edited an existing watermark,
the Add and Update button is enabled.
To add a new watermark to the list, click Add.
5
If you want to edit, select the desired watermark from the
list, edit, and then click Update.
6
When you complete the edit, click OK, and then start
printing.
To stop printing the watermark, select None in the Message
drop-down list.
1
When you change the print settings from your software
application, access the printer properties. See page 5.1 to
access the printer properties.
2
From the Watermark tab, select the watermark you want
to delete in the Messages drop-down list.
3
Click Delete.
4
Click OK.
To delete a watermark
Printing Watermarks
PRINTING TASKS
5.16
Using Page Overlay
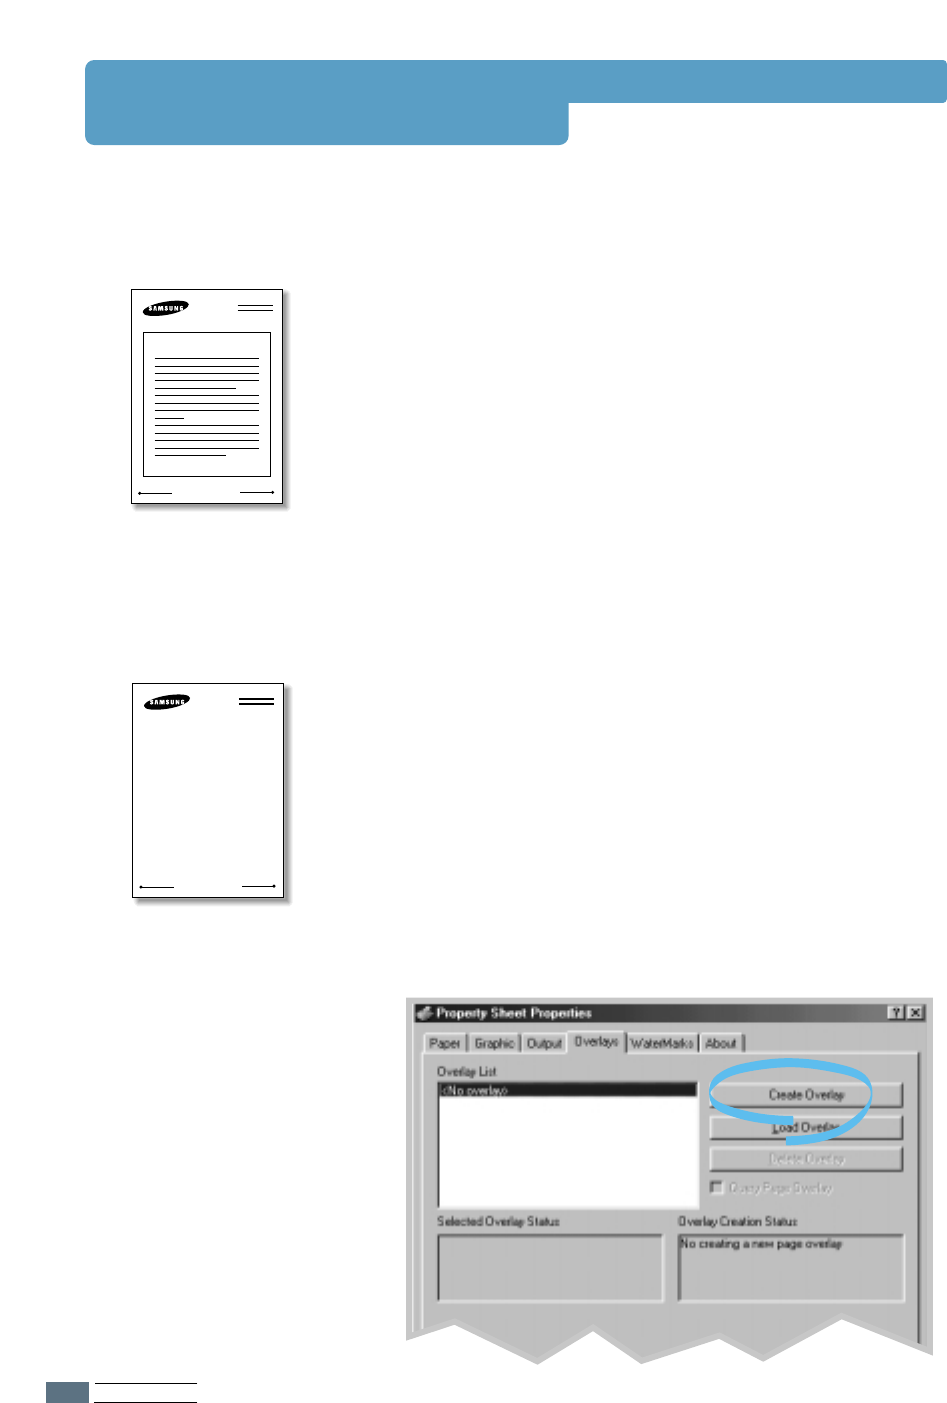
An overlay is text and/or images stored in the computer HDD
as a special file format that can be printed on any document
you choose. Overlays are often used to take the place of
preprinted forms and letterhead paper. Rather than using
preprinted letterhead, for example, you can create an overlay
containing the exact same information that is currently on
your letterhead. Then when you want to print a letter with
your company’s letterhead, you do not need to load preprinted
letterhead paper in the printer. You need only tell the printer
to print the letterhead overlay on your document.
What is an Overlay?
WORLD BEST
Dear ABC
Regards
To use a page overlay, you must create a new page overlay
containing your logo or image.
1
Create or open a document containing a text or image you
want to use for page overlay. Position the items exactly as
you wish them to appear when printed as an overlay. If
needed, save the file for later use.
2
Select Print from the File menu. Then click Properties in
the application’s Print dialog box to access the printer
properties. For details, see page 5.1.
3
Click the Overlays tab, and click Create Overlay.
Creating a New Page
Overlay
WORLD BEST
PRINTING TASKS
5.17
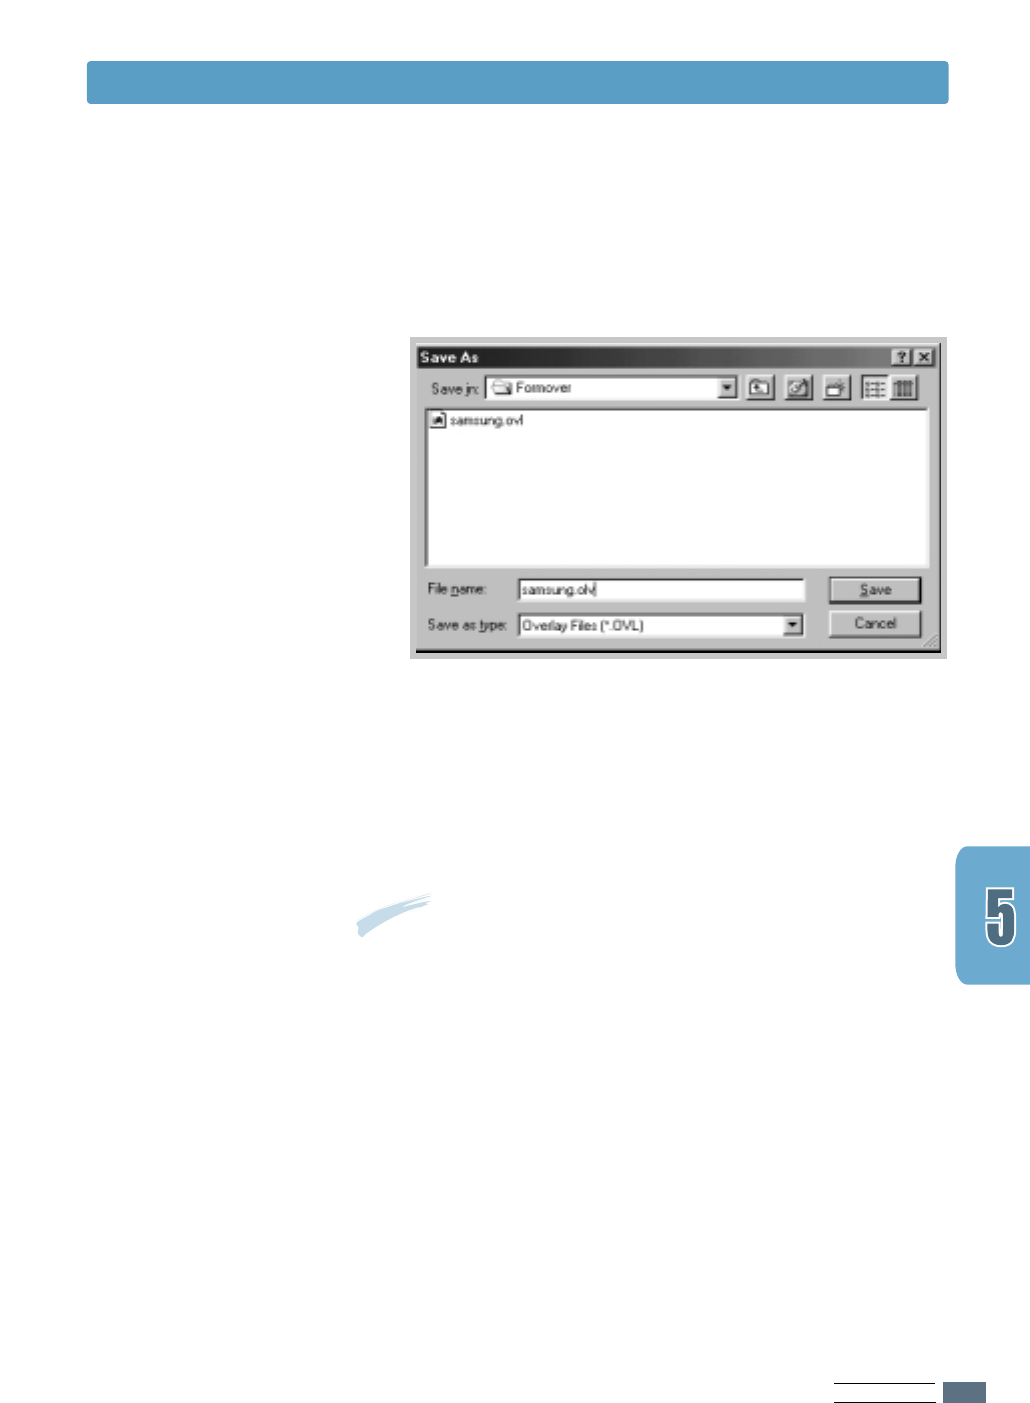
4
In the Create Overlay dialog box, type a name of up to
eight characters in the File name box. Select the
destination path if necessary. (The default is
C:\FORMOVER).
5
Click OK. You will see the name in the Overlay List box.
6
Click OK or Yes until you complete the creation.
The file is not printed out. Instead it will be stored on your
computer HDD disk.
Note: The overlay document size must be the same as
documents you will print with the overlay.
Using Page Overlay
After an overlay has been created, it is ready to be printed
with your document. To print an overlay with a document:
1
Create or open the document you want to print.
2
When you change the print settings from your software
application, access the printer properties. See page 5.1 to
access the printer properties.
3
Click the Overlays tab, and select the desired overlay from
the Overlay List box.
Using Page Overlay
PRINTING TASKS
5.18
Using Page Overlay
4
If the desired overlay file does not appear in the Overlay
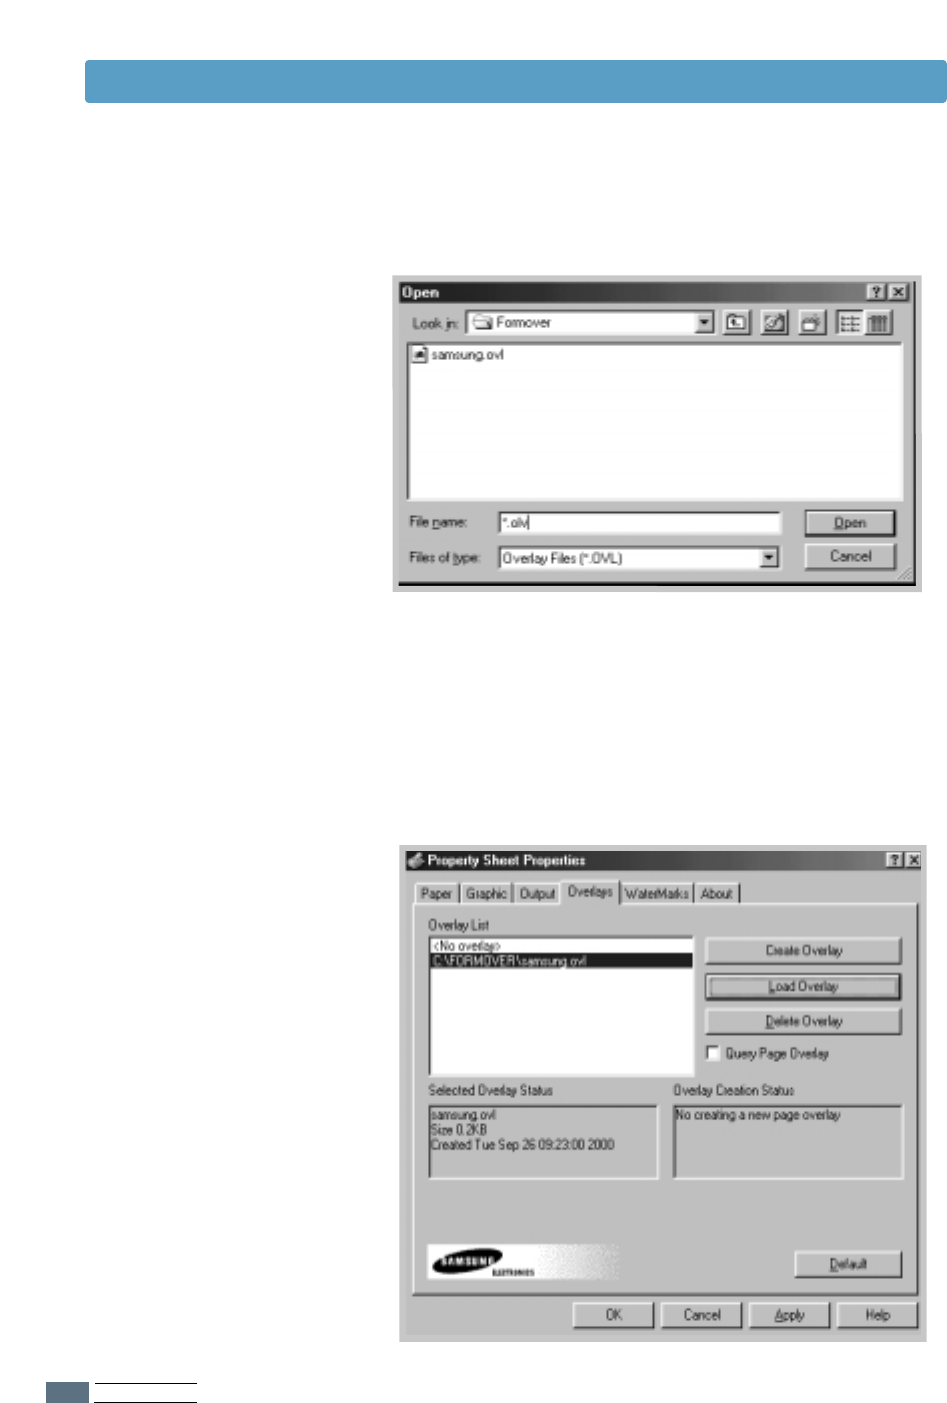
List box, click Load Overlay, and select the overlay file.
If you have stored the overlay file you want to use into an
external source, you can also load the file when you access
this Load Overlay window.
After you select the file, click OK. The file is now shown in
the Overlay List box and is available for printing. Select
the overlay from the Overlay List box.

PRINTING TASKS
5.19
You can delete page overlays that are no longer used.
1
In the printer properties dialog box, click the Overlays tab.
2
Select the overlay you want to delete from the Overlay
List box.
3
Click Delete Overlay.
4
Click OK until you exit the Print dialog box.
Deleting a Page Overlay
5
If necessary, click Query Page Overlay. If this box is
checked, a message box will appear each time you submit a
document for printing, asking you to confirm your wish to
print an overlay on your document.
Answering Yes to the message box means that the selected
overlay will be printed with your document.
Answering No to the message box cancels overlay printing.
If this box is empty, and an overlay has been selected, the
overlay will be automatically printed with your document.
6
Click OK or Yes until the printing starts.
The selected overlay will be downloaded with your print job
and printed on your document.
Using Page Overlay