Samsung Electronics Co NP-Q1-C Notebook PC User Manual Samsung Q1b v1 0 English
Samsung Electronics Co Ltd Notebook PC Samsung Q1b v1 0 English
Contents
- 1. Users Manual 1 of 2
- 2. Users Manual 2 of 2
Users Manual 1 of 2
1
User’s Guide
Product Features 2
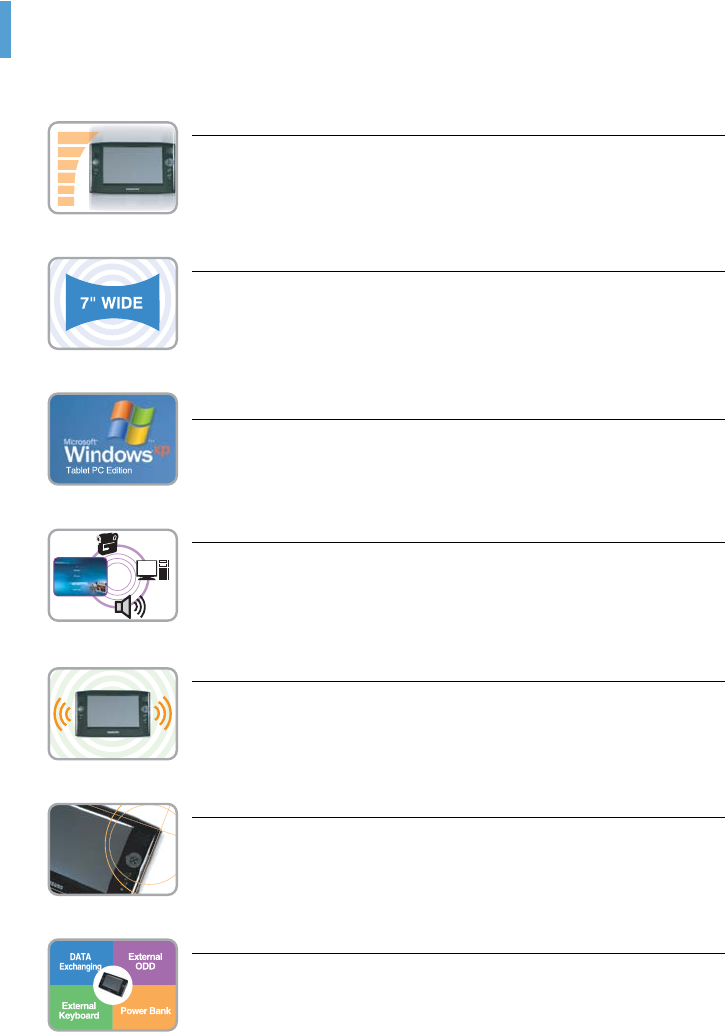
Product Features
Small but Strong UMPC (Ultra Mobile PC)
●VIA C7 MULV
●512MB ~ Max. 1GB DDR2 Memory
●1.8" High Capacity Hard Disk Drive of 30~60GB
7" WVGA TFT LCD
●Basic Resolution of 800x480 Pixels, Maximum Resolution of 1600x1200 Pixels
(when an external display is connected)
●Auto Scaler (Automatic Resolution Adjustment) Function to Support High Resolu-
tion Output
●
Easy-to-Use Touch Screen usable with your fingers.
Microsoft Windows XP Tablet PC Edition
●Resolve PDA and Pocket PC restrictions
●Usability Similar to a Normal PC with Windows
Powerful Multimedia Functions
Various Multimedia Programs Such as AVStation etc.
Multiple Network Support
●Wireless LAN, Bluetooth (Optional)
●Resolves Space Restrictions through the Wireless Communication Function
Compact, Light-Weight Design for Portability / Polished Design
●A mere 746g (Including the Bluetooth modules)
●High-Gloss Front Panel
Optional Accessories for Additional Convenience
●USB Data Cable Enabling Data Exchange with another PC.
●USB External ODD, Ultra-Slim USB External Keyboard
●Power Bank to Extend Use Time
Using Your Document 3
Using Your Document
Congratulations on your purchase of a computer with the Windows® XP operating system. Whether you
are new to using a portable computer or are an experienced user, this user’s manual can help you get the
most from your computer.
Manual Documentation Conventions
Some devices and software may differ from the descriptions in the User's guide or may not be
supplied with the product depending on your computer model.
The actual appearance of the computer may differ from the pictures printed on the cover and in
the User's guide.
This manual describes procedures with both the Stylus Pen and Mouse.
'Single-Click' in this manual also means 'Single-tap' for the Stylus Pen.
Information Icons
Three icons and their associated messages appear in this manual. The information icons are placed
before the step/information they apply to:
Warning
Indicates the possibility of personal injury.
Caution
Warns you of possible damage to equipment or data.
Note
Informs you of special circumstances.
Before starting!
Informs you of special requirements or limitations for use of item(s).
p.xx
Shows the page number you can refer to for more detailed information.

Contents 4
Contents
Product Features 2
Using Your Document 3
Contents 4
Safety Precautions 6
Maintaining a Proper Posture
While Using the Computer 11
Chapter 1. Getting Started
Overview 14
Front View / Status Indicators 14
Top View 15
Right View 16
Left View 16
Rear View 17
Turning the Computer On and Off 18
Turning the computer on 18
Turning the computer off 18
Chapter 2. Using the Computer
Stylus Pen 20
Entering Text 22
Using the Tablet PC Input Panel 22
Entering text using the Dialkeys 25
Volume Control 26
Using the Buttons 27
The Menu Button 27
The Quick Launch Button 28
The Auto Scaler Button 30
Using an external Monitor 31
Connecting a Monitor 31
Viewing on a Monitor 31
Dual View 32
Chapter 3. Using Microsoft Windows XP
About Microsoft Windows XP 35
Get Going with the Tablet PC 35
Tablet PC Tutorials 36
Reinstalling Windows XP 36
The Windows XP Screen Layout 37
Desktop 37
Understanding the Start Menu 38
Understanding a Window 39
Control Panel 40
Opening the Control Panel 40
User Account 41
Changing the Resolution and Colors 43
Chapter 4. Using the Network
Connecting to a Wireless LAN 45
Connecting to an Access Point (AP) 46
Connecting to computer-to-computer
networks (peer-to-peer or ad hoc) 47
Setting up a Wireless Network Setup
Using the Wireless LAN Setup Program 50
Using Samsung Network Manager 51
Setting Up a Network 51
Accessing a network
from a different location 54
Network Status Diagnosis 54
Using Bluetooth Devices 55
Bluetooth Software Setup 56
Using Bluetooth 58

Contents 5
Chapter 5. Using Applications
Introducing Programs 63
Using Samsung Update Plus 65
Program Launcher 67
Program Launcher Screen Layout 67
Using Program Launcher 68
Using AVStation premium 69
Start and Screen Layout 69
MUSIC Station 70
PHOTO Station 73
MOVIE Station 76
Using AVStation NOW /
AVStation Viewer 79
Start / Exit AVStation NOW 79
Start / Exit AVStation Viewer 80
Screen Layout 81
MUSIC Station 81
PHOTO Station 83
MOVIE Station 84
CyberLink PowerDVD 86
Chapter 6. Settings
Using System Setup 89
Starting System Setup 89
The System Setup Screen 90
Setting a Booting Password 92
Changing the Booting Priority 95
Using the Battery 96
Removing and Attaching a Battery 96
Charging the Battery 97
Monitoring the Battery Charge 97
Extending the Battery Usage Time 99
Chapter 7. Troubleshooting / Appendix
Using Magic Doctor 103
Using Norton AntiVirus 104
Restoring the System 105
Creating a Restore Point 105
Returning your computer
to an earlier restore point 106
Undoing the last restoration 107
Reinstalling Software 108
Running the system software Media 108
Installing drivers and programs 109
Reinstalling Windows XP 110
Running the System Recovery Media 110
Quick Installation 111
Standard Installation 112
Installing Windows When Windows Fails 113
Questions and Answers 114
Windows Related 114
Display Related 114
Sound Related 116
Wireless LAN Related 117
Games and Programs Related 120
Bluetooth 121
Security Center 122
Other 124
Specifications 125
Glossary 127
Index 130
Important Safety Information 131
Regulatory Compliance Statements 132
WEEE Symbol Information 138
Contact SAMSUNG WORLD WIDE 139

Safety Precautions 6
Safety Precautions
For security purposes and to prevent damage, please read the following safety instructions carefully.
Warning
Failing to follow the instructions marked with this symbol may cause injury to yourself and even
fatality.
Caution
Failing to follow the instructions marked with this symbol may cause injury to yourself or damage
the product.
Warning
Installation Related
•Do not install the product in places exposed to humidity such as bathrooms.
There is a danger of electric shock. Use the product within the operating conditions specified in
the User Guide.
•Keep the plastic bags out of reach of children’s reach, as there is a danger of suffo-
cation.
Power Related
•Do not touch the power cord with wet hands, as there is a danger of electric shock.
•Take care not to exceed the standard capacity (voltage/current) of a multi-tap or
power outlet extension when using it for the product.
Electric leakage may cause electric shock or fire.
•If the power cord or power outlet makes a noise, disconnect the power cord from
the wall outlet and contact a service center, as there is a danger of electric shock or
fire.
•Do not use a damaged or loose power cord or power outlet, as there is a danger of
electric shock or fire.
•Plug the power cord into the power outlet firmly.
Failing to do so may cause fire.
•Do not unplug the power cord by pulling only the cable.
If the cord is damaged, this may cause electric shock.

Safety Precautions 7
•Do not bend the power cord excessively and do not place heavy objects on the
power cord. Keep the power cord out of the reach of infants and pets.
A damaged cord may cause electric shock or fire.
•Use a wall outlet or multi-tap with a grounding port.
Failing to do so may cause electric shock.
•If water or another substance comes into contact with the power input jack or into
the computer, disconnect the power cord and contact a service center.
Damage to the device within the computer may cause electric shock or fire.
•Keep the power cord and power outlet clean.
Failing to do so may cause fire.
Use Related
•Do not place a cup or container filled with water or chemicals over or near the com-
puter.
If water or chemicals come into contact with the computer, it may cause fire or electric shock.
•When dropping the computer or the computer is broken, disconnect the power cord
and contact a service center for a safety check.
Using a broken computer may cause electric shock or fire.
•Avoid direct sunlight when in an air-tight location such as inside a vehicle.
The computer may become deformed or fire may be caused by high temperatures.
•Do not scratch the surface of the LCD with a sharp object such as a knife.
THE LAMP(S) INSIDE THIS PRODUCT CONTAIN MERCURY AND MUST BE RECYCLED OR
DISPOSED OF ACCORDING TO LOCAL, STATE OR FEDERAL LAWS. For details see lamprecy-
cle.org, eise.org, or call 1-800-Samsung.
Upgrade Related
•Never disassemble the power supply or AC adapter.
There is a danger of electric shock.
•Use only authorized parts (multi-bay, battery and memory) and never disassemble
parts.
There is a danger of damage to the product, electric shock or fire.
Custody and Movement Related
•Follow the instructions of the relevant location (e.g. airplane, hospital, etc.) when
using a wireless communication device (wireless LAN, Bluetooth, etc.).

Safety Precautions 8
Caution
Installation Related
•Do not block the ports (hole), vents, etc. of the product and take care not to insert
any alien substances into the product.
Damage to the device within the computer may cause electric shock or fire.
•Do not place heavy objects over the product, as this may cause a problem with the
computer. In addition, the object may fall and cause injury or damage the com-
puter.
Battery Use Related
•Dispose of worn-out batteries properly.
Failing to do so may cause fire or an explosion.
Follow the proper disposal method relevant to your region. The battery disposal method may
differ depending on your location.
Dispose of the used battery in the appropriate way.
•Do not throw or disassemble the battery, as this may cause injury, fire or an explo-
sion.
•Use only batteries authorized by Samsung Electronics.
Failing to do so, may cause an explosion.
•Avoid contact with metal objects such as car keys or clips when storing or carrying
a battery.
Contact with metal may cause excessive current and a high temperature and may damage the
battery or cause fire.
•Change the battery according to the instructions in the manual.
Failing to do so may damage the product.
Do not place the battery into a fire or heat it, as there is a danger of fire or explosion.
Safety Precautions 9
Use Related
•Do not place a candle, lighted cigar, etc. over the product.
There is a danger of fire.
•Make sure that the product is tested by a service engineer after repairing the prod-
uct.
Using a repaired product without a safety test might cause electric shock or fire.
•In case of lightning, immediately turn the system off and disconnect the power
cord from the wall outlet, as there is a danger of electric shock or fire.
•Connect only permitted devices to the connectors or ports of the computer.
Failing to do so may cause electric shock or fire.
•When the computer is used for a long time, an ‘odd’ smell may arise.
Ventilate the room frequently and use the computer carefully.
•Do not press the Eject Button while the CD-ROM drive is operating, as this might
cause data to be lost. The disk may suddenly eject and cause injury.
•When using a walkie-talkie, please keep a distance of at least 1m between the
walkie-talkie and the computer. Since a walkie-talkie's transmission power is very
high, this may cause the computer to malfunction.
•Avoid dropping the product while using it.
– Dropping the product may damage the product or cause data loss.
– Take care not to drop the product when using the computer on the stand.
•Do not touch the antenna and power outlet, as there is a danger of electric shock.
Upgrade Related
•Take care when touching the product or any of the parts, as this may damage the
device or cause injury.
•Take care not to drop any computer part or device.
Dropping a device or part may cause injury, or damage the product.
•Use parts authorized by Samsung Electronics only.
Failing to do so may cause fire or damage the product.
•To connect a device that is not manufactured or authorized by Samsung Electron-
ics, ask at a service center before connecting the device.
Failing to do so may damage the product.
Safety Precautions 10
Custody and Movement Related
•When moving the product, turn the power off and separate all connected cables
first.
Failing to do so may damage the product or cause users to trip over the cables.
•Keep the Stylus Pen out of the reach of children.
Children may injure themselves by swallowing it or damaging their eyes.
•Use a computer cleansing solution when cleaning the product.
Using a cleansing solution or chemical not explicitly developed for computer use may damage
the product.
•Do not use or watch the computer while driving a vehicle, as this may cause a traf-
fic accident. Concentrate on driving.
Avoiding Data Loss (HDD Management)
•Avoid damaging the data on a hard disk drive.
– A hard disk drive is extremely sensitive to external impact and may cause data loss on the
surface of the disk.
– The company is not liable for any loss of user data due to a user's carelessness or any
external impact.
•Possible causes of data loss of a hard disk drive.
– Data may be lost due to an external impact to the disk while disassembling or assembling
the computer.
– Data may be lost when the computer is turned off or reset by a power failure while the
hard disk drive is in operation.
– Data may be lost if the power is turned off while running a program.
– Moving the computer or any impact caused to it while the hard disk drive is in operation,
may damage the data on the hard disk drive.
To prevent data loss due to damage to the hard disk drive, please backup your data
frequently.

Maintaining a Proper Posture While Using the Computer 11
Maintaining a Proper Posture While Using the Computer
Maintaining a proper posture while using the computer is very important for avoiding physical discomfort
or even harm.
The following instructions are about maintaining the proper posture while using the computer de-
veloped through human engineering. Please read and follow the instructions carefully for when using
the computer.
Failing to do so may increase the probability of RSI (Repetitive Strain Injury) through repeated op-
erations may increase and serious physical bodily harm may result.
The recommendations (System specification, p.125) have been prepared so that they can be
applied within the coverage of general users.
If users are not included in the coverage, the recommendations are to be applied according to
the user's needs.
Proper Posture
•Do not use the computer on your lap or close to your skin for long periods.
There is a danger of burns due to the high temperature of the computer.
•To use the computer while talking over the telephone, use the ear-microphone phone.
When using the computer while holding a phone over your shoulder and talking on the phone,
your posture becomes bad.
•Keep frequently used work items within an easy working range (where they can easily be
reached).
Eye Position
Keep a distance of at least 50cm between the LCD and your eyes.
•Adjust the height of the LCD screen so that its top height is equal to or lower than your eyes.
•Avoid setting the LCD excessively bright.
•Keep the LCD screen clean.
•When wearing glasses, clean them before using the computer.
Hand Position
•It is recommended connecting and using an external keyboard and mouse when using the
computer over long periods.
•Do not hold the Stylus Pen with excessive force.
•Do not press the touch screen with excessive force.
Maintaining a Proper Posture While Using the Computer 12
Volume Control (Headphones and Speakers)
Check the volume level before listening to music.
•Check if the volume level is too high before using the headphones.
•Do not set the volume to the maximum from the beginning. Set the volume low and find a
comfortable level while turning it up.
•Do not use the headphones for long periods of time.
Usage Time (Break Time)
•When working for more than one hour, take a 10 minute break after every 50 minutes of work.
•Using this computer for two hours or less a day is recommended.
Illumination
•Do not use the computer in a dark environment. The illumination level for computer use must
be as bright so when reading a boo.
•Indirect illumination is recommended. Use a curtain to prevent the reflection of the LCD screen.
Operating Conditions
•Do not use the computer in hot and humid locations.
•Use the computer within the allowed temperature and humidity ranges specified in the User
Guide.

Chapter 1. Getting Started
Overview 14
Front View / Status Indicators 14
Top View 15
Right View 16
Left View 16
Rear View 17
Turning the Computer On and Off 18
Turning the computer on 18
Turning the computer off 18
Overview 14
Overview
Before Starting!
The actual appearance and color of the contents may differ from the pictures used in the mate-
rial.
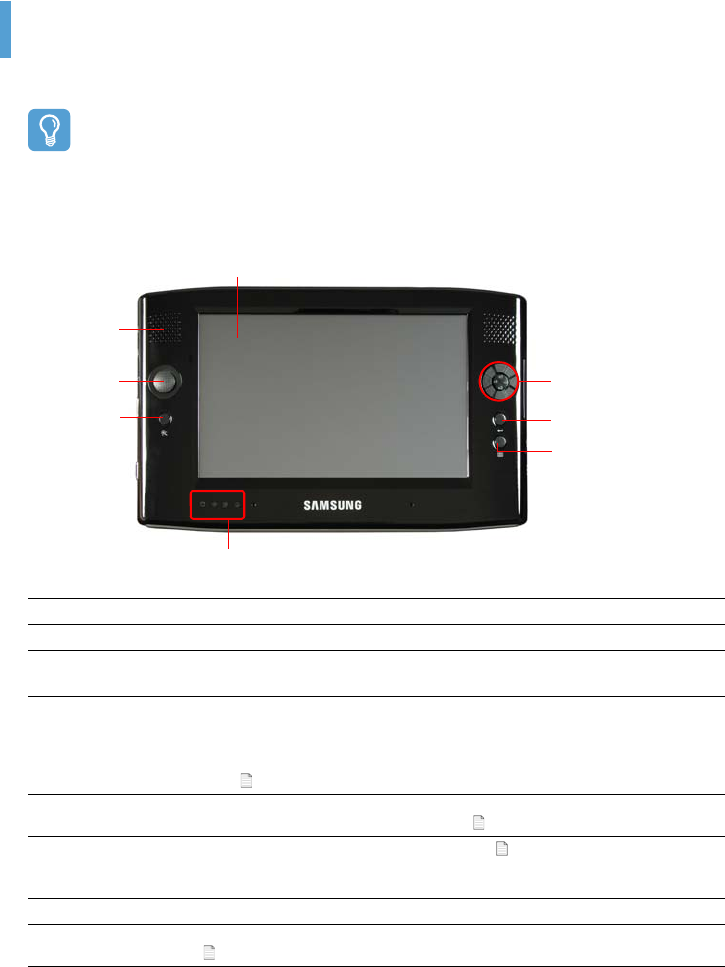
Front View / Status Indicators
zLCD The screen images from the computer are displayed here.
xMono Speaker A device generating sound. One speaker is at the top left of the computer.
cJoystick Plays the same role as the direction keys ( ←,→,↑,↓) on the keyboard.
Used as a joystick when playing games.
vAuto Scaler Button (Automatic Resolution Adjustment Button)
Press this button to change the screen resolution.
Auto Scaler provides 3-step resolutions. Whenever you press this button, the screen
resolution changes to 800x480 (Default Resolution) > 800x600 > 1024x600 sequen-
tially. (
p.30)
bStatus Indicators Shows the operating status of the computer. The corresponding operating LED is lit
when the corresponding function operates. ( p.15)
nMenu Button Press this button to launch the Menu Program. ( p.27)
The Menu Program provides shortcuts to frequently used functions on the computer.
You can easily change the settings.
mEnter Button Press this button to select an item. It is the same as the Enter key on the keyboard.
,Quick Launch
Button You can register a frequently used program to launch it just by pressing this button.
( p.28)
m Enter Button
x Mono
Speaker
z LCD
b Status Indicators
c Joystick
v Auto Scaler
Button
n Menu Button
, Quick Launch Button
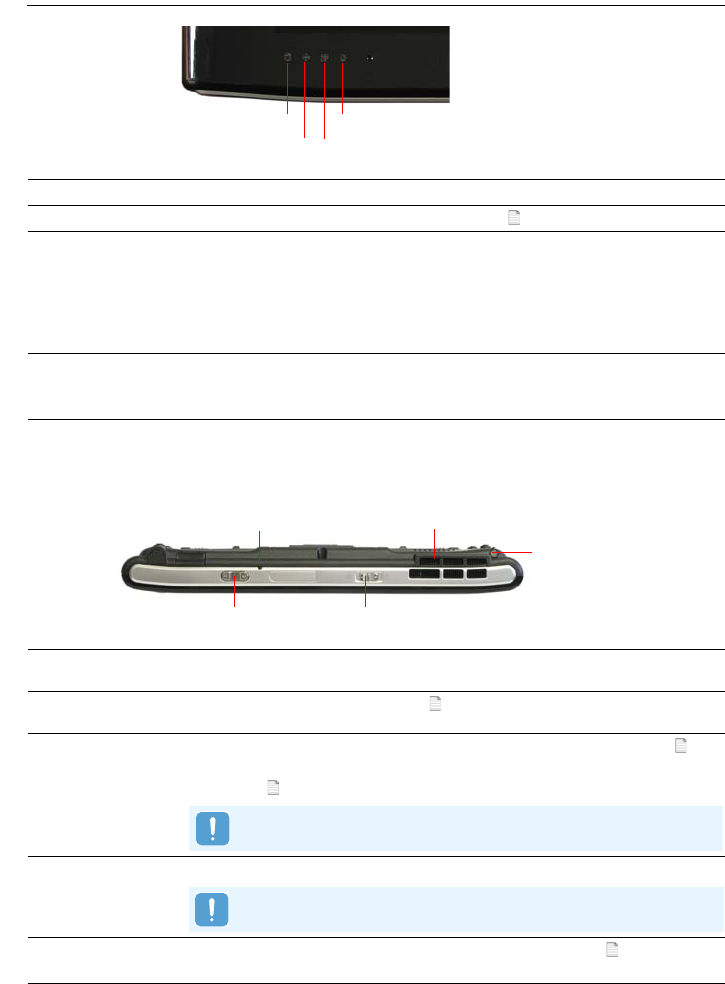
Overview 15
Status Indicators
Top View
zHDD This turns on while the hard disk drive is being accessed.
xWireless LAN This turns on when the wireless LAN is operating. ( p.45)
cCharge Status This shows the power source and the battery charge status.
Green: When the battery is fully charged or the battery is not installed.
Amber: When the battery is being charged.
Blinks: It blinks for a while when sliding the HOLD switch up or when pressing
a button when the HOLD switch is in the HOLD position.
Off
: When the computer is running on battery power without being connected to AC power.
vPower Status This shows the computer operating status.
On : When the computer is operating.
Blinks: When the computer is in Standby mode.
zWindows Security
Button Pressing this button is the same as pressing the <Ctrl>+<Alt>+<Del> keys on the
keyboard. Press the Stylus Pen, display the Windows Task Manager window.
xVolume Control
Button A button used to control the volume. ( p.26)
cPower Switch /
AVStation NOW
Switch
You can turn the computer on or off by sliding this switch to the right and releasing it. ( p.18)
You can launch AVStation NOW by sliding this switch to the left when the computer is
turned off. ( p.79)
vVents The internal heat of the computer is emitted through these holes.
bStylus Pen /
Stylus Slot The Stylus is used to enter information through the touch screen. ( p.20)
You can keep the Stylus Pen in the Stylus Slot.
x Wireless LAN
z HDD v Power Status
c Charge Status
z Windows Security Button
c Power Switch / AVStation NOW Switch
b Stylus Pen / Stylus Slot
v Vents
x Volume Control Button
To turn the computer on, slide the Power switch to the right and hold it for
more than 0.1 seconds before releasing it.
If the vents are blocked the computer may over-heat. This may be danger-
ous, so avoid blocking the vents.
Overview 16
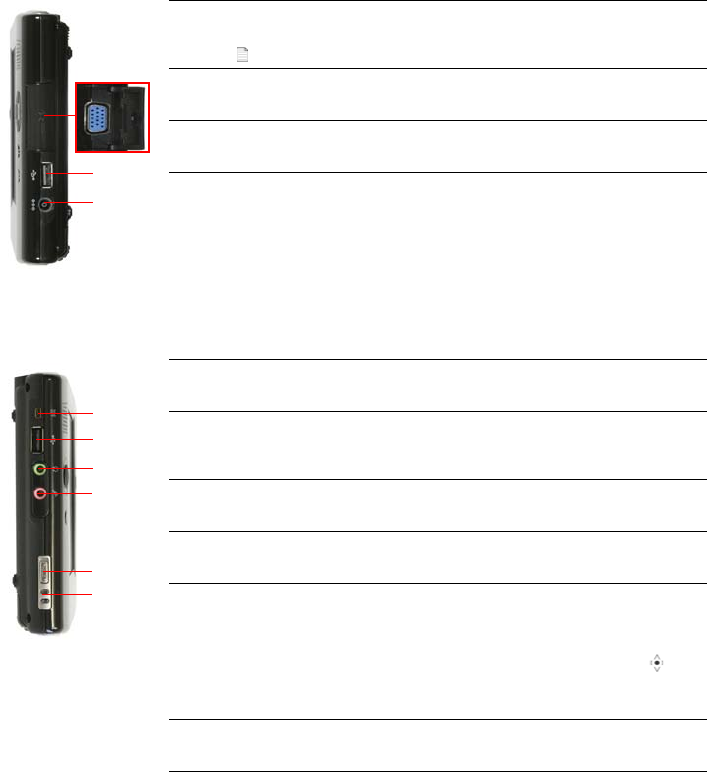
Right View
Left View
zMonitor Port
A jack used to connect a monitor, TV or projector supporting a 15-pin D-SUB inter-
face. ( p.31)
xUSB Port
A port used to connect a USB device such as a USB keyboard, mouse, etc.
cDC-in Jack
A port used to connect the AC adapter supplying power to the computer.
zExternal ODD Power Port
A port used to supply power to the external USB ODD.
xUSB Port
A port used to connect a USB device such as a USB keyboard, mouse, USB ODD,
etc.
cHeadphone Jack
A jack used to connect the headphones.
vMIC Jack
The jack for connecting a microphone.
bHOLD Switch
When sliding the HOLD switch into the HOLD position (upwards), no buttons will
work.
When pressing a button or switch in the HOLD status, the Charge LED ( )
blinks for a moment.
To use the computer again, slide the HOLD switch down.
nHand Strap Hole
You can connect the Hand Strap here.
z
x
c
z
x
c
v
b
n
Overview 17
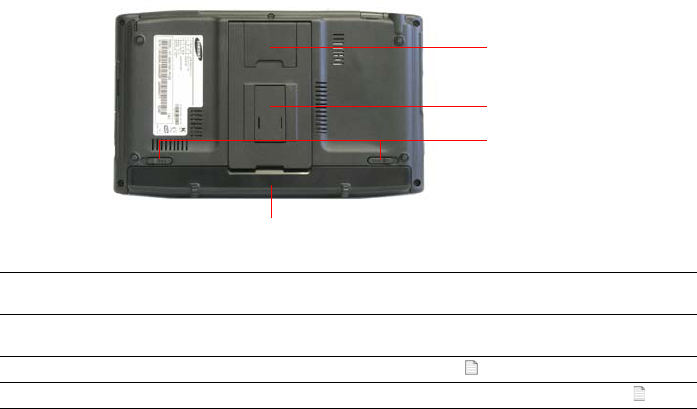
Rear View
z20° Stand You can position the computer at a 20° degree angle so that you can comfortably
enter text.
x80° Stand You can position the computer at an 80° degree angle so that you can comfortably
view the screen.
cBattery Latch The latch used to remove or install the battery. ( p.96)
vBattery A Lithium Ion rechargeable battery which supplies power to the computer. ( p.96)
x 80° Stand
z 20° Stand
c Battery Latch
v Battery
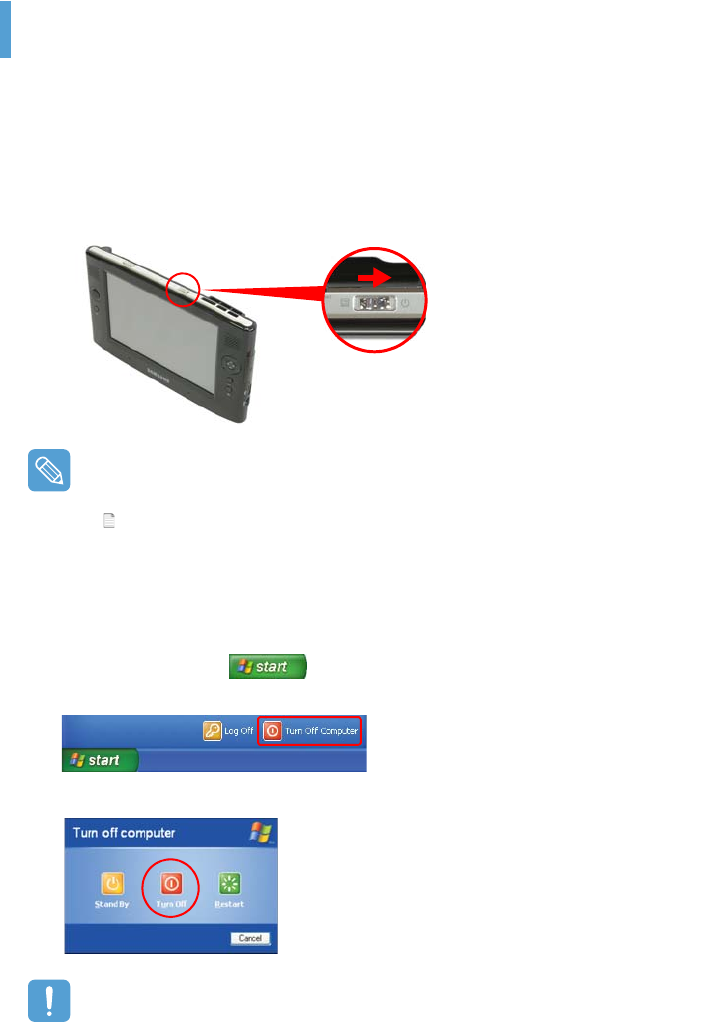
Turning the Computer On and Off 18
Turning the Computer On and Off
Turning the computer on
1Install the battery and connect the AC adapter. (Refer to the Getting Started Guide.)
2Adjust the stand at the back of the computer to a comfortable angle.
3Slide the Power Switch to the right, hold it for more than 0.1 seconds and then release it.
The computer is turned on.
When running the computer on battery power, the LCD brightness is automatically dimmed to
save battery power.
Press the
Menu
button and then
Brightness Up
or
Brightness Up
to adjust the LCD brightness.
( p.27).
Alternatively, press the + or -
Volume Control
buttons at the top of the computer while holding
down the
Menu
button to adjust the LCD brightness.
Turning the computer off
1Click the start button ( ) on the taskbar.
2Click Turn Off Computer.
3Click Turn Off.
When the system cannot be shut down due to a system error, turn it off by sliding and holding
the Power Switch for more than 4 seconds.
After that, when turning it on by sliding the Power Switch, the disk checking program may launch.

Chapter 2. Using the Computer
Stylus Pen 20
Entering Text 22
Using the Tablet PC Input Panel 22
Entering text using the Dialkeys 25
Volume Control 26
Using the Buttons 27
The Menu Button 27
The Quick Launch Button 28
The Auto Scaler Button 30
Using an external Monitor 31
Connecting a Monitor 31
Viewing on a Monitor 31
Dual View 32
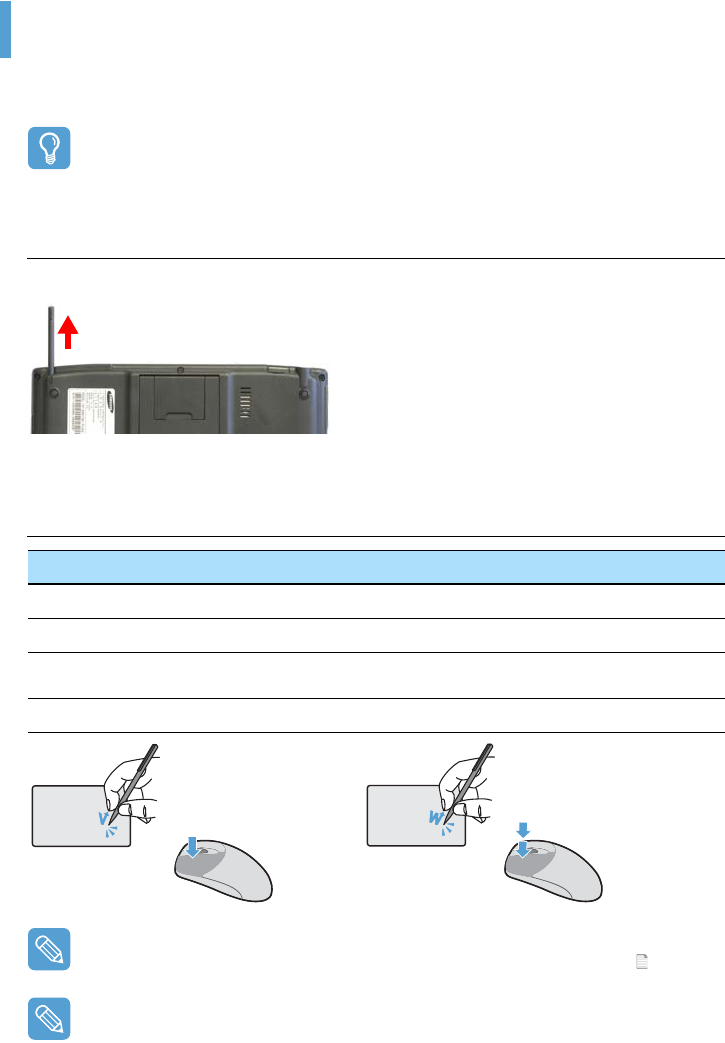
Stylus Pen 20
Stylus Pen
A Stylus Pen instead of a mouse is supplied with the computer and provides the same function.
Before Starting!
It is recommended connecting and using a USB keyboard and mouse when using the computer
over long periods.
Removing the Stylus Pen from the computer
Pull the Stylus Pen upwards and out.
When finished, return it to the Stylus Slot.
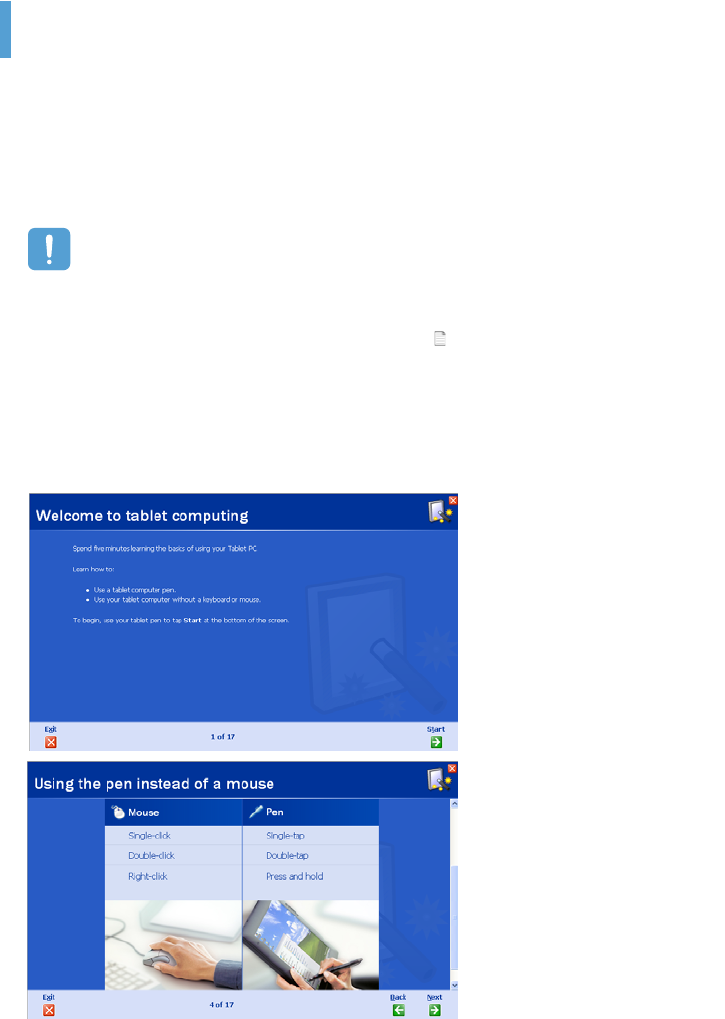
Stylus Pen Functions
Learning How to Use the Stylus Pen
Select Start > Get Going with Tablet PC to learn how to use the Stylus Pen. (
p.35)
Operate the touch screen LCD with a Stylus Pen or your finger. Sharp objects may scratch or
damage the LCD surface.
Mouse Stylus Pen Function
Single-click Single-tap Single-tap with the pen to select an item.
Double-click Double-tap Double-tap with the pen to run an item.
Right-click Press and Hold Press and hold for more than 3 seconds with the pen to display
the Pop-up menu.
Drag Drag Press an item and drag it with the pen to move the item.
Stylus Pen 21
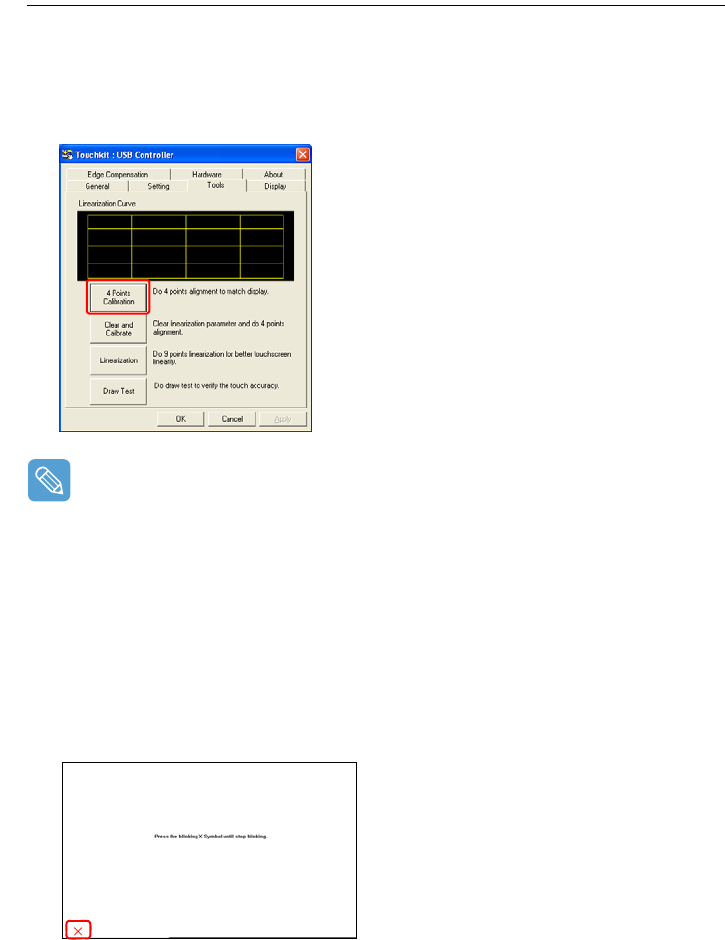
Calibrating the Stylus Pen
When using the Stylus Pen for the first time or the pointing position of the Stylus Pen is incorrect,
you can correct the pointing position using the TouchKit program.
1Select Start > All Programs > Touchkit > Configure Utility.
2In the Tools tab, select 4 Points Calibration.
Enhancing the Accuracy
If greater precision is required, you can correct the pointing position by using 9-Points or 25-
Points Calibration.
To setup 9-Point or 25 Point Calibration, follow these steps:
z Before beginning with the Calibration, click on the Settings tab in the TouchKit.
x In the Linearization Style item in the Settings tab, select 9-Points or 25-Points and
then press the Apply button.
c To calibrate, click the Tools tab.
v x Select Linearization from the Tools tab. The higher the number, the more precise the
correction.
3Press and hold the X-symbol displayed on the screen until it stops blinking. The X-symbol
appears repeatedly according to the selected number of points.
4If the Calibration Result window appears, click the OK button. The pointing position of the
Stylus Pen is corrected.
Entering Text 22
Entering Text
You can enter text by using the Tablet PC Input Panel or the DialKeys on-screen keyboard.
Before Starting!
Using a USB keyboard and Notepad is more convenient than using the Tablet PC Input Panel or
the Dialkeys when entering large amounts of text.
For example, to enter texts in Notepad, select Start > All Programs > Accessories > Note-
pad and run Notepad.
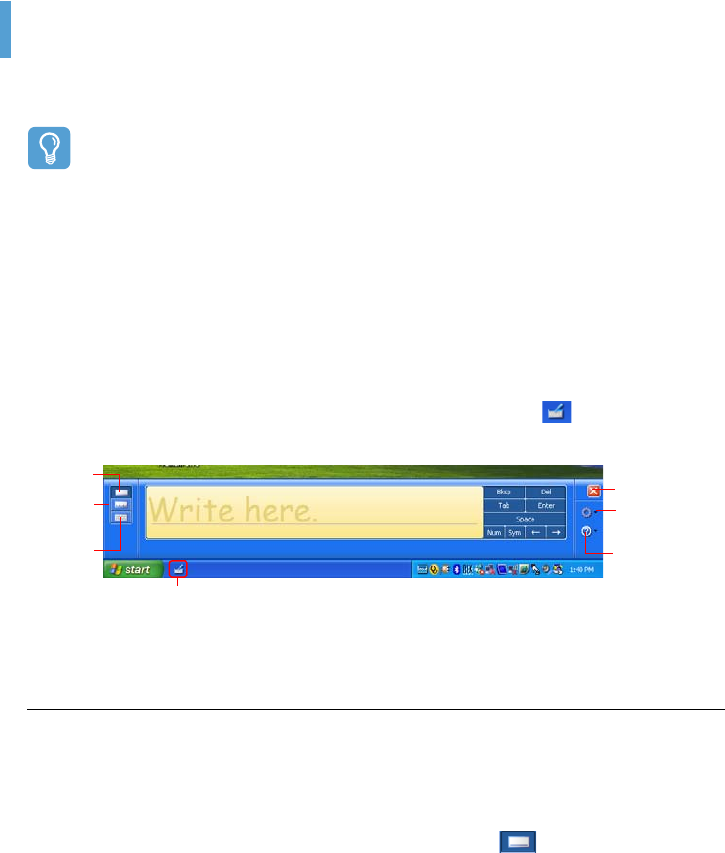
Using the Tablet PC Input Panel
The Tablet PC Input Panel is an on-screen letter input pad provided by Windows. Letters can be
entered with the Stylus Pen when a keyboard is not available. There are three ways in which letters
can be entered using the Tablet PC.
Input Panel: with the Writing Pad, with the Character Pad, and with the On-Screen Keypad.
To open the Tablet PC Input Panel, click on the Tablet PC Input Panel ( ) icon on the taskbar.
A picture of the Tablet PC Input Panel is displayed below.
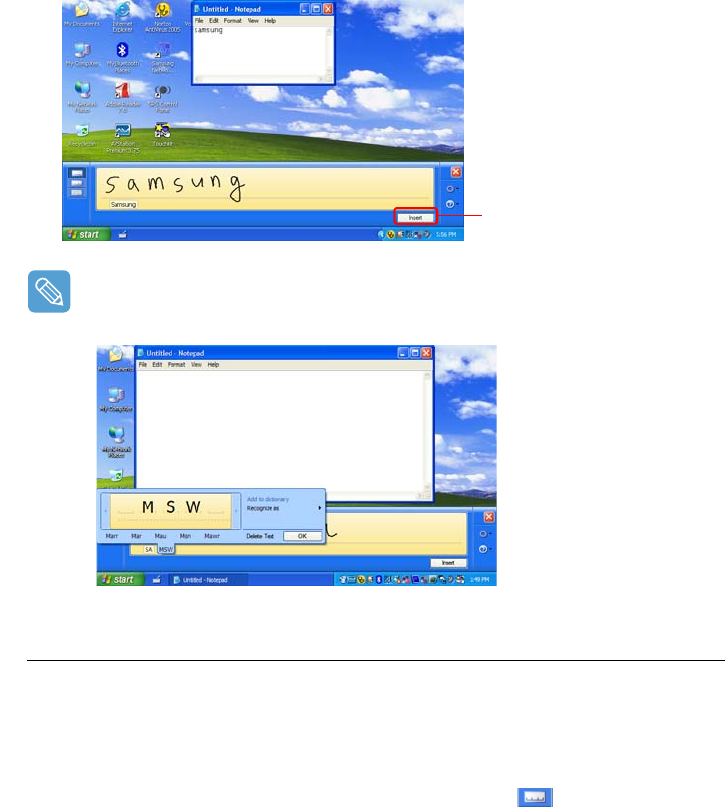
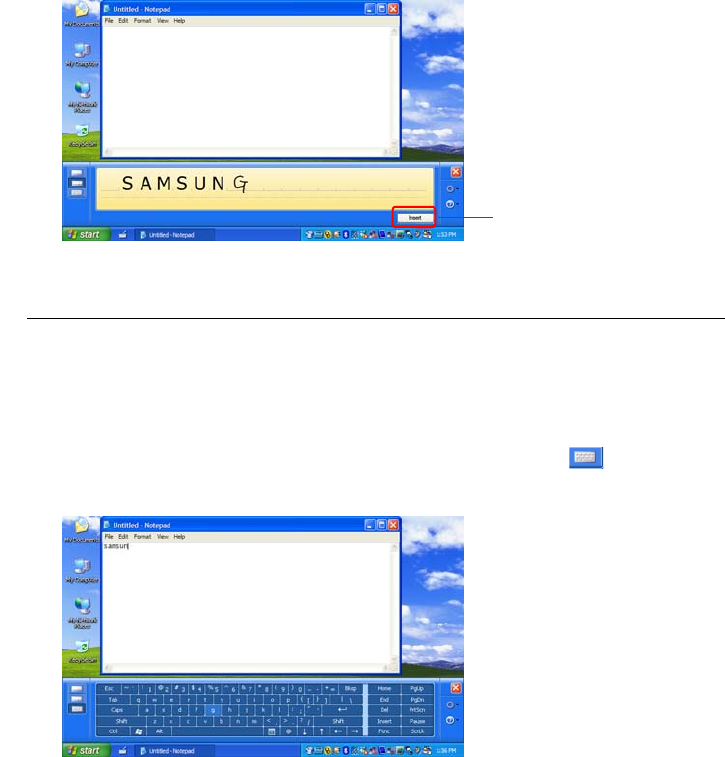
Entering text using the Writing Pad
The Writing Pad converts text written with the Stylus Pen into electronic text.
To use the Writing Pad, follow these steps:
1Open the Tablet PC Input Panel and an editing program.
2In the Tablet PC Input Panel, click the Writing Pad icon ( ).
3Enter text into the input area of the Writing Pad using the Stylus Pen and wait a moment. The
written letters are converted into the corresponding computer characters.
Writing Pad Close
Tools and
Options
Help
You can learn
detailed usage
for the Tablet PC
Input Panel.
Character
Pad
On-Screen
Keyboard
Tablet PC Input Panel icon
Entering Text 23
4Press the Insert button to enter the converted letters.
Editing Letters
Write over incorrect letters or press the lower part of a letter to select another letter from the
displayed letters.
Entering text using the Character Pad
The Character Pad is divided into cells separated by lines. Text entered with the stylus pen into each
cell is converted into electronic text.
To use the Character Pad, follow these steps:
1Open the Tablet PC Input Panel and an editing program.
2In the Tablet PC Input Panel, click the Character Pad icon ( ).
3Write a letter in the cell of the Character Pad with the Stylus Pen and wait a moment. The writ-
ten letter is converted into the corresponding computer character.
Insert
Entering Text 24
4Press the Insert button to enter a converted letter.
Entering text using the On-Screen Keyboard
The On-Screen Keyboard displays a standard keyboard on the screen. Text is entered by pressing
the corresponding keys on the screen.
To use the On-Screen Keyboard, follow these steps:
1Open the Tablet PC Input Panel and an editing program.
2In the Tablet PC Input Panel, click the On-Screen Keyboard icon ( ).
3Select letters using the Stylus Pen.
Insert
Entering Text 25
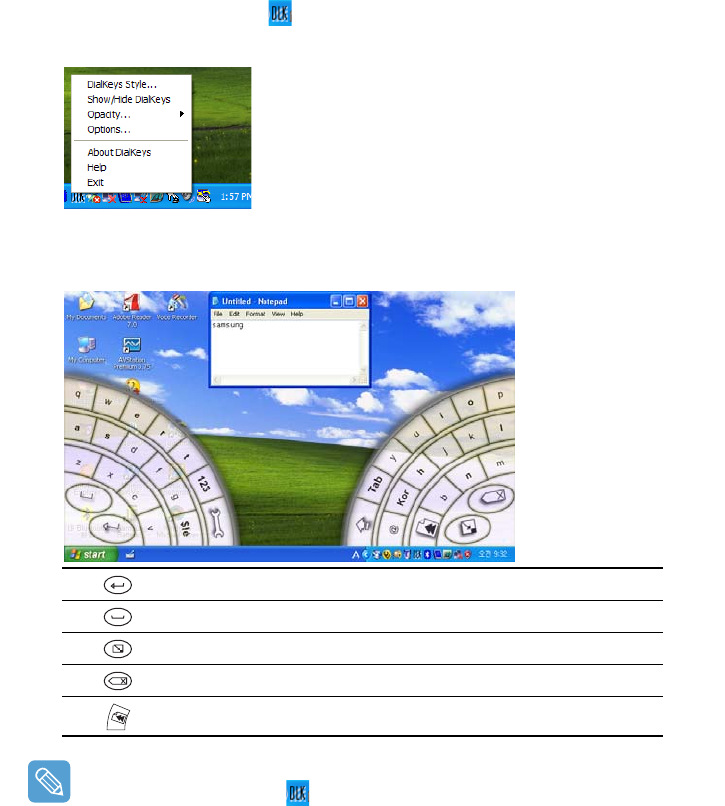
Entering text using the Dialkeys
DialKeys is an on-screen keyboard designed to be used with compact touch screen computers.
You can enter letters using the DialKeys by pressing key on the screen with your thumbs while
holding both of the lower corners of the computer with your hands.
To launch the DialKeys for the first time, click Start > All Programs > Microsoft Touch Pack
for Tablet PC > DialKeys. You can launch the DialKeys as follows after the first launch.
To use DialKeys, Follow thexe steps:
1Click on the Dialkeys icon () on the taskbar.
2Select Show/Hide DialKeys from the pop-up menu.
3Open an editing program.
4The Dialkeys appears on both lower corners of the screen. Enter letters using your thumbs.
To View Detailed Usage of the Dialkeys
Click on the Dialkeys icon ( ) on the taskbar for more than 3 seconds and select Help from
the pop-up menu.
Corresponds to the Enter key on a keyboard.
Corresponds to the space bar on a keyboard.
Minimizes the Dialkeys.
Corresponds to the Backspace on a keyboard.
Move the current window upwards.
Volume Control 26
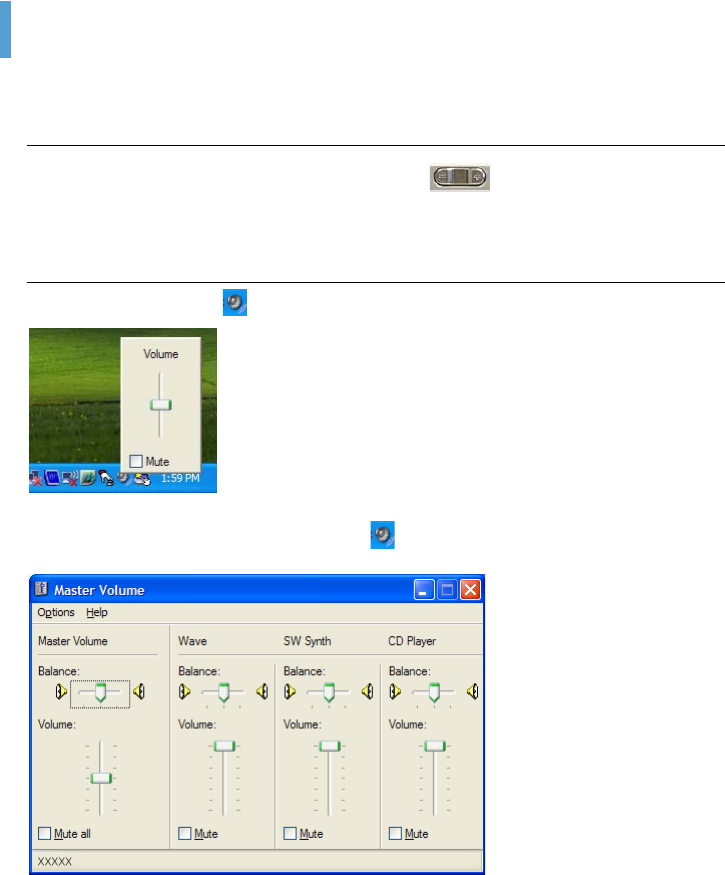
Volume Control
You can control the volume with the Volume Control button or Volume Control program.
Controlling the Volume Using the Volume Control Button
Press the right side (+) of the Volume Control button ( ) to turn the volume up and press
the left side (-) to turn the volume down.
Using the Volume Control Program
Click on the Volume icon ( ) on the taskbar and slide the volume bar up or down.
Alternatively, double-click on the Volume icon ( ) and adjust the master volume control.
Using the Buttons 27
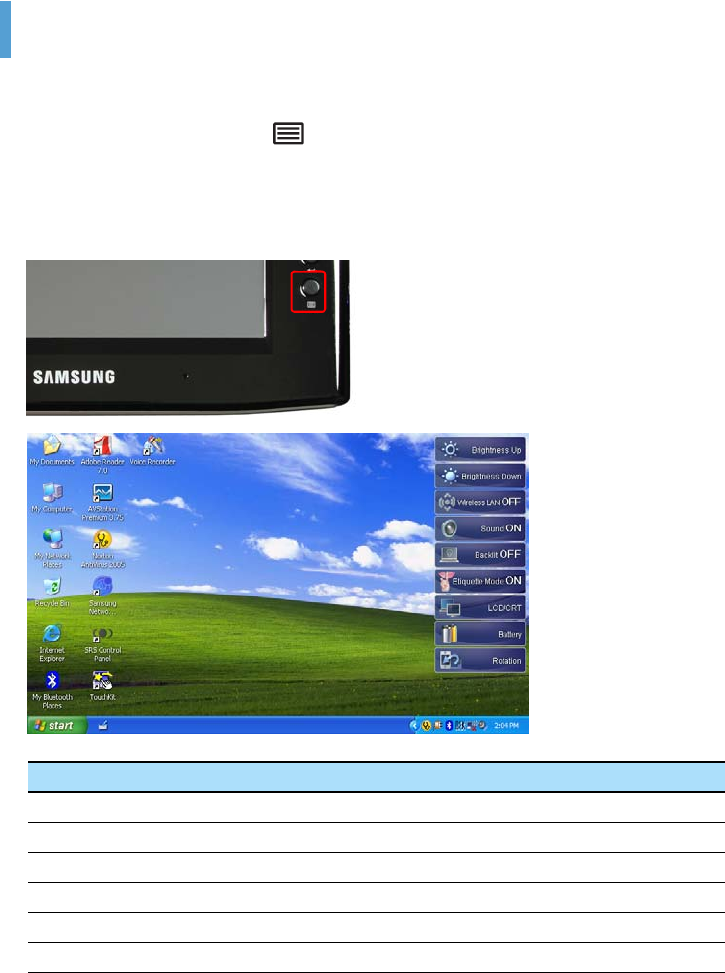
Using the Buttons
The procedures to use the Menu, Quick Launch and Auto Scaler buttons are described below.
The Menu Button ( )
Press the Menu button to launch the Menu Program. The Menu Program provides shortcuts to fre-
quently used functions on the computer. You can easily change the settings.
Press the Menu button again or press a point on the screen to hide the Menu Program.
Menu Items Function
Brightness Up This increases the LCD brightness by one step.
Brightness Down This decreases the LCD brightness by one step.
Wireless LAN ON (OFF) Turns the Wireless LAN on or off.
Sound ON (OFF) Turns the volume on or off.
Backlit OFF Turns the LCD backlight off. Press a point on the screen once to turn it on again.
Etiquette Mode ON (OFF) You can select Etiquette Mode for a tranquil work enviornment.
Using the Buttons 28
The Quick Launch Button
You can register a frequently used program, and launch a program just by pressing this button.
The procedures to change the default settings are described below.
Default Setting
The Quick Launch button is defined as follows by default.
LCD/CRT
Press the item to view screen images on an external monitor.
When pressing this item once, screen images are displayed on the LCD. When
pressing this item twice, screen images are displayed on both the LCD and the
CRT (external monitor) simultaneously.
Battery Shows the remaining battery charge.
Rotation
Whenever this item is pressed, the screen rotates by 90 degrees to the left.
Button Function Description
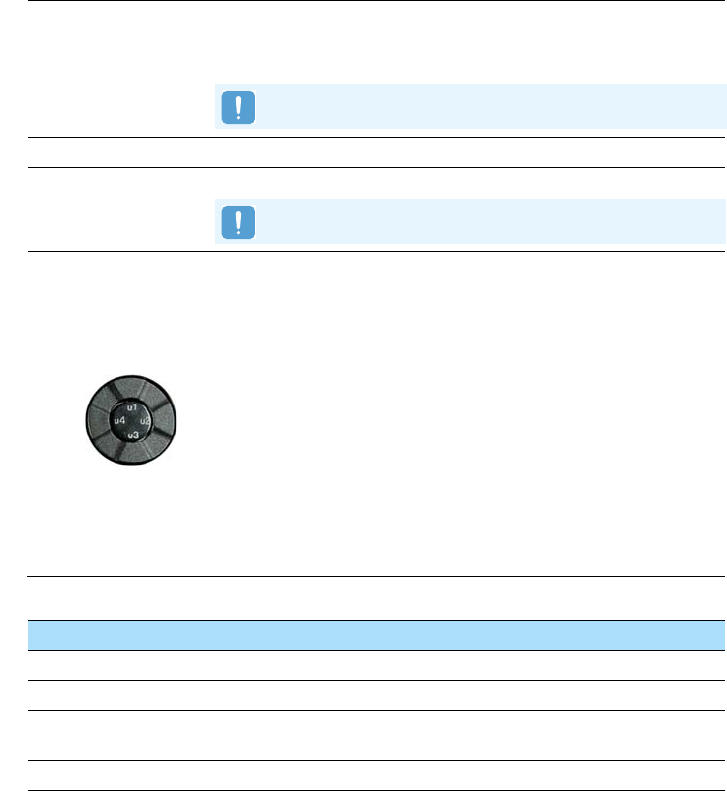
u1 Mouse Scroll Up Scrolls up in the current window.
u2 Back Moves to the previous page in Internet Explorer or Windows Explorer.
u3 Mouse Scroll Down Moves to the next page in Internet Explorer or Windows Explorer.
Scrolls down in the current window.
u4 Forward Scrolls down in the current window.
CRT Output Only is not supported.
When rotating the screen, a part of the screen image may not be dis-
played in some software programs.
Using the Buttons 29
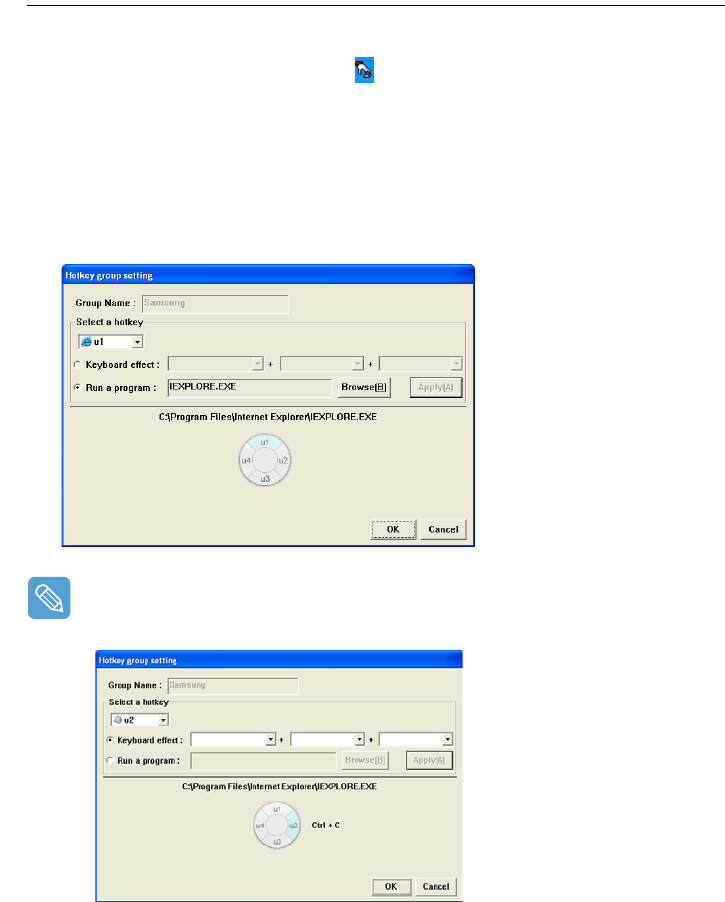
Changing the Settings
The procedures to change the default settings are described below.
1Double-click the Magic Keyboard icon ( ) on the taskbar.
2Click the add button.
3
Enter a name in the
Group Name
field and select a shortcut key in the
Select Shortcut Key
field.
4Select the Run Program option, click the Browse button, select a program to be launched
and click the Open button.
Example) C:\Program Files\Internet Explorer\IEXPLORE
Select a program and click the Apply button.
Keyboard Effect Function
A Keyboard Effect Function is used to simulate key combinations that are difficult to enter using
the Tablet PC Input Pad.
For example, to simulate the Ctrl+C key combination by pressing the u2 button, select Key-
board Effect, select Ctrl+C and click Apply.
5Click OK to finish the setting.
Using the Buttons 30
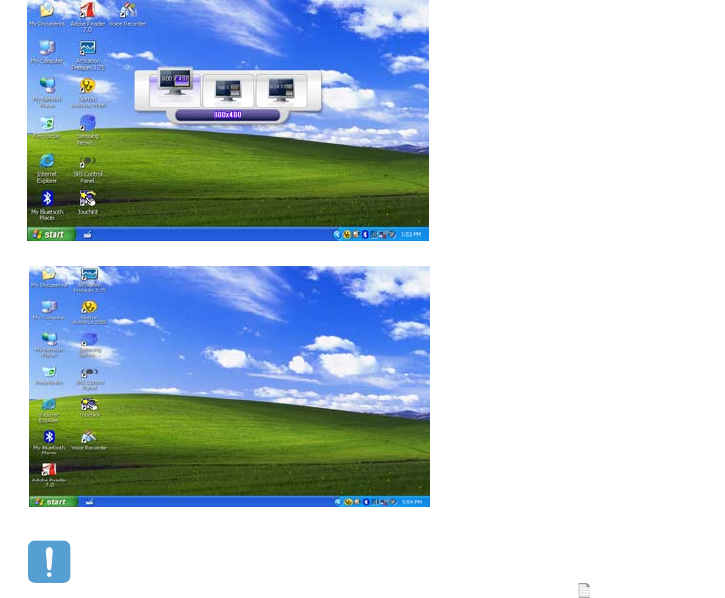
The Auto Scaler Button
The default resolution of this computer is 800x480 pixels. In the default resolution, the complete
screen image of programs designed for high resolutions may not be displayed properly. In this case,
press the Auto Scaler button(Automatic Resolution Adjustment Button) on the left side of the
computer and select a higher screen resolution.
When pressing the Auto Scaler button, the Auto Scaler menu appears. Whenever this button is
pressed, the screen resolution changes between 800 x 480 (Default Resolution) > 800 x 600 > 1024
x 600 sequentially.
The Auto Scaler button provides a function that fits high resolution screen images to the screen
size and does not support all resolutions supported by the graphics chipset. To select a resolu-
tion, which is not supported by Auto Scaler, use the Display Properties. ( p.43)
Example)
Selecting a 800 x 480 pixels resolution
Example)
Selecting a 800 x 600 pixels resolution
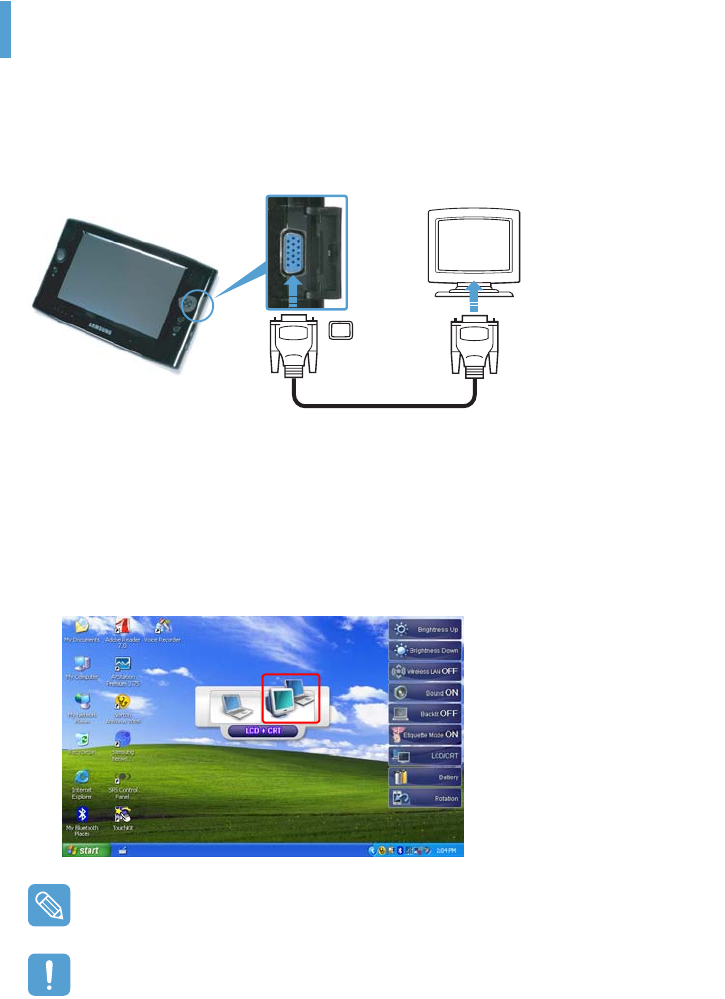
Using an external Monitor 31
Using an external Monitor
Using an external display device is useful when giving a presentation or watching a movie.
Connecting a Monitor
Open the Monitor OUT port cover by pulling the cover and connecting a monitor.
Viewing on a Monitor
1Press the Menu button.
2Press the LCD/CRT item once to display screen images on the LCD screen.
When pressing the item twice, you can view screen images on both the LCD and CRT screens
simultaneously.
LCD: Computer Screen
CRT: External Monitor Screen
Outputting to CRT only is not supported.

Using an external Monitor 32
Dual View
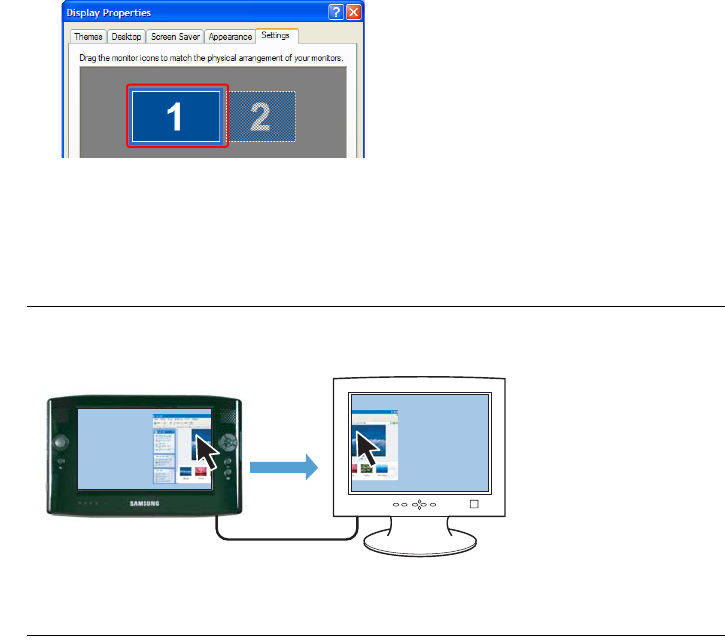
Dual View is a function that enables a computer screen to be viewed over two display devices.
The Menu button does not support Dual View mode. You have to use Windows 'Display Properties'
to use Dual View.
When using Dual View, use a USB mouse.
Using a mouse to move between screens is convenient. You cannot move between screens using
the Stylus Pen.
Using Dual View to View an Extended Screen
Check if an external display device has been properly connected and configure Dual View.
1Select Start > Control Panel > Appearance and Themes > Display.
2Click the Settings tab.
3Click the monitor '2' icon, select the 'Extend my Windows desktop onto this monitor'
check box and click Apply and then the OK button.
4If the LCD is set as the primary display device, the primary display device (the LCD) is indicated
as '1', and the secondary display device is indicated as '2'. Now you can view the screen
through two monitors.
Using an external Monitor 33
It is recommended setting the LCD screen as the primary device ('1') when using Dual View.
If the screen of the secondary display device is displayed at 640x480 pixels with 256 colors,
select Start > Control Panel > Appearance and Themes > Display > Settings tab >
Monitor 2 and change the settings to the desired screen resolution and color quality.
To Move a Window between Monitors in Dual View Mode
Click and hold a window title bar on the primary display device ('1') with the mouse and drag the
window title bar to the secondary display device ('2') to move the window.
Deactivating Dual View Mode
1Select the Start > Control Panel > Appearance and Themes > Display > Settings tab.
2Click the monitor '2' icon, unselect the 'Extend my Windows desktop onto this monitor'
check box and then click Apply.

Chapter 3. Using Microsoft Windows XP
About Microsoft Windows XP 35
Get Going with the Tablet PC 35
Tablet PC Tutorials 36
Reinstalling Windows XP 36
The Windows XP Screen Layout 37
Desktop 37
Understanding the Start Menu 38
Understanding a Window 39
Control Panel 40
Opening the Control Panel 40
User Account 41
Changing the Resolution and Colors 43
About Microsoft Windows XP 35
About Microsoft Windows XP
The Microsoft Windows XP Tablet PC Edition (hereafter, Windows) operating system is installed on this
computer.
The Microsoft Windows XP Tablet PC Edition is an operating system based on Microsoft Windows XP Profes-
sional. Additional features for the tablet PC, such as a hand-writing recognition function, have been added.
You can learn elementary functions for using this PC through the Get Going with Tablet PC and Tablet
PC Tutorials.
The computer has adopted touch screens so that you can operate the computer with your hands
and does not accord completely with the characteristics of a typical tablet PC.
In addition, since a Stylus Pen is provided instead of a Tablet Pen, the Tablet and Pen Settings
provided by the Windows XP Tablet PC Edition are not completely supported by the Pen Op-
tions.
To calibrate the Pen, use the Touchkit program. ( p.21)
Get Going with the Tablet PC
Select Start > All Programs > Get Going with Tablet PC.
The
Welcome to Tablet Computing
screen appears. Click
Start
to learn how to use your tablet PC.
About Microsoft Windows XP 36
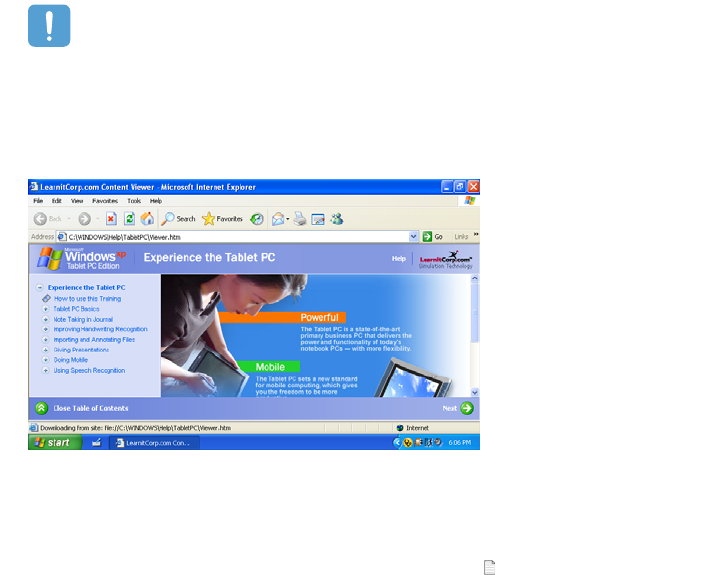
Tablet PC Tutorials
You can tour elementary functions of your tablet PC and learn how to hand-write on the Writing Pad
through the Tablet PC Tour.
The Tablet PC Tutorials only supports the 1024x768 pixels resolution.
Before running the Tutorials, select the Start > Control Panel > Appearance and Themes
> Display > Settings tab and change the screen resolution to 1024x768 pixels.
Select Start > All Programs > Tablet PC > Tablet PC Tutorials.
The Tablet PC Tour screen appears. Click Next to learn how to perform 'Note Writing', 'Entering
texts with the Tablet PC Input Panel', etc.
Reinstalling Windows XP
If Windows cannot be started up due to damage to the system or errors frequently occur, you can
reinstall Windows using the System Recovery Media (DVD). ( p.110)
You can use the system recovery media by connecting the external USB ODD to the system.

The Windows XP Screen Layout 37
The Windows XP Screen Layout
The screen layout of Windows XP Tablet PC Edition is the same as that of Windows XP.
Desktop
The desktop is the working area on the computer. It consists of a large workspace and a taskbar at
the bottom as shown in the figure below.
zStart Opens the Start menu.
xTablet PC Input Panel The Input Pad used to enter letters.
cTaskbar Programs currently running are displayed here.
vSystem Tray with
Clock Displays some program icons that are currently running. Infrequently used icons
are hidden. Clicking the left arrow icon, displays hidden icons.
c Taskbar
z Start v System Tray with Clock
x Tablet PC Input Panel
The Windows XP Screen Layout 38
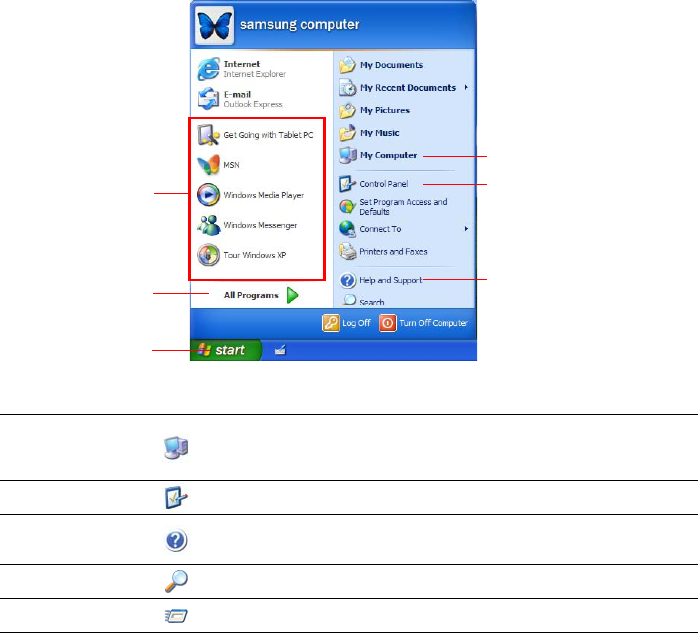
Understanding the Start Menu
The Start menu includes everything required to start Windows. From the Start menu it is possible to
run a program, open a file, assign system users with the Control Panel, receive support by selecting
Help and Support, and search for items on the computer or on the Internet by selecting Search.
My Computer Displays the contents of the hard disk, the CD-ROM drive, the network
drive(s), and floppy disks. It can also be used to search and open files and
folders.
Control Panel Enables users to configure settings on the computer.
Help and
Support Provides on-line help, information on Windows and troubleshooting.
Search Enables users to search for information in files or the Internet.
Run Runs programs or documents.
My Computer
Control Panel
Help and Support
Start Button
All Programs
Frequently used
programs
The Windows XP Screen Layout 39
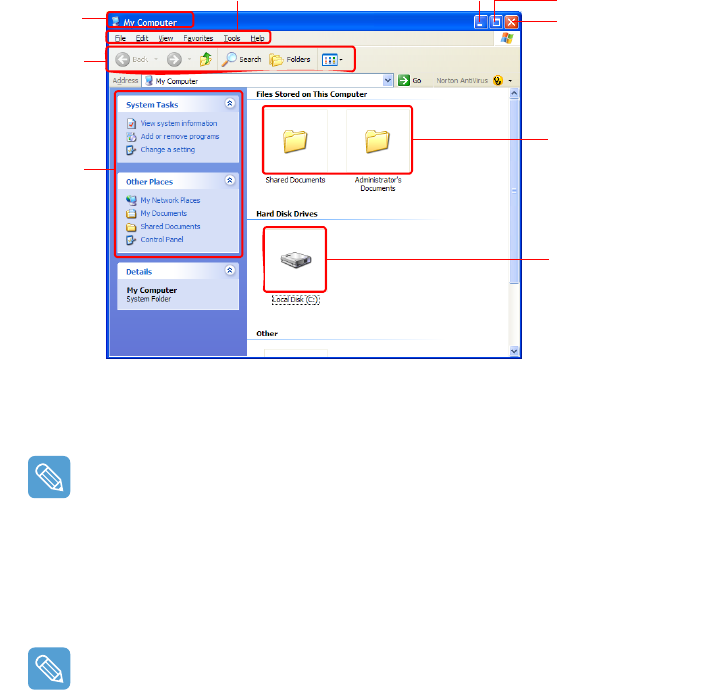
Understanding a Window
A window is the basic display component of Windows computers. The My Computer window, which
displays information on the computer's hard drive, will be used as an example to show the basic
composition of a window.
Click Start > My Computer.
Double-click the hard drive (local disk) to view the folders and files stored on in it. If the contents
do not appear, click Show the contents of this folder.
What is a drive?
A storage device on which files and folders are saved in, and read from.
What is a folder?
A folder is used to group and manage files systematically, and may include files in sub-folders.
It is similar to a filing cabinet.
What is a file?
A file is a document or a collection of various kinds of data generated as a result of program
operation.
To view the entire structure of the drive
Click the Folder icon in the taskbar to view the entire structure. Click the icon again to return to
the Quick Task Window.
Close Button
Maximize Button
Minimize Button
Drive Icon
(Storage Device)
Title Bar Menu Bar
Quick Task
Window
Folder Icon
Tool Bar
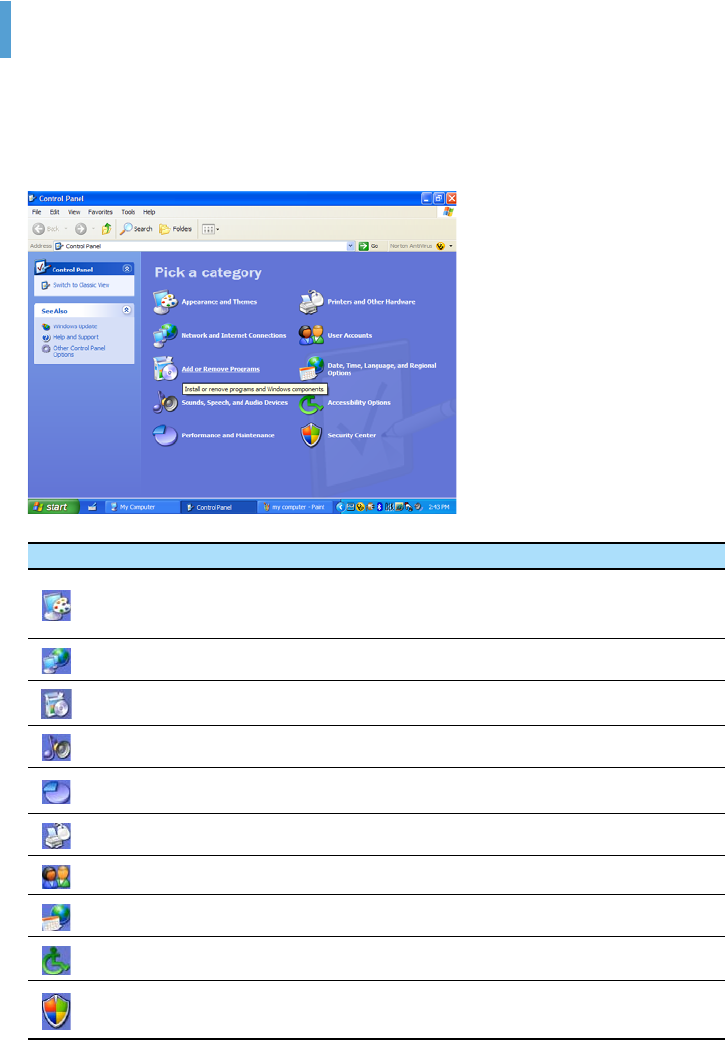
Control Panel 40
Control Panel
The Control Panel contains tools to configure Windows.
Opening the Control Panel
Select Start > Control Panel.
Icon Name Function
Appearance and
Themes
Changes the appearance of Windows.
This function is used to change the Desktop, apply a theme and a screen
saver to the computer, and change the Start menu and Taskbar.
Network and Internet
Connections This function is used to configure the network settings or configure and
add Internet connections.
Add or Remove
Programs This function is used to add remove a program from Windows.
Sound, Speech and
Audio Devices This function is used to adjust the volume, select a sound scheme, and set
up the speakers.
Performance and
Maintenance This function is used to configure the Windows performance options.
In addition, you can manage the hard disk drive and hardware.
Printers and Other
Hardware This function is used to add or configure a printer, mouse, keyboard, scan-
ner, camera, or gaming device, etc.
User Accounts This function is used to add or set up a Windows XP user account.
Date, Time, Language
and Regional Options This function is used to configure the date, time, language, and regional
settings.
Accessibility Options This function is used to select options for disabled persons and people with
bad vision.
Security Center This function is used to check the current security status to protect a user's
computer and configure the security settings for the firewall, virus anti-
virus program, etc.
Control Panel 41
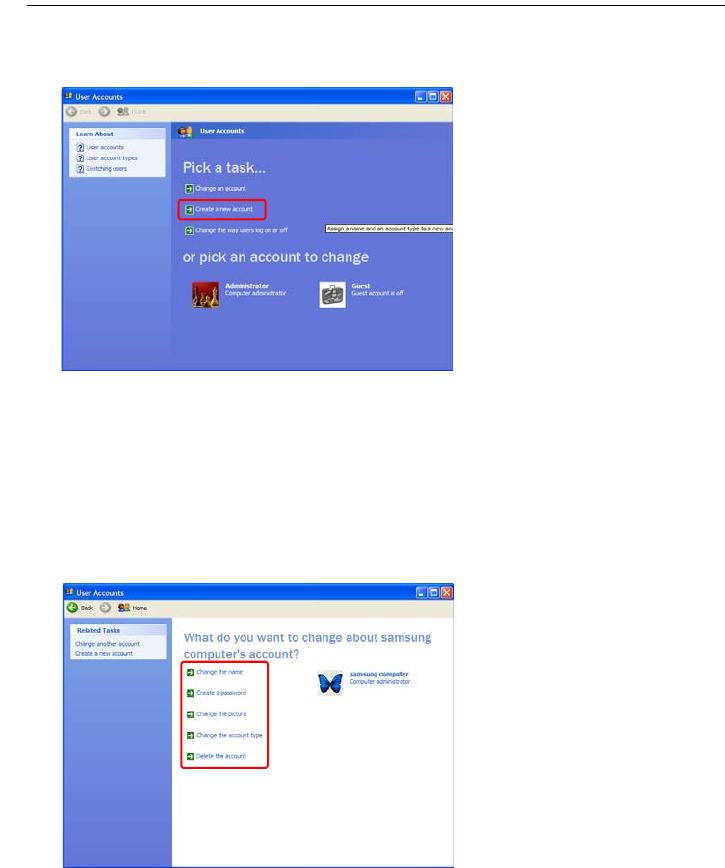
User Account
Windows XP allows multiple user to use a computer with their own user account. The procedures to
add a user account and switch between user accounts are described below.
Adding a User Account
1Select Start > Control Panel.
2Double-click User Accounts and click Create a New account.
3Click the Tablet PC Input Panel icon, enter a name and then click the Next button.
4Select an account type, click Create Account, and then check the newly created account in
the user account screen.
If you cannot see the bottom of the screen, press and drag the scroll bar of the window with
the Stylus Pen.
5To change the user account information, click on account to be changed.
You can change the account name, password, type and picture.
Control Panel 42
Deleting a User Account
1Select Start > Control Panel > User Accounts.
2Click on user account to be deleted and click Delete Account.
You cannot delete a currently logged in user account.
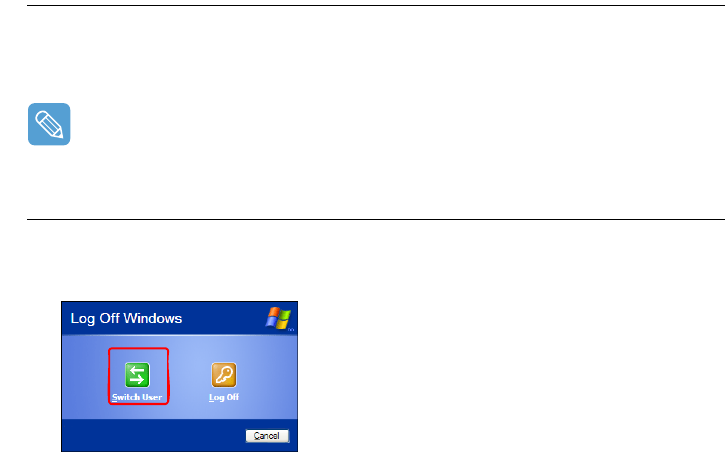
Switching Users
1Select Start > Log Off.
2Click Switch User.
3Click on user account to login to the Start screen.
Login with a new user account.
Control Panel 43
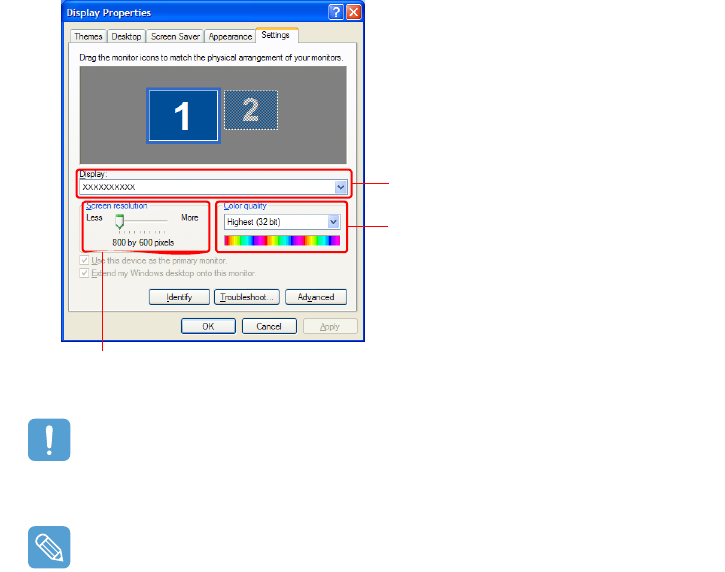
Changing the Resolution and Colors
The resolution means the number of pixels displayed on the screen. When selecting a higher reso-
lution, items on the Desktop become smaller and more items can be displayed on the screen. The
color quality can also be configured. The higher the color quality, the more colors are displayed on
the screen.
To change the screen resolution or color quality, follow these steps:
1Select Start > Control Panel > Appearance and Themes > Display.
2Click on Settings and change the Screen Resolution and Color Quality.
3Click OK.
If the 800x480 resolution is not available
When selecting the 800x600 or 1024x600 resolution by pressing the Auto Scaler button, the
800x480 resolution may not appear in the Display Properties window. In this case, press the Auto
Scaler button and select the 800x480 resolution.
About the 1024X768 Pixels Resolution
The 1024x768 pixels resolution is also fits to the screen size. You can select the 1024X768 pixels
resolution by selecting the Start > Control Panel > Appearance and Themes > Display >
Setting tab.
You can check your graphics chipset.
To set the resolution, slide the resolution slide bar to a
desired resolution in the Screen resolution field.
To set the color quality, select a color
quality in the Color quality field.

Chapter 4. Using the Network
Connecting to a Wireless LAN 45
Connecting to an Access Point (AP) 46
Connecting to computer-to-computer
networks (peer-to-peer or ad hoc) 47
Setting up a Wireless Network Setup
Using the Wireless LAN Setup Program 50
Using Samsung Network Manager 51
Setting Up a Network 51
Accessing a network
from a different location 54
Network Status Diagnosis 54
Using Bluetooth Devices 55
Bluetooth Software Setup 56
Using Bluetooth 58

Connecting to a Wireless LAN (Optional) 45
Connecting to a Wireless LAN (Optional)
A wireless network (Wireless LAN) environment is a network environment that enables communication be-
tween multiple computers using wireless LAN devices.
Using the wireless network connections between computer systems, you can use normal network
functions such as sharing of files, folders and printers.
A wireless LAN card is optional. The model of the wireless LAN card is determined by the relevant
product.
To view the installed wireless LAN card, click Start > Control Panel > Performance and Mainte-
nance > System > Hardware tab > Device Manager.
The wireless LAN connection settings are described on the basis of a Windows XP Service Pack
2 installed computer.
It is recommended using the default settings provided by Windows XP as the wireless LAN set-
tings for Windows XP installed computers.
To setup the wireless card using the software supplied by the wireless LAN card manufacturer,
refer to "Setting up a Wireless Network Setup Using the Wireless LAN Setup Program" (p50).
To use the Wireless LAN, the Wireless LAN must be turned on.
Press the Menu button and press the Wireless LAN ON item to turn it on. If the Wireless LAN
is turned on, the Wireless LAN LED ( ) is lit up.
Wireless Network Connection Types
Wireless network connections can be classified into two categories.
1) Access Point (AP)
You can connect to an AP to use the network. This is only possible in an environment equipped with
an AP. For details, see “Connecting to an Access Point (AP)” on page 46.
What is an Access Point (AP)?
An AP is a network device that bridges wired and wireless LANs, and act a s a wireless hub. You
can connect multiple wireless LAN installed computers to an AP.
2) Computer-to-computer (ad hoc)
This is also called a peer-to-peer network.
In computer-to-computer wireless networks, you can wirelessly connect 2 or more computers that
have wireless LAN modules. For details, see “Connecting to computer-to-computer networks (peer-
to-peer or ad hoc)” on page 47.
Connecting to a Wireless LAN (Optional) 46
Connecting to an Access Point (AP)
This section describes how to connect to an AP. You can access the network when you are connected
to an AP.
For more detailed information, about your network, such as the network key (encryption key),
ask your network administrator.
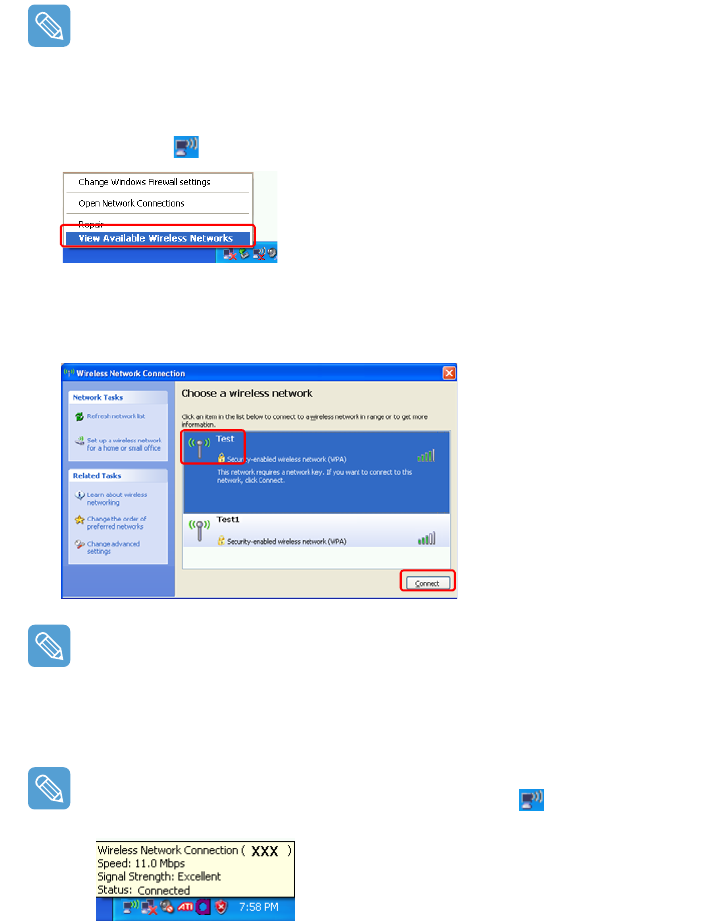
To connect to an AP, follow these steps:
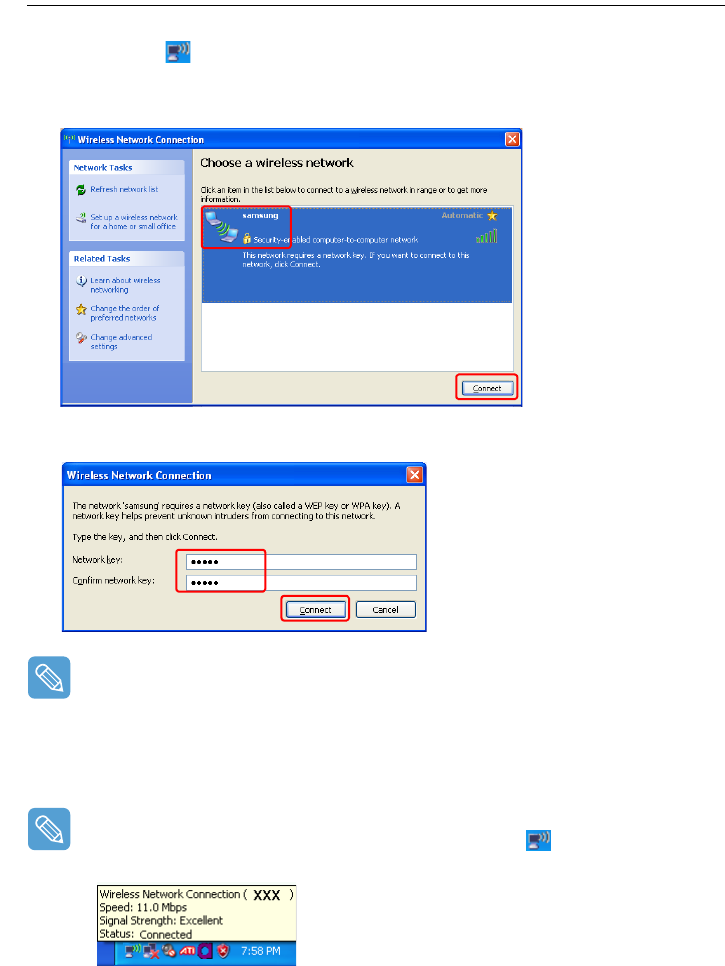
1Right-click(press and hold the Stylus Pen for more than 3 seconds) on the Wireless Network
Connections ( ) icon on the taskbar, and select View Available Wireless Networks.
2Select an AP (E.g. see the Test network diagram below) to connect to and click Connect.
If there is a configured network key for the AP, the Enter Network Key window appears. Enter
the Network Key and click the Connect button.
When on network key is defined for a selected AP, click on Link to display the warning message
box. Then click on Connect again in the box.
Now when Connected is displayed in the right corner of the AP information window, you can
access the network.
Checking the connection status
Move the mouse pointer over the Wireless Network Connection ( ) icon on the taskbar to dis-
play the connection status.
Connecting to a Wireless LAN (Optional) 47
Connecting to computer-to-computer networks
(peer-to-peer or ad hoc)
In computer-to-computer wireless networks, you can connect two or more computers that have
wireless LAN modules. Using this method, a computer that is not connected to the Internet can ac-
cess the Internet through another computer connected to the Internet.
You can connect by completing the following steps:
•Step 1. Set up a computer-to-computer network on a computer.
•Step 2. Connect to the configured computer from other computers.
Step 1. Setting up a computer-to-computer network
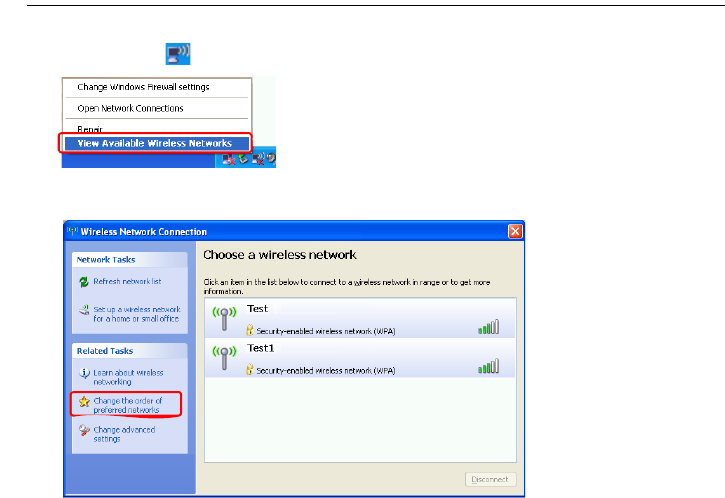
1Right-click(press and hold the Stylus Pen for more than 3 seconds) on the Wireless Network
Connection ( ) icon on the taskbar, and select View Available Wireless Networks.
2Click Change the order of Preferred Networks.
3In the Wireless Network tab, click Advanced.
4Make sure the 'Automatically connect to non-default network' checkbox is not, selected. Select
'Computer-to-computer (ad hoc) networks only', and click Close.
5In the Wireless Networks tab, click Add.
Connecting to a Wireless LAN (Optional) 48
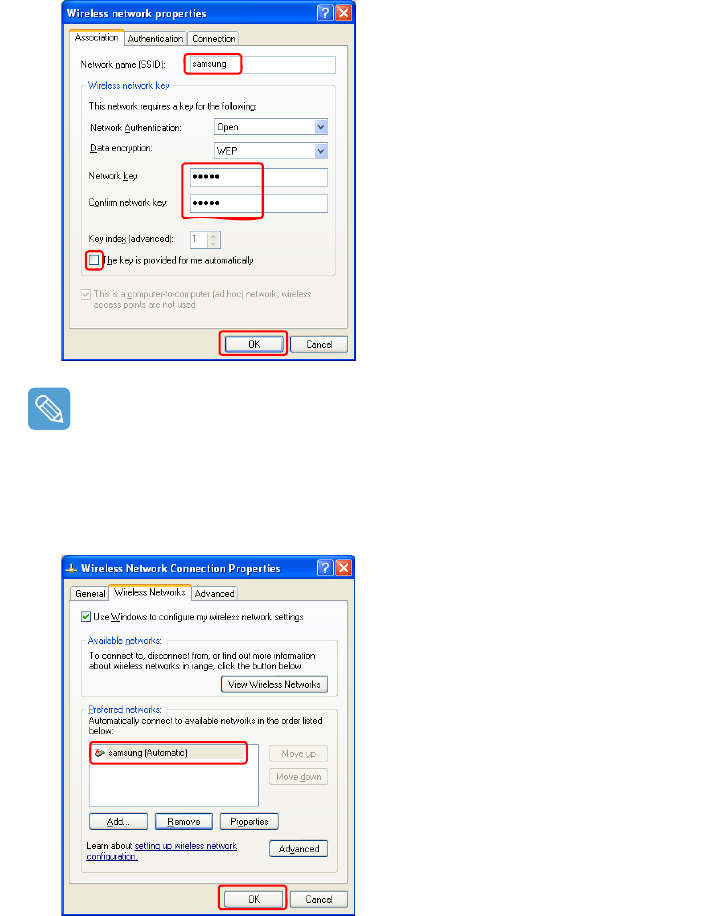
6Enter the network name (e.g. samsung), and unselect 'The key is provided for me automatical-
ly'. Enter the encryption key in the Network key field, and click OK.
To prevent a network access from unauthorized user, it is better to configure a network key (en-
cryption key). A network key consists of 5 ~ 13 alphanumeric characters (e.g. magic), or of 10
~ 26 hexadecimal numbers (a hexadecimal number is represented by the numbers '0' to '9' and
the letters 'a' to 'f').
7Check that the configured network name (e.g. samsung) is in the ’Preferred networks’ item,
and click OK.
Now your wireless network setup has been completed.
Connecting to a Wireless LAN (Optional) 49
Step 2. Connecting to the configured computer
1Right-click(press and hold the Stylus Pen for more than 3 seconds) on the Wireless Network
Connection ( ) icon on the taskbar, and select View Available Wireless Networks.
2Select the wireless network name (e.g. samsung) specified in ”Connecting to computer-to-com-
puter networks (peer-to-peer or ad hoc)” on page 47, and click Connect.
3Enter a cryptographic key in the network key box and click Connect.
If the network key is not configured in ”Connecting to computer-to-computer networks (peer-to-
peer or ad hoc)” on page 47, just click Connect, without any keystrokes.
When connected to the wireless network, the system displays Connected in the selected net-
work of the Network Connection window.
Checking the connection status
Move the mouse pointer over the Wireless Network Connection ( ) icon on the taskbar, to
display the connection status is displayed.
Connecting to a Wireless LAN (Optional) 50
Setting up a Wireless Network Setup Using the Wireless LAN Setup Program
The procedures to connect to an access point using a wireless LAN configuration program are de-
scribed below. Since the wireless LAN configuration program is included on the System Software
Media, the user has to install the program.
Before Starting!
To use the system software media, the external USB ODD must be connected to the computer.
The following descriptions presuppose that the external ODD is connected.
1Insert the System Software Media into the CD drive and install the wireless LAN configura-
tion program (ACU: Atheros Client Utility).
Select System Software Media > User Installation > Wireless LAN Driver ReadMe,
click ReadMe and install the program according to the instructions.
2Right-click( press and hold the Stylus Pen for more than 3 seconds) on the wireless LAN con-
figuration program ( ) on the taskbar and select Open Atheros Client Utility.
Alternatively, click Start > All Programs > Atheros Client Utility > Atheros Client Util-
ity.
3In the Profile Management tab, click Scan to search for available wireless networks.
4Select the name of an access point (AP) to connect to from the network name (SSID) and then
click Activate.
5Enter a profile name to be used for the connection and select the security settings of the AP to
be connected to in the Security tab.
The network authentication, encryption type and password of an access point are configured
through the access point management program. For the security information, check the security
settings of an access point or ask your wireless network administrator.
Refer to the following when configuring a WEP key.
•Data encryption (WEP): The IEEE 802.11 WEP (Wired Equivalent Privacy) standard
defines two levels of encryption, a 64-bit key (this is sometimes represented by 40bits) and a
128-bit key.
When connecting to an Atheros access point, you can use the 152-bit key (32 hexadecimal
digits or 16 ASCII characters).
•Key index: Select the current encryption key index used by the access point from between
1 to 4.
•Using an encryption key: Enter 5 (for 64-bit) or 13 (for 128-bit) alphanumeric characters
(represented by 0-9, a-z, or A-Z).
6Click OK and then OK again in the Profile Management window.
If the profile is created, the profile appears in the list in the Profile Management tab and the
connection is established using the profile.

Using Samsung Network Manager 51
Using Samsung Network Manager
Samsung Network Manager is a program that helps configure the network settings.
Samsung Network Manager provides the following features.
•You can easily configure the network and printer settings.
•You can immediately use the network without defining new network settings again
after moving locations.
By setting the network settings (IP address, printer settings, etc.) for each location, you can im-
mediately access the network without following network setting procedures each time regard-
less of your location.
•You can diagnose the network status.
You can diagnose the network status when the network is not properly connected.
Setting Up a Network
The setup procedures include the procedures to add a printer to the network.
Before Starting!
Before configuring the network settings, click the Auto Scaler button and set the resolution to
800 x 600 or 1024 x 600 pixels.
At the default resolution (800x480), the lower part of the software screen may not be displayed.
1To use a wireless LAN, make sure it is on.
Press the Menu button and click the Wireless LAN ON item to turn it on. When the wireless
LAN is turned on, the Wireless LAN LED () lights up.
2Run Samsung Network Manager.
Select Start > All Programs > Samsung > Samsung Network Manager > Samsung
Network Manager or double click the Samsung Network Manager( ) icon on the
Desktop.
3Click the Add button. You may need to rotate the screen to access the Add button.
4Select a network location icon and enter the name of the location (e.g. Home). Click the Next
button.
Using Samsung Network Manager 52
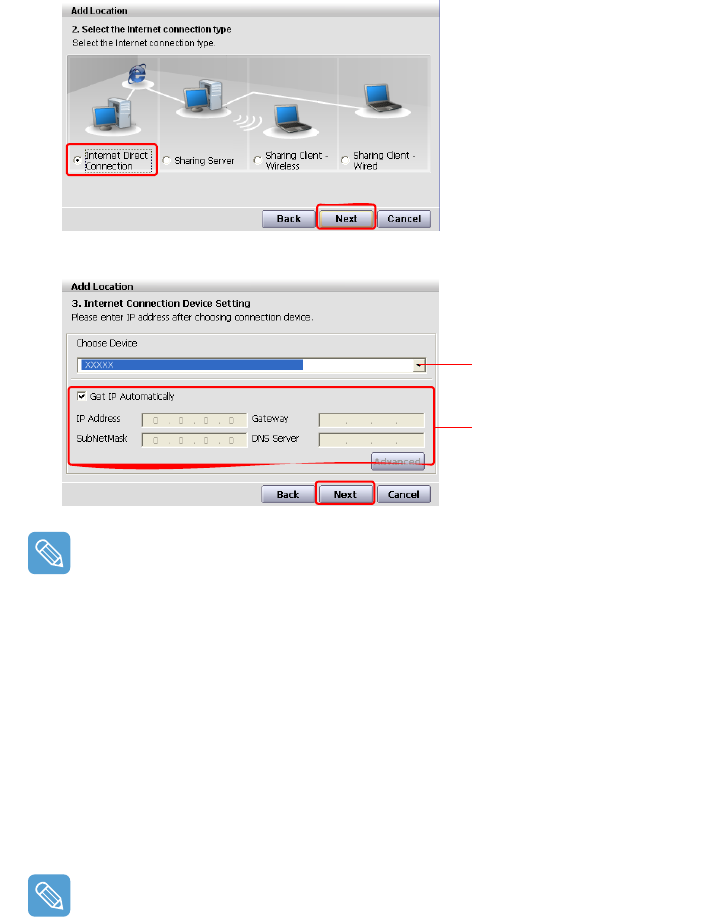
5Select Internet direct connection and click the Next button.
6Select the LAN device, configure the IP address, and click the Next button.
Select Device
Select a device to be connected to the Internet. Select Wireless LAN.
Setting up the IP Address
To allocate an IP address automatically (DHCP), select Get IP Automatically.
To use a static IP address, unselect Get IP Automatically and enter an IP address. For the IP
address information, ask your network administrator.
7When the Printer Setting window appears, click Finish.
To add a printer, click Add Printer. The Add Printer Wizard appears. Set up the printer accord-
ing to the instructions displayed on the screen.
When the printer has been added, click the Show printer button, select the newly added print-
er and then click the Finish button.
To not add a printer, select No Default Printer and then click the Finish button.
When the network setting is complete, the ’Do you want to move to newly added location
now?’ message appears. If you select ’Yes’, the network settings for the added location are ap-
plied.
When the network settings for the added location are applied, the added place and the correspond-
ing network connection information is displayed in
The detailed Information for window
.
Select Device
Setup IP Address
Using Samsung Network Manager 53
When the network setting is complete, an icon for the added location is created within the Saved
Locations window. Now you can use the Internet at that location or add a new network location.
Wireless LAN AP Connection Procedures
To use a wireless LAN, first connect to a wireless LAN AP to access the network even when at a
different location. Or moving location and then you can access the network even when connect-
ing to a wireless LAN AP.
z Right-click over the Wireless Network Connection ( ) icon on the Taskbar and click
View Available Wireless Networks.
x Click Search AP from the Wireless menu to search for wireless LAN APs.
Select an available wireless network (e.g. SAMSUNG) and click the Connect button. For in-
formation on available wireless LAN APs, ask your network administrator.
c The network key (security key) input window appears.
- If a network key has been configured for the wireless LAN AP, enter the network key and
click the Connect button. For the network key information, ask your network administrator.
- If no network key has been configured for the wireless LAN AP, click the Connect button
without entering the network key.
v When the computer is connected to the wireless LAN AP, the Connected message will ap-
pear on the Wireless Network icon in the Taskbar.
Menu
Current Place
Information
Saved Locations
Available AP
Connect
Using Samsung Network Manager 54
Accessing a network from a different location
By configured the network settings (IP address, printer setting, etc.) for each location, you can immedi-
ately access the network without performing the network setting procedures regardless of your location.
To access a network you have entered into the Network Manager, follow these steps:
1Run Samsung Network Manager when connected to the Internet.
2Select an icon that represents the corresponding location from the Saved Locations window and
then click Move.
You may need to rotate the screen to click Move.
3When the network settings of the selected location are applied, the new location and the net-
work connection information are displayed in The detailed Information for window.
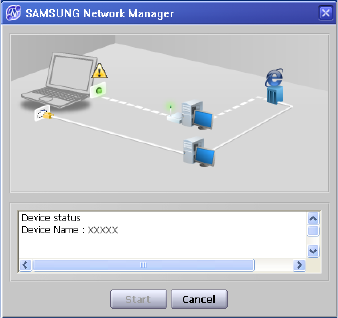
Network Status Diagnosis
You can diagnose the network status when the network is not properly connected.
1Run Samsung Network Manager.
2Select Auto Diagnosis from the Manage menu.
3The Network Connections figure window appears. Click the Start button to start the network
diagnosis.
4When the diagnosis is complete, devices which are out of order are marked by the exclamation
mark icon. For detailed device status, read the description at the bottom of the window.
Reconnect and set up the device according to the diagnosis result.
Using Bluetooth Devices (Optional) 55
Using Bluetooth Devices (Optional)
Bluetooth is a wireless communication technology that allows access to nearby devices such as computers,
mobile phones, printers, keyboards or mice without a cable connection. Bluetooth enables file transmis-
sions, Internet access, a private area network function, and access to a keyboard, mouse and printer be-
tween devices supporting the Bluetooth function without a cable connection.
Before Starting!
•The Bluetooth function is only available between devices supporting Bluetooth (computers,
mobile phones, PDAs, printers, etc.), and the function may be restricted depending on the
device profile.
•The Bluetooth function is optional and may not be supported depending on your model.
•Compatibility with a Bluetooth device not certified by a Bluetooth certification or logo is not
guaranteed.
Bluetooth Functions
•File Transmission ( )
You can exchange files between 2 Bluetooth devices. You can exchange files with other com-
puters, mobile phones, PDAs, etc.
•Network Access ( )
You can connect to another computer using the Bluetooth function as if accessing a wireless LAN
in Ad-Hoc mode or connect to the Internet through an AP or Internet Connecting Sharing Server.
•Network Access through a Phone Connection ( )
You can connect to the Internet through a Bluetooth mobile phone.
•Data Sync (Synchronization) ( )
You can synchronize the PIMS data (Outlook E-mail address data) with mobile phones, PDAs,
notebook computers, etc. supporting Bluetooth.
•Electronic Business Card (Vcard) Exchange ( )
You can exchange electronic business cards with mobile phones, PDAs, notebook computers,
etc. supporting Bluetooth.
•Sound Output ( )
You can listen to audio from the computer through another Bluetooth device or listen to audio
of another Bluetooth device through the computer.
•HID Connections ( )
You can connect a keyboard, mouse, joystick, etc. supporting Bluetooth.
To use the Bluetooth function, refer to the online help of the corresponding Bluetooth device.
Using Bluetooth Devices (Optional) 56
Bluetooth Software Setup
Bluetooth software is installed on computers supporting Bluetooth.
For first time use, configure the Bluetooth software as follows.
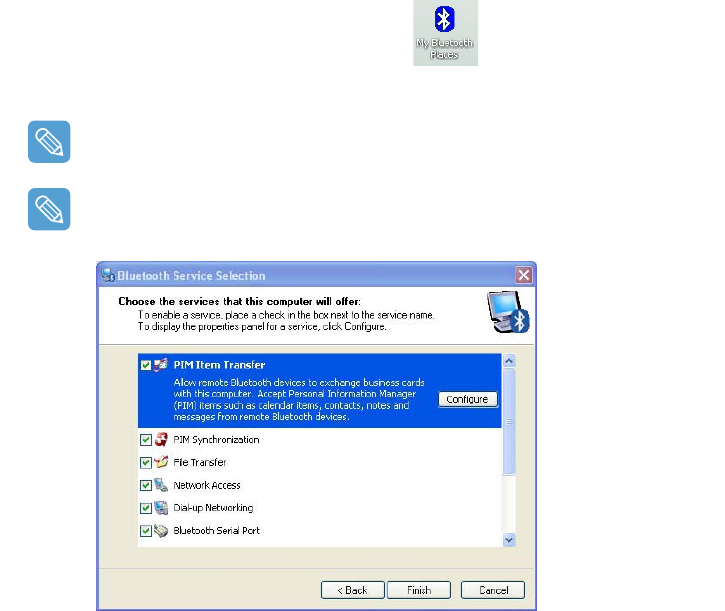
1Double-click the My Bluetooth Environment icon ( ) on the Desktop.
2Click the Next button to start the configuration.
In the configuration steps, enter a device name to be displayed in the Bluetooth Manager pro-
gram. Enter a Name in the Computer Name field and select Laptop for the Computer Type field.
Also, a step appears for selecting the services to be provided by your Bluetooth device for other
Bluetooth devices. At this point, the program automatically detects available services and dis-
plays them as selected. It is recommended keeping the default selection.
If you change the service settings, the drivers necessary for the additionally selected services
are installed.
At this point, a warning message may appear informing you that there is no Microsoft logo. Since
it does not affect the operation, continue the installation.
Using Bluetooth Devices (Optional) 57
3If the driver installation is complete, the next step proceeds which searches for nearby Blue-
tooth devices. Since you do not have to search while setting up, click the Skip button and finish
the settings.
4If the settings are complete, the My Bluetooth Environment window appears.
Using Bluetooth Devices (Optional) 58
Using Bluetooth
Describes how to exchange files between computers supporting Bluetooth and how to use other
Bluetooth devices.
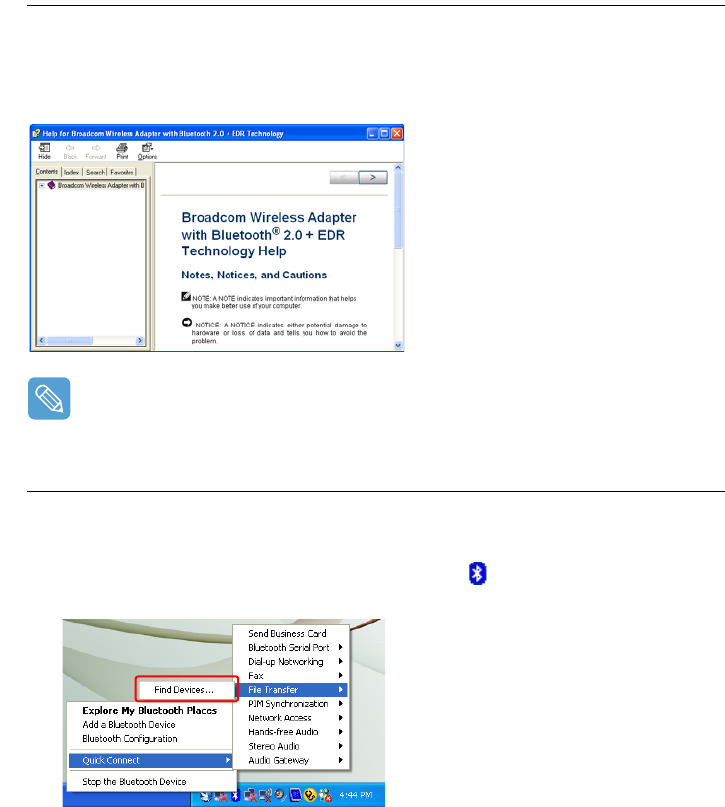
Bluetooth Help
Bluetooth Help provides detailed procedures on using Bluetooth functions.
Double-click on My Bluetooth Settings on the Desktop and click Help > Bluetooth Help from
the top menu.
Select Start > Help and Support > Networking and the Web > Networking > Wireless networking
> Bluetooth devices (wireless) to view Windows Help.
Exchanging Files between Bluetooth computers
The procedures to exchange files and folders between Bluetooth computers are described below.
1On the computer which is sending a file (hereafter Computer A), right-click(press and hold the
Stylus Pen for more than 3 seconds) the Bluetooth icon ( ) on the taskbar and select Quick
Connection > File Transmission > Search for Device.
2In the Select Device window, click on a computer to be connected (hereafter Computer B).
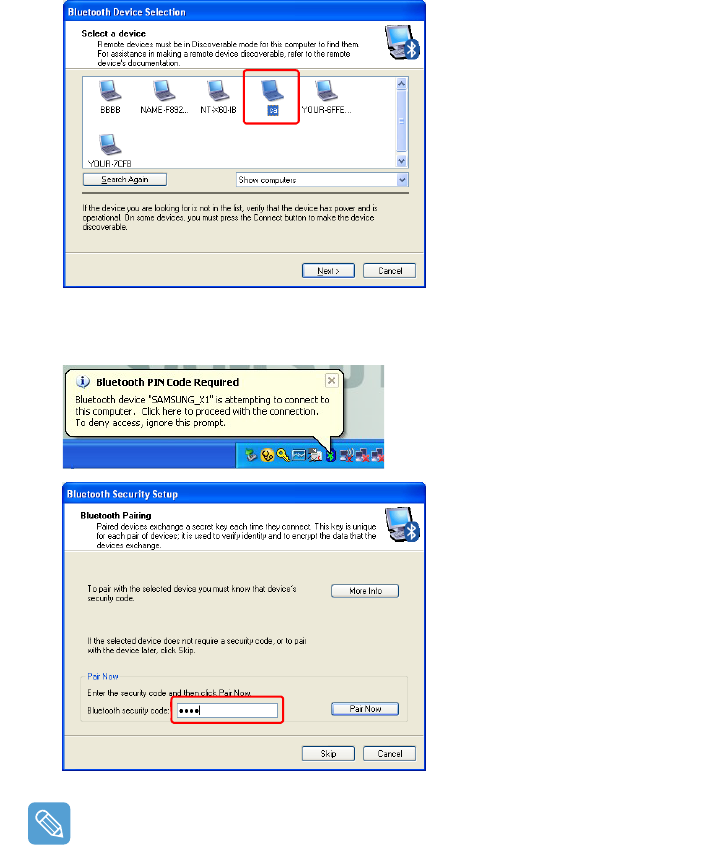
Using Bluetooth Devices (Optional) 59
3If the Bluetooth Security Settings window appears, enter the Bluetooth Security Code (or
Bluetooth PIN) and click on Start Pairing.
The Bluetooth PIN Code is a password used for the connection between two Bluetooth devic-
es, the user just enter the same PIN Code (E.g. same numbers) on both Bluetooth devices to
make a connection.
4After a short while, the Bluetooth PIN Code required dialog box appears on Computer B,
enter the same code entered in Step 3 above.
5If the FTP File Access Privilege Request window appears on Computer B, click on the window.
If the Select Access Permission window appears, click the OK button.
Using Bluetooth Devices (Optional) 60
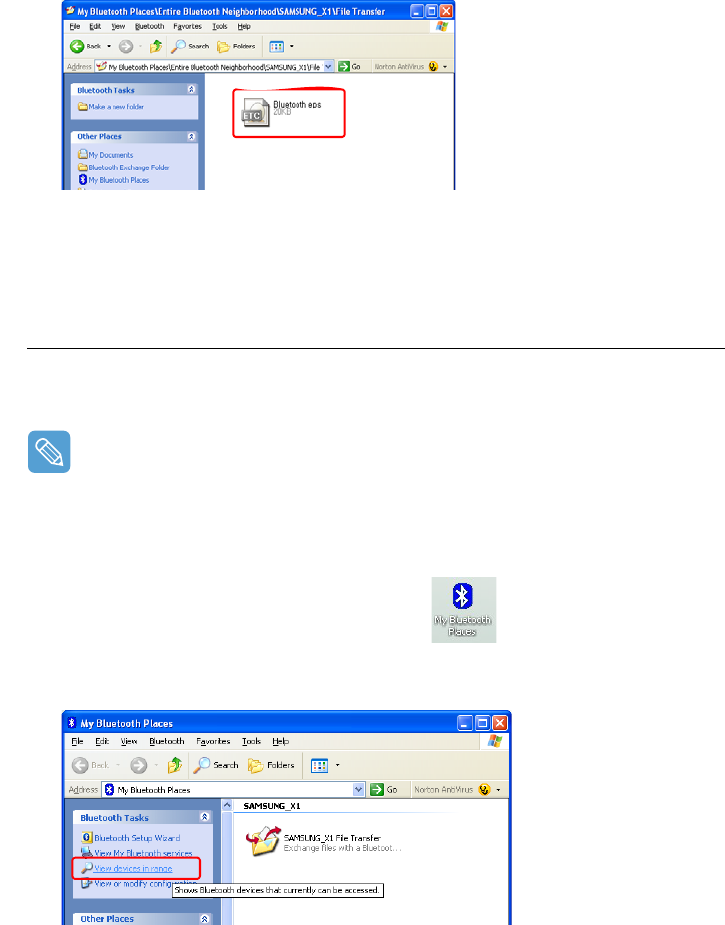
6The file transmission window appears on computer A. Drag files or folders to send onto the
window, and the files or folders are automatically transmitted.
7If the file transmission is complete, close the File Transmission window.
The received files are saved in the C:\Documents and Settings\[user name]\My Docu-
ments\Bluetooth Exchange folder.
Connecting Keyboard, Mouse, Joystick and Headset devices
The procedures to use Bluetooth HID devices (keyboard, mouse, joystick, etc.) or a headset, etc.
on the computer are described below.
The Bluetooth PIN Code is a password used for the connection between two Bluetooth devices,
the user simply enters the same PIN Code on both Bluetooth devices to make a connection.
1Turn on the Bluetooth function on the device to connect to (mouse, keyboard, joystick or head-
set).
Some devices have a button to turn on the Bluetooth function, so refer to the corresponding
device manual.
2Double-click on the My Bluetooth Settings icon ( ) on the Desktop.
3If the My Bluetooth Settings window appears, click on View Devices within Coverage.
If the device to connect to appears, click on the device. (E.g. mouse)
Using Bluetooth Devices (Optional) 61
If the device does not appear, click the View Devices within Coverage. If the device has not
appeared yet, since this menu changes to Search Devices within Coverage, click the Search
Devices within Coverage to show the device.
4If the Bluetooth PIN Code input window appears, enter a PIN code referring to the manual
of the corresponding device. The PIN code for an HID device is generally printed in the manual
of the corresponding device.
5If you enter the PIN code, you can immediately use the device.
A Bluetooth keyboard and mouse work only in Windows. They will not work in MS-DOS mode or
in Hibernation mode.
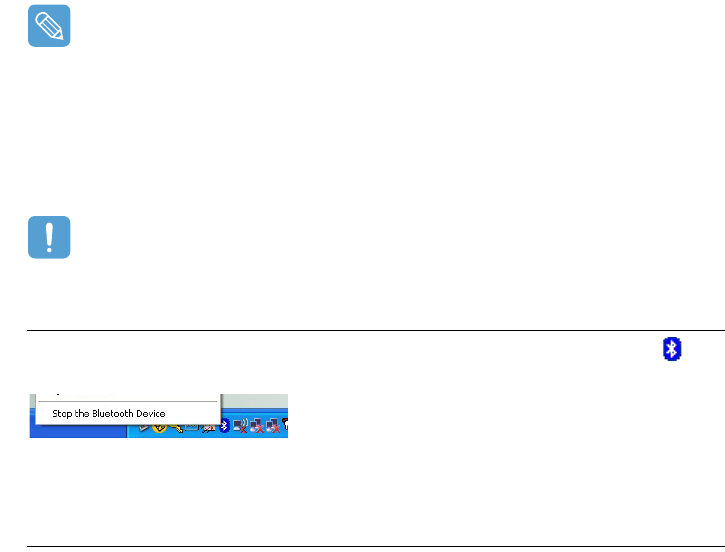
Stopping a Bluetooth device
Right-click(press and hold the Stylus Pen for more than 3 seconds) the Bluetooth icon () on
the taskbar and select Stop the Bluetooth Device.
To use a Bluetooth device after stopping it, select Start Bluetooth device as above.
Usage Instructions
•Bluetooth devices must be within a 3m (10 ft.) distance.
•For a better communications environment, use the devices in an open space where no wall or
obstacle exists.
•For a telephone connection, data synchronization, electronics business card exchange, fax
transmission/reception, sound related functions, and serial port function, you can connect with
only one Bluetooth device.
•Using the network connection or file transmission function, multiple Bluetooth devices can be
connected. However, since connecting with multiple devices may slow down the data rate or
make the connection unstable, connecting with one device at a time is recommended.
•The Bluetooth function of a Bluetooth PDA, mobile phone, mouse or keyboard may be turned
off. To use them in connection with a Samsung computer supporting Bluetooth, you must
check if the Bluetooth function of the device to connect to is turned on.
For the procedures on turning on the Bluetooth function of a device, refer to the manual of the
device.
•The services provided by Bluetooth devices may vary depending on their capability. For the
services provided by Bluetooth devices, refer to the manual of the device.
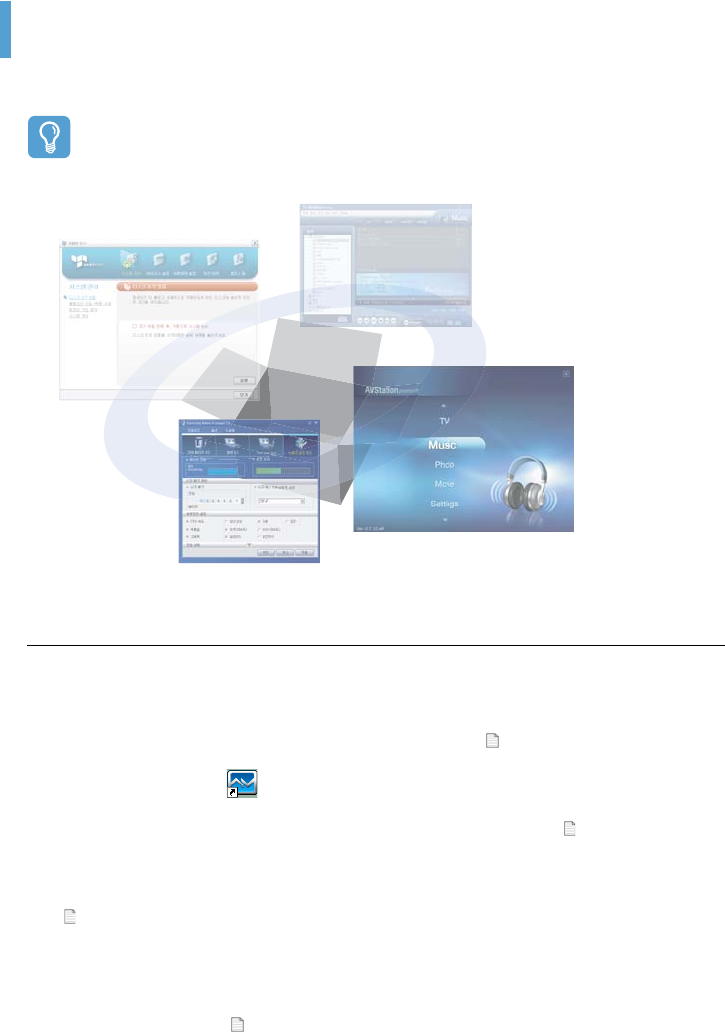
Chapter 5. Using Applications
Introducing Programs 63
Using Samsung Update Plus 65
Program Launcher 67
Program Launcher Screen Layout 67
Using Program Launcher 68
Using AVStation premium 69
Start and Screen Layout 69
MUSIC Station 70
PHOTO Station 73
MOVIE Station 76
Using AVStation NOW / AVStation Viewer 79
Start / Exit AVStation NOW 79
Start / Exit AVStation Viewer 80
Screen Layout 81
MUSIC Station 81
PHOTO Station 83
MOVIE Station 84
CyberLink PowerDVD 86
Introducing Programs 63
Introducing Programs
Using software supplied with the Samsung computer, you can easily use functions and troubleshoot prob-
lems. For detailed information, refer to the help of the corresponding software.
Before Starting!
Not every software program may be provided or the version may differ depending on your com-
puter model.
Multi Media Functions
•Program Launcher
The Program Launcher categorizes frequently used programs, folders, web sites so that you can
easily manage and access them. This program is designed for the small LCD size so that you can
easily use this program with the Stylus Pen or your fingers. ( p.67)
•AVStation premium ( )
AVStation premium is an integrated multimedia program that enables users to enjoy better mu-
sic, photographs, video, movies, etc. quality all with a single program. ( p.69)
•AVStation Viewer
AVStation Viewer is a program that enables you to easily run AVStation premium in full screen.
( p.79)
•AVStation NOW
AVStation NOW is an integrated multimedia program that enables users to enjoy photographs,
video, DVDs, music, etc. all with a single program and without booting Windows even when the
computer is turned off. ( p.79)
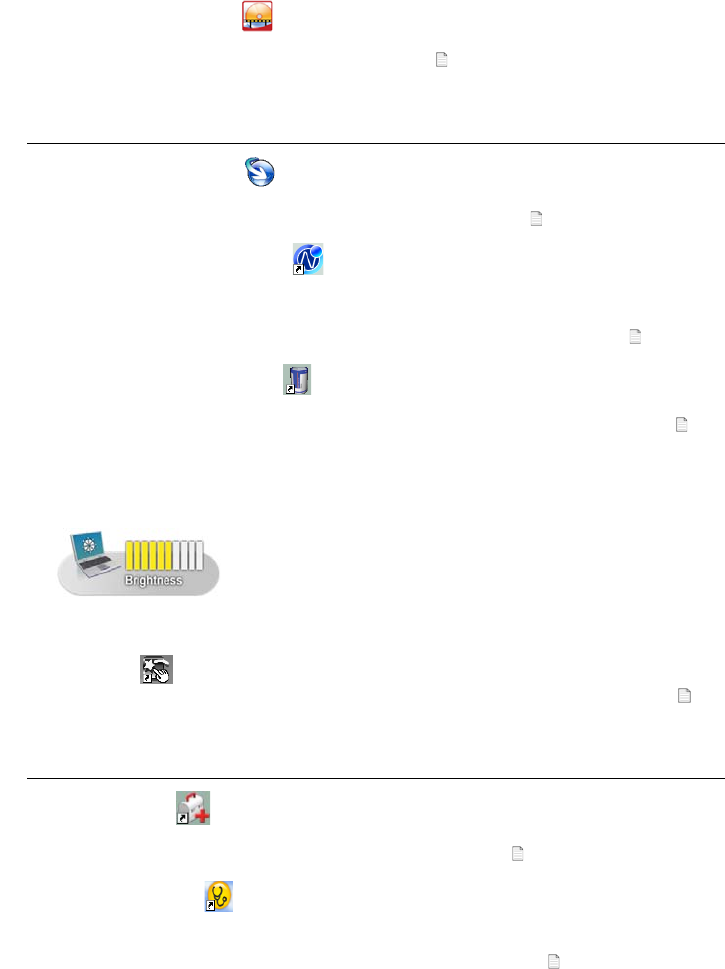
Introducing Programs 64
•CyberLink PowerDVD ( )
CyberLink PowerDVD is a DVD player program supplied with the external USB ODD. To use this
program, you have to install this program manually. ( p.86)
Management Functions
•Samsung Update Plus ( )
Samsung Update Plus is software that examines and updates the Samsung software and drivers
installed on your Samsung computer to the most recent versions. ( p.65)
•Samsung Network Manager ( )
Samsung Network Manager is a program provided to support network and Internet sharing set-
up.
You can configure the network settings by location and diagnose your network. ( p.51).
•Samsung Battery Manager (
)
Samsung Battery Manager is a power management program that provides easy-to-use power
management and power saving settings so that the battery usage time can be extended. (
p.99
)
•Samsung Display Manager
Samsung Display Manager is a program that displays the setting status of some buttons on the
screen.
Example) The icon that appears when pressing the Menu button and clicking Brightness Up.
•Touchkit ( )
Touchkit is a program used to calibrate the Stylus Pen when the pointer position is not correct.
(
p.21)
Troubleshooting Functions
•Magic Doctor ( )
Magic Doctor is troubleshooting software provided by Samsung Computer. A user can diagnose
system problems via one-click or by selecting diagnostic items. ( p.103)
•Norton AntiVirus ( )
Norton AntiVirus is a program that examines the computer for viruses and deals with any found
viruses. Since viruses may damage the files and data on your computer, it is recommended to
examine your system frequently with the Norton AntiVirus program. ( p.104)
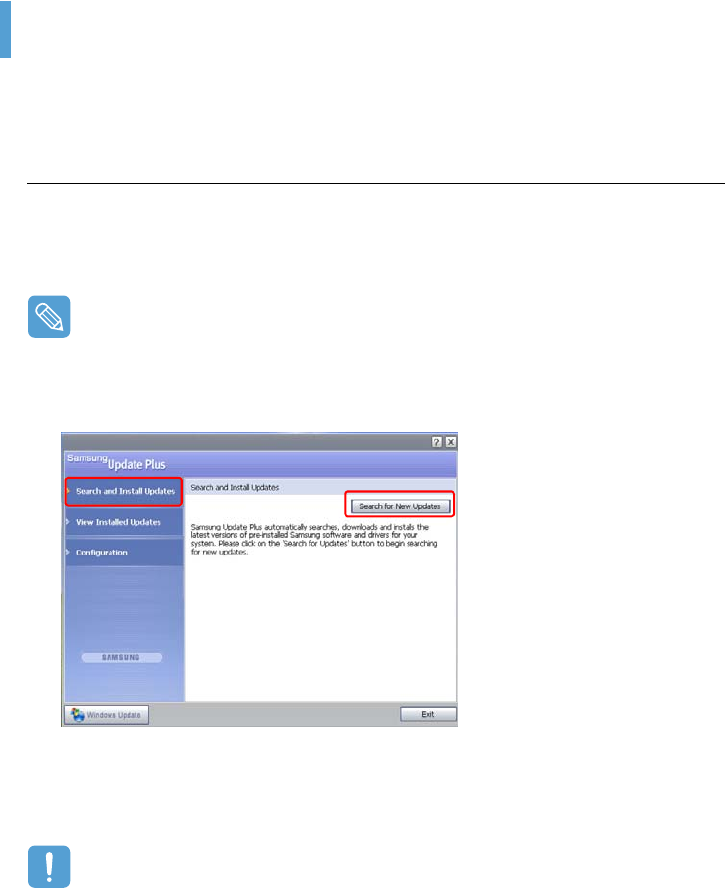
Using Samsung Update Plus 65
Using Samsung Update Plus
Samsung Update Plus is software that examines and updates Samsung software and drivers installed on
your Samsung computer to the latest version. To use Samsung Update Plus, your computer has to be con-
nected to the Internet.
To Update Samsung Software and Drivers
1Select Start > All Programs > Samsung > Samsung Update Plus > Samsung Update
Plus.
If this is the first time you are running the program, a window will appear asking you if you agree
to the agreement in the window.
Click Agree to use this software.
2Click Search for and Install Updates and click the Search for New Updates button.
3If there are available software or driver updates for your computer, the available updates will
be listed. Select the required updates from the list and click Install Update to start the update.
(The update list on the screen may differ depending on the computer model.)
Updates that must be installed separately.
If you select Install as an update item that must be installed separately, a message appears
informing you of this. Follow the instruction message to correctly install it.
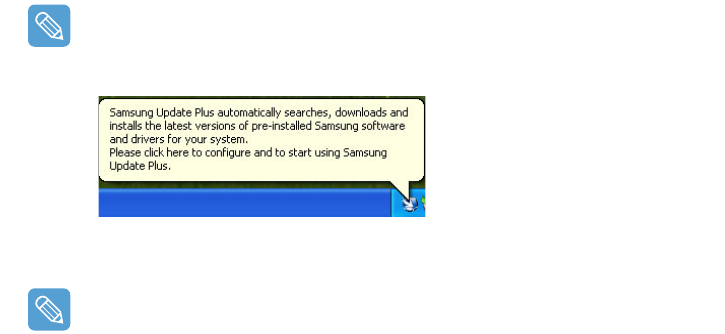
Using Samsung Update Plus 66
Automatic update items display
By default, your computer is configured to automatically search for updates. If there is a new
update available, this is displayed in the notification area. Click the balloon help icon in the no-
tification area, to locate the latest available updates.
To change the automatic update settings, click the Configuration button in Figure 2 and
change the settings.
Samsung Update Plus does not provide updates for additionally installed software and device
drivers.
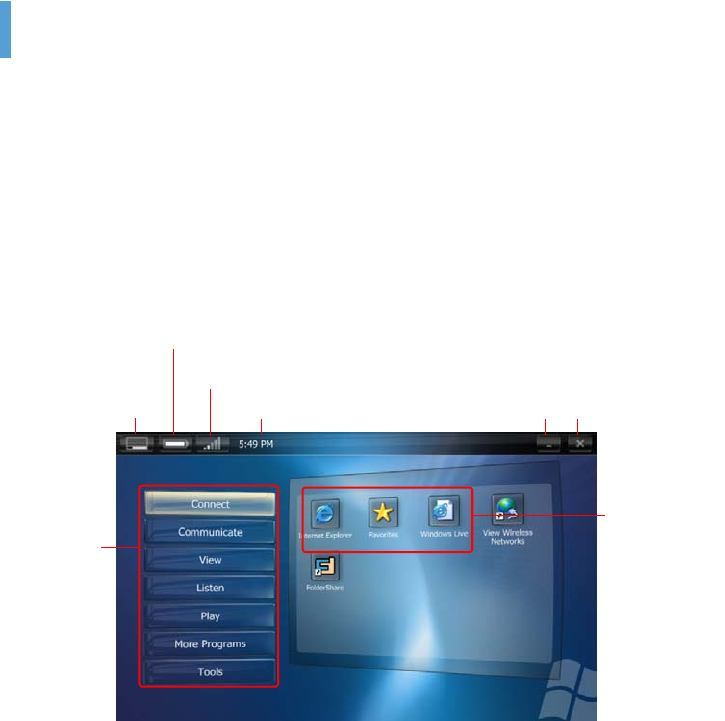
Program Launcher 67
Program Launcher
The Program Launcher categorizes frequently used programs, folders, and websites so that you can easily
manage and access them.
This program is designed for the small LCD size so that you can easily use this program with the Stylus Pen
or your fingers.
Program Launcher Screen Layout
To launch the Program Launcher, click Start > All Programs > Microsoft Touch Pack for Tab-
let PC > Program Launcher.
The Program Launcher is launched.
Close
View Taskbar
Battery Charge Status
When clicking the icon, the Power Option Properties window appears.
Wireless LAN Status
When clicking the icon, the Network Connections window appears.
Clock Minimize
Short-
cut Icon
Category
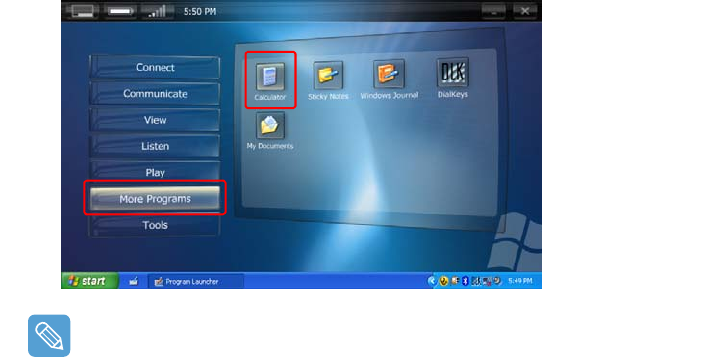
Program Launcher 68
Using Program Launcher
As an example, the procedures to launch the Calculator on the Program Launcher are described
below.
1Run the Program Launcher.
2Select More Programs > Calculator. The Calculator program is launched.
•For more detailed usage
For more detailed usage, click Program Launcher Help from the Tools category.
•Program Launcher User Setting functions
You can add a category and add or delete a shortcut icon.
Click on Customize Launcher from the Tools category to change the settings.
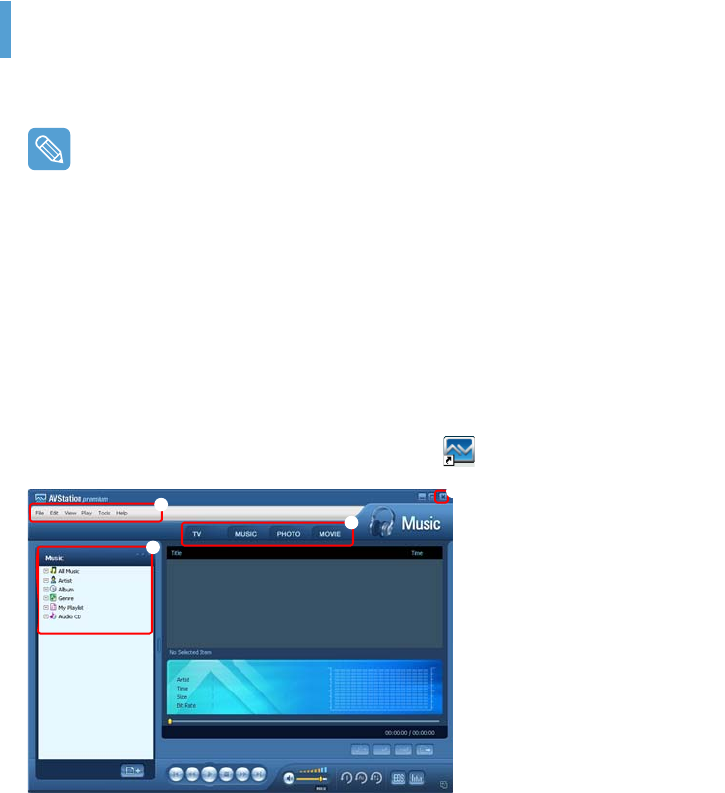
Using AVStation premium 69
Using AVStation premium
AVStation premium is an integrated multimedia program that enables users to enjoy music, photo-
graphs, video, movies, etc. all with a single program.
Before Starting!
•AVStation premium is optional and is not always provided depending on the model.
•The screenshots used in this manual may differ from the actual screens according to the pro-
gram version.
•TV Station is only available for systems supporting the TV function.
•To play an audio CD or DVD, you have to connect the external USB ODD to the computer.
The following descriptions presuppose that the external ODD is connected.
•For detailed usage, refer to the program help.
Start and Screen Layout
To launch the program, select Start > All Programs > Samsung > AVStation premium >
AVStation premium.
Alternatively double-click the AVStation premium icon ( ) on the Desktop.
MUSIC
You can play a music file or an audio CD.
PHOTO
You can view or edit a photograph (image), and also view the photographs through in a SlideShow.
MOVIE
You can play a video (movie) file or a DVD/VCD title.
z
x
z Station Bar
x Menu Bar
c Library
v Exit
Press the Exit button to exit
the program.
c
v
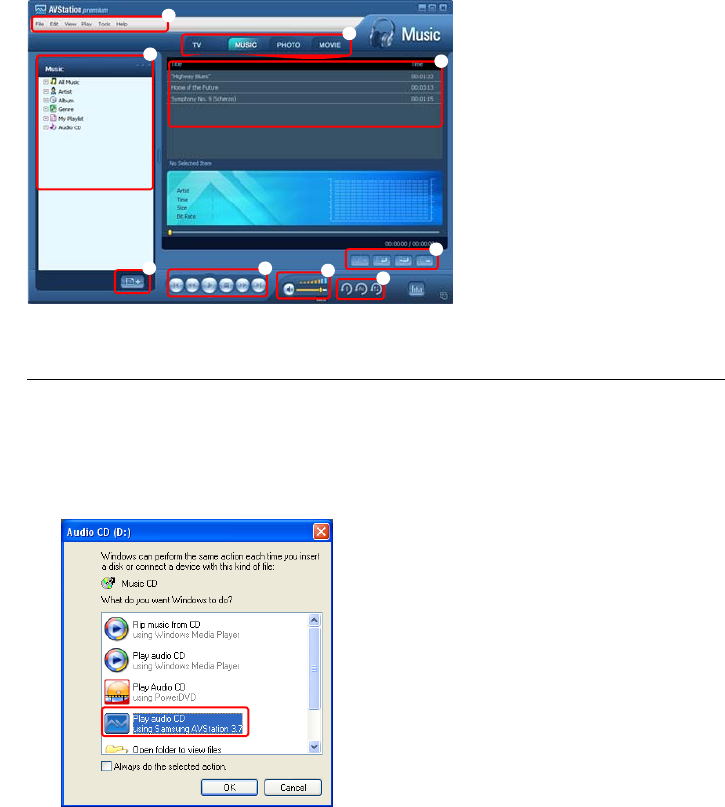
Using AVStation premium 70
MUSIC Station
Launch AVStation premium and click MUSIC on the Station Bar.
Playing an Audio CD
The procedures to play an audio CD are described below.
1Launch AVStation premium and insert an audio CD into the CD drive.
2In the Audio CD window, select Play Audio CD using Samsung AVStation and click the
OK button.
z
MUSIC Menu Bar
x Station Bar
c MUSIC Library
v Register a File
b Playlist
n Playlist Control Buttons
m Play Control Buttons
, Volume Control
. Play Options
z
x
cb
m.
v
n
,