Samsung Electronics Co NP-Q1-C Notebook PC User Manual Samsung Q1b v1 0 English
Samsung Electronics Co Ltd Notebook PC Samsung Q1b v1 0 English
Contents
- 1. Users Manual 1 of 2
- 2. Users Manual 2 of 2
Users Manual 2 of 2
Using AVStation premium 71
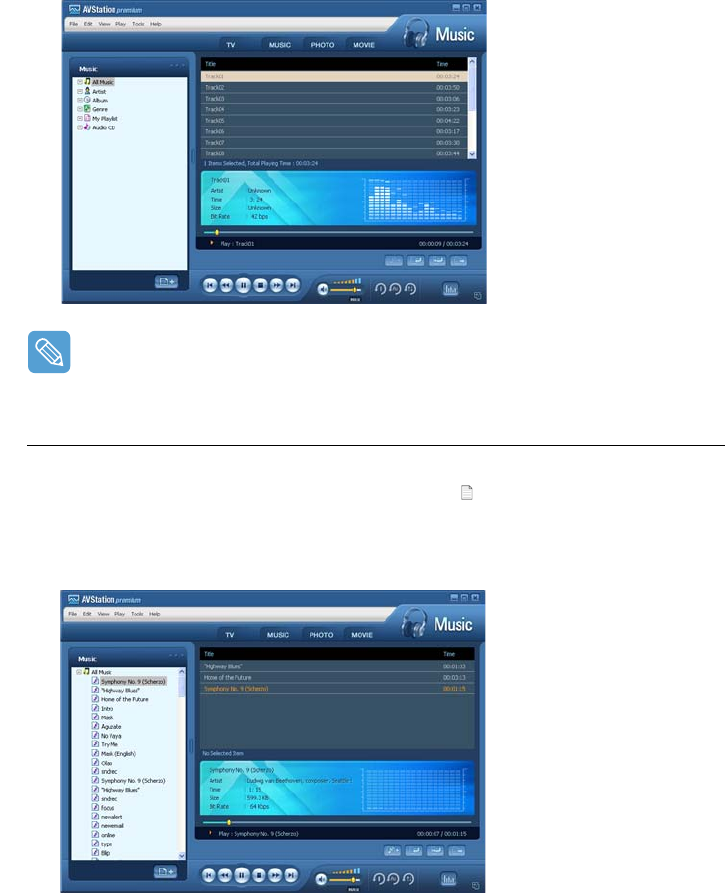
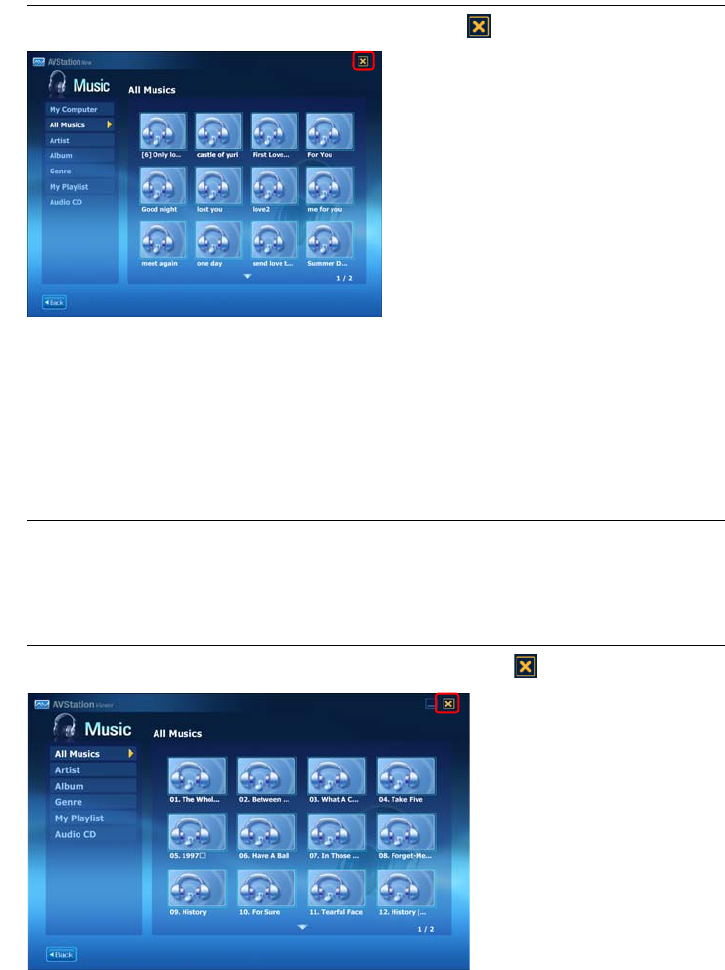
3The tracks on the audio CD are displayed in the Playlist and the first track is automatically
played.
If an audio CD is already in the CD drive, double-click the album title in the Audio CD folder
of the Library and add the tracks to the Playlist. The tracks added to the Playlist are played.
Playing a Music File
If a music file is registered to the MUSIC Library, you can easily play the music file.
For the procedures to register tracks to the Library, refer to ( p.72).
1Move to MUSIC Station and double-click on All Music.
2Double-click a music file. The file is added to the playlist and played.
Using AVStation premium 72
•Playing a Track not registered to the Library
Click File > Open, select a music file to be played and click Open. The selected track is regis-
tered to the Library and played.
•Creating My Playlist
My Playlist is a personal album used to collect, manage and play your favorite music files. For
the procedures to create My Playlist, refer to the descriptions of MUSIC Station in Help.
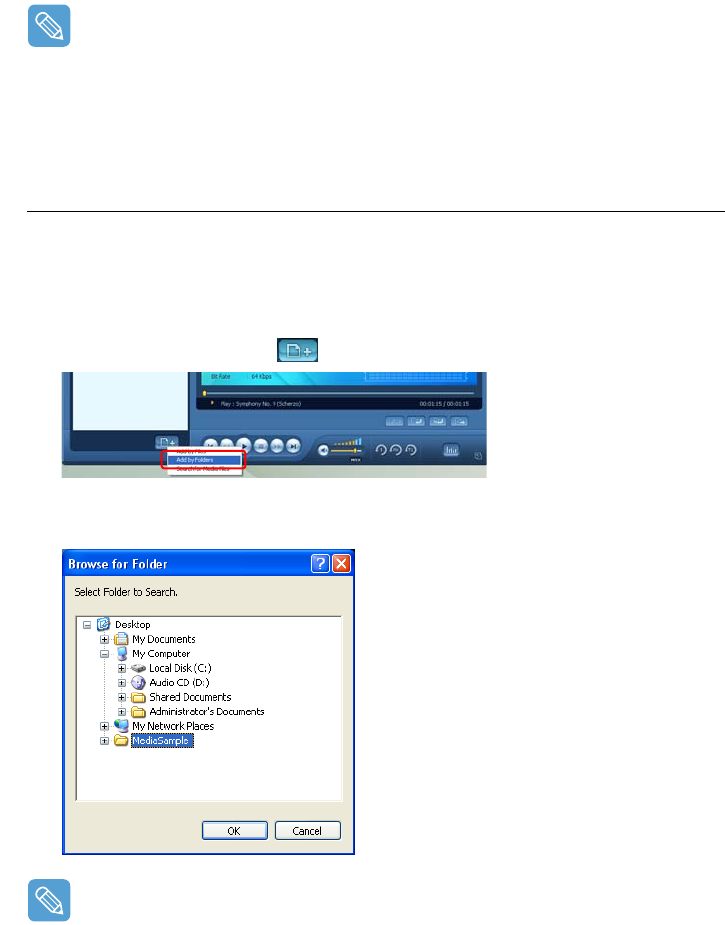
Adding Music Files to the Library
MUSIC Library is a library of music files used by MUSIC Station. The procedures to add music files
saved on the computer to the Library are described below.
You can add files, folders or search and add files. As an example, the procedures to add a folder are
described below.
1Click on the Register a File ( ) button below the Library and click on Add by Folders.
2Select a folder which includes music files and click the OK button. The music files in the folder
are added to the Library.
The tracks used in AVStation are automatically added to the Library.
Using AVStation premium 73
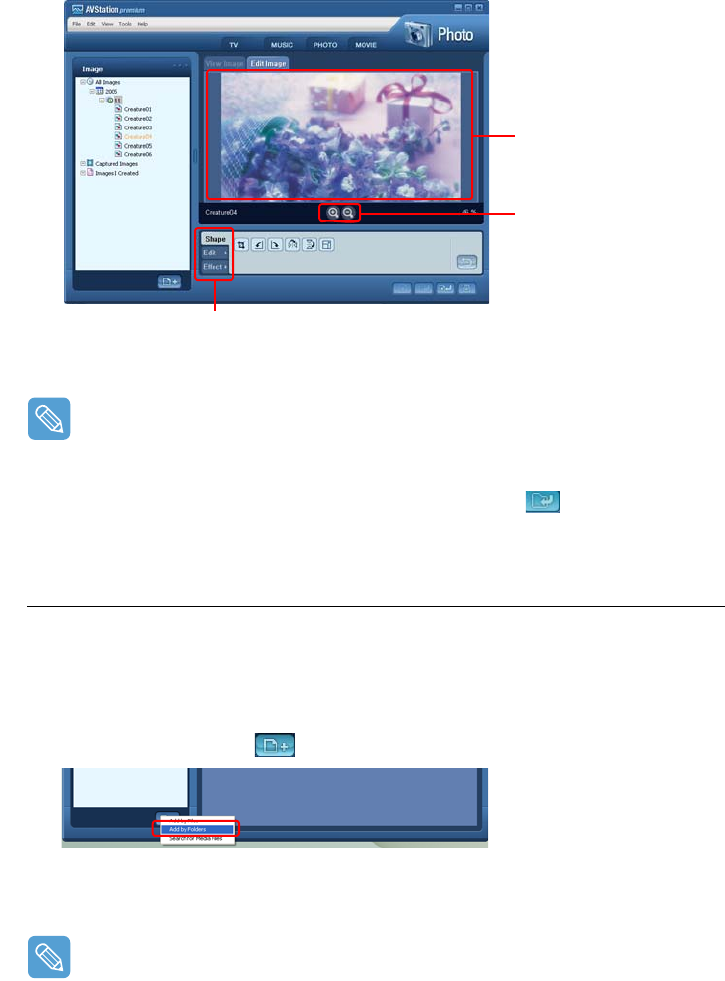
PHOTO Station
Launch AVStation premium and click PHOTO on the Station Bar.
Viewing an Image
The procedures to view images registered to the PHOTO Library indivedually or via a SlideShow are
described below.
For the procedures to register image files to the Library, refer to ( p.75).
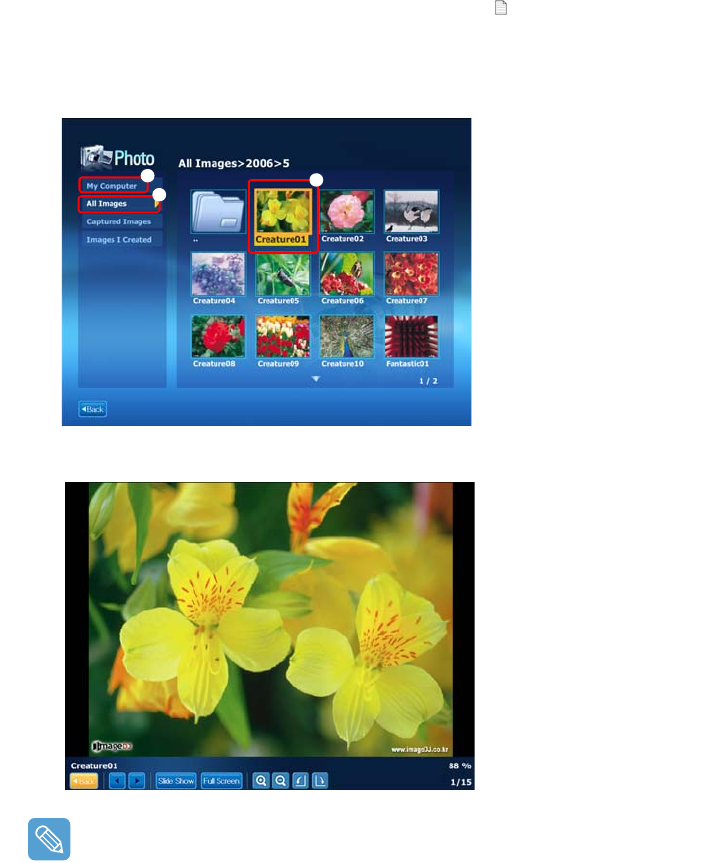
1Move to PHOTO Station and double-click on All Images.
2Click on a folder which includes images, and the images in the folder are displayed in the Image
Viewer window.
z
x
c
b
m
v
n
,
z
PHOTO Menu Bar
x Station Bar
c PHOTO Library
v Register a File
b Image Viewer Tab
n Image Editor Tab
m Move to a Higher-Level Folder
, Preview/Zoom-in
Image Viewer Window
Image
Using AVStation premium 74
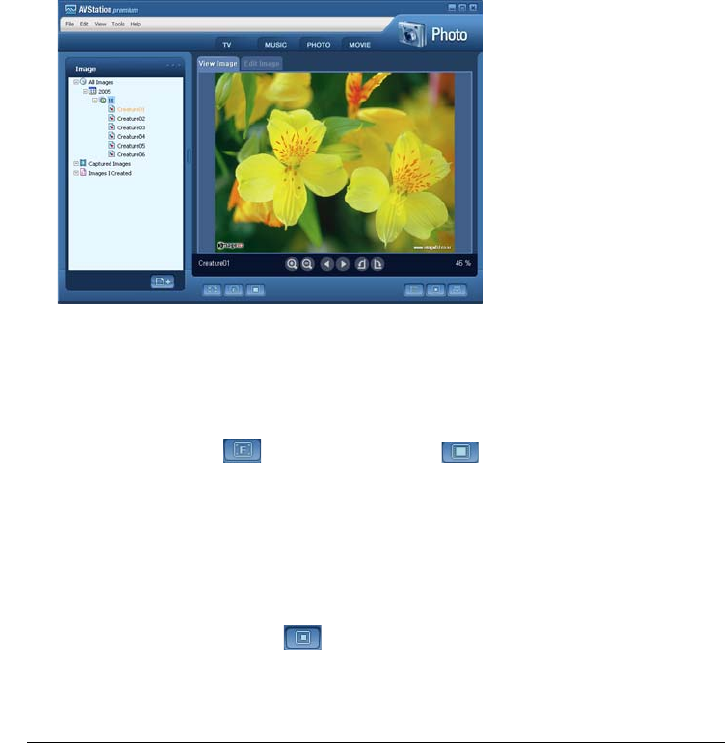
3Double-click on an image. The selected image is zoomed in on.
•Viewing an Image not registered to the Library
Click File > Open, select an image file to view and click Open.
The selected image file is registered to the Library and displayed in the Image Viewer window.
•Viewing an Image in Full Screen or through a SlideShow.
Click the Full Screen () button or SlideShow ( ) button below the Image Viewer
window.
To return to the Image Viewer window, double-click on the screen.
•Watching a SlideShow while Listening to Music
To view a SlideShow while listening to music, play music from MUSIC Station and run SlideShow.
•Setting an Image as the Background.
Click the Set as Background ( ) button below the Image Viewer window. The selected
image is set as the Desktop background.
Editing an Image
You can change the shape of an image, edit an image or apply special effects to an image. The im-
age editor functions are described below.
1Select an image to edit in the Image Viewer window, and select the Image Editor tab. The
Image Editor screen appears.
Using AVStation premium 75
The Image Editor screen consists of an Image Workspace window and 3 Tool tabs.
2Edit the image using the Shape, Edit and Effect tools.
Shape tool: Change the shape of an image through cut, resize.
Edit tool: Draw a line, add some clip art or enter letters.
Effect tool: Apply various effects to an image.
3When finishing editing an image, click the Save Edited Image ( ) button below the Im-
age Editor window. The edited image is saved.
Adding Images to the Library
The PHOTO Library is a library storing image files to be used by PHOTO Station. The procedures to
add image files saved on the computer to the Library are described below.
You can add files, add folders or search and add files. As an example, the procedures to add folders
are described below.
1Click the Register a File ( ) button below the Library and click on Add by Folders.
2Select a folder with image files and click the OK button. The image files in the folder are added
to the Library.
The image files used in AVStation are automatically added to the Library.
Image Workspace
Zoom In / Zoom Out
Tool Tabs
Using AVStation premium 76
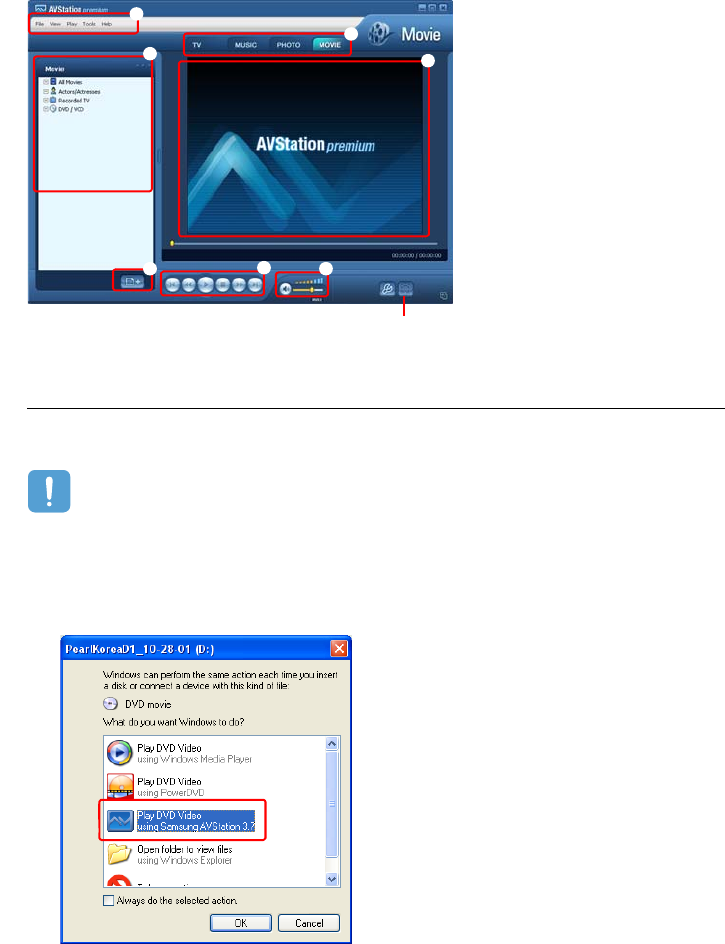
MOVIE Station
Launch AVStation premium and click on MOVIE on the Station Bar.
Playing a DVD
The procedures to play a DVD title are described below.
To play a DVD title, DVD playing software (e.g. CyberLink PowerDVD) must be installed. Install
the DVD playing software first.
1Launch AVStation premium and insert a DVD title into the DVD drive.
2In the 'What do you want Windows to do?' window, select Play DVD Video using Sam-
sung AVStation and click the OK button.
z
MOVIE Menu Bar
x
Station Bar
c
MOVIE Library
v
Register a File
b
Video Play window
n
Play Control Buttons
m
Volume Control
, Capture Button
z
x
cb
mv n
,
Using AVStation premium 77
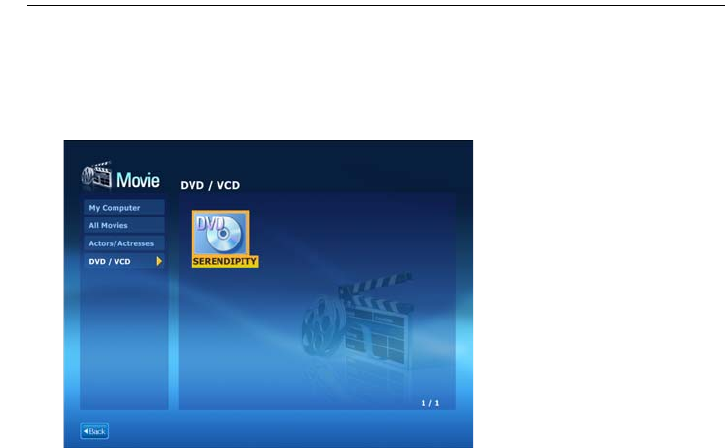
3The DVD title is played.
If a DVD title is already in the DVD drive, double-click the DVD title in the DVD / VCD folder
of the Library. The DVD title is played.
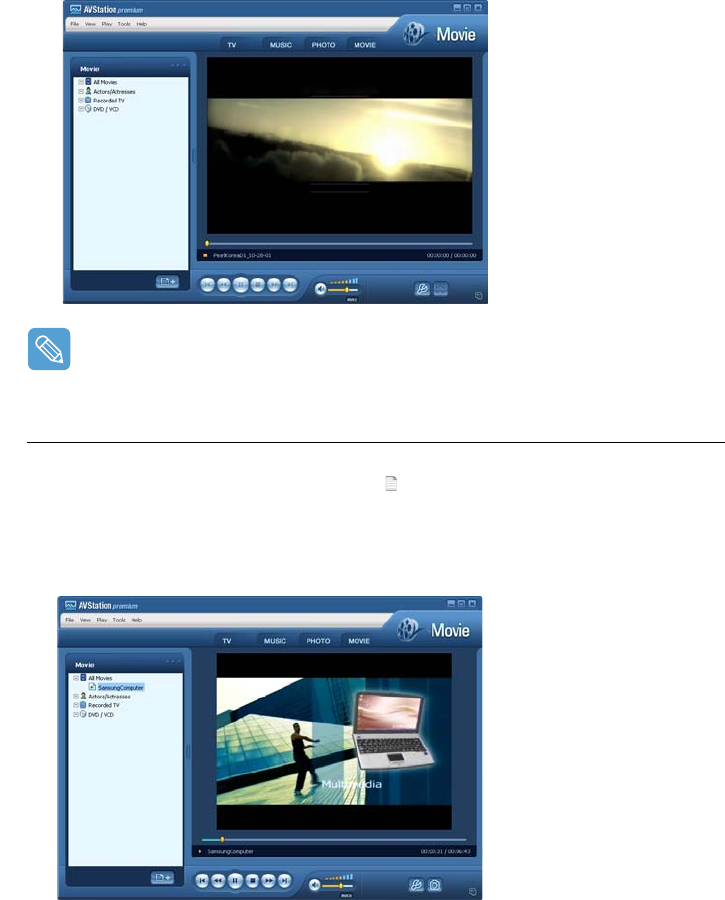
Playing a Movie(Video) File
The procedures to play a video file registered to the MOVIE Library are described below. For the
procedures to register files to the Library, refer to p.78.
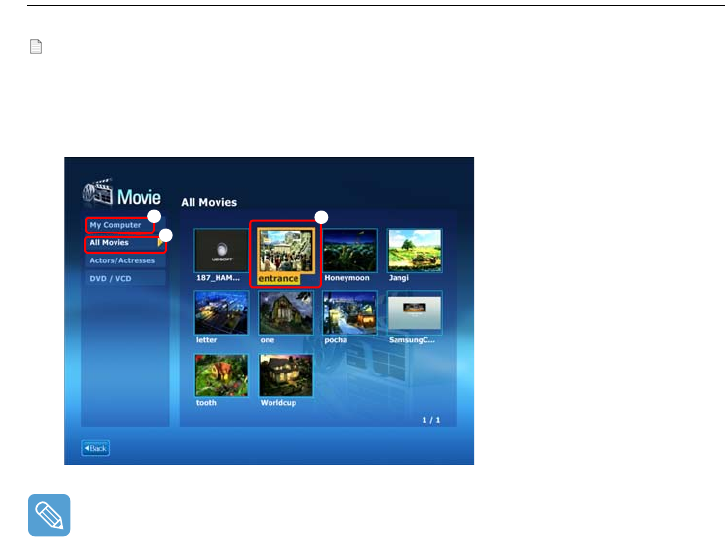
1Move to MOVIE Station and double-click All Movies.
2Double-click a video file. The file is played.
•Playing a Video File not Registered to the Library
Click File > Open, select a video file to be played and click Open. The selected file is registered
to the Library and played.
Using AVStation premium 78
•Playing a Video File in Full Screen
1) Double-click on the current playback screen.
2) The video is played in full screen. In full screen, move the mouse pointer to the bottom of
the screen to show the Play Control bar.
To play at the default screen size, double-click on the screen.
•Capturing the Video Screen
Click on Capture Current Screen ( ) below the Play window when the desired image ap-
pears on the screen and click the OK button.
Captured images are saved in the C:\Program Files\Samsung\AVStation premium
x.x\Data\Captured Images folder.
In addition, you can view captured images in the PHOTO Station > Captured Images folder.
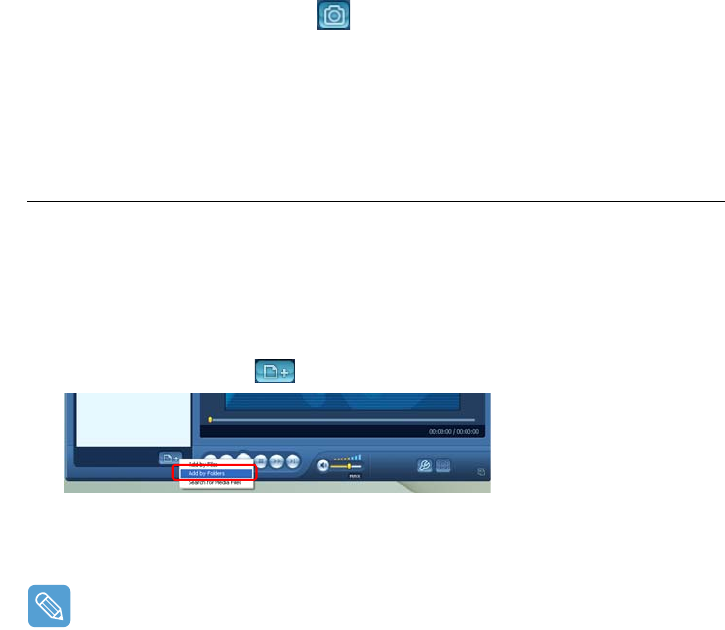
Adding Videos to the Library
The MOVIE Library is a library storing video files to be used by MOVIE Station. The procedures to
add video files saved on the computer to the Library are described below.
You can add files, add folders or search and add files. As an example, the procedures to add folders
are described below.
1Click the Register a File ( ) button below the Library and click Add by Folders.
2Select a folder which includes video files and click the OK button. The video files in the folder
are added to the Library.
The video files used in AVStation are automatically added to the Library.

Using AVStation NOW / AVStation Viewer 79
Using AVStation NOW / AVStation Viewer
Using these programs, you can play music, photographs, video and movies in full screen. You can enjoy
multimedia files using AVStation NOW when the computer is off and using AVStation Viewer when the com-
puter is on.
Before Starting!
•AVStation NOW and AVStation Viewer are optional and may not be provided depending on
the model.
•AVStation NOW Restrictions
You can only use AVStation NOW when the computer is turned off.
Using AVStation NOW, you can play files registered to the AVStation premium Library, saved
to My Computer, and saved on the multi-card slot. (For the procedures to register files to the
Library, refer to
p.72,
p.75 and
p.78.)
If a login password for a Windows user account has been defined or if the folder is protected,
you cannot play the files in the folder in AVStation NOW.
•In AVStation NOW, the Auto Scaler function is not available.
•AVStation Viewer Restrictions
Using AVStation Viewer, you can only play files registered to the AVStation premium Library.
(For the procedures to register files to the Library, refer to
p.72,
p.75 and
p.78.)
•Since the screen layout and usage of the two programs are similar, the manual describes the
functions and screens on the basis of AVStation NOW.
•The screenshots figures may differ from actual ones depending on the program version.
•TV Station is only available for systems supporting the TV function.
Start / Exit AVStation NOW
Starting
To turn the computer on, slide the Power switch/AVS NOW switch to the left ( ) and hold it
for more than 0.1 seconds.
If the HOLD switch on the left side of the computer is slid upwards all buttons of the computer
are locked and do not function. If AVStation NOW is not launched, check the position of the
HOLD switch.
Using AVStation NOW / AVStation Viewer 80
Exiting
Move the mouse pointer to the top screen and click the Exit () button.
Alternatively, slide and hold the Power switch/AVS NOW switch to the right for more than 0.1
seconds.
Start / Exit AVStation Viewer
Starting
Select Start > All Programs > Samsung > AVStation premium > AVStation Viewer from
Windows.
Exiting
Move the mouse pointer to the top of the screen and click the Exit () button.
Using AVStation NOW / AVStation Viewer 81
Screen Layout
MUSIC
You can play a music file or audio CD.
PHOTO
You can view a photograph or image file one by one or in a SlideShow.
MOVIE
You can play a video, DVD or VCD title.
Settings
You can configure the Music, Photo and Movie settings.
Move to the start screen while using the program
Click over the top left in the current screen. Then the icon appears. When dicking this icon,
you can move to the start screen.
MUSIC Station
The procedures to play a music file or an audio CD are described below.
Playing a Music File
The procedures to play a music file registered to the MUSIC Library are described below. (For the
procedures to register files, refer to
p.72.)
1Launch AVStation NOW and click on Music.

Using AVStation NOW / AVStation Viewer 82
2Click on All Music and double-click a file in the right pane. The music file is played.
Playing an Audio CD
1Launch AVStation NOW and insert an audio CD into the CD drive.
2In the AVStation NOW start screen, click on Music.
3Double-click the Audio CD in the left pane and double-click on an album or music file in the
right pane. The selected music file is played.
z My Computer
This only appears in AVS-
tation NOW. You can
manually find and play
files on My Computer or a
removable disk.
x All Music
c Playlist Window
v Music File
z
x
c
v
Using AVStation NOW / AVStation Viewer 83
PHOTO Station
The procedures to view images registered to the PHOTO Library one by one and through a Slide-
Show are described below.
(For the procedures to register image files to the Library, refer to p.75.)
1Launch AVStation NOW and click on Photo.
2Click on All Images and double-click on an image file in the right pane.
3The selected image is zoomed in on.
To view an image in Full Sreen or via a SlideShow.
Click on the SlideShow or Full Screen button below the zoomed in image.
To return to the previous status in the SlideShow or Full Screen, double-click on the screen. In
AVStation NOW, double-click and click on Back.
z My Computer
This only appears in AVS-
tation NOW. You can
manually find and play
files on My Computer or a
removable disk.
x All Images
c Image File
z
x
c
Using AVStation NOW / AVStation Viewer 84
MOVIE Station
The procedures to play a video (movie) file or DVD/VCD title are described below.
Playing a Movie File
The procedures to play a video file registered to the MOVIE Library are described below. (Refer to
p.78.)
1Launch AVStation NOW and click the Movie.
2Click on All Movies and double-click a movie file in the right pane. The movie file is played.
Displaying the Play Control window
When clicking on the screen once, the Play Control window appears at the bottom.
z
My Computer
This only appears in AVS-
tation NOW. You can
manually find and play
files on My Computer or a
removable disk.
x
All movies
c
movie File
z
x
c
Using AVStation NOW / AVStation Viewer 85
Playing a DVD
1Launch AVStation NOW and insert a DVD title into the DVD drive.
2In the AVStation NOW start screen, click on Movie.
3Click on DVD/VCD and double-click on the DVD title. The DVD title is played.
CyberLink PowerDVD 86
CyberLink PowerDVD
CyberLink PowerDVD is a DVD player program.
Before Starting!
CyberLink PowerDVD is supplied with the external USB ODD. So, it is optional and is not supplied
with some models.
In addition, to use this program, you have to install the program manually using the external
USB ODD.
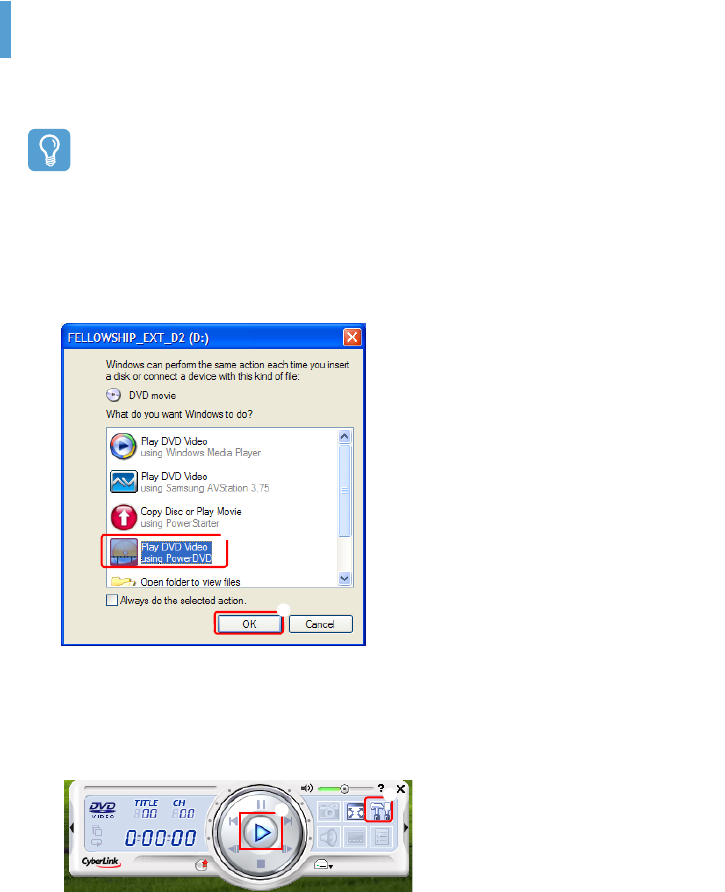
1Insert a DVD title into the DVD drive.
2Select Play DVD Video Using PowerDVD and click OK.
After a moment, the DVD title is played.
3If the DVD title is not played automatically, click Start > All Programs > CyberLink Pow-
erDVD > CyberLink PowerDVD.
4Click the Play button in the CyberLink PowerDVD play control panel.
z
x
z
xz PLAY
x SETTINGS

CyberLink PowerDVD 87
For more detailed usage
For more detailed usage, click Start > All Programs > CyberLink PowerDVD > PowerDVD
Help.
DVD Region Code
A DVD title has a region code according to the international specifications so that it can be played
only in that specific region. DVD titles with a region code will only play on DVD drives with the
same region code.
A DVD drive is sold with an empty region code and the region code is set when the user inserts
a DVD title into the drive for the first time. Whenever a DVD title is inserted with a region code
that is different from that of the DVD drive, the region code of the DVD drive is automatically
changed to the region code of the DVD title. However, changing the region code of a DVD drive
is limited to 5 changes. After that, the region code is permanently fixed to the last region code.
Chapter 6. Settings
Using System Setup 89
Starting System Setup 89
The System Setup Screen 90
Setting a Booting Password 92
Changing the Booting Priority 95
Using the Battery 96
Removing and Attaching a Battery 96
Charging the Battery 97
Monitoring the Battery Charge 97
Extending the Battery Usage Time 99
Using System Setup 89
Using System Setup
The System Setup (BIOS) program enables the configuration of the computer hardware.
Before Starting!
•Use the BIOS setup to define a booting password, change the booting priority or add a new
device.
Since incorrect settings may cause your system to malfunction or crash, take care when con-
figuring up the BIOS.
•The functions of the BIOS setup are subject to change for product function enhancement
purposes.
•Press the + or - Volume Control buttons at the top of the computer while holding down the
Menu button to adjust the LCD brightness.
Starting System Setup
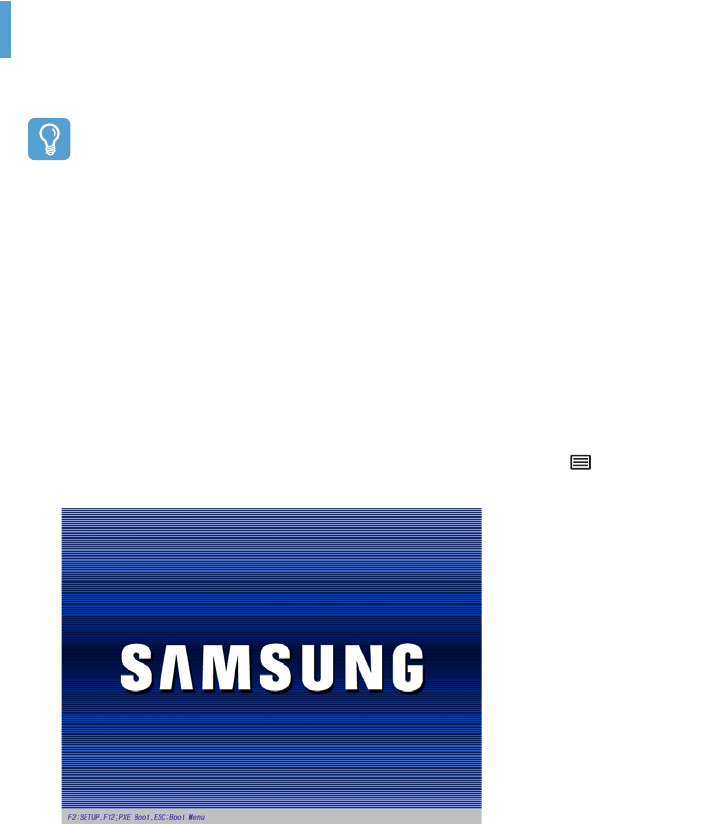
1Slide the Power switch to the right to turn the computer on.
2The booting screen (SAMSUNG logo) appears. Press the Menu button ( ) on the right side
of the computer. When an external keyboard is connected, press the F2 key.
Using System Setup 90
3After a moment, the BIOS setup screen appears. The items of the BIOS setup may differ de-
pending on the product.
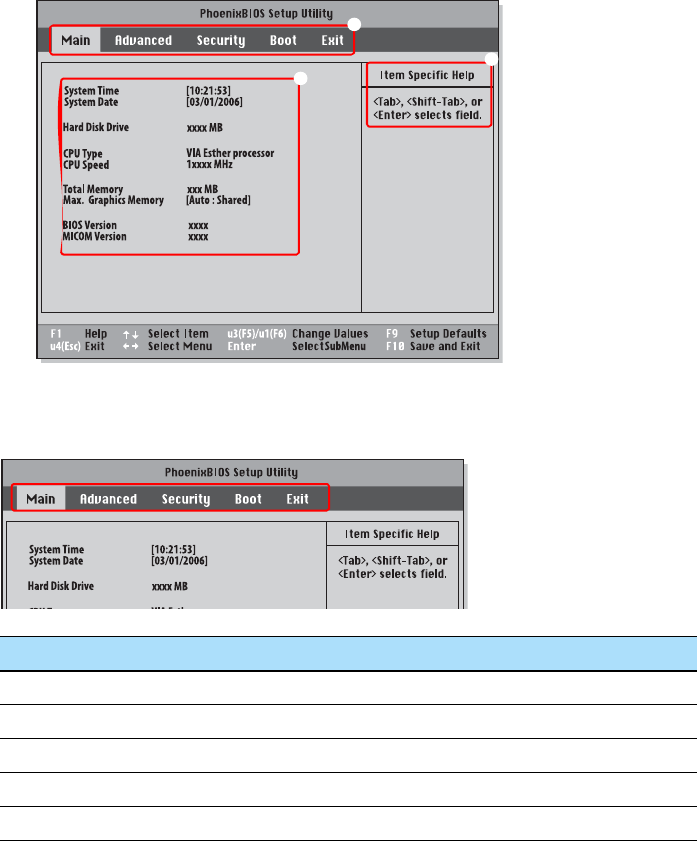
The System Setup Screen
Menu Function
Main Changes the basic system.
Advanced Configures the advanced functions on your computer.
Security Enables the security functions, including passwords.
Boot Specifies the order of the boot devices and configures them.
Exit Exits System Setup
z Setup Menu
x Setup Items
c Help
Descriptions of
the selected item
are displayed.
z
x
c
Using System Setup 91
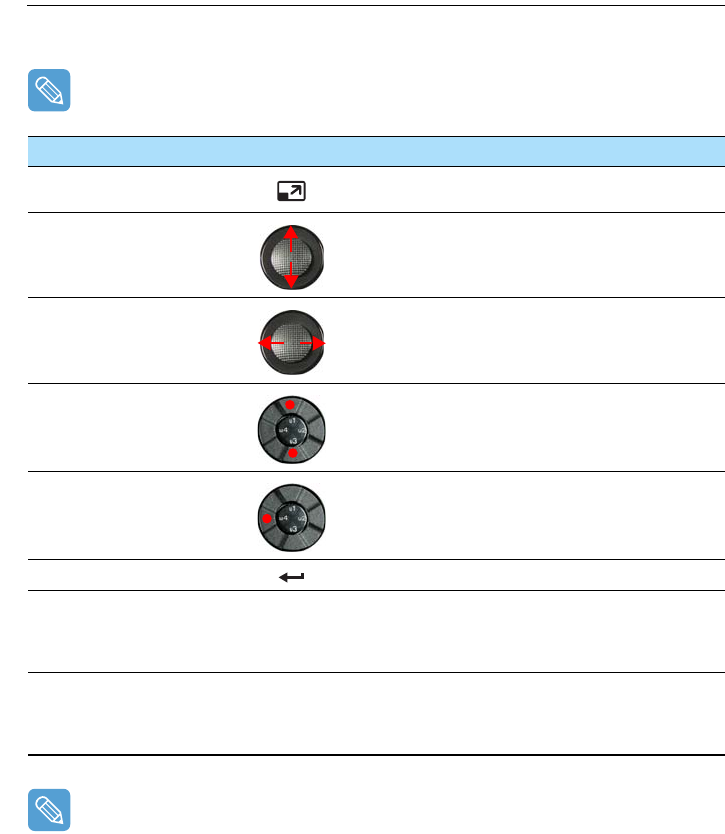
System Setup Buttons(Keys)
The following buttons (keys) are used in System Setup.
When an external keyboard is connected, you can use the keys enclosed by parenthesis. For ex-
ample, you can press the F1 key instead of the Auto Scaler button.
Exiting the System Setup
z Move to Exit menu > Exit Saving Changes using the Joystick and press Enter.
x Select Yes and press the Enter button. The System Setup is closed and Windows is started.
Setup Key Button Function
Auto Scaler Button (F1) When pressing the Auto Scaler button, Help appears.
When pressing the button again, Help disappears.
Up & Down Keys (
↑
,
↓
)Move the Joystick up or down to move the cursor up and
down.
Left & Right Keys (
←
,
→
)Move the Joystick left or right to move the cursor left or
right.
u3(F5) / u1(F6) Press the u3 (F5) / u1 (F6) u3 and u1 buttons to change
the value of an item.
u4(Esc) Press the u4 button to return to a higher-level menu or to
move to the Exit menu.
Enter Selects an item or opens a submenu.
(F9)
To initialize the setup settings, press the F9 key on the
external keyboard.
If an external keyboard is not connected, select Exit >
Load Setup Default from the setup menu.
(F10)
To save the changes press the F10 key on the external
keyboard.
If an external keyboard is not connected, select Exit >
Exit Saving Changes from the setup menu.
Setting a Booting Password 92
Setting a Booting Password
When setting a password, you have to enter a password to start up the computer or enter the System
Setup. By configuring a supervisor password, you can restrict system access to authorized users only and
protect data and files saved on the computer.
Before Starting!
Do not lose or forget your password. If you have forgotten your password, contact a Samsung
service center. In this case, a service fee will be charged.
For the setup buttons, refer to the description of 'System Setup Buttons(Keys)'. p.91
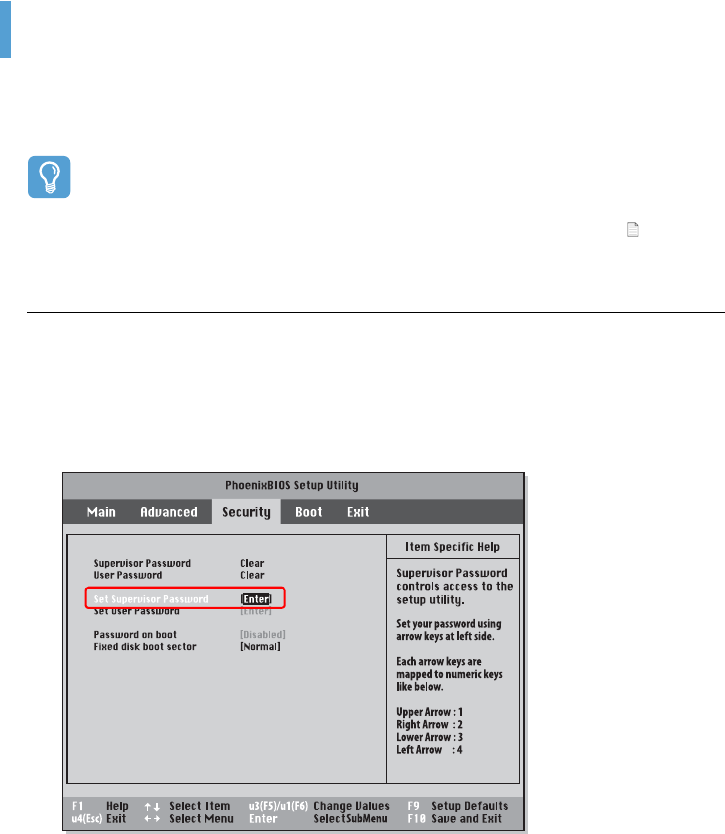
Setting a Supervisor Password
A Supervisor Password is required to turn the computer on or to start System Setup.
When a supervisor Password is set, users other than a supervisor cannot use the computer.
1Select the Security menu in the System Setup.
2In the Set Supervisor Password item, press <Enter>.
Setting a Booting Password 93
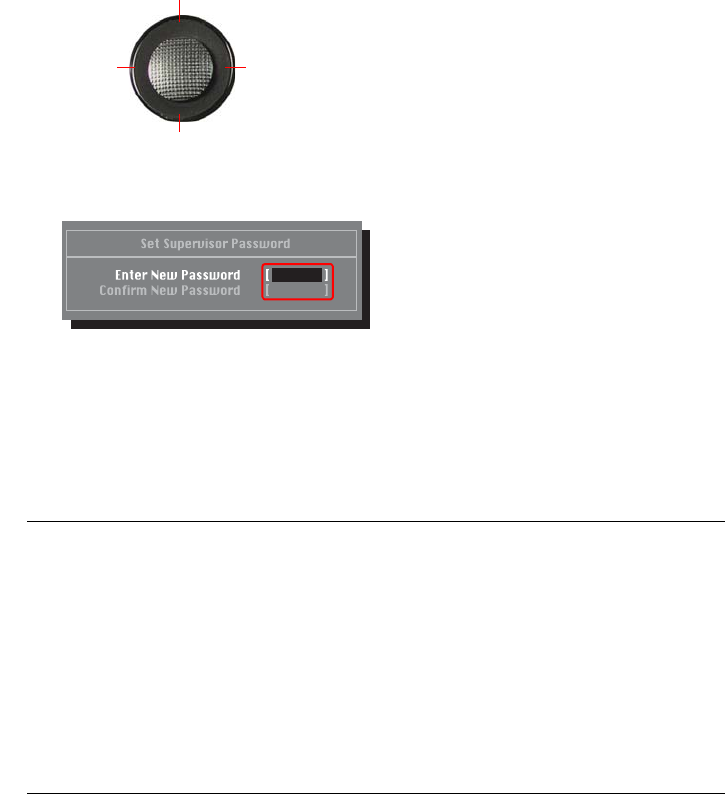
3On the screen, the password setting buttons are described.
You can set a password by entering numbers between 1 and 4 with the Joystick.
Since the u2 button is used as the Delete (BackSpace) function and the u4 button is used as
the Cancel (Esc) function, enter the password using the Joystick.
Enter a password, press <Enter>, re-enter the password for confirmation, and press <Enter>
again.
4When a message confirming the password configuration appears in the [Setup Notice] win-
dow, press <Enter>.
The supervisor password has been set. The supervisor password is required to turn the com-
puter on or to enter System Setup.
Setting a User Password
Users can start the system with their user password, but cannot enter the System Setup.
Before configuring a user password, a supervisor password must have been configured. Deactivating
the supervisor password also deactivates the user password.
However, please note that deactivating a user password does not deactivate the supervisor pass-
word.
In the Set User Password item, press <Enter> and complete the procedures of Step 3 for Setting
a Supervisor Password.
Activating the Booting Password
Before activating the booting password, a supervisor password must be configured.
Set the Password on boot option to Enabled. From now on, system booting will not proceed with-
out the password.
Up: 1
Right: 2
Next: 3
Left: 4

Setting a Booting Password 94
Deactivating the Password
1On the password to be deactivated, press <Enter>. For example, to deactivate a supervisor
password in the Set Supervisor Password item, press<Enter>.
2In the Enter Current Password item, enter the currently configured password and press
<Enter>.
3Leave the Enter New Password item field empty, and press <Enter>.
4Leave the Confirm New Password field empty, and press <Enter>.
5In the [Setup Notice] window, press <Enter>.
The password is deactivated.
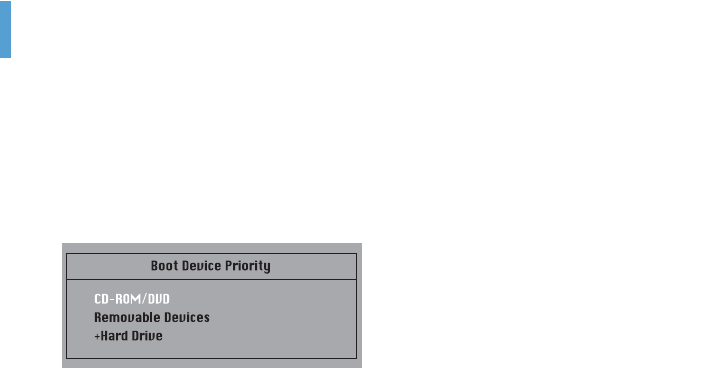
Changing the Booting Priority 95
Changing the Booting Priority
The default booting priority of your computer is the CD-ROM, a removable device and the hard disk drive
in this order. You can change the booting priority using the Boot menu of the System Setup.
1Select the Boot menu in System Setup.
2Press <Enter> on the Boot Device Priority item.
3Use the u1 or u3 button to move a booting device up.
4Exit from the Boot menu by pressing the u4 button and move to the Exit > Exit Saving
Changes menu using the Joystick and press <Enter> to save the settings and exit the setup.
Using the Battery 96
Using the Battery
Please refer to the following instructions when running the computer on battery power, without connecting
the AC power. A Lithium-Ion smart battery is supplied with this computer.
Before Starting!
Carefully read and follow the precautions printed on the battery before using the battery.
Precautions
•Use only charges specified in the user's guide.
•Never heat the battery pack, put it near or in a fire or use at a temperature higher than
60°C, as this may cause fire.
•Never cause a short circuit between the battery pack terminals or disassemble the battery
pack.
•Carefully read and follow the precautions printed on the battery and the safety instructions in
the user's guide before using the battery.
•Please refer to the system operation environment of this manual and operate and the store
the battery at room temperature. ( p.125)
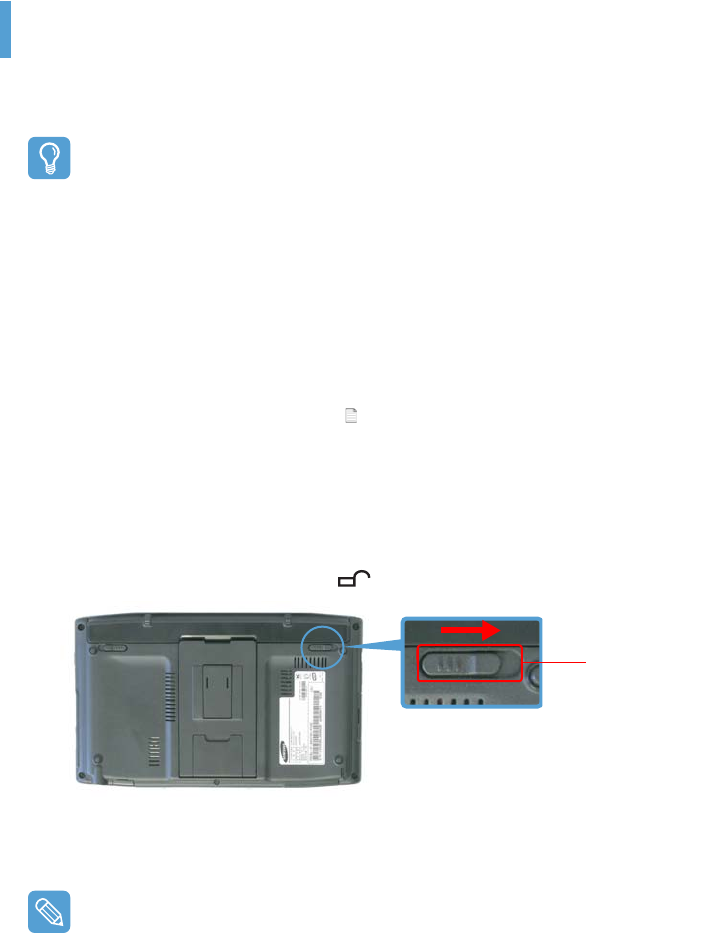
Removing and Attaching a Battery
1Shutdown the system and place the computer upside down on a flat surface.
2Pull the two battery latches outwards ( ), then remove the battery.
3To install the battery again, slide the battery into the system. The battery latches move inwards
and fix the battery automatically.
Check if the battery latch has been moved inwards.
Battery latch
Using the Battery 97
Charging the Battery
1Attach the battery and connect the AC adapter to the DC-in jack of the computer.
The battery will then be charged.
2When charging is complete, the Charge LED turns green.
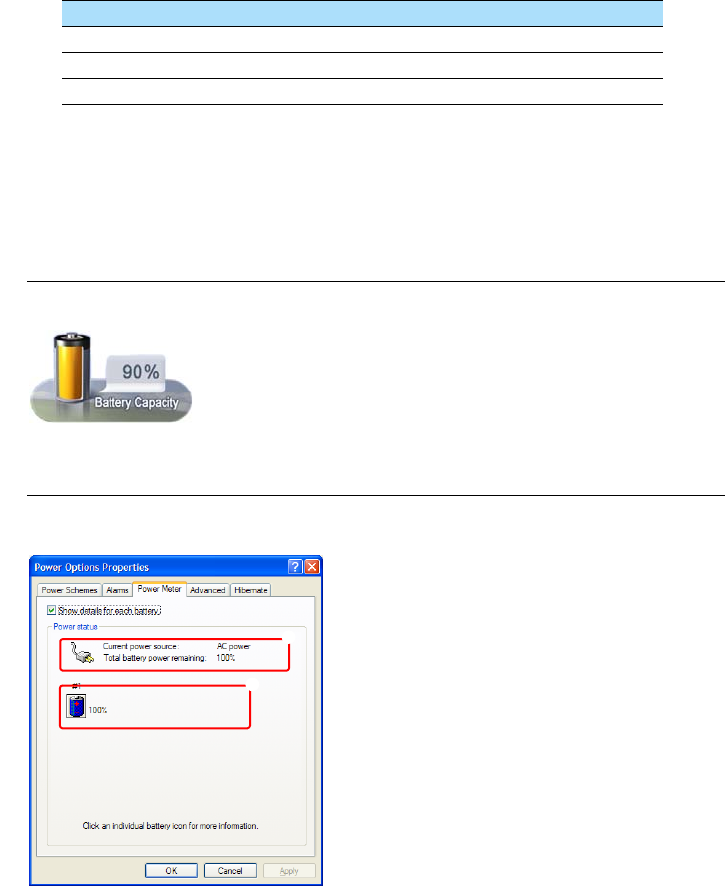
Monitoring the Battery Charge
You can view the battery charge status by completing the following procedures.
Viewing the battery Charge from the Menu button
Press the Menu button and select Battery.
Viewing the Battery Charge the Control Panel
Select the Start > Control Panel > Performance and Maintenance > Power Options >
Power Meter tab.
Status Charge LED
Charging Amber
Charging complete Green
AC adapter not connected Off
z
x
z Power Supply Status
x Remaining Battery Charge
Using the Battery 98
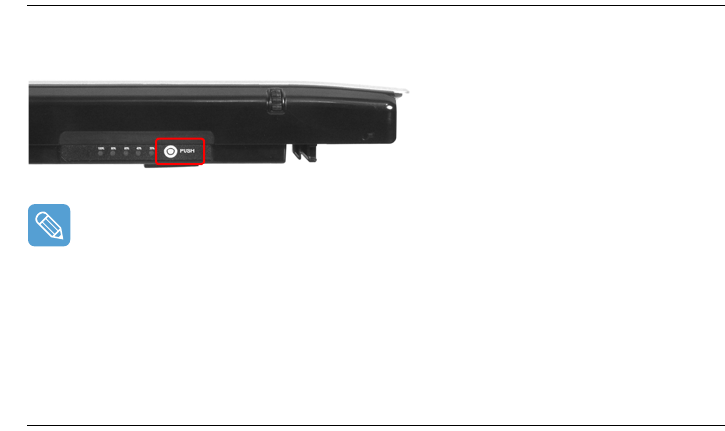
Viewing the Battery Charge on the battery
Separate the battery and press the PUSH button on the battery. The remaining battery charge (%)
will be displayed.
Battery Warning
•An alarm will sound when the remaining battery charge reaches below 10%.
In this case, connect the AC adapter or turn off the computer and install a fully charged bat-
tery.
•When the remaining battery charge is under 3%, the computer automatically saves the cur-
rent work and turns off. These settings may differ according to the settings in the Control
Panel > Performance and Maintenance > Power Options > Alarms tab.
Using the Battery
A battery is an expendable supply, so when using it for a long time, the capacity/battery life is short-
ened. If the battery life is reduced to under half its initial time, we recommend purchasing a new
battery.
For long periods of not using the battery, store the battery after discharging it. This extends the
battery life time.
Using the Battery 99
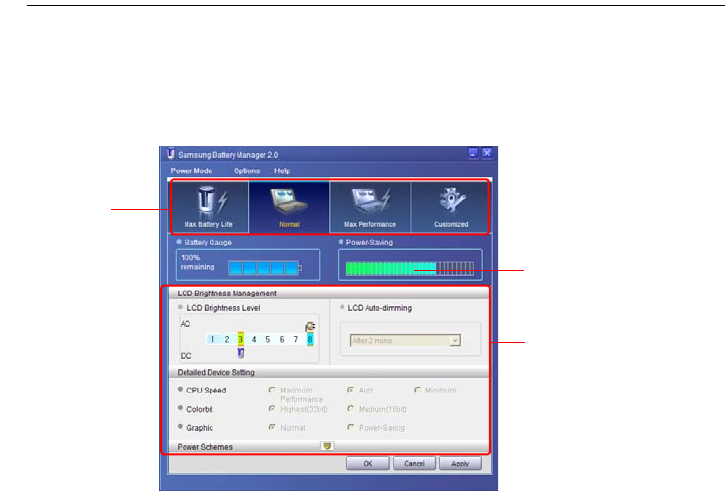
Extending the Battery Usage Time
Using Samsung Battery Manager
The Battery Manager is a power management program that enables using battery power efficiently.
You can select an optimized power mode according to your requirements.
Click Start > All Programs > Samsung > Samsung Battery Manager > Samsung Battery
Manager.
Maximum Battery Saving Mode
This mode is appropriate for conditions which require the maximum battery usage time. This may
degrade the performance of the system.
Normal Mode
This mode is appropriate for normal conditions. Both system performance and battery usage time
are optimized.
Maximum Performance Mode
This mode is appropriate for conditions that require maximum system performance. Therefore, the
battery usage time may be reduced in this mode.
Custom Mode
In this mode, a user can configure a detailed configuration to save the battery usage time. You can
adjust the LCD brightness, the system standby time, the screen color quality, and the graphics mode
values.
Change Power
Mode
You can only change the
detailed configuration in
Custom Mode.
Power Saving Effects
Using the Battery 100
Power Saving Effect
This shows the relative battery usage time for each power mode. The more effective the power
saving, the longer the graph will appear.
When Running a Game or Multimedia Application
A game or multimedia application may not work smoothly in Maximum Battery Saving Mode. Us-
ing this is recommended when the AC adapter is connected or in Normal or higher modes.
Samsung Battery Manager Power Modes
•Since the Maximum Battery Saving Mode of the Samsung Battery Manager controls the sys-
tem operating speed to extend the battery usage time, the performance of the system may
be degraded.
•When changing the power settings in Custom Mode in the Samsung Battery Manager, the
settings of the Power Options Properties window are changed accordingly.
•To use Normal Mode in Samsung Battery Manager after reinstalling Windows XP, you have to
install the Samsung Battery Manager using the system software media.
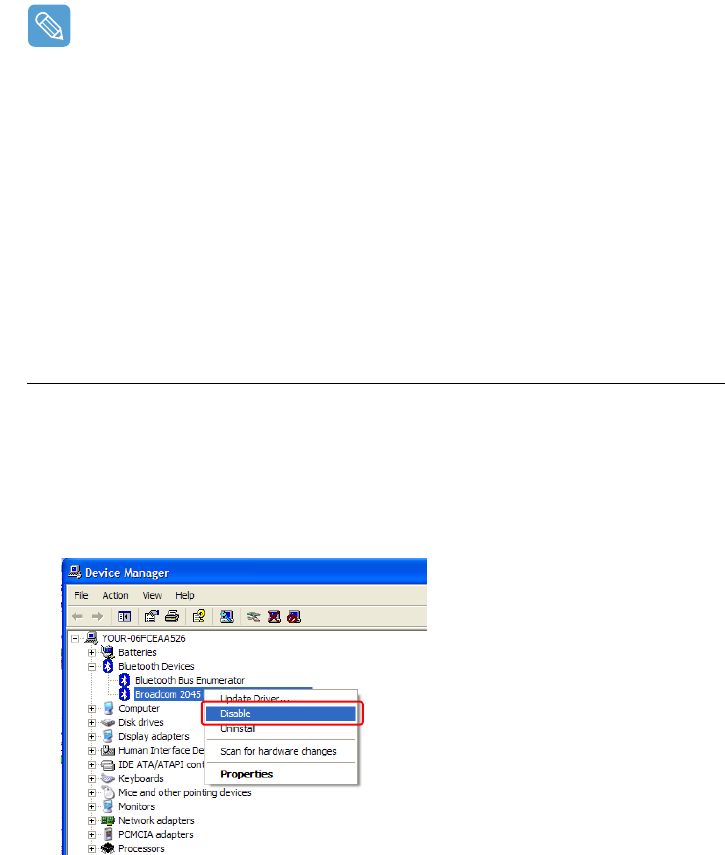
Turning Off Unnecessary Devices
Turning off unnecessary devices extends the battery usage time.
1Select the Start > Control Panel > Performance and Maintenance > System > Hard-
ware tab and click on Device Manager.
2Right-click(press and hold the Stylus Pen for more than 3 seconds) a device you are not using,
and select Disable.
Example) Wireless LAN, Bluetooth, etc.

Using the Battery 101
Battery Calibration
When charging/discharging the battery repeatedly for only a short time, the battery usage time may
be reduced by the difference between the actual battery charge and the remaining charge display.
In this case, the actual battery charge and the remaining charge display will be the same by dis-
charging the battery completely using the Battery Calibration function, and then recharging it again.
1Disconnect the AC power adapter after turning off the system.
2Restart your computer and press the Menu button when the SAMSUNG logo appears, to start
System Setup.
3Using the arrow keys, select Smart Battery Calibration in the Boot menu and press Enter.
4Highlight Yes in the [Battery Calibration Confirmation] window and press Enter.
The Battery Calibration function is activated and the battery is discharged by force. To stop the
operation press the u4 (Esc) button.
This operation requires 3~5 hours depending on the battery capacity and the remaining battery
charge.

Chapter 7. Troubleshooting / Appendix
Using Magic Doctor 103
Using Norton AntiVirus 104
Restoring the System 105
Creating a Restore Point 105
Returning your computer to an earlier restore point 106
Undoing the last restoration 107
Reinstalling Software 108
Running the system software Media 108
Installing drivers and programs 109
Reinstalling Windows XP 110
Running the System Recovery Media 110
Quick Installation 111
Standard Installation 112
Installing Windows When Windows Fails 113
Questions and Answers 114
Windows Related 114
Display Related 114
Sound Related 116
Wireless LAN Related 117
Games and Programs Related 120
Bluetooth 121
Security Center 122
Other 124
Specifications 125
Glossary 127
Index 130
Important Safety Information 131
Regulatory Compliance Statements 132
WEEE Symbol Information 138
Contact SAMSUNG WORLD WIDE 139
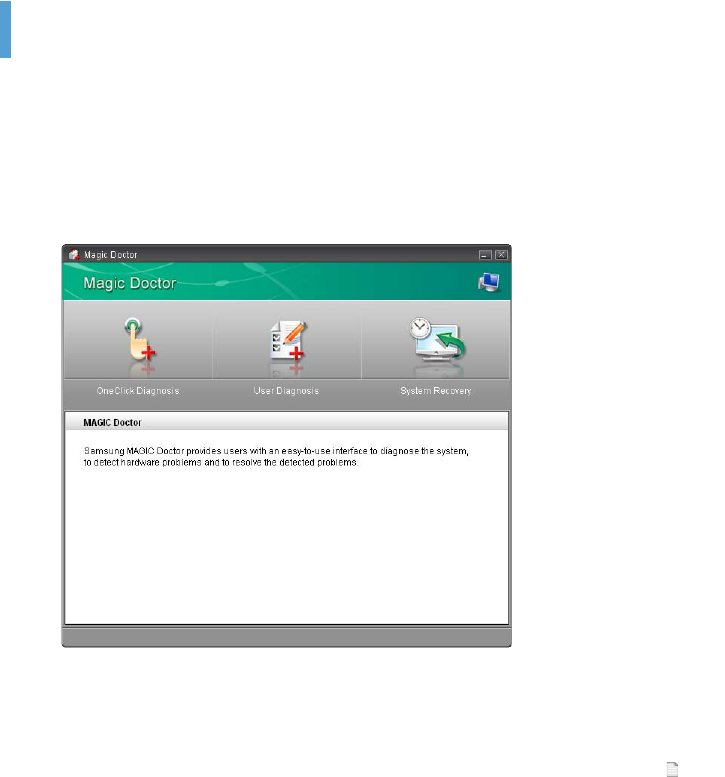
Using Magic Doctor 103
Using Magic Doctor
Magic Doctor is troubleshooting software provided by Samsung Computer. A user can diagnose system
problems via one-click or by selecting diagnostic items.
1Click Start > All Programs > Samsung > Magic Doctor > Magic Doctor.
2Click on an icon at the top of the screen.
–OneClick Diagnosis: You can diagnose problems affecting the system connections and
system operations via one-click.
–User Diagnosis: You can select the necessary diagnostic items and diagnose system
problems.
–System Recovery: Launches the Restoring the System function of Windows XP. p.105
3When the system diagnosis is completed, the diagnostic result appears.
If problems are found, click the Cure button to correct the problem. Magic Doctor starts the
correction operations.
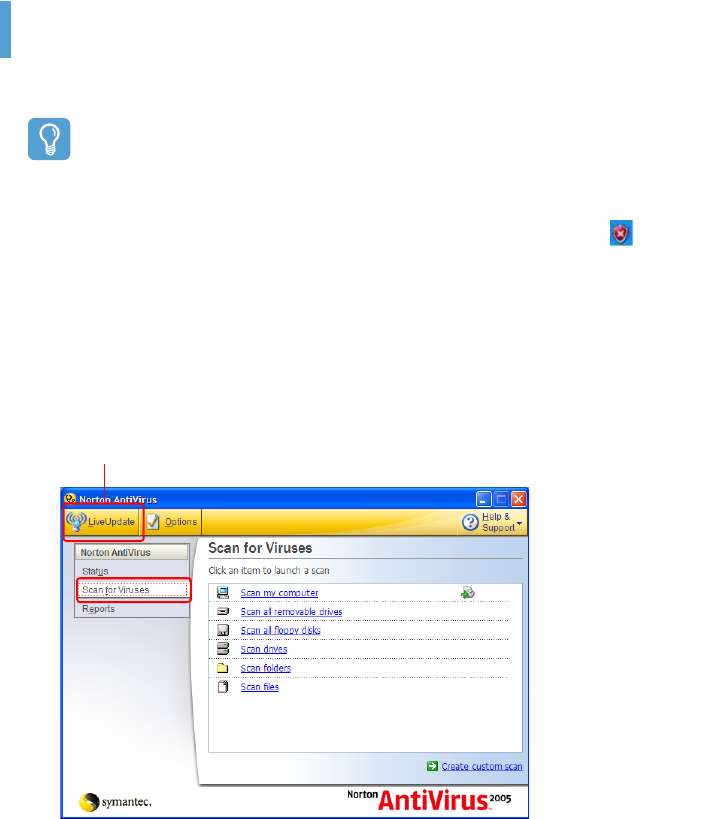
Using Norton AntiVirus 104
Using Norton AntiVirus
The Norton AntiVirus software is provided as the virus inspection program.
Before Starting!
•When first running Norton AntiVirus, the Norton AntiVirus Configuration window pops up. If
you complete the configuration and your computer is connected to a network, you can
download and install the latest updates via the network. When the live update is completed,
virus scanning starts automatically. To stop scanning, click on Stop.
•If you didn’t configure the Norton AntiVirus program, a security alert icon ( ) appears in
the notification area on the right of the task bar. This indicates that the current security state
of your computer is not secure. Configure the virus-scanning program to make the security
alert icon disappear.
To run Norton Antivurs, follow the steps below:
1Select Start > All Programs > Norton AntiVirus > Norton AntiVirus 200x.
2Click Scan Virus, select the drive to inspect, and click Scan.
3If a virus is detected, select Automatic in Norton AntiVirus, and click Next to delete the virus.
Vaccines for the latest viruses can be downloaded by con-
necting to Symantec’s homepage.

Restoring the System 105
Restoring the System
This description is only for models running Window XP.
The System Restore function allows you to restore your computer to an earlier copy (called a restore
point), and restores the settings if a problem occurs.The System Restore function is provided by
Windows XP to enable the resolution of various problems without reinstalling Windows XP complete-
ly.
You can use System Restore in the following cases.
•The system files are deleted or damaged by mistake.
•The system is unstable or a problem occurs in a device driver.
•A problem occurs after changing system files such as the registry.
•A problem occurs after installing a new program.
Creating a Restore Point
Restore points are created at predetermined times and at times of significant system events such as
when a program or a driver is installed. You can also decide when to create your own restore points.
There must be more than 200MB of free space on the hard disk drive. If the disk space is insuf-
ficient, a saved restore point might be deleted.
It is recommended to creating a restore point when purchasing a new computer and before in-
stalling new programs or device drivers. Before creating a restore point, check that the computer
is operating properly.
The procedures to create your own restore point are described below.
1Click Start > All Programs > Accessories > System Tools > System Restore.

Restoring the System 106
2Select "Create a restore point", and click Next.
Since changes made after the Recovery Point may not be maintained, please back-up all neces-
sary files to another location before performing system recovery.
3In the Restore point description box, type a name to identify the restore point, and than click
Create. A restore point has been created.
Returning your computer to an earlier restore point
The procedures to return your computer to an earlier restore point when a problem has occurred
are described below.
1Click Start > All Programs > Accessories > System Tools > System Restore.
2Select "Restore my computer to an earlier time", and then click Next.
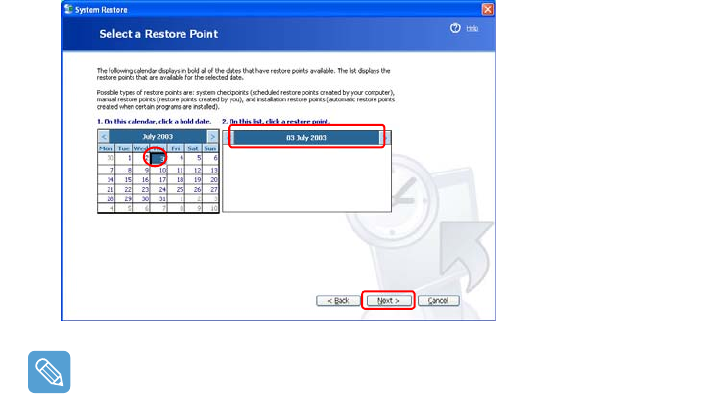
Restoring the System 107
3Select a restore date from the calendar restoration and select a restore point from the list, and
then click Next.
The date of the restore point is displayed in bold font.
4Confirm the selected restore point and click Next. System Restore shuts down Windows, and
starts the restoration processes.
5After the restoration is complete, Windows restarts. In the [System Restore completed] dialog,
click OK.Your computer has been restored to the selected restore point.
Undoing the last restoration
The procedures to undo a restoration are described below.
1Click Start > All Programs > Accessories > System Tools > System Restore.
2Select "Undo my last restoration", and then click Next.
3Confirm the restoration information to undo, and than click Next. System Restore shuts down
Windows and starts undoing the restoration.
4After the undo restoration is complete, Windows restarts. In the [Undo the last restoration com-
pleted] dialog, click OK.Your computer has been restored to the point prior to the last restora-
tion.
Reinstalling Software 108
Reinstalling Software
If you have reinstalled the Windows operating system, or the system and program do not operate
properly, you can re-install the driver and program using the system software Media.
Before Starting!
If a program has a problem, it is recommended removeing the program using Add or Remove
Programs in the Control Panel and reinstalling it using the system software media.
To use the system software media, the external USB ODD must be connected to the com-
puter. The following descriptions presuppose that the external USB ODD is connected.
This computer is optimized for Microsoft Windows XP, therefore drivers for other operating sys-
tems are not included on the System Software Media.
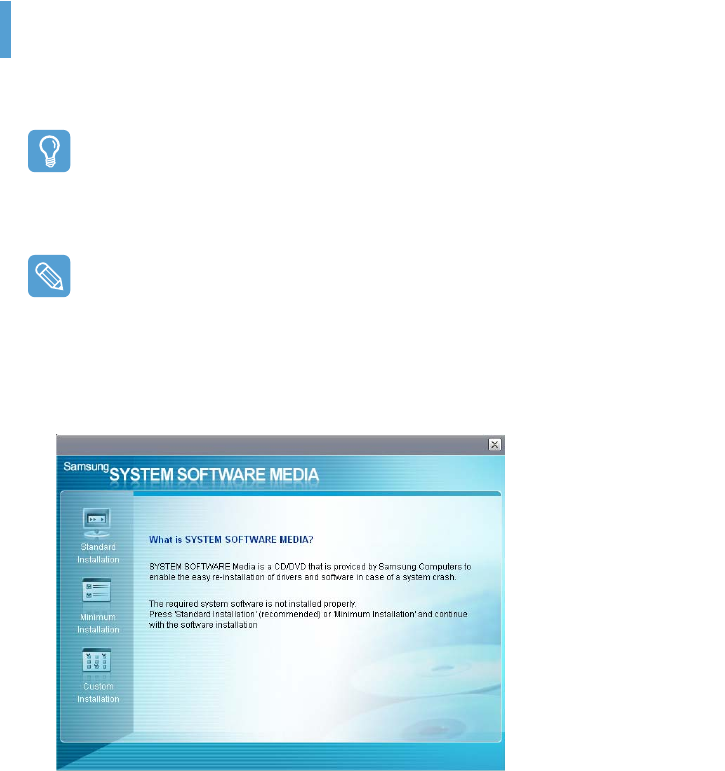
Running the system software Media
Insert the system software Media into the external USB ODD. The initial screen appears automati-
cally.
•Standard Installation: This displays a list of drivers or programs that are not currently
installed on your computer from the system software Media provided. All necessary
components are installed using the factory defaults.
•Minimum Installation: This displays the components (driver, Windows programs, etc) that,
if not installed, may cause problems with the system performance. You can install only required
components.
•Custom Installation: You can customize the installation of drivers and programs.
Reinstalling Software 109
Installing drivers and programs
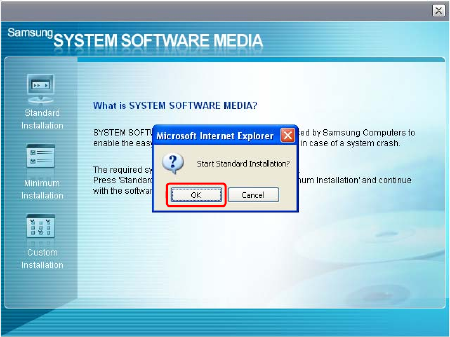
1Click Standard Installation in the main window of the System Software Media. (Standard In-
stallation is recommended)
2The system is scanned to display the drivers and programs that need to be installed.
3Click OK. The drivers and programs are automatically installed as factory defaults.
4When done, restart the system.
Reinstalling Windows XP 110
Reinstalling Windows XP
If Windows XP is not operating properly due to a system error, or if the hard disk drive has been replaced,
you can reinstall Windows XP using the system recovery media.
Before Starting!
•To use the system recovery media, the external USB ODD must be connected to the compu-
ter. The following descriptions presuppose that the external ODD is connected.
•There are two Windows installation modes: Standard Installation, which allows users to
change options, and Quick Installation, which allows users to install Windows easily.
•If you cannot run Windows, refer to p.113 to install Windows.
•When Windows does not run or when trying to install Windows using the Standard Installa-
tion of the system recovery media, a USB external keyboard is necessary.
Before turning the computer on, connect the USB keyboard. Then, install Win-
dows.
When connecting the USB keyboard during the installation, the system will not recognize the
USB keyboard.
Reinstalling Windows may delete the data on the hard disk drive such as files, programs, etc. In
order to minimize damage from data loss, please remember to always back up your data. Sam-
sung Electronics is not liable for any data loss.
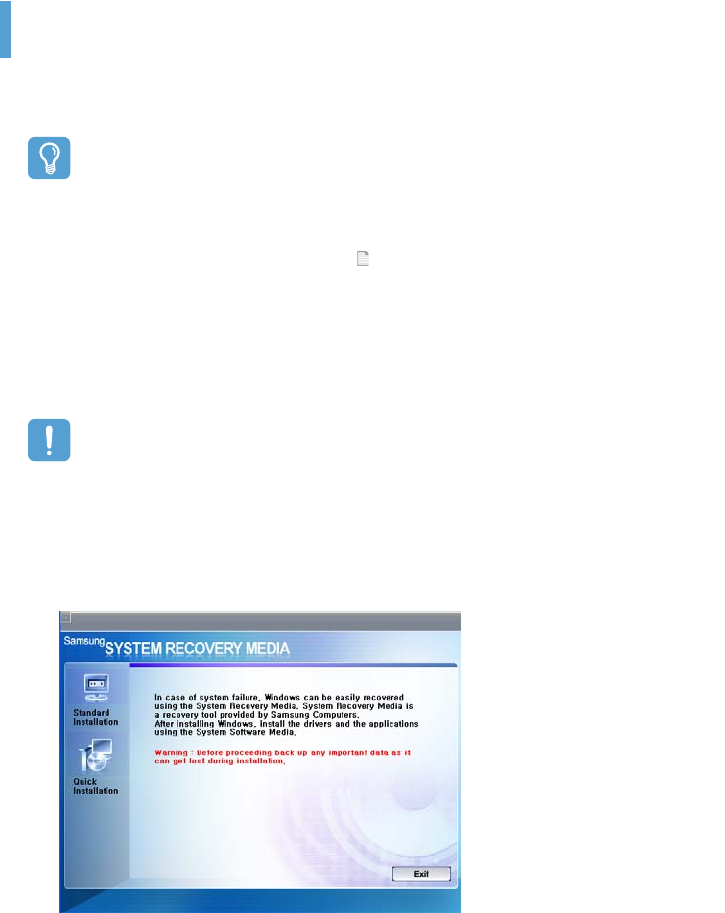
Running the System Recovery Media
Insert the system recovery media into the external USB ODD. The start screen will appear auto-
matically.
•Standard Installation
You can change the settings for Regional and Language Options, Date and Time,
Computer Name, User Accounts, etc. during the Windows installation.
However, after reinstalling Windows, you have to manually reinstall device drivers and programs
using the system software media.
Reinstalling Windows XP 111
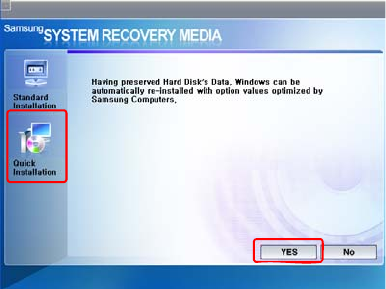
•Quick Installation
This reinstalls Windows with the user data and the system settings intact by over-
writing the Windows folder.
Since the user data and the system settings in the already existing Windows folders are pre-
served, you do not have to reinstall device drivers and programs.
Quick Installation
The Windows Quick Installation procedures are described below.
You can install using the Stylus Pen.
1In the system recovery media start screen, click Quick Installation.
2The description for the Quick Installation appears.
Click Yes to start Windows installation.
When the installation is complete, the Windows Desktop appears. Remove the system recov-
ery media from the ODD.
Reinstalling Windows XP 112
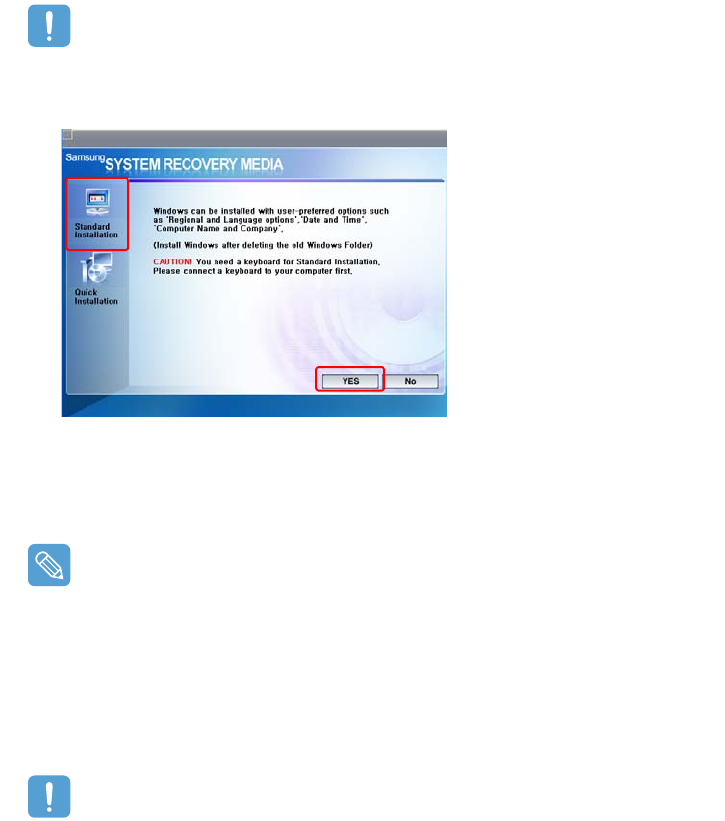
Standard Installation
The Windows Standard Installation procedures are described below.
For the Standard Installation, a USB keyboard is necessary. You have to connect the USB key-
board before turning the computer on. The descriptions assume that you are using an external
USB ODD and USB keyboard.
1In the system recovery media start screen, click Standard Installation.
2The description for the Standard Installation appears.
Click Yes to start the Windows installation. The system restarts and the Windows installation
begins.
If you have set a booting password, enter the booting password when booting the system to
continue the installation.
3After the system has restarted, the message 'Press any key to boot from DVD' appears. Do
not press any key at this time.
After a moment the partition configuration screen appears.
To leave the partition unchanged, move to the C:Partition 2 using the direction key ( ↓) and
press <Enter>.
Partition setting is a function that divides the hard disk drive into one or several partitions. Note
that changing the partition deletes all data on the hard disk drive.
4Select the folder to install the Windows operating system.
To delete the previous version of Windows and install in the current folder, press <L> on the
keyboard.

Reinstalling Windows XP 113
When pressing the ESC key to select another folder for the installation, a new Windows folder
is created causing the risk of dual booting.
5After the installation process copies the necessary folders for the Windows installation, restart
the system, and the message "Press any key to boot from DVD" is displayed. You do not
need to enter anything. The Windows XP installation screen will appear shortly to proceed with
the installation.
6When the Regional and Language Options window appears, click Next.
7When a window that requires your name and organization pops up, enter your name and
the organization and click Next.
A window that requires the computer name and the administrator password appears. Enter the
computer name and the administrator password and click Next.
8When the Date and Time Settings window appears, click Next. Setup continues and the sys-
tem restarts.
9When the system restarts, the message "Press any key to boot from DVD" is displayed. You
do not need to enter anything. In a moment, the Windows XP Desktop appears. When you see
the Windows desktop, this means that the installation process is completed.
10 Remove the system recovery media and install the device drivers and applications from the
system software media. ( p.108)
Installing Windows When Windows Fails
If you cannot run Windows, you have to boot the system with the system recovery media and rein-
stall Windows.
An external USB ODD and USB keyboard must be connected before starting the installation.
You have to connect the USB keyboard before turning the computer on.
If you connect the USB keyboard during the installation, the system will not recognize the USB keyboard.
1Insert the system recovery media into the external USB ODD and turn the computer on.
2When the system restarts, the message "Press any key to boot from DVD" is displayed. You
do not need to press anything.
3The partition configuration screen will appear. To install Windows in the selected partition with-
out change, press <Enter>.
4Select a file system (format). To keep the current file system, press <Enter>.
5Select the folder to install the Windows operating system.
To delete the previous version of Windows and install in the current folder, press <
L
> on the keyboard.
6
The subsequent procedures are the same as those after Step 5 of <
Standard Installation
>. (
p.113)

Questions and Answers 114
Questions and Answers
This section provides information on possible problems, solutions and other references for system use.
Windows Related
Q1 The system does not shutdown properly.
AWhen the system does not shutdown normally, press and hold the Power button until the sys-
tem shuts down manually. If the Power-Saving Mode is configured into the Power button,
press and hold for more than 4 seconds to shut the system off. When the system is turned on
after such a manual shutdown, Scandisk will run to check errors in the system.
Q2 The system freezes during a program operation
A1 There is an error with the program currently being used. Press the <Ctrl>, <Alt>, and <Del>
keys (Windows Security Button) simultaneously and select End Task in the [Windows Task
Manager] window.
A2 There is an error with the Windows OS. Reboot the system by using the Power button.
Display Related
Q1 The LCD screen is too dark or too bright
AAdjust the LCD brightness. Press the Menu button and select either Brightness UP or
Brightness Down.
Alternatively, press the + or - Volume Control buttons at the top of the computer while hold-
ing down the Menu button to adjust the LCD brightness.
Q2 The screen saver is activated while Media Player is playing a movie or video clip.
AUnselect Tools > Options > Player > Allow screen saver during playback in the Media
Player.
Q3 In the following cases, the screen blinks or displays noise for a short time.
Clicking on the Graphics Related tab, Changing the Resolution, Changing the
Display Device, Removing the AC Adapter, Restarting the System, Changing
the Power Mizer level.
AThis may happen while the video driver is examining the connected device. While busy detect-
ing, any connected display devices may blink or some noise may occur.
In addition, when pressing the Auto Scaler button, the screen may blink or display noise for a
short time, while the resolution changes or the Down Scale (resolution zoom out) function op-
erates.
Questions and Answers 115
Q4 When I connect a projector, and change the settings to display the screen image
on both the LCD and the projector by pressing the Menu button, the screen is not
displayed properly.
APress the Menu button and press the LCD/CRT twice to select LCD+CRT. If the screen image
or some part of it is not displayed on the screen, this is because the LCD resolution is low or
the current resolution is too wide and cannot be supported by the projector. Press the Auto
Scaler button and change the resolution to 800x600 pixels.
Q5 I have run a function from the menu program, but the corresponding shortcut icon
does not appear on the screen.
AThe shortcut icons only appear when both the Magic Keyboard and Samsung Display Manager
programs are installed.
Q6 When I connect an external monitor and select the monitor, no screen image is dis-
played (Clone Mode).
AThis may happen when the current resolution is inappropriate or Dual View (Extended Mode)
is selected. Try the following methods.
z When the current resolution is inappropriate
This computer supports the 800x480 WVGA resolution. Since this resolution is lower than that
of the operating system, the above symptom may appear when the external monitor cannot
support this resolution. Change the resolution to 800x600 pixels, press the Menu button and
press the LCD/CRT twice to select LCD+CRT.
x When Dual View (Extended mode) is selected
When Dual View is selected, Clone Mode is not supported. In this case, unselect Dual View,
and press the Menu button to select the Clone Mode.
For the procedures to deactivate Dual View, refer to (p.33).
Q7 In the Display Properties window, the resolution starts from 800x600.
AEven if the current resolution is 800x480 pixels, it may be represented as 800x600 in the Dis-
play Properties. This is because the lowest resolution of the operating system is 800x600 and
is unable to show the 800x480 resolution in the Display Properties window.
Q8 Pressing [Start] displays a [Some items cannot be shown] message.
AThis message appears when all start menu items cannot be displayed in the default resolution
(800x480 pixels). In this case, change the screen resolution to 800x600 pixels or press the
Auto Scaler button to change the resolution.
Q9 When I press the Auto Scaler button, the letters on the screen are blurry.
AFor the resolutions provided by Auto Scaler, the letters on the screen may be blurred because
these are not the optimal resolutions of the LCD panel.
In this case, press the Auto Scaler button again and change the screen resolution to 800x480
pixels which is the default resolution of the LCD panel.

Questions and Answers 116
Q10 I've run the Rotation function from the Menu, and the pointer on the screen does
not correspond to the pointer position.
AIt is recommended using an external USB mouse when the screen is pivoted.
If the above problem appears, complete the following steps.
z Right-click on the TouchKit ( ) icon from the Taskbar and confirm that the Display
Pivot Support function is selected (V). If it is not selected, select it by selecting the Display
Pivot Function.
If you cannot find the TouchKit icon on the Taskbar, click Start > All Programs > TouchKit
> TouchMon.
x Click on Start > All Programs > TouchKit > Configure Utility and click on 4-Point
Calibration from the Tools tab. If the Stylus Pen Calibration screen appears, proceed accord-
ing to the instructions on the screen.
Q11 When using the 'Mouse Function' Rotation function using the joystick, the pointer
on the screen may move in a different direction from that of the joystick.
AWhen using the Rotation function, use the Stylus Pen or external USB mouse.
The Mouse Function is a function that enables moving the pointer by moving the joystick
while holding down the Menu button.
(See Using the Buttons in the 'Getting Started Manual'.)
Q12 The rotation function does not work.
AIf the Rotation function does not work, run the 'Setup.exe' file in the 'C:\Program
Files\samsung\Graphics Driver' folder.
If you have reinstalled Windows, reinstall the Graphics Driver using the supplied 'System
Software Media'.
Sound Related
Q1 How can I configure the Recording Mixer while I am video or audio chatting?
Az Double-click the volume icon from the Taskbar and select Options > Properties from
the menu.
x In the Mixer device field, select Realtek HD Audio Input.
c Unselect 'Mute all' in the Recording control and unselect 'Mute' in the Microphone volume.
v Select 'Mute' in the Stereo Mixer.
Q2 How can I configure the Recording Mixer while playing music in WinAMP?
Az Double-click the Volume icon in the Taskbar and click on Options.
x In the Mixer device field, select Realtek HD Audio Input.
c Unselect 'Mute all' in the Recording control and unselect 'Mute' in the Microphone volume.
v Unselect 'Mute' of the Stereo Mixer.
Questions and Answers 117
Wireless LAN Related
Q1 I cannot find an AP.
●Check the Wireless LAN LED.
ACheck if the Wireless LAN LED is on. If off, click the Menu button and select Wireless LAN
ON to turn the Wireless LAN on.
●Reinstall the driver.
AReinstall the driver using the software media.
●Check the Wireless Zero Configuration (WZC) service.
AIf the "Windows cannot make this wireless connection" message appears while searching for
wireless networks, it indicates that a program other than Windows is set to manage the wire-
less LAN settings.
●To use the wireless LAN settings using Windows:
Az Click Start > Control Panel > Network and Internet Connections > Network Con-
nections > Wireless LAN Connection, right-click and check if the "Windows manages wire-
less network settings (W)" option is selected in the Wireless Network tab of the Properties
window. If not, select the option.
x Click Start > Control Panel > Performance and Maintenance > Administrative
Tools > Computer Management and click Services and Applications > Services. In
the right pane, double-click the Wireless Zero Configuration and check if the Startup Type is
Automatic and the Status is Started.
Q2 I cannot connect to an AP. (The wireless connection is disconnected frequently.)
●Check the Network Key.
ARight-click the Wireless Network Connections icon from the Taskbar and click on 'View
available wireless networks'. If wireless networks are found, it indicates that the device is
operating properly but the network settings may have a problem. Please check the Network
Key (Encryption Key) and the AP settings.
●Check if there is a device nearby using the same frequency band.
A1 If there is a device nearby using the same frequency band such as another wireless LAN de-
vice, wireless video transceiver, microwave oven, plasma bulb, etc., channel interference may
occur. If you experience interference from another device, it is recommended changing the AP
channel.
A2 When operating in EEE802.11g mode, if there is a IEEE802.11b device operating nearby, you
may experience low data rates or even disconnection as it operates in Hybrid mode.
●Check the authentication type.
AA connection may be disconnected after a period of time if the "Use IEEE 802.1x network au-
thentication" option is selected when IEEE 802.1x authentication is not being used.
View the properties of the corresponding AP in the Wireless Network Properties. In the Au-
thentication tab, unselect the "Use IEEE 802.1x authentication in this network" option.
For detailed information on the authentication server, ask your network administrator.
Questions and Answers 118
●Check the AP settings.
A1 Check if the surroundings are appropriate for a wireless LAN. A wireless LAN connection may
be limited by the surrounding environment and distance. Obstacles such as walls and door
mats affect the quality of the wireless LAN signal. You have to install an AP in a high, open
position far away from any other radio signal sources. If the AP is excessively far away, or is
installed at the end of a building and you are attempting to use the wireless LAN from the other
end, you may not be able to use the wireless communication normally because the signal is
blocked by obstacles between you and the AP (such as a wall).
A2 Check if the AP operates properly. If the AP is not operating properly, turn it off and on again
and try again.
A3 Check if the AP firmware is the latest version. (For more information on the AP firmware, ask
the AP manufacturer or your product provider.)
A4 Check if the AP is properly connected to the network. Connect the LAN cable from the AP to a
computer and check if the network is connected properly.
A5 Check the Network Key (Encryption Key) settings again.
If the automatic password converting function (passphrase function) is enabled and the wire-
less connection is normal but you cannot send data over the connection, please enter the Net-
work Key (Encryption Key) manually.
A6 Check the AP settings as follows.
If there are multiple APs running at the same time, check the channel setting of each AP. If
the interval between the channels of the APs is narrow, you may experience electromagnetic
interference. Set the channel numbers of the APs so that the internals between the channels
are maximized. (E.g., Ch1, Ch5, Ch9, Ch13)
If the SSID option is set to Hide, you will not be able to find the AP on your computer. It is
recommended unselecting the Hide option of the AP. SSID (Service Set ID) is a name used to
distinguish a wireless LAN from other wireless LANs.
It is recommended using Long Preamble. Preamble is a signal for data transmission synchro-
nization. Although some APs support Short Preamble, there might be a compatibility problem.
Because 'Fixed' channel selection is more stable then 'Auto' channel selection, 'Fixed' channel
selection is recommended. It is recommended not using the 'Block Any' and 'Any Connection
Block' functions. Although these functions block connections at the client side when the net-
work name is Any or Blank, it may cause a compatibility problem.
For more information on the AP settings, refer to the owner's manual supplied with the AP.
Q3 Although a connection has been established, I cannot connect to the Internet.
●Check the TCP/IP settings.
AIf you cannot connect to the Internet but you are connected to an AP, check if the TCP/IP
settings are configured properly.
When you are not connected to an AP, an X mark appears over the 'Wireless Network Connec-
tions' ( ) icon in the Taskbar. If you double-click the icon, the Search for Wireless Connec-
tions window appears. Reconnect to a wireless network referring to the descriptions of
Connecting to a Wireless LAN in the Using the Network section.
When you are connected to an AP, an X mark appears over the 'Wireless Network Connections'
( ) icon in the Taskbar. Double-click the icon and check if the IP address is properly allocat-
ed on the Support tab. If the IP address is not properly allocated, the IP address will be dis-
played as follows; (e.g. 169.254.xxx.xxx).
Questions and Answers 119
If your network does not support DHCP, you have to manually configure an IP address by ask-
ing your network administrator.
In addition, even if your network supports DHCP, the Internet connection may not be available
if the DHCP server fails to allocate an IP address to your computer.
Q4 I have configured both wired and wireless connections with the same IP address,
but the network connections do not work properly.
AYou cannot use the same IP address for wired and wireless connections. To use only one IP
address for both wired and wireless connections, you must disable one of them according to
your requirements in Network Connections in the Control Panel.
Q5 After installing the Wireless LAN Setting program, the "AEGIS Protocol (IEEE
802.1x)" protocol appears in the [Local Area Connect Properties] window.
AThe protocol is a security authentication protocol that is automatically installed when the Wire-
less LAN Settings program is installed and does not affect the program operation.
Q6 I want to use the Wireless LAN power saving function to extend the system battery
use time.
AYou can configure this in the Samsung Battery Manager program. Run the Samsung Battery
Manager and select Options > Wireless LAN Power Saving > On from the menu.
However, this setting may affect the performance of the Wireless LAN.
In addition, the wireless LAN connection might be disconnected while configuring this.
Questions and Answers 120
Games and Programs Related
Q1 3D games cannot run, or some functions are not working.
AChange the graphics setting of the game to '2D' or 'Software Renderer', then run the program
again.
Q2 While playing a game, pressing the Menu button or pressing the LCD/CRT item
does not work or the screen is not properly displayed.
ASome games and 3D application programs may change the display device control. Therefore,
pressing the Menu button and clicking the LCD/CRT item may terminate the running program
or may display an abnormal screen.
Press the Menu button and press the LCD/CRT item before launching a program and do not
press these buttons while running the program.
Q3 The running speed of a game is too slow or too fast.
AChange the setting of the Power Schemes to 'Always On'.
(Click the Start > Control Panel > Performance and Maintenance > Power Options > Power
Schemes tab, then configure the Power schemes field to 'Always On'.)
Q4 Some part of a game image is not displayed or is black.
AThis may happen when running a game designed for DirectX 8.1, such as NHL 2003, MVP
Baseball 2003, etc.
Q5 The picture is not displayed properly for some games.
ASome games such as 'Harry Potter and the Sorcerer's Stone', 'Harry Potter and the Chamber
of Secrets', etc. may not display the picture properly when the screen resolution is set to
1024x768 and the color quality is set to 32 bit.
For these games, set the screen resolution to 1024x768, and the color quality to 16 bit.
Q6 Game play is not performed smoothly on the screen.
AFor 3D games, the texture data for the 3D screen display is saved to the system memory. If
there is insufficient system memory, the data is saved to the hard disk drive and loaded to
memory when required. This operation may temporarily stop displaying the picture on the
screen.
In this case, lower the game resolution or the screen settings. (For Delta Force: Black Hawk
Down, Medal of Honor, Battle Field, 1942, etc.)
Q7 If I run a program, an error message appears or the program does not launch.
AThis may happen when the program does not support the 800x480 pixels resolution.
This is caused by a program that is designed for a minimum resolution of 800x600 pixels and
fails to support a resolution lower than its minimum resolution.
In this case, change the screen resolution to 800x600 pixels or press the Auto Scaler button
to change the resolution.
Questions and Answers 121
Bluetooth
Q1 The characters are broken when I receive a business card with Korean or Chinese
characters using the Send Business Card function via Bluetooth.
A1 If a business card with Korean or Chinese characters is sent by selecting the Select a busi-
ness card from files (*.vcf, *.vcd) option in the Send Business Card menu, the characters
of the received business card will be broken because the character set of the business card is
not set to the Korean or Chinese character set (CHARSET). To resolve this problem, edit the
contents of the business card file directly.
z Right-click a business card (*.vcf, *.vcd) to be transmitted and select Connect a program
> Select a program.
x Select Notepad from the program list.
c Modify the contents of the file as follows.
Example) N:MagicSense => N;CHARSET=KS_C_5601:MagicSense
For Korean, add "CHARSET=KS_C_5601".
For Chinese Simplified (CHS), add "CHARSET=gb2312".
For Chinese Traditional (CHT), add "CHARSET=Big5".
A2
When sending a business card directly from the address book of
Microsoft Outlook
, or sending it
by selecting the
Select an Outlook business card
option in the Send Business Card menu, you
can properly send a business card with Korean or Chinese characters without editing the VCF file.
Q2 I cannot locate or connect the headset.
A1 If the headset is connected to another device and is being used, you will not be able to locate
it on your computer and connect to it even if it is found. To resolve this problem, disconnect
the headset from the currently connected device and locate it again.
A2 If the headset is connected to the power adapter, it cannot be connected through the Blue-
tooth connection. In this case, disconnect the headset from the power adapter and try again.
A3 In general, a Bluetooth headset has two operating modes - On/Off mode and Pairing mode.
To connect a headset to another Bluetooth device such as a PC or cellphone, it must be in
Pairing mode. Switch the headset to Pairing mode and try to locate it again.
In general, a headset automatically switches from Pairing mode to On/Off mode after a pre-
determined period of time.
Q3 I have connected the headset, but sound is heard intermittently or not at all.
A1 If a Bluetooth headset is connected to a PC, the Sound playback device in the Control
Panel is to be changed to Bluetooth Audio (for a mono headset) or High Quality Blue-
tooth Audio (for a stereo headset). If the Sound playback device in the Control Panel is
not changed properly, there may be no sound through the headset. Check the audio settings
of the Control Panel according to the procedures given below.
Configuring the Audio Device in the Control Panel
z Click Start > Control Panel and double-click on Sound and Audio Devices.
x Select the Audio tab in the Sound and Audio Devices Properties window.
c Check if the Sound playback device and the Sound recording device are set to Bluetooth
Audio (for a mono headset) or High Quality Bluetooth Audio (for a stereo headset).
Questions and Answers 122
A2 When using a Bluetooth headset with another Bluetooth device, you may experience no sound,
data transmission rate degradation, transmission errors or the disconnection of the device.
Therefore, it is recommended not using another Bluetooth device when using a Bluetooth
headset.
A3 Check if the headset is properly connected and working properly.
A4 Check the volume level of the headset and PC.
A5 When running a multimedia program such as Windows Media Player that accesses the audio
device, a headset may not be properly connected or used. To resolve this problem, exit the
multimedia program, connect the headset and then launch the multimedia program again.
Security Center
Q1 How do change change the popup window display settings when connected to the
Internet.
In the Windows XP SP2 environment, you can decide whether to display a
popup window when connected to the Internet, for user convenience and se-
curity.
A1 To display most of the popup windows when connected to the Internet:
z Select the Internet Options in Start > Control Panel > Security Center > Manage security
settings for.
x In the Privacy tab of Internet Properties, clear Block pop-ups.
A2 To only display popup windows from the current site when connected to the Internet:
Place the cursor on the notification area at the bottom of the Internet address bar and right-
click to display a menu, from which you can select Temporarily Allow Pop-ups or Always Allow
Pop-ups from This Site.
A3 To display popup windows from a particular site:
z Click on Internet Options in Start > Control Panel > Security Center > Manage security set-
tings for.
x In the Privacy tab of Internet Properties, click on Settings from Block pop-ups.
c Enter a URL for which to allow pop-ups for into the Address of Websites to allow and click
on Add.
v The entered address is added to the allowed sites list. The next time you connect to the
website, you will see pop-ups appearing.
When you need to re-block a permitted site, select the website address that you want to block
from the Allowed Sites and click on Remove.
Q2 When connecting to a website, the message, “To help protect your security, Inter-
net Explorer stopped this site from installing an ActiveX control on your computer”
or “This site might require the following ActiveX control” is displayed below the ad-
dress bar.
AWindows XP SP2 blocks unsigned ActiveX controls from being installed when connected to cer-
tain websites for security reasons. On some Websites that have no ActiveX controls installed,
applications are not started or do not display properly.
In this case, to install ActiveX controls, right-click the notification area to display a menu from
which you can select Install ActiveX control.

Questions and Answers 123
Q3 When a Windows Security Alert icon ( ) appear on the right part of the task bar.
With the Security Center feature added, Windows XP SP2 checks the Firewall,
the automatic updates configuration and installation of virus-checking pro-
grams to display a Windows Security Alert icon on the right part of the task
bar when it judges that the computer is vulnerable to attacks from the Inter-
net. In this case, check the following to install the necessary components.
A1 Configure the Windows Firewall.
When configuring the Windows Firewall, you will be protected from unauthorized access
through the Internet or the network.
z Click on Windows Firewall in Start > Control Panel > Security Center > Manage security
settings for.
x From the General tab of Windows Firewall, select ON (recommended).
c To allow certain program or service to gain access to your computer via the Firewall, select
and check the program or service that you want to allow access from, in the Exceptions tab
of the Windows Firewall. If you want to add a program to Programs and Services, click on
Add Program and select it.
A2 Setting up Windows Automatic Updates.
This automatically downloads and installs critical updates via the Internet to keep your com-
puter up to date.
z Click on Automatic Updates in Start > Control Panel > Security Center > Manage security
settings for.
x From general tab of the Automatic Updates window, select Automatic (recommended).
A3 Keep your computer current with the latest virus updates. (ex: Norton Antivirus)
Even when Norton AntiVirus is installed on your computer, Windows cannot recognize the pro-
gram until you configure the settings, displaying a Security Alert icon.
When first using or installing Norton AntiVirus, follow the Registration Wizard steps to config-
ure the registration settings.
To protect your computer from virus attacks with the latest updates, click on Options to display
the Norton AntiVirus Options window. From the left menu of the window, check Run Automatic
Protection to select Automatic Protection and check Run LiveUpdate to select LiveUpdate.
A4 Two virus scanning programs on one computer may cause a system conflict. Remove one of
the programs from the system.
A5 If Windows does not recognize the existence of an anti-virus program even when it has been
installed, your computer could be vulnerable to attacks from the Internet. You should install
an anti-virus program that your computer is able to identify.
Check the following programs which Windows can detect and select one from the list.
A list of anti-virus programs that Windows can detect:
-Symantec Norton Anti-Virus
-NetworkAssociates (McAfee)
-TrendMicro
-ComputerAssociates
-Panda
-Kaspersky
-Ahnlabs (AhnLab)

Questions and Answers 124
Visit the Microsoft Web site (www.microsoft.com) regularly to check the latest list.
Other
Q1 I cannot run any functions.
A1 This may happen when the computer is in the HOLD status. When pressing a button or switch
in the HOLD status, the Charge LED () blinks for a moment. Slide the HOLD switch down-
wards and try again.
A2 If the computer is running on battery power, check the battery charge status.
Q2 The [Power Switch] and the [AVStation NOW] switch do not work.
A1 This may happen when the computer is in the HOLD status. When pressing a button or switch
in the HOLD status, the Charge LED () blinks for a moment. Slide the HOLD switch down-
wards and try again.
A2 To use the switch, you have to slide and hold the switch for more than 0.1 seconds. Slide and
hold the switch for more than 0.1 seconds before releasing it.
A3 If the computer is running on battery power, check the battery charge status.
Q3 I've hidden the Taskbar, but I cannot display it again.
AIf the Taskbar is behind the screen, you cannot display it with the Stylus Pen. In this case,
press the Menu button to display the Taskbar again.
Q4 How can I install a program onto my computer?
ATo install a program to the UMPC, you have to purchase one of the following devices.
For more information, refer to the Installing Programs of the 'Getting Started Guide'.
● External USB ODD Designed for UMPC or other compatible external USB ODD
● External USB HDD
● USB Data Cable
Q5 Precautions for Using a Portable USB Keyboard
A●When using a Portable USB Keyboard Designed for UMPC, which is sold separately, if
you selected Backlit OFF (Screen Off) by pressing the <Fn>+<F5> keys, you must press
the <Fn>+<F5> keys on the USB keyboard to select Backlit ON (Screen On) because if the
backlight is off while using the USB keyboard, the backlight does not turn on even if you touch
the computer screen.
●The Portable USB Keyboard is equipped with a Pointing Stick that can be used instead of
a mouse. Another pointing stick cap is supplied with the USB keyboard. If you need to replace
the cap, pull the cap out and install the new cap.
Specifications 125
Specifications
System Specifications
The system specifications will be described below. The system specifications may differ depending
on the derived models.
The system specifications are subject to change without notice. For detailed system specifications, refer to the
product catalog.
Item Specification Remarks
CPU Intel Celeron M ULV Optional
Cache memory Celeron (512KB) Optional
Main memory 256MB ~ Max 1GB, Memory type : DDR2 SODIMM Optional
Main Chipset Intel 915GMS / 400 MHz FSB Support, Intel ICH6-M Optional
Hard disk drive
(HDD) 1.8" HDD 20 ~ 60GB Optional
Graphics Intel 915GMA 900 Graphics Optional
Sound AD1986 (2CH)
Network Interface Wired LAN: Marvell Yukon 88E8036 PCI-E Fast Ethernet Controller
Wireless LAN: 802.11BG
Bluetooth 2.0+EDR
Optional
Optional
Optional
CF Card Slot Type I and II Compatible
Ports USB 2.0 x 2, Video (Monitor) Out Port, Headphone Jack, Wired LAN
Port, DC-in Jack, External ODD Power Port Optional
Dimensions (mm) 227.5 x 138 x 24~25.7 W x D x H
LCD 7" WVGA (800x480)
Weight 746g (Including the Bluetooth modules) Optional
Battery Lithium-Ion smart battery: 3 Cells or 6 Cells Optional
Operation Environ-
ment Temperature (storage) : -5 ~ 40°C (operation) : 10 ~ 32° C
Humidity (storage) : 5% ~ 90% (operation) : 20% ~ 80%
Operating Voltage 100 - 240 VAC
Frequency 50 - 60 Hz
Output Power 60W
Output Voltage 19.0VDC
Specifications 126
Wireless LAN Specifications (Optional)
Atheros AR5006EX Wireless Network Adapter Device
Product Specification
* This device supports the Wi-Fi wireless LAN security standard, WPA (Wi-Fi Protected Access) and CCX (Cisco
Compatible eXtensions). To connect to a wireless network consisting of the WPA and CCX, certificates or
Atheros Client Utility may be required depending on the network settings. For more information, ask your network
administrator.
Radio Specifications
* The data rate may differ from the real data transmission rate.
**11g mode is supported only when the device is connected with an IEEE 802.11g device. (e.g. Access Point sup-
ported IEEE 802.11g)
Item Detailed Specifications
Physical
Specifications
Dimensions (Width X Height) 30 X 50.95 mm
Operating Temperature
and Humidity
Same as system operation
Temperature: 0°C ~ 70°C
Humidity: 85%
Power Specifications
Power Saving Mode 726mW
Receiving Mode 1.353W
Transmission Mode 2.046W
Power 3.3V
Network
Specifications
Compatibility IEEE 802.11g, IEEE 802.11b
Operating System Microsoft Windows XP
- NDIS5 Miniport Driver
Media Access Protocol CSMA/CA (Collision Avoidance) with Acknowledge-
ment(ACK)
Security Wired Equivalent Privacy support (WEP) 64bit / 128bit
*WPA, *CCX
RF Band 2.4 GHz
Support Channels Channels allowed per country.
Device Transceiver
Modulation Scheme 11b Mode: DSSS, CCK 11g Mode: OFDM
Standard Output Power MAX 10 mW
*Transmission Rate **11g mode: 54, 48, 36, 24, 18, 12, 9, 6
11b mode: 11, 5.5, 2, 1
Antenna Type 1ea internal antennas (main)

Glossary 127
Glossary
You can find the terminologies in this User Guide listed in alphabetic order. For terminologies other than
these, find them in the Windows Help.
Backup
A way to save the current data, which can be restored later if necessary. Backup is a way to restore
computer data when the data or computer is damaged.
Client
This refers to a computer that uses a shared network resource provided by a server.
DDR SDRAM (Double Date Rate Synchronous Dymamic Random Access Memory)
DRAM is a memory type whose cells consist of a capacitor and transistor manufactured at a low
price.
SDRAM is a memory type whose performance is improved by synchronizing the clock with the ex-
ternal clock of the CPU.
DDR SDRAM is a memory type whose performance has been improved by doubling the operating
speed of the SDRAM and is widely used nowadays. This computer uses DDR SDRAM.
Device Manager
An administrative tool used to manage computer devices. You can add or remove hardware or up-
date a device driver using the Device Manager.
Direct X
An application interface that has been developed to enable Windows application programs to access
hardware devices at a very high speed. Since the operating speed of graphics, memory and sound
cards must be very fast to provide high quality video and sound for games, Direct X enables a faster
control and interaction between applications and hardware devices. By using Direct X, the multime-
dia performance of Windows has been hugely improved.
Driver
Software that interacts between the hardware and the operating system. An operating system man-
ages and controls the hardware information. In general, a driver is supplied with the corresponding
hardware device.
DVD (Digital Versatile Disk)
The DVD was developed to replace the CD (compact disk). Although the shape and size of a DVD
are the same as a CD, the capacity of a DVD is at least 4.7GB while the capacity of a CD is 600MB.
DVD video is digital unlike VHS video and supports MPEG2 compression and digital audio. To play a
DVD, a DVD drive is required.
Firewall
A security system that is used to protect an internal network or intranet from external networks
through an authentication procedure.
Glossary 128
Hibernation Mode
A power mode that saves all data in memory to the hard disk and turns the CPU and hard disk off.
When canceling Hibernation Mode, all application programs that were running are restored to their
last state.
Icon
This refers to a small image that represents an object that a user can use.
LAN (Local Area Network)
A communication network connecting computers, printers and other devices within a local area such
as within a building. A LAN enables all connected devices to interact with other devices on the net-
work. The current LAN uses the Ethernet media access control method developed in the early 1980s.
To connect to an Ethernet, a network card called a LAN card, Ethernet card or network interface
card is required. To exchange data between computers, a protocol is required besides the hardware
equipment. Windows XP uses TCP/IP as the default protocol.
LCD (Liquid Crystal Display)
There are Passive Matrix and Active Matrix LCD types. This computer uses the Active Matrix type
LCD called TFT LCD. Since an LCD is implemented by transistors instead of a cathode-ray tube unlike
a CRT, it can be slim. Because it does not blink, it reduces eye strain.
Network
A group of computers and devices, such as a printer and scanner, connected by a communications
link. A network can be either small or large and can be connected permanently through cables or
temporarily through a telephone lines or a wireless link. The biggest network is the Internet, a world-
wide network group.
Network Administrator
A user who plans, configures and manages the network operations. Sometimes, a network admin-
istrator is called a system administrator.
Notification Area
This refers to the right area of the Taskbar including program icons such as the volume control, the
power options and the time.
Power Schemes
This refers to a pre-determined power management option group. For example, you can set the time
the computer waits before entering Standby Mode, or before the monitor or hard drive turns off.
The settings are saved as a power scheme.
Quick Launch
This refers to a toolbar that can be configured so that you can launch a program such as Internet
Explorer or display Windows Desktop with one click. You can add any icon to the quick launch area
of the Taskbar and launch frequently used program by clicking that icon.
Glossary 129
Server
In general, a server refers to a computer that provides shared resources for network users.
Share
This refers to configuring a resource of a computer such as a folder or printer so that other users
can also use it.
Shared Folder
A folder that can be used by other users on the network.
Standby Mode
A power mode that enables a computer to save power consumption when not in use. When a com-
puter is in Standby Mode, the data on the computer memory is not saved onto the hard disk. If the
power is tuned off, the data in memory will be lost.
System Restore
A tool that tracks computer changes and creates a restoration point when a change is made. If you
restore your computer to a restoration point, you can restore your computer to the previous status
that has been saved before the change, which caused a problem.
System File
System Files refer to files that are read and used by the Windows operating system. In general, sys-
tem files must not be deleted or moved.
USB (Universal Serial Bus)
This refers to a serial interface standard developed to replace the conventional interface standards
such as Serial and PS/2.
While USB 1.1 supports 12Mbps (12 million bits per second), USB 2.0 supports a data rate that is 40
times (480Mpbs) faster then that of USB 1.1. The data rate of USB 2.0 is equivalent to that of
IEEE1394. Therefore USB 2.0 is used for A/V devices supported by IEEE 1394 and 2nd HDD and CD-
RW that require a high data rate.
Windows
The name of an operating system developed by Microsoft Corp. Windows XP Tablet PC Edition is
installed on this computer,.
Windows Media Player
A multimedia program included with Windows. Using this program, you can play a media file, create
an audio CD, listen to a radio broadcast, search and manage media files, copy files to a portable
device, etc.

Index 130
Index
A
AP / AP Connection 46
Auto Scaler Button 30
AVStation NOW 79
AVStation premium 69
B
Battery 96
Battery Calibration 101
Battery Remaining Charge 101
BIOS (BIOS, Setup) Setting 89
Bluetooth / Help 55
Booting Priority 95
C
Charge 97
Click 20
Control Panel 40
CyberLink PowerDVD 64, 86
D
Desktop 37
Dual View 32
DVD Play 76, 86
M
Magic Doctor 103
Maximum Battery Saving Mode 99
Menu Button 27
Monitor Connection / Output 31
Multimedia 63
Music Play 70, 81
N
Network 44
Network Status Diagnosis 54
Norton AntiVirus 104
O
Overviews 14
P
Password 92
Playlist 72
Program 63
Program Launcher 67
Q
Quick Launch Button 28
R
Resolution / Color 43
S
Samsung Battery Manager 99
Samsung Network Manager 51
Samsung Update Plus 65
Slideshow 83
Specifications 125
Status Indicators 15
Stylus Pen 20
T
Tablet PC Input Panel 22
Writing Pad 22
Character Pad 23
On-Screen Keyboard 24
Touchkit 21
U
User Account / Switch User 41
V
Video Play 77, 84
Volume Control 26
W
Windows XP 35
Wireless Network 45

Important Safety Information 131
Important Safety Information
Battery Disposal
Do not place rechargeable batteries or products powered by non-removable rechargeable bat-
teries in the garbage.
Contact the Samsung Helpline for information on how to dispose of batteries that are no longer re-
quired. Follow all local regulations when disposing of old batteries.
Laser Safety
All systems equipped with CD or DVD drives comply with the appropriate safety standards, including
IEC 825. The laser devices in these components are classified as “Class 1 Laser Products” under a
US Department of Health and Human Services (DHHS) Radiation Performance Standard. Should the
unit ever need servicing, contact an authorized service location.
Laser Safety Note
Use of controls, or adjustments, or performing procedures other than those specified in this man-
ual may result in hazardous radiation exposure. To prevent exposure to laser beams, do not try
to open the enclosure of a CD or DVD drive.
Power Cord Requirements
The power cord set (wall plug, cable and AC adapter plug) received with your computer meets the
requirements for use in the country where the equipment was purchased.
Power cord sets for use in other countries must meet the requirements of the country where the
computer is used. For more information on power cord set requirements, contact an authorized deal-
er, reseller, or service provider.
General Requirements
The requirements listed below are applicable to all countries:
•The length of the power cord set must be at least 6.00 feet (1.8m) and a maximum of 9.75 feet
(3.0m).
•All power cord sets must be approved by an acceptable accredited agency responsible for
evaluation in the country where the power cord set will be used.
•The power cord set must have a minimum current capacity of 7 A and a nominal voltage rating
of 125 or 250 volts AC, as required by each country’s power system.
•The appliance coupler must meet the mechanical configuration of an EN 60 320/IEC 320
Standard Sheet C7 connector, for mating with the appliance inlet on the computer.

Regulatory Compliance Statements 132
Regulatory Compliance Statements
Wireless Guidance
Low power, Radio LAN type devices (radio frequency (RF) wireless communication devices), oper-
ating in the 2.4 GHz Band, may be present (embedded) in your notebook system. The following sec-
tion is a general overview of considerations while operating a wireless device.
Additional limitations, cautions, and concerns for specific countries are listed in the specific country
sections (or country group sections). The wireless devices in your system are only qualified for use
in the countries identified by the Radio Approval Marks on the system rating label. If the country you
will be using the wireless device in, is not listed, please contact your local Radio Approval agency for
the requirements. Wireless devices are closely regulated and using them may be restricted.
The power output of the wireless device or devices that may be embedded in your notebook is well
below the RF exposure limits as known at this time. Because the wireless devices (which may be
embedded in your notebook) emit less energy than permitted by the radio frequency safety stan-
dards and recommendations, the manufacturers believe these devices are safe for use. Regardless
of the power levels, care should be taken to minimize human contact during normal operation.
This transmitter must not be collocated or operate in conjunction with any other antenna or trans-
mitter except for the installed Bluetooth transmitter.
Some circumstances require restrictions on wireless devices. Examples of common restrictions are
listed below:
Radio frequency wireless communication can interfere with equipment on commercial aircraft.
Current aviation regulations require wireless devices to be turned off while travelling in an air-
plane. 802.11B/G (also known as wireless Ethernet or Wifi) and Bluetooth communication devic-
es are examples of devices that provide wireless communication.
In environments where the risk of interference to other devices or services is harmful or per-
ceived as harmful, the option to use a wireless device may be restricted or eliminated. Airports,
Hospitals, and Oxygen or flammable gas laden atmospheres are limited examples where use of
wireless devices may be restricted or eliminated. When in environments where you are uncertain
of whether wireless devices can be used, ask the applicable authority for authorization prior to
use or turning on the wireless device.
Every country has different restrictions on the use of wireless devices. Since your system is
equipped with a wireless device, when travelling between countries with your system, check with
the local Radio Approval authorities prior to any move or trip for any restrictions on the use of a
wireless device in the destination country.
If your system came equipped with an internal embedded wireless device, do not operate the
wireless device unless all covers and shields are in place and the system is fully assembled.

Regulatory Compliance Statements 133
Wireless devices are not user serviceable. Do not modify them in any way. Modification to a wire-
less device will void the authorization to use it. Please contact the respective manufacturer for
servicing.
Only use drivers approved for the country in which the device will be used. See the manufacturer
System Restoration Kit, or contact manufacturer Technical Support for additional information.
United States of America
USA and Canada Safety Requirements and Notices
Do not touch or move the antenna while the unit is transmitting or receiving.
Do not hold any component containing the radio so that the antenna is very close or touching any
exposed parts of the body, especially the face or eyes, while transmitting.
Do not operate the radio or attempt to transmit data unless the antenna is connected; if not, the
radio may be damaged.
Use in specific environments:
The use of wireless devices in hazardous locations is limited by the constraints posed by the safety
directives of such environments.
The use of wireless devices on airplanes is governed by the Federal Aviation Administration (FAA).
The use of wireless devices in hospitals is restricted to the limits set forth by each hospital.
Explosive Device Proximity Warning
Do not operate a portable transmitter (such as a wireless network device) near unshielded
blasting caps or in an explosive environment unless the device has been modified to be qualified
for such use.
Using On Aircraft Warning
Regulations of the FCC and FAA prohibit airborne operation of radio-frequency wireless devices
because their signals could interfere with critical aircraft instruments.
Other Wireless Devices
Safety Notices for Other Devices in the Wireless Network: Refer to the documentation supplied with
wireless Ethernet adapters or other devices in the wireless network.
The Part 15 radio device operates on a non-interference basis with other devices operating at
this frequency. Any changes or modification to said product not expressly approved by Samsung
could void the user's authority to operate this device.

Regulatory Compliance Statements 134
Unintentional Emitter per FCC Part 15
This device complies with Part 15 of the FCC Rules. Operation are subject to the following two con-
ditions:(1) this device may not cause harmful interference, and (2) this device must accept any in-
terference received, including interference that may cause undesired operations.
This equipment has been tested and found to comply with the limits for a Class B digital device
pursuant to Part 15 of the FCC Rules. These limits are designed to provide reasonable protection
against harmful interference in a residential installation. This equipment uses and can radiate
radio frequency energy and if not installed and used in accordance with the instructions may
cause harmful interference. If this equipment does cause harmful interference to radio or tele-
vision reception, which can be determined by turning the equipment off and on, the user is en-
couraged to try to correct the interference by following one or more of the following measures:
•Reorient or relocate the receiving antenna.
•Increase the distance between the equipment and receiver.
•Connect the equipment into an outlet on a circuit different from that to which the receiver is
connected.
•Consult the dealer or an experienced radio/TV technician for help.
If necessary, users should consult the dealer or an experienced radio/television technician for addi-
tional suggestions. Users may find the following booklet helpful: “Something About Interference.”
This is available at FCC local regional offices. Our company is not responsible for any radio or tele-
vision interference caused by unauthorized modifications of the equipment or the substitution or at-
tachment of connecting cables and equipment other than those specified by our company. The
correction will be the responsibility of the user. Use only shielded data cables with this system.
Intentional emitter per FCC Part 15
Low power, Radio LAN type devices (radio frequency (RF) wireless communication devices), oper-
ating in the 2.4 GHz Band, may be present (embedded) in your notebook system. This section is
only applicable if these devices are present. Refer to the system label to verify the presence of wire-
less devices.
Wireless devices that may be in your system are only qualified for use in the United States of America
if an FCC ID number is on the system label.
This transmitter must not be collocated or operate in conjunction with any other antenna or trans-
mitter except for the installed Bluetooth transmitter.
Operation of this device is subject to the following two conditions: (1) this device may not cause
harmful interference, and (2) this device must accept any interference received, including interfer-
ence that may cause undesired operations of the device.
Wireless devices are not user serviceable. Do not modify them in any way. Modification to a wire-
less device will void the authorization to use it. Contact the manufacturer for servicing.
Regulatory Compliance Statements 135
European Union
European Union CE Marking and Compliance Notices
Products intended for sale within the European Union are marked with the Conformité Européene
(CE) mark, which indicates compliance with the applicable Directives and European standards and
amendments identified below. This equipment also carries the Class 2 identifier.
The following information is only applicable to systems labeled with the CE mark .
European Directives
This Information Technology device has been tested and found to comply with the following Euro-
pean directives:
•
EMC Directive 89/336/EEC with amending directives 92/31/EEC & 93/68/EEC as per
– EN 55022 Class B
– EN 61000-3-2
– EN 61000-3-3
– EN 55024
•
Low Voltage Directive (Safety) 73/23/EEC as per EN 60950(A1/A2/A3/A4/A11)
•Radio and Telecom Terminal Equipment Directive 199/5/EC as per
– CTR21 (if fitted with a modem device)
– ETS 300 328 (if fitted with a 2.4 GHz band embedded wireless device)
– ETS 301 489-1 (if fitted with a 2.4 GHz band embedded wireless device)
– ETS 301 489-17 (if fitted with a 2.4 GHz band embedded wireless device)
European Radio Approval Information (for products fitted with EU-approved radio devices)
This Product is a Notebook computer; low power, Radio LAN type devices (radio frequency (RF)
wireless communication devices), operating in the 2.4 GHz band, may be present (embedded) in
your notebook system which is intended for home or office use. This section is only applicable if
these devices are present. Refer to the system label to verify the presence of wireless devices.
Wireless devices that may be in your system are only qualified for use in the European Union or
associated areas if the CE mark with the Alert Symbol is on the system label.
The power output of the wireless device or devices that may be embedded your notebook is well
below the RF exposure limits as set by the European Commission through the R&TTE directive.
See 802.11b and 802.11g restrictions for specific countries or regions within countries under the
heading “European Economic Area Restrictions” below.
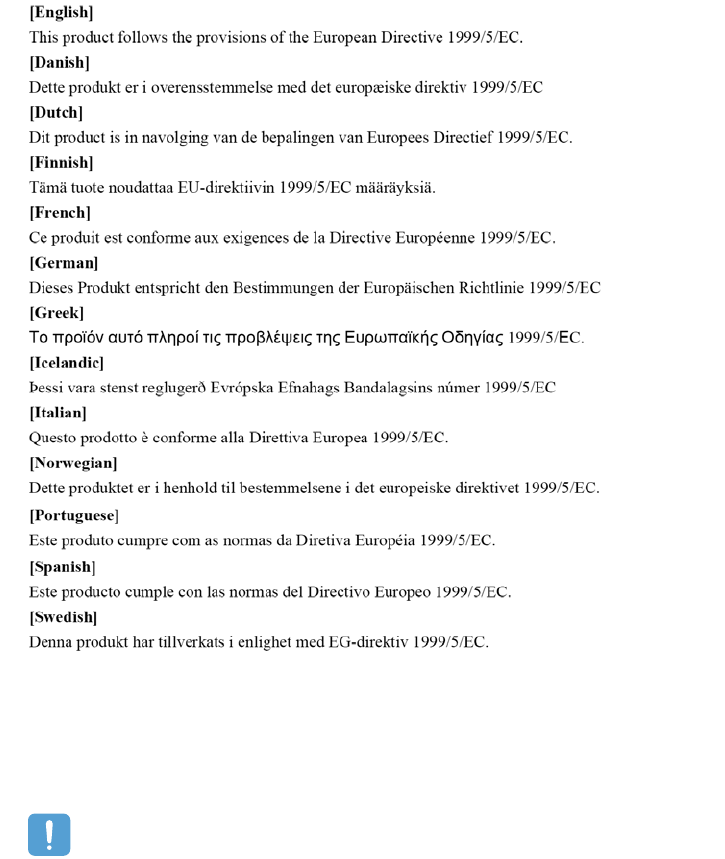
Regulatory Compliance Statements 136
Translated Statements of Compliance
European Economic Area Restrictions
Local Restriction of 802.11b/802.11g Radio Usage
[Note to integrator: The following statements on local restrictions must be published in all end-user
documentation provided with the system or product incorporating the Wireless product.]
Due to the fact that the frequencies used by 802.11b/802.11g wireless LAN devices may not yet
be harmonized in all countries, 802.11b/802.11g products are designed for use in specific coun-
tries or regions only, and are not allowed to be operated in countries or regions other than those
designated.
As a user of these products, you are responsible for ensuring that the products are used only in
the countries or regions for which they were intended and for verifying that they are configured
with the correct selection of frequencies and channels for the country or region of use. Any de-
viation from permissible settings and restrictions in the country or region of use could be an in-
fringement of local law and may be punishable as such.
Regulatory Compliance Statements 137
The European variant is intended for use throughout the European Economic Area. However, autho-
rization for use is further restricted in particular countries or regions within countries, as follows:
General
European standards dictate a maximum radiated transmit power of 100 mW effective isotropic ra-
diated power (EIRP) and the frequency range 2400 – 2483.5 MHz.
Belgium
The product may be used outdoors, but for outdoor transmissions over a distance of 300m or more,
a license from the BIPT is required.
This restriction should be indicated in the manual as follows:
Dans le cas d'une utilisation privée, à l'extérieur d'un bâtiment, au-dessus d'un espace public, aucun
enregistrement n'est nécessaire pour une distance de moins de 300m. Pour une distance supérieure
à 300m un enregistrement auprès de l'IBPT est requise. Pour une utilisation publique à l'extérieur
de bâtiments, une licence de l'IBPT est requise. Pour les enregistrements et licences, veuillez con-
tacter l'IBPT.
France
For Metropolitan departments:
2.400 - 2.4835 GHz for indoor use.
2.400 -2.454 GHz (channels 1 to 7) for outdoor use.
For Guadeloupe, Martinique, St Pierre et Miquelon, Mayotte:
2.400 - 2.4835 GHz for indoor and outdoor use.
For Reunion, Guyane:
2.400 - 2.4835 GHz for indoor use.
2.420 - 2.4835 GHz for outdoor use (channels 5 to 13)

WEEE Symbol Information 138
WEEE Symbol Information
(Applicable in the European Union and other European countries with separate
collection systems)
The marking shown on the product or in the literature, indicates that it should not be disposed of
with other household wastes at the end of its working life. To prevent possible harm to the environ-
ment or human health from uncontrolled waste disposal, please separate this from other types of
wastes and recycle it responsibly to promote the sustainable reuse of material resources.
Household users should contact either the retailer where they purchased this product, or their local
government office, for details of where and how they can take this item for environmentally safe
recycling.
Business users should contact their supplier and check the terms and conditions of the purchase con-
tract. This product should not be mixed with other commercial waste for disposal.
Correct Disposal of This Product
(Waste Electrical & Electronic Equipment)

Contact SAMSUNG WORLD WIDE 139
Contact SAMSUNG WORLD WIDE
[U.S.A. / U.K. / AUSTRALIA / HONG KONG / INDIA / MALAYSIA / SINGAPORE]
Contact SAMSUNG WORLD WIDE
If you have any comments or questions regarding a Samsung product, contact the SAMSUNG Cus-
tomer Care Center.
[FRANCE] Comment contacter Samsung dans le monde
Si vous avez des suggestions ou des questions concernant les produits Samsung, veuillez contacter
le Service Consommateurs Samsung.
[GERMANY] Kontakt zu Samsung
Falls Sie Fragen oder Anregungen zu Samsung-Produkten haben, wenden Sie sich bitte an den Sam-
sung-Kundendienst.
[SPAIN] Contacte con SAMSUNG WORLD WIDE
Si tiene alguna pregunta o comentario referente a nuestros productos, por favor contacte con nues-
tro Servicio de Atencion al Cliente.
Customer Care Center TEL WebSite
U.S.A. 1 800 SAMSUNG (7267864) www.samsung.com
U.K. 0870 242 0303 www.samsung.com/uk
AUSTRALIA 1300 362 603 www.samsung.com/au
HONG KONG 2862 6001 www.samsung.com/hk
INDIA 3030 8282 / 1600 1100 11 www.samsung.com/in
MALAYSIA 1800-88-9999 www.samsung.com/my
SINGAPORE 1800-SAMSUNG(7267864) www.samsung.com/sg
Customer Care Center TEL WebSite
FRANCE 08 25 08 65 65 www.samsung.fr
Customer Care Center TEL WebSite
GERMANY 01805 121213 www.samsung.de
Customer Care Center TEL WebSite
SPAIN 902 10 11 30 www.samsung.com/es
Contact SAMSUNG WORLD WIDE 140
[PORTUGAL] Contacte SAMSUNG GLOBAL
Se tem algumas dúvidas ou comentários sobre os produtos Samsung, contacte por favor a nossa
linha de apoio a clientes Samsung.
[RUSSIA / UKRAINE] Связывайтесь с SAMSUNG по всему миру
Если у вас есть предложения или вопросы по продуктам Samsung, связывайтесь с
информационным центром Samsung.
[CHINA]
[THILAND]
Rev.1.1
Customer Care Center TEL WebSite
PORTUGAL 808 200 128 www.samsung.pt
Customer Care Center TEL WebSite
RUSSIA 8-800-200-0400 www.samsung.ru
UKRAINE 8-800-502-0000 www.samsung.com/ur
Customer Care Center TEL WebSite
CHINA 800-810-5858 / (010) 64751880 www.samsung.com.cn
Customer Care Center TEL WebSite
THAILAND 1800-29-3232 / 02-689-3232 www.samsung.com/th