Samsung Electronics Co NP-Q40 Notebook PC User Manual SAMSUNG Q40 v1 1 English
Samsung Electronics Co Ltd Notebook PC SAMSUNG Q40 v1 1 English
Contents
- 1. Users Manual 1
- 2. Users Manual 2
- 3. Users Manual 3
Users Manual 2
Using the Computer 37
Using Samsung Update Plus
Samsung Update Plus is software that examines and updates Samsung software and
drivers installed on your Samsung computer to the latest version. To use Samsung Up-
date Plus, your computer has to be connected to the Internet.
To Update Samsung Software and Drivers
1. Select Start > All Programs > Samsung > Samsung Update Plus > Samsung
Update Plus.
If this is the first time you are running the program, a window will appear asking
you if you agree to the agreement in the window.
Click Agree to use this software.
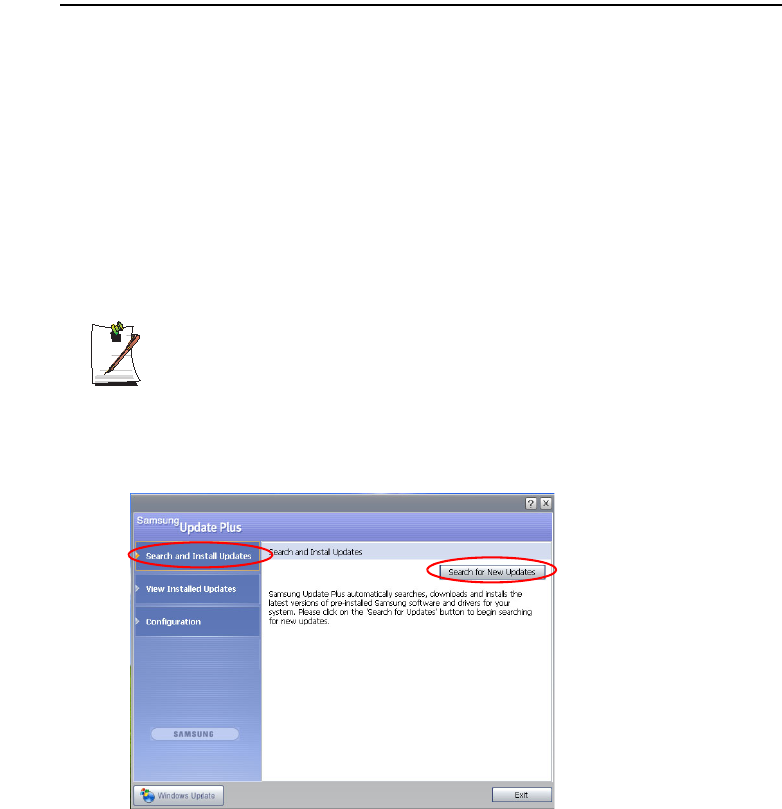
2. Click Search for and Install Updates and click the Search for New Updates but-
ton.
3. If there are available software or driver updates for your computer, the available
updates will be listed. Select the required updates from the list and click Install
Update to start the update.
(The update list on the screen may differ depending on the computer model.)
38 Users Manual
Updates that must be installed separately.
If you select Install as an update item that must be installed separately, a mes-
sage appears informing you of this. Follow the instruction message to correctly
install it.
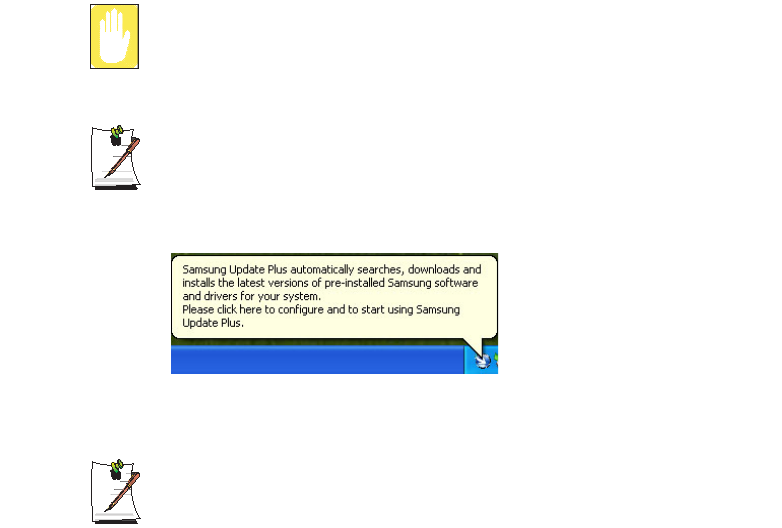
Automatic update items display
By default, your computer is configured to automatically search for updates. If
there is a new update available, this is notified in the notification area. Click the
balloon help icon in the notification area. Here you will be able to find the latest
available updates.
To change the automatic update settings, click the Configuration button in
Figure 2 and change the settings.
Samsung Update Plus does not provide updates for additionally installed soft-
ware and device drivers.
Using the Computer 39
Using AVStation premium
AVStation premium is an integrated multimedia program that enables users to enjoy
music, photographs, video, movies, etc. all with a single program.
Before You Start!
•AVStation premium is optional and may not be provided depending on the
model.
•The screens used in this manual may differ from actual screens according
to the program version.
•TV Station is only available for systems supporting the TV function.
•For detailed usage, refer to the program help.
Start and Screen Layout
To launch the program, select Start > All Programs > Samsung > AVStation premi-
um > AVStation premium.
Alternatively double-click the AVStation premium icon ( ) on the Desktop.
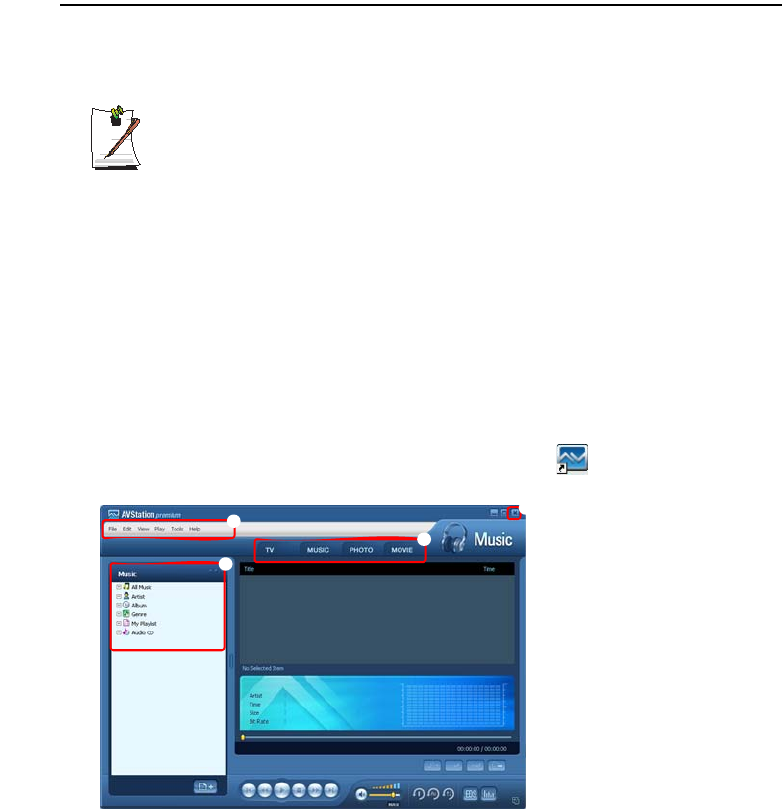
MUSIC
You can play a music file or an audio CD.
z
x
z
Station Bar
x Menu Bar
c Library
v Exit
Press the Exit button to exit
the program.
c
v
40 Users Manual
PHOTO
You can view or edit a photograph (image), and also view the photographs through a
SlideShow.
MOVIE
You can play a video (movie) file or a DVD/VCD title.
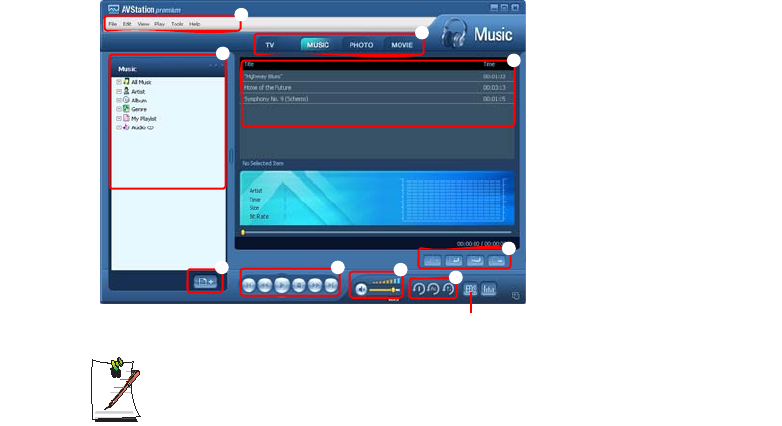
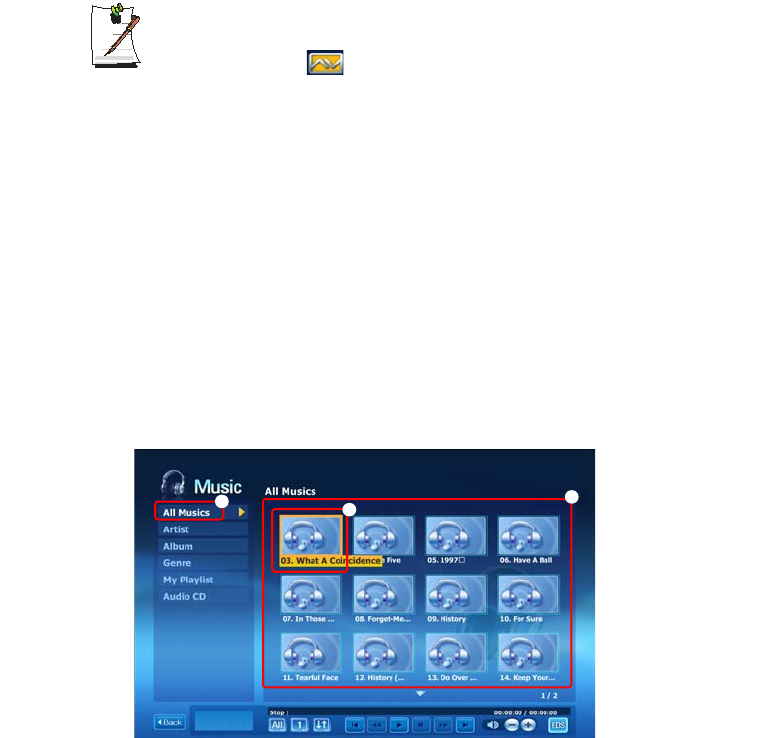
MUSIC Station
Launch AVStation premium and click MUSIC on the Station Bar.
What is EDS (Enhanced Digital Sound)?
EDS (Enhanced Digital Sound) is a sound quality enhancement technology
developed by Samsung Electronics. You can listen to clearer sound if you en-
able the EDS function when playing music or video on AVStation premium.
z
MUSIC Menu Bar
x Station Bar
c MUSIC Library
v Register a File
b Playlist
n Playlist Control Buttons
m Play Control Buttons
, Volume Control
. Play Options
/ EDS Setting Button
z
x
cb
m.
/
v
n
,
Using the Computer 41
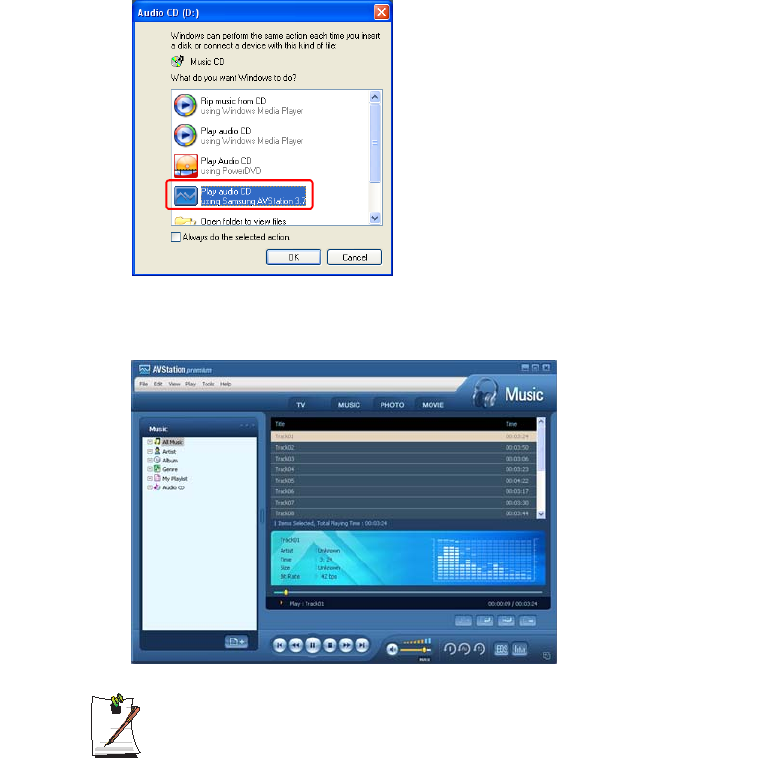
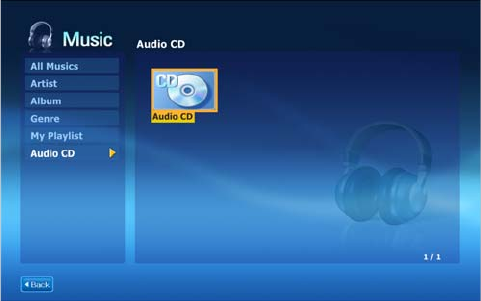
Playing an Audio CD
The procedures to play an audio CD are described below.
1. Launch AVStation premium and insert an audio CD into the CD drive.
2. In the Audio CD window, select Play Audio CD using Samsung AVStation and
click the OK button.
3. The tracks on the audio CD are displayed in the Playlist and the first track is auto-
matically played.
If an audio CD is already in the CD drive, double-click the album title in the
Audio CD folder of the Library and add the tracks to the Playlist. The tracks
added to the Playlist are played.
42 Users Manual
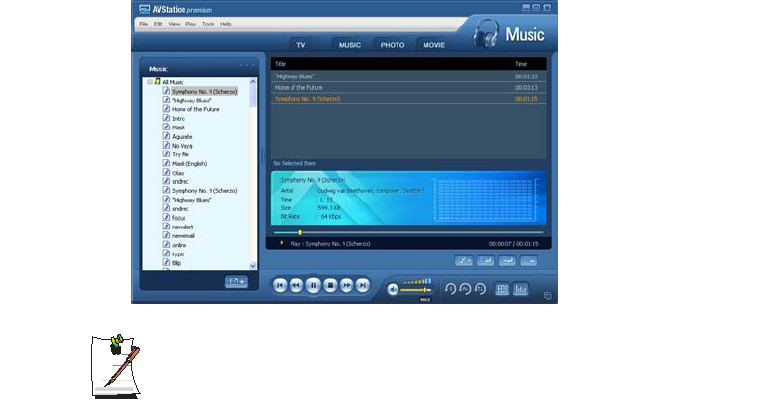
Playing a Music File
If a music file is registered to the MUSIC Library, you can easily play the music file.
For the procedures to register tracks to the Library, refer to (p43).
1. Move to MUSIC Station and double-click on All Music.
2. Double-click a music file. The file is added to the playlist and played.
Play a Track not registered to the Library
Click File > Open, select a music file to be played and click Open. The selected
track is registered to the Library and played.
Creating My Playlist
My Playlist is a personal album with which you can collect, manage and play
your favorite music files. For the procedures to create My Playlist, refer to the
descriptions of MUSIC Station in Help.
Using the Computer 43
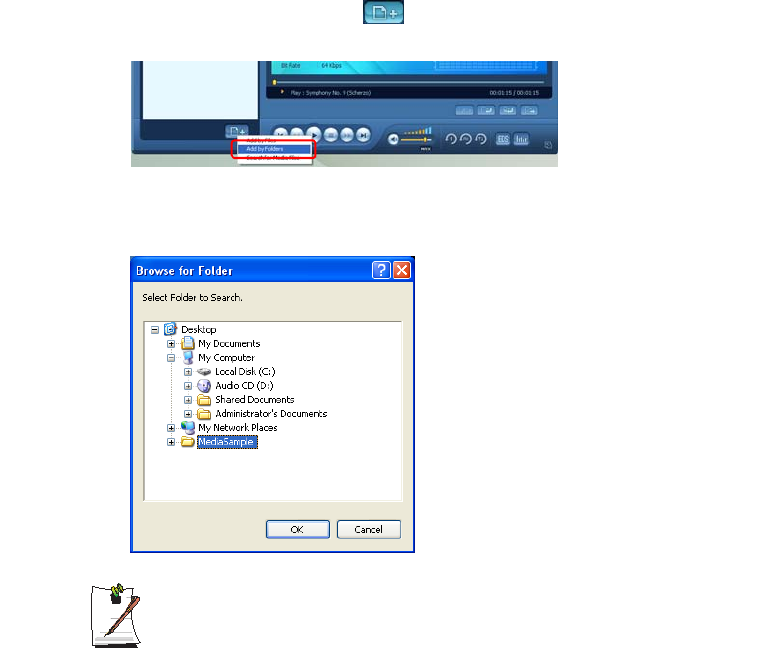
Adding Music Files to the Library
MUSIC Library is a library holding music files used by MUSIC Station. The proce-
dures to add music files saved on the computer to the Library are described below.
You can add files, folders or search and add files. As an example, the procedures to add
a folder are described below.
1. Click on the Register a File ( ) button below the Library and click on Add by
Folders.
2. Select a folder which included music files and click the OK button. The music files
in the folder are added to the Library.
The tracks used in AVStation are automatically added to the Library.
44 Users Manual
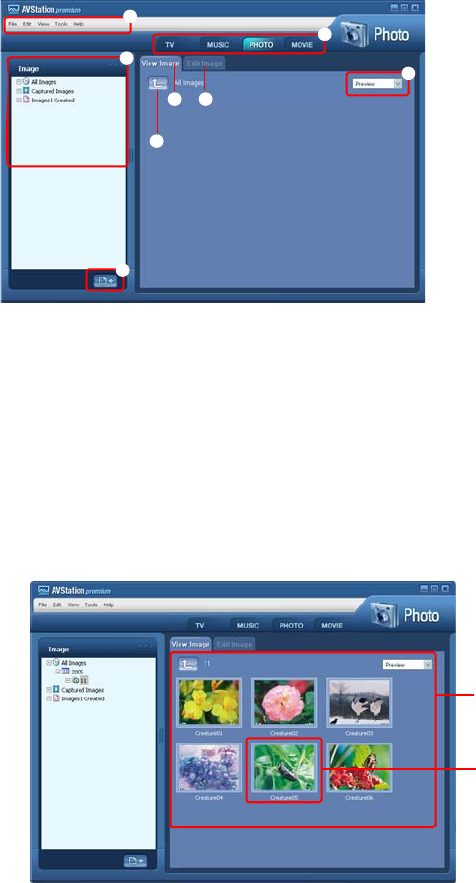
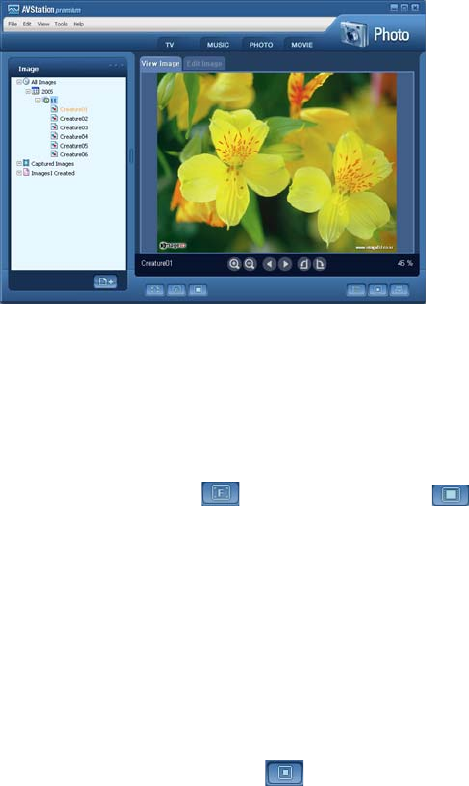
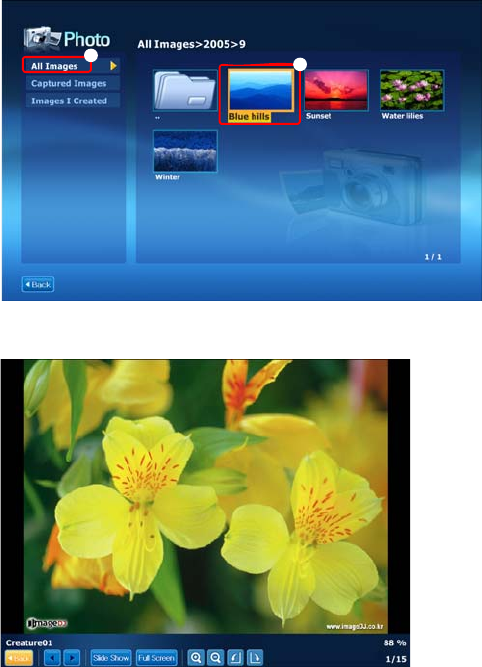
PHOTO Station
Launch AVStation premium and click PHOTO on the Station Bar.
Viewing an Image
The procedures to view images registered to the PHOTO Library one by one and
through a SlideShow are described below.
For the procedures to register image files to the Library, refer to (p47).
1. Move to PHOTO Station and double-click on All Images.
2. Click on a folder which includes images, and the images in the folder are displayed
in the Image Viewer window.
z
x
c
b
m
v
n
,
z
PHOTO Menu Bar
x Station Bar
c PHOTO Library
v Register a File
b Image Viewer Tab
n Image Editor Tab
m Move to a Higher-Level Folder
, Preview/Zoom-in
Image Viewer Window
Image
Using the Computer 45
3. Double-click on an image. The selected image is zoomed in on.
•Viewing an Image not registered to the Library
Click File > Open, select an image file to view and click Open.
The selected image file is registered to the Library and displayed in the Image
Viewer window.
•Viewing an Image in Full Screen or through a SlideShow.
Click the Full Screen ( ) button or SlideShow ( ) button below the Im-
age Viewer window.
Run Full Screen View and you can rotate the picture using the direction keys.
To return to the Image Viewer window, press the <Esc> key or double-click on
the screen.
•Watching a SlideShow while Listening to Music
To watch a SlideShow while listening to music, play music from MUSIC Station
and run SlideShow.
•Setting an Image as the Background.
Click the Set as Background ( ) button below the Image Viewer window.
The selected image is set as the Desktop background.
46 Users Manual
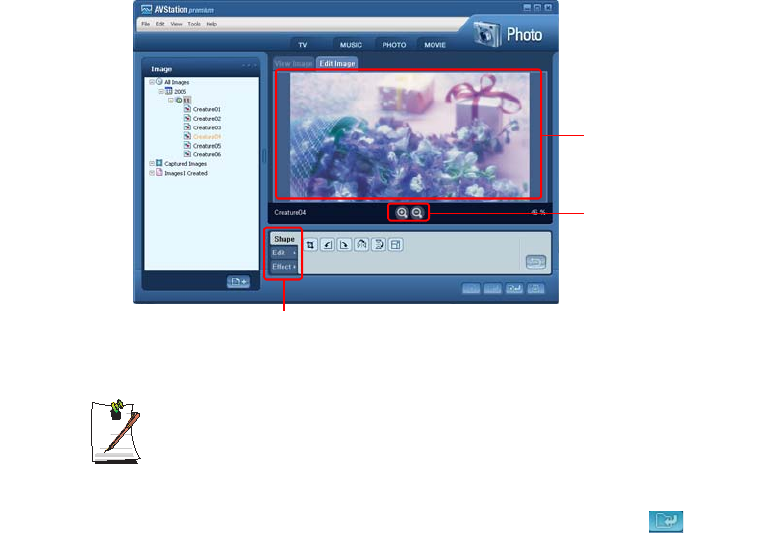
Editing an Image
You can change the shape of an image, edit an image or apply special effects to an im-
age. The image editor functions are described below.
1. Select an image to edit in the Image Viewer window, and select the Image Editor
tab. The Image Editor screen appears.
The Image Editor screen consists of an Image Workspace window and 3 Tool
tabs.
2. Edit the image using the Shape, Edit and Effect tools.
Shape tool: Change the shape of an image through cut, resize.
Edit tool: Draw a line, add some clip art or enter letters.
Effect tool: Apply various effects to an image.
3. When finishing editing an image, click the Save Edited Image ( ) button be-
low the Image Editor window. The edited image is saved.
Image Workspace
Zoom In / Zoom Out
Tool Tabs
Using the Computer 47
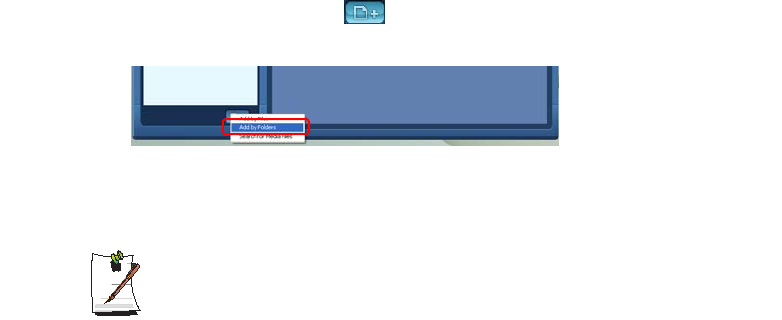
Adding Images to the Library
The PHOTO Library is a library holding image files to be used by PHOTO Station. The
procedures to add image files saved on the computer to the Library are described be-
low.
You can add files, add folders or search and add files. As an example, the procedures
to add folders are described below.
1. Click the Register a File ( ) button below the Library and click on Add by
Folders.
2. Select a folder which includes image files and click the OK button. The image files
in the folder are added to the Library.
The image files used in AVStation are automatically added to the Library.
48 Users Manual
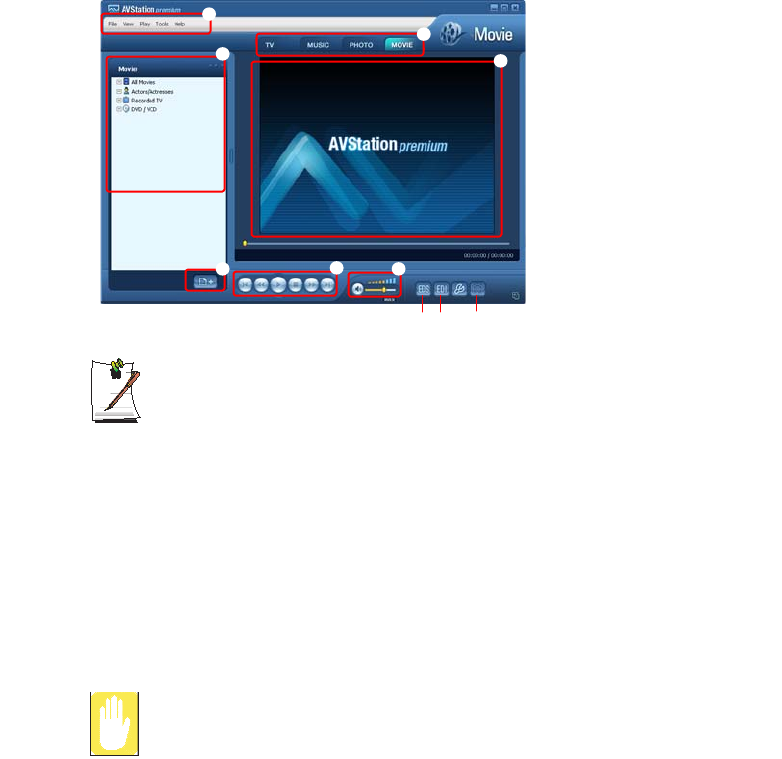
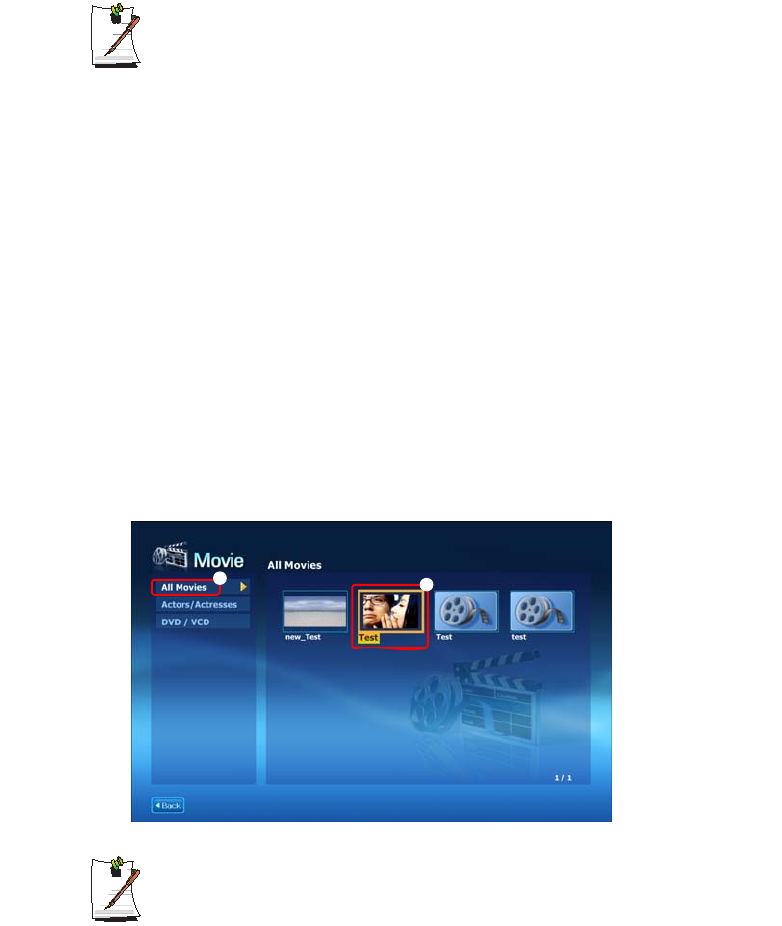
MOVIE Station
Launch AVStation premium and click on MOVIE on the Station Bar.
What is EDI (Enhanced Digital Image)?
EDI (Enhanced Digital Image) is a visual quality enhancement technology de-
veloped by Samsung Electronics. You can view a clearer and sharper picture
by enabling the EDI function when watching TV or playing a video on AVSta-
tion premium.
However, some TV tuners and graphics cards are not supported by EDI.
For information on EDS (Enhanced Digital Sound), refer to p40.
Playing a DVD
The procedures to play a DVD title are described below.
To play a DVD title, DVD playing software (e.g. CyberLink PowerDVD) must
be installed. Install the DVD playing software first.
1. Launch AVStation premium and insert a DVD title into the DVD drive.
z
MOVIE Menu Bar
x
Station Bar
c
MOVIE Library
v
Register a File
b
Video Play window
n
Play Control Buttons
m
Volume Control
,
EDS Setting Button (p40)
.
EDI Setting Button
/
Capture Button
z
x
cb
m
./
vn
,
Using the Computer 49
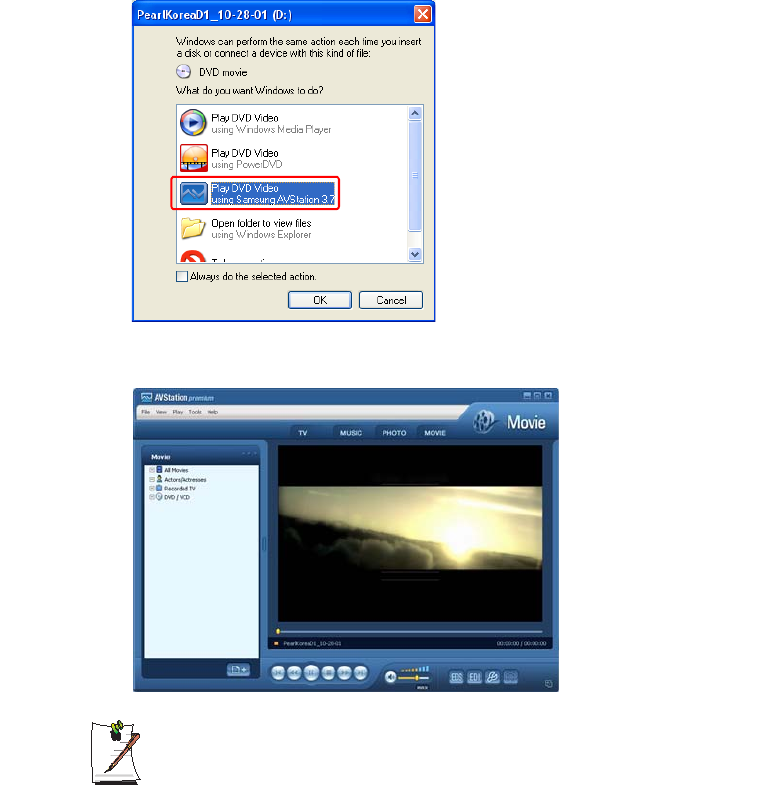
2. In the 'What do you want Windows to do?' window, select Play DVD Video us-
ing Samsung AVStation and click the OK button.
3. The DVD title is played.
If a DVD title is already in the DVD drive, double-click the DVD title in the DVD
/ VCD folder of the Library. The DVD title is played.
50 Users Manual
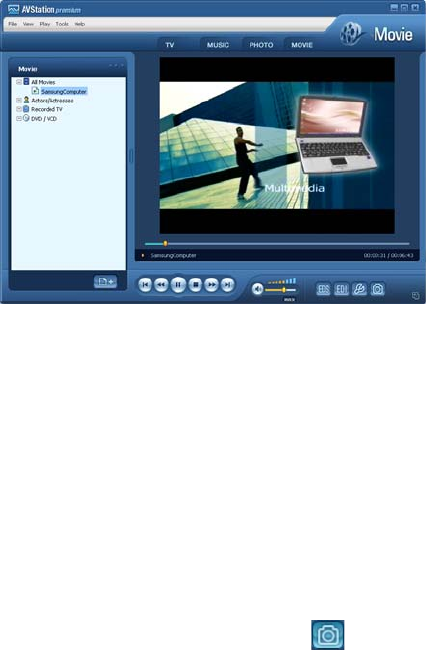
Playing a Movie(Video) File
The procedures to play a video file registered to the MOVIE Library are described be-
low. For the procedures to register files to the Library, refer to p51.
1. Move to MOVIE Station and double-click All Movies.
2. Double-click a video file. The file is played.
•Playing a Video File not Registered to the Library
Click File > Open, select a video file to be played and click Open. The selected
file is registered to the Library and played.
•Playing a Video File in Full Screen
1) Double-click on the current playback screen.
2) The video is played in full screen. In full screen, move the mouse pointer to
the bottom of the screen to show the Play Control bar.
To play at the default screen size, press the <Esc> key or double-click on the
screen.
•Capturing the Video Screen
Click on Capture Current Screen ( ) below the Play window when the de-
sired image appears on the screen and click the OK button.
Captured images are saved in the C:\Program Files\Samsung\AVStation Pre-
mium 3.75\Data\Captured Images folder.
In addition, you can view captured images in the PHOTO Station > Captured
Images folder.
Using the Computer 51
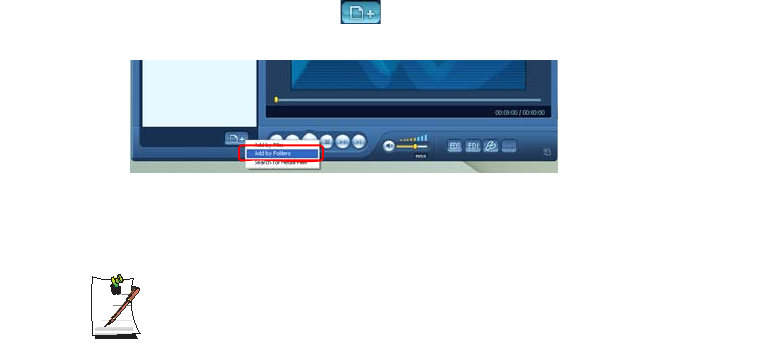
Adding Videos to the Library
The MOVIE Library is a library holding video files to be used by MOVIE Station. The
procedures to add video files saved on the computer to the Library are described below.
You can add files, add folders or search and add files. As an example, the procedures
to add folders are described below.
1. Click the Register a File ( ) button below the Library and click Add by Fold-
ers.
2. Select a folder which includes video files and click the OK button. The video files
in the folder are added to the Library.
The video files used in AVStation are automatically added to the Library.

52 Users Manual
AVStation Viewer
This is a multimedia program that can play music, photos, video, movies, etc. in full
screen.
Before You Start!
•The AVStation Viewer program is optional and may not be provided
depending on the computer model.
•AVStation Viewer Restrictions
Using AVStation Viewer, you can only play files registered to the AVStation
premium Library. (For the procedures to register files to the Library, refer to
p43, p47 and p51.)
•The screen figures may differ from actual ones depending on the program
version.
•TV Station is only available for systems supporting the TV function.
Using the Computer 53
Start / Exit AVStation Viewer
Starting
Select Start > All Programs > Samsung > AVStation premium > AVStation View-
er from Windows.
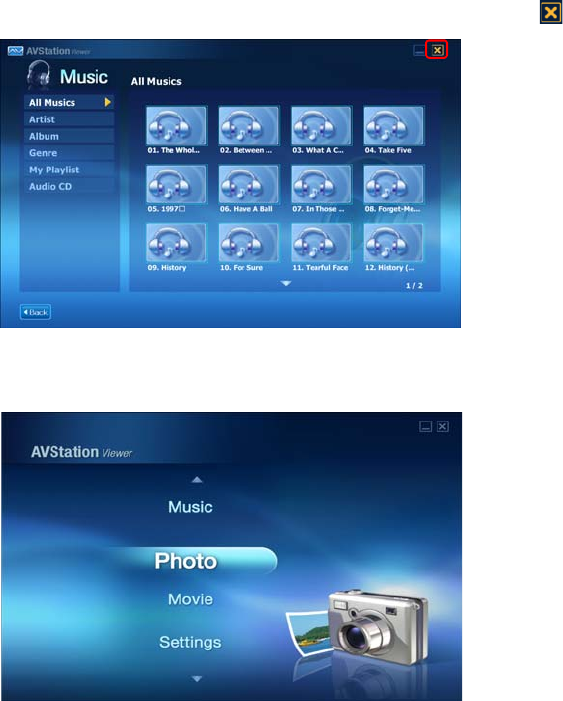
Exiting
Move the mouse pointer to the top of the screen and click the Exit ( ) button.
Screen Layout
MUSIC
You can play a music file or audio CD.
54 Users Manual
PHOTO
You can view a photograph or image file one by one or in a SlideShow.
MOVIE
You can play a video, DVD or VCD title.
Settings
You can set the Music, Photo and Movie settings.
To move to the start screen while using the program, Press the <Esc> key.
Or, move the mouse pointer to the top left in the current screen and click the
AVStation icon ( ).
MUSIC Station
The procedures to play a music file or an audio CD are described below.
Playing a Music File
The procedures to play a music file registered to the MUSIC Library are described be-
low. (For the procedures to register files, refer to p43.)
1. Launch AVStation Viewer and click on Music.
2. Click on All Music and double-click a file in the right pane.
The music file is played.
z All Music
x Playlist Window
c Music File
zx
c
Using the Computer 55
Playing an Audio CD
1. Launch AVStation Viewer and insert an audio CD into the CD drive.
2. In the AVStation Viewer start screen, click on Music.
3. Double-click the Audio CD in the left pane and double-click on an album or music
file in the right pane. The selected music file is played.
56 Users Manual
PHOTO Station
The procedures to view images registered to the PHOTO Library one by one and
through a SlideShow are described below.
(For the procedures to register image files to the Library, refer to p47.)
1. Launch AVStation Viewer and click on Photo.
2. Click on All Images and double-click on an image file in the right pane.
3. The selected image is zoomed in on.
z All Images
x Image File
zx
Using the Computer 57
To view an image in Full Sreen or through a SlideShow.
Click on the SlideShow or Full Screen button below the zoomed in image.
To return to the previous status in SlideShow or Full Screen, press the <Esc>
key or double-click on the screen.
In AVStation Viewer, press the <Esc> key or double-click and click Back.
MOVIE Station
The procedures to play a video (movie) file or DVD/VCD title are described below.
Playing a Movie File
The procedures to play a video file registered to the MOVIE Library are described be-
low. (Refer to p51.)
1. Launch AVStation Viewer and click the Movie.
2. Click on All Movies and double-click a movie file in the right pane.
The movie file is played.
Showing the Play Control window
Press the space bar or move the mouse pointer. The Play Control window ap-
pears at the bottom.
z
All movies
x
movie File
zx
58 Users Manual
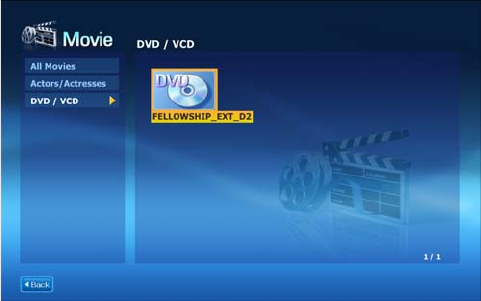
Playing a DVD
1. Launch AVStation Viewer and insert a DVD title into the DVD drive.
2. In the AVStation Viewer start screen, click on Movie.
3. Click on DVD/VCD and double-click on the DVD title. The DVD title is played.
Connecting to the Internet 59
Connecting to the Internet
Connecting with a Modem
Before You Start:
•Use a standard non-digital phone line to connect.
•Contact an internet service provider (ISP) for instructions on how to connect to
and disconnect from the Internet.
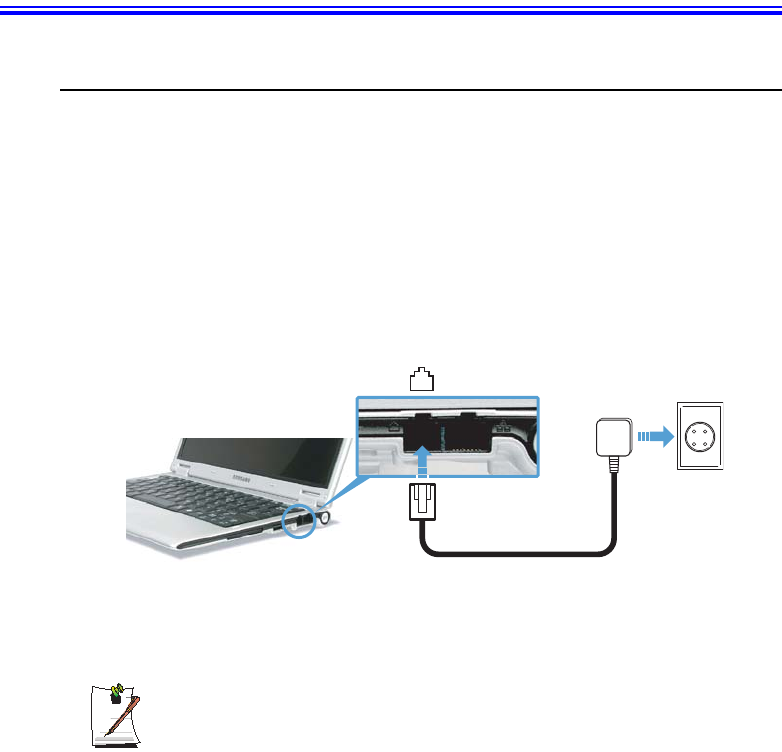
1. Connect a telephone line to the computer’s modem port.
(The phone jack and the wall phone socket shown in the picture below may vary
from country to country.)
2. Connect to the Internet according to the instructions provided by your ISP.
If the Internet connection is not disconnected properly, additional telephone
charges may be imposed.
60 Users Manual
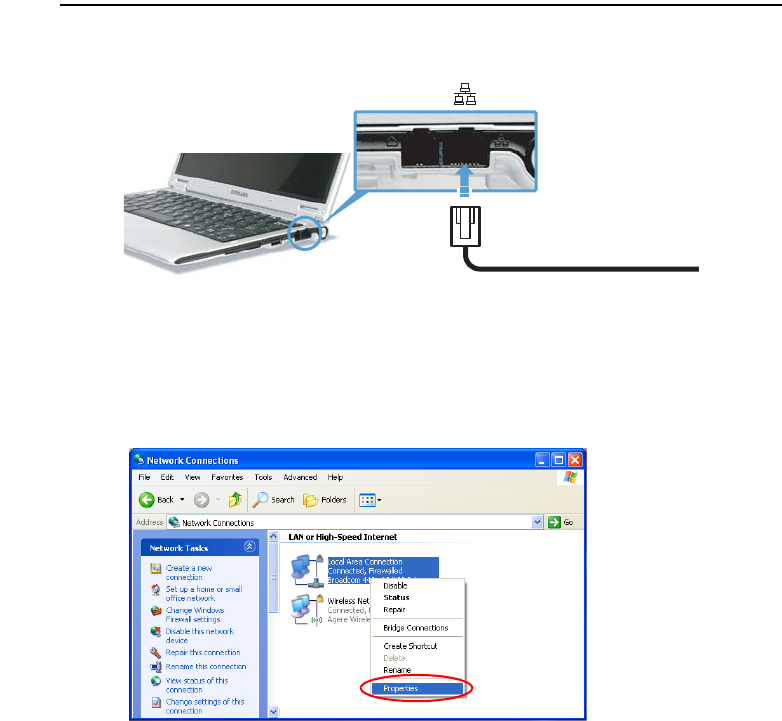
Connecting Through a Wired LAN
1. Connect a LAN cable to the computer’s LAN port.
2. Click Start > Control Panel.
3. Click Network and Internet Connections in the [Control Panel] window.
4. Click Network Connections in the [Network and Internet Connections] window.
5. Right-click the Local Area Connection icon and click Properties.
Connecting to the Internet 61
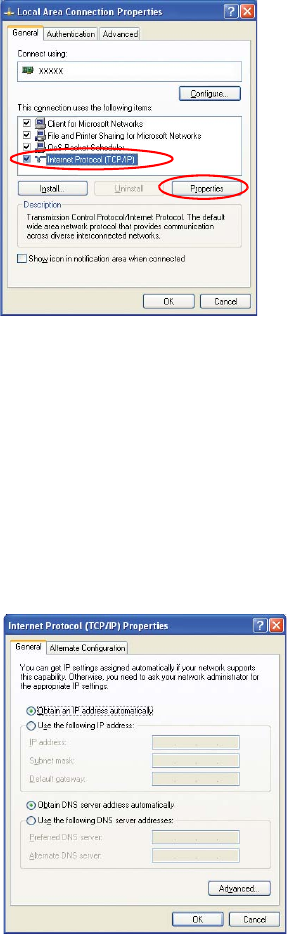
6. On the General tab, select “Internet Protocol(TCP/IP)” and click Properties.
7. To use DHCP:
On the General tab, select “Obtain an IP address automatically” and “Obtain DNS
server address automatically”. Click OK.
To use a static IP:
On the General tab, select “Use the following IP address” and fill in the IP ad-
dress, Subnet mask, Default gateway, Preferred DNS server, and Alternative DNS
server fields. Click OK.
To use both DHCP and static IP simultaneously:
On the Alternate Configuration tab, click User configured and fill in the fields.
Click OK.

62 Users Manual
Connecting Through a Wireless LAN (Optional)
A wireless network (Wireless LAN) environment is a network environment that en-
ables communication between multiple computers at home or a small-size office
through wireless LAN devices.
Using the wireless network connections between the systems, you can use normal net-
work functions such as sharing of files, folders and printers. When a computer-to com-
puter network has been established, a computer that is not connected to the Internet can
share the Internet by accessing another computer connected to the Internet. For details,
see “Sharing Internet Access” on page 74.
The description in this section refers to the Intel(R) PRO/Wireless 3945ABG
Network Connection (hereafter referred to as an 802.11ABG card) device.
A wireless LAN card is optional. The model of the wireless LAN card is deter-
mined by the relevant product.
To view the installed wireless LAN card, click Start > Control Panel > Perfor-
mance and Maintenance > System > Hardware tab > Device Manager.
The wireless LAN connection settings will be described on the basis of the
Windows XP Service Pack 2 installed computer.
It is recommended using the default settings provided by Windows XP for the
wireless LAN settings for Windows XP installed computers.
To setup using the software supplied by the wireless LAN card manufacturer,
refer to "Wireless Network Setup Using the Wireless LAN Setup Program"
(p68).
To use a wireless LAN, press the <Fn> and <F8> key combination simulta-
neously to enable a wireless LAN. When the wireless LAN is enabled, the
Wireless LAN Operation LED ( ) lights up.
Wireless network connections can be classified into two categories.
1) Access Point (AP)
You can connect to an AP to use the network. This is possible only in an environment
equipped with an AP. For details, see “Connecting to an Access Point (AP)” on page
63.
What is an Access Point (AP)?
An AP is a network device that bridges wired and wireless LANs, and corre-
sponds to a wireless hub in a wired network. You can connect multiple wireless
LAN installed computers to an AP.
Connecting to the Internet 63
2) Computer-to-computer (ad hoc)
This is also called a peer-to-peer network.
In computer-to-computer wireless networks, you can wirelessly connect 2 or more
computers that have wireless LAN modules. For details, see “Connecting to computer-
to-computer networks (peer-to-peer or ad hoc)” on page 65.
Connecting to an Access Point (AP)
This section describes how to connect to an AP. You can use the network when you are
connected to an AP.
For more detailed information such as the network key (encryption key), ask
your network administrator.
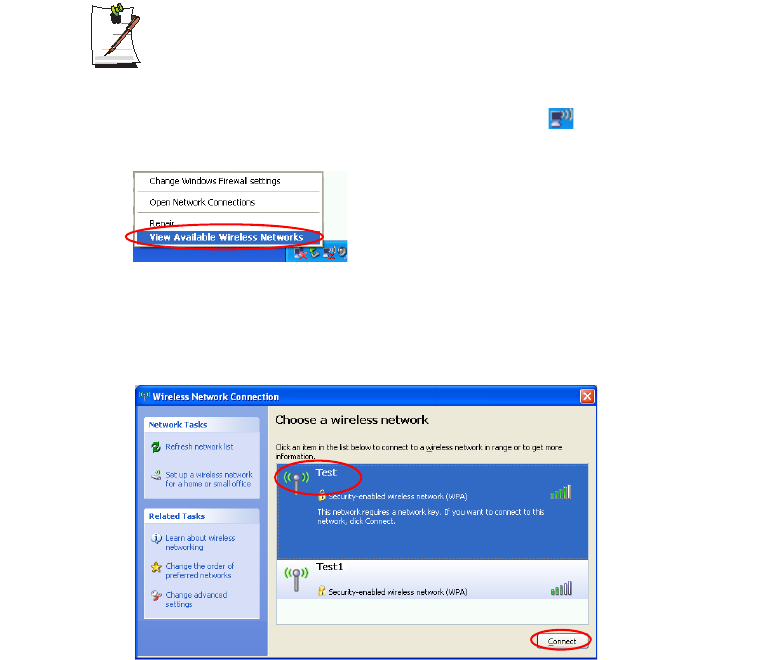
1. Right-click on the Wireless Network Connection ( ) icon on the taskbar, and
select View Available Wireless Networks.
2. Select an AP (E.g. Test) to connect to and click Connect.
If there is a configured network key for the AP to connect to, the Enter Network
Key window appears. Enter the Network Key in the window and then click the
Connect button.
64 Users Manual
When a network key is not defined for a selected AP, click on Link to display
the warning message box. Then click Connect again in the box.
Now when Connected in AP is displayed, and you can access the network.
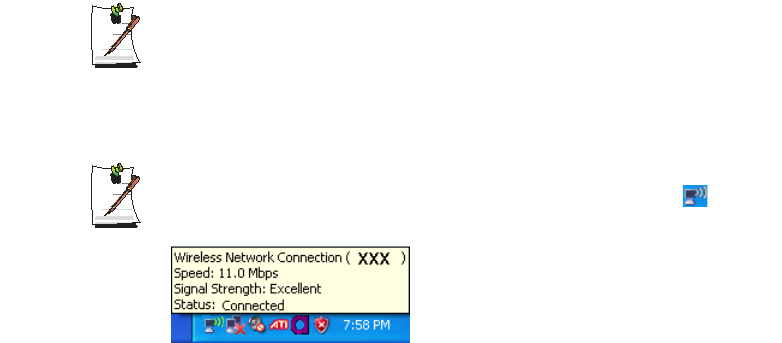
Checking the connection status
Move the mouse pointer over the Wireless Network Connection ( ) icon on
the taskbar, and the connection status is displayed.
Connecting to the Internet 65
Connecting to computer-to-computer networks
(peer-to-peer or ad hoc)
In computer-to-computer wireless networks, you can wirelessly connect 2 or more
computers that have wireless LAN modules. Using this method, a computer that is not
connected to the Internet can share the Internet by accessing another computer connect-
ed to the Internet. (Refer to "Sharing Internet Access" on page 74.)
You can connect by completing the following steps:
•Step 1. Set up a computer-to-computer network on a computer.
•Step 2. Connect to the configured computer from other computers.
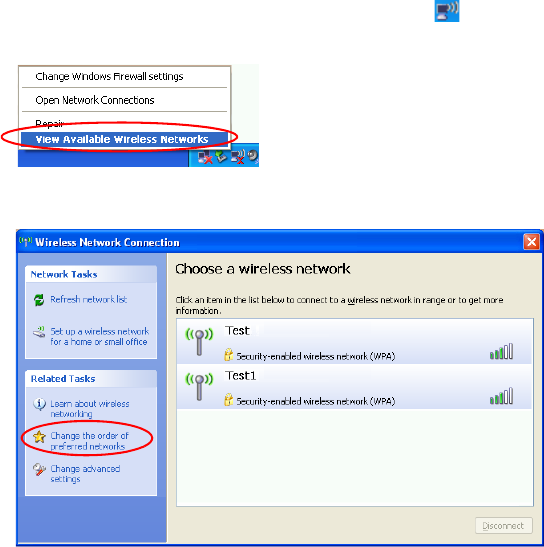
Step 1. Setting up a computer-to-computer network
1. Right-click on the Wireless Network Connection ( ) icon on the taskbar, and
select View Available Wireless Networks.
2. Click Change the order of Preferred Networks.
3. On the Wireless Network tab, click Advanced.
4. Clear 'Automatically connect to non-default network' check box, if it is selected.
Select 'Computer-to-computer (ad hoc) networks only', and click Close.
5. In the Wireless Networks tab, click Add.
66 Users Manual
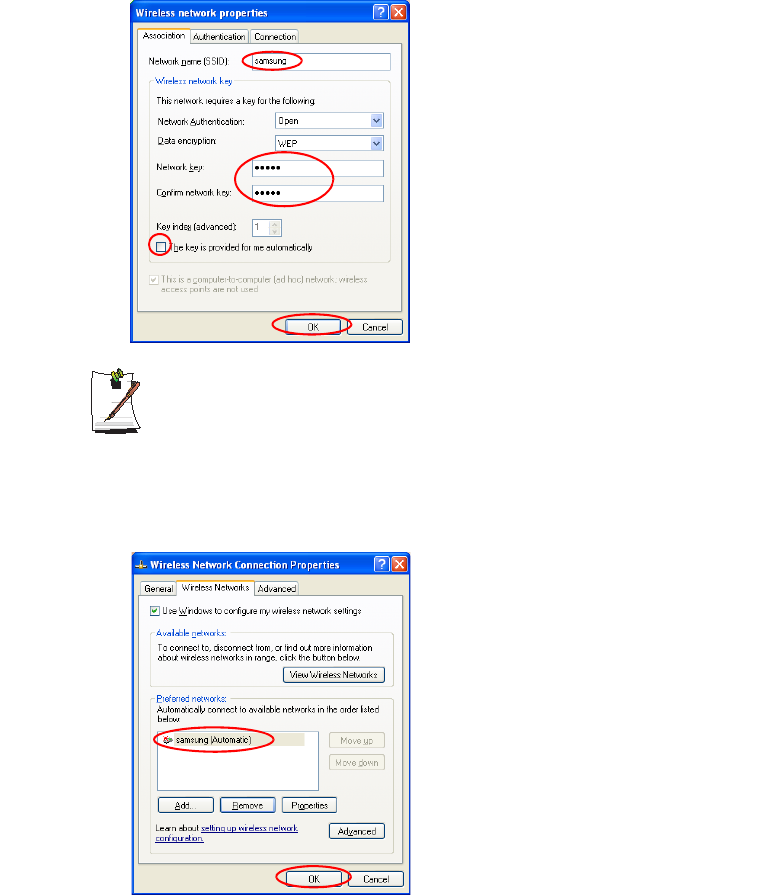
6. Enter the network name (e.g. samsung), and unselect 'The key is provided for me
automatically'. Enter the encryption key in the Network key field, and click OK.
To prevent a network connection from an unauthorized user, it would be better
to configure a network key (encryption key). A network key consists of 5 ~ 13
alphanumeric characters (e.g. magic), or of 10 ~ 26 hexadecimal numbers (a
hexadecimal number is represented by numbers '0' to '9' or letters 'a' to 'f').
7. Check that the configured network name (e.g. samsung) is in the ’Preferred net-
works’ item, and click OK.
Now your wireless network setup has been completed.
Connecting to the Internet 67
Step 2. Connecting to the configured computer
1. Right-click on the Wireless Network Connection ( ) icon on the taskbar, and
select View Available Wireless Networks.
2. Select the wireless network name (e.g. samsung) specified in ”Connecting to com-
puter-to-computer networks (peer-to-peer or ad hoc)” on page 65, and click Con-
nect.
3. Enter a cryptographic key in the network key box and click Connect.
If the network key is not configured in ”Connecting to computer-to-computer
networks (peer-to-peer or ad hoc)” on page 65, just click Connect, without any
keystrokes.
When connected to the wireless network, the system displays Connected in the select-
ed network of the Network Connection window.
68 Users Manual
Checking the connection status
Move the mouse pointer over the Wireless Network Connection ( ) icon on
the taskbar, and the connection status is displayed.
Wireless Network Setup Using the Wireless LAN Setup Program
The procedures to connect to an access point using a wireless LAN configuration pro-
gram are described. Since the wireless LAN configuration program is included in the
system software media, the user has to install the program.
Before You Start!
To use the system software media, the external ODD must be connected to
the computer. The following descriptions presuppose that the external ODD is
connected.
1. Insert the system software media into the CD drive and install the wireless LAN
configuration program (PROSet).
Select System Software Media > User Installation > Wireless LAN Driver Re-
adMe, click ReadMe and install according to the instructions.
2. Double-click on the wireless LAN program ( ) icon on the taskbar.
Alternatively, click Start > All Programs > Intel PROSet Wireless > Intel
PROSet Wireless.
3. In Available Networks, click on Refresh.
4. Select the name of an access point to connect to from the available network list and
click on Connect.
If a network does not appear, click on Refresh.
5. Enter a WEP key and click the OK button.

Connecting to the Internet 69
The Wireless Security Settings window may differ depending on the security
settings of the AP.
Click the Advanced button to set up network authentication, data encryption,
etc. For more security setting information, ask your wireless network adminis-
trator.
Refer to setting up the advanced settings by clicking on the Advanced button.
•Network authentication: The network authentication options include an
Open System and Shared Key. When selecting Open Systems, no
authentication is applied (however, encryption is supported). When
selecting Shared Key, a WEP key is used for authentication. The default
setting is Open System.
•Data encryption (WEP): The IEEE 802.11 WEP (Wired Equivalent
Privacy) standard defines two levels of encryption, a 64-bit key (this is
sometimes represented by 40bits) and a 128-bit key.
•Key index: Select the current encryption key index used by the access
point out of 1 to 4.
•Using an encryption key: Click Use pass phrase to activate, and enter 5
(for 64-bit) or 13 (for 128-bit) alphanumeric characters (represented by 0-
9, a-z, or A-Z).
6. The Done window appears, click OK.
When a wireless connection to an access point is established, the connection icon
( ) appears in front of the name of the connected profile.

70 Users Manual
Using Samsung Network Manager
Samsung Network Manager is a program that has been developed to enable users to use
the network easily.
Samsung Network Manager provides the following features.
•You can easily set up the network and printer settings.
•You can immediately use the network without defining new network set-
tings again after moving locations.
By setting the network settings (IP address, printer settings, etc.) for each loca-
tion, you can immediately access the network without following network setting
procedures each time regardless of your location.
•You can easily share Internet Access.
You can share your Internet connection by setting up a computer with 2 LAN
interfaces (wired and wireless, or 2 wired LAN) as the sharing server. Then, you
can access the Internet on a sharing client by connecting to the sharing server.
•You can diagnose the network status.
You can diagnose the network status when the network is not properly connect-
ed.
Using the Network
This section describes the procedures to connect to the Internet by setting up a network.
The setting up procedures include the procedures to add a printer to the network.
The setting up procedures are different for wired and wireless LAN connec-
tions.
To use a wireless LAN, there should be a wireless LAN AP available nearby.
Connecting to the Internet 71
Setting Up a Network
1. To use a wired LAN, connect the LAN cable to the LAN port.
To use a wireless LAN, press the <Fn> and <F8> key combination simultaneously
to enable a wireless LAN.
When the wireless LAN is turned on, the Wireless LAN Operation LED ( ) lights up.
2. Run Samsung Network Manager.
Select Start > All Programs > Samsung > Samsung Network Manager > Sam-
sung Network Manager or double click the Samsung Network Manager( )
icon on the Desktop.
3. Click the Add button.
4. Select a network location icon and enter the name of the location (e.g. Home).
Click the Next button.
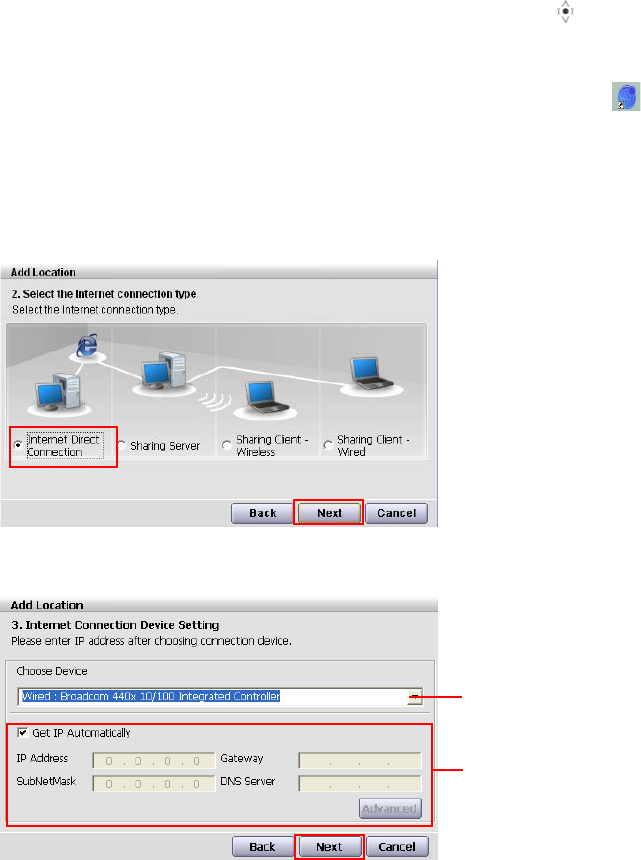
5. Select Internet direct connection and click the Next button.
6. Select the LAN device, setup the IP address and click the Next button.
Select Device
Setup IP Address
72 Users Manual
Select Device
Select a device to be connected to the Internet. Select either Wired LAN or
Wireless LAN.
Setting up the IP Address
To allocate an IP address automatically (DHCP), select Get IP Automatically.
To use a static IP address, unselect Get IP Automatically and enter an IP ad-
dress. For IP address information, ask your network administrator.
7. When the Printer Setting window appears, click Finish.
To add a printer, click Add Printer. The Add Printer Wizard appears. Set up the
printer according to the instructions displayed on the screen.
When the printer has been added, click the Show printer button, select the newly
added printer and then click the Finish button.
To not add a printer, select
No Default Printer
and then click the
Finish
button.
When the network setting is complete, the ’Do you want to move to newly
added location now?’ message appears. If you select ’Yes’, the network set-
tings for the added location are applied.
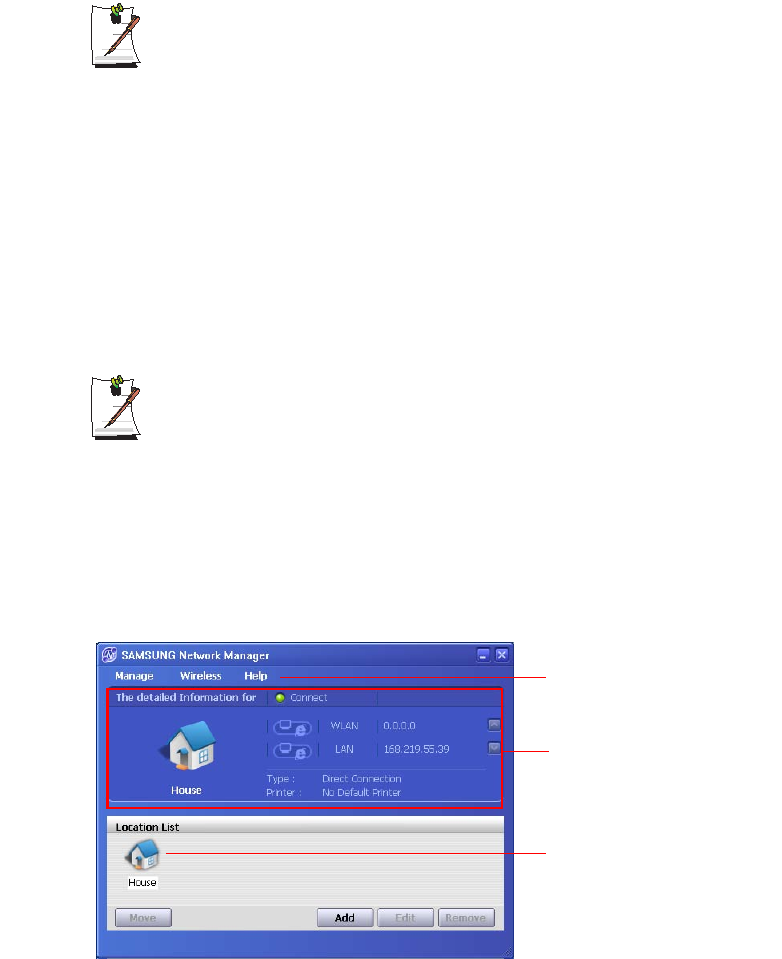
When the network settings for the added location are applied, the added place
and the corresponding network connection information is displayed in The de-
tailed Information for window.
When the network setting is complete, an icon for the added location is created within the
Saved Locations window. Now you can use the Internet or add a new network location.
Menu
Current Place
Information
Saved Locations
Connecting to the Internet 73
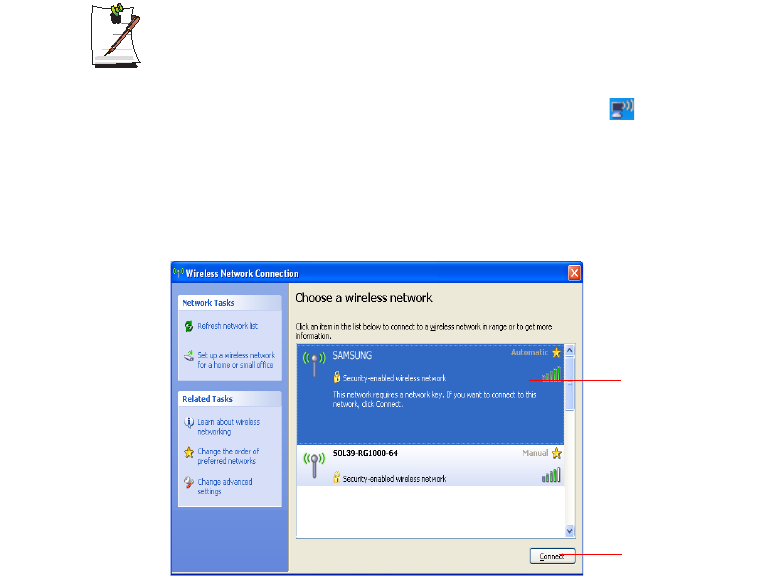
Wireless LAN AP Connection Procedures
To use a wireless LAN, first connect to a wireless LAN AP and then you can
access the network even when moving location. Or moving location and then
you can access the network even when connecting to a wireless LAN AP
1. Right-click over the Wireless Network Connection ( ) icon on the Task-
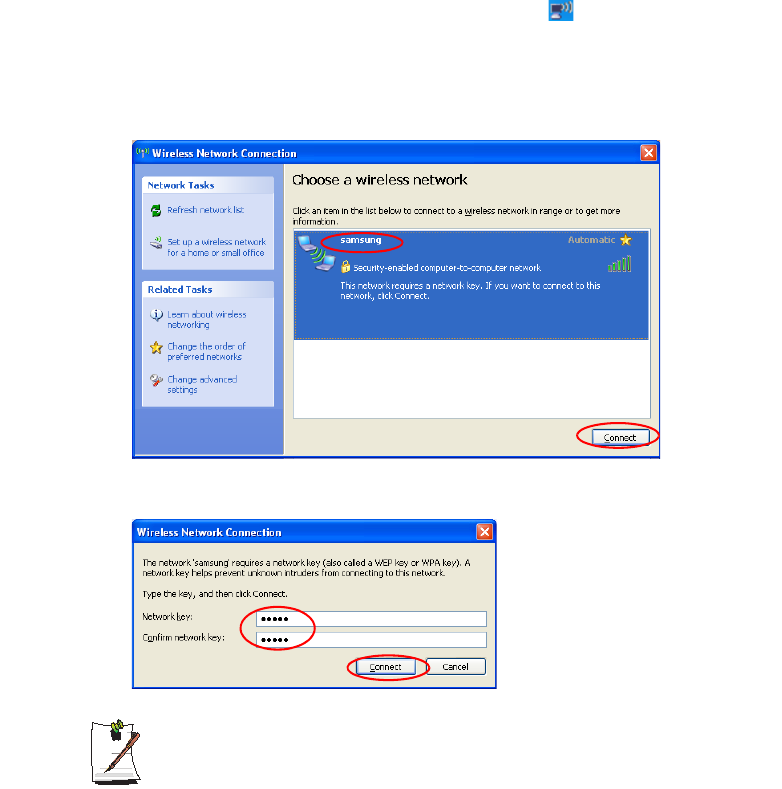
bar and click View Available Wireless Networks.
2. Click Search AP from the Wireless menu to search for wireless LAN APs.
Select an available wireless network (e.g. SAMSUNG) and click the Connect
button. For information on available wireless LAN APs, ask your network ad-
ministrator.
3. The network key (security key) input window appears.
- If a network key has been set for the wireless LAN AP, enter the network key
and click the Connect button. For the network key information, ask your net-
work administrator.
- If no network key has been set for the wireless LAN AP, click the Connect
button without entering the network key.
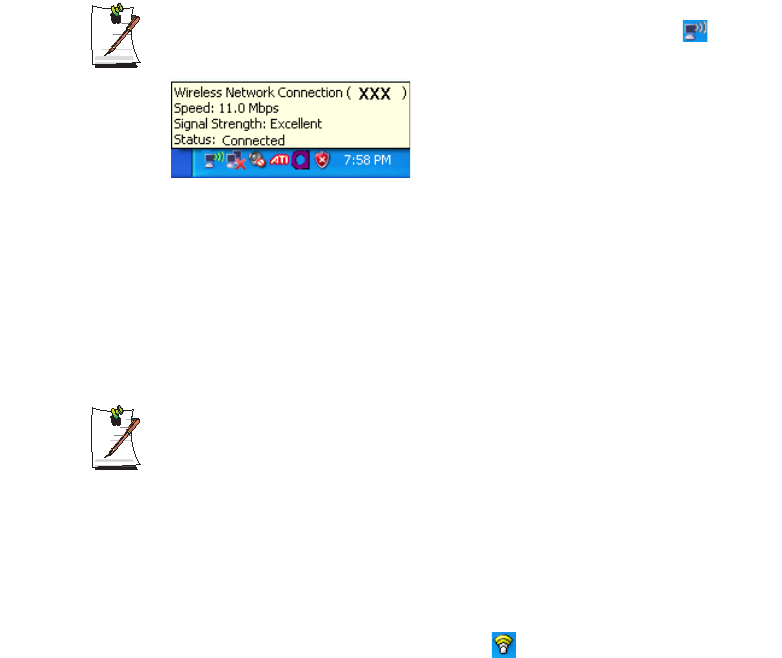
4. When the computer is connected to the wireless LAN AP, the Connected
message will appear on the Wireless Network icon in the Taskbar.
Using the network after moving location
By setting the network settings (IP address, printer setting, etc.) for each location, you
can immediately access the network without performing the network setting proce-
dures regardless of your location.
1. Run Samsung Network Manager when connected to the Internet.
Available AP
Connect

74 Users Manual
2. Select an icon that represents the corresponding location from the Saved Locations
window and then click Move.
3. When the network settings of the selected location are applied, the new location
and the network connection information are displayed in The detailed Informa-
tion for window.
Sharing Internet Access
This section describes the procedures to share Internet Access.
To share Internet Access, you first have to set a sharing server and a sharing client.
When the setup is complete, you can access the Internet from the sharing client by con-
necting to the sharing server.
Sharing Server : A computer with a direct connection to the internet and a lo-
cal network connection.
Sharing Client : A computer that uses the Internet by connecting to a sharing
server without itself having a direct connection to the Internet.
You can connect a sharing server and a sharing client as follows.(See Figure
5 on page (p71))
For Connection 3, you have to connect a LAN card in advance.
To connect a sharing server and a sharing client using a wired LAN, connect
the computers with a crossover LAN cable or network hub first.
To use a wireless LAN, press the <Fn> and <F8> key combination simulta-
neously to enable a wireless LAN.
When the wireless LAN is turned on, the Wireless LAN Operation LED ( )
lights up.
As an example, Internet sharing procedures for [Connection 1], which connect the
sharing server and the Internet through a wired LAN and connect the sharing server and
the sharing client through a wireless LAN, are described below.
Sharing Server Sharing Client
External Internet Device Client Device
Connection 1 Wired LAN Wireless LAN Connect a sharing client with the
Connection 2 Wireless LAN Wired LAN device that is the same as the
Connection 3 Wired LAN Wired LAN client device of the sharing server.
Connecting to the Internet 75
Setting Up a Sharing Server
1. Run Samsung Network Manager on the computer to be used as the sharing serv-
er.
2. Click the Add button.
3. Select a network location icon and enter the name of the location (e.g. Home).
Click the Next button.
4. Select Internet direct Connection for sharing and click the Next button.
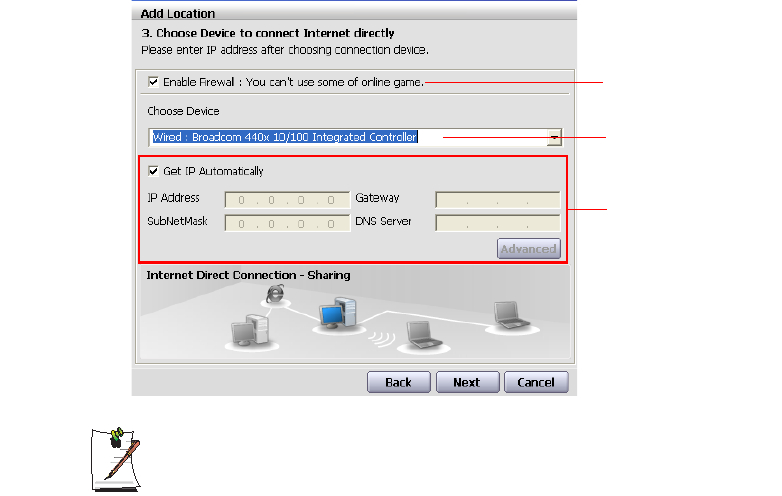
5. Set up the network device to be connected to the external Internet. Determine
whether to use a firewall and select a network device to be connected to the exter-
nal Internet (e.g. Wired LAN). Set the IP address and then click the Next button.
- To protect against external intrusion attempts, using a firewall is recommend-
ed.
- For more information on selecting a device and setting the IP address, refer
to the description of item 6 of "Setting Up a Network" (p71).
6. Select a network device to connect to the sharing client (e.g. wireless LAN) and
click the Next button.
Determine whether
to use a firewall
Select a device
Set an IP address

76 Users Manual
To Share Internet Access through a Wireless LAN
- In the Select Device field, select Wireless.
- In the Wireless Connection Name (e.g. Samsung) field, enter the network
name.
- To use the network key (security key), select the "Use Password ,,," option
and enter a network key. Remember the network key because you have to re-
enter the key on the sharing client to connect to the sharing server.
7. The setup information is displayed. Confirm the settings and click the Next button.
8. When the Printer Setting window appears, click Finish.
For the printer setup procedures, refer to the description of item 7 of "Setting Up
a Network" on page 71
When the Shared Server setting is completed, set up the shared client.
Setting Up the Sharing Client
1. Run Samsung Network Manager on the computer to be used as a sharing client.
2. Click the Add button.
3.
Select a network location icon and enter the name of the location. Click the
Next
button.
4. Select Internet Sharing and click the Next button.
- To connect through a wireless LAN, select Internet Sharing - Wireless.
- To connect through a wired LAN, select Internet Sharing - Wired.
5.
Confirm the network device to be connected to the server and click the
Next
button.
- To connect through a wireless LAN, enter the wireless connection name
(e.g. Samsung) you entered in the sharing server. If you have set a network
key (security key) for the sharing server, enter the network key.
6. The setup information appears. Confirm the information and click the Next button.
7. When the Printer Setting window appears, click Finish.
For the printer setup procedures, refer to the description of item 7 of "Setting Up
a Network" on page 71.
When the settings are completed, you can use the Internet on the shared client.
Connecting to the Internet 77
- To access the Internet from the sharing client, the sharing server has to be
on.
- To use the Internet on the sharing client, select a sharing client icon from the
Location List window and then click the Move button.
- If the connection is broken while using the Internet on the sharing client, click
the Ap Active from the Wireless menu to reestablish the connection.
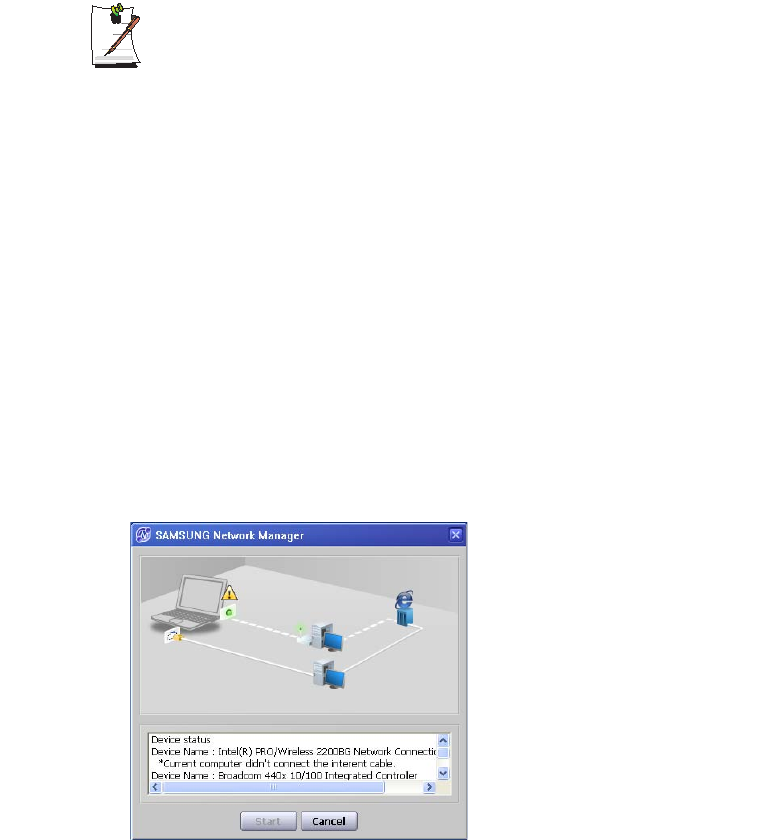
Network Status Diagnosis
You can diagnose the network status when the network is not properly connected.
1. Run Samsung Network Manager.
2. Select Auto Diagnosis from the Manage menu.
3. The Network Connections figure window appears. Click the Start button to start
the network diagnosis.
4. When the diagnosis is complete, out of order devices are marked by the exclama-
tion mark icon. For detailed device status, read the description in the lower part of
the window.
Reconnect and set up the device according to the diagnosis result.

78 Users Manual
Using Network Services
While the computer is connected to the network, you can use network services to share
files, folders, and printers.
Network services are provided for the computers that are connected to the net-
work through wired or wireless network connections. For details, see “Con-
necting Through a Wired LAN” on page 60 and see “Connecting Through a
Wireless LAN (Optional)” on page 62.
Sharing files or folders
This section describes how to share files and folders between computers connected to
the network.
To share files, complete the following procedures:
•Step 1. Configuring the sharing of files and folders on a computer.
•Step 2. Accessing shared files and folders from another computer.
When a file or folder is shared, anyone connected to the network can open and
delete the shared file or folder.
Configure a file sharing network only when the network is secure, and do not
share important data.
Connecting to the Internet 79
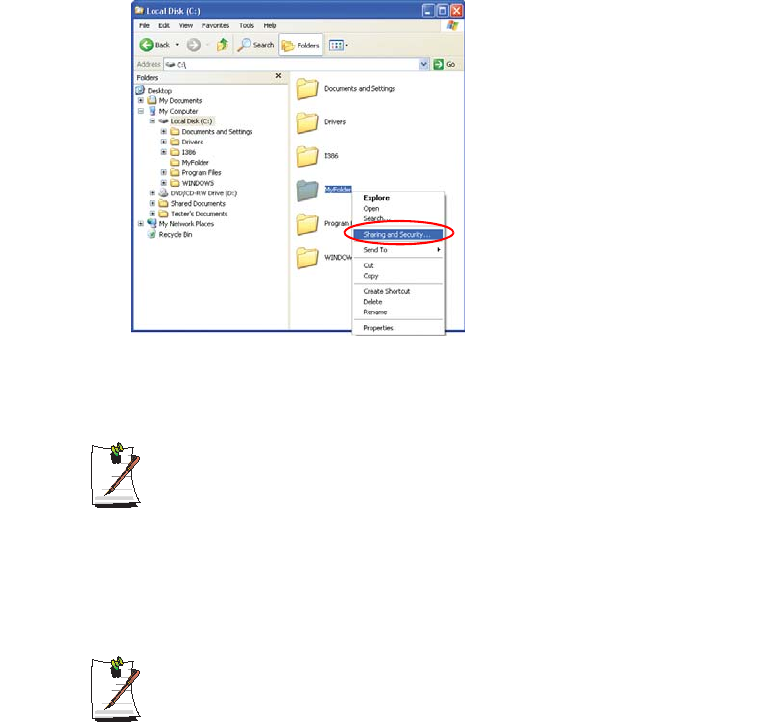
Step 1. Configuring Sharing
1. Right-click the target file or folder to share in My Computer, and select Sharing
and Security.
2. Click 'IF you understand the security risks but want to share files without running
the wizard, click here'.
It has the same security effect as that of the 'Network Setup Wizard'.
This screen does not appear if Internet Sharing Network Wizard has been in-
stalled in the computer-to-computer wireless network environment.
3. Select 'Just enable file sharing', and click OK.
4. In the 'Network sharing and security' field, select 'Share this folder on the network',
enter the share name, and click OK.
Be cautious when selecting 'Allow network users to change my files' since oth-
er network users can change the files in the shared folder.
The file and folder sharing configuration has been completed.
80 Users Manual
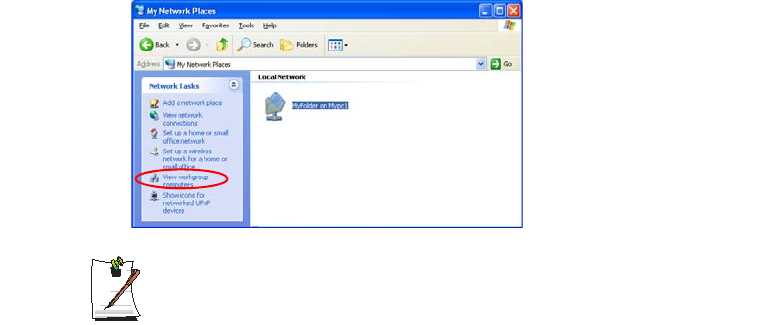
Step 2. Using Shared Files or Folders
This section describes how to access shared files or folders if your computer is a mem-
ber of the same workgroup.
1. Double-Click My Network Places of desktop under Other Places.
2. Click 'View workgroup computers', and click the desired computer to access the
shared file.
If your computer is a member of another workgroup:
1. Click Other Places > Microsoft Windows Network.
2. Click the desired workgroup.
3. Click the desired computer to display the shared files or folders.
Sharing Printers
This section describes how to share a printer between computers connected to a net-
work.
To share a printer, complete the following procedures:
•Step 1. Configure printer sharing in the computer connected to the printer.
•Step 2. Add and use the shared printer in other computers on the network.
Connecting to the Internet 81
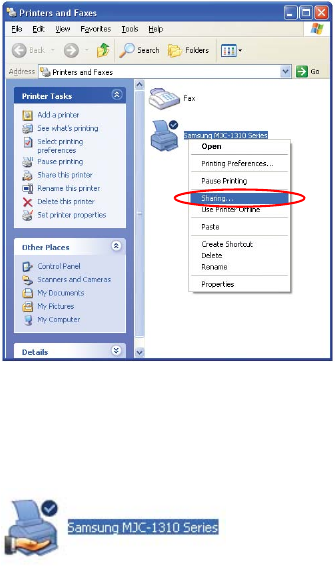
Step 1. Configuring Printer Sharing
1. From the computer connected to the printer, click Start > Printers and Faxes.
2. Right-click the printer you want to share, and click Sharing.
3. Select 'Share this printer', enter a share name for the shared printer, and click OK.
4. In the Printers and Faxes window, you will find the printer icon has been changed
to another icon on a hand.
Step 2. Adding and Using a Shared Printer.
1. From a different computer that wants to use the shared printer, click Start > Print-
ers and Faxes.
2. Click Add a printer.
3. In the Add Printer Wizard, click Next.
4. Select 'A network printer, or a printer attached to another computer', and click
Next.
5. Select 'Browse for a printer', and click Next.
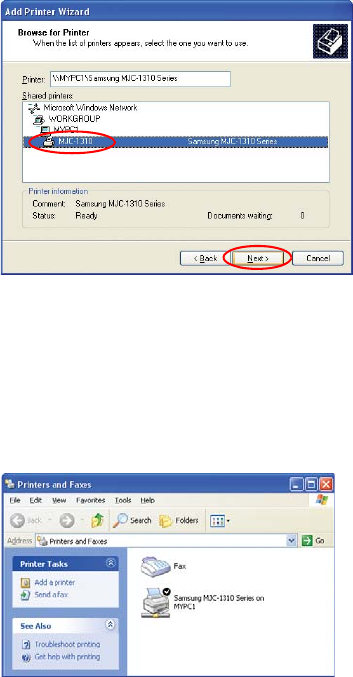
82 Users Manual
6. Select the workgroup or computer, select the desired printer, and click Next.
If you cannot find the desired printer, try again after a while.
7. Read the warning about a shared printer, and click Yes to install the shared printer.
8. Select Yes for 'Do you want to use this printer as a default printer?', and click Next.
9. Click Finish.
10. When the printer sharing configuration has been completed, the shared printer ap-
pears in the Printers and Faxes window.
Now you can print using the shared printer even if your computer is not directly
connected to a printer.

Connecting to the Internet 83
Using Bluetooth Devices (Optional)
Bluetooth is a wireless communication technology that allows access to devices nearby
such as a computer, mobile phone, printer, keyboard or mouse without a cable connec-
tion. Bluetooth enables file transmissions, Internet access, a private area network func-
tion, and access to a keyboard, mouse and printer between devices supporting the
Bluetooth function without a cable connection.
The Bluetooth function is only available between devices supporting Bluetooth
(computers, mobile phones, PDAs, printers, etc.), and the function may be re-
stricted depending on the device profile.
The Bluetooth function is optional and may not be supported depending on
your model.
Compatibility with a Bluetooth device not certified by a Bluetooth certification
or logo is not guaranteed.
Bluetooth Functions
•File Transmission ( )
You can exchange files between 2 Bluetooth devices. You can exchange files
with other computers, mobile phones, PDAs, etc.
•Network Access ( )
You can connect to another computer with the Bluetooth function as you access
a wireless LAN in Ad-Hoc mode or connect to the Internet through an AP or In-
ternet Connecting Sharing Server.
•Network Access through a Phone Connection ( )
You can connect to the Internet through a Bluetooth mobile phone.
•Data Sync (Synchronization) ( )
You can synchronize the PIMS data (Outlook E-mail address data) with mobile
phones, PDAs, notebook computers, etc. supporting Bluetooth.
•Electronic Business Card (Vcard) Exchange ( )
You can exchange electronic business cards with mobile phones, PDAs, note-
book computers, etc. supporting Bluetooth.
•Sound Output ( )
You can listen to audio from the computer through another Bluetooth device or
listen to audio of another Bluetooth device through the computer.
84 Users Manual
•HID Connections ( )
You can connect a keyboard, mouse, joystick, etc. supporting Bluetooth.
For more information about using the Bluetooth function, refer to the online
help of the Bluetooth Device.
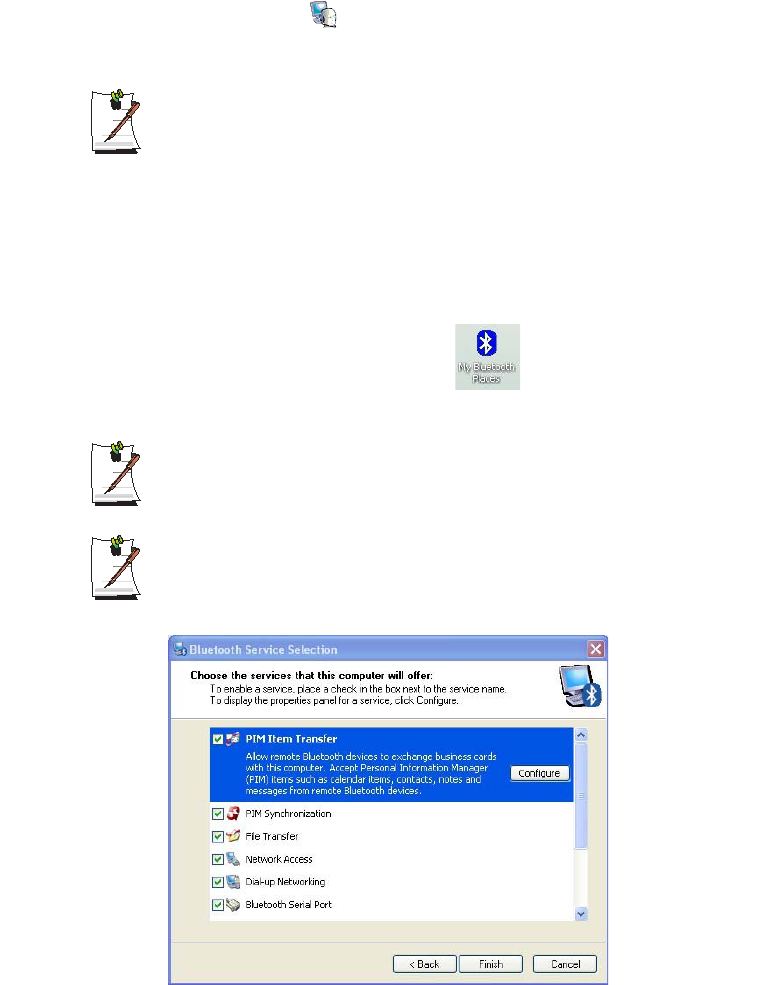
Bluetooth Software Setup
Bluetooth software is installed on computers supporting Bluetooth.
For first time use, set up the Bluetooth software as follows.
1. Double-click My Bluetooth Places icon( ) on the desktop.
2. Click the Next button to start setting up.
In the setting up steps, enter a device name to be displayed in the Bluetooth
Manager program. Enter a Name in the Computer Name field and select Lap-
top for the Computer Type field.
Also, a step appears for selecting the services to be provided by your Blue-
tooth device for other Bluetooth devices. At this point, the program automati-
cally detects available services and displays them as selected. It is
recommended not to change the default selection.

Connecting to the Internet 85
If you change the service settings, the driver necessary for the additionally se-
lected services are installed.
At this point, a warning message may appear informing you that there is no
Microsoft logo. Since it does not affect the operation, continue the installation.
3. If the driver installation is complete, the next step proceeds which searches for
nearby Bluetooth devices. Since you do not have to search while setting up, click
the Skip button and finish the settings.
4. When the settings are complete, the Bluetooth icon menu of the notification area
changes as shown in the figure.
86 Users Manual
Using Bluetooth
Describes how to exchange files between computers supporting Bluetooth and how to
use other Bluetooth devices.
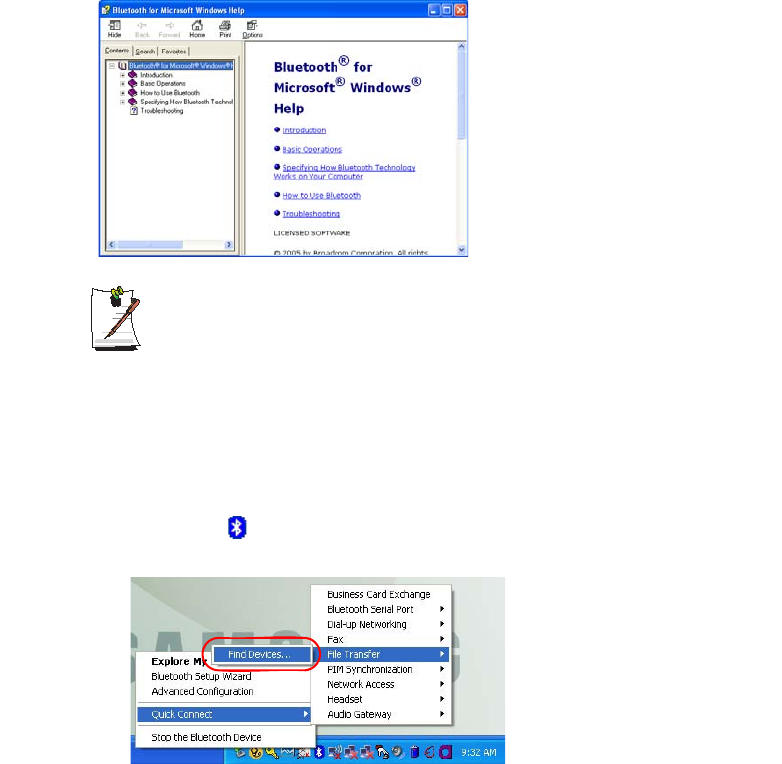
Bluetooth Help
Bluetooth Help provides detailed procedures on using Bluetooth functions.
Double-click on
My Bluetooth Settings
on the
Desktop
and press the
<F1>
key (Help).
Select Start > Help and Support > Networking and the Web > Networking >
Wireless networking > Bluetooth devices (wireless) to view Windows Help.
Exchanging Files between Bluetooth computers
The procedures to exchange files and folders between Bluetooth computers are de-
scribed below.
1. On the computer that is sending a file (hereafter Computer A), right-click the Blue-
tooth icon ( ) in the notification area and select Quick Connection > File
Transmission > Search for Device.

Connecting to the Internet 87
2. In the Select Device window, click on a computer to be connected (hereafter Com-
puter B).
3. If the Bluetooth PIN code requested notification window appears on the bottom
right taskbar, click on the window, enter the Bluetooth PIN code and click the OK
button.
The Bluetooth PIN Code is a password used for the connection between two
Bluetooth devices, the user just enter the same PIN Code (E.g. same num-
bers) on both Bluetooth devices to make a connection.
4. After a short while, the Bluetooth PIN Code required dialog box appears on
Computer B, enter the code that you have entered in Step 3 above.
88 Users Manual
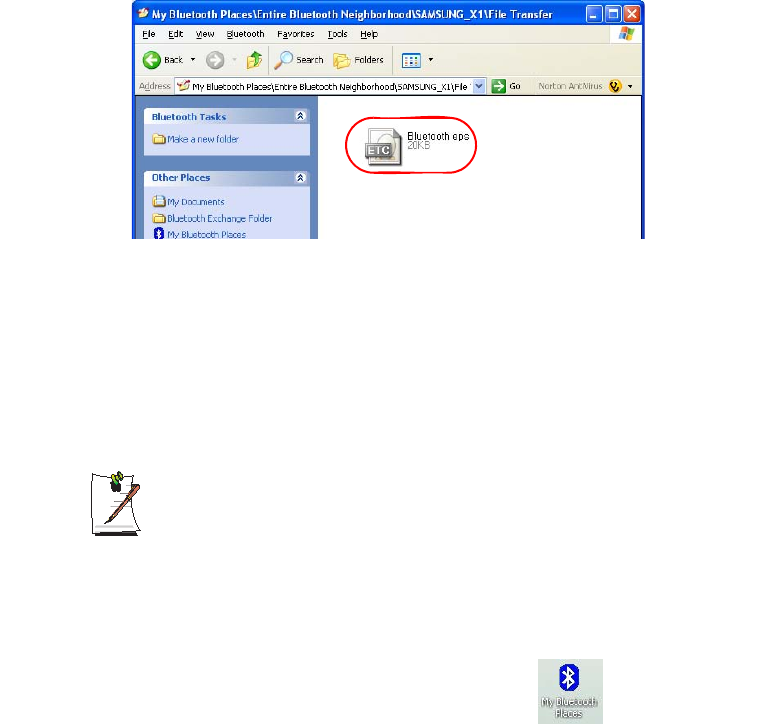
5. If the FTP File Access Privilege Request window appears on Computer B, click on
the window. If the Select Access Permission window appears, click the OK button.
6. The file transmission window appears on computer A. Drag files or folders to send
onto the window, and the files or folders are automatically transmitted.
7. If the file transmission is complete, close the File Transmission window.
The received files are saved in the C:\Documents and Settings\[user name]\My
Documents\Bluetooth Exchange folder.
Connecting Keyboard, Mouse, Joystick and Headset devices
The procedures to use Bluetooth HID devices (keyboard, mouse, joystick, etc.) or a
headset, etc. on the computer are described below.
The Bluetooth PIN Code is a password used for the connection between two
Bluetooth devices, the user just enter the same PIN Code on both Bluetooth
devices to make a connection.
1. Turn on the Bluetooth function on the device to connect to (mouse, keyboard, joy-
stick or headset).
Some devices have a button to turn on the Bluetooth function, so refer to the cor-
responding device manual.
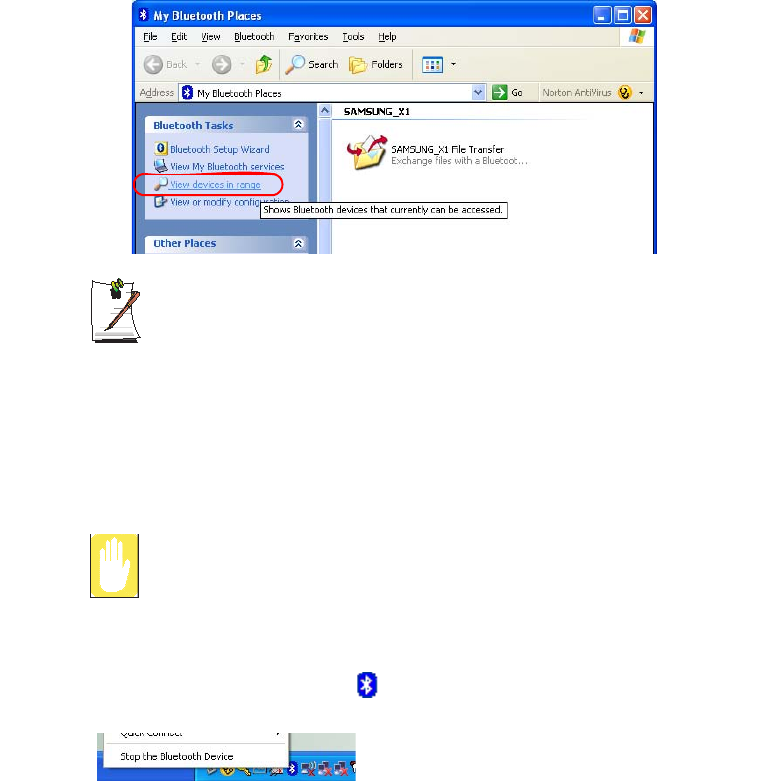
2. Double-click on the My Bluetooth Settings icon ( ) on the Desktop.
3. If the My Bluetooth Settings window appears, click on View Devices within
Coverage.
Connecting to the Internet 89
If the device to connect to appears, click on the device. (E.g. mouse)
If the device does not appear, click the View Devices within Coverage. If the
device has not appeared yet, since this menu changes to Search Devices
within Coverage, click the Search Devices within Coverage to show the de-
vice.
4. If the Bluetooth PIN Code input window appears, enter a PIN code referring to
the manual of the corresponding device. The PIN code for an HID device is gen-
erally printed in the manual of the corresponding device.
5. If you enter the PIN code, you can immediately use the device.
A Bluetooth keyboard and mouse work only in Windows. They will not work in
MS-DOS mode or in Hibernation mode.
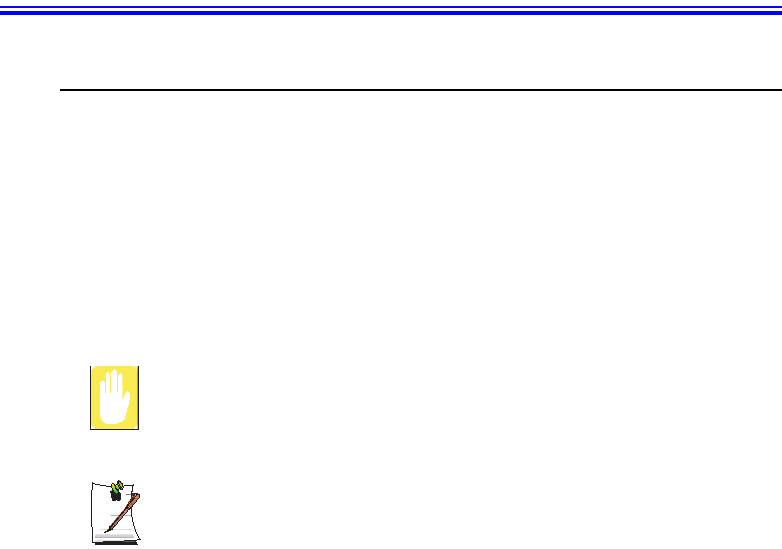
Stopping a Bluetooth device
Right-click the Bluetooth icon ( ) on the taskbar and select Stop the Bluetooth de-
vice.
To use a Bluetooth device after stopping it, select Start Bluetooth device as above.
90 Users Manual
Use Instructions
•Bluetooth devices must be within a 3m (10 ft.) distance.
•For a better communications environment, use the devices in an open space
where no wall or obstacle exists.
•For a telephone connection, data synchronization, electronics business card
exchange, fax transmission/reception, sound related functions, and serial port
function, you can connect with only one Bluetooth device.
•Using the network connection or file transmission function, multiple Bluetooth
devices can be connected. However, since connecting with multiple devices
may slow down the data rate or make the connection unstable, connecting with
one device at a time is recommended.
•The Bluetooth function of a Bluetooth PDA, mobile phone, mouse or keyboard
may be turned off. To use them in connection with a Samsung computer sup-
porting Bluetooth, you must check if the Bluetooth function of the device to
connect to is turned on.
For the procedures on turning on the Bluetooth function of a device, refer to the
manual of the device.
•The services provided by Bluetooth devices may vary depending on their capa-
bility. For the services provided by Bluetooth devices, refer to the manual of the
device.
Customizing Your Computer 91
Customizing Your Computer
Using System Setup
The System Setup (BIOS) program enables you to configure your computer hardware
and set security and power-savings options. The settings you choose are stored in bat-
tery-maintained CMOS memory that saves the information even when the computer’s
power is turned off. When your computer is turned back on, it is configured with the
values found in this memory.
Run System Setup if you get a message prompting you to run the program. You may
also want to run System Setup, particularly the first time you use your computer, to set
the time and date, use security or power-management features, or alter the settings of
other features.
BIOS Caution:
If you are not familiar with BIOS setup and what the parameters mean, seek
help from a person who is knowledgeable. Incorrect settings may cause your
system to malfunction or "Crash”.
Your computer’s version of System Setup may not include all the fields listed
here or may include additional fields. Field names and order of appearance
can vary according to the version of the BIOS (basic input/output system) on
your computer.

92 Users Manual
Starting System Setup
To start System Setup, turn on your computer and then press <F2> and hold until the
System Setup screen appears.
Table 2. System Setup Menus
To open the menu you need to use, use the left or right arrow keys to select the menu
name.
Table 3. System Setup Navigation Keys
Menu Function
Main Changes the basic system.
Advanced Configures advanced features on your computer.
Security Enables security features, including passwords.
Boot Specifies the order of boot devices and configures boot features.
Exit Specifies how to exit System Setup.
Navigation Key Function
<F1> Displays the General Help window.
<Esc> Exits the current menu.
<> or <> Moves the cursor up and down between fields.
<> or <> Selects different menus. Pressing the <Esc>key at the Main menu brings
you to the Exit menu.
<F5> Scrolls backwards through the options for the highlighted field.
<F6> Scrolls forward through the options for the highlighted field.
<F9> Sets the parameters for the current menu to their default values.
<F10> Save changes and exit system setup.
<Enter> Executes commands or opens a submenu.

Customizing Your Computer 93
Changing Booting Priority
You can select the booting priority among the devices such as the hard drive, CD-ROM
drive, etc. The following example describes how to configure the hard drive as the first
booting device when the CD-ROM drive is configured as the first booting device by
default.
1. Select the Boot menu in System Setup.
2. Press <Enter> on Boot Device Priority item.
3. Use <> key to move to the Hard Drive item, and press <F6> until it is at the
very top.
4. Press <F10> to save the changed configuration, and exit System Setup.
Now you can boot the system with the hard disk drive as the first booting device.

94 Users Manual
Configuring the Password
Setting the Supervisor Password
By configuring a supervisor password, you can restrict system access to authorized us-
ers only.
Do not lose or forget your password. If you have forgotten your password, con-
tact the Samsung service center.
1. Select the Security menu in the System Setup. To enter System Setup, see “Starting
System Setup” on page 92.
2. On the Set Supervisor Password item, press <Enter>.
3. Enter a password, press <Enter>, re-enter the password for confirmation, and
press <Enter> again.
4. When a message confirming the password configuration appears in the [Setup No-
tice] window, press <Enter>.
Setting the User Password
You can configure user passwords so that other users can use the system.
Before configuring a user password, a supervisor password must have been
configured.
Users can start the system with their user password, but cannot enter into the
System Setup.
Deactivating the supervisor password also deactivates the user password.
On the Set User Password item, press <Enter>, and complete step 3-4 of "Setting the
Supervisor Password".

Customizing Your Computer 95
Activating the Booting Password
Before activating the booting password, the supervisor password must have
been configured.
Set the Password on boot option to [Enabled].
From now on, system booting will not proceed without the password.
Deactivating the Password
1. On the password to delete, press <Enter>. (e.g. supervisor password)
2. Enter the current configured password, and press <Enter>.
3. Leave the 'Enter New Password' and 'Confirm New Password' field empty, and
press <Enter> to deactivate the password.
96 Users Manual
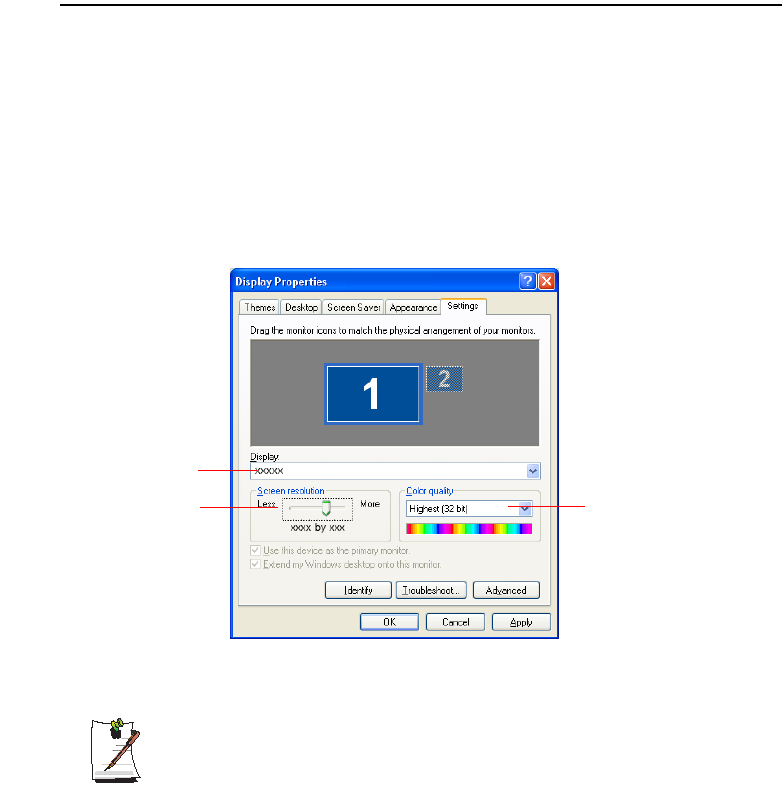
Configuring Resolution and Color Depth
Screen resolution is the number of pixels displayed on the screen. High resolution
makes the overall screen area large, although individual items appear small. Color
quality is determined by the number of bits used to represent a pixel on the screen. High
color quality displays more number of colours(colors) on your screen.
1. Select Start > Control Panel > Appearance and Themes > Change the screen
resolution.
2. Make changes on the Settings tab of the [Display Properties] dialog box.
3. When you have completed configuration, click Apply.
The following resolution and color quality settings are recommended depend-
ing on the LCD screen of the system.
- WXGA: Screen resolution: 1280 x 768, Color quality: Very high (32bit)
To change the number of
colors(colors) displayed on a
monitor, select an appropriate
colour(color) quality.
To change your screen
resolution, move the slider
to select an appropriate
resolution.
You can view the graphics
chipset.