Samsung Electronics Co NX2000 Digital Camera User Manual 1 of 4
Samsung Electronics Co Ltd Digital Camera 1 of 4
UserManual.wiki
>
Samsung Electronics Co
>
NX2000 User Manual
>
User manual 1 of 4
Contents
1.
User manual 1 of 4
2.
User manual 2 of 4
3.
User manual 3 of 4
4.
User manual 4 of 4
User manual 1 of 4
Navigation menu
Upload a User Manual
Namespaces
Wiki Guide
HTML
PDF
Info
Views
User Manual
Discussion / Help
Navigation
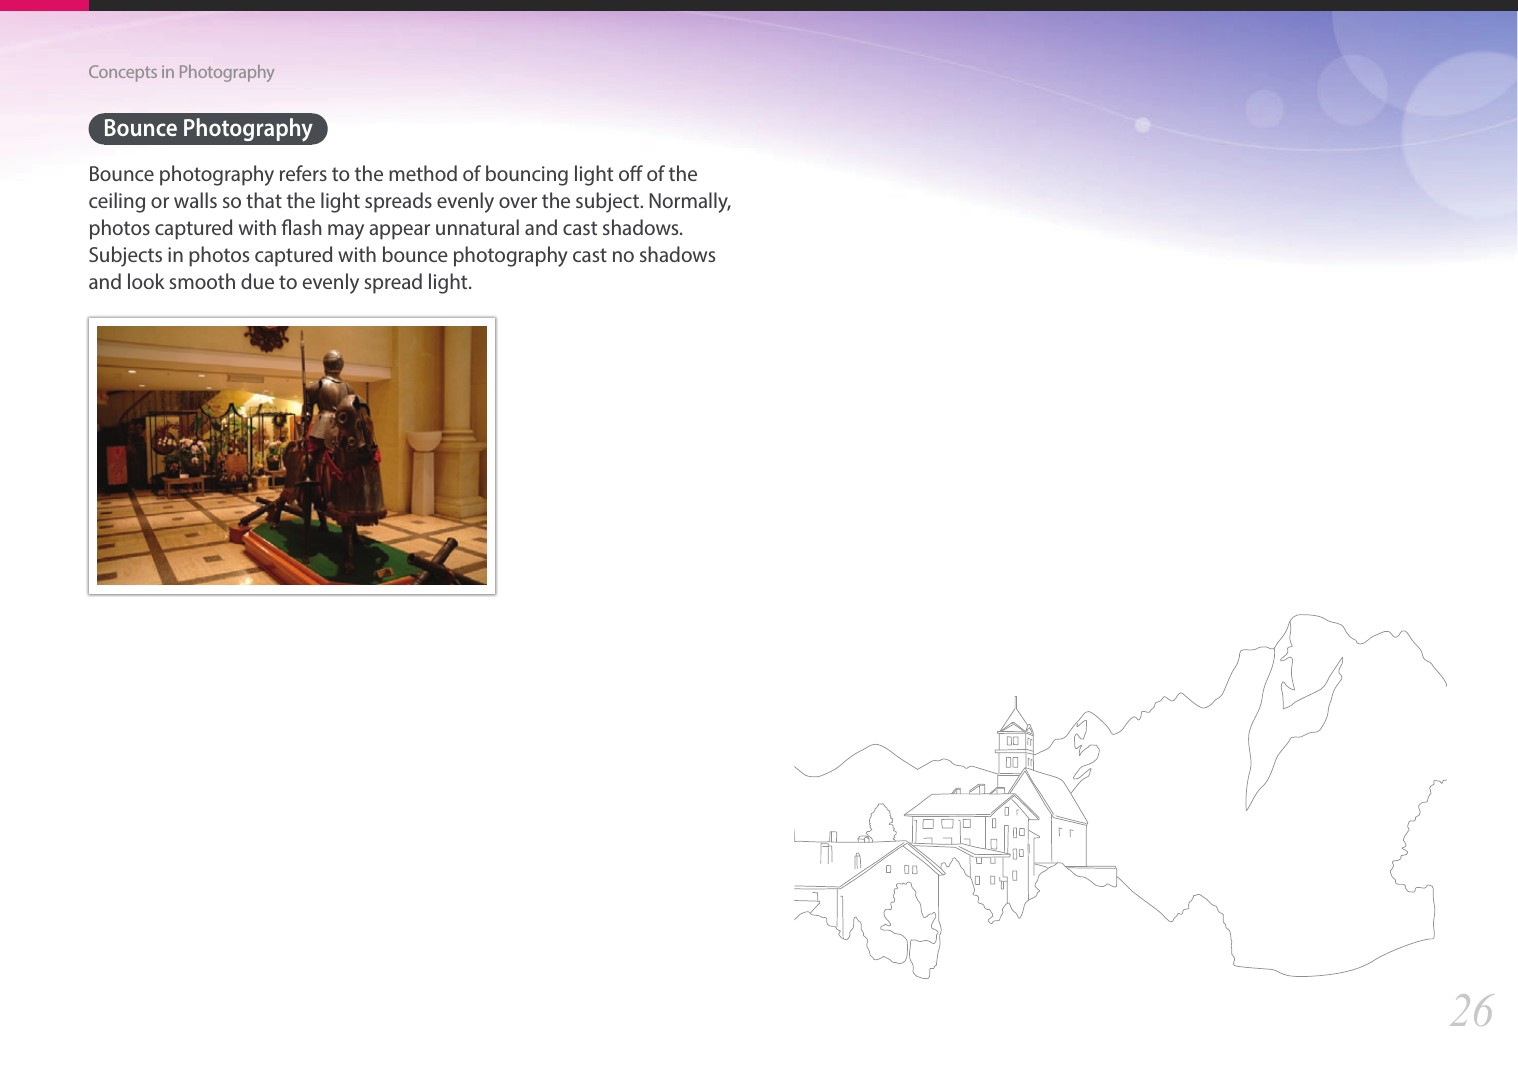
![6Indications used in this manualIcons used in this manualIcon FunctionAdditional informationSafety warnings and precautions[ ]Camera buttons. For example, [Shutter] represents the shutter button.( )Page number of related information→The order of options or menus you must select to perform a step; for example: Select 1 → Quality (represents select 1, and then Quality). *Annotation](https://usermanual.wiki/Samsung-Electronics-Co/NX2000.User-manual-1-of-4/User-Guide-1938442-Page-7.png)

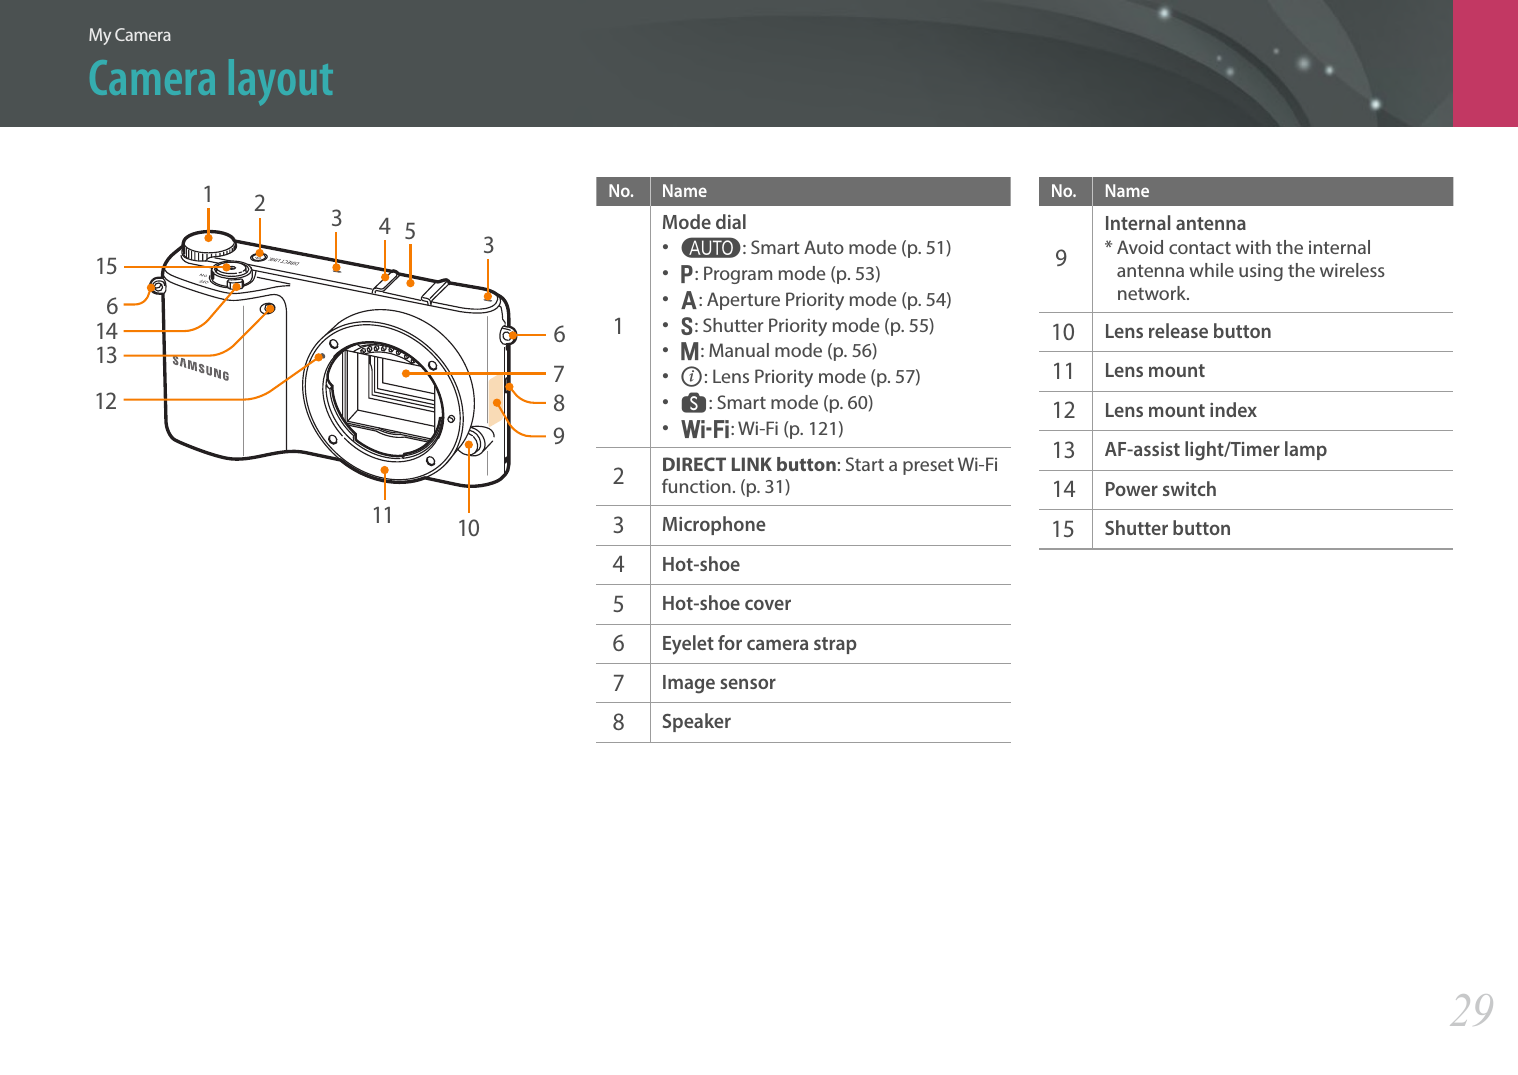
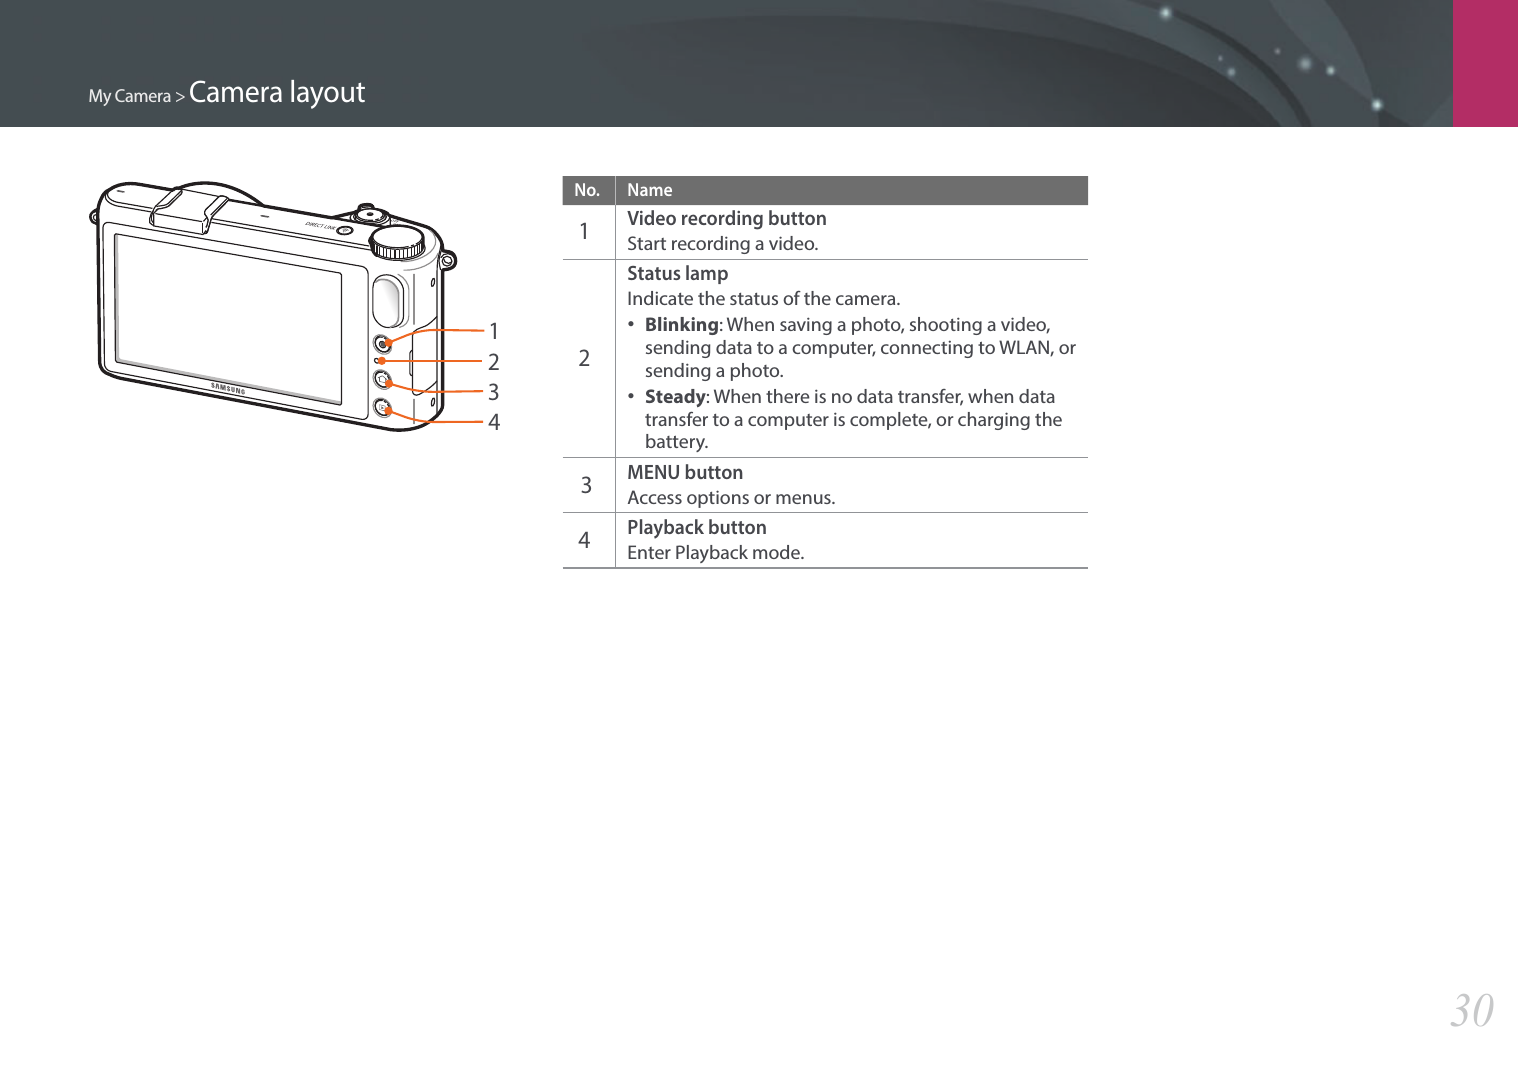
![My Camera > Camera layout31No. Name1 USB and shutter release portConnect the camera to a computer or shutter release. Use a shutter release cable with a tripod to minimize camera movement.2 HDMI port3 Battery chamber/Memory card coverInsert a memory card and battery.4 DisplayTouch the screen to select a menu or an option. (p. 35)5 Tripod mountUsing the DIRECT LINK buttonYou can turn on the Wi-Fi feature conveniently by pressing [DIRECT LINK]. Press [DIRECT LINK] again to return to the previous mode.Setting the DIRECT LINK buttonYou can select a Wi-Fi function to launch when you press [DIRECT LINK]. (p. 149)To set a DIRECT LINK option, In Shooting mode, press [m] → 5 → Key Mapping → DIRECT LINK → an option.45123](https://usermanual.wiki/Samsung-Electronics-Co/NX2000.User-manual-1-of-4/User-Guide-1938442-Page-32.png)
![My Camera34Performing the initial setupWhen you turn on your camera for the rst time, the initial setup screen appears. The language is preset for the country or region where the camera is sold. You can change the language as desired. You can also select an item by touching it on the screen.1 Press [I] to select Time Zone, and then press [F] or [o].2 Press [D/I] to select a time zone, and then press [o].Back SetTime Zone[GMT +00:00] London[GMT -01:00] Cape Verde[GMT -02:00] Mid-Atlantic[GMT -03:00] Buenos Aires, Sao Paulo[GMT -03:30] Newfoundland3 Press [I] to select Date & Time, and then press [F] or [o].Back SetDate & TimeYear Month Day Hr Min DST• The screen may dier depending on the language selected.4 Press [C/F] to select an item (Year/Month/Day/Hr/Min/DST).5 Press [D/I] to set the option, and then press [o].6 Press [I] to select Date Type, and then press [F] or [o].7 Press [D/I] to select a date type, and then press [o].8 Press [I] to select Time Type, and then press [F] or [o].9 Press [D/I] to select a time type, and then press [o].10 Press [m] to nish the initial setup.](https://usermanual.wiki/Samsung-Electronics-Co/NX2000.User-manual-1-of-4/User-Guide-1938442-Page-35.png)
![My Camera > Selecting functions (options)36Using mPress [m] or touch on the screen, and then change shooting options or settings.E.g. Selecting the photo size in P mode1 Rotate the mode dial to P.2 Press [m] or touch .3 Press [C] → [D/I] to move to 1, and then press [o].• You can also touch 1 on the screen.4 Scroll the jog dial or press [D/I] to move to Photo Size, and then press [o].• You can also drag the option list, and then touch an option.Back SelectAutoSharePhoto SizeQualityISOWhite Balance5 Scroll the jog dial or press [D/I] to move to an option, and then press [o].• You can also drag the option list, and then touch an option.• Press [m] or touch Back to go back to the previous menu.Back SetAutoSharePhoto SizeQualityISOWhite Balance5472x3648 (3:2)3888x2592 (3:2)2976x1984 (3:2)1728x1152 (3:2)5472x3080 (16:9)6 Press [m] or touch Back to switch to Shooting mode.](https://usermanual.wiki/Samsung-Electronics-Co/NX2000.User-manual-1-of-4/User-Guide-1938442-Page-37.png)
![My Camera > Selecting functions (options)37Using the Smart panelPress [f] or touch on the screen to access some functions such as Exposure, ISO, and White Balance.E.g. Adjust the exposure value in P mode1 Rotate the mode dial to P.2 Press [f] or touch .3 Press [D/I/C/F] to move to EV, and then press [o]. • You can directly select an option by scrolling the jog dial without having to press [o].• You can also select an option by touching it.EV : 0.0AdjustYou can adjust some options by dragging them. Back4 Scroll the jog dial or press [C/F] to adjust the exposure value, and then press [o].• You can also drag the dial on the screen, and then select Set to adjust the option.EV : 0.0Back Set](https://usermanual.wiki/Samsung-Electronics-Co/NX2000.User-manual-1-of-4/User-Guide-1938442-Page-38.png)
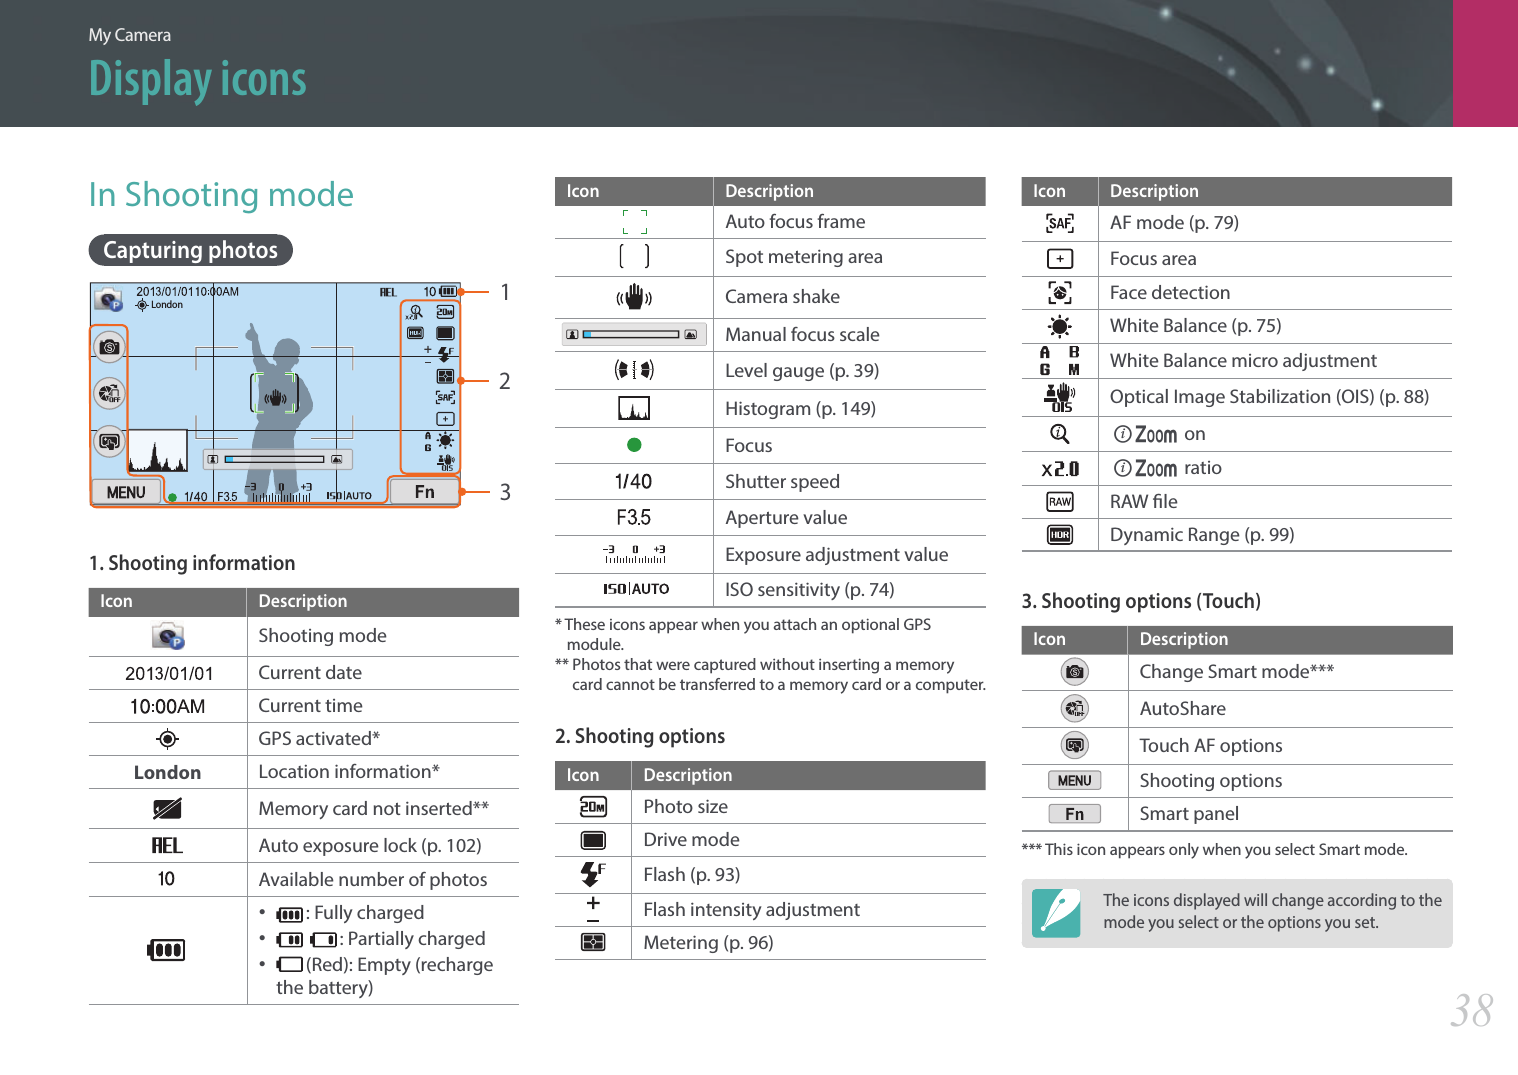
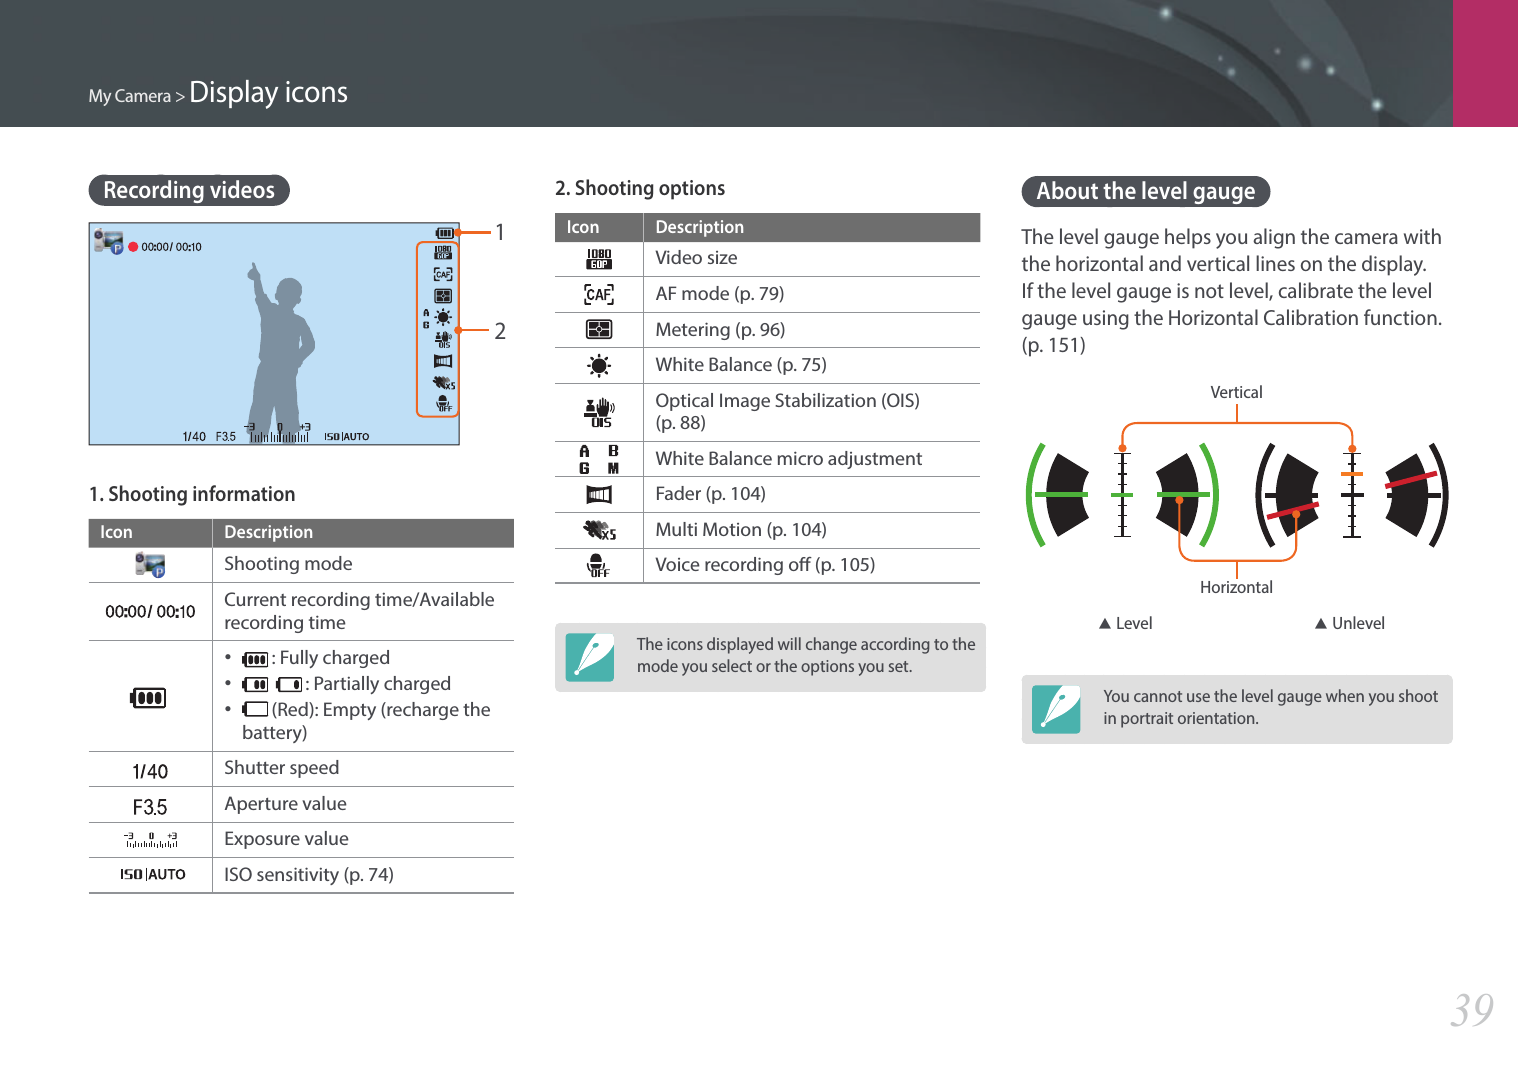
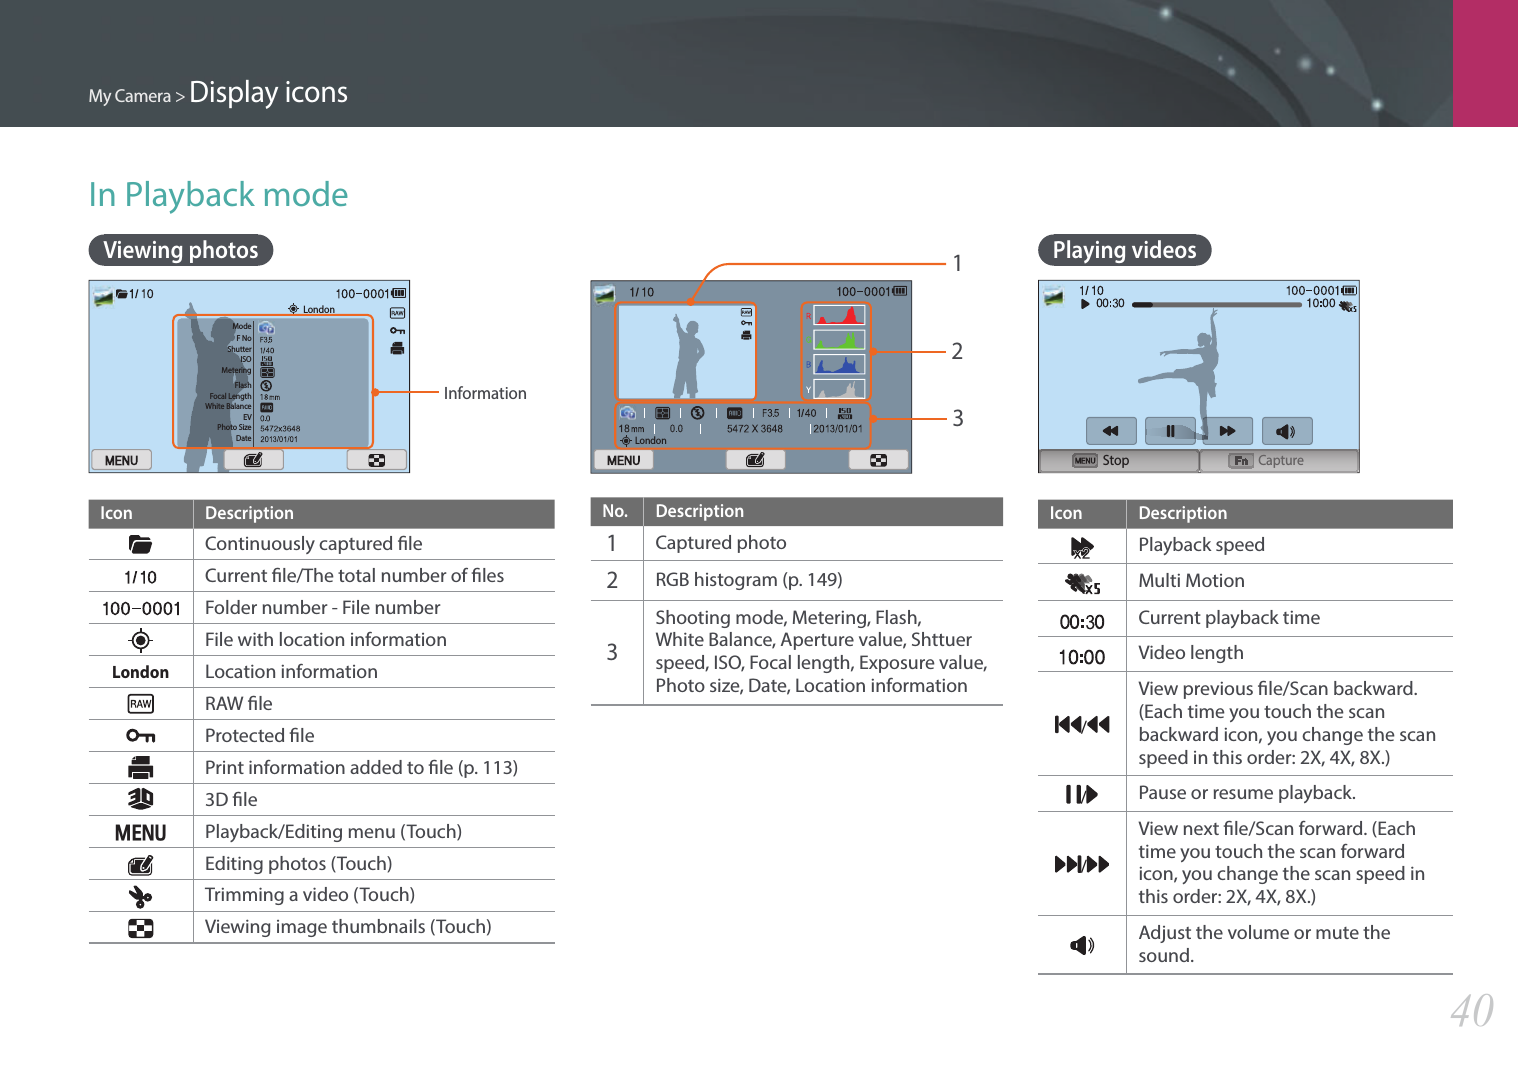
![My Camera > Display icons41Changing the information displayedPress [D] repeatedly to change the display type.Mode Display typeShooting• Display shooting options at the right of the display, AutoShare, Touch AF, and basic shooting information (Shooting mode, Shutter speed, Aperture value, Exposure value, ISO sensitivity, AEL).• Display all information about shooting including histogram, date, and time. (p. 149)• Hide information about shooting except basic shooting information.• Basic shooting information and the level gauge.Playback• Basic information• Display all information about the current le.• Display all information about the current le including RGB histogram.](https://usermanual.wiki/Samsung-Electronics-Co/NX2000.User-manual-1-of-4/User-Guide-1938442-Page-42.png)

![My Camera51Shooting modesTwo simple shooting modes—Smart Auto and Smart mode—help you capture photos with numerous automatic settings. Additional modes allow for greater customization of settings.t Smart Auto modeIn Smart Auto mode, the camera recognizes surrounding conditions and automatically adjusts factors that contribute to exposure, including shutter speed, aperture value, metering, White Balance, and exposure compensation. As the camera controls most of the functions, some shooting functions are limited. This mode is useful for capturing quick snapshots with the least amount of adjustment.1 Rotate the mode dial to t.2 Align your subject in the frame.3 Half-press [Shutter] to focus.• The camera selects a scene. An appropriate scene icon appears at the screen.](https://usermanual.wiki/Samsung-Electronics-Co/NX2000.User-manual-1-of-4/User-Guide-1938442-Page-52.png)
![My Camera > Shooting modes52Recognizable scenesIcon DescriptionLandscapesScenes with bright white backgroundsLandscapes at nightPortraits at nightLandscapes with backlightingPortraits with backlightingPortraitsClose-up photos of objectsClose-up photos of textSunsetsIndoors, darkPartially litClose-up with spot lightingPortraits with spot lightingIcon DescriptionBlue skiesForested areas typically consist of green-colored subjectsClose-up photos of colorful subjectsCamera is stabilized on a tripod and the subject is not moving for a certain period of time. (when shooting in the dark)Actively moving subjectsFireworks (when using a tripod)4 Press [Shutter] to capture the photo.• The camera may detect dierent scenes, even the same subjects, depending on external factors such as camera shake, lighting, and distance to the subject.• If the camera does not recognize an appropriate scene mode, it uses the default settings for the Smart Auto mode.• Even if it detects a face, the camera may not select a portrait mode depending on the subject's position or lighting.• Even if you use a tripod, the camera may not detect the tripod mode ( ) if the subject is moving.• The camera consumes more battery power, because it changes settings often to select appropriate scenes.](https://usermanual.wiki/Samsung-Electronics-Co/NX2000.User-manual-1-of-4/User-Guide-1938442-Page-53.png)
![My Camera > Shooting modes53P Program modeThe camera automatically adjusts shutter speed and aperture value so that an optimal exposure value can be achieved.This mode is useful when you want to capture shots of constant exposure while being able to adjust other settings.1 Rotate the mode dial to P.2 Set the desired options. 3 Half-press [Shutter] to focus, and then press [Shutter] to capture the photo.Program ShiftProgram Shift function lets you adjust the shutter speed and aperture value while the camera maintains the same exposure. When you scroll the jog dial to the left, the shutter speed decreases and the aperture value increases. When you scroll the jog dial to the right, the shutter speed increases and the aperture value decreases.](https://usermanual.wiki/Samsung-Electronics-Co/NX2000.User-manual-1-of-4/User-Guide-1938442-Page-54.png)
![My Camera > Shooting modes54A Aperture Priority modeIn Aperture Priority mode, the camera automatically calculates shutter speed according to the aperture value you choose. You can adjust the depth of eld (DOF) by changing the aperture value. This mode is useful for taking portraits and landscape shots. Large Depth of Field Small Depth of Field1 Rotate the mode dial to A.2 Scroll the jog dial to adjust the aperture value. • You can also adjust the aperture value by pressing [f], moving to the aperture value, and then scrolling the jog dial or dragging the screen. 3 Set the desired options. 4 Half-press [Shutter] to focus, and then press [Shutter] to capture the photo.In low-light settings, you may need to increase the ISO sensitivity to prevent blurred photos.](https://usermanual.wiki/Samsung-Electronics-Co/NX2000.User-manual-1-of-4/User-Guide-1938442-Page-55.png)
![My Camera > Shooting modes55S Shutter Priority modeIn Shutter Priority mode, the camera automatically adjusts the aperture value according to the shutter speed you choose. This mode is useful for capturing photos of fast-moving subjects or for creating tracer eects in a photo.For example, set the shutter speed to over 1/500 s to freeze the subject. To make the subject appear blurred set the shutter speed to below 1/30 s.Slow shutter speed Fast shutter speed1 Rotate the mode dial to S.2 Scroll the jog dial to adjust the shutter speed.• You can also adjust the shutter speed by pressing [f], moving to the shutter speed, and then scrolling the jog dial or dragging the screen.3 Set the desired options. 4 Half-press [Shutter] to focus, and then press [Shutter] to capture the photo.In order to compensate for the reduced amount of light allowed by fast shutter speeds, open the aperture and let in more light. If your photos are still too dark, increase the ISO value.](https://usermanual.wiki/Samsung-Electronics-Co/NX2000.User-manual-1-of-4/User-Guide-1938442-Page-56.png)
![My Camera > Shooting modes56M Manual modeManual mode lets you adjust the shutter speed and aperture value manually. In this mode, you can fully control the exposure of your photos.This mode is useful in controlled shooting environments, such as a studio, or when it is necessary to ne-tune camera settings. The Manual mode is also recommended for shooting night scenes or reworks.1 Rotate the mode dial to M.2 Scroll the jog dial to adjust the shutter speed.3 Press and hold [W], and then rotate the mode dial to adjust the aperture value.• You can also adjust the shutter speed or the aperture value by pressing [f], moving to the shutter speed or the aperture value, and then scrolling the jog dial or dragging the screen.4 Set the desired options.5 Half-press [Shutter] to focus, and then press [Shutter] to capture the photo.Framing modeWhen you adjust the aperture value or shutter speed, the exposure changes according to the settings, so the display may darken. With this function on, the brightness of the display is constant regardless of the settings, so you can better frame your shot.To use Framing Mode,In Shooting mode, press [m] → 1 → Framing Mode → an option.](https://usermanual.wiki/Samsung-Electronics-Co/NX2000.User-manual-1-of-4/User-Guide-1938442-Page-57.png)
![My Camera > Shooting modes57Using the Bulb functionUse the Bulb function to shoot night scenes or the night sky. While you are pressing [Shutter], the shutter is left open so you can create moving light eects.To use a bulb, Completely scroll the jog dial to the left to Bulb → Press and hold [Shutter] for the desired time.• If you set a high ISO value or open the shutter for a long time, image noise may increase.• Drive options, ash, and One touch shot cannot be used with the Bulb function.• The Bulb function is available only in Manual mode.• Use a tripod and shutter release to prevent your camera from shaking.• The longer you open the shutter, the longer it takes to save a photo. Do not turn the camera o while the camera saves a photo. • If you use this function for a long time, use a fully charged battery. i Lens Priority modeUsing i-Function in P/A/S/M modesWhen you use the i-Function button on an i-Function lens, you can manually select and adjust shutter speed, aperture value, exposure value, ISO sensitivity, and White Balance on the lens.1 Rotate the mode dial to P, A, S, or M.2 Press [i-Function] on the lens to select a setting.• You can also press [i-Function], and then press [C/F] or drag the screen to select a setting.](https://usermanual.wiki/Samsung-Electronics-Co/NX2000.User-manual-1-of-4/User-Guide-1938442-Page-58.png)
![My Camera > Shooting modes583 Adjust the focus ring to select an option.• You can also scroll the jog dial or drag the screen to select an option.4 Half-press [Shutter] to focus, and then press [Shutter] to capture the photo.Available optionsShooting mode PASM3DAperture-O-O-Shutter Speed--OO-EVOOO-OISOOOOO -White BalanceOOOOOZOOOO -• To select items to appear when you press [i-Function] on the lens in Shooting mode, press [m] → 5 → iFn Customizing → an item.• This function is not available when you set 3D Auto Mode in 3D mode.](https://usermanual.wiki/Samsung-Electronics-Co/NX2000.User-manual-1-of-4/User-Guide-1938442-Page-59.png)