Samsung Electronics Co P6100 Laser Beam Printer User Manual Phaser 6100 Color Laser Printer User Guide
Samsung Electronics Co Ltd Laser Beam Printer Phaser 6100 Color Laser Printer User Guide
Contents
- 1. Users Manual 1
- 2. Users Manual 2
Users Manual 1

Användarhandbok
Gebruikershandleiding
Guia do Usuário
Guía del usuario
Benutzerhandbuch
Guida dell'utente
Guide D’utilisation
User Guide
www.xerox.com/office/6100support
color laser printer
Phaser® 6100

1
Copyright © 2004, Xerox Corporation. All Rights Reserved. Unpublished rights
reserved under the copyright laws of the United States. Contents of this publication
may not be reproduced in any form without permission of Xerox Corporation.
Copyright protection claimed includes all forms of matters of copyrightable materials
and information now allowed by statutory or judicial law or hereinafter granted,
including without limitation, material generated from the software programs which
are displayed on the screen such as styles, templates, icons, screen displays, looks,
etc.
XEROX
®
, The Document Company
®
, the digital X
®
, CentreWare
®
, infoSMART
®
, and
Phaser
®
are registered trademarks of Xerox Corporation in the United States and/or
other countries.
Adobe
®
, Acrobat
®
Reader
®
, and PostScript
®
are registered trademarks of Adobe
Systems Incorporated in the United States and/or other countries.
Apple
®
, AppleTalk
®
, iBook
®
, iMac
®
, Macintosh
®
, Mac
®
OS, PowerBook
®
, and Power
Macintosh
®
are registered trademarks of Apple Computer, Inc. in the United States
and/or other countries.
Centronics
®
is a registered trademark of Centronics Data Computer Corporation.
Ghostscript
®
is a registered trademark of Artifex Software, Inc.
IBM
®
and PowerPC
®
are registered trademarks of International Business Machines
Corporation in the United States and/or other countries.
HP-GL
®
and PCL
®
are registered trademarks of Hewlett-Packard Corporation in the
United States and/or other countries.
Microsoft
®
, Windows
®
, and Windows NT
®
are registered trademarks of Microsoft
Corporation in the United States and/or other countries.
UNIX
®
is a registered trademark in the United States and other countries, licensed
exclusively through X/Open Company Limited.

2
C
ONTENTS
Chapter 1 :
Introduction
Special Features ........................................................ 1.2
Printer Components .................................................. 1.4
Front View ........................................................... 1.4
Right View ........................................................... 1.5
Rear View ............................................................ 1.5
Changing the Display Language ................................ 1.6
Chapter 2 :
Using Paper or Specialty Media
Choosing Paper and other Specialty Media ................ 2.2
Sizes and Capacities ............................................. 2.2
Guidelines for Paper and Specialty Media ................. 2.3
Loading Paper ........................................................... 2.4
Using Tray 1 ........................................................ 2.4
Changing the Paper Size in the Tray ........................ 2.7
Using the Optional Tray 2 ...................................... 2.8
Using the Multi-Purpose Tray (MPT) ........................ 2.9
Using the Manual Feed ........................................ 2.12
Printing Specialty Media .......................................... 2.14
Printing on Envelopes .......................................... 2.14
Printing on Labels ............................................... 2.16
Printing on Transparencies ................................... 2.17
Printing on Preprinted Paper ................................ 2.20
Printing on Card Stock or Custom Size Paper .......... 2.21
Chapter 3 :
Printing Tasks
Printer Driver Features ............................................. 3.2
Printing a Document ................................................. 3.3
Canceling a Print Job ............................................. 3.4

3
Printer Settings ......................................................... 3.5
Layout tab ........................................................... 3.6
Paper tab ............................................................ 3.7
Graphics tab ........................................................ 3.9
Extras tab ......................................................... 3.11
Troubleshooting ................................................. 3.12
Using a Favorite Setting ...................................... 3.12
Using Help ......................................................... 3.13
Chapter 4 :
Advanced Printing
Printing on Both Sides of the Paper ........................... 4.2
Scaling Your Document ............................................. 4.4
Fitting Your Document to a Selected Paper Size ........ 4.5
Printing Multiple Pages on One Sheet of Paper ......... 4.6
Printing Posters ........................................................ 4.7
Printing Booklets ...................................................... 4.9
Using Watermarks .................................................. 4.10
Using an Existing Watermark ............................... 4.10
Creating a Watermark ......................................... 4.11
Editing a Watermark ........................................... 4.12
Deleting a Watermark ......................................... 4.12
Using Overlays ........................................................ 4.13
What is an Overlay? ............................................ 4.13
Creating a New Page Overlay ............................... 4.13
Using a Page Overlay .......................................... 4.15
Deleting a Page Overlay ...................................... 4.16
Chapter 5 :
Using the Control Panel
Understanding the Control Panel .............................. 5.2
Display ............................................................... 5.2
Buttons ............................................................... 5.3
Using Control Panel Menus ........................................ 5.5
Accessing Control Panel Menus ............................... 5.5
Overview of Control Panel Menus ............................ 5.6
Information Menu ................................................. 5.6
Page Layout Menu ............................................... 5.7
Color Menu .......................................................... 5.8
Printer Setup Menu ............................................... 5.9
Maintenance Menu .............................................. 5.11
Network Setup Menu ........................................... 5.12

4
Chapter 6 :
Maintaining Your Printer
Printing a Config Page ............................................... 6.2
Replacing the Supplies .............................................. 6.3
Managing the Toner Cartridges ................................. 6.4
Toner Cartridge Storage ........................................ 6.4
Toner Cartridge Life Expectancy ............................. 6.4
Checking the Remaining Toner ............................... 6.4
Redistributing the Toner ........................................ 6.5
Replacing the Toner Cartridges ................................. 6.8
Replacing the Waste Cartridge ................................ 6.11
Replacing the Imaging Unit ..................................... 6.14
Replacing the Transfer Belt ..................................... 6.22
Cleaning the Printer ................................................ 6.29
Printing a Cleaning Page ...................................... 6.29
Cleaning the Outside of the Printer ....................... 6.29
Cleaning the Laser Scanning Unit (LSU)
Inside the Printer ............................................... 6.30
Cleaning the Inside of the Printer .......................... 6.31
Replacement Parts .................................................. 6.38
Chapter 7 :
Solving Problems
Troubleshooting Checklist ......................................... 7.2
Solving General Printing Problems ............................ 7.3
Clearing Paper Jams ................................................. 7.6
Jam at Tray 1 or the Paper Feed Area ..................... 7.7
Jam at the Multi-purpose Tray (MPT) ....................... 7.9
Jam at C (Inside the Printer) .................................. 7.9
Jam at C (In Duplex Area) ................................... 7.10
Jam at B, C ....................................................... 7.14
Jam at Optional Tray 2 ........................................ 7.17
Tips for Avoiding Paper Jams ................................ 7.20
Solving Print Quality Problems ................................ 7.21
Understanding Display Messages ............................ 7.25
Common Windows Problems ................................... 7.29
Common Macintosh Problems ................................. 7.30
Problems in the Chooser ...................................... 7.30
Printing Errors .................................................... 7.30
Common Linux Problems ......................................... 7.31

5
Appendix A :
Using Your Printer with
a Macintosh
Software for Macintosh ............................................. A.2
System Requirements ........................................... A.2
Appendix B :
Using Your Printer in Linux
Installing the Printer Driver ...................................... B.2
System Requirements ........................................... B.2
Installing the Printer Driver .................................... B.2
Changing the Printer Connection Method ................. B.6
Uninstalling the Printer Driver ................................ B.7
Using the Configuration Tool ..................................... B.8
Changing LLPR Properties ....................................... B.10
Appendix C :
Using Your Printer on a Network
About Sharing the Printer on a Network ................... C.2
Setting Up a Locally Shared Printer ........................... C.3
In Windows 98/Me ................................................ C.3
In Windows NT 4.0/2000/XP/Server 2003 ................ C.4
Setting Up a Network-Connected Printer .................. C.6
Configuring Network Parameters on the
Control Panel ....................................................... C.7
Appendix D :
Installing An Optional Tray 2
Installing an Optional Tray 2 ..................................... D.2

6
Appendix E :
Specifications
Printer Specifications ................................................ E.2
Paper Specifications .................................................. E.3
Overview ............................................................. E.3
Supported Sizes of Paper ....................................... E.4
Guidelines for Using Paper ..................................... E.5
Paper Specifications .............................................. E.6
Paper Output Capacity .......................................... E.6
Paper Input Capacity ............................................ E.6
Printer and Paper Storage Environment ................... E.7
Envelopes ............................................................ E.8
Labels ............................................................... E.10
Transparencies ................................................... E.10
Appendix F :
Product Recycling and Disposal
Product Recycling and Disposal ................................. F.2
Appendix G :
Additional Resources
Web Links ................................................................. G.2
7
Environmental and Safety Consideration
Laser Safety Statement
The printer is certified in the U.S. to conform to the requirements of DHHS 21 CFR,
chapter 1 Subchapter J for Class I(1) laser products, and elsewhere, is certified as a
Class I laser product conforming to the requirements of IEC 60825-1.
Class I laser products are not considered to be hazardous. The laser system and
printer are designed so there is never any human access to laser radiation above a
Class I level during normal operation, user maintenance, or prescribed service
condition.
WARNING
Never operate or service the printer with the protective cover removed from Laser/
Scanner assembly. The reflected beam, although invisible, can damage your eyes.
When using this product, these basic safety precautions should always be followed to
reduce risk of fire, electric shock, and injury to persons:

8
Ozone Safety
During normal operation, this machine may produce ozone,
which does not present a hazard to the operator. However, it is
advisable that the machine be operated in a well ventilated area.
If you need additional information about ozone, please contact
your nearest Xerox dealer.
Radio Frequency Emissions
Federal Communications Commission (FCC), United States of America
This device has been tested and found to comply with the limits for a Class B digital
device, pursuant to Part 15 of the FCC rules. These limits are designed to provide
reasonable protection against harmful interference in a residential installation. This
equipment generates, uses and can radiate radio frequency energy and, if not
installed and used in accordance with the instructions, may cause harmful
interference to radio communications. However, there is no guarantee that
interference will not occur in a particular installation. If this equipment does cause
harmful interference to radio or television reception, which can be determined by
turning the equipment off and on, the user is encouraged to try to correct the
interference by one or more of the following measures:
1. Reorient or relocate the receiving antenna.
2. Increase the separation between the equipment and receiver.
3. Connect the equipment into an outlet on a circuit different from that to which the
receiver is connected.
4. Consult the dealer or an experienced radio/TV technician for help.
Operation of this device is subject to the following two conditions:(1) This device may
not cause harmful interference, and (2) this device must accept any interference
received, including interference that may cause undesired operation of the device.
CAUTION
: Changes or modifications not expressly approved by the manufacturer
responsible for compliance could void the user’s authority to operate the equipment.
OZONE

9
Canadian Radio Interference Regulations
This digital apparatus does not exceed the Class B limits for radio noise emissions
from digital apparatus as set out in the interference-causing equipment standard
entitled “Digital Apparatus”, ICES-003 of the Industry and Science Canada.
Cet appareil numérique respecte les limites de bruits radioélectriques applicables aux
appareils numériques de Classe B prescrites dans la norme sur le matériel brouilleur:
“Appareils Numériques”, ICES-003 édictée par l’Industrie et Sciences Canada.
Declaration of Conformity (European Union)
Approvals and Certifications
The CE marking applied to this product symbolizes the Xerox
Corporation's Declaration of Conformity with the following 93/68/
EEC Directives of the European Union as of the dates indicated.
January 1, 1995: Council Directive 73/23/EEC Approximation of the
laws of the member states related to low voltage equipment.
January 1, 1996: Council Directive 89/336/EEC (92/31/EEC), approximation of the
laws of the Member States related to electromagnetic compatibility.
A signed copy of the Declaration of Conformity, defining the relevant Directives and
referenced standards can be obtained from your Xerox Corporation representative.

10
MEMO

1INTRODUCTION
Congratulations on the purchase of your printer!
This chapter includes:
• Special Features
• Printer Components
• Changing the Display Language
I
NTRODUCTION
1.2
Special Features
Your new printer is equipped with special features that improve
the print quality. You can:
Print in color with excellent quality and speed
• You can print in a full range of colors using cyan, magenta,
yellow, and black.
• You can print at
1200 dpi
(Enhanced). See page 3.9.
• In black & white mode your printer prints A4-sized paper
at 20 ppm and letter-sized paper at 21 ppm (pages per
minute). For color printing, A4/letter-sized paper prints at
5 ppm.
• In duplex printing, your printer prints A4/Letter sized
paper at 9.6 IPM (images per minute) for black & white
and 5 IPM for color.
Handle paper flexibly
•
Multi-purpose Tray
supports letterhead, envelopes,
labels, transparencies, custom size paper, postcards, and
heavy paper. A 100-sheet
Multi-purpose Tray
supports
plain paper.
• The
Standard 250-sheet feeder
(Tray1) and
optional
500-sheet feeder
(Tray2) supports A4/letter-sized paper.
Create professional documents
• Print
Watermarks
. You can customize your documents
with a word, such as “Confidential.” See page 4.10.
• Print
Booklets
. This feature enables you to easily print the
pages to create books. Once printed, all you have to do is
to fold and staple the pages. See page 4.9.
• Print
Posters
. The text and pictures on each page of your
document are magnified and printed across sheets of
paper. Tape them together to form a poster. See page 4.7.
9
8
I
NTRODUCTION
1.3
1
Save time and money
• You can print on both sides of the paper to save paper
(
double-sided printing
). See page 4.2.
• You can print multiple pages on one single sheet of paper
to save paper.
• You can use preprinted forms and letterhead on plain
paper. See “Using Overlays” on page 4.13.
• The printer saves electricity by lowering power
consumption when it is not printing.
Expand the printer capacity
• You can install an optional 500-sheet tray in your printer.
This tray reduces how often you have to add paper to the
printer.
•A
Network interface
enables network printing.
The Phaser 6100DN printer comes with a built-in network
interface, 10/100 Base TX.
Print in various environments
• You can print in
Windows 98/Me/2000/XP/Server
2003
.
• Your printer is compatible with a
Macintosh (USB only)
and
Linux
.
• Your printer comes with both the
USB
and
Parallel
interface.
I
NTRODUCTION
1.4
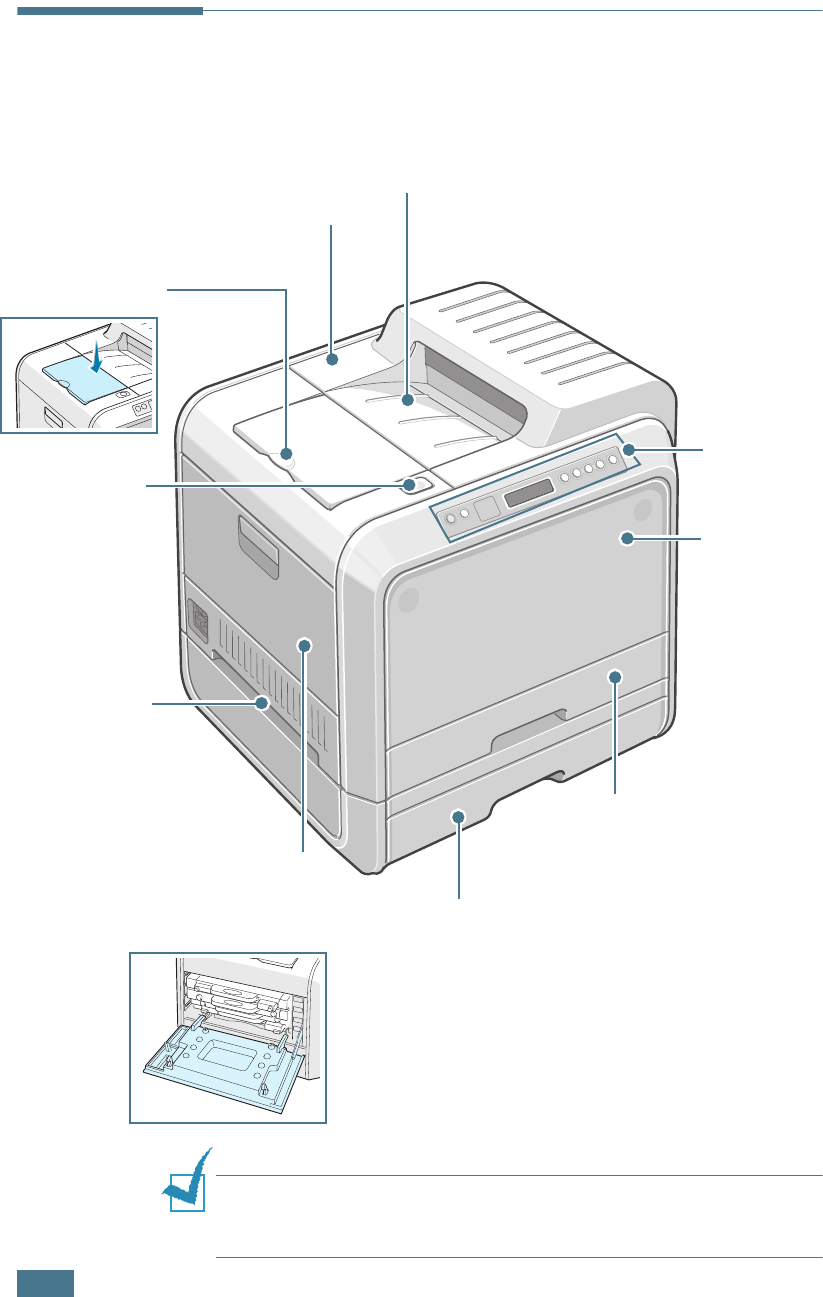
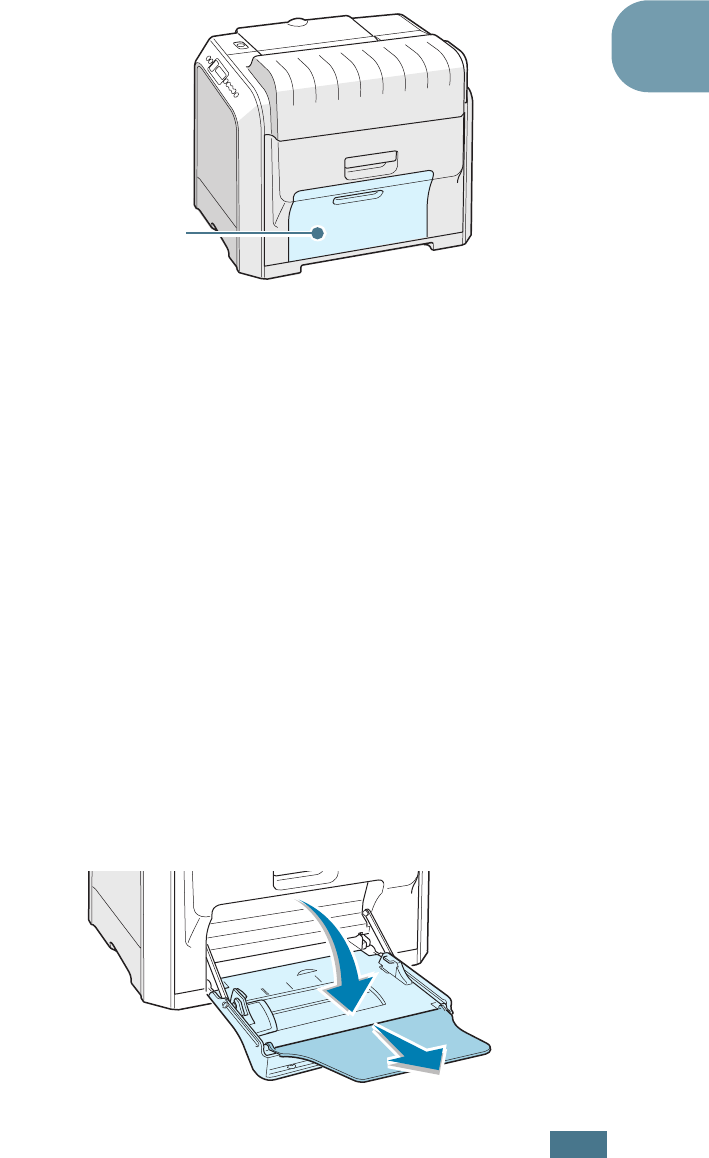
Printer Components
Front View
NOTE
:
If you continuously print many pages, the surface of the
output tray may become hot. Be careful not to touch the surface,
especially for children.
Control Panel
(see page 5.2.)
Paper Output Tray
Top Cover B
Open to install the imaging unit,
transfer belt, and fuser.
Front Cover
Open to remove
the waste
cartridge.
Output Support
Tray 1
(250-sheet feeder)
Top Cover
Release Button
Optional Tray 2
500-sheet feeder
Left Cover A
Open Left Cover A to install the toner
cartridges and clean the Laser Scanning Unit
(LSU). Pull the handle to open Left Cover A.
Handle
(Use it to lift
the printer.)
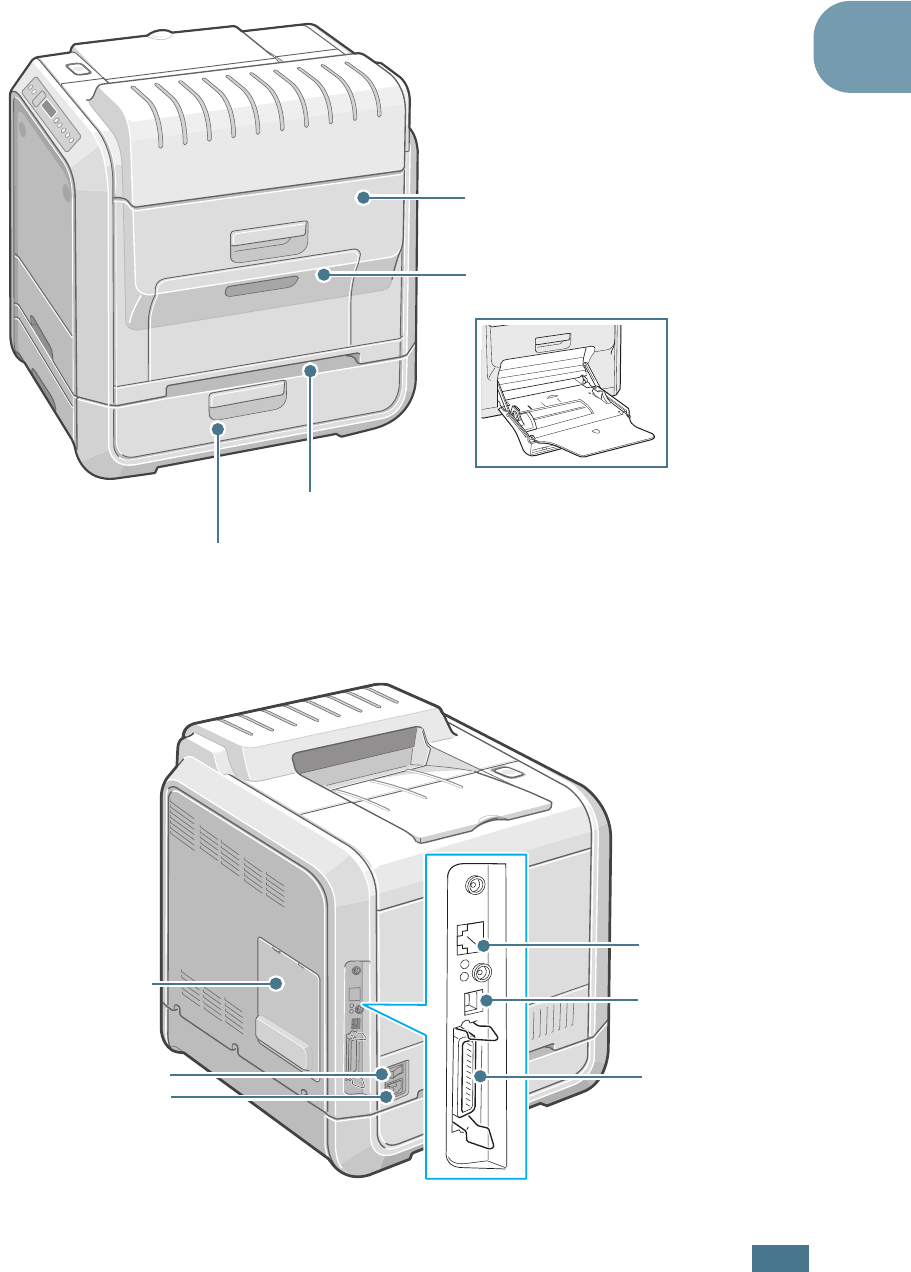
I
NTRODUCTION
1.5
1
Right View
Rear View
Optional Tray 2 Jam Cover D
(Open to remove jams from Tray 2.)
Multi-purpose Tray (MPT)
(Open to load specialty media.)
Right Cover C
(Open to remove paper jams.)
Handle
(Use it to lift the printer.)
Control Board
Cover
Power Receptacle
Power Switch
Network Port
*
USB Port
* Available only on Phaser 6100DN.
Parallel Port
I
NTRODUCTION
1.6
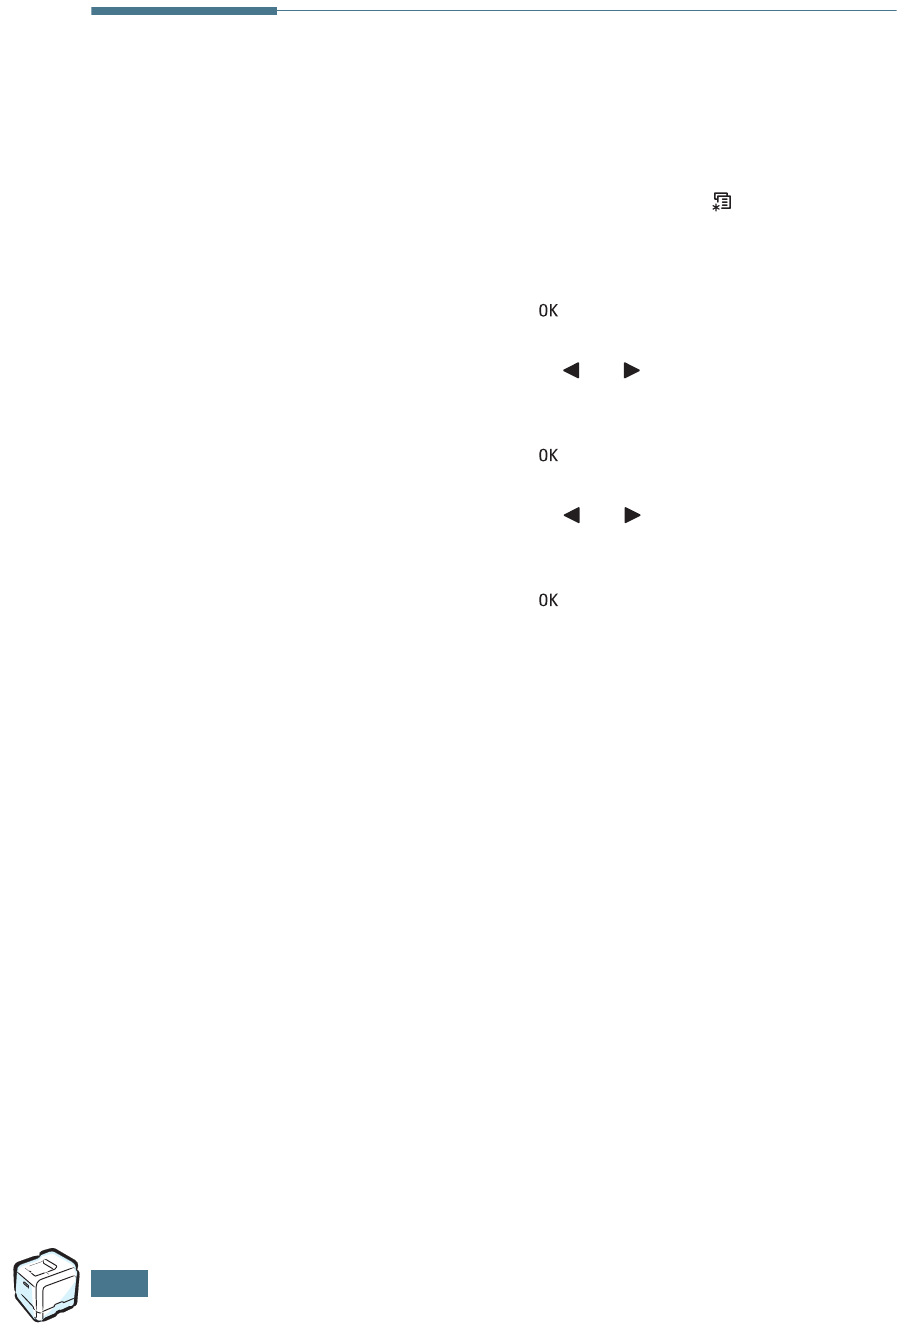
Changing the Display Language
To change the language that is displayed on the control panel,
take the following steps:
1
In ready mode press the Menu button ( ) on the control
panel until you see ‘Printer Setup’ on the bottom line of the
display.
2
Press the OK button ( ) to access the menu.
3
Press the scroll button ( or ) until you see ‘Language’
on the bottom line.
4
Press the OK button ( ) to confirm the menu item.
5
Press the scroll button ( or ) to display the language
you want to use.
6
Press the OK button ( ) to save the selection.
7
Press the On Line/Continue button to return to ready
mode.

2
This chapter will help you understand the types of paper you
can use with your printer and how to properly load paper in
the different paper trays for the best print quality.
This chapter includes:
• Choosing Paper and other Specialty Media
• Loading Paper
• Printing Specialty Media
USING PAPER OR SPECIALTY
MEDIA
U
SING
P
APER
OR
S
PECIALTY
2.2
Choosing Paper and other Specialty
Media
You can print on a variety of paper types and sizes, such as plain
paper, envelopes, labels, transparencies and so on. See
“Printing Specialty Media” on page 2.14.
When you choose paper, consider the following:
•Desired outcome: The paper you choose should be
appropriate for the project.
•Size: You can use any size paper that fits easily within the
paper adjusters of the paper tray.
•Weight : Your printer supports paper weights as follows:
-16~24lbs (60~90g/m
2
) bond for Tray 1 or
optional Tray 2
-16~32lbs (60~160g/m
2
) bond, up to 60 lb cover,
for the Multi-purpose Tray
-20~24lbs (75~90g/m
2
) bond for duplex printing
•Brightness: Some papers are whiter than others and
produce sharper, more vibrant images.
CAUTION
: Using a paper that does not conform to the
specifications listed on page E.6 can cause problems that may
require service. This service is not covered by the warranty or
service agreements.
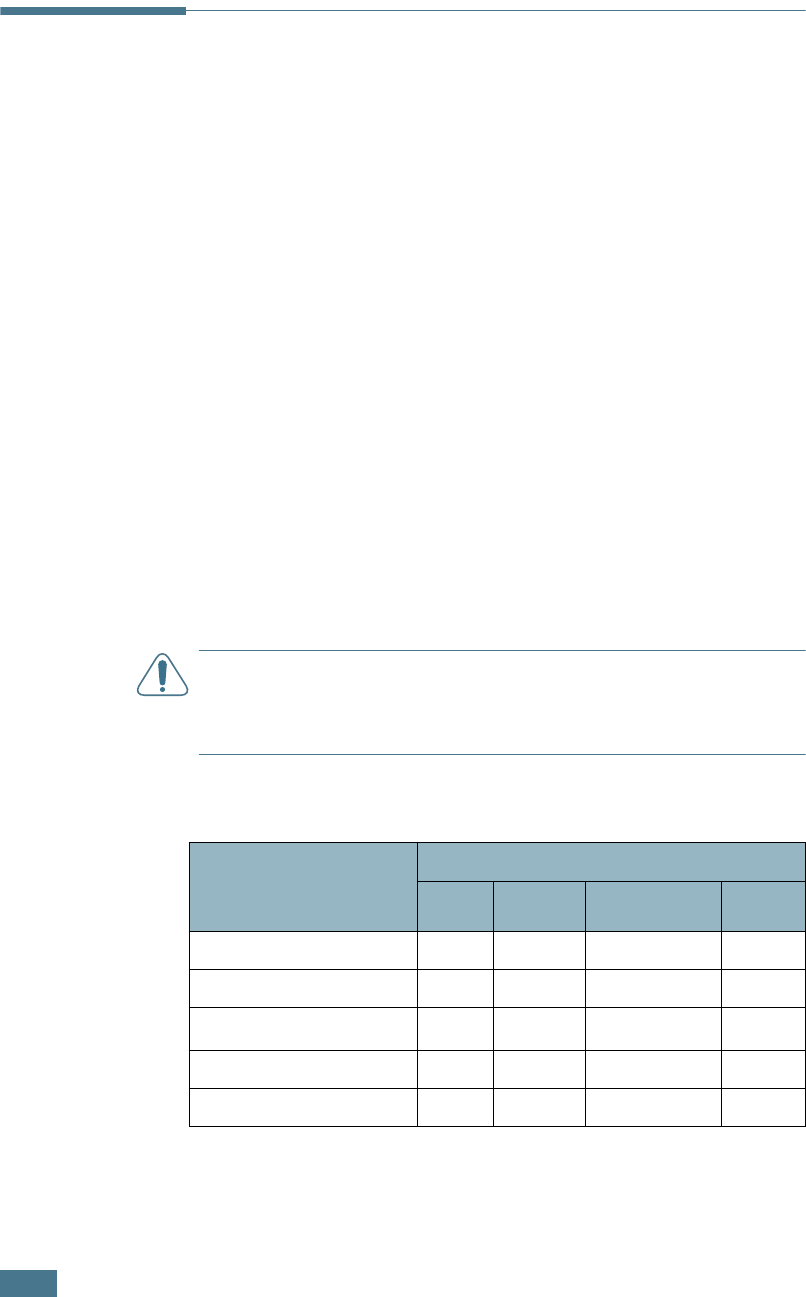
Sizes and Capacities
Size
Input Source/Capacity
*
*Depending on paper thickness, the maximum capacity may be reduced.
Tray 1 Tray 2
(option)
Multi-
purpose Tray
Manual
Feed
Plain Paper
250 500 100 1
Envelopes**
— — 10 1
Labels
**
** If you are experiencing excessive jamming, feed one sheet or envelope at a time
through the Multi-purpose Tray.
— — 10 1
Transparencies
30 — 30 1
Card stock**
— — 10 1

U
SING
P
APER
OR
S
PECIALTY
2.3
2
Guidelines for Paper and Specialty Media
When selecting or loading paper, envelopes, or other specialty
media keep these guidelines in mind:
• Attempting to print on damp, curled, wrinkled, or torn paper
can cause paper jams and poor print quality.
• Use cut-sheet paper only. You cannot use multi-part paper.
• When printing transparencies, use only Phaser 35-Series
Premium Transparency Film.
• Do not use paper with irregularities, such as tabs or staples.
• Do not attempt to load any tray while printing and never
overfill the tray. This could cause a paper jam.
• Avoid paper with embossed lettering, perforations, or a
texture that is too smooth or too rough.
• Colored paper should be of the same high quality as white
photocopy paper. The pigments must withstand the printer’s
fusing temperature of 180°C (356°F) for 0.1 seconds without
deteriorating. Do not use paper with a colored coating that
was added after the paper was produced.
• Preprinted forms must be printed with nonflammable, heat-
resistant ink that does not melt, vaporize, or release
hazardous emissions when subject to the printer’s fusing
temperature.
• Store paper in its ream wrapper until you are ready to use it.
Place cartons on pallets or shelves, not on the floor.
• Do not place heavy objects on top of the paper, whether it is
packaged or unpackaged.
• Keep paper away from moisture, direct sunlight or other
conditions that can cause it to wrinkle or curl.
NOTE
:
Do not use carbonless paper and tracing paper. The
chemicals can damage your printer.
U
SING
P
APER
OR
S
PECIALTY
2.4
Loading Paper
Proper paper loading helps prevent paper jams and ensure
trouble-free printing. Do not remove the paper tray while a job
is printing. Doing so may cause a paper jam. See “Sizes and
Capacities” on page 2.2 for acceptable paper capacities for each
tray.
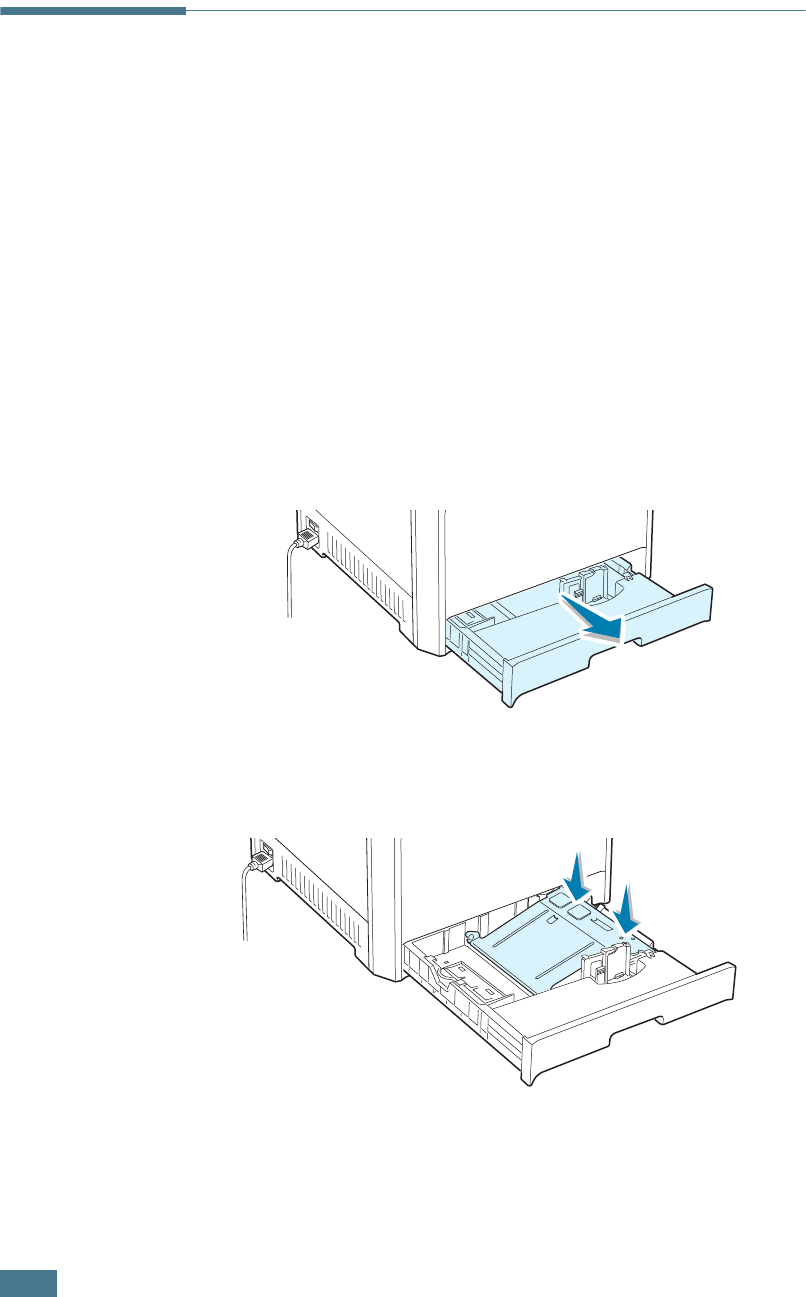
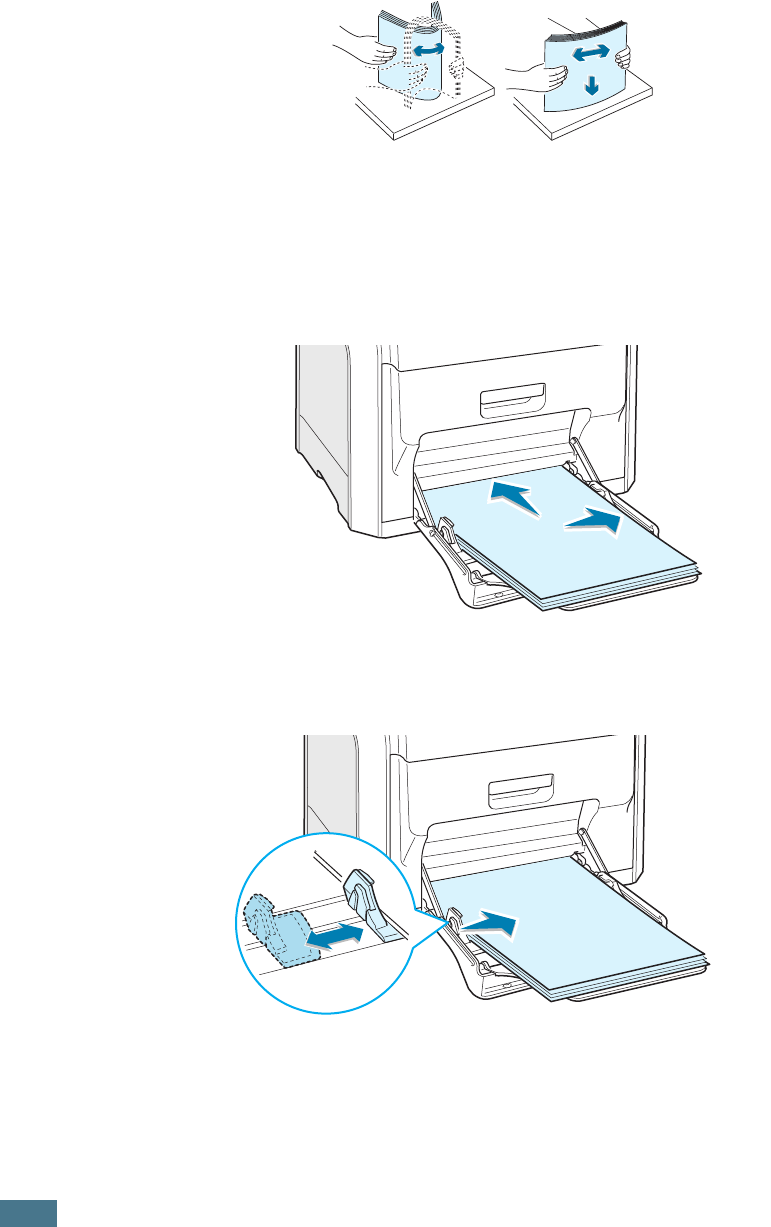
Using Tray 1
Tray 1 can hold a maximum of 250 sheets plain A4 and letter-
sized paper or 30 transparencies.
You can purchase an optional tray, Tray 2, and attach it below
Tray 1, to load an additional 500 sheets of paper.
1
Pull the tray out of the printer.
2
Push down on the metal plate until it locks into position.
U
SING
P
APER
OR
S
PECIALTY
2.5
2
3
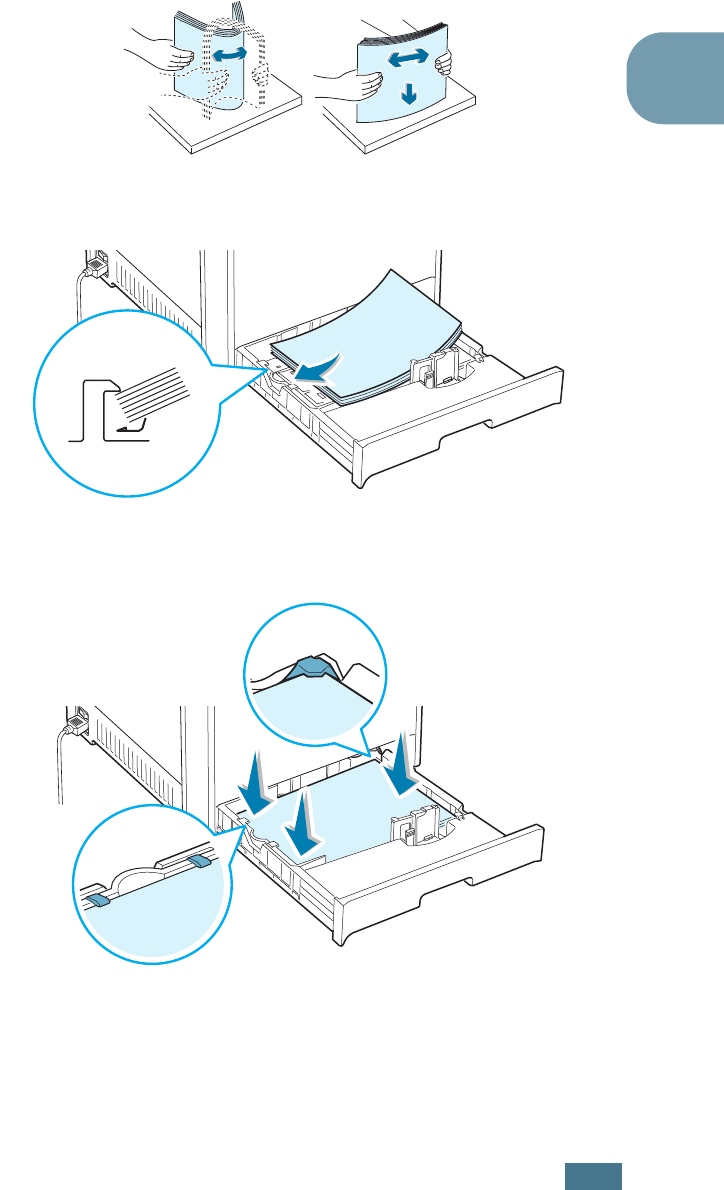
Flex the paper sheets back and forth to separate the pages,
and then fan them while holding one edge. Tap the edge of
the stack on a flat surface to even it up.
4
Load paper with the print side facing up.
Make sure that all four corners are flat in the tray and under
the corner brackets as shown below.
U
SING
P
APER
OR
S
PECIALTY
2.6
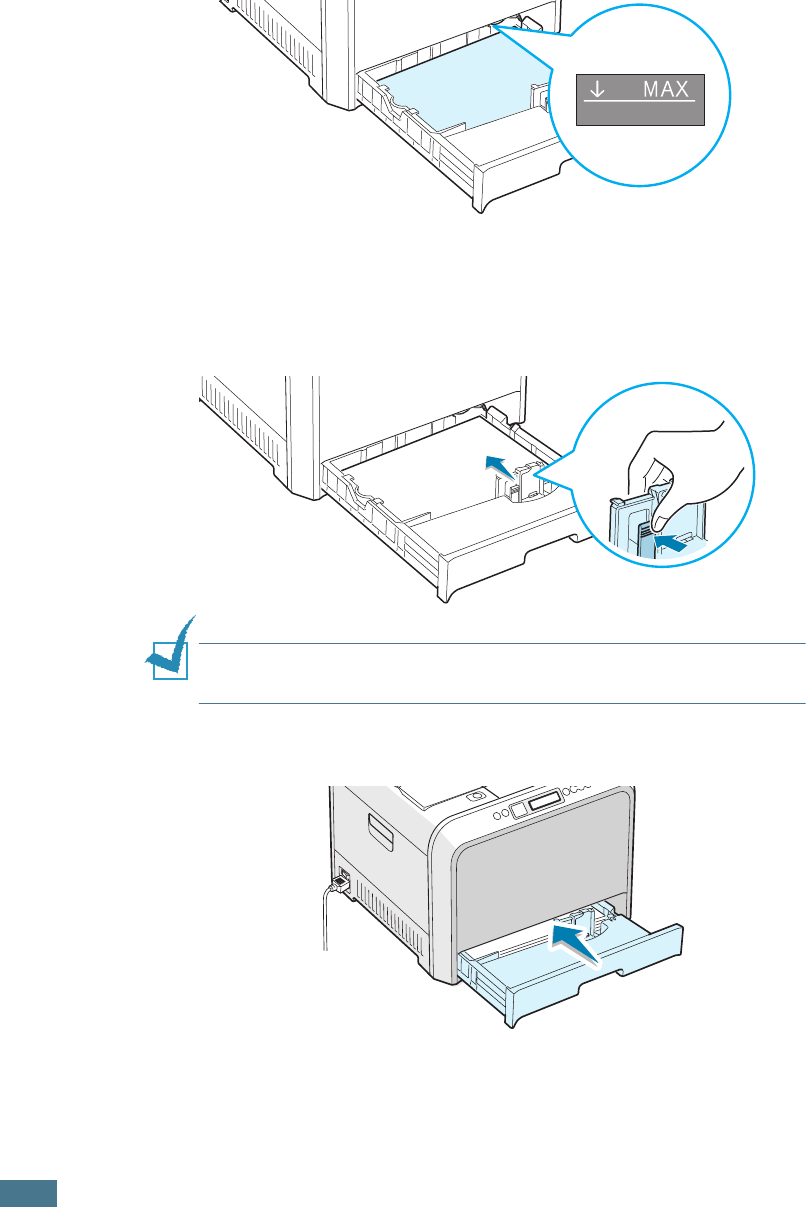
5
Do not exceed the maximum stack height. Overfilling the
tray may cause a paper jam. Do not load more than 30
transparencies in Tray 1.
6
While pinching the paper guide as shown, move it toward
the paper until it lightly touches the side of the stack. Do
not press the guide too tightly against the edge of the
paper; the guide may bend the paper.
NOTE
:
If you want to change the paper size in the tray, refer to
page 2.7.
7
Slide the tray back into the printer.
8
When you print a document, select the paper type, paper
size and tray selection in your software application. For
details, see page 3.7.
U
SING
P
APER
OR
S
PECIALTY
2.7
2
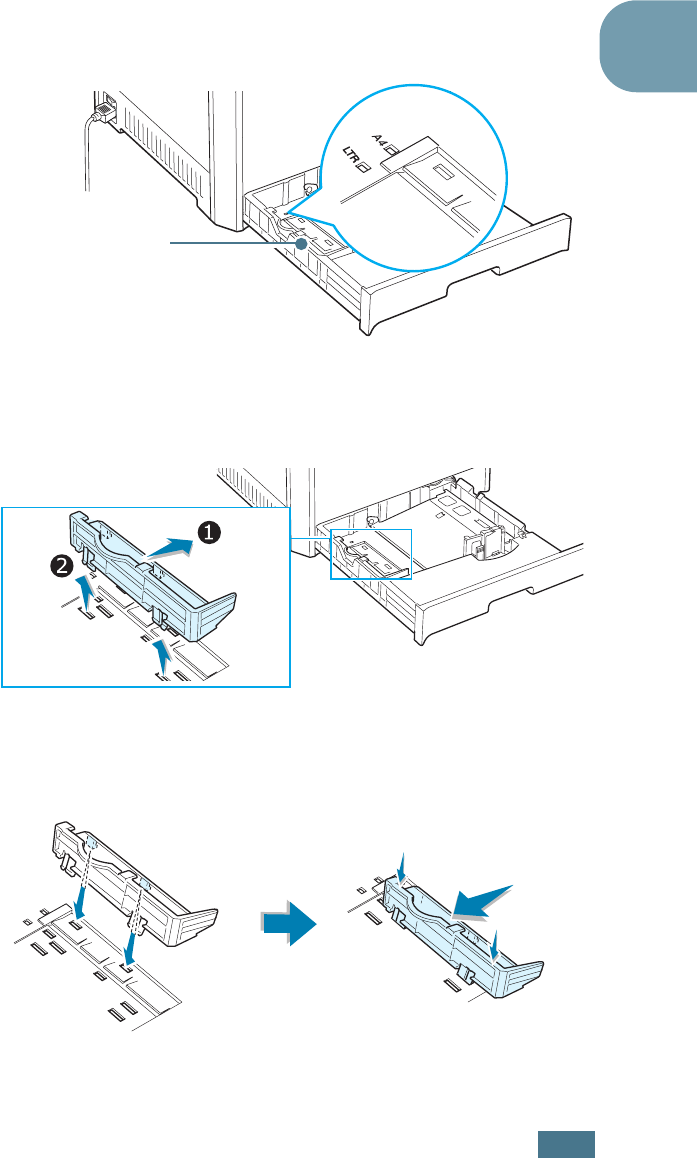
Changing the Paper Size in the Tray
The tray is preset to Letter or A4 size, depending on your
country. To change the size to A4 or Letter, you must adjust the
paper length guide properly.
1
Lift the paper length guide and place it in the correct
position for the paper size you are loading.
To remove the paper length guide, turn it slightly to your
right to release the locks on the bottom of the guide, then
pull it up.
To place the paper length guide in the paper position you
want, insert the locks on the bottom of the guide into the
desired paper slot and push it all the way in.
Paper length guide
U
SING
P
APER
OR
S
PECIALTY
2.8
2
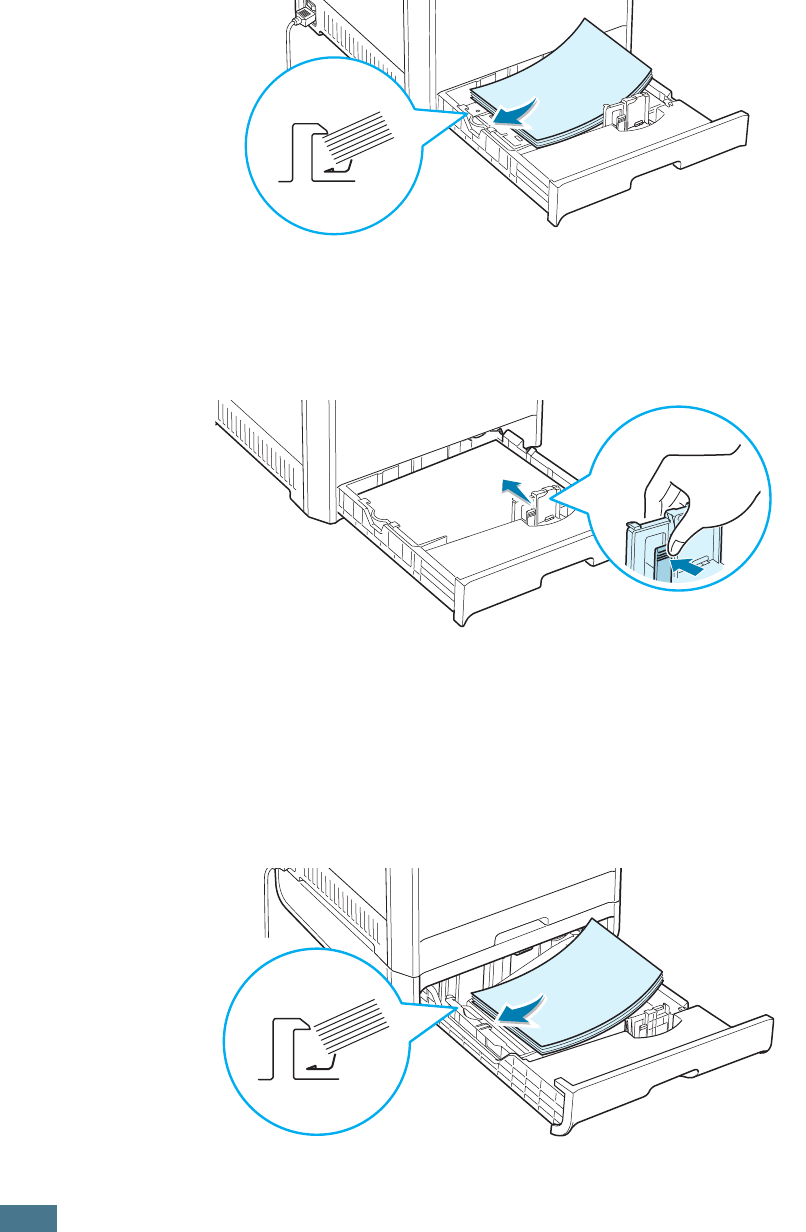
Load paper with the print side facing up. For more
information see steps 4 and 5 on page 2.5~2.6.
3
While pinching the paper guide as shown, move it toward
the paper until it lightly touches the side of the stack. Do
not push the guide to tightly against the edge of the paper
as it may cause the paper to bend.
Using the Optional Tray 2
The optional tray, Tray 2, can hold a maximum of 500 sheets of
plain paper.
To load paper in Tray 2, follow the instructions for loading paper
on page 2.4.
U
SING
P
APER
OR
S
PECIALTY
2.9
2
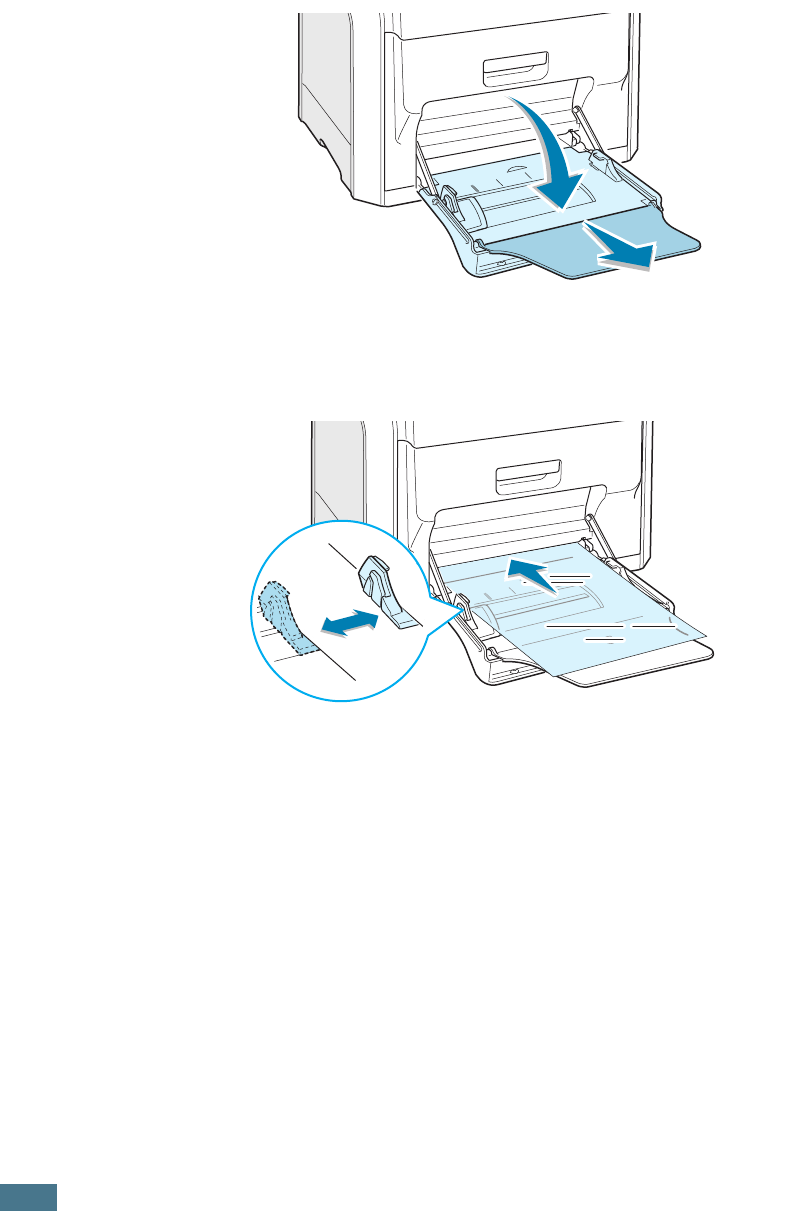
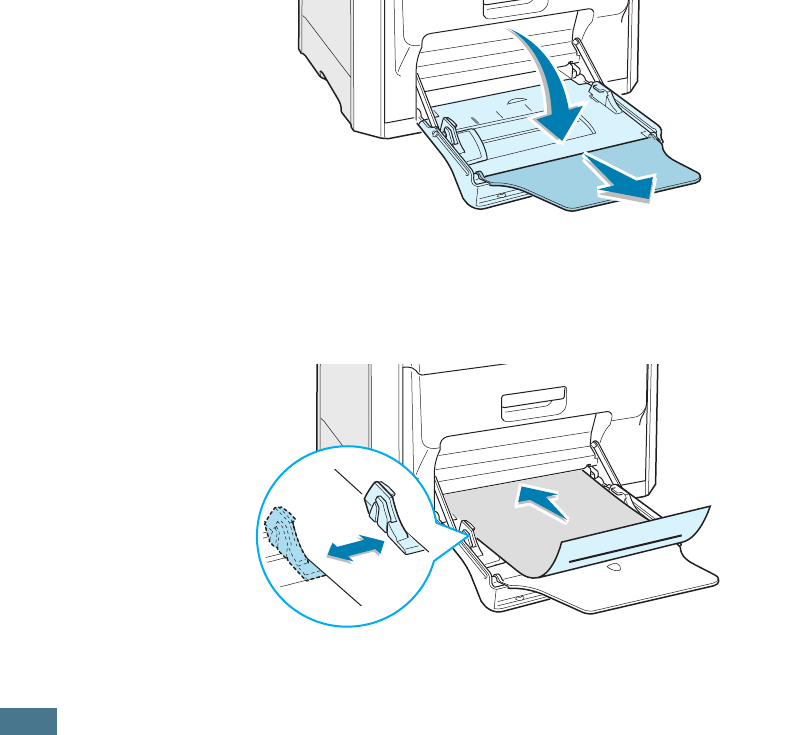
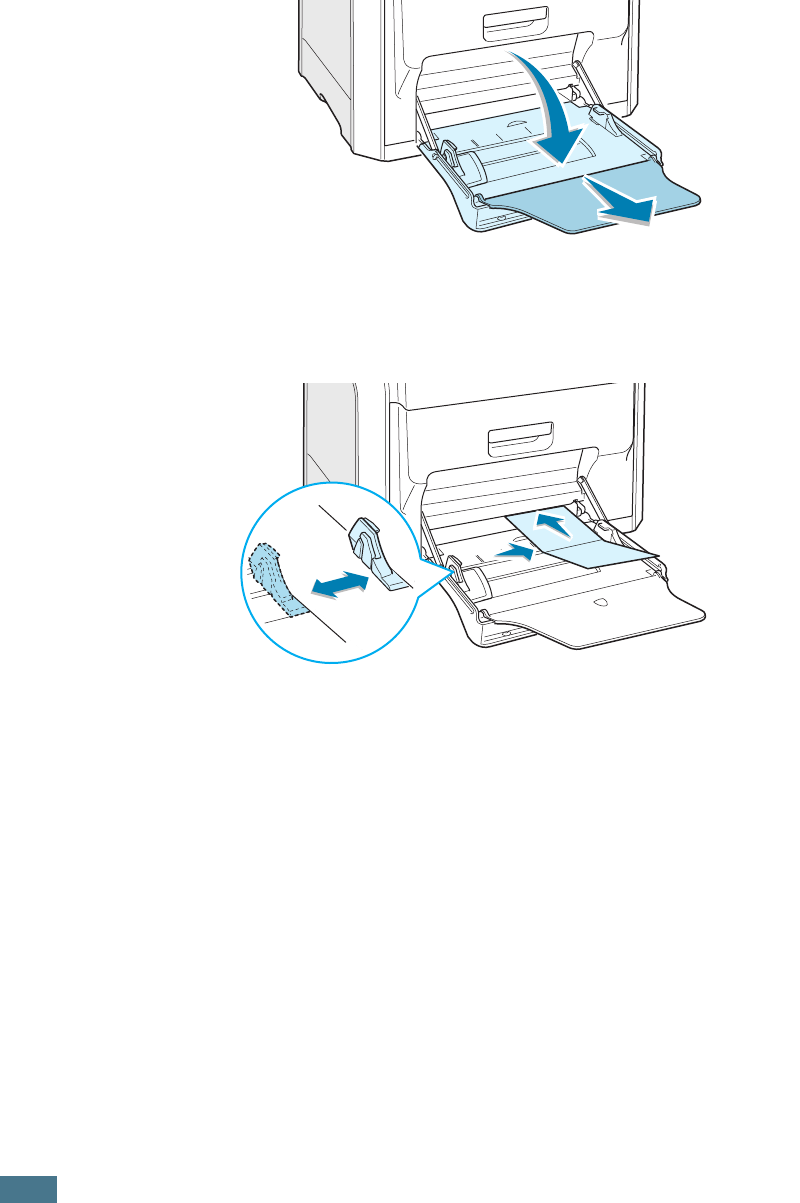
Using the Multi-Purpose Tray (MPT)
The Multi-purpose Tray (MPT) is located on the right side of your
printer. It can be closed when you are not using it, making the
printer more compact.
The Multi-purpose Tray can hold several sizes and types of
paper, such as transparencies, cards and envelopes. You may
also want to use the Multi-purpose Tray for single page print jobs
on letterhead, colored paper for use as separator sheets, or
other specialty media that you do not normally keep in the paper
tray. You can load approximately 100 sheets of plain paper, 10
envelopes, 30 transparencies, 10 sheets of card stock or 10
labels at a time.
• Load only one size of paper at a time in the
Multi-purpose Tray.
• To prevent paper jams, do not add paper when there is still
paper in the Multi-purpose Tray. This also applies to other
types of specialty media.
• Paper should be loaded face down with the top edge going
into the Multi-purpose Tray first and be placed in the center of
the tray.
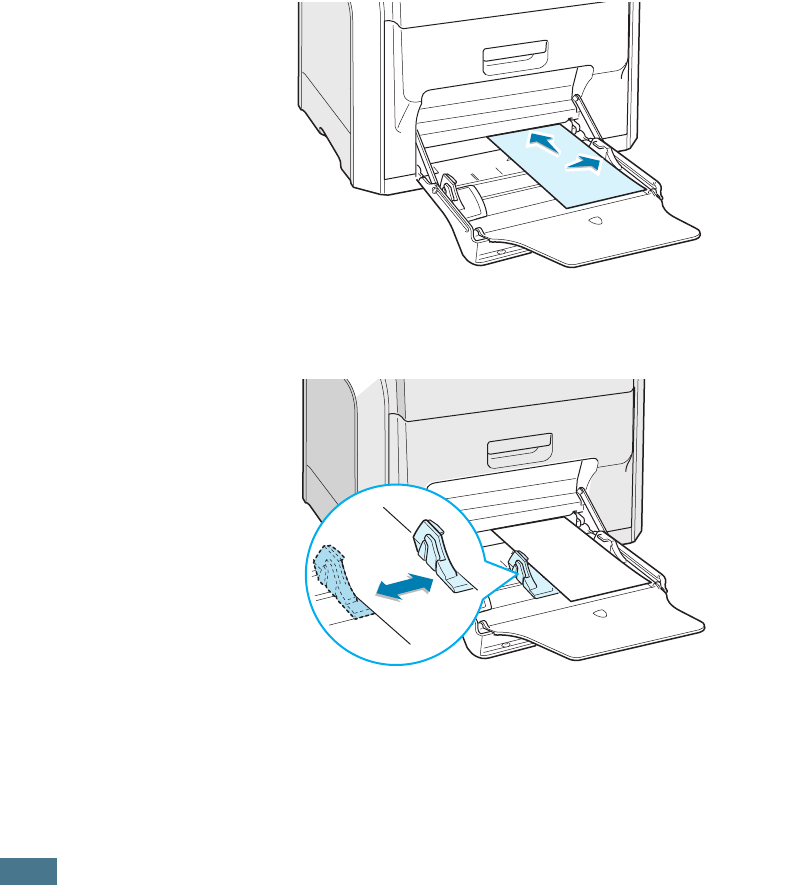
To load paper in the Multi-purpose Tray:
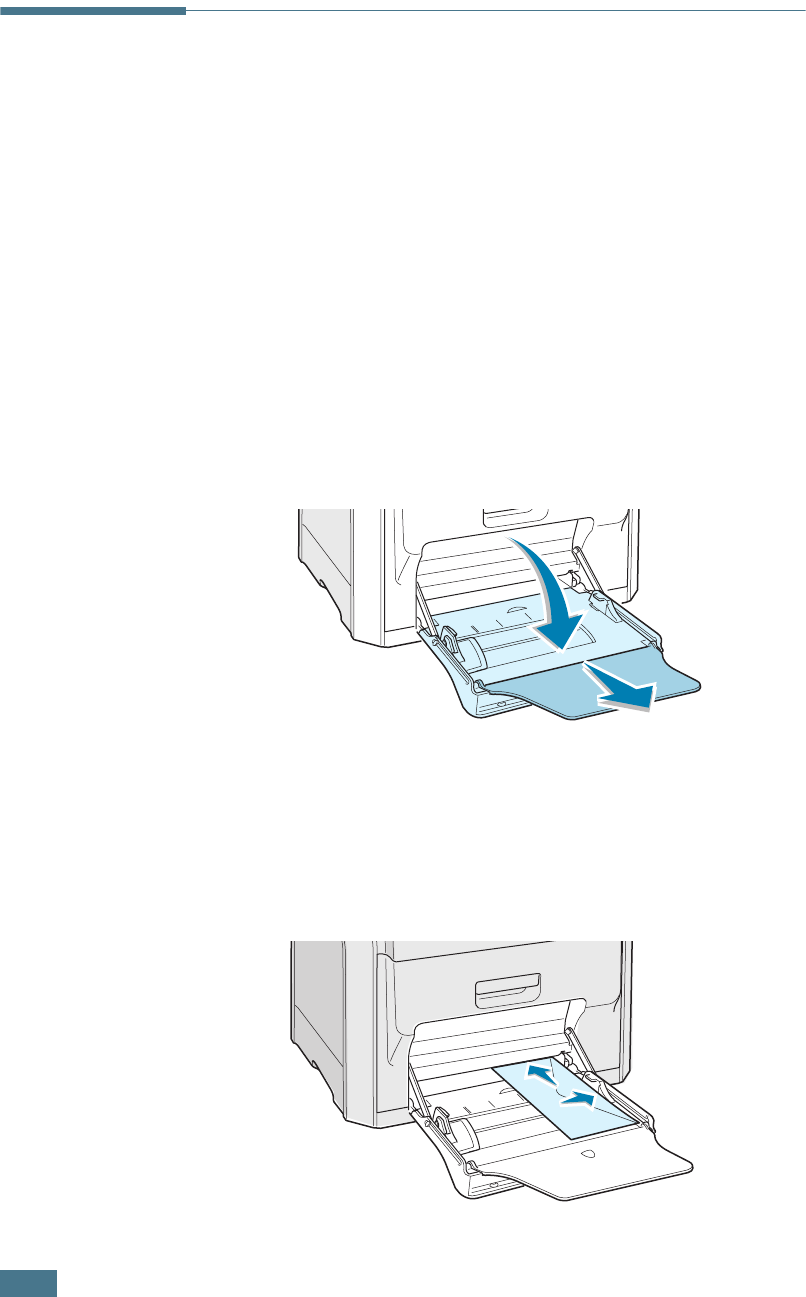
1
Lower the Multi-purpose Tray and unfold the paper support
extension as shown.
Multi-purpose Tray (MPT)
U
SING
P
APER
OR
S
PECIALTY
2.10
2
If you are using paper, flex or fan the edge of the paper
stack to separate the pages before loading.
For transparencies, hold them by the edges and avoid
touching the print side. Oils from your fingers can cause
print quality problems.
3
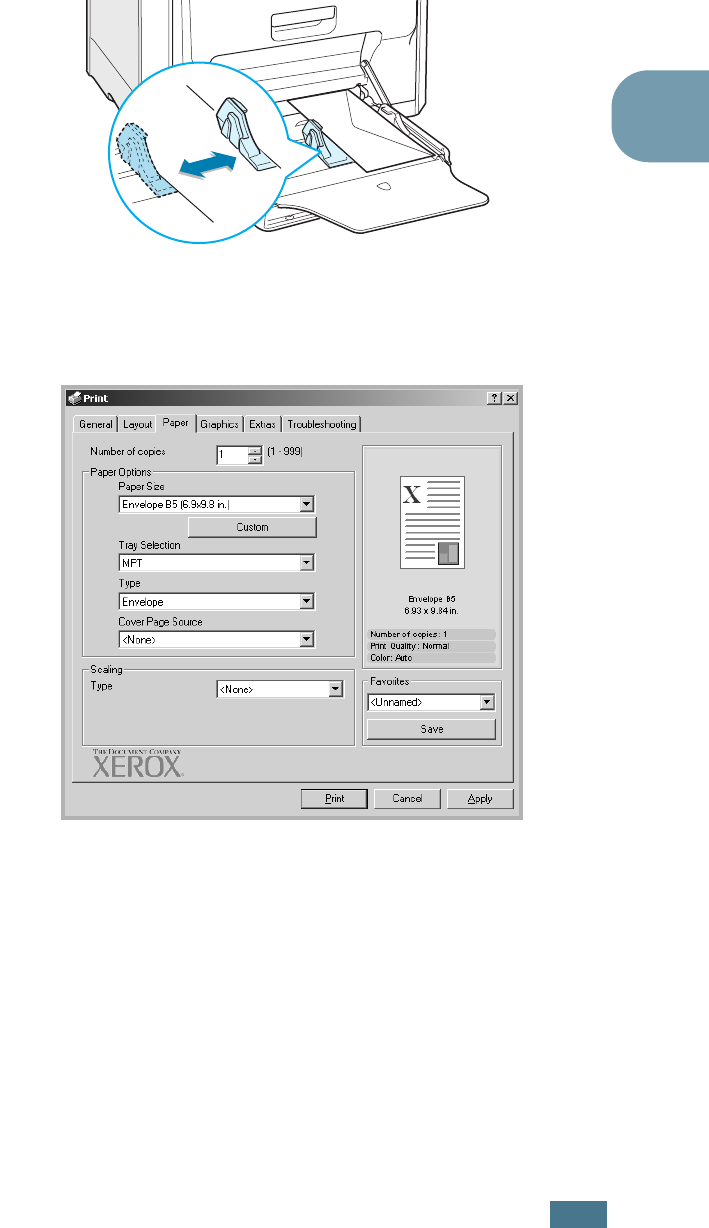
Load the paper with the print side facing down and
against the right edge of the tray.
4
Pinch the paper width guide and slide it to the right to touch
lightly against the edge of the paper without bending it.
U
SING
P
APER
OR
S
PECIALTY
2.11
2
If you want to print on previously printed paper from the
Multi-purpose Tray, the printed side should be facing up
with the uncurled edge towards the printer. If you
experience problems with the paper feeding, turn the paper
around.
NOTE
: Make sure that you have
not loaded too much paper.
The paper buckles if you load a
stack that is too deep or if you
push it in too far.
5
When you print a document, set the tray selection to MPT
and select the correct paper type in the software
application. For details, see page 3.7.
NOTE
: After printing fold away the
paper support extension and close
the Multi-purpose Tray.
U
SING
P
APER
OR
S
PECIALTY
2.12
Using the Manual Feed
If you select Manual in the Tray selection option when
changing print settings, you can manually load a sheet of paper
in Multi-purpose Tray. Manually loading paper can be helpful
when you want to check the print quality after each page is
printed.
This loading procedure is almost the same as the procedure for
loading in the Multi-purpose Tray, except you load paper
sheet-by-sheet in the Tray, send print data to print the first
page, and press the On Line/Continue button on the control
panel to print each following page.
1
Load a sheet of paper with the print side down and
against the right edge of the Multi-purpose Tray.
2
Pinch the paper width guide and slide it to the right to touch
lightly against the edge of the paper without bending it.

U
SING
P
APER
OR
S
PECIALTY
2.13
2
3
When you print a document, you must select Manual for
Tray selection in the software application, and then select
the correct paper size and type. For details, see page 3.7.
4
Print the document.
The display shows a message prompting you to load paper.
5
Press the On Line/Continue button.
The printer picks up the paper and prints. After one page is
printed, the message appears again.
6
Insert the next sheet into the Multi-purpose Tray and press
the On Line/Continue button.
Repeat this step for every page to be printed.
U
SING
P
APER
OR
S
PECIALTY
2.14
Printing Specialty Media
Printing on Envelopes
• Load envelopes into the Multi-purpose Tray only.
• Only use envelopes recommended for laser printers. Before
loading envelopes in the Multi-purpose Tray, make sure that
they are undamaged and are not stuck together.
• Do not feed stamped envelopes.
• Never use envelopes with windows, metal clasps or snaps, or
adhesives.
To print on envelopes:
1
Open the Multi-purpose Tray and unfold the paper support.
2
Flex or fan the edge of the envelope stack to separate them
before loading.
3
Load the envelopes into the Multi-purpose Tray with the
flap side up. The end of the envelope with the stamp area
enters the tray first.
U
SING
P
APER
OR
S
PECIALTY
2.15
2
4
Pinch the paper width guide and slide it to the right to touch
lightly against the edge of the stack without bending it.
5
When you print, configure the tray selection to MPT, the
paper type to Envelope and the paper size in the software
application. For details, see page 3.7.
U
SING
P
APER
OR
S
PECIALTY
2.16
Printing on Labels
• Only use labels recommended for laser printers.
• Verify that the labels’ adhesive material can tolerate a fusing
temperature of 180°C (356°F) for 0.1 seconds.
• Make sure that there is no exposed adhesive material
between the labels. Exposed areas can cause labels to peel
off during printing, which can cause paper jams. Exposed
adhesive can also cause damage to the printer components.
• Never print on any sheet where labels are missing.
• Do not use labels that are curled, wrinkled, or damaged.
• To prevent labels from sticking together, do not let the printed
label sheets stack up as they are printed out.
To print on labels:
1
Open the Multi-purpose Tray and unfold the paper support.
2
Load labels only in the Multi-purpose Tray with the print
side down and the top, short edge in first. Adjust the guide
to fit the width of the labels.
U
SING
P
APER
OR
S
PECIALTY
2.17
2
3
When you print, configure the tray selection to MPT, the
paper type to Labels and the paper size in the software
application. For details, see page 3.7.
Printing on Transparencies
• Do not use transparencies attached to plain paper.
• Only use Phaser 35-Series Premium Transparency Film with
the Phaser 6100 printer.
• Ensure that transparencies do not have torn edges and are
not wrinkled or curled.
• Hold the transparencies by the edges and avoid touching the
print side. Oils from your fingers can cause print quality
problems.
• Be careful not to leave fingerprints on or scratch the print
side.
CAUTION
: To avoid damaging the printer, use only transparencies
recommended for laser printers using oil-less fusers. Do not use
transparencies with paper backing or paper tape. Use only Phaser
35-Series Premium Transparency Film.
NOTES
:
• Transparencies print only in black and white.
• Before printing on transparencies,
make sure that the output support
is laid down.
U
SING
P
APER
OR
S
PECIALTY
2.18
To print on transparencies:
1
Open Multi-purpose Tray and unfold the paper support.
2
They must be loaded with the print side downwards.
Adjust the guide to fit the width of the transparencies.
U
SING
P
APER
OR
S
PECIALTY
2.19
2
3
When you print, configure the tray selection to MPT, the
paper type to Transparency, and the paper size in the
software application. For details, see page 3.7.
NOTES
:
• To prevent transparencies from sticking together, do not let the
printed sheets stack up as they are printed out.
• Place transparencies on a flat surface after removing them from
the printer.
U
SING
P
APER
OR
S
PECIALTY
2.20
Printing on Preprinted Paper
• Preprinted paper is paper that has some type of printing
placed on it before it is sent through the printer (paper that
has a preprinted logo at the top of the page, for example).
• Letterhead must be printed with heat-resistant ink that will
not melt, vaporize, or release hazardous emissions when
subjected to the printer’s fusing temperature of 180°C
(356°F) for 0.1 seconds.
• Ink on letterhead must be non-flammable, non-metallic, and
should not adversely affect any printer rollers.
• Forms and letterhead should be sealed in moisture-proof
wrapping to prevent changes during storage.
• Before you load preprinted paper, such as forms and
letterhead, verify that the ink on the paper is dry. During the
fusing process, wet ink can come off of preprinted paper,
reducing the print quality.
To print on preprinted paper:
1
Open the Multi-purpose Tray and unfold the paper support.
2
Load letterhead only in the Multi-purpose Tray with the
print side down and the top, short edge, in first.
Adjust the guide to fit the width of the paper stack.

U
SING
P
APER
OR
S
PECIALTY
2.21
2
3
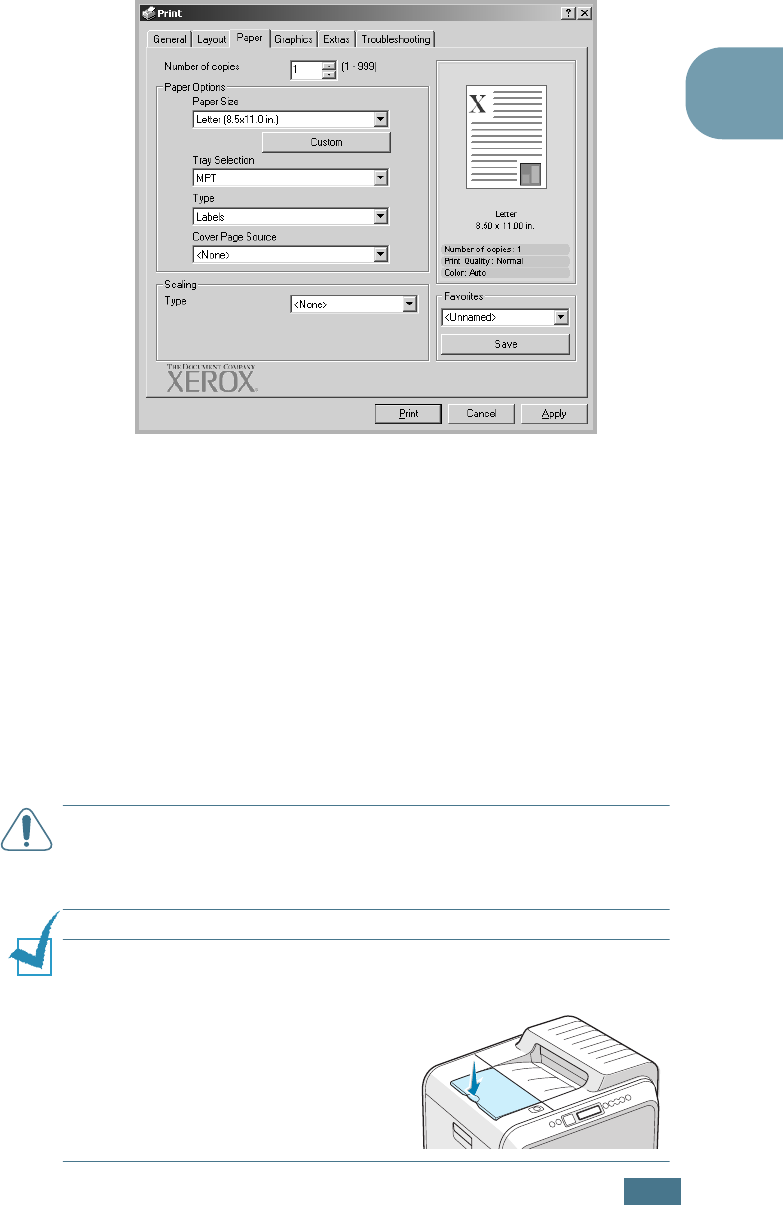
When you print, configure the tray selection to MPT, the
paper type to Letterhead, and the paper size in the
software application. For details, see page 3.7.
Printing on Card Stock or Custom Size
Paper
• Print index cards (3.5 in. x 5.5 in.), postcards, and custom
size paper with the Phaser 6100 printer. The minimum size is
90mm by 140mm (3.5in. by 5.5in.) and the maximum size is
216mm by 356mm (8.5in. by 14in.).
• Always insert the short edge into the Multi-purpose Tray first.
If you want to print in landscape mode, make this selection
using your software. Do not insert paper with the long edge
entering the printer first as it may cause the paper to jam.
• Do not load more than 10 cards into the Multi-purpose Tray at
a time.
• Do not print on paper smaller than 90mm (3.5in.) wide or
140mm (5.5in.) long.
• Set margins at least 4.3mm away from the edges of the
paper in the software application.
U
SING
P
APER
OR
S
PECIALTY
2.22
To print on card stock:
1
Open the Multi-purpose Tray and unfold the paper support.
2
Load paper only in the Multi-purpose Tray with the print
side down and the short edge first. Slide the guide until
it lightly touches the stack without bending it.
U
SING
P
APER
OR
S
PECIALTY
2.23
2
3
When you print, configure the tray selection to MPT, the
paper type and paper size in the software application. For
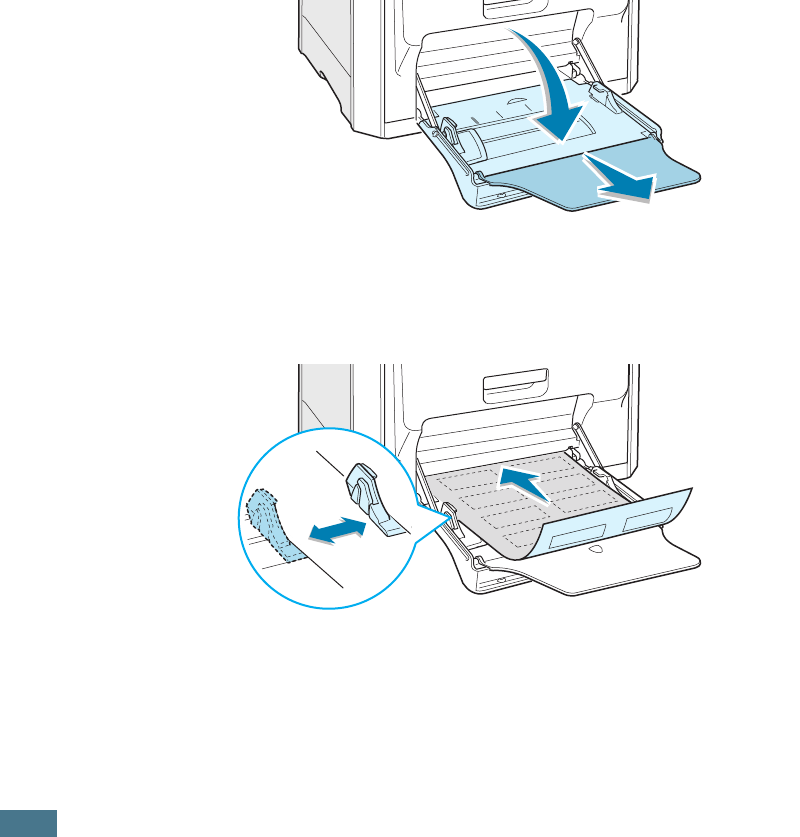
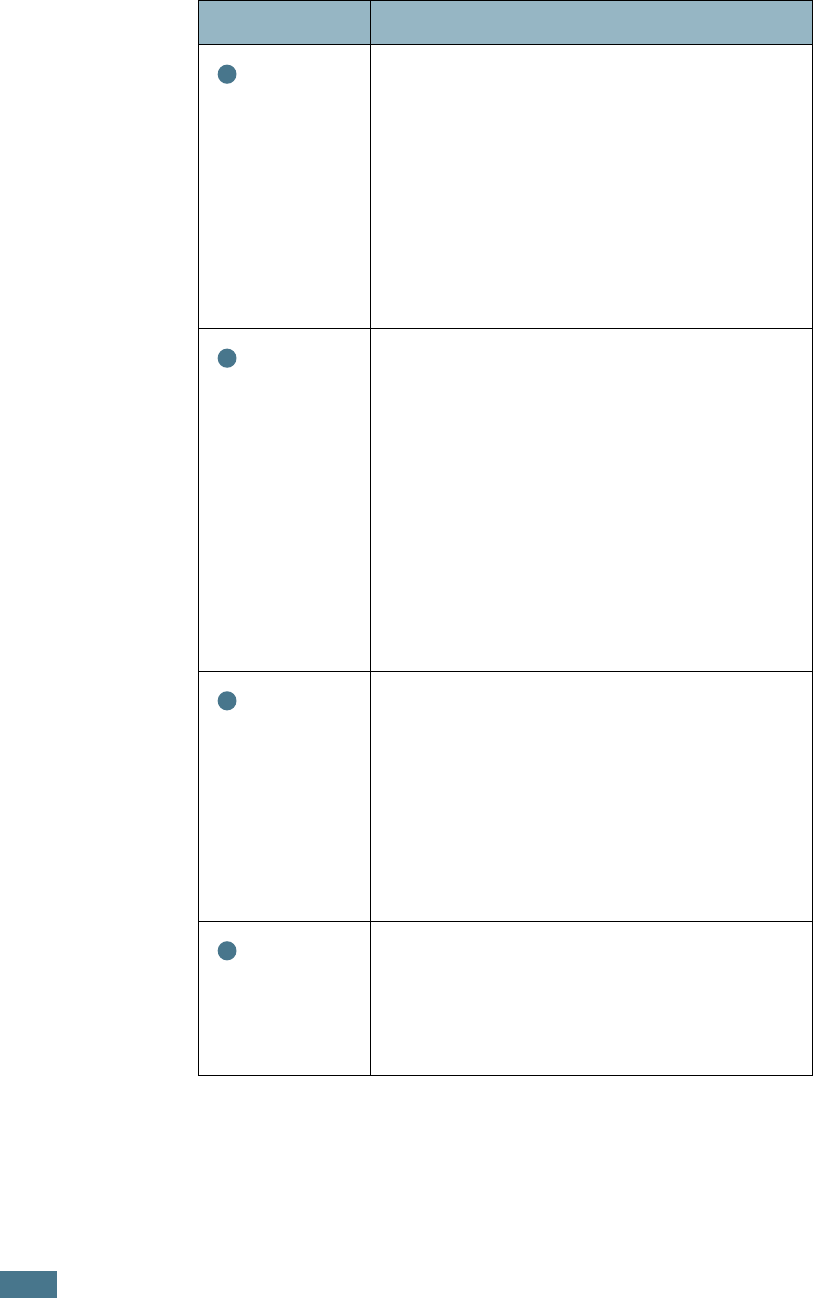
details, see page 3.7.
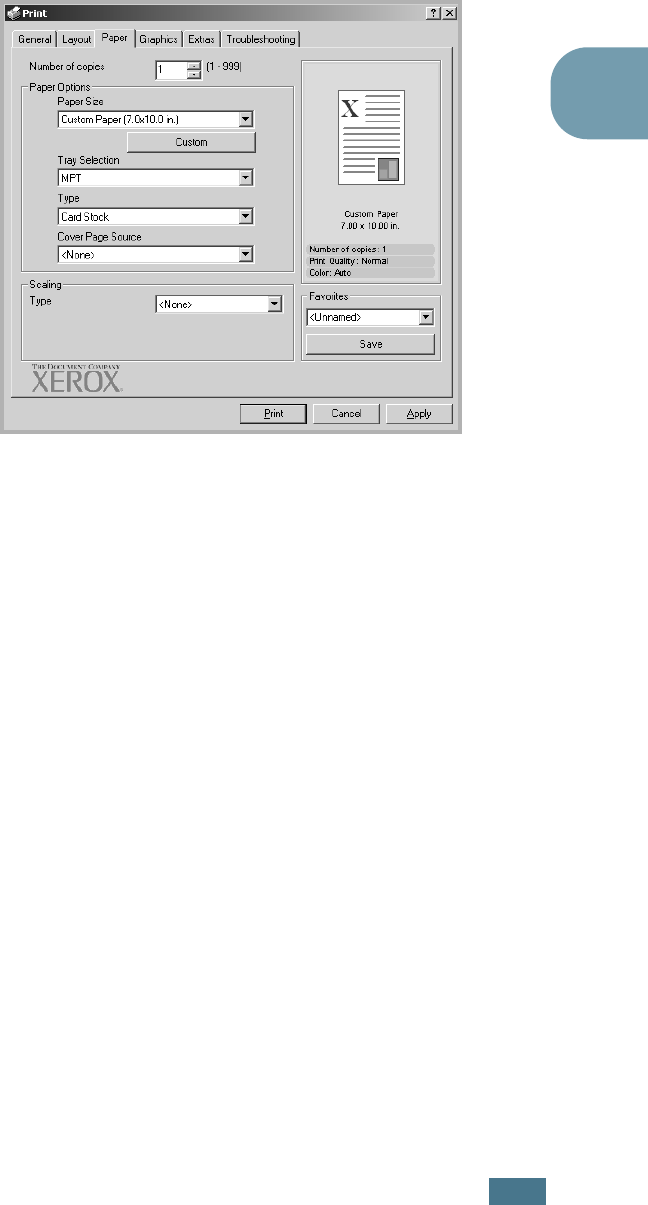
If the paper size of your paper is not listed in the Paper
Size box in the Paper tab, click the
Custom
button and set
the paper size manually. See page 3.7.

U
SING
P
APER
OR
S
PECIALTY
2.24
MEMO

3
This chapter explains the printing options and common
printing tasks.
This chapter includes:
• Printer Driver Features
• Printing a Document
• Printer Settings
PRINTING TASKS
P
RINTING
T
ASKS
3.2
Printer Driver Features
The Phaser 6100 printer drivers will support the following
standard features:
• Paper tray selection
• Paper size, orientation and media type
• number of copies
Table below lists a general overview of features supported by
your printer drivers.
NOTES
:
• Some of feature are not supported on Mac OS 10.x such as Tray
selection, Paper Type, Grayscale and Black&White.
• The Watermark feature is not supported on Mac OS 9.1 or higher.
Feature
Win98/Me Win2000/XP/
Server 2003 NT4.0 Macintosh
Color mode Y Y Y Y
Print quality option Y Y Y N
Poster printing Y Y Y N
Double-sided printing Y Y Y N
Booklet printing Y Y Y N
Multiple pages per sheet
(N-up) YYYY
Fit to page printing Y Y Y N
Scale printing Y Y Y Y
Different source for first
page YYYN
Watermark Y Y Y Y
Overlay Y Y Y N
P
RINTING
T
ASKS
3.3
3
Printing a Document
The following procedure describes the general steps required for
printing from various Windows applications. The exact steps for
printing a document may vary depending on the application
program you are using. Refer to the User Guide of your software
application for the exact printing procedure.
NOTE
: For information about printing from a Macintosh computer
or a Linux system, see Appendix A and Appendix B.
1
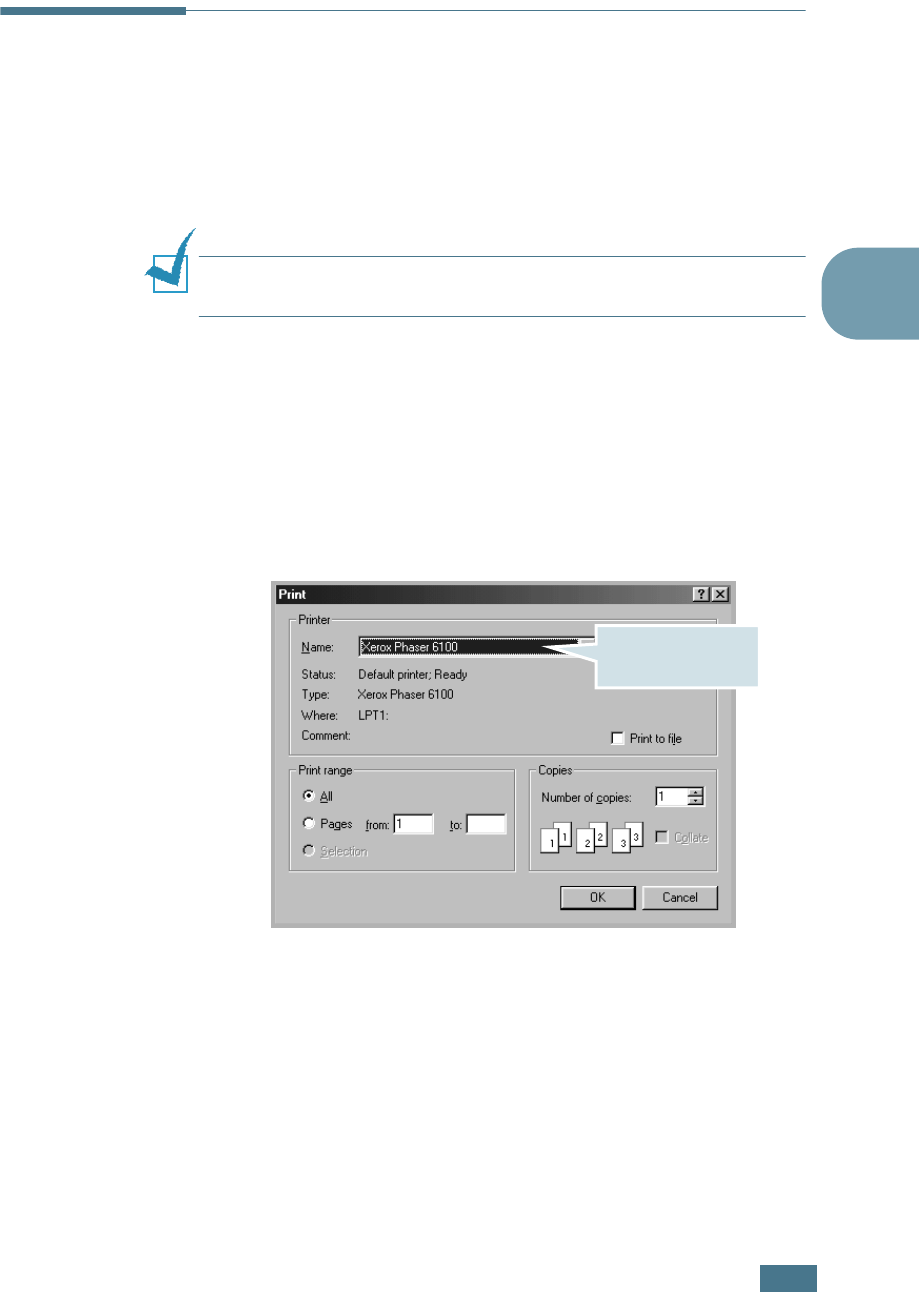
Open the document you want to print.
2
Select Print from the File menu. The Print window opens.
It may look slightly different depending on your application.
You can select the basic print settings within the Print
window. These settings include the number of copies and
the print range.
3
To take advantage of the printer features provided by your
printer, click Properties in the application’s print window.
For details, see “Printer Settings” on page 3.5
If you see a Setup, Printer or Options button in your Print
window, click it instead. Then click Properties on the next
screen.
4
Click OK to close the Properties window.
5
To start the print job, click OK in the Print window.
Make sure that your
printer is selected.
➐☎Windows 98
P
RINTING
T
ASKS
3.4
Canceling a Print Job
Select one of the following options to cancel a print job:
Control Panel
Press the Cancel button ( ) to stop a job that is printing. The
printer prints pages that are currently in the printer then deletes
the remainder of the print job.
NOTE
: To cancel more than one print job if several jobs have been
sent to the printer, press the
Cancel
button once when each job
begins printing to cancel it.
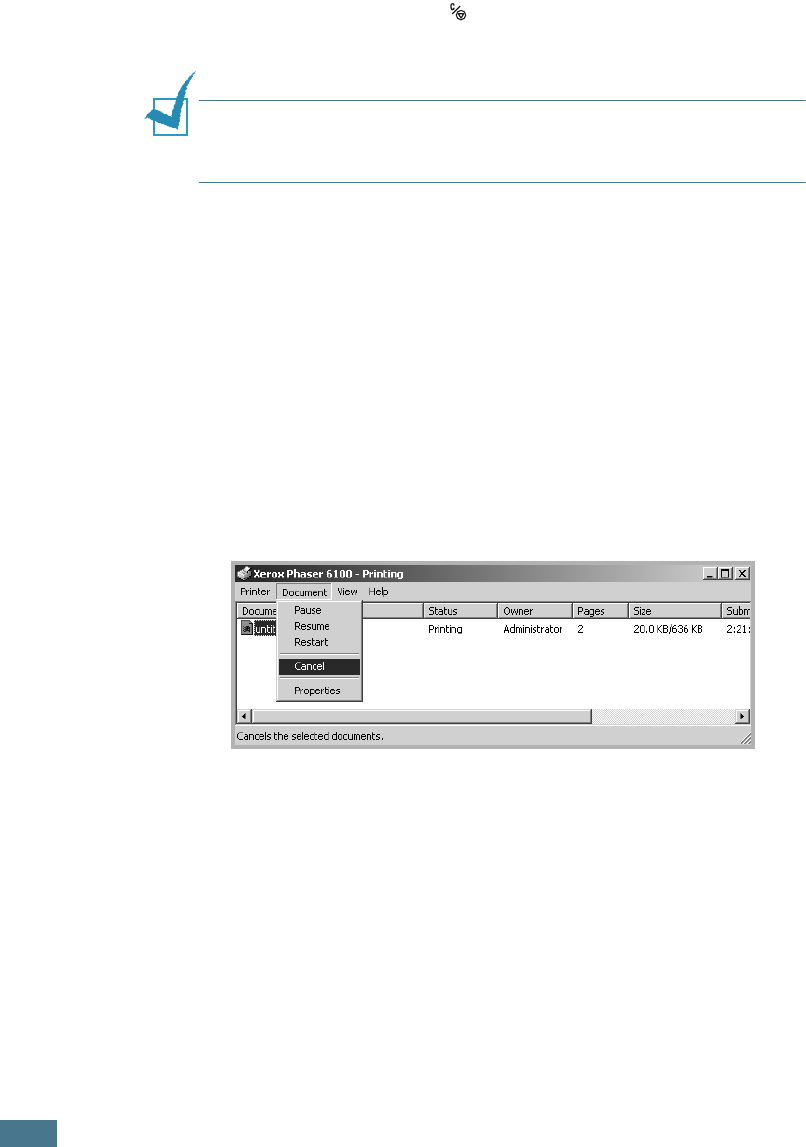
Printers Folder
To delete a pending print job:
1
From the Windows Start menu, select Settings.
2
Select Printers to open the Printers window, and
double-click the Xerox Phaser 6100 printer icon.
3
From the Document menu, select Cancel Printing
(Windows 98/Me) or Cancel (Windows NT 4.0/2000/XP/
Server 2003).
➐☎Windows 2000

P
RINTING
T
ASKS
3.5
3
Printer Settings
You can use the Xerox Phaser 6100 printer Properties window,
which allows you to access all of the information you need when
using your printer. When the printer properties are displayed, you
can review and change whatever settings are needed for your print
job.
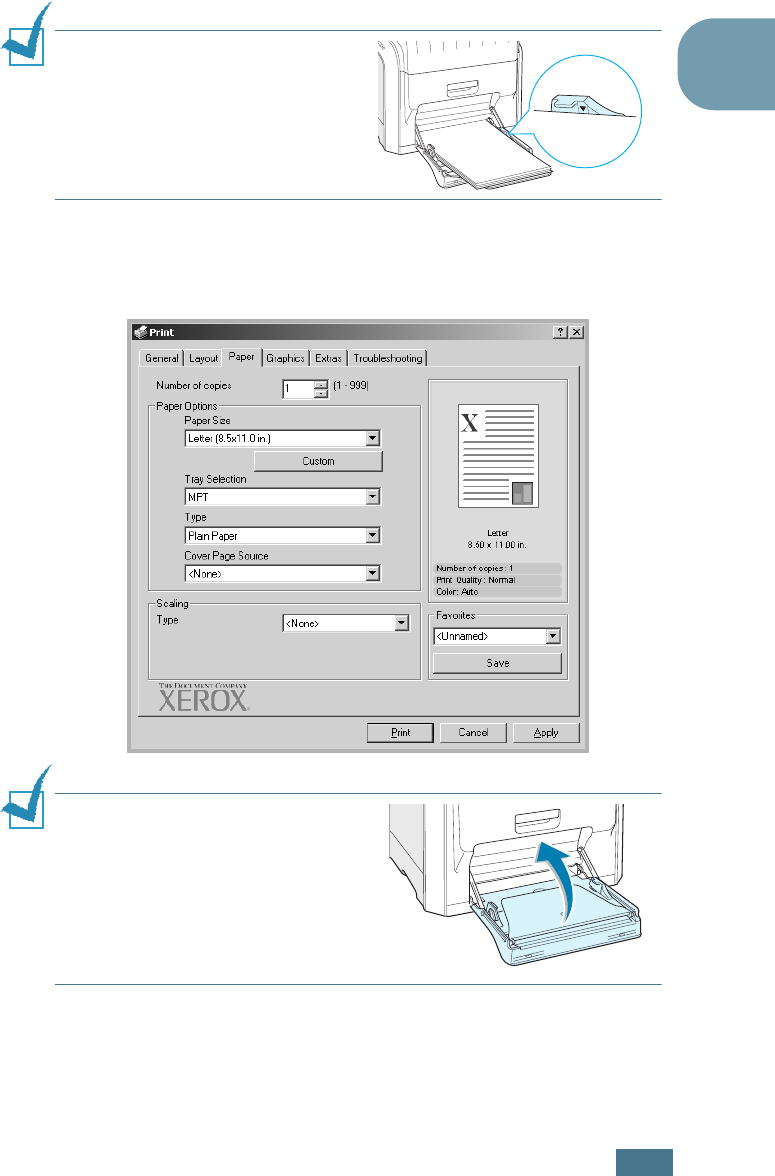
Your printer’s Properties window consists of 5 tabs: Layout,
Paper, Graphics, Extras and Troubleshooting.
If you access the printer properties through the Printers folder,
you can view more Windows-based tabs; refer to your Windows
User Guide.
The printer’s Properties window may differ, depending on your
operating system. This User Guide shows the Properties window on
Windows 2000.
Notes:
• Most Windows applications will override the settings you specify in
the printer driver. Change all of the print settings available in the
software application first, and change any remaining settings using
the printer driver.
• The settings you change remain in effect only while you are using
the current program. To make your changes permanent, make
them in the
Printers
folder. Follow this procedure:
1. Click the Windows Start menu.
2. For Windows 98/Me/NT 4.0/2000, select Settings and then
Printers.
For Windows XP/Server 2003, select
Printers and Faxes
.
3. Select the
Xerox Phaser 6100
printer.
4. Click the right mouse button on the printer icon and:
• In Windows 98/Me, select Properties.
• In Windows 2000/XP/Server 2003, select Printing
Preferences.
• In Windows NT 4.0, select Document Default.
5. Change the settings on each tab, and click OK.

P
RINTING
T
ASKS
3.6
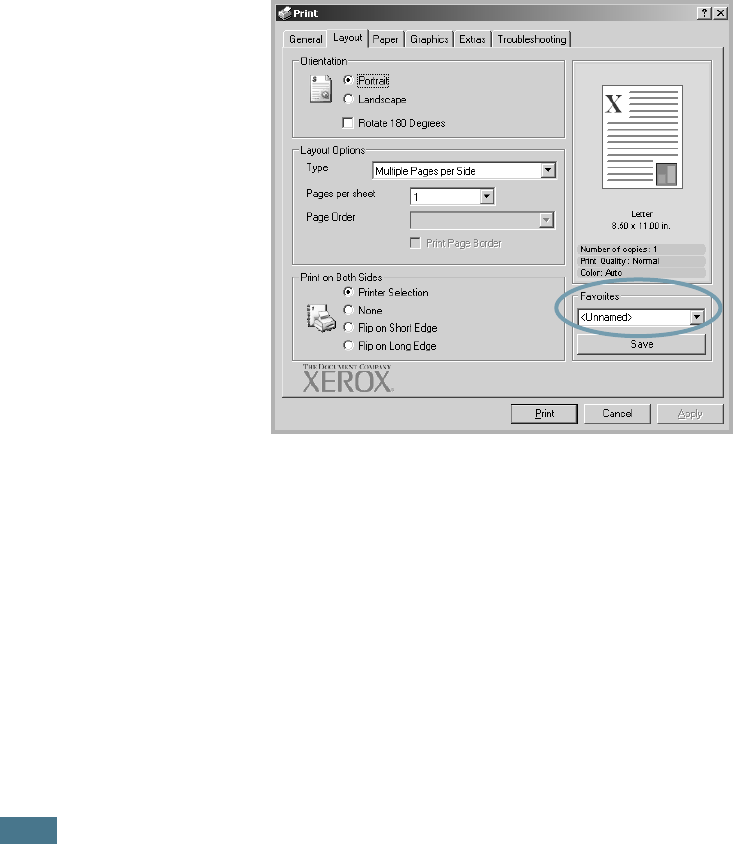
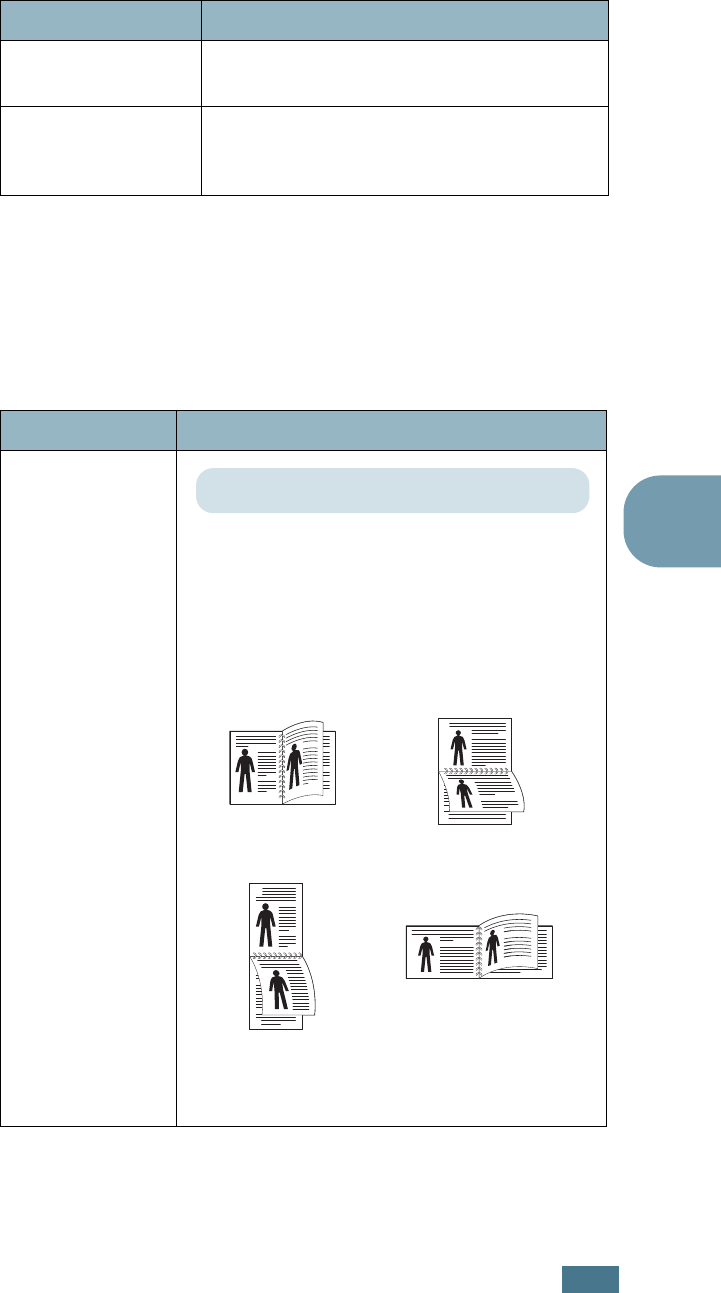
Layout tab
The Layout tab provides options for you to adjust how the
document appears on the printed page. The Layout Options
includes Multiple Pages per Side, Booklet Printing, and
Poster. You can also use Print on Both Sides in this tab. See
page 3.3 for more information on accessing your software
application.
Property Description
Orientation Orientation
allows you to select the
direction in which information is printed
on a page.
•
Portrait
prints across the width of the
page, letter style.
•
Landscape
prints across the length of
the page, spreadsheet style.
If you want to turn the page upside
down, select
Rotate 180 degrees
.
Layout
Options
Layout Options
allows you to select
advanced printing options. For details ,
see Chapter 4, "Advanced Printing."
Print on Both
Sides
Print on Both Sides
allows you to
automatically print two-sided
documents. If you use the printer
driver’s default setting, select
Printer
Selection
. For details, see page 4.3.
1
2
3
The preview image
shows the sample page
with the settings you
specified.
1
➐☎Landscape
➐☎portrait
2
3
P
RINTING
T
ASKS
3.7
3
Paper tab
You can use the following options for basic paper handling. See
page 3.3 for more information about accessing your software
application.
Click the Paper tab to display the Paper properties.
Property Description
Number
of Copies
Number of Copies
allows you to choose
the number of copies to be printed. You can
enter up to 999.
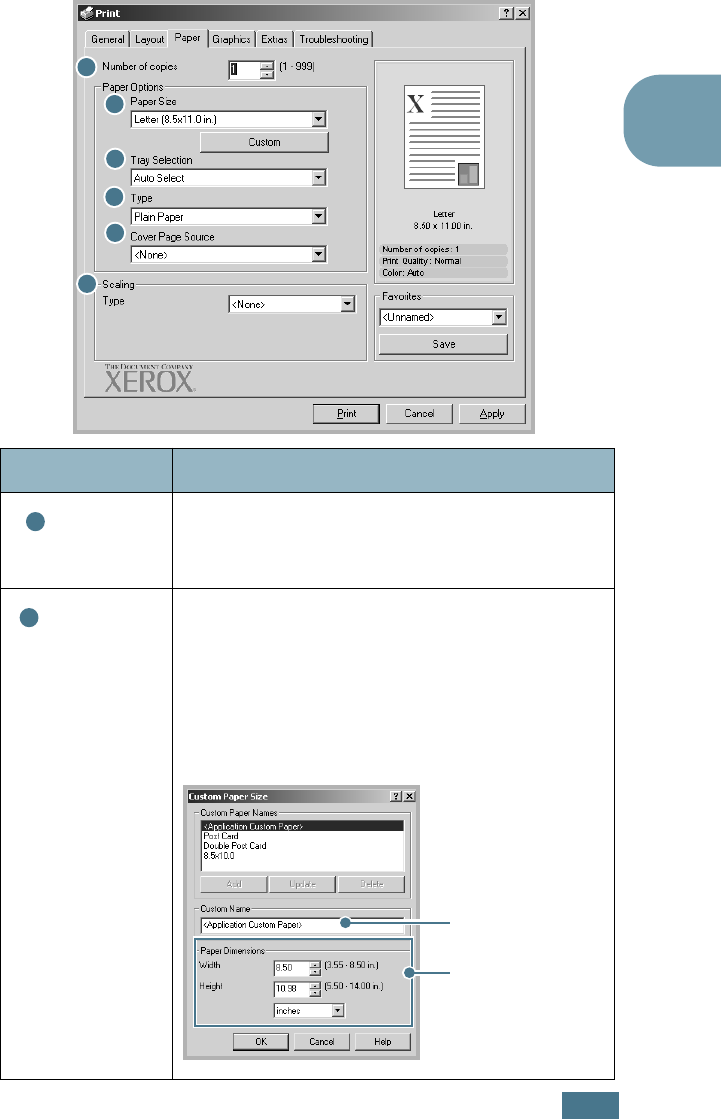
Paper
Size
Paper Size
allows you to choose the size of
the paper loaded in the tray.
If the required size is not listed in the
Paper
Size
box, click
Custom
. When the
Custom
Paper Size
window appears, set the paper
size and click
OK
. The setting appears on the
list so that you can select it.
1
2
3
4
5
6
1
2
Enter the custom
name you want to
use.
Enter the paper
size.
P
RINTING
T
ASKS
3.8
Tray
Selection
Make sure that
Tray Selection
is set to the
corresponding paper tray.
Use the
Manual
source when printing to
specialty media. You have to load one sheet
at a time into the Multi-purpose Tray. See
page 2.9.
If the tray selection is set to
Auto Select
,
the printer automatically picks up paper in
the following order: Multi-purpose Tray,
Tray1, Optional Tray2.
Type
Make sure that
Type
is set to
Plain Paper
.
If you load a different type of paper, select
the corresponding paper type. For more
information on paper, refer to Chapter 2,
"Using Paper or Specialty Media."
If you use cotton paper, which weighs from
16lb to 24lb (60~90g/m
2
), such as Gilbert
25% and Gilbert 100%, set the paper type to
Cotton for the best printing.
To use recycled paper, which weighs from
20lb to 24lb (75~90g/m
2
), or colored paper,
select Colored.
Cover
Page
Source
This property allows you to print the first
page using a different paper type from the
rest of the document. You can select the tray
selection for the first page.
For example, load thick stock for the first
page into the Multi-purpose Tray, and plain
paper into Tray1. Then, select
Tray1
in the
Tray Selection
option and
MPT
in the
Cover Page Source
option.
Scaling Scaling
allows you to automatically or
manually scale your printer job on a page.
You can choose from
None
,
Scale Printing
,
Fit to Page
. For details, see page 4.4 and
page 4.5.
Property Description
3
4
5
6
P
RINTING
T
ASKS
3.9
3
Graphics tab
Use the following graphic options to adjust the print quality for
your specific printing needs. See page 3.3 for more information
about accessing your software application.
Click the Graphics tab to display the Graphics properties.
Property Description
Print
Quality
You can select the printing resolution by
choosing from 1200 dpi (Enhanced),
600 dpi (Standard). The higher the
setting, the sharper the printed characters
and graphics. The higher settings may
increase the time it takes to print a
document.
Color Mode
You can
set the color options. Setting to
Color
typically produces the best possible
print quality for color documents. If you
want to print a color document in grayscale,
select
Black & White
.
1
2
3
1
2
P
RINTING
T
ASKS
3.10
Color Mode
(Continued)
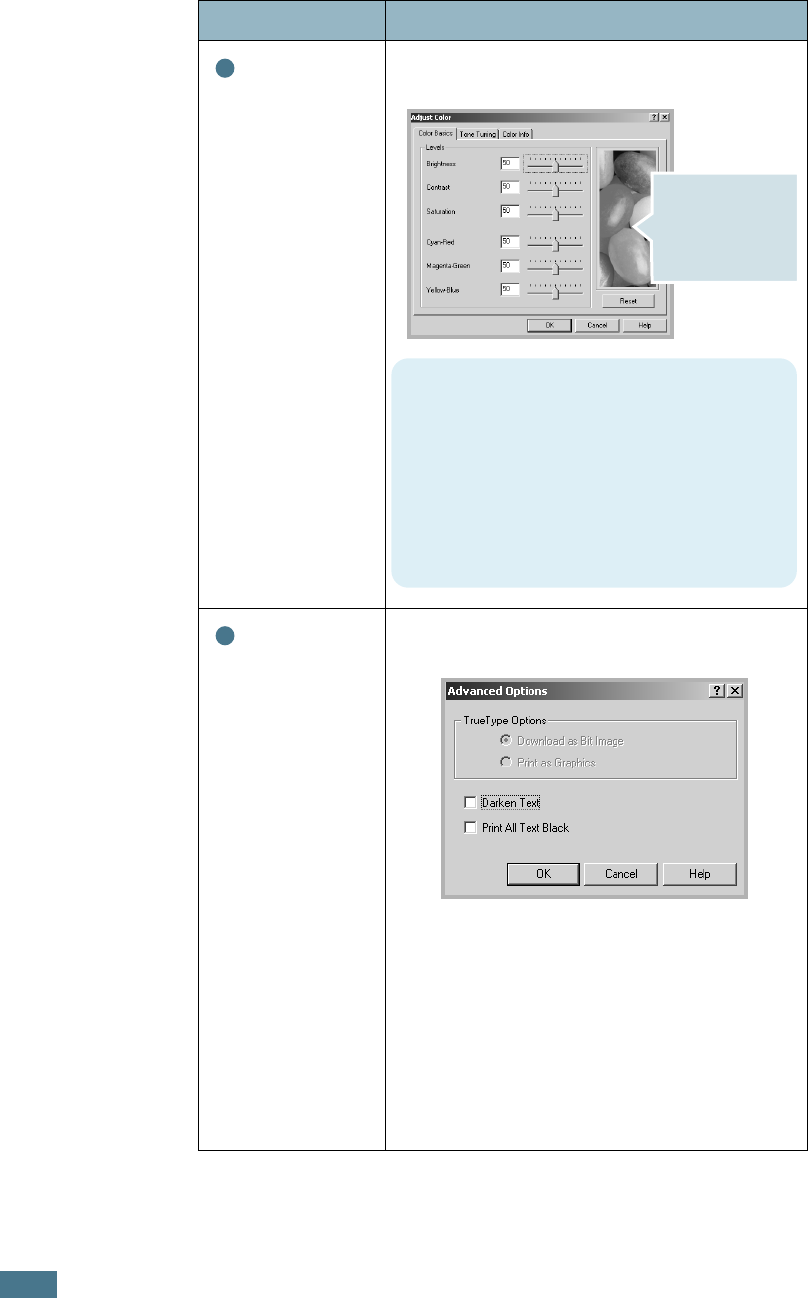
If you click
Adjust Color
, you can change
the appearance of the document’s images.
Advanced
Options
You can make advanced settings by clicking
the
Advanced Options
button.
•
Darken Text
: When this option is
selected, all text in your document prints
darker than normal.
•
Print All Text Black
: When this option
is selected, all text in your document
prints solid in black, regardless of the
color it appears on the screen. When it is
not checked, colored text prints in shades
of gray.
Property Description
2
The preview image
shows the sample
page with the
settings you
specified.
•
Color Basics
: You can adjust the
appearance of the images by changing
the settings in the
Levels
option.
•
Tone Tuning
: You can adjust the
tonal range of images by changing the
Tone Curve
option.
•
Color Info
: This tab contains
information about the driver’s color
conversion system.
3
P
RINTING
T
ASKS
3.11
3
Extras tab
See page 3.3 for more information about accessing your
software application. Click the Extras tab to access the
following features:
Option Description
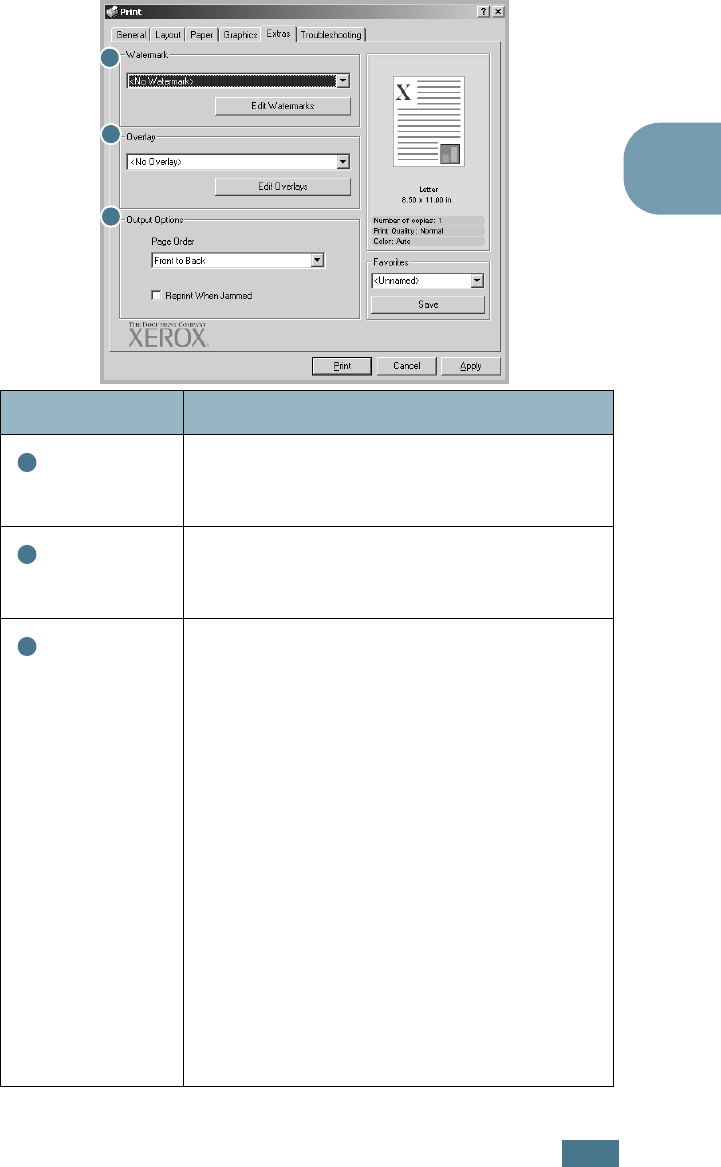
Watermark
You can create a background image of text
to print on each page of your document. See
“Using Watermarks” on page 4.10.
Overlay
Overlays are often used to take the place of
preprinted forms and letterhead paper. See
“Using Overlays” on page 4.13.
Output
Options
Page Order:
You can set the sequence for
the pages to print. Select the print order
from the drop-down list.
•
Front to Back
: Your printer prints all
pages from the first page to the last page.
•
Back to Front
: Your printer prints all
pages from the last page to the first page.
•
Print Odd Pages
: Your printer prints
only the odd pages of the document.
•
Print Even Pages
: Your printer prints
only the even pages of the document.
Reprint When Jammed:
When this
option is checked, the printer keeps the
image for a printed page until the printer
signals that the page has successfully exited
the printer. When a paper jam occurs, the
printer reprints the last page after you clear
the jam.
1
2
3
1
2
3
P
RINTING
T
ASKS
3.12
Troubleshooting
The Troubleshooting tab offers help and information about
using your printer. If you have internet access, use the web links
to connect to helpful web locations.
Using a Favorite Setting
The Favorites option, which is visible on each tab, allows you
to save the current properties settings for future use.
To save a Favorites item:
1
Change the settings as needed on each tab.
2
Enter a name for the item in the Favorites input box.
3
Click Save.
When you save Favorites, all current driver settings are
saved.

P
RINTING
T
ASKS
3.13
3
To use a saved setting, select the item from the Favorites drop
down list.
The printer is now set to print according to the Favorites setting
you selected.
To delete a Favorites item, select it from the list and click
Delete.
You can also restore the printer driver’s default settings by
selecting <Printer Default> from the list.
Using Help
Your printer has a help screen that can be activated using the
Help button in the printer’s Properties window. The help screen
gives you detailed information about the printer features
provided by the printer driver.
You can also click in the upper right hand corner, and then
click on any setting.

P
RINTING
T
ASKS
3.14
MEMO

4
This chapter explains the printing options and advanced
printing tasks.
This chapter includes:
• Printing on Both Sides of the Paper
• Scaling Your Document
• Fitting Your Document to a Selected Paper Size
• Printing Multiple Pages on One Sheet of Paper
• Printing Posters
• Printing Booklets
• Using Watermarks
• Using Overlays
ADVANCED PRINTING
A
DVANCED
P
RINTING
4.2
Printing on Both Sides of the Paper
You can print on both sides of the paper automatically. Before
printing, decide how you want your documents oriented.
The options are:
•Flip on Long Edge, which is the conventional layout used in
book binding, or portrait.
•Flip on Short Edge, which is the type often used with
calendars, or landscape.
CAUTION
: Do not print on both sides of labels, transparencies,
envelopes, or thick paper. Paper jamming and damage to the
printer may result.
NOTE
:To use double-sided printing, you can use only the following
paper sizes: A4, Letter, Legal and Folio that weigh 20~24lbs
(75~90g/m
2
).
There are two ways to enable or disable double-sided printing:
Using the Control Panel Menu
Select Duplex in the Page Layout menu. Set the Duplex
Margin item in the same menu, if necessary. See page 5.7 for
more details.
For further details about using the control panel menu, see
page 5.5.
➐☎Long Edge ➐☎Short Edge
25
3
2
5
3
2
5
3
25
3

A
DVANCED
P
RINTING
4.3
4
From the software application
1
When you change the print settings from your software
application, access the printer’s Properties. See page 3.3.
2
From the Layout tab, select the paper orientation.
3
From the Print on Both Sides section, select either Printer
Selection, None, Flip on Short Edge, or Flip on Long Edge.
4
Click the Paper tab and select the paper tray, paper size
and type.
5
Click OK and print the document.
NOTE
: The settings in the software application override those on
the control panel.
A
DVANCED
P
RINTING
4.4
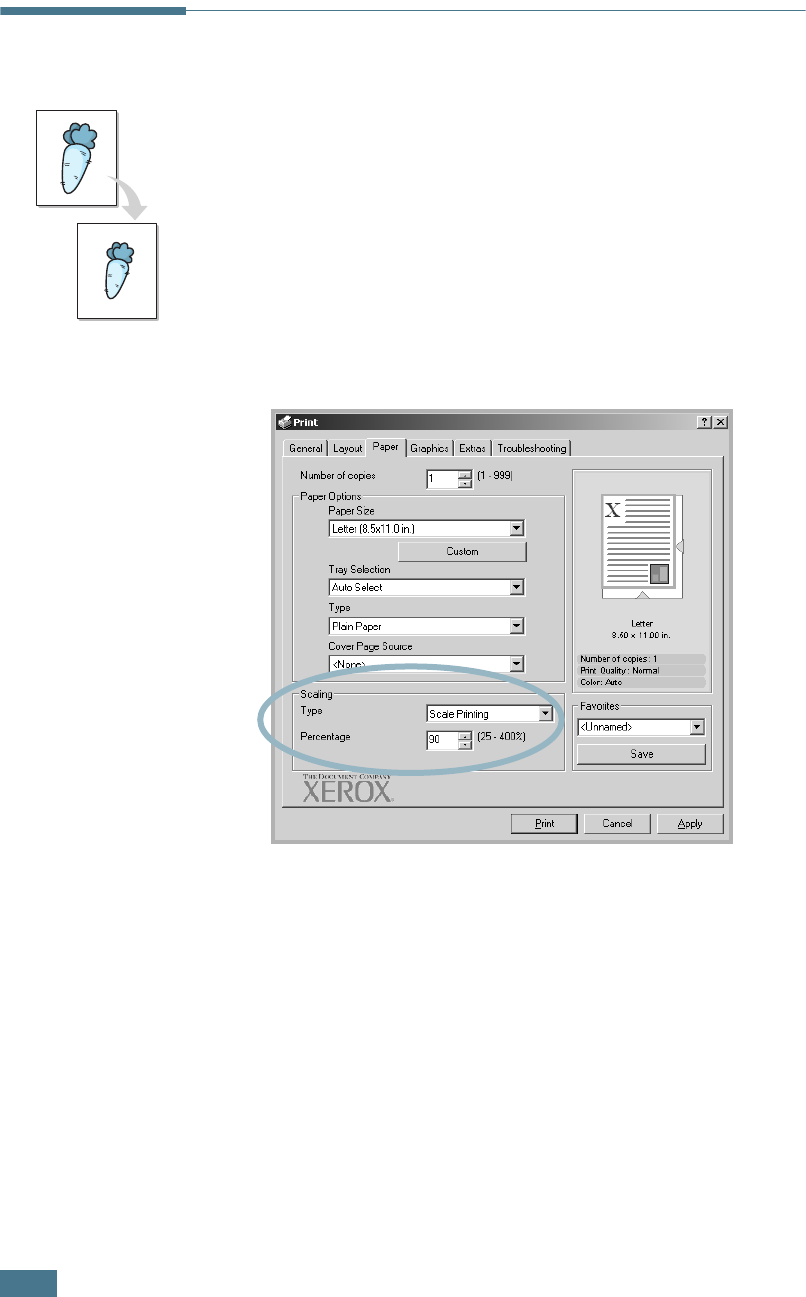
Scaling Your Document
You can scale your print job on a page.
1
When you change the print settings from your software
application, access the printer Properties. See page 3.3.
2
From the Paper tab, select Scale Printing from the Type
drop-down list.
3
Enter the scaling rate in the Percentage input box.
You can also click the ➐☎or ❷ button.
4
Select the paper tray, paper size and type in Paper
Options.
5
Click OK and print the document.
A
DVANCED
P
RINTING
4.5
4
Fitting Your Document to a Selected
Paper Size
This printer feature allows you to scale your print job to any
paper size regardless of the digital document size. This can be
useful when you want to check the fine details on a small
document.
1
When you change the print settings from your software
application, access the printer Properties. See page 3.3.
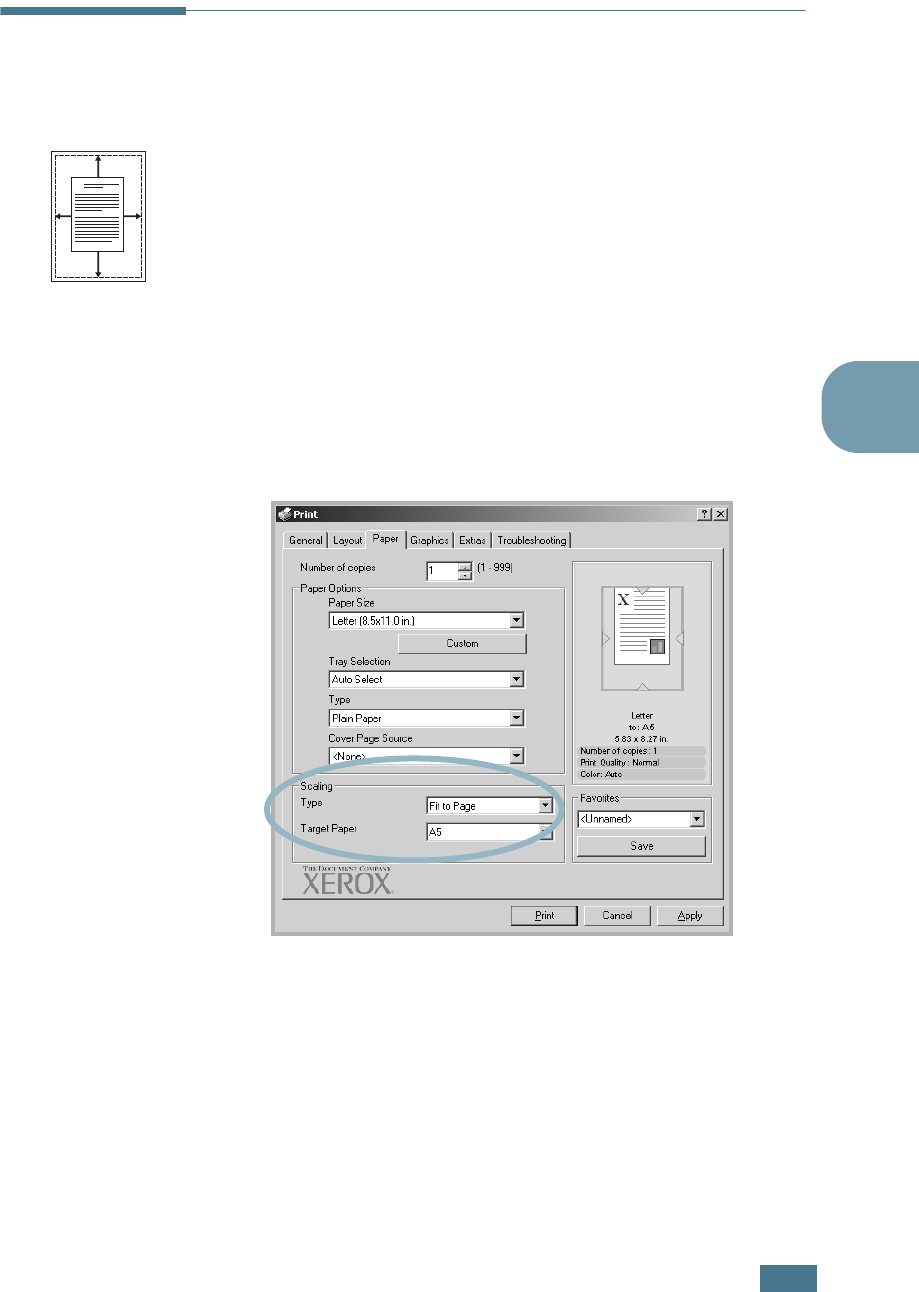
2
From the Paper tab, select Fit to Page from the Type
drop-down list.
3
Select the correct size from the Target Paper drop-down
list.
4
Select the paper tray, paper size and type in Paper
Options.
5
Click OK and print the document.
A
A
DVANCED
P
RINTING
4.6
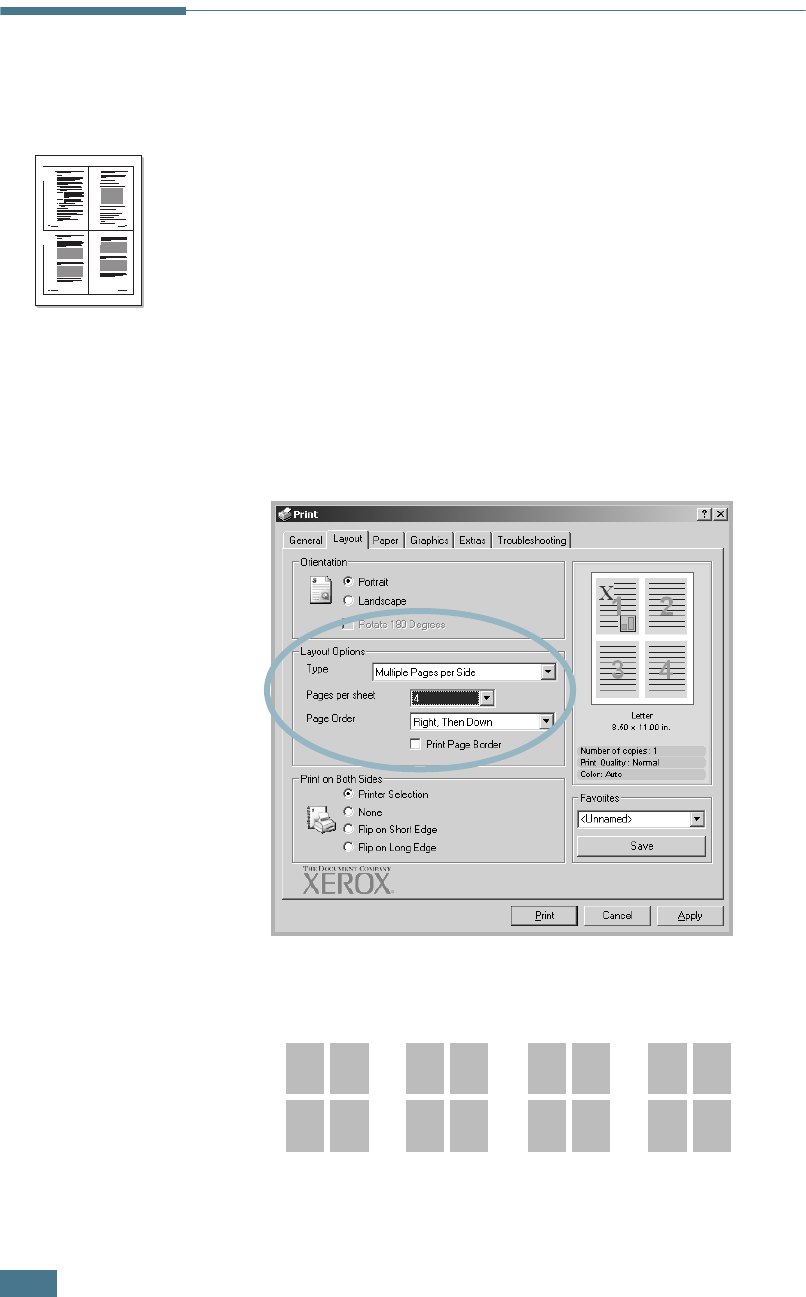
Printing Multiple Pages on One
Sheet of Paper
You can select the number of pages to print on a single sheet of
paper. To print more than one page per sheet, the pages are
smaller and arranged in the order you specify on the sheet. You
can print up to 16 pages on one sheet.
1
To change the print settings from your software application,
access the printer Properties. See page 3.3.
2
From the Layout tab, choose Multiple Pages per Side
from the Type drop-down list.
3
Select the number of pages you want to print per sheet
(1, 2, 4, 9 or 16) from the Pages per sheet drop-down list.
4
Select the page order from the Page Order drop-down list,
if necessary.
1 2
3 4
Right, Then
Down
1
3
2
4
1
2
3
4
2
4
1
3
3
4
1
2
Down, Then
Right
Left, Then
Down
Down, Then
Left
A
DVANCED
P
RINTING
4.7
4
The Page Order drop down list is enabled only if the
number of pages per side is 4, 9 or 16.
Check Print Page Border to print a border around each
page on the sheet. Print Page Border is enabled only if
the number of pages per side is 2, 4, 9, or 16.
5
Click the Paper tab and select the paper tray, paper size
and type.
6
Click OK and print the document.
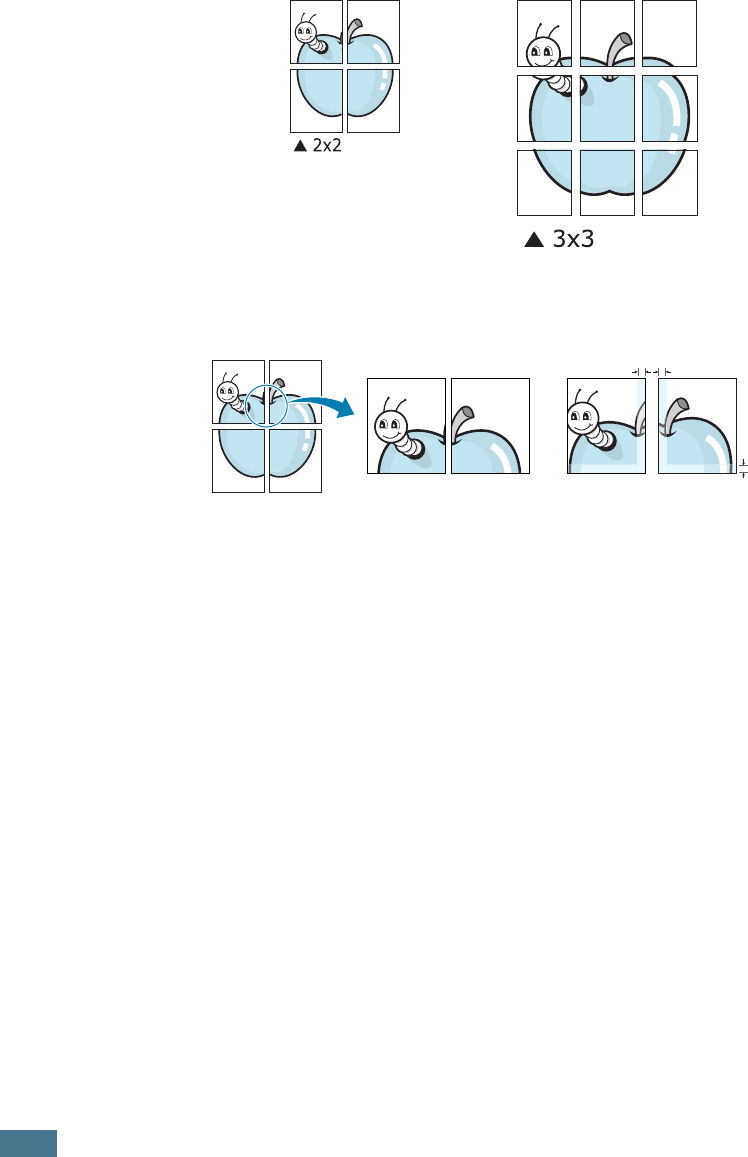
Printing Posters
This feature allows you to print a single-page document onto 4,
9 or 16 sheets of paper, for the purpose of pasting the sheets
together to form one poster-sized document.
1
When you change the print settings from your software
application, access the printer Properties. See page 3.3.
2
From the Layout tab, select Poster from the Type drop-
down list.
A
DVANCED
P
RINTING
4.8
3
Configure the poster option:
You can select the page layout from 2x2, 3x3 or 4x4. If you
select 2x2, the image is automatically stretched to cover 4
physical pages.
Specify an overlap in millimeters or inches to make it easier
to paste the sheets together.
4
Click the Paper tab and select the paper tray, paper size
and type.
5
Click OK and print the document. You can complete the
poster by pasting the sheets together.
4 mm
4 mm
A
DVANCED
P
RINTING
4.9
4
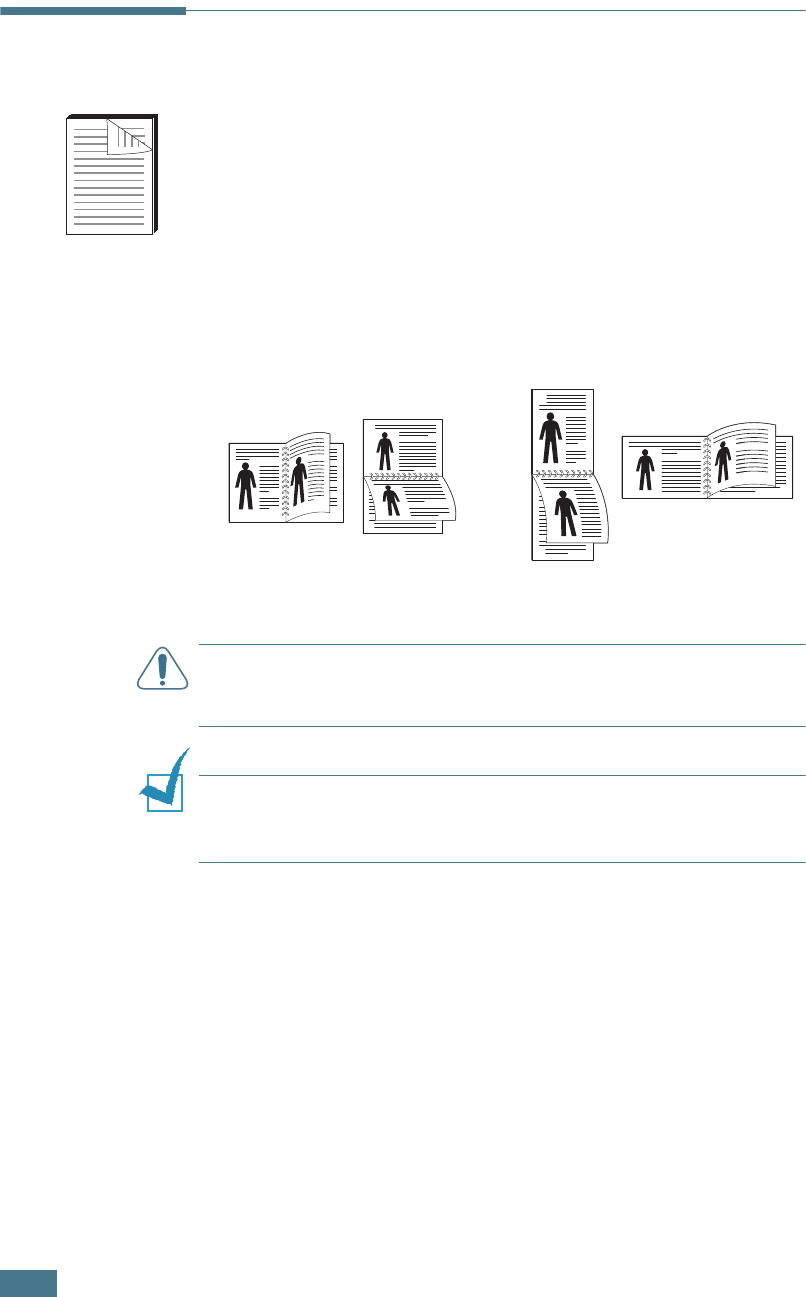
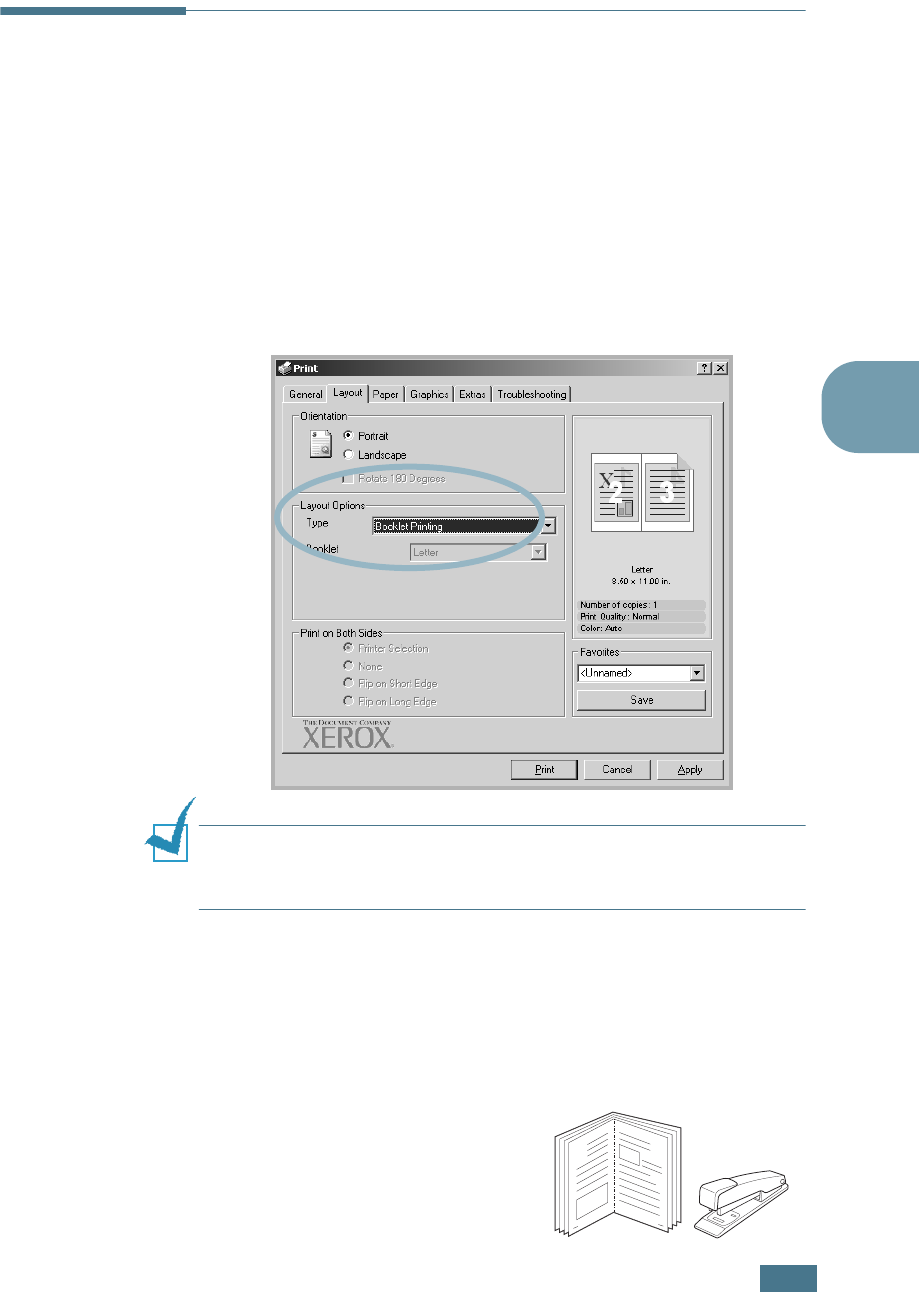
Printing Booklets
The Booklet printing feature allows you to print your document
on both sides of the paper and arranges the pages so that the
paper can be folded in half after printing to produce a booklet.
1
When you change the print settings from your software
application, access the printer Properties. See page 3.3.
2
From the Layout tab, choose Booklet Printing from the
Type drop-down list.
NOTE
: The booklet printing option is available when A4, Letter,
Legal or Folio size is selected in the
Paper Size
option on the
Paper
tab.
3
Click the Paper tab, and select the paper tray, paper size
and type.
4
Click OK and print the document.
5
After printing, fold and
staple the pages.
8
9
A
DVANCED
P
RINTING
4.10
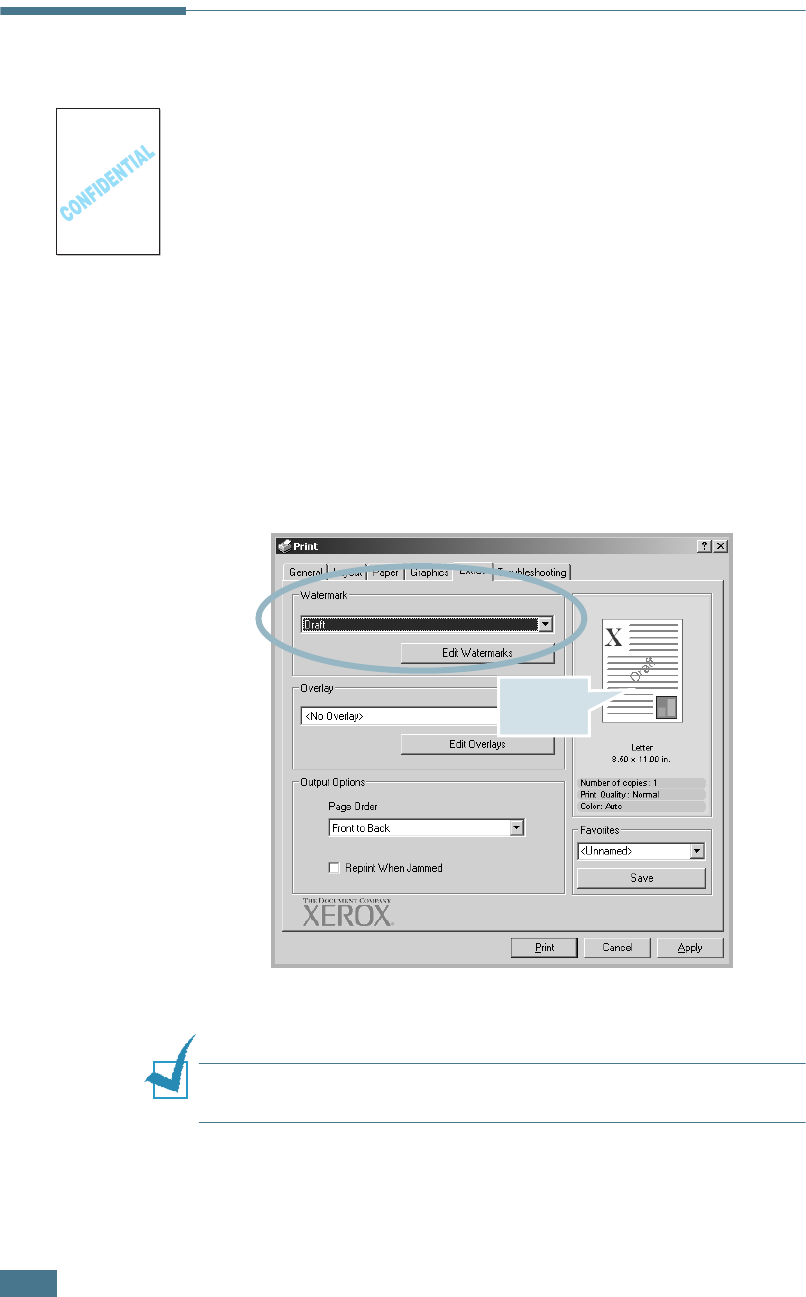
Using Watermarks
A watermark is additional text that can be printed across one or
more pages. For example, terms like Draft, Confidential, Date,
or Version can be inserted using the watermark feature.
There are several predefined watermarks that come with your
printer, and they can be modified or you can add new ones to
the list.
Using an Existing Watermark
1
When you change the print settings from your software
application, access the printer Properties. See page 3.3.
2
Click the Extras tab, and select a watermark from the
Watermark drop-down list. You will see the selected
watermark in the preview image.
3
Click OK and start printing.
NOTE
: The preview image shows how the page will look when it is
printed.
Preview
image

A
DVANCED
P
RINTING
4.11
4
Creating a Watermark
1
When you change the print settings from your software
application, access the printer Properties. See page 3.3.
2
Click the Extras tab, and click the Edit Watermarks
button in the Watermark section. The Watermarks window
appears.
3
Enter a text message in the Watermark Message box. You
can enter up to 40 characters and it displays in the preview
window.
When the First Page Only box is checked, the watermark
prints on the
first page
only
.
4
Select the watermark options.
You can select the font name, style, color, grayscale level
and size from the Font Attributes section and set the
angle of the watermark from the Message Angle section.
5
Click Add to add a new watermark to the list.
6
When you finish editing, click OK and start printing.
To stop printing the watermark, select <No Watermark>
from the Watermark drop-down list.

A
DVANCED
P
RINTING
4.12
Editing a Watermark
1
When you change the print settings from your software
application, access the printer Properties. See page 3.3.
2
Click the Extras tab, and click the Edit Watermarks
button in the Watermark section. The Watermarks window
appears.
3
Select the watermark you want to edit from the Current
Watermarks list to change the watermark message and
the options. Refer to page 4.11.
4
Click Update to save the changes.
5
Click OK.
Deleting a Watermark
1
When you change the print settings from your software
application, access the printer Properties. See page 3.3.
2
From the Extras tab, click the Edit Watermarks button in
the Watermark section. The Watermarks window appears.
3
Select the watermark you want to delete from the Current
Watermarks list and click Delete.
4
Click OK.
A
DVANCED
P
RINTING
4.13
4
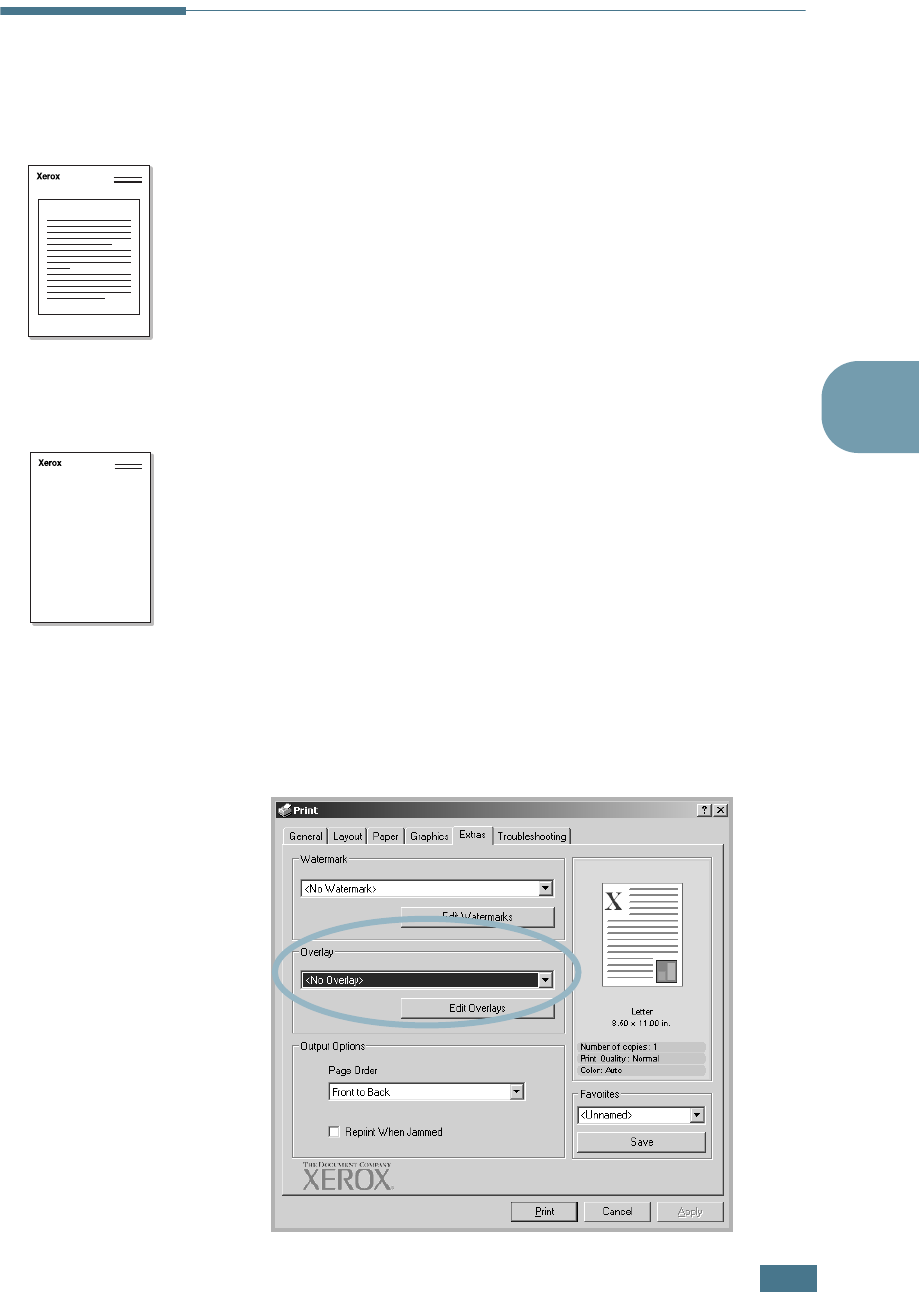
Using Overlays
What is an Overlay?
An overlay is text and/or images stored on the computer hard
disk drive (HDD) as a special file format that can be printed on
any document. Overlays are often used to take the place of
preprinted forms and letterhead paper. Rather than using
preprinted letterhead, you can create an overlay containing the
exact same information that is currently on your letterhead. To
print a letter with your company’s letterhead, you need only tell
the printer to print the letterhead overlay on your document.
Creating a New Page Overlay
To use a page overlay, you must create a new page overlay
containing your logo or image.
1
Create or open a document containing text or an image for
use in a new page overlay. Position the items exactly as you
wish them to appear when printed as an overlay. If needed,
save the file for later use.
2
When you change the print settings from your software
application, access the printer Properties. See page 3.3.
3
Click the Extras tab, and click the Edit Overlays button in
the Overlay section.
Dear ABC
Regards
A
DVANCED
P
RINTING
4.14
4
In the Overlays window, click Create Overlay.
5
In the Create Overlay window, type a name of up to eight
characters in the File name box. Select the destination
path, if necessary. (The default is C:\Formover.)
6
Click Save. The name appears on the Overlay List box.
7
Click OK or Yes to finish creating.
The file is not printed out. Instead it is stored on your
computer hard disk drive.
NOTE
: The overlay document size must be the same as the
documents you print with the overlay. Do not create an overlay
with a watermark.
A
DVANCED
P
RINTING
4.15
4
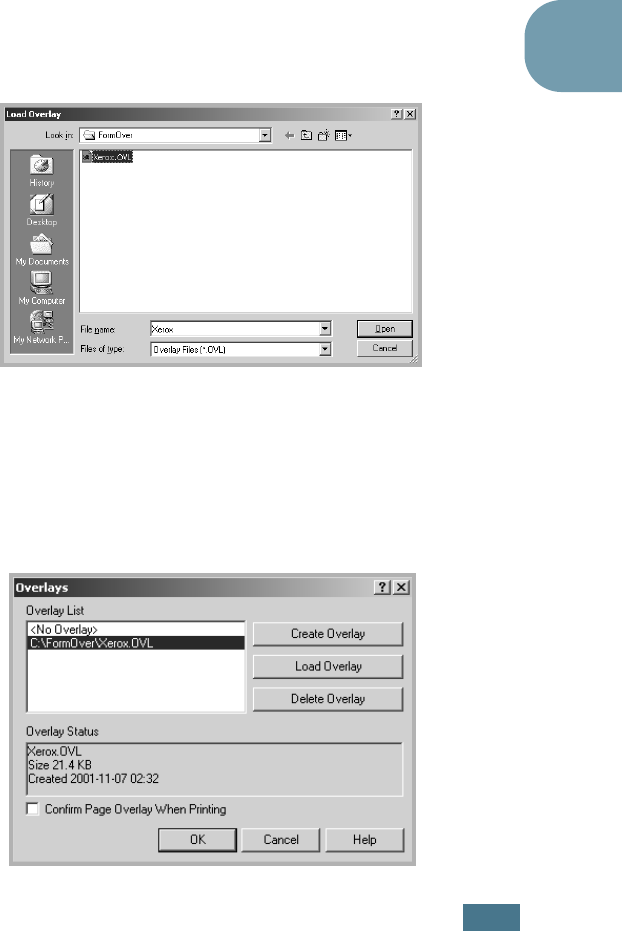
Using a Page Overlay
After an overlay has been created, it is ready to be printed with
your document. To print an overlay with a document:
1
Create or open the document you want to print.
2
When you change the print settings from your software
application, access the printer Properties. See page 3.3.
3
Click the Extras tab.
4
Select an overlay from the Overlay drop-down list box.
5
If the overlay file you want does not appear on the Overlay
list, click the Edit Overlays button and Load Overlay, and
select the overlay file.
If you have stored the overlay file you want to use in an
external source, you can also load the file when you access
this Load Overlay window.
After you select the file, click Open. The file appears in the
Overlay List box and is available for printing. Select the
overlay from the Overlay List box.

A
DVANCED
P
RINTING
4.16
6
If necessary, click Confirm Page Overlay When Printing.
If this box is checked, a message window appears each
time you submit a document for printing, asking you to
confirm your wish to print an overlay on your document.
If this box is empty and an overlay has been selected, the
overlay automatically prints with your document.
7
Click OK or Yes until the printing starts.
The selected overlay downloads with your print job and
prints on your document.
NOTE
: The resolution of the overlay document must be the same
as that of the document you are printing with the overlay.
Deleting a Page Overlay
You can delete page overlays that you no longer use.
1
In the printer Properties window, click the Extras tab.
2
Click Edit Overlays button in the Overlay section.
3
Select the overlay you want to delete from the Overlay
List box.
4
Click Delete Overlay.
5
Click OK until you exit the Print window.

5
This chapter describes how to use the printer’s control
panel.
This chapter includes:
• Understanding the Control Panel
• Using Control Panel Menus
USING THE CONTROL PANEL
U
SING
THE
C
ONTROL
P
ANEL
5.2
Understanding the Control Panel
The control panel on the top right side of your printer has a
display and seven buttons.
Display
See “Understanding Display Messages” on page 7.25 for a
complete listing of all the printer messages.
Buttons
Display: displays the printer
status and job in progress.
Status Map
Message Description
Ready
• The printer is on-line and ready to print.
• If you press
On Line/Continue
, the
printer switches to off-line.
Offline
• The printer is off-line and cannot print.
• If you press
On Line/Continue
, the
printer switches to on-line.
Processing...
• The printer is printing.
• If you want to cancel printing, press
OK()
.
Power Saver
• The printer is in Power Saver mode,
using less power. When a print job is
received from the computer or if any
button is pressed, the printer switches
to on-line.
• To deactivate the Power Saver mode or
change the power-saving time, see
page 5.9.
U
SING
THE
C
ONTROL
P
ANEL
5.3
5
Buttons
Button Description
(status
map)
When an error occurs, a lamp turns on at the
corresponding location on the Status map. An error
message appears on the display so that you can
locate the error. For details on the meaning of the
error messages, see page 7.25.
• Press to switch between on-line and off-line.
• In menu mode, press to return to ready mode.
The color of the On Line/Continue button
indicates the status of the printer.
Green
On
The printer is on-line and can
receive data from the
computer.
Blinking
• When the backlight blinks
slowly, the printer is receiving
data from the computer.
• When the backlight blinks
quickly, the printer is
receiving and printing data.
Orange
On
The printer stops printing due
to a major error. Check the
display message. See
page 7.25 for details on the
meaning of the error message.
Blinking
A minor error has occurred and
the printer is waiting for the
error to be cleared.
Off
• The printer is off-line and cannot print.
• The printer is in Power Save mode.
When data is received, it switches to
on-line.
• Press to enter menu mode.
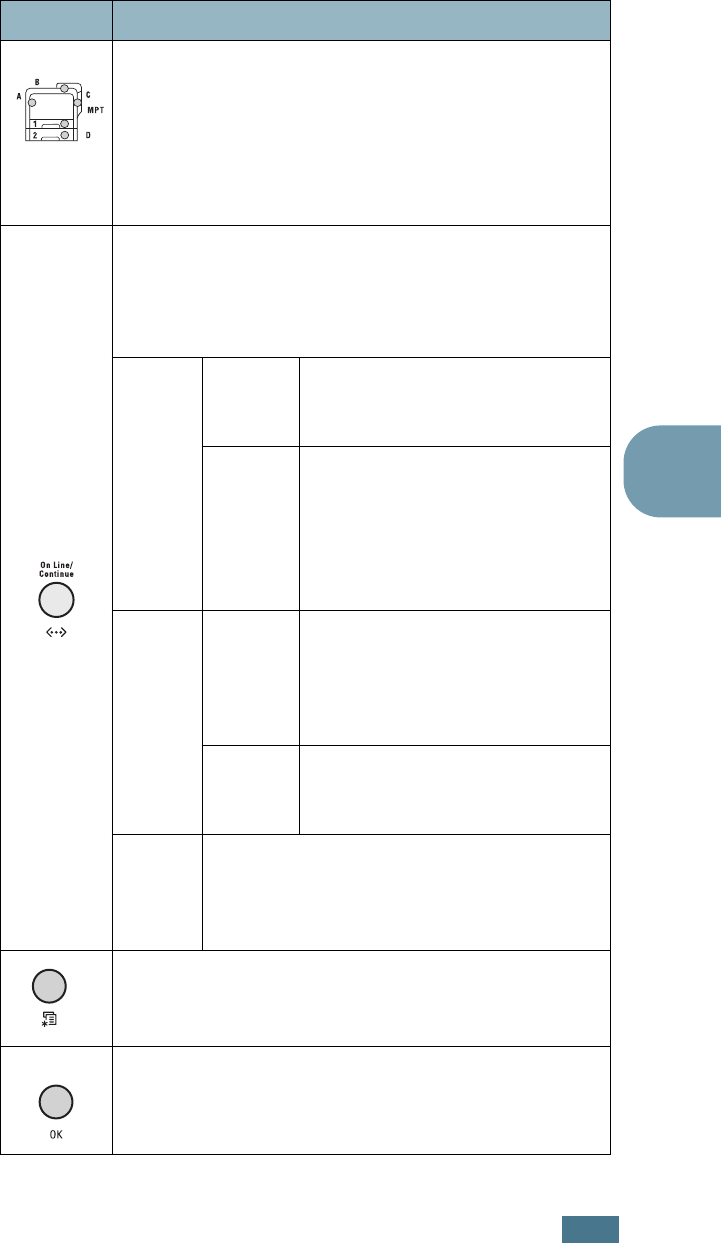
• In menu mode, press to scroll through the menus.
In menu mode, press to select the displayed
submenu item or confirm the changed setting. The
selected item is marked with an *.
U
SING
THE
C
ONTROL
P
ANEL
5.4
In menu mode, press to scroll through submenu
items or setting options. Pressing ❿ moves you to
the next option and pressing ➛ sends you back to
the previous option.
• Press to cancel the current print job.
• In menu mode, press to return to ready mode.
In menu mode, press to go back to the upper menu
level.
Button Description
U
SING
THE
C
ONTROL
P
ANEL
5.5
5
Using Control Panel Menus
A number of menus are available to make it easy for you to
change the printer settings. The diagram on page 5.6 shows the
menus and all of the items available in each menu. The items in
each menu and the options you can select are described in more
detail in the tables beginning on page 5.6.
Accessing Control Panel Menus
You can configure your printer from the printer’s control panel.
You can also use the control panel menus while the printer is in
use.
1
In ready mode press the Menu button ( ) until you see
the menu you want on the bottom line of the display.
2
Press the OK button ( ) to access the menu.
3
Press the scroll button ( or ) until the menu item you
want displays on the bottom line.
4
Press the OK button ( ) to confirm the selected item.
5
If the menu item has submenus, repeat steps 3 and 4.
6
Press the scroll button ( or ) until the setting option
you want displays on the bottom line or enter the required
value.
7
Press the OK button ( ) to save your input or selection.
An asterisk (
*
) appears next to the selection on the display,
indicating that it is now the default.
8
To exit the menu, press the Back button ( ) repeatedly, or
the Cancel button ( ).
After 60 seconds of inactivity (no key has been pressed),
the printer automatically returns to ready mode.
NOTE
: Print settings made from the printer driver override the
settings on the control panel.
U
SING
THE
C
ONTROL
P
ANEL
5.6
Overview of Control Panel Menus
The control panel menus are used to configure the printer. The
control panel provides access to the following menus:
Information Menu
This menu contains information pages that you can print to give
details about the printer and its configuration.
Page Layout
(See page 5.7.)
Duplex
Duplex Margin
Color
(See page 5.8.)
Calibration
Custom Color
Information
(See page 5.6.)
Config Page
Menu Map
Demo Page
Connection Pg*
Maintenance
(See page 5.8.)
Check Toner
Check Others
Low Warning
Cleaning Page
Registration
Primary Color
All Color Page
Cyan Solid
Magenta Solid
Yellow Solid
Black Solid
Network Setup*
(See page 5.12.)
Configure TCP
Enable AppleTK
Reset Network
Reset Defaults
Printer Setup
(See page 5.9.)
Language
Pwr Save Time
Auto Continue
Jam Recovery
Altitude Adj.
Power Save
Reset Defaults
* This menu only appears on the
Phaser 6100DN printer.
Item Explanation
Config Page
The configuration page shows the
printer’s current configuration. See
page 6.2.
Menu Map
The menu map shows the layout and
current settings of the control panel menu
items.
U
SING
THE
C
ONTROL
P
ANEL
5.7
5
Page Layout Menu
Use the Page Layout menu to define all settings relating to
output.
(*: the default setting)
Demo Page The demo page allows you to check to see
if your printer is printing properly.
Connection Pg
The Connection Page prints displaying the
current network settings when using a
Phaser 6100DN printer.
Item Explanation
Duplex
To print on both sides of paper, choose the
edge as follows.
•
Long Edge
: Flips on the long edge. Prints
pages to read like a book.
•
Short Edge
: Flips on the short edge.
Prints pages to read by flipping over like a
note pad.
Select
Off
to print on one side of the paper.
Item Explanation
Options: Off*, Long Edge, Short Edge
Long Edge in the
Portrait orientation Long Edge in the
Landscape orientation
25
3
2
5
3
2
5
3
25
3
Short Edge in the
Landscape orientation
Short Edge in the
Portrait orientation
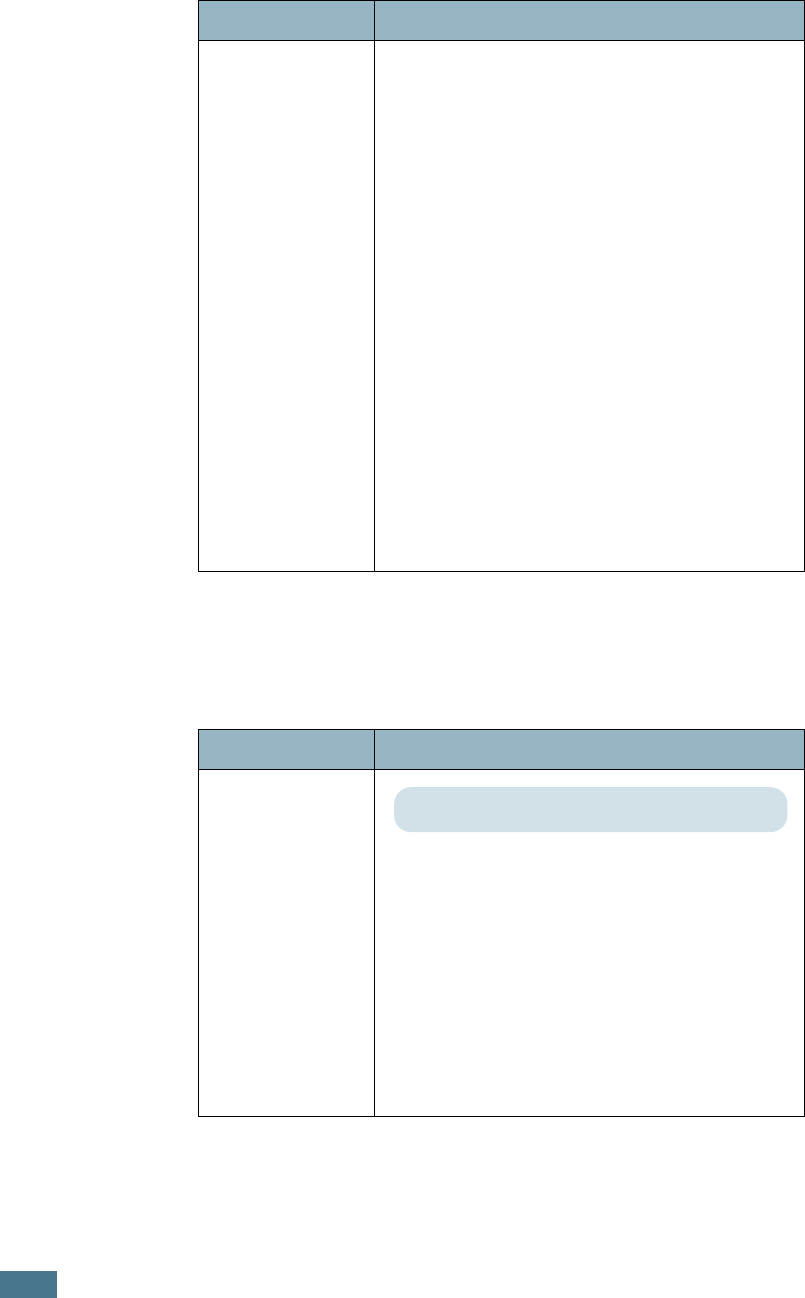
U
SING
THE
C
ONTROL
P
ANEL
5.8
Color Menu
This menu allows you to adjust the color setting.
Duplex Margin
In this menu, you can set the margins for
double-sided printing. You can increase or
decrease the value in 0.1mm increments.
•
Top Margin
: Set the top margin, from
0.0mm to 9.9mm.
•
Left Margin
: Set the left margin, from
0.0mm to 9.9mm.
•
Short Binding
: Set the bottom margin of
the back of the page for short binding,
from 0.0mm to 10mm.
Binding position: In the portrait
orientation, appears in the upper line of
the page. In the landscape orientation,
appears on the right side of the page.
•
Long Binding
: Set the right margin of
the back of the page for long binding, from
0.0mm to 22mm.
Binding position: In the portrait
orientation, appears on the left side of the
page. In the landscape orientation,
appears in the upper line of the page.
Item Explanation
Calibration
This menu item allows you to calibrate the
printer for the best possible color printer
quality.
•
Off
: The printer is calibrated by the
default setting.
•
Auto
: It automatically calibrates the
printer to produce the best possible print
quality for color documents.
•
Run Now
: It manually calibrates the
printer.
Item Explanation
Options: Off, Auto*, Run Now
U
SING
THE
C
ONTROL
P
ANEL
5.9
5
Printer Setup Menu
Use the Printer Setup menu to configure a variety of printer
features.
(*: the default setting)
Custom Color
This item allows you to adjust a specific
color contrast individually.
•
CMYK:
It allows you to adjust the contrast
of the toner in each toner cartridge.
Default
: It optimizes the colors
automatically.
Manual Adjust
: It allows you to
manually adjust the selected color
contrast for each cartridge.
Note
: You should use the
Default
setting
for a best color quality.
Item Explanation
Language The Language setting determines the
language of the text that appears on the
control panel display and information
printing.
Pwr Save Time Set how long the printer waits before going
to power save (when Power Save is
enabled).
Item Explanation
Options: English*, German, French, Italian,
Spanish, Russian
Options: 30 Minutes, 45 Minutes, 60 Minutes,
120 Minutes*
U
SING
THE
C
ONTROL
P
ANEL
5.10
Auto Continue
This item determines whether or not the
printer continues printing when it detects
paper mismatched to your paper setting.
•
Off
: If a paper mismatch occurs, the
message remains on the display and the
printer remains off-line until you insert the
correct paper.
•
On
: If the paper is mismatched, an error
message displays. The printer goes off-line
for 30 seconds then automatically clears
the message and continues printing.
Jam Recovery
This item determines how the printer
behaves when a paper jam occurs.
•
Off
: The printer does not reprint pages.
Printing performance might be increased
with this setting.
•
On
: The printer automatically reprints
pages after you clear the paper jam.
Altitude Adj.
You can optimize the print quality according
to your altitude.
Power Save When the printer does not receive data for
an extended period of time, power
consumption is automatically lowered when
Power Save is enabled.
Reset Defaults This menu allows you to reset the printer's
factory default settings.
Item Explanation
Options: Off, On*
Options: Off*, On
Options: Low*, High
Options:On*, Off
U
SING
THE
C
ONTROL
P
ANEL
5.11
5
Maintenance Menu
Use the Maintenance menu to maintain the toner cartridges
and other consumables.
Item Explanation
Check Toner Allows you to check how much toner is left in
the each toner cartridge.
Check Others
•
Imaging Unit
: allows you to check the
total number of images printed, since the
image counter was last set to zero. See
page 6.14.
•
Transfer Belt
: allows you to check the
total number of images printed, since the
image counter was last set to zero. See
page 6.22.
•Fuser, Transfer Roll:
allows you to
check the total number of pages printed
and reset the life count after the fuser or
transfer roller is replaced.
•
MPT Roller, Tray 1 Roller, Tray 2
Roller:
allows you to check the total
number of images fed from each tray.
Low Warning
This item determines how the printer
behaves when the consumables are low.
•
Off
: The printer does not display the
warning message.
•
On
:
The printer displays the warning
message.
Cleaning Page
Allows you to print a page that cleans the
fuser unit inside the printer.
Registration
Allows you print a color registration print
page.
Primary Color Allows you to print a 4x4 color bar test print
page.
All Color Page
Allows you to print a primary and secondary
test print page.
Cyan Solid
Allows you to print a 100% Cyan fill test
page.
Magenta Solid
Allows you to print a 100% Magenta fill test
page.
Yellow Solid
Allows you to print a 100% Yellow fill test
page.
U
SING
THE
C
ONTROL
P
ANEL
5.12
Network Setup Menu
This menu lets you configure the network interface card
installed in your printer according to how the network is set up.
(*: the default setting)
Black Solid
Allows you to print a 100% Black fill test
page.
Item Explanation
Configure TCP
Sets whether or not you want to manually
configure the network. If you select Yes, you
can configure the IP Address settings.
If you select Yes, the IP Source menu
appears displaying the following options:
• BOOTP
• DHCP
• Static
See the IP Source table for information on
BOOTP, DHCP, and Static options.
Enable AppleTK
This item enables AppleTalk.
Reset Network This item reboots the network interface card.
Select
Reset Now
to reboot.
Reset Defaults This item performs a simple reset and
restores the network configuration
parameters to the factory defaults.
Item Explanation
Options:Yes*, No
Options:Yes, No*
Options:Yes, No
U
SING
THE
C
ONTROL
P
ANEL
5.13
5
IP Source
The IP Source menu option provides three methods for setting
an IP address:
Static
The Static menu option provides three methods for manually
entering an IP address:
Item Explanation
BOOTP
•
BOOTP
: The BOOTP server allots the IP
address to you automatically.
DHCP
•DHCP: The DHCP server allots the IP
address to you automatically.
Static
•
Static:
You can enter IP address,
subnetmask, and gateway manually.
See the
Static
table
for information on
manually entering an IP address.
Item Explanation
IP Address
This item lets you enter the IP address
manually.
• Press the scroll button to set the value of
the 1st byte between 1 and 255, and then
press the
OK
button.
• Set the value for the 2nd to the 4th byte
the same way.
Subnet Mask
This item lets you enter the subnet mask
manually.
• Press the scroll button to set the value of
the 1st byte between 1 and 255, and then
press the
Enter
button.
• Set the value for the 2nd to the 4th byte
the same way.
Gateway
This item lets you enter the gateway
manually.
• Press the scroll button to set the value of
the 1st byte between 1 and 255, and then
press the
Enter
button.
•
Set the value for the 2nd to the 4th byte
the same way.

U
SING
THE
C
ONTROL
P
ANEL
5.14
MEMO

6
This chapter provides information for maintaining your
printer and suggestions for high-quality and economical
printing.
This chapter includes:
• Printing a Config Page
• Replacing the Supplies
• Managing the Toner Cartridges
• Replacing the Toner Cartridges
• Replacing the Waste Cartridge
• Replacing the Imaging Unit
• Replacing the Transfer Belt
• Cleaning the Printer
• Replacement Parts
MAINTAINING YOUR PRINTER
M
AINTAINING
Y
OUR
P
RINTER
6.2
Printing a Config Page
You can print a config page from the printer’s control panel. Use
the config page to view the current settings, to help
troubleshoot problems, or to verify the installation of options.
To print the config page:
1
In ready mode press the Menu button ( ) on the control
panel until you see ‘Information’ on the bottom line of the
display.
2
Press the OK button ( ) to access the menu.
3
Press the OK button ( ) when ‘Config Page’ displays on
the bottom line.
The config page prints out.
M
AINTAINING
Y
OUR
P
RINTER
6.3
6
Replacing the Supplies
From time to time, you need to replace the following items to
maintain top performance and to avoid print quality problems.
Refer to the table below:
Item(s) Printer message Pages Printed See
page
Black toner
cartridge
Replace
Black Toner
3,000 pages
*
(standard
capacity)
*Average A4-/letter-sized pages counts based on 5% coverage of
individual colors on each page. Usage conditions and print patterns
may cause results to vary.
6.8.
7,000 pages
(high capacity) 6.8.
Color toner
cartridges
Replace
[Color] Toner
2,000 pages
*
(standard
capacity)
6.8.
5,000 pages
(high capacity) 6.8.
Waste
cartridge
Waste Box Full/
Not Install
3,000 to 5,000
pages
**
6.11.
Imaging Unit Replace
Imaging Unit
50,000
images
**
6.14.
Transfer Belt Replace
Transfer Belt
50,000
images
**
**Image counts are based on one color on each page. If you print
documents in full colors (Cyan, Magenta, Yellow, Black) then 1 page
is equivalent to 4 images and these three items are reduced to 25%
of the indicated value.
6.22.
Fuser Replace
Fuser
100,000
monochrome
pages
50,000 color
pages
Transfer Roller Replace
Transfer Roller50,000 pages

M
AINTAINING
Y
OUR
P
RINTER
6.4
Managing the Toner Cartridges
Toner Cartridge Storage
To get the maximum results from the toner cartridge, keep the
following guidelines in mind:
• Do not remove the toner cartridges from their packages until
you are ready to use them.
• Do not refill the toner cartridges. The printer warranty
does not cover damage caused by using a refilled
cartridge.
• Store the toner cartridges in the same environment as the
printer.
• To prevent damage to the toner cartridges, do not expose
them to light for more than a few minutes.
Toner Cartridge Life Expectancy
The life of the toner cartridge depends on the amount of toner
that your print jobs require. When printing text at 5% coverage,
a high-capacity toner cartridge lasts an average of 7,000 pages
for black and 5,000 pages for each color. The standard-capacity
toner cartridge supplied with the printer lasts an average of
3,000 pages for black and 2,000 pages for each color.
At any time, you can verify the life expectancy by checking the
toner level. See the below.
Checking the Remaining Toner
You can check the level of toner left in each cartridge.
1
In ready mode press the Menu button ( ) on the control
panel until you see ‘Maintenance’ on the bottom line of the
display.
2
Press the OK button ( ) to access the menu.
3
When ‘Check Toner’ displays on the bottom line, press the
OK button ( ).
4
Press the scroll button ( or ) until the color of the
toner cartridge you want to check displays on the bottom
line.
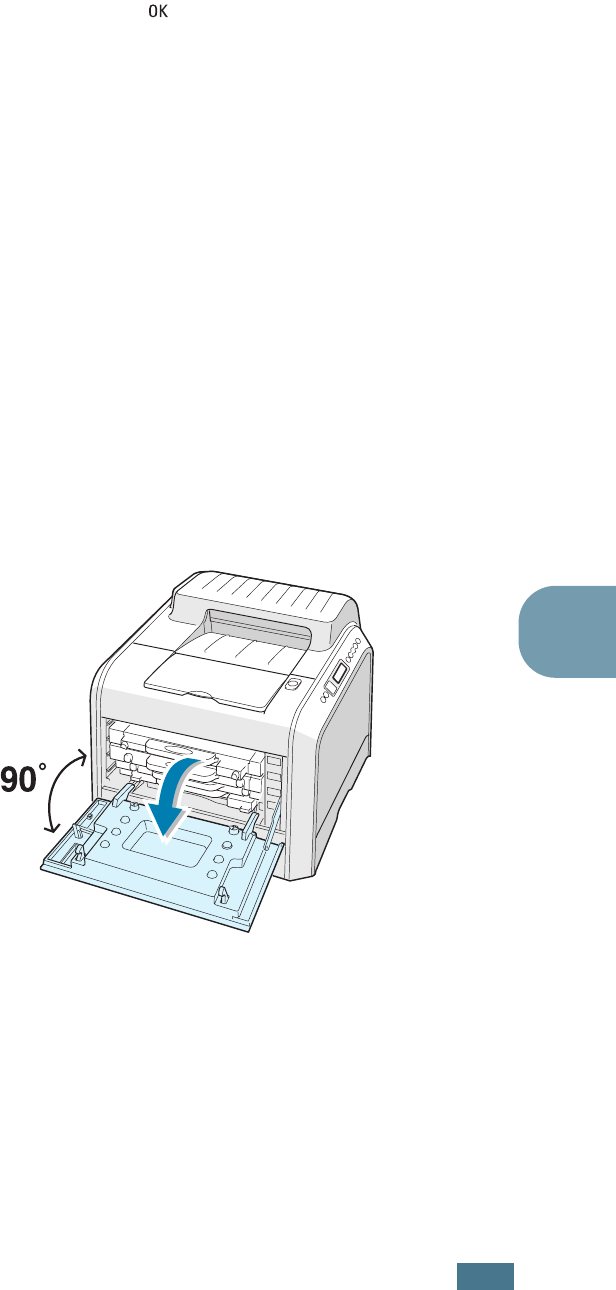
M
AINTAINING
Y
OUR
P
RINTER
6.5
6
5
Press the OK button ( ).
The display shows the percentage of the remaining toner.
Redistributing the Toner
When a toner cartridge is nearly empty, faded or light areas may
appear. Equally it is possible that colored images may have
incorrect colors due to incorrect mixing of the toner colors when
one of the colored toner cartridge is nearly empty. 'Ready
[Color] Low Toner' appears on the display. The printer can
continue to print using the current toner cartridge until the
control panel displays a message telling you to replace the
cartridge.
You may be able to temporarily improve the print quality by
redistributing the toner. The control panel display tells you which
color cartridge is low in toner.
1
Using the handle, completely open the left cover A until it is
at right angles to the main frame and the toner cartridges
are ejected.
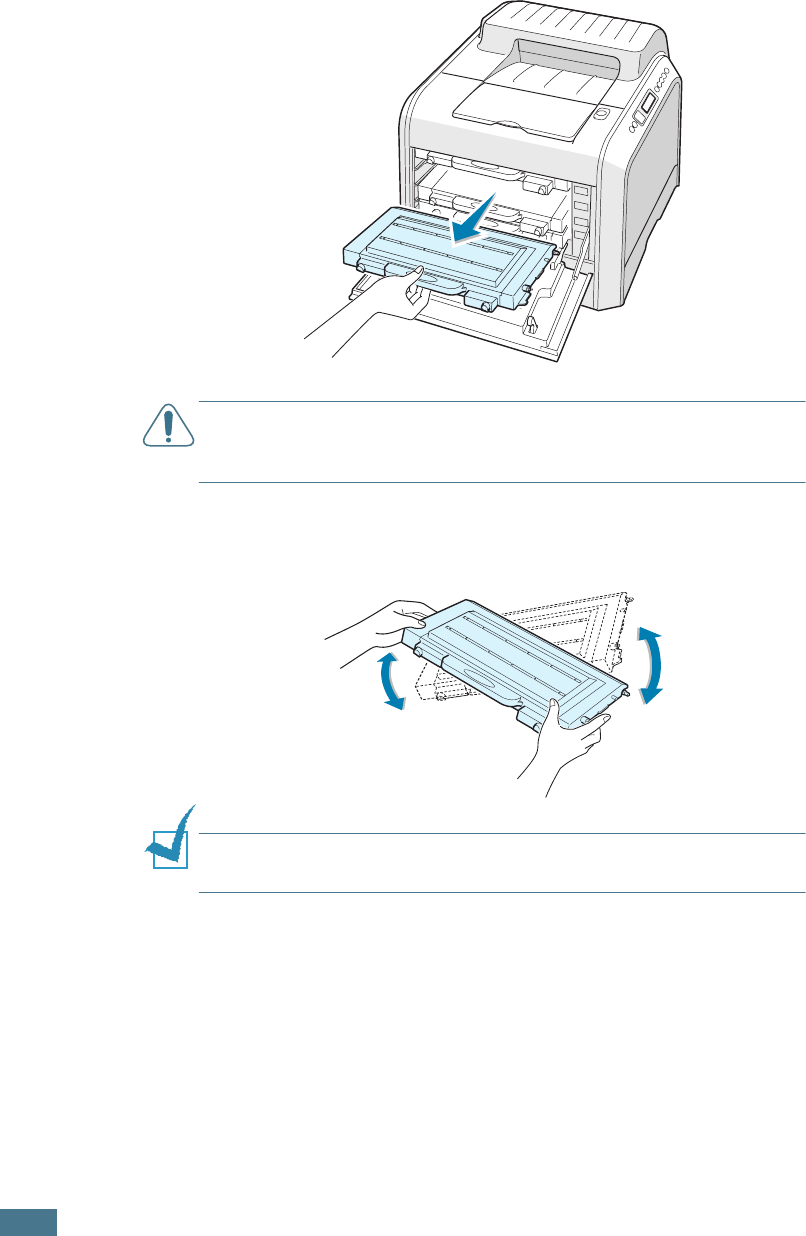
M
AINTAINING
Y
OUR
P
RINTER
6.6
2
Pull the handle lightly first, and then holding the used toner
cartridge, remove it.
CAUTION
: If you open the left cover A for a few minutes, the
imaging unit can be exposed to light. This causes damage to the
imaging unit.
3
Holding both sides of the toner cartridge, gently roll it from
side to side to redistribute the toner.
NOTE
:
If toner gets on your clothing, wipe it off with a dry cloth
and wash it in cold water. Hot water sets toner into fabric.

M
AINTAINING
Y
OUR
P
RINTER
6.7
6
4
Slide the toner cartridge back into the printer.
5
Close the left cover A. Make sure that the cover is securely
latched.
Make sure you have correctly installed the toner cartridge.
The left cover will not close properly if toner cartridges are
installed incorrectly. Never use force to close the cover.
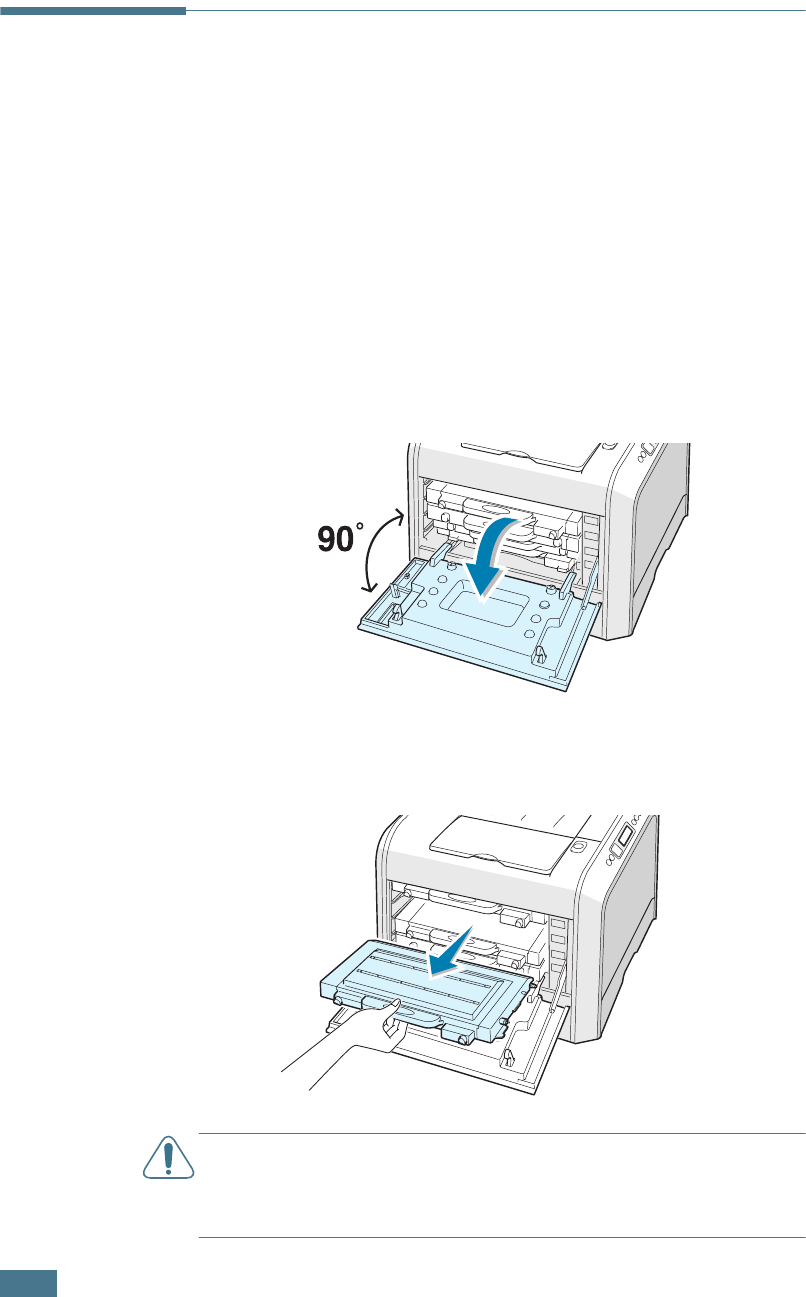
M
AINTAINING
Y
OUR
P
RINTER
6.8
Replacing the Toner Cartridges
The printer uses four colors and has a different toner cartridge
for each one: cyan (C), magenta (M), yellow (Y), and black (K).
Replace a toner cartridge when the printer control panel displays
‘Replace [Color] Toner’. The control panel display tells you which
color needs to be replaced.
1
Turn the printer off, then wait a few minutes for the printer
to cool.
2
Using the handle, completely open the left cover A until it is
at right angles to the main frame and the toner cartridges
are ejected.
3
Pull the handle lightly first, and then holding the used toner
cartridge, remove it.
CAUTION
: If you open the left cover A for a few minutes, the
imaging unit can be exposed to light. This causes damage to the
imaging unit. Close the top and left cover A should the setup need
to be halted for any reason.
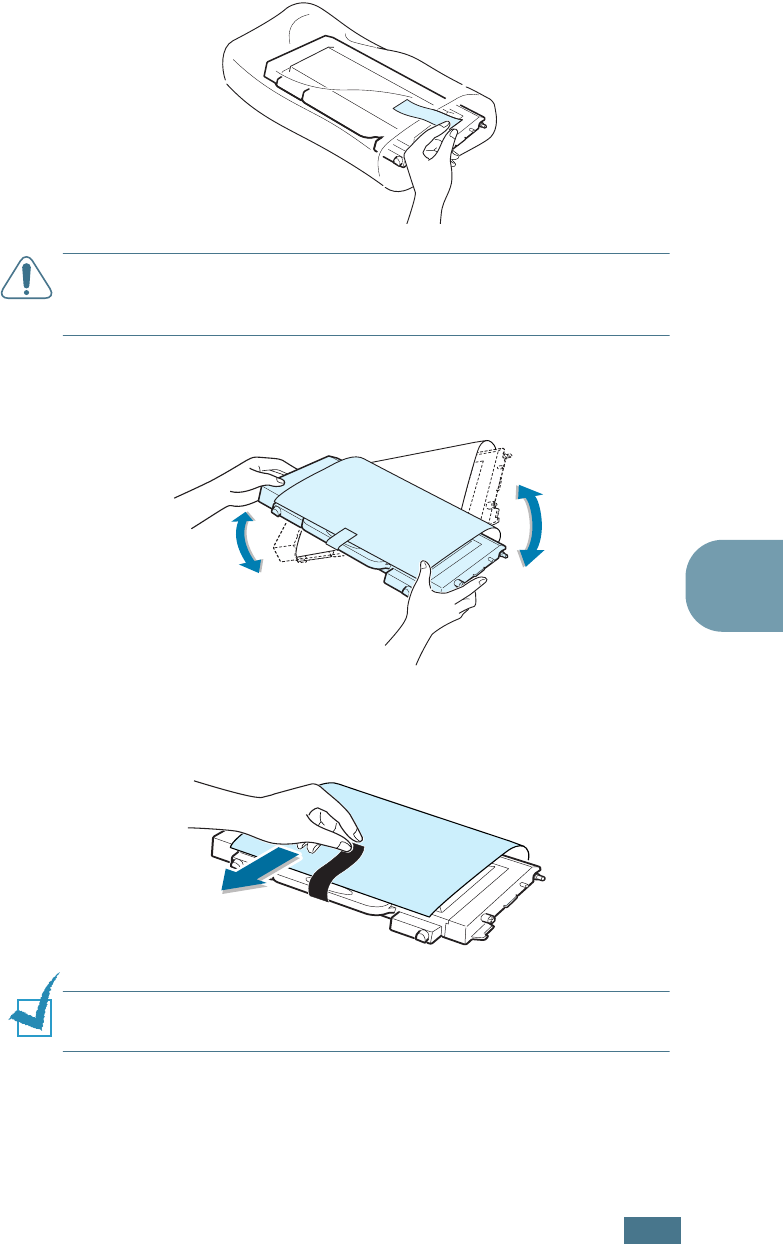
M
AINTAINING
Y
OUR
P
RINTER
6.9
6
4
Take a new toner cartridge out of the package.
CAUTION
: Don’t use sharp objects, such as a knife or scissors, to
open the toner cartridge package. You could damage the surface
of the toner cartridge.
5
Holding both sides of the toner cartridge, gently roll it from
side to side to distribute the toner.
6
Place the toner cartridge on a flat surface as shown and
remove the paper covering the toner cartridge by removing
the tape. Discard the paper and tape.
NOTE
:
If toner gets on your clothing, wipe it off with a dry cloth
and wash it in cold water. Hot water sets toner into fabric.
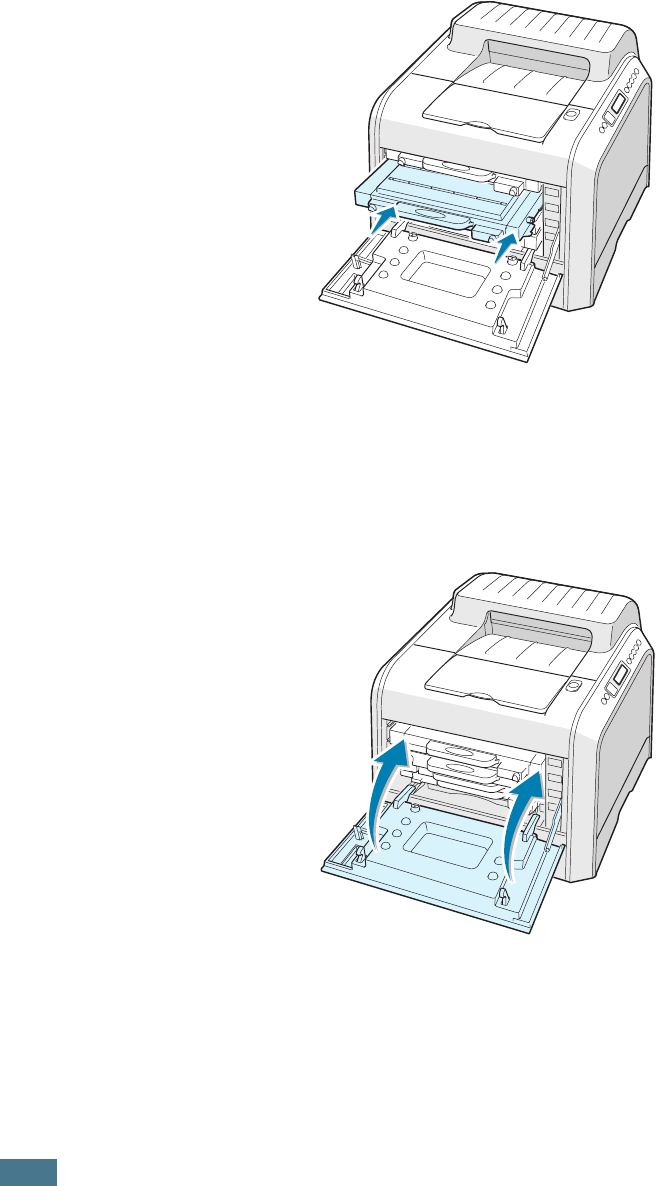
M
AINTAINING
Y
OUR
P
RINTER
6.10
7
Make sure that the color of the toner cartridge matches the
color slot and then slide the new toner cartridge into the
printer. Using both hands, grip the cartridge to insert into
the slot. Then hold the handle to slide the cartridge in.
Although you correctly install the toner cartridges, the black
and yellow toner cartridges are not inserted completely.
When you close the left cover, they insert into place.
8
Close the left cover A. Make sure that the cover is securely
latched, and then turn the printer on.
Make sure you have correctly installed the toner cartridge.
The left cover will not close properly if toner cartridges are
installed incorrectly. Never use force to close the cover.
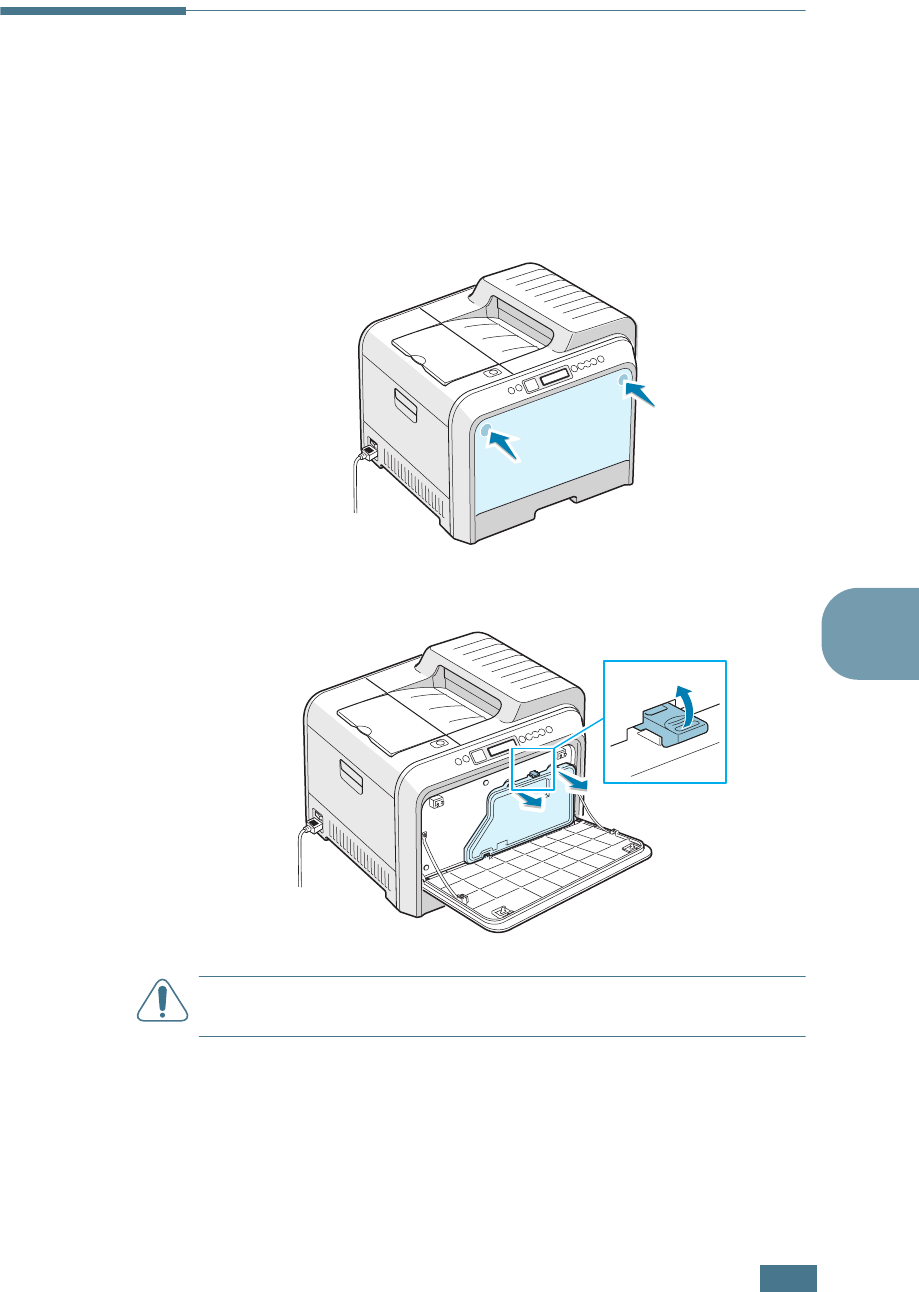
M
AINTAINING
Y
OUR
P
RINTER
6.11
6
Replacing the Waste Cartridge
Replace the waste cartridge when the control panel displays
‘Waste Box Full/Not Install’.
1
Unlatch the front cover, by quickly pressing and releasing it
using the depressions at the top.
2
Push the lock lever up and pull the waste cartridge out.
CAUTION
: Make sure that you lay the waste cartridge on a flat
surface so that the toner does not spill.

M
AINTAINING
Y
OUR
P
RINTER
6.12
3
Remove the container’s caps which are attached as shown
below and use them to close the waste cartridge.
4
Take a new waste cartridge out of the package.
5
Insert the lower of the new container into place and then
push it to make sure that it is seated in place.
6
Make sure that the lock lever latches the container.
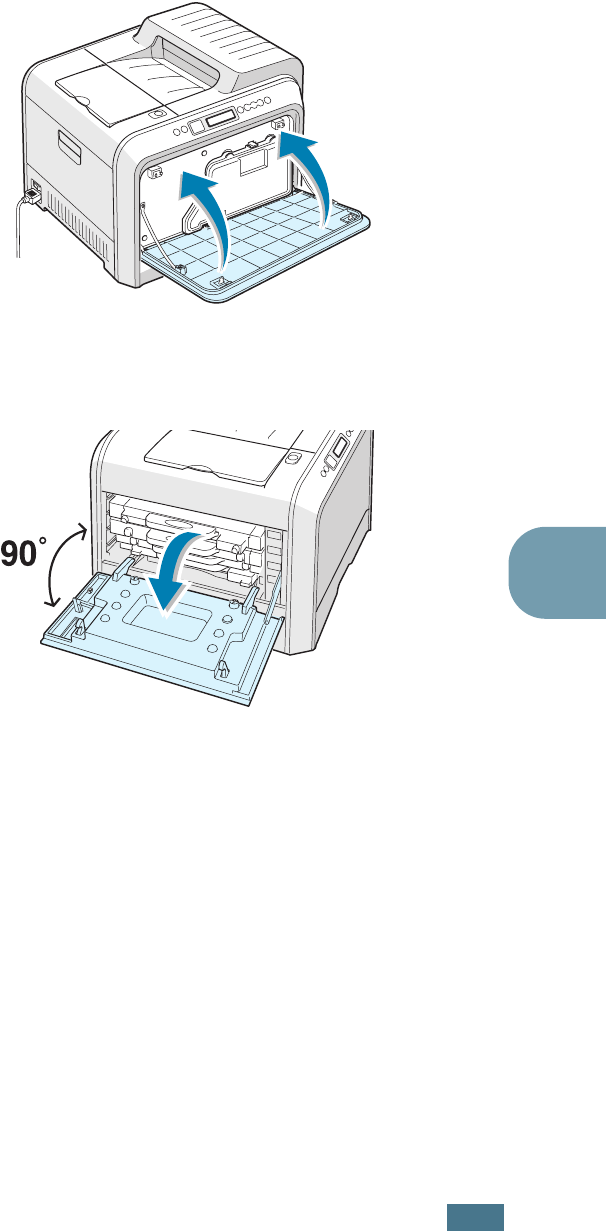
M
AINTAINING
Y
OUR
P
RINTER
6.13
6
7
Close the front cover. Make sure that the cover is securely
latched.
8
Using the handle, completely open the left cover A until it is
at right angles to the main frame and the toner cartridges
are ejected.
9
Close the left cover A firmly.
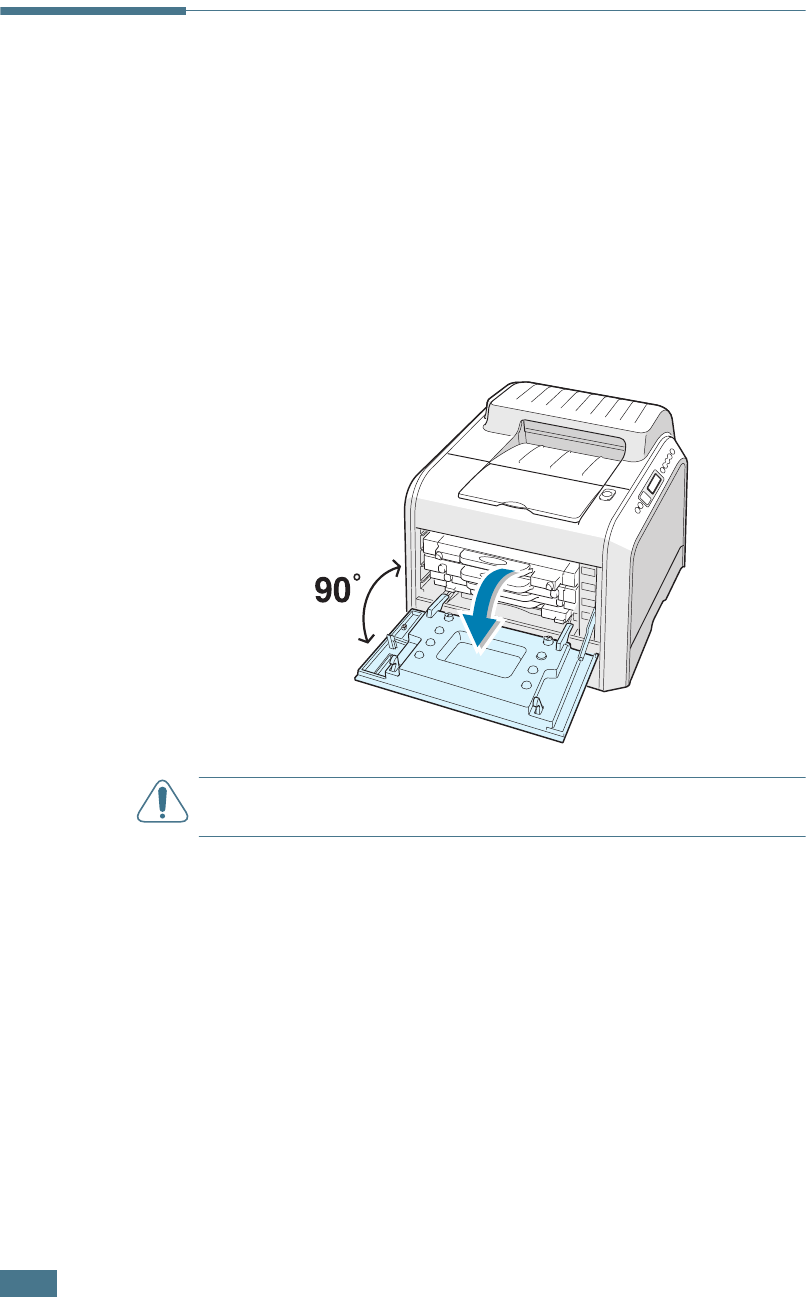
M
AINTAINING
Y
OUR
P
RINTER
6.14
Replacing the Imaging Unit
The life of the imaging unit is approximately 50,000 images.
Replace the imaging unit when the printer control panel displays
‘Replace Imaging Unit’.
1
Turn the printer off, then wait a few minutes for the printer
to cool.
2
Using the handle, completely open the left cover A until it is
at right angles to the main frame and the toner cartridges
are ejected.
CAUTION
: If the left cover A is not completely open, the top
cover release button does not press.
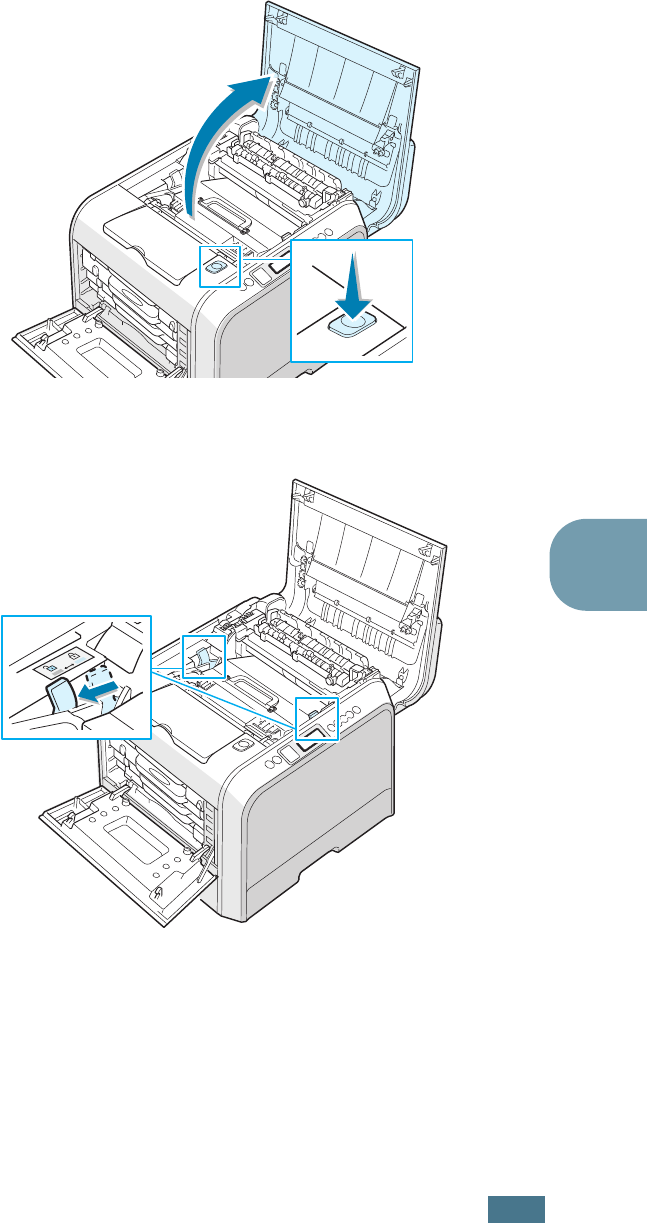
M
AINTAINING
Y
OUR
P
RINTER
6.15
6
3
Press the top cover release button to unlatch the top cover
B and open it all the way.
4
Pull the lock levers on each side towards you, as shown
below, to release the transfer belt.
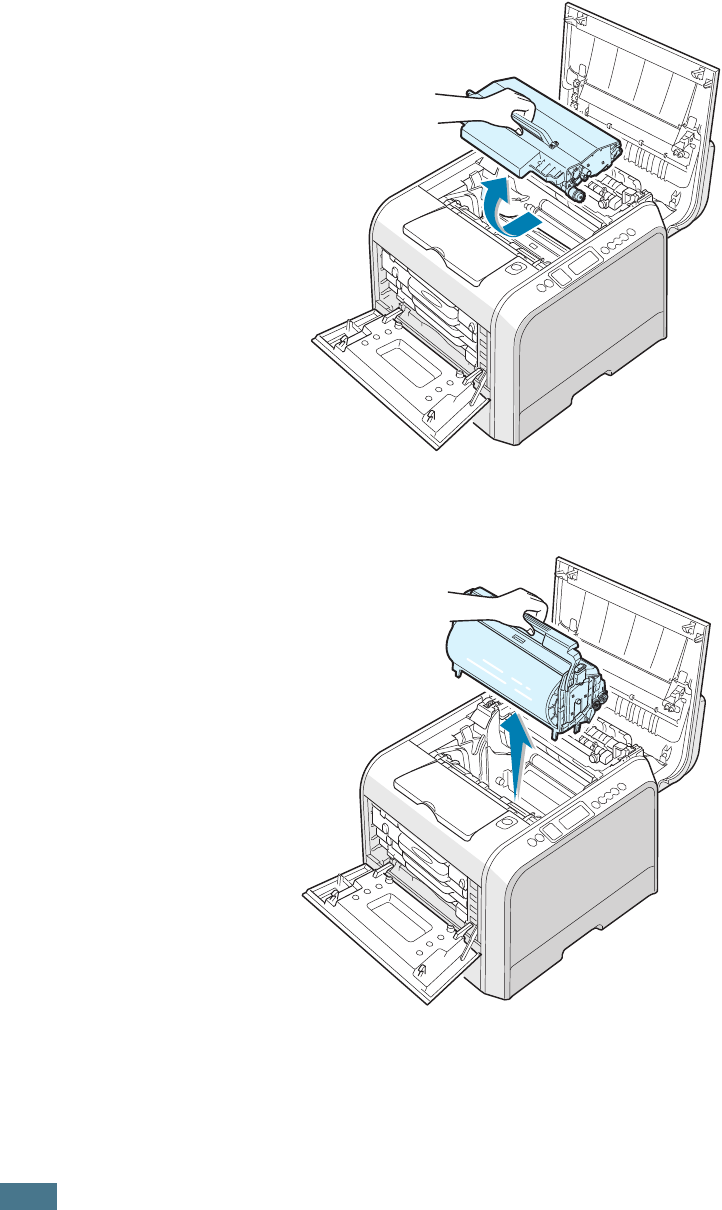
M
AINTAINING
Y
OUR
P
RINTER
6.16
5
Using the handle, lift the transfer belt out of the printer by
lightly pulling it towards the left of the printer. Set it on a
clean flat surface.
6
Lift the handle of the used imaging unit and use it to pull
the imaging unit out of the printer.