Samsung Electronics Co P6100 Laser Beam Printer User Manual Phaser 6100 Color Laser Printer User Guide
Samsung Electronics Co Ltd Laser Beam Printer Phaser 6100 Color Laser Printer User Guide
Contents
- 1. Users Manual 1
- 2. Users Manual 2
Users Manual 2
M
AINTAINING
Y
OUR
P
RINTER
6.17
6
7
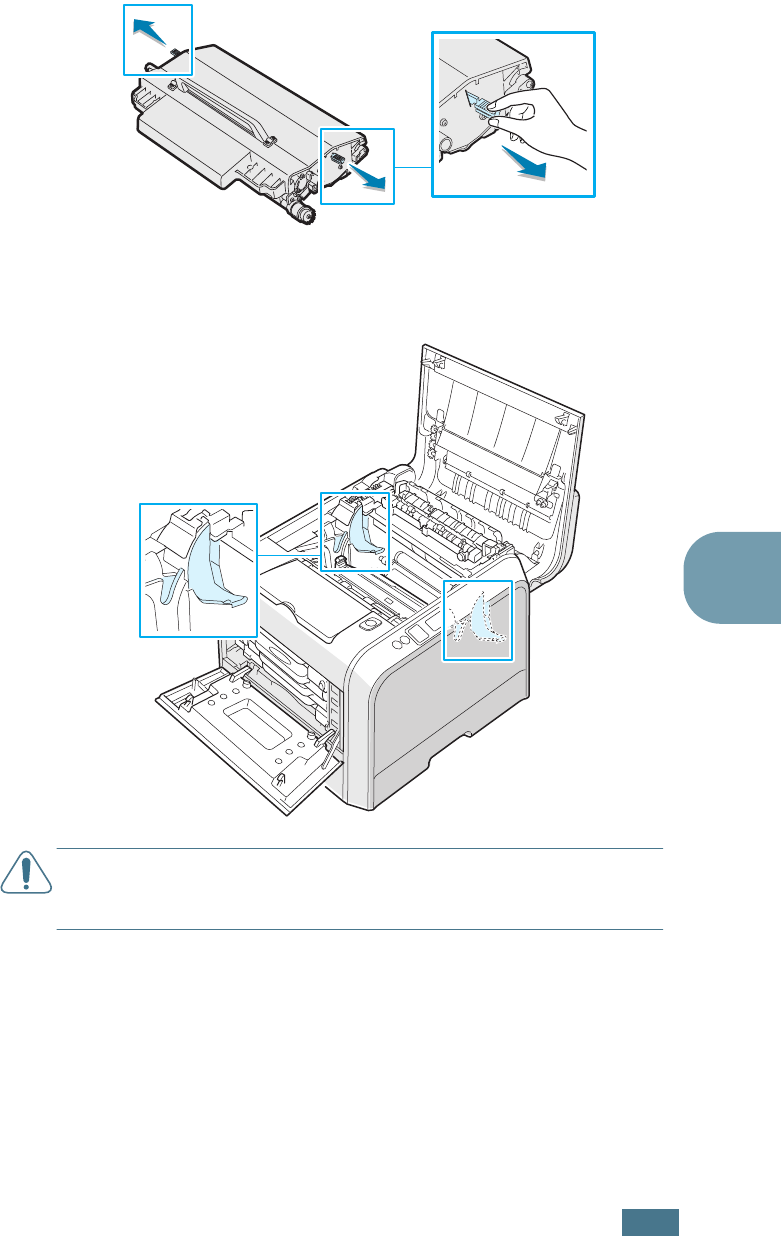
Take a new imaging unit out of the package using the
handle.
8
Remove the paper covering the imaging unit by removing
the tape under the handle of the imaging unit.
CAUTIONS
:
• Don’t use sharp objects, such as a knife or scissors, to open the
imaging unit package and tape on the protective paper liner. You
could damage the surface of the imaging unit.
• To prevent damage, do not expose the imaging unit to light for
more than a few minutes. Cover it with black paper, if necessary.
• Close the top and left cover A should the setup need to be halted
for any reason.
• Do not touch the surface of the green roller on the imaging unit
or print quality problems can occur.
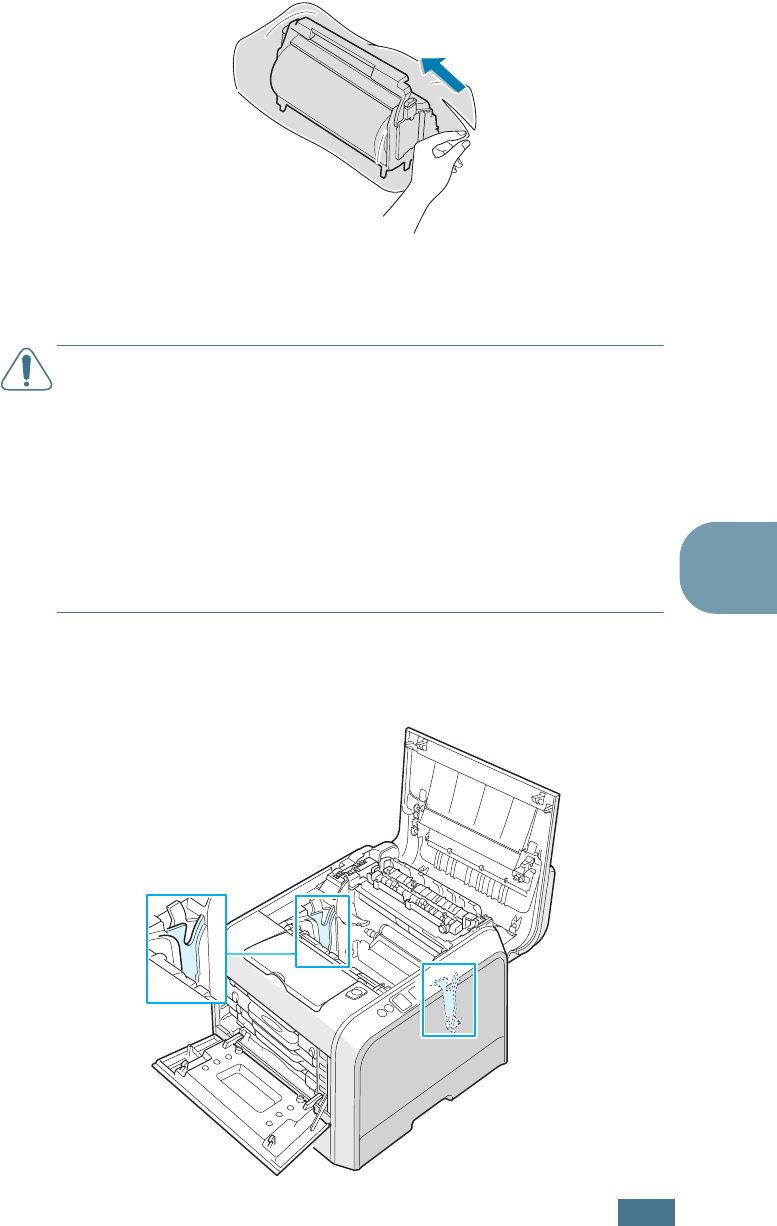
9
Locate the imaging unit slots inside the printer, one on each
side.
M
AINTAINING
Y
OUR
P
RINTER
6.18
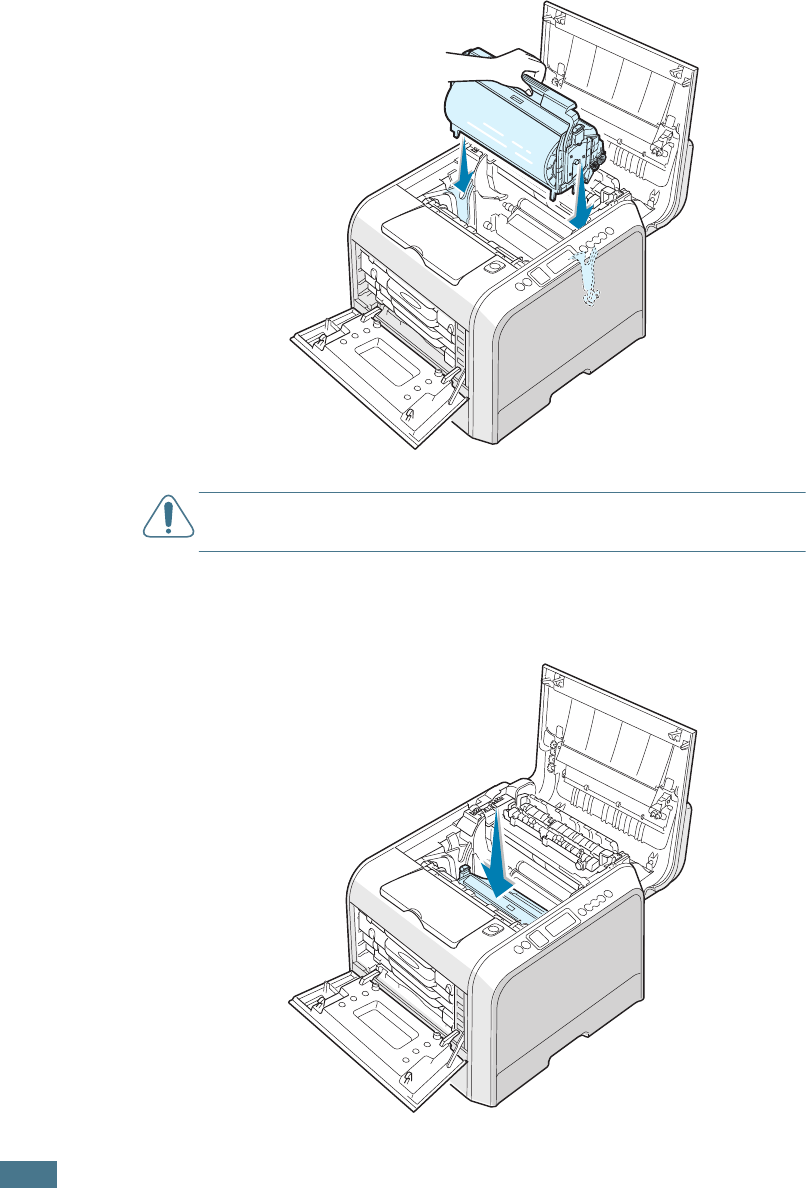
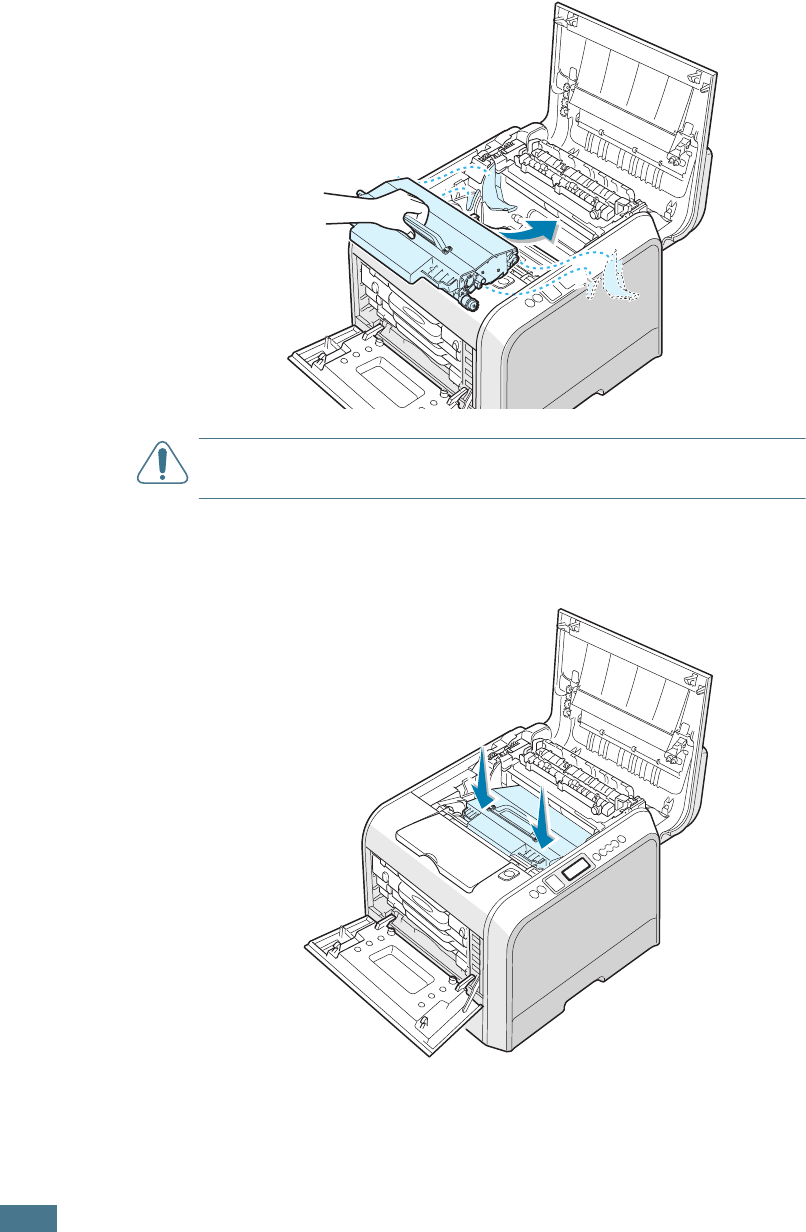
10
Hold the handle of the new imaging unit with the green
roller facing you. Align the imaging unit with the slots in
your printer so that the colors on both sides of the imaging
unit slide into the corresponding colors of the slots.
CAUTION
:
Insert the imaging unit carefully so as not to scratch
and damage the surface of the green roller.
11
Slide the imaging unit down into the printer until it cannot
be pushed in any further and fold the handle down.
M
AINTAINING
Y
OUR
P
RINTER
6.19
6
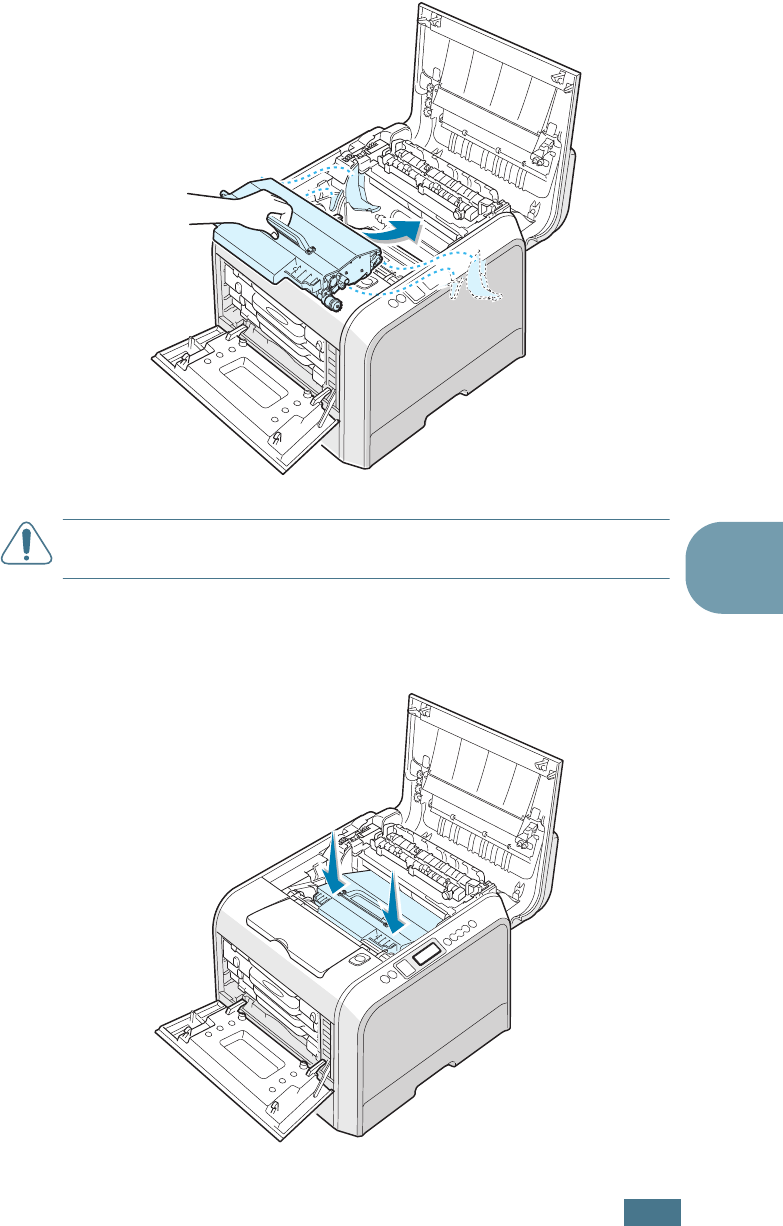
12
To replace the transfer belt, hold its handle and then align it
with the slots inside your printer, on each side.
CAUTION
: Do not turn the transfer belt over. If you do this, the
toner may spill.
13
Slide the transfer belt down into the printer and press it
firmly into place.
M
AINTAINING
Y
OUR
P
RINTER
6.20
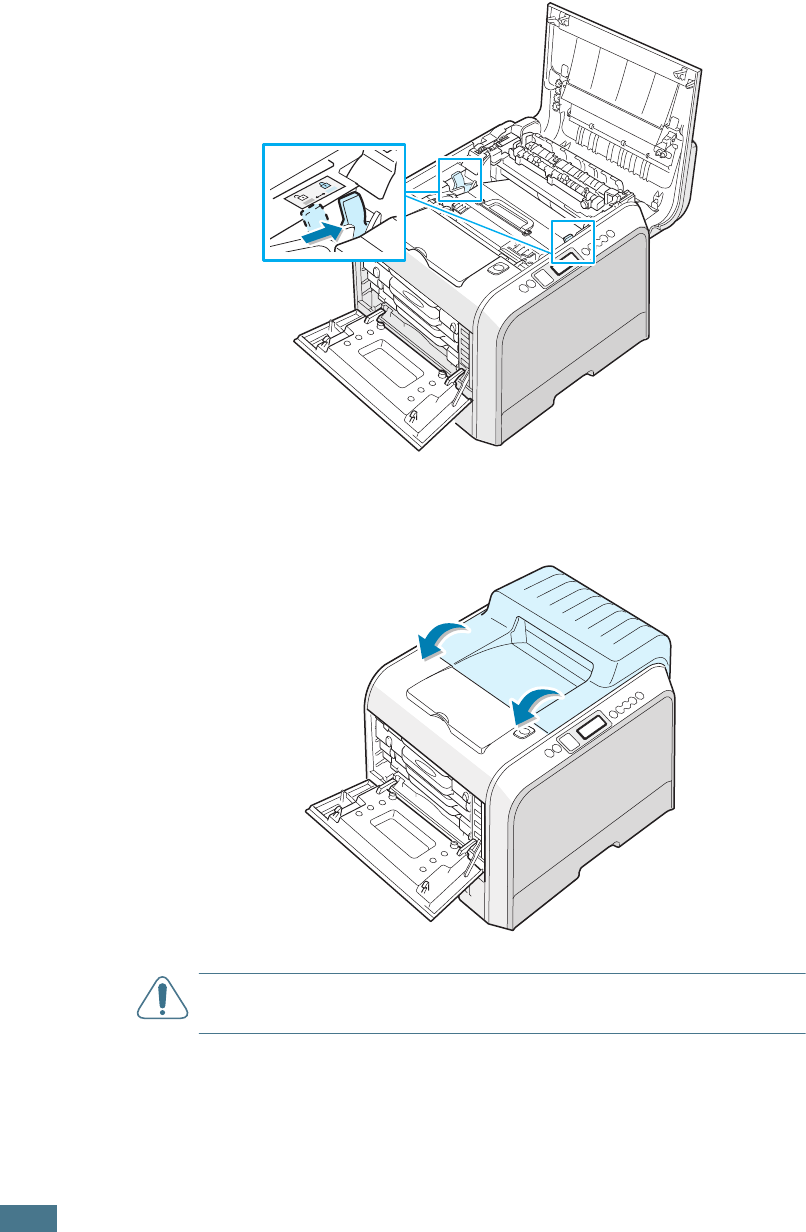
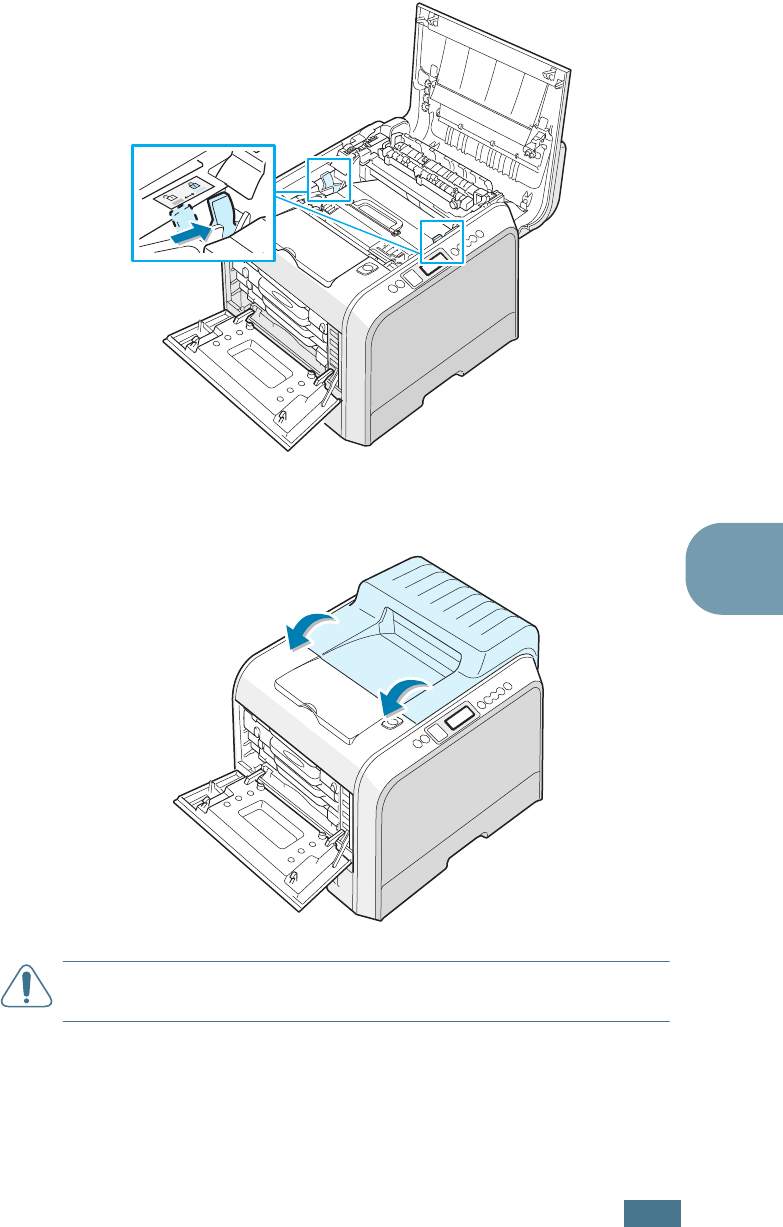
14
Firmly push the lock levers on each side towards the top
cover B, as shown below, to lock the transfer belt into place.
15
After making sure that the left cover A is open, close the
top cover B. Make sure that it is securely latched.
CAUTION
: Do not try to close the left cover A with the top cover B
open. This may cause damage to the printer.
M
AINTAINING
Y
OUR
P
RINTER
6.21
6
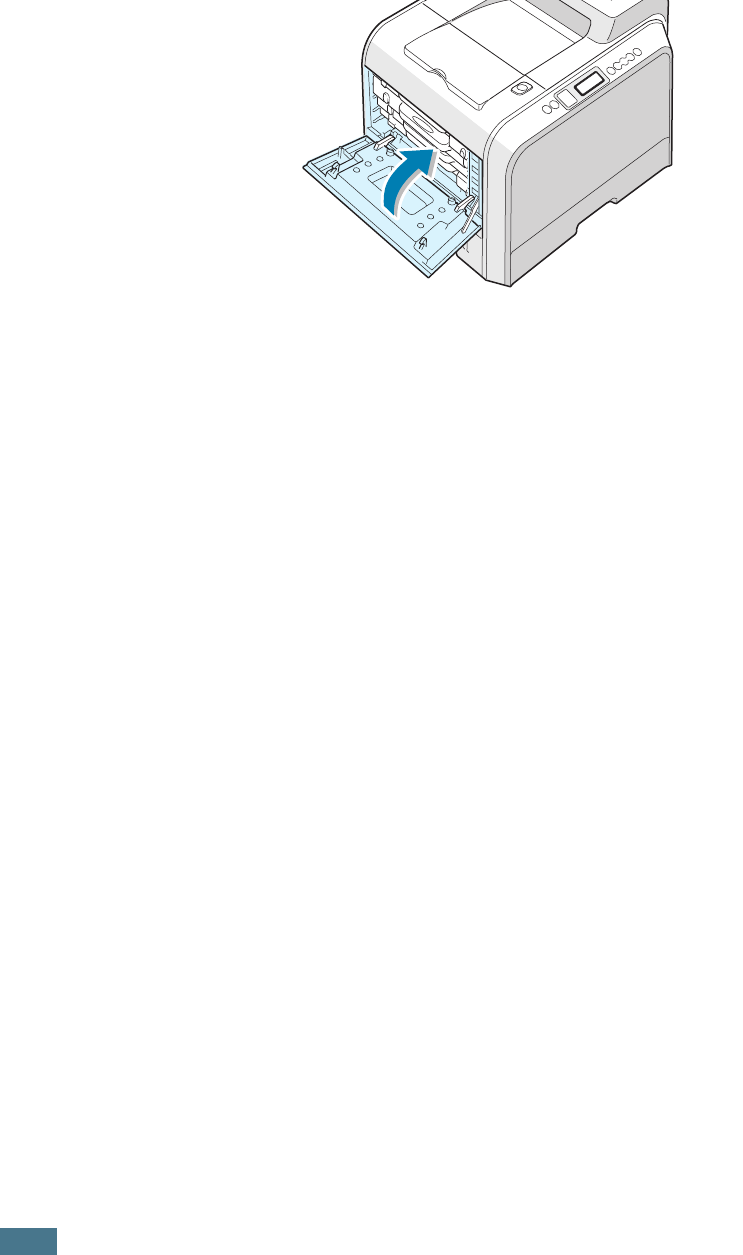
16
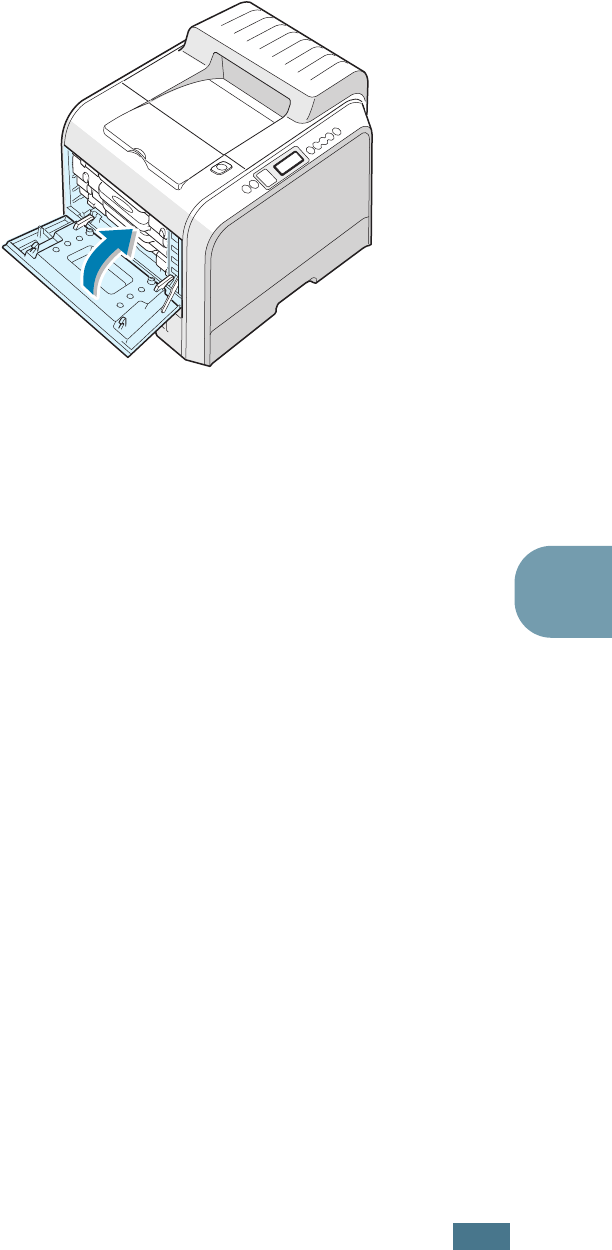
Close the left cover A firmly.
17
Turn the printer on.
M
AINTAINING
Y
OUR
P
RINTER
6.22
Replacing the Transfer Belt
The life of the transfer belt is approximately 50,000 images.
Replace the transfer belt when the control panel displays
‘Replace Transfer Belt’.
To replace the transfer belt:
1
Turn the printer off, then wait a few minutes for the printer
to cool.
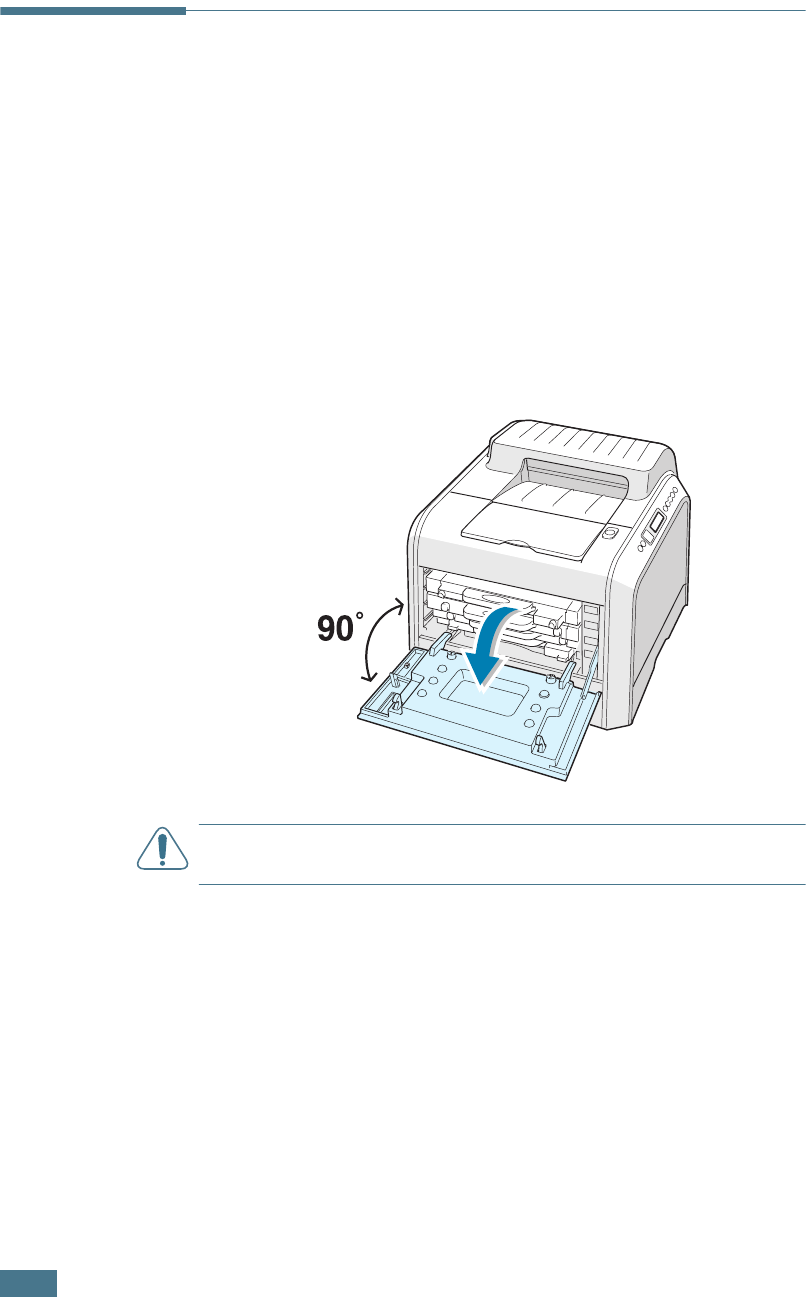
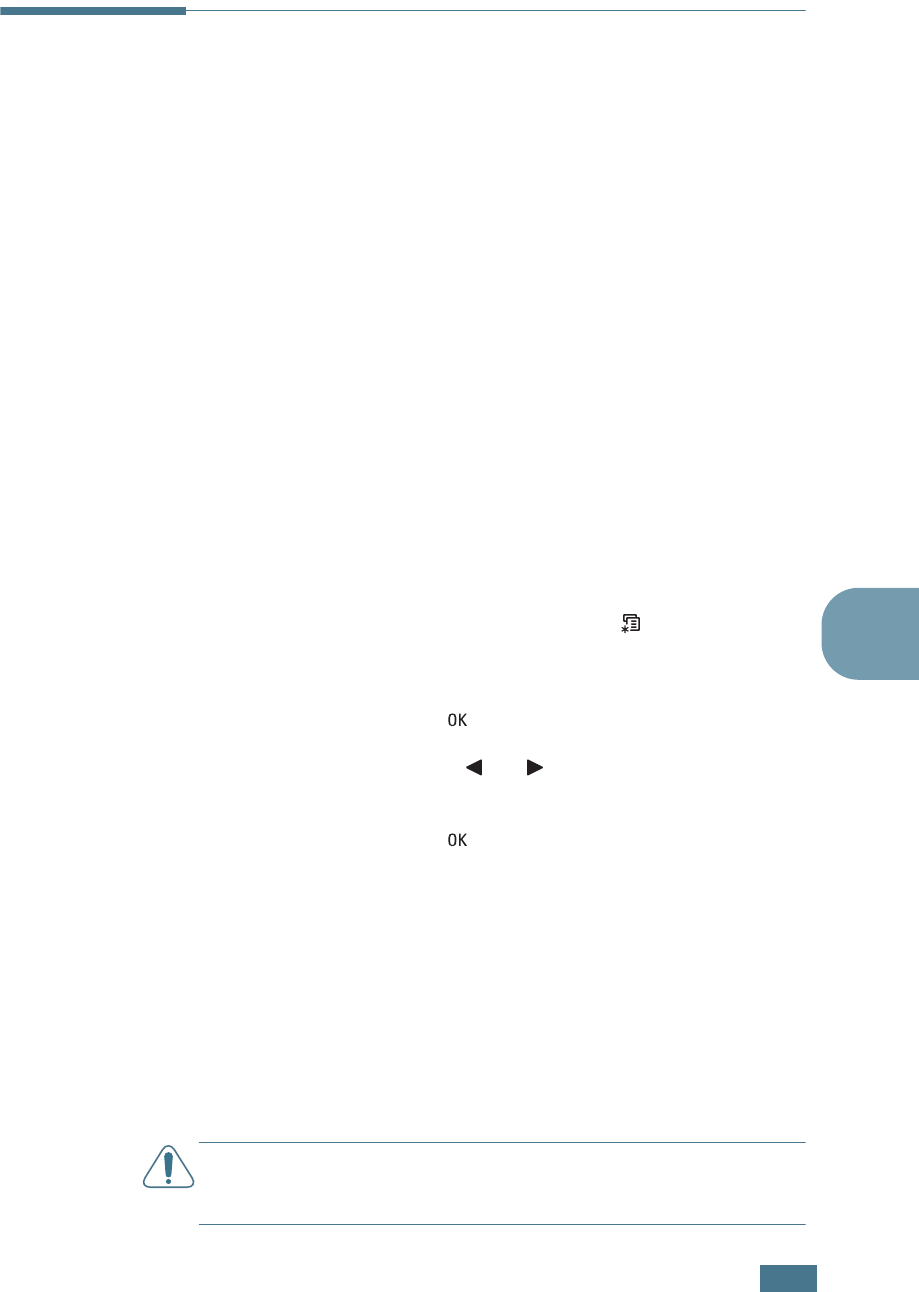
2
Using the handle, completely open the left cover A until it is
at right angles to the main frame and the toner cartridges
are ejected.
CAUTION
: If the left cover A is not completely open, the top
cover release button does not press.
M
AINTAINING
Y
OUR
P
RINTER
6.23
6
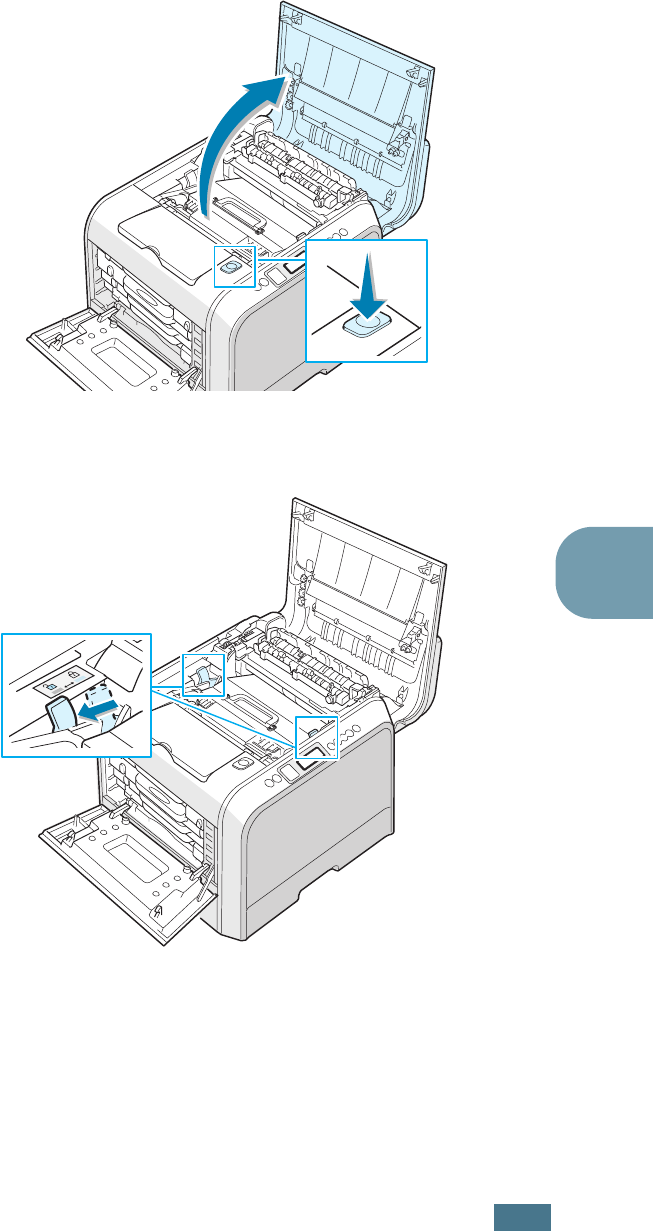
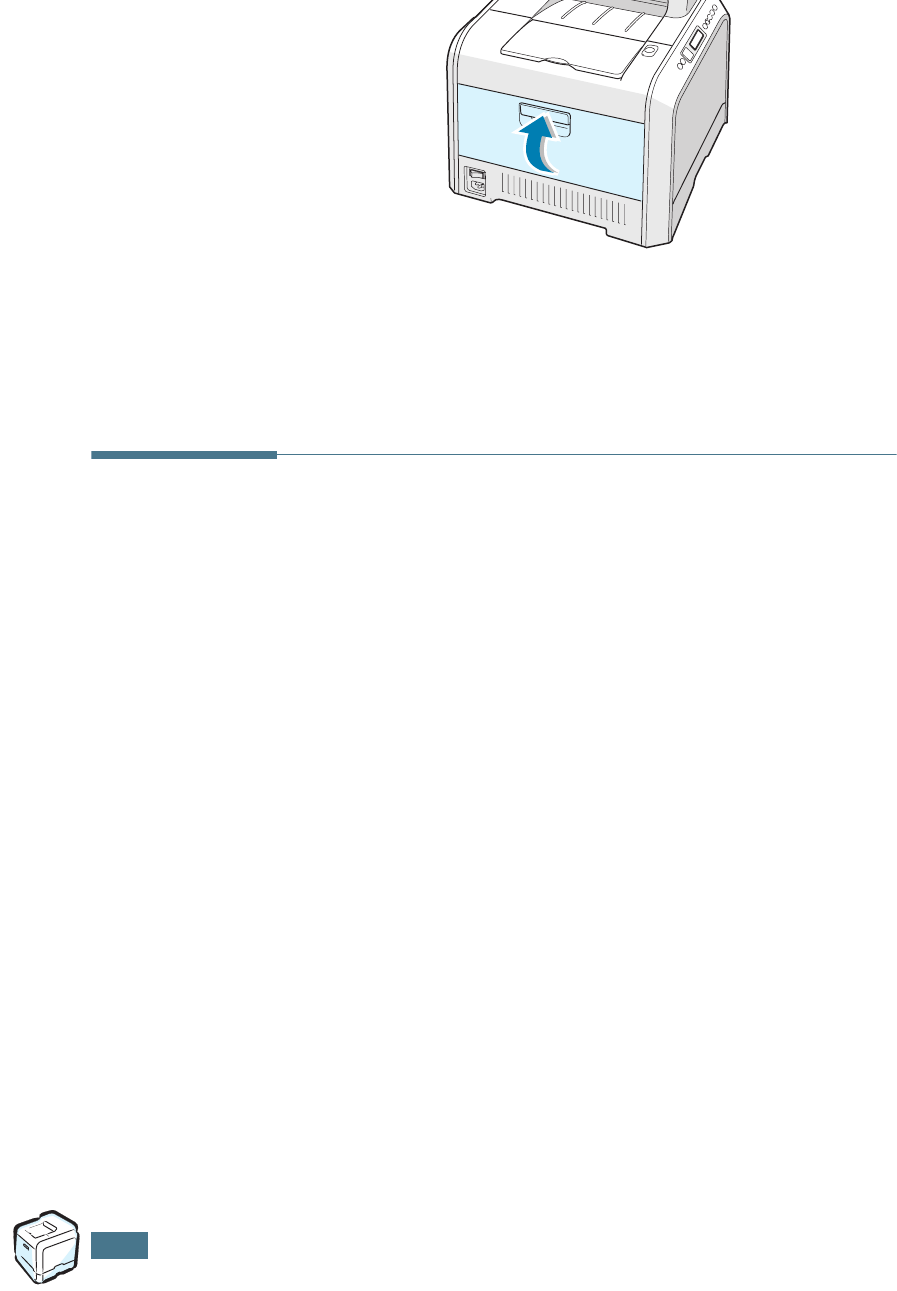
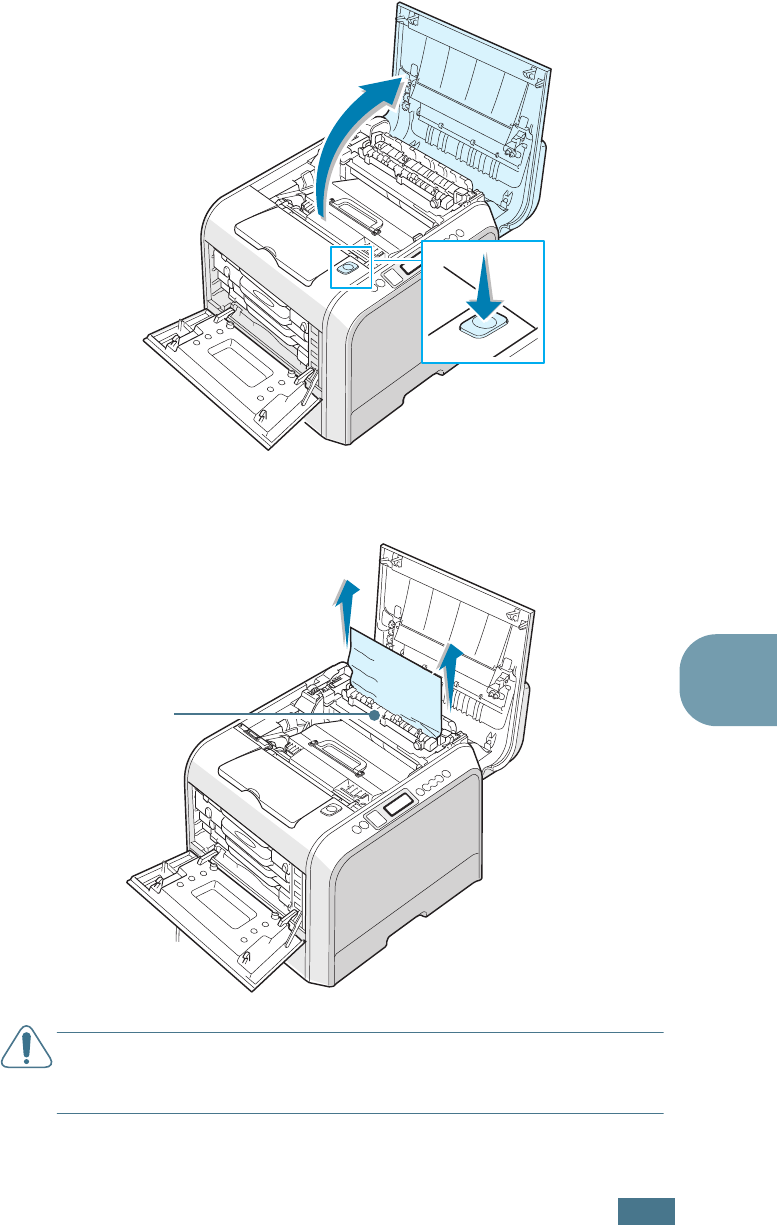
3
Press the top cover release button to unlatch the top cover
B and open it all the way.
4
Pull the lock levers on each side towards you, as shown
below, to release the transfer belt.
M
AINTAINING
Y
OUR
P
RINTER
6.24
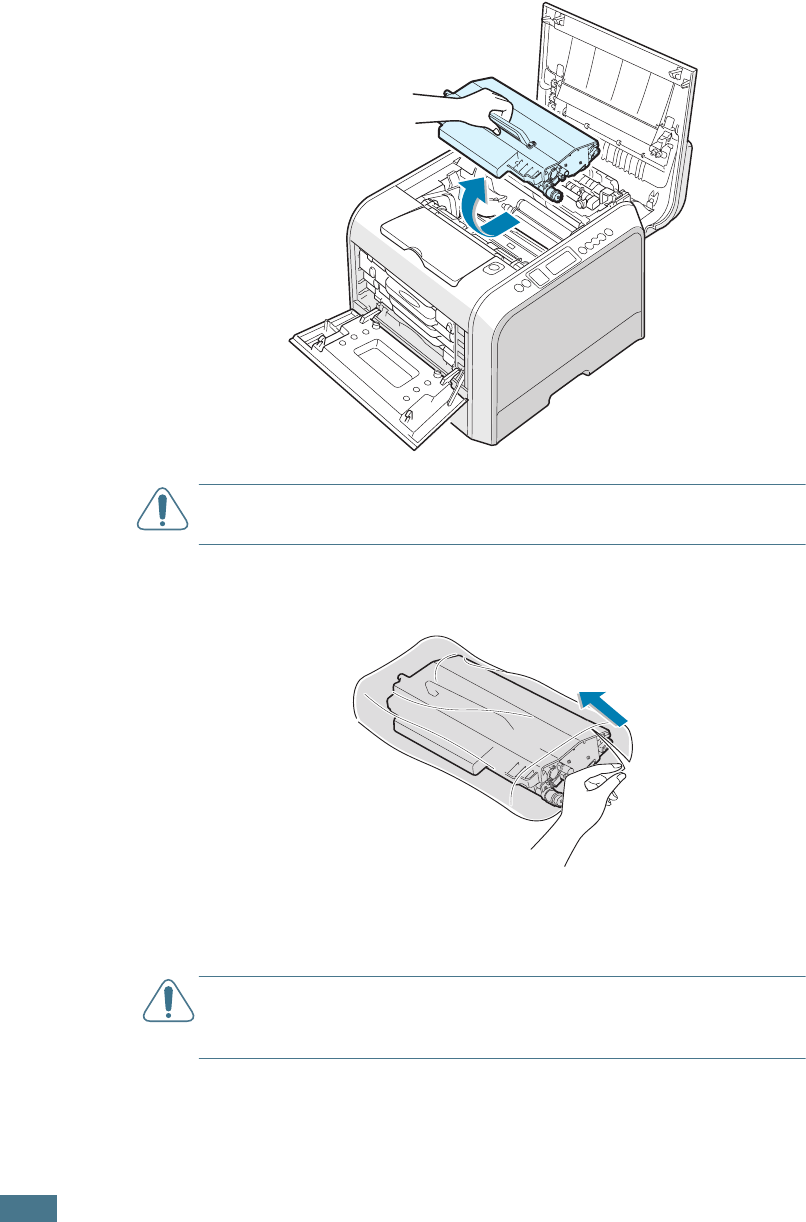
5
Using the handle, lift the used transfer belt out of the
printer by lightly pulling it towards the left of the printer.
CAUTION
: Keep the transfer belt level, do not turn the transfer
belt over otherwise loose toner may be spilled.
6
Take a new transfer belt out of the package.
7
Remove the paper covering the transfer belt by removing
the tape under the handle of the transfer belt.
CAUTION
:
Don’t use sharp objects, such as a knife or scissors, to
open the transfer belt package. You could damage the surface of
the transfer belt.
M
AINTAINING
Y
OUR
P
RINTER
6.25
6
8
Pinch the transfer belt tension levers on both sides of the
transfer belt. Then, pull them out, as shown below.
9
Locate the transfer belt slots inside the printer, one on each
side.
CAUTION
:
To prevent damage, do not expose the imaging unit to
light for more than a few minutes. Close the top and left cover A
should the setup need to be halted for any reason.
M
AINTAINING
Y
OUR
P
RINTER
6.26
10
Hold the handle on the new transfer belt and then align it
with the slots inside your printer, on each side.
CAUTION
: Keep the transfer belt level, do not turn the transfer
belt over otherwise loose toner may be spilled.
11
Slide the new transfer belt down into the printer and press
it firmly into place.
M
AINTAINING
Y
OUR
P
RINTER
6.27
6
12
Firmly push the lock levers on each side towards the top
cover B, as shown below, to lock the transfer belt into place.
13
After making sure that the left cover A is open, close the
top cover B. Make sure that it is securely latched.
CAUTION
: Do not try to close the left cover A with the top cover B
open. This may cause damage to the printer.
M
AINTAINING
Y
OUR
P
RINTER
6.28
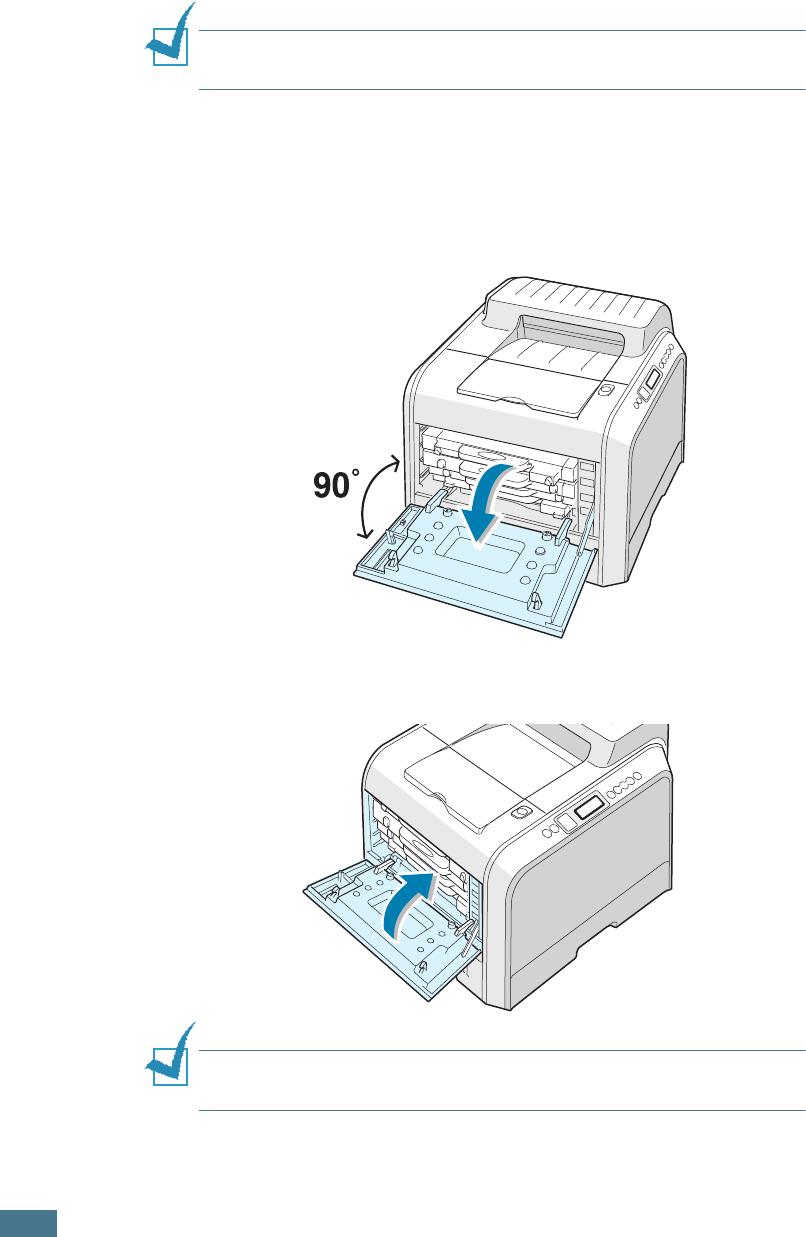
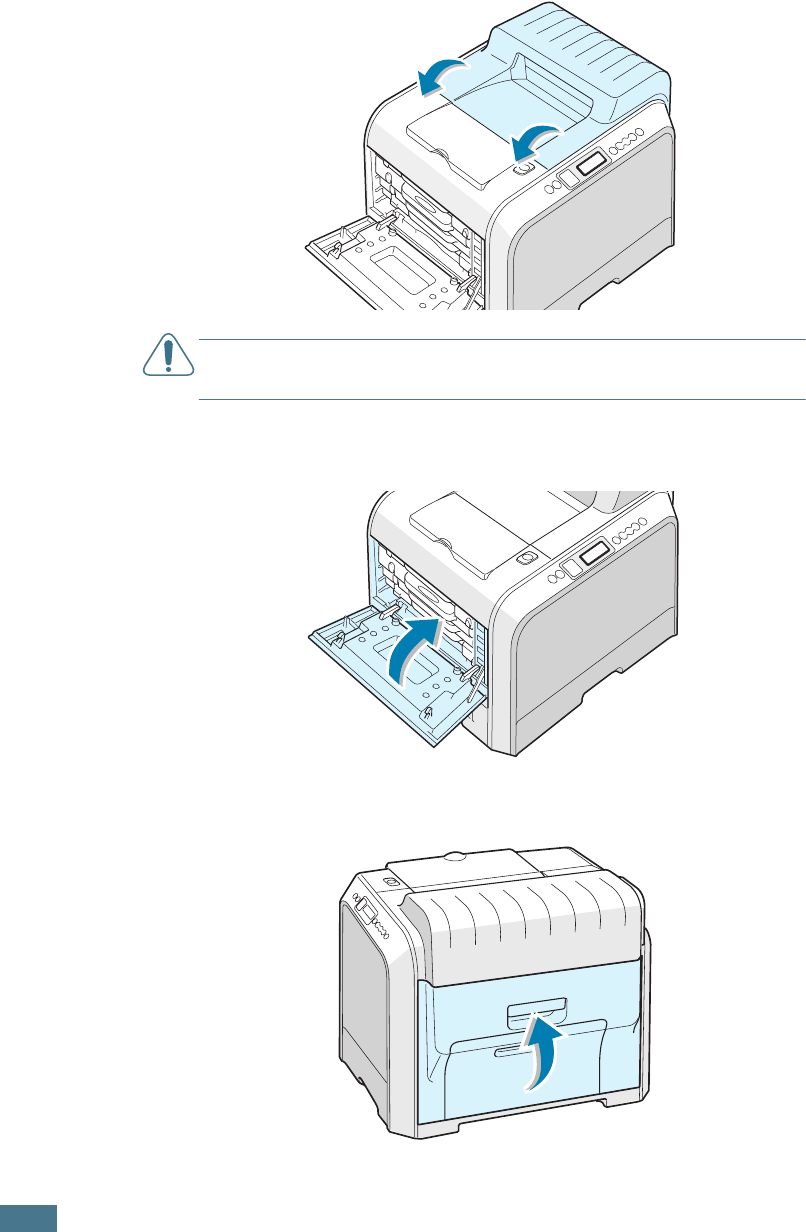
14
Close the left cover A firmly.
15
Turn the printer on.
M
AINTAINING
Y
OUR
P
RINTER
6.29
6
Cleaning the Printer
Your printer needs little maintenance, other than periodic
cleaning, to keep it producing quality prints. See the following
options for methods to use when cleaning your printer:
• Printing a Cleaning Page
• Cleaning the Outside of the Printer
• Cleaning the Laser Scanning Unit (LSU) Inside the Printer
• Cleaning the Inside of the Printer
Printing a Cleaning Page
You can print a fuser cleaning sheet. It cleans the fuser unit
inside the printer.
This process produces a page with toner debris, which you
should throw away.
1
Ensure that the printer is turned on and in ready mode with
paper loaded in the tray.
2
In ready mode press the Menu button ( ) on the control
panel until you see ‘Maintenance’ on the bottom line of the
display.
3
Press the OK button ( ) to access the menu.
4
Press the scroll button ( or ) until ‘Cleaning Page’
displays.
5
Press the OK button ( ).
‘Cleaning Now’ appears on the display and your printer
automatically prints out the cleaning sheet with dust or toner
particles on it.
Cleaning the Outside of the Printer
Clean the cabinet of the printer with a soft, lint-free cloth. You
can dampen the cloth slightly with water, but be careful not to
be let any water drip onto the printer or inside of it.
CAUTION
: Cleaning the cabinet of the printer with cleaners
containing large amounts of alcohol, solvent or other strong
substances can discolor or crack the cabinet.
M
AINTAINING
Y
OUR
P
RINTER
6.30
Cleaning the Laser Scanning Unit (LSU)
Inside the Printer
NOTE
: Clean the LSU when you remove the particles of paper,
toner and dust inside the printer.
Open and close the left cover A to clean the LSU inside of the
printer automatically.
1
Using the handle, completely open the left cover A until it is
at right angles to the main frame and the toner cartridges
are ejected.
2
Close the left cover A firmly.
NOTE
: Repeat this procedure as many times as necessary to
clean the Laser Scanning Unit (LSU).
M
AINTAINING
Y
OUR
P
RINTER
6.31
6
Cleaning the Inside of the Printer
NOTE
:
While cleaning the inside of the printer, be careful not to
touch the transfer roller located underneath the toner cartridge.
Oil from your fingers can cause print quality problems.
1
Turn the printer off and unplug the power cord, then wait a
few minutes for the printer to cool.
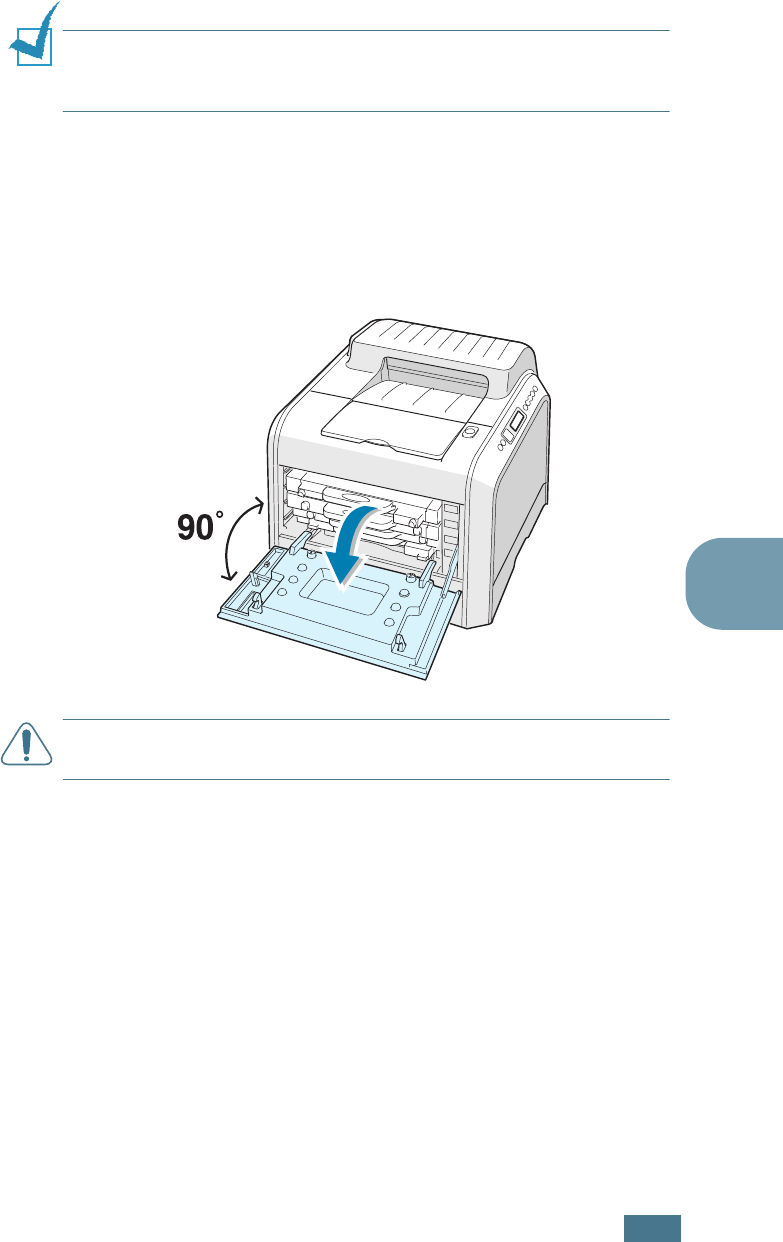
2
Using the handle, completely open the left cover A until it is
at right angles to the main frame and the toner cartridges
are ejected.
CAUTION
: If the left cover A is not completely open, the top
cover release button does not press.
M
AINTAINING
Y
OUR
P
RINTER
6.32
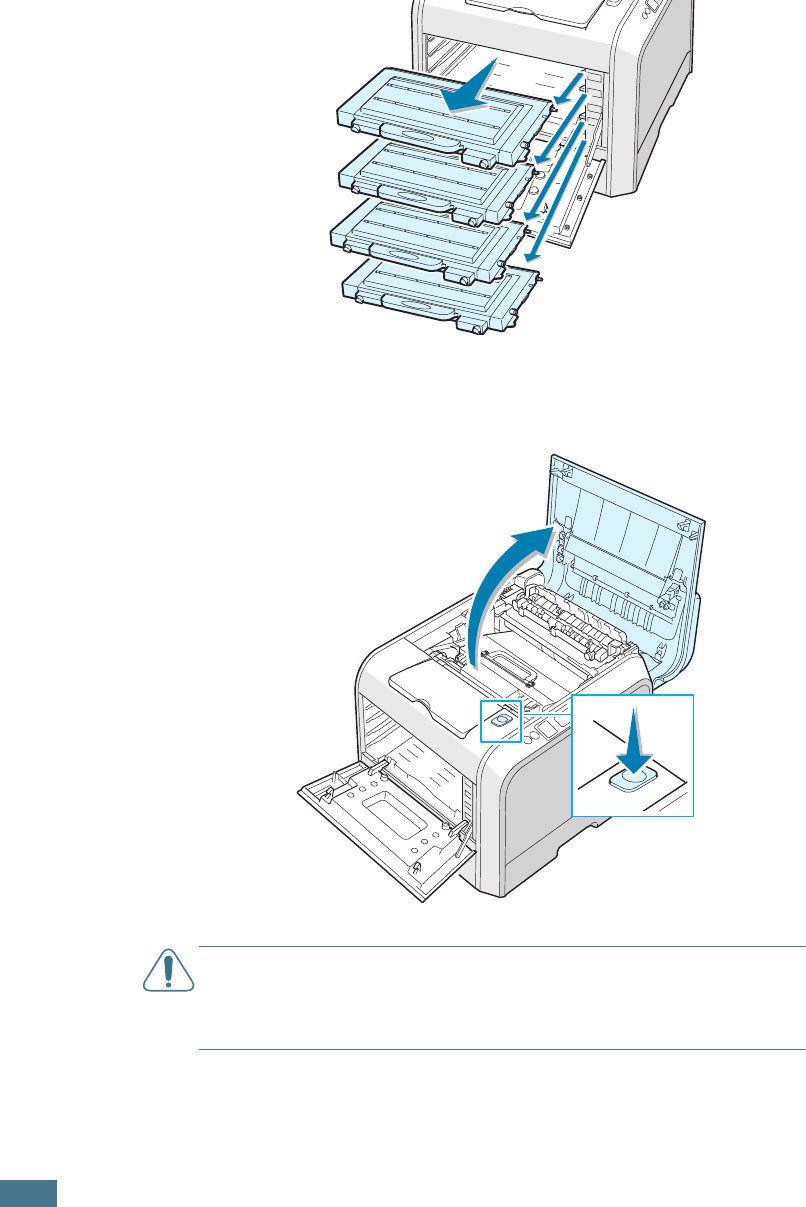
3
Pull the handle lightly first, and then holding the toner
cartridges, remove them from the printer. Set them on a
clean flat surface.
4
Press the top cover release button to unlatch the top cover
B and open it all the way.
CAUTION
: If you open the left cover A for a few minutes, the
imaging unit can be exposed to light. This causes damage to the
imaging unit. Close the top and left cover A should the setup need
to be halted for any reason.
M
AINTAINING
Y
OUR
P
RINTER
6.33
6
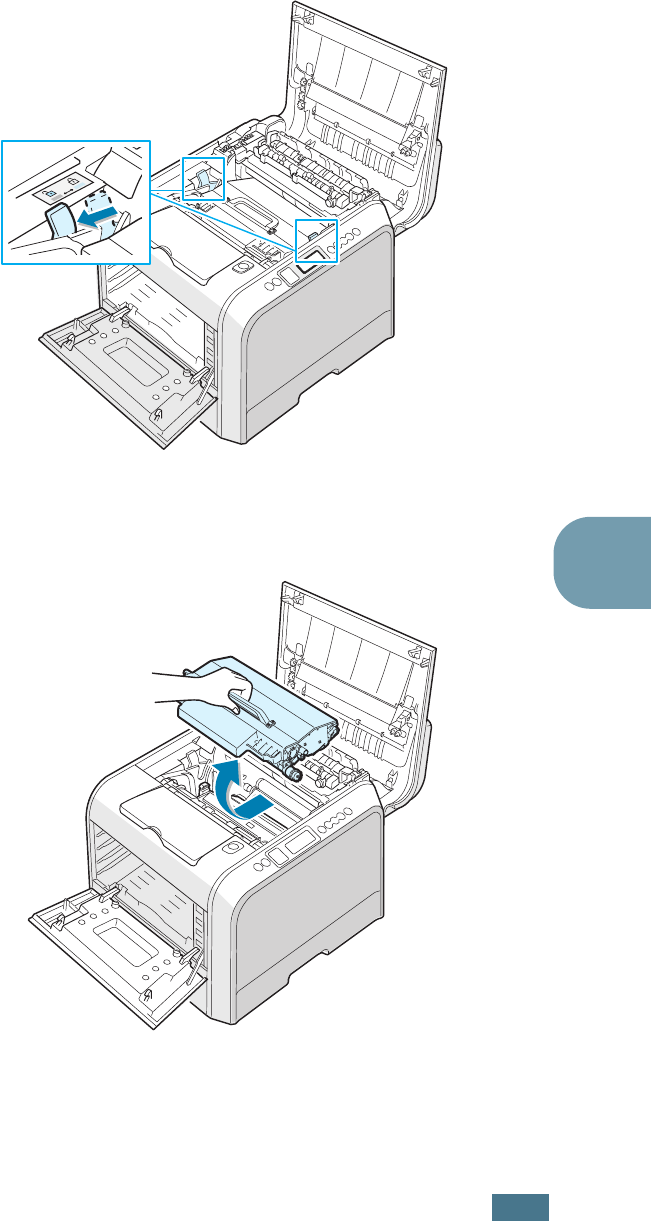
5
Pull the lock levers on each side towards you, as shown
below, to release the transfer belt.
6
Using the handle, lift the transfer belt out of the printer by
lightly pulling it towards the left of the printer. Set it on a
clean flat surface.
M
AINTAINING
Y
OUR
P
RINTER
6.34
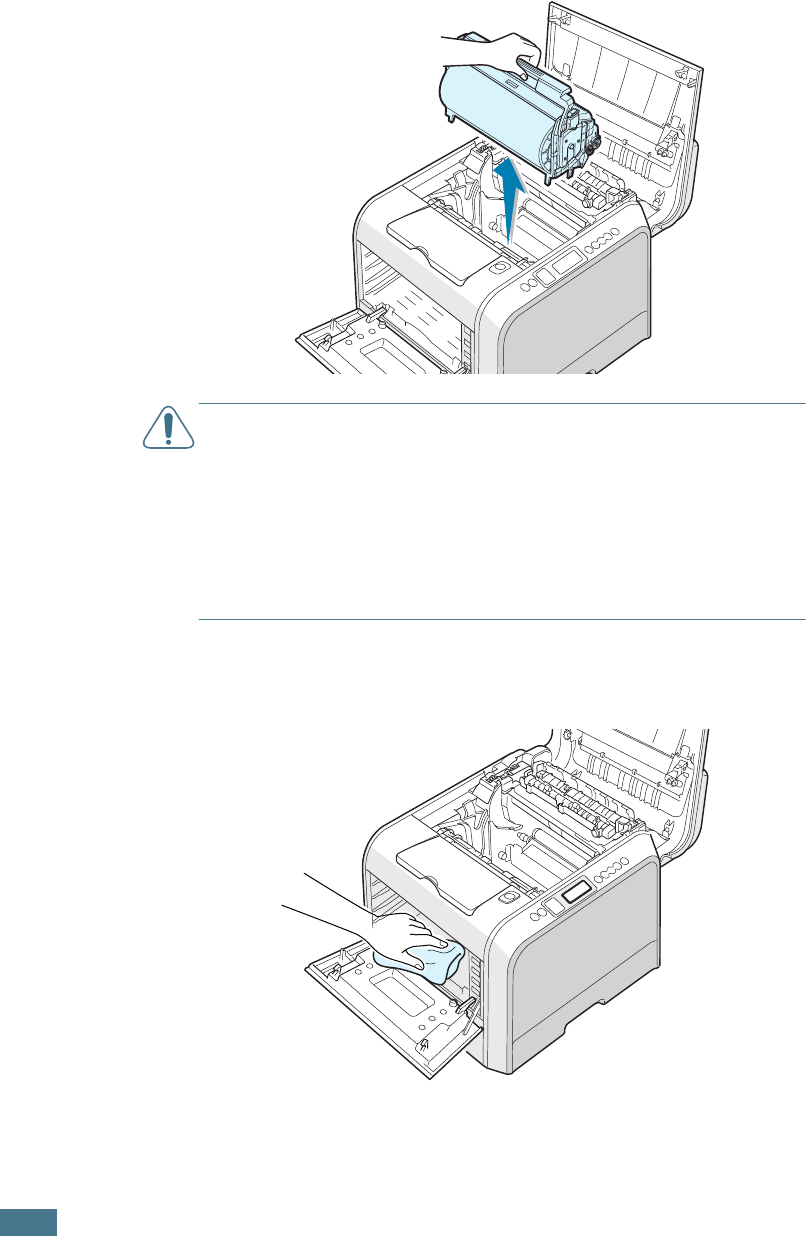
7
Lift the handle of the imaging unit and use it to pull the
imaging unit out of the printer. Set it on a clean flat surface.
CAUTIONS
:
• To prevent damage, do not expose the imaging unit to light
for more than a few minutes. Cover it with black paper, if
necessary.
• Close the top and left cover A should the setup need to be halted
for any reason.
• Do not touch the surface of the green roller on the imaging unit
or print quality problems can occur.
8
Look inside the printer. Remove any dust, paper particles,
and spilled toner with a damp, soft lint-free cloth.
M
AINTAINING
Y
OUR
P
RINTER
6.35
6
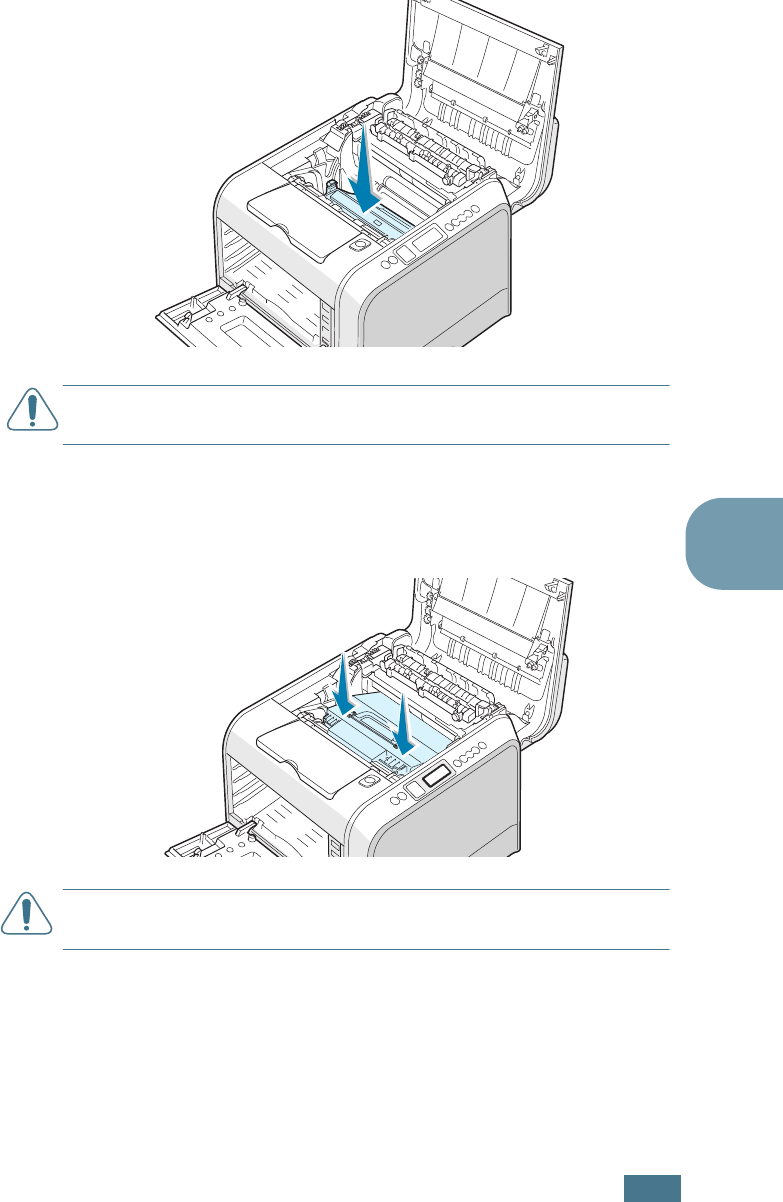
9
Insert the imaging unit back into the printer. Make sure you
hear it click, and then fold the handle down. For details, see
steps 9 to 10 on page 6.17.
CAUTION
: Replace the imaging unit carefully so as not to scratch
and damage the surface of the green roller on the imaging unit.
10
Insert the transfer belt back into the printer. Press it firmly
to make sure it fits into place. For details, see steps 9 and
10 on page 6.25.
CAUTION
: Keep the transfer belt level, do not turn the transfer
belt over otherwise loose toner may be spilled.
M
AINTAINING
Y
OUR
P
RINTER
6.36
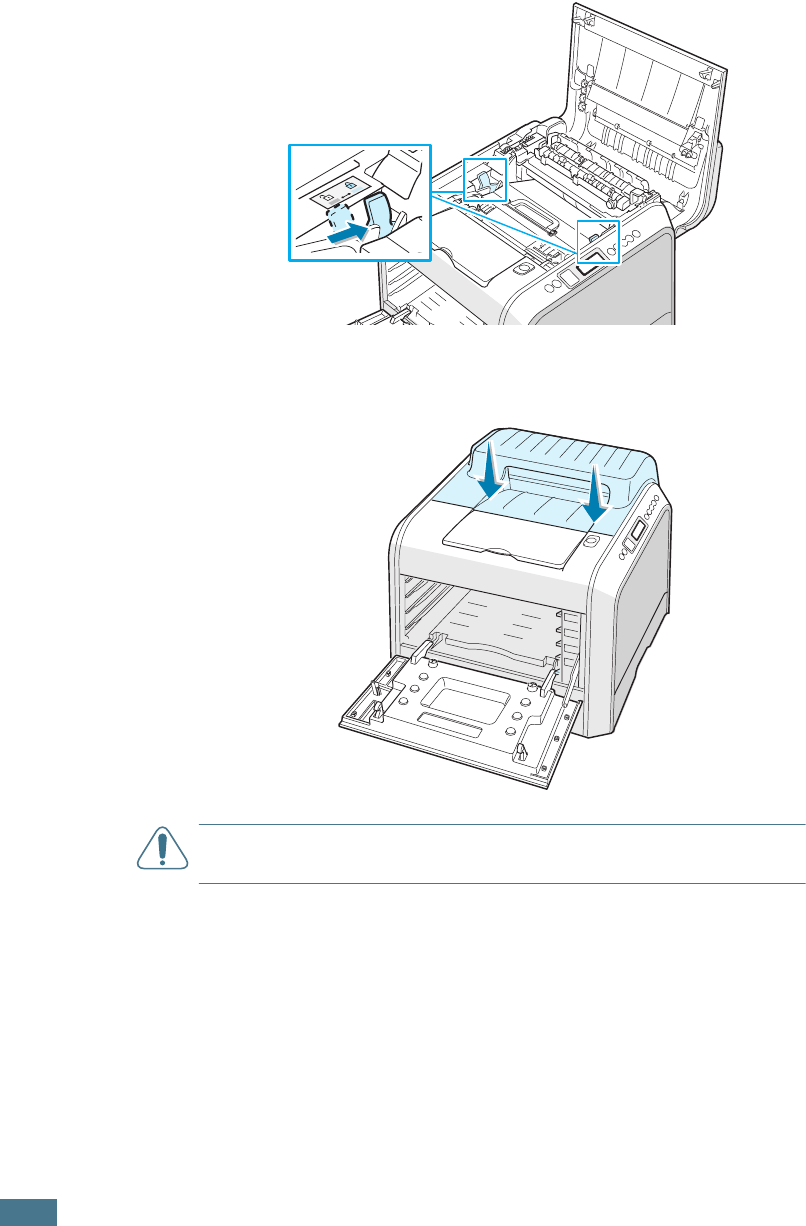
11
Firmly push the lock levers on each side towards the top
cover B, as shown below, to lock the transfer belt into place.
12
After making sure that the left cover A is open, close the
top cover B. Make sure that it is securely latched.
CAUTION
: Do not try to close the left cover A with the top cover B
open. This may cause damage to the printer.
M
AINTAINING
Y
OUR
P
RINTER
6.37
6
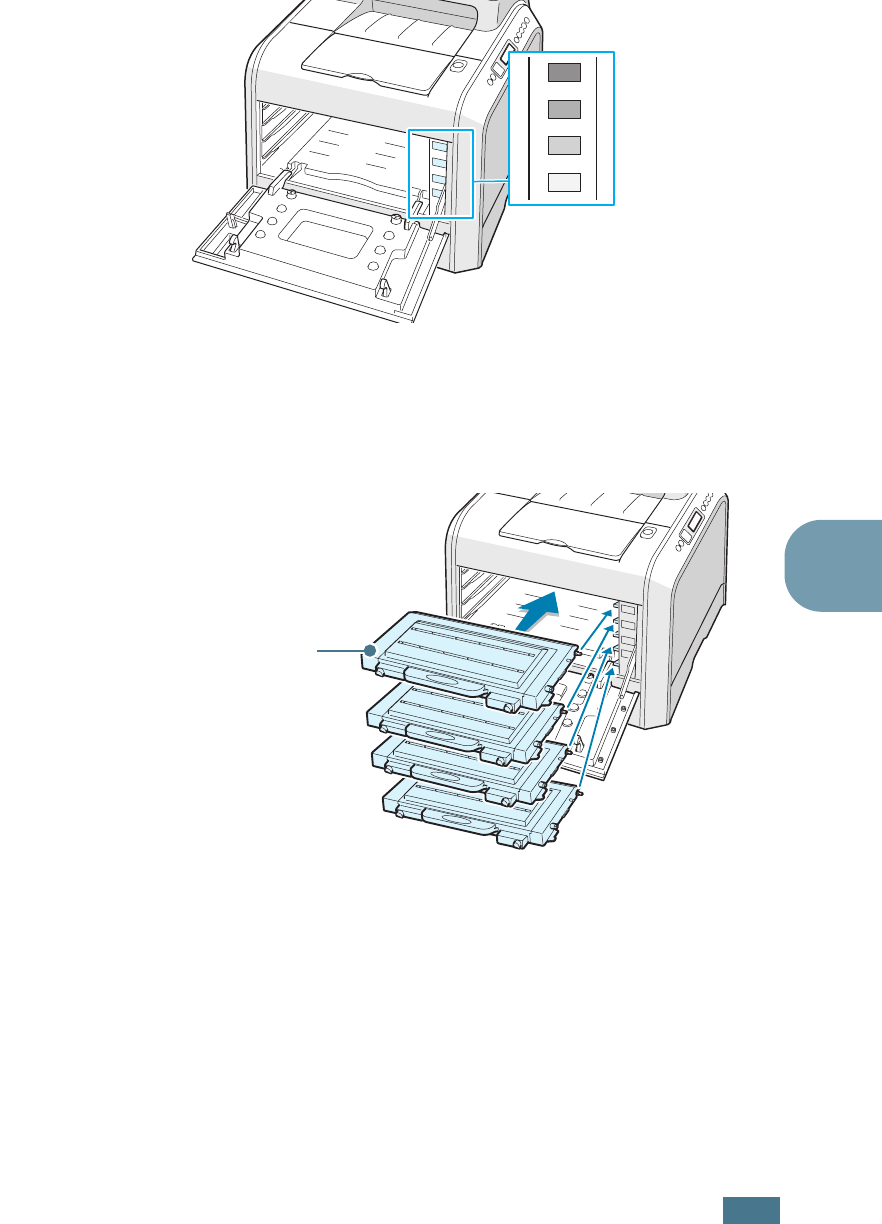
13
Look inside the printer on the right and then locate the color
of the toner cartridges that matches the color of the slot.
14
Holding each toner cartridge, insert them into their
corresponding positions in order of Cyan, Magenta, Yellow
and then Black. Using both hands, grip the cartridge to
insert into the slot. Then hold the handle to slide the
cartridge in.
Although you correctly installed the toner cartridges, the
black and yellow toner cartridges are not inserted
completely. When you close the left cover, they insert into
place.
C
M
Y
K
Black
Yellow
Magenta
Cyan
M
Y
K
C
Grip here.
M
AINTAINING
Y
OUR
P
RINTER
6.38
15
Close the left cover A. Make sure that it is securely latched.
If you installed the toner cartridges incorrectly, the left
cover A will not close properly. Check again to make sure
the colors correspond. Never use force to close the cover.
16
Plug the power cord in and turn the printer on.
Replacement Parts
From time to time, you will need to replace the transfer roller
and fuser unit to maintain top performance and avoid print
quality problems and paper feed problems resulting from worn
parts.
To purchase replacement parts, contact your Xerox reseller or
see Appendix G for the Xerox web site.

7
This chapter provides helpful information for what to do if
you encounter an error while using your printer.
This chapter includes:
• Troubleshooting Checklist
• Solving General Printing Problems
• Clearing Paper Jams
• Solving Print Quality Problems
• Understanding Display Messages
• Common Windows Problems
• Common Macintosh Problems
• Common Linux Problems
SOLVING PROBLEMS

S
OLVING
P
ROBLEMS
7.2
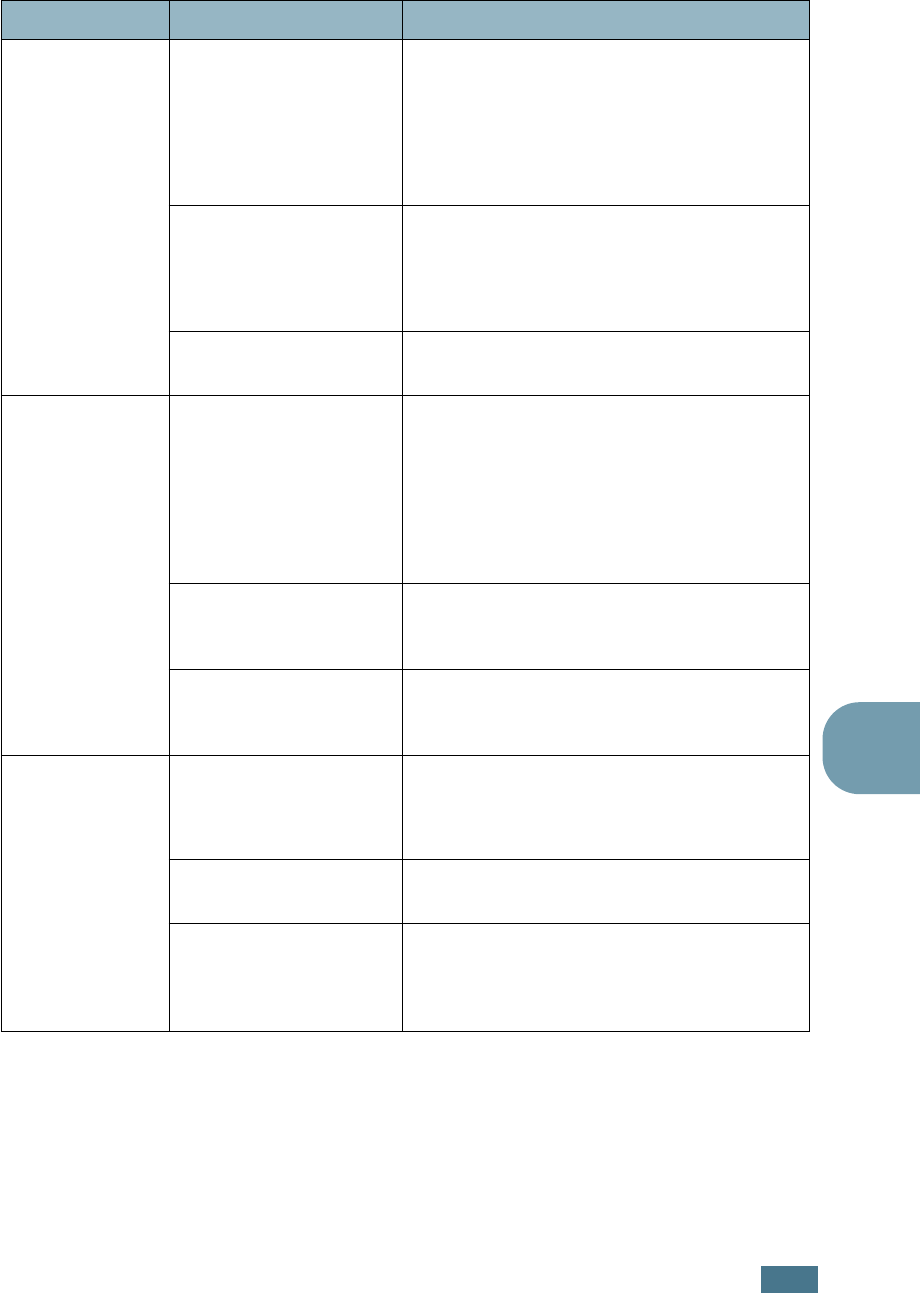
Troubleshooting Checklist
If the printer is not working properly, use the information on this
page to troubleshoot the problem.
Check Solution
Make sure that the
On Line/Continue
button on the control panel
is green and “Ready” is
shown on the display.
• If the button backlight is off, check the power cord
connection. Check the power switch. Check the power
source by plugging it into another outlet.
• If the button backlight is orange, check the display
message and go to “Understanding Display Messages” on
page 7.25.
Print a demo page to verify
that the printer is feeding
paper correctly.
• If a demo page does not print, check the paper supply in
the paper tray.
• If the paper jams in the printer, go to “Clearing Paper
Jams” on page 7.6.
• If an error message appears on the display, go to
“Understanding Display Messages” on page 7.25.
Check the demo page to see
if it is printed correctly.
If there is a print quality problem, go to “Solving Print
Quality Problems” on page 7.21.
Print a short document
from a software application
to verify that the computer
and printer are connected
and are communicating
correctly.
• If the page does not print, check the cable connection
between the printer and the computer.
• Check the print queue or print spooler to see if the
printer has been paused.
• Check the software application to ensure that you are
using the proper printer driver and communication port.
If the page is interrupted during printing, go to “Solving
General Printing Problems” on page 7.3.
If completing the checklist
does not resolve the printer
problem, check the
following troubleshooting
sections.
• See “Solving General Printing Problems” on page 7.3.
• See “Understanding Display Messages” on page 7.25.
• See “Common Windows Problems” on page 7.29.
• See “Common Macintosh Problems” on page 7.30
• See “Common Linux Problems” on page 7.31.

S
OLVING
P
ROBLEMS
7.3
7
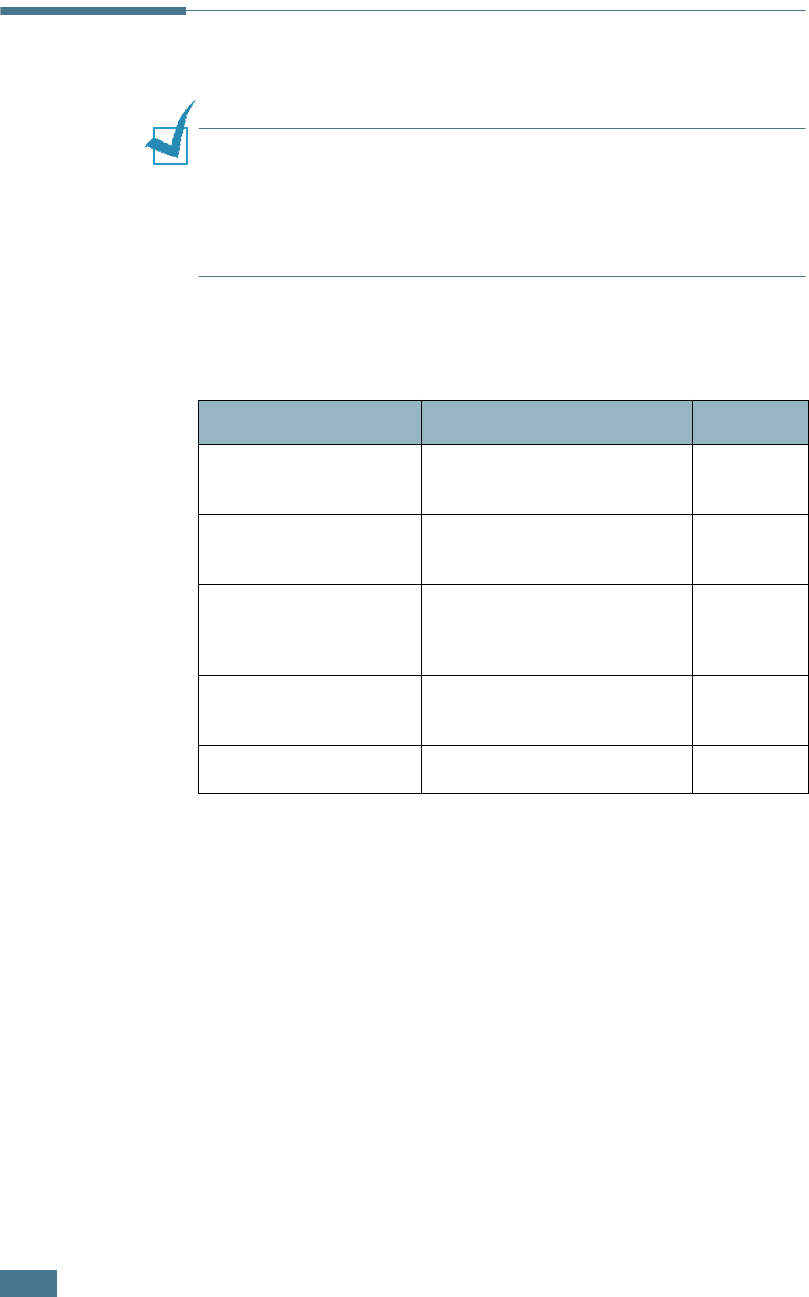
Solving General Printing Problems
For problems with the operation of your printer, refer to the table
for suggested solutions.
You can also find solutions in the infoSMART knowledge base on
the Xerox web site. See Appendix G for the web site address.
Problem Possible Cause Solution
The printer does
not print.
The printer is not
receiving power.
Check the power cord connections. Check
the power switch and the power source.
The printer is not
selected as the default
printer.
Select
Xerox Phaser 6100
as your
default printer.
Check the printer for
the following:
• The printer cover is
not closed.
• Paper is jammed.
• No paper is loaded.
• The toner cartridge is
not installed.
• Close the printer cover.
• Remove the jammed paper.
• Load paper into the tray.
• Install the toner cartridges.
The printer may be in
manual feed mode and
out of paper.
Check the display message, add paper to
the Multi-purpose Tray and press the
On Line/Continue button on the printer’s
control panel.
The connection cable
between the computer
and the printer is not
connected properly.
Disconnect the printer cable and reconnect
it.
The connection cable
between the computer
and the printer is
defective.
If possible, attach the cable to another
computer that is working properly and print
a document. You can also try using a
different printer cable.
The port setting is
incorrect.
Check the Windows printer setting to make
sure that the print job is sent to the correct
port, for example, LPT1. If the computer
has more than one port, make sure that the
printer is attached to the correct one.
The printer may be
configured incorrectly.
Check the printer properties to ensure that
all of the print settings are correct.
The printer driver may
be incorrectly installed.
Reinstall the printer driver. Try printing a
demo page.

S
OLVING
P
ROBLEMS
7.4
The printer does
not print.
(Continued)
The printer is
malfunctioning.
Check the display message on the control
panel to determine if the printer is
indicating a system error.
Printer selects
paper from the
wrong tray
selection.
The tray selection in
the printer properties
may be incorrect.
For many software applications, the tray
selection is found under the
Paper
tab
within the printer properties. Select the
correct paper tray. See page 3.7.
Paper does not
feed into the
Printer.
Paper has been loaded
incorrectly.
Remove paper from the tray and reload it
correctly.
Check that the paper size adjusters are set
correctly.
There is too much
paper in the paper tray.
Remove excess paper from the tray.
The paper is too thick. Use only paper that meets the specifications
required by the printer.
Print job is
printing very
slowly.
The print job is very
complex.
Adjust the printer settings or lessen the
complexity of the document.
Your printer prints A4-size paper at 20 ppm
for black, Letter-size paper at 21 ppm or
A4/Letter-sized at 5 ppm for color.
If using Windows 98/
Me, the Spooling
Setting may be set
incorrectly.
From the Start menu, choose Settings and
Printers. Right-click the
Xerox Phaser
6100
printer icon, choose Properties,
click the Details tab, and then choose the
Spool Settings button. Select the desired
spool setting.
Half the page is
blank.
The page orientation
setting may be
incorrect.
Change the page orientation in your
application. See page 3.6.
The paper size and the
paper size settings do
not match.
Ensure that the paper size in the printer
driver settings matches the paper in the
tray.
Problem Possible Cause Solution
S
OLVING
P
ROBLEMS
7.5
7
The paper
keeps jamming.
There is too much
paper in the paper tray.
Remove excess paper from the tray.
If printing on specialty media, use the Multi-
purpose Tray.
Check that the paper size adjusters are set
correctly.
An incorrect type of
paper is being used.
Use only paper that meets the specifications
required by the printer.
If printing on specialty media, use the Multi-
purpose Tray.
There may be debris
inside the printer.
Open the top cover B and remove the
debris.
The text is
scrambled, or
incomplete.
The printer cable is not
plugged in or is
defective.
Unplug the printer cable, reconnect it, then
print a job you know will print successfully.
Attach the cable and printer to another
computer, then print a job you know will
print successfully.
Try using a new printer cable.
An incorrect printer
driver is selected.
Check the application’s printer selection
menu to ensure that your printer is
selected.
The software
application is
malfunctioning.
Try printing a job from another application.
Pages print, but
are blank.
The toner cartridge is
defective or out of
toner.
Redistribute the toner. If necessary, see
page 6.5.
If necessary, replace the toner cartridge.
The file may have blank
pages.
Check the file to ensure that it does not
contain blank pages.
Some parts, such as
the controller or the
board, may be
defective.
Contact a service representative.
Problem Possible Cause Solution
S
OLVING
P
ROBLEMS
7.6
Clearing Paper Jams
NOTE
: When removing paper that is jammed in the printer if
possible always pull the paper in the direction that it normally
moves so as not to damage internal components. Always pull
firmly and evenly, do not jerk the paper. If the paper tears ensure
that all fragments of paper are removed, otherwise a jam will
occur again.
The display on the control panel tells you where a paper jam
occurs. Refer to the table below to locate the paper jam and to
clear it:
To resume printing after clearing paper jams, you must open
and close the right cover C.
Message Location of Jam Go to...
Jam at Tray 1
At Tray 1 or paper feed
area
page 7.7
Jam at MPT
At the Multi-purpose Tray
(MPT)
page 7.9
Jam at C
Jam inside the printer or
in the duplex area.
page 7.9
and
page 7.10
Jam at B,C
Jam in the paper exit
area.
page 7.14
Jam at Tray 2
At Optional Tray 2
page 7.17
S
OLVING
P
ROBLEMS
7.7
7
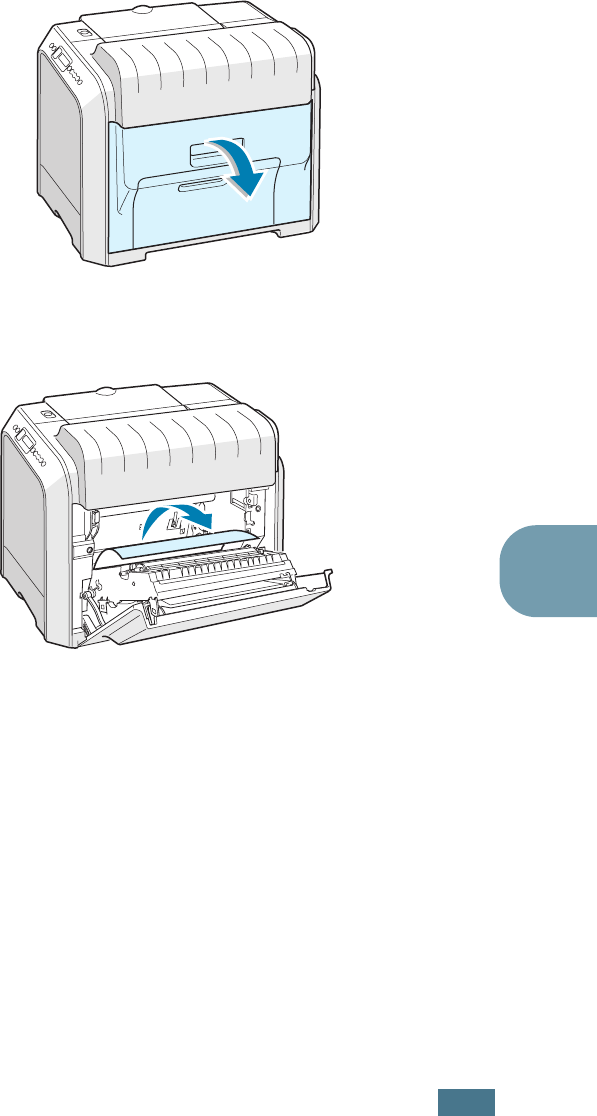
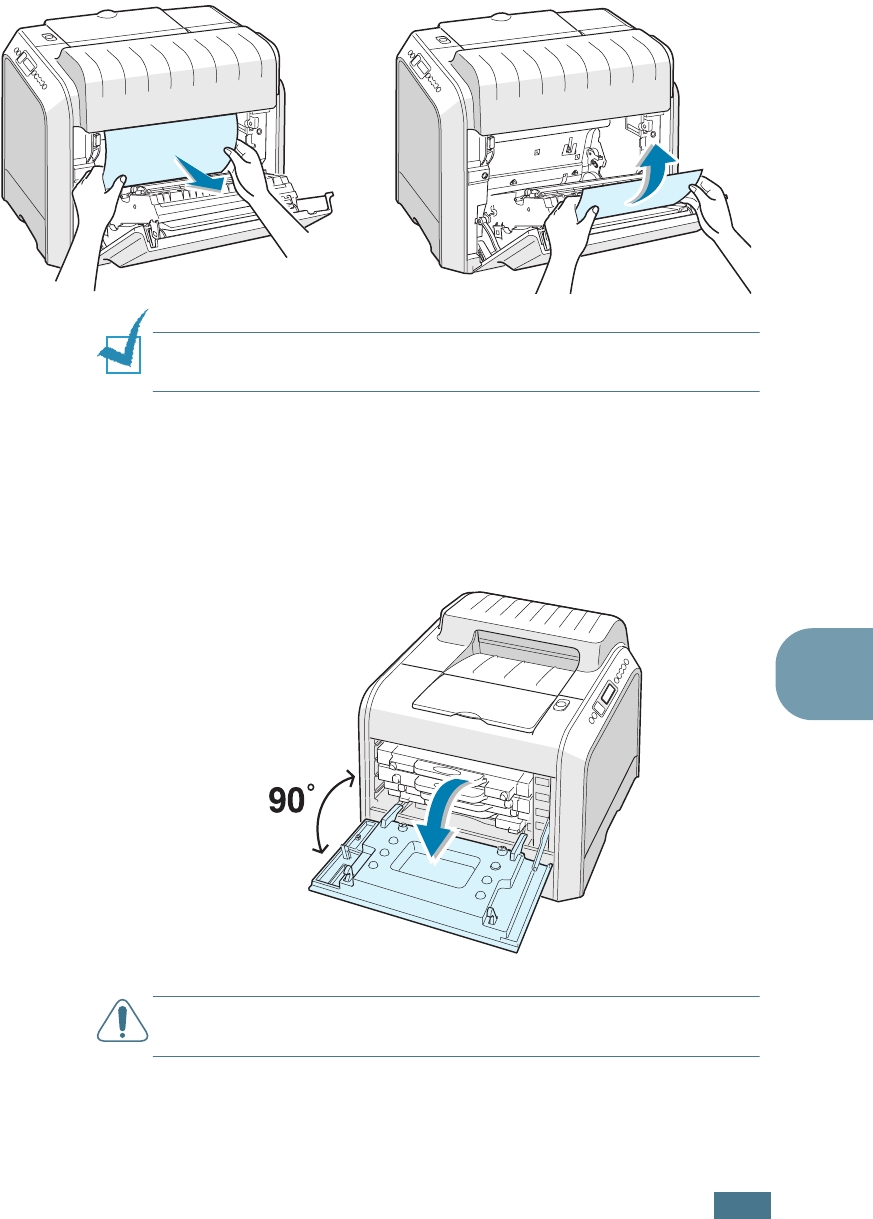
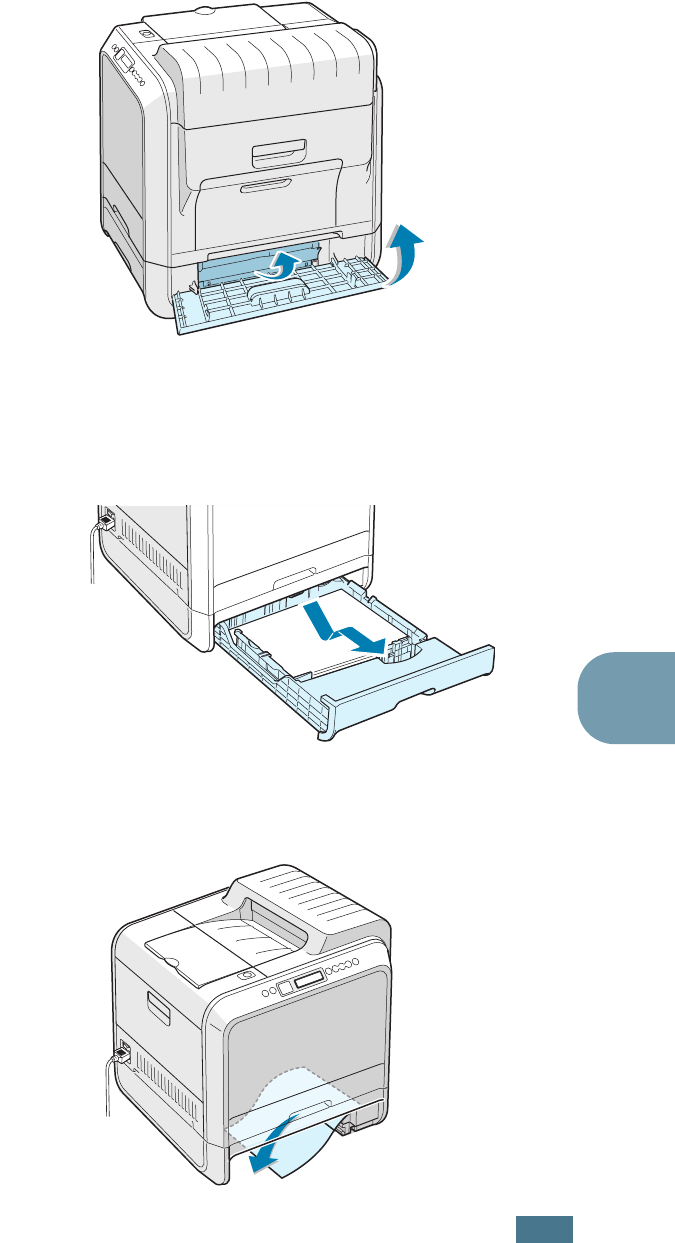
Jam at Tray 1 or the Paper Feed Area
If paper is jammed in the paper feed area, ‘Jam at Tray 1’
appears on the display.
1
Using the handle, open the right cover C.
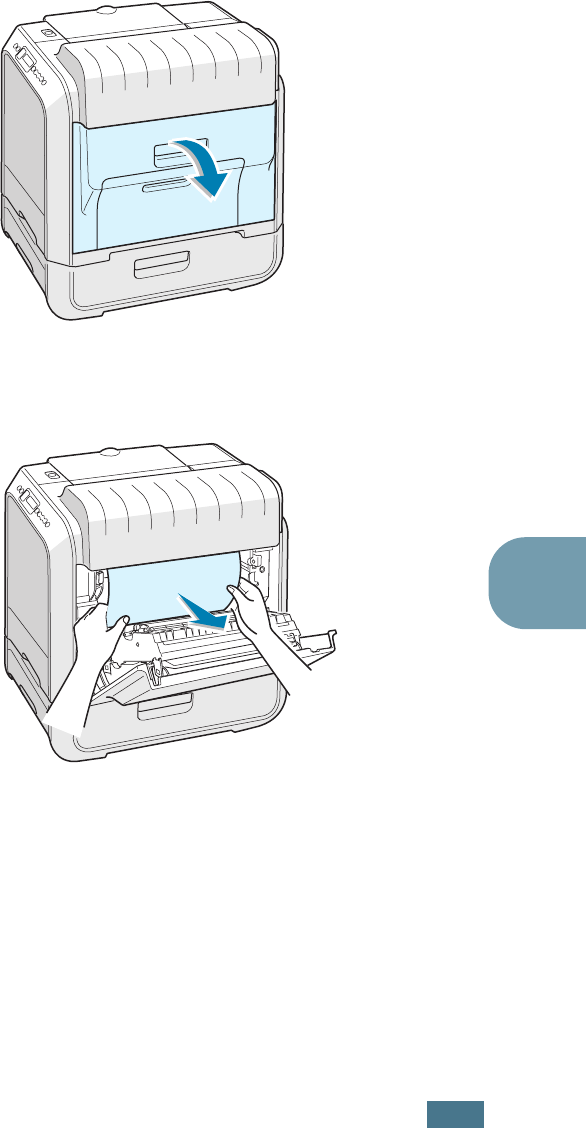
2
Carefully remove the misfed paper in the direction as
shown. Go to step 6.
If there is any resistance, and the paper does not move
immediately when you pull, stop pulling and go to step 3.
S
OLVING
P
ROBLEMS
7.8
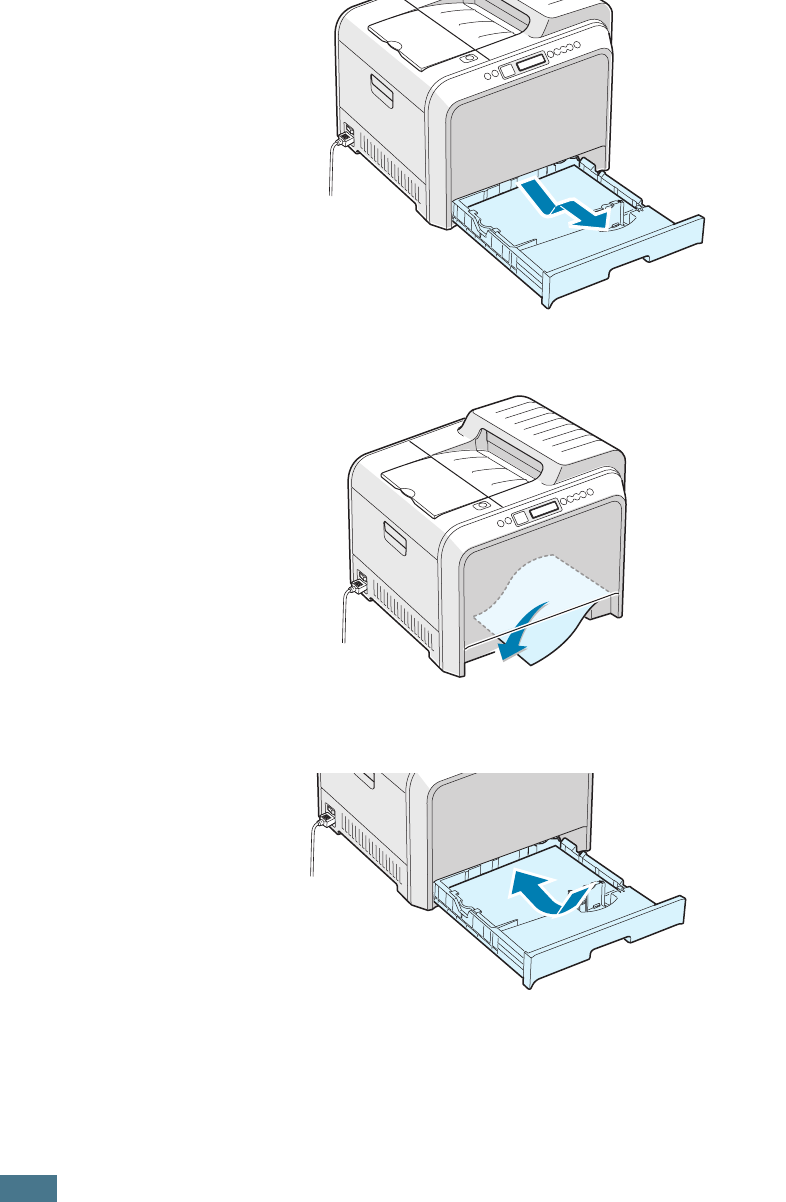
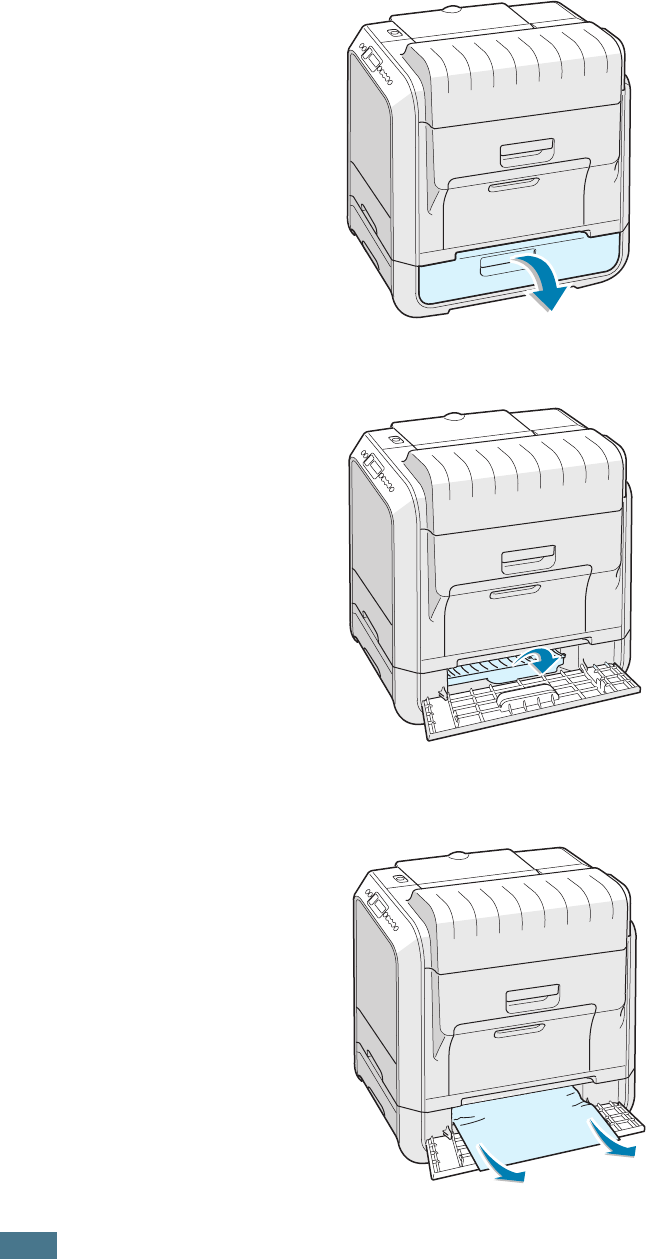
3
Pull the tray open. After you pull it all the way out, lift up
the front part of the tray slightly to release the tray from
the printer.
4
Remove the jammed paper by gently pulling it straight out.
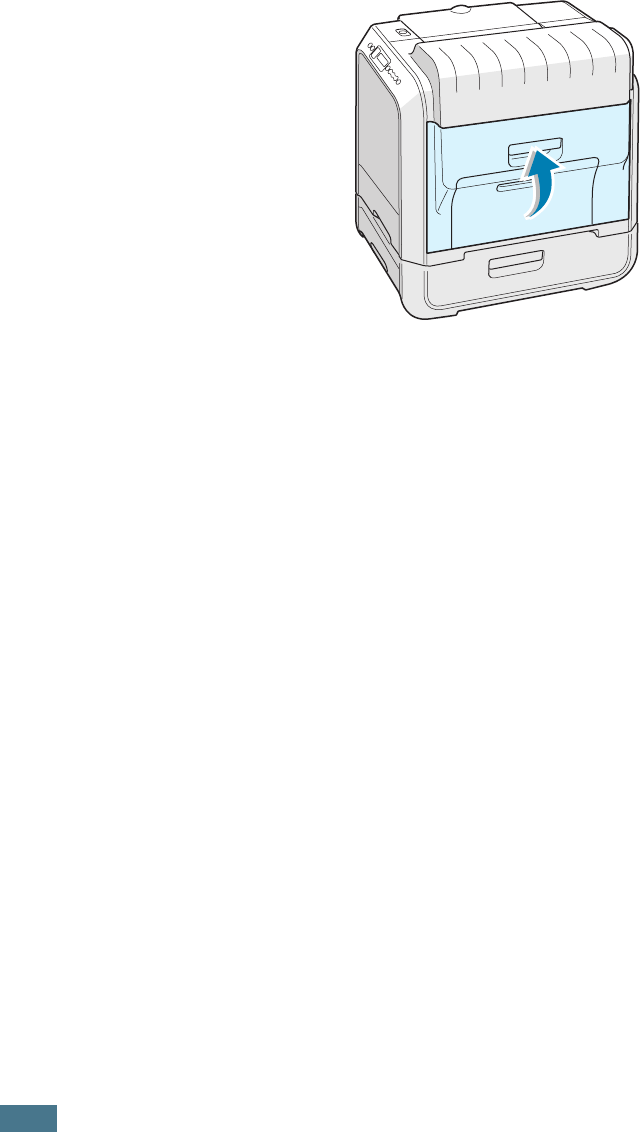
5
To replace the tray, lower the rear edge, align it to the slot
and slide it into the printer.
6
Close the right cover C. The printer resumes printing.
S
OLVING
P
ROBLEMS
7.9
7
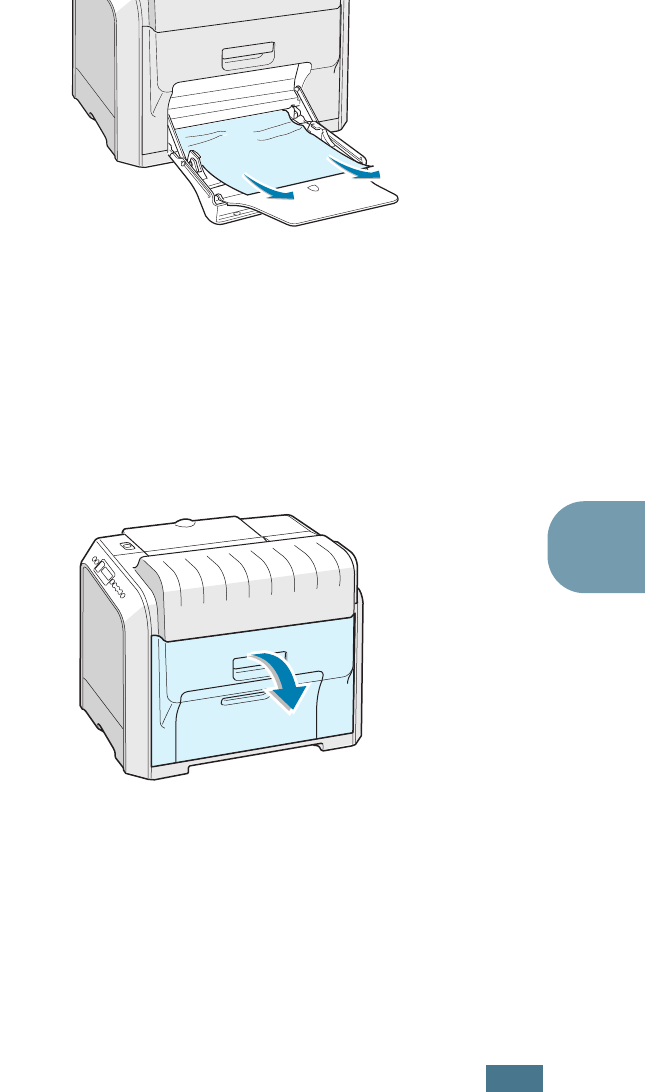
Jam at the Multi-purpose Tray (MPT)
‘Jam at MPT’
appears on the display when you print using the
Multi-purpose Tray and the printer detects either there is no
paper or the paper is improperly loaded.
If the paper is not feeding properly, pull the paper out of the
printer.
To resume printing, open and close the right cover C.
Jam at C (Inside the Printer)
If paper is jammed inside the printer, ‘Jam at C’
appears on the
display.
1
Using the handle, open the right cover C.
S
OLVING
P
ROBLEMS
7.10
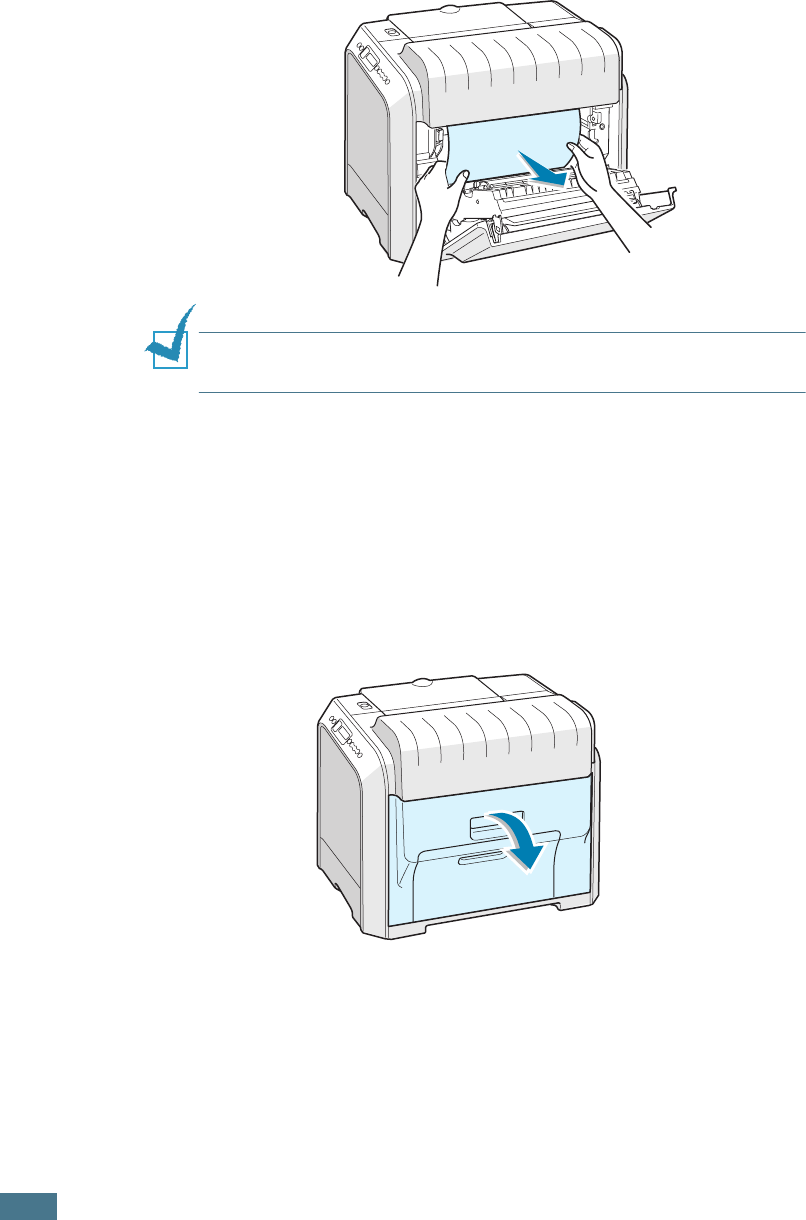
2
Remove the jammed paper, in the direction shown. To avoid
the paper tearing, pull it out gently and slowly.
NOTE
: If the paper tears, make sure that all of the paper
fragments are removed from the printer.
3
Close the right cover C. The printer resumes printing.
Jam at C (In Duplex Area)
If paper is jammed in the duplex area, ‘Jam at C’ appears on the
display.
1
Using the handle, open the right cover C.
S
OLVING
P
ROBLEMS
7.11
7
2
Locate the jammed paper, and then pull it out gently and
slowly to avoid the paper tearing. Go to step 8.
NOTE
: If the paper tears, make sure that all of the paper
fragments are removed from the printer.
If you cannot find the jammed paper or there is any
resistance removing the paper, go to step 3.
3
Using the handle, completely open the left cover A until it is
at right angles to the main frame and the toner cartridges
are ejected.
CAUTION
: If the left cover A is not completely open, the top
cover release button does not press.
OR
S
OLVING
P
ROBLEMS
7.12
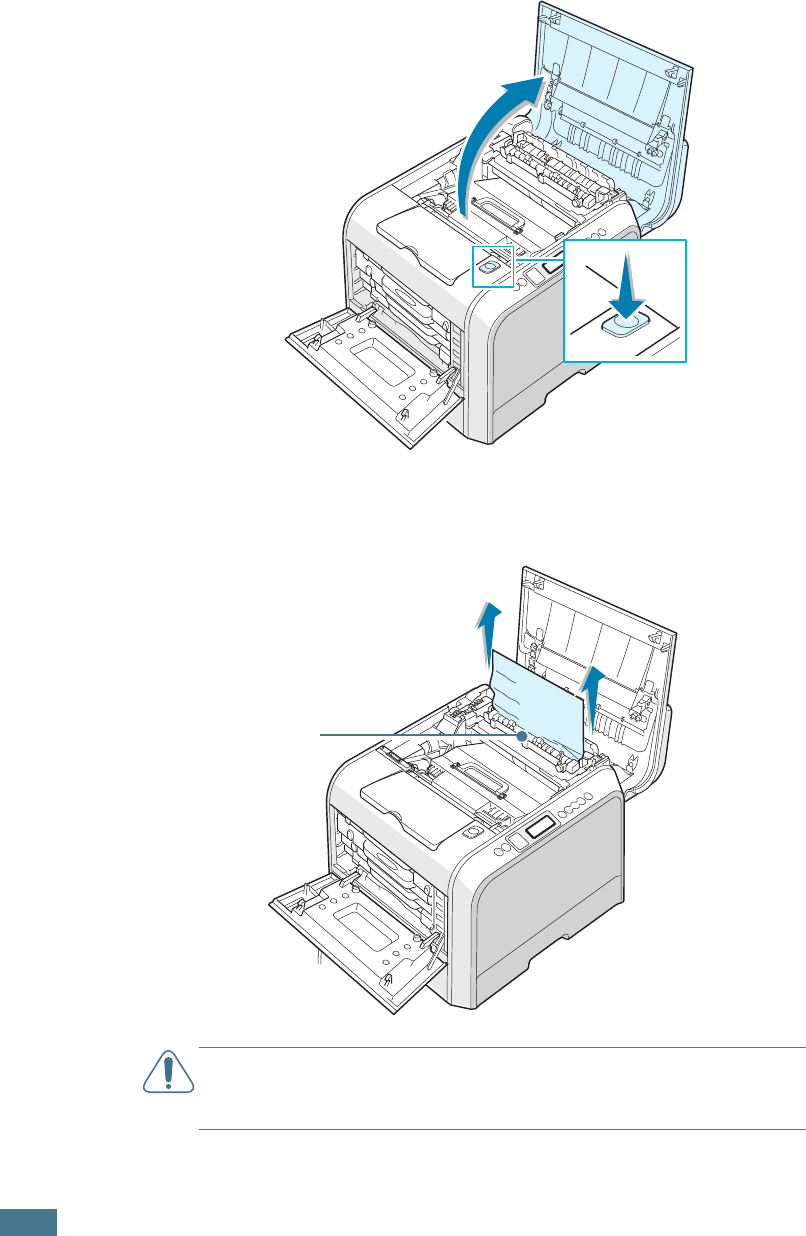
4
Press the top cover release button to unlatch the top cover
B and open it all the way.
5
Locate the jammed paper, and then carefully take it out of
the printer.
CAUTION
:
Do not touch the fuser. It is hot and could cause
burns! The fuser’s operating temperature is 180°C (356°F). Take
care when removing paper from the printer.
The fuser
is hot!
S
OLVING
P
ROBLEMS
7.13
7
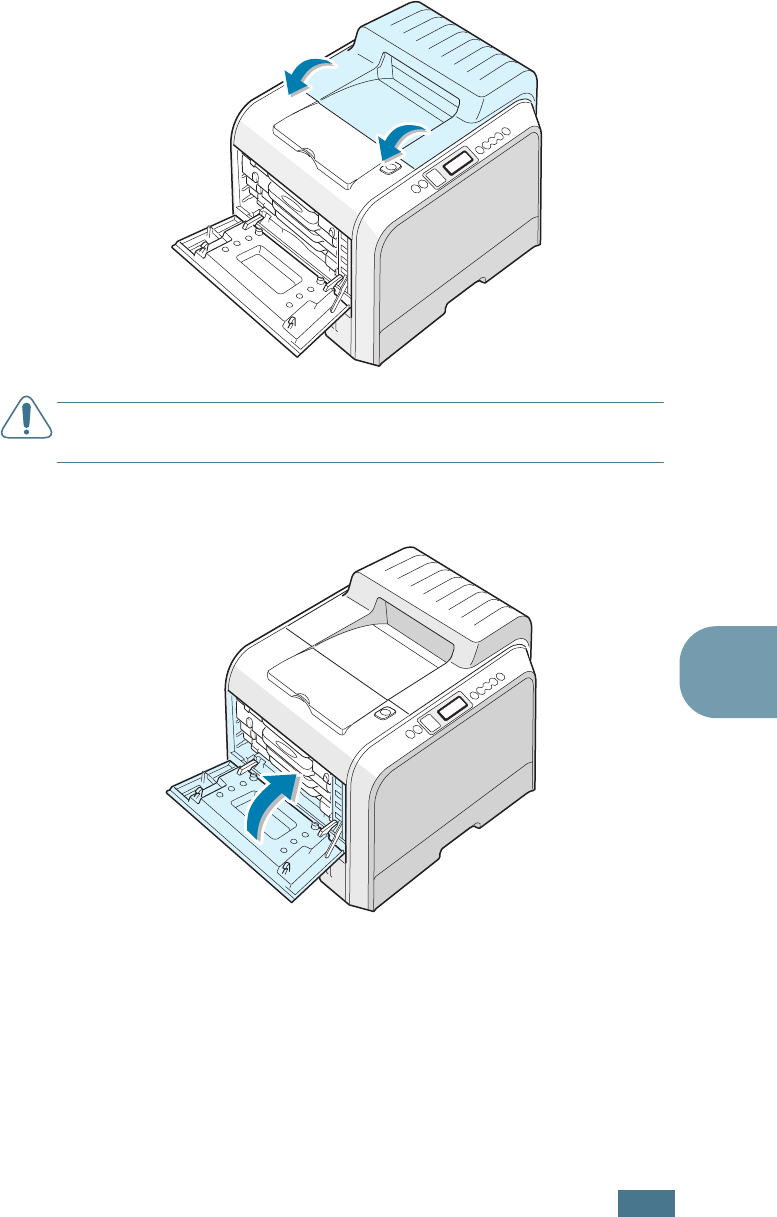
6
After making sure that the left cover A is open, close the
top cover B. Make sure that it is securely latched.
CAUTION
:
Do not try to close the left cover A with the top cover
B open. This may cause damage to the printer.
7
Close the left cover A firmly.
8
Close the right cover C. The printer resumes printing.
S
OLVING
P
ROBLEMS
7.14
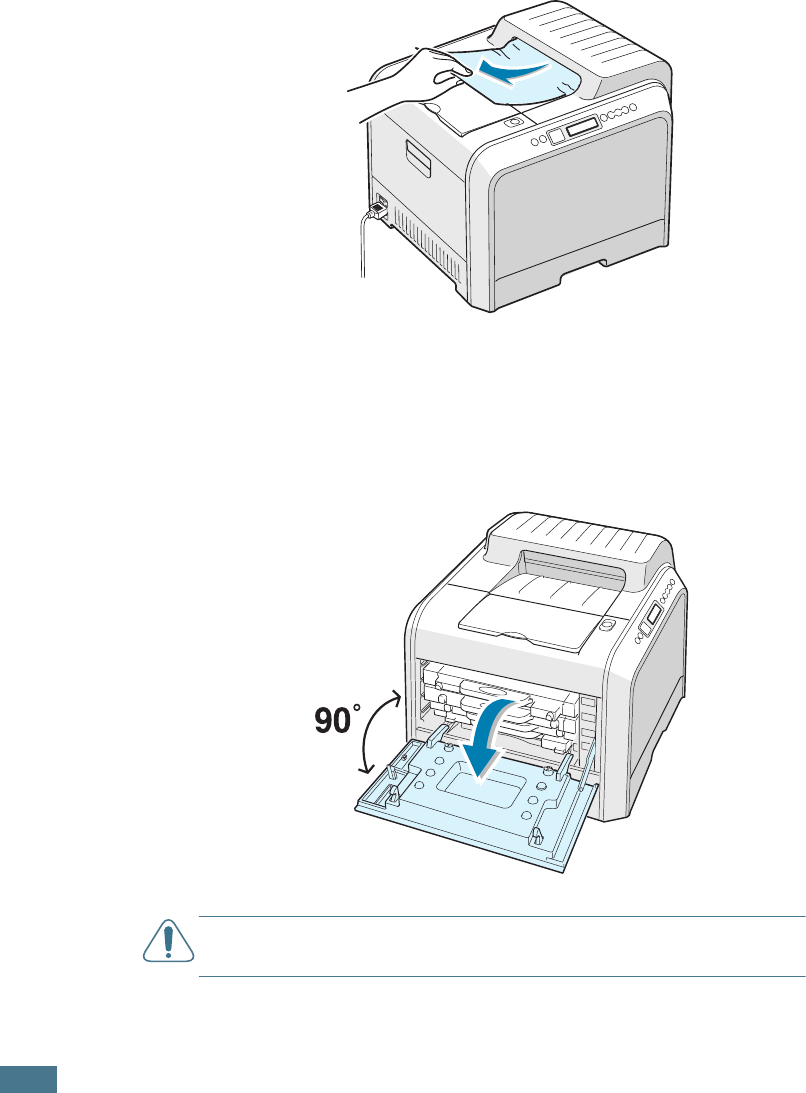
Jam at B, C
If paper is jammed in the paper exit area, ‘Jam at B,C’ appears
on the display.
1
If a long portion of the paper is visible, pull it straight out.
Go to step 7.
If you cannot find the jammed paper or there is any
resistance removing the paper, go to step 2.
2
Using the handle, completely open the left cover A until it is
at right angles to the main frame and the toner cartridges
are ejected.
CAUTION
: If the left cover A is not completely open, the top
cover release button does not press.
S
OLVING
P
ROBLEMS
7.15
7
3
Press the top cover release button to unlatch the top cover
B and open it all the way.
4
Carefully take the jammed paper out of the printer.
CAUTION
:
Do not touch the fuser. It is hot and could cause
burns! The fuser’s operating temperature is 180°C (356° F). Take
care when removing paper from the printer.
The fuser
is hot!
S
OLVING
P
ROBLEMS
7.16
5
After making sure that the left cover A is open, close the
top cover B. Make sure that it is securely latched.
CAUTION
:
Do not try to close the left cover A with the top cover
B open. This may cause damage to the printer.
6
Close the left cover A firmly.
7
Open and close the right cover C to resume printing.
S
OLVING
P
ROBLEMS
7.17
7
Jam at Optional Tray 2
If paper is jammed in the optional tray2, ‘Jam at Tray 2’ appears
on the display.
1
Using the handle, open the right cover C.
2
Remove the jammed paper in the direction shown. To avoid
the paper tearing, pull it out gently and slowly. Go to step
10.
If you cannot find the jammed paper in the printer, go to
step 3.
S
OLVING
P
ROBLEMS
7.18
3
Open the outer jam cover D in Tray 2.
4
Open the inner cover of Tray 2.
5
Pull the jammed paper out in the direction shown. To avoid
the paper tearing, pull it out gently and slowly.
S
OLVING
P
ROBLEMS
7.19
7
6
Close the two jam covers and go to step 10.
If there is any resistance, and paper does not move
immediately when you pull, stop pulling and continue to
step 7.
7
Pull the optional tray2, out of the printer.
8
If you see the jammed paper, remove the paper from the
printer by gently pulling it straight out.
S
OLVING
P
ROBLEMS
7.20
9
Slide the tray back into the printer and close the two jam
covers.
10
Open and close the right cover C. The printer resumes
printing.
Tips for Avoiding Paper Jams
By selecting the correct paper types, most paper jams can be
avoided. If a paper jam occurs, follow the steps outlined in
“Clearing Paper Jams” on page 7.6.
• Follow the procedures on page 2.4. Ensure that the adjustable
guides are positioned correctly.
• Do not overload the paper tray. Ensure that the paper is below
the paper limit mark on the inside wall of the tray.
• Do not remove the paper from the tray while printing.
• Flex, fan and straighten the paper before loading.
• Do not use creased, damp or highly curled paper.
• Do not mix paper types in the tray.
• Use only recommended paper and specialty media. See “Paper
Specifications” on page E.3.
• Ensure that the print side is facing down when loading paper
in the tray and in the Multi-purpose Tray.
S
OLVING
P
ROBLEMS
7.21
7
Solving Print Quality Problems
Dirt inside of the printer or improper paper loading may reduce
the print quality. See the table below to troubleshoot the
problem.
NOTE
: Make sure that driver settings match the paper loaded in
the tray.
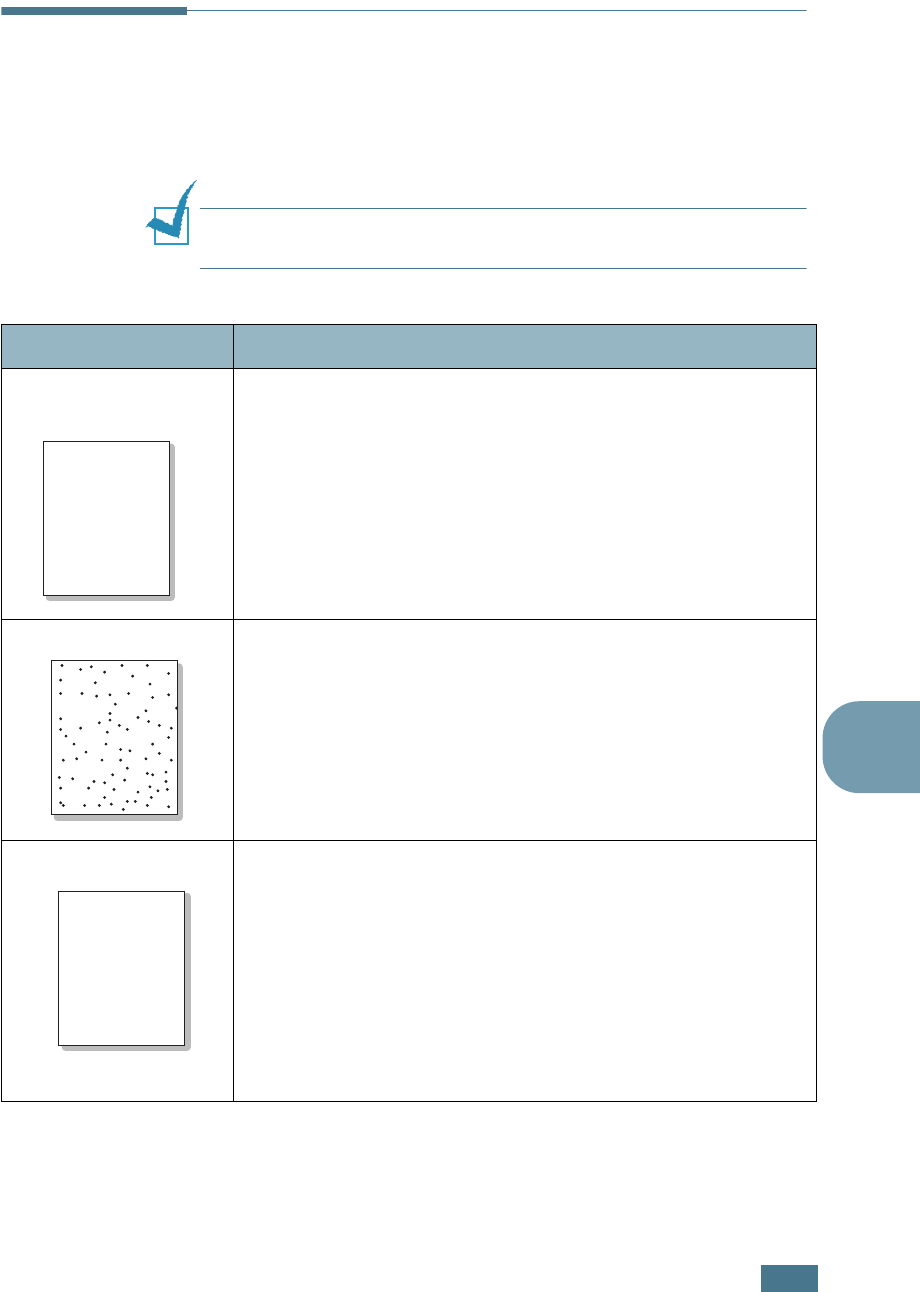
Problem Solution
Light or faded
print
If a vertical white streak or faded area appears on the page:
• The toner supply is low. You may be able to temporarily
extend the toner cartridge life. See “Redistributing the Toner”
on page 6.5. If this does not improve the print quality, install a
new toner cartridge of faded color.
• The paper loaded in the tray does not meet media
specifications. See “Paper Specifications” on page E.3.
• The surface of the Laser Scanning Unit (LSU) may be dirty.
Clean the LSU. See page 6.30.
Toner specs
• The paper may not meet specifications (for example, the
paper is too moist or too rough). See “Paper Specifications” on
page E.3.
• The paper path may be dirty. See “Cleaning the Inside of the
Printer” on page 6.31.
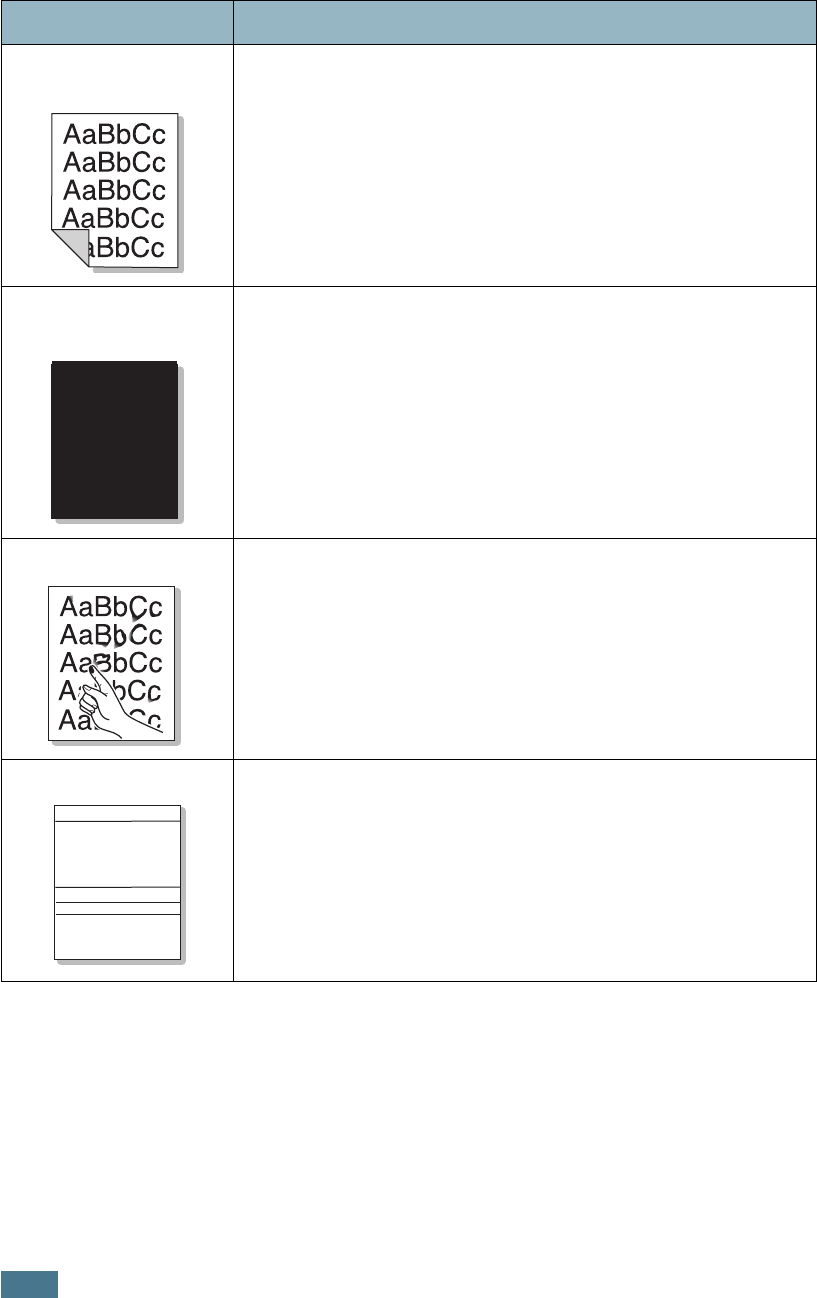
Dropouts
If faded areas appear randomly on the page:
• A single sheet of paper may be defective. Try reprinting the
job.
• The paper's moisture content may be irregular or too moist.
Try using a different brand or type of paper. See “Paper
Specifications” on page E.3.
• The paper lot is bad. Try using a different brand or type of
paper. See “Paper Specifications” on page E.3.
• The toner cartridge may be defective. See “
Vertical repetitive
defects
” on the next page.
AaBbCc
AaBbCc
AaBbCc
AaBbCc
AaBbCc
AaBbCc
AaBbCc
AaBbCc
AaBbCc
AaBbCc
AaBbCc
AaBbCc
AaBbCc
AaBbCc
AaBbCc

S
OLVING
P
ROBLEMS
7.22
Vertical lines
If black vertical streaks appear on the page:
• The imaging unit inside the printer has probably been
scratched. Install a new imaging unit.
If white vertical lines appear on the page:
• The Laser Scanner window has probably been contaminated,
clean the Laser Scanner window. Open and close left cover A
several times to clean the Laser Scanning Unit (LSU). See
“Cleaning the Laser Scanning Unit (LSU) Inside the Printer” on
page 6.30.
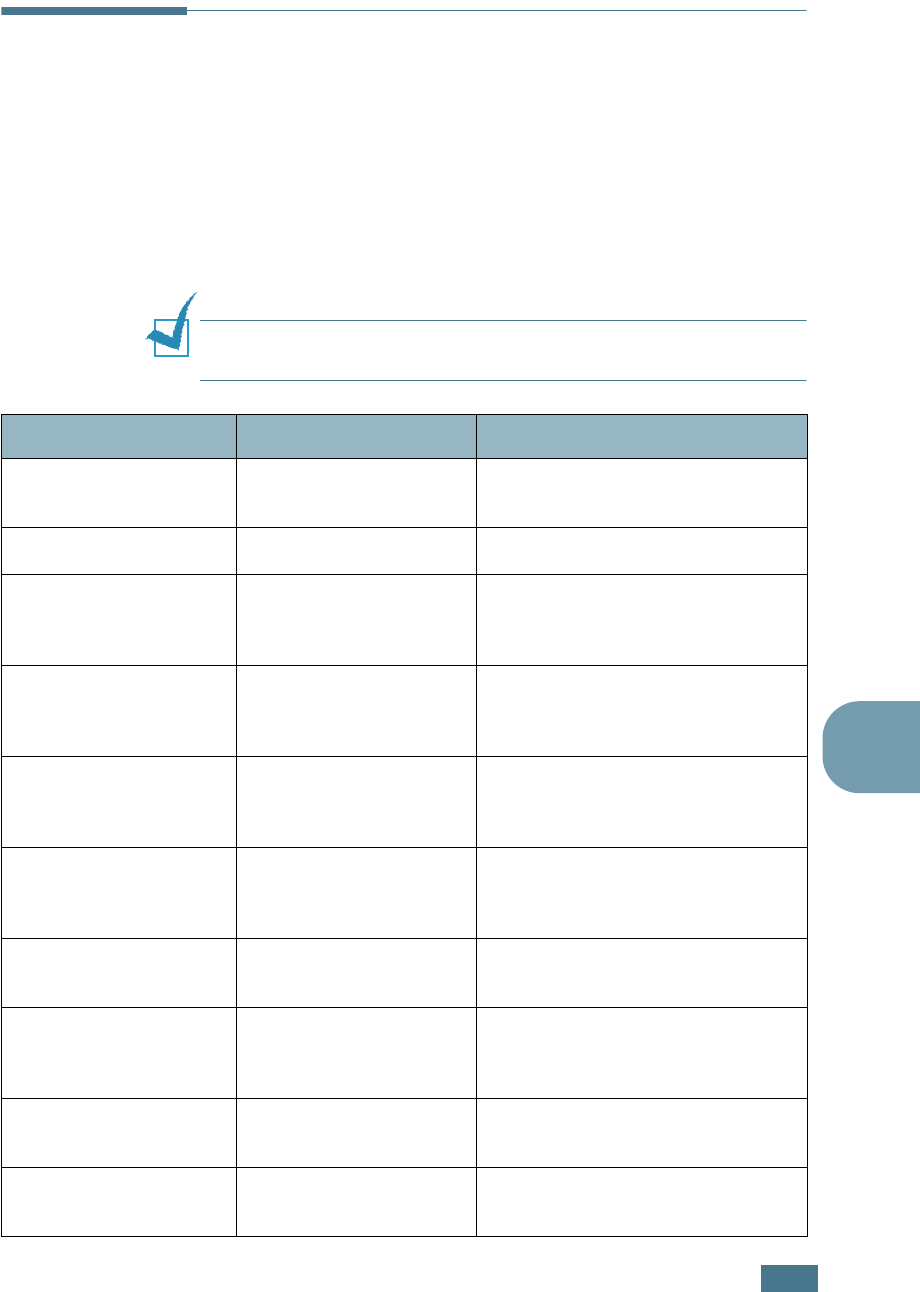
Color or Black
background
If the amount of background shading becomes unacceptable,
the procedures below may fix the problem.
• Change to lighter weight pages. See “Paper Specifications” on
page E.3.
• Check the printer’s environment; very dry (low humidity) or
high humidity (higher than 80% RH) conditions can increase
the amount of background shading.
• Remove the old imaging unit and install a new one. See
“Replacing the Imaging Unit” on page 6.14.
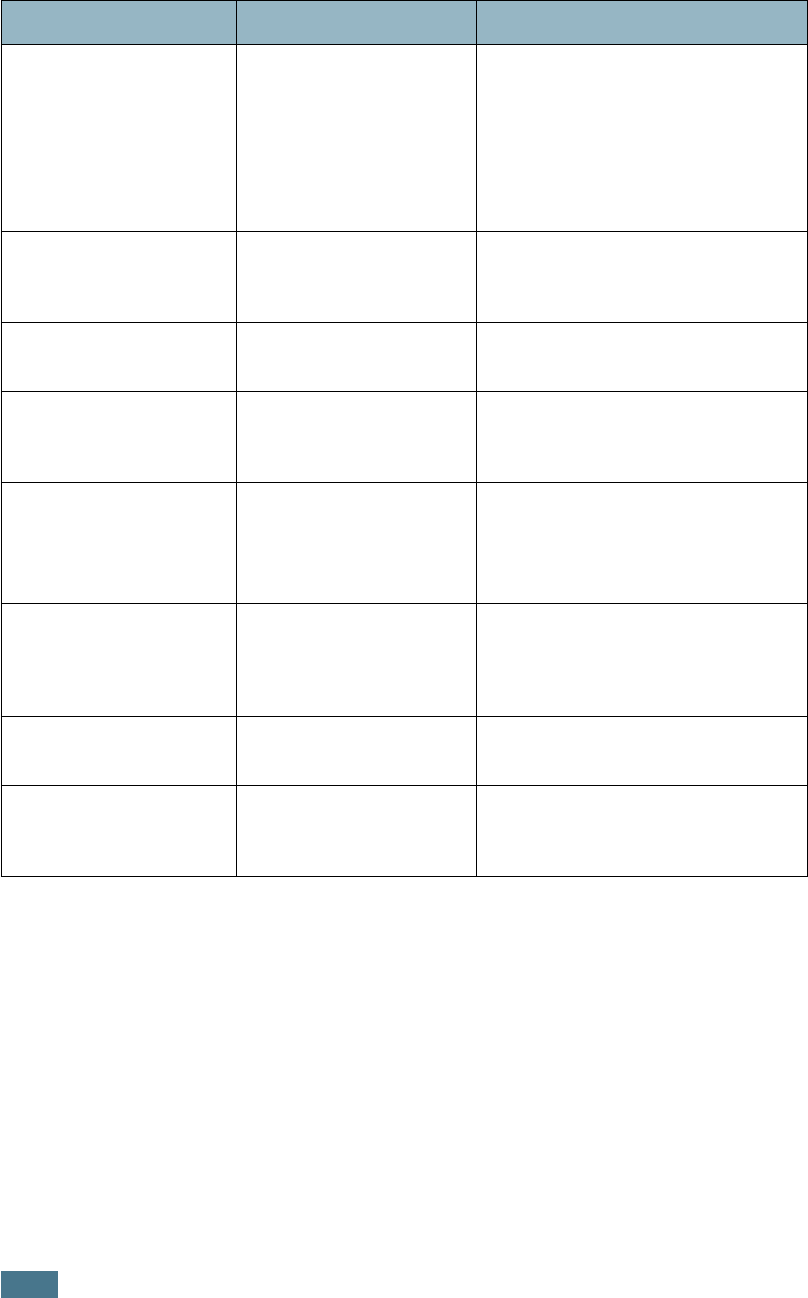
Toner smear
• Print several cleaning pages. See “Printing a Cleaning Page” on
page 6.29
• Check the paper type and quality. See “Paper Specifications”
on page E.3.
• Remove the transfer belt and install a new one. See “Replacing
the Transfer Belt” on page 6.22.
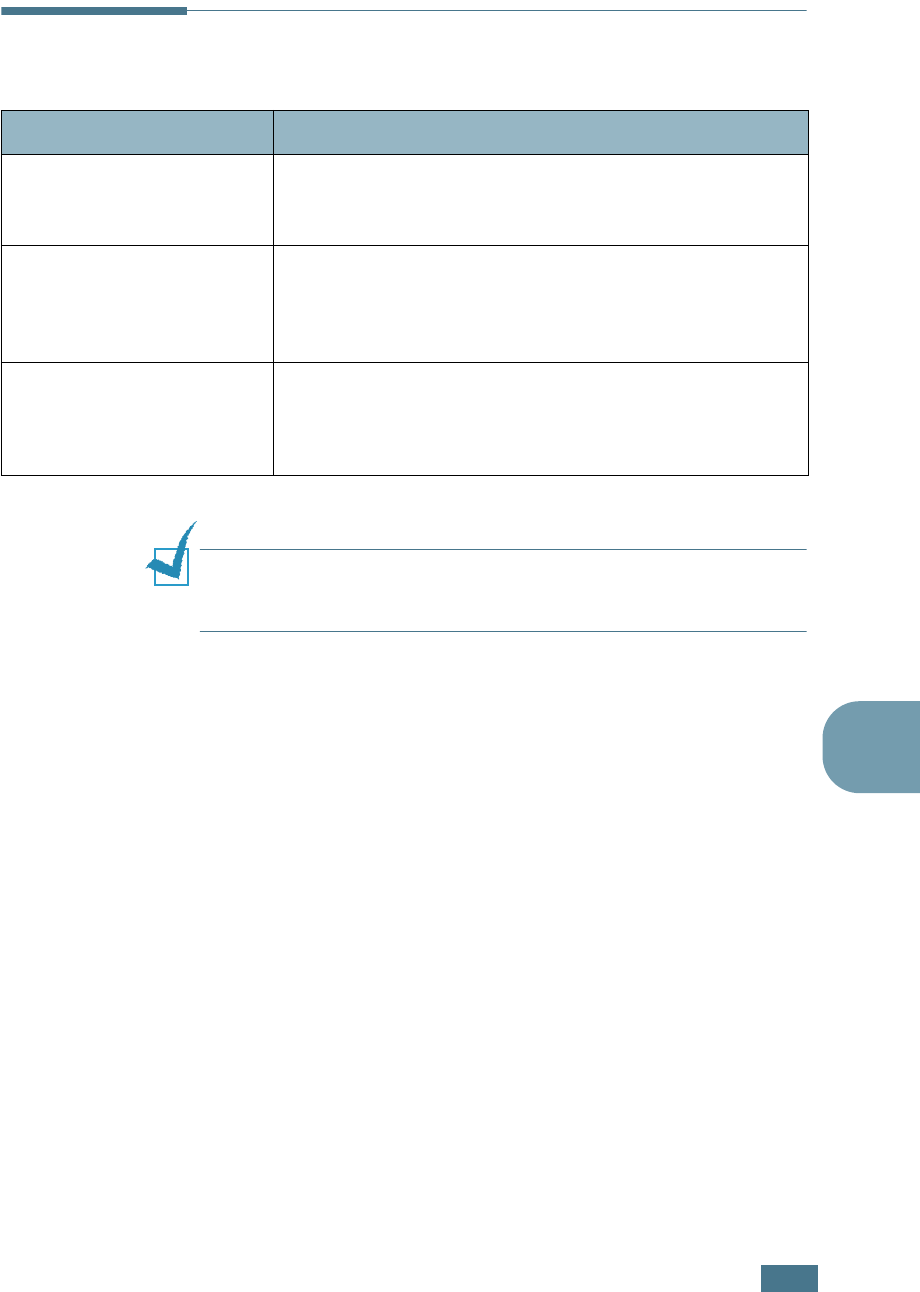
Vertical repetitive
defects
If marks repeatedly appear on the printed side of the page at
even intervals:
• Clean the inside of the printer. See “Cleaning the Inside of the
Printer” on page 6.31. After cleaning the inside of the printer,
if you still have the same problems, install a new toner
cartridge of defected color. See “Replacing the Toner
Cartridges” on page 6.8.
• Parts of the printer may have toner on them. If the defects
occur on the back of the page, the problem will likely correct
itself after a few more pages.
• The fusing assembly may be damaged. Replace the fuser.
Problem Solution
AaBbCc
AaBbCc
AaBbCc
AaBbCc
AaBbCc
AaBbCc
AaBbCc
AaBbCc
AaBbCc
AaBbCc
AaBbCc
AaBbCc
AaBbCc
AaBbCc
AaBbCc
S
OLVING
P
ROBLEMS
7.23
7
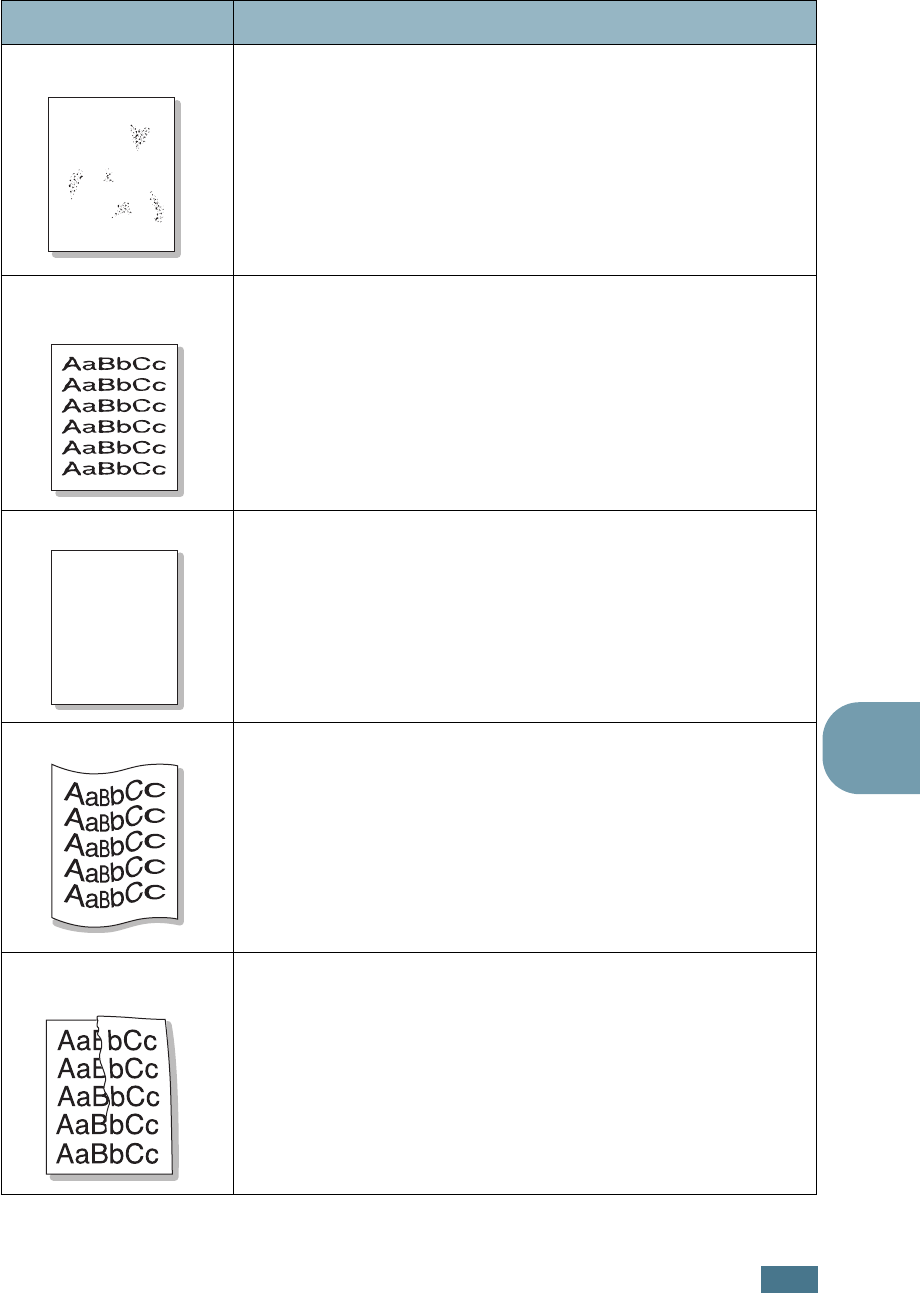
Background scatter
Background scatter results from bits of toner distributed on the
printed page.
• The paper may be too damp. Try printing with a different batch
of paper. Do not open packages of paper until necessary so
that the paper does not absorb too much moisture.
• If background scatter occurs on an envelope, change the
printing layout to avoid printing over areas that have
overlapping seams on the reverse side. Printing on seams can
cause problems.
Misformed
characters
• If characters appear as unfilled images or are incorrectly
shaped, the paper may be too smooth. Try using a different
brand or type of paper. See “Paper Specifications” on page E.3.
Page skew
• Check the paper type and quality. See “Paper Specifications”
on page E.3.
• Make sure that the paper or specialty media is loaded correctly
and the paper guides are placed securely against the paper
stack.
Curl or wave
• Check the paper type and quality. Both high temperature and
humidity can cause paper curl. See “Paper Specifications” on
page E.3.
• Turn the stack of paper over in the tray. Also try rotating the
paper 180° in the tray.
Wrinkles or
creases
• Ensure that the paper is loaded properly.
• Check the paper type and quality. See “Paper Specifications”
on page E.3.
• Turn the stack of paper over in the paper tray. Also try rotating
the paper 180° in the tray.
Problem Solution
A
AaBbCc
AaBbCc
AaBbCc
AaBbCc
AaBbCc
S
OLVING
P
ROBLEMS
7.24
Back of printouts
are dirty
• The transfer roller may be dirty. See “Cleaning the Inside of
the Printer” on page 6.31.
Color or Black
pages
• The imaging unit may not be installed properly. Remove the
imaging unit and reinsert.
• The imaging unit may be defective and need replacing. Install
a new imaging unit.
• The printer may require repair.
Loose toner
• Clean the inside of the printer. See “Cleaning the Inside of the
Printer” on page 6.31.
• Check the paper type and quality. See “Paper Specifications”
on page E.3.
• If the problem persists, the printer may require repair.
Horizontal stripes
If horizontally aligned color or black streaks or smears appear:
• The imaging unit may be installed improperly. Remove the
imaging unit and reinsert.
• The imaging unit may be defective. Install a new imaging unit.
See “Replacing the Imaging Unit” on page 6.14.
Problem Solution
A
AaBbCc
AaBbCc
AaBbCc
AaBbCc
AaBbCc
S
OLVING
P
ROBLEMS
7.25
7
Understanding Display Messages
Messages appear on the display on the control panel to indicate
the printer’s status or errors. Refer to the tables below to
understand the message’s meaning and correct the problem if
necessary. Messages and their meanings are listed in
alphabetical order.
For information on ordering replacement supplies, see page G.2
or contact your local reseller.
NOTE
: When you call for service, it is very helpful to tell the
service
representative
the display message.
Message Status Do this...
ADC Not
Confirm Error
A problem has occurred
in the ADC in the printer.
Contact a service representative.
Cover Open The top cover B is open. Close the top cover B firmly.
CTD Calibration
Error
The Color Toner Density
(CTD) sensor is polluted
by dust or toner.
Contact a service representative.
Dev. Motor
Error
A problem has occurred
in the development
motor of the printer.
Unplug the power cord and plug it
in again. If the problem persists,
please call for service.
Fuser Error
Low Temperature
The temperature in the
fuser is abnormally low.
Unplug the power cord and plug it
in again. If the problem persists,
please call for service.
Fuser Error
High Temperature
The temperature in the
fuser is abnormally high.
Unplug the power cord and plug it
in again. If the problem persists,
please call for service.
Inside Cover D
Open
Cover D is open. Close Cover D firmly.
Install
[Color] Toner
The indicated color toner
cartridge is not installed
in the printer.
Install the corresponding color
toner cartridge.
Install
Imaging Unit
The imaging unit is not
installed in the printer.
Install the imaging unit.
Install
Transfer Belt
The transfer belt is not
installed in the printer.
Install the transfer belt.

S
OLVING
P
ROBLEMS
7.26
Invalid [Color]
Toner
An invalid toner
cartridge is installed.
Only install a Xerox-approved
toner cartridge, designed for your
printer. If you have installed an
approved toner cartridge and this
error still occurs contact an
authorized service agent.
Invalid
Transfer Belt
An invalid transfer belt
is installed.
Only install a Xerox-approved
transfer belt, designed for your
printer. If you have installed an
approved transfer belt and this
error still occurs contact an
authorized service agent.
IP Conflict An IP address conflicts
with other devices on
the network.
Contact your network
administrator and choose an
address within your subnet which
will not conflict with any other
devices.
Jam at [Tray] A paper jam has
occurred from the
indicated tray.
Remove the jammed paper from
the corresponding tray, referring to
page 7.7.
Jam at B,C A paper jam has
occurred in the paper
exit area.
Remove the jammed paper from
the printer, referring to page 7.14.
Jam at C A paper jam has
occurred while printing
on both sides of the
paper.
Remove the jammed paper from
the printer, referring to page 7.10.
Jam at C A paper jam has
occurred inside the
printer.
Open the right cover C and remove
the jammed paper from the
printer, referring to page 7.9.
Laser Unit
Error
A problem has occurred
in the LSU (Laser
Scanning Unit) in the
printer.
Turn off the printer. Unplug the
power cord and plug it in again.
Turn on the printer. If the problem
persists, please call for service.
Load [Size]
In Tray [X]
The paper size specified
in the printer properties
does not match the
paper you are loading.
Load the correct paper in the tray.
Load Manual
Press Cont Key
The Multi-purpose Tray
is empty in the manual
feed mode.
Load a sheet of paper and press
the
On Line/Continue
button.
You need to press the button for
each page to be printed.
Message Status Do this...

S
OLVING
P
ROBLEMS
7.27
7
Main Motor
Error
A problem has occurred
in the main motor of the
printer.
Unplug the power cord and plug it
in again. If the problem persists,
please call for service.
Memory Overflow The printer does not
have enough memory to
print the current job.
Simplify the page layout and
remove unnecessary graphics from
your document.
Page Too Complex Too much complicated
data was sent to the
printer.
Simplify the page layout and
remove unnecessary graphics from
your document.
Ready [Color]
Low Toner
The corresponding toner
cartridge in your printer
is low.
Order a replacement toner
cartridge.
Replace
[Color] Toner
The corresponding toner
cartridge in your printer
is empty.
Replace the corresponding toner
cartridge with a new one. See
page 6.8.
Replace Fuser
Soon
The fuser is nearing the
end of its life.
• Order a replacement fuser.
• When the printout is too light,
replace the fuser.
• You can select whether or not
this message displays on the
control panel. See page 5.11.
Replace
Fuser
The fuser is not installed
or is at the end of its life
• Order a replacement fuser.
• When the printout is too light,
replace the fuser.
• You can select whether or not
this message displays on the
control panel. See page 5.11.
Replace
Imaging Unit
The imaging unit is at
the end of its life.
• Order a replacement imaging
unit.
• When the printout is too light,
replace the imaging unit.
• You can select whether or not
this message displays on the
control panel. See page 5.11.
Replace Imaging
Unit Soon
The lifetime of the
imaging unit is nearing
the end of its life.
Replace the imaging unit with a
new one. See page 6.14.
Message Status Do this...
S
OLVING
P
ROBLEMS
7.28
Replace
Transfer Belt
The transfer belt is at
the end of its life.
• Order a replacement transfer
belt.
• When the printout is too light,
replace the transfer belt.
• You can select whether or not
this message displays on the
control panel. See page 5.11.
Replace Transfer
Belt Soon
The lifetime of the
transfer belt is nearing
the end of its life.
Replace the transfer belt with a
new one. See page 6.22.
Replace
Transfer Roller
The lifetime of the
transfer roller is ended.
Order a replacement transfer roller.
Replace Transfer
Roller Soon
The transfer roller is
nearing the end of its
life.
Order a replacement transfer roller.
Transfer Belt
Error
The transfer belt is
either not working or
not correctly installed in
the printer.
Replace the transfer belt.
OR
Make sure that installed transfer
belt is properly seated.
Tray2 Error Optional Tray2 is not
properly installed or
connected to the printer.
After turn the printer off and then
back on, reinstall the optional
tray2. If the message persists,
contact a service representative.
Waste Box Full/
Not Installed
The waste cartridge is
full.
Replace the waste cartridge with a
new one. See page 6.11.
Waste Motor
Error
A problem has occurred
in waste toner motor.
Turn the printer off then turn it
back on. If the error still occurs,
contact a service representative.
Message Status Do this...
S
OLVING
P
ROBLEMS
7.29
7
Common Windows Problems
NOTE
: Refer to the Microsoft Windows 98/Me/NT 4.0/2000/XP/
Server 2003 User Guide that came with your PC for further
information on Windows error messages.
Problem Possible Cause and Solution
“File in Use” message
appears during installation.
Exit all software applications. Remove all software from the
StartUp Group, then restart Windows. Reinstall the printer
driver.
“Error Writing to LPTx”
message appears.
• Ensure that the cables are connected correctly and the
printer is on.
• If bi-directional communication is not turned on in the
driver, it will also cause this message.
“General Protection Fault”,
“Exception OE”, “Spool32”,
or “Illegal Operation”
messages appear.
Close all other applications, reboot Windows and try
printing again.

S
OLVING
P
ROBLEMS
7.30
Common Macintosh Problems
Problems in the Chooser
Printing Errors
Problem Possible Cause and Solution
The printer driver icon
does not appear in
Chooser.
Software is not installed correctly.
• Install the printer driver.
• Make sure that you are using a high-quality cable.
The printer name does
not appear in the
Chooser.
• Make sure that the cables are connected correctly and the
printer is turned on.
• Check if “Ready” appears on the display of the control panel.
If not, press the
On Line/Continue
button to switch your
printer to on-line.
• Make sure that the correct printer driver has been selected in
Chooser.
Problem Possible Cause and Solution
You cannot use the
computer while the
printer is printing.
Background Printing has not been selected.
• Select Background in the printer’s properties.

S
OLVING
P
ROBLEMS
7.31
7
Common Linux Problems
Problem Possible Cause and Solution
I can’t change settings in
the configuration tool.
You need to have administrator privileges to be able to
change global settings.
I am using the KDE
desktop but the
configuration tool and LLPR
won’t start.
You may not have the GTK libraries installed. These usually
come with most Linux distributions, but you may have to
install them manually. Refer to your distribution’s installation
manual for more details about installing additional packages.
I just installed this
package but can’t find
entries in the KDE/Gnome
menus.
Some versions of the KDE or GNOME desktop environments
may require that you restart your session for the changes to
take effect.
I get a “Some options are
not selected” error
message while editing the
printer settings.
Some printers have conflicting settings, meaning that some
settings for two options can’t be selected at the same time.
When you change a setting and the Printer Package detects
such a conflict, the conflicting option is changed to a “No
Choice” value. You have to choose an option that does not
conflict before being able to submit the changes.
I can’t make a printer the
system default.
In some conditions, it may not be possible to change the
default queue. This happens with some variants of LPRng,
especially on recent RedHat systems that use the “printconf”
database of queues.
When using printconf, the
/etc./printcap
file is
automatically refreshed from the database of printers
managed by the system (usually through the “printtool”
command), and the queues in
/etc./printcap.local
are
appended to the resulting file. The default queue in LPRng is
defined as the first queue in
/etc./printcap
, therefore it is
not possible for the Linux Printer Package to change the
default when some queues have otherwise been defined using
printtool.
LPD systems identify the default queue as the one named “lp”.
Thus, if there is already a queue by this name, and if it
doesn’t have any alias, then you won’t be able to change the
default. To work around this, you can either delete the queue
or rename it by manually editing the
/etc./printcap
file.
The N-up setting does not
work correctly for some of
my documents.
The N-up feature is achieved through post-processing of the
PostScript data that is being sent to the printing system.
However, such post-processing can only be adequately
achieved if the PostScript data conforms to the Adobe
Document Structuring Conventions. Problems may arise when
using N-up and other features relying on post-processing if
the document being printed isn’t compliant.

S
OLVING
P
ROBLEMS
7.32
I am using BSD lpr
(Slackware, Debian, older
distributions) and some
options chosen in LLPR
don’t seem to take effect.
Legacy BSD lpr systems have a hard limitation on the length
of the option string that can be passed to the printing system.
As such, if you selected a number of different options, you
may exceed the length of the options and some of your
choices won’t be passed to the programs responsible for
implementing them. Try to select less options that deviate
from the defaults, to save on memory usage.
I am trying to print a
document in Landscape
mode, but it prints rotated
and cropped.
Most Unix applications that offer a Landscape orientation
option in their printing options will generate correct PostScript
code that should be printed as is. In that case, you need to
make sure that you leave the LLPR option to its default
Portrait setting, to avoid unwanted rotations of the page that
would result in a cropped output.
Some pages come out all
white (nothing is printed),
and I am using CUPS.
If the data being sent is in Encapsulated PostScript (EPS)
format, some earlier versions of CUPS (1.1.10 and before)
have a bug preventing them from being processed correctly.
When going through LLPR to print, the Printer Package will
work around this issue by converting the data to regular
PostScript. However, if your application bypasses LLPR and
feeds EPS data to CUPS, the document may not print
correctly.
I can’t print to a SMB
(Windows) printer.
To be able to configure and use SMB-shared printers (such as
printers shared on a Windows printer), you need to have a
correct installation of the SAMBA package that enables that
feature. The “smbclient” command should be available and
usable on your system.
My application seems to be
frozen while LLPR is
running.
Most Unix applications will expect a command like the regular
“lpr” command to be non-interactive and thus return
immediately. Since LLPR is waiting for user input before
passing the job on to the print spooler, very often the
application will wait for the process to return, and thus will
appear to be frozen (its windows won’t refresh). This is
normal and the application should resume functioning
correctly after the user exits LLPR.
How do I specify the IP
address of my SMB server?
It can be specified in the “Add Printer” dialogue of the
configuration tool, if you don’t use the CUPS printing system.
Unfortunately, CUPS currently doesn’t allow you to specify the
IP address of SMB printers, so you will have to be able to
browse the resource with Samba in order to be able to print.
Some documents come out
as white pages when
printing.
Some versions of CUPS, especially those shipped with
Mandrake Linux before the 8.1 release, have some known
bugs when processing the PostScript output from some
applications. Try upgrading to the latest version of CUPS (at
least 1.1.14). Some RPM packages for the most popular
distributions are provided as a convenience with this Linux
Printing Package.
Problem Possible Cause and Solution

S
OLVING
P
ROBLEMS
7.33
7
I have CUPS and some
options (such as N-up)
seem to be always enabled
even though I don’t choose
them in LLPR.
There may be some local options defined in your
~/
.lpoptions
file, which are manipulated by the lpoptions
command. These options are always used if not overridden by
LLPR settings. To get rid of all options for a printer, run the
following command, replacing “printer” with the name of the
queue: lpoptions -x printer
I configured a printer to
print to a file, but I get
“Permission denied” errors.
Most printing systems will not run as the super-user but as a
special user (usually “lp”). Therefore, make sure that the file
you have chosen to print to is accessible to the user owning
the spooler daemon.
On my PCL (or GDI)
printer, I sometimes get
error messages printing
instead of my document.
Unfortunately, some Unix applications may generate non-
compliant PostScript output that may not be supported by
Ghostscript, or even the printer itself in PostScript mode. You
can try to capture the output to a file and view the results
with Ghostscript (gv or ghostview will allow you to do so
interactively) and see if you get error messages. However,
since the application is at fault probably, contact your
software vendor to inform them of the issue.
Some color images come
out all black.
This is a known bug of Ghostscript (until GNU Ghostscript
version 7.05) when the base color space of the document is
indexed color space and it is converted through CIE color
space. Because Postscript uses CIE color space for Color
Matching System, you should upgrade Ghostscript on your
system at least GNU Ghostscript version 7.06 or later. You can
find the recent Ghostscript at www.ghostscript.com.
Problem Possible Cause and Solution

S
OLVING
P
ROBLEMS
7.34
MEMO

A
This chapter includes Macintosh information.
USING YOUR PRINTER WITH
A MACINTOSH

U
SING
Y
OUR
P
RINTER
WITH
A
M
ACINTOSH
A.2
Software for Macintosh
Your printer supports Macintosh systems with a built-in USB
interface. When you print a file from a Macintosh computer, you
can use the SPLC driver to support your printer’s major printing
features.
System Requirements
To use your printer and its software with a Macintosh, your
system should have:
Macintosh Hardware Requirement:
• One of the following Macintosh models:
-Power Macintosh series
-Power Macintosh G3, G4
-iMac series
-PowerBook series
-iBook series
• USB interface
NOTE
: Your printer must be connected directly to your Macintosh
using a USB cable. The Phaser 6100 printer does not currently
support printing over a network connection from any Macintosh
Operating System. For information about future network
capability, see Appendix G for the Phaser 6100 Support web site.
Macintosh System Requirement:
Macintosh OS 9.x
NOTES
:
• The Phaser 6100 printer does not support PostScript printing.
Ensure that the application you are using does not expect to be
able to use PostScript.
• For information on printer driver installation, printing features,
and Macintosh OS X support, see Appendix G for the
Phaser 6100 Support web site.


U
SING
Y
OUR
P
RINTER
IN
L
INUX
B.2
Installing the Printer Driver
System Requirements
Supported OS
• Redhat 6.2/7.0/7.1 and above
• Linux Mandrake 7.1/8.0 and above
• SuSE 6.4/7.0/7.1 and above
Recommended Requirements
• Pentium II or PowerPC G3
• RAM 64 MB or higher
• Hard drive 20 MB or higher
Software
• Glibc 2.1 or higher
• GTK+ 1.2 or higher
• Ghostscript
Installing the Printer Driver
1
Make sure that you connect the printer to your computer.
Turn both the computer and the printer on.
2
When the Administrator Login window appears, type in
“root” in the Login field and enter the system password.
NOTE
: You must log in as a super user (root) to install the printer
software. If you are not the super user, ask your system
administrator.
3
Insert the printer software CD-ROM. The CD-ROM
automatically runs.

U
SING
Y
OUR
P
RINTER
IN
L
INUX
B.3
B
NOTE
: If the CD-ROM does not automatically run, click the
icon at the bottom of the window. When the Terminal screen
appears, type in:
[root@local /root]#
cd /mnt/cdrom
(the CD-ROM directory)
[root@local cdrom]#
./setup.sh
4
Select the installation type, either Recommended or
Expert, and then click Continue.
Recommended is fully automated and no interaction is
required. Expert installation allows you to select the install
path or printing system.
5
If you selected Recommended, go to Step 6.
For Expert, select an option and then click Begin Install.
U
SING
Y
OUR
P
RINTER
IN
L
INUX
B.4
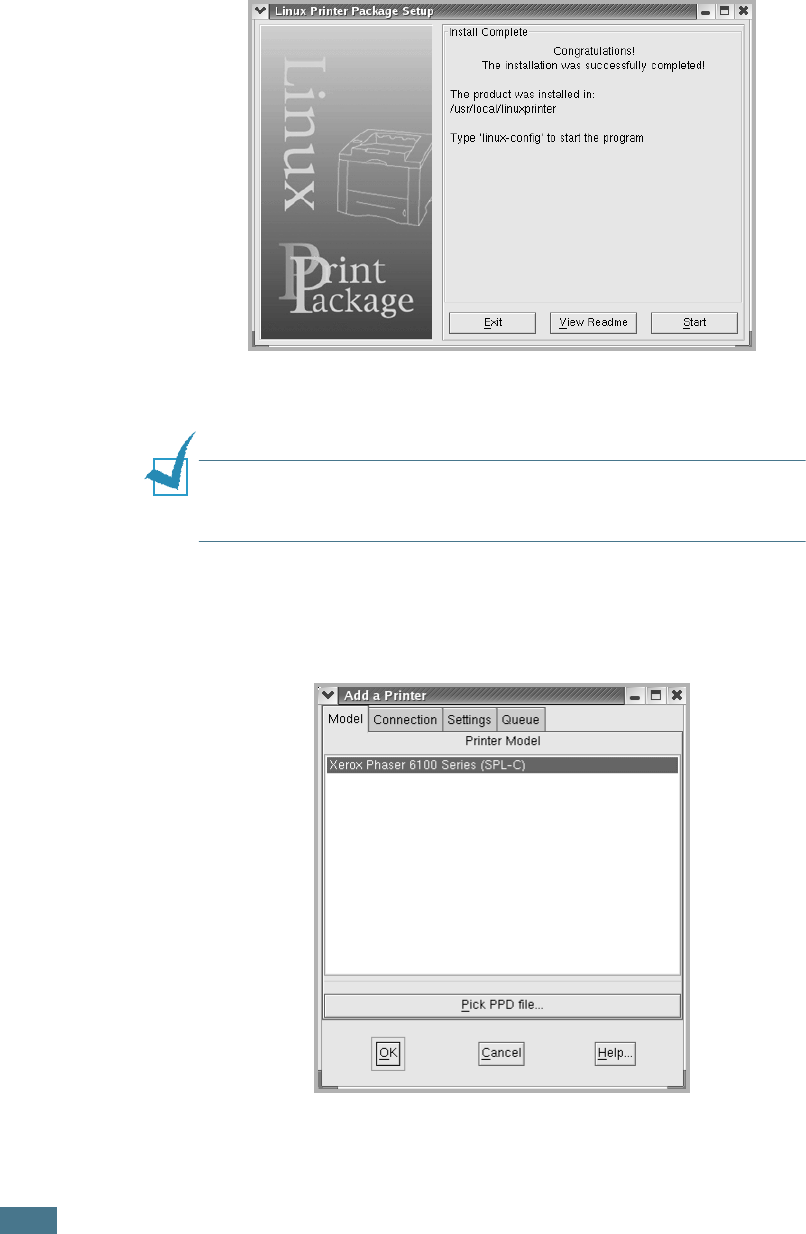
6
The printer driver installation begins. When the installation
is completed, click Start.
7
The Linux Printer Configuration window opens. Click the
Add Printer icon on the tool bar at the top of the window.
NOTE
: Depending on the printing system in use, the
Administrator Login window may appear. Type in “root” in the
Login field and enter the system password.
8
You see the printers currently added to your system. Select
the printer you want to use. The function tabs available for
the selected printer appear at the top of the Add a Printer
window.
U
SING
Y
OUR
P
RINTER
IN
L
INUX
B.5
B
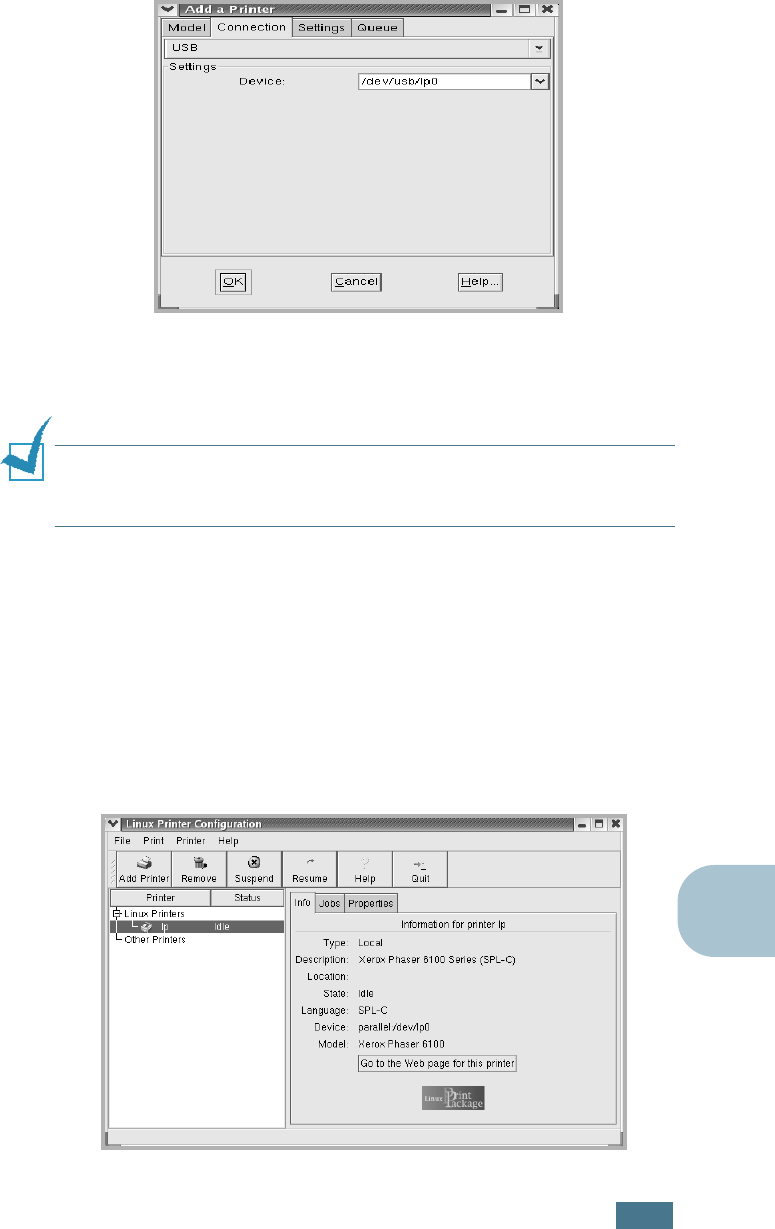
9
Click the Connection tab and ensure that the printer port is
set properly. If not, change the device setting.
10
You can use the Settings tab and the Queue tab to view the
printer’s current settings. If necessary, you can change the
settings.
NOTE
: The options may differ depending on the printer in use. The
Description and the Location field in the Queue screen may not
appear depending on the printing system in use.
11
To exit, click OK.
12
When the window prompts that the new printer is
successfully configured, click OK.
13
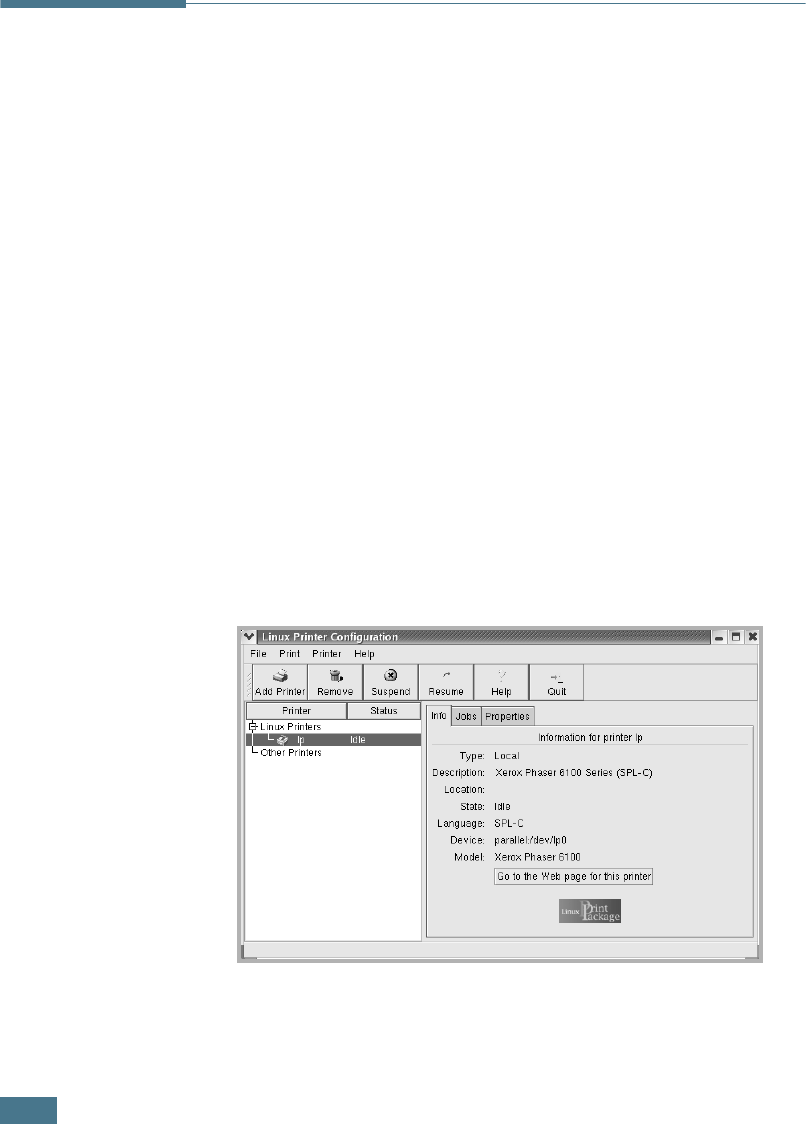
The Linux Printer Configuration window reappears. You can
view the information about your printer from the Info tab. If
necessary, you can change the printer’s configuration. For
details about changing the printer’s configuration, see “Using
the Configuration Tool” on page B.8.
U
SING
Y
OUR
P
RINTER
IN
L
INUX
B.6
Changing the Printer Connection Method
If you change the printer connection method from USB to
parallel or vice versa while in use, you must re-configure your
Linux printer by adding the printer to your system. Take the
following steps:
1
Make sure that you connect the printer to your computer.
Turn both the computer and the printer on.
2
When the Administrator Login window appears, type in
“root” in the Login field and enter the system password.
NOTE
: You must log in as a super user (root) to install a new
printer to the printing system. If you are not the super user, ask
your system administrator.
3
From the Startup Menu icon at the bottom of the desktop,
select Linux Printer and then Configuration Tool.
You can also access the Linux Printer Configuration window
by typing “linux-config” in the Terminal screen.
4
When the Linux Printer Configuration window appears, click
the Add Printer icon on the tool bar at the top of the
window.
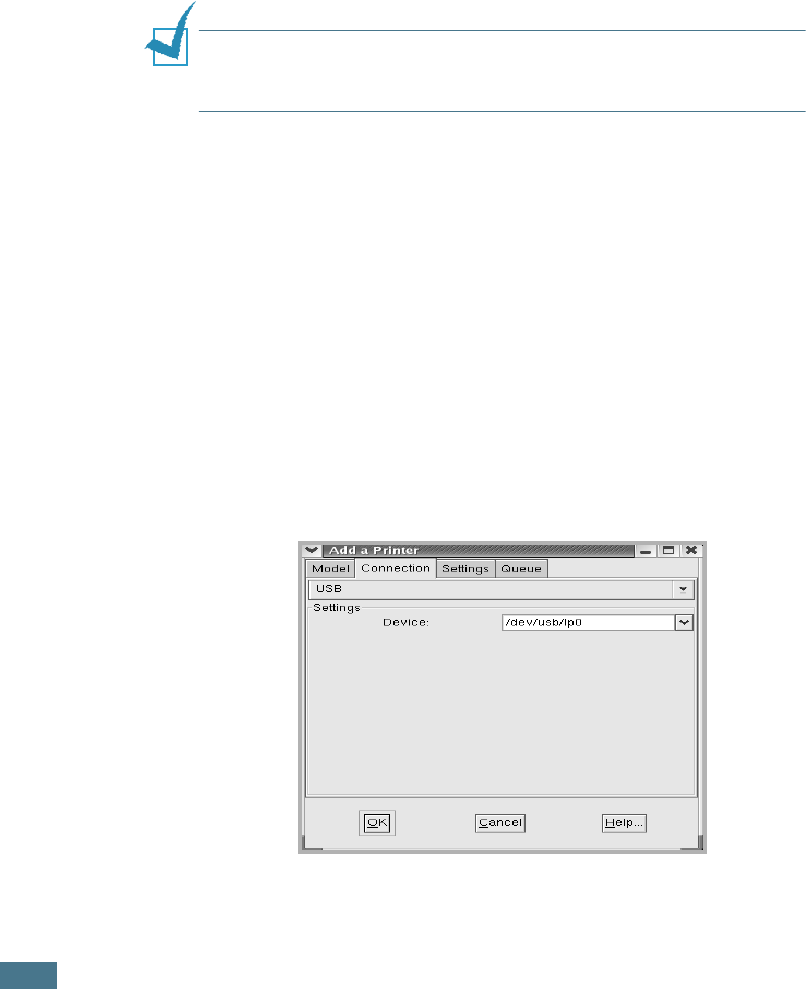
5
Click the Connection tab at the top of the Add a Printer
window.
Ensure that the printer port is set properly. If not, change
the device setting.
6
Click OK.
U
SING
Y
OUR
P
RINTER
IN
L
INUX
B.7
B
Uninstalling the Printer Driver
1
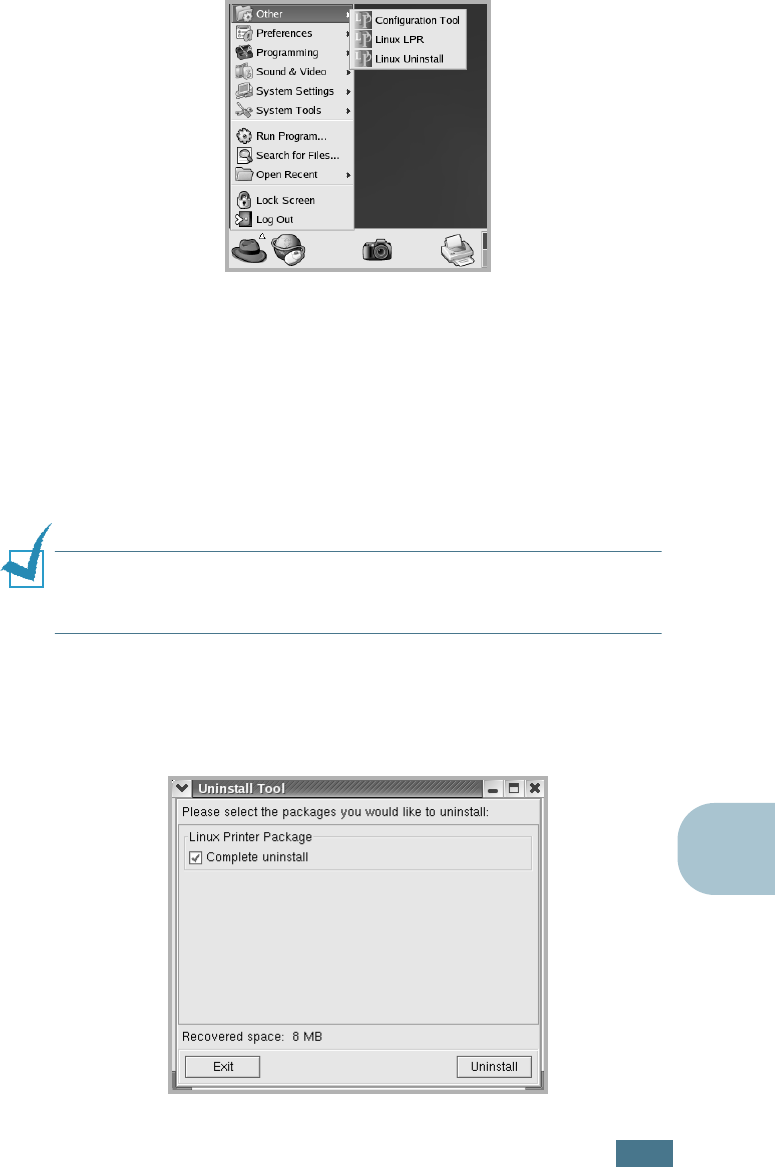
From the Startup Menu icon at the bottom of the desktop,
select Other and then Configuration Tool.
You can also access the Linux Printer Configuration window
by typing “linux-config” in the Terminal screen.
2
In the Linux Printer Configuration window, select the
Uninstall command from the File menu.
3
The Administrator Login window appears. Type in “root” in
the Login field and enter the system password. Click
Proceed.
NOTE
: You must log in as a super user (root) to uninstall the
printer software. If you are not the super user, ask your system
administrator.
4
A message window appears asking you to confirm the
uninstallation. Click Yes.
5
Select Complete uninstall and then click Uninstall.
U
SING
Y
OUR
P
RINTER
IN
L
INUX
B.8
6
Click OK to begin uninstallation.
7
When the uninstallation is completed, click Finished.
Using the Configuration Tool
The configuration tool accesses administrative tasks, including
adding and removing a new printer, and changing their global
settings. Regular users can also run it to easily inspect job
queues, examine the printer properties and change their local
preferences.
To access the Configuration Tool:
1
From the Startup Menu icon at the bottom of the screen,
select Linux Printer and then Configuration Tool. The
Linux Printer Configuration window appears.
You can also open this window from the Terminal screen by
typing in “linux-config.”
2
The Linux Printer Configuration window shows a list of
installed printers in the left pane. The right pane shows a
number of tabs that display information regarding the
currently selected printer.
Select your printer, if not currently selected.
U
SING
Y
OUR
P
RINTER
IN
L
INUX
B.9
B
3
The Info tab shows general information about the printer.
If you are an Internet user, you can click Go to the Web
page for this printer to access the web page.
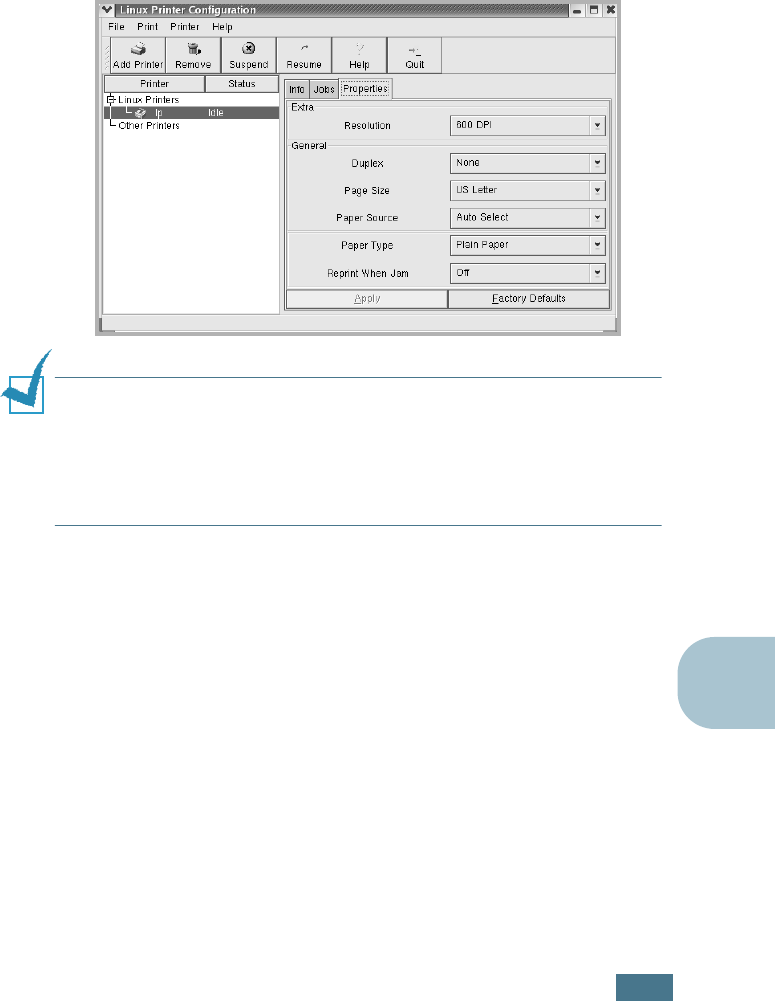
Click the Jobs tab to inspect and manage the job queue for
the selected printer. You can suspend, resume or delete a
specific job(s) in the queue. If you drag a specific job(s),
you can drop it into the print queue of another printer.
The Properties tab allows you to change the default printer
settings.
NOTE
: Regular users are able to override the system-wide default
settings defined by the administrator. When a regular user clicks
Apply, these custom settings are saved in the user’s profile and
may be later used with LLPR. If the administrator is running the
configuration tool, then the settings are saved as the new global
defaults.
U
SING
Y
OUR
P
RINTER
IN
L
INUX
B.10
Changing LLPR Properties
You can fine tune the printer’s properties by opening the LLPR
Properties window.
To open the LLPR Properties window:
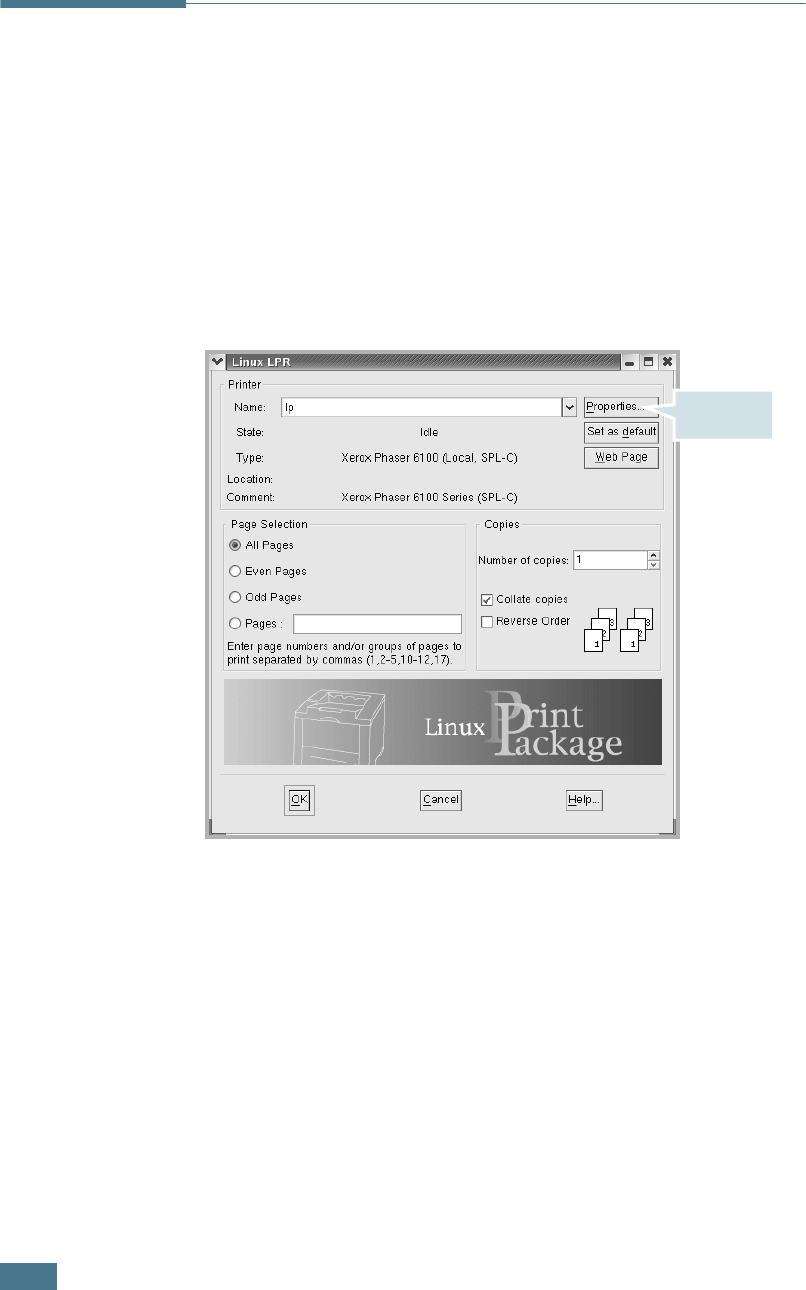
1
From the application you are using, select the Print
command.
2
When the Linux LPR window opens, click Properties.
You can also open the LLPR window:
• Click the Startup Menu icon at the bottom of the screen
and select Linux Printer and then Linux LPR.
• If the Linux Printer Configuration window is currently
open, select Test Print from the Print menu.
Click
Properties.
U
SING
Y
OUR
P
RINTER
IN
L
INUX
B.11
B
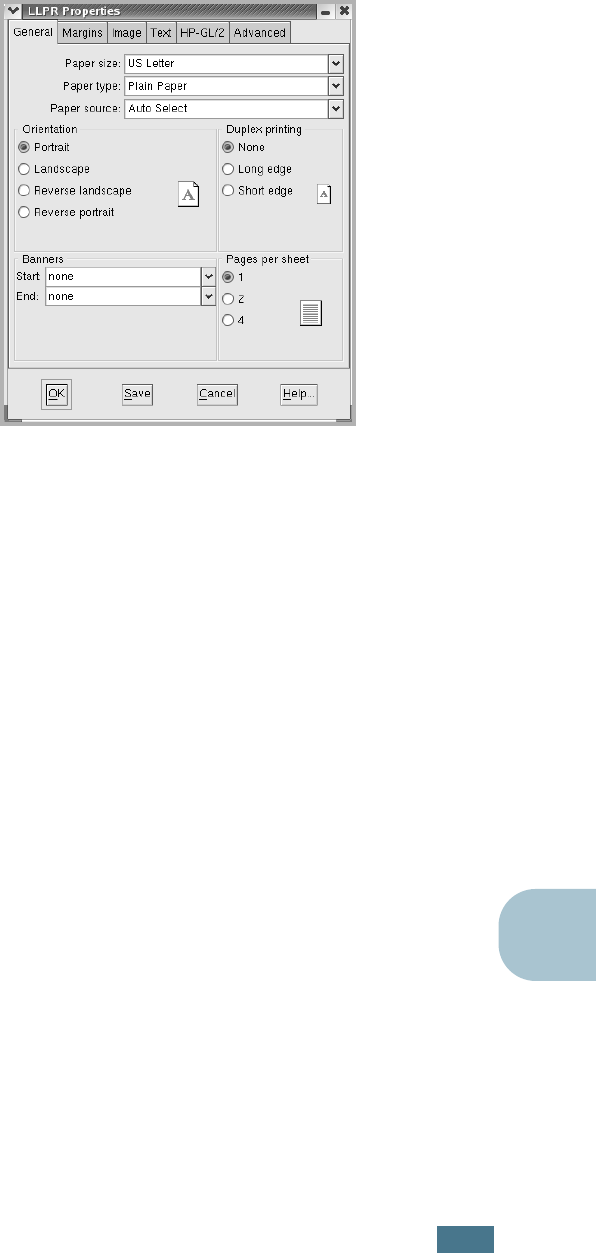
3
The LLPR Properties window opens.
The following six tabs are at the top of the window:
•General - allows you to change the paper size, the paper
type, the paper source, the orientation of the documents;
enables the duplex feature, adds start and end banners,
and changes the number of pages per sheet.
•Margins - allows you to specify the page margins. These
margins do not apply when printing regular PostScript
data.
•Image - allows you to set image options that are used
when printing image files, i.e. when a non-PostScript
document is passed to LLPR on the command line. Color
settings will also take effect for postscript documents.
•Text - allows you to select the density of the text and
turn the syntax coloring on or off.
•HP-GL/2 - allows you to set default options to print
documents in the HP-GL/2 format, which is used by some
plotters.
•Advanced - allows you to override the default settings for
the printer.
If you click the Save button at the bottom of the window,
the options are kept between LLPR sessions.
Use the Help button to view details about the options in the
window.
4
To apply the options, click OK in the LLPR Properties
window. You are returned to the Linux LPR window. To
start printing, click OK.

U
SING
Y
OUR
P
RINTER
IN
L
INUX
B.12
MEMO


U
SING
Y
OUR
P
RINTER
ON
A
N
ETWORK
C.2
About Sharing the Printer on a
Network
If you work in a networked environment, you can connect your
printer to the network.
Locally-Shared Printer
You can connect the printer directly to a selected computer,
which is called the “host computer” on the network. The printer
can then be shared by other users on the network through a
Windows 98/Me/XP/NT 4.0/2000/Server 2003 network printer
connection.
Wired Network-connected Printer
A Phaser 6100DN printer has the built-in network interface.
Printing Across a Network
Whether the printer is locally connected or network-connected,
you need to install the Phaser 6100 printer software on each
computer that prints documents using the printer.

U
SING
Y
OUR
P
RINTER
ON
A
N
ETWORK
C.3
C
Setting Up a Locally Shared Printer
In Windows 98/Me
Setting Up the Host Computer
1
Start Windows.
2
From the Start menu, select Control Panel from Settings
and double-click on the Network icon.
3
Check the File and Print Sharing box, and click OK. Close
the window.
4
From the Start menu, select Printers from Settings and
double-click your printer name.
5
Select Properties in the Printer menu.
6
Click the Sharing tab and check the Shared As box. Fill in
the Shared Name field and click OK.
Setting Up the Client Computer
1
Right-click the Windows Start button and select Explorer.
2
Open your network folder in the left column.
3
Right-click the shared name and select Capture Printer
Port.
4
Select the port you want, check the Reconnect at log on
box, and click OK.
5
From the Start menu, select Settings and then Printers.
6
Double-click your printer icon.
7
From the Printer menu, select Properties.
8
From the Details tab, select the printer port and click OK.

U
SING
Y
OUR
P
RINTER
ON
A
N
ETWORK
C.4
In Windows NT 4.0/2000/XP/Server 2003
Setting Up the Host Computer
1
Start Windows.
2
For Windows NT 4.0/2000, select Settings, and Printers
from the Start menu.
For Windows XP/Server 2003, select Printers and Faxes
from the Start menu.
3
Double-click your printer icon.
4
From the Printer menu, select Sharing.
5
For Windows NT 4.0, check the Shared box.
For Windows 2000, check the Shared As box.
For Windows XP/Server 2003, check the Share this
printer box.
6
Fill in the Shared Name field and click OK.

U
SING
Y
OUR
P
RINTER
ON
A
N
ETWORK
C.5
C
Setting Up the Client Computer
1
Right-click the Windows Start button and select Explorer.
2
Open your network folder in the left column.
3
Click the shared name.
4
For Windows NT 4.0/2000, select Settings and Printers
from the Start menu.
For Windows XP/Server 2003, select Printers and Faxes
from the Start menu.
5
Double-click your printer icon.
6
From the Printer menu, select Properties.
7
From the Ports tab, click Add Port.
8
Select Local port and click New Port.
9
Fill in the Enter a port name field, enter the shared name.
10
Click OK and click Close.
11
For Windows NT 4.0, click OK.
For Windows 2000/XP/Server 2003, click Apply and click
OK.

U
SING
Y
OUR
P
RINTER
ON
A
N
ETWORK
C.6
Setting Up a Network-Connected
Printer
You have to set up the network protocols on the printer to use it
as your network printer. Setting protocols can be accomplished
by using CentreWare Internet Services (IS).
To access CentreWare IS:
1
Launch your web browser.
2
Enter your printer's IP address in the browser’s Address
field (http://xxx.xxx.xxx.xxx).
The CentreWare Internet Services (IS) screen appears. Access
printer status and manage your printer over a TCP/IP network
using a web browser.
You can configure the basic network parameters through the
printer’s control panel. Use the printer control panel to do the
following:
• Enable or disable network protocols (TCP/IP, LPD)
• Configure TCP/IP
U
SING
Y
OUR
P
RINTER
ON
A
N
ETWORK
C.7
C
Configuring Network Parameters on the
Control Panel
Supported Operating Systems
• TCP/IP: Transmission Control Protocol/Internet Protocol
• DHCP: Dynamic Host Configuration Protocol
• BOOTP: Bootstrap Protocol
Printing a Network Connection Page
The Network Connection page shows how the network interface
card on your printer is configured. The default settings which are
suitable for most applications are enabled.
1
In ready mode press the Menu button ( ) until you see
‘Information’ on the bottom line of the display.
2
Press the OK button ( ) to access the menu.
3
Press the scroll button ( or ) until ‘Connection Pg’
displays on the bottom line.
4
Press the OK button ( ).
The Network Connection page prints out.
Setting Network Protocols
When you first install the printer, all supported network
protocols are enabled when you turn the printer on. If a network
protocol is enabled, the printer may actively transmit on the
network even when the protocol is not in use. This may increase
network traffic slightly. To eliminate unnecessary traffic, you can
disable unused protocols.
Item Requirements
Network Interface 10/100 Base-TX (standard for Phaser
6100DN)
Network Operating
System
• Windows 98/Me, NT 4.0/2000/XP/
Server 2003
• Linux RedHat 6.2/7.0/7.1 and higher
• Linux Mandrake 7.1/8.0 and higher
• SuSE 6.4/7.0/7.1 and higher
Network Protocols • LPD (LPR), Port9100 on Windows NT,
Linux
Dynamic Addressing
Server
• DHCP, BOOTP
U
SING
Y
OUR
P
RINTER
ON
A
N
ETWORK
C.8
Configuring TCP/IP
Your printer can be set up on a variety of TCP/IP networks. There
are several ways in which your printer can be assigned a TCP/IP
address, depending on your network.
• Static Addressing: TCP/IP address is assigned manually by
the system administrator.
• Dynamic Addressing BOOTP/DHCP (default): TCP/IP address
is assigned automatically by the server.
1
In ready mode press the Menu button ( ) until you see
‘Network Setup’ on the bottom line of the display.
2
Press the OK button ( ) to access the menu.
3
Press the scroll button ( or ) until ‘Configure TCP’
displays on the bottom line. Press the OK button ( ).
4
Press the scroll button ( or ) to display ‘Yes’ and press
the OK button ( ). The IP Source screen appears.
5
Press the scroll button ( or ) to select one of the
following options, then press the OK button ( ):
• Static: See “Static Addressing” on page C.8
• BOOTP: See “Dynamic Addressing (BOOTP/DHCP)” on
page C.9
• DHCP: See “Dynamic Addressing (BOOTP/DHCP)” on
page C.9
Static Addressing
To enter the TCP/IP address from your printer’s control panel,
take the following steps:
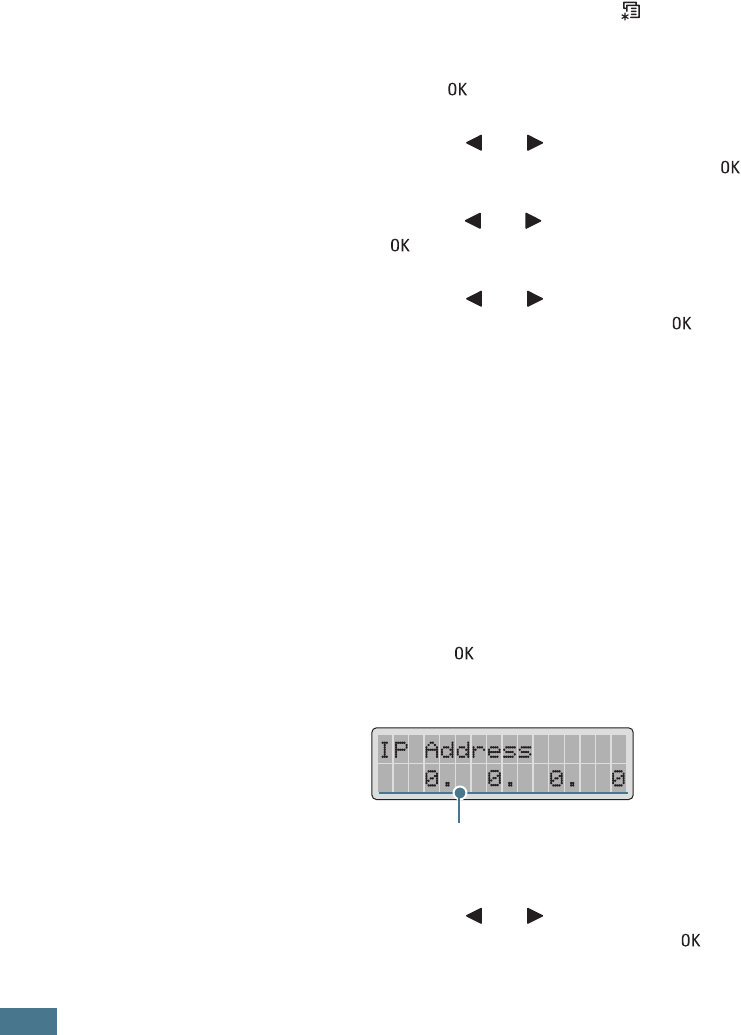
1
Press the OK button ( ) to access the IP Address menu.
An IP address consists of 4 bytes.
2
Press the scroll button ( or ) to enter a number
between 0 and 255 and press the OK button ( ).
Enter a number between 0
and 255 for each byte.
U
SING
Y
OUR
P
RINTER
ON
A
N
ETWORK
C.9
C
3
Repeat Step 2 to complete the address from the 1st byte to
the 4th byte.
4
To select other parameters, such as the Subnet Mask or
Gateway, press the scroll button ( or ). Press the OK
button ( ).
5
Repeat steps 2 through 4 to configure the other TCP/IP
parameters.
Dynamic Addressing (BOOTP/DHCP)
To assign the TCP/IP address automatically by the server, take
the following steps:
1
Press the scroll button ( or ) until ‘BOOTP’ or ‘DHCP’ is
displayed on the bottom line. Press the OK button ( ).
2
Press the scroll button ( or ) to display ‘YES’ and press
the OK button ( ).
Resetting the Network Interface Card
You can reset the network interface card when the connection to
the network is lost.
1
Press the Menu button ( ) until you see ‘Network Setup’
on the bottom line of the display.
2
Press the OK button ( ) to access the menu.
3
Press scroll button ( or ) until ‘Reset Network’ displays
on the bottom line.
4
Press the OK button ( ) to confirm the selection.

U
SING
Y
OUR
P
RINTER
ON
A
N
ETWORK
C.10
Resetting the Network Configuration
You can return the network configuration to its default settings.
1
Press the Menu button ( ) until you see ‘Network Setup’
on the bottom line of the display.
2
Press the OK button ( ) to access the menu.
3
Press scroll button ( or ) until ‘Reset Defaults’ displays
on the bottom line.
4
Press the OK button ( ) to confirm the selection.

D
Your printer is a full-featured laser printer that has been
optimized to meet most of your printing needs. Recognizing
that each user may have different requirements, however,
Xerox makes several options available to enhance your
printer’s capabilities.
This chapter includes information for installing an Optional
Tray 2.
INSTALLING AN OPTIONAL
TRAY 2
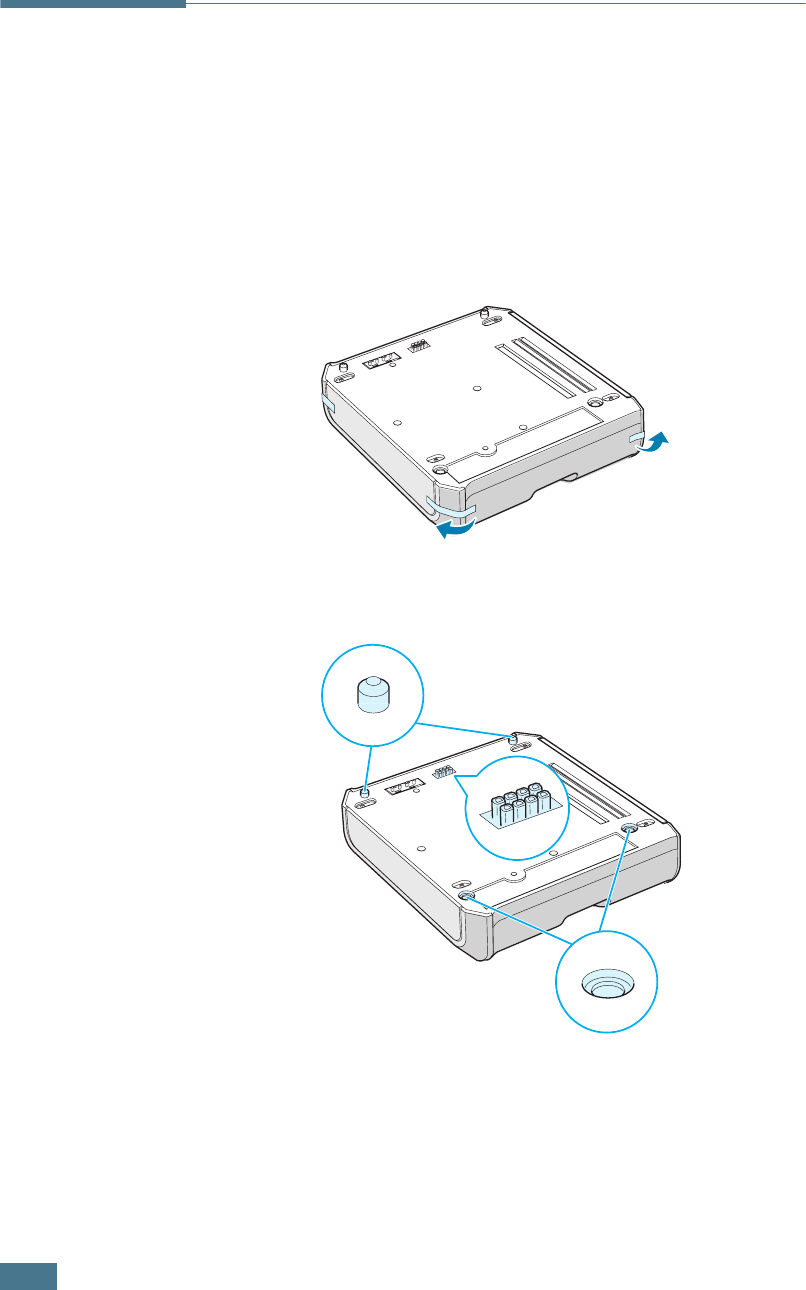
I
NSTALLING
A
N
O
PTIONAL
T
RAY
2
D.2
Installing an Optional Tray 2
You can increase the paper handling capacity of your printer by
installing an optional Tray2. This tray holds 500 sheets of paper.
1
Turn the printer off and unplug all cables from the printer.
2
Remove the packing tape and the packing material inside of
the tray.
3
Find the location of the connector and the optional tray
positioners.
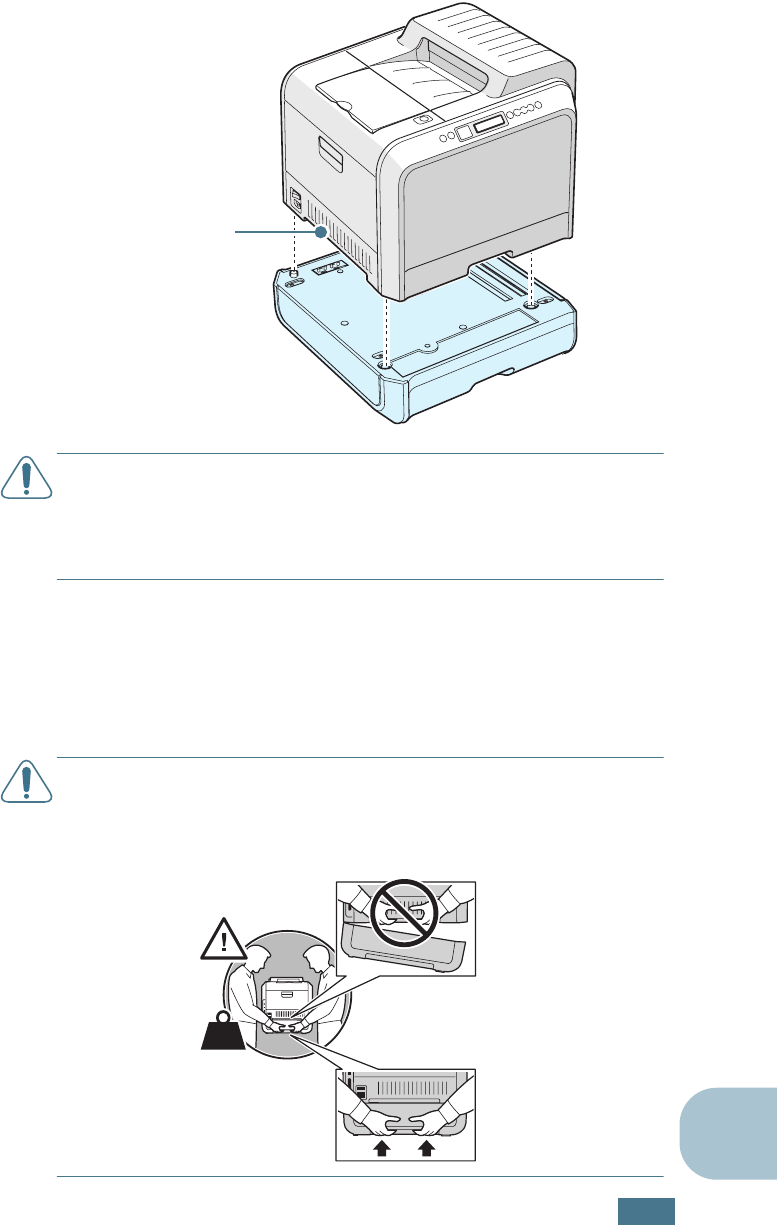
I
NSTALLING
A
N
O
PTIONAL
T
RAY
2
D.3
D
4
Place the printer over the tray, aligning the feet on the
printer with the positioners in the optional tray.
CAUTION
: This printer weighs 35kg including developer cartridge
and cassette. Use safe lifting and handling techniques. If you need
to move the printer it must be moved by two people. Use the
lifting handles located as shown in the diagram. Back injury could
be caused if a single person attempts to lift the printer.
5
Load paper in the optional tray. For information about
loading paper in this tray, see “Using the Optional Tray 2”
on page 2.8.
6
Reconnect the power cord and cables and then turn the
printer on.
CAUTION
: When moving the printer with the Optional Tray 2, lift
using the handles on each side of the Optional Tray 2 to prevent
the tray from separating from the printer. The illustration below
demonstrates the proper technique for lifting the printer.
Lifting handles are
located at the lower
edge of both sides of
the printer.
38 kg
84 lbs.

I
NSTALLING
A
N
O
PTIONAL
T
RAY
2
D.4
When you print a document on the paper loaded in Tray 2, you
must configure the properties of the printer driver.
To access the properties of the printer driver:
1
Click the Windows Start menu.
2
For Windows 98/Me/NT 4.0/2000, select
Settings
and then
Printers
.
For Windows XP/Server 2003, select
Printers and Faxes
.
3
Select the Xerox Phaser 6100 printer.
4
Click the right mouse button on the printer icon and:
In Windows 98/Me, select
Properties
.
In Windows NT 4.0/2000/XP/Server 2003, select
Properties
.
5
Click the Printer tab, and select Tray 2 from the Optional
Tray drop-down list.
6
Click OK.

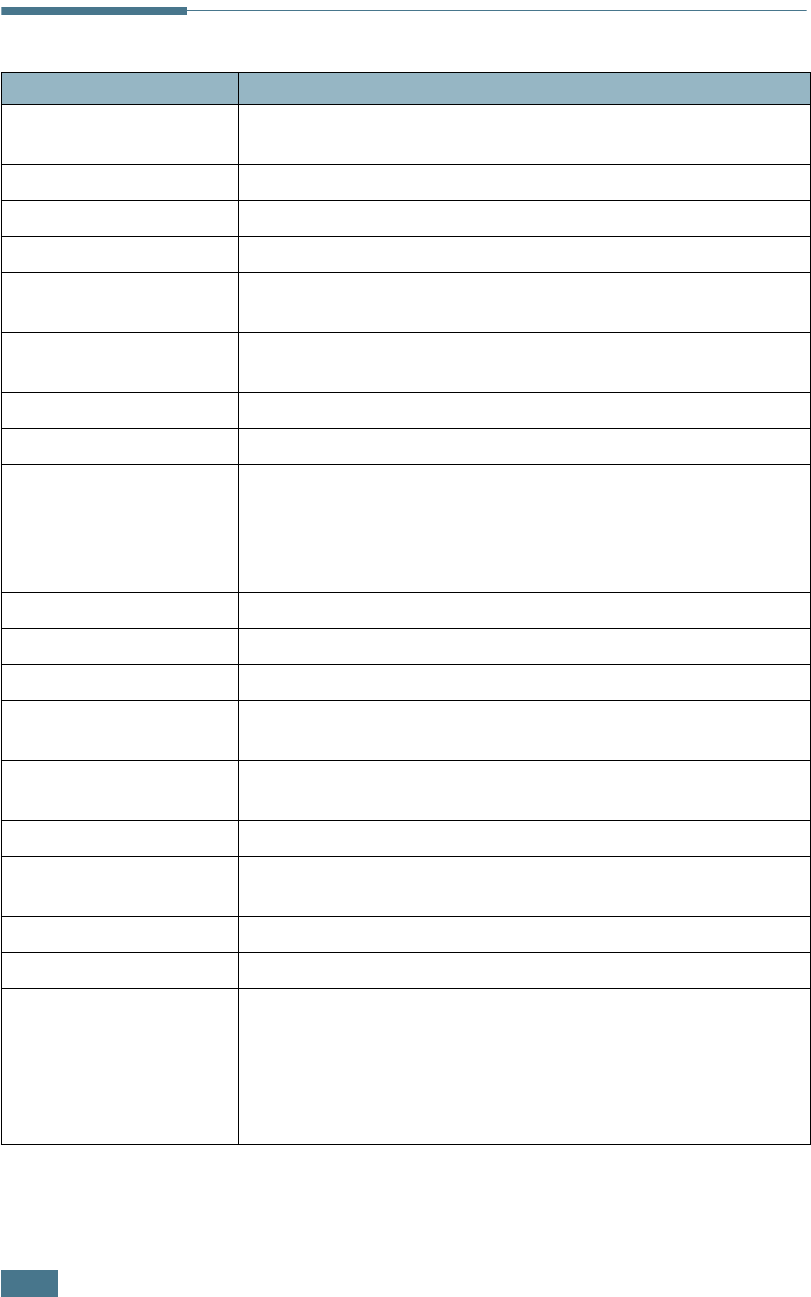
S
PECIFICATIONS
E.2
Printer Specifications
Item Specifications and Description
Print Speed Black:20 PPM (A4), 21 PPM (Letter);Color: 5 PPM (A4/Letter)
Duplex: 9.6 IPM (Black); 5 IPM (Color)
Resolution True 600x600 dpi (1200x1200 dpi class)
Warm-up Time 15 seconds (Black); 24 seconds (4-Color)
First Page Out Time < 120 seconds
Power Rating AC 110 ~ 127V (USA, Canada) / 220 ~ 240V (Others),
50 / 60Hz
Power consumption 450 W average during operation /
Less than 30 W in Power Saver mode
Acoustic Noise Printing: 48dB
Toner Supply Four toner cartridges (Black, Yellow, Magenta, Cyan)
Toner cartridge Life
7,000 Sheets high-capacity (for standard-capacity 3,000
sheets) @ IDC 5% coverage (Black Toner)
5,000 Sheets high-capacity (for standard-capacity, 2,000
sheets) @ IDC 5% coverage (C/M/Y)
Duty Cycle Monthly: 35,000 pages maximum (Black)
Weight 38kg/84lb (including consumables)
Package Weight Paper: 4.36Kg, Plastic: 1.48Kg
External Dimensions
(W x D x H) 510 (W) x 470 (D) x 405 (H) mm
Operating Environment Temperature: 15 ~ 32.5°C / 50 ~ 90°F
Humidity: 20 ~ 80% RH
Emulation SPL-Color
Random Access Memory
(RAM) Standard 64 MB
Fonts Windows font
Interface Switching Automatic (Parallel, USB, Network)
Interface
• IEEE 1284 Bidirectional Parallel
- Modes supported: Compatible, Nibble, Byte, ECP
• USB Interface Standard
- USB 1.1/2.0 compliant (12/480 Mbps 1 port)
• Network Interface
- 10/100 Base TX (Phaser 6100DN only)
S
PECIFICATIONS
E.3
E
Paper Specifications
Overview
Your printer is designed to be used with a variety of paper types
including envelopes, labels, transparencies, and custom size
paper. Paper weight and size affect both print quality and the
printer’s performance. Using unsupported paper or specialty
media can cause:
• Poor print quality
• Increased paper jams
• Premature wear on the printer.
See “Supported Sizes of Paper” on page E.4.
NOTES
:
• When the correct paper or specialty media is used and print
problems still occur, other factors may be involved. Paper may
have been stored incorrectly or has become wrinkled, dusty, too
moist, or too dry. Xerox has no control over, or responsibility for,
these occurrences.
• Before purchasing large quantities of paper, ensure that the
paper meets the requirements specified in this User Guide.
CAUTION
: Damage caused by using unsupported paper,
transparencies, and other specialty media is not covered by the
Xerox warranty or service agreement.
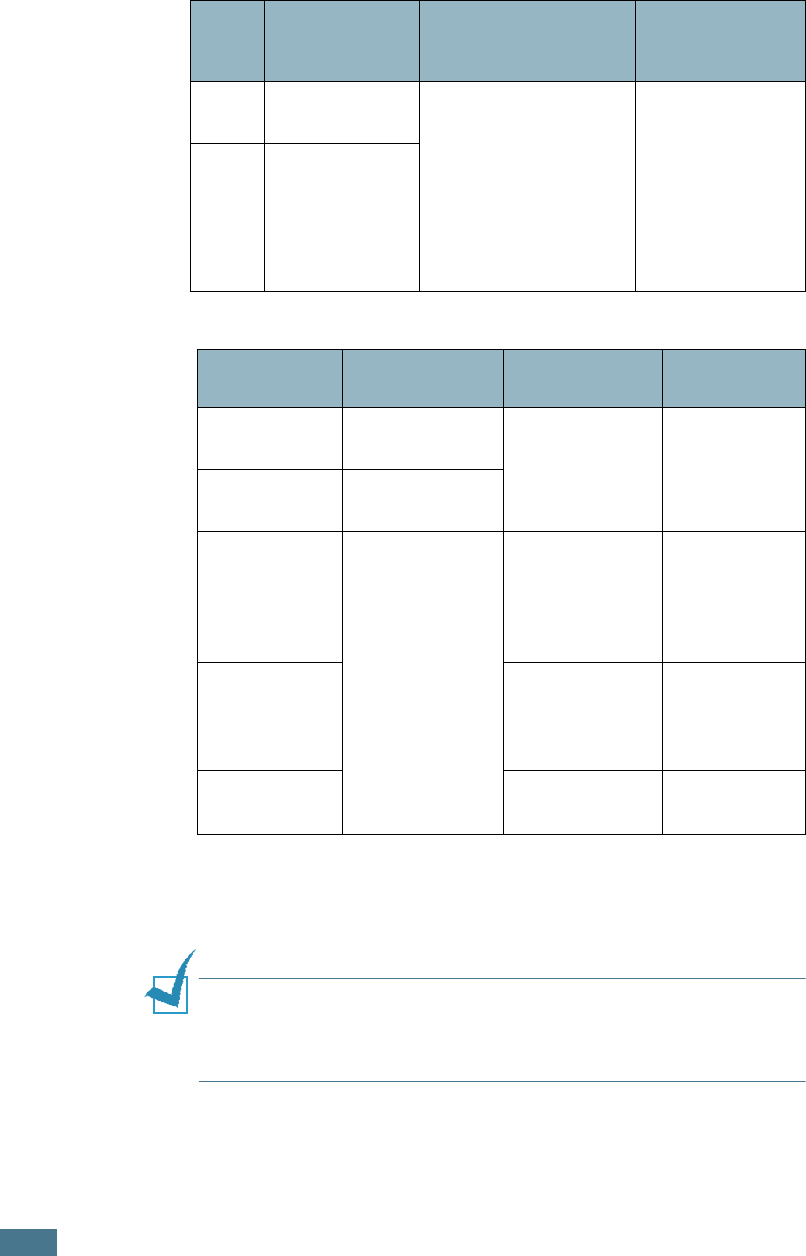
S
PECIFICATIONS
E.4
Supported Sizes of Paper
NOTE
: You may experience jams when using paper with a length
of less than 140mm (5.5in.). For optimum performance, ensure
that you are storing and handling the paper correctly. Please refer
to “Printer and Paper Storage Environment” on page E.7.
Tray1
/
Tray2
Dimensions
*
Weight Capacity
**
Letter 216 X 279mm
(8.5 X 11in.)
• 16 to 24lb (60 to
90g/m
2
) bond for
single-sided
printing
•
20 to 24lb (75 to 90
g/m
2
) bond for
duplex printing
• 250 sheets of
75g/m
2
bond
paper for
Tray 1
• 500 sheets of
75g/m
2
bond
paper for
Tray 2
A4 210 X 297mm
(8.3 X 11.7in.)
Multi-
Purpose Tray Dimensions
*
*The printer supports a wide range of media sizes. See “Printing on Card Stock
or Custom Size Paper” on page 2.21.
Weight Capacity
**
**Capacity may vary depending on media weight and thickness, and
environmental conditions.
Minimum Size
(custom)
90 X 140mm
(3.5 X 5.5in.) 16 to 32lb (60
to 160g/m
2
)
bond, up to 60
lb cover
100 sheets of
75g/m
2
bond
paper
Maximum Size
(custom)
216 X 356mm
(8.5 X 14in.)
Transparency
Same minimum
and maximum
paper sizes as
listed above.
Use only Phaser
35-Series
Premium
Transparency
Film.
30 typical
Labels
***
***Smoothness: 100 to 250 (Sheffield)
Thickness:
0.10 X 0.14
mm (0.0039 X
0.0055in.)
10 typical
Envelopes up to 90g/m
2
(16 to 24lb) up to 10
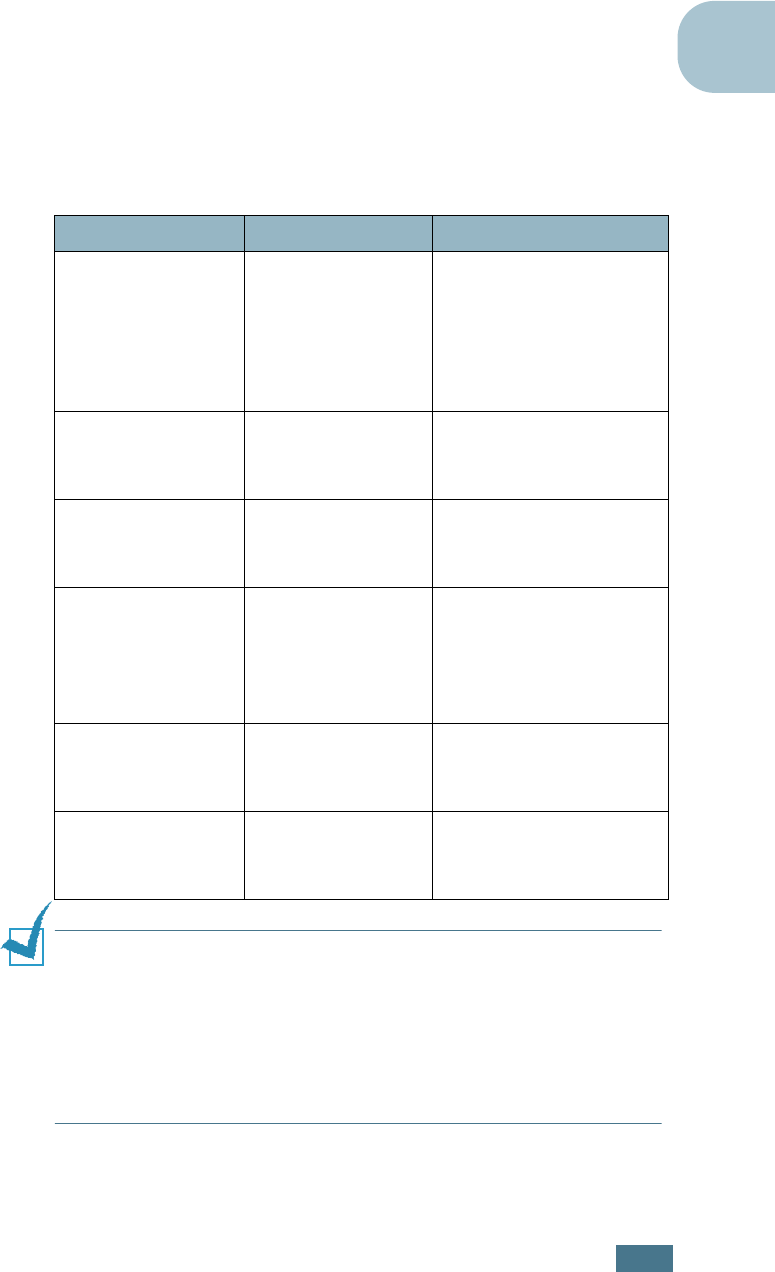
S
PECIFICATIONS
E.5
E
Guidelines for Using Paper
Use conventional 75g/m
2
(20lb) paper. For best results, use
Xerox Phaser Color Printing Media specified for your printer.
They are guaranteed to produce excellent results with your
Phaser 6100 Color Laser Printer.
Follow the guidelines in this table to ensure the best print quality
and avoid printer jams.
NOTES
:
• Do not use letterhead paper printed with low-temperature inks
used in some types of thermography.
• Do not use raised or embossed letterhead.
• Make sure that colored paper or preprinted forms use inks that
are compatible with a fusing temperature of 180°C or 356°F for
0.1 second.
Symptom Problem Solution
Poor print quality,
paper does not
feed into the
printer
Paper weight,
texture, or
moisture content
may be
unsupported by
the printer.
Try using a different
kind of paper, between
100 ~ 250 Sheffield, 4
~ 5% moisture
content.
Text Dropout,
paper jams, paper
curl
Paper may have
been improperly
stored.
Store paper flat in its
moisture-proof
wrapping.
Increased gray
background
shading
Paper weight is
too heavy for the
print job.
Use lighter weight
paper. Open the rear
output tray.
Paper curls when
fed into printer
Paper is too moist
or contains a
wrong grain
direction or short-
grain construction
Use long-grain paper.
Printer jams,
printer is
damaged
Paper contains
cutouts or
perforations
Do not use paper with
cutouts or perforations.
Paper does not
feed into printer
properly
Ragged edges Use good quality paper.
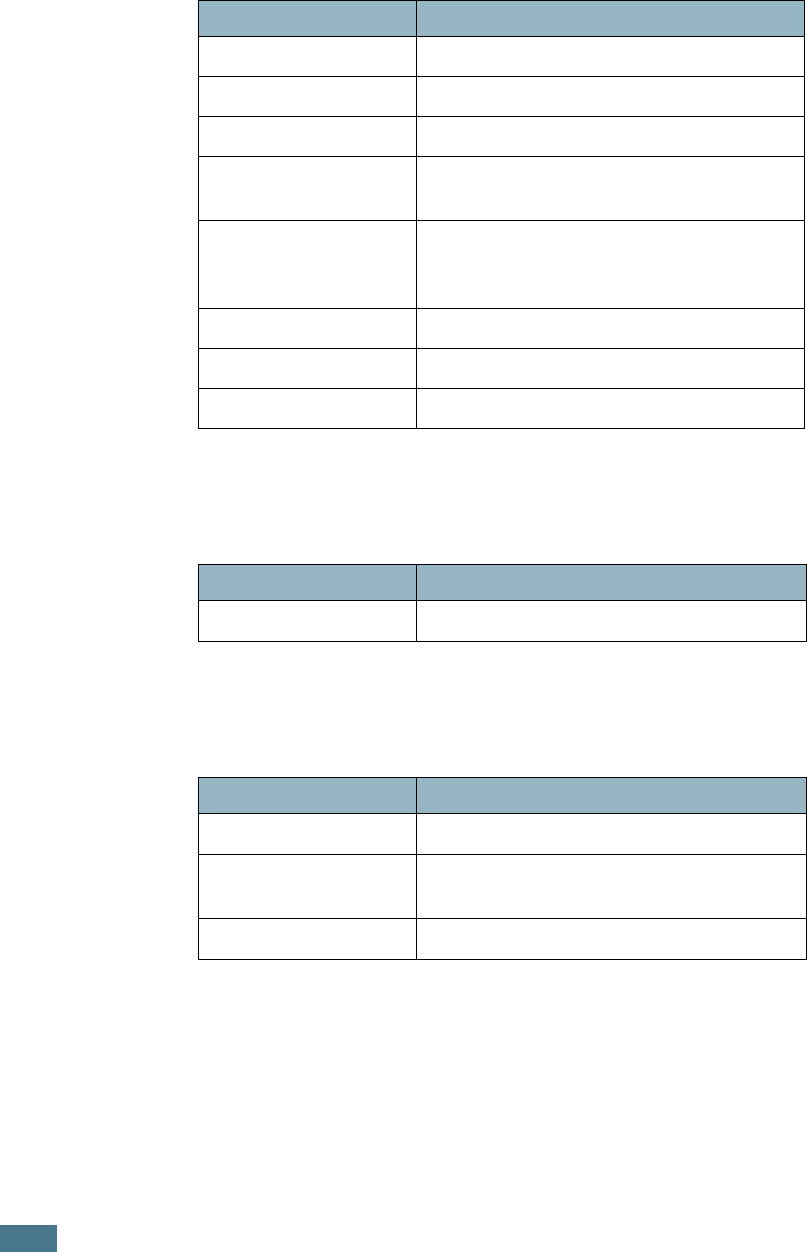
S
PECIFICATIONS
E.6
Paper Specifications
Paper Output Capacity
Paper Input Capacity
Category Specifications
Acid Content 5.5 ~ 8.0pH
Caliper 0.094 ~ 0.18mm (3.0 ~ 7.0mils)
Curl in Ream Flat within 5mm (0.02in.)
Cut Edge Conditions Cut with sharp blades with no visible
fray.
Fusing Compatibility
Must not scorch, melt, offset, or release
hazardous emissions when heated to
180°C (356°F) for 0.1 second.
Grain Long Grain
Moisture Content 4% ~ 6% by weight
Smoothness 100 ~ 250 Sheffield
Output Tray Capacity
Face-down 250 sheets of 75g/m
2
bond paper
Input Tray Capacity
Tray 1 250 sheets of 75g/m
2
, 20lb bond paper
Multi-purpose Tray
(MPT) 100 sheets of 75g/m
2
, 20lb bond paper
Optional Tray 2 500 sheets of 75g/m
2
, 20lb bond paper

S
PECIFICATIONS
E.7
E
Printer and Paper Storage Environment
Optimal print quality is achieved by providing a good
environment and safe handling and storage conditions for your
paper.
• Store the printer and paper in room-temperature
environment that is neither too dry nor too humid. Paper
absorbs or loses moisture rapidly. Heat removes moisture in
paper while cold condenses moisture on the sheets. The
humidity, or lack of it, in air conditioned, heated, or water-
cooled rooms affects paper quality.
• Paper removed from its packaging, and not protected by
tightly wrapping it in moisture-proof wrapping, can absorb
excess moisture. This can cause light print, dropouts, paper
distortion, and paper jams. Unopened paper in sealed reams
remains stable for several months before use.
NOTE
: If the printer environment is subject to extremes, unwrap
only the amount of paper to be used during the day’s operation to
prevent paper damage.
• Do not purchase large quantities of paper that cannot be used
in a short period of time–approximately three months. When
stored too long, paper can be damaged by temperature and
moisture.
• The paper storage environment should be properly
maintained to ensure optimum printer performance. The
required condition is 20° to 24°C (68° to 75°F), with a
relative humidity of 45% to 55%.
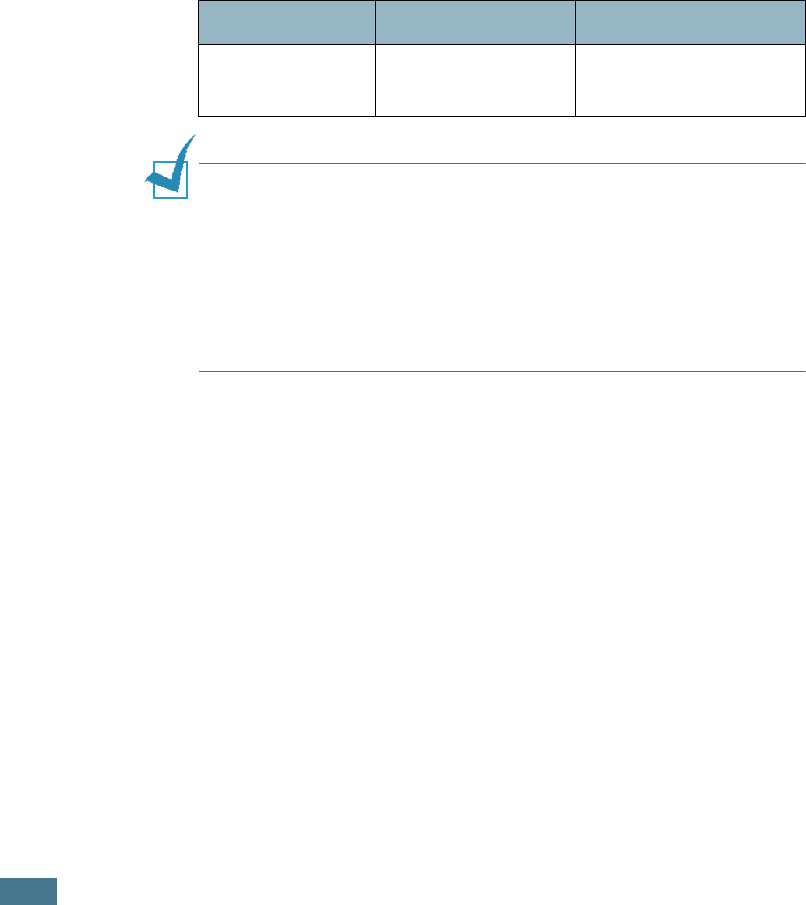
S
PECIFICATIONS
E.8
Envelopes
Successful envelope printing is highly dependent on the quality
and construction of the envelopes. Use envelopes made
specifically for laser printers. When selecting envelopes,
consider the following guidelines:
• Weight: 90g/m
2
(24lb) or less
• Construction: Flat with less than 6mm (0.25in.) curl
• Condition: No wrinkles or damaged surface or edges
• Temperature: Compatible with the heat and pressure of the
printer
• Size: Meet the following size ranges:
NOTES
:
• Use only the Multi-purpose Tray to print envelopes.
• You may experience some paper jams when using any media
with a length less than 140mm
(
5.5in.). This may be caused by
paper that has been affected by environmental conditions. For
optimum performance, make sure you are storing and handling
the paper correctly. Please refer to “Printer and Paper Storage
Environment” on page E.7.
Minimum Maximum
Multi-purpose
Tray
90 X 140mm
(3.5 X 5.5in.)
216 X 356mm
(8.5 X 14in.)
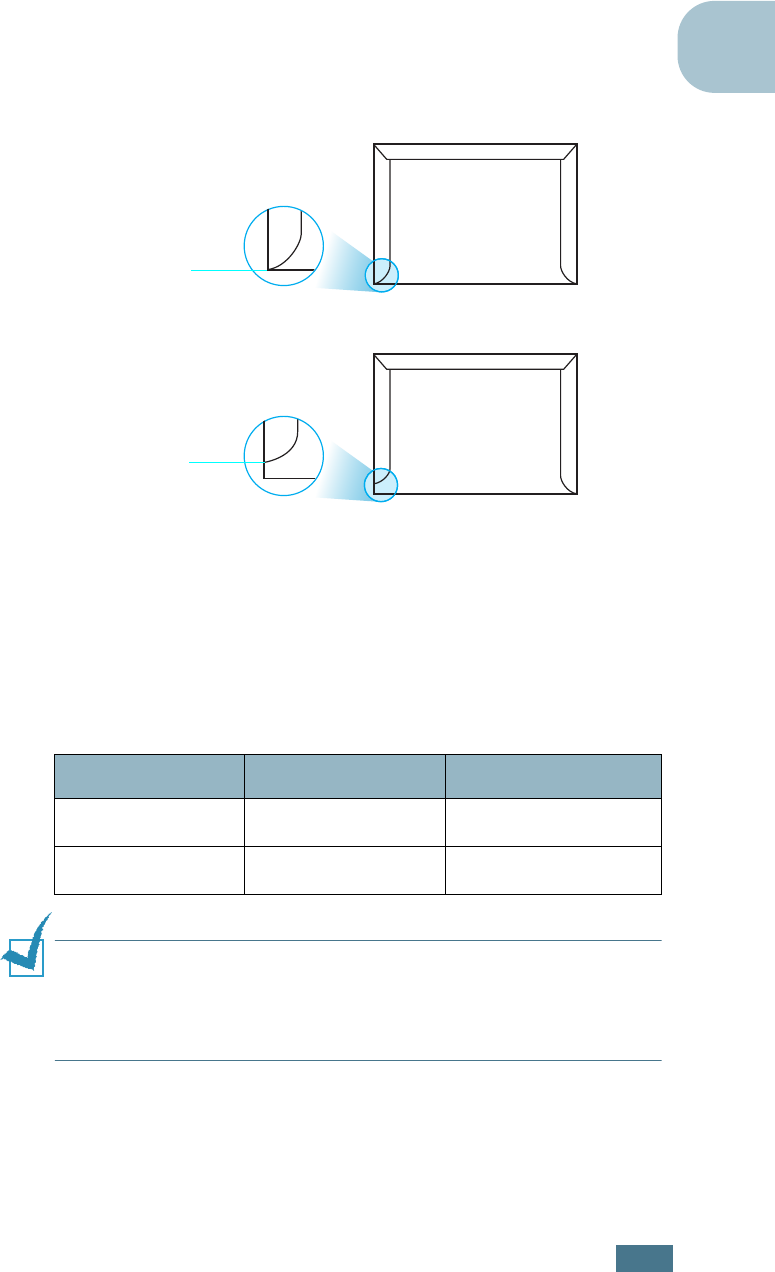
S
PECIFICATIONS
E.9
E
Envelopes with Double Side Seams
Envelopes designed with double side-seams (vertical seams at
both ends of the envelope) may wrinkle easily. Select only those
envelopes with a seam that extends to the corner of the
envelope. See the following illustration.
Envelopes with Adhesive Strips or Flaps
These types of envelopes are not recommended.
Envelope Margins
The following gives typical address margins for a commercial
#10 or DL envelope.
NOTES
:
• For best print quality, position margins no closer than 15mm
(0.6in.) from the edges of the envelope.
• Avoid printing over the area where the envelope’s seams meet.
Type of Address Minimum Maximum
Return address 10mm (0.4in.) 51mm (2in.)
Delivery address 51mm (2in.) 90mm (3.5in.)
Correct
Incorrect

S
PECIFICATIONS
E.10
Envelope Storage
Store envelopes properly to ensure print quality. Envelopes
should be stored flat. Remove air bubbles from envelopes before
printing to avoid wrinkling or paper jams. See “Printing on
Envelopes” on page 2.14.
Labels
CAUTIONS
:
• To avoid damaging the printer, use only labels recommended for
laser printers.
• To prevent serious jams, always use the Multi-purpose Tray to
print labels.
• Never print on the same sheet of labels more than once and
never print on a partial sheet of labels.
When selecting labels, consider the quality of each component:
• Adhesives: The adhesive material should be stable at 180°C
(356°F), the printer’s fusing temperature.
• Arrangement: Only use labels with no exposed backing
between them. Labels can peel off sheets with spaces
between the labels, causing serious jams. Exposed adhesive
can also cause damage to the printer components.
• Curl: Prior to printing, labels must lie flat with no more than
13mm (0.5in.) of curl in any direction.
• Condition: Do not use labels with wrinkles, bubbles, or other
indications of separation.
See “Printing on Labels” on page 2.16.
Transparencies
Transparencies used in the printer must be able to withstand
180°C (356°F) for 0.1 second, the printer’s fusing temperature.
CAUTION
: To avoid damaging the printer, use only transparencies
recommended for laser printers using oil-less fusers. Do not use
transparencies with paper backing or paper tape. Phaser 35-Series
Premium Transparency Film is recommended.
See “Printing on Transparencies” on page 2.17.

F
This chapter includes information on the Xerox product
recycling and disposal program.
PRODUCT RECYCLING AND
DISPOSAL

P
RODUCT
R
ECYCLING
AND
D
ISPOSAL
F.2
Product Recycling and Disposal
Xerox operates a worldwide equipment takeback and reuse/
recycle program. Contact your Xerox sales representative
(1-800-ASK-XEROX) to determine whether this Xerox product is
part of the program. For more information about Xerox
environmental programs, visit www.xerox.com/
environment.html.
If your product is not part of the Xerox program and you are
managing its disposal, please note that the product may contain
lead and other materials whose disposal may be regulated due
to environmental considerations. For recycling and disposal
information, contact your local authorities. In the United States,
you may also refer to the Electronic Industries Alliance at
www.eiae.org.

G
This chapter includes web site information to help you learn
more about your Phaser 6100 Color Laser Printer.
ADDITIONAL RESOURCES
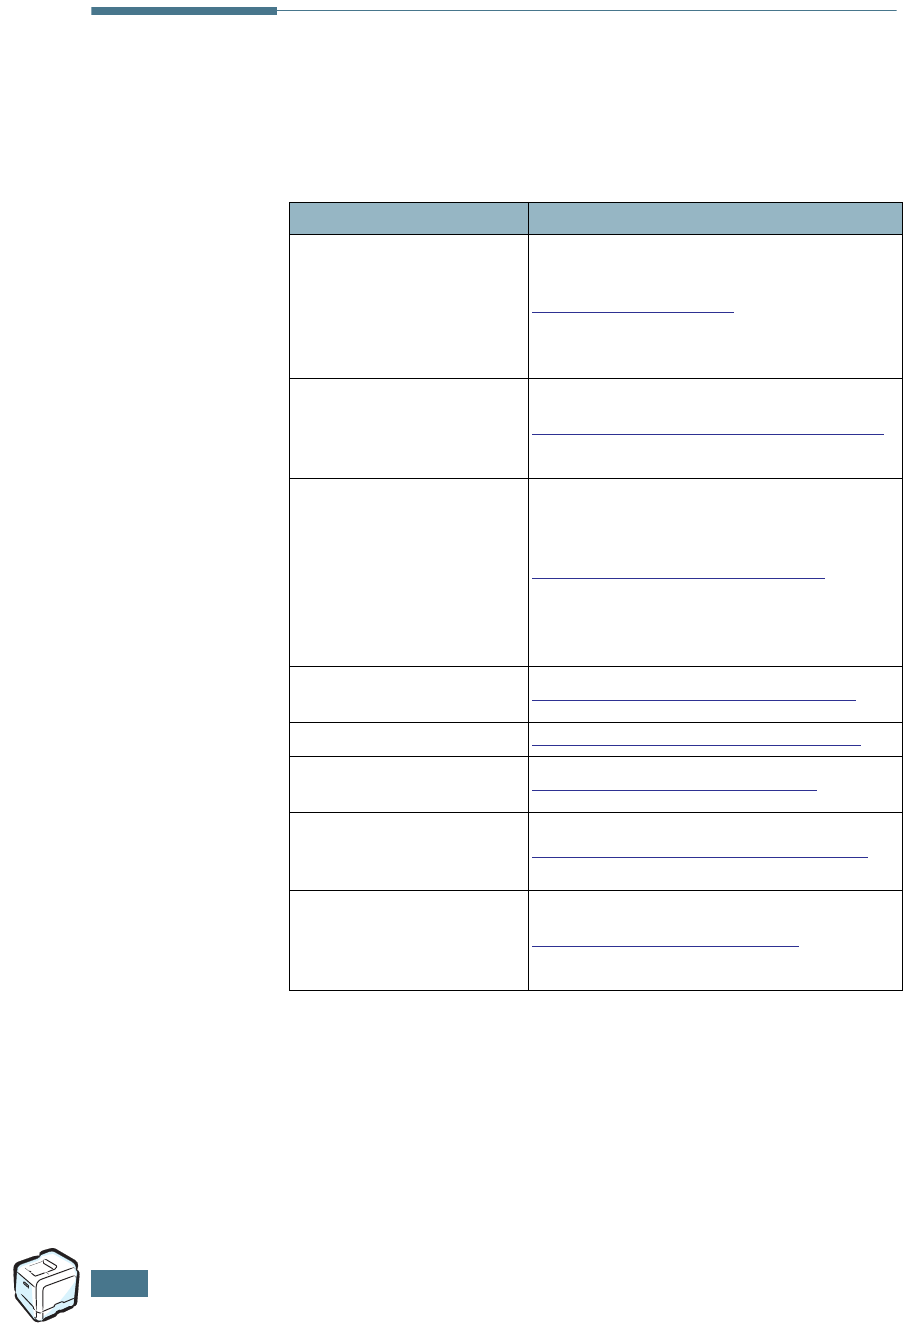
A
DDITIONAL
R
ESOURCES
G.2
Web Links
Xerox provides many resources to help you learn more about
your Xerox printer. Use these web sites to obtain information
about your printer:
Resource Link
To link to product and
supplies information,
download printer drivers,
view documents, and
access support
information:
www.xerox.com/office
To access the
troubleshooting knowledge
base used by Xerox
Customer Support staff:
www.xerox.com/office/6100infoSMART
To link to a color resource
for tools and information
such as interactive
tutorials, color printing
templates, helpful tips,
and customized features to
meet your individual
needs:
www.colorconnection.xerox.com
To view technical support
information:
www.xerox.com/office/6100support
To order Xerox supplies:
www.xerox.com/office/6100supplies
To find your local sales and
support center:
www.xerox.com/office/contacts
To view warranty
information regarding your
Xerox printer:
www.xerox.com/office/6100warranty
To view Material Safety
Data Sheet information
regarding your Phaser
6100 Color Laser Printer:
www.xerox.com/office/msds

i
B
binding preferences
5.8
booklet printing
4.9
C
cancel, print jobs
3.4
card stock, print
2.21
clean
inside the printer
6.31
Laser Scanning Unit (LSU)
6.30
outside of the printer
6.29
cleaning sheet, print
6.29
color mode
3.9, 3.10
components
1.4
config page, print
6.2
connect
network
1.5
parallel
1.5
USB
1.5
control panel
5.2
buttons
5.3
display
5.2
menus
5.5
Custom Size paper, print
2.21
D
display language, change
1.6
double-sided printing
4.2
E
envelopes, print
2.14
error messages
7.25
F
Favorite setting, use
3.12
features
printer
1.2
G
getting help
infoSMART
G.2
technical support
G.2
graphic properties, set
3.9
H
help, use
3.13
I
imaging unit, replace
6.14
install
optional Tray2
D.2
SPL driver for Linux
B.2
L
labels, print
2.16
Laser Scanning Unit (LSU)
6.30
Linux
common problems
7.31
configuration tool
B.8
driver, install
B.2
LLPR properties
B.10
load, paper
in the Multi-Purpose Tray
2.9
in the optional Tray2
2.8
in the Tray1
2.4
using the manual feed
2.12
M
Macintosh
common problems
7.30
drive
A.2
manual feed mode, use
2.12
Multi-Purpose Tray, use
2.9
INDEX

ii
N
network printing
locally shared printer, set
C.3
network-connected printer, set
C.6
parameters, configure
C.7
n-up printing
4.6
O
option, install
paper tray 2
D.2
optional tray, install
D.2
ordering supplies
G.2
orientation, select
3.6
overlay, use
4.13
P
paper
choose
2.2
guideline
2.3
load
2.4
sizes and capacities
2.2
specifications
E.3
paper jam
jam at B, C
7.14
jam at C
7.9, 7.10
jam at Optional Tray 2
7.17
jam at the Multi-purpose Tray
(MPT)
7.9
jam at Tray 1 or the Paper Feed
Area
7.7
tips for avoiding
7.20
paper properties, set
3.7
paper size, change in the tray
2.7
paper size, set
3.7
poster printing
4.7
power saver mode
5.2
preprinted paper, print
2.20
print order, set
3.11
print quality problems
7.21
print quality, set
3.9
printer driver
features
3.2
printer software
install
in Linux
B.2
uninstall
in Linux
B.7
printing
booklets
4.9
config page
6.2
double-sided
4.2
fitting to a selected paper
4.5
from Windows
3.3
multiple pages on one sheet
4.6
posters
4.7
reduced/enlarged document
4.4
using overlays
4.13
watermarks
4.10
printing problems
7.3
problem, solving
checklist
7.2
error messages
7.25
general
7.3
Linux
7.31
Macintosh
7.30
paper jams
7.6
print quality
7.21
Windows
7.29
Q
quality problems, solve
7.21
R
replace
imaging unit
6.14
toner cartridge
6.8
transfer belt
6.22
waste cartridge
6.11
S
safety
7
scaling
4.4
specification
paper
E.3
printer
E.2, G.2
system requirements
for Linux
B.2
Windows
C.2

iii
T
toner cartridge
maintain
6.4
redistribute
6.5, 6.8
replace
6.8
toner remain, check
6.4
transfer belt, replace
6.22
transparencies, print
2.17
tray selection, set
3.8
Tray1, use
2.4
troubleshooting
infoSMART
G.2
technical support
G.2
U
uninstall
Linux
B.7
user safety
7
W
warranty
G.2
waste cartridge, replace
6.11
watermarks, use
4.10
website
resources
G.2
X
Xerox warranty
G.2