Samsung Electronics Co PHASER3200MFP Multi Function Laser Printer User Manual Phaser 3200MFP English
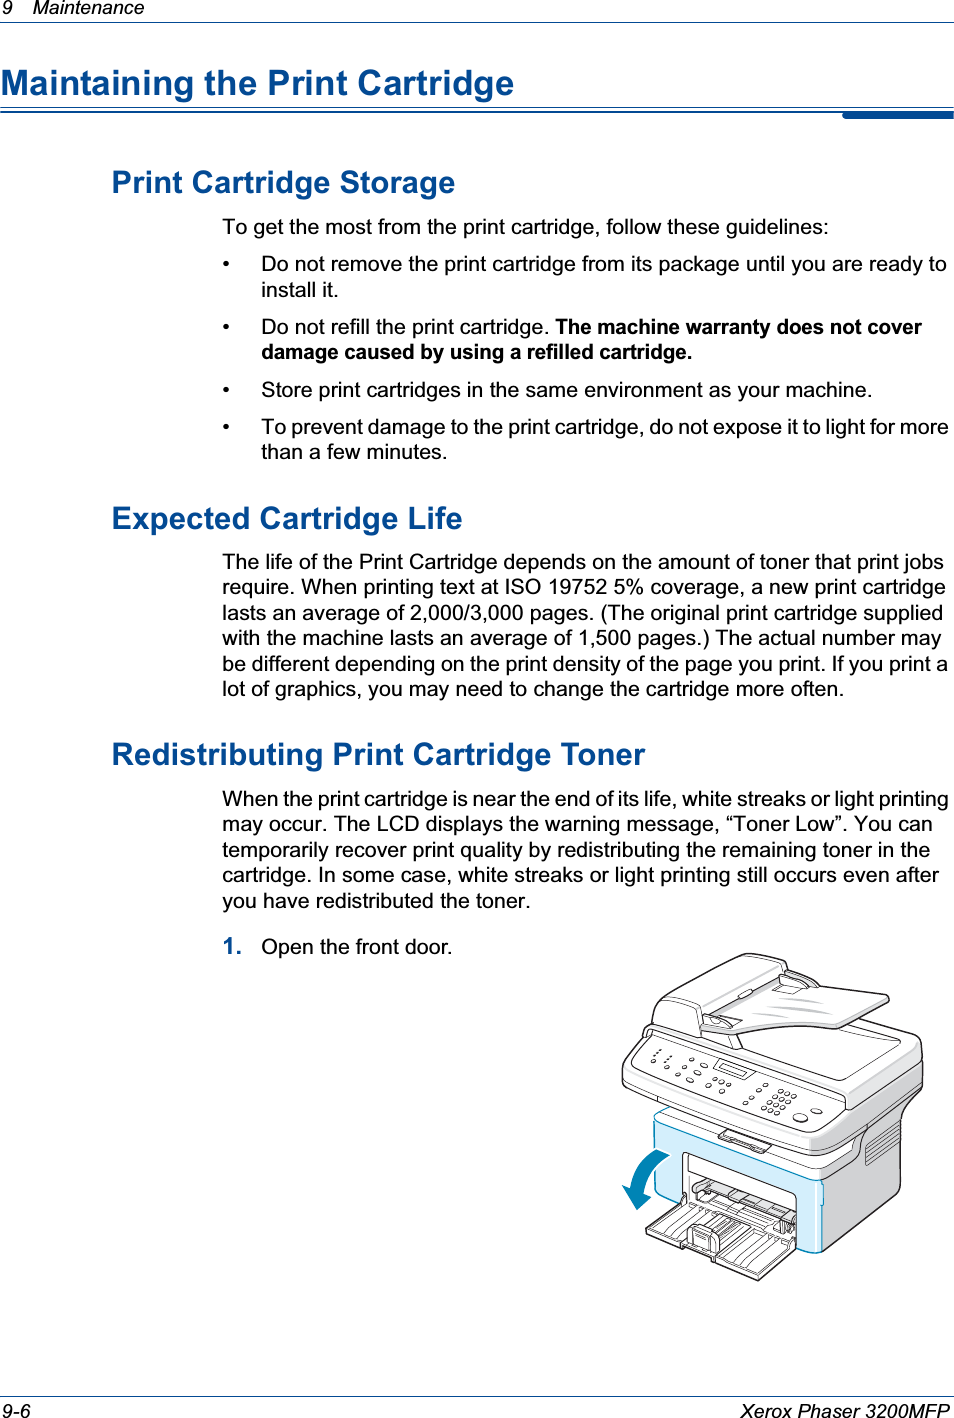
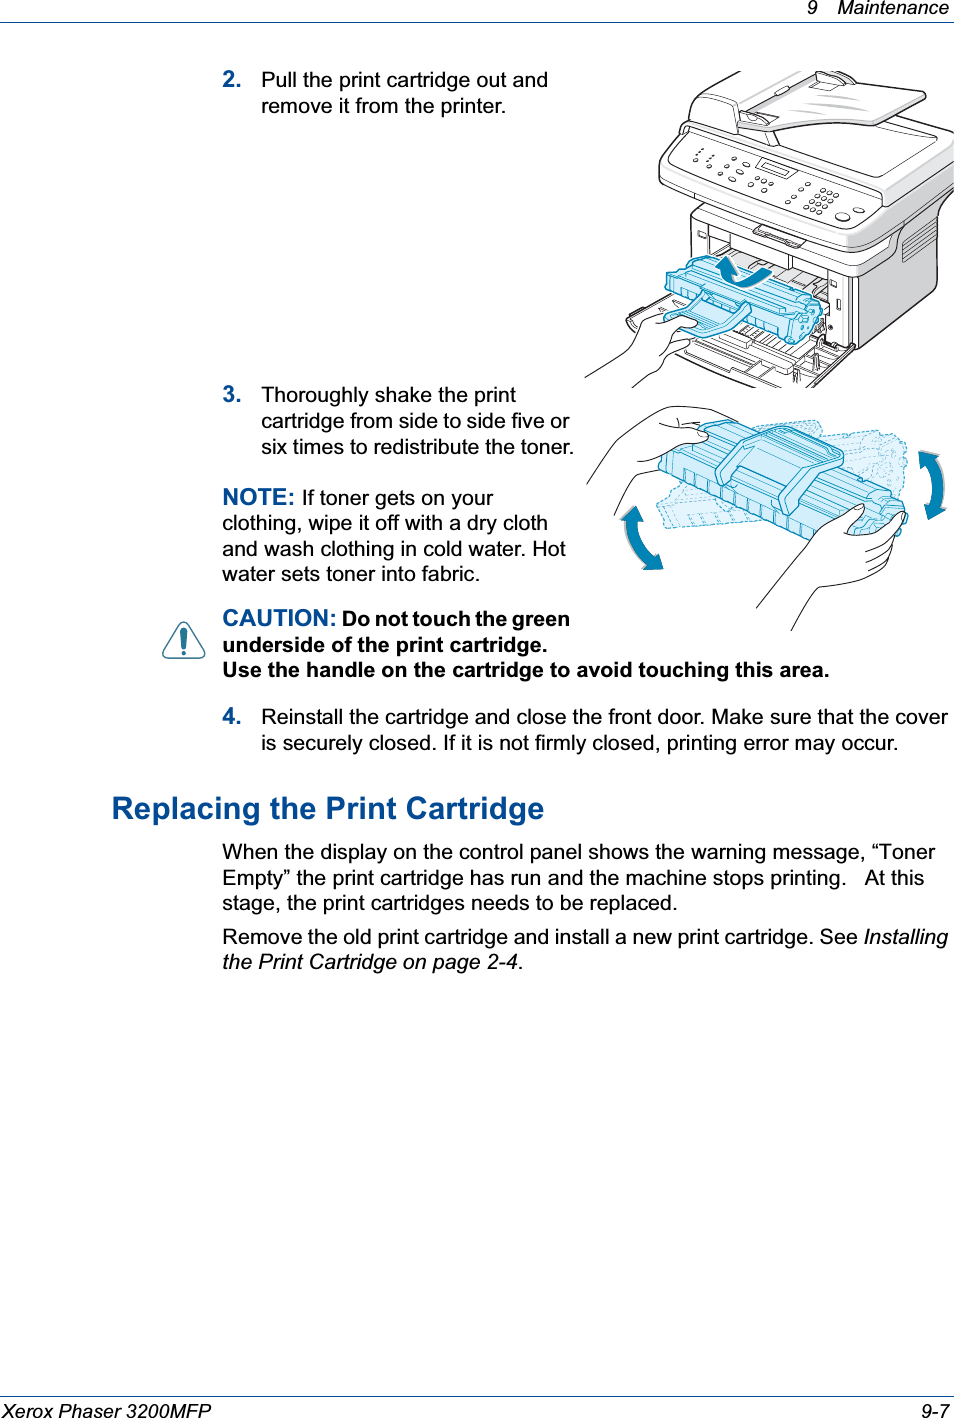
Samsung Electronics Co Ltd Multi Function Laser Printer Phaser 3200MFP English
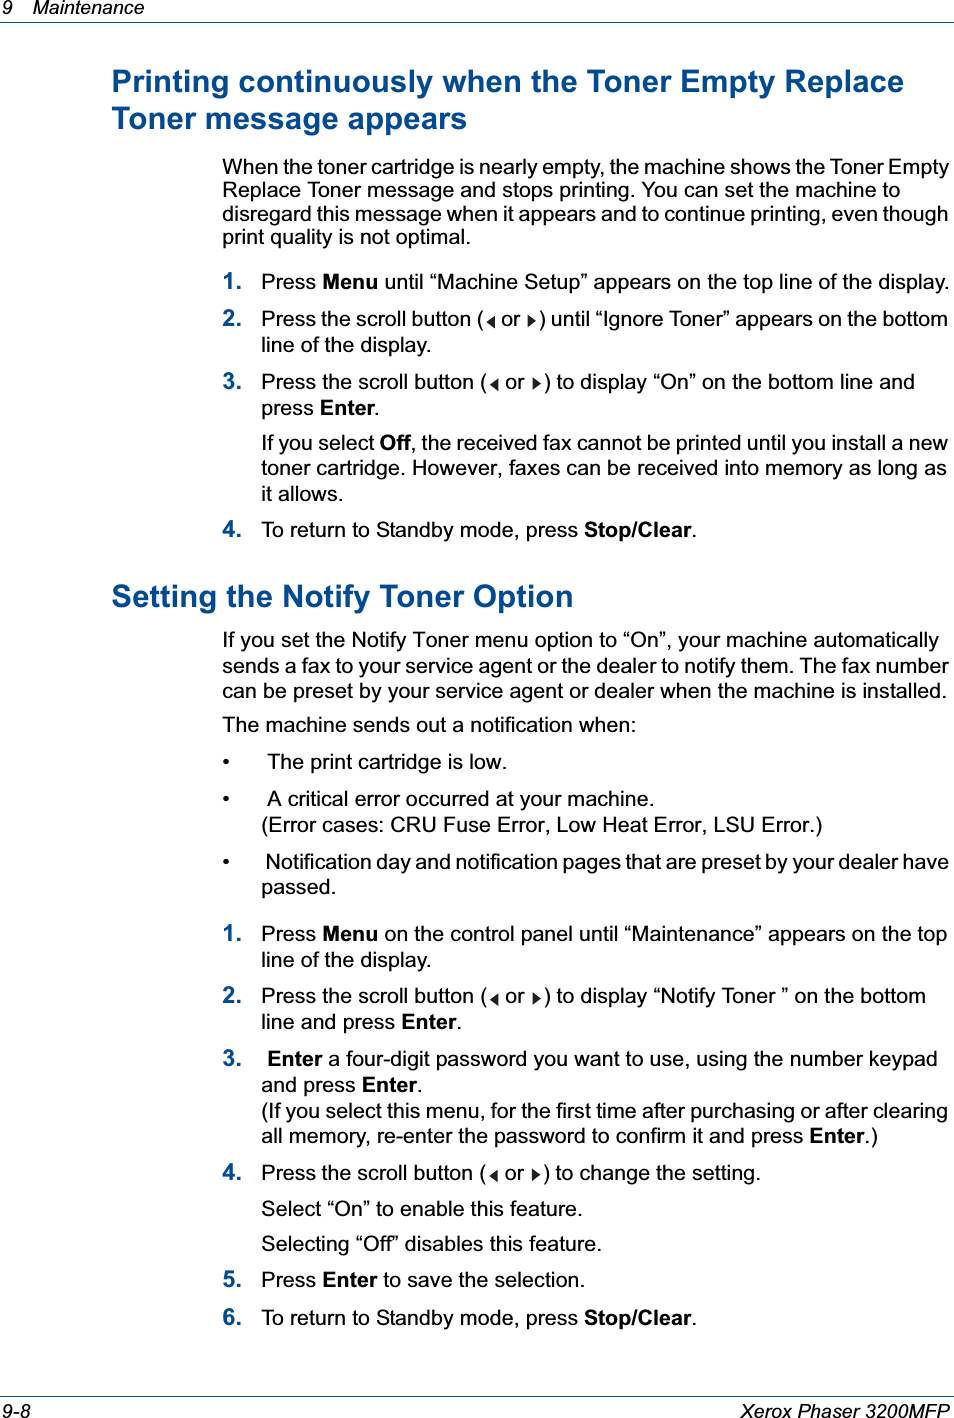
UserManual.wiki
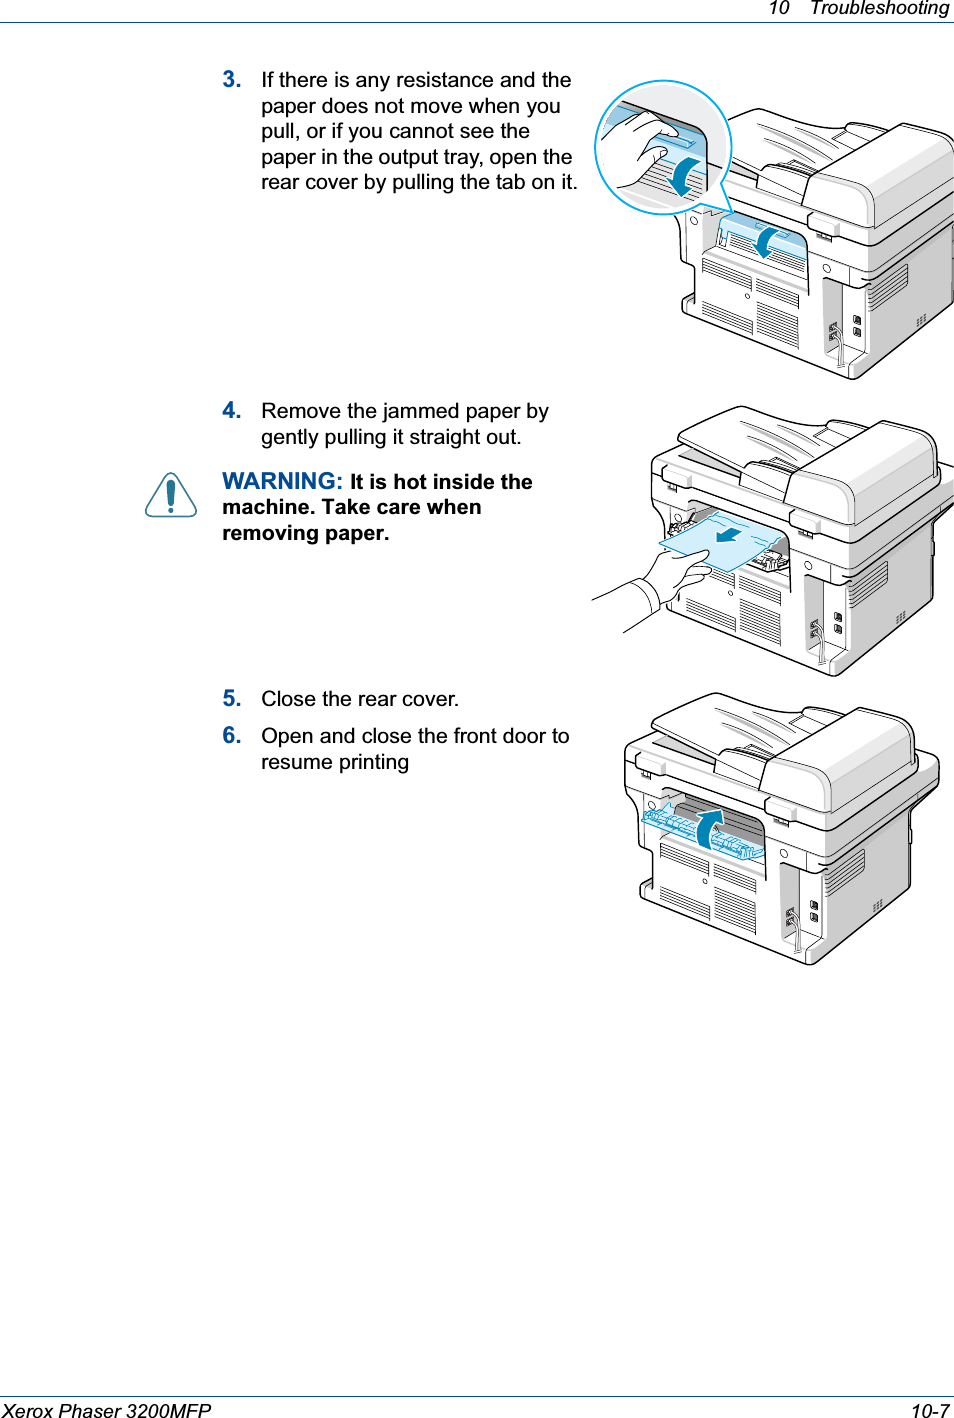
>
Samsung Electronics Co
>
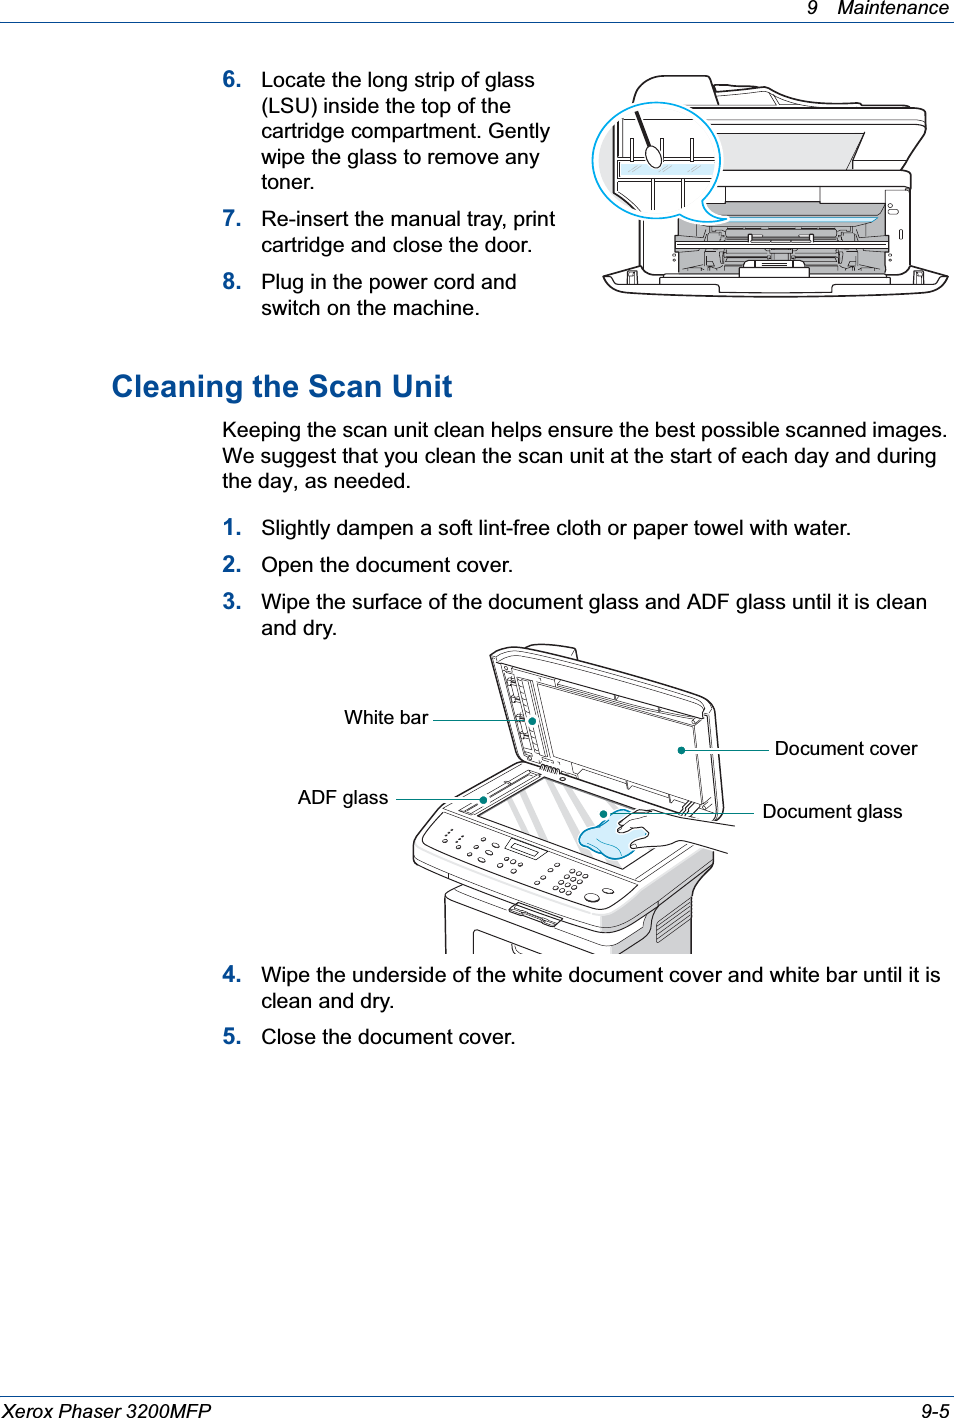
PHASER3200MFP User Manual
>
Users Manual 2
Contents
1.
Users Manual 1
2.
Users Manual 2
Users Manual 2
Navigation menu
Upload a User Manual
Namespaces
Wiki Guide
HTML
PDF
Info
Views
User Manual
Discussion / Help
Navigation
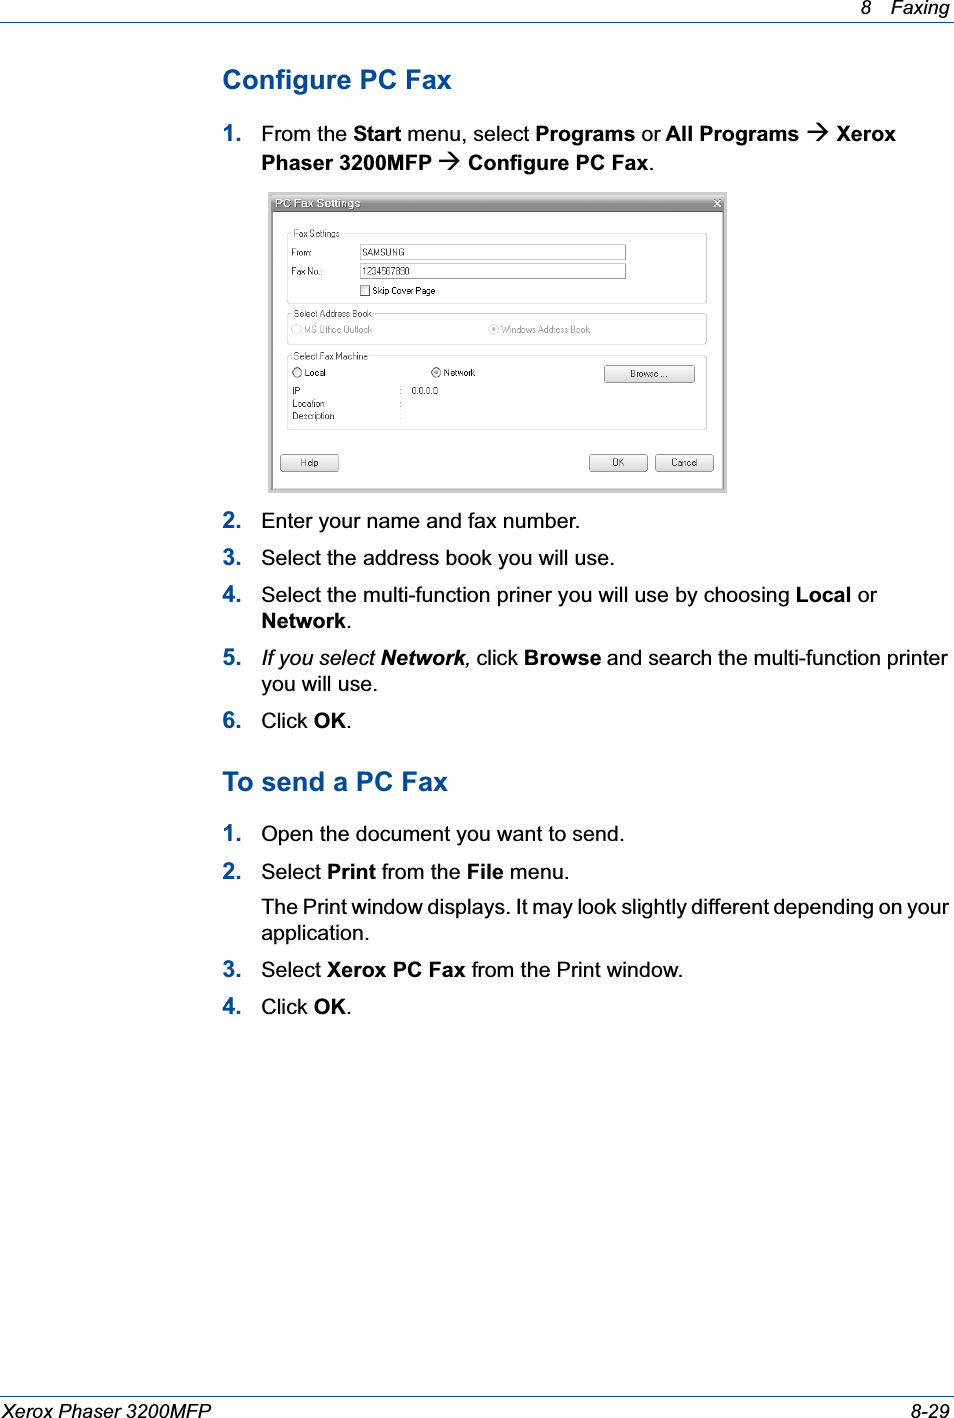
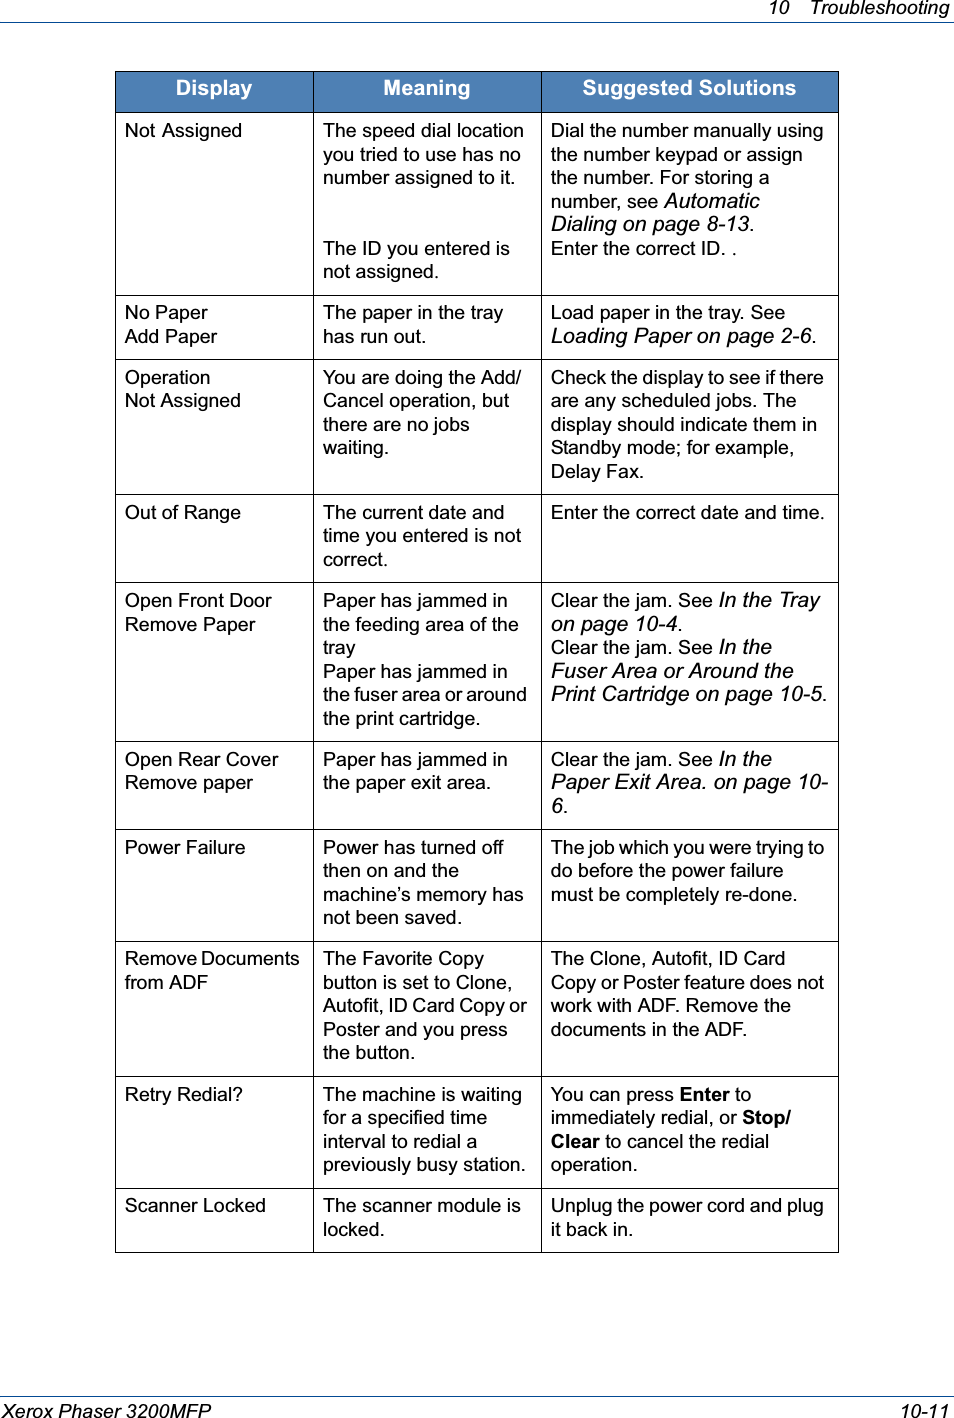
![6Printing Xerox Phaser 3200MFP 6-33NOTE: • It is necessary to claim swap partition of 300 MB or larger when working with large scanned images.• The Linux scanner driver supports the optical resolution at maximum. Please refer to the scanner and copy section of Specifications. See Scanner and Copier Specifications on page 11-3.Software• Linux Kernel 2.4 or higher• Glibc 2.2 or higher• CUPS• SANEInstalling the Unified Linux Driver1. Make sure that you connect your machine to your computer. Turn both the computer and the machine on.2. When the Administrator Login window appears, type in root in the Login field and enter the system password.NOTE: You must log in as a super user (root) to install the printer software. If you are not a super user, ask your system administrator.3. Insert the printer software CD-ROM. The CD-ROM will automatically run.If the CD-ROM does not automatically run, click the icon at the bottom of the desktop. When the Terminal screen appears, type in:If the CD-ROM is secondary master and the location to mount is /mnt/cdrom,[root@localhost root]#mount -t iso9660 /dev/hdc /mnt/cdrom[root@localhost root]#cd /mnt/cdrom/Linux[root@localhost root]#./install.shNOTE: The installation program runs automatically if you have an autorun software package installed and configured.](https://usermanual.wiki/Samsung-Electronics-Co/PHASER3200MFP.Users-Manual-2/User-Guide-771031-Page-1.png)
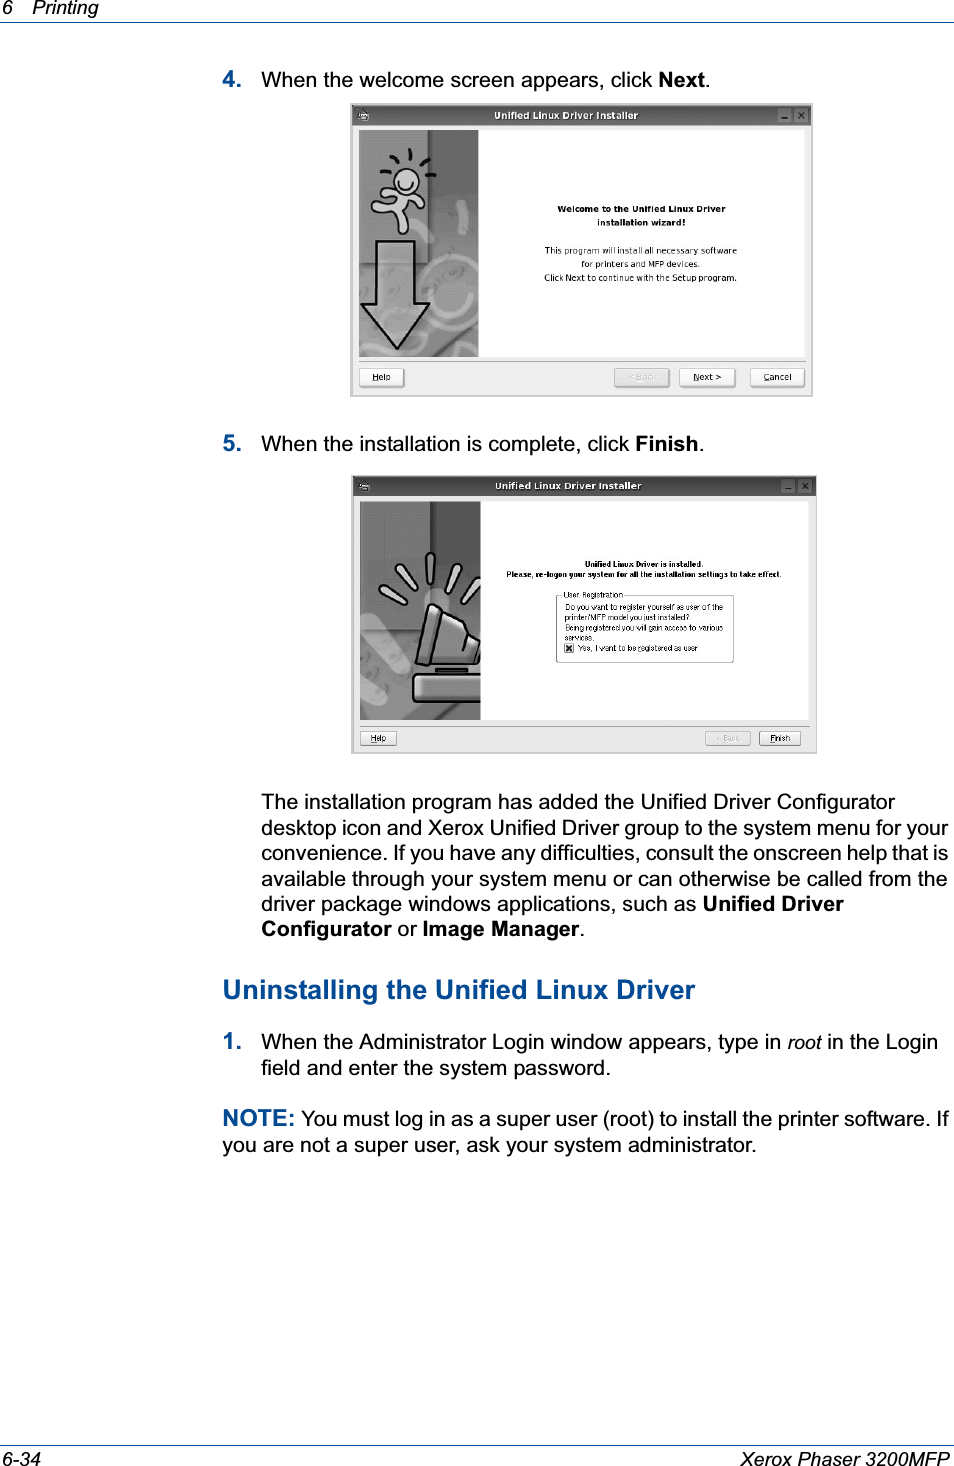
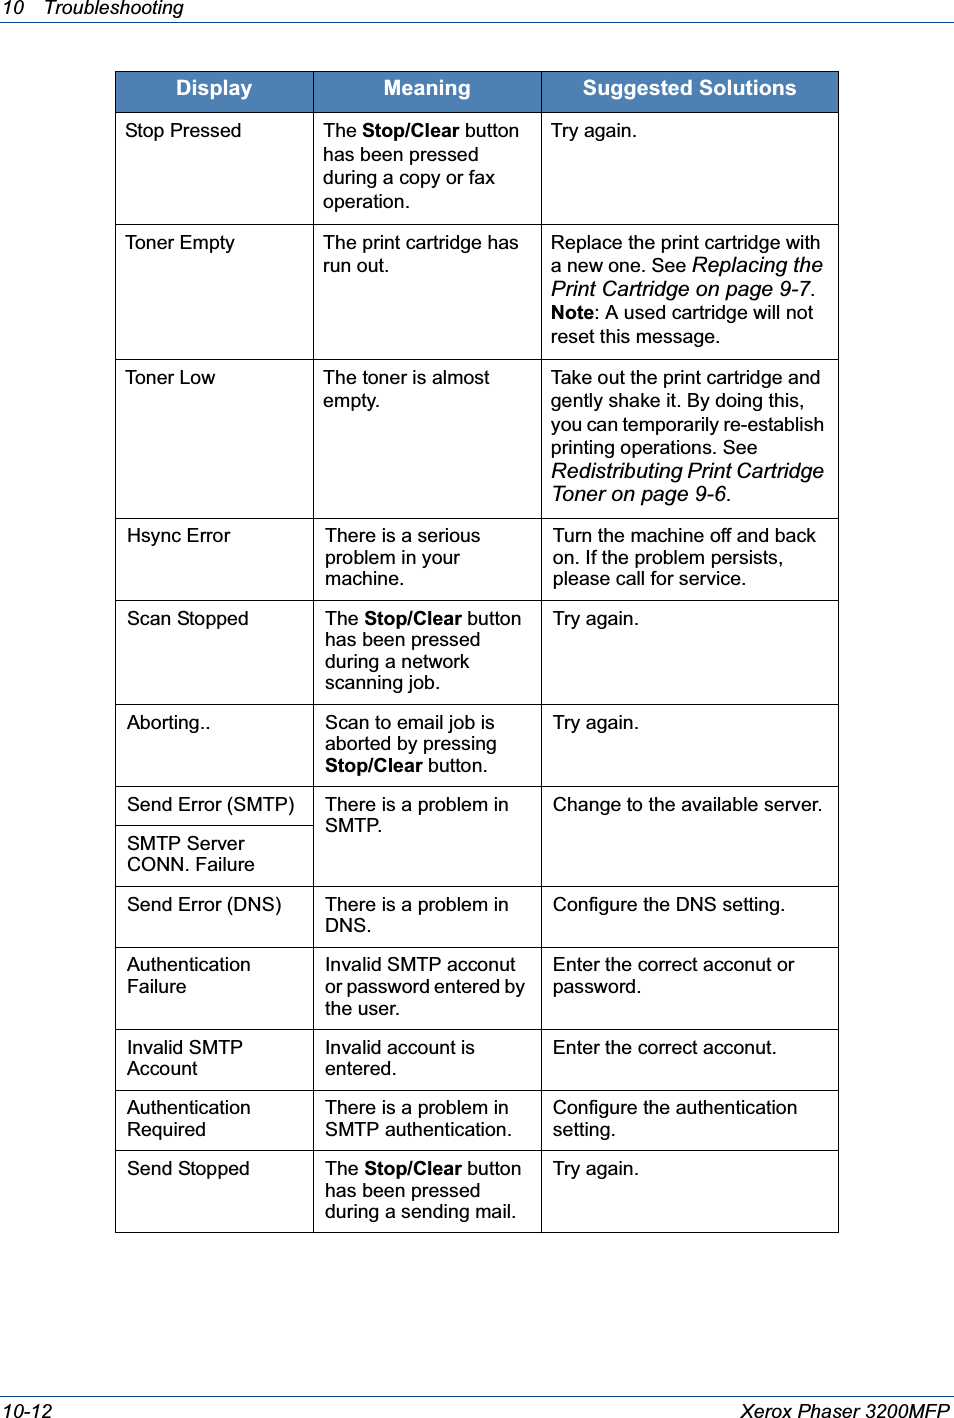
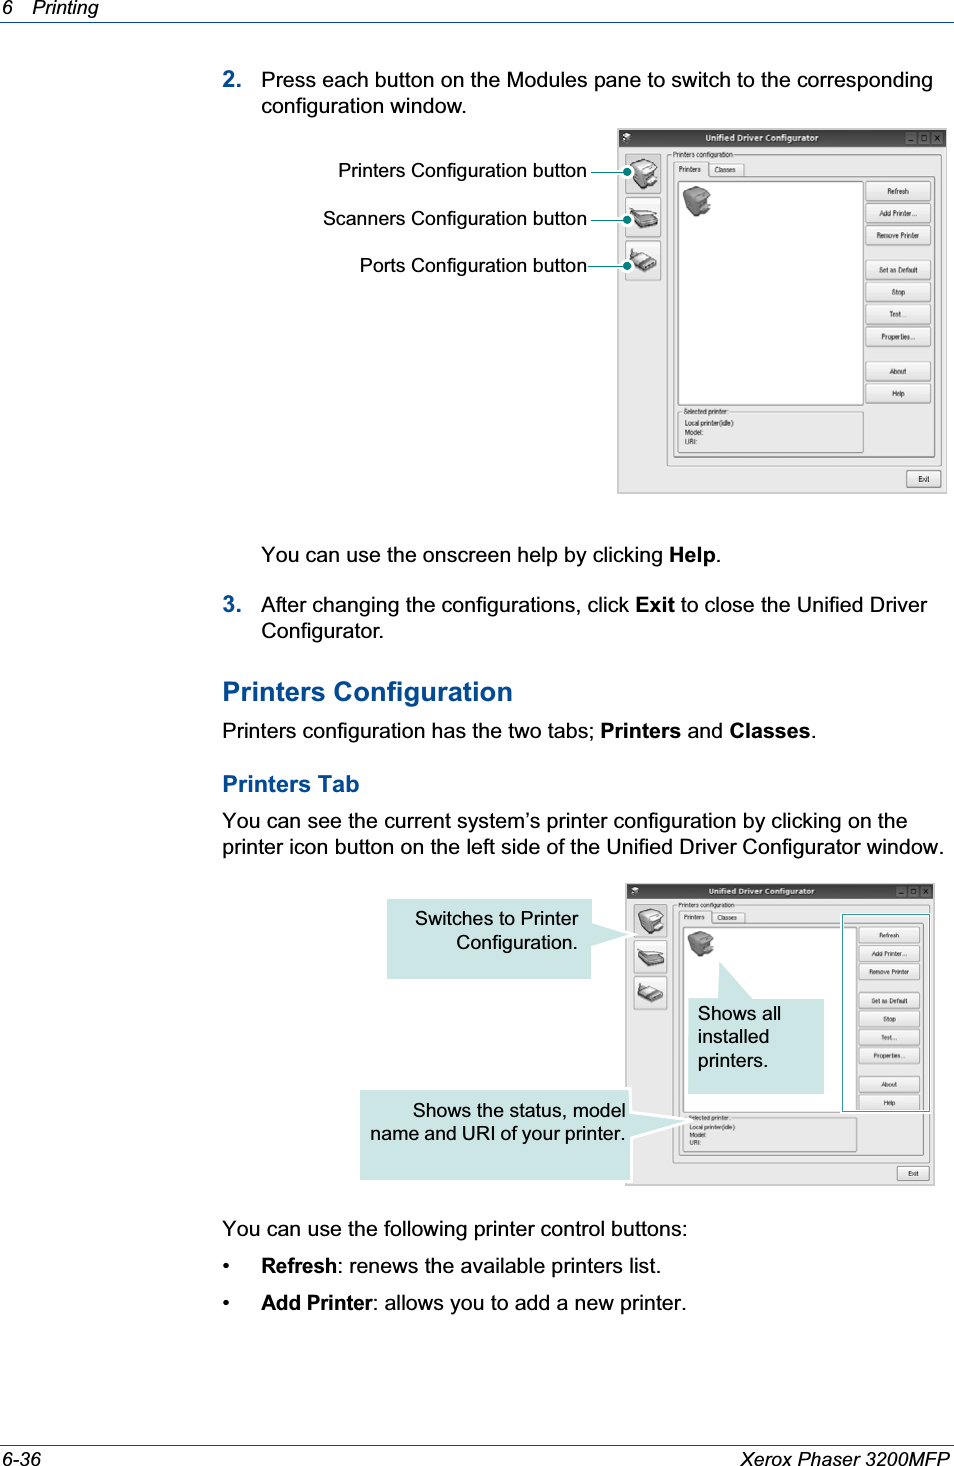
![6Printing Xerox Phaser 3200MFP 6-352. Insert the printer software CD-ROM. The CD-ROM will automatically run.If the CD-ROM does not automatically run, click the icon at the bottom of the desktop. When the Terminal screen appears, type in:If the CD-ROM is secondary master and the location to mount is /mnt/cdrom,[root@localhost root]#mount -t iso9660 /dev/hdc /mnt/cdrom[root@localhost root]#cd /mnt/cdrom/Linux[root@localhost root]#./uninstall.shNOTE: The installation program runs automatically if you have an autorun software package installed and configured.3. Click Uninstall.4. Click Next.5. Click Finish.Using the Unified Driver ConfiguratorUnified Linux Driver Configurator is a tool primarily intended for configuring Printer or MFP devices. Since an MFP device combines the printer and scanner, the Unified Linux Driver Configurator provides options logically grouped for printer and scanner functions. There is also a special MFP port option responsible for the regulation of access to an MFP printer and scanner via a single I/O channel.After installing the Unified Linux driver (see Installing the Unified Linux Driver on page 6-32), the Unified Linux Driver Configurator icon will automatically be created on your desktop.Opening the Unified Driver Configurator1. Double-click Unified Driver Configurator on the desktop.You can also click the Startup Menu icon and select the Unified Driver Configurator.](https://usermanual.wiki/Samsung-Electronics-Co/PHASER3200MFP.Users-Manual-2/User-Guide-771031-Page-3.png)


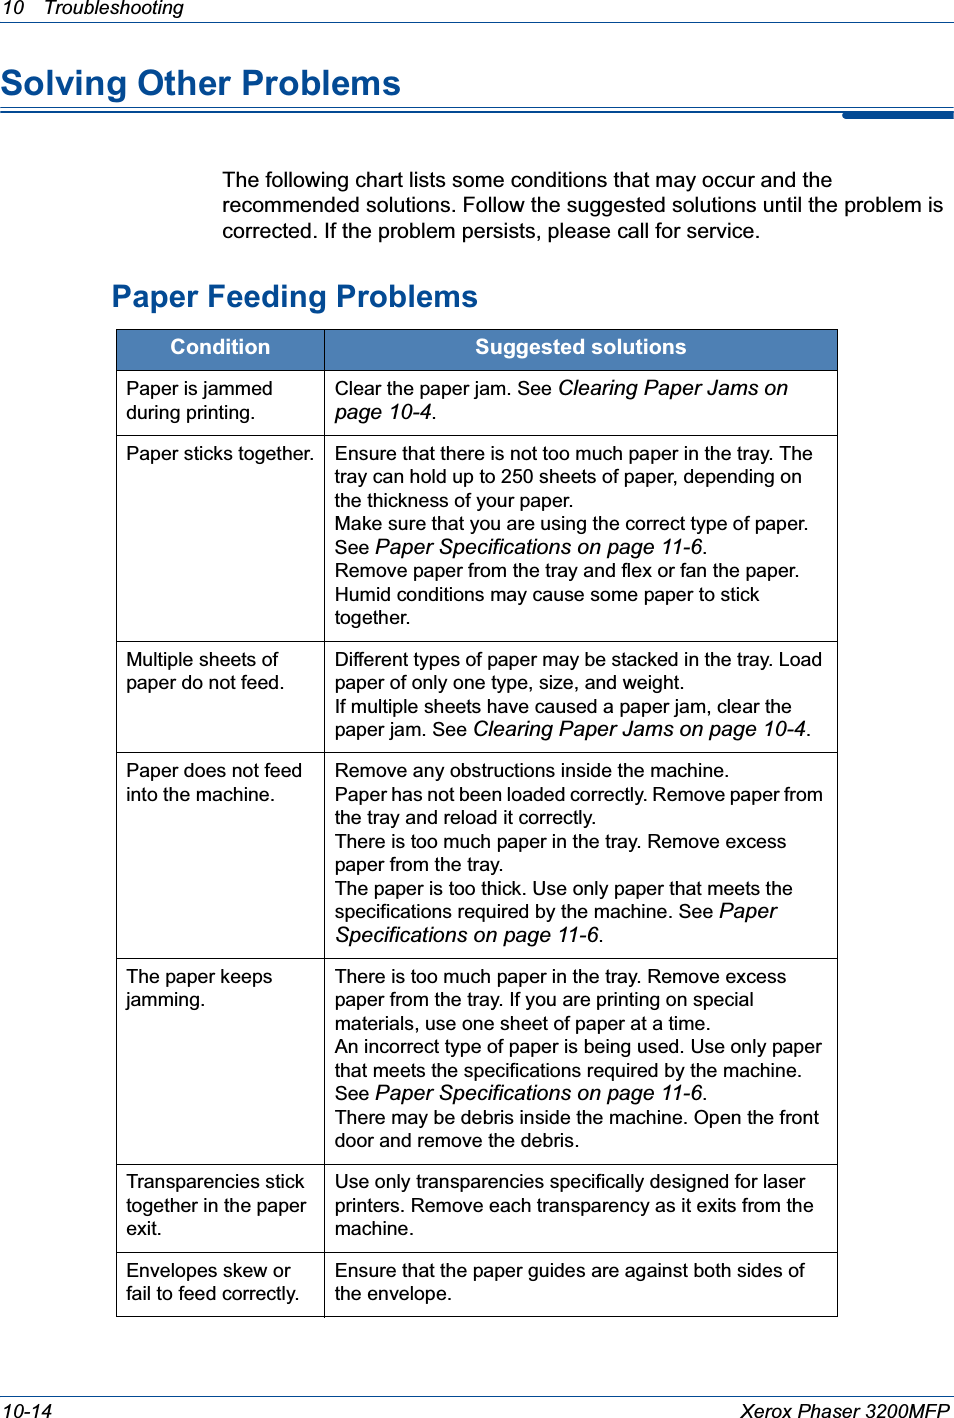
![8 Faxing 8-26 Xerox Phaser 3200MFPAdvanced Fax Setting OptionsForwarding faxesYou can forward your incoming and outgoing faxes to an email address.Forwarding sent faxes to email addressYou can set the machine to send copies of all outgoing faxes to a specified destination, in addition to the email address you entered.1. Press Menu until “Network setup” appears on top line of the display.2. Press the scroll button ( or ) until “Email Setup” appears on the bottom line of the display and press Enter.3. Press Enter when “Email Forward” appears.4. Press the scroll button ( or ) until “[Tx Only]” appears on the bottom line of the display and press Enter.Option DescriptionJunk Fax Setup Using the Junk Fax Barrier feature, the system will not accept faxes sent from remote stations whose numbers are stored in the memory as junk fax numbers. This feature is useful for blocking any unwanted faxes.Select Off to turn the feature off. Your machine accepts all faxes.Select On to turn the feature on. You can set up to 10 fax numbers as junk fax numbers using the Set option. After storing numbers, your machine will not accept faxes from the registered stations. To delete all junk fax numbers, use the All Delete option.Secure Receive You can keep your received faxes from being accessed by unauthorized people.For further details about setting this mode, see Using Secure Receiving Mode on page 8-22.Prefix Dial You can set a prefix dial number of up to five digits. This number dials before any automatic dial number is started. It is useful for accessing a PABX exchange.Stamp RCV Name This option allows the machine to automatically print the page number, and the date and time of reception at the bottom of each page of a received document.Select Off to turn this feature off.Select On to turn this feature on.ECM Mode (Error Correction Mode) Error Correction Mode helps with poor line quality and makes sure any faxes you send are sent smoothly to any other ECM-equipped fax machine. If the line quality is poor, it takes more time to send a fax when you are using ECM.Select Off to turn this feature off.Select On to turn this feature on.](https://usermanual.wiki/Samsung-Electronics-Co/PHASER3200MFP.Users-Manual-2/User-Guide-771031-Page-58.png)
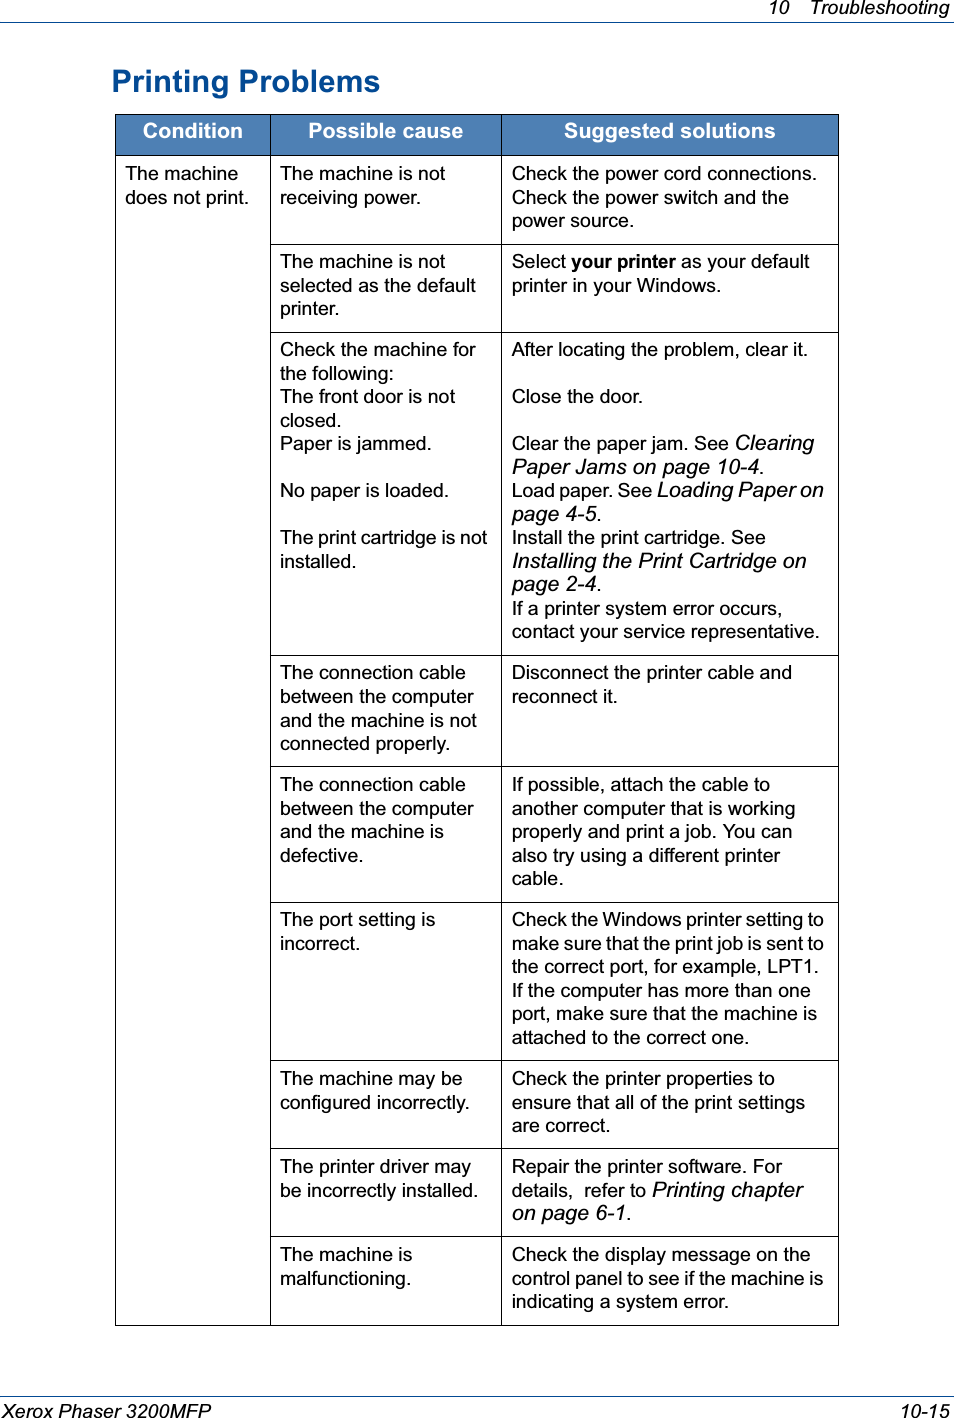
![8 Faxing Xerox Phaser 3200MFP 8-275. Enter “From” email address and press Enter.6. Enter the “To” email address to which faxes are to be sent and press Enter.7. Press Stop/Clear to return to Standby mode.Subsequent sent faxes will be forwarded to the specified email address.Forwarding received faxes to email addressYou can set your machine to forward incoming faxes to the email address you entered.1. Press Menu until “Network setup” appears on top line of the display.2. Press the scroll button ( or ) until “Email Setup” appears on the bottom line of the display and press Enter.3. Press Enter when “Email Forward” appears.4. Press the scroll button ( or ) until “[Rx Only]” appears on the bottom line of the display and press Enter.5. Enter “From” email address and press Enter.6. Enter the “To” email address to which faxes are to be sent and press Enter.“Print Local?” appears on the bottom line of the display.To set the machine to print out a fax when fax forwarding has been completed, press the scroll button ( or ) until “[On]” appears on the bottom line of the display and press Enter.7. Press Stop/Clear to return to Standby mode.Subsequent received faxes will be forwarded to the specified email address.](https://usermanual.wiki/Samsung-Electronics-Co/PHASER3200MFP.Users-Manual-2/User-Guide-771031-Page-59.png)