Samsung Electronics Co SCX4216F Multi-Function Printer User Manual 4x16Series
Samsung Electronics Co Ltd Multi-Function Printer 4x16Series
Contents
- 1. Users Manual 1
- 2. Users Manual 2
- 3. Users Manual 3
Users Manual 3
P
RINTING
F
ROM
A
M
ACINTOSH
A.6
Using Advanced Printing Features
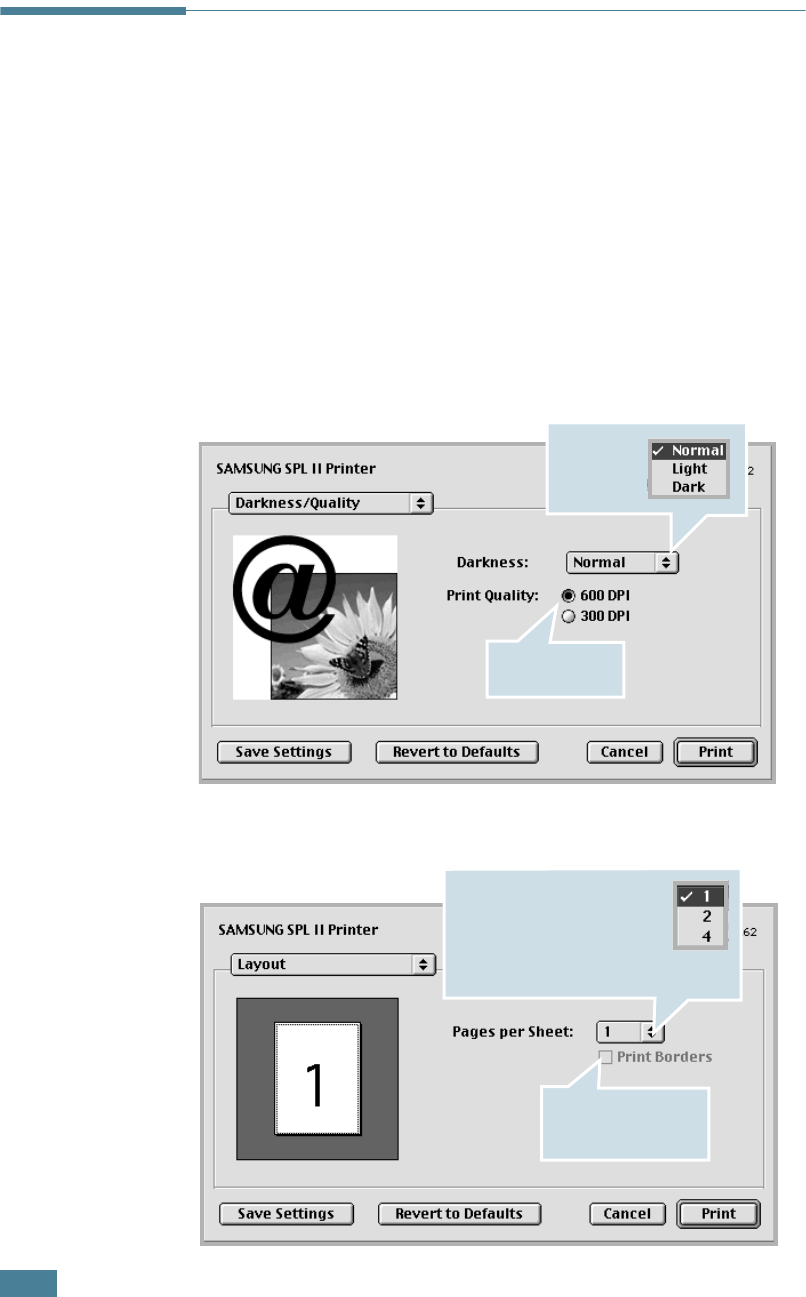
The SAMSUNG SPL II Printer window contains five categories of
advanced properties. Listed below is the name of each property.
- Darkness/Quality
- Layout
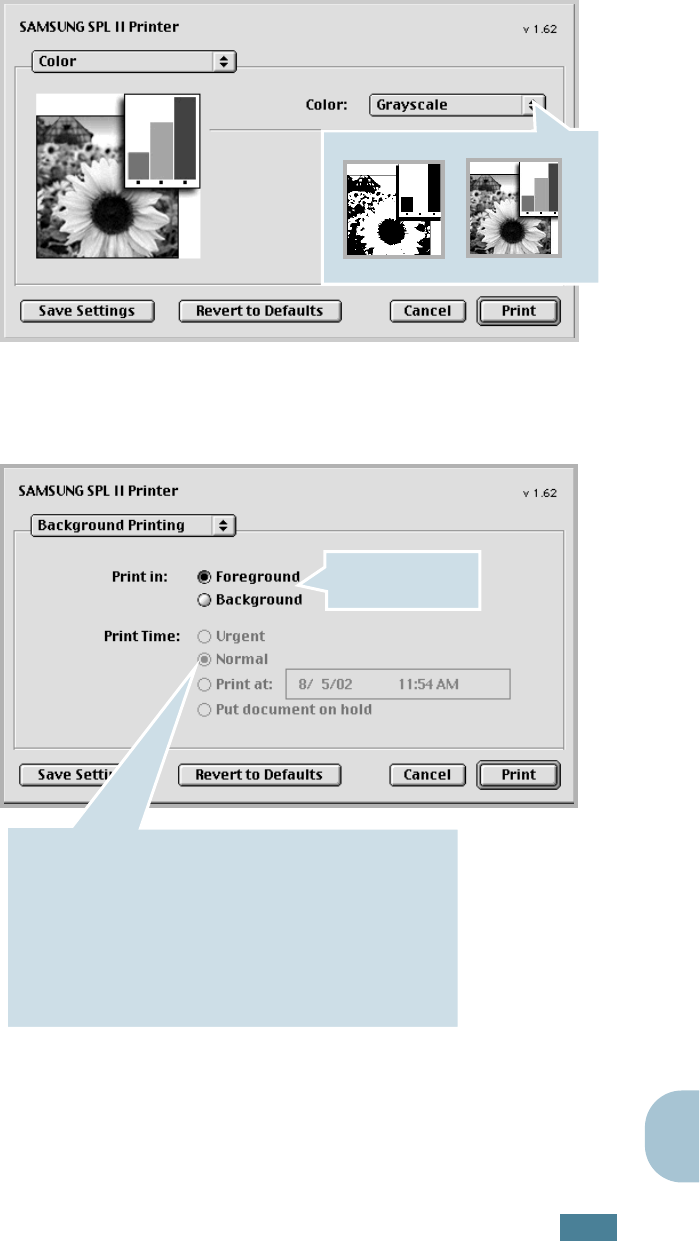
- Color
- Background Printing
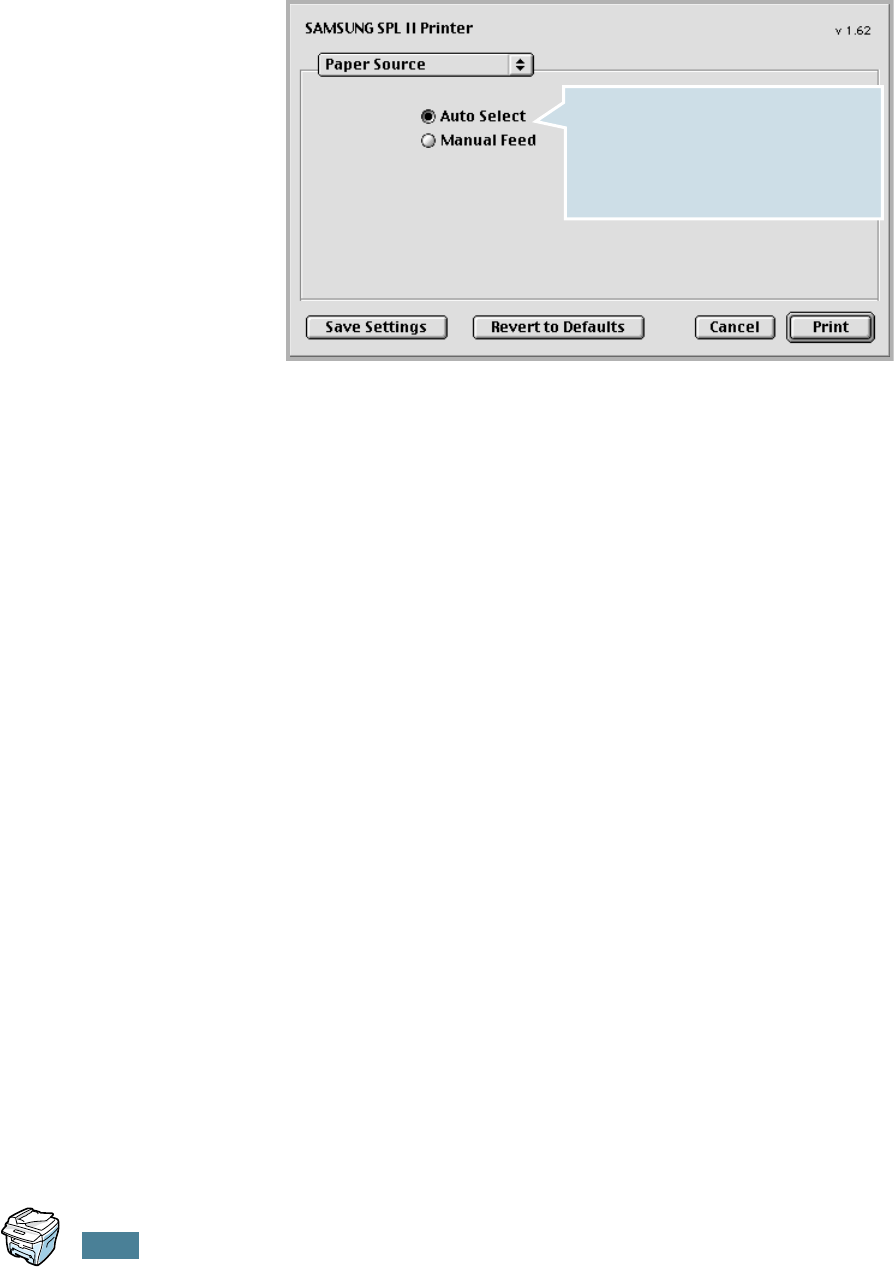
- Paper Source
The following figures display each property in the SAMSUNG
SPL II Printer window.
Darkness/Quality
Layout
Select the
print
darkness.
Select the print
resolution.
Select the number of pages
you want to print on one
sheet of paper. The pages
will appear decreased in
size and arranged on the
sheet.
To print the border
of each page, check
this box.
P
RINTING
F
ROM
A
M
ACINTOSH
A.7
A
Color
Background Printing
Select the grayscale mode.
➐
Black&White
➐
Grayscale
Turns background
printing on or off.
Select priority for your print job in the queue of jobs waiting
to print, click one of the following:
• Urgent: to print before any Normal priority job.
• Normal: to print in the order the job is received.
• Print at: to print at the specific time you enter in the day
and time in the fields to the right.
• Put document on hold: to hold the print job in the print
queue until you are ready to release it.
P
RINTING
F
ROM
A
M
ACINTOSH
A.8
Paper Source
Select the corresponding paper source.
If Auto Select is set, the machine
automatically selects the print material
from the paper tray, according to the
following order: the Bypass tray and the
paper tray.
S
PECIFICATIONS
B.2
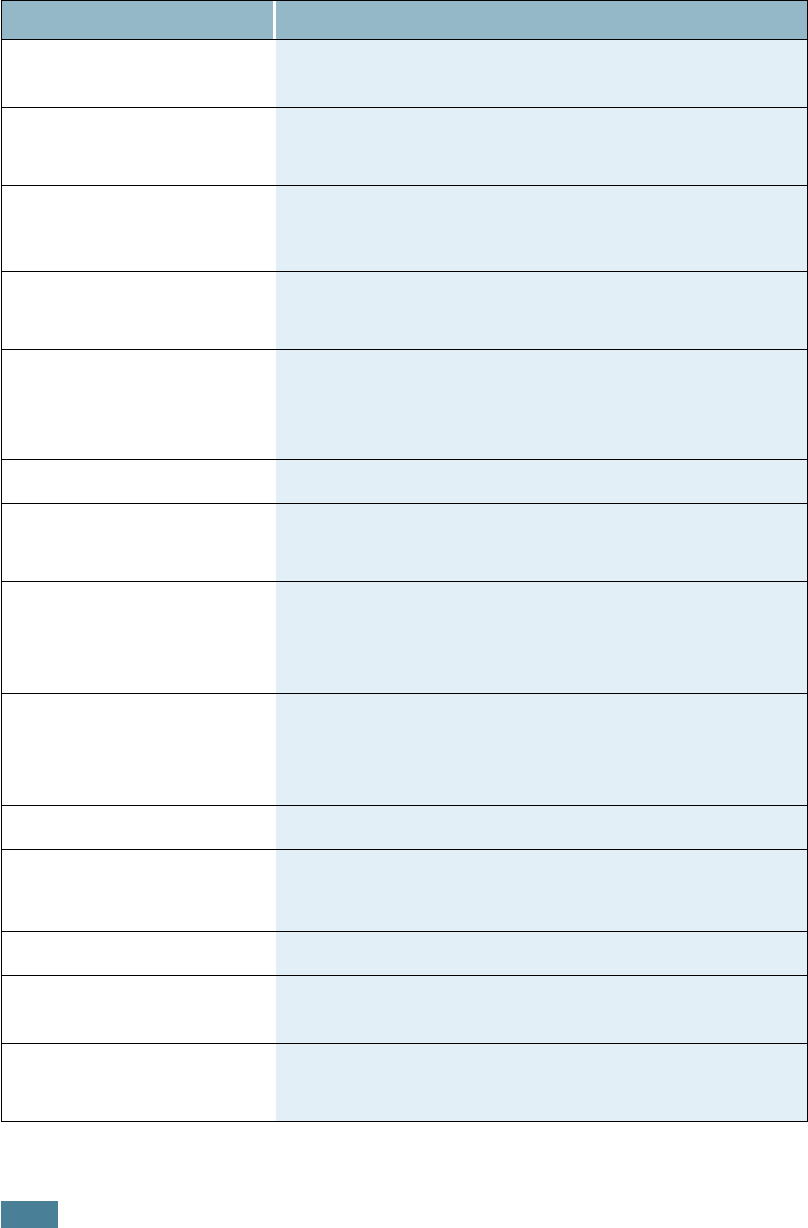
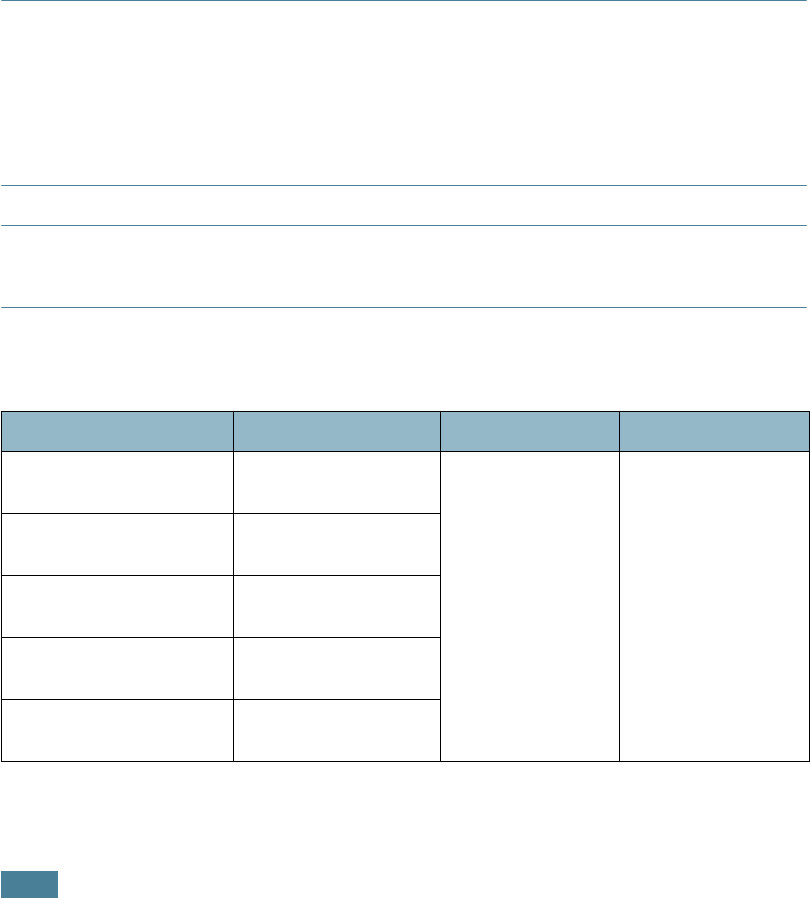
General Specifications
Item Description
Automatic document
feeder
(for SCX-4116/4216F)
Up to 30 sheets (20 lb, 75 g/m
2
)
ADF Document size
(for SCX-4116/4216F)
Width: 142 to 216 mm (5.6 to 8.5 inches)
Length: 148 to 356 mm (5.8 to 14 inches)
Paper input capacity Paper tray: 250 sheets (weight: 75 g/m
2
, 20 lb)
Bypass tray: 1 sheets (weight: 75 g/m
2
, 20 lb)
Paper output capacity Front output tray: 150 sheets (face down)
Rear output slot: 1 sheet (face up)
Paper type
Paper tray: Plain paper (60 ~ 90 g/m
2
, 16 ~ 24 lb)
Bypass tray: Plain paper, Transparencies, Labels, Card,
Post card, Envelopes (60 ~ 120 g/m
2
, 16 ~ 32 lb)
Consumables 1-piece toner cartridge system
Power requirements 100 ~ 127 VAC, 50/60 Hz, 4.5A
220 ~ 240 VAC, 50/60 Hz, 2.5A
Power consumption
Sleep mode: 19 W
Standby mode: 85 W(100 ~ 127 VAC) / 95 W(220 ~ 240 VAC)
Average: 350 W
Noise
Warm-up: 50 dB
Standby mode: 35 dB
Printing: 55 dB
Warm-up Time 30 seconds
Operating conditions Temperature: 50
o
F to 89
o
F (10
o
C to 32
o
C)
Humidity: 20 % to 80 % RH
LCD 16 characters x 2 lines
Toner cartridge life 3,000 pages (for starter, 1,000 pages) @ IDC 5 %
coverage
SET dimension
(W x D x H)
SCX-
4116/
4216F: 474 x 436 x 417 mm
SCX-4016: 474 x 436 x 353 mm
S
PECIFICATIONS
B.3
B
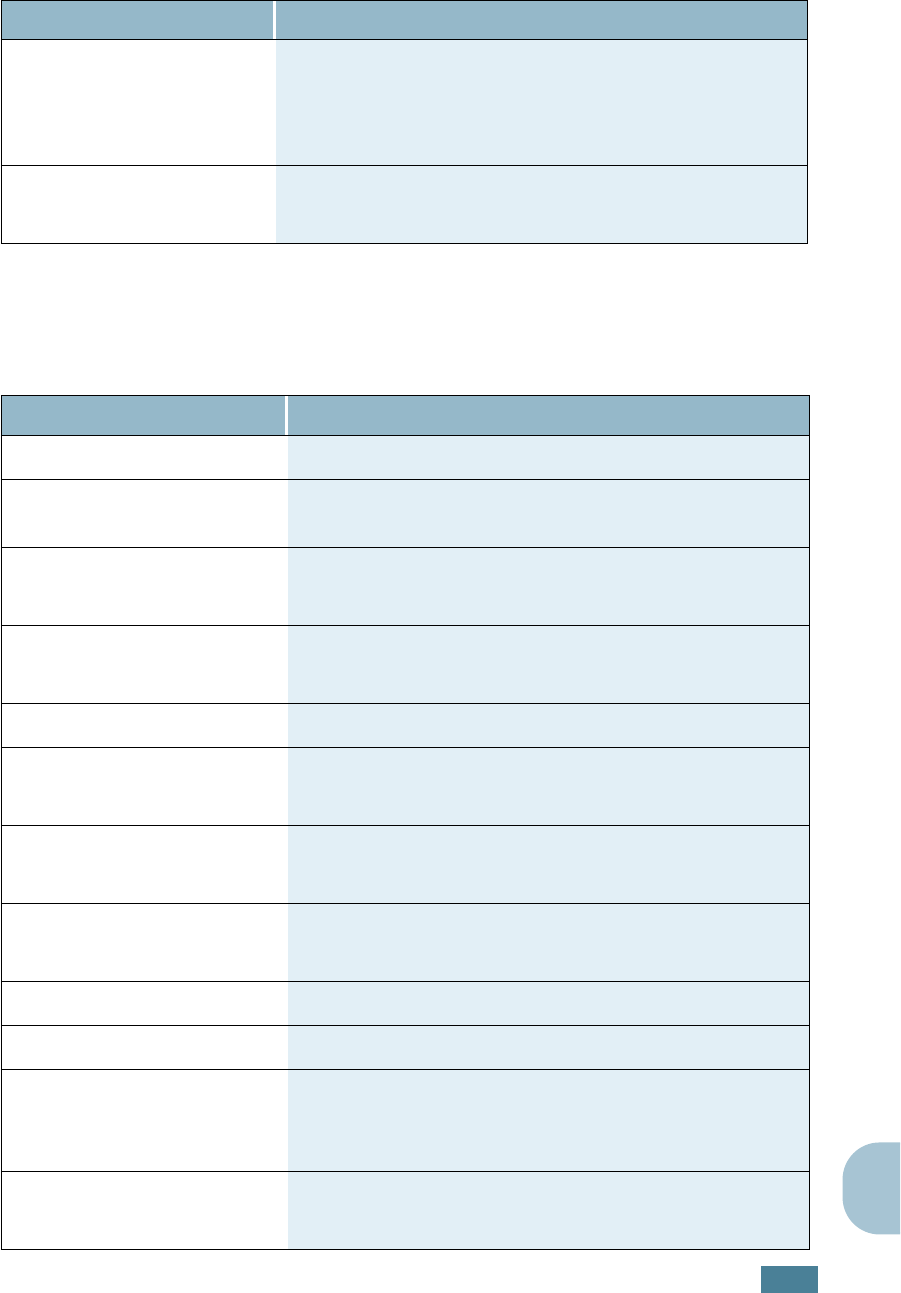
Scanner and Copier Specifications
Weight
Net: 13 (SCX-4116/4216F)/11.7 (SCX-4016) Kg
(including consumables)
Gross: 17 (SCX-4116/4216F)/15.7 (SCX-4016) Kg
(including consumables, accessories and package)
Package Weight Paper: 2.7 Kg
Plastic: 0.7 Kg
Item Description
Compatibility TWAIN standard
Scanning method Sheet-fed and Flat-bed CCD (Charge Coupled Device)
module
Resolution Optical: 600 dpi (Mono and Color)
Enhanced: 4,800 dpi
Effective scanning length Platen: 297 mm (11.7 in.)
ADF (for SCX-4116/4216F): 356 (14 in.)
Effective scanning width 8.2 inches (208 mm)
Color bit depth Internal: 32 bit
External: 24 bit
Mono bit depth 1 bit for Text mode
8 bit for Gray mode
Scan speed (Text mode) Platen: 23 seconds
ADF (SCX- 4116/4216F): 25 seconds
Copy speed 17 copies per minute (Letter)
Paper size Letter, A4, Legal
Copy resolution
Platen: 600 x 300 (Text, Mixed) / 600 x 600 (Photo)
ADF (for SCX-4116/4216F): 600 x 300 (Text, Mixed,
Photo)
Zoom rate Platen: 25 ~ 400 %
ADF (for SCX-4116/4216F): 25 ~ 100 %
Item Description
S
PECIFICATIONS
B.4
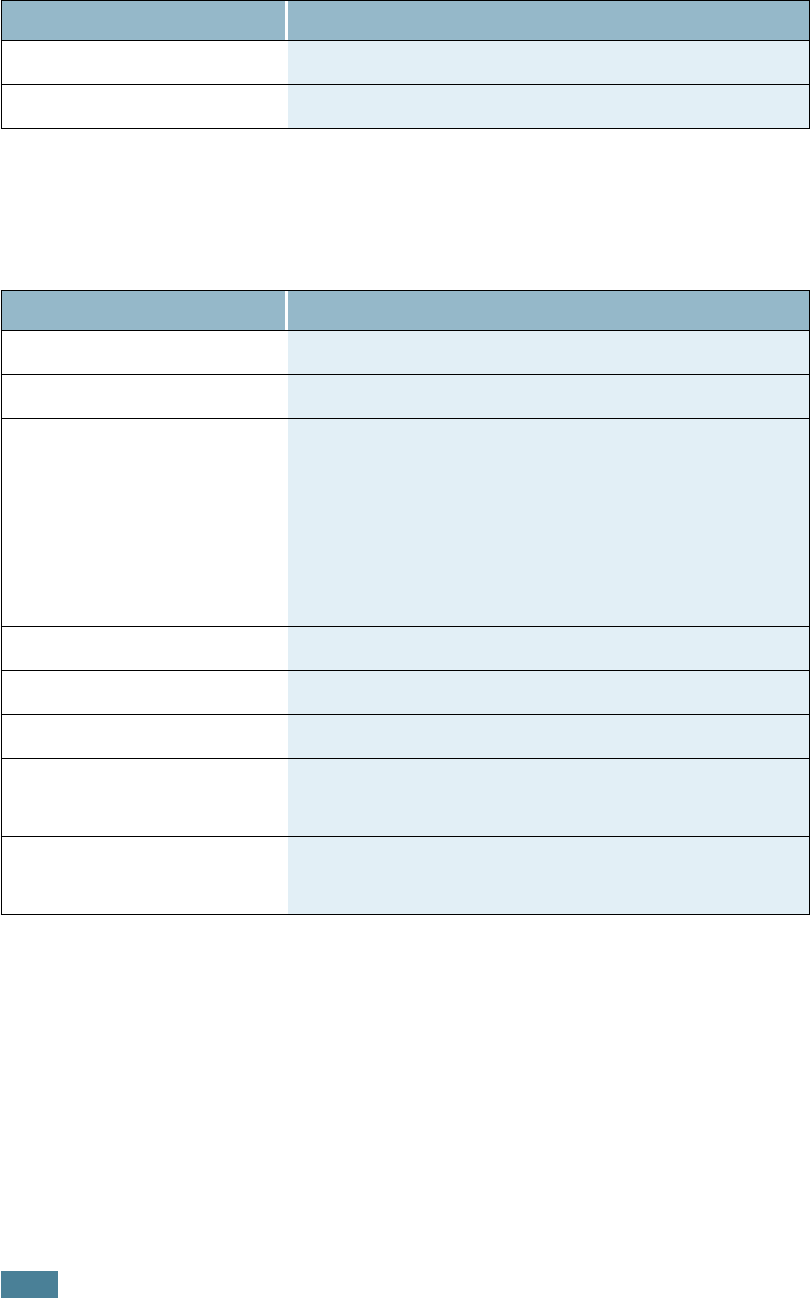
Printer Specifications
Multiple copies 99 pages
Grayscale 256 levels
Item Description
Printing method Laser Beam Printing
Printing speed 17 pages per minute (Letter)
Paper size
Paper tray: Letter, A4, Legal, Folio, A5, A6
Bypass tray: Letter, Legal, A4, Folio, Executive, A5, A6,
A6 card, Post Card 4x6, HagaKi, Envelope 7-3/4,
Envelope 9, Envelope 10, Envelope DL, Envelope C5,
Envelope C6, Envelope B5
* Min.: 76 x 127 mm (3 x 5 in.)
Max.: 216 x 356 (8.5 x 14 in.)
Print resolution 600 x 600 dpi
Emulation SPL (GDI)
PC Interface IEEE 1284, USB 1.1
Compatibility Windows 95/98/2000/NT 4.0/Me/XP
Macintosh 8.6 or higher
First printing time Standby mode: 12 seconds
Power save mode: 42 seconds
Item Description
S
PECIFICATIONS
B.5
B
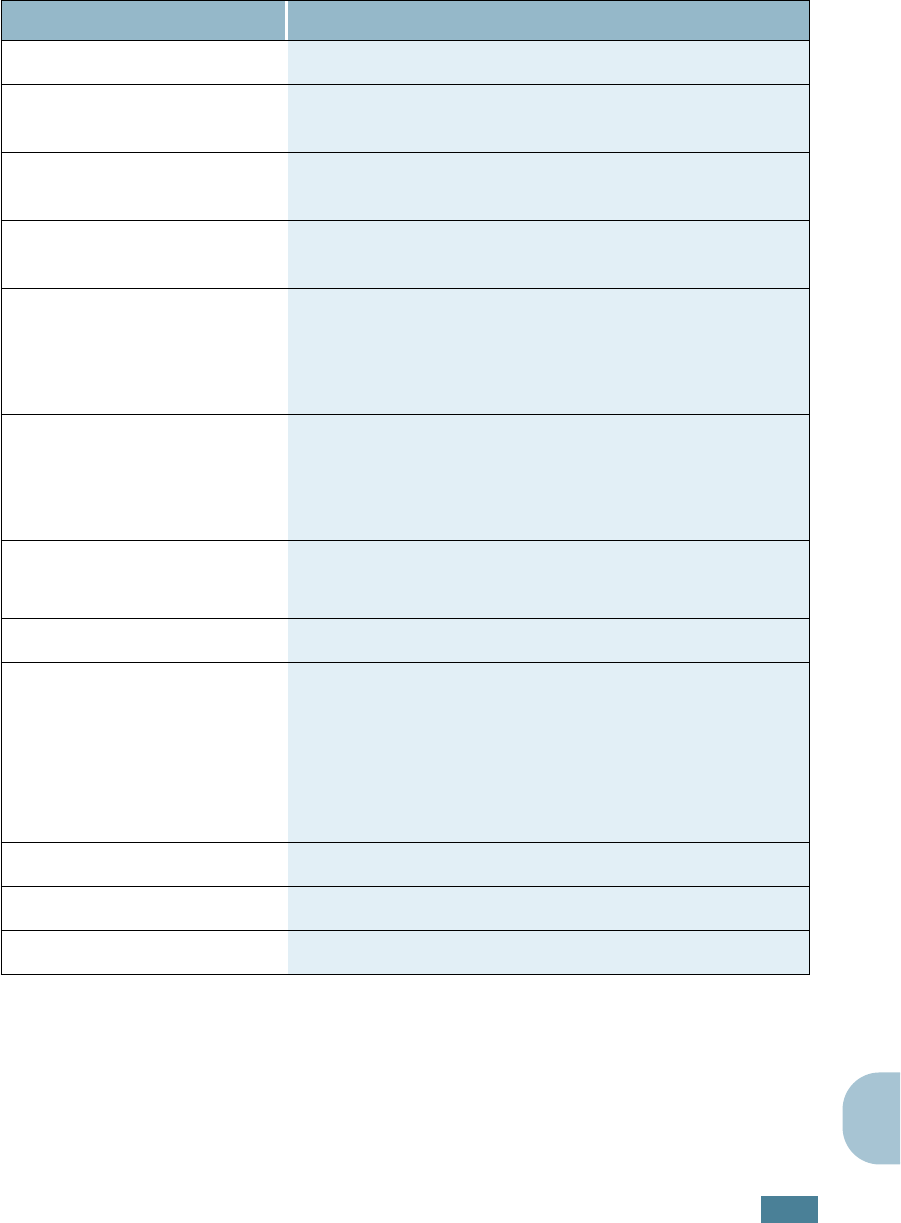
Facsimile Specifications
(For SCX-4216F)
Item Description
Compatibility ITU-T Group 3, ECM
Applicable line Public Switched Telephone Network (PSTN) or behind
PABX
Data coding MH/MR/MMR (ECM Mode) and JPEG for color fax
transmission
Modem speed 33600/28800/21600/19200/14400/12000/9600/
7200/4800/2400 bps with fall back
Transmission speed
Approx. 3 seconds/page
* Transmission time applies to memory transmission of
text data with ECM compression using only ITU-T
No.1 Chart.
Scanning speed
Platen: approx. 3 seconds/letter (at standard fax
resolution mode)
ADF: approx. 5 seconds/letter (at standard fax
resolution mode)
Maximum document length Platen: 297 mm
ADF: 1.5 m
Paper size Letter, A4, Legal
Resolution
Standard: 203 x 98 dpi
Fine: 203 x 196 dpi
Super Fine: 300 x 300 dpi / 203 x 392 dpi
Photo: 203 x 196 dpi
Color: 200 x 200 dpi
User Memory 4 MB (320 pages)
Halftone 256 levels
Auto dialer Speed dialing (registration for 100 numbers)
S
PECIFICATIONS
B.6
Paper Specifications
Overview
Your machine accepts a variety of print materials, such as cut-sheet paper (including
up to 100% recycled fiber content paper), envelopes, labels, transparencies and
custom-size paper. Properties, such as weight, composition, grain and moisture
content, are important factors affecting the machine’s performance and the output
quality. Paper that does not meet the guidelines outlined in this User’s Guide can
cause the following problems:
•Poor print quality
• Increased paper jams
• Premature wear on the machine.
NOTES
:
• Some paper may meet all of the guidelines in this guide and still not produce
satisfactory results. This may be the result of improper handling, unacceptable
temperature and humidity levels, or other variables over which Samsung has no
control.
•Before purchasing large quantities of paper, insure the paper meets the requirements
specified in this User’s Guide.
CAUTION
: Using paper that does not meet these specifications may cause problems,
requiring repairs. These repairs are not covered by the Samsung warranty or service
agreements.
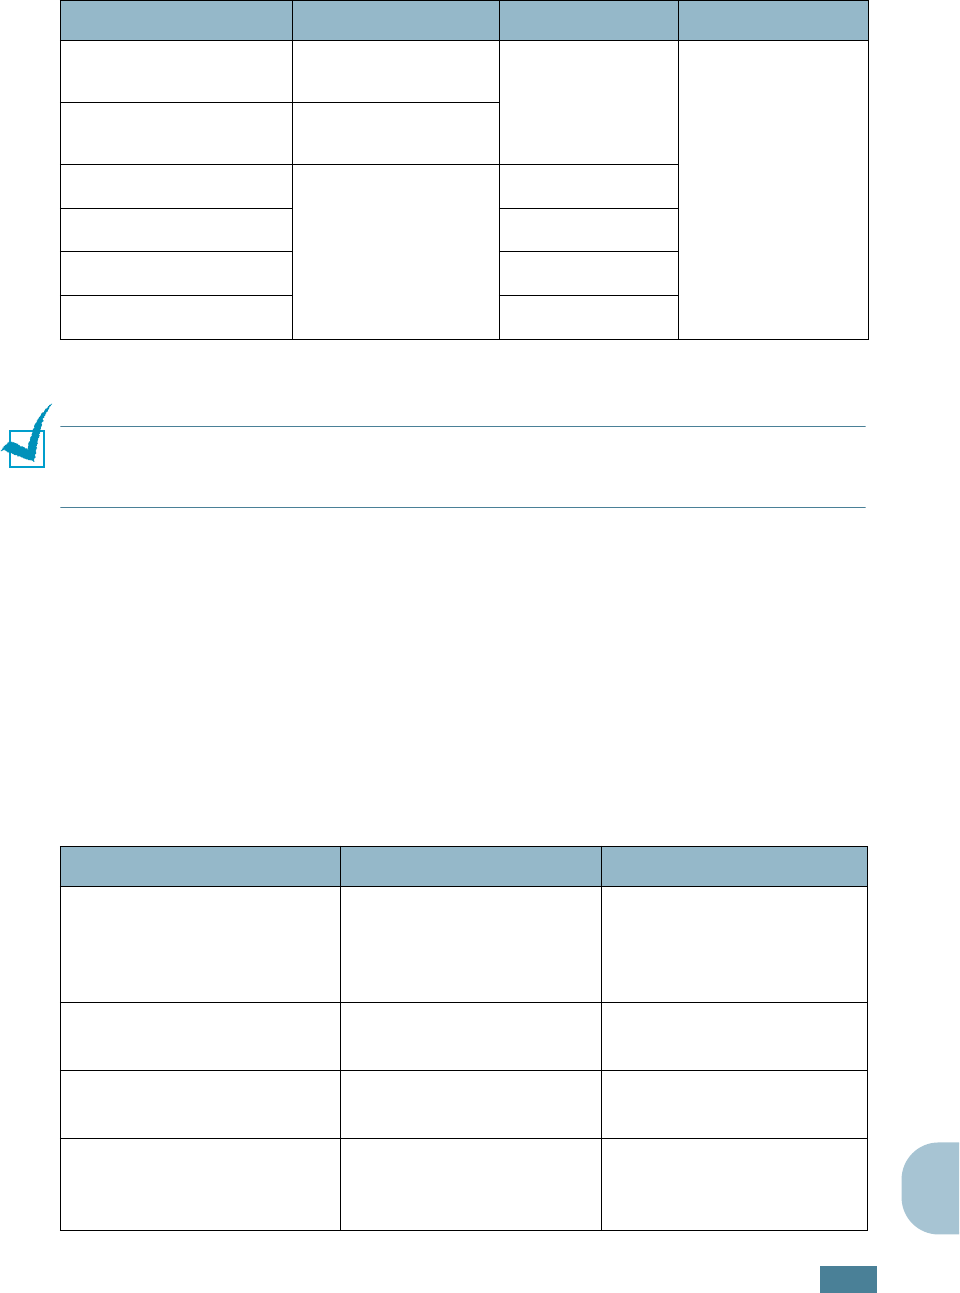
Supported Sizes of Paper
Paper Dimensions
1
Weight Capacity
2
Letter
8.5 X 11 in.
(216 X 279 mm)
• 60 to 105 g/m
2
bond (16 to
28 lb) for the
paper tray
• 60 to 120 g/m
2
bond (16 to
32 lb) for the
Bypass tray
• 250 sheets of 75
g/m
2
bond (20
lb) paper for the
paper tray
•
1 sheet of paper
for the Bypass
tra
y
A4
210 X 297 mm
(8.3 X 11.7 in.)
Executive
7.25 X 10.5 in. (191
X 267 mm)
Legal
8.5 X 14 in.
(216 X 356 mm)
Folio
216 X 330 mm
(8.5 X 13 in.)
S
PECIFICATIONS
B.7
B
NOTE
: You may experience jams when using print materials with a length of less than
127 mm (5 in.). For optimum performance, ensure that you are storing and handling the
paper correctly. Please refer to “Printer and Paper Storage Environment” on page B.9.
Guidelines for Using Paper
For the best result, use conventional 75 g/m
2
(20 lb) paper. Ensure that the paper is
of good quality, and free of cuts, nicks, tears, spots, loose particles, dust, wrinkles,
voids, and curled or bent edges.
If you are unsure of what type of paper you are loading, such as bond or recycled
paper, check the label on the package.
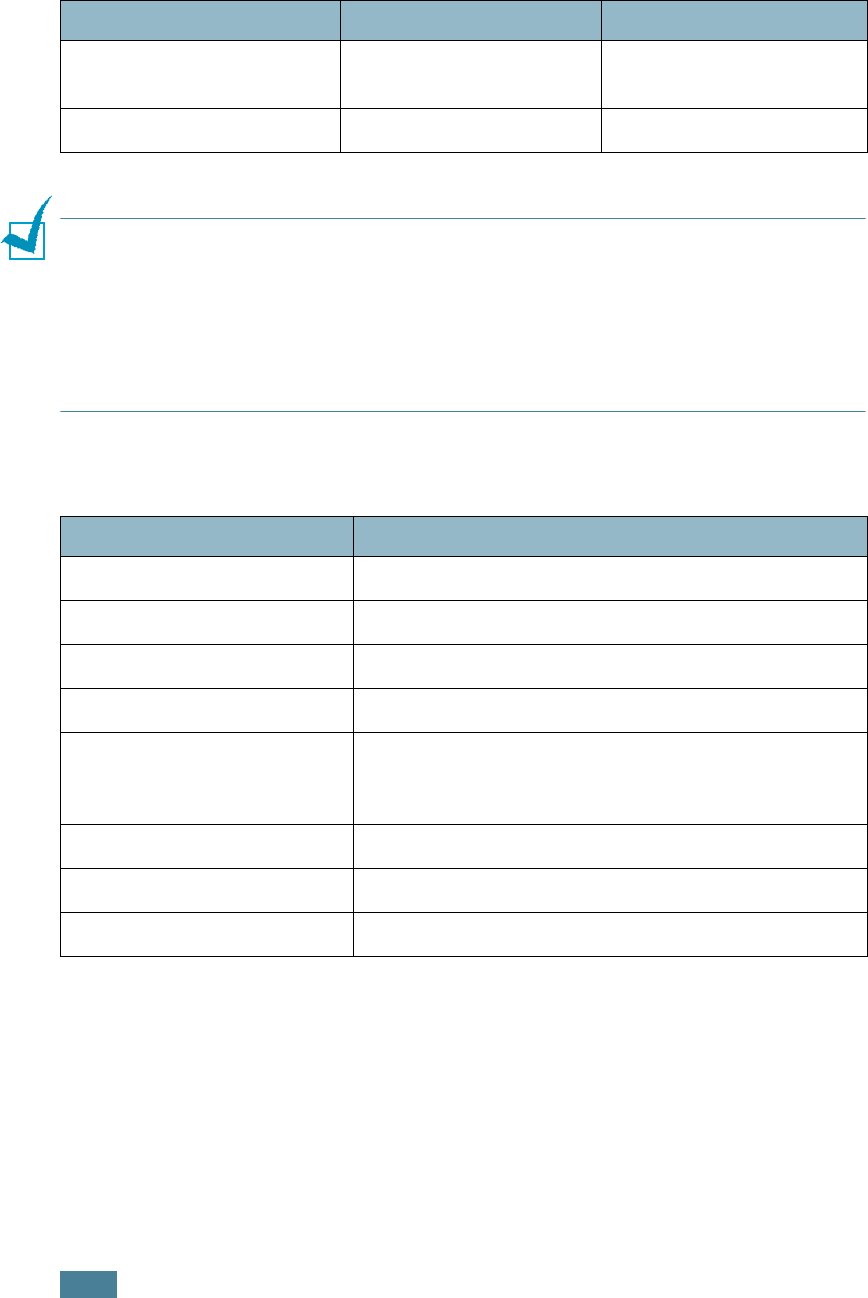
The following problems may cause print quality deviations, jamming or even damage
to the printer.
Minimum size (custom)
76 x 127 mm
(3 x 5 in) 60 to 120 g/m
2
bond (16 to
32 lb)
• 1 sheet of paper
for the Bypass
tray
Maximum size (Legal)
216 x 356mm
(8.5 x 14 in)
Transparency
Same minimum and
maximum paper sizes
as listed above.
138 to 146 g/m
2
Labels
120 to 150 g/m
2
Cards
90 to 163 g/m
2
Envelopes
75 to 90 g/m
2
1. The machine supports a wide range of media sizes. See “Size, Input Sources and Capacities” on
page 3.2.
2. Capacity may vary depending on print materials’ weight and thickness, and environmental conditions.
Symptom Problem with Paper Solution
Poor print quality or toner
adhesion, problems with
feeding
Too moist, too rough, too
smooth or embossed;
faulty paper lot
Try another kind of paper,
between 100 ~ 400
Sheffied, 4 ~ 5 %
moisture content.
Dropout, jamming, curl Stored improperly Store paper flat in its
moisture-proof wrapping.
Increased gray background
shading/printer wear Too heavy Use lighter paper, use the
rear output slot.
Excessive curl problems
with feeding
Too moist, wrong grain
direction or short-grain
construction
• Use the rear output slot.
• Use long-grain paper.
Paper Dimensions
1
Weight Capacity
2
S
PECIFICATIONS
B.8
NOTES:
• Do not use letterhead paper printed with low-temperature inks, such as those used in
some types of thermography.
• Do not use raised or embossed letterhead.
•The printer uses heat and pressure to fuse toner to the paper. Insure that any colored
paper or preprinted forms use inks that are compatible with this fusing temperature
(200 °C or 392 °F for 0.1 second).
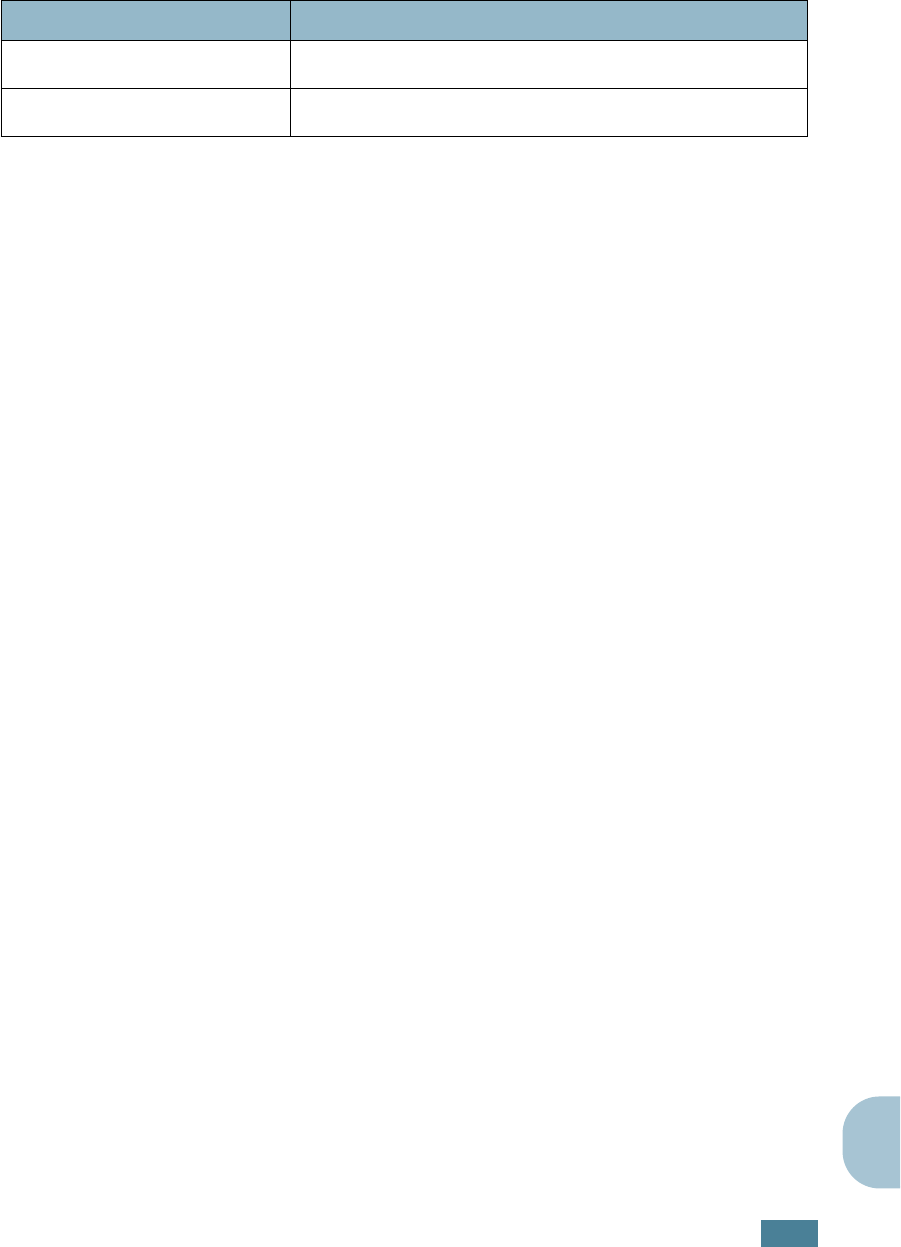
Paper Specifications
Jamming, damage to
printer Cutouts or perforations Do not use paper with
cutouts or perforations.
Problems with feeding Ragged edges Use good quality paper.
Category Specifications
Acid Content 5.5 pH or lower
Caliper 0.094 ~ 0.18 mm (3.0 ~ 7.0 mils)
Curl in Ream Flat within 5 mm (0.02 in.)
Cut Edge Conditions Cut with sharp blades with no visible fray.
Fusing Compatibility
Must not scorch, melt, offset or release hazardous
emissions when heated to 200 °C (392 °F) for 0.1
second.
Grain Long Grain
Moisture Content 4 % ~ 6 % by weight
Smoothness 100 ~ 400 Sheffied
Symptom Problem with Paper Solution
S
PECIFICATIONS
B.9
B
Paper Output Capacity
Printer and Paper Storage Environment
Paper storage environmental conditions directly affect the feed operation.
Ideally, the machine and paper storage environment should be at or near room
temperature, and not too dry or humid. Remember that paper is hygroscopic; it
absorbs and loses moisture rapidly.
Heat works with humidity to damage paper. Heat causes the moisture in paper to
evaporate, while cold causes it to condense on the sheets. Heating systems and air
conditioners remove most of the humidity from a room. As paper is opened and used,
it loses moisture, causing streaks and smudging. Humid weather or water coolers can
cause the humidity to increase in a room. As paper is opened and used it absorbs any
excess moisture, causing light print and dropouts. Also, as paper loses and gains
moisture it can become distorted. This can cause paper jams.
Care should be taken not to purchase more paper than can be used in a short time
(about 3 months). Paper stored for long periods may experience heat and moisture
extremes, which can cause damage. Planning is important to prevent damage to
large supplies of paper.
Unopened paper in sealed reams can remain stable for several months before use.
Opened packages of paper have more potential for environment damage, especially
if they are not wrapped with a moisture-proof barrier.
The paper storage environment should be properly maintained to ensure optimum
performance. The required condition is 20 to 24 °C (68 to 75 °F), with a relative
humidity of 45 % to 55 %. The following guidelines should be considered when
evaluating the paper’s storage environment:
•Paper should be stored at or near room temperature.
• The air should not be too dry or too humid.
• The best way to store an opened ream of paper is to rewrap it tightly in its
moisture-proof wrapping. If the machine environment is subject to extremes,
unwrap only the amount of paper to be used during the day’s operation to prevent
unwanted moisture changes.
Output Location Capacity
Face-down output tray 150 sheets of 75 g/m
2
bond (20 lb) paper
Face-up output slot 1 sheet of 75 g/m
2
bond (20 lb) paper

S
PECIFICATIONS
B.10
M
EMO
INDEX
Numerics
2/4-up, special copy
4.11
2-side, special copy
4.10
A
ADF, load
4.4
auto fit, special copy
4.8
B
bypass tray, use
3.8
C
cancel
copy
4.3
print
5.5
scan
6.5
CCD power save mode, use
1.20
clone, special copy
4.9
collation, special copy
4.10
connection
AC power
1.17
parallel
1.16
telephone line cord
1.15
USB
1.16
consumables
7.10
contrast, copy
4.6
control panel
1.7
copy
contrast
4.6
default setting, change
4.13
from ADF
4.4
from document glass
4.2
image
4.6
number of pages
4.7
special features
4.8
time out, set
4.14
D
display language, change
control panel
1.17
document
jam, clear
8.2
load in ADF
4.4
load on document glass
4.2
document glass
clean
7.4
load
4.2
drum, clean
7.9
E
error messages
8.10
F
Favorite setting, use
5.6
fit to page
copy
4.8
print
5.11
front output tray, use
3.5
G
graphic properties, set
5.20
H
help, use
5.6
I
install
Macintosh software
A.2
toner cartridge
1.10
Windows software
2.4
J
jam, clear
document
8.2
paper
8.4
M
Macintosh
common problems
8.25
document, print
A.4
driver, install
A.2
memory, clear
7.2
MFP driver
install
2.4
uninstall
2.9
N
network printer, set
5.22
n-up (multiple pages per sheet)
copy
4.11
print
5.8
O
orientation, print
5.3
,
A.4
output location, select
3.4
overlay, use
5.16
P
paper guidelines
3.3
paper jam, clear
8.4
paper level indicator
3.7
paper load
in bypass tray
3.8
in paper tray
1.12
paper load capacity
3.2
paper properties, set
5.7
paper size, set
bypass tray
3.10
paper tray
1.18
print
5.7
,
A.4
paper source, set
5.8
,
A.8
paper type, set
bypass tray
3.10
paper tray
1.18
print
5.8
,
A.4
parallel, connect
1.16
poster
copy
4.12
print
5.12
power save mode, use
1.19
print order, set
5.4
print resolution
5.20
,
A.6
printer driver
install in Windows
2.4
installin Macintosh
A.2
uninstall
2.9
printing
fitting to a selected paper size
5.11
from Macintosh
A.4
from Windows
5.2
multiple pages on one sheet
5.8
posters
5.12
reduced or enlarged document
5.10
using overlays
5.16
watermarks
5.13
problem, solve
copying
8.23
error messages
8.10
fax
8.21
paper feeding
8.13
printing
8.14
printing quality
8.17
scanning
8.24
problem, solving
Macintosh
8.25
R
rear output slot, use
3.5
reduced/enlarged
copy
4.7
print
5.10
S
scan driver
install
2.4
uninstall
2.9
SmarThru
install
2.4
uninstall
2.10
specifications
facsimile
B.5
general
B.2
paper
B.6
printer
B.4
scanner and copier
B.3
system requirements
Macintosh
A.2
Windows
2.3
T
tel line, connect
1.15
toner cartridge
install
1.10
life
7.6
redistribute
7.6
replace
7.7
toner save mode, use
1.19
TWAIN, scan
6.5
U
unistall
MFP driver
2.9
SmarThru
2.10
using CD-ROM
2.12
USB
connect
1.16
mode, change
8.16
USB driver, install
in Windows 98/Me
2.8
W
watermarks, use
5.13
Z
zoom rate, copy
4.7
SCX-4216F

CONTENTS
i
C
ONTENTS
Chapter 1:
G
ETTING
S
TARTED
Control Panel Functions ....................................... 1.2
Setting the Machine ID ......................................... 1.4
Entering Characters Using the Number Keypad ... 1.5
Setting the Date and Time .................................... 1.7
Changing the Clock Mode ................................. 1.8
Setting Sounds .................................................... 1.8
Speaker Control, Ringer, Key Sound and
Alarm Sound .................................................. 1.9
Speaker Volume ............................................. 1.9
Setting the Dial Mode .......................................... 1.10
Using the Toll Save Mode ..................................... 1.11
Setting up the Fax System ................................... 1.12
Changing the Fax Setup options ...................... 1.12
Available Fax Setup Options ............................ 1.12
Chapter 2:
G
ENERAL
F
AX
F
UNCTIONS
Sending a Fax ..................................................... 2.2
Preparing Documents for Faxing ....................... 2.2
Loading an Original Document .......................... 2.2
Adjusting the Document Resolution ................... 2.4
Sending a Fax Automatically ............................ 2.5
Sending a Fax Manually ................................... 2.6
Confirming Transmission ................................. 2.6
Automatic Redialing ........................................ 2.7
Receiving a Fax ................................................... 2.7
About Receiving Modes .................................... 2.7
Loading Paper for Receiving Faxes .................... 2.7
Receiving Automatically in the Fax Mode ............ 2.8
Receiving Manually in the Tel Mode ................... 2.8
Receiving Faxes in the Memory ......................... 2.8

CONTENTS
ii
Chapter 3:
A
UTOMATIC
D
IALING
Speed Dialing ...................................................... 3.2
Storing a Number for Speed Dialing .................. 3.2
Sending a Fax using a Speed Number ................ 3.3
Group Dialing ...................................................... 3.4
Setting Group Dial .......................................... 3.4
Editing Group Dial Numbers ............................. 3.5
Sending a Fax Using Group Dialing
(Multi-address Transmission) ........................... 3.6
Searching for a Number in the Memory ................... 3.7
Searching Sequentially through the Memory ....... 3.7
Searching with a Particular First Letter .............. 3.7
Printing a Phonebook List ...................................... 3.8
Chapter 4:
O
THER
W
AYS
TO
F
AX
Redialing ............................................................ 4.2
Sending Broadcasting Faxes .................................. 4.2
Sending a Delayed Fax ......................................... 4.3
Sending a Priority Fax .......................................... 4.5
Adding Documents To a Scheduled Fax ................... 4.7
Canceling a Scheduled Fax .................................... 4.8
Chapter 5:
A
DDITIONAL
F
EATURES
Using the Secure Receiving Mode ........................... 5.2
Printing Reports .................................................. 5.3
Using Advanced Fax Settings ................................. 5.5
Changing Setting Options ................................ 5.5
Advanced Fax Setting Options .......................... 5.6
Using the Remote Control Panel ............................. 5.7

CONTENTS
iii
M
EMO

CONTENTS
iv
G
ETTING
S
TARTED
1
.
2
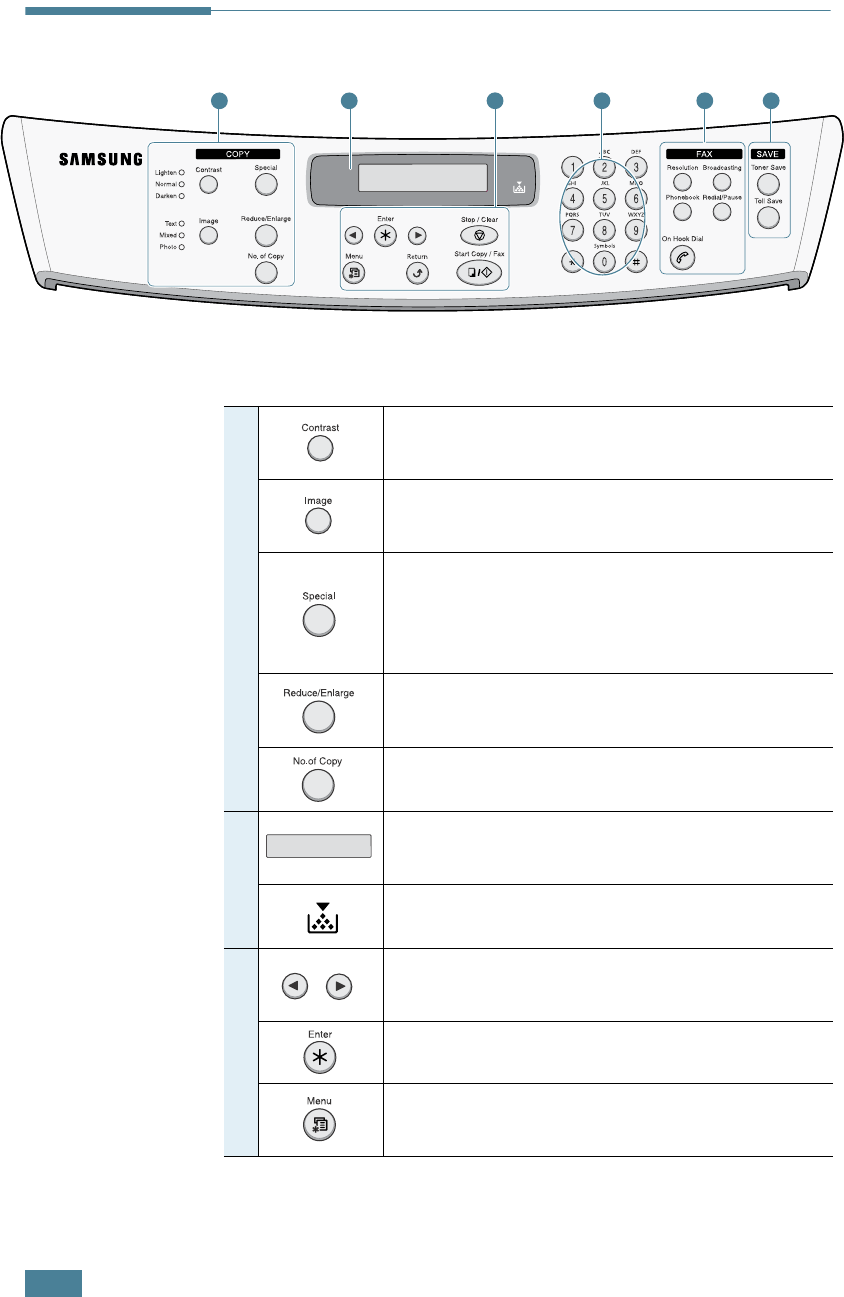
Control Panel Functions
1 2 4 653
1
C
O
P
Y
*
Adjusts the brightness of the documents for
the current copy job.
Selects the document type for the current
copy job.
Allows you to use special copy features, such
as Clone, Collation, Auto fit, 2-side, N-up
(multiple pages on a sheet) and Poster
copying.
Makes a copy smaller or larger than the
original.
Selects the number of copies.
2
Displays the current status and prompts
during an operation.
Turns on when the toner cartridge is empty.
3
Scrolls through the options available for the
selected menu item.
Confirms the selection on the display.
Enters the menu mode and scrolls through the
menus available.
G
ETTING
S
TARTED
1
.
3
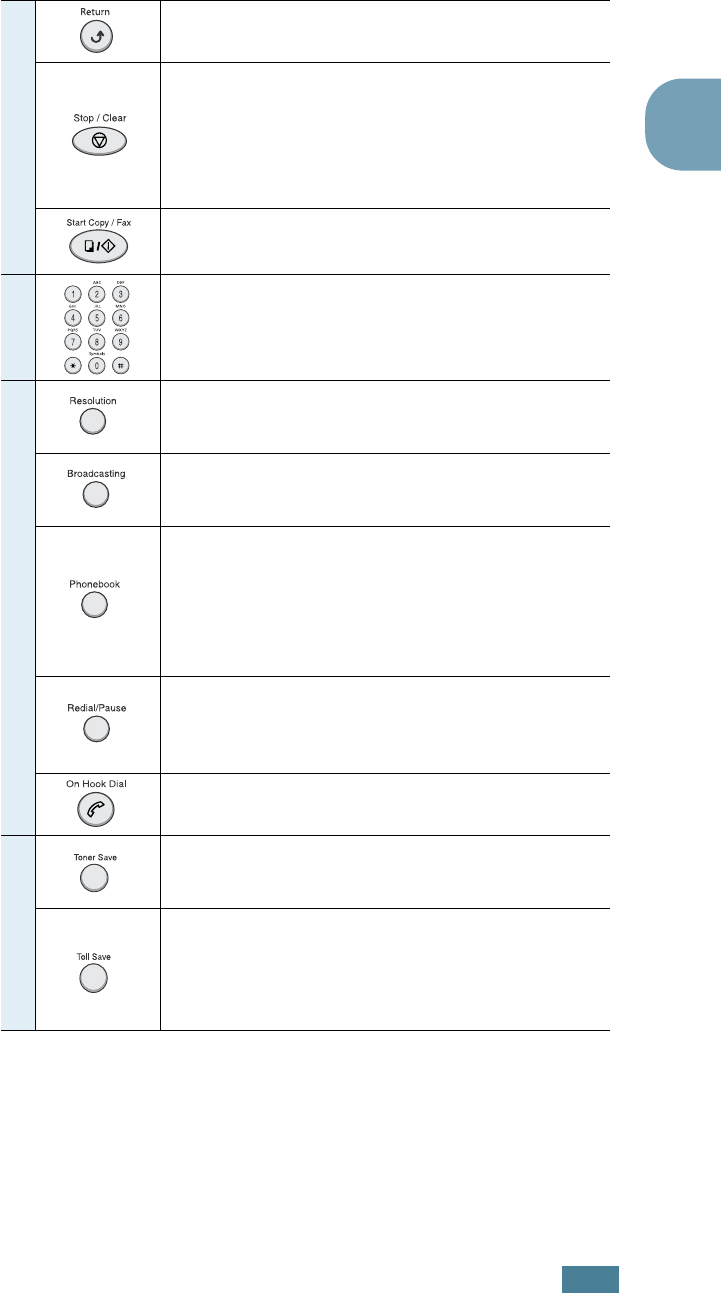
1
3
Sends you back to the upper menu level.
Stops an operation at any time.
In the standby mode, clears/cancels the copy
options, such as the contrast, the image
setting, the copy size and the number of
copies.
Starts a job.
4
Dials a number or enters alphanumeric
characters.
5
F
A
X
Adjusts the resolution of the documents for
the current fax job.
Allows you to send a fax to multiple
destinations.
• Allows you to store frequently-dialed fax
numbers using a one or two-digit speed dial
or group number for automatic dialing and
edit the stored numbers.
• Allows you to print a Phonebook list.
Redials the last number in the standby mode
or insert a pause into a fax number in the edit
mode.
Engages the telephone line.
6
S
A
V
E
Allows you to save on toner by using less
toner to print a document.
Allows you to save on call costs by sending a
fax at a preset toll-saving time. Using this
feature, you can take advantage of lower long
distance rates at night, for example.
*. For details about copy features, refer to the MFP User’s Guide.
G
ETTING
S
TARTED
1
.
4
Setting the Machine ID
In some countries, you are required by law to indicate your fax
number on any fax you send. The Machine ID, containing your
telephone number and name (or company name), will be printed
at the top of each page sent from your machine.
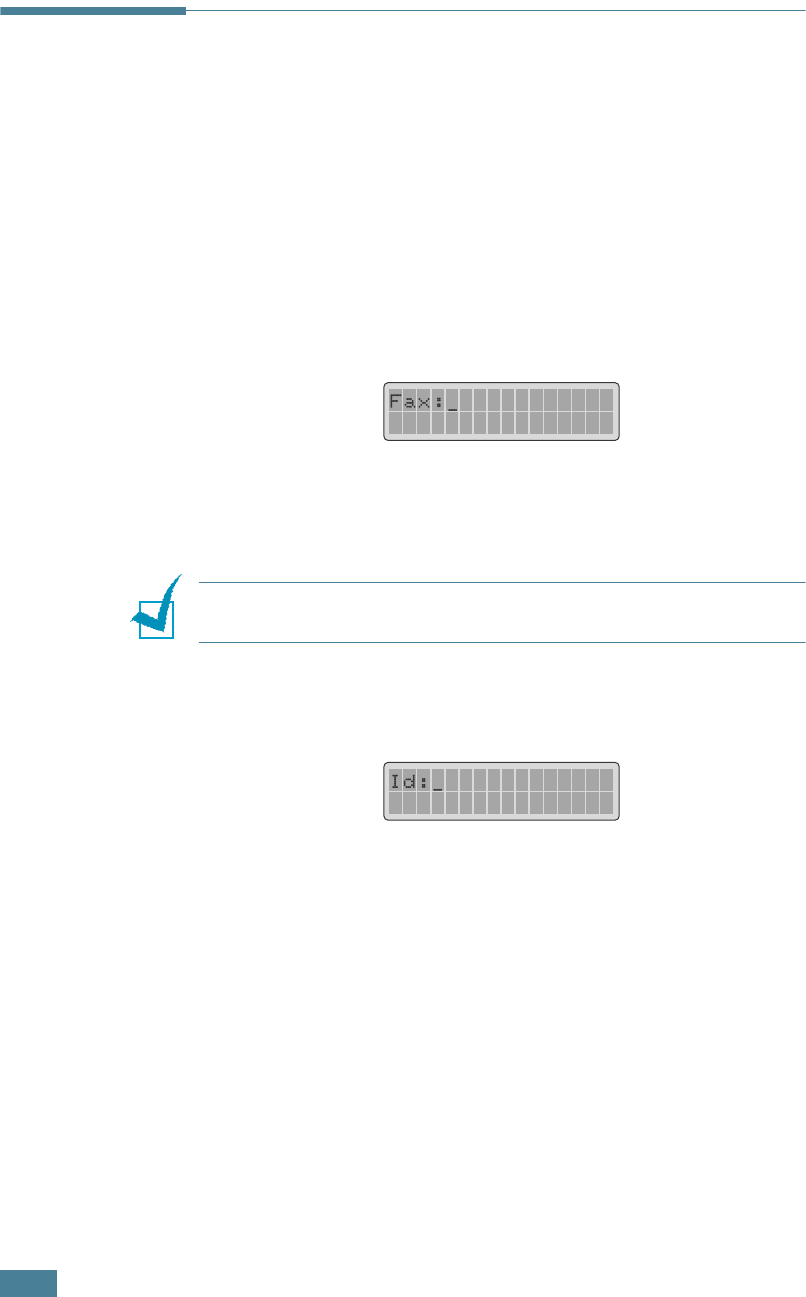
1
Press
Menu
until “Machine Setup” appears on the top line
of the display. The first available menu item, “Machine Id”
displays on the bottom line.
2
Press
Enter
. The display asks you to enter the fax number.
If there is a number already set, the number appears.
3
Enter your fax number using the number keypad.
N
OTE
:
If you make a mistake while entering numbers, press the
☎
➛
button to delete the last digit.
4
Press
Enter
when the number on the display is correct. The
display asks you to enter the ID.
5
Enter your name or company name using the number
keypad.
You can enter alphanumeric characters using the number
keypad, and include special symbols by pressing the
0
button.
For details on how to use the number keypad to enter
alphanumeric characters, see “Entering Characters Using
the Number Keypad” on page 1.5.
If you want to enter the same letter or number in
succession (e.g. SS, AA, 777), enter one digit, move the
cursor by pressing the
❿
button and enter the next digit.
If you want to insert a space in the name, you can also use
the
❿
button to move the cursor to skip the position.

G
ETTING
S
TARTED
1.5
1
6
Press Enter when the name on the display is correct.
7
Press Stop/Clear to return to the standby mode.
Entering Characters Using the Number
Keypad
As you perform various tasks, you will need to enter names and
numbers. For example, when you set up your machine, you
enter your name (or your company’s name) and telephone
number. When you store one or two digit speed dial or group dial
numbers, you may also enter the corresponding names.
To enter alphanumeric characters:
1
When you are prompted to enter a letter,
locate the button labeled with the
character you want. Press the button
until the correct letter appears on the
display.
For example, to enter the letter O,
press 6, labeled with “MNO.”
Each time you press 6, the display
shows a different letter, M,
N, O and finally 6.
You can enter special characters (space, plus sign, etc.). For
details, see “Keypad Letters and Numbers” on page 1.6.
2
To enter additional letters, repeat Step 1.
If the next letter is printed on the same button, move the
cursor by pressing the
❿
button and then press the button
labeled with the letter you want. The cursor will move to the
right and the next letter will appear on the display.
You can enter a space by pressing the button.
3
When you finish entering letters, press Enter.

G
ETTING
S
TARTED
1.6
Keypad Letters and Numbers
Changing Numbers or Names
If you make a mistake while entering a number or name, press
the
➛
button to delete the last digit or character. Then enter the
correct numbers or characters.
Inserting a Pause
With some telephone systems, you must dial an access code (9,
for example) and listen for a second dial tone. In such cases,
you must insert a pause in the telephone number. You can insert
a pause while you are setting up speed dial numbers.
To insert a pause, press Redial/Pause at the appropriate place
while entering the telephone number. A “–” appears on the
display at the corresponding location.
Key Assigned numbers, letters or characters
1 1 Space
2 A B C 2
3 D E F 3
4 G H I 4
5 J K L 5
6 M N O 6
7 P Q R S 7
8 T U V 8
9 W X Y Z 9
0 + - , . ‘ / * # & 0
G
ETTING
S
TARTED
1.7
1
Setting the Date and Time
All of your faxes will have the date and time printed on them.
NOTE:
If power to the machine is cut off, you need to reset the
correct time and date once the power is restored.
1
Press Menu until “Machine Setup” appears on the top line
of the display.
2
Press the scroll button (
➛
or
❿
) to display “Date & Time” on
the bottom line and press Enter.
3
Enter the correct time and date using the number keypad.
Month = 01 ~ 12
Day = 01 ~ 31
Year = requires the four digits
Hour = 01 ~ 12 (12-hour mode)
00 ~ 23 (24-hour mode)
Minute = 00 ~ 59
NOTE
: The date format may differ from each country.
You can also use the scroll button (
➛
or
❿
) to move the
cursor under the digit you want to correct and enter a new
number.
4
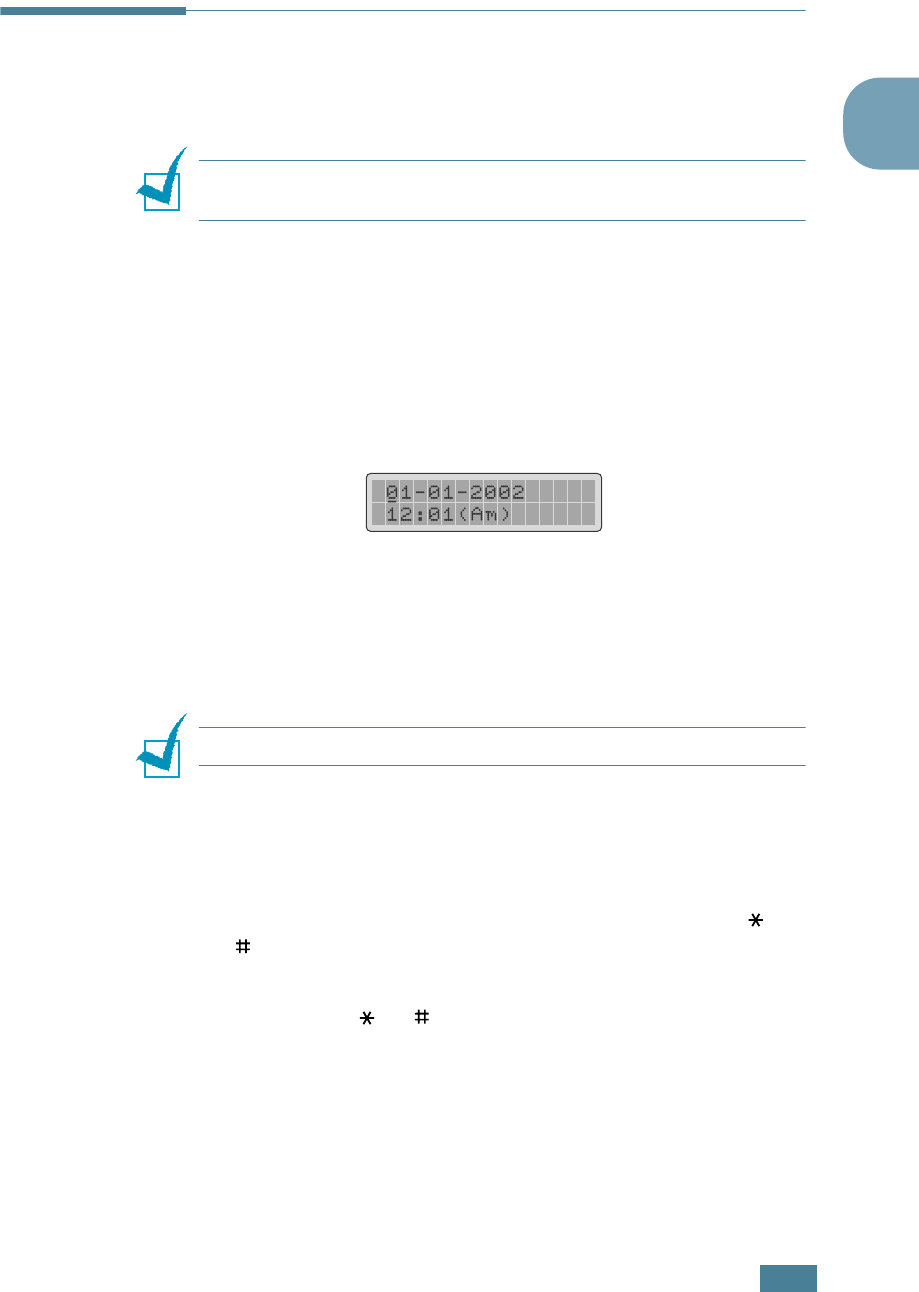
To select “Am” or “Pm” for 12-hour format, press the or
button.
When the cursor is not under the AM or PM indicator,
pressing the or button immediately moves the cursor
to the indicator.
You can change the clock mode to 24-hour format (e.g.
01:00 PM as 13:00). For details, see “Changing the Clock
Mode” on page 1.8.

G
ETTING
S
TARTED
1.8
5
Press Enter when the time and date on the display is
correct.
When you enter a wrong number, the machine beeps and
does not proceed to the next step. If this happens, just
reenter the correct number.
Changing the Clock Mode
You can set your machine to display the current time using
either a 12-hour or 24-hour format.
1
Press Menu until “Machine Setup” appears on the top line
of the display.
2
Press the scroll button (
➛
or
❿
) until you see “Clock Mode”
on the bottom line and press Enter.
The clock mode currently set for the machine displays.
3
Press the scroll button (
➛
or
❿
) to select the other mode
and then press Enter to save the selection.
4
To return to the standby mode, press Stop/Clear.
Setting Sounds
You can control the following sounds:
• Ringer: You can adjust the ringer volume.
•Alarm Sound: You can turn the alarm sound on or off. With
this option set to “On,” an alarm tone sounds when an
error occurs or fax communication ends.
•Key Sound: With this option set to “On,” a key tone sounds
each time any key is pressed.
• Speaker Control: You can turn the speaker on or off. With
this option set to “Com,” the speaker is on until the remote
machine answers.
• Speaker volume: You can adjust the speaker volume.

G
ETTING
S
TARTED
1.9
1
Speaker Control, Ringer, Key Sound and
Alarm Sound
1
Press Menu until “Sound/Volume” appears on the top line
of the display.
2
Press the scroll button (
➛
or
❿
) to scroll through the
options. Press Enter when you see the desired sound
option.
3
Press the scroll button (
➛
or
❿
) to display the desired
status or loudness for the option you have selected.
You will see the selection on the bottom line of the display.
For the ringer volume, you can select from Off, Low, Med
and High. You will also hear the selected loudness. Setting
“Off” turns the ringer off. The machine will work normally
even if the ringer is turned off.
4
Press Enter to save the selection. The next sound option
appears.
5
If necessary, repeat steps 2 through 4.
6
To return to the standby mode, press Stop/Clear.
Speaker Volume
1
Press On Hook Dial. You will hear a dial tone.
2
Press the scroll button (
➛
or
❿
) until you hear the desired
loudness. The display shows the current volume level.
3
Press On Hook Dial to save the change and return to the
standby mode.

G
ETTING
S
TARTED
1.10
Setting the Dial Mode
You can select the type of the telephone dial system where your
machine is connected.
NOTE:
The Dial Mode setting may be unavailable depending on
your country.
1
Press Menu until “Machine Setup” appears on the top line
of the display.
2
Press the scroll button (
➛
or
❿
) until you see “Dial Mode”
on the bottom line and press Enter.
3
Press the scroll button (
➛
or
❿
) to select the desired dial
mode.
Select “Tone” if your machine is connected to a tone dial
line.
Select “Pulse” if the machine is connected to a pulse dial
line.
4
Press Enter to save the selection.
5
To return to the standby mode, press Stop/Clear.
G
ETTING
S
TARTED
1.11
1
Using the Toll Save Mode
Using the Toll Save button on the control panel, you can quickly
set your machine to send the document(s) stored in the memory
during the preset time slot, when the call charge is lowered. This
Toll Save mode helps you to take advantage of lower long
distance rates at night, for example.
NOTE
: The toll-saving time slot may vary depending on your
contract with a long distance phone company.
To turn the toll save mode on:
1
Press Toll Save. The button backlight turns on.
2
Press Enter when “Start Time” displays on the bottom line.
3
Enter the time when your machine starts sending toll save
faxes, using the number keypad.
To select “Am” or “Pm” for 12-hour format, press the or
button.
4
Press Enter when the start time on the display is correct.
5
Press the scroll button (
➛
or
❿
) to display “End Time” and
press Enter.
6
Enter the time when the toll save transmission ends, using
the number keypad.
7
Press Enter to save the setting.
8
To return to the standby mode, press Stop/Clear.
Once the toll save mode is activated, your machine stores all of
the documents to be faxed into the memory and sends them at
the programed time.
NOTE:
You can change the toll-saving time in the
Advaced Fax
menu. See page 5.5.
To turn the toll save mode off, press Toll Save again. The button
backlight turns off and the mode is deactivated.

G
ETTING
S
TARTED
1.12
Setting up the Fax System
From the Fax Setup menu, you can configure many settings for
the fax system.
Changing the Fax Setup options
1
Press Menu until “Fax System” appears on the top line of
the display.
The first available menu item, “Receive Mode,” displays on
the bottom line.
2
Press the scroll button (
➛
or
❿
) until you see the desired
menu item on the bottom line and press Enter.
3
Use the scroll button (
➛
or
❿
) to find the desired status or
use the number keypad to enter the desired value for the
option you have selected.
4
Press Enter to save the selection. The next Fax Setup
option appears.
5
If necessary, repeat steps 2 through 4.
6
To return to the standby mode, press Stop/Clear.
Available Fax Setup Options
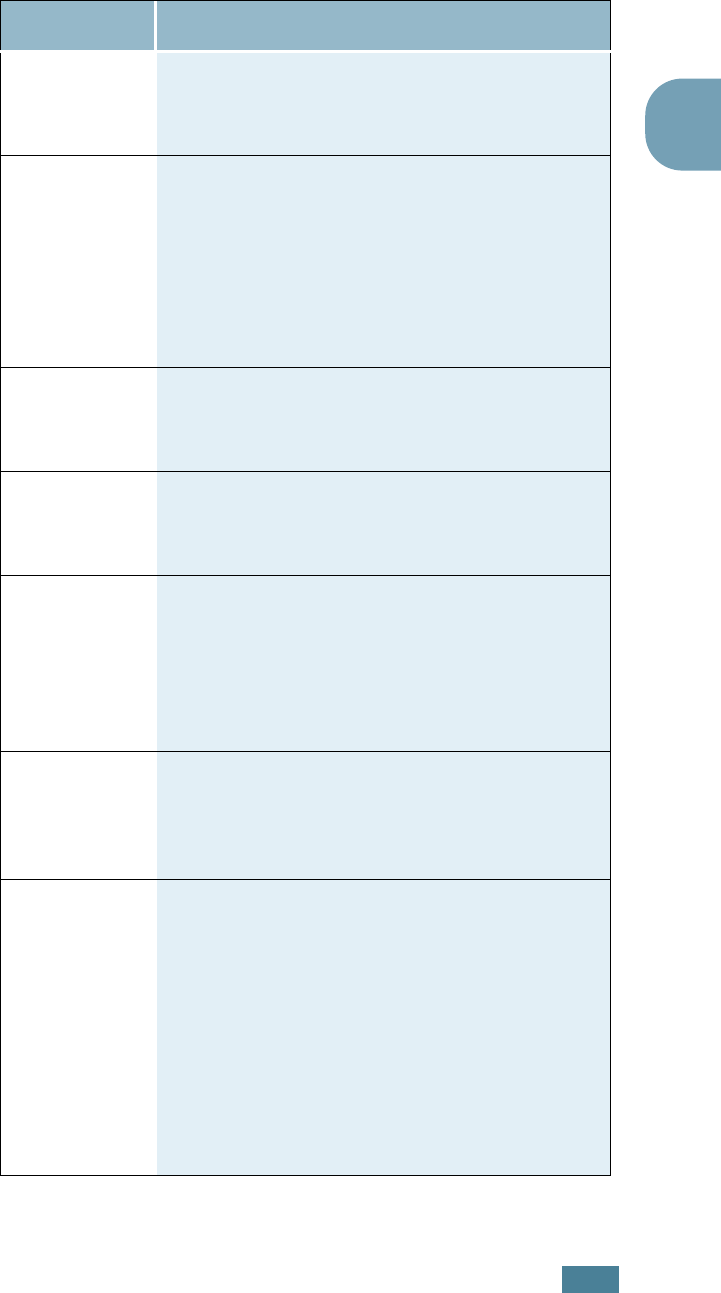
Option Description
Receive
Mode
You can select the default fax receiving mode.
• In the Fax mode,
the machine answers an
incoming call and immediately goes into
the fax reception mode.
• In the Tel mode,
you can receive a fax by
pressing Start Copy/Fax on the control
panel when you can hear a fax tone on
the line.
G
ETTING
S
TARTED
1.13
1
Ring To
Answer
You can specify the number of times the
machine rings, 1 to 7, before answering an
incoming call.
Contrast
You can select the default contrast mode to
fax your documents lighter or darker.
•
Lighten
works well with dark print.
•
Normal
works well with standard typed or
printed documents.
•
Darken
works well with light print or faint
pencil markings.
Redial Term
Your machine can automatically redial a
remote fax machine if it was busy. Intervals
from 1 to 15 minutes can be entered.
Redials
You can specify the number of redial
attempts, 0 to 13. If you enter
0
, the machine
will not redial.
MSG
Confirm
You can set your machine to print a report
showing whether the transmission was
successful, how many pages were sent, and
more. The available options are
On
,
Off
and
On-Error
, which prints only when a
transmission is not successful.
Auto Report
A report with detailed information about the
previous 50 communications operations,
including time and dates. The available
options are
On
or
Off
.
Auto
Reduction
When receiving a document as long as or
longer than the paper loaded in the paper
tray, the machine can reduce the size of the
document to fit the size of paper loaded in the
machine. Select
On
if you want to
automatically reduce an incoming page.
With this feature set to
Off
, the machine
cannot reduce the document to fit onto one
page, the document is divided and printed in
actual size on two or more pages.
Option Description

G
ETTING
S
TARTED
1.14
Discard Size
When receiving a document as long as longer
than the paper installed in your machine, you
can set the machine to discard any excess at
the bottom of the page. If the received page
is outside the margin you set, it will print on
two sheets of paper at the actual size.
If the document is within the margin and the
Auto Reduction feature is turned on, it will be
reduced to fit into the appropriate sized paper
and discard does not occur. If the Auto
Reduction feature is turned off or fails, the
data within the margin will be discarded.
Settings range from 0 to 30 mm.
Option Description
G
ENERAL
F
AX
F
UNCTIONS
2.2
Sending a Fax
Preparing Documents for Faxing
Use the following guidelines to prepare your documents for
faxing:
•Do not load documents smaller than 142 x 148 mm or larger
than 216 x 356 mm in the Automatic Document Feeder
(ADF).
•Do not attempt to load the following types of documents into
the ADF:
- carbon-paper or carbon-backed paper
- coated paper
- onion skin or thin paper
- wrinkled or creased paper
- curled or rolled paper
- torn paper
•Remove all staples and paper clips before loading documents
in the ADF.
• Make sure any glue, ink or correction fluid on the paper is
completely dry before loading documents in the ADF.
• Do not load documents containing different sizes or weights
of paper in the ADF.
• If you want to make copies from booklets, pamphlets,
transparencies or documents having other unusual
characteristics, use the document glass to load the
document.
Loading an Original Document
To fax a document using the Automatic Document Feeder (ADF):
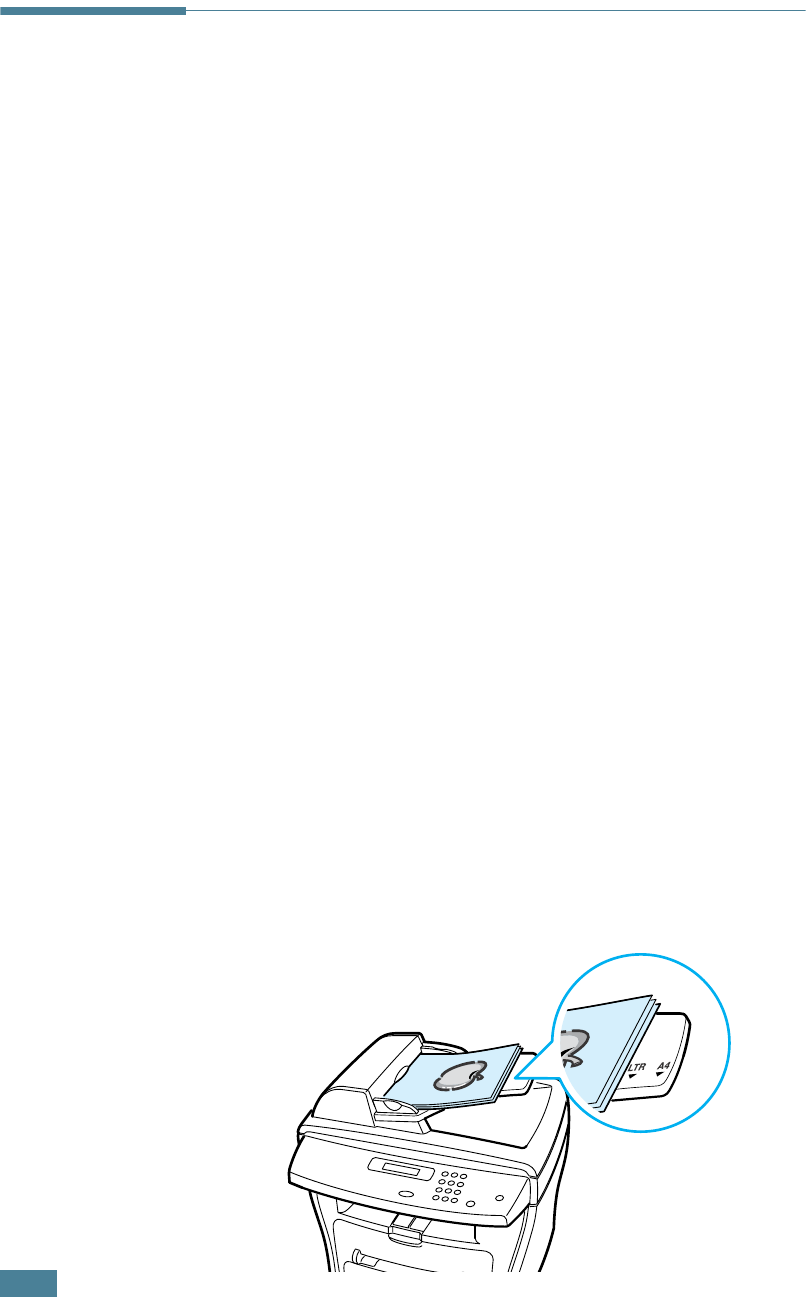
1
Slide the document face up into the ADF. You can insert up
to 30 sheets at a time.
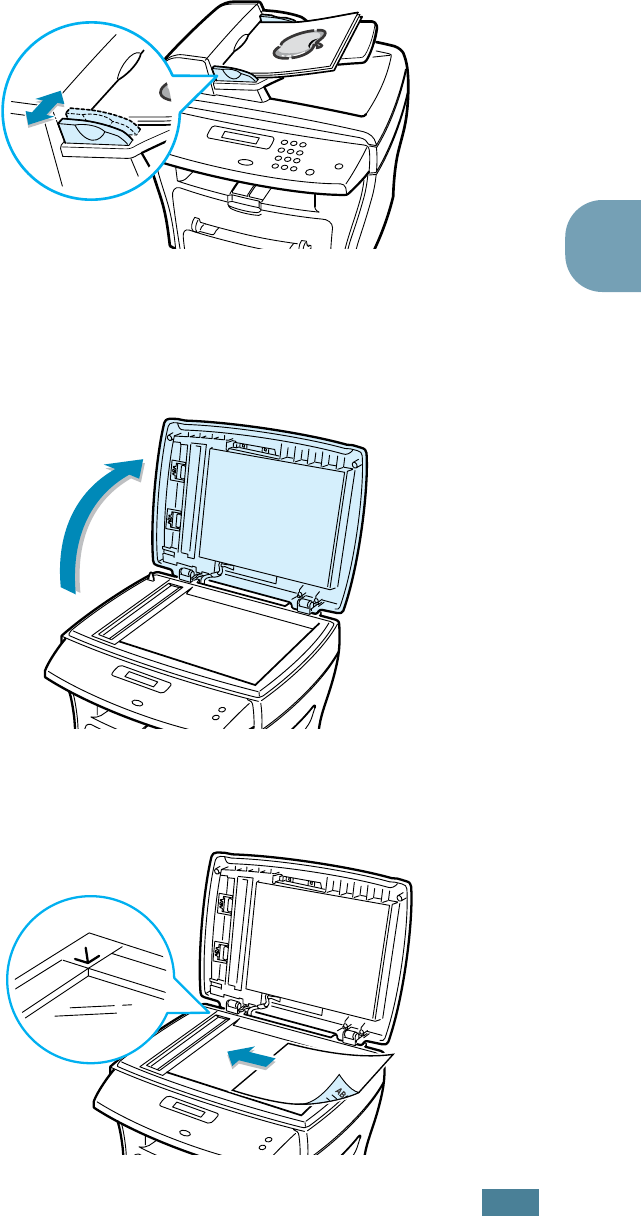
G
ENERAL
F
AX
F
UNCTIONS
2.3
2
2
Adjust the document guide on the ADF to match the width
of the document.
To fax a document from the document glass:
1
Open the document cover.
2
Place the document face down on the document glass and
align it with the registration guide on the top left corner of
the glass.
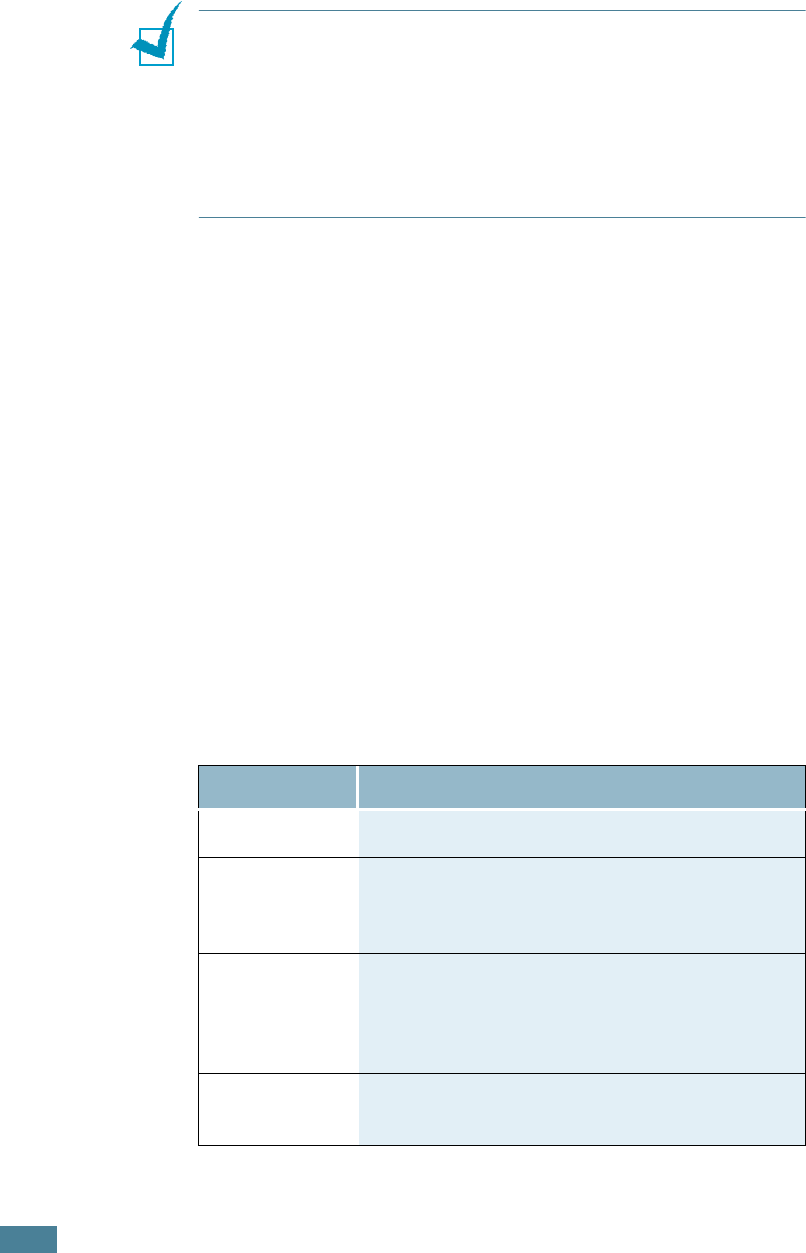
G
ENERAL
F
AX
F
UNCTIONS
2.4
3
Close the document cover.
NOTES:
•If you are copying a page from a book or magazine, lift the cover
until its hinges are caught by the stopper and then close the
cover. If the book or magazine is thicker than 30 mm, start
copying with the cover open.
•Make sure that no document is in the ADF. If any document is
detected in the ADF, it has priority over the document on the
document glass.
Adjusting the Document Resolution
The default document settings produce good results when
setting typical text based documents.
However, if you send documents that are of a poor quality, or
contain photographs, you can adjust the resolution to produce a
higher quality fax.
1
Press Resolution.
2
By pressing Resolution or the scroll button (
➛
or
❿
), you
can choose from Standard, Fine, Super Fine, Photo and
Color.
3
When the desired mode is displayed, press Enter to save
the selection.
The document types recommended for the resolution settings
are described in the table below.
Mode
Recommended for:
Standard Documents with normal sized characters.
Fine
Documents containing small characters or thin
lines or documents printed using a dot-matrix
printer.
Super Fine
Documents containing extremely fine detail.
The super fine mode is enabled only if the
remote machine also supports the Super Fine
resolution. See the notes below.
Photo Documents containing shades of gray or
photographs.

G
ENERAL
F
AX
F
UNCTIONS
2.5
2
NOTES
:
•For the memory transmission, the super fine mode is not
available. The resolution setting will be automatically changed to
Fine.
• If your machine is set to Super Fine resolution and the remote
fax machine does not support the Super Fine resolution, the
machine will transmit using the highest resolution mode
supported by the remote fax machine.
Sending a Fax Automatically
1
Load the document(s) face up into the ADF.
OR
Place a single document face down on the document glass.
For details about loading a document, see page 2.2.
2
Adjust the document resolution to suit your fax needs (see
page 2.4).
If you need to change the contrast, see page 1.13.
3
Enter the remote fax phone number using the number
keypad.
You can use one or two-digit speed or group dial numbers.
For details, see Chapter 3, "Automatic Dialing."
4
Press Start Copy/Fax.
5
If the document is loaded on the document glass, the
display shows “Another Page?” on the top line after the
document is scanned into the memory. If you have the next
page, remove the scanned page and load the next page on
the glass and select “1.Yes.” Repeat as necessary.
When all of the pages are scanned, select “2.No” when the
display shows “Another Page?.”
Color
Documents with colors. Sending a color fax is
enabled only if the remote machine supports
color fax reception and you send the fax
manually. In this mode, the memory
transmission is not available.
Mode
Recommended for:
G
ENERAL
F
AX
F
UNCTIONS
2.6
6
The number is dialed and then the machine begins sending
the fax when the remote fax machine is ready.
NOTE:
If you want to cancel the fax job, press Stop/Clear at any
time while sending the fax.
Sending a Fax Manually
1
Load the document(s) face up into the ADF.
OR
Place a single document face down on the document glass.
For details about loading a document, see page 2.2.
2
Adjust the document resolution to suit your fax needs (see
page 2.4).
If you need to change the contrast, see page 1.13.
3
Press On Hook Dial. You hear a dial tone.
4
Enter the remote fax machine’s fax number using the
number keypad.
5
When you hear a high-pitched fax signal from the remote fax
machine, press Start Copy/Fax.
NOTE:
If you want to cancel the fax job, press Stop/Clear at any
time while sending the fax.
Confirming Transmission
When the last page of your document has been sent successfully,
the machine beeps and returns to the standby mode.
If something goes wrong while sending your fax, an error
message appears on the display. For a listing of error messages
and their meanings, see the MFP User’s Guide.
If you receive an error message, press Stop/Clear to clear the
message and try to send the document again.
You can set your machine to print a confirmation report
automatically each time sending a fax is completed. For further
details, see the MSG Confirm item in “Available Fax Setup
Options” on page 1.12.
G
ENERAL
F
AX
F
UNCTIONS
2.7
2
Automatic Redialing
If the number you have dialed is busy or there is no answer
when you send a fax, the machine will automatically redial the
number every three minutes up to five times by the factory
default settings.
When the display shows “Retry Redial ?,” press Enter to redial
the number without waiting. To cancel the automatic redialing,
press Stop/Clear.
To change the time interval between redials and the number of
redial attempts. See page 1.12.
Receiving a Fax
About Receiving Modes
Your machine provides two receiving modes:
• In the fax mode, the machine answers an incoming fax call
and immediately goes into fax reception mode.
• In the tel mode, you can receive a fax pressing Start Copy/
Fax on the control panel of your machine when you can hear
a fax tone from the remote machine.
If the memory is full, the receiving mode automatically switches
to Tel.
For details about changing the receiving mode, see page 1.12.
NOTE:
If you do not want other people to view your received
documents, you can use the secure receiving mode. In this mode,
all received faxes are stored in the memory. For further details,
see page 5.2.
Loading Paper for Receiving Faxes
The instructions for loading paper in the paper tray are the same
whether you are printing, faxing, or copying, except that faxes
can only be printed on Letter-, A4- or Legal-sized paper. For
details about loading paper and setting the paper size in the
tray, refer to the MFP User’s Guide.

G
ENERAL
F
AX
F
UNCTIONS
2.8
Receiving Automatically in the Fax Mode
Your machine is preset to the fax mode at the factory.
When you receive a fax, the machine answers the call on a
specified number of rings and automatically receives the fax.
To change the number of rings,
see “Advanced Fax Setting
Options” on page 5.6.
If you want to adjust the ringer volume, see “Setting Sounds”
on page 1.8.
Receiving Manually in the Tel Mode
When a fax comes in, your machine sounds the ringer and then
you can hear a fax tone. Press Start Copy/Fax.
The machine begins receiving a fax and returns to the standby
mode when the reception is completed.
Receiving Faxes in the Memory
Since your machine is a multi-tasking device, it can receive
faxes while you are making copies or printing. If you receive a
fax while you are copying or printing, your machine stores
incoming faxes in the memory. Then, as soon as you finish
copying or printing, the machine automatically prints the faxes.

A
UTOMATIC
D
IALING
3.2
Speed Dialing
You can store up to 100 frequently dialed numbers in one or
two-digit speed dial locations (0-99).
Storing a Number for Speed Dialing
1
Press Phonebook on the control panel.
2
Press Phonebook or the scroll button (
➛
or
❿
) to display
“Store/Edit” on the bottom line of the display. Press Enter.
3
Press Enter when “Speed Dials” appears on the display.
4
Enter a one or two-digit speed dial number between 0 and
99, using the number keypad and press Enter.
If a number is already stored in the location you chose, the
display shows the number to allow you to change it. To start
over with another speed-dial number, press Stop/Clear.
5
Enter the number you want to store using the number
keypad and press Enter.
To insert a pause between numbers, press Redial/Pause
and a “-” appears on the display.
6
To assign a name to the number, enter the desired name.
For details on how to enter names, see “Entering Characters
Using the Number Keypad” on page 1.5.
OR
If you do not want to assign a name, skip this step.
7
Press Enter when the name appears correctly or without
entering a name.
8
To store more fax numbers, repeat steps 4 through 7.
OR
To return to the standby mode, press Return or Stop/
Clear.

A
UTOMATIC
D
IALING
3.3
3
Sending a Fax using a Speed Number
1
Feed the document(s) face up into the ADF.
Or
Place a single document face down on the document glass.
For details about loading a document, see page 2.2.
2
Adjust the document resolution to suit your fax needs (see
page 2.4).
If you need to change the contrast, see page 1.13.
3
Enter the speed dial number.
• For a one-digit speed dial number, press and hold down
the appropriate digit button.
• For a two-digit speed dial number, press the first digit
button and hold down the last digit button.
The corresponding entry’s name briefly displays.
4
The document scans into the memory.
If the document is loaded on the document glass, the LCD
display asks if you want to send another page. Select
“1.Yes” to add more documents or “2.No” to begin sending
the fax immediately.
5
The fax number stored in the speed dial location will be
automatically dialed. The document is sent when the
remote fax machine answers.

A
UTOMATIC
D
IALING
3.4
Group Dialing
If you frequently send the same document to several
destinations, you can create a group of these destinations and
set them under a one or two-digit group dial location. This
enables you to use a group dial number setting to send the same
document to all the destinations in the group.
Setting Group Dial
1
Press Phonebook on the control panel.
2
Press Phonebook or the scroll button (
➛
or
❿
) to display
“Store/Edit” on the bottom line of the display. Press Enter.
3
Press the scroll button (
➛
or
❿
) to display “Group Dials” on
the bottom line and press Enter.
4
Press Enter when “New” displays on the bottom line.
5
Enter the desired group number between 0 and 99 and
press Enter.
6
Enter a one or two-digit speed number you want to include
in the group and press Enter.
• For a one-digit speed dial number, press and hold down
the appropriate digit button.
• For a two-digit speed dial number, press the first digit
button and hold down the last digit button.
7
Repeat Step 6 to enter other speed dial numbers into the
group.
8
Press Return or the right scroll button (
❿
) when you
entered all of the desired numbers. The display asks you to
enter a group ID.
9
To assign a name to the group, enter the desired name.
OR
If you do not want to assign a name, skip this step.

A
UTOMATIC
D
IALING
3.5
3
10
Press Enter when the name appears correctly or without
entering a name.
11
If you want to assign another group, repeat from Step 4.
OR
To return to the standby mode, press Stop/Clear.
NOTE:
You cannot include one group dial number in another
group dial number.
Editing Group Dial Numbers
You can delete a specific speed dial number from a selected
group or add a new number to the selected group.
1
Press Phonebook on the control panel.
2
Press Phonebook or the scroll button (
➛
or
❿
) to display
“Store/Edit” on the bottom line of the display. Press Enter.
3
Press the scroll button (
➛
or
❿
) to display “Group Dials” on
the bottom line and press Enter.
4
Press the scroll button (
➛
or
❿
) to display “Edit” on the
bottom line and press Enter.
5
Enter the group number you want to edit and press Enter.
The display prompts you to enter a speed dial number.
6
Enter a speed dial number to be added or deleted.
• For a one-digit speed dial number, press and hold down
the appropriate digit button.
• For a two-digit speed dial group number, press the first
digit button and hold down the last digit button.
If you entered the specific number from the group, the
display shows “Delete?.”
If you entered a new number, the display shows “Add?.”
7
Press Enter.

A
UTOMATIC
D
IALING
3.6
8
If you want to edit another group, repeat from Step 4.
Or
To return to the standby mode, press Stop/Clear.
Sending a Fax Using Group Dialing
(Multi-address Transmission)
You can use group dialing for Broadcasting or Delayed
transmissions.
Follow the procedure of the desired operation (Broadcasting
transmission; see page 4.2, Delayed transmission; see
page 4.3). When you come to a step in which the display asks
you to enter the remote fax number:
•For a one-digit group number, press and hold down the
appropriate digit button.
•For a two-digit group number, press the first digit button and
hold down the last digit button.
You can use only one group number for one operation. Then
continue the procedure to complete the desired operation.
Your machine automatically scans the document loaded in the
Automatic Document Feeder or on the document glass into the
memory. The machine dials each of the numbers included in the
group.

A
UTOMATIC
D
IALING
3.7
3
Searching for a Number in the
Memory
There are two ways to search for a number in the memory. You
can either scan from A to Z sequentially, or you can search using
the first letter of the name associated with the number.
Searching Sequentially through the Memory
1
Press Phonebook.
2
Press Enter when “Search/Dial” appears on the display.
3
Press the scroll button (
➛
or
❿
) to scroll through the
memory until the name and number you want to dial
display. You can search upwards or downwards through the
entire memory in alphabetical order, from A to Z.
While searching through the machine’s memory, you can
see that each entry is preceded by one of two letters; “S”
for speed dial or “G” for group dial number. These letters
tell you how the number is stored.
4
When the name and/or the number you want displays,
press Start Copy/Fax or Enter to dial.
Searching with a Particular First Letter
1
Press Phonebook.
2
Press Enter when “Search/Dial” appears on the display.
3
Press the button labeled with the letter you want to search
for. A name beginning with the letter displays.
For example, if you want to find the name “MOBILE,” press
the 6 button, which is labeled with “MNO.”
4
Press the scroll button (
➛
or
❿
) to display the next name.
5
When the name and/or the number you want displays,
press Start Copy/Fax or Enter to dial.

A
UTOMATIC
D
IALING
3.8
Printing a Phonebook List
You can check your automatic dial setting by printing a
Phonebook list.
1
Press Phonebook.
2
Press Phonebook or the scroll button (
➛
or
❿
) until “Print”
appears on the bottom line and press Enter.
A list showing your speed dial and group dial entries prints
out.

O
THER
W
AYS
TO
F
AX
4.2
Redialing
To redial the number you last called:
Press Redial/Pause.
If a document is loaded in the ADF (Automatic Document
Feeder; see page 2.2), the machine automatically begins to
send.
For the document loaded on the document glass, the display
asks if you want to load another page. Select “1.Yes” to add.
Otherwise, select “2.No.”
Sending Broadcasting Faxes
Using the Broadcasting button on the control panel, you can
use the broadcasting fax feature, which allows you to send a
document to multiple locations. Documents are automatically
stored in the memory and sent to a remote station. After
transmission, the documents are automatically erased from the
memory.
1
Load the document(s) face up into the ADF.
OR
Place a single document face down on the document glass.
For details about loading a document, see page 2.2.
2
Adjust the document resolution to suit your fax needs (see
page 2.4).
If you need to change the contrast, see page 1.13.
3
Press Broadcasting on the control panel.
4
Enter the number of the remote machine using the number
keypad.
You can use one or two-digit speed dial or group dial
numbers. For details, see Chapter 3, "Automatic Dialing."

O
THER
W
AYS
TO
F
AX
4.3
4
5
Press Enter to confirm the number. The display asks you to
enter another fax number to send the document.
NOTE:
Your machine can send one broadcasting fax to multiple
destinations. The “Enter Number” prompt does not appear if a
broadcast is set up and not completed. You must wait until the
current broadcast is completed.
6
If you want to enter more fax numbers, repeat steps 4 and
5. You can add up to 10 destinations.
Note that you cannot use group dial numbers for another
fax number.
7
When you finish entering fax numbers, press Start Copy/
Fax.
The document is scanned into the memory before
transmission. The display shows the memory capacity and
the number of pages being stored in the memory.
For the document loaded on the document glass, the
display asks if you want to load another page. Select
“1.Yes” to add. Otherwise, select “2.No.”
8
The machine begins sending the document in order of the
numbers you entered.
Sending a Delayed Fax
You can set your machine to send a fax at a later time when you
will not be present.
1
Load the document(s) face up into the ADF.
OR
Place a single document face down on the document glass.
For details about loading a document, see page 2.2.
2
Adjust the document resolution to suit your fax needs (see
page 2.4).
If you need to change the contrast, see page 1.13.
O
THER
W
AYS
TO
F
AX
4.4
3
Press Menu until “Fax Feature” appears on the top line of
the display. The first available menu item, “Delay Fax”
displays on the bottom line.
4
Press Enter.
5
Enter the number of the remote machine using the number
keypad.
To enter the number, you can use one or two-digit speed
dial or group dial numbers. For details, see Chapter 3,
"Automatic Dialing."
6
Press Enter to confirm the number on the display. The
display asks you to enter a name.
7
If you want to assign a name to the transmission, enter the
name. If not, skip this step.
For details on how to enter the name using the number
keypad, see “Entering Characters Using the Number
Keypad” on page 1.5.
8
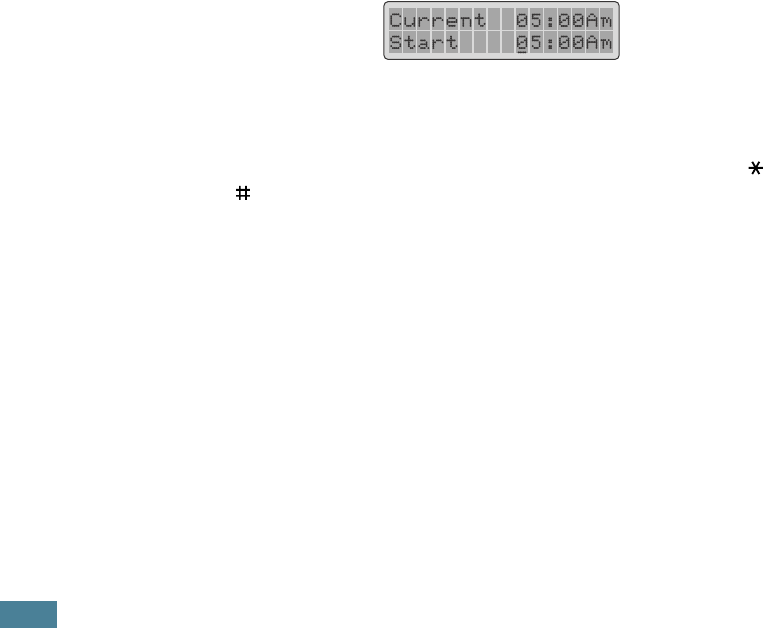
Press Enter. The display shows the current time and asks
you to enter the start time when the fax is to be sent.
9
Enter the time using the number keypad.
To select “Am” or “Pm” for 12-hour format, press the or
button.
If you set a time earlier than the current time, the
document will be sent at that time on the following day.
10
Press Enter when the start time displays correctly.
11
The document is scanned into the memory before
transmission. The display shows the memory capacity and
the number of pages being stored in the memory.
For the document loaded on the document glass, the
display asks if you want to load another page. Select
“1.Yes” to add. Otherwise, select “2.No.”

O
THER
W
AYS
TO
F
AX
4.5
4
12
The machine returns to the standby mode. The display
reminds you that you are in the standby mode and that a
delayed fax is set.
NOTE:
If you want to cancel the delayed transmission, see
“Canceling a Scheduled Fax” on page 4.8.
Sending a Priority Fax
Using the Priority Fax feature, a high priority document can be
sent ahead of reserved operations. The document is scanned
into the memory and transmitted when the current operation is
finished. In addition, the priority transmission will interrupt a
broadcast operation between stations (i.e., when transmission
to station A ends, before transmission to station B begins) or
between redial attempts.
1
Load the document(s) face up into the ADF.
OR
Place a single document face down on the document glass.
For details about loading a document, see page 2.2.
2
Adjust the document resolution to suit your fax needs (see
page 2.4).
If you need to change the contrast, see page 1.13.
3
Press Menu until “Fax Feature” appears on the top line of
the display.
4
Press the scroll button (
➛
or
❿
) to display “Priority Fax” on
the bottom line and press Enter.
5
Enter the number of the remote machine using the number
keypad.
To enter the number, you can use one or two-digit speed
dial or group dial numbers. For details, see Chapter 3,
"Automatic Dialing."

O
THER
W
AYS
TO
F
AX
4.6
6
Press Enter to confirm the number. The display asks you to
enter a name.
7
If you want to assign a name to the transmission, enter the
name. If not, skip this step.
For details on how to enter a name using the number
keypad, see “Entering Characters Using the Number
Keypad” on page 1.5.
8
Press Enter.
The document is scanned into the memory before
transmission. The display shows the memory capacity and
the number of pages being stored in the memory.
For the document loaded on the document glass, the
display asks if you want to load another page. Select
“1.Yes” to add. Otherwise, select “2.No.”
9
The machine shows the number being dialed and begins
sending the document.

O
THER
W
AYS
TO
F
AX
4.7
4
Adding Documents To a Scheduled
Fax
You can add documents to the delayed transmission previously
reserved in your machine’s memory.
1
Load the document(s) face up into the ADF.
OR
Place a single document face down on the document glass.
For details about loading a document, see page 2.2.
2
Adjust the document resolution to suit your fax needs (see
page 2.4).
If you need to change the contrast, see page 1.13.
3
Press Menu until “Fax Feature” appears on the top line of
the display.
4
Press the scroll button (
➛
or
❿
) to display “Add/Cancel” on
the bottom line and press Enter.
5
Press Enter when “Add Page” displays on the bottom line.
The display shows the last job reserved in the memory.
6
Press the scroll button (
➛
or
❿
) until you see the fax job to
which you want to add documents and press Enter.
The machine automatically stores the documents in the
memory, and the display shows the memory capacity and
the number of pages.
For the document loaded on the document glass, the
display asks if you want to load another page. Select
“1.Yes” to add. Otherwise, select “2.No.”
7
After storing, the machine displays the numbers of total
pages and added pages and then returns to the standby
mode.

O
THER
W
AYS
TO
F
AX
4.8
Canceling a Scheduled Fax
1
Press Menu until “Fax Feature” appears on the top line of
the display.
2
Press the scroll button (
➛
or
❿
) to display “Add/Cancel” on
the bottom line and press Enter.
3
Press the scroll button (
➛
or
❿
) to display “Cancel Job” and
press Enter. The display shows the last job reserved in the
memory.
4
Press the scroll button (
➛
or
❿
) until you see the fax job
you want to cancel, and press Enter.
The selected job is canceled and the machine returns to the
standby mode.
A
DDITIONAL
F
EATURES
5.2
Using the Secure Receiving Mode
You may need to prevent your received faxes from being
accessed by unauthorized people. You can turn on the secure fax
mode using the Secure Receive option to restrict printing out all
of the received faxes when the machine is unattended. In the
secure fax mode, all incoming faxes will go in the memory. When
the mode turns off, any faxes stored will be printed.
To turn the secure receiving mode on:
1
Press Menu until “Advanced Fax” appears on the top line of
the display.
2
Press the scroll button (
➛
or
❿
) until “Secure Receive”
appears on the bottom line and press Enter.
3
Press the scroll button (
➛
or
❿
) to display “On” on the
bottom line and press Enter.
4
Enter a four-digit passcode you want to use, using the
number keypad and press Enter.
NOTE:
You can use the secure receiving mode without setting a
passcode, but cannot protect your faxes.
5
To return to the standby mode, press Stop/Clear.
When a fax is received in the secure receiving mode, your
machine stores it into the memory and displays “Secure Fax
RCV” to let you know that there is a fax stored.
To print received documents:
1
Access the Secure Receive menu by following Step 1 and
2 above.
2
Press the scroll button (
➛
or
❿
) to display “Print” on the
bottom line and press Enter.
3
Enter the four-digit passcode and pressEnter.
The faxes stored in the memory are printed all together.

A
DDITIONAL
F
EATURES
5.3
5
To turn the secure receiving mode off:
1
Access the Secure Receive menu by following Step 1 and
2 in “To turn the secure fax mode on.”
2
Press the scroll button (
➛
or
❿
) to display “Off” on the
bottom line and press Enter.
3
Enter the four-digit passcode and press Enter.
The mode is deactivated and the faxes stored in the
memory are printed all together.
4
To return to the standby mode, press Stop/Clear.
Printing Reports
Your machine can print reports containing useful information.
The following reports are available:
Phonebook List
This list shows all of the numbers currently stored in the
machine’s memory as speed dial and group dial numbers.
You can print this Phonebook list using the Phonebook button;
see page 3.8.
Sent Fax Report
This report shows information of the faxes you recently sent.
Received Fax Report
This report shows information of the faxes you recently
received.
System Data List
This list shows the status of the user-selectable options. You
may print this list to confirm your changes after changing any
settings.

A
DDITIONAL
F
EATURES
5.4
Scheduled Job Information
This list shows the document currently stored for Delayed faxes
or Toll Save faxes. The list shows the starting time and type of
operation.
Message Confirmation
This report shows the fax number, the number of pages, the
elapsed time of the job, the communication mode, and the
communication results.
You can set up your machine to automatically print the message
confirmation report after each fax job. See page 1.13.
Junk Fax Number List
This list shows up to 10 fax numbers specified as the junk fax
numbers by using the Junk Fax Setup menu; see page 5.6.
When the Junk Fax Barrier feature is turned on, incoming faxes
from those numbers will be blocked.
Multi-Communication Report
This report is printed automatically after sending documents
from more than one location.
Power Failure Report
This report is printed out automatically when power is restored
after a power failure, if there occurs any data loss due to the
power failure.
NOTE:
The list you have set to print out automatically will not
print out when there is no paper loaded or a paper jam has
occurred.
Printing a Report
1
Press Menu until “Reports” appears on the top line of the
display. The first available menu item, “Phone Book”
displays on the bottom line.
2
Press the scroll button (
➛
or
❿
) to display the report or list
you want to print on the bottom line.
• Phone Book: Phonebook list
• Sent Report: Sent fax report

A
DDITIONAL
F
EATURES
5.5
5
• RCV Report: Received fax report
•System Data: System data list
• Scheduled Jobs: Scheduled job information
• MSG Confirm: Message confirmation
• Junk Fax List: Junk fax number list
3
Press Enter.
The selected information prints out.
Using Advanced Fax Settings
Your machine has various user-selectable setting options for
sending or receiving faxes. These options are preset at the
factory, but you may need to change them. To find out how the
options are currently set, print the System Data list. For details
about printing the list, see “Printing Reports” on page 5.3.
Changing Setting Options
1
Press Menu until “Advanced Fax” appears on the top line of
the display. The first available menu item, “Send Forward,”
displays on the bottom line.
2
Press the scroll button (
➛
or
❿
) until you see the desired
menu item on the bottom line and press Enter.
3
When the option you want appears on the display, choose
the desired status by pressing the scroll button (
➛
or
❿
) or
enter the desired value using the number keypad.
4
Press Enter to save the selection.
5
You can exit from the setup mode at any time by pressing
Stop/Clear.
A
DDITIONAL
F
EATURES
5.6
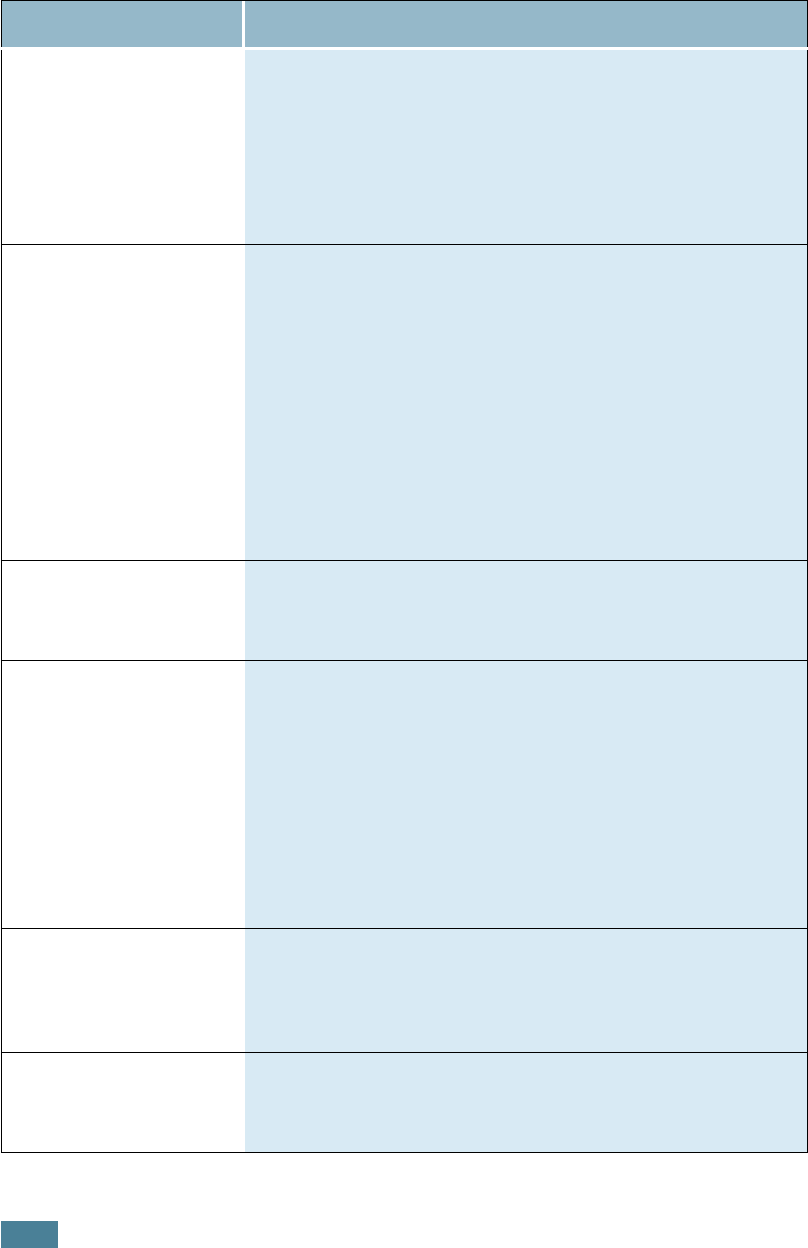
Advanced Fax Setting Options
Option Description
Send Forward
You can set the machine to always forward all of the
outgoing faxes to the specified destination besides the fax
numbers you entered.
Select
Off
to turn this feature off.
Select
On
to turn this feature on. You can set the number
of the remote fax machine to which faxes are forwarded.
RCV Forward
You can set your machine to forward incoming faxes to
another fax number during a specified time period. When
a fax arrives at your machine, it is stored in the memory.
Then, the machine dials the fax number that you have
specified and sends the fax.
Select
Off
to turn this feature off.
Select
On
to turn this feature on. You can set the fax
number to which faxes are forwarded. Then, you can enter
the start time and/or the end time. The Print Local Copy
option allows you to set the machine to print the fax, if fax
forwarding is completed with no error.
Toll Save
You can set the start time and/or the end time for toll save
mode. For details about sending toll save faxes, see
page 1.11.
Junk Fax Setup
Using the Junk Fax Barrier feature, the system will not
accept faxes sent from remote stations of which their
numbers are stored in the memory as junk fax numbers.
This feature is useful for blocking any unwanted fax.
Select Off to turn the feature off. Anybody can send you a
fax.
Select
On
to turn the feature on. You can set up to 10 fax
numbers as junk fax numbers. After storing numbers, you
do not receive any faxes from the registered stations.
Secure Receive
You can keep your received faxes from being accessed by
unauthorized people.
For further details about setting this mode, see page 5.2.
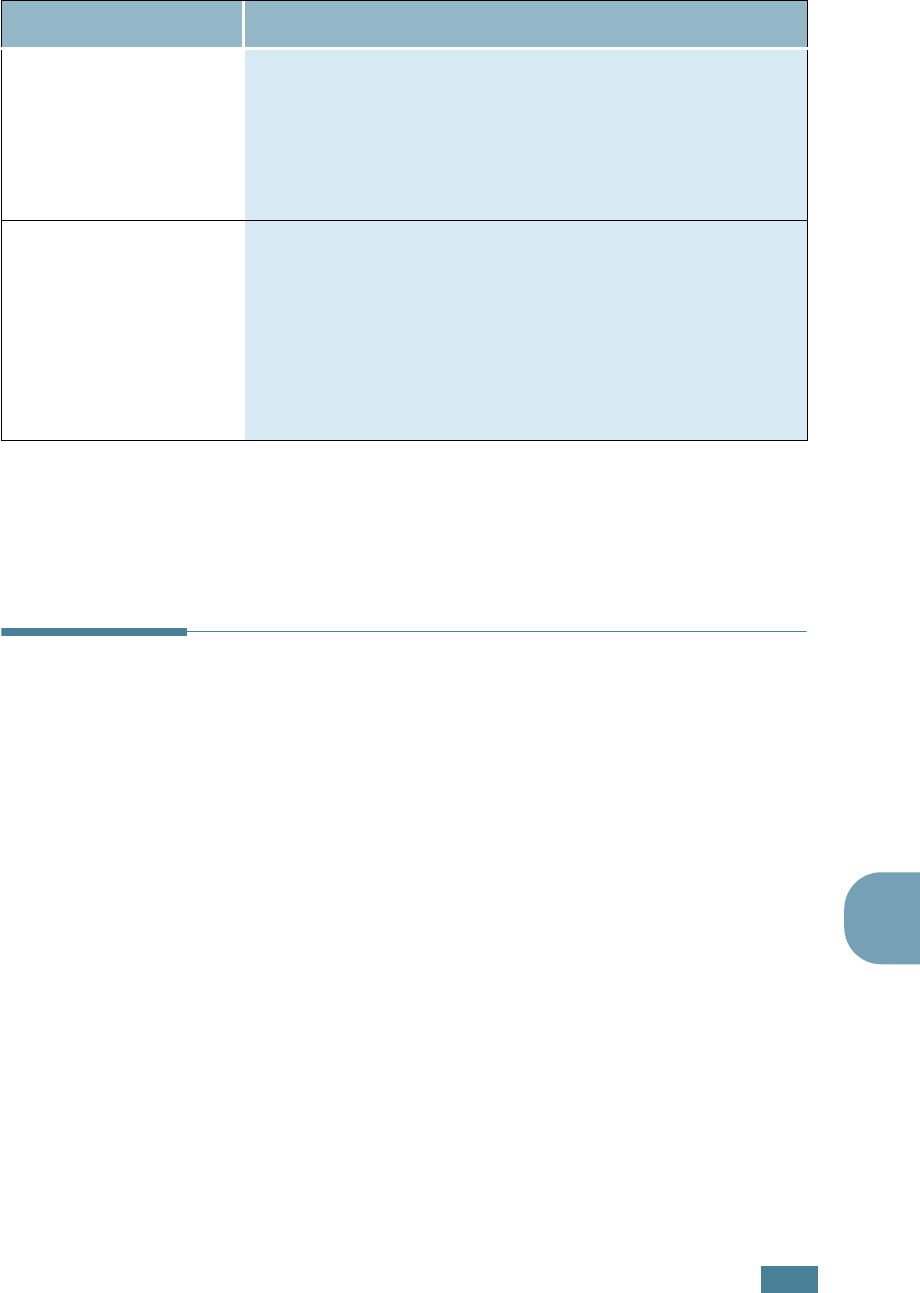
Prefix Dial
You can set a prefix dial number of up to five digits. This
number dials before any auto dial number is started. It is
useful for accessing the PABX exchange.
A
DDITIONAL
F
EATURES
5.7
5
Using the Remote Control Panel
Using the Remote Control Panel, you can set up fax system data
options, create and edit Phonebook entries or view information
of your machine on the desktop window of your computer.
When you install the Samsung software, the Remote Control
Panel program is automatically installed.
For information about installing the Samsung software, please
refer to the MFP User’s Guide.
To open the Remote Control Panel:
1
Start your Windows.
2
Click the Start button on your desktop computer.
Stamp RCV Name
This option allows the machine to automatically print the
page number, and the date and time of the reception at
the bottom of each page of a received document.
Select Off to turn this feature off.
Select
On
to turn this feature on.
ECM Mode
The Error Correction Mode helps with poor line quality and
makes sure any fax you send are sent smoothly to any
other ECM-equipped fax machine. If the line quality is
poor, it takes more time to send a fax when you are using
the ECM mode.
Select Off to turn this feature off.
Select
On
to turn this feature on.
Option Description
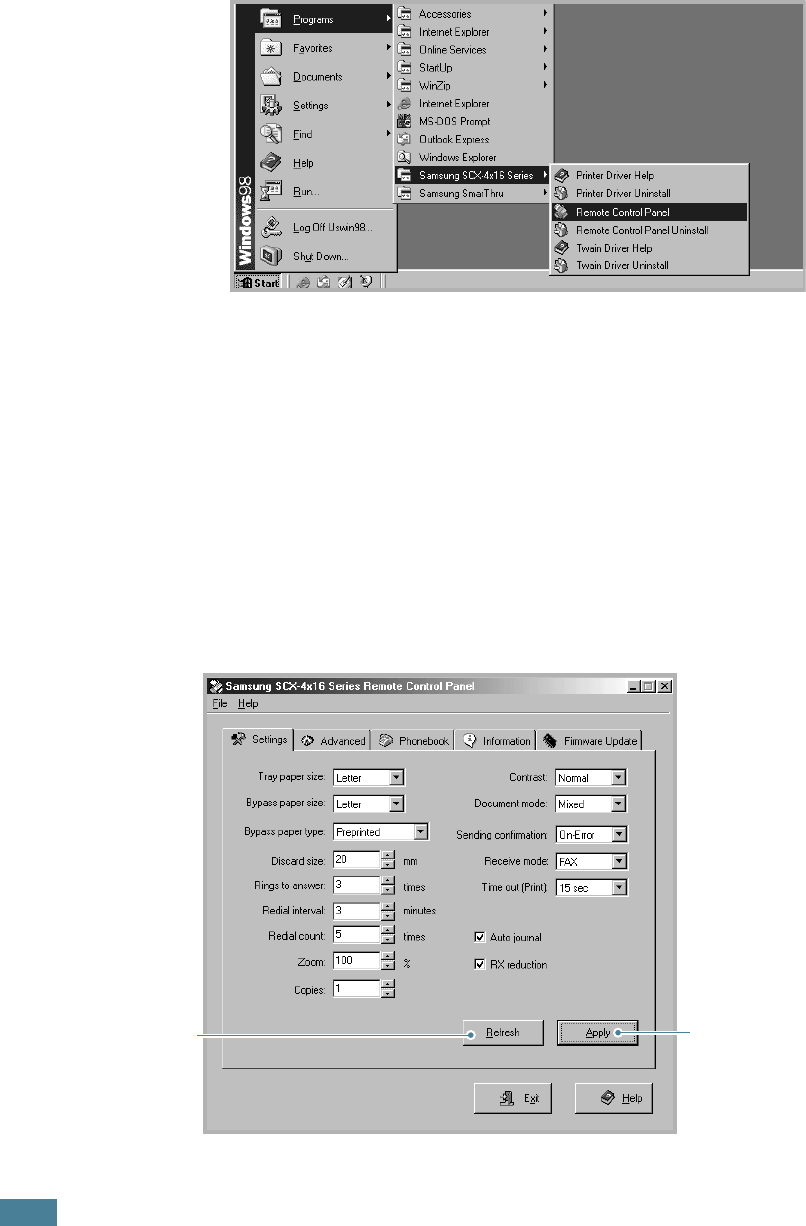
A
DDITIONAL
F
EATURES
5.8
3
From Programs, select Samsung SCX-4x16 Series and
then Remote Control Panel.
Then the Remote Control Panel program opens.
4
The SCX-4x16 Series Remote Control Panel window
provides five tabs; Settings, Advanced, Phonebook,
Information, and Firmware Update.
To exit, click the Exit button at the bottom of each tab.
For further details, click the Help button at the bottom of
each tab.
The Settings Tab
Click the Settings tab to configure fax system settings.
Downloads the
settings made in
Remote Control
Panel to your
machine.
Reads the current
settings in your
machine and refreshes
the Remote Control
Panel with them.
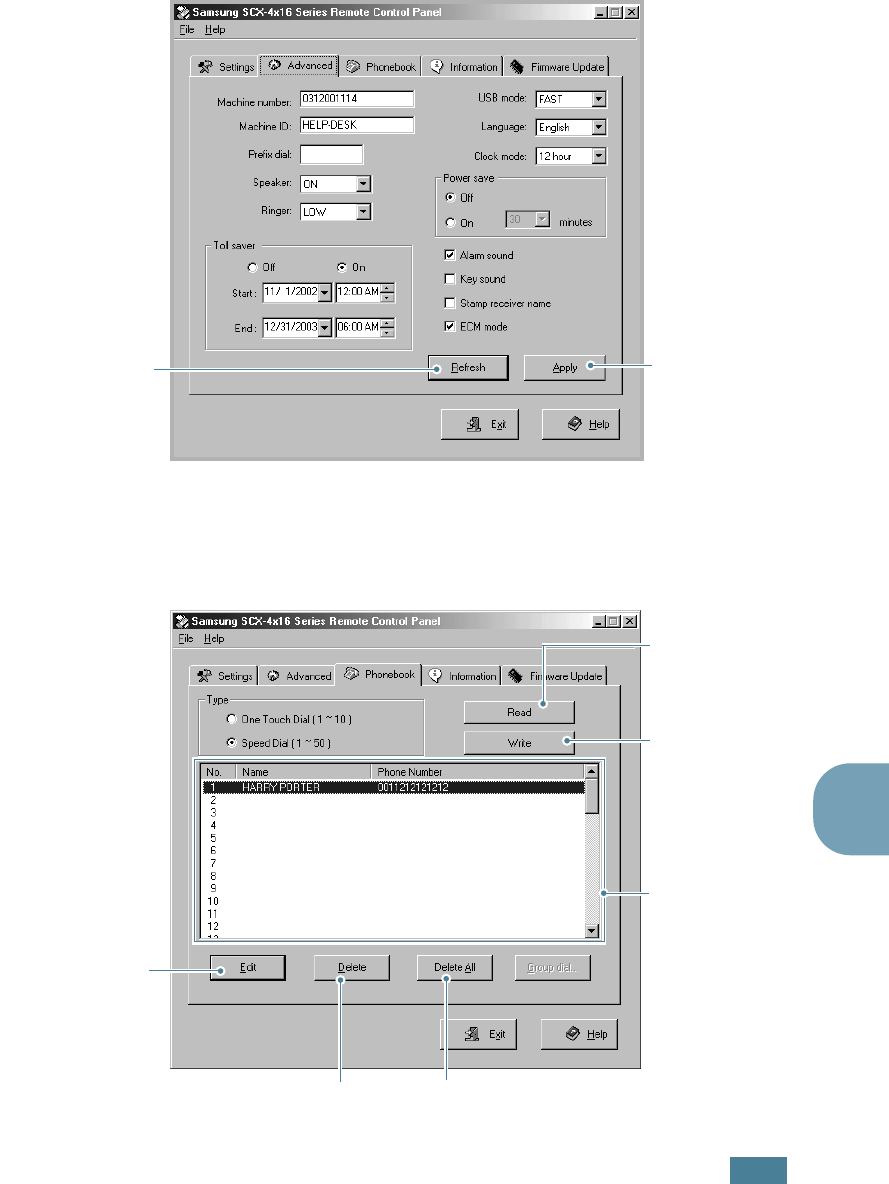
A
DDITIONAL
F
EATURES
5.9
5
The Advanced Tab
Click the Advanced tab to configure advanced fax system
settings.
The Phonebook Tab
Click the Phonebook tab to create and edit Phonebook entries.
Reads the current
settings in your
machine and
refreshes the Remote
Control Panel with
them.
Downloads the
settings made in
Remote Control
Panel to your
machine.
Reads the
Phonebook entries
from the machine to
the Remote Control
Panel.
Downloads the
Phonebook entries
from the Remote
Control Panel to
the machine.
Phonebook entries
Deletes all
Phonebook entries.
Allows you to
edit a selected
Phonebook entry
in a separate Edit
window.
Deletes a selected
Phonebook entry.
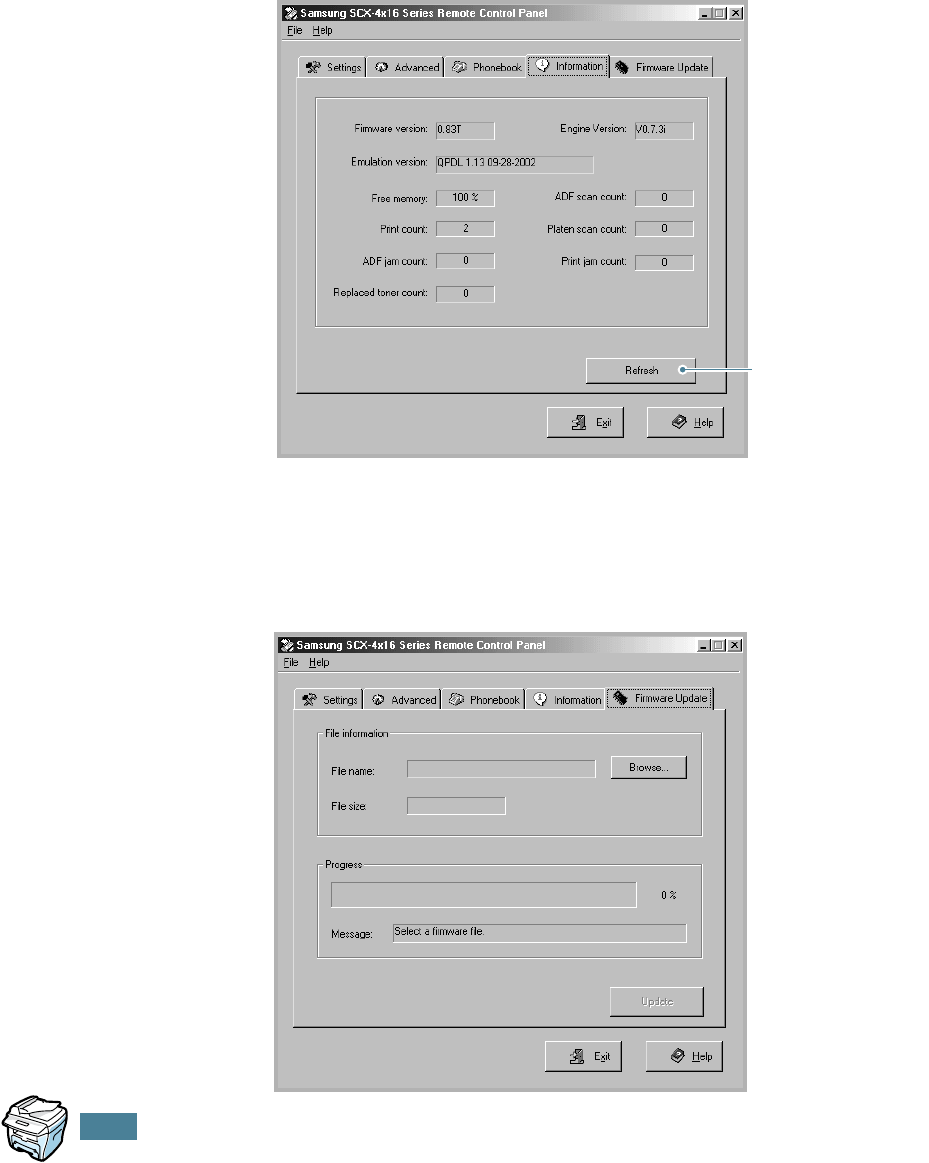
A
DDITIONAL
F
EATURES
5.10
The Information Tab
Click the Information tab to view the software version
information and many counters which allow you to check how
many scanning, printing, and jamming are made in your
machine.
The Firmware Update Tab
Click the Firmware Update tab to update the firmware of your
machine. This feature should be used by an authorized
technician. Please consult with the purchase point.
Reads the current
information in your
machine and
refreshes the
Remote Control
Panel.
INDEX
A
add documents
4.7
ADF, load
2.2
automatic dialing
group
3.4
speed
3.2
automatic redialing
2.7
B
broadcasting faxes
4.2
C
canceling
fax
2.6
scheduled faxes
4.8
characters, enter
1.5
contrast, set
1.13
control panel
1.2
D
date and time, set
1.7
delayed fax
4.3
document
load
ADF 2.2
document glass 2.3
prepare
2.2
document glass, load
2.3
F
fax system, set
advanced settings
5.5
options
1.12
G
group dial
dialing
3.6
editing
3.5
setting
3.4
M
machine ID, set
1.4
P
paper, load
2.7
print
Phonebook list
3.8
reports
5.3
priority fax
4.5
R
receive a fax
in fax mode
2.8
in secure receiving mode
5.2
in tel mode
2.8
in the memory
2.8
receive mode, set
1.12
redial, last number
4.2
Remote Control Panel
5.7
reports, print
5.3
resolution, set
2.4
S
search, a number
3.7
secure receiving mode, use
5.2
send a fax
automatically
2.5
manually
2.6
sounds, set
1.8
speed dial
dialing
3.3
storing
3.2


