Samsung Electronics Co SF531P Laser Multi-Function Printer User Manual 1
Samsung Electronics Co Ltd Laser Multi-Function Printer Users Manual 1
Contents
- 1. Users Manual 1
- 2. Users Manual 2
- 3. Users Manual 3
Users Manual 1

Trademarks
• SmarThru 2, MailBox, Image Manger, Scan Manager, Copy Manager, Image
Viewer, AnyPage are trademarks of Samsung Electronics.
• Acrobat Reader is a trademark of Adobe Systems Inc.
• Windows, Windows 95, Windows 98, Windows Me, Windows NT and Windows
2000 are trademarks of Microsoft corporation.
• Other names and trademarks mentioned in this manual are trademarks of their
respective holders.
I
Introduction
Welcome! ––––––––––––––––––––––––––––––––––––––––– 1.1
Contents –––––––––––––––––––––––––––––––––––––––––– 1.3
Identifying Parts ––––––––––––––––––––––––––––––––––– 1.4
Setting Up Your Machine
Choosing a Location ––––––––––––––––––––––––––––––– 1.11
Preparing Your Machine for Use –––––––––––––––––––– 1.11
Attaching the Supports –––––––––––––––––––––––––––– 1.12
Connecting to the Phone Line –––––––––––––––––––––– 1.14
Connecting to the Computer (SF-535e only) ––––––––– 1.16
Plugging In the Power ––––––––––––––––––––––––––––– 1.17
Loading Paper –––––––––––––––––––––––––––––––––––– 1.17
Installing the Toner Cartridge –––––––––––––––––––––– 1.20
Setting the Date and Time ––––––––––––––––––––––––– 1.22
Setting Your Fax Number and Name –––––––––––––––– 1.23
Testing the Machine (SF-530 only) ––––––––––––––––– 1.23
Using Save Modes –––––––––––––––––––––––––––––––– 1.24
Contents
Getting Started
Samsung SmarThru
About Samsung SmarThru Software ––––––––––––––––– 2.1
Installing Software
System Requirements –––––––––––––––––––––––––––––– 2.3
Installing the Samsung Software –––––––––––––––––––– 2.4
Configuring the Fax Gate on Your PC ––––––––––––––––– 2.6
Configuring the Internet Gate on Your PC –––––––––––– 2.9
Using Your Machine with a USB Cable ––––––––––––––– 2.13
Installing Bonus Software ––––––––––––––––––––––––– 2.16
Making Installation Diskettes ––––––––––––––––––––––– 2.16
Installing Software from Diskettes –––––––––––––––––– 2.17
Uninstalling Samsung Software –––––––––––––––––––– 2.18
1
2
Installing Samsung Software (SF-531P only)

II
Setting Up Stand-alone Fax System
Setting Volume –––––––––––––––––––––––––––––––––– 3.1
Setting Alert Tones ––––––––––––––––––––––––––––––– 3.2
Setting User-Selectable System Options –––––––––––––– 3.2
Sending a Fax
Preparing Documents for Faxing or Copying ––––––––––– 3.7
Setting Document Resolution and Contrast –––––––––––– 3.8
Loading Documents ––––––––––––––––––––––––––––––– 3.9
Sending a Fax Automatically ––––––––––––––––––––––– 3.10
Sending a Fax After Talking ––––––––––––––––––––––– 3.11
Voice Request –––––––––––––––––––––––––––––––––– 3.12
Receiving a Fax
About
Reception Modes –––––––––––––––––––––––––– 3.13
Loading Paper for Receiving Faxes
–––––––––––––––– 3.14
Receiving Automatically in FAX Mode –––––––––––––––– 3.14
Receiving in AUTO Mode –––––––––––––––––––––––––– 3.15
Receiving Automatically in ANS/FAX Mode –––––––––––– 3.15
Receiving Manually in TEL Mode –––––––––––––––––––– 3.16
Receiving Manually in TEL Mode Using an Extension Phone 3.16
Making a Copy
Copying Overview ––––––––––––––––––––––––––––––– 3.17
Making a Single Copy –––––––––––––––––––––––––––– 3.17
Using Advanced Copy Features ––––––––––––––––––––– 3.18
Automatic Dialling
How To Enter a Name Using the Number Keys ––––––––– 3.19
One-Touch Dialling –––––––––––––––––––––––––––––– 3.21
Speed Dialling –––––––––––––––––––––––––––––––––– 3.23
Using the Phonebook on Your Computer (SF-535e only) – 3.25
Searching for a Number in the Memory –––––––––––––– 3.27
Advanced Fax
Broadcasting ––––––––––––––––––––––––––––––––––– 3.28
Delayed Fax –––––––––––––––––––––––––––––––––––– 3.29
Priority Fax –––––––––––––––––––––––––––––––––––– 3.31
Polling –––––––––––––––––––––––––––––––––––––––– 3.32
Adding Documents To a Scheduled Operation ––––––––– 3.34
Cancelling a Scheduled Operation ––––––––––––––––––– 3.34
Stand-alone Fax
3
III
Contents (continued)
Print Media
Selecting Print Media ––––––––––––––––––––––––––––––– 5.1
Using the Automatic Paper Input Tray –––––––––––––––– 5.3
Using the Manual Paper Input Tray –––––––––––––––––– 5.6
Specialty Paper Guidelines –––––––––––––––––––––––––– 5.8
Printing
Printing a Document ––––––––––––––––––––––––––––––– 5.9
Cancelling a Print Job ––––––––––––––––––––––––––––– 5.12
Printing Help ––––––––––––––––––––––––––––––––––––– 5.13
Reprinting a Last Page –––––––––––––––––––––––––––– 5.13
Printing Several Pages Per Sheet ––––––––––––––––––– 5.14
Scaling Your Document –––––––––––––––––––––––––––– 5.15
Fitting Your Document to a Selected Paper Size –––––– 5.16
Printing Posters ––––––––––––––––––––––––––––––––––– 5.17
Printing Watermarks –––––––––––––––––––––––––––––– 5.18
Using Overlays ––––––––––––––––––––––––––––––––––– 5.20
Printing in a Network Environment ––––––––––––––––– 5.24
Additional Functions
Sending Flash ––––––––––––––––––––––––––––––––––– 3.35
Monitoring a Dual Job Status ––––––––––––––––––––––– 3.35
Forwarding Received Faxes –––––––––––––––––––––––– 3.36
Toll Save Fax –––––––––––––––––––––––––––––––––––– 3.37
Printing Reports ––––––––––––––––––––––––––––––––– 3.38
Group Dialling (for Multi-Address Transmission) ––––––––––– 3.40
5
Printing (SF-531P only)
Stand-alone Fax (continued)
3
About the E-mail Fax ––––––––––––––––––––––––––––––– 4.1
Configuring E-mail Information –––––––––––––––––––––––– 4.2
Setting up E-mail Address Book ––––––––––––––––––––––– 4.8
Sending an E-mail Fax –––––––––––––––––––––––––––––– 4.11
Receiving an E-mail Fax ––––––––––––––––––––––––––––– 4.12
4
E-mail Fax (SF-535e only)
IV
Guidelines for Maintenance ––––––––––––––––––––––––– 6.1
Clearing Memory ––––––––––––––––––––––––––––––––––– 6.1
Cleaning the OPC Drum –––––––––––––––––––––––––––– 6.2
Adjusting Shading ––––––––––––––––––––––––––––––––– 6.2
Setting the Machine to be Checked by Phone ––––––––– 6.3
Sending Toner Low Information
to the Service Company ––––––––––––––––––––––––––––– 6.3
Cleaning the Machine –––––––––––––––––––––––––––––– 6.4
Caring for the Toner Cartridge ––––––––––––––––––––––– 6.7
6
Maintenance
Clearing Jams
––––––––––––––––––––––––––––––––––––––––
7.1
LCD Error Messages
––––––––––––––––––––––––––––––––––
7.5
Fax Problems
––––––––––––––––––––––––––––––––––––––––
7.7
General Printing Problems (SF-531P only)
–––––––––––––
7.9
Print Quality Problems
––––––––––––––––––––––––––––––
7.11
Troubleshooting
7
Connecting Other Device to the Phone line
––––––––––––
A.1
Specifications
––––––––––––––––––––––––––––––––––––––––
A.4
Safety Information
–––––––––––––––––––––––––––––––––––
A.6
Index
––––––––––––––––––––––––––––––––––––––––––––––
A.10
Appendix
Refer to the SmarThru User’s Guide for information on:
• Scanning a document
• Copying a document
• Creating and sending e-mail and PC-fax
• Working with a scanned image
• Recognizing a scanned image as text
• How to use additional features using the Samsung SmarThru 2 program
CAUTION - INVISIBLE LASER RADIATION WHEN
THIS COVER OPEN. DO NOT OPEN THIS
COVER.
VORSICHT - UNSICHTBARE LASERSTRAHLUNG, WENN ABDECKUNG
GEÖFFNET. NICHT DEM STRAHL AUSSETZEN.
ATTENTION - RAYONNEMENT LASER INVISIBLE EN CAS
D’OUVERTURE.EXPOSITION DAN GEREUSE AU
FAISCEAU.
ATTENZIONE -RADIAZIONE LASER INVISIBILE IN CASO DI
APERTURA.
EVITARE L’ESPOSIZIONE AL FASCIO.
PRECAUCION -RADIACION LASER IVISIBLE CUANDO SE ABRE.
EVITAR EXPONERSE AL RAYO.
ADVARSEL. - USYNLIG LASERSTRÅLNING VED ÅBNING NÅR
SIKKERHEDSBRYDERE ER UDE AF FUNKTION. UNDGÅ
UDSAETTELSE FOR STRÅLNING.
ADVARSEL. - USYNLIG LASERSTRÅLNING NÅR DEKSEL ÅPNES.
STIRR IKKE INN I STRÅLEN. UNNGÅ EKSPONERING
FOR STRÅLEN.
VARNING - OSYNLIG LASERSTRÅLNING NÄR DENNA DEL ÄR
ÖPPAND OCH SPÄRREN ÄR URKOPPLAD. BETRAKTA EJ
STRÅLEN. STRÅLEN ÄR FARLIG.
VARO! - AVATTAESSA JA SUOJALUKITUS OHITETTAESSA OLET
ALTTIINA NÄKYMÄTTÖMÄLLE LASERSÄTEILYLLE ÄLÄ
KATSO SÄTEESEEN.
Environmental and Safety Consideration
Laser Safety Statement
The printer is certified in the U.S. to conform to the
requirements of DHHS 21 CFR, chapter 1 Subchapter J for Class
I(1) laser products, and elsewhere is certified as a Class I laser
product conforming to the requirements of IEC 825.
Class I laser products are not considered to be hazardous. The
laser system and printer are designed so there is never any
human access to laser radiation above a Class I level during
normal operation, user maintenance, or prescribed service
condition.
WARNING
Never operate or service the printer with the protective cover removed
from Laser/Scanner assembly. The reflected beam, although invisible, can
damage your eyes.
V

Ozone Safety
During normal operation, the Samsung SF-530 Series produces
ozone. the ozone produced does not present a hazard to the
operator. However, it is advisable that the machine be operated
in a well ventilated area.
If you need additional information about ozone, please request
your nearest Samsung dealer.
Power Saver
This printer contains advanced energy conservation technology
that reduces power consumption when it is not in active use.
When the printer does not receive data for an extended period
of time, power consumption is automatically lowered.
The energy star emblem does not represent EPA endorsement of
any product or service.
Radio Frequency Emissions
FCC Regulations
This equipment has been tested and found to comply with the
limits for a Class B digital device, pursuant to Part 15 of the FCC
Rules. These limits are designed to provide reasonable
protection against harmful interference in a residential
installation. This equipment generates, uses and can radiate
radio frequency energy and, if not installed and used in
accordance with the instructions, may cause harmful
interference to radio communications. However, there is no
guarantee that interference will not occur in a particular
installation.
If this equipment does cause harmful interference to radio or
television reception, which can be determined by turning the
equipment off and on, the user is encouraged to try to correct
the interference by one or more of the following measures:
• Reorient or relocate the receiving antenna.
• Increase the separation between the equipment and receiver.
• Connect the equipment into an outlet on a circuit different
from that to which the receiver is connected.
• Consult the dealer or an experienced radio/TV technician for
help.
Do not make any changes or modifications to the equipment
unless otherwise specified in the manual. If such changes or
modifications should be made, you must first stop operation of
the equipment.
Use of shielded cable is required to comply with Class B limits in
Subpart B of Part 15 of FCC Rules.
VI

Canadian Radio Interference Regulations
This digital apparatus does not exceed the Class B limits for
radio noise emissions from digital apparatus as set out in the
interference-causing equipment standard entitled “Digital
Apparatus”, ICES-003 of the Industry and Science Canada.
Cet appareil numérique respecte les limites de bruits
radioélectriques applicables aux appareils numériques de Classe
B prescrites dans la norme sur le matériel brouilleur: “Appareils
Numériques”, ICES-003 édictée par l’Industrie et Sciences
Canada.
VII

VIII
Declaration of Conformity (European Countries)
Approvals and Certifications
The CE marking applied to this product symbolises Samsung Electronics Co.,
Ltd. Declaration of Conformity with the following applicable 93/68/EEC
Directives of the European Union as of the dates indicated:
January 1, 1995: Council Directive 73/23/EEC Approximation of the laws of
the member states related to low voltage equipment.
January 1, 1996: Council Directive 89/336/EEC (92/31/EEC), approximation
of the laws of the Member States related to electromagnetic compatibility.
March 9, 1999: Council Directive 1999/5/EC on radio equipment and
telecommunications terminal equipment and the mutual recognition of their
conformity.
A full declaration, defining the relevant Directives and referenced standards
can be obtained from your Samsung Electronics Co., Ltd. representative.
EC Certification
Certification to 1999/5/EC Radio Equipment &
Telecommunications Terminal Equipment Directive (FAX)
This Samsung product has been self-certified by Samsung for pan-European
single terminal connection to the analogue public switched telephone
network (PSTN) in accordance with Directive 1999/5/EC. The product has
been designed to work with the national PSTNs and compatible PBXs of the
European countries:
In the event of problems, you should contact the Euro QA Lab of Samsung
Electronics Co., Ltd. in the first instance.
The product has been tested against TBR21 and TBR 38. To assist in the use
and application of terminal equipment which complies with this standard, the
European Telecommunication Standards Institute (ETSI) has issued an
advisory document (EG 201 121) which contains notes and additional
requirements to ensure network compatibility of TBR21 terminals. The
product has been designed against, and is fully compliant with, all of the
relevant advisory notes contained in this document.

chapter
1
1
Congratulations on the purchase of your SF-530 series
product! This chapter provides information on the following
topics:
Introduction
◆ Welcome!
◆ Contents
◆ Identifying Parts
Setting Up Your Machine
◆ Choosing a Location
◆ Attaching the Supports
◆ Connecting Your Machine to the Phone Line
◆ Connecting Other Devices to the Phone Line
◆ Connecting to Computer (SF-531P only)
◆ Plugging In the Power
◆ Loading Paper
◆ Installing Toner Cartridge
◆ Setting the Date and Time
◆ Setting Your Fax Number and Name
◆ Testing the Machine (SF-530 only)
◆ Using Save Modes

1.1
Getting Started
Welcome!
Thank you for purchasing the Samsung SF-530 series, a powerful
business tool with the capabilities of a full range of office equipment.
With the Samsung SF-530 series, you can:
Introduction
You can get 600 x 600 dpi high-quality laserjet printing
from the Samsung SF-531P machine. You can create
professional documents using the creative printing
features on the various kinds of print media, such as plain
papers, envelopes, transparencies, label, and so on.
Print (SF-531P only)
Use the Samsung SF-530 series as a full-featured stand-
alone fax machine to send and receive faxes. Perform
advanced tasks such as delayed transmission,
broadcasting, and unattended memory sending.
For Samsung SF-531P, you can faxes a document as a E-
mail message. And if you use the Samsung SmarThru
software, you can send faxes from and receive to your
computer (PC faxing).
Fax
Make up to 99 copies of a 20-pages document without
having to connect to a PC. You can adjust the contrast,
enlarge or reduce the copies, collate, and more.
For Samsung SF-531P, if you use the Samsung SmarThru
software on the PC, you can copy a scanned image using
various copy options, such as multiple pages on a sheet,
poster printing, and a cloning feature.
A
A
Copy
1.2 Getting Started
Scan important documents to create electronic files. Use
the scanner to add photo or graphic images to other
software applications or to jazz up your projects. You can
also scan a document and attach it to an e-mail message.
AnyPage OCR (Optical Character Recognition) software lets
you scan text directly into your word processing program.
Scan (SF-531P only)
Samsung SmarThru program consists of several
components that provide particular functionality as follows:
• Scan Manager — Working with documents or images,
you can scan to Image Manager, scan to OCR software,
scan to e-mail or to e-fax.
• Image Manager — Working with images, you can
import, export, store and change images.
• Copy Manager — Working with documents or images,
you can control the copying process. It can also save a
copy of the image or document to Image Manager.
• MailBox — Working with e-mail and e-fax messages,
you can create, send, browse and store messages. (Note
e-mail service is available only if you have subscribed to
an Internet service provider and properly configured the
Internet gate when you install the Samsung software)
• Image Viewer — Working with documents or images,
you can view the image in a variety of graphical formats.
Use Samsung SmarThru software (SF-531P only)

1.3
Getting Started
Contents
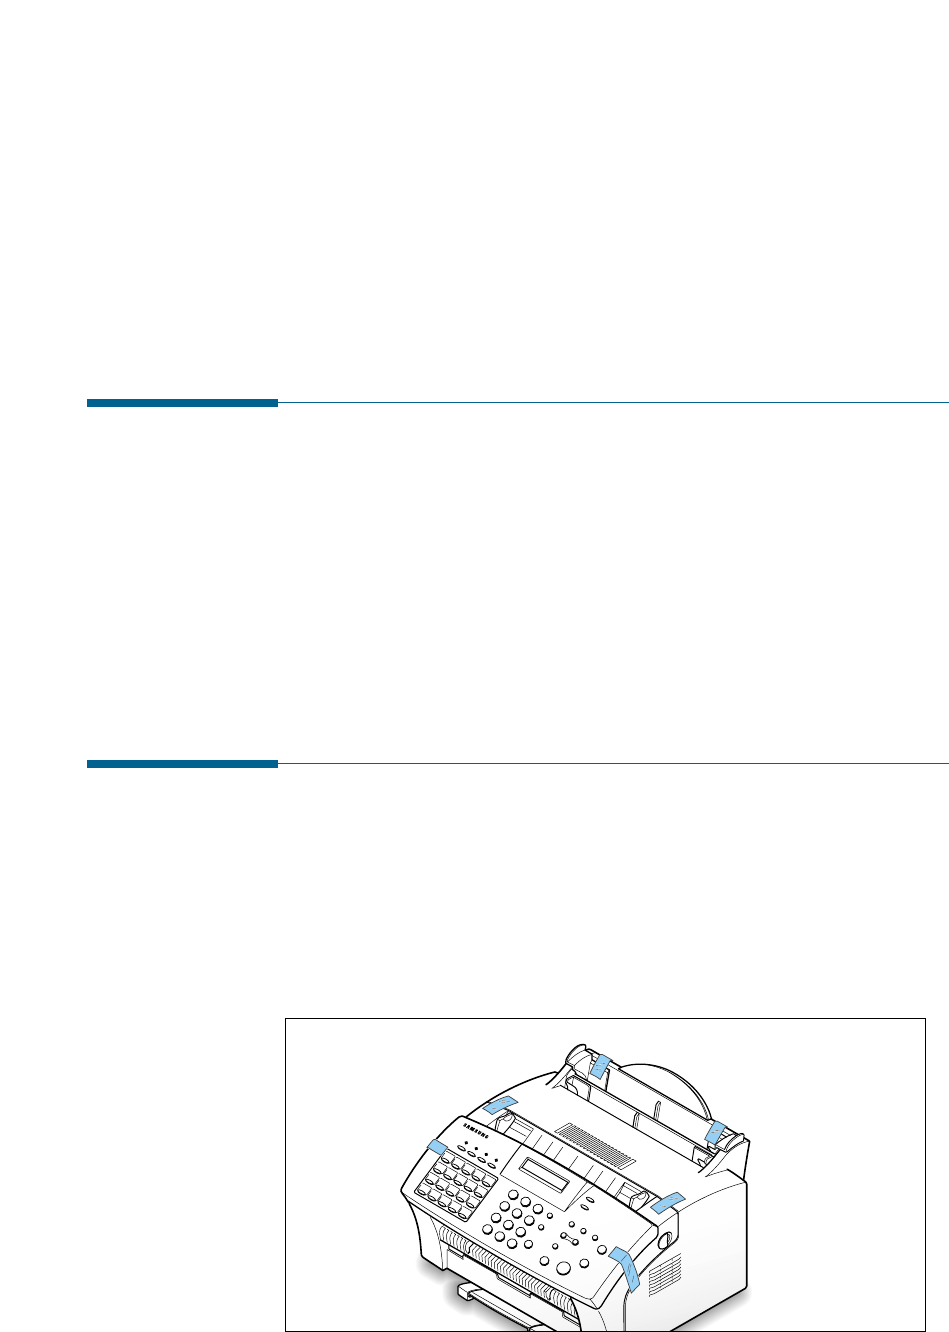
Here’s what comes with the SF-530 series.
Toner cartridge
SF-530 series machine
Document input support
Document output support
Handset cradle
Handset
Telephone line cord *
Power cord *
software CD-ROM
(for SF-531P only)
Parallel cable
(for SF-531P only)
No.
1
2
3
4
5
No.
1
2
3
4
5
No.
1
2
3
4
5
No.
1
2
3
4
5
No.
1
2
3
4
5
No.
1
2
3
4
5
One-touch label
for the plate
One-touch label
for the front panel
SF-530 series
User’s Guide
SmarThru
User’s Guide
(for SF-531P only)
*
: These may look different depending on the country.
Note: You should use the Telephone line cord which is supplied with the machine. If you
are replacing it with the other vendor’s part, it should be AWG #26 or lower gage.
1.4 Getting Started
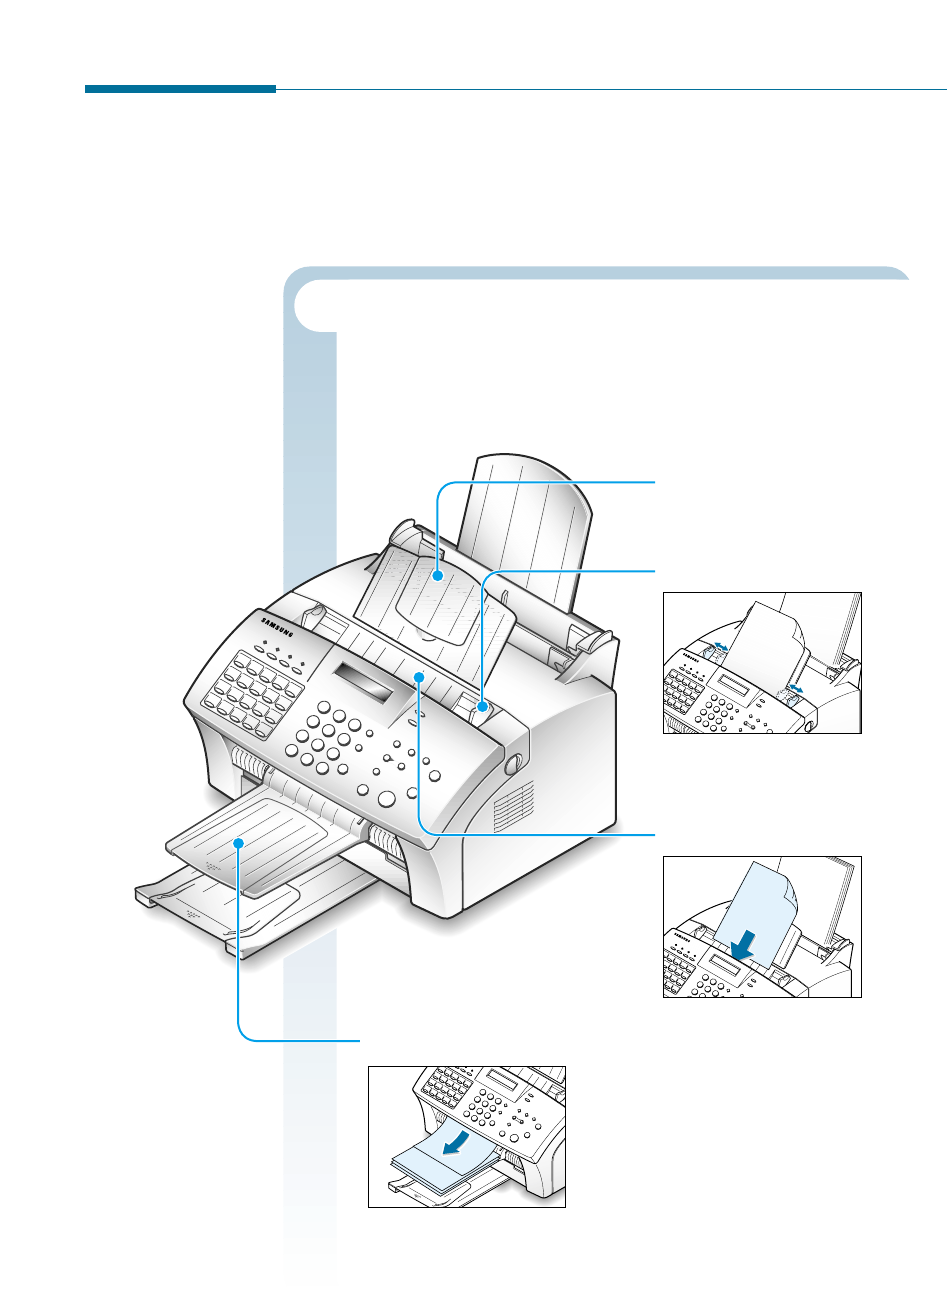
Identifying Parts
Before setting up your machine, make sure you identify the following
parts related to the scanner and paper print paths.
Document input support
Supports original documents.
Aligns documents.
Loads up to 20 pages at a time.
Supports the original document
when faxing, copying, or
scanning is complete.
Document guides
Automatic document feeder
Document output support
Identifying Scanner Path Parts
Items to be faxed, copied, or scanned use the scanner path
which consists of the following parts:
1.5
Getting Started
Identifying Printer Path Parts
Paper for printing, receiving faxes and copying follow the printer
path. This path consists of the following parts:
Use to feed paper one
sheet at a time.
Supports the printed pages.
Holds paper.
Aligns paper.
Manual paper input tray
(For SF-535e only)
Support the print media
Paper input support
Paper output tray
Automatic paper input tray
Paper guides
Toner Power Paper Toll
ABC
Laser Plain Paper Facs
JKLGHI
TUVPQRS
Symbols
12
45
78
0
Demo
SAVE
01 02 03 04 05
16 17 18 19
11 12 13 14 15
20
06 07 08 09 10
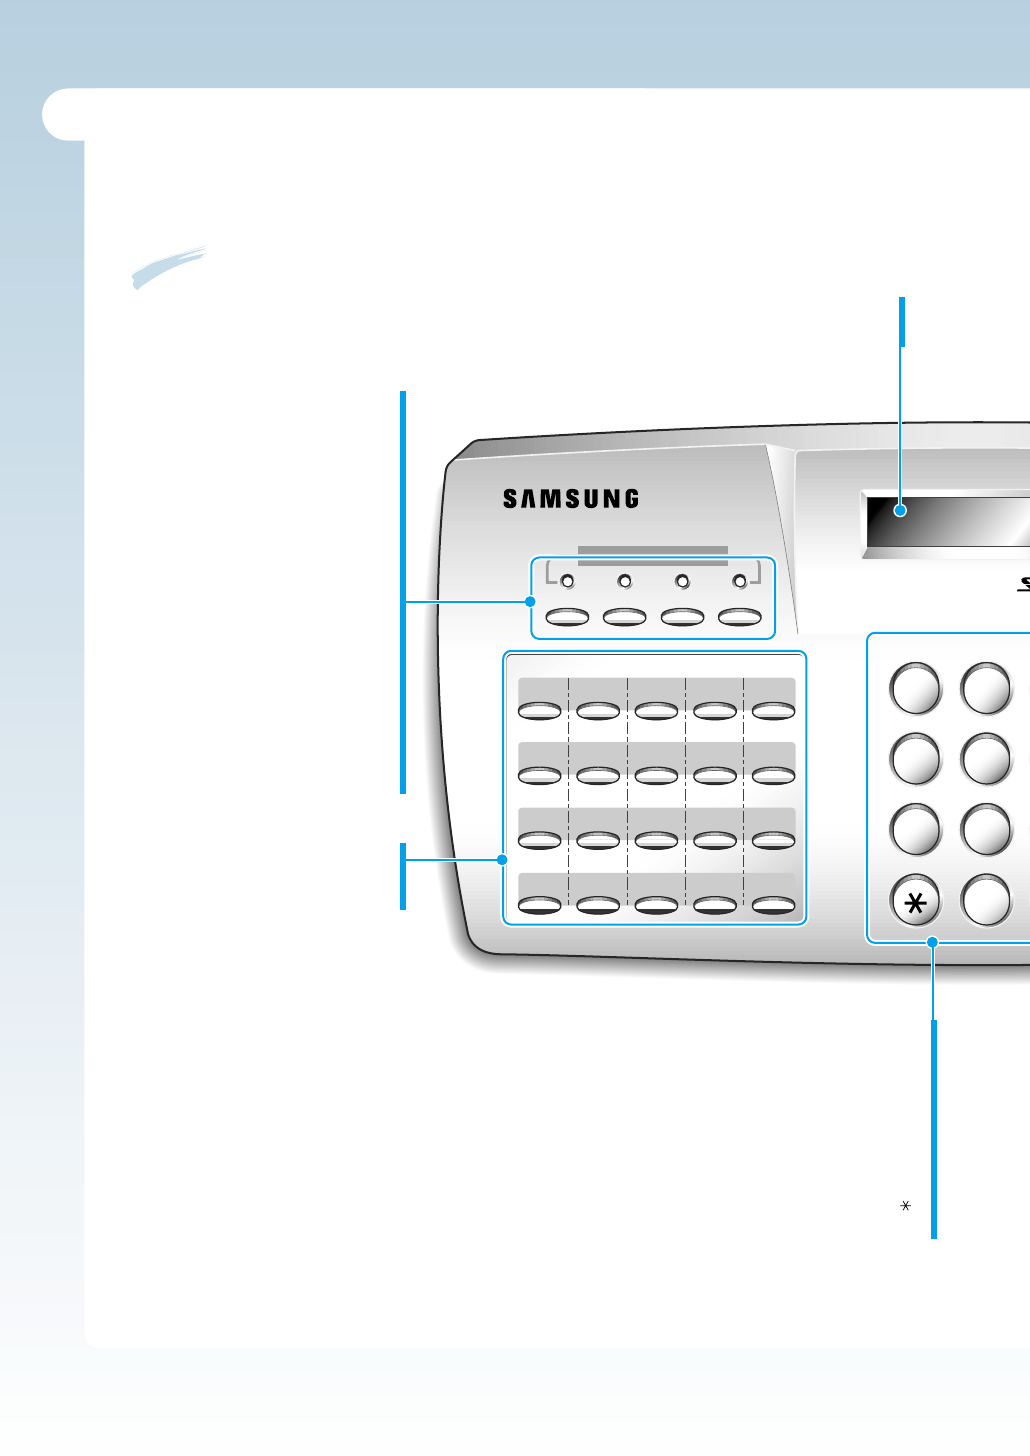
Identifying Front Panel Features
Look for the following keys and features on the front panel. These features are used to fax
documents, make copies, and adjust settings.
Toner
Turns Toner Save mode on or off.
Power
Turns Power Save mode on or off.
Also, allows you to set up the Power
Save option when held down.
Paper
Turns Paper Save mode on or off.
Also, allows you to set up the Paper
Save option when held down.
Toll
Allows you to send the Toll Save
fax. Also, allows you to set up the
time and destination for Toll Save
fax when held down.
Twenty One-Touch Buttons
Store frequently dialled fax
numbers.
LCD Display
Displays messages and menu settings.
Number Keypad
Use to enter fax numbers manually or to
enter letters.
Speed (#)
Use to send documents
by entering a registered 2-digit number.
Demo ( )
Prints a demo page to test your machine.
1.6 Getting Started
For SF-530
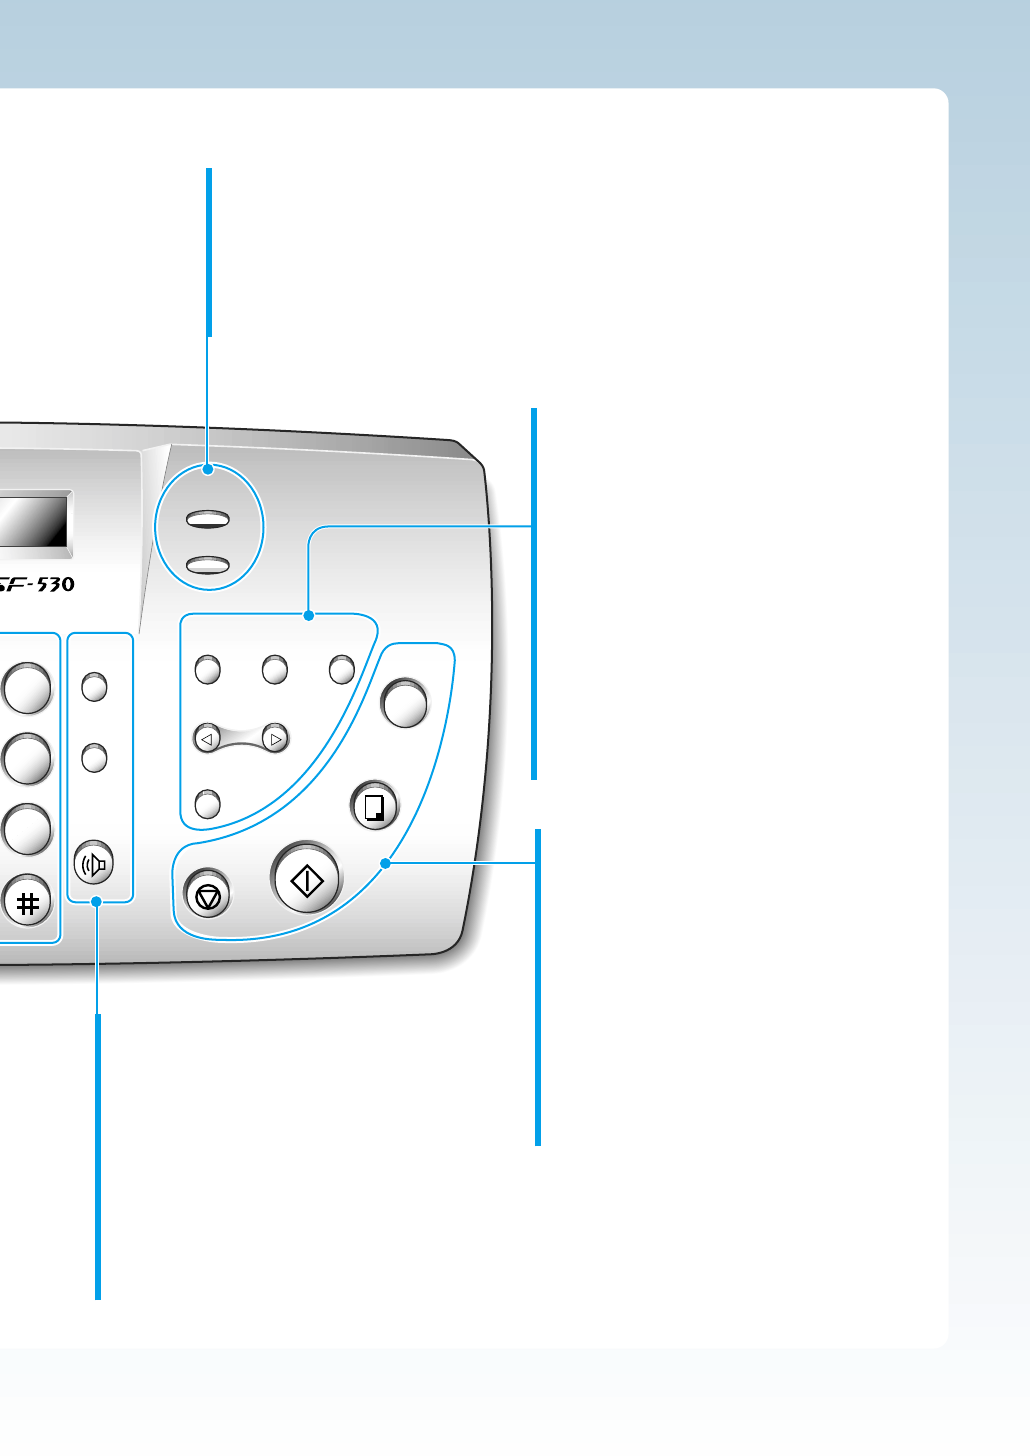
DEF Recall/
Status
Redial/
Pause
OHD/V.Req
Setup Advanced
FAX
Rcv. Mode/
Contrast
Resolution
simile
Report/
Help
Search/
Delete
Stop
Start/Enter
Copy
Fax
Forward
Scroll/Volume
MNO
WXYZ
3
6
9
Speed
RCV. Mode/Contrast
When a document is loaded, choose the contrast characteristic of copied
or transmitted documents.
When a document is not loaded, choose the receive mode to use.
The selected mode is displayed in Standby mode.
Resolution
Choose the resolution of documents.
Recall(Ror Flash)/Status
Performs a switch-hook operation.
Also use to switch the display status
while performing dual jobs.
Redial/Pause
Use to redial the last fax number or
to insert a pause into a fax number.
OHD/V.Req
Use to dial numbers without picking up
the handset. Also use to make a voice
call after sending or receiving a fax.
Setup
Use to set up various system options.
Advanced Fax
Use to access advanced fax operations.
Report/Help
Use to print various reports and the help list.
Scroll/Volume
Use to scroll the menu items or use to move
the cursor left or right through the display.
Also, use to adjust the ringer volume.
Search/Delete
Use to search for a number in memory or to
delete the last digit when typing text.
1.7
Getting Started
Fax Forward
Allows you to forward the received faxes to
the defined remote fax machine(s) at a
specified duration.
Copy
Makes a copy of a document.
Start/Enter
Starts a job. Also use to activate the selection
shown on the display.
Stop
Stops an operation at any time.

1.8 Getting Started
01
Toner Power Paper Toll
ABC
Laser MFP & Internet FA
JKLGHI
TUVPQRS
Symbols
02 03 04 05
16 17 18 19
Report/
Help
11 12 13 14 15
06 07 08 09 10
12
45
78
0
SAVE
Toner
Turns Toner Save mode on or off.
Power
Turns Power Save mode on or off.
Also, allows you to set up the
Power Save option when held down.
Paper
Turns Paper Save mode on or off.
Also, allows you to set up the Paper
Save option when held down.
Toll
Allows you to send the Toll Save
fax. Also, allows you to set the
time and destination for Toll Save
fax when held down.
Nineteen One-Touch Buttons
Store frequently dialled fax numbers.
Also, stores e-mail addresses.
Report/Help
Allows you to print various reports
and the help list.
LCD Display
Displays messages and menu settings.
Number Keypad
Use to enter fax numbers manually or to
enter letters.
Speed (#)
Use to send documents
by entering a registered 2-digit number.
For SF-535e
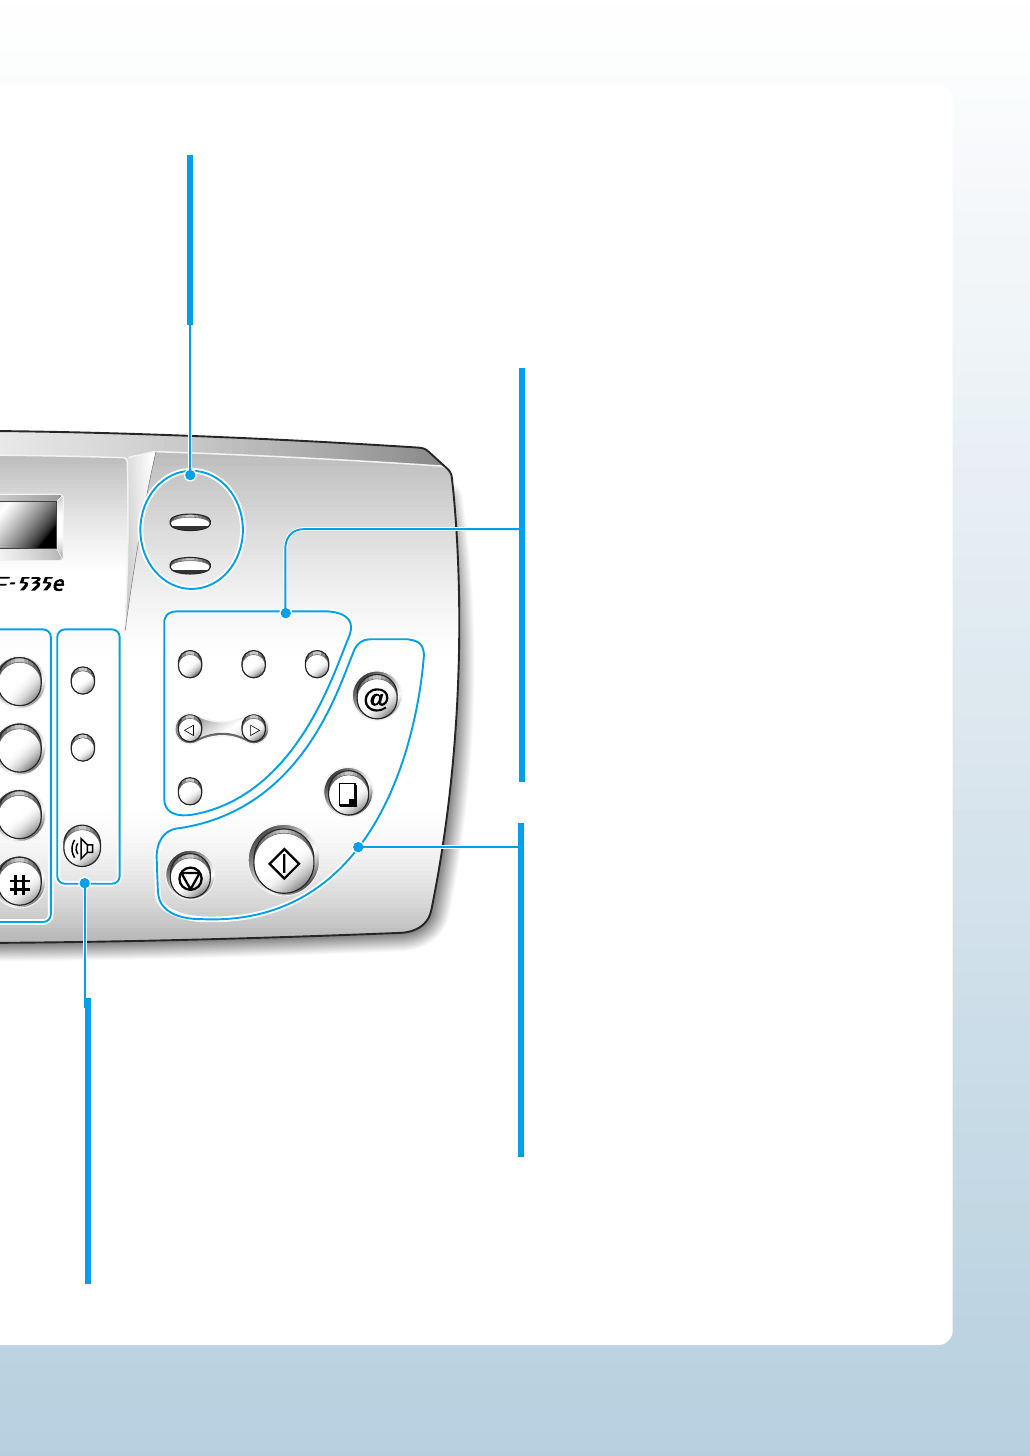
1.9
Getting Started
DEF Recall/
Status
Redial/
Pause
OHD/V.Req
Setup Advanced
Fax
Rcv. Mode/
Contrast
Resolution
AX
Fax
Forward
Search/
Delete
Stop
Start/Enter
Copy/Reprint
E-mail
Scroll/Volume
MNO
WXYZ
3
6
9
Speed
RCV. Mode/Contrast
When a document is loaded, choose the contrast characteristic of copied
or transmitted documents.
When a document is not loaded, choose the receive mode to use.
The selected mode is displayed in Standby mode.
Resolution
Choose the resolution of documents.
Recall(Ror Flash)/Status
Performs a switch-hook operation.
Also use to switch the display status
while performing dual jobs.
Redial/Pause
Use to redial the last fax number or
to insert a pause into a fax number.
OHD/V.Req
Use to dial numbers without picking up
the handset. Also use to make a voice
call after sending or receiving a fax.
Setup
Use to set up various system options.
Advanced FAX
Use to access advanced fax operations.
Fax Forward
Allows you to forward the received faxes to
the defined remote fax machine(s) at a
specified duration.
Scroll/Volume
Use to scroll the menu items or use to move
the cursor left or right through the display.
Also, use to adjust the ringer volume.
Search/Delete
Use to search for a number in memory or to
delete the last digit when typing text.
E-mail
Use to send or receive an e-mail message and
to register the information for e-mail
transmission or reception.
Copy/Reprint
Makes a copy of a document.
Also, reprints the last page from the PC when .
Start/Enter
Starts a job. Also use to activate the selection
shown on the display.
Stop
Stops an operation at any time.
1.10 Getting Started
Identifying Connecting Parts and Others
0
0
0
0
0
0
0
0
0
0
0
0
0
0
0
0
0
0
0
0
0
0
0
0
0
0
0
0
0
0
0
0
0
0
0
0
0
0
0
0
0
0
0
0
0
0
0
0
0
0
0
0
0
0
0
0
0
0
0
0
0
0
0
0
0
0
0
0
0
Power cord connector
Telephone line jack
Extension telephone jack
Cover
Cover release
buttons (right and left)
Parallel cable connector
USB cable jack
(SF-535e only)
1.11
Getting Started
Choosing a Location
For the trouble-free operation of your machine, place it on a flat, stable
surface near your workstation. Leave enough space to allow for easy
paper loading and exiting, as well as opening the front cover.
Do not place your machine:
• In direct sunlight.
• Near heat sources or air conditioners.
• In a dusty or dirty environment.
Preparing Your Machine for Use
When you take the SF-530 series out the box, note that it has been
packaged to protect it during shipping. Before you use the machine,
make certain that you check for the following items:
• Remove all tapes.
• Remove all packing materials.
Setting Up
Your Machine
1.12 Getting Started
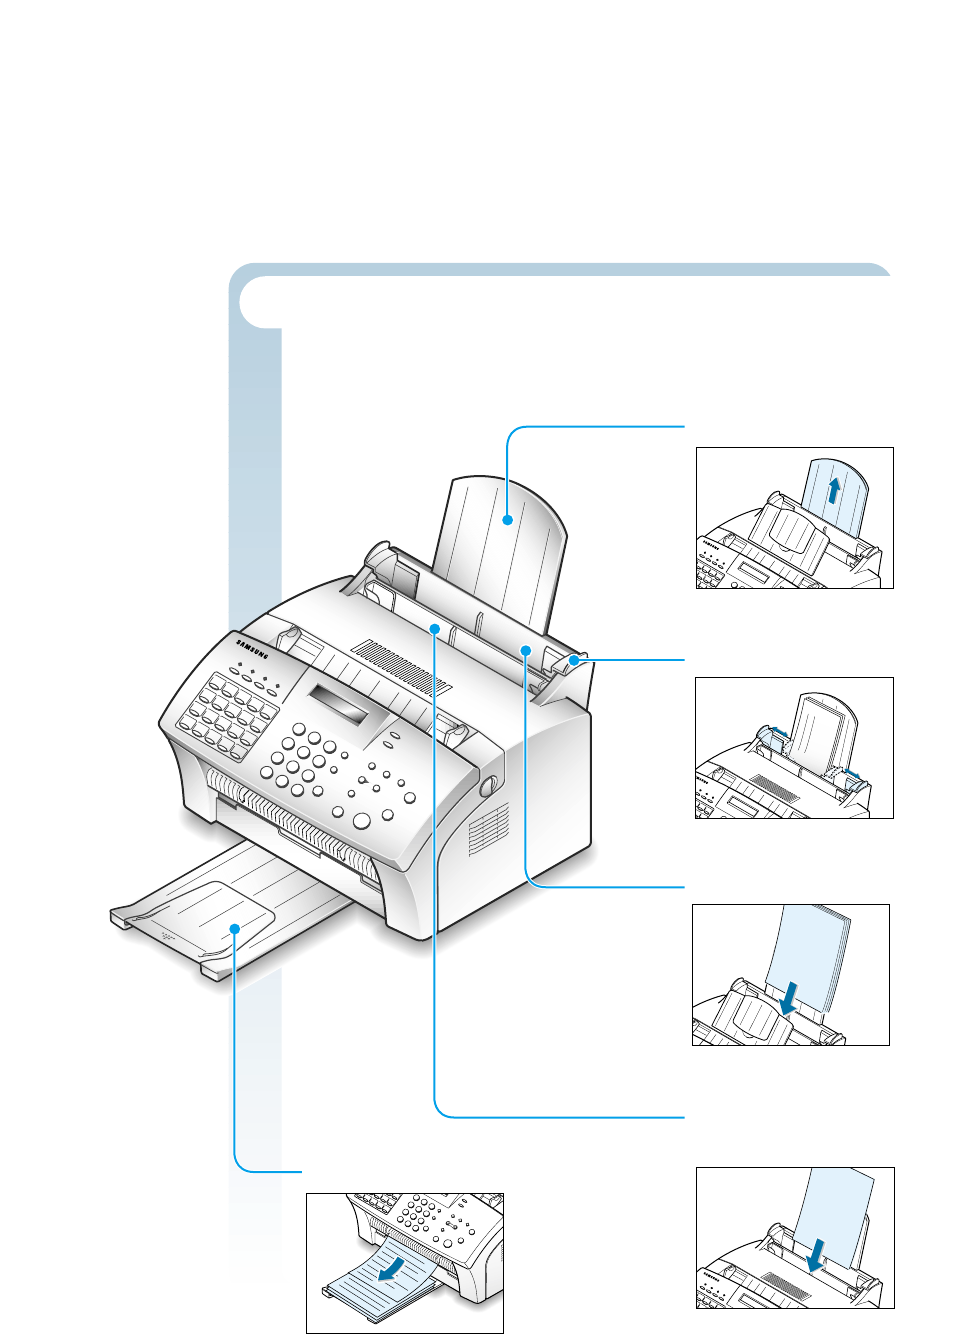
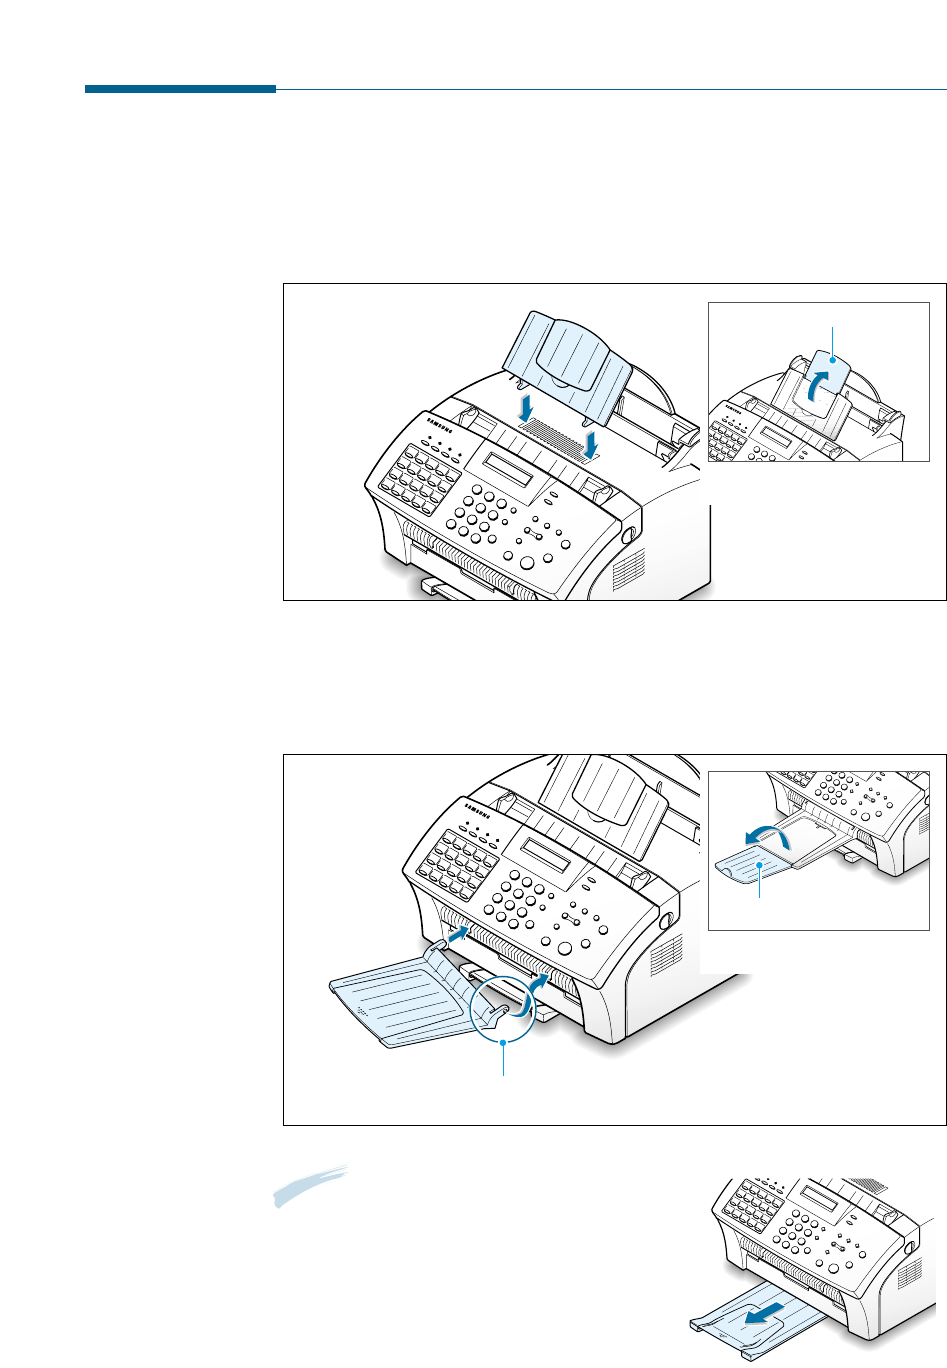
Attaching the Supports
Document Input Support
Insert the document input support with the groove pointing to the rear
top of the machine.
Document Output Support
Insert the two tabs on the document output support into the slots on the
front of your machine.
Note: The SF-530 series is shipped with the
paper output tray already installed.
Extend the tray to use.
Fold out the extender if necessary.
Extender
Fold out the extender if
necessary.
Insert one end first, then the other end by squeezing this
leg inward to make the tray easy to insert.
Extender
Fold out the extender if
necessary.
1.13
Getting Started
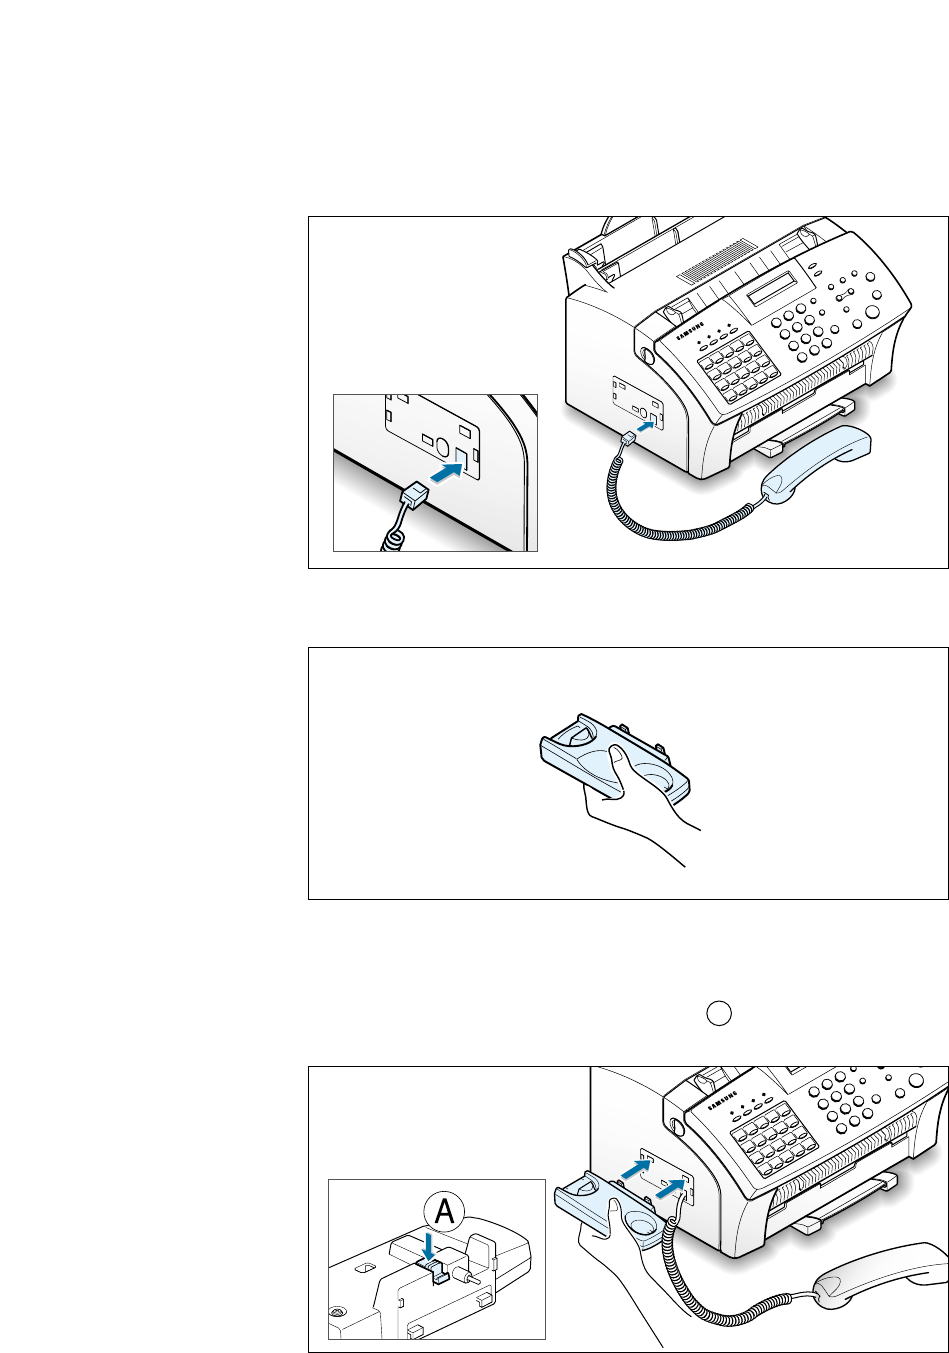
Handset and Handset Cradle
1. Plug the end of the coiled cord of the handset into the jack on the left
side of your machine.
2. Hold the cradle using your hand as shown.
3. Attach the handset cradle to the main body.
Insert the two tabs of the cradle into the slots on the left side of the
machine as shown, and while pressing part Aon the bottom of the
cradle, push the cradle toward the machine until it clicks into place.
1.14 Getting Started
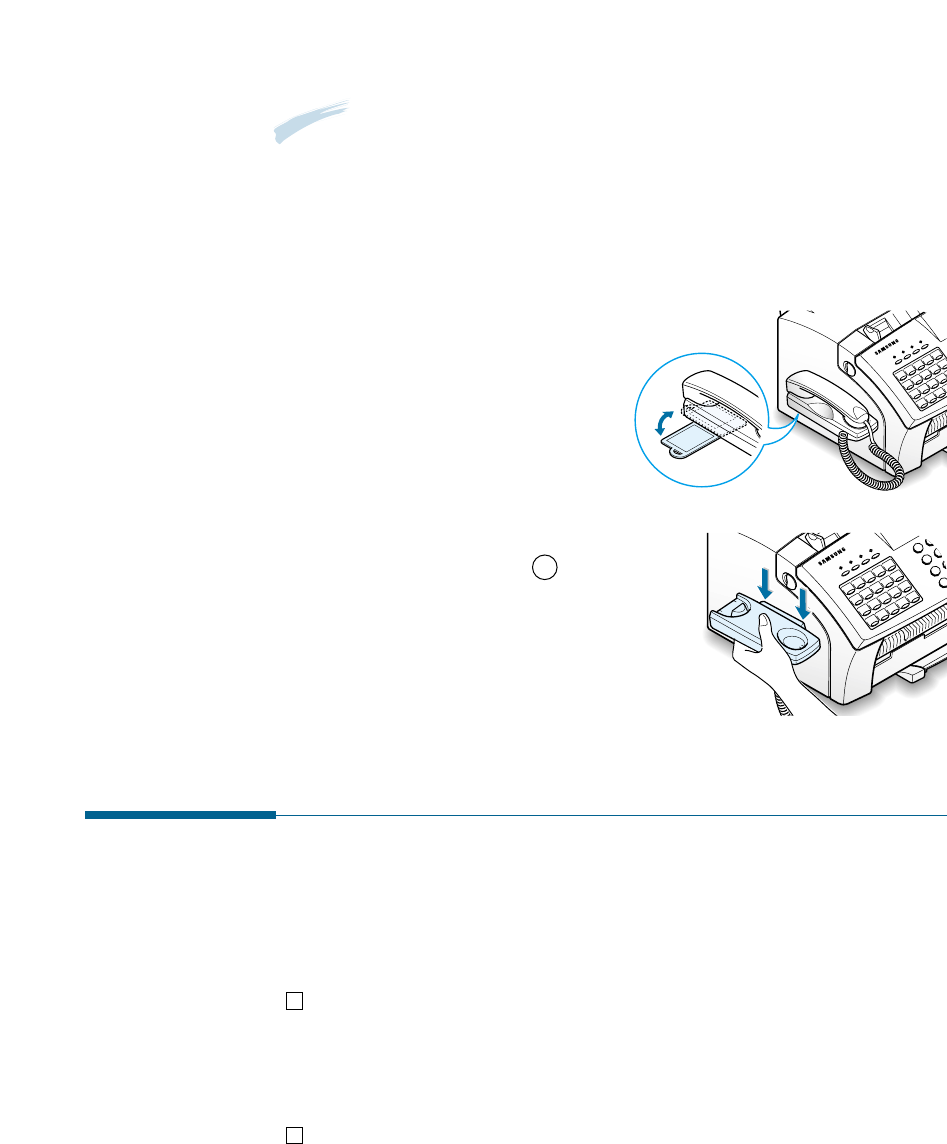
To find the desired number, rotate
the plate away from the cradle, and
slide it under the cradle after using
it.
• If you want to remove the cradle,
while pushing up the part A , on
the bottom of the cradle, slide the
cradle down, then take it out.
Notes:
• There is a one-touch plate built under the handset cradle. You can use
this plate with the supplied one-touch label sheet. Write information on
the label up to 10 items to remind you where the most frequently used
number is stored and attach the label on the plate.
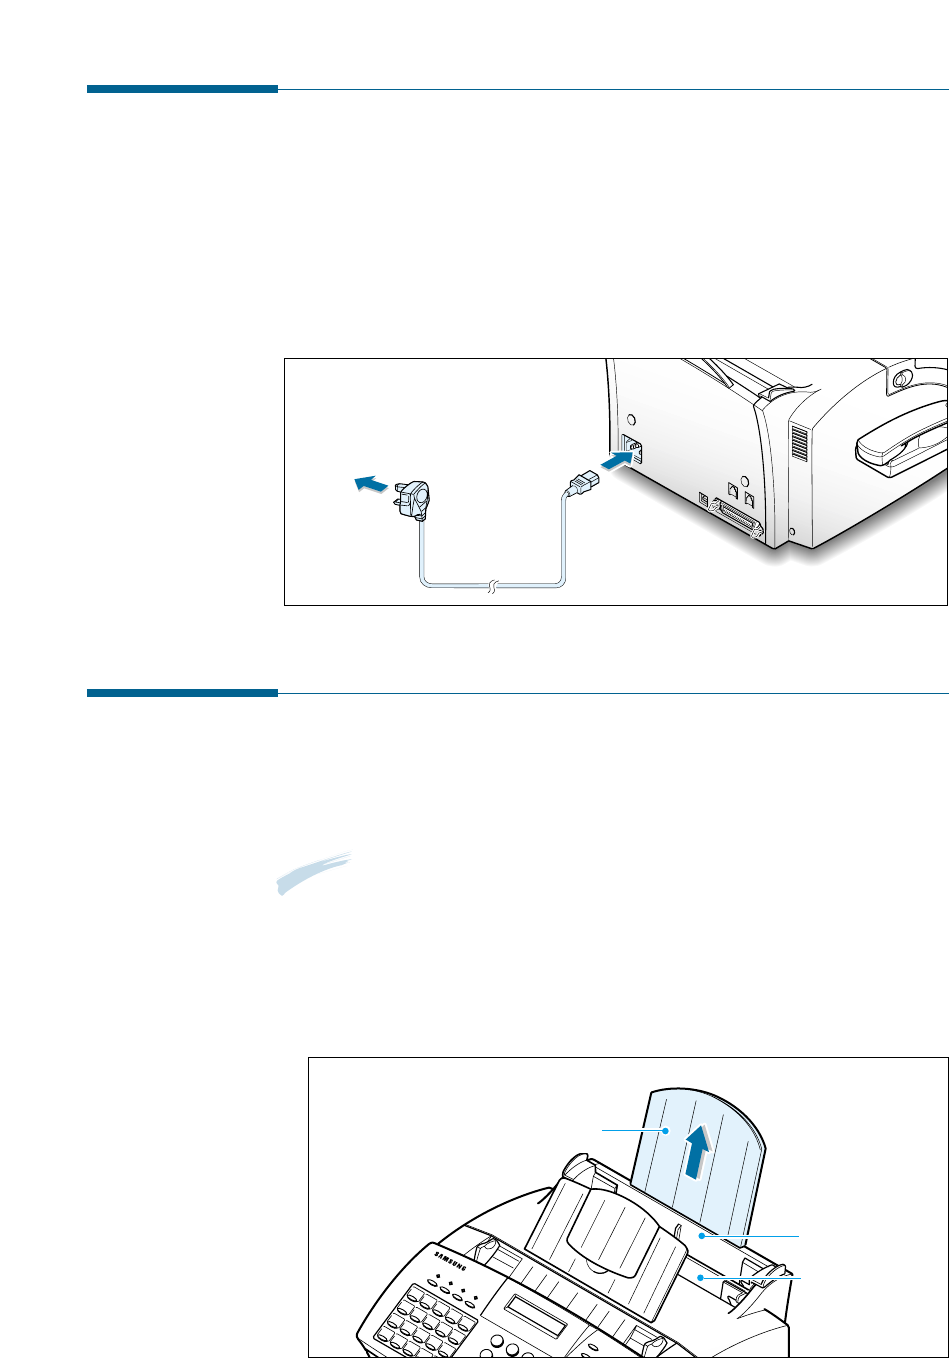
Connecting to the Phone Line
For proper operation, the SF-530 series must be connected to the wall
jack. Once you have decided which wall jack you will be using, check a
box below and follow the instructions.
I only have one phone line coming to this wall jack. (This
includes two phone numbers on one line with distinctive ring service.)
Go to “To Connect to a Wall Jack that Has Only One Phone Line” on
next page.
I have two phone lines coming to this wall jack. Go to “To
Connect to a Wall Jack that Has Two Phone Lines” on page A.2.

1.15
Getting Started
LINEEXT.
To a standard
phone wall jack
To Connect to a Wall Jack that has Only One Phone Line
1. Plug the included telephone cord into the jack on the back of the unit
marked the word LINE.
2. If a telephone cord is plugged into the wall jack, unplug the cord and
set it aside.
3. Plug the other end of the phone cord into the wall jack.
Notes:
• If you are connecting other devices such as a telephone to the phone
line, go to Appendix “Connecting Other Devices To the Phone Line” on
page A.1.
• If you are not connecting other devices, go to “Plugging In the Power”
on page 1.17.
To Connect to a Wall Jack that Has Two Phone Lines
1. Plug the included telephone cord into the jack on the back of the unit
marked the word LINE.
2. If a telephone cord is plugged into the wall jack, unplug it and set it
aside.
3. If you do not have a wall jack that has a built-in splitter, plug a phone
unit splitter (not included) into the wall jack.
4. Plug the cord into the side of the phone unit splitter for the fax
number.
Notes:
• If you are connecting other devices such as a telephone to the same
phone line, go to Appendix “Connecting Other Devices To the Phone
Line” on page A.1.
• If you are not connecting other devices, go to “Plugging In the Power”
on page 1.17.
1.16 Getting Started
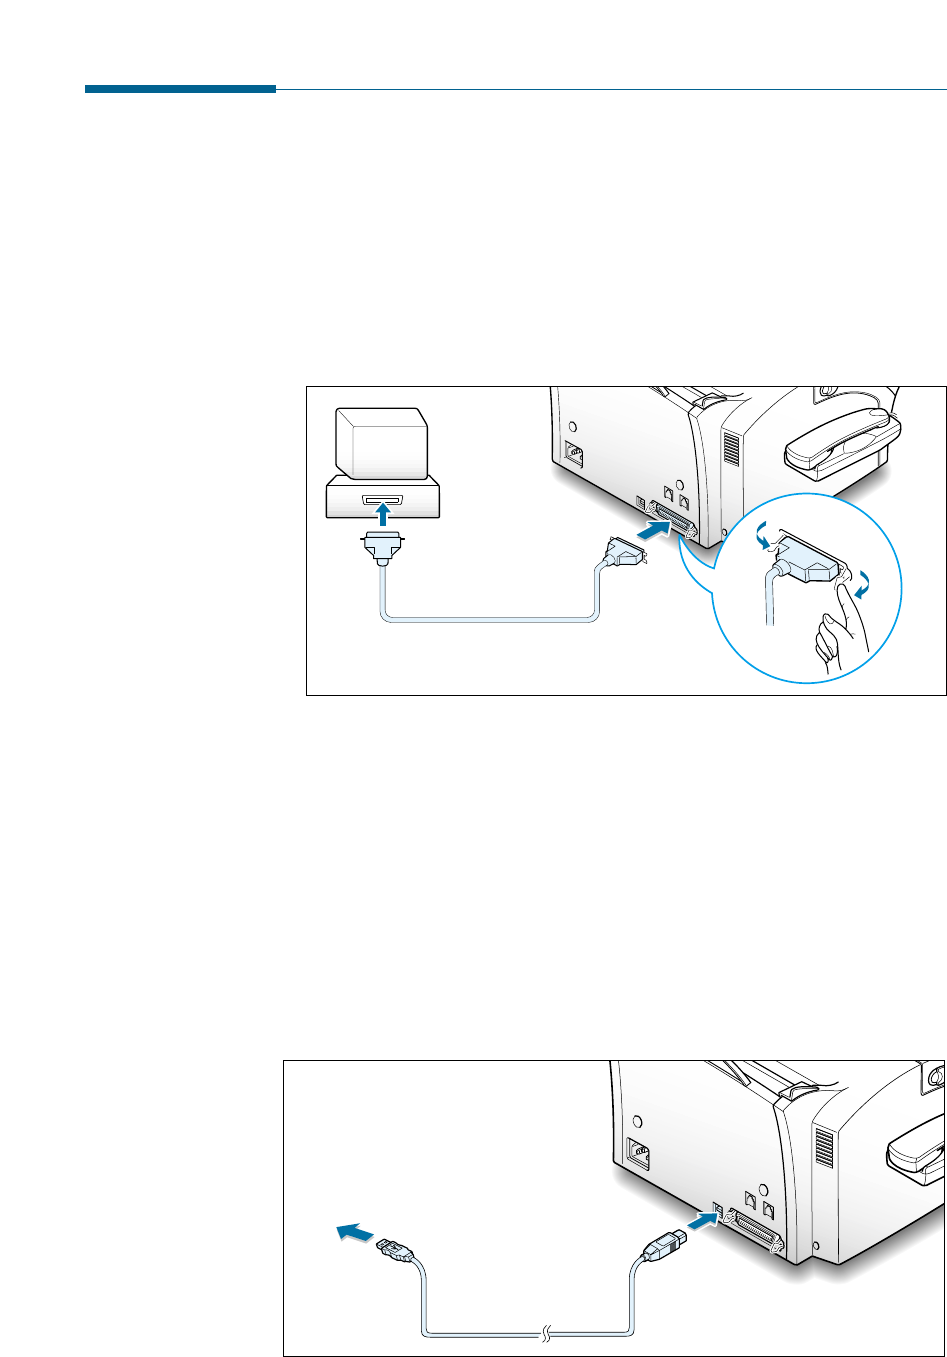
Connecting to the Computer (SF-535e only)
Your machine has a parallel and a USB interface port which allow use
with a Windows PC.
Connecting to the Computer Using the Parallel interface
1. Plug the supplied parallel printer cable into the connector on the back
of your machine. Push the metal clips down to fit inside the notches
on the cable plug.
2. Connect the other end of the cable to the parallel interface port on
your computer. See your computer documentation for more
information.
Connecting to the Computer Using the USB interface
If you have a USB (Universal Serial Bus) port enabled on your computer,
and if your computer is running Windows 98, you can connect your SF-
535e to the USB chain of devices.
To use your machine using the USB cable, see page 2.13.
0
0
0
0
0
0
0
0
0
0
0
0
0
0
0
0
0
0
0
0
0
0
0
0
0
0
0
0
0
0
0
0
0
0
0
0
0
0
0
0
0
0
0
0
0
0
0
0
0
0
0
0
0
0
0
0
0
0
0
0
0
0
0
0
0
0
0
0
0
0
0
0
0
0
0
0
0
0
0
0
0
0
0
0
0
0
0
0
0
0
0
0
0
0
0
0
0
0
0
0
0
0
0
0
0
0
0
0
0
0
0
0
0
0
0
0
0
0
0
0
0
0
0
0
0
0
0
0
0
0
0
0
0
0
0
0
0
0
To PC
1.17
Getting Started
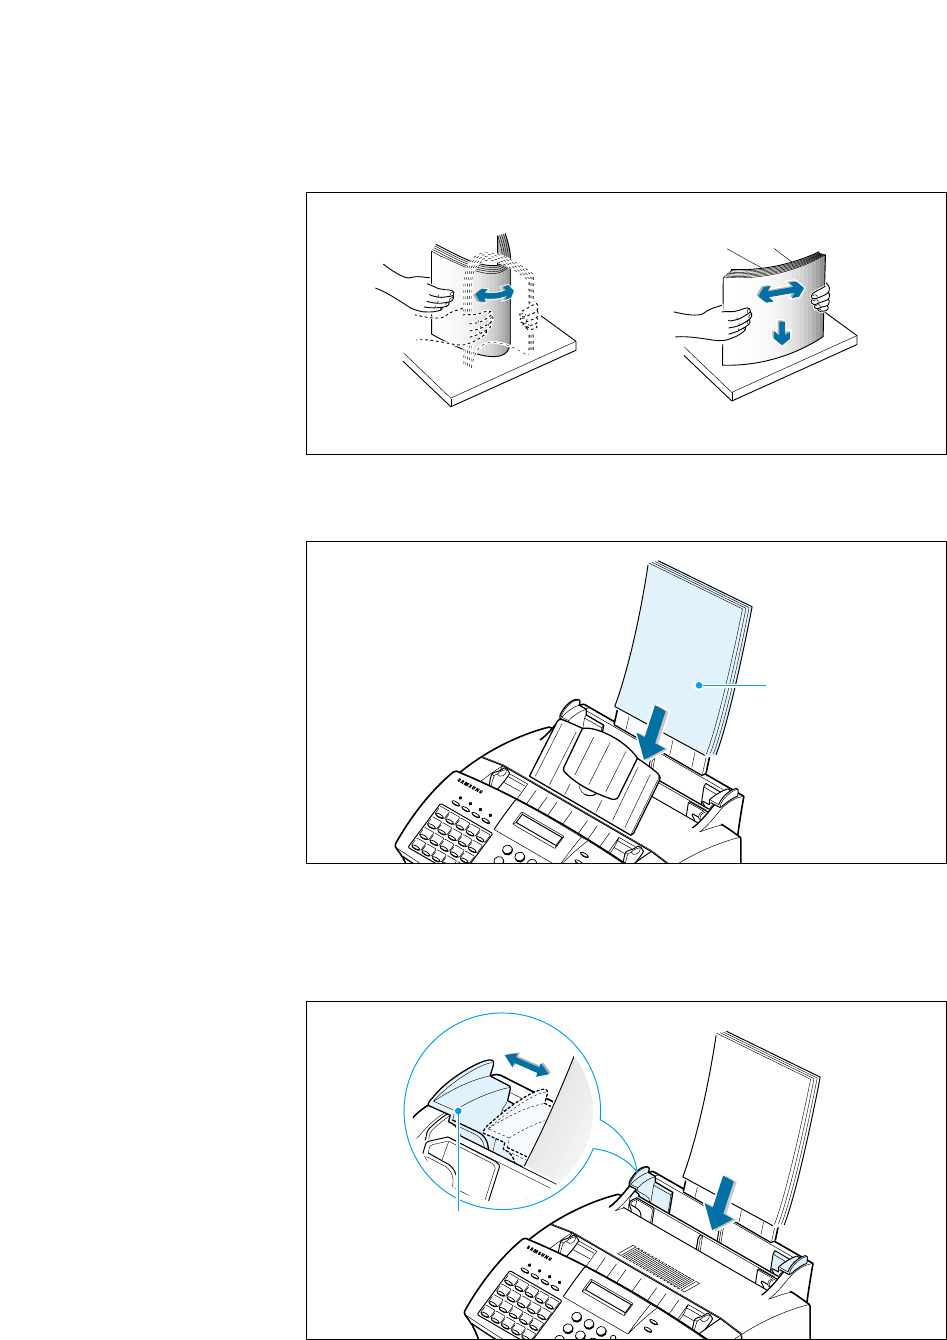
Loading Paper
For best results, use high quality xerographic paper. The automatic paper
input tray can hold a maximum of 150 sheets of plain paper. The
maximum capacity may be less, depending on the paper thickness.
Note: For stand-alone copy and fax operations, the SF-530 series product
supports A4, letter, and legal paper. After loading paper, make sure
that you select the correct paper size. For more information on
setting the paper size, see ‘Setting User-Selectable System Options’
on page 3.2.
1. Pull the paper input support completely out of the unit.
Paper input support
Automatic paper
input tray
Manual paper
input tray only
for SF-535e
Plugging In the Power
Plug one end of the cord into the back of the machine and the other end
into a standard AC power outlet.
The SF-530 series will turn on and the display will show ‘SYSTEM
INITIAL’. If there is no paper loaded, the displays will shows ‘NO PAPER.’
then if there is no cartridge installed, the display will show ‘JAM/ NO
CARTRIDGES’.
0
0
0
0
0
0
0
0
0
0
0
0
0
0
0
0
0
0
0
0
0
0
0
0
0
0
0
0
0
0
0
0
0
0
0
0
0
0
0
0
0
0
0
0
0
0
0
0
0
0
0
0
0
0
0
0
0
0
0
0
0
0
0
0
0
0
0
0
0
To AC outlet
To turn off, unplug the power cord.
1.18 Getting Started
2. Remove a stack of paper from its packaging. Tap the stack on a flat
surface to even it up.
4. Adjust the paper guides to the width of the print media. Slide the
guides until they lightly touch the stack of print media. Do not bend
the print material.
Paper guide
3. Insert the paper with the print side facing you.
Place the print side
facing you.

1.19
Getting Started
Paper Type and Size
Satisfactory print and receive quality can be obtained with many types of
plain paper. Since the quality of plain paper varies widely, test the print
quality before buying large quantities of paper. Your machine uses a
variety of papers including:
• Xerographic paper
• Bond paper
• Dual-purpose paper
Because all papers vary in physical characteristics, you can receive
mixed results from different packages of paper even through the
packages contain the same paper. If you encounter undesirable results,
try the other side of the paper, a different type, or another package of
the same kind of paper.
DO NOT use the following types of paper with your machine:
• Continuous form feed paper
• Synthetic paper
• Thermal paper
• Multi-sheet forms and documents
• Chemically treated paper
• Papers with raised, embossed lettering
To load paper with a preferred print side:
• If you are using xerographic paper, load the paper with the preferred
print side facing down.
• If you are using letterhead or bond paper, load the paper with the
preferred side facing up.
The following papers can be used in your machine for fax:
• Letter : 216 x 279 mm (8.5 x 11.0 in.) - 60 g/m2 ~ 90 g/m2 (16 ~ 24 lb)
• A4 : 210 x 297 mm (8.3 x 11.7 in.) - 60 g/m2 ~ 90 g/m2 (16 ~ 24 lb)
• Legal : 216 x 356 mm (8.5 x 14.0 in.) - 60 g/m2 ~ 90 g/m2 (16 ~ 24 lb)
1.20 Getting Started
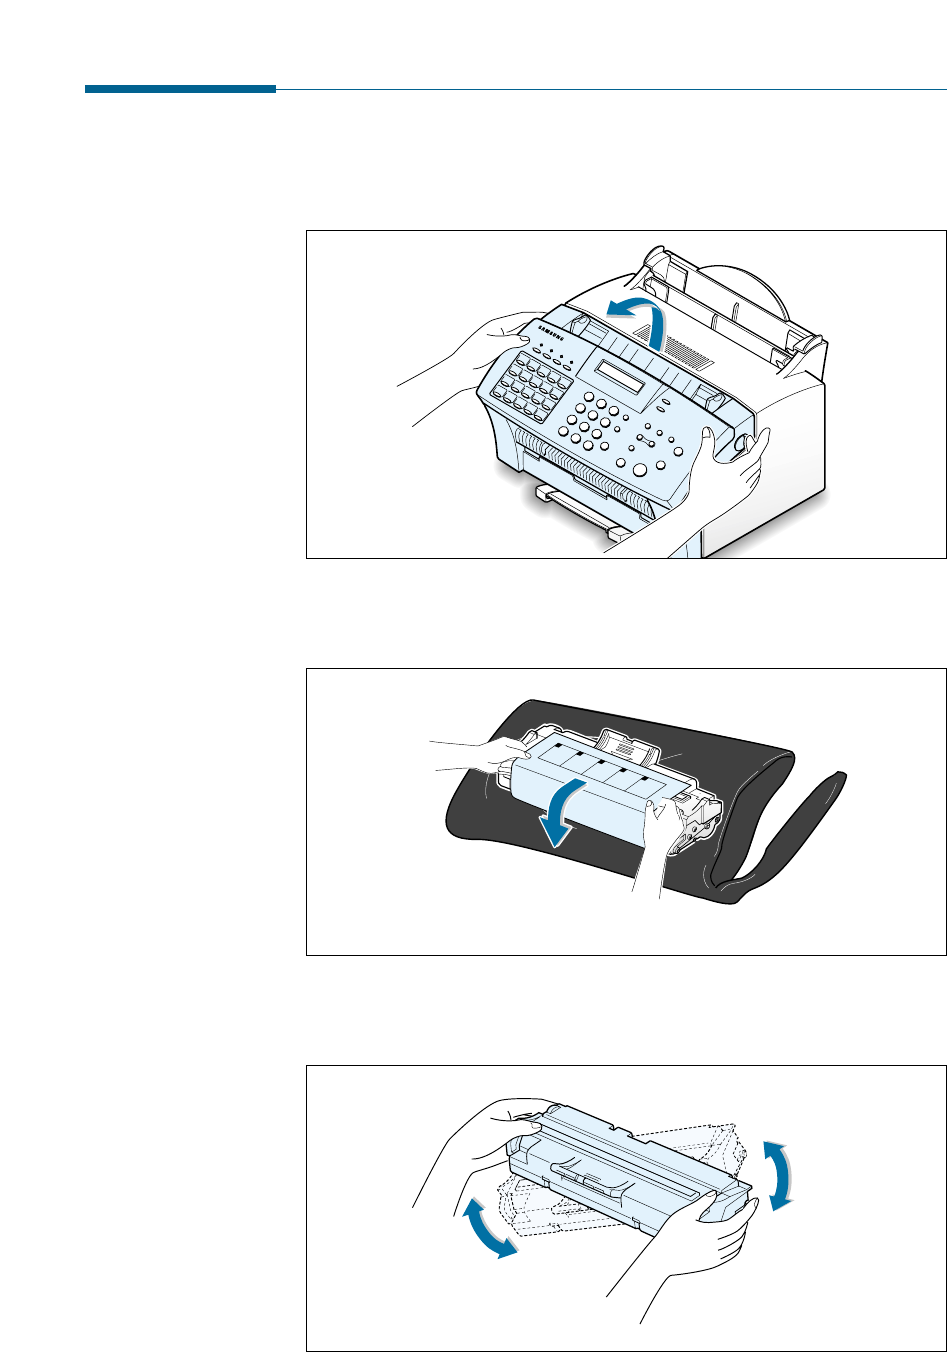
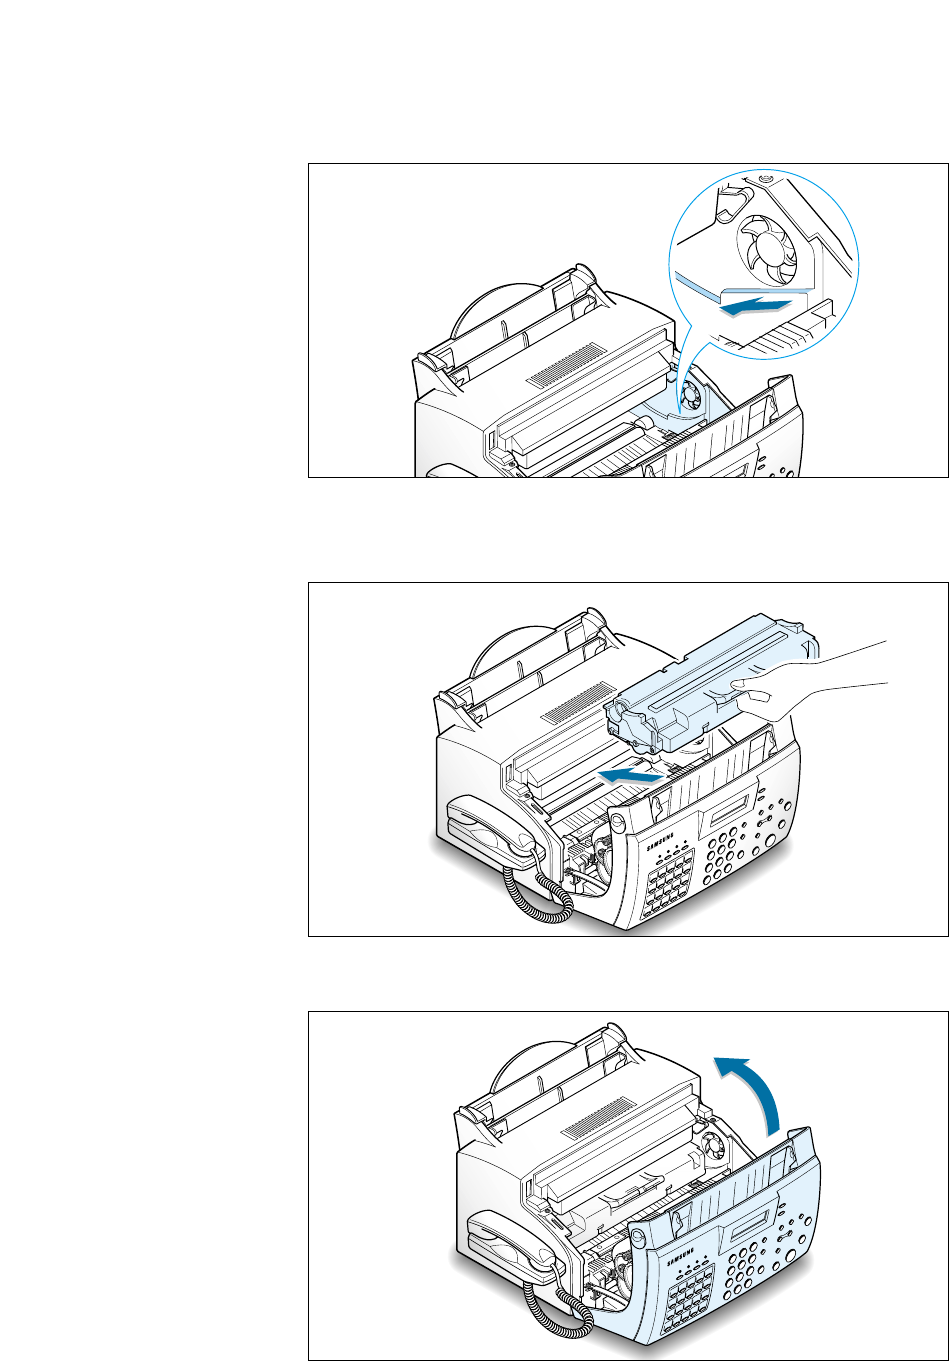
Installing the Toner Cartridge
1. Pulling the cover release buttons found on both sides of the machine
toward you, open the cover.
2. Unpack the cartridge from its plastic bag, and then remove the paper
rolled the cartridge.
3. Shake the cartridge from side to side 5 or 6 times to redistribute the
toner evenly inside the cartridge.
1.21
Getting Started
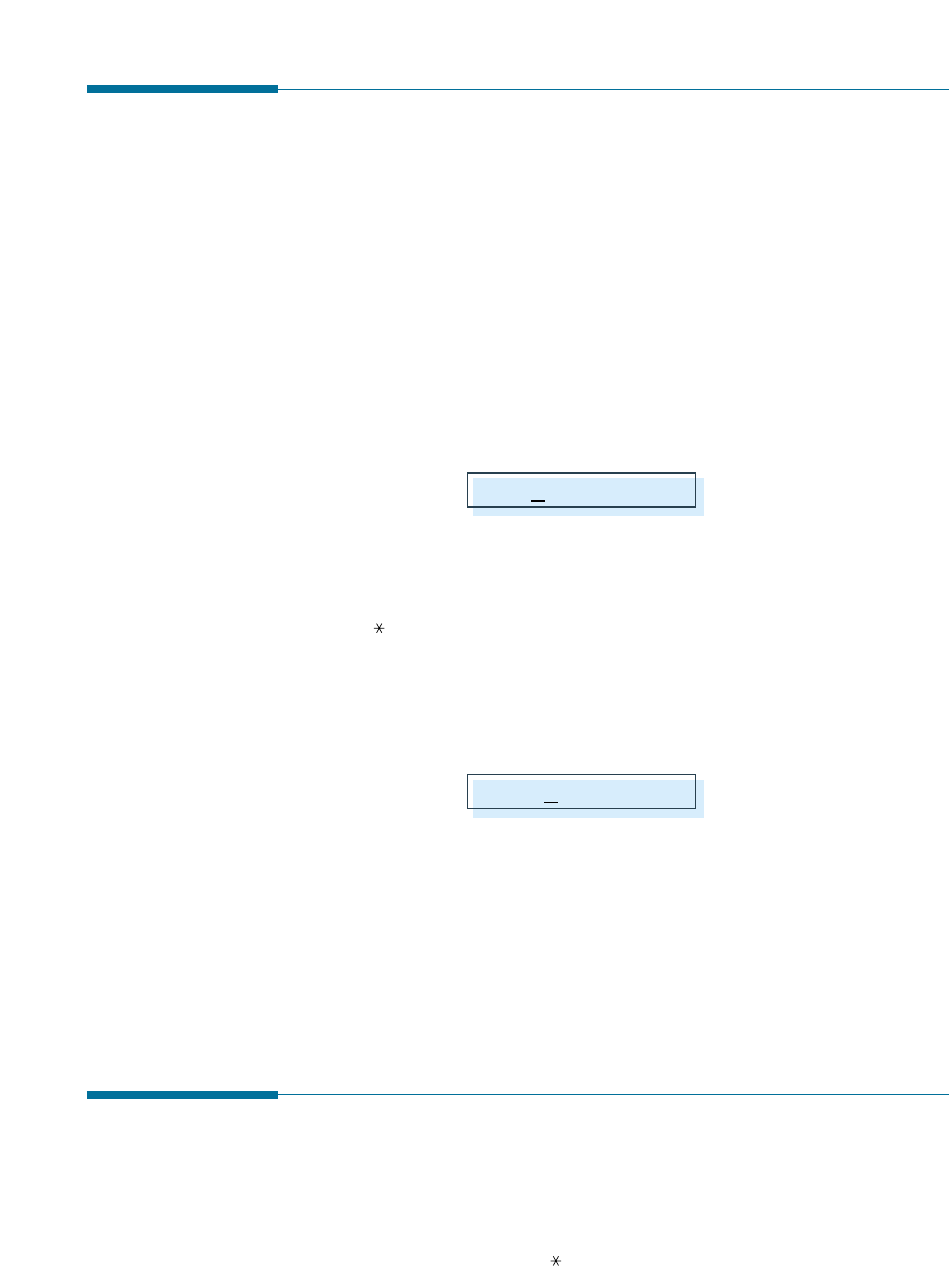
4. Find the cartridge slots inside the machine, one on each side.
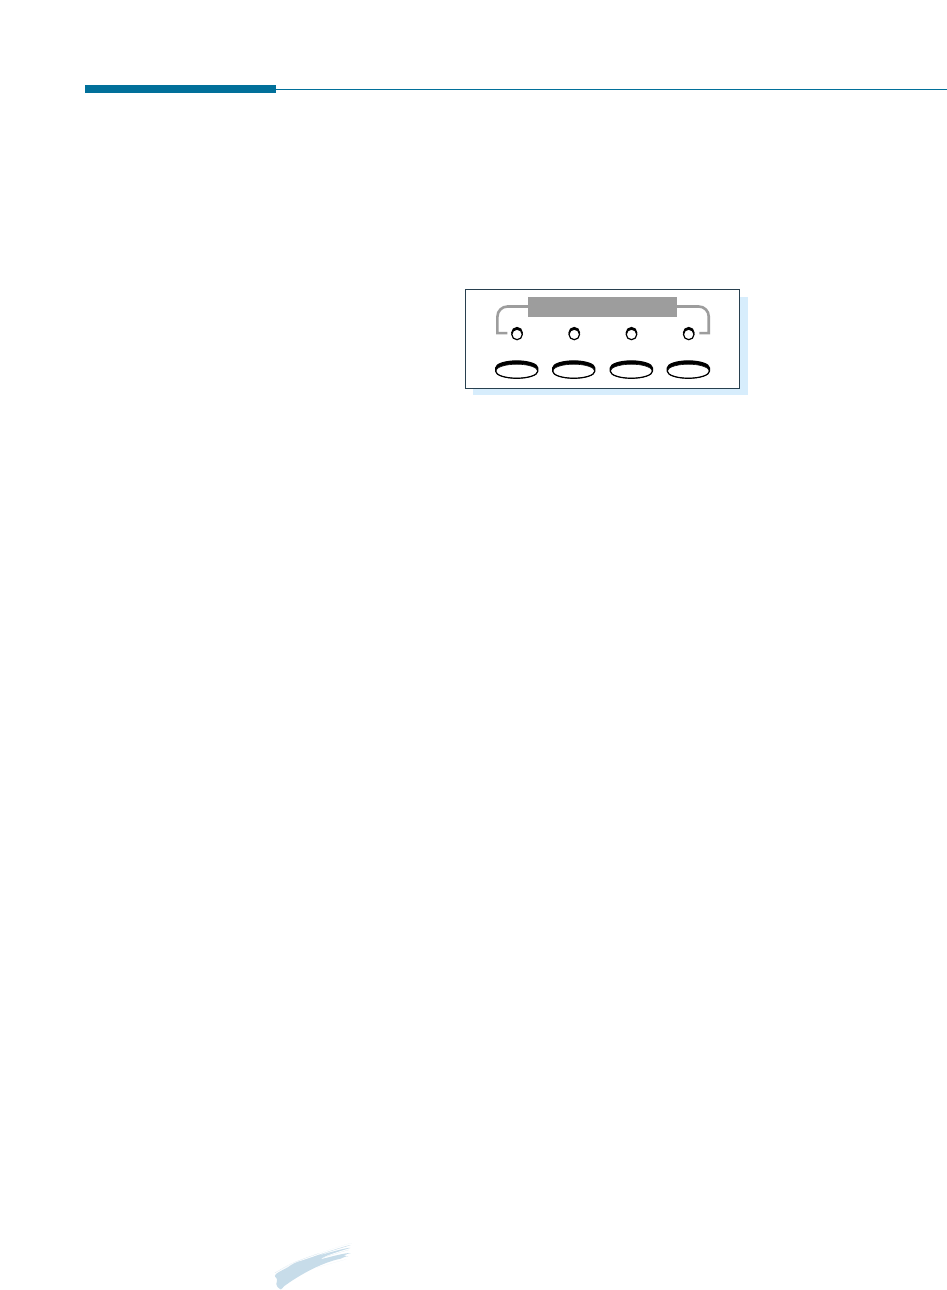
6. Close the cover. Make sure that the cover is securely closed.
5. Grasp the handle at the front of the cartridge and slide it down
between the cartridge slots, and push it firmly.

1.22 Getting Started
Setting the Date and Time
The current date and time are shown on the display when the machine is
on and ready for use (Standby mode). The date and time are printed on
all transmitted faxes.
When you install the SF-530 series for the first time, or when the product
is without power for about 15 seconds, the display prompts you to reset
the date and time.
1. Press Setup on the front panel. the display shows the first setup menu;
FAX NUMBER/NAME.
2. Press ➛or ❿until ‘TIME/DATE SETUP’ appears, then press
Start/Enter to access the Time/Date Setup menu.
3. The display asks you to choose a date format. Press Start/Enter.
4. Press ➛or ❿until you find the desired date format, then press
Start/Enter.
If you select USA, the date appears in format of Month-Day-Year. The
EUROPE format will be displayed in format of Day-Month-Year.
The display shows the currently set date and time using the selected
date format and asks you to set the month.
5. Enter the correct date and time for each item using the number keypad.
Each time you enter the appropriate number, the display asks you to
enter the next item in the following order: MONTH, DATE, YEAR, HOUR,
and MINUTE.
Enter the time in 24-hour format. For example, enter 2230 for 10:30
P. M .
If you enter an invalid number, the display does not proceed to the next
step. If this happens, re-enter the correct number.
6. When you are finished, press Start/Enter to save the setting. The
display returns to Standby mode and shows the date and time you have
set.
SET DATE & TIME
04-01-2001 10:30
MAR-9 12:30 FAX
1.23
Getting Started
Setting Your Fax Number and Name
Your fax number and name can be printed at the top of each page
transmitted.
1. Press Setup on the front panel. The display shows the first setup
menu; FAX NUMBER/NAME.
2. Press Start/Enter to access the Fax Number/Name menu.
The display shows ‘FAX NUMBER.’
3. Press Start/Enter.
If there is a number already set, the number appears.
4. Enter the telephone number your machine is connected to. You can
enter up to 20 digits.
Press for plus sign (+) and # for a hyphen. If you entered a wrong
number, press Search/Delete to delete it.
5. Press Start/Enter when the number on the display is correct.
If there is a name already set, the name appears.
6. Enter your name using number keypad. You can enter up to 40
characters.
For details on how to use the number keypad to enter alphanumeric
characters, see page 3.19.
7. Press Start/Enter when the name on the display is correct.
Testing the Machine (SF-530 only)
After installation, you may want to run a simple test on your machine by
printing out a demo page.
Press and hold down Demo ( ) on the front panel until the machine
begins printing a demo page.
TEL:
NAME:
1.24 Getting Started
Using Save Modes
There is four saving mode buttons on the front panel of the SF-530
series. Using these buttons, you can save toner and power consumption,
paper for printing, and toll for the fax call.
Toner Save Mode
Toner Save mode allows the machine to use less toner on each page.
Press Toner on the front panel to turn this mode on or off.
• If the LED is on, Toner Save mode activates and the machine uses less
toner by 50% to print a page. Using this mode will extend the life of
your toner cartridge and reduce your cost per page, but will reduce
print quality.
• If the LED is off, Toner Save mode deactivates and the machine prints
in the normal mode.
Power Save Mode
Power Save mode allows you to save the power consumption.
Press Power on the front panel to turn this mode on or off.
• If the LED is on, Power Save mode activates and the machine will go to
a reduced power state. But it takes long to receive incoming faxes for
warming up the machine.
• If the LED is off, Power Save mode deactivates and the machine keeps
ready to operate with the minimum warm-up time. This uses more
energy to keep your machine warm and ready to print.
To specify how long the machine waits before going to the Power Save
mode, press and hold down Power, and select the desired time length
among 5MIN, 10MIN and 15MIN using ➛or ❿. Selecting OFF turns
the Power Save mode off.
Note: Although you turned Power Save mode off by pressing Power, it
activates if you have set the time length.
Toner Power Paper Toll
SAVE
1.25
Getting Started
Paper Save Mode
With Paper Save mode on, you can save paper by reducing the data and
printing two pages on one sheet of paper when copying or printing
received document.
Press Paper on the front panel to turn this mode on or off.
• If the LED is on, Paper Save mode activates and the machine prints
two pages on one sheet of paper when receiving a fax or making a
copy of a document. The odd pages will be printed at the bottom of
the paper. and the even pages at the top of the paper.
• If the LED is off, Paper Save mode deactivates.
To set up the Power Save mode option, press and hold down Paper, and
select the desired option. The following options are available;
2-UP COPY: Uses Paper Save mode only for copying a document. Select
ON or OFF using ➛or ❿.
2-UP FAX: Uses Paper Save mode only for receiving faxes. Select ON to
or OFF using ➛or ❿.
Notes:
• When you making multiple copies, you cannot use this mode because
the machine scans and prints the pages one by one.
• The data will be reduced in vertical and horizontal at the same rate
depending on the paper size you chose in the Fax Paper Size setup menu
(see page 3.3).
Toll Save Mode
Toll Save mode allows you to save the toll for the telephone call by
transmitting the document stored in memory during the time slot when
the call charge is discounted.
For more information on Toll Save fax, see page 3.37.
First page
Second page
chapter
2
2
This chapter provides information on installing the supplied
Samsung software. You MUST install the Samsung software to
use your machine as a printer and scanner.
The topics included in this chapter are:
Samsung SmarThru
◆ About Samsung SmarThru Software
Installing Software
◆ System Requirements
◆ Installing the Samsung Software
◆ Configuring the Fax Gate on Your PC
◆ Configuring the Internet Gate on Your PC
◆ Using Your machine with a USB Cable
◆ Installing Bonus Software
◆ Making Installation Diskettes
◆ Installing Software from Diskettes
◆ Un-installing Samsung Software

2.1
Installing Samsung Software
About Samsung SmarThru Software
You must to install the SmarThru CD-ROM after you have setup your
machine and connected it to your computer. The SmarThru CD-ROM
includes the following:
• MFP Driver
• USB Driver
• SmarThru Software
• OCR Software (AnyPage Lite)
• Acrobat Reader (Bonus Software)
MFP Driver
To use the SF-530 series as a printer, scanner, or to send and receive
electronic faxes, you MUST install the MFP driver.
USB Driver
To use the SF-530 series connected to your computer using a USB cable,
you MUST install the USB driver and set the USB port.
SmarThru Software
SmarThru consists of several components, each of which provides a
particular function:
MailBox – Working with e-mail and fax messages, you can create, send,
browse and store messages.
Image Manager – Working with images, you can import, export, store and
operate on images.
Samsung SmarThru

2.2 Installing Samsung Software
Scan Manager – Working with documents or images, you can scan to
Image Manager, scan to OCR software, or to a fax.
Copy Manager – Working with documents or images, you can control a
copying process. You can also save a copy of the image
or document to Image Manager.
Image Viewer – Working with documents or images, you can view images
in a variety of graphical formats.
OCR Software (AnyPage Lite)
OCR (Optical Character Recognition) is the software that has the ability
to recognize most character formats, so that a scanned document can be
read and edited on your word processor.
Acrobat Reader
This bonus program allows you to view and print Adobe P.D.F files on all
major computer platforms.

System Requirements
Before you begin, ensure you have the following computer setup:
Minimal requirements:
• Operating systems: Windows 95 OSR2/Windows 98/Windows 98
SE/Windows Me/Windows NT 4 Workstation or
Server with Service Pack 3/Windows 2000
• Disk space: 120 MB for installation
• Memory: 32 MB
• CPU: Pentium 133
• Required software: Internet Explorer 4.01
• User rights: Administrative rights should be set for installation on
Windows NT and Windows 2000.
Recommended
• Operating systems: Windows 98/Windows 98 SE/Windows
Me/Windows NT 4 Workstation or Server with
Service Pack 5/Windows 2000
• Disk space: 120MB for installation, 100MB for message/image
database
• Memory: 32MB for Windows 9x, 64MB for Windows NT
• CPU: Pentium II 200
• Required software: Internet Explorer 4.01 or 5.0
• User rights: Administrative rights should be set for installation on
Windows NT and Windows 2000.
Note: Windows 95 versions prior to OSR2 are not recommended due to
compatibility with OLE/COM libraries.
2.3
Installing Samsung Software
Installing Software
2.4 Installing Samsung Software
Installing the Samsung Software
Note: For Windows 95/98 users, close “New Hardware Found” screen
when the computer boots up.
1. Insert the supplied CD-ROM into your CD-ROM drive.
The SmarThru CD-ROM is automatically running and the opening
window appears.
If the opening window does not appear, click Start, and then Run.
Type X:Setup.exe, replacing “X” with the letter of your drive, and
click OK.
2. When the opening screen appears, click on SF-530 Series, then the
language you want to use.
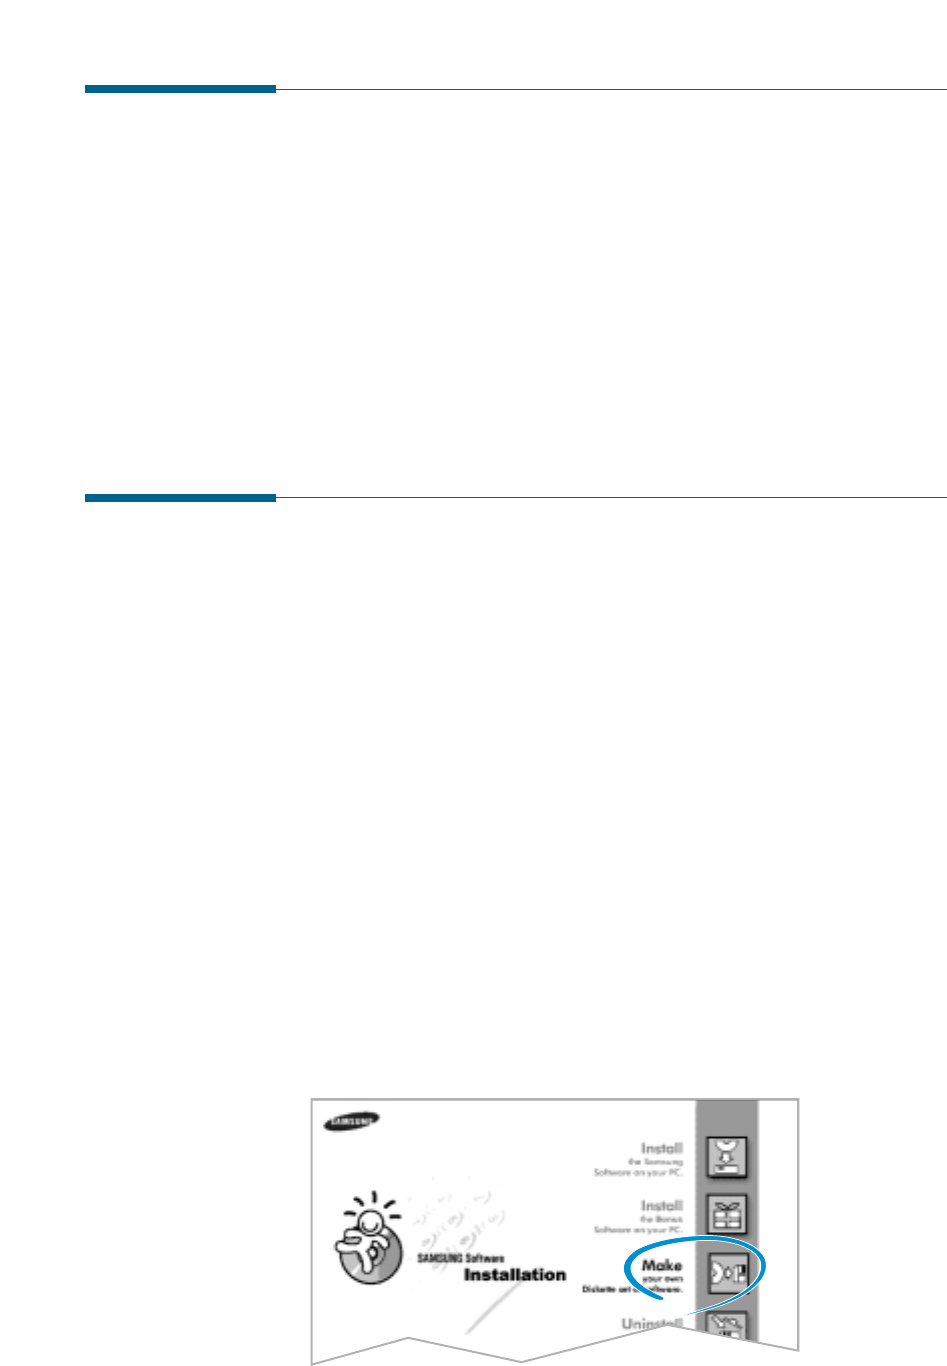
3. Click Install the Samsung Software on your PC.
Installs Acrobat Reader on
your PC. See page 2.16.
Makes the software
diskette. See page 2.16.
Uninstall the Samsung
Software. See page 2.21.
S
A
M
S
U
N
G
S
F
-
5
3
0
S
e
r
i
e
s
Installs the Samsung
Software on your PC.

2.5
Installing Samsung Software
4. Follow the on-screen instructions and click Next.
5. The SmarThru installation supports three types of setup:
• Typical: Program will be installed with the most common options
and is recommended for most users.
• Compact: Only the MFP driver will be installed.
• Custom: You may choose the options you want to install.
Recommended for advanced users.
If you select the Custom installation, you may choose the options
you want to install.
SmarThru software to scan
and edit images and work
with electronic documents.
AnyPage Lite software to
enable OCR.
MFP driver to print, scan, or to send and
receive PC faxes.
2.6 Installing Samsung Software
6. Click Next.
7. When the installation is completed, The message box recommends
you restart your computer. Click Finish, then Windows restarts.
If your computer does not shut down and restart automatically, you
must shut it down manually and restart for the changes to saved.
Note: If you are using Windows NT or Windows 2000, the warning
message may appear when your computer boots up, telling you cannot
install the fax driver on your computer. Click OK and continue the following
steps.
Configuring the Fax Gate on Your PC
1. After installing the SmarThru software, Windows will automatically
restart. When you see the Samsung SF-530 Series Program folder,
close it by clicking x on the right-top of the window.
2.7
Installing Samsung Software
2. The SmarThru Add New Fax Modem dialogue box appears. Click Next.
To add a fax modem later or you do not want to have fax service
using the SmarThru system, press Cancel, and go to page 2.9 to
configure the Internet gate.
3. Choose SAMSUNG FaxThru Modem from the list. It will be used by
SmarThru Fax Gate for sending and/or receiving PC faxes. Then, click
Next.
Note: The Windows NT or Windows 2000 users must click System
modems... to open Install New Modem dialogue box. Follow the
instructions on screen to install fax modem on your computer.

2.8 Installing Samsung Software
5. When you are finished, click Finish.
Note: To edit the advanced properties of Fax service or to add other
modems, choose SmarThru Configuration from the Tools menu
when you run the Samsung SmarThru2. For details, refer to the
SmarThru User’s Guide.
4. Enter your fax number or name in the Fax identifier box, and
click Next.
If you put a check mark in this box, the
SmarThru system will automatically will
receive incoming calls. If you want to receive
faxes at the SF-530 series, clear this box.

2.9
Installing Samsung Software
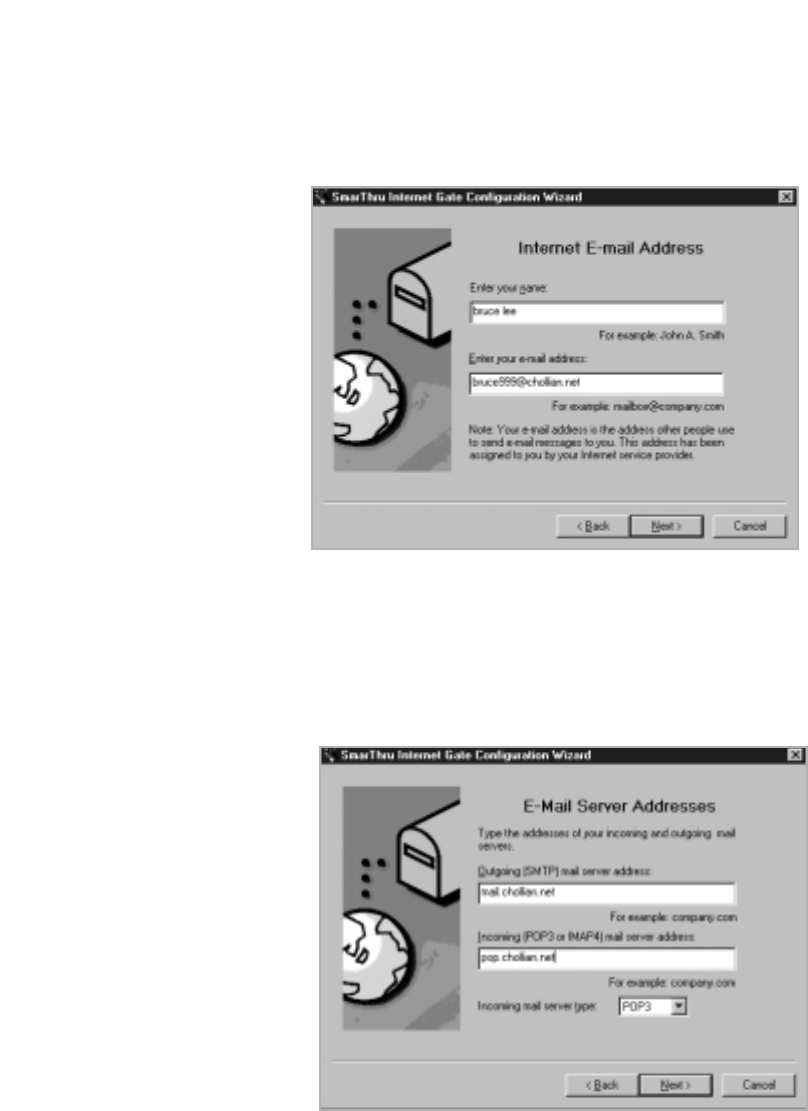
Configuring the Internet Gate on Your PC
When the fax modem configuration is complete, the SmarThru software
loads the Internet Gate sets up your internet connection.
Note: To configure the internet gate of the SmarThru system, you must
enter your e-mail address, SMTP/POP3 server address, POP3
account name and password. Ask your Internet Service Provider
or online service provider about the information on your internet
gate configuration.
1. The SmarThru Internet Gate Configuration Wizard dialogue box
appears. Select the way you are connected to the Internet, then click
Next.
If you are connected to the Internet over a LAN (i.e. in an office
network environment), select Connection to Internet over LAN,
and skip to Step 4.
If you use dial-up for Internet connection, select Use Dial-Up for
Internet Connection, and proceed to the next step.

2.10 Installing Samsung Software
2. If you use a phone line for your Internet connection, configure Dial-Up
settings using Windows Dial-Up Networking setup wizard. Click
Configure.
3. Click Add. The dial-up connections which are already set up on your
computer are displayed. Select one from the list you want to use for
Internet connection on the SmarThru system, then click OK.
If no connection is available, you cannot use the system Dial-Up in the
Samsung SmarThru system.
To modify the Dial-Up connection properties, click Dialing Properties.
Note: For details on the Dial-Up Configuration using the Windows Dial-Up
Networking setup wizard, please refer to your Windows
documentation.
2.11
Installing Samsung Software
4. Enter your name and e-mail address, then click Next. The e-mail
address has been assigned to you by your Internet service provider.
5. Enter the addresses of your incoming and outgoing mail servers.
Choose the incoming mail server type, then click Next. Your Internet
service provider must provide you this information.
2.12 Installing Samsung Software
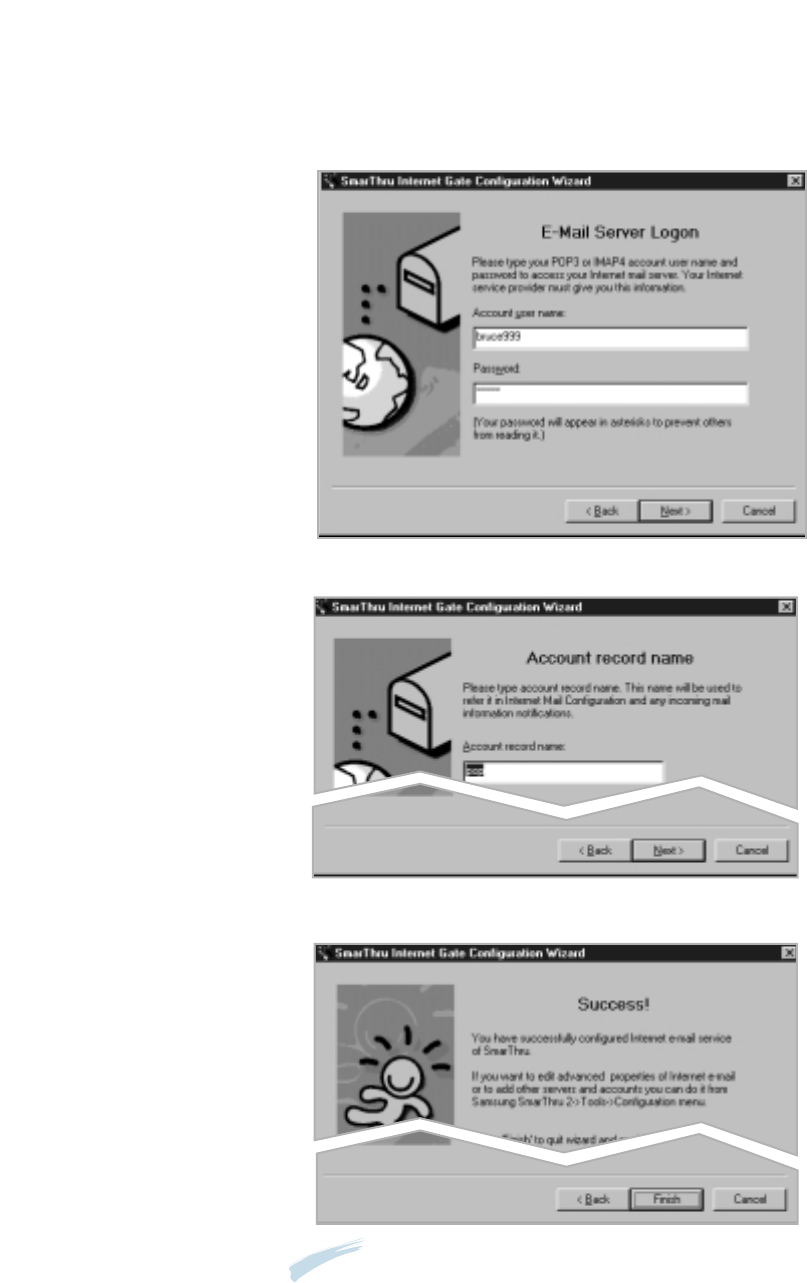
6. Enter your account name and password to access your Internet mail
server, then click Next. Your Internet service provider will provide this
information.
7. Enter the account record name, then click Next.
8. Click Finish to enable Internet e-mail service.
Note: If you wish, you can enable or reconfigure the Internet connection
later. Open the Samsung SmarThru2, and select SmarThru
Configuration from the Tools menu. For details, refer to the
SmarThru User’s Guide.
2.13
Installing Samsung Software
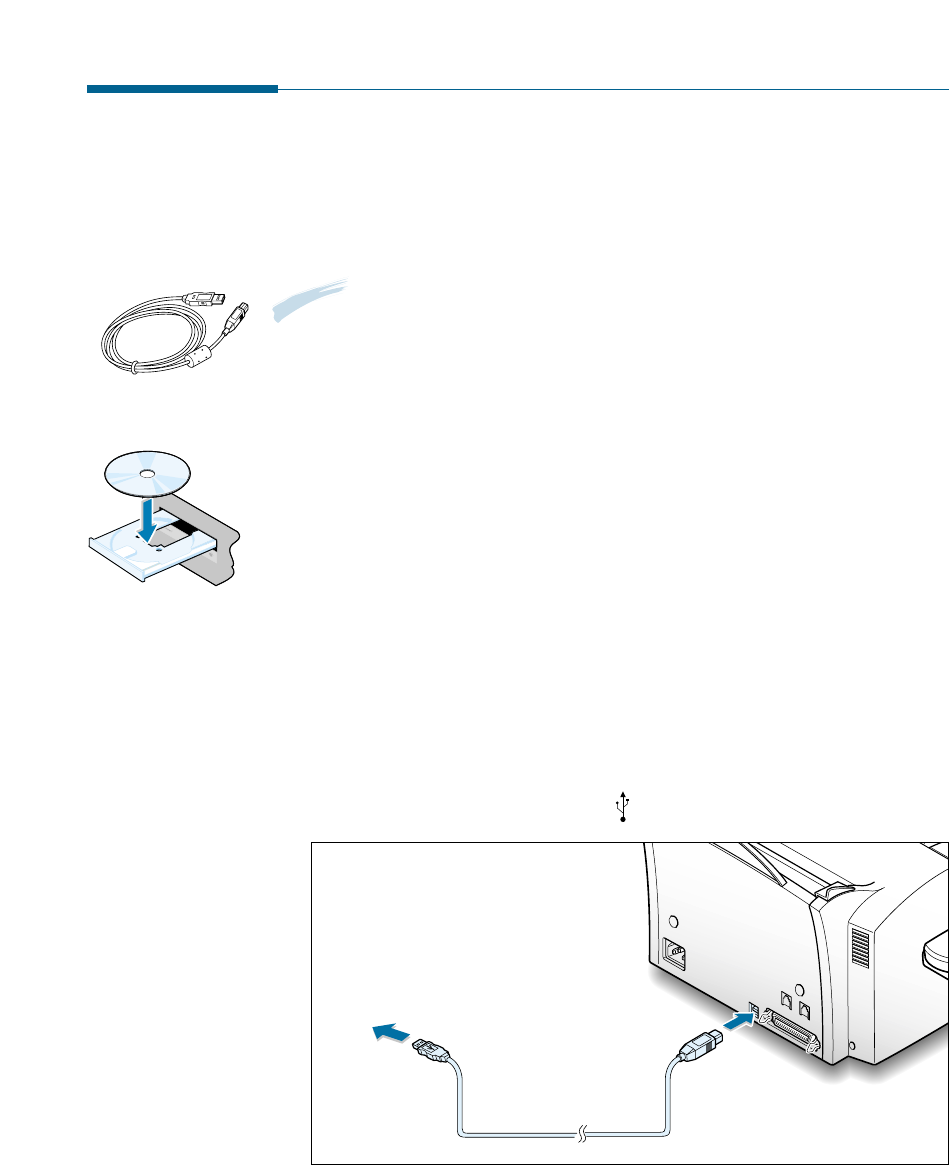
Using Your Machine with a USB Cable
If you have a USB (Universal Serial Bus) port enabled on your computer,
and if your computer is running Windows 98, you can connect your SF-
530 series to the USB chain of devices.
Note: To connect the printer to the USB port of the computer requires a
certified USB cable. You will need to buy the USB 1.0 compliant
cable.
Installing MFP Driver
To operate your printer with Windows PC, you must install the MFP
driver. Place the CD-ROM in the CD-ROM drive and perform the
instructions on page 2.4.
Connecting Your Machine with USB Cable and Installing
USB Driver
1. Make sure that both the printer and computer are turned ON.
2. Plug one end of the USB cable into the USB port on the printer and
the other end into the USB port ( ) on the computer.
0
0
0
0
0
0
0
0
0
0
0
0
0
0
0
0
0
0
0
0
0
0
0
0
0
0
0
0
0
0
0
0
0
0
0
0
0
0
0
0
0
0
0
0
0
0
0
0
0
0
0
0
0
0
0
0
0
0
0
0
0
0
0
0
0
0
0
0
0
To PC
S
A
M
S
U
N
G
S
F
-
5
3
0
S
e
r
i
e
s
2.14 Installing Samsung Software
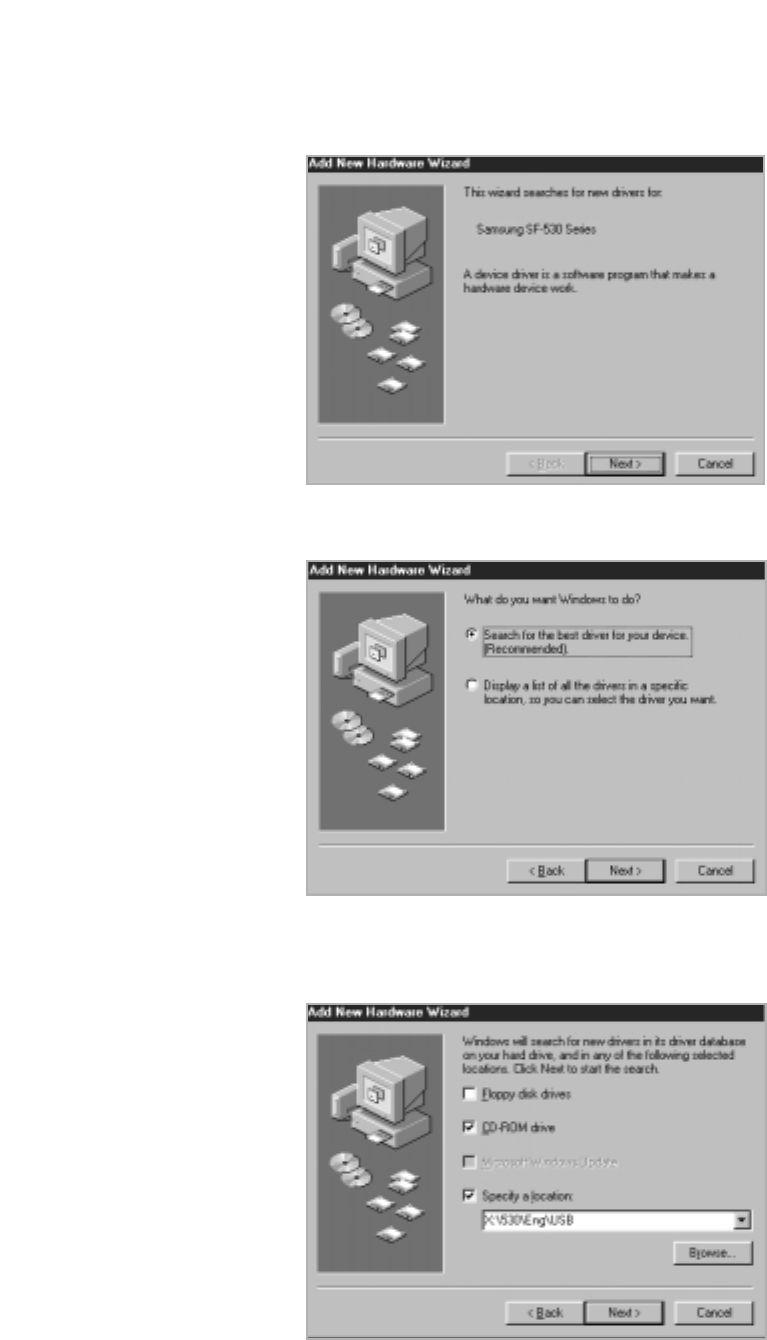
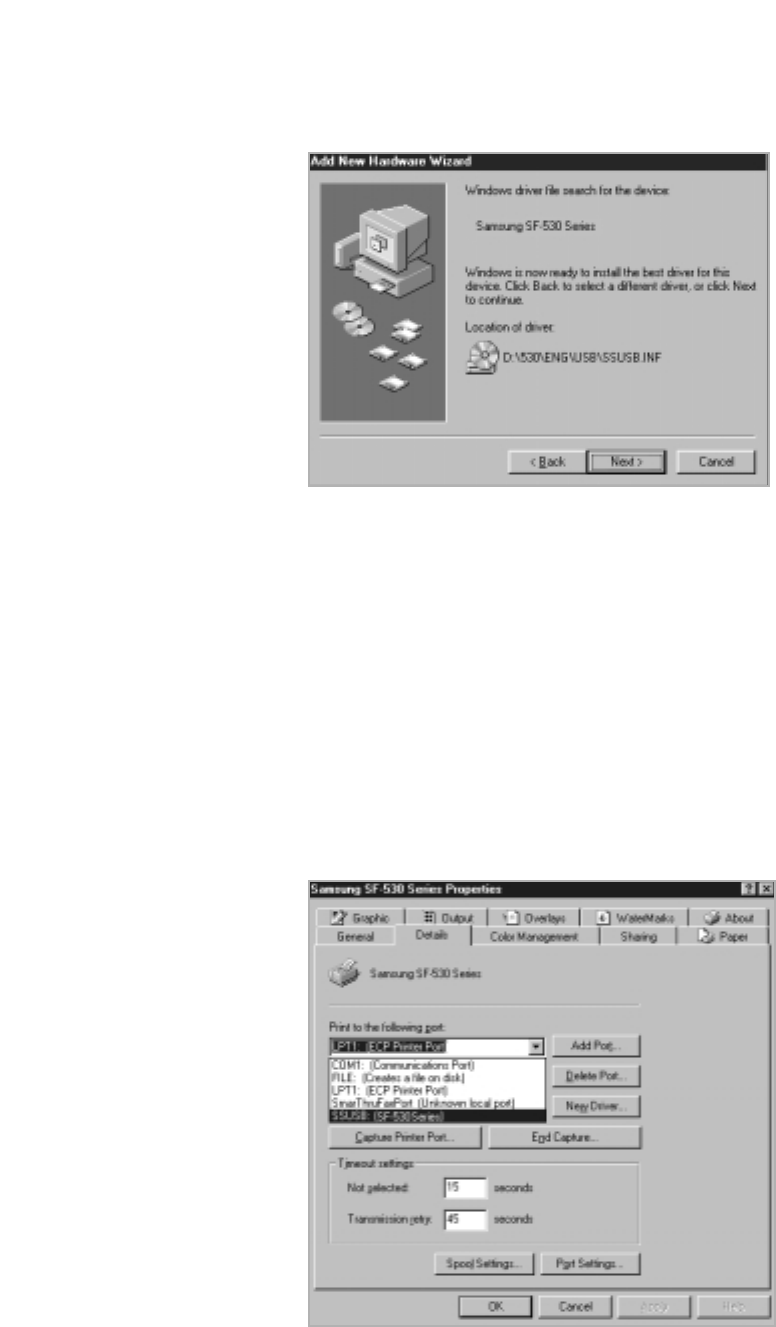
3. The Add New Hardware Wizard dialogue box appears. Click Next.
4. Check Search for the best driver for your device and click Next.
5. Check CD-ROM drive and click Browse, then choose x:\530\Eng
\USB (where x is the drive letter for the CD-ROM drive).
2.15
Installing Samsung Software
6. Click Next. The USB driver will be installed.
7. Follow the instructions on the screen to complete the installation.
Setting Your PC Printer Port
1. From Window’s Start menu, select Settings, then select Printers.
2. Select the Samsung SF-530 series printer icon in the Printers folder.
3. Select Properties from the File menu.
4. Click the Details tab. Select SSUSB: (SF-530 Series) in the Print to
the following port box. Click OK. The setup is now completed.
2.16 Installing Samsung Software
Installing Bonus Software
If you needed, you can install Acrobat Reader program on your PC.
1. Insert the SmarThru CD-ROM into your CD-ROM drive.
2. When the opening screen appears, select your machine’s model, then
the appropriate language.
3. Click Install the Bonus Software on Your PC.
4. Follow the on-screen instructions to complete the installation.
For details on Acrobat Reader, refer to the on-line help.
Making Installation Diskettes
If you do not have a CD-ROM drive and if you have access to another
computer with a CD-ROM drive, you can copy software installation files
from the Samsung software CD-ROM onto floppy diskettes. The diskettes
can then be used instead of the CD-ROM to install the software.
To make the installation diskettes for an MFP drive, ensure you have
several formatted diskettes ready, and follow these steps:
1. Insert the supplied CD-ROM into your CD-ROM drive.
The SmarThru CD-ROM is automatically running and the opening
window appears. (If the opening window does not appear, click Start,
and then Run. Type X:Setup, replacing “X” with the letter of your
drive, and click OK).
2. When the opening screen appears, lick on SF-530 Series, then the
language you want to use
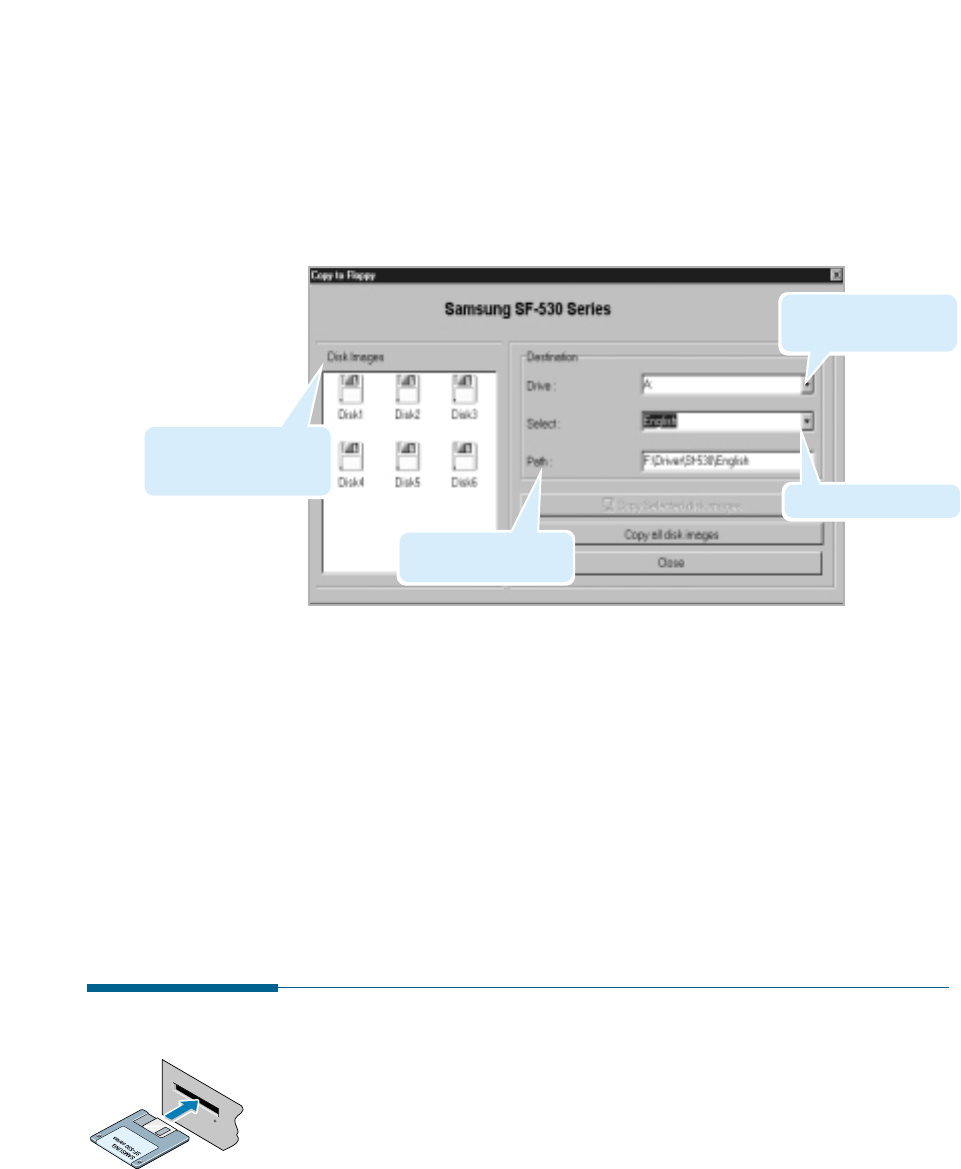
3. Click Make your own Diskette set of software.
2.17
Installing Samsung Software
4. The Copy to Floppy dialogue box appears. Click Copy all disk
images.
If you want to copy a portion of the selected component, select the
disk image you want to copy in the Disk Images window, then click
Copy selected disk image.
5. When prompted, insert a blank, formatted diskette into the floppy
drive, and click Yes to copy the first diskette. When the first diskette
is finished, you are prompted on the PC screen to insert disk 2.
Label each diskette in the order you create it: MFP driver, disk 1 of 6,
etc.
6. When the diskettes have finished copying, click Close in the Copy to
Floppy dialogue box.
Installing Software from Diskettes
1. Insert the first diskette which contains the MFP driver.
2. From the Start menu, select Run.
3. Type A:\setup.exe in the Open box and click OK. (if your floppy
drive is not A, substitute the correct letter.)
4. Follow the on-screen instructions to complete the installation.
Select the floppy drive
you will use.
The component to copy.
Shows the number of
disks required to copy
the selected component.
Shows the path of the
selected component.
2.18 Installing Samsung Software
Un-installing Samsung Software
Un-installing is required if you are upgrading the software or if your
installation fails.
Note: Before beginning un-installation, ensure all applications are closed
on your PC. A system reboot is required after the software is un-
installed.
Un-installing the MFP Driver
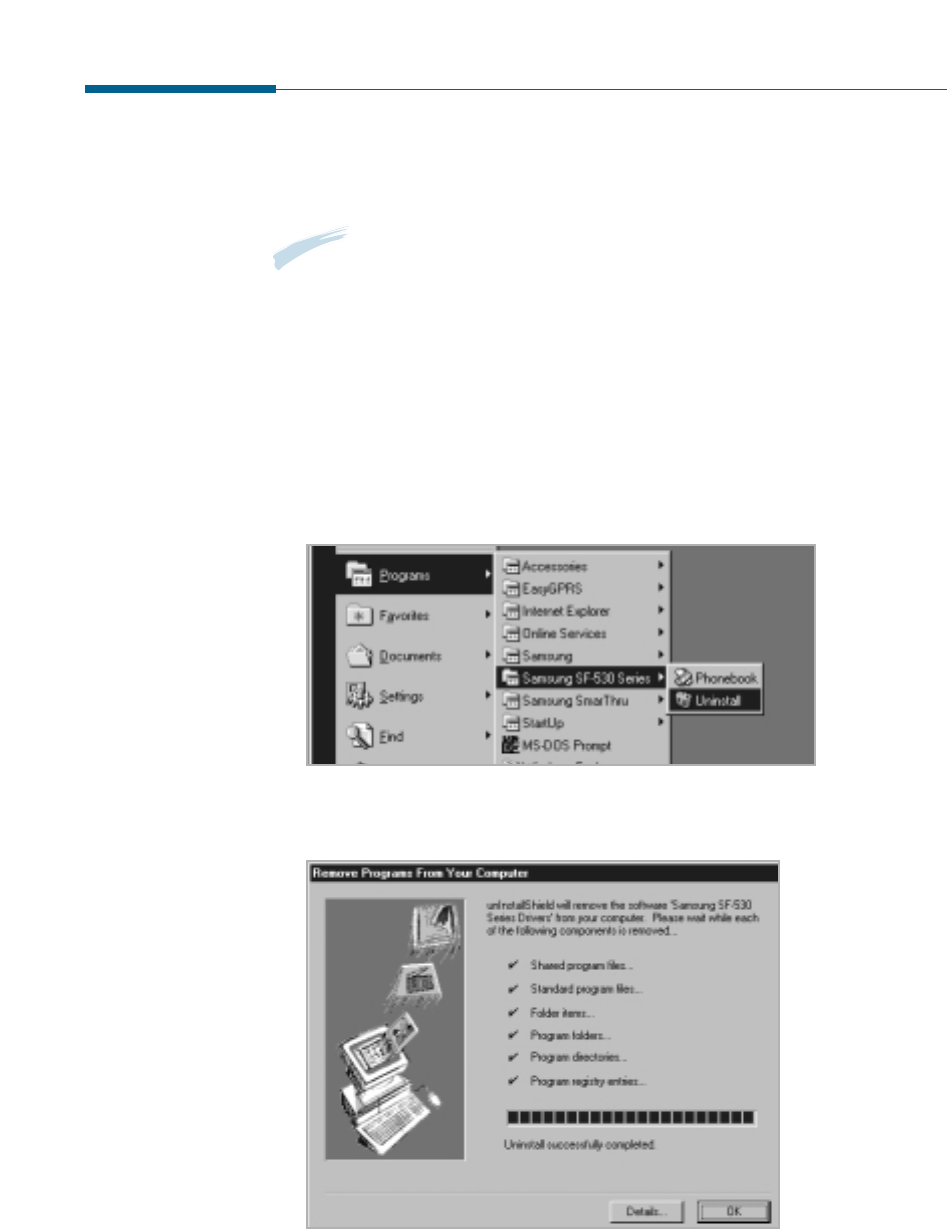
1. Start Windows if not already started.
2. From the Start menu, select Programs, then select Samsung SF-
530 Series, then select Uninstall.
3. When your computer confirms your selection, click Yes. The printer
driver and all its components are removed from your computer.
4. When un-installation is done, click OK.
5. The message box recommends you restart your computer.
Click OK, then restart Windows.
2.19
Installing Samsung Software
4. When your computer asks you to confirm your selection, click Yes.
The Select Backup Options dialogue box appears.
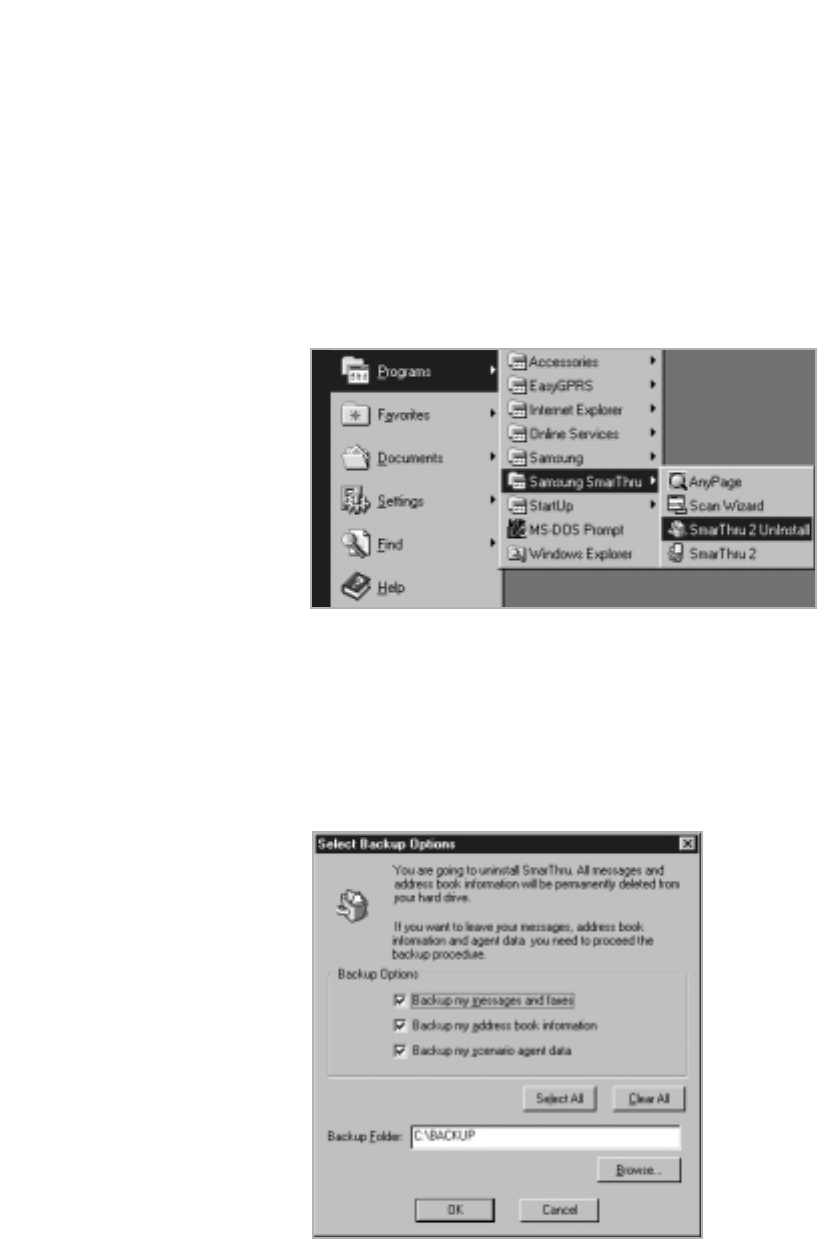
5. To remove all messages and address book information from your hard
drive, click Clear All, then OK. When the message box confirms your
selection, click Yes.
To leave the information, put checkmarks on the check boxes to select
options you want to leave or click Select All, then click OK. The
backup proceeds. When the backup is done, click Close.
Un-installing the SmarThru Software
1. Start Windows if not already started.
2. From the Start menu, select Programs.
3. Select Samsung SmarThru, then select SmarThru 2 Uninstall.
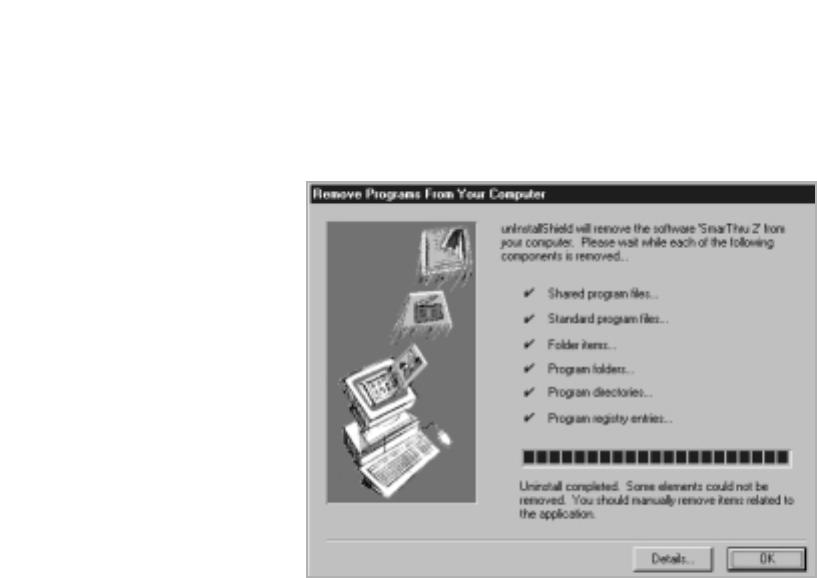
2.20 Installing Samsung Software
6. Follow the on-screen instructions to complete the un-installation. The
SmarThru software and all components will be removed.
7. When un-installing is done, click OK. The message box recommends
restarting your computer.
8. Click OK.
Shut down and restart your computer to complete the un-installation
process and save your changes.

2.21
Installing Samsung Software
Using the SmarThru CD-ROM
You can un-install both the MFP driver and the SmarThru software with
the CD-ROM you have used to install the software.
1. Insert the SmarThru CD-ROM into your CD-ROM drive.
The SmarThru CD-ROM is automatically running and the opening
window appears. (If the opening window does not appear, select Run
from the Start menu, then type X:SETUP, replacing “X” with the
letter of your drive and click OK.
2. When the opening window appears, lick on SF-530 Series, then the
language you want to use.
3. Click Uninstall the Samsung software on your PC.
4. Follow the on-screen instructions to complete un-installation.
You must shut down and restart your computer before changes you
have made will be in effect.