Samsung Electronics Co SF531P Laser Multi-Function Printer User Manual 3
Samsung Electronics Co Ltd Laser Multi-Function Printer Users Manual 3
Contents
- 1. Users Manual 1
- 2. Users Manual 2
- 3. Users Manual 3
Users Manual 3
5.9
Printing
3. To take advantage of the printer features provided by the SF-530
series, click Properties in the application’s Print dialogue box and go
to step 4.
If you see Setup, Printer, or Options, click that button instead.
Then click Properties in the next screen.
Printing a Document
The following procedure describes the steps required for printing from
various Windows applications. The exact steps for printing a document
may vary depending on the application program. Refer to your software
application’s documentation for the exact printing procedure.
1. Start the program to create the document, and open the document
you want to print.
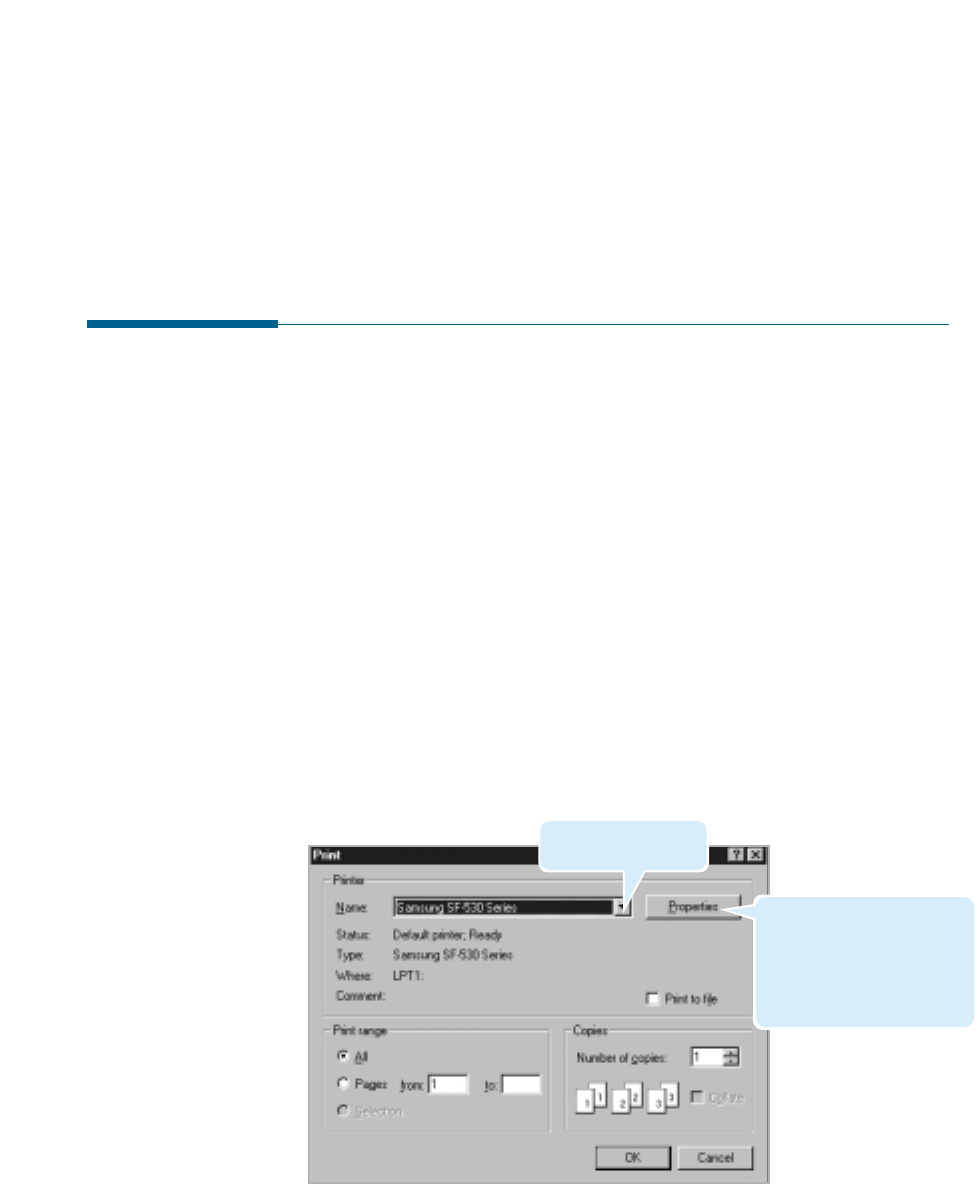
2. Select Print from the File menu. You see the Print dialogue box for
your application (the Print dialogue box for your application may look
slightly different).
The basic print settings you required are usually selected within the
Print dialogue box. These settings include the number of copies, paper
size, and page orientation.
Printing
Make sure that your
printer is selected.
If you see Properties
button, click it. If you see
Setup, Printer, or Options,
click that button instead;
then click Properties in the
next screen.
5.10 Printing
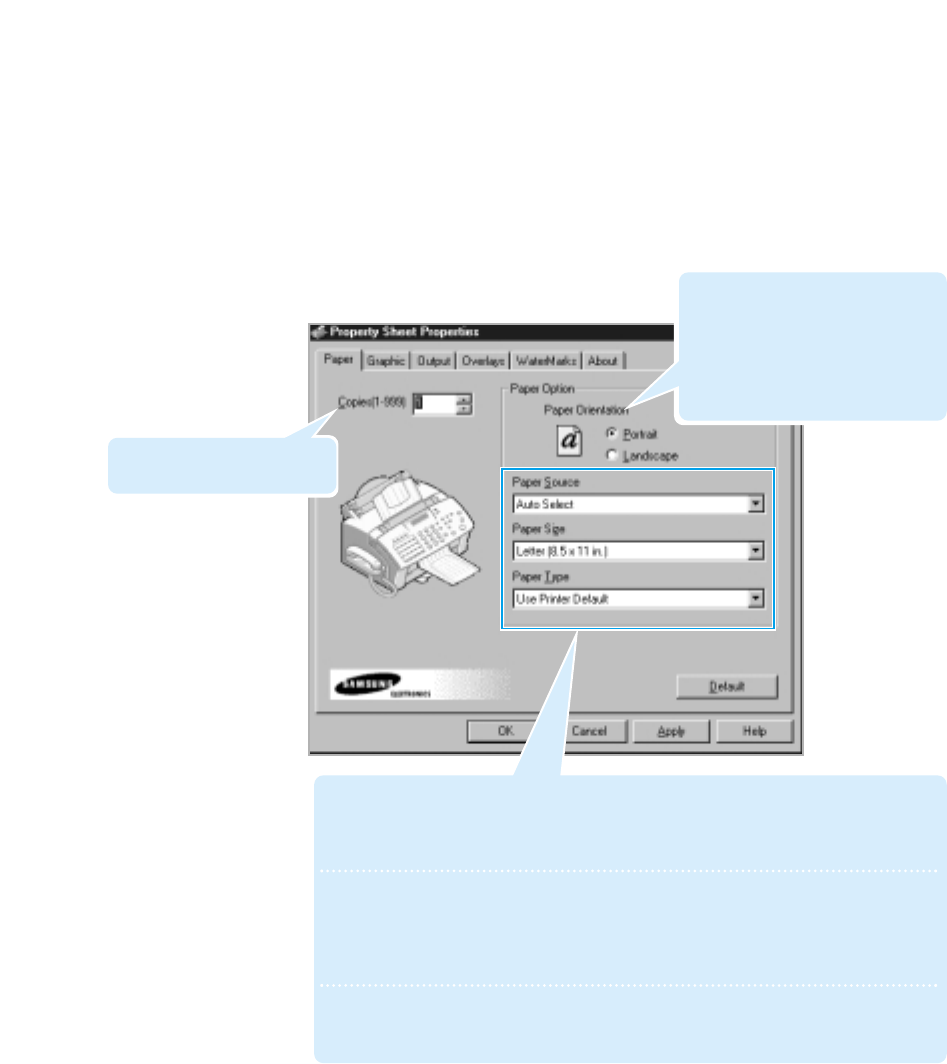
4. The dialogue box allows you to access all information necessary for
using your printer.
If necessary, click the Paper tab to display the settings shown below.
The Paper tab contains the options for setting the basic paper
handling.
• Paper Source: Make sure the Paper Source is set to Auto Select. If you use
the manual input slot on the back of the printer (see page 5.6),
select Manual.
• Paper Size: Select the paper size you have loaded in your printer. If you have a
special size of paper to print on, select Custom and define its size
in the custom paper size dialogue box. The minimum size you can
use is 3 by 5 inches. The maximum size is 8.5 inches by 17 inches.
• Paper Type: The Paper Type option allows you to select the paper type you
want to use.
Select the number of copies
to be printed.
The Paper Orientation option
allows you to select the direction in
which information is printed on a
page. Portrait prints across the
width of the page, letter style.
Landscape prints across the length
of the page, spreadsheet style.
5.11
Printing
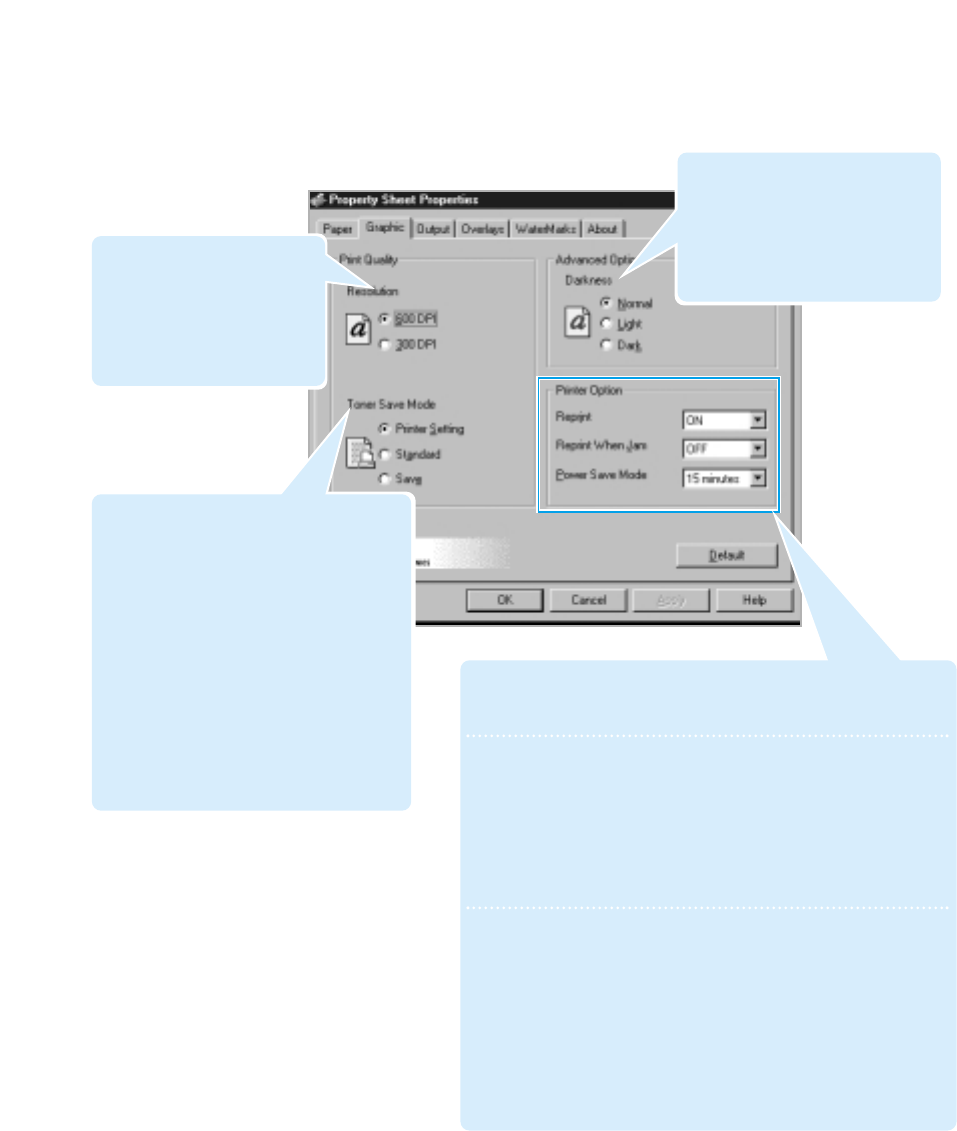
5. If you want to change the setting for print quality, click the Graphic
tab.
The Resolution option allows
you to select the print
resolution. The higher the
setting, the sharper the clarity
of printed characters. Higher
settings may increase the time
it takes to print a document.
You can lighten or darken the
image appearance in your print
jobs. Select Light for bolder line
width or darker grayscale images.
Select Dark for finer line width,
higher definition in graphics, and
lighter grayscale images.
• Reprint: You can set the Reprinting feature to be used or not.
For details on reprinting, see page 5.13.
• Reprint When Jam: With this option ON, the printer keeps
the image for a printed page until the
printer signals that the page has
successfully exited the printer. If a paper
jam occurs, the printer will automatically
reprint all jammed pages after the jam is
cleared.
• Power Save Mode: You can determine the length of time of
the printer waits after a last job before it
goes to a reduced power state. Select the
desired length of time the machine waits.
Selecting OFF will not use the Power Save
mode.
Note: You can turn the this feature on or off by the Power button on
the front panel(see page 1.24). The setting the printer’s
properties will override the setting on on the front panel.
8. When you complete changing print settings, click OK until you see the
Print dialogue box again.
9. Click OK to start printing.
The Toner Save Mode option allows the
printer to use less toner on each page.
• Printer Setting: this feature is
determined by the setting you’ve made
on the control panel of the printer.
• Standard: does not save toner to print
a document.
• Save: allows the printer to use less
toner on each page.
Note: You can turn the this feature on or off by
the Toner button on the front panel(see
page 1.24). The setting on the printer’s
properties will override the setting on
the front panel.
5.12 Printing
Notes:
• Most Windows applications will override settings you specify in the
printer driver. Change all print settings available in the software
application first, and any remaining settings with the printer driver.
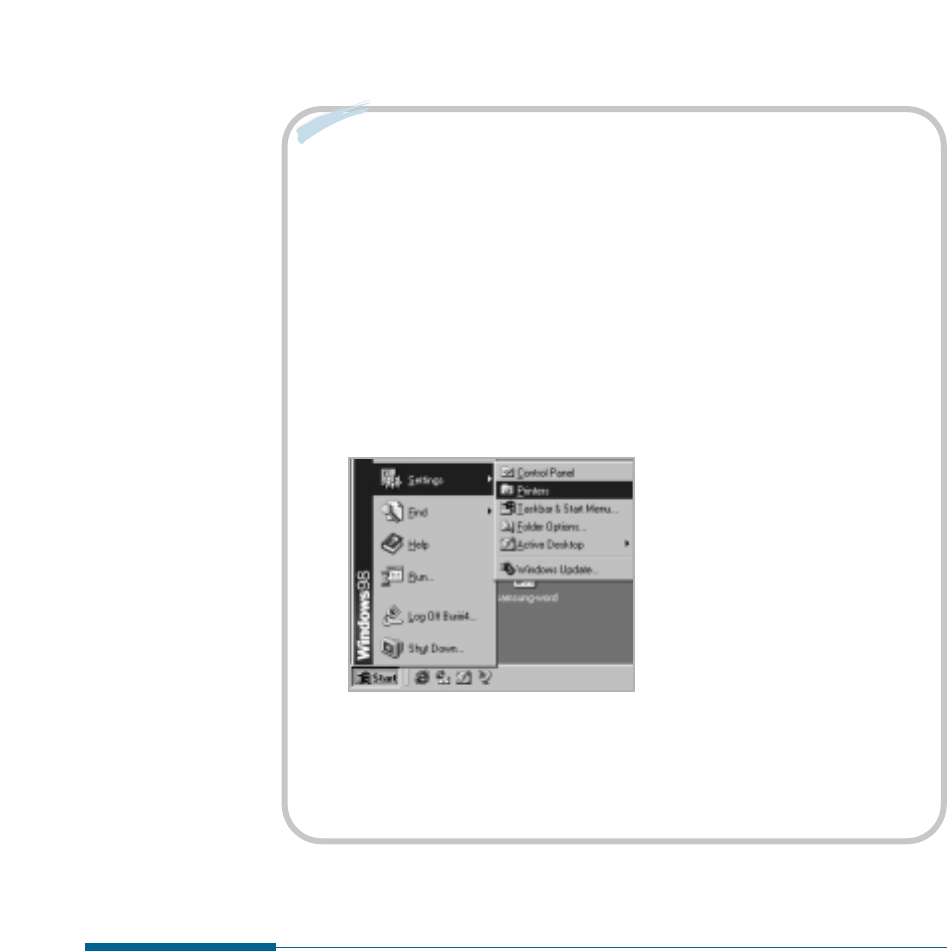
• The settings you change here remain in effect while you are using
the current program. To make your changes permanent, make them
in the Printers folder as follows:
1. Click the Windows Start button.
2. Select Settings, then Printers to open the Printers window.
3. Select the Samsung SF-530 Series.
4. Click the right mouse button and select Properties to open
the properties window.
Cancelling a Print Job
There are two ways to cancel a print job:
• If your print job has not started to print, cancel from the print spooler
in Windows 95, 98, or NT 4.0.
• If your print job is currently printing, press Stop twice on the front
panel of your printer.
CAUTION: If a fax job is currently being transmitted or received, this
procedure will also clear it.

5.13
Printing
Printing Help
Samsung SF-530 series printer has the help screen that can be activated
from the Help button in the printer properties dialogue box. These help
screens give detailed information about the printer features provided by
the SF-530 series printer driver.
From the upper right hand corner, click ? then click on a setting for
more information.
To restore default printer properties setting when you change the print
settings, click Defaults in the properties dialogue box.
Reprinting a Last Page
The Samsung SF-530 series printer’s memory keeps always the last page
of the last job until the printer signals that the paper exits successfully
the printer. If you canceled a print job due to a paper jam or other
problems and you want to know which page was printed lastly, reprint
the last page.
Press Copy/Reprint on the front panel briefly in Standby mode.
Copy/Reprint
Note: If you want to prevent somebody from reprinting your document, you
can turn the Reprinting feature off in the printer’s properties dialog box.
When you turn the feature off in the printer’s properties, the Copy/Reprint
button on the control panel does not perform the reprinting operation. To
disable this feature, proceed as follows.
1. Access the printer properties referring to page 5.9.
2. From the Graphic tab, select OFF in the Reprint drop down list.
When you want to reprint the last page on the control panel, you must
select ON from the list.
3. Click OK.
5.14 Printing
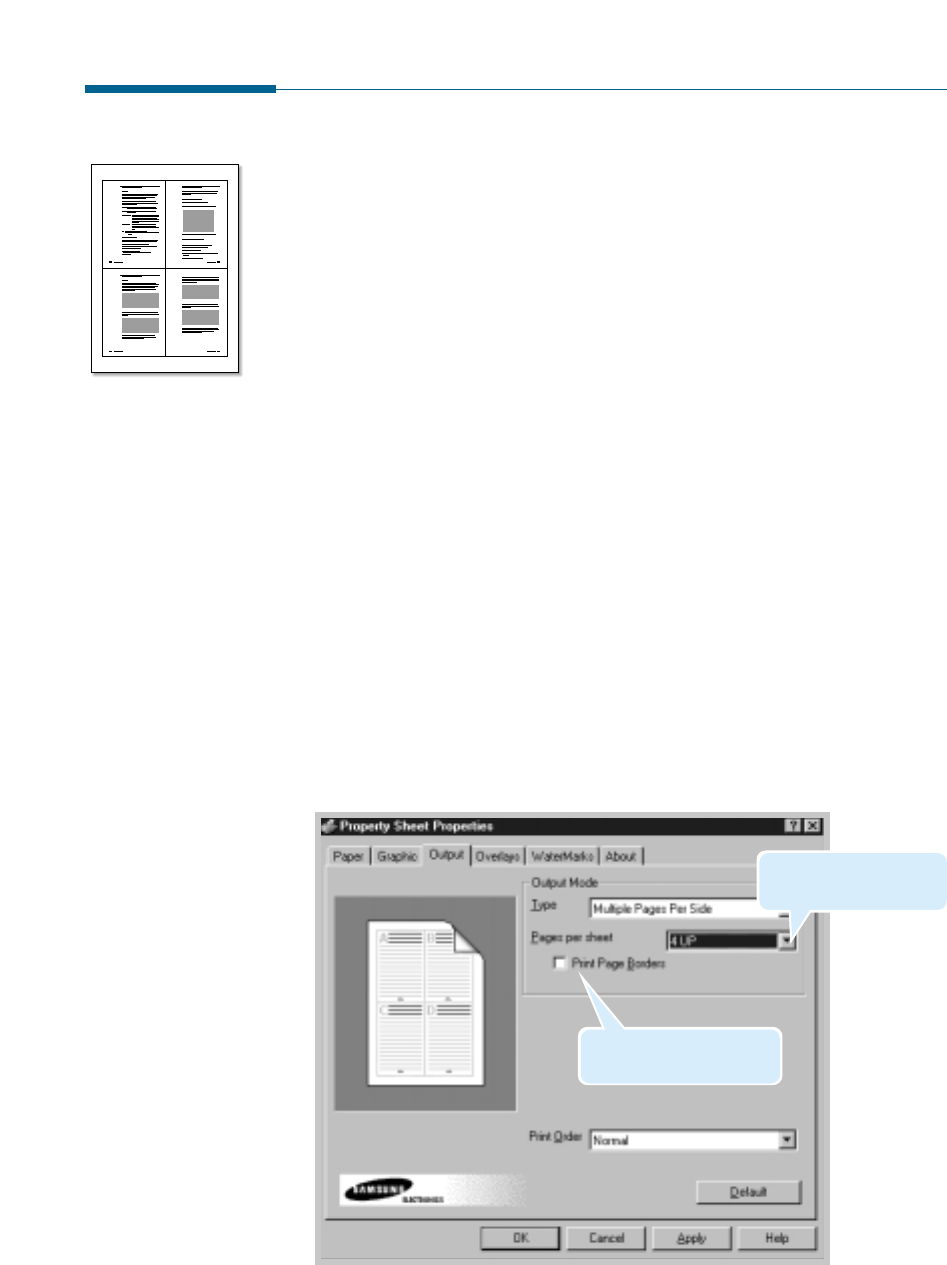
Printing Several Pages Per Sheet
Your printer is equipped with an option that prints several pages on one
sheet of paper by reducing the size of each page and organizing them in
rows and columns.
1. Load letter or A4 paper into the paper input tray.
2. To change the print settings from your software application, access
the printer properties. See page 5.9 to access the printer properties.
From the Paper tab, select the paper orientation, source and size.
3. Click the Output tab, and choose Multiple Pages Per Sheet in the
Type drop down list under the Output Mode section.
4. Select the number of pages to print per sheet (2, 4, 9, or 16) in the
Pages per sheet drop-down list. When you make a selection, the
graphic above the option changes to show how the printed page will
look.
5. Click Print Page Borders when you want each page image in your
document to print with a border.
1 2
3 4
6. Click OK, then start printing.
Select the number of the
pages per one sheet.
Put a check mark to print
borders of each pages.
5.15
Printing
4. Click OK, then start printing.
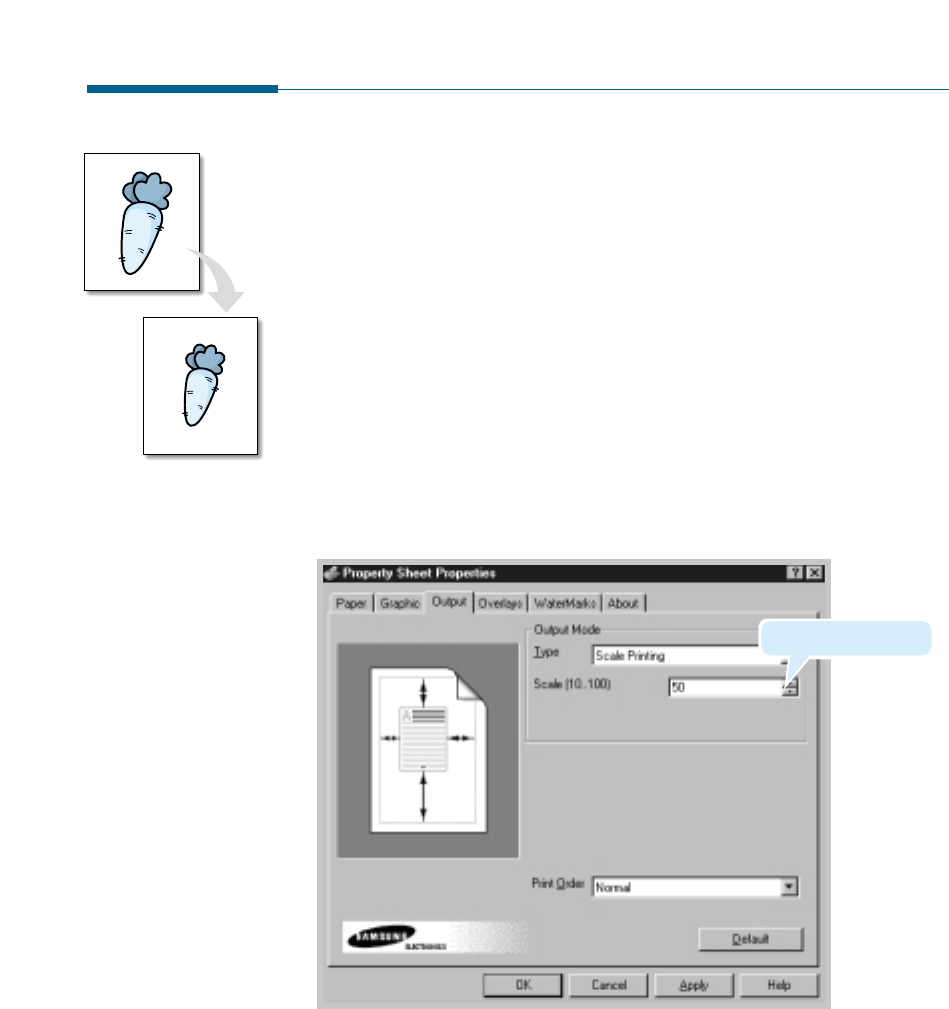
Scaling Your Document
This printer feature allows you to scale your print job on a page.
1. When you change the print settings from your software application,
access the printer properties. See page 5.9 to access the printer
properties.
2. Click the Output tab, and select Scale Printing in the Type drop
down list under the Output Mode section.
3. Enter the desired scaling rate in the Scale input field.
You can also click the ➐or ❷buttons.
Select the scaling rate
5.16 Printing
4. Click OK, then start printing.
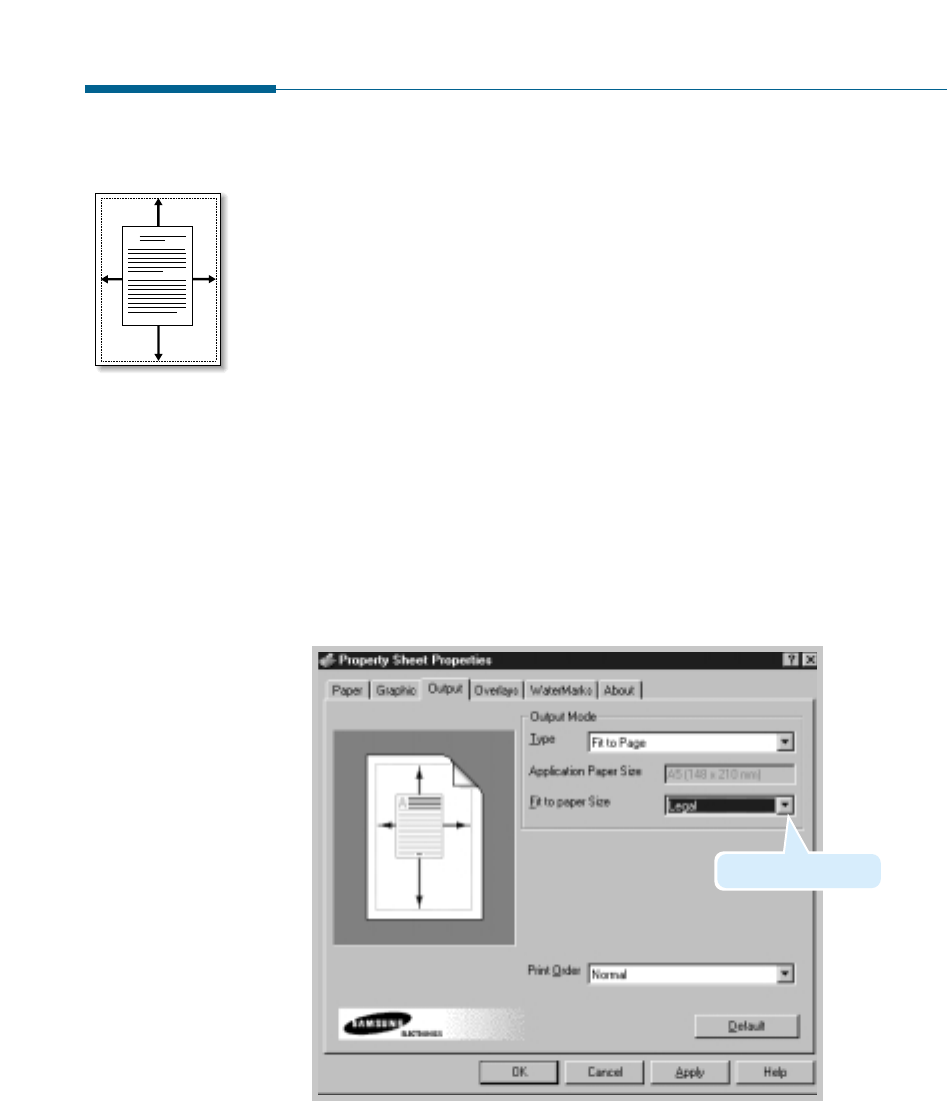
Fitting Your Document To a Selected Paper
Size
This printer feature allows you to scale your print job to any selected
paper size regardless of the digital document size. This can be useful
when you want to check fine details on a small document.
1. When you change the print settings from your software application,
access the printer properties. See page 5.9 to access the printer
properties.
2. Click the Output tab, and select Fit to Page in the Type drop down
list under the Output Mode section.
3. You’ll see the Application page size and be prompted to select the Fit
to Paper Size. Select the correct size from the drop-down list.
A
Select the paper size
5.17
Printing
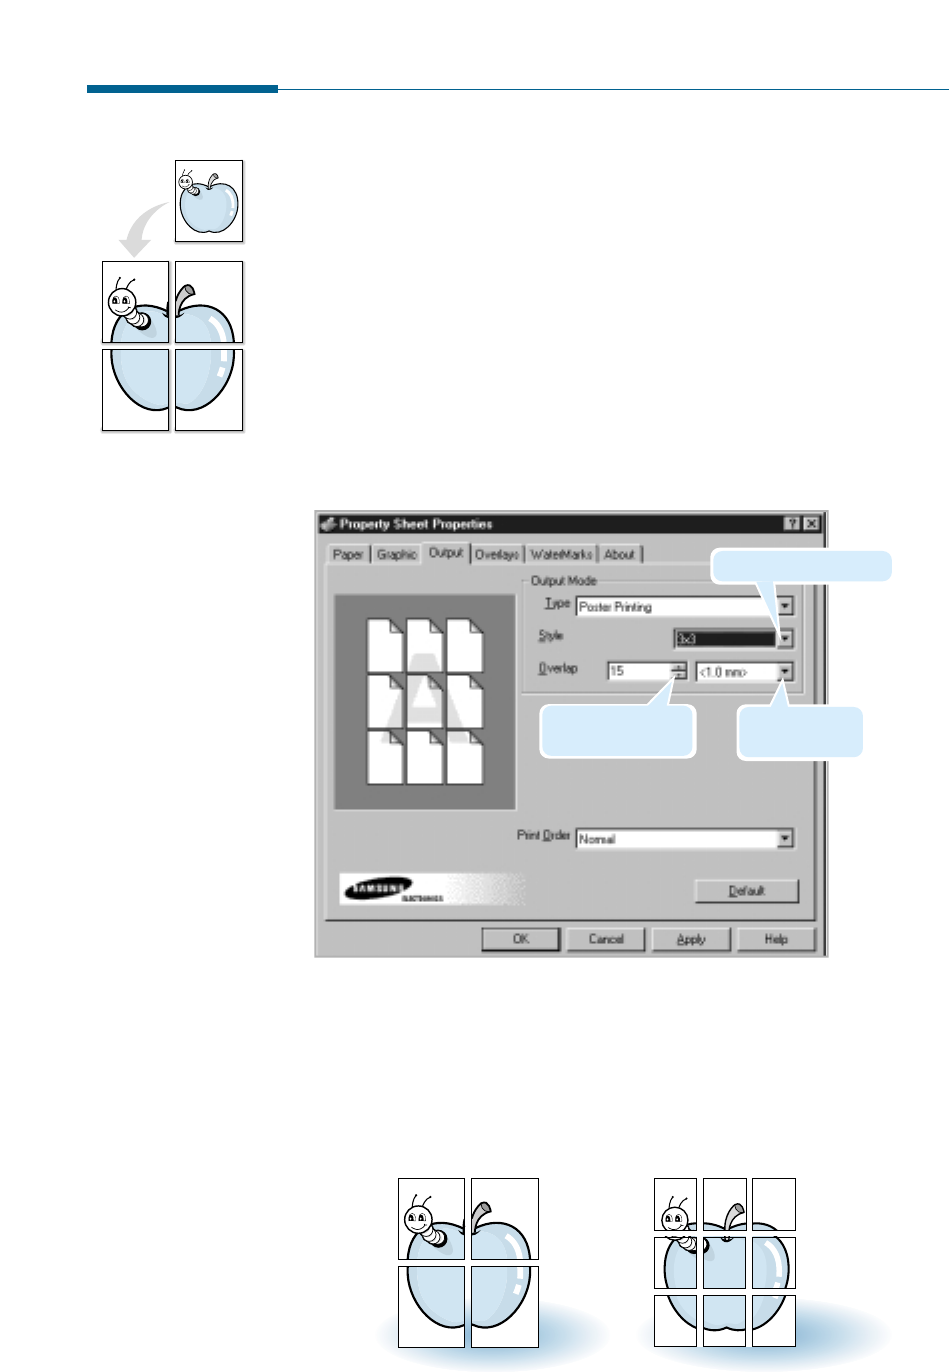
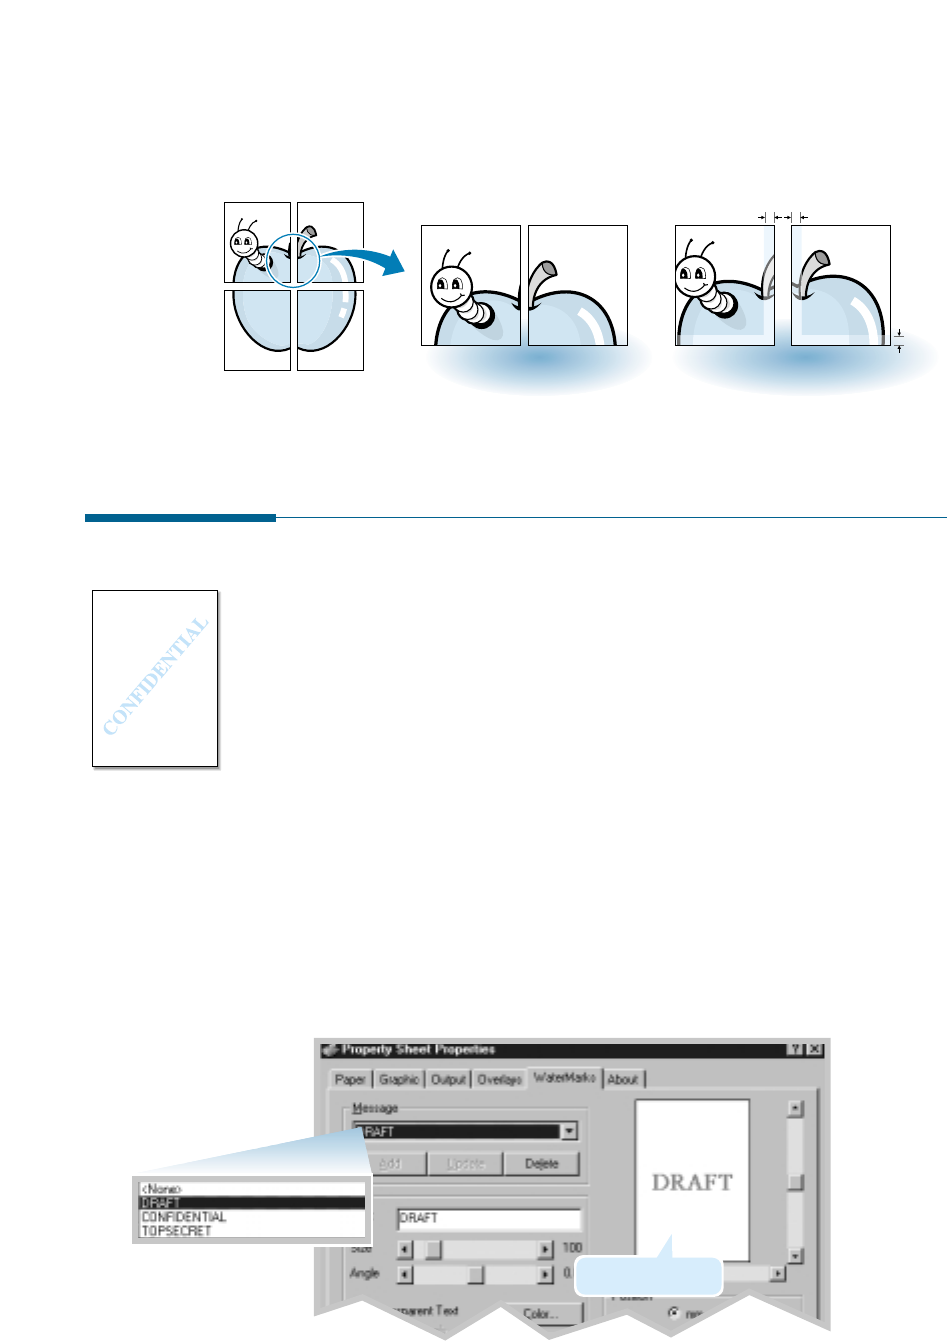
Printing Posters
This feature allows you to print a single-page document onto up to 36
sheets of paper which can be pasted together to form one poster-size
document.
1. To change the print settings from your software application, access
the printer properties. See page 5.9 to access the printer properties.
From the Paper tab, select the paper orientation, source and size.
2. Click the Output tab, and Poster Printing in the Type drop down
list under the Output Mode section.
Select the poster style.
Specify the area to
be overlapped.
Switch between
mm or inch.
➛➛☎☎☎☎
➛➛☎☎☎☎2 x 2 ➛➛☎☎☎☎
➛➛☎☎☎☎3 x 3
3. To determine the scaling factor, select the Style; 2x2, 3x3, 4x4, 5x5
or 6x6.
For example, if you select 2x2, the output will be automatically
stretched to cover 4 physical pages.
5.18 Printing
➐➐☎☎☎☎
➐➐☎☎☎☎Overlap=0 ➐➐☎☎☎☎
➐➐☎☎☎☎Overlap=5mm
5 mm
5 mm
5. Click OK, then start printing.
4. You may specify an overlap in millimeter or inch to make it easier to
reconstruct the resulting poster.
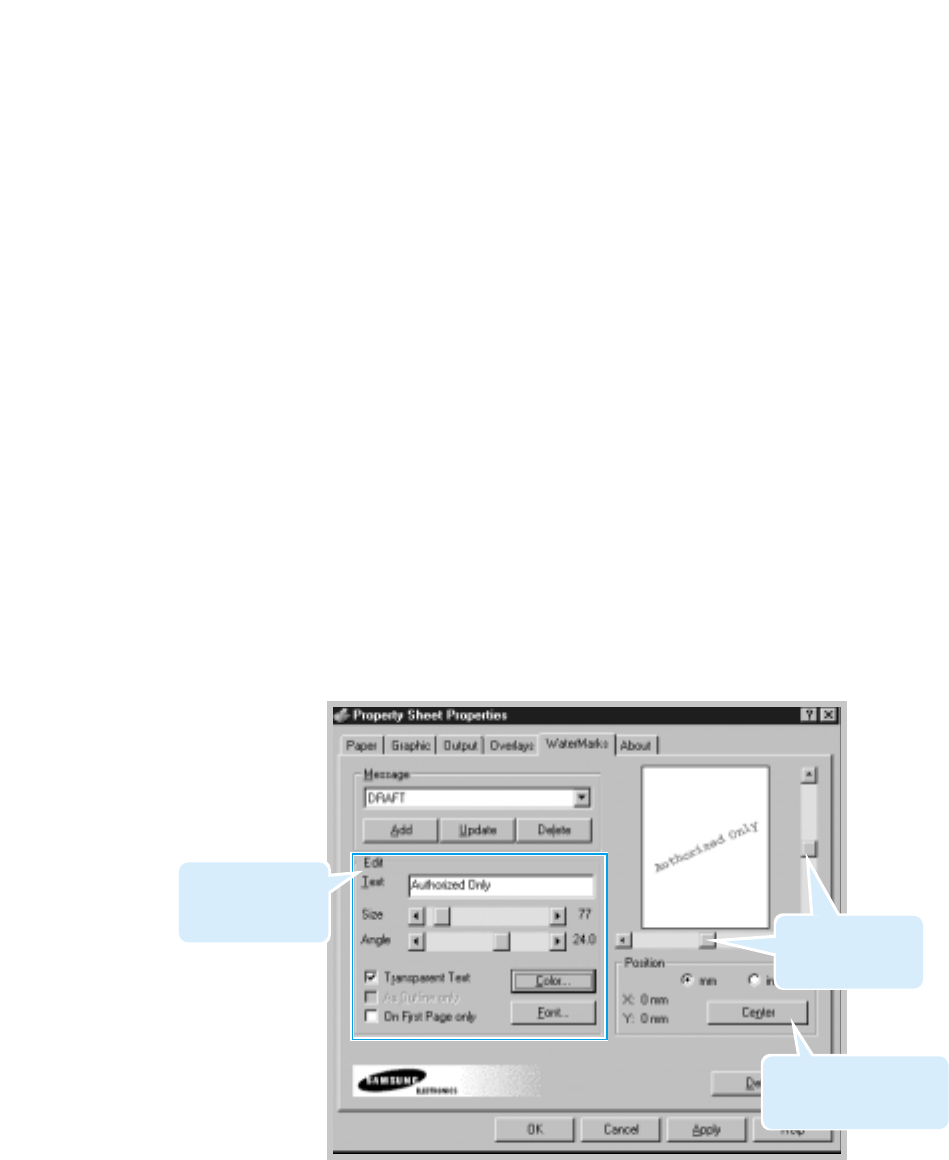
Printing Watermarks
The Watermark option allows you to print text over an existing
document. For example, you may want to have large gray letters reading
“Draft” or “Confidential” printed across the first page or all pages of a
document.
There are several predefined watermarks that come with the SF-530
series, and they can be modified or you can add new ones to the list.
To use an existing watermark
1. When you change the print settings from your software application,
access the printer properties. See page 5.9 to access the printer
properties.
2. Click the Watermark tab, and select the desired watermark in the
Message drop-down list. You will see the selected watermark in the
preview window.
3 Click OK, then start printing.
preview window
5.19
Printing
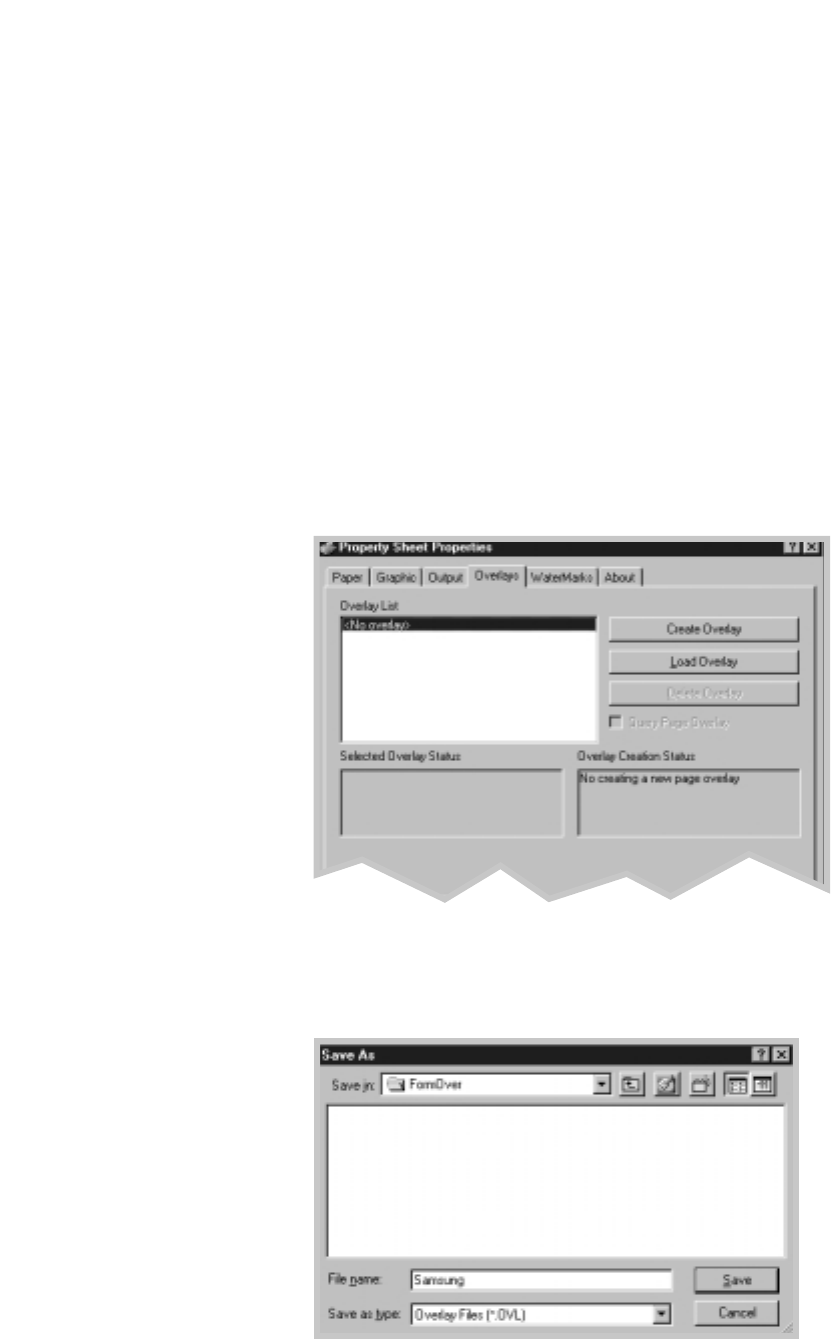
To create or edit a watermark
1. When you change the print settings from your software application,
access the printer properties. See page 5.9 to access the printer
properties.
2. Click the Watermark tab, and enter the desired text message in the
Text field. This will be displayed in the preview window. The preview
window is provided so that you can see how the watermark will
appear on the printed page.
3. Select the desired watermark options. You can select the font type
and size, color and angle. There are three checkboxes at the bottom
of the dialog box:
• Transparent Text – Allows the document to show through the
watermark.
• As Outline Only – Prints the text outline of the watermark. This
setting globally effects all watermarks in the list.
• On First Page Only – Prints the watermark only on the
first page.
Use these scroll
bars to adjust the
position.
Use this button to move
the watermark to the
center of the page.
Use these options
to edit or create a
watermark.

5.20 Printing
4. If you have created a new or edited an existing watermark, the Add
and Update button is enabled.
To add a new watermark to the list, click Add.
5. If you want to edit, select the desired watermark from the list, edit,
then click Update.
6. When you complete the edit, click OK, then start printing.
To stop printing the watermark, select None in the Message drop-down
list.
To delete a watermark
1. When you change the print settings from your software application,
access the printer properties. See page 5.1 to access the printer
properties.
2. From the Watermark tab, select the watermark you want to delete in
the Messages drop-down list.
3. Click Delete.
4. Click OK.
WORLD BEST
Dear ABC
Regards
Using Page Overlay
What is an Overlay?
An overlay is text and/or images stored in the computer HDD as a
special file format that can be printed on any document you choose.
Overlays are often used to take the place of preprinted forms and
letterhead paper. Rather than using preprinted letterhead, for example,
you can create an overlay containing the exact same information as is
currently on your letterhead. Then when you want to print a letter with
your company’s letterhead, you do not need to load preprinted
letterhead paper in the printer. You need only to tell the printer to print
the letterhead overlay on your document.
5.21
Printing
Creating a New Page Overlay
To use a page overlay, you must create a new page overlay containing
your logo or image.
1. Create or open a document containing a text or image you want to
use for page overlay. Position the items exactly as you wish them to
appear when printed as an overlay. If needed, save the file for later
use.
2. Select Print from the File menu. Then click Properties in the
application’s Print dialog box to access the printer properties. For
details, see page 5.9.
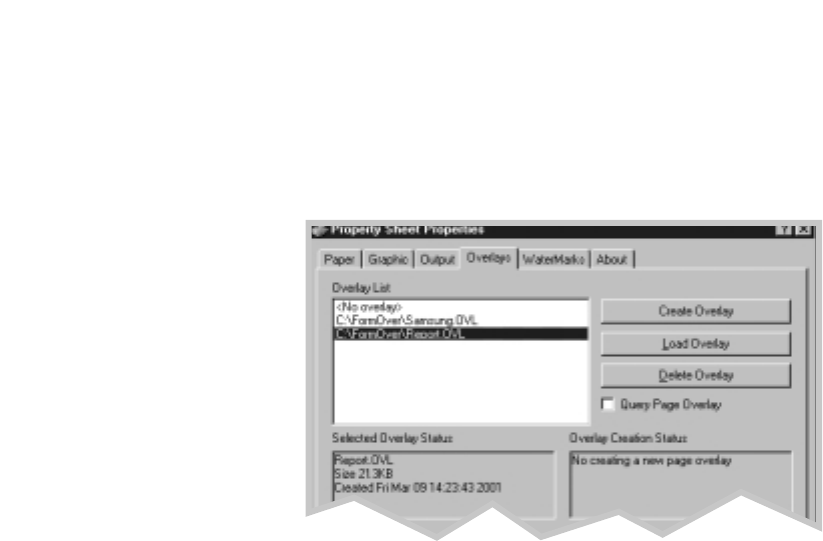
3. Click the Overlays tab, and click Create Overlay.
4. In the Create Overlay dialog box, type a name of up to eight
characters in the File name box. Select the destination path if
necessary.

5.22 Printing
5. Click OK. You will see the name in the Overlay List box.
6. Click OK or Yes until you complete the creation.
The file is not printed out. Instead it will be stored on your computer
HDD disk.
Note: The overlay document size must be the same as documents you will
print with the overlay.
Using Page Overlay
After an overlay has been created, it is ready to be printed with your
document. To print an overlay with a document:
1. Create or open the document you want to print.
2. When you change the print settings from your software application,
access the printer properties. See page 5.9 to access the printer
properties.
3. Click the Overlays tab, and select the desired overlay from the
Overlay List box.
4. If the desired overlay file does not appear in the Overlay List box,
click Load Overlay, and select the overlay file.
If you have stored the overlay file you want to use into an external
source, you can also load the file when you access this Load Overlay
window.
5.23
Printing
After you select the file, click OK. The file is now shown in the
Overlay List box and is available for printing. Select the overlay from
the Overlay List box.
5. If necessary, click the Query Page Overlay check box. If this box is
checked, a message box will appear each time you submit a document
for printing, asking you to confirm your wish to print an overlay on your
document.
Answering Yes to the message box means that the selected overlay will
be printed with your document.
Answering No to the message box cancels overlay printing.
If this box is empty, and an overlay has been selected, the overlay will
be automatically printed with your document.
6. Click OK or Yes until the printing starts.
The selected overlay will be downloaded with your print job and printed
on your document.
Deleting a Page Overlay
You can delete page overlays that are no longer used.
1. In the printer properties dialog box, click the Overlays tab.
2. Select the overlay you want to delete from the Overlay List box.
3. Click Delete Overlay.
4. Click OK until you exit the Print dialog box.

5.24 Printing
Printing in a Network Environment
If you work in a network environment, you can connect your SF-530
series printer directly to a selected computer (called the “host
computer”) on the network. The printer can then be shared by other
users on the network through a Windows 9x, 2000 or NT 4.0 network
printer connection.
Note: You need to install the Samsung SF-530 Series printer driver on each
computer that will print documents to the printer.
Setting Up Host Computer
1. Start Windows.
2. From the Start menu, select Control Panel, and double-click on the
Network icon.
3. Check the File and Print Sharing box, then click OK. Close the
window.
4. Click Start and select Printers from Settings, then double-click your
printer name.
5. Select Properties in the Printers menu.
6. Click the Sharing tab, then check the Shared As box. Fill in the
Shared Name field, then click OK.
Setting Up Client PC
1. Right-click the Start menu, and select Explorer.
2. Open your network folder in the left column.
3. Right-click the shared name, and select Capture Printer Port.
4. Select the port you want, check the Reconnect at log on box, then
click OK.
5. From the Start menu, select Settings, then Printers.

5.25
Printing
6. Double-click your printer icon.
7. From the Printers menu, select Properties.
8. Press the Details tab, select the printer port, then click OK.
Printing a Document
Print your document following the procedures described in page 5.9.

chapter
This chapter provides suggestions for high-quality and
economical operating and information for maintaining the
toner cartridge and the machine.
The topics included in this chapter are:
◆ Guidelines for Maintenance
◆ Clearing Memory
◆ Clearing the OPC Drum
◆ Adjusting Shading
◆ Setting the Machine to be checked by Phone
◆ Sending Toner Low Information to the Service Company
◆ Cleaning the Machine
◆ Caring for the Toner Cartridge
6
6

6.1
Maintenance
Guidelines for Maintenance
For optimal performance of the SF-530 series, follow these guidelines:
• Place the machine on a stable surface.
• Do not install your machine near devices that contain magnets or
generate magnetic fields, such as speakers.
• Keep your machine clean. Dust accumulation can prevent the unit from
operating properly.
• For your safety, unplug the power cord from the machine during
electrical storms.
• Lift the machine from the bottom only. Do not lift the unit by the front
panel or any of the trays.
Clearing Memory
You can selectively clear information stored in your machine’s memory.
1. Press Setup on the control panel. The display shows the first menu;
FAX NUMBER/NAME.
2. Press ➛or ❿until ‘MEMORY CLEAR’ appears, then press Start/Enter.
The display shows the items you can clear.
• FAX NUMBER/NAME: your fax number and name are cleared from
the machine’s memory.
• DIAL/SCHEDULE: clears the one-touch, speed dial, or group dial
numbers stored in the memory. In addition, all
the Schedule Job operations you have reserved
are also cancelled.
• E-MAIL INFORM: clears all the registered e-mail transmission
(on SF-535e) and reception information.
• JOURNAL: clears all records of transmissions & receptions.
• DEFAULT SETUP: restores all the option settings to factory default.
3. Press ➛or ❿until you find the item you want to clear, then press
Start/Enter. The display asks you to confirm your selection.
4. Press Start/Enter to confirm. The selected memory is cleared, then
the display asks you to continue clearing the next item.
5. Repeat steps 3 through 5 to clear another item.
Or, to return to Standby mode, press Stop.

6.2Maintenance
Adjusting Shading
The scanning unit becomes dirty, it can alter the shading value. If your
print has black lines or is blurred, adjust the shading setting. Take the
following steps:
1. Load a sheet of white paper into the document feeder.
2. Press Setup on the front panel.
The display shows the first setup menu; FAX NUMBER/NAME.
3. Press ➛or ❿until ‘MAINTENANCE’ appears,then press Start/Enter.
The display shows the first menu; CLEAN DRUM.
4. Press ➛or ❿until you find ‘ADJUST SHADING’, then press
Start/Enter.
The white paper is scanned through the document feeder.
Cleaning the OPC Drum
If you are getting streaks or spots on your print, you may clean the OPC
drum.
1. Make sure that the paper is loaded in the automatic input tray.
2. Press Setup on the control panel.
The display shows the first setup menu; FAX NUMBER/NAME.
3. Press ➛☎or ❿until ‘MAINTENANCE’ appears, then press Start/Enter.
4. The display shows the first menu, ‘CLEAN DRUM’, then press
Start/Enter.
The machine automatically pulls in a sheet of paper, and prints it out.
The toner particles on the OPC drum surface are fixed to the paper.
5. Press Stop to return to Standby mode.

6.3
Maintenance
Setting the Machine to be Checked by Phone
The Remote Test feature allows your machine to be checked out by a
service company at a remote place by phone.
1. Press Setup on the control panel.
The display shows the first setup menu; FAX NUMBER/NAME.
2. Press ➛or ❿until ‘MAINTENANCE’ appears, then press Start/Enter.
The display shows the first menu; CLEAN DRUM.
3. Press ➛or ❿until you find ‘REMOTE TEST’, then press Start/Enter.
4. Press ➛or ❿to turn this feature ON or OFF, then press Start/Enter.
If you want to protect your machine from being opened by an
unauthorized person, select OFF.
5. Press Stop to return to Standby mode.
Sending Toner Low Information to the
Service Company
If you have set this Notify Toner Low menu option to ON, when the toner
cartridge needs to be replaced, your machine automatically sends a fax
to your service company or the dealer to notify them that your machine
requires a new toner cartridge. This feature will be activated only when
the phone number of the service company or the dealer is stored in your
machine’s memory by technician. Ask your dealer for more information.
1. Press Setup on the control panel.
The display shows the first setup menu; FAX NUMBER/NAME.
2. Press ➛or ❿until ‘MAINTENANCE’ appears, then press Start/Enter.
The display shows the first menu; CLEAN DRUM.
3. Press ➛☎or ❿until you find ‘NOTIFY TONER LOW’, then press
Start/Enter.
4. Press ➛☎or ❿to turn this feature ON or OFF, then press Start/Enter.
5. Press Stop to return to Standby mode.

6.4Maintenance
Cleaning the Machine
To maintain print quality, follow the cleaning procedures below every
time the toner cartridge is replaced or whenever print quality problems
occur. As much as possible, keep your machine free from dust and
debris.
Note:
• Do not use ammonia-based sprays or volatile solvents such as thinner to
clean the machine, as these can damage the machine’s surface.
• While cleaning the inside of the machine, be careful no to touch the
transfer roller (located underneath the toner cartridge). The oil from your
hands on the roller can cause print quality problems.
Cleaning the Outside
Wipe the outside surfaces of your machine with a soft, clean, and lint-
free cloth. You can dampen the cloth slightly with water, but be careful
not to let any water drip onto the machine or inside it.
Cleaning the Inside
During the printing process, paper, toner, and dust particles can
accumulate inside the machine. Over time, this buildup can cause print
quality problems such as toner specks or smearing. Cleaning inside the
printer will eliminate or reduce these problems.
1. Turn the machine off and unplug the power cord, then wait for the
machine to be cool.
2. Pulling the cover release buttons toward you, open the cover and
remove the toner cartridge.
Note: To prevent damage to the toner cartridge, do not expose it to
light for more than a few minute. Cover it with a piece of paper, if
necessary.
3. With a dry, lint-free cloth, wipe away any dust and spiled toner from
the toner cartridge area and the toner cartridge cavity.
6.5
Maintenance
Cleaning the Document Scanner
To keep your machine working properly, occasionally clean the white
roller, ADF rubber, and the scanning glass.
Note: Do not turn the power off to clean the scanner, as documents stored
in the memory will be lost.
1. Lift the front panel by grabbing the panel along the top edge and
open the cover.
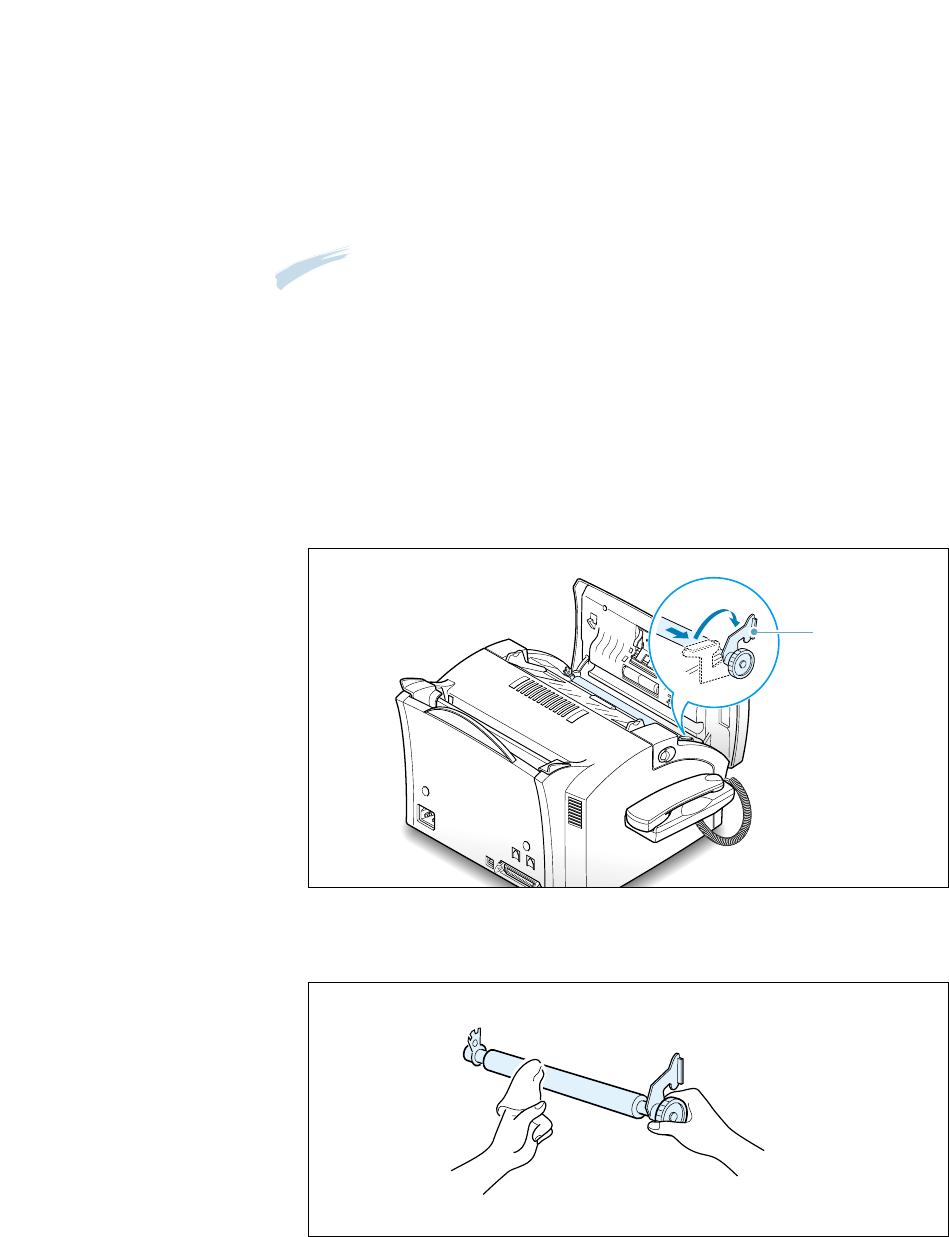
2. Disassemble the white roller as follows:
Pull the handle of the bushing on the end of the roller slightly
outward(A), rotate it until it reaches a slot(B), then pull the roller
upward.
A
B
bushing
3. Wipe the roller surface with a soft cloth dampened with water.
6.6Maintenance
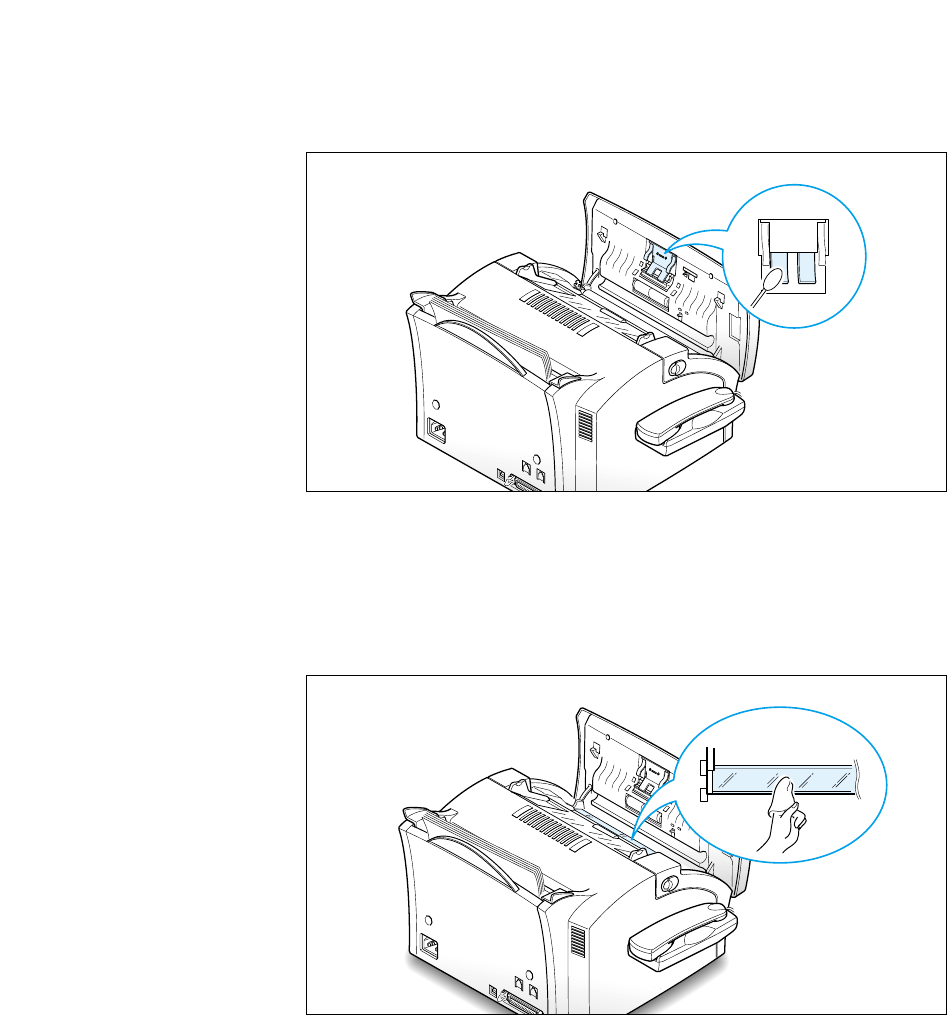
4. Clean the ADF rubber piece.
0
0
0
0
0
0
0
0
0
0
0
0
0
0
0
0
0
0
0
0
0
0
0
0
0
0
0
0
0
0
0
0
0
0
0
0
0
0
0
0
0
0
0
0
0
0
0
0
0
0
0
0
0
0
0
0
0
0
0
0
0
0
0
0
0
0
0
0
0
5. Carefully wipe the scanning glass with a soft, dry cloth.
If the glass is very dirty, first wipe it with a slightly dampened cloth,
then with a dry cloth. Be very careful not to scratch the glass surface.
0
0
0
0
0
0
0
0
0
0
0
0
0
0
0
0
0
0
0
0
0
0
0
0
0
0
0
0
0
0
0
0
0
0
0
0
0
0
0
0
0
0
0
0
0
0
0
0
0
0
0
0
0
0
0
0
0
0
0
0
0
0
0
0
0
0
0
0
0
6. Replace the roller in reverse order, and then close the front panel
firmly until it clicks into place.
6.7
Maintenance
Caring for the Toner Cartridge
Expected Cartridge Life
The life of your toner cartridge depends on the amount of toner used in
each print job. For instance, when you print a typical business letter with
about 5% page coverage, you can expect a toner cartridge life of
approximately 2,500 pages (1,000 pages only for the toner cartridge
shipped with your machine). The actual number may vary according to
the print density of the page you print. If you print a lot of graphics, you
may need to change the cartridge more often.
You can extend the life of your toner cartridge by using Toner Save Mode
on the printer properties (page 5.11) or on the front panel (page 1.24).
The Toner Save Mode uses less toner than normal printing. The printed
image is much lighter, and is adequate for printing drafts or proofs.
Replacing the Toner Cartridge
When the toner cartridge is near the end of its life, white streaks or hue
changes will occur. You can temporarily re-establish the print quality by
re-distributing the remaining toner in the cartridge.
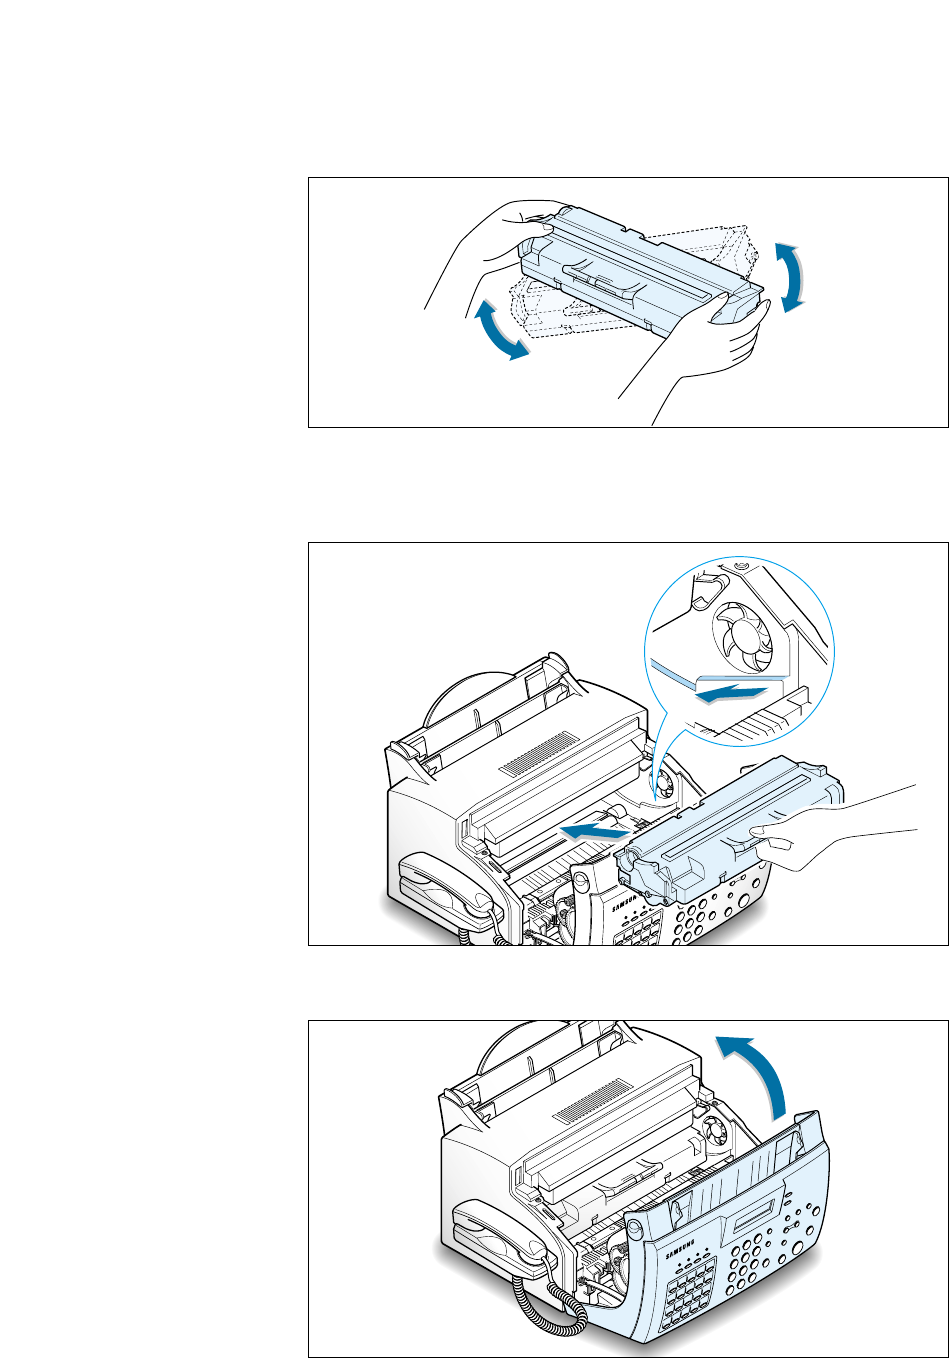
1. Open the cover and remove the toner cartridge.
2. Gently shake the cartridge to distribute the toner evenly inside the
cartridge.
3. Reinstall the cartridge and close the cover.
This is typically successful one time only. When the toner eventually runs
out, only blank pages will print when a print job is sent, or when
a fax is received. At this stage, the toner cartridge needs to be replaced.
See the following page.
6.8Maintenance
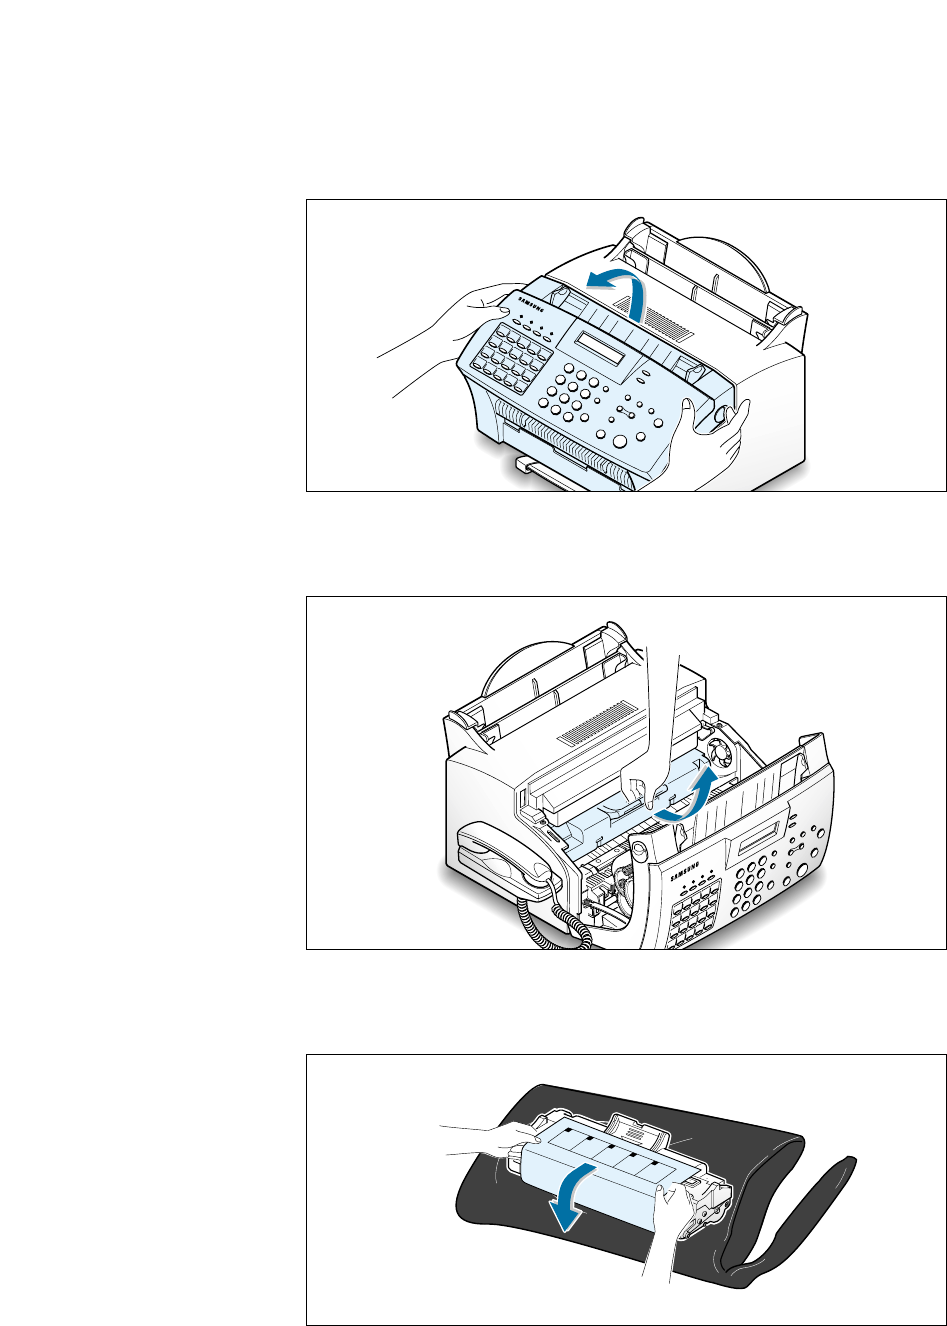
2. Remove the old toner cartridge. Follow the instructions printed on the
cartridge box to recycle the used cartridge.
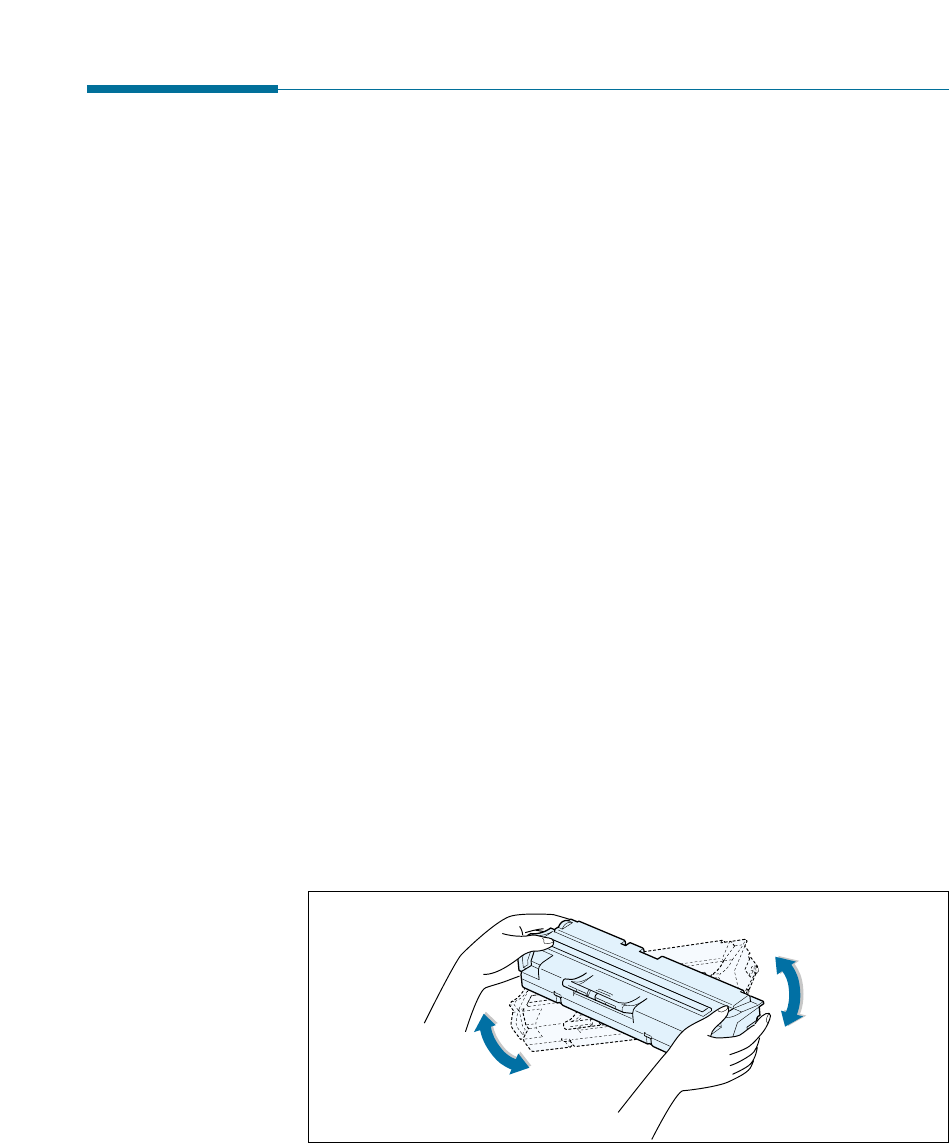
3. Unpack a new toner cartridge from its plastic bag, and then remove
the paper rolled the cartridge.
Take the following steps to replace the toner cartridge:
1. Pulling the cover release buttons toward you, open the cover.
6.9
Maintenance
5. Find the cartridge slots inside the machine, one on each side. Grasp
the handle and slide the cartridge down between the cartridge slots
until it drops into place.
4. Shake the cartridge from side to side 5 or 6 times to distribute the
toner evenly inside the cartridge.
6. Close the cover firmly until it snaps closed.

chapter
7
7
This chapter gives helpful information for what to do if
you encounter a operating error.
It provides information on the following topics:
◆Clearing Paper Jams
◆LCD Error Messages
◆Fax Problems
◆Printer Problems
◆Print Quality Problems

7.1
Troubleshooting
Clearing Jams
Document Jams While Sending a Fax
If a document jams while you are sending it, ‘DOCUMENT JAM’ appears
on the display. Do not pull the document out of the slot. If you do this, it
could harm your machine.
1. Lift the front panel by grabbing the panel along the top edge.
0
0
0
0
0
0
0
0
0
0
0
0
0
0
0
0
0
0
0
0
0
0
0
0
0
0
0
0
0
0
0
0
0
0
0
0
0
0
0
0
0
0
0
0
0
0
0
0
0
0
0
0
0
0
0
0
0
0
0
0
0
0
0
0
0
0
0
0
0
2. Carefully remove the jammed document.
0
0
0
0
0
0
0
0
0
0
0
0
0
0
0
0
0
0
0
0
0
0
0
0
0
0
0
0
0
0
0
0
0
0
0
0
0
0
0
0
0
0
0
0
0
0
0
0
0
0
0
0
0
0
0
0
0
0
0
0
0
0
0
0
0
0
0
0
0
3. Close the front panel firmly until it clicks into place.

7.2 Troubleshooting
Paper Jams While the Machine is Printing
By carefully selecting the paper type and loading them properly, you
should be able to avoid most paper jams. If paper jams occur, an error
message appears on the display. Follow the steps below to clear the jam.
To avoid tearing the paper, pull the jammed paper out gently and slowly.
IF JAMMED IN THE PAPER INPUT TRAY
1. Remove the jammed paper by carefully pulling it out of the tray.
2. After you have removed the jammed paper, load the paper with the
print side facing you.
IF JAMMED IN THE PAPER OUTPUT AREA
If the paper jams as it exits to the paper output tray and a long portion
of the paper is visible, pull the paper straight out.
If there is any resistance, and the paper does not move immediately
when you pull, stop pulling. Continue with the next step.
7.3
Troubleshooting
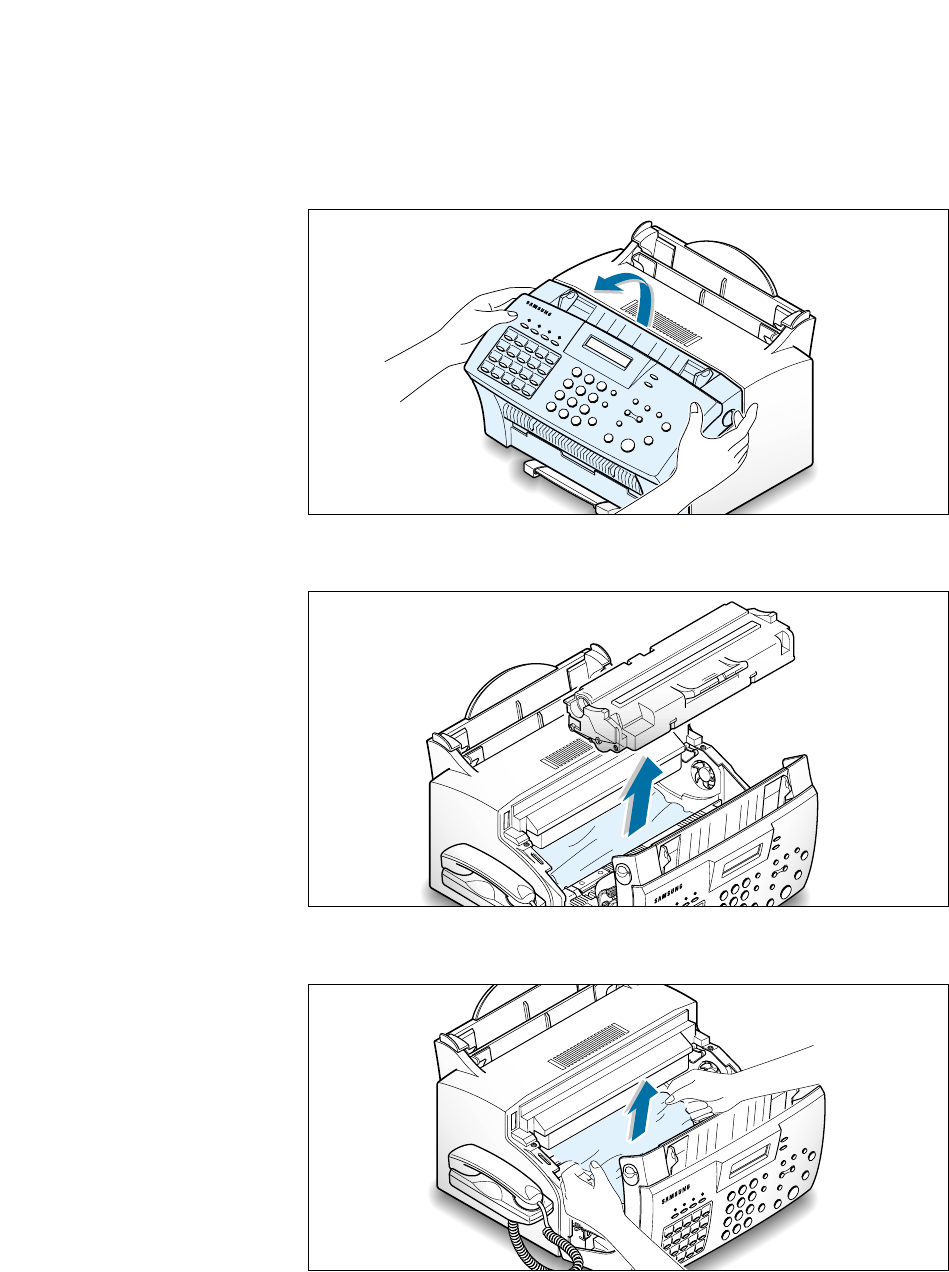
IF JAMMED INSIDE THE MACHINE
1. Pulling the cover release buttons toward you, open the cover.
2. Remove the toner cartridge.
4. Check that there is no other paper inside the machine.
5. Replace the toner cartridge and close the cover.
3. Remove the jammed paper by carefully pulling it out of the machine.

7.4 Troubleshooting
Tips for Avoiding Paper Jams
By carefully selecting print materials and loading them properly, you
should be able to avoid most paper jams. If jams do occur, follow the
steps outlined in “Clearing Jams” starting on page 7.1. If jams occur
frequently, make sure that you are following these preventative tips:
• Follow the procedures in “Loading Paper” on page 1.17 to load paper
properly. Make sure that the adjustable guides are positioned correctly.
• Do not overload the paper. Up to 150 sheets can be loaded in the
automatic paper input tray at a time and the manual input tray holds
only one sheet at a time.
• If you are needed to add more sheets of paper while printing, remove
the remaining paper from the tray at first. Then, reinsert them with the
new paper. Note that adding new paper into the remains in the tray
may cause paper jams or multiple feeding.
• Envelopes with self-stick adhesives may cause wrinkling, creasing, or
even jams and may even damage your machine.
• Fan stacks of labels or transparencies before loading them into the
automatic paper input tray. If jams occur when using the paper input
tray, try feeding one sheet at a time in the manual input tray.
• Do not load wrinkled, creased, damp, or highly curled paper.
• Do not mix paper sizes in the paper input tray.
• Use only recommended print media.
• Make sure that the recommended print side is facing up when loading
it in the paper input tray.
• Keep print media stored in a suitable environment.

7.5
Troubleshooting
LCD Error Messages
Display Meaning Solution
DOCUMENT JAM
DOOR OPEN
LINE ERROR
LOAD DOCUMENT
LSU ERROR
The loaded document has jammed
in the feeder.
Clear the document jam.
The front cover is not securely
latched.
Press down on the cover until
it clicks in place.
Your unit cannot connect with the
remote machine, or has lost
contact because of a problem on
the phone line.
Try again. If failure persists,
wait an hour or so for the line
to clear, then try again.
Or, turn the ECM mode on. See
‘Setting User-Selectable System
Options’ on page 3.2.
You have attempted to set up a
sending operation with no
document loaded.
Load a document and try again.
A problem has occurred in the
LSU (Laser Scanning Unit).
Unplug the power cord and plug
it back in. If the problem still
persists, please call for service.
FUSER ERROR
There occurs a problem in the
fuser unit.
Unplug the power code and
plug it back in. If the problem
still persists, please call for
service.
MEMORY FULL
The memory is full. Either delete unnecessary
documents, or retransmit after
more memory becomes
available, or split the
transmission into more than
one operation.
JAM/NO
CARTRIDGE
Recording paper has jammed
inside the unit, or the toner
cartridge is not installed.
Clear the jam, or install the
cartridge
NO ANSWER
The remote machine has not
answered after all the redial
attempts.
Try again. Make sure the
remote machine is operational.
NO. NOT
ASSIGNED
The one-touch or speed dial
location you tried to use has no
number assigned to it.
Dial the number manually with
the keypad, or assign a number.

7.6 Troubleshooting
Display Meaning Solution
PAPER JAM 2
POLLING ERROR
POWER FAILURE
WARMING UP
Jammed paper still remains
inside the unit.
Clear the jam. See page 7.1.
The remote fax machine you
want to poll is not ready to
respond to your poll.
Or
When setting up to poll another
fax machine, you have used an
incorrect poll code.
The remote operator should know
in advance that you are polling
and have their fax unit loaded
with the original document.
Enter the correct poll code.
A power failure has occurred. If documents have been stored in
the memory, a ‘Power Failure
Report’ will be automatically
printed when the power is
restored.
TONER EMPTY
The printer is warming up and
is off-line.
Wait until the machine is on-line.
The toner cartridge has run out.
The machine stops.
Replace with a new toner
cartridge.
TONER LOW
The toner is almost empty. Take out the toner cartridge and
gently shake it. By doing this,
you can temporarily re-establish
printing operations.
RETRY REDIAL ?
The machine is waiting for a
specified time interval to redial
a previously busy station.
You can press Start/Enter to
immediately redial, or Stop to
cancel the redial operation.
RECEIVE ERROR
A fax has not been received
successfully.
A problem with the facsimile
communications has occurred.
Try again.
SEND ERROR
Your fax has not gone through
successfully.
A problem with the facsimile
communications has occurred.
Ask the sender to try again.
PAPER JAM 0
Recording paper has jammed in
the paper feeding area.
Press Stop and clear the jam.
See page 7.1.
NO PAPER
The recording paper has run
out.
Load the recording paper.
OVER HEAT
The printer part in your unit
has overheated.
Please wait until it cools down.
If you cannot solve the problem,
please call for service.

7.7
Troubleshooting
Symptom
The machine is not working,
there is no display and the
buttons are not working.
Cause and Solution
• Unplug the power cord and plug it in again.
• Check that your socket is active.
No dial tone.
• Check that the phone line is connected properly.
• Check that the phone socket in the wall by plugging in
another phone.
The numbers stored in the
memory do not dial correctly.
• Make sure that the numbers are stored in the memory
correctly.
• Print a Phonebook list. See page 3.38.
The document does not feed
into the machine.
• Make sure that the document is not wrinkled and you
are putting it in correctly. Check the document is the
right size, not too thick or thin.
• Make sure that the cover is firmly closed.
You cannot receive faxes
automatically.
• The FAX mode should be selected.
• Is there paper in the machine?
• Check if the display shows ‘MEMORY FULL.’
Your machine will not send
anything.
• Make sure that the document is loaded face down.
• ‘TX’ should show up on the display.
• Check the other machine you are sending to, to see if
it can receive your fax.
Your machine cannot receive
faxes manually.
• Did you hang up the handset of the machine before you
pressed Start/Enter?
Fax Problems

7.8 Troubleshooting
Symptom
You cannot poll another
machine.
Cause and Solution
• The fax machine you are polling may be using a poll
code.
The incoming fax has blank
spaces or you received a
poor-quality copy.
• The machine sending you the fax may be faulty.
• The fax machine sending you a fax may have a dirty scan
glass.
• A noisy phone line can cause line errors.
• Check your machine by making a copy.
• The toner cartridge may be empty.
Are some of the words on
the incoming fax stretched?
• The machine sending you the fax had a temporary
document jam.
There are lines on the copies
or documents you send.
• Check your scan glass for marks, and clean it.
See page 6.5.
The machine dials a number,
but fails to make a
connection with another fax
machine.
• The other fax machine may be turned off, out of paper,
or cannot answer incoming calls. Speak with the other
machine operator and ask them to sort out the problem.
You cannot store a document
in the memory.
• There may not be enough memory to store the
document. If the display shows a ‘MEMORY FULL’
message, delete any documents you no longer need from
the memory, then restore the document.
Blank areas appear at the
bottom of each page or on
other pages, with only a
small strip of text printed at
the top.
• You may have chosen the wrong paper settings in the
user option setting. See page 3.3 to choose a proper
paper size.

7.9
Troubleshooting
Problem Possible Cause and Remedy
• A paper jam has occurred. Remove the jammed paper.
See page 7.1.
• The toner cartridge is not installed properly. Remove and
reinsert the toner cartridge.
• The printer cable is not connected properly. Check the
printer cable connection.
• The printer cable is defective. Swap the cable with one
known to work.
• The port setting is incorrect. Check the Windows printer
settings to make sure that the print job is being sent to
the correct port (for example, LPT1).
• The printer properties may be configured incorrectly.
Check the application to make sure that all print settings
are correct.
• The printer driver may be incorrectly installed. Uninstall
the MFP driver and reinstall the MFP driver. Then try
printing a test page. Refer to ‘Uninstalling SmarThru
Software’ on page 2.19.
• Paper has not been inserted correctly. Remove and
reinsert the paper correctly. See ‘Using Automatic Paper
Input Tray’ on page 5.3 or ‘Using Manual Paper Input Tray’
on page 5.6.
• There is too much paper in the paper input tray.
Remove some of the paper from the input tray.
• There is too much paper in the paper input tray. Remove
some of the paper from the tray. (If printing onto
envelopes or labels, insert them one at a time in the
manual paper input tray.)
• The paper setting method may be incorrect. If printing
onto envelopes, insert the envelopes so that there is a gap
of approximately 1 mm (1/32”) between the left and right
edge of the envelopes at the paper guide.
Your machine does not
print.
General Printing Problems (SF-535e only)
The paper is not fed into
the machine.
The paper keeps jamming.

7.10 Troubleshooting
Problem Possible Cause and Remedy
• The page layout is too complex. Simplify the page layout
and remove any unnecessary graphics from the document
if possible.
• The page orientation setting may be incorrect. Change the
page orientation in the Printer Properties dialogue box.
• The paper size and the software paper size settings do not
match. Insert the correct paper into the machine or change
the software paper size settings.
• Scaling may be set to less than 100%. Change the Scaling
setting in the Printer Properties dialogue box.
• The printer cable specifications may be incorrect. Use or
replace the cable with an IEEE-1284 rated cable.
Your machine prints the
wrong data, or it prints
incorrect characters.
Half of the page is blank.
• The printer cable might not be connected properly. Check
the printer cable connection.
• There may be a problem with the printer driver software.
Exit Windows and reboot the computer. Turn the printer off
and then back on again.
• The printer cable specifications may be incorrect. Use or
replace the cable with an IEEE-1284 rated cable.
• If using Windows 95/98/Me, the Spooling Setting may be
set incorrectly. From the Start menu, select Settings and
Printers. Click your printer icon with the right mouse
button, select Properties, click the Details tab, and then
click the Spool Settings button. Select the desired spool
setting from the available choices.
• If you are using Windows NT/2000, the Scheduling setting
may be set incorrectly. From the Start menu, select
Settings and Printers. Click your printer icon with the
right mouse button, select Properties, click the
Scheduling tab. Then, select the desired scheduling
setting from the available choices.
Printing is too slow.
7.11
Troubleshooting
Print Quality Problems
Problem Possible Cause and Remedy
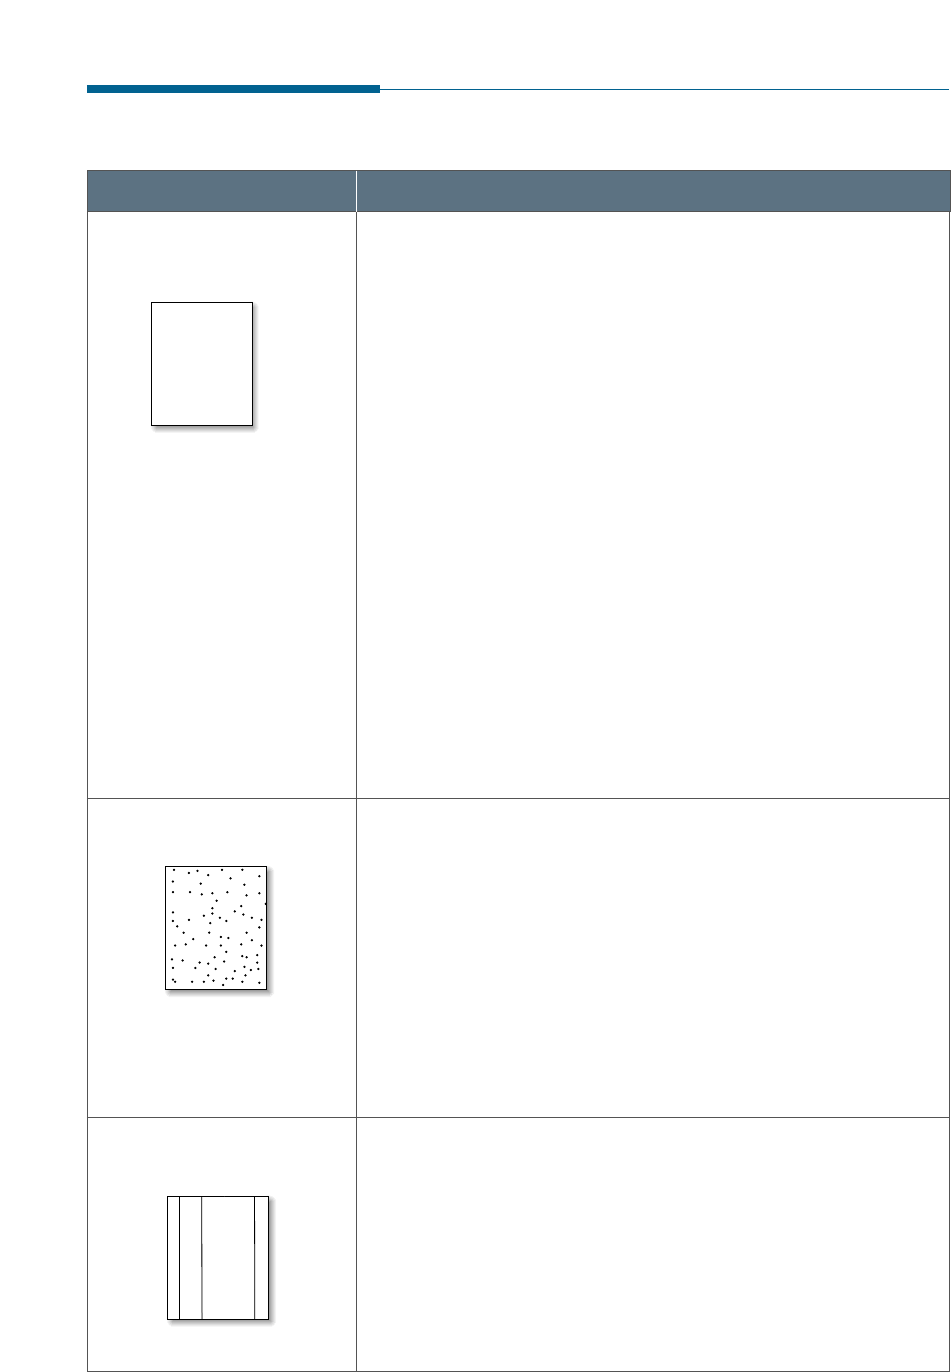
If a vertical white streak or faded area appears on the page:
• The toner supply is low. You may be able to temporarily
extend the toner cartridge life. See “Redistributing the
Toner” on page 6.7. If this does not improve the print
quality, install a new toner cartridge.
• The paper may not meet paper specifications (for
example, the paper is too moist or too rough). See “Paper
Type and Size” for faxing on page 1.19 and “Selecting
Print Media” for PC printing on page 5.1.
• If the whole page is light, Toner Save Mode may be on.
Turn the Toner Save Mode option off on front panel or
within the printer properties as your setting. See page
1.24 and 5.11 respectively.
• A combination of faded and smeared defects may indicate
that the toner cartridge needs cleaning. See “Cleaning the
OPC Drum” on page 6.2.
• The surface of scanner parts inside the machine may be
dirty. See “Cleaning the Document Scanner” on page 6.5.
Light or faded print
AaBbCc
AaBbCc
AaBbCc
AaBbCc
AaBbCc
AaBbCc
AaBbCc
AaBbCc
AaBbCc
AaBbCc
• The paper may not meet paper specifications. See “Paper
Type and Size” for faxing on page 1.19 and “Selecting Print
Media” for PC printing on page 5.1.
• The transfer roller area may be dirty. See “Cleaning the
Inside” on page 6.4.
• The paper path may need cleaning. See “Cleaning the
Inside”.
• The surface of scanner parts may need cleaning. See
“Cleaning the Document Scanner” on page 6.5.
Toner specks
If black vertical streaks appear on the page:
• The photosensitive drum inside the toner cartridge has
probably been scratched. Install a new toner cartridge.
If white vertical streaks appear on the page:
• The surface of LSU part inside the machine may be dirty.
Clean the LSU (see page 6.5).
Vertical lines
AaBbCc
AaBbCc
AaBbCc
AaBbCc
AaBbCc
AaBbCc
AaBbCc
AaBbCc
AaBbCc
AaBbCc
AaBbCc
AaBbCc
AaBbCc
AaBbCc
AaBbCc
AaBbCc
AaBbCc
AaBbCc
AaBbCc
AaBbCc
AaBbCc
AaBbCc
AaBbCc
AaBbCc
AaBbCc
7.12 Troubleshooting
Problem Possible Cause and Remedy
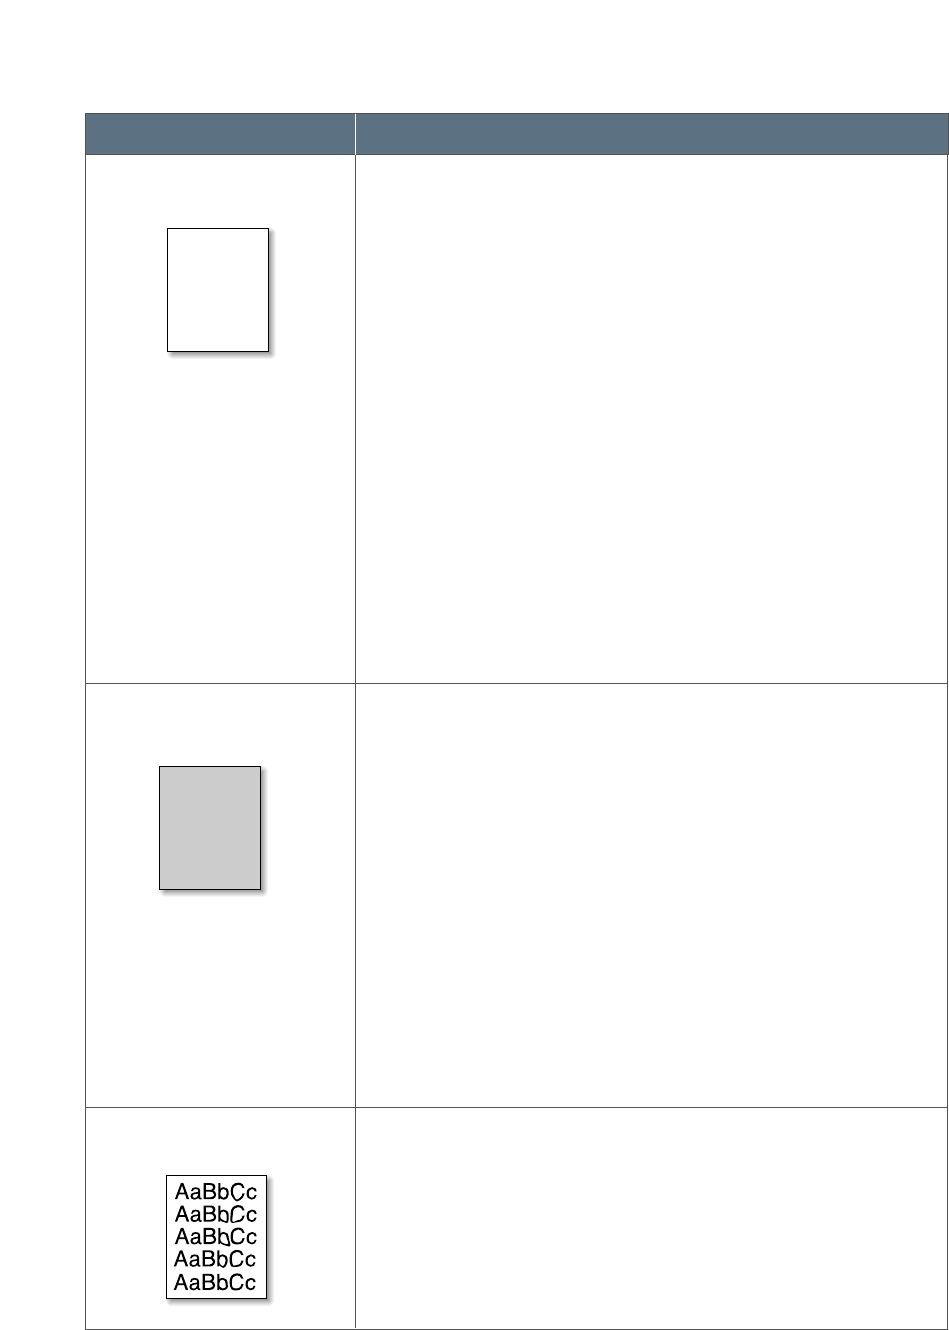
If faded areas, generally rounded, occur randomly on the
page:
• A single sheet of paper may be defective. Try reprinting
the job.
• The moisture content of the paper is uneven or the paper
has moist spots on its surface. Try a different kind or
brand of paper. See “Paper Type and Size” for faxing on
page 1.19 and “Selecting Print Media” for PC printing on
page 5.1.
• The paper lot is bad. The manufacturing processes can
cause some areas to reject toner. Try a different kind or
brand of paper.
• The toner cartridge may be defective. See “Vertical
repetitive defects” on page 7.13.
• If these steps do not correct the problems, contact a
service representative.
Dropouts
AaBbCc
AaBbCc
AaBbCc
AaBbCc
AaBbCc
AaBbCc
AaBbCc
AaBbCc
AaBbCc
AaBbCc
AaBbCc
AaBbCc
AaBbCc
AaBbCc
AaBbCc
If the amount of background toner shading becomes
unacceptable, the procedures below may help to clear the
condition:
• Change the paper to a lighter basis weight. See “Paper
Type and Size” for faxing on page 1.19 and “Selecting Print
Media” for PC printing on page 5.1.
• Check the printer’s environment; very dry (low humidity)
or high humidity (higher than 80 % RH) conditions can
increase the amount of background shading.
• Install a new toner cartridge.
• Adjust the shading setting. See “Adjusting Shading” on
page 6.2.
Gray background
• Clean the inside of the printer. See “Cleaning the Inside” on
page 6.4.
• Check the paper type and quality. See “Paper Type and
Size” for faxing on page 1.19 and “Selecting Print Media”
for PC printing on page 5.1.
• Try installing a new toner cartridge.
Toner smear
AaBbCc
AaBbCc
AaBbCc
AaBbCc
AaBbCc
AaBbCc
AaBbCc
AaBbCc
AaBbCc
AaBbCc
AaBbCc
AaBbCc
AaBbCc
AaBbCc
AaBbCc
AaBbCc
AaBbCc
AaBbCc
AaBbCc
AaBbCc
AaBbCc
AaBbCc
AaBbCc
AaBbCc
AaBbCc
7.13
Troubleshooting
Problem Possible Cause and Remedy
If marks repeatedly appear on the printed side of the page at
even intervals:
• The toner cartridge may be damaged. Print a cleaning
sheet several times by cleaning the OPC drum (see page
6.2). After the printout, if you still have the same
problems, install a new toner cartridge.
• Parts in the machine may have toner on them. If the
defects occur on the back of the page, the problem will
likely correct itself after a few more pages.
• The fusing assembly may be damaged. Contact a service
representative.
Vertical repetitive defects
AaBbCc
AaBbCc
AaBbCc
AaBbCc
AaBbCc
AaBbCc
AaBbCc
AaBbCc
AaBbCc
AaBbCc
AaBbCc
AaBbCc
AaBbCc
AaBbCc
AaBbCc
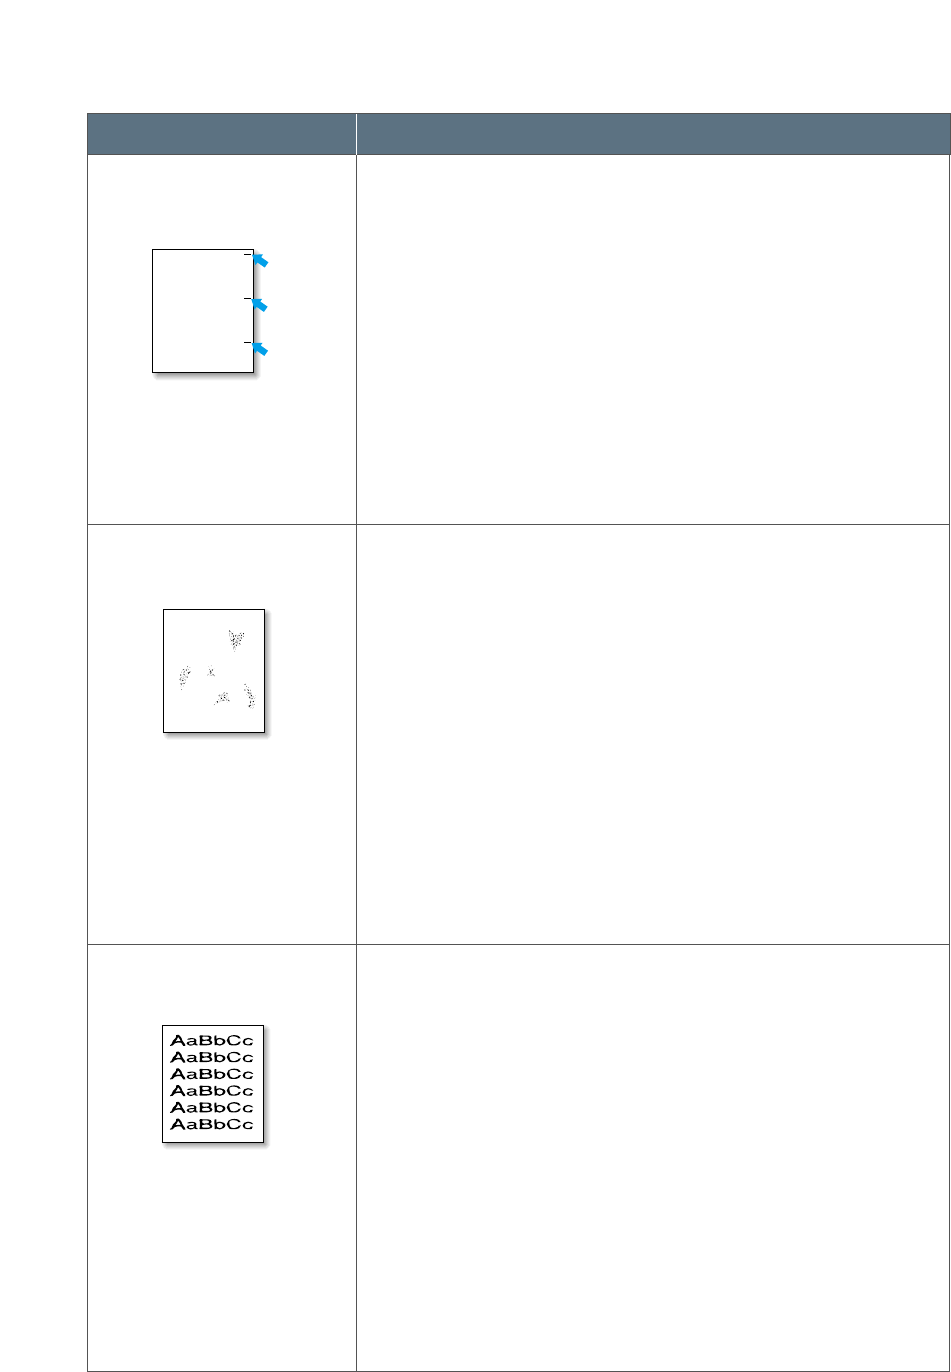
Background scatter results from bits of toner distributed on
the printed page.
• The paper may be too damp. Try printing with a different
batch of paper. Do not open packages of paper until
necessary so that the paper does not absorb too much
moisture from the air.
• If background scatter occurs on an envelope, change your
printing layout to avoid printing over areas that have
overlapping seams on the reverse side. Printing on seams
can cause this problem.
• If background scatter covers the entire surface of a printed
page, adjust the print resolution through your software
application or the printer properties.
Background scatter
AaBbCc
AaBbCc
AaBbCc
AaBbCc
AaBbCc
AaBbCc
AaBbCc
AaBbCc
AaBbCc
AaBbCc
A
• If characters are improperly formed, producing hollow
images, the paper stock may be too slick. Try a different
paper. See “Paper Type and Size” for faxing on page 1.19
and “Selecting Print Media” for PC printing on page 5.1.
• If characters are improperly formed, producing a wavy
effect, the scanner unit may need service. Verify that it also
occurs on a demo page.
- On SF-530: Press Demo (*) on the front panel when the
machine is ready.
- On SF-535e: In Windows, select Start → Settings →
Printers →Samsung SF-530 Series →File →
Properties, then click Print Test Page in General tab.
If you need service, contact a service representative.
Misformed characters
AaBbCc
AaBbCc
AaBbCc
AaBbCc
AaBbCc
AaBbCc
AaBbCc
AaBbCc
AaBbCc
AaBbCc
7.14 Troubleshooting
Problem Possible Cause and Remedy
• Check the paper type and quality. See “Paper Type and
Size” for faxing on page 1.19 and “Selecting Print Media”
for PC printing on page 5.1.
• Make sure that the paper or other media is loaded
correctly and the guides are not too tight or too loose
against the paper stack.
Page skew
AaBbCc
AaBbCc
AaBbCc
AaBbCc
AaBbCc
AaBbCc
AaBbCc
AaBbCc
AaBbCc
AaBbCc
AaBbCc
AaBbCc
AaBbCc
AaBbCc
AaBbCc
• Check the paper type and quality. Both high temperature
and humidity will cause paper curl. See “Paper Type and
Size” for faxing on page 1.19 and “Selecting Print Media”
for PC printing on page 5.1.
• Turn over the stack of paper in the input tray. Also try
rotating the paper 180° in the input tray.
Curl or wave
• Make sure that paper is loaded properly.
• Check the paper type and quality. See “Paper Type and
Size” for faxing on page 1.19 and “Selecting Print Media”
for PC printing on page 5.1.
• Turn over the stack of paper in the input tray. Also try
rotating the paper 180° in the tray.
Wrinkles or creases
• The transfer roller area may be dirty. See “Cleaning the
Inside” on page 6.4.
• Check if the toner is leaking. Clean inside the machine.
See page 6.4.
Back of printouts dirty
AaBbCc
AaBbCc
AaBbCc
AaBbCc
AaBbCc
AaBbCc
AaBbCc
AaBbCc
AaBbCc
AaBbCc
AaBbCc
AaBbCc
AaBbCc
AaBbCc
AaBbCc
AaBbCc
AaBbCc
AaBbCc
AaBbCc
AaBbCc
AaBbCc
AaBbCc
AaBbCc
AaBbCc
AaBbCc
AaBbCc
AaBbCc
AaBbCc
AaBbCc
AaBbCc
• The toner cartridge may not be installed properly. Remove
the cartridge and reinsert it.
• The toner cartridge may be defective and need replacing.
Install a new toner cartridge.
• The printer may require repairs. Contact a service
representative.
AaBbCc
AaBbCc
AaBbCc
AaBbCc
AaBbCc
AaBbCc
AaBbCc
AaBbCc
AaBbCc
AaBbCc
Black pages
7.15
Troubleshooting
Problem Possible Cause and Remedy
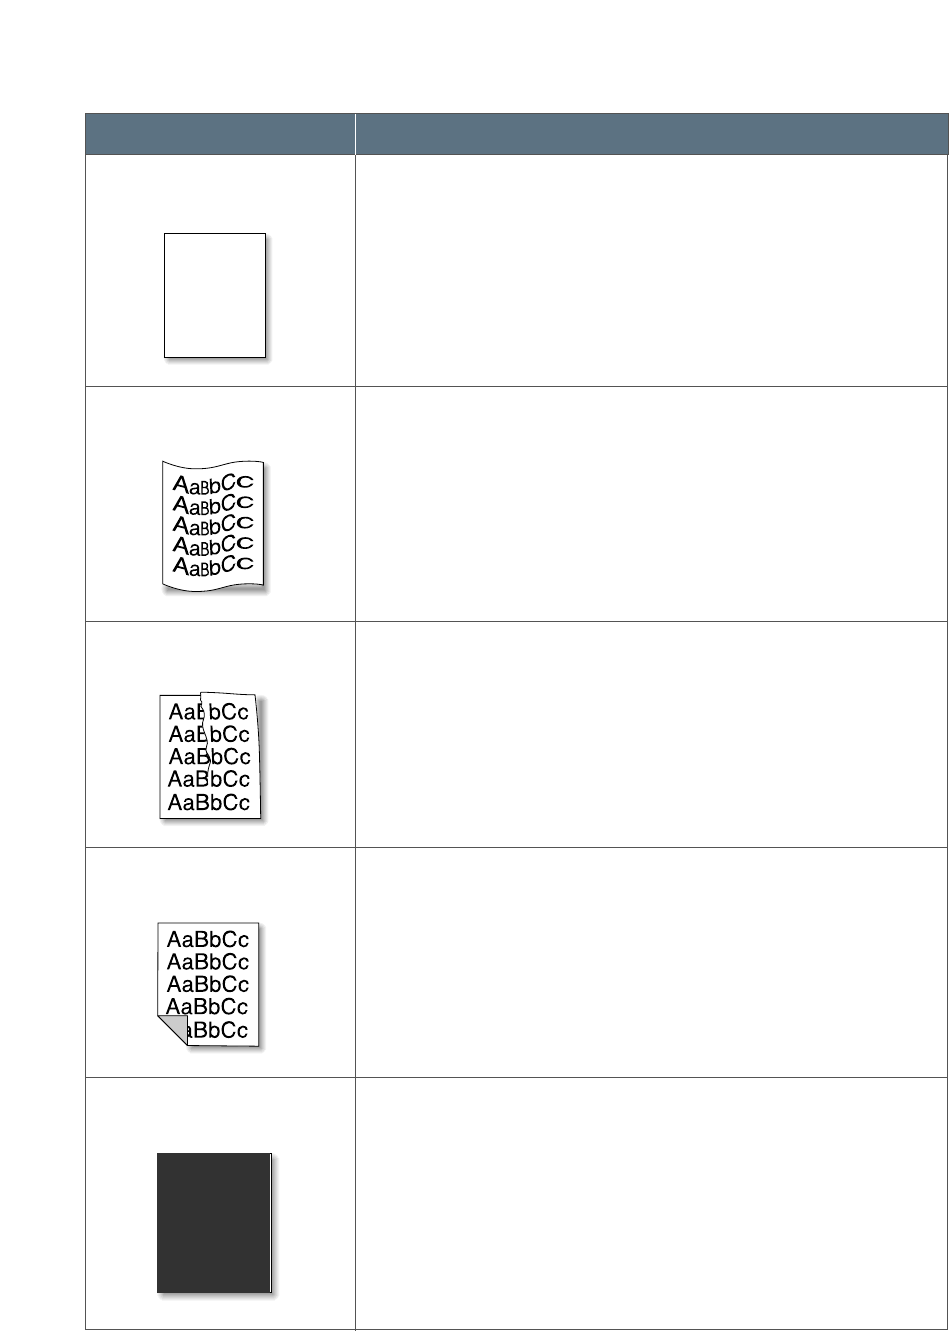
Character voids are white areas within the parts of characters
that should be solid black:
• If you are using transparencies when you experience this
problem, try another type of transparency. (Because of the
composition of transparency media, some character voids
are normal.)
• You may be printing on the wrong surface on the paper.
Remove the paper and turn it around.
• The paper may not meet paper specifications. See “Paper
Type and Size” for faxing on page 1.19 and “Selecting Print
Media” for PC printing on page 5.1.
Character Voids
• Clean the inside of the printer.
• Check the paper type and quality. See “Paper Type and
Size” for faxing on page 1.19 and “Selecting Print Media”
for PC printing on page 5.1.
• Try installing a new toner cartridge.
• If the problem persists, the printer may require repairs.
Contact a service representative.
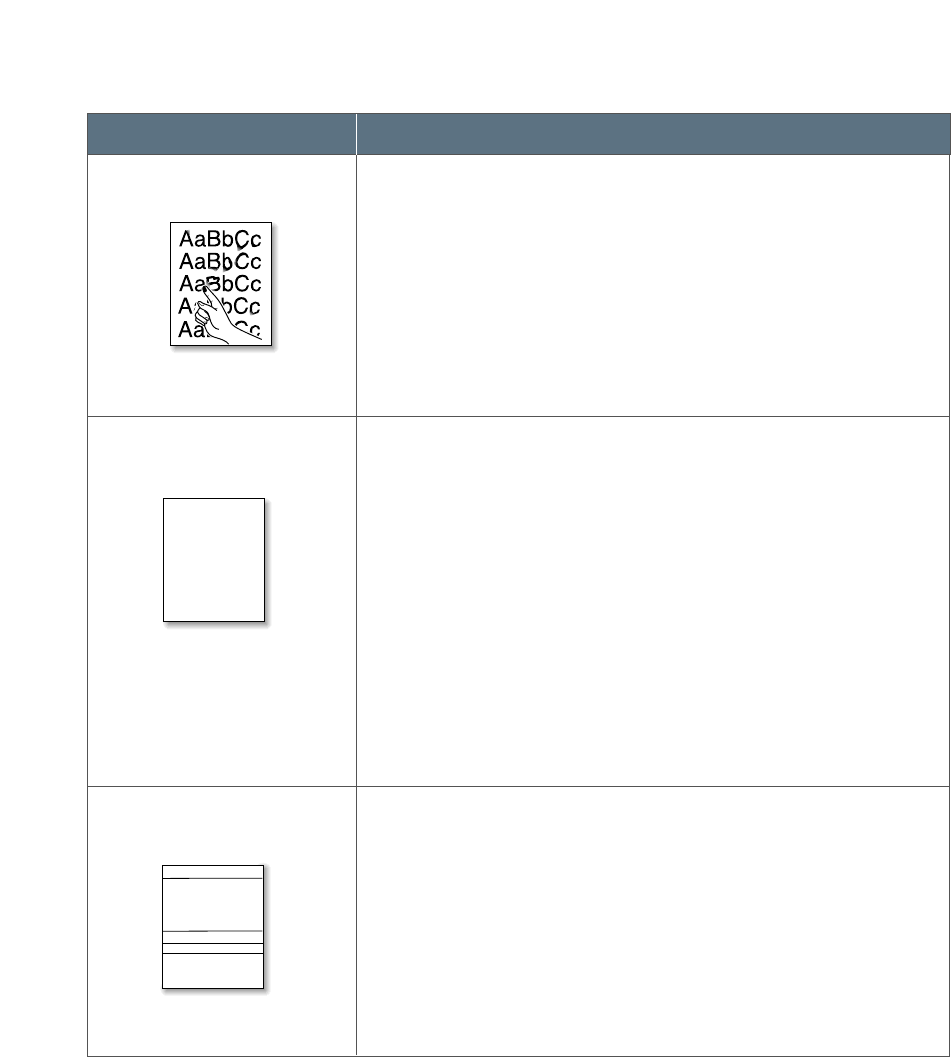
Loose toner
If horizontally aligned black streaks or smears appear:
• The toner cartridge may be installed improperly. Remove
the cartridge and reinsert it.
• The toner cartridge may be defective. Install a new toner
cartridge.
• If the problem persists, the printer may require repairs.
Contact a service representative.
Horizontal stripes
AaBbCc
AaBbCc
AaBbCc
AaBbCc
AaBbCc
AaBbCc
AaBbCc
AaBbCc
AaBbCc
AaBbCc
AaBbCc
AaBbCc
AaBbCc
AaBbCc
AaBbCc
AaBbCc
AaBbCc
AaBbCc
AaBbCc
AaBbCc
A
AaBbCc
AaBbCc
AaBbCc
AaBbCc
AaBbCc
AaBbCc
AaBbCc
AaBbCc
AaBbCc
AaBbCc
AaBbCc
AaBbCc
AaBbCc
AaBbCc
AaBbCc

◆Connecting Other Device to Phone Line
◆Specifications
General
Printer
Scanner
Copy
Fax
◆Safety Information

A.1
Appendix
Connecting Other Devices to the Phone Line
You can connect other devices to the same phone line as the SF-530
series product.
Deciding What to Connect
You have connected the SF-530 series to the wall jack. Generally, there
are three other devices that can be connected to the same phone line:
• a telephone
• an answering machine
• an external modem or a computer with an internal modem
Which, of these you connect to this phone line depends on your
configuration. Please see the following configurations.
Situation 1
You connected the SF-530 series to a wall jack with a phone
line for fax calls only (a dedicated fax line).
You do not need to connect any other devices. However:
• You can connect an external modem or a computer with an internal
modem to this phone line if you want to use the fax line to access the
Internet or e-mail.
• You can connect an extra telephone to this wall jack if you would like
to make outgoing voice calls.
To connect any of these devices to the same phone line, go to
“Connecting Other Devices, Overview” on page A.3. If you have another
wall jack for this phone line, you can connect the extra phone and/or
external modem or computer with internal modem to the other wall jack.
Note: Because this is a dedicated fax line, you should never have an
answering machine or computer connected. Or, using computer
voicemail, you must connect the computer with internal modem or
the external modem to your dedicated voice line. You will connect to
the Internet or e-mail using the dedicated voice line.

A.2 Appendix
Situation 2
You connected the SF-530 series to a wall jack with a phone
line for fax and voice calls (a shared line).
Connect any other devices you have to this phone line. To connect the
other devices you have to the same wall jack as the product, go to
Appendix “Connecting Other Devices, Overview” on page A.3.
If you have another wall jack for this phone line, you can connect some
of the devices to that wall jack. However, if you have an answering
machine or computer with voicemail, make sure to connect it to the
same wall jack as the SF-530 series.
Special Situations
You have two phone lines coming into one wall jack.
When you connected the SF-530 series, you should have plugged it into
a phone unit splitter connected to the wall jack. Proceed as if that side of
the phone unit splitter is a phone line for fax calls only (a dedicated
line). See “Situation 1” on page A.1.
You have one phone line with two phone numbers and
distinctive ring service.
Use the same guidelines in “Situation 2” above for connecting other
devices. You can change settings for distinctive ring later.
A.3
Appendix
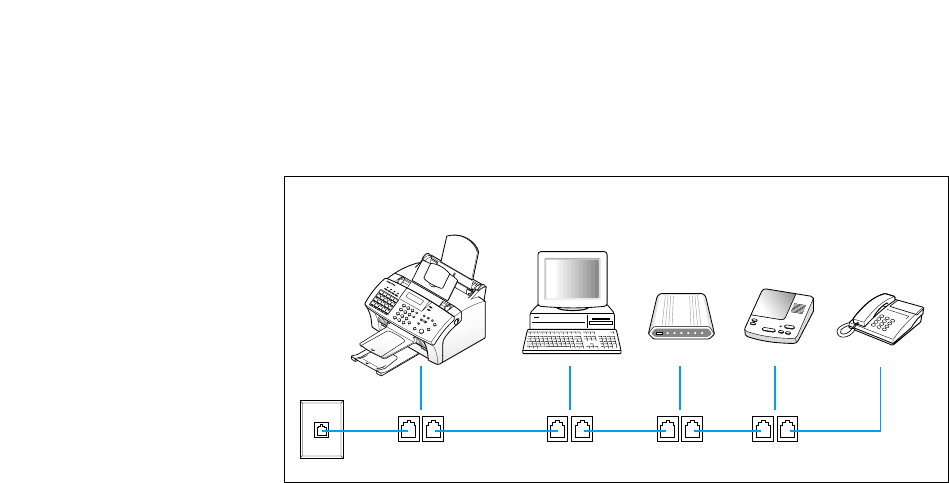
Connecting Other Devices, Overview
Connect other device in the order indicated.
Note:
• The SF-530 series product the device connected to the wall jack. If it
isn’t, it cannot answer incoming fax calls.
• As the drawing indicates, always plug the LINE jack into one device
and the EXT. jack into another device.
• Some computers have a second LINE jack which is used to connect
the computer to a dedicated voice line. If you have a second LINE
jack, check your computer’s documentation to ensure you are
connecting to the correct LINE jack.
SF-530 series
LINE EXT. LINE EXT. LINE EXT. LINE EXT.
Computer with
Internal Modem
External
Modem
Answering
Machine Phone
A.4 Appendix
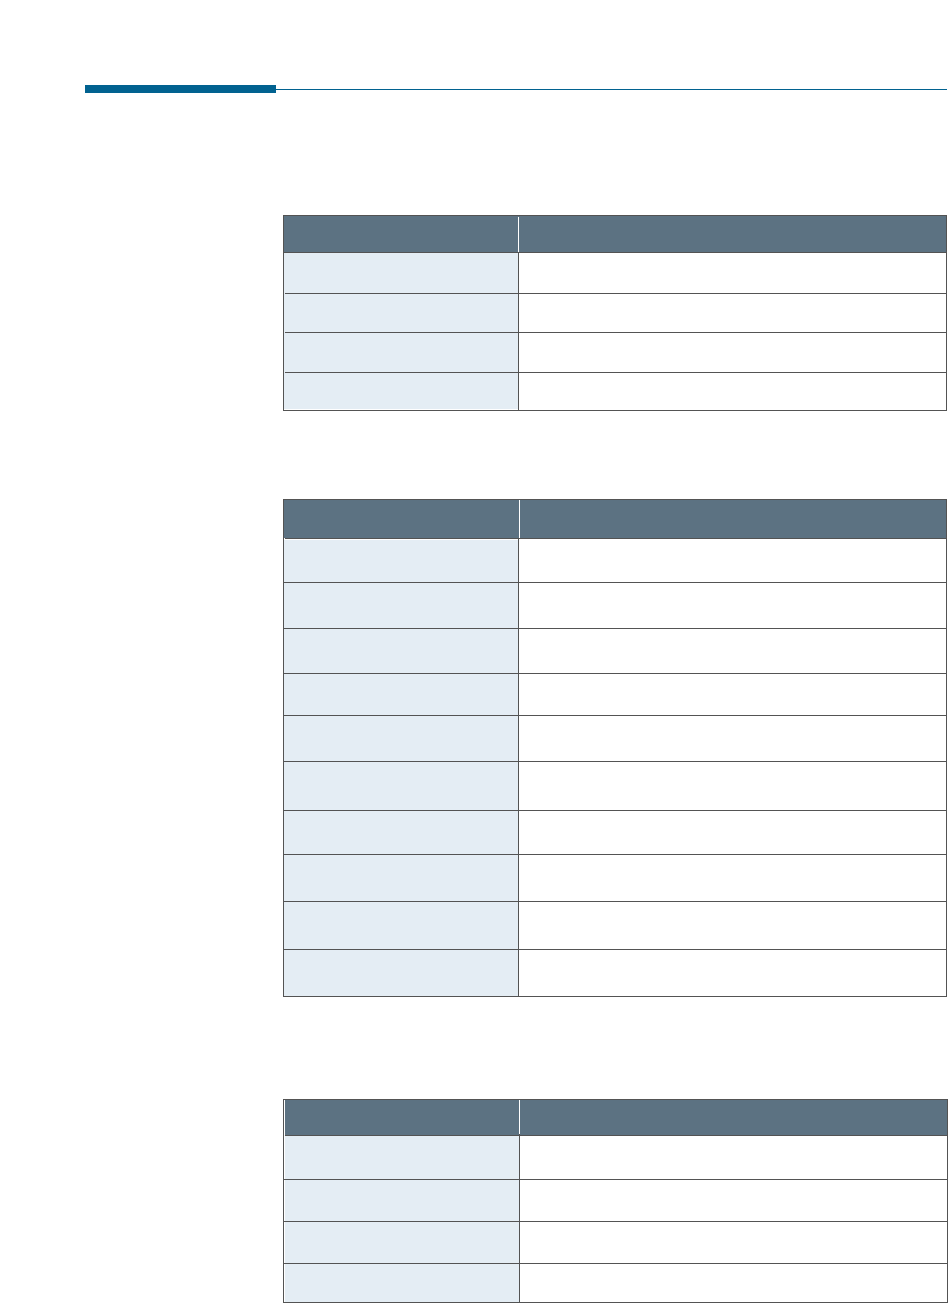
Copy
Item Specification and Description
Resolution Optical 300 x 300 dpi
BW Contrast Control Lighten, normal, darken
Multiple Copy 99 pages
Reduce & Enlarge 50 ~ 200 %
Specifications
General
Item Specification and Description
Technology Laser Beam
Paper Path-Recording Front to Front
Paper Path-Document Rear to Front
Effective Printing Width 203 mm
Feeding Method FIFO (C-Path)
Manual Feed Rear to Front
O/S Windows 95/98/Me, Windows NT/2000
Emulation Samsung PrinThru
Resolution 600 x 600 dpi
Speed 8 ppm mono, 5% Coverage in draft mode
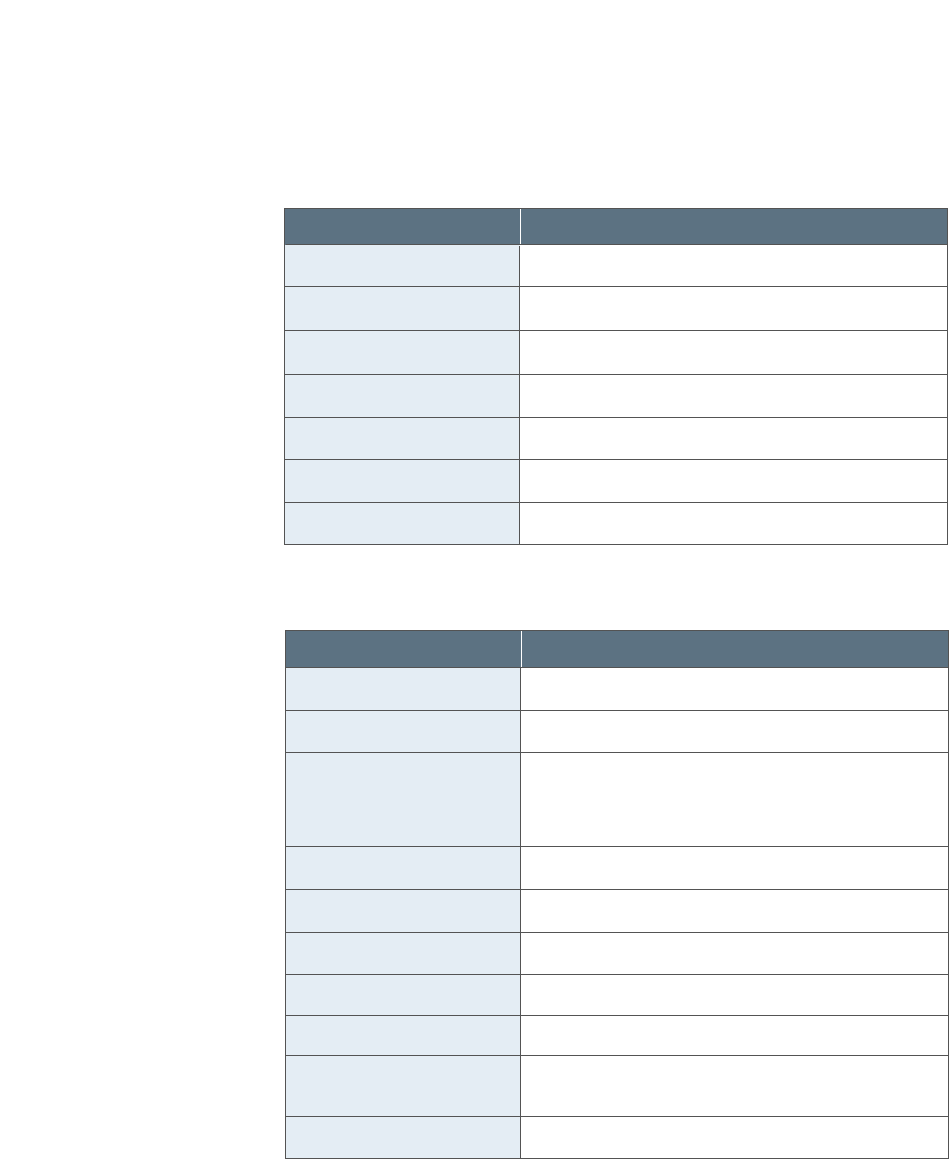
Item Specification and Description
Size (W x D x H) mm 467.5 x 313 x 194.2 mm
Weight (with accessories) 6.9 Kg
Interface Parallel: IEEE 1284, USB: 1.0 compliant
Cable Parallel and USB
Printer
A.5
Appendix
Scanner
Item Specification and Description
Scan Method Contact Image Sensor (CIS)
Scan Width Max. 216 mm, Effective: 210 mm
Scan Resolution-Optical 300 x 300 dpi
ADF Capacity Max 20 sheets
BW Contrast Control lighten, normal, darken
Feeding Method Sheet-fed
Scan(Copy) Speed 6 sec/page
Fax
Item Specification and Description
Modem Speed 33.6 kbps
Compatibility ITU Group 3
Resolution
(Selectable by 1-key & LCD)
Standard: 200 x 100 dpi (Default)
Fine: 200 x 200 dpi
Superline: 300 x 300 dpi
ECM Support Yes
Halftone Photo: 256 grayscales
TAD Interface Yes
Memory 2 MB
Memory Backup 30 Min.
Receive Mode TEL, FAX, ANS/FAX
Tone/Pulse Switching DTMF (Tech mode)
Compression MH/MR/MMR

A.6 Appendix
Important Precautions and Safety Information
When using this fax machine, these basic safety precautions should always be
followed to reduce risk of fire, electric shock, and injury to persons:
1. Read and understand all instructions.
2. Use common sense whenever operating electrical appliances.
3. Follow all warnings and instructions marked on the product and in the
literature accompanying the product.
4. If an operating instruction appears to conflict with safety information, heed
the safety information. You may have misunderstood the operating
instruction. If you cannot resolve the conflict, contact your sales or service
representative for assistance.
5. Unplug the fax machine from the AC wall socket and telephone jack before
cleaning. Do not use liquid or aerosol cleaners. Use only a damp cloth for
cleaning.
6. Do not place the fax machine on an unstable cart, stand, or table. It may fall,
causing serious damage.
7. Your fax machine should never be placed on, near, or over a radiator, heater,
air conditioner, or ventilation duct.
8. Do not allow anything to rest on the power, telephone. Do not locate your fax
machine where the cords will be abused by persons walking on them.
9. Do not overload wall outlets and extension cords. This can diminish
performance, and may result in the risk of fire or electric shock.
10. Do not allow pets to chew on the AC power, telephone, or PC interface
cords.
11. Never push objects of any kind into the fax machine through case or cabinet
openings. They may touch dangerous voltage points, creating a risk of fire
or shock. Never spill liquid of any kind onto or into the fax machine.
Safety Information

A.7
Appendix
12. To reduce the risk of electric shock, do not disassemble the fax machine.
Take it to aqualified service technician when repair work is required.
Opening or removing covers may expose you to dangerous voltages or other
risks. Incorrect reassembly could cause electric shock when the unit is
subsequently used.
13. Unplug the machine from the telephone jack, PC, and AC wall outlet, and
refer servicing to qualified service personnel under the following conditions:
• When any part of the power cord, plug, or connecting cable is damaged or
frayed.
• If liquid has been spilled into the product.
• If the product has been exposed to rain or water.
• If the product does not operate properly after instructions have been
followed.
• If the product has been dropped, or the cabinet appears damaged.
• If the product exhibits a sudden and distinct change in performance.
14. Adjust only those controls covered by the operating instructions. Improper
adjustment of other controls may result in damage, and may require
extensive work by a qualified service technician to restore the product to
normal operation.
15. Avoid using this fax machine during a lightning storm. There may be a
remote risk of electric shock from lightning. If possible, unplug the AC
power and telephone for the duration of the lightning storm.
16. SAVE THESE INSTRUCTIONS.
In Case of Interference
In normal operation, your SAMSUNG fax machine produces and uses radio-
frequency energy. In some cases, this can cause interference to other electronic
equipment. Part 15 of the FCC rules establishes guidelines limiting the amount
of radio-frequency energy which may be produced by electronic equipment.
Tests have proven that your Samsung FAX machine meets or exceeds these
guidelines, and is classified a “Class B Digital Device” for operation in a
residential environment. When installed and operated according to instructions,
your SAMSUNG fax machine should not cause interference to the types of
equipment expected to be found in a normal residential environment.
Unauthorized changes or modifications could void the user’s authority to operate
the equipment.

A.8 Appendix
Fax Branding
The Telephone Consumer Protection Act of 1991 makes it unlawful for any
person to use a computer or other electronic device to send any message via a
telephone facsimile machine unless such message clearly contains in a margin
at the top or bottom of each transmitted page
or on the first page of the transmission the following information:
(1) the date and time of transmission
(2) identification of either business, business entity or individual sending the
message; and
(3) telephone number of either the sending machine, business, business
entity or individual.
See pages 1.22 to 1.23 for instructions on how to enter this information into
your Samsung FAX machine’s memory.
The Telephone Company may make changes in its communications facilities,
equipment operations, or procedures where such action is reasonably required
in the operation of its business and is not inconsistent with the rules and
regulations in FCC Part 68. If such changes can be reasonably expected to
render any customer terminal equipment incompatible with telephone company
communications facilities, or require modification or alteration of such terminal
equipment, or otherwise materially affect its use or performance, the customer
shall be given adequate notice in writing, to allow the customer an opportunity
to maintain uninterrupted service.
In the event your SAMSUNG fax machine appears to cause interference to other
electronic equipment, it can often be easily remedied. First determine if the
source of interference really is your FAX machine. To do this, turn its power off
and on while observing the equipment experiencing the interference. If the
interference disappears when you turn the FAX machine off, the following steps
can be very effective in correcting interference problems:
• Connect the FAX machine to an AC outlet which is on a different circuit
breaker from the equipment experiencing interference.
• Increase the distance between the FAX machine and the equipment
experiencing interference.
• Cable TV amplifiers and splitters are extremely prone to interference. Be
certain that they are as far as possible from the FAX machine and its AC
power and telephone cords.
• Replace “twin lead” antenna wire with shielded coaxial cable, and use proper
connectors and adaptors.
• Turn or relocate the receiving antenna. In most cases this is easily done by
sim-ply moving a radio. A TV antenna may need to be re-oriented or installed
in another area of the building.
• Consult your dealer, a reputable radio/TV technician, or an Amateur Radio
Operator for help.
* To locate an Amateur Radio Operator in your area, contact The American
Radio Relay League, 610 Main St., Newington, CT 06111.

A.9
Appendix
Telephone Company Information
FCC IDENTIFICATION NUMBER
The Ringer Equivalence Number and FCC Registration Number for this equipment
may be found on the label located on the bottom or rear of the machine. In some
instances you may need to provide these numbers to the telephone company.
RINGER EQUIVALENCE NUMBER
The Ringer Equivalence Number (REN) is a measure of the electrical load placed on
the telephone line, and is useful for determining whether you have “overloaded”
the line. Installing several types of equipment on the same telephone line may
result in problems making and receiving telephone calls, especially ringing when
your line is called. The sum of all Ringer Equivalence Numbers of the equipment on
your telephone line should be less than five in order to assure proper service from
the telephone company. In some cases, a sum of five may not be usable on your
line. If any of your telephone equipment is not operating properly, you should
immediately remove it from your telephone line, as it may cause harm to the
telephone network.
WARNING:
FCC Regulations state that changes or modifications to this equipment not
expressly approved by the manufacturer could void the user’s authority to operate
this equipment. In the event that terminal equipment causes harm to the
telephone network, the telephone company should notify the customer that service
may be stopped. However, where prior notice is impractical, the company may
temporarily cease service, providing that they:
a) Promptly notify the customer.
b) Give the customer an opportunity to correct the equipment problem.
c) Inform the customer of the right to bring a complaint to the Federal
Communication Commission pursuant to procedures set out in FCC Rules and
Regulations Subpart E of Part 68.
You should also know that:
• Your Samsung FAX machine is not designed to be connected to a digital PBX
system.
• If you intend to use a computer modem or fax modem on the same phone line as
your FAX machine, you may experience transmission and reception problems with
all the equipment. It is recommended that no other equipment, except for a
regular telephone, share the line with your FAX machine.
• If your area experiences a high incidence of lightning or power surges, we
recommend that you install surge protectors for both the power and the
telephone lines. Surge protectors can be purchased from your dealer or
telephone and electronic specialty stores.
• When programming emergency numbers and/or making test calls to emergency
numbers, use a non-emergency number to advise the emergency service
dispatcher of your intentions. The dispatcher will give you further instructions on
how to actually test the emergency number.
• This equipment may not be used on coin service or party lines.
• This telephone provides magnetic coupling to hearing aids.
• You may safely connect this equipment to the telephone network by means of a
standard modular jack, USOC RJ-11C.

A.10 Appendix
Index
A
adding documents 3.34
address label, using 3.23
adjusting shading 6.2
alert tone, setting 3.2
automatic dial
one-touch dial 3.21
speed dial 3.23
using remote control panel 3.25
automatic input tray
loading paper 1.17, 5.3
paper source setting 5.10
B
bonus software (Acrobat Reader) 2.16
broadcasting transmission 3.28
C
cancel
print job 5.12
scheduled operation 3.34
cleaning
document scanner 6.5
machine 6.4
OPC drum 6.2
connecting
other devices A.1
parallel cable 1.16
phone line 1.14
power cord 1.17
USB cable 2.13
contents 1.3
copying
using advanced features 3.18
overview 3.17
single copying 3.17
D
date and time, setting 1.22
delayed transmission 3.29
diskette,
making 2.16
installing software 2.17
document contrast, setting 3.8
document feeder, loading 3.9
document resolution, setting 3.8
document scanner, cleaning 6.5
driver,
access 5.9
install 2.4
remove 2.18
E
e-mail fax
configuring information 4.2
receiving 4.12
sending 4.11
setting up address book 4.8
entering, name 3.19
error messages 7.5
F
fax problem, solving 7.7
fitting document to selected paper 5.16
forwarding received faxes 3.36
front panel, features
SF-530 1.6
SF-535e 1.8
G
group dialing 3.40
H
handset, inserting 1.13

A.11
Appendix
I
install
bonus software(Acrobat Reader) 2.16
printer software 2.4
software from diskette 2.17
toner cartridge 1.20
introduction
SF-530 series 1.1
SmarThru software 2.1
L
load, document 3.9
load, paper
in the automatic input tray 1.17, 5.3
in the manual input tray 5.6
location, choosing 1.11
M
manual input tray
loading paper 5.6
paper source setting 5.10
memory
clearing 6.1
searching 3.27
monitoring status 3.35
multiple pages on one sheet, print 5.14
N
network, setting 5.24
notifying toner low 6.3
number and name, setting 1.23
O
one-touch dialing 3.21
one-touch label plate 1.14
OPC drum, cleaning 6.2
orientation 5.10
overlay, using 5.20
P
parts, identifying 1.4
paper
in automatic input tray 1.17, 5.3
in the manual input tray 5.6
selecting 1.19, 5.1
setting 3.3, 5.10
paper jam, clear 7.8
document 7.1
inside the machine 7.3
output area 7.2
paper input tray 7.2
tips avoiding paper jams 7.4
paper orientation, setting 5.10
paper save mode 1.25
paper size, setting 5.10
paper source, setting 5.10
paper type, setting 5.10
parallel, connection 1.16
pause, inserting 3.21
phone line, connection 1.14
polling
reception 3.33
transmission 3.32
poster, printing 5.17
power, plugging 1.17
power save mode 1.24, 5.11
printer driver see driver
print media see paper
print quality problem, solving 7.11
print quality, setting 5.10
print resolution 5.10
printer software, install 2.4
printing problem, solving 7.9
printing
cancel 5.12
cleaning page 6.2
document 5.9
general problems, solving 7.9
help 5.13
in network environment 5.24
last page 5.13
several pages per sheet 5.14
quality problems, solving 7.11
reports 3.38

A.12 Appendix
P (continued)
problem, solving
error messages 7.5
fax 7.7
general printing 7.9
paper jam 7.1
print quality 7.11
priority transmission 3.31
Q
quality, problems 7.11
R
receiving e-mail fax 4.12
receiving fax
by an extension telephone 3.16
in ANS/FAX mode 3.15
in AUTO mode 3.15
in DRPD mode 3.6
in FAX mode 3.14
in TEL mode 3.16
reception mode 3.13
redialling
automatic 3.10
last number 3.11
replacing, toner cartridge 6.8
remote control panel
e-mail address 4.8
e-mail information 4.5
phonebook 3.25
remote test 6.3
reprint
last page 5.13
setting 5.11
reports, printing 3.38
S
scaling document 5.15
send
e-mail fax 4.11
fax 3.10
flash 3.35
searching, memory 3.27
setting
alert tones 3.2
automatic e-mail reception 4.13
date and time 1.22
default ISP 4.7
e-mail address book 4.8
fax number and name 1.23
resolution and contrast 3.8
volume 3.1
stand-alone fax system 3.2
specifications A.4
speed dialing 3.23
storing
e-mail addresses 4.8
group dial 3.40
one-touch 3.21
speed dial 3.23
supports, attaching 1.12
system options, 3.2
system requirements, for software 2.3
T
tape, removing 1.11
toll save transmission 3.37
toner cartridge
installing 1.20
replacing 6.7
toner save mode 1.24, 5.11
troubleshooting see problem, solving
U
uninstall,
MFP driver 2.18
SmarThru software 2.19
using CD-ROM 2.21
USB port, connection 2.13
user-selectable options 3.3
V
voice request 3.12
volume, setting 3.1
W
watermarks, printing 5.18

Home
Visit us at:
http://www.samsungprinter.com
P/N. JCXX-XXXXXA Rev.1.00