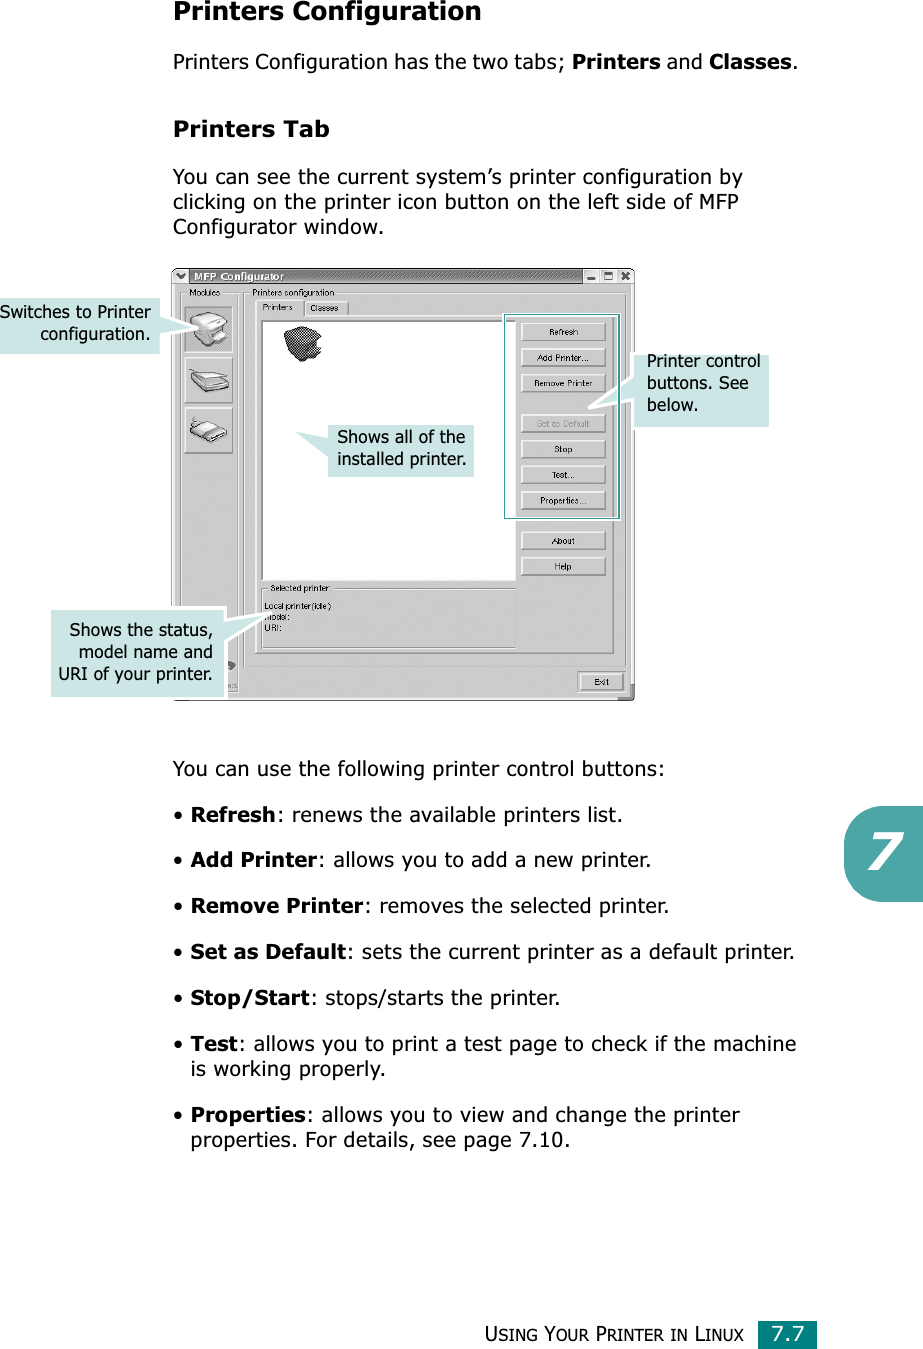
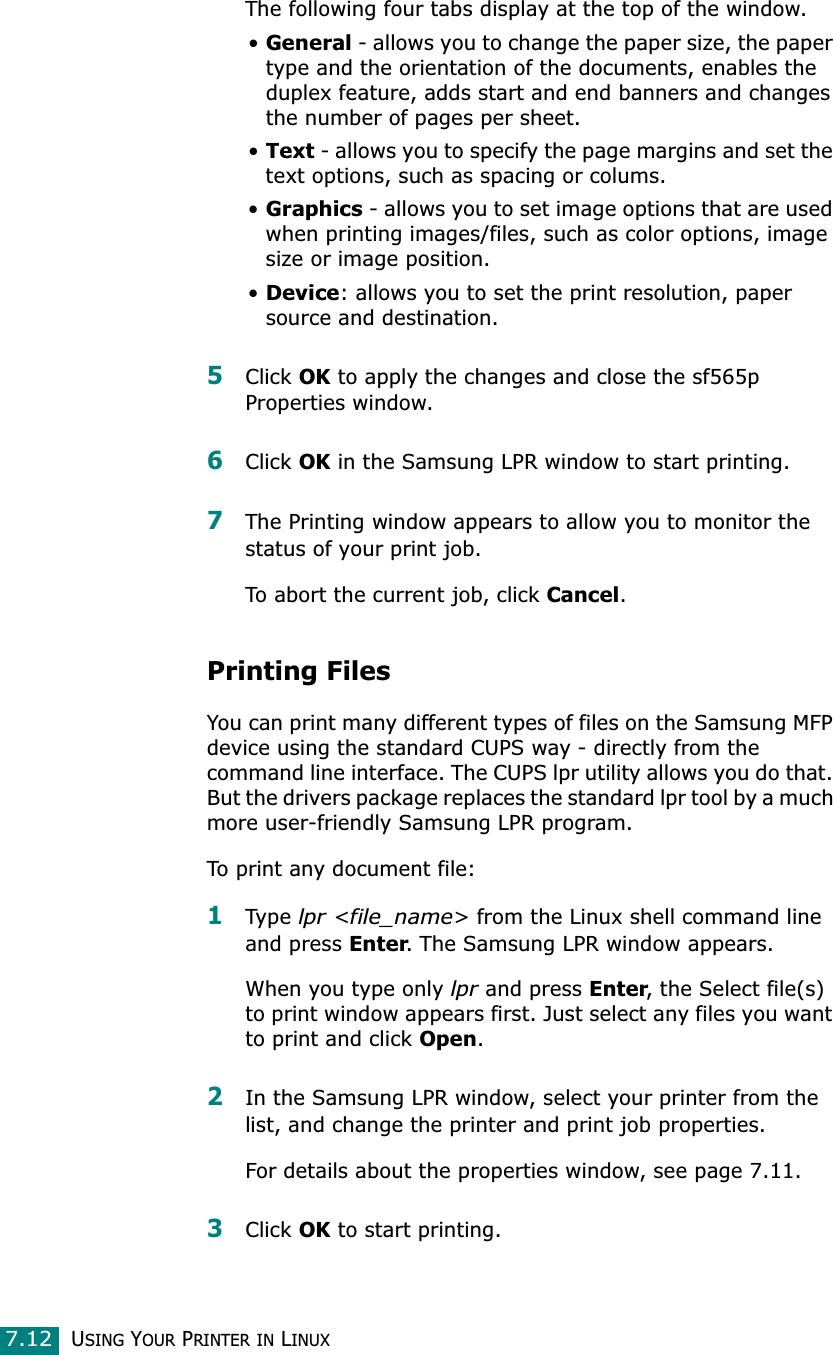
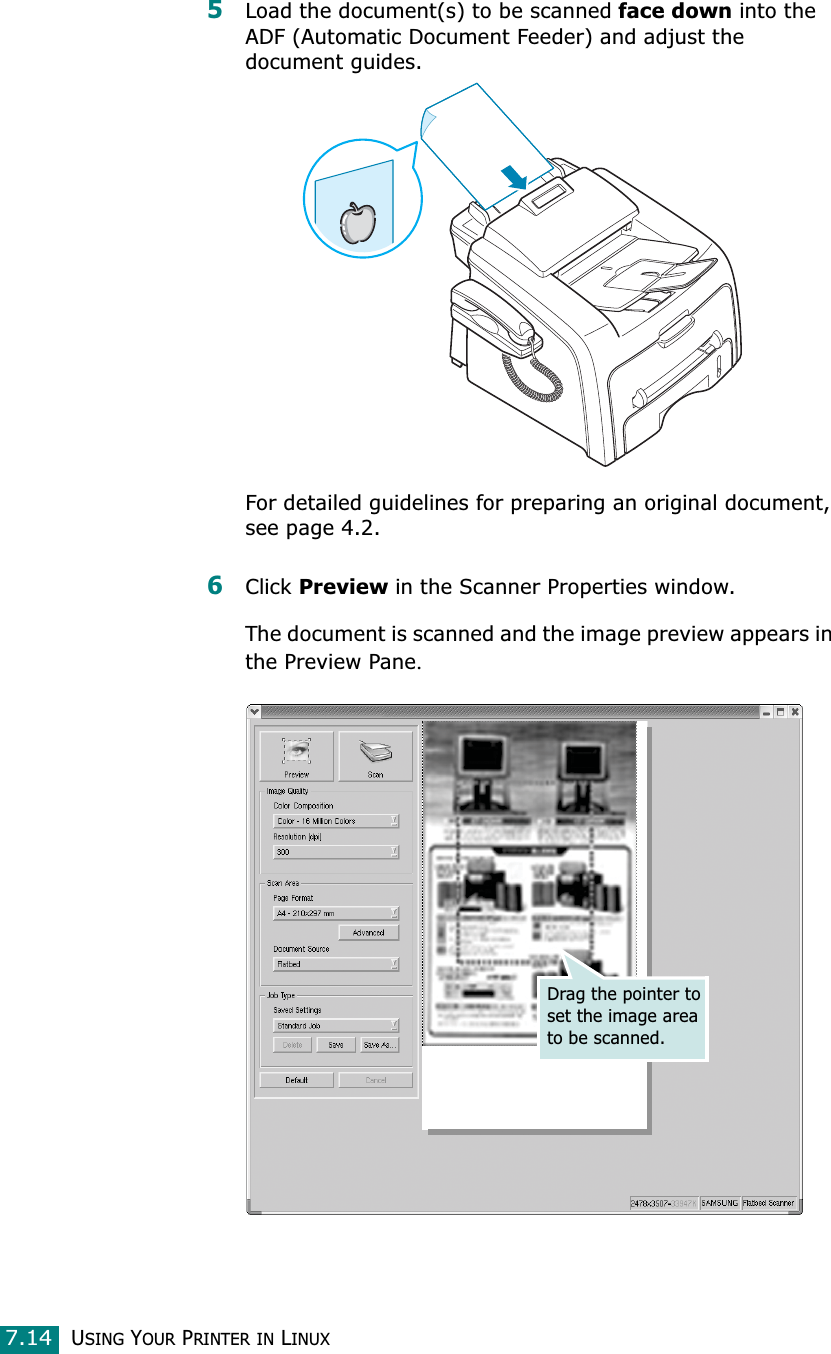
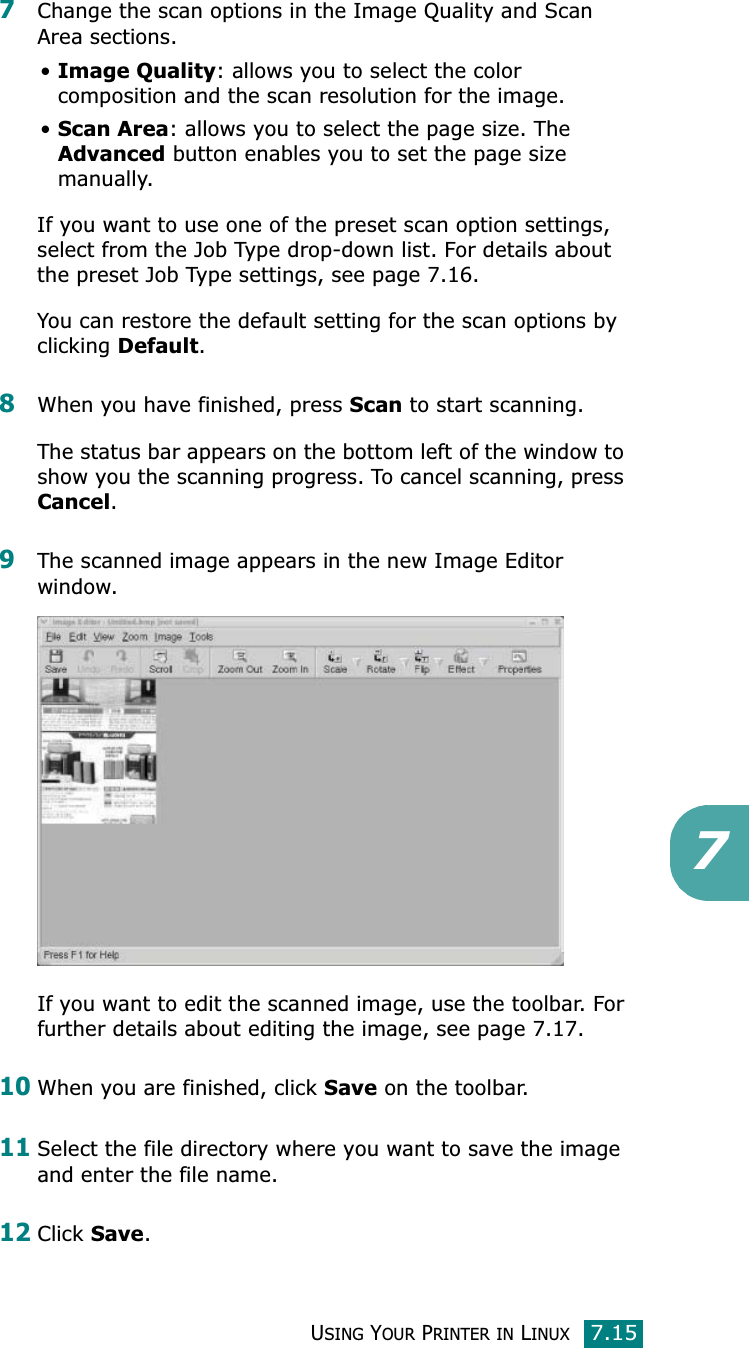
Samsung Electronics Co SF565PR Multi Function Printer User Manual 565P
Samsung Electronics Co Ltd Multi Function Printer 565P
UserManual.wiki
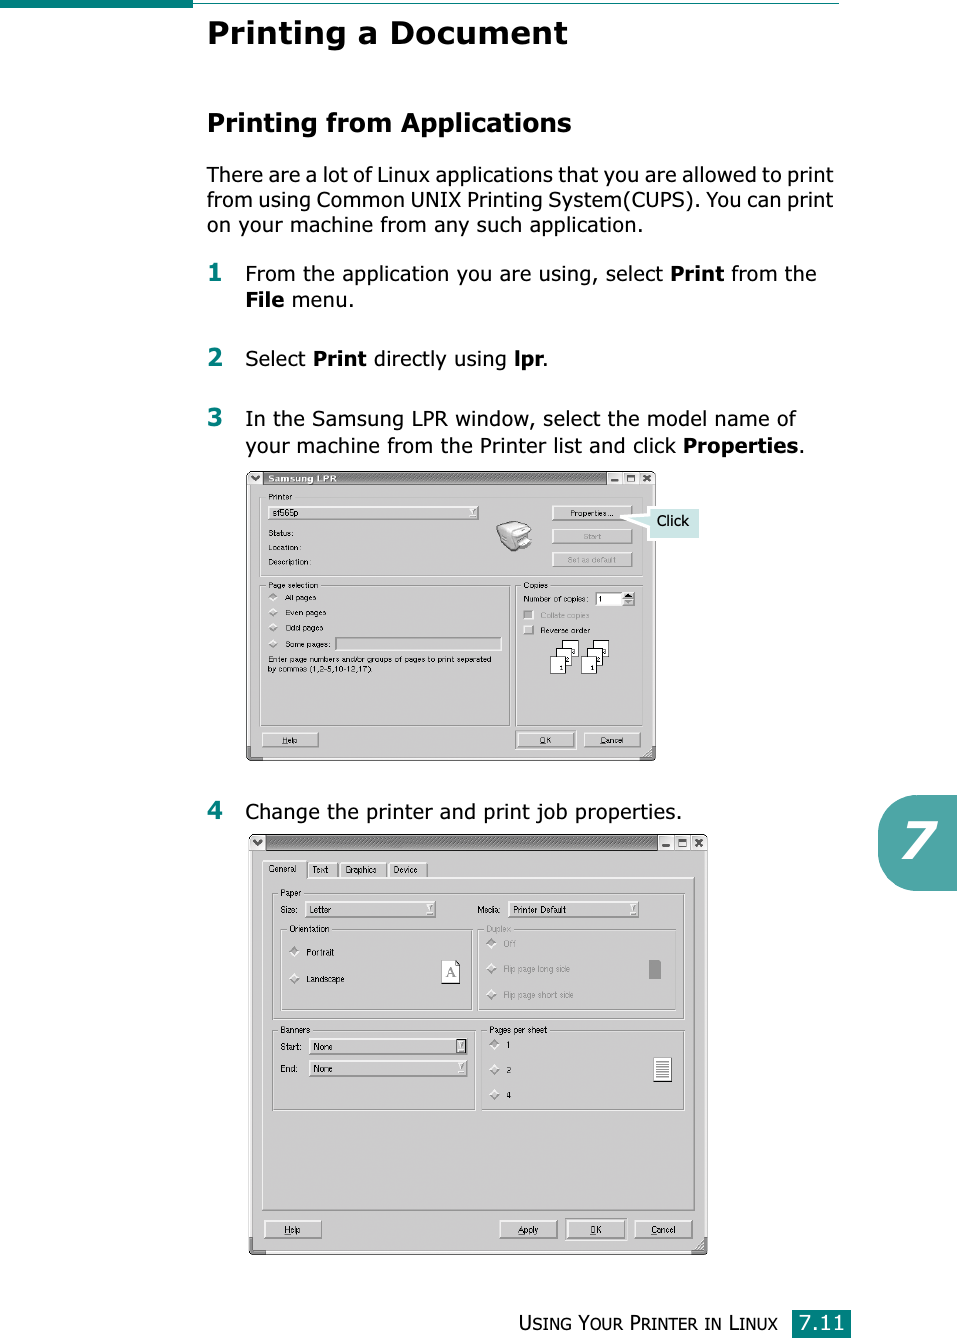
>
Samsung Electronics Co
>
SF565PR User Manual
>
Users Manual 2
Contents
1.
Users Manual 1
2.
Users Manual 2
Users Manual 2
Navigation menu
Upload a User Manual
Namespaces
Wiki Guide
HTML
PDF
Info
Views
User Manual
Discussion / Help
Navigation

![FAXING6.14To set up the DRPD mode:1Press Menu until “Fax Setup” appears on the top line of the display.The first available menu item, “Receive Mode,” displays on the bottom line.2Press the scroll button (W or X) until you see “DRPD Mode” on the bottom line and press Enter.3When “Set” displays on the bottom line, press Enter. The LCD displays ‘[Waiting Ring].” 4Call your fax number from another telephone. It is not necessary to place the call from a fax machine. 5When your machine begins to ring, do not answer the call. The machine requires several rings to learn the pattern.When the machine completes learning, the LCD displays “End DRPD [Setup]”.If the DRPD setup fails, “DRPD Ring Error” appears. Press Enter when “DRPD Mode” displays and retry from Step 3.6To return to Standby Mode, press Stop/Clear.When the DRPD feature is set up, the DRPD option is available in the Receive Mode menu. To receive faxes in the DRPD mode, you need to set the menu to DRPD.NOTES:• DRPD must be set up again if you re-assign your fax number, or connect the machine to another telephone line.• After DRPD has been set up, call your fax number again to verify that the machine answers with a fax tone. Then have a call placed to a different number assigned to that same line to be sure the call is forwarded to the extension telephone or answering machine plugged into the EXT. jack.:Receiving Faxes in the MemorySince your machine is a multi-tasking device, it can receive faxes while you are making copies or printing. If you receive a fax while you are copying or printing, your machine stores incoming faxes in the memory. Then, as soon as you finish copying or printing, the machine automatically prints the fax.](https://usermanual.wiki/Samsung-Electronics-Co/SF565PR.Users-Manual-2/User-Guide-893233-Page-11.png)


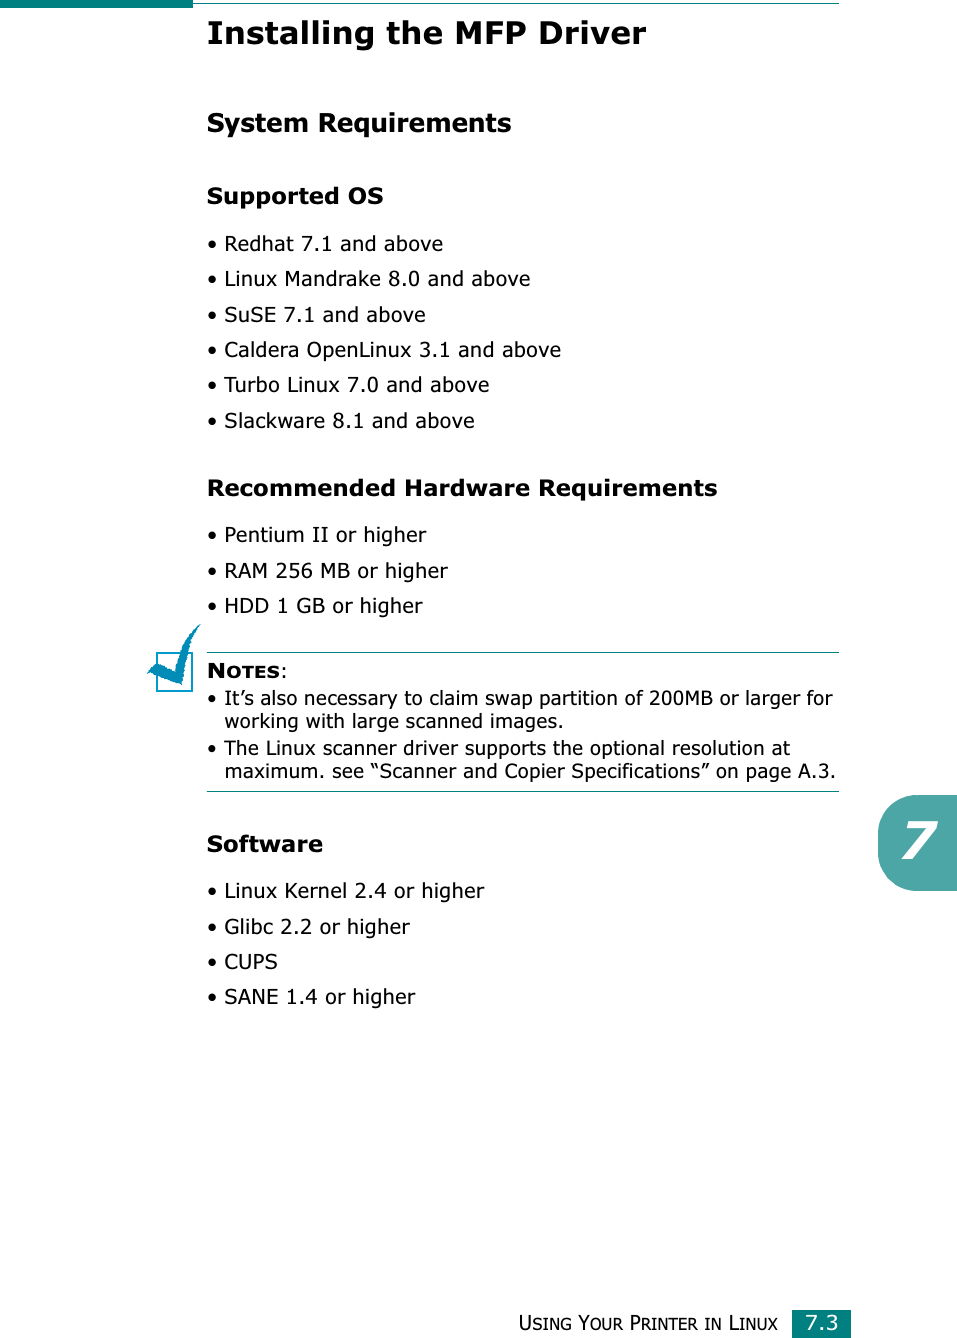
![USING YOUR PRINTER IN LINUX7.4Installing the MFP Driver1Make sure that you connect your machine to your computer. Turn both the computer and the machine on.2When the Administrator Login window appears, type in rootin the Login field and enter the system password.NOTE: You must log in as a super user (root) to install the printer software. If you are not a super user, ask your system administrator.3Insert the printer software CD-ROM. The CD-ROM will automatically run.If the CD-ROM does not automatically run, click the icon at the bottom of the desktop. When the Terminal screen appears, type in:[root@localhost root]#cd /mnt/cdrom/Linux[root@localhost root]#./install.shNOTE: The installation program runs automatically if you have an autorun software package installed and configured.4Click Install.5When the welcome screen appears, click Next.](https://usermanual.wiki/Samsung-Electronics-Co/SF565PR.Users-Manual-2/User-Guide-893233-Page-39.png)
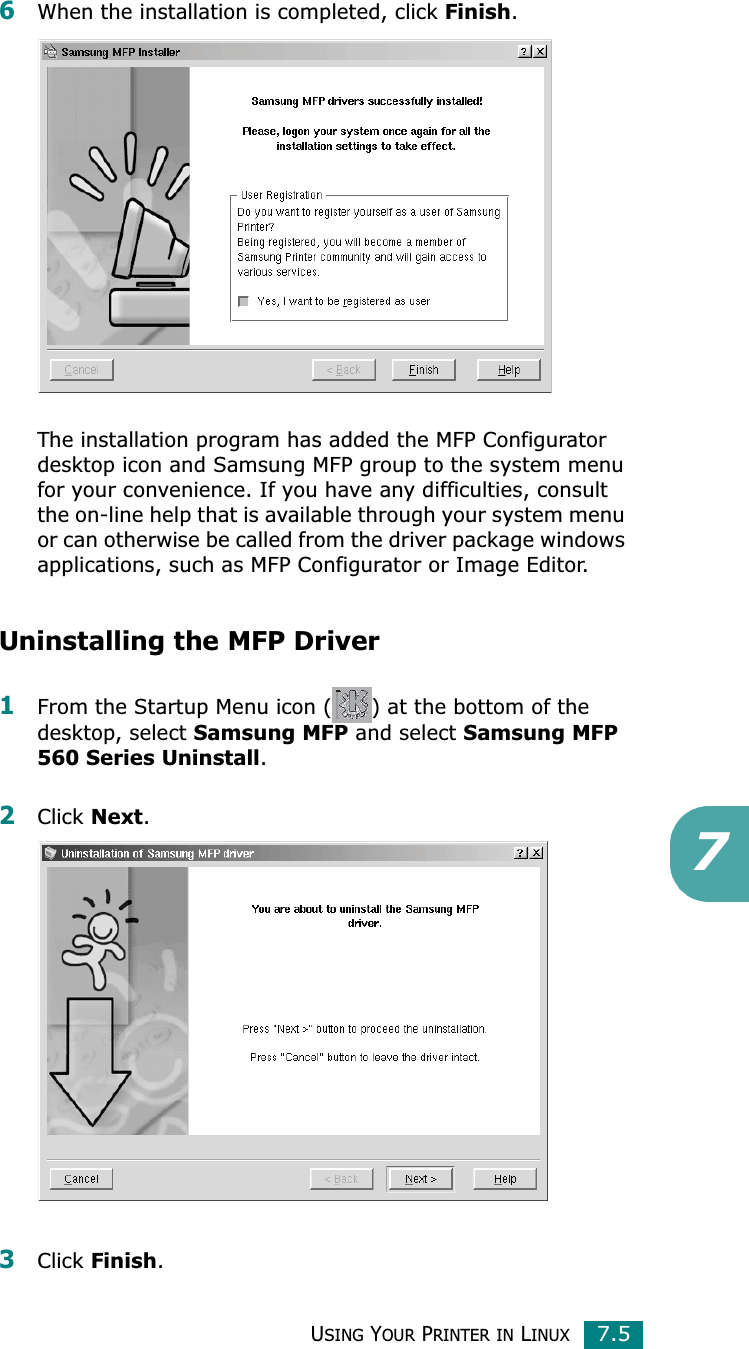


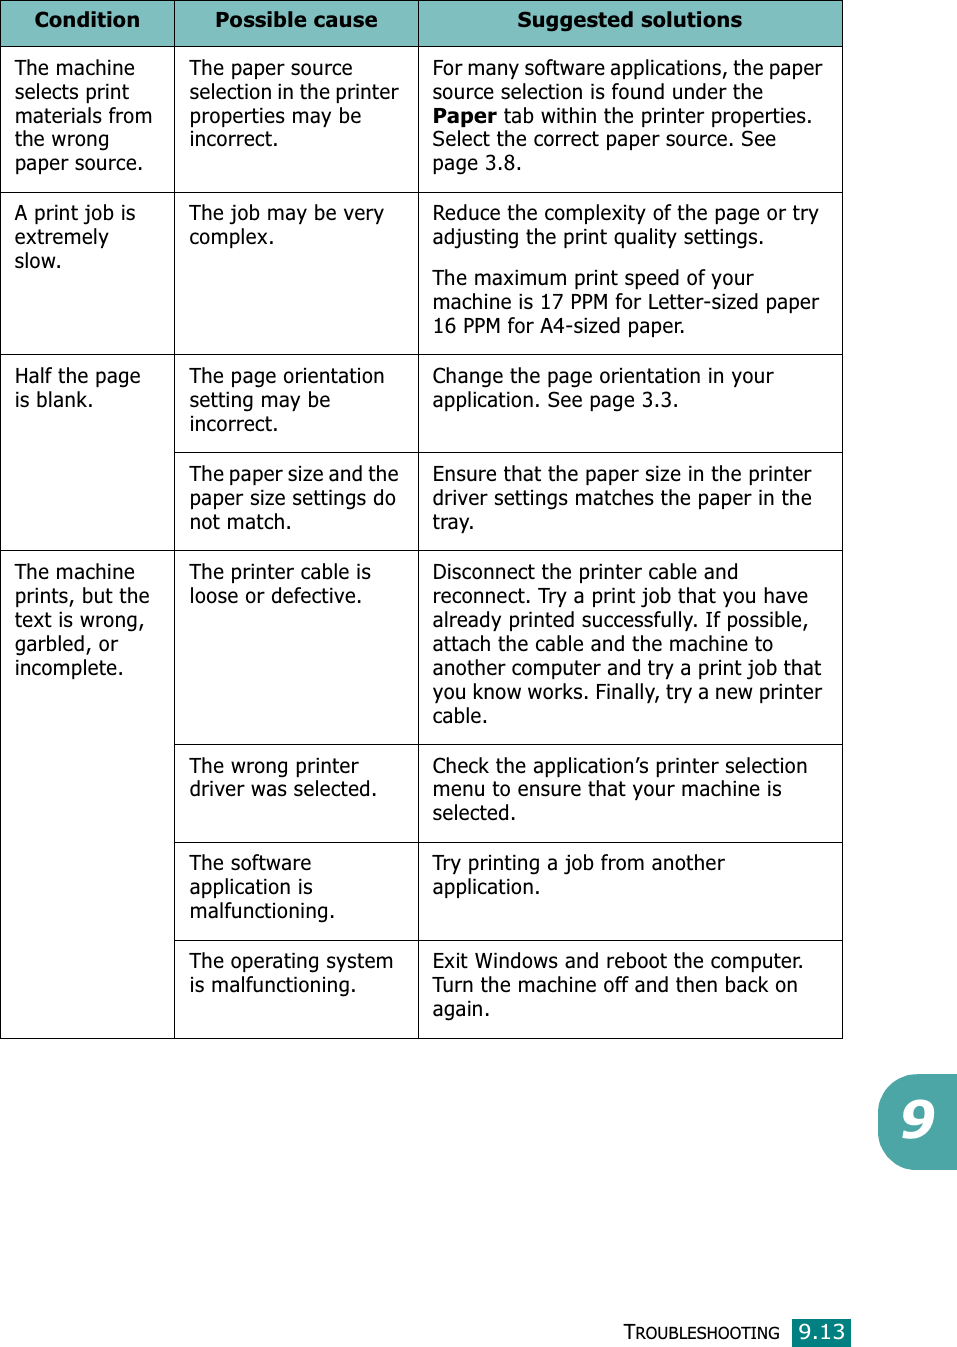
![TROUBLESHOOTING9.393Pull the document gently out of the ADF.4Close the control panel. Then load the documents back into the ADF.Clearing Paper JamsWhen a paper jam occurs, “Paper Jam” appears on the display. Refer to the table below to locate and clear the paper jam.To avoid tearing the paper, pull the jammed paper out gently and slowly. Follow the steps on the next pages to clear the jam. Message Location of Jam Go to[Paper Jam 0]Open/Close DoorIn the paper tray.page 9.4[Paper Jam 1]Open/Close DoorIn the fuser area or around the toner cartridge.In the manual feederpage 9.6[Paper Jam 2]Check InsideIn the paper exit areapage 9.5](https://usermanual.wiki/Samsung-Electronics-Co/SF565PR.Users-Manual-2/User-Guide-893233-Page-70.png)
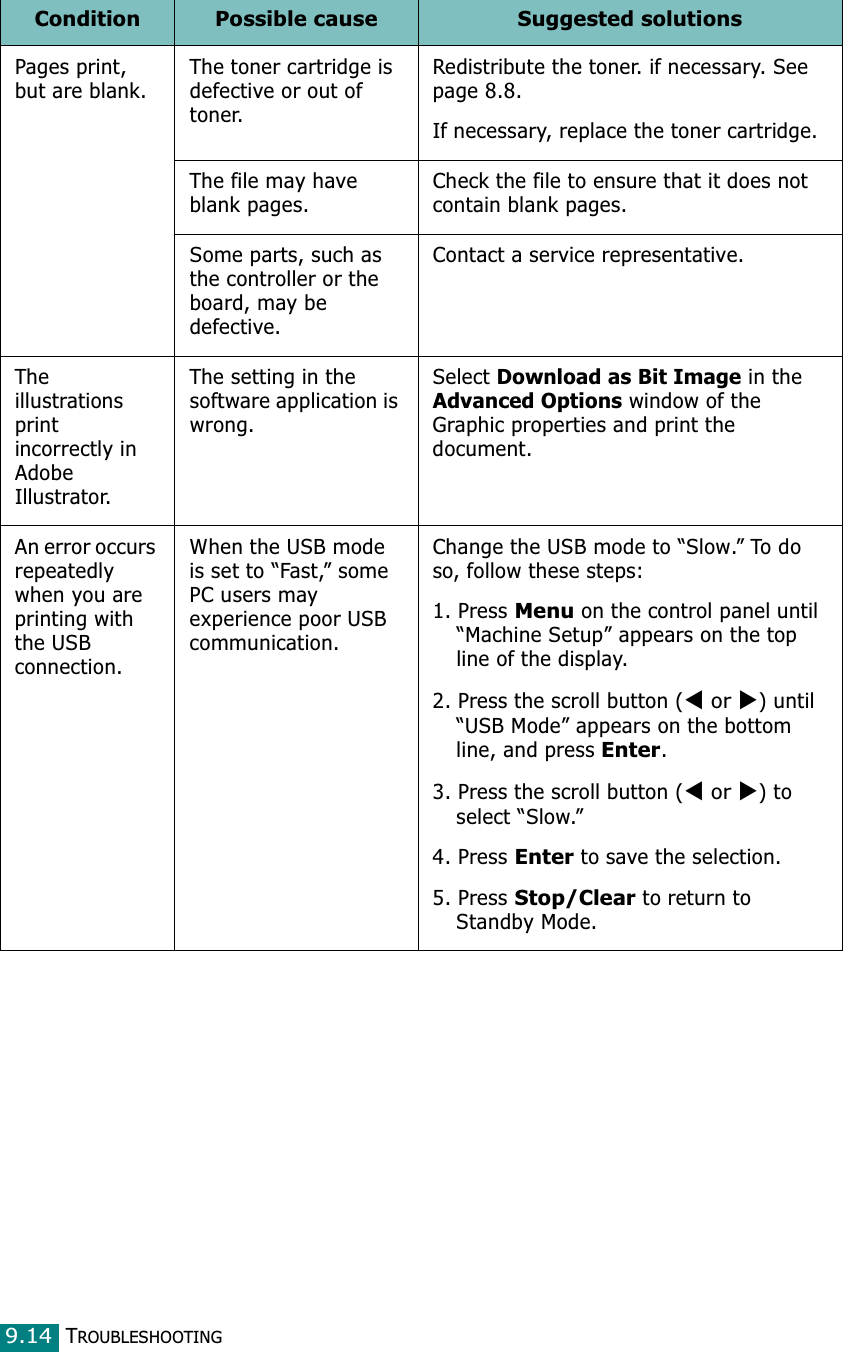
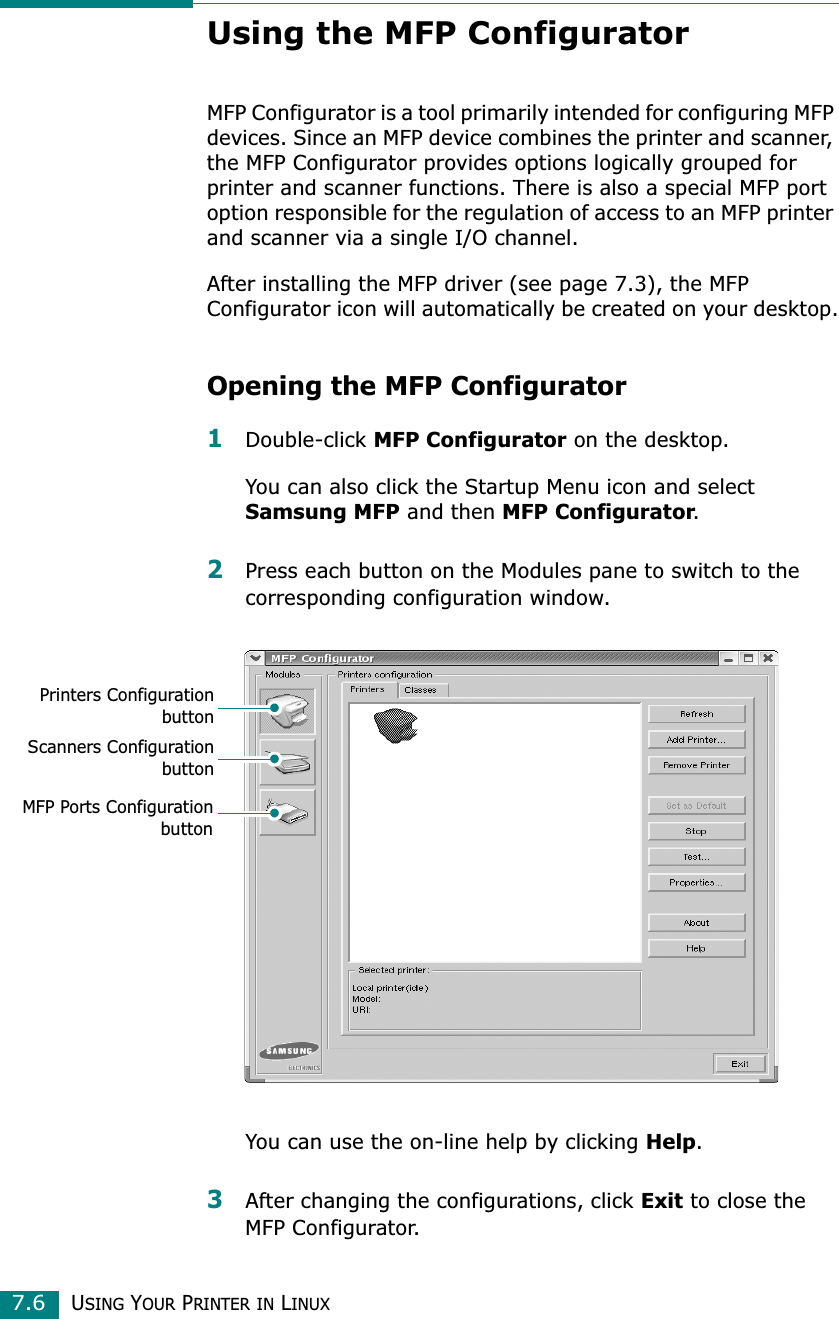
![TROUBLESHOOTING9.8Clearing LCD Error MessagesMessages appears on the display to indicate the control panel to indicate the machine’s status or errors. Refer to the following table to understand the message’s meaning and correct the problem, if necessary. Messages and their meanings are listed in alphabetical order. Display Meaning Suggested solutionsCancel ?1:Yes 2:NoYour machine’s memory has become full while documents were being loaded into memory. To cancel the fax job, press the No 1 button “Yes.” If you want to send the pages already stored, press the No 2button “No.” You should send the remaining pages later when the memory is available.[Comm. Error]The machine has a communication problem.Ask the sender to try again.CRU Fuse ErrorThe machine has a problem with recognizing the new toner cartridge.Please contact a service representative.[Document Jam]The loaded document has jammed in the ADF (Automatic Document Feeder).Clear the document jam. See page 9.2.[Door Open]The front or rear cover is not securely latched.Close the cover until it locks into place.Group Not AvailableYou have tried to select a group location number where only a single location number can be used, such as when adding locations for a broadcasting operation.Just use a one-touch or speed dial number or dial a number manually using the number keypad.](https://usermanual.wiki/Samsung-Electronics-Co/SF565PR.Users-Manual-2/User-Guide-893233-Page-75.png)
![TROUBLESHOOTING9.99[Incompatible]The remote machine does not have the requested feature, such as a delayed transmission.It also occurs if the remote machine does not have enough memory space to complete the operation you are attempting.Reconfirm the remote machine’s features.[Jam 1] or[No Cartridge]The toner cartridge is not installed.Install the toner cartridge. See page 1.10.Line BusyThe remote person did not answer or the line is already engaged.Try again after a few minutes.[Line Error]Your machine cannot connect with the remote machine or has lost contact because of a problem with the phone line.Try again. If the problem persists, wait an hour or so for the line to clear and try again.Or, turn the ECM on. See page 6.35.Load DocumentYou have attempted to set up a copy or fax operation with no document loaded.Load a document and try again.Low Heat ErrorThere is a problem in the fuser unit.Unplug the power cord and plug it back in. If the problem persists, please contact a service representative.Open Heat Error[Over Heat]Memory FullThe memory is full. Delete unnecessary documents, retransmit after more memory becomes available or split the transmission into more than one operation.[No Answer]The remote fax machine has not answered after several redial attempts.Try again. Make sure that the remote machine is operational.NO. Not AssignedThe one-touch or speed dial location you tried to use has no number assigned to it.Dial the number manually using the number keypad or assign the number. For storing a number, see “Automatic Dialing” on page 6.15.Display Meaning Suggested solutions](https://usermanual.wiki/Samsung-Electronics-Co/SF565PR.Users-Manual-2/User-Guide-893233-Page-76.png)
![TROUBLESHOOTING9.10[No Paper]Add PaperThe paper tray has run out of paper.Load paper in the paper tray. See page 1.12.Operation Not AssignedYou are doing in the Add/Cancel operation, but there is no jobs waiting.Check the display to see if there is any scheduled job. The display should indicate them in Standby mode, for example, Delay Fax.[Paper Jam 0]Open/Close DoorPaper has jammed in the feeding area of the paper tray.Clear the jam. See page 9.4.[Paper Jam 1]Open/Close Door• Paper has jammed in the paper exit area.• A paper jam has occurred in the manual feeder or the machine detects non-feeding from the manual feeder.Clear the jam. See page 9.6.[Paper Jam 2]Check InsidePaper has jammed in the fuser area.Clear the jam. See page 9.5.Power FailurePower has turned off then on and the machine’s memory has not been saved.You need to start again the job which you were trying to do before the power failure.Retry Redial?The machine is waiting for a specified time interval to redial a previously busy station.You can press Enter to immediately redial, or Stop/Clear to cancel the redial operation.[Stop Pressed]The Stop/Clear button is pressed during a copy or fax operation.Try again.[Toner Empty]The toner cartridge has run out. The machine stops printing.Replace with a new toner cartridge. See page 8.9.[Toner Low]The toner cartridge is almost empty.Take out the toner cartridge and gently shake it. By doing this, you can temporarily reestablish printing operations.Display Meaning Suggested solutions](https://usermanual.wiki/Samsung-Electronics-Co/SF565PR.Users-Manual-2/User-Guide-893233-Page-77.png)