Samsung Electronics Co SGHT999L Portable Handset with Multi-band WCDMA/GSM/EDGE/LTE, WLAN, RFID and Bluetooth User Manual T Mobile SGH T999L
Samsung Electronics Co Ltd Portable Handset with Multi-band WCDMA/GSM/EDGE/LTE, WLAN, RFID and Bluetooth T Mobile SGH T999L
Contents
- 1. Users Manual 1
- 2. Users Manual 2
- 3. Users Manual 3
- 4. Health/Safety/Warranty Guide
Users Manual 2

DRAFT
I
nterna
l
U
se
O
nl
y
150
• Exchange Server
: your exchange server remote email
address. Typically starts with
mail.XXX.com
. Obtain this
information from your company network administrator.
Important!
Do not accept the default entry as this is a guess
based on returned information.
•
If your network requires SSL encryption, tap the
Use secure
connection (SSL)
field to place a check mark in the box and
activate this additional level. Most often, this option should be
enabled.
•
If your network requires that you accept SSL certificates, tap
the
Accept all SSL certificates
field to place a check mark in
the box and activate this additional level. Most often, this option
is not required. Confirm this information with your IT
Administrator.
Important!
If your Exchange server requires this feature,
leaving this field unchecked can prevent
connection.
9. Consult your IT Administrator if it is necessary to
enable the
Use client certification
option.
10. With the new server information entered, tap
Next
.
11. Read the on-screen
Activation disclaimer
and, when
prompted, tap
OK
. The device then verifies your
incoming server settings.
12. If prompted, read the
Remote security administration
information and tap
OK
to accept the service and
continue.
13. Adjust the various on-screen configuration fields and
tap
Next
. It may take a few seconds for the next screen
to load.
•
Enabling the
Automatically download attachments when
connected to Wi-Fi
option decreases the wait time to access
large email attachments.
14. If prompted, read the
Activate device administrator?
screen and tap
Activate
to complete the email setup
process.
Note:
This process can take a few minutes. If the previous
setup screen re-appears,
ignore it and do not alter any
fields
during this process.
DRAFT
I
nterna
l
U
se
O
nl
y
Messages 151
15. Identify your new work email account with a unique
name (Ex: Work), then tap
Done
.
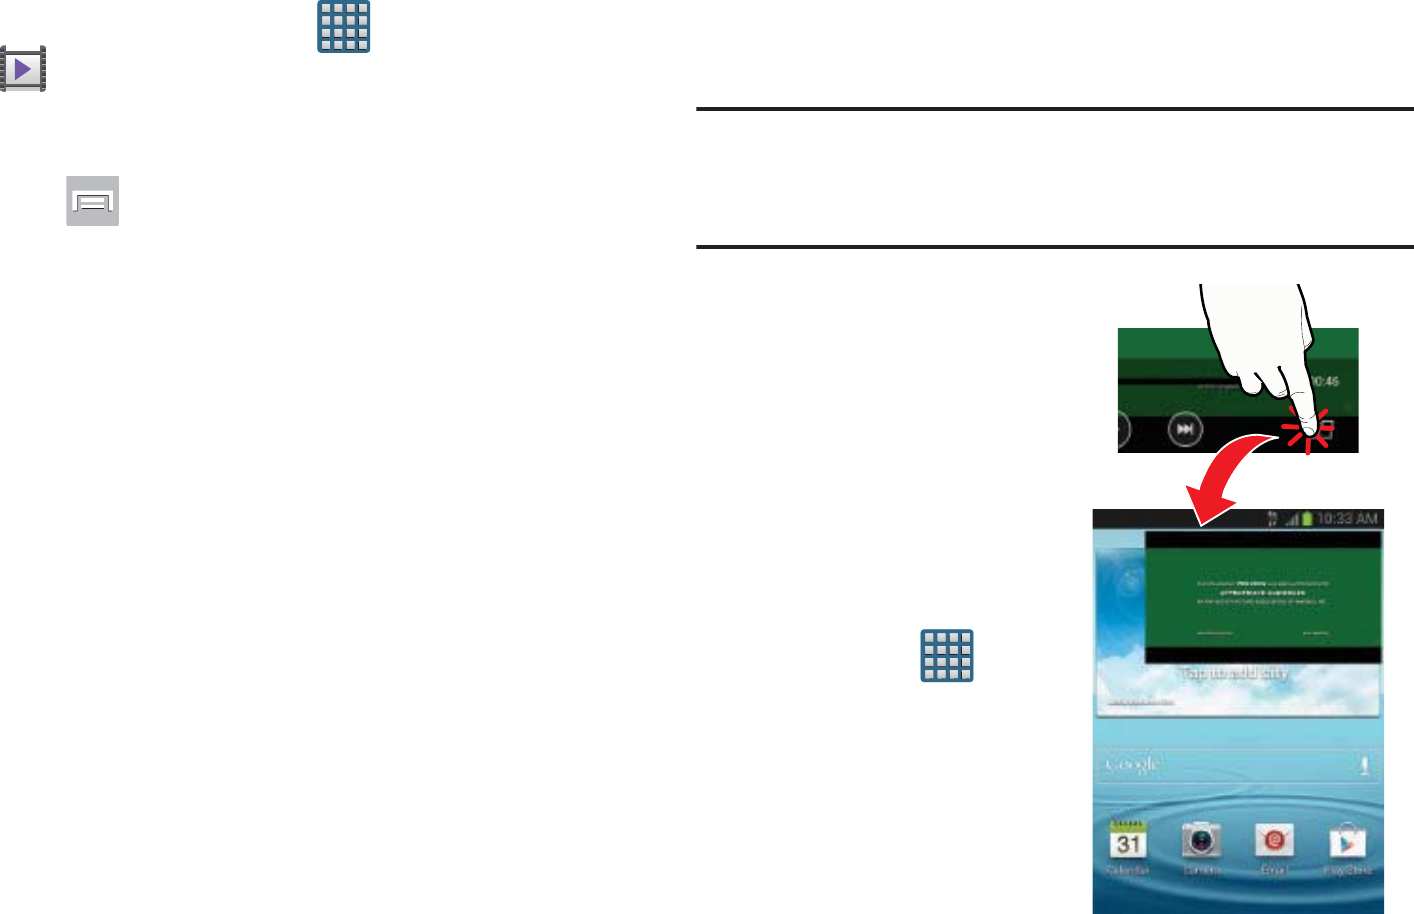
Opening an Exchange Email
1. From the Home screen, tap ➔ (
Email
).
2. Tap the account name field (upper-left) to open the
complete email account list page.
3. Select an exchange email account and tap an email
message.
Refreshing Exchange Email
1. From the Home screen, tap ➔ (
Email
).
2. Select an email account.
•
If you are already in an email account, tap the account name
field (upper-left) to open the complete email account list page.
•
Select an available email account.
3. Tap (
Refresh
).
Composing Exchange Email
For more information, refer to “Composing Email” on
page 146.
Deleting an Exchange Email Message
Touch and hold an email (from your inbox list) and
select
Delete
from the on-screen context menu.
– or –
With the email message displayed, tap (
Delete
).
Configuring Microsoft Exchange Email Settings
1. From the Home screen, press and then tap
Settings
and then navigate to the
Accounts
area.
2. Tap the Microsoft Exchange account and
Settings
➔
<
Exchange email account>
.
– or –
From the current Email inbox listing, press and
then tap
Settings
➔ <
Exchange email account>
and
specify the email settings you wish to synchronize:
• Account name
displays the name used by the device to track
the account.
•Signature
: Lets you attach a customized signature to the
bottom of all outgoing emails.
–
In a single motion touch and slide to the right to turn it on
.
ON
DRAFT
I
nterna
l
U
se
O
nl
y
152
–
Tap the
Signature
field, change the current text, and tap
Done
to save the new signature.
• Default account
: Assign this account as the default email
account used for outgoing messages.
• Always Cc/Bcc myself
allows you to include your own email
address in either the CC, Bcc, or None fields. Lets you always
receive a copy of outgoing emails.
• Forward with attachment
: Lets you include attachments
when forwarding an email.
• Show images
: allows you to view embedded images located
within the body of the currently displayed email.
• Auto download attachments
: allows the device to
automatically download email attachments when an active
Wi-Fi connection is detected. This process speeds up the
process of downloading an emails attachments for offline
review by not using a 3G or 4G/LTE network connection.
• Period to sync Email
to assign the sync range for your
incoming and outgoing email messages between your phone
and your external exchange server. How many days worth of
email messages should the phone and server synchronize.
Choose from:
Automatic, All, 1 day
,
3 days
,
1 week
,
2 weeks
, or
1 month
.
• Empty server trash
: allows you to delete your email account’s
trash bin remotely.
• Sync schedule
allows you to configure your email sync
schedule.
• Folder sync settings
allows you to configure the sync settings
for various folders such as Inbox, Drafts, Outbox, etc..
• Out of office settings
allows you to both activate/deactivate
your email’s out of office settings, and configure both the start/
end dates and your outgoing message.
• Size to retrieve emails
configures the incoming email size
allowed to pass through to your phone automatically without
user interaction. Emails with attachments larger than
configured will have to be retrieved manually.

DRAFT
I
nterna
l
U
se
O
nl
y
Messages 153
• Period to sync Calendar
assigns a period for your phone to
sync calendar events. Choose from:
2 weeks, 1 month
,
3 months
,
6 months
, or
All calendar
.
• Security options
: allows you to enable several security options
such as: Encryption, Encryption algorithm, Sign, Sign
algorithms, Email certificates, and Security policy list. These
security policies could restrict some functions from corporate
servers.
–
Security policy list
: lists the current email’s security policy.
These policies could restrict some functions from corporate
servers.
• In case of sync conflict
allows you to assign the master
source on emails. If there is a conflict with the current email
sync you can assign the server as the main source for all
emails (
Server has priority
) or assign the phone to be the main
source and update the server accordingly (
Device has
priority
).
• Auto resend times
enables the phone to resend an outgoing
email a specified number of times if delivery fails.
The default is 3 auto resends.
• Email notifications
enables the phone to display a status bar
icon when new email messages have been received.
• Select ringtone
assigns an audible ringtone when a new or
upcoming event is pending.
•Vibrate
assigns a vibration when a new or upcoming event is
pending.
• Exchange server settings
provides access to the
Domain\user name, Password, and Exchange server settings.
•Sync Email
synchronizes emails between your device and the
remote exchange server.
• Sync Contacts
synchronizes the contacts between your device
and the remote exchange server.
•Sync Calendar
synchronizes your exchange calendar entries
between your device and the remote exchange server.
• Sync Task
synchronizes your exchange tasks entries between
your device and the remote exchange server.
3. Press to return to the previous page.
DRAFT
I
nterna
l
U
se
O
nl
y
154
Using Google Mail
Google Mail (Gmail) is Google’s web-based email. When you
first setup the phone, Gmail is configured. Depending on the
synchronization settings, Gmail is automatically synchronized
with your Gmail account.
Signing into Google Mail
1. From the Home screen, tap ➔ (
Gmail
).
Note:
You must sign in to your Gmail account in order to
access features such as Google Mail and Play Store.
2. Tap
New
if you do not have a Google account.
– or –
Tap
Existing
if you have a Google account.
The Inbox loads conversations and email.
Opening Gmail
1. From the Home screen, tap ➔ (
Gmail
).
2. Tap an existing email message.
Refreshing Gmail Mail
From within the Gmail message list, tap (
Refresh
)
at the bottom of the screen to refresh the screen, send
and receive new emails, and synchronize your email
with the Gmail account.
Other Gmail Options
1. From the main Gmail screen, tap (
Labels
) at the
bottom of the screen to set up and manage Labels for
your Gmail messages.
2. From the main Gmail screen, tap (
Search
) at the
bottom of the screen to search through your Gmail
messages.
Composing a Gmail Message
1. From the Home screen, tap ➔ (
Gmail
).
2. From the Gmail Inbox, tap (
Compose
) at the
bottom of the screen to create a new message.
3. Enter the recipients Email address in the
To
field.
Tip:
Separate multiple recipient email addresses with a
comma.
DRAFT
I
nterna
l
U
se
O
nl
y
Messages 155
4. Press and select
Add Cc/Bcc
to add a carbon or
blind copy.
5. Enter the subject of this message in the
Subject
field.
6. Tap the
Compose email
field and begin composing your
message.
7. Once complete tap (
Send
).
Viewing a Gmail Message
1. From the Gmail Inbox, tap a message to view the
following options located at the bottom of the screen:
•Archive
: archives the selected Email.
• Delete
: deletes the currently selected Email.
•Labels
: assigns a label to the current Email.
• Mark as Unread
: tags the current message as unread
and returns you to the Google Mail Inbox.
• Newer
: swiping to the right displays newer Emails.
•Older
: swiping to the left displays older Emails.
2. Press to select one of the following additional
options:
• Mark important
: assigns the current email an important
status.
•Mute
: mutes the conversation.
• Report spam
: reports the Email message as spam.
• Report phishing
: reports the Email message as a phishing
email attempt.
• Settings
: allows you to configure the General, or Notification
settings.
• Send feedback
: sends feedback to Google.
•Help
: launches the browser and displays Google Mobile Help
information.
Creating an Additional Gmail Account
1. From the Home screen, tap ➔ (
Gmail
).
2. Press and then tap
Settings
➔
ADD ACCOUNT
and
follow the same steps as referenced in the previous
section. For more information, refer to “Signing into
Google Mail” on page 154.
DRAFT
I
nterna
l
U
se
O
nl
y
156
Google Talk
Google Talk™ is a free Windows and web-based application
for instant messaging offered by Google. Conversation logs
are automatically saved to a Chats area in your Gmail
account. This allows you to search a chat log and store them
in your Gmail accounts.
Note:
Before using this application, you must first have an
active Gmail account available and be currently logged
in.
1. From the Home screen, tap ➔ (
Talk
).
Note:
If you are not already logged into Google, refer to the
instructions for signing in on page 154.
2. Begin using Google Talk.
Note:
The Network confirms your login and processes. This
could take up to 5 minutes to complete.
ChatON
Provides a global mobile communication service where you
can chat with more than 2 buddies via a group chat. Share
things such as pictures, videos, animation messages
(Scribbles), audio, Contacts, Calendar entries, and Location
information.
Important!
The Samsung account manages the access
information (username/password) to several
applications, such as AllShare Play, ChatON, and
Media Hub.
For more information, visit:
https://web.samsungchaton.com
.
DRAFT
I
nterna
l
U
se
O
nl
y
Messages 157
Registering with the Service
1. Confirm you have already logged in to your Samsung
account.
Note:
There should be no (
Samsung account
icon) in the
Notifications area of the screen.
2. From the Home screen, tap (
Apps
) ➔
(
ChatON
).
3. Read the on-screen notification about data charges
and tap
OK
.
4. Select a country code, enter your current phone
number to register with the service, and tap
Done
.
5. Select either the
Terms and conditions
or
Privacy policy
and read the on-screen information. Tap
Accept
to
continue.
6. Choose to receive the verification code via either
SMS
(text message) or
Voice
(answering machine call) to
your device.
Note:
If you opt to receive the verification code via SMS, this
information is sent directly to your device. Once
received, the
Verification
field is automatically filled in.
7. Enter your real name and tap (
OK
).
Adding Your First Chat On Buddy
1. From the Home screen, tap (
Apps
) ➔
(
ChatON
).
2. Tap
Add buddy
and choose a search method.
•Address
: to search by Country code and phone number.
• Search by Samsung Account ID
: to search by using
a known samsung account ID.
3. Select a country code if it differs from yours.
4. Enter the information and tap (
Search
). Once the
recipient is matched, their entry appears in the
Results
area.
5. Tap (
Add buddy
) and confirm your new buddy
appears in the Buddies tab.
Note:
For more information, press (
Settings
) and tap
General
➔
Help
.

DRAFT
I
nterna
l
U
se
O
nl
y
158
Using ChatON for Chatting
1. From the Home screen, tap (
Apps
) ➔
(
ChatON
).
2. Tap the Buddies tab and select a buddy to initiate your
chat.
3. Enter your message using the on-screen text entry
method.
4. Tap
Send
.
To reply to a ChatON message:
1. While the chat session is active, tap the
Enter message
field and then type your reply message.
2. Compose your reply.
Your texts are colored Blue and your buddy’s messages
are white.
3. Tap
Send
to deliver your reply.
Deleting a single message bubble
1. From the Home screen, tap (
Apps
) ➔
(
ChatON
).
2. Launch a chat session to reveal the message string.
3. Touch and hold a message bubble, then select
Delete
.
Google +
Google+ makes messaging and sharing with your friends a
lot easier. You can set up Circles of friends, visit the Stream
to get updates from your Circles, use Messenger for fast
messaging with everyone in your Circles, or use Instant
Upload to automatically upload videos and photos to your
own private album on Google+.
1. Sign on to your Google account. For more information,
refer to “Creating a New Google Account” on page 18.
2. From the Home screen, tap (
Apps
) ➔
(
Google+
).
3. Select the account you want to use to sign in to
Google+.
– or –
Tap
Add account
to create another account.

DRAFT
I
nterna
l
U
se
O
nl
y
Messages 159
4. Follow the on-screen instructions to use Google+.
5. Visit
www.google.com/mobile/+/
for more information.
Messenger
Messenger allows you to bring groups of friends together into
a simple group conversation. When you get a new
conversation in Messenger, Google+ sends an update to your
device.
1. Sign on to your Google account. For more information,
refer to “Creating a New Google Account” on page 18.
2. From the Home screen, tap (
Apps
) ➔
(
Messenger
).
– or –
From the Google+ application, select
Messenger
.
3. Select the account you want to use to sign in to
Google+.
– or –
Tap
Add account
to create another account.
4. When prompted, configure the Sync contacts
parameter (Sync contacts or Don’t sync) and tap
Continue
.
5. When prompted, configure the Instant Upload
parameters as desired and tap
DONE
.
6. Follow any on-screen setup instructions.
7. At the
Messenger
screen, tap to start a new
message.
8. In the upper text field, enter a name, email address, or
circle.
9. In the bottom message field, enter a message then tap
(
Send
).
10. From the
Messenger
screen, tap
Learn more
for more
detailed information.
DRAFT
I
nterna
l
U
se
O
nl
y
160
Section 8: Multimedia
This section explains how to use the multimedia features of
your device, including the Camera/Camcorder, Music Player,
AllShare Play, and how to manage your photos, images and
sounds.
You can take photographs and shoot video by using the
built-in camera functionality. Your camera produces photos in
JPEG format.
Important!
Do not take photos of people without their
permission.
Do not take photos in places where cameras are
not allowed.
Do not take photos in places where you may
interfere with another person’s privacy.
Note:
An SD card is no longer needed to take pictures or shoot
video since there is already 16/32GB of built-in storage.
Assigning the Default Storage
Location
Important!
Too many users can overlook this storage location
until something goes wrong. It is recommended
that you verify this location or change it before
initiating the use of the camera or camcorder
features.
1. From the Home screen, tap (
Apps
)
➔
(
Camera
).
2. From the viewfinder screen, tap (
Settings
) and
scroll down to the
Storage
entry.
3. Tap this entry and select the desired default storage
location for newly taken pictures or videos. Choose
from:
Phone
or
Memory card
.
Note:
It is recommended that you insert an external microSD
card and then set the option to
Memory card
.
4. Press to return to the Home screen.
DRAFT
I
nterna
l
U
se
O
nl
y
Multimedia 161
Using the Camera
Taking Photos
Taking pictures with your device’s built-in camera is as
simple as choosing a subject, pointing the camera, then
pressing the camera key.
Note:
When taking a photo in direct sunlight or in bright
conditions, shadows may appear on the photo.
1. From the Home screen, tap
(
Camera
).
2. Using the device’s main display screen as a viewfinder,
adjust the image by aiming the camera at the subject.
Note:
Use either the Up and Down volume keys or spread/
pinch the screen to zoom in or out. For more
information, refer to “Navigating Through the Screens”
on page 52.
3. If desired, before taking the photo, use the left area of
the screen to access various camera options and
settings.
4. You can also tap the screen to move the focus to a
desired area of interest.
5. Press (
Camera
) until the shutter sounds. (The
picture is automatically stored within your designated
storage location (page 160). If no microSD is installed,
all pictures are stored on the Phone.) For more
information, refer to “Camera Options” on page 162.
Note:
Touch and hold to take a burst shot. These are
saved using a Fine image quality.
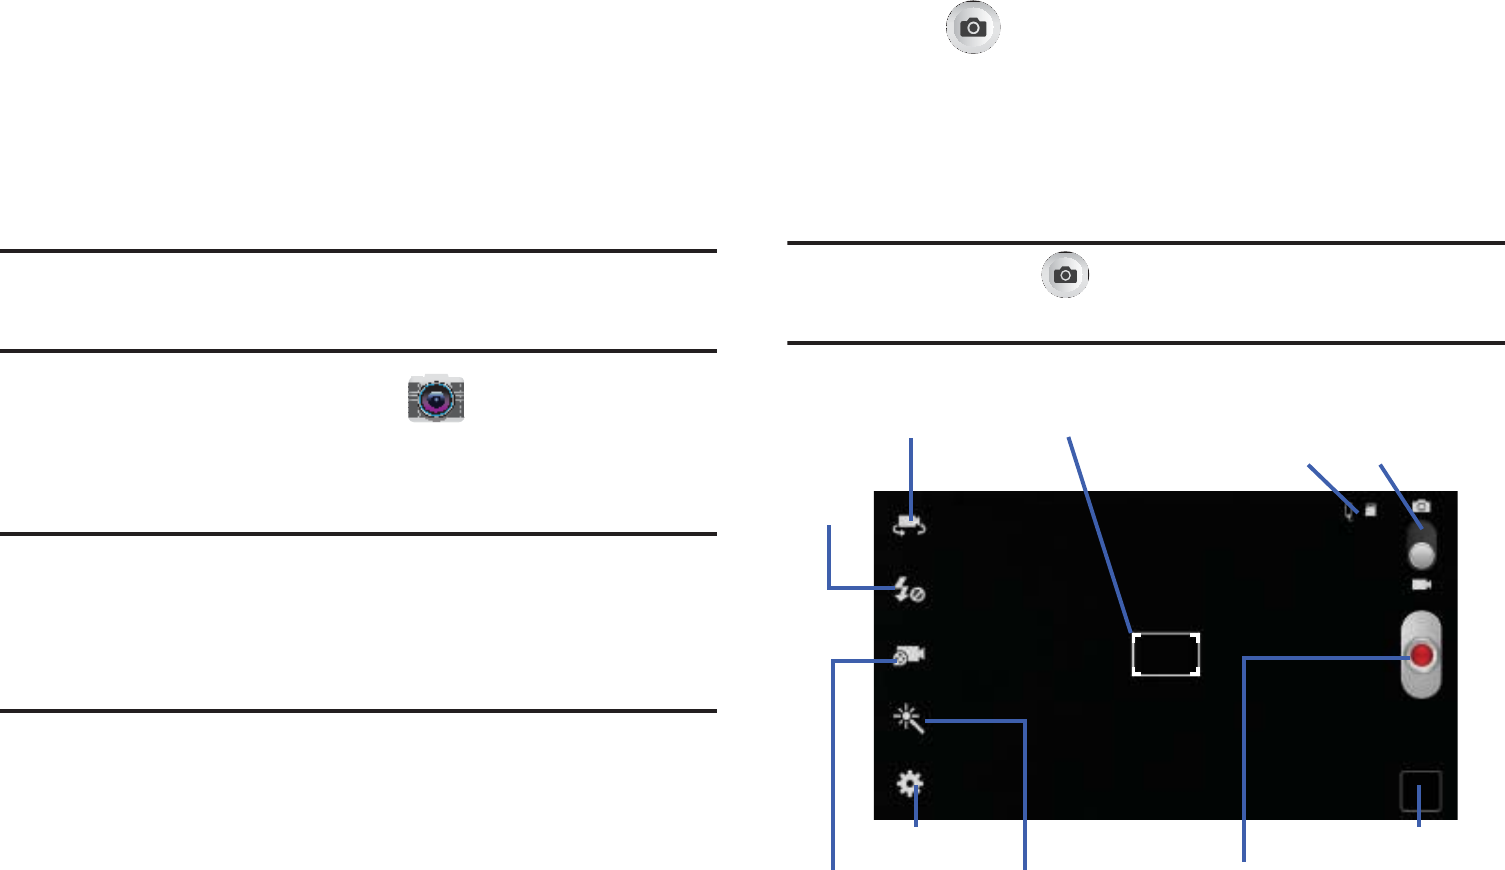
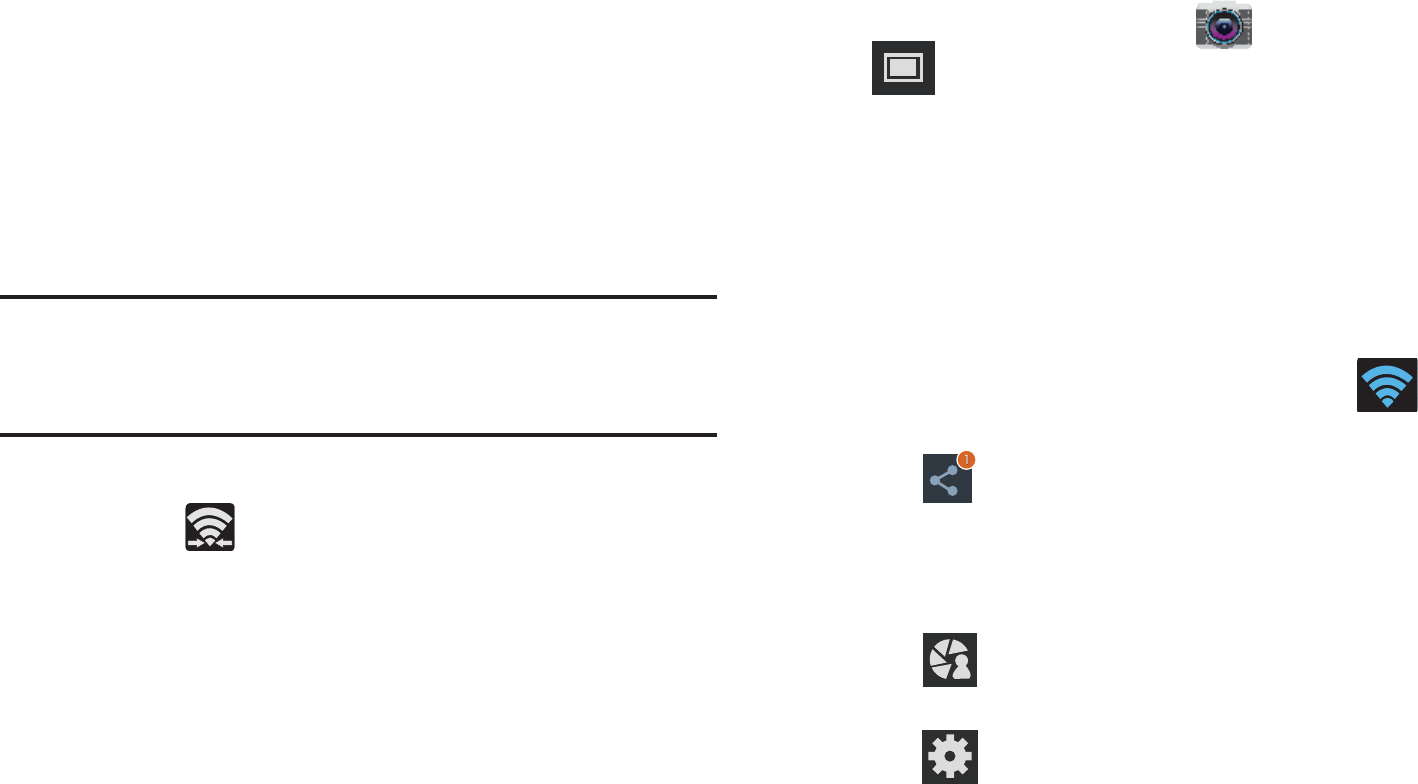
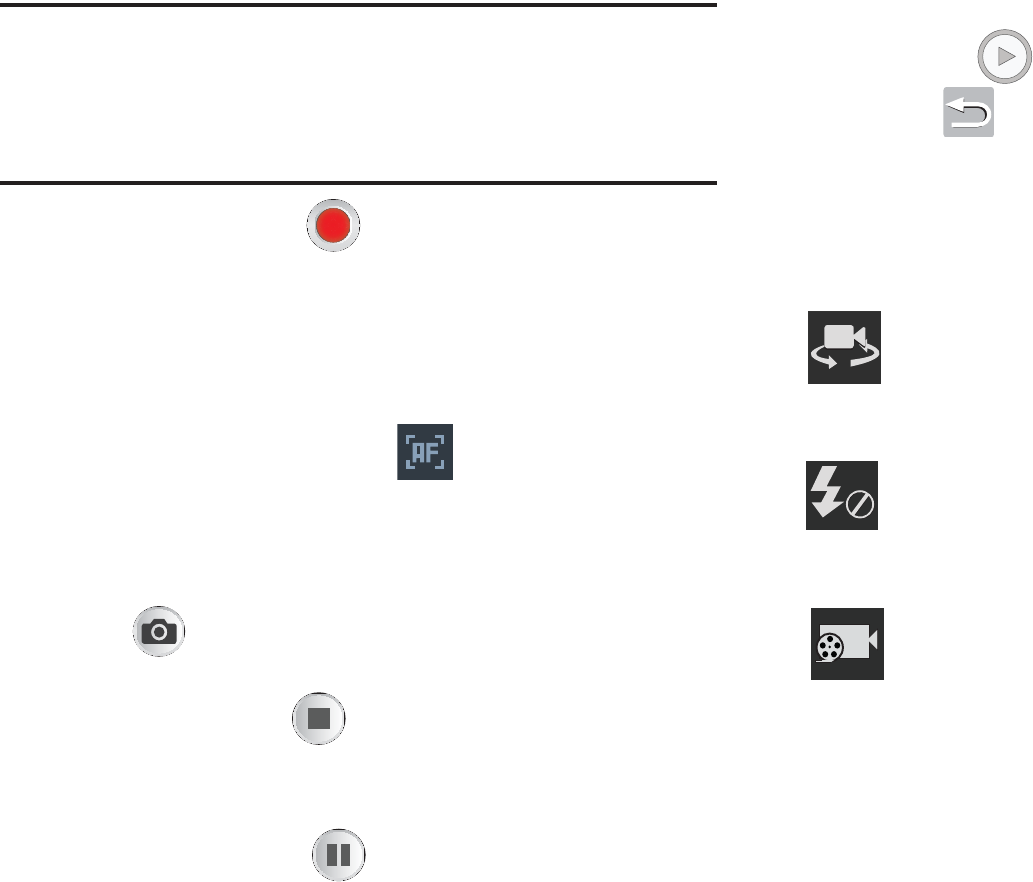
Focus areaSelf-portrait
Flash
Shooting
mode
Settings
Effects Camera/Camcorder
Image viewer
button
Camera/Camcorder
mode
Storage/Charge
DRAFT
I
nterna
l
U
se
O
nl
y
162
Camera Options
Options are represented by icons across both sides of the
screen.
The following shortcuts are available for the camera:
Focus area
: displays the area of the image used as the
main focus area. If the image is too close, the square
will turn red.
Self portrait
: allows you to set the front camera so you
can take pictures of yourself.
Flash
: allows you to set the flash options to Off, On, or
Auto flash.
Shooting mode
: allows you to set the shooting mode
to one of the following:
•
Single shot
: takes a single photo and view it
before returning to the shooting mode.
•
Best photo
: takes a series of photographs
simultaneously, then allows you to cycle through
the available thumbnails and choose the best
photo to keep. Tap
Done
to select the photo.
Shooting mode (continued):
•
Best face
: takes a series of photographs
simultaneously, then allows you to cycle through
the available thumbnails and choose the best
photo showing the subject’s best face. Tag
subject from the image, tap a desired image, and
select
Save
to store the photo.
•
Face detection
: adjusts the camera focus based
on face detection technology.
•
Panorama
: takes a landscape photo by taking an
initial photo and then adding additional images to
itself. The guide box lets you view the area
where the second part of the panoramic picture
should fall within.
•
Share shot
: uses Wi-Fi Direct to share your
pictures quickly with your friends. For more
information, refer to “Enabling Share Shot” on
page 168.
•
HDR
: takes pictures in HDR (High Dynamic
Range) mode to increase image detail.

DRAFT
I
nterna
l
U
se
O
nl
y
Multimedia 163
•
Buddy photo share
: uses face recognition from
pictures in your contacts to send your friends or
family pictures of themselves.
•
Beauty
: adjusts the contrast to smooth facial
features.
•
Smile shot
: the camera focuses on the face of
your subject. Once the camera detects the
person’s smile, it takes the picture.
•
Low light
: adjusts the aperture and light settings
to take better images in low light conditions.
Effects
: allows you to change the color tone or apply
special effects to the photo. Options include:
No effect, Cold vintage, Warm vintage, Posterize,
Solarize, Green point, Blue Point, Red-yellow point,
Washed out, Cartoonify, Black and white, Sepia, or
Negative.
Share shot - Share with
: lists the current participants
sharing images with you via an active Share shot
session.
Share shot - Shooting mode
: lists the current shooting
modes available from with the Share Shot mode.
Settings:
Edit shortcuts
: allows you to set shortcut icons for the
settings that you use the most.
Burst shot
: allows several photographs to be captured
in quick succession by touching and holding the
Camera button.
GPS tag
: allows you to turn GPS On or Off (also known
as Geotagging). The location of where the picture is
taken is attached to the picture. (Only available in
Camera mode.)
Self-portrait
: allows you to set the front camera so you
can take pictures of yourself or video chat.
Flash
: allows you to set the flash options to Off, On, or
Auto flash.
Shooting mode
: allows you to set the shooting mode.
For more information, see Shooting mode
description.

DRAFT
I
nterna
l
U
se
O
nl
y
164
Settings (continued):
Effects
: allows you to change the color tone or apply
special effects to the photo. Options include:
No effect, Cold vintage, Warm vintage, Posterize,
Solarize, Green point, Blue point, Red-yellow
point, Washed out, Cartoonify, Black and white,
Sepia, and Negative.
Scene mode
: allows you to set the Scene to help take
the best pictures possible. Options include None,
Portrait, Landscape, Sports, Party/Indoor, Beach/
Snow, Sunset, Dawn, Autumn color, Firework, Text,
Candlelight, Firework, Backlight, and Night. Helpful
tips are shown for each scene mode at the bottom of
the display screen.
Exposure value
: allows you to adjust the brightness
level by moving the slider.
Focus mode
: allows you to set this option to Auto focus
or Macro. Use Auto focus for all other focal situations.
Timer
: allows you to set a timer for how long to wait
before taking a picture. Options include: Off, 2 sec,
5 sec, and 10 sec.
Settings (continued):
Resolution
: allows you to set the image size to either:
8M (3264x2448), W6M (3264x1836),
3.2M (2048x1536), W2.4M (2048x1152),
W0.9M (1280x720), or 0.3M (640x480).
White balance
: allows you to set this option to one of
the following choices: Auto, Daylight, Cloudy,
Incandescent, or Fluorescent.
ISO
: ISO determines how sensitive the light meter is
on your digital camera. Choose from Auto, 100, 200,
400, or 800. Use a lower ISO number to make your
camera less sensitive to light, a higher ISO number to
take photos with less light, or Auto to let the camera
automatically adjust the ISO for each of your shots.
Metering
: allows you to set how the camera measures
or meters the light source: Center-weighted, or Spot.
Auto contrast
: provides a clear image even under
backlight circumstances where intensity of
illumination can vary excessively.
Guidelines
: allows you to turn the guidelines On or Off.

DRAFT
I
nterna
l
U
se
O
nl
y
Multimedia 165
Settings (continued):
Auto share shot
: when enabled, automatically enable
the share shot feature once a Wi-Fi Direct connection
is detected.
Anti-Shake
: compensates for camera movement.
Shutter sound
: allows you to set the Shutter sound to
On or Off.
Contextual filename
: (requires GPS tagging) allows
you to adjust the filename based on contextual
information such as your current GPS location.
Image quality
: allows you to set the image quality to:
Superfine, Fine, or Normal.
Storage
: allows you to configure the default storage
location for images or videos as either Phone or
Memory card (if inserted).
Reset
: allows you to reset all camera or camcorder
settings to the default values.
Image viewer
: allows you to access the Image
viewer and the various viewing options for a
selected picture. The last picture you took, will be
displayed as a thumbnail in the Image viewer icon.
Camera button
: takes a photo when pressed in
Camera mode.
Camera Mode
: allows you to take a photo in various
modes. Once you change the mode, the
corresponding indicator appears at the
top left of the display. Slide the button up for Camera,
or down for Camcorder.
Storage location/Charge Status
: indicates the
current storage location (Phone or Memory card)
and the charge state of the device.
DRAFT
I
nterna
l
U
se
O
nl
y
166
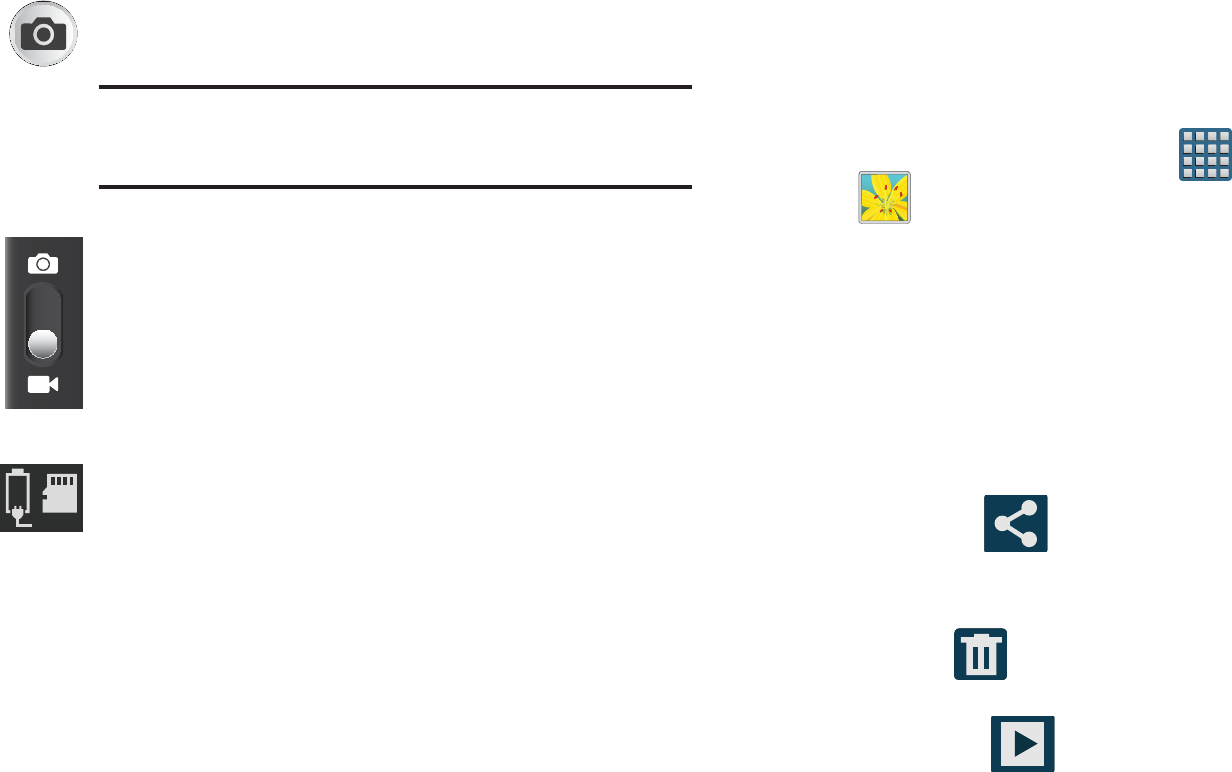
Pictures and Videos Image Viewer Options
After you take a photo or record a video, you can access
various options.
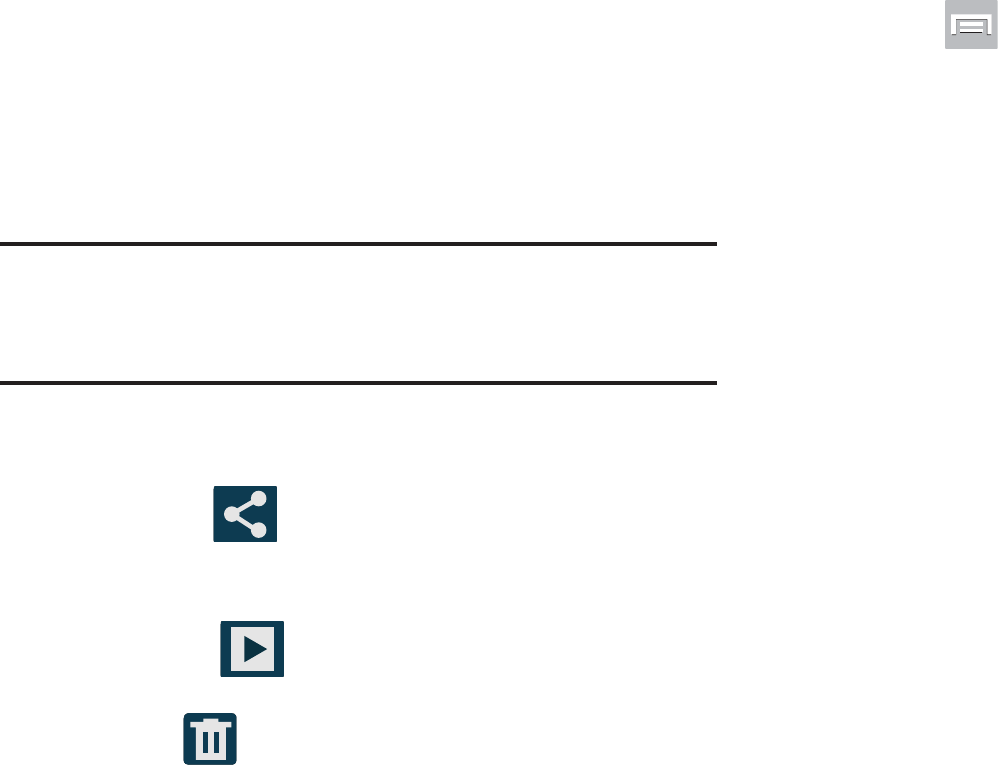
Photo viewing options
1. Tap a thumbnail to view the picture.
Note:
If no control icons are displayed on the screen in
addition to the picture, tap anywhere on the screen to
display them.
2. The following options are available at the top of the
screen:
•Share via
: allows you to share the picture via ChatON,
Dropbox, Flipboard, Picasa, Google+, S Memo, Bluetooth,
Wi-Fi Direct, Messaging, Gmail, and Email.
• Slideshow
: allows you to see your photos in a
slideshow.
• Delete
: allows you to delete the current picture.
3. Press for additional options such as:
–
Face tag
:
allows you to activate/deactivate face recognition
for use with external social media applications.
–
Copy to clipboard
allows you to copy one or more pictures to a
different folder.
–
Rotate left
: allows you to rotate the view of the current image in
a counterclockwise direction.
–
Rotate right
: allows you to rotate the view of the current image
in a clockwise direction.
–
Crop
: provides an on-screen box that allows you to crop the
current picture. Tap
Save
to update the image with the new
dimensions or tap
Discard
to ignore any changes.
–
Edit
: launches the Photo Editor application. The Photo Editor
application can be downloaded from the Play Store.
–
Set as
: allows you to assign the current image as a Contact
photo, Home screen, Lock screen, or Home and lock screens.
–
Buddy photo share
: allows you to share the current image
with active ChatON buddies.
–
Print
: allows you to print the current image on a compatible
Samsung printer.
–
Rename
: allows you to rename the current file.
DRAFT
I
nterna
l
U
se
O
nl
y
Multimedia 167
–
Scan for nearby devices
: scans for nearby DLNA-compliant
devices that can receive or display the current image.
–
Details
: files details such as Title, Time, Width, Height,
Orientation, File Size, and Path.
Video viewing options
Note:
If no control icons are displayed on the screen in
addition to the picture, tap anywhere on the screen to
display them.
1. Tap a video to select it.
2. Tap to play the video.
3. Press for additional options.
Sharing Pictures
Pictures are the best way of remembering the moment, but
an even better treat is to share them with others.
Two new features allow you to either instantly share a series
of pictures as they are taken or quickly share a picture
without using email or messaging.
•
Share Shot
is a great way to instantly share a series of pictures
among a group of users. The best example for this feature is
having multiple users instantly sharing each others pictures at a
company or family gathering. As each person takes a separate
picture with their own device, they are all pooled together and
instantly appear in each user’s Gallery.
No more “Email your pictures to me later”. Each person walks out
of the event with all the pictures taken by everyone.
This method of image transfer requires that both devices have
Wi-Fi Direct active and be paired prior to use.
Note:
You can only share a shot with other external users who
also have their Wi-Fi Direct feature active.

DRAFT
I
nterna
l
U
se
O
nl
y
168
•
S Beam Transfer
uses the NFC (near Field Communication)
feature found on your device to transmit large files directly to
another compatible device by
direct touch
.
This method of image transfer requires NFC and S Beam to be
enabled prior to use.
For more information, refer to
“Using S Beam to Share
Pictures”
on page 170.
Enabling Share Shot
Share shot is a Wi-Fi Direct group sharing feature where
multiple users can Wi-Fi connect their devices and then all
share each others pictures in real-time. This is really useful
in group events (ex: family gathering or company party)
where you don’t want to have to email everyone later and
make sure you all can share your pics at a later date.
For more information, refer to “Wi-Fi Direct Setup and
Settings” on page 276.
The general process is:
•
Enable Wi-Fi Direct communication
•
Pair your device with other users
•
Enable Share shot
To enable Wi-Fi Direct:
1. From the Home screen, press and then tap
Settings
.
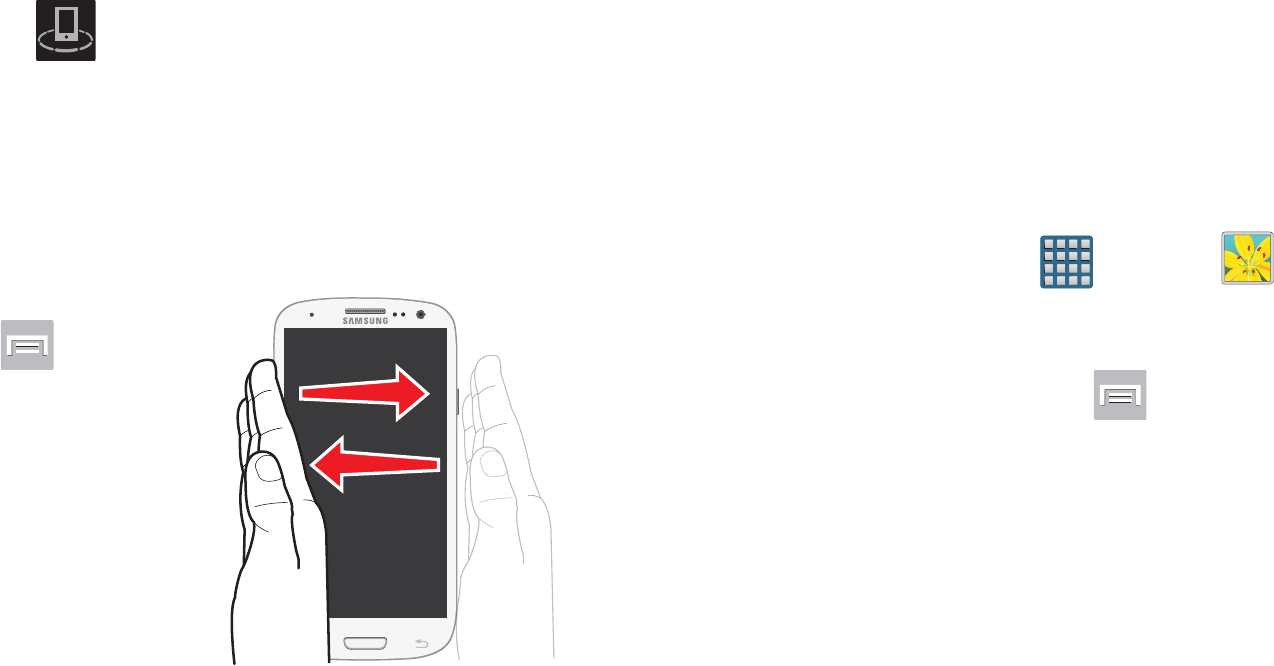
2. In a single motion touch and slide the
Wi-Fi
slider to the
right to turn it on. The slider color indicates the
activation status.
3. Tap
Wi-Fi Direct
.
DRAFT
I
nterna
l
U
se
O
nl
y
Multimedia 169
4. Tap
Scan
and select the single device name to begin
the connection process to another Wi-Fi Direct
compatible device.
– or –
Tap
Multi-connect
➔
Scan
and select all the device
names to begin the connection process to these Wi-Fi
Direct compatible devices.
Note:
The target device must also have Wi-Fi Direct service
active and running before it can be detected by your
device.
5. Tap
Done
. The direct connection is then established.
Confirm appears in the Status bar.
6. When prompted to complete the connection, the
recipient should tap
OK
. Your status field now reads
“Connected” and your connected device is listed within
the Wi-Fi Direct devices listing.
7. Each partner (including yourself) must then tap
Accept
to consent to the new Wi-Fi Direct pairing.
To enable Share shot on Camera:
1. From the Home screen, tap
(
Camera
) ➔
(
Shooting Mode
) ➔
Share shot
.
2. If you are prompted to activate your Wi-Fi Direct
connection, tap
OK
and follow the activation
procedures for Wi-Fi Direct.
To configure your Share Shot options:
1. Confirm the Share Shot viewfinder is active (see
below).
2. Confirm the Wi-Fi is actively sharing icon ( )
appears at the top of the viewfinder window.
3. Tap (
Devices for sharing with
) to display list of
current participants.
•
Stop sharing images with select participants by tapping their
entry and removing the green check mark.
4. Tap (
Shooting modes
) to display list of currently
available shooting modes from within Share Shot.
5. Tap (
Settings
) to disable share shot while
maintaining a Wi-Fi Direct connection.

DRAFT
I
nterna
l
U
se
O
nl
y
170
To take share shot images:
1. Press (
Camera
key) until the shutter sounds.
2. From the Home screen, tap (
Apps
)
➔
(
Gallery
) to locate your newly shot images located in
their default storage location.
•
External users will be able to locate their images in either a
downloaded or
RECV
(received) folder.
3. Confirm (
Share shot images delivered/received
)
appears in the Notifications area of the screen.
Using S Beam to Share Pictures
This feature (when activated via NFC) allows you to beam
large files directly to another compatible device that is in
direct contact. These files can be larger, such as Videos, HD
pictures, and other large files.You can beam images and
videos from your gallery, music files from your music player,
and more.
1. From the Home screen, press and then tap
Settings
➔
More settings
.
2. If not already active, in a single motion touch and slide
the
NFC
slider to the right to turn it on.
3. Tap
S Beam
and make sure the feature is turned on.
4. If not already active, in a single motion touch and slide
the
S Beam
slider to the right to turn it on.
5. On the source device (containing the desired image or
video), tap (
Apps
)
➔ (
Gallery
).
6. Locate and tap the selected image to open it in the
preview window.
Important!
Neither device must be in Lock mode or displaying
the Lock screen. They must both be active and
unlocked. It is recommended that the target device
be on the Home screen.
7. Place the two active NFC-enabled devices back to back
to begin (1).
Note:
If the
Touch to beam
screen does not appear on the
source device:
- Pull them apart
- Verify the image is visible in the preview window on
the source device (providing the file)
- Place them together again
DRAFT
I
nterna
l
U
se
O
nl
y
Multimedia 171
8. From the
Touch to beam
screen, tap the reduced image
preview to begin the transfer (2). After a few seconds
(depending on file size) the recipient with then see the
transferred file displayed on their screen.
To share multiple pictures via S Beam:
1. On the source device (containing the desired image or
video), tap (
Apps
)
➔ (
Gallery
).
2. Locate the selected folder.
3. Touch and hold the first image and place a checkmark
on it and all desired images.
4. Place the two active NFC-enabled devices back to back
to begin.
5. From the
Touch to beam
screen, tap the reduced image
preview to begin the transfer (2).
6. When prompted, separate the two devices.
Place device atop each other
Tap the source image
DRAFT
I
nterna
l
U
se
O
nl
y
172
Camera Gallery Options
The Gallery is where you can access the Gallery of stored
camera images.
1. From the Home screen, tap (
Apps
)
➔
(
Gallery
).
2. Select a folder location (ex:
Camera
) and tap an image
to open it.
– or –
Touch and hold an image to place a box around the file
and select multiple files.
– or –
Tap the upper-right camera to begin taking pictures
that are placed in this folder.
– or –
3. Tap the on-screen image and use either of the
following image menu options:
•Share via
: allows you to share the picture via ChatON,
Dropbox, Flipboard, Picasa, Google+, S Memo, Bluetooth,
Wi-Fi Direct, Messaging, Gmail, or Email.
• Slideshow
: allows you to see your photos in a
slideshow or access the slideshow settings. Configure the
slideshow settings (Effect, Music, and Speed) then tap
Start
to
begin the playback.
• Delete
: allows you to delete the current picture.
4. Press to select additional options:
–
Face tag
: allows you add embedded tag information about
those in your image.
–
Copy to clipboard
: allows you to copy one or more pictures to
a different folder.
–
Rotate left
: allows you to rotate the view of the current image in
a counterclockwise direction.
–
Rotate right
: allows you to rotate the view of the current image
in a clockwise direction.
DRAFT
I
nterna
l
U
se
O
nl
y
Multimedia 173
–
Crop
: provides an on-screen box that allows you to crop the
current picture. Tap
Save
to update the image with the new
dimensions or tap
Discard
to ignore any changes.
–
Edit
: launches the photo editor application. This application can
be downloaded from the Play Store.
–
Set as
: allows you to assign the current image as a Contact
photo, Home and lock screens, Home screen wallpaper, or Lock
screen wallpaper.
–
Buddy photo share
: allows you to share the current image
with active ChatON buddies.
–
Print
: allows you to print the current image on a compatible
Samsung printer.
–
Rename
: allows you to rename the current file.
–
Scan for nearby devices
: allows you to look for DLNA -
compliant devices used to control streaming media.
–
Details
: files details such as Title, Time, Width, Height,
Orientation, File Size, and Path.
Sharing a Gallery Image to a Target Device
Important!
Make sure all communicating devices are
connected to the same Wi-Fi.
1. Launch AllShare on the target device (such as an
Internet TV, Samsung Tablet, etc..).
2. From the Home screen, tap (
Apps
)
➔
(
Gallery
).
Note:
You must be signed in to your Samsung Account before
you can use this feature.
3. Open a selected image.
4. Tap (
Stream to connected devices
) and select an
available target device to begin streaming.
5. On a target device (ex: Internet TV) select the
on-screen
Allow
button to continue.
Note:
At this stage your device is requesting access to share
media with the external source.
DRAFT
I
nterna
l
U
se
O
nl
y
174
6. Confirm (
AllShare Controller enabled
) appears in
the Notification area at the top of the device to indicate
you are using your device as the media source.
Taking a Screen Shot
Also known as a screen capture, this feature allows you to
mimic the print screen function on most computers.
1. From the Home screen,
press and then
tap
Settings
➔
Motion
.
2. Tap the desired
on-screen motion
option.
3. In a single motion
touch and slide the
Motion
slider to the
right to turn it on.
4. Tap the desired on-screen motion option.
5. Although enabled by default, enable the
Palm swipe to
capture
field by placing a check mark in the adjacent
field.
6. With the current screen showing the desired image, in
a single motion, place the side of your palm along the
one side of the device and then slowly swipe it in the
opposite direction over the screen.
Assigning an Image as a Contact Photo
1. From the Home screen, tap (
Apps
)
➔
(
Gallery
).
2. Select a folder location and tap a file to open it.
3. With the image displayed, press and then tap
Set as
➔
Contact photo
.
4. Tap a contact to make a selection.
5. Use the on-screen crop the image by dragging it
around or out from its corners.
6. Tap
Done
to store the new image.
DRAFT
I
nterna
l
U
se
O
nl
y
Multimedia 175
Assigning an Image as a Wallpaper
1. From the Home screen, tap (
Apps
)
➔
(
Gallery
).
2. Select a folder location and tap a file to open it.
3. With the image displayed, press and then tap
Set as
.
4. Select one of the these options:
•Home screen
assigns the current image to the home screen
background. This image is spread across all available screens.
• Lock screen
assigns the selected image to the background for
the lock screen.
• Home and lock screens
assigns the current image to both the
Home screen and Lock screens.
5. Touch and drag the crop box anywhere on the picture.
Touch and drag the sides of the crop box to zoom in or
out to create a cropped area.
6. Tap
Done
to assign the wallpaper image.
– or –
Tap
Cancel
to stop without updating the wallpaper
image.
Editing a Photo
You can edit your photos using the optional Photo editor
application on your device.
Using the Camcorder
In addition to taking photos, the camera also doubles as a
camcorder that also allows you to record, view, and send
high definition videos.
Shooting Video
Tip:
When shooting video in direct sunlight or in bright
conditions, it is recommended that you provide your
subject with sufficient light by having the light source
behind you.
1. From the Home screen, tap (
Apps
)
➔
(
Camera
) to activate the camera mode.
2. Tap and slide the Camera mode button down to
Camcorder
Mode.
3. Using the device’s main display screen as a viewfinder,
adjust the image by aiming the camcorder at the
subject.
DRAFT
I
nterna
l
U
se
O
nl
y
176
Note:
Use either the Up and Down volume keys or spread/
pinch the screen to zoom in or out. For more
information, refer to “Navigating Through the Screens”
on page 52.
4. Tap the Video key ( ) to begin shooting video. The
red light will blink while recording.
5. Tap anywhere on the screen to re-focus the camera on
that object. The camcorder auto-focuses on the new
target area.
6. Tap the screen then select to turn on auto focus.
This will automatically focus the video based on the
object at the middle of the screen.
7. To capture an image from the video while recording,
tap . This feature is not available while the
anti-shake feature is activated.
8. Tap the Stop key ( ) to stop the recording and save
the video file to your Camera folder.
– or –
Tap the Pause key ( ) to pause the recording.
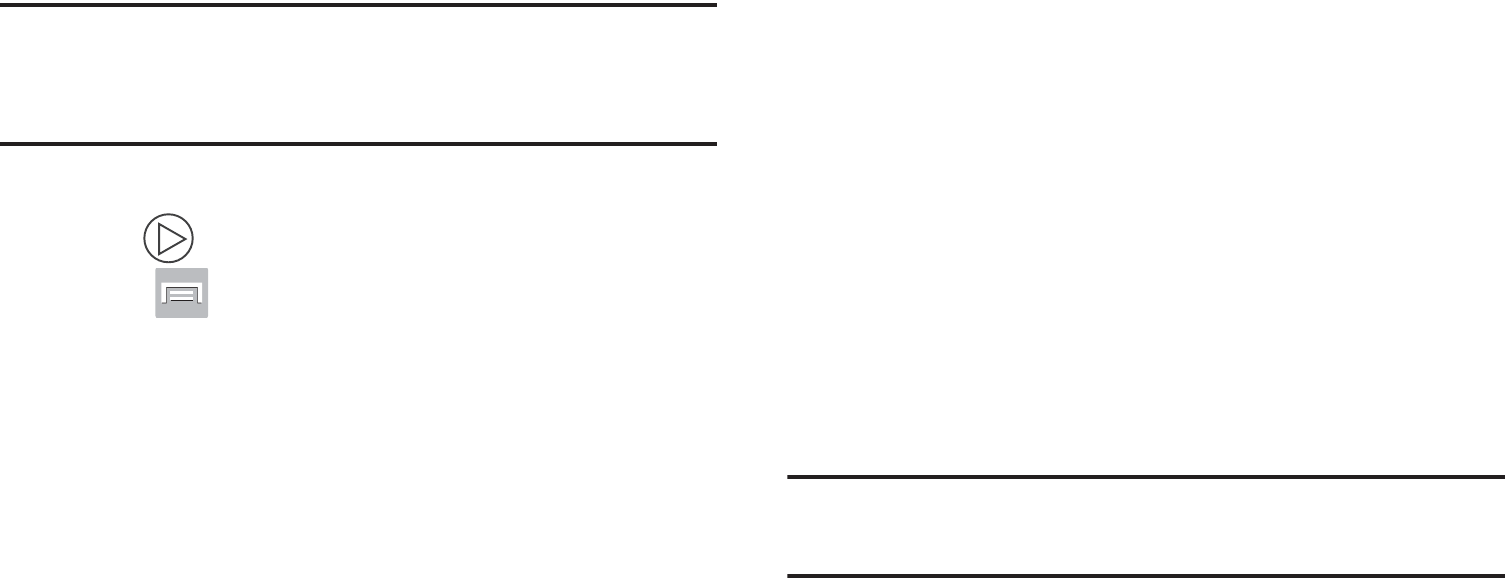
9. Once the file has been saved, tap the image viewer,
then tap (
Play
) to playback your video for review.
10. Press to return to the viewer.
Camcorder Options
You can change options using your keypad in capture mode.
The following short cuts are available:
Self portrait
: allows you to activate the front facing
camera so you can take videos of yourself or video
chat.
Flash
: allows you to set the flash options to Off or On.
When you set the flash to On, it stays on continually
while you are taking a video.
Recording mode
: allows you to set the recording mode
to: Normal, which is limited only by available space on
the destination location, Limit for MMS, which is
limited by MMS size restrictions.

DRAFT
I
nterna
l
U
se
O
nl
y
Multimedia 177
Effects
: allows you to change the color tone or apply
special effects to the video. Options include: No effect,
Cold vintage, Warm vintage, Posterize, Solarize,
Green point, Blue point, Red-yellow point,
Washed out, Cartoonify, Black and white, Sepia, or
Negative.
Settings:
Edit shortcuts
: allows you to set shortcut icons for the
settings that you use the most.
GPS tag
: allows you to turn GPS On or Off (also
known as Geo-tagging). The location of where the
video is shot is attached to the file.
Self-recording
: allows you to set the front camera so
you can take videos of yourself or video chat.
Flash
: allows you to set the flash options to Off or On.
When you set the flash to On, it stays on continually
while you are taking a video.
Recording mode
: allows you to set the recording mode
to:
•
Normal
: is limited only by available space on the
destination location.
•
Limit MMS
: is limited by MMS size restrictions.
DRAFT
I
nterna
l
U
se
O
nl
y
178
Settings (continued):
Effects
: allows you to change the color tone or apply
special effects to the video. Options include:
No effect, Cold vintage, Warm vintage, Posterize,
Solarize, Green point, Blue point, Red-yellow point,
Washed out, Cartoonify, Black and white, Sepia, or
Negative.
Exposure value
: allows you to adjust the brightness
level by moving the slider.
Timer
: allows you to set a timer for how long to wait
before taking a video. Options include: Off, 2 sec,
5 sec, and 10 sec.
Resolution
: allows you to set the image size to either:
1920x1080, 1280x720, 720x480, 640x480, or
320x240.
White balance
: allows you to set this option to one of
the following choices: Auto, Daylight, Cloudy,
Incandescent, or Fluorescent.
Guidelines
: allows you to turn the guidelines On or Off.
Anti-Shake
: reduces image blur due to the movement
of the subject of the video or hand movement.
Settings (continued):
Contextual filename
: (requires GPS tagging) allows
you to adjust the filename based on contextual
information such as your current GPS location.
Video quality
: allows you to set the image quality to:
Superfine, Fine, or Normal.
Storage
: allows you to configure the default storage
location for images or videos as either Phone or
Memory card (if inserted).
Reset
: allows you to reset all camera or camcorder
settings to the default values.
Image viewer
: allows you to access the Image
viewer and the various viewing options for a
selected video. Image viewer options are
described in the following section. The last video
you took, will be displayed as a thumbnail in the Image
viewer icon.
Camcorder button
: shoots or stops video recording
when pressed in Camcorder mode.
DRAFT
I
nterna
l
U
se
O
nl
y
Multimedia 179
Accessing Videos
When you shoot a video, the file is saved in the Camera
folder. You can view your videos immediately or view them
anytime in the Camera folder.
1. From the Home screen, tap (
Apps
)
➔
(
Gallery
).
2. Select a folder location and tap a video icon to begin
video playback.
– or –
Touch and hold the video icon from the main Gallery to
select the video (indicated by a colored border) and
display the following video menu context options:
•Share via
: allows you to share the video via ChatON,
Dropbox, Picassa, Google+, Bluetooth, Wi-Fi Direct,
Messaging, YouTube, Gmail, or Email.
• Delete
: allows you to delete the current video. Choose
either OK or Cancel.
•Slideshow
: (shown in Landscape mode) allows you to
see your files in a slideshow or access the slideshow settings.
Configure the slideshow settings (Effect, Music, and Speed)
then tap
Start
to begin the playback.
Live Shooting
: takes a photo during a video
recording session in Camcorder mode.
Note:
This feature is not functional when the
Anti-Shake feature is activated.
Camcorder Mode
: allows you to shoot video.
Slide the button up for Camera mode or down for
Camcorder mode.
Storage location/Charge Status
: indicates the
current storage location (Phone or Memory card) and
the charge state of the device.
DRAFT
I
nterna
l
U
se
O
nl
y
180
•More
: provides you with the additional options such as:
–
Slideshow
: (shown in Portrait mode)
allows you to see your
files in a slideshow or access the slideshow settings.
–
Rename
: allows you to rename one or more video files.
–
Details
: displays video file information.
The Gallery
The Gallery is where you view photos and play back videos.
For photos, you can also perform basic editing tasks, view a
slideshow, set photos as wallpaper or caller image, and
share as a picture message.
Note:
If the phone displays a memory full message when
accessing the Gallery, access
Files
and remove some of
the media files from the folders, and then open the
Gallery.
Opening the Gallery
From the Home screen, tap (
Apps
)
➔
(
Gallery
). For more information, refer to “Camera
Gallery Options” on page 172.
Note:
If you stored your files in folders (directories) on the
storage card, Gallery displays these folders as separate
albums. The top left album contains all the pictures in
the storage card.
Viewing a Video within the Gallery
1. From the Home screen, tap (
Apps
)
➔
(
Gallery
).
2. Locate your folder and video.
3. Tap (
Play
) to playback your video.
For more information on using the Picture-in-Picture feature
for video playback, see “Using Picture-In-Picture” on
page 181.
Using the Video Player
The Video Player application plays video files stored on the SD
card. This device is able to playback DivX videos.
1. From the Home screen, tap (
Apps
)
➔
(
Video Player
). A list of available videos displays in
the Video list.
2. Tap a video file to begin viewing.
DRAFT
I
nterna
l
U
se
O
nl
y
Multimedia 181
Sharing Videos
1. From the Home screen, tap (
Apps
)
➔
(
Video Player
). After a few seconds, each
on-screen video begins to cycle through a preview of
the first five seconds of the clip.
2. Press and then tap
Share via
.
3. Select either individual videos or tap
Select all
.
4. Click
Done
to complete the process or
Cancel
to quit.
5. Select a sharing option. Choose from: Bluetooth,
ChatON, Dropbox, Email, Gmail, Google+, Messaging,
Picassa, Wi-Fi Direct, and YouTube.
Using Picture-In-Picture
This feature can be used during playback of supported video
types via either the Gallery, Play Videos, or Video player.
Note:
Some applications might not allow this video to remain
active in the foreground (ex: Camera/Camcorder
screen).
This feature allows you to
continue to view your video
as a background operation
while you multi-task and do
other things, such as surf the
Internet, access your
Contacts list, look for a
picture, etc..
1. From the Home
screen, tap
(
Apps
).
2. Tap the desired video
playback application.
3. Tap the desired video
to begin playback.
DRAFT
I
nterna
l
U
se
O
nl
y
182
Note:
The Picture-In-Picture feature only works when using
the Video player application. Other video players (ex:
YouTube), do not support this feature.
4. As playback is initiated, locate and tap
(
Picture-in-Picture
) from the bottom-right of the
playback screen. Your current video is then sent to
foreground of any new page and most application
screens.
5. The video disappears from the screen once it ends.
Screen Capturing a Video
1. From the Home screen, tap (
Apps
)
➔
(
Video Player
). A list of videos sorted on the SD
card displays in the Video list.
2. Tap a video file to begin viewing.
3. Tap (
Video Screen Capture
) to take a snapshot
from the current video.
Once the image is captured, it is stored in the
My Files/sdcard0/Pictures/Screenshots
folder.
DivX Overview
This device is able to playback DivX videos. DivX Certified®
to play DivX® video up to HD 720p, including premium
content. If you try to play DivX VOD content not authorized for
your device, the message “Authorization Error” will be
displayed and your content will not play. Learn more at
www.divx.com/vod
.
Your device must first be registered to playback protected or
purchased DivX content. DRM-free or unprotected content
does not required DivX VOD registration.
Locating Your VOD Registration Number
1. From the Home screen, press and then tap
Settings
➔
About device
➔
Legal information
➔
License settings
➔
DivX® VOD > Register
.
2. Write down your Registration code.
3. Tap
OK
.

DRAFT
I
nterna
l
U
se
O
nl
y
Multimedia 183
Register Your DivX Device for VOD Playback of
Purchased Movies
To play purchased DivX movies on your device, you will first
need to complete a one-time registration using both your
device and your computer.
1. Write down the DivX registration code that appears
on-screen. Copy this 8 or 10-digit number down.
2. Verify you have the latest DivX software running on
your computer. Download the free player (for your
computer) from
www.divx.com
.
3. Open the DivX Player on your computer and from
within the
VOD
menu, select
Register a DivX Certified
Device.
.
4. You are prompted to log in or create a DivX account if
your account information has not already been saved in
DivX Player.
5. Follow the instructions in DivX Player to enter the
registration code from step 2 and create a device
nickname (ex: “Pat or Pat’s Device”).
6. Select a location on your computer to download the
DivX registration video with the same title as your
device nickname (ex: Pat.divx).
7. Follow the on-screen instructions to download the file
and initiate the transfer process. You will need to place
this video file onto your device and play it back.
8. Connect your device to the computer via USB and
transfer this video. For more information, refer to
“Communicating with the SD card” on page 67.
9. From the
Registration
screen (Transfer), click Transfer
Video now and select the location of the microSD card
or
USB
(the device) as the target destination for the
registration video (created in step 6) and click
Start
.
– or –
Locate the created file, copy and paste it into the new
drive letter corresponding to your device’s storage
location.
10. From the Home screen, tap (
Apps
)
➔
(
My Files
).

DRAFT
I
nterna
l
U
se
O
nl
y
184
11. Locate your registration DivX video file and tap the file
to play it. Once you play the registration file on your
device, your registration is complete.
12. Return to the DivX VOD Manager screen (from within
your computer’s DivX Player) and confirm both your
computer and your new device appears in the list of
registered DivX devices.
Important!
There is no special registration or configuration
necessary to playback DRM-free DivX movies.
Registration of your device is only required for
playback of protected DivX material.
Media Hub
Samsung Media Hub is your one stop for the hottest movie
and TV content. With hundreds of titles available,
entertaining your family on the go was never easier. You can
rent or purchase your favorite content and watch from any
location. Featuring the stunning viewing quality Samsung is
known for, Samsung Media Hub is your gateway to mobile
video like you've never experienced it before.
You must have the Samsung Account application installed and
registered prior to using Media Hub.
Note:
Media Hub usage is based on service availability.
Important!
You must be using an active Wi-Fi/4G/LTE
connection to preview and download a media file.
The internal memory acts as a storage location for
your downloaded rental or purchase.
Important!
The Samsung account manages the access
information (username/password) to several
applications, such as AllShare Play, Chat On, and
Media Hub.
DRAFT
I
nterna
l
U
se
O
nl
y
Multimedia 185
Creating a New Media Hub Account
Before you can rent or buy media, you must first create an
account. Enter the required information.
1. Confirm you have already logged in to your Samsung
account. There should be no icon in the
Notifications area of the screen.
2. From the Home screen, tap (
Apps
)
➔
(
Media Hub
).
3. Read the
Terms and Conditions
screen and tap the
I
agree to the Terms and Conditions
check box.
4. Tap
Accept
to continue or
Decline
to exit. The Media
Hub screen displays.
Tip:
In some cases it might be necessary to sign in via the
application. Press ➔
Sign in
.
5. From the main page, press and then tap
My page
.
Note:
Your Media Hub account is managed by the Samsung
account application. This application manages your user
profile information.
6. If not already signed in, use the keypad to enter the
required information, then tap
Create new account
.
Follow the on-screen instructions to complete your
registration for a new Samsung account.
Using Media Hub
1. From the Home screen, tap (
Apps
)
➔
(
Media Hub
).
2. At the Media Hub screen,
What’s New
is displayed with
recently added media that you can rent or purchase.
3. The following tabs are displayed at the top of the
screen:
•Home
: displays the Media Hub main screen.
•Movies
: displays movies that are available for rent or purchase.
Scroll through the top navigation bar and select a movie
category. The movies of that type will be displayed below.
• TV Shows
: displays TV shows that are available for purchase.
Scroll through the top navigation bar and select a TV category.
The TV shows of that type will be displayed below.
•My Media
: allows you to view all of the media that you have
purchased or rented. Tap a media entry to view it.
DRAFT
I
nterna
l
U
se
O
nl
y
186
4. Scroll through the media listings and tap on an item
you would like to purchase or rent.
5. Tap tap
Buy
or
Rent
.
6. Choose a payment method and then follow the
on-screen instructions. The media stores to the
My
Media
folder.
Media Hub Notices
•
Any media item (Media Content) may be rented or purchased after
you create an account in Media Hub.
•
Media Content that is downloaded may be viewed concurrently on
up to five (5) devices with Media Hub that are also registered to
the same account.
•
You may choose to remove a device from your account no more
than once every 90 days.
•
You may remove Media Content from a device as many times as
you’d like. You will have the ability to re-download the Media
Content at a later point in time subject to content re-download
availability and studio permissions.
•
You MUST be in network coverage to license Media Content you
have acquired through the Service.
•
You can use 3G, 4G, or Wi-Fi connectivity in order to download
Media Content.
•
Unlike purchased Media Content, rented Media Content will be
viewable on only 1 device in your account.
•
Media Content is downloaded and saved to internal memory.
No SD Card included out of box.
•
Your Media Content may pause/stop or not download in networks
where there is a weak signal.
•
You may begin watching downloaded Media Content as soon as a)
license acquisition has occurred and b) sufficient amount of the
Media Content has been buffered.
•
You must finish watching rented Media Content within 24
consecutive hours of start of playback.
•
Stopping, pausing or restarting rented Media Content does not
extend the available viewing time.

DRAFT
I
nterna
l
U
se
O
nl
y
Multimedia 187
•
In no event will rented Media Content be available for a period
of more than thirty (30) days (or shorter on a title-by-title basis)
after the Media Content has been rented (e.g., if you begin
viewing rented Media Content on the 29th day after the rental
transaction, but do not finish viewing the entire title, that rented
Media Content may not be available for the entire twenty-four
(24) consecutive hour period if such period would extend the
viewable time beyond the thirty (30) day rental window).
•
You cannot play any media content downloaded from Media Hub
through any output on your mobile phone, including All Share.
Play Movies & TV
This application allows you to connect to the Play Store,
download a movie and then watch it instantly.
Choose from thousands of movies, including new releases and
HD titles in the Play Store and stream them instantly on your
Android device.
Movies, previously rented via the Play Store are automatically
added to your My Movies library across your devices.
Learn more about Google Play Movies at:
http://play.google.com/about/movies
.
1. From the Home screen, tap (
Apps
)
➔
(
Play Movies & TV
).
2. Log on to your Google account if you have not already
done so. A list of videos sorted on the SD card displays
in the Video list.
3. Following the on-screen instructions for renting and
viewing movies.
4. Tap the
MOVIES
tab to view movies you have rented.
5. Tap the
TV SHOWS
tab to view shows you have rented.
6. Tap the
PERSONAL VIDEOS
tab to view movies you have
on your device or memory card.

DRAFT
I
nterna
l
U
se
O
nl
y
188
For more information on using the Picture-in-Picture feature
for video playback, see “Using Picture-In-Picture” on
page 181.
Play Music
Also known as Google Music, allows you to browse, shop,
and playback songs purchased from the Play Store. The
music you choose is automatically stored in your Google
Music library and instantly ready to play or download.
Access the new music tab from within your Play Store
application.
The Music application contains a music player that plays
music and other audio files that you copy from your computer.
1. From the Home screen, tap (
Apps
)
➔
(
Play Music
).
The Music app searches both your online library and
your device’s internal storage for music and playlists;
this can take from a few seconds to several minutes,
depending on the amount of new music added since
you last opened the application. It then displays a
carousel view of your new and recent music, organized
by album.
2. If prompted, follow the on-screen instructions to link
your current account to Google Play Music.
3. Tap an on-screen account to add it or select
Add
account
to use a new account.
4. At the free songs screen, select either
Get free songs
or
Skip
.
•
Get free songs are downloaded via either the Internet or Play
Store.
•
Follow the on-screen download and installation instructions.
5. Swipe left or right to browse through your new and
available music. Music, albums, and artists are
grouped into categories.
6. Tap an on-screen album to open it and begin playback.
7. Return to the Library screen from most other screens
in the Music application by tapping the Music
application icon (
Music notification icon
) at the
top-left of the Application bar.
DRAFT
I
nterna
l
U
se
O
nl
y
Multimedia 189
Changing Library View
You can change the way you view the contents of your
library.
1. From the Home screen, tap (
Apps
)
➔
(
Play Music
).
2. While in a selection or screen, tap (near the
top-left of the Application bar) or the tab name to back
up to the main Music App menu.
3. Available tabs include:
PLAYLISTS
,
RECENT, ARTISTS
,
ALBUMS
,
SONGS
, or
GENRES
.
Note:
The contents of your library display in a scrolling grid or
list view, depending on the view.
Searching for Music in Your Library
1. From the Home screen, tap (
Apps
)
➔
(
Play Music
).
2. Tap (
Search
) to search through your available
songs.
3. Type the name of an artist, album, song, or playlist.
Matching songs are displayed in a list below the search
box.
4. Tap a matching song to play it, tap a matching album,
artist or playlist to view a list of its’ songs.
Changing Music Settings
1. From the Home screen, tap (
Apps
)
➔
(
Play Music
).
2. Press and then make a selection.
•Shuffle all
: Play all songs in a random order.
•Settings
: Provides access to the Play Music settings.
•Help
: Displays application help information.
DRAFT
I
nterna
l
U
se
O
nl
y
190
Listening to Music
You can listen to music by using your device’s built-in
speakers, through a wired headset, or through a wireless
Bluetooth stereo headset.
Press the volume keys on the side of the device to activate
on-screen volume control, then touch and drag on the scale
to set volume.
Playing Music
1. From the Home screen, tap (
Apps
)
➔
(
Play Music
).
2. Tap a song in your library to listen to it.
– or –
While viewing a list of songs, tap (
Options
) next to
a song and tap
Play
.
– or –
While viewing a list of albums, artists, playlists, or
genres, tap (
Options
) adjacent to the label and tap
Play
.
The
Now playing
screen opens and the song you
touched or the first song in the album or playlist starts
to play. The tracks in the current list play in order until
you reach the end of the list (unless you choose a
repeat option). Otherwise, playback stops only if you
stop it, even when you switch applications.
Note:
If you navigate away from the
Now playing
screen in the
Music application, the Now Playing bar appears at the
bottom of the screen.
DRAFT
I
nterna
l
U
se
O
nl
y
Multimedia 191
Displaying the Now Playing Screen
If you navigate away from the
Now playing
screen, to return
to the
Now playing
screen from other Music screens:
Tap the name of the current song in the Now Playing
bar.
– or –
In a single motion, touch and drag (
Music
notification icon
) down from the Status bar and tap the
song title from the Notifications area. You can also
pause and resume playback and skip to the next song
in the panel. For more information, refer to
“Notification Bar” on page 37.
Tab Options
There are various options available from the various tabs:
1. From the Home screen, tap (
Apps
)
➔
(
Play Music
).
2. Select one of the following tabs and tap to access
an available option.
•PLAYLISTS:
Play, Add to queue, Rename, or Delete.
• RECENT:
to display the most recently played songs and albums
•ARTISTS:
Play, Add to queue, Add to playlist, More by artist, or
Shop for artist.
• ALBUMS:
Play, Add to queue, Add to playlist, More by artist, or
Shop for artist.
•SONGS:
Play, Add to queue, Add to playlist, Shop for artist, or
Delete.
• GENRES:
Play, Add to queue, Add to playlist, More by artist, or
Shop for artist.
Options While Playing a Song
When you play a song, the
Now playing
screen displays.
There are various options and controls available while a song
is playing:
1. From the Home screen, tap (
Apps
)
➔
(
Play Music
).
2. Tap an album or song.
3. From the Now playing screen, press (
Menu
) to
display the following options:
•Equalizer
: applies selected equalizer features such as:
FX booster, Bass boost, and 3D effect.
• Clear queue
: clears the current queue.
• Save queue
: stores the current queue.
DRAFT
I
nterna
l
U
se
O
nl
y
192
• Settings
: Allows you to view and assign various music settings,
and view different application-specific information.
•Help
: Provides an on-screen series of related help topics.
4. Tap ➔
Add to playlist
to add the song to a playlist.
– or –
Tap ➔ ➔
Add to playlist
to add the song to
a playlist.
The
Now playing
screen contains several buttons that you
can tap to control the playback of songs, albums, and
playlists:
Creating a Playlist
1. From the Home screen, tap (
Apps
)
➔
(
Play Music
).
2. Tap an album or song list and play a song.
3. Tap ➔ adjacent to the song name and
select
Add to playlist
.
Tap to go back to the previous song. Touch and
hold to scan backward through the current song.
Tap to resume playback.
Tap to pause playback.
Tap to advance to the next song. Touch and hold to
scan forward through the current song.
When Shuffle mode is enabled via
Show Options
,
songs play in random order. When disabled
(as shown), songs play in the order they appear
in List view. Also visible when is tapped.
When Shuffle mode is enabled via
Show Options
,
songs play in random order. When enabled,
songs play in random order. Also visible when
is tapped.
Tap to repeat the current song,
repeat all songs, or disable repeat mode.
Also visible when is tapped.
DRAFT
I
nterna
l
U
se
O
nl
y
Multimedia 193
4. Tap
New playlist
➔
Playlist name
field to enter a name
for the playlist.
5. Tap
OK
to save the new playlist.
Adding Songs to Playlists
1. From the Home screen, tap (
Apps
)
➔
(
Play Music
).
2. Tap an album or song list and play a song.
3. Tap ➔ adjacent to the song name and
select
Add to playlist
.
4. Select the desired target playlist.
Playing a Playlist
1. From the Home screen, tap (
Apps
)
➔
(
Play Music
).
2. Select the
PLAYLISTS
tab.
3. Tap next to a playlist title and tap
Play
.
Deleting a Playlist
1. From the Home screen, tap (
Apps
)
➔
(
Play Music
).
2. Display the
PLAYLISTS
library view.
3. Tap next to a playlist title and tap
Delete
.
Music Player
The Music Player is an application that can play music files.
The music player supports files with extensions AAC, AAC+,
eAAC+, MP3, WMA, 3GP, MP4, and M4A. Launching the
Music Player allows you to navigate through your music
library, play songs, and create playlists (music files bigger
than 300 KB are displayed).
Playing Music
1. From the Home screen, tap (
Apps
)
➔
(
Music Player
).
2. Tap a library category tab to select the music category:
All
,
Playlists
,
Albums
,
Artists
,
Music square
, or
Folders
.
3. Scroll through the list and tap an entry to begin
playback.
Note:
The 5.1 channel sound effect works when earphones or
sound is connected through the headset jack only.
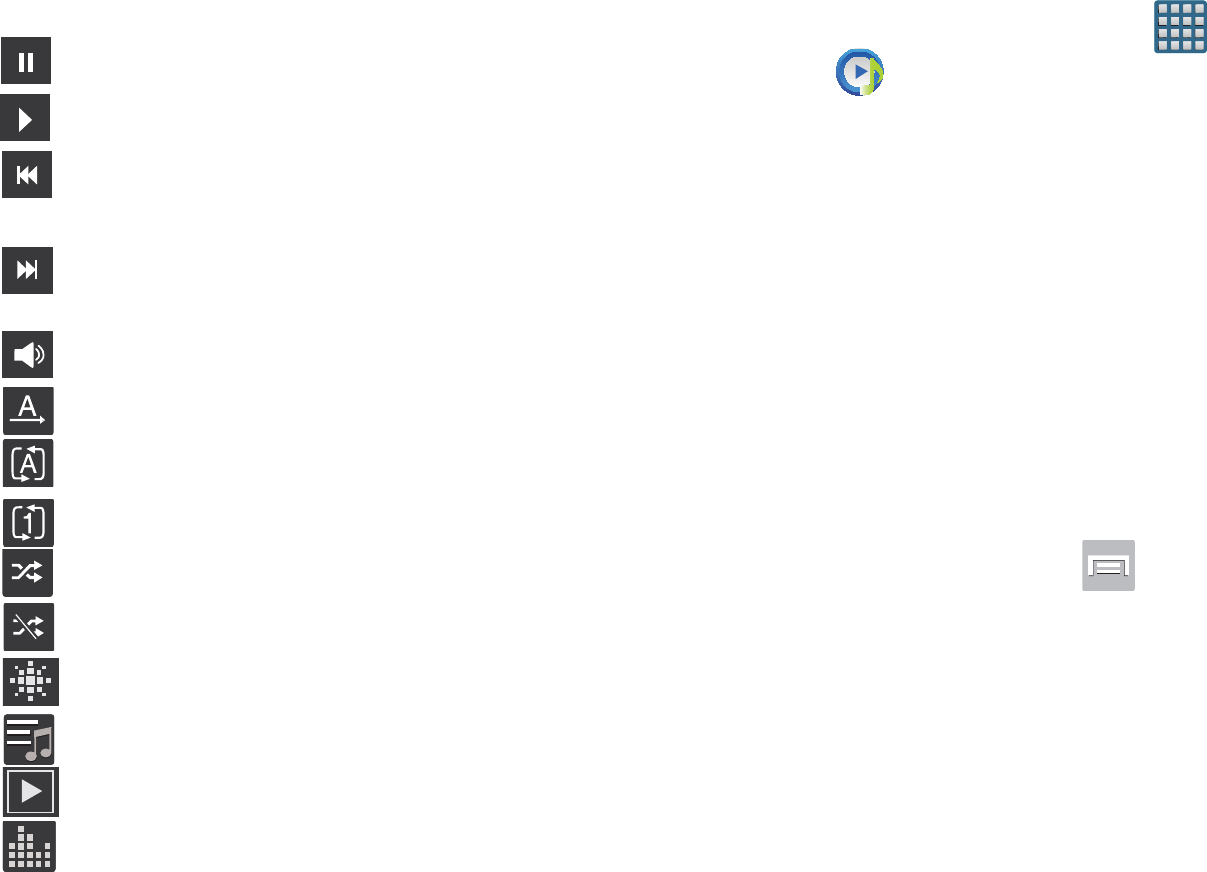
DRAFT
I
nterna
l
U
se
O
nl
y
194
4. Use any of the following Music Player controls:
Making a Song a Phone Ringtone
1. From the Home screen, tap (
Apps
)
➔
(
Music Player
).
2. Tap the
All
tab.
3. Touch and hold a song from the list to reveal the
on-screen context menu.
4. Tap
Set as
➔
Phone ringtone.
Music Player Options
The Music Player Settings menu allows you to set
preferences for the music player such as whether you want
the music to play in the background, sound effects, and how
the music menu displays.
With the Music player application displayed and
playing a song, press and select one of the
following options:
• Add to quick list
: adds the current music file to the Quick list.
• Via Bluetooth
: scans for devices and pairs with a Bluetooth
headset.
•Share via
: allows you to share your music by using Bluetooth,
Dropbox, Email, Gmail, Messaging, or Wi-Fi Direct.
Pause the song.
Start the song after pausing.
Press and hold to rewind the song. Tap to go to
previous song.
Press and hold to fast-forward the song. Tap to
go to next song.
Volume control.
Plays the entire song list once.
Replays the current list when the list ends.
Repeats the currently playing song.
shuffles the current list of songs randomly.
songs play in order and are not shuffled.
provides access to the Music square.
lists the current playlist songs
displays the current song in the player window
provides access to the Equalizer

DRAFT
I
nterna
l
U
se
O
nl
y
Multimedia 195
•Add to playlist:
allows you to add the current music file to a
selected playlist.
•Details
: allows you to view media info such as Artist, Title,
Album, Track length, Genre, Track number, Format, Size, and
Location.
•Set as
: allows you to set the current song as a Phone ringtone,
Caller ringtone, or Alarm tone.
• Scan for nearby devices
: allows you to look for DLNA -
compliant devices used to control streaming media.
•Settings
: allows you to change your music player settings.
•End
: closes the application.
Music Player Settings
The Music Player Settings menu allows you to set
preferences for the music player such as whether you want
the music to play in the background, sound effects, and how
the music menu displays.
1. From the Home screen, tap (
Apps
)
➔
(
Music Player
).
2. Press ➔
Settings
.
3. Select one of the following settings:
•SoundAlive
: set a type of equalization such as Normal, Pop,
Rock, Jazz, Dance, Classic, etc.
• Play speed
: set the play speed anywhere between 0.5X and
2.0X using the slider.
• Music menu
: this menu allows you to select which categories
you want to display. Choices are: Albums, Artists, Genres,
Music square, Folders, Composers, Years, Most played,
Recently played, or Recently added. Tap each item that you
want to display in the Music menu.
•Lyrics
: when activated, the lyrics of the song are displayed if
available.
• Music auto off
: when activated, music will automatically turn
off after a set interval.
DRAFT
I
nterna
l
U
se
O
nl
y
196
Using Playlists
Playlists are used to assign music files into groups for
playback. These Playlists can be created using the Music
player on this device, or using a third-party application (such
as Windows Media Player) and downloading those files to an
SD card inserted into the device.
Creating a Playlist
1. From the Home screen, tap (
Apps
)
➔
(
Music Player
).
2. Tap the
Playlists
tab.
3. Press and then tap
Create playlist
.
4. Backspace over the default playlist title and type a new
name for this playlist, then tap
OK
.
Adding Music to a Playlist
1. From the Home screen, tap (
Apps
)
➔
(
Music Player
).
2. Tap the
Playlists
tab.
3. Tap the playlist name in which to add music.
4. Press and then tap
Add
.
– or –
Tap (
Add music
). This option is available within
user-created playlists.
Note:
If a playlist is empty, add a song by touching a holding a
song name from the main screen to open the context
menu. Select
Add to playlist
and choose the playlist.
5. Tap a music file, or tap
Select all
to add all the music
tracks to this playlist then tap
Done
.
DRAFT
I
nterna
l
U
se
O
nl
y
Multimedia 197
Removing Music from a Playlist
1. From the Home screen, tap (
Apps
)
➔
(
Music Player
).
2. Tap the
Playlists
tab.
3. Tap the playlist name in which to delete music.
4. Touch and hold a song to reveal the on-screen context
menu.
5. Tap
Remove
.
Editing a Playlist
Besides adding and removing music files in a playlist, you
can also share, delete, or rename the playlist.
Note:
Only those playlist you have created can be edited.
Default playlists can not be renamed.
1. From the Home screen, tap (
Apps
)
➔
(
Music Player
).
2. Tap the
Playlists
tab.
3. Touch and hold a playlist entry to reveal the on-screen
context menu.
4. Tap
Edit title
.
5. Enter a new name for this playlist and tap
OK
.
Transferring Music Files
Music files can be downloaded to the phone using one of two
methods:
1. Downloaded to the device from the Play Store.
Music files are directly stored on your phone.
2. Downloaded to the phone via a direct USB connection.
Music files are stored into a Music folder on the SD
card.
For more information, refer to “Communicating with the SD
card” on page 67.
Removing Music Files
1. From the Home screen, tap (
Apps
)
➔
(
Music Player
).
2. Tap the
All
tab.
3. Touch and hold a song entry to reveal the on-screen
context menu.
4. Tap
Delete
➔
OK.
The music file(s) is deleted.
DRAFT
I
nterna
l
U
se
O
nl
y
198
Music Hub
Samsung Music Hub makes your device a personal music
manager. It lets you access, buy, and download millions of
music tracks. Access top albums, top tracks, featured
albums, and new releases as well as search for tracks,
albums and artist. Enjoy music samples before you download
them from your device.
Note:
You must sign up for an account before accessing some
of the Music Hub options.
1. From the Home screen, tap (
Apps
)
➔
(
Music Hub
).
2. Read the Disclaimer and tap
Confirm
to continue or
(
Back
) to exit. The Music Hub Home screen
displays.
3. Read the 30-day trial offer and choose either
Start
or
Not now, go to store
. Follow the on-screen instructions.
4. Choose from any of the following options: My Music,
Catalog, Radio, Recommended, Recent, Tagged, Q
(Queue), or Settings.
Note:
You have to be signed in to use some options.
To sign in without your Samsung account, tap
Sign in
and use the keyboard to enter your
Email address
and
Music Hub Password
.
Tap
Create account
to set up a new account.
5. Tap (
Search
) and use the keyboard to enter a key
word or phrase to search for tracks, albums, or artists.
Tap on the keyboard to search Music Hub.
Select an item to play a sample, add an item to your
basket, or add an item to your album.
Making a Purchase
You can use Music Hub to buy albums or individual tracks.
You can also build your own album from various tracks.
1. From the Home screen, tap (
Apps
)
➔
(
Music Hub
) ➔
Store
.
2. Select an album or a track.

DRAFT
I
nterna
l
U
se
O
nl
y
Multimedia 199
3. To the right of the entry, tap (
Preview
) hear a 30
second preview of the current selection.
– or –
4. To the far right of the entry, tap (
Options
) choose
from: Add to queue, Add to playlist..., Add to My Music,
Find similar music, View artist, or Buy song.
5. Tap
Buy song
and follow the on-screen instructions to
complete your purchase.
AllShare Play
This application wirelessly synchronizes your Samsung
device with your TV, streams content and even keeps tabs on
who calls or sends text messages with real-time, on-screen
monitoring. Samsung’s AllShare makes staying connected
easy.
Allows users to share their in-device media content with
other external devices using DLNA certified™ (Digital Living
Network Alliance) Devices. These external devices must also
be DLNA-compliant. Wi-Fi capability can be provided to TVs
via a digital multimedia streamer.
Important!
You must first connect both of your communicating
devices to the same Wi-Fi and be using an
active/registered Samsung account prior to using
this application.
For more information, refer to “Wi-Fi settings” on
page 272.
For more information, refer to “Creating a
Samsung Account” on page 20.
DRAFT
I
nterna
l
U
se
O
nl
y
200
Note:
For more information on defining the various AllShare
features definitions on page 211.
Important!
The Samsung account manages the access
information (username/password) to several
applications, such as AllShare Play, Chat On, and
Media Hub.
1. Confirm you have already logged in to your Samsung
account. There should be no icon in the
Notifications area of the screen.
2. From the Home screen, tap (
Apps
)
➔
(
AllShare Play
).
3. If prompted, read the on-screen message about
network charges and tap
OK
to continue and return to
the main AllShare Play screen.
Note:
If the main screen still shows a Sign in box, close the
application and restart it.
4. Tap
Start
and follow the on-screen prompts.
The application contains two separate streaming media
options:
•Registered storage
: allows you to receive and playback media
stored externally (server, laptop, etc.) directly on your device by
allowing you to add a Web storage service for streaming
content.
• Registered devices
allows you to stream/share selected
multimedia content from your device to DLNA compliant device
connected to the same Wireless Access Point.
Configuring AllShare Settings
The AllShare Play™ application must first be configured
prior to its initial use. You must setup parameters such as
connected Wi-Fi, Items to share, source server address, and
external device acceptance rights.
1. From the Home screen, tap (
Apps
)
➔
(
AllShare Play
).
2. Press and then tap
Settings
and configure the
following settings as desired:
• Registered storage
: allows you to add a Web storage location.
Without a storage service/location added, you will not be able
to use AllShare Play.
DRAFT
I
nterna
l
U
se
O
nl
y
Multimedia 201
• Registered devices
: defaults to your phone. This indicates the
source of the streaming images and videos. Use the main
screen to add more external devices.
• Setting up web services
: allows you to set up external Web
services by signing in to external sites such as Facebook,
Twitter, YouTube, etc..
•Auto upload
: allows you to setup automatic upload of images
from your device to those storage locations specified within the
Web storage list.
• Video quality settings
: allows you to setup the video quality for
streamed video content.
• Lock AllShare Play
: allows you to restrict access to AllShare
Play by requiring a user enter the currently active and
associated Samsung account password. Tap
Locking
AllShare Play
to activate/deactivate the feature.
• Language
: allows you select a display language.
•About
: displays application information.
• Customer support
: allows you to contact the AllShare team via
a new email from an available email account.
Setting Up Web Storage
SugarSync is a Web storage service that allows you to use
storage space to store your files and share them on the
“Cloud”.
Note:
If you are using another Web storage service, log into
that service first before using AllShare Play.
1. From the Home screen, tap (
Apps
)
➔
(
AllShare Play
).
Note:
When adding storage, an N Drive is added.
2. From the main screen, select
(
Add storage
) and
then tap on the media that you would like to share.
•
A file with in the upper-right indicates it is stored remotely
on a Web storage location. Selecting this media causes your
device to access the file currently stored on your services’
servers.
3. If this is your first time to use the service, set up a new
account by tapping
Sign up
➔
SugarSync Sign Up
.

DRAFT
I
nterna
l
U
se
O
nl
y
202
Note:
If you already have a current Sugar Sync account, tap
Sign in
.
4. Enter in your Email address and your password.
5. Agree to the terms of service and tap
Sign up
or
Go
on
your on-screen keyboard.
Important!
After you enter your passwords, do not press
to hide the keyboard. This action erases the
password fields.
6. You can choose to download the SugerSync app or tap
Skip
to continue.
7. Once the process is successfully completed, the Web
storage icon or name appears in the Web storage area
of the main screen.
Sharing files via Web Storage
Files can be uploaded to a Web storage location, such as
SugerSync by either login into the service and sharing a
folder on your computer with the storage location or sharing
files, images, and videos from your device.
To upload an image on your device to Web storage:
1. From the Home screen, tap (
Apps
)
➔
(
Gallery
).
2. Select a folder location (ex:
Camera
) and open an
image by tapping it once. This opens the image in the
preview window.
Note:
To select multiple images, touch and hold an image to
place a colored border around the selected images.
3. Select the remote storage location (ex: Dropbox).
4. Select the target folder location and select
Upload
. The
device then confirms the available storage locations
and begin the process of uploading the selected
images.
DRAFT
I
nterna
l
U
se
O
nl
y
Multimedia 203
To upload a video on your device to Web storage:
1. From the Home screen, tap (
Apps
)
➔
(
Gallery
).
2. Select a folder location (ex:
Camera
) and touch and
hold a video to place a colored border around the
selected file.
3. Tap ➔
Dropbox
from the top of the Gallery
screen. The device then confirms the available storage
locations and begin the process of uploading the
selected video.
Sharing Media via AllShare Play to a Target
Device
Important!
Make sure all communicating devices are
connected to the same Wi-Fi.
1. Launch AllShare on the target device (such as an
Internet TV, Samsung Tablet, etc..).
2. From the Home screen, tap (
Apps
)
➔
(
AllShare Play
).
Note:
You must be signed in to your Samsung Account before
you can use this feature.
3. Tap your device name from the
Devices
list.
4. Tap an available category tab (Pictures, Music, Movies,
Files, or Info) and select a file.
•
Touch and hold to select multiple files.
•
A file with in the upper-right indicates it is stored remotely
on a Web storage location. Selecting this media causes your
device to access the file currently stored on your services’
servers.
5. Tap an available on-screen file, image, or video to
place a green check mark alongside it.
6. Tap (
Stream to connected devices
) and select an
available target device to begin streaming.
7. On a target device (ex: Internet TV) select the
on-screen
Allow
button to continue.
Note:
At this stage your device is requesting access to share
media with the external source.
DRAFT
I
nterna
l
U
se
O
nl
y
204
8. Confirm (
AllShare Controller enabled
) appears in
the Notification area at the top of the device to indicate
you are using your device as the media source.
AllShare Cast Hub
This hardware allows you to enjoy what’s currently on your
device directly on your TV.
Note:
There is no need to be connected to a Wi-Fi network or
to be logged into your Samsung Account to use this
feature.
AllShare Cast Hub establishes a WI-Fi Direct connection
between the device and the hub
Connecting AllShare Cast Hub
To connect your AllShare Cast Hub hardware:
1. Connect the AllShare Cast hub to a power source via
the USB Travel Adapter.
AllShare Cast
(with
Hub accessory)
This feature functions with an
external AllShareCast Hub to fully
mirror what is currently displayed on
your device to the external TV.
AllShare Cast Hub
HDMI Travel Adapter (Power)
Status LED
RESET button
DRAFT
I
nterna
l
U
se
O
nl
y
Multimedia 205
Note:
The status LED begins to blink solid red to indicate
it has begun the start up process.
2. Connect your TV to the AllShare Cast Hub via an HDMI
cable (A-to-A cable) as shown above.
3. Change the source input on your TV to match the input
port used by the incoming HDMI cable.
Note:
The television screen should now display an on-screen
tutorial showing you how to configure your device’s
AllShare Cast Hub and device settings.
To activate AllShare Cast on your device:
1. From the Home screen, press and then tap
Settings
➔
More settings
➔
AllShare Cast
.
2. If not already on, touch and slide the
AllShare Cast
slider to the right to turn it on. The slider color indicates
the activation status.
Pairing AllShare Cast Hub
To pair your device and Hub for the 1st time:
1. Locate the AllShare Hub (dongle) name displayed at the
bottom of the TV (showing the tutorial).
Ex: Name:
Dongle - XXXXXX
.
2. Access your device’s
AllShare Cast
screen and locate
the same hub/dongle name in the list.
•
Tap
Scan
if your AllShare Cast Hub (dongle) does not appear in
the list.
3. Verify your AllShare Cast Hub is on (blinking red LED)
and the on-screen tutorial is displaying on the
connected TV.
4. Verify the previous (
Wi-Fi Direct Active
) is
displayed.
LED Color/Patterns Description
Red - Solid
Indicates the AllShare Cast Hub is
booting or processing.
Red - Blinking
Indicates the AllShare Cast Hub is in
standby mode (ready for connection).
Blue - Solid
Indicates the AllShare Cast Hub is
ready to be connected with a new
device.
DRAFT
I
nterna
l
U
se
O
nl
y
206
Note:
The AllShare Cast Hub communicates with your paired
device via a Wi-Fi Direct connection.
5. For a first time connection:
•
Press the
RESET
button (located at the rear of the hub) once
and only for a second until the LED turns solid
BLUE
.
•
Quickly tap the hub name entry on your device’s AllShare Cast
screen.
6. Verify (
AllShare Cast Hub Communicating
) appears
at the top of the device’s screen.
7. Confirm the connection by making sure both your TV
and device show the same image/screen and
(
Wi-Fi Direct Communicating
) now displays on the
device.
Important!
The AllShare Cast Hub is a 1-to-1 connection. If a
previous device was paired to the Hub and is still
connected to the AllShare Cast Hub, you can not
pair a new device until the first connection is
stopped.
To disconnect your device from the hub:
1. Access your device’s
AllShare Cast
screen and locate
the current connection.
2. Tap the entry and select
End connection
.
To reconnect your device again to an existing hub:
1. Locate the AllShare Hub (dongle) name displayed at the
bottom of the TV (showing the tutorial).
Ex: Name:
Dongle - XXXXXX
.
Important!
Verify the LED is not a solid blue. This indicates
there is another device currently connected.
2. Access your device’s
AllShare Cast
screen and tap the
same hub/dongle name in the list.
3. Confirm the connection by making sure both your TV
and device show the same image/screen.

DRAFT
I
nterna
l
U
se
O
nl
y
Multimedia 207
AllShare Cast Hub - Troubleshooting
Connections
•
If this is the first time you are connecting your device to a hub
and the connection fails:
•
Press the
RESET
button for 1 second until it turns solid
BLUE
.
•
Quickly tap the dongle name from within your device’s AllShare
cast screen.
Note:
This process is similar to initially pairing a Bluetooth
device.
•
If you have already successfully paired another device and you
are trying to connect another device:
•
Only one device can be paired and in use at a time with the
hub.
•
From the previously connected device’s AllShare Cast screen,
tap the connection and select
End connection
.
•
If you can’t find the previous device:
–
Press and hold the
RESET
button (on the back of the hub),
for about FOUR seconds until the LED begins to blink
RED
.
–
Access your new device’s AllShare Cast screen and rescan for
the existing hub/dongle.
–
Press the
RESET
button on the hub for ONE second until the
LED turns
BLUE
.
–
Tap the entry from your device’s AllShare Cast screen and
confirm connection.
Important!
The AllShare Cast Hub is a 1-to-1 connection. If a
previous device was paired to the Hub and is still
connected to the AllShare Cast Hub, you can not
pair a new device until the first connection is
stopped.
•
I have a new device and the hub is connected but it doesn’t show
up in my list:
•
Force the hub to disconnect from any previously paired
devices:
–
Press and hold the
RESET
button (on the back of the hub),
for about FOUR seconds until the LED begins to blink
RED
.
–
Access your new device’s AllShare Cast screen and rescan for
the existing hub/dongle.
–
Press the
RESET
button on the hub for ONE second until the
LED turns
BLUE
.
DRAFT
I
nterna
l
U
se
O
nl
y
208
–
Tap the entry from your device’s AllShare Cast screen and
confirm connection.
AllShare Cast Hub - Streaming Videos
The hub supports streaming of purchased media content that
contains DRM (Digital Rights Management).
Note:
You can control the volume level of your playback file
being shown on your TV by using your device’s Volume
buttons. For additional volume, use your TV’s volume
controls.
To stream video content to your Tv via AllShare Cast Hub:
1. Connect your AllShare Cast Hub to your TV. For more
information, refer to “Connecting AllShare Cast Hub”
on page 204.
2. Verify your TV is set to the same source as your hub
and that you can see the on-screen connection and
configuration tutorials.
3. On your device, press ➔ and then tap
Settings
➔
More settings
➔
AllShare Cast
.
4. In a single motion touch and slide the
AllShare Cast
slider to the right to turn it on. A list of available hubs
will appear on the screen.
5. Press the
RESET
button on the back of the hub once
(LED turns blue) and tap the dongle entry from your
device’s list.
– or –
If reconnecting, verify the hub’s LED is blinking red and
then tap the dongle entry from your device’s list.
6. Verify (
AllShare Cast Hub Communicating
) appears
at the top of the device’s screen.
7. Verify the previous (
Wi-Fi Direct On
) now displays
(
Wi-Fi Direct Communicating
).
8. To playback a user-created video:
•
From the Home screen, tap (
Apps
)
➔
(
Gallery
).
•
Locate your video and tap it to begin playback. Your TV now
shows the video
DRAFT
I
nterna
l
U
se
O
nl
y
Multimedia 209
9. To playback a DRM purchased video:
•
From the Home screen, tap (
Apps
)
➔
(
Gallery
). Locate your video and tap it to begin playback.
•
From the Home screen, tap (
Apps
)
➔
(
Play Movies & TV
). Locate your purchased video and
tap it to begin playback.
•
From the Home screen, tap (
Apps
)
➔
(
Video Player
). Locate your video and tap it to begin
playback.
T-Mobile TV
T-Mobile TV is an application that allows you to get live TV
and Video on Demand.
1. From the Home screen, tap (
Apps
)
➔
(
T-Mobile TV
). The T-Mobile Terms and Conditions
page displays.
Note:
A data plan is required to use this feature. Charges may
apply. Please contact your service provider for further
details.
2. Tap
Accept
if you accept the Terms and Conditions.
– or –
Tap
Exit
to close the application.
Note:
T-Mobile TV must be initialized over a cellular network
before it can be used. During this initial registration
process, any Wi-Fi connections must be disabled.
3. Tap
Disable Wi-Fi
if you currently have an active Wi-Fi
connection.

DRAFT
I
nterna
l
U
se
O
nl
y
210
4. Tap
Start Trial
to begin a free 30-day trial of the
service.
– or –
Tap
Continue
to keep viewing the free content or
Purchase Options
to buy the paid features.
5. Tap any of the following categories to begin viewing:
Home
,
Live TV
,
TV Shows
,
Favorites
,
Help
,
Search
,
More
Info
,
Browse
,
or
Live Channels
.
YouTube
YouTube is a video sharing website on which users can
upload and share videos, and view them in MPEG-4 format.
1. From the Home screen, tap (
Apps
)
➔
(
YouTube
).
2. When the screen loads you can begin searching and
viewing posted videos.
3. Press ➔
Settings
➔
General
➔
High quality on
mobile
if you prefer high quality output.

DRAFT
I
nterna
l
U
se
O
nl
y
Applications and Development 211
Section 9: Applications and Development
This section contains a description of each application that is
available in the Applications Menu, its function, and how to
navigate through that particular application. If the application
is already described in another section of this user manual,
then a cross reference to that particular section is provided.
Note:
This manual only addresses applications that have been
loaded on your [device/computer/tablet] as of the date
of purchase. Information concerning third party
applications that you may choose to download from the
Google Play Store or otherwise should be obtained from
the application provider directly.
Tip:
To open applications quickly, add the icons of frequently-
used applications to one of the Home screens. For more
information, refer to “Customizing the Screens” on page
59.
You can also add an application icon as a Primary
Shortcut that will display on all Home screens. If you add
an application as a primary shortcut, the application icon
will not be displayed in the Applications menu.
Applications
The Applications list provides quick access to all the
available applications on the phone.
AllShare Play
This application wirelessly synchronizes your Samsung
mobile phone with your TV, streams content and even keeps
tabs on who calls or sends text messages with real-time,
on-screen monitoring. Samsung’s AllShare makes staying
connected easy.
Allows users to share their in-device media content with
other external devices using DLNA certified™ (Digital Living
Network Alliance) Devices. These external devices must also
be DLNA-compliant. Wi-Fi capability can be provided to TVs
via a digital multimedia streamer.
AllShare Definitions:
AllShare
This uses the traditional DLNA
technology for sharing multimedia
(photos, videos, or music) to your
Samsung Smart TV and other DLNA
devices.

DRAFT
I
nterna
l
U
se
O
nl
y
212
Important!
You must first connect both of your communicating
devices to the same Wi-Fi and be using an
active/registered Samsung account prior to using
this application.
For more information, refer to “Wi-Fi settings” on
page 272.
For more information, refer to “Creating a
Samsung Account” on page 20.
Important!
The Samsung account manages the access
information (username/password) to several
applications, such as AllShare Play.
1. From the Home screen, tap (
Apps
)
➔
(
AllShare Play
).
2. If prompted, read the on-screen message about
network charges and tap
Yes
to continue and return to
the main AllShare Play screen.
Note:
If the main screen still shows a Sign in box, close the
application and restart it.
AllShare Play
This new feature builds on the
previous AllShare feature. It includes
features such as Web storage
integration and social networking
integration. This is a Web service
that requires using a Samsung account.
Group Cast
A subset feature of AllShare Play, this
allows you to mirror photos and
multimedia presentations with other
members of your current Wi-Fi
group. Users must be on the same
Wi-Fi and provide an access code to
join the group.
AllShare Cast
(with
Hub accessory)
This feature functions with an
external AllShareCast Hub to fully
mirror what is currently displayed on
your device to the external TV.
DRAFT
I
nterna
l
U
se
O
nl
y
Applications and Development 213
3. Tap
Start
and follow the on-screen prompts.
For more information, refer to “AllShare Play” on page 199.
Calculator
Using this feature allows you to use your device as a
calculator. The calculator provides the basic arithmetic
functions; addition, subtraction, multiplication, and division.
You can also use this as a scientific calculator.
1. From the Home screen, tap (
Apps
)
➔
(
Calculator
).
2. Enter the first number using the numeric keys.
3. Enter the operation for your calculation by tapping the
Plus, Minus, Multiplication,
or
Division
key.
4. Enter the next number.
5. To view the result, tap the
= (equals)
key.
6. Repeat steps 1 to 4 as many times as required.
Note:
Place the screen in Landscape mode to reveal additional
scientific functions.
Calendar
With this feature, you can consult the calendar by day, week,
or month, create events, and set an alarm to act as a
reminder. Google Calendar is built into the phone and
synchronizes both new and existing entries between your
phone and your online Google account.
Important!
You should previously add an account (Facebook,
Microsoft Exchange ActiveSync, or Google) prior to
using the Calendar.
1. From the Home screen, tap (
Apps
)
➔
(
Calendar
). Tap (
Show More
) to display
these tabs:
•Year
: displays the Year view.
•Month
: displays the Month view.
• Week
: displays the Week view.
•Day
: displays the Day view.
•List
: displays the events in a List view.
•Task
: allows you to search for tasks.
DRAFT
I
nterna
l
U
se
O
nl
y
214
2. Tap (
Create event
) to create a new Calendar
event.
– or –
Tap
Today
to display the current date indicated by a
blue box, then press and select one of the
following options:
•Go to
: displays a specific date.
•Delete
: allows you to delete All events, All events before today,
or an individual event.
•Search
: allows you to search within your current events.
• Sync
: synchronizes your current calendar events with your
available accounts (such as Gmail, Microsoft Exchange
ActiveSync, etc..).
• Settings
: displays a list of configurable settings.
Creating a Calendar Event
1. From the Home screen, tap (
Apps
)
➔
(
Calendar
).
2. Tap to access the various calendar tabs.
3. Within the Year, Month, Week, and Day tabs, tap
(
Create event
).
Calendar Settings
Using the Calendar settings you can select the day with
which you want the calendar to begin. You also select how
you want to view the calendar, by Month, Week, or Day or
determine how to manage events, notifications, sounds, and
defaults reminders.
1. From the Home screen, tap (
Apps
)
➔ .
2. Press ➔
Settings
.
3. Tap
Month view styles
and select a style:
Calendar view
+ list
or
Calendar view + pop-up
.
4. Tap
Week view
and select a type:
Timeline
or
Analog
.
5. Tap
First day of week
and select either
Local default,
Saturday, Sunday
or
Monday
.
6. Tap
Hide declined events
to activate this option. A check
mark indicates selection.
DRAFT
I
nterna
l
U
se
O
nl
y
Applications and Development 215
7. Tap
Lock time zone
(to lock event time based on your
current user-selected time zone). Select a time zone
from within the
Select time zone
field.
8. Tap
Show week number
to display the week numbers
along the side of the week entries.
9. Tap
Calendars
and select the type of general
synchronization settings you want. A check mark
indicates selection.
10. Tap
Set alerts & notifications
to adjust the event
notification method. Choose from:
Alert
,
Status bar
notification
, and
Off
.
11. Tap
Select ringtone
to assign a ringtone to a calendar
event notification.
12. Tap
Vibration
to assign a vibration notification to this
event.
13. Tap
Default reminder time
to assign a default time
frame for event reminders.
14. Tap
Notifications while screen is off
to display
notifications on the full screen while it is turned off.
15. Tap
Quick responses
to edit your default quick
responses for outbound emails. These are default
responses similar to those used by text templates.
16. Tap
Swipe with two fingers
to change the way events
are displayed when swiped.
Camera
Use your 8.0 megapixel camera feature to produce photos in a
JPEG format. The Camcorder shoots High Definition video in an
MP4 format.
Note:
A microSD card is no longer necessary before you take
pictures or shoot video.
It is recommended that you confirm your default storage
location for images and videos.
From the Home screen, tap (
Apps
)
➔
(
Camera
).
For more information, refer to “Using the Camera” on page 161.
DRAFT
I
nterna
l
U
se
O
nl
y
216
ChatON
Provides a global mobile communication service where you
can chat with more than 2 buddies via a group chat, In this
service you can send pictures, videos, animation messages
(Scribbles), audio, Contacts, Calendar entries, and Location
information. Create special animated messages for your
friends using handwritten messages, text, photos,
background images and music.
1. From the Home screen, tap (
Apps
)
➔
(
ChatON
).
2. Log in to the service and follow the on-screen
instructions.
For more information, visit:
https://web.samsungchaton.com
.
For more information, refer to “ChatON” on page 156.
Chrome
The Google Chrome app allows you to use the Google
Chrome Web browser on your device.
1. From the Home screen, tap (
Apps
)
➔
(
Chrome
).
2. Read the Google Chrome Terms of Service and tap
Accept and Continue
.
3. If you have an existing Chrome account, tap
Sign in
to
bring your open tabs, bookmarks, and omnibox data
from your computer to your phone, otherwise tap
No
thanks
.
4. Follow the on-screen instructions to use Google
Chrome.
DRAFT
I
nterna
l
U
se
O
nl
y
Applications and Development 217
Clock
Here you can set an Alarm, configure and view the World
clock, use a Stopwatch, set a Timer, or use a Desk Clock.
The applications display in a tabular format and quickly
accessed with the touch of a finger.
From the Home screen, tap (
Apps
)
➔
(
Clock
).
Setting an Alarm
1. From the Home screen, tap (
Apps
)
➔
(
Clock
).
2. From the
Alarm
tab, tap (
Create alarm
).
3. Use the arrow symbols to enter adjust the hour, and
minutes, then tap
AM
or
PM
(toggles depending on
which was last selected).
4. Tap the
Alarm repeat
field and touch the number of
times you want this alarm to repeat. Selections are:
day blocks or
Repeat Weekly
. Selected day blocks turn
blue when active.
5. Tap the
Alarm type
field and select one of the following:
Melody
,
Vibration
,
Vibration and melody
, or
Briefing
.
6. Tap
More
to configure additional alarm settings such as
volume slider, Alarm tone, Snooze, Smart alarm, and
assign a name.
To configure additional alarm settings:
1. Tap
More
to access additional alarm settings.
2. Slide the slider bar left or right in the
Alarm volume
field
to decrease or increase the alarm volume. A sample of
the volume level plays.
3. Tap the
Alarm tone
field and either select an available
tone or select
Add
to use locate a sound to use as an
alarm ringtone. Tap
OK
to activate the ringtone.
4. Move the
Snooze
slider to the right to activate the
feature. Tap the field to assign a
Interval
time
(3 minutes, 5 minutes, 10 minutes, 15 minutes, or
30 minutes) and
Repeat
(1 time, 2 times, 3 times,
5 times, and 10 times).
•Interval
indicates the length of time the alarm will remain silent
between alarm notifications (snooze time).
•Repeat
indicates the numbers of snooze sessions that are
assigned to this alarm. How many times will the snooze silence
the alarm.
DRAFT
I
nterna
l
U
se
O
nl
y
218
5. Move the
Smart alarm
slider to the right to activate this
feature which slowly increases screen brightness and
the volume of nature tones to simulate dawn breaking.
Tap the field to assign a interval time (3 min, 5 min,
10 min, 15 min, or 30 min) and nature tone (Fairy
fountain, Birdsong by the lake, Sparkling mist, The
secret forest, Serenity, or Gentle spring rain).
•Interval
category describes the length of time the alarm will
remain silent between alarm notifications (snooze time).
•Tone
category provides one of several nature sounds that are
used as the alarm tone.
6. Tap the
Name
field and enter a name for this Alarm.
7. Tap
Save
to store the new alarm event.
Turning Off an Alarm
To stop an alarm when it sounds, touch and slide
to any direction.
Setting the Snooze Feature
To activate the Snooze feature after an alarm sounds,
touch and slide to any direction. Snooze must
first be set in the alarm settings.
Deleting an Existing Alarm
1. From the Home screen, tap (
Apps
)
➔
(
Clock
).
2. Touch and hold an on-screen alarm event.
3. Tap
Delete
.
World Clock
This feature allows you to find out what time it is another part
of world.
1. From the Home screen, tap (
Apps
)
➔
(
Clock
).
2. Tap the
World Clock
tab.
3. Tap
Add city
then scroll and select the desired city, or
tap in the search field to locate a city.
To assign DST settings:
1. Locate a desired city from the World Clock list.
2. Touch and hold a city and select
DST settings
.
3. Select a DST setting (Automatic, Off, or 1 hour).
If Daylight Savings Time is selected, a sun symbol
appears next to the World Clock city listing.
DRAFT
I
nterna
l
U
se
O
nl
y
Applications and Development 219
Stopwatch
This feature allows you to capture elapsed time while letting the
stopwatch keep running.
1. From the Home screen, tap (
Apps
)
➔
(
Clock
) ➔
Stopwatch
tab.
2. Tap
Start
to start the stopwatch counter.
3. Tap
Lap
to begin the lap time counter.
4. Tap
Stop
to stop the counter.
5. Tap
Restart
to restart the lap counter. You can have
multiple lap times.
6. Tap
Reset
to reset the counter.
Setting a Timer
1. From the Home screen, tap (
Apps
)
➔
(
Clock
) ➔
Timer
tab.
2. Tap the
Hours
,
Minutes
, or
Seconds
field and use the
on-screen keypad to enter the hour, minute, or
seconds. The timer plays an alarm at the end of the
countdown.
3. Tap
Start
to start the timer.
4. Tap
Stop
to stop the timer or
Reset
to reset the timer
and start over.
5. Tap
Restart
to resume the timer counter.
Configuring a Desk Clock
This feature lets you activate an on-screen clock that can be
viewed when the device is docked.
From the Home screen, tap (
Apps
)
➔
(
Clock
) ➔
Desk clock
tab.
Contacts
The default storage location for saving phone numbers to
your Contacts List is your phone’s built-in memory.
From the Home screen, tap (
Apps
)
➔
(
Contacts
).
For more information, refer to “Contacts List” on page 108.