Samsung Electronics Co SGHX495H Single-Band PCS GSM Phone User Manual SGH X497 FCC
Samsung Electronics Co Ltd Single-Band PCS GSM Phone SGH X497 FCC
Contents
- 1. Users Manual 1
- 2. Users Manual 2
- 3. Users Manual 3
Users Manual 2

Section 4
40
Menu Navigation
You can tailor the phone’s range of functions to your
needs using menus and sub-menus. Menus and sub-
menus can be accessed by scrolling using the Navigation
keys or by using the shortcuts.
Accessing a Menu Function by Scrolling
1. In Idle mode, press the Menu soft key to access Menu
mode.
2. Scroll using the Navigation keys to reach a main menu,
Settings for example. Press the Select soft key or the
key to enter the menu.
3. If the menu contains sub-menus, Language for
example, you can access them by pressing the Select
soft key or the key.
If the menu that you have selected contains further
options, repeat this step.
4. To scroll through the menus, press the Up or Down keys.
5. To confirm the chosen setting, press the Select soft key,
or the key.
6. To return to the previous menu level, press the key or
the key.
7. To exit the menu without changing the settings, press the
key.
Using Shortcuts
The menu items, such as menus, sub-menus, and options,
are numbered and can be accessed quickly by using their
shortcut numbers. For the main menus, you can access
x495.book Page 40 Thursday, August 18, 2005 12:23 PM

Section 4: Menu Navigation 41
Menu Outline
Section 4
any one of them by pressing the number keys (1 to 9)
corresponding to their location on the screen.
Example: Accessing the Language menu.
1. Press the Menu soft key.
2. Press the 9 key for Settings.
3. Press the 5 key for Language.
4. Press the 1 key for Text language.
The available languages are displayed.
Menu Outline
The following list shows the menu structure and indicates
the number assigned to each option.
1. Voice messages
2. Call records
2.1 Missed calls
2.2 Incoming calls
2.3 Outgoing calls
2.4 Delete all
2.5 Call time
2.5.1 Last call
2.5.2 Total outgoing
2.5.3 Total incoming
2.5.4 Life time
2.5.5 Reset timers
x495.book Page 41 Thursday, August 18, 2005 12:23 PM

Section 4
42
3. t-zones
3.1 Home
3.2 Favorites
3.3 Go to URL
3.4 Clear cache
4. IM
5. Messages
5.1 Text messages
5.1.1 Create
5.1.2 Inbox
5.1.3 Outbox
5.1.4 Delete all
5.2 Picture messages
5.2.1 Create
5.2.2 Inbox
5.2.3 Outbox
5.2.4 Draft
5.2.5 Delete all
5.3 Browser messages
5.3.1 Inbox
5.3.2 Receive
5.3.3 Delete all
5.4 Voice mail
x495.book Page 42 Thursday, August 18, 2005 12:23 PM

Section 4: Menu Navigation 43
Menu Outline
Section 4
5.4.1 Call voice mail
5.4.2 Voice server number
5.5 Broadcast*
5.6 Settings
5.6.1 Text messages
5.6.2 Picture messages
5.7 Memory status
5.7.1 Text messages
5.7.2 Picture messages
6. Funbox
6.1 t-zones
6.2 Sounds
6.3 Images
6.4 Games
6.5 Delete all
6.5.1 Sounds
6.5.2 Images
6.6 Memory status
7. Organizer
7.1 Alarm
7.2 Calendar
7.3 Calculator
7.4 To do list
x495.book Page 43 Thursday, August 18, 2005 12:23 PM
Section 4
44
7.5 Voice memo
7.5.1 Record voice
7.5.2 Voice memos
7.5.3 Delete all
7.5.4 Settings
7.5.5 Memory status
7.6 Conversion
7.6.1 Length
7.6.2 Weight
7.6.3 Volume
7.6.4 Area
7.6.5 Temperature
7.7 Timer
7.8 Stopwatch
8. Sound settings
8.1 My MegaTones
8.2 Get More MegaTones
8.3 Ringtones
8.4 Ring volume
8.5 Alert type
8.6 Keypad tone
8.7 Message tone
8.7.1 Text messages
8.7.2 Picture messages
x495.book Page 44 Thursday, August 18, 2005 12:23 PM
Section 4: Menu Navigation 45
Menu Outline
Section 4
8.8 Power on/off
8.9 Alerts on call
8.0 Extra tones
9. Settings
9.1 Time & Date
9.1.1 Set date
9.1.2 World time
9.1.3 Set time
9.1.4 Time format
9.1.5 Auto update
9.2 Display settings
9.2.1 Wallpaper
9.2.2 Interior display
9.2.3 Backlight
9.2.4 Brightness control
9.2.5 Dialing font color
9.3 Get More Help
9.4 Greeting message
9.5 Language
9.5.1 Text language
9.5.2 Input mode
9.6 Security
9.6.1 PIN check
9.6.2 Change PIN
x495.book Page 45 Thursday, August 18, 2005 12:23 PM

Section 4
46
9.6.3 Phone lock
9.6.4 Change password
9.6.5 Privacy
9.6.6 FDN mode
9.6.7 Change PIN2
9.7 Extra settings
9.8 Reset settings
9.8.1 Sound settings
9.8.2 Phone settings
9.8.3 All settings
9.9 Network services
9.9.1 Call forwarding
9.9.2 Call waiting
9.9.3 Network selection
9.9.4 Caller ID
9.9.5 Band selection
* Shows only if supported by your SIM card.
x495.book Page 46 Thursday, August 18, 2005 12:23 PM

Section 5: Entering Text 47
Section 5
Section 5: Entering Text
Topics Covered
• Changing the Text Input Mode
• Using T9 Mode
• Using ABC Mode
• Using Symbols
• Using Numbers
This section outlines how to select the desired text input
mode when entering characters into your phone. This
section also describes how to use the T9 predictive text
entry system to reduce the number of key strokes
associated with entering text.
x495.book Page 47 Thursday, August 18, 2005 12:23 PM
48
Section 5
Changing the Text Input Mode
When using your phone, you will often need to enter text,
such as when storing a name in Phonebook, creating your
personal greeting or scheduling events on your calendar.
You can enter alphanumeric characters by using your
phone’s keypad.
Your phone has the following text input modes:
• ABC mode: this mode allows you to enter letters by pressing
the key labeled with the letter you want. Press the key once,
twice, three, or four times until it displays.
• T9 mode: this mode allows you to enter words with only one
keystroke per letter. Each key on the keypad has more than one
letter; for example, pressing the 5 key can enter J, K, or L.
However, the T9 mode automatically compares the series of
keystrokes you make with an internal linguistic dictionary to
determine the most likely word, thus requiring far fewer
keystrokes than the traditional ABC mode.
• Number mode: this mode allows you to enter numbers.
• Symbol mode: this mode allows you to enter symbols, such as
punctuation marks.
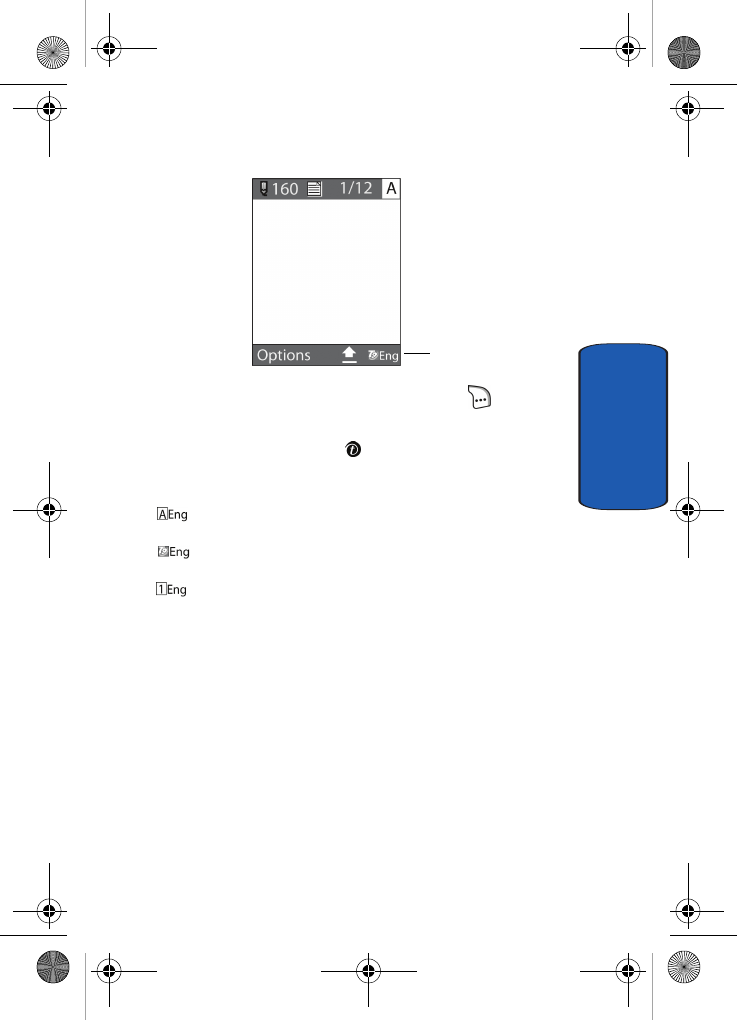
When you are in a field that allows characters to be
entered, you will notice the text input mode indicator on
the display.
Example: Writing a text message.
x495.book Page 48 Thursday, August 18, 2005 12:23 PM
Section 5: Entering Text 49
Using T9 Mode
Section 5
1. To change the text input mode, press the key.
2. Highlight the input option that you want and press the
Select soft key or the key.
3. Choose from the following options:
: ABC mode
: T9 mode
: Number mode
Using T9 Mode
T9 is a predictive text input mode that allows you to key
in any character using single keystrokes. This text input
mode is based on a built-in dictionary.
To enter a word in T9 mode:
1. When you are in T9 mode, start entering a word by
pressing the 2 to 9 keys. Press each key only once for
each letter.
Text input mode
indicator
x495.book Page 49 Thursday, August 18, 2005 12:23 PM
50
Section 5
Example: To enter “Hello” in T9 mode, press the 4,3,5,5, and 6 keys.
The word that you are typing appears on the display. It
may change with each key that you press.
2. Enter the whole word before editing or deleting the
keystrokes.
3. When the word displays correctly, go to step 4.
If the word doesn’t display correctly, press the 0 key or
the Up or Down key to display alternative word choices
for the keys that you have pressed.
Example: Both “Of” and “Me” have the 6 and 3 keys. The phone displays
the most commonly used choice first.
4. Insert a space by pressing the key and start entering
the next word.
To add a new word into the T9 dictionary:
1. After pressing the keys corresponding to the word you
want to add, press the 0 key to display the alternative
words.
2. When you press the 0 key at the last alternative word,
the display shows Spell on the bottom line. Press the
Spell soft key or the key.
3. Enter the word you want to add using ABC mode. See
page "Changing the Text Input Mode" on page 48.
4. Press the OK soft key or the key.
The word is added to the T9 dictionary and becomes a
word for the associated keypress series.
x495.book Page 50 Thursday, August 18, 2005 12:23 PM
Section 5: Entering Text 51
Using ABC Mode
Section 5
Note: This feature may not be available for some languages.
• To enter periods, hyphens, or apostrophes, press the 1 key. T9
mode applies grammar rules to ensure that correct punctuation
is used.
• To shift case in T9 mode, use the key. There are 3 cases:
Initial capital, Capital lock, and Lower case.
• You can move the cursor by using the Navigation keys. To
delete letters, press the C key. Press and hold the C key to
clear the display.
Using ABC Mode
To use the ABC Mode use the 1 to 0 keys to enter your text.
1. Press the key labeled with the letter you want:
•Once for the first letter
•Twice for the second letter
•And so on
2. Select the other letters in the same way.
Note: The cursor moves to the right when you press a different key. When
entering the same letter twice or a different letter on the same key, just
wait for a few seconds for the cursor to move to the right automatically,
and then select the next letter.
Keys
x495.book Page 51 Thursday, August 18, 2005 12:23 PM

52
Section 5
x495.book Page 52 Thursday, August 18, 2005 12:23 PM
Section 5: Entering Text 53
Using Symbols
Section 5
Using Symbols
Symbol mode enables you to insert symbols and
punctuation marks into text.
1. To select a symbol, press the corresponding number key.
2. To display more symbols, press the Up or Down
Navigation key.
3. To clear the symbol(s), press the C key. When the input
field is empty, this key returns the display to the
previous mode.
4. To insert the symbol(s) into your message, press the OK
soft key or the key.
Using Numbers
Number mode enables you to enter numbers into a text
message. Press the keys corresponding to the digits you
want to enter.
x495.book Page 53 Thursday, August 18, 2005 12:23 PM
54
Section 5
x495.book Page 54 Thursday, August 18, 2005 12:23 PM

Section 6: Understanding Your Phonebook 55
Section 6
Section 6: Understanding Your
Phonebook
Topics Covered
• Finding a Phonebook Entry
• Storing a Number in the Phone’s Memory
• Storing a Number in the SIM Memory
• Dialing a Number from the Phonebook
• Dialing a Number from the SIM Card
• Speed Dialing
• Copying SIM Phonebook Entries to Phone
• Deleting all Phonebook Entries
• Group Settings
• Finding My Own Number
• Checking the Memory Status
• Service Dialing Numbers (SDN)
This section allows you to manage your daily contacts by
storing their name and number in your Phonebook.
Phonebook entries can be sorted by name, entry, or group.
x495.book Page 55 Thursday, August 18, 2005 12:23 PM

56
Section 6
Finding a Phonebook Entry
You can store phone numbers and their corresponding
names in your SIM card and phone’s memories. They are
physically separate but are used as a single entity, called
Phonebook.
Depending on your particular SIM card, the maximum
number of phone numbers the SIM card can store may
differ.
1. At the Idle screen, press the Ph.Book soft key.
2. Highlight the Search option and press the Select soft
key or the key. You are asked to enter a name.
3. Enter the first few letters of the name.
The Phonebook entries are listed, starting with the first
entry matching your input.
4. To view the highlighted entry, press the View soft key.
5. Press the key to dial the number, or press the
Options soft key to access the Phonebook entry options.
Storing a Number in the Phone’s Memory
1. At the Idle screen, press the Ph.Book soft key.
2. Scroll to New entry by pressing the Up or Down key and
press the Select soft key or the key.
3. Select the Phone option by pressing the Up or Down key
and press the Select soft key or the key.
4. Select a number type by pressing the Up or Down key,
and press the Select soft key or the key.
The following types are available:
x495.book Page 56 Thursday, August 18, 2005 12:23 PM

Section 6: Understanding Your Phonebook 57
Storing a Number in the Phone’s Memory
Section 6
•Mobile: assigns the number entered to the Mobile entry.
•Home: assigns the number entered to the Home entry.
•Office: assigns the number entered to the Office entry.
•Fax: assigns the number entered to the Fax entry.
•Other: allows you to enter more detailed information for the
entry.
•E-mail: allows you to enter an e-mail address for the number
entered.
5. Enter the number you want to store and press the Save
soft key or the key.
6. Enter a name and press the OK soft key or the key.
For further details about how to enter characters, see
"Using ABC Mode" on page 51.
After storing, the phone displays the Phonebook entry
and name you just created.
7. Tab through the options using the Right and Left
Navigation keys to assign the Phonebook entry Group,
Graphic, and Alert settings.
8. To use the entry options, press the Options soft key. The
following options are available:
•Send message: allows you to send a message to the
selected number.
•Assign speed dial: allows you to assign a speed dial
number to the phone number you entered. For more
information, see "Speed Dialing" on page 59.
•Edit number: allows you to edit the number.
•Edit Name: allows you to edit the name.
x495.book Page 57 Thursday, August 18, 2005 12:23 PM

58
Section 6
•Delete entry: allows you to delete the name and number
from Phonebook. You are asked to confirm that you wish to
delete the name and number by pressing the Yes soft key.
•Copy to SIM: allows you to copy the number to your SIM
card.
9. To return to the Idle screen, press the key.
Storing a Number in the SIM Memory
1. At the Idle screen, press the Ph.Book soft key.
2. Scroll to New entry by pressing the Up or Down key and
press the Select soft key or the key.
3. Select the SIM memory location, by pressing the Up or
Down key and press the Select soft key or the key.
4. Enter a number you want to store and press the Save
soft key or the key.
5. Enter a name and press the OK soft key or the key.
For further details about how to enter characters, see
"Using ABC Mode" on page 51.
After storing, the phone displays the Phonebook entry
number you just created.
6. To use the entry options, press the Options soft key.
The following options are available:
•Send message: allows you to send a message to the
selected number.
•Assign speed dial: allows you to assign a speed dial
number to the phone number you entered. For more
information, see "Speed Dialing" on page 59.
•Edit number: allows you to edit the number.
x495.book Page 58 Thursday, August 18, 2005 12:23 PM
Section 6: Understanding Your Phonebook 59
Dialing a Number from the Phonebook
Section 6
•Edit Name: allows you to edit the name.
•Delete entry: allows you to delete the name and number
from Phonebook. You are asked to confirm that you wish to
delete the name and number by pressing the Yes soft key.
•Copy to phone: allows you to copy the number to your
phone.
7. To return to the Idle screen, press the key.
Dialing a Number from the Phonebook
Once you have stored phone numbers in the Phonebook,
you can dial them easily and quickly by using the location
numbers that were assigned to them in the Phonebook.
Note: If you cannot remember a location number, you must go into the
Search menu in the Phonebook menu to search for the entry by name. For
details, see "Finding a Phonebook Entry" on page 56.
Dialing a Number from the SIM Card
1. In Idle mode, enter the location number for the phone
number you want to dial and press the key.
The location number in the SIM card appears, with the
desired number displayed.
2. You can press the Up or Down key to find other
numbers on the list.
3. Press the Dial soft key, the key, or the key when
you have selected the number you want.
Speed Dialing
Once you have stored phone numbers from your
Phonebook list, you can set up to 8 speed dial entries and
x495.book Page 59 Thursday, August 18, 2005 12:23 PM

60
Section 6
then dial them easily whenever you want, simply by
pressing and holding the associated numeric key.
Setting Up Speed Dial Entries
1. At the Idle screen, press the Ph.Book soft key.
2. Scroll to Speed Dial by pressing the Up or Down key
and press the Select soft key or the key.
3. Select the key to which you wish to assign the speed-
dialing number, from the 2 to 9 keys, and press the
Select soft key or the key.
Note: Memory location 1 is reserved for your Voice mail server number.
4. Highlight Edit number and press the Select soft key or
the key.
5. Enter a number or press the Ph.Book soft key to display
entries in the Phonebook.
6. If you pressed the Ph.Book soft key, select an entry from
the Phonebook list and press the View soft key or the
key.
7. Press the OK soft key or the key.
Copying SIM Phonebook Entries to Phone
You can copy all SIM entries to the Phone using this
option. When you copy entries to the phone, duplicate
entries are created.
1. At the Idle screen, press the Ph. Book soft key.
2. Highlight Copy all to phone and press the Select soft
key or the key.
x495.book Page 60 Thursday, August 18, 2005 12:23 PM
Section 6: Understanding Your Phonebook 61
Deleting all Phonebook Entries
Section 6
3. When you receive the Sure to copy all? message, press
the Yes soft key or the key.
Note: Options are available for phone entries that are not available when
stored to the SIM card. For details, see "Storing a Number in the Phone’s
Memory" on page 56.
Deleting all Phonebook Entries
You can delete all of your entries from your phone’s
memory, your SIM card, or both.
1. At the Idle screen, press the Ph.Book soft key.
2. Scroll to Delete all by pressing the Up or Down key and
press the Select soft key or the key.
3. To place a check mark by the memory location you want
to empty, All, SIM, or Phone, press the Select soft key or
the key.
You can remove the check mark by pressing the Select
soft key or the key.
4. Press the Delete soft key to delete the entries in the
selected memory location. A confirmation “Sure to
delete?” displays. Press Yes to delete or No to cancel.
Group Settings
1. At the Idle screen, press the Ph.Book soft key.
2. Scroll to Group settings by pressing the Up or Down
key and press the Select soft key or the key.
3. Scroll through the group list by pressing the Up or Down
key.
x495.book Page 61 Thursday, August 18, 2005 12:23 PM
62
Section 6
4. When the group you want highlights, press the Select
soft key or the key. You may choose Family, Friends,
Co-workers, VIPs, or Other.
5. Select an option and change the settings, as required.
The following options are available:
•Ringtone: allows you to set the ring tone to be used when
you receive a voice call from a member of that group.
•Edit Name: allows you to rename the selected group setting.
•View Image: allows you to view the graphic displayed when
you receive a voice call from a member of that group.
6. When you are finished, press the C key or the key.
Finding My Own Number
This function is a memory aid, which you can use to check
your own phone number if you need to do so.
You can assign a name to each of your own phone
numbers registered on your SIM card. You can also edit
the names and numbers. Any changes made here do not
in any way affect the actual subscriber numbers on your
SIM card.
1. At the Idle screen, press the Ph.Book soft key.
2. Select the Own number option by pressing the Up or
Down key and press the Select soft key or the key.
3. Select a location and press the Select key or the key.
4. To edit the number, highlight Edit number and press the
Select soft key or the key. Enter the phone number
you want and press the OK soft key or the key.
x495.book Page 62 Thursday, August 18, 2005 12:23 PM
Section 6: Understanding Your Phonebook 63
Checking the Memory Status
Section 6
5. To edit the name, highlight Edit name and press the
Select soft key or the key. Enter the name and press
the OK soft key or the key.
6. To delete the number, highlight Delete and press the
Select soft key or the key. Select Yes to confirm
deletion or No to cancel.
Checking the Memory Status
You can check how many names and numbers are stored
in Phonebook, in both SIM card and the phone memory.
You can also see the capacity of both memories.
1. At the Idle screen, press the Ph.Book soft key.
2. Select the Memory status option by pressing the Up or
Down key. Press the Select soft key or the key.
3. A total of the numbers stored in the Phone and SIM are
displayed.
4. When you are finished, press the C soft key or the
key.
Service Dialing Numbers
You can view the list of Service Dialing Numbers (SDN)
assigned by your service provider. These numbers
include emergency numbers, directory enquiries and
voice mail numbers.
1. At the Idle screen, press the Ph.Book soft key.
2. Select the SDN option by pressing the Up or Down key
and press the Select soft key or the key.
x495.book Page 63 Thursday, August 18, 2005 12:23 PM
64
Section 6
3. Scroll through the numbers by using the Up or Down
key.
4. To dial the number displayed, press the Select soft key
or the key.
Note: This function is available only if it is supported by your service
provider.
x495.book Page 64 Thursday, August 18, 2005 12:23 PM
Section 7: Messaging 65
Section 7
Section 7: Messaging
Topics Covered
• Types of Messages
• Voice Messages
• Text Messages
• Picture Messages
• Browser Messages
• Voice mail Messages
• Broadcast Messages
• Settings
• Memory Status
• Instant Messaging
This section allows you to send or receive different types
of messages. It also includes the features and functionality
associated with messaging.
x495.book Page 65 Thursday, August 18, 2005 12:23 PM

66
Section 7
Types of Messages
Your phone provides the following message types:
• Voice Messages
• Text Messages
• Picture Messages
• Browser Messages
• Voice Mail Messages
• Broadcast Messages (SIM Dependent)
Voice messages
In this menu, you can record a voice message of up to 1
minute and then immediately send it in an MMS
(Multimedia Message Service) message. MMS will be
referred to as Picture Messaging.
When you access this menu, a timer appears on the screen.
1. Press the Record soft key to start recording.
2. Record a message by speaking into the microphone.
The display shows the elapsed time and the remaining
time simultaneously.
3. When you are finished, press the Stop soft key or the
key. Or, when the recording time is expired, the display
switches to the next screen.
4. To choose your destination target, highlight one of the
following options and press the Select soft key or the
keys:
x495.book Page 66 Thursday, August 18, 2005 12:23 PM
Section 7: Messaging 67
Voice messages
Section 7
•Recent log: allows you to select a number or an address
from the 5 last destinations you entered for sending the last
messages.
•Phonebook: allows you to retrieve a number from your
Phonebook.
•Phone number: allows you to enter the phone number you
want.
•E-mail address: allows you to enter the e-mail address of
the recipient.
Note: You can access the following options by pressing the Options soft
key:
•Replay: plays back your voice message.
•Re-record: discards the voice message and enables you to
record another one.
•Send: allows you to send the voice message.
•Default destination: allows you to send the voice message
directly without entering another destination. To select a default
destination, press the Select soft key and select from the
available options.
•Save: saves the voice message and continues to the send
options.
5. Enter a number or an e-mail address and press the OK
soft key, or select a destination from the Phonebook.
6. To select a destination from the Phonebook, highlight
the desired number and press the Select soft key or the
key. Press the Send soft key or the key to send
the message.
After your message is sent, it is saved in the Outbox in the
Picture messages menu.
x495.book Page 67 Thursday, August 18, 2005 12:23 PM

68
Section 7
Text Messages
Short Message Service (SMS) allows you to send and
receive short text messages to and from other mobile
phones. In addition, your phone supports the Enhanced
Messaging Service (EMS), which enables you to include
simple pictures, melodies, and animated images in your
messages. To use this feature, you must subscribe to your
service provider’s message service.
When the Message icon ( ) appears, you have received
new text messages. When the memory is full, an error
message displays and you cannot receive any new
messages. Use the Delete option in each message box to
delete obsolete messages.
Create
In this menu, you can write and send a text message.
Creating a Simple Text Message
1. Create your message.
You can create a message using standard Alphabet
characters or special Uni-code characters, depending on
the setting in the Character support menu.
Notes: For further details about entering characters, see "Using ABC
Mode" on page 51.
You can enter up to 160 standard Alphabet characters in your message.
When you enter text using Uni-code characters, the maximum number of
characters that can be in a message is reduced to 70.
2. When you finish entering your message, press the
Options soft key. The following options are available:
x495.book Page 68 Thursday, August 18, 2005 12:23 PM
Section 7: Messaging 69
Text Messages
Section 7
•Send: allows you to send the message. The message is
deleted after sending.
•Text formatting: allows you to format the style of the text.
For the Size attribute, Normal, Large, and Small size are
available. Mode options are Normal, Underline, and
Strikethrough. Bold and Italic options are On or Off. Alignment
options are Left, Center, and Right.
•Add content: allows you to add a picture, melody, or
animation to your message. Select the category of the item to
be added. In each category, you can select from the various
factory-set items or choose an item received from other
sources, such as the Internet or other phones.
Note: When you add media items to a message, the number of characters
you can enter decreases.
•Templates: allows you to apply one of the preset message
templates to the text. Select one of the 4 items stored in the
Templates menu.
•Save message: allows you to save a copy of the message
to the Phone or SIM card.
3. Select Send and press the Select soft key or the key.
4. Enter a number and press the OK soft key.
5. Press the Send soft key or the key.
Note: When the phone fails to send the message, it asks you if you want to
retry. Press the Retry soft key to confirm. Otherwise, press the No soft key
to return to the message screen.
Inbox
This message box is used to store messages that you have
received.
x495.book Page 69 Thursday, August 18, 2005 12:23 PM
70
Section 7
When you enter this menu, the list of messages in the box
displays with the senders’ phone numbers or names, if
available in your Phonebook.
1. Select a text message from the list and press the
Options soft key or the key.
Options available are:
•View: read the text message.
•Text reply: create a new message to reply with.
•Call back: dials the number that sent the text message.
•Delete: deletes the text message.
2. Highlight the View option and press the Select soft key
or the key to read the message contents.
3. To scroll through the contents, press the Up or Down
key.
4. To scroll to the previous or next message, press the Left
or Right key.
While reading a message, you can choose the following
options by pressing the Options soft key:
• Text reply: allows you to send a reply to the sender by sending
a text message.
• Call back: allows you to call the sender.
• Delete: allows you to delete the message.
• Save address: allows you to extract the sender’s number and
URL, e-mail addresses or phone numbers from the message
text, so that you can save them in your phone’s memory.
• Forward: allows you to send/resend the message. For further
information about how to send a message, see "Create" on
page 68.
x495.book Page 70 Thursday, August 18, 2005 12:23 PM
Section 7: Messaging 71
Text Messages
Section 7
• Select content: allows you to save media items, such as
sounds or images, from the message into your phone’s
memory. You can then use the items when writing a message.
• Move to Phone: allows you to move the message from the SIM
card to the phone’s memory. This option is only available for
messages stored in the SIM card.
• Move to SIM: allows you to move the message from the
phone’s memory to the SIM card. This option is only available
for messages stored in the phone’s memory.
Outbox
This message box is used to store messages that you have
sent or will send.
When you enter this menu, the list of messages in the box
displays with the recipients’ phone numbers or names, if
available in your Phonebook.
1. Select a text message from the list and press the
Options soft key.
Options available are:
•View: read the text message.
•Delete: deletes the text message.
•Send: send the text message.
2. Highlight the View option and press the Select soft key
or the key to read the message contents.
3. To scroll through the contents, press the Up or Down
Navigation key.
4. To scroll to the previous or next message, press the Left
or Right Navigation key.
While reading a message, you can choose the following
options by pressing the Options soft key:
x495.book Page 71 Thursday, August 18, 2005 12:23 PM
72
Section 7
• Delete: allows you to delete the message.
• Save address: allows you to extract the destination number
and URL, e-mail addresses or phone numbers from the
message text, so that you can save them in your phone’s
memory.
• Send: allows you to send/resend the message. For further
information about how to send a message see "Create" on
page 68.
• Forward: allows you to send/resend the message. For further
information about how to send a message, see "Create" on
page 68.
• Move to Phone: allows you to move the message from the SIM
card to the phone’s memory. This option is only available for
messages stored in the SIM card.
• Move to SIM: allows you to move the message from the
phone’s memory to the SIM card. This option is only available
for messages stored in the phone’s memory.
Delete All
This menu allows you to delete all of the text messages in
each message box. You can also delete all of your messages
at one time.
1. To select a text message box to clear, press the Up or
Down key. To delete all of your messages, select All
messages.
2. To place or remove a check mark, press Select soft key
or the key.
3. Press the Delete soft key to delete the marked objects.
4. At the Delete? confirmation, press the Yes soft key.
x495.book Page 72 Thursday, August 18, 2005 12:23 PM

Section 7: Messaging 73
Picture Messages
Section 7
Picture Messages
This menu allows you to use the Multimedia Message
Service.
Picture Messaging is a messaging service that provides
delivery of personal multimedia messages from phone to
phone or from phone to e-mail.
In addition to the familiar text content of text messages,
multimedia messages can contain images, graphics,
voice, and audio clips. A Picture Messaging message is a
multimedia presentation in a single file. It is not a text file
with attachments.
Using the Picture Messaging feature, your phone can
receive and send messages that contain multimedia files,
such as photos, sounds and images you downloaded from
the Internet and voice messages you recorded. This
function is available only if it is supported by your service
provider. Only phones that offer multimedia messaging
features can receive and display multimedia messages.
Create
This menu allows you to create a new multimedia
message and send to one or multiple destinations.
Creating and Sending a Multimedia Message
1. Highlight Subject and press the Add soft key or the
key.
2. Enter the subject of your message and press the OK soft
key or the key.
x495.book Page 73 Thursday, August 18, 2005 12:23 PM
74
Section 7
Note: For more information about entering characters, see "Using ABC
Mode" on page 51.
3. To add a picture, highlight the Picture option and press
the Add soft key or the key.
4. Highlight a photo or image and press the Select soft key
or the key.
5. After the picture appears, press the Add soft key or the
key.
6. To add a sound, highlight the Sound option and press the
Add soft key or the key.
7. Highlight one of the following options and press the
Select soft key or the key.
•Record new: allows you to record a new voice message.
•Voice memos: takes you to the Voice memos folder in your
Organizer to select a voice memo to add.
•Sounds: allows you to select a sound from your Sounds
folder.
8. Highlight a Sound or Voice memo and press the Select
soft key or the key to add the sound to your message.
9. To add a message, highlight Message and press the
Add soft key or the key.
10. Enter your message and press the Opt. soft key or the
key.
11. Highlight the Done option and press the Select soft key
or the key. You may select the Templates option to
add pre-defined phrases.
x495.book Page 74 Thursday, August 18, 2005 12:23 PM
Section 7: Messaging 75
Picture Messages
Section 7
12. Press the Opt. soft key for the following options:
•Send: sends the Picture Messaging message.
•Preview: allows you to see the message before you send.
•Add page: allows you to add another page for the Picture
Messaging message.
•Page timing: page timing allows you to set how long each
page of the Picture Messaging is displayed. The default time is
5 seconds, maximum 99 seconds.
•Text effect: allows you to change the color, size, and style of
the Picture Messaging text.
•Clear picture/sound/message/subject: allows you to
remove the selected picture, sound, message, or subject.
•Delete page: allows you to delete the page selected.
•Save message: allows you to save the Picture Messaging
message.
To change the text or replace the image or sound with
another one, select a category and press the Opt. soft
key. Depending on the category selected, highlight Clear
picture/sound/message/subject to remove the item.
13. When you have finished creating the message, press the
Opt. key and highlight the Send option. Press the Select
soft key or the key.
14. Choose one of the following options and press the
Select soft key or the key:
•Recent log: allows you to select a number or an address
from the 5 last destinations you entered for sending the last
messages.
•Phonebook: allows you to enter the phone number you
want.
x495.book Page 75 Thursday, August 18, 2005 12:23 PM

76
Section 7
•Phone number: allows you enter a phone number or
choose one from the Ph.Book.
•E-mail address: allows you to enter the e-mail address of
the recipient.
15. Press the Send soft key to send the message. Your
phone sends the message.
Inbox
Viewing a Message When You Receive It
When a new multimedia message comes in, the display
shows the Picture Messaging icon.
1. Press the View soft key or the key to view your
message.
If you want to view the message later in the Inbox, press
the Exit soft key.
2. If your message is longer than the display screen, use
the Up or Down key to scroll through the message. If
your message has more than one page, use the Left or
Right key to scroll through the pages.
3. Press the Opt. soft key or the key to access the
following options:
•Reply: allows you to create a message and reply to the
sender.
•Replay: if there are multiple screens to this message, allows
you to replay the message from the beginning.
•Delete: deletes the message.
•Forward: allows you to forward this message to another
destination.
x495.book Page 76 Thursday, August 18, 2005 12:23 PM
Section 7: Messaging 77
Picture Messages
Section 7
•Call back: allows you to dial the number from which this
message was sent.
•Save content: allows you to save the contents of this
message (picture or sound) to send to another destination in a
different message.
•Save address: allows you to store the address from which
this message was sent. You can also reply to the message
from this option.
•Properties: shows you information about the message, such
as the time and date the message was received, sender’s
e-mail address, phone number or name, message size, priority,
and class.
4. When you are finished, press the key.
Viewing a Received Message in the Inbox
When you access the Inbox menu, a list of multimedia
messages you received displays along with the message
subjects. The icons on the left tell you the status of the
messages.
Picture Messaging notifications that have been opened.
Picture Messaging notifications that have not been opened.
1. Select a message on the list and press the Select soft
key or the key.
The message displays and scrolls to the next page, if it
has more than one, after a specified time.
2. To scroll through the message, press the Up or Down
Navigation key. If the message has more than one page,
you can scroll through the pages by using the Left and
Right Navigation keys.
x495.book Page 77 Thursday, August 18, 2005 12:23 PM

78
Section 7
While viewing a message, you can choose the message
options by pressing the Opt. soft key.
Outbox
When you access this menu, the list of multimedia
messages that you have sent or saved displays. The icons
on the left tell you the status of each message:
Messages sent
Messages currently being sent
Messages your phone couldn’t send
Messages to be sent
Messages deferred
1. Select a message on the list and press the Select soft
key or the key.
The message displays and scrolls to the next page, if it
has more than one, after a specified time.
2. To scroll through the message, press the Up or Down
Navigation key.
If the message has more than one page, you can scroll
through the pages by using the Left and Right
Navigation keys.
While viewing a message, you can choose the following
options by pressing the Opt. soft key:
• Delete: allows you to delete the message.
• Replay: allows you to replay the message from the beginning.
• Send: allows you to send/resend the message.
x495.book Page 78 Thursday, August 18, 2005 12:23 PM
Section 7: Messaging 79
Browser Messages
Section 7
• Properties: shows you information about the message, such as
the time and date, to (recipient number), size, priority, and
class.
Draft
After creating a multimedia message, you can store it in
this message box to be sent at a later time. After creating
your message, select the Save message option.
Delete All
This menu allows you to delete all of the multimedia
messages in each message box separately. You can also
delete all of your messages at one time.
1. To select Picture messages to clear, press the Up or
Down key. To delete all of your messages, select All
Messages.
2. To place or remove a check mark, press the Select soft
key or the key.
3. Press the Delete soft key to delete the marked objects.
4. At the Delete? confirmation, press the Yes soft key.
Browser Messages
This menu allows you to receive web messages from the
server, or to set the phone not to receive Web messages.
The following options are available:
• Inbox: allows you to read the messages received from the web
server.
• Receive: allows you to set whether or not your phone receives
web messages.
• Delete all: allows you to delete all of the web messages.
x495.book Page 79 Thursday, August 18, 2005 12:23 PM
80
Section 7
Voice Mail Messages
This menu provides you with a way of accessing your
voice mailbox, if provided by your network.
The following options are available:
• Call voice mail: before using the Voice Mail feature, you must
enter the voice server number obtained from your service
provider. You can then highlight this option and press the
Select soft key or the key to listen to your messages.
You can connect to the voice server by pressing and holding the
1 key in Idle mode.
• Voice server number: allows you to change the voice mail
server number, if necessary.
Note: Voice mail is a network feature. Please contact your service provider
for further details.
Broadcast Messages (SIM Dependent)
This network service allows you to receive text messages
on various topics, such as the weather or traffic.
Please contact your service provider for further details.
Settings
In this menu, you can set up default text message and
picture message information. The last setting you
accessed is automatically activated for sending
subsequent messages.
Text Messages
• Service center: allows you to store or change the number of
your message center, which is required when sending
x495.book Page 80 Thursday, August 18, 2005 12:23 PM

Section 7: Messaging 81
Settings
Section 7
messages. You must obtain this number from your service
provider.
• Validity period (SIM dependent): allows you to set the length
of time your text messages are stored at the message center
while attempts are made to deliver them.
• Message type (SIM dependent): allows you to view the type of
message sent.
• Reply path: allows the recipient of your message to send you a
reply message using your message center, if your network
supports this service.
• Delivery report (SIM dependent): allows you to activate or
deactivate the report function. When this function is activated,
the network informs you whether or not your message has
been delivered.
• Character support: allows you to select a character encoding
type, either GSM-alphabet, Uni-code, or Automatic. If you
select Automatic, the phone automatically changes the
encoding type from GSM-alphabet to Uni-code when you enter
a Uni-code character.
When you select Uni-code, the maximum number of
characters that can be in a message is reduced to
approximately half. If your recipient’s phone does not
support Uni-code characters, he/she may not be able to
read your message correctly.
Note: If your phone doesn’t have the Character support menu, the phone
provides the Automatic character encoding by default.
Picture Messages
The following options are used to set Send and Receive
settings for Picture messages.
x495.book Page 81 Thursday, August 18, 2005 12:23 PM

82
Section 7
Send Settings
• Priority: you can select the priority level of your messages.
• Validity period: set the length of time your messages are
stored in the message center while the network attempts to
deliver them.
• Delivery after: you can set a delay time before the phone sends
your messages.
• Delivery report: when this option is enabled, the network
informs you whether or not your message has been delivered.
• Read reply: when this option is enabled, your phone sends a
request for a reply along with your message to the recipient.
Receive Settings
• Msg. reception: you can set your phone to automatically
receive incoming messages.
• Ads reject: you can set your phone to automatically reject or
receive advertising messages.
• Report allowed: you can set the option to receive a delivery
report.
Memory Status
You can check the amount of the memory being used and
the memory remaining for multimedia messages.
The display shows the total space including the used and
free space. You can also view how much space is currently
occupied by each message box.
IM (Instant Messaging)
Instant Messenger (IM) is a way of sending short, simple
messages that are delivered immediately to users online
at that moment.
x495.book Page 82 Thursday, August 18, 2005 12:23 PM

Section 7: Messaging 83
IM (Instant Messaging)
Section 7
Before using this feature, you need to subscribe to a
messenger service. For further details, contact your
service provider.
Starting your IM
1. Select the messenger service to which you subscribed
using the Left or Right key and press the Select soft key
or the key.
2. Enter your screen name. The name will be displayed on
other people’s phones or PCs.
3. Press the Down key and enter your password to connect
to the service.
4. Press the Options soft key.
5. Highlight the Sign On option and press the Select soft
key or the key to connect to your messenger service.
Using the IM Options
On the sign-on screen of your messenger, press the
Options soft key to access the following options:
• Sign On: allows you to login to your IM account.
• Saved Conversations: shows the records of your connections
to the messenger service.
x495.book Page 83 Thursday, August 18, 2005 12:23 PM