Samsung Electronics Co SIT200EMRB OFFICESERV SOHO User Manual USERS MANUAL 1 OF 2
Samsung Electronics Co Ltd OFFICESERV SOHO USERS MANUAL 1 OF 2
UserManual.wiki
>
Samsung Electronics Co
>
SIT200EMRB User Manual
>
USERS MANUAL 1 OF 2
Contents
1.
USERS MANUAL 1 OF 2
2.
USERS MANUAL 2 OF 2
USERS MANUAL 1 OF 2
Navigation menu
Upload a User Manual
Namespaces
Wiki Guide
HTML
PDF
Info
Views
User Manual
Discussion / Help
Navigation
 ButtonUT ............................................................... 53 TUDialling using the PhoneBookUT .......................................................................................... 54 TUANSWERING CALLSUT 55 TUBefore Answering CallsUT ...........................................................................................55 TUAnswering MethodUT ........................................................................................................... 55 TUCall Refusal / Call DeflectionUT ........................................................................................... 56](https://usermanual.wiki/Samsung-Electronics-Co/SIT200EMRB.USERS-MANUAL-1-OF-2/User-Guide-599887-Page-9.png)
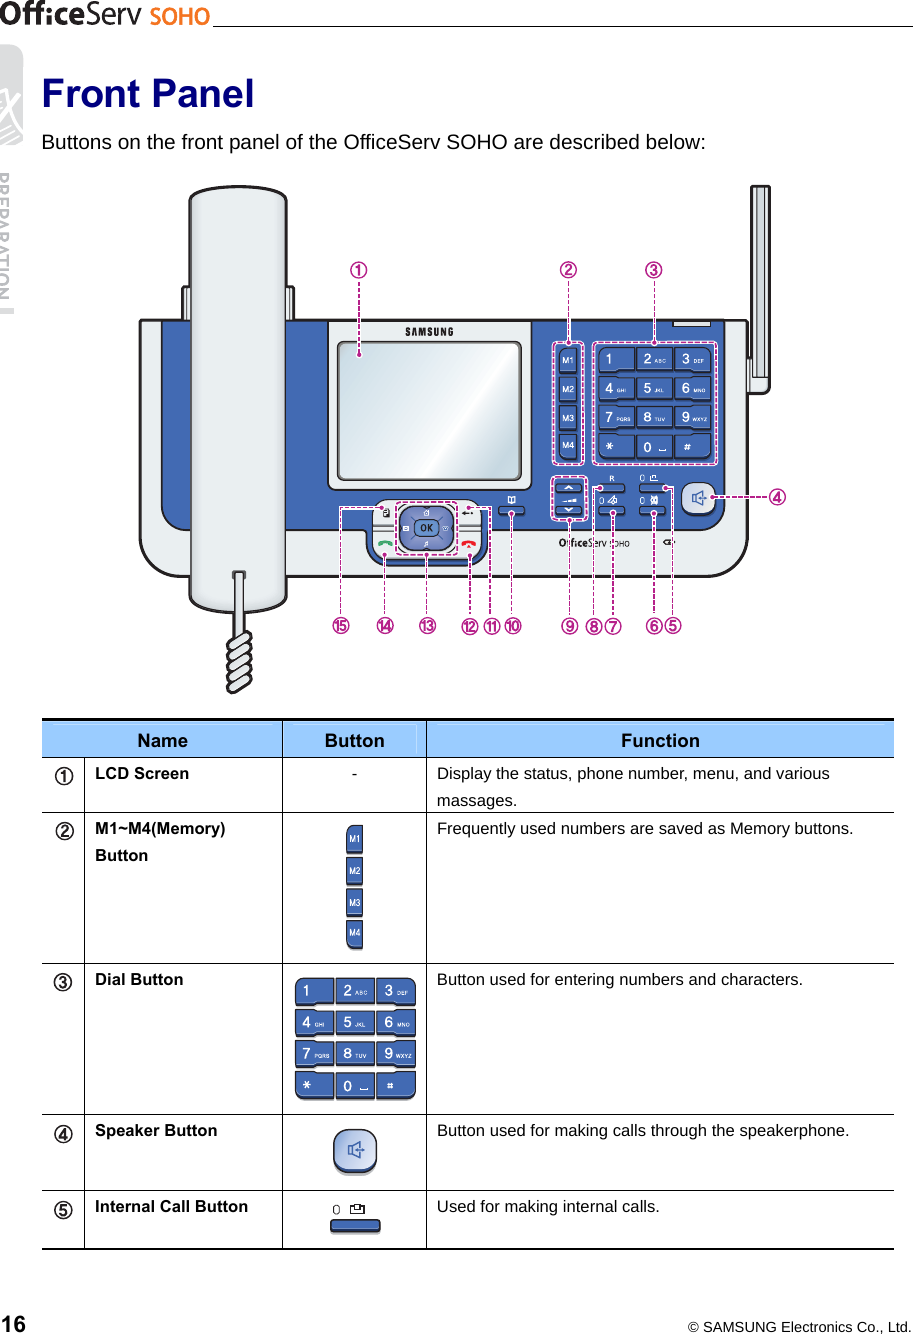
![© SAMSUNG Electronics Co., Ltd. 17 Name Button Function Mute Button Used to switch off the microphone. Services Button Button used for Special Services according to Service Provider. R Button Button used for holding/transferring a connected call. Volume Button Button used for adjusting the ring volume. Button used for adjusting the volume during a call. PhoneBook Button Button used for viewing the phonebook. Cancel Button - Used when moving to the previous step in menu mode. - Used to exit the menu mode. - Used to delete an entered character/number after the character/number is entered. End Button - Used when terminating a call during a call. - Used to exit the menu mode. Direction Button/ OK Button - Direction button: Used when editing characters/numbers or moving a menu item. - OK button: Used when selecting/saving the item where a cursor is in the menu mode. Send Button - Used when making a call(Press [Send] button after entering number.) - Used for checking recent outgoing/incoming(including no answer) call or for dialing the corresponding number. - Used when receiving an incoming call. - Used when pressing the dial button for over a certain time period to make a call to the most recent dialed number. - Press the send button in a standby state to retrieve the list of recent calls. Menu Button Used for using menu functions such as: SMS, PhoneBook, E-Diary, Sound, Services, Phone Setup.](https://usermanual.wiki/Samsung-Electronics-Co/SIT200EMRB.USERS-MANUAL-1-OF-2/User-Guide-599887-Page-17.png)
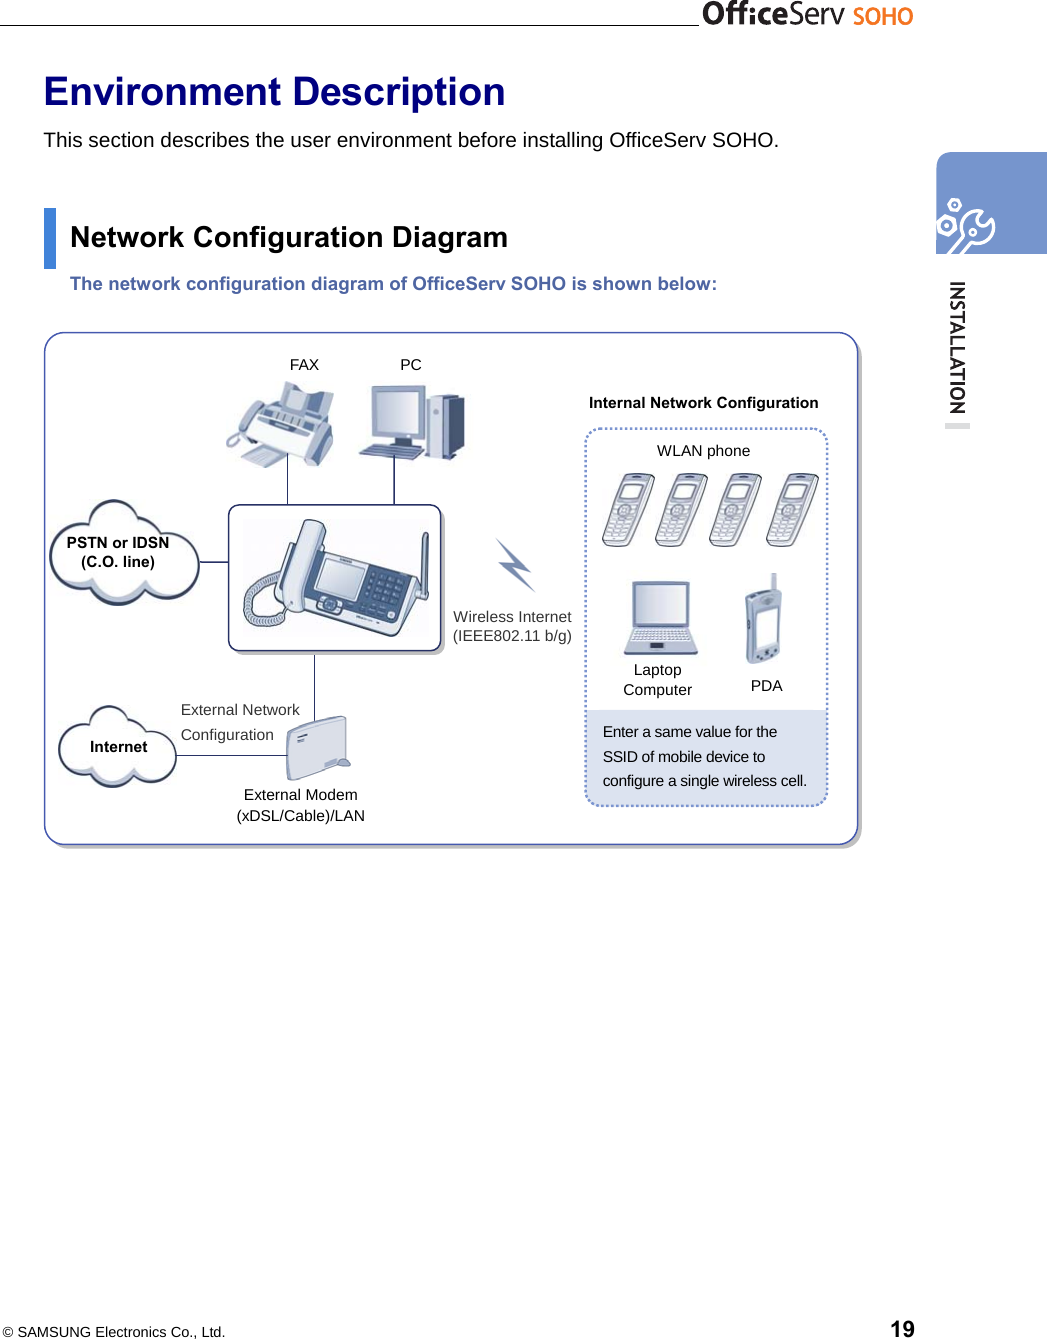
![20 © SAMSUNG Electronics Co., Ltd. Check the following network environment: 1. PC Environment: Check the type of OS(e.g., Windows 95/98/ME/2000/XP) of the PC and whether a LAN card is equipped on the PC. The Internet setup procedure differs depending on the type of OS. There are two ways to check the type of OS. • Clicking [Start] will open a menu tab. You can verify the version from the Windows information displayed on the left section of the menu tab. • Right click [My Computer] on your desktop and select [Properties] to check the system information. 2. LAN Environment of PC: The OfficeServ SOHO can be connected only to PCs that have a LAN card. Check if a LAN/WLAN card is equipped on the PC. 3. Types and number of terminals - Mobile terminal: WLAN phone(WIP-5000M), Laptop computer, PDA - Wired terminal: PC, FAX 4. External Network: Check the connecting method and network information(Refer to the next page).](https://usermanual.wiki/Samsung-Electronics-Co/SIT200EMRB.USERS-MANUAL-1-OF-2/User-Guide-599887-Page-20.png)
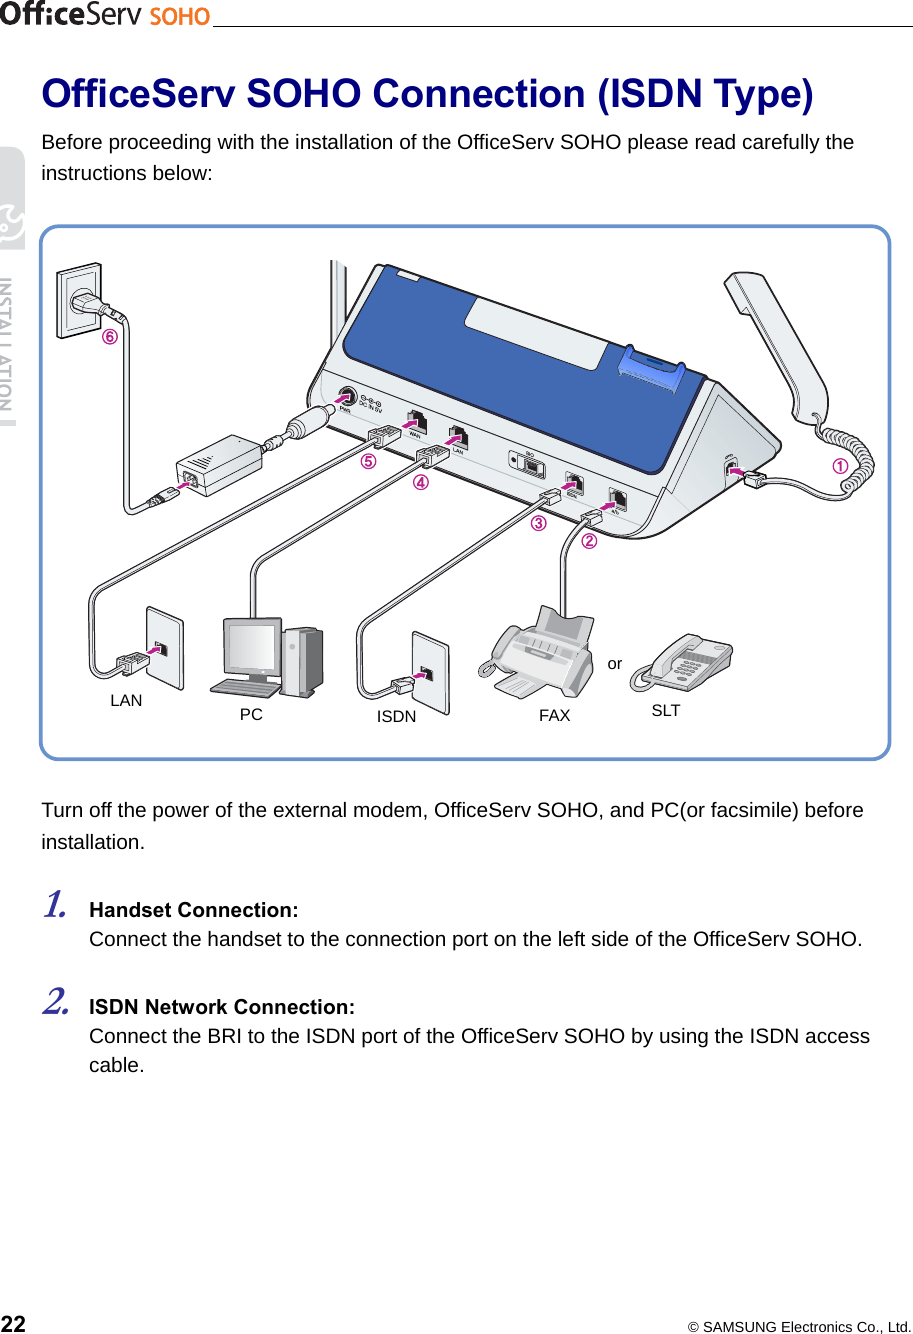
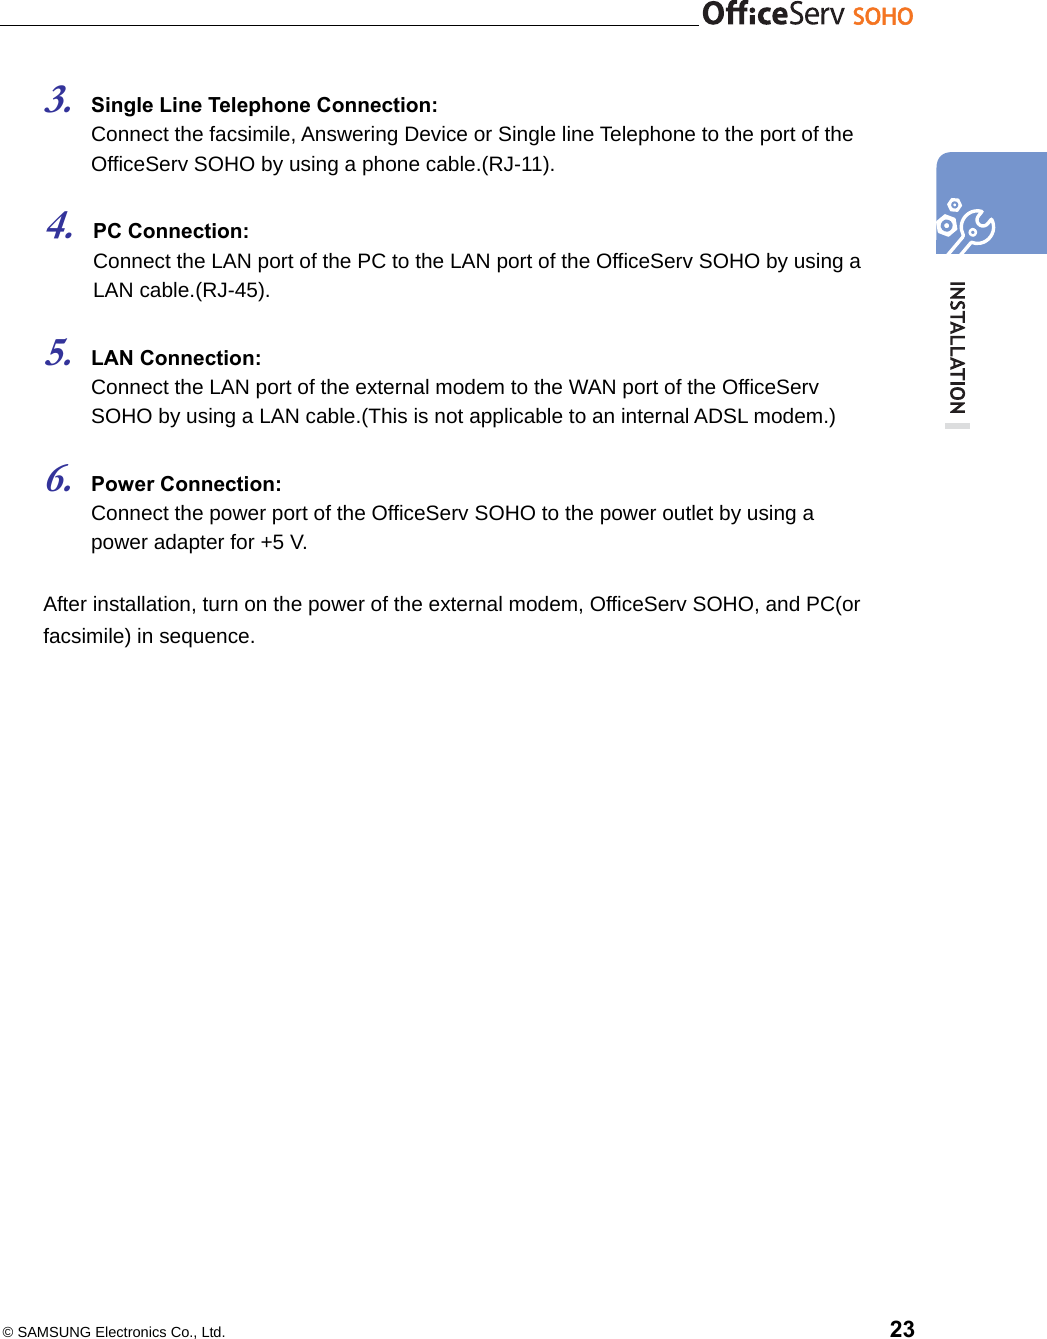
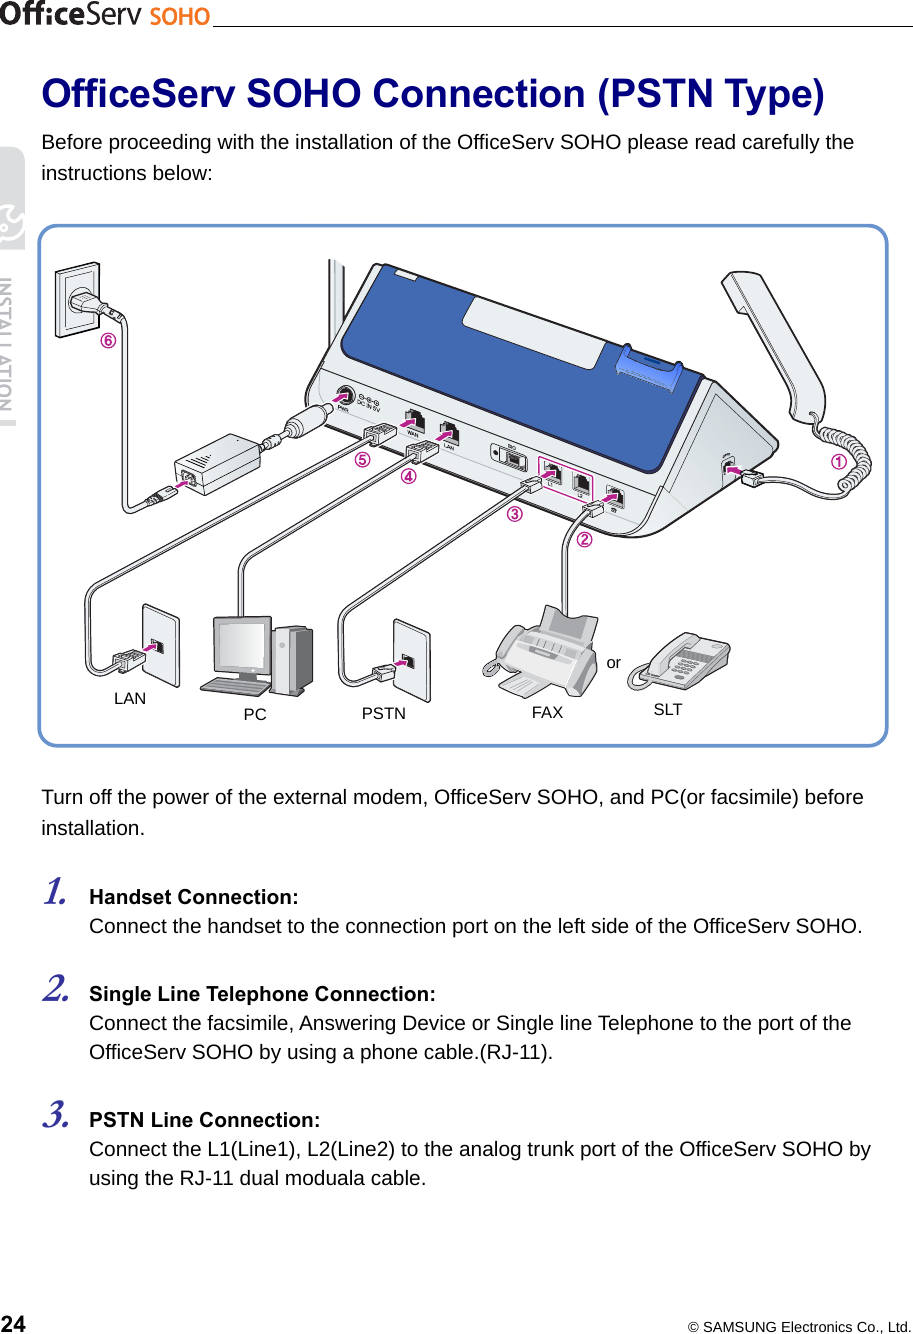
![© SAMSUNG Electronics Co., Ltd. 25 4. PC Connection: Connect the LAN port of the PC to the LAN port of the OfficeServ SOHO by using a LAN cable.(RJ-45). 5. LAN Connection: Connect the LAN port of the external modem to the WAN port of the OfficeServ SOHO by using a LAN cable.(This is not applicable to an internal ADSL modem.) 6. Power Connection: Connect the power port of the OfficeServ SOHO to the power outlet by using a power adapter for +5 V. After installation, turn on the power of the external modem, OfficeServ SOHO, and PC(or facsimile) in sequence. Easy Installation of OfficeServ SOHO Once the power of the OfficeServ SOHO is turned on, the green LEDs of the [Internal Call] and [Mute] buttons on the front panel of the OfficeServ SOHO blink in turns. Within a short time, the loading screen and the [EasyInstall] screen will appear in sequence on the LCD of the OfficeServ SOHO. The use of the buttons for menu settings is described below: Button Description Button Description The [OK] button is used after text is entered or to set the menus. The direction buttons are used to move the cursor left or right or to search the menus. The [Cancel] button is used to delete entries or to return to the previous step. The direction buttons are used to move the cursor up or down. Press the [OK] button to move to the next step after the menu settings or press the [Cancel] button to return to the previous step. In case of problems with the Internet connection or with the registration of a WLAN phone, please refer to the ‘Troubleshooting’ section in User Guide. The procedure for easy installation of the OfficeServ SOHO is as follows:](https://usermanual.wiki/Samsung-Electronics-Co/SIT200EMRB.USERS-MANUAL-1-OF-2/User-Guide-599887-Page-25.png)
![26 © SAMSUNG Electronics Co., Ltd. Easy Install Start Easy Install Connect the Internet cable(LAN cable) to the OfficeServ SOHO and press [OK] to start the installation. Time Setup: This is only for PSTN Type (Model: SIT200EM) Enter the current date and time and press [OK].](https://usermanual.wiki/Samsung-Electronics-Co/SIT200EMRB.USERS-MANUAL-1-OF-2/User-Guide-599887-Page-26.png)
![© SAMSUNG Electronics Co., Ltd. 27 Network Mode Use the or button to select your Internet service system among PPPoE, Static, DHCP, and Setup Later, and press [OK]. Items are described below: 1. PPPoE Select this item if you are a PPPoE user. Enter the ID and Password provided by the ISP and press [OK]. • Contact your ISP if you have forgotten the ID or password. 2. Static Select this item if you are a Static IP user. Enter the address provided by ISP and press [OK]. • IP: Enter IP address • SN: Enter Subnet Mask • GW: Enter Gateway address • DNS: Enter DNS(Domain Name Server) address 3. DHCP Select this item if you are a DHCP user. Press [OK] to set up the Internet automatically. 4. Setup Later To skip Internet setup, select this item and press [OK].](https://usermanual.wiki/Samsung-Electronics-Co/SIT200EMRB.USERS-MANUAL-1-OF-2/User-Guide-599887-Page-27.png)
![28 © SAMSUNG Electronics Co., Ltd. ISDN Settings (This is only for ISDN Type (Model: SIT200EI)) Use the navigation button or to Select the ISDN connection mode between DDI and P-MP Multinumber and press [OK]. The items are described below: 5. DDI Select this item if you have a point-to-point ISDN subscription. Enter your main telephone number (e.g., 0292189777) and select the destination of the incoming calls, then press [OK]. 6. P-MP Multinumber Select this item if you have a point-to-multipoint ISDN subscription. Enter the main telephone number and if necessary any additional telephone number (e.g., 0292189765) and select, per each of them, the destination of the incoming calls, by pressing [OK] to confirm each entry. To continue, once the ISDN setting procedure is concluded, select Go to CLIP Settings and press [OK].](https://usermanual.wiki/Samsung-Electronics-Co/SIT200EMRB.USERS-MANUAL-1-OF-2/User-Guide-599887-Page-28.png)
![© SAMSUNG Electronics Co., Ltd. 29 CLIP Settings (This is only for ISDN type (Model: SIT200EI)) Enter, per each extension, the telephone number, among those received from your network operator(e.g.,: 0292189765), that you want to display to the person called. To continue, select Go to WLAN settings and press [OK]. Register WLAN phone Enter a 13 characters WEP key • Entering a WEP key(Wireless Equivalence Privacy) is optional. To skip this entry, press the [OK] button. Turn on the WLAN WIP-5000M phone and press the [OK] button of the OfficeServ SOHO. Register the WLAN WIP-5000M phone according to the procedure described in the section ‘Easy Registration(38page)’ inherent to the WIP-5000M and press [OK].](https://usermanual.wiki/Samsung-Electronics-Co/SIT200EMRB.USERS-MANUAL-1-OF-2/User-Guide-599887-Page-29.png)
![30 © SAMSUNG Electronics Co., Ltd. Connecting OfficeServ SOHO with Desktop / Laptop Computers You can use the Internet on a desktop or a laptop computer using OfficeServ SOHO. You can connect a desktop or a laptop computer to OfficeServ SOHO in a wireless method(using a WLAN card) or in a wired method(using a wired LAN card and a LAN cable). Connecting Desktop / Laptop Computer to OfficeServ SOHO Wirelessly - A wireless connection can be made only if a WLAN card is installed in the desktop or laptop computer. If a wired LAN card is installed, refer to the wired connection method. - You can set up a WLAN by using an extra program provided by the WLAN card manufacturer. It is recommended that you configure the WLAN using such program. For information on how to set up a WLAN, refer to the user guide of the program. - You can also set up a WLAN by using the WLAN connection service of Windows XP. Setting up a WLAN in Windows 2000/ME/98 Windows 2000/ME/98 do not provide WLAN setting menus. Use programs provided by the manufacturer to set up a WLAN. Checking Windows Version Here are two ways to check the version(e.g. Windows XP, Windows 2000, Windows 98) of the Windows OS running on your computer - Clicking [Start] will open a menu tab. You can verify the version from the Windows information displayed on the left section of the menu tab. - Right click [My Computer] on your desktop and select [Properties] to check the system information.](https://usermanual.wiki/Samsung-Electronics-Co/SIT200EMRB.USERS-MANUAL-1-OF-2/User-Guide-599887-Page-30.png)
![© SAMSUNG Electronics Co., Ltd. 31 Using WLAN Card Program A WLAN card or a WLAN adapter is provided with an extra program for WLAN setup. To set up a WLAN, refer to the user guide of the program. Enter the same SSID set in the OfficeServ SOHO. To check the SSID of the OfficeServ SOHO, refer to the procedure described in the ‘Note’ paragraph on the next page. Wireless Laptop Network Configuration 1. Click [Start] to select [Control Panel]. 2. Double-click [Network Connection] in Control Panel. • If the Control Panel does not have [Network Connection], select [Switch to Classic View] at the upper left corner of the Control Panel. 3. If [Wireless Network Connection] is set to [Disabled], right-click [Wireless Network Connection] and select [Enabled]. • Even if a message, ‘A wireless connection is not available’ appears after selecting [Enabled], proceed to the next step. 4. Right-click [Wireless Network Connection] to select [Properties], and select [Show icon in notification area when connected]. Click [OK]. 5. Right-click [Wireless Network Connection] and select [View Available Wireless Networks]. 6. From the list of [View Available Wireless Networks], select the same SSID of OfficeServ SOHO. To check the SSID of the OfficeServ SOHO, refer to the procedure described in the ‘NOTE’ below. Select [Allow Access to the Selected Wireless Network Regardless of Security] and click the [Connect] button. Verifying SSID From the OfficeServ SOHO, press [Menu] [2. WLAN Setup] [Enter Password(default: 0000)] [OK] [4. WLAN Information] to verify the SSID.](https://usermanual.wiki/Samsung-Electronics-Co/SIT200EMRB.USERS-MANUAL-1-OF-2/User-Guide-599887-Page-31.png)
![32 © SAMSUNG Electronics Co., Ltd. Connecting Desktop / Laptop Computer to OfficeServ SOHO by LAN Cable If the computer has been connected to the Internet before, additional setting is not required. Check the Internet connection(LAN cable status) by referring to ‘OfficeServ SOHO connection’, and execute the Internet Explorer. If the computer is not connected to the Internet, follow the steps below: For Windows 98/ME 1. Select [Start] [Settings] [Control Panel] [Network]. 2. Double-click [TCP/IP]. 3. Select ‘Obtain an IP address automatically’ and click [OK]. Restart the computer. For Windows 2000 1. Select [Start] [Settings] [Control Panel] [Network and Dial-up Connections]. 2. Right-click [Local Area Connection] and select [Properties]. 3. Double-click [Internet Protocol(TCP/IP)]. 4. Select ‘Obtain an IP address automatically’ and ‘Obtain DNS server address automatically’ and click [OK].](https://usermanual.wiki/Samsung-Electronics-Co/SIT200EMRB.USERS-MANUAL-1-OF-2/User-Guide-599887-Page-32.png)
![© SAMSUNG Electronics Co., Ltd. 33 For Windows XP 1. Press [Start] and select [Control Panel]. 2. Double-click [Network Connection]. 3. Right-click [Local Area Connection] and select [Properties]. 4. Double-click [Internet Protocol(TCP/IP)]. 5. Select [Obtain an IP address automatically] and [Obtain DNS address automatically]. Click [OK] to finish the setting.](https://usermanual.wiki/Samsung-Electronics-Co/SIT200EMRB.USERS-MANUAL-1-OF-2/User-Guide-599887-Page-33.png)
![34 © SAMSUNG Electronics Co., Ltd. THINGS YOU SHOULD KNOW Screens Major screens that are displayed on the LCD of OfficeServ SOHO are described below: Main Screen The default background screen of the main screen is shown below. The background screen can be changed by pressing [Menu] button and selecting [Phone Setup] [1. My Phone] [1. Select Background]. Icons of the background screen are described below: Icon Function Station Message Call forward Answer mode DND Mute Alarm Message Network connection](https://usermanual.wiki/Samsung-Electronics-Co/SIT200EMRB.USERS-MANUAL-1-OF-2/User-Guide-599887-Page-34.png)
![© SAMSUNG Electronics Co., Ltd. 35 Station Status Display Screen You can display this screen by pressing the [SCREEN] button while in standby mode or during a call. Statuses of stations and DND, and System Speed Dial are displayed as icons. You can use a function by moving to the corresponding menu and pressing the [OK] button. Menus During Call Screen You can display menus available during a call by pressing the [Menu] button. Various functions that can be used during a call are displayed in this screen. You can use a function by moving to the corresponding menu and pressing the [OK] button. Menus Displayed During a Call Available menus may differ depending on the system version. You can use direction buttons to view menus that are not shown on the screen. ‘RETRY’ menu is not displayed during intercom calls. <PSTN Type> <ISDN Type>](https://usermanual.wiki/Samsung-Electronics-Co/SIT200EMRB.USERS-MANUAL-1-OF-2/User-Guide-599887-Page-35.png)
![36 © SAMSUNG Electronics Co., Ltd. Menu Screen You can display the Menu screen by pressing the [Menu] button while the OfficeServ SOHO is in standby mode. The Menu screen displays PhoneBook, E-Diary, Message, Conference, Phone Setup, and WLAN functions as icons. This menu may be different according to the country. Entering Characters You can use the dial button and the [Menu] button of OfficeServ SOHO to enter or edit letters, numbers, and special characters. Dial Button MENU Button](https://usermanual.wiki/Samsung-Electronics-Co/SIT200EMRB.USERS-MANUAL-1-OF-2/User-Guide-599887-Page-36.png)
![© SAMSUNG Electronics Co., Ltd. 37 Selecting Entry Mode Press the [Menu] button when the character input screen appears. Repeat pressing [Menu] button until the cursor moves to the desired entry mode. Character Entry Mode Character entry mode is set to ‘Capital Alphbet’ by default. Entering Characters 1. Press the [Menu] button and select the capital/small alphabet mode. 2. Press the dial button to enter or edit characters. (For uppercase) Dial Button Character Dial Button Character Dial Button Character A B C D E F G H I J K L M N O P Q R S T U V W X Y Z * / . space # @ - : Capital Alphabet : Small Alphabet : Number : Special Character](https://usermanual.wiki/Samsung-Electronics-Co/SIT200EMRB.USERS-MANUAL-1-OF-2/User-Guide-599887-Page-37.png)
![38 © SAMSUNG Electronics Co., Ltd. (For lowercase) Dial Button Character Dial Button Character Dial Button Character a b c d e f g h i j k l m n o p q r s t u v w x y z * / . space # @ - Entering Numbers Select number entry mode by pressing [Menu] button, and press the corresponding dial button. Entering Special Characters 1. Press the [Menu] button and select the special character mode. Available special characters will appear below the entry screen. 2. Press direction buttons to select a special character and press [OK] button. Press direction buttons to select another type of special character. Entering Characters - If the character to be entered is same as the character immediately entered, press the button and move the cursor one space to the right. - Press the button to enter a space. - To enter a space between two characters already entered, press the direction button to move to the character that should be right after the space and press the [0] button. - Press the [C] button to erase an entered character. Press the [C] button briefly to erase characters one by one, or press and hold the button to erase all characters.](https://usermanual.wiki/Samsung-Electronics-Co/SIT200EMRB.USERS-MANUAL-1-OF-2/User-Guide-599887-Page-38.png)
 button - Dialling using the PhoneBook - Dialling using the LCR function Calling Method Calls can be made by using the handset or speakerphone. Using Handset Lift the handset and enter the phone number. Then press [Send] button. Using Speakerphone Press [Speaker] button, enter a phone number, and then press [Send] button without lifting the handset to make a call. Listen to the voice and speak to the microphone. Press [Speaker] button again to end the call. • You can lift the handset while speaking through the speakerphone to continue the call by using the handset.](https://usermanual.wiki/Samsung-Electronics-Co/SIT200EMRB.USERS-MANUAL-1-OF-2/User-Guide-599887-Page-39.png)
![40 © SAMSUNG Electronics Co., Ltd. Making Intercom Calls This section describes how to make an internal call. Making an Intercom Call This function is used for making an internal call from OfficeServ SOHO to a WLAN phone or vice versa. Calling From OfficeServ SOHO to WLAN phone 1. Lift the handset. • Press [Speaker] button to speak through the speakerphone. 2. Press the number of the recipient’s station. 3. Press the [Send] button. A connecting tone will be played. 4. Start conversation when the recipient answers.](https://usermanual.wiki/Samsung-Electronics-Co/SIT200EMRB.USERS-MANUAL-1-OF-2/User-Guide-599887-Page-40.png)
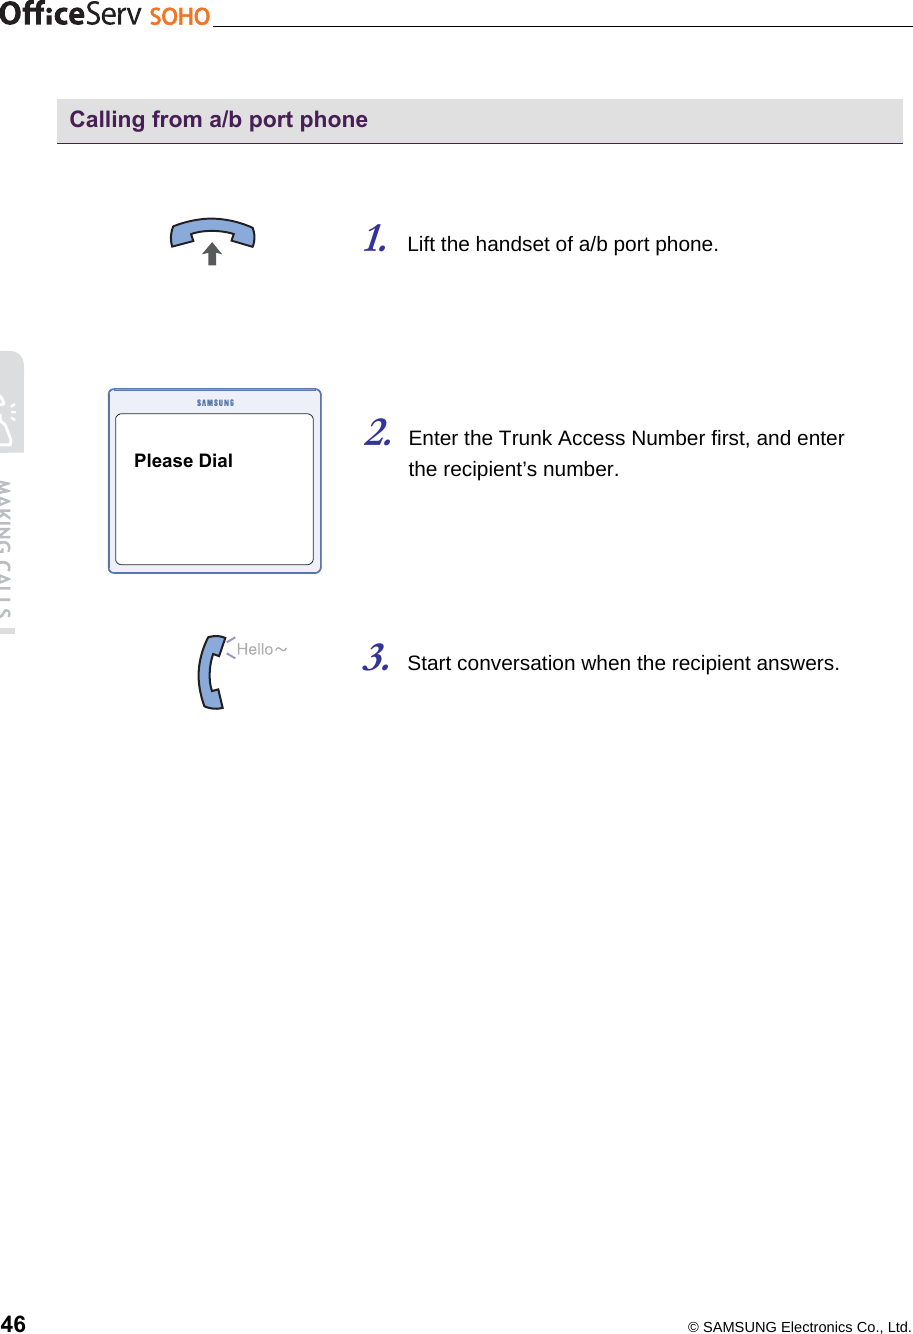
![© SAMSUNG Electronics Co., Ltd. 41 Calling from WLAN phone to OfficeServ SOHO or to Another WLAN phone 1. Press the number of the recipient’s station. 2. Press the [Send] button to hear a connecting tone. 3. Start conversation when the recipient answers. Calling from a/b port phone to OfficeServ SOHO or to WLAN phone 1. Lift the handset of the a/b port Phone 2. Press the number of the recipient’s station. 3. Start conversation when the recipient answers.](https://usermanual.wiki/Samsung-Electronics-Co/SIT200EMRB.USERS-MANUAL-1-OF-2/User-Guide-599887-Page-41.png)
![42 © SAMSUNG Electronics Co., Ltd. Calling from [Station Status Display Screen] of OfficeServ SOHO 1. Press the [Internal Call] button while the phone is in standby mode. 2. Select a WLAN phone from the ‘Station Status Display Screen’. 3. Press the [OK] button to dial the selected station. • In case an unregistered WLAN phone is selected the ‘Plug out’ message appears. <PSTN Type> <ISDN Type>](https://usermanual.wiki/Samsung-Electronics-Co/SIT200EMRB.USERS-MANUAL-1-OF-2/User-Guide-599887-Page-42.png)
![© SAMSUNG Electronics Co., Ltd. 43 Callback When you make an internal call but if the recipient is busy, you can reserve a call on the recipient’s station. 1. If you hear a busy tone on making a call, press [Menu] button and select [CALLBACK]. 2. On hearing the confirmation tone, replace the handset. 3. Your phone rings when the recipient finishes the earlier call. • A message indicating callback is displayed on the LCD. 4. Lift the handset and the recipient’s station will ring. 5. Start conversation when the recipient answers.](https://usermanual.wiki/Samsung-Electronics-Co/SIT200EMRB.USERS-MANUAL-1-OF-2/User-Guide-599887-Page-43.png)
![44 © SAMSUNG Electronics Co., Ltd. Making External Calls This chapter describes how to make an external call from OfficeServ SOHO or a WLAN phone. Making an External Call This function is used for making an external call from OfficeServ SOHO or a WLAN phone. Calling from OfficeServ SOHO 1. Lift the handset. • Press [Speaker] button to call through the speakerphone. 2. When the ‘Please Dial’ message appears on the LCD, enter the recipient’s number. 3. Start conversation when the recipient answers. Please Dial](https://usermanual.wiki/Samsung-Electronics-Co/SIT200EMRB.USERS-MANUAL-1-OF-2/User-Guide-599887-Page-44.png)
![© SAMSUNG Electronics Co., Ltd. 45 Calling from Mobile 1. Enter an external phone number. 2. Press the [Send] button to hear a connecting tone. 3. Start conversation when the recipient answers.](https://usermanual.wiki/Samsung-Electronics-Co/SIT200EMRB.USERS-MANUAL-1-OF-2/User-Guide-599887-Page-45.png)
![© SAMSUNG Electronics Co., Ltd. 47 Making Calls Using Pause You can use the pause function when making a call from the OfficeServ SOHO or from a WLAN phone to an Automatic Response System(ARS). Pause Function Pause function refers to using the pause character when dialing numbers for making a call to an Automatic Response System(ARS) such as telebanking. Note that some ARS may not be able to recognize electronic dialing. 1. Enter an ARS number(e.g., Telebanking). 2. Press [Menu] and enter the pause character ‘p’. 3. Enter the function numbers to be used for the ARS. 4. Press [Send] to connect to the ARS and to automatically execute the functions corresponding to the entered function numbers.](https://usermanual.wiki/Samsung-Electronics-Co/SIT200EMRB.USERS-MANUAL-1-OF-2/User-Guide-599887-Page-47.png)
![48 © SAMSUNG Electronics Co., Ltd. Auto Redial When you make an external call but if the recipient is busy, you can use this function to redial the same number periodically until the recipient answers the call. 1. If you hear a busy tone on making a call, press [Menu] button and select [RETRY]. 2. Replace the handset and wait until the call is connected. The ‘wait for redial’ message is displayed on the LCD, and the number is redialled periodically. • If the recipient continues to be on the phone, auto redial will be performed up to 99 times, and then the auto redial mode will be released. 3. When the recipient answers the call, lift the handset or press the [Speaker] button to start conversation. • The Speaker LED is blinked until answering the call. Canceling Auto Redial To cancel the auto redial function, press dial button, [Speaker] button or lift and replace the handset. RETRY NEW CALL TRUNK FLASH <PSTN Type> USER BUSY RETRY <ISDN Type>](https://usermanual.wiki/Samsung-Electronics-Co/SIT200EMRB.USERS-MANUAL-1-OF-2/User-Guide-599887-Page-48.png)
![© SAMSUNG Electronics Co., Ltd. 49 CALLBACK (CCBS / CCNR) (ISDN Only) If the external called does not answer(CCNR) or is busy(CCBS), you can reserve the call pressing [CALL BACK] in soft menu. This function is serviced ISDN network. 1. Press [Menu] [CALL BACK], if the external called does not answer of is busy. 2. On hearing the confirmation tone, replace the handset. 3. When the called is IDLE state, OfficeServ SOHO is called the reserved number automatically.](https://usermanual.wiki/Samsung-Electronics-Co/SIT200EMRB.USERS-MANUAL-1-OF-2/User-Guide-599887-Page-49.png)
![50 © SAMSUNG Electronics Co., Ltd. New Call (PSTN Only) This function allows you to make another call immediately after the current call. 1. During a call, press [Menu] button and select [NEW CALL]. 2. Press the target phone number on hearing the dial tone. Making Intercom / External Calls This chapter describes how to make an external or intercom call from OfficeServ SOHO or a WLAN phone. Dialing The Most Recent Dialed Number This function is used to dial the most recently dialed internal/external number. 1. Press the [Send] button for at least 2 seconds. 2. Speak through the speakerphone or handset. Long~RETRY NEW CALL TRUNK FLASH](https://usermanual.wiki/Samsung-Electronics-Co/SIT200EMRB.USERS-MANUAL-1-OF-2/User-Guide-599887-Page-50.png)
![© SAMSUNG Electronics Co., Ltd. 51 Dialing Using Recent Call Log This function is used for making an internal or external call using a list of numbers recently dialed. 1. Press [Send] button while in standby mode. • Press the [Send] button briefly to display the call log, or press and hold the button to dial the most recently dialed number. 2. Recently outgoing, incoming, and missed calls are each displayed up to 32 numbers. Use direction buttons and move to the intended number. • Press the [OK] button to display the user name, registered to the phonebook, the call time, and call duration. 3. Press [Send] button to dial the selected number. 4. Speak through the speakerphone or handset.](https://usermanual.wiki/Samsung-Electronics-Co/SIT200EMRB.USERS-MANUAL-1-OF-2/User-Guide-599887-Page-51.png)
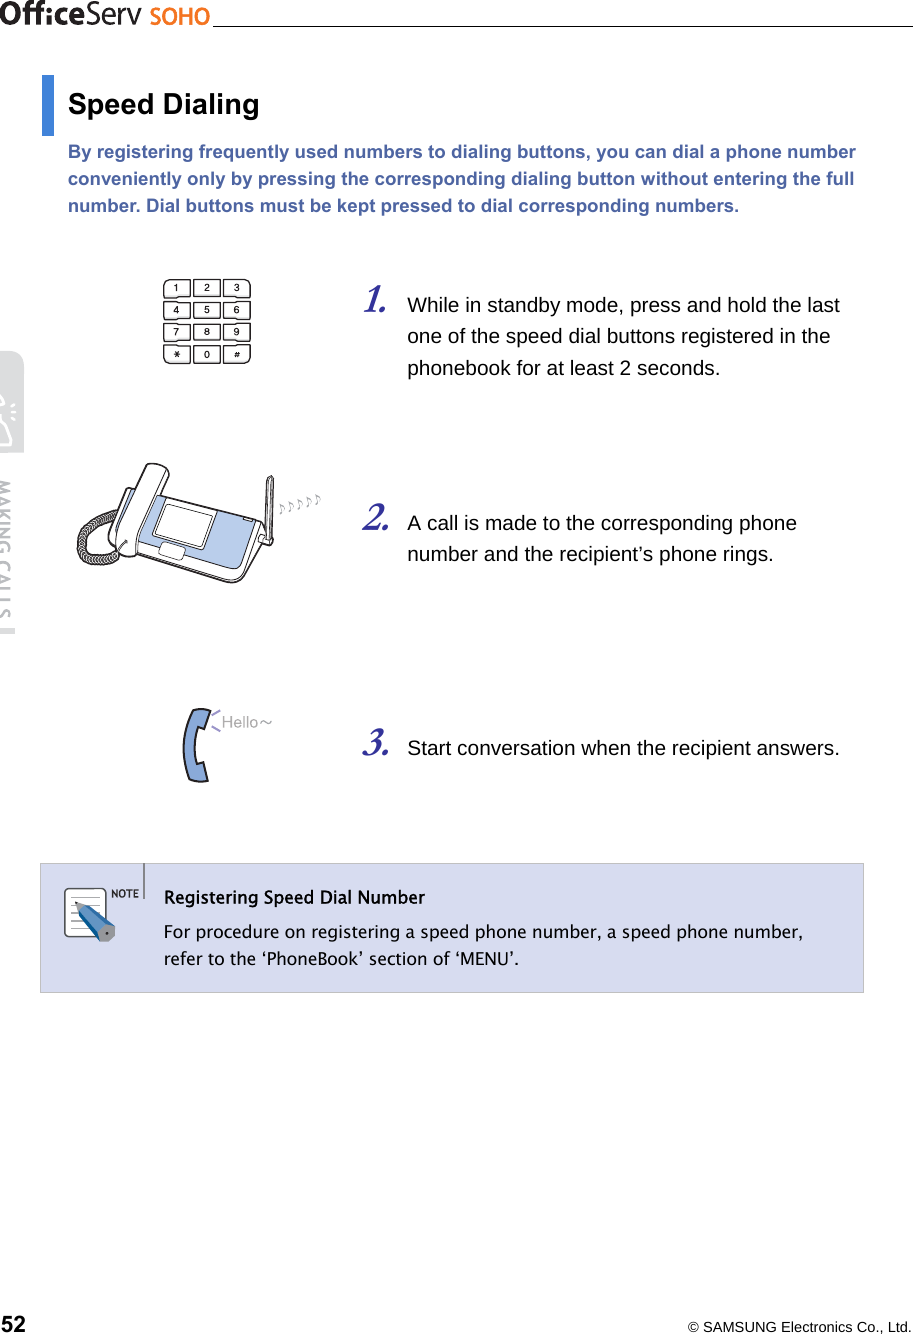
 Button By registering a frequently used number to memory button, you can dial the number conveniently only by pressing the memory button without entering the full number. 1. Select the [M](Memory) button where the target number is saved. 2. A call is made to the corresponding phone number and the recipient’s phone rings. 3. Start conversation when the recipient answers. Registering a Phone Number to [M](Memory) Button For procedure on registering a number to a [M](memory) button, refer to the ‘PhoneBook’ section of ‘MENU’.](https://usermanual.wiki/Samsung-Electronics-Co/SIT200EMRB.USERS-MANUAL-1-OF-2/User-Guide-599887-Page-53.png)
![54 © SAMSUNG Electronics Co., Ltd. Dialing using the PhoneBook You can save the names of up to 250 contacts in your PhoneBook. You can search for the required telephone number using various criteria. 1. [Menu] [Phone book] [1. Find Number]. Select the finding option. • Options are By Name/ By Number/ By Location/ By Group/ By Time 2. Enter the information according to the option, and select the number, 3. Press [Send] button to dial the selected number. 4. Start conversation when the recipient answers.](https://usermanual.wiki/Samsung-Electronics-Co/SIT200EMRB.USERS-MANUAL-1-OF-2/User-Guide-599887-Page-54.png)
![© SAMSUNG Electronics Co., Ltd. 55 ANSWERING CALLS Before Answering Calls The means and features for answering calls are summarized in the table below. For procedures on using the functions, refer to the corresponding descriptions. Category Intercom Call External Call Call method Handset, speakerphone Answering intercom calls Answering external calls Function Call pickup Answering Method Calls can be answered by using the handset or speakerphone. Using handset Lift the handset to answer a call. Using speakerphone Press [Speaker] button without lifting the handset to answer a call. You can hear the caller’s voice(or the other party’s voice) through speaker and speak through the microphone. Press the [Speaker] button again to hang up. • You can lift the handset while speaking through the speakerphone to continue the call by using the handset.](https://usermanual.wiki/Samsung-Electronics-Co/SIT200EMRB.USERS-MANUAL-1-OF-2/User-Guide-599887-Page-55.png)
![56 © SAMSUNG Electronics Co., Ltd. Call Refusal / Call Deflection You can refusal or deflect the call you would not like to answer. 1. The base station is ringing. The display shows you the number of the caller. Select ‘REFUSAL’ or ‘DEFLECT’. And press [OK]. 2. If you select the DEFLECT, Enter the station number you want the call diverted to. And press ‘#’ or [OK] button. If you press the ‘*’, it is cleared the number you enter.](https://usermanual.wiki/Samsung-Electronics-Co/SIT200EMRB.USERS-MANUAL-1-OF-2/User-Guide-599887-Page-56.png)
![© SAMSUNG Electronics Co., Ltd. 57 Answering Intercom Calls This function allows you to answer internal calls incoming to OfficeServ SOHO or a WLAN phone. Answering from OfficeServ SOHO 1. On receiving a call, the bell rings and an incoming message is displayed on the LCD. 2. Lift the handset to answer the call. • Press the [Speaker] button to speak through the speakerphone. 3. Replace the handset to disconnect the call. • Press the [Speaker] button again when using the speakerphone. Answering from OfficeServ SOHO Press the [▼Vol▲] button while the bell is ringing to adjust the bell volume. If the volume is set to mute, an incoming message is displayed on the LCD but the bell does not ring. Auto Answering setting - PSTN: [Menu] [Phone Setup] [1. My Phone] [1. Feature On/Off] [2.Auto Answer]에서 [Auto Answer] Set to ‘On’ - ISDN: [Menu] [Phone Setup] [1. My Phone] [1. Feature On/Off] [3.Auto Answer] Set the Internal to ‘On’. Call from 11](https://usermanual.wiki/Samsung-Electronics-Co/SIT200EMRB.USERS-MANUAL-1-OF-2/User-Guide-599887-Page-57.png)
![58 © SAMSUNG Electronics Co., Ltd. Answering from WLAN phone 1. On receiving a call, the bell rings and an incoming message is displayed on the LCD. 2. Press the [Send] button to answer the call. 3. Press the [End] button to disconnect the call. Call from 123456789](https://usermanual.wiki/Samsung-Electronics-Co/SIT200EMRB.USERS-MANUAL-1-OF-2/User-Guide-599887-Page-58.png)
![© SAMSUNG Electronics Co., Ltd. 59 Answering External Calls This section describes how to answer an external call. Answering from OfficeServ SOHO 1. On receiving an external call, the phone rings and a green lamp lights on the corresponding C.O. line button. Lift the handset to answer the call. • Press the [Speaker] button to answer using the speakerphone. 2. Start conversation. 3. Replace the handset to disconnect the call. • Press the [Speaker] button again when using the speakerphone.](https://usermanual.wiki/Samsung-Electronics-Co/SIT200EMRB.USERS-MANUAL-1-OF-2/User-Guide-599887-Page-59.png)
![60 © SAMSUNG Electronics Co., Ltd. Answering from Mobile 1. On receiving a call, the bell rings and an incoming message appears on the LCD. C 2. Press the [Send] button to answer the call. 3. Press the [End] button to disconnect the call. Call from 11](https://usermanual.wiki/Samsung-Electronics-Co/SIT200EMRB.USERS-MANUAL-1-OF-2/User-Guide-599887-Page-60.png)
![© SAMSUNG Electronics Co., Ltd. 61 Call Pick Up This function is used to pick up a call incoming to another station. 1. When another station rings, press the [SCREEN] button of your phone. 2. Select the flashing station number from the screen. 3. Start conversation. 4. Replace the handset to disconnect the call. • Press the [Speaker] button again when using the speakerphone. <PSTN Type> <ISDN Type>](https://usermanual.wiki/Samsung-Electronics-Co/SIT200EMRB.USERS-MANUAL-1-OF-2/User-Guide-599887-Page-61.png)
![62 © SAMSUNG Electronics Co., Ltd. FUNCTIONS USED DURING CALLS During Intercom Call This section describes some functions during intercom calls. Call Transfer This function is used for transferring a connected internal call to another intercom user or external user. 1. Press the [R] button during an internal call. 2. Press the destination number. 3. Replace the handset when the handset answers the call. • Replace the handset while the transfer tone is ringing to transfer the call unconditionally. Otherwise, wait until the destination user answers the call to transfer the call after consulting the user. HOLD Please dial](https://usermanual.wiki/Samsung-Electronics-Co/SIT200EMRB.USERS-MANUAL-1-OF-2/User-Guide-599887-Page-62.png)
![© SAMSUNG Electronics Co., Ltd. 63 Mute When this function is used, you can hear what the other party is saying but the other party cannot hear any voice or sound from your phone. 1. Press [Mute] key during the call, [Mute] LED is changed to RED. Mute function is enable. 2. Press [Mute] key again, [Mute] LED is off. Mute function is disable.](https://usermanual.wiki/Samsung-Electronics-Co/SIT200EMRB.USERS-MANUAL-1-OF-2/User-Guide-599887-Page-63.png)
![64 © SAMSUNG Electronics Co., Ltd. During External Calls This section describes some functions during external calls. Call Transfer This function is used for transferring a connected external call to another intercom user or internal call to external call. In case of ISDN, it’s available to transfer a connected external call to another external call. 1. Press the [R] button during an external call. 2. Press the destination station number. 3. Replace the handset when the handset answers the call. • Replace the handset while the transfer tone is ringing to transfer the call unconditionally. Otherwise, wait until the destination user answers the call to transfer the call after consulting the user. Call Transfer On successful transfer, the color of the C.O. line lamp changes from green to red.](https://usermanual.wiki/Samsung-Electronics-Co/SIT200EMRB.USERS-MANUAL-1-OF-2/User-Guide-599887-Page-64.png)
![© SAMSUNG Electronics Co., Ltd. 65 Trunk Flash If OfficeServ is under other PBX system, this function allows you to be used features that the upper PBX system is serviced. 1. If an external call arrives while you are already answering another external call, press [Menu]. 2. Select [TRUNK FLASH] to answer the new call. The previous caller will remain on hold. 3. Select [TRUNK FLASH] again to return to the previous caller on hold. Trunk Flash The trunk flash function is a additional function of a trunk switch connected to the OfficeServ SOHO and will only be provided if the trunk switch supports the function.](https://usermanual.wiki/Samsung-Electronics-Co/SIT200EMRB.USERS-MANUAL-1-OF-2/User-Guide-599887-Page-65.png)
![66 © SAMSUNG Electronics Co., Ltd. KEYPAD facility (ISDN Only) Keypad information is data in the form of characters of the telephone keypad (e.g. numbers, star key, hash key) which are converted into particular functions in an integrated services private branch exchange, a remote station or in the switching centre of your network operator. The keypad facility can be switched on or off via the menu. ( [Menu] [Phone Setup] [1. Feature On/Off] [1. Keypad facility On/Off], Set to ON.) 1. Press [KEYPAD] button during an external call to activate the KEYPAD facility. When KEYPAD facility is activated, the [KEYPAD] button will be changed to [DTMF] button. 2. Press [DTMF] button during an external call to deactivate the KEYPAD facility. Service charges You may have to apply for this service from your network operator and it might incur additional charges. Malicious call tracing (malicious call identification, MCID)(ISDN Only) If you receive malicious phone calls and the caller's number is not shown on the display, you can still find out the number via the switching centre. This is achieved by means of an intercept function. 1. Press [Menu] Button during the external call. And select ‘MCID’. The switching centre will then trace back the call to its point of origin](https://usermanual.wiki/Samsung-Electronics-Co/SIT200EMRB.USERS-MANUAL-1-OF-2/User-Guide-599887-Page-66.png)
![© SAMSUNG Electronics Co., Ltd. 67 To Service (contact with your network operator, firstly.) The caller’s network does not support CLIP (Calling Line Identification Presentation = identification of the oncoming call). In this case, the call cannot be traced. Parking a call (ISDN Only) You are holding a conversation and you would like to continue the call in another room. In this other room there is also an ISDN wall socket. However, you can also unpark the call with another telephone, e.g., a mobile handset. 1. Press [Intern] Key when you would like continue the call somewhere else. 2. Select the ‘PARK’. And enter the number to park. Call Waiting If the other call is incoming when you are holding a conversation, the incoming call number is displayed on LCD and indication tone is listened periodically. - Press [Menu] [ANSWER] or [R], You can answer the other call. - If you would like to refuse the other call, Press [Menu] [REFUSAL]. - If you would like the deflect the other call, press [Menu] [DEFLECT]. CAMP 2224444 Jone](https://usermanual.wiki/Samsung-Electronics-Co/SIT200EMRB.USERS-MANUAL-1-OF-2/User-Guide-599887-Page-67.png)
![68 © SAMSUNG Electronics Co., Ltd. Conference during Intercom / External Calls This function is used for organizing a conference call between up to three parties(internal/external) during a call. 1. Press [Menu] during a call. 2. Enter the phone number of a third party to add to the conference. 3. When the third party answers the call, press [Menu] and select [CONFERENCE]. 4. Conference member numbers appears. • To remove a member from the conference, enter the phone number of the member while the ‘Make Next Call’ message is displayed.](https://usermanual.wiki/Samsung-Electronics-Co/SIT200EMRB.USERS-MANUAL-1-OF-2/User-Guide-599887-Page-68.png)
![© SAMSUNG Electronics Co., Ltd. 69 CONVENIENT FEATURES Calling Line Identification Presentation (CLIP) This function displays the caller ID on the LCD of the phone. CLIP is a pay service provided by the telephone company. Such information may not be provided in the following cases: - Caller requested the telephone company not to disclose his/her ID. - Call was made from an area where the CLIP service is not provided(e.g., international calls). - Call was made from a public phone. - Caller information provided by the telephone company is damaged. - The telephone company does not serve CLIP. [PSTN] Select [Menu] [Phone Setup] [5. Global Setup] [1. Feature On.Off] [3. CID Detection] to display Caller ID. [ISDN] It is not need the additional settings, CID is displayed if the network is serviced the CLIP](https://usermanual.wiki/Samsung-Electronics-Co/SIT200EMRB.USERS-MANUAL-1-OF-2/User-Guide-599887-Page-69.png)
![70 © SAMSUNG Electronics Co., Ltd. Conference This section describes two functions of conference. Up to three members, including the caller, can participate in a conference call. Group Conference This function allows you to make a conference call with members registered to a group. Up to five groups can be assigned to a group conference. 1. Press the [Menu] button while the phone is in a standby mode. 2. Select [Services] [2. Conference] [1. Group Conference] by using the direction button. 3. Move to the target group and press the [OK] button. Then, the phone number list of the target group is displayed. • If no group is registered, the screen for registering a group is displayed. Register the target group and select the group to make a conference call. • Move the curser to the target group and press the [Menu] button to edit or delete the group. 4. Press the [Send] button to make a call to the recipient.](https://usermanual.wiki/Samsung-Electronics-Co/SIT200EMRB.USERS-MANUAL-1-OF-2/User-Guide-599887-Page-70.png)
![© SAMSUNG Electronics Co., Ltd. 71 Each Conference This function allows you to call the recipient directly for a conference call, and to make a conversation. 1. Press the [Menu] button while the phone is in a standby mode. 2. Select [Services] [2. Conference] [2. Each Conference] by using the direction button 3. Enter the target phone number and press the [Send] button to connect the recipient. • Press the [Menu] button and select the [Sending] menu. Then, the call is connected to the recipient. 4. Once the recipient answers the phone, the conference call starts.](https://usermanual.wiki/Samsung-Electronics-Co/SIT200EMRB.USERS-MANUAL-1-OF-2/User-Guide-599887-Page-71.png)
![72 © SAMSUNG Electronics Co., Ltd. Do Not Disturb (DND) This sections describes how to use DND function. Setting DND This function allows you to block calls to your phone even if the calls arrive. 1. Press the [SCREEN] button while the phone is in a standby mode. 2. Select [9. DND] from the [Station Status Display Screen]. 3. DND function is set and the ‘DO NOT DISTURB’ message is displayed on the main screen. • When DND function is set, the DND icon is displayed on the main screen, and the DND button of the [Station Status Display Screen] is expressed in black.](https://usermanual.wiki/Samsung-Electronics-Co/SIT200EMRB.USERS-MANUAL-1-OF-2/User-Guide-599887-Page-72.png)
![© SAMSUNG Electronics Co., Ltd. 73 Canceling DND This function allows you to cancel DND. 1. Press the [SCREEN] button while the phone is in a standby mode. 2. Select [9. DND] from the [Station Status Display Screen]. • When DND function is set, the DND button is expressed in black. 3. DND is cancelled, and the ‘DND is cancelled’ message is displayed on the main screen. • When DND function is cancelled, the DND icon disappears from the main screen. <PSTN Type> <ISDN Type>](https://usermanual.wiki/Samsung-Electronics-Co/SIT200EMRB.USERS-MANUAL-1-OF-2/User-Guide-599887-Page-73.png)
![74 © SAMSUNG Electronics Co., Ltd. Group Listening You can enable others to hear the conversation of a call through the speaker. The microphone is disabled. 1. Press the [Speaker] button during a call. 2. Other people can hear the conversation. 3. Press the [Speaker] button to turn off the speaker.](https://usermanual.wiki/Samsung-Electronics-Co/SIT200EMRB.USERS-MANUAL-1-OF-2/User-Guide-599887-Page-74.png)
![© SAMSUNG Electronics Co., Ltd. 75 MENU This section describes how to set various menus of OfficeServ SOHO. You can select a menu either by using the direction key to move to an item and pressing the [OK] button or by entering the item number. Main Menu Press the [Menu] button to display the following main menu on the LCD screen when the OfficeServ SOHO is in a standby mode. The Menu screen displays the SMS, PhoneBook, E-Diary, Sound, Services and Phone Setup as icons. Menu Item Description Inbox Lists the received messages Outbox Send new messages and lists the messages sent Templates Stores the most frequently used messages to use them as templates SMS Settings Configuration of the SMS service(Service Centre, notification, Display) Find Number Search an item in the Phonebook(per number, name, position, etc.) Outgoing calls Lists the outgoing calls and allows recalling the relevant numbers Incoming calls Lists the received calls and allows recalling the relevant numbers Missed calls Lists the calls with no answer and allows recalling the relevant numbers New Entry To add a name into the Phonebook](https://usermanual.wiki/Samsung-Electronics-Co/SIT200EMRB.USERS-MANUAL-1-OF-2/User-Guide-599887-Page-75.png)