Samsung Electronics Co SMC7000 Mobile Phone User Manual A3LSMC7000 User manaul rev 1 2
Samsung Electronics Co Ltd Mobile Phone A3LSMC7000 User manaul rev 1 2
Contents
- 1. A3LSMC7000_User manaul_rev.1 (1)
- 2. A3LSMC7000_User manaul_rev.1 (2)
A3LSMC7000_User manaul_rev.1 (2)

Applications
89
Samsung Video
Watch videos stored on your device and stream online video content from various Video On
Demand (VOD) services.
Tap
Samsung
→
Samsung Video
on the Home screen.
Tap one of the following options:
•
CATEGORY
: View online videos by category.
•
RECOMMENDED
: View recommended online videos.
•
MY VIDEOS
: View videos stored on your device.
Voice Recorder
Introduction
Use different recording modes for various situations, such as in an interview. The device can
convert your voice to text and distinguish between sound sources.
Making voice recordings
1 On the Home screen, tap 实用工具
→
Voice Recorder
.
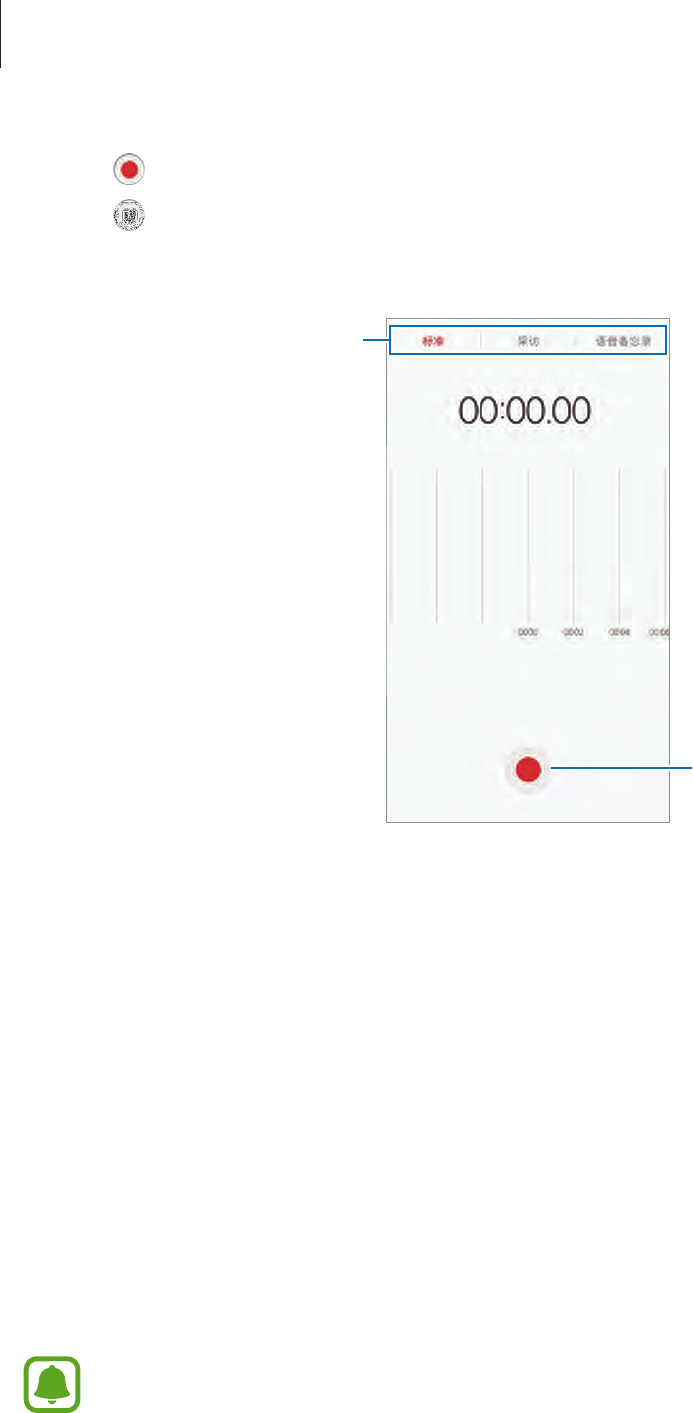
Applications
90
2 Tap to start recording. Speak into the microphone.
Tap to pause recording.
While making a voice recording, tap
BOOKMARK
to insert a bookmark.
Change the recording mode.
Start recording.
3 Tap
SAVE
to finish recording.
Changing the recording mode
On the Home screen, tap 实用工具
→
Voice Recorder
.
Select a mode from the top of the voice recorder screen.
•
STANDARD
: This is the normal recording mode.
•
INTERVIEW
: The microphone is sensitive to sounds from two directions. In this mode,
both the top and the bottom of the device pick up equal amounts of sound.
•
VOICE MEMO
: The device records your voice and simultaneously converts it to on-screen
text. For best results, keep the device near your mouth and speak loudly and clearly in a
quiet place.
If the voice memo system language does not match the language you are speaking,
the device will not recognise your voice. Before using this feature, tap the current
language to set the voice memo system language.
Applications
91
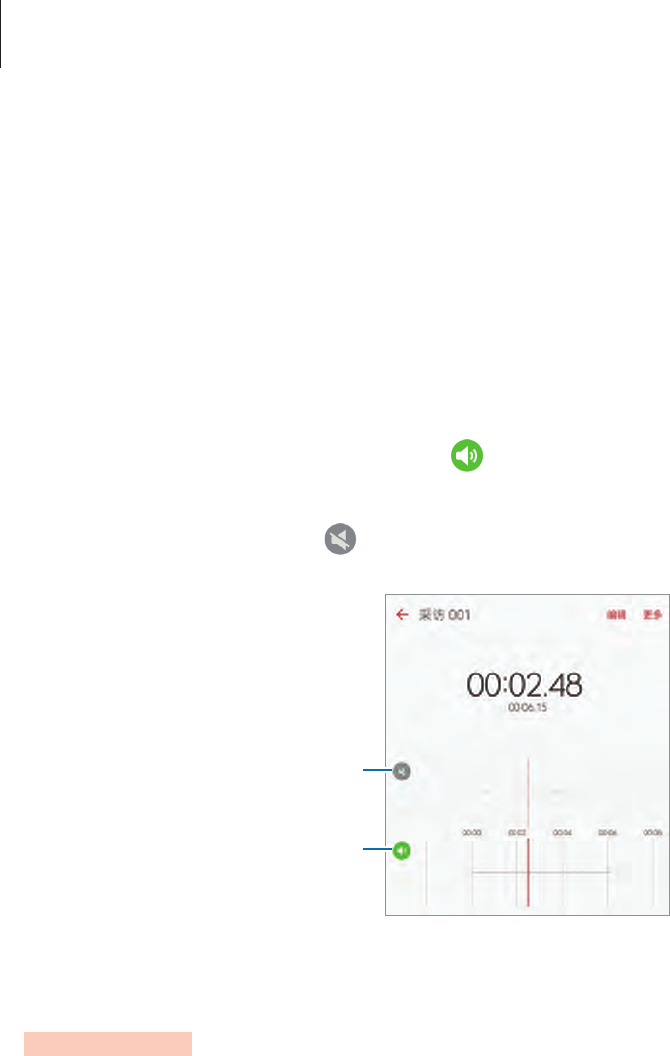
Playing selected voice recordings
When you review interview recordings, you can mute or unmute certain sound sources in the
recording.
1 On the Home screen, tap 实用工具
→
Voice Recorder
.
2 Tap
Recordings
and select a voice recording made in interview mode.
3 To mute certain sound sources, tap for the corresponding direction that sound is to
be muted.
The icon will change to and the sound will be muted.
Muted sound source
Unmuted sound source
My Files
Access and manage various files stored in the device.
On the Home screen, tap 实用工具
→
My Files
.
View files by category or view files stored in the device.
To check the status of used and available memory, tap
STORAGE USAGE
.
To search for files or folders, tap
SEARCH
.

Applications
92
Memo
Create memos and organise them by category.
On the Home screen, tap 实用工具
→
Memo
.
Composing memos
Tap on the memos list and enter a memo. While composing a memo, use the following
options:
•
Category
: Create or set a category.
•
Tasks
: Add tick boxes at the beginning of each row to create a list of tasks.
•
Image
: Insert images.
•
Drawing
: Write or draw memos to insert. You can select pen thickness and colour.
•
Voice
: Make a voice recording to insert.
To save the memo, tap
SAVE
.
To edit a memo, tap a memo, and then tap the content of the memo.
Searching for memos
Tap
SEARCH
on the memos list and enter a keyword to search for memos that include the
keyword.

Applications
93
Clock
Introduction
Set alarms, check the current time in many cities around the world, time an event, or set a
specific duration.
Alarm
On the Home screen, tap
Clock
→
Alarm
.
Setting alarms
Tap
ADD
, set an alarm time, and tap
SAVE
.
To open the keypad to enter an alarm time, tap the time input field.
To activate or deactivate alarms, tap the clock icon next to the alarm in the alarms list.
Stopping alarms
Tap
DISMISS
to stop an alarm. If you have previously enabled the snooze option, tap
SNOOZE
to repeat the alarm after a specified length of time.
Deleting alarms
Tap on an alarm in the list of alarms.
World clock
On the Home screen, tap
Clock
→
World clock
.
Creating clocks
Enter a city name or select a city from the globe, and then tap .
Deleting clocks
Tap on a clock.

Applications
94
Stopwatch
1 On the Home screen, tap
Clock
→
Stopwatch
.
2 Tap
START
to time an event.
To record lap times while timing an event, tap
LAP
.
3 Tap
STOP
to stop timing.
To restart the timing, tap
RESUME
.
To clear lap times, tap
RESET
.
Timer
1 On the Home screen, tap
Clock
→
Timer
.
2 Set the duration, and then tap
START
.
To open the keypad to enter the duration, tap the duration input field.
3 Tap
DISMISS
when the timer goes off.
Calculator
Perform simple or complex calculations.
Tap 实用工具
→
Calculator
on the Home screen.
Rotate the device to landscape orientation to display the scientific calculator. If
Auto rotate
is
disabled, tap to display the scientific calculator.
To see the calculation history, tap
HISTORY
. To close the calculation history panel, tap
KEYPAD
.
To clear the history, tap
HISTORY
→
CLEAR HISTORY
.
Applications
95
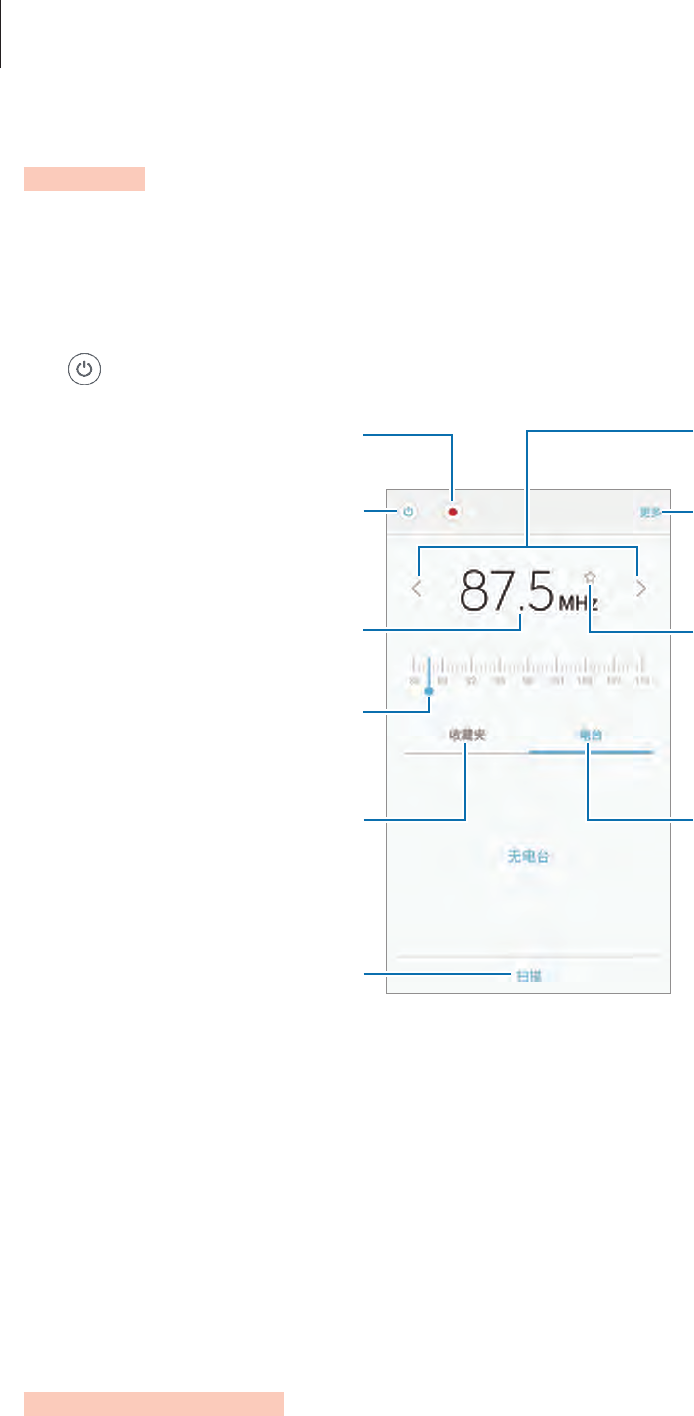
Radio
Listening to the FM radio
Tap 实用工具
→
Radio
on the Home screen.
Tap to turn on the FM radio. Select the radio station you want from the stations list.
View the list of favourites
stations.
Scan and save available stations
automatically.
Enter radio station frequency
manually.
Fine-tune the frequency.
Record a song from the FM radio.
View the list of available stations.
Access additional options.
Add the current radio station to
the favourites list.
Search for an available radio
station.
Turn the FM radio on or off.
Scanning radio stations
Tap 实用工具
→
Radio
on the Home screen.
Tap
Scan
, and then select a scan option. The FM radio scans and saves available stations
automatically.
Select the radio station you want from the stations list.
Theme store
Purchase and download themes to change the visual elements of the Home screen, locked
screen, and icons.
Tap
Samsung
→
Theme store
on the Home screen.

96
Settings
Introduction
Customise settings for functions and apps. You can make your device more personalised by
configuring various setting options.
On the Home screen, tap
Settings
.
To search for settings by entering keywords, tap
SEARCH
.
To edit the list of frequently used settings, tap
MORE
→
Edit quick settings
. Then, tick items
to add or deselect items to remove.
WLAN
Connecting to a Wi-Fi network
Activate the Wi-Fi feature to connect to a Wi-Fi network and access the Internet or other
network devices.
Turn off Wi-Fi to save the battery when not in use.
1 On the Settings screen, tap
WLAN
, and then tap the switch to activate it.
2 Select a network from the Wi-Fi networks list.
Networks that require a password appear with a lock icon.
3 Tap
CONNECT
.
•
Once the device connects to a Wi-Fi network, the device will reconnect to that
network each time it is available without requiring a password. To prevent the
device connecting to the network automatically, select it from the list of networks
and tap
FORGET
.
•
If you cannot connect to a Wi-Fi network properly, restart your device’s Wi-Fi feature
or the wireless router.

Settings
97
Wi-Fi Direct
Wi-Fi Direct connects devices directly via a Wi-Fi network without requiring an access point.
1 On the Settings screen, tap
WLAN
, and then tap the switch to activate it.
2 Tap
WLAN Direct
.
The detected devices are listed.
If the device you want to connect to is not in the list, request that the device turns on its
Wi-Fi Direct feature.
3 Select a device to connect to.
The devices will be connected when the other device accepts the Wi-Fi Direct
connections request.
Sending and receiving data
You can share data, such as contacts or media files, with other devices. The following actions
are an example of sending an image to another device.
1 Tap
Gallery
on the Home screen.
2 Select an image.
3 Tap
Share
→
WLAN Direct
and select a device to transfer the image to.
4 Accept the Wi-Fi Direct connection request on the other device.
If the devices are already connected, the image will be sent to the other device without
the connection request procedure.
Ending the device connection
1 Tap
WLAN
on the Settings screen.
2 Tap
WLAN Direct
.
The device displays the connected devices in the list.
3 Tap the device name to disconnect the devices.

Settings
98
Bluetooth
Introduction
Use Bluetooth to exchange data or media files with other Bluetooth-enabled devices.
•
Samsung is not responsible for the loss, interception, or misuse of data sent or
received via Bluetooth.
•
Always ensure that you share and receive data with devices that are trusted
and properly secured. If there are obstacles between the devices, the operating
distance may be reduced.
•
Some devices, especially those that are not tested or approved by the Bluetooth
SIG, may be incompatible with your device.
•
Do not use the Bluetooth feature for illegal purposes (for example, pirating copies
of files or illegally tapping communications for commercial purposes).
Samsung is not responsible for the repercussion of illegal use of the Bluetooth
feature.
Pairing with other Bluetooth devices
1 On the Settings screen, tap
Bluetooth
, and then tap the switch to activate it.
The detected devices are listed.
2 Select a device to pair with.
If the device you want to pair with is not in the list, request that the device turns on its
visibility option. Refer to the other device’s user manuals.
Your device is visible to other devices while the Bluetooth settings screen is open.
3 Accept the Bluetooth connection request on your device to confirm.
The devices will be connected when the other device accepts the Bluetooth connection
request.

Settings
99
Sending and receiving data
Many apps support data transfer via Bluetooth. You can share data, such as contacts or media
files, with other Bluetooth devices. The following actions are an example of sending an image
to another device.
1 Tap
Gallery
on the Home screen.
2 Select an image.
3 Tap
Share
→
Bluetooth
, and then select a device to transfer the image to.
If your device has paired with the device before, tap the device name without confirming
the auto-generated passkey.
If the device you want to pair with is not in the list, request that the device turns on its
visibility option.
4 Accept the Bluetooth connection request on the other device.
Unpairing Bluetooth devices
1 Tap
Bluetooth
on the Settings screen.
The device displays the paired devices in the list.
2 Tap next to the device name to unpair.
3 Tap
Unpair
.

Settings
100
SIM card manager
Activate your SIM or USIM cards and customise the SIM card settings. Refer to Using dual SIM
or USIM cards for more information.
On the Settings screen, tap
SIM card manager
.
•
Voice call
: Select a SIM or USIM card for voice calls.
•
Text messages
: Select a SIM or USIM for messaging.
•
Mobile data
: Select a SIM or USIM card for data service.
•
Dual SIM always on
: Set the device to allow incoming calls from the other SIM or USIM
card during a call.
When this feature is enabled, you may incur additional charges for call forwarding
depending on the region or service provider.
More connection settings
Options
Customise settings to control other features.
On the Settings screen, tap
More connection settings
.
•
Data usage
: Keep track of your data usage amount and customise the settings for the
limitation. Refer to Data usage for more information.
•
Mobile networks
: Configure your mobile network settings.
•
Flight mode
: This disables all wireless functions on your device. You can use only non-
network services.
Make sure the device is turned off during takeoff and landing. After takeoff, you can
use the device in flight mode if allowed by aircraft personnel.
•
WLAN hotspot and tethering
: Use the device as a mobile hotspot to share the device’s
mobile data connection with other devices when the network connection is not
available. Refer to WLAN hotspot and tethering for more information.
•
NFC and payment
: Activate the NFC feature to read NFC tags that contain information or
to make payments. Refer to NFC and payment for more information.
•
Nearby device scanning
: Set the device to scan for nearby devices to connect to.

Settings
101
•
Printing
: Configure settings for printer plug-ins installed on the device. You can search
for available printers or add one manually to print files. Refer to Printing for more
information.
•
MirrorLink
: Use the MirrorLink feature to control your device’s MirrorLink apps on the
vehicle’s head unit monitor. Refer to MirrorLink for more information.
•
VPN
: Set up and connect to virtual private networks (VPNs).
Data usage
Keep track of your data usage amount and customise the settings for the limitation.
On the Settings screen, tap
More connection settings
→
Data usage
.
•
Mobile data
: Set the device to use data connections on any mobile network.
•
Set data usage limit
: Set a limit for mobile data usage.
•
Manage app data
: Set network connection settings for each app to prevent them from
using WLAN or mobile network data.
•
Data compression
: Activate the Opera Max data compression feature to compress
Internet data when using the mobile network.
•
Top up phone balance
: Add to the balance of your prepaid SIM or USIM card.
•
Check phone balance
: Check the balance of the selected SIM or USIM card and monitor
data usage.
•
Enter usage data
: Manually enter your data usage.
•
Data usage notifications
: Set the device to notify you of your data usage while the
device is locked. You will receive a notification after the device has been locked for more
than 5 minutes.
To change the monthly reset date for the monitoring period, tap
Set data usage limit
→
Set
plan billing date
.

Settings
102
Limiting data usage
Set the device to automatically disable the mobile data connection when the amount of
mobile data you have used reaches your specified limit.
1 On the Settings screen, tap
More connection settings
→
Data usage
→
Set data usage
limit
and tap the switch to activate it.
2 Tap
Monthly data usage limit
, enter the limit, and then tap
SET
.
3 Tap
Data usage warning
and select an option.
The device will alert you when the warning percentage is reached.
To set the device to automatically turn off the data connection, tap the
Limit data usage
switch to activate it.
WLAN hotspot and tethering
Use the device as a mobile hotspot to share the device’s mobile data connection with other
devices when the network connection is not available. Connections can be made via Wi-Fi,
USB, or Bluetooth.
On the Settings screen, tap
More connection settings
→
WLAN hotspot and tethering
.
You may incur additional charges when using this feature.
•
Mobile hotspot
: Use the mobile hotspot to share the device’s mobile data connection
with computers or other devices.
•
Bluetooth tethering
: Use Bluetooth tethering to share the device’s mobile data
connection with computers or other devices via Bluetooth.
•
USB tethering
: Use USB tethering to share the device’s mobile data connection with
a computer via USB. When connected to a computer, the device is used as a wireless
modem for the computer.

Settings
103
Using the mobile hotspot
Use your device as a mobile hotspot to share your device’s mobile data connection with other
devices.
1 On the Settings screen, tap
More connection settings
→
WLAN hotspot and tethering
→
Mobile hotspot
.
2 Tap the switch to activate it.
The icon appears on the status bar. Other devices can find your device in the Wi-Fi
networks list.
To set a password for the mobile hotspot, tap
MORE
→
Configure Mobile hotspot
and
select the level of security. Then, enter a password and tap
SAVE
.
3 On the other device’s screen, search for and select your device from the Wi-Fi networks
list.
4 On the connected device, use the device’s mobile data connection to access the Internet.
NFC and payment
Your device allows you to read near field communication (NFC) tags that contain information
about products. You can also use this feature to make payments and buy tickets for
transportation or events after downloading the required apps.
The device contains a built-in NFC antenna. Handle the device carefully to avoid
damaging the NFC antenna.
Using the NFC feature
Use the NFC feature to send images or contacts to other devices, and read product
information from NFC tags.
1 On the Settings screen, tap
More connection settings
→
NFC and payment
, and then
tap the switch to activate it.
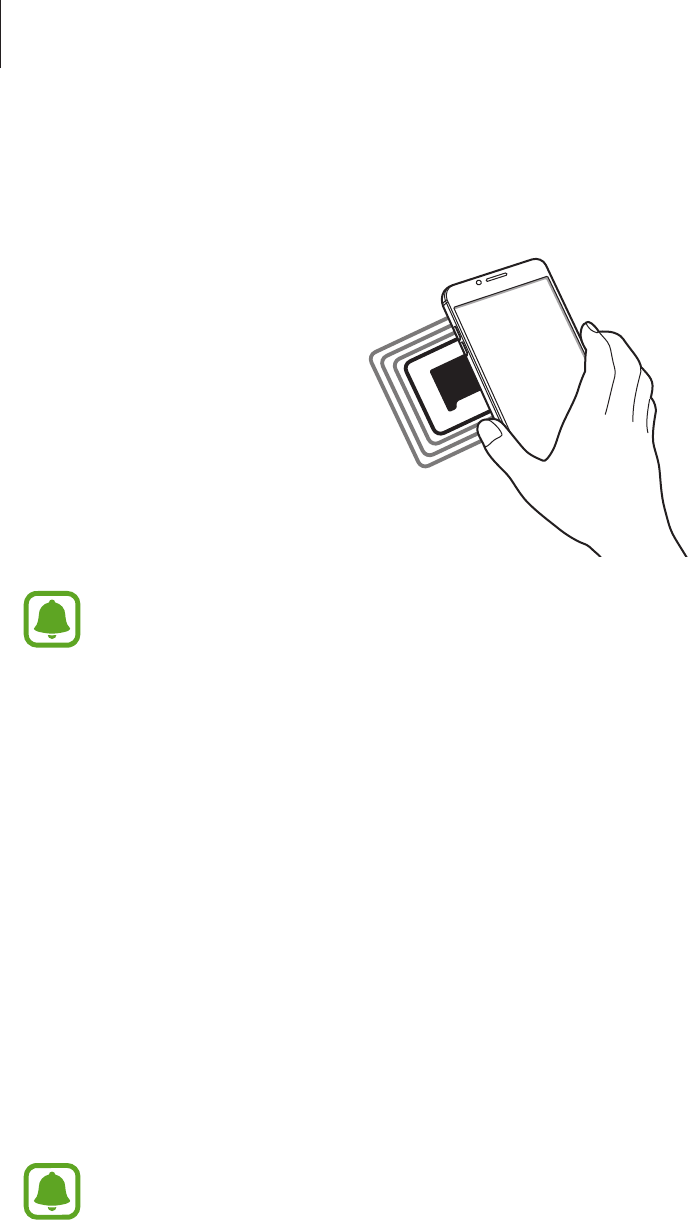
Settings
104
2 Place the NFC antenna area on the back of your device near an NFC tag.
The information from the tag appears.
Ensure that the device’s screen is unlocked. Otherwise, the device will not read NFC
tags or receive data.
Making payments with the NFC feature
Before you can use the NFC feature to make payments, you must register for the mobile
payment service. To register or get more information about the service, contact your service
provider.
1 On the Settings screen, tap
More connection settings
→
NFC and payment
, and then
tap the switch to activate it.
2 Touch the NFC antenna area on the back of your device to the NFC card reader.
To set the default payment app, open the Settings screen and tap
More connection settings
→
NFC and payment
→
Tap and pay
→
PAYMENT
, and then select an app.
The payment services list may not include all available payment apps.

Settings
105
Sending data
Allow data exchange when your device’s NFC antenna touches the other device’s NFC
antenna.
1 On the Settings screen, tap
More connection settings
→
NFC and payment
, and then
tap the switch to activate it.
2 Tap
Android Beam
and tap the switch to activate it.
3 Select an item and touch the other device’s NFC antenna to your device’s NFC antenna.
4 When
Touch to beam.
appears on the screen, tap your device’s screen to send the item.
If both devices try to send data simultaneously, the file transfer may fail.
Printing
Configure settings for printer plug-ins installed on the device. You can connect the device to a
printer via Wi-Fi or Wi-Fi Direct, and print images or documents.
Some printers may not be compatible with the device.
1 Download and install printer plug-ins from
Galaxy Apps
or another apps store.
2 On the Settings screen, tap
More connection settings
→
Printing
.

Settings
106
3 Select a printer plug-in and tap the switch to activate it.
The device searches for printers that are connected to the same Wi-Fi network as your
device.
To add printers manually, tap
MORE
→
Add printer
→
ADD PRINTER
.
To change print settings, tap
MORE
→
Printing settings
.
Printing content
While viewing content, such as images or documents, tap
Share
→
Print
→
→
All
printers
, and then select a printer.
MirrorLink
Connect your device to a vehicle to control your device’s MirrorLink apps on the vehicle’s
head unit monitor.
On the Settings screen, tap
More connection settings
→
MirrorLink
.
Your device is compatible with vehicles that support MirrorLink version 1.1 or higher.
Connecting your device to a vehicle via MirrorLink
When using this feature for the first time, connect the device to a Wi-Fi or mobile network.
1 Pair your device with a vehicle via Bluetooth.
Refer to Pairing with other Bluetooth devices for more information.
2 Connect your device to the vehicle using a USB cable.
When they are connected, access your device’s MirrorLink apps on the head unit monitor.
Ending the MirrorLink connection
Unplug the USB cable from your device and the vehicle.

Settings
107
Sounds and vibrations
Change settings for various sounds on the device.
On the Settings screen, tap
Sounds and vibrations
.
•
Sound mode
: Set the device to use sound mode or silent mode.
•
Vibrate while ringing
: Set the device to vibrate and play a ringtone for incoming calls.
•
Do not disturb
: Set the device to mute incoming calls and notification sounds, except for
allowed exceptions.
•
Volume
: Adjust the volume level for call ringtones, music and videos, system sounds, and
notifications.
•
Ringtone
: Change the ringtone settings.
•
Vibration pattern
: Select a vibration pattern.
•
Notification sounds
: Select a default notification sound. You can also change the
notification settings for each app.
•
Touch sounds
: Set the device to sound when you select an app or option on the
touchscreen.
•
Screen lock sounds
: Set the device to sound when you lock or unlock the touchscreen.
•
Charging sound
: Set the device to sound when it is connected to a charger.
•
Dialing keypad tones
: Set the device to sound when you tap the buttons on the keypad.
•
Keyboard sound
: Set the device to sound when a key is touched.
•
Sound quality and effects
: Configure additional sound settings.
Notifications
Change the notification settings for each app.
On the Settings screen, tap
Notifications
.
Select apps to receive notifications from. To show only the most recent notification’s icon on
the status bar, tap the
Hide icons on status bar
switch to activate it.
To customise notification settings, tap
ADVANCED
and select an app.
•
Allow notifications
: Allow notifications from the selected app.
•
Set as priority
: Display notifications at the top of the notification panel and include them
in the allowed list when
Do not disturb
is activated.

Settings
108
•
Previews in pop-ups
: Display notification previews in pop-up windows.
•
Hide on lock screen
: Hide notifications from the selected app when the device is locked.
•
Show on status bar
: Display the notification icon for the selected app on the status bar.
•
Hide content on lock screen
: Hide the content of notifications from the selected app
when the device is locked.
•
More settings
: Customise additional notification settings for the selected app.
Display
Change the display settings.
On the Settings screen, tap
Display
.
•
Brightness
: Adjust the brightness of the display.
•
Font
: Change the font size and type.
•
Display scaling
: Set whether to condense the display to view more content on the
screen. In condensed display mode, items on the screen will be smaller.
Condensed display mode will only be applied to some apps.
•
Icon backgrounds
: Set whether to display shaded backgrounds to make icons stand out.
•
Screen timeout
: Set the length of time the device waits before turning off the display’s
backlight.
•
Screen mode
: Change the screen mode to adjust the display’s colour and contrast.
•
LED indicator
: Set the device to turn on the LED indicator while the battery is charging,
when you have notifications, or when you make voice recordings.
•
Screensaver
: Set the device to launch a screensaver when the device is charging or
connected to a dock.

Settings
109
Advanced features
Activate advanced features and change the settings that control them.
On the Settings screen, tap
Advanced features
.
Excessive shaking or impact to the device may cause unintended input for some
features.
•
Games
: Activate the Game Launcher and Game Tools icon and manage useful features
while you play games. Refer to Game Launcher for more information.
•
Floating messages
: Set the device to notify new messages with a floating icon. You can
check and reply to messages instantly while watching videos or playing games in full
screen.
•
Call/message spam filter
: Set the device to reject calls or messages from specified phone
numbers or reject messages containing specified text.
•
Hongbao assistant
: Set the device to notify you when you receive a hongbao via
WeChat. This feature will help you quickly open hongbaos.
•
One-handed operation
: Activate one-handed operation mode for your convenience
when using the device with one hand.
This feature may not be available depending on the region or service provider.
•
Quick launch Camera
: Set the device to launch the camera by pressing the Home key
twice quickly.
•
Pop-up view gesture
: Set the device to view the app screen in the pop-up view. Refer to
Pop-up view for more information.
•
Smart capture
: Set the device to capture content that continues across multiple screens,
and crop and share the screenshot immediately. Refer to Smart capture for more
information.
•
Palm swipe to capture
: Set the device to capture a screenshot when you swipe your
hand to the left or right across the screen. You can view the captured images in
Gallery
.
It is not possible to capture a screenshot while using some apps and features.

Settings
110
•
Smart alert
: Set the device to alert you if you have missed calls or new messages when
you pick up the device.
This feature may not work if the screen is turned on or the device is not on a flat
surface.
•
Easy mute
: Set the device to mute incoming calls or alarms by using palm motions or
facing the device’s screen downwards.
Applications
Manage the device’s apps and change their settings.
On the Settings screen, tap
Applications
.
•
Application manager
: View and manage the apps on your device.
•
Default applications
: Select a default setting for using apps.
•
Application settings
: Customise the settings for each app.
Wallpaper
Change the wallpaper settings for the Home screen and the locked screen.
On the Settings screen, tap
Wallpaper
.
Home screen and themes
Home screen
Customise the Home screen by adding, deleting, or rearranging Home screen panels, and
more. Refer to Home screen options for more information.
On the Settings screen, tap
Home screen and themes
→
Home screen
.
Settings
111
Themes
Apply various themes to the device to change the visual elements of the Home screen, locked
screen, and icons.
On the Settings screen, tap
Home screen and themes
→
Themes
.
To download more themes, tap
MORE THEMES
.
Easy mode
Easy mode provides an easier user experience by using a simpler layout and bigger icons on
the Home screen.
Some app features may not be available in easy mode.
Switching to easy mode
1 On the Settings screen, tap
Home screen and themes
→
Easy mode
→
Easy mode
.
2 Select apps under
Easy applications
to apply a simpler layout.
3 Tap
DONE
.
Returning to standard mode
Swipe to the left on the Home screen and tap
Settings
→
Home screen and themes
→
Easy
mode
→
Standard mode
→
DONE
.
Managing shortcuts
To add a shortcut to an app to the Home screen, swipe to the left, tap , and then select an
app.
To add a shortcut to a contact on the Home screen, swipe to the right and tap .
To delete a shortcut from the Home screen, tap
EDIT
and select an app or contact with .

Settings
112
Lock screen and fingerprints
Options
Change the settings for securing the device and the SIM or USIM card.
On the Settings screen, tap
Lock screen and fingerprints
.
The available options may vary depending on the screen lock method selected.
•
Screen lock type
: Change the screen lock method.
•
Info and app shortcuts
: Change settings for the items displayed on the locked screen.
•
Notifications on lock screen
: Set whether or not to show notification content on the
locked screen and select which notifications to display.
•
Secure lock settings
: Change screen lock settings for the selected lock method.
•
Fingerprints
: Register your fingerprint to the device to secure the device or sign in to
your Samsung account. Refer to Fingerprint recognition for more information.
Fingerprint recognition
In order for fingerprint recognition to function, your fingerprint information needs to be
registered and stored in your device. After registering, you can set the device to use your
fingerprint for the features below:
•
Screen lock
•
Web sign-in
•
Verify Samsung account
•
Samsung Pay
•
This feature may not be available depending on the region or service provider.
•
Fingerprint recognition uses the unique characteristics of each fingerprint to
enhance the security of your device. The likelihood of the fingerprint sensor
confusing two different fingerprints is very low. However, in rare cases where
separate fingerprints are very similar the sensor may recognise them as identical.
•
If you use your fingerprint as a screen lock method, your fingerprint cannot be
used to unlock the screen after restarting the device. You must unlock the device
using a pattern, PIN, or password you set when registering the fingerprint.
•
If your fingerprint is not recognised, you must take the device to a Samsung
Service Centre to have it reset. Then, you must re-register your fingerprints.

Settings
113
For better fingerprint recognition
When you scan your fingerprints on the device, be aware of the following conditions that
may affect the feature’s performance:
•
The Home key contains a fingerprint recognition sensor. Ensure that the Home key is not
scratched or damaged by metal objects, such as coins, keys, and necklaces.
•
The screen protector supplied with the device may cause the fingerprint recognition
sensor to malfunction. Remove the screen protector to improve fingerprint sensitivity.
•
Ensure that the fingerprint recognition area and your fingers are clean and dry.
•
The device may not recognise fingerprints that are affected by wrinkles or scars.
•
The device may not recognise fingerprints from small or thin fingers.
•
If you bend your finger or use a fingertip, the device may not recognise your fingerprints.
Make sure to cover the entire Home key with your finger.
•
To improve recognition performance, register fingerprints of the hand used most often to
perform tasks on the device.
•
In dry environments, static electricity can build up in the device. Avoid using this feature
in dry environments or before using the feature, discharge static electricity by touching a
metal object.
Registering fingerprints
1 On the Settings screen, tap
Lock screen and fingerprints
→
Fingerprints
.
2 Unlock the screen using the preset screen lock method.
If you have not set a screen lock method, create one.
3 Tap
Add fingerprint
.
4 Place your finger on the Home key.
5 After the device detects your finger, lift it up and place it on the Home key again.
Repeat this action by moving your finger upwards or downwards until the fingerprint is
registered.
When a fingerprint lock pop-up window appears, tap
TURN ON
to use your fingerprint to
unlock the screen.

Settings
114
Deleting fingerprints
You can delete registered fingerprints.
1 On the Settings screen, tap
Lock screen and fingerprints
→
Fingerprints
.
2 Unlock the screen using the preset screen lock method.
3 Tap
EDIT
.
4 Tick fingerprints to delete and tap
REMOVE
.
Verifying the Samsung account password
Use fingerprints to verify your Samsung account password. You can use a fingerprint instead
of entering your password, for example, when you purchase content from
Galaxy Apps
.
1 On the Settings screen, tap
Lock screen and fingerprints
→
Fingerprints
.
2 Unlock the screen using the preset screen lock method.
3 Tap the
Verify Samsung account
switch to activate it.
4 Sign in to your Samsung account.
Using fingerprints to sign in to accounts
You can use your fingerprints to sign in to webpages that support password saving.
This feature is only available for webpages that you access via the
Internet
app.
1 On the Settings screen, tap
Lock screen and fingerprints
→
Fingerprints
.
2 Unlock the screen using the preset screen lock method.
3 Tap the
Web sign-in
switch to activate it.
4 Open a webpage that you want to sign in to with a fingerprint.
5 Enter your user name and password, and then tap the webpage’s sign in button.

Settings
115
6 Tick
Sign in using your fingerprints
and tap
REMEMBER
.
You can use your fingerprint to verify your account and password to sign in to the
webpage.
Using fingerprints with Samsung Pay
You can use fingerprints with Samsung Pay to make payments quickly and securely. Refer to
Samsung Pay for more information.
Samsung Pay may not be available depending on the region or service provider.
Unlocking the screen with fingerprints
You can unlock the screen with your fingerprint instead of using a pattern, PIN, or password.
1 On the Settings screen, tap
Lock screen and fingerprints
→
Fingerprints
.
2 Unlock the screen using the preset screen lock method.
3 Tap the
Fingerprint unlock
switch to activate it.
4 On the locked screen, place your finger on the Home key and scan your fingerprint.
Privacy and security
Options
Change the settings for maintaining your privacy and safety.
On the Settings screen, tap
Privacy and security
.
•
Location
: Change settings for location information permissions.
•
App permissions
: View the list of features and apps that have permission to use them.
You can also edit the permission settings. Refer to Setting app permissions for more
information.
•
Private mode
: Activate private mode to prevent others from accessing your personal
content. Refer to Private mode for more information.
•
App lock
: Set a lock method to prevent others from accessing selected apps.

Settings
116
•
Report diagnostic info
: Set the device to automatically send the device’s diagnostic and
usage information to Samsung.
•
Send SOS messages
: Set the device to send help messages by pressing the Power
key three times. You can also send sound recordings along with the message to the
recipients. Refer to Send SOS messages for more information.
•
Find My Mobile
: Activate or deactivate the Find My Mobile feature. Access the Find
my mobile website (findmymobile.samsung.cn) to track and control your lost or stolen
device.
•
Unknown sources
: Set the device to allow the installation of apps from unknown
sources.
•
Encrypt device
: Your device’s data is encrypted to prevent others from accessing it if
the device is lost or stolen. To use your encrypted device, you must decrypt the device’s
data every time you turn on the device. You can set whether your device’s data will be
decrypted automatically or whether an unlock code is required. It is not possible to back
up or restore data when it is encrypted. If you enter the unlock code incorrectly several
times in a row and reach the attempt limit, your device will perform a factory data reset.
•
Encrypt SD card
: Set the device to encrypt files on a memory card.
If you reset your device to the factory defaults with this setting enabled, the device
will not be able to read your encrypted files. Disable this setting before resetting the
device.
•
Other security settings
: Configure additional security settings.
Private mode
Hide personal content in your device to prevent others from accessing it.
Activating private mode
1 On the Settings screen, tap
Privacy and security
→
Private mode
, and then tap the
switch to activate it.
If you are activating private mode for the first time, follow the on-screen instructions to
set up a private mode access code.
2 Follow the on-screen instructions to enter the preset private mode access code.
Private mode is activated and the icon appears on the status bar.
You can view and access the hidden items only when private mode is activated. To
hide items stored in the private folder, deactivate private mode.

Settings
117
Hiding content
1 On the Home screen, launch an app to hide items.
2 Select an item and tap
MORE
→
Move to Private
.
If private mode is not activated, follow the on-screen instructions to enter the preset
private mode access code.
The selected items will be moved to the private folder.
Viewing hidden content
You can view hidden items only when private mode is activated.
1 On the Settings screen, tap
Privacy and security
→
Private mode
, and then tap the
switch to activate it.
2 Follow the on-screen instructions to enter the preset private mode access code.
3 On the Home screen, tap 实用工具
→
My Files
→
Private
.
Items moved to the private folder will appear on the screen.
Unhiding content
1 In the private folder, tap and hold an item to, and then tick items to unhide.
2 Tap
MORE
→
Remove from Private
.
3 Select a folder to move the items to, and then tap
DONE
.
The items will be moved to the selected folder.
Automatically deactivating private mode
You can set the device to automatically deactivate private mode each time the screen turns
off.
1 On the Settings screen, tap
Privacy and security
→
Private mode
, and then tap the
switch to activate it.
2 Follow the on-screen instructions to enter the preset private mode access code.
Settings
118
3 Tap the
Auto off
switch to activate it.
When the
Auto off
option is enabled, the device will fail to transfer files to the private
folder if the screen turns off during transfer.
Send SOS messages
In an emergency situation, quickly press the Power key three times. The device sends
messages to your emergency contacts. The messages include your location information.
1 On the Settings screen, tap
Privacy and security
→
Send SOS messages
, and then tap
the switch to activate it.
2 Follow the on-screen instructions to add emergency contacts if you have not already
done so.
To send help messages with audio recordings or photos, tap the
Attach audio recording
or
Attach pictures
switch to activate it.
The
Attach pictures
option may not be available depending on the region or service
provider.
Adding emergency contacts
On the Settings screen, tap
Privacy and security
→
Send SOS messages
→
Send messages
to
→
ADD
. Tap
Create contact
and enter contact information or tap
Select from contacts
to
add an existing contact as an emergency contact.
Accessibility
Configure various settings to improve accessibility to the device.
On the Settings screen, tap
Accessibility
.
•
Vision
: Customise the settings to improve accessibility for visually impaired users.
•
Hearing
: Customise the settings to improve accessibility for users with hearing
impairment.
•
Dexterity and interaction
: Customise the settings to improve accessibility for users who
have reduced dexterity.

Settings
119
•
Direction lock
: Change the directional combination settings for unlocking the screen.
•
Direct access
: Set the device to open selected accessibility menus when you press the
Home key three times quickly.
•
Notification reminder
: Set the device to alert you to notifications that you have not
checked at the interval.
•
Answering and ending calls
: Change the method of answering or ending calls.
•
Single tap mode
: Set the device to control incoming calls or notifications by tapping the
button instead of dragging it.
•
Manage accessibility
: Export or import the accessibility settings to share them with
other devices.
•
Services
: View accessibility services installed on the device.
Accounts
Add your Samsung account and other accounts to sync with them.
Adding accounts
Some apps used on your device require a registered account. Create accounts to have the
best experience with your device.
1 On the Settings screen, tap
Accounts
→
Add account
.
2 Select an account service.
3 Follow the on-screen instructions to complete the account setup.
To sync content with your accounts, select an account and select items to sync.
Removing accounts
On the Settings screen, tap
Accounts
, select an account name, select the account to remove,
and then tap
MORE
→
Remove account
.

Settings
120
Backup and reset
Change the settings for managing settings and data.
On the Settings screen, tap
Backup and reset
.
•
Back up my data
: Back up your personal information and app data to the Samsung
server. You can also set the device to automatically back up data.
•
Restore
: Restore previously backed up personal information and app data from your
Samsung account.
•
Auto restart
: Set the device to restart itself at preset times for optimal performance.
•
Auto turn on/off
: Set the device to automatically turn on or off at a preset time.
•
Reset settings
: Return the device’s settings to the factory default settings without
deleting data.
•
Reset network settings
: Return the network connection settings to the factory default
settings.
•
Factory data reset
: Return the device to the factory default settings and delete all data.
Language and input
Select device languages and change settings, such as keyboards and voice input types. Some
options may not be available depending on the selected language.
On the Settings screen, tap
Language and input
.
•
Language
: Select a display language for all menus and apps.
•
Default keyboard
: Select a default keyboard type for text input.
•
Samsung keyboard
: Change the Samsung keyboard settings.
•
Samsung voice input
: Select a default language for voice input.
•
Text-to-speech
: Change the text-to-speech settings.
•
Pointer speed
: Adjust the pointer speed for the mouse or trackpad connected to your
device.

Settings
121
Battery and storage
Battery
View battery power information and change power saving options.
On the Settings screen, tap
Battery and storage
→
Battery
.
The usage time left shows the time remaining before the battery power runs
out. Usage time left may vary depending on your device settings and operating
conditions.
•
BATTERY USAGE
: View the amount of battery power consumed by your device.
•
Power saving mode
: Activate power-saving mode and change the settings for power-
saving mode. Refer to Power saving mode for more information.
•
Network power saving mode
: Activate the Network power saving feature to
automatically turn off network features. You can also set when the network features will
be turned off after the screen is turned off.
•
Ultra power saving mode
: Extend standby time and reduce battery consumption by
displaying a simpler layout and allowing limited access to an app. Refer to Ultra power
saving mode for more information.
•
Percentage on status bar
: Set the device to display the remaining battery life.
•
Fast cable charging
: Set whether to use the fast cable charging feature to charge your
device quickly.
Storage
View memory information for your device.
On the Settings screen, tap
Battery and storage
→
Storage
.
The actual available capacity of the internal memory is less than the specified
capacity because the operating system and default apps occupy part of the memory.
The available capacity may change when you update the device.

Settings
122
Date and time
Access and alter the following settings to control how the device displays the time and date.
On the Settings screen, tap
Date and time
.
If the battery remains fully discharged or removed from the device, the time and date
is reset.
•
Automatic date and time
: Automatically update the time and date when moving across
time zones. When this feature is deactivated, you can manually set the date, time, and
time zone.
•
Use 24-hour format
: Display time in 24-hour format.
About device
Access device information, edit the device name, or update device software.
On the Settings screen, tap
About device
.

123
Appendix
Troubleshooting
Before contacting a Samsung Service Centre, please attempt the following solutions. Some
situations may not apply to your device.
When you turn on your device or while you are using the device, it
prompts you to enter one of the following codes:
•
Password: When the device lock feature is enabled, you must enter the password you set
for the device.
•
PIN: When using the device for the first time or when the PIN requirement is enabled, you
must enter the PIN supplied with the SIM or USIM card. You can disable this feature by
using the Lock SIM card menu.
•
PUK: Your SIM or USIM card is blocked, usually as a result of entering your PIN incorrectly
several times. You must enter the PUK supplied by your service provider.
•
PIN2: When you access a menu requiring the PIN2, you must enter the PIN2 supplied with
the SIM or USIM card. For more information, contact your service provider.
Your device displays network or service error messages
•
When you are in areas with weak signals or poor reception, you may lose reception. Move
to another area and try again. While moving, error messages may appear repeatedly.
•
You cannot access some options without a subscription. For more information, contact
your service provider.
Your device does not turn on
When the battery is completely discharged, your device will not turn on. Fully charge the
battery before turning on the device.

Appendix
124
The touchscreen responds slowly or improperly
•
If you attach a screen protector or optional accessories to the touchscreen, the
touchscreen may not function properly.
•
If you are wearing gloves, if your hands are not clean while touching the touchscreen,
or if you tap the screen with sharp objects or your fingertips, the touchscreen may
malfunction.
•
The touchscreen may malfunction in humid conditions or when exposed to water.
•
Restart your device to clear any temporary software bugs.
•
Ensure that your device software is updated to the latest version.
•
If the touchscreen is scratched or damaged, visit a Samsung Service Centre.
Your device freezes or encounters a fatal error
Try the following solutions. If the problem is still not resolved, contact a Samsung Service
Centre.
Restarting the device
If your device freezes or hangs, you may need to close apps or turn off the device and turn it
on again.
Forcing restart
If your device is frozen and unresponsive, press and hold the Power key and the Volume
Down key simultaneously for more than 7 seconds to restart it.
Resetting the device
If the methods above do not solve your problem, perform a factory data reset.
On the Home screen, tap
Settings
→
Backup and reset
→
Factory data reset
→
RESET
DEVICE
→
DELETE ALL
. Before performing the factory data reset, remember to make backup
copies of all important data stored in the device.
Calls are not connected
•
Ensure that you have accessed the right cellular network.
•
Ensure that you have not set call barring for the phone number you are dialling.
•
Ensure that you have not set call barring for the incoming phone number.

Appendix
125
Others cannot hear you speaking on a call
•
Ensure that you are not covering the built-in microphone.
•
Ensure that the microphone is close to your mouth.
•
If using a headset, ensure that it is properly connected.
Sound echoes during a call
Adjust the volume by pressing the Volume key or move to another area.
A cellular network or the Internet is often disconnected or audio
quality is poor
•
Ensure that you are not blocking the device’s internal antenna.
•
When you are in areas with weak signals or poor reception, you may lose reception. You
may have connectivity problems due to issues with the service provider’s base station.
Move to another area and try again.
•
When using the device while moving, wireless network services may be disabled due to
issues with the service provider’s network.
The battery icon is empty
Your battery is low. Charge the battery.
The battery does not charge properly (For Samsung-approved
chargers)
•
Ensure that the charger is connected properly.
•
Visit a Samsung Service Centre and have the battery replaced.

Appendix
126
The battery depletes faster than when first purchased
•
When you expose the device or the battery to very cold or very hot temperatures, the
useful charge may be reduced.
•
Battery consumption increases when you use messaging features or some apps, such as
games or the Internet.
•
The battery is consumable and the useful charge will get shorter over time.
Your device is hot to the touch
When you use apps that require more power or use apps on your device for an extended
period of time, your device may feel hot to the touch. This is normal and should not affect
your device’s lifespan or performance.
If the device overheats or feels hot for a prolonged period, do not use it for a while. If the
device continues to overheat, contact a Samsung Service Centre.
Error messages appear when launching the camera
Your device must have sufficient available memory and battery power to operate the camera
app. If you receive error messages when launching the camera, try the following:
•
Charge the battery.
•
Free some memory by transferring files to a computer or deleting files from your device.
•
Restart the device. If you are still having trouble with the camera app after trying these
tips, contact a Samsung Service Centre.
Photo quality is poorer than the preview
•
The quality of your photos may vary, depending on the surroundings and the
photography techniques you use.
•
If you take photos in dark areas, at night, or indoors, image noise may occur or images
may be out of focus.

Appendix
127
Error messages appear when opening multimedia files
If you receive error messages or multimedia files do not play when you open them on your
device, try the following:
•
Free some memory by transferring files to a computer or deleting files from your device.
•
Ensure that the music file is not Digital Rights Management (DRM)-protected. If the file is
DRM-protected, ensure that you have the appropriate licence or key to play the file.
•
Ensure that the file formats are supported by the device. If a file format is not supported,
such as DivX or AC3, install an app that supports it. To confirm the file formats that your
device supports, visit www.samsung.com/cn.
•
Your device supports photos and videos captured with the device. Photos and videos
captured by other devices may not work properly.
•
Your device supports multimedia files that are authorised by your network service
provider or providers of additional services. Some content circulated on the Internet,
such as ringtones, videos, or wallpapers, may not work properly.
Another Bluetooth device is not located
•
Ensure that the Bluetooth wireless feature is activated on your device.
•
Ensure that the Bluetooth wireless feature is activated on the device you wish to connect
to.
•
Ensure that your device and the other Bluetooth device are within the maximum
Bluetooth range (10 m).
If the tips above do not solve the problem, contact a Samsung Service Centre.
A connection is not established when you connect the device to a
computer
•
Ensure that the USB cable you are using is compatible with your device.
•
Ensure that you have the proper driver installed and updated on your computer.
•
If you are a Windows XP user, ensure that you have Windows XP Service Pack 3 or higher
installed on your computer.

Appendix
128
Your device cannot find your current location
GPS signals may be obstructed in some locations, such as indoors. Set the device to use Wi-Fi
or a mobile network to find your current location in these situations.
Data stored in the device has been lost
Always make backup copies of all important data stored in the device. Otherwise, you cannot
restore data if it is corrupted or lost. Samsung is not responsible for the loss of data stored in
the device.
A small gap appears around the outside of the device case
•
This gap is a necessary manufacturing feature and some minor rocking or vibration of
parts may occur.
•
Over time, friction between parts may cause this gap to expand slightly.
There is not enough space in the device’s storage
Delete unnecessary data, such as cache, using the Smart manager or manually delete unused
apps or files to free up storage space.
Appendix
129
Notices
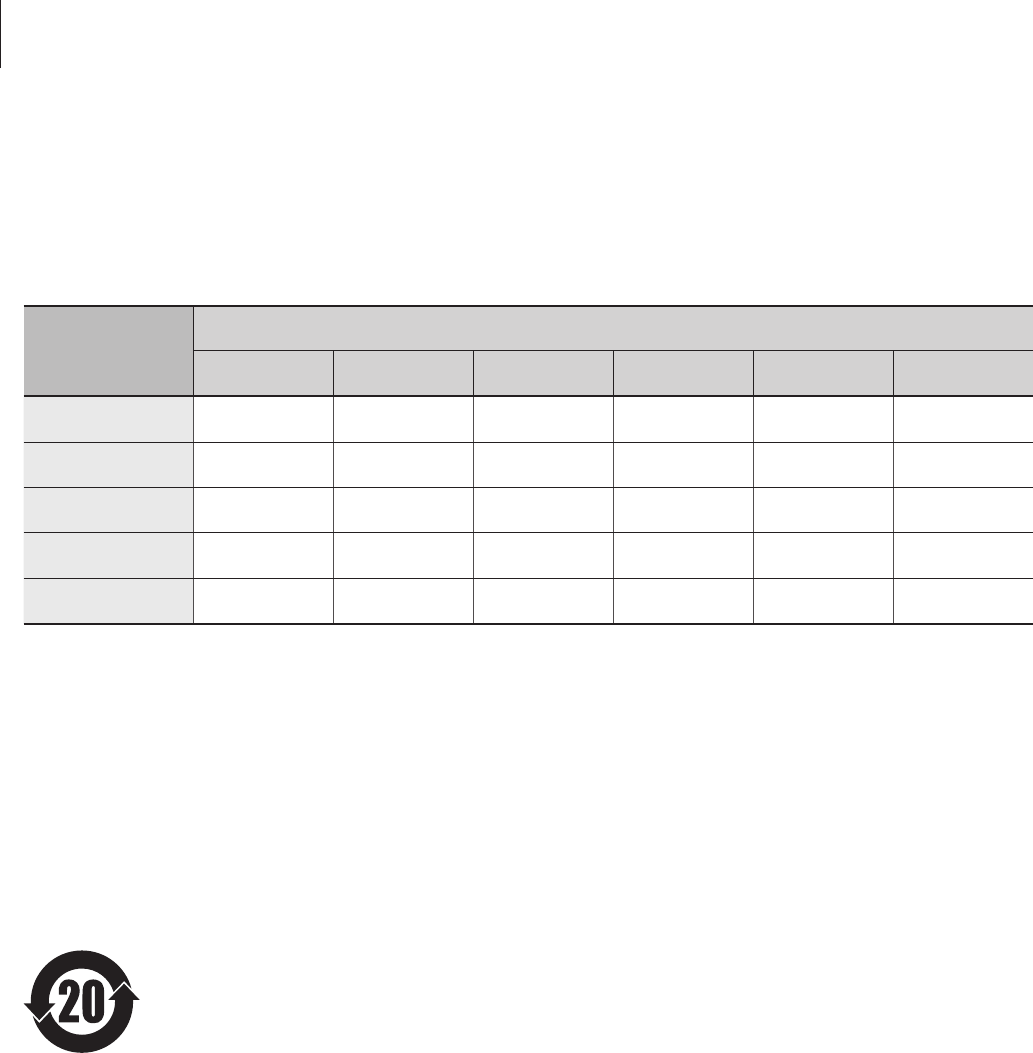
The names and content of toxic and hazardous substances or elements
PartToxic and hazardous substances or elements
Pb Hg Cd Cr6+ PBB PBDE
PBA XOOOOO
Plastic OOOOOO
Metal XOOOOO
Battery XOOOOO
Accessory XOOOOO
O: Indicates that the toxic or hazardous substance contained in all of the homogeneous materials for this
part is below the limit specified in GB/T 26572.
X: Indicates that the toxic or hazardous substance contained in at least one of the homogeneous materials
used for this part is above the limit specified in GB/T 26572.
The information provided in this table is based on figures presented by supply manufacturers
and tests conducted by Samsung. All toxic and hazardous substances or elements are used at
the minimum level allowed by current technology. Samsung continues to make every effort
to reduce the need for these substances or elements through improved technology.
The “environmental protection use period” for this product is 20 years and
the corresponding logo is as shown on the left. Exchangeable parts, such
as batteries, may have different periods of warranty. The “environmental
protection use period” is valid only when the product is used under normal
conditions, as described in the manual.
FCC Part 15.19 Statements:
This device complies with Part 15 of the FCC Rules. Operation is subject to the following two
conditions: (1) this device may not cause harmful interference, and (2) this device must accept any
interference received, including interference that may cause undesired operation.
FCC Part 15.105 statement
This equipment has been tested and found to comply with the limits for a Class B digital device,
pursuant to part 15 of the FCC Rules.
These limits are designed to provide reasonable protection against harmful interference in a
residential installation. This equipment generates, uses and can radiate radio frequency energy
and, if not installed and used in accordance with the instructions, may cause harmful interference
to radio communications. However, there is no guarantee that interference will not occur in a
particular installation. If this equipment does cause harmful interference to radio or television
reception, which can be determined by turning the equipment off and on, the user is encouraged
to try to correct the interference by one or more of the following measures:
- Reorient or relocate the receiving antenna.
- Increase the separation between the equipment and receiver.
- Connect the equipment into an outlet on a circuit different from that to which the receiver is
connected.
- Consult the dealer or an experienced radio/TV technician for help.
FCC Part 15.21 statement
Any changes or modifications not expressly approved by the party responsible for compliance
could void the user's authority to operate this equipment.

Health and safety information
Exposure to Radio Frequency (RF) Signals
Certification Information (SAR)
Your wireless phone is a radio transmitter and receiver. It is designed and
manufactured not to exceed the exposure limits for radio frequency (RF) energy set
by the Federal Communications Commission (FCC) of the U.S. government. These
FCC exposure limits are derived from the recommendations of two expert
organizations, the National Counsel on Radiation Protection and Measurement
(NCRP) and the Institute of Electrical and Electronics Engineers (IEEE). In both
cases, the recommendations were developed by scientific and engineering experts
drawn from industry, government, and academia after extensive reviews of the
scientific literature related to the biological effects of RF energy.
The exposure limit set by the FCC for wireless mobile phones employs a unit of
measurement known as the Specific Absorption Rate (SAR). The SAR is a measure
of the rate of absorption of RF energy by the human body expressed in units of watts
per kilogram (W/kg). The FCC requires wireless phones to comply with a safety limit
of 1.6 watts per kilogram (1.6 W/ kg). The FCC exposure limit incorporates a
substantial margin of safety to give additional protection to the public and to account
for any variations in measurements.
SAR tests are conducted using standard operating positions accepted by the FCC
with the phone transmitting at its highest certified power level in all tested frequency
bands. Although the SAR is determined at the highest certified power level, the
actual SAR level of the phone while operating can be well below the maximum value.
This is because the phone is designed to operate at multiple power levels so as to
use only the power required to reach the network. In general, the closer you are to a
wireless base station antenna, the lower the power output.
Before a new model phone is available for sale to the public, it must be tested and
certified to the FCC that it does not exceed the exposure limit established by the
FCC. Tests for each model phone are performed in positions and locations (e.g. at
the ear and worn on the body) as required by the FCC.
For body worn operation, this model phone has been tested and meets the FCC RF
exposure guidelines when used with a Samsung accessory designated for this
product or when used with an accessory that contains no metal and that positions
the handset a minimum of 1.5 cm from the body.
Non-compliance with the above restrictions may result in violation of FCC RF
exposure guidelines.
SAR information on this and other model phones can be viewed on-line at
http://www.fcc.gov/oet/ea/fccid/. Please use the phone FCC ID number for search,
( ). Sometimes it may be necessary to remove the battery pack to find
the number. Once you have the FCC ID number for a particular phone, follow the
instructions on the website and it should provide values for typical or maximum SAR
for a particular phone. Additional product specific SAR information can also be
obtained at http://www.fcc.gov/encyclopedia/specific-absorption-rate-sar-cellular-telephones
A3LSMC7000

Copyright
Copyright © 2016 Samsung Electronics
This manual is protected under international copyright laws.
No part of this manual may be reproduced, distributed, translated, or transmitted in any form
or by any means, electronic or mechanical, including photocopying, recording, or storing
in any information storage and retrieval system, without the prior written permission of
Samsung Electronics.
Trademarks
•
SAMSUNG and the SAMSUNG logo are registered trademarks of Samsung Electronics.
•
Bluetooth® is a registered trademark of Bluetooth SIG, Inc. worldwide.
•
All other trademarks and copyrights are the property of their respective owners.