Samsung Electronics Co SP30 Notebook PC User Manual manual eng
Samsung Electronics Co Ltd Notebook PC manual eng
Contents
- 1. Users Manual 1
- 2. Users Manual 2
- 3. Users Manual 3
- 4. Supp Reponse to CRN 231113AA3L
Users Manual 2
Connecting to the Internet 35
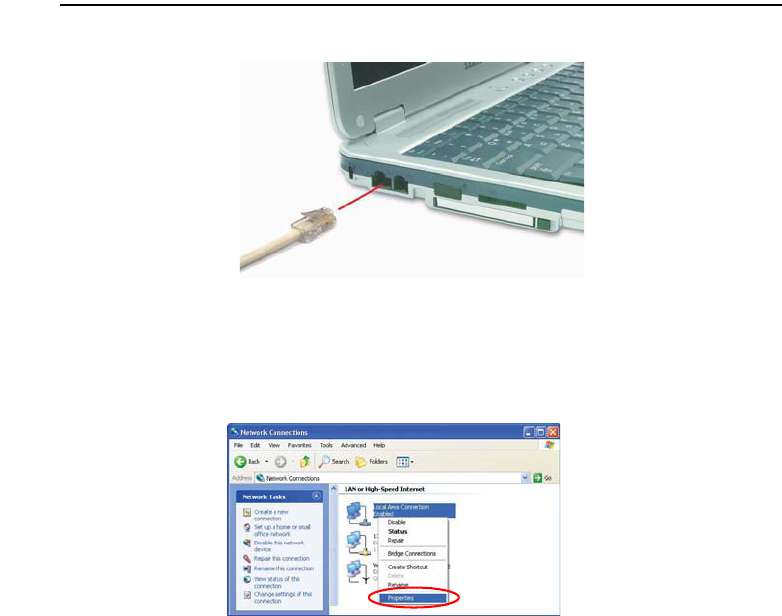
Connecting Through a Wired LAN
1. Connect a LAN cable to the computer’s LAN port.
2. Click Start > Control Panel.
3. Click Network and Internet Connections in the [Control Panel] window.
4. Click Network Connections in the [Network and Internet Connections] window.
5. Right-click the Local Area Connection icon and click Properties.
36 Users Manual
6. On the General tab, select “Internet Protocol(TCP/IP)” and click Properties.
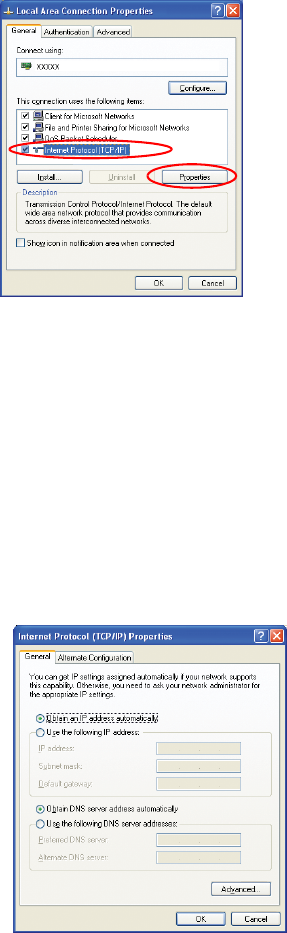
7. To use DHCP:
On the General tab, select “Obtain an IP address automatically” and “Obtain DNS
server address automatically”. Click OK.
To use a static IP:
On the General tab, select “Use the following IP address” and fill in the IP
address, Subnet mask, Default gateway, Preferred DNS server, and Alternative
DNS server fields. Click OK.
To use both DHCP and static IP simultaneously:
On the Alternate Configuration tab, click User configured and fill in the fields.
Click OK.

Connecting to the Internet 37
Connecting Through a Wireless LAN (Option)
A wireless network (Wireless LAN) environment is a network environment that
enables communication between multiple computers at home or a small-size office
through wireless LAN devices.
Using the wireless network connections between the systems, you can use normal
network functions such as sharing of files, folders and printers. Using computer-to-
computer network (ad hoc) connections, you can access the Internet through a
computer connected directly to the Internet even if your computer is not directly
connected to the Internet. For details, see “Using Network Services” on page 48.
The information provided in this section only applies to models equipped with
an optional wireless LAN device.
To turn off the Wireless LAN
If the wireless LAN is turned on, the computer consumes much power,
therefore shortening the amount of time you can run on battery. Therefore, if
you are not using the WLAN or if you are in an environment that does not
provided WLAN, you are recommended to turn off the WLAN by pushing the
WLAN/Bluetooth button (p15) on the computer.
Wireless network connections can be classified into two categories.
1) Access Point
You can connect to an AP to use the network. This is possible only in an environment
equipped with an AP. For details, see “Connecting to an Access Point (AP)” on page
38.
What is an Access Point (AP)?
An AP is a network device that bridges wired and wireless LANs, and
corresponds to a wireless hub in a wired network. You can connect multiple
wireless LAN installed computers to an AP.
2) Computer-to-computer (ad hoc)
This is also called a peer-to-peer or ad hoc network.
In computer-to-computer wireless networks, you can wirelessly connect 2 or more
computers that have wireless LAN modules. Using computer-to-computer wireless
38 Users Manual
networks, you can access the Internet through a computer that is connected to the
Internet even if your computer is not directly connected to the Internet. For details, see
“Connecting to computer-to-computer networks (peer-to-peer or ad hoc)” on page 39.
Connecting to an Access Point (AP)
This section describes how to connect to an AP. You can use the network when you are
connected to an AP.
In this section, the configuration procedures are described for Windows XP
installed computers. For information on the configuration procedures for other
operating systems, see “Using Wireless Networks in Other Operating
Systems” on page 44. Please ask your network administrator about detailed
configuration information such as the network key (encryption key).
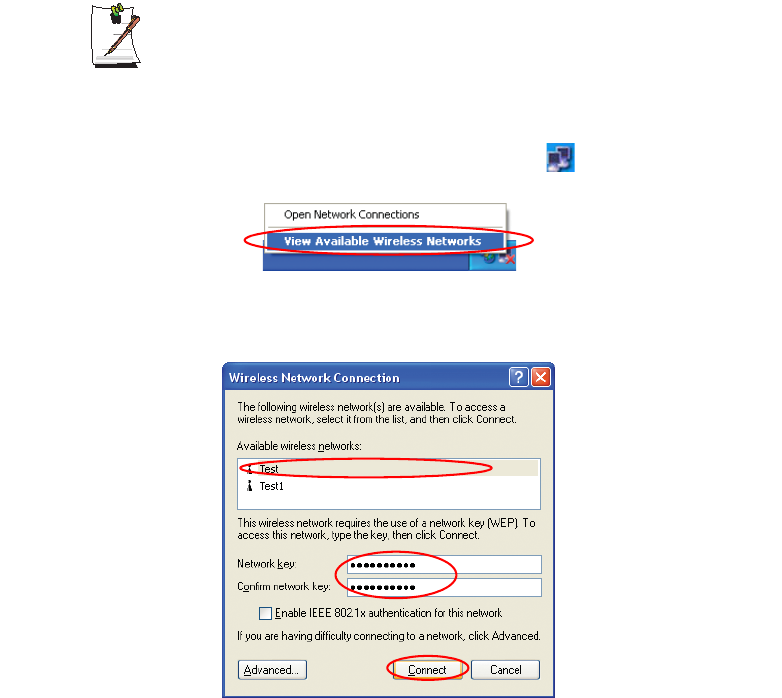
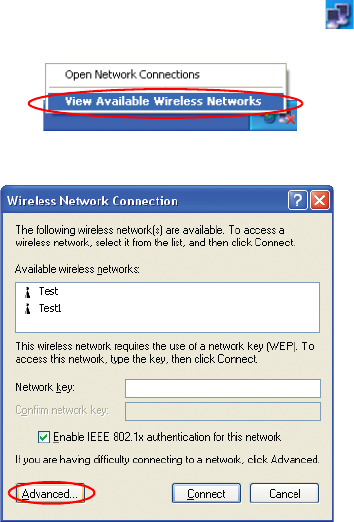
1. Right-click on the Wireless Network Connection ( ) icon on the taskbar, and
select View Available Wireless Networks.
2. Select your desired AP (e.g. Test) to connect, and enter the encryption key for the
AP in the Network key field, and click Connect.
Connecting to the Internet 39
If the network key is not configured for the desired AP, select 'Allow me to
connect to the selected wireless network, even though it is not secure’.
Now you are connected to the AP, and you can access the network.
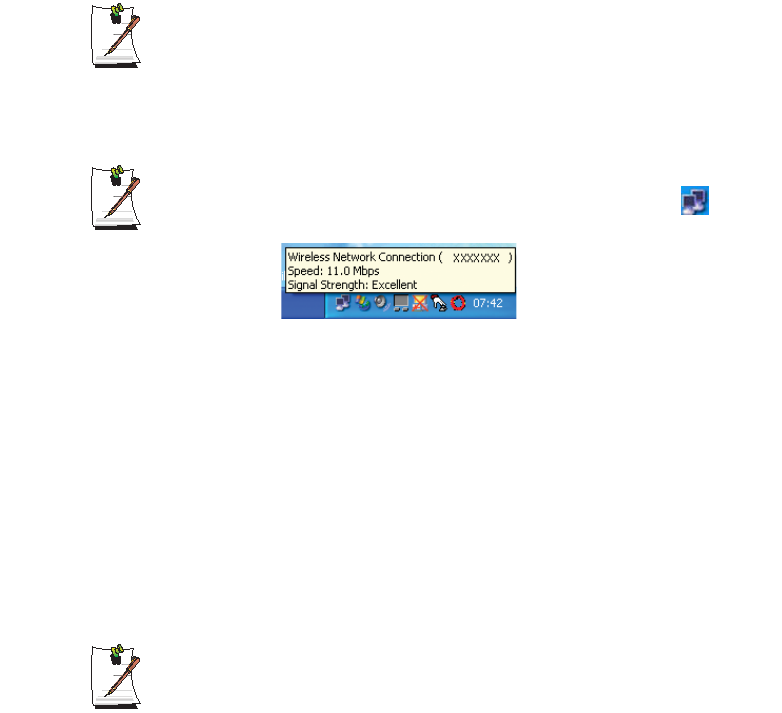
Checking the connection status
Move the mouse pointer over the Wireless Network Connection ( ) icon on
the taskbar, and the connection status is displayed.
Connecting to computer-to-computer networks (peer-to-peer or
ad hoc)
In computer-to-computer wireless networks, you can wirelessly connect 2 or more
computers that have wireless LAN modules.
You can connect by completing the following steps:
xStep 1. Set up a computer-to-computer network on a computer.
xStep 2. Connect to the configured computer from other computers.
In this section, the configuration procedures are described for Windows XP
installed computers. For information on the configuration procedures for other
operating systems, see “Using Wireless Networks in Other Operating
Systems” on page 44.
40 Users Manual
Step 1. Setting up a computer-to-computer network
1. Right-click on the Wireless Network Connection ( ) icon on the taskbar, and
select View Available Wireless Networks.
2. Click Advanced.
3. On the Wireless Network tab, click Advanced.
4. Clear 'Automatically connect to non-default network' check box, if it is selected.
Select 'Computer-to-computer (ad hoc) networks only', and click Close.
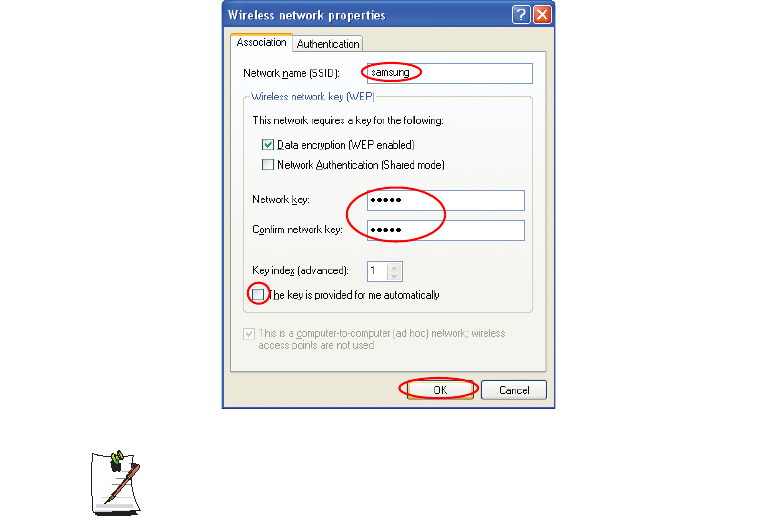
5. In the Wireless Networks tab, click Add.
Connecting to the Internet 41
6. Enter the network name (e.g. samsung), and unselect 'The key is provided for me
automatically'. Enter the encryption key in the Network key field, and click OK.
To prevent a network connection from an unauthorized user, it would be better
to configure a network key (encryption key). A network key consists of 5 or 13
alphanumeric characters (e.g. magic), or of 10 or 26 hexadecimal numbers (a
hexadecimal number is represented by numbers '0' to '9' or letters 'a' to 'f').
42 Users Manual
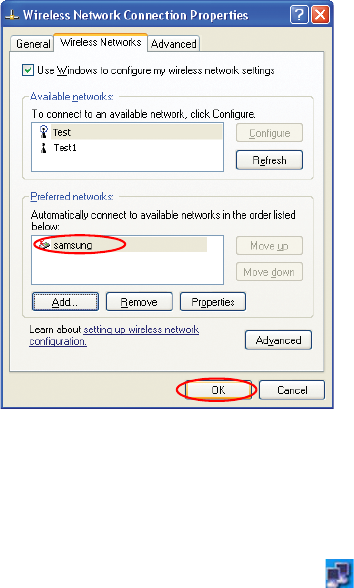
7. Check that the configured network name (e.g. samsung) is in the ’Preferred
networks’ item, and click OK.
Now your wireless network setup has been completed.
Step 2. Connecting to the configured computer
1. Right-click on the Wireless Network Connection ( ) icon on the taskbar, and
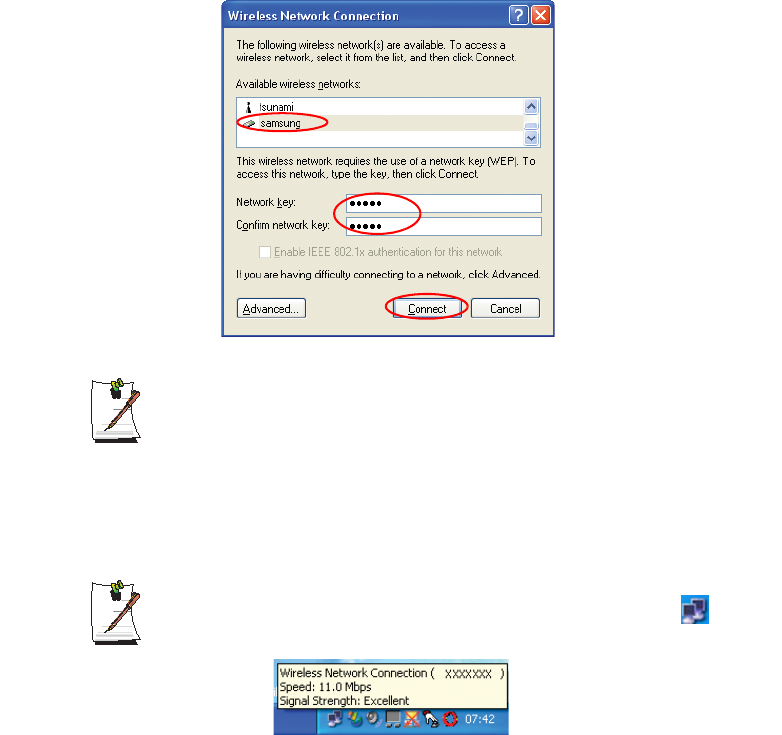
select View Available Wireless Networks.
2. Select the wireless network name (e.g. samsung) specified in ”Connecting to
computer-to-computer networks (peer-to-peer or ad hoc)” on page 39, enter the
encryption key in the Network key field, and then click Connect.
Connecting to the Internet 43
If the network key is not configured in ”Connecting to computer-to-computer
networks (peer-to-peer or ad hoc)” on page 39, select 'Allow me to connect to
the selected wireless network, even though it is not secure'.
The two computers are connected and are able to communicate with each other. When
the computers are connected, the 'Wireless Network Connection' message is displayed
for a short time over the Wireless Network Connection icon of the two computers.
Checking the connection status
Move the mouse pointer over the Wireless Network Connection ( ) icon on
the taskbar, and the connection status is displayed.

44 Users Manual
Using Wireless Networks in Other Operating Systems
In a operating system other than Windows XP, you have to install additional wireless
LAN configuration program, and configure wireless network settings.
To use wireless network connection, complete the following procedures.
xStep1. Install the wireless LAN configuration program (PROSet).
xStep2. Configure wireless network settings through the wireless LAN
configuration program.
Step 1. Installing the wireless LAN configuration program (PROSet)
You can install the wireless LAN client administrator program following the
instruction displayed automatically when you insert the system software CD. Insert the
system software CD into the CD-ROM drive, and install the wireless LAN
configuration program.
To disable the 'Intel Configuration Service' window afterward
After installing the wireless LAN configuration program, select "Do not show
this again." check box, then click Close.
Step 2. Using the wireless LAN configuration program (PROSet)
Double-click the wireless LAN program ( ) icon on the taskbar.
(Or, click Start > All Programs > Intel Network Adapters > Intel(R) PROSet.)
In some languages, some buttons on the window may not be displayed. If this
is the case, resize the window to use the program.
Configure wireless network settings in PROSet following the procedures below.

Connecting to the Internet 45
To connect to an Access Point:
To connect to an access point or existing computer-to-computer (Ad Hoc) network,
refer to the following procedures. (To create a new computer-to-computer network,
refer to the following To create computer-to-computer (Ad Hoc) network section.)
1. Click Scan in the Networks tab.
2. Select the name of desired access point or computer-to-computer network to
connect from the searched available networks list, and click Connect.
If your desired network does not appear, click Refresh.
An access point is represented by the ( ) icon, and a computer-to-computer
network is represented by the ( ) icon. An ( ) icon is displayed in front of
an access point or a computer-to-computer network with configured security
settings.
3. Select "Yes, create a profile for this Network.", and click OK.
4. Enter Profile Name and click Next.
5. Enter the network authentication,data encryption (WEP),key index, and
password configured for the target access point or computer-to-computer network
in the Security Settings window, and click Finish.
The network authentication, data encryption (WEP), key index, and password
of a access point are configured in the access point management program.
For information on the security information, check the security settings of the
access point or ask your wireless network administrator.
To connect to an existing computer-to-computer (Ad Hoc) network, enter the
password configured when creating the computer-to-computer network for the
first time. You do not need to enter network authentication or key index.
Security Settings
-Network authentication: Network authentication has two options of Open
System and Shared Key. If you select Open, no authentication procedure is
used. If you select Shared, the WEP key is used as the authentication
procedure. The default option setting is Open.

46 Users Manual
-Data encryption (WEP): IEEE 802.11 WEP (Wired Equivalent Privacy)
standard has two security levels of 64-bit key (40-bit key for some cases) and
128-bit key.
-Key index: Select the current encryption key index used by the access point
out of 1 to 4.
-To use pass phrase: Click Use pass phrase to activate, and enter 5 (for 64-
bit) or 13 (for 128-bit) alphanumeric characters (represented by 0-9, a-z, or A-
Z).
-To use WEP key: Click Use WEP keys to activate, and enter a hexadecimal
number (represented by 0-9 and A-F) of 10 (for 64-bit) or 26 (for 128-bit) digits
in the WEP key field.
When a wireless connection to an access point is established, the connection icon
( ) appears in front of the name of the connected profile.
To create a computer-to-computer (Ad Hoc) network:
To create a new computer-to-computer (Ad Hoc) network or to connect to a hidden
access point (Stealth/Closed Mode), refer to the following procedures.
A hidden access point is an access point that exists, but is configured not to
be detected by the scan operation to prevent access attempts from
unauthorized users.
1. Click Add in the Networks tab.
2. Enter Profile Name and Network name (SSID), select Operating Mode, then
click Next.
What is a network name (SSID)?
Network name (SSID) is a name that a wireless adapter uses for identifying
connection. Enter the name of computer-to-computer network to create (e.g.,
P2P) or the name of access point to connect. The network name identifies
cases. (capital and lowercase) For the name of access point, check the
settings of the access point, or ask your wireless network administrator.
Operating Mode:
Infrastructure - Connect to an Access Point - Select to connect to an
access point.
Ad hoc - Connect directly to other computers - Select to create a
computer-to-computer (Ad Hoc) network.

Connecting to the Internet 47
3. Configure password setting to be used for computer-to-computer network
connection in the Security Settings window.
To connect to an access point, enter the network authentication,data encryption
(WEP),key index, and password configured in the access point.
It is recommended to configure data encryption for security purposes when
creating a computer-to-computer network connection profile. For more
information on security settings refer to the security settings in Connecting to
an AP or Help.
When you are creating a computer-to-computer network connection profile,
the network authentication setting is disabled.
4. When a profile creation is completed, the new created profile appears in the
profiles list in the Networks tab. Select corresponding profile, and click Connect
to connect to the created profile.
When a wireless connection to the created profile is established, the connection
icon ( ) appears in front of the name of the connected profile.

48 Users Manual
Using Network Services
While the computer is connected to the network, you can use network services to share
files, folders, and printers. Using computer-to-computer wireless networks, you can
access the Internet through a computer that is connected to the Internet even if your
computer is not directly connected to the Internet.
Network services are provided for the computers that are connected to the
network through wired or wireless network connections. For details, see
“Connecting Through a Wired LAN” on page 35 and see “Connecting Through
a Wireless LAN (Option)” on page 37.
Sharing files or folders
This section describes how to share files and folders between computers connected to
the network.
To share files, complete the following procedures:
xStep 1. Configuring the sharing of files and folders on a computer.
xStep 2. Accessing shared files and folders from another computer.
When a file or folder is shared, anyone connected to the network can open and
delete the shared file or folder.
Configure a file sharing network only when the network is secure, and do not
share important data.
Connecting to the Internet 49
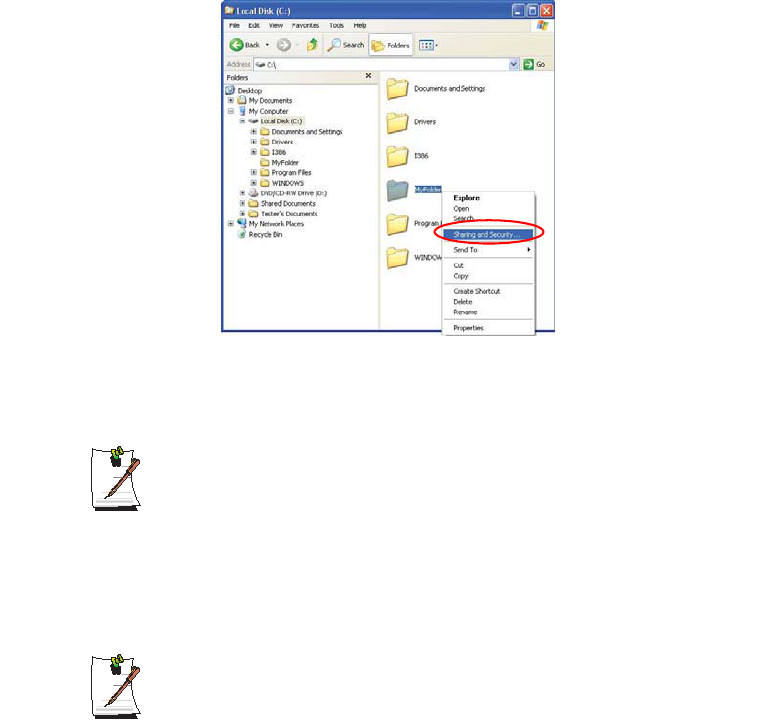
Step 1. Configuring Sharing
1. Right-click the target file or folder to share in My Computer, and select Sharing
and Security.
2. Click 'IF you understand the security risks but want to share files without running
the wizard, click here'.
It has the same security effect as that of the 'Network Setup Wizard'.
This screen does not appear if Internet Sharing Network Wizard has been
installed in the computer-to-computer wireless network environment.
3. Select 'Just enable file sharing', and click OK.
4. In the 'Network sharing and security' field, select 'Share this folder on the network',
enter the share name, and click OK.
Be cautious when selecting 'Allow network users to change my files' since
other network users can change the files in the shared folder.
The file and folder sharing configuration has been completed.
50 Users Manual
Step 2. Using Shared Files or Folders
This section describes how to access shared files or folders if your computer is a
member of the same workgroup.
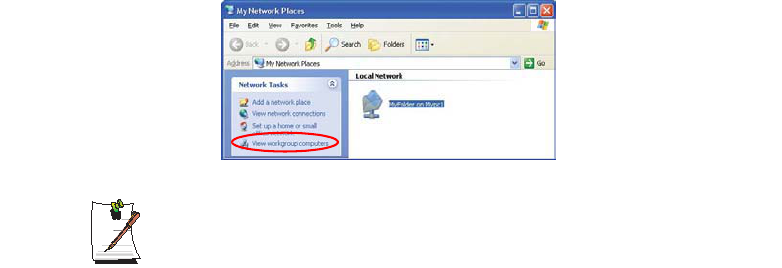
1. Click Start > My Computer. Under Other Places, click My Network Places in
your computer.
2. Click 'View workgroup computers', and click the desired computer to access the
shared file.
If your computer is a member of another workgroup:
1. Click Other Places > Microsoft Windows Network.
2. Click the desired workgroup.
3. Click the desired computer to display the shared files or folders.
Sharing Printers
This section describes how to share a printer between computers connected to a
network.
To share a printer, complete the following procedures:
xStep 1. Configure printer sharing in the computer connected to the printer.
xStep 2. Add and use the shared printer in other computers on the network.
Connecting to the Internet 51
Step 1. Configuring Printer Sharing
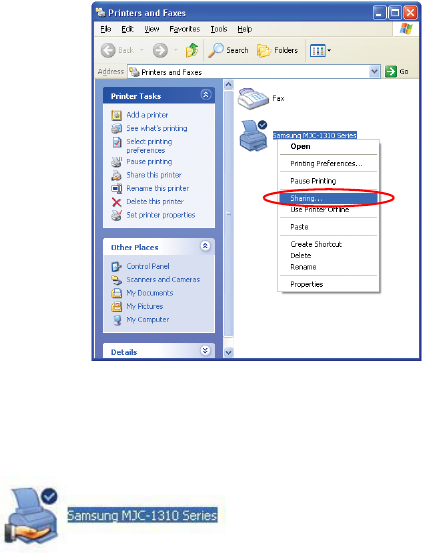
1. From the computer connected to the printer, click Start > Printers and Faxes.
2. Right-click the printer you want to share, and click Sharing.
3. Select 'Share this printer', enter a share name for the shared printer, and click OK.
4. In the Printers and Faxes window, you will find the printer icon has been changed
to another icon on a hand.
Step 2. Adding and Using a Shared Printer.
1. From a different computer that wants to use the shared printer, click Start >
Printers and Faxes.
2. Click Add a printer.
3. In the Add Printer Wizard, click Next.
4. Select 'A network printer, or a printer attached to another computer', and click
Next.
52 Users Manual
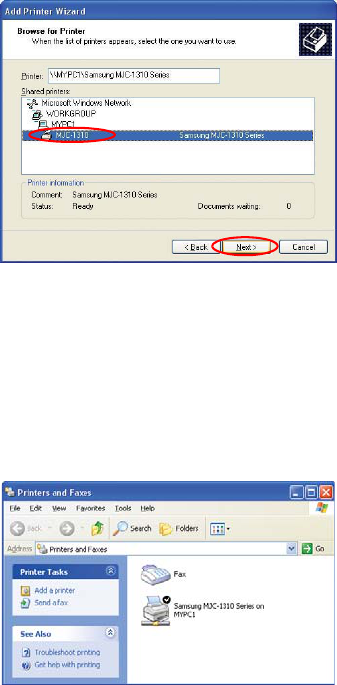
5. Select 'Browse for a printer', and click Next.
6. Select the workgroup or computer, select the desired printer, and click Next.
If you cannot find the desired printer, try again after a while.
7. Read the warning about a shared printer, and click Yes to install the shared printer.
8. Select Yes for 'Do you want to use this printer as a default printer?', and click Next.
9. Click Finish.
10. When the printer sharing configuration has been completed, the shared printer
appears in the Printers and Faxes window.
Now you can print using the shared printer even if your computer is not directly
connected to a printer.

Connecting to the Internet 53
Sharing an Internet Connection
Using computer-to-computer (peer-to-peer) network connections, you can access the
Internet through a computer connected to the Internet even if your computer is not
directly connected to the Internet.
To share an Internet connection, the computers should be connected to a
computer-to-computer (peer-to-peer) wireless network. For details, see
“Connecting to computer-to-computer networks (peer-to-peer or ad hoc)” on
page 39.
Also, one of the computers has to be connected to the Internet (external
network).
The configuration procedure to share an Internet connection are described for
Windows XP installed computers.
To share an Internet connection, complete the following procedures:
xStep 1. Configuring a Internet connection sharing from the computer connected
to the Internet.
xStep 2. After completing the shared Internet connection configuration, check
that the other computers can access the Internet through the shared Internet
connection.
Step 1. Configuring Internet Sharing.
Configuring a shared Internet connection on the computer connected to the Internet.
1. Click Start > Control Panel > Network and Internet Connections > Network
Connections.
2. Right-click on the device connected to the Internet, the external network, and
select Properties.

54 Users Manual
If the computer is connected to the Internet through a wired LAN, select 'Local
Area Connection'.
3. On the Advanced tab, select 'Allow other network users to connect through this
computer's Internet connection', and click OK.
Step 2. Checking the Shared Internet Connection.
When the Internet connection sharing configuration has been completed, the network
icon in the Network Connections window is displayed as follows:
Click Start > Control Panel > Network and Internet Connections > Network
Connections.
– A computer connected to the Internet.
– A computer sharing the remote Internet connection (other computer).
If the icon does not appear after a long time, restart the computer.
Computers on the network can access the Internet through the shared Internet
connection only when the computer connected to the Internet is turned on.

Connecting to the Internet 55
Infrared Communication (Optional)
Your computer may have infrared port. Using the infrared port, you can transfer data
to computer, printer, camera and other devices through infrared communication.
Restrictions in Use
For infrared communication, the devices should have infrared communication
capability, and should be located within 1 m of each other. In addition, there
should be no obstacle between the infrared ports of the target devices.
To establish infrared connection
The procedures to communicate with another computer through infrared port are
described below.
1. Locate the target computers so that the infrared ports face each other.
2. When infrared communication is available, a beep sounds and Send files to
another computer icon ( ) appears on the desktop.
You can now transfer data through infrared communication.
To transmit data through infrared communication
The procedures to transmit files to another computer are described below.
1. Connect the target computers through infrared communication.
2. Drag a file over the Send files to another computer icon( ) in one of the
computer.
3. [Wireless Link] dialog box appears on the other computer screen. Click Yes.
4. When the file transmission is completed, click Close to close the [Receiving Files]
dialog box.
To change infrared communication configuration
To change the folder to save the received files, or to receive images from a
digital camera, click Start > Control Panel > Printers and Other Hardware
> Wireless Link and change the configuration.

56 Users Manual
If you cannot use infrared communication
1. Check BIOS setup.
a. Start the computer, and press <F2> to enter System Setup.
b. Select I/O Device Configuration in the Advanced menu, and press
<Enter>.
c. Select Infrared Port, and set the item to Enabled by pressing <F5> or
<F6>.
d. Save the configuration, and exit the Setup.
2. Check Windows configuration.
a. Click Start > Control Panel > Performance and Management > System
> Hardware tab > Device Manager.
b. Double-click the “Infrared device”, and then double-click “IrDA Fast Infrared
Port” item.
c. On the Advanced tab, select “Infrared Transceiver A” in the Properties field,
then select “HP HSDL-2300/3600” in the Value field.
d. Click OK.
Customizing Your Computer 57
Customizing Your Computer
Using System Setup
The System Setup (BIOS) program enables you to configure your computer hardware
and set security and power-savings options. The settings you choose are stored in
battery-maintained CMOS memory that saves the information even when the
computer’s power is turned off. When your computer is turned back on, it is configured
with the values found in this memory.
Run System Setup if you get a message prompting you to run the program. You may
also want to run System Setup, particularly the first time you use your computer, to set
the time and date, use security or power-management features, or alter the settings of
other features.
BIOS Caution:
If you are not familiar with BIOS setup and what the parameters mean, seek
help from a person who is knowledgeable. Incorrect settings may cause your
system to malfunction or "Crash”.
Your computer’s version of System Setup may not include all the fields listed
here or may include additional fields. Field names and order of appearance
can vary according to the version of the BIOS (basic input/output system) on
your computer.

58 Users Manual
Starting System Setup
To start System Setup, turn on your computer and then press <F2> and hold until the
System Setup screen appears.
Table 2. System Setup Menus
To open the menu you need to use, use the left or right arrow keys to select the menu
name.
Table 3. System Setup Navigation Keys
Menu Function
Main Changes the basic system.
Advanced Configures advanced features on your computer.
Security Enables security features, including passwords.
Boot Specifies the order of boot devices and configures boot
features.
Exit Specifies how to exit System Setup.
Navigation Key Function
<F1> Displays the General Help window.
<Esc> Exits the current menu.
<> or <> Moves the cursor up and down between fields.
<> or <> Selects different menus. Pressing the <Esc>key at the Main
menu brings you to the Exit menu.
<F5> Scrolls backwards through the options for the highlighted field.
<F6> Scrolls forward through the options for the highlighted field.
<F9> Sets the parameters for the current menu to their default values.
<F10> Save changes and exit system setup.
<Enter> Executes commands or opens a submenu.

Customizing Your Computer 59
Changing Booting Priority
You can select the booting priority among the devices such as the hard drive, CD-ROM
drive, etc. The following example describes how to configure the hard drive as the first
booting device when the CD-ROM drive is configured as the first booting device by
default.
1. Select the Boot menu in System Setup.
2. Use <> key to move to the Boot Device Priority, and press <Enter>.
3. Use <> key to move to the Hard Drive item, and press <F6> until it is at the
very top.
4. Press <F10> to save the changed configuration, and exit System Setup.
Now you can boot the system with the hard disk drive as the first booting device.

60 Users Manual
Configuring the Password
Setting the Supervisor Password
By configuring a supervisor password, you can restrict system access to authorized
users only.
Do not lose or forget your password. If you have forgotten your password,
contact the Samsung service center.
1. Select the Security menu in the System Setup. To enter System Setup, see “Starting
System Setup” on page 58.
2. On the Set Supervisor Password item, press <Enter>.
3. Enter a password, press <Enter>, re-enter the password for confirmation, and
press <Enter> again.
4. When a message confirming the password configuration appears in the [Setup
Notice] window, press <Enter>.
Setting the User Password
You can configure user passwords so that other users can use the system.
Before configuring a user password, a supervisor password must have been
configured.
Users can start the system with their user password, but cannot enter into the
System Setup.
Deactivating the supervisor password also deactivates the user password.
On the Set User Password item, press <Enter>, and complete step 3-4 of "Setting the
Supervisor Password".

Customizing Your Computer 61
Activating the Booting Password
Before activating the booting password, the supervisor password must have
been configured.
Set the Password on boot option to [Enabled].
From now on, system booting will not proceed without the password.
Activating the Hard Disk Drive Password
Activating the hard disk drive password prevents the currently installed hard disk drive
from being used in other systems.
Before activating the hard disk drive password, the supervisor password must
have been configured.
On the Set HDD 0 Password item, press <Enter>, and complete step 3-4 of "Setting
the Supervisor Password".
Deactivating the Password
1. On the password to delete, press <Enter>. (e.g. supervisor password)
2. Enter the current configured password, and press <Enter>.
3. Leave the 'Enter New Password' and 'Confirm New Password' field empty, and
press <Enter> to deactivate the password.
62 Users Manual
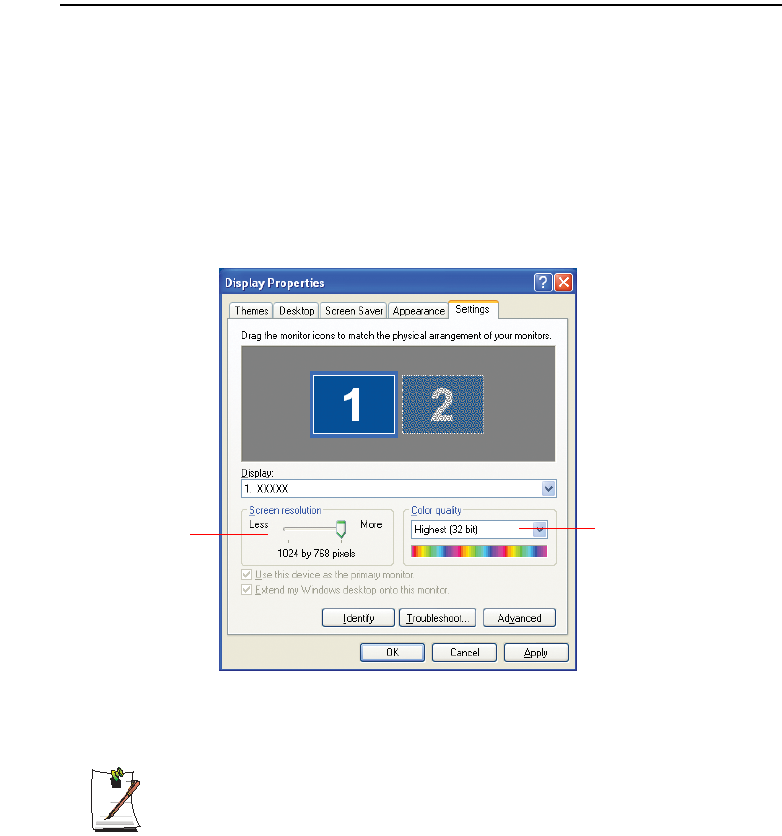
Configuring Resolution and Colour Depth
Screen resolution is the number of pixels displayed on the screen. High resolution
makes the overall screen area large, although individual items appear small.
Colour quality is determined by the number of bits used to represent a pixel on the
screen. High colour quality displays more number of colours on your screen.
1. Select Start > Control Panel > Appearance and Themes > Change the screen
resolution.
2. Make changes on the Settings tab of the [Display Properties] dialog box.
3. When you have completed configuration, click Apply.
It is recommended setting the resolution to 1024x768, and the number of
colours to Highest (32bit) on XGA models.
It is recommended setting the resolution to 1400x1050, and the number of
colours to Highest (32bit) on SXGA+ models.
To change the number of
colours displayed on a
monitor, select an
appropriate colour quality.
To change your screen
resolution, move the slider
to select an appropriate
resolution.