Samsung Electronics Co SQ10WL Mini PCI Card in Personal Computer User Manual PP 21 to 30
Samsung Electronics Co Ltd Mini PCI Card in Personal Computer PP 21 to 30
Contents
PP 21 to 30
Using Your Computer for the First Time 11
Using Your Computer for the First Time
This section gives you detailed information on using your computer for the first time.
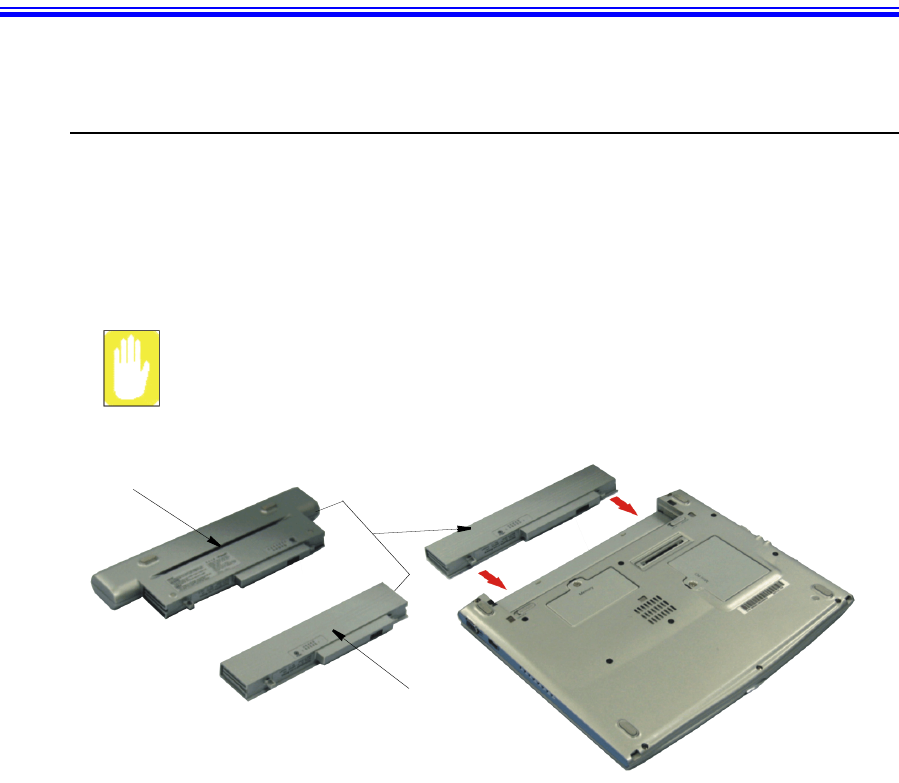
Installing the Battery
The first step in using your notebook computer is to determine the normal use for your
computer. Two batteries (Standard and Long Life) come with the computer and both
go into the same slot. The standard battery may be used whether the computer is in the
docking station or not. the long life battery may only be used when the PC is not in the
docking station.
Ensure that both battery latches are slid fully toward the center of the
computer.
The long life battery cannot be used with the PC in the docking station.
Long Life Battery
Standard Battery
11 or 22
11
22
12 Users Manual
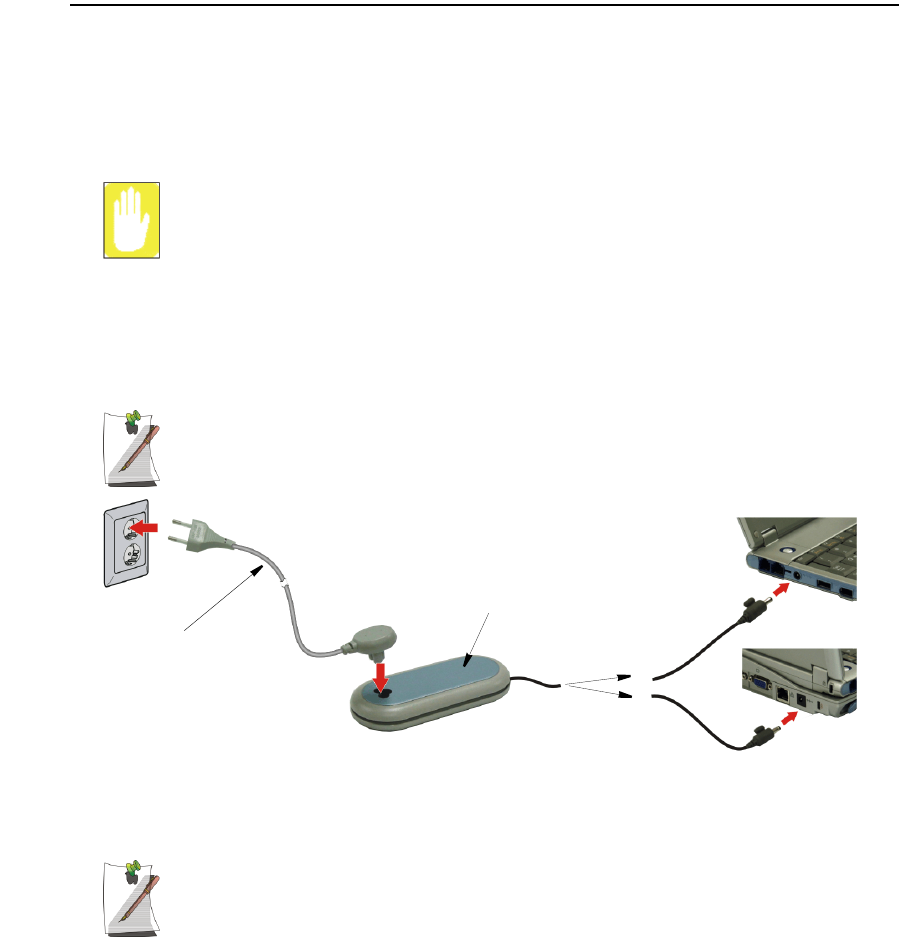
AC Adapter
Your computer runs on power from the battery in the computer or from an electrical
outlet. The first time that you use your computer, fully charge the battery using the AC
adapter.
To attach the power cord complete the following:
Power Cords:
Many countries have different power cord configurations. Your computer
should be supplied with the correct one for your area. If not contact the
supplier. DO NOT wind the DC Output cable around the AC Adapter to prevent
damage to AC adapter while operating your computer.
1. Plug the AC adapter into the power connector on the side of the computer.
2. Connect the power cord to the AC adapter and then to an electrical outlet.
The power connector may be plugged into either the computer or the docking
station. The preferred method when docked is to plug into the docking station.
The battery starts charging as soon as you plug the power cord into an electrical outlet.
The battery charges faster if the computer is turned off during charging.
Ensure you charge the battery fully the first time you use it.
See “Using the Battery” on page 42 for more information on using your computer’s
battery.
Power Cord
AC Adapter
Using Your Computer for the First Time 13
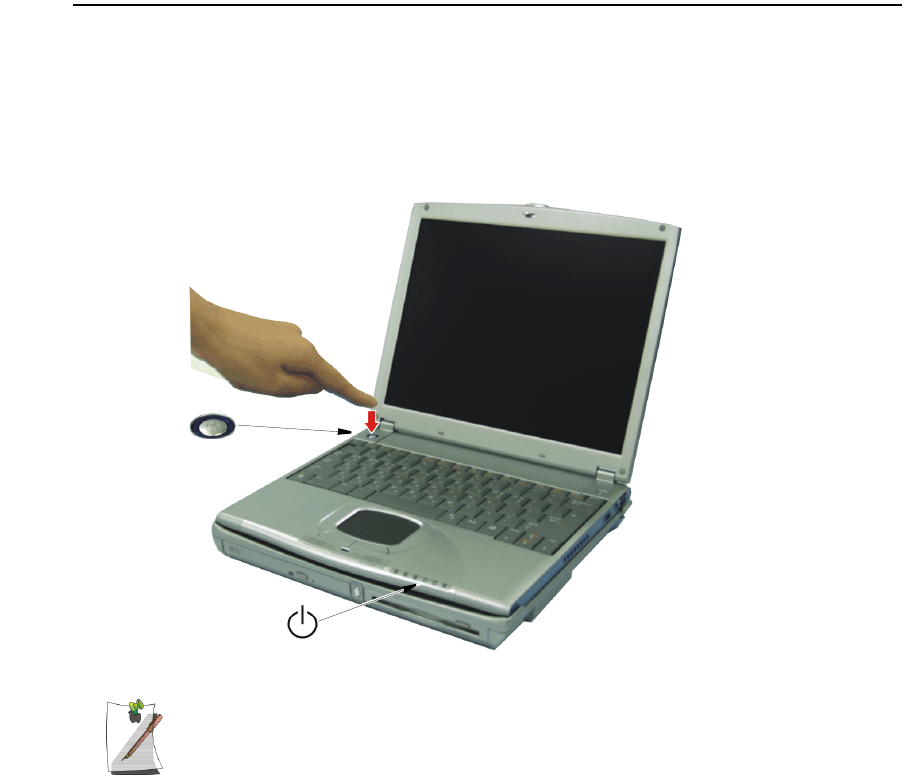
Turning On the Computer
To turn on the computer’s power for the first time:
1. Slide the LCD latch, located on the front of the cover to the right.
2. Lift up the LCD display.
3. Press and then release the power button.
The power LED is on when the computer’s power is on.
Initial computer startup
The first time you start your computer you will see the operating system
registration screens. There are several screens in the registration process.
Simply read each screen and follow the simple directions. You must complete
this process in order to use your computer. A tutorial is provided if you require
it.
Power LED
Power Button
14 Users Manual
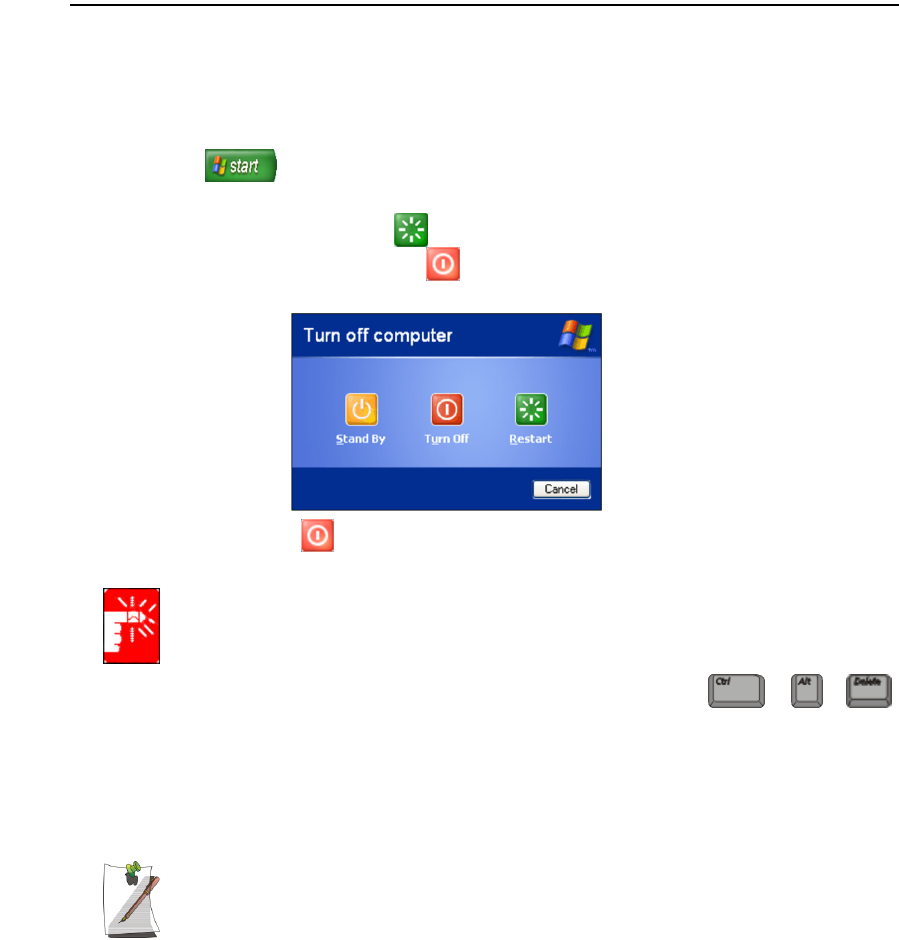
Turning Off Your Computer
Prior to shutting down your computer ensure all of your data and current work are
saved. The system will ask if you wish to save any unsaved work, saving your work
first will speed the shutdown process.
To turn off the computer, complete the following steps:
1. Click on the taskbar.
If you need to restart your computer after software (re)installation or because it is not
responding, select the Restart option in step 3 below.
2. Click Shut Down Computer to display the shutdown popup window shown
below.
3. Click Turn Off to complete the shutdown sequence.
If the system does not power off, then press and hold the power button for over
4 seconds.
See “Using Power Management Options” on page 53.
You can also perform a soft boot by saving your files and pressing
to pop-up the “Windows Task Manager” window. Click Shut Down > Restart.
You can perform a cold boot by pressing the power button for more than 4 seconds to
turn the computer off, waiting more than 5 seconds, and then pressing the power button
to turn the computer on.
The power button has several functions other than just turning on and off your
computer, see “Using Power Management Options” on page 53.
+
+
Using Your Computer for the First Time 15
Using the LCD Display
This section will discuss using/changing the LCD display:
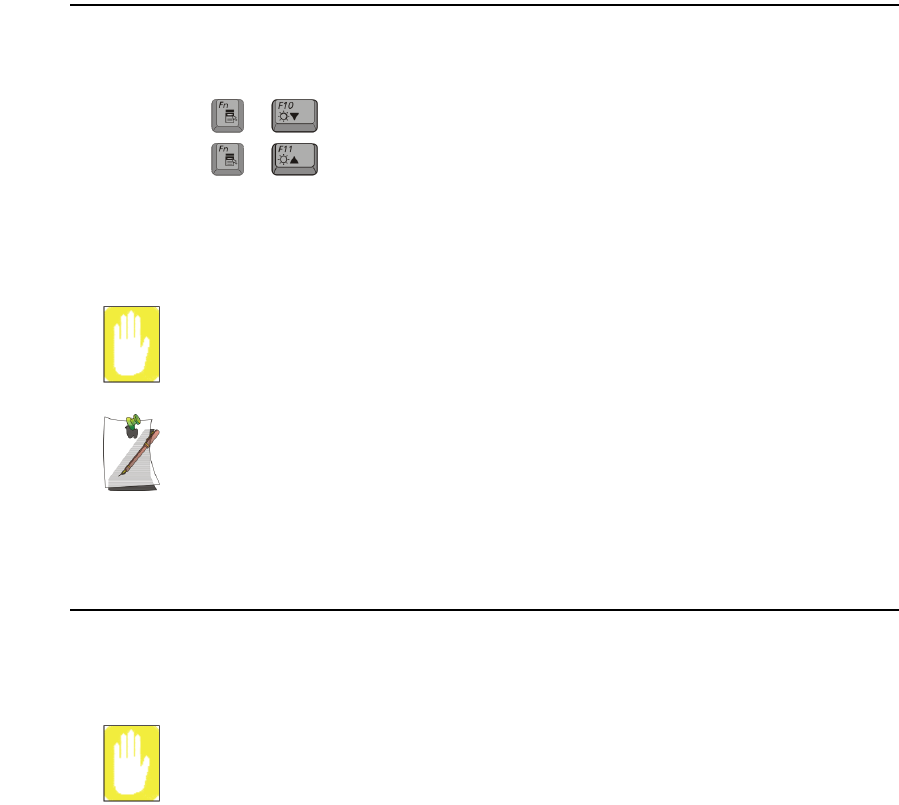
The LCD display brightness adjustment is divided into 8 levels.
•The key combination decreases LCD brightness.
•The key combination increases LCD brightness.
The LCD display will automatically dim when you remove AC power to conserve
battery power. If required, adjust the LCD brightness to a higher level when you are on
battery power, however this will decrease battery life.
LCD Cleaning:
Cleaning the LCD display should only be done with a soft cloth dampened with
denatured alcohol or a proprietary LCD screen cleaner.
Even if you change the default LCD display brightness settings, the defaults
listed above will be restored once you power off and then back on.
Notice: The limits of LCD manufacturing technology allow a maximum of 10
abnormal/bad pixels.
Tips for Using Your Computer
The following information helps you avoid potential problems as you use your
computer:
Do not try to disassemble your computer. Opening the system chassis voids
your warranty. Only an authorized manufacturer service center can replace or
add any parts inside the chassis.
•Follow all the instructions and cautions in your computer user documentation.
•The LCD display has a polarized surface and can be damaged easily. To
prevent damage, avoid touching the LCD display screen.
•Because a notebook computer is small and has restricted air flow around
components, it is more likely to overheat than a desktop computer. A fan inside
your computer runs when needed to help eliminate heat. Make sure the fan vent
on the right side of your computer is not blocked when you use the computer.
Occasionally check the vents and remove any accumulated dust on the outside.
+
+

16 Users Manual
•Use only approved AC adapters, auto adapters, memory modules and other
options.
•Avoid using or storing the computer in extremely hot or cold areas, such as a
car on a hot day. Keep the computer away from heaters and out of direct
sunlight. Exposure to excessive heat may damage computer components.
If you have left your computer in a hot place, let it cool down slowly to room
temperature (with the LCD panel open) before using it.
•Do not remove the memory-module compartment door, or try to install a
memory module when the computer is on.
(For information on installing a memory module, see “Installing a Memory
Module” on page 62.)
•Set up your computer work area to avoid physical strain. Sit with your back
straight and supported by your chair. Adjust your chair or work table so that
your arms and wrists can remain in a relaxed position, parallel with the floor.
Avoid bending or twisting your wrists as you work. Your hands should “float”
slightly above the keyboard. Refer to a book on office ergonomics for more
information on setting up your work area.
•Take frequent breaks from working at the computer to rest your eyes and
stretch your muscles.
•Remember to save your data files frequently and to make backup copies of your
files.
Travelling with Your Computer
Air Travel
If you are travelling by air, follow these tips:
•Take the computer with you as carry-on luggage. Do not check the computer
with your baggage.
•Allow the computer and disks to go through the X-ray security devices. Do not
hand-carry disks through the walk-through metal detectors, which can cause
loss of data.
•Make sure that the battery is charged or the power cord is easily accessible.
You may be required to turn on the computer for airport security personnel.
•Be prepared to turn off the computer during take off and landing.
Using Your Computer for the First Time 17
Locking your Computer
As a precaution when you are travelling you should keep your computer as safe as
possible. An option to do this is the Security Lock System. Follow the Security Lock
System manufacturers instructions for specific installation and use.
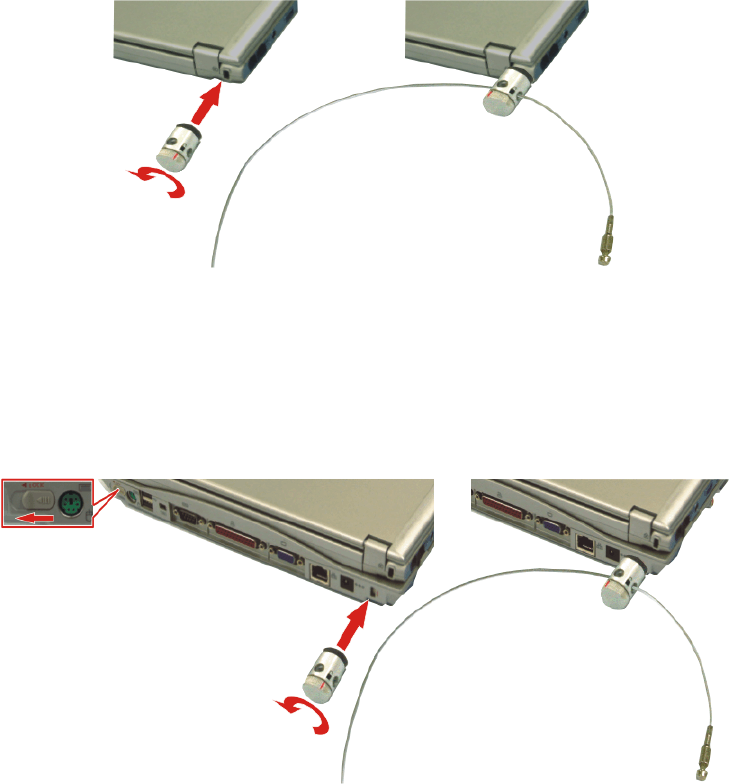
There are two locking ports for your system. One is for the Notebook alone and the
other locks the Notebook to the docking station and prevents the docking release levers
from operating.
To lock the Notebook Only:
1. Insert the lock as instructed by the manufacturer.
2. Secure to a strong platform as instructed by the manufacturer.
To lock the Notebook and Docking Station:
1. If you are Dock your Notebook if not already done.
2. Slide the Docking Bay Security Lock latch to the left to open the Security Port
opening. Insert the Security Lock as instructed by the manufacturer. This will lock
the Notebook to the Docking station and disable the docking release levers.
3. Secure to a strong platform as instructed by the manufacturer.
To Lock
From Lock
To Lock
From Lock

18 Users Manual
Handling Spills
Sweet liquids leave a sticky residue that may jam the keyboard despite your
efforts to dry it.
Some liquids damage the polarized LCD screen. If your screen is damaged,
contact your authorized manufacturer’s service center for a replacement.
Do not spill anything on your computer. The best way to avoid spills is to not eat or
drink around your computer. If you do spill something on your computer, turn it off
and unplug it immediately, then do the following:
•If you spill liquid on the keyboard, drain as much of the liquid from the
keyboard as possible. Be careful not to let the liquid drip onto the LCD panel.
Allow the system to dry for several days before trying to use it.
•If you spill liquid on an external keyboard or keypad, unplug it and drain as
much of the liquid as possible. Allow the keyboard to sit at room temperature
for a full day before trying to use it.
•If you spill liquid on the LCD panel, clean it immediately with a soft cloth and
denatured alcohol or a proprietary LCD screen cleaner. Do not use water,
window cleaner, acetone, aromatic solvent, or dry, rough towels to clean it.
Using the Keyboard 19
Using the Keyboard
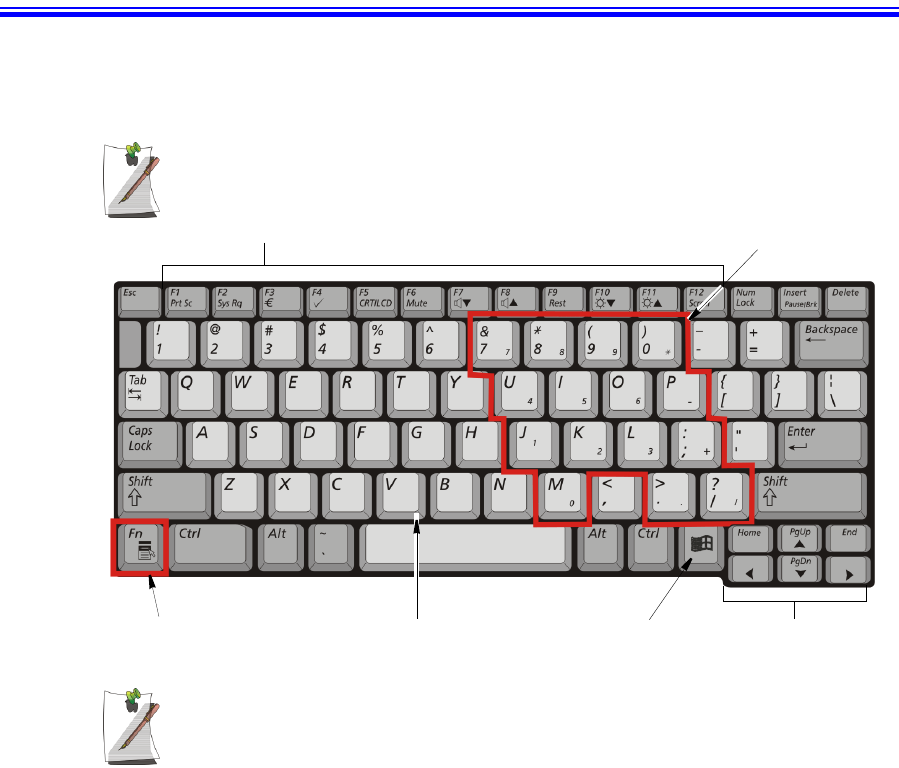
Your computer has an 81-key keyboard. By pressing designated key combinations, you
can have access to all the key functions of a full-sized keyboard.
Keyboard configuration is different from one country to another, however the
operation of the keys and key combinations remain the same.
Although the layout of the keys on your computer’s keyboard is different from
that on a desktop computer’s keyboard, the keyboard feels like a full-sized
keyboard when you use it.
Function & Special purpose Hot Keys Embedded Numeric Keypad
Alphanumeric KeysFunction/Application Key Cursor/Screen Control Keys
Windows Key
20 Users Manual
The keys on the keyboard can be grouped into the following categories:
•Full-sized Alphanumeric typewriter keys are arranged like a standard
typewriter keyboard [QWERTY] and are used for text entry. The Windows key
opens Windows menus and performs other special functions.
•F1 to F12 and the Cursor/Screen Control keys, when pressed together with
key, enable special functions.
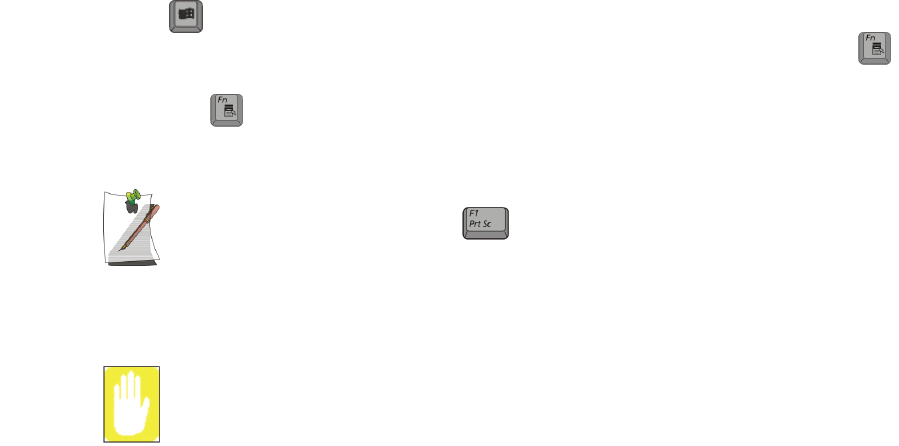
•The Application/Fn key is used for quick access to shortcut menus and help
assistants in Windows as well as standard Fn key combinations.
The F1 to F12 keys are assigned to different functions depending on the
program in use, however the key is usually assigned to program help.
•Cursor and Screen control keys move the cursor. They may perform other
functions, depending on your software.
Do not allow liquid to drip into the keyboard or you may damage the keyboard.
To clean the computer keyboard, use slightly damp cotton swabs. Scrub the keys and
the surface around the keys.