Samsung Electronics Co SQ10WL Mini PCI Card in Personal Computer User Manual PP 61 to 70
Samsung Electronics Co Ltd Mini PCI Card in Personal Computer PP 61 to 70
Contents
PP 61 to 70
Using System Security 51
Using System Security
This section describes the security options provided with your computer.
System Passwords
The computer provides two levels of password security: administrative-level
(supervisor) and user-level (user). Either password prevents unauthorized access to the
computer. The supervisor password enables full access to all System Setup fields. The
user password enables full access to only the Set User Password and Password on
boot security fields and read access to all other System Setup fields.
If multiple users have access to the computer (such as in a network environment), a
supervisor password can prevent unauthorized access to certain security options.
If You Forget Your Password
It is very important that you do not forget your password. If you do, you cannot access
your system. Write your password down and keep it in a safe place. If you do forget
and cannot find the written note, you will have to contact the reseller of your computer
and possibly take or send it in to them so that you can access the computer again.
Creating a Password
To create a password follow the instructions below:
1. At startup, press to open System Setup.
2. Use to select the Security menu.
Precautions for Password Entry:
You can enter letters or numbers, but you cannot use the function keys, such
as the Shift key. Your computer does not distinguish between capitalized and
lowercase letters in your password. As you type the password, the cursor
moves but your password does not appear on the screen. Choose the type of
password security that is appropriate for your work. If you want to set a user
password, you must set a supervisor password first.
3. Use to select Set Supervisor Password or Set User Password.
4. Press Enter. The Set Password dialog box appears.
5. Type a password from four to eight characters.
52 Users Manual
6. Press Enter after you have typed your password. The computer prompts you to
reenter your password for verification.
7. Type your password again and press Enter. A message appears telling you that the
changes have been saved.
8. Press Enter again to return to the Security menu.
9. Press to go to the Exit menu.
10. Press Enter or <F10> to exit and save your changes.
11. Press Enter again to restart the computer.
Deleting a Password
To delete the password follow the steps below:
1. At startup, press to open System Setup.
2. Type your password when prompted and press Enter.
3. Use to select the Security menu.
4. Use to select Set Supervisor Password or Set User Password.
5. Press Enter. The computer prompts you to enter the current password.
6. Press Enter. The computer prompts you to enter a password. Do not type anything.
7. Press Enter. The computer prompts you to re-enter the password. Do not type
anything.
8. Press Enter. A message appears telling you that the changes have been saved.
9. Press Enter again to return to the Security menu.
10. Press to go to the Exit menu.
11. Press Enter or <F10> to exit and save your changes.
12. Press Enter again to restart the computer.
To enable the prompt, select the option Enabled in the Password on boot field
in System Setup.

Using Power Management Options 53
Using Power Management Options
Your computer includes Power Management options that can help the battery charge
last longer and extend the life of the battery. Power-management options will slow
down or shut off system components when the components are not being used.
Power management may slow down system performance. Your computer runs fastest
with the power cord attached, when power management is disabled.
In the next sections, basic and advanced methods of power management will be
discussed.
Basic Power Management Schemes
This section discusses the basic schemes of power management when the computer is
operating on battery power or using AC power.
Standby vs. Hibernation
Standby unlike hibernation mode does not store unsaved information on your
hard disk; it's stored only in the computer memory. If there is an interruption in
power, the information is lost. So before putting your computer on standby,
you should save your files.
Changing Devices:
Do not change PC Cards while in standby or hibernate modes.
To enter the power management window complete the following:
1. Click Start > Control Panel > Performance and Maintenance.
2. Click icon to display the Power Options Properties window.
54 Users Manual
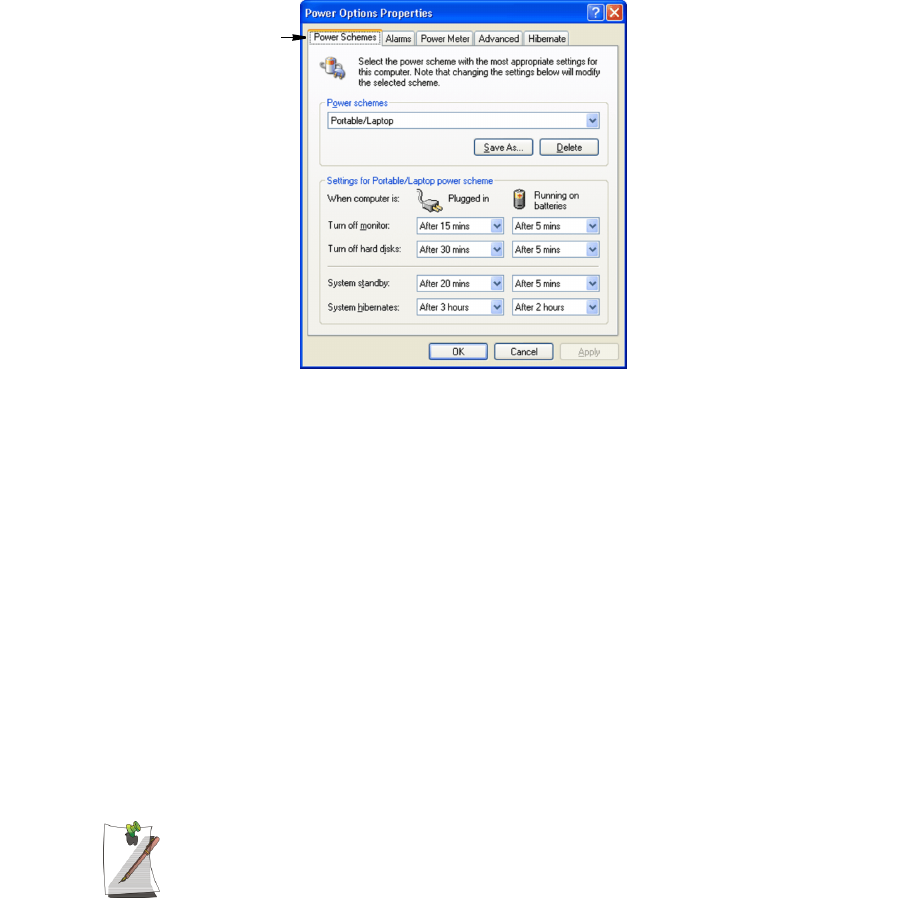
3. Click the Power Schemes tab to display the basic power management options.
4. Select the time that you wish each of the following actions to occur in Battery and
AC power mode.
•Turn off monitor:
•Turn off hard disks:
•System standby:
•System hibernates:
Turning off the monitor and HDDs will save a substantial battery power, therefore
when in battery only mode select the shortest time practical.
a Hibernate Mode (Power Management or Manual Method)
When hibernation is used, your computer turns off and when you power up again,
everything is restored exactly as you left it—including programs and documents
you may not have saved or closed. Everything in memory gets saved to the HDD,
and the monitor and hard disk get turned off.
Frequent Interruptions:
If you experience frequent interruptions, you might also consider putting your
computer into automatic hibernation after a specified number of minutes using
the power management options.
Power Schemes Tab
Using Power Management Options 55
a Standby Mode (Power Management or Manual Method)
Standby is used mainly for conserving battery power in your notebook computer. It
also gives you the benefit of getting right back to your work without waiting for the
computer to restart. Standby turns off your monitor and hard disks, placing your entire
system in a low-power state. When you return to your computer, restores your desktop
exactly as you left it. It is recommended that you do not enter standby mode with less
than 20% battery power.
5. Click OK to set your power management options and close the window.
Rest Key:
The manual key combination will not activate Standby or
Hibernate modes whilst you are playing a multimedia program or have an
active USB device connected.
Advanced Power Management Schemes
This section discusses the advanced power management schemes. There are three
methods that you can use to conserve power.
To enter the power management window complete the following:
1. Click Start > Control Panel > Performance and Maintenance.
2. Click icon to display the Power Options Properties window.
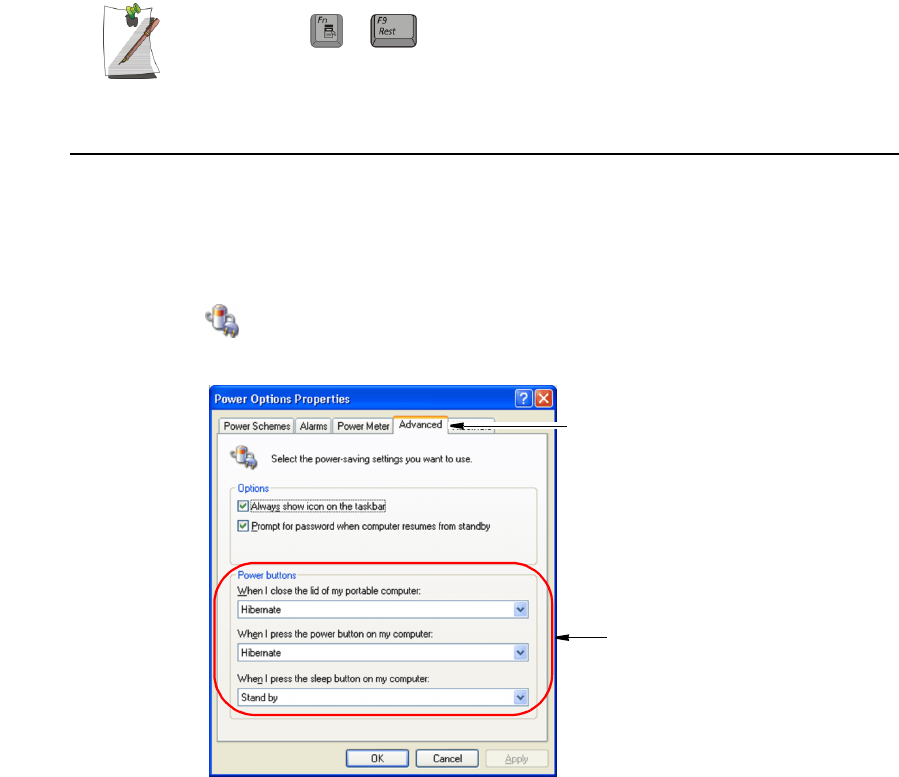
3. Click the Advanced tab to display the advanced power management options.
+
Advanced Tab
Power, Sleep and Lid Button
Programming Windows

56 Users Manual
4. Select the mode (Do nothing/Ask me what to do/Standby/Hibernate/Shut
down) assigned to the Power button and/or Rest key. Also select the action
(Do nothing/Standby/Hibernate) associated with closing the computer lid.
The "Rest" key is assigned to the key combination. See “Basic
Power Management Schemes” on page 53 for a better understanding of
Standby and Hibernate modes.
5. Click OK to set your power management options and close the window.
You can return to normal operation after you have used one of the “Power
Management” buttons by quickly pushing and releasing the Power button.
+

Installing a New HDD 57
Installing a New HDD
This section discusses installing a new HDD and other basic HDD operations.
Installing/Reinstalling a HDD
To install a new HDD you must contact your local service representative. He will do
the physical change of the drive. You should complete the instructions below before
you go to the service center.
See the information below before you install your HDD:
•Back up data files of your old hard drive.
•For system boot with CD-ROM, under the Boot menu in System setup, set
Bootable CD Check to Enabled and set Boot Device Priority is ordered starting
from the [DVD/CD-ROM].
When you are ready to install the new HDD use the Recovery CD-ROM to install the
device driver.
(Re)Installing Windows and Device Drivers
Use the System Recovery CD to (re)install the Operating System and System
Software CD to (re)install the device drivers.
The System Recovery CD is used to (re)install the OS and System Software
to a new HDD or recover from a system crash.

58 Users Manual
Video Features and Configuration
Your computer includes a TFT LCD or active-matrix display. The capabilities of the
screen plus the video drivers installed on the computer determine the quality of the
image your LCD can display.
The following sections describe the display capabilities of your computer.
Resolution and Colour Depth
The resolution of the LCD is the sharpness of the image it can display. Resolution is
measured by the number of pixels (individual dots) displayed on the entire screen. In
general, the more pixels the LCD can display, the better the image.
Your LCD screen is XGA. In XGA, the screen has a maximum display of 1024x768,
about 786,432 pixels.
The number of colours the LCD can display is measured by how many bits the LCD
uses to represent each pixel:
•16-bit colour can support 64 K (65,536) colours.
•32-bit colour can support 16 M (16.8 million) colours.
All these video modes can be displayed on an external monitor. However, if you
disconnect an external monitor that was attached to your computer and then start the
computer, the LCD may revert to a different resolution than the one you chose for the
external monitor.
Configuring Display Features
The following sections describe how to configure the display settings on your
computer.
Display Resolution Notes:
When Windows XP is initially installed it will automatically adjust the resolution
to maximum available.

Video Features and Configuration 59
Changing Colour Depth and Resolution
To change the colour depth and resolution of your LCD or external monitor:
1. Click Start > Control Panel > Appearance and Themes.
2. Click icon . The Display Properties window appears.
3. Click the Settings tab. The Settings screen appears.
4. Click the Advanced tab.
5. Click the Intel(R) Graphics Technology tab.
6. Click the Graphics Properties Button.
7. To change "Colors" and "Screen Area", select one from the appropriate drop down
menu in the Settings box.
8. Click Apply
9. Click OK if satisfied with the changes.
Using Dual View Mode
Single View mode is the basic display mode which displays same view on all the
display devices connected to a system.
Dual View mode is the “Extended screen mode” supported in Windows, which
displays separate views on each display devices connected to a system.
The default setting on your system is Single View mode.
Setting Dual View Mode
To set Dual View mode on your system:
1. Connect peripheral display device such as monitor or TV to your system and start
the system.
2. Select Start > Control Panel > Appearance and Themes.
3. Click icon. The Display Properties window appears.
4. Click the Settings tab. The Settings screen appears.
5. Click the Advanced tab.
6. Click the Intel(R) Graphics Technology tab.
7. Click the Graphics Properties Button.

60 Users Manual
8. If the external monitor is correctly attached it will be displayed as an icon in the
left hand side of the Devices tab.
To change the Primary device or configuration on your system:
1. Click on the icon for the device or configuration you wish to change to.
2. Click Apply
3. Click OK if satisfied with the changes otherwise they will return to previous
selection in 15 seconds.
Return to Stand Alone Mode
To reset the system to Stand Alone mode:
1. Click on the Notebook icon in the left hand side of the Devices tab.
2. Click Apply.
3. Click OK.
Adjusting the LCD Display
You may wish to adjust the LCD (Liquid-Crystal Display) when you begin using your
computer. A TFT (Thin-Film Transistor) LCD does not require adjustment for contrast
because the contrast is set to remain at maximum.
To adjust the LCD:
•Press to decrease the display brightness.
•Press to increase the display brightness.
+
+