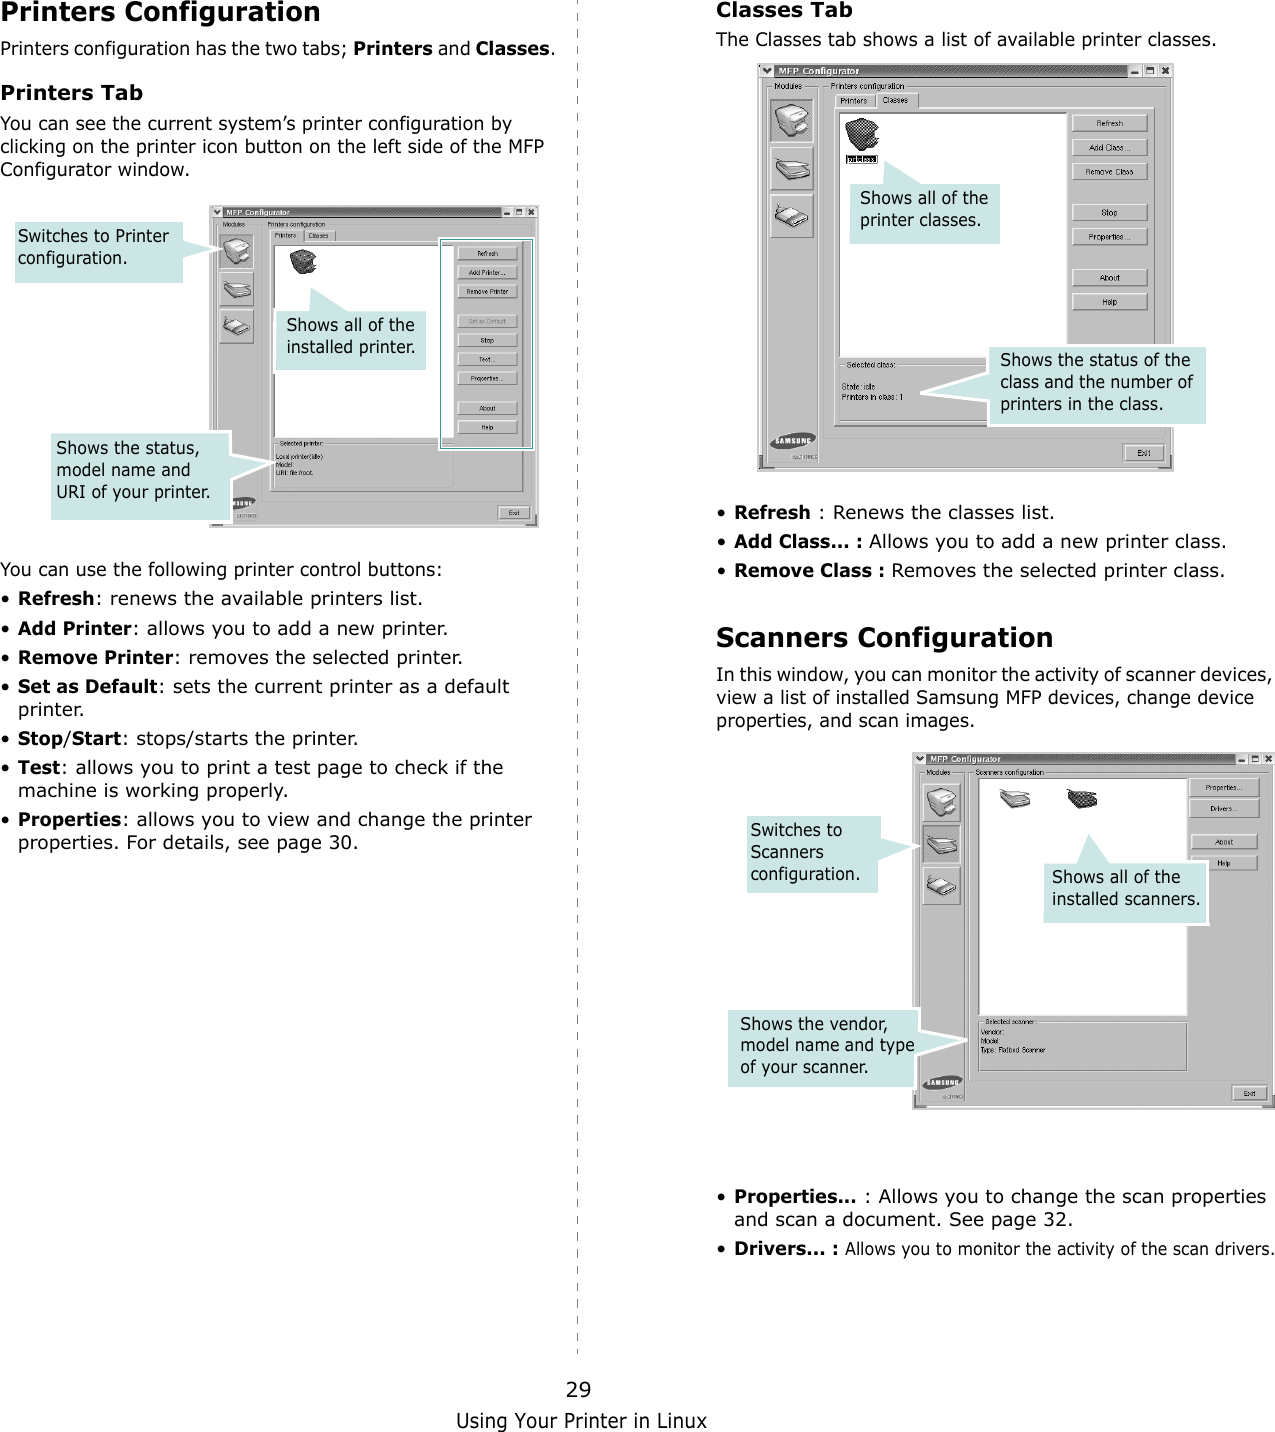
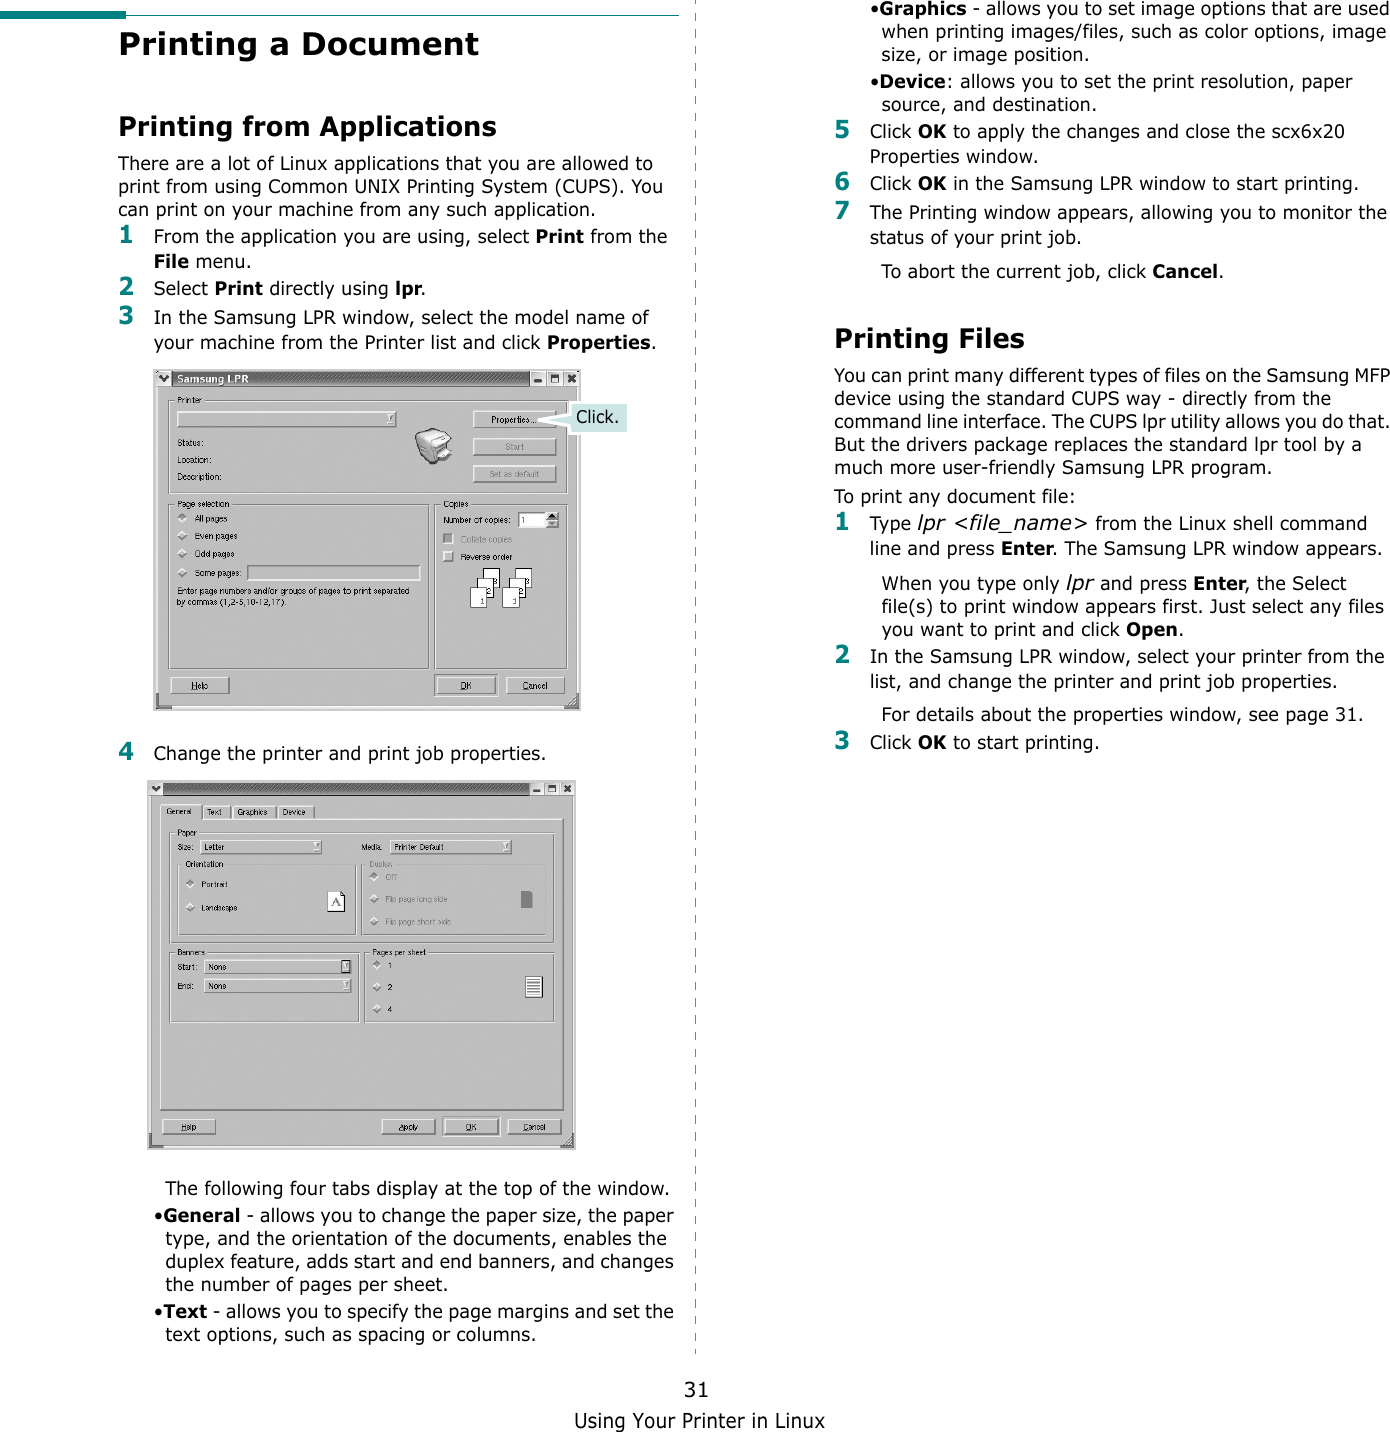
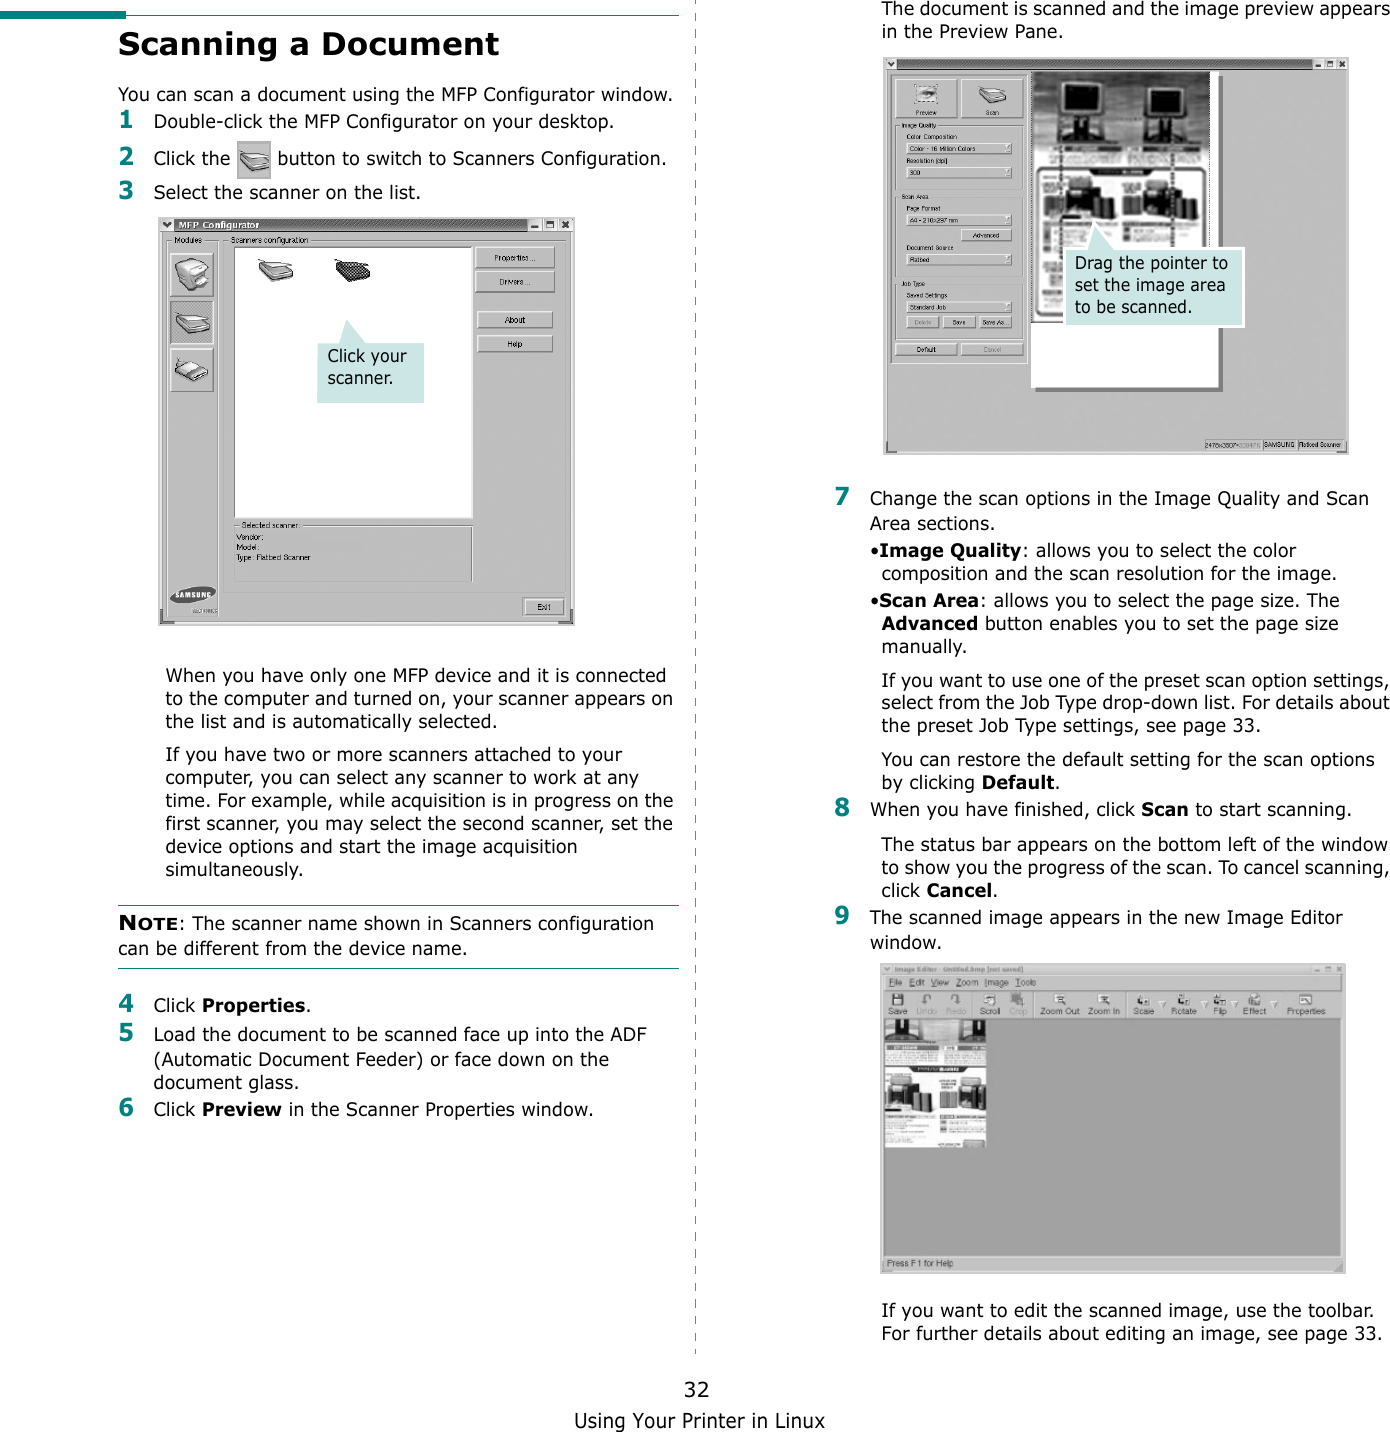
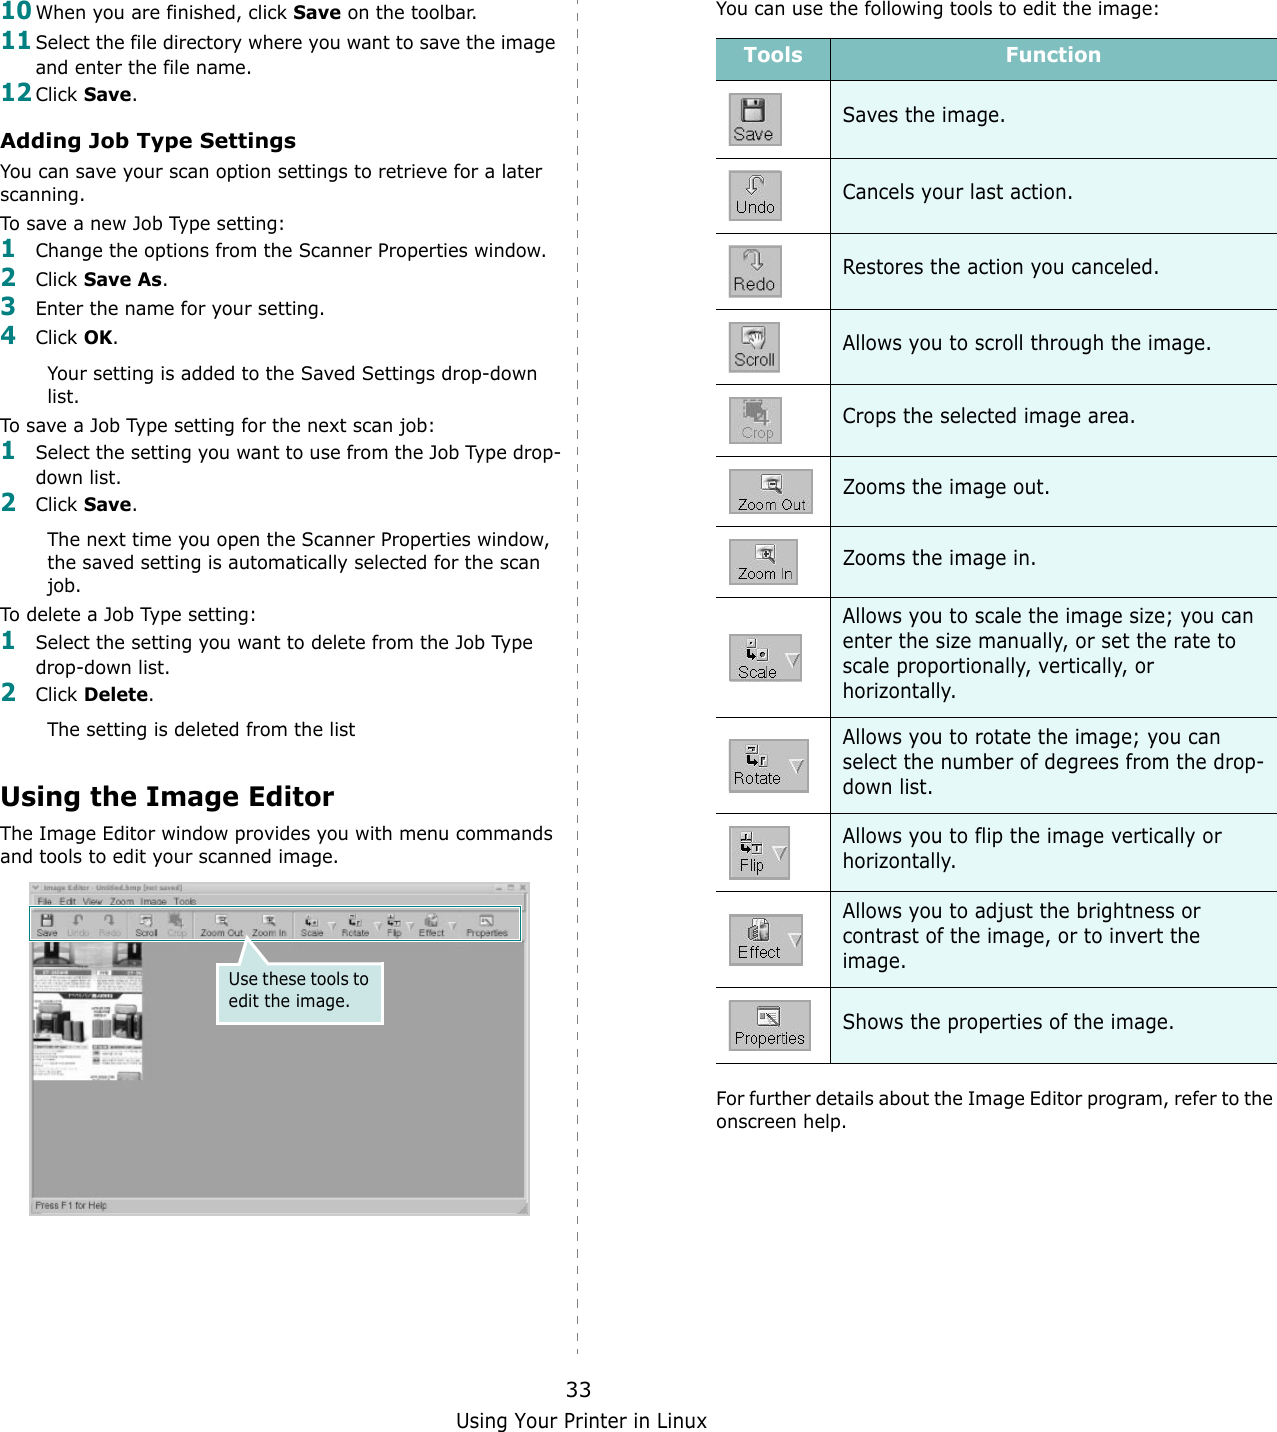
Samsung Electronics Co WT21MFF Laser Beam Printer User Manual 4x17 EN
Samsung Electronics Co Ltd Laser Beam Printer 4x17 EN
UserManual.wiki
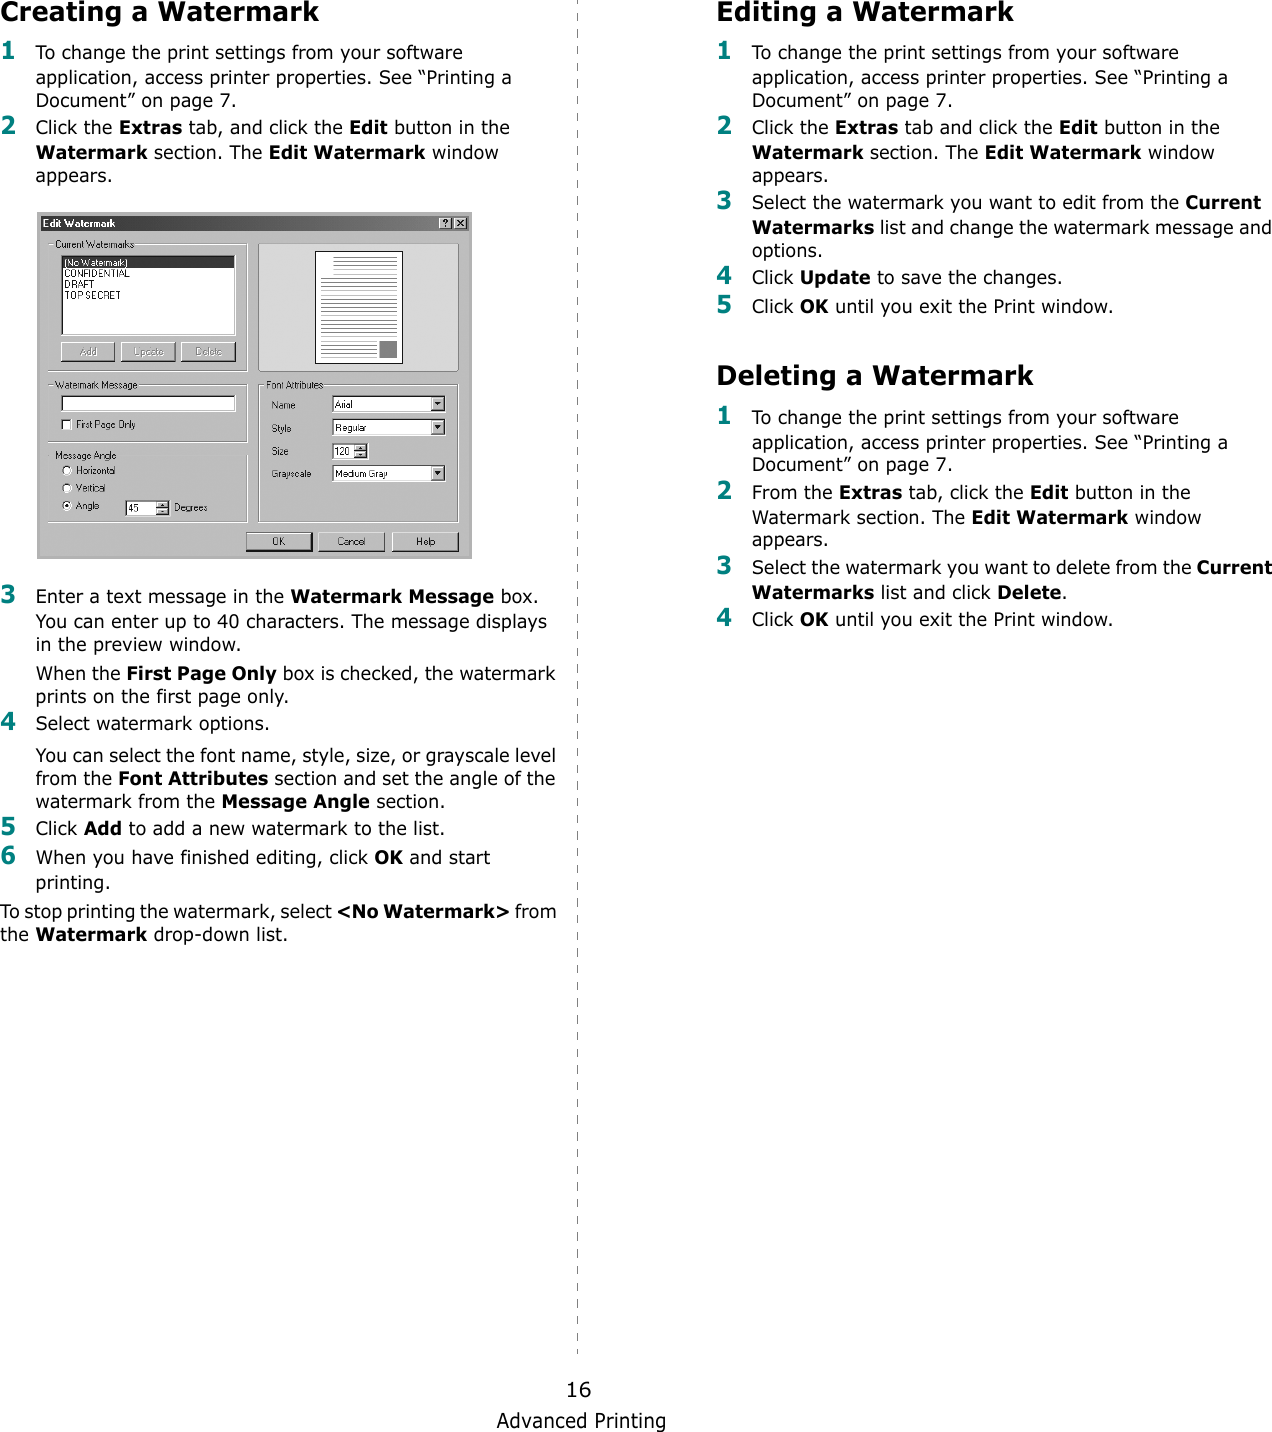
>
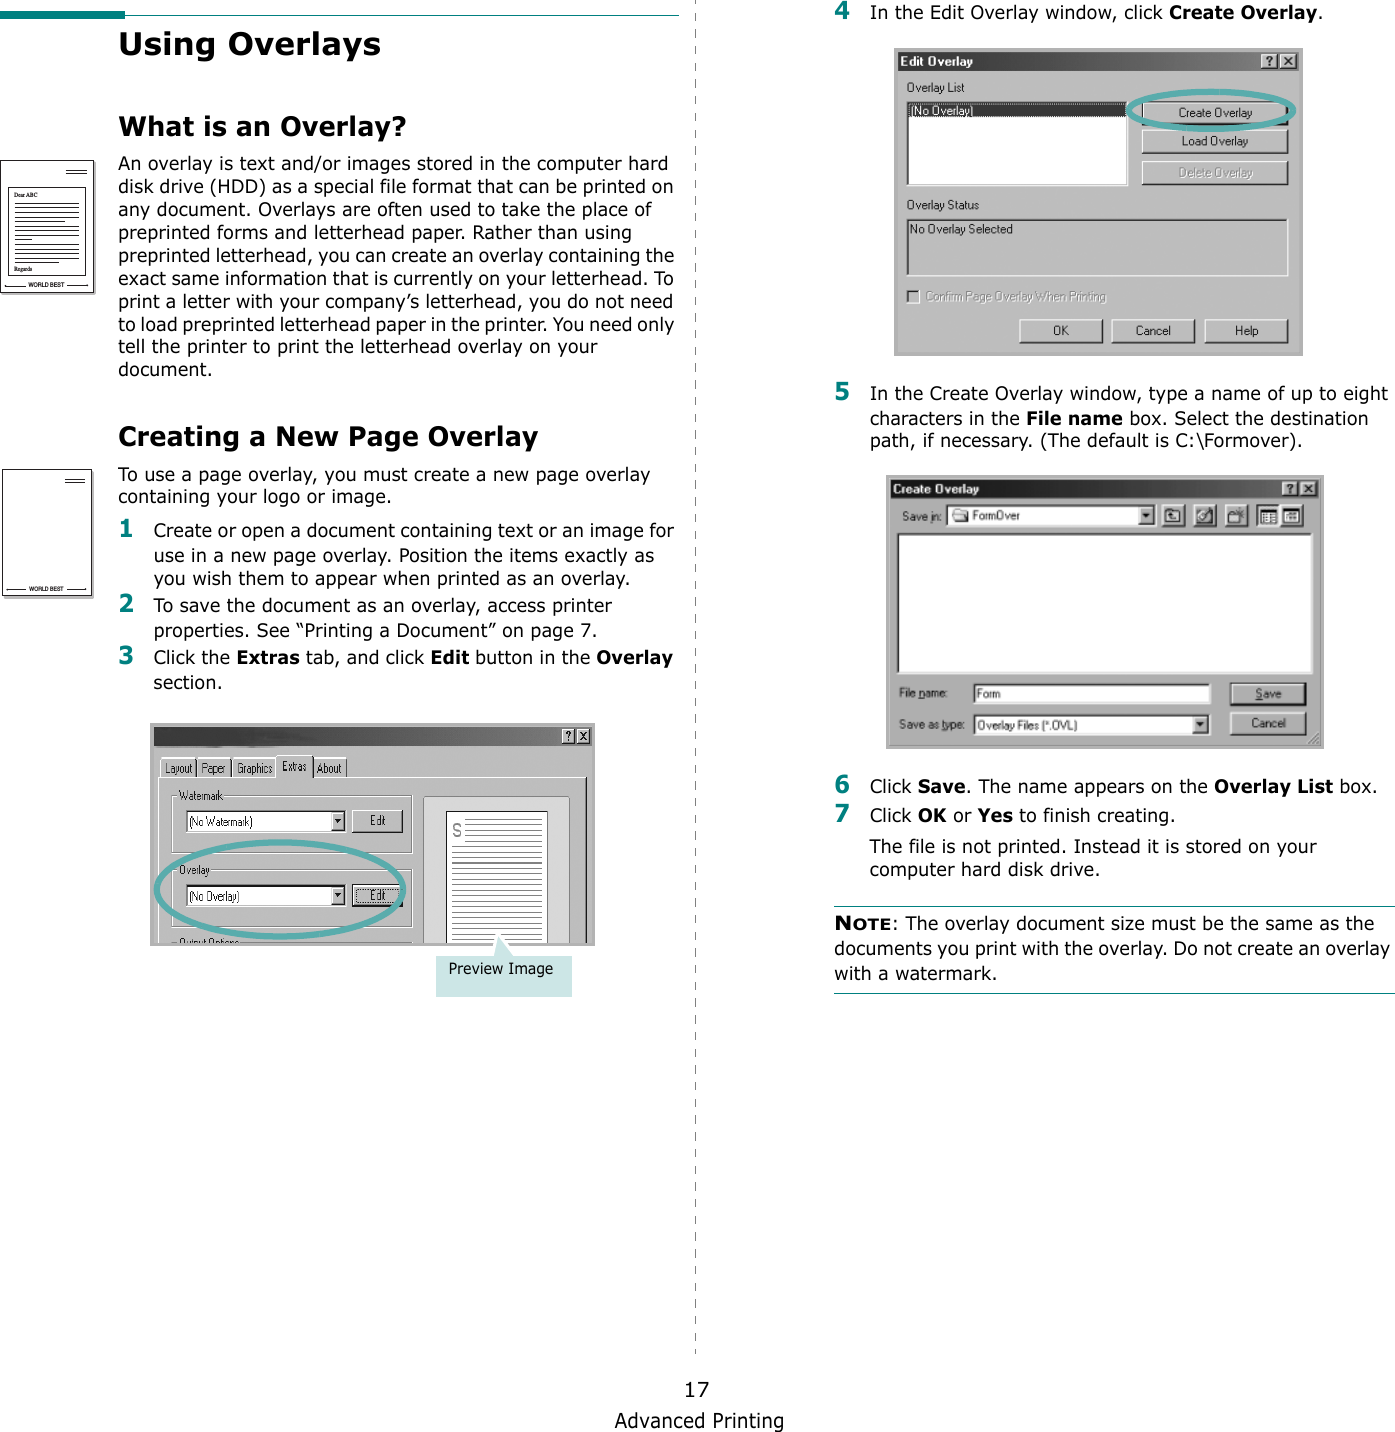
Samsung Electronics Co
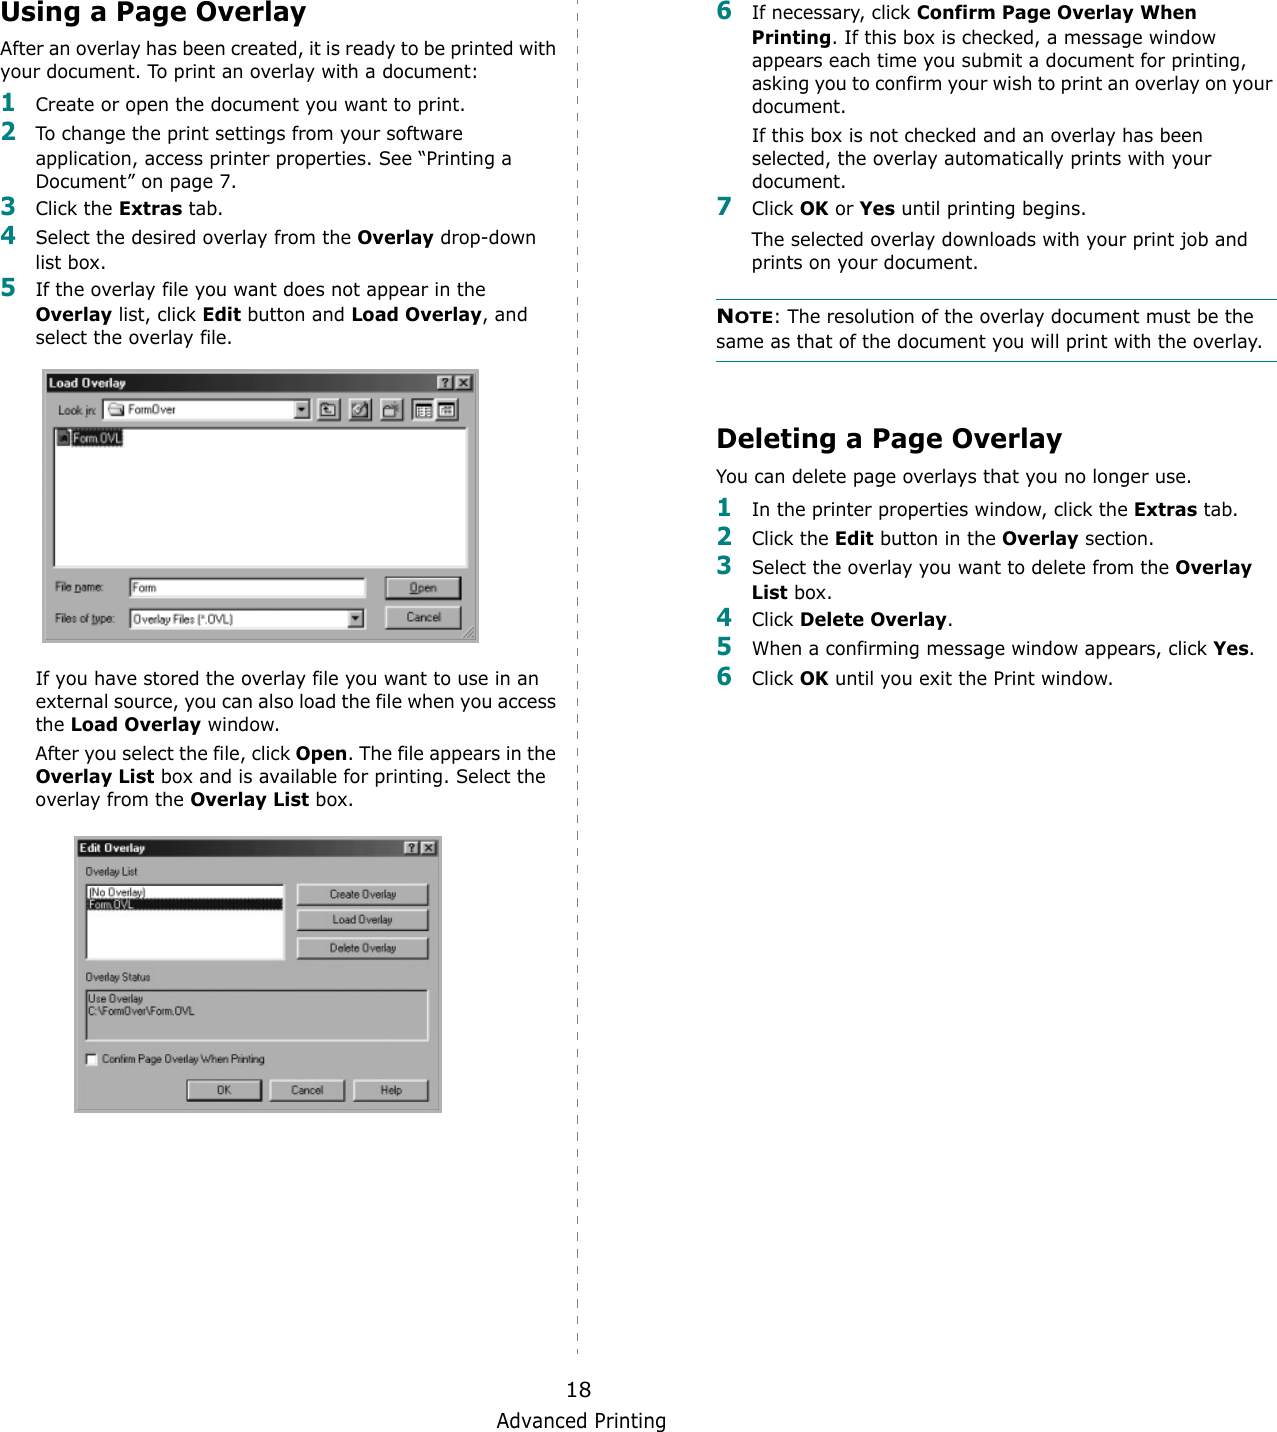
>
WT21MFF User Manual
>
Users Manual 2
Contents
1.
Users Manual 1
2.
Users Manual 2
Users Manual 2
Navigation menu
Upload a User Manual
Namespaces
Wiki Guide
HTML
PDF
Info
Views
User Manual
Discussion / Help
Navigation
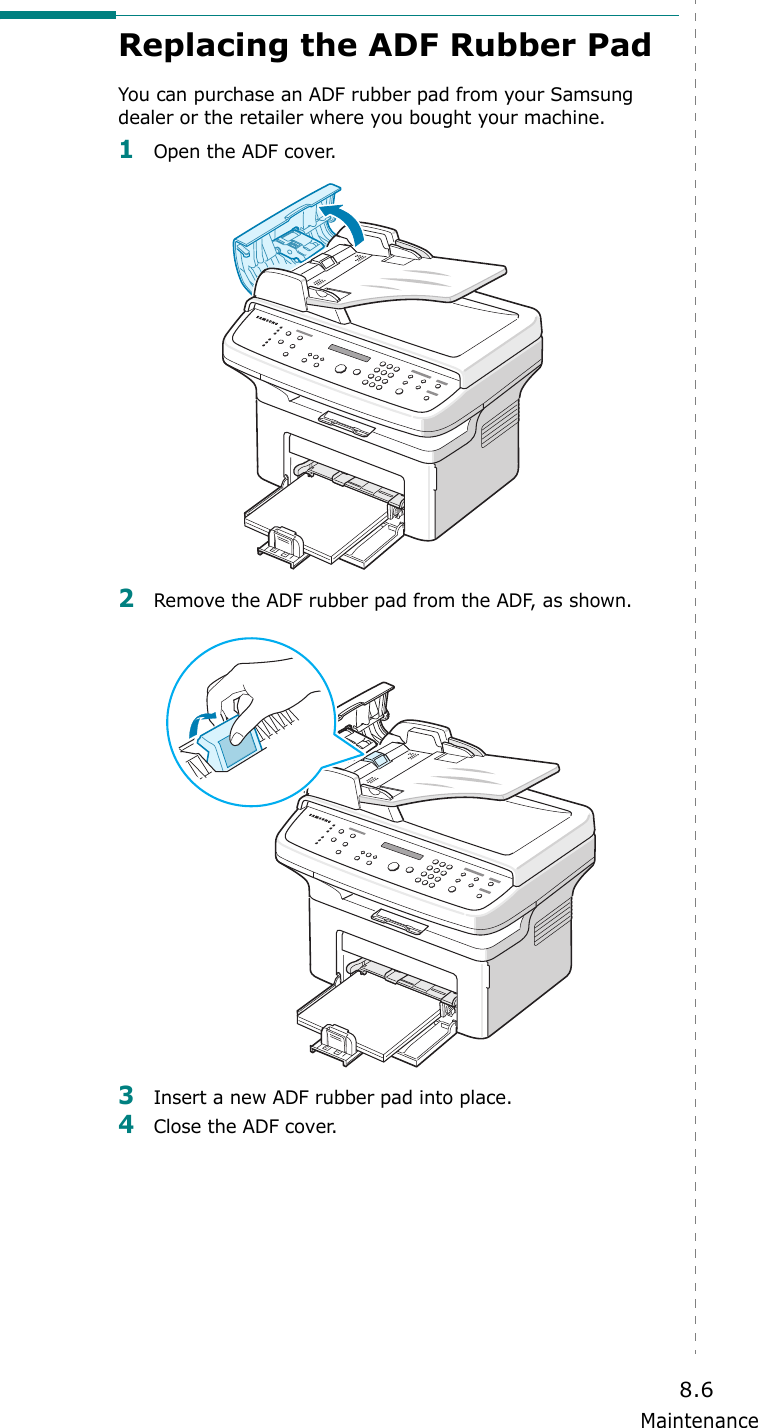
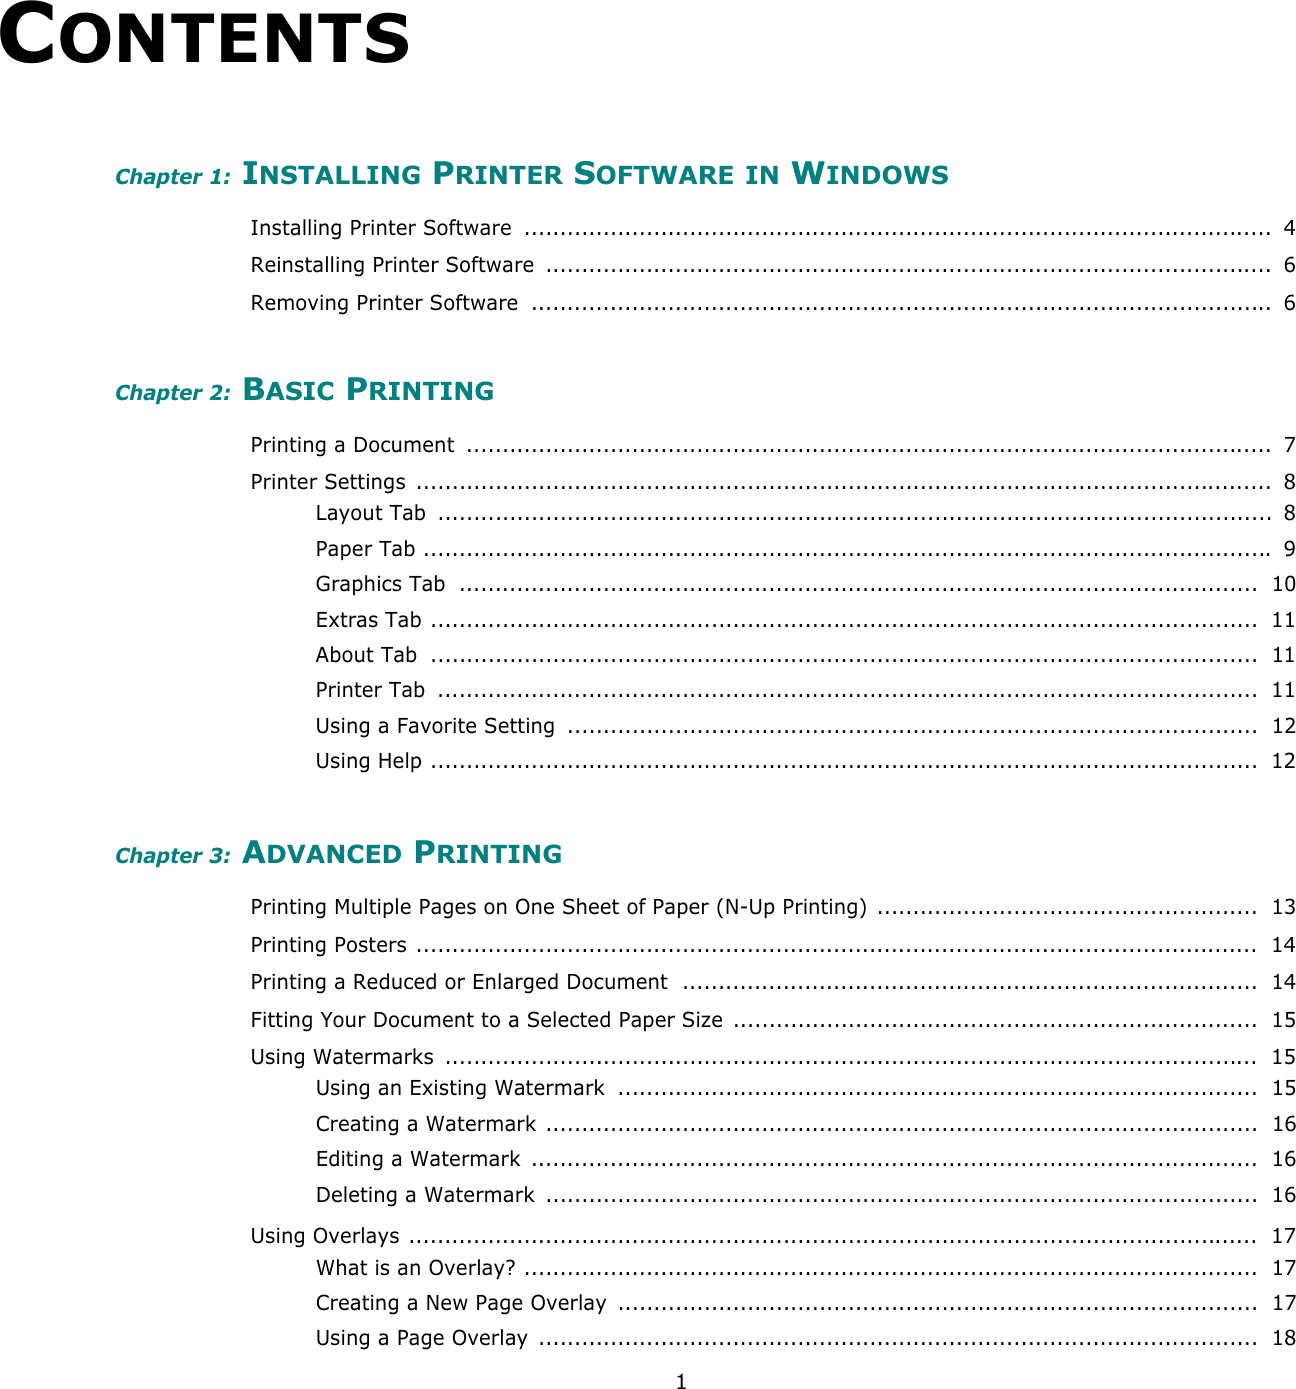
![Maintenance8.5Cleaning the DrumYou can clean the OPC drum of the toner cartridge manually or automatically.If there are streaks or spots on documents you print, the OPC drum of the toner cartridge may require manual cleaning.1Before starting the cleaning procedure, make sure that paper is loaded in the machine. 2Press Menu on the control panel until “Maintenance” appears on the top line of the display. The first available menu item, “Clean Drum”, displays on the bottom line.3Press Enter. The first available menu item, “Yes” displays on the bottom line.4Press Enter.The machine prints out a cleaning page. Toner particles on the drum surface are affixed to the paper. 5If the problem remains, repeat steps 1 through 4.6To return to Standby mode, press Stop/Clear.Ignoring the Toner Empty Message (Only for SCX-4521F)When the toner cartridge is nearly empty, the machine shows the “[Toner Empty]” message and continues printing except incoming faxes. In this case, incoming faxes are saved in memory.However, you can set the machine to print incoming faxes, even though print quality is not optimal.1Press Menu until “Machine Setup” appears on the display.2Press the scroll button ( or ) until “Ignore Toner” appears on the bottom line and press Enter.3Press the Scroll button ( or ) to select “On” or “Off”. Select “On” to ignore the [Toner Empty] message.Select “Off” to stop printing incoming faxes when the message appears. This is the default setting.4Press Enter to save the selection.5To return to Standby mode, press Stop/Clear.Consumables and Replacement PartsFrom time to time, you needs to replace the toner cartridge, roller, and fuser unit to maintain top performance and to avoid print quality problems and paper feed problems resulting from worn parts.The following items should be replaced after you have printed the specified number of pages:To purchase consumables and replacement parts, contact your Samsung dealer or the retailer where you bought your machine. We strongly recommend that these items be installed by a trained service professional, except for the toner cartridge (see “Replacing the Toner Cartridge” on page 8.4) and the ADF rubber pad (see “Replacing the ADF Rubber Pad” on page 8.6).Items Yield (Average)ADF rubber pad Approx. 20,000 pagesADF roller Approx. 50,000 pagesPaper feeding roller Approx. 50,000 pagesTransfer roller Approx. 50,000 pagesFuser unit Approx. 50,000 pages](https://usermanual.wiki/Samsung-Electronics-Co/WT21MFF.Users-Manual-2/User-Guide-544360-Page-1.png)
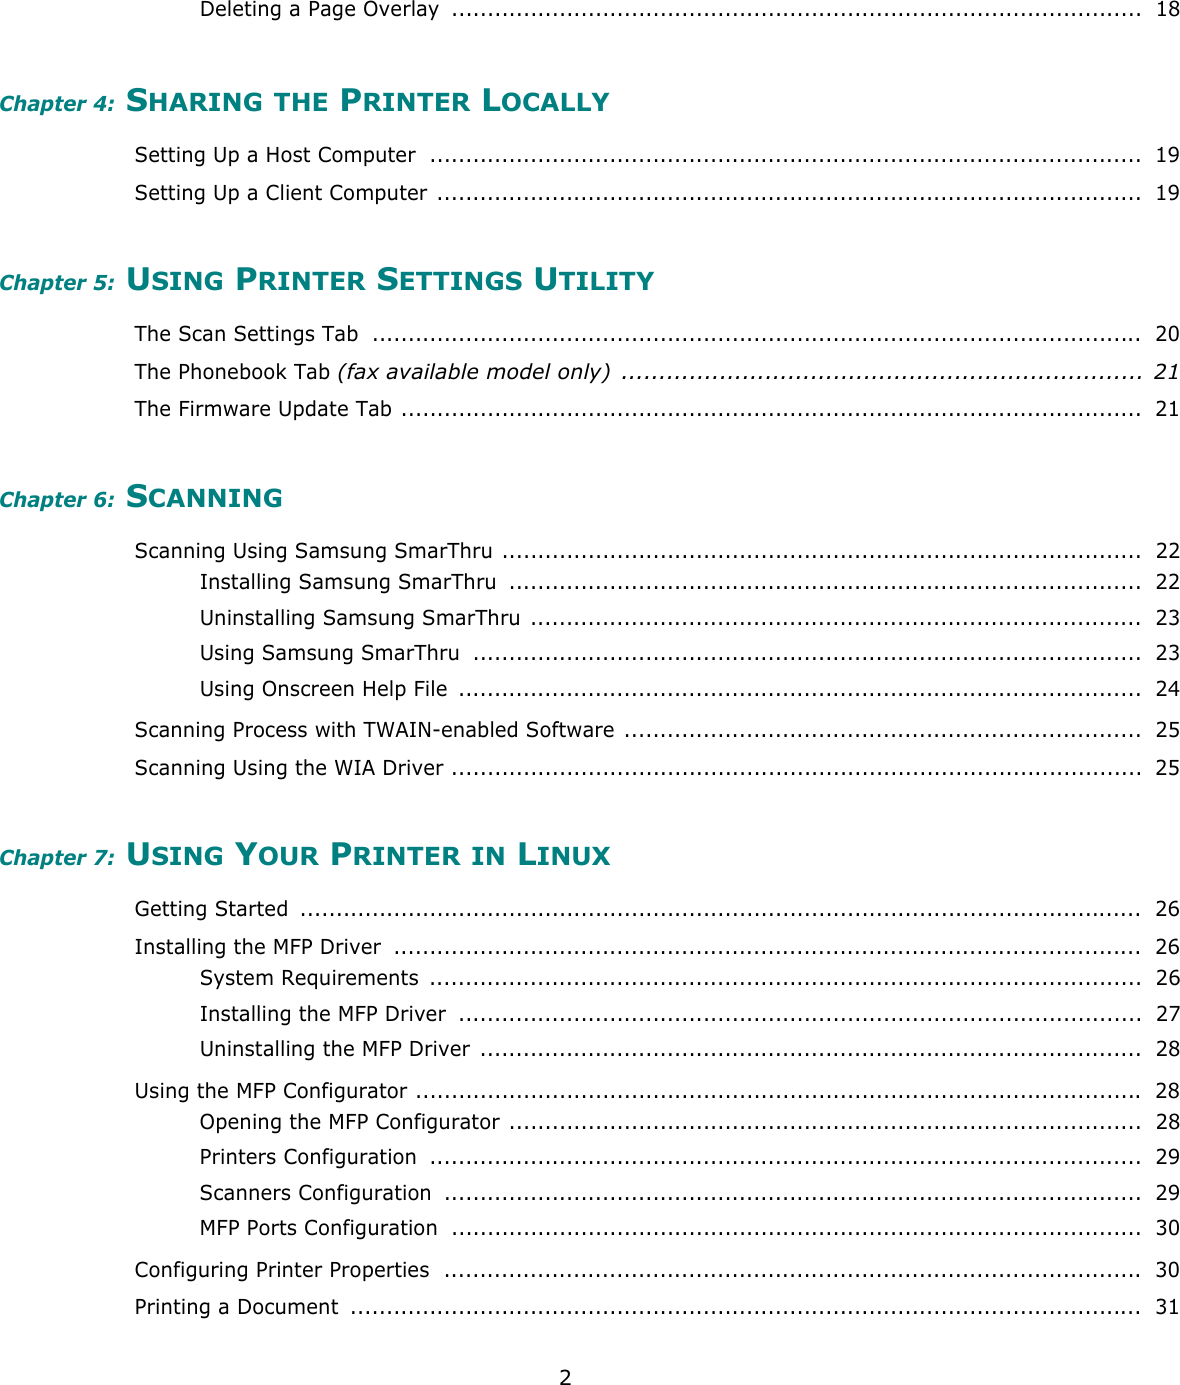
![Troubleshooting9.19TroubleshootingThis chapter gives helpful information for what to do if you encounter an error.This chapter includes:• Clearing Document Jams• Clearing Paper Jams• Clearing LCD Error Messages• Solving Other Problems• Common Linux Problems• Common Macintosh ProblemsClearing Document JamsWhen a document jams while passing through the ADF (Automatic Document Feeder), “[Document Jam]” appears on the display.Input Misfeed1Remove any remaining page(s) from the ADF.2Open the ADF cover.3Pull the document gently out of the ADF.4Close the ADF cover. Then load the removed page(s), if any, back into the ADF.NOTE: To prevent document jams, use the document glass for thick, thin, or mixed paper-type documents.](https://usermanual.wiki/Samsung-Electronics-Co/WT21MFF.Users-Manual-2/User-Guide-544360-Page-3.png)
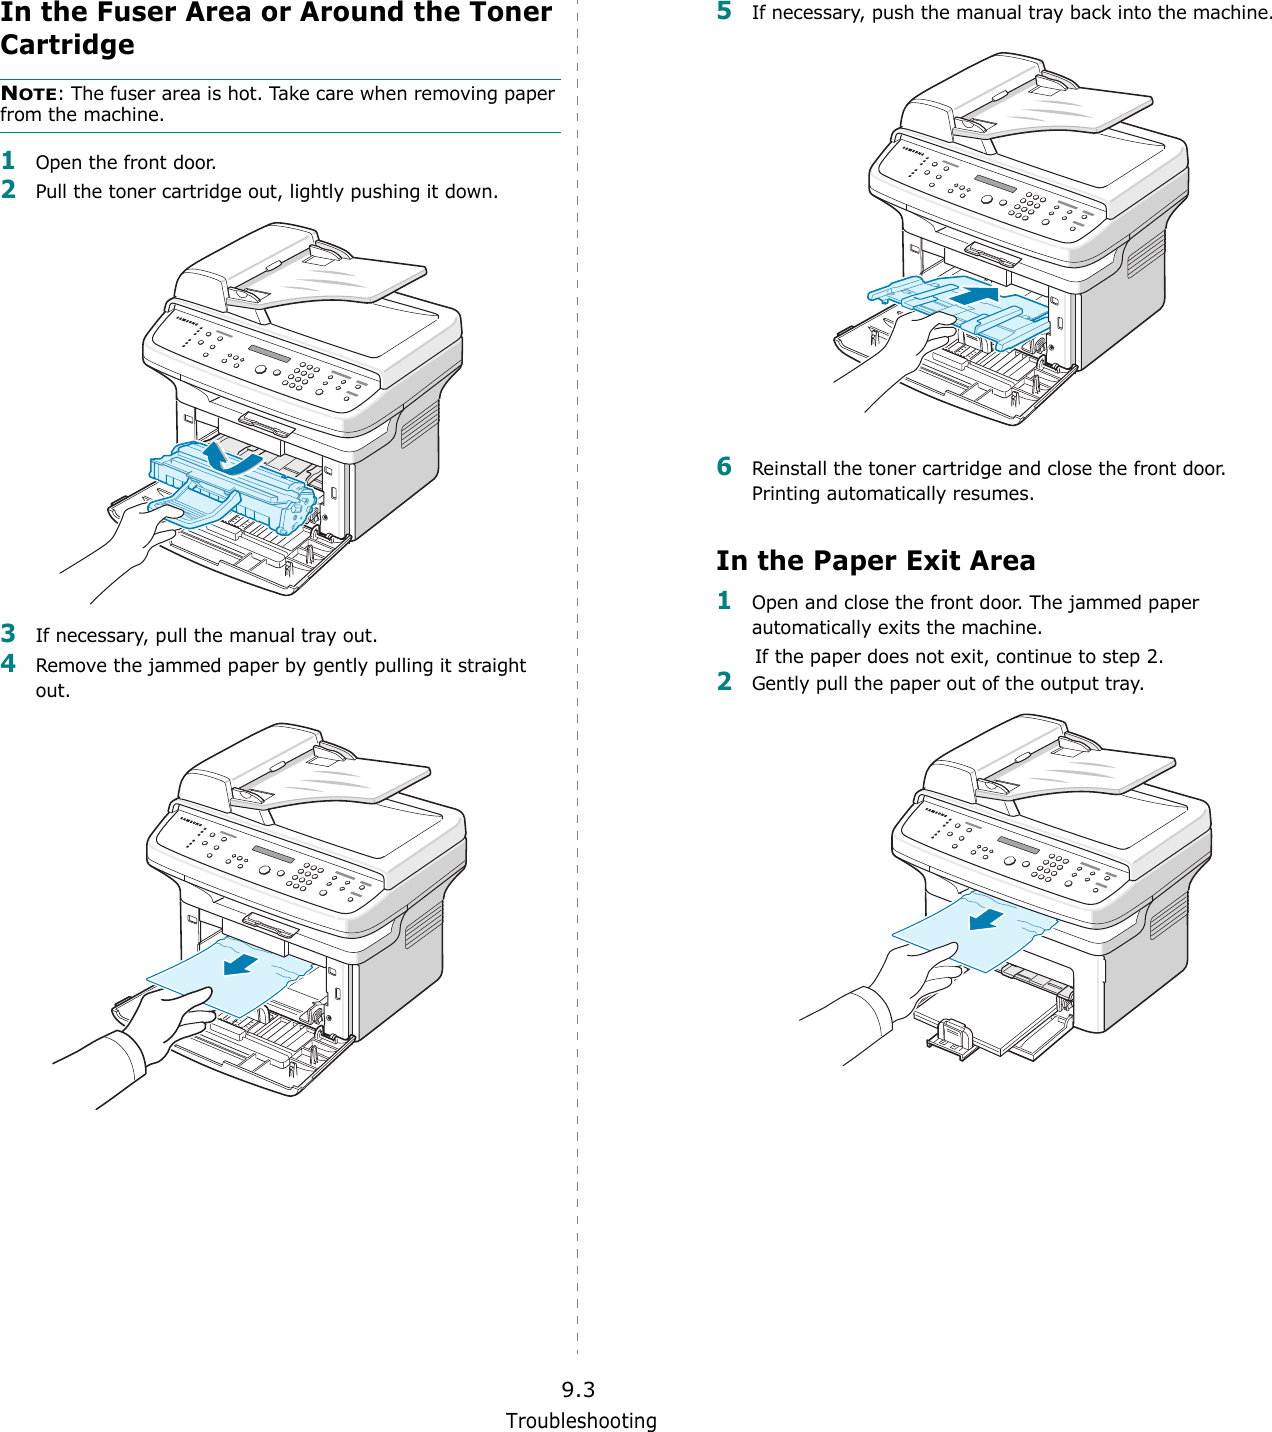
![Troubleshooting9.2Exit Misfeed1Remove any remaining page(s) from the ADF.2Open the ADF cover.3Remove the misfed documents from the document output tray.4Close the ADF cover. Then load the removed page(s), if any, back into the ADF.Clearing Paper JamsWhen a paper jam occurs, “Paper Jam” appears on the display. Refer to the table below to locate and clear the paper jam.To avoid tearing the paper, pull out the jammed paper gently and slowly. Follow the instructions in the following sections to clear the jam. Message Location of Jam Go to[Paper Jam 0]Open/Close DoorIn the tray or manual traypage 9.2[Paper Jam 1]Open/Close DoorIn the fuser area or around the toner cartridge.page 9.3[Paper Jam 2]Check InsideIn the paper exit area page 9.3In the Tray1Remove the jammed paper in the tray by gently pulling it straight out.If there is any resistance and the paper does not move when you pull, or if you cannot see the paper in this area, check the fuser area around the toner cartridge. See page 9.3. 2Open and close the front door to resume printing.In the Manual Tray1Remove the jammed paper in the tray by gently pulling it straight out.If there is any resistance and the paper does not move when you pull, or if you cannot see the paper in this area, check the fuser area around the toner cartridge. See page 9.3. 2Open and close the front door to resume printing.](https://usermanual.wiki/Samsung-Electronics-Co/WT21MFF.Users-Manual-2/User-Guide-544360-Page-4.png)
The machine has a communication problem.Ask the sender to try again.CRU Fuse Error The toner cartridge is not installed correctly.Install the toner cartridge correctly. See “Replacing the Toner Cartridge” on page 8.4.[Document Jam] The loaded document has jammed in the ADF (Automatic Document Feeder).Clear the document jam. See “Clearing Document Jams” on page 9.1.[Front or Rear][Cover Open]The front door or rear cover is not securely latched.Close the door until it locks into place.Enter Again You entered an unavailable item.Enter the correct item again.](https://usermanual.wiki/Samsung-Electronics-Co/WT21MFF.Users-Manual-2/User-Guide-544360-Page-6.png)
![Troubleshooting9.5Low Heat Error There is a problem in the fuser unit.Unplug the power cord and plug it back in. If the problem persists, please call for service.Open Heat Error[Over Heat]Group NotAvailable(only for SCX-4521F)You have tried to select a group location number where only a single location number can be used, such as when adding locations for a broadcast operation.Use a speed dial number or dial a number manually using the number keypad.[Incompatible](only for SCX-4521F)The remote machine did not have the requested feature, such as a delayed transmission.This message also occurs if the remote machine does not have enough memory space to complete the operation you are attempting.Reconfirm the remote machine’s features.[Line Busy](only for SCX-4521F)The receiving party did not answer or the line is already engaged.Try again after a few minutes.[Line Error](only for SCX-4521F)Your machine cannot connect with the remote machine or has lost contact because of a problem with the phone line.Try again. If the problem persists, wait an hour or so for the line to clear and try again.Or, turn the ECM mode on. See “ECM Mode (Error Correction Mode)” on page 7.15.Load Document You have attempted to set up a copy or fax operation with no document loaded into the ADF.Load a document into the ADF and try again.[LSU Error] A problem has occurred in the LSU (Laser Scanning Unit).Unplug the power cord and plug it back in. If the problem persists, please call for service.Memory Dial Full (only for SCX-4521F)The fax jobs queue in the memory is full.Cancel unnecessary fax jobs in the memory.Display Meaning Suggested solutionsMemory Full(only for SCX-4521F)The memory is full. Delete unnecessary documents and retransmit after more memory becomes available. Alternatively, split the transmission into more than one operation.[No Answer](only for SCX-4521F)The receiving fax machine has not answered after several redial attempts.Try again. Make sure that the receiving machine is operational.[No Cartridge] The toner cartridge is not installed.Install the toner cartridge. See “Installing the Toner Cartridge” on page 2.2.Not Assigned(only for SCX-4521F)• The speed dial location you tried to use has no number assigned to it.• The ID you entered is not assigned.• Dial the number manually using the number keypad or assign the number. For storing a number, see “Automatic Dialing” on page 7.9.• Enter the correct ID page 2.10.[No Paper]Add PaperThe paper in the tray has run out.Load paper in the tray. See “Loading Paper” on page 2.3.Operation Not Assigned(only for SCX-4521F)You are doing the Add/Cancel operation, but there are no jobs waiting.Check the display to see if there are any scheduled jobs. The display should indicate them in Standby mode; for example, Delay Fax.Out of Range The current date and time you entered is not correct.Enter the correct date and time.[Paper Jam 0]Open/Close DoorPaper has jammed in the feeding area of the tray.Clear the jam. See “In the Tray” on page 9.2.[Paper Jam 1]Open/Close DoorPaper has jammed in the fuser area or around the toner cartridge.Clear the jam. See “In the Fuser Area or Around the Toner Cartridge” on page 9.3.[Paper Jam 2]Check InsidePaper has jammed in the paper exit area.Clear the jam. See “In the Paper Exit Area” on page 9.3.[Power Failure] Power has turned off then on and the machine’s memory has not been saved.The job which you were trying to do before the power failure must be completely re-done.Display Meaning Suggested solutions](https://usermanual.wiki/Samsung-Electronics-Co/WT21MFF.Users-Manual-2/User-Guide-544360-Page-7.png)
The machine is waiting for a specified time interval to redial a previously busy station.You can press Enter to immediately redial, or Stop/Clear to cancel the redial operation.Scanner Locked The scanner module is locked.Upload the power cord and plug it back in.[Stop Pressed] The Stop/Clear button has been pressed during a copy or fax operation.Try again.[Toner Empty] The toner cartridge has run out. Replace the toner cartridge with a new one. See “Replacing the Toner Cartridge” on page 8.4.[Toner Low] The toner is almost empty.Take out the toner cartridge and gently shake it. By doing this, you can temporarily reestablish printing operations. See “Redistributing Toner” on page 8.4.Display Meaning Suggested solutionsSolving Other ProblemsThe following chart lists some conditions that may occur and the recommended solutions. Follow the suggested solutions until the problem is corrected. If the problem persists, please call for service.Paper Feeding ProblemsCondition Suggested solutionsPaper is jammed during printing.Clear the paper jam. See “Clearing Paper Jams” on page 9.2.Paper sticks together.• Ensure that there is not too much paper in the tray. The tray can hold up to 150 sheets of paper, depending on the thickness of your paper.• Make sure that you are using the correct type of paper. See “Paper Specifications” on page 10.3.• Remove paper from the tray and flex or fan the paper.• Humid conditions may cause some paper to stick together.Multiple sheets of paper do not feed.• Different types of paper may be stacked in the tray. Load paper of only one type, size, and weight.• If multiple sheets have caused a paper jam, clear the paper jam. See “Clearing Paper Jams” on page 9.2.Paper does not feed into the machine.• Remove any obstructions inside the machine.• Paper has not been loaded correctly. Remove paper from the tray and reload it correctly.• There is too much paper in the tray. Remove excess paper from the tray.• The paper is too thick. Use only paper that meets the specifications required by the machine. See “Paper Specifications” on page 10.3.The paper keeps jamming.• There is too much paper in the tray. Remove excess paper from the tray. If you are printing on special materials, use one sheet of paper at a time.• An incorrect type of paper is being used. Use only paper that meets the specifications required by the machine. See “Paper Specifications” on page 10.3.• There may be debris inside the machine. Open the front door and remove the debris.Transparencies stick together in the paper exit.Use only transparencies specifically designed for laser printers. Remove each transparency as it exits from the machine.Envelopes skew or fail to feed correctly.Ensure that the paper guides are against both sides of the envelopes.](https://usermanual.wiki/Samsung-Electronics-Co/WT21MFF.Users-Manual-2/User-Guide-544360-Page-8.png)


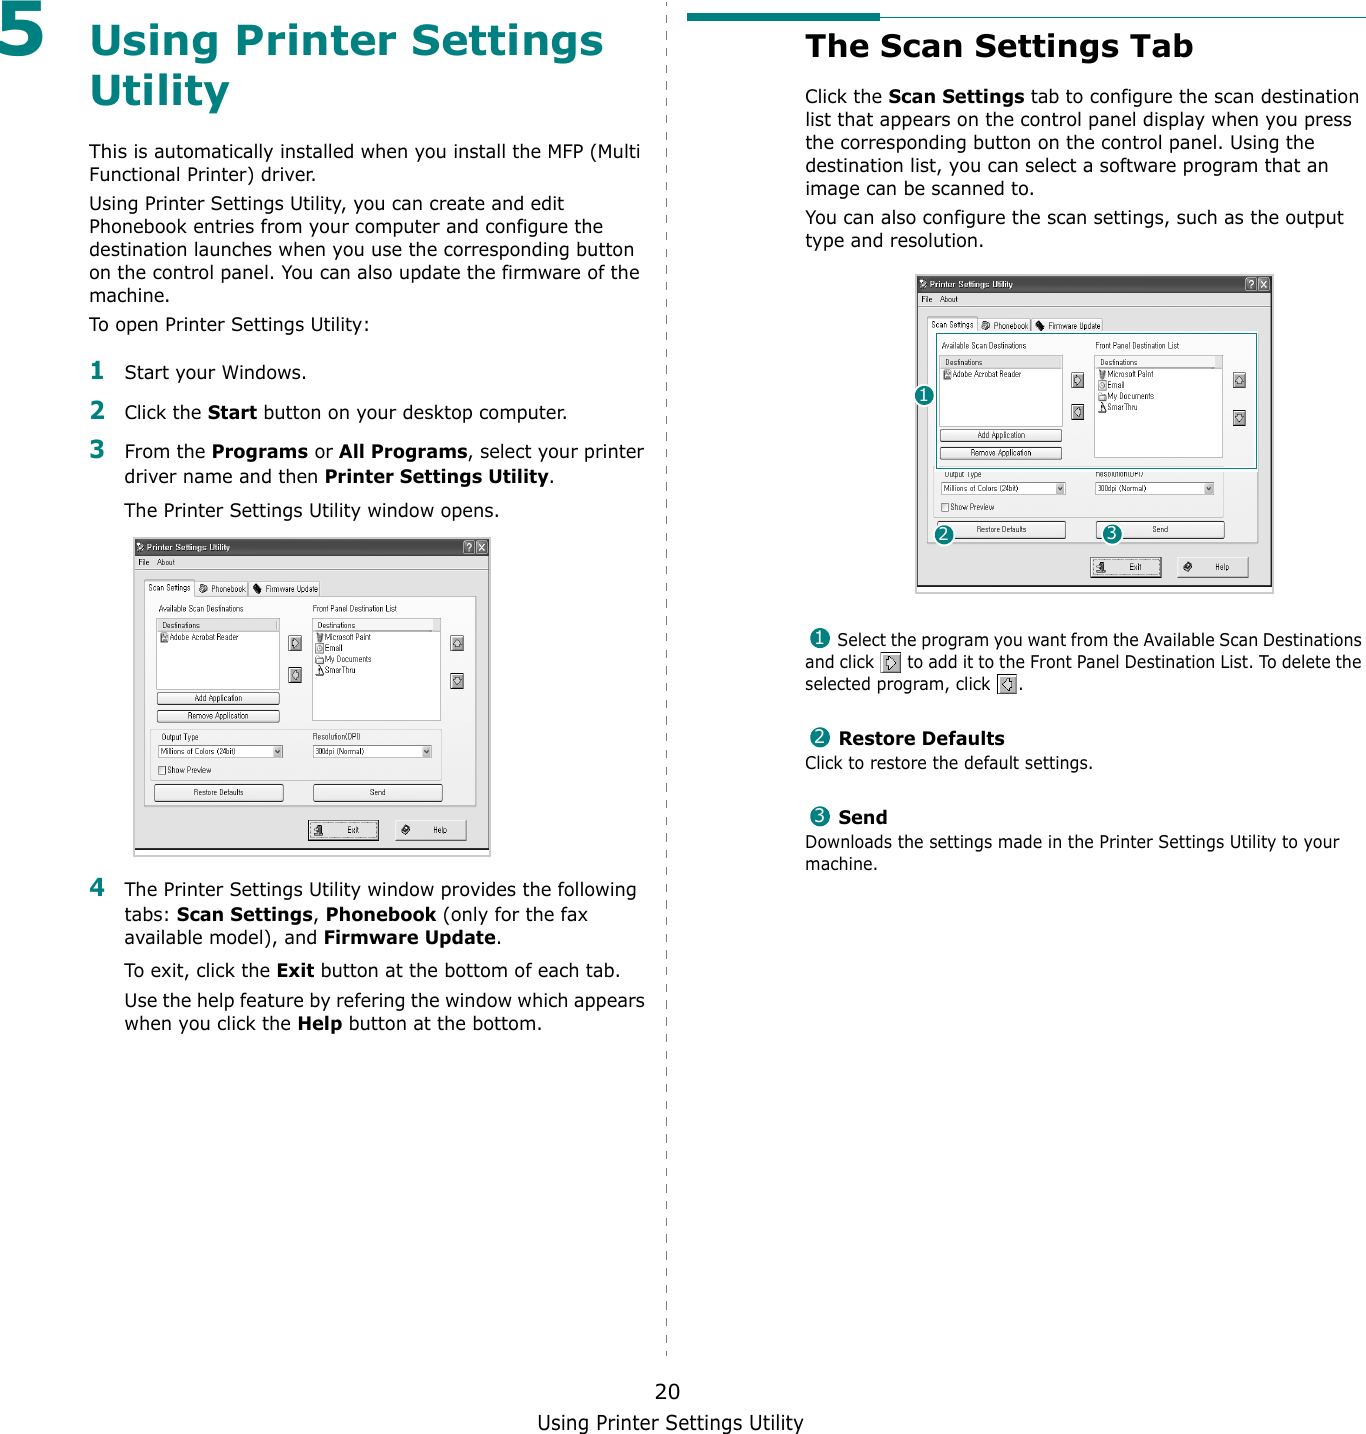
![Using Your Printer in Linux27Installing the MFP Driver1Make sure that you connect your machine to your computer. Turn both the computer and the machine on.2When the Administrator Login window appears, type in root in the Login field and enter the system password.NOTE: You must log in as a super user (root) to install the printer software. If you are not a super user, ask your system administrator.3Insert the printer software CD-ROM. The CD-ROM will automatically run.If the CD-ROM does not automatically run, click the icon at the bottom of the desktop. When the Terminal screen appears, type in:[root@localhost root]#cd /mnt/cdrom/Linux[root@localhost root]#./install.sh NOTE: The installation program runs automatically if you have an autorun software package installed and configured.4Click Install.5When the welcome screen appears, click Next.6When the installation is complete, click Finish.The installation program has added the MFP Configurator desktop icon and Samsung MFP group to the system menu for your convenience. If you have any difficulties, consult the onscreen help that is available through your system menu or can otherwise be called from the driver package windows applications, such as MFP Configurator or Image Editor.](https://usermanual.wiki/Samsung-Electronics-Co/WT21MFF.Users-Manual-2/User-Guide-544360-Page-51.png)
![Using Your Printer in Linux28Uninstalling the MFP Driver1When the Administrator Login window appears, type in root in the Login field and enter the system password.NOTE: You must log in as a super user (root) to install the printer software. If you are not a super user, ask your system administrator.2Insert the printer software CD-ROM. The CD-ROM will automatically run.If the CD-ROM does not automatically run, click the icon at the bottom of the desktop. When the Terminal screen appears, type in:[root@localhost root]#cd /mnt/cdrom/Linux[root@localhost root]#./install.sh NOTE: The installation program runs automatically if you have an autorun software package installed and configured.3Click Uninstall.4Click Next. 5Click Finish.Using the MFP ConfiguratorMFP Configurator is a tool primarily intended for configuring MFP devices. Since an MFP device combines the printer and scanner, the MFP Configurator provides options logically grouped for printer and scanner functions. There is also a special MFP port option responsible for the regulation of access to an MFP printer and scanner via a single I/O channel.After installing the MFP driver (see page 26), the MFP Configurator icon will automatically be created on your desktop.Opening the MFP Configurator1Double-click MFP Configurator on the desktop.You can also click the Startup Menu icon and select Samsung MFP and then MFP Configurator.2Press each button on the Modules pane to switch to the corresponding configuration window.You can use the onscreen help by clicking Help.3After changing the configurations, click Exit to close the MFP Configurator.Printers Configuration buttonScanners Configuration buttonMFP Ports Configuration button](https://usermanual.wiki/Samsung-Electronics-Co/WT21MFF.Users-Manual-2/User-Guide-544360-Page-52.png)