Samsung Electronics Co YPT10 DIGITAL AUDIO PLAYER User Manual YPT10 USA ENGLISH0 0 print 0723 indd
Samsung Electronics Co Ltd DIGITAL AUDIO PLAYER YPT10 USA ENGLISH0 0 print 0723 indd
UserManual.wiki
>
Samsung Electronics Co
>
YPT10 User Manual
>
USERS MANUAL 1
Contents
1.
USERS MANUAL 1
2.
USERS MANUAL 2
USERS MANUAL 1
Navigation menu
Upload a User Manual
Namespaces
Wiki Guide
HTML
PDF
Info
Views
User Manual
Discussion / Help
Navigation

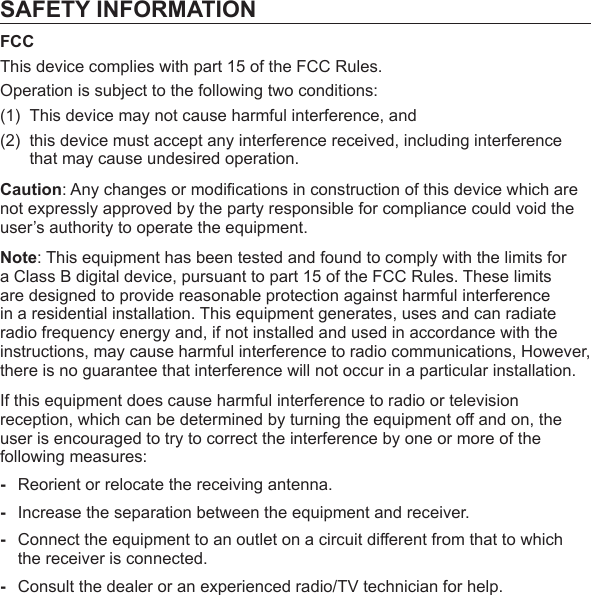
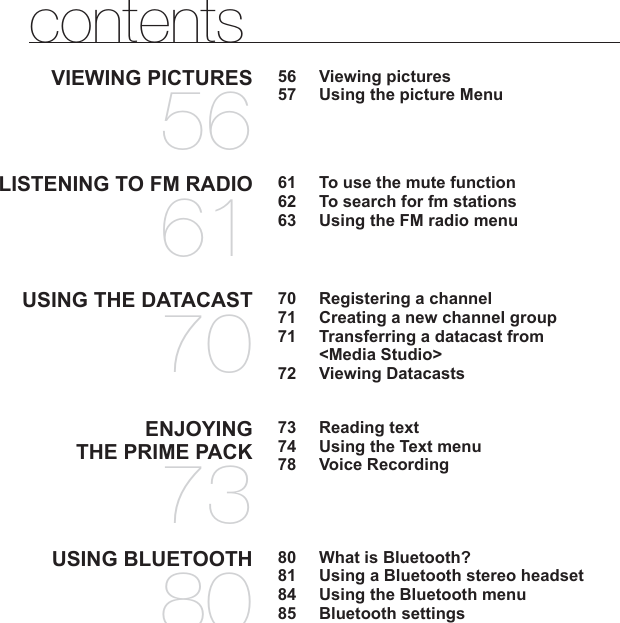
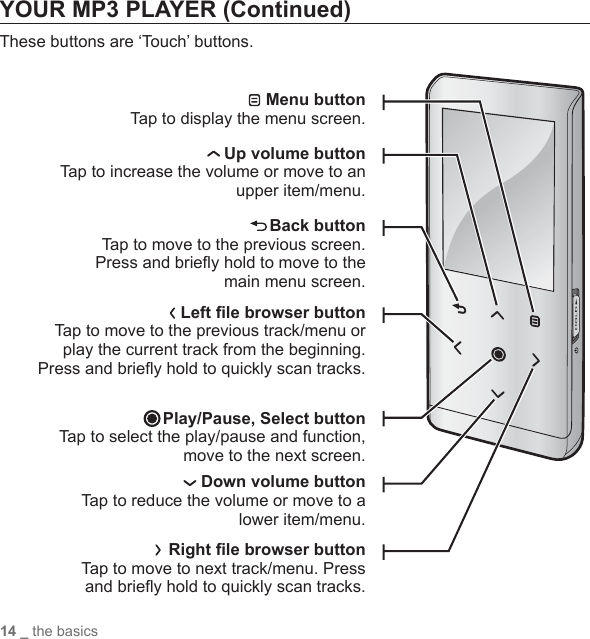
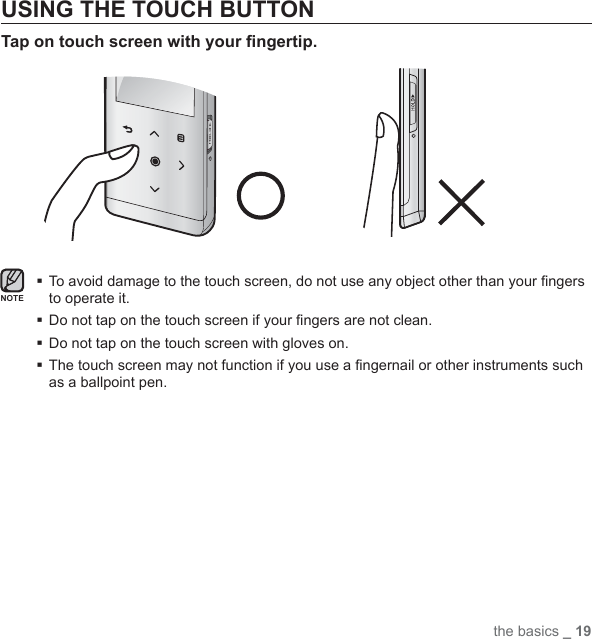
![18 _ the basicsSCREEN DISPLAYS (Continued)Picture1Bluetooth/Lock Indicator2Battery Status3Current fi le /Total number of fi les Indicator4Current Time5Music Play Status6Picture Mode Indicator7Parent Menu Indicator8File NameFM Radio1Bluetooth/Lock Indicator2Battery Status3Current Time4Radio Mode Indicator5Manual/Preset Indicator6Current Frequency(MHz) IndicatorMANUAL456231PicturesPicture Image1.jpg56781234[Preview Screen]](https://usermanual.wiki/Samsung-Electronics-Co/YPT10.USERS-MANUAL-1/User-Guide-823713-Page-18.png)
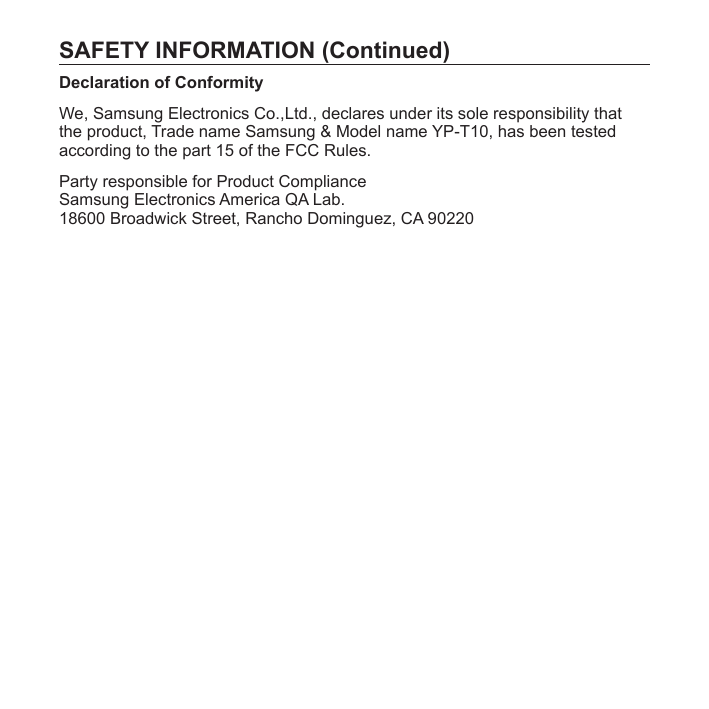
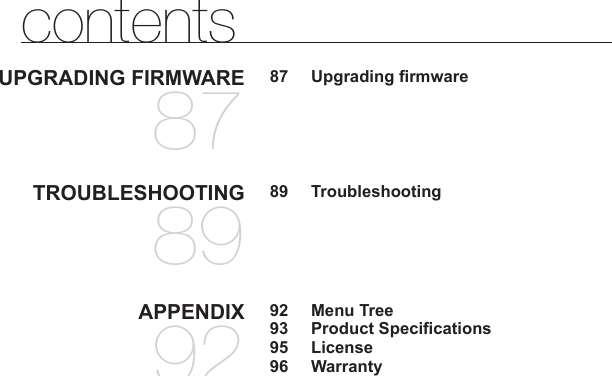
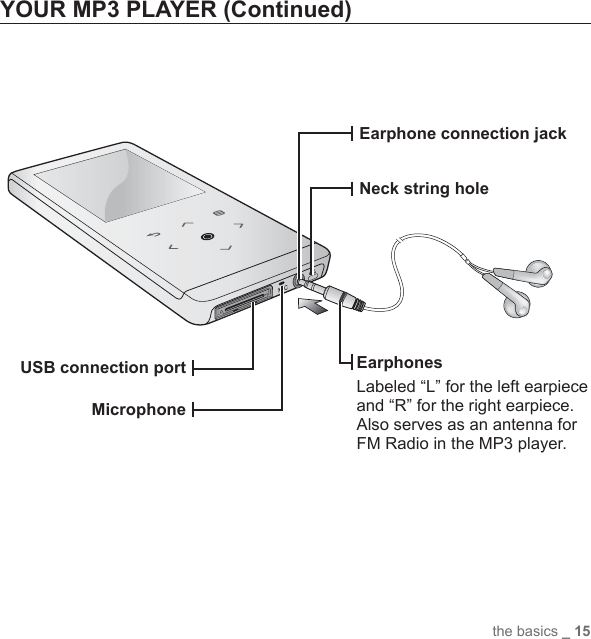
![22 _ the basicsPLAYING MUSICLoad music fi les onto your new mp3 player using Samsung Media Studio. Learn more about Media Studio on page 34.1. Press and briefl y hold [ ] to move to the main menu screen.2. Ta p [ ] to select <Music> and tap [ ].3. Use [] and [ ] to select a music fi le of your choice.4. Tap [ ].The music fi le will begin playing. Tap [ ] to move to the previous screen.Press and briefl y hold [ ] to move to the main menu screen.CONTROLLING THE VOLUMETap [ ].You will see a volume control icon.The range of volume is set between 0 to 30.Tap [ ] to increase the volume or [ ] to decrease it.NOTEMusicMusic](https://usermanual.wiki/Samsung-Electronics-Co/YPT10.USERS-MANUAL-1/User-Guide-823713-Page-22.png)
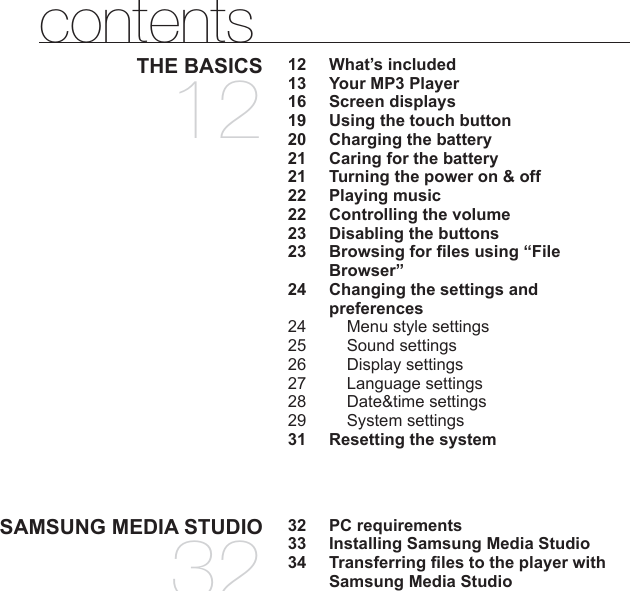
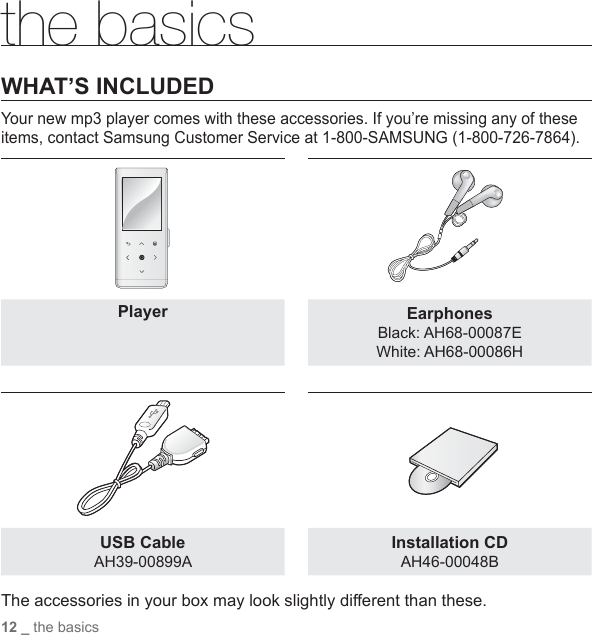
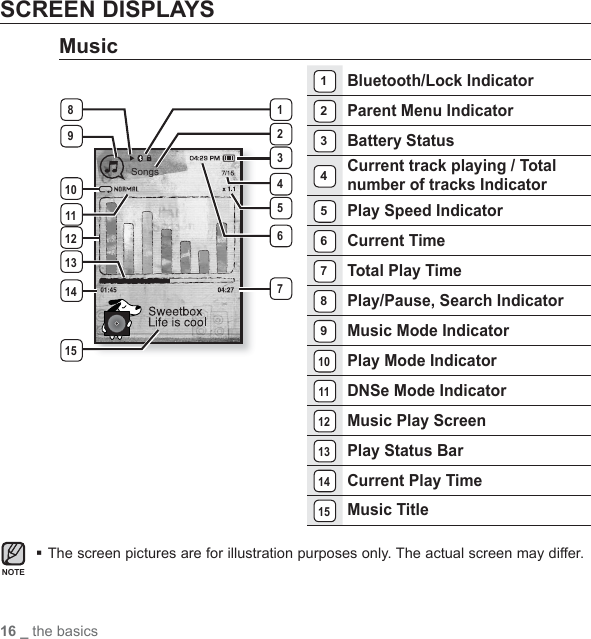
![the basics _ 23DISABLING THE BUTTONSThe hold function disables all the other buttons on the mp3 player, so that if you accidentally bump one-while working out, for example-your music won’t be interrupted.1. Slide the switch in the direction of the arrow.2. Slide the switch in the opposite direction of the arrow to release the Lock function.BROWSING FOR FILES USING “File Browser”Search easily for fi les using the “File Browser” function.1. Press and briefl y hold [ ] to move to the main menu screen.2. Tap [ ] to select <File Browser> and tap [ ]. The <File Browser> folder list containing “Music, Playlists, Video, Pictures, Datacasts, Texts and Recorded Files” appears.3. Tap [ ] to select a desired folder.4. Tap [ ] to bring up the fi le list in the selected folder.Tap [ ] to move to the previous screen.5. Tap [ ] to select a desired fi le.6. Tap [ ]. The fi le will start playing.Music](https://usermanual.wiki/Samsung-Electronics-Co/YPT10.USERS-MANUAL-1/User-Guide-823713-Page-23.png)
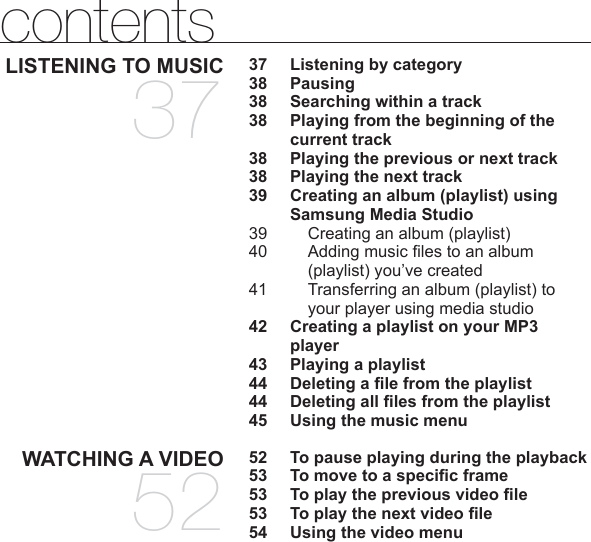
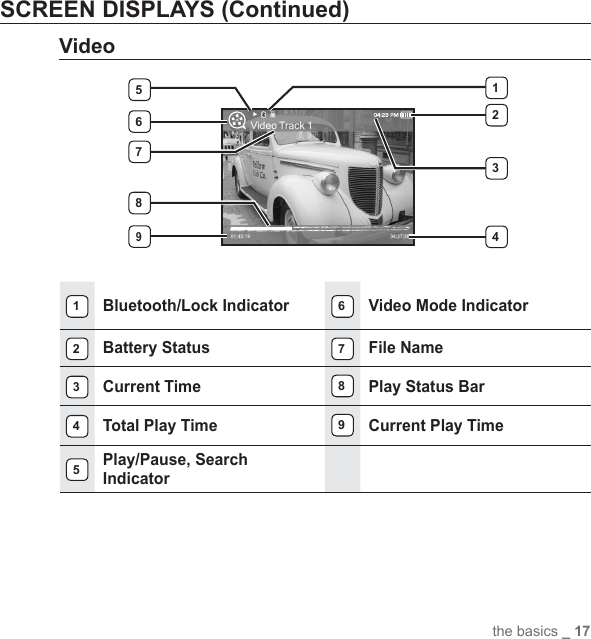
![24 _ the basicsCHANGING THE SETTINGS AND PREFERENCESYour mp3 player comes with settings and preferences that were set up at the factory, but you can change these pre-set values to truly customize your player. Ta p [ ] to move to the previous screen.Press and briefl y hold [] to move to the main menu screen.Menu Style SettingsYou can change the menu design and font and delete background image of the main menu.1. Press and briefl y hold [ ] to move to the main menu screen.2. Tap [] to select <Settings> and tap [ ].The <Settings> menu appears.3. Tap [ ] to select <Menu Style> and tap [ ].The <Menu Style> menu appears.4. Use the [] and [ ] to set functions.Tap [ ] to move to the next item/select the menu. Tap [ ] to move up or down through the current menu. Menu Style Setting Options Menu Design : You can change the style of the main menu screen. Select from <Sammy>, <Pendant> and <My Skin>. Color Theme : You can change the menu and screen background color. If you set <Sammy> in <Menu Design>, <Color Theme> will be disabled. Font : You can change the font type of the menu language. Select one from 3 font types. Reset My Skin : Initializes the background image of the screen display to its default image. If you set <Sammy> or <Pendant> in <Menu Design>, <Reset My Skin> will be disabled.NOTEMenu StyleSoundDisplayLanguageDate & TimeSystemSettings](https://usermanual.wiki/Samsung-Electronics-Co/YPT10.USERS-MANUAL-1/User-Guide-823713-Page-24.png)
![the basics _ 25CHANGING THE SETTINGS AND PREFERENCES (Continued)Sound SettingsYou can set Master EQ, Beep Sound and Volume Limit.1. Press and briefl y hold [ ] to move to the main menu screen.2. Tap [ ] to select <Settings> and tap [ ].The <Settings> menu appears.3. Tap [ ] to select <Sound> and tap [ ].The <Sound> menu appears.4. Use the [ ] and [ ] to set functions.Sound Setting Options Master EQ : You can optimize sound settings. Tap [ ] to select the frequency you want to adjust. The frequencies that can be adjusted are <60Hz>, <140Hz>, <500Hz>, <1KHz>, <3KHz>,<7KHz> and <10KHz>. Tap [ ] to adjust the selected frequency’s level and then tap [ ]. Beep Sound : Sets the beep sound for button operations to on or off. Select from <Off> and <On>. During music playback, the beep will be disabled even if set to <On>. Volume Limit : You can avoid hearing damage by setting the limit of the volume when using the earphone. <On> will limit the maximum volume level to 15. The maximum volume level when volume limit is set to <Off> is 30.Even if you have selected <Off>, the volume will be set back to 15 to avoid hearing damage when you turn the player back on.SettingsMenu StyleSoundDisplayLanguageDate & TimeSystem](https://usermanual.wiki/Samsung-Electronics-Co/YPT10.USERS-MANUAL-1/User-Guide-823713-Page-25.png)
![26 _ the basicsCHANGING THE SETTINGS AND PREFERENCES (Continued)Display SettingsChange the display off time and brightness of your screen.1. Press and briefl y hold [ ] to move to the main menu screen.2. Tap [ ] to select <Settings> and tap [ ].The <Settings> menu appears.3. Tap [ ] to select <Display> and tap [ ].The <Display> menu appears.4. Use the [ ] and [ ] to set functions.Display Setting Options Display Off : If no buttons are tapped within the time set shown below, the screen display will automatically be turned off. Select either <15 sec>, <30 sec>, <1 min>, <3 min>, <5 min>, or <Always On>. Press any button to turn it back on. Brightness : You can adjust the brightness of the display screen. Select a level from <0-10>, where 10 is the brightest.SettingsMenu StyleSoundDisplayLanguageDate & TimeSystem](https://usermanual.wiki/Samsung-Electronics-Co/YPT10.USERS-MANUAL-1/User-Guide-823713-Page-26.png)
![the basics _ 27CHANGING THE SETTINGS AND PREFERENCES (Continued)Language SettingsThe menus on your new mp3 player can be set to appear in any one of multiple languages. You can change your preference language easily.1. Press and briefl y hold [ ] to move to the main menu screen.2. Tap [] to select <Settings> and tap [ ].The <Settings> menu appears.3. Tap [ ] to select <Language> and tap [ ]. Select from <English>, <한국어>, <Français>, <Deutsch>, <Italiano>, <日本語>, <简体中文>, <繁體中文>, <Español>, <Русский>, <Magyar>, <Nederlands>, <Polski>, <Português>, <Svenska>, <ไทย>, <Čeština>, <Ελληνικά>, <Türkçe>, <Norsk>, <Dansk>, <Suomi>, <Español (Sudamérica)>, <Português (Brasil)>, <Indonesia>, <Tiếng Việt>, <Bulgarian>, <Română>, <Українська>, <Slovenščina> or <Slovenský>.4. Tap [ ] to select a desired language and tap [ ].The supported languages can be changed or added.SettingsMenu StyleSoundDisplayLanguageDate & TimeSystemNOTE](https://usermanual.wiki/Samsung-Electronics-Co/YPT10.USERS-MANUAL-1/User-Guide-823713-Page-27.png)
![28 _ the basicsCHANGING THE SETTINGS AND PREFERENCES (Continued)Date&Time SettingsYou can set the current time and date.1. Press and briefl y hold [ ] to move to the main menu screen.2. Tap [ ] to select <Settings> and tap [ ].The <Settings> menu appears.3. Tap [ ] to select <Date&Time> and tap [ ].The <Date&Time> screen appears.4. Tap [ ] to move to <Year, Month, Date, Hour, Min, AM/PM> and tap [ ] to set each item.5. Tap [ ].6. Tap [ ] to select <Yes> and tap [ ].The time setting is completed.Menu StyleSoundDisplayLanguageDate & TimeSystemSettings](https://usermanual.wiki/Samsung-Electronics-Co/YPT10.USERS-MANUAL-1/User-Guide-823713-Page-28.png)
![the basics _ 29CHANGING THE SETTINGS AND PREFERENCES (Continued)System SettingsChoose the sleep timer, start mode, auto power off, default setting that’s right for you.1. Press and briefl y hold [ ] to move to the main menu screen.2. Tap [ ] to select <Settings> and tap [ ].The <Settings> menu appears.3. Tap [ ] to select <System> and tap [ ].The <System> menu appears.4. Use the [ ] and [ ] to set functions.Menu StyleSoundDisplayLanguageDate & TimeSystemSettings](https://usermanual.wiki/Samsung-Electronics-Co/YPT10.USERS-MANUAL-1/User-Guide-823713-Page-29.png)
![samsung media studio _ 35TRANSFERRING FILES TO THE PLAYER WITH SAMSUNG MEDIA STUDIO (Continued)3. Click the icon for the type of fi le you want to transfer. Click to display music list.Click to display video list.Click to display picture list Click to display etc list. The ETC list includes fi le types (ex: TXT, etc) other than music, picture, and video fi les.4. Click <Add File> on the bottom of <Media Studio>.The <Open> window will appear.5. Select the fi les to add and click <Open>. The fi les are added to the list on the left side the <Media Studio> Screen.6. Select the fi le to transfer from the list on the left side.7. Click the icon.The fi le you selected is transferred to the player.[YP-T10 [MTP]]Portable [YP-T10[MTP]]34576[YP-T10 [MTP]]Portable [YP-T10[MTP]]](https://usermanual.wiki/Samsung-Electronics-Co/YPT10.USERS-MANUAL-1/User-Guide-823713-Page-35.png)
![listening to music _ 37listening to music Before you start - Connect the earphones, then turn on the player, and check the battery. Tap [ ] to move to the previous screen.Press and briefl y hold the tap [] to move to the main menu screen.LISTENING BY CATEGORY1. Press and briefl y hold [ ] to move to the main menu screen.2. Tap [] to select <Music> and tap [ ].The <music> list appears.3. Tap [ ] to select the desired list and tap [ ].The music fi les appears.4. Tap [ ] to select the fi le to play and tap [ ].The music will start playing.Music ListFile information including the artist name, album name, music title and genre will be displayed according to the ID3 tag information on the appropriate music fi le. A fi le without an ID3 Tag is displayed as [Unknown].Now Playing : Plays a recently played fi le or moves to the playback screen of the current fi le.Artists : To play by artist Albums : To play by albumSongs : To play in numeric or alphabetical order Genres : To play by genrePlaylists : To play by Playlist.Recorded Files : Shows all recorded fi les.Music Browser : Shows all the music fi les stored in the Music Folder. MP3 and WMA music fi les are compatible with the player. MP1 or MP2 fi les which only have a changed extension to MP3, may not play on the player. What is an ID3 Tag?This is what is attached to an MP3 to carry information relevant to the such as the title, artist, album, year, genre and a comment fi eld.NOTENOTENow PlayingArtistsAlbumsSongsGenresPlaylistsRecorded FilesMusic BrowserMusic](https://usermanual.wiki/Samsung-Electronics-Co/YPT10.USERS-MANUAL-1/User-Guide-823713-Page-37.png)
![38 _ listening to musicPAUSING1. Tap [ ] while the music is playing.The music playback will be paused.2. Tap [ ] again.The music will play from the point where it stopped.SEARCHING WITHIN A TRACK1. Press and briefl y hold [ ] while the selected track is playing.It searches to the beginning or the end of the track.2. Release the button at the point you wish to start.It starts playing from the point you release the button.PLAYING FROM THE BEGINNING OF THE CURRENT TRACK1. Tap [ ] after 3 seconds of play.The current track starts playing from the beginning.PLAYING THE PREVIOUS TRACKTap [ ] within 3 seconds of play.Tap [ ] twice after 3 seconds of play.The previous track will start playing.PLAYING THE NEXT TRACKTap [ ].The next track will start playing. For a VBR fi le, the previous music fi le cannot be played even if you tap [ ] within 3 seconds after it started.CAUTION](https://usermanual.wiki/Samsung-Electronics-Co/YPT10.USERS-MANUAL-1/User-Guide-823713-Page-38.png)
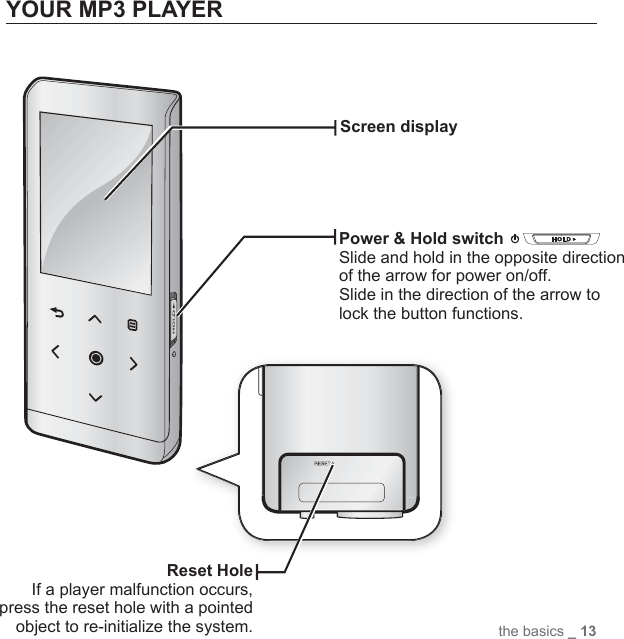
![listening to music _ 39CREATING AN ALBUM (PLAYLIST) USING SAMSUNG MEDIA STUDIOWith <Media Studio>, you can create your own collection, or album, of audio fi les. Before you start - Connect the player to your PC. Media Studio must be installed on your PC.Creating an Album (Playlist)1. Click <My Album> on the top of <Media Studio>.The <My Album> window appears.2. Click <New Album> on the bottom.The <Creation> window appears.3. Type in the album title and click [OK]. A new album (playlist) will be named and stored in the <My Album> section of <Media Studio>.21[YP-T10 [MTP]]OKNew Album3Portable [YP-T10[MTP]]My Album](https://usermanual.wiki/Samsung-Electronics-Co/YPT10.USERS-MANUAL-1/User-Guide-823713-Page-39.png)
![40 _ listening to musicCREATING AN ALBUM (PLAYLIST) USING SAMSUNG MEDIA STUDIO (Continued)Adding music fi les to an Album (Playlist) you’ve created1. Click <My PC> on the top of <Media Studio>.The <My PC> window appears.2. Click <My Album> in the right corner of the window.The <My Album> window appears.3. Double click on an album in the right window.4. Select fi les that you want to transfer in the <My PC> window.5. Click .The selected fi les will be added to the album (playlist).51My Album34 2[YP-T10 [MTP]]](https://usermanual.wiki/Samsung-Electronics-Co/YPT10.USERS-MANUAL-1/User-Guide-823713-Page-40.png)