Samsung Electronics Co YPT10 DIGITAL AUDIO PLAYER User Manual YPT10 USA ENGLISH0 0 print 0723 indd
Samsung Electronics Co Ltd DIGITAL AUDIO PLAYER YPT10 USA ENGLISH0 0 print 0723 indd
UserManual.wiki
>
Samsung Electronics Co
>
YPT10 User Manual
>
USERS MANUAL 2
Contents
1.
USERS MANUAL 1
2.
USERS MANUAL 2
USERS MANUAL 2
Navigation menu
Upload a User Manual
Namespaces
Wiki Guide
HTML
PDF
Info
Views
User Manual
Discussion / Help
Navigation
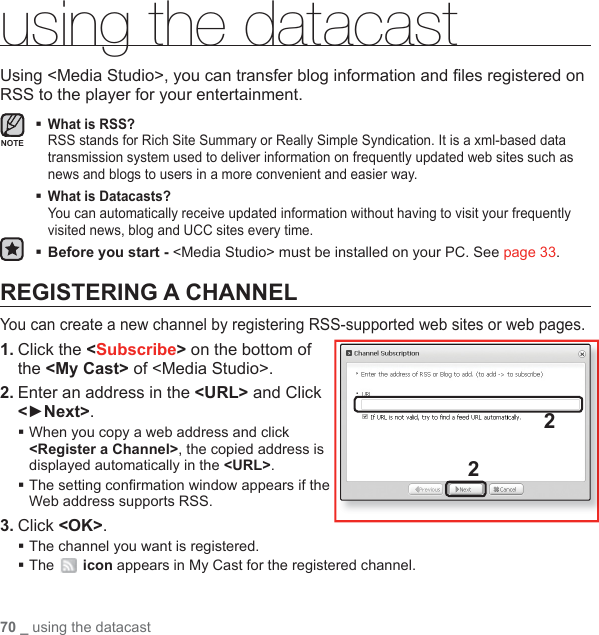
![listening to music _ 41CREATING AN ALBUM (PLAYLIST) USING SAMSUNG MEDIA STUDIO (Continued)Transferring an Album (Playlist) to your player using Media Studio1. Click <My Album> on the top of <Media Studio>.The <My Album> window appears.2. Select an album in the <My Album> list.3. Click . The selected album will be transferred to the player folder by folder in <File Browser> of the main menu → <Playlists>. The player can play up to 400 playlists and up to 400 music fi les for each playlist.1[YP-T10 [MTP]]32 My AlbumPortable [YP-T10[MTP]]NOTE](https://usermanual.wiki/Samsung-Electronics-Co/YPT10.USERS-MANUAL-2/User-Guide-823714-Page-1.png)
![42 _ listening to musicCREATING A PLAYLIST ON YOUR MP3 PLAYERIf you’ve already downloaded fi les to your mp3 player, you can create a “Favorites” playlist without Media Studio or your PC.1. Press and briefl y hold [] to move to the main menu screen.2. Tap [ ] to select <File Browser> and tap [ ].3. Tap [] to select <Music> and tap [ ].The music fi le appears.4. Tap [ ] to select a fi le to add to the favorite list and tap [ ].The Playlist menu appears.5. Tap [ ] to select <Add to Playlist> and tap [ ].<Playlist 1> to <Playlist 5> appears.6. Tap [ ] to select a playlist number to add the selected fi le and tap [ ]. The selected fi le will be added to the playlist. You can check the playlist in <Music> → <Playlists> → <Playlist 1> to <Playlist 5> in the main menu. You can add up to 200 music fi les to each playlist (<Playlist 1> to <Playlist 5>).NOTEAdd to PlaylistDelete from Playli..| Playlist 1| Playlist 2| Playlist 3| Playlist 4| Playlist 5](https://usermanual.wiki/Samsung-Electronics-Co/YPT10.USERS-MANUAL-2/User-Guide-823714-Page-2.png)
![listening to music _ 43PLAYING A PLAYLIST1. Press and briefl y hold [ ] to move to the main menu screen.2. Tap [ ] to select <Music> and tap [ ].The music list appears.3. Tap [ ] to select <Playlists> and tap [ ].The Playlists appears.4. Tap [ ] to select the playlist of your choice and tap [ ].Music fi les stored in the selected playlist appear. If there is no playlist found, you will see a <No fi le> message on the screen.5. Tap [ ] to select a music fi le to play, then tap [ ].The music fi le will start playing. See pages 39 and 41 to see how to transfer the playlist using <Media Studio>.Now PlayingArtistsAlbumsSongsGenresPlaylistsRecorded FilesMusic BrowserMusicNOTEPlaylist 1Playlist 2Playlist 3Playlist 4Playlist 5Playlists](https://usermanual.wiki/Samsung-Electronics-Co/YPT10.USERS-MANUAL-2/User-Guide-823714-Page-3.png)
![44 _ listening to musicDELETING A FILE FROM THE PLAYLIST1. Press and briefl y hold [ ] to move to the main menu screen.2. Tap [ ] to select <Music> and tap [ ].The music list appears.3. Tap [ ] to select <Playlists> and tap [ ].The playlist(s) appears.4. Tap [ ] to select the playlist of your choice and tap [ ].Music fi les stored in the selected playlist appear.5. Tap [ ] to select a fi le to delete from the playlist and tap [ ].The playlist menu appears.6. Tap [ ] to select <Delete from Playlist> and tap [ ].The selected fi le is deleted from the playlist.The selected fi le in the playlist cannot be deleted while its playing back.DELETING ALL FILES FROM THE PLAYLISTFollow the steps 1-4 above.5. Tap [ ].The playlist menu appears.6. Tap [ ] to select <Delete All from Playlist> and tap [ ].All fi les are deleted from the playlist.Delete from Playli..Delete All from Pl...Delete from Playli..Delete All from Pl...NOTE](https://usermanual.wiki/Samsung-Electronics-Co/YPT10.USERS-MANUAL-2/User-Guide-823714-Page-4.png)
![listening to music _ 45USING THE MUSIC MENU The Music menu allows you manage all facets of listening - from repeating tracks and albums to choosing the background on the screen as you listen.To set the sound effectYou can enjoy clearer sound.1. Tap [ ] while listening to music.The <Music> menu appears.2. Tap [ ] to select <Sound Efect> and tap [ ].The <Sound Effect> menu appears.3. Tap [ ] to select the desired sound effect and tap [ ].Sound Effect OptionsStreet Mode : Allows you to hear the music outdoors clearly by fi ltering out some of the street noise. Select either <Off> or <On>.Clarity : You can enjoy clearer sound with improved quality. Select from 0 - 2.To exit the menu, tap [ ].Sound EffectDNSePlay ModeMusic Play ScreenPlay SpeedSkip IntervalConnect to Heads..NOTE](https://usermanual.wiki/Samsung-Electronics-Co/YPT10.USERS-MANUAL-2/User-Guide-823714-Page-5.png)
![46 _ listening to musicUSING THE MUSIC MENU (Continued)To set the Digital Natural Sound engine (DNSe)Select the right sound for each music genre.1. Tap [ ] while listening to music.The <Music> menu appears.2. Tap [ ] to select <DNSe> and tap [ ].The <DNSe> menu appears.3. Tap [ ] to select a desired DNSe and tap [ ]. Select from <Normal>, <Studio>, <Rock>, <Classical>, <Jazz>, <Ballad>, <Rhythm & Blues>, <Club>, <Dance>, <Concert Hall> and <User>. You can set <EQ> and <3D&Bass> when you have selected <User>. What is DNSe?Digital Natural Sound Engine (DNSe) is a sound effect function for MP3 players developed by Samsung. It provides various sound settings to enhance the type of music you’re listening to.NOTESound EffectDNSePlay ModeMusic Play ScreenPlay SpeedSkip IntervalConnect to Heads..](https://usermanual.wiki/Samsung-Electronics-Co/YPT10.USERS-MANUAL-2/User-Guide-823714-Page-6.png)
![listening to music _ 47USING THE MUSIC MENU (Continued)To set the Digital Natural Sound engine (DNSe) (Continued)<EQ>You can adjust individual sound frequencies to your preference.1 Tap [] in the DNSe menu to select <User> and tap [ ].2. Ta p [ ] to select <EQ> and tap [ ].The EQ setting screen appears.3. Tap [ ] to select the frequency you want to adjust and tap [ ] to adjust the selected frequency’s level. The frequencies that can be adjusted are <60Hz>, <150Hz>, <400Hz>, <1KHz>, <3KHz>, <8KHz>, <14KHz>.You can select from –10 to +10 for <EQ>.4. Tap [ ]. The setting is completed.<3D&BASS>You can set the 3D surround sound and bass boost level.1. Tap [] in the DNSe menu to select <User> and tap [ ].2. Ta p [ ] to select <3D & BASS> and tap [ ].The <3D & BASS> setting screen appears.3. Tap [ ] to select <3D> or <BASS> and tap [ ]. You can select a <3D> level from 0 to 4, and <BASS> from 0 to 4.4. Tap [ ]. The setting is completed.EQ >3D & BASSEQ >3D & BASS >](https://usermanual.wiki/Samsung-Electronics-Co/YPT10.USERS-MANUAL-2/User-Guide-823714-Page-7.png)
![48 _ listening to musicUSING THE MUSIC MENU (Continued)To set the play modeSelect playback mode such as repeat settings.1. Tap [ ] while listening to music.The music menu appears.2. Tap [ ] to select <Play Mode> and tap [ ].The <Play Mode> menu appears.3. Tap [ ] to select the desired mode and tap [ ]. Select from <Normal>, <Repeat>, <Repeat One> and <Shuffl e>.Play Mode OptionsNormal : To play all the tracks in order one time.Repeat : To repeat all fi les in the current folder.Repeat One : To repeat one fi le.Shuffl e : To play fi les at random.Sound EffectDNSePlay ModeMusic Play ScreenPlay SpeedSkip IntervalConnect to Heads..](https://usermanual.wiki/Samsung-Electronics-Co/YPT10.USERS-MANUAL-2/User-Guide-823714-Page-8.png)
![listening to music _ 49USING THE MUSIC MENU (Continued)To select the music play screenChoose a background image from those provided, or choose an image of your own to be displayed as you listen to music.1. Tap [ ] while listening to music.The music menu appears.2. Tap [ ] to select <Music Play Screen> and tap [ ].The <Music Play Screen> menu appears.3. Tap [ ] to select a desired music play screen and tap [ ]. Select from <Type 1>, <Type 2>, <Type 3>,<Type 4>, <Album Art> and <Album Info.>.Music Play Screen OptionsType 1 ~ Type 4 : You can select a desired music play screen.Album Art : The album cover image displays if an album cover image is included in the ID3 Tag information of the music fi le.Album Cover images less than 200 pixel (horizontal) x 200 pixel(vertical) in size are supported.Album Info. : Information on the artist name, album and genre displays if ID3 Tag information is stored on the music fi le. If you set <Sammy> in <Menu Design>, <Album Art> can not be displayed. What is an ID3 Tag?This is what is attached to an MP3 to carry information relevant to the fi le, such as the title, artist, album, year, genre and a comment fi eld.Sound EffectDNSePlay ModeMusic Play ScreenPlay SpeedSkip IntervalConnect to Heads..NOTE](https://usermanual.wiki/Samsung-Electronics-Co/YPT10.USERS-MANUAL-2/User-Guide-823714-Page-9.png)
![50 _ listening to musicUSING THE MUSIC MENU (Continued)To set the play speedSpeed up or slow down your favorite music by adjusting the play speed.1. Tap [ ] while listening to music.The music menu appears.2. Tap [ ] to select <Play Speed> and tap [ ].The <Play Speed> menu appears.3. Tap [ ] to select a desired play speed and tap [ ]. Select from <X 0.7>, <X0.8>, <X 0.9>, <X 1.0(Normal)>, <X 1.1>, <X 1.2> and <X 1.3>. The higher the number is, the faster the speed is. The adjusted play speed may differ from the actual speed, depending on the fi le.To set the skip intervalYou can fast forward through a fi le at various intervals. Skip a whole track or skip several seconds at a time.1. Tap [ ] while listening to music.The music menu appears.2. Tap [ ] to select <Skip Interval> and tap [ ].The <Skip interval> menu appears.3. Tap [ ] to select a desired skip interval and tap [ ]. Select from <1 Song>, <5sec>, <10sec>, <30sec> and <1min>. If the fi le was developed with a variable bit rate, the actual length of the skip interval may not be exactly what you select.NOTESound EffectDNSePlay ModeMusic Play ScreenPlay SpeedSkip IntervalConnect to Heads..Sound EffectDNSePlay ModeMusic Play ScreenPlay SpeedSkip IntervalConnect to Heads..NOTE](https://usermanual.wiki/Samsung-Electronics-Co/YPT10.USERS-MANUAL-2/User-Guide-823714-Page-10.png)
![listening to music _ 51USING THE MUSIC MENU (Continued) Before you start - Use only the Bluetooth-certifi ed stereo headset.Check if the stereo headset has been registered. <Connect to Headset> appears when there is a registered headset. For more information, refer to <Using a Blooth Stereo Headset>. See page 81To connect a Bluetooth stereo headsetYou can connect directly to the registered Bluetooth stereo headset during music playback.1. Tap [] while listening to music.The music menu appears.2. Tap [ ] to select <Connect to Headset> and tap [ ]. If <Bluetooth Mode> is set to <Off>, it will be changed to <On>. When the connection is successfully done, you will see the [ ] icon on the screen.You can listen to music through the stereo headset.To disconnect the Bluetooth stereo headset1. Tap [ ] while listening to music.The music menu appears.2. Tap [ ] to select <Disconnect Headset> and tap [ ].The headset is disconnected. Some menu will not be selected while the player is connecting to the Bluetooth stereo headset.Sound EffectDNSePlay ModeMusic Play ScreenPlay SpeedSkip IntervalConnect to Heads..Play ModeMusic Play ScreenPlay SpeedSkip IntervalDisconnect HeadsetNOTE](https://usermanual.wiki/Samsung-Electronics-Co/YPT10.USERS-MANUAL-2/User-Guide-823714-Page-11.png)
![52 _ watching a Videowatching a video Before you start - Connect the earphones, then turn on the player, and check the battery. Transfer a video fi le to the player. See pages 34~36 Tap [] to move to the previous screen.Press and briefl y hold the tap [] to move to the main menu screen.1. Press and briefl y hold [ ] to move to the main menu screen.2. Tap [ ] to select <Videos> and tap [ ].The video list appears.3. Tap [ ] to select a video to play and tap [ ].The selected video fi le starts to play horizontally.TO PAUSE PLAYING DURING THE PLAYBACK1. Tap [ ] during a video playback.The player pauses playing.2. Tap [ ] again.The player resumes playing from the last played point. When transferring a video fi le to the player using <Media Studio>, it is automatically converted into SVI format before transfer. The fi le size is automatically adjusted, too. NOTENOTE](https://usermanual.wiki/Samsung-Electronics-Co/YPT10.USERS-MANUAL-2/User-Guide-823714-Page-12.png)
![watching a Video _ 53TO MOVE TO A SPECIFIC FRAME1. In horizontal view, press and briefl y hold [ ]. This enables you to move backwards or forwards in the current video fi le.2. Release the button when you have moved to the position you want.The video starts playing from the position.TO PLAY THE PREVIOUS VIDEO FILE1. Tap [ ] within 3 seconds after the current fi le started playing. Tap [ ] twice 3 seconds after the current fi le started playing.This will return to the previous movie.TO PLAY THE NEXT VIDEO FILE1. Tap [ ].This will move to the next movie.Video Track 1Video Track 1Video Track 2](https://usermanual.wiki/Samsung-Electronics-Co/YPT10.USERS-MANUAL-2/User-Guide-823714-Page-13.png)
![54 _ watching a VideoUSING THE VIDEO MENU (Continued)To adjust the brightnessYou can adjust the screen brightness.1. Tap [ ] during a video playback.The Video menu appears.2. Tap [ ] to select <Brightness> and tap [].The <Brightness> menu appears.3. Tap [ ] to select a desired brightness and tap [ ] Select from <0~10>.To set the Digital Natural Sound engine (DNSe)Select the right sound for each video genre.1. Ta p[ ] during a video playback.The Video menu appears.2. Select <DNSe> and tap [ ].The <DNSe> menu appears.3. Tap [ ] to select a desired DNSe and tap [ ] Select from <Normal>, <Drama> and <Action>. What is DNSe?Digital Natural Sound Engine (DNSe) is a sound effect function for MP3 players developed by Samsung. It provides various sound settings to enhance the type of music you’re listening to.Brightness >DNSeConnect to HeadsetBrightnessDNSe >Connect to HeadsetNOTE](https://usermanual.wiki/Samsung-Electronics-Co/YPT10.USERS-MANUAL-2/User-Guide-823714-Page-14.png)
![watching a Video _ 55USING THE VIDEO MENU Before you start - Use only the Bluetooth-certifi ed stereo headset.Check if to make sure your Bluetooth stereo headset has been registered. <Connect to Headset> appears when there is a registered headset. For more information, refer to <Using a Bluetooth Stereo Headset>. See page 81To connect a Bluetooth stereo headsetYou can directly connect to a registered Bluetooth headset during video playback.1. Tap [ ] during a video playback.The Video menu appears.2. Select <Connect to Headset> and tap [ ]. If <Bluetooth Mode> is set to <Off>, it will be changed to <On>. When the connection is successfully done, you will see the [ ] icon on the screen. You can enjoy listening to audio on video fi le via the stereo headset.To disconnect the Bluetooth stereo headset1. Tap [ ] during a video playback.The Video menu appears.2. Select <Disconnect Headset> and tap [ ].The headset is disconnected. Some menu will not be selected while the player is connecting to the Bluetooth stereo headset.BrightnessDNSeConnect to Headset >Disconnect Headset >NOTE](https://usermanual.wiki/Samsung-Electronics-Co/YPT10.USERS-MANUAL-2/User-Guide-823714-Page-15.png)
![56 _ viewing Picturesviewing pictures Before you start - Connect the earphones, then turn on the player, and check the battery. Tap [ ] to move to the previous screen.Press and briefl y hold the tap [] to move to the main menu screen.1. Press and briefl y hold [ ] to move to the main menu screen.2. Tap [ ] to select <Pictures> and tap [ ].The picture preview window appears.3. Tap [ ] to select the picture you want to look at and tap [ ].The selected picture will be displayed.Tap [ ] to move to the preview window.To move to the previous/next picture1. In horizontal view, tap [ ].The previous/next picture will be displayed. A JPG fi le including incorrect thumbnail data will be displayed in .Some picture can be displayed slowly. When transferring a picture fi le to the player using <Media Studio>, it is automatically converted into JPG format before transfer. The fi le size is automatically adjusted, too. You can also use the <File Browser> to search for a picture. See page 23.NOTENOTE](https://usermanual.wiki/Samsung-Electronics-Co/YPT10.USERS-MANUAL-2/User-Guide-823714-Page-16.png)
![viewing Pictures _ 57NOTEUSING THE PICTURE MENUTo exit the menu, tap [ ].To listen to music while viewing your pictureYou can listen to the song that you last played while viewing your picture.1. Tap [ ] while viewing a picture.The Picture menu appears.2. Tap [ ] to select <Music> and tap [ ]. The <Music> menu appears. 3. Tap [ ] to select <Off> or <On> and tap [ ]. <Off> : No background music is played while viewing a picture. <On> : You can listen to the music that you last played while viewing your picture.To watch a slideshowHow To 11. Tap [ ] while viewing a picture. You will see on the screen and then the player will start the slideshow.How To 21. In the picture preview mode, tap [ ].The Start Slideshow window appears.2. Tap [ ]. You will see on the screen and then the player will start the slideshow.Music >Start SlideshowSlideshow SpeedZoomRotateSelect as My SkinStart Slideshow >](https://usermanual.wiki/Samsung-Electronics-Co/YPT10.USERS-MANUAL-2/User-Guide-823714-Page-17.png)
![58 _ viewing PicturesUSING THE PICTURE MENU (Continued)To stop the slideshowHow To 11. In the slideshow mode, tap [].The slideshow stops.How To 21. In the slideshow mode, tap [ ].The Picture menu appears.2. Tap [ ] to select <Stop Slideshow> and tap [ ].The slideshow stops.To set the slideshow speed1. Tap [ ] while viewing a picture.The Picture menu appears.2. Tap [ ] to select <Slideshow Speed> and tap [ ].The <Slideshow speed> menu appears.3. Tap [ ] to select a desired speed and tap [ ]. Select from <Fast>, <Normal> and <Slow>.MusicStop Slideshow >Slideshow SpeedZoomRotateSelect as My SkinMusicStop SlideshowSlideshow Speed >ZoomRotateSelect as My Skin](https://usermanual.wiki/Samsung-Electronics-Co/YPT10.USERS-MANUAL-2/User-Guide-823714-Page-18.png)
![viewing Pictures _ 59USING THE PICTURE MENU (Continued)To enlarge a pictureYou can zoom in a picture.1. Tap [ ] while viewing a picture.The Picture menu appears.2. Tap [ ] to select <Zoom> and tap [ ].The <Zoom> menu appears.3. Tap [ ] to select a desired scale factor and tap [ ].Select from <100%>, <200%> and <400%>.4. Tap [ ] to move to the portion of the picture to magnify.To cancel the zoomingHow To 11. Tap [ ] in an enlarged picture view.This returns to the original sizeHow To 21. Tap [ ] in an enlarged picture view.The Picture menu appears. 2. Tap [ ] to select <Zoom> and tap [ ].The <Zoom> menu appears.3. Tap [ ] to select <100%> and tap [ ].This returns to the original sizeA big picture fi le may take awhile to zoom.NOTEMusicStart SlideshowSlideshow SpeedZoom >RotateSelect as My Skin 100%| 200%| 400%](https://usermanual.wiki/Samsung-Electronics-Co/YPT10.USERS-MANUAL-2/User-Guide-823714-Page-19.png)
![60 _ viewing PicturesUSING THE PICTURE MENU (Continued)To rotate a pictureYou can rotate a picture for your convenience.1. Tap [ ] while viewing a picture.The Picture menu appears.2. Tap [ ] to select <Rotate> and tap [ ].The <Rotate> menu appears.3. Tap [ ] to select a desired angle and tap [ ]. Select from <Left 90°>, <Right 90°> and <180°>.To set a picture as a background imageYou can set a desired picture as a background image for the display window.1. Select a picture fi le to set as a background image.The Picture menu appears.2. Tap [ ] to select <Select as My Skin> and tap [ ]. The save confi rmation window appears.3. Tap [ ] to select <Yes> and tap [ ].The selected picture fi le will be set to the background image. If <My Skin> is selected from <Settings>→ <Menu Style>→ <Menu Design>, the set image will be displayed.MusicStart SlideshowSlideshow SpeedZoomRotate >Select as My SkinMusicStart SlideshowSlideshow speedZoomRotateSelect as My Skin >](https://usermanual.wiki/Samsung-Electronics-Co/YPT10.USERS-MANUAL-2/User-Guide-823714-Page-20.png)
![listening to FM Radio _ 61listening to FM Radio Before you start - Connect the earphones, then turn on the player, and check the battery. Tap [ ] to move to the previous screen.Press and briefl y hold the tap [] to move to the main menu screen.1. Press and briefl y hold [ ] to move to the main menu screen.2. Tap [ ] to select <FM Radio> and tap [ ]. FM radio reception will start.TO USE THE MUTE FUNCTIONTap [ ] while listening to FM Radio. Sound is muted. Tap [] once again to resume listening. Always connect your earphones to the player when searching or setting frequencies. The earphones serve as antennas to receive FM Radio reception.In poor reception areas, the player may not fi nd an available FM frequency.The Bluetooth function cannot be used while you are listening to FM Radio.NOTENOTE](https://usermanual.wiki/Samsung-Electronics-Co/YPT10.USERS-MANUAL-2/User-Guide-823714-Page-21.png)
![62 _ listening to FM RadioTO SEARCH FOR FM STATIONS1. Press and briefl y hold [ ] and then release in Manual mode. <Auto Searching....> appears on the display. The search will stop at the frequency nearest from the point the button is released.OR,1. Tap [] to progress through the frequencies one by one in Manual mode.Moves to frequencies whenever the button is pressed.MANUALAuto Seaching...MANUAL](https://usermanual.wiki/Samsung-Electronics-Co/YPT10.USERS-MANUAL-2/User-Guide-823714-Page-22.png)
![listening to FM Radio _ 63USING THE FM RADIO MENUTo switch to Preset ModeSelect this mode if you want to search through your saved FM presets one preset at a time.1. Tap [ ] in Manual mode.The FM Radio menu appears.2. Tap [ ] to select <Go to Preset Mode> and tap [ ].You will see <PRESET> on the screen. If no preset frequencies are set, you will see <No preset> and the player will not switch to <Preset Mode>. If you select <Default Set> from <Settings> → <System>, all preset frequencies will be deleted.To switch to Manual ModeSelect this mode if you want to manually search through the FM band one frequency at a time.1. Tap [ ] in Preset mode.The FM Radio menu appears.2. Tap [ ] to select <Go to Manual Mode> and tap [ ].You will see <MANUAL> on the screen.NOTEPRESETMANUAL](https://usermanual.wiki/Samsung-Electronics-Co/YPT10.USERS-MANUAL-2/User-Guide-823714-Page-23.png)
![64 _ listening to FM RadioUSING THE FM RADIO MENU (Continued)To store stations in the Preset memoryYou can store up to 30 stations in your MP3 player’s memory and return to them with the press of just one number. Have the MP3 player choose only the stations you want using the manual process, or fi nd and storethe local stations automatically.Manual - choose only the stations you want to store1. Tap [] to select the desired frequency in Manual mode.The FM Radio menu appears.2. Ta p [ ].3. Tap [ ] to select <Add to Preset> and tap [ ]. The selected frequency will be added to the preset list with the [ . ] symbol on the selected frequency bar.4. To set a preset for other frequencies, follow steps 1-3 above. If the same frequency is already set, the <This preset already exists> message appears and the setting is disabled.NOTEGo to Preset ModeAdd to PresetAuto PresetStrat RecordingFM SensitivityFM Region](https://usermanual.wiki/Samsung-Electronics-Co/YPT10.USERS-MANUAL-2/User-Guide-823714-Page-24.png)
![listening to FM Radio _ 65USING THE FM RADIO MENU (Continued)To store stations in the Preset memory (continued)Automatic - automatically store all the stations the player receives1. Tap [ ] in FM Radio mode.The FM Radio menu appears.2. Tap [ ] to select <Auto Preset> and tap [ ].The confi rmation window appears.3. Tap [ ] to select <Yes> and tap [ ]. The <Auto Preset> will appear and up to 30 frequencies are automatically set.To cancel Auto PresetIf you want to cancel the auto preset, tap [ ] in the process. The auto preset setting is canceled, and only frequencies set up to that point are stored. You may want to re-set the stored stations if you’re going to listen to yourMP3 player in a different city. To delete the preset stations and store new ones, simply repeat the process.NOTEGo to Preset ModeAdd to PresetAuto PresetStrat RecordingFM SensitivityFM Region](https://usermanual.wiki/Samsung-Electronics-Co/YPT10.USERS-MANUAL-2/User-Guide-823714-Page-25.png)
![66 _ listening to FM RadioUSING THE FM RADIO MENU (Continued)To listen to preset stationsWhile in Preset mode, tap [ ] to scroll through preset stations. You can listen to the stored radio frequency.To delete a preset Follow the steps below to delete frequencies while listening to FM Radio.1. While in Preset mode, tap [ ] to search for a preset frequency to delete and tap [ ].The <FM Radio> menu appears.2. Tap [ ] to select <Delete from Preset> and tap [ ].The selected frequency will be deleted.3. To set a preset for other frequencies, follow steps 1-2 above.PRESETGo to Manual ModeDelete from PresetAuto PresetStrat RecordingFM SensitivityFM Region](https://usermanual.wiki/Samsung-Electronics-Co/YPT10.USERS-MANUAL-2/User-Guide-823714-Page-26.png)
![listening to FM Radio _ 67USING THE FM RADIO MENU (Continued)To record FM Radio broadcasting You can record FM radio broadcasting at any time while listening to the radio.1. Tap [ ] to select a frequency to record in FM Radio mode and tap [ ].The <FM Radio> menu appears.2. Tap [ ] to select <Strat Recording> and tap [ ]. The fi le name is displayed and the player starts recording.To stop FM recording1. Tap [ ] during the recording. A message appears asking you if you want to listen to the fi le you just recorded.2. Tap [ ] to select <Yes> or <No> and tap [ ]. Selecting <Yes> will play the just recorded fi le. Selecting <No> will not play the recorded fi le. The recorded fi le is stored in <File Browser> → <Recorded Files>. You can store a maximum of 999 fi les for FM radio recording. You can make a recording for up to approximately 23 hours (based on 96Kbps, 1GB) The recording fi le name will be automatically specifi ed such as “FM_000.mp3”. Where “FM” indicates the fi le is a FM recording and “000” is the recording fi le number.NOTEGo to Manual ModeDelete from PresetAuto PresetStrat RecordingFM SensitivityFM Region](https://usermanual.wiki/Samsung-Electronics-Co/YPT10.USERS-MANUAL-2/User-Guide-823714-Page-27.png)
![68 _ listening to FM RadioUSING THE FM RADIO MENU (Continued)To set the FM sensitivityTo receive more or fewer FM radio frequencies, adjust the FM sensitivity.1. Tap [] in the FM Radio Mode.The <FM Radio> menu appears.2. Tap [ ] to select <FM Sensitivity> and tap [].The <FM Sensitivity> menu appears.3. Tap [ ] to select the search level and tap [ ]. Select from <High>, <Middle> and <Low>. When you select <High>, more frequencies will be received.Go to Manual ModeDelete from PresetAuto PresetStrat RecordingFM Sensitivity >FM Region](https://usermanual.wiki/Samsung-Electronics-Co/YPT10.USERS-MANUAL-2/User-Guide-823714-Page-28.png)
![listening to FM Radio _ 69USING THE FM RADIO MENU (Continued)To set the FM regionYou can change an FM region setting in preparation for overseas travel.1. Tap [ ] in FM Radio mode.The FM Radio menu appears.2. Tap [ ] to select <FM Region> and tap [ ].The <FM Region> menu appears.3. Tap [ ] to select your regional area for FM radio and tap [ ]. Select from <Korea/US>, <Japan> and <Other Countries>. Your previously stored radio frequencies will be deleted when you change the <FM Region> on your player. Frequency range by region- Korea/US: Search for FM frequencies in 100 kHz increments between 87.5 MHz~108.0 MHz.- Japan: Search for FM frequencies in 100 kHz increments between 76.0 MHz~108.0 MHz.- Other Countries: Search for FM frequencies in 50 kHz increments between 87.50 MHz~108.00 MHz.NOTEGo to Manual ModeDelete fromPresetAuto PresetStrat RecordingFM SensitivityFM Region >](https://usermanual.wiki/Samsung-Electronics-Co/YPT10.USERS-MANUAL-2/User-Guide-823714-Page-29.png)
![using the datacast _ 71CREATING A NEW CHANNEL GROUPYou can create a new group to manage your own channels.1. Click <New Group> on the bottom of <My Cast> of <Media Studio>.2. Type in a group name and description and click <OK>.TRANSFERRING A DATACAST FROM <MEDIA STUDIO>Before you start - Connect the player to your PC.<Media Studio> must be installed on your PC. See page 33.1. <Media Studio> will automatically start when the player is connected to your PC. If the program does not start automatically, double click the <Media Studio> icon on the desktop.2. Click <My Datacast> on the top of <Media Studio>.My Datacast group channel list appears.3. Click a desired group channel.4. Click a desired channel.5. Select the post you want to transfer.6. Click the icon. The Post of the selected channel will be transferred to the player in <File Browser> → <Datacasts>.Click on the top of <Media Studio> to move to the previous screen. In <My Cast> of <Media Studio>, if the post has the attachment, you can download the attachment to the player. However, the attachment may not be downloaded, depending on the policy of the applicable website.NOTE652Portable [YP-T10[MTP]][YP-T10[MTP]]2](https://usermanual.wiki/Samsung-Electronics-Co/YPT10.USERS-MANUAL-2/User-Guide-823714-Page-31.png)
![72 _ using the datacastVIEWING DATACASTSYou can view channel posts added to <My Cast>. Before you start - Transfer the post of a desired channel to the player using <Media Studio>. See page 71 Tap [ ] to move to the previous screen.Press and briefl y hold the [] to move to the main menu screen.1. Press and briefl y hold [ ] to move to the main menu screen.2. Tap [] to select <Datacasts> and tap [ ].The Datacasts list appears.3. Tap [ ] to select a desired group channel and tap [ ]. The title is the same as that of the channel added to <My Cast> in <Media Studio>.4. Tap [ ] to select a desired channel and tap [ ]. The fi le list appears. icon : main text for the transferred posticon : picture fi le icon : music fi leicon : movie fi le5. Tap [ ] to select a desired post and tap []. The selected post will be played.My channel 1My channel 2My channel 3My channel 4My channel 5My channel 6DatacastsNOTE](https://usermanual.wiki/Samsung-Electronics-Co/YPT10.USERS-MANUAL-2/User-Guide-823714-Page-32.png)
![enjoying the Prime Pack_ 73enjoying the Prime PackPrime Pack enables you to enjoy various functions such as reading text, the alarm setting and viewing the calendar or world clock.READING TEXTWhether it’s a novel, the manuscript of a new story, or your research paper, your mp3 player allows you to read it… all while listening to music! Before you start - Turn on the player and check the battery capacity.Transfer text fi les to the player using <Media Studio>. See page 34. Tap [] to move to the previous screen.Press and briefl y hold the [] to move to the main menu screen.1. Press and briefl y hold [ ] to move to the main menu screen.2. Tap [] to select <Prime Pack> and tap [ ].The <Prime Pack> list appears.3. Tap [ ] to select <Text> and tap [ ].The text fi le list appears.4. Tap [ ] to select a desired text fi le and tap [ ].You will see the text on the screen.To move to previous/next pageTap [ ]. Press and briefl y hold [ ] to move continuously to the previous / next page.Your mp3 player supports the TXT fi le format in Text mode.You can also use the <File Browser> to search for a text fi le.NOTENOTETextVoice RECPrime Pack](https://usermanual.wiki/Samsung-Electronics-Co/YPT10.USERS-MANUAL-2/User-Guide-823714-Page-33.png)
![74 _ enjoying the Prime PackUSING THE TEXT MENUTo exit the menu, tap [ ].To listen to music while viewing your textYou can listen to the music that you last played while viewing your text.1. Tap [ ] while viewing a text.The Text menu appears.2. Tap [ ] to select <Music> and tap [ ].The <Music> menu appears.3. Tap [ ] to select a desired mode and tap [ ]. <Off> : No background music is played while viewing your text. <On> : You can listen to the music that you last played while viewing your text.To move to the fi rst pageUse this if you want to view the text from the fi rst page.1. Tap [ ] while viewing a text.The Text menu appears.2. Tap [ ] to select <Go 1st page> and tap [ ]. You will see the confi rmation window to move to the fi rst page.3. Tap [ ] to select <Yes> and tap [ ]. Moves to the fi rst page.NOTEMusic >Go to 1st PageAdd BookmarkGo to BookmarkDelete BookmarkText Viewer ColorFont SizeLanguageMusicGo to 1st Page >Add BookmarkGo to BookmarkDelete BookmarkText Viewer ColorFont SizeLanguage](https://usermanual.wiki/Samsung-Electronics-Co/YPT10.USERS-MANUAL-2/User-Guide-823714-Page-34.png)
![enjoying the Prime Pack_ 75USING THE TEXT MENUTo exit the menu, tap [ ].To set a bookmarkSet a bookmark to return to that point in the text at any time.1. Tap [ ] while viewing a text.The Text menu appears.2. Tap [ ] to select <Add Bookmark> and tap [ ]. The current text screen is set to a bookmark with the [] symbol displayed on the top left corner. The Overwrite window appears if there is a bookmark previously set. If you select <Yes>, the previously set bookmark is deleted and a new bookmark is added. The bookmark can be set one for each text fi le, and you can set a maximum of 100 bookmarks.To move to / remove the bookmark1. Tap [ ] while viewing a text.The Text menu appears.2. Tap [ ] to select <Go to Bookmark> or <Delete bookmark> and tap [ ]. When you selected <Go to Bookmark> then it will move to the selected bookmark and <Delete bookmark> will remove the selected bookmark from the text fi le.NOTENOTEMusicGo to 1st PageAdd BookmarkGo to BookmarkDelete BookmarkText Viewer ColorFont SizeLanguageMusicGo to 1st PageAdd BookmarkGo to BookmarkDelete bookmarkText Viewer ColorFont SizeLanguage](https://usermanual.wiki/Samsung-Electronics-Co/YPT10.USERS-MANUAL-2/User-Guide-823714-Page-35.png)
![76 _ enjoying the Prime PackUSING THE TEXT MENU (Continued)To set the text viewer colorChoose what color you’d like the text to appear.1. Tap [] while viewing a text.The Text menu appears.2. Tap [ ] to select <Text Viewer Color> and tap []. The <Text Viewer Color> setting window appears.3. Tap [ ] to select a desired text viewer color and tap [ ]. Select from <Type 1> to <Type 6>.To change the font sizeYou can change the font size of the text.1. Tap [] while viewing a text.The Text menu appears.2. Tap [ ] to select <Font Size> and tap [ ].The <Font Size> menu appears.3. Tap [ ] to select a desired font size and tap [ ].Select from <Small>, <Medium> and <Large>.MusicGo to 1st PageAdd BookmarkGo to BookmarkDelete bookmarkText Viewer Color >Font SizeLanguageMusicGo to 1st PageAdd BookmarkGo to BookmarkDelete bookmarkText Viewer ColorFont Size >Language](https://usermanual.wiki/Samsung-Electronics-Co/YPT10.USERS-MANUAL-2/User-Guide-823714-Page-36.png)
![enjoying the Prime Pack_ 77USING THE TEXT MENU (Continued)To set a text languageYou can select a language for text to view.1. Tap [] while viewing a text.The Text menu appears.2. Tap [ ] to select <Language> and tap [ ]. The <Language> list appears. Select from <English>, <Korean>, <French>, <German>, <Italian>, <Japanese>, <Chinese(S)>, <Chinese(T)>, <Spanish>, <Russian>, <Hungarian>, <Dutch>, <Polish>, <Portuguese>, <Swedish>, <Thai>, <Finnish>, <Danish>, <Norwegian>, <Farsi>, <Afrikaans>, <Basque>, <Catalan>, <Czech>, <Estonian>, <Greek>, <Hrvatski>, <Icelandic>, <Romany>, <Slovak>, <Slovene>, <Turkish> or <Vietnamese>.3. Tap [ ] to select a desired language and tap [ ].You can view text in the selected language.The supported languages can be changed or added.MusicGo to 1st PageAdd BookmarkGo to BookmarkDelete bookmarkText Viewer ColorFont SizeLanguage >NOTE](https://usermanual.wiki/Samsung-Electronics-Co/YPT10.USERS-MANUAL-2/User-Guide-823714-Page-37.png)
![78 _ enjoying the Prime PackVOICE RECORDINGYou can make a voice recording.To make a voice recording1. Press and briefl y hold [ ] to move to the main menu screen.2. Tap [ ] to select <Prime Pack> and tap [ ].The <Prime Pack> list appears.3. Tap [ ] to select <Voice REC> and tap [ ]. The fi le name is displayed and the recording window appears.4. Tap [ ]. The player starts recording. You can make a recording for up to approximately 23 hours (based on 96Kbps, 1GB)You can store a maximum of 999 fi les for voice recording.NOTETextVoice RECPrime Pack](https://usermanual.wiki/Samsung-Electronics-Co/YPT10.USERS-MANUAL-2/User-Guide-823714-Page-38.png)
![enjoying the Prime Pack_ 79VOICE RECORDING (Continued)To stop voice recording1. Tap [ ] during the recording. A message appears asking you if you want to listen to the fi le you just recorded.2. Tap [ ] to select <Yes> or <No> and tap [ ]. Selecting <Yes> will play the just recorded fi le. Selecting <No> will not play the recorded fi le. The recorded fi le is stored in <File Browser> → <Recorded Files>. Do not put the microphone too close to or far away from your mouth as it may cause a poor recording.Voice recording does not perform properly when the battery is low. The recording fi le name will be automatically specifi ed such as “VCE_000.mp3”. Where “VCE” indicates the fi le is a voice recording and “000” is the recording fi le number.NOTE](https://usermanual.wiki/Samsung-Electronics-Co/YPT10.USERS-MANUAL-2/User-Guide-823714-Page-39.png)
![80 _ using Bluetoothusing Bluetooth Tap [ ] to move to the previous screen.Press and briefl y hold the [] to move to the main menu screen.WHAT IS BLUETOOTH?Bluetooth is an industry specifi cation that describes how Bluetooth-compliant stereo headsets, mobile phones, and external devices can easily interconnect with each other using a short wireless connection.The Bluetooth device can cause a noise or malfunction, depending on the use conditions. Physical signal interference, for instance, if you hold the player in the hand and wear a stereo headset in your ears. When a part of the body is in contact with the receiving/transmitting system of the player or the stereo headset. Electrical variation from electrical jamming by the wall, corner or offi ce partitioning. Electrical interference from the same frequency-band devices including medical equipment, microwave oven and wireless LAN.When pairing the Bluetooth device with the player, make it within as short distance as possible.The farther the distance between player and stereo headset is, the worse the quality is. If the distance exceeds the limit, the communications are disconnected.We do not recommend you use text and picture view modes while listening to the music with the stereo headset as it can cause deterioration of both player performance and Bluetooth communications.Depending on the model of the stereo headset, fi les in less than 32 KHz can not be played.In poor reception-sensitivity areas such as inside an elevator or underground, the Bluetooth connection may not work properly.The maximum distance that enables wireless connection between the player and the bluetooth is 32.8 feet. The connection will be automatically cut off if the distance is out of this range. Even within this range, the sound quality may be deteriorated by obstacles such as walls or doors.NOTE](https://usermanual.wiki/Samsung-Electronics-Co/YPT10.USERS-MANUAL-2/User-Guide-823714-Page-40.png)
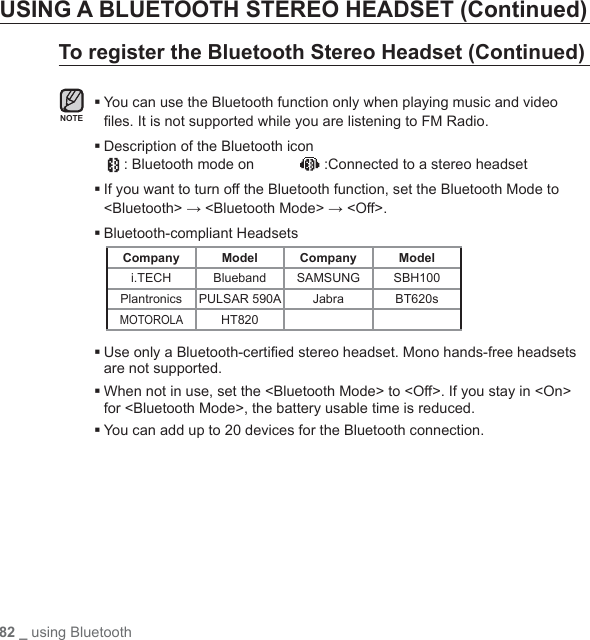
![using Bluetooth_ 81USING A BLUETOOTH STEREO HEADSETYou can use a Bluetooth stereo headset to let you enjoy music with high quality stereo sound, all without wires! Before you start - Ensure that the Bluetooth device to connect is ready for pairing. (refer to the device’s user manual)To register the Bluetooth Stereo Headset(you only need to register it once)1. Press and briefl y hold [] to move to the main menu screen.2. Tap [ ] to select <Bluetooth> and tap [ ].The <Bluetooth Mode> is set to <On>.The icon will light.3. Set the stereo headset ready for pairing. To set the headset ready for the pairing mode, refer to the headset’s user manual.4. Tap [ ] to select <Stereo Headset> and tap [ ]. You will see <Search New Device> on the screen, if there is any device that has been previously paired with the player. Select <Search New Device> so that you can search for a new device to pair.The headset to be registered will be listed.5. Tap [ ] to select a headset name to add and tap [ ]. The Password input window appears if the password for the headset is other than 0000. Refer to the Headset’s manual for the password.The registration of the headset is completed.](https://usermanual.wiki/Samsung-Electronics-Co/YPT10.USERS-MANUAL-2/User-Guide-823714-Page-41.png)
![using Bluetooth_ 83USING A BLUETOOTH STEREO HEADSET (Continued)To connect the registered Bluetooth stereo headset1. Tap [ ] in the Bluetooth Setting screen to select <Stereo Headset> and tap [ ].2. Tap [] to select a stereo headset to connect and tap [ ]. When the connection is successfully done, you will see the icon on the display.You can connect up to 2 headsets.3. Play the music. You can listen to the music using a stereo headset.If you can’t fi nd the desired headset to connect, register it fi rst. If you turn off the player or the headset, and then turn it on, the bluetooth communication may be disconnected. If you want to listen to the music again using the stereo headset, repeat the instructions above. When two headsets are connected, the fi rst-connected headset alone can be enabled for functional operation such as play/stop and volume control. For more information, refer to the headset’s user manual.NOTEStereo HeadsetBluetooth ModeBluetooth SettingsBluetooth](https://usermanual.wiki/Samsung-Electronics-Co/YPT10.USERS-MANUAL-2/User-Guide-823714-Page-43.png)
![84 _ using BluetoothUSING THE BLUETOOTH MENUTo disconnect the Bluetooth device1. Tap [ ] in the Bluetooth screen.2. Tap [ ] to select <Disconnect> and tap [ ]. The Disconnect confi rmation window appears.3. Tap [ ] to select <Yes> and tap [ ]. The currently connected device will be disconnected.To check the Bluetooth device connected1. Ta p [ ] in the Bluetooth screen.2. Tap [ ] to select <Connected Device> and tap [ ].You can see information of connected device.DisconnectConnected DeviceDisconnectConnected Device](https://usermanual.wiki/Samsung-Electronics-Co/YPT10.USERS-MANUAL-2/User-Guide-823714-Page-44.png)
![using Bluetooth_ 85BLUETOOTH SETTINGSBefore you start - Set <Bluetooth Mode> to <On>.1. Press and briefl y hold [ ] to move to the main menu screen.2. Tap [] to select <Bluetooth> and tap [ ].3. Tap [] to select <Bluetooth Settings> and tap [ ].The Bluetooth Settings menu appears.4. Use [ ] and [ ] to set functions.Bluetooth Setting OptionsSearch Timeout : You can select the search time period for a new device. After setting a time, a new device will be searched for the time limit you set. Select one from <10sec>, <20sec>, <30sec>, <45sec> and <60sec>.Delete Device : You can delete a registered device in the player. See page 81. Select <Delete All> to delete all of the registered devices.My Device Info : You can check the name and address of your player.Stereo HeadsetBluetooth ModeBluetooth SettingsBluetooth](https://usermanual.wiki/Samsung-Electronics-Co/YPT10.USERS-MANUAL-2/User-Guide-823714-Page-45.png)
![86 _ using BluetoothBLUETOOTH SETTINGS (Continued)To delete a Bluetooth device1. Tap [ ] to select <Delete Device> and tap [ ].You will see the list of the registered devices.2. Tap [ ] to select a device to delete and tap [ ]. If you want to delete all of the registered devices, select <Delete All>.3. Tap [ ] to select <Yes> and tap [ ].The selected device will be removed.To rename a Bluetooth device1. Tap [ ] to select <My Device Info> and tap [ ].2. Tap [ ]. The My Device Info menu appears.3. Tap [ ] to select <Edit Device Name> and tap [ ].The Edit Device Name window appears.4. Use [ ] and [ ] to rename the device.[ ] : The input mode switches from number to uppercase English and to lowercase English.[] : You can delete the characters one at a time.[] : Confi rm your change. E.g. To enter “YPS5” -Move to the corresponding key icon and tap on it.(once) ¨ (3 times) ¨ (once) ¨ (3 times) ¨ (twice)¨ (once)My Device In..Search TimeoutDelete DeviceMy Device Info.Bluetooth Settings](https://usermanual.wiki/Samsung-Electronics-Co/YPT10.USERS-MANUAL-2/User-Guide-823714-Page-46.png)
![upgrading fi rmware _ 87upgrading fi rmware Future upgrades may be available for this player to enhance performance andcompatibility.1. Connect to http://www.samsung.com, select [SUPPORT] [DOWNLOAD CENTER] and then select your player.2. When the player page appears, select [Firmware] below the model name to download the latest fi rmware.3. Uncompress the downloaded fi le onto your Desktop.The uncompressed fi les will be displayed.4. Connect the player to your PC with the USB cable.5. Right click on the Start button on the bottom left of your PC’s screen, then choose Explore to Open Windows Explorer on your PC. [T10] is displayed in Windows Explorer.](https://usermanual.wiki/Samsung-Electronics-Co/YPT10.USERS-MANUAL-2/User-Guide-823714-Page-47.png)
![88 _ upgrading fi rmware 6. Locate and click on the Desktop icon in Windows Explorer (left column).The contents of the Desktop will appear in the right column.7. (Windows Media Player 10)Locate and select the Firmware update fi les (right column) and drag-and-drop it into the folder of [T10] [Data] [System].OR,(Windows Media Player 11) Locate and select the Firmware update fi les (right column) and drag-and-drop it into the [T10] [Internal Storage].8. After disconnecting the USB cable, the player will be turned off automatically.9. Slide and hold the switch.The fi rmware will be upgraded.When upgrading is complete, the player will be turned off automatically.10. Slide and hold the switch in the opposite direction of the arrow.The image and font will be upgraded.When upgrading is complete, the player will be turned off automatically. Check the battery charge status of the player. If the battery is not suffi ciently charged, the fi rmware will not be upgraded. You need to have at least 40 MB of free space on the player for the upgrade.NOTE](https://usermanual.wiki/Samsung-Electronics-Co/YPT10.USERS-MANUAL-2/User-Guide-823714-Page-48.png)