Saris Cycling Group CPU2FT3 Bicycle Monitoring Transmitter User Manual Rev 29 After Translations Joule 2 indd
Saris Cycling Group Inc Bicycle Monitoring Transmitter Rev 29 After Translations Joule 2 indd
Contents
- 1. manual
- 2. final manual
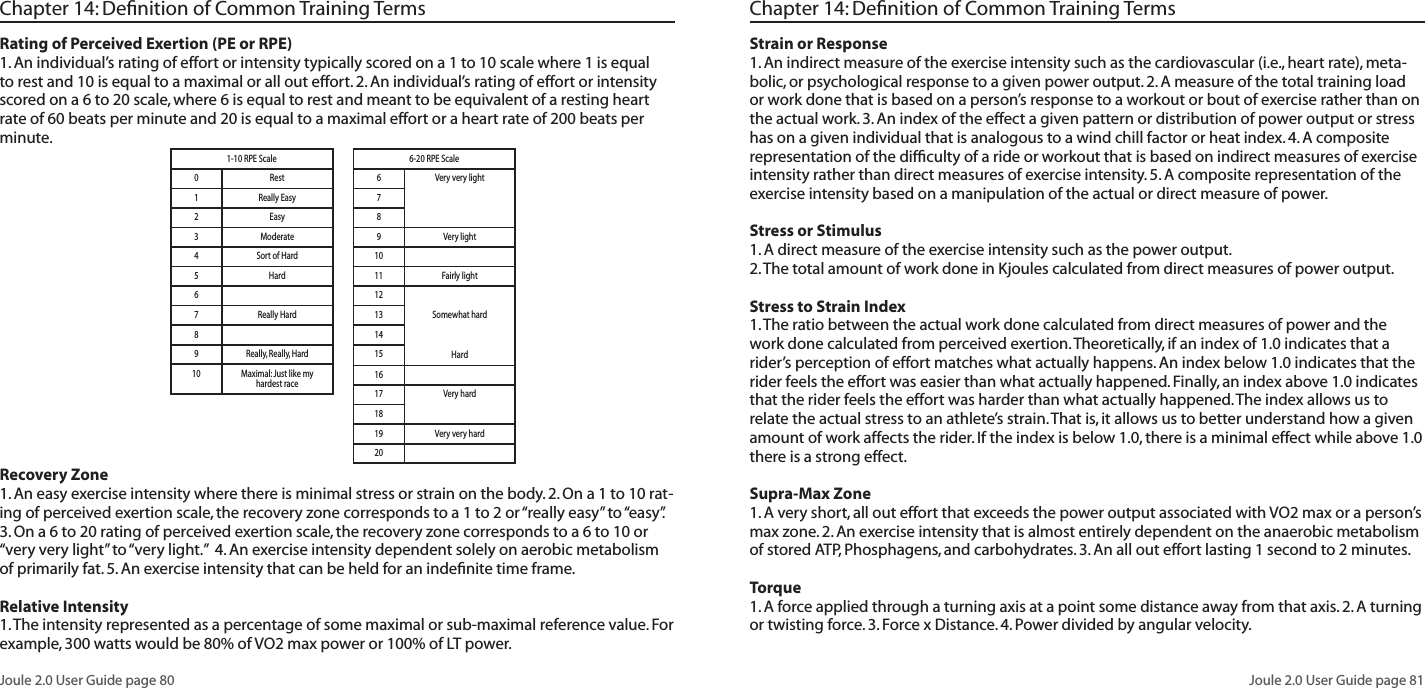
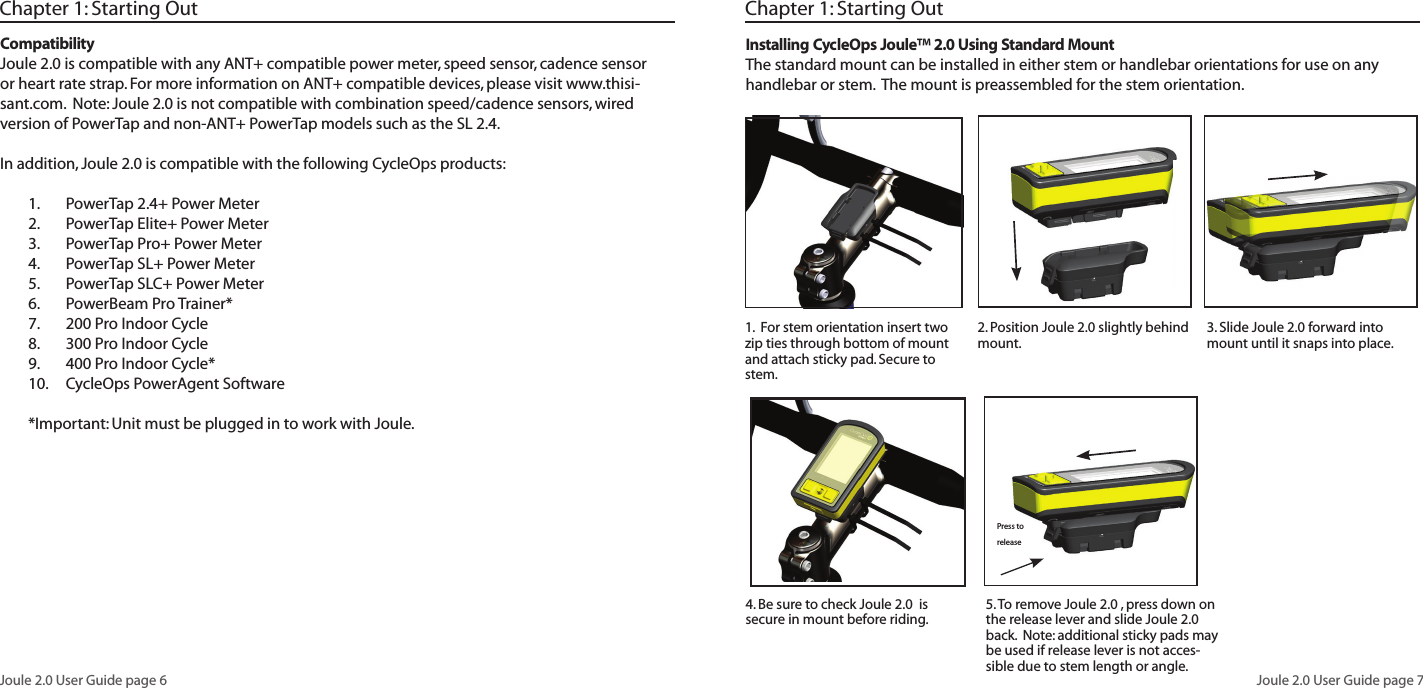
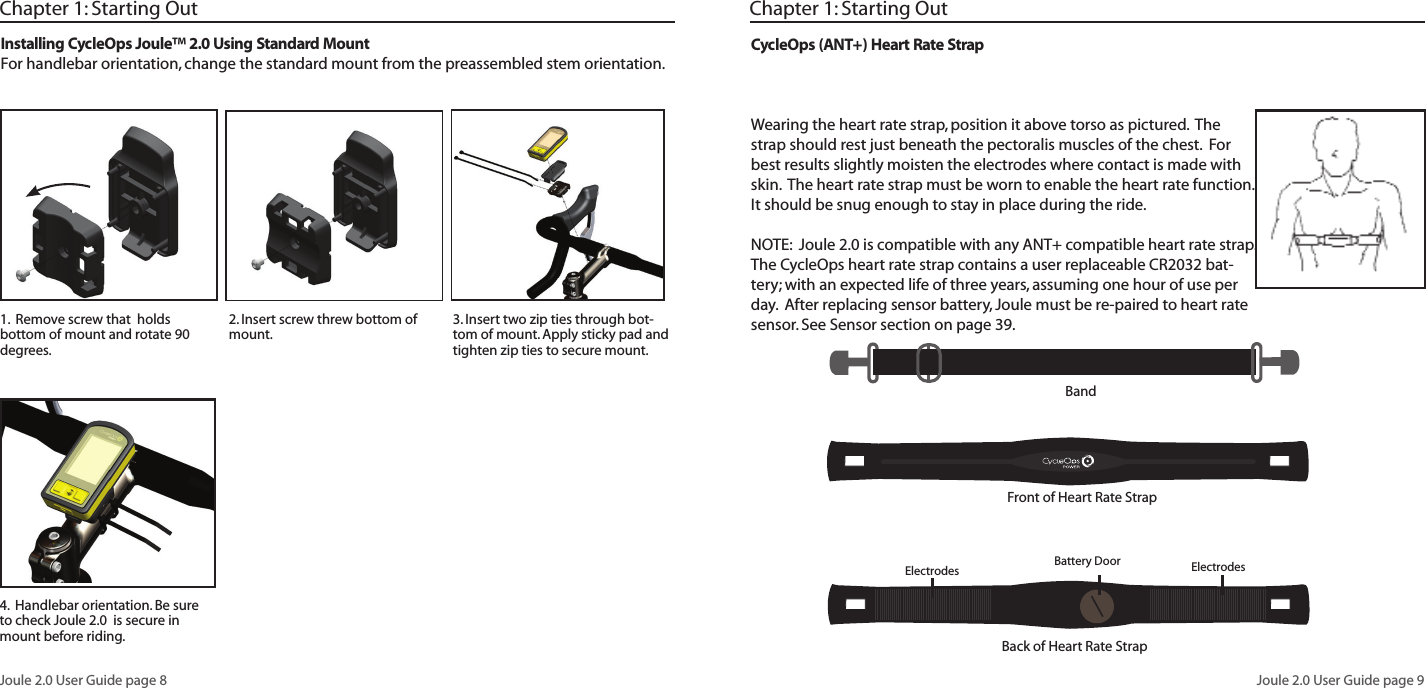
final manual

![Joule 2.0 User Guide page 10Joule 2.0 User Guide page 11Charging BatteryThe Joule 2.0 is powered by a user replaceable lithium-ion battery that can be recharged using the included USB cable and a computer. A 5VDC 400mA charger can also be used (not included). A fully charged battery can run for approximately 20 hours before it must be recharged. Recharg-ing completely, via USB cable or AC adapter will take approximately six hours. The battery level is indicated in the title bar. The Joule 2.0 is fully charged at the factory, but shipping and handling may inadvertently consume charge. For more information see Important Precautions section on page 38.Chapter 1: Starting Out1. Press in release [MODE] button or [INTERVAL] button to turn on Joule 2.0. Note: Pressing [JOYSTICK] will not turn Joule 2.0 on.2. Plug the mini-USB cable into the mini-USB port on the back of Joule 2.0 and plug the other end into an avail-able USB port on a computer. 3. A standard AC adapter to wall outlet is available separately. 4. Once connected to a computer or AC adapter, Joule 2.0 displays the connection and charge screen (charging or charge complete). No data will be displayed.ConnectedFirmware Version14.045Charging Mini- USB portFront of Joule Back of Joule Chapter 1: Starting OutMini-USB portInstalling MicroSD CardJoule 2.0 provides 4 MB of onboard memory for storing activities, history and workouts. Activity fi le size increases with ride time but a one hour ride is approximately 150 KB, history fi les are always 1 KB (1,000 history fi les = 1 MB) and workout fi les also increase with workout size but a workout containing 500 segments will be approximately 50 KB. A microSD card slot is available under the battery for additional memory. Once a microSD card is installed, all fi les are stored on the card. For more information see Data Management section on page 16. MicroSD card holder1. Remove the four screws attaching battery cover to Joule 2.0. 2. Remove battery cover. Remove battery. Note: disconnecting the battery is not necessary. Be careful not to damage the o-ring3. Slide microSD card into microSD card holder, behind battery. 4. Attach battery cover and four bolts, using screwdriver. Make sure red O-ring is clean and in place before attaching battery cover. O-rings should be inspected and replaced if necessary whenever the battery cover is removed. Use a light coating of grease when re-installing the battery cover on the O-rings.Battery coverRed O-ring](https://usermanual.wiki/Saris-Cycling-Group/CPU2FT3.final-manual/User-Guide-1246547-Page-6.png)
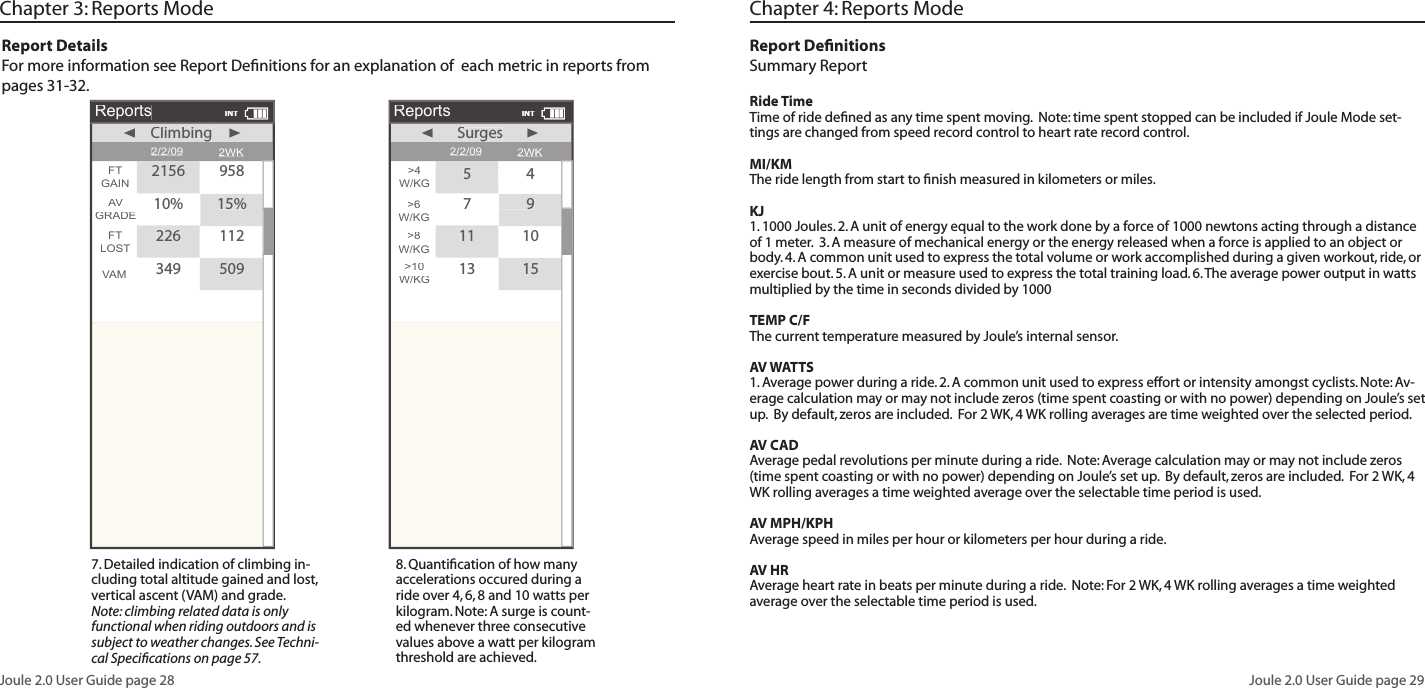
![Joule 2.0 User Guide page 12Joule 2.0 User Guide page 13Chapter 1: Starting Out[MODE] button [JOYSTICK] [INTERVAL] buttonNavigation Overview CycleOps Joule™ 2.0There are two buttons and one [JOYSTICK] to navigate Joule 2.0. To help navigate Joule 2.0 display and this user guide note; bold letters will bring special attention to Menu items as they appear on the screen. Letters appearing in all [CAPs] denote an actual button.Chapter 1: Starting Out Button Function [JOYSTICK] Press left/right Move within a screen or change screens Press up/down Move within a screen or scroll up/down screen Press in and release Change metrics in dashboard, change date ranges in reports or select settings in menu Press and hold for 2 seconds Initate list for changing dashboard categorysettings [MODE] Press and release Change between dashboard, reports, activities, menu Press and release Navigate “back” in menu mode Press and hold for 2 seconds Display “Ride Paused” screen[INTERVAL] Press and release Stop current interval and start next interval Press and hold for 2 seconds Change dashboard to and from “Interval Mode” [MODE] Press and hold for 2 seconds Initiates fi nding previously paired sensors +[INTERVAL] Display ActionsNavigation Overview CycleOps Joule™ 2.0 [JOYSTICK] Press left/right Move within a screen or change screens Press up/down Move within a screen or scroll up/down screen Press in and release Change metrics in dashboard, change date ranges in reports or select settings in menu Press and hold for 2 seconds Initate list for changing dashboard categorysettings [MODE] Press and release Change between dashboard, reports, activities, menu Press and release Navigate “back” in menu mode Press and hold for 2 seconds Display “Ride Paused” screen[INTERVAL] Press and release Stop current interval and start next interval Press and hold for 2 seconds Change dashboard to and from “Interval Mode” [MODE] Press and hold for 2 seconds Initiates fi nding previously paired sensors[JOYSTICK] Press left/right Move within a screen or change screens Press up/down Move within a screen or scroll up/down screen Press in and release Change metrics in dashboard, change date ranges in reports or select settings in menu Press and hold for 2 seconds Initate list for changing dashboard categorysettings [MODE] Press and release Change between dashboard, reports, activities, menu Press and release Navigate “back” in menu mode Press and hold for 2 seconds Display “Ride Paused” screen[INTERVAL] Press and release Stop current interval and start next interval Press and hold for 2 seconds Change dashboard to and from “Interval Mode” [MODE] Press and hold for 2 seconds Initiates fi nding previously paired sensorsDashboardW/W/W/KGMXWATTWATTWASAVWATTWATTWAS2128764075.2MPHCHCAD27.498MILESFT GAIN37.8987WATTWATTWAS](https://usermanual.wiki/Saris-Cycling-Group/CPU2FT3.final-manual/User-Guide-1246547-Page-7.png)
![Joule 2.0 User Guide page 14Joule 2.0 User Guide page 15Chapter 1: Starting OutData File ManagementJoule 2.0 saves three types of fi les into memory, activities, workouts and history. Activities fi les contain second by second ride data for analysis by PC or Mac on software such as CycleOps PowerAgent. History fi les contain summary data only and are used by Joule 2.0 for calculating averages, maximums and totals for Reports. Workout fi les are created in PowerAgent and sent to Joule 2.0. Whenever ride time is accumulated an activities fi le is created and saved automatically. A history fi le is generated anytime a ride is stopped and saved. Note: because history fi les are used by Reports for calculating averages, maximums and totals it is important to manage them carefully, only saving rides that you want to contribute to these calculations. Because Joule 2.0 acts as a mass storage device, activities and history fi les may also be viewed from a PC or Mac when con-nected via USB cable. File Type Description SizeActivtiies Second by second complete ride storage 1hr=150KWorkouts Summarized ride data for reports and history 1 ride=1KBHistory Created by PowerAgent for training a precise power output, powerzone or terrain (slope). 500 segments=5KBChapter 1: Starting OutPausing, Saving and/or Deleting a RideA ride may be paused at any time. Joule 2.0 will turn off automatically if paused for longer than the designated sleep time. See page 34 for how to change sleep time. 1. Press and hold [MODE] button for two seconds to access ride paused screen from any mode. 2. Press [JOYSTICK] in and release to resume ride. DashboardW/W/W/KGMXWATTWATTWASAVWATTWATTWAS2128764075.2MPHCHCAD27.498MILESFT GAIN37.8987WATTWATTWAS>Resume ride>>>>Stop and Save>Stop and Delete>12:02pINTRide Paused](https://usermanual.wiki/Saris-Cycling-Group/CPU2FT3.final-manual/User-Guide-1246547-Page-8.png)
![Joule 2.0 User Guide page 16Joule 2.0 User Guide page 17Chapter 1: Starting OutPausing, Saving and/or Deleting a RideStopping and saving a ride creates a history fi le. History fi les are used for calculating averages, maximums and totals for Reports. 1. Hold [MODE] button for two seconds to access ride paused screen from any mode.2. Press [JOYSTICK] up/down to highlight stop and save. Press [JOYSTICK] in and release to select. Chapter 1: Starting OutPausing, Saving and/or Deleting a RideA ride may be deleted at any time. If a ride is deleted no history fi le is created. 1. Press and hold [MODE] button to access ride paused screen from any mode. 2. Press [JOYSTICK] up/down to highlight stop and delete. Press [JOYSTICK] in and re-lease to select stop and delete. 3. Press [JOYSTICK] in and release to confi rm deletion. DashboardW/W/W/KGMXWATTWATTWASAVWATTWATTWAS2128764075.2MPHCHCAD27.498MILESFT GAIN37.8987WATTWATTWASDashboardW/W/W/KGMXWATTWATTWASAVWATTWATTWAS2128764075.2MPHCHCAD27.498MILESFT GAIN37.8987WATTWATTWASResume ride>Stop and Save>MenuINTRideStop and Delete>Resume ride>Stop and SaveMenuINTRideStop and Delete>>Are you sureAre you sureNoExit to Main Menu<MenuINTStop and DeleteStop and DeleteStop and DeleteYes>><<<<BackExit to Main MenuBackExit to Main Menu](https://usermanual.wiki/Saris-Cycling-Group/CPU2FT3.final-manual/User-Guide-1246547-Page-9.png)
![Joule 2.0 User Guide page 18Joule 2.0 User Guide page 19AlertsNotifi cations indicated in the title bar alerting users to prepare to action step to optimize Joule 2.0 functionality. Battery Low: indicating Joule 2.0 battery is low. Need to plug in and charge to computer or AC adapter. If one bar remains on the battery icon, there is approximately a half an hour of use left before Joule 2.0 battery dies. Connected: indicating Joule 2.0 is connected to a computer or AC adapter and is receiving a charge. Charging may take three hours to complete. Hub Battery Low: indicating the CycleOps PowerTap hub battery is low. Reference CycleOps Pow-erTap User Guide to change battery in hub. Finding: indicatingJoule 2.0 is attempting to fi nd activated sensors. RU Lost: indicating the resistance unit that was activated and paired to Joule 2.0 has been lost. Hub Lost: indicating the power meter that was activated and paired to Joule 2.0 has been lost. Memory Full: indicating the memory on the Joule 2.0 has reached its limit. Insert new microSD card or delete fi les to create more memory. Title barChapter 2: Dashboard ModeDashboardDetailed viewUsing Dashboard ModeJoule 2.0 has four modes of operation: dashboard, reports, activities and menu indicated by the title bar. Note: after the mode is displayed in the title bar for fi ve seconds, the time of day will be displayed. Press and release [MODE] button to change to dashboard mode. Selected metric Battery indicatorInterval On/OffMode level indicatorDashboardW/W/W/KGMX WAT WAT WTSAV WAV WAVAT WAT WTS2128764024025.2MPHCHCAD27.498MILESFT GAIN37.8987WATTWATTWASINTChapter 2: Dashboard Mode](https://usermanual.wiki/Saris-Cycling-Group/CPU2FT3.final-manual/User-Guide-1246547-Page-10.png)
![Joule 2.0 User Guide page 20Joule 2.0 User Guide page 211. Press [JOYSTICK] left/right or up/down to highlight a metric. Note: when a new met-ric is highlighted, the detailed view changes to show related metrics. 2.Press in and release [JOY-STICK] to rotate metrics from detailed view to dashboard. (Example: watts, av watts, mx watts). 3. Press in and hold [JOYSTICK] to change the metric category displayed in the dashboard. Chapter 2: Dashboard ModeUsing Dashboard ModeDashboard mode shows current ride data. It displays six metrics, out of a choice of eighteen, that can be easily customized. The detailed view shows additional metrics related to the selected metric in the dashboard. Detailed viewSelected metricChapter 2: Dashboard ModeDashboard CategoriesEach dashboard category is made up of three metrics. There are twelve available dashboard cat-egories. Press and hold [JOYSTICK] to change the metric category displayed in the dashboard. Category Metric 1Metric 2Metric 3Watts watts average wattsaverage watts/kgcurrent power zone average power zonemaximum watts/kgmaximum wattsWatts/kg watts/kgZonesPeak PowerScoresWorkSpeedVAM2999 29992999WATTSW/KGAV W ATTSMXWA T TS20.0PWR ZONE6AV PWR ZONE4.2heart rate zoneHR ZONE35sec Peak Power 5min Peak Power5 SEC29995 MIN299920 min Peak Power20 MIN2999training stress score normalized powerTSS500.1NORM PWR2999intensity factorIF2.000kilojoules kilojoules / hourKJ9999KJ/HR9999training stress scoreTSS9999RPM rpmaverage rpmCAD250AV CAD250maximum rpmMX CAD250current speed average speedMPH99.9AV MPH99.9maximum speedMX MPH99.9current grade current altitude ft or mcurrent altitude ft or m% GRADE45.0ALTITUDE FT29999total ascent ft or mtotal ascent ft or mFT GAIN9999vertical ascentVA MHeart Rate% Gradeheart rate average heart rateHR250AV HR250MX HR250maximum heart rateAV W/KG20.0MX W/KG20.0Ride ride time99:59:59MILEtime of day12:5999.99ride distanceRIDE TIME HR CLOCK PM29999 9999ALTITUDE FTFT GAIN45.0DashboardW/W/W/KGMXWATTWATTWASAVWATTWATTWAS2128764075.2MPHCHCAD27.498MILESFT GAIN37.8987WATTWATTWASDashboardW/W/W/KGWATTWATTWASMX WAT WAT WTS8764072125.2MPHCHCAD27.498MILESFT GAIN37.8987AV WAV WAVAT WAT WTSDashboardW/W/W/KG20 MIN5 MIN4353075125125.2MPHCHCAD27.498MILESFT GAIN37.89875 SEC](https://usermanual.wiki/Saris-Cycling-Group/CPU2FT3.final-manual/User-Guide-1246547-Page-11.png)
![Joule 2.0 User Guide page 22Joule 2.0 User Guide page 23Title barTodays Ride Report TypeChapter 3: Reports ModeUsing Reports ModeJoule 2.0 has four modes of operation: dashboard, reports, activities and menu indicated by the title bar. Note: after the mode is displayed in the title bar for fi ve seconds, the time of day will be displayed. Press and release [MODE] button to change from dashboard mode to report mode. Better MetricComparable Timeframe Report MetricsBattery indicatorMode level indicatorChapter 2: Intervals1. Intervals can be started at any point during the ride and from any mode. Press and release [INTERVAL]. To stop the existing interval and start the next one, press and release [INTERVAL] again. 2. To view intervals from the dashboard press and hold [INTERVAL] until “INT” is displayed in the title bar. Note: All dashboard data now pertains to the active interval only. 3. To exit interval mode, press and hold [INTERVAL] again. Note: all dashboard data will now pertain to the entire ride. 4. To view all interval data press and release [MODE] to navigate to activities mode. Note: Activities mode shows all intervals completed with the current interval at the top of the list. Average power, heart rate, interval time and distance are displayed for each interval.Intervals are disabled during saved workouts. IntervalsIntervals may be viewed from activities mode or dashboard mode. Intervals are useful for view-ing ride data specifi c to a section of your ride such as a hill or other period of high intensity riding. IntervalsActivities4168w182hr0:18:225.1mi3142w0:33:1612.3mi2139w182hr0:30:049.9mi1119w170hr00:11:273.4mi184hrINTDashboardW/W/W/KGMX WAT WAT WTSAV WAV WAVAT WAT WTS2128764024025.2MPHCHCAD27.498MILESFT GAIN37.8987WATTWATTWASINT](https://usermanual.wiki/Saris-Cycling-Group/CPU2FT3.final-manual/User-Guide-1246547-Page-12.png)
![Joule 2.0 User Guide page 24Joule 2.0 User Guide page 251. From dashboard mode, press and release [MODE] button. Press [JOYSTICK] left/right to change reports. 2. Press [JOYSTICK] up/down to scroll screen. Reports may also be accessed through History, see page 55. 3. Press in and release [JOYSTICK] to change date ranges from two weeks, four weeks, eight weeks, six months and twelve months. 4. Move [JOYSTICK] left and right to show the other reports. There are eight available reports.Using Reports ModeJoule 2.0 provides eight reports with an easy comparison of the current ride and historical aver-ages so information can be seen in context. Each report contains three columns; the fi rst column is the metric label, the second column is the data for a given metric on the current ride, the third column is the average of all rides completed over the selected date range. Note: the highlighted metrics represents the higher of the two metrics. For more information see Report Defi nitions for an explanation of each metric in reports from pages 31-32. Chapter 3: Reports Mode Chapter 3: Reports ModeReport DetailsJoule 2.0 provides eight reports that provide an easy comparison of the ride and historical aver-ages so information can be seen in the context. For more information see Report Defi nitions for an explanation of each metric in reports from pages 31-32. 2. In depth view of power specifi c information for new insight into ride intensity and characteristics. Includes normalized power, watts per kilogram of body weight and time spent at zero watts. 1. Basic information with minimal manipulation or calculation and how they compare to previous rides. Note: Ride time equals time moving. Average watts is calcu-lated without zeros and is time weighted.Reports2/2/09RIDETIMEAVWATTSWATTSWAAVCAD2WK MEANSummaryryMILES75125KJ432376337311TEMPF525610594AVMPH2220AVHR1671651:45:3300:59:45INTReports2/2/09AVWATTSWATTSWAZEROWATTSWATTSWANP2WKPower DetailMXWATTSWATTSWA478641ZEROWATTSWATTSWA10%6%258205AVW/KG3.1212.2MXW/KG7.3535.237829900:05:1200:09:06INT](https://usermanual.wiki/Saris-Cycling-Group/CPU2FT3.final-manual/User-Guide-1246547-Page-13.png)

![Joule 2.0 User Guide page 34Joule 2.0 User Guide page 35Chapter 4: Reports ModeReport Defi nitionsClimbing and Surges ReportM/FT GAINThe total vertical distance in feet or meters traveled or climbed over a given distance ridden. AV% GRADEThe rise or vertical increase in elevation divided by the run or horizontal distance traveled multiplied by 100 (rise ÷ run x 100).M/FT LOSTThe total vertical distance in feet or meters descended over a given distance ridden. VAM1. The rate of vertical ascent in meters per hour. Note: At an 8% grade, a rate of ascent of 1800 meters per hour requires a power output of 6.3 watts per kg and is considered the upper limit for climbing speed in professional cyclists. SurgesA surge is a sudden, short acceleration lasting a minimum of 3 seconds within a particular w/kg zone. The value is simply displayed as the number of times this occurs per watts/kg zone. Once a surge is recorded in a w/kg zone, the w/kg value must drop at least 0.1 w/kg below the minimum zone value before a positive increase in value back into that zone can be considered a new surge.Title barCustomizable MetricsActivities TypeUsing Activities ModeJoule 2.0 has four modes of operation: dashboard, reports, activities and menu indicated by the title bar. Note: after the mode is displayed in the title bar for fi ve seconds, the time of day will be displayed. Press and release [MODE] button to change from dashboard mode to report mode to activites mode. Upcoming SegmentsManual Workout4:38PTRG PWR300300WATTWATTWAS289Current:6 01:42:232999w250b 999.9miInterval:5 01:42:232999w250b 999.9miInterval:4 01:42:232999w250b 999.9miInterval:3 01:42:232999w250b 999.9miBattery indicatorInterval On/OffMode level indicatorChapter 5: Workouts](https://usermanual.wiki/Saris-Cycling-Group/CPU2FT3.final-manual/User-Guide-1246547-Page-18.png)
![Joule 2.0 User Guide page 36Joule 2.0 User Guide page 37Using WorkoutsJoule 2.0 offers two types of workouts, manual and saved, each managed in the Activities Mode. Manual workouts may only be performed with a CycleOps 400 Pro indoor cycle or PowerBeam Pro trainer. Saved workotus are created using PowerAgent software and transferred to Joule 2.0 Both workout types are helpful for making sure a specifi c workout plan is followed by displaying the workout in a series of segments with target intenisty and rest indicated. Chapter 5: WorkoutsUsing Manual Workouts with CycleOps 400 Pro Indoor CycleThe controlled resistance technology offered on the CycleOps 400 Pro indoor cycle allows workout intensity to be precisely managed by targeting slope or a specifi c power output. Sensors>Setup Joule >Setup User>Workouts>History>Sensors>Main>Exit Menu<MenuMenuMainHillWorkoutActivities10%WATTWATTWAS2999Current Segment:6 00:42:2310%250b 999.9miSegment:5 01:42:238%250b 999.9miSegment:4 01:42:237%250b 999.9miSegment:3 01:42:2315%250b 999.9miChapter 5: WorkoutsWorkouts can be ridden in dashboard mode and activities mode. 1. Press and release [MODE] until Menu mode is displayed. 2. Press [JOYSTICK] up/down to highlight Workouts. Press [JOYSTICK] in and release to select Workouts.3. If Joule 2.0 has been paired to the 400 Pro resistance unit a manual workout will be started automatically once the resistance unit is found by Joule 2.0. For more information on pairing and fi nding sensors please refer to page 56. It is also possible to select manual workout by selecting workouts from Menu mode and then manual workout. 4. Press [JOYSTICK] up/down to adjust the target power from any mode once a manual workout is started in 10 watt increments from 30 watts to 1000 watts. Note: The 400 Pro will automatically adjust the resistance to match the target power output. Power is a combination of speed and torque. Because of this, you experience less resis-tance the faster you pedal, keeping your power output at the targeted level. Not all power levels are available at all speeds. When the 400 Pro cannot add any more resistance, you should speed up to achieve the target power. When the 400 Pro cannot remove any more resistance you should slow down to achieve the target power.](https://usermanual.wiki/Saris-Cycling-Group/CPU2FT3.final-manual/User-Guide-1246547-Page-19.png)
![Joule 2.0 User Guide page 38Joule 2.0 User Guide page 39Using Manual Workouts with CycleOps 400 Pro Indoor Cycle...continued Gear RatiosHillWorkoutActivitiesR SP10%WATTWATTWAS2999Current Segment:6 00:42:2310%250b 999.9miSegment:5 01:42:238%250b 999.9miSegment:4 01:42:237%250b 999.9miSegment:3 01:42:2315%250b 999.9miChapter 5: WorkoutsUsing Manual Workouts with CycleOps PowerBeam Pro TrainerThe controlled resistance technology offered on the CycleOps PowerBeam Pro trainer allows workout intensity to be precisely managed by targeting slope or a specifi c power output. Manual Workout>Select Workout Workout WBack<3:16pWorkoutsManual Workout4:38PTRG PWRG PWRG300300WATTWATTWAS289Current:6 01:42:232999w250b 999.9miInterval:5 01:42:232999w250b 999.9miInterval:4 01:42:232999w250b 999.9miInterval:3 01:42:232999w250b 999.9miChapter 5: WorkoutsChainring Sprocket Display Gear Diffi culty50 10 1 Hardest53 11 2 Harder50 11 3 Harder50 12 4 Harder50 13 5 Harder50 14 6 Harder50 15 7 Harder50 11 8 Harder34 17 9 Harder50 12 10 Harder34 19 11 Harder34 14 12 Easier50 15 13 Eaiser34 23 14 Easier34 17 15 Easier34 19 16 Easier34 21 17 Easier34 23 18 Easier34 25 19 Easier34 27 20 Easier34 30 21 Easier34 34 22 Easiest5. Press [JOYSTICK] in and release to change the resistance type from target power to target slope. Slope measures grade steepness of your simulated climb. You can choose a grade between 0 and 25. The higher the number, the steeper the slope you’re climbing. While in slope mode, the 400 Pro provides the resistance for the selected slope at whatever speed you’re riding. The faster you pedal, the more resistance you’ll need to over-come, just like riding up an actual hill. The resistance the 400 Pro simulates is calculated considering the power needed to climb the target slope on a road bike with slick tires and the user weight saved in Joule’s User Setup. For information on setting up user weight see pages 66-67 or connect Joule to PowerAgent software to adjust user weight. 6. Press [JOYSTICK] in and release again to change from target slope to gearing. The gearing setting uses the previously set target slope but allows you to change the gear ratio simulated by the 400 Pro. This is useful for understanding what gear combination is best for you on various slopes so you can train for your goal terrain. The gears and ratios simulated by the 400 Pro are listed above:7. Press and release [INTERVAL] at anytime during a manual workout to start a new interval and end a previous interval. To review intervals during a manual workout, press [MODE] to navigate to Activities Mode and then pess the [JOYSTICK] left/right to highlight the intervals then press [JOYSTICK] up/down to scroll list. 1. Press and release [MODE] until Menu mode is displayed. 2. Press [JOYSTICK] up/down to highlight Workouts. Press [JOYSTICK] in and release to select Workouts.3. If Joule 2.0 has been paired to the PowerBeam Pro resistance unit a manual workout will be started automati-cally once the resistance unit is found by Joule 2.0 and speed is detected. For more information on pairing and fi nding sensors please refer to pages 48-54.4. Press the [JOYSTICK] up/down to adjust the target power from any mode once a manual workout is started in 10 watt increments from 30 watts to 1000 watts. Note: The PowerBeam Pro will automatically adjust the resistance to match the target power output. Power is a combination of speed and torque. Because of this, you experience less resistance the faster you pedal, keeping your power output at the targeted level. Not all power levels are available at all speeds. 5. When the PowerBeam Pro cannot add any more resistance, you should speed up to achieve the target power. When the PowerBeam Pro cannot remove any more resistance you should slow down to achieve the target power.](https://usermanual.wiki/Saris-Cycling-Group/CPU2FT3.final-manual/User-Guide-1246547-Page-20.png)
![Joule 2.0 User Guide page 40Joule 2.0 User Guide page 41Using Manual Workouts with CycleOps PowerBeam Pro Trainer...continued Manual Workout>Select Workout Workout WBack<3:16pWorkoutsManual Workout4:38PTRG PWRG PWRG300300WATTWATTWAS289Current:6 01:42:232999w250b 999.9miInterval:5 01:42:232999w250b 999.9miInterval:4 01:42:232999w250b 999.9miInterval:3 01:42:232999w250b 999.9miChapter 5: Workouts6. Press [JOYSTICK] in and release to change the resistance type from target power to target slope. Slope mea-sures grade steepness of your simulated climb. You can choose a grade between 0 and 10 for the slope. The higher the number, the steeper the slope you’re climbing. While in slope mode, the PowerBeam Pro provides the resistance for the selected slope at whatever speed you’re riding. The faster you pedal, the more resistance you’ll need to overcome, just like riding up an actual hill. The resistance the PowerBeam Pro simulates is calcu-lated considering the power needed to climb the target slope on a road bike with slick tires and the user weight saved in Joule’s User Setup. For information on setting up user weight see pages 66-67 or connect Joule to PowerAgent software to adjust user weight.7. Shift gears on your bicycle to adjust the intensity at the target slope. 8. Press in and release INTERVAL] at anytime during a manual workout to start a new interval and end a previous interval. To review intervals during a manual workout, press [JOYSTICK] left/right to highlight the intervals then press [JOYSTICK] up/down to scroll list. Using Saved Workouts with CycleOps 400 Pro Indoor CycleWorkouts may be created in PowerAgent software and saved to Joule for use on the 400 Pro indoor cycle. The advantage of saved workouts over manual workouts is that the resistance will change automatically based on the saved time or distance of each segment. This is helpful for du-plicating a specifi c course you are training for. Note: Resistance target and type can be changed during a ride in a saved workout in the same way as a manual workout. Chapter 5: Workouts1. Press and release [MODE] until Menu mode is displayed. 2. Press [JOYSTICK] up/down to highlight Workouts. Press [JOYSTICK] in and release to select Workouts.3. Press [JOYSTICK] up/down to highlight the desired saved workout. Press [JOYSTICK] in and release to select the desired saved workout. 4. Once the saved workout is selected, Joule 2.0 will display activities mode and the segments associated with the saved workout. The fi rst segment of the workout will begin as soon as pedaling begins. 5. Pressing [JOYSTICK] up/down adjusts the target resistance from any mode once a saved workout is started. Note: The 400 Pro will automatically adjust the resistance to match the target resistance from the saved work-out. Power is a combination of speed and torque. Because of this, you experience less resistance the faster you pedal, keeping your power output at the targeted level. Not all power levels are available at all speeds. When the 400 Pro cannot add any more resistance, you should speed up to achieve the target power. When the 400 Pro cannot remove any more resistance you should slow down to achieve the target power. Manual Workout>Select Workout Workout WBack<3:16pWorkoutsHillWorkoutActivitiesR SP10%WATTWATTWAS2999Current Segment:6 00:42:2310%250b 999.9miSegment:5 01:42:238%250b 999.9miSegment:4 01:42:237%250b 999.9miSegment:3 01:42:2315%250b 999.9mi](https://usermanual.wiki/Saris-Cycling-Group/CPU2FT3.final-manual/User-Guide-1246547-Page-21.png)
![Joule 2.0 User Guide page 42Joule 2.0 User Guide page 43Using Saved Workouts with CycleOps PowerBeam Pro TrainerWorkouts may be created in PowerAgent software and saved to Joule for use on the PowerBeam Pro trainer. The advantage of saved workouts over manual workouts is that the resistance will change automatically based on the saved time or distance of each segment created in Power-Agent software. This is helpful for duplicating a specifi c course you are training for. Note: Resis-tance target and type can be changed in a saved workout in the same way as a manual workout. Manual Workout>Select Workout Workout WBack<3:16pWorkoutsHillWorkoutActivitiesR SP10%WATTWATTWAS2999Current Segment:6 00:42:2310%250b 999.9miSegment:5 01:42:238%250b 999.9miSegment:4 01:42:237%250b 999.9miSegment:3 01:42:2315%250b 999.9miChapter 5: WorkoutsUsing Saved Workouts with CycleOps 400 Pro Indoor Cycle...continued Chapter 5: WorkoutsSlope measures grade steepness of your simulated climb. You can choose a grade between 0 and 25 for the slope. The higher the number, the steeper the slope you’re climbing. While in slope mode, the 400 Pro provides the resistance for the selected slope at whatever speed you’re riding. The faster you pedal, the more resistance you’ll need to overcome, just like riding up an actual hill. The resistance the 400 Pro simulates is calculated con-sidering the power needed to climb the target slope on a road bike with slick tires and the user weight saved in Joule’s User Setup. For information on setting up user weight see pages 66-67 or connect Joule to PowerAgent software to adjust user weight. 6. Press [JOYSTICK] in and release to change from target slope to gearing. The gearing setting uses the previ-ously set target slope but allows you to change the gear ratio simulated by the 400 Pro. This is useful for un-derstanding what gear combination is best for you on various slopes so you can train for your goal terrain. The gears and ratios simulated by the 400 Pro are listed on page 40.7. When a saved workout is completed each saved segment is automatically converted to an interval. Press [JOYSTICK] left/right to highlight the intervals. Press [JOYSTICK] up/down to scroll up/down and review the intervals. Note: when a saved workout is completed the target resistance defaults to 100 watts. Note: Intervals are disabled during while riding saved workouts.1. Press and release [MODE] until Menu mode is displayed. 2. Press [JOYSTICK] up/down to highlight Workouts. Press [JOYSTICK] in and release to select Workouts.3. Press [JOYSTICK] up/down to highlight the desired saved workout. Press [JOYSTICK] in and release to select the desired saved workout. 4. Once the saved workout is selected, Joule 2.0 will display Activities Mode and the segments associated with the saved workout. The fi rst segment of the workout will begin as soon as pedaling begins. 5. Pressing [JOYSTICK] up/down adjusts the target resistance from any mode once a saved workout is started Note: The PowerBeam Pro will automatically adjust the resistance to match the target power output. Power is a combination of speed and torque. Because of this, you experience less resistance the faster you pedal, keeping your power output at the targeted level. Not all power levels are available at all speeds. When the PowerBeam Pro cannot add any more resistance, you should speed up to achieve the target power. When the PowerBeam Pro cannot remove any more resistance you should slow down to achieve the target power.](https://usermanual.wiki/Saris-Cycling-Group/CPU2FT3.final-manual/User-Guide-1246547-Page-22.png)
![Joule 2.0 User Guide page 44Joule 2.0 User Guide page 45Using Saved Workouts with CycleOps PowerBeam Pro Trainer...continued Manual Workout>Select Workout Workout WBack<3:16pWorkoutsHillWorkoutActivitiesR SP10%WATTWATTWAS2999Current Segment:6 00:42:2310%250b 999.9miSegment:5 01:42:238%250b 999.9miSegment:4 01:42:237%250b 999.9miSegment:3 01:42:2315%250b 999.9miChapter 5: WorkoutsSlope measures grade steepness of your simulated climb. You can choose a grade between 0 and 10 for the slope. The higher the number, the steeper the slope you’re climbing. While in slope mode, the PowerBeam Pro provides the resistance for the selected slope at whatever speed you’re riding. The faster you pedal, the more resistance you’ll need to overcome, just like riding up an actual hill. The resistance the PowerBeam Pro simulates is calculated considering the power needed to climb the target slope on a road bike with slick tires and the user weight saved in Joule’s User Setup. For information on setting up user weight see pages 66-67 or connect Joule to PowerAgent software to adjust user weight.6. Shift gears on your bicycle to adjust the intensity at the target slope. 7. When a saved workout is completed each saved segment is automatically converted to an interval. Press [JOYSTICK] left/right to highlight the intervals. Press [JOYSTICK] up/down to scroll up/down and review the intervals. Note: when a saved workout is completed the target resistance defaults to 100 watts. Note: Intervals are disabled during while riding saved workouts. Pausing, Saving or Deleting a WorkoutA workout, like any ride can be paused, saved or deleted.1. Press and hold [MODE] button to access Ride Paused screen. 2. Press [JOYSTICK] up/down to highlight Pause, Stop and Save or Stop and Delete workout. Press [JOYSTICK] in and release to save changes. Note: there will be a confi rmation screen before deleting a ride. Stop and save will stop the workout and save it to History.>Resume ride>>>>Stop and Save>Stop and Delete>12:02pINTRide PausedIntervalsActivitiesR PWR300300WATTWATTWAS289Current:6 01:42:232999w250b 999.9miInterval:5 01:42:232999w250b 999.9miInterval:4 01:42:232999w250b 999.9miInterval:3 01:42:232999w250b 999.9miINTChapter 5: Workouts](https://usermanual.wiki/Saris-Cycling-Group/CPU2FT3.final-manual/User-Guide-1246547-Page-23.png)
![Joule 2.0 User Guide page 46Joule 2.0 User Guide page 471. Press and release the [MODE] button until Menu mode is displayed. 2. Press [JOYSTICK] in and release to select Sensors. 3. Press [JOYSTICK] in and release to select Power Sensor. 4. Press [JOYSTICK] up/down to highlight the desired Sensor Type. For CycleOps PowerTap Plus series hubs press [JOYSTICK] in and release to select Add PowerTap. For CycleOps Pro Series indoor cycles select Add IC Power. For any ANT+ compatible power sensor select Add ANT+. 5. Make sure the power sensor is awake and isolated from other active sensors by 65 feet/20 meters. For Power-Tap and IC Power sensors rotate the hub/wheel at least one revolution. For ANT+ sensors see that sensor’s user guide for information on waking up the sensor.6. Press the [JOYSTICK] in and release to Start Pairing. Pairing may take up to 60 seconds. Once pairing is suc-cessful, the sensor ID will be displayed. 7. Press [JOYSTICK] up/down to highlight Name. Press [JOYSTICK] in and release to select name and change the name of the paired power sensor. 8. For PowerTap sensors only, press [JOYSTICK] up/down to highlight the wheel circumference and press [JOY-STICK] in and release to select wheel circumference. Press [JOYSTICK] up/down to change wheel circumference. Press JOYSTICK in and release to save changes. For a list of common wheel circumferences see FAQ section. Chapter 6: SensorsSetting Up Power SensorsJoule 2.0 is compatible with many ANT+ sensors, each having a unique code. A sensor is defined as any ANT + compatible power meter, cadence sensor, speed sensor, heart rate strap and CycleOps resistance unit. Joule 2.0 needs to be paired to each sensor to ensure proper function-ality. Common CycleOps power sensors include the PowerTap hub, 300 Pro and 400 Pro indoor cycles. Once set up, sensors can be managed using PowerAgent software. Note: if you purchased a CycleOps 200 Pro, 300 Pro, 400 Pro indoor cycle or PowerBeam trainer all available sensors have been paired at the factory. Setting Up Power Sensors...continued. 9. Press [JOYSTICK] up/down to highlight Auto Zero Yes or No. Press [JOYSTICK] in and release to select Auto Zero Yes or No. Press [JOYSTICK] up/down to change Auto Zero Yes or No. Note: Auto Zero setting should remain set to Yes in all cases except when using a Track PowerTap. 10. Press [JOYSTICK] up/down to highlight Activate Sensor. 11. Press [JOYSTICK] in and release to Activate Sensor. Note: active sensor is designated by a hash mark next to the sensor name in the sensor list. When switching speed sensors, be sure to activate the appropriate sensor. 12. Once a sensor has been paired and activated Joule 2.0 will automatically find the active sensor whenever it is turned on. Note: multiple sensors can be stored by Joule 2.0 but only one can be active per sensor category at a given time.Chapter 6: Sensors](https://usermanual.wiki/Saris-Cycling-Group/CPU2FT3.final-manual/User-Guide-1246547-Page-24.png)
![Joule 2.0 User Guide page 48Joule 2.0 User Guide page 491. Press and release the [MODE] button until Menu mode is displayed. 2. Press [JOYSTICK] in and release to select Sensors.3. Press [JOYSTICK] in and release to select Power Sensor.4. Press [JOYSTICK] up/down to highlight the Active Sensor. Press [JOYSTICK] in and release to select the Active Sensor. Note active sensor is designated by a hash mark next to the sensor name in the sensor list. 5. Make sure the power sensor is awake. For PowerTap and IC Power sensors rotate the hub/wheel at least one revolution. For ANT+ sensors see that sensor’s user guide for information on waking up the sensor.6. Press [JOYSTICK] up/down to highlight Manual Zero. Press [JOYSTICK] in and release to select Manual Zero. 7. The raw torque value, offset and fi rmware version will be shown. If the raw value and offset value does not match a manual zero should be performed.8. Press [JOYSTICK] up/down to highlight Manual Zero. Press [JOYSTICK] in and release to perform Manual Zero. Power Sensor Manual Zero Like a kitchen scale, it is possible for power sensors to incur an offset that needs to be zeroed. This can happen due to large temperature changes which effect the material the power sensors are attached to and often results in power being displayed even while coasting. Chapter 6: SensorsSetting up Cadence SensorsJoule 2.0 is compatible with many ANT+ cadence sensors, each having a unique code. A sensor is defi ned as any ANT + compatible power meter, cadence sensor, speed sensor, heart rate strap and CycleOps resistance unit. Joule 2.0 needs to be paired to each sensor to ensure proper functional-ity. Once set up, sensors can be managed using PowerAgent software. Note: some power sensors do not require a separate cadence sensor in order to display cadence data. 1. Press and release the [MODE] button until Menu mode is displayed. 2. Press [JOYSTICK] in and release to select Sensors. 3. Press [JOYSTICK] in and release to select Cadence Sensor. 4. Press [JOYSTICK] up/down to highlight Add New Sensor. Press [JOYSTICK] in and release to select Add New Sensor.5. Make sure the power sensor is awake and isolated from other active sensors by 65 feet/20 meters. Rotate the crank to wake up the cadence sensor. 6. Press the [JOYSTICK] in and release to Start Pairing. Pairing may take up to 60 seconds. Once pairing is suc-cessful, the sensor ID will be displayed. 7. Press [JOYSTICK] up/down to highlight Name. Press [JOYSTICK] in and release to select Name and change the name of the paired power sensor. Press [JOYSTICK] in and release to save changes. 8. Press [JOYSTICK] up/down to select Activate Sensor. Press [JOYSTICK] in and release to Activate Sensor. Note: The active sensor is designated by a hash mark next to the sensor name in the sensor list. When switch-ing cadence sensors, be sure to activate the appropriate sensor. 9. Once a sensor has been paired and activated Joule 2.0 will automatically fi nd the active sensor whenever it is turned on. Chapter 6: SensorsManual Zero> XX>To XTo Xrque Rrque R Xrque R XXrque RXAW>>>> SEARCHING>Torque Oset>Manual Calibration>Torque Oset>PaToPaToirrirrque Oirque O>>>>>>>>Back>k><To<ToMenuCalibration> SEARCHING>Hub Version Version V> SEARCHINGr SEARCHINGrque O SEARCHINGque O SEARCHINGset SEARCHINGsetir SEARCHINGirrirr SEARCHINGrirrque Oirque O SEARCHINGque Oirque O>>>>>>>>>>>](https://usermanual.wiki/Saris-Cycling-Group/CPU2FT3.final-manual/User-Guide-1246547-Page-25.png)
![Joule 2.0 User Guide page 50Joule 2.0 User Guide page 51 Setting Up Speed SensorsJoule 2.0 is compatible with ANT+ speed sensors, each having a unique code. Joule 2.0 needs to be paired to each sensor to ensure proper functionality. Once set up, sensors can be managed using PowerAgent software. 1. Press and release the [MODE] button until Menu mode is displayed. 2. Press [JOYSTICK] in and release to select Sensors. 3. Press [JOYSTICK] up/down to highlight Speed Sensor. Press [JOYSTICK] in and release to select Speed Sensor. 4. Press [JOYSTICK] up/down to highlight Add New Sensor. Press [JOYSTICK] in and release to select Add New Sensor. 5. Make sure the Speed Sensor is awake and isolated from other active sensors by 65 feet/20 meters. Note: For most Speed Sensors, rotating the wheel will wake up the sensor. 6. Press the [JOYSTICK] in and release to Start Pairing. Pairing may take up to 60 seconds. Once pairing is suc-cessful, the sensor ID will be displayed. 7. Press [JOYSTICK] up/down to highlight Name. Press [JOYSTICK] in and release to select Name and change the name of the paired speed sensor. Press [JOYSTICK] in and release to save changes. 8. Press [JOYSTICK] up/down to highlight the Wheel Circumference and press [JOYSTICK] in and release to select wheel circumference. For a list of common wheel circumferences see FAQ section. 9. Press [JOYSTICK] up/down to highlight Activate Sensor. Press [JOYSTICK] in and release to Activate Sensor. Note: active sensor is designated by a hash mark next to the sensor name in the sensor list. When switching speed sensors, be sure to activate the appropriate sensor. 10. Once a sensor has been paired and activated Joule 2.0 will automatically find the active sensor whenever it is turned on. Chapter 6: SensorsSetting Up Heart Rate SensorsJoule 2.0 is compatible with ANT+ heart rate sensors, each having a unique code. Joule 2.0 needs to be paired to each sensor to ensure proper functionality. Once set up, sensors can be managed using PowerAgent software. 1. Press and release the [MODE] button until Menu mode is displayed. 2. Press [JOYSTICK] in and release to select Sensors. 3. Press [JOYSTICK] up/down to highlight Heart Rate Sensor. Press [JOYSTICK] in and release to select Heart Rate Sensor. 4. Press [JOYSTICK] up/down to highlight Add New Sensor. Press [JOYSTICK] in and release to select Add New Sensor. 5. Make sure the Heart Rate Sensor is being worn and isolated from other active sensors by 65 feet/20 meters. 6. Press the [JOYSTICK] in and release to Start Pairing. Pairing may take up to 60 seconds. Once pairing is suc-cessful, the sensor ID will be displayed. 7. Press [JOYSTICK] up/down to highlight Name. Press [JOYSTICK] in and release to select Name and change the name of the paired heart rate sensor. Press [JOYSTICK] in and release to save changes. 8. Press [JOYSTICK] up/down to highlight Activate Sensor. Press [JOYSTICK] in and release to Activate Sensor. Note: active sensor is designated by a hash mark next to the sensor name in the sensor list. When switching heart rate sensors, be sure to activate the appropriate sensor. 9. Once a sensor has been paired and activated Joule 2.0 will automatically find the active sensor whenever it is turned on. Chapter 6: Sensors](https://usermanual.wiki/Saris-Cycling-Group/CPU2FT3.final-manual/User-Guide-1246547-Page-26.png)
![Joule 2.0 User Guide page 52Joule 2.0 User Guide page 53Setting Up Resistance Unit SensorsJoule 2.0 is compatible with CycleOps electronic resistance units (RU) found on the CycleOps 400 Pro indoor cycle and PowerBeam Pro trainer. In order to be paired, CycleOps electronic resistance units need to be set for pairing by unplugging them for 5 seconds and the plugging them back in.1. Press and release the [MODE] button until Menu mode is displayed. 2. Press [JOYSTICK] in and release to select Sensors. 3. Press [JOYSTICK] up/down to highlight RU Sensor. Press [JOYSTICK] in and release to select RU Sensor. 4. Press [JOYSTICK] up/down to highlight Add New Sensor. Press [JOYSTICK] n and release to select Add New Sensor. 5. Make sure the RU sensor has been unplugged and plugged back in in the last 30 seconds. 6. Press the [JOYSTICK] in and release to Start Pairing. Pairing may take up to 60 seconds. Once pairing is suc-cessful, the sensor ID will be displayed. 7. Press [JOYSTICK] up/down to highlight Name. Press [JOYSTICK] in and release to select name and change the name of the paired RU sensor. Press [JOYSTICK] in and release to save changes. 8. Press [JOYSTICK] up/down to highlight Activate Sensor. Press [JOYSTICK] in and release to Activate Sensor. Note: active sensor is designated by a hash mark next to the sensor name in the sensor list. When switching RU sensors, be sure to activate the appropriate sensor. 9. Once a sensor has been paired and activated Joule 2.0 will automatically find the active sensor whenever it is turned on. Chapter 6: Sensors Chapter 7: Setting Up CycleOps Joule 2.0Manual Calibration for CycleOps PowerBeam Pro TrainerIf you use a power meter such as the PowerTap, you can perform a manual calibration to more accurately calibrate your CycleOps PowerBeam Pro trainer. Note: the power meter must be paired to Joule 2.0 prior to performing the manual calibration. 1. Before entering the calibration routine, warm up the PowerBeam Pro and tires by riding the system for five minutes.2. Press and release the [MODE] button until Menu mode is displayed. 3. Press [JOYSTICK] in and release to select Sensors. 4. Press [JOYSTICK] up/down to highlight RU Sensor. Press [JOYSTICK] in and release to select RU Sensor. 5. Press [JOYSTICK] up/down to highlight the active RU Sensor. Note: the active RU Sensor is indicated by a hash mark next to the name in the RU Sensor list. Press [JOYSTICK] in and release to select the active RU Sensor. 6. Press [JOYSTICK] up/down to highlight Calibration. Press [JOYSTICK] up/down to select Calibration.7. Press [JOYSTICK] up/down to highlight Manual Calibration. Press [JOYSTICK] in and release to select Manual Calibration.8. Joule 2.0 will show the measured power using the current rolling resistance calibration. 9. Pedal at a constant speed to stabilize the resistance. Target 20 mph and press [JOYSTICK] up/down to change the calibration until the displayed power matches the measured power. 10. When the two values match, press [JOYSTICK ].11.The unique rolling resistance calibration is now incorporated into the factory calibration. This calibration will remain in the system until another calibration is performed. Note: The Roll Down Calibration and the Manual Calibration adjust the same calibration values. Only the last calibration values are saved.OK >Name: > 12345 > 12345 >Weight - lbs: > 12.1 >Wheel Circumference:> 1234 >Auto Zero (Y or N): >Y>>Auto Zero (Y or N):> Cervelo >Sensor ID: > 12345 >Calibration >ERU Data>Re-Pair Sensor>>Delete Sensor >Delete Sensor >Delete Sensor >Delete Sensor >Delete Sensor >Delete Sensor >Delete Sensor >Delete Sensor >Delete Sensor >Delete Sensor >Back<ReportMenuINTPowerBeam1Scenerio:ERU CalibrationRoll Down >Manual >Reset to Defaults >Sensor IDSensor IDThe Gun Show >Torque Offset >Manual Calibration >Torque Offset >Back<ReportMenuINTCalibrationPower Sensor: 9999 w >>Roll Down CalibrationWheel Circumference >Wheel Circumference >The Gun Show >Auto Zero>Auto Zero>Pair >Roll Down >Manual >Reset to Defaults >Sensor IDSensor IDThe Gun Show >Torque Offset >Manual Calibration >Torque Offset >Pair New Sensor >Back<ReportMenuINTCalibrationPedal to 18-22 MPH > XXHold for (sec): XXXCurrent Speed: XX.X >Torque Offset >Manual Calibration >Torque Offset >Pair >Completed >Back<ReportMenuINTRoll DownUse up/down to >match ERU to powersensor number.Tu: XXXXXERU Power: >Torque Offset >Manual Calibration >Torque Offset > XXX >Power Sensor: XXX >Back<ReportMenuINTManual CalibrationPower Sensor: 9999 w >>Roll Down CalibrationWheel Circumference >Wheel Circumference >The Gun Show >Auto Zero>Auto Zero>Pair >Roll Down >Manual >Reset to Defaults >Sensor IDSensor IDThe Gun Show >Torque Offset >Manual Calibration >Torque Offset >Pair New Sensor >Back<ReportMenuINTCalibrationRestoring Defaults >match ERU to powersensor number.ERU PowerCompletedThe Gun Show >Torque Offset >Manual Calibration >Torque Offset >Completed >Pair New Sensor >Back<ReportMenuINTReset CalibrationTu is the only user selectable field.TheJoystick up/down causesthe Tu value toincrease/decrease in stepsof fifty.Activate Sensor>Name: > 12345 > 12345 >Weight - lbs: > 12.1 > 1234 >Auto Zero (Y or N): >Y>> RUSENSOR1 >Sensor ID: > 60054 >>>>>Delete Sensor >>>>Back<ReportMenuRUSensor1Cancel PairingDelete SensorRU DataCalibration>>Start Pairing>Roll Down >Manual >Reset to Defaults >Sensor IDSensor IDThe Gun Show >Torque Offset >Manual Calibration >Torque Offset >BackReportMenuCalibrationPower Sensor: 9999 w >>Roll Down CalibrationWheel Circumference >Wheel Circumference >The Gun Show >Auto Zero>Auto Zero>Pair >Roll Down >Manual >Reset to Defaults >Sensor IDSensor IDThe Gun Show >Torque Offset >Manual Calibration >Torque Offset >Pair New Sensor >Back<ReportMenuCalibrationPedal to 18-22 MPH > XXHold for (sec): XXXCurrent Speed: XX.X >Torque Offset >Manual Calibration >Torque Offset >Pair >Completed >Back<ReportMenuRoll DownUse up/down to >match ERU to powersensor number.Tu: XXXXXERU Power: >Torque Offset >Manual Calibration >Torque Offset > XXX >Power Sensor: XXX >Back<ReportMenuManual CalibrationPower Sensor: 9999 w >>Roll Down CalibrationWheel Circumference >Wheel Circumference >The Gun Show >Auto Zero>Auto Zero>Pair >Roll Down >Manual >Reset to Defaults >Sensor IDSensor IDThe Gun Show >Torque Offset >Manual Calibration >Torque Offset >Pair New Sensor >Back<ReportMenuCalibrationRestoring Defaults >match ERU to powersensor number.ERU PowerCompletedThe Gun Show >Torque Offset >Manual Calibration >Torque Offset >Completed >Pair New Sensor >Back<ReportMenuReset CalibrationOK >Name: > 12345 > 12345 >Weight - lbs: > 12.1 >Wheel Circumference:> 1234 >Auto Zero (Y or N): >Y>>Auto Zero (Y or N):> Cervelo >Sensor ID: > 12345 >Calibration >ERU Data>Re-Pair Sensor>>Delete Sensor >Delete Sensor >Delete Sensor >Delete Sensor >Delete Sensor >Delete Sensor >Delete Sensor >Delete Sensor >Delete Sensor >Delete Sensor >Back<ReportMenuINTPowerBeam1Scenerio:ERU CalibrationRoll Down >Manual >Reset to Defaults >Sensor IDSensor IDThe Gun Show >Torque Offset >Manual Calibration >Torque Offset >Back<ReportMenuINTCalibrationPower Sensor: 9999 w >>Roll Down CalibrationWheel Circumference >Wheel Circumference >The Gun Show >Auto Zero>Auto Zero>Pair >Roll Down >Manual >Reset to Defaults >Sensor IDSensor IDThe Gun Show >Torque Offset >Manual Calibration >Torque Offset >Pair New Sensor >Back<ReportMenuINTCalibrationPedal to 18-22 MPH > XXHold for (sec): XXXCurrent Speed: XX.X >Torque Offset >Manual Calibration >Torque Offset >Pair >Completed >Back<ReportMenuINTRoll DownUse up/down to >match ERU to powersensor number.Tu: XXXXXERU Power: >Torque Offset >Manual Calibration >Torque Offset > XXX >Power Sensor: XXX >Back<ReportMenuINTManual CalibrationPower Sensor: 9999 w >>Roll Down CalibrationWheel Circumference >Wheel Circumference >The Gun Show >Auto Zero>Auto Zero>Pair >Roll Down >Manual >Reset to Defaults >Sensor IDSensor IDThe Gun Show >Torque Offset >Manual Calibration >Torque Offset >Pair New Sensor >Back<ReportMenuINTCalibrationRestoring Defaults >match ERU to powersensor number.ERU PowerCompletedThe Gun Show >Torque Offset >Manual Calibration >Torque Offset >Completed >Pair New Sensor >Back<ReportMenuINTReset CalibrationTu is the only user selectable field.TheJoystick up/down causesthe Tu value toincrease/decrease in stepsof fifty.Activate Sensor>Name: > 12345 > 12345 >Weight - lbs: > 12.1 > 1234 >Auto Zero (Y or N): >Y>> RUSENSOR1 >Sensor ID: > 60054 >>>>>Delete Sensor >>>>Back<ReportMenuRUSensor1Cancel PairingDelete SensorRU DataCalibration>>Start Pairing>Roll Down >Manual >Reset to Defaults >Sensor IDSensor IDThe Gun Show >Torque Offset >Manual Calibration >Torque Offset >BackReportMenuCalibrationPower Sensor: 9999 w >>Roll Down CalibrationWheel Circumference >Wheel Circumference >The Gun Show >Auto Zero>Auto Zero>Pair >Roll Down >Manual >Reset to Defaults >Sensor IDSensor IDThe Gun Show >Torque Offset >Manual Calibration >Torque Offset >Pair New Sensor >Back<ReportMenuCalibrationPedal to 18-22 MPH > XXHold for (sec): XXXCurrent Speed: XX.X >Torque Offset >Manual Calibration >Torque Offset >Pair >Completed >Back<ReportMenuRoll DownUse up/down to >match ERU to powersensor number.Tu: XXXXXERU Power: >Torque Offset >Manual Calibration >Torque Offset > XXX >Power Sensor: XXX >Back<ReportMenuManual CalibrationPower Sensor: 9999 w >>Roll Down CalibrationWheel Circumference >Wheel Circumference >The Gun Show >Auto Zero>Auto Zero>Pair >Roll Down >Manual >Reset to Defaults >Sensor IDSensor IDThe Gun Show >Torque Offset >Manual Calibration >Torque Offset >Pair New Sensor >Back<ReportMenuCalibrationRestoring Defaults >match ERU to powersensor number.ERU PowerCompletedThe Gun Show >Torque Offset >Manual Calibration >Torque Offset >Completed >Pair New Sensor >Back<ReportMenuReset Calibration](https://usermanual.wiki/Saris-Cycling-Group/CPU2FT3.final-manual/User-Guide-1246547-Page-27.png)
![Joule 2.0 User Guide page 54Joule 2.0 User Guide page 55Chapter 7: Setting Up CycleOps Joule 2.0Roll Down Calibration for CycleOps PowerBeam Pro TrainerThe CycleOps PowerBeam Pro resistance unit is calibrated at the factory. This enables it to ac-curately measure power using similar technology as a PowerTap. Rolling resistance is calibrated into each individual resistance unit, but can vary depending on tire type, tire pressure, clamping pressure and other conditions. To obtain the most accurate results, follow these guidelines:• PerformtheManualCalibrationdescribedbelow.• Inflatetirestotheratedpressure.• AttachthebicycleaccordingtothePowerBeamProtraineruserguide• ClamptheresistanceunittothereartireaccordingtothePowerBeamProtraineruser guide• Formountainbicycles,usesmoothtires.Knobbytiresarenoisyandcontributetoinac curacies.1.Before entering the calibration routine, warm up the PowerBeam Pro and tires by riding the system for five minutes.1. Press and release the [MODE] button until Menu mode is displayed. 3. Press [JOYSTICK] in and release to select Sensors. 4. Press [JOYSTICK] up/down to highlight RU Sensor. Press [JOYSTICK] in and release to select RU Sensor. 5. Press [JOYSTICK] up/down to highlight the active RU Sensor. Note: the active RU Sensor is indicated by a hash mark next to the name in the RU Sensor list. Press [JOYSTICK] in and release to select the active RU Sensor. 6. Press [JOYSTICK] up/down to highlight Calibration. Press [JOYSTICK] up/down to select Calibration. 7. Press [JOYSTICK up/down to highlight Roll Down calibration. Press [JOYSTICK] in and release to select Roll Down calibration.Chapter 7: Setting Up CycleOps Joule 2.0Roll Down Calibration for CycleOps PowerBeam Pro Trainer...continued 8. Once selected, the roll down calibration process will begin with instructions to pedal at 18 mph. 9. Once at 18 mph, hold this speed for two minutes. A count down timer displays your remaining time.10. After two minutes, immediately stop pedaling and allow the bicycle wheel to coast to a complete stop.11. Do not touch or disturb the resistance unit while coasting. Do not pedal or apply the brakes while coasting. 12. After the resistance unit comes to a complete stop, a “Calibration Passed” message will be shown. Note: if you do not wait the full two minutes or another issue occurs during calibration, a “Calibration Failed” message will be shown and calibration must be repeated. Note: If calibration continues to fail, contact Saris Cycling Group at 1-800-783-7257. 13. The unique rolling resistance calibration is now incorporated into the factory calibration. This calibration will remain in the system until another calibration is performed.OK >Name: > 12345 > 12345 >Weight - lbs: > 12.1 >Wheel Circumference:> 1234 >Auto Zero (Y or N): >Y>>Auto Zero (Y or N):> Cervelo >Sensor ID: > 12345 >Calibration >ERU Data>Re-Pair Sensor>>Delete Sensor >Delete Sensor >Delete Sensor >Delete Sensor >Delete Sensor >Delete Sensor >Delete Sensor >Delete Sensor >Delete Sensor >Delete Sensor >Back<ReportMenuINTPowerBeam1Scenerio:ERU CalibrationRoll Down >Manual >Reset to Defaults >Sensor IDSensor IDThe Gun Show >Torque Offset >Manual Calibration >Torque Offset >Back<ReportMenuINTCalibrationPower Sensor: 9999 w >>Roll Down CalibrationWheel Circumference >Wheel Circumference >The Gun Show >Auto Zero>Auto Zero>Pair >Roll Down >Manual >Reset to Defaults >Sensor IDSensor IDThe Gun Show >Torque Offset >Manual Calibration >Torque Offset >Pair New Sensor >Back<ReportMenuINTCalibrationPedal to 18-22 MPH > XXHold for (sec): XXXCurrent Speed: XX.X >Torque Offset >Manual Calibration >Torque Offset >Pair >Completed >Back<ReportMenuINTRoll DownUse up/down to >match ERU to powersensor number.Tu: XXXXXERU Power: >Torque Offset >Manual Calibration >Torque Offset > XXX >Power Sensor: XXX >Back<ReportMenuINTManual CalibrationPower Sensor: 9999 w >>Roll Down CalibrationWheel Circumference >Wheel Circumference >The Gun Show >Auto Zero>Auto Zero>Pair >Roll Down >Manual >Reset to Defaults >Sensor IDSensor IDThe Gun Show >Torque Offset >Manual Calibration >Torque Offset >Pair New Sensor >Back<ReportMenuINTCalibrationRestoring Defaults >match ERU to powersensor number.ERU PowerCompletedThe Gun Show >Torque Offset >Manual Calibration >Torque Offset >Completed >Pair New Sensor >Back<ReportMenuINTReset CalibrationTu is the only user selectable field.TheJoystick up/down causesthe Tu value toincrease/decrease in stepsof fifty.Activate Sensor>Name: > 12345 > 12345 >Weight - lbs: > 12.1 > 1234 >Auto Zero (Y or N): >Y>> RUSENSOR1 >Sensor ID: > 60054 >>>>>Delete Sensor >>>>Back<ReportMenuRUSensor1Cancel PairingDelete SensorRU DataCalibration>>Start Pairing>Roll Down >Manual >Reset to Defaults >Sensor IDSensor IDThe Gun Show >Torque Offset >Manual Calibration >Torque Offset >BackReportMenuCalibrationPower Sensor: 9999 w >>Roll Down CalibrationWheel Circumference >Wheel Circumference >The Gun Show >Auto Zero>Auto Zero>Pair >Roll Down >Manual >Reset to Defaults >Sensor IDSensor IDThe Gun Show >Torque Offset >Manual Calibration >Torque Offset >Pair New Sensor >Back<ReportMenuCalibrationPedal to 18-22 MPH > XXHold for (sec): XXXCurrent Speed: XX.X >Torque Offset >Manual Calibration >Torque Offset >Pair >Completed >Back<ReportMenuRoll DownUse up/down to >match ERU to powersensor number.Tu: XXXXXERU Power: >Torque Offset >Manual Calibration >Torque Offset > XXX >Power Sensor: XXX >Back<ReportMenuManual CalibrationPower Sensor: 9999 w >>Roll Down CalibrationWheel Circumference >Wheel Circumference >The Gun Show >Auto Zero>Auto Zero>Pair >Roll Down >Manual >Reset to Defaults >Sensor IDSensor IDThe Gun Show >Torque Offset >Manual Calibration >Torque Offset >Pair New Sensor >Back<ReportMenuCalibrationRestoring Defaults >match ERU to powersensor number.ERU PowerCompletedThe Gun Show >Torque Offset >Manual Calibration >Torque Offset >Completed >Pair New Sensor >Back<ReportMenuReset CalibrationOK >Name: > 12345 > 12345 >Weight - lbs: > 12.1 >Wheel Circumference:> 1234 >Auto Zero (Y or N): >Y>>Auto Zero (Y or N):> Cervelo >Sensor ID: > 12345 >Calibration >ERU Data>Re-Pair Sensor>>Delete Sensor >Delete Sensor >Delete Sensor >Delete Sensor >Delete Sensor >Delete Sensor >Delete Sensor >Delete Sensor >Delete Sensor >Delete Sensor >Back<ReportMenuINTPowerBeam1Scenerio:ERU CalibrationRoll Down >Manual >Reset to Defaults >Sensor IDSensor IDThe Gun Show >Torque Offset >Manual Calibration >Torque Offset >Back<ReportMenuINTCalibrationPower Sensor: 9999 w >>Roll Down CalibrationWheel Circumference >Wheel Circumference >The Gun Show >Auto Zero>Auto Zero>Pair >Roll Down >Manual >Reset to Defaults >Sensor IDSensor IDThe Gun Show >Torque Offset >Manual Calibration >Torque Offset >Pair New Sensor >Back<ReportMenuINTCalibrationPedal to 18-22 MPH > XXHold for (sec): XXXCurrent Speed: XX.X >Torque Offset >Manual Calibration >Torque Offset >Pair >Completed >Back<ReportMenuINTRoll DownUse up/down to >match ERU to powersensor number.Tu: XXXXXERU Power: >Torque Offset >Manual Calibration >Torque Offset > XXX >Power Sensor: XXX >Back<ReportMenuINTManual CalibrationPower Sensor: 9999 w >>Roll Down CalibrationWheel Circumference >Wheel Circumference >The Gun Show >Auto Zero>Auto Zero>Pair >Roll Down >Manual >Reset to Defaults >Sensor IDSensor IDThe Gun Show >Torque Offset >Manual Calibration >Torque Offset >Pair New Sensor >Back<ReportMenuINTCalibrationRestoring Defaults >match ERU to powersensor number.ERU PowerCompletedThe Gun Show >Torque Offset >Manual Calibration >Torque Offset >Completed >Pair New Sensor >Back<ReportMenuINTReset CalibrationTu is the only user selectable field.TheJoystick up/down causesthe Tu value toincrease/decrease in stepsof fifty.Activate Sensor>Name: > 12345 > 12345 >Weight - lbs: > 12.1 > 1234 >Auto Zero (Y or N): >Y>> RUSENSOR1 >Sensor ID: > 60054 >>>>>Delete Sensor >>>>Back<ReportMenuRUSensor1Cancel PairingDelete SensorRU DataCalibration>>Start Pairing>Roll Down >Manual >Reset to Defaults >Sensor IDSensor IDThe Gun Show >Torque Offset >Manual Calibration >Torque Offset >BackReportMenuCalibrationPower Sensor: 9999 w >>Roll Down CalibrationWheel Circumference >Wheel Circumference >The Gun Show >Auto Zero>Auto Zero>Pair >Roll Down >Manual >Reset to Defaults >Sensor IDSensor IDThe Gun Show >Torque Offset >Manual Calibration >Torque Offset >Pair New Sensor >Back<ReportMenuCalibrationPedal to 18-22 MPH > XXHold for (sec): XXXCurrent Speed: XX.X >Torque Offset >Manual Calibration >Torque Offset >Pair >Completed >Back<ReportMenuRoll DownUse up/down to >match ERU to powersensor number.Tu: XXXXXERU Power: >Torque Offset >Manual Calibration >Torque Offset > XXX >Power Sensor: XXX >Back<ReportMenuManual CalibrationPower Sensor: 9999 w >>Roll Down CalibrationWheel Circumference >Wheel Circumference >The Gun Show >Auto Zero>Auto Zero>Pair >Roll Down >Manual >Reset to Defaults >Sensor IDSensor IDThe Gun Show >Torque Offset >Manual Calibration >Torque Offset >Pair New Sensor >Back<ReportMenuCalibrationRestoring Defaults >match ERU to powersensor number.ERU PowerCompletedThe Gun Show >Torque Offset >Manual Calibration >Torque Offset >Completed >Pair New Sensor >Back<ReportMenuReset Calibration](https://usermanual.wiki/Saris-Cycling-Group/CPU2FT3.final-manual/User-Guide-1246547-Page-28.png)
![Joule 2.0 User Guide page 56Joule 2.0 User Guide page 57Deleting SensorsSensors can be deleted at anytime. If the active sensor is deleted a new sensor must be activated or added. 1. Press and release the [MODE] button until Menu mode is displayed. 2. Press [JOYSTICK] in and release to select desired action select Sensors. 3. Press [JOYSTICK] up/down to select the sensor type to be deleted. 4. Press [JOYSTICK] up/down to highlight the sensor to be deleted. 5. Press [JOYSTICK] in and release to select the sensor to be deleted. 6. Press [JOYSTICK] up/down to highlight Delete Sensor. Select Sensor >- PowerSensor1 >Sensor Power >e n S ow >or e set >or e set >or e set > Power> >Pr ew Sensor >ceortMenuPower Sensorct te Sensor >> >eel rc erence >02096 >to ero or >>to ero or >>>to ero or >e-P r Sensor >ncel P rn >elete Sensor >lrton>Pr >Pr ew Sensor >ceortMenuPowerSensor1Sensor PowerSensor1Scener o P SensorPower Sensor >- PowerSensor1ence Sensor >See Sensor >- SpeedSensor1 >ert te Sensor >- Sensor1 > Sensor >-RUSensor1 >>>to ero or >Re-P r Sensor >Re-P r Sensor >elete Sensor >P t>Pr >Pr ew Sensor >cReportMenuSensors- CadenceSensor1ae >Start Parn>ct ate Sensor >> P R >eel C rc erence >02096 >to ero or >>to ero or >>>to ero or >Re-Pa r Sensor >Cancel Parn>elete Sensor >Calrat on >Pa r>Pa r ew Sensor >acReportMenuPowerSensor1Sensor PowerSensor1ae >Start Parn>ct ate Sensor >> 12 >eel C rc erence >02096 >to ero or >>to ero or >>>to ero or >Re-Pa r Sensor >Cancel Parn>elete Sensor >Calrat on >Pa r>Pa r ew Sensor >acReportMenuPowerSensor1Sensor PowerSensor1ae >Start Parn> 09Pa rn does not start de altStart Parn s lted de altealt sensor s 00000Cancel Parn w ll stop pa rn process and de a lt to 00000ac and oe tton w ll sa e c an es and e t screenwt o t selectn sensorct ate w ll select sensorac oe tton and ct ate Sensor w ll not do an tnw le pa rns w ll also address 21 266 2 6 and 2ln o andle Sar s t pes a ser w ll select a power sensor t peto pa r tos w ll also 2Power Sensor >- NoneCadence Sensor >Speed Sensor >- None >eart Rate Sensor >- None >RU Sensor >-None >>>to ero or N>Re-Pa r Sensor >Re-Pa r Sensor >elete Sensor >P ata>Pa r>Pa r New Sensor >acReportMenuSensors- NoneSelect Sensor >- PowerSensor1 >Sensor Add PowerTap>Te n S ow >Tore set >Tore set >Tore set >Add C Power >Add ANT >Pa r New Sensor >acReportMenuPower SensorActate Sensor >> 00000 >eel C rc erence >02096 >Ato ero or N >>Ato ero or N >>>Ato ero or N>Re-Pa r Sensor >Cancel Parn>elete Sensor >Calrat on >Pa r>Pa r New Sensor >acReportMenuPowerSensor1Sensor PowerSensor1Na e>Start Parn>Actate Sensor >> PARN >eel C rc erence >02096 >Ato ero or N >>Ato ero or N >>>Ato ero or N>Re-Pa r Sensor >Cancel Parn>elete Sensor >Calrat on >Pa r>Pa r New Sensor >acReportMenuPowerSensor1Sensor PowerSensor1Na e>Start Parn>Actate Sensor >> 12 >eel C rc erence >02096 >Ato ero or N >>Ato ero or N >>>Ato ero or N>Re-Pa r Sensor >Cancel Parn>elete Sensor >Calrat on >Pa r>Pa r New Sensor >acReportMenuPowerSensor1Sensor PowerSensor1Na e>Start Parn>lnActate Sensor >> 31864 >eel C rc erence >02096 >Ato ero or N >>Ato ero or N >>>Ato ero or N>Re-Pa r Sensor >Cancel Parn>Delete Sensor >Calrat on >Pa r>Pa r New Sensor >acReportMenuAshley Race WSensor D Ashley Race WNa e>Start Pairing >Power Sensor >- Ashley Race WCadence Sensor >Speed Sensor >- SpeedSensor1 >eart Rate Sensor >- RSensor1 >RU Sensor >-RUSensor1 >>>Ato ero or N>Re-Pair Sensor >Re-Pair Sensor >Delete Sensor >PT Data>Pair >Pair New Sensor >acReportMenuSensors- CadenceSensor1Select Sensor >Ashley Race W>Sensor DAdd PowerTap>The n Show >Tore set >Tore set >Tore set >Add C Power >Add ANT >Pair New Sensor >acReportMenuAshley Race WAshley Train W >Chapter 7: Setting Up CycleOps Joule 2.0 Chapter 7: Setting Up CycleOps Joule 2.0Setting Up Date and TimeJoule 2.0 date and time can be set using PowerAgent software > configure device. 1. Press and release the [MODE] button until Menu mode is displayed. 2. Press [JOYSTICK] up/down to highlight Setup Joule. Press [JOYSTICK] in and release to select Setup Joule. 3. Press [JOYSTICK] in and release to select Date and Time. 4. Press [JOYSTICK] up/down to highlight Date of Time. Use [JOYSTICK] to change date and time values. Press [JOYSTICK] in and release to save changes. 5. Press [JOYSTICK] up/down to highlight Clock Format. Press [JOYSTICK] in and release to select Clock Format. Use [JOYSTICK] to change between 12 and 24 hour format. Press [JOYSTICK] in and release to save changes.Workouts >History >PowerTest >Preferences >CPU Setup >Sensors >Main >Exit Menu<ReportMenuINTMainWorkouts >History >PowerTest >Preferences >Setup >Sensors >Main >Exit Menu<ReportMenuINTMainBacklight Level1 - 10Backlight Time (sec):Off, 2, 5, 30, 60, OnContrast:1 - 10Zero averaging:With,WithoutPower Avg (sec):1, 2, 3, 5, 10, 30Cadence Avg (sec):1, 2, 3, 5, 10, 30Speed Avg (sec):1, 2, 3, 5, 10, 30Units:English, MetricCRecord Control:Speed, HRMSleep Time:1-5Frequency000 - 124Power:0-3End Ride Time (min):15,30,90,NeverDate:Jan/Feb/Mar...Time:XX:XX am/pmClock Format:12/24OK >Date & Time >>Display >Memory >CPU Mode >CPU Data>CPU Data> XXX >Automatic DST: > On >Back<ReportMenuINTCPU SetupOK >Date & Time >>Display >Memory >CPU Mode >CPU Data>CPU Data> XXX >Automatic DST: > On >Back<ReportMenuINTCPU SetupOK >Date & Time >>Display >Memory >CPU Mode >CPU Data>CPU Data> XXX >Automatic DST: > On >Back<ReportMenuINTCPU SetupOK >Date & Time >>Display >Memory >CPU Mode >CPU Data>CPU Data> XXX >Automatic DST: > On >Back<ReportMenuINTCPU SetupAre you sure? >Date & Time >>Yes>No >CPU Mode >CPU Data>CPU Data> XXX >Automatic DST: > On >Back<ReportMenuINTClear Ride MemoryDate:> Feb 26 2009Time:Clock Format: 12 >Automatic DST: > On >DST Effective: > On >Clock Format: >> 12Units > English >The Gun Show >Auto Zero >>PHR Zones >Pair New Sensor >Back<ReportMenuINTDate & TimeUser >CPU >Heart Rate Sensor >RU Sensor >Speed Sensor >Back<ReportMenuINTSetup 04:55 pmBacklight Level: > 2Backlight Time (sec):Contrast: 5 >Zero averaging:>With >Power Avg (sec): > 1 >Cadence Avg (sec): >> 1Speed Avg (sec): > 1 >Language: > English >Units: > English >Pair New Sensor >Back<ReportMenuINTDisplay 10End Ride Time (min): > 90Clear MemoryClear Ride Memory > 90 >Power Avg (sec): > 1 >Power Zeros: >With >Cadence Avg (sec): >> 1Units: > English >Pair New Sensor >Back<ReportMenuINTMemory 5End Ride Time (min): > 90Clear MemoryClear ride memory > 90 >Power Avg (sec): > 1 >Power Zeros: >With > English > English >Back<ReportMenuINTMemory 5OK >Date & Time >>Display >Memory >CPU Mode >CPU Data>CPU Data> XXX >Automatic DST: > On >Back<ReportMenuINTCPU SetupOK >Date & Time >>Display >Memory >CPU Mode >CPU Data>Test Mode > XXX >Automatic DST: > On >Back<ReportMenuINTCPU Setup>Record Control >Sleep Time: 1 >Power Avg (sec): > 1 >Power Zeros: >With >Cadence Avg (sec): >> 1Speed Avg (sec): > 1 >Language: > English >Units: > English >Pair New Sensor >Back<ReportMenuINTCPU Mode SpeedFirmware Version: > 01:00OdometerReset Odometer 90 >Power Avg (sec): >Designed in: >Madison,WI by >Saris Cycling Group >800-783-7257 >> 1Speed Avg (sec): > 1 >Language: > English >Units: > English >Pair New Sensor >Back<ReportMenuINTCPU Data 512356OK >Date & Time >>Display >Memory >CPU Mode >CPU Data>Test Mode > XXX >Automatic DST: > On >Back<ReportMenuINTCPU SetupFrequency > 057PowerEnd Ride Time (min):Start Radio Test >Stop Radio Test >Designed in: >Madison,WI by >Saris Cycling Group >800-783-7257 >Units: > English >Pair New Sensor >Back<ReportMenuINTTest Mode 3Workouts >History >Setup User >Setup CPU >SensorsSensors >Main >Exit Menu<ReportMenuMain>](https://usermanual.wiki/Saris-Cycling-Group/CPU2FT3.final-manual/User-Guide-1246547-Page-29.png)
![Joule 2.0 User Guide page 58Joule 2.0 User Guide page 59Chapter 7: Setting Up CycleOps Joule 2.0Setting Up DisplayJoule 2.0 display can be customized for viewing preferences. PowerAgent software may also be used to change settings. 1. Press and release the [MODE] button until Menu mode is displayed. 2. Press [JOYSTICK] up/down to highlight Setup Joule. Press [JOYSTICK] in and release to select Setup Joule. 3. Press [JOYSTICK] up/down to highlight Display. Press [JOYSTICK] in and release to select Display. 4. Press [JOYSTICK] up/down to highlight Backlight Level. Press [JOYSTICK] in and release to select Backlight Level. 5. Press [JOYSTICK] up/down to change Backlight Level from 1-10. Press [JOYSTICK] in and release to save settings. Note: Backlight Level10 is the brightest level, 1 is the dimmest. Press [JOYSTICK] in and release to save changes. 6. Press [JOYSTICK] up/down to highlight Backlight Timeout. Press [JOYSTICK] in and release to select Back-light Timeout. 7. Press [JOYSTICK] up/down to change Backlight Timeout from Off, 2 seconds, 5 seconds, 30 seconds, 1 minute or On. Note: the backlight will turn on after any button is pressed and remain on for the duration of the Back-light Timeout setting. Press [JOYSTICK] in and release to save changes. 8. Press [JOYSTICK] up/down to highlight Contrast. Press [JOYSTICK] in and release to select Contrast. 9.Press [JOYSTICK] up/down to change Contrast from 1-10. Press [JOYSTICK] in and release to save settings. Note: Contrast setting 1 offers little distinction between black and white shades while setting 10 offers greater distinction between black and white shades. Press [JOYSTICK] in and release to save changes. 10. Press JOYSTICK up/down to highlight Power Smoothing. Press [JOYSTICK] in and release to select Power Smoothing. 11. Press [JOYSTICK] up/down to change Power Smoothing from 1, 2,3,5,10,30. Press [JOYSTICK] in and release to save settings. Note: Power smoothing 1 displays power data as it is sent from the power sensor, Power smooth-ing 30 displays power data as a 30 second rolling average which can be used for better pacing during intervals and races. Press [JOYSTICK] in and release to save changes. 12. Press [JOYSTICK] up/down to highlight Power With Zeros. Press [JOYSTICK] in and release to select Power With Zeros. 13. Press [JOYSTICK] up/down to change Power With Zeros from Yes to No. Press [JOYSTICK] in and release to save settings. Note: Power With Zeros set to Yes will calculate all average power data with zeros included, Power With Zeros set to No will calculate all average power data without zeros or only when pedaling. Press [JOYSTICK] in and release to save changes. 14. Press [JOYSTICK] up/down to change Cadence Smoothing from 1, 2,3,5,10,30. Press [JOYSTICK] in and release to save settings. Note: Cadence Smoothing 1 displays cadence data as it is sent from the cadence sensor, Ca-dence Smoothing 30 displays cadence data as a 30 second rolling average which can be used for better pacing during intervals and races. Press [JOYSTICK] in and release to save changes. 15. Press [JOYSTICK] up/down to highlight Cadence With Zeros. Press [JOY-STICK] in and release to select Cadence With Zeros. 16. Press [JOYSTICK] up/down to change Cadence With Zeros from Yes to No. Press [JOYSTICK] in and release to save settings. Note: CadenceWith Zeros set to Yes will calculate all average cadence data with zeros included, Cadence With Zeros set to No will calculate all average cadence data without zeros or only while pedaling. Press [JOYSTICK] in and release to save changes. 17. Press [JOYSTICK] up/down to change Speed Smoothing from 1, 2,3,5,10,30. Press [JOYSTICK] in and release to save settings. Note: Speed Smoothing 1 displays speed data as it is sent from the speed sensor, Speed smoothing 30 displays speed data as a 30 second rolling average which can be used for bet-ter pacing during intervals and races. Press [JOYSTICK] in and release to save changes. Chapter 7: Setting Up CycleOps Joule 2.0 Setting Up Display...continuedWorkouts >History >PowerTest >Preferences >CPU Setup >Sensors >Main >Exit Menu<ReportMenuINTMainWorkouts >History >PowerTest >Preferences >Setup >Sensors >Main >Exit Menu<ReportMenuINTMainBacklight Level1 - 10Backlight Time (sec):Off, 2, 5, 30, 60, OnContrast:1 - 10Zero averaging:With,WithoutPower Avg (sec):1, 2, 3, 5, 10, 30Cadence Avg (sec):1, 2, 3, 5, 10, 30Speed Avg (sec):1, 2, 3, 5, 10, 30Units:English, MetricCRecord Control:Speed, HRMSleep Time:1-5Frequency000 - 124Power:0-3End Ride Time (min):15,30,90,NeverDate:Jan/Feb/Mar...Time:XX:XX am/pmClock Format:12/24OK >Date & Time >>Display >Memory >CPU Mode >CPU Data>CPU Data> XXX >Automatic DST: > On >Back<ReportMenuINTCPU SetupOK >Date & Time >>Display >Memory >CPU Mode >CPU Data>CPU Data> XXX >Automatic DST: > On >Back<ReportMenuINTCPU SetupOK >Date & Time >>Display >Memory >CPU Mode >CPU Data>CPU Data> XXX >Automatic DST: > On >Back<ReportMenuINTCPU SetupOK >Date & Time >>Display >Memory >CPU Mode >CPU Data>CPU Data> XXX >Automatic DST: > On >Back<ReportMenuINTCPU SetupAre you sure? >Date & Time >>Yes>No >CPU Mode >CPU Data>CPU Data> XXX >Automatic DST: > On >Back<ReportMenuINTClear Ride MemoryDate:> Feb 26 2009Time:Clock Format: 12 >Automatic DST: > On >DST Effective: > On >Clock Format: >> 12Units > English >The Gun Show >Auto Zero >>PHR Zones >Pair New Sensor >Back<ReportMenuINTDate & TimeUser >CPU >Heart Rate Sensor >RU Sensor >Speed Sensor >Back<ReportMenuINTSetup 04:55 pmBacklight Level: > 2Backlight Time (sec):Contrast: 5 >Zero averaging:>With >Power Avg (sec): > 1 >Cadence Avg (sec): >> 1Speed Avg (sec): > 1 >Language: > English >Units: > English >Pair New Sensor >Back<ReportMenuINTDisplay 10End Ride Time (min): > 90Clear MemoryClear Ride Memory > 90 >Power Avg (sec): > 1 >Power Zeros: >With >Cadence Avg (sec): >> 1Units: > English >Pair New Sensor >Back<ReportMenuINTMemory 5End Ride Time (min): > 90Clear MemoryClear ride memory > 90 >Power Avg (sec): > 1 >Power Zeros: >With > English > English >Back<ReportMenuINTMemory 5OK >Date & Time >>Display >Memory >CPU Mode >CPU Data>CPU Data> XXX >Automatic DST: > On >Back<ReportMenuINTCPU SetupOK >Date & Time >>Display >Memory >CPU Mode >CPU Data>Test Mode > XXX >Automatic DST: > On >Back<ReportMenuINTCPU Setup>Record Control >Sleep Time: 1 >Power Avg (sec): > 1 >Power Zeros: >With >Cadence Avg (sec): >> 1Speed Avg (sec): > 1 >Language: > English >Units: > English >Pair New Sensor >Back<ReportMenuINTCPU Mode SpeedFirmware Version: > 01:00OdometerReset Odometer 90 >Power Avg (sec): >Designed in: >Madison,WI by >Saris Cycling Group >800-783-7257 >> 1Speed Avg (sec): > 1 >Language: > English >Units: > English >Pair New Sensor >Back<ReportMenuINTCPU Data 512356OK >Date & Time >>Display >Memory >CPU Mode >CPU Data>Test Mode > XXX >Automatic DST: > On >Back<ReportMenuINTCPU SetupFrequency > 057PowerEnd Ride Time (min):Start Radio Test >Stop Radio Test >Designed in: >Madison,WI by >Saris Cycling Group >800-783-7257 >Units: > English >Pair New Sensor >Back<ReportMenuINTTest Mode 3Workouts >History >Setup User >Setup CPU >SensorsSensors >Main >Exit Menu<ReportMenuMain>](https://usermanual.wiki/Saris-Cycling-Group/CPU2FT3.final-manual/User-Guide-1246547-Page-30.png)
![Joule 2.0 User Guide page 60Joule 2.0 User Guide page 61Chapter 7: Setting Up CycleOps Joule 2.0 Setting Up Display...continued18. Press [JOYSTICK] up/down to highlight Speed With Zeros. Press [JOYSTICK] in and release to select Speed With Zeros. 19. Press [JOYSTICK] up/down to change Speed With Zeros from Yes to No. Press [JOYSTICK] in and release to save settings. Note: Speed With Zeros set to Yes will calculate all average speed data with zeros included, Speed With Zeros set to No will calculate all average speed data without zeros. Press [JOYSTICK] in and release to save changes. 20. Press [JOYSTICK] up/down to highlight Language. Press [JOYSTICK] in and release to select Language. 21. Press [JOYSTICK] up/down to change Language. Press [JOYSTICK] in and release to save changes. 22. Press [JOYSTICK] up/down to highlight Units. Press [JOYSTICK] in and release to select Units. Press [JOYSTICK] in and release to save changes. 23. Press [JOYSTICK] up/down to change Units. Press [JOYSTICK] in and release to save changes. Workouts >History >PowerTest >Preferences >CPU Setup >Sensors >Main >Exit Menu<ReportMenuINTMainWorkouts >History >PowerTest >Preferences >Setup >Sensors >Main >Exit Menu<ReportMenuINTMainBacklight Level1 - 10Backlight Time (sec):Off, 2, 5, 30, 60, OnContrast:1 - 10Zero averaging:With,WithoutPower Avg (sec):1, 2, 3, 5, 10, 30Cadence Avg (sec):1, 2, 3, 5, 10, 30Speed Avg (sec):1, 2, 3, 5, 10, 30Units:English, MetricCRecord Control:Speed, HRMSleep Time:1-5Frequency000 - 124Power:0-3End Ride Time (min):15,30,90,NeverDate:Jan/Feb/Mar...Time:XX:XX am/pmClock Format:12/24OK >Date & Time >>Display >Memory >CPU Mode >CPU Data>CPU Data> XXX >Automatic DST: > On >Back<ReportMenuINTCPU SetupOK >Date & Time >>Display >Memory >CPU Mode >CPU Data>CPU Data> XXX >Automatic DST: > On >Back<ReportMenuINTCPU SetupOK >Date & Time >>Display >Memory >CPU Mode >CPU Data>CPU Data> XXX >Automatic DST: > On >Back<ReportMenuINTCPU SetupOK >Date & Time >>Display >Memory >CPU Mode >CPU Data>CPU Data> XXX >Automatic DST: > On >Back<ReportMenuINTCPU SetupAre you sure? >Date & Time >>Yes>No >CPU Mode >CPU Data>CPU Data> XXX >Automatic DST: > On >Back<ReportMenuINTClear Ride MemoryDate:> Feb 26 2009Time:Clock Format: 12 >Automatic DST: > On >DST Effective: > On >Clock Format: >> 12Units > English >The Gun Show >Auto Zero >>PHR Zones >Pair New Sensor >Back<ReportMenuINTDate & TimeUser >CPU >Heart Rate Sensor >RU Sensor >Speed Sensor >Back<ReportMenuINTSetup 04:55 pmBacklight Level: > 2Backlight Time (sec):Contrast: 5 >Zero averaging:>With >Power Avg (sec): > 1 >Cadence Avg (sec): >> 1Speed Avg (sec): > 1 >Language: > English >Units: > English >Pair New Sensor >Back<ReportMenuINTDisplay 10End Ride Time (min): > 90Clear MemoryClear Ride Memory > 90 >Power Avg (sec): > 1 >Power Zeros: >With >Cadence Avg (sec): >> 1Units: > English >Pair New Sensor >Back<ReportMenuINTMemory 5End Ride Time (min): > 90Clear MemoryClear ride memory > 90 >Power Avg (sec): > 1 >Power Zeros: >With > English > English >Back<ReportMenuINTMemory 5OK >Date & Time >>Display >Memory >CPU Mode >CPU Data>CPU Data> XXX >Automatic DST: > On >Back<ReportMenuINTCPU SetupOK >Date & Time >>Display >Memory >CPU Mode >CPU Data>Test Mode > XXX >Automatic DST: > On >Back<ReportMenuINTCPU Setup>Record Control >Sleep Time: 1 >Power Avg (sec): > 1 >Power Zeros: >With >Cadence Avg (sec): >> 1Speed Avg (sec): > 1 >Language: > English >Units: > English >Pair New Sensor >Back<ReportMenuINTCPU Mode SpeedFirmware Version: > 01:00OdometerReset Odometer 90 >Power Avg (sec): >Designed in: >Madison,WI by >Saris Cycling Group >800-783-7257 >> 1Speed Avg (sec): > 1 >Language: > English >Units: > English >Pair New Sensor >Back<ReportMenuINTCPU Data 512356OK >Date & Time >>Display >Memory >CPU Mode >CPU Data>Test Mode > XXX >Automatic DST: > On >Back<ReportMenuINTCPU SetupFrequency > 057PowerEnd Ride Time (min):Start Radio Test >Stop Radio Test >Designed in: >Madison,WI by >Saris Cycling Group >800-783-7257 >Units: > English >Pair New Sensor >Back<ReportMenuINTTest Mode 3Workouts >History >Setup User >Setup CPU >SensorsSensors >Main >Exit Menu<ReportMenuMain>Chapter 7: Setting Up CycleOps Joule 2.0Setting Up MemoryJoule 2.0 has 4 MB of onboard memory for storing activities, history and workouts. See Chapter 1: Data Management for details. 1. Press and release the [MODE] button until Menu mode is displayed. 2. Press [JOYSTICK] up/down to highlight Setup Joule. Press [JOYSTICK] in and release to select Setup Joule.3. Press [JOYSTICK] up/down to highlight Memory. Press [JOYSTICK] in and release to select Memory. 4. Press [JOYSTICK] up/down to highlight End Ride Time. Press [JOYSTICK] in and release to select End Ride Time from 1, 2,3,5,10,30 and never. Press [JOY-STICK] in and release to save changes. After ride has ended, it has been entered into History data. Note: End ride time controls when the current ride automati-cally is saved to History and Reports. 5. Press [JOYSTICK] up/down to highlight Clear Ride Memory. Press [JOYSTICK] in and release to select Clear Ride Memory. Workouts >History >PowerTest >Preferences >CPU Setup >Sensors >Main >Exit Menu<ReportMenuINTMainWorkouts >History >PowerTest >Preferences >Setup >Sensors >Main >Exit Menu<ReportMenuINTMainBacklight Level1 - 10Backlight Time (sec):Off, 2, 5, 30, 60, OnContrast:1 - 10Zero averaging:With,WithoutPower Avg (sec):1, 2, 3, 5, 10, 30Cadence Avg (sec):1, 2, 3, 5, 10, 30Speed Avg (sec):1, 2, 3, 5, 10, 30Units:English, MetricCRecord Control:Speed, HRMSleep Time:1-5Frequency000 - 124Power:0-3End Ride Time (min):15,30,90,NeverDate:Jan/Feb/Mar...Time:XX:XX am/pmClock Format:12/24OK >Date & Time >>Display >Memory >CPU Mode >CPU Data>CPU Data> XXX >Automatic DST: > On >Back<ReportMenuINTCPU SetupOK >Date & Time >>Display >Memory >CPU Mode >CPU Data>CPU Data> XXX >Automatic DST: > On >Back<ReportMenuINTCPU SetupOK >Date & Time >>Display >Memory >CPU Mode >CPU Data>CPU Data> XXX >Automatic DST: > On >Back<ReportMenuINTCPU SetupOK >Date & Time >>Display >Memory >CPU Mode >CPU Data>CPU Data> XXX >Automatic DST: > On >Back<ReportMenuINTCPU SetupAre you sure? >Date & Time >>Yes>No >CPU Mode >CPU Data>CPU Data> XXX >Automatic DST: > On >Back<ReportMenuINTClear Ride MemoryDate:> Feb 26 2009Time:Clock Format: 12 >Automatic DST: > On >DST Effective: > On >Clock Format: >> 12Units > English >The Gun Show >Auto Zero >>PHR Zones >Pair New Sensor >Back<ReportMenuINTDate & TimeUser >CPU >Heart Rate Sensor >RU Sensor >Speed Sensor >Back<ReportMenuINTSetup 04:55 pmBacklight Level: > 2Backlight Time (sec):Contrast: 5 >Zero averaging:>With >Power Avg (sec): > 1 >Cadence Avg (sec): >> 1Speed Avg (sec): > 1 >Language: > English >Units: > English >Pair New Sensor >Back<ReportMenuINTDisplay 10End Ride Time (min): > 90Clear MemoryClear Ride Memory > 90 >Power Avg (sec): > 1 >Power Zeros: >With >Cadence Avg (sec): >> 1Units: > English >Pair New Sensor >Back<ReportMenuINTMemory 5End Ride Time (min): > 90Clear MemoryClear ride memory > 90 >Power Avg (sec): > 1 >Power Zeros: >With > English > English >Back<ReportMenuINTMemory 5OK >Date & Time >>Display >Memory >CPU Mode >CPU Data>CPU Data> XXX >Automatic DST: > On >Back<ReportMenuINTCPU SetupOK >Date & Time >>Display >Memory >CPU Mode >CPU Data>Test Mode > XXX >Automatic DST: > On >Back<ReportMenuINTCPU Setup>Record Control >Sleep Time: 1 >Power Avg (sec): > 1 >Power Zeros: >With >Cadence Avg (sec): >> 1Speed Avg (sec): > 1 >Language: > English >Units: > English >Pair New Sensor >Back<ReportMenuINTCPU Mode SpeedFirmware Version: > 01:00OdometerReset Odometer 90 >Power Avg (sec): >Designed in: >Madison,WI by >Saris Cycling Group >800-783-7257 >> 1Speed Avg (sec): > 1 >Language: > English >Units: > English >Pair New Sensor >Back<ReportMenuINTCPU Data 512356OK >Date & Time >>Display >Memory >CPU Mode >CPU Data>Test Mode > XXX >Automatic DST: > On >Back<ReportMenuINTCPU SetupFrequency > 057PowerEnd Ride Time (min):Start Radio Test >Stop Radio Test >Designed in: >Madison,WI by >Saris Cycling Group >800-783-7257 >Units: > English >Pair New Sensor >Back<ReportMenuINTTest Mode 3Workouts >History >Setup User >Setup CPU >SensorsSensors >Main >Exit Menu<ReportMenuMain>](https://usermanual.wiki/Saris-Cycling-Group/CPU2FT3.final-manual/User-Guide-1246547-Page-31.png)
![Joule 2.0 User Guide page 62Joule 2.0 User Guide page 63Chapter 7: Setting Up CycleOps Joule 2.0Setting Up Joule™ Mode1. Press and release the [MODE] button until Menu mode is displayed. 2. Press {JOYSTICK} up/down to highlight Setup Joule. Press [JOYSTICK] in and release to select Setup Joule.3. Press [JOYSTICK] up/down to highlight Joule Mode. Press [JOYSTICK] in and release to select Joule Mode. 4. Press [JOYSTICK] in and release to select Record Control. Select between speed and HRM (heart rate monitor) for record control. Speed setting starts recording when speed is detected. Heart rate setting starts recording anytime heart rate is detected. Press [JOYSTICK] in and release to save changes. 5. Press [JOYSTICK] up/down to highlight Sleep Time. Press [JOYSTICK] in and release to select Sleep Time from 1, 2,3,4 and 5. Note: sleep time designates how long Joule 2.0 stays on after not getting valid data to record, such as after a ride. A longer sleep time will slightly effect battery life. Press [JOYSTICK] in and release to save changes. Workouts >History >PowerTest >Preferences >CPU Setup >Sensors >Main >Exit Menu<ReportMenuINTMainWorkouts >History >PowerTest >Preferences >Setup >Sensors >Main >Exit Menu<ReportMenuINTMainBacklight Level1 - 10Backlight Time (sec):Off, 2, 5, 30, 60, OnContrast:1 - 10Zero averaging:With,WithoutPower Avg (sec):1, 2, 3, 5, 10, 30Cadence Avg (sec):1, 2, 3, 5, 10, 30Speed Avg (sec):1, 2, 3, 5, 10, 30Units:English, MetricCRecord Control:Speed, HRMSleep Time:1-5Frequency000 - 124Power:0-3End Ride Time (min):15,30,90,NeverDate:Jan/Feb/Mar...Time:XX:XX am/pmClock Format:12/24OK >Date & Time >>Display >Memory >CPU Mode >CPU Data>CPU Data> XXX >Automatic DST: > On >Back<ReportMenuINTCPU SetupOK >Date & Time >>Display >Memory >CPU Mode >CPU Data>CPU Data> XXX >Automatic DST: > On >Back<ReportMenuINTCPU SetupOK >Date & Time >>Display >Memory >CPU Mode >CPU Data>CPU Data> XXX >Automatic DST: > On >Back<ReportMenuINTCPU SetupOK >Date & Time >>Display >Memory >CPU Mode >CPU Data>CPU Data> XXX >Automatic DST: > On >Back<ReportMenuINTCPU SetupAre you sure? >Date & Time >>Yes>No >CPU Mode >CPU Data>CPU Data> XXX >Automatic DST: > On >Back<ReportMenuINTClear Ride MemoryDate:> Feb 26 2009Time:Clock Format: 12 >Automatic DST: > On >DST Effective: > On >Clock Format: >> 12Units > English >The Gun Show >Auto Zero >>PHR Zones >Pair New Sensor >Back<ReportMenuINTDate & TimeUser >CPU >Heart Rate Sensor >RU Sensor >Speed Sensor >Back<ReportMenuINTSetup 04:55 pmBacklight Level: > 2Backlight Time (sec):Contrast: 5 >Zero averaging:>With >Power Avg (sec): > 1 >Cadence Avg (sec): >> 1Speed Avg (sec): > 1 >Language: > English >Units: > English >Pair New Sensor >Back<ReportMenuINTDisplay 10End Ride Time (min): > 90Clear MemoryClear Ride Memory > 90 >Power Avg (sec): > 1 >Power Zeros: >With >Cadence Avg (sec): >> 1Units: > English >Pair New Sensor >Back<ReportMenuINTMemory 5End Ride Time (min): > 90Clear MemoryClear ride memory > 90 >Power Avg (sec): > 1 >Power Zeros: >With > English > English >Back<ReportMenuINTMemory 5OK >Date & Time >>Display >Memory >CPU Mode >CPU Data>CPU Data> XXX >Automatic DST: > On >Back<ReportMenuINTCPU SetupOK >Date & Time >>Display >Memory >CPU Mode >CPU Data>Test Mode > XXX >Automatic DST: > On >Back<ReportMenuINTCPU Setup>Record Control >Sleep Time: 1 >Power Avg (sec): > 1 >Power Zeros: >With >Cadence Avg (sec): >> 1Speed Avg (sec): > 1 >Language: > English >Units: > English >Pair New Sensor >Back<ReportMenuINTCPU Mode SpeedFirmware Version: > 01:00OdometerReset Odometer 90 >Power Avg (sec): >Designed in: >Madison,WI by >Saris Cycling Group >800-783-7257 >> 1Speed Avg (sec): > 1 >Language: > English >Units: > English >Pair New Sensor >Back<ReportMenuINTCPU Data 512356OK >Date & Time >>Display >Memory >CPU Mode >CPU Data>Test Mode > XXX >Automatic DST: > On >Back<ReportMenuINTCPU SetupFrequency > 057PowerEnd Ride Time (min):Start Radio Test >Stop Radio Test >Designed in: >Madison,WI by >Saris Cycling Group >800-783-7257 >Units: > English >Pair New Sensor >Back<ReportMenuINTTest Mode 3Workouts >History >Setup User >Setup CPU >SensorsSensors >Main >Exit Menu<ReportMenuMain>Chapter 7: Setting Up CycleOps Joule 2.0Setting Up Joule™ Data Firmware version denotes the revision Joule 2.0 is operating on. Reference www.cycleops.com for the latest version. 1. Press and release the [MODE] button until Menu mode is displayed. 2. Press [JOYSTICK} up/down to highlight Setup Joule. Press [JOYSTICK] in and release to select Setup Joule.3. Press [JOYSTICK] up/down to highlight Joule Data. Press [JOYSTICK] in and release to select Joule Data. 4. Press [JOYSTICK] up/down to view Joule 2.0 firmware version. 5. Press [JOYSTICK] up/down to highlight Odometer. Press [JOYSTICK] in and release to select Odometer. The odometer can be changed for a desired start point and can be reset at any time. Press {JOYSTICK] up/down to change. Press [JOYSTICK] in and release to save changes. Workouts >History >PowerTest >Preferences >CPU Setup >Sensors >Main >Exit Menu<ReportMenuINTMainWorkouts >History >PowerTest >Preferences >Setup >Sensors >Main >Exit Menu<ReportMenuINTMainBacklight Level1 - 10Backlight Time (sec):Off, 2, 5, 30, 60, OnContrast:1 - 10Zero averaging:With,WithoutPower Avg (sec):1, 2, 3, 5, 10, 30Cadence Avg (sec):1, 2, 3, 5, 10, 30Speed Avg (sec):1, 2, 3, 5, 10, 30Units:English, MetricCRecord Control:Speed, HRMSleep Time:1-5Frequency000 - 124Power:0-3End Ride Time (min):15,30,90,NeverDate:Jan/Feb/Mar...Time:XX:XX am/pmClock Format:12/24OK >Date & Time >>Display >Memory >CPU Mode >CPU Data>CPU Data> XXX >Automatic DST: > On >Back<ReportMenuINTCPU SetupOK >Date & Time >>Display >Memory >CPU Mode >CPU Data>CPU Data> XXX >Automatic DST: > On >Back<ReportMenuINTCPU SetupOK >Date & Time >>Display >Memory >CPU Mode >CPU Data>CPU Data> XXX >Automatic DST: > On >Back<ReportMenuINTCPU SetupOK >Date & Time >>Display >Memory >CPU Mode >CPU Data>CPU Data> XXX >Automatic DST: > On >Back<ReportMenuINTCPU SetupAre you sure? >Date & Time >>Yes>No >CPU Mode >CPU Data>CPU Data> XXX >Automatic DST: > On >Back<ReportMenuINTClear Ride MemoryDate:> Feb 26 2009Time:Clock Format: 12 >Automatic DST: > On >DST Effective: > On >Clock Format: >> 12Units > English >The Gun Show >Auto Zero >>PHR Zones >Pair New Sensor >Back<ReportMenuINTDate & TimeUser >CPU >Heart Rate Sensor >RU Sensor >Speed Sensor >Back<ReportMenuINTSetup 04:55 pmBacklight Level: > 2Backlight Time (sec):Contrast: 5 >Zero averaging:>With >Power Avg (sec): > 1 >Cadence Avg (sec): >> 1Speed Avg (sec): > 1 >Language: > English >Units: > English >Pair New Sensor >Back<ReportMenuINTDisplay 10End Ride Time (min): > 90Clear MemoryClear Ride Memory > 90 >Power Avg (sec): > 1 >Power Zeros: >With >Cadence Avg (sec): >> 1Units: > English >Pair New Sensor >Back<ReportMenuINTMemory 5End Ride Time (min): > 90Clear MemoryClear ride memory > 90 >Power Avg (sec): > 1 >Power Zeros: >With > English > English >Back<ReportMenuINTMemory 5OK >Date & Time >>Display >Memory >CPU Mode >CPU Data>CPU Data> XXX >Automatic DST: > On >Back<ReportMenuINTCPU SetupOK >Date & Time >>Display >Memory >CPU Mode >CPU Data>Test Mode > XXX >Automatic DST: > On >Back<ReportMenuINTCPU Setup>Record Control >Sleep Time: 1 >Power Avg (sec): > 1 >Power Zeros: >With >Cadence Avg (sec): >> 1Speed Avg (sec): > 1 >Language: > English >Units: > English >Pair New Sensor >Back<ReportMenuINTCPU Mode SpeedFirmware Version: > 01:00OdometerReset Odometer 90 >Power Avg (sec): >Designed in: >Madison,WI by >Saris Cycling Group >800-783-7257 >> 1Speed Avg (sec): > 1 >Language: > English >Units: > English >Pair New Sensor >Back<ReportMenuINTCPU Data 512356OK >Date & Time >>Display >Memory >CPU Mode >CPU Data>Test Mode > XXX >Automatic DST: > On >Back<ReportMenuINTCPU SetupFrequency > 057PowerEnd Ride Time (min):Start Radio Test >Stop Radio Test >Designed in: >Madison,WI by >Saris Cycling Group >800-783-7257 >Units: > English >Pair New Sensor >Back<ReportMenuINTTest Mode 3Workouts >History >Setup User >Setup CPU >SensorsSensors >Main >Exit Menu<ReportMenuMain>](https://usermanual.wiki/Saris-Cycling-Group/CPU2FT3.final-manual/User-Guide-1246547-Page-32.png)
![Joule 2.0 User Guide page 64Joule 2.0 User Guide page 65Chapter 8: Setting Up UserSetting Up User ProfileSetting up a user profile is important for Joule 2.0 to display the most accurate information. A user profile can be set up and managed using PowerAgent software. Note: if using Joule 2.0 in group environment, a USB stick will store user information. 1. Press and release the [MODE] button until Menu mode is displayed. 2. Press [JOYSTICK] up/down to highlight Setup User. Press [JOYSTICK] in and release to select Setup User. 3. Press [JOYSTICK] in and release to select Name. Press [JOYSTICK] up/down to spell desired user name. Press [JOYSTICK] in and release to save changes. 4. Press [JOYSTICK] up/down to highlight Weight. Press [JOYSTICK] in and release to select Weight. Use [JOYSTICK] to toggle appropriate user weight. Calculations such as: watts/kg and accurate target slope resistance require cor-rect user weight. Press [JOYSTICK] in and release to save changes. 5. Press [JOYSTICK] up/down to highlight Height. Press [JOYSTICK] in and release to select Height. Use [JOYSTICK] to set appropriate user height. Press [JOYSTICK] in and release to save changes. 6. Press [JOYSTICK] up/down to highlight Date of Birth. Press [JOYSTICK] in and release to select Date of Birth. Use [JOYSTICK] to set appropriate date of birth. Press [JOYSTICK] in and release to save changes. Name: > New UserActive: > XWeight - lbs: XXX >Height - in: > XXX >Date of Birth: > Feb 02 1974 >Gender: >> MalePower Zones >HR Zones >The Gun Show >Auto Zero >Power Zones >HR Zones >Pair New Sensor >Back<ReportMenuSetup User>>XXXX XXXX >The Gun Show >Auto Zero >Power Zones >HR Zones >Pair New Sensor >Back<ReportMenuPower ZonesZone Upper imit1: Recover 122: ndurance 12:Threshold4: Race Pace > 12 >: Ma imum > 12 >>: Supra Ma MAX >12Name: > esseActive 1- : > XWeight - lbs: XXX >Height - in: > XXX >Date of Birth: > Feb 02 1974 >Gender: >> MalePower Zones >HR Zones >The Gun Show >Auto Zero >Power Zones >HR Zones >Pair New Sensor >Back<ReportMenuSetup User>>>: Supra MaXXXX XXXX >Gender >The Gun Show >Auto Zero >Power Zones >HR Zones >Pair New Sensor >Back<ReportMenuHeart Rate ZonesSensors >Setup Joule >Setup User >Workouts >History >Sensors >Main >it Menu<ReportMenuMainZone Upper imit1: Recovery2: ndurance 12:Threshold4: Race Pace > 12 >: Ma imum > 12 >>: Supra Ma MAX >12 12Chapter 8: Setting Up UserSetting Up User Profile...continued7. Press [JOYSTICK] up/down to highlight Gender. Press [JOYSTICK] in and release to select Gender. Press [JOYSTICK] up/down to change from male to female. Press [JOYSTICK] in and release to save changes. 8.Press [JOYSTICK] up/down to highlight Power Zones. Press [JOYSTICK] in and release to select Power Zones. Press [JOYSTICK] up/down to highlight and select Recovery Zone, Endurance Zone, Threshold Zone, Race Pace Zone and Maximum Zone. Press [JOYSTICK] in and release to save changes. 9.Press [JOYSTICK] up/down to highlight Heart Rate Zones. Press [JOYSTICK] in and release to select Heart Rate Zones. Press [JOYSTICK] up/down to highlight and Recovery Zone, Endur-ance Zone, Threshold Zone, Race Pace Zone and Maximum Zone. Use [JOYSTICK] to set appropri-ate zone values. Press [JOYSTICK] in and release to save changes. Name: > New UserActive: > XWeight - lbs: XXX >Height - in: > XXX >Date of Birth: > Feb 02 1974 >Gender: >> MalePower Zones >HR Zones >The Gun Show >Auto Zero >Power Zones >HR Zones >Pair New Sensor >Back<ReportMenuSetup User>>XXXX XXXX >The Gun Show >Auto Zero >Power Zones >HR Zones >Pair New Sensor >Back<ReportMenuPower ZonesZone Upper imit1: Recover 122: ndurance 12:Threshold4: Race Pace > 12 >: Ma imum > 12 >>: Supra Ma MAX >12Name: > esseActive 1- : > XWeight - lbs: XXX >Height - in: > XXX >Date of Birth: > Feb 02 1974 >Gender: >> MalePower Zones >HR Zones >The Gun Show >Auto Zero >Power Zones >HR Zones >Pair New Sensor >Back<ReportMenuSetup User>>>: Supra MaXXXX XXXX >Gender >The Gun Show >Auto Zero >Power Zones >HR Zones >Pair New Sensor >Back<ReportMenuHeart Rate ZonesSensors >Setup Joule >Setup User >Workouts >History >Sensors >Main >it Menu<ReportMenuMainZone Upper imit1: Recovery2: ndurance 12:Threshold4: Race Pace > 12 >: Ma imum > 12 >>: Supra Ma MAX >12 12Name: > New UserActive: > XWeight - lbs: XXX >Height - in: > XXX >Date of Birth: > Feb 02 1974 >Gender: >> MalePower Zones >HR Zones >The Gun Show >Auto Zero >Power Zones >HR Zones >Pair New Sensor >Back<ReportMenuSetup User>>XXXX XXXX >The Gun Show >Auto Zero >Power Zones >HR Zones >Pair New Sensor >Back<ReportMenuPower ZonesZone Upper imit1: Recover 122: ndurance 12:Threshold4: Race Pace > 12 >: Ma imum > 12 >>: Supra Ma MAX >12Name: > esseActive 1- : > XWeight - lbs: XXX >Height - in: > XXX >Date of Birth: > Feb 02 1974 >Gender: >> MalePower Zones >HR Zones >The Gun Show >Auto Zero >Power Zones >HR Zones >Pair New Sensor >Back<ReportMenuSetup User>>>: Supra MaXXXX XXXX >Gender >The Gun Show >Auto Zero >Power Zones >HR Zones >Pair New Sensor >Back<ReportMenuHeart Rate ZonesSensors >Setup Joule >Setup User >Workouts >History >Sensors >Main >it Menu<ReportMenuMainZone Upper imit1: Recovery2: ndurance 12:Threshold4: Race Pace > 12 >: Ma imum > 12 >>: Supra Ma MAX >12 12](https://usermanual.wiki/Saris-Cycling-Group/CPU2FT3.final-manual/User-Guide-1246547-Page-33.png)
![Joule 2.0 User Guide page 66Joule 2.0 User Guide page 67Chapter 9: History Previous Rides Previous rides history allows for comparisons of any selected ride to averages over 2 weeks, 4 weeks, 8 weeks, 6 moths or 12 months prior to the selected ride. Note: the averages do not include the selected ride. 1. Press and release the [MODE] button until Menu mode is displayed. 2. Press [JOYSTICK] up/down to highlight History.3. Press [JOYSTICK] in and release to select History.4. Press [JOYSTICK] in and release to select Previous Rides.5. Press [JOYSTICK] up/down to highlight desired ride. Note: each ride is named using the format YYYYMMDD HHMMSS so a ride listed as 20091120 154335 was created November 20th, 2009 at 3:43:35 PM. 6. Press [JOYSTICK] in and release to select the desired ride. Note: Reports are now shown with 3 columns; the fi rst column is the metric label, the second column is the data for a given metric on the selected ride and the 3rd column is the average of all rides completed over the selected date range. 7. Press [JOYSTICK] in and release to change the selected data range from 2 weeks, 4 weeks, 8 weeks, 6 months and 12 months. 8. Press [JOYSTICK] left/right to change reports and exit History reports. Note: Rides will be organized and sorted by date, with most current date at top. Previous Rides >Reports - Max >Reports - Totals >Back<ReportMenuHistorySelect by Date> 20090731123542 > 20090731123542 >Back<ReportMenuHistory - Previous RidesSelect by Date>Back<ReportMenuHistory - Previous RidesPrevious Rides >Reports - Max >Reports - Totals >Reports - Max >Back<ReportMenuHistoryReportHistory2/2/09RIDETIMEAVWATTSAVCAD2wk mean SummaryMILES9999 9999KJ9999 99999999 9999250 250AVMPH99 99AVHR240 24099:59:59 99:59:59ReportHistory2/2/095 SEC5 MIN20 MIN2wk mean Peak Power30 SEC2999 29991 MIN2999 29992999 29992999 299930 MIN2999 299940 MIN2999 299960 MIN2999 29992999 2999ReportHistory2/2/091452wk mean Time in Power Zones299:59:59 99:59:59399:59:59 99:59:5999:59:59 99:59:5999:59:59 99:59:59699:59:59 99:59:591100% 100%2100% 100%3100% 100%4100% 100%5100% 100%6100% 100%99:59:59 99:59:59ReportHistory2/2/091452wk mean Time in HR Zones299:59:59 99:59:59399:59:59 99:59:5999:59:59 99:59:5999:59:59 99:59:591100% 100%2100% 100%3100% 100%4100% 100%5100% 100%99:59:59 99:59:59ReportHistory2/2/09FTGAINVA M2wk mean ClimbingAVGRADE100% 100%FTLOST9999 99999999 99999999 9999ReportHistory2/2/09AVWATTSZEROWATTSNP2wk mean Power DetailMXWATTS9999 9999ZEROWATTS100% 100%2999 2999AVW/KG2999 2999MXW/KG2999 29999999 999999:59:59 99:59:59ReportHistoryMAXRIDETIMEAVWATTSAVCAD2WK MEANSummaryMILES9999 9999KJ9999 99999999 9999250 250AVMPH99 99AVHR240 24099:59:59 99:59:59ReportHistoryMAX5 SEC5 MIN20 MIN2WK MEANPeak Power30 SEC2999 29991 MIN2999 29992999 29992999 299930 MIN2999 299940 MIN2999 299960 MIN2999 29992999 2999ReportHistoryMAX1452WK MEAN Time in Power Zones299:59:59 99:59:59399:59:59 99:59:5999:59:59 99:59:5999:59:59 99:59:59699:59:59 99:59:591100% 100%2100% 100%3100% 100%4100% 100%5100% 100%6100% 100%99:59:59 99:59:59ReportHistoryMAX1452WK MEAN Time in HR Zones299:59:59 99:59:59399:59:59 99:59:5999:59:59 99:59:5999:59:59 99:59:591100% 100%2100% 100%3100% 100%4100% 100%5100% 100%99:59:59 99:59:59ReportHistoryMAXFTGAINVA M2WK MEANClimbingAVGRADE100% 100%FTLOST9999 99999999 99999999 9999ReportHistoryMAXAVWATTSZEROWATTSNP2WK MEANPower DetailMXWATTS9999 9999ZEROWATTS100% 100%2999 2999AVW/KG2999 2999MXW/KG2999 29999999 999999:59:59 99:59:59Previous Rides >Reports - Max >Reports - Totals >Reports - Max >Back<ReportMenuHistoryReportHistoryTOT A LRIDETIMECALFTGAIN2WK MEANSummaryMILES9999 9999KJ9999 99999999 99999999 9999AVMPH99 99AVHR240 24099:59:59 99:59:59ReportHistoryTOT A L1452WK MEAN Time in Power Zones299:59:59 99:59:59399:59:59 99:59:5999:59:59 99:59:5999:59:59 99:59:59699:59:59 99:59:591100% 100%2100% 100%3100% 100%4100% 100%5100% 100%6100% 100%99:59:59 99:59:59ReportHistoryTOT A L1452WK MEAN Time in HR Zones299:59:59 99:59:59399:59:59 99:59:5999:59:59 99:59:5999:59:59 99:59:591100% 100%2100% 100%3100% 100%4100% 100%5100% 100%99:59:59 99:59:59ReportHistory2/2/09KJ2WK MEANWorkKJ/HR9999 9999TSS500 500IF250 2509999 9999ReportHistoryMAXKJ2WK MEANWorkKJ/HR9999 9999TSS500 500IF250 2509999 9999Workouts >History >Setup User >Setup CPU >Sensors >Sensors >Main >Exit Menu<ReportMenuMainSensorsSetup Joule Setup serWorkoutsHistorySensorsinit enueportMenuinChapter 9: History Maximum HistoryMaximum History reports allows for comparisons of the maximum values achieved in a selected time frame to the averages achieved in that same time frame. 1. Press and release the [MODE] button until Menu mode is displayed. 2. Press [JOYSTICK] up/down to highlight History.3. Press [JOYSTICK] in and release to select History.4. Press [JOYSTICK] in and release to select Reports – Max. Note: Reports are now shown with 3 columns; the fi rst column is the metric label, the second column is the maximum value achieved for a given metric over the selected time frame and the 3rd column is the average of all rides completed over the selected date range. 5. Press [JOYSTICK] in and release to change the selected data range from 2 weeks, 4 weeks, 8 weeks, 6 months and 12 months. 6. Press [JOYSTICK] left/right to change reports and exit History reports. Note: Max view is the max values achieved for each report metric over the average on two week, four week, etc.SensorsSetup Joule Setup serWorkoutsHistorySensorsinit enueportMenuinPrevious Rides >Reports - Max >Reports - Totals >Back<ReportMenuHistorySelect by Date> 20090731123542 > 20090731123542 >Back<ReportMenuHistory - Previous RidesSelect by Date>Back<ReportMenuHistory - Previous RidesPrevious Rides >Reports - Max >Reports - Totals >Reports - Max >Back<ReportMenuHistoryReportHistory2/2/09RIDETIMEAVWATTSAVCAD2wk mean SummaryMILES9999 9999KJ9999 99999999 9999250 250AVMPH99 99AVHR240 24099:59:59 99:59:59ReportHistory2/2/095 SEC5 MIN20 MIN2wk mean Peak Power30 SEC2999 29991 MIN2999 29992999 29992999 299930 MIN2999 299940 MIN2999 299960 MIN2999 29992999 2999ReportHistory2/2/091452wk mean Time in Power Zones299:59:59 99:59:59399:59:59 99:59:5999:59:59 99:59:5999:59:59 99:59:59699:59:59 99:59:591100% 100%2100% 100%3100% 100%4100% 100%5100% 100%6100% 100%99:59:59 99:59:59ReportHistory2/2/091452wk mean Time in HR Zones299:59:59 99:59:59399:59:59 99:59:5999:59:59 99:59:5999:59:59 99:59:591100% 100%2100% 100%3100% 100%4100% 100%5100% 100%99:59:59 99:59:59ReportHistory2/2/09FTGAINVA M2wk mean ClimbingAVGRADE100% 100%FTLOST9999 99999999 99999999 9999ReportHistory2/2/09AVWATTSZEROWATTSNP2wk mean Power DetailMXWATTS9999 9999ZEROWATTS100% 100%2999 2999AVW/KG2999 2999MXW/KG2999 29999999 999999:59:59 99:59:59ReportHistoryMAXRIDETIMEAVWATTSAVCAD2WK MEANSummaryMILES9999 9999KJ9999 99999999 9999250 250AVMPH99 99AVHR240 24099:59:59 99:59:59ReportHistoryMAX5 SEC5 MIN20 MIN2WK MEANPeak Power30 SEC2999 29991 MIN2999 29992999 29992999 299930 MIN2999 299940 MIN2999 299960 MIN2999 29992999 2999ReportHistoryMAX1452WK MEAN Time in Power Zones299:59:59 99:59:59399:59:59 99:59:5999:59:59 99:59:5999:59:59 99:59:59699:59:59 99:59:591100% 100%2100% 100%3100% 100%4100% 100%5100% 100%6100% 100%99:59:59 99:59:59ReportHistoryMAX1452WK MEAN Time in HR Zones299:59:59 99:59:59399:59:59 99:59:5999:59:59 99:59:5999:59:59 99:59:591100% 100%2100% 100%3100% 100%4100% 100%5100% 100%99:59:59 99:59:59ReportHistoryMAXFTGAINVA M2WK MEANClimbingAVGRADE100% 100%FTLOST9999 99999999 99999999 9999ReportHistoryMAXAVWATTSZEROWATTSNP2WK MEANPower DetailMXWATTS9999 9999ZEROWATTS100% 100%2999 2999AVW/KG2999 2999MXW/KG2999 29999999 999999:59:59 99:59:59Previous Rides >Reports - Max >Reports - Totals >Reports - Max >Back<ReportMenuHistoryReportHistoryTOT A LRIDETIMECALFTGAIN2WK MEANSummaryMILES9999 9999KJ9999 99999999 99999999 9999AVMPH99 99AVHR240 24099:59:59 99:59:59ReportHistoryTOT A L1452WK MEAN Time in Power Zones299:59:59 99:59:59399:59:59 99:59:5999:59:59 99:59:5999:59:59 99:59:59699:59:59 99:59:591100% 100%2100% 100%3100% 100%4100% 100%5100% 100%6100% 100%99:59:59 99:59:59ReportHistoryTOT A L1452WK MEAN Time in HR Zones299:59:59 99:59:59399:59:59 99:59:5999:59:59 99:59:5999:59:59 99:59:591100% 100%2100% 100%3100% 100%4100% 100%5100% 100%99:59:59 99:59:59ReportHistory2/2/09KJ2WK MEANWorkKJ/HR9999 9999TSS500 500IF250 2509999 9999ReportHistoryMAXKJ2WK MEANWorkKJ/HR9999 9999TSS500 500IF250 2509999 9999Workouts >History >Setup User >Setup CPU >Sensors >Sensors >Main >Exit Menu<ReportMenuMain](https://usermanual.wiki/Saris-Cycling-Group/CPU2FT3.final-manual/User-Guide-1246547-Page-34.png)
![Joule 2.0 User Guide page 68Joule 2.0 User Guide page 69Chapter 9: History Total HistoryTotals History reports allows for comparisons of the totals achieved in a selected time frame to the averages achieved in that same time frame. 1. Press and release the [MODE] button until Menu mode is displayed. 2. Press [JOYSTICK] up/down to highlight History.3. Press [JOYSTICK] in and release to select History.4. Press [JOYSTICK] in and release to select Reports – Totals. Note: Reports are now shown with 3 col-umns; the first column is the metric label, the second column is the total value achieved for a given metric over the selected time frame and the 3rd column is the average of all rides completed over the selected date range. 5. Press [JOYSTICK] in and release to change the selected data range from 2 weeks, 4 weeks, 8 weeks, 6 months and 12 months. 6. Press [JOYSTICK] left/right to change reports and exit History reports. Note: Total view is the total values achieved for each report metric over the average on two week, four week, etc.SensorsSetup Joule Setup serWorkoutsHistorySensorsinit enueportMenuinPrevious Rides >Reports - Max >Reports - Totals >Back<ReportMenuHistorySelect by Date> 20090731123542 > 20090731123542 >Back<ReportMenuHistory - Previous RidesSelect by Date>Back<ReportMenuHistory - Previous RidesPrevious Rides >Reports - Max >Reports - Totals >Reports - Max >Back<ReportMenuHistoryReportHistory2/2/09RIDETIMEAVWATTSAVCAD2wk mean SummaryMILES9999 9999KJ9999 99999999 9999250 250AVMPH99 99AVHR240 24099:59:59 99:59:59ReportHistory2/2/095 SEC5 MIN20 MIN2wk mean Peak Power30 SEC2999 29991 MIN2999 29992999 29992999 299930 MIN2999 299940 MIN2999 299960 MIN2999 29992999 2999ReportHistory2/2/091452wk mean Time in Power Zones299:59:59 99:59:59399:59:59 99:59:5999:59:59 99:59:5999:59:59 99:59:59699:59:59 99:59:591100% 100%2100% 100%3100% 100%4100% 100%5100% 100%6100% 100%99:59:59 99:59:59ReportHistory2/2/091452wk mean Time in HR Zones299:59:59 99:59:59399:59:59 99:59:5999:59:59 99:59:5999:59:59 99:59:591100% 100%2100% 100%3100% 100%4100% 100%5100% 100%99:59:59 99:59:59ReportHistory2/2/09FTGAINVA M2wk mean ClimbingAVGRADE100% 100%FTLOST9999 99999999 99999999 9999ReportHistory2/2/09AVWATTSZEROWATTSNP2wk mean Power DetailMXWATTS9999 9999ZEROWATTS100% 100%2999 2999AVW/KG2999 2999MXW/KG2999 29999999 999999:59:59 99:59:59ReportHistoryMAXRIDETIMEAVWATTSAVCAD2WK MEANSummaryMILES9999 9999KJ9999 99999999 9999250 250AVMPH99 99AVHR240 24099:59:59 99:59:59ReportHistoryMAX5 SEC5 MIN20 MIN2WK MEANPeak Power30 SEC2999 29991 MIN2999 29992999 29992999 299930 MIN2999 299940 MIN2999 299960 MIN2999 29992999 2999ReportHistoryMAX1452WK MEAN Time in Power Zones299:59:59 99:59:59399:59:59 99:59:5999:59:59 99:59:5999:59:59 99:59:59699:59:59 99:59:591100% 100%2100% 100%3100% 100%4100% 100%5100% 100%6100% 100%99:59:59 99:59:59ReportHistoryMAX1452WK MEAN Time in HR Zones299:59:59 99:59:59399:59:59 99:59:5999:59:59 99:59:5999:59:59 99:59:591100% 100%2100% 100%3100% 100%4100% 100%5100% 100%99:59:59 99:59:59ReportHistoryMAXFTGAINVA M2WK MEANClimbingAVGRADE100% 100%FTLOST9999 99999999 99999999 9999ReportHistoryMAXAVWATTSZEROWATTSNP2WK MEANPower DetailMXWATTS9999 9999ZEROWATTS100% 100%2999 2999AVW/KG2999 2999MXW/KG2999 29999999 999999:59:59 99:59:59Previous Rides >Reports - Max >Reports - Totals >Reports - Max >Back<ReportMenuHistoryReportHistoryTOT A LRIDETIMECALFTGAIN2WK MEANSummaryMILES9999 9999KJ9999 99999999 99999999 9999AVMPH99 99AVHR240 24099:59:59 99:59:59ReportHistoryTOT A L1452WK MEAN Time in Power Zones299:59:59 99:59:59399:59:59 99:59:5999:59:59 99:59:5999:59:59 99:59:59699:59:59 99:59:591100% 100%2100% 100%3100% 100%4100% 100%5100% 100%6100% 100%99:59:59 99:59:59ReportHistoryTOT A L1452WK MEAN Time in HR Zones299:59:59 99:59:59399:59:59 99:59:5999:59:59 99:59:5999:59:59 99:59:591100% 100%2100% 100%3100% 100%4100% 100%5100% 100%99:59:59 99:59:59ReportHistory2/2/09KJ2WK MEANWorkKJ/HR9999 9999TSS500 500IF250 2509999 9999ReportHistoryMAXKJ2WK MEANWorkKJ/HR9999 9999TSS500 500IF250 2509999 9999Workouts >History >Setup User >Setup CPU >Sensors >Sensors >Main >Exit Menu<ReportMenuMainFor most up to date Frequently Asked Questions, visit www.cycleops.com.No display on computer screen· Computer is asleep – Press [MODE] or [INTERVAL] on the computer to wake up the computer.· Computer is too cold- operating temp. is 32 to 110 degrees FahrenheitComputer display is fully discharged· It will need to be recharged for at least 30 minutes.Computer display is on, but there is no transmission of data.· Hub is asleep - spin the wheel to wake up the hub.· Computer has not “found” the hub. Press and hold [MODE] and [INTERVAL] until “Find” appears on Title Bar. Make sure hub is awake by rotating wheel once.· Batteries need replacement - replace the hub batteries as shown in the maintenance section of the User GuidePower seems incorrect·Torque value is not zeroed. To manually zero torque, go to Menu, Sensors, Select Sensor, Calibra-tion. Manual Zero the hub. Torque is now being displayed. If re-zeroing the torque does not recalibrate the unit, call Saris Cycling Group customer service at 1-800-783-7257.Speed seems incorrect· Wheel size incorrect -refer to Sensors to enter the correct size in corresponding sensor. Chapter 10: Troubleshooting CycleOps Joule 2.0](https://usermanual.wiki/Saris-Cycling-Group/CPU2FT3.final-manual/User-Guide-1246547-Page-35.png)