Satellite Tracking of People BTV0909 BluTag Stalker Alert User Manual
Satellite Tracking of People LLC BluTag Stalker Alert
User Manual

Stalker Alert and Stalker Alert and
Victim Feature Victim Feature
Users GuideUsers Guide
https://www.veritracks.com
Username:__________________________
For 24/7 assistance, contact the STOP®Solutions Center
1-866-703-STOP (7867) | techsupport@stopllc.com

Stalker Alert®and VeriTracks®Training, Page 2
V
e
riTr
ac
k
s
1
0
.4
,
Bl
u
T
ag
v4
&
v
5,
F
eb
r
ua
r
y
2
0
1
0
VeriTracks 10.4, BluTag v4 & v5, February 2010
BluTag® complies with Part 15 of the FCC Rules. Operation is subject to the following two conditions:
This device may not cause harmful interference, and
This device must accept any interference received, including interference that may cause undesired operation.
RF Exposure (SAR) Statement for BluTag®: (FCC ID S5EAA90048, FCC ID S5EAA70038 & S5E0906BT5)
This equipment complies with FCC RF radiation exposure limits set forth for an uncontrolled environment. It was tested as an ankle worn device in accordance with OET Bulletin 65 Supplement C. The
maximum SAR value reported is 0.572W/Kg (S5E0906BT5) and 0.967 W/kg (S5EAA90048) and 0.967 W/kg (S5EAA70038)
The GSM and ISM transmitters used in BluTag are not co-located. The ISM transmitter is operational only when it is required to communicate with the associated equipment. The BluTag is set up
automatically to prevent simultaneous transmission between the GSM and ISM transmitters”
RF Exposure Statement for BluBox™ (FCC ID S5EAA90548) and BluHome™ (FCC ID S5EBH0107A)
This equipment complies with FCC RF radiation exposure limits set forth for an uncontrolled environment. The antenna(s) used fo
r
this transmitter must be installed to provide a separation distance of at
least 20 cm from all persons and must not be co-located or operating in conjunction with any other antenna or transmitter.
RF Exposure (SAR) Statement for Stalker Alert®: (FCC ID S5EBTV0909)
This equipment complies with FCC RF radiation exposure limits set forth for an uncontrolled environment. The maximum SAR value reported is 0.389W/Kg
The GSM and ISM transmitters used in Stalker Alert are not co-located. The ISM transmitter is operational only when it is required to communicate with the associated equipment. The Stalker Alert is set up
automatically to prevent simultaneous transmission between the GSM and ISM transmitters”
WARNING
–
Changes or modifications to this unit not expressly approved by the party responsible for compliance could void the user’s au
t
hority to operate the equipment.
Battery Safety
The Blutag Device contains a non-removable lithium-Ion battery. Do not attempt to remove the battery. Do not dispose of The Blutag or the lithium-Ion battery in a fire. Please return the Device to Satellite
Tracking of People LLC for disposal otherwise only dispose of the battery or Blutag device in accordance with the laws and regulations in your area governing disposal of this type of battery.
The lithium-Ion battery might present a fire or chemical burn hazard if mistreated. Do not disassemble, crush, or puncture the lithium-Ion battery or the Blutag Device. Do not heat the battery or Blutag
ib
(
)
Dev
i
ce a
b
ove 140°F
(
60°C
)
.
Copyright Notice
© 2008 Satellite Tracking of People LLC. All rights reserved.
Reproduction of this document is expressly forbidden without written approval from Satellite Tracking of People LLC.
VeriTracks®, BluBox™, BluTag®, BluHome™ and various software icons are worldwide registered trademarks of Satellite Tracking of People LLC (STOP).
The software described herein has U.S. and Foreign Patents Pending.
STOP provides this publication as is without warranty of any kind, expressed or implied, including, but not limited to, the implied warranties of merchantability or fitness for a particular purpose.
This publication could include technical inaccuracies or typographical errors. Changes are periodically made to the information contained herein; these changes will be incorporated in new editions of the
publication. STOP may make improvements and/or changes to the products described in this publication at any time.

Stalker Alert®and VeriTracks®Training, Page 3
Ob
j
ectivesOb
j
ectives
jj
What will we cover in this Doument?
Oi
Slid 4
5
O
verv
i
ew
Slid
es
4
-
5
Victim Enrollment Slides 6 - 19
Proximity Settings
Slides 20
24
Proximity Settings
Slides 20
-
24
Supervision Slides 25 - 33
Unenrollment
Slides 34
–
35
Unenrollment
Slides 34
–
35

Stalker Alert®and VeriTracks®Training, Page 4
Overview Overview –– Stalker Alert GPS Trackin
g
DeviceStalker Alert GPS Trackin
g
Device
gg
• Small compact device easily fits inside a handbag or briefcase or attaches to a belt or
i tb d W i h l th d it di i 4 7” 3” 1 1”
wa
i
s
tb
an
d
.
W
e
igh
s
l
ess
th
an
seven
ounces
an
d it
s
di
mens
i
ons
are
4
.
7”
x
3”
x
1
.
1”
.
• Operates for 60 hours on a single charge and recharging takes about one hour.
• T-Mobile or AT&T cellular service
• A charging indicator light assures the wearer that the device is charging.
• Low battery indicator vibrates twice every 10 minutes for 3-5 hours
• Contact Stalker Alert via vibrate and audible alerts

Stalker Alert®and VeriTracks®Training, Page 5
Overview Overview –– Stalker Alert GPS Trackin
g
Device
(
cont’d
)
Stalker Alert GPS Trackin
g
Device
(
cont’d
)
g()g()
How Stalker Alert works with BluTag
• Stalker Alert is assigned to a victim profile similar to the way a BluTag is assigned to an
enrollee profile.
• The victim profile and enrollee profile are linked in VeriTracks
• Both BluTag and Stalker Alert determine and record their position on Earth once every
minute.
• VeriTracks stores three concentric zones that “travel” with the Stalker Alert.
• When each device reports its GPS, VeriTracks compares the points. If a comparison of
BluTag and Stalker Alert points determines that the enrollee is inside any of the three
zones, VeriTracks immediately records the event.
• VeriTracks sends immediate notifications to the supervising agency as well as the victim.
• For added safety, Stalker alert detects the rf signal emitted by the enrollee’s BluTag.

Stalker Alert®and VeriTracks®Training, Page 6
Enrollment Basics Enrollment Basics –– Maintain Stalker Alert in ReadinessMaintain Stalker Alert in Readiness
1. Turn on the Stalker Alert b
y
p
lacin
g
it on its char
g
er for at least 2
yp g g
hours before an installation.
2. Acquire GPS by giving the tag a clear view of the sky for 45 minutes.
The Stalker Alert will usually acquire GPS in the first few minutes, but
for optimal performance it needs to download the GPS almanac data
for optimal performance it needs to download the GPS almanac data
.
Stalker Alert®and VeriTracks®Training, Page 7
Enrollment Basics Enrollment Basics ––Verif
y
Stalker Alert ReadinessVerif
y
Stalker Alert Readiness
yy
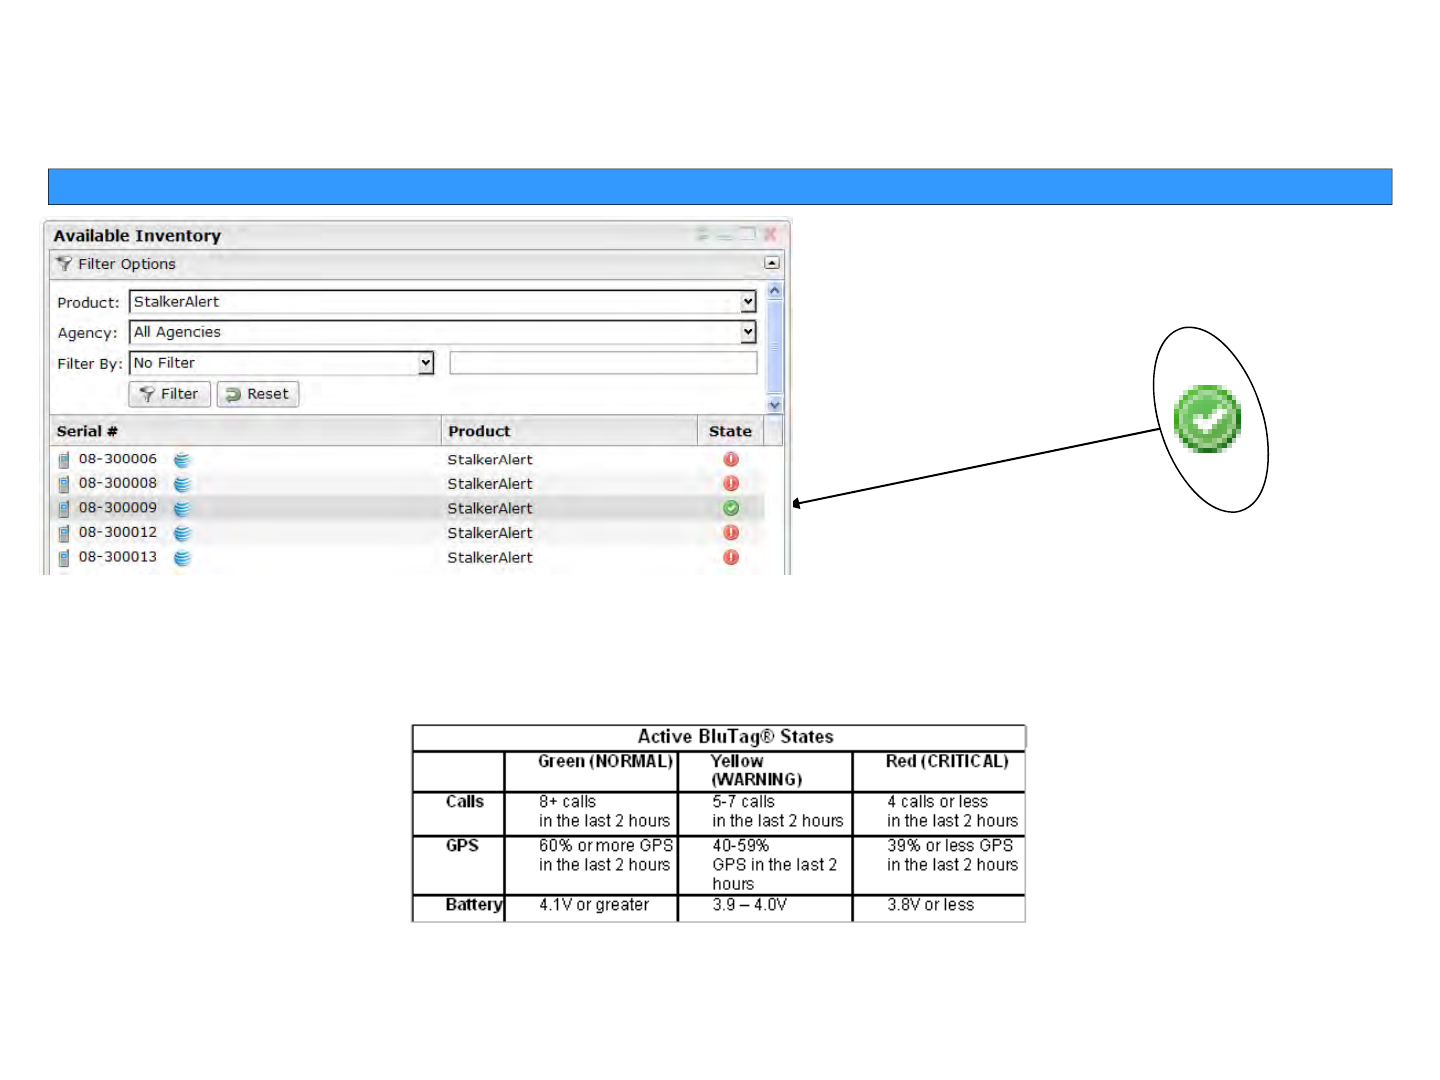
GREEN Means GO!
Scroll or use the filter options to find a device
’
s serial number then check to see if its State
Scroll or use the filter options to find a device s serial number
,
then check to see if its State
is NORMAL. OR To find all NORMAL devices, click the State column header to sort the list by
color.
To view details of the state of a device, Click its State icon. You will see the Device Data
Load modal which contains records of recent calls and percent GPS during those calls.

Stalker Alert®and VeriTracks®Training, Page 8
Enrollment BasicsEnrollment Basics
Four Easy Steps to Enroll
Create victim profile
Assign Stalker Alert to victim profile
Link enrollee to victim
Set victim notifications
Stalker Alert®and VeriTracks®Training, Page 9
Enrollment Basics Enrollment Basics ––Ste
p
1 Ste
p
1 -- Create Victim ProfileCreate Victim Profile
pp
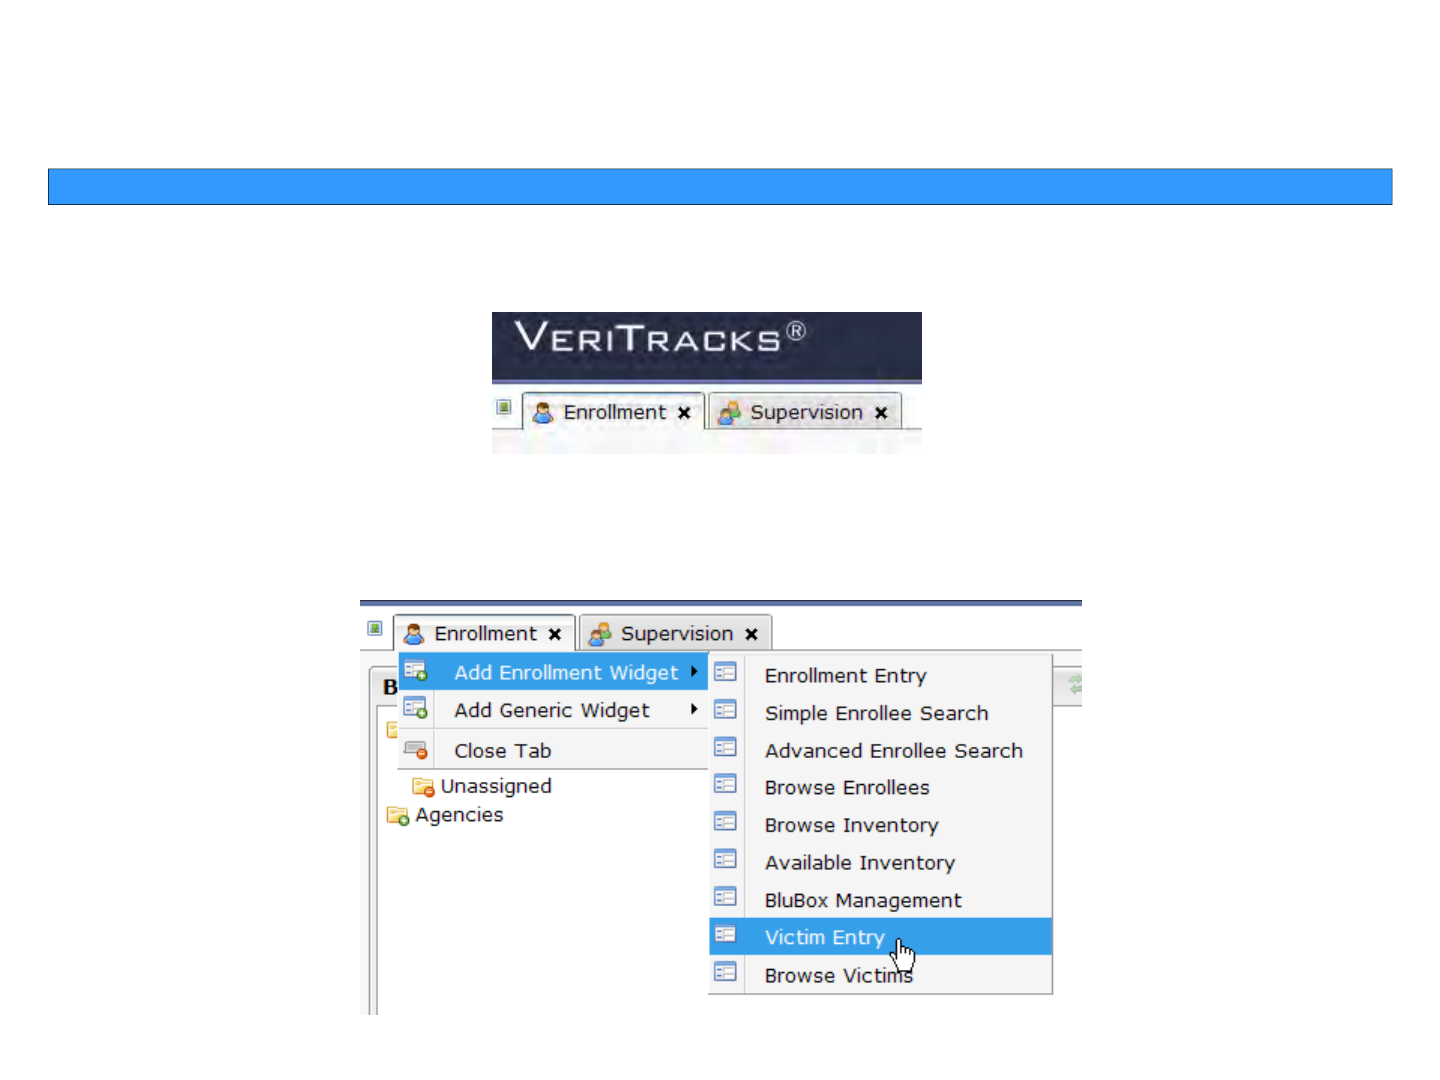
Click on the Enrollment tab to open the Enrollment page
From the Enrollment tab menu, choose the Victim Entry widget.
Stalker Alert®and VeriTracks®Training, Page 10
Enrollment Basics Enrollment Basics ––Ste
p
1 Ste
p
1 -- Create Victim ProfileCreate Victim Profile
pp
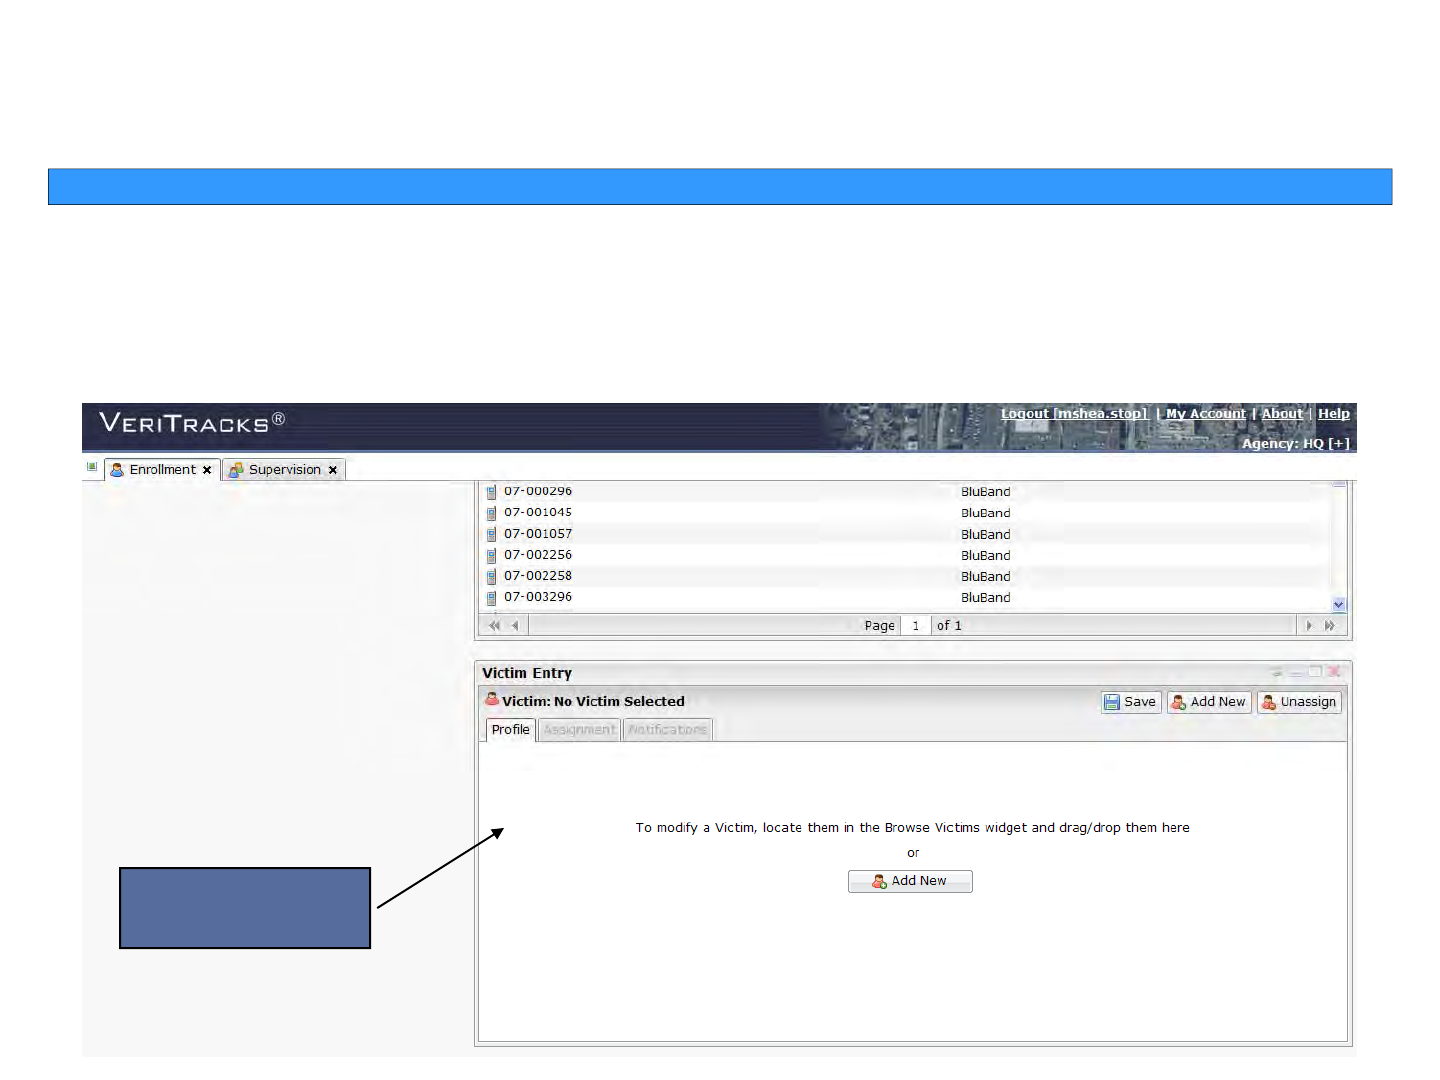
With the Browse Enrollees, Enrollment Entry, and Available Inventory widgets
already open scroll down the page and under the
Available Inventory
widget you will
already open
,
scroll down the page and under the
Available Inventory
widget you will
see the Victim Entry widget on the right side of the screen.
V
ictim Entr
y
wid
g
et
yg
Stalker Alert®and VeriTracks®Training, Page 11
Enrollment Basics Enrollment Basics ––Ste
p
1 Ste
p
1 -- Create Victim ProfileCreate Victim Profile
pp
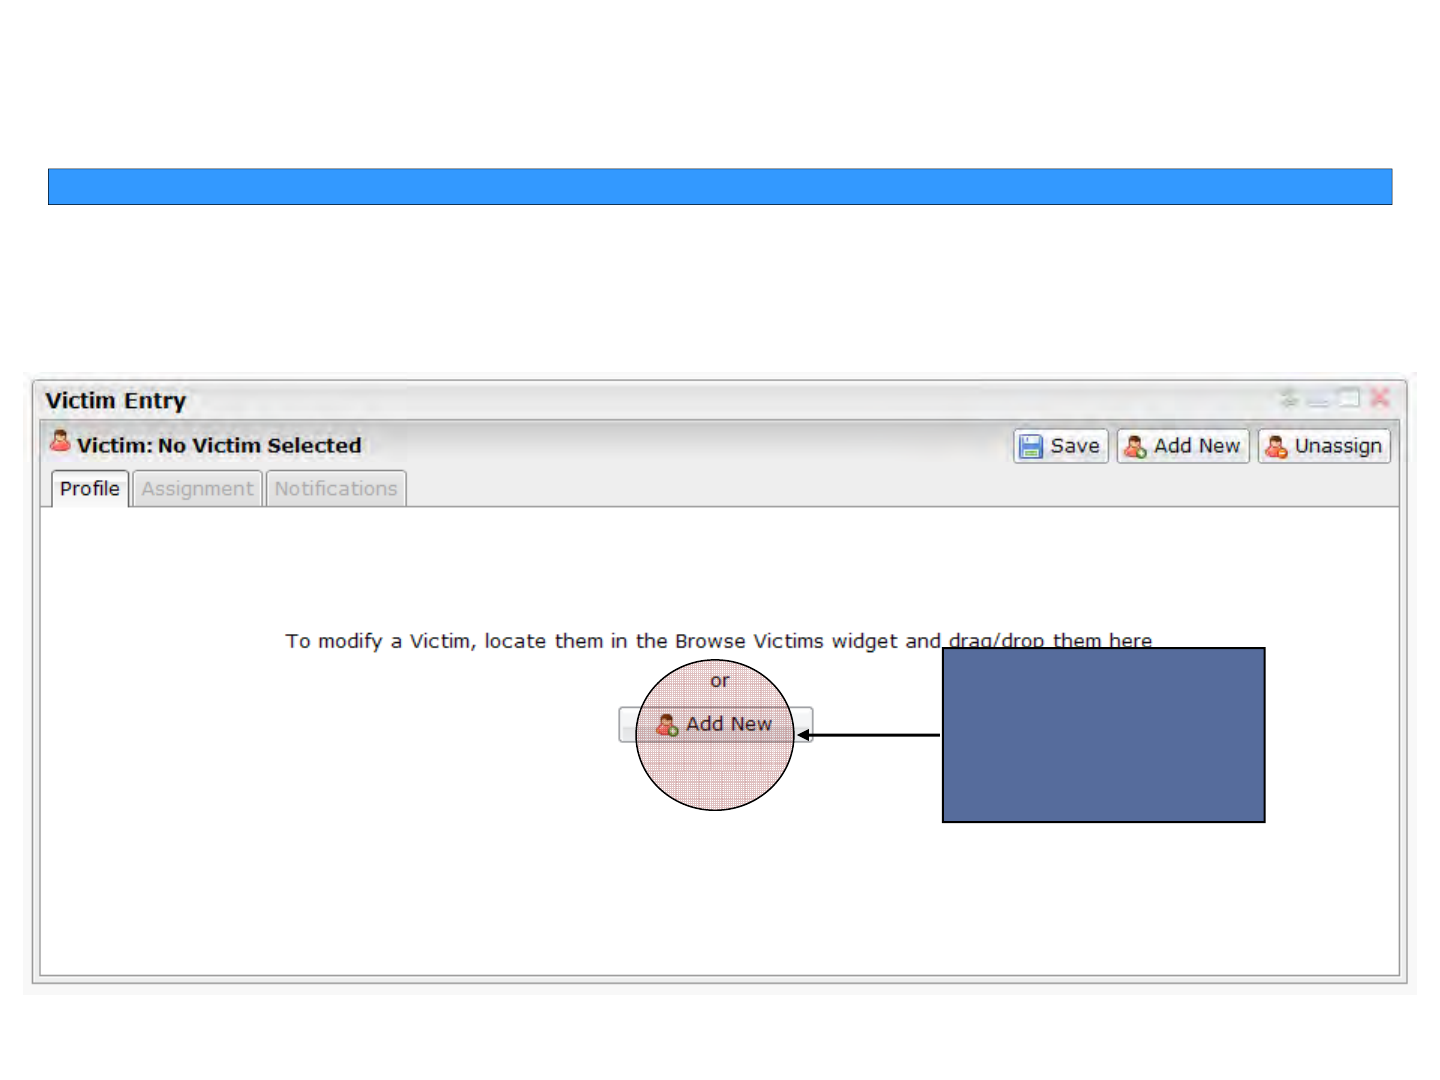
Click the Add New button.
Create a new
Victim Record
Stalker Alert®and VeriTracks®Training, Page 12
Enrollment Basics Enrollment Basics ––Ste
p
1 Ste
p
1 -- Create Victim ProfileCreate Victim Profile
pp
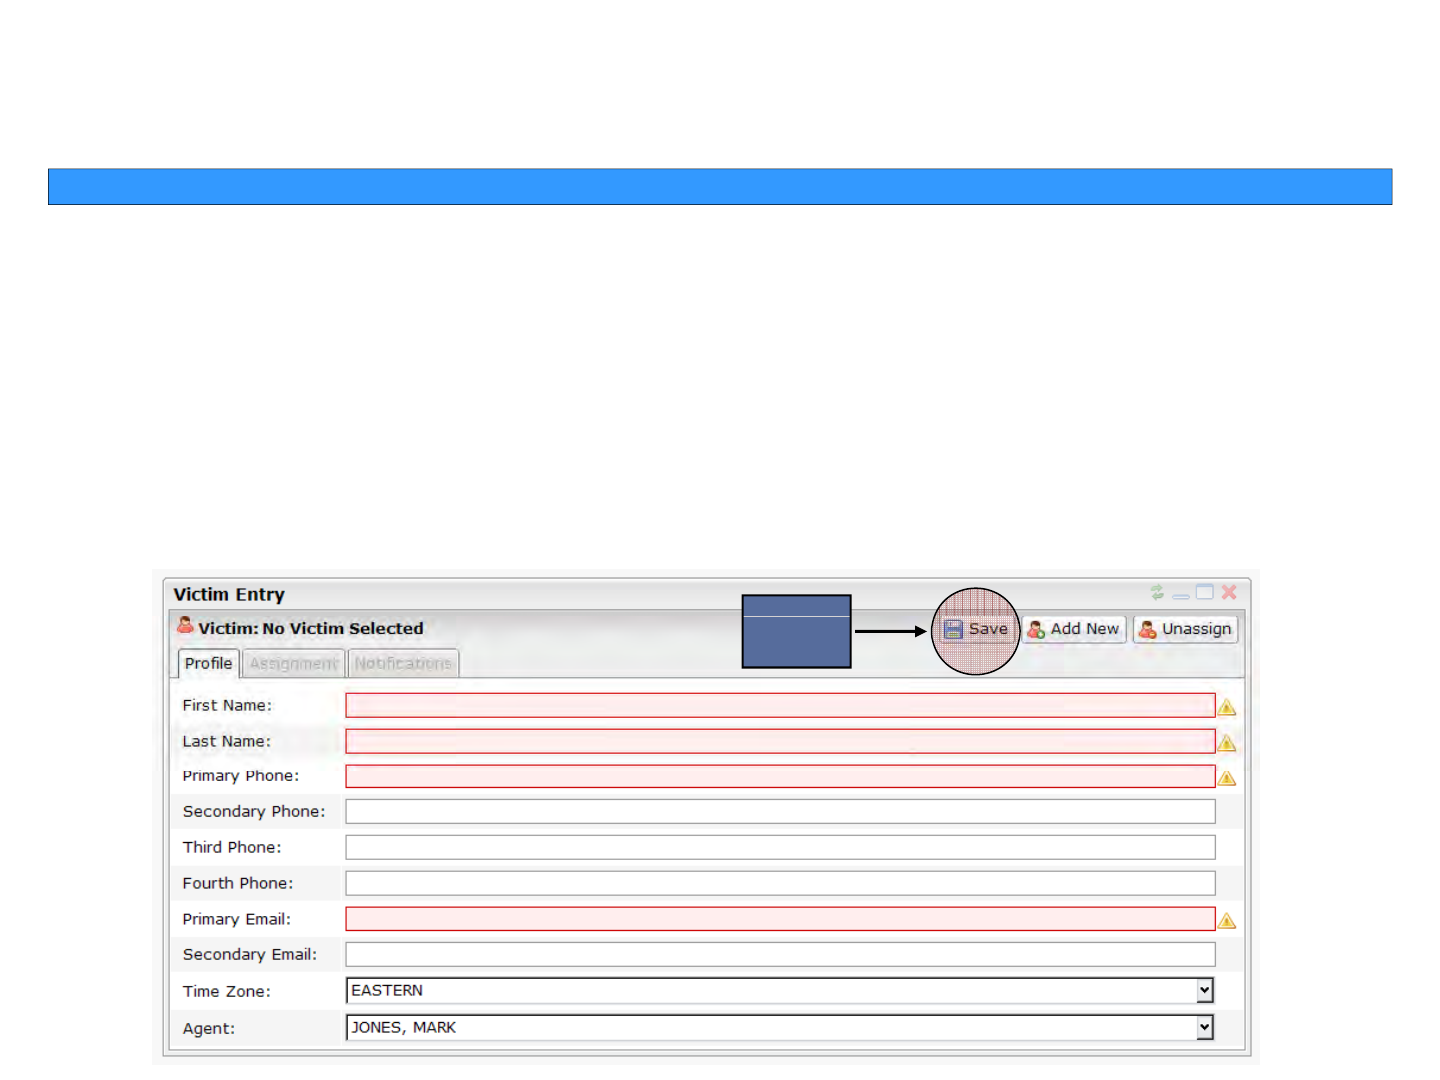
Complete the victim profile. The following are required fields:
•First Name and Last Name
•Primary Phone
•Primary E-mail
•Time Zone
•
Agent of Record (defaults to user who is logged in)
•
Agent of Record (defaults to user who is logged in)
Click the Save button.
Save
Save
button
Stalker Alert®and VeriTracks®Training, Page 13
Enrollment Basics Enrollment Basics ––Ste
p
2 Ste
p
2 –– Assi
g
n Stalker Alert to Victim ProfileAssi
g
n Stalker Alert to Victim Profile
pp
gg
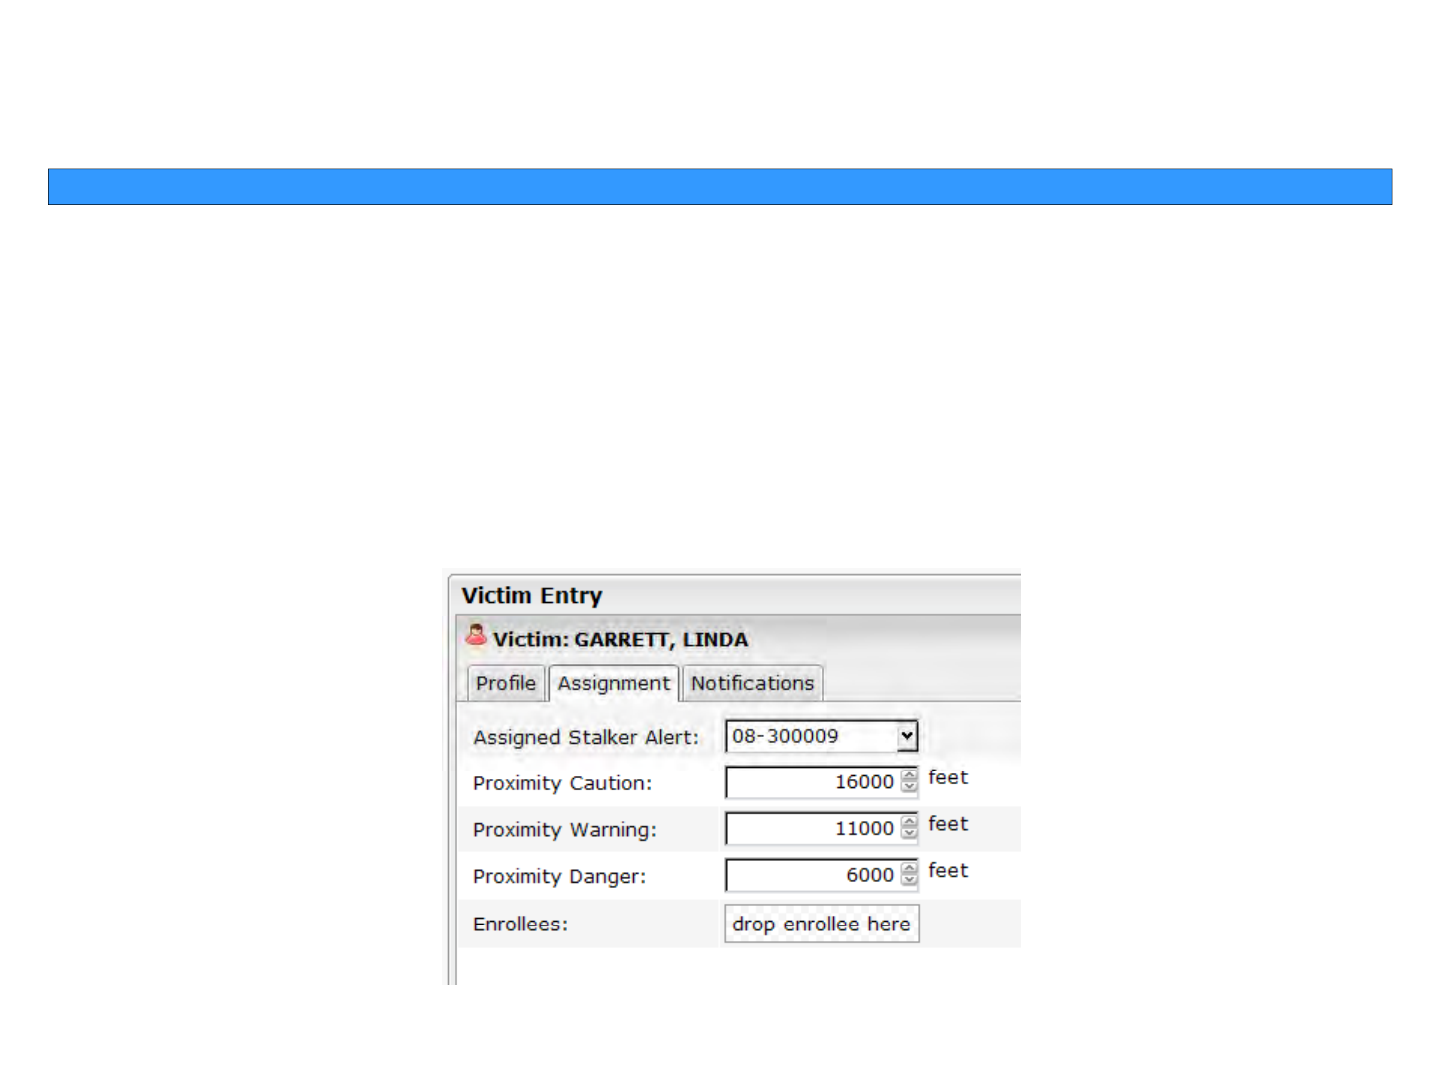
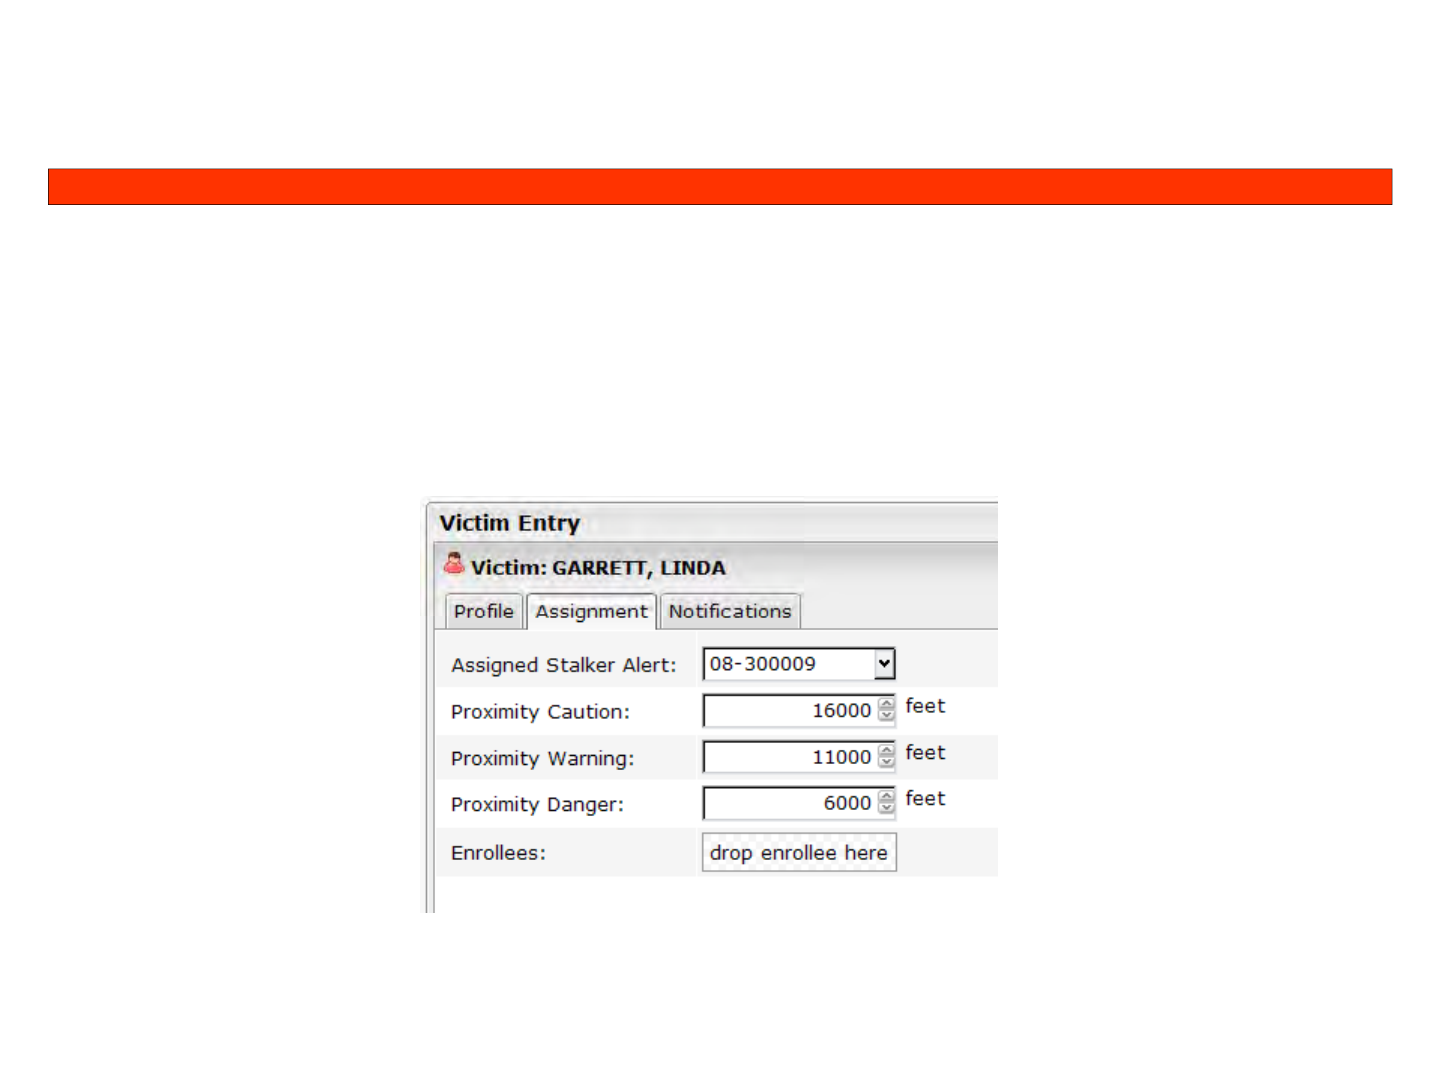
Click on the Assignment tab:
•
Choose the Stalker Alert serial number from the Assigned Stalker Alert drop
-
down.
•
Choose the Stalker Alert serial number from the Assigned Stalker Alert drop
down.
•Set the Proximity Caution (Minimum 3 miles recommended)
•Set the Proximity Warning (Minimum 2 miles recommended)
•Set the Proximity Danger (Minimum 1 mile recommended)
Click the Save button.
Stalker Alert®and VeriTracks®Training, Page 14
Enrollment Basics Enrollment Basics ––Ste
p
3 Ste
p
3 –– Link Enrollee to the VictimLink Enrollee to the Victim
pp
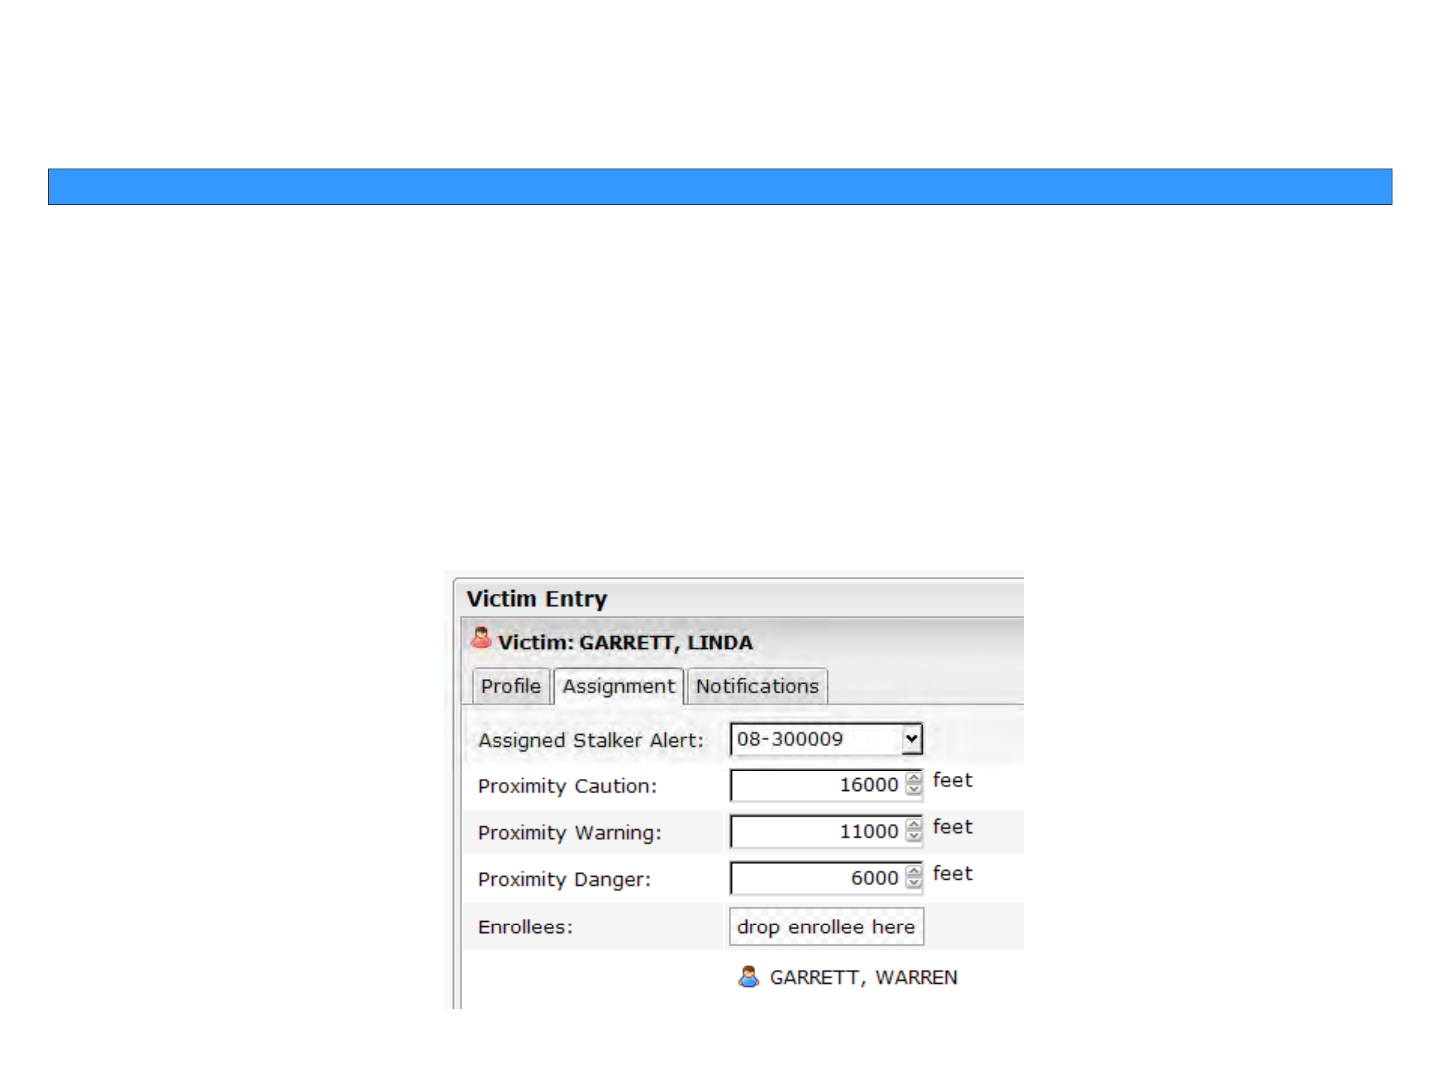
From the Browse Enrollee widget, drag the enrollee profile to the tab and drop it on the
drop enrollee here
button.
drop enrollee here
button.
When you first drop the enrollee their name will appear below the drop enrollee here
button.
Click the Save button.
Stalker Alert®and VeriTracks®Training, Page 15
Enrollment Basics Enrollment Basics ––Ste
p
4 Ste
p
4 –– Set Victim NotificationsSet Victim Notifications
pp
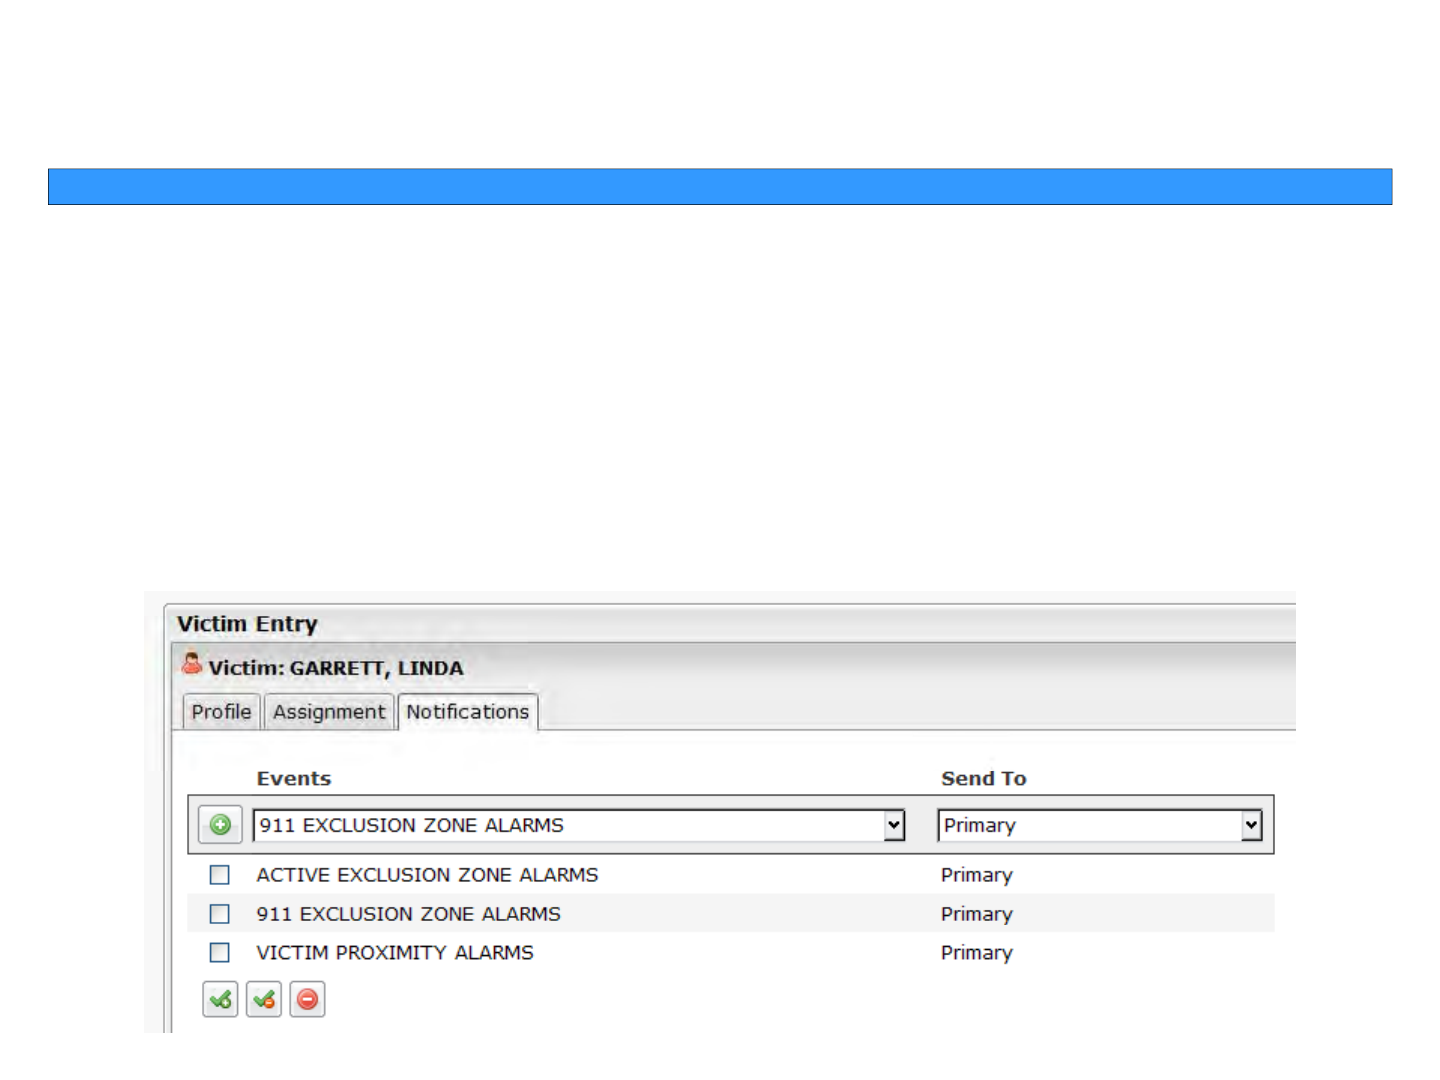
Click on the Notifications tab
S t tifi ti th i il t th th t f t / ffi
S
e
t
no
tifi
ca
ti
ons
th
e
s
i
m
il
ar
t
o
th
e
way
th
ey
are
se
t f
or
agen
t
s
/
o
ffi
cers.
• Choose the event from the Events drop-down.
• Choose the destination from the Send To drop-down.
Clik h G i h lf f h
Et
d
d
•
Cli
c
k
t
h
e
G
reen
i
con
to
t
h
e
l
e
f
t
o
f
t
h
e
E
ven
t
s
d
rop-
d
own.
Click the Save button.

Stalker Alert®and VeriTracks®Training, Page 16
Additional Enrollment InformationAdditional Enrollment Information
What to Tell the Victim
Victim Instructions for Maintaining Stalker Alert
How to Modify Victim Information
Browse Victim Widget for your own Victims
Verify Victim Status

Stalker Alert®and VeriTracks®Training, Page 17
Enrollment Basics Enrollment Basics -- Victim Instructions for Maintainin
g
Stalker Aler
t
Victim Instructions for Maintainin
g
Stalker Aler
t
gg
Discuss the following with the Victim:
•Charge twice a day, every 12 hours, for 30 minutes.
•If a charge is skipped, the tag must be charged for 60 minutes.
•Light on front indicates contact with charger, not battery level.
•Do not expose to extreme temperatures.
•Do not
p
ress “status call button” unless instructed b
y
y
our A
g
ent.
pyyg
•If the device vibrates, it is likely that the battery is low. Charge the device
immediately
•
If the light shines or blinks when off the charger contact your Agent
•
If the light shines or blinks when off the charger
,
contact your Agent
.
Stalker Alert®and VeriTracks®Training, Page 18
Enrollment Basics Enrollment Basics –– Browse Enrollee and Sim
p
le Search Wid
g
etsBrowse Enrollee and Sim
p
le Search Wid
g
ets
pgpg
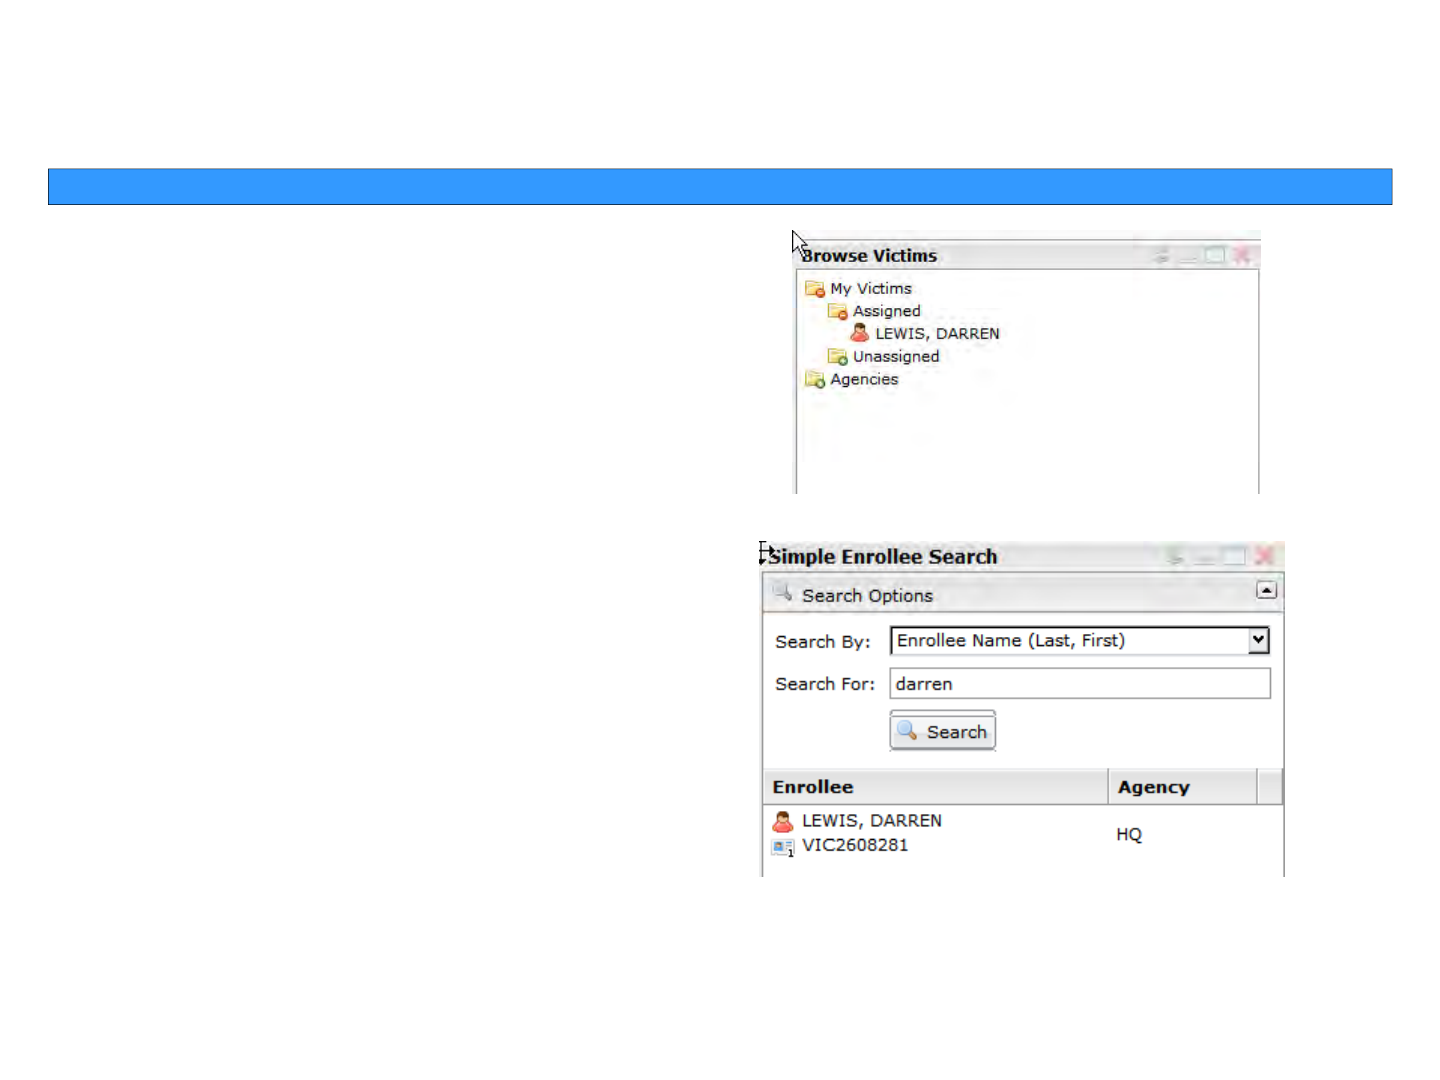
The Browse Victims widget defaults to showing
the victims in your caseload.
The Simple Search widget allows you to search
The Simple Search widget allows you to search
for victims by name or agent.
To modify any information for a victim click on the icon next to their name and drag it to
To modify any information for a victim
,
click on the icon next to their name and drag it to
the Victim Entry widget.
Stalker Alert®and VeriTracks®Training, Page 19
Enrollment Basics Enrollment Basics ––Verif
y
Victim StatusVerif
y
Victim Status
yy
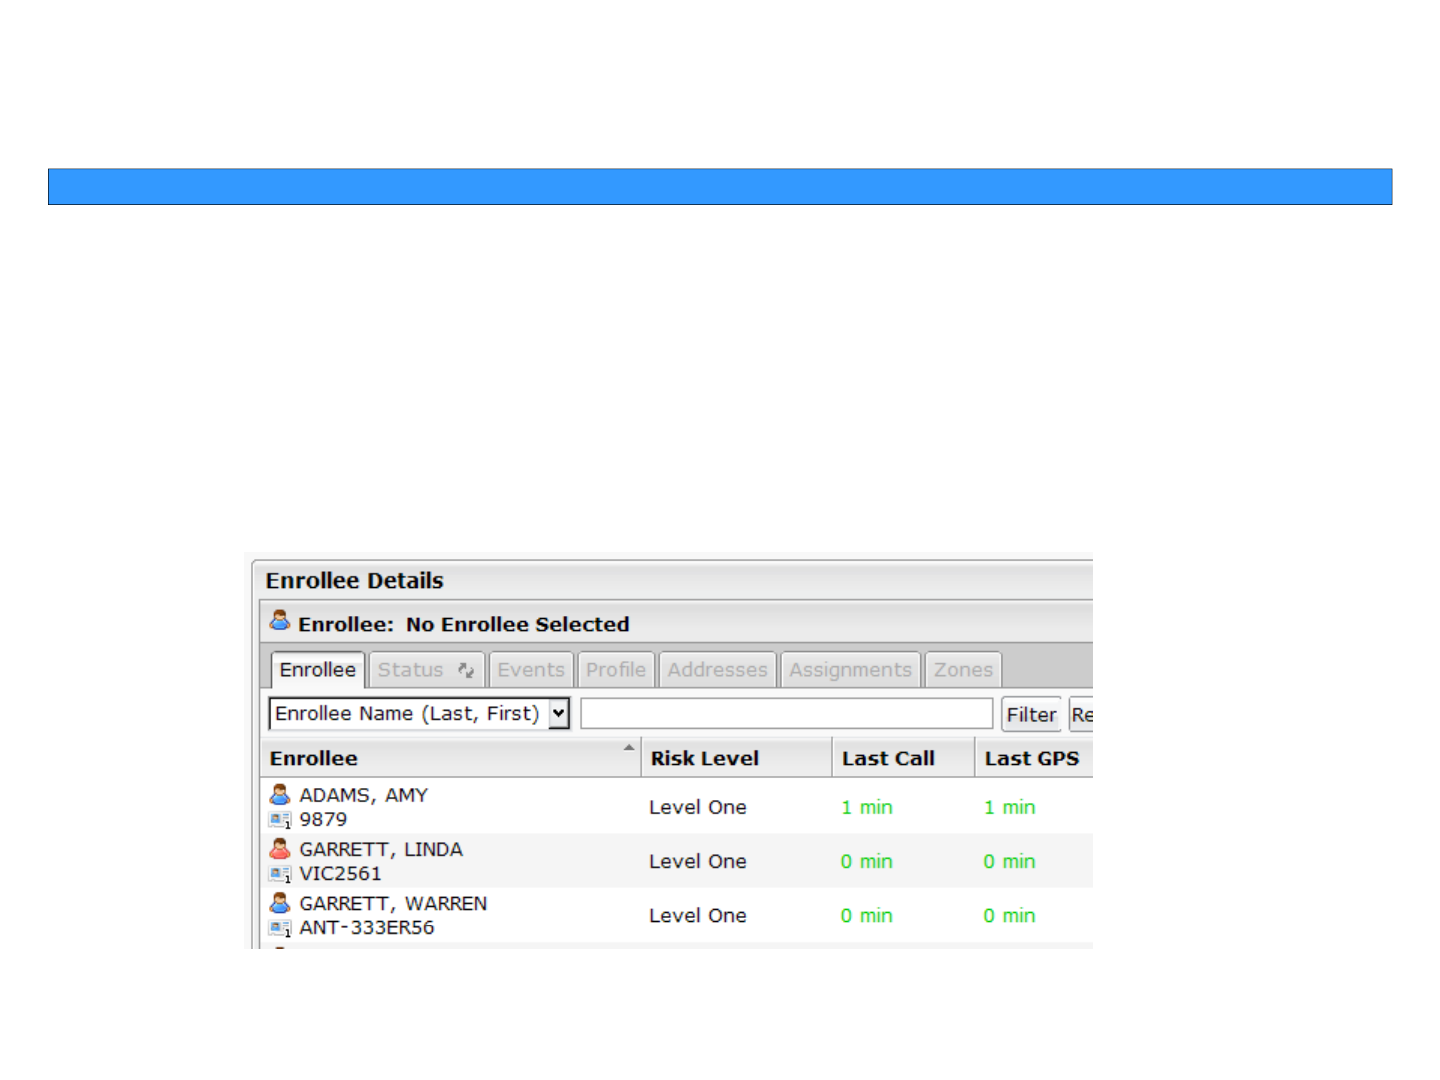
Use the Same Enrollee details under which you supervise your enrollees:
1. Click the name of your victim in the Enrollees tab. The victim icon should display red
instead of blue.
2. Click the Status tab to view the last GPS, call, battery level, and events in progress just
as with any enrollee
as with any enrollee
.

Stalker Alert®and VeriTracks®Training, Page 20
Enrollee and Victim Proximit
y
DeterminationEnrollee and Victim Proximit
y
Determination
yy
T t f Vi ti P i it S tti
T
wo
t
ypes
o
f Vi
c
ti
m
P
rox
i
m
it
y
S
e
tti
ngs
•Fixed Proximity Settings
•Custom Proximity Settings

Stalker Alert®and VeriTracks®Training, Page 21
Victim Proximit
y
Settin
g
s Victim Proximit
y
Settin
g
s –– Fixed Proximit
y
Settin
g
sFixed Proximit
y
Settin
g
s
ygyg
ygyg
Fixed Proximity Settings determine the frequency with which the
Bl T d St lk Al t t th i t k d t t th t
Bl
u
T
ag
an
d St
a
lk
er
Al
er
t
repor
t th
e
i
r
t
rac
k d
a
t
a
t
o
th
e
sys
t
em.
When an enrollee BluTag and a victim Stalker Alert are linked together in VeriTracks, both
devices immediately be
g
in to report their track points every 5 minutes.
If the devices report tracks that are within 7 miles of each other, the devices will begin to
report every three minutes.
If the devices report tracks that are within 4 miles of each other, the devices will begin to
i
report
every
m
i
nute.
Stalker Alert®and VeriTracks®Training, Page 22
Victim Proximit
y
Settin
g
s Victim Proximit
y
Settin
g
s –– Custom Proximit
y
Custom Proximit
y
ygyg
yy
Custom Proximity Settings determine the distance at which
tifi ti ill b t t th t d i ti Th tti
no
tifi
ca
ti
ons
w
ill b
e
sen
t t
o
th
e
agen
t
an
d
v
i
c
ti
m.
Th
ese
se
tti
ngs
are
entered in the Assignment tab during enrollment.

Stalker Alert®and VeriTracks®Training, Page 23
Victim Proximit
y
Settin
g
s Victim Proximit
y
Settin
g
s –– Custom Proximit
y
Custom Proximit
y
ygyg
yy
Caution – When the victim and enrollee are less than this distance apart, a Caution event
is generated This will be displayed on the status page for both the Enrollee and the Victim
is generated
.
This will be displayed on the status page for both the Enrollee and the Victim
.
If the Victim and agents are subscribed to receive proximity event notifications, they will
receive an email or text with the subject line +VCAU.
Warning – When the victim and enrollee are less than this distance apart, a Caution
event is generated. This will be displayed on the status page for both the Enrollee and the
Victim If the Victim and agents a e s bsc ibed to ecei e p o imit e ent notifications the
Victim
.
If the Victim and agents a
r
e s
u
bsc
r
ibed to
r
ecei
v
e p
r
o
x
imit
y
e
v
ent notifications
,
the
y
will receive an email or text with the subject line +VWAR.
Dange
Wh th i ti d ll l th thi di t t C ti t
Dange
r
–
Wh
en
th
e
v
i
c
ti
m
an
d
enro
ll
ee
are
l
ess
th
an
thi
s
di
s
t
ance
apar
t
,
a
C
au
ti
on
even
t
is generated. This will be displayed on the status page for both the Enrollee and the Victim.
If the Victim and agents are subscribed to receive proximity event notifications, they will
i il t t ith th bj t li +DNGR
rece
i
ve
an
ema
il
or
t
ex
t
w
ith th
e
su
bj
ec
t li
ne
+DNGR
.

Stalker Alert®and VeriTracks®Training, Page 24
Additional Proximit
y
Event Additional Proximit
y
Event –– CriticalCritical
yy
Critical
When the Enrollee BluTag and the Stalker Alert come within Radio Frequency
Critical
–
When the Enrollee BluTag and the Stalker Alert come within Radio Frequency
Range (approx. 300 ft), A Proximity Critical Event is Generated. This will be displayed on
the status page for both the Enrollee and the Victim. If the Victim and agents are subscribed
to receive proximity event notifications they will receive an email or text with the subject
to receive proximity event notifications
,
they will receive an email or text with the subject
line +VCRT.

Stalker Alert®and VeriTracks®Training, Page 25
Su
p
ervision Su
p
ervision ––Ma
pp
in
g
Enrollee and Victim Tracks Concurrentl
y
Ma
pp
in
g
Enrollee and Victim Tracks Concurrentl
y
pp
pp g ypp g y
Tracks for victims can be viewed in exactly the same manner as tracks for other
ll l ll d k l
enro
ll
ees. You can a
l
so view enro
ll
ee an
d
victim trac
k
s concurrent
l
y.
• Drag Victim from the Browse Victims Widget to the Map
• Verify that the Victim Tracks are displayed
• Drag the Enrollee from the Browse Enrollees Widget to the Map
V if th t l th E ll t k h i
•
V
er
if
y
th
a
t
on
l
y
th
e
E
nro
ll
ees
t
rac
k
s
are
s
h
ow
i
n
g
• Click on the icon to add the victim to the map.

Stalker Alert®and VeriTracks®Training, Page 26
Su
p
ervision Su
p
ervision ––Pro
g
ram Level Best PracticesPro
g
ram Level Best Practices
pp
gg
• Clearly defined roles and responsibilities for managers and agents/officers.
• Clear and inviolable procedures for responding to every VeriTracks event.
• Explicit and enforced sanctions for antagonist violations.
• Escalation plans for agent/officer notification.
• Realistic expectations for protecting the victim. An antagonist living two blocks from a
victim is not a good fit for this program. Does antagonist regularly travel near the victim
(f l b th i ti ’ h th t k)?
(f
or
examp
l
e,
pass
b
y
th
e
v
i
c
ti
m
’
s
h
ouse
on
th
e
way
t
o
wor
k)?

Stalker Alert®and VeriTracks®Training, Page 27
Su
p
ervision Su
p
ervision ––Su
p
ervision Routine Best PracticesSu
p
ervision Routine Best Practices
pp
pp
Daily is a minimum level. More frequently is better.
• Daily review of victim charging habits
• Daily review of victim tracks to provide insight to victim’s compliance (keep the tracker
with them)
• Daily review of victim events to monitor GPS and cell signal reception.
• Daily review of enrollee charging habits
• Daily review of enrollee events to monitor zone and device compliance
• Daily review of enrollee events to monitor GPS and cell signal reception.
• Daily review of combined victim and enrollee tracks to highlight potential stalking, etc.
Stalker Alert®and VeriTracks®Training, Page 28
Su
p
ervision Su
p
ervision –– Inclusion Zone la
y
ersInclusion Zone la
y
ers
pp
yy
Standard 300 or 500 foot
Inclusion Zone for
Inclusion Zone for
enrollee curfew.
Additional 1 mile Inclusion
Additional 1 mile Inclusion
Zone (24x7) to alert
supervisors to enrollee’s
departure.
departure.
Stalker Alert®and VeriTracks®Training, Page 29
Su
p
ervision Su
p
ervision –– Exclusion Zone la
y
ersExclusion Zone la
y
ers
pp
yy
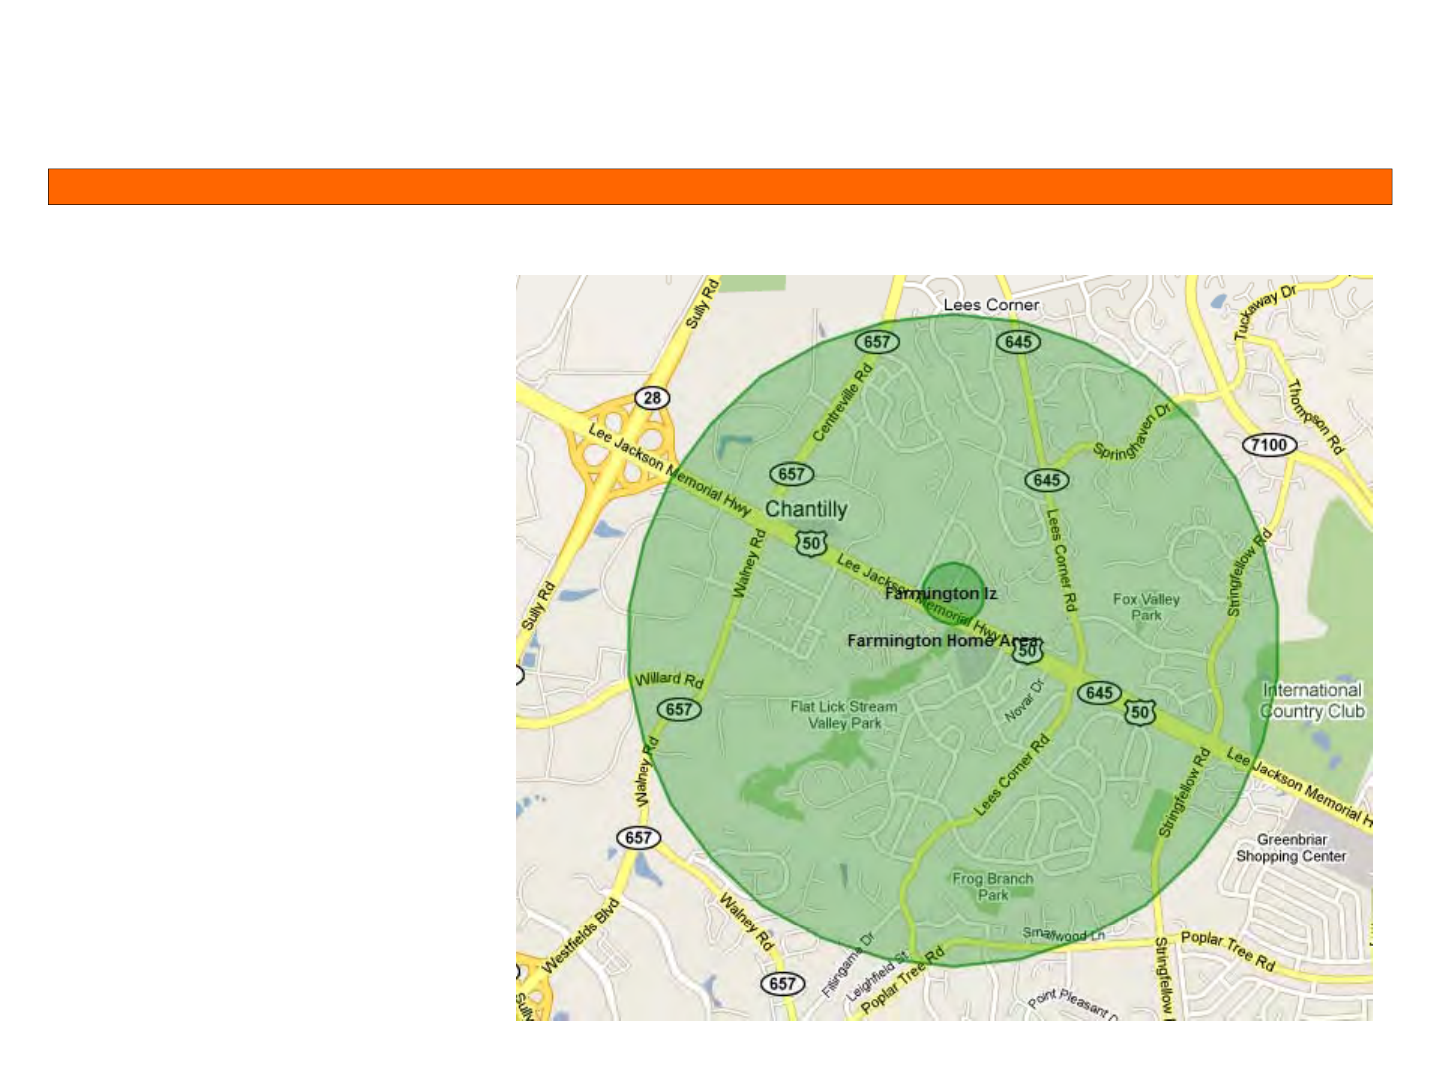
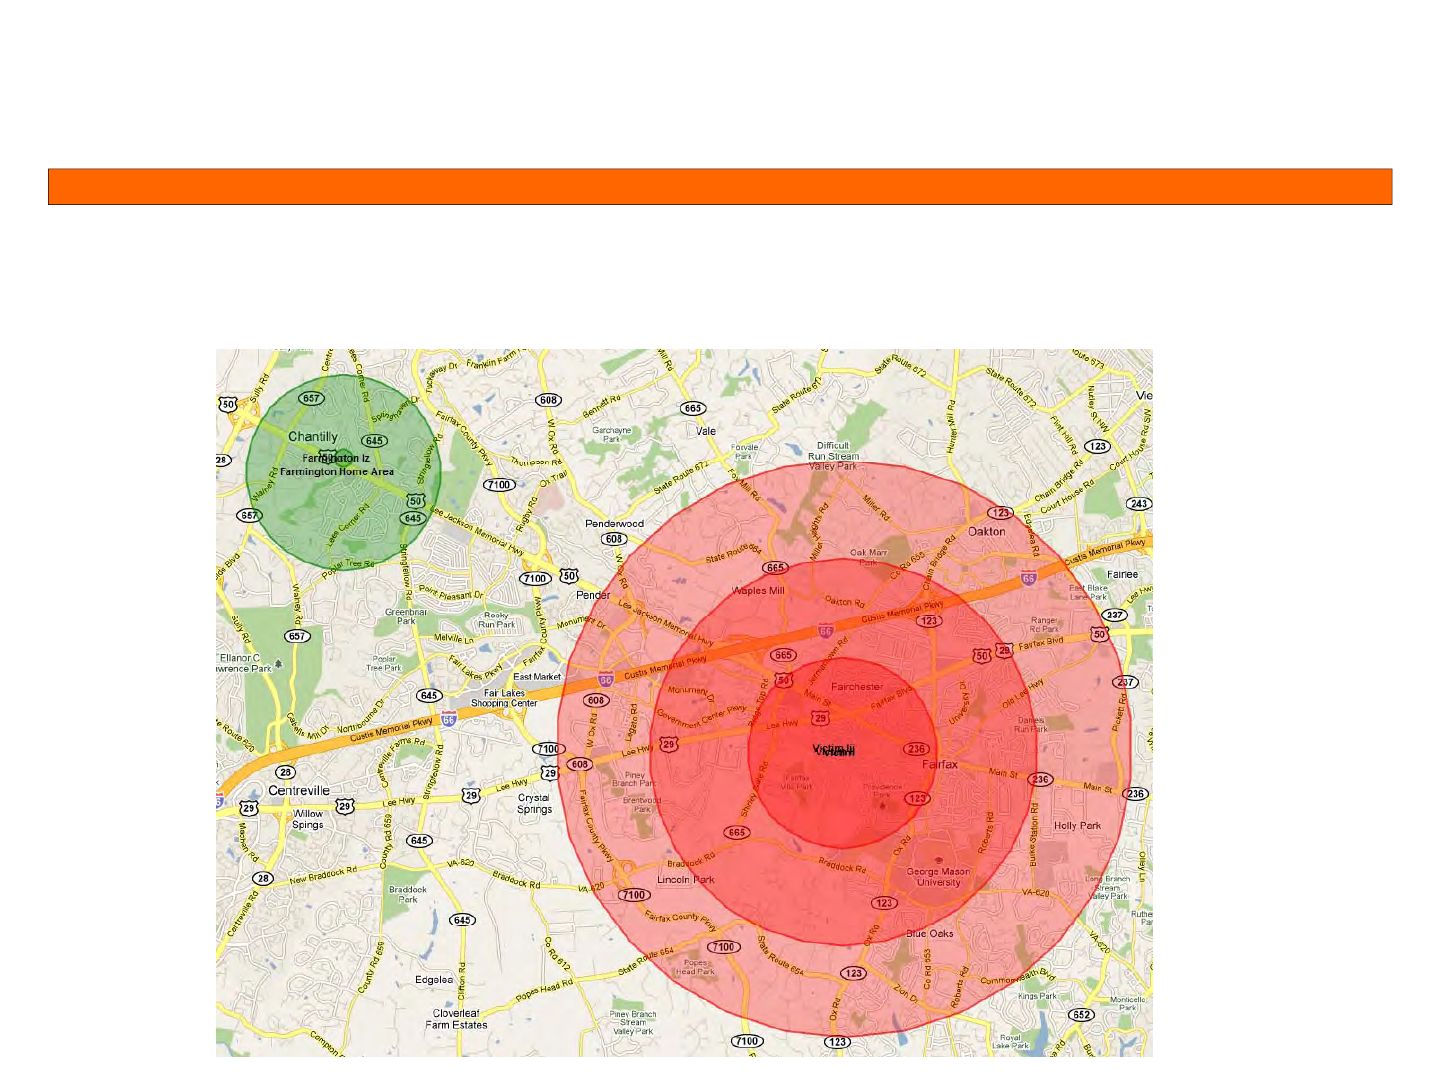
Multiple Layered Exclusion Zones for victim frequent locations (home, work, school, etc) –
sizes can equate with recommended proximity zone sizes
sizes can equate with recommended proximity zone sizes
Stalker Alert®and VeriTracks®Training, Page 30
Su
p
ervision Su
p
ervision –– Extended Exclusion Zone la
y
ersExtended Exclusion Zone la
y
ers
pp
yy
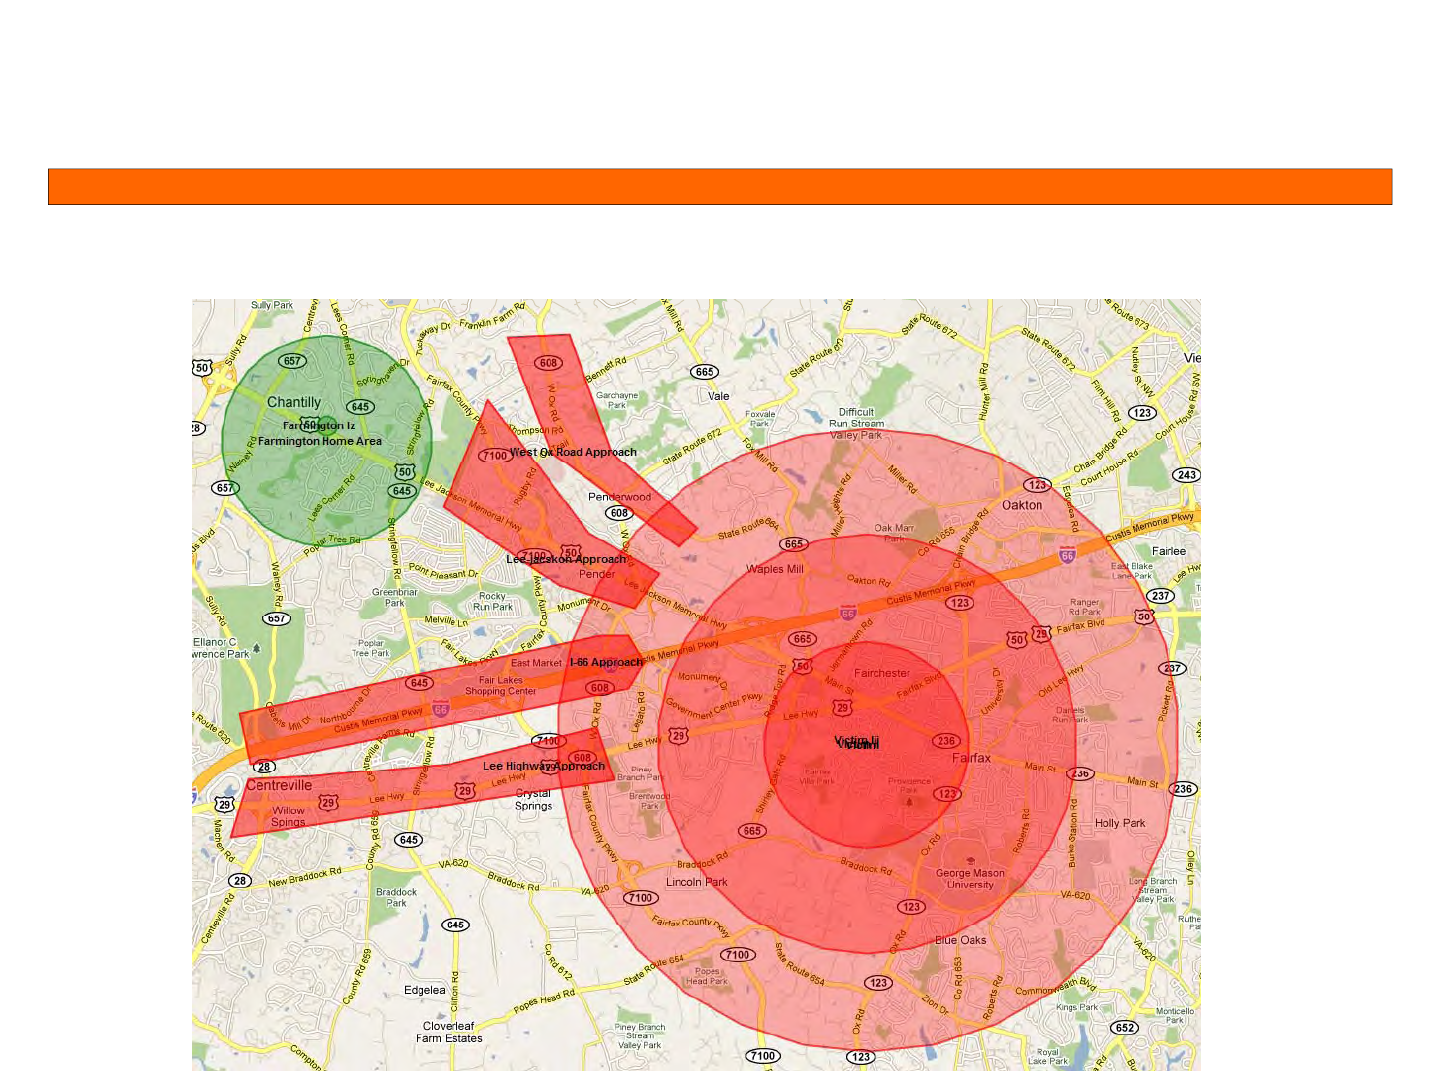
Extended polygon Exclusion Zones to cover rapid approach corridors such as highways

Stalker Alert®and VeriTracks®Training, Page 31
Su
p
ervision Su
p
ervision ––Proximit
y
Zone Minimum Recommended sizesProximit
y
Zone Minimum Recommended sizes
pp
yy
Minimum suggested proximity zone sizes are:
Minimum suggested proximity zone sizes are:
Caution 16,000 ft
Warning 11,000 ft
Danger
6 000 ft
Danger
6
,
000 ft
These are slightly greater than 1 mile increments and so represent one minute of travel
at 60 mph.
Note: If one of the paired devices is not calling or getting valid GPS, the events will generate
based on the last valid track point for this device. For example, if the Enrollee BluTag has
not called in 2 hours, and the Stalker Alert reports GPS points within proximity of the last
reported position of the BluTa
g
, the event will be
g
enerated based on the info available.

Stalker Alert®and VeriTracks®Training, Page 32
Su
p
ervision Su
p
ervision –– How It All Works To
g
etherHow It All Works To
g
ether
pp
gg
When linked BluTag and Stalker Alert devices each reports its GPS, VeriTracks
compares the points.
– If a comparison of points determines that the enrollee falls within the
parameters of a fixed proximity, both devices will increase their reporting
parameters of a fixed proximity, both devices will increase their reporting
tempo as described previously.
– If a comparison of points determines that the enrollee falls within the
parameters of a custom proximity VeriTracks will send an immediate
parameters of a custom proximity
,
VeriTracks will send an immediate
notification in accordance with the setup for both the victim and the
supervising agency..
Note: If one of the paired devices is not calling or getting valid GPS, the events will generate
based on the last valid track point for this device. For example, if the Enrollee BluTag has not
called in 2 hours and the Stalker Alert reports GPS points within proximity of the last
called in 2 hours
,
and the Stalker Alert reports GPS points within proximity of the last
reported position of the BluTag, the event will be generated based on the info available.
Stalker Alert®and VeriTracks®Training, Page 33
2 miles
Warning notification
Victim location
3 Miles 1 mile
Danger notification
Caution notification
Danger notification
4 Miles
Both devices begin 1 minute reporting
7 Mil
7 Mil
es
Both devices begin 3 minute reporting
Antagonist starting point

Stalker Alert®and VeriTracks®Training, Page 34
Unenrollment Unenrollment –– Unassi
g
nin
g
a VictimUnassi
g
nin
g
a Victim
gggg
Page: Enrollment Widget: Victim Entry > Assignment Tab
1. Find the Victim in the Browse Victim or Simple Search widget.
2. Drag and drop the Victim onto Victim Entry widget.
3. Click the Unassign button in the top-right corner.
4. A message will generate stating that the victim is unenrolled.
5. The Enrollee BluTag that was paired with the Stalker Alert will return to 10 minute
reporting
6. An
y
p
roximit
y
events that are o
p
en will close for both Victim and the Enrollee.
yp y p
The system will tell the Stalker Alert to turn itself off. Place it in storage or place it
on a charger to turn it back on for the next Victim.

Stalker Alert®and VeriTracks®Training, Page 35
Unenrollment Unenrollment –– Unenrollin
g
a
p
aired EnrolleeUnenrollin
g
a
p
aired Enrollee
gpgp
Page: Enrollment Widget: Enrollment Entry > Assignment Tab
1. Find the Enrollee in the Browse Enrollee or Simple Search widget.
2. Drag and drop the Enrollee onto Enrollee Entry widget.
3. Click the Unenroll Enrollee icon button in the top-ri
g
ht corner.
4. Select the Reason for Unassignment and click OK.
5. The Stalker Alert that was
p
aired with the Enrollee BluTa
g
will return to 10 minute
pg
reporting.
6. Any proximity events that are open will close for both Victim and the Enrollee.
7. The system will tell the BluTag to turn itself off. Place it in storage or place it on a
charger to turn it back on for the next Enrollee.
Note: Unenrollin
g
an Enrollee will not remove him from the Victim Entr
y
gy
assignment. Pairing will commence if another BluTag is assigned