Senseonics orporated 3400 The Eversense Smart Transmitter User Manual 1
Senseonics Incorporated The Eversense Smart Transmitter Users Manual 1
Contents
Users Manual 1

Sensor Smart Transmitter Mobile App
User Guide
A guide for using the Eversense
Continuous Glucose Monitoring System
LBL-0202-01-001 Rev 1_Eversense User Guide_mgdL_R6.indd 1 7/22/16 11:38 AM

LBL-0202-01-001 Rev 1_Eversense User Guide_mgdL_R6.indd 2 7/22/16 11:38 AM
Eversense Trademark
Eversense, Eversense Continuous Glucose Monitoring, Eversense CGM, Eversense Sensor, Eversense Smart Transmitter, Eversense App and the Eversense
logo are trademarks of Senseonics, Incorporated. Other brands and their products are trademarks or registered trademarks of their respective holders.
LBL-0202-01-001 Rev 1_Eversense User Guide_mgdL_R6.indd 1 7/22/16 11:38 AM

Contents
Glossary 5
1. Introduction 7
Help and Support 7
Eversense CGM System Components 7
System Requirements 10
End User License Agreement and Privacy Policy 10
Jailbroken Devices 10
Indications for Use 10
Contraindications 11
What is Included in this Package 11
How to Use this User Guide 11
2. Benets and Risks 12
Risks and Side Eects 13
Warnings 13
Precautions 14
3. Getting Started 16
Charge your Smart Transmitter 17
Step 1. Download and Install the App 18
Step 2. Set up the App – Account Creation,
Pairing and Settings 19
4. Inserting and Linking the Sensor 24
5. Using the Smart Transmitter 26
Daily Use 27
Secure the Smart Transmitter over Inserted Sensor 28
Turn the Smart Transmitter ON and OFF 30
Smart Transmitter Care and Maintenance 31
Battery Indicator 31
LED Status Indicators 32
6. Calibrating the System 33
Calibration Phases 34
How To Calibrate 35
7. Using the App 38
Check Your Mobile Device Settings 38
Get To Know the “My Glucose” Screen 39
Trend Arrows 41
Trend Graph 42
Menu Options 43
8. Customizing your Settings 44
Setting Glucose Target Levels 46
Setting Glucose Alert Levels 47
LBL-0202-01-001 Rev 1_Eversense User Guide_mgdL_R6.indd 2 7/22/16 11:38 AM

Setting Predictive Alerts 48
Setting Rate of Change Alerts 49
Setting Daily Calibration Times 50
Setting System Information 51
Setting Mealtimes Schedule 52
Setting Sounds 53
Setting Temporary Profile 55
Logging out 57
9. Alert Descriptions 58
Alerts and Notifications 58
Alert History 59
Alert Descriptions and Actions 60
10. Event Log 70
Glucose 71
Meals 72
Insulin 73
Health 74
Exercise 75
11. Glucose Reports and Sharing 76
Weekly Modal Summary 77
Glucose Pie Chart 78
Glucose Statistics 78
Eversense Data Management Software
(DMS) Program 79
Share My Data 79
12. Product and General Information
on the App 80
13. Viewing Eversense Data on the
Apple Watch 82
Glance View 82
14. About the Sensor 84
Insertion Steps 84
Removal Steps 85
15. Travel 86
16. Troubleshooting 87
Smart Transmitter 87
Smart Transmitter Battery and Charging 88
Connection with Smart Transmitter 89
Calibration 92
Alerts and Notifications 93
LBL-0202-01-001 Rev 1_Eversense User Guide_mgdL_R6.indd 3 7/22/16 11:38 AM

Glucose Readings 95
Trend Arrows 96
App 96
Sensor 97
Events 98
Sync 98
17. Device Performance 99
Clinical Study Performance 99
Overall System Performance Compared to YSI 99
Clarke Error Grid Analysis 100
Consensus (Parkes) Error Grid Analysis 103
Calibration Performance 105
Sensor Life 106
Smart Transmitter Wear 106
Safety 107
18. Technical Specications 108
Sensor 108
Smart Transmitter 108
Electrical and Safety Standards 109
Symbols on the Eversense Mobile App 113
Symbols on Packaging and Devices 115
Eversense Smart Transmitter Limited Warranty 116
Legal Notices 118
Apple Legal Notice 118
Google Legal Notice 118
About Bluetooth® 118
Bluetooth® Trademark 118
FCC Information 119
Index 120
LBL-0202-01-001 Rev 1_Eversense User Guide_mgdL_R6.indd 4 7/22/16 11:39 AM
5
Eversense CGM User Guide
5
Eversense CGM User Guide
Glossary
Alert An alert warns you that a situation needs your attention and that
you should respond/take appropriate action.
Blood Glucose Meter A commercially available device used to
measure glucose using a blood sample from a fingerstick.
Bluetooth® A brand name for a wireless networking technology that
uses short wave radio frequencies (RF) to connect mobile devices and
other wireless electronic devices.
Calibration Blood glucose reading from a fingerstick sample entered
in the Eversense App to check the accuracy of the system. With the
Eversense System, there are two phases: Initialization Phase during
which 4 fingerstick tests are required, and the Daily Calibration Phase,
during which 1 fingerstick test is required every 12 hours.
CGM Continuous Glucose Monitoring. Continuously monitoring your
glucose levels from interstitial fluid every few minutes.
Contraindication A condition or circumstance in which a person
should not use the device.
CT Computed Tomography
Do Not Disturb Mode (in the Eversense App) When enabled,
smart transmitter will stop providing vibratory and visual notification
for non-critical alerts. Critical alerts will still be provided. Many
mobile devices have a separate Do Not Disturb Mode. Consult the
manufacturer’s instructions for more information.
Electromagnetic Interference A strong field of energy generated by
electrical or magnetic devices.
EULA End User License Agreement
Eversense App Software program that is installed on a mobile device
and is used to display CGM glucose data sent from the smart transmitter.
Eversense DMS A web-based application compatible with the
Eversense app where your glucose data is stored and can be viewed.
FAQ Frequently Asked Questions
“HI” Reading Indicates a sensor glucose reading is > 400 mg/dL.
Hyperglycemia An episode of high blood glucose.
Hypoglycemia An episode of low blood glucose.
Interstitial Fluid (ISF) The fluid between cells in the body. The
Eversense CGM measures glucose from an interstitial fluid sample, versus
glucose in a blood sample obtained from a fingerstick.
Jailbroken Device A device (iPhone or iPod) that has been modified to
remove the controls and limits set by the original manufacturer.
LED Light Emitting Diode
Linked Sensor A sensor that is connected to a smart transmitter.
“LO” Reading Indicates sensor glucose reading is < 40 mg/dL.
LBL-0202-01-001 Rev 1_Eversense User Guide_mgdL_R6.indd 5 7/22/16 11:39 AM

6
Eversense CGM User Guide
6
Eversense CGM User Guide
Mobile Device A handheld device built on a mobile operating system
that runs the Eversense App and communicates with the smart
transmitter.
mg/dL Milligrams per deciliter, a unit of measure that shows the
concentration of a substance in a specific amount of fluid. In some
countries, including the United States, glucose test results are reported as
mg/dL, indicating how much glucose is in the blood when using a blood
glucose meter, or how much glucose is in the interstitial fluid when using
some CGM systems, like the Eversense CGM System.
mmol/L Millimoles per liter, a unit of measure that shows the
concentration of a substance in a specific amount of fluid. In many
countries, glucose test results are reported as mmol/L, indicating how
much glucose is in the blood when using a blood glucose meter, or how
much glucose is in the interstitial fluid when using some CGM systems,
like the Eversense CGM System.
MRI Magnetic Resonance Imaging
Rate of change/trend arrows Indicators of direction and speed of
change of your glucose levels.
Sensor A device inserted subcutaneously for continually measuring
interstitial fluid glucose levels.
Snooze Setting Used to set how often an alert repeats.
Subcutaneous Located beneath the skin.
Smart Transmitter A reusable device worn externally over the inserted
sensor that powers the sensor and sends glucose information to the
mobile device for display in the Eversense App.
Warm-Up Phase The period the sensor requires to adjust after the
sensor has been inserted and before calibrations.
LBL-0202-01-001 Rev 1_Eversense User Guide_mgdL_R6.indd 6 7/22/16 11:39 AM

7
Eversense CGM User Guide
1
1. Introduction
This section reviews how to use this guide and describes your new Eversense CGM System, including its components and
intended purpose.
Help and Support
Please review this User Guide with your health care provider. For additional Eversense
product questions and troubleshooting issues, contact Customer Support toll free in the US at
844-SENSE4U (844-736-7348). Outside the US, call your local distributor or visit
www.eversensediabetes.com to locate your local distributor.
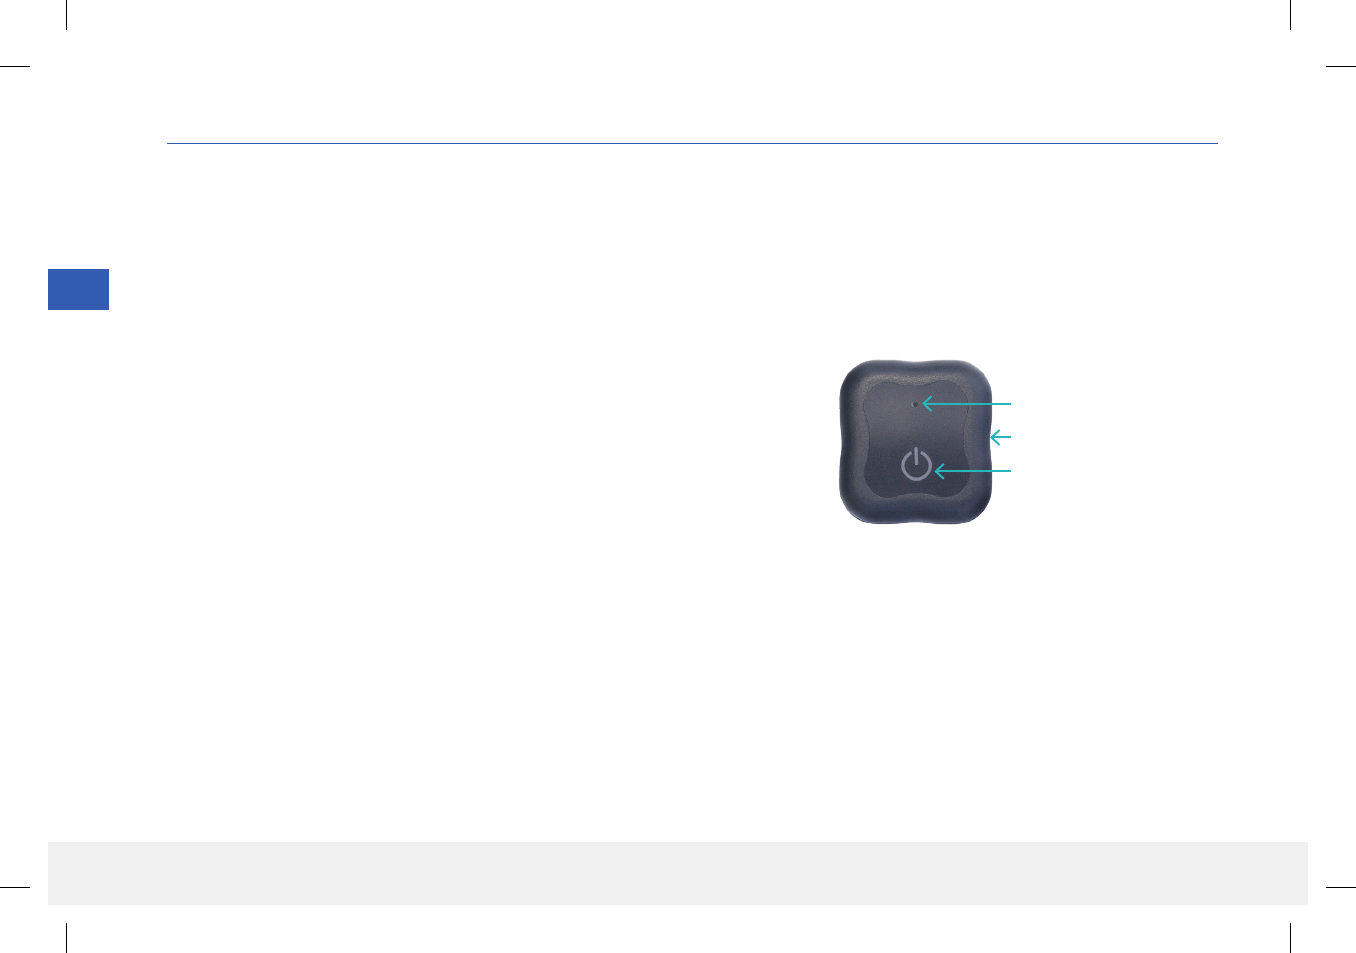
Eversense CGM System Components
The System includes 1) a small sensor inserted subcutaneously by a physician, 2) a removable
smart transmitter worn over the sensor, and 3) a mobile app to display the glucose readings.
Eversense Sensor
The sensor is inserted under the skin (upper arm) and measures glucose in interstitial fluid for up
to 90 days. These glucose levels are then calculated by the smart transmitter and sent to the app.
Eversense Smart Transmitter
The removable smart transmitter is worn externally over the sensor and powers the sensor.
It wirelessly sends glucose data (via Bluetooth) to the mobile device app. The smart transmitter
also provides on-body vibe alerts based on the glucose settings you choose. It has a
rechargeable battery and is reusable for up to one year.
Smart Transmitter Mobile App
Sensor
Make sure your mobile
device is using the latest
operating system.
Congratulations on having the latest technology to assist you in managing your diabetes. Your Eversense CGM System is intended to continually measure
glucose levels for up to 90 days after your sensor is inserted. Glucose information collected by the system is automatically sent to your mobile device. You
must contact your physician’s oce to schedule the insertion and removal of your sensor.
LBL-0202-01-001 Rev 1_Eversense User Guide_mgdL_R6.indd 7 7/22/16 11:39 AM
8
Eversense CGM User Guide
1
Eversense App
The Eversense App is a software application that runs on a mobile device (e.g., smartphone or tablet) and displays glucose data in a variety of ways.
It also provides alerts based on the glucose settings you choose.
IMPORTANT: In order to use the Eversense CGM System, you must have an understanding of downloading and using mobile apps on your
handheld device. Data from the Eversense Smart Transmitter is sent wirelessly via Bluetooth. Carefully read the instructions in this User Guide for
downloading and installing the Eversense mobile app, and for pairing your mobile device with the smart transmitter. If there is anything you do not
understand in this User Guide, please contact your local distributor.
Disposable adhesive patches for daily use are also included as part of the system, and will be provided to you by your physician after your sensor has
been inserted. The patch has an adhesive side that attaches to the back of the smart transmitter, and a silicone adhesive side that attaches to the skin.
Eversense System Overview
A separate blood glucose monitoring system (not provided by Senseonics) is required for calibrating the CGM System, and to make treatment decisions.
When used properly, these components work together to help ensure you get continuous glucose monitoring for up to 90 days.
To ensure you receive continuous glucose readings and other information, follow these daily use tips:
Wear your smart transmitter all the time except when charging or during showering/bathing or any other water related activity. The smart transmitter
is not water resistant.
Make sure your smart transmitter has enough battery power at all times.
Perform two blood glucose meter calibration tests each day when prompted.
Pay attention to alerts and notifications you receive from your smart transmitter and mobile device.
Replace the adhesive patch on your smart transmitter daily.
LBL-0202-01-001 Rev 1_Eversense User Guide_mgdL_R6.indd 8 7/22/16 11:39 AM

9
Eversense CGM User Guide
1
You can remove the smart transmitter from the upper arm at any time, except during calibration. Remember that no data are collected when the
smart transmitter is not communicating with the sensor. When you place the smart transmitter back on the sensor site, it will take 10 minutes for
sensor communication to re-start and for glucose readings to appear in the app.
When the smart transmitter and mobile device are not within range of each other, any data gathered by the smart transmitter is stored and sent
to the app when the mobile device and smart transmitter are back within range.
It is safe for you to wear your sensor and smart transmitter when you go through metal detectors at airports. While flying, the smart transmitter
performs similar to any other Bluetooth device. Be sure to follow the specific safety guidelines mandated by the airline.
Some of the features of the Eversense CGM System:
• Wireless communication with the sensor, smart transmitter and app.
• Long-term sensor wear in the upper arm for up to 90 days.
• Alerts when pre-set Low or High Glucose Alert levels (hypoglycemia or hyperglycemia) are reached.
• Predictive Alerts let you know before reaching pre-set Low or High Glucose Alert levels.
• Use of mobile device (e.g., smartphone) to display glucose readings.
• On-body vibe alerts with the smart transmitter even when mobile device is not nearby.
• Provides readings within 40 - 400 mg/dL range every 5 minutes.
• Trend arrows that show whether your glucose values are rising or falling and how fast.
• Graphs and statistics that show your glucose results in easy-to-understand formats.
• Removable and rechargeable smart transmitter.
• Event entry capabilities (like meals, exercise and insulin).
• Stores glucose data in the app and on the smart transmitter.
LBL-0202-01-001 Rev 1_Eversense User Guide_mgdL_R6.indd 9 7/22/16 11:39 AM

10
Eversense CGM User Guide
1
System Requirements
• The Eversense CGM System.
• A compatible smartphone for Android (version 4.4 or higher) or Apple iPhone® or iPod® or iPad® (iOS version 8.0 or higher) that has Bluetooth Smart
(or Bluetooth Low Energy). The Eversense app also works with the Apple Watch®.
• For a list of compatible devices, please go to www.eversensediabetes.com.
• The Eversense App downloaded to your mobile device from the Apple App Store or on Google Play™.
End User License Agreement and Privacy Policy
Use of the Eversense app is subject to the terms and conditions of the most current Eversense App End User License Agreement and Eversense App
Privacy Policy. These documents are updated from time to time and are posted at www.eversensediabetes.com.
Jailbroken Devices
DO NOT use the Eversense apps on jailbroken iPhones or iPods. Jailbroken devices do not provide an acceptable level of security and accuracy for the
user and are not approved for use by Senseonics.
Indications for Use
The Eversense CGM System is indicated for continually measuring interstitial fluid glucose levels in adults (18 years and older) with diabetes for the
operating life of the sensor.
The system is intended to:
• Aid in the management of diabetes.
• Provide real-time glucose readings.
• Provide glucose trend information.
• Provide alerts for the detection and prediction of episodes of low blood glucose (hypoglycemia) and high blood glucose (hyperglycemia).
LBL-0202-01-001 Rev 1_Eversense User Guide_mgdL_R6.indd 10 7/22/16 11:39 AM

11
Eversense CGM User Guide
1
What is Included in this Package
This Eversense Smart Transmitter Pack contains the following:
Also included in this package is this User Guide and a
Quick Reference Guide (not shown).
Eversense Smart
Transmitter
Power Supply
(USB cable and AC power adapter)
How to Use this User Guide
This guide describes how to use your CGM System. Read the entire guide before using the system.
• Any warnings or cautions are highlighted in a box.
• User tips are preceded by the symbol.
The system is a prescription device. Historical data from the system can be interpreted to aid in providing therapy adjustments. These adjustments should
be based on patterns and trends seen over time.
The system is indicated for use as an adjunctive device to complement, not replace, information obtained from standard home blood glucose monitoring
devices.
Contraindications
The sensor and smart transmitter are incompatible with magnetic resonance imaging (MRI) procedures. DO NOT undergo an MRI procedure while the
sensor is inserted or when wearing the smart transmitter. Should an MRI be required, please contact your physician to arrange for sensor removal before
the procedure.
The system is contraindicated in people for whom dexamethasone or dexamethasone acetate may be contraindicated.
Therapeutics products such as mannitol intravenous and irrigation solutions may increase blood mannitol concentrations and cause falsely elevated
readings of your sensor glucose results.
LBL-0202-01-001 Rev 1_Eversense User Guide_mgdL_R6.indd 11 7/22/16 11:39 AM
12
Eversense CGM User Guide
2
2. Benets and Risks
This section describes the benets, expectations and risks associated with using the Eversense CGM System.
Continuous glucose monitoring aids in the management of diabetes and glucose control, which can improve your quality of life. Best results are achieved
when you are fully informed about the risks and benefits, insertion procedure, follow-up requirements, and self-care responsibilities. You should not have
the sensor inserted if you cannot properly operate the CGM System.
The safety and eectiveness of the CGM System has not been established for the following:
• Children or adolescents (younger than 18 years of age).
• Women who are pregnant.
The CGM System measures glucose in interstitial fluid (ISF) between the body’s cells. Physiologic dierences between ISF and blood from a fingerstick
may result in dierences in glucose measurements. These dierences are especially evident during times of rapid change in blood glucose (e.g., after
eating, dosing insulin, or exercising). Glucose levels in ISF lag behind glucose levels in blood by several minutes.
The sensor has a silicone ring that contains a small amount of an anti-inflammatory drug (dexamethasone acetate). It has not been determined whether
the risks associated with injectable dexamethasone acetate apply to the dexamethasone acetate elution ring inside the sensor. The elution ring releases a
small amount of dexamethasone acetate when the sensor comes in contact with body fluids and serves to minimize the body’s inflammatory response to
the inserted sensor. Dexamethasone acetate in the ring may also cause other adverse events not previously seen with the injectable form. For a listing of
potentially adverse eects related to dexamethasone acetate, contact your physician.
Caution: Federal (US) law restricts this device to sale by or on the order of a physician.
LBL-0202-01-001 Rev 1_Eversense User Guide_mgdL_R6.indd 12 7/22/16 11:39 AM
13
Eversense CGM User Guide
2
Risks and Side Eects
The glucose alerts and notifications will not audibly notify the user when the sound on the mobile device is turned o. If the system cannot display a
glucose value, it also cannot provide glucose alerts. If you are unable to feel the vibration of the smart transmitter you may not notice the alerts. The
system’s calculated glucose can be slightly dierent from your blood glucose meter. This may cause an alert to activate at a dierent time than they
would have if the system’s values always matched the blood glucose meter values. If you do not take frequent blood glucose measurements and miss
an alert, you may not be aware of high or low glucose levels. You may need medical attention in the event that you have high or low glucose and are
unaware of it.
If you do not test your glucose with a blood glucose meter when you have symptoms of a low or high blood glucose level OR when your symptoms are
not consistent with the sensor glucose readings, you may miss a high or low glucose event. Treatment decisions made without confirming with a blood
glucose meter check may result in a high or low glucose event, since blood glucose values can be slightly dierent than your sensor glucose values
measured in interstitial fluid.
The sensor is inserted by making a small incision and placing it under the skin. This process may cause infection, pain or skin irritation. Additionally, the
adhesive may cause a reaction or skin irritation.
Warnings
• If at any time you have symptoms of a low or high blood glucose level OR if your symptoms are not consistent with the sensor glucose readings,
you should test your glucose with a blood glucose meter.
• Always test your glucose with your blood glucose meter before making a treatment decision.
• If your smart transmitter is damaged or cracked, DO NOT use, as this could create an electrical safety hazard or malfunction, and could result in
electrical shock.
• Close contact with direct EMI may interfere with the smart transmitter’s ability to send data to your mobile device. Move away from the source of
EMI and check that your mobile device is connected to your smart transmitter.
• High doses of aspirin (over 2000 mg), such as for chronic treatment of inflammatory conditions (e.g., rheumatoid arthritis), may falsely lower
Sensor glucose readings.
• Until it has healed, always cover the insertion site with a sterile bandage before placing the smart transmitter adhesive over the sensor. Failure to
do so could result in infection at the insertion site.
LBL-0202-01-001 Rev 1_Eversense User Guide_mgdL_R6.indd 13 7/22/16 11:39 AM
14
Eversense CGM User Guide
2
Precautions
• DO NOT exchange smart transmitters with another person. Each smart transmitter can be linked to only one sensor at a time.
• The following medical therapies or procedures may cause permanent damage to the sensor particularly if used in close proximity to the device:
– Lithotripsy – The use of lithotripsy is not recommended for people who have an inserted sensor because the eects are unknown.
– Diathermy – DO NOT use diathermy on people who have an inserted sensor. Energy from the diathermy can transfer through the sensor and
cause tissue damage in the insertion area.
– Electrocautery – The use of electrocautery near the inserted sensor may damage the device. DO NOT use electrocautery near the sensor.
• Steroid use – It has not been determined whether the risks usually associated with injectable dexamethasone acetate apply to the use of this
dexamethasone acetate elution ring, a highly localized, controlled-release device. The dexamethasone acetate ring could cause other adverse
events not listed or previously seen.
• DO NOT wear the smart transmitter during medical x-rays or computed tomography (CT) scans. To avoid interference with results, remove the
smart transmitter before undergoing medical x-ray or CT scans. Make sure your physician knows about your smart transmitter.
• The sensor and smart transmitter should be linked the day of insertion. Failure to link the sensor and smart transmitter could result in a delay in
receiving glucose readings.
Warnings (continued)
• Please review this User Guide with your health care provider. For additional Eversense product questions and troubleshooting issues,
contact Customer Support toll free in the US at 844-SENSE4U (844-736-7348). Outside the US, call your local distributor or visit
www.eversensediabetes.com to locate your local distributor.
• Always calibrate the system using only a fingerstick blood sample. DO NOT use an alternative site (such as forearm or palm) blood glucose
reading to calibrate the system.
• DO NOT insert your infusion set within 10.16 cm (4 in) of the sensor site. If the insulin delivery site is within 10.16 cm (4 in) of the sensor site, it
may interfere with sensor glucose readings and can cause inaccurate glucose readings.
Always follow your physician’s instructions for care after the sensor insertion or removal. Contact your physician if any of the following events occur:
• You have pain, redness, or swelling at the incision site(s) later than 5 days after the sensor insertion or removal.
LBL-0202-01-001 Rev 1_Eversense User Guide_mgdL_R6.indd 14 7/22/16 11:39 AM
15
Eversense CGM User Guide
2
Precautions (continued)
• If the sensor, insertion site or smart transmitter feels warm, remove the smart transmitter immediately and contact your physician for further
advice. A warm sensor could mean there is an infection or a sensor malfunction.
• DO NOT immerse the smart transmitter in water or use the smart transmitter for any activity where it might be submerged in water. Immersing
the smart transmitter in water may result in electrical shock. Always remove the smart transmitter before bathing or swimming.
• DO NOT switch back and forth between smart transmitters. Frequently pairing dierent smart transmitters with the sensor may result in
inaccurate glucose measurements.
• Remove the smart transmitter from your arm before charging the smart transmitter battery. Failure to remove the smart transmitter while it is
charging could result in electrical shock.
• DO NOT attempt to use the Eversense App while operating a motor vehicle.
• You should not receive massage therapy near the inserted sensor site. Massage therapy near the sensor site could cause discomfort or skin
irritation.
• Use only the AC power adapter and USB cable provided with the smart transmitter when charging the smart transmitter battery. Use of another
power supply could damage the smart transmitter, not allowing blood glucose readings to be received properly, and could result in voiding your
warranty.
• If you have any concerns about allergic reaction to adhesive products containing silicone, contact your physician prior to use. Discard the
Eversense adhesive patch after 24 hours of use.
• DO NOT change the unit of measurement unless you have discussed it with your physician. Using the incorrect unit of measure could result in
missing a high or low glucose event.
• Entering incorrect blood glucose values for calibration can result in inaccurate sensor glucose readings, which may result in you missing a high or
low glucose event.
• Follow your health care provider’s recommendation for setting your glucose alerts. Incorrectly setting your glucose alerts can result in you
missing a high or low glucose event.
• Pay attention to the glucose alerts the system provides. Failure to appropriately respond to an alert might result in you missing a high or low
glucose event.
LBL-0202-01-001 Rev 1_Eversense User Guide_mgdL_R6.indd 15 7/22/16 11:39 AM
16
Eversense CGM User Guide
3
3. Getting Started
This section describes the initial start-up steps required before you can begin using your new Eversense CGM System on
a daily basis. You may perform these steps before your physician inserts the sensor.
To get started you need:
• Your mobile device to download the Eversense App.
• Wireless internet connection.
• This Eversense Smart Transmitter Pack that includes your smart transmitter and power supply.
Note: If you have not received your Smart Transmitter Pack skip to instructions on downloading and installing the Eversense App
to your mobile device later in this chapter.
You may complete the following start-up steps before your sensor is inserted so that you can familiarize yourself with the system.
2 easy start-up steps:
1. Download the Eversense App to your mobile device.
2. Set up the app – Create an Account, Pairing and Settings.
After you receive your smart transmitter it must be fully charged before pairing with the app.
LBL-0202-01-001 Rev 1_Eversense User Guide_mgdL_R6.indd 16 7/22/16 11:39 AM
17
Eversense CGM User Guide
3
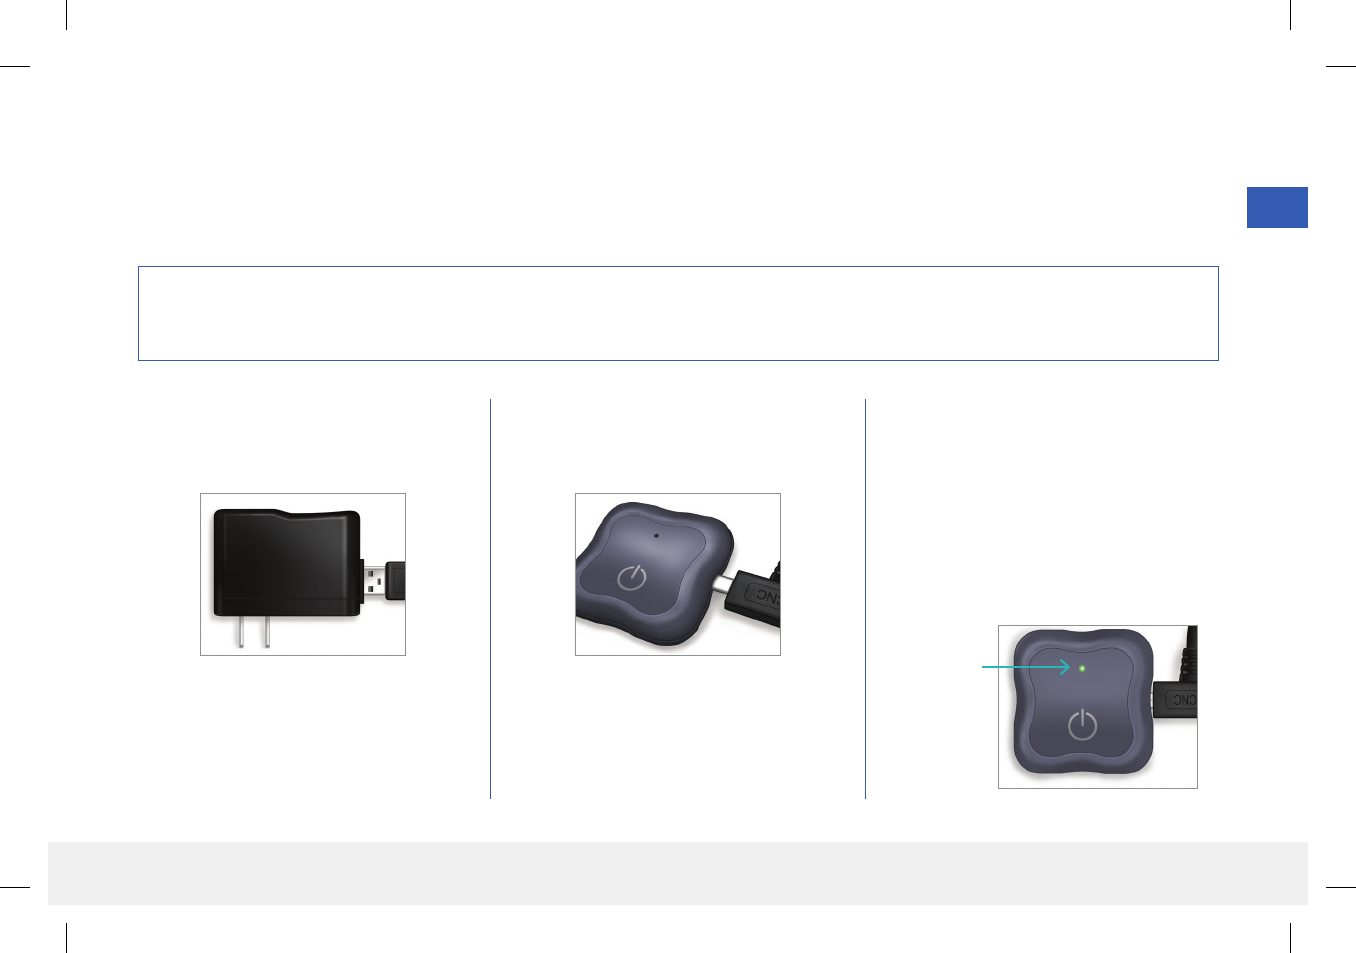
1. Plug the standard end of the USB cable
into the adapter USB port.
2. Plug the micro end of the USB cable into
the smart transmitter USB port.
3. Plug the adapter into an AC power outlet.
• Once fully charged, a small green LED
light appears on the top front of the
smart transmitter (above the power
button).
• Disconnect the power supply from
the smart transmitter after it is fully
charged.
It is important to charge the smart transmitter battery daily to ensure data is collected from the sensor and sent to the app. The smart transmitter does
not collect information from the sensor or send it to the app while charging. You may also charge your smart transmitter by connecting the USB cable to a
computer USB port instead of the AC power adapter. Using a computer may take longer to fully charge the smart transmitter battery.
Precaution: Use only the AC power adapter and USB cable provided with the smart transmitter when charging the smart transmitter battery.
Use of another power supply could damage the smart transmitter, not allowing glucose readings to be received properly, and could result in
voiding your warranty.
Charge your Smart Transmitter
LED Indicator
(lights green
or orange)
LBL-0202-01-001 Rev 1_Eversense User Guide_mgdL_R6.indd 17 7/22/16 11:39 AM
18
Eversense CGM User Guide
3
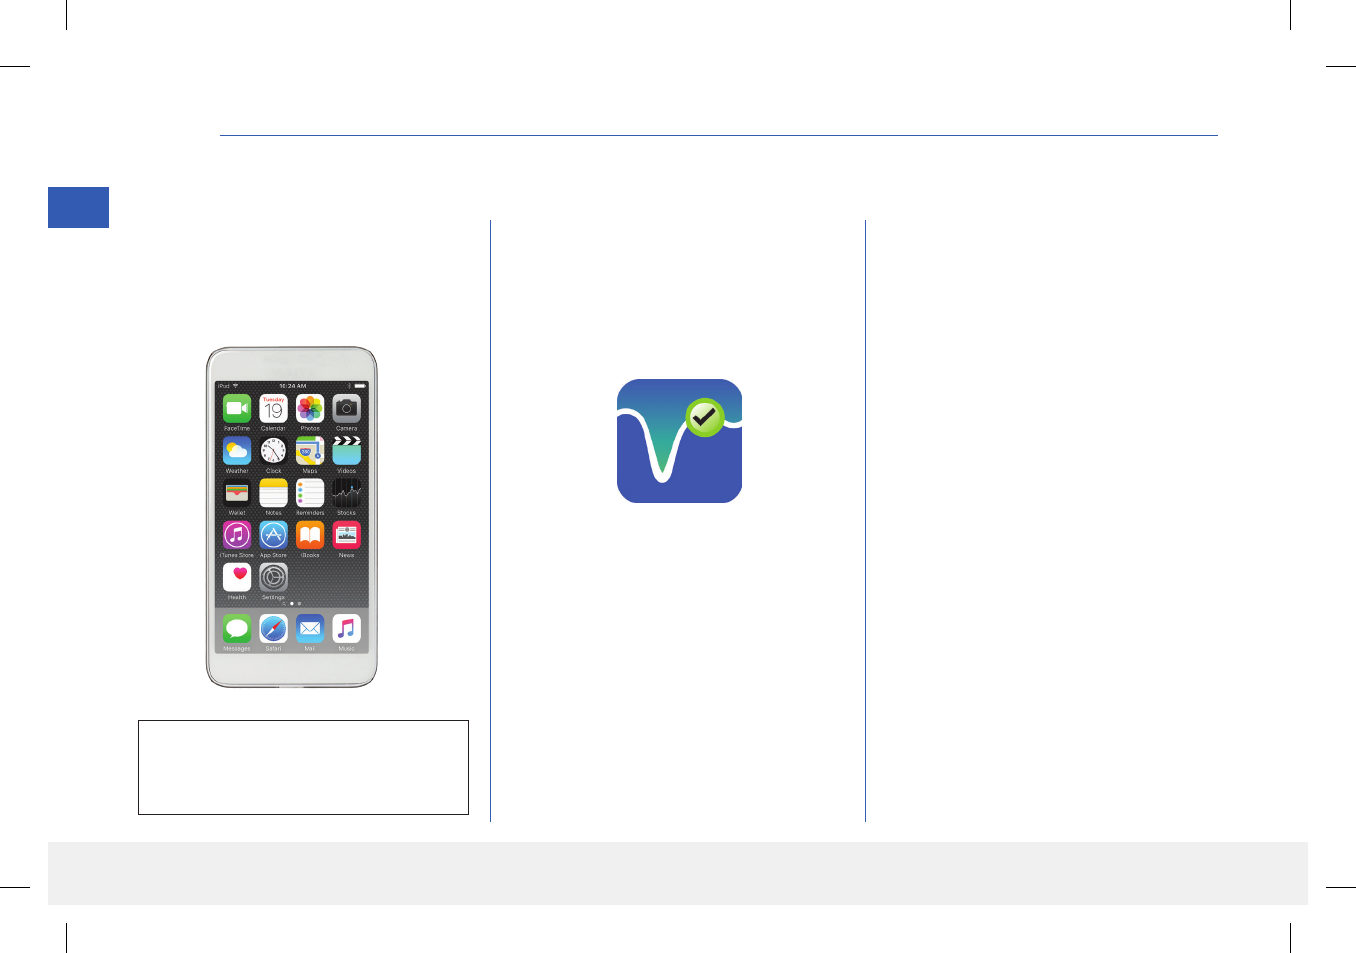
Step 1. Download and Install the App
2. Download the free Eversense app from the
Apple App Store or on Google Play.
The prompts to install the app will vary
between iOS and Android operating
systems.
3. On the install screen, tap Install
application and follow the installation
instructions.
After 1 - 2 minutes, check your mobile
device display for the Eversense App icon
(as shown to the left).
The app is designed to work with the smart transmitter to automatically receive and display sensor glucose data.
Eversense App Icon
Note: Make sure your mobile device is
using the latest operating system.
1. Select the mobile device you would like to
use to display your glucose readings.
In most cases, this would be a
smartphone.
IMPORTANT: Make sure that you
have a wireless internet connection and that
Bluetooth is turned ON before continuing.
LBL-0202-01-001 Rev 1_Eversense User Guide_mgdL_R6.indd 18 7/22/16 11:39 AM
19
Eversense CGM User Guide
3
Step 2. Set up the App – Account Creation, Pairing and Settings
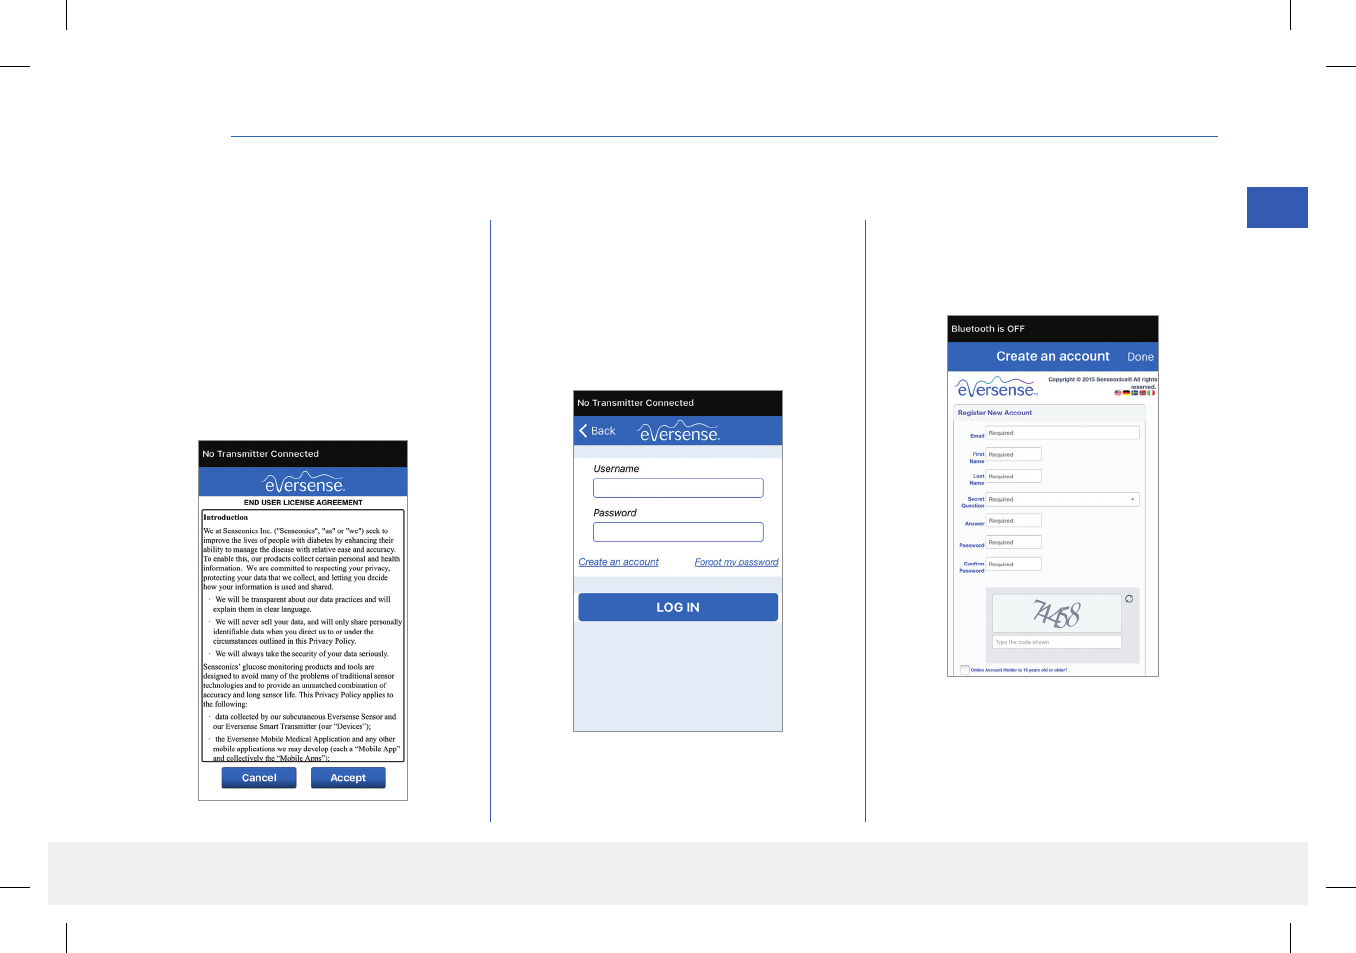
1. Launch the app by tapping the
Eversense App icon on your mobile
device. The END USER LICENSE
AGREEMENT will appear.
• Review the Agreement and tap
Accept to agree to the terms of the
License Agreement.
2. After you accept the Agreement, you will
be prompted to create and register an
account with a Username and Password.
• You must register an account before
you are able to log in. Tap Create an
Account.
Once the app is downloaded, connect the app and smart transmitter by pairing the smart transmitter with your mobile device.
Note: If you forget your password, you
can reset it via the app. If you forget your
username, contact Customer Support.
3. Enter your account information and then
tap Register. The email address you
enter will be your username for Login.
LBL-0202-01-001 Rev 1_Eversense User Guide_mgdL_R6.indd 19 7/22/16 11:39 AM
20
Eversense CGM User Guide
3
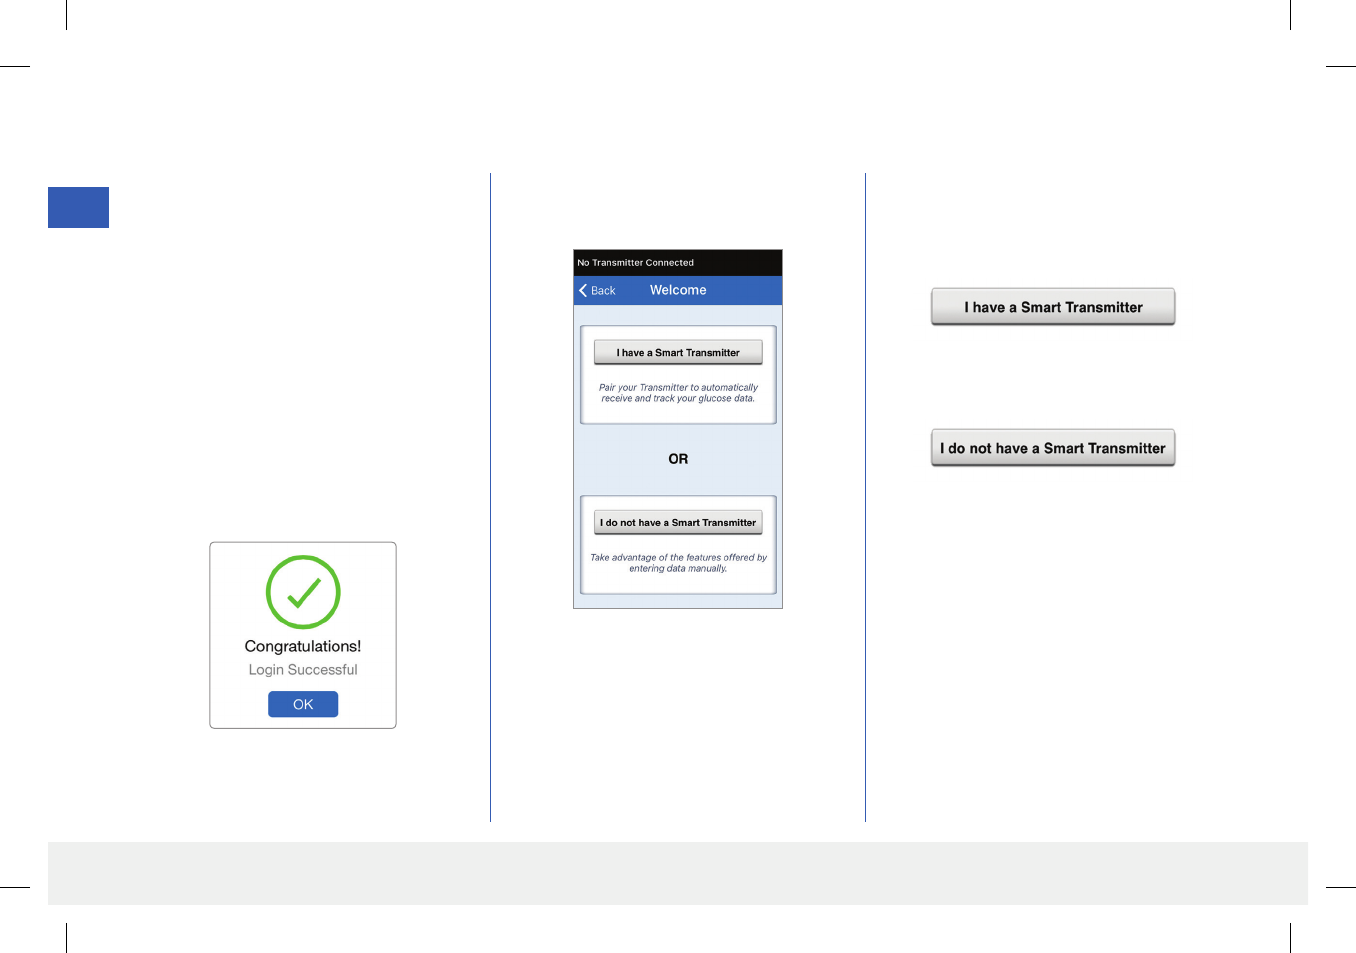
4. Enter the email address you registered as
your username and your password and
tap LOG IN. You will see a confirmation
screen. Tap OK.
Note: The password is case sensitive.
5. When you complete registration and
log in, a WELCOME screen appears.
To complete registration check the email
address you provided and click the link in the
email.
• Tap Done to return to the Eversense
LOGIN screen.
6. Choose one of the two options depending
on whether you already have your smart
transmitter or not:
(skip to step 7).
(skip to step 12).
LBL-0202-01-001 Rev 1_Eversense User Guide_mgdL_R6.indd 20 7/22/16 11:39 AM

21
Eversense CGM User Guide
3
7. With the smart transmitter turned
on, and when the PAIR YOUR
TRANSMITTER screen appears
on your mobile device, set your smart
transmitter to “Discoverable” mode
for the mobile device to find the smart
transmitter:
• Press the smart transmitter power
button three times. Make sure your
smart transmitter is not plugged into
the power supply.
• The LED will blink green and orange
to indicate the smart transmitter is in
Discoverable mode.
8. On the PAIR YOUR
TRANSMITTER screen, the smart
transmitter ID detected by the app
is listed as “Not Connected”. (Your
smart transmitter ID matches the serial
number found on the back of the smart
transmitter.)
Tap Not Connected to begin pairing
process.
9. A BLUETOOTH PAIRING
REQUEST pop-up screen appears.
Tap Pair to complete the pairing process.
Note: The smart transmitter can only be
paired with one mobile device at a time.
Power button
Note: If you press the power button on the
smart transmitter and no LED appears, press
and hold the power button for about
5 seconds to turn it on.
LBL-0202-01-001 Rev 1_Eversense User Guide_mgdL_R6.indd 21 7/22/16 11:39 AM

22
Eversense CGM User Guide
3
10. “Connected” appears next to the
smart transmitter ID once the pairing
is complete. The smart transmitter will
provide intermittent vibrations until
the smart transmitter is linked with
the inserted sensor (see Inserting and
Linking the Sensor).
• Tap Next.
11. The DAILY CALIBRATION
screen appears for you to set your
morning and evening reminder times
for your twice-a-day calibrations. You
will automatically receive a notification
when it is time to make a calibration
entry.
• Tap Morning to change the time and
repeat for Evening.
• Tap Next when done.
12. The UNIT OF MEASUREMENT
screen appears and indicates the
standard unit of measurement for your
region. Your glucose readings will always
be displayed in this unit of measurement.
Precaution: DO NOT change the unit
of measurement unless you have discussed
it with your physician. When the unit of
measurement is confirmed, tap Finish.
LBL-0202-01-001 Rev 1_Eversense User Guide_mgdL_R6.indd 22 7/22/16 11:39 AM

23
Eversense CGM User Guide
3
13. Next, the MY GLUCOSE screen
appears. The screen will not have any
glucose data to display at this time.
Once the sensor is inserted by your physician
and the 24-hour Warm-Up Phase is
completed, you can begin calibration. If you
have not yet had your sensor inserted, you can
review this User Guide to become familiar with
the app and its features.
Note: Once the sensor is linked to the smart
transmitter, the red blood drop with the X will
no longer appear and a black blood drop with
signal bars will be displayed.
LBL-0202-01-001 Rev 1_Eversense User Guide_mgdL_R6.indd 23 7/22/16 11:39 AM

24
Eversense CGM User Guide
4
1. Make sure your smart transmitter is turned ON
(see “Using the Smart Transmitter”) and that your mobile
device has access to the internet.
• Position the smart transmitter directly over the inserted
sensor until the Placement Guide in the app shows some
connection. The Placement Guide page is located in Menu >
Placement Guide.
This section describes how to link the sensor and smart transmitter after your physician has inserted the sensor. Only your
physician can insert the sensor. See “About the Sensor” to learn more.
If the smart transmitter was sent directly to you, be sure to bring it and your mobile device to your insertion appointment. Once your physician has
inserted your sensor, the smart transmitter and the sensor must be linked in order to start the Warm-Up Phase. Your smart transmitter can only be linked
to one sensor at a time.
2. To link the smart transmitter and sensor,
tap Link Sensor on either the New
Sensor Detected pop-up screen or by
tapping Menu > Settings > System>
Linked Sensor and then tap Link
Sensor.
4. Inserting and Linking the Sensor
LED indicator
(lights green
or orange)
Power button
Note: The connection between the sensor
and the smart transmitter is sensitive to the
orientation of the transmitter. If the smart
transmitter is directly over the sensor and the
Placement Guide indicates there is no connection,
try rotating the smart transmitter slightly to the
left or right so the power icon and LED are parallel
to the sensor.
LBL-0202-01-001 Rev 1_Eversense User Guide_mgdL_R6.indd 24 7/22/16 11:39 AM

25
Eversense CGM User Guide
4
3. When the smart transmitter and sensor
are successfully linked, the LINKED
SENSOR screen appears and displays
the sensor ID number.
Precaution: The sensor and smart
transmitter should be linked the day of the
sensor insertion. Failure to link the sensor
and smart transmitter could result in a
delay in receiving glucose readings.
Note: The sensor requires a 24-hour Warm-Up Phase to
stabilize in your body before glucose values will be collected
by the smart transmitter. During the Warm-Up Phase, you do
not need to wear the smart transmitter. If you decide to wear
the smart transmitter over the sensor during this time, you will
receive a message on the app indicating the Warm-Up Phase is
in progress. Once the Warm-Up Phase is complete, and you are
wearing the smart transmitter, the system will prompt you to
calibrate using the app.
IMPORTANT: If your smart transmitter is not turned on
and paired with the Eversense App and linked to the sensor,
the system is not able to prompt you to calibrate.
LBL-0202-01-001 Rev 1_Eversense User Guide_mgdL_R6.indd 25 7/22/16 11:39 AM
26
Eversense CGM User Guide
5
5. Using the Smart Transmitter
This section describes the many features of the smart transmitter and how to get uninterrupted and continuous monitoring of
your glucose levels.
Your smart transmitter communicates with both the sensor and the app to provide CGM information.
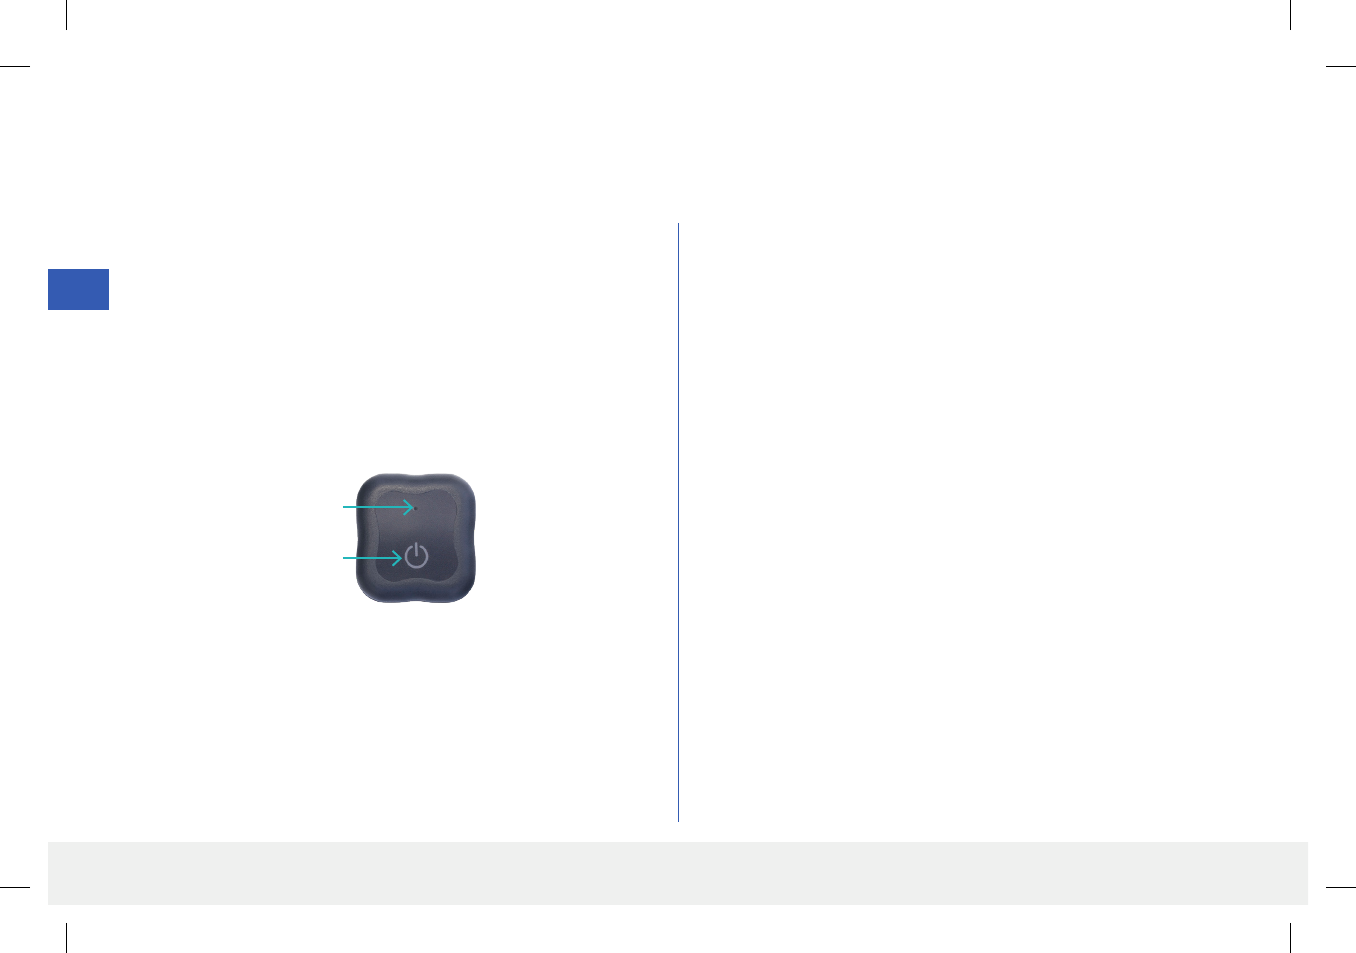
Your Eversense Smart Transmitter does the following:
• Powers the sensor.
• Calculates and stores up to 90 days of glucose data.
• Provides on-body vibe alerts when you have reached the glucose alert levels you set.
• Sends glucose data to the app via Bluetooth.
• USB port to download data to external application or use for charging.
• Multi-color LED to indicate various modes of the smart transmitter.
• Communicates with mobile device.
• Can be powered ON or OFF.
Power button
USB port (power supply)
LED indicator (lights green or orange)
LBL-0202-01-001 Rev 1_Eversense User Guide_mgdL_R6.indd 26 7/22/16 11:39 AM
27
Eversense CGM User Guide
5
Daily Use
To receive continuous glucose readings and information, keep the following in mind when using your smart transmitter:
Wear your smart transmitter at all times except when charging or during showering/bathing or any other water related activity. The smart transmitter
is not water resistant.
Make sure your smart transmitter has enough battery power at all times.
Perform two blood glucose meter calibration tests each day when prompted.
Pay attention to alerts and notifications you receive from your smart transmitter and mobile device.
Replace the smart transmitter with a new adhesive patch on a daily basis.
You can remove the smart transmitter from the upper arm at any time, except during calibration. Remember that no data are collected when the smart
transmitter is not communicating with the sensor. When you place the smart transmitter back on the sensor site, it will take about 10 minutes for
sensor communication to re-start and for glucose readings to appear in the app.
When the smart transmitter and mobile device are not within range of each other, any data gathered by the smart transmitter is stored and sent
to the app when the mobile device and smart transmitter are back within range.
It is safe for you to wear your sensor and smart transmitter when you go through metal detectors at airports. While flying, the smart transmitter
performs similar to any other Bluetooth device. Be sure to follow the specific safety guidelines mandated by the airline.
Precaution:
• Your smart transmitter is not water resistant. DO NOT wear it during any water-related activities. DO NOT submerge in water.
• Always remove the smart transmitter from your body before charging the battery.
Warning: If your smart transmitter is damaged or cracked, DO NOT use, as this could create an electrical safety hazard or malfunction, and
could result in electrical shock.
LBL-0202-01-001 Rev 1_Eversense User Guide_mgdL_R6.indd 27 7/22/16 11:39 AM
28
Eversense CGM User Guide
5
Precaution: If you have any concerns about allergic reaction to silicones, contact your physician prior to use. DO NOT reuse the adhesive
patch. Discard the patch after 24 hours of use.
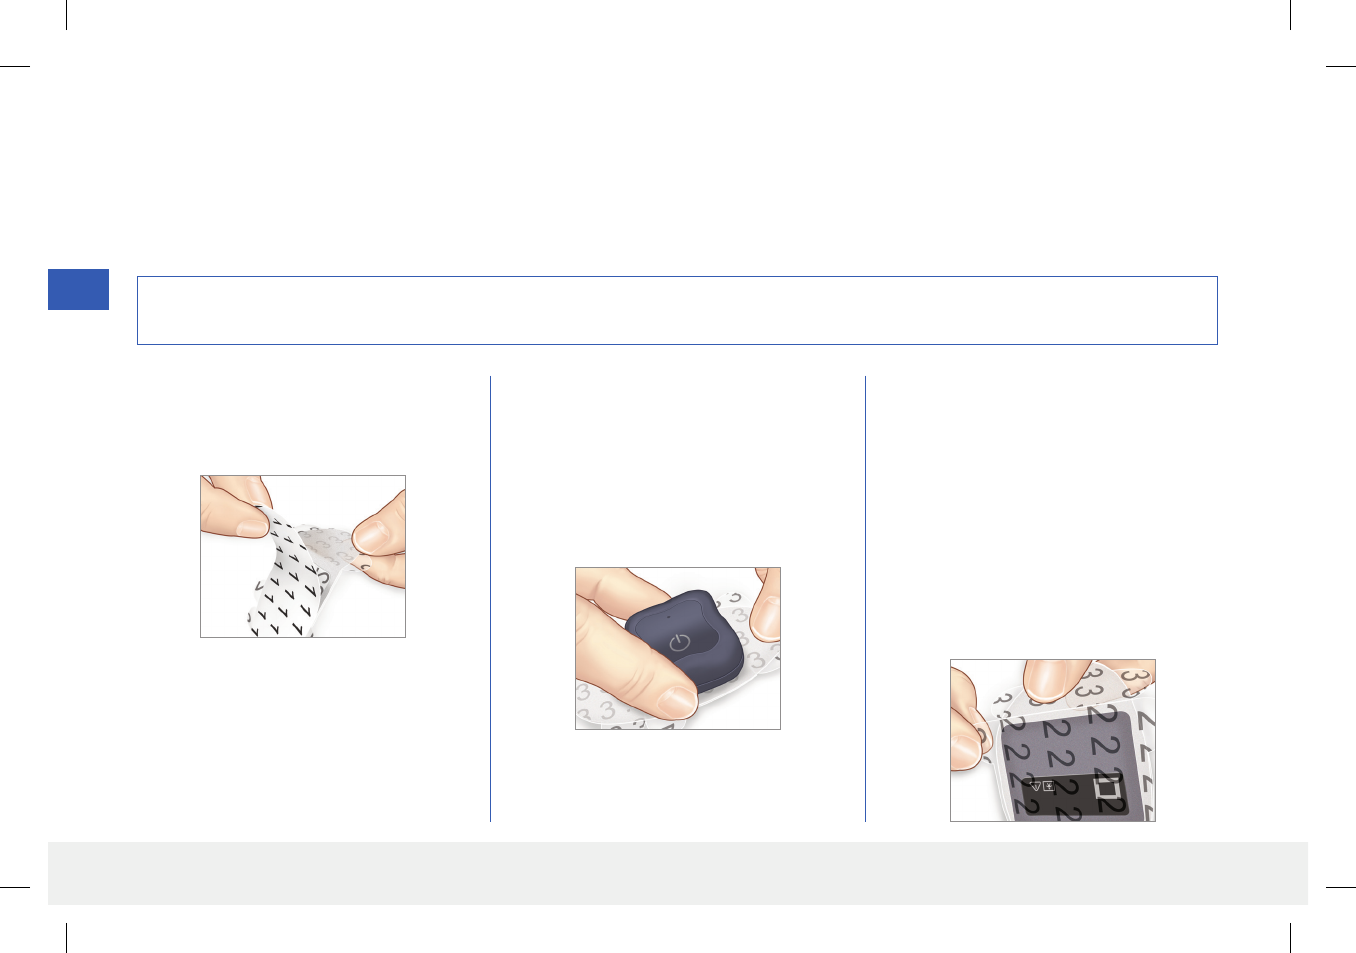
Secure the Smart Transmitter over Inserted Sensor
The smart transmitter must be secured on the skin directly over the sensor with the disposable adhesive patch. Each adhesive patch is designed to be
replaced daily and has an adhesive side that attaches to the back of the smart transmitter and a silicone adhesive side that attaches to the skin. Both the
skin and smart transmitter surfaces should be clean and dry to secure the adhesive surfaces of the patch.
1. Hold the tabbed side of the patch and
remove the backing labeled “1”. Try not to
touch the sticky portion of the adhesive.
2. Align the smart transmitter over the sticky
side (center) of patch and press firmly to
secure.
• The smart transmitter should be placed
so that its sides face the wings of the
patch (as shown).
3. Remove the backing labeled “2” and
position the smart transmitter directly
over the sensor.
• For the maximum signal strength,
the smart transmitter must be placed
directly over the sensor. Signal strength
can also be improved by rotating the
smart transmitter over the sensor such
that the sensor aligns with the smart
transmitter.
Note: You will receive adhesive patches from your physician.
LBL-0202-01-001 Rev 1_Eversense User Guide_mgdL_R6.indd 28 7/22/16 11:39 AM

29
Eversense CGM User Guide
5
4. Check the connection between the smart
transmitter and the sensor.
• Tap Menu > Placement Guide.
• Refer to the Placement Guide
when attaching your smart transmitter
to ensure there is some connection
between the sensor and smart
transmitter.
5. Press the adhesive patch firmly on skin
surface over the sensor.
• The smart transmitter should be
positioned so that the patch wings lay
horizontally on the arm.
6. Remove the two remaining clear liner tabs
labeled “3” by pulling on the tabs.
• Smooth the adhesive onto the skin.
Make sure the patch is flat on the skin
surface.
LBL-0202-01-001 Rev 1_Eversense User Guide_mgdL_R6.indd 29 7/22/16 11:39 AM
30
Eversense CGM User Guide
5
Turn the Smart Transmitter ON and OFF
The smart transmitter has a power button to turn the device on and o. The power button and two light emitting diodes (LED) lights are also used to
indicate the remaining battery power.
1. To turn the smart transmitter ON, press and hold the power button
for about five seconds.
• The smart transmitter will vibrate once.
• Release the power button and the LED will blink once indicating
the power is ON.
At any time, you can press the power button once to see if the smart
transmitter is ON. If the LED appears, the smart transmitter is ON.
If no LED appears, the smart transmitter is OFF.
2. To turn the smart transmitter OFF, press and hold the power button
for about five seconds.
• The smart transmitter will vibrate once.
• Release the power button and an orange light will blink once,
indicating the power is OFF.
Power button
LED indicator
LBL-0202-01-001 Rev 1_Eversense User Guide_mgdL_R6.indd 30 7/22/16 11:39 AM

31
Eversense CGM User Guide
5
Smart Transmitter Care and Maintenance
• Keep the smart transmitter clean (free of visible dirt) and protected when not in use. Wipe the outside with a cloth between uses to keep clean.
• DO NOT spill fluid on the smart transmitter or submerge it in any liquid.
• Charge the smart transmitter whenever the battery power is low.
• Use only the power supply supplied with your system to charge the smart transmitter battery. Using a power supply other than one provided by
Senseonics may void your smart transmitter warranty. DO NOT use the power supply if it is damaged in any way.
• To clean your smart transmitter, wipe it down with a water dampened, NOT WET, cloth; dispose of the cloth according to your local regulations.
• Dispose of the smart transmitter according to local regulations.
Battery Indicator
The smart transmitter battery power can be checked using the app, or on the smart transmitter itself.
With the app:
• Tap Menu > About > My Transmitter. Scroll down to the Battery Level line that indicates amount of battery power left.
Or
• Check the battery icon on the upper right corner on the MY GLUCOSE screen. A red battery icon indicates the smart transmitter battery
is empty.
With the smart transmitter:
• With the smart transmitter ON, press and release the power button. The LED will blink green once if the battery is charged. The LED will blink orange
once if the battery is low. See the next page for more information on the LED indicators.
LBL-0202-01-001 Rev 1_Eversense User Guide_mgdL_R6.indd 31 7/22/16 11:39 AM
32
Eversense CGM User Guide
• During smart transmitter charging:
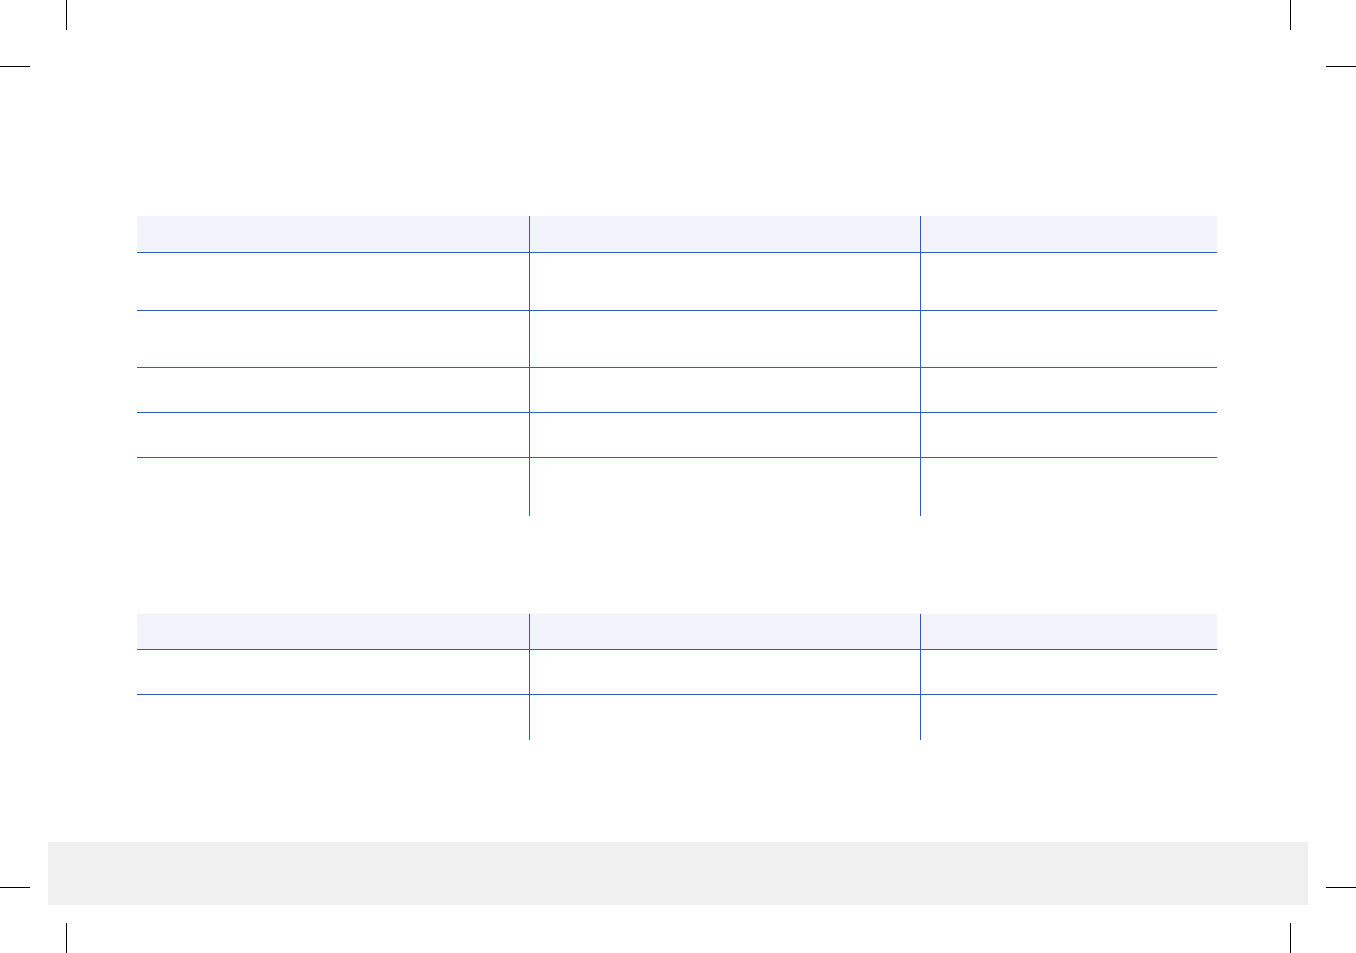
LED Status Battery Status Action
Solid orange when connected to the USB cable Not yet fully charged Continue charging until complete
Solid green when connected to the USB cable 100% charged Disconnect from power supply
LED Status Status Action
Alternating green and orange when power button
is pressed 3 times in 5 seconds Discoverable mode Pair smart transmitter with mobile
device
Does not blink when power button is pressed Smart transmitter o Hold down power button for
5seconds to turn on
Blinks green (once) when power button is pressed 10% - 90% battery power No immediate action required
Blinks orange (once) when power button is pressed Low battery, less than 10% battery power remaining Charge battery soon
LED is orange for one minute An alert has been triggered Check the app on your mobile device
to understand the alert
• During smart transmitter use:
LED Status Indicators
The smart transmitter communicates several dierent states based upon the color of the LED.
LBL-0202-01-001 Rev 1_Eversense User Guide_mgdL_R6.indd 32 7/22/16 11:39 AM

33
Eversense CGM User Guide
6
6. Calibrating the System
This section describes the calibration procedure and schedule of your Eversense CGM System.
To ensure best performance, routine calibration is required using fingerstick readings from a blood glucose meter. Any commercially available meter
may be used for calibration. Once your sensor has been inserted and linked to your smart transmitter, the system begins a 24-hour Warm-Up Phase.
No calibration is required during this phase.
There are two calibration phases:
Initialization Phase – After the 24 Warm-Up Phase, you must complete 4 fingerstick calibration tests, spaced 2 to 12 hours apart.
Daily Calibration Phase – After the Initialization Phase, you must complete 2 fingerstick calibration tests per day, spaced 10 to 14 hours apart.
Routine calibration is critically important to ensuring the best performance of the Eversense CGM System. The following tips can help you improve your
calibration measurements:
Tips for ensuring good calibration:
Calibrate at times when glucose is NOT changing rapidly (e.g., before
meals, before dosing insulin).
Calibrate when you know you will not be removing the smart
transmitter during the next 15 minutes.
Wash your hands with warm, soapy water and dry thoroughly before
taking a blood glucose meter reading. It is very important to have
clean, dry hands when you test your blood glucose.
Always follow the blood glucose meter manufacturer’s instructions to
get accurate blood glucose readings for calibration.
Be sure the code on test strip vial matches the code on your blood
glucose meter (if coding is required).
Calibration will NOT be complete or results NOT accepted if:
Blood glucose meter reading is less than 40 mg/dL.
Blood glucose meter reading is greater than 400 mg/dL.
Blood glucose meter reading was taken more than 10 minutes before
entering the result in the Eversense App.
Sensor glucose reading is significantly dierent than the blood
glucose meter reading.
Your smart transmitter was being charged during the 15 minutes after
you entered your calibration value.
Warning: DO NOT use alternative test sites such as your forearm for calibration.
LBL-0202-01-001 Rev 1_Eversense User Guide_mgdL_R6.indd 33 7/22/16 11:39 AM
34
Eversense CGM User Guide
6
Calibration Phases
A. Initialization Phase (after 24-hour Warm-Up Phase)
During this phase, 4 fingerstick blood glucose meter tests are required.
• The 4 calibration tests must be spaced 2 to 12 hours apart, and all
4tests must be completed within a 36 hour period.
– 1st calibration = 24 hours after sensor insertion.
– 2nd calibration = 2 to 12 hours after 1st successful calibration.
– 3rd calibration = 2 to 12 hours after 2nd successful calibration.
– 4th calibration = 2 to 12 hours after 3rd successful calibration.
• Glucose readings will start displaying in the app a few minutes after
the 2nd calibration is successfully completed.
• When the last several blood glucose meter measurements are
significantly dierent than the sensor glucose values.
• If the smart transmitter is out of battery power for more than 16 hours.
• When you receive a Sensor Check Alert.
• Six hours after you receive a Sensor Suspend Alert.
B. Daily Calibration Phase
The Daily Calibration Phase requires 2 blood glucose meter tests
at the scheduled morning and evening calibration times. The first
Daily Calibration Phase will begin after successful completion of the
Initialization Phase.
• Y our system will automatically tell you when it is time to perform the
twice-daily calibration test.
• Daily Calibration times must be spaced 10 to 14 hours apart.
• The system allows the calibration test to be taken up to 2 hours before
the scheduled time. If you miss your scheduled calibration time, the
system will prompt you hourly.
• The CALIBRATE screen provides the next allowable calibration
time.
Note: If a Daily Calibration test is missed, no additional CGM readings
will be displayed after 16 hours have elapsed since the last accepted
calibration result. If a calibration test result is not entered within
24hours from the last accepted calibration, the system will re-enter the
Initialization Phase.
Re-Entering Initialization Phase
The following will cause the system to re-enter Initialization Phase.
• Not completing a calibration test within a 12-hour period during the
Initialization Phase.
• Not completing all 4 calibration tests within 36 hours during the
Initialization Phase.
• Not completing 2 calibration tests within a 24-hour period during the
Daily Calibration Phase (see C. Daily Calibration Phase).
IMPORTANT: If your smart transmitter is not turned on and
paired with the Eversense App and sensor, the system is not able to
prompt you to calibrate.
LBL-0202-01-001 Rev 1_Eversense User Guide_mgdL_R6.indd 34 7/22/16 11:39 AM

35
Eversense CGM User Guide
6
Warning: Always calibrate the system using only a fingerstick blood sample. DO NOT use an alternative site (such as forearm or palm) blood
glucose reading to calibrate the system.
How To Calibrate
Notes
• For daily calibrations your CGM System will
alert you when it is time to calibrate based
on your scheduled calibration times.
• You can change your scheduled calibration
times to better fit your schedule.
Tap Menu > Settings > Daily
Calibration.
• You can calibrate up to 2 hours before your
scheduled calibration time. If you miss your
scheduled calibration time, the system will
prompt you hourly.
• You can enter additional calibration
readings as long as each calibration is
at least one hour apart. Tap Menu >
Calibrate.
• If the time chosen is not within the
calibration time frame, the CALIBRATE
screen will indicate that it is not yet time for
a calibration test.
1. When it is time for calibration, the app
displays the CALIBRATE NOW
screen.
• Tap Calibrate.
• The CALIBRATE screen appears.
• Tap Not Now if you want to wait
until later.
2. Obtain a fingerstick reading from your
blood glucose meter.
LBL-0202-01-001 Rev 1_Eversense User Guide_mgdL_R6.indd 35 7/22/16 11:39 AM