Senseonics orporated 3400 The Eversense Smart Transmitter User Manual 4
Senseonics Incorporated The Eversense Smart Transmitter Users Manual 4
Contents
Users Manual 4
77
Eversense CGM User Guide
11
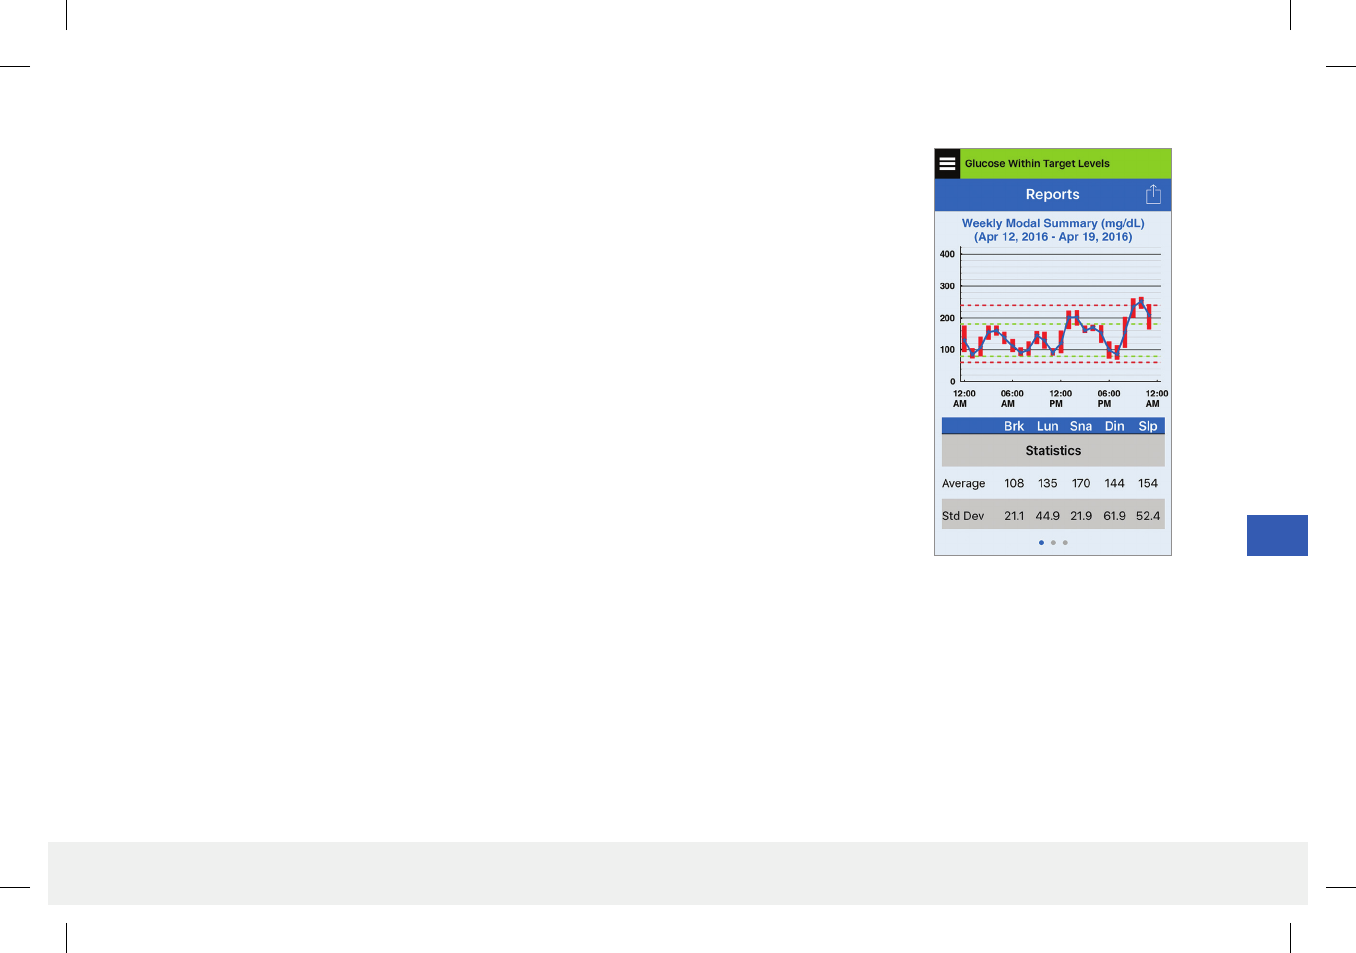
Weekly Modal Summary
This report shows your last seven days of glucose readings summarized in a 24-hour line graph
format to help find patterns during the day.
• The blue line is the average of the last seven days of your readings in an hour time block.
• The red bars show the highest and lowest actual readings in the same hour time block.
• The red horizontal dotted lines are your pre-set High and Low Glucose Alert levels.
• The green horizontal dotted lines are your pre-set High and Low Glucose Target levels.
This report also provides summary statistics (average readings, standard deviation of readings),
glucose target performance (percent within, above and below glucose target levels), and glucose
reading highs and lows (percent of readings that fall within the low and high glucose target levels).
The information is shown based on mealtime slots.
Note: To review or change the mealtime slots, please see Setting Mealtimes Schedule.
LBL-0202-01-001 Rev 1_Eversense User Guide_mgdL_R6.indd 77 7/22/16 11:39 AM
78
Eversense CGM User Guide
11
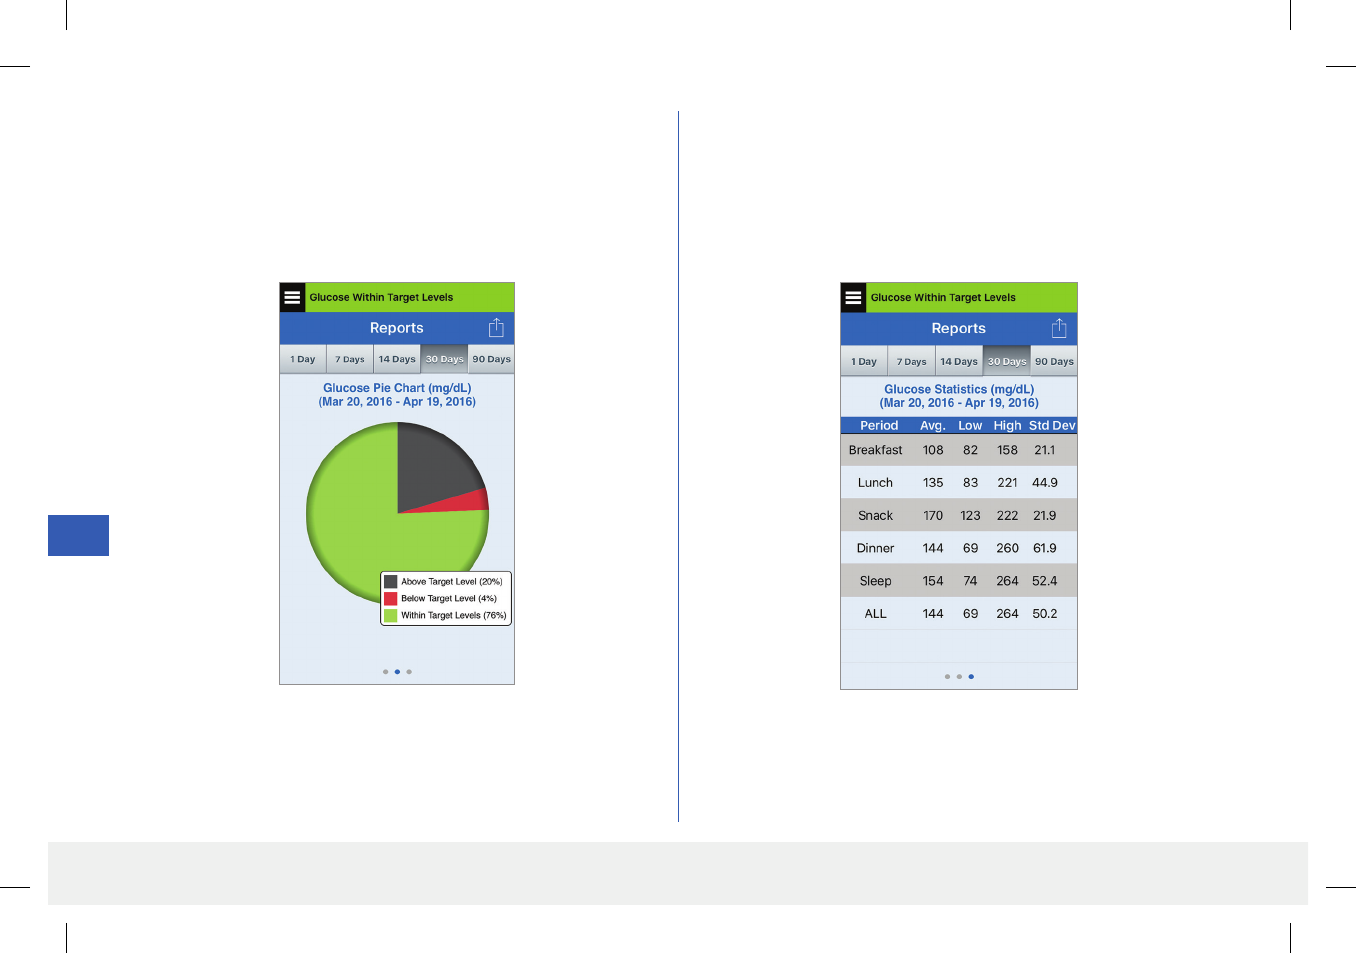
Glucose Pie Chart
This report shows in graphical format what percent of your readings
within a given time period are within, below or above your Glucose Target
levels. You can choose the last 1, 7, 14, 30 or 90 days.
Glucose Statistics
This report shows your average, low and high glucose readings, along
with standard deviation within a mealtime slot period. You can choose
the last 1, 7, 14, 30 or 90 days.
LBL-0202-01-001 Rev 1_Eversense User Guide_mgdL_R6.indd 78 7/22/16 11:39 AM
79
Eversense CGM User Guide
11
Eversense Data Management Software (DMS) Program
The Eversense DMS Program is a web-based application that enables patients, caregivers, and health care professionals to view and analyze glucose
data that has been transmitted from the Eversense Smart Transmitter or application.
This program is oered at no cost to users of the Eversense CGM System. To learn about the Eversense DMS Program, go to www.eversensediabetes.com.
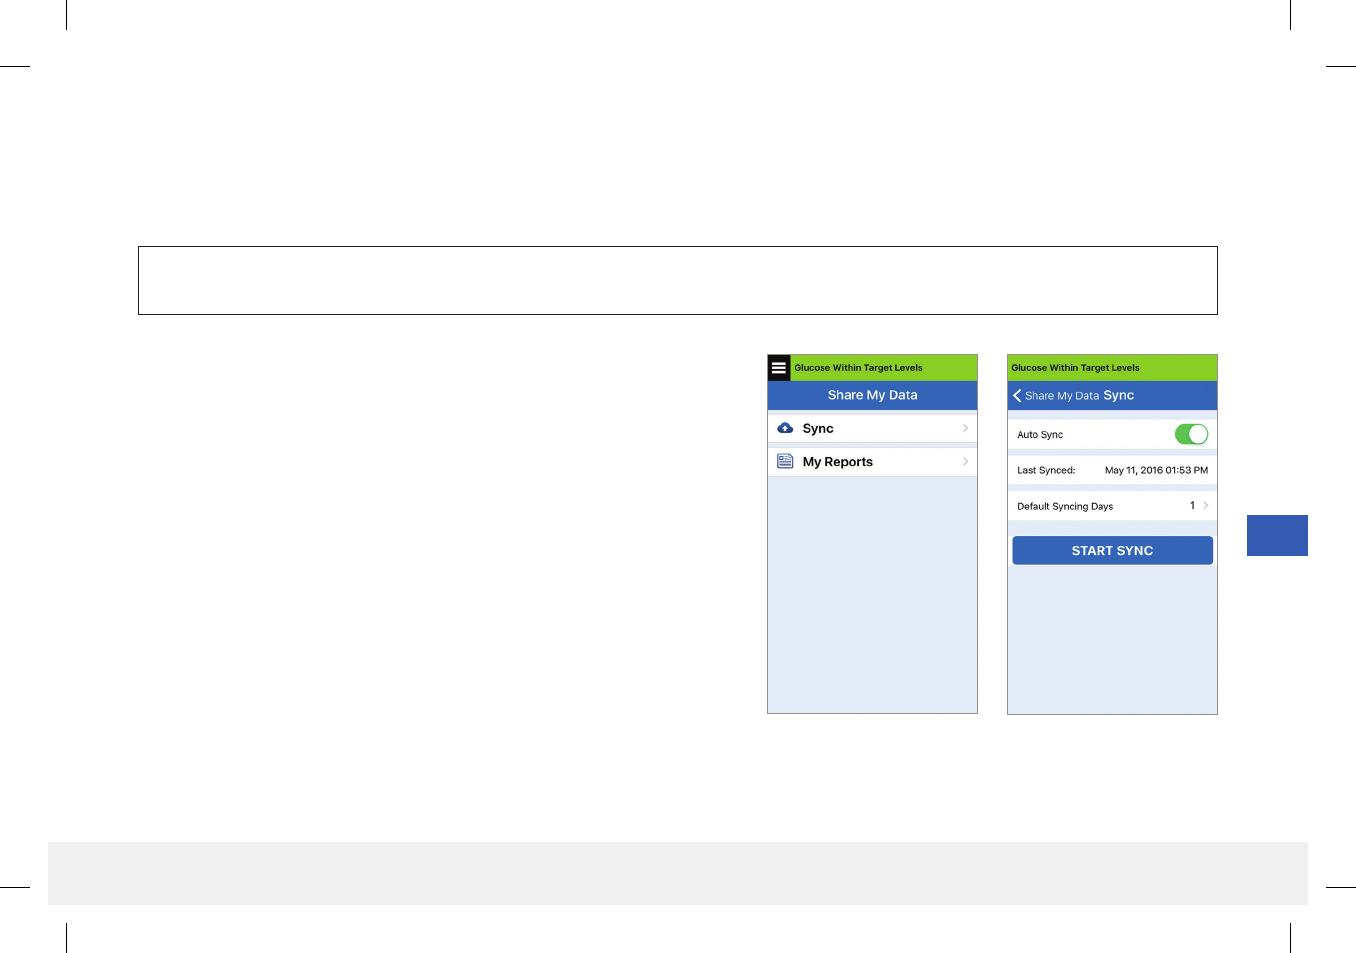
Share My Data
After authorizing your glucose readings to sync with the Eversense DMS, your results
will auto sync every 2 hours as long as you stay logged into the app. You can choose
to opt out of auto sync.
• Tap Sync on the SHARE MY DATA screen.
• Tap the Auto Sync button to o.
You may also choose to export your glucose readings in a CSV-file format.
Tap Menu > Share My Data > My Reports
• Select the number of days of your glucose readings you want to export then tap
Done.
• Tap Export.
• Email the CSV-file format by tapping the email icon on the top right hand corner.
IMPORTANT: EVERSENSE DATA MANAGEMENT SYSTEM DOES NOT PROVIDE MEDICAL ADVICE. CHANGES TO YOUR TREATMENT PLAN
SHOULD ONLY BE MADE BY YOUR HEALTH CARE TEAM.
LBL-0202-01-001 Rev 1_Eversense User Guide_mgdL_R6.indd 79 7/22/16 11:39 AM
80
Eversense CGM User Guide
12
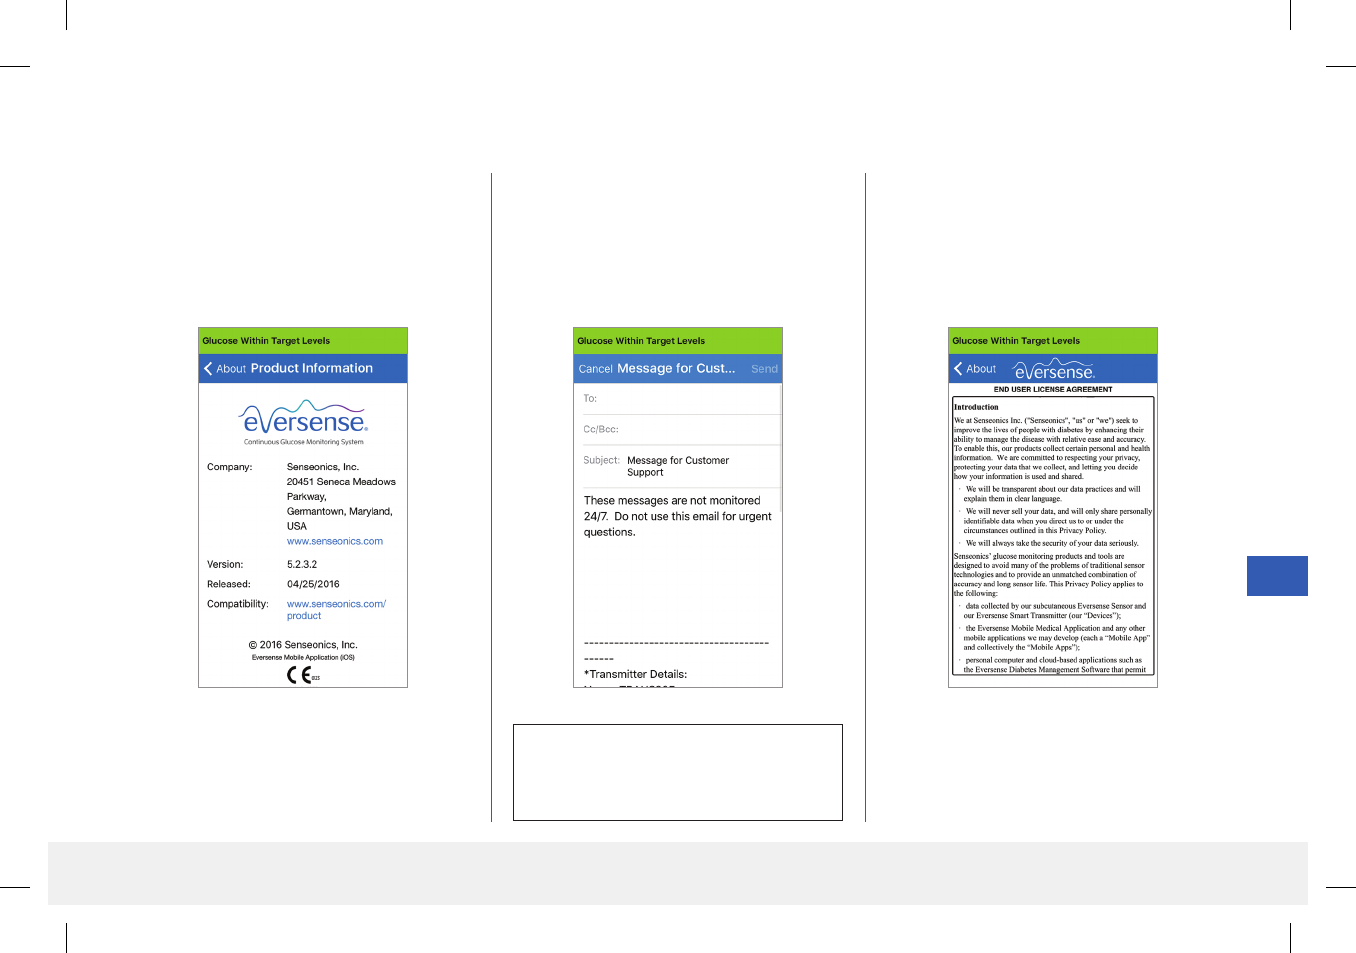
12. Product and General Information on the App
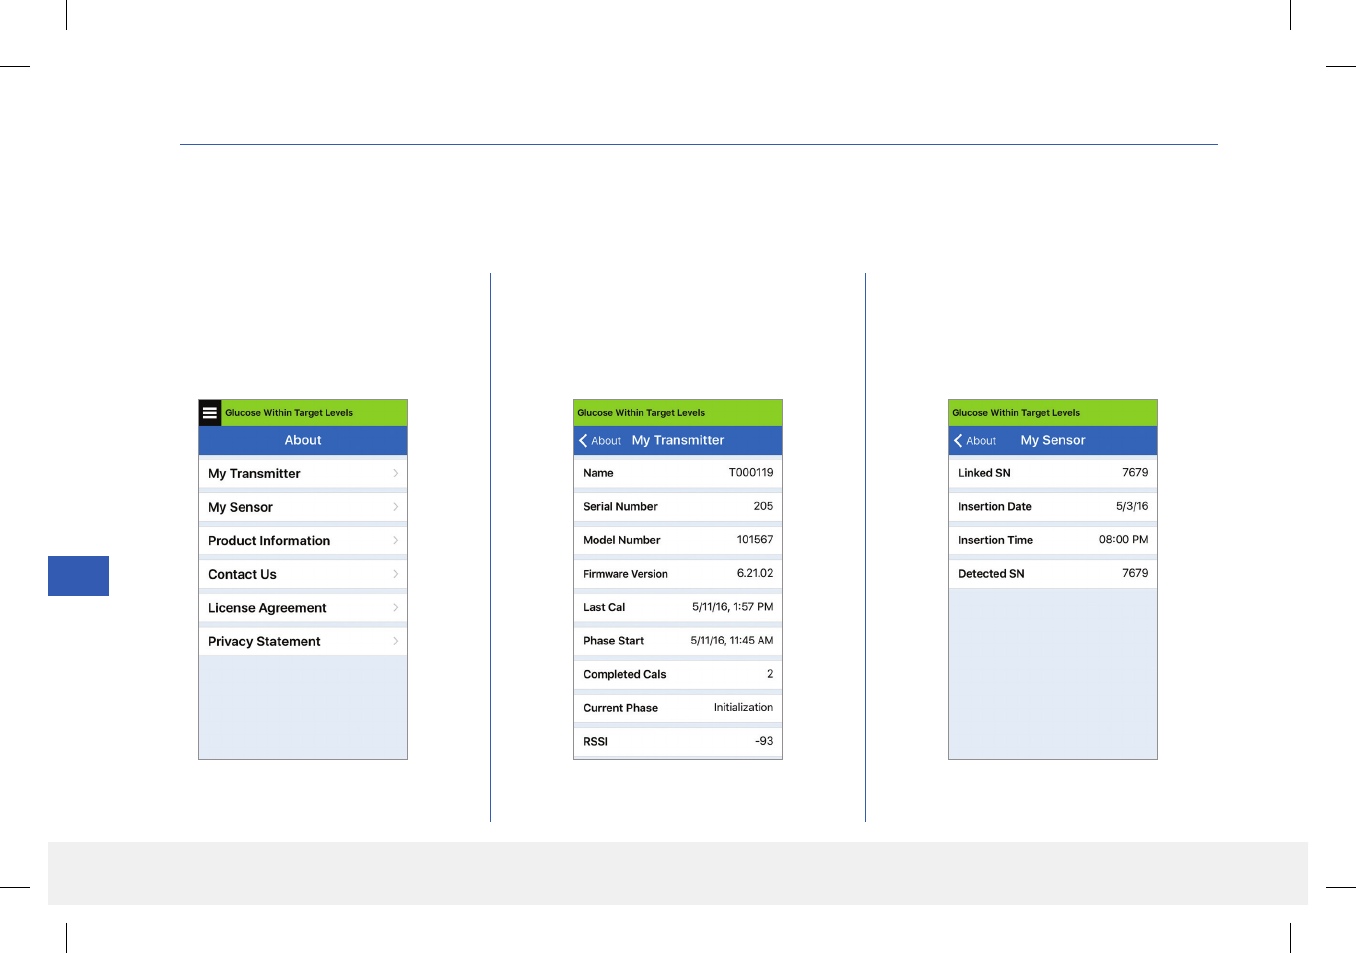
This section describes the information available from the About section of the Main Menu.
You can view product information about your smart transmitter, your sensor and your Eversense mobile app.
1. Tap Menu > About and then tap
My Transmitter, My Sensor or
Product Information.
On the MY TRANSMITTER screen,
you can find information that includes the
serial number, calibration information and
battery level.
On the MY SENSOR screen, you can view
the sensor serial number and insertion details.
LBL-0202-01-001 Rev 1_Eversense User Guide_mgdL_R6.indd 80 7/22/16 11:39 AM
81
Eversense CGM User Guide
12
On the PRODUCT INFORMATION
screen, you can view information about
the mobile app software version and
Senseonics, Inc., the manufacturer of the
Eversense CGM System.
You can also send feedback or view the End
User License Agreement and Privacy Policy
from the About menu.
• Tap Contact Us to send an email to
Senseonics, Inc.
To read the End User License Agreement and
the Privacy Policy, tap either option.
IMPORTANT: This email is not
monitored 24/7. DO NOT use this email for
health-related or or any urgent issues.
LBL-0202-01-001 Rev 1_Eversense User Guide_mgdL_R6.indd 81 7/22/16 11:39 AM
82
Eversense CGM User Guide
13
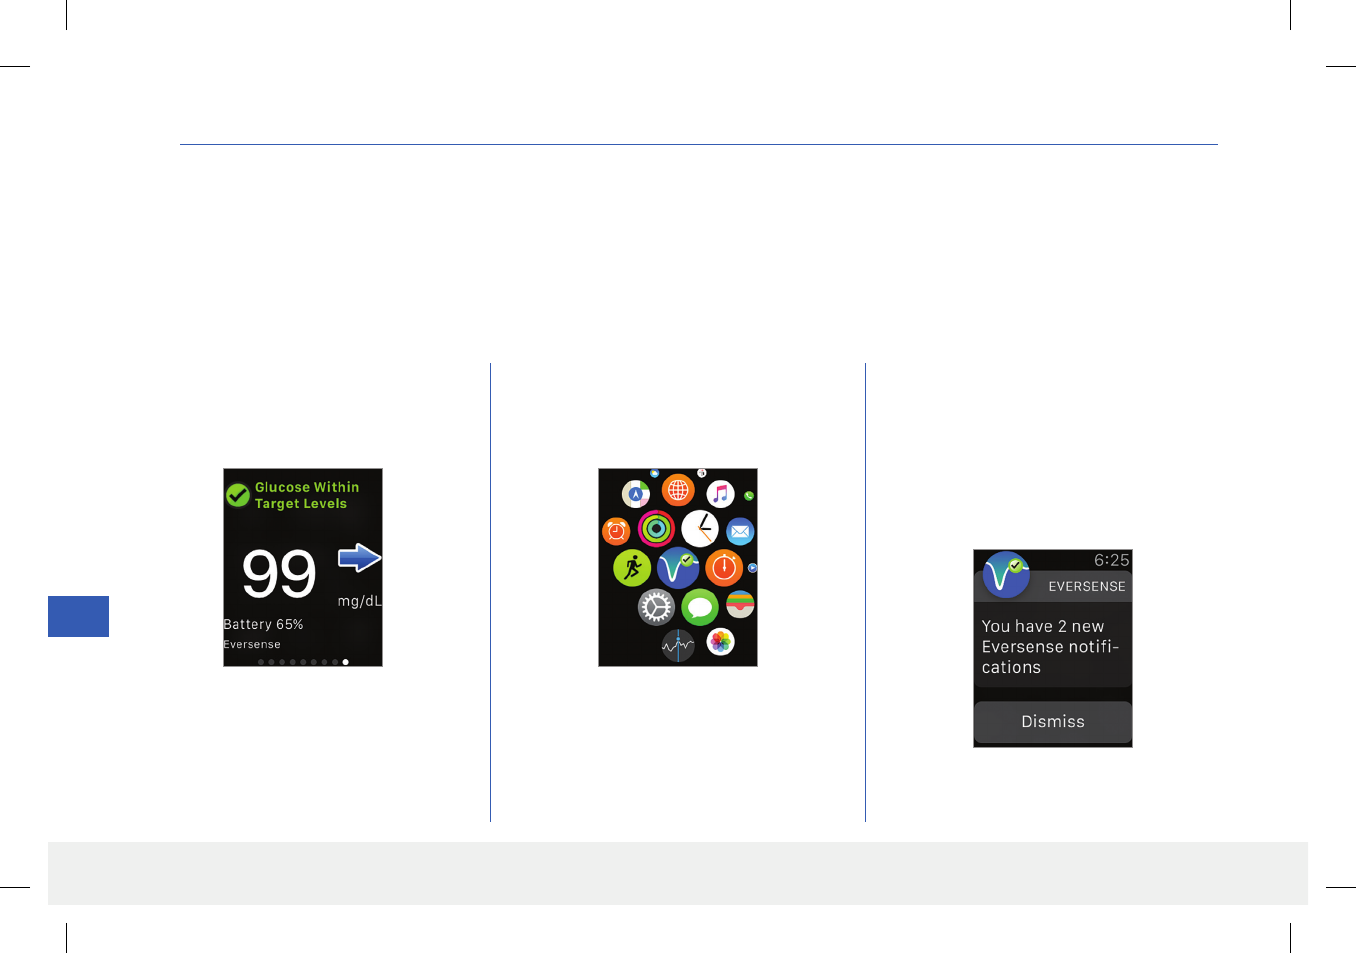
13. Viewing Eversense Data on the Apple Watch
You can view a snapshot of your Eversense CGM data on your Apple Watch. Once you’ve downloaded and installed the Eversense mobile app on your
mobile device, follow the Apple Watch instructions for adding the app to your watch.
Glance View
If you have already set the Eversense App on your mobile device to Show in Glances under the Apple Watch settings, simply swipe up on the watch
HOME screen to display the Eversense App Glance View.
Status bar information, your current glucose
value with trend arrow, and the battery life
remaining in your smart transmitter appear.
To access additional app features, tap
the Eversense icon on your watch
HOME screen to open the app.
You can also access the MY GLUCOSE
screen if you turn on notifications from
Eversense in your Apple Watch settings. When
you receive a notification, you can also tap on
the message to see the MY GLUCOSE
screen.
LBL-0202-01-001 Rev 1_Eversense User Guide_mgdL_R6.indd 82 7/22/16 11:39 AM

83
Eversense CGM User Guide
13
Swipe left to the next screen showing a pie
chart of your total time within and outside your
target range for the past 24 hours.
Swipe up to display the same data shown as
percentages.
Swipe up to display your next scheduled
calibration time, and the current system
calibration phase.
Swipe left to the next screen showing your
current glucose with trend arrow, and the date,
time and BG value for your last calibration.
The My Glucose screen shows your current
glucose with trend arrow, and a trend graph of
your last three hours of CGM data.
LBL-0202-01-001 Rev 1_Eversense User Guide_mgdL_R6.indd 83 7/22/16 11:39 AM
84
Eversense CGM User Guide
14
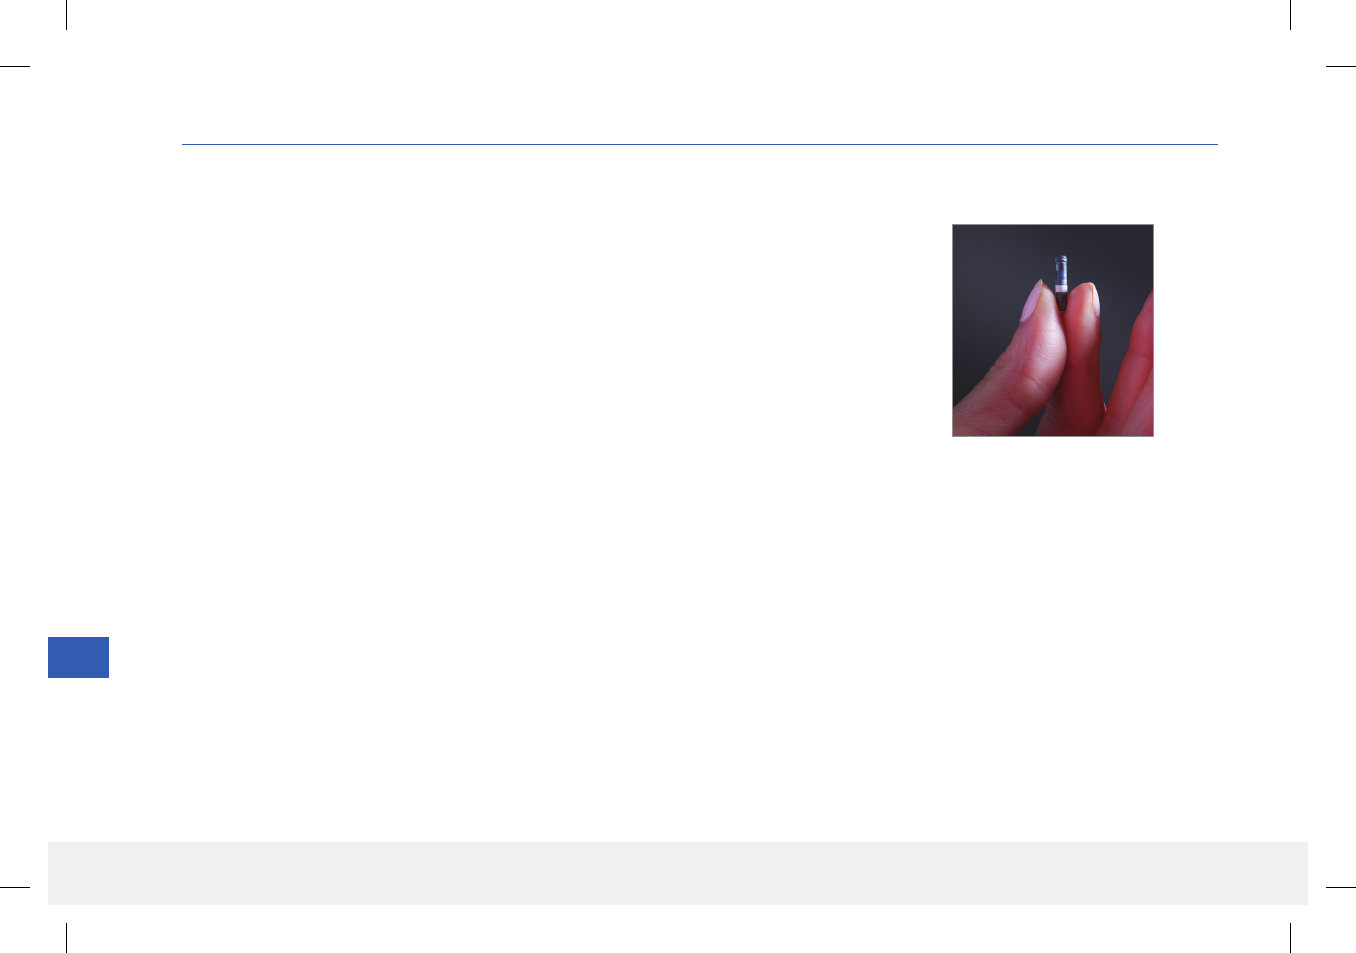
14. About the Sensor
This section describes the Eversense Sensor and how it is inserted by your physician.
The Eversense Sensor is a miniaturized fluorometer that uses fluorescent intensity to measure glucose in
interstitial fluid. The sensor is implanted subcutaneously (under the skin) on the upper arm, leaving no
part of the sensor protruding from the skin. The sensor remains in place and provides CGM measurements
for up to 90 days.
The sensor is encased in a biocompatible material and utilizes a unique fluorescent, glucose indicating
polymer. A light emitting diode embedded in the sensor excites the polymer, and the polymer then rapidly
signals changes in glucose concentration via a change in light output. The measurement is then relayed to
the smart transmitter. Measurements are completed automatically and require no action by the user.
The sensor is approximately 3.3 mm x 18.3 mm and has a silicone ring that contains a small amount of
dexamethasone acetate, an anti-inflammatory steroid drug. The dexamethasone acetate minimizes
inflammatory responses, very similar to common medical devices, such as pacemakers.
Insertion Steps
Your physician will explain and perform the simple and quick steps to insert the sensor. You will be fully awake during the approximately 5-minute
insertion procedure.
Insertion site:
It is important to choose a site that is comfortable for you to wear the sensor and smart transmitter for the entire 90 day period. It is recommended
to have the sensor inserted toward the back of the upper arm. Placement in this area minimizes the chance of the sensor and smart transmitter being
bumped by doorways, walls or other narrow passages. If possible, avoid areas with loose skin, scars, tattoos, nevus, or blood vessels that could be incised
during the procedure.
Eversense Sensor
LBL-0202-01-001 Rev 1_Eversense User Guide_mgdL_R6.indd 84 7/22/16 11:39 AM

85
Eversense CGM User Guide
14
Removal Steps
Similarly to the insertion steps, your physician will explain the simple and quick steps for the sensor removal and you will be fully awake during the
5-minute (approximate) removal process.
Step 1: Site preparation – the sensor site will be cleaned, disinfected, then anesthetized using lidocaine.
Step 2: Incision – a small (less than 1 centimeter) incision will be made at the sensor site.
Step 3: Sensor removal – the sensor will be removed and discarded.
Step 4: Site closure - once removed, the incision will be closed with a steri-stip (sutures may be used depending on provider’s preference).
Step 1: Site preparation – the insertion site will be cleaned, disinfected, then anesthetized using lidocaine.
Step 2: Incision – a small (less than 1 centimeter) incision will be made at the insertion site.
Step 3: Sensor insertion – a subcutaneous pocket will be created under the skin and the sensor will be inserted in this pocket.
Step 4: Site closure - the incision will be closed with an adhesive bandage. Steri Strips™ are typically used to close the incision.
Step 5: Sensor and smart transmitter linking - link the sensor and smart transmitter to begin the 24-hour Warm-Up Phase.
Note: After insertion, link the smart transmitter and the sensor and then allow the incision site to heal 24 hours before replacing the transmitter.
The sensor requires 24 hours to stabilize within the insertion site, this period is known as the Warm-up Phase. After the first 24 hours of sensor insertion,
position and secure the smart transmitter over the sensor and ensure you have a connection. (See Secure the Smart Transmitter over Inserted Sensor.)
Then you can perform your Initialization Phase calibration of 4 fingerstick blood glucose tests to start getting glucose readings.
LBL-0202-01-001 Rev 1_Eversense User Guide_mgdL_R6.indd 85 7/22/16 11:39 AM
86
Eversense CGM User Guide
15. Travel
When traveling, your smart transmitter and sensor are safe to go through airport security without removing them. You may inform security that you have
an implanted medical device.
Your smart transmitter will automatically sync to your smartphone’s current time and date when time zones are changed.
The Eversense CGM System is safe for use on U.S. commercial airlines. The Eversense Smart Transmitter is a Medical Portable Electronic Device (M-PED)
with emission levels that meet FAA mandates for use in all modes while in flight. (Reference FAA Advisory, Circular #21-16G, dated 6.22.2011.) To use,
turn your mobile device’s Bluetooth feature on after you have put your mobile device in airplane mode. For flights outside the US, follow local security
regulations for use of medical devices in flight.
This section describes the safety issues when traveling with your Eversense smart transmitter and sensor.
IMPORTANT: When traveling to dierent time zones, check your calibration reminder settings to ensure the times are convenient for you in the
local time zone.
15
LBL-0202-01-001 Rev 1_Eversense User Guide_mgdL_R6.indd 86 7/22/16 11:39 AM
87
Eversense CGM User Guide
16
16. Troubleshooting
This section lists information about troubleshooting your Eversense CGM System and includes a list of frequently asked
questions (FAQs).
Smart Transmitter
Q: How do I turn my smart transmitter OFF?
A: Press and hold the smart transmitter power button for 5 seconds.
Release the button when the smart transmitter begins to vibrate.
Q: How do I turn my smart transmitter ON?
A: Press and hold the smart transmitter power button for 5 seconds.
Release the button when the smart transmitter begins to vibrate.
Q: How do I properly position the smart transmitter over the sensor?
A: There are two ways to ensure proper positioning:
1. When using the adhesive patch to secure the smart transmitter,
make sure the power button symbol and the LED are lined up in
parallel with your arm.
2. Use the PLACEMENT GUIDE screen on the app to confirm
connection between the sensor and the transmitter.
• Tap Placement Guide.
• Position the smart transmitter over the sensor so that a
connection is confirmed.
Q: My smart transmitter will not vibrate? Why?
A: If the smart transmitter does not vibrate, try the following steps:
• Check that the smart transmitter is connected to your mobile device.
• Check that the Do Not Disturb is disabled by tapping Menu >
Settings > System.
• Check that your smart transmitter has enough battery power and
charge if necessary.
If the smart transmitter still will not vibrate, contact Customer Support
or your local distributor for further troubleshooting.
Q: Can I use the same adhesive patch more than once a day?
A: The individual adhesive patch is intended to be used for a 24-hour
period.
Q: What is the serial number and model number of my smart
transmitter?
A: You can find the serial number and model on the back of your smart
transmitter. Once you have paired your smart transmitter and mobile
device, you can also find the serial number and model by tapping
Menu > About > My Transmitter.
LBL-0202-01-001 Rev 1_Eversense User Guide_mgdL_R6.indd 87 7/22/16 11:39 AM

88
Eversense CGM User Guide
16
Q: How do I customize the name of my smart transmitter?
A: Tap Menu > Settings > System > Transmitter Name. Type
in the name you desire. The updated name of the smart transmitter
will appear in your connection status screen.
Q: Why does my smart transmitter show a continuous solid orange
LED?
A: Follow the steps below to troubleshoot the smart transmitter:
1. Make sure the smart transmitter is paired with your mobile device.
2. Make sure the smart transmitter is charged.
3. Check your app for any alerts or notifications.
4. Remove the smart transmitter from your arm and wait for a few
minutes. A No Sensor Detected message will appear and the
smart transmitter should vibrate more frequently as it searches for
a sensor. If the smart transmitter does not vibrate or if the app does
not show No Sensor Detected, contact Customer Support
in the US. Outside the US, contact your local distributor. Place the
smart transmitter back over the sensor to see if the orange LED
disappears and observe any notifications on the app.
If the orange LED continues to stay lit, contact Customer Support.
Smart Transmitter Battery and Charging
Q: How long does a fully charged smart transmitter battery last?
A: A fully charged smart transmitter battery typically lasts about a day
and half.
Q: How long does it take to charge a smart transmitter?
A: It takes approximately 15 minutes to fully charge a smart transmitter
when plugged into a wall outlet.
It may take longer if charging via a computer USB port.
Q: How do I check the smart transmitter battery status?
A: There are three ways to check battery status:
1. Tap Menu > About > My Transmitter. Scroll down to the
Battery Level line that indicates amount of battery power left.
2. Check the battery symbol in the upper right corner on the
MY GLUCOSE screen. A red battery icon indicates the smart
transmitter battery is empty.
3. Power ON the smart transmitter. Press and release the smart
transmitter power button. An orange LED on the smart transmitter
indicates low battery. A green LED indicates the battery is at least
10% charged.
Q: What happens if my smart transmitter battery is completely
drained?
A: No glucose readings will be displayed. Always charge immediately
when the smart transmitter battery is completely drained.
LBL-0202-01-001 Rev 1_Eversense User Guide_mgdL_R6.indd 88 7/22/16 11:39 AM

89
Eversense CGM User Guide
16
Connection with Smart Transmitter
Q: How do I pair my mobile device and smart transmitter for the first time?
A: Follow the steps below to pair your mobile device and smart
transmitter. Please read this User Guide for more detailed information.
1. Launch the Eversense App.
2. Press the smart transmitter power button three times to get it into
“Discoverable” mode.
3. When the smart transmitter blinks green and orange, tap the smart
transmitter ID on the PAIR YOUR TRANSMITTER screen.
The app will then begin the searching process.
• Your smart transmitter ID is the same as the serial number listed
on the back of the smart transmitter.
4. When the app finds your smart transmitter, a BLUETOOTH
PAIRING REQUEST pop-up screen appears.
5. Tap Pair to confirm the pairing.
6. The app will display Connected next to the smart transmitter ID
once the pairing is completed.
7. Tap Next.
Q: My smart transmitter and mobile device do not appear to be
connected.
A: There may be several reasons why you do not have a connection.
• Make sure the Bluetooth setting on your mobile device is ON and the
smart transmitter’s name or serial number appears on the device list.
• The condition may only be temporary. Tap Menu > Connect.
If your smart transmitter name indicates Disconnected, tap the
smart transmitter name to connect manually.
• Your smart transmitter and mobile device may be out of wireless
range. Move your mobile device closer to the smart transmitter.
• Your smart transmitter may be turned o, out of battery power or
is currently being charged. You may need to restart the Bluetooth
(BLE) function on the smart transmitter by following the steps
below.
1. Power o the smart transmitter – Press and hold the power
button for 5 seconds and wait for the vibration to confirm it is
powered o.
2. Wait 2 seconds and press the power button three times to
restart BLE. (Note: When doing a BLE restart, do not
remove/forget the paired device via your mobile device’s
Bluetooth Settings.)
3. Press the power button 3 times again to place the smart
transmitter in discoverable mode and pair with your mobile
device. Tap Menu > Connect to see if your smart transmitter
is connected. If not connected, tap to select your smart
transmitter from the list.
If these steps do not resolve the problem, you may need to go to
the Bluetooth Settings feature on your mobile device and unpair or
forget the smart transmitter and then press the smart transmitter
power button 3 times to re-pair. If the problem still exists, you may
need to reset your smart transmitter.
LBL-0202-01-001 Rev 1_Eversense User Guide_mgdL_R6.indd 89 7/22/16 11:39 AM

90
Eversense CGM User Guide
16
Q: Can other people connect to my smart transmitter?
A: The Eversense CGM System utilizes a secure Bluetooth connection and
will not allow others to connect.
Q: What happens if my smart transmitter is disconnected from my
mobile device or app?
A: The smart transmitter will vibrate and the app will provide a
“Transmitter Disconnected” notification every 30 minutes until the
app is launched or the smart transmitter is reconnected. Once the
connection is re-established, the data collected will sync with the
mobile app.
Q: Why am I unable to connect my mobile device to my smart
transmitter (No Transmitter Connected is displayed in the
app status bar)?
A: The smart transmitter may fail to connect with your mobile device for
any of the following reasons:
• The smart transmitter is currently charging.
• The smart transmitter is turned OFF.
• The smart transmitter battery is completely drained.
• Bluetooth on your mobile device is turned OFF.
• Smart transmitter pairing to your mobile device has not been
established or has been “un-paired”. You must re-establish pairing.
Q: How do I reset my smart transmitter?
A: Follow the steps below.
1. Connect the smart transmitter to the USB cable and adapter that
came with your smart transmitter. Plug the cable into the wall outlet.
(You can also plug the standard USB end of the cable directly into a
USB port on your computer.)
2. Press and hold the smart transmitter’s power button for about
10 seconds until it begins to vibrate. Do not release the power
button until the vibration stops.
3. Once the vibration stops, release the power button. The orange LED
should be on. Quickly (within about 2 seconds) unplug the smart
transmitter from the USB cable. The LED should be o.
4. To verify the first part of the reset is complete, press the power
button multiple times. The LED should not light up. If the LED lights
up, repeat steps 1 through 4.
5. After 30 seconds, reconnect the transmitter to the USB cable. The
smart transmitter will complete a series of self-tests that lasts about
90 seconds. During this time, the LED will blink green and orange.
When the self-test is complete, the transmitter will vibrate and the
LED (either green or orange) will stay on. If the self-test doesn’t
complete, repeat steps 1 through 5.
6. Disconnect the smart transmitter from the USB cable and proceed
with pairing. Once paired, the system will be in the Initialization
Phase. If you are unable to complete the reset, contact Customer
Support.
LBL-0202-01-001 Rev 1_Eversense User Guide_mgdL_R6.indd 90 7/22/16 11:39 AM

91
Eversense CGM User Guide
16
Q: Why do I see Searching on the CONNECT screen?
A: The app will continue to show Searching for any of the following
reasons:
• The smart transmitter is currently charging.
• The smart transmitter is turned OFF.
• The smart transmitter battery is completely drained.
• Bluetooth on your mobile device is turned OFF.
• Smart transmitter pairing to your mobile device has not been
established or has been “un-paired”. You must re-establish pairing.
Q: What is “Discoverable” (Pairing) mode?
A: Discoverable mode is the smart transmitter state that enables it to be
located by your mobile device for pairing. See Getting Started for more
information.
Q: My smart transmitter is not listed on the CONNECT screen?
A: The smart transmitter will not be listed on the CONNECT screen for
any of the following reasons:
• The smart transmitter is currently charging via USB.
• The smart transmitter is turned OFF.
• The smart transmitter battery is completely drained.
• Bluetooth on your mobile device is turned OFF.
• Smart transmitter pairing to your mobile device has not been
established or has been “un-paired”. You must re-establish pairing.
Q: Why do I see other smart transmitters listed on the CONNECT
screen?
A: The app may find other Bluetooth enabled devices in the vicinity.
However, the app connects only to the smart transmitter that was
paired with your mobile device. DO NOT attempt to pair your mobile
device to other smart transmitters that are not yours.
Q: I just received a new smart transmitter. How do I unlink the old one
and link the new one to my sensor?
A: On the Main Menu, tap Connect. Tap and hold the name of your
old smart transmitter. Tap OK to stop the app from automatically
connecting with the old smart transmitter. Follow the steps in this User
Guide for pairing the new smart transmitter with the app and linking it
to your sensor.
LBL-0202-01-001 Rev 1_Eversense User Guide_mgdL_R6.indd 91 7/22/16 11:39 AM

92
Eversense CGM User Guide
16
Q: Why am I unable to calibrate?
A: You may not be able to calibrate for any of the following reasons:
• Not enough sensor glucose data has been collected, which may take
up to 5 minutes.
• Sensor glucose values are changing rapidly, such as after eating or
taking insulin.
• The blood glucose reading is less than 40 mg/dL.
• The blood glucose reading is greater than 400 mg/dL.
• The blood glucose reading was taken more than 10 minutes prior to
entering it in the Eversense App.
• The last sensor glucose value is significantly dierent than the blood
glucose reading entered.
• It is not time for your calibration.
Q: Why was my calibration rejected?
A: The system will reject the calibration for the any of the following
reasons:
• The blood glucose reading entered is less than 40 mg/dL.
• The blood glucose reading entered is greater than 400 mg/dL.
• The blood glucose reading entered is significantly dierent from the
last sensor glucose reading.
If the calibration is rejected, you must re-calibrate. You may need to
wait up to 60 minutes before re-calibrating.
Calibration
Q: Will doing more than 2 fingerstick calibrations per day aect the
accuracy of the system?
A: The accuracy will not be negatively impacted if you do more than the
required 2 calibrations per day.
Q: When should I do a fingerstick test with a blood glucose meter?
A: You should perform a blood glucose test on a meter:
• When it is time to calibrate.
• When you cannot get sensor glucose readings.
• Any time you have reached your low or high glucose alert levels.
• Any time you have symptoms of low or high blood glucose.
• Any time your symptoms are not consistent with the sensor glucose
readings.
• Prior to making treatment decisions, such as dosing insulin or
consuming carbohydrates.
Q: What time should I enter on the CALIBRATE screen when I am
notified to calibrate?
A: Enter the time you tested your blood glucose with your meter. You must
enter the blood glucose reading within 10 minutes of doing the test.
LBL-0202-01-001 Rev 1_Eversense User Guide_mgdL_R6.indd 92 7/22/16 11:39 AM

93
Eversense CGM User Guide
16
Q: How do I change my scheduled morning and evening Daily
Calibration times?
A: Tap Menu > Settings > Daily Calibration. Select the morning
or evening time to change. Morning and evening times must be set a
minimum of 10 hours apart and maximum of 14 hours apart.
Q: Can I calibrate earlier than my scheduled time?
A: You can calibrate up to 2 hours before the scheduled time. If you miss
your scheduled time, the system will send an hourly calibration prompt.
To view the next available calibration time, tap Menu > Calibrate.
The next scheduled calibration time is displayed.
Q: Where can I find details for Calibration Phase, number of
calibrations and last calibration date and time?
A: You can view calibration details by tapping Menu > About > My
Transmitter.
Q: What are the dierent types of calibration phases?
A: The Eversense CGM System has two types of Calibration Phases, the
Initialization Phase and the Daily Calibration Phase. Initialization Phase
begins 24 hours after sensor insertion and requires 4 fingerstick blood
glucose tests for calibration. The Daily Calibration Phase occurs after
the Initialization Phase and requires 2 daily calibrations (morning and
evening) for the life of the sensor.
Alerts and Notifications
Q: Can I change the vibration alert pattern on my smart transmitter?
A: Smart transmitter vibe patterns are fixed and cannot be changed.
The repeat interval can be changed for some Alerts in Settings >
Sound Settings.
Q: Can I increase the volume of the app sounds coming from my
mobile device?
A: You may increase the volume of the app sounds by connecting your
mobile device to an external device to amplify the sound.
Q: How do I silence glucose alerts?
A: Glucose alerts can be silenced by confirming the alert on your mobile
device and taking the appropriate action if necessary.
Q: Can I change the number of alerts I receive?
A: If you feel that you are getting too many alerts, you should first discuss
the alert settings best suited for you with your physician. If you need
to change your glucose alert settings, tap Menu > Settings >
Glucose.
LBL-0202-01-001 Rev 1_Eversense User Guide_mgdL_R6.indd 93 7/22/16 11:39 AM

94
Eversense CGM User Guide
16
Q: What is the dierence between a notification and alert?
A: A Notification is a non-critical, low priority message (e.g., calibration
reminder).
An Alert is an important message that needs your attention and may
require you to respond/take action.
Q: What are rate of change alerts?
A: Rate of Change Alerts notify you when your glucose level is falling or
rising faster than the setting you entered in Settings > Glucose.
You should immediately perform a fingerstick blood glucose test to
confirm your glucose value.
Q: What are predictive alerts?
A: Predictive Alerts notify you in advance of an event that is likely to
occur if current trends continue. Predictive Alerts use High and Low
Glucose Alert levels you set to determine when the Predictive Alerts
occur. You can set the alerts to notify you at 10, 20, or 30 minutes in
advance of when the CGM System anticipates you reaching the alert
levels you set. Your smart transmitter will vibrate, and your app will
sound an alert and display a message on the MY GLUCOSE
screen to notify you of a predicted high or low glucose. You should
immediately perform a fingerstick blood glucose test to confirm your
glucose value.
Q: Why am I unable to see notifications when the app is in the
background?
A: Refer to your mobile device instructions to enable the notifications in
the background.
Q: What happens to the notifications if my app is disconnected from
my smart transmitter?
A: If the app is disconnected from your smart transmitter, but you have
been wearing your smart transmitter over your sensor, the alerts
received during that time will be sent to the app once it is reconnected
and synced with the smart transmitter.
Q: How can I sort the notifications on the ALERT HISTORY
screen?
A: The ALERT HISTORY screen has a sort filter at the top. You can
sort based on the severity levels (yellow and blue), and alert type. Tap
the desired sort filter icon.
LBL-0202-01-001 Rev 1_Eversense User Guide_mgdL_R6.indd 94 7/22/16 11:39 AM

95
Eversense CGM User Guide
16
Glucose Readings
Q. Why is my sensor reading dierent from my blood glucose meter
reading?
A: The Eversense CGM System measures glucose in interstitial fluid
(ISF) between the body’s cells. Physiologic dierences between ISF
and blood from a fingerstick may result in dierences in glucose
measurements. These dierences are especially evident during times
of rapid change in blood glucose (e.g., after eating, dosing insulin, or
exercising). On average, glucose levels in ISF lag behind glucose levels
in blood by several minutes.
Q: I am getting “-- -- --” in place of sensor glucose readings on
the app.
A: You may not get any sensor glucose readings when there is no
connection between your smart transmitter and your sensor or smart
transmitter and mobile device.
You may also not get any readings when one of the alerts below is
activated:
• No sensor detected.
• Out of Range High or Out of Range Low Glucose Sensor reading.
• Low Sensor Temperature.
• High Ambient Light.
• Sensor Check.
• High Smart Transmitter Temperature.
• High Sensor Temperature.
• Empty Battery.
• Calibration Past Due.
• New Sensor Detected.
• Sensor Replacement.
• Calibration Expired.
• Smart Transmitter Error.
• Sensor Suspend Alert.
Please follow the instructions provided in the notification message to
clear the Alert.
LBL-0202-01-001 Rev 1_Eversense User Guide_mgdL_R6.indd 95 7/22/16 11:39 AM

96
Eversense CGM User Guide
16
Trend Arrows
Q: My trend arrows and glucose alerts do not match.
A: Trend arrows indicate the rate and direction of change in glucose
levels. For example, you may have a trend arrow that points up or
down (indicating slow or rapid changes). Glucose alerts notify you
when your current glucose level reaches the alert level you set,
regardless of the rate or direction of change.
Q: My trend arrow is gray instead of blue.
A: The CGM System uses the last 20 minutes of continuous glucose
data for calculating and displaying the trend arrow. When there are
not enough sensor values available for the calculation, the arrow is
displayed in gray.
App
Q: What will happen if I re-install the app?
A: Upon re-installing the app, the app will download historical data only
from the last 3 days.
Q: What version of the app is installed on my mobile device?
A: You can find the app software version by tapping Menu > About >
Product Information.
Q: How will my app be updated?
A: Visit www.eversensediabetes.com for instructions on updating the
app software.
Q: What devices are compatible with the Eversense App?
A: Visit www.eversensediabetes.com for a list of compatible devices.
Q: Can I still use the same smart transmitter if I switch to a new mobile
device?
A: You will need to install the app on your new mobile device and pair it
with your smart transmitter. The last 3 days of historical data will be
synced to the app on the new mobile device.
LBL-0202-01-001 Rev 1_Eversense User Guide_mgdL_R6.indd 96 7/22/16 11:39 AM

97
Eversense CGM User Guide
16
Q: What is the Do Not Disturb option?
A: When Do Not Disturb is enabled in the Eversense App Settings, the
smart transmitter will stop providing vibratory alerts for non-critical
alerts. Critical alerts will still be provided via on-body vibe alerts.
All alerts and notifications will continue to be provided on the
mobile app.
Note that the Do Not Disturb feature on your smartphone overrides
the Do Not Disturb option in the app. So if the Do Not Disturb feature
on your smartphone is turned on, you will not receive the alerts on
the smart transmitter or in the app.
Q: Why does my status bar say “syncing”?
A: “Syncing” will appear in the status bar when the app on your mobile
device is connecting to your smart transmitter.
Q: My Glucose Settings and Temp Profile Settings are grayed out and
I cannot adjust them.
A: Your app must be paired to a smart transmitter to be able to adjust
your Glucose and Temp Profile settings.
Sensor
Q: Can the sensor be inserted in another body part besides my upper
arm?
A: The Eversense CGM System was only tested in the upper arm during
clinical studies.
Q: When do I need to replace my sensor?
A: Your sensor lasts up to 90 days. You will receive periodic notices
(30, 14, 7, 3, 2, and 1 day prior) to remind you when the sensor needs to
be replaced. Contact your physician to schedule a sensor replacement.
Q: Can I extend the 90 day life of the sensor?
A: The sensor will no longer provide glucose readings after 90 days of
wear and must be replaced.
Q: Where can I find the sensor serial number?
A: You can view the sensor serial number by tapping Menu > About >
My Sensor.
LBL-0202-01-001 Rev 1_Eversense User Guide_mgdL_R6.indd 97 7/22/16 11:39 AM
98
Eversense CGM User Guide
Events
Q: How can I sort my events on the EVENT LOG screen?
A: The EVENT LOG screen has a sort filter at the top of the screen.
Tap the desired sort filter icon to include and exclude events from the
list. The default sort option is to show ALL events.
Q: Why do I see a “New Sensor Detected” notification?
A: This message appears when your smart transmitter detects a new
sensor so you may link the smart transmitter and sensor. The smart
transmitter can only be linked to one sensor at a time. If you see a
New Sensor Detected message and you already have a sensor
inserted and linked to your smart transmitter, tap Not Now. If
unsure, contact Customer Support for more information.
Q: Why did my CGM System re-enter Initialization Phase?
A: You will re-enter Initialization Phase for any one of the following
reasons:
• Calibration period has expired without you having entered a
fingerstick test value.
• 3 or more blood glucose readings are significantly dierent than the
current sensor glucose readings.
• Y our smart transmitter has not been charged within 16 hours of the
empty battery alert.
• If you manually change the time on your mobile device your smart
transmitter will sync and reinitialize to your mobile device.
Sync
Q: Why do I sometimes see a blue and white progress bar across the
top of my screen?
A: You will see this syncing progress bar for several reasons.
• Your smart transmitter was out of range of your sensor for a while
and it is re-syncing.
• You closed the Eversense app completely and re-launched it.
• Your mobile device lost battery power and was recharged.
• Your data is being uploaded to your Eversense DMS account.
LBL-0202-01-001 Rev 1_Eversense User Guide_mgdL_R6.indd 98 7/22/16 11:39 AM
99
Eversense CGM User Guide
17
17. Device Performance
This section lists Device Performance Characteristics.
Clinical Study Performance
The performance of the Eversense CGM System was evaluated in a multi-site, non-randomized clinical study. Adult (18 years and older) subjects with
diabetes were enrolled at 7 dierent sites in 3 dierent countries. Each subject had 2 separate sensors inserted, one in each upper arm. One sensor was
used to display glucose data on the subject’s mobile device and the other sensor was used to collect glucose data but was not displayed to the subject.
Forty-four (44) subjects were followed for 90 days following the insertion of the sensor. Accuracy assessments were made at various points during the
study, and subjects were asked to report any adverse events throughout the study. The Mean Absolute Relative Dierence (MARD) measured throughout
the 90 days was 11.4% for glucose values over 75 mg/dL.
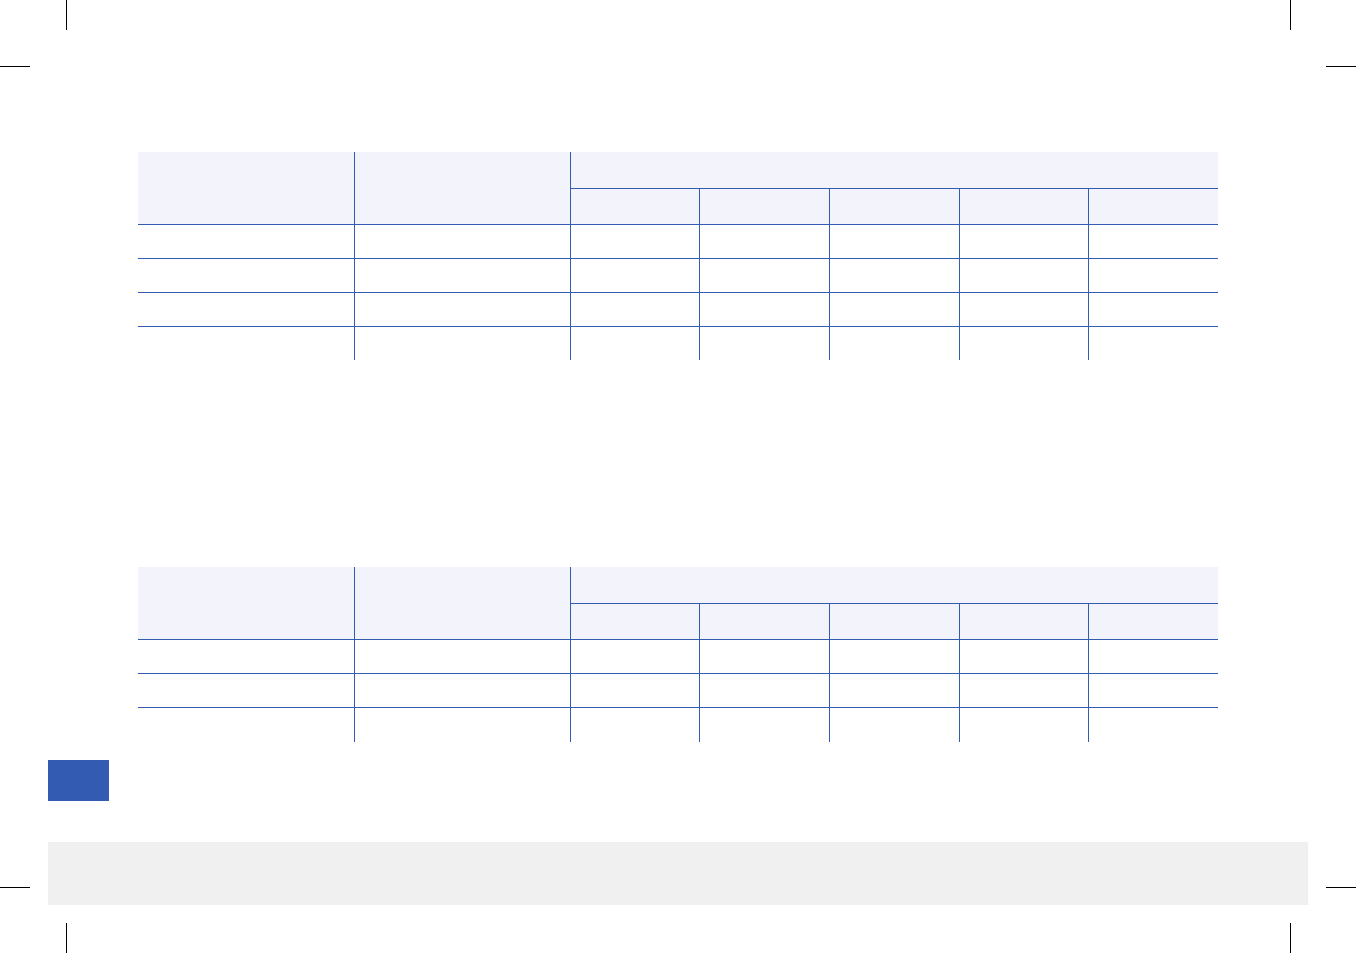
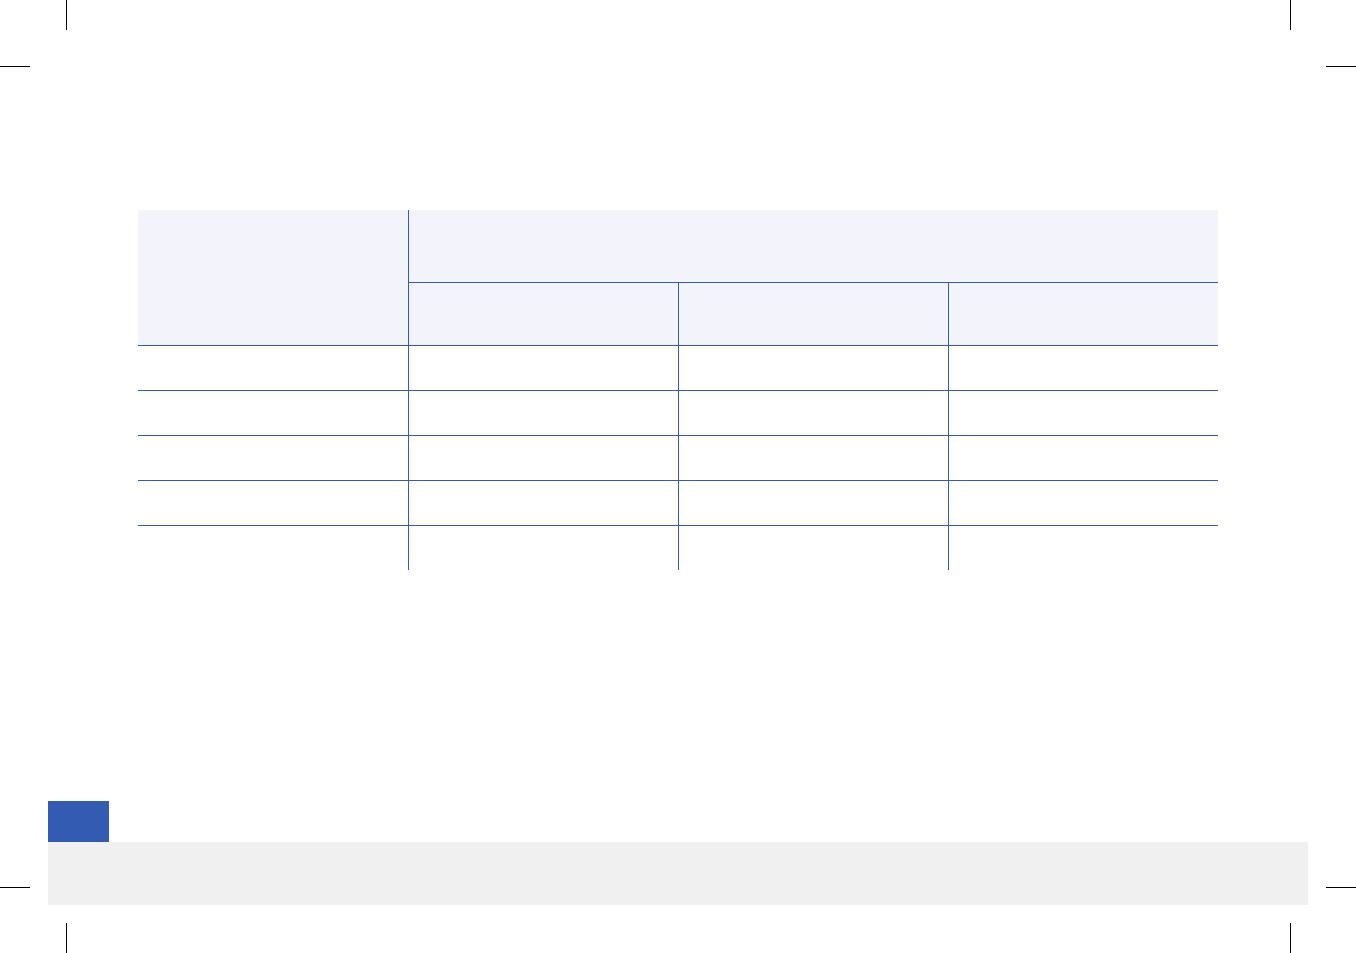
Overall System Performance Compared to YSI
The study demonstrated that 83.8% of overall CGM System readings were within ± 20% of YSI values, 93.9% were within ± 30% of YSI values, and 97.5%
were within ± 40% of YSI values. The chart below provides a percentage breakdown by glucose range.
Dierence between CGM System readings and YSI Measurements by Glucose Level
YSI Glucose Range
(mg/dL)
Number of paired
CGM-YSI Readings
Percent within
20% of YSI
Percent within
30% of YSI
Percent within
40% of YSI
≤ 70* 422 80.6% 93.4% 96.7%
71-180 6633 80.6% 92.2% 96.7%
> 180 3387 90.4% 97.3% 99.1%
Overall 10442 83.8% 93.9% 97.5%
*The absolute dierence from the YSI reading is measured in mg/dL if the YSI reading is ≤ 70 mg/dL.
LBL-0202-01-001 Rev 1_Eversense User Guide_mgdL_R6.indd 99 7/22/16 11:39 AM

100
Eversense CGM User Guide
17
Although device measurement errors may have been present in either YSI or sensor readings, and interstitial values (sensor) are known to have time
lags in responses to changing blood glucose levels compared to blood values (YSI), it was demonstrated that 80% or greater of dierences were within
20%/20 mg/dL (20% for YSI values greater than 70 mg/dL, within 20 mg/dL for YSI values ≤ 70 mg/dL). The level of agreement increased to above 92%
for dierences within 30%/30 mg/dL and above 96% for dierences within 40%/40 mg/dL.
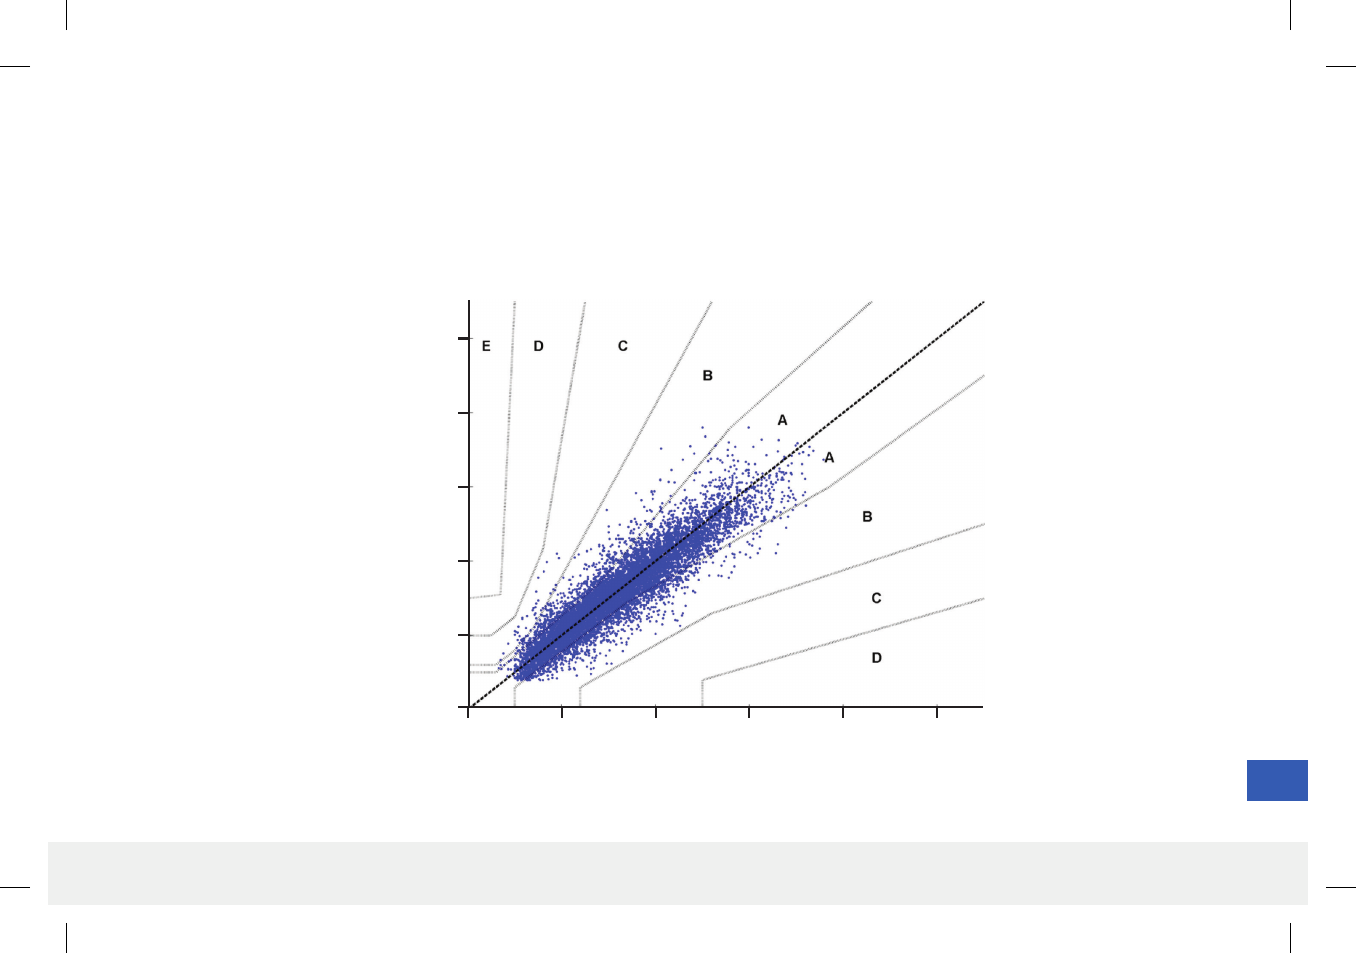
Clarke Error Grid Analysis
The Clarke Error Grid Analysis (EGA) is one of the standards for quantifying the accuracy of CGM systems. Clarke EGA measures accuracy by comparing
subject glucose values taken from their CGM system to reference values taken in a lab.
Clarke EGA calculates accuracy by looking at the number and percentage of data points that fell into 5 “clinical risk” zones. Data is presented in both
graph and chart formats.
• Zone A (no risk) contains CGM values that fell within ±20% of the reference values.
– Zone A values are considered to be within the acceptable accuracy range of CGM systems.
• Zone B (no risk) contains CGM values that fell outside ±20% of the reference values.
– Zone B values are not considered to be within the acceptable accuracy range, but their dierence from the reference values would not lead a
subject to making an inappropriate treatment decision.
• Zone C (low risk) contains CGM values that diered enough from the reference values that a subject might make an unnecessary treatment decision
based on the CGM information.
• Zone D (medium risk) contains CGM values that were correctly identified as hypoglycemic or hyperglycemic by the reference system but not the
CGMsystem.
– Not correctly identifying a CGM value as hypoglycemic or hyperglycemic is a potentially dangerous situation.
• Zone E (high risk) contains CGM values that were incorrectly identified as hypoglycemic when the reference system correctly identified them as
hyperglycemic (and vice versa).
– Mistakenly identifying a CGM value as hypoglycemic when it is actually hyperglycemic (or vice versa) is a potentially dangerous situation.
LBL-0202-01-001 Rev 1_Eversense User Guide_mgdL_R6.indd 100 7/22/16 11:39 AM
101
Eversense CGM User Guide
17
Clarke Error Grid percentages were calculated by glucose range, and at certain “wear duration” points in the study.
Clarke Error Grid Scatterplot
Eversense CGM (mg/dL)
YSI (mg/dL)
400
350
300
250
200
150
100
50
0
0 50 100 150 200 250 300 350 400
LBL-0202-01-001 Rev 1_Eversense User Guide_mgdL_R6.indd 101 7/22/16 11:39 AM
102
Eversense CGM User Guide
17
Overall, 83.6% of CGM readings fell within zone A. This indicates CGM readings were in close agreement with reference values for the great majority
of readings.
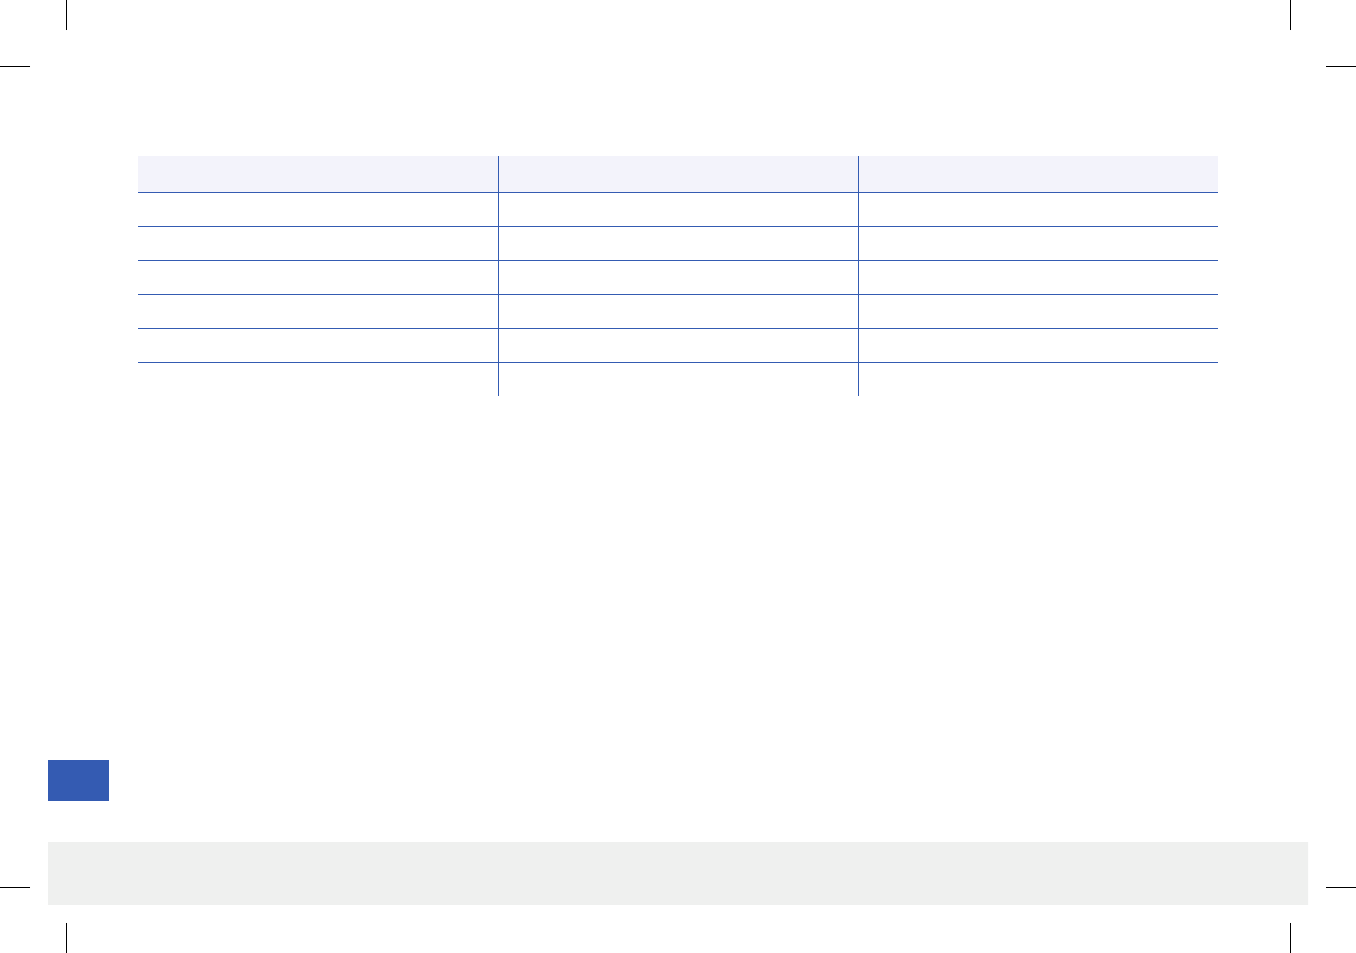
Clarke Error Grid Accuracy by Glucose Level
YSI Glucose Range
(mg/dL)
Number of paired
CGM-YSI Readings
Clarke Score
A B C D E
≤70 422 77.2% 2.4% 0.0% 20.4% 0.0%
71-180 6633 80.6% 19.4% 0.0% 0.0% 0.0%
>180 3387 90.4% 9.4% 0.1% 0.1% 0.0%
Overall 10442 83.6% 15.4% 0.1% 0.9% 0.0%
Overall, 83.6% of CGM readings fell within zone A. This indicates CGM readings were in close agreement with reference values for the great majority of
readings. Also, there were no real dierences in zone A percentages as the duration of wear increased.
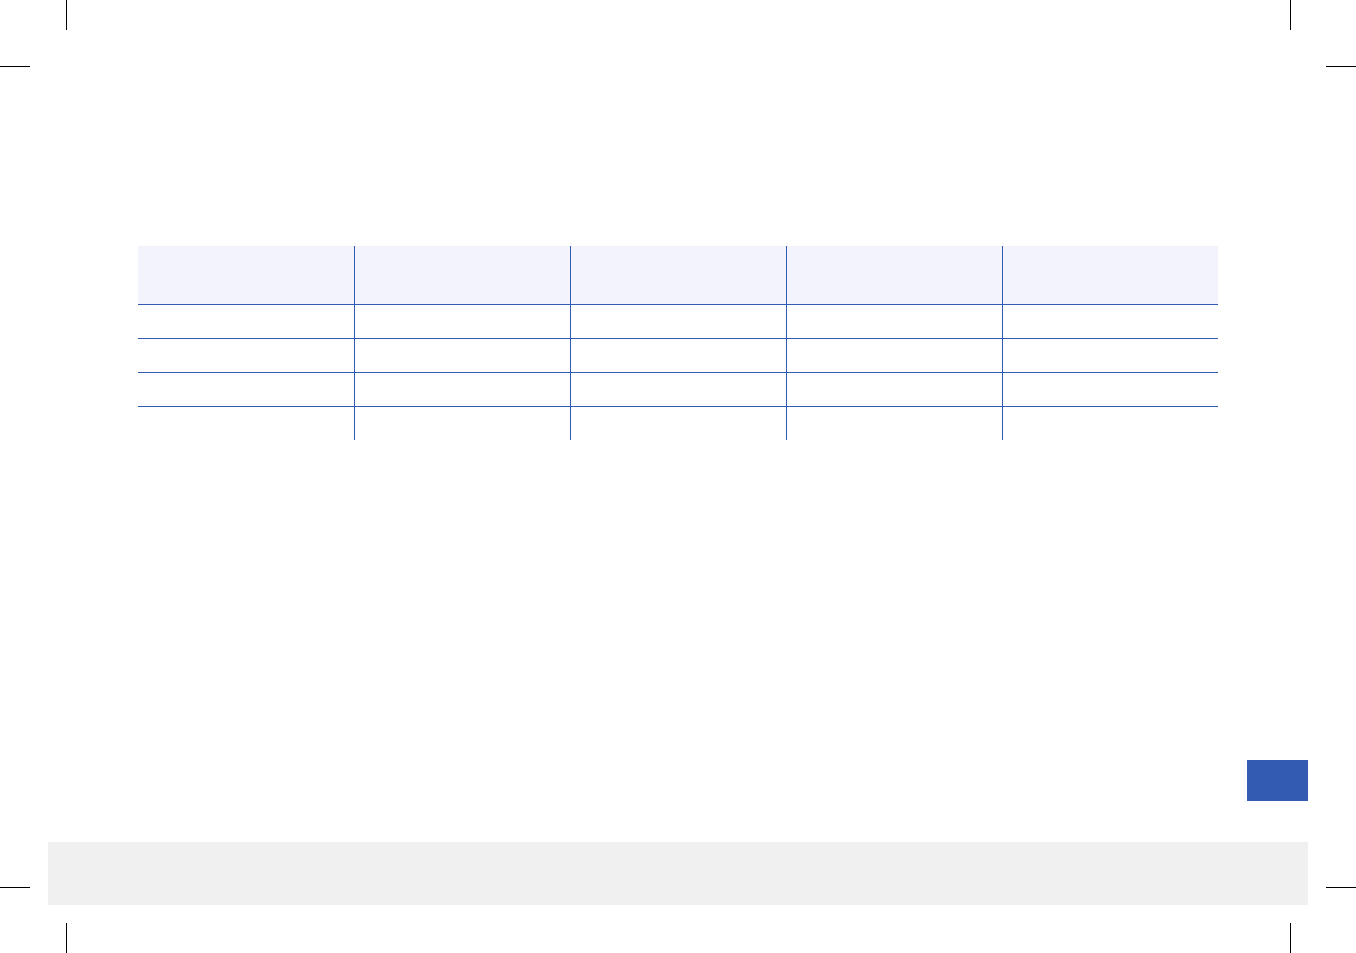
Clarke Error Grid Accuracy by Duration of Wear
Percent values are reported to single precision.
Period of Wear Number of paired
CGM-YSI Readings
Clarke Score
A B C D E
Days 1-30 6784 82.9% 16.0% 0.1% 1.1% 0.0%
Days 1-60 9529 83.5% 15.6% 0.1% 0.9% 0.0%
Days 1-90 10442 83.6% 15.4% 0.1% 0.9% 0.0%
LBL-0202-01-001 Rev 1_Eversense User Guide_mgdL_R6.indd 102 7/22/16 11:39 AM
103
Eversense CGM User Guide
17
Consensus (Parkes) Error Grid Analysis
The Consensus Error Grid Analysis (CEG) is another standard for quantifying the accuracy of CGM systems. CEG is similar to the Clarke EGA in that it
assigns the dierences (errors) between the CGM system values and reference values to one of 5 “clinical risk” regions. But the CEG diers from the
Clarke EGA in that the risk regions are continuous (A through E), whereas with the Clarke EGA they are not continuous (e.g., A is next to D).
CEG percentages were calculated for the total number of CGM readings.
Test Device Glucose (mg/dL)
Reference Glucose (mg/dL)
500
400
300
200
100
0
0 100 200 300 400 500
LBL-0202-01-001 Rev 1_Eversense User Guide_mgdL_R6.indd 103 7/22/16 11:39 AM
104
Eversense CGM User Guide
17
Overall, 85.4% of CGM readings fell within zone A. This indicates CGM readings were in close agreement with reference values for the great majority of readings.
Consensus Error Grid Accuracy by Glucose Level
Zone Frequency Percent
A8922 85.4%
B1481 14.2%
C39 0.4%
D00.0%
E00.0%
Total 10442 100.0%
LBL-0202-01-001 Rev 1_Eversense User Guide_mgdL_R6.indd 104 7/22/16 11:39 AM
105
Eversense CGM User Guide
17
Overall, there is no real dierence in accuracy based on how long after the last blood glucose calibration the CGM readings were recorded.
CGM System Performance by Time Since Last Calibration
Time from
Calibration
Number of paired
CGM-YSI Readings
Percent
within 20%
Percent
within 30%
Percent
within 40%
0-4 hrs 6043 83.1% 93.1% 97.0%
4-8 hrs 2479 85.0% 94.5% 97.7%
8-12 hrs 1663 83.6% 95.6% 98.6%
Total 10185 83.6% 93.8% 97.4%
Calibration Performance
Calibration performance looks at whether accuracy is aected by how much time has elapsed since the last system calibration with a blood glucose value.
LBL-0202-01-001 Rev 1_Eversense User Guide_mgdL_R6.indd 105 7/22/16 11:39 AM

106
Eversense CGM User Guide
17
Sensor Life
Sensor life measured how many days out of the intended 90-day duration period subjects were able to continue using the sensor to record CGM readings.
Overall, the analysis estimated that 87.5% of sensors remained functioning through 90 days.
Smart Transmitter Wear
Smart transmitter wear measured how many hours of the day subjects wore the smart transmitter. Overall, subjects wore their smart transmitters an
average of 22.3 hours per day, with a median of 23.5 hours.
LBL-0202-01-001 Rev 1_Eversense User Guide_mgdL_R6.indd 106 7/22/16 11:39 AM

107
Eversense CGM User Guide
17
Safety
The number of adverse events were recorded over the first 90 days of the study period.
The CGM system was extremely well tolerated in the study. There were no serious adverse events reported that were related to use of the system or
the insertion procedure. A total of 37 adverse events were reported in 26 subjects, all recorded as mild. Twelve (12) of these were related to the sensor
insertion procedure. None of the adverse events resulted in hospitalization due to hypoglycemia, hyperglycemia, or ketoacidosis.
LBL-0202-01-001 Rev 1_Eversense User Guide_mgdL_R6.indd 107 7/22/16 11:39 AM
108
Eversense CGM User Guide
18
18. Technical Specications
Characteristic Description
Dimensions Length: 18.3 mm
Diameter: 3.3 mm
Materials Polymethylmethacrylate and
Hydroxyethylmethacrylate (HEMA)
Copolymer, and Polyethylene
glycol diacrylate (PEGDA), Silicone,
Dexamethasone acetate (NMT 1.0 mg),
Platinum, epoxy 301-2
Glucose Range 40 - 400 mg/dL
Sensor Life Up to 90 days
Calibration Commercially available self-monitoring
blood glucose meter
Calibration Range 40 - 400 mg/dL
Sterilization Sterile by Ethylene Oxide
Altitude/Cabin Pressure 6561 to 9842 feet
Characteristic Description
Dimensions Length: 3.9 cm
Width: 4.2 cm
Thickness: 1.4 cm
Materials Body: polycarbonate
Operating Temperature 10 - 30 °C (50 - 86 °F)
Weight 22 g
Power Supply Rechargeable lithium batteries
(not replaceable)
Operational Conditions 5 - 40 °C (41 - 104 °F)
Operational Life 12 months
Storage Conditions 5 - 35 °C (41 - 95 °F)
Moisture Protection IP22: dripping water when tilted up to
15 degrees
Protection Against
Electrical Shock
Type BF applied part
Charge time using
AC adapter
about 15 minutes
Communication
Distance
Between app and smart transmitter
is up to 24.9 feet
Sensor Smart Transmitter
LBL-0202-01-001 Rev 1_Eversense User Guide_mgdL_R6.indd 108 7/22/16 11:39 AM
109
Eversense CGM User Guide
18
Electrical and Safety Standards
Guidance and Manufacturer’s Declaration – Electromagnetic Immunity
The transmitter is intended for use in the electromagnetic environment specified in the next table. The customer or the user of the transmitter should
ensure that it is used in such an environment.
Immunity
Tes t
Immunity
Tes t
Transmitter
Compliance Level
Electromagnetic Environment
Guidance
Electrostatic Discharge
(ESD) IEC 61000-4-2 ± 6 kV Contact
± 8 kV Air
± 6 kV Contact
± 8 kV Air
Floors should be wood, concrete or ceramic tile. If floors are
covered with synthetic material, the relative humidity should be
at least 30%.
Power Frequency
(110VAC/60Hz, 230VAC/50 Hz)
Magnetic Field IEC 61000-4-8
3 A/m 3 A/m
Power frequency magnetic fields should be at levels
characteristic of a typical location in a typical commercial or
hospital environment.
Transmitter Electromagnetic Immunity Specifications
LBL-0202-01-001 Rev 1_Eversense User Guide_mgdL_R6.indd 109 7/22/16 11:39 AM
110
Eversense CGM User Guide
18
Electrical and Safety Standards (continued)
The Eversense CGM System is intended to be used in the electromagnetic environment detailed in the table below. Users of the System should ensure it is
used according to these specifications.
System Electromagnetic Immunity Specifications
Immunity
Tes t
IEC 60601 Test
Level
Transmitter
Compliance Level
Electromagnetic Environment
Guidance
Conducted RF
IEC 61000-4-6
(Smartphone only
(Receiving Device))
≥3 Vrms
(150 kHz to 80 MHz)
3 Vrms Floors should be wood, concrete or ceramic tile. If floors are covered with
synthetic material, the relative humidity should be at least 30%.
Recommended Separation Distance
d = 1.2 √P 150 kHz to 80 MHz
d = 1.2 √P 80 MHz to 800 MHz
d = 2.3 √P 800 MHz to 2.5 GHz
Where P is the maximum output power rating of the transmitter in
watts (W) according to the transmitter manufacturer and d is the
recommended separation distance in meters (m). Field strengths
from fixed RF transmitters, as determined by an electromagnetic site
surveya should be less than the compliance level in each frequency
rangeb. Interference may occur in the vicinity of equipment marked with
following symbol:
Radiated RF
IEC 61000-4-3
≥3 V/m at 80 MHz
to 2700 MHz (AM
Modulation)
3 Vrms
Note 1: At 80 MHz and 800 MHz, the higher frequency range applies.
Note 2: These guidelines may not apply in all situations. Electromagnetic propagation is aected by absorption and reflection from structures, objects and people.
a. Field strengths from fixed transmitters, such as base stations for radio (cellular/cordless) telephones and land mobile radios, amateur radio, AM and FM radio broadcast, and TV broadcast
cannot be predicted theoretically with accuracy. To assess the electromagnetic environment due to fixed RF transmitters, an electromagnetic site survey should be considered. If the
measured field strength in the location in which the Eversense CGM System is used exceeds the applicable RF compliance level above, the Eversense CGM System should be observed to verify
normal operation. If abnormal performance is observed, additional measures may be necessary, such as reorienting or relocating the Eversense CGM System.
b. Over the frequency range 150 kHz to 80 MHz, field strengths should be less than 3 V/m.
LBL-0202-01-001 Rev 1_Eversense User Guide_mgdL_R6.indd 110 7/22/16 11:39 AM
111
Eversense CGM User Guide
18
Electrical and Safety Standards (continued)
Guidance and Manufacturer’s Declaration – Electromagnetic Emissions
The Eversense CGM Mobile System is intended for use in the electromagnetic environment specified in the next table. The customer or the user of the
System should ensure that it is used in such an environment.
Emissions Test Compliance Electromagnetic Environment
Guidance
RF Emissions
CISPR 11 Group 1 The Eversense CGM System uses RF energy only for its internal function. Therefore, its RF emissions
are very low and are not likely to cause any interference in nearby electronic equipment.
RF Emissions
CISPR 11 Class B
The Eversense CGM System is suitable for use in all establishments including domestic and those
directly connected to the public low-voltage power supply network that supplies buildings used for
domestic purposes.
Recommended Separation Distances Between Other Portable/Mobile RF Communications Equipment and the Smartphone
(Receiving Device)
Follow the smartphone (or other receiving device) manufacturer’s instructions for separation distances. The customer or the user of the smartphone
(or other receiving device) can help prevent electromagnetic interference by maintaining a minimum distance between other portable/mobile RF
communications equipment (transmitters) and the smartphone as recommended in the next table, according to the maximum output power of the
communications equipment. Portable/mobile RF equipment include: baby monitors, Bluetooth wireless headsets, wireless routers, microwave ovens,
laptops with internal Wi-Fi adapters, GSM cell phones, RFID scanners and hand-held security metal detector often used by security screeners.
LBL-0202-01-001 Rev 1_Eversense User Guide_mgdL_R6.indd 111 7/22/16 11:39 AM
112
Eversense CGM User Guide
18
Electrical and Safety Standards (continued)
Rated Maximum Output
Power of Transmitter
(W)
Separation Distance According to Frequency of Transmitter (m)
150 kHz to 80 MHz
d = 1.2 P½
80 MHz to 800 MHz
d = 1.2 P½
800 MHz to 2.5 GHz
d = 2.3 P½
0.01 0.12 0.12 0.23
0.1 0.38 0.38 0.73
11.2 1.2 2.3
10 3.8 3.8 7.3
100 12 12 23
Minimum Recommended Distance Between Other RF Transmitters and the Eversense Smart Transmitter
For transmitters rated at a maximum output power not listed above, the recommended separation distance (d) in feet can be estimated using the
equation applicable to the frequency of the transmitter, where P is the maximum output power rating of the transmitter in watts (W) according to the
transmitter manufacture.
Note 1: At 80 MHz and 800 MHz, the separation distance for the higher frequency range applies.
Note 2: These guidelines may not apply in all situations. Electromagnetic propagation is aected by absorption and reflection from structures, objects and people.
LBL-0202-01-001 Rev 1_Eversense User Guide_mgdL_R6.indd 112 7/22/16 11:39 AM
113
Eversense CGM User Guide
18
Symbols on the Eversense Mobile App
Symbol Explanation
Glucose Alert
Appears when the glucose is above the high glucose alert range and below the low glucose alert range. The icon appears in the
ALERT HISTORY screen.
Falling Rate Alert
Appears when the glucose value is falling beyond a defined rate.
Rising Rate Alert
Appears when the glucose value is rising beyond a defined rate.
Empty Battery Alert
Appears when the smart transmitter battery is empty.
Low Battery Alert
Appears when the smart transmitter battery is less than 10% charged.
Smart Transmitter/Sensor Alert
The icon appears in the ALERT HISTORY screen.
Smart Transmitter/Sensor Notifications
Appears when there are notifications related to the smart transmitter or sensor.
LBL-0202-01-001 Rev 1_Eversense User Guide_mgdL_R6.indd 113 7/22/16 11:39 AM
114
Eversense CGM User Guide
18
Symbol Explanation
Calibration Alert
Appears when there are calibration-related alerts.
Calibration Notification
Appears when there are calibration-related notifications.
Calibration Failure
Appears when the smart transmitter rejects the user-entered calibration value.
Connection Failure
Appears when the smart transmitter is disconnected from the smartphone or when the sensor is not linked to the smart transmitter.
Multiple alerts (more than one alert or event)
Appears when there are two or more alerts or events in a short interval.
Temp Profile
Appears when the Temp Profile is active.
Symbols on the Eversense Mobile App (continued)
LBL-0202-01-001 Rev 1_Eversense User Guide_mgdL_R6.indd 114 7/22/16 11:39 AM