Senseonics orporated 3400 The Eversense Smart Transmitter User Manual 3
Senseonics Incorporated The Eversense Smart Transmitter Users Manual 3
Contents
Users Manual 3
59
Eversense CGM User Guide
9
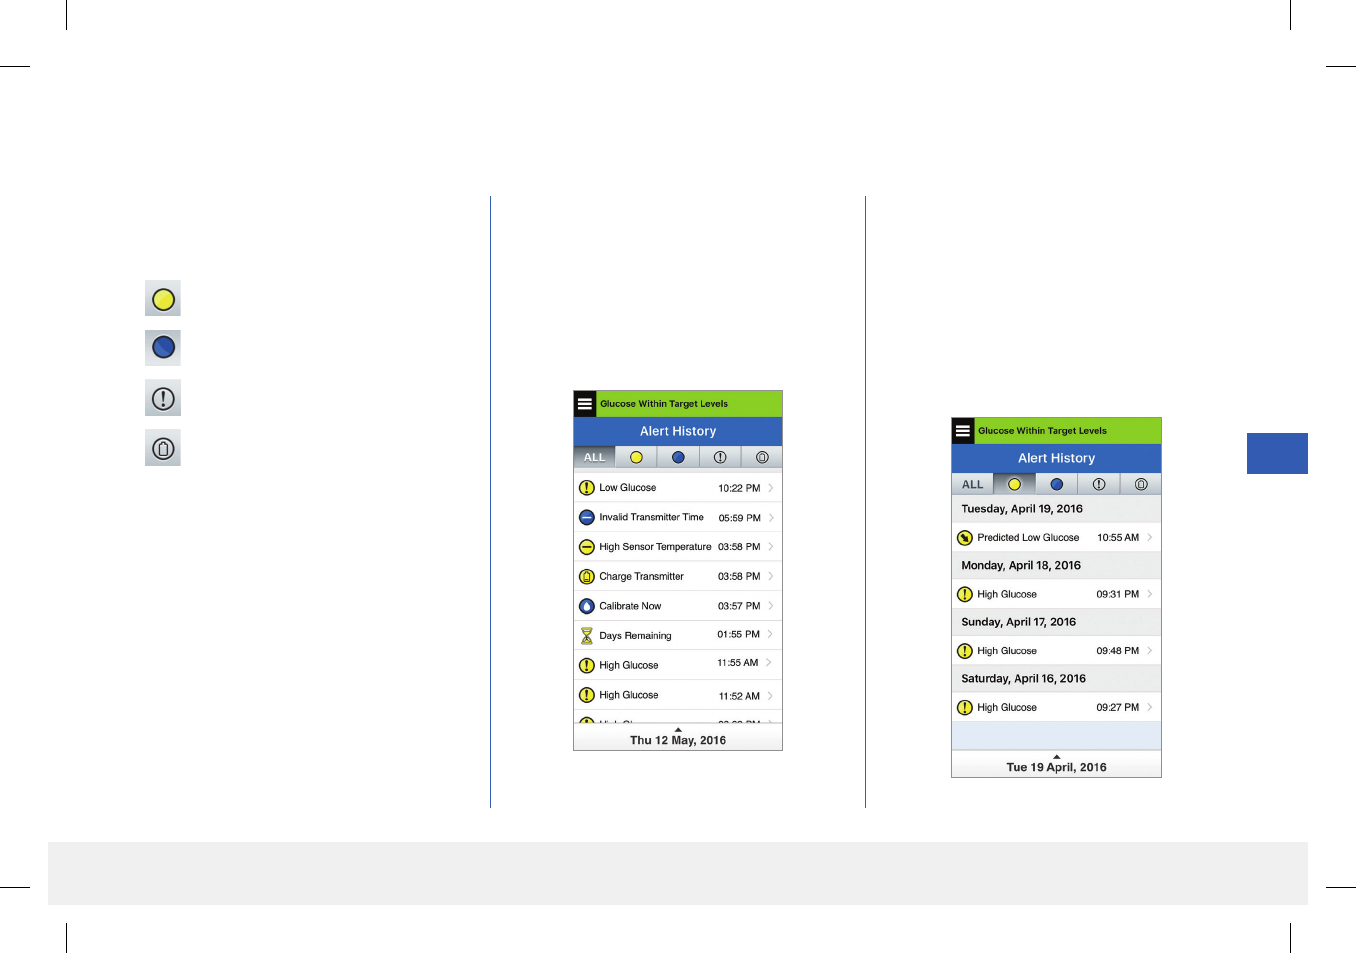
Alert History
The ALERT HISTORY screen lists alerts and notifications you have received.
1. Tap Menu > Alert History.
• The ALERT HISTORY screen
will list ALL alerts and notifications
for that day.
• Tap on any message to get more
information.
The following icons are used to indicate the
severity level of messages.
2. You can choose to include only certain
messages (alerts and notifications, etc.)
for review by tapping selected alert icons.
• Tap ALL, then tap icons on top of the
screen to select only the types of alerts
you want displayed.
• Tap Menu when done.
Alerts
Notifications
More than 1 Alert in Same Period
Battery Alerts
Example of ALL
Example of alerts only
Note: When you receive 2 or more alerts
that have not been acknowledged, the app
will display an option to Dismiss All. This can
happen when your mobile device has been
out of range of your smart transmitter and
then re-syncs. You can review each alert in
Alert History.
LBL-0202-01-001 Rev 1_Eversense User Guide_mgdL_R6.indd 59 7/22/16 11:39 AM
60
Eversense CGM User Guide
9
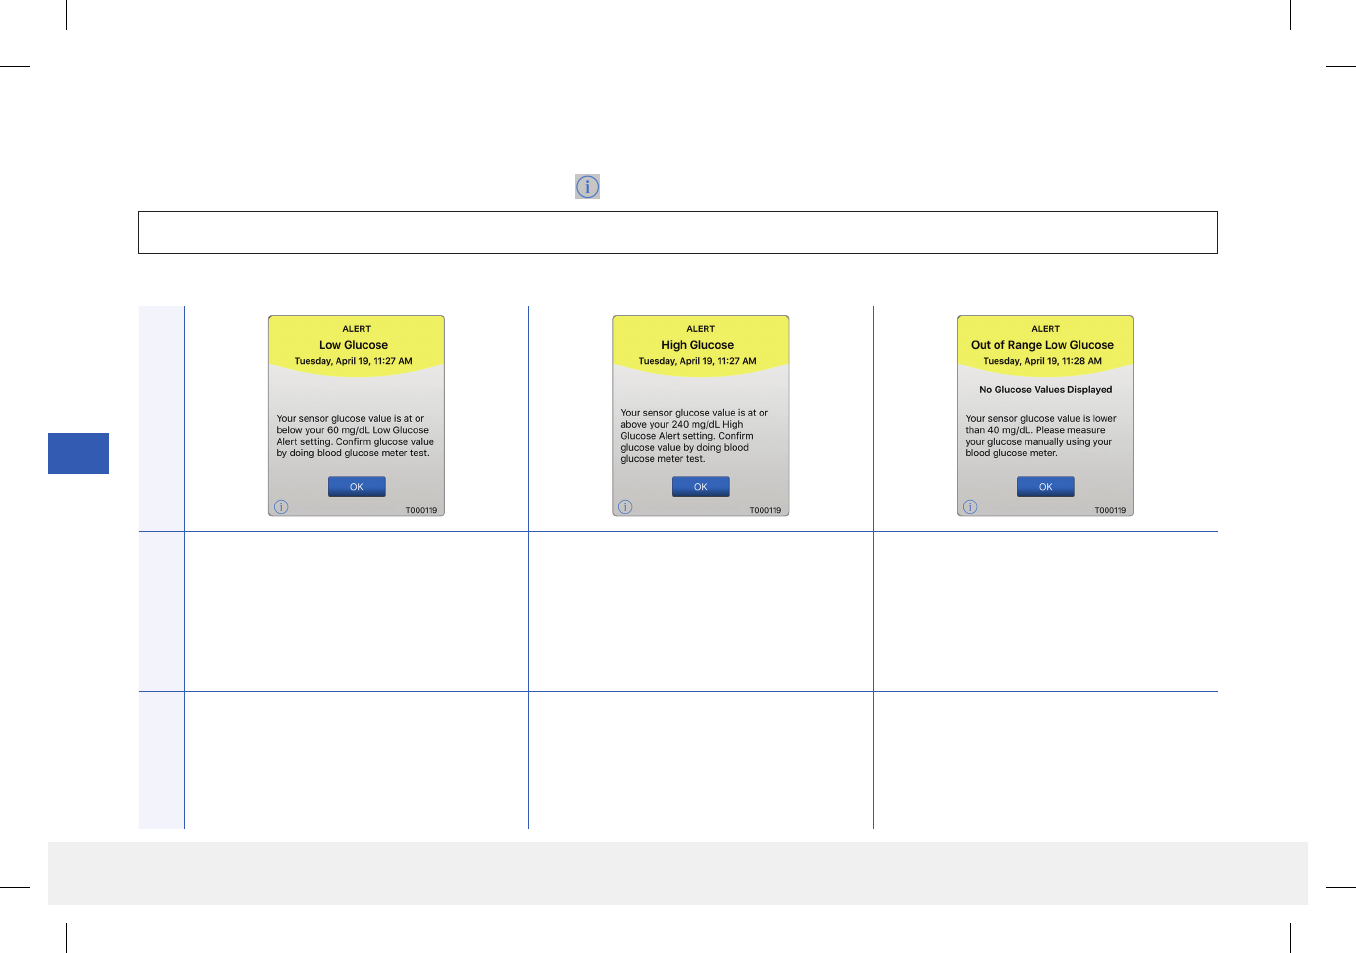
Alert Descriptions and Actions
The following table lists the alerts and notifications you may receive on the Eversense App.
Note: For each message, you can also tap the information icon to receive additional details about the message.
App DisplayDescription
Low Glucose*
Appears at the interval you enter in sound
settings when your sensor glucose reading
is at or below the low glucose alert level
you set.
High Glucose*
Appears at the interval you enter in sound
settings when your sensor glucose reading
is at or above the high glucose alert level
you set.
Out of Range Low Glucose*
Appears when your glucose reading is lower
than 40 mg/dL.
No glucose reading can be displayed (only LO
is displayed on the MY GLUCOSE screen).
Actions
Pay close attention to your glucose values,
symptoms, and trends. Confirm your glucose
value with a blood glucose meter test before
making a treatment decision.
Pay close attention to your glucose values,
symptoms, and trends. Confirm your glucose
value with a blood glucose meter test before
making a treatment decision.
Confirm your glucose value with a blood
glucose meter test before making a treatment
decision. Once the sensor glucose value is at
or higher than 40 mg/dL, glucose readings
will resume on the display.
Alerts
IMPORTANT: On-body vibe alerts for the alerts marked with a * cannot be turned o using DND in the app.
LBL-0202-01-001 Rev 1_Eversense User Guide_mgdL_R6.indd 60 7/22/16 11:39 AM
61
Eversense CGM User Guide
9
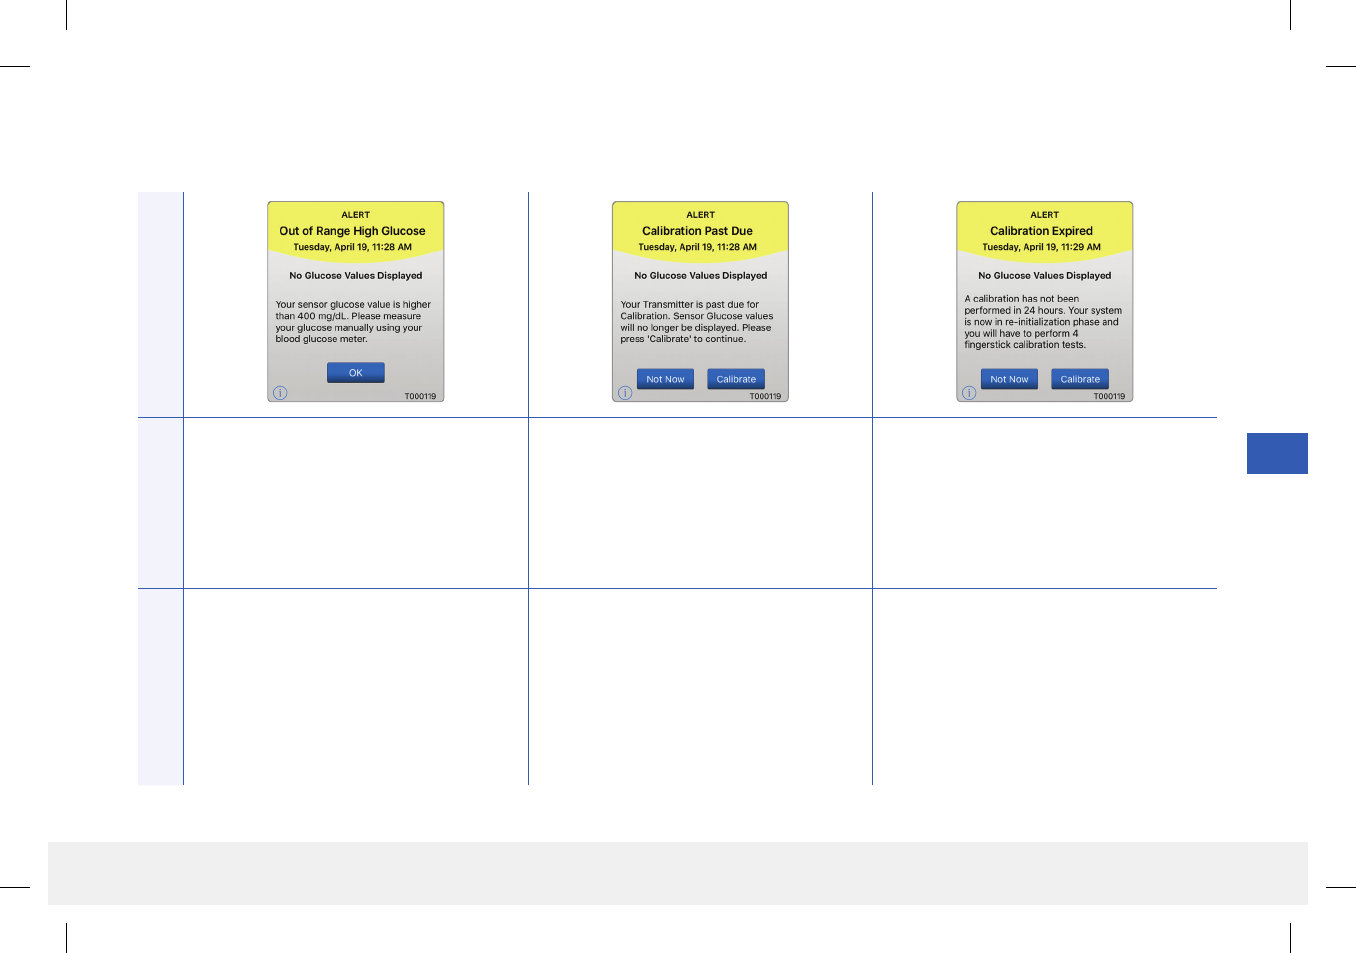
App Display
Description
Out of Range High Glucose*
Appears when your glucose value is higher
than 400 mg/dL.
No glucose reading can be displayed (only
HI is displayed on the MY GLUCOSE
screen).
Calibration Past Due
Appears when your system is past due for
calibration.
No glucose readings can be displayed until
calibration is performed.
Calibration Expired
Appears when a calibration has not been
performed in 24 hours. The system returns to
the Initialization Phase.
No glucose reading can be displayed until
calibration is performed.
Actions
Measure your glucose manually by using your
blood glucose meter. Always confirm your
glucose value with a blood glucose meter test
before making a treatment decision.
Once the sensor glucose value is at or lower
than 400 mg/dL, glucose readings will resume
on the display.
Perform a fingerstick calibration in order to
resume displaying glucose values.
In the Initialization Phase, you must perform
4 fingerstick calibration tests spaced 2 – 12
hours apart. Display of glucose readings will
resume after the 2nd successful fingerstick
calibration test.
Alert Descriptions and Actions (continued)
Alerts
LBL-0202-01-001 Rev 1_Eversense User Guide_mgdL_R6.indd 61 7/22/16 11:39 AM

62
Eversense CGM User Guide
9
Alert Descriptions and Actions (continued)
App Display
Description
Battery Empty*
Appears once when your smart transmitter
battery is empty and needs to be charged.
No glucose reading can be displayed until the
smart transmitter is charged.
Sensor Replacement (7 days)
Appears when your sensor will stop collecting
glucose data in 7 days.
Sensor Replacement
Appears every 20 minutes when your sensor
needs to be replaced.
No glucose reading can be displayed until the
sensor is replaced.
Actions
Charge the smart transmitter immediately.
Remove the smart transmitter from your body
before connecting it to the power supply.
Contact your physician to schedule your
sensor removal and insertion of new sensor.
Contact your physician to have your sensor
replaced.
Alerts
LBL-0202-01-001 Rev 1_Eversense User Guide_mgdL_R6.indd 62 7/22/16 11:39 AM
63
Eversense CGM User Guide
9
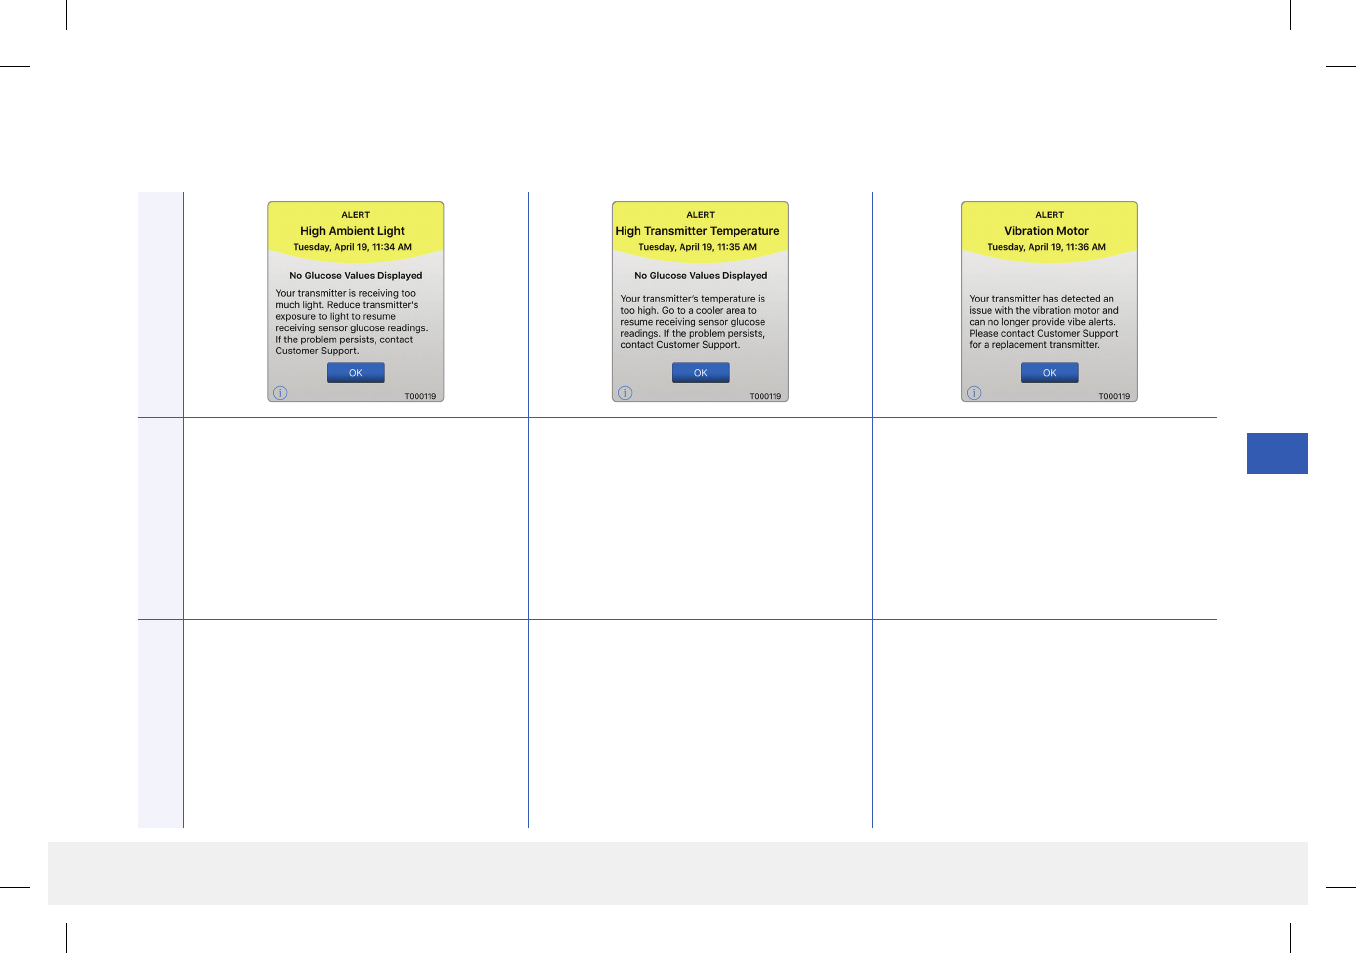
Alert Descriptions and Actions (continued)
App DisplayDescription
High Ambient Light
Appears every 20 minutes when your smart
transmitter is receiving too much ambient
light, aecting its ability to communicate with
the sensor.
No glucose reading can be displayed until
ambient light is reduced.
High Smart Transmitter Temperature*
Appears every 20 minutes when your smart
transmitter temperature is too high.
No glucose reading is displayed until the
smart transmitter temperature is within
normal operating conditions.
Vibration Motor*
Appears every 20 minutes when the vibration
motor on your smart transmitter can no longer
provide on-body vibe alerts. You will continue
to get glucose readings up to 72 hours after
receiving the alert message. After 72 hours, you
will receive a Transmitter Error Alert every 20
minutes until you replace the smart transmitter.
Actions
Reduce ambient light by doing one or more of
the following:
• Move to an area where there is less light
exposure.
• Place a dark material over the smart
transmitter.
• Wear the smart transmitter under clothing.
Reduce the smart transmitter temperature by
moving to a cooler environment. Once the smart
transmitter temperature is below 42 °C (108 °F),
it will resume displaying glucose values.
You may temporarily remove the smart
transmitter to cool it down. Once the smart
transmitter is back to a lower temperature, be
sure to replace it over the sensor.
Contact Customer Support to have your smart
transmitter replaced immediately.
Alerts
LBL-0202-01-001 Rev 1_Eversense User Guide_mgdL_R6.indd 63 7/22/16 11:39 AM
64
Eversense CGM User Guide
9
Alert Descriptions and Actions (continued)
App Display
Description
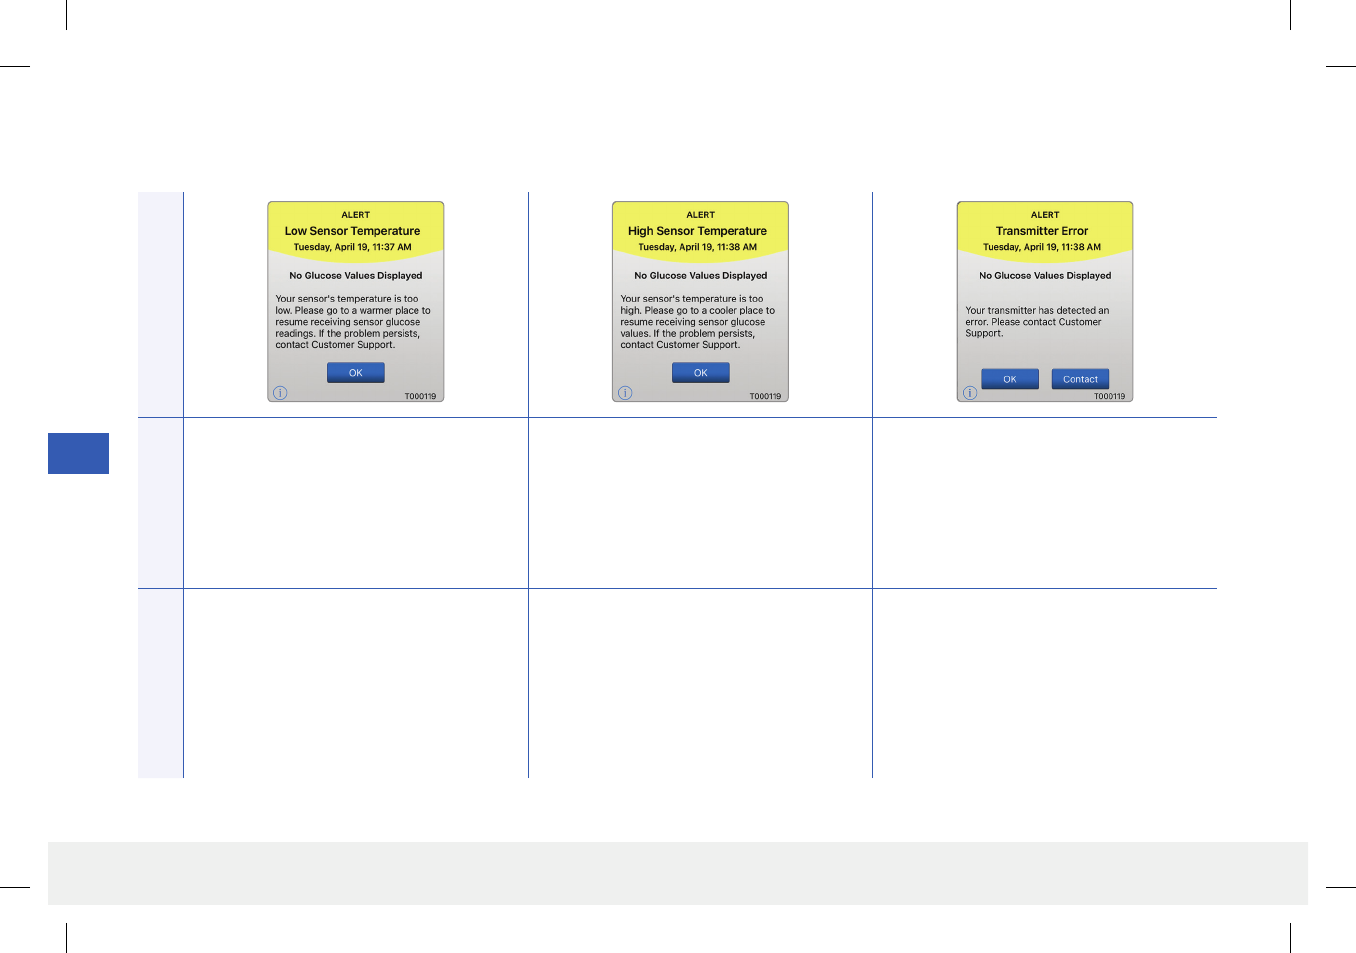
Low Sensor Temperature*
Appears every 20 minutes when the sensor
temperature is too low.
No glucose reading is displayed until the
sensor temperature is within normal operating
conditions.
High Sensor Temperature*
Appears every 20 minutes when the sensor
temperature is too high. No glucose reading
is displayed until the sensor temperature is
within normal operating conditions.
Smart Transmitter Error*
Appears when the system’s internal checks
detect a smart transmitter error.
No glucose reading is displayed until the error
is corrected.
Actions
Go to a warmer environment to increase
the sensor temperature. Keep your smart
transmitter turned on so you will start
receiving glucose values when the sensor
temperature is between
26 - 40 °C (81 - 104 °F).
Go to a cooler environment to reduce the
sensor temperature. Briefly remove the smart
transmitter while the sensor temperature
cools to between 26 - 40° C (81 - 104 °F).
Then put the smart transmitter back on to
start receiving glucose values again from the
sensor.
Follow the steps shown in the Troubleshooting
section to reset your smart transmitter. If you
are unable to complete the reset, contact
Customer Support.
Alerts
LBL-0202-01-001 Rev 1_Eversense User Guide_mgdL_R6.indd 64 7/22/16 11:39 AM
65
Eversense CGM User Guide
9
App Display
Description
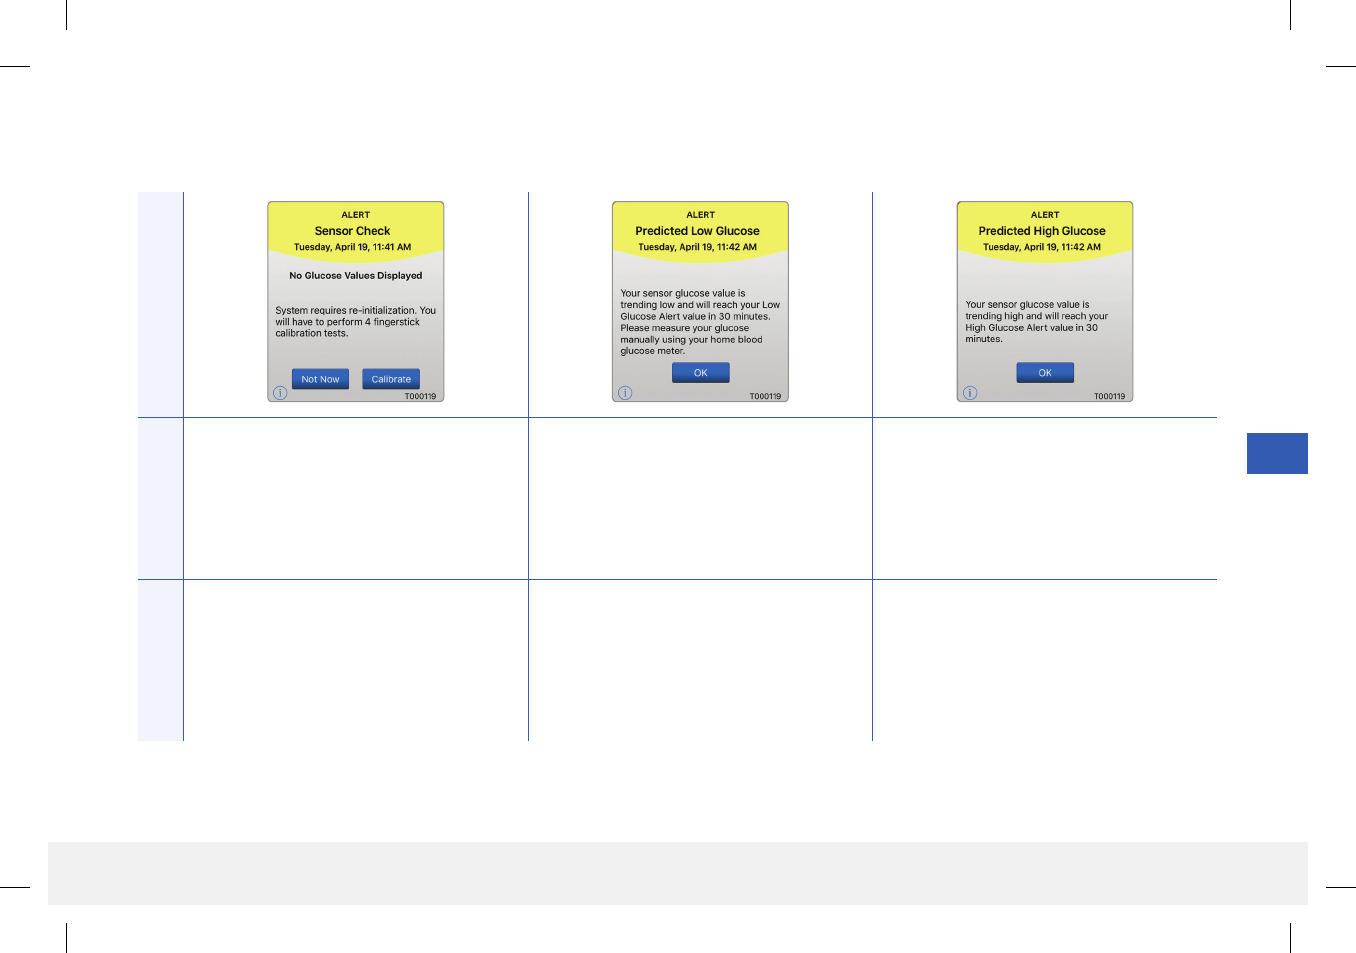
Sensor Check
Appears once when the system’s internal
checks detect instability with the sensor which
requires a return to calibration Initialization
Phase.
Predicted Low Glucose
Appears every 60 minutes when your glucose
values are trending low and will reach your
Low Glucose Alert level within the time you
entered in Settings.
Predicted High Glucose
Appears every 60 minutes when your glucose
values are trending high and will reach your
High Glucose Alert level within the time you
entered in Settings.
Actions
In the Initialization Phase, you must perform
4 fingerstick calibration tests spaced 2 - 12
hours apart. Display of glucose readings will
resume after the 2nd successful fingerstick
calibration test.
Pay close attention to your glucose values,
symptoms, and trends. Confirm your glucose
value with a blood glucose meter test before
making a treatment decision.
Pay close attention to your glucose values,
symptoms, and trends. Confirm your glucose
value with a blood glucose meter test before
making a treatment decision.
Alerts
Alert Descriptions and Actions (continued)
LBL-0202-01-001 Rev 1_Eversense User Guide_mgdL_R6.indd 65 7/22/16 11:39 AM
66
Eversense CGM User Guide
9
Alert Descriptions and Actions (continued)
App Display
Description
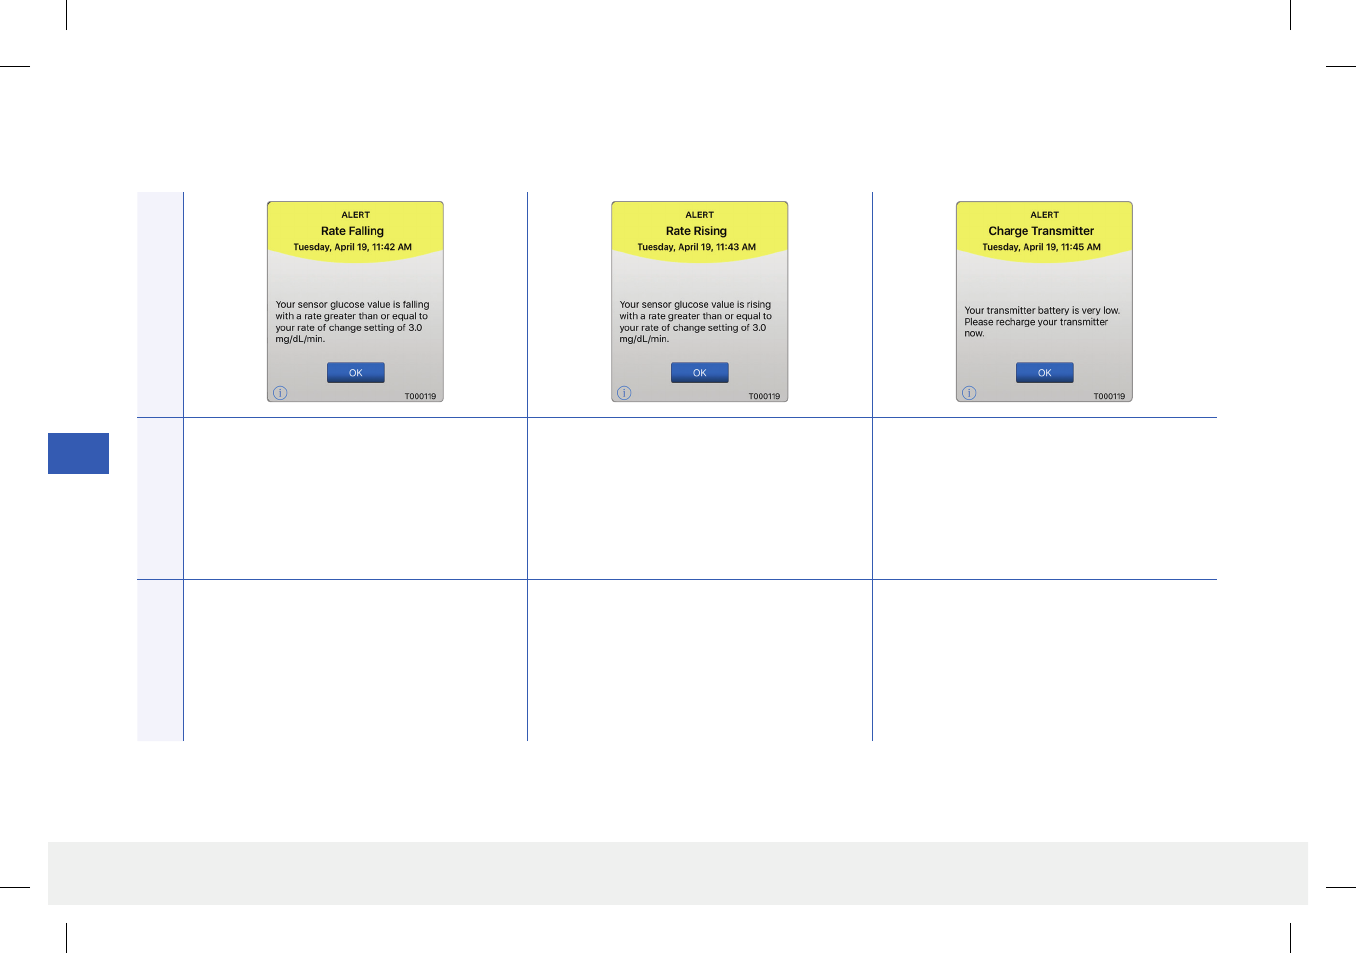
Rate Falling
Appears every 60 minutes when your glucose
values are falling at a rate equal to or faster
than the rate of change you entered in
Settings.
Rate Rising
Appears every 60 minutes when your glucose
value is rising at a rate equal to or faster than
the rate of change you entered in Settings.
Charge Smart Transmitter
Appears when smart transmitter battery
power is very low and you need to charge
your battery very soon.
Actions
Pay close attention to your glucose values,
symptoms, and trends. Confirm your glucose
value with a blood glucose meter test before
making a treatment decision.
Pay close attention to your glucose values,
symptoms and trends. Confirm your glucose
value with a blood glucose meter test before
making a treatment decision.
Charge your smart transmitter as soon as
possible.
Alerts
LBL-0202-01-001 Rev 1_Eversense User Guide_mgdL_R6.indd 66 7/22/16 11:39 AM
67
Eversense CGM User Guide
9
Alert Descriptions and Actions (continued)
App DisplayDescription
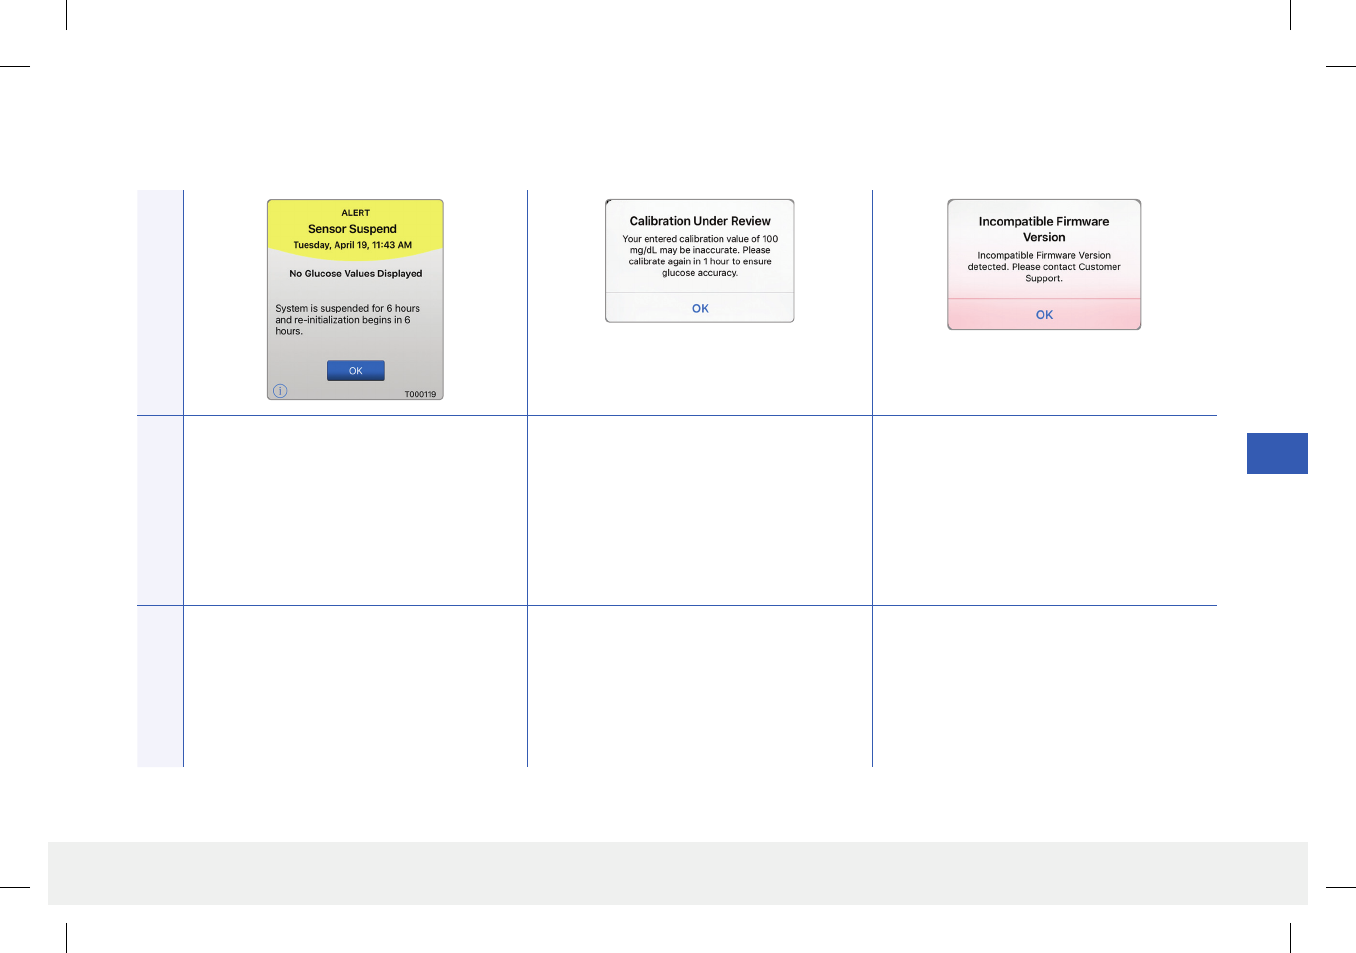
Sensor Suspend
Appears when the system’s internal checks
detect a need to restart the Initialization
Phase for additional calibrations. Glucose
values will be displayed a few minutes after
the second successful calibration during the
Initialization Phase.
Calibration Under Review
Appears when your calibration value is
significantly dierent from your sensor
glucose value.
Incompatible Firmware Version
Appears when the firmware in your smart
transmitter is incompatible with the Eversense
mobile app version on your mobile device.
Actions
Re-initialization of the system begins in
6hours.
Re-calibrate when prompted. Contact Customer Support.
Alerts
LBL-0202-01-001 Rev 1_Eversense User Guide_mgdL_R6.indd 67 7/22/16 11:39 AM

68
Eversense CGM User Guide
9
Alert Descriptions and Actions (continued)
App Display
Description
Upgrade Eversense App
Appears when a newer version of the
Eversense app is available to download.
Incompatible Device/Operating System
Appears when an incompatible device/
operating system is being used with the app.
Actions
Tap Yes to install the update. For a list of compatible devices/operating
systems visit eversensediabetes.com.
Alerts
LBL-0202-01-001 Rev 1_Eversense User Guide_mgdL_R6.indd 68 7/22/16 11:39 AM
69
Eversense CGM User Guide
9
Alert Descriptions and Actions (continued)
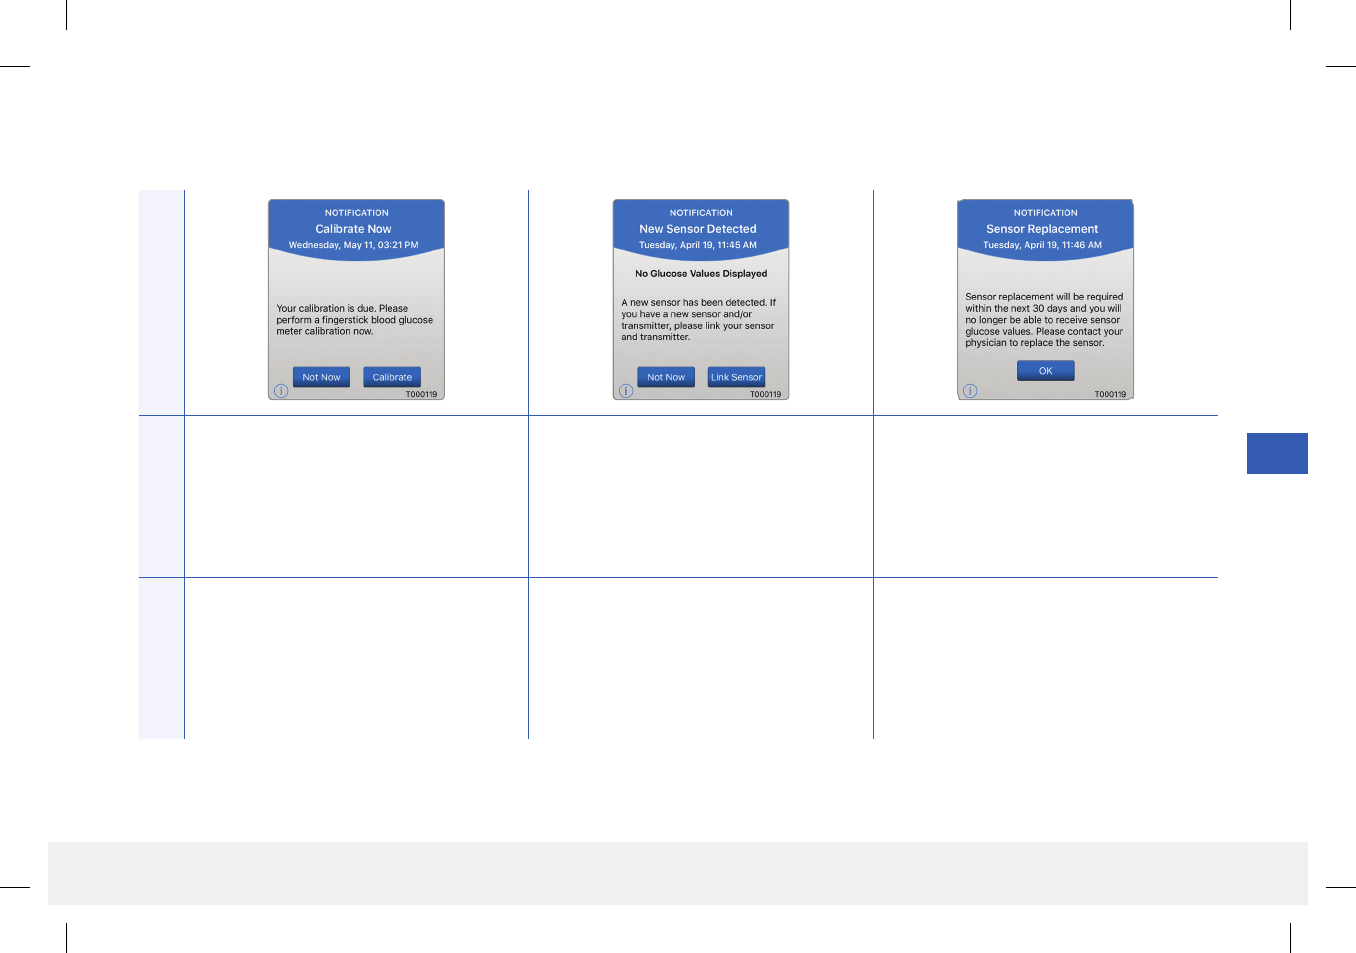
App DisplayDescription
Calibrate Now
Appears when it is time for you to calibrate.
New Sensor Detected
Appears when the smart transmitter detects
a new sensor. The inserted sensor and the
smart transmitter must be linked to begin
communication.
Sensor Replacement
Appears 30, 14, 7, 3, 2, and 1 day before your
sensor has completed its 90-day wear period
as a reminder to replace your sensor.
Actions
Do a fingerstick blood glucose test and enter
the reading as your calibration value. DO NOT
use an alternative site (such as forearm) to
obtain your blood glucose reading.
Tap Link Sensor to complete the linking
process and begin the 24-hour Warm-Up
Phase. You do not need to wear your smart
transmitter over the sensor until the Warm-Up
Phase is complete.
Contact your physician to schedule the
removal and replacement of your sensor.
Notifications
LBL-0202-01-001 Rev 1_Eversense User Guide_mgdL_R6.indd 69 7/22/16 11:39 AM

70
Eversense CGM User Guide
10
10. Event Log
This section describes how to review and log events to help better track glucose patterns.
The Eversense CGM System allows you to log
and track events in addition to continually
monitoring glucose levels. You can manually
enter events that will appear on the trend
graph and glucose reports to help you find
patterns in your glucose profile.
Types of Events:
View Events
You can view past events entered from the EVENT LOG screen.
Glucose
Meals
Insulin
Health
Exercise
1. Tap Menu > Event Log.
The EVENT LOG screen will appear.
2. All your entered events will be listed.
You can also select specific event types to
view by tapping a selected event type.
• Tap ALL, then tap icons on top of the
screen to select only the types of events
you want displayed.
Note: You can also access the
ADD EVENT screen directly from the
MY GLUCOSE screen with a single tap
anywhere on the graph area.
LBL-0202-01-001 Rev 1_Eversense User Guide_mgdL_R6.indd 70 7/22/16 11:39 AM
71
Eversense CGM User Guide
10
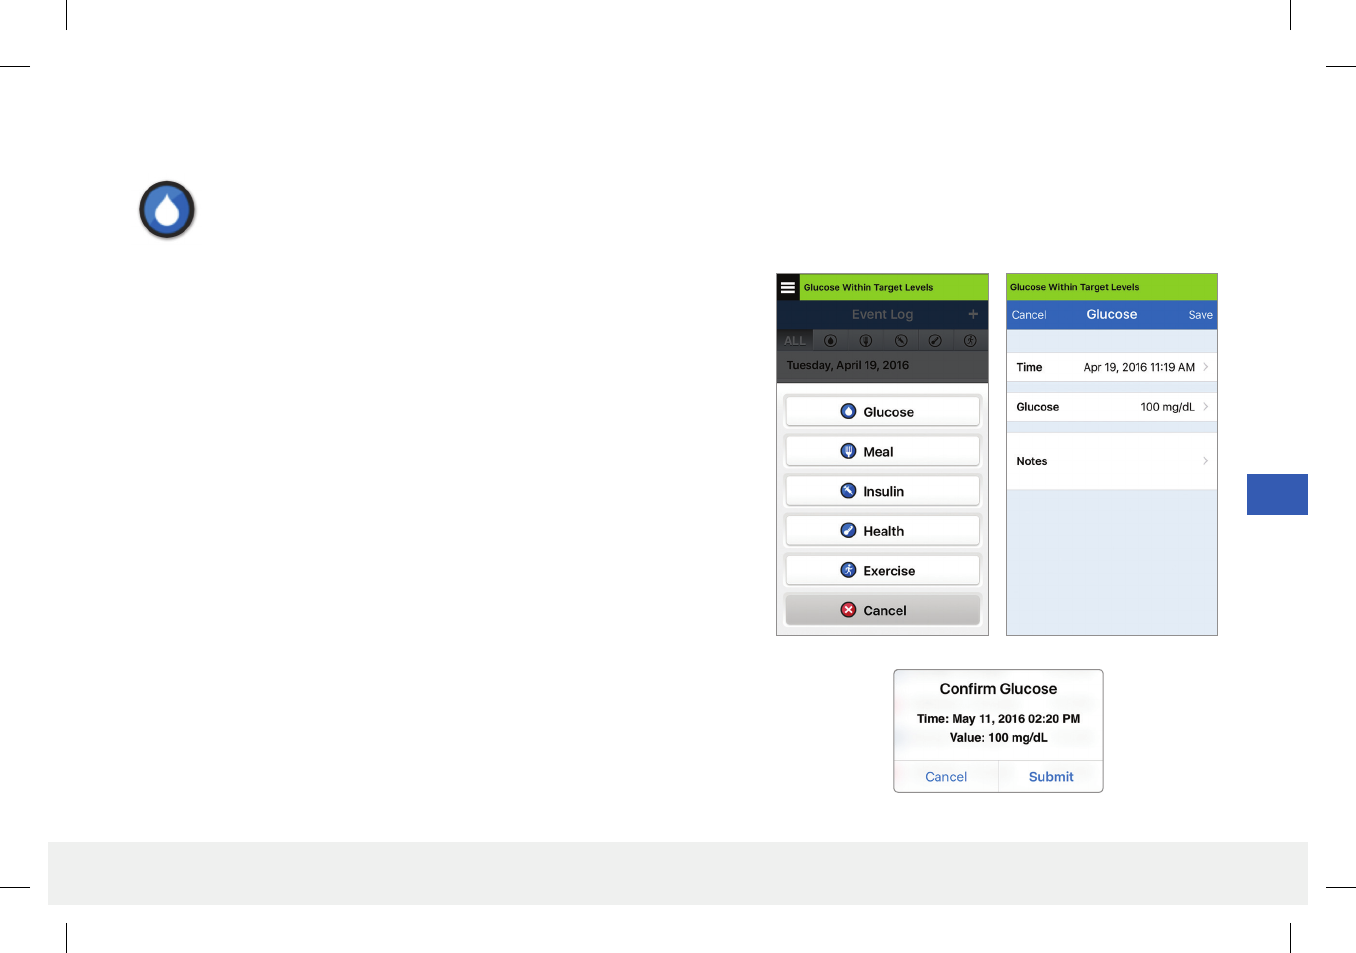
Glucose
Enter and track blood glucose meter tests (test results other than calibrations).
1. Tap Menu > Event Log.
2. Add an event using the event icon “+” > Glucose.
3. Tap Time to enter the correct date and time.
Tap Done.
4. Tap Glucose to enter the correct blood glucose value.
Tap Done.
Note: You can enter a BG value between 20 and 600 mg/dL. Entries < 20 mg/dL
will be converted to 20, and entries above 600 mg/dL will be converted to 600 for
calculation and display purposes.
5. Tap Notes to enter any notes.
Tap Done.
6. Tap Save.
7. On the Confirm Glucose pop up box, tap Submit to confirm the glucose event
and return to the EVENT LOG screen, or tap Cancel to exit without saving
changes or to edit the information before saving.
Note: Glucose Events do not replace calibration measurements. You will still
have to enter calibration readings.
Log Specific Events
LBL-0202-01-001 Rev 1_Eversense User Guide_mgdL_R6.indd 71 7/22/16 11:39 AM

72
Eversense CGM User Guide
10
Meals
Enter the type of meal, date and time and carbohydrate count.
1. Tap Menu > Event Log.
2. Add an event using the event icon “+” > Meals.
3. Tap Time to enter the correct date and time.
Tap Done.
4. Tap Type to enter the type of meal.
Tap Done.
5. Tap Carbs to enter correct number of carbohydrates.
Tap Done.
6. Tap Notes to enter any notes.
Tap Done.
7. Tap Save to save entry and return to EVENT LOG screen. Tap Cancel to exit without
saving changes.
LBL-0202-01-001 Rev 1_Eversense User Guide_mgdL_R6.indd 72 7/22/16 11:39 AM
73
Eversense CGM User Guide
10
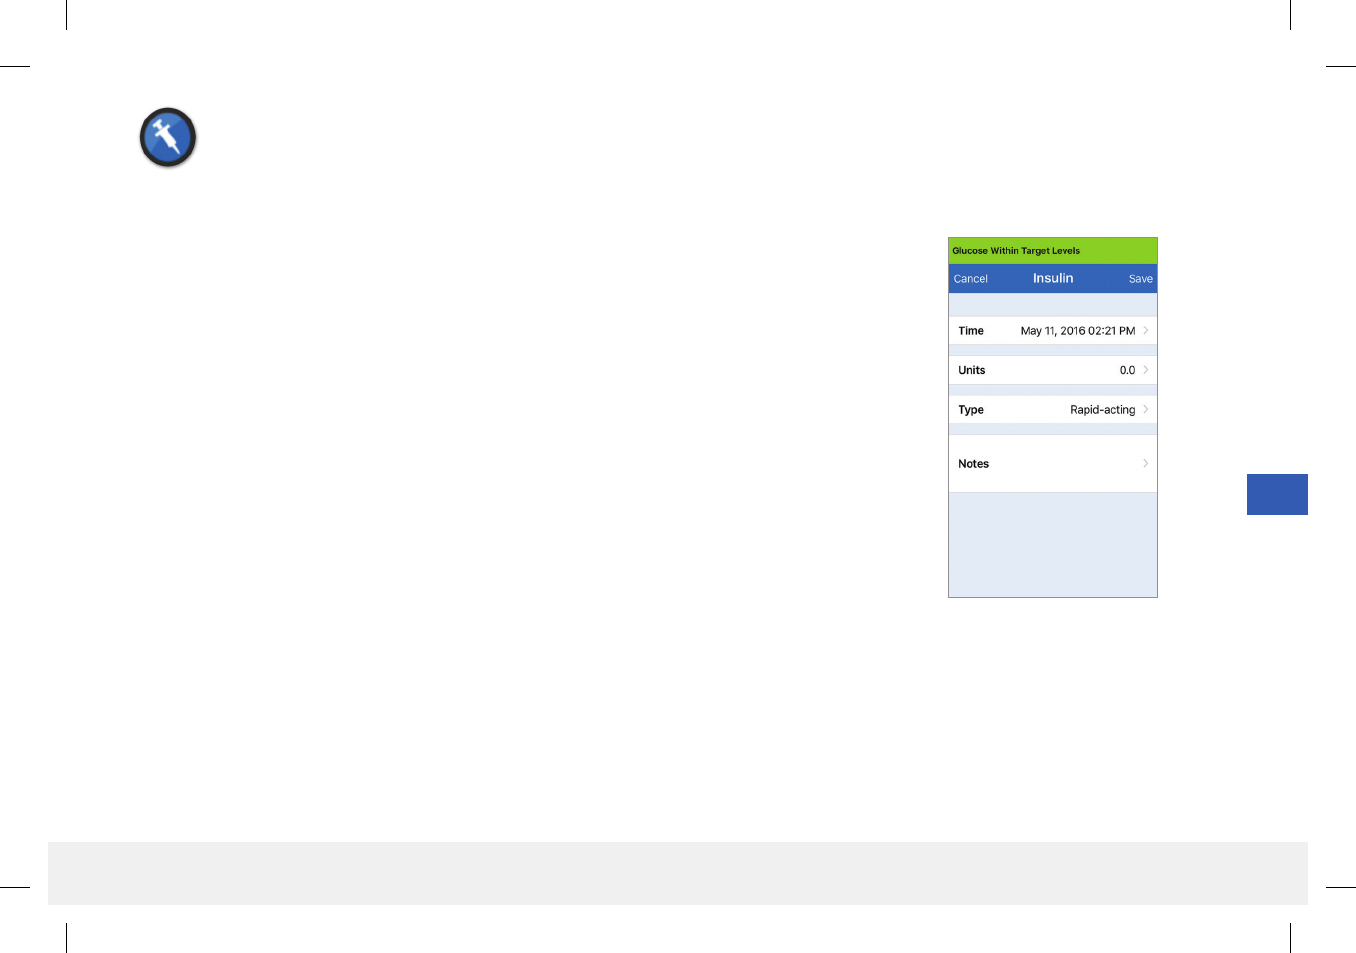
Insulin
Enter the units of insulin according to Time and Insulin type.
1. Tap Menu > Event Log.
2. Add an event using the event icon “+” > Insulin.
3. Tap Time to enter the correct date and time.
Tap Done.
4. Tap Units to enter the correct number of Units.
Tap Done.
Note: The maximum insulin units that can be entered is 200U.
5. Tap Type to enter the correct Type of Insulin.
Tap Done.
6. Tap Notes to enter any notes.
Tap Done.
7. Tap Save to save entry and return to EVENT LOG screen. Tap Cancel to exit without
saving changes.
LBL-0202-01-001 Rev 1_Eversense User Guide_mgdL_R6.indd 73 7/22/16 11:39 AM
74
Eversense CGM User Guide
10
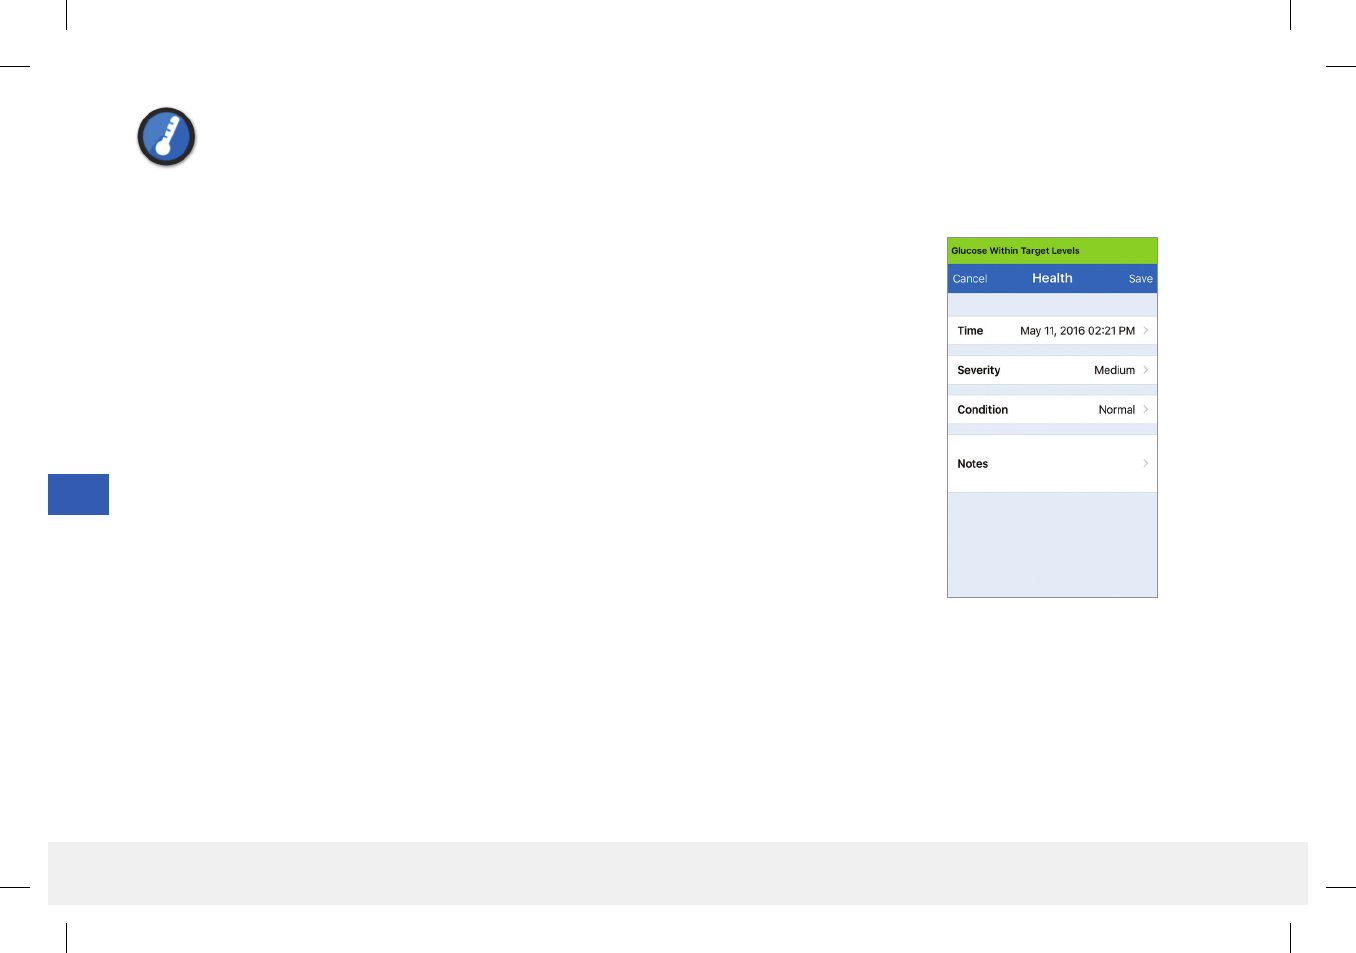
Health
Enter the type of health condition, severity, and date and time.
1. Tap Menu > Event Log.
2. Add an event using the event icon “+” > Health.
3. Tap Time to enter the correct date and time.
Tap Done.
4. Tap Severity to enter Low, Medium or High.
Tap Done.
5. Tap Condition to enter the health condition.
Tap Done.
6. Tap Notes to enter any notes.
Tap Done.
7. Tap Save to save entry and return to EVENT LOG screen. Tap Cancel to exit without
saving changes.
LBL-0202-01-001 Rev 1_Eversense User Guide_mgdL_R6.indd 74 7/22/16 11:39 AM
75
Eversense CGM User Guide
10
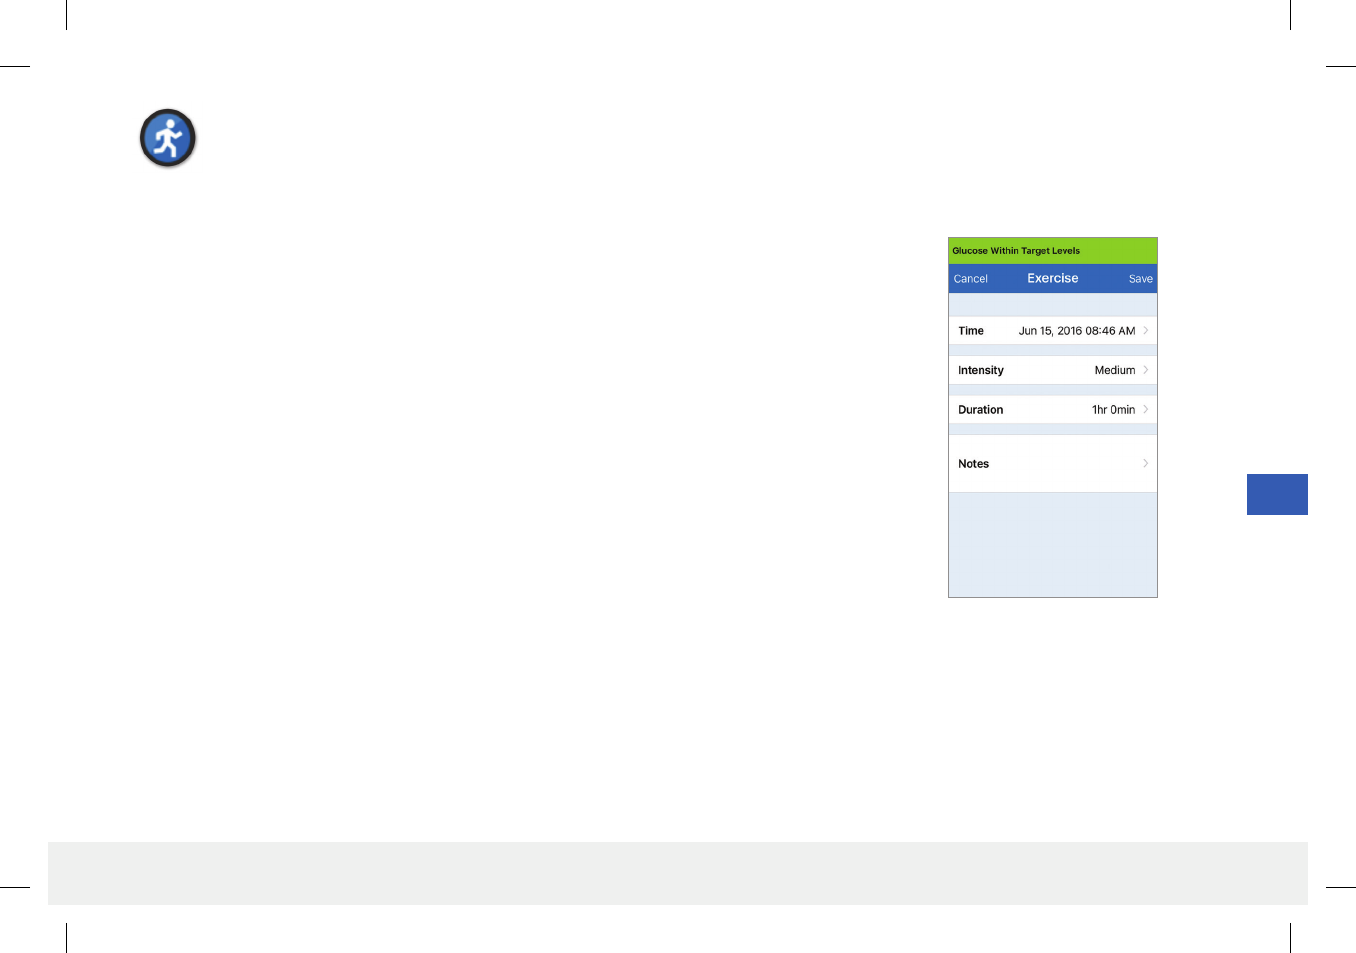
Exercise
Enter exercise type, duration, and intensity.
1. Tap Menu > Event Log.
2. Add an event using the event icon “+” > Exercise.
3. Tap Time to enter the correct date and time.
Tap Done.
4. Tap Intensity to enter Low, Medium or High.
Tap Done.
5. Tap Duration to enter the duration.
Tap Done.
6. Tap Notes to enter any notes.
Tap Done.
7. Tap Save to save entry and return to EVENT LOG screen. Tap Cancel to exit without
saving changes.
LBL-0202-01-001 Rev 1_Eversense User Guide_mgdL_R6.indd 75 7/22/16 11:39 AM
76
Eversense CGM User Guide
11
11. Glucose Reports and Sharing
This section describes the dierent glucose reports available for a summary of your glucose prole. You may choose specic
dates or select pre-selected time ranges.
Types of reports
• Weekly Modal Summary.
• Glucose Pie Chart.
• Glucose Statistics.
Note: Be sure to set the mobile device date and time correctly. The accuracy of the graphs and reports depends upon the date and time being correct.
To view the glucose reports tap Menu > Reports and swipe to move across the three dierent reports. You can also email each report as a pdf file by
tapping the email icon in the top right hand corner.
LBL-0202-01-001 Rev 1_Eversense User Guide_mgdL_R6.indd 76 7/22/16 11:39 AM