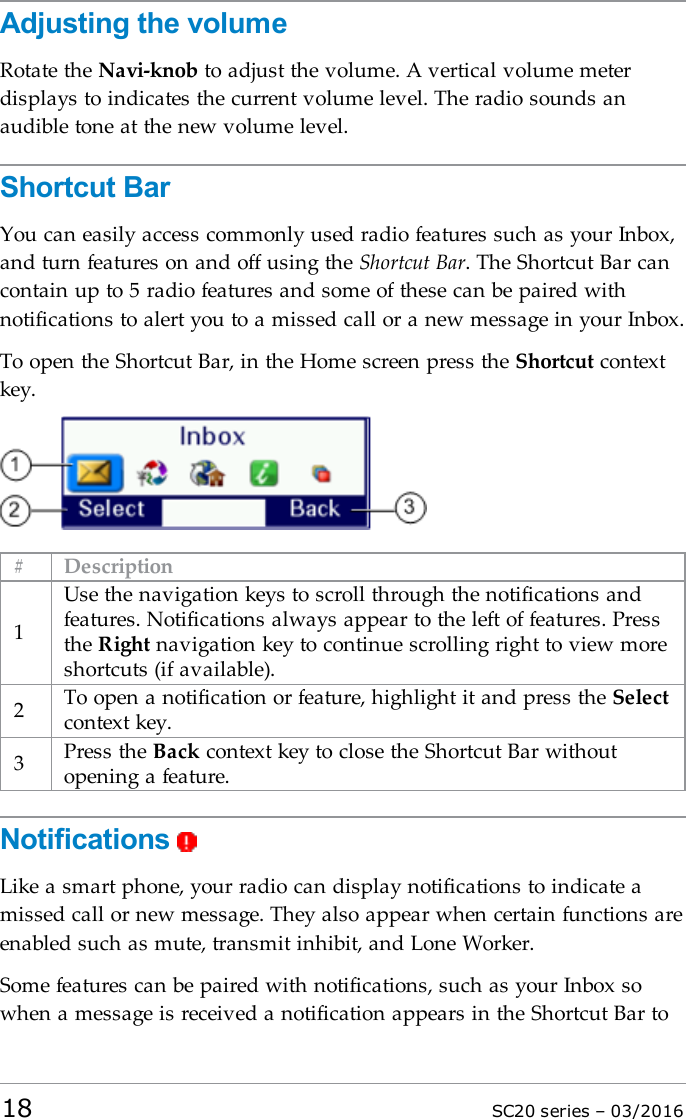
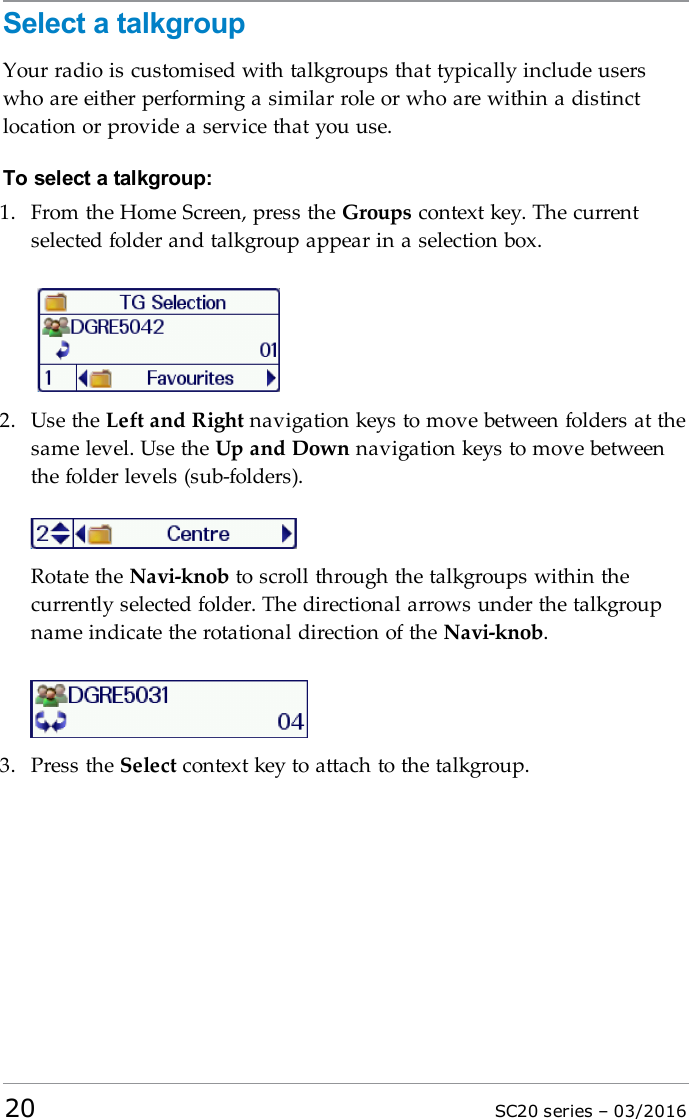
Sepura SC2024 TETRA Terminal with Bluetooth User Manual SC2020 Quick Start Guide

Sepura plc TETRA Terminal with Bluetooth SC2020 Quick Start Guide

Contents

SC20_Series_Quick_Start_Guide

Quick Start GuideSC20 series hand-portable radio
Original Instructions: ENGLISHDocument Number: MOD-15-1898Issue 1.0Copyright© Sepura plc. 2002–2016All rights reserved. This document is intended for the use of Sepura plc’s customers and/orother parties only for the purposes of the agreement or arrangement under which thisdocument is submitted, and no part of it may be reproduced or transmitted in any form ormeans without the prior written permission of Sepura plc.DisclaimerSepura’s policy is to continually improve its products. The features and facilities describedin this document were correct at publication, but are subject to change without notice.Software license agreementNOTICE: CAREFULLY READ THE LEGAL AGREEMENT CORRESPONDING TO THELICENSE YOU PURCHASED, WHICH SETS FORTH THE GENERAL TERMS ANDCONDITIONS FOR THE USE OF THE LICENSED SOFTWARE.Contact DetailsSepura plc9000 Cambridge Research ParkBeach DriveWaterbeachCambridgeCB25 9TLUnited Kingdomsepura.comii SC20 series – 03/2016
CONTENTSGeneral information 1Your radio at a glance 2Battery 4Charging the battery 4Fitting the battery 6Removing the battery 6Operational overview 7Keys, buttons and knobs 7LED indicators 9Home screen 9Status icons 10Antenna and radio coverage 12Menu 13SmartMenus 16Getting Started 17Power on 17Power off 17Locking and unlocking the keypad 17Adjusting the volume 18Shortcut Bar 18Notifications 18Selecting TMO and DMO 19Select a talkgroup 20Emergency operation 21Quick Start Guide iii
Making an Alarm call 22Receiving an Alarm call 22Clearing an Alarm call 23Power on Alarm call 23Contacts 24Searching and filtering contacts 24Creating contacts 25Editing contacts 26Calls 28Group calls 28Individual calls 29Text entry 31Character sets 31Features 33Connector Protector 33User profiles 33Man Down 34Lone Worker 35Messages 36Inbox 36Create a text message 36Read a new message 36Reply to a message 37Send a message 37Send a status message 38Personalising your radio 39iv SC20 series – 03/2016
Invert the display 39Adjusting the backlight 39Day/Night mode 40Adjusting text and icon size 41Setting the display language 42Tips & Tricks 43Quick Start Guide v
vi SC20 series – 03/2016
Quick Start Guide 1General informationThis user guide describes the default operation and features of the SC20series radio mobile radio. Your service provider or organisation mayhave customised your radiomobile radioto optimise its performance tosuit your individual needs. There may be differences between this guideand the way your product operates. Contact your service provider ororganisation for information about the customisation of your SC20 seriesradio mobile radio.Safety InformationBefore using this product read the safety and regulatory informationcontained in the Product Safety Guide (SPR-DOC-00170) supplied withyour radio. It is your responsibility to ensure that this product is operatedsafely at all times, and that local laws governing the use of RadioFrequency (RF) devices are observed.Sepura products are designed for use by mobile workforces, often workingalone, and are intended for use in occupational and controlled conditions.It is recommended that you obtain training on how to operate thisproduct. Your personal safety could be at risk if you do not understandhow to operate this product correctly.Sepura products have been tested to meet strict guidelines for personalsafety and operational conditions. Do not operate this product inenvironments that exceed those listed on the product technical data sheet.
Your radio at a glanceItem Description1Antenna.2Programmable Emergency Button. Press and hold (2 seconds)to initiate an Alarm call.3Rugged Accessory Connector (sRAC). Provides connection foraccessories.4Centre context key. Press to activate the feature or option thatappears directly above the key.5Right context key. Press to activate the feature or option thatappears directly above the key.6Cancel/Home key. Press and hold (2 seconds) to power onyour radio. From the Home screen, press and hold (4 seconds)to power off.2SC20 series – 03/2016
Quick Start Guide 3Item Description7Alphanumeric keypad with backlight. Loudspeaker andmicrophone behind. The loudspeaker is used during Groupcalls when an audio acccessory is not connected and the radiois held in the hand. The microphone is used during phonecalls.8Navigation keys. Press to scroll through lists and move thecursor when writing text.9Select/Send key. Press to initiate a phone call.10 Left context key. Press to activate the feature or option thatappears directly above the key.11 Colour display with backlight.12Earpiece and microphone. Earpiece is active during phonecalls when the radio is held like a smart phone against the ear.Speak into the microphone during Group calls when the radiois not attached to an audio accessory and held in the hand.13 Tri-colour LED (indicator). Indicates various operational statesof the radio.14 Blue LED (indicator). Indicates a missed event such as a call,Callout or message. Also indicates Bluetooth® status.15 Navi-knob. A continuously rotating knob used to adjust thespeaker volume.16 Side Button (A/B). Press to activate a programmed feature.17 PTT (Press-to-talk) button. Press and hold to talk during agroup call. Release to listen to other radio users.18 Side Button (C). Press to activate a programmed feature.19 Digital Accessory Connector (sDAC). Used to charge thebattery, program the radio and attach accessories.20 Battery21 Battery label area for attaching an asset label (optional).22 Attachment point for accessory. Used to connect a belt clip orother accessory designed for securing the radio during use.23 External Antenna Connector used with a car kit to attach anexternal antenna to the radio.24 Radio ID Label for attaching an asset label (optional).25 RFID tag for monitoring and auditing purposes.
BatteryFor your safety, inspect the battery regularly for any signs of damage,such as cracks or surface damage caused by an impact or the batterybeing dropped. Fit a new battery if there are any signs of damage.Warning: Risk to personal safety. Sepura TETRA radios havebeen tested and certified using Sepura approved batteries. The useof non-approved batteries may damage the product, will result innon-compliance with regulatory requirements, compromise theproduct safety ratings including SARS, reduce the length ofoperating time and will invalidate the product warranty.Checking the battery chargeAlways check the amount of battery charge before lengthy periods ofoperation. A fully charged battery should provide continuous operationfor a full shift, depending on a number of operational factors such as howthe radio is operated, the operating environment (temperature andnetwork signal strength) and the condition of the battery. When the radiois powered on, the amount of charge remaining may be displayed as apercentage (%) on the screen.Charging the batteryYour radio is powered by a rechargeable battery. The battery may berecharged many times but it will eventually need replacing to ensurecontinuous maximum performance from your radio.First time battery chargingNew batteries (Standard battery part no. 300-01174 and High Capacitybattery part no. 300-01175) are supplied in 'storage mode' which meansthey have a minimum amount of charge for storage purposes. Beforeusing a new battery for the first time it must be fully charged to reactivateit. If the battery is used before it is reactivated (fully charged) the radio4SC20 series – 03/2016
Quick Start Guide 5may not power on, or may indicate a low battery status icon or low levelof charge.Battery chargersOnly use Sepura approved battery chargers. Use of non-approvedchargers may not fully charge the battery or damage it. Always read theuser documentation supplied with the charger for additional safetyinstructions and how to use it.Charging methodsThe radio may be powered on or off during charging.Attach the Charger cable to the sDAC connector at the base of the radio orplace the radio with battery attached into a charging dock. If the battery ischarged attached to the radio, and the radio is powered on, an indicationof the remaining time to fully charge the battery is displayed (in hh:mmformat). During charging, the tri-coloured LED on the radio indicates thecharging progress and the charging icon appears on the status line,providing there is sufficient charge in the battery to support this function.Status LED DescriptionFlashing Orange Battery temperature is either too hot or cold tocommence charging.Solid Orange Charging in progress.Solid Green Charging complete.Solid Red Battery has failed to charge and may be not bechargable. Contact your service provider or Sepura.The battery may be charged separately from the radio using a battery-onlycharger.
Fitting the batteryIf a belt clip is fitted to the radio, lift the belt clip before attempting to fitthe battery. Do not attempt to insert the battery into the batterycompartment sideways under the belt clip. This may result in damage tothe radio and the belt clip.To attach the battery, insert the battery into the battery compartment asshown. Press the battery downwards until it clicks into position.Removing the batteryAlways power off before removing the battery.Push the safety latch on the bottom of the battery. Lift the batteryupwards and remove.6SC20 series – 03/2016
Quick Start Guide 7Operational overviewKeys, buttons and knobsEmergency buttonPress and hold (2 seconds) to initiate an Alarm Call.If the radio is powered off, press and hold (3 seconds) to power on andinitiate an Alarm Call. It may take several seconds for the radio tocomplete its power on process before initiating the Alarm call.PTT (press-to-talk) buttonPress and hold to transmit (speak) during a Group call.Release to receive and listen to other radio users.Cancel/Home keyPress and hold (2 seconds) to power on.In the Home screen, press and hold (4 seconds) to power off.Press and hold (2 seconds) to return to the Home screen from any otherscreen.Press to end a phone call.Select/Send keyPress to initiate a phone call.Press to select a menu or option.Navi-knobRotate to adjust the volume.Navigation keysPress to scroll lists, menus, talkgroup folders and status messages.
Press to move through characters when writing text.Context keysContext labels appear at the bottom of the screen, directly above eachcontext key. These labels show the action of the key when it is pressed;either activating a feature or performing a function such as clearing a call(Clear) or selecting an option (Select).The labels and actions of the context keys in the Home screen are:Contextkey Label ActionLeft Menu Press to enter the main menu.CentreGroups Press to change the talkgroup. See Selecta talkgroup on page 20Status Press 2 times to send a status message.See Send a status message on page 38Profiles Press 3 times to select a user profile.See User profiles on page 33Right ShortcutPress to open the Shortcut Bar toquickly access regularly used featuresor clear a notification. See Notificationson page 18 and Shortcut Bar on page 18Soft keysSpecial features such as SmartMenus can be assigned to a soft key. Yourservice provider or organisation can provide information about thecustomisation of your radio's soft keys.To activate a soft key function, press a programmable side key (A, B, C) orpress and hold (1 second) any one of the 0–9, * and # keys.8SC20 series – 03/2016
Quick Start Guide 9LED indicatorsBlue LEDThe blue LED indicates either a missed event, such as a missed call orunread message, or your Bluetooth®status (if enabled). A notificationalerting you to the missed call, Callout or unread message appears in theShortcut Bar. See Notifications on page 18.Tri-colour LEDThe tri-colour LED indicates the operational state of the radio.LED Colour DescriptionSolid green Radio is powering on or in a call and receivingSolid red Radio is in a call and transmittingIntermittentflashing redAttempting to connect to the network orincoming telephone SDS/Status message orbattery low warningFlashing orange Incoming telephone call or SDS/Status messageIntermittent fourflashes orangeTransmit Inhibit mode or Fallback mode areactiveHome screenThe top level screen, known as the Home screen, appears when the radiopowers on and when it is idle.Tip: To quickly get back to the Home Screen, press and hold (2seconds) the Cancel/Home key.The status line, at the top of the screen, displays various icons to indicatethe state of operation or when certain functions like keypad lock havebeen activated.The context key labels at the bottom of the screen indicate what the contextkey directly below the label is configured to do. These labels changeaccording to where you are in the menu hierarchy.
# Description1Status line showing the radio coverage signal strength, batterycharge indicators, and operational status icons.2Information area containing information that only appears on theHome screen. This is customised by your service provider ororganisation. It may show your selected talkgroup, date and time.3Context key options (available in the Home screen).Status iconsIcons appear on the status line (at the top of the screen) when the radio isengaged in certain activities or when certain functions are active.Icon DescriptionSecurity and EmergencyEmergencyAppears when emergency operation mode is active on yourradio and an Alarm call is in progress.Air Interface Encryption disabledCalls will not be encrypted.10 SC20 series – 03/2016
Quick Start Guide 11Icon DescriptionE2E Encryption enabledThe Secure Communications icon indicates that the selectedtalkgroup is customised for End-to-End Encryption. In otherwords, calls you make by pressing the PTT button are End-to-End Encrypted.E2E Encryption disabledIndicates that the call is not encrypted.Trunked Mode Operation (TMO)Outgoing TMOcall in progressYou are in a call that you initiated.Incoming TMO call in progressYou are in a call that was initiated by another person oryour dispatcher on the TMO network.Missed incoming TMO callThe blue LEDflashes to notify you that you have missed anincoming TMO call. A notification alerting you to themissed call appears in the Shortcut Bar.Broadcast CallA high-priority group call (point-to-multi-point) initiated byyour Dispatcher to all network radio users. You cannotreply to the caller.Direct Mode Operation (DMO)Incoming DMO callYou are in a DMO call that was initiated by another radiouser.Outgoing DMO call in progressYou are in a call to another radio user.Missed incoming DMO CallThe blue LEDflashes to notify you that you have missed anincoming DMO call. A notification alerting you to themissed call appears in the Shortcut Bar.General icons
Icon DescriptionSignal StrengthShows the current signal strength. More bars indicate astronger signal.Good radio coverageIndicates good radio coverage.No serviceIndicates poor signal or no radio coverage.Battery StrengthIndicates the level of charge in your battery. More barsindicates more charge.Low battery warningAppears when there is less than 12% charge remaining inthe battery.ChargingAppears when the battery is attached to the radio duringcharging and the radio is powered on.Keypad lockedTransmit InhibitIndicates that you have activated transmit inhibit and theradio is unable to transmit (overridden when Emergencymode is activated).Antenna and radio coverageCaution: The antenna must be attached to the radio at all times.Never remove the antenna during operational periods.The ability to transmit and receive RF signals depends on the strengthand quality of the radio coverage.Good radio coverage is indicated by the Signal Strength icon and barindicator displayed on the status line. In Trunked Mode Operation (TMO)the bar indicator represents the network signal strength. In Direct ModeOperation (DMO) it indicates the strength of the signal from the12 SC20 series – 03/2016
Quick Start Guide 13transmitting radio. Poor or no radio coverage is indicated by a short baror no bar at all with the poor signal strength icon.MenuYour radio is customised by your service provider or organisation with anumber of features that are accessed from the main menu.To open the main menu, in the Home screen press Menu.To open a sub-menu or menu option, scroll to the option (highlight it)and press Select.To return to a higher level menu, press Back.To return to the Home screen at any time within the menu hierarchy,press and hold (2 seconds) the Cancel/Home key.Menu optionsThe following icons are used to identify the sub-menus that provideaccess to further options.Icon Menu optionPhoneAdd, edit and delete your personal contacts within yourpersonal folder. Search (or filter) your contacts to locate thecontact you want and initiate a call. Review you call history.MessagesRead, create, save and send text (SDS) messages. Viewpicture messages (if customised). Select and send a statusmessage. Clear your mailbox of unwanted messages.GroupsSearch your talkgroup folders and select a talkgroup. Enablescanning of your selected talkgroups. Set up your speech callsettings.GPSManage your GPS location and position settings. View yourcurrent location, direction and speed.
ApplicationsYour radio may be customised with a number ofapplications such as Man-down and Lone Worker. Yourservice provider or organisation may have installed specificapplications (Short Data Applications) to help you in yourrole. Access WAP sites.NetworksManage your network connections and DMO options.Change your operating mode (TMO/DMO). Enable/disableTransmit Inhibit mode when working in RF sensitive areas.OptionsManage your Bluetooth® devices and settings. Personaliseyour radio settings such as backlight, text size and language.Enable Connector Protector when working in salt ladenenvironments to protect your radio.User ProfilesSelect customised profiles designed specifically for the wayyou work.HelpView help, such as a list of customised soft keys on yourradio.14 SC20 series – 03/2016
Quick Start Guide 15Menu Structure
SmartMenusSmartMenus are designed to provide quick access to regularly used radiofeatures, usually with a common theme. Your service provider ororganisation may customise your radio with a number of SmartMenus,for example you may have a SmartMenu containing all your QuickStatus messages, another for user profiles and another for selectingoperational modes such as toggling on/off covert mode, Transmit Inhibit,loudspeaker mute and so on.SmartMenus are assigned to a soft key, either a Side key or one of thekeys on the keypad. To open a SmartMenu, press the Side key or pressand hold (1 second) the assigned key on the keypad.Use the navigation keys to scroll the list of options on the SmartMenu.Options are labelled with a number, shown to the right of the option. Toselect the option, press the key that corresponds to the number of theoption, for example to select option 3, press the 3 key. Note that using thismethod only options numbered 1 to 12 can be selected using the keys onthe keypad (press 0 for option 10, the Star (*) key for option 11 and theHash (#) key for option 12). For options numbered 13 onwards, scroll tothe option (highlight it), and press Select.16 SC20 series – 03/2016
Quick Start Guide 17Getting StartedPower onTo power on, press and hold (2 seconds) the Cancel/Home key.Your radio attaches to the last selected talkgroup when it was poweredoff (if it is 'in service').Power offNote: Do not power off the radio by removing the battery. The radiomust be powered off correctly to ensure that it performs a controlled'powered down'.To power off, from the Home screen press and hold (4 seconds) theCancel/Home key.Scroll to the Shutdown option, then press the Select key to power offyour radio.Locking and unlocking the keypadTo prevent accidental activity during operation, you can lock the keypad.This will also prevent access to the radio's functions if the radio is stolen.When the keypad is locked, the Key icon appears in the status line.The Navi-knob, and the PTTand Emergency buttons remain unlocked soyou can still adjust the adjust the volume, make a Group or Alarm callwhen the keypad is locked.To lock/unlock the keypad:Press the *(star) key (or a designated soft key), then press the OK contextkey to lock/unlock the keypad.If you press any other key while the keypad is locked no action is taken.A message is displayed to remind you that the keypad is locked.
Adjusting the volumeRotate the Navi-knob to adjust the volume. A vertical volume meterdisplays to indicates the current volume level. The radio sounds anaudible tone at the new volume level.Shortcut BarYou can easily access commonly used radio features such as your Inbox,and turn features on and off using the Shortcut Bar. The Shortcut Bar cancontain up to 5 radio features and some of these can be paired withnotifications to alert you to a missed call or a new message in your Inbox.To open the Shortcut Bar, in the Home screen press the Shortcut contextkey.# Description1Use the navigation keys to scroll through the notifications andfeatures. Notifications always appear to the left of features. Pressthe Right navigation key to continue scrolling right to view moreshortcuts (if available).2To open a notification or feature, highlight it and press the Selectcontext key.3Press the Back context key to close the Shortcut Bar withoutopening a feature.NotificationsLike a smart phone, your radio can display notifications to indicate amissed call or new message. They also appear when certain functions areenabled such as mute, transmit inhibit, and Lone Worker.Some features can be paired with notifications, such as your Inbox sowhen a message is received a notification appears in the Shortcut Bar to18 SC20 series – 03/2016
Quick Start Guide 19alert you to the unread message. When paired with a feature, the featureicon appears with a notification badge .# Description1Notifications paired with features appear to the left of allother feature icons.2 Example notification of a change of state (Transmit Inhibit).3Shortcuts to commonly used features always appear to theright of notifications. Scroll right to see more features (if any).4In the Home screen, press the Shortcut context key to accessthe notification.To close a notification:From the Home screen, press the Shortcut context key, highlight thenotification then press the Select context key. Use the feature in the usualway, for example, read an unread message or respond to a missed call.The notification automatically closes and disappears from the ShortcutBar.Selecting TMO and DMOIn Direct Mode Operation (DMO), radios communicate directly with otherTETRA radios without using a network. Coverage depends on theposition of the caller and the receiving radio. When you switch to DMOmode your radio leaves the network and tunes to the selected DMOtalkgroup. In Trunked Mode Operation (TMO) your radio operates on thenetwork infrastructure supplied by your service provider.To change operating mode from the Home screen:Press the Menu context key, then select Networks > Operating Mode.Scroll to the mode (highlight it) and press Select.
Select a talkgroupYour radio is customised with talkgroups that typically include userswho are either performing a similar role or who are within a distinctlocation or provide a service that you use.To select a talkgroup:1. From the Home Screen, press the Groups context key. The currentselected folder and talkgroup appear in a selection box.2. Use the Left and Right navigation keys to move between folders at thesame level. Use the Up and Down navigation keys to move betweenthe folder levels (sub-folders).Rotate the Navi-knob to scroll through the talkgroups within thecurrently selected folder. The directional arrows under the talkgroupname indicate the rotational direction of the Navi-knob.3. Press the Select context key to attach to the talkgroup.20 SC20 series – 03/2016
Quick Start Guide 21Emergency operationThe red button on the top of your radio is programmed to initiate anAlarm call at any time when your radio is in operation. This button isknown as the Emergency Button.Your radio may be customised to perform one or more of the following:Initiate an Alarm call set up to one or more pre-defined users(typically to your dispatcher and other members of your talkgroup)and/or;Send an Emergency Status message to an individual, the dispatcher ora talkgroup and/or;Send a position report (GPS dependent).If you are working in RF sensitive areas and have enabled TransmitInhibit, prohibiting radio transmission, initiating an Alarm call willoverride the Transmit Inhibit feature and the Alarm call will betransmitted.Your service provider or organisation can provide information on howyour radio is customised for Alarm calls and how to operate your radioin emergency situations. If you are working in a sensitive environmentyour radio may be customised for Silent Alarm calls where audible anddisplay alerts are disabled, or your radio may be customised for LiveMicrophone that allows you to call for assistance hands-free withoutpressing the PTT button.Live Microphone featureYour radio may be customised with the Live Microphone feature. Thisfeature allows you to broadcast a call for assistance hands-free for aspecified period of time and without having to press the PTT button. Theradio automatically cycles between transmit and receive communicationduring a programmed period of time (seconds). Live Microphone iscancelled when the time expires or by pressing the PTT button.
Making an Alarm callYou can still make an Alarm call if the keypad is locked.1. Press and hold (2 seconds) the Emergency button; a confirmation beepsounds.2. Release the button and speak into the microphone.During an Alarm call:the microphone is ‘live’ for a programmed period (seconds) allowingyou to speak hands-free without pressing the PTT button(customisable)the LED illuminates solid redyour radio sounds audible tonesa large emergency symbol appears on the screenyour identity and talkgroup appears on the display of those receivingthe Alarm callReceiving an Alarm callAn Alarm call overrides any existing calls on the talkgroup.You know you are receiving an Alarm call when:your radio sounds an audible tonethe LED flashes redthe emergency symbol appears on the screenyour radio status changes to Emergency22 SC20 series – 03/2016
Quick Start Guide 23Clearing an Alarm callYou can only clear an Alarm call that you have initiated.To cancel the Alarm call, press the Clear context key.Warning: Depending on which network is being used, if theTETRA Alarm call is a group call, then although both of theTETRA Alarm call exit functions will clear the TETRA Alarm callon the call originator’s radio, it will not remove the alarm fromthe system. It should also be noted that those radios alerted to theemergency may, depending upon the infrastructure configuration,remain in the TETRA Alarm call condition until the dispatcherclears the call from the system.When the Alarm call is cancelled, your radio returns to the talkgroup thatwas selected before the call was initiated.Power on Alarm callIf your radio is powered off, press and hold (3 seconds) the Emergencybutton to power on and initiate an Alarm call. Any customised Welcomescreen is not displayed during power on. If your radio is customised forPIN entry, you will need to enter your PIN before the alarm call isinitiated. It may take several seconds for the radio to complete its poweron process before initiating the Alarm call.
ContactsDetails of regularly used contacts are stored in a phone book. The phonebook has a series of folders labelled Menu,Search,All and Personal. Yourradio may have additional folders containing contacts programmed intoyour radio during customisation.The Personal folder contains contacts you create (personal contacts). Thisfolder only appears when you create your first personal contact. The Allfolder contains both personal contacts and contacts programmed intoyour radio.Each contact can have up to six associated numbers. The icon next toeach contact indicates the dial mode, a radio or to a telephone,of the first number associated with it.To open the Phone book, from the Home screen, press the Menu contextkey, then select Phone > Contacts.To open the Phone book, select Menu > Phone > Contacts.Searching and filtering contactsYou can search the entire phone book for contact names and numbers, orfilter the contacts within a folder by entering a search string into theSearch Bar at the top of any folder (except Menu):When the search is complete:the Search folder lists folders containing at least one entry containingthe search string, and the number of entries in those folders. You canopen any of the listed folders.all other folders are filtered to show their matching entries above adotted line. All non-matching entries are listed below the dotted line.To search for contacts and numbers within the phone book:1. Select Menu > Phone > Contacts. Navigate to the Search folder.2. Press the Up navigation key to open the Search Bar.24 SC20 series – 03/2016
Quick Start Guide 253. Enter a search string (see Text entry on page 31) and press the Searchcontext key.4. When the search is complete, any folder containing a possible matchto your search (and the number of possible matches within that folder)appear in the Search folder. To open a folder, select it and then pressthe Open context key.5. To clear the search string, press the Delete context key to delete eachcharacter in the search string, then press the Cancel context key, thenthe OK context key.To filter contacts within a folder:1. Open the folder.2. Press the Up navigation key to open the Search Bar.3. Enter a search string (see Text entry on page 31), then press the Filtercontext key.4. Any contact in the folder that is a possible match to your searchcriteria appears at the top of the contact list. To view the contact'sdetails, select the contact and press the Open context key.5. To clear the search string, press the Delete context key to delete eachcharacter in the search string, then press the Cancel context key, thenthe OK context key.Creating contactsTo create a contact:1. Select Menu > Phone > Contacts.2. Navigate to the Menu card and select Create Contact.3. Enter the contact name (see Text entry on page 31) then press the Savecontext key.
4. Select a dial mode for this contact, either TETRA Network (default) ortelephone/mobile network.To change the dial mode, press the Up navigation key to select the dialmode line then use the Left or Right navigation keys to switch dialmodes. Press the Down navigation key to continue entering thenumber.Note: If the message Wrong number type appears, change the dialmode or check that the length of the number is between 5 and 8numbers.5. Enter the number (see Text entry on page 31) then press the Savecontext key.6. To add more phone numbers for the contact select Add Next Numberand repeat the previous step.Tip: To add further contact numbers to a saved contact, open thecontact and select Add New Number at the end of its numberslist.7. To return to the Personal folder press the Cancel context key.Editing contactsYou can edit (and delete) contacts in the Personal folder of the Phone book.To edit personal contacts:1. Select Menu > Phone > Contacts and then select the Personal folder.2. Navigate to the contact you want to edit, then press Open.To edit the name:1. Select the name and then press Edit.2. Make changes as required, then press Save.26 SC20 series – 03/2016
Quick Start Guide 27To edit a number:1. Select the number and then press Options. Select Edit and pressSelect.2. Make changes: to add additional digits press the number keys; todelete digits press the Left navigation key.3. After making changes press Save.To delete a contact:1. Select the contact and press Open.2. Press Options.3. Select Edit >Delete contact, then press Select.
CallsThe various types of voice and data calls that are supported by yourradio, and the acoustic and visual alerts that accompany a call, dependon your radio's customisation.Group callsGroup (point-to-multipoint) calls are calls where you talk to other userswithin a nominated group of radio users (a talkgroup). In a Group callonly one person can talk at any one time (known as half-duplex mode).During Group calls the microphone at the top of your radio is active andall received audio is routed to the loudspeaker.Making a group call1. Press and hold the PTT button and speak into the top microphone.The LEDchanges to solid red to indicate that your radio istransmitting, and an audible tone is heard and your radio status textchanges to 'Talk'.2. When you have finished talking, release the PTT button and listen toaudio received, through the loudspeaker.The LED changes to solid green whilst the group call is active andyour radio status text changes to ‘Group Call’.Receiving a group callWhen a Group call is received, the LEDflashes red and your radio statuschanges to ‘Group Call’. The name of the talk group, talk group folderand the caller’s ID are displayed. When the LED changes to solid green(after a few seconds) you can respond to the call.28 SC20 series – 03/2016
Quick Start Guide 29Individual callsIndividual calls (point-to-point) are private calls between you and oneother person. You can make individual calls in two modes:individual calls (half-duplex mode)—where only one person can talkat a time using the PTT button.individual ‘phone’ calls (full-duplex mode)—where both parties cantalk simultaneously.Making individual calls (half-duplex mode)Calling a contact:1. Select Menu > Phone > Contacts to open the contacts menu.2. Navigate to a contacts folder (such as the All folder) and select yourcontact. Press the Open context key, then choose the phone number.3. Press the PTT button to initiate the call (or press Options, select Dialthen press Select.4. To speak, press the PTT button; release the PTT button to listen.5. To end the call, press the Clear context key or the Cancel/Home key.Calling by dialling:1. From the Home Screen, dial the number of the person you are calling.2. Press the PTT button to initiate the call (or press the Call context key).3. To speak press the PTT button; release the PTT button to listen to theother radio users.4. To end the call, press the Clear context key.Receiving individual calls (half-duplex)1. Press the PTT button to answer the call or the Clear context key toreject the call.
Making individual phone calls (full-duplex mode)Calling a contact:1. Select Menu > Phone > Contacts to open the contacts menu.2. Navigate to a contacts folder (such as the All folder) and select yourcontact. Press the Open context key, then choose the phone number.3. To initiate the ‘phone’ call press the Dial context key.4. To end the call, press the Clear context key .Calling by dialling:1. From Home Screen, dial the number of the person you are calling.2. Press Send to iniate the call.3. To end the call, press Clear.Note: If your radio has been customised with a single dial mode forTETRA, PBX and PSTN numbers, the dial mode icon cannot bechanged.Receiving a phone callWhen an incoming phone call is received, your radio sounds an audiblealert and displays the identity of the caller (if the contact or number isstored in your phone book).1. Press the Accept context key to answer the call. Press the Rejectcontext key to reject the call.2. To end the call, press the Clear context key .30 SC20 series – 03/2016
Quick Start Guide 31Text entryWriting and editing text on your radio is similar to most smart phones.Text edit mode is automatically activated when you select certainfunctions, such as creating a message or adding a contact to your phonebook.Character setsYou can use character sets to change the style of the text, and to enternumbers and special characters. The character set can be changed asoften as required when entering text. The following character sets aresupported:Character set DescriptionAuto-capitalisation (Abc)The first letter is entered in upper-case,with all following characters in lower-case. New sentences start with acapital letter and end with a full stop(.), question mark (?) or exclamationmark (!) followed by one or morespaces.Upper case (ABC) All characters are entered in upper-case.Lower case (abc) All characters are entered in lower-case.Numeric (123) All characters are numbers.Special characters(!.@)You can select special characters suchas full stops (.), semi-colon (;) andcommas (,) by pressing the 0key.Further special characters#@!”£$%&’()*+- are availableon the #key.The selected character set is indicated on the status line at the top of thedisplay, next to the Battery Charge icon.
To change the character set:Press the Star (*) key during text entry.To enter characters:Press a key repeatedly to highlight a character in its Character SelectionBox at the bottom of the screen, then press the Select context key (or waitfor the character to be auto-inserted).To delete a character:To delete the character to the left of the cursor press the Delete contextkey.To enter special characters:To insert punctuation (full stop, comma, or semi-colon) press zero (0)repeatedly until the symbol is highlighted in the Character Selection Box,then press the Select context key (or wait for the character to be auto-inserted).To insert a space press 1(on the keypad).To insert symbols press the hash(#) key repeatedly until the symbol ishighlighted in the Character Selection Box, then press the Select contextkey (or wait for the character to be auto-inserted).32 SC20 series – 03/2016
Quick Start Guide 33FeaturesYour radio can be customised for various advanced features and canhave various soft keys assigned to frequently used features.Connector ProtectorWhen working in salt water environments or in an area with high salt-laden humidity such as sea mist or fog, enabling the Connector Protectorfeature will protect the Digital Accessory connector (sDAC) from potentialcorrosive damage when an accessory is not attached.Note: A cover must be fitted to the Rugged Accessory Connector(RAC) (on the side of the radio) if an accessory is not attached.To enable Connector Protector:1. Press Menu then select Options > Settings > Connector Protection.2. To toggle protection on/off press the Toggle context key. When the CPEnable check box is ticked, Connector Protector is enabled, and whenthe check box is empty it is disabled.If Connector Protector is enabled ( ) when the radio is powered off, itwill remain enabled when the radio is next powered on unless the radiois in a charger or car kit or if a data accessory is attached when the radiois powered on, in which case Connection Protector is disabled ( ) untilthe radio is removed from the charger, car kit or data accessory. In thesecircumstances it is not necessary to re-enable Connector Protector.User profilesUser profiles are pre-set combinations of alerts and settings on your radio.They allow you to switch settings easily to match your circumstances orenvironment. An icon showing the number of the profile selected,appears on the status line or the Shortcut Bar. Up to ten pre-defined user
profiles may be configured for your radio. Example user profiles could beNormal,Lone Worker and Covert.To change the user profile:1. From the Home screen, press the Groups context key 3 times ( UserProfiles).2. Use the navigation keys to scroll through the user profiles.3. Press the Select context key to activate the selected user profile.Man DownMan Down is a licensed customisable feature which uses motion sensorsto detect motion in three dimensions. When your radio is powered on itstores it's current angle of inclination (orientation). If it moves more thana customised angle from the original inclination or is stationary for morethan a customised length of time, the radio sounds an alarm anddisplays a ‘Man Down Alarm’ message. In other words the radio candetect conditions indicating that you have become incapacitated. If youdo not respond to the alert within a customised time period, your radioinitiates a Man Down Emergency and takes action depending on itscustomisation.To toggle Man Down on/off:1. Activate Man Down using one of the following methods:Press a customised soft key to toggle Man Down on. The sensorsactivated are those set in Man Down options on the facing page.Select a user profile which uses Man Down (see User profiles on theprevious page). The sensors activated are those customised in theprofile.From the Home screen, press the Shortcut context key, then selectthe Man Down icon.A message (‘Man Down Starting’) is displayed and an alert sounds (asuccession of beeps).34 SC20 series – 03/2016
Quick Start Guide 352. Attach your radio in a comfortable wearing position on your body.When a two second continuous tone finishes the radio’s ‘normal’wearing position has been recorded. An icon indicates that Man Downis switched on and which sensors are active.To deactivate Man Down, either select a user profile which does not useMan Down, or press the customised soft key to toggle Man Down off.Man Down options1. Press Menu then select Applications > Man Down.2. Select the Man Down sensors to use: Motion & Tilt sensors,Motion Sensor only, or Tilt Only sensor.If you enable Man Down from a User Profile, the Man Down Settingsscreen updates to reflect the sensors defined as active in the Profile.Lone WorkerIf you are working alone you can use the Lone Worker feature to let yourdispatcher know that you are safe.When Lone Worker is enabled your radio periodically sounds an alertwhich you must acknowledge—usually by pressing a pre-programmedkey—otherwise the radio sends an emergency status message to yourdispatcher.To enable Lone Worker, scroll to a user profile which has Lone Workerenabled, then press the Select context key. See User profiles on page 33.To disable Lone Worker mode, repeat the process and but choose adifferent user profile.
MessagesYour radio supports status messages, text (SDS) messages andpicture messages. All message types are available from the Messagesmenu.InboxIncoming messages are displayed in the Inbox with the most recentlyreceived messages at the top. Unread messages appear in Bold. The iconnext to the message indicates the type of message received and whetherthe message is read or unread.The Inbox can store up to 50 messages. When the Inbox is full, unsavedolder messages are automatically deleted when new messages arereceived. If you want to keep a message, you must save it.To open your inbox, from the Home screen, press the Menu context key,then select Messages > Inbox. A shortcut to your Inbox may be availablefrom the Shortcut Bar, see Shortcut Bar on page 18.Create a text messageTo create a text message, from the Home screen, press the Menu contextkey, then select Messages > Create Message. Write your message (seeText entry on page 31).To send your message, see Send a message on the facing page.Read a new messageWhen a message is received your radio vibrates and/or generates anaudible alert. A notification appears in the Shortcut Bar, see Notificationson page 18 and the blue LED flashes.To read a new message, open your Inbox (Messages > Inbox). To openthe message, select it and press the Open context key. To read a long36 SC20 series – 03/2016
Quick Start Guide 37message use the Down navigation key to continue reading, and the Upnavigation key to return to the top of the message.When you have finished reading the message, you can choose to reply tothe message (see Reply to a message below), delete it or save it.To delete the message, press the Options context key, select the Deleteoption and press the Select context key. Select the Delete Messageoption and press the Select context key.To save the message, press the Options context key, select Save andthen press the Select context key.Reply to a messageYou can only reply to a text message.To reply to a message, press the Reply context key. Write your messageand when you have finished entering text, press the Send context key. Forinformation on how to send your message, see Send a message below.Send a messageYour service provider or organisation may customise your radio with adefault destination, for example when you reply to a message it is sent toyour Supervisor or Dispatcher. Other options allow you to send yourmessage to your current talkgroup or a contact in your phone book or aknown contact by dialling their number (ISSI).To send to your default destination, select Send to default and then pressSend.To send to your talkgroup, select Send to group. The details of yourcurrent talkgroup appear. You cannot change the talkgroup. Press theSend context key to send your message.To send to a contact in your phone book, select Phonebook then selectyour contact and the destination number (see Contacts on page 24). PressSend to send your message.
To dial the number of a known contact, select Dial. Enter the ISSI(Individual Short Subscriber Identity) for your contact and press the Sendcontext key.Send a status messageYour service provider or organisation may customise your radio withstatus messages. These are pre-defined short messages that are uniquelyidentified by a status code. They are used to notify others of your currentstatus.To send a status message, from the Home screen press the Groupscontext key 2 times. Use the navigation keys to scroll through your statusmessages. To send the message, press the Send context key. See Send amessage on the previous page.38 SC20 series – 03/2016
Quick Start Guide 39Personalising your radioYou can personalise your display settings (such as text size, backlight,inverting the screen and change languages) and create a personal phonebook containing your own contacts.Invert the displayWhen you are wearing the radio on your shoulder, attached to a belt or toa body vest, you may want to flip the display upside down to make iteasier to read. The Invert Display option rotates all screen elements (apartfrom the Context key labels) by 180 degrees.To invert the display:1. Select Menu > Options > Settings > Display Settings > Invert Display.2. Press the Toggle context key. When a tick appears in the check box,the display is flipped, and when the check box is empty the display isset to normal.Note: When the display is inverted, the navigation keys work inopposite to their normal function. Press the Up key to scroll down andthe Down key to scroll up. The Right key to scroll left and the Left keyto scroll right.Adjusting the backlightWhen a call or message is received, and when you press any key, thebacklight lights up the display and keypad. The length of time thebacklight illuminates is set during customisation.To adjust the backlight:1. Select Menu >Options >Settings >Display Settings >Backlight.2. Press the Toggle context key.
To adjust brightness:1. Select Menu >Options >Settings >Display Settings >Day/NightMode.2. Select Backlight Level.3. Rotate the Navi-knob to adjust the intensity of the backlight and thekeypad illumination on a scale of 1–7 (max.).Day/Night modeWhen a call or message is received, and when you press any key, thebacklight lights up the display and keypad. A bright display can be apotential distraction, particularly when driving at night or in poorlighting conditions. Day/Night mode lets you adjust the intensity of thebacklight and keypad illumination to suit your working conditions. Nightmode reduces the glare from the display, making it ideally suited forwhen the radio is cradled in a vehicle at night time.When the preferences for day and night mode have been set, switchingbetween the modes automatically adjusts the backlight and displaysettings.To change Day/Night mode settings1. Select Menu >Options >Settings >Display Settings >Day/NightMode.2. Scroll to each option (highlight it) to make your adjustments:Day Mode—to toggle between Day Mode and Night Mode pressthe Toggle context key.Backlight Enabled—to toggle the backlight on/off press the Togglecontext key. When a tick appears in the box, the backlight is on,and when the box is empty, the backlight is off.Backlight Level—to adjust the intensity of the backlight and the keypad illumination on a scale of 1 to 7 rotate the Navi-knob.40 SC20 series – 03/2016
Quick Start Guide 41Adjusting text and icon sizeYour radio uses the default size for the text and icons set duringcustomisation, however it also supports a number of different size modesthat control how text and icons are displayed. Having the ability tochange the text and icon size is useful when the handset is cradled in thecar and you want to enlarge the text and icons to make them easier toread from a distance.Caution: When selecting larger modes, some prompts or icons maynot appear on the radio display.Your radio supports the following modes:Normal Mode allows the maximum amount of information available tobe displayed in a compact character size.Large Mode displays screen information in a large character size.Very Large Mode displays the talkgroup number or talkgroup name, ascustomised, in an extra large size on the Home screen with all otherscreens in Large mode.Custom displays the Home screen, menu and WAP browser inpredefined text sizes set during customisation. Only the Home screensupports Very Large mode, with other screens set to either Normal orLarge mode.To change text mode:1. Select Menu >Options >Settings >Display Settings >Text Size.2. Use the Up and Down Navigation keys to highlight the mode andthen press the Select context key.The radio displays the Home screen, with the text and icons appearing inthe chosen mode.
Setting the display languageYour radio operates in the language chosen during customisation andcan support two display languages. The display uses the defaultlanguage if the radio is only customised for a single language, or thecurrently selected language if two languages are programmed.To change the language:1. Select Menu >Options >Settings >Language.2. Scroll to the language option, and then press the Select context key.The Home screen appears and the display shows the selected language.42 SC20 series – 03/2016
Quick Start Guide 43Tips & TricksHome ScreenTo quickly get back to the Home Screen, press and hold (2 seconds) theCancel/Home key.Keypad lock/unlockTo quickly lock/unlock the keypad, press and hold (2 seconds) the *(star)key.Change talkgroupFrom the Home screen, press the Groups context key. Use the navigationkeys to change the folder, then rotate the Navi-knob to select thetalkgroup. Press Select to attach to the talkgroup.Send status messageFrom the Home screen, press Shortcut to open the Shortcut Bar. Scroll tothe Quick Status shortcut and press Select. Use the navigation keys toscroll through the messages. Press Send then choose a destination for themessage. See Send a message on page 37Writing textTo change character sets: press the Star (*) key during text entry.To delete a character to the left of cursor: select Delete.To add punctuation (full stop, comma, or semi-colon): press zero (0).To insert a space: press 1(on the keypad).To insert symbols: press the hash(#) key repeatedly until the symbol ishighlighted in the Character Selection Box, then press Select (or wait forthe character to be auto-inserted).Select and cancel functionsTo select and cancel functions within the sub-menus, you can press theSelect/Send key to select a function and the Cancel/Home key to cancel a
function.Automatic scrolling using the navigation keysTo scroll a list quickly, press and hold the Up or Down navigation key.Making a phone callInstead of using the context keys to initiate and end a call, use theSelect/Send key to make a call and the Cancel/Home key to end the call.View recent callsTo view recent calls, from the Home screen press Menu > Phone > CallHistory.44 SC20 series – 03/2016
Sepura plc9000 Cambridge Research ParkBeach DriveWaterbeachCambridgeCB25 9TLUnited Kingdom sepura.com

Navigation menu