Sepura SC2024 TETRA Terminal with Bluetooth User Manual SC2020 Quick Start Guide
Sepura plc TETRA Terminal with Bluetooth SC2020 Quick Start Guide
Sepura >
Contents
- 1. SC20_Series_Quick_Start_Guide
- 2. SC20_Series_UserGuide
- 3. Product_safety_guide
SC20_Series_Quick_Start_Guide

Quick Start Guide
SC20 series hand-portable radio

Original Instructions: ENGLISH
Document Number: MOD-15-1898
Issue 1.0
Copyright
© Sepura plc. 2002–2016
All rights reserved. This document is intended for the use of Sepura plc’s customers and/or
other parties only for the purposes of the agreement or arrangement under which this
document is submitted, and no part of it may be reproduced or transmitted in any form or
means without the prior written permission of Sepura plc.
Disclaimer
Sepura’s policy is to continually improve its products. The features and facilities described
in this document were correct at publication, but are subject to change without notice.
Software license agreement
NOTICE: CAREFULLY READ THE LEGAL AGREEMENT CORRESPONDING TO THE
LICENSE YOU PURCHASED, WHICH SETS FORTH THE GENERAL TERMS AND
CONDITIONS FOR THE USE OF THE LICENSED SOFTWARE.
Contact Details
Sepura plc
9000 Cambridge Research Park
Beach Drive
Waterbeach
Cambridge
CB25 9TL
United Kingdom
sepura.com
ii SC20 series – 03/2016

CONTENTS
General information 1
Your radio at a glance 2
Battery 4
Charging the battery 4
Fitting the battery 6
Removing the battery 6
Operational overview 7
Keys, buttons and knobs 7
LED indicators 9
Home screen 9
Status icons 10
Antenna and radio coverage 12
Menu 13
SmartMenus 16
Getting Started 17
Power on 17
Power off 17
Locking and unlocking the keypad 17
Adjusting the volume 18
Shortcut Bar 18
Notifications 18
Selecting TMO and DMO 19
Select a talkgroup 20
Emergency operation 21
Quick Start Guide iii

Making an Alarm call 22
Receiving an Alarm call 22
Clearing an Alarm call 23
Power on Alarm call 23
Contacts 24
Searching and filtering contacts 24
Creating contacts 25
Editing contacts 26
Calls 28
Group calls 28
Individual calls 29
Text entry 31
Character sets 31
Features 33
Connector Protector 33
User profiles 33
Man Down 34
Lone Worker 35
Messages 36
Inbox 36
Create a text message 36
Read a new message 36
Reply to a message 37
Send a message 37
Send a status message 38
Personalising your radio 39
iv SC20 series – 03/2016


vi SC20 series – 03/2016

Quick Start Guide 1
General information
This user guide describes the default operation and features of the SC20
series radio mobile radio. Your service provider or organisation may
have customised your radiomobile radioto optimise its performance to
suit your individual needs. There may be differences between this guide
and the way your product operates. Contact your service provider or
organisation for information about the customisation of your SC20 series
radio mobile radio.
Safety Information
Before using this product read the safety and regulatory information
contained in the Product Safety Guide (SPR-DOC-00170) supplied with
your radio. It is your responsibility to ensure that this product is operated
safely at all times, and that local laws governing the use of Radio
Frequency (RF) devices are observed.
Sepura products are designed for use by mobile workforces, often working
alone, and are intended for use in occupational and controlled conditions.
It is recommended that you obtain training on how to operate this
product. Your personal safety could be at risk if you do not understand
how to operate this product correctly.
Sepura products have been tested to meet strict guidelines for personal
safety and operational conditions. Do not operate this product in
environments that exceed those listed on the product technical data sheet.
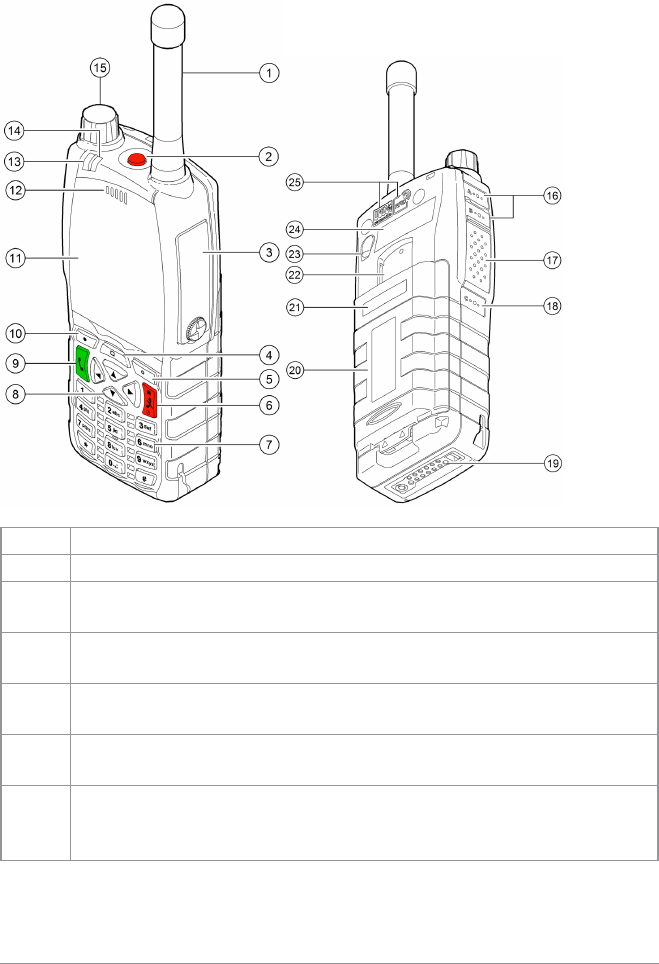
Your radio at a glance
Item Description
1Antenna.
2Programmable Emergency Button. Press and hold (2 seconds)
to initiate an Alarm call.
3Rugged Accessory Connector (sRAC). Provides connection for
accessories.
4Centre context key. Press to activate the feature or option that
appears directly above the key.
5Right context key. Press to activate the feature or option that
appears directly above the key.
6
Cancel/Home key. Press and hold (2 seconds) to power on
your radio. From the Home screen, press and hold (4 seconds)
to power off.
2SC20 series – 03/2016

Quick Start Guide 3
Item Description
7
Alphanumeric keypad with backlight. Loudspeaker and
microphone behind. The loudspeaker is used during Group
calls when an audio acccessory is not connected and the radio
is held in the hand. The microphone is used during phone
calls.
8Navigation keys. Press to scroll through lists and move the
cursor when writing text.
9Select/Send key. Press to initiate a phone call.
10 Left context key. Press to activate the feature or option that
appears directly above the key.
11 Colour display with backlight.
12
Earpiece and microphone. Earpiece is active during phone
calls when the radio is held like a smart phone against the ear.
Speak into the microphone during Group calls when the radio
is not attached to an audio accessory and held in the hand.
13 Tri-colour LED (indicator). Indicates various operational states
of the radio.
14 Blue LED (indicator). Indicates a missed event such as a call,
Callout or message. Also indicates Bluetooth® status.
15 Navi-knob. A continuously rotating knob used to adjust the
speaker volume.
16 Side Button (A/B). Press to activate a programmed feature.
17 PTT (Press-to-talk) button. Press and hold to talk during a
group call. Release to listen to other radio users.
18 Side Button (C). Press to activate a programmed feature.
19 Digital Accessory Connector (sDAC). Used to charge the
battery, program the radio and attach accessories.
20 Battery
21 Battery label area for attaching an asset label (optional).
22 Attachment point for accessory. Used to connect a belt clip or
other accessory designed for securing the radio during use.
23 External Antenna Connector used with a car kit to attach an
external antenna to the radio.
24 Radio ID Label for attaching an asset label (optional).
25 RFID tag for monitoring and auditing purposes.
Battery
For your safety, inspect the battery regularly for any signs of damage,
such as cracks or surface damage caused by an impact or the battery
being dropped. Fit a new battery if there are any signs of damage.
Warning: Risk to personal safety. Sepura TETRA radios have
been tested and certified using Sepura approved batteries. The use
of non-approved batteries may damage the product, will result in
non-compliance with regulatory requirements, compromise the
product safety ratings including SARS, reduce the length of
operating time and will invalidate the product warranty.
Checking the battery charge
Always check the amount of battery charge before lengthy periods of
operation. A fully charged battery should provide continuous operation
for a full shift, depending on a number of operational factors such as how
the radio is operated, the operating environment (temperature and
network signal strength) and the condition of the battery. When the radio
is powered on, the amount of charge remaining may be displayed as a
percentage (%) on the screen.
Charging the battery
Your radio is powered by a rechargeable battery. The battery may be
recharged many times but it will eventually need replacing to ensure
continuous maximum performance from your radio.
First time battery charging
New batteries (Standard battery part no. 300-01174 and High Capacity
battery part no. 300-01175) are supplied in 'storage mode' which means
they have a minimum amount of charge for storage purposes. Before
using a new battery for the first time it must be fully charged to reactivate
it. If the battery is used before it is reactivated (fully charged) the radio
4SC20 series – 03/2016
Quick Start Guide 5
may not power on, or may indicate a low battery status icon or low level
of charge.
Battery chargers
Only use Sepura approved battery chargers. Use of non-approved
chargers may not fully charge the battery or damage it. Always read the
user documentation supplied with the charger for additional safety
instructions and how to use it.
Charging methods
The radio may be powered on or off during charging.
Attach the Charger cable to the sDAC connector at the base of the radio or
place the radio with battery attached into a charging dock. If the battery is
charged attached to the radio, and the radio is powered on, an indication
of the remaining time to fully charge the battery is displayed (in hh:mm
format). During charging, the tri-coloured LED on the radio indicates the
charging progress and the charging icon appears on the status line,
providing there is sufficient charge in the battery to support this function.
Status LED Description
Flashing Orange Battery temperature is either too hot or cold to
commence charging.
Solid Orange Charging in progress.
Solid Green Charging complete.
Solid Red Battery has failed to charge and may be not be
chargable. Contact your service provider or Sepura.
The battery may be charged separately from the radio using a battery-only
charger.
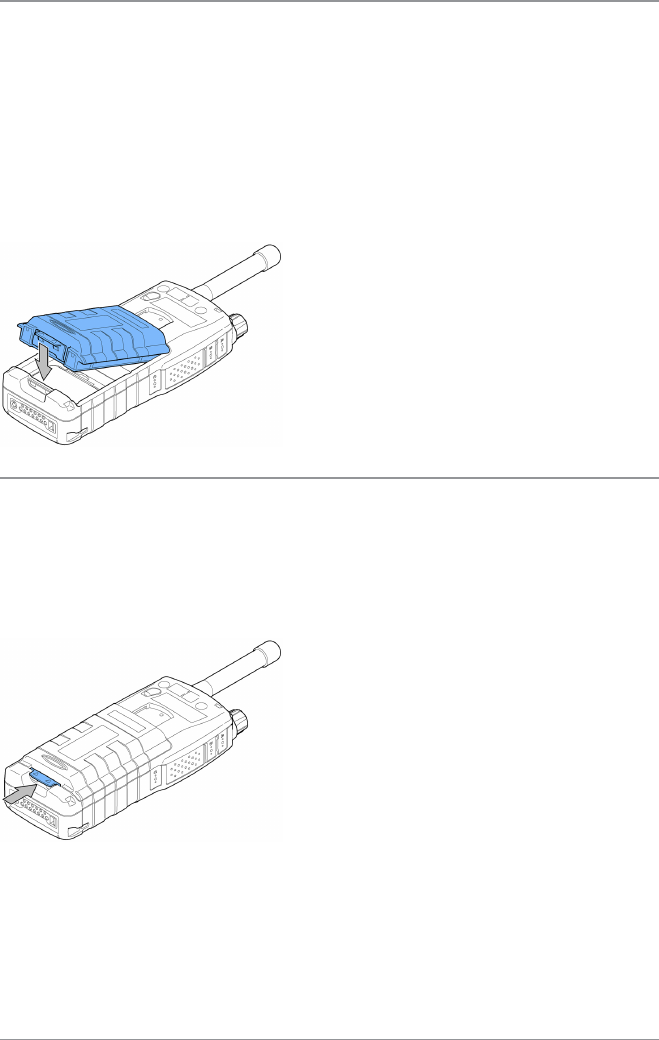
Fitting the battery
If a belt clip is fitted to the radio, lift the belt clip before attempting to fit
the battery. Do not attempt to insert the battery into the battery
compartment sideways under the belt clip. This may result in damage to
the radio and the belt clip.
To attach the battery, insert the battery into the battery compartment as
shown. Press the battery downwards until it clicks into position.
Removing the battery
Always power off before removing the battery.
Push the safety latch on the bottom of the battery. Lift the battery
upwards and remove.
6SC20 series – 03/2016

Quick Start Guide 7
Operational overview
Keys, buttons and knobs
Emergency button
Press and hold (2 seconds) to initiate an Alarm Call.
If the radio is powered off, press and hold (3 seconds) to power on and
initiate an Alarm Call. It may take several seconds for the radio to
complete its power on process before initiating the Alarm call.
PTT (press-to-talk) button
Press and hold to transmit (speak) during a Group call.
Release to receive and listen to other radio users.
Cancel/Home key
Press and hold (2 seconds) to power on.
In the Home screen, press and hold (4 seconds) to power off.
Press and hold (2 seconds) to return to the Home screen from any other
screen.
Press to end a phone call.
Select/Send key
Press to initiate a phone call.
Press to select a menu or option.
Navi-knob
Rotate to adjust the volume.
Navigation keys
Press to scroll lists, menus, talkgroup folders and status messages.
Press to move through characters when writing text.
Context keys
Context labels appear at the bottom of the screen, directly above each
context key. These labels show the action of the key when it is pressed;
either activating a feature or performing a function such as clearing a call
(Clear) or selecting an option (Select).
The labels and actions of the context keys in the Home screen are:
Context
key Label Action
Left Menu Press to enter the main menu.
Centre
Groups Press to change the talkgroup. See Select
a talkgroup on page 20
Status Press 2 times to send a status message.
See Send a status message on page 38
Profiles Press 3 times to select a user profile.
See User profiles on page 33
Right Shortcut
Press to open the Shortcut Bar to
quickly access regularly used features
or clear a notification. See Notifications
on page 18 and Shortcut Bar on page 18
Soft keys
Special features such as SmartMenus can be assigned to a soft key. Your
service provider or organisation can provide information about the
customisation of your radio's soft keys.
To activate a soft key function, press a programmable side key (A, B, C) or
press and hold (1 second) any one of the 0–9, * and # keys.
8SC20 series – 03/2016
Quick Start Guide 9
LED indicators
Blue LED
The blue LED indicates either a missed event, such as a missed call or
unread message, or your Bluetooth®status (if enabled). A notification
alerting you to the missed call, Callout or unread message appears in the
Shortcut Bar. See Notifications on page 18.
Tri-colour LED
The tri-colour LED indicates the operational state of the radio.
LED Colour Description
Solid green Radio is powering on or in a call and receiving
Solid red Radio is in a call and transmitting
Intermittent
flashing red
Attempting to connect to the network or
incoming telephone SDS/Status message or
battery low warning
Flashing orange Incoming telephone call or SDS/Status message
Intermittent four
flashes orange
Transmit Inhibit mode or Fallback mode are
active
Home screen
The top level screen, known as the Home screen, appears when the radio
powers on and when it is idle.
Tip: To quickly get back to the Home Screen, press and hold (2
seconds) the Cancel/Home key.
The status line, at the top of the screen, displays various icons to indicate
the state of operation or when certain functions like keypad lock have
been activated.
The context key labels at the bottom of the screen indicate what the context
key directly below the label is configured to do. These labels change
according to where you are in the menu hierarchy.
# Description
1Status line showing the radio coverage signal strength, battery
charge indicators, and operational status icons.
2
Information area containing information that only appears on the
Home screen. This is customised by your service provider or
organisation. It may show your selected talkgroup, date and time.
3Context key options (available in the Home screen).
Status icons
Icons appear on the status line (at the top of the screen) when the radio is
engaged in certain activities or when certain functions are active.
Icon Description
Security and Emergency
Emergency
Appears when emergency operation mode is active on your
radio and an Alarm call is in progress.
Air Interface Encryption disabled
Calls will not be encrypted.
10 SC20 series – 03/2016
Quick Start Guide 11
Icon Description
E2E Encryption enabled
The Secure Communications icon indicates that the selected
talkgroup is customised for End-to-End Encryption. In other
words, calls you make by pressing the PTT button are End-
to-End Encrypted.
E2E Encryption disabled
Indicates that the call is not encrypted.
Trunked Mode Operation (TMO)
Outgoing TMOcall in progress
You are in a call that you initiated.
Incoming TMO call in progress
You are in a call that was initiated by another person or
your dispatcher on the TMO network.
Missed incoming TMO call
The blue LEDflashes to notify you that you have missed an
incoming TMO call. A notification alerting you to the
missed call appears in the Shortcut Bar.
Broadcast Call
A high-priority group call (point-to-multi-point) initiated by
your Dispatcher to all network radio users. You cannot
reply to the caller.
Direct Mode Operation (DMO)
Incoming DMO call
You are in a DMO call that was initiated by another radio
user.
Outgoing DMO call in progress
You are in a call to another radio user.
Missed incoming DMO Call
The blue LEDflashes to notify you that you have missed an
incoming DMO call. A notification alerting you to the
missed call appears in the Shortcut Bar.
General icons
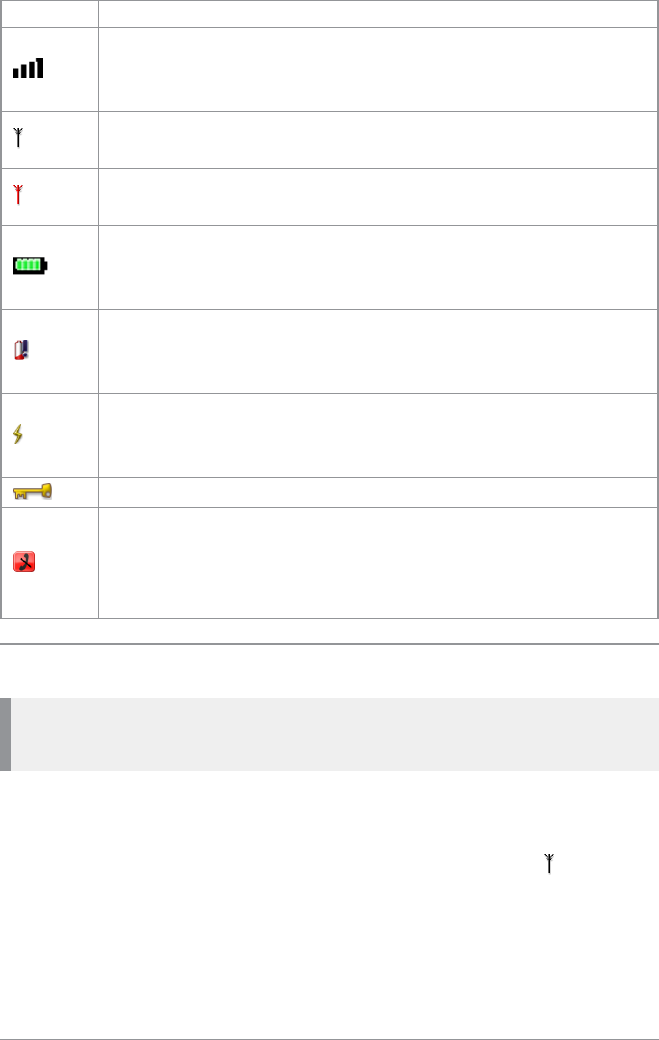
Icon Description
Signal Strength
Shows the current signal strength. More bars indicate a
stronger signal.
Good radio coverage
Indicates good radio coverage.
No service
Indicates poor signal or no radio coverage.
Battery Strength
Indicates the level of charge in your battery. More bars
indicates more charge.
Low battery warning
Appears when there is less than 12% charge remaining in
the battery.
Charging
Appears when the battery is attached to the radio during
charging and the radio is powered on.
Keypad locked
Transmit Inhibit
Indicates that you have activated transmit inhibit and the
radio is unable to transmit (overridden when Emergency
mode is activated).
Antenna and radio coverage
Caution: The antenna must be attached to the radio at all times.
Never remove the antenna during operational periods.
The ability to transmit and receive RF signals depends on the strength
and quality of the radio coverage.
Good radio coverage is indicated by the Signal Strength icon and bar
indicator displayed on the status line. In Trunked Mode Operation (TMO)
the bar indicator represents the network signal strength. In Direct Mode
Operation (DMO) it indicates the strength of the signal from the
12 SC20 series – 03/2016
Quick Start Guide 13
transmitting radio. Poor or no radio coverage is indicated by a short bar
or no bar at all with the poor signal strength icon.
Menu
Your radio is customised by your service provider or organisation with a
number of features that are accessed from the main menu.
To open the main menu, in the Home screen press Menu.
To open a sub-menu or menu option, scroll to the option (highlight it)
and press Select.
To return to a higher level menu, press Back.
To return to the Home screen at any time within the menu hierarchy,
press and hold (2 seconds) the Cancel/Home key.
Menu options
The following icons are used to identify the sub-menus that provide
access to further options.
Icon Menu option
Phone
Add, edit and delete your personal contacts within your
personal folder. Search (or filter) your contacts to locate the
contact you want and initiate a call. Review you call history.
Messages
Read, create, save and send text (SDS) messages. View
picture messages (if customised). Select and send a status
message. Clear your mailbox of unwanted messages.
Groups
Search your talkgroup folders and select a talkgroup. Enable
scanning of your selected talkgroups. Set up your speech call
settings.
GPS
Manage your GPS location and position settings. View your
current location, direction and speed.
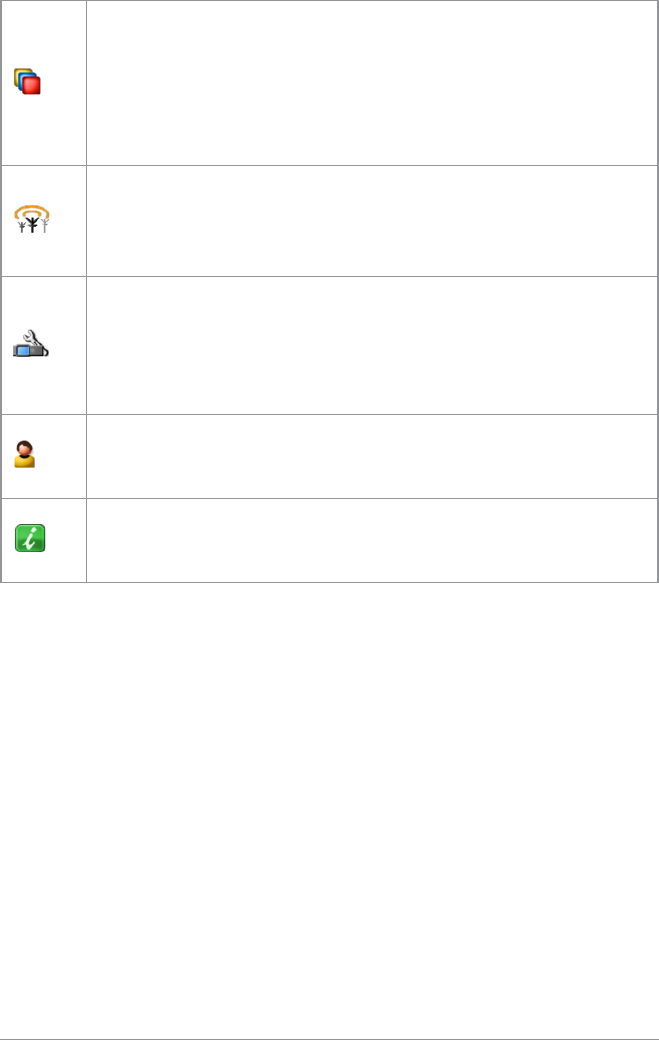
Applications
Your radio may be customised with a number of
applications such as Man-down and Lone Worker. Your
service provider or organisation may have installed specific
applications (Short Data Applications) to help you in your
role. Access WAP sites.
Networks
Manage your network connections and DMO options.
Change your operating mode (TMO/DMO). Enable/disable
Transmit Inhibit mode when working in RF sensitive areas.
Options
Manage your Bluetooth® devices and settings. Personalise
your radio settings such as backlight, text size and language.
Enable Connector Protector when working in salt laden
environments to protect your radio.
User Profiles
Select customised profiles designed specifically for the way
you work.
Help
View help, such as a list of customised soft keys on your
radio.
14 SC20 series – 03/2016

Quick Start Guide 15
Menu Structure
SmartMenus
SmartMenus are designed to provide quick access to regularly used radio
features, usually with a common theme. Your service provider or
organisation may customise your radio with a number of SmartMenus,
for example you may have a SmartMenu containing all your Quick
Status messages, another for user profiles and another for selecting
operational modes such as toggling on/off covert mode, Transmit Inhibit,
loudspeaker mute and so on.
SmartMenus are assigned to a soft key, either a Side key or one of the
keys on the keypad. To open a SmartMenu, press the Side key or press
and hold (1 second) the assigned key on the keypad.
Use the navigation keys to scroll the list of options on the SmartMenu.
Options are labelled with a number, shown to the right of the option. To
select the option, press the key that corresponds to the number of the
option, for example to select option 3, press the 3 key. Note that using this
method only options numbered 1 to 12 can be selected using the keys on
the keypad (press 0 for option 10, the Star (*) key for option 11 and the
Hash (#) key for option 12). For options numbered 13 onwards, scroll to
the option (highlight it), and press Select.
16 SC20 series – 03/2016
Quick Start Guide 17
Getting Started
Power on
To power on, press and hold (2 seconds) the Cancel/Home key.
Your radio attaches to the last selected talkgroup when it was powered
off (if it is 'in service').
Power off
Note: Do not power off the radio by removing the battery. The radio
must be powered off correctly to ensure that it performs a controlled
'powered down'.
To power off, from the Home screen press and hold (4 seconds) the
Cancel/Home key.
Scroll to the Shutdown option, then press the Select key to power off
your radio.
Locking and unlocking the keypad
To prevent accidental activity during operation, you can lock the keypad.
This will also prevent access to the radio's functions if the radio is stolen.
When the keypad is locked, the Key icon appears in the status line.
The Navi-knob, and the PTTand Emergency buttons remain unlocked so
you can still adjust the adjust the volume, make a Group or Alarm call
when the keypad is locked.
To lock/unlock the keypad:
Press the *(star) key (or a designated soft key), then press the OK context
key to lock/unlock the keypad.
If you press any other key while the keypad is locked no action is taken.
A message is displayed to remind you that the keypad is locked.
Adjusting the volume
Rotate the Navi-knob to adjust the volume. A vertical volume meter
displays to indicates the current volume level. The radio sounds an
audible tone at the new volume level.
Shortcut Bar
You can easily access commonly used radio features such as your Inbox,
and turn features on and off using the Shortcut Bar. The Shortcut Bar can
contain up to 5 radio features and some of these can be paired with
notifications to alert you to a missed call or a new message in your Inbox.
To open the Shortcut Bar, in the Home screen press the Shortcut context
key.
# Description
1
Use the navigation keys to scroll through the notifications and
features. Notifications always appear to the left of features. Press
the Right navigation key to continue scrolling right to view more
shortcuts (if available).
2To open a notification or feature, highlight it and press the Select
context key.
3Press the Back context key to close the Shortcut Bar without
opening a feature.
Notifications
Like a smart phone, your radio can display notifications to indicate a
missed call or new message. They also appear when certain functions are
enabled such as mute, transmit inhibit, and Lone Worker.
Some features can be paired with notifications, such as your Inbox so
when a message is received a notification appears in the Shortcut Bar to
18 SC20 series – 03/2016
Quick Start Guide 19
alert you to the unread message. When paired with a feature, the feature
icon appears with a notification badge .
# Description
1Notifications paired with features appear to the left of all
other feature icons.
2 Example notification of a change of state (Transmit Inhibit).
3Shortcuts to commonly used features always appear to the
right of notifications. Scroll right to see more features (if any).
4In the Home screen, press the Shortcut context key to access
the notification.
To close a notification:
From the Home screen, press the Shortcut context key, highlight the
notification then press the Select context key. Use the feature in the usual
way, for example, read an unread message or respond to a missed call.
The notification automatically closes and disappears from the Shortcut
Bar.
Selecting TMO and DMO
In Direct Mode Operation (DMO), radios communicate directly with other
TETRA radios without using a network. Coverage depends on the
position of the caller and the receiving radio. When you switch to DMO
mode your radio leaves the network and tunes to the selected DMO
talkgroup. In Trunked Mode Operation (TMO) your radio operates on the
network infrastructure supplied by your service provider.
To change operating mode from the Home screen:
Press the Menu context key, then select Networks > Operating Mode.
Scroll to the mode (highlight it) and press Select.
Select a talkgroup
Your radio is customised with talkgroups that typically include users
who are either performing a similar role or who are within a distinct
location or provide a service that you use.
To select a talkgroup:
1. From the Home Screen, press the Groups context key. The current
selected folder and talkgroup appear in a selection box.
2. Use the Left and Right navigation keys to move between folders at the
same level. Use the Up and Down navigation keys to move between
the folder levels (sub-folders).
Rotate the Navi-knob to scroll through the talkgroups within the
currently selected folder. The directional arrows under the talkgroup
name indicate the rotational direction of the Navi-knob.
3. Press the Select context key to attach to the talkgroup.
20 SC20 series – 03/2016

Quick Start Guide 21
Emergency operation
The red button on the top of your radio is programmed to initiate an
Alarm call at any time when your radio is in operation. This button is
known as the Emergency Button.
Your radio may be customised to perform one or more of the following:
Initiate an Alarm call set up to one or more pre-defined users
(typically to your dispatcher and other members of your talkgroup)
and/or;
Send an Emergency Status message to an individual, the dispatcher or
a talkgroup and/or;
Send a position report (GPS dependent).
If you are working in RF sensitive areas and have enabled Transmit
Inhibit, prohibiting radio transmission, initiating an Alarm call will
override the Transmit Inhibit feature and the Alarm call will be
transmitted.
Your service provider or organisation can provide information on how
your radio is customised for Alarm calls and how to operate your radio
in emergency situations. If you are working in a sensitive environment
your radio may be customised for Silent Alarm calls where audible and
display alerts are disabled, or your radio may be customised for Live
Microphone that allows you to call for assistance hands-free without
pressing the PTT button.
Live Microphone feature
Your radio may be customised with the Live Microphone feature. This
feature allows you to broadcast a call for assistance hands-free for a
specified period of time and without having to press the PTT button. The
radio automatically cycles between transmit and receive communication
during a programmed period of time (seconds). Live Microphone is
cancelled when the time expires or by pressing the PTT button.

Making an Alarm call
You can still make an Alarm call if the keypad is locked.
1. Press and hold (2 seconds) the Emergency button; a confirmation beep
sounds.
2. Release the button and speak into the microphone.
During an Alarm call:
the microphone is ‘live’ for a programmed period (seconds) allowing
you to speak hands-free without pressing the PTT button
(customisable)
the LED illuminates solid red
your radio sounds audible tones
a large emergency symbol appears on the screen
your identity and talkgroup appears on the display of those receiving
the Alarm call
Receiving an Alarm call
An Alarm call overrides any existing calls on the talkgroup.
You know you are receiving an Alarm call when:
your radio sounds an audible tone
the LED flashes red
the emergency symbol appears on the screen
your radio status changes to Emergency
22 SC20 series – 03/2016
Quick Start Guide 23
Clearing an Alarm call
You can only clear an Alarm call that you have initiated.
To cancel the Alarm call, press the Clear context key.
Warning: Depending on which network is being used, if the
TETRA Alarm call is a group call, then although both of the
TETRA Alarm call exit functions will clear the TETRA Alarm call
on the call originator’s radio, it will not remove the alarm from
the system. It should also be noted that those radios alerted to the
emergency may, depending upon the infrastructure configuration,
remain in the TETRA Alarm call condition until the dispatcher
clears the call from the system.
When the Alarm call is cancelled, your radio returns to the talkgroup that
was selected before the call was initiated.
Power on Alarm call
If your radio is powered off, press and hold (3 seconds) the Emergency
button to power on and initiate an Alarm call. Any customised Welcome
screen is not displayed during power on. If your radio is customised for
PIN entry, you will need to enter your PIN before the alarm call is
initiated. It may take several seconds for the radio to complete its power
on process before initiating the Alarm call.

Contacts
Details of regularly used contacts are stored in a phone book. The phone
book has a series of folders labelled Menu,Search,All and Personal. Your
radio may have additional folders containing contacts programmed into
your radio during customisation.
The Personal folder contains contacts you create (personal contacts). This
folder only appears when you create your first personal contact. The All
folder contains both personal contacts and contacts programmed into
your radio.
Each contact can have up to six associated numbers. The icon next to
each contact indicates the dial mode, a radio or to a telephone,
of the first number associated with it.
To open the Phone book, from the Home screen, press the Menu context
key, then select Phone > Contacts.
To open the Phone book, select Menu > Phone > Contacts.
Searching and filtering contacts
You can search the entire phone book for contact names and numbers, or
filter the contacts within a folder by entering a search string into the
Search Bar at the top of any folder (except Menu):
When the search is complete:
the Search folder lists folders containing at least one entry containing
the search string, and the number of entries in those folders. You can
open any of the listed folders.
all other folders are filtered to show their matching entries above a
dotted line. All non-matching entries are listed below the dotted line.
To search for contacts and numbers within the phone book:
1. Select Menu > Phone > Contacts. Navigate to the Search folder.
2. Press the Up navigation key to open the Search Bar.
24 SC20 series – 03/2016

Quick Start Guide 25
3. Enter a search string (see Text entry on page 31) and press the Search
context key.
4. When the search is complete, any folder containing a possible match
to your search (and the number of possible matches within that folder)
appear in the Search folder. To open a folder, select it and then press
the Open context key.
5. To clear the search string, press the Delete context key to delete each
character in the search string, then press the Cancel context key, then
the OK context key.
To filter contacts within a folder:
1. Open the folder.
2. Press the Up navigation key to open the Search Bar.
3. Enter a search string (see Text entry on page 31), then press the Filter
context key.
4. Any contact in the folder that is a possible match to your search
criteria appears at the top of the contact list. To view the contact's
details, select the contact and press the Open context key.
5. To clear the search string, press the Delete context key to delete each
character in the search string, then press the Cancel context key, then
the OK context key.
Creating contacts
To create a contact:
1. Select Menu > Phone > Contacts.
2. Navigate to the Menu card and select Create Contact.
3. Enter the contact name (see Text entry on page 31) then press the Save
context key.
4. Select a dial mode for this contact, either TETRA Network (default) or
telephone/mobile network.
To change the dial mode, press the Up navigation key to select the dial
mode line then use the Left or Right navigation keys to switch dial
modes. Press the Down navigation key to continue entering the
number.
Note: If the message Wrong number type appears, change the dial
mode or check that the length of the number is between 5 and 8
numbers.
5. Enter the number (see Text entry on page 31) then press the Save
context key.
6. To add more phone numbers for the contact select Add Next Number
and repeat the previous step.
Tip: To add further contact numbers to a saved contact, open the
contact and select Add New Number at the end of its numbers
list.
7. To return to the Personal folder press the Cancel context key.
Editing contacts
You can edit (and delete) contacts in the Personal folder of the Phone book.
To edit personal contacts:
1. Select Menu > Phone > Contacts and then select the Personal folder.
2. Navigate to the contact you want to edit, then press Open.
To edit the name:
1. Select the name and then press Edit.
2. Make changes as required, then press Save.
26 SC20 series – 03/2016

Quick Start Guide 27
To edit a number:
1. Select the number and then press Options. Select Edit and press
Select.
2. Make changes: to add additional digits press the number keys; to
delete digits press the Left navigation key.
3. After making changes press Save.
To delete a contact:
1. Select the contact and press Open.
2. Press Options.
3. Select Edit >Delete contact, then press Select.

Calls
The various types of voice and data calls that are supported by your
radio, and the acoustic and visual alerts that accompany a call, depend
on your radio's customisation.
Group calls
Group (point-to-multipoint) calls are calls where you talk to other users
within a nominated group of radio users (a talkgroup). In a Group call
only one person can talk at any one time (known as half-duplex mode).
During Group calls the microphone at the top of your radio is active and
all received audio is routed to the loudspeaker.
Making a group call
1. Press and hold the PTT button and speak into the top microphone.
The LEDchanges to solid red to indicate that your radio is
transmitting, and an audible tone is heard and your radio status text
changes to 'Talk'.
2. When you have finished talking, release the PTT button and listen to
audio received, through the loudspeaker.
The LED changes to solid green whilst the group call is active and
your radio status text changes to ‘Group Call’.
Receiving a group call
When a Group call is received, the LEDflashes red and your radio status
changes to ‘Group Call’. The name of the talk group, talk group folder
and the caller’s ID are displayed. When the LED changes to solid green
(after a few seconds) you can respond to the call.
28 SC20 series – 03/2016

Quick Start Guide 29
Individual calls
Individual calls (point-to-point) are private calls between you and one
other person. You can make individual calls in two modes:
individual calls (half-duplex mode)—where only one person can talk
at a time using the PTT button.
individual ‘phone’ calls (full-duplex mode)—where both parties can
talk simultaneously.
Making individual calls (half-duplex mode)
Calling a contact:
1. Select Menu > Phone > Contacts to open the contacts menu.
2. Navigate to a contacts folder (such as the All folder) and select your
contact. Press the Open context key, then choose the phone number.
3. Press the PTT button to initiate the call (or press Options, select Dial
then press Select.
4. To speak, press the PTT button; release the PTT button to listen.
5. To end the call, press the Clear context key or the Cancel/Home key.
Calling by dialling:
1. From the Home Screen, dial the number of the person you are calling.
2. Press the PTT button to initiate the call (or press the Call context key).
3. To speak press the PTT button; release the PTT button to listen to the
other radio users.
4. To end the call, press the Clear context key.
Receiving individual calls (half-duplex)
1. Press the PTT button to answer the call or the Clear context key to
reject the call.

Making individual phone calls (full-duplex mode)
Calling a contact:
1. Select Menu > Phone > Contacts to open the contacts menu.
2. Navigate to a contacts folder (such as the All folder) and select your
contact. Press the Open context key, then choose the phone number.
3. To initiate the ‘phone’ call press the Dial context key.
4. To end the call, press the Clear context key .
Calling by dialling:
1. From Home Screen, dial the number of the person you are calling.
2. Press Send to iniate the call.
3. To end the call, press Clear.
Note: If your radio has been customised with a single dial mode for
TETRA, PBX and PSTN numbers, the dial mode icon cannot be
changed.
Receiving a phone call
When an incoming phone call is received, your radio sounds an audible
alert and displays the identity of the caller (if the contact or number is
stored in your phone book).
1. Press the Accept context key to answer the call. Press the Reject
context key to reject the call.
2. To end the call, press the Clear context key .
30 SC20 series – 03/2016

Quick Start Guide 31
Text entry
Writing and editing text on your radio is similar to most smart phones.
Text edit mode is automatically activated when you select certain
functions, such as creating a message or adding a contact to your phone
book.
Character sets
You can use character sets to change the style of the text, and to enter
numbers and special characters. The character set can be changed as
often as required when entering text. The following character sets are
supported:
Character set Description
Auto-capitalisation (Abc)
The first letter is entered in upper-case,
with all following characters in lower-
case. New sentences start with a
capital letter and end with a full stop
(.), question mark (?) or exclamation
mark (!) followed by one or more
spaces.
Upper case (ABC) All characters are entered in upper-
case.
Lower case (abc) All characters are entered in lower-
case.
Numeric (123) All characters are numbers.
Special characters(!.@)
You can select special characters such
as full stops (.), semi-colon (;) and
commas (,) by pressing the 0key.
Further special characters
#@!”£$%&’()*+- are available
on the #key.
The selected character set is indicated on the status line at the top of the
display, next to the Battery Charge icon.

To change the character set:
Press the Star (*) key during text entry.
To enter characters:
Press a key repeatedly to highlight a character in its Character Selection
Box at the bottom of the screen, then press the Select context key (or wait
for the character to be auto-inserted).
To delete a character:
To delete the character to the left of the cursor press the Delete context
key.
To enter special characters:
To insert punctuation (full stop, comma, or semi-colon) press zero (0)
repeatedly until the symbol is highlighted in the Character Selection Box,
then press the Select context key (or wait for the character to be auto-
inserted).
To insert a space press 1(on the keypad).
To insert symbols press the hash(#) key repeatedly until the symbol is
highlighted in the Character Selection Box, then press the Select context
key (or wait for the character to be auto-inserted).
32 SC20 series – 03/2016
Quick Start Guide 33
Features
Your radio can be customised for various advanced features and can
have various soft keys assigned to frequently used features.
Connector Protector
When working in salt water environments or in an area with high salt-
laden humidity such as sea mist or fog, enabling the Connector Protector
feature will protect the Digital Accessory connector (sDAC) from potential
corrosive damage when an accessory is not attached.
Note: A cover must be fitted to the Rugged Accessory Connector
(RAC) (on the side of the radio) if an accessory is not attached.
To enable Connector Protector:
1. Press Menu then select Options > Settings > Connector Protection.
2. To toggle protection on/off press the Toggle context key. When the CP
Enable check box is ticked, Connector Protector is enabled, and when
the check box is empty it is disabled.
If Connector Protector is enabled ( ) when the radio is powered off, it
will remain enabled when the radio is next powered on unless the radio
is in a charger or car kit or if a data accessory is attached when the radio
is powered on, in which case Connection Protector is disabled ( ) until
the radio is removed from the charger, car kit or data accessory. In these
circumstances it is not necessary to re-enable Connector Protector.
User profiles
User profiles are pre-set combinations of alerts and settings on your radio.
They allow you to switch settings easily to match your circumstances or
environment. An icon showing the number of the profile selected,
appears on the status line or the Shortcut Bar. Up to ten pre-defined user

profiles may be configured for your radio. Example user profiles could be
Normal,Lone Worker and Covert.
To change the user profile:
1. From the Home screen, press the Groups context key 3 times ( User
Profiles).
2. Use the navigation keys to scroll through the user profiles.
3. Press the Select context key to activate the selected user profile.
Man Down
Man Down is a licensed customisable feature which uses motion sensors
to detect motion in three dimensions. When your radio is powered on it
stores it's current angle of inclination (orientation). If it moves more than
a customised angle from the original inclination or is stationary for more
than a customised length of time, the radio sounds an alarm and
displays a ‘Man Down Alarm’ message. In other words the radio can
detect conditions indicating that you have become incapacitated. If you
do not respond to the alert within a customised time period, your radio
initiates a Man Down Emergency and takes action depending on its
customisation.
To toggle Man Down on/off:
1. Activate Man Down using one of the following methods:
Press a customised soft key to toggle Man Down on. The sensors
activated are those set in Man Down options on the facing page.
Select a user profile which uses Man Down (see User profiles on the
previous page). The sensors activated are those customised in the
profile.
From the Home screen, press the Shortcut context key, then select
the Man Down icon.
A message (‘Man Down Starting’) is displayed and an alert sounds (a
succession of beeps).
34 SC20 series – 03/2016

Quick Start Guide 35
2. Attach your radio in a comfortable wearing position on your body.
When a two second continuous tone finishes the radio’s ‘normal’
wearing position has been recorded. An icon indicates that Man Down
is switched on and which sensors are active.
To deactivate Man Down, either select a user profile which does not use
Man Down, or press the customised soft key to toggle Man Down off.
Man Down options
1. Press Menu then select Applications > Man Down.
2. Select the Man Down sensors to use: Motion & Tilt sensors,
Motion Sensor only, or Tilt Only sensor.
If you enable Man Down from a User Profile, the Man Down Settings
screen updates to reflect the sensors defined as active in the Profile.
Lone Worker
If you are working alone you can use the Lone Worker feature to let your
dispatcher know that you are safe.
When Lone Worker is enabled your radio periodically sounds an alert
which you must acknowledge—usually by pressing a pre-programmed
key—otherwise the radio sends an emergency status message to your
dispatcher.
To enable Lone Worker, scroll to a user profile which has Lone Worker
enabled, then press the Select context key. See User profiles on page 33.
To disable Lone Worker mode, repeat the process and but choose a
different user profile.

Messages
Your radio supports status messages, text (SDS) messages and
picture messages. All message types are available from the Messages
menu.
Inbox
Incoming messages are displayed in the Inbox with the most recently
received messages at the top. Unread messages appear in Bold. The icon
next to the message indicates the type of message received and whether
the message is read or unread.
The Inbox can store up to 50 messages. When the Inbox is full, unsaved
older messages are automatically deleted when new messages are
received. If you want to keep a message, you must save it.
To open your inbox, from the Home screen, press the Menu context key,
then select Messages > Inbox. A shortcut to your Inbox may be available
from the Shortcut Bar, see Shortcut Bar on page 18.
Create a text message
To create a text message, from the Home screen, press the Menu context
key, then select Messages > Create Message. Write your message (see
Text entry on page 31).
To send your message, see Send a message on the facing page.
Read a new message
When a message is received your radio vibrates and/or generates an
audible alert. A notification appears in the Shortcut Bar, see Notifications
on page 18 and the blue LED flashes.
To read a new message, open your Inbox (Messages > Inbox). To open
the message, select it and press the Open context key. To read a long
36 SC20 series – 03/2016

Quick Start Guide 37
message use the Down navigation key to continue reading, and the Up
navigation key to return to the top of the message.
When you have finished reading the message, you can choose to reply to
the message (see Reply to a message below), delete it or save it.
To delete the message, press the Options context key, select the Delete
option and press the Select context key. Select the Delete Message
option and press the Select context key.
To save the message, press the Options context key, select Save and
then press the Select context key.
Reply to a message
You can only reply to a text message.
To reply to a message, press the Reply context key. Write your message
and when you have finished entering text, press the Send context key. For
information on how to send your message, see Send a message below.
Send a message
Your service provider or organisation may customise your radio with a
default destination, for example when you reply to a message it is sent to
your Supervisor or Dispatcher. Other options allow you to send your
message to your current talkgroup or a contact in your phone book or a
known contact by dialling their number (ISSI).
To send to your default destination, select Send to default and then press
Send.
To send to your talkgroup, select Send to group. The details of your
current talkgroup appear. You cannot change the talkgroup. Press the
Send context key to send your message.
To send to a contact in your phone book, select Phonebook then select
your contact and the destination number (see Contacts on page 24). Press
Send to send your message.

To dial the number of a known contact, select Dial. Enter the ISSI
(Individual Short Subscriber Identity) for your contact and press the Send
context key.
Send a status message
Your service provider or organisation may customise your radio with
status messages. These are pre-defined short messages that are uniquely
identified by a status code. They are used to notify others of your current
status.
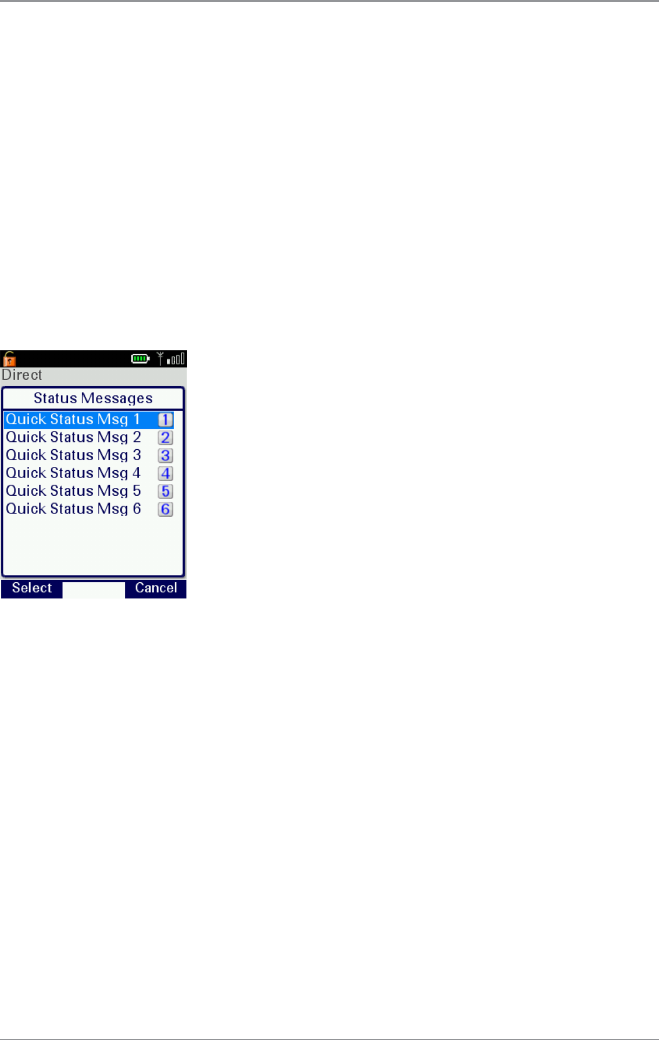
To send a status message, from the Home screen press the Groups
context key 2 times. Use the navigation keys to scroll through your status
messages. To send the message, press the Send context key. See Send a
message on the previous page.
38 SC20 series – 03/2016

Quick Start Guide 39
Personalising your radio
You can personalise your display settings (such as text size, backlight,
inverting the screen and change languages) and create a personal phone
book containing your own contacts.
Invert the display
When you are wearing the radio on your shoulder, attached to a belt or to
a body vest, you may want to flip the display upside down to make it
easier to read. The Invert Display option rotates all screen elements (apart
from the Context key labels) by 180 degrees.
To invert the display:
1. Select Menu > Options > Settings > Display Settings > Invert Display.
2. Press the Toggle context key. When a tick appears in the check box,
the display is flipped, and when the check box is empty the display is
set to normal.
Note: When the display is inverted, the navigation keys work in
opposite to their normal function. Press the Up key to scroll down and
the Down key to scroll up. The Right key to scroll left and the Left key
to scroll right.
Adjusting the backlight
When a call or message is received, and when you press any key, the
backlight lights up the display and keypad. The length of time the
backlight illuminates is set during customisation.
To adjust the backlight:
1. Select Menu >Options >Settings >Display Settings >Backlight.
2. Press the Toggle context key.

To adjust brightness:
1. Select Menu >Options >Settings >Display Settings >Day/Night
Mode.
2. Select Backlight Level.
3. Rotate the Navi-knob to adjust the intensity of the backlight and the
keypad illumination on a scale of 1–7 (max.).
Day/Night mode
When a call or message is received, and when you press any key, the
backlight lights up the display and keypad. A bright display can be a
potential distraction, particularly when driving at night or in poor
lighting conditions. Day/Night mode lets you adjust the intensity of the
backlight and keypad illumination to suit your working conditions. Night
mode reduces the glare from the display, making it ideally suited for
when the radio is cradled in a vehicle at night time.
When the preferences for day and night mode have been set, switching
between the modes automatically adjusts the backlight and display
settings.
To change Day/Night mode settings
1. Select Menu >Options >Settings >Display Settings >Day/Night
Mode.
2. Scroll to each option (highlight it) to make your adjustments:
Day Mode—to toggle between Day Mode and Night Mode press
the Toggle context key.
Backlight Enabled—to toggle the backlight on/off press the Toggle
context key. When a tick appears in the box, the backlight is on,
and when the box is empty, the backlight is off.
Backlight Level—to adjust the intensity of the backlight and the key
pad illumination on a scale of 1 to 7 rotate the Navi-knob.
40 SC20 series – 03/2016

Quick Start Guide 41
Adjusting text and icon size
Your radio uses the default size for the text and icons set during
customisation, however it also supports a number of different size modes
that control how text and icons are displayed. Having the ability to
change the text and icon size is useful when the handset is cradled in the
car and you want to enlarge the text and icons to make them easier to
read from a distance.
Caution: When selecting larger modes, some prompts or icons may
not appear on the radio display.
Your radio supports the following modes:
Normal Mode allows the maximum amount of information available to
be displayed in a compact character size.
Large Mode displays screen information in a large character size.
Very Large Mode displays the talkgroup number or talkgroup name, as
customised, in an extra large size on the Home screen with all other
screens in Large mode.
Custom displays the Home screen, menu and WAP browser in
predefined text sizes set during customisation. Only the Home screen
supports Very Large mode, with other screens set to either Normal or
Large mode.
To change text mode:
1. Select Menu >Options >Settings >Display Settings >Text Size.
2. Use the Up and Down Navigation keys to highlight the mode and
then press the Select context key.
The radio displays the Home screen, with the text and icons appearing in
the chosen mode.

Setting the display language
Your radio operates in the language chosen during customisation and
can support two display languages. The display uses the default
language if the radio is only customised for a single language, or the
currently selected language if two languages are programmed.
To change the language:
1. Select Menu >Options >Settings >Language.
2. Scroll to the language option, and then press the Select context key.
The Home screen appears and the display shows the selected language.
42 SC20 series – 03/2016

Quick Start Guide 43
Tips & Tricks
Home Screen
To quickly get back to the Home Screen, press and hold (2 seconds) the
Cancel/Home key.
Keypad lock/unlock
To quickly lock/unlock the keypad, press and hold (2 seconds) the *(star)
key.
Change talkgroup
From the Home screen, press the Groups context key. Use the navigation
keys to change the folder, then rotate the Navi-knob to select the
talkgroup. Press Select to attach to the talkgroup.
Send status message
From the Home screen, press Shortcut to open the Shortcut Bar. Scroll to
the Quick Status shortcut and press Select. Use the navigation keys to
scroll through the messages. Press Send then choose a destination for the
message. See Send a message on page 37
Writing text
To change character sets: press the Star (*) key during text entry.
To delete a character to the left of cursor: select Delete.
To add punctuation (full stop, comma, or semi-colon): press zero (0).
To insert a space: press 1(on the keypad).
To insert symbols: press the hash(#) key repeatedly until the symbol is
highlighted in the Character Selection Box, then press Select (or wait for
the character to be auto-inserted).
Select and cancel functions
To select and cancel functions within the sub-menus, you can press the
Select/Send key to select a function and the Cancel/Home key to cancel a

function.
Automatic scrolling using the navigation keys
To scroll a list quickly, press and hold the Up or Down navigation key.
Making a phone call
Instead of using the context keys to initiate and end a call, use the
Select/Send key to make a call and the Cancel/Home key to end the call.
View recent calls
To view recent calls, from the Home screen press Menu > Phone > Call
History.
44 SC20 series – 03/2016

Sepura plc
9000 Cambridge Research Park
Beach Drive
Waterbeach
Cambridge
CB25 9TL
United Kingdom sepura.com