User operation manual

®
READ ALL INSTRUCTIONS CAREFULLY BEFORE USING THE OVEN.
MICROWAVE OVEN
OPERATION MANUAL
®
MODEL
R-120D
followed by letter indicating color
K=black, W=white
B=blue, R=Amber

• Precautions to Avoid Possible
Exposure to Excessive Microwave
Energy............................ Inside Front Cover
• For Customer AssistanceInside Front Cover
• Product lnformation Card ...........................1
• Consumer Limited Warranty.......................1
• Important Safety Instructions .....................2
• Unpacking and Installation Instructions......3
• Grounding Instructions ...............................3
• Information You Need to Know...................4
• Part Names ................................................7
• Control Panel Illustrations ..........................7
• Before Operating........................................8
• Manual Operation.......................................8
• Special Features ........................................8
• Cleaning and Care ...................................11
• Service Call Check ...................................12
• Specifications ...........................................12
• Cooking Reference ..................................13
• Guia Auto-Touch............. Parte Interior de la
Cubierta Trasera
• Auto-Touch Guide .................... Back Cover
CONTENTS

TO PHONE:
DIAL 1-800- BE-SHARP ( 237-4277 ) for :
SERVICE (for your nearest Sharp Authorized Servicer)
PARTS (for your authorized parts distributor)
ADDITIONAL CUSTOMER INFORMATION
DIAL 1-800-642-2122 for :
ACCESSORIES and COOKBOOK
DIAL (201)529-8703 for :
COOKING ASSISTANCE
TO WRITE:
For service problems, warranty information, missing items and other assistance:
Sharp Electronics Corporation
Customer Assistance Center
1300 Naperville Drive
Romeoville, IL 60446-1091
For cooking and operation questions:
Susan Edwards/Test Kitchen
Sharp Electronics Corporation
Sharp Plaza, Box 650
Mahwah, NJ 07430-2135
TO ACCESS INTERNET:
www.sharp-usa.com
To aid in reporting this microwave oven in case of loss or theft, please record below the model number and serial
number located on the unit. We also suggest you record all the information listed and retain for future reference.
Please provide the following information when you write or call: model number, serial number, date of
purchase, your complete mailing address (including zip code), your daytime telephone number (including
area code) and description of the problem.
MODEL NUMBER ________________________ SERIAL NUMBER ______________
DATE OF PURCHASE ______________________
DEALER ____________________________ TELEPHONE ________________
SERVICER ___________________________ TELEPHONE ________________
PRECAUTIONS TO AVOID POSSIBLE
EXPOSURE TO EXCESSIVE
MICROWAVE ENERGY
(a) Do not attempt to operate this oven with the door open since open-door operation can
result in harmful exposure to microwave energy. It is important not to defeat or tamper with
the safety interlocks.
(b) Do not place any object between the oven front face and the door or allow soil or cleaner
residue to accumulate on sealing surfaces.
(c) Do not operate the oven if it is damaged. It is particularly important that the oven door close
properly and that there is no damage to the: (1) door (bent), (2) hinges and latches (broken
or loosened), (3) door seals and sealing surfaces.
(d) The oven should not be adjusted or repaired by anyone except properly qualified service
personnel.
FOR CUSTOMER ASSISTANCE

1
CONSUMER LIMITED WARRANTY
SHARP ELECTRONICS CORPORATION warrants to the first consumer purchaser that this Sharp brand
product (the “Product”), when shipped in its original container, will be free from defective workmanship and
materials, and agrees that it will, at its option, either repair the defect or replace the defective Product or part
thereof with a new or remanufactured equivalent at no charge to the purchaser for parts or labor for the
period(s) set forth below.
This warranty does not apply to any appearance items of the Product nor to the additional excluded item(s)
set forth below nor to any Product the exterior of which has been damaged or defaced, which has been
subjected to improper voltage or other misuse, abnormal service or handling, or which has been altered or
modified in design or construction.
In order to enforce the rights under this limited warranty, the purchaser should follow the steps set forth
below and provide proof of purchase to the servicer.
The limited warranty described herein is in addition to whatever implied warranties may be granted
to purchasers by law. ALL IMPLIED WARRANTIES INCLUDING THE WARRANTIES OF
MERCHANTABILITY AND FITNESS FOR USE ARE LIMITED TO THE PERIOD(S) FROM THE DATE
OF PURCHASE SET FORTH BELOW. Some states do not allow limitations on how long an implied
warranty lasts, so the above limitation may not apply to you.
Neither the sales personnel of the seller nor any other person is authorized to make any warranties other
than those described herein, or to extend the duration of any warranties beyond the time period described
herein on behalf of Sharp.
The warranties described herein shall be the sole and exclusive warranties granted by Sharp and shall
be the sole and exclusive remedy available to the purchaser. Correction of defects, in the manner and for
the period of time described herein, shall constitute complete fulfillment of all liabilities and responsibilities
of Sharp to the purchaser with respect to the Product, and shall constitute full satisfaction of all claims,
whether based on contract, negligence, strict liability or otherwise. In no event shall Sharp be liable, or in any
way responsible, for any damages or defects in the Product which were caused by repairs or attempted
repairs performed by anyone other than an authorized servicer. Nor shall Sharp be liable or in any way
responsible for any incidental or consequential economic or property damage. Some states do not allow the
exclusion of incidental or consequential damages, so the above exclusion may not apply to you.
THIS WARRANTY GIVES YOU SPECIFIC LEGAL RIGHTS. YOU MAY ALSO HAVE OTHER RIGHTS
WHICH VARY FROM STATE TO STATE.
Your Product Model Number
& Description:
Warranty Period for this Product:
Additional Item(s) Excluded from
Warranty Coverage (if any):
Where to Obtain Service:
What to do to Obtain Service:
R-120D Home Use Carousel Microwave Oven. (Be sure to have this in-
formation available when you need service for your Product.)
One (1) year parts and labor. The warranty period continues for an
additional four (4) years, for a total of five (5) years, with respect to the
magnetron tube in the Product for parts only; labor and service are not
provided free of charge for this additional period.
Non-functional accessories, turntable and light bulb.
From a Sharp Authorized Servicer located In the United States. To find
the location of the nearest Sharp Authorized Servicer, call Sharp toll
free at 1-800-BE-SHARP (1-800-237-4277).
Ship prepaid or carry in your Product to a Sharp Authorized Servicer.
Be sure to have Proof of Purchase available. If you ship the Product,
be sure it is insured and packaged securely.
PRODUCT INFORMATION CARD
The product information card which is on the inside of the microwave oven carton should be completed within
ten days of purchase and returned. We will keep it on file and help you access the information in case of
loss, damage or theft. This will also enable us to contact you in the unlikely event that any adjustments or
modifications are ever required for your oven.
TO OBTAIN SUPPLY, ACCESSORY OR PRODUCT INFORMATION, CALL
1-800-BE-SHARP
OR VISIT www.Sharp-usa.com
.
Save the proof of purchase as it is needed should your oven ever require warranty service.

2
IMPORTANT SAFETY INSTRUCTIONS
SAVE THESE INSTRUCTIONS
When using electrical appliances basic safety precautions should be followed, including the following:
WARNING - To reduce the risk of burns, electric shock, fire, injury to persons or exposure to
excessive microwave energy:
1. Read all instructions before using the
appliance.
2. Read and follow the specific “PRECAU-
TIONS TO AVOID POSSIBLE EXPO-
SURE TO EXCESSIVE MICROWAVE
ENERGY” on inside front cover.
3. This appliance must be grounded. Connect
only to properly grounded outlet. See
“GROUNDING INSTRUCTIONS” on
page 3.
4. Install or locate this appliance only in ac-
cordance with the provided installation
instructions.
5. Some products such as whole eggs and
sealed containers —for example, closed glass
jars — may explode and should not be heated
in this oven.
6. Use this appliance only for its intended use
as described in this manual. Do not use
corrosive chemicals or vapors in this appli-
ance. This type of oven is specifically
designed to heat, cook or dry food. It is not
designed for industrial or laboratory use.
7. As with any appliance, close supervision is
necessary when used by children.
8. Do not operate this appliance if it has a
damaged cord or plug, if it is not working
properly or if it has been damaged or dropped.
9. This appliance should be serviced only by
qualified service personnel. Contact nearest
Sharp Authorized Servicer for examination,
repair or adjustment.
10. Do not cover or block any openings on the
appliance.
11. Do not store or use this appliance outdoors.
Do not use this product near water—for
example, near a kitchen sink, in a wet base-
ment or near a swimming pool, and the like.
12. Do not immerse cord or plug in water.
13. Keep cord away from heated surfaces.
14. Do not let cord hang over edge of table or
counter.
15. See door surface cleaning instructions on
page 11.
16. To reduce the risk of fire in the oven cavity:
a. Do not overcook food. Carefully attend
appliance if paper, plastic or other com-
bustible materials are placed inside the
oven to facilitate cooking.
b. Remove wire twist-ties from paper or
plastic bags before placing bag in oven.
c. If materials inside the oven should
ignite, keep oven door closed, turn
oven off and disconnect the power
cord or shut off power at the fuse or
circuit breaker panel.
d. Do not use the cavity for storage pur-
poses. Do not leave paper products,
cooking utensils or food in the cavity
when not in use.
17. If the oven light fails, consult a SHARP AU-
THORIZED SERVICER.
3
Unpacking and Examining Your Oven
Remove:
1. all packing materials from inside the oven cav-
ity; however, DO NOT REMOVE THE
WAVEGUIDE COVER, which is located on the
right cavity wall. Read
enclosures and SAVE
the Operation Manual.
2. the feature sticker, if
there is one, from the
outside of the door.
Check the oven for any
damage, such as mis-
aligned or bent door,
damaged door seals
and sealing surfaces, broken or loose door hinges
and latches and dents inside the cavity or on the
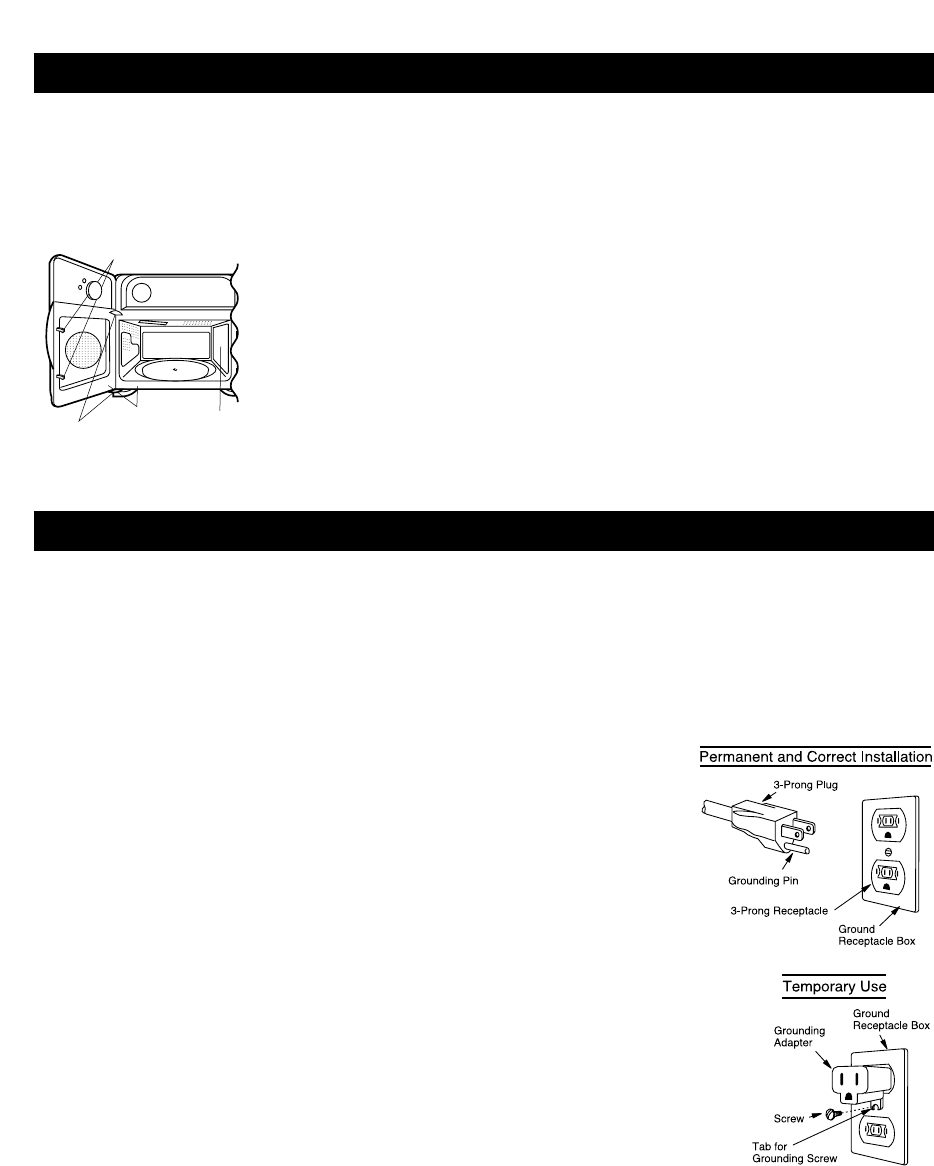
This appliance must be grounded. This oven is equipped with a cord having a grounding wire with a
grounding plug. It must be plugged into a wall receptacle that is properly installed and grounded in
accordance with the National Electrical Code and local codes and ordinances. In the event of an electri-
cal short circuit, grounding reduces risk of electric shock by providing an escape wire for the electric
current.
WARNING – Improper use of the grounding plug can result in a risk of electric shock.
Electrical Requirements
The electrical requirements are a 120 volt 60 Hz, AC only, 15 amp. or more
protected electrical supply. It is recommended that a separate circuit serv-
ing only this appliance be provided.
The oven is equipped with a 3-prong grounding plug. It must be plugged
into a wall receptacle that is properly installed and grounded. Should you
only have a 2-prong outlet, have a qualified electrician install a correct wall
receptacle.
A 3-prong adapter may be purchased and used temporarily if local codes
allow. Follow package directions.
A short power-supply cord is provided to reduce risk of becoming entangled
in or tripping over a longer cord.
Extension Cord
If it is necessary to use an extension cord, use only a 3-wire extension cord
that has a 3-blade grounding plug and a 3-slot receptacle that will accept
the plug on the microwave oven. The marked rating of the extension cord
should be AC 115-120 volt, 15 amp. or more.
Be careful not to drape the cord over the countertop or table where it can be
pulled on by children or tripped over accidentally.
Notes:1. If you have any questions about the grounding or electrical in-
structions, consult a qualified electrician or service person.
2. Neither Sharp nor the dealer can accept any liability for damage
to the oven or personal injury resulting from failure to observe the
correct electrical connection procedures.
Radio or TV Interference
Should there be any interference caused by the microwave oven to your radio or TV, check that the
microwave oven is on a different electrical circuit, relocate the radio or TV as far away from the oven as
feasible or check position and signal of receiving antenna.
UNPACKING AND INSTALLATION INSTRUCTIONS
GROUNDING INSTRUCTIONS
door. If there is any damage, do not operate the
oven and contact your dealer or SHARP
AUTHORIZED SERVICER.
Choosing a Location for Your Oven
You will use the oven frequently so plan its loca-
tion for ease of use. It's wise, if possible, to have
counter space on at least one side of the oven.
Allow at least 2 inches on the sides, top and at
the rear of the oven for air circulation. Do not place
or install the oven in any area where heat and
steam are generated; for example, next to or
above a conventional gas or electric range or
above a conventional wall oven. Heat and steam
may damage the electronics or the mechanical
parts of the oven.
Safety door latches
Hinges
Door seals and
sealing surfaces Waveguide
cover

4
INFORMATION YOU NEED TO KNOW
ABOUT YOUR OVEN
This Operation Manual is valuable: read it carefully and
always save it for reference.
A good microwave cookbook is a valuable asset.
Check it for microwave cooking principles, techniques,
hints and recipes. See page 16 for ordering the Ulti-
mate Accessory, the SHARP CAROUSEL MICRO-
WAVE COOKBOOK.
NEVER use the oven without the turntable and support
nor turn the turntable over so that a large dish could be
placed in the oven. The turntable will turn both clock-
wise and counterclockwise.
ALWAYS have food in the oven when it is on to absorb
the microwave energy.
When using the oven at power levels below 100%, you
Eggs, sausages,
nuts, seeds
fruits &
vegetables
Popcorn
Baby food
General
ABOUT FOOD
• Puncture egg yolks before cooking
to prevent “explosion”.
• Pierce skins of potatoes, apples,
squash, hot dogs and sausages so
that steam escapes.
• Use specially bagged popcorn for the
microwave oven.
• Listen while popping corn for the
popping to slow to 1 or 2 seconds or
use special POPCORN pad.
• Place carefully so bag does not touch
oven walls. The corners of the bag may
be folded down.
• Transfer baby food to small dish and
heat carefully, stirring often. Check
temperature before serving.
• Put nipples on bottles after heating
and shake thoroughly. “Wrist” test
before feeding.
• Cut baked goods with filling after
heating to release steam and avoid
burns.
• Stir liquids briskly before and after
heating to avoid “eruption”.
• Use deep bowl, when cooking liquids
or cereals, to prevent boilovers.
• Cook eggs in shells.
• Reheat whole eggs.
• Dry nuts or seeds in shells.
• Pop popcorn in regular brown bags
or glass bowls.
• Exceed maximum time on popcorn
package.
• Heat baby food in original jars.
• Heat disposable bottles.
• Heat bottles with nipples on.
• Heat or cook in closed glass jars or
air tight containers.
• Can in the microwave as harmful
bacteria may not be destroyed.
• Deep fat fry.
• Dry wood, gourds, herbs or wet papers.
DO DON’T
FOOD
may hear the magnetron cycling on and off. It is normal
for the exterior of the oven to be warm to the touch
when cooking or reheating.
Condensation is a normal part of microwave cooking.
Room humidity and the moisture in food will influence
the amount of moisture that condenses in the oven.
Generally, covered foods will not cause as much con-
densation as uncovered ones. Vents on the oven back
must not be blocked.
The oven is for food preparation only. It should not be
used to dry clothes or newspapers.
Your oven is rated 600 watts by using the IEC Test
Procedure. In using recipes or package directions,
check food a minute or two before the minimum time
and add time accordingly.

5
ABOUT UTENSILS AND COVERINGS
The following coverings are ideal:
• Paper towels are good for covering foods for re-
heating and absorbing fat while cooking bacon.
• Wax paper can be used for cooking and
reheating.
• Plastic wrap that is specially marked for micro-
wave use can be used for cooking and reheat-
ing. DO NOT allow plastic wrap to touch food.
Vent so steam can escape.
• Lids that are microwave-safe are a good choice
because heat is kept near the food to hasten
cooking.
• Oven cooking bags are good for large meats or
foods that need tenderizing. DO NOT use metal
twist ties. Remember to slit bag so steam can
escape.
How to use aluminum foil in your microwave
oven:
• Small flat pieces of aluminum foil placed
smoothly on the food can be used to shield
areas that are either defrosting or cooking too
quickly.
• Foil should not come closer than one inch to any
surface of the oven.
Should you have questions about utensils or coverings,
check a good microwave cookbook or follow recipe
suggestions.
ACCESSORIES There are many microwave accesso-
ries available for purchase. Evaluate carefully before
you purchase so that they meet your needs. A micro-
wave-safe thermometer will assist you in determining
correct doneness and assure you that foods have
been cooked to safe temperatures. Sharp is not
responsible for any damage to the oven when acces-
sories are used.
Children should be taught all safety precautions: use
potholders, remove coverings carefully, pay special
attention to packages that crisp food because they
may be extra hot.
Don’t assume that because a child has mastered one
cooking skill he/she can cook everything.
Children need to learn that the microwave oven is not
a toy. See page 13 for Safety Lock feature.
It is not necessary to buy all new cookware. Many
pieces already in your kitchen can be used success-
fully in your new microwave oven. Make sure the uten-
sil does not touch the interior walls during cooking.
Use these utensils for safe microwave cooking
and reheating:
• glass ceramic (Pyroceram®), such as
Corningware®.
• heat-resistant glass (Pyrex®)
• microwave-safe plastics
• paper plates
• microwave-safe pottery, stoneware and
porcelain
• browning dish (Do not exceed recommended
preheating time. Follow manufacturer's
directions.)
These items can be used for short time reheat-
ing of foods that have little fat or sugar in them:
• wood, straw, wicker
DO NOT USE
• metal pans and bakeware
• dishes with metallic trim
• non-heat-resistant glass
• non-microwave-safe plastics (margarine tubs)
• recycled paper products
• brown paper bags
• food storage bags
• metal twist-ties
Should you wish to check if a dish is safe for
microwaving, place the empty dish in the oven and
microwave on HIGH for 30 seconds. A dish which
becomes very hot should not be used.
ABOUT CHILDREN AND THE MICROWAVE
Children below the age of 7 should use the microwave
oven with a supervising person very near to them.
Between the ages of 7 and 12, the supervising person
should be in the same room.
The child must be able to reach the oven comfortably;
if not, he/she should stand on a sturdy stool.
At no time should anyone be allowed to lean or swing
on the oven door.
INFORMATION YOU NEED TO KNOW

6
ABOUT MICROWAVE COOKING
•Arrange food carefully. Place thickest areas towards
outside of dish.
•Watch cooking time. Cook for the shortest amount
of time indicated and add more as needed. Food
severely overcooked can smoke or ignite.
•Cover foods while cooking. Check recipe or cook-
book for suggestions: paper towels, wax paper,
microwave plastic wrap or a lid. Covers prevent
spattering and help foods to cook evenly.
•Shield with small flat pieces of aluminum foil any
thin areas of meat or poultry to prevent overcooking
before dense, thick areas are cooked thoroughly.
•Stir foods from outside to center of dish once or twice
during cooking, if possible.
•Turn foods over once during microwaving to
speed cooking of such foods as chicken and ham-
burgers. Large items like roasts must be turned over
at least once.
INFORMATION YOU NEED TO KNOW
•Rearrange foods such as meatballs halfway
through cooking both from top to bottom and from
the center of the dish to the outside.
•Add standing time. Remove food from oven and
stir, if possible. Cover for standing time which allows
the food to finish cooking without overcooking.
•Check for doneness. Look for signs indicating that
cooking temperatures have been reached.
Doneness signs include:
- Food steams throughout, not just at edge.
- Center bottom of dish is very hot to the touch.
- Poultry thigh joints move easily.
- Meat and poultry show no pinkness.
- Fish is opaque and flakes easily with a fork.
•Check foods to see that they are cooked to the
United States Department of Agriculture's
recommended temperatures.
To test for doneness, insert a meat thermometer in a
thick or dense area away from fat or bone. NEVER
leave the thermometer in the food during cooking,
unless it is approved for microwave oven use.
•ALWAYS use potholders to prevent burns when
handling utensils that are in contact with hot food.
Enough heat from the food can transfer through
utensils to cause skin burns.
•Avoid steam burns by directing steam away from
the face and hands. Slowly lift the farthest edge of
a dish's covering and carefully open popcorn and
oven cooking bags away from the face.
•Stay near the oven while it's in use and check
cooking progress frequently so that there is no
chance of overcooking food.
•NEVER use the cavity for storing cookbooks or
other items.
•Select, store and handle food carefully to preserve
its high quality and minimize the spread of
foodborne bacteria.
•Keep waveguide cover clean. Food residue can
cause arcing and/or fires.
•Use care when removing items from the oven so
that the utensil, your clothes or accessories do not
touch the safety door latches.
ABOUT SAFETY
... for fresh pork, ground meat,
boneless white poultry, fish,
seafood, egg dishes and frozen
prepared food.
... for leftover, ready-to-reheat
refrigerated, and deli and carry-
out “fresh” food.
... white meat of poultry.
... dark meat of poultry.
160°F
TEMP FOOD
165°F
170°F
180°F
7
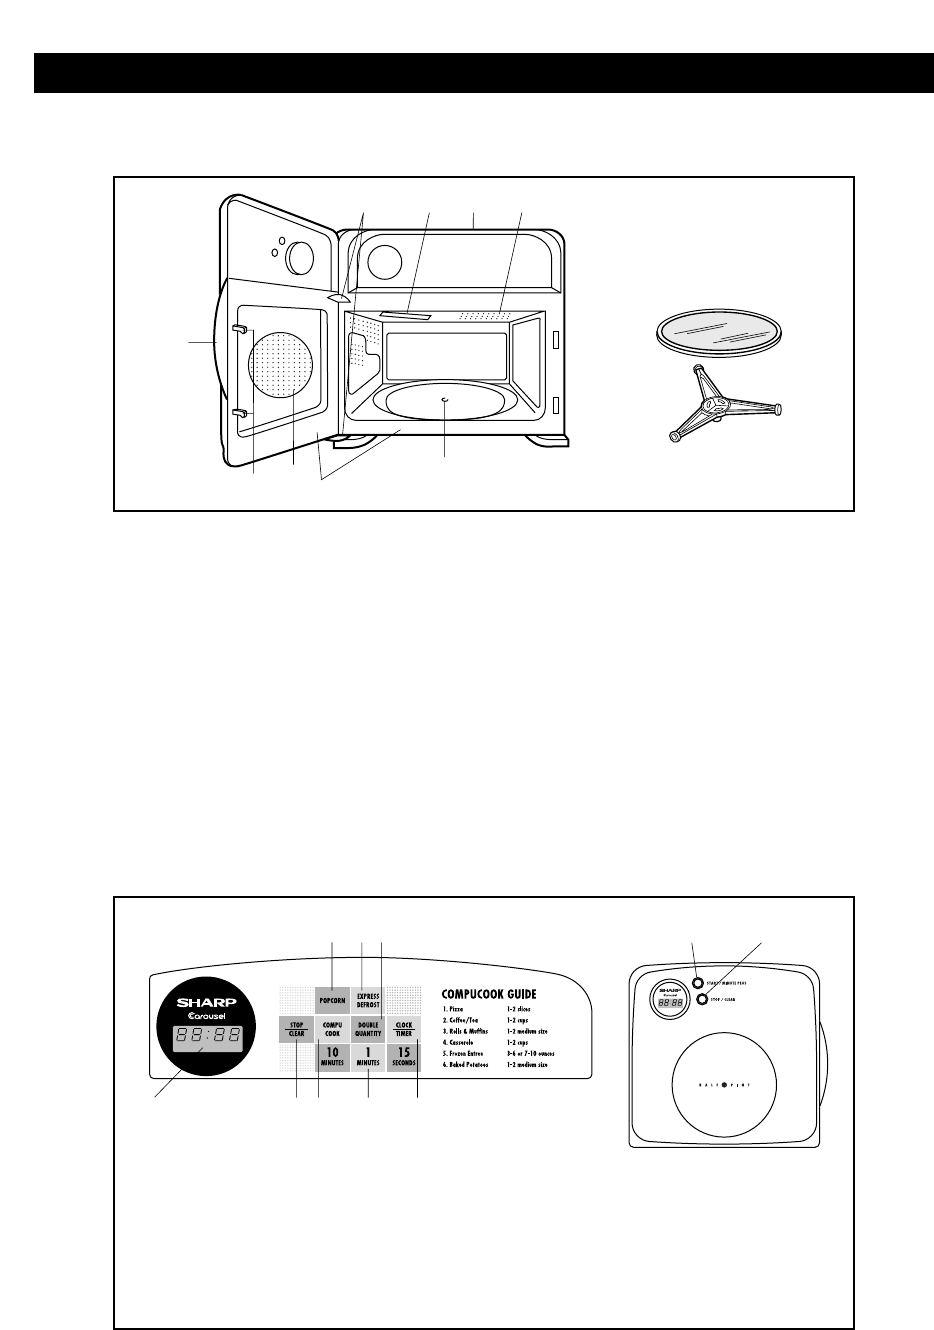
PART NAMES
1Oven door with see-through window
2Safety door latches
The oven will not operate unless the
door is securely closed.
3Door hinges
4Door seals and sealing surfaces
5Turntable motor shaft
6Removable turntable support
7Removable turntable
Place the turntable on the turntable
support securely. The turntable will
rotate clockwise or counterclockwise.
Only remove for cleaning.
8Ventilation openings (Rear)
9Oven light
It will light when oven is operating.
10 Waveguide cover: DO NOT REMOVE.
11 Door open handle
Pull to open door.
MICROWAVE OVEN PARTS
TOUCH CONTROL PANEL
1
2
11
3
4
7
6
910 8
5
DEF. QTY.
CHECK
ON
10 109
8,118,11
8,11
8
8
10
Control panel display
Words will light in the
display to indicate features
and cooking instructions.
Number indicates page on which there are a feature description and usage information.
NOTE:
Open the door to press the pads. Although STOP/CLEAR pad can
be used even if the door is closed.
START/MINUTE PLUS pad can be used when the door is closed.
TOUCH CONTROL PANEL DOOR CLOSED
8
CLOCK
TIMER
0
BEFORE OPERATING
•Before operating your new microwave oven make
sure you read and understand this operation
manual completely.
•Before the oven can be used, follow these
procedures:
1. Plug in the oven. Close the door. The oven display
will then begin flashing
88:88
.
2. Touch STOP/CLEAR pad.
will appear.
3. Touch TIMER/CLOCK pad to set clock.
:::::
TO SET THE CLOCK
•Suppose you want to enter the correct time of day
12:35 (A.M. or P.M.).
PROCEDURE DISPLAY
1
Open the door and
touch CLOCK pad.
Enter the correct time
of day (hours) by
touching TIME pads.
2
3
12
Touch CLOCK pad again.
12 35
MANUAL OPERATION
Your oven can be programmed for 99 minutes 45 sec-
onds (99.45). And the oven has only HIGH (100%)
power level.
•Suppose you want to cook 2 minutes 30 seconds.
TIME COOKING
The colon (:) will flash.
x 1 x 2
CLOCK
TIMER
12 00
10
MINUTES 1
MINUTE
x 3 x 5
10
MINUTES 1
MINUTE
4
Enter the correct time
of day (minutes) by
touching TIME pads.
This is a 12 hour clock.
•If the electrical power supply to your microwave
oven should be interrupted, the display will inter-
mittently show
88:88
after the power is reinstated.
If this occurs during cooking, the program will be
erased. The time of day will also be erased. Simply
touch STOP/CLEAR pad and reset the clock for the
correct time of day.
STOP/CLEAR
Touch STOP/CLEAR pad to:
1. Erase if you make a mistake during programming.
2. Cancel timer.
3. Stop the oven temporarily during cooking.
4. Return the time of day to the display.
5. Cancel a program during cooking, touch twice.
PROCEDURE DISPLAY
1
Open the door and enter
cooking time.
Close the door.
Touch START pad.
2
2.30
2.30
x 2 x 2
START/MINUTEPLUS
5
Touch CLOCK pad again.
CLOCK
TIMER
12:35
SPECIAL FEATURES
Popcorn will automatically compute the correct cook-
ing time and microwave power level for most brands of
microwave popcorn.
•Suppose you want to pop 3.5 oz. bag of light micro-
wave popcorn.
POPCORN
PROCEDURE DISPLAY
1
Open the door and touch
POPCORN pad twice.
Close the door and touch
START pad.
2
2
x 2
START/MINUTEPLUS
QTY
POPCORN
1
MINUTE 15
SECONDS

9
CompuCook will automatically compute the correct
cooking/reheating time and microwave power level for
foods shown in the chart below.
•Suppose you want to use CompuCook to reheat a
fresh roll.
COMPUCOOK
SPECIAL FEATURES
PROCEDURE DISPLAY
COMPUCOOK CHART
CC-1
CC-2
CC-3
CC-4
CC-5
CC-6
SETTING PROCEDURE
MENU/AMOUNT 2 slices
2 cups
2 medium
2 cups
7 - 10 oz
3 - 6 oz
7 - 10 oz
2 medium
(DOUBLE QUANTITY)
Microwave Pizza
1 slice
Coffee/Tea
1 cup
Rolls/Muffins
1 medium
Casserole
1 cup
Frozen Entree
3 - 6 oz
Baked Potatoes
1 medium
CC -3
COMPU
COOK
PROCEDURE DISPLAY
1
Open the door and touch
COMPUCOOK pad until
the desired menu number
is displayed.
x 3
Close the door and touch
START pad.
2
START/MINUTEPLUS
To cook double quantity, touch DOUBLE QUANTITY
pad prior to touching START pad.
NOTE:
More or less food than the quantity listed in
the chart should be cooked following the
guidelines in any microwave cookbook.
Use frozen microwave pizza. Follow package
directions for placing pizza on special crisping
susceptor.
Use this setting for heating COLD TAP WATER to
a temperature somewhat below the boiling point
to make instant coffee or tea. Stir liquid briskly
before and after heating to avoid “eruption”.
Arrange on plate with paper towel; cover with
another towel.
Use this pad to reheat refrigerated canned or
homemade pasta with sauce or other cooked
casserole. For pasta without sauce, measure 2
cups of cooked noodles and program for 1 cup.
Cover with lid or plastic wrap. After cooking, stir
and let stand, covered, 2 to 3 minutes.
Use this pad for frozen, convenience foods. It will
give satisfactory results for most brands. You may
wish to try several and choose your favorite.
Remove package from outer wrapping and follow
package directions for covering. After cooking, let
stand covered for 1 to 3 minutes.
Touch COMPUCOOK pad five times for packages
weighing 3 - 6 oz.
Touch DOUBLE QUANTITY pad prior to touching
START pad for packages weighing 7 - 10 oz.
7-10
will appear in the display.
Pierce with fork in several places; place on paper
towel on turntable. At end of cooking time, remove
from oven, wrap in foil and let stand 10 minutes.
10
After the 1st stage, open the door.
Turn steak over and shield any warm
portions. Close the door.
Touch START pad.
Express Defrost automatically defrosts foods shown in the chart below.
•
Suppose you want to defrost a 2.0 pound steak (11/2” thick) for 14 minutes.
PROCEDURE
Open the door and
enter the defrost time.
(Refer to the chart
below.)
1
EXPRESS DEFROST
Touch EXPRESS
DEFROST pad.
2
Close the door and
touch START pad.
3
4
6
5
The oven will stop and the remaining defrosting
time will be flashing.
The food can be checked.
After the 2nd stage, open the door.
Shield any warm portions. Close the door.
Touch START pad.
After defrost cycle ends, cover and let stand
as indicated in chart below.
x 1
EXPRESS DEFROST CHART
After the 1st stage, turn over and shield the warm
portions with aluminum foil.
After the 2nd stage, if there are warm portions,
shield with aluminum foil. A “collar” of foil around
entire edge works well with thick steaks.
Stand, covered 10 - 20 minutes.
Remove any thawed pieces after at pause.
Stand, 5 - 10 minutes.
At pause, turn over and rearrange.
If there are warm portions, shield with aluminum foil.
Stand 10 - 20 minutes.
1. Steaks,
chops
2. Ground
meat
3. Chicken
pieces
FOOD PROCEDURE
AMOUNT
x 4
EXPRESS
DEFROST
14.00
START/MINUTEPLUS
START/MINUTEPLUS
START/MINUTEPLUS
6 - 61/2
7 - 71/2
6 - 61/2
61/2 - 7
51/2 - 6
TIME (MIN/LB)
.5 - 4.0 lbs.
Less than 1” thick
More than 1” thick
.5 - 1.0 lbs.
1.1 - 3.0 lbs.
.5 - 3.0 lbs
DISPLAY
SPECIAL FEATURES
10
MINUTES 1
MINUTE
14.00
DEF.
11
Exterior
Interior
Exterior
The outside surface is painted. Clean the outside with mild soap
and water; rinse and dry with a soft cloth. Do not use any type of
household or abrasive cleaner.
Door
Wipe the window on both sides with a damp cloth to remove any
spills or spatters. Metal parts will be easier to maintain if wiped
frequently with a damp cloth. Avoid the use of spray and other
harsh cleaners as they may stain, streak or dull the door sur-
face.
Touch Control Panel
Care should be taken in cleaning the touch control panel. If the
control panel becomes soiled, open the oven door before clean-
ing. Wipe the panel with a cloth dampened slightly with water
only. Dry with a soft cloth. Do not scrub or use any sort of chemi-
cal cleaners. Close door and touch STOP/CLEAR pad.
Interior
Cleaning is easy because little heat is generated to the interior
surfaces; therefore, there is no baking and setting of spills or
spattering. To clean the interior surfaces, wipe with a soft cloth
and warm water. DO NOT USE ABRASIVE OR HARSH CLEAN-
ERS OR SCOURING PADS. For heavier soil, use baking soda
or a mild soap; rinse thoroughly with hot water. NEVER SPRAY
OVEN CLEANERS DIRECTLY ONTO ANY PART OF THE
OVEN.
Waveguide Cover
The waveguide cover is made from mica so requires special
care. Keep the waveguide cover clean to assure good oven per-
formance. Carefully wipe with a damp cloth any food spatters
from the surface of the cover immediately after they occur. Built-
up splashes may overheat and cause smoke or possibly catch
fire. Do not remove the waveguide cover.
Odor Removal
Occasionally, a cooking odor may remain in the oven. To re-
move, combine 1 cup water, grated peel and juice of 1 lemon
and several whole cloves in a 2-cup glass measuring cup. Boil
for several minutes using 100% power. Allow to set in oven until
cool. Wipe interior with a soft cloth.
Turntable/Turntable Support
The turntable and turntable support can be removed for easy
cleaning. Wash them in mild, sudsy water; for stubborn stains
use a mild cleanser and a non-abrasive scouring sponge. They
are also dishwasher-proof. The turntable motor shaft is not
sealed, so excess water or spills should be wiped up immedi-
ately.
Turntable Support
CLEANING AND CARE
Turntable

12
Please check the following before calling for service:
Place one cup of water in a glass measuring cup in the oven and close the door securely.
Operate the oven for one minute at HIGH Power Level.
A
Does the oven light come on? YES _______ NO _______
B
Does the cooling fan work? YES _______ NO _______
(Put your hand over the rear ventilating openings.)
C
Does the turntable rotate? YES _______ NO _______
(It is normal for the turntable to turn in either direction.)
D
Is the water in the oven warm? YES _______ NO _______
If “NO” is the answer to any of the above questions, please check electrical outlet, fuse and/or circuit
breaker. If they are functioning properly, CONTACT YOUR NEAREST SHARP AUTHORIZED SERVICER.
A microwave oven should never be serviced by a “do-it-yourself” repair person.
SERVICE CALL CHECK
SPECIFICATIONS
AC Line Voltage:
AC Power Required:
Output Power:
Microwave
Frequency:
Outside Dimensions:
Cavity Dimensions:
Oven Capacity:
Cooking Uniformity:
Weight:
Single phase 120V, 60Hz, AC only
1030W
600W★ (IEC Test Procedure)
2450 MHz
143/8”(W) x 141/8”(H) x 14”(D)
113/4”(W) x 6”(H) x 117/8”(D)
0.5 Cu.Ft.
Turntable system
Approx. 24 lb
★The International Electrotechnical Commission’s standardized method for measuring output wattage. This
test method is widely recognized.
In compliance with standards set by:
FCC – Federal Communications Commission Authorized.
DHHS – Complies with Department of Health and Human Services (DHHS) rule, CFR, Title 21, Chapter I,
Subchapter J.
– This symbol on the nameplate means the product is listed by Underwriters Laboratories, Inc.

13
TO ORDER
$10.25 plus tax, where applicable. ($.44 per book in lllinois.)
Simply call this toll-free number : 1-800-642-2122.
Have a credit card ready when you telephone.
SATISFACTION GUARANTEED
You must be completely satisfied with the Sharp
Carousel Microwave Cookbook. If, within 14 days, you
are dissatisfied for any reason, simply return the book
and we'll gladly refund your $6.00 plus tax.
Great recipes
~ Reliable microwave
reference guide
~ Many color photos
~ Step-by-step
instructions
~Nutritional
information for
each recipe
~ Durable wipe-clean
soft cover with 128
8 1/2 x 11 pages
~ Helpful tips and
special techniques
CAROUSEL MICROWAVE
COOKBOOK
THE ULTIMATE ACCESSORY
COOKING REFERENCE
Allow standing time after cooking.
FOOD POWER LEVEL TIME
MEATS, POULTRY, FISH,
SEAFOOD
Bacon High 3/4 - 11/4 min./slice
Frankfurter 70% 1 - 11/2 minutes
in Bun
Ground Beef High 4 - 6 minutes
for Casseroles
(1 lb)
Hamburger High 1st side 2 minutes
Patties(2) 2nd side 11/2 to 21/2
minutes
Ham slice 50% 5 - 8 minutes
(1 lb)
Meatloaf High 10 - 16 minutes
(11/2 lbs)
Boneless High 1st side 2 minutes
Chicken 2nd side 2 - 4 minutes
Breasts
Chicken High 4 - 8 minutes/lb.
Pieces
Fish High 5 - 6 minutes
Fillets (1lb)
Fish Steaks 70% 6 - 8 minutes
Scallops and High 3 - 5 minutes
Shrimp (1lb)
Check internal temperature after standing.
See chart on page 6.
Food should be very hot (165°F). Stir before serving, if possible.
FOOD POWER LEVEL TIME
REHEATING
Meat Slices 50% 1 - 3 min./slice
Non-Stirrable 50%
Casseroles
(1 serving) 3 - 5 minutes
(2 servings) 6 - 10 minutes
Pie (1 slice) High 10 - 30 seconds
Soup High
(1 serving) 2 - 3 minutes
(2 servings) 4 - 5 minutes
Vegetables High
(1 serving) 3/4 - 11/2 minutes
(2 servings) 11/2 - 21/2 minutes
FOOD POWER LEVEL TIME
OTHER
Applesauce (4) High 5 - 8 minutes
Baked Apples
(4) High 4 - 6 minutes
Chocolate 50% 1 - 2 minutes
(melt 1 square)
Eggs, High
scrambled (2) 1 - 11/2 minutes
Hot Cereal
(1 serving) High 1 - 3 minutes
Nachos 50% 1 - 2 minutes
(large plate)
(SOLAMENTE ESCRITO EN INGLES!)
14
MINUTE
PLUS
START
START
POPCORN
GUIA AUTO-TOUCH®
Para mayor información y precauciones de seguridad, consulte el Manual de Operaciones.
Carousel® y Auto-touch® son marcas registradas de Sharp Corporation.
ALIMENTOS CANTIDAD
.5 a 3.0 libras
.5 a 4.0 libras
.5 a 3.0 libras
1.
Ground meat (Carne picada)
2.
Steaks/chops (Filetes, chuletas)
3.
Chicken pieces (Piezas de pollo)
CUADRO DE COMPU DEFROST
FIJACION DEL RELOJ
Si en la pantalla aparece
88:88
toque primero
STOP/CLEAR.
1
Toque el botón CLOCK.
2
Ponga la hora correcta tocando
los números en orden. (Ej: 12:30)
3
Toque nuevamente el botón
CLOCK.
TIMER
CLOCK
TIMER
CLOCK
3 01 2
INSTANT START
1
Toque el botón POPCORN
una vez para palomitas de
maiz regular.
2 Veces - tamaño regular
ligero
3 Veces - tamaño de snack
4 Veces - snack de tomaño
ligero
ALIMENTO CANTIDAD
INSTANT ACTION CHART
Popcorn 3.5 onzas
(Palomitas de maiz) 3.0 or 3.5 onzas (ligero)
1.75 onzas
1.5 or 1.75 onzas (ligero)
Beverage .5 - 1 tazas
(Bebida)
Baked Potatoes 1 - 2 medjano
(Papas al homo)
Fresh Vegetables 1 - 2 tazas
(Verduras frescas)
Dinner Plate 1 plate de comida
(Plato de comida)
Rolls & Muffins 1 - 2 pedazas
(Pan fresco)
MUNUTE PLUS
Toque el botón de adición
de un minuto (MINUTE
PLUS) para un minuto al
100% de energla, o para
añadir un minuto cuando
cocine en el modo manual.
Continúe tocándolo para
añadir más minutos.
OPERACION MANUAL
Cocinando con energía alta
1
Programe el tiempo para cocinar
tocando los botones de números.
(Ej: 1 min. 30 seg.)
2
Toque START.
Cocinando con energía variable
1
Después del paso 1 anterior,
toque el botón POWER LEVEL.
2
Escoja el nivel de energía.
(Ej: 50%)
3
Toque START.
130
POWER
LEVEL
5
EXPRESS DEFROST
(R-220D)
Toque el botón EXPRESS DE-
FROST para un aumento de 0,5
libras cada vez.
(Ej: filete de 2,5 libras)
COMPU DEFROST
COMPU DEFROST
(Para el R-230D)
1
Seleccione el nivel de
descongelamiento rapido
deseado con el botón COMPU
DEFROST
(Ej: tóquelo dos veces para
filetes).
2
Toque los botones número 2 y 5
para 2.5 libras.
(Ej: filete de 2.5 libras)
3
Toque START.
x 2
START
52
START
MINUTE PLUS
x 5
EXPRESS
DEFROST
15
®
AUTO-TOUCH® GUIDE
For more complete information and safety precautions, refer to your Operation Manual.
SHARP ELECTRONICS CORPORATION
Sharp Plaza, Mahwah, NJ 07430-2135
TINSEA831WRRZ-D91
Printed in Thailand
SETTING MENU AMOUNT
CC-1 Microwave Pizza 1 - 2 slices
CC-2 Coffee/Tea 1 - 2 cups
CC-3 Rolls/Muffins 1 - 2 medium
CC-4 Casserole 1 - 2 cups
CC-5 Frozen Entree 3 - 6, 8 - 10 oz.
CC-6 Baked Potatoes 1 - 2 medium
SET CLOCK
If
88:88
is in display, first touch STOP/CLEAR.
COMPUCOOK
1
Open the door and touch
COMPUCOOK pad until the
desired menu number is diplayed.
(Ex: Touch 3 times to reheat a roll.)
2
Close the door and touch
START pad.
MANUAL OPERATION
1
Enter cooking time by
touching number pads.
(Ex: 1 min. 30 sec.)
2
Touch START pad.
FOOD/AMOUNT TIME (MIN/LB)
6 - 61/2
7 - 71/2
6 - 61/2
61/2 - 7
51/2 - 6
1. Steaks/chops (fish)
.5 to 4.0 lbs
Less than 1” thick
More than 1” thick
2. Ground meat
.5-1.0 lbs.
1.1-3.0 lbs.
3. Chicken pieces
.5-3.0 lbs
1
Open the door and touch
CLOCK pad.
2
Enter correct time of the
day (hours) by touching
TIME pads.
3
Touch CLOCK pad again.
4
Enter the correct time of
day (minutes) by touching
TIME pads.
5
Touch CLOCK pad again.
MINUTE PLUS
Touch MINUTE PLUS pad for
one minute at 100% power or
to add a minute during
manual cooking. Continue to
touch for additional minutes.
1
Open the door and
enter the defrost time.
(Ex: 14 min.)
2
Touch EXPRESS
DEFROST pad.
3
Close the door and
touch START pad.
EXPRESS DEFROST
POPCORN
1
Open the door and touch
POPCORN pad once for a
regular size.
Twice - light regular size
3 times - snack size
4 times - light snack size
2
Close the door and touch
START pad.
FOOD AMOUNT
3.5 oz.
3.0 or 3.5 oz (Light)
1.75 oz.
1.5 or 1.75 oz. (Light)
Popcorn
x 1 x 2
10
MINUTES 1
MINUTE
CLOCK
TIMER
CLOCK
TIMER
x 3 x 5
10
MINUTES 1
MINUTE
COMPU
COOK
CLOCK
TIMER
START/MINUTEPLUS
START/MINUTEPLUS
x 1 x 2
1
MINUTES 15
SECONDS
START/MINUTEPLUS
x 1 x 4
10
MINUTES 1
MINUTE
EXPRESS
DEFROST
START/MINUTEPLUS
START/MINUTEPLUS
POPCORN
x 3
Carousel® and Auto-touch® are registered trademarks of Sharp Corporation.