Sharp HRO00061 Cellular Transceiver User Manual dv50 e
Sharp Corporation Cellular Transceiver dv50 e
UserManual.wiki
>
Sharp
>
HRO00061 User Manual
>
Manual 1
Contents
1.
Manual Model Description
2.
Manual 1
3.
Manual 2
Manual 1
Navigation menu
Upload a User Manual
Namespaces
Wiki Guide
HTML
PDF
Info
Views
User Manual
Discussion / Help
Navigation
![24e02_dv50_7e.fmBefore Using the Handset※Key illustrations are examples and may look different from actual keys.1Earpiece Emits the other party’s voice. When in stand-by, listen to Record message/Voice memo using the earpiece.2Display (nP. 28)3i-mode/Guidance key i (,) Press to make or receive a Videophone call (nP. 53, P. 67). Press to use i-mode (nP. 184). Press to execute the function displayed at the lower left of the display in guidance (nP. 27). In stand-by, press twice to display the i-appli screen. Press for 1+ seconds to display the i-appli software list screen (nP. 253).4Multi-guide key (four-way key w and OK key t) (nP. 27) Press to display/select Menu, Redial, Received calls, Shortcut menu, Active marker (nP. 405) as well as use these functions. In stand-by, press t for 1+ seconds to set/cancel Multi easy lock (nP. 150). To disable, terminal security code is required. In stand-by, press r for 1+ seconds to set/cancel IC card lock (nP. 278). To disable, terminal security code is required. In stand-by, press u for 1+ seconds to adjust earpiece volume (nP. 128).5Mail/Guidance key m Press to use mail functions (nP. 210).Component Names and Functionsvutifehdgc216945omlab38kjnpqrlszyxw7The brightness sensor areaWhen Brightness of Light/Power Saver (nP. 134, P. 136) is set to [Automatic], the sensor detects the light of the surrounding area and automatically adjusts the display brightness and keypad backlight. Do not cover the sensor area (a) with a sticker. May interfere with the sensor. dv50_e.book 24 ページ 2007年9月7日 金曜日 午前8時47分](https://usermanual.wiki/Sharp/HRO00061.Manual-1/User-Guide-854233-Page-2.png)
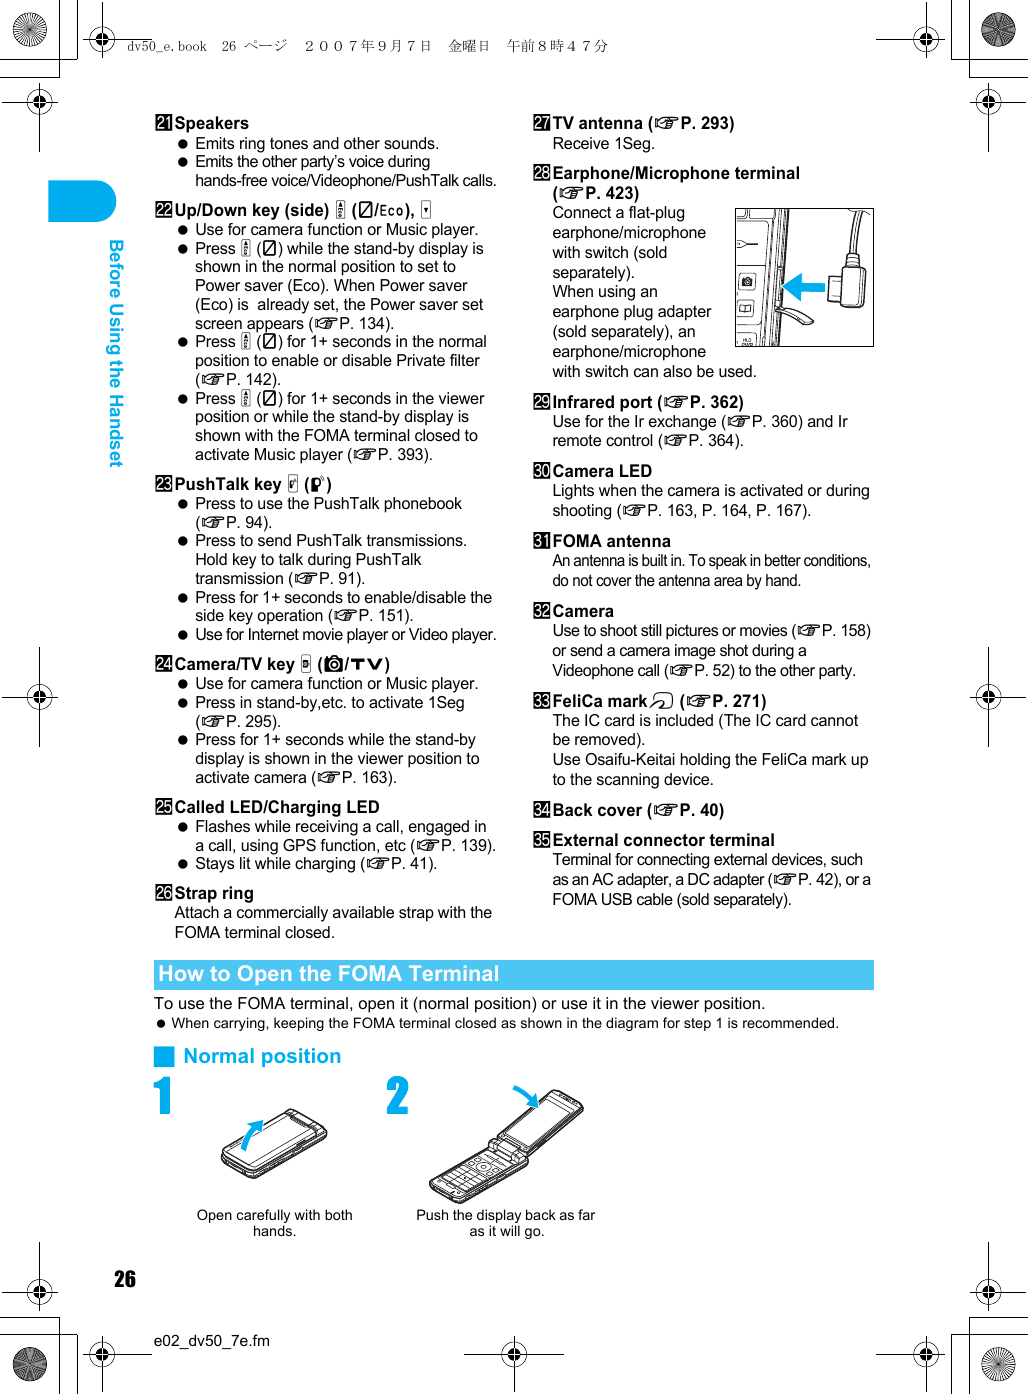
![25e02_dv50_7e.fmBefore Using the HandsetContinued on next page ?? In stand-by, press for 1+ seconds to display a new mail message screen (nP. 211).Press twice to check new messages (nP. 211, P. 223). Press to execute the function displayed at the lower left of the display in guidance (nP. 27). Press to switch between upper and lower case when entering text (nP. 429). Press for 1+ seconds in text input screen to use emoticons (nP. 433). Press for 1+ seconds while Mail ticker is being displayed to to view Inbox (nP. 222).6Start/Hands-free key s Press to make or receive a voice call. Press for 1+ seconds during a voice call to turn Hands-free on and off (nP. 55). Press during a Videophone call to turn Hands-free ON/OFF (nP. 84). Press during a PushTalk transmission to turn Hands-free ON/OFF (nP. 91).7microSD Memory Card slot (nP. 343)Insert a microSD Memory Card.8Charger terminal (nP. 44)Terminal for recharging with the desktop holder.9b/Line break/Public mode (Drive mode) key * Press to enter an [b] (asterisk), [゛] (dakuten), [゜] (handakuten) or a line break (nP. 429). In stand-by, press for 1+ seconds to set/cancel Public mode (Drive mode) (nP. 72). In text input screen, press for 1+ seconds to paste text (nP. 434).aBrightness sensor (nP. 134, P. 136)The sensor detects the light of the surrounding area and automatically adjusts the display brightness and key backlight ON/OFF.bUp/Down key (front) -, _ Use for camera function or music player. Press while charging in the viewer position to show the desktop clock (nP. 132). Press - for 1+ seconds while running an application in the viewer position to use the phonebook, mail or other functions (nP. 298).cTOUCH CRUISER pad (nP. 28)dCamera/Guidance key C Press to activate Camera (nP. 163). Press to execute the function displayed at the lower right of the display in guidance (nP. 27). In stand-by, press for 1+ seconds to display Data box (nP. 356).ePhonebook/Guidance key a Press to use the phonebook (nP. 102). In stand-by, press for 1+ seconds to display the phonebook entry screen (nP. 104, P. 108). Press to execute the function displayed at the lower right of the display in guidance (nP. 27). Press to change the type of text to be entered (nP. 430). In text input screen, press for 1+ seconds to display insert phrase screen (nP. 432).fi-Channel/Clear/i-appli stand-by key c (J) Press to show the channel list (nP. 206). Use to delete phone numbers and text (nP. 430). Press to return to the previous screen. Press when i-appli stand-by is set and i-appli starts (nP. 263).gPower/End/On hold key H Press for 2+ seconds to turn the power on/off (nP. 45). Press to end a call or i-mode, or to put calls on hold (nP. 71). Press to play/pause when animated GIF or Flash movies are set as the stand-by display. Press while setting i-motion to play/stop (nP. 131).hDial/Text entry keys 1 to 9, 0 Press to enter a phone number (nP. 53). Press to enter text (nP. 428).i#/Manner mode key # Press to enter a [#], [ー] (prolonged sound), [、] (touten), [。] (kuten), [!] (exclamation mark), [?] (question mark), or [・] (chuten). When in the normal position, press for 1+ seconds in stand-by to set/disable Manner mode (nP. 129). In text input screen, press for 1+ seconds to cut text (nP. 434).jMulti/GPS/Supportbook key $ To activate Multi Assistant: Press while running an application to use the phonebook, mail or other useful functions (nP. 404). GPS positioning: In stand-by, press for 1+ seconds to position the present location (nP. 280). To view Supportbook: Press in stand-by to view Supportbook (preset) (nP. 37). To save a shortcut in the Shortcut menu: Press for 1+ seconds when m is on the screen to save a shortcut (nP. 417).kMicrophoneSends out your own voice.dv50_e.book 25 ページ 2007年9月7日 金曜日 午前8時47分](https://usermanual.wiki/Sharp/HRO00061.Manual-1/User-Guide-854233-Page-3.png)

![28e02_dv50_7e.fmBefore Using the HandsetThe display allows you to check the current status after the power is turned on or while setting up functions. The display lights for a set period of time when a key is pressed. In the viewer position, the display is set horizontally, and the icon positions are different.1Signal status When A (Out of service area) appears, the handset is outside the service area or in a place with no signal. Signal icon can be changed (nP. 138).2Battery level/Charging (nP. 45) Signal icon can be changed (nP. 138).3i-mode/Full Browser (nP. 184, P. 310)4SSL (nP. 185) When o appears while using Multi Assistant, function such as i-mode, Full Browser, i-appli or Software update is being used with Multi Assistant.5i-appli (nP. 253)* Indicates that an i-appli is set as the stand-by display, but cannot be used.6GPS display (nP. 280, P. 283)7Shortcut menu (nP. 417)8i-mode mail/SMS/Area mail received (nP. 221)9Message R/F icon (nP. 210)Viewing the Display]Indication of the signal strength]n opStrong Weak"Battery level{Charging7 = A A BN OIndicates i-mode/Full Browser statusoSSL compatible sites are viewedSSL compatible Internet web pages are viewedIcons that appear in the upper part of the displayIcons that appear in the lower part of the display<123456789vefg h i jkdpq sca bu wtl m zo rxy nGi-appli is runningi-appli stand-by is runningNi-appli stand-by is set*Ii-appliDX is being activatedi-appliDX stand-by is being activatedQi-appliDX stand-by is set*A (blue)Location provision is set to [Loc. provision:ON]Location provision permission schedule is setLocation provision is acceptedA (black)Location provision permission schedule is setLocation provision is rejectedBGPS positioningmAppears when the function can be added to the Shortcut menuU (green) U (red) hHv[ (red font) [ (blue font)Indicates the status of the i-mode mail/SMS/Area mail receptionIndicates the status of the memory to store received mailA (green) B (green) A (yellow) B (yellow) GISTz8<9>07!Indicates the reception status of the Message R/FIndicates the storage status of the Message R/Fdv50_e.book 28 ページ 2007年9月7日 金曜日 午前8時47分](https://usermanual.wiki/Sharp/HRO00061.Manual-1/User-Guide-854233-Page-6.png)
![29e02_dv50_7e.fmBefore Using the HandsetContinued on next page ?? The status may not always be indicated even if messages are held at the i-mode center.amicroSD Memory Card (nP. 343)bClock display (nP. 47) Clock display icon can be changed (nP. 138).cMultitask (nP. 404)Indicates functions that are running.dAlarm (nP. 301, P. 408, P. 413)* Appears only when an Alarm is set for that day.eHands-free (nP. 55, P. 84, P. 100)fRestriction indicator (nP. 147, P. 152)gIC card lock (nP. 278)hStorage status of i-mode center(nP. 221)iPublic mode (Drive mode) (nP. 72)jManner mode (nP. 129)kVibrator (nP. 127)^ (gray)microSD Memory Card is inserted^ (pink)Data on microSD Memory Card is being viewedgFour or more applications are running2Camera (still picture)3Camera (movie)*Videophone4Character reader (OCR)hVoice calltPhonebook5Bar code readerkPushTalk/PushTalk phonebookvVoice recorder]Card readerwSchedule#Modem transmission (appears during data transmission)yText memozCalculator6Manga&BookReader>ToruCaiSoftware updateCGPS{AlarmjReceive Ir data8Timerli-appli}microSD managermi-mode, i-Channel, Internet movie player9General settings0Record message, Voice memonFull BrowserpMail, SMS, Message R/F, Check new message!Redial/Sent messages history7Document ViewerqMail/SMS being composed"Own numbersSD-Audiof1SeguData box, Music&Video Channel^Reception reserve/ Recording reserve alarm|Received calls/Received messages history\Schedule alarm is set*Alarm is setReception reserve alarm is set*Recording reserve alarm is set*; (red)Hands-free active call; (green)Connected to Hands-free compatible deviceRSecret modeSSecret data is being editedTKeypad dial lockUAll lockedVFunction lock is setWKeypad dial lock and Function lock are setK (red)Secret mode and Function lock or Keypad dial lock are setK (blue)Key guard/Secret mode and Function lock or Keypad dial lock are setXKey guard is setYIC card is lockedWMail being held at the centerXMail being held at the center full_Public mode (Drive mode) is setZManner mode is setbVibration mode is setdv50_e.book 29 ページ 2007年9月7日 金曜日 午前8時47分](https://usermanual.wiki/Sharp/HRO00061.Manual-1/User-Guide-854233-Page-7.png)
![30e02_dv50_7e.fmBefore Using the HandsetlSilent (nP. 124)mRecord message (nP. 76) When there are messages, D to P appears, indicating the total number of both types of messages. When there are three Record messages (voice calls) and two Record messages (Videophone), k appears.nPrivate filter (nP. 142)oFOMA card errorpSelf mode (nP. 149) Appears when the handset cannot make/receive calls or PushTalk, send/receive i-mode mail/SMS, or use i-mode functions or Ir exchange.qPushTalk (nP. 90)r3G/GSM display (nP. 451)sIr exchange/External devicetUSB mode (nP. 352)uEarphone/microphone connection (nP. 424) Appears when Auto answer for PushTalk is set even if earphone/microphone with switch is not connected.vi-mode mail send reservation (nP. 212)wMusic&Video Channel program reservation (nP. 384)xToruCa (nP. 273) The ToruCa icon does not appear during hands-free operation.yStatus of Comics setting (nP. 375)z1Seg being recorded (nP. 300, P. 299) The icon does not appear while private filter is set.<Operation guidanceIndicates the functions that can be used with keys such as i, m, t, w, C and a.JOther iconsRefer to respective pages for information on icons for the functions shown below. Videophone (nP. 52) Redial/Received calls (nP. 57 to P. 59) Phonebook (nP. 103 to P. 105) Camera mode (nP. 161 to P. 162) Message R/F (nP. 210 to P. 212) Mail/SMS (nP. 228 to P. 230) Received/Sent message list/details screen (nP. 235) ToruCa (nP. 274)[The phone ring volume [Silent] is set]Record message is setPPrivate filter is setRAppears when FOMA card is malfunctioning or not insertedBAppears when a card other than the FOMA card is insertedgSelf mode is setaDuring PushTalk transmission5(green)3G network(Packet transmission available)5(red)3G network(Packet transmission not available)5(green)GSM/GPRS network(Packet transmission available)5(red)GSM/GPRS network(Packet transmission not available)JData is communicated with another device using the Ir exchange function (nP. 360)Data is sent using the Ir remote control (nP. 364)t (green)Connected to an external device and transmitting packetst (red)Connected to an external device and sending/receiving packet datauConnected to an external device and transmitting 64K dataxFOMA USB cable (sold separately) is connectedsA flat-plug earphone/microphone with switch (sold separately) is connected (when Auto answer for voice/Videophone calls is set) Auto answer for PushTalk is set=Mail with send reservation;Mail failed to be automatically sent0Appears 12 hours before Music&Video program distributionQUnread ToruCaIFrame display is setHPage display is seta1Seg is being recordeddv50_e.book 30 ページ 2007年9月7日 金曜日 午前8時47分](https://usermanual.wiki/Sharp/HRO00061.Manual-1/User-Guide-854233-Page-8.png)
![31e02_dv50_7e.fmBefore Using the Handset 1Seg (nP. 296) Internet movie player (nP. 316) My picture of Data box (nP. 321 to P. 322) i-motion of Data box (nP. 331 to P. 332) Melody of Data box (nP. 342 to P. 342) Music&Video Channel (nP. 384 to P. 386) Music player (nP. 392 to P. 393)Display stock icons in stand-by when you miss a call or have a new mail. In stand-by, select stock icons to check notice details.JStock icon*1 In Dual mode, the number of Number B also appears.*2 The message that appear differs depending on the menu screen.Note microSD Memory Card is referred to as [microSD] or [SD] on the FOMA terminal (nP. 343). Some of the screen in this manual have been modified or abbreviated. The display for the FOMA terminal is manufactured using high-precision technology, but it may occasionally contain dots that fail to light or that remain permanently lit. This is not a malfunction.Checking Notices with Stock IconStock iconNumber of entriesMessageIcon Message Page Icon Message PageBxx missed call*1 P. 75#Check update P. 502FRecorded messages Fxx message/Axx message P. 78#Update required P. 4996Check for update P. 499Exx voice mail*1 P. 440 DUSB mode setting P. 352Cxx mail message P. 221P. 246 tDownload successful (Music&Video Channel) P. 385Lxx New Message R P. 210 gDownload failed (Music&Video Channel) P. 384Qxx New Message F P. 210Dxx new ToruCa P. 273 4Charge limit exceeded P. 4215New auto send result P. 212 GCustom menu/Basic menu*2 P. 34#Update complete P. 5021When a stock icon appears in stand-by, press t. Stock icons do not appear when playing i-motion set to stand-by or running i-appli in stand-by.2Select a stock icon. Check notice details. After the details are checked, the stock icon and message disappear.dv50_e.book 31 ページ 2007年9月7日 金曜日 午前8時47分](https://usermanual.wiki/Sharp/HRO00061.Manual-1/User-Guide-854233-Page-9.png)
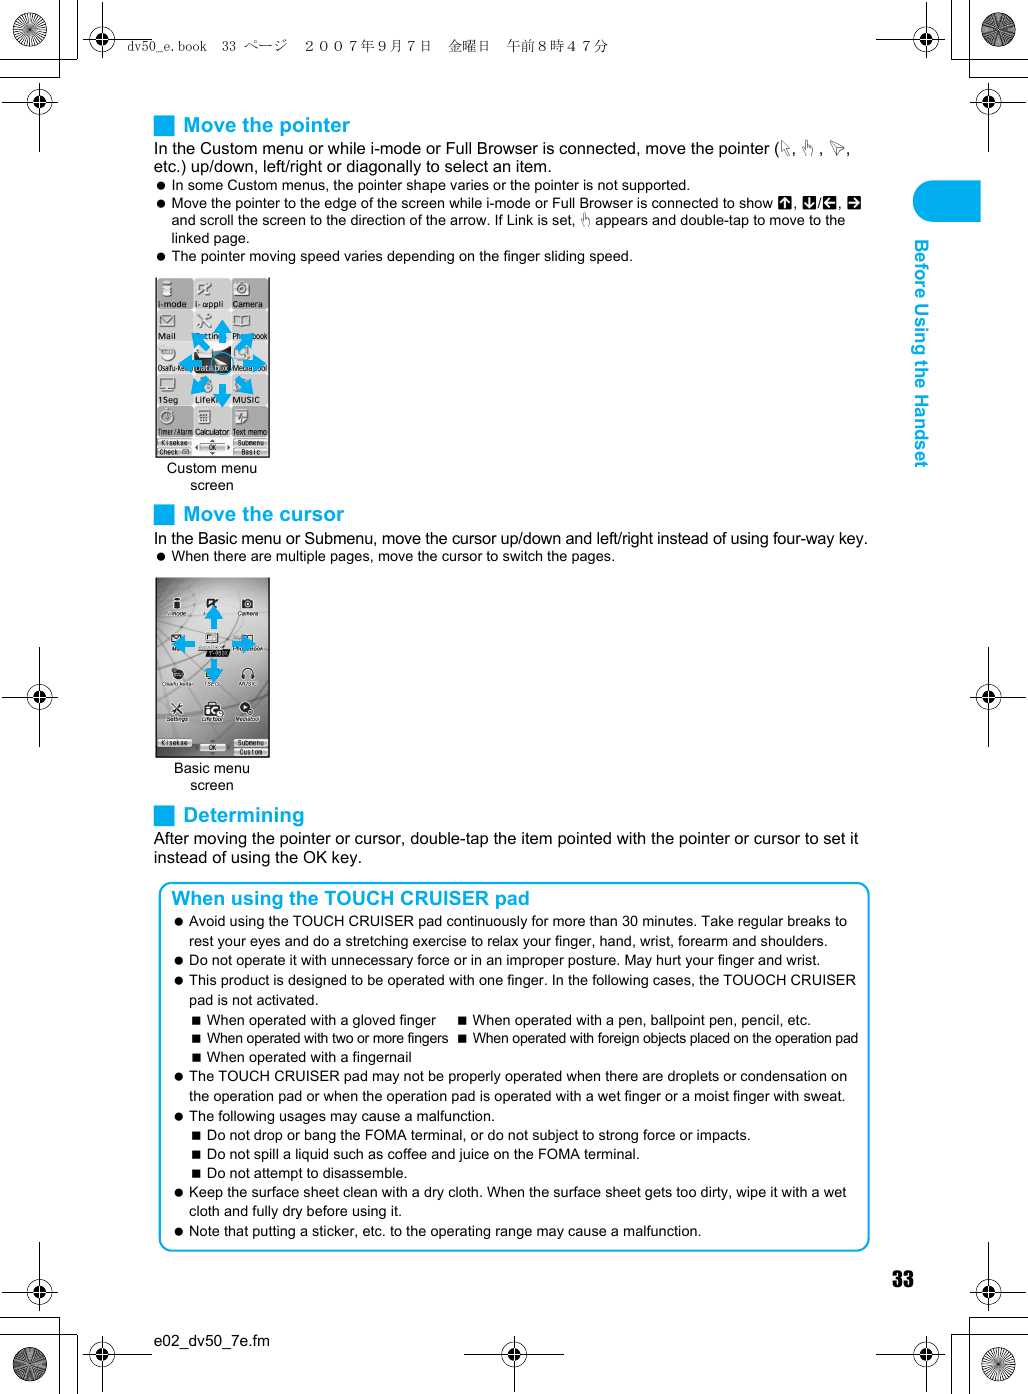
![32e02_dv50_7e.fmBefore Using the HandsetWhen Calendar is set in stand-by, press H to switch between the stand-by and the calendar (nP. 131).Use TOUCH CRUISER pad to perform the same operations as those of Multi-guide key (e.g. selecting an item, moving the cursor or scrolling the screen). Move the pointer or double-tap the TOUCH CRUISER pad in the range where there is a logo, “TOUCH CRUISER”. Make the finger stand a little bit to operate easily.Switching Between Displays When the calendar is set to [1 month (Large)], icons appear to the right of dates with schedule entries.Stand-by Calendar(2 months down)TOUCH CRUISER PadHow to Use the TOUCH CRUISER PadNote In the following cases (screens), the TOUCH CRUISER pad is not available. However, when the Submenu appears, the pad can be operated.Stand-by i-appli Notice window Dial Input screenWhile making, receiving or during the Voice call/Videophone call/PushTalk, etc.HOperating range of TOUCH CRUISER padThe pointer or cursor moves in conjunction with sliding of the fingerDouble-tap the finger to selectdv50_e.book 32 ページ 2007年9月7日 金曜日 午前8時47分](https://usermanual.wiki/Sharp/HRO00061.Manual-1/User-Guide-854233-Page-10.png)
![34e02_dv50_7e.fmBefore Using the HandsetJSetting whether to use the TOUCH CRUISER padJSetting pointer speed/scroll speed/double tap speedSet, change or save functions from the menu screens.In stand-by, press t to show the menu screen that is selected in Menu priority. Select from the Custom menu and Basic menu.JMenu screensSetting the TOUCH CRUISER Pad <TOUCH CRUISER Set>1In stand-by, press t ? [Settings] ? [General settings] ? [TOUCH CRUISER set] ? [Usage settings] ? [ON]/[OFF].1In stand-by, press t ? [Settings] ? [General settings] ? [TOUCH CRUISER set].2Select speed.Menu SelectionsWhen a stock icon (nP. 31) appears in stand-by, perform from G (MENU) being selected.Switching the Menu ScreensCustom menu Use the Kisekae Tool (nP. 136) to change the menu design. The design set by default differs depending on the color of the FOMA terminal handset.Basic menu Input the function number to quickly retrieve the function to be used. Alternatively, select from 12 icons to retrieve the function. Icons and background images in the Basic menu can also be changed (nP. 139).Shortcut menu Retrieve the saved functions quickly. Other function can also be saved (nP. 417).Related OperationsSet the menu screen to be used <Menu priority>1In stand-by, press t ? [Settings] ? [Disp/LED/Power saver] ? [Menu priority].2Select [Custom menu]/[Basic menu].Pointer speed[Pointer speed] b [Fast]/[Normal]/[Slow]Scroll speed [Scroll speed] b [Fast]/[Normal]/[Slow]Double tap speed [Double tap speed] b [Fast]/[Normal]/[Slow]dv50_e.book 34 ページ 2007年9月7日 金曜日 午前8時47分](https://usermanual.wiki/Sharp/HRO00061.Manual-1/User-Guide-854233-Page-12.png)
![35e02_dv50_7e.fmBefore Using the HandsetContinued on next page ??JMethod for switching the menu screensPerform one of the following to retrieve a function.Use Multi-guide key, TOUCH CRUISER pad or pre-assigned button to select each menu and retrieve a function while checking the function name.The explanations in this manual are based on this method.Input the function number to quickly retrieve the function to be used (Available for the Basic menu only). Refer to Menu List (nP. 456) for available functions. In the Custom menu, unavailable menus can also be selected. However, the functions are not available. When functions appear in guidance, use the assigned buttons to operate them (nP. 27). Press c to re-select a function and the previous screen reappears. Press H to return to stand-by. The method for selecting functions may differ depending on the Kisekae Tool set for the Custom menu.Example: When retrieving [My picture(phone)] from each menu screen to show still pictures in [Camera] Double-tap the , mark to select a function name or icon in TOUCH CRUISER pad (double-tapping may not be required depending on the menu screen). Refer to P. 28 for instructions on TOUCH CRUISER pad.JUsing Multi-guide key or TOUCH CRUISER pad to retrieve from the Custom menu The following shows the screen operated with the TOUCH CRUISER pad.When the handset color is “White” or “Black” (the screen of the handset color “White”)Method for Retrieving a FunctionRetrieving a Function from Each Menu ScreenStand-bytShortcut menuaBasic menuCustom menuoCustom menu When [Data box] appearsWhen [My picture(phone)] appears,orutWhen [Camera] appears,orut,orwtdv50_e.book 35 ページ 2007年9月7日 金曜日 午前8時47分](https://usermanual.wiki/Sharp/HRO00061.Manual-1/User-Guide-854233-Page-13.png)