Sharp HRO00061 Cellular Transceiver User Manual dv50 e
Sharp Corporation Cellular Transceiver dv50 e
UserManual.wiki
>
Sharp
>
HRO00061 User Manual
>
Manual 2
Contents
1.
Manual Model Description
2.
Manual 1
3.
Manual 2
Manual 2
Navigation menu
Upload a User Manual
Namespaces
Wiki Guide
HTML
PDF
Info
Views
User Manual
Discussion / Help
Navigation
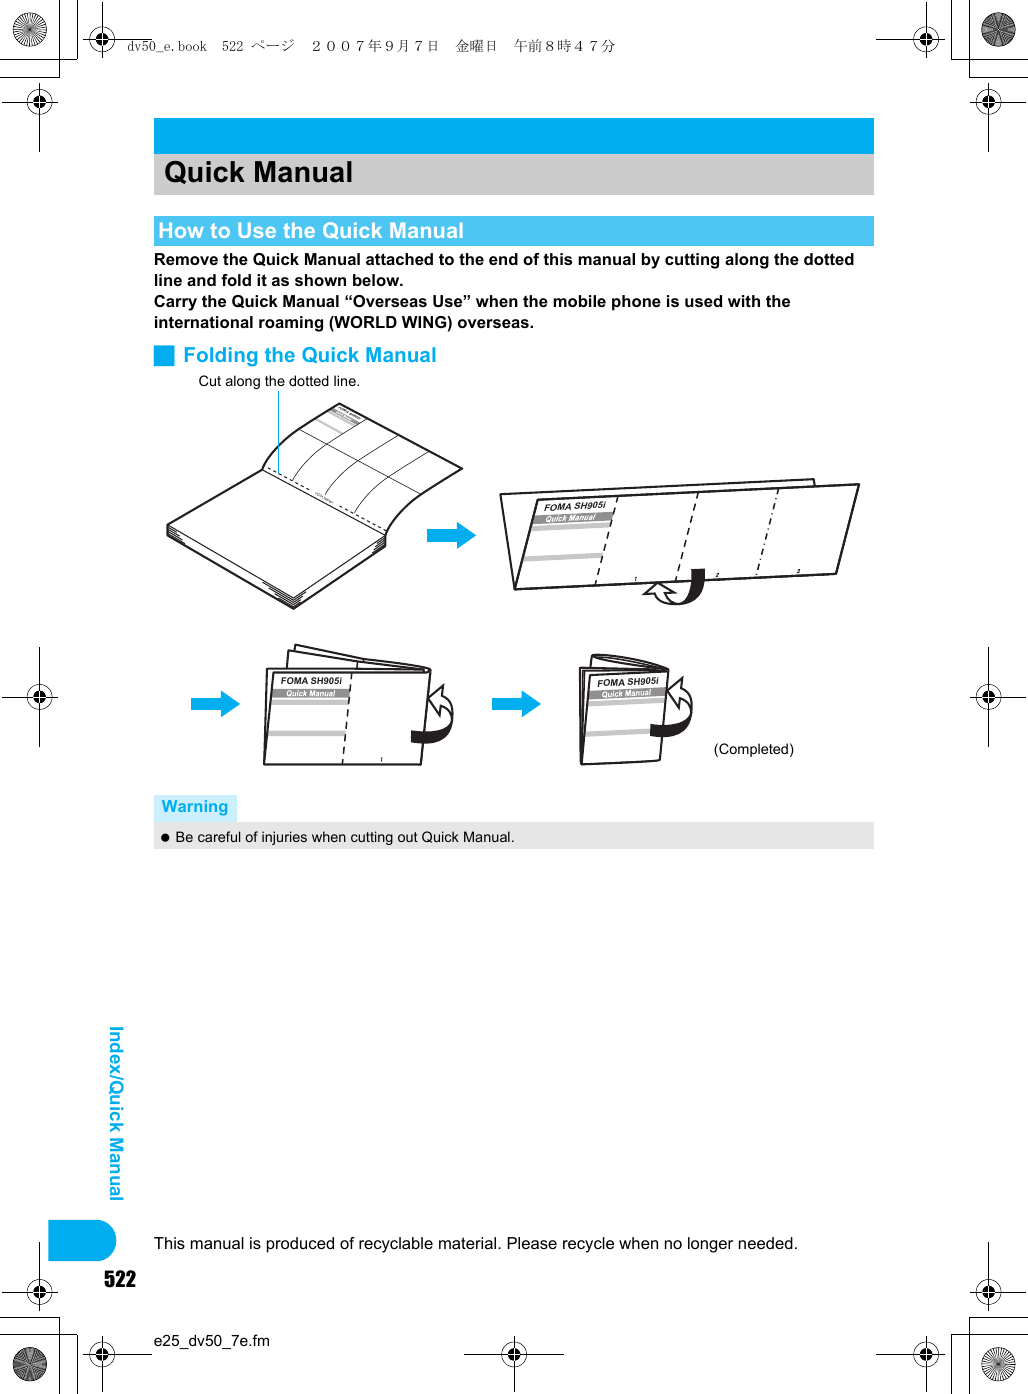
![37e02_dv50_7e.fmBefore Using the HandsetSupportbook (preset) is a simple operation guide on the FOMA terminal that uses Manga&BookReader. Use this function when unsure of operations (nP. 375).For example, when composing a message with Multi Assistant, press $ to use Supportbook (preset) (nP. 404). Useful tips and functions are explained to allow for rapid comprehension. Directly start functions that were looked up in Supportbook.Example: When checking own addressA FOMA card is an IC card that records personal information, such as phone numbers. A FOMA card can store phonebook data and SMS. By switching FOMA cards, multiple FOMA terminals can be used for different purposes as needed. If a FOMA card is not inserted, voice/Videophone calls, PushTalk transmission, i-mode, i-Channel, i-mode mail and SMS transmission, Message R/F reception and data transmission are not available on the FOMA terminal. In addition, 1Seg cannot be watched.SupportbookDisplaying the Supportbook1In stand-by, press $ ? [A メール] (Mail).2Select [A 自分のアドレス確認] (Check your own address). A description appears below the title.Related OperationsStart functions from SupportbookIn the Supportbook details screen, select the function to start ? [Yes].Note Functions cannot be started from Supportbook when functions other than Supportbook are used simultaneously.FOMA CardUsing a FOMA CardDetails screendv50_e.book 37 ページ 2007年9月7日 金曜日 午前8時47分](https://usermanual.wiki/Sharp/HRO00061.Manual-2/User-Guide-854234-Page-1.png)
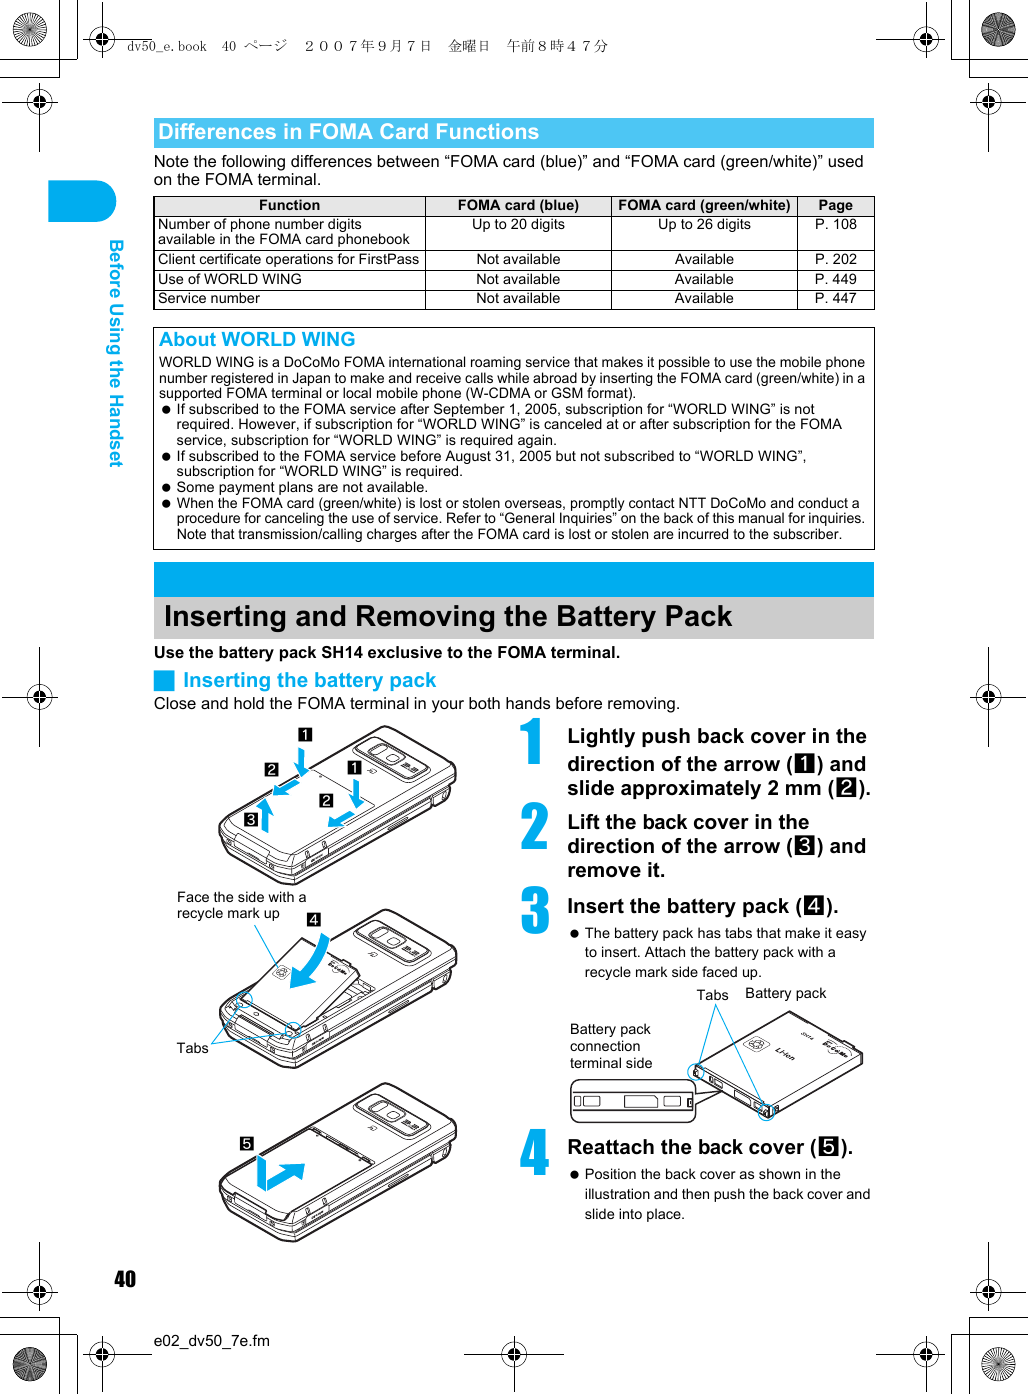
![38e02_dv50_7e.fmBefore Using the Handset※Refer to step 1 of “Turning the Power Off” on P. 46 to turn off the power, position the back facing upwards and remove the battery pack. Then insert or remove the FOMA card.JInsertingClose and hold the FOMA terminal with your both hands when inserting the FOMA card.JRemovingClose and hold the FOMA terminal with your both hands when removing the FOMA card.The FOMA card has a “PIN1 code” and a “PIN2 code”.Both are set to [0000] by default but can be changed to a four- to eight-digit number by the user (nP. 147).The FOMA card has built-in restriction functions as security functions for protecting personal data and files. When the FOMA card is inserted into the FOMA terminal and data or files are retrieved using any of the following methods or when an i-appli is running, FOMA card restriction functions are automatically set in the retrieved data or files.When a file such as an image, melody or PDF is downloaded from a site or Internet web pageWhen a site or Internet web page is saved as a screen memoWhen i-mode mail with a file attached is receivedWhen an i-appli is runningInserting and Removing a FOMA Card1Hook a finger on the tab (1) and pull the tray out (2). Pull out the tray straight out until it stops.2Hold the FOMA card with the IC facing up, put on the tray and set (3).3Push the tray all the way in (4).1Hook a finger on the tab, pull the guide out (1) and remove the FOMA card (2). Do not allow the FOMA card to fall when removing it.Note Inserting or removing the FOMA card forcibly may damage the card or deform the tray. Use caution. Refer to the FOMA card user’s guide for more information on the FOMA card. If the FOMA card is inserted into another i-Channel supported terminal, i-Channel tickers do not appear. The i-Channel tickers are automatically shown when the latest information is received or the channel list is shown. Do not misplace the FOMA card once it is taken out. The FOMA terminal power may turn off if the IC area of the FOMA card is dirty. When the tray falls off, slide the tray in straight along the guide rail.FOMA Card Security CodesFOMA Card Restriction Functions <FOMA Card Restriction Functions>1234TrayTabFit the notch of the FOMA card to that of the tray.NotchIC (gold)12dv50_e.book 38 ページ 2007年9月7日 金曜日 午前8時47分](https://usermanual.wiki/Sharp/HRO00061.Manual-2/User-Guide-854234-Page-2.png)
![39e02_dv50_7e.fmBefore Using the Handset Data, files or software with FOMA card restriction functions run only when in use with the FOMA card inserted at time of acquisition. Display, play, attach to i-mode mail, run software, send data using Ir function and iC transmission function, and copy to microSD Memory Card can be executed. The following indicates the data for which FOMA card restriction is set.Melody Image (including animation and Flash movie) Chaku-uta®/Chaku-uta full®Screen memo File attached to Message R/F ToruCa (details) imageChara-den Image inserted to Deco-mail or signature Videophone picture memoi-motion i-appli (including i-appli stand-by) Download dictionaryPDF data Contents transfer compatible data Image in Message R/FMusic&Video Channel program Kisekae ToolMail templates with operation restricted datae-book/e-dictionary/e-comic saved in the [Comic] folderFile attached to i-mode mail (excluding the files listed below)・ToruCa ・Phonebook ・Schedule ・Bookmark ・Documents※“Chaku-uta” is a registered trademark of the Sony Music Entertainment (Japan) Inc. The following indicates the settings saved in FOMA card.Own number PIN setting SMS expirySMS center Language SSL certificates The above operations cannot be performed if the FOMA card inserted at time of data/file retrieval or i-appli startup is replaced with a different FOMA card.※Explanation that follows refers to the FOMA card inserted at time of data/files retrieval as “one’s own FOMA card” and other FOMA cards as “another’s FOMA card”.Note When one’s own FOMA card is replaced with another’s FOMA card, the data or files for which FOMA card restriction functions are set cannot be set as stand-by displays or ring tones. When a FOMA card is replaced with another’s FOMA card, FOMA card restriction functions are activated and if data or file retrieved from a site is set as the stand-by display or ring tone, the setting is reset to the default. When one’s own FOMA card is re-inserted, the setting returns.Example: When setting [Melody A], for which FOMA card restriction functions are set, as a ring toneWhen one’s own FOMA card is taken out or is replaced with another’s FOMA card, ring tone returns to default setting. When one’s own FOMA card is put back, the ring tone returns to [Melody A]. FOMA card restrictions functions cannot be set for data received using Ir exchange or data transmission functions, and still pictures/Continuous mode images/movies shot with the FOMA terminal. It is possible to move or delete data or files for which FOMA card restriction functions are set even when another’s FOMA card is inserted. Running i-appli by selecting highlighted text in i-mode mail display screen cannot be performed or retrieved when FOMA card restriction functions are set. If the FOMA card is replaced with another’s FOMA card after i-appli stand-by is set, the set i-appli cannot be activated in stand-by, and the image set in Stand-by display appears.One’s own FOMA card restriction functions are set for downloaded data, files attached to received mail and i-appli that have been run, allowing viewing and playback of data.When another’s FOMA card is inserted, data with one’s own FOMA card restriction functions set cannot be viewed or played back.One’s own FOMA cardAnother’s FOMA cardDifferent FOMA card inserteddv50_e.book 39 ページ 2007年9月7日 金曜日 午前8時47分](https://usermanual.wiki/Sharp/HRO00061.Manual-2/User-Guide-854234-Page-3.png)
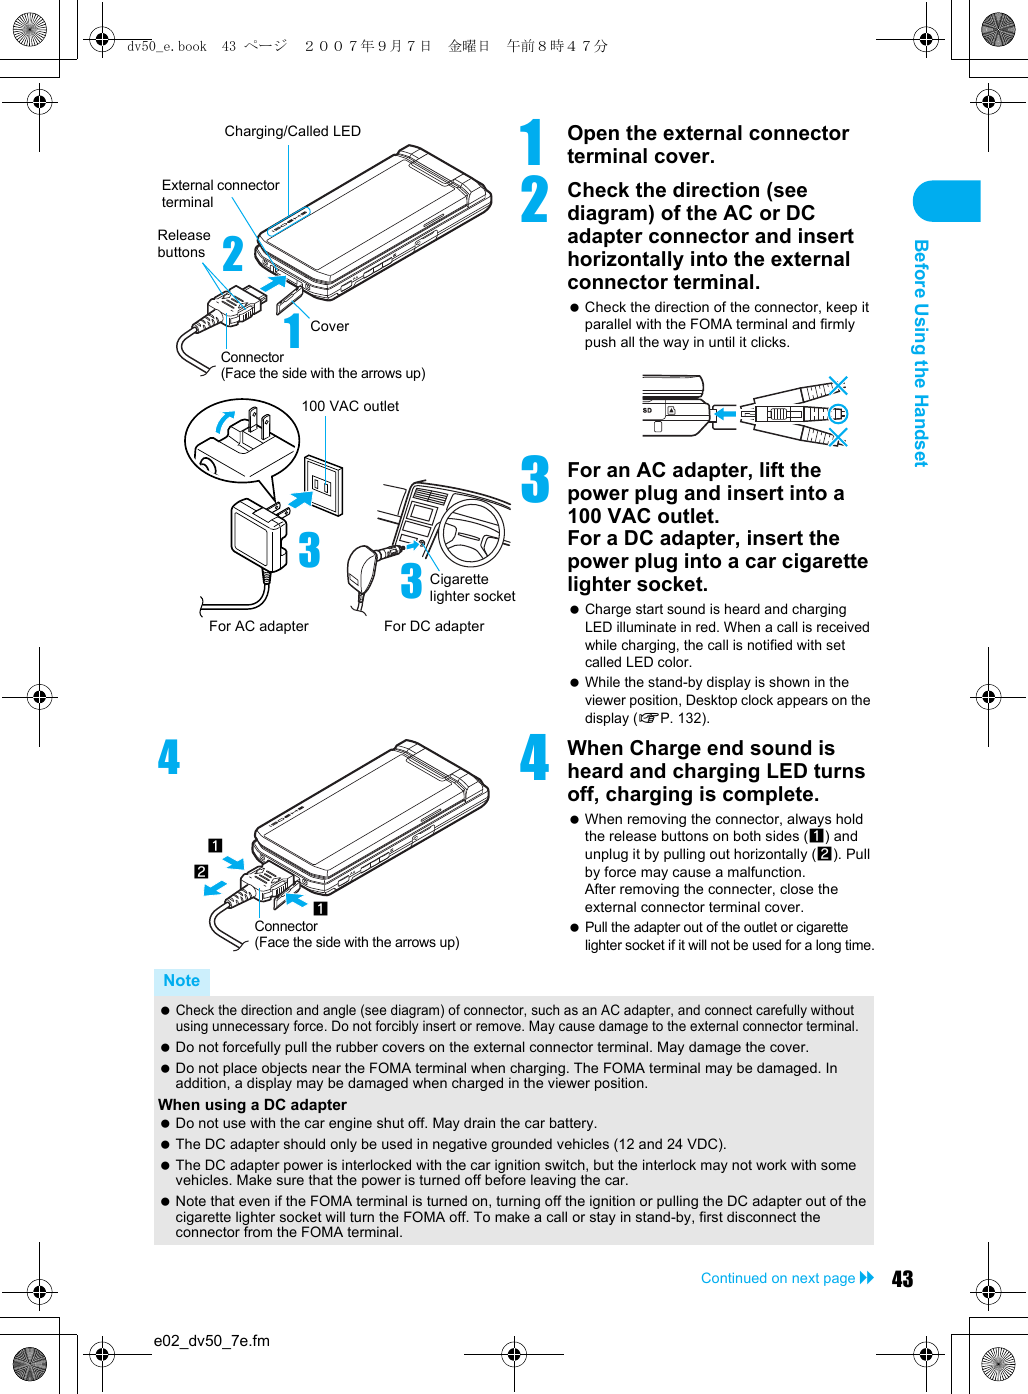
![42e02_dv50_7e.fmBefore Using the Handset Continuous talk time is estimated as the usage time at normal transmission signal strength, and continuous stand-by time is estimated as the usage time while moving with the FOMA terminal closed at normal signal strength. Talk and stand-by times may be reduced by about half depending on conditions including battery level status, stand-by display, Power saver mode, Missed call notice and New unread mail notice settings, temperature and other environmental conditions, and signal strength (no signal or weak signal). Using i-mode reduces talk (transmission) and stand-by times. When i-Channel is subscribed, information is automatically received and updated. Talk (transmission) time and stand-by time will be reduced. In addition, when shooting or editing an image, watching 1Seg, composing i-mode mail, activating the downloaded i-appli or the i-appli stand-by, or SD-Audio or Music player, the call (transmission)/stand-by duration will be shorten even if calls or i-mode transmission are not made. Some i-appli software may continue transmission even after downloading. To avoid this, set not to connect in advance. The actual usage time is a combination of stand-by time and talk time, and the longer the call duration, the shorter the stand-by time becomes. Time for watching 1Seg depends on conditions including battery level status, functions used, temperature and other environmental conditions.JBattery pack service life Battery pack is a consumable product. Service time per charge is gradually reduced every time the battery is charged. When service time per charge is reduced to about half of the default time, this means that the battery pack is approaching the end of its service life. In such a case, it is recommended to replace the battery pack as soon as possible. Depending on usage, the battery pack may swell as it approaches the end of its service life but this will not cause problems. If i-appli, Videophone, or 1Seg is used while charging for a long time, the service life of the battery pack may become shorter than estimated. To protect the environment, return used batteries to NTT DoCoMo, any DoCoMo retailer, or a recycling agency.JAbout charging batteries Refer to user’s guide of FOMA AC Adapter 01/02 (sold separately), FOMA AC Adapter 01 for Global use (sold separately), or FOMA DC Adapter 01/02 (sold separately). FOMA AC Adapter 01 covers only 100 VAC. FOMA AC Adapter 02 covers from 100 VAC through 240 VAC. FOMA AC Adapter 01 for Global use covers from 100 VAC through 240 VAC, however, the shape of the power plug for the AC power cable is for 100 VAC (for domestic use). To use the adapter overseas, a conversion plug adapter that is compatible with the voltage of your country of stay is required. Do not use a transformer for use overseas to charge the battery.JCautions when charging Do not charge for long periods of time with the power left on. If the FOMA terminal is left on after charging is complete, the battery pack charge decreases.In such cases, the AC or DC adapter charges the battery again. However, depending on when the FOMA terminal is disconnected from the AC or DC adapter, the battery charge level may be low, the battery alert tone may sound, or the battery may only be usable for a short time. When the battery is empty and terminal is recharging, charging LED may not illuminate immediately. If the alert tone sounds and the power cannot be turned on, charge the battery for a while. If the battery empty alert is displayed and charging begins within 60 seconds of the alert tone, the status returns to normal. While charging, terminal may not turn on even when charging LED is illuminated in red. Charge longer and try turning power on again. Frequently recharging the battery when power is still remaining enough may shorten the life of the battery pack. It is recommended to use the battery to a certain level before recharging. The battery pack cannot be charged by itself.[Read “FOMA AC adapter 01/02 (sold separately) and FOMA DC adapter 01/02 (sold separately) user’s guide” carefully.] Battery pack can be charged with FOMA terminal open and in the viewer position.Charging Using the AC Adapter/DC Adapterdv50_e.book 42 ページ 2007年9月7日 金曜日 午前8時47分](https://usermanual.wiki/Sharp/HRO00061.Manual-2/User-Guide-854234-Page-6.png)
![44e02_dv50_7e.fmBefore Using the Handset[Read “Desktop holder SH16 (sold separately) user’s guide” carefully.] Battery pack can be charged with FOMA terminal open and in the viewer position. The DC adapter fuse (2A) is a consumable. For replacement, purchase a new fuse at a local automobile supply shop.Charging Using the Desktop Holder1Face the side with the arrows of the AC adapter connector up and insert it into the connector terminal of the desktop holder. Keeping the connector parallel with the desktop holder, firmly push it all the way in until it clicks.2Lift the AC adapter power plug and insert into a 100 VAC outlet.3Place the FOMA terminal into the desktop holder. Place the FOMA terminal as shown in 1 on the left, and push in the direction of the arrow shown in 2 until it clicks. Charge start sound is heard and Charging LED illuminates in red. When a call is received while charging, the call is notified with set called LED color. While the stand-by display is shown in the viewer position, Desktop clock appears on the display (nP. 132).4When Charge end sound is heard and charging LED turns off, charging is complete. Hold the desktop holder and lift the FOMA terminal out. Pull the AC adapter out of the outlet when left unused for a long period of time.Note When Charge start sound is not heard (except when Charge start sound is set to [Silent], Manner mode is set or when terminal is turned off) or when charging LED do not illuminate, check that the FOMA terminal is placed securely in the desktop holder.NoteConnector (Face the side with the arrows up)FOMA AC adapter 01/02100 VAC outlet12Connector terminalCharging/Called LED312Making the desktop holder stand upMake the stand behind the desktop holder stand up until it clicks so that charging becomes available with the desktop holder stood up.Standdv50_e.book 44 ページ 2007年9月7日 金曜日 午前8時47分](https://usermanual.wiki/Sharp/HRO00061.Manual-2/User-Guide-854234-Page-8.png)
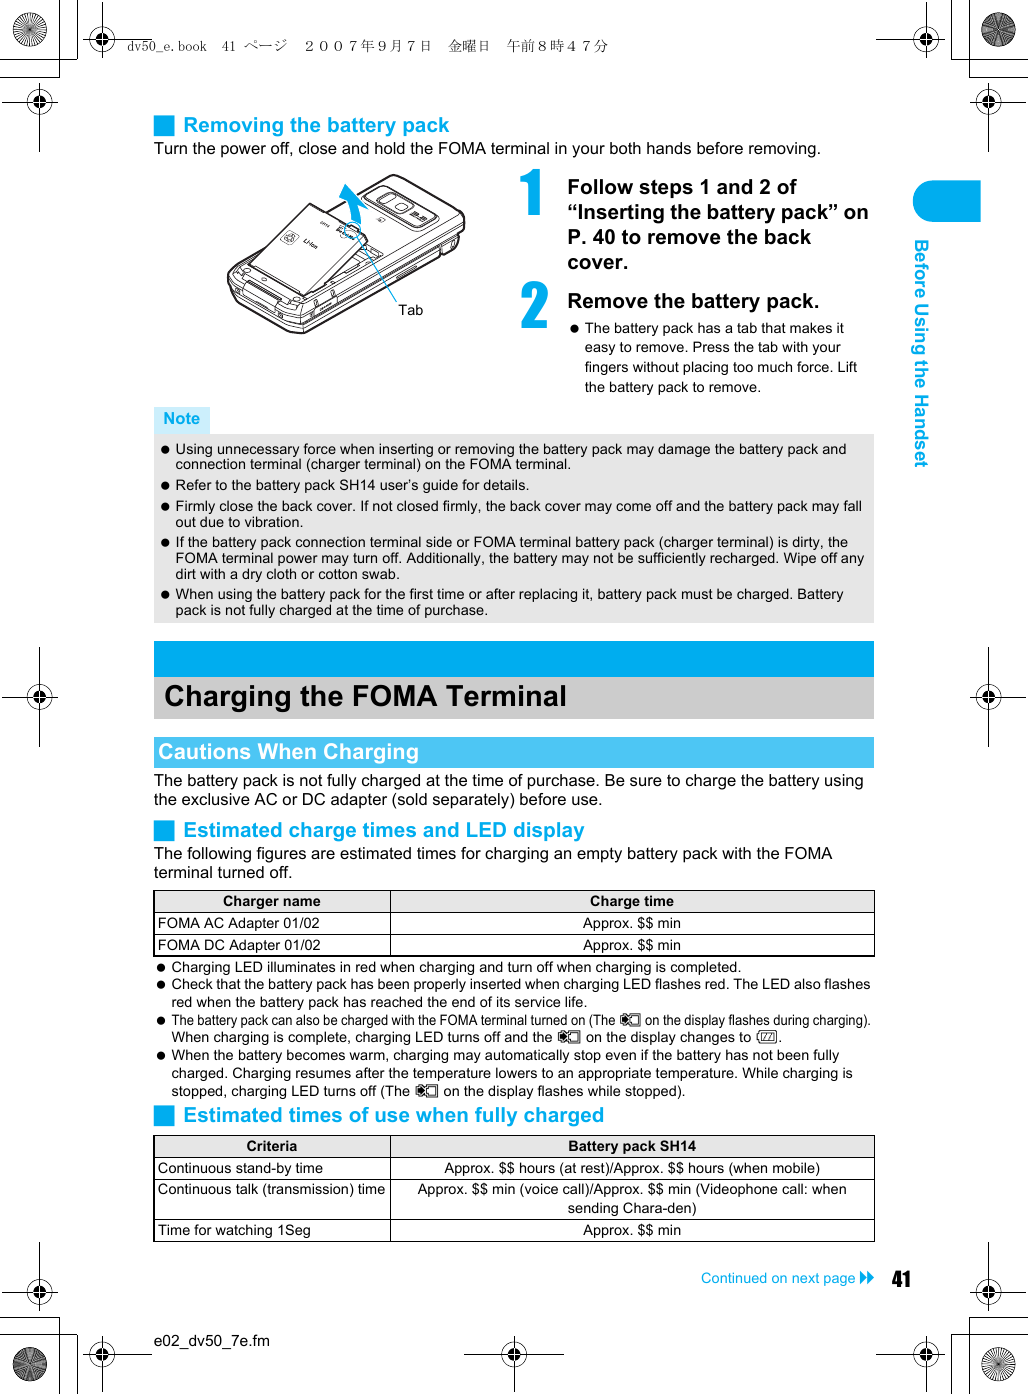
![45e02_dv50_7e.fmBefore Using the HandsetContinued on next page ??Check the approximate battery level in the display.[Battery empty. Unsaved data will be lost. Ending current operation] appears if battery starts to run out (Press t to clear the message). After a while, an alert tone sounds. The screen on the right appears, handset operations are disabled and power turns off after approximately 60 seconds. During a voice/Videophone call, the alert tone sounds and [Battery empty. Unsaved data will be lost. Ending current operation] appears. The call is disconnected after approximately 20 seconds. At the same time, the screen above appears and after approximately 60 seconds, the power turns off. Alert tone does not sound when Manner mode or Public mode (Drive mode) is set (Alert tone sounds during a call). When H is pressed during a call, the call is disconnected. Turn off the power and recharge the battery. Before turning the power on, check that the FOMA card is properly inserted (nP. 38). If the FOMA card is not inserted, [Insert UIM] and a FOMA card error appear (nP. 30). When placing the FOMA terminal in the desktop holder, be careful that the strap is not caught in between the handset and the desktop holder.Battery LevelHow to Check the Battery LevelChecking the Battery Level with Sound and Display1In stand-by, press t ? [Settings] ? [General settings] ? [Check status] ? [Battery level]. Graphic for battery level appears (A different sound is heard for each battery level). The battery level sound is heard at the volume set in Key/Standby i-motion (nP. 125). Wait approximately 2 seconds or press c/t and the previous menu reappears.If the Battery Runs OutPower ON/OFFTurning the Power On and OffTurning the Power OnNote When battery icons have been changed (nP. 138), the above icons may differ."Battery level is still sufficient.#Battery level is low.$Battery is almost empty. Charge the battery.%Battery is empty (Power will turn off soon).{Battery pack is being charged.GraphicSound Three beeps Two beeps One beepStatus Battery is sufficiently full. Battery is running low. Battery is almost empty. Charge the battery.dv50_e.book 45 ページ 2007年9月7日 金曜日 午前8時47分](https://usermanual.wiki/Sharp/HRO00061.Manual-2/User-Guide-854234-Page-9.png)
![46e02_dv50_7e.fmBefore Using the HandsetSwitch display language between Japanese and English for functions, messages, and menu items.1Press H (Power) for 2+ seconds. It may take some time for the wakeup screen to appear. The wakeup screen appears followed by the initial settings screen. Proceed to initial settings (nP. 47). If initial settings are not yet completed, the setting screen appears every time the power is turned on. If initial settings have been completed, the screen shown on the right appears when power is turned on. This screen is called the “stand-by display”. When [Enter PIN1 code] appears, enter the PIN1 code (nP. 146). When A (Out of service area) appears, the handset is outside the service area or in a place with no signal. Move to a place where the icon disappears.Note When a FOMA card is replaced with a new card, the terminal security code (four to eight digits) must be entered after turning on the terminal. If a correct terminal security code is entered, stand-by display appears. When a wrong terminal security code is entered five times, the power is turned off. However, turning on the power again is possible.Turning the Power Off1Press H (Power) for 2+ seconds. It may take some time for the power to be turned off (The end screen appears on the display until the power is turned off).Note Before connecting to an external device, make sure that all transmissions are complete and then turn off the FOMA terminal.Select LanguageSwitching Display to English1In stand-by, press t ? [Settings] ? [General settings] ? [Select language] ? [English]. To switch display language from English to Japanese, in stand-by, press t and select [Settings] b [General settings] b [Select language] b [日本語].Note If a FOMA card is inserted, settings are saved to the FOMA card. Select language settings are saved to FOMA terminal handset and inserted FOMA card. When each setting varies, the setting in FOMA card is prioritized.Stand-by displayJapanese display English displaydv50_e.book 46 ページ 2007年9月7日 金曜日 午前8時47分](https://usermanual.wiki/Sharp/HRO00061.Manual-2/User-Guide-854234-Page-10.png)
![47e02_dv50_7e.fmBefore Using the HandsetContinued on next page ??The initial settings screen appears automatically when the power is turned on for the first time. Each setting item can also be set from Menu (When the initial settings are complete, the stand-by display appears).Date and time settings Change terminal security code Key/Standby i-motionLocation provision Font size settings When items that have not been set remain, the setting screen appears every time the power is turned on.Set the date and time on the FOMA terminal. Set to automatically correct the date and time. For overseas use, the settings are automatically corrected to the local date and time.Initial SettingsMaking the Initial Settings1Set the date and time (nP. 47). Alternatively, press t in stand-by and select [Settings] b [Initial setting] to perform initial settings. Set date and time from 00:00 January 1, 2001 to 23:59 December 31, 2050.2Register a terminal security code (nP. 145).3Set the Key/Standby i-motion (nP. 125). Select [ON]/[OFF].4Set GPS Location provision ON/OFF (nP. 283). Select [on]/[off].5Set font size (nP. 141). Select [Normal]/[Enlarge]. When the initial settings are complete, the software update function confirmation screen appears. Read the description and select [Agree] (When the initial settings are made from the menu or the software update is set to other than [auto-update], the confirmation screen does not appears).NoteCanceling the initial settings Press H while setting. Date settings are set even if canceled.Date SettingsSetting the Date and Time1In stand-by, press t ? [Settings] ? [General settings] ? [Date settings]. When Limit settings is set to [Enable], terminal security code is required to set date and time. Times appear in 24-hour format.dv50_e.book 47 ページ 2007年9月7日 金曜日 午前8時47分](https://usermanual.wiki/Sharp/HRO00061.Manual-2/User-Guide-854234-Page-11.png)
![48e02_dv50_7e.fmBefore Using the HandsetDisplay your number (caller ID) on the other party’s phone (display) when making a voice/Videophone call or transmission PushTalk. Handset number (caller ID) is important personal information. Be very careful about your caller ID setting. The Notify caller ID function is available only on compatible phone devices.Set whether or not to send your caller ID using the methods below.2Select [Auto time correction] ? [ON]/[OFF].Related OperationsChange the time zone manually <City>1In stand-by, press t ? [Settings] ? [General settings] ? [Date settings] ? select [Auto time correction] ? [OFF].2Press C (City) ? select a time zone ? select a city ? i. Note The date and time that are set are saved even if the battery pack is removed, but if the battery pack remains removed for approximately a week or more or the battery remains empty, the settings may be reset. When this happens, set again after charging the battery. If the date and time are not set correctly, date and time are not correctly recorded for Redial, Received calls, Record message (voice), Record message (Videophone calls), and camera image titles/shooting date. In addition, functions that use the clock, such as Auto power ON/OFF, Alarm, Schedule, SSL (authentication), i-appli Auto start, starting i-appliDX, Reception, Recording, and playback or view of i-motion/music data/e-comic with replay restrictions, cannot be used properly.When Auto time correction is set to [ON] The FOMA automatically adjusts the time by connecting to the DoCoMo network’s time information. When time difference is adjusted, [Time adjusted] appears. When Auto time correction is set to [ON], the time is sometimes not adjusted for a while. To activate Auto time correction, turn off FOMA terminal power and restart. Time is not adjusted depending on the signal status. Time may be off by a few seconds. When time difference is adjusted overseas, the local time and date appear in Redial, Received calls, Received messages (excluding i-mode mail) and Received messages list, and ! appears. The received messages are not displayed in order of the displayed time and date but the mail reception. ! does not appear in the Outbox and Unsent messages for mail messages. If the date order display is set for the Outbox or Unsent messages, sent messages are displayed in the order of the displayed time and date. Time correction may not be performed depending on the overseas network. When Auto time correction is set to [ON] and time correction information is being received from an overseas network during overseas use, Japan time and local time appear (dual display). When Auto time correction is set to [OFF], only manually set time appears.Notify Caller IDSending Your Own Phone Number to the Other PartyMethod Notify caller ID Do not notify caller IDTo set up in advanceIn stand-by, press t and select [Settings] b [NW Services] b [Notify caller ID] b [Notify caller ID][Yes] [No]To automatically correct date and time[ON] b iTo enter date and time [OFF] b select [Date] b enter date and press t b select [Time] b enter time and press t b i Use 24-hour format. When entering month, day and time, add 0 before numbers one through nine (example: 01, 02, 03, etc.). Alternatively, select numbers with u. If you make a mistake, move the cursor using v and re-enter.dv50_e.book 48 ページ 2007年9月7日 金曜日 午前8時47分](https://usermanual.wiki/Sharp/HRO00061.Manual-2/User-Guide-854234-Page-12.png)
![49e02_dv50_7e.fmBefore Using the Handset Notify caller ID cannot be set while A (Out of service area) appears on the screen. To check the Notify caller ID setting, press t in stand-by, select [Settings] b [NW Services] b [Notify caller ID] b [Status request]. Specifications made when making a call take priority over the Notify caller ID setting. If no specifications are made when a call is made, the Notify caller ID setting is followed. The method for making specifications when making a voice call is enabled for PushTalk. However, specifications are not made by adding 186 or 184.To set up when making a callAdd 186/184 before a phone number Add 186 Add 184Enter the phone number and select from the Submenu (nP. 62)Press C and select [Caller ID setting] b [Send own no.]Press C and select [Caller ID setting] b [No caller ID]Own NumberChecking Your Phone Number1In stand-by, press t0.Own number screen If during a voice/Videophone call, press C and select [Own number]. While Function lock is applied to phonebook, enter terminal security code and press t. When the 2in1 mode is set to [Dual mode], press i to switch between [Number A] and [Number B] and view your number. Refer to P. 418 for details on confirming, saving or changing owner information.Note When “Change for the Number B of 2in1” or “FOMA card exchange (2in1 subscriber b 2in1 subscriber)” is performed while the 2in1 is used, set 2in1 function OFF once and then set the 2in1 setting to ON again or check 2in1 registration (nP. 419) to receive the correct Number B. Also, when “FOMA card exchange (2in1 subscriber b 2in1 nonsubscriber)” is performed, set 2in1 function OFF to update the correct owner information.Method Notify caller ID Do not notify caller IDdv50_e.book 49 ページ 2007年9月7日 金曜日 午前8時47分](https://usermanual.wiki/Sharp/HRO00061.Manual-2/User-Guide-854234-Page-13.png)
![<Cut here>FOMA SH905iGeneral Inquiries <DoCoMo Information Center>(In English)s 0120-005-250 (toll free)※Can be called from mobile phones and PHSs.(In Japanese only)r (No prefix) 151 (toll free)※Can only be called from DoCoMo mobile phones and PHSs. Please confirm the phone number before you dial.(In Japanese only)r (No prefix) 113 (toll free)※Can only be called from DoCoMo mobile phones and PHSs.(In Japanese only)s 0120-800-000 (toll free)※Can be called from mobile phones and PHSs. Please confirm the phone number before you dial. For further information, refer to the “Service Station List” included with your FOMA terminal and other devices.1In stand-by, press a for 1+ seconds ? [Phone]/[UIM].2Enter name ? t ? 9/S* ? t ? phone number ? t ? phone number type (not applicable for FOMA card) ? t ? S/T* ? t ? mail address ? t ? mail address type (not applicable for FOMA card) ? t.* For FOMA cards3Press i (Complete) ? memory number (not applicable for FOMA card).4Select PushTalk phonebook entry (not applicable for FOMA card).1In stand-by, press q (M) ? phone number ? C ? [Add to phonebook].To save from Redial: In stand-by, press r (I) ? phone number ? C ? [Add to phonebook].2Select [Save new to phone] ? save phonebook.To save to FOMA card phonebook: Select [Save new to UIM].To add/overwrite: Select [Add/overwrite].To add to PushTalk phonebook: Select [PushTalk phonebook].To add to PushTalk group: Select [Add PushTalk group].* Cannot be saved to FOMA card.1In stand-by, press a ? name ? C ? [Edit data] ? [Edit] ? item ? t ? edit.1In stand-by, press a.To change search method: Press C in phonebook list ? [Search by] ? search method ? t.2Select name ? t ? s or t.Quick ManualRegistration/ContactsIf you have problems with your FOMAAdd to PhonebookSaving to Phonebook from Redial and Received CallsItems to addIcon Item=NameBReadingQGroup9 SPhone number9 y R u A 3T Y ZPhone number type*S TMail addressS c v 7 B UMail address type*aCompany/School*qDepartment*rTitle*NPostal code*OPostal address*jLocation info*PBirthday*GMemo*;Secret*FSecret code*<Select ring tone*VMail ring tone*qCalled LED color*-Called LED pattern*:Mail LED color*+Mail LED pattern*8Picture call set*1Substitute image settings*Editing EntriesMaking Calls from Phonebook EntriesIcon Item1In text input screen, press a.Press a to switch from } (single-byte numbers) b U (kuten code) b > (kanji/hiragana) b [ (double-byte katakana) b ^ (single-byte katakana) b X (double-byte alphanumerics) b d (single-byte alphanumerics).1In double-byte/single-byte alphanumeric mode, press m.Lower case mode is enabled.To convert to lower case after entering text: Press m.1After entering text, press o.1Move the cursor to text and press c.To erase all text: Press c for 1+ seconds at the end.1In text input screen, press a for 1+ seconds ? categorize phrase ? t ? phrase ? t ? t.1In text input screen, press i (Pict/Sym).Pictograph mode is activated.To enter Deco-mail pictographs: Press i in pictograph mode. The input mode switches between Pictograph and Pictograph D (Deco-mail pictograph).To switch symbol mode: Press C in pictograph mode. Press C in symbol mode to switch between upper case and lower case. 1In text input screen, press m for 1+ seconds ? emoticon ? t.1In text input screen, move cursor to the first character to cut ? press # for 1+ seconds.To copy: In text input screen, press C ? [Copy] ? move cursor to the first character to copy ? t.2Move the cursor to the last character to cut/copy ? t.3Move the cursor to the paste location ? press * for 1+ seconds.Ex.) 今日のテニス3時t1In text input screen, press 2 twice ? p ? [今日] ? t.2Press p ? [の] ? t.3Press 453 ? o ? [テニス] ? t. Use o for 1-touch conversion.4Press a five times ? 3.5Press a twice ? 3 twice ? * ? p ? [時] ? t. Use * for dakuten mark.6Press i (Pict/Sym) ? p ? t ? t.1In stand-by, press t ? [Settings] ? [Disp/LED/Power saver] ? [Font style] ? [Font style setting] ? font.To set to LC Gothic : Select [LC Gothic].To set to SH Heisei Mincho: Select [SH Heisei Mincho].To set to SH Crystal Touch: Select [SH crystal touch].1In stand-by, press t ? [Settings] ? [Disp/LED/Power saver] ? [Font style] ? [Font size] ? [Input] ? [Maximum]/[Large]/[Normal]/[Small] ? [Yes].For Collective setting: Press 5 for 1+ seconds in stand-by.Text InputChanging input modeEntering lower case letters1-touch conversionDeleting textUsing phrasesEntering pictographs/symbols/Deco-mail pictEntering emoticonsCutting/Copying/Pasting textExample Enter hiragana with the dial key. Every time the key is pressed, the character changes. Closest entry appears after each character is entered. Select conversion candidates. Press m for lower case. To enter multiple characters assigned to the same key, press r to move the cursor, or after entering a character, press the same key for 1+ seconds. Press a five times for single-byte alphanumeric mode.Changing font (font style)Changing font size-3--2--1--6--5--4- -7-dv50_e.book 523 ページ 2007年9月7日 金曜日 午前8時47分](https://usermanual.wiki/Sharp/HRO00061.Manual-2/User-Guide-854234-Page-17.png)
![<Cut here>1In stand-by, press C ? t (Y) ? t (Save).JShoot panoramic pictures1In stand-by, press m (Panorama) ? t (Y) ? move the FOMA terminal to either direction of left or right ? t (End) ? t (Save).1In still picture shooting screen, press C ? [Switch camera-mode] ? [Movie] ? t (Rec) ? (record) ? t (Stop) ? [Save].1In stand-by, press t ? [Data box] ? [My picture] ? folder ? t ? still picture ? t.1In stand-by, press t ? [Data box] ? [i-motion] ? folder ? t ? movie ? t.1In stand-by, press t ? [1Seg] ? [Channel setting].2Select the destination No. ? C ? [Auto channel set] ? [Yes].3Select a region ? t ? prefecture/district ? t.4Press t ? [Yes].1In stand-by, press t ? [1Seg] ? [Channel setting] ? Channel list ? t (Set).1In stand-by, press < (&).To record a movie of 1Seg programs: Press i for 1+ seconds while watching 1Seg ? (record) ? i (Stop).To record 1Seg programs as a still picture: Press i for 1+ seconds while watching 1Seg.1In stand-by, press t ? [Data box] ? [1Seg] ? video file ? t.1In stand-by, press t ? [Data box] ? [MUSIC] ? data type.To select from Sent/Received messages history: Select [Sent messages]/[Rcvd messages] ? recipient ? t ? t.To select from mail members: Select [Mail members] ? member ? t.3Select [Sub] ? t ? enter subject ? t ? [Msg] ? t ? enter message ? t ? i (Send).JPaste Position location URL to i-mode mail text1In message entry screen, press C ? [Location info] ? [From position loc.] ? location information ? t ? [Yes].CameraShoot still pictureShoot movieViewing still picturesViewing moviesWatching 1SegPerforming the Automatic Channel SettingSelecting a Channel ListWatching 1SegWatching VideoMusic PlaybackPlaying back with Music playerChaku-uta full®[i-mode] ? music data ? tWMA file [WMA] ? folder type ? t ? folder ? t ? music data ? tData in [Multimedia] [i-mode] ? m (bmicroSD) ? [Multimedia] ? music data ? tPlaylist [Playlist] ? playlist ? m (Play)Key operations during playbackTo pausetTo st o pmTo adjust volumep/oTo play previous song/To return to beginning of songqTo play next songrTo end Music playerc/H ? [Yes]MailComposing/Sending i-mode Mail1In stand-by, press m for 1+ seconds ? [To] ? t.2Select [Direct input] ? enter address ? t.To select from phonebook: Select [Search phonebook] ? recipient ? t.1In message entry screen, press C ? [Decorate mail] ? select decoration ? enter text ? C ? [Preview] ? t (Agree) ? t ? i (Send).1In stand-by, press m for 1+ seconds ? attachment entry field ? t ? file to attach.1In stand-by, press m ? [Compose SMS] ? [To] ? t ? [Direct input] ? enter address ? t ? [Msg] ? t ? enter message ? t ? i (Send).1In stand-by, press m ? [Mail setting] ? [Receive opt. setting] ? [ON] ? [Yes].1In stand-by, press m ? [Check new message].For SMS: Press m ? [SMS check].1Open i-mode mail ? C ? [Reply/Forward].2Select [Reply].To quote message and reply: Select [Reply with quote].3Compose and send i-mode mail.1Open i-mode mail ? C ? [Reply/Forward] ? [Forward].2Compose and send i-mode mail.1In stand-by, press t ? select menu from Custom menu ? t ? function ? t.1In Custom menu screen, press m (Basic).For Basic menu: Press m (Custom).1In stand-by, press t ? function number in Basic menu.Sending Deco-mailAttaching a file[Image] ? folder ? t ? image ? i[Melody] ? folder ? t ? melody ? i[i-motion] ? folder ? t ? movie/i-motion ? i[ToruCa] ? folder ? t ? Tor u C a ? i[PDF] ? folder ? t ? PDF data ? i[Phonebook] ? [phone] ? name ? t[Schedule] ? [phone] ? date ? i ? schedule ? t[Bookmark] ? [i-mode]/[Full Browser] ? folder ? t ? bookmark ? t[Document] ? file ? i[Other] ? file ? tComposing/Sending SMS (Short Messages)Auto receive1i-mode mail is automatically received.2Select [Mail] ? t ? folder ? t ? mail ? t. Received mail appears.Receive option settingCheck new messagesReplying to i-mode mailForwarding i-mode mailMenu ListSelecting from Custom menuSwitching Custom menu/Basic menuRecalling function numberSoundUSnd/Vibrator/MannerUSelect volume phone ring vol, Mail ring vol, PushTalk tone vol, Key/Standby i-motion, Charge start sound, Charge end sound, Timer sound, GPS volumeVSelect sound Select ring tone, Select mail tone, PushTalk tone, Shutter sound, Timer sound, GPS toneWVibrator Vibration mode, Mail vibration, GPS vibratorXManner mode ON (Normal, Silent, Original), OFFYEarphone settingZRing time settingMail ring time set, PT ring time set, GPS ring time set[Set mute ring time\Hold/On hold toneSet on hold tone, Set hold tone]Sound plybck (melody)Stereo effects, Equalizer, Run music settings-9- -10- -11--8--13- -14- -15--12-dv50_e.book 524 ページ 2007年9月7日 金曜日 午前8時47分](https://usermanual.wiki/Sharp/HRO00061.Manual-2/User-Guide-854234-Page-18.png)
![<Cut here>DisplayVDisp/LED/Power saverUSet screen Stand-by display, Clock display, Calendar display, Desktop clockVFont style Font style setting, Font sizeWThemes Kisekae Tool, Call/Rcv display, Send/Rcv display, Submenu image, Dial image set, Animate notices, Signal/batt/s clock, Color theme settingXLED settings Called LED, Mail LED, In-call LED, Alarm/Timer LED, IC card LED, Open/close LED, Notice LED, GPS LEDYDisplay img qualityVibrant image mode, Control by sceneZPower saver setNormal(auto bright), Normal(fixed bright), Eco mode (Pwr saver), Original Eco mode[Private filter Linked manner, Filter density\Menu priorityGeneral SettingsWGeneral settingsUCheck status Owner Information, Check memory, Battery level, Check settingsVText input settingUser dictionary, Dwnld dictionary, Edit phrase, Clear memory termsWAuto power ON/OFFAuto power ON, Auto power OFF, Link alarm/power ONXDate settingsYSelect languageZTOUCH CRUISER setUsage settings, Pointer speed, Scroll speed, Double tap speed[USB mode setting\Scanning functionUpdate, Set auto-update, Set scan, Version]Software updateTReset settingsNW ServicesXNW ServicesUVoice Mail Check messages, Play Messages, Activate VoiceMail, Set ring time, Deactivate VoiceMail, Status(Voice Mail), Voice Mail setting, Notification setting, NotificationVCall waiting Activate, Deactivate, Status requestWCall forwardingActivate, Deactivate, Register number, Forwarding No. busy, Status requestXBar nuisance callsRegister caller, Register selected No, Delete all entries, Delete last entry, Check No of entriesYNotify caller IDStatus request, Notify caller IDZCaller ID requestActivate, Deactivate, Status request[Talk time/costXNW Services\2in1 setting Mode switching, Phonebook 2in1 set, Stand-by display, Set call/receive No., 2in1 function OFF, Receive avoidance]In-call arrival actSet arrival act, Arrival Call ActOther NW ServicesYOther NW ServicesURemote controlActivate, Deactivate, Status requestVDual network Switching, Status requestWEnglish guidanceGuidance setting, Status requestXService numberドコモ故障問合せ, ドコモ総合案内・受付YAdditional serviceUSSD, Reply messageZMulti number Set multi number, Status request, Number setting[Chaku-moji Create message, Message display\Roaming guidanceActivate, Deactivate, Status requestPhone settingsZPhone settingsUIn-call settings Noise reduction, Reconnect, Quality alarmVHeadset sw to callWIncoming settingsAny key answer, Set auto answer, Melody Call settingXVideophone setRedial voice call, Set sending image, Display setting, Subscreen position, Visual preference, Notify switch mode, Hands-free V.phone, Packet trans arr actYRecord messageRecord message, Answering duration, Reply message, V.phone reply imageZSet PushTalk Set PT arrival act, Hands-free PT[Set when foldedPhone/Videophone, PushTalk\Self mode]Other settings Int’l prefix, Sub address, Int’l dial assist, International Roam., In-area statusSecurity[SecurityUSecret modeVUIM Settings PIN1 code input set, Change PIN1 code, Change PIN2 codeWAccept/Reject callsAccept calls, Reject calls, Reject unknown, Reject user unset, Reject payphone, Reject not supportXShow call/receivedShow rcvd calls, Show redialYShow sent/receivedShow sent messages, Show rcvd messagesZLock settings All lock, Keypad dial lock, Function lock, IC card lock, Multi easy lock set, Multi lock auto-set[Change security code\Writing authentic]Delete all data Delete user data, Del secret dataOther settings\Initial settingsTOwn numberData box]UData boxUMy pictureVMUSICWMusic&Video chXi-motionY1SegZMelody[My Documents\Kisekae Tool]Chara-denTPrint setting(DPOF)LifeKit]VLifeKitUBar code readerVReceive Ir dataWmicroSD managerView microSD data, Backup/restore, Import, New manager info, Format, USB mode setting]VLifeKitXGPS menu Position location, i-appli, Location history, Set position loc., Loc.notification/set, Loc. request menuYCard readerZSchedule[Calculator\Text memo]Timer/Alarm Timer, Alarm, Wakeup TVTVoice memo/Rec msgRCharacter readerSData Sec. ServiceMedia tool]WMedia toolUVoice recorderVManga&BookReaderWDocument ViewerXPDF Viewer]XMUSIC menu]YOsaifu-Keitai menu]Z1Seg menu-17- -18- -19--16--21- -22- -23--20-dv50_e.book 525 ページ 2007年9月7日 金曜日 午前8時47分](https://usermanual.wiki/Sharp/HRO00061.Manual-2/User-Guide-854234-Page-19.png)
![<Cut here>※In the confirmation screen, select [Yes] and press t.Voice Mail Service is a paid option (monthly fees apply) that requires subscription.1In stand-by, press t ? [Settings] ? [NW Services] ? [Voice Mail].2Select [Activate VoiceMail] ? [Activate VoiceMail].To deactivate: Select [Deactivate VoiceMail].To play message: Select [Play Messages].To check for messages: Select [Check messages].Call Waiting is a paid option (monthly fees apply) that requires subscription.1In stand-by, press t ? [Settings] ? [NW Services] ? [Call waiting].2Select [Activate].To deactivate: Select [Deactivate].To request status: Select [Status request].JPlace current call on hold and answer a voice call1Beeps during call ? s ? call ? H ? s ? call.Call Forwarding Service is a free option that requires subscription.1In stand-by, press t ? [Settings] ? [NW Services] ? [Call forwarding].2Select [Activate].To deactivate: Select [Deactivate].To request status: Select [Status request].3Select [Forwarding number] ? [Input directly] ? enter forwarding number ? t ? [Set ring time] ? enter ringing time ? t ? [Activate].Subscription is not required (no monthly fees).1In stand-by, press t ? [Settings] ? [NW Services] ? [Caller ID request].2Select [Activate].To deactivate: Select [Deactivate].To request status: Select [Status request].Other FunctionsManner mode enable/disable Press # for 1+ secondsPublic mode (Drive mode) activate/deactivate Press * for 1+ secondsMulti easy lockactivate/deactivate Press t for 1+ secondsShow RedialrShow Received callsqShow i-Channel properties Press c (J)/c (J) for 1+ secondsShow Active markerpShow i-mode menuiShow i-appli software list screenPress i (,) for 1+ secondsActivate Record message/Voice memo Press 7 for 1+ secondsFont Size Collective setting/Individual settingPress 5 for 1+ secondsDisplay Mail menumView phonebookaActivate camera (still picture mode)CActivate camera (movie mode)In still picture shooting screen, press C ? [Switch camera-mode] ? [Movie]Display Data box Press C for 1+ seconds Supportbook (preset) In stand-by, press $Activate Multi Assistant (Multitask)$ while running an applicationDisplay Shortcut menuoRegister Shortcut menu Press $ for 1+ seconds when m appearsEarpiece Volume During call, press o/pSide Key Guard Set/DisablePress & (q) for 1+ seconds Private filter ON/OFF Press : (N) for 1+ seconds Activate Music player Press : (r) for 1+ seconds in the viewer position/when FOMA terminal is closedNetwork ServicesVoice Mail ServiceCall WaitingCall Forwarding ServiceCaller ID Request Service※Refer to P. 28 to P. 30 of Manual for detailed explanations on displayed icons.Icon ListUpper Part of the Main Display123456789a bvefg hi jkdu wtl mpq so rcxy nz1]Signal strength indicator2"/{Battery level/Charging37=AABNOi-mode/Full Browser4oSSL indicator5GNIQi-appli indicator6ABGPS indicator7mShortcut menu registration indicator8UhHv[i-mode mail/SMS Area mail received9ABGISTz8<9>07!Message R/F icona^microSD Memory Card indicatorbClock displaycMultitaskd\Alarme;Hands-freefRSTUVWKXRestriction enabledgYIC Card lockhWXStorage status of i-mode centeri_Public mode (Drive mode)jZManner mode activekbVibrator enabledl[Silentm]D to PkRecord messagenPPrivate filteroR/BFOMA card errorpgSelf mode enabledqaPushTalk in progressr453G/GSM settingsJtuIr exchange/External device indicatortxFOMA USB cable is connectedusEarphone/Microphone connectedv=;i-mode mail send reservationw0Music&Video Channel program reservationxQView ToruCayIHStatus of Comics settingza1Seg being recorded<Emergency contacts in case of loss or other accidents>Omakase Lock※Omakase Lock is a paid service. If Omakase Lock is subscribed while or at the same time as when the use of FOMA terminal is suspended, the usage fee of Omakase Lock is not charged.Enable/Disable Omakase Locks 0120-524-360Office hours: 24hoursOther contacts<Contacts: ><Contacts: ><Contacts: >※Please confirm the phone number before you dial.-25- -26- -27--24--29- -30- -31--28-dv50_e.book 526 ページ 2007年9月7日 金曜日 午前8時47分](https://usermanual.wiki/Sharp/HRO00061.Manual-2/User-Guide-854234-Page-20.png)
![<Cut here>FOMA SH905iFor DoCoMo mobile phones*Communication charges to Japan will apply when you make a call from a fixed-line telephone.※If you use the SH905i, you should dial the number +81-3-5366-3114 (to dial “+”, press the “0” key for over a second).For fixed-line telephones<Universal number>*Communication charges or other charges to your country of stay will apply.※See P.13 and P.14 for international call access codes of major countries (Table1) and international prefix number for the universal number (Table2).For DoCoMo mobile phones*Communication charges to Japan will apply when you make a call from a fixed-line telephone.※If you use the SH905i, you should dial the number +81-3-6718-1414 (to dial “+”, press the “0” key for over a second).For fixed-line telephones<Universal number>*Communication charges or other charges to your country of stay will apply.※See P.13 and P.14 for international call access codes of major countries (Table1) and international prefix number for the universal number (Table2).1In stand-by, press i ? [iMenu] ? [English iMenu] ? [Options] ? [International Settings] ? [i-mode services Settings] ? [Yes] ? enter i-mode password ? [OK] ? t.1In stand-by, press t ? [Settings] ? [Other NW Services] ? [Remote control] ? [Yes].1In stand-by, press t ? [Settings] ? [General settings] ? [Date settings] ? [Auto time correction] ? [ON] ? i.1In stand-by, press t ? [Settings] ? [General settings] ? [Date settings] ? [Auto time correction] ? [OFF].2Press C (City) ? time zone ? t ? city ? t ? i.1In stand-by, press t ? [Settings] ? [Phone setting] ? [Other settings] ? [International Roam.] ? [3G/GSM setting] ? [Automatic]/[3G]/[GSM/GPRS].Quick Manual “Overseas Use”Loss or theft of FOMA terminal or payment of cumulative cost overseas <DoCoMo Information Center> (24-hour service)International call access code of your country of stay (Table 1)-81-3-5366-3114*(toll free)International prefix number for the universal number (Table 2)-800-0120-0151*Failures encountered overseas<Network Technical Operation Center> (24-hour service)International call access code of your country of stay (Table 1)-81-3-6718-1414*(toll free)International prefix number for the universal number (Table 2)-800-5931-8600*Preparing for Oversea UseSetting i-modeSetting Remote AccessCorrect the Date and Time AutomaticallySet the Time Zone ManuallyAvailable Network3G network AvailableGSM network AvailableGPRS network AvailableSetting Network Communication SystemDefault setting: [Auto] (Automatically switches to a telecommunications carrier)1In stand-by, press t ? [Settings] ? [Phone settings] ? [Other settings] ? [International Roam.] ? [Network search mode].2Select [Auto] ? [Yes].To manually switch telecommunications carriers: Select [Manual] ? telecommunications carrier ? t.JSearching the host network again1In stand-by, press t ? [Settings] ? [Phone settings] ? [Other settings] ? [International Roam.] ? [Network search mode] ? [Network re-search]. When Network search setting is [Auto], automatically switches an available carrier. When Network search setting is [Manual], displays the list of carriers. Select a carrier.1In stand-by, press t ? [Settings] ? [Phone settings] ? [Other settings] ? [International Roam.] ? [Network search mode] ? [PLMN setting] ? numbers of carriers in the priority order ? C.2Select [UPLMN manual] ? enter country code (MCC) ? t ? enter network code (MNC) ? t ? [Yes].To select from a telecommunications carrier list: Select [UPLMN by list] ? telecommunications carrier ? t ? [Yes].To save the telecommunications carrier currently connected to: Select [Set VPLMN to PLMN] ? [Yes].To change priority: Select [Change priority] ? destination ? t ? [Yes]. If Network search mode is set to [Auto], reset Network search mode to the FOMA network (DoCoMo) automatically when the power is turned on.JSetting to the FOMA network (DoCoMo) manually1In stand-by, press t ? [Settings] ? [Phone settings] ? [Other settings] ? [International Roam.] ? [Network search mode].2Select [Manual] ? [DoCoMo].Services Available OverseasCommunication serviceExplanationVoice call Make or receive calls in your country of stay or make international calls to Japan or to other countries with the same phone number as used in Japan while abroad.Videophone Make international Videophone calls to users of the specified 3G carriers overseas and FOMA users in Japan.i-mode mail Send/receive i-mode mail overseas with the same address as used in Japan.i-mode Use i-mode overseas.i-Channel Use i-Channel overseas.SMS (Short Messages)Send/receive SMS overseas with the same phone number as used in Japan.Data communicationData communication (Packet transmission and 64K data communications), which are performed by connecting the FOMA terminal to a PC, are available.Setting a Search Method of CarrierNetwork search modeSetting a Carrier to Preferentially Connect toDisplaying a Carrier on the Stand-bySetting After Homecoming1In stand-by, press t ? [Settings] ? [Phone settings] ? [Other settings] ? [International Roam.] ? [Operator name disp] ? [display ON] ? [Yes].A carrier-3--2--1--6--5--4- -7-dv50_e.book 527 ページ 2007年9月7日 金曜日 午前8時47分](https://usermanual.wiki/Sharp/HRO00061.Manual-2/User-Guide-854234-Page-21.png)
![<Cut here>JUse + to make an international call1In stand-by, press 0 1+ seconds ? enter country code, area code (city code) and other party’s phone number ? s (Phone)/i (V.phone) ? [Yes].Enter 81 as a country code to make an international call to Japan.When the area code (city code) begins with 0, omit the 0 when dialing. However, include 0 when making a call to some countries or regions such as Italy.JMaking an international call outside your country of stay using country code conversion0 at the beginning of a phone number is automatically converted to the country code set in Country code conversion.Example : Make a call from phonebook1In stand-by, press a ? select person to call ? s (Phone)/i (V.phone) ? [Call].JInternational callSave a country number using Set country code to select a country code before making an international call.The following operation is available overseas only.1In stand-by, enter phone number ? C ? [Add prefix setting] ? [International Call] ? select country code ? t ? s (Phone)/i (V.phone).1In stand-by, enter phone number ? s (Phone)/i (V.phone).JMaking a call to the phone in your country of stay using phonebook1In stand-by, press a ? select person to call ? s (Phone)/i (V.phone) ? [Original number] ? t.JMaking a call to a WORLD WING subscriber overseasEven when making a call to the phone in your country of stay, make an international call to Japan if the call recipient is a “WORLD WING” subscriber.1In stand-by, press 0 1+ seconds ? 81 ? enter the other party’s phone number excluding 0 ? s (Phone)/i (V.phone) ? [Yes].1Press s to answer an incoming call.JHaving calls to your FOMA phone made from JapanEnter the phone number in the same way as it is entered in Japan and make a call.JHaving calls to your FOMA phone made from countries other than JapanEnter international access code of the country of the caller-81-user’s phone number excluding 0 and make a call.Set only in Japan.1In stand-by, press t ? [Settings] ? [Phone settings] ? [Other NW Services] ? [Roaming guidance].2Select [Activate].To deactivate: Select [Deactivate].To request status: Select [Status request].Set only in Japan.1In stand-by, press t ? [Settings] ? [Phone settings] ? [Other settings] ? [International Roam.] ? [Call barring].2Select [Activate] ? [Bar all incoming]/[Bar V.phone/64K] ? enter network security code ? t.To deactivate: Select [Deactivate] ? enter network security code ? t.To request status: Select [Status request]. Operate according to voice guidance.1In stand-by, press t ? [Settings] ? [Phone settings] ? [Other settings] ? [International Roam.] ? [Voice Mail(Int.)].2Select [Activate Voice Mail].To deactivate: Select [Deactivate VoiceMail].To play message: Select [Play Messages].To set Voice Mail Service: Select [Voice Mail settings]. Operate according to voice guidance.1In stand-by, press t ? [Settings] ? [Phone settings] ? [Other settings] ? [International Roam.] ? [Call Forward (Int.)].2Select [Activate Call Forwarding].To deactivate: Select [Deactivate Call Forwarding].1In stand-by, press t ? [Settings] ? [Phone settings] ? [Other settings] ? [International Roam.] ? [Roam. guidance(Int.)] ? operate according to voice guidance.Making CallsMaking a call to other countries from your country of stay (includes Japan)Making a call to the phone in your country of stayReceiving CallsSetting Roaming GuidanceCall BarringUsing Network ServiceVoice Mail (Int.)Call Forwarding (Int.)Roaming guidance (Int.)The following shows “Country code” used when making international calls or setting International dial assist.(As of $$ 2007)※For other country codes and details, refer to the “DoCoMo global service web page”.The following shows the International call access codes of major countries.(As of $$ 2007)The following shows the International prefix number for the universal number of each country.(As of $$ 2007)For lost, stolen, and cost settlement, or malfunction of the FOMA terminal overseas, refer to “Loss or theft of FOMA terminal or payment of cumulative cost overseas” on the cover of Quick Manual “Overseas Use” or “Failures encountered overseas” on P.1. Add “international call access code” of your country of stay that is assigned to your country of stay, or the “international prefix number for the universal number”, to the head of your phone number for inquiries.Country Codes of Major CountriesCountry/region Code Country/region CodeAustralia 61 Maldives 960Austria 43 Netherlands 31Belgium 32 New Caledonia 687Brazil 55 New Zealand 64Canada 1 Norway 47China 86 Peru 51Czech 420 Philippines 63Egypt 20 Russia 7Fiji 679 Singapore 65Finland 358 South Korea 82France 33 Spain 34Germany 49 Sweden 46Greece 30 Switzerland 41Hong Kong 852 Tahiti (French Polynesia)689Hungary 36India 91 Taiwan 886Indonesia 62 Thailand 66Italy 39 Turkey 90Japan 81 U.K. 44Macao 853 U.S.A. 1Malaysia 60 Vietnam 84International Call Access Codes of Major Countries (Table 1)Country/region Code Country/region CodeAustralia 0011 Malaysia 00Belgium 00 Monaco 00Brazil 0041/0021/0023Netherlands 00New Zealand 00Norway 00Canada 011 Philippines 00China 00 Poland 00Czech 00 Portugal 00Denmark 00 Russia 810Finland 00/990 Singapore 001France 00 South Korea 001Germany 00 Spain 00Greece 00 Sweden 00Hong Kong 001 Switzerland 00Hungary 00 Taiwan 002India 00 Thailand 001Indonesia 001 Turkey 00Ireland 00 U.A.E. 00Italy 00 U.K. 00Luxemburg 00 U.S.A. 011Macao 00 Vietnam 00International Prefix Number for the Universal Number (Table 2)Country/region Code Country/region CodeArgentina 00 Luxemburg 00Australia 0011 Malaysia 00Austria 00 Netherlands 00Belgium 00 New Zealand 00Brazil 0021 Norway 00Canada 011 Philippines 00China 00 Singapore 001Columbia 009 South Korea 001Denmark 00 Spain 00France 00 Sweden 00Germany 00 Switzerland 00Hong Kong 001 Taiwan 00Ireland 00 Thailand 001Israel 014 U.K. 00Italy 00 U.S.A. 011About Inquiries Overseas-9- -10- -11--8--13- -14- -15--12-dv50_e.book 528 ページ 2007年9月7日 金曜日 午前8時47分](https://usermanual.wiki/Sharp/HRO00061.Manual-2/User-Guide-854234-Page-22.png)