Contents
- 1. Users Manual 1
- 2. Users Manual 2
- 3. Users Manual 3
- 4. Users Manual 4
Users Manual 2

e02_pr10_7e.fm
[23/46]
23
Before Using the Handset
Component names and functions . . . . . . . . . . . . . . . . . . . . . . . . . . 24
Viewing display . . . . . . . . . . . . . . . . . . . . . . . . . . . . . . . . . . . . . . . . 27
Setting and selecting menu . . . . . . . . . . . . . . . . . . . . . . . . . . . . . . . 32
Displaying Support Book . . . . . . . . . . . . . . . . . . . . <Support Book>34
Using FOMA card . . . . . . . . . . . . . . . . . . . . . . . . . . . <FOMA card>34
Attaching/Removing battery pack . . . . . . . . . . . . . . . . . . . . . . . . . . 38
Charging . . . . . . . . . . . . . . . . . . . . . . . . . . . . . . . . . . . . . . . . . . . . . 39
Checking battery level . . . . . . . . . . . . . . . . . . . . . . . <Battery level>42
Turning power ON/OFF . . . . . . . . . . . . . . . . . . . .<Power ON/OFF>43
Changing screen display to English . . . . . . . . . <Select language>44
Making initial setting . . . . . . . . . . . . . . . . . . . . . . . . <Initial setting>44
Setting date and time. . . . . . . . . . . . . . . . . . . . . . . <Date settings>44
Notifying the other party of your phone number
. . . . . . . . . . . . . . . . . . . . . . . . . . . . . . . . . . . . . <Notify caller ID>45
Checking your own phone number . . . . . . . . . . . . .<Own number>46
pr10_E.book 23 ページ 2008年11月18日 火曜日 午前11時17分
24
e02_pr10_7e.fm
[24/46]
Before Using the Handset
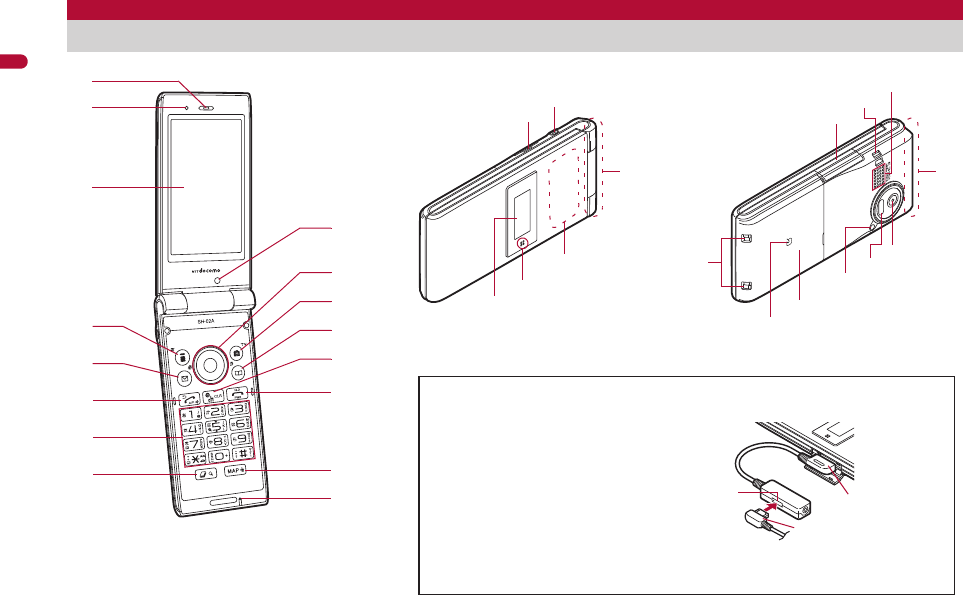
※Key illustrations are examples and may look different from actual keys.
Component names and functions
Using earphone
Connect an earphone compatible
with external connector terminal
(sold separately). When using an
earphone which does not support
external connector terminal,
connect with an earphone plug
adapter for external connector
terminal (sold separately).
Connector
Flat-plug
earphone
terminal Flat-plug connector of
flat-plug earphone/
microphone with switch
(sold separately)
Connection example for flat-plug earphone/
microphone with switch (sold separately)
k
h
l
i
j
2
4
8
7
1
3
6
5
a
c
9
e
d
b
f
g
mt
q
n
r
j
o
s
u
v
p
pr10_E.book 24 ページ 2008年11月18日 火曜日 午前11時17分

e02_pr10_7e.fm
[25/46]
25
Continued on next page
Before Using the Handset
1Earpiece
Listen to the other party’s voice.
Listen to Record message/Voice memo.
2Brightness sensor (nP. 94)
The sensor detects the light of the surrounding area and
automatically adjusts the display brightness and turns on/off the
keypad backlight.
Do not cover the sensor area with your hand or a sticker. May
interfere with the sensor.
3Main display (nP. 27)
4i-mode/Operation guidance key i (,)
Press to use i-mode (nP. 154).
Press to execute the functions of the operation guidance
(nP. 27).
Press for 1+ seconds to display the i-appli software list screen
(nP. 245).
5Mail/Operation guidance key m
Press to use mail functions (nP. 122).
Press to execute the functions of the operation guidance
(nP. 27).
Press twice to check new messages (nP. 132).
Press for 1+ seconds to display a compose message screen
(nP. 122).
6Start/Hands-free key s
Press to make or receive a voice call.
Press to use Hands-free (nP. 49).
Press for 1+ seconds to set the Eco mode (Power saver)
(nP. 93).
7Dial/Text entry keys 1 to 9, 0, *, #
Press to enter a phone number or text.
Press * for 1+ seconds to enable/disable the Public mode
(Drive mode) (nP. 62).
Press # for 1+ seconds to enable/disable the Manner mode
(nP. 89).
Press 1 to 3 for 1+ seconds to use assigned functions
(nP. 351).
Press 5 for 1+ seconds to set font size collectively (nP. 101).
Press 7 for 1+ seconds to record Voice memos or play Voice
memos/Recorded messages (nP. 66, P. 355).
Press 8 for 1+ seconds to start to use 2in1 or switch modes
(nP. 381, P. 382).
Press 9 for 1+ seconds to reset Kisekae Tool settings or Font
style setting (nP. 96, P. 101).
8Multi/Quick search key $
Press to use Quick search (nP. 352).
Press to use Multi Assistant (nP. 340).
9Sub camera
Use to shoot still pictures of yourself.
Use to send images of yourself during a Videophone call.
aMulti-guide key wt
Move the cursor to select an item and execute or set (nP. 27).
Press to display Menu, Redial list screen, Received calls list
screen and Shortcut menu.
Press t for 1+ seconds to enable/disable Multi easy lock
(nP. 111).
Press o to activate the function saved to the One-touch key
(nP. 351).
Press q for 1+ seconds to enable/disable Side Key guard
(nP. 111).
Press r for 1+ seconds to enable/disable IC card lock
(nP. 268).
Press u for 1+ seconds to adjust the earpiece volume
(nP. 86).
bCamera/Operation guidance key C
Press to activate the camera (nP. 191).
Press to execute the functions of the operation guidance
(nP. 27).
Press for 1+ seconds to activate 1Seg (nP. 211).
cPhonebook/Operation guidance key a
Press to use the phonebook (nP. 75).
Press to execute the functions of the operation guidance
(nP. 27).
Press for 1+ seconds to display the phonebook entry screen
(nP. 75).
pr10_E.book 25 ページ 2008年11月18日 火曜日 午前11時17分

26
e02_pr10_7e.fm
[26/46]
Before Using the Handset
di-Channel/Clear key c (J)
Press to show the channel list (nP. 173).
Press to return to the previous screen.
Use to delete text or phone numbers.
ePower/End key H
Press for 2+ seconds to turn the power on/off (nP. 43).
Use to end the function being used and return to stand-by
display.
fMAP key {
Press to activate GPS compatible i-appli (nP. 279).
Press for 1+ seconds to check your present location (nP. 278).
Press to add location information to still pictures or display the
added location information (nP. 191, P. 299).
gMouthpiece/Microphone
Sends out your own voice.
hmicroSD Card slot (nP. 314)
iLight key &
Press for 1+ seconds with the FOMA terminal closed to turn on/
off the picture light.
Press with the FOMA terminal closed to scroll i-Channel ticker in
the sub display from the beginning (nP. 174).
jFOMA antenna
An antenna is built in. To speak in better conditions, do not cover
the antenna area by hand.
k1Seg antenna (nP. 208)
A 1Seg antenna is built in. To receive in better conditions, do not
cover the antenna area by hand.
lCalled/Charging LED
Flashes while receiving a call, etc (nP. 99).
Illuminates while charging (nP. 39).
mSub display (nP. 27)
nExternal connector terminal
Integrated terminal used while charging, connecting the
earphone, etc.
Connect to an external device such as AC adapter/DC adapter,
FOMA USB Cable with Charge Function 01/02 (sold separately)
(nP. 40, P. 322).
oStrap ring
pSpeakers
Emits ring tones, music, etc.
Emits the other party’s voice during hands-free operation.
qMain camera
Use to shoot still pictures or movies (nP. 186).
Use to send a camera image shot during a Videophone call to
the other party (nP. 48).
rInfrared port
Use for the Ir communication (nP. 328).
Use for the Ir remote control (nP. 332).
sPicture light
Illuminates while activating the camera (nP. 186).
Illuminates/Flashes during shooting (nP. 191, P. 193).
tBack cover (nP. 38)
A radio frequency-preventing sticker is attached on the back of
the back cover. Do not peel off this sticker.
ub mark
The IC card is included (The IC card cannot be removed). Use
Osaifu-Keitai holding the b mark up to the scanning device
(nP. 267).
Use to send and receive data via the iC communication
(
n
P. 333).
vCharger terminal (nP. 41)
Terminal for charging with the desktop holder.
pr10_E.book 26 ページ 2008年11月18日 火曜日 午前11時17分

e02_pr10_7e.fm
[27/46]
27
Continued on next page
Before Using the Handset
Use to select or execute the menus that appear in the operation
guidance. The following shows the keys allotted to select or execute
the menus items that appear in the operation guidance.
■Operation guidance menu
In the operation guidance, menus appear according to the used
function and situation.
The following table describes examples of the main operation
guidance menus that appear.
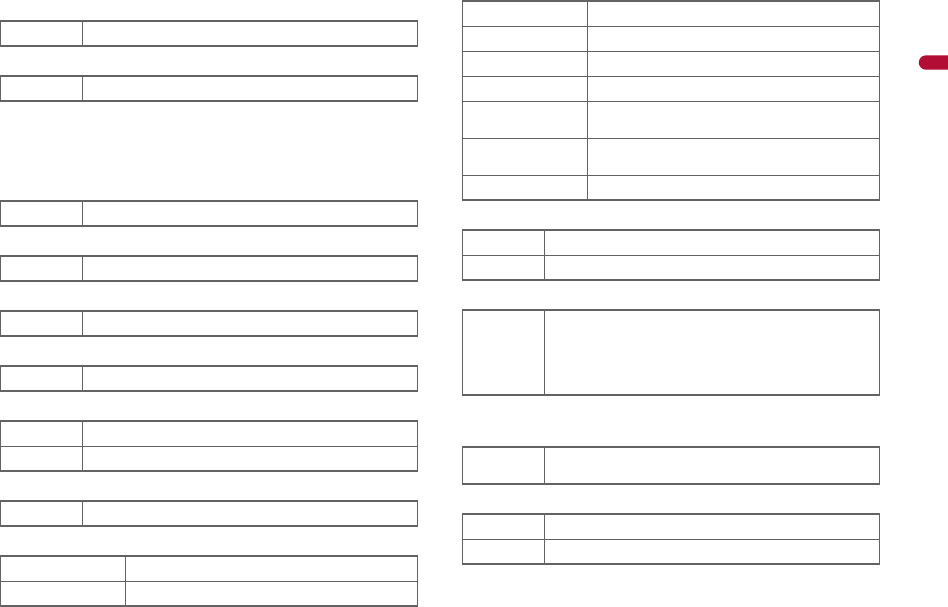
Main display
Sub display
The display appears when Sub) Clock display (
n
P. 91) is set to
[Stand-by clock(L)].
※Icons are shown in the order of main display and sub display.
Using Multi-guide key and Operation guidance key
OK Sets the selected item
Submenu Displays the Submenu
Agree Checks selected image, music, etc.
Back Returns to the previous screen
Play/Stop Plays/Stops i-motion, music, etc.
Full Displays selected images, etc. in full screen
Show all Displays sorted files, etc. as a list
1/1 or Zoome
Displays selected images, etc. in actual/reduced size
Mail Displays the compose message screen
Send Sends a message
Cancel Cancels the operation such as receiving a message
SelAll/ClrAll Selects/Disables all selectable items
(Up to 50 items can be selected/disabled depending
on the function)
Page
▲
/Page
▼
Scrolls the display by page
Close Closes the Submenu, etc.
ituC
avm
Viewing display
12345 789
olkjihgfm
y
a b
p nq e d c
r
xw uv
ts
6
1r g 82 a 2h
jk
b
y2z
s
pr10_E.book 27 ページ 2008年11月18日 火曜日 午前11時17分

28
e02_pr10_7e.fm
[28/46]
Before Using the Handset
1Signal status
When A appears, the handset is outside the service area or in
a place with no signal. Signal icon can be changed (nP. 97).
2Battery level/Charging (nP. 42)
Battery icon can be changed (nP. 97).
3i-mode/Full Browser (nP. 154, P. 176)
4SSL (nP. 156, P. 176)
When o appears while Multi Assistant is used, function such as
i-mode, Full Browser, i-appli or Software update is being used
with Multi Assistant.
5i-appli (nP. 245)
* Indicates that i-appli is set as the stand-by display, but cannot be
used.
6GPS (nP. 278, P. 286)
7Shortcut menu (nP. 351)
8i-mode mail/SMS/Area Mail received (nP. 130)
* Appears when Area Mail is received.
9Message R/F (nP. 146)
The status may not always be indicated even if messages are
held at the i-mode center.
amicroSD Card (nP. 314)
bClock display (nP. 44)
Small clock icon can be changed (nP. 97).
]/aIndication of the signal strength
]no p
Strong Weak
"/bBattery level
{/kCharging
7 = A A
B N OIndicates i-mode/Full Browser status
oSSL compatible sites are viewed
SSL compatible Internet web pages are viewed
SSL/TLS pages are viewed
Gi-appli is being activated
i-appli stand-by is being activated
Ni-appli stand-by is set*
Ii-appliDX is being activated
i-appliDX stand-by is being activated
Qi-appliDX stand-by is set*
A (blue)
Location request menu is set to [Loc. provision:ON]/
[Reject No. unset]
Location request menu is set to [Permission sched.]
and Location provision is permitted
A (gray) Location request menu is set to [Permission sched.]
and Location provision is rejected
BGPS positioning
mAppears when the function can be added to the
One-touch key or Shortcut menu
U h H v
[/x*
Indicates the status of the i-mode mail/SMS/
Area Mail reception
Indicates the status of the memory to store
received mail
ABGIST
z8<9>0
7!
Indicates the reception status of the Message
R/F
Indicates the storage status of the Message R/F
^ (gray)/
m (gray) microSD Card is inserted
^ (pink)/
m (pink) microSD Card is being used
pr10_E.book 28 ページ 2008年11月18日 火曜日 午前11時17分
e02_pr10_7e.fm
[29/46]
29
Continued on next page
Before Using the Handset
c1Seg being recorded (nP. 216)
dRecord message (nP. 64)
When messages (voice calls/Videophone) are recorded, D to P
appears to indicate the total number of both types of message. If
three messages (voice calls) and two messages (Videophone)
are recorded, k appears.
eSilent (nP. 85)
fVibrator (nP. 87)
gManner mode (nP. 89)
hPublic mode (Drive mode) (nP. 62)
iStorage status of i-mode center (nP. 130)
jIC card lock (nP. 268)
kRestriction indicator (nP. 106, P. 112)
lHands-free (nP. 49)
mAlarm (nP. 217, P. 343, P. 347)
* Appears only when an Alarm is set for that day.
nMusic&Video Channel program reservation (nP. 227)
oi-mode mail send reservation (nP. 129)
a1Seg is being recorded
]Record message is set
[The phone ring volume [Silent] is set
bVibration mode is set
Z/fManner mode is set
_/dPublic mode (Drive mode) is set
WMail being held at the center
XMail being held at the center full
H/cIC card is locked
R/iSecret mode is set
SSecret data is being edited
TKeypad dial lock
U/eAll lock is set
V/eFunction lock is set
W/eKeypad dial lock and Function lock are set
K (red)/eSecret mode, Function lock and Keypad dial
lock are set
K (blue)/eSide key guard, Secret mode, Function lock
and Keypad dial lock are set
X/eSide key guard is set
; (red) Hands-free in progress
; (green) USB hands-free in progress
\
Alarm is set
Schedule alarm is set*
Reception reserve alarm is set*
Recording reserve alarm is set*
Wakeup TV is set*
0Appears 12 hours before Music&Video Channel
program distribution
=Mail with send reservation
;Mail failed to be automatically sent
pr10_E.book 29 ページ 2008年11月18日 火曜日 午前11時17分
30
e02_pr10_7e.fm
[30/46]
Before Using the Handset
pEarphone/microphone connection (nP. 360)
qUSB mode (nP. 322)
rFOMA card error
sSelf mode (nP. 108)
tIr communication/External device
uVeilView (nP. 102)
The VeilView icon does not appear during International roaming
or while 1Seg is recorded.
vOverseas 3G network
wStatus of Comics setting (nP. 335)
Status of Comics setting icon does not appear during hands-free
operation.
xToruCa (nP. 270)
The ToruCa icon does not appear during hands-free operation or
e-comic display.
yMultitask (nP. 340)
Indicates functions that are running.
While two or more functions are running, the Multitask icon
appears also in the sub display.
sWhen Auto answer setting is set to [ON] and while an
earphone/microphone (sold separately) is connected
x
FOMA USB Cable with Charge Function 01/02 (sold
separately) is connected in the Communication mode
R/j
Appears when FOMA card is malfunctioning or not inserted
B/h
Appears when a card other than the FOMA card is inserted
g/gSelf mode is set
JData is communicated with another device using the
Ir communication function (nP. 328)
Data is sent using the Ir remote control (nP. 332)
t (green) Connected to an external device and transmitting
packets
t (red) Connected to an external device and sending/
receiving packet data
uConnected to an external device and transmitting
64K data
PVeilView is set
4 (green) 3G network (Packet transmission is available)
4 (red) 3G network (Packet transmission is not available)
IFrame display is set
HPage display is set
QUnread ToruCa
gFour or more applications
are running
4Character reader (OCR)
5Bar code reader
*Videophone ]Card reader
hVoice call vVoice recorder
tPhonebook wSchedule
#Modem transmission
(appears during data
transmission) yText memo, Stand-by
memo
iSoftware update zCalculator
)Shotdeco 6Manga&BookReader
jReceive via Ir/iC/USB
communication
=Quick search
nFull Browser, Internet
movie player
li-appli
mi-mode, i-Channel, WEB
Mail
>ToruCa
{Alarm
pr10_E.book 30 ページ 2008年11月18日 火曜日 午前11時17分
e02_pr10_7e.fm
[31/46]
31
Continued on next page
Before Using the Handset
zOperation in progress
■Flash display in sub display
Flash movies are viewed in the sub display when Sub) Clock display is
set to [Graphic stdby clock] or calls and messages are received.
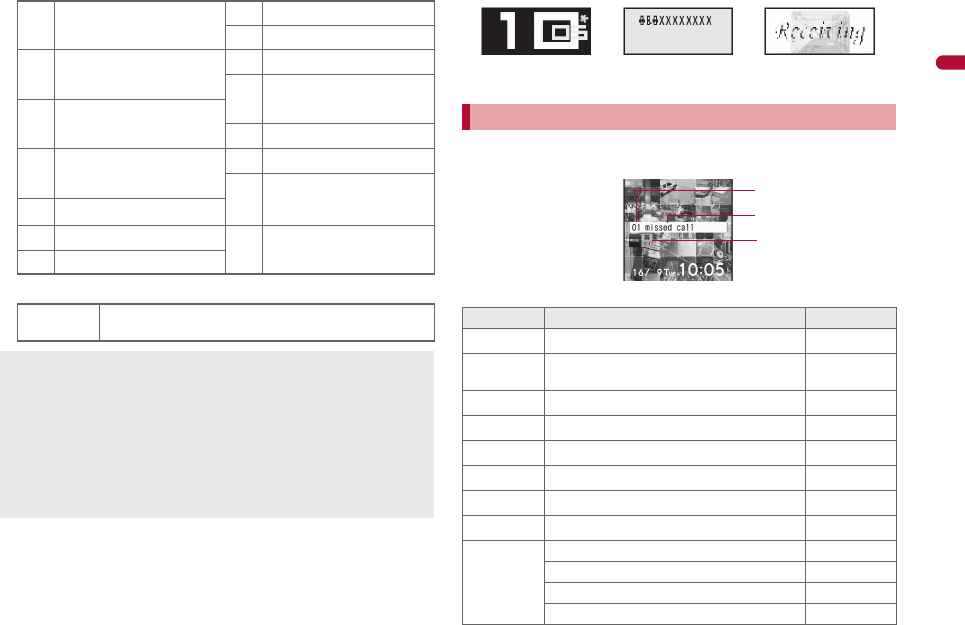
Stock icons are displayed in stand-by when a call is missed or new
mail is received. In stand-by, select stock icons to check notice details.
Stock icon type
pMail, SMS, Message R/F,
Check new message
8Timer
}microSD manager
qMail/Decome-Anime/SMS
being composed
9General settings
0Voice memo/Record
message
|Received calls/Received
messages history "Own number
!Redial/Sent messages
history
f1Seg
^Reception reserve/
Recording reserve alarm
sounds
2Shoot still picture
CGPS uData box, Music&Video
Channel
3Shoot movie
wA screen other than stand-by appears in the main
display
microSD Card is referred to as [microSD] or [SD] on the FOMA
terminal (nP. 314).
Some of the screen shots in this manual have been modified or
abbreviated.
The display for the FOMA terminal is manufactured using
high-precision technology, but it may occasionally contain dots
that fail to light or that remains permanently lit. This is not a
malfunction.
The display time of sub display follows the light duration setting.
Checking notices with stock icon
Icon Message Page
Bxx missed call*1 P. 64
FRecorded messages Fxx message/
Axx message P. 66
Exx voice mail*1 P. 373
Cxx mail message
P. 131, P. 151
Lxx New Message R P. 146
Qxx New Message F P. 146
Dxx new ToruCa P. 270
5New auto send result P. 129
6
Update complete P. 451
Check update P. 451
Update required P. 449
Check for update
P. 449
Stand-by
([Graphic stdby clock])
Receiving Receiving mail
Stock icon
Message
Number of entries
pr10_E.book 31 ページ 2008年11月18日 火曜日 午前11時17分
32
e02_pr10_7e.fm
[32/46]
Before Using the Handset
*1 When the 2in1 mode is set to [Dual mode], the number of [A mode]
and [B mode] appears each.
*2 The message that appears differs depending on the menu screen.
1In stand-by, a stock icon appears/t.
2Select the stock icon/t.
:After the details are checked, the stock icon and message
disappear.
Set, change or save functions from the menu screens.
Set the start menu that displayed when t is pressed while displaying
the stand-by.
1In stand-by, press t/[Settings]/[Disp/LED/
Power saver]/[Menu priority].
:In the Custom menu/Basic menu: Press C/[Menu priority].
2Select the start menu/t/[Yes].
DUSB mode setting P. 322
tDownload successful (Music&Video
Channel) P. 227
gDownload failed (Music&Video Channel) P. 227
4Charge limit exceeded P. 356
@
Send loc - No resp P. 289
Send loc - Resp P. 289
Send loc - Failed P. 289
GCustom menu/Basic menu/Menu*2 P. 33
Stock icons do not appear while the i-motion set as stand-by is
played or the i-appli stand-by is being activated.
Icon Message Page
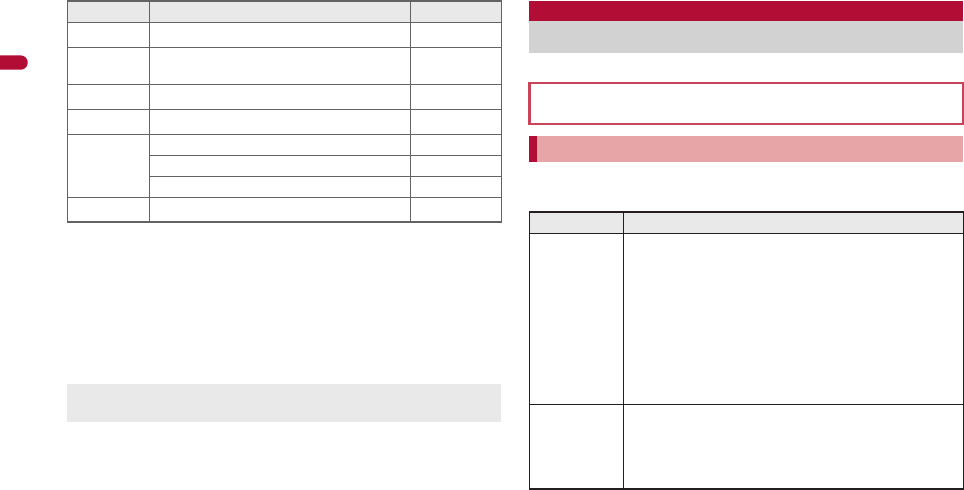
Setting and selecting menu
The explanations in this manual are based on how to retrieve a
function from the Custom menu.
Setting start menu <Menu priority>
Start menu Characteristics
Custom
menu
The preset Kisekae Tool (nP. 95) can be selected
and set. Each Kisekae Tool consists of different
functions and designs. Kisekae Tools can be
downloaded from sites and used.
Preset Kisekae Tools
HiTechSports NeoClassic
拡大メニュー(Large) シンプル(Simple)
ダイレクトメニュー
※Preset Kisekae Tools differ depending on the
FOMA terminal handset color.
Basic menu In the Basic menu, input the function number, which is
assigned to each function, to quickly retrieve the
function to be used.
For details on assigned function numbers
nP. 404
pr10_E.book 32 ページ 2008年11月18日 火曜日 午前11時17分
33
e02_pr10_7e.fm
[33/46]
Before Using the Handset
■Switching set start menu temporarily
Switch the start menu temporarily. When the stand-by display
reappears, the start menu returns to the one set in Menu priority.
Use the Shortcut menu to retrieve saved functions quickly. Other
functions can also be saved in the Shortcut menu (nP. 351).
For details on operating Shortcut menu nP. 351
For details on the available functions nP. 404
Use w in all menus.
Press the dial key corresponding to the menu item number (U, V,
W, etc.) to select a function. However, in the Custom menu, a
function may not be selected by using the menu item numbers.
The method for selecting functions may differ depending on the
Kisekae Tool set for the Custom menu.
Press c to re-select a function, and the previous screen
reappears. Press H to return to stand-by.
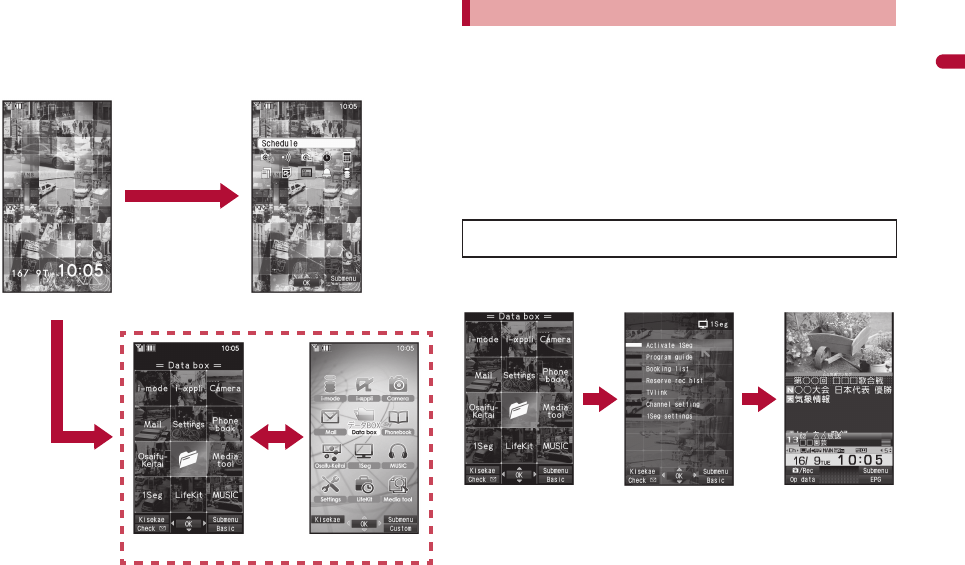
■Retrieving from the Custom menu
Example: Activating 1Seg with Multi guide key
Stand-by
t
Shortcut menu
a
Basic menuCustom menu
p
Retrieving a function from each start menu
When a stock icon (nP. 31) appears in stand-by, select G to
show the start menu.
w
t
Custom menu When [1Seg] is
displayed
When 1Seg is
activated
w
t
pr10_E.book 33 ページ 2008年11月18日 火曜日 午前11時17分