Sharp NAR0059 Laptop Computer with Integral 802.11 Transmitter User Manual safety m4000
Sharp Corporation Laptop Computer with Integral 802.11 Transmitter safety m4000
Sharp >
Contents
- 1. Users Manual part 1
- 2. Users Manual part 2
Users Manual part 2
Operation Manual
4-1
4
CHAPTER 4
Communication Functions
This chapter explains how to use the LAN, wireless LAN, and built-in modem
functions.
• When you use communication software:
• Connect the computer to the AC power source.
• Do not allow the computer enter a system standby or system
hibernation mode. (See the Power Saving section on page 2-7.)
• See also the manual or online help of the software you are using.
• The communication speed may vary depending on the traffic, local
telecommunications infrastructure, and ISP (Internet Service
Provider) infrastructure.
Local Area Network (LAN)
You can connect to a LAN with the 100 Base-TX or 10 Base-T connector on the
computer. To activate the LAN, perform the following steps.
Never insert any other cables, but a LAN cable, which may have different
electric characteristics from those of the LAN cable. Otherwise, the LAN
and the cables may be damaged.
Use the appropriate cable for each LAN standard.
100 Base-TX : Category 5 or higher
10 Base-T : Category 3 or higher
Communication Functions
4-2
4
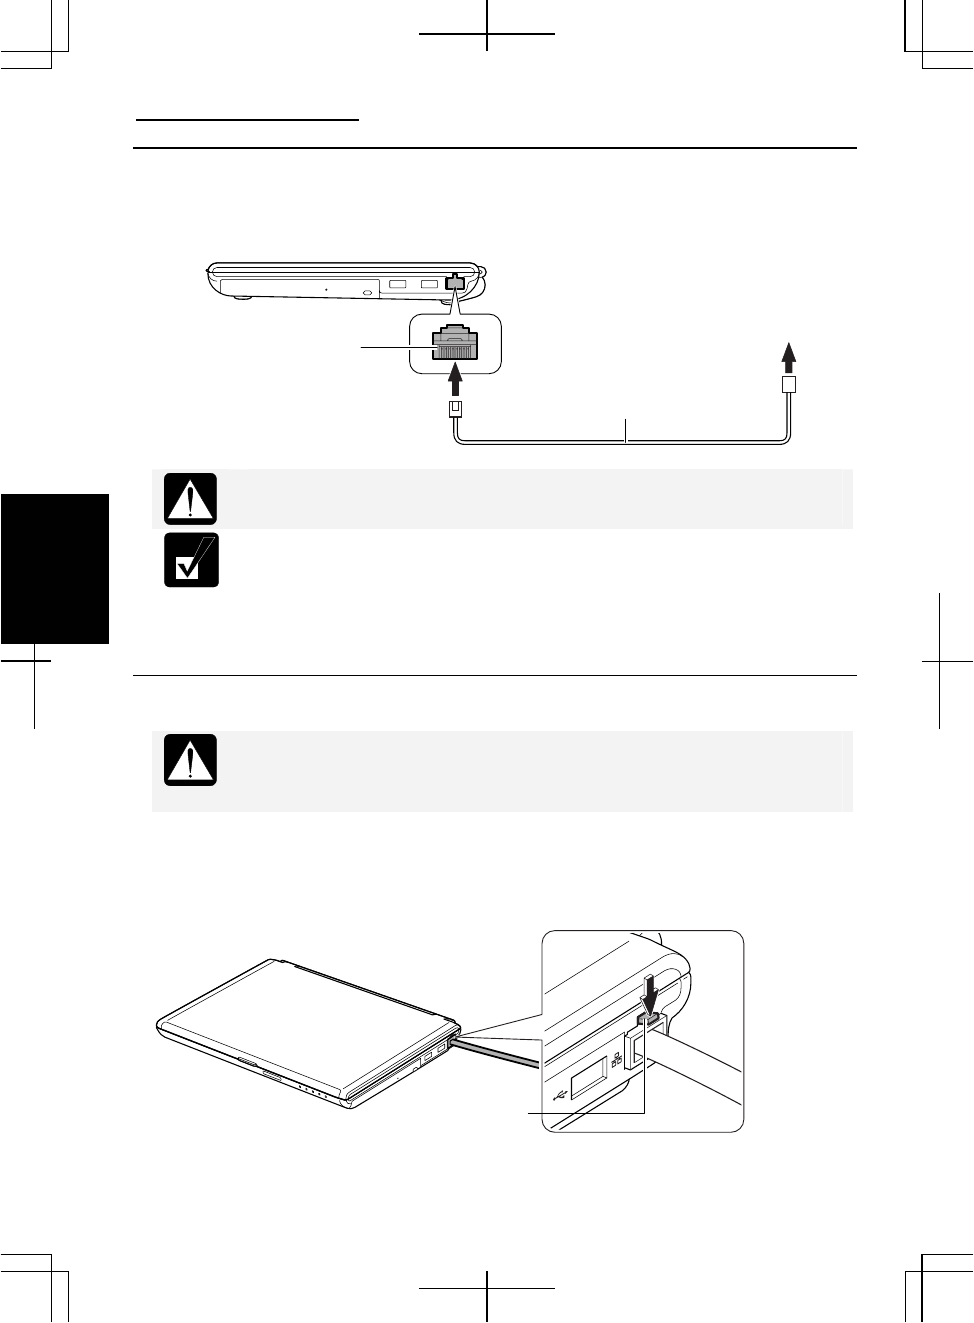
Connecting Your Computer to the LAN
1. Turn off the computer.
2. Connect a LAN cable to the LAN jack and the network hub.
Do not insert a modem cable into the LAN jack. It may damage the
modem cable and the LAN jack.
You can also directly communicate with another computer using a cross
LAN cable.
3. Turn on the computer.
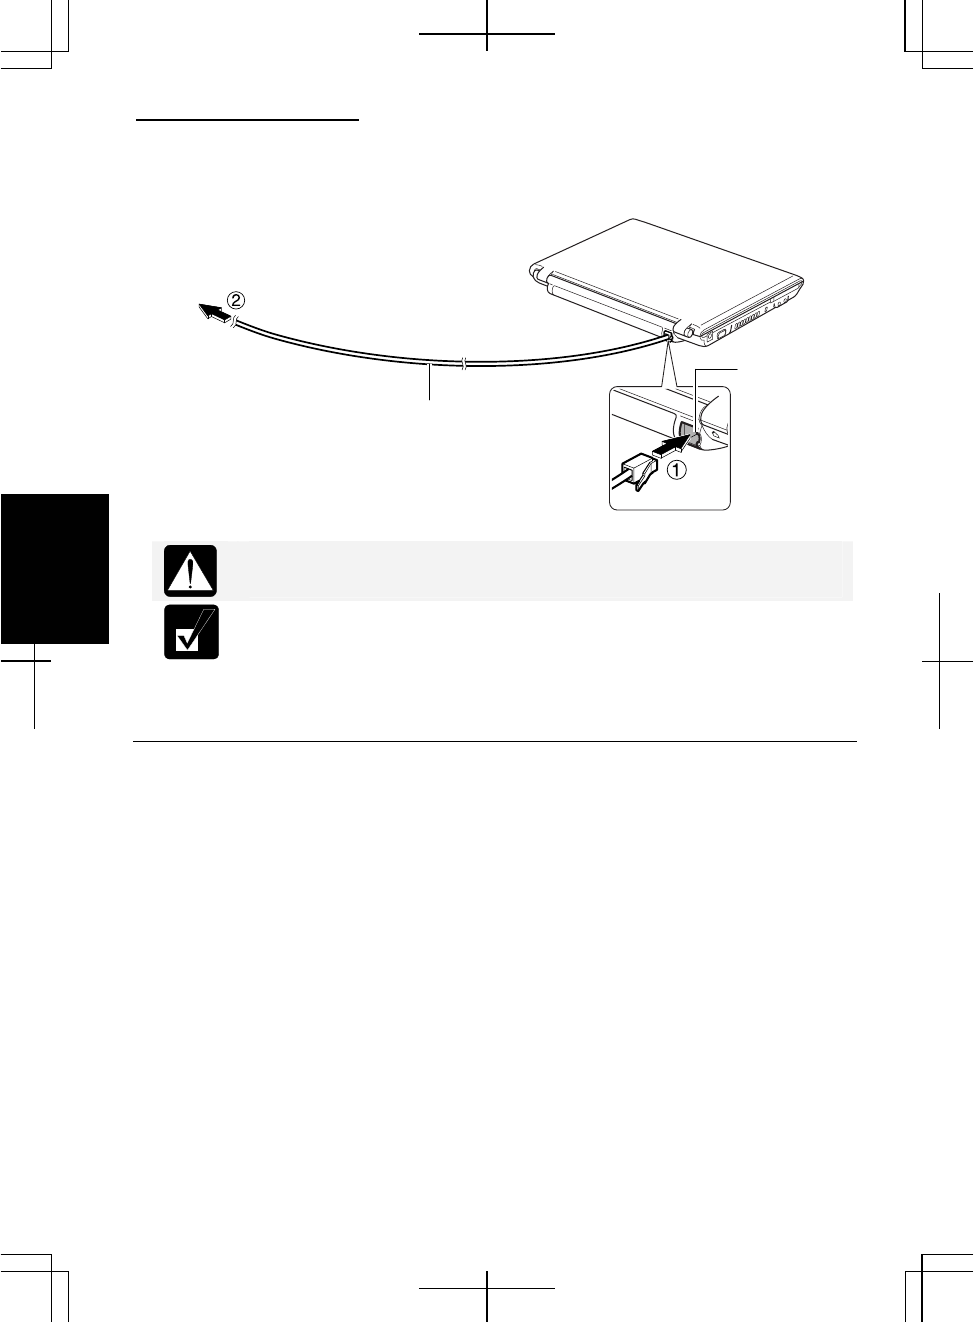
Removing the LAN cable
Before pulling the LAN cable out of the LAN jack, be sure to release the
connector of the LAN cable by pressing the connector tab. Excessive
force may damage the tab.
1. Turn off the computer.
2. Press and hold the connector tab of the LAN cable and then, pull out the cable.
LAN Jack To Network Hub
LAN Cable (Straight Cable)
Connector Tab

Operation Manual
4-3
4
Configuring the LAN
1. Click start - Control Panel.
2. Click Network and Internet Connections; then, Network Connections. If the
Classic view is selected, double-click the Network Connections icon.
3. Right-click Local Area Connection.
4. From the pop-up menu, click Properties.
5. In the Local Area Connection Properties dialog box, set the network setting
according to the instruction of your network administrator.
Make sure to log on the computer as a member of the Computer
administrators group. Otherwise, you cannot set or change some settings
for the LAN unit.
If you cannot access the network,
1. Click start - Control Panel.
2. Click Performance and Maintenance; then, System. If the Classic view is
selected, double-click the System icon.
3. Click the Hardware tab; then, the Device Manager button.
4. Double-click Network adapters, then, Realtek RTL8139/810x Family Fast
Ethernet NIC.
5. Click the Advanced tab, and select Link Speed/Duplex Mode in the Property list
and select an appropriate value in the Value pull-down menu.
6. Click OK and close the Device Manager window.
7. Click OK and close the Control Panel window.
Configuring Network Settings
You can configure your network settings in various manners depending on the
network environment. This section provides one of them with the following
conditions.
• Two computers, which do not have Internet connections, are connected directly to
each other with a cross LAN cable.
• The two computers are running on Windows XP.
• The Network Setup Wizard is used for network configuration.

Communication Functions
4-4
4
Configuring Network Settings of the Computer
• Before configuring the network settings, be sure to connect the two
computers with a cross LAN cable and turn them on.
• You need to perform the following process on the both computers.
1. Click start – Control Panel – Network and Internet Connections – Network
Setup Wizard. The Network Setup Wizard dialog box will open.
2. Click Next.
3. Click Next again.
When a message “The wizard found disconnected network hardware.”
appears:
• With the Local Area Connection string displayed in the Connections
field, click Cancel to quit the wizard and confirm the other computer
is powered on or the both computers are connected correctly with a
cross cable.
• Otherwise, check the box of Ignore disconnected network hardware
and then, click Next.
4. Select Other and click Next.
5. Select the third option, This computer belongs to a network that does not have an
Internet connection, and click Next.
6. Select the second choice, Let me choose the connections to my network, and click
Next.
When the message Give this computer a description and name appears,
go to the step 9.
7. Clear all boxes except that of Local Area Connection.
Confirm only the box of Local Area Connection is checked.
8. Click Next.
9. Input Computer description if necessary and Computer name, then, click Next.

Operation Manual
4-5
4
The Computer name should be unique. Type a name that is different from
that of the other computer.
10. Type a Workgroup name and click Next.
The Workgroup name should be same as that of the other computer.
11. Select Turn on file and printer sharing and then, click Next.
12. Click Next. The network configuration will start.
13. Select the forth option, Just finish the wizard; I don’t need to run the wizard on
other computers, and click Next.
14. Click Finish, then, Yes. The computer will restart.
Changing Your Computer Name or Workgroup Name
When you need to change the computer name or workgroup name, follow these
instructions.
1. Click start – My Computer.
2. Click View system information in the System Tasks field. The System Properties
dialog box will open.
3. Click the Computer Name tab and the Change… button. The Computer Name
Changes dialog box will appear.
4. Type the Computer name and the Workgroup and then, click OK.
5. Click OK twice and Yes. The computer will restart.
Sharing Files and Folders
You can share files and folders stored on the computer when they are permitted to
share. With the function you can copy the documents stored on your desktop
computer to your notebook computer or display from one computer on your computer.

Communication Functions
4-6
4
Sharing Files and Folders
This section provides how to share a folder on the network. With these steps you can
also share a drive.
1. Right-click on a folder to be shared and click Sharing and Security…. The XXX
Properties dialog box will open. (XXX is the folder’s name.)
2. Check the box of Share this folder on the network. Confirm the name typed in
the Share name field is the folder name to be shared.
When you have not used the Network Setup Wizard or shared any folders
or drives before, follow these instructions to enable file sharing.
1. Click If you understand the security risks but want to share files
without running the wizard, click here in the Network Sharing and
Security section. The Enable File Sharing dialog box will appear.
2. Select Just enable file sharing and click OK.
3. Check the box of Share this folder on the network and type the
folder name to be shared in the Share name field.
3. Click the View your Windows Firewall settings string.
When the string is not shown in the dialog box, go to the step 6.
4. Click the Exceptions tab and check the box of File and Printer Sharing.
5. Click OK.
6. Click OK.
A sharing symbol ( ) will be added to the icon of the shared folder.
Operation Manual
4-7
4
Copying Shared Files
1. Click start – Control Panel.
2. Click Network and Internet Connections; then, Network Connections. If the
Classic view is selected, double-click the Network Connections icon.
3. Click My Network Places in the Other Places field located on the left.
4. Click View workgroup computers in the Network Tasks field. All the icons of
computers belonging to the same workgroup will appear.
5. Double-click the icon of the other computer. The shared folder(s) will appear.
6. Double-click the shared folder. When a password is required, type it.
7. Drag and drop the desired file to the desktop of your computer.
The file will be copied on your computer.
8. Close the window.
Wireless LAN
The computer has an integrated wireless LAN compliant with the IEEE802.11b and
IEEE802.11g standards.
• The computer can communicate with wireless devices supporting
IEEE802.11b or IEEE802.11g. Note that there are some devices the
computer cannot communicate with even if they support IEEE802.11b
or IEEE802.11g.
• The computer cannot communicate with wireless devices only
supporting IEEE802.11a.
• The range for reliable performance and the quality of connection
varies depending on the environment you are in.
Communication Functions
4-8
4
Wireless LAN Modes
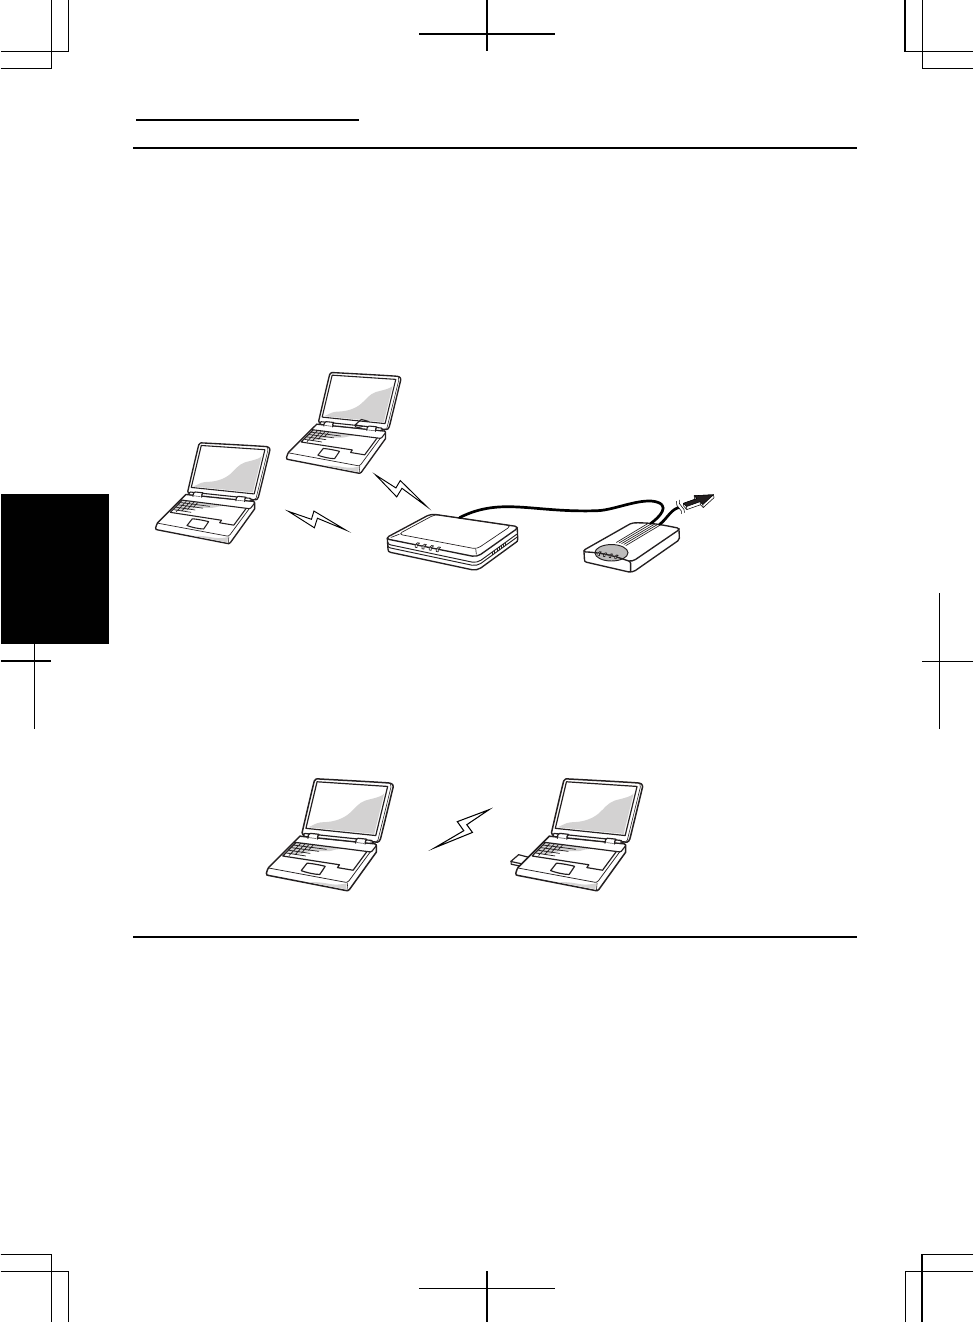
There are two kinds of wireless LAN modes: Infrastructure mode and Ad Hoc mode.
Access Point (Infrastructure) Mode
Infrastructure mode refers to a wireless network in which wireless devices
communicate with each other through an access point (AP). Wireless devices can
communicate with each other or can communicate with a wired network through AP.
Ad Hoc Mode
Ad Hoc mode refers to a type of network that consists of multiple computers each
equipped with a wireless networking interface. Each computer can communicate
directly with other wireless enabled computers.
Security Measures
Since wireless LANs provide data transfer using electric waves instead of LAN cables
between communicating devices, a third party can illegally access to and monitor the
transmitted information. The following security measures reduce opportunities to
receive the threats. Use a combination of the following measures for more secure
communications.
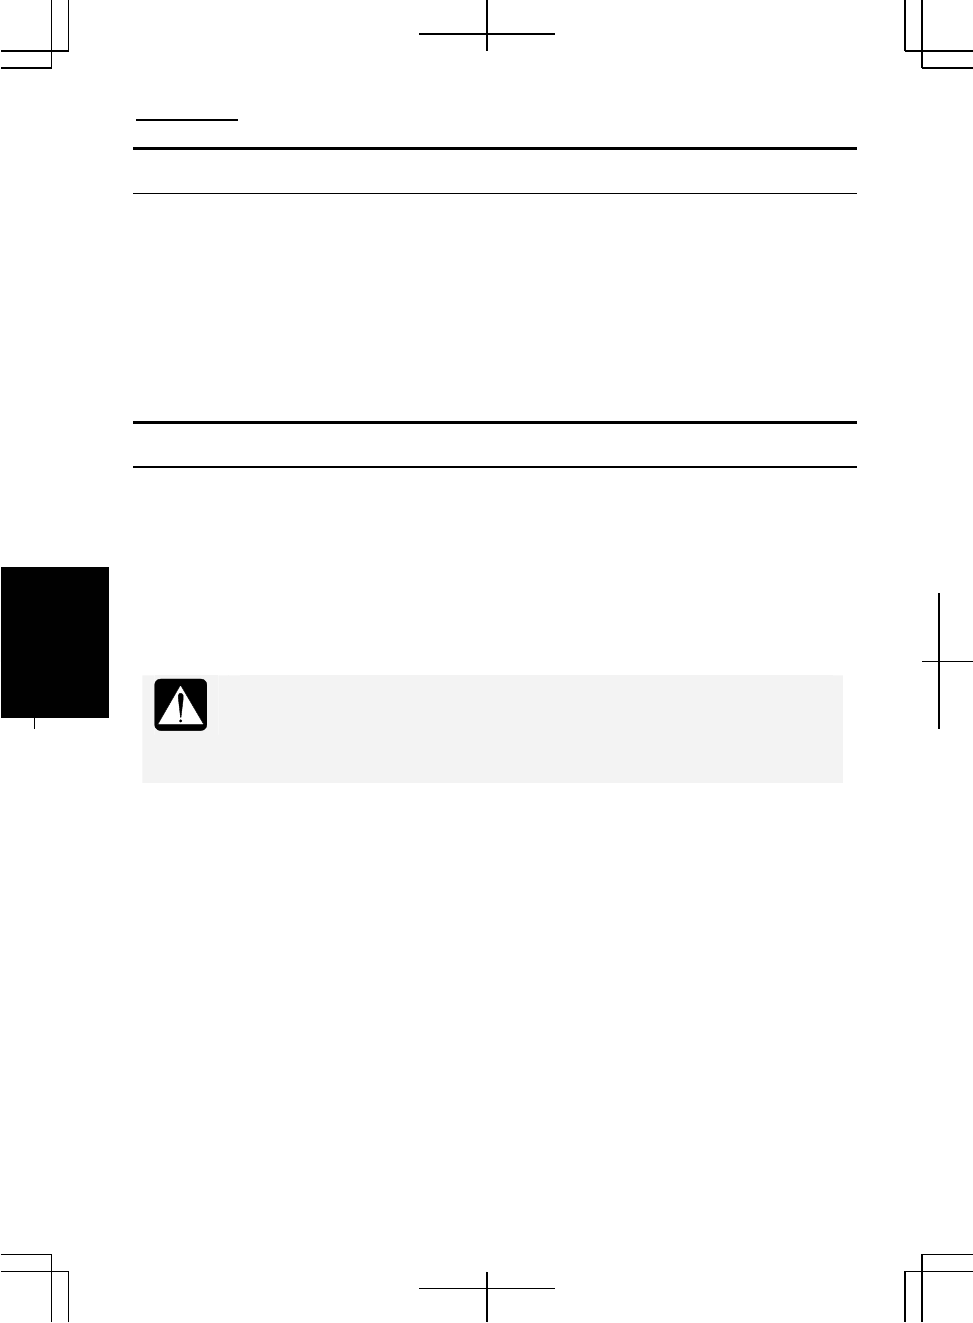
ADSL modem,
cable modem,
or similar
Access Point
To Internet

Operation Manual
4-9
4
See the Notice of Security with Wireless Devices section on page xv.
Authentication
The following may help you to protect your important data from illegal access.
• SSID (Service Set Identifier)
“SSID” is a common network name. An SSID acts as a password that is shared
with all connecting wireless devices, resulting in preventing access by any device
that does not have the SSID. Set a same SSID on the computer and an access point
which you are using. To enhance the security, rely on a combination of the SSID
and WEP or WPA security. (For details on configuration of the access point, refer
to its manual.)
• MAC (Media Access Control) address filtering
MAC addresses are unique addresses on the network, which are assigned to the
computer’s network interface cards. An access point allows access by only devices
if their MAC addresses match the addresses in an authentication list used by the
access point. Register your MAC address with the access point which you are
using. (For more information, refer to the manual of the access point.)
To confirm the MAC address of the computer;
1. Click start – All Programs – Accessories – Command Prompt.
2. Type ipconfig/all and press Enter.
3. Confirm the numbers of Physical Address in the Ethernet adapter
Wireless Network Connection field.
4. Type exit and press Enter.
• WPA (Wi-Fi Protected Access)
The computer supports WPA, a wireless LAN security standard increasing the
level of data protection and access control compared to WEP (Wired Equivalent
Privacy) encryption. To use the WPA security, a WPA-enabled access point is
required. To implement user authentication, one of the security enhancements of
WPA, an authentication server is needed. For details on WPA features, consult
your network administrator or the manual of the access point which you are using.

Communication Functions
4-10
4
Encryption
The computer provides the following encryption mechanisms including: TKIP, AES,
and WEP. The three techniques allow you to encrypt data to be transmitted, which
will make illegal interception more difficult.
• To use the WEP functions, your communication partner must support
the functions.
• To utilize TKIP, the access point which you are using must support
TKIP.
• To utilize AES, the access point which you are using must support AES.
• WEP (Wired Equivalent Privacy)
WEP relies on an encryption key that is shared between a wireless device and an
access point. The key is used to encrypt data and decrypt the transmitted data.
• The computer supports 128-bit and 64-bit WEP keys.
• For enhancement of security, the encryption keys should be
periodically changed.
• TKIP (Temporal Key Integrity Protocol)
TKIP provides an improved data encryption, which was weak in WEP. The TKIP
encryption automatically generates a new unique encryption key periodically for
each device to avoid the same key staying in use for weeks as they do with WEP.
• AES (Advanced Encryption Standard)
AES is a stronger form of encryption than is found in the WPA protocol and is the
security standard approved by US Government organizations.
Operation Manual
4-11
4
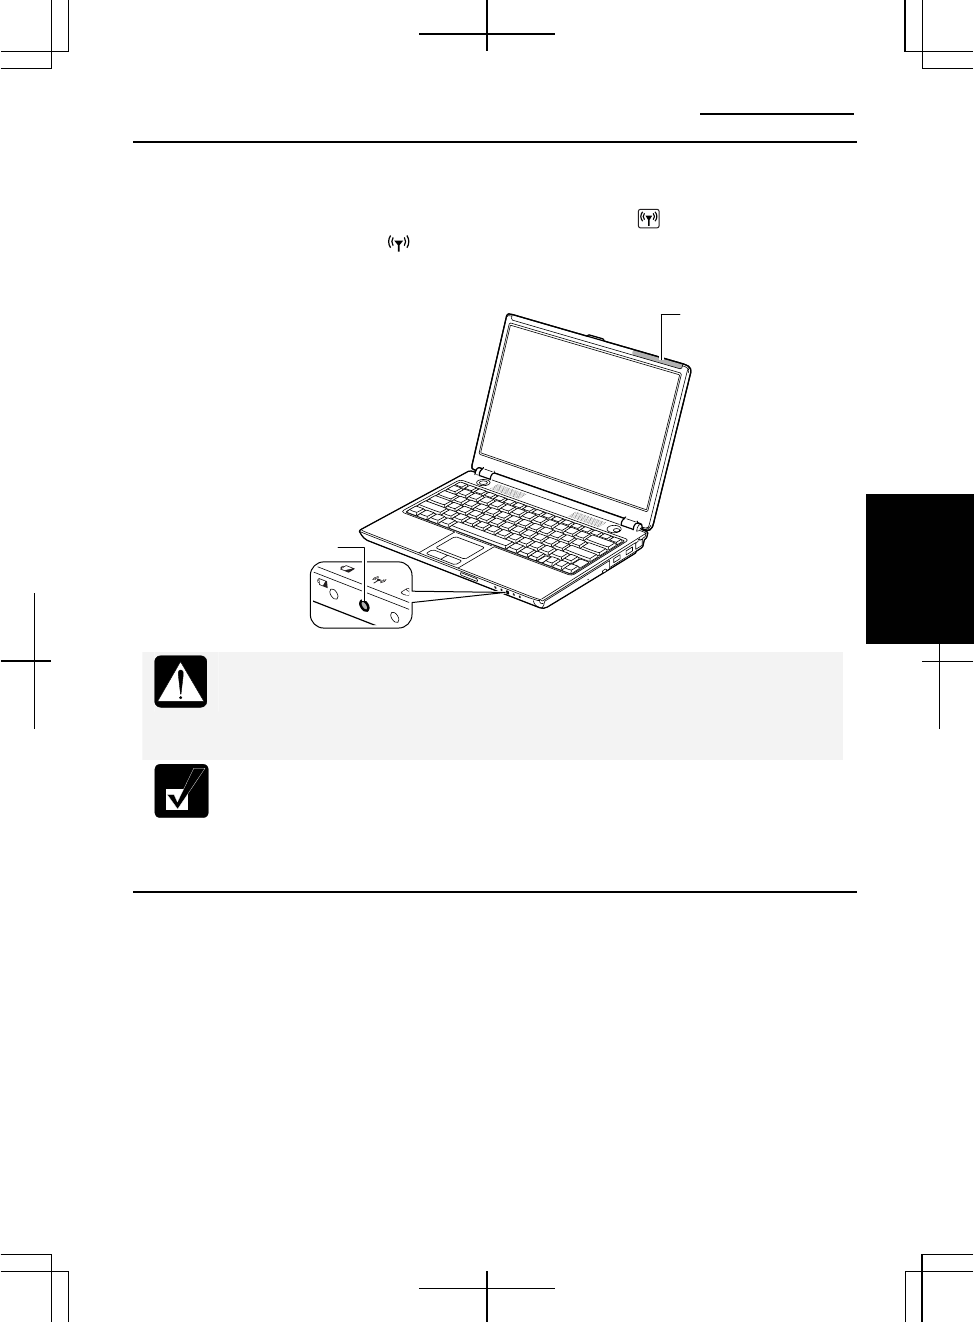
Activating the Wireless LAN Antenna
To communicate using the wireless LAN, the integrated antenna must be activated.
You can enable/disable the antenna by pressing the Fn+F1 ( ) key combination.
When the antenna indicator ( ) lights green, the antenna is enabled. When the
indicator light is off, it is disabled.
Disable the antenna on airplanes and in specific places where radio-
susceptible equipment is nearby such as medical and electrical
equipment. Electric waves generated from the antenna may affect the
performance of the devices and cause malfunction of the devices.
When the Wireless LAN of the APM button is set to ON or OFF, pressing
the APM button will turn on or off the wireless LAN antenna according to
the APM button setting. (For more information, refer to the Using the
Advanced Power Management Button section on page 2-9.)
Connecting to a Network via an Access Point
You can connect the computer to the Internet or a wired network via an access point
supporting IEEE802.11b or IEEE802.11g. For details on the access point, refer to its
manual or consult your network administrator.
This section describes how to communicate or access to the Internet through the
access point.
Wireless LAN
Antenna Indicator
Wireless LAN
Antenna (Invisible)

Communication Functions
4-12
4
Configuring the Wireless LAN Setting
The following steps lead you to configure the wireless LAN setting by automatically
obtaining the IP address, DNS server, etc. from an access point. By default, no
configuration is needed. Skip these steps and go to the Connecting to Network section
on the next page.
• There are some access points requiring the specific IP address, subnet
mask, default gateway and DNS server on the computer. Refer to the
manual of the access point or consult your network administrator.
• You can store the configured settings using Network Setup Utility,
which allows you to easily access one of the stored networks
appropriate to the current environment. (For the Network Setup
Utility, refer to the Network Setup Utility section later in this chapter.)
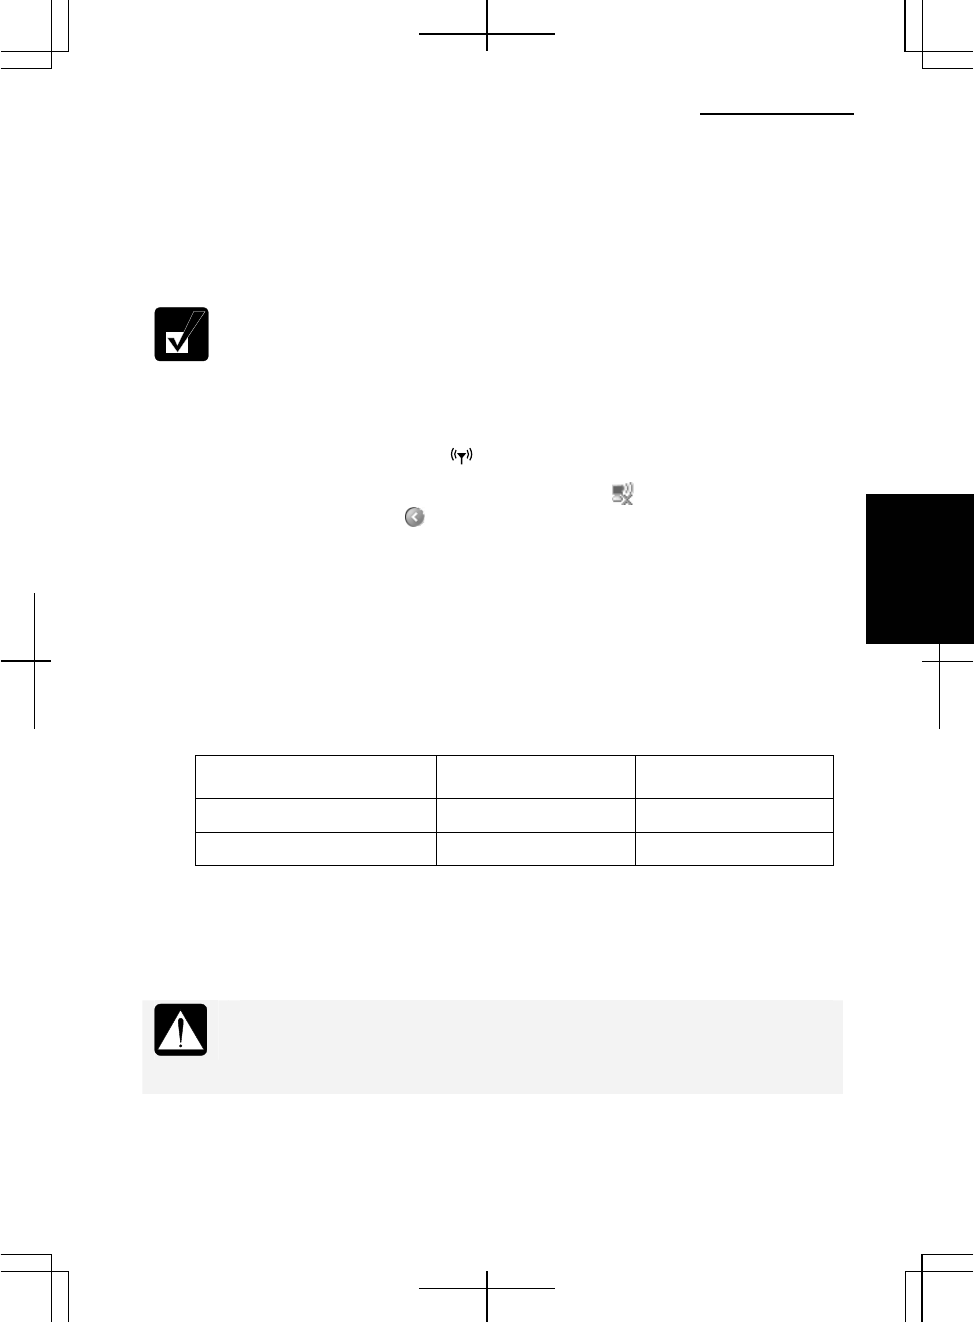
1. Confirm the antenna indicator ( ) is on.
2. Right-click the Wireless Network Connection icon ( , or ) on the
taskbar. If you cannot find the icon click to show all kinds of icons.
3. Select View Available Wireless Networks.
4. Click Change advanced settings of the Related Tasks field.
5. Double-click Internet Protocol (TCP/IP) in This connection uses the following
items.
6. Confirm the radio buttons of Obtain an IP address automatically and Obtain
DNS server address automatically are selected. If not, select them.
This step will remove the existing IP address, subnet mask, default
gateway and DNS server if they have been already assigned. Write down
the information before you perform this step.
7. Click the Advanced button.
8. Confirm the Default gateways section is emptied. If not, remove the gateway
address.
9. Click OK each time you close the dialog boxes.
10. Close the Network Connections window.
Operation Manual
4-13
4
Connecting to a Network
This section describes how to connect to a WEP enabled access point or WPA-
PSK/TKIP capable access point. (WPA-PSK/TKIP refers to WPA with pre-shared key
(PSK) with Temporal Key Integrity Protocol (TKIP) encryption.) For access points
with user authentication, consult your network administrator.
WPA-PSK is a special mode allowing only devices with a matching
network key to access the WPA-PSK capable access point.
Before connecting to wireless network, confirm the access point which you are using
is powered on and ready to use. (Refer to its manual.)
1. Confirm the antenna indicator ( ) is on.
2. Right-click the Wireless Network Connection icon ( ) on the taskbar. If you
cannot find the icon click to show all kinds of icons.
3. Select View Available Wireless Networks.
4. Select a network to be connected from the list and then, click Connect.
5. Type the correct network key in the fields of Network key and Confirm network
key.
Network keys are generated from ASCII or hexadecimal entries. Refer to the
following table for available letters and digits.
WEP Access Point WPA-PSK/TKIP or
AES Access Point
ASCII format*1 5 or 13 characters 8 to 63 characters
Hexadecimal format*2 10 or 26 digits 64 digits
*1 0 to 9, a to z, and A to Z (The uppercase and lowercase letters are
distinguished.)
*2 0 to 9, a to f, and A to F (The uppercase and lowercase letters are not
distinguished.)
When you select a network that is not configured for encryption settings,
the caution message appears. Read the message carefully. Although you
can connect to the network by clicking Connect Anyway, security is not
ensured. Select a security configured network.
6. Click Connect.
Communication Functions
4-14
4
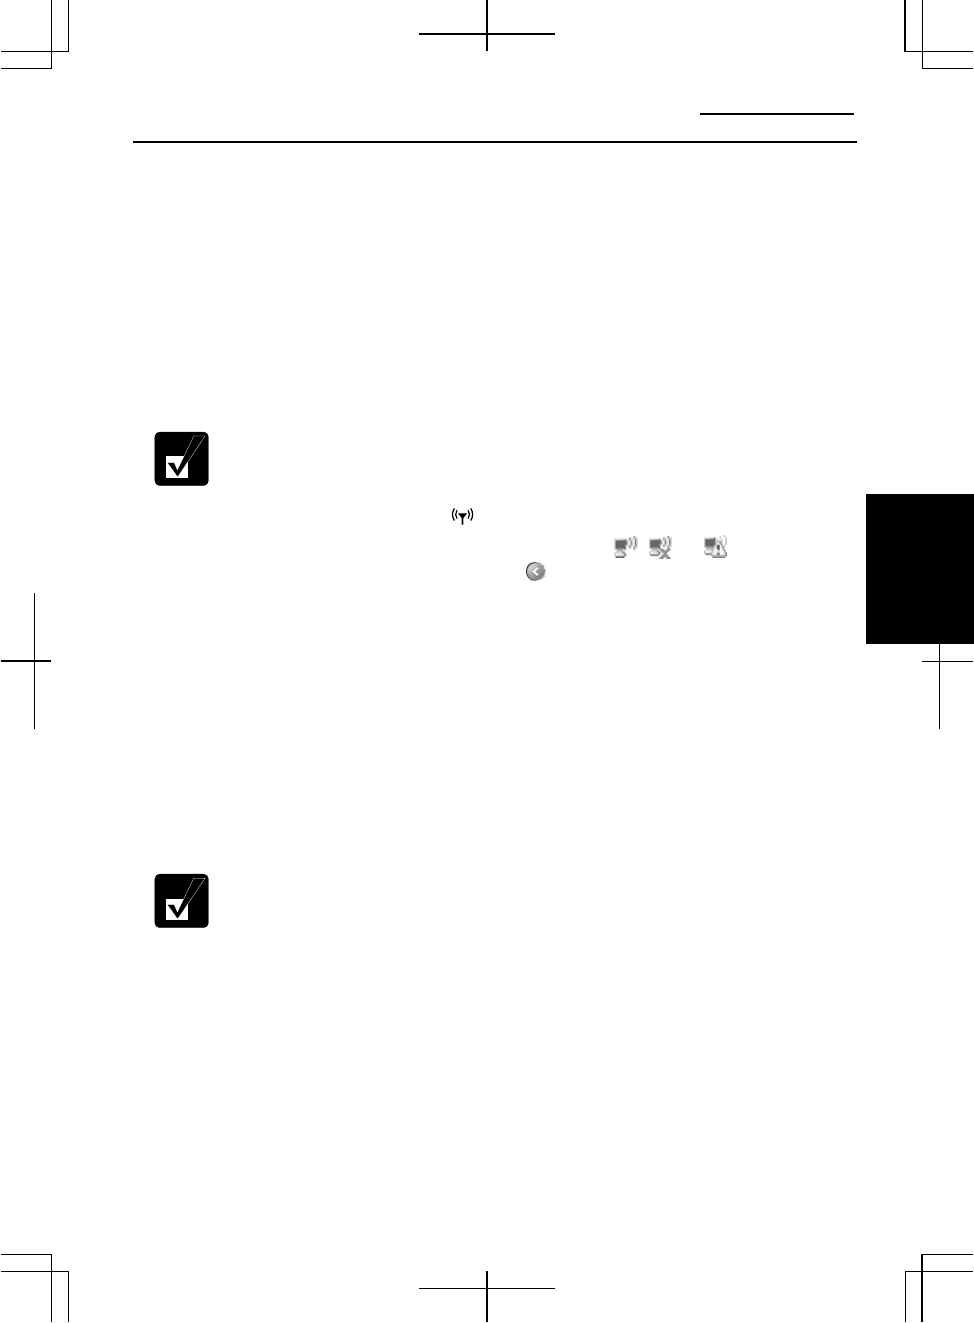
• When the computer successfully connects to the selected access point,
the Connected signage will appear in the connected network name
field and the Wireless Network Connection icon ( ) on the taskbar
will change to ( ).
• Entering an incorrect network key or selecting an inappropriate key
index will show the Limited or no connectivity signage in the network
name field and the icon on the taskbar will change to ( ). Reenter
the correct network key and/or change the key index referring to the
Changing the Security Mode section on page 4-17.
• To establish a new connection with another access point, first
disconnect the current connection and then, perform the steps 3 and 4.
(To disconnect the current connection, select the connected access
point in the Wireless Network Connection dialog box and then, click
the Disconnect.)
Confirming the Status of Wireless Connection
The Wireless Network Connection icon on the taskbar shows the current wireless
connection status.
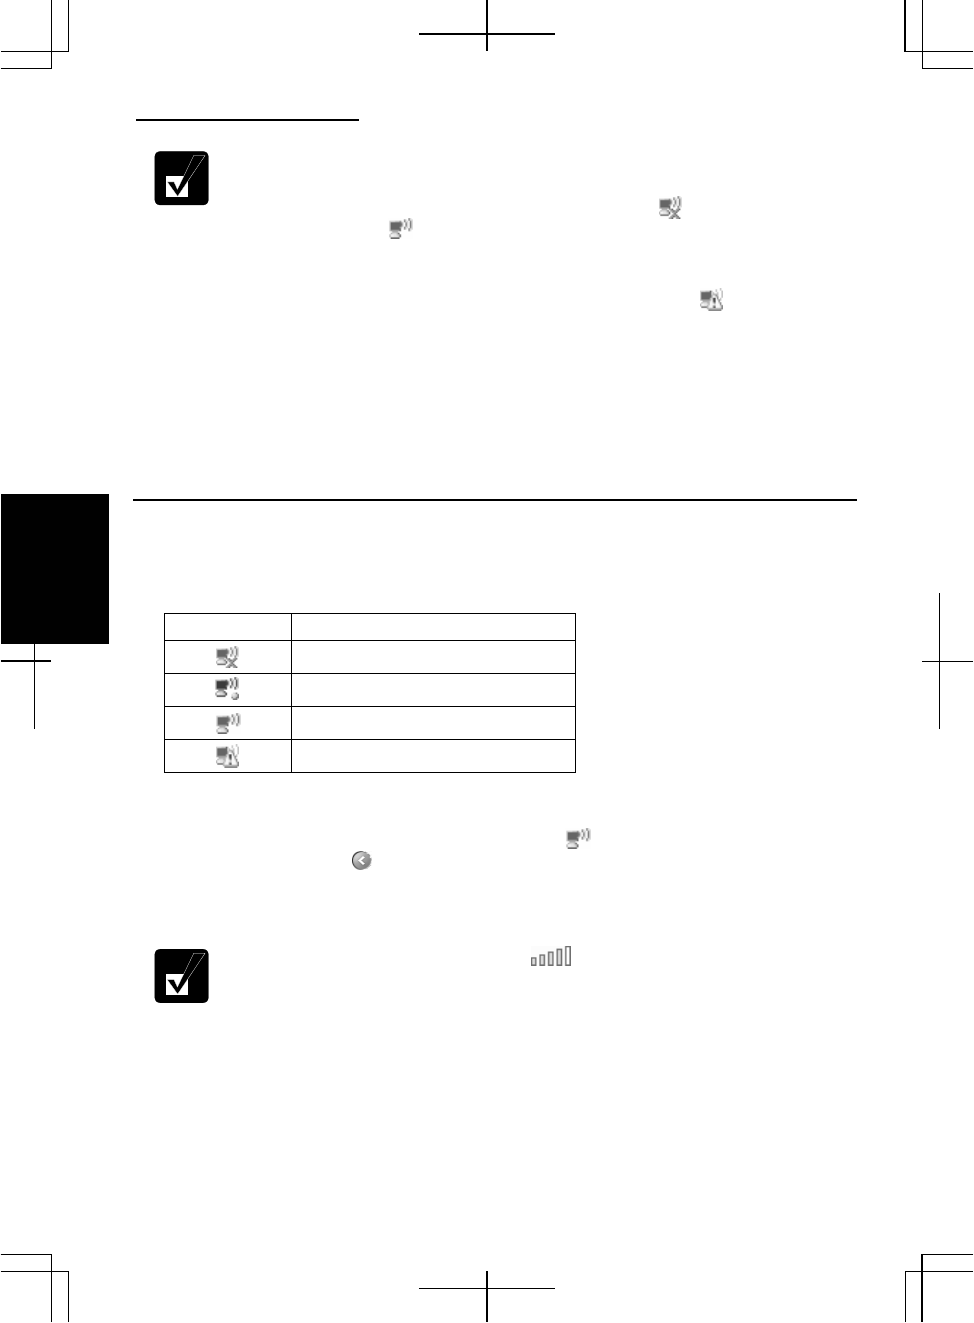
Icon Connection status
Disconnected
Trying to connect
Connected
Failed to connect
To check the connection speed and quality:
1. Click the Wireless Network Connection icon ( ) on the taskbar. If you cannot
find the icon, click to show all kinds of icon.
2. In the Wireless Network Connection Status dialog box, confirm your connection
status.
• The number of the green signals ( ) shows the connection quality.
The more signals light on, the better quality is given to the computer.
• When the connection quality is poor, adjust the distance between the
computer and other devices or the access point you are communicating
with and/or the facing direction of the computer.
3. Click Close.
Operation Manual
4-15
4
Communicating with Other Computers
This section describes how to communicate between wireless computers with built-in
wireless LAN or a wireless LAN card installed.
To enable wireless communication between the computers;
• Assign IP address and subnet mask for each computer.
• Set the communication mode to ad hoc.
• Give the same network name (SSID) to each computer.
• Set the encryption key (WEP key).
TKIP and AES cannot be utilized in ad-hoc mode.
1. Confirm the antenna indicator ( ) is on.
2. Right-click the Wireless Network Connection icon ( , , or ) on the
taskbar. If you cannot find the icon click to show all kinds of icons.
3. Select View Available Wireless Networks.
4. Click Change advanced settings of the Related Tasks field.
5. Select Wireless Network Connection; then, click Change settings of this
connection of Network Tasks.
6. Double-click Internet Protocol (TCP/IP) in This connection uses the following
items.
7. In the Internet Protocol (TCP/IP) Properties dialog box, select Use the following
IP address and set the IP address to 192.168.1.2 through 192.168.1.254 and the
Subnet mask to 255.255.255.0; then, click OK.
• The IP address of each computer should be unique.
• The same subnet mask should be set to all computers.
• The Default gateway can be blank.
8. Click the Wireless Networks tab; then, the Advanced button in the lower right of
the dialog box. The Advanced dialog box appears.
9. Select Computer-to-computer (ad hoc) networks only; then, click the Close
button.
10. Click the Add… button in Preferred networks of the Wireless Network
Connection Properties dialog box.
11. Type a name of the network in the Network name (SSID) field of the Wireless
Network Properties dialog box.
Communication Functions
4-16
4
Confirm the computer and other computers are assigned the same
Network name.
12. Confirm Open is selected in the Network Authentication pull-down menu and
WEP in the Data encryption pull-down menu.
13. Clear the box of The key is provided for me automatically.
14. Type the same network key as that of the partner in the Network key and Confirm
network key fields.
Network keys are generated from ASCII or hexadecimal entries. Refer to the
following table for available letters and digits.
ASCII format*1 5 or 13 characters
Hexadecimal format*2 10 or 26 digits
*1 0 to 9, a to z, and A to Z (The uppercase and lowercase letters are
distinguished.)
*2 0 to 9, a to f, and A to F (The uppercase and lowercase letters are not
distinguished.)
• The network key to be typed must be equal to that of the partner(s).
• Be sure to match the key index between your computer and the other
computer(s). Note some computers have the key index options 0
through 3. Refer to the Key index matching table on page 4-18.
15. Click OK twice; then, close the Control Panel window.
16. Configure the network by setting the name of the computer and workgroup.
• To communicate with other wireless enabled computers, set the
computer name and the workgroup name. The computer name should
be unique and the workgroup name should be same as others. (Refer to
the Changing Your Computer Name or Workgroup Name section on
page 4-5.)
• To share the folder(s) on the computer with other computers, refer to
the Sharing Files and Folders section on page 4-5.
Operation Manual
4-17
4
Changing the Security Mode
This section describes how to change the security mode to WEP or WPA-PSK with
TKIP or AES.
When using the user authentication security technology, consult your
network administrator for the mode changes.
WEP
1. Right-click the Wireless Network Connection icon ( , , or ) on the
taskbar.
2. Select View Available Wireless Networks.
3. In the Related Tasks field, click Change the order of preferred networks.
The Wireless Network Connection Properties dialog box will appear.
4. In the Preferred networks field, select the network to be given the security
change and then, click Properties.
5. Select Open in the Network Authentication pull-down menu and WEP in the
Data encryption pull-down menu.
Some access points require that you select shared for the Network
Authentication. Refer to the manual of your access point.
6. Clear the box of The key is provided for me automatically.
7. Type the same network key as the other device to be communicated with in the
Network key and Confirm network key fields.
Available letters and digits are following;
ASCII format*1 5 or 13 characters
Hexadecimal format*2 10 or 26 digits
*1 0 to 9, a to z, and A to Z (The uppercase and lowercase letters are
distinguished.)
*2 0 to 9, a to f, and A to F (The uppercase and lowercase letters are
not distinguished.)

Communication Functions
4-18
4
8. If necessary, change the key index in the key index fields.
• The key index options of the computer are 1 through 4.
• Some access points and computers have the options 0 through 3. Refer
to the table below for matching.
Key index matching table
Access Point 1
/Computer 1
Access Point 2
/Computer 2 Your computer
1 0 1
2 1 2
3 2 3
4 3 4
(ex. When your access point type is “Access Point 2” and its key index
is set to 0, set 1 to the key index of your computer.)
9. Click OK twice and close the Wireless Network Connection Properties dialog
box.
WPA-PSK with TKIP or AES
1. Follow the steps 1 to 4 in the WEP section above.
2. Select WPA-PSK in the Network Authentication pull-down menu and TKIP or
AES in the Data encryption pull-down menu.
3. Type the same network key as the other device to be communicated with in the
Network key and Confirm network key fields.
Available letters and digits are following;
ASCII format*1 8 through 63 characters
Hexadecimal format*2 64 digits
*1 0 to 9, a to z, and A to Z (The uppercase and lowercase letters are
distinguished.)
*2 0 to 9, a to f, and A to F (The uppercase and lowercase letters are
not distinguished.)
4. Click OK twice and close the Wireless Network Connection Properties dialog
box.
Operation Manual
4-19
4
Built-in Modem
You can use the built-in modem for data transfer and fax communication.
• The built-in modem on the computer is designed only for regular
analog telephone lines. The modem may be damaged when connected
to a digital ISDN terminal or a digital PBX.
• Use TA (terminal adapter) to connect the built-in modem to a digital
telephone line.
• If an unusual device is attached to the line you are connecting to, the
modem may not function properly. Remove the device or contact the
dealer of the device.
• Before connecting to a PBX, consult the PBX maintenance staff or its
service company. If the electric characteristics of your PBX are
different from those of a regular analog line, the modem will not
function properly. If you connect the modem to a digital PBX, both the
modem and the PBX may be damaged.
• Within the communication software you are using, set the COM port of
the built-in modem to COM 3 and modem name to Agere System HDA
Modem if required.
• Before commencing with fax communication, it is recommended that
you exit other application programs.
Connecting the Modem to Telephone Line
To reduce the risk of fire, use only No. 26 AWG or larger UL Listed or
CSA Certified Telecommunication Line Cord.
1. Turn off the computer.
Communication Functions
4-20
4
2. Connect a modem cable to the modem jack and the telephone line.
Be sure not to insert a modem cable into the LAN jack on the rear side of
the computer. It may damage the LAN jack and the modem cable.
Connect the modem to the telephone line directly. Do not use a
distributor or allotter.
3. Turn on the computer.
Configuring the Modem
You may have already configured your modem during the Windows setup process.
Otherwise, make the necessary adjustments as shown below.
Modem Configuration
When you use the modem first time, you must type your location’s information.
1. Click start – Control Panel – Printers and Other Hardware; then, Phone and
Modem Options. If the Classic view is selected, double-click the Phone and
Modem Options icon.
2. In the Location Information dialog box, select your country, type your area code,
etc. and select your dial type; then, click OK.
Modem Cable
To Telephone Line
Modem Jack
Operation Manual
4-21
4
After the configuration, click or double-click the Phone and Modem Options (icon) to
open the Phone and Modem Options dialog box and double-click the location name in
the Locations field of the Dialing Rules tab for the information you set above.
Clicking Edit… or New…allows you to make a new location or change the settings.
Internet Connection
Windows XP has a special Internet connection wizard to help you to connect to the
Internet with ease.
• If you plan to connect into the Internet and dial an Internet Service
Provider (ISP) through the modem, have your account information
and dial-up number ready before you begin the wizard.
• Once you set your connection, you can see or edit the connection
status by double-clicking the icon appearing on the Dial-up field of the
Network Connections dialog box.
1. Click start – Control Panel – Network and Internet Connections – Network
Connections. If the Classic view is selected, double-click the Network
Connections icon.
2. In the Network Connections dialog box, click Create a new connection of the
Network Tasks section. The New Connection Wizard dialog box will appear.
3. Follow the instructions on the screen.
Removing the Modem Cable
Before pulling the modem cable out of the modem jack, be sure to release
the connector of the modem cable by pressing the connector tab.
Excessive force may damage the tab.
1. Turn off the computer.
Communication Functions
4-22
4
2. Press and hold the connector tab of the modem cable and then, pull out the cable.
Connector Tab

Operation Manual
4-23
4
Network Setup Utility
With the Network Setup Utility, you can define specific network settings based on
your network environments such as work, home, etc. You can also allow for the
computer automatically to switch to the appropriate network.
• Not every setting item can be stored.
• The Network Setup Utility may not be compliant with all network
environments.
• The Help of the Network Setup Utility will give you more information.
Running the Network Setup Utility
For the first use;
1. Click start – All Programs – Network Setup Utility – Network Setup Utility.
The Network Setup Utility icon ( ) will appear on the taskbar.
2. Click the Network Setup Utility icon ( ) on the taskbar.
3. Read the message and then, click Yes or No.
For the second use and later;
• When Yes is chosen in the step 3 above, the Network Setup Utility will
automatically run on Windows start-up.
• When No is chosen in the step 3 above, click start – All Programs - Network Setup
Utility –Network Setup Utility.
Loading the Network Settings
To set your specific network setting, confirm that the computer is connected into the
network and has the proper settings for your current environment and follow the
instructions below.
1. Confirm the current network setting is to be loaded.
2. Run the Network Setup Utility to display the Network Setup Utility window.
3. Click the ( ) icon.
4. Click OK in the confirmation window.

Communication Functions
4-24
4
5. In the Register an icon and network name dialog box, select the SHARP icon or
Windows icon, then, click the Select icon button.
6. Select an icon and click OK.
7. Type a network name, then, click OK. The selected icon appears on the main
screen of the Network Setup Utility window.
It takes a moment to load and register the network settings.
Using or Switching to a Network
Using or Switching to a Loaded Network
To use or switch the loaded network, confirm the computer is ready to connect into
the network and follow these steps.
1. Run the Network Setup Utility to display the Network Setup Utility window.
2. Select the appropriate network icon in the Network Setup Utility window.
3. Click OK.
• Make sure the computer is connected to the proper environment.
• If your hardware or software configuration has been changed, you may
not be able to switch to the network properly. In this case, you may
need to reconfigure the network settings.
Automatically Switching to an Available Network
The computer supports the auto-switching function, “Auto Pilot,” automatically to
detect one of the available networks registered and switch to it.
1. Run the Network Setup Utility to display the Network Setup Utility window.
2. Click the Auto Pilot icon ( ).
3. Read the message in the confirmation window and click OK.
• It will take a moment to switch to the auto pilot mode.
• To exit from the auto pilot mode, click the icon ( ) again.

Operation Manual
5-1
5
CHAPTER 5
Setup Utility
This chapter describes how to run the Setup Utility to change settings on the
computer.
Running the Setup Utility
With the Setup Utility, you can customize the system configuration information, such
as time and date, or passwords. The information you have specified is saved in a
special area called CMOS RAM, which the system reads every time you turn on the
computer. The computer is shipped from the factory with the appropriate setting of the
Setup Utility. Leave it as default in normal use.
Contents of Setup Utility
The Setup Utility consists of six menu pages, as follows:
• Main: Configures basic setting.
• Advanced: Configures device interface.
• Security: Sets Passwords.
• Boot: Sets where the system boots from.
• Battery: Conditions the battery pack.
• Exit: Exits the Setup Utility or retrieves the default values.

Setup Utility
5-2
5
Entering and Exiting the Setup Utility
1. Turn on the computer.
2. When Press F2 for System Utilities appears, press F2.
3. Change to the desired settings. (Refer to the next section.)
4. Select Exit menu; then, press Enter.
5. Select one of the exit methods, and press Enter.
6. Confirm the message and press Enter again. The system restarts.
When the Setup Utility is opened, power management does not work. Do
not close the display cover.
Changing the Settings of the Setup Utility
The touchpad and mouse are disabled in the Setup Utility. Use the
keyboard.
To change the settings:
1. Use → or ← key to select the menu.
2. Use ↑ or ↓ key to select the item.
Minus key or Space bar: Changes the value.
In the item with ►mark, press Enter to open a sub menu. Press Esc to close the
sub menu and return to the previous menu.
For date and time, press Enter on the item to select the value to be changed;
then, use the minus key or space bar to change the value.
3. Close the Setup Utility referring to the steps in the Entering and Exiting Setup
Utility section.

Operation Manual
5-3
5
Main Menu
System Time defines the system time, using the format hour:minute:second (24-hour
format). Use the Enter key to move the cursor, and the minus key or space bar to
change numerals.
System Date defines the system date, using the format month/day/year. Use the Enter
key to move the cursor, and the minus key or space bar to change numerals.
Hard Disk Drive Type defines the hard disk type of the computer. To display more
information, press Enter. Normally use as default.
Optical Disk Drive Type defines the optical drive type of the computer. To display
more information, press Enter. Normally use as default.
Internal NumLock defines whether the numlock keys of the built-in keyboard are
always enabled or disabled.
Quiet Boot defines whether SHARP logo appears on the screen while booting.
CPU Information shows the information of the CPU.
System Memory shows the volume of the conventional memory.
Extended Memory shows the volume of the extended memory more than 1MB.
BIOS Version shows the BIOS version of the system.
EC/KBC Version shows the EC/keyboard controller version of the system.
Setup Utility
5-4
5
Advanced Menu
Resolution Expansion defines whether the screen is expanded when it is in a low
resolution. (The setting is not used on Windows.)
Plug&Play O/S normally has to be set to default as “Yes.”
Max ACPI C-State determines the amount of power management while the system is
idling. Normally set to default as “C4 State.”
Security Menu
Set Supervisor Password defines the supervisor password (up to eight letters,
figures, or the combinations). See the next section about the supervisor password.
Set User Password defines the user password (up to eight letters, figures, or the
combinations). You can set the user password only when the supervisor password has
been set.
If you lose your password, you will be unable to access the computer or
change the configuration. Make sure to select a password you will never
forget, or write it down and protect it in a secure place. Otherwise, you
will have to contact your dealer for assistance.
Password On Boot defines whether the system requires the password entry to boot
up.
Hard Disk Boot Sector defines whether the boot sector of the hard disk is write-
protected. When formatting the hard disk or reinstalling software, set it to Normal.
Operation Manual
5-5
5
Passwords
Setting a password will protect the computer against unauthorized access. Once a
password is set, the system requires the password when entering to the Setup Utility.
If the Password on boot is enabled, the system will require the created password when
the computer is turned on.
• If you enter a wrong password three times, the message “System
Disabled” appears. Press the power button to shut down the computer,
and after 10 seconds, press the power button to turn it on again.
• If the Password On Boot is disabled, the password entry will be
needed to enter the Setup Utility.
Your computer supports two different levels of password security: a supervisor
password and a user password. A user password is available to be set with a
supervisor password set. If you share the computer with others we recommend that
you set both supervisor and user passwords, and let others know the user password
only.
Setting the Password
If not necessary, do not set the supervisor password or user password. If
you forget the password, you cannot boot the computer.
The user password can change the following items:
• System Time
• System Date
• Resolution Expansion
• Set User Password
• Battery Calibration
• Exit Saving Changes
• Exit Discarding Changes
• Save Changes
1. In the Security menu of the Setup Utility, select Set Supervisor Password or Set
User Password and press Enter.
2. Type your password (up to eight letters, figures, or the combinations), and press
Enter.
3. Type the same password again, and press Enter.
4. Press Enter.

Setup Utility
5-6
5
5. Select Exit menu and confirm Exit Saving Changes is highlighted; then press
Enter.
6. Confirm Yes is highlighted and press Enter. The system restarts.
• To enable the supervisor password or the user password when booting
up the computer, enable the Password On Boot.
• When entering the Setup Utility, the password will be required.
Changing the Password
1. In the Security menu of the Setup Utility, select Set Supervisor password or Set
User password and press Enter.
2. Type your current password, and press Enter.
3. Type your new password, and press Enter.
4. Type your new password again, and press Enter twice.
5. Select Exit menu and confirm Exit Saving Changes is highlighted; then press
Enter.
6. Confirm Yes is highlighted and press Enter. The system restarts.
Deleting the Password
A deletion of the supervisor password will delete the user password.
1. In the Security menu of the Setup Utility, select Set Supervisor password or Set
User password and press Enter.
2. Type your current password, and press Enter.
3. Without typing any characters, press Enter.
4. Without typing any characters, press Enter twice.
5. Select Exit menu and confirm Exit Saving Changes is highlighted; then press
Enter.
6. Confirm Yes is highlighted and press Enter. The system restarts.

Operation Manual
5-7
5
Boot Menu
Boot Sequence specifies where the system boots from. Press Enter to open the sub
menu. The system boots from the drive at the top of the list. If the system cannot find
the drive, it will boot from the second one; then, third one; then forth one. Use arrow
keys to select the drive you want to move and then, use the space bar or minus key to
move it up or down.
USB Boot enables or disables the boot from the USB floppy disk drive.
LAN Boot defines whether the system boots from other server via the LAN unit of the
computer.
Battery Menu
Battery Calibration conditions the battery pack. (Refer to the Conditioning the
Battery Pack on page 2-4.)
Exit Menu
Exit Saving Changes saves the settings you have changed and exits the Setup Utility.
Exit Discarding Changes exits the Setup Utility without saving the settings you have
changed.
Load Setup Defaults returns the values of all items to the default. To exit, select one
of the first two items.
Discard Changes returns the values of all items to the values you last saved. To exit,
select one of the first two items.
Save Changes saves the settings you have changed.

Setup Utility
5-8
5

Appendixes
Operation Manual
A-1
Appendixes
The appendixes contain additional information on the use and care of the computer.
Memory Module
You can upgrade the memory amount of the computer by installing an expansion
memory module. See the specification on the separate specification sheet for the
default and maximum memory size. For available memory modules, contact your
local dealer or visit http://www.sharpsystems.com.
Installing the Memory Module
• Do not handle the memory module in a location where static electricity
is easily generated such as on the carpet.
• Before installing the memory module, carefully discharge static
electricity from your body by touching an unpainted metal area.
• Avoid touching the integrated circuits on the memory module. Handle
all components by their edges.
• Keep the memory module in the anti-static wrapping until you are
ready to install it.
1. Turn off the computer.
2. Disconnect the AC adapter and remove the peripheral devices.
3. Put the computer on a stable surface and remove the battery pack. (See Chapter 2
for removing the battery pack.)
• Make sure to turn off the computer and remove the AC adapter and the
battery pack. Otherwise you may get an electrical shock.
• After long use of the computer, the temperature inside the computer
may have gone up. Leave it alone until it becomes cool before going
on to the next step.
Appendixes
A-2
Appendixes
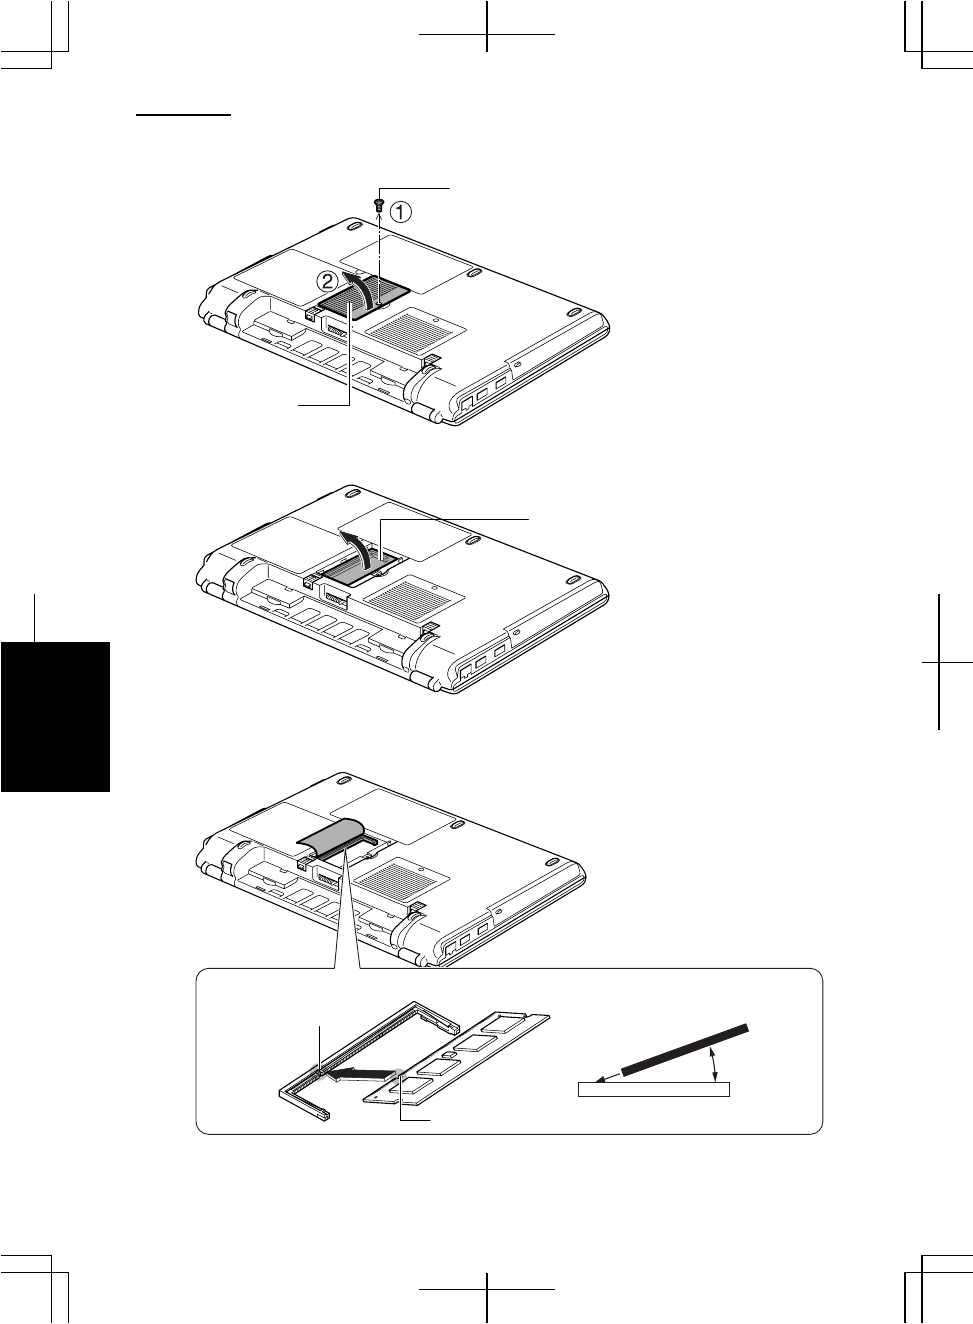
4. Loosen the screw and remove the cover.
5. Turn over the sheet.
6. Align the notched part of a memory module to the projecting part of the memory
socket and then, put the module into the socket until it is seated.
.
Notched Part
Cover
Screw
Memory Module
Projecting Part
Memory Socket
20°
Sheet
Appendixes
Operation Manual
A-3
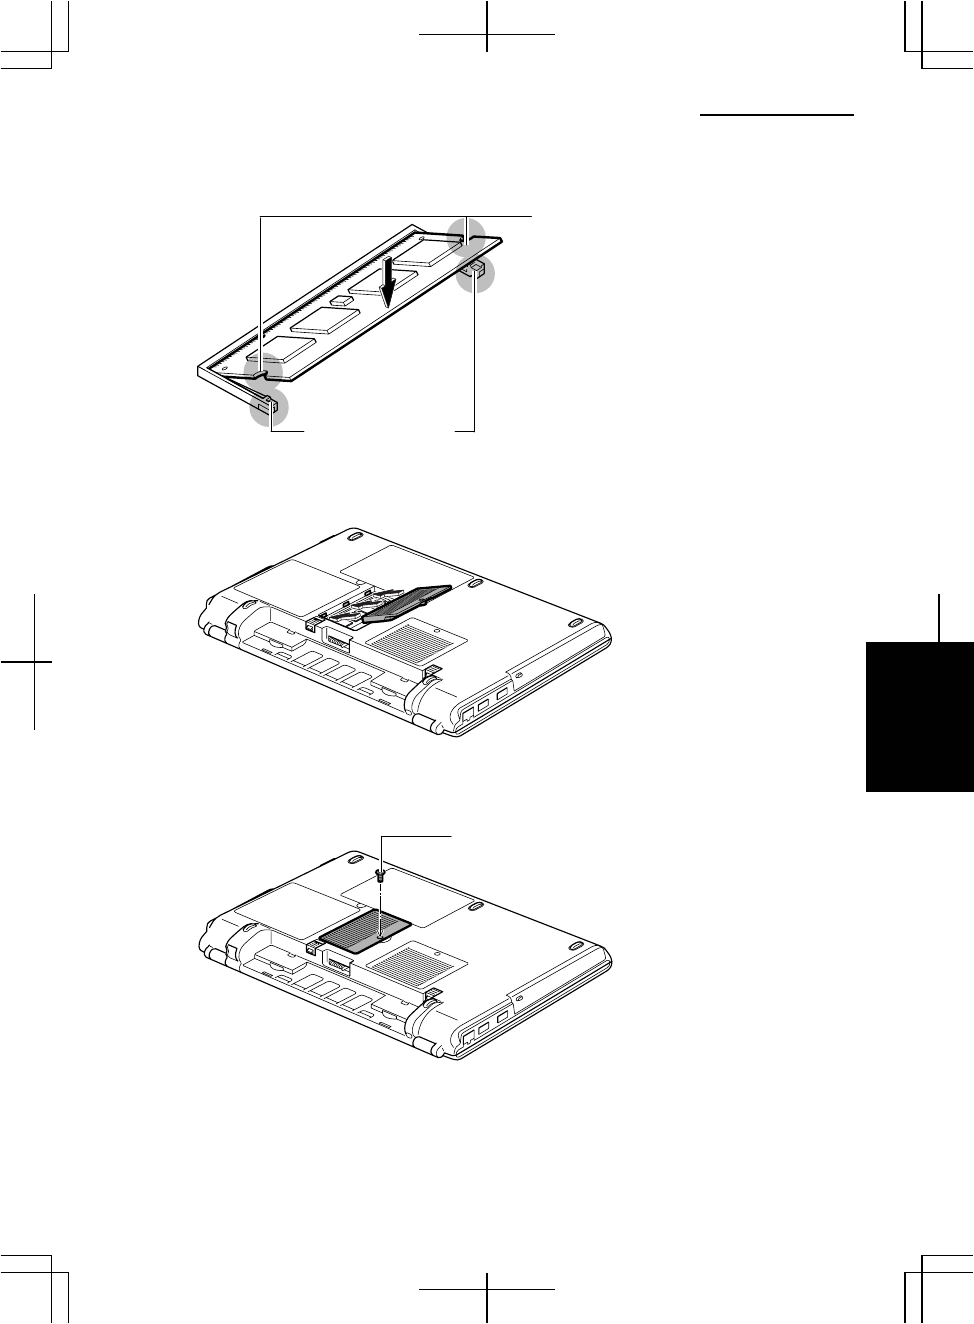
7. Gently press the module to place it into the socket, matching the notched parts of
the module with the projecting parts of the socket.
8. Match the tabs of the cover with the notched parts of the computer, and then, put
down the cover so that it is placed in the original position.
9. Tighten the screw.
10. Reinstall the battery pack, turn over the computer and connect the AC adapter.
Notched Parts
Projecting Parts
Screw
Appendixes
A-4
Appendixes
Finding the Memory Size
1. Turn on the computer. When the message Press F2 for System Utilities appears,
press F2 to open the Setup Utility.
2. Find the memory size shown in the Extended Memory field in the Main menu.
• The available memory size will appear, minus the total amount of
shared video memory size and other factors.
• If you find the memory size shown incorrectly, it is considered that the
memory module has been installed improperly. Press the power button
to turn off the computer and reinstall the memory module correctly.
3. Press Esc key. The Exit menu will appear.
4. Confirm Exit Saving Changes is selected and then, press Enter.
5. Confirm Yes is selected and then, press Enter.
The computer will restart.
You can find the memory size on Windows.
Click start – My Computer – View system information of System Tasks.
The memory size will appear, minus the amount of shared video memory
size, at the bottom of the sentence in General tab.
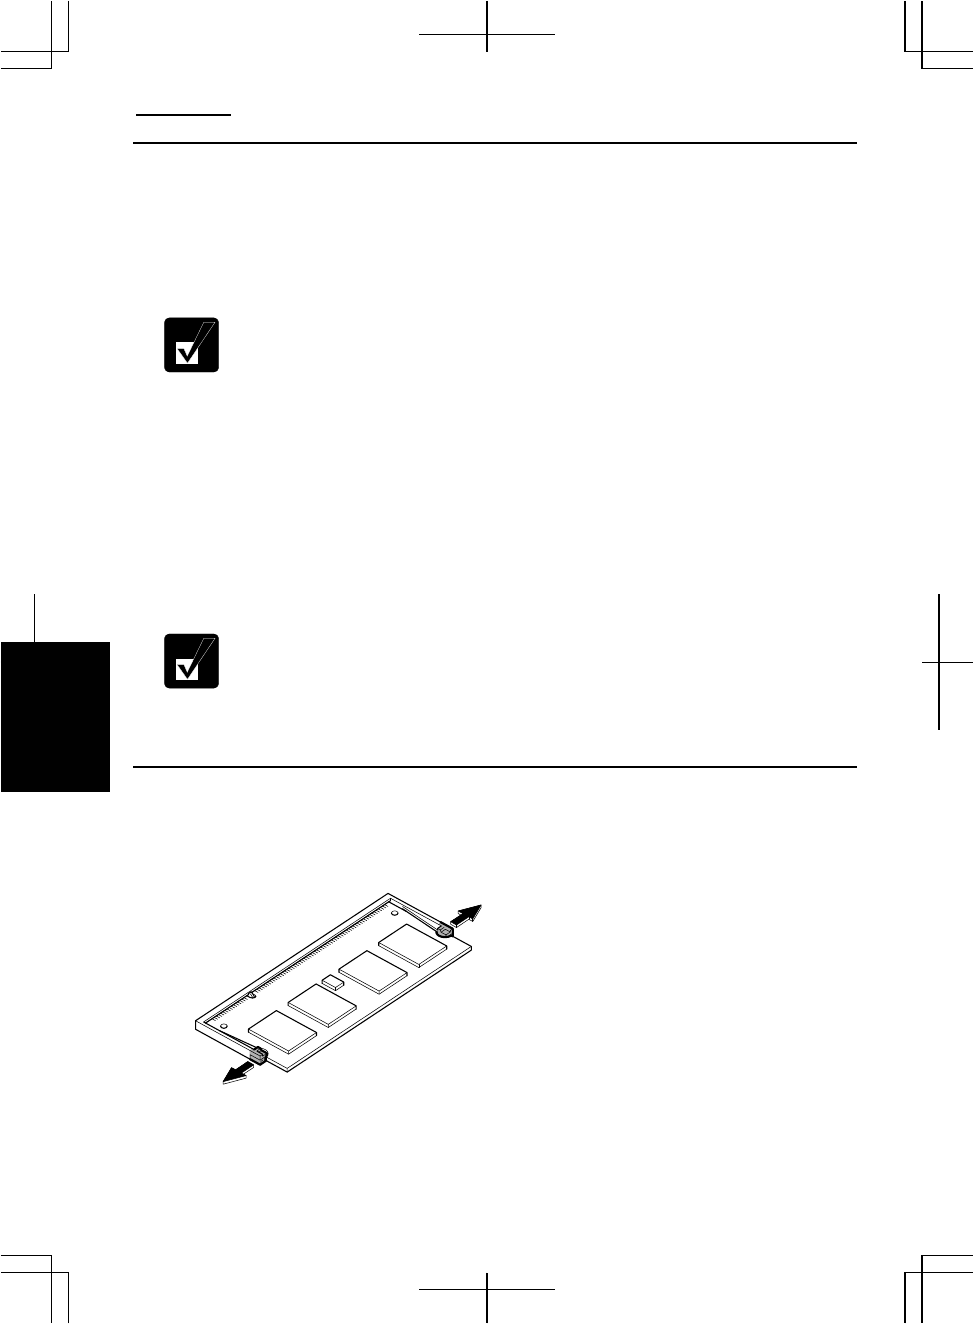
Removing the Memory Module
1. Follow the steps 1 to 5 of the Installing the Memory Module section.
2. Slightly bend both latches outwards until the memory module is released.
3. Remove the memory module and close the cover.

Appendixes
Operation Manual
A-5
Maintenance and Care
This section provides you with information on how to maintain your computer in
excellent working condition.
Using a Security Cable
You can connect a security cable to the security slot on the computer to prevent theft.
Cleaning the Computer
Cabinet
Apply a small amount of mild cleaning solution to a dry, lint-free cloth and wipe the
cabinet with the cloth.
• Never clean the computer while it is powered on.
• Do not use alcohol, benzene, thinner, or other strong chemical agents
that may damage the cabinet.
Security Cable
Security Slot
Connect the cable to a
fixed object to ensure
that the computer stays
in the intended area.

Appendixes
A-6
Appendixes
Screen
The surface of the screen may become smeared and accumulate dust during use.
Avoid touching the screen with your fingers when using the system. Gently wipe the
surface of the screen with a soft cloth that has been dipped in a mild detergent solution
and squeezed dry.
Touchpad
Wipe the touchpad with a soft, dry cloth.
Ventilation Openings
Dust on the ventilation openings may cause overheating of the computer. Wipe the
ventilation openings with a soft, dry cloth.
Traveling with Your Computer
The computer is designed for portability. For safety and convenience when traveling,
please follow these guidelines.
• Before traveling, back up your data on external media.
• Do not travel with a protruding PC card inserted in the PC card slot of the
computer.
• Do not carry the computer with the power on. This may result in loss of data and/or
damage to the hard disk drive.
• Make sure the display cover is completely closed before traveling. Otherwise the
cover may be opened unexpectedly, and the display and/or the keyboard may be
damaged.
• If you carry the computer in a bag, avoid unnecessary pressure to the computer by
the other items in the bag.
• Disconnect the AC adapter and any other cables and any peripherals from the
computer.
• Fully charge the battery pack and remember to bring the AC adapter and the AC
power cord with the computer.
• Avoid sudden shocks or extreme vibration.

Appendixes
Operation Manual
A-7
Virus Protection
Computer viruses are referred to as a kind of malignant program intentionally
engineered. When the computer is infected, several damages would be generated; data
in the hard disk may be destructed; the computer may be provided external operation
by unauthorized users; you may inadvertently attach infected files to your e-mails
resulting in spreading the viruses, for example.
To avert virus infection,
• Use the latest virus protection/cleaner software,
• Apply the latest virus definition file for prevention of new virus attack,
• Before opening incoming files such as attached files or downloaded files, detect the
virus infecting them,
• Do not open e-mails originating from an unknown place,
• Enable the security functions of your application to be used (i.e. disabling macros
when handling Word or Excel files,) and
• Regularly update Windows or the applications/software on your computer.
Be sure to back up your important data regularly. If the data has been
damaged by a virus, you may not be able to recover it.
When virus infections occur
Eliminate the virus by using the latest anti-virus software or virus cleaner software.
When it fails, repair all the hard disks. (For repairing the hard disks, refer to the Re-
installation Instructions section on page A-13.)
Updating Windows
Enabling Automatic Updates
If the Automatic Updates is turned off on the computer, follow these steps.
• You can check the current Automatic Updates status by following these
steps. If it is turned off, turn it on.
1. Click start – Control Panel – Security Center.
2. See the Automatic Updates field in the Security Center window.
When the Automatic Updates is ON, the function is enabled.
• When the Automatic Updates is turned on, the computer will

Appendixes
A-8
Appendixes
automatically detect the important programs to be updated and install
them if any.
1. Click start – Control Panel – Security Center.
2. In the Security Center window, click the Turn on Automatic Updates button.
3. Close the window.
Updating Windows
You can update Windows by clicking the Windows Update icon on the taskbar or
accessing to the Microsoft site.
For more information, visit the Windows Help and Support Center.
Protecting Your Computer against Viruses
The Norton AntiVirus software is preinstalled on the computer for detecting and
eliminating viruses. Since the software downloads the latest information or data
through the Internet, the computer needs to be connected to the Internet. Some of the
software features are below:
• Regularly updates itself to maintain the latest program and virus definition file
against new virus threats. (LiveUpdate)
• Automatically scans all incoming messages and attachments so that viruses can be
identified and blocked. Also detects viruses intruded into the computer. (Auto-
Protect)
• Manually detects infected programs or files. (Virus Scan)
Refer to Help of the Norton AntiVirus for more information.
• By default, the Norton AntiVirus software :
• Enables the Auto Protect function.
• Scans the computer for virus weekly.
• Refer to the Help and Support of the Norton AntiVirus software for
details.
Enabling Norton Antivirus Software
To use the preinstalled Norton Antivirus software for the first time, you must
complete the Norton Antivirus wizard to enable it and update the definition file.
1. Connect the computer to the Internet.
2. Click start – All Programs – Norton AntiVirus – Norton Antivirus 2005.

Appendixes
Operation Manual
A-9
3. Follow the on-screen instructions to complete the Norton Antivirus wizard and
the LiveUpdate.
Running LiveUpdate Automatically
The Automatic LiveUpdate function automatically updates the definition file.
Be sure to complete the Norton AntiVirus wizard before going on these
steps.
1. Click start – All Programs – Norton AntiVirus – Norton AntiVirus 2005.
2. Click Automatic LiveUpdate in the Subscription Service field.
3. Click the Turn On button and close the Norton AntiVirus window.
Norton AntiVirus Update Service
Norton AntiVirus software scans for virus by means of a virus definition file allowing
the software to identify and block a particular virus. To protect the computer against
new viruses, the virus definitions and application need to be kept current. The
software automatically checks the web and updates the definition file when needed.
Free update service will be provided within ninety days after the software is installed.
After the free service is over, one-year paid update service can be available. Refer to
http://www.symantec.com for the application.
Scanning Viruses
By default settings, the Norton AntiVirus software automatically scans the computer
once a week. To manually detect viruses infecting the computer, follow the
instructions below.
Be sure to complete the Norton AntiVirus wizard before going on these
steps.
1. Click start – All Programs – Norton AntiVirus – Norton AntiVirus 2005.
2. Click Scan for Viruses in the Norton AntiVirus menu.
3. Click an option you want to perform and then, follow the on-screen instructions.

Appendixes
A-10
Appendixes
Data Execution Prevention
The computer is mounted with the CPU supporting Data Execution Prevention (DEP)
technology (or a memory protection feature) built into the Windows operating system.
With the DEP technology, the operating system marks some memory regions as non-
executable and prevents execution of malicious program code there, which will result
in protecting the computer from virus infection.
• Only the members of the Computer administrators group can change
the settings of DEP or the Security Center.
• With the computer connected to LAN, the settings may not be changed.
Consult your network administrator.
Changing DEP Settings
By default, the DEP technology is enabled only for essential Windows programs and
services. To turn on the DEP for all programs and services;
1. Click start – My Computer.
2. Click View system information in the System Tasks field.
3. Click the Advanced tab.
4. In the Performance field, click the Settings button.
5. Click the Data Execution Prevention tab and select Turn on DEP for all
programs and services except those I select.
6. Click OK.
7. Click OK in the confirmation window.
8. Click OK to close the dialog box.
9. Close the My Computer window.
10. Restart the computer.
Checking Safety of Programs
As the DEP always functions on the computer against the security threats, some
programs may be blocked and cannot execute. If you have the message “To help
protect your computer, Windows has closed this program,” close the message window
and check out the safety of the program and computer by following theses steps.
Appendixes
Operation Manual
A-11
1. Open the Security Center and confirm all of the Firewall, Automatic Updates
and Virus Protection are ON.
• Be sure to enable all of these three functions.
• For details on the Security Center, refer to the Notice of Computer
Security on page xiv.
2. Scan the system for viruses.
• If some viruses are detected, eliminate them according to the
instructions of the virus protection/cleaner software.
• If no viruses are detected and the three functions are enabled, consult
the program publisher for an updated version.
Disabling DEP for Specific Programs
After ensuring the safety of the program, disable the DEP function to enable the
program execution.
To protect the computer, try to update the program and enable the DEP
function.
1. Follow the steps 1 to 5 of the Changing DEP Settings section on the previous
page.
2. Check the box of the program in the list to be run and then, click OK.
If the program is not on the list, click Add… and select the program to be
run.
3. Click OK.
If the confirmation window appears, click OK.
4. Click OK.
5. Restart the computer if prompted in the step 3.
Appendixes
A-12
Appendixes
Data Backup and Restore
Your important data such as e-mails or files is stored on the hard disk of the computer.
Backing up the data in another place is one of the ways that can protect your data
against any disaster, data corruption or data erase, for example.
Backing Up Data and Settings
Backing Up Data
You can back up your data on the D drive, external hard disk, or CD-R/RW disks.
The D drive is not perfectly safe place for backup. If the hard disk is
damaged, you cannot access the backup data.
The Auto-Grabber function of Drag’n Drop CD+DVD4 helps you back
up your data onto your media. Refer to Auto-Grabber Help for more
information.
Backing Up Settings
The File and Settings Transfer Wizard can help you to back up several settings at one
time. To open the wizard, follow the instructions below.
You cannot back up the details on the network settings such as an IP
address and subnet mask by using the File and Settings Transfer Wizard.
Note down the details on the settings and keep it in a safe place.
1. Connect the backup device or media to the computer.
2. Click start – All Programs – Accessories – System Tools – Files and Settings
Transfer Wizard.
3. Follow the on-screen instructions.
Restoring Data and Settings
You can also use the File and Settings Transfer Wizard to restore your data or settings
from the backup media to the hard disk.
Confirm that the backup data to be restored is the one you want before
overwriting the existing file.
Appendixes
Operation Manual
A-13
Re-installation Instructions
Refer to this section to re-install the system of the computer.
• The reinstallation process will overwrite all information in the C and
D drives of the hard disk and restore the hard disk drive to its factory
configuration.
• The necessary reinstallation data is on the hard disk of the computer.
Never modify or delete this data. Without the correct data, you cannot
restore the computer to its factory configuration.
• Do not change the setting of the hard disk partition. The change may
result in deleting the reinstallation data. Without the data, you cannot
restore the computer.
• If you have installed commercial data recovery software on the
computer, never perform the reinstall process until you uninstall the
recovery software, which may rewrite the MBR* of the hard disk. If the
MBR is rewritten, you may not be able to reinstall the system.
( *Master Boot Record: a sector on the beginning of a hard disk drive
that contains a sequence of commands necessary for booting an
operating system)
To recover your hard disk, you will use the PowerQuest EasyRestore software which comes
pre-installed on your computer. Before starting re-installation, read the following End User
License Agreement first.
PowerQuest® EasyRestoreTM End User License Agreement
IMPORTANT: Read this before using your copy of PowerQuest software.
This document is a legal agreement between you, the "end user," and PowerQuest Corporation. Use of the
software indicates your acceptance of these terms. As used in this License Agreement, the term "Software"
means the EasyRestore software included on the CD provided with this License Agreement.
1. PROPRIETARY RIGHTS. The Software is a proprietary product of PowerQuest Corporation
("PowerQuest") or its licensors and is protected under U.S. copyright laws and international treaty
provisions. Ownership of the Software and all copies, modifications, and merged portions thereof shall at
all times remain with PowerQuest or its licensors.

Appendixes
A-14
Appendixes
2. GRANT OF LICENSE. The Software is being licensed to you, which means you have the right to use the
Software only in accordance with this License Agreement. The Software contains pre-installed software for
disaster recovery purposes. The Software is only authorized for distribution together with a specific
computer. This License authorizes you to use the Software for disaster recovery purposes only, to restore
the hard disk image contained on the CD to the computer with which the CD and Software were originally
shipped.
3. NONPERMITTED USES. Without the express permission of PowerQuest, you may not (a) use, copy,
modify, alter, or transfer, electronically or otherwise, the Software or documentation except as expressly
permitted in this License Agreement, or (b) translate, reverse program, disassemble, decompile, or
otherwise reverse engineer the Software.
4. TECHNICAL SUPPORT. PowerQuest is NOT responsible to provide technical support. Any and all
technical support questions, regarding the Software, should be referred to the place of purchase.
5. U.S. GOVERNMENT RESTRICTED RIGHTS. If you are acquiring the Software on behalf of any unit
or agency of the United States Government, the following provision applies: It is acknowledged that the
Software and the documentation were developed at private expense and that no part is in the public domain
and that the Software and documentation are provided with RESTRICTED RIGHTS. Use, duplication, or
disclosure by the Government is subject to restrictions as set forth in subparagraph (c)(1)(ii) of the Rights in
Technical Data and Computer Software clause at DFARS 252.227-7013or subparagraphs (c)(1) and (2) of
the Commercial Computer Software-Restricted Rights at 48 CFR 52.227-19, as applicable.
Contractor/manufacturer is PowerQuest Corporation/P.O. Box 1911/Orem, UT 84059.
6. NO WARRANTY. The Software is being provided to you AS IS. PowerQuest does not warrant the
Software to end users. If the Software fails to perform substantially in accordance with the documentation
provided to your hardware supplier, PowerQuest will repair or replace the copy of the Software provided to
your hardware supplier and will authorize your hardware supplier to provide such repaired or replaced
Software to you without charge.
7. LIMITATION OF LIABILITY. NEITHER POWERQUEST NOR ITS SUPPLIERS SHALL IN ANY
EVENT BE LIABLE FOR ANY DAMAGES WHATSOEVER ARISING OUT OF OR RELATED TO
THE USE OF OR INABILITY TO USE THE SOFTWARE, INCLUDING BUT NOT LIMITED TO
DIRECT, INDIRECT, SPECIAL, INCIDENTAL, OR CONSEQUENTIAL DAMAGES, AND
DAMAGES FOR LOSS OF BUSINESS PROFITS, BUSINESS INTERRUPTION, LOSS OF BUSINESS
INFORMATION, OR OTHER PECUNIARY LOSS, EVEN IF POWERQUEST CORPORATION HAS
BEEN ADVISED OF THE POSSIBILITY OF SUCH DAMAGES, WHETHER SUCH LIABILITY IS
BASED ON CONTRACT, TORT, WARRANTY, OR ANY OTHER LEGAL OR EQUITABLE
GROUNDS. BECAUSE SOME STATES DO NOT ALLOW THE EXCLUSION OR LIMITATION OF
LIABILITY FOR CONSEQUENTIAL OR INCIDENTAL DAMAGES, THE ABOVE LIMITATION
MAY NOT APPLY TO YOU.
Appendixes
Operation Manual
A-15
8. NO WAIVER. Any failure by either party to this agreement to enforce a specific part of the agreement in
a specific situation is not a waiver of rights under the agreement. The party may still enforce the rest of the
agreement in that situation and may still enforce some or all of the agreement in other situations.
9. This License Agreement constitutes the entire agreement between you and PowerQuest pertaining to its
subject matter. This License Agreement is governed by the laws of the State of Utah. Any litigation arising
from this license will be pursued only in the state or federal courts located in the State of Utah.
Copyright 1994-2005, PowerQuest Corporation. All rights reserved. U.S. Patents 5,675,769; 5,706,472; and
5,930,831; other patents pending in the U.S.A. and elsewhere. PowerQuest is a registered trademark and
EasyRestore is a trademark of PowerQuest Corporation.
Recovery Options
You can format the hard disk and re-install the preinstalled software and set the status
of the computer to the same configuration as you used for the first time. There are two
options to recover the hard disk drive(s) of the computer: via hard disk and via
recovery CD. The former saves your time, while the latter secures the re-installation
data from potential loss or corruption. The later sections describe the specific steps for
each option.
Before you recover via recovery CDs, you need to write the preinstalled
recovery data on the computer onto blank CD-R disks. (Refer to the
related section later in this chapter.) You are allowed to create only one
copy of the recovery data.
Preparation for Reinstallation
The following items are necessary for reinstallation.
Via Hard Disk
• Operation Manual
Via Recovery CD
When you recover first time:
• Operation Manual
• Four blank 650MB or 700MB CD-R disks for creating recovery CDs
When you recover after preparing the recovery CDs:
• Operation Manual
• The created recovery CDs

Appendixes
A-16
Appendixes
Backing Up Data
Before you format the hard disk, back up your data. For details on how to back up
your data, refer to Data Backup and Restore section on page A-12.
Selecting Way to Recover Your System
The computer has partitioned the hard disk into two drives (C: and D:) when it was
shipped from the factory. You can select one of the following options to recover your
system.
• Recovers C: drive only. (Recommended)
This process will format the C drive only and recover the C drive to the same status
as shipped from the factory. Nothing will be performed to the D drive. The volume
of the drives will not be changed and will keep the current one.
• Recovers both C: and D: drive.
This process will format both the C and D drives, and contents of the hard disk will
be restored to its original state in the C and D drives. The volume of the drives will
be back to the same as you used for the first time. This process will delete any new
data stored in the hard disk.
• Formats hard disk and creates new partition.
This process will format the whole hard disk drive and create new drive partitions.
You can select the specified volume of the C and D drives. The contents of the hard
disk will be restored to its original state. This process will delete any new data
stored in the hard disk.
While you are recovering with the created recovery CDs, “Recover both
C: and D: drive” and “Formats hard disk and creates new partition”
will eliminate the reinstallation data stored in the hard disk. If it is
eliminated, you cannot recover your system via hard disk.
Appendixes
Operation Manual
A-17
Formatting Drives and Re-installing Windows
The formatting and re-installing process will restore the hard disk drive
to its factory configuration. To ensure the computer’s safety, enable the
virus protection/cleaner software and update the virus definition file to
the latest one. Also, the Windows Update should be run for virus
prevention. (Refer to the Virus Protection section on page A-7.)
Via Hard Disk
With this way, recovery will come from data already installed on the computer rather
than from external media such as CDs.
Note that if there is any possibility of the data being lost or corrupted,
you may not format the hard disk drive(s) and reinstall Windows.
1. Make sure the computer is turned off.
2. If any peripheral devices are connected to the computer, disconnect them.
3. Connect the AC adapter.
Be sure to connect the AC adapter. If the battery power becomes
significantly low, the reinstallation process will be canceled.
4. Turn on the computer. When the message Press F2 for System Utilities appears
on the bottom left of the screen, press F2. Then, the Setup Utility will open.
5. In the Exit menu, select Load Setup Defaults; then, press Enter twice.
6. In the Exit menu, confirm Exit Saving Changes is highlighted and press Enter
twice.
7. The system will restart. When the message Press F10 to Recover appears on the
upper left of the screen, press F10.
The message stays there for two seconds.
8. Read the message on the screen, and select the way to recover your system; then,
press Enter. If you selected Formats hard disk and creates new partition, go to
the next step. Otherwise, go to the step 10.

Appendixes
A-18
Appendixes
9. Select the volume of C drive and press Enter.
10. Read the message and select Continue; then, press Enter. The formatting and re-
installation will start.
Although the pointer may be shown on the screen, never touch the
keyboard or the mouse during recovery except when the message prompts
you to. If you touch them, the reinstallation process may be canceled.
11. When the hard disk has been recovered successfully, the system will restart
automatically.
12. Set up Windows XP by following the on-screen instructions. After you complete
the Windows setup, be sure to set date and time.
Via Recovery CD
Recovery CDs do not come with the computer. First, you need to copy the recovery
data onto CD-R disks and then, recover the system with them.
• You will only have the ability to create one set of recovery CDs.
• Even if you cancel the CD burning process, you can create the
recovery CDs by starting at the first step.
• You can recover your system via hard disk even after succeeding in
creating the recovery CDs.

Appendixes
Operation Manual
A-19
Creating Recovery CD
To create the recovery CDs, you will use the Bootable CD Creator software. Read the
following End User License Agreement first.
Enterprise Corporation International Software License Agreement
This End-User License Agreement (“the Agreement”) is a legal agreement between you, the “end user,” and
Enterprise Corporation International (“ECI”) for the ECI product, which includes a computer program
(Bootable CD Creator), data, and manuals (“SOFTWARE PRODUCT”). Ownership of the SOFTWARE
PRODUCT shall at all times remain with ECI. The SOFTWARE PRODUCT and accompanying
documentation are licensed to you, which means you have the non-transferable and non-proprietary right to
use the SOFTWARE PRODUCT in accordance with this Agreement. The SOFTWARE PRODUCT and
any accompanying documentation are proprietary products of ECI or its licensors and are protected by
United States copyright laws and international copyright treaties. Use of the enclosed software indicates
your acceptance of these terms.
Intended Purpose:
The SOFTWARE PRODUCT is installed on and shipped with a computer manufactured by Sharp. You
may use the SOFTWARE PRODUCT only for making a Bootable CD from the recovery image file that is
pre-installed on the hard disk. You may use the SOFTWARE PRODUCT only on the computer with which
this SOFTWARE PRODUCT is provided.
You may not:
1. Copy the SOFTWARE PRODUCT, in whole or in part, to another media except for installation.
2. Share the license for the SOFTWARE PRODUCT or use it concurrently on different computers.
3. Alter, transfer or sell (including e-sales through the Internet) the SOFTWARE PRODUCT and/or its
copy to a third party, in whole or in part.
4. Delete or change the notice of copyright contained in the SOFTWARE PRODUCT.
5. Reverse engineer, disassemble, or decompile the SOFTWARE PRODUCT.
6. Create source code for the SOFTWARE PRODUCT from the object code.
7. Use any portion of the SOFTWARE PRODUCT within any other program.
8. Install or run the SOFTWARE PRODUCT over the Internet for use by multiple users.
Term: This Agreement is effective from your date of purchase or the date you opened the package and shall
remain in force until terminated. Upon termination of this Agreement, you must destroy all copies of the
SOFTWARE PRODUCT and all accompanying documents. ECI may terminate this Agreement if you fail
to comply with its terms and conditions.
Limited Warranty: ECI warrants that the SOFTWARE PRODUCT will perform substantially in
accordance with the accompanying documentation. The warranties set out in this agreement are in lieu of
and exclude all other warranties not expressly set forth herein, whether express or implied, including but not

Appendixes
A-20
Appendixes
limited to any warranties of merchantability, fitness for a particular purpose, or warranties arising from
usage of trade or course of dealing.
Limitation of Liability: In no event shall ECI or Sharp be liable for any special, incidental, indirect, or
consequential damages, or for damages for loss of business profits, business interruption, loss of business
information, or other pecuniary loss, even if ECI or Sharp has been advised of the possibility of such
damages.
Before creating the recovery CDs, follow the instructions below:
• Prepare four blank 650MB or 700MB CD-R disks.
• Connect the AC adapter. If the battery is discharged, the operation
will stop and fail.
• Set the APM button mode to Max Power and set the CPU
performance level to 100%. (See the Using the Advanced Power
Management Button section on page 2-9.)
• Disable system standby and system hibernate. (See Power Saving
section on page 2-7.)
• Close all of the unnecessary or the automatic start-up applications.
• Disable the screen saver. (See the Wallpaper and Screen Saver
section on page 1-20.)
Disabling Auto Protect of Norton AntiVirus
Before creating the recovery CDs, disable the Auto Protect function of the Norton
AntiVirus.
1. Right-click the Norton Antivirus icon ( ) on the taskbar.
2. Click Norton AntiVirus Options.
3. Clear the boxes of Enable Auto-Protect and Start Auto-Protect when Windows
starts up in the How to stay protected field.
4. Click OK.
5. Select the duration for the Auto Protect to be disabled.
It is recommended that you select Until system restart when you create
the recovery CDs.
6. Click OK.
7. If a message appears, read it and click OK.
Appendixes
Operation Manual
A-21
The icon ( ) will change to ( ).
Creating Recovery CDs
1. Connect the AC adapter to the computer.
Be sure to connect the AC adapter. If the battery is completely
discharged, the burning CD process will be stopped.
2. Insert a blank CD-R into the optical drive.
If a dialog box or window appears, close it.
3. Click start – All Programs – Create Product Recovery CD.
4. In the Bootable CD Creator SE1.1 window, select the appropriate speed from the
Speed pull-down menu, then, click the Create Recovery Disc button.
5. Read the message on the screen and then, click Yes, then, OK. The burning
process will start.
Never touch the keyboard, mouse or touchpad during the burning process
except when the message prompts you to do so. If you touch them, the
burning process may be stopped.
6. Replace the CD-R by following the instructions on the screen. Label each CD-R
in the order of burning so that you will set them in correct order when recovering.
If a window or dialog box opens, close it.
7. When you see the message Disc creation complete on the screen, click OK, then,
Close.
8. Click Yes and remove the CD-R from the optical drive.
Appendixes
A-22
Appendixes
• Store the burned disks in a secure place.
• Keep your disks away from direct sunlight, heat and excessive
moisture.
9. Close the optical drive.
10. Restart the computer.
Enabling Auto Protect of Norton AntiVirus
If the Norton Antivirus icon on the taskbar is disabled, appearing as ( ), follow these
steps. If it is ( ), skip the steps.
1. Right-click the Norton Antivirus icon ( ) on the taskbar.
2. Click Norton AntiVirus Options.
3. Check the boxes of Enable Auto-Protect and Start Auto-Protect when Windows
starts up in the How to stay protected field.
4. Click OK.
5. If a message appears, read it and click OK.
The icon ( ) will change to ( ).
Recovering with Recovery CDs
When you format the entire hard disk drive (both C and D drives), the
reinstallation data stored in it will be eliminated. Therefore you will not
be able to recover your system via hard disk.
1. Make sure the computer is turned off.
2. If any peripheral devices are connected to the computer, disconnect them.
3. Connect the AC adapters to the computer and then, turn it on.
Be sure to connect the AC adapter. If the battery is completely
discharged, the installation process will be canceled.
4. When the message Press F2 for System Utilities appears, press F2. The Setup
Utility will open.

Appendixes
Operation Manual
A-23
5. Insert the Recovery CD disk 1 into the optical drive.
6. In the Exit menu, select Load Setup Defaults; then, press Enter twice.
7. In the Boot menu, confirm the Boot Sequence is highlighted and then, press
Enter.
8. In the Boot Sequence, select the Optical Disk Drive and press the space bar to
place the Optical Disk Drive in the top of the list; then, press Esc.
9. In the Exit menu, confirm Exit Saving Changes is highlighted and press Enter
twice.
10. Read the message on the screen, and select the way to recover your system; then,
press Enter. If you select Formats hard disk and creates new partition, go to the
next step. Otherwise, go to the step 12.
When you select Recovers both C: and D: drive or Formats hard disk and
creates new partition, the recovery process will delete the reinstallation
data stored in the hard disk. Therefore you will not be able to recover
your system from the hard disk.
11. Select the volume of C drive and press Enter.
12. Read the message and select Continue; then, press Enter. Follow the on-screen
instructions for replacing the recovery CD.
Although the pointer may be shown on the screen, never touch the
keyboard, the mouse or the screen during recovery except when the
message prompts you to. If you touch them, the reinstallation process
may be canceled.
13. After the recovery process is complete, the system will restart automatically.
When the message Press F2 for System Utilities appears, press F2. The Setup
Utility will open.
14. In the Exit menu, select Load Setup Defaults; then, press Enter twice.
15. In the Exit menu, confirm Exit Saving Changes is highlighted and press Enter
twice. The system will restart.
16. Set up Windows, following the instructions on the screen.
17. Remove the recovery CD from the optical drive.
18. Make sure to set date and time.

Appendixes
A-24
Appendixes

Troubleshooting
Operation Manual
T-1
Troubleshooting
This chapter describes how to troubleshoot computer problems.
Common Problems
Problems with your computer can be caused by something as minor as an unplugged
power cord or as major as a damaged hard disk drive. The information in this
troubleshooting section is designed to help you find and solve minor problems. If you
still have a problem after trying all the suggested remedies in this chapter, contact
your dealer or, for users in U.S, call: 1-800-BE-SHARP (237-4277).
The problems that you might encounter can be divided into two basic categories:
hardware and software. Hardware problems can be further divided into being of an
electrical or a mechanical nature. You will know you have a hardware problem if, for
example, the screen is blank, or your computer cannot recognize the disk drives.
Software problems can occur at several levels. Both your operating system and your
software application programs are capable of generating errors and error messages. If
you encounter a software error, try to determine if the error message is from your
operating system or from an application program, and refer to the appropriate manual
for possible remedies.
You can also refer to the Windows help program to solve the problem. To access the
program, click start – Help and Support. It also gives you troubleshooting tips and an
index.
Successful troubleshooting is the result of careful observation, deductive reasoning,
and an organized approach to solving the problem. If you encounter a problem, begin
by performing a careful visual inspection. Check the exterior of your computer first. If
no lights are displayed, check the battery charge or power outlet, the plug and power
cord, and any power switches that may affect your computer. If your computer has
been connected to any peripheral devices, look for loose or disconnected cables. You
may also need to check the fuses and breakers in your electric box. A few common
problems and suggested solutions are presented in the examples that follow.

Troubleshooting
T-2
Troubleshooting
Trouble when Starting
Why doesn't the power indicator or the battery indicator turn on?
• Make sure the AC adapter is correctly connected to the AC adapter jack of your
computer.
• Make sure the AC power cable is correctly connected to a live wall outlet. To find
it is live or not, connect another electric equipment to the wall outlet.
• Make sure the battery pack is correctly installed and charged.
• If the battery pack is discharged, connect the AC adapter.
• If all the steps above failed, follow the instructions on Why doesn't the keyboard or
the touchpad respond to your operation? on page T-3.
Why do I get the message Invalid system disk?
• You may have inserted a non-bootable disk (either a defective disk or one without
an installed operating system) in the optional external floppy disk drive unit. Eject
the disk.
Why can’t I boot from the floppy disk?
• Make sure that the optional external floppy disk drive unit is correctly connected to
your computer.
• Check whether the floppy disk set to the optional external floppy disk drive unit
contains a system disk.
• Check whether USB Boot in the Boot menu of the Setup Utility is enabled. (Refer
to the Boot Menu section on page 5-7.)
• Check whether Floppy Disk Drive is at the top in the Boot Sequence in the Boot
menu of the Setup Utility. (Refer to the Boot Menu section on page 5-7.)
Why do I get the message Operating System not found?
• The message may appear when the installation has failed. Recover the C and D
drives using the created recovery CDs.

Troubleshooting
Operation Manual
T-3
Why do I get the message Press <F1> to resume, <F2> to setup?
• The setting of the Setup Utility is deleted. Follow these steps:
1. Press F2 key while the message Press F1 to resume, <F2> to setup is appearing.
2. In the Exit menu, select Load Setup Defaults and press the Enter key to retrieve
the default values.
3. Confirm Yes is highlighted and then, press the Enter key.
4. Set the desired values in the Setup Utility or just leave the default values.
5. In the Exit menu, select Exit Saving Changes and then, press the Enter key.
6. Confirm Yes is highlighted and then, press the Enter key.
7. On Windows, click start – Control Panel.
8. Click Date, Time, Language, and Regional Options.
9. Click Change the date and time.
10. In the Date and Time Properties dialog box, set the current date and time; then,
click OK.
11. Close the dialog box.
12. Make an appropriate setting on the Setup Utility, if necessary. If you want to
keep the default settings, no setting performance is needed.
• If the operation above fails to work, contact your dealer or call: 1-800-BE-SHARP
(237-4277) for users in U.S.
Trouble with the Keyboard or Touchpad
Why doesn't the keyboard or the touchpad respond to your operation?
• Try the following in this order:
1. Press Ctrl+Alt+Delete and select the Applications tab of the Windows Task
Manager dialog box. Click the program name that hangs up, then, the End Task.
If this does not solve the problem, select the Users tab, click the Disconnect or
Logoff of the Windows Task Manager dialog box, and then Yes.
2. If the step 1 fails to work, confirm the hard disk indicator is turned off and press
the power button for more than four seconds to turn off the system. Ten seconds
later, turn your computer on.
3. If pressing the power button fails to turn off your computer, confirm the hard
disk indicator is turned off and remove the AC adapter, then, the battery pack.
Ten seconds later, reinstall the battery pack, connect the AC adapter and then,
turn on your computer.

Troubleshooting
T-4
Troubleshooting
Why doesn't the touchpad function?
• The surface of the touchpad or your palm may be moist or dirty and grease. Wipe
the touchpad with a soft, dry cloth.
• The touchpad may be disabled because of the connected USB mouse. Remove the
mouse or enable the touchpad by following these instructions.
1. Click start – Control Panel.
2. Click Printers and Other Hardware - Mouse.
3. In the Mouse Properties dialog box, click the Device Settings tab.
4. Clear the box of Disable internal pointing device when external USB pointing
device is attached.
5. Click OK to close the dialog box.
6. Close the Printers and Other Hardware dialog box.
Trouble with the Display
See also the Adjusting the Display section on page 1-19 and the External Monitors
section on page 3-8.
Why is the screen blank?
• Confirm the computer is turned on by checking the power indicator. When it lights
green, the computer is on.
• Press any key to find any power management feature has turned off the screen to
save power.
• If you are using a battery pack, make sure it is correctly installed and has a charge
remaining.
• Make sure the LCD screen is selected as the display by pressing Fn+F5 ( ).
• Check whether the display is on by pressing Fn+F11 ( ).
• If you still have the problem after trying the above, follow the steps in Why doesn't
the keyboard or the touchpad respond to your operation? on page T-3.

Troubleshooting
Operation Manual
T-5
Why does the external monitor display nothing or distorted images?
• Confirm the monitor is turned on.
• Confirm the monitor is connected correctly.
• Make sure the external monitor is selected as the output display by pressing
Fn+F5 ( ).
• If you use Fn+F5 ( ) to change the display, the image may be distorted. Press
Fn+F5 ( ) again to return the previously selected display and then, use the
Display Properties dialog box to change it again.
• Make sure the value of the Screen resolution field in the Settings tab of the Display
Properties is same as or lower than the resolution of the external monitor.
• Make sure the external monitor is not near any electric devices having strong
magnetic fields such as a TV set or radio.
• Do not share an outlet with a TV set or radio.
Why can’t I change the display with the Fn+F5 keys?
• While you are playing a game or running animation, the Fn+F5 ( ) key
combination may not work. Close the currently running application(s).
• Use the Display Properties icon ( ) to change it.
• Use the Display Properties dialog box to change it.
• While the display is in the Extended Desktop mode, Fn+F5 ( ) key combination
may not work.
Why does the screen brightness increase or decrease not when intended?
• If you press the APM button, the selected screen brightness value of the APM
button is applied.
Trouble with Floppy Disks
Why can't I use a floppy disk?
• Confirm the optional external floppy disk drive unit is correctly connected.
• Confirm the floppy disk is inserted correctly.
• Confirm the drive or file name is correct.

Troubleshooting
T-6
Troubleshooting
• The floppy disk may not be formatted or could be corrupted. Format the disk or use
another disk.
• If you cannot write to a floppy disk, the disk may be write-protected. Eject the disk
and ensure that the write-protect tab covers the detection hole.
• If you cannot write to a floppy disk, the disk may be full. Use another disk.
• 720KB (2DD) disks are not available to boot the computer.
• 720KB (2DD) disks cannot be formatted in your computer.
• The DISKCOPY command on 720KB (2DD) disks is not available.
• 720KB (2DD) disks are not appropriate to save data.
• 720KB (2DD) disks may not be available for data transfer with other computers
using 1.44MB (2HD) disks.
Trouble with the Optical Drive
Why does not the drive open?
• Confirm your computer is turned on.
• When your computer is turned off, insert a fine rod into the drive tray ejection hole.
(Try this only if the eject button does not work.)
Why can’t I read/write the data from/onto a disk or play files?
• Confirm the disk is inserted correctly.
• Confirm the drive and file names are correct.
• Confirm the disk is not stained or scratched.
• Confirm the disk or files are supported by the optical drive.
Ejection Hole

Troubleshooting
Operation Manual
T-7
Why can’t I write/delete the data onto/from a disk?
• Confirm the disk is available in writing or deleting data.
• If you wish to use the Windows CD writing software, you may need to enable it.
(Refer to Windows Help and Support.)
Why doesn’t the DVD video play smoothly?
• Ensure that the AC adapter is attached to the computer and a power source.
• Disable system standby and system hibernate.
• Set the APM button to the max power mode and then, select 100% for the CPU
performance. (See the Using the Advanced Power Management Button section on
page 2-9.)
• When playing a DVD video, you may experience a picture with irregular motion or
frame dropouts, depending on videos. Enabling the Hardware Decode Acceleration
function of InterVideo WinDVD may solve this problem. Follow these instructions
to enable the function.
1. Quit the playback if it is running.
2. Right-click somewhere in the InterVideo WinDVD5 window and select Setup…
from the pop-up menu. The Setup dialog box will open.
3. Check the box of Use Hardware Decode Acceleration in the Video Hardware
Configuration field.
4. Click OK.
When the Hardware Decode Acceleration function is enabled, the LCD
Optimization function is disabled. (Refer to Help of WinDVD for LCD
Optimization.)
Why isn’t the optical drive recognized?/Why can’t I find the optical drive
in My Computer window?
• If your computer is turned on with a DVD disk inserted in the drive, the drive may
not be recognized. In this case, turn off your computer and open the disk tray by
inserting a fine rod into the ejection hole. (Refer to the Why does not the drive
open? section on page T-6.) Remove the disk from the drive, close the optical
drive, and then, turn on your computer again.
• If you click the Safely Remove Hardware icon ( ) on the taskbar and
MATSHITA xxxxx (xxxxx is your optical drive name), the optical drive powers
off. The optical drive icon does not appear in the My Computer window while the
drive is off.

Troubleshooting
T-8
Troubleshooting
• If you press the APM button and select the mode where the Optical drive is OFF,
the optical drive powers off. To power it on, press the optical drive eject button or
Fn+F2 keys.
Trouble with the Hard Disk
Why can't I read or write data to/from the hard disk?
• Confirm the drive and file names are correct.
• Confirm the hard disk has sufficient free space.
Trouble with Communications
Why can't I communicate through the built-in modem?
• Confirm the telephone line is properly connected to the modem jack.
• Confirm the dial setting (pulse or tone) of Windows XP and/or communication
software is matched with the telephone line.
• If you set your connection status using the New Connection Wizard, check the Use
dialing rules in the Properties dialog box of that connection status. (Refer to the
Internet Connection section on page 4-21.)
• Confirm the country/region setting is appropriate.
• Confirm the network configuration is appropriate.
• Confirm the user name or password is correct.
• Confirm the COM port in the communication software is set appropriately.
• Disable system standby and system hibernate.
• If an unusual device is attached to the line you are connecting to, the modem may
not function properly. Remove the device or contact the dealer of the device.
• If your computer is connected to a PBX, consult the PBX maintenance staff or its
service company. If the electric characteristics of your PBX are different from
those of a regular analog line, the modem will not function properly. If you connect
the modem to a digital PBX, both the modem and the PBX may be damaged.
Why is the access speed so slow?
• Set the APM button to the max power mode and then, select 100% for the CPU
performance. (See the Using the Advanced Power Management Button section on
page 2-9.)

Troubleshooting
Operation Manual
T-9
• Close the applications currently opened.
• Try to connect another ISP (Internet Service Provider), or try to connect in some
other time.
Why can't I access the LAN?
• Confirm the cable is properly connected to the LAN jack and the network hub.
• Confirm the network configuration is appropriate. (Refer to the Configuring the
LAN section on page 4-3.)
• Confirm the user name or the password is correct.
• Reconfigure the network settings by following the Network Setup Wizard.
Why can't I detect the wireless access point on my computer?
• Confirm your computer is enabled for the wireless LAN communication.
• Confirm the access point is powered on.
• Confirm the antenna indicator is lit.
• Restart your computer.
Why can't I connect to the network via an access point?
• Confirm the wireless LAN antenna is enabled. When the antenna indicator lights
green, the antenna is enabled. If not, press the Fn+F1 ( ) keys.
• Confirm Any available network (access point preferred) is selected in the Networks
to access field of the Advanced dialog box. (To open Advanced dialog box, refer to
the Communicating with Other Computers section on page 4-15.)
• Confirm the Network name of your computer matches that of the access point you
want to communicate with.
• Confirm the security settings of your computer equals to those of the access point if
the encryption security of the access point is enabled.
• Reenter the Network key.
• When using the WEP key, confirm the key index is correctly selected.
• When you have more than one access points, your computer may be connected to
other than right one you want to access. Follow the steps below.
1. Right-click the Wireless Network Connection icon ( ) on the taskbar; then,
click View Available Wireless Networks.

Troubleshooting
T-10
Troubleshooting
2. Select the desired network in the Available wireless networks list; then, connect
to the network. (Refer to the Confirming the Status of Wireless Connection
section on page 4-14.)
• Repair the connection with the following steps.
1. Right-click the Wireless Network Connection icon.
2. Click Repair.
• If there are more than one available access points nearby, they interact in the
connection. In this case, the connection speed will become low or the connection
will stop.
• You may have accidentally enabled IEEE802.1x authentication. Disable it with the
following steps.
1. Click start – Control Panel.
2. Click Network and Internet Connections – Network Connections. If Classic view
is selected, double-click Network Connections.
3. Right-click Wireless Network Connection and click Properties.
4. Click Wireless Networks tab, select the network in Preferred networks field and
click Properties button.
5. Select Authentication tab, then, clear the box of Enable IEEE802.1x
authentication for this network.
6. Click OK twice and close the window.
Why can't I communicate with other computers through the wireless
LAN?
• Confirm the antenna is enabled with pressing the Fn+F1 ( ) key combination.
When the antenna indicator is on, the antenna is enabled. (Refer to the Activating
the Wireless LAN Antenna section on page 4-11.)
• Confirm each computer is enabled for wireless LAN.
• Confirm Computer-to-computer (ad hoc) networks only is selected in Networks to
Access of Advanced dialog box. (To open the Advanced dialog box, refer to the
Communicating with Other Computers section on page 4-15.) Also confirm the
other computers are in ad-hoc mode.
• Adjust the distance between your computers by bringing your computer closer to
others and remove any obstructions that may impede the communication; then, try
to connect again.
• Confirm the IP address and the subnet mask of each computer are set correctly.

Troubleshooting
Operation Manual
T-11
• Confirm the WEP keys are correctly set to your computer if the WEP security of
the communicated computers is enabled.
How can I detect the MAC address?
• Follow the instructions below:
1. Click start – All Programs – Accessories – Command Prompt.
2. Type ipconfig/all; then, press Enter. The information about IP appears.
3. See the address of the Physical Address in the Ethernet adapter Local Area
Connection section.
4. Type exit; then, press Enter.
Trouble with Peripherals
Why don't peripheral devices function?
• Confirm they are correctly connected to your computer.
• Confirm they are Windows XP compliant.
• Confirm drivers necessary for the devices are installed.
Why can't I print?
• Make sure the printer is turned on.
• Check whether your computer and the printer are connected correctly.
• Check whether the printer is ready to print.
• Check whether the printer has enough paper.
• Check whether the printer driver is installed.
• Click start - Control Panel - Printers and Other Hardware – Printers and Faxes. If
the Classic view is selected, double-click the Printers and Faxes icon. Confirm
your printer is installed. If not, click Add a printer of Printer Tasks to install it.
• See also the Windows help program by clicking start - Help and Support.
Why don't peripheral devices function correctly?
• Confirm they are Windows XP compliant.
• Confirm drivers necessary for the devices are installed.

Troubleshooting
T-12
Troubleshooting
• Disable System standby and System hibernates. If this does not work, set Turn off
hard disks to Never.
Trouble with Security Settings
Why do I have the message “Your computer might be at risk” each time I
boot my computer?
• Make sure the three functions (Firewall, Automatic Updates, and Virus Protection)
in the Security Center are ON.
• If you have the message “Automatic Updates is turned off” addition to the above
message, turn on the Automatic Updates to enable your computer periodically to
update Windows.
Other Troubles
Why does my computer not power on?
• Disconnect the AC adapter from the computer, remove the battery pack, correctly
reinstall the battery pack and connect the AC adapter, then turn on the computer
again.
Why do I get the message Pop-up blocked in the information bar?
• The Microsoft Internet Explorer prevents most pop-ups from appearing by using
the popup blocker function.
• If you wish to have the pop-ups on the current web site;
1. Start up the Microsoft Internet Explorer.
2. Click on the information bar.
3. Select “Temporarily Allow Pop-ups” or “Always Allow Pop-ups from This
Site…”.
• If you wish to have pop-up ads on the specified web site;
1. Start up the Microsoft Internet Explorer.
2. Open the Tools menu and select the Pop-up Blocker – Pop-up Blocker
Settings….
3. Enter the URL to be permitted in the Address of Web site to allow field and
then, click Add.

Troubleshooting
Operation Manual
T-13
Why do I get the message This site might require the following ActiveX
control in the information bar?
• The Microsoft Internet Explorer prevents active contents from appearing. The
following steps allow them to appear. Before performing the steps, ensure the
safety of the contents.
1. Click the information bar.
2. Select Install ActiveX Control… from the pop-up menu.
3. Click Install.
Why isn’t the web site displayed properly?
• Disable the popup blocker. (Refer to the Why do I get the message Pop-up blocked
in the information bar? Section on page T-12.)
• Install the appropriate ActiveX control application(s).
Why isn’t the e-mail displayed properly?
• The Microsoft Outlook Express may prevent images in HTML e-mails from
appearing. To display the image, follow theses steps. (Note that if you click the
message, the sender of the e-mail may receive the fact that you open the message.
Ensure the safety of the mail before operating these steps.)
1. Start up the Microsoft Outlook Express.
2. Select the e-mail containing the image to be displayed.
3. Click the message displayed in the bar.
Why does the battery pack discharge so quickly?
• Initialize the battery pack.
Why is the date and/or time incorrect?
• Correct the date and time in Windows. Double-click the time appearing on the
taskbar and set them in Date and Time Properties dialog box.
Why can't I use a hardware device?
• Make sure the hardware device is not crossed out with an X mark using the
following procedure.
1. Click start – Control Panel. Click Performance and Maintenance; then, System.
If the Classic view is selected, double-click the System icon.

Troubleshooting
T-14
Troubleshooting
2. Click the Hardware tab; then, Device Manager.
3. Double-click the device you cannot use and confirm Use this device (enable)
appears in the Device usage field.
Why can't I produce sound?
• Click or double-click the speaker symbol on the taskbar and check the Windows
volume.
• If you press the APM button and select the mode where the Audio is Mute, the
sound turns off.
Why can't I turn off my computer?
• Follow the instructions on Why doesn't the keyboard or the glide pad function?
Why is the background white?
• If you press the APM button and select the mode where the Wallpaper is white, the
screen background change to white.
Why is my computer so hot?
• When charging the battery pack, its surrounding area or the front of the keyboard
may become hot, but this is not a problem.
Why can’t I record the sound from the microphone?
• Follow the instructions below:
1. Double-click the speaker symbol on the taskbar.
2. Click Options and select Properties.
3. From the Mixer device pull down menu, select Realtek HD Audio input and then,
click OK.
4. Confirm Select is checked in MicVolume of Recording Control dialog box.
5. Close the Recording Control dialog box.

Troubleshooting
Operation Manual
T-15
Why can’t I find the system drivers and software applications?
• You may accidentally remove them. Refer to the following to retrieve them.
• The drivers are stored on the last recovery disk if you have created the recovery
CDs.
• The applications are stored on the last recovery disk if you have created the
recovery CDs. Without the recovery CDs, you need to reinstall the operating
system from the hard disk.
If you are not sure how to install them, consult local service staff.

Troubleshooting
T-16
Troubleshooting

Operation Manual
Index-1
Index
Index
A
AC adapter
connecting, 1-1
using, 1-5
Account
creating, 1-21
switching, 1-21
APM button
about, 2-8
using, 2-9
Audio
controlling output volume, 1-18
B
Backing up data, A-12
Battery pack
changing, 2-5
charging, 2-2
checking level, 2-2
conditioning, 2-4
indicator, 1-4, 2-2,3
low battery indication, 2-3
C
Cleaning
computer, A-5
CD
handling, 1-10
inserting, 1-10
supported disk, 1-9
removing, 1-12
troubleshooting, T-6
CD-R/RW, 1-12
Computer name, 4-5
D
Data execution prevention
changing settings, A-10
checking programs, A-10
disabling, A-11
Display
changing brightness, 1-19
changing resolution, 1-19
changing number of colors, 1-19
switching the display, 1-8, 3-9
troubleshooting, T-4
turning off, 1-8
DVD
handling, 1-10
inserting, 1-10
supported disk, 1-9
removing, 1-12
troubleshooting, T-6
DVD video
parental control, 1-15
playing, 1-13
region code, 1-14
E
External monitor
changing the primary monitor, 3-10
connecting, 3-8
disconnecting, 3-11
extending an image, 3-10
switching the display, 1-8, 3-9

Index
Index-2
Index
F
File sharing
copying, 4-7
sharing, 4-6
Floppy disk
ejecting, 3-6
handling, 3-5
inserting, 3-5
troubleshooting, T-5
Floppy disk drive (external)
connecting, 3-4
removing, 3-6
H
Hard disk drive
troubleshooting, T-8
I
Indicators
battery, 1-4, 2-2,3
optical drive, 1-10
power, 1-3,4
status, xxii
wireless LAN antenna, 4-11
K
Keyboard
application key, 1-8
function keys, 1-8
special keys, 1-8
troubleshooting, T-3
windows key, 1-8
L
LAN
configuring the network settings, 4-3
configuring the LAN, 4-3
connecting to the LAN, 4-2
removing the cable, 4-2
troubleshooting, T-9
M
Memory module
finding the memory size, A-4
installing, A-1
removing, A-4
Modem
configuring, 4-20
connecting to telephone line, 4-19
removing the cable, 4-21
troubleshooting, T-8
N
Network Setup Utility
auto-switching, 4-24
loading, 4-23
running, 4-23
switching, 4-24
O
Optical Drive
powering off, 2-15
troubleshooting, T-6
using, 1-9
P
Passwords
changing, 1-23, 5-6
deleting, 1-23, 5-6
setting, 1-22, 5-5
PC cards
ejecting, 3-15
inserting, 3-14
Peripherals
audio equipment, 3-12
connecting guidelines, 3-1
external floppy disk drive, 3-4
external monitors, 3-8
headphones, 3-12
microphones, 3-13
PC cards, 3-14
printers, 3-7
speakers, 3-11
troubleshooting, T-11
USB devices, 3-3

Operation Manual
Index-3
Index
Power
choosing AC or battery, 1-4
indicator, 1-3,4
Power saving
APM button, 2-9
system hibernate, 2-8
system standby, 2-8
Printers, 3-7
R
Re-installation
about, A-13
CD recovery, A-18, 22
creating recovery CDs, A-21
hard disk recovery, A-17
preparing, A-15
selecting way, A-16
Restoring data and settings, A-12
S
Screen Saver, 1-20
SD card
ejecting, 1-17
inserting, 1-16
Setup utility
advanced menu, 5-4
battery menu, 5-7
boot menu, 5-7
changing setting, 5-2
entering and exiting, 5-2
exit menu, 5-7
main menu, 5-3
running, 5-1
security menu, 5-4
Security cable, A-5
Security notice for the computer, xiv
Security notice for the wireless LAN, xv
Status indicators, xxii
System standby
about, 2-8
entering, 2-14
resuming from, 2-8
System hibernate
about, 2-8
entering, 2-14
resuming from, 2-8
T
Touchpad
changing the configuration, 1-7
clicking and double-clicking, 1-7
drag and drop, 1-7
scroll, 1-7
troubleshooting, T-3
using, 1-6
Troubleshooting
applications/drivers, T-15
CD/DVD, T-6
common problems, T-1
communications, T-8
display, T-4
floppy disk drive, T-5
hard disk drive, T-8
Internet Explorer, T-12
keyboard or touchpad, T-3
LAN, T-9
modem, T-8
peripherals, T-11
security settings, T-12
U
USB devices, 3-3
V
Virus protection
about, A-7
enabling, A-8
running LiveUpdate, A-9
scanning, A-9
update service, A-9
W
Wallpaper, 1-20
Windows
updating, xiv, A-7
firewall, xiv
Security Center, xiv
Wireless LAN,
activating the antenna, 4-11
communicating between computers, 4-15
configuring, 4-12

Index
Index-4
Index
confirming the status, 4-14
connecting to a network, 4-13
security measures, 4-8
security modes, 4-17
security notice, xv
troubleshooting, T-9
wireless LAN modes, 4-8
Workgroup name, 4-5