Sharp NAR0064 GSM Mobile Phone User Manual Manual 1
Sharp Corporation GSM Mobile Phone Manual 1
Sharp >
Contents
- 1. Manual 1
- 2. Manual 2
- 3. Manual 3
- 4. Manual 4
Manual 1
Sidekick®
Reference Guide
27-4013-01 Rev. 0I - R4.7 - Apr , 2008
Copyright © 2008 Danger, Inc. All rights reserved.
Contents
Welcome! 6
Opening and Closing the Display 8
Control Buttons 9
Phone Controls 11
Sound Controls 13
Mini Media Player 13
Volume Controls 14
Wireless On/Off Control 15
Display Controls 15
Battery Charger 16
Removable Battery 17
Replaceable Device Shell 18
SIM Card Slot 20
Memory Card Slot 21
USB / Power Port 22
Registration 23
Setting Up Your Device 27
Bluetooth® Technology Setup 27
Themes 28
Font Size 28
Backlighting 29
Key Guard Mode 29
Device Privacy Code 30
Sound Profiles 31
Alarm Clock 31
Application Customization 31
2 Contents
The Device Interface 32
The Jump Screen 32
Indicators 33
Menus 35
Quick Jump 35
Quick Find 36
Empty Trash 36
Type and Edit Text 37
Navigate in Text Boxes 37
Delete Text 37
Cut, Copy, Paste, Undo 37
Check Spelling 38
AutoText & Spelling 38
Type Special Unicode Characters 40
The Desktop Interface 41
Using the Applications 43
myFaves
Add a Contact to myFaves 43
Communicate with a myFaves Contact 43
Assign an Icon to a myFaves Contact 44
Phone
Make a Phone Call 45
Use Bluetooth Hands-Free Headset or Car Kit 45
Answer a Phone Call 46
Add a Number to Your Speed Dial List 46
Check Your Voice Mail 47
Change Your Phone Ringtone 47
Import Contacts from Your SIM Card 48
Contents 3
Text Messaging
Send a Text Message 48
Picture Messaging
Send a Multimedia Message 49
Web Browser
Browse the Web 51
Bookmark a Web Page 51
Copy Text on a Web Page 52
View and Save Web Page Images 52
Web Page Layout 53
Email
Send an Email Message 54
Fetch Email from External Accounts 54
Edit External Email Account 57
Fetch Email Using Your Device’s Web Browser 58
Attach a Media File or vCard to an Email Message 58
Address Book
Add a Contact to the Address Book 59
Assign a Contact as a “Favorite” 60
Address Book Tabs 61
Communicate with a Contact 61
Import Address Book Contacts 62
Set and Send “My vCard” 63
Send any Contact’s vCard 64
Calendar
Add an Event to Calendar 64
Notes
Create a Note 65
Send a Note via Email 65
4 Contents
To Do
Add a Task 66
Camera
Take a Photo 66
Capture Video 67
Send Media Files via Bluetooth, Email or MMS Message 68
Use Photo for Caller ID or Key Guard Background 69
Media Player
Copy Music or Video to the Memory Card 70
Play Music or Video 71
Listen Using Stereo Bluetooth Headset 72
Create a Playlist 72
Download Catalog
Download Items from the Catalog 73
Manage Your Downloaded Items 74
Instant Messaging
Sign On 75
Send an Instant Message 75
Switch Between IM Conversations 75
Keyboard Shortcuts 77
Troubleshooting 78
Handling and Safety Precautions 82
Regulatory and Compliance Information 87
Legal Information 90
Contents 5
Welcome!
Thank you for buying a Sidekick device. Your Sidekick will
change the way you communicate, get organized, and stay
connected.
Your Sidekick connects seamlessly to wireless networks, allowing
you to browse the Internet, exchange instant messages, and
send and receive email with image attachments and multimedia
messages with voice notes. Other features include a full-featured
phone, personal information management (PIM) applications,
access to a personal Web portal (the “Desktop Interface”),
entertainment applications, a built-in video/photo 2 megapixel
camera, and a media player.
For the latest instructions on all the Sidekick applications, open
the online version of this Reference Guide by clicking Help on the
Desktop Interface.
6 Welcome

Here’s what you’ll find in the box:
Sidekick device
SIM card*
Removable battery
Replaceable Shells
USB cable
Battery charger (wall adapter)
Hands-free stereo headset
Start Guide
Reference Guide (on CD-ROM)
Limited Warranty (Terms & Conditions)
If any of these items are missing, please contact T-Mobile’s Customer Care
department.
*May not be included with all models.
Welcome 7
Now, let’s get started!
Device Basics
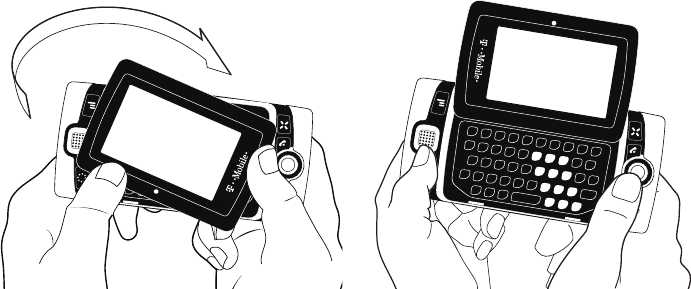
Opening and Closing the Display
To open the display, press your left thumb on the lower-left corner of the
display and gently push up in a clockwise direction. The display will spring
smoothly into the open position.
Alternatively, use your right index finger to push down gently on the upper-
right corner of the display. The screen will spring into the open position.
The normal operating position of the device is horizontal, with the trackball
on the right, as shown above.
To close the display, reverse the motion to pivot the display counter-
clockwise and snap it into the closed position.
8 Device Basics
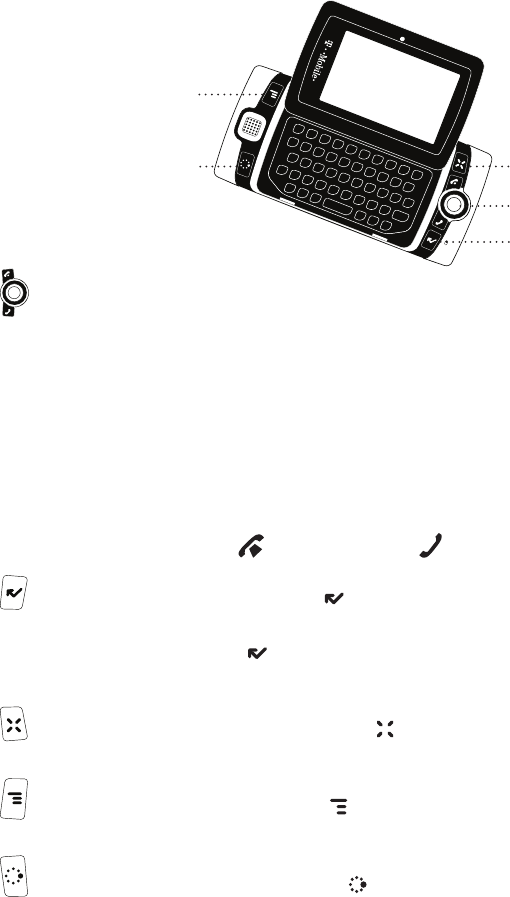
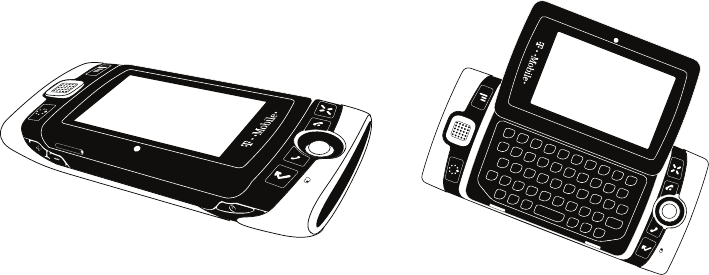
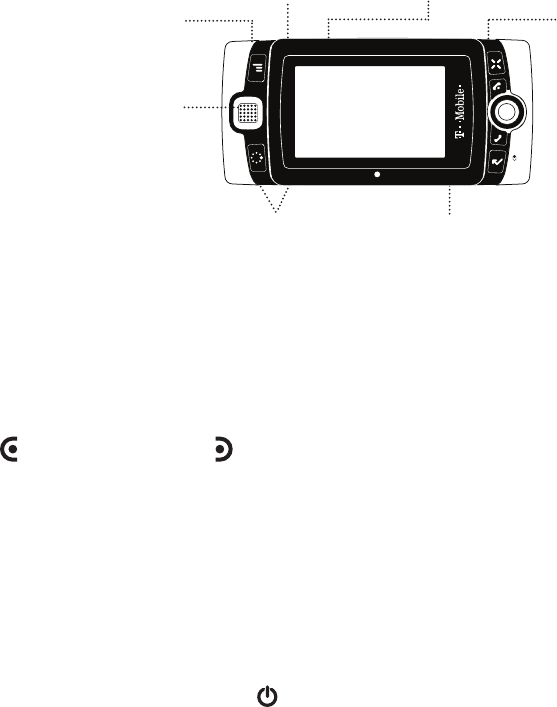
Control Buttons
MENU
JUMP
TRACKBALL + SEND/END
CANCEL
DONE
TRACKBALL – Press the trackball to select a highlighted item or press
and hold to open a pop-up menu. Roll the trackball to reverse or advance
the current selection through the “selectable” items on a screen. Rolling
the trackball left or right with a folder highlighted opens/collapses folder
contents. Adjust trackball speed and acceleration from the Jump Menu >
Settings > Trackball & D-Pad screen. Read what the trackball colors mean
during sleep in “Trackball light indicators” on page 34.
SEND/END buttons – When the buttons are lit, use them to initiate/end a
call. When unlit, press to page up or to page down.
DONE button – Press DONE to go back through the screens you were
previously viewing, until you reach the Jump screen. On a screen or in a
dialog box, press DONE to save your changes and dismiss the screen or
dialog box.
CANCEL button – Press CANCEL to dismiss any changes you have
made to a screen or dialog box.
MENU button – Press MENU to open a list of actions you can take on
the current screen.
JUMP button – Pressing JUMP takes you back to the Jump screen, your
starting point for launching all the device applications.
Device Basics 9
RIGHT SHOULDER
BUTTON
LEFT SHOULDER
BUTTON
POWER ON / OFF
BUTTON
VOLUME
BUTTONS
D-PAD
+–
USB /
POWER PORT
STEREO
HEADSET JACK
DIRECTIONAL PAD (D-Pad) – Press up, down, left, or right to scroll or move
within text fields, and navigate in the browser or games. By default, the
D-Pad navigates folders and screens, jumping over individual items. You
can make the D-Pad navigate the same as the trackball (moving item-by-
item) from the Jump Menu > Settings > Trackball & D-Pad settings screen.
LEFT AND RIGHT SHOULDER buttons – The function of these buttons
depends on which application you’re using. For example, while using
the Camera, the right shoulder button captures a photo. While using the
Phone, the left shoulder button toggles Mute and the right shoulder button
toggles Speakerphone. While in the Email and MMS Messaging compose
screens, the right shoulder button opens your photo albums so you can
select a photo to attach to the message, and the left shoulder button opens
the voice recorder.
POWER ON/OFF button – Press the Power button for three seconds
to power the device on or off. You can also press the Power button twice
(“double-tap”) to power off.
VOLUME buttons – Press and hold + or – to step through your Sound
Profiles or to increase/decrease the volume on the phone or music player.
To silently mute your device, press and hold –.
10 Device Basics
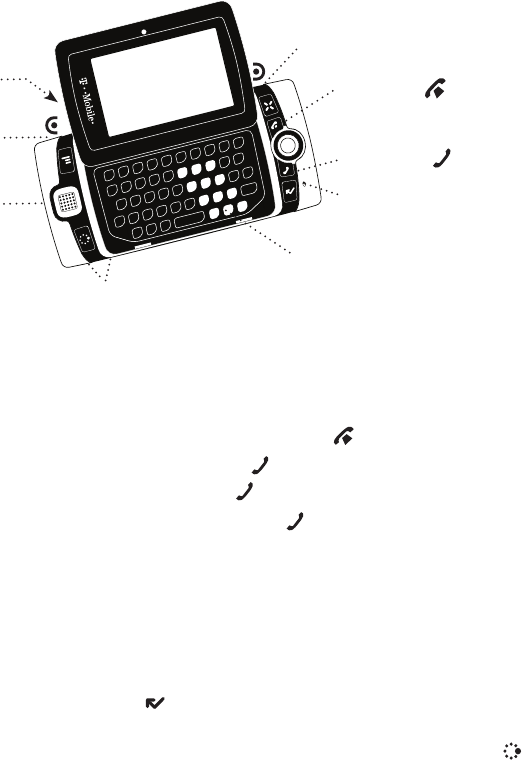
Phone Controls
MICROPHONE
SPEAKERPHONE BUTTON
(while on phone)
SPEAKER
VOLUME BUTTONS
+ -
DIAL PAD
SEND CALL
END CALL
MUTE BUTTON
(while on phone)
STEREO
HEADSET JACK
DIAL PAD – Use the keyboard dial pad to dial a number with one hand.
END CALL and SEND CALL buttons – When the Send and End buttons are
lit, it means you can use them to place a call. Press to end a call or clear
the screen of a number you’ve typed. Press to call the phone number
you’ve typed or highlighted in a list. Press with no number typed to
display a list of recently-dialed numbers. Press from the Jump screen to
open the Recent list.
SPEAKER – When using the device as a handset, place the speaker,
located in the D-Pad, to your ear.
MICROPHONE – When you are using the phone, speak into the
microphone, located by the DONE button.
VOLUME buttons – The volume buttons are located under the JUMP
button. While on a phone call, press + to increase or – to decrease volume.
Use the left and right shoulder buttons to turn Mute or Speakerphone on
and off.
Device Basics 11

BLUETOOTH® HANDS-FREE HEADSET OR CAR KIT To use a Bluetooth
stereo/mono hands-free headset or car kit, do the following:
1 Press JUMP to go to the Jump screen. Press MENU to open the menu,
then select Bluetooth to open the submenu. Make sure Bluetooth
features are “on”.
2
While you are in your car, make sure your hands-free headset or car kit
is ready to pair by following the manufacturer’s instructions. On your
device, go into the Phone application. Press MENU and select Settings >
Pairing.
3 From the Pairing dialog box, select your Bluetooth hands-free headset
or car kit from the list of devices (it may take a few seconds for the list to
populate). If prompted, type the device’s PIN code, then press DONE
to dismiss the PIN Code dialog box.
4 By default, your call’s sound will go through the device handset. To
send or receive your call using a Bluetooth device, press MENU and
select Transfer Sound to, then select your Bluetooth device from the
submenu.
You may transfer the call’s sound either before or during a call.
5 Place your call.
6 When finished with your call, press END CALL .
STEREO HEADSET JACK
Always connect your headset to your device
before making/receiving a call.
To use the headset button:
n Press the button once to answer a call and again to end it.
n During a call, press once to answer a second incoming call and put the
first caller on hold.
n
With two callers on the phone, press the button once to end the active call
and press again to resume the on-hold call.
12 Device Basics
Sound Controls
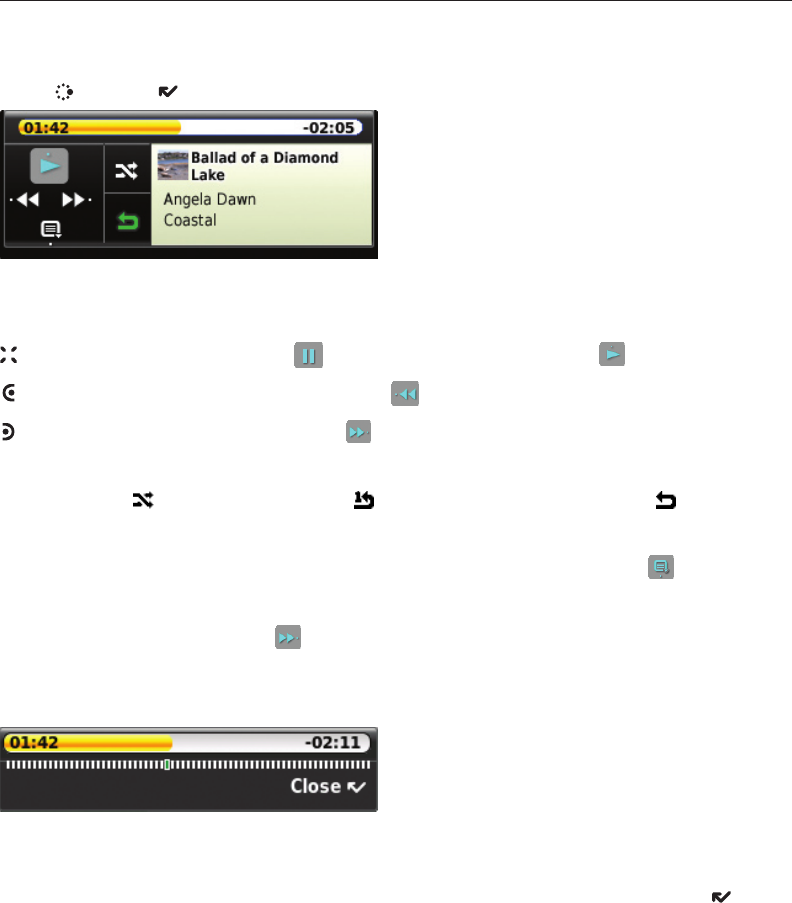
Mini Media Player
To open the mini media player from any application on the device, press
JUMP + DONE .
Use the D-Pad or the trackball to select a control. You can also use these
shortcuts:
– Pause item now playing , or resume play if paused .
– Play previous item in Play Queue .
– Play next item in Play Queue .
When the shuffle and repeat icons are highlighted, this indicates:
shuffle is on , repeat once is on , repeat continuously is on . Select an
icon to cycle through settings.
To jump to the Play Queue screen, press the Play Queue icon .
To scroll through the items in the Play Queue, press the D-Pad left/right or
select the forward control with the trackball.
To go to a specific place in a song or video
, roll the trackball up, then select
the progress bar at the top of the player. A slider opens:
The row of bars is referred to as the “scrubber bar”. The highlighted bar
indicates where you are in the currently-playing item. Roll the trackball right
to fast forward, left to rewind. To close
the scrubber bar, press DONE .
Device Basics 13
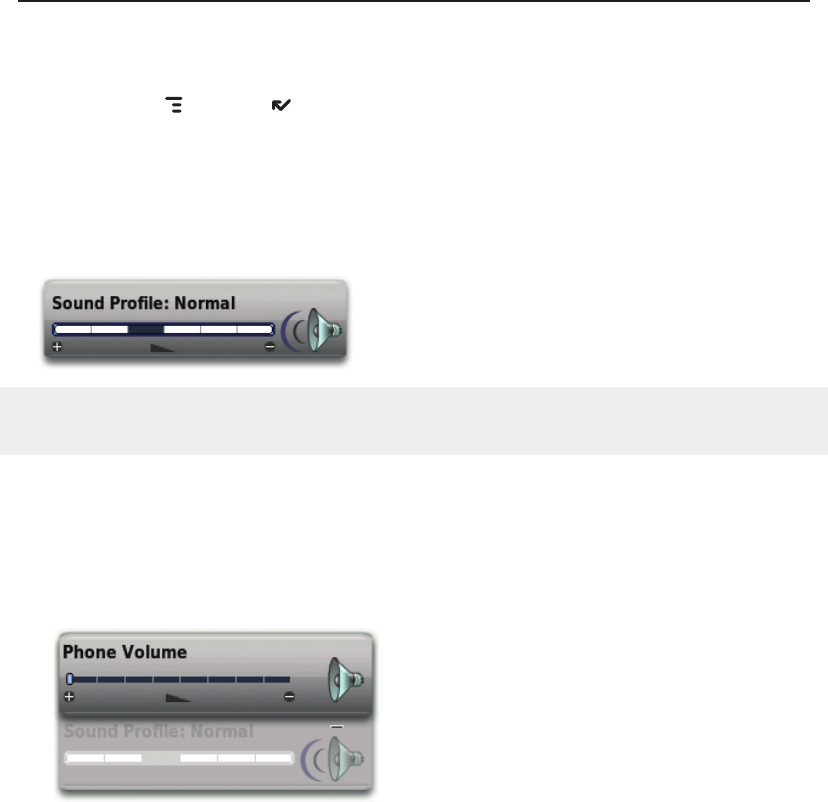
Volume Controls
There are two ways you can open the volume controls:
n Press MENU + DONE . This opens the audio/display control panes.
Make sure the Sound Profile panel is highlighted, then roll the trackball
left or right to step through your sound profiles. Left is louder, right is
softer. (Read more in “Sound Profiles” on page 31.)
n Press the + or – volume buttons on the lower-left edge of your device.
Continue pressing the buttons to step through your sound profiles:
To switch to the “silent” sound profile without making a sound, hold
down the – volume button.
If you are playing a song/video or are on the phone, there is a separate
volume control panel for the song/video or phone call. By default, the
appropriate control will be in focus; to change your Sound Profile (which is
the ringer volume) roll the trackball down to focus the Sound Profile pane,
then roll the trackball left or right to select a profile.
14 Device Basics
Wireless On/Off Control
If you need to turn off your device’s GSM, GPRS, EDGE, and Bluetooth
wireless connectivity (for example, prior to aircraft takeoff), do the
following:
1 From the Jump screen, press MENU and select Airplane Mode > Turn
Wireless Off.
2 Your device is now offline. Confirm offline status by looking at the
title bar; the radio tower icon and “OFF” should blink alternately. (See
“Indicators” page 33 for icon definitions.)
3 To turn wireless back on, from the Jump screen, press MENU and
select Airplane Mode > Turn Wireless On.
Remember to turn wireless back on after landing so you can make and
receive calls.
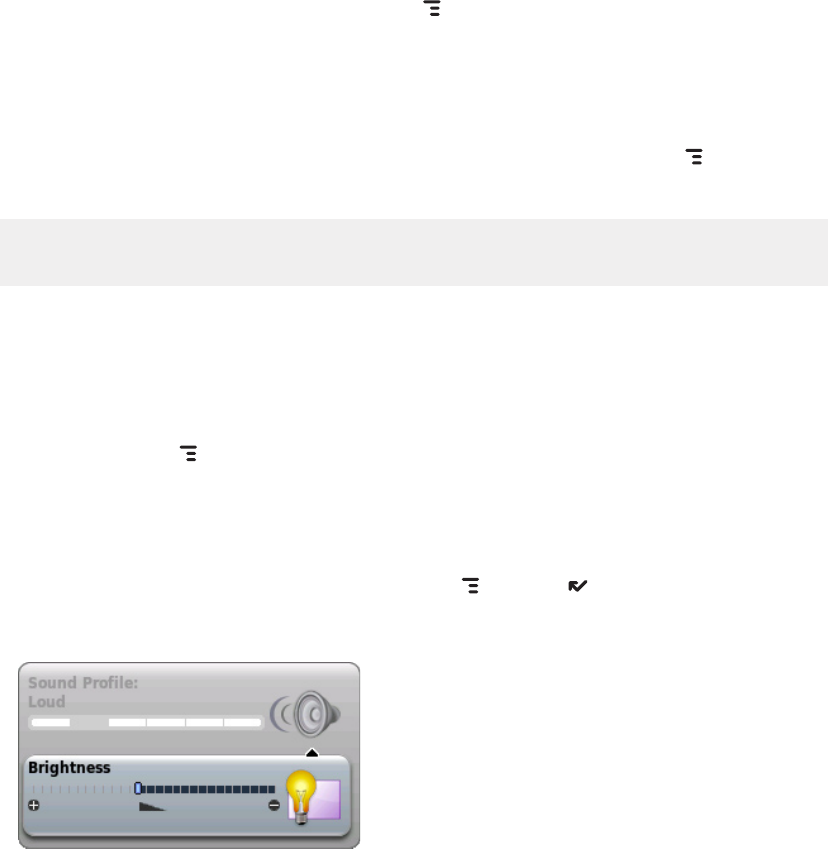
Display Controls
To adjust the display brightness, go to the Battery & Display settings
screen:
1 Press MENU then select Settings > Battery & Display.
2 Select the Brightness slider to open it for adjustment.
Roll the trackball right to increase brightness; roll left to decrease.
3 When ready, press the trackball to apply the setting.
Alternatively, you can you can press MENU + DONE from anywhere
on the device to open the audio and display controls. Highlight the lower
Brightness panel then roll the trackball to make adjustments.
Device Basics 15
16 Device Basics
Battery Charger
Your device comes with a removable, rechargeable lithium-ion battery.
When you first receive your device, it is important that you fully charge the
battery, described below.
! Only use the charger and battery provided with your device or approved
by T-Mobile, or you risk damaging your device. Do not insert battery
chargers from previous Sidekick models into the stereo headset jack.
If you attach your device to your computer via USB, be aware that the
power received may not be enough to charge your device. For example,
when computers are in “sleep” mode, only a trickle charge may be
supplied via USB. In this situation you could lose more power than you
gain. To connect the device to your computer, insert the USB plug into your
device’s USB port with the icon on the underside of the plug.
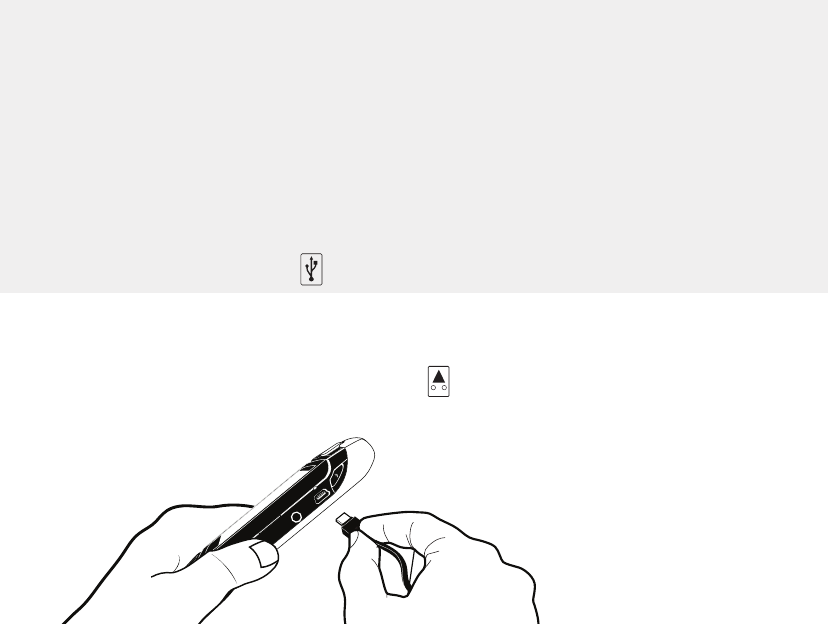
1 Locate the battery charger that came in the box with your device. Insert
the charger’s USB plug into your device’s USB port, which is next to the
left shoulder button. Make sure the icon is on the underside of the
plug.
Now plug the power cord into a standard electrical wall outlet.
An orange charge indicator light will go on and a lightning bolt icon
will appear over the battery icon in the title bar, indicating the charger
is connected and the battery is charging. Note that if your device has
discharged completely, it may take up to 15 minutes before you see any
indication of charging on the screen.

2 Put the device in a safe place and let the battery charge for at least four
hours with the device powered on.
As the device is charging, the bars in the battery icon fill repeatedly
from left to right. When your device is fully charged, the lightning bolt
icon will disappear and the bars will stop moving and remain in the
filled position.
For efficient operation, charge your device nightly. If you plan to leave
your device unattended for an extended period of time, be aware that the
battery will discharge after two days if it is turned on and not attached
to the charger. If your device does fully discharge, simply attach it to the
charger to recharge (as described in this section).
Removable Battery
To replace your rechargeable battery, or if you need to insert or remove
your SIM card, first you will need to remove the installed battery. Begin by
powering down your device:
1 Press and hold the power button for three seconds to power down.
2 Turn the device over. With the camera at the top, slide the battery cover
to the right by carefully pressing the notched line on the cover with your
left thumb. Lift the cover to remove it.
Device Basics 17
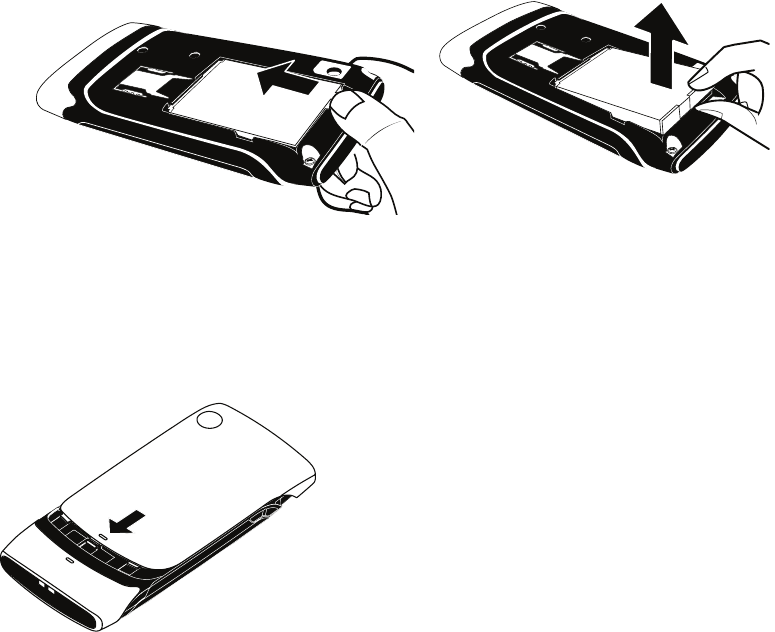
3 Push the battery in slightly along the bottom edge, then lift the battery
from that same edge to remove it.
4 Replace with a new battery by first inserting the straight edge (with the
gold contacts) and then pushing the battery down to lock into place.
5 Replace the battery cover by aligning its notched line with the notched
line on the end cover and sliding it back into place. Once the battery
makes contact, the power-on sequence begins.
Replaceable Device Shell
You can customize your device with replaceable shells! Follow the simple
instructions below:
1 Press and hold the power button three seconds to power down.
18 Device Basics
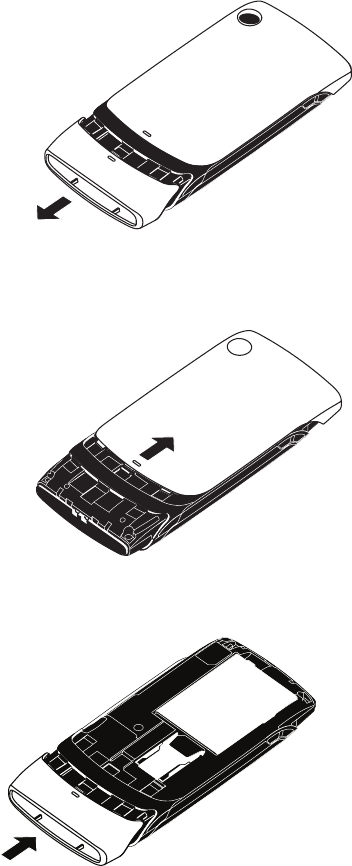
2 Turn the device over. With the camera at the top, slide the end-cover to
the left with your left thumb while carefully pressing the notched line,
and lift the end-cover to remove it.
3 Remove the battery cover by following the instructions in “Removable
Battery” step 2. Lift the battery cover to remove it.
4 Take your replacement end-cover and slide it back to the original
position.
Device Basics 19
5 Replace the battery cover by following the instructions in “Removable
Battery” step 5.
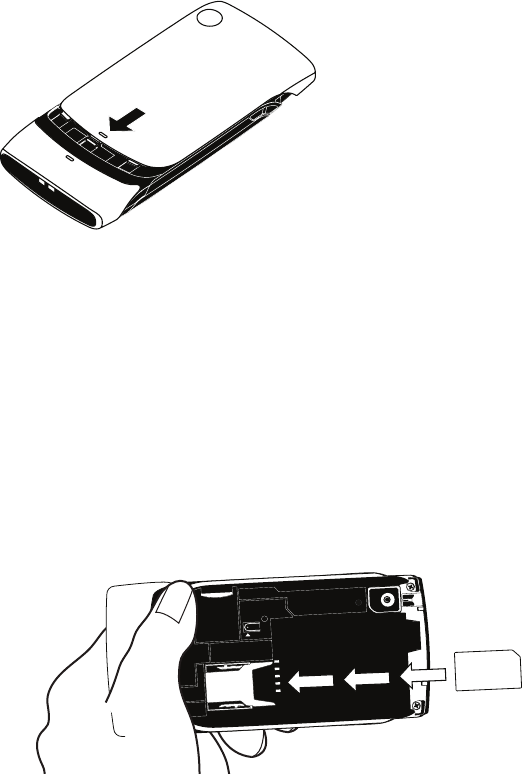
SIM Card Slot
To access your SIM card, you must first remove the battery.
1 Remove the battery cover and battery by following “Removable Battery”
steps 1-3, on pages 17 and 18.
2 Notice the SIM card slot, which is located just to the left of the battery
slot.
3 To insert the SIM card, slide the card into the slot with the gold contacts
facing down and the notched corner at the upper right. Be sure the
metal bracket is on top of the card, holding the card in place.
4
To remove the SIM card, use your finger to press down gently and slide
the card right. When it’s free of the bracket, lift the card to remove it.
20 Device Basics
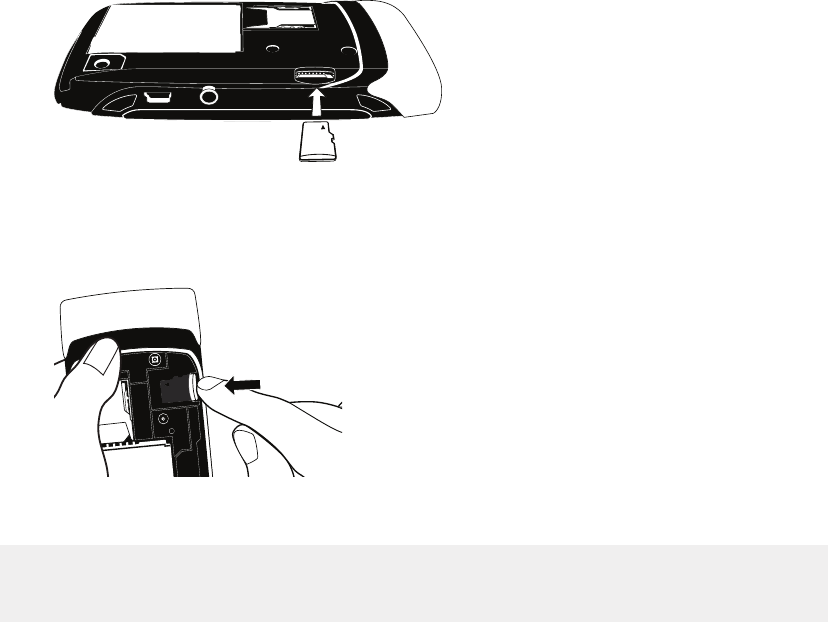
Memory Card Slot
Your device includes a slot for a Micro Secure Digital (microSD™) flash
memory card. To insert or remove a memory card, you must first remove
the back cover as described in “Removable Battery” step 2, on page 17.
1 With the back cover removed and the camera at the top, you can see
the memory card slot on the upper left of the device.
2 To insert the memory card, hold the card with the gold contacts facing
down and the card notch facing to the right. Insert the card into the slot
and push to lock into place.
3 To remove the memory card, push the card in slightly and release; the
card should spring partly out of the slot. Pull the card free of the device.
! Forcing the memory card out before pushing to release it may cause the
card or slot to break.
Device Basics 21

USB / Power Port
The USB/power port is located on the upper left of your device. With a
flash memory card installed, you can manage the contents of the card by
connecting your device to a computer with a USB cable.
To connect your device to your computer, locate the USB cable that came
in the box with your device and insert the USB plug—with the icon on the
underside—into your device’s USB port.
While your device is connected to your computer via the USB port, the
memory card contents are not available for playing music or viewing photos
or videos from your device.
The memory card will appear as a drive on your computer, and you will be
able to add or remove music, video, or image files using your computer’s
file system. Remember that you cannot transfer files unless you have first
installed a memory card. For instructions on installing, read “Memory Card
Slot” on page 21.
To avoid the possiblity of corrupting the file system on the memory card,
follow your computer’s instructions on removing external hardware to
safely remove the device from the computer.
It’s a good idea to periodically back up your memory card onto your
computer or removable media, to avoid possible loss of valuable photos,
music, and videos.
22 Device Basics
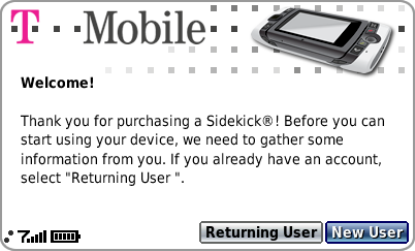
Registration
Before you can start using your Sidekick, you must complete registration.
This section of the guide takes you through registration in more detail. Note
that these instructions are for new users, not returning users. Returning
users can sign in using their username/password.
1 Wait to register for data services.
Before you can use your account, you must register for data services.
The registration screens can take up to 48 hours to appear, but usually
takes only 1-3 hours. While you wait, step through the screens that
appear. If applicable, you’ll be given the opportunity to select your
language. When you see the Welcome screen, you’re ready to register:
Press the trackball to select the New User button and advance to the
next screen. On subsequent screens, select the Next button to advance.
2 Type your first name and last name.
Use the keyboard to type your First name, then roll the trackball down
to highlight the Last name field. Type your last name, scroll down to
highlight the Next button, then press the trackball to advance to the
next screen.
Registration 23
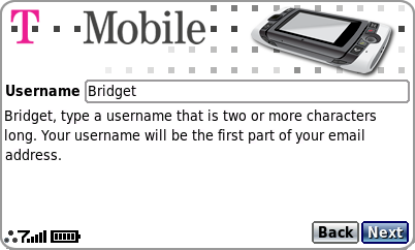
3 Select a username.
The username you type will become the first part of your email address
(for example, username@example.com). Before you select a username,
read the following:
n Usernames must start with an alphabetic character (A-Z) and can
include numbers (0-9), dashes (-), periods (.), and underscores (_),
but no other punctuation. Although you can use periods within a
username, do not use a period at the beginning or end of the name,
and do not use two periods (..) in a row.
n Usernames must be at least 2 but no more than 32 characters long.
n Usernames are not case-sensitive. For example, if your username is
“bridget”, you will be authenticated if you sign in by typing “Bridget”,
“BRIDGET”, or any combination of upper or lowercase letters.
Once you decide on a username, type it in the text box, then select
Next.
4 Select a password.
Select a secure password that follows the rules below:
n Passwords cannot be the same as your username.
n Passwords must contain 4-15 characters, can include both letters and
numbers, but no spaces, single quotes ('), semicolons (;), backslashes
(\), or percent signs (%).
24 Registration
n
For enhanced security, do not choose an actual word that appears in
any language dictionary. Do not choose a proper name, such as the
name of a child, local sports team, pet’s name, or city of birth. Do not
choose adjacent letters on your keyboard or a sequential or repeating
combination of letters or characters, such as “12345678”, “222222”,
“abcdefg”.
n For enhanced security, do choose a password that is more than seven
characters long, mixes letters and numerals, and uses upper- and
lower-case letters.
n Passwords are case-sensitive. For example, if you set your password
to be “Hard2Guess”, then you will not be authenticated if you sign in
by typing “hard2guess”.
Type the password in the text box, then type it again to confirm. You will
see feedback on how secure your password is.
5 Select your time zone.
Open the pop-up menu to see a list of time zones. Select yours from the
list, then select Next.
6 Select a “secret question” and type your answer.
If you ever forget your password and so need to call T-Mobile Customer
Care department, for security purposes you will be asked to provide
an answer to the “secret question” you select on this screen. Press
the trackball to open the Question pop-up menu, scroll to highlight a
question, then press the trackball to select it.
Roll the trackball down to highlight the Answer field, then type your
answer. When finished, select Next to continue.
7 Read and agree to the end-user license agreement.
Before you can finish registration, you must read and agree to the end-
user license agreement. You can read it by selecting the on-screen View
Agreement link or from the Desktop Interface. Once you read the end-
user agreement, select the Next button to indicate your acceptance and
transmit your registration data.
Registration 25