Sharp NAR0064 GSM Mobile Phone User Manual Manual 2
Sharp Corporation GSM Mobile Phone Manual 2
Sharp >
Contents
- 1. Manual 1
- 2. Manual 2
- 3. Manual 3
- 4. Manual 4
Manual 2
8 Wait while data transmits.
Wait while the data you entered in the Registration screens transmits
to T-Mobile. The service will check to see if your username already has
been taken. If it has, you will be offered alternatives. You can select
one of these alternatives or type a different username. Note that if you
are out of network coverage, you’ll be asked to “try again” to resume
registration.
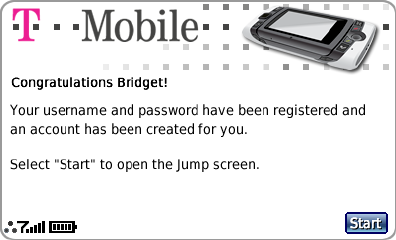
9 Congratulations!
Once your account has been set up,
you’ll see the
Congratulations
screen:
screen:
Select the Start button to begin!
26 Registration

Setting Up Your Device
Bluetooth® Technology Setup
Your device supports the Bluetooth wireless technology Specification
2.0+EDR so you can connect to hands-free devices (stereo or mono
headsets and car kits) and any device that can receive a vCard, photo, or
other file via Bluetooth (PCs, phones).
To turn on Bluetooth features and open the Bluetooth settings, do the
following:
1 Press JUMP to go to the Jump screen. Press MENU to open the menu,
then select Bluetooth. The submenu opens.
2 Pairing – Displays a list of available Bluetooth devices with which you
can pair.
3 My Device – Rename your device (as it appears to others) and select
an option requiring that others authenticate before connecting to your
device. You can also request that the device automatically try the PINs
0000 and 1234 when authenticating with other devices.
For maximum privacy and security, make sure you select the Require
authentication check box.
4 Visibility and Turn Bluetooth On/Off –
Bluetooth features are “off” by
default; to select a the visibility option, you must first Turn Bluetooth On
from the menu. Once Bluetooth features are on, select from: Always
Visible (if you are actively using Bluetooth devices), Visible for 60sec
(to exchange a vCard or file quickly), and Never Visible (prevents others
from sending you vCards or pairing with you).
5 Send My vCard – If you have set “My vCard” in the Address Book, you
can send your vCard quickly to another Bluetooth device by selecting
this option or by using the shortcut MENU + Y. Read more in “Set and
Send My vCard” on page 63.
Setting Up Your Device 27
6 Transfer Sound to – With Bluetooth features on, you can use a hands-
free headset or car kit to place and receive phone calls from your
device. You can also use a Bluetooth stereo headset to listen to songs,
videos, or game sounds. Read more in “Bluetooth Hands-Free Headset
or Car Kit” on page 12.
Themes
You can customize the backgrounds that appear on the application splash
screens and even the system sounds by selecting different “themes.” In
addition to the themes that come by default with your device, you can
download themes from the Catalog. To change the theme on your device,
do the following:
1 Press JUMP to go to the Jump screen. Press MENU then select
Themes.
2 The submenu opens to display a list of available themes. Your current
selection is marked with a bullet and appears dimmed. If you have
downloaded themes from the Catalog, they will appear at the top.
3 Select your choice with the trackball.
Font Size
By default, the text on your device appears in a “Medium” size font, but you
can change this size:
1 Press JUMP to go to the Jump screen. Press MENU to open the menu,
then select Settings > Font Size.
2 Select the Font Size pop-up menu and choose from Small, Medium, or
Large.
3 Press DONE to save your font size setting. It will take a few moments
for the font size to change.
This font size setting does not affect the text size on pages viewed with
the Web Browser.
28 Setting Up Your Device

Backlighting
As long as you are actively using your device, the backlight will stay on.
After you stop using your device, the backlight will stay on for 15 seconds,
but you can change this setting:
1 Press JUMP to go to the Jump screen. Press MENU then select
Settings > Battery & Display.
2 In the Display Backlight group box, open the Dim after pop-up menu
and select a timeout option, up to five minutes. The lower the time, the
more battery power you will conserve.
3 By default, the Use ambient light sensor check box is selected. This
conserves battery power by causing the backlight to automatically
adjust to the surrounding light.”
Key Guard Mode
You can “lock” your device controls by entering key guard mode:
1 You can enter key guard mode from any screen by pressing and holding
DONE for two seconds. Or, press JUMP to go to the Jump screen.
Press MENU to open the menu, scroll to highlight Key Guard, then
press the trackball.
2 The control buttons lock and the key guard screen appears.
3 To unlock and wake the device, open the screen or press MENU
+ DONE . If you have set a privacy code (see next section, “Device
Privacy Code”) type it at the prompt.
To change the image displayed while in key guard mode, see “Use
Photo for Caller ID or Key Guard Background” on page 68.
To turn on the backlight while in key guard or sleep, press the right
shoulder button.
Setting Up Your Device 29
By default, your device is set to enter key guard mode after two minutes of
idle time. You can change this setting from the Jump Menu > Settings > Key
Guard & Security screen.
To prevent display damage, after your device has been in key guard mode
for five
minutes, the screen will go black, putting the device in “sleep mode.” To
wake your device, press any key or open the screen.
To learn what the blinking
trackball colors mean during sleep mode, read “Trackball light indicators”
on page 34.
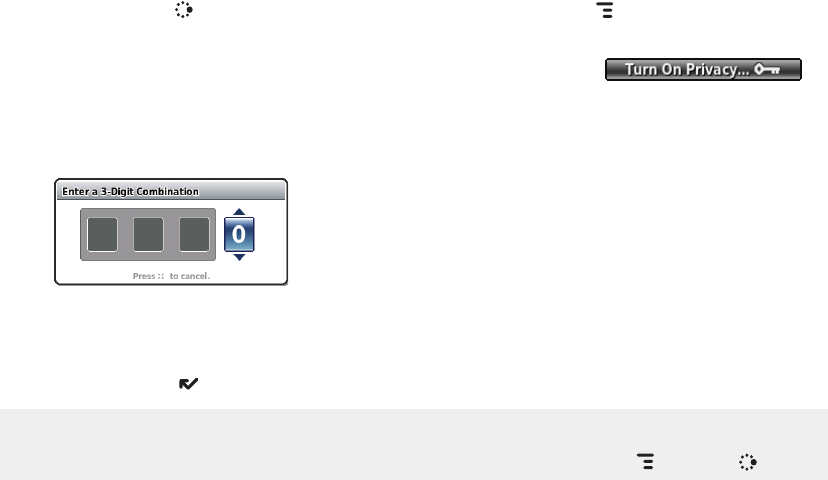
Device Privacy Code
If you want to secure your device from unauthorized access once your
device has gone into key guard mode, you must set up a privacy code:
1 Press JUMP to go to the Jump screen. Press MENU then select
Settings > Key Guard & Security.
2 Scroll down to the Privacy Lock
group box. Highlight
,
then press the trackball to select it.
3 Enter a three-digit code using the keyboard or the number pop-up
menu:
At the prompt, re-enter your code to verify.
4 A “New Combination Enabled” message appears. Select OK.
5 Press DONE to save your settings and return to the Jump screen.
You can make emergency calls from the key guard screen, even if privacy
code is enabled, by opening the display then pressing
MENU + JUMP .
30 Setting Up Your Device

Sound Profiles
Each sound profile defines the volume of rings, reminders, and system
sounds. You can have up to eight profiles; six editable profiles are provided
by default. To create a new or modify an existing sound profile, press JUMP
, then press MENU and select Settings > Sound Profiles. From the
Sound Profiles screen you can also set the behavior of pending alerts and
reminders, and schedule sound profiles.
To change the current sound profile, read “Volume Controls” on page 14.
Alarm Clock
To set a recurring alarm, do the following:
1 press JUMP , then press MENU and select Settings > Date, Time, &
Alarm. Scroll down to the Alarm group box.
2 Select the Alarm Time from the pop-up menu.
3 If you want the alarm volume to be different from the sound profile
setting, select the Override Sound Profile check box then select the
Alarm Volume button to set a volume.
When the alarm sounds, a dialog box will appear, giving you the choice to
snooze the alarm for 10 minutes or stop it. (Stopping the alarm turns it off.)
Application Customization
You can set application-specific preferences using the Settings screens
found within the applications. Some of application settings you can
customize include:
n Set your favorite Web home page (Web Browser).
n
Select Photo Caller ID icons or photos (Phone/Address Book).
n Create your own categories and labels for contact information (Address
Book).
n Set different ringtones for callers (Phone/Address Book).
If you see a musical note next to a menu item, you’ll know that’s
where you customize that application’s ringtone setting.
Setting Up Your Device 31
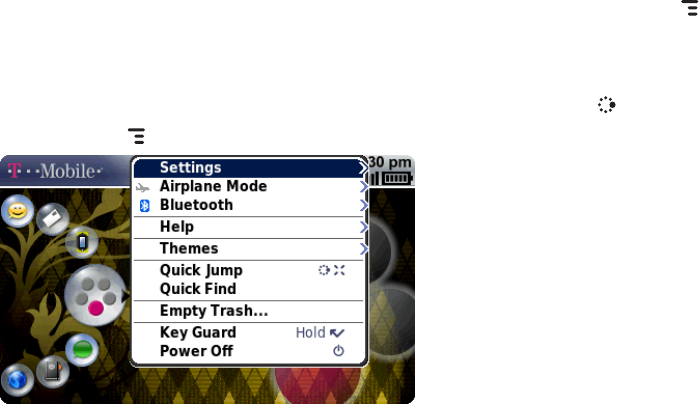
The Device Interface
The Jump Screen
The Jump screen is your entry point to all device applications. Application
selections are arranged on the left-side of the screen in a “ring”. Some
applications are grouped into a second-level ring. If you press MENU
while on the Jump screen, you’ll have access to device-wide settings and
controls:
1 Go to the Jump screen from any screen by pressing JUMP .
2 Press MENU from the Jump screen to open the Jump screen menu.
3 To select an application, scroll through the “ring” of application icons.
When the application or application folder you want is highlighted,
press the trackball once to open that application or to enter the second-
level application ring.
32 The Device Interface
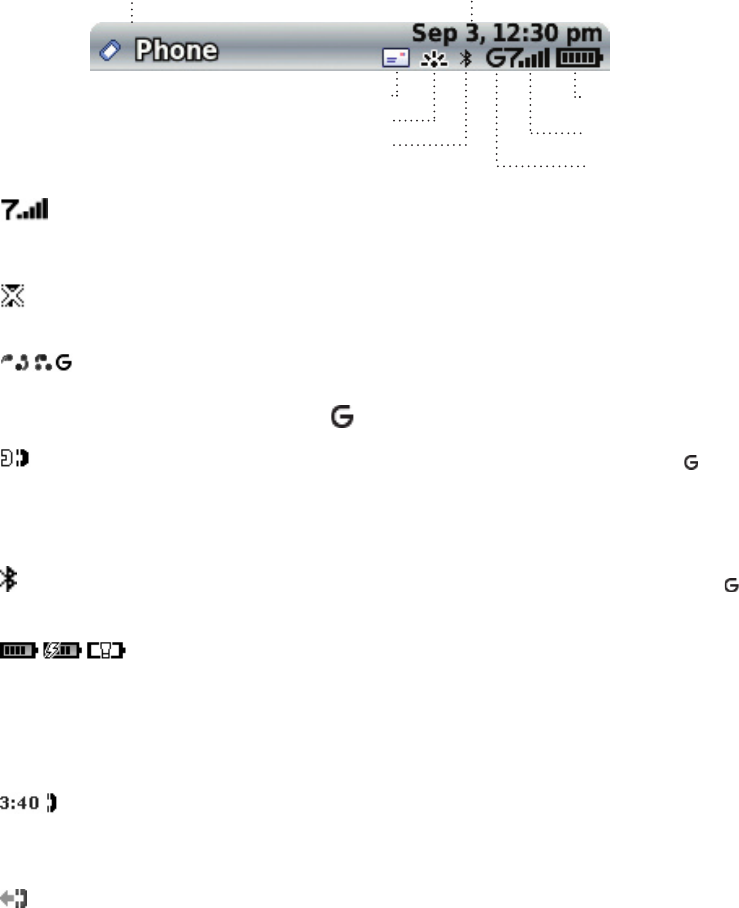
Indicators
Bluetooth On
Screen Title
Battery Level
Wireless
Signal Strength
Date and Time
Service Connectivity
New Message Notification (Email)
Sound Profile Setting
Wireless signal strength indicator – The number of signal bands
showing to the right of the radio tower icon represents the strength of the
signal at your current location.
If you see an X flashing over the radio tower icon, you’ve temporarily
lost your network connection and can make no calls.
Service connectivity indicators – One dot = device is connecting
to the GPRS/EDGE network; two dots = getting IP address; three dots =
connecting to the data service; = fully connected to the data service.
GSM (Phone) service only – A phone icon in the place of the means
you are using (or only have access to) GSM phone service. If you have a
call in progress you’ll also see a timer. If the phone icon is hollow, you can
only make emergency phone calls.
Bluetooth indicator – When you see this icon just to the left of the ,
Bluetooth features are available.
Battery level indicators – The number of bars showing in
the battery icon represents the charge remaining in the battery. While
charging, a lightning bolt appears, and when your battery is almost fully
discharged, a “!” appears.
Phone call indicators –
A timer appears when you have a call in progress; in the example,
call time elapsed is 3 mins, 40 secs. Note that the phone icon blinks. If you
have two calls active, the time displayed is for the foreground call.
Call forwarding is turned on. Your phone will not ring.
The Device Interface 33

Sound Profile setting – When you have selected a sound profile
that has sound turned off, the title bar will indicate whether you have
flashing lights or vibration set for alerts or notifications. From left to right,
the icons indicate: totally silent (no sound, no flashing lights, no vibration),
flashing lights only, and vibration only.
Communication services notifications – When you receive a
new email, text, IM, MMS, or voice mail message, or when a Web page has
finished loading, you’ll see a visual “balloon” notification move across the
title bar, while you’re in any application except games.
Until you check your new message, you’ll see the appropriate
icon in the title bar as a reminder. The examples shown to the left illustrate
a pending multimedia message, text message, and email message.
Memory card activity indicator – When data is being transferred to or
from your memory card, you will see this icon flashing in the title bar, just to
the left of the date.
Do not eject a memory card while the memory card activity card icon is
blinking. Wait til blinking stops to safely remove the card.
When you are inserting or ejecting the card, you will see the
memory card icon with an arrow; the arrow points left when inserting, right
when ejecting.
USB connector icon – When your device is connected to your
computer using the USB port, you will see this icon in the title bar, just
to the left of the date. Note that when your device is attached to your
computer via USB, you cannot view the contents of your memory card from
your device.
Trackball light indicators – During device sleep, the trackball will blink a
color: blue = pending message, green = normal sleep, red = low battery.
34 The Device Interface
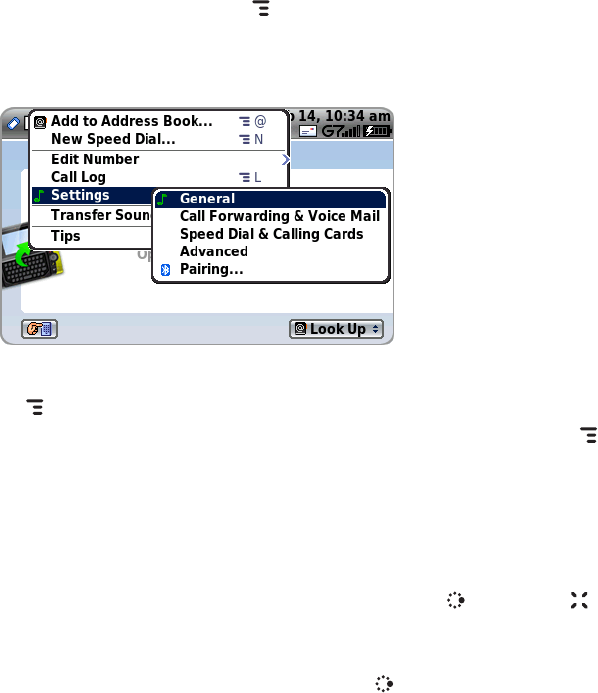
Menus
Almost every screen on your device has a set of actions you can take while
on that screen. These actions are listed in a floating window, which you
open by pressing the MENU button. Menu items with submenus are noted
with a right-pointing arrowhead. The Phone Settings submenu is shown
expanded below.
Frequently-used menu items also have keyboard shortcuts that use the
MENU button plus a shortcut key. Take a look at the menu shown above:
to create a new speed dial shortcut, you could press MENU + N rather than
opening the menu and selecting New Speed Dial with the trackball.
Quick Jump
To jump to an unread message or an application you’ve recently used,
open the Quick Jump dialog by pressing JUMP + CANCEL . Select from
Recent (recently-used applications) or Pending (messages you haven’t
read yet). Note that you can use the shortcuts listed to go directly to that
application or message. Pressing JUMP + 0 will always open the latest
unread message.
The Device Interface 35
Quick Find
To search for an item on your device (such as a contact, message, note,
task, event, song, photo, or video), open the Quick Find dialog. Note that
for email and MMS messages, the To, CC, From, Date, and Subject fields
are searched, not the message bodies.
1 From the Jump screen, press MENU and select Quick Find. You can
also use the shortcut JUMP + F from any screen on your device.
2 Type the name of the item or a date into the text field. You can use an
asterisk (*) as a wildcard. (To read more about acceptable formats for
the find field, press MENU then select Tips.) As you type, the search
begins.
3 When the search is complete, you’ll see the results grouped by
application in tabs. Press the D-Pad left/right to navigate tabs; roll the
trackball up/down to highlight individual results.
4 To open an item, highlight then select it using the trackball. To discard
an item, press MENU and select Discard [ + ]. Note that if you
discard an item in the find results field, it is moved to the relevant appli-
cation’s trash.
5 To clear the find matches, press CANCEL . To dismiss the Quick Find
dialog box, press DONE . The find results will be saved if you did not
explicitly clear them.
Empty Trash
Emptying trash is a good way to make more room on your device if you
are running out of storage space. You can empty trash from selected
applications or all applications by using this dialog box:
1 From the Jump screen, press MENU and select Empty Trash.
2 On the Empty Trash dialog box, check the applications whose trash you
want to empty, or check All Applications.
! Once you select the Empty Trash button, all the items selected to be
trashed are permanently discarded without confirmation.
36 The Device Interface

Type and Edit Text
It’s easy to type and edit text using the keyboard and the advanced text
editing features described below.
Navigate in Text Boxes
Use the control buttons and keyboard to navigate within a text box:
n Move character-by-character – Press the D-Pad or roll the trackball left/
right.
n Jump to beginning/end of a word – Press ALT + D-Pad or trackball left/
right.
n
Jump to beginning/end of a line
– P
ress MENU +
trackball
left/right.
n Jump to beginning/end of the text box – Press MENU + / .
Delete Text
n Delete a character to the left of the cursor – Press DEL .
n
Delete a character to the right of the cursor
– P
ress
SHIFT + DEL .
n Delete all the characters on one line – Press ALT + .
Cut, Copy, Paste, Undo
To cut, copy, or paste text you have typed, do the following:
1 Position your text cursor next to the text you want to cut or copy. (Use
the navigation methods listed above to position the text cursor.)
2 Hold down the SHIFT key while pressing the D-Pad or trackball in a
direction. As you select text, it is shown highlighted. (To de-select all,
release the SHIFT key and roll the trackball.)
The Device Interface 37

3 Press MENU and select Edit Text to open the Edit Text submenu, or
simply press and hold the trackball to open the Edit Text context menu.
Select the operation you want to perform on the selected text. Note the
standard shortcuts:
n Cut MENU + X
n Copy MENU + C
n Select All MENU + A
4 Paste text that you have copied (or cut) into any text box in any
application. Position your cursor where you want to paste the text, then
use the Paste shortcut MENU + V. Note that the device clipboard only
stores one set of copied or cut text at a time.
5 If you make a text edit and want to undo it, simply press MENU + Z. To
redo an undo, press MENU + SHIFT + Z again.
Check Spelling
You can run spell check on any text field.
1 With the focus in the text field, press MENU then select Edit Text >
Check Spelling, or simply press MENU + S.
2 If you have spelling errors, a pop-up will offer spelling suggestions for
each error. Select the word replacement, Ignore the word, or Add the
word to “My Dictionary”.
Go to “AutoText & Spelling” (next section) to read about setting spell check
options. Note that words containing numbers are never flagged as spelling
errors.
AutoText & Spelling
To help you type accurately, the AutoText & Spelling screen provides
control over the spell check function and allows you to customize rules
that automatically correct common typing errors. You can add to, edit, or
discard the AutoText rules that come with your device:
38 The Device Interface

1 Press JUMP to go to the Jump screen. Press MENU to open the
menu, then select Settings > AutoText & Spelling. The AutoText &
Spelling screen appears.
2 From this screen you can set the following:
n Highlight misspelled words – When checked, as you type words
that are misspelled will be underlined in red. (You can override this
global setting in individual applications by going to the application’s
Settings screen.)
n Auto-correct spelling when possible – When checked, spelling
corrections will be made automatically when possible.
n Skip slang words during spell check – When checked, common word
abbreviations and slang will not flagged as misspellings during spell
check.
n Edit My Dictionary – Select this button to open “My Dictionary”,
where you can add/discard/edit words that you want spell check to
skip.
n Automatic Word Replacement – When checked, the replacement
rules listed on the screen will be applied as you type. Open the menu
to discard or create AutoText rules. Note that when typing, words are
replaced only after you press the SPACE. To undo a word replacement,
press the DEL key to delete the space.
Quickly insert your email address, date, time, or phone number by
using these AutoText rules:
n @email to insert your email address
n @ld to insert the current day and date
n @lt to insert the current time
n @phone to insert your phone number
The Device Interface 39
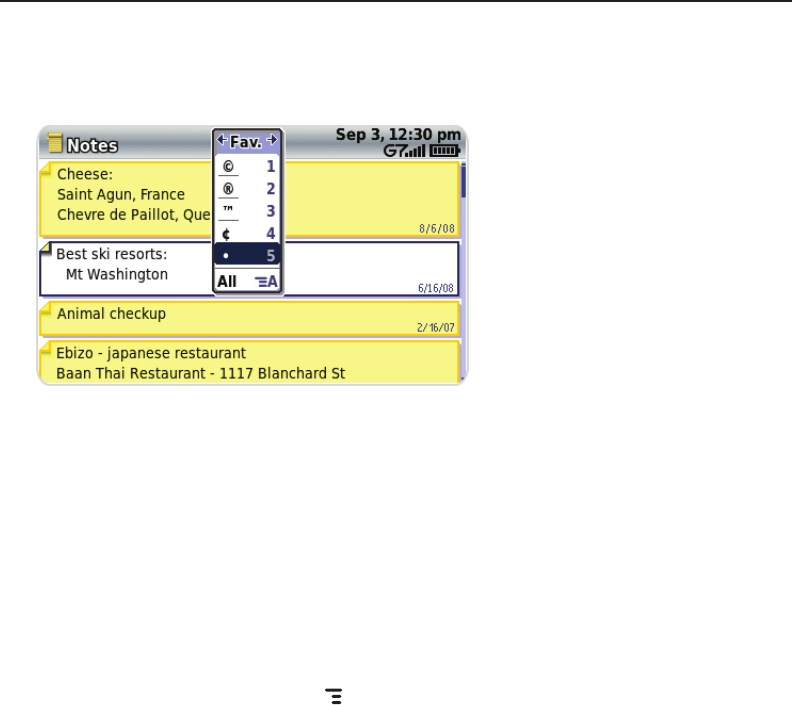
Type Special Unicode Characters
To type special Unicode characters in any text box, press the SYM key. The
Special Character selector opens.
Use the D-Pad or trackball to navigate through the list: left-right to flip
through the Favorites, Recent, alphabet, and symbol sets; up-down to
select specific characters. Press the trackball to insert a highlighted
character.
Here are some useful tips when using the Special Character selector:
n With the selector open, you can show the same characters capitalized
by pressing SHIFT + the character (like “a”). Toggle back to lowercase by
pressing the letter again.
n To see all special characters, select All (at the bottom of the selector) or
use the menu shortcut MENU + A, and the grid expands.
n To open a list of the accented versions of a specific letter, press SYM +
the letter.
n To type a character using its Unicode value (highlight a selection in the
selector for two seconds to see the Unicode), press SYM + SPACE (press
the keys simultaneously), then type the four-character Unicode value.
40 The Device Interface

The Desktop Interface
The data you store in your device’s Email, To Do, Calendar, Address Book,
Notes, and Camera applications is also available for viewing or editing
on the Web from any computer connected to the Internet. Information in
your Sidekick account is stored on servers in a data center with enhanced
security and firewall features.
To reach the Desktop Interface, use the Web navigation and sign-in
instructions provided in the Start Guide, included in the box.
Once you’ve signed in, your Jump page will open. Use the Jump page
navigation buttons to open the various applications:
n Open the online Help page by clicking the Help link.
n Import existing contacts from the Address Book > Import page; import
existing Calendar events from the Calendar > Import page.
n Synchronize your Sidekick Address Book, Calendar, and To Do items
with Microsoft Outlook by downloading the Intellisync application: click
Settings (next to the Help link on the top bar), then click the Sync tab
and simply follow the instructions.
n Change your default language or time zone by clicking Settings.
The Desktop Interface 41
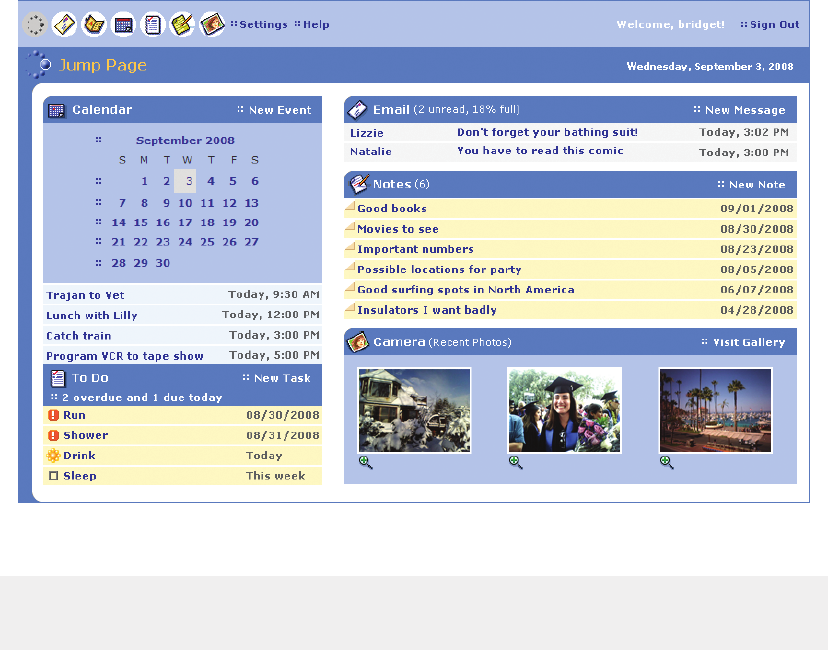
Desktop Interface Jump Page
Remember! When finished using the Web applications, always click Sign
Out to exit the Web site securely.
42 The Desktop Interface
Using the Applications
myFaves®
Add a Contact to myFaves
Create a new myFaves contact, or assign a phone number already in your
Address Book to your myFaves plan:
1 Press JUMP to go to the Jump screen. If not already selected, scroll to
highlight myFaves, then press the trackball.
2 To add a number already in your Address Book, press MENU + @. Roll
the trackball to highlight a contact and phone number, then press the
trackball to assign the contact to myFaves.
3 To add a new contact, press MENU + N. On the dialog box that opens,
complete the Nickname and Phone number fields. (Type a 7- or 10-digit
number. You don’t need to add hyphens or spaces in the number.)You
can also choose a category from the Label field and a special ringtone
for this person from the Ringtone field. Press Add .
4 Confirm your decision to add the contact to myFaves by selecting OK .
5 Your new contact will appear in the myFaves ring of contacts. When
the “pending” notice disappears, you can call or send messages to this
contact.
Communicate with a myFaves Contact
1 Press JUMP to go to the Jump screen. If not already selected, scroll to
highlight myFaves, then press the trackball.
2 Roll the trackball to highlight the myFaves contact you want to call, then
press SEND CALL . To send a text message, press MENU and select
Send Text. To send a photo, video or audio message, press MENU and
select Send Photo/Video.
Using the Applications 43

3 If you have stored an email address or IM screen name for the
highlighted contact in the Address Book, you can press MENU and
select Send Email or Send Instant Message.
4 To view a contact’s details (including Web site, address, alternate
phone numbers, and so on), highlight the contact, then press the
trackball. In the Details tab that opens, you can select the Edit button
to add or change the information. Or, you can select any of the contact
information that may be on this page —phone number, email address or
IM screen name—to send your communication from here.
Switch to the Activity Log tab to view a history of your interactions with
your selected contact.
Assign an Icon to a myFaves Contact
1 Press JUMP to go to the Jump screen. If not already selected, scroll to
highlight myFaves, then press the trackball.
2 Roll the trackball to highlight the myFaves contact to whom you want
to assign an icon, then press MENU and select Change Icon. The icon
selector opens.
3 Select one of the folders to view the icons within that folder. To assign
one of your photos, open the Select from Photos folder.
4 Select an icon or photo with the trackball. If you select a photo from
your Photo Album, you will be able to crop the photo to the portion
you want represented in the icon. Simply roll the trackball to move the
cropper, then press the trackball to set the crop location. Once the
crop location is set, you can also re-size the circle by using the D-Pad or
trackball. When you’re satisfied with your icon, press DONE .
5 The icon will appear in the Edit myFaves Contact dialog box. Press
DONE to complete the assignment.
44 Using the Applications
Phone
Make a Phone Call
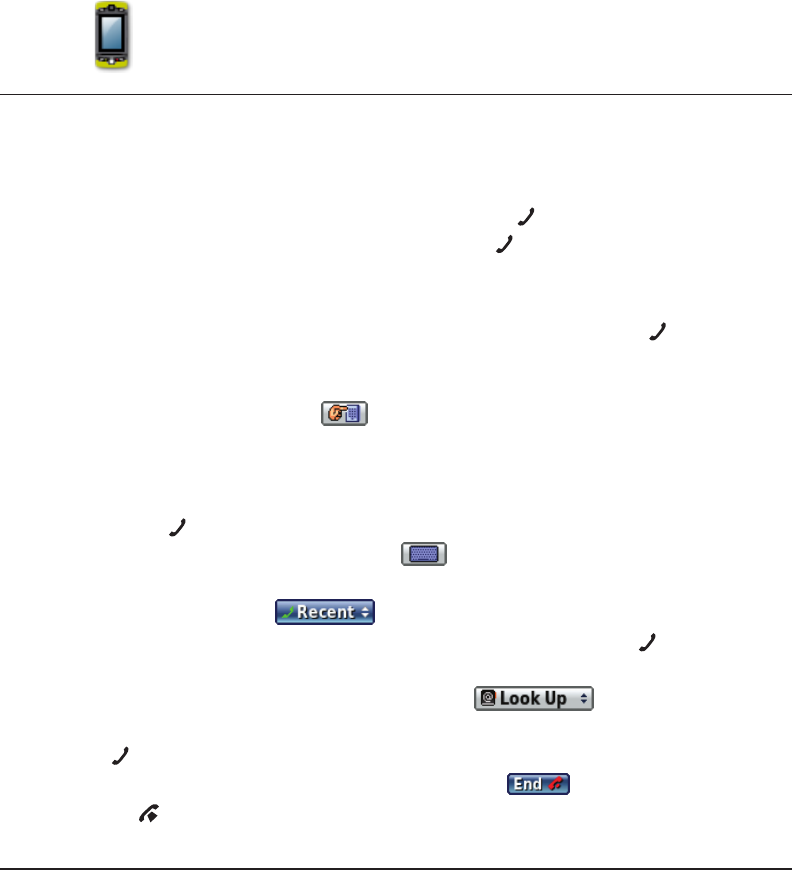
1 You can make a call using any of these dialing methods:
n Dial using your list of speed dials and recently-dialed numbers – From
the Jump or Phone screen, press SEND CALL . Highlight the number,
then place the call by pressing SEND CALL again.
n Dial with numbers – From the Jump screen or Phone screen, open the
display and type your number using the embedded keyboard dial
pad, or use the numbers on the top row. Press SEND CALL to place
the call.
n Dial using letters (such as 1-800-LETTERS) – First open the on-screen
dial pad by selecting the button on the Phone screen. Now you
can use the keyboard to type letters; use the on-screen dial pad or
the number row to type numbers (in this mode you can’t use the
embedded keyboard dial pad to type numbers). When ready, press
SEND CALL to place the call. To switch back to using the embedded
dial pad to type numbers, select .
n Dial using a list of recently-dialed numbers – From
the Phone screen,
highlight then selec
t . If the number you want to call is on the
list, highlight it with the trackball, then press SEND CALL .
n Dial by finding a contact’s number from your Address Book – From
the Phone screen, highlight then select . Start typing a
name to narrow your search. Highlight a number, then press SEND
CALL to place the call.
2 To end your call, select the on-screen button , or press
END CALL .
Use Bluetooth Hands-Free Headset or Car Kit
You can use a Bluetooth device to make or receive phone calls. To pair
and set your headset or hands-free for use with the phone, read “Bluetooth
Hands-Free Headset or Car Kit” on page 12.
Using the Applications 45
Answer a Phone Call
When your device signals an incoming phone call, the display shows the
name of the caller and the icon or photo associated with that caller in your
Address Book (see “Add a Contact to the Address Book” on page 58).
1 Press the trackball to select or press SEND CALL . Your call
connects.
2 To hang up, select or press END CALL .
If you receive another call while you’re on the phone (call waiting), a
dialog box will appear, giving you the call details and options for handling
the incoming call: select either Switch Calls or Ignore. Or, If you are
leaving someone a voicemail and that person happens to be calling you at
the same time, select End Call & Answer to end your message and answer
the call.
Add a Number to Your Speed Dial List
1 Press JUMP to go to the Jump screen, then scroll to highlight Phone
and press the trackball to open the Phone application.
2 Press MENU to open the menu. Select New Speed Dial to open the
New Speed Dial Entry dialog box. You can create eight speed dial
shortcuts.
46 Using the Applications
3 Select a Shortcut Key from the pop-up menu. Only the numbers
available will appear in the pop-up menu.
4 Type the speed dial Name and Number, then select DONE .
5 To dial using the shortcut, from either the Phone application or the
Jump screen, simply press and hold the number on the keyboard.
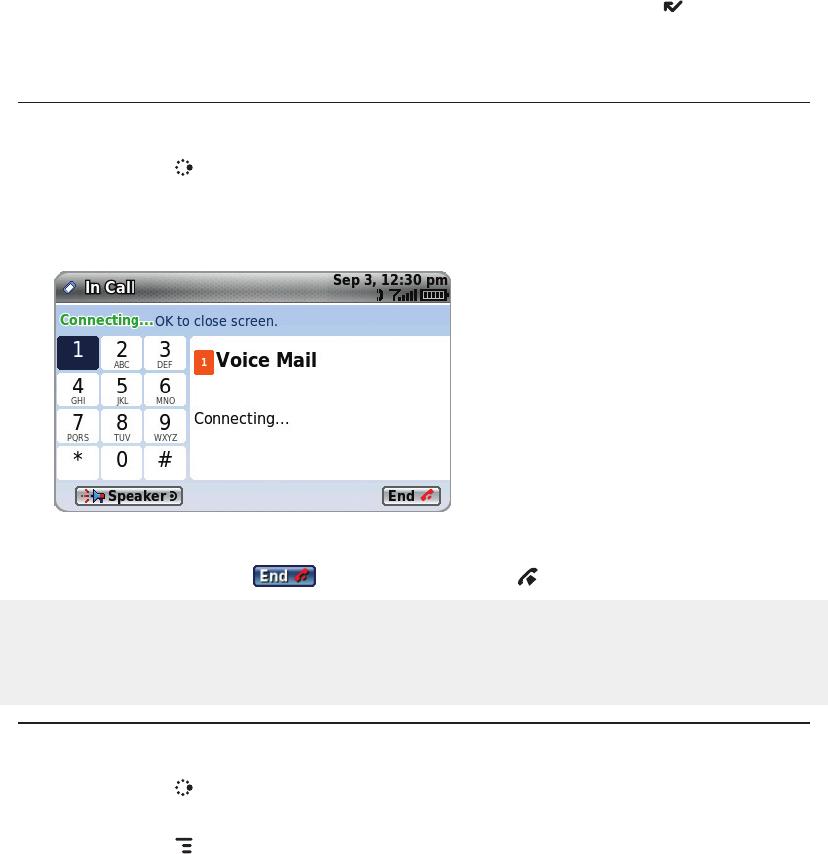
Check Your Voice Mail
1 Press JUMP to go to the Jump screen, then press the trackball to open
the Phone application.
2 Press and hold the 1 key (the speed dial shortcut assigned to voice
mail) to call your voice mailbox.
3 Follow the prompts to retrieve your messages.
4 To hang up, select , or press END CALL .
To check your voice mail from another phone, dial your mobile number
and then press the star key (*) to interrupt the greeting. At the prompt, type
your password.
Change Your Phone Ringtone
1 Press JUMP to go to the Jump screen, then scroll to highlight Phone
and press the trackball to open the Phone application.
2
Press MENU to open the Phone menu. Select Settings > General.
Using the Applications 47

3 Highlight the Incoming Call Ringtone pop-up menu, then press the
trackball. The menu reveals the ringtone categories. First highlight a
category, then press the trackball to open the ringtones submenu. As
you scroll through the songs, you can preview each song by hovering
over it for a few seconds.
4 When you have decided on a ringtone, press the trackball to select it.
Press DONE to assign your new ringtone.
Assign caller-specific ringtones from the Address Book, Edit Contact
Details pages.
Import Contacts from Your SIM Card
If you already have a T-Mobile SIM card, you can import the phone
numbers you have stored on the SIM card into your device’s Address Book.
First, make sure you’ve inserted the SIM card with the contacts into your
device, then:
1 Press JUMP to go to the Jump screen. Scroll to highlight Address
Book, then press the trackball.
2 Press MENU , then select Settings > Import SIM Contacts.
3 The SIM Import dialog will alert you when the import is complete.
Text Messaging
Send a Text Message
1 Press JUMP to go to the Jump screen. Scroll to highlight Phone
Messaging, then press the trackball to open the second-level ring of
applications. Highlight Text Messaging, then press the trackball.
2 Press MENU + N to open a message Compose screen.
3 Address your message using the recipient’s phone number, or start
typing their name to bring up Address Book matches. Add more
recipients by typing a comma (,) or semicolon (;) in the To field.
48 Using the Applications
4 Use the trackball to scroll to the message body; type your message or
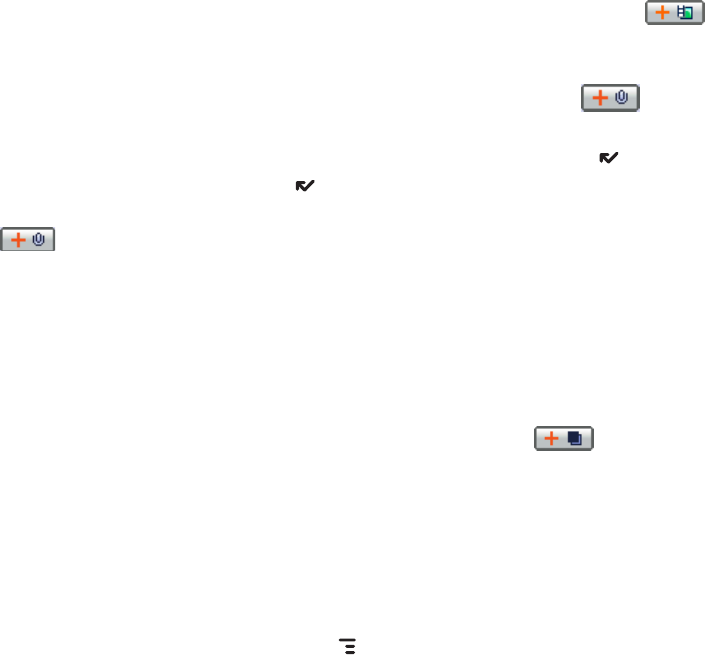
use one of the Prewritten Messages by selecting the button. Add
Smileys by selecting the button. To attach a vCard, press MENU
and select Attach vCard. Select a contact from the list that appears and
their vCard will be attached to your message.
If your message is larger than the limit for a single text message (around
160 characters), the message will be sent in parts but received as one.
The Compose screen will display how many characters you’ve typed as
you go.
5 When ready to send, either select the Send button at the bottom of the
Compose screen, or press MENU + M.
Picture Messaging
Send a Multimedia Message
Each message you create can contain up to five multimedia slides, with
each slide containing text, sound (voice recording or song), and video or
photo attachment. To create, preview, then send a picture message, follow
the steps below. Be creative!
1 Press JUMP to go to the Jump screen. Scroll to highlight Phone
Messaging, then press the trackball to open the second-level ring of
applications. Highlight Picture Messaging, then press the trackball.
2 Press MENU + N to open a message Compose screen.
3 Address your message using the recipient’s phone number, or start
typing their name to bring up Address Book matches. Add more
recipients by typing a comma (,) or semicolon (;) in the To field. Type a
Subject for the entire message. (Each slide you create can have its own
text message as well.)
Using the Applications 49
4 Create your first slide:
n Add the slide’s message by typing in the text field.
n Add a photo or video by selecting the “Add Photo or Video” icon .
Your
Browse Albums screen opens, where you can select one photo or
video. Select the item to attach it to the slide.
n
Add a voice recording by selecting the “Add Audio” icon
. Select
Record from the audio selector list that opens and begin the voice
recording. Speak into the microphone (next to the DONE button).
When finished, select DONE to attach it to your slide.
n Add a song or ringtone to your slide by selecting the “Add Audio” icon
. Select a song/ringtone category from the audio selector list,
then choose a specific song or ringtone from the pop-up menu. (Due
to format and copyright limitations, not all ringtones available in other
applications will be available as attachments to multimedia messages.)
n Use the sec(s) pop-up menu to select how long you want the slide to play.
Note that if you have attached a voice recording that plays longer than
the menu setting, the voice recording will be cut off when played.
5 To create another slide, select the “Add Slide” icon . Add up to
five slides by repeating Step 4.
6 To preview your message, select the Preview button. You can edit the
attachments from the Compose screen: first highlight the attachment,
then press the trackball to bring up the context menu containing edit
options.
7 When ready to send, either select the Send button at the bottom of the
Compose screen, or press MENU + M.
50 Using the Applications