Sharp TCG037 Video Cassette Recorder w/ Remote Locator Transmitter User Manual Manual b

Sharp Corporation Video Cassette Recorder w/ Remote Locator Transmitter Manual b

Contents

revised manual part 2
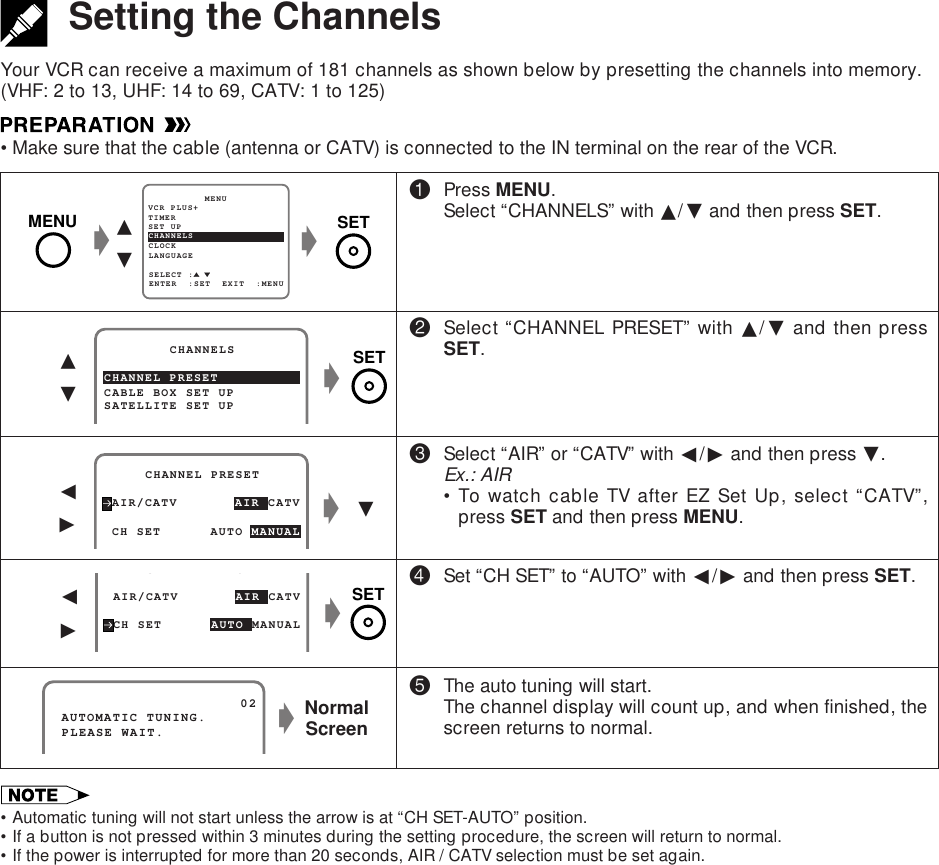
Connecting the VCRTape DubbingYour VCR can dub (copy) video material from another video device. It can also output video and audio signalsfor recording on other video or audio equipment.!Switch your VCR to the auxiliary input by pressing INPUT on the remote control.   lights up on the multi-function display. (You can also use CHANNEL ∂/ƒ on the VCR or CH ∂/ƒ on the remote control.)@Begin recording on the dubbing VCR and playback on the source VCR simultaneously.•When using special playback functions (still picture, video search, frame advance, and variable slow motion) duringdubbing, a blue screen may appear.Set BLUE SCREEN mode on the dubbing VCR (for recording) to OFF. (See Mode Selection.)•To use the TV as a monitor while dubbing, press TV/VCR to “VCR” on the dubbing VCR.•Use an RCA pin–type connection cable (not supplied with VCR, but supplied with VIEWCAM) to connect source VCR todubbing VCR.•Refer to the manual of the VCR connected to this unit when dubbing a tape.•You can also use the front AV jacks. Select “ ” (Aux. 2 input) by pressing INPUT twice.•If source VCR is a monaural mode, connect the audio cable to “AUDIO-L” on the front AV jacks of the dubbing VCR.Setting UpAuto VIEWCAM Dubbing!Connect the AV cable to the front AV jacks on the VCR when the VCR is off. The VCRwill automatically turn on and enter the external input mode (AV2).@When using a Sharp VIEWCAM as the dubbing source, press VIEWCAM DUBBINGon the remote control. The VIEWCAM will automatically begin playback and the VCRwill begin recording.#To pause dubbing, press PAUSE on the remote control.  VIEWCAM  playback willenter still mode and VCR recording will enter pause mode.$When you are finished dubbing, press STOP on the VCR and VIEWCAM, and removethe cassette.%To dub another scene from a different part of the VIEWCAM tape, fast forward theVIEWCAM tape to the desired scene and set the VIEWCAM in STILL mode. Thenpress VIEWCAM DUBBING to begin dubbing.• If the AV cable is connected to the front AV jacks when the VCR is on, the VCR will automatically enter the external inputmode (AV2).• Before using the VIEWCAM DUBBING function, place the VIEWCAM next to the VCR with the VIEWCAM photoreceptorfacing in the direction of the infrared transmitter on the VCR remote control.• A few seconds of video at the beginning of the VIEWCAM tape may be lost when dubbing to the VCR tape.• To begin dubbing at an exact point on the tape, set the VIEWCAM in STILL mode at the desired scene to be recorded andset the VCR in REC PAUSE at the point on the tape to begin recording, then press VIEWCAM DUBBING.ANT/CABLETV RearSource VCR(for playback) Sharp Viewcam(for playback)To FrontDubbing VCR(for recording)orAudio/Video cable (supplied with Viewcam)
EZ Set Up (With Auto Clock Setting)The EZ Set Up function automatically sets the tuner channels and clock when the antenna cable is connected tothe rear of the VCR and the power plug is then connected to an AC outlet.IMPORTANT (Caution during EZ Set Up):• Do not press the POWER button on theVCR or remote control.• Do not insert a video cassette into the VCR.IMPORTANT:When using a cable box:•See Cable TV Connections and Cable Box Set-up Function.•Leave POWER on the cable box turned on.TIMERRECVCRSPEPDuring Auto Channel SettingEZ Set Up complete!Make sure that the antenna cable is connected. Forconnection configuration, refer to Connecting theVCR.@Connect the VCR power plug to an AC outlet.#The tuner channels and clock will automatically beset.•This VCR can monitor and use time-signals (EDSsignals), which are provided by some TV stations, toautomatically adjust the VCR clock. This VCRautomatically searches EDS signals, but if you are ina hurry to use timer recording or know the channelof the EDS signal carrier in your area, follow theprocedure in Auto Clock Setting or Manual ClockSetting.•If power is supplied to the VCR before the cable is connected. EZ Set Up will not be able to preset the channels intomemory. If this occurs unplug the VCR from the power source and wait a few minutes. Check the cable /antenna connectionand supply power to the VCR. EZ Set Up will automatically begin again.•If the power is turned on during EZ Set Up, the Auto Channel setting will be interrupted and the tuner channels will not beable to be preset.•Auto Clock Setting may take several minutes.•If the Auto Clock Setting is not completed within 30 minutes, there may be no channels with EDS signals. In this case, set theclock manually. (See Manual Clock Setting.)•If the antenna signal is weak, the Auto Clock Setting function may not operate.•During initial channel setting, the channels are set into the AIR channel setting. To watch a cable TV channel, select “CATV”on the CHANNEL PRESET screen. (See Setting the Channels.)During Auto Clock Settingff
Setting the LanguageWhen you use the VCR for the first time or the power isinterrupted for more than 20 seconds (power failure, etc.),you should set the language to be used for the MENUscreen.•Turn on your TV and select the video channel.(See Setting the 3 ↔ 4 Output Channel Selector.)•Press POWER and then TV/VCR to select “VCR”.(“VCR” will light on the multi-function display.)g!Press MENU.LANGUAGE screen will appear.@Select the language with ∂/ƒ.Ex.: ENGLISH#Press SET to enter. The screen returns to normal.ESPANOL        LANGUAGEENTER  :SET  EXIT  :MENUFRANÇAISSELECT :ENGLISH∂ƒNormalScreengSetting the ClockAuto Clock Setting (If you DO know a channel that carries EDS signals)•Make sure that the antenna cable is connected and connect the power cord.•Turn on your TV and select the video channel. (See Setting the 3 ↔ 4 Output Channel Selector.)•Press POWER and then TV/VCR to select “VCR”. (“VCR” will light on the multi-function display.)!Press MENU.Select “CLOCK” with ∂/ƒ and then press SET.@Select “AUTO” with ∂/ƒ and then press SET.#Set EDS CH SET mode to “MANUAL” with ß/©and then press ƒ.MANUAL         CLOCKAUTO∂ƒ EDS CH SET  AUTO MANUAL EDS CH       02ALß©ggƒƒ∂MENU ©ßSET•If you press MENU to exit the LANGUAGE screen in Step #, the data will not be stored.•You can also use the ∂ (CHANNEL ∂), ƒ (CHANNEL ƒ), © (FF  ), ß (REW  ), MENU or SET buttons on the VCR toset the On Screen Display (OSD).(Remote Control)g∂ƒgSET UP          MENUENTER  :SET  EXIT  :MENUCHANNELSSELECT :CLOCKLANGUAGETIMERVCR PLUS+MENUSETIMPORTANT:When using a cable box:•See Cable TV Connections and Cable Box Set-up Function.•Leave POWER on the cable box turned on.MENU SETSET
Setting the Clock$Select a channel that carries EDS signals with ß/©.Ex.:  07•The number of channels that can be selected dependson the mode setting on the CHANNEL PRESET screen.See NOTE.%Press SET to enter. The screen returns to normal.Press POWER to turn off the VCR.The Auto Clock Setting function will automatically set theclock.NormalScreengg•If the EDS CH SET mode is set to MANUAL mode in Step # and a channel that does not carry EDS signal is selected inStep $, the Auto Clock Setting function will not operate.•In Step $, the number of channels that can be selected depends on the mode setting on the CHANNEL PRESET screen.See the table below. EDS CH SET  AUTO MANUAL EDS CH       07ß©!Press MENU.Select “CLOCK” with ∂/ƒ and then press SET.@Select “MANUAL” with ∂/ƒ and then press SET.∂ƒgSET UP          MENUENTER  :SET  EXIT  :MENUCHANNELSSELECT :CLOCKLANGUAGETIMERVCR PLUS+gSET∂ƒgSELECT :MANUAL         CLOCKENTER  :SET  EXIT  :MENUAUTOWhen using a cable box:•If you turn off the VCR when the CLOCK mode is set to “AUTO”, the cable box will select a broadcasting channel with theEDS signal automatically.•In Step !, if you press MENU when operating the screen setting for the first time or after a power failure of more than 20seconds, the LANGUAGE screen will appear.•If you entered incorrect data during the setting procedure, re-enter the correct data in the following manner:1Use ß/© to select the data to be corrected.2Set the correct data with ∂/ƒ.3After correcting the data in Step 2, press SET to enter.•If you press MENU in Step %, the data will not be stored.•If a button is not pressed within 3 minutes during the setting procedure, the screen will return to the normal screen.Manual Clock Setting•Turn on your TV and select the video channel. (See  Setting the 3 ↔ 4 Output Channel Selector.)•Press POWER and then TV/VCR to select “VCR”. (“VCR” will light on the multi-function display.)AIR/CATV Channels to be selectedAIRUSE CABLE BOXNOYESCATV—02 03 04 68 69 0201 02 03 124 125 0101 02 03 98 99 01SETMENUSET
Setting the Clock%If the data is correct, press SET to enter.The screen returns to normal.NormalScreeng•Press ENT. /AM/PM (100) to select AM or PM during time setting.•Numbered buttons can be used instead of ∂/ƒ to set the time and date.•In Step !, if you press MENU when operating the screen setting for the first time or after the power is interrupted for morethan 20 seconds, the LANGUAGE screen will appear.•If you entered incorrect data during the setting procedure, re-enter the correct data in the following manner:1Use ß/© to select the data to be corrected.2Set the correct data with ∂/ƒ.3After correcting the data in Step 2, press SET to enter.•If you press MENU to exit the CLOCK screen in Step %, the data will not be stored.•If a button is not pressed within 3 minutes during the setting procedure, the screen will return to the normal screen.SELECT :     CHANGE:10:28AM  7/04SAT 98  ON         CLOCKENTER  :SET  EXIT  :MENUTIME     DATE   YEAR DSTß/©and∂/ƒ#Select “TIME” with ß/© and set time by holding ∂/ƒ.Ex.: 10:28 AM$Select and set “DATE”, “YEAR” and “DST” in turn, in thesame manner as in Step #.•See Automatic Daylight Saving–Time (D.S.T.) Adjust-ment.Ex.: Jul. 4, 1998, DST: ONAutomatic Daylight Saving–Time (D.S.T.) AdjustmentThis VCR is equipped with an internal Automatic Daylight Saving–Time Adjustment function. In spring (firstSunday in April) and autumn (last Sunday in October), the time is adjusted as shown below. This function hasbeen preset to ON at the factory. Set the D.S.T. mode in the clock setting screen.SpringProgrammed timer recording set within this time frame (2:00AM to 3:00 AM) will not be carried out.First Sunday in April (D.S.T. is ON)AutumnBecause there will be two time frames from 1:00 AM to 2:00AM, timer programming set between these times will beinfluenced by the time change.Last Sunday in October (D.S.T. is ON)The clock is automaticallyadvanced 1 hour.vvvv3:00 AM1:00 AM 2:00 AM4:00 AMThe clock is automaticallyset back 1 hour.vvvv2:00 AM2:00 AM1:00 AM1:00 AMSET•If the timer recording program is affected by the D.S.T. time change, check your TV listing and find out when it reflects thetime change. Some TV listings will indicate the time change in the same manner as is programmed in this VCR, but othersdo not show the time change until the next morning. In that case, when programming a timer, use the CLOCK screen to setthe D.S.T. mode to OFF so the time change will not be carried out.
Your VCR can receive a maximum of 181 channels as shown below by presetting the channels into memory.(VHF: 2 to 13, UHF: 14 to 69, CATV: 1 to 125)•Make sure that the cable (antenna or CATV) is connected to the IN terminal on the rear of the VCR.Setting the ChannelsSET UP          MENUENTER  :SET  EXIT  :MENUCHANNELSSELECT :CLOCKLANGUAGETIMERVCR PLUS+g∂ƒg!Press MENU.Select “CHANNELS” with ∂/ƒ and then press SET.@Select “CHANNEL PRESET” with ∂/ƒ and then pressSET.#Select “AIR” or “CATV” with ß/© and then press ƒ.Ex.: AIR• To watch cable TV after EZ Set Up, select “CATV”,press SET and then press MENU.$Set “CH SET” to “AUTO” with ß/© and then press SET.%The auto tuning will start.The channel display will count up, and when finished, thescreen returns to normal. AIR/CATV       AIR CATV     CHANNEL PRESETCHANNEL PRESET CH SET      AUTO MANUALß©gƒCHANNEL PRESET        CHANNELSCABLE BOX SET UPSATELLITE SET UPg∂ƒg AIR/CATV       AIR CATVCS CH SET      AUTO MANUALß©gNormalScreen AUTOMATIC TUNING.                      02 PLEASE WAIT.•Automatic tuning will not start unless the arrow is at “CH SET-AUTO” position.•If a button is not pressed within 3 minutes during the setting procedure, the screen will return to normal.•If the power is interrupted for more than 20 seconds, AIR / CATV selection must be set again.MENUSETSETSET
 ß /©Adding Channel Memory/Erasing Channel MemoryUse this function to manually add or erase channels to/from the memory.Setting the ChannelsSET UP          MENUENTER  :SET  EXIT  :MENUCHANNELSSELECT :CLOCKLANGUAGETIMERVCR PLUS+g∂ƒgMENU SET!Select the channel to be added with the numbered buttons and the channel to be erased withthe CH ∂/ƒ or numbered buttons.@Press MENU. Select “CHANNELS” with ∂/ƒ and pressSET.#Select “CHANNEL PRESET” with ∂/ƒ and then pressSET.$Select “CH SET” with ∂/ƒ and then select “MANUAL”with ß/©. Then press SET.%Select “ADD” if you want to add the channel memory or“ERASE” if you want to erase the channel memory withß/©.^Press MENU to return to the normal screen.CHANNEL PRESET        CHANNELSCABLE BOX SET UPSATELLITE SET UP AIR/CATV       AIR CATV     CHANNEL PRESET CH SET      AUTO MANUAL∂ƒg∂ƒß©gCHANNEL SELECT     :              ADD     03ADD/ERASE          :             EXIT  :MENU[ADD][ERASE]              ERASE   03NormalScreeng•If the power is interrupted for more than 20 seconds, the channel memory may be erased. If this happens, reset thechannels again and reset AIR/CATV selection.•If a button is not pressed within 3 minutes during the setting procedure, the screen will return to normal.MENUSETSET
If your VCR is connected to a CATV network requiring a cable box, follow this section. (Connection type  B or C.See Cable TV Connections.) This allows you to select the channel you wish to record in Timer-Controlled orVCR PLUS+ programming system mode, by transmitting an infrared signal from the VCR to the cable box.Cable Box Set-up Function!Press MENU. Select “CHANNELS” with ∂/ƒ and pressSET.@Select “CABLE BOX SET UP” with ∂/ƒ and press SET.#Select “BOX OUTPUT CH” with ß/© (03   04 02   03) and then press ƒ.gSET UP          MENUENTER  :SET  EXIT  :MENUCHANNELSSELECT :CLOCKLANGUAGETIMERVCR PLUS+gSELECT :CHANNEL PRESET        CHANNELSENTER  :SET   EXIT :MENUCABLE BOX SET UPSATELLITE SET UP∂ƒ BOX OUTPUT CH      03    CABLE BOX SET UP USE CABLE BOX  YES NO BOX CODE           01•There may be some Cable Boxes that cannot be operated with this function.g∂ƒƒg•Turn on your cable box and select channel 02.•Turn on your TV and select the video channel. (See Setting the 3 ↔ 4 Output Channel Selector.)•Press POWER and then TV/VCR to select “VCR”. (“VCR” lights up on the multi-function display.)•If your cable box is remote-controllable, check the code number corresponding to your cable box brand.The brand name of your cable box can be found on the bottom or back panel.•If the wall or other surface for reflecting the signal is too distant, or if there is signal-absorbing material (curtains, etc.) at thereflecting location, the signal transmitted from the VCR may not reach the cable box.BrandArcherEagleGEGeneral InstrumentHamlinJerroldMacomNSCCode Number(s)28,29,30,31,49,5037,38,39,40,414301,02,03,04,05,06,07,0826,2701,02,03,04,05,06,07,084233,34,35BrandOak PanasonicPhilipsPioneerRCARegalRegencyScientific AtlantaCode Number(s)19,2022,2324,2516,17,1822,23213209,10,11,12,13BrandSylvaniaTeknicaTelecaptionTocomToshibaUniversalVid TekZenithCode Number(s)4448453647465114,15ß©Setting Up the Cable Box (Overhead View)SETSETMENUInfrared sensor windowon the front of cable boxCable box controlcommands aretransmitted throughthis window.Multi-Function DisplayWindowInfrared signalfrom VCRFront of VCRWALL
Cable Box Set-up Function$Select “BOX CODE” with ∂/ƒ and set the code numberwith ß/©.See the code list in PREPARATION.%Press 100 to check if the setting is completed.If the selected code matches the brand of your cablebox, the VCR will automatically send a signal to changethe channel of your cable box from 02 to 09.“” is displayed on the multi-function display. Thisindicates that the setting is successful.Press ƒ.^Set “USE CABLE BOX” to “YES” with ß/©.&Press SET to enter.The screen returns to normal.SELECT :     CHANGE:CHECK  :PRESS 100 KEY BOX OUTPUT CH      03    CABLE BOX SET UPENTER  :SET  EXIT  :MENU USE CABLE BOX  YES NO BOX CODE           01∂ƒ01   02 ... 51   01SELECT :     CHANGE: BOX OUTPUT CH      03    CABLE BOX SET UPENTER  :SET  EXIT  :MENU USE CABLE BOX  YES NO BOX CODE           01ß©NormalScreengWhen using a remote-controllable cable box•If you found two or more codes for the brand of your cable box in the code list, try each of these codes untilthe channel of the cable box changes to 09.•If none of the codes work, try the following:1. This VCR emits a high-frequency infrared signal to the cable box. By repositioning your cable box and VCRcloser and/or within the line of sight of each other, the signal may successfully travel from the VCR to thecable box. Reposition the cable box and/or VCR and test by setting the code number again.2. Another code number may be the correct one for your cable box. Proceed by setting and testing each code(01 through 51) until you find the one that works. Start with the ones listed under the same brand as yourcable box.3. Even if solutions 1 and 2 do not work, your VCR will still work with the VCR Plus+ system. Set USE CABLEBOX to “NO” in Step ^. Since the VCR will not change the cable box channel, keep your cable box poweron and the box tuned to the channel you wish to record.4. Your local cable company may offer a choice of cable boxes. You should request an alternate brand ormodel of cable box, and exchange your present one for one compatible with your new VCR.Before Timer Recording Starts:Remote-Controllable Cable Box•Turn ON the cable box.Non Remote-Controllable Cable Box•Turn ON the cable box and select the channel you wish to record.ß©gƒg(on the multi-function display)SET
ANT/CABLEVHF UHFU/V INUHF VHFMODE SELECTIONDigital Satellite Receiver Set-up FunctionIf your VCR is connected to a digital satellite network requiring a digital satellite receiver, follow this section. Thisallows you to select the channel you wish to record in Timer-Controlled mode, by transmitting an infrared signalfrom the VCR to the digital satellite receiver.•If the wall or other surface for reflecting the signal is too distant, or if there is signal-absorbing material(curtains, etc.) at the reflecting location, the signal transmitted from the VCR may not reach the digital satellitereceiver.ConnectionBasic Connection•Use this connection if your TV does not have audio/video jacks.!Set the CH3 CH4 switch on the rearof the digital satellite receiver toeither channel 3 or 4.You will tune the VCR to this channelor its auxiliary input ( ) to recordfrom the digital satellite receiver.To watch the digital satellite receiver,turn off the VCR.If you want to watch or record thesignal from your antenna, cable, orcable box, make sure the digitalsatellite receiver is turned off.@Set the 3 ↔ 4 OUTPUT CHANNELselector on the rear of the VCR to 3or 4. (Factory preset: 3) (See Settingthe 3 ↔ 4 Output Channel Selec-tor.) Tune the TV to this channel andpress TV/VCR to watch the VCR.#Connect as shown.Then go to “After the Connection”.Setting Up the Digital Satellite Receiver (Overhead View)FromSatelliteDishDigitalSatelliteReceiverRearFrom Cable,Cable Box orAntennaVCR RearCoaxial cable(Not supplied)Coaxialcable (Supplied)Audio/Video cables(Not supplied)TV RearorSeparator(Not supplied)Infrared sensor windowon the front of digitalsatellite receiverDigital satellite receivercontrol commands aretransmitted throughthis window.Multi-Function DisplayWindowInfrared signalfrom VCRFront of VCRWALL
Digital Satellite Receiver Set-up FunctionAdvanced Connection•Use this connection if your TV has audio/video jacks and your receiver has oneset of audio/video jacks.!Set the CH3 CH4 switch on the rearof digital satellite receiver to eitherchannel 3 or 4.You will tune the VCR to this channelto record from the digital satellitereceiver.To watch the digital satellite receiver,tune your TV to its video input chan-nel.If you want to watch or record thesignal from your antenna, cable, orcable box, make sure the digitalsatellite receiver is turned off.@Set the 3 ↔ 4 OUTPUT CHANNELselector on the rear of the VCR to 3or 4. (Factory preset: 3) (See Settingthe 3 ↔ 4 Output Channel Se-lector.) Tune the TV to this channeland press TV/VCR to watch the VCR.#Connect as shown.Then go to “After the Connection”.Advanced Connection witha Deluxe Digital SatelliteReceiver•Use this connection if your TV has audio/video jacks and your receiver has twosets of audio/video jacks.!Set the 3 ↔ 4 OUTPUT CHANNELselector on the rear of the VCR to 3or 4.You will tune the TV to this channeland use TV/VCR to watch the VCR.To record from the digital satellitereceiver, you will tune the VCR to itsauxiliary input ( ).To watch the digital satellite receiver,tune your TV to its video inputchannel.@Connect as shown.Then go to “After the Connection”.After the ConnectionPlug in the power cords of the VCR, TVand digital satellite receiver. Then, go toHow to Remote-Control the Digital Sat-ellite Receiver.FromSatelliteDishFromCable,Cable Boxor AntennaAudio/Videocables(Notsupplied)Coaxial cable(Supplied)DigitalSatelliteReceiverRearVCR RearTV RearCoaxial cable(Not supplied)Digital SatelliteReceiver RearFrom Cable,Cable Boxor AntennaVCR RearAudio/Video cables(Not supplied)TVRearCoaxial cable(Supplied)FromSatelliteDish
Digital Satellite Receiver Set-up FunctionHow to Remote-control the Digital Satellite Receiver•Turn on your digital satellite receiver and select DSS® mode.•Turn on your TV and select the video channel. (See Setting the 3 ↔ 4 Output Channel Selector.)•Press POWER and then TV/VCR to select “VCR”. (“VCR” lights up on the multi-function display.)•If your digital satellite receiver is remote-controllable, check the code number corresponding to your digitalsatellite receiver brand.The brand name of your digital satellite receiver can be found on the bottom or back panel.!Press MENU. Select “CHANNELS” with ∂/ƒ and pressSET.@Select “SATELLITE SET UP” with ∂/ƒ and press SET.#Select “SAT. OUTPUT CH” with ß/© (03   04 AV1   03) and then press ƒ.$Select “SAT. CODE” with ∂/ƒ and set the code numberwith ß/©.See the code list in PREPARATION.%Press 100 to check if the setting is completed.If the selected code matches the brand of your digitalsatellite receiver, the VCR will automatically send a signalto change the channel of your digital satellite receiver to200.“” is displayed on the multi-function display. This indi-cates that the setting is successful.Press ƒ.gSET UP          MENUENTER  :SET  EXIT  :MENUCHANNELSSELECT :CLOCKLANGUAGETIMERVCR PLUS+g∂ƒSELECT :     CHANGE: SAT. OUTPUT CH     03    SATELLITE SET UPENTER  :SET  EXIT  :MENU USE SATELLITE  YES NO SAT. CODE          01CHECK  :PRESS 100KEYß©∂ƒBrandGEProScanRCASONYCode Number(s)01010102•There may be some digital satellite receiver that cannot be operated with this function.(on the multi-function display)ƒggß©ƒggSELECT :CHANNEL PRESET        CHANNELSENTER  :SET   EXIT :MENUCABLE BOX SET UPSATELLITE SET UP∂ƒ01   02   01MENU SETSET SAT. OUTPUT CH     03    SATELLITE SET UP USE SATELLITE  YES NO SAT. CODE          01
Digital Satellite Receiver Set-up Function^Set “USE SATELLITE” to “YES” with ß/©.&Press SET to enter.The screen returns to normal.SELECT :     CHANGE: SAT. OUTPUT CH     03    SATELLITE SET UPENTER  :SET  EXIT  :MENU USE SATELLITE  YES NO SAT. CODE          01ß©NormalScreengWhen using a remote-controllable digital satellite receiver.•If none of the codes work, try the following:1. This VCR emits a high-frequency infrared signal to the digital satellite receiver. By repositioning your digitalsatellite receiver and VCR closer and/or within the line of sight of each other, the signal may successfullytravel from the VCR to the digital satellite receiver. Reposition the digital satellite receiver and/or VCR andtest by setting the code number again.2. Another code number may be the correct one for your digital satellite receiver. Proceed by setting andtesting each code (01 or 02) until you find the one that works.3. Even if solutions 1 and 2 do not work, your VCR will still work with VCR Plus+ system. Set “USE SATELLITE”to “NO” in Step ^ and see Non Remote-Controllable Digital Satellite Receiver below.Before Timer Recording Starts:Remote-Controllable Digital Satellite Receiver1. Select the DSS® mode on the digital satellite receiver.2. Turn OFF the digital satellite receiver.Non Remote-Controllable Digital Satellite Receiver1. Turn ON the digital satellite receiver.2. Select the DSS® mode and select the channel you wish to record on the digital satellite receiver.3. Set the timer recording channel to the output channel of the digital satellite receiver (03, 04 or AV (AV1)) onthe timer setting screen).• You cannot simultaneously set timer recording for a satellite broadcast program and other programsreceived by conventional VHF-UHF antenna or Cable TV.*DSS® is a registered trademark of Directv. inc., a unit of GM Hughes Electronics.SET
•If the clock is not set, the time and date will not be displayed.How to Display IndicatorsEach time ON SCREEN is pressed, the screen changes as follows:AUTO DisplayWhen an operation button, numbered button, or CH ∂/ƒ is pressed, the current function status or the numberof the channel will be displayed in the upper section of the TV screen for about 3 seconds.•When the VCR power is turned off, the display mode is retained in memory.•When you record a video signal output from this VCR on another VCR, press ON SCREEN to select Display Off. (If thefunction status is displayed on the screen, it is also recorded on the tape.)MENU screen is a home screen used to select various screen functions.!Turn on the TV and select the video channel. (See Setting the 3 ↔ 4 Out-put Channel Selector on page 10.)@Press POWER, and then TV/VCR to select “VCR” (“VCR” will light on themulti-function display).#Press MENU to display the MENU screen.The following 6 items can be set by using the MENU screen.VCR PLUS+...................... Setting a timer recording using VCR PLUS+ pro-gramming system. (See page 33.)TIMER............................... Setting a timer recording (and checking it). (See page 35.)SET UP ............................. VCR operating conditions are set according to the broadcast reception and tapeplayback conditions. (See page 25.)CHANNELS ...................... Setting the channels, cable box code and digital satellite receiver code. (Seepages 16–23.)CLOCK............................. Setting the present time. (See pages 13–15.)LANGUAGE ..................... Selection of language to be used for the MENU screen. (See page 13.)$Press ∂/ƒ and then SET. The screen changes to the one which you have selected.%To cancel the MENU screen, press MENU.Menu ScreenSET UP          MENUENTER  :SET  EXIT  :MENUCHANNELSSELECT :CLOCKLANGUAGETIMERVCR PLUS+To facilitate the operation and check the current VCR mode information, the following OSD (On Screen Display)will appear on the TV screen when using this VCR.OSD (On Screen Display)STOP                 123FRI  4/25        DPSS 19S. PICTURE ON     STEREO10:00AM         -1:59.59SP  STOP  11:30AM SAPSAP                     L RProgram channel positionReal time counterTape speedClock displayCalendar displaySimple Recording TimerDisplay exampleSharp Super PictureDPSSAudio Output modeStereo/SAP mode  - - - - - - - Function statusPLAYFFREWSTOPRECPAUSEPlayFast forwardRewindStopRecRec pauseRecorded SectionAuto  RepeatPLAY                  REC                   09(When you pressREC while you arereceiving CH 9.)(When you pressPLAY)! AUTO Display @ FULL Display # COUNTER Display $ Display off
MODE SELECTIONMode SelectionYou can use the SET UP–selection screen to select the mode for basic features.•Turn on the TV and select the video channel. Press POWER and then TV/VCR to select “VCR” (“VCR” will lighton the multi-function display).!Press MENU.@Select “SET UP” with ∂/ƒ and then press SET.#Set AUTO REPEAT mode to ON or OFF with ß/©. Thenpress ƒ.(See Recorded Section Auto Repeat.)$Set BLUE SCREEN mode to ON or OFF with ß/©. Thenpress ƒ.(See Blue Screen Noise Elimination.)%Set SAP (Separate Audio Program) mode to ON or OFFwith ß/©. Then press ƒ.(See Recording MTS (Multi-channel TV sound)Broadcasts.)^Set AUDIO OUTPUT mode to MONO, LR, L or R withß/©.(See Audio Output Mode.)&Set R/C CALL to ON  or OFF with ß/©.(See Remote Pager.)*Press SET to enter.The screen returns to normal.ƒSELECT :     CHANGE: BLUE SCREEN    ON  OFF AUTO REPEAT    ON  OFFENTER  :SET  EXIT  :MENU AUDIO OUTPUT SAP            ON  OFF            MONO LR L R R/C CALL     ON  OFFSET UP          MENUENTER  :SET  EXIT  :MENUCHANNELSSELECT :CLOCKLANGUAGETIMERVCR PLUS+ BLUE SCREEN    ON  OFF AUTO REPEAT    ON  OFF AUDIO OUTPUT SAP            ON  OFF            MONO LR L R R/C CALL     ON  OFF BLUE SCREEN    ON  OFF AUTO REPEAT    ON  OFF AUDIO OUTPUT SAP            ON  OFF            MONO LR L R R/C CALL     ON  OFF BLUE SCREEN    ON  OFF AUTO REPEAT    ON  OFF AUDIO OUTPUT SAP            ON  OFF            MONO LR L R R/C CALL     ON  OFF∂ƒgggƒgß©ƒgß©ß©[AUTO REPEAT][BLUE SCREEN][SAP][AUDIO OUTPUT]ß©SETMENU BLUE SCREEN    ON  OFF AUTO REPEAT    ON  OFF AUDIO OUTPUT SAP            ON  OFF            MONO LR L R R/C CALL     ON  OFFß©[R/C CALL]NormalScreengSET•If you press MENU to exit the mode selection screen in Step *, the data will not be stored. Be sure to press SET to storethe data.•SAP is used for bilingual broadcasting. Check your local broadcast station or cable company.
PlaybackInserting a Video CassetteGently insert the video cassette into the cassette compartment. The VCR turns on automatically and “ ”appears on the multi-function display. If the cassette is inserted incorrectly, the loading system will not function.Do not force the cassette into the VCR.To remove the cassette, press EJECT during stop mode.Playback•Turn on the TV and select the video channel. (See Setting the 3 ↔ 4 Output Channel Selector.)!Press POWER to turn on the VCR.@Insert a cassette.#Press PLAY. (The automatic tracking control system engages and “PLAY” flashes on the TV screen for afew seconds.)$To stop playback, press STOP. (If the tape reaches its end, the VCR will automatically rewind the tape tothe beginning, eject the cassette, and turn off the power.)•If noise should remain on the TV screen after tracking adjustment has been completed by the Automatic Tracking ControlSystem, use the manual tracking mode.•Press CH ∂/ƒ during playback mode to change to manual tracking mode. Adjust the tracking using CH ∂/ƒ until thenoise is minimized or eliminated.•For tapes recorded in EP on another VCR that still have vertical jitter even after manual adjustment, hold down PLAY forabout 2 seconds. (On screen display may be blurred.) Ejecting the tape or turning off the power will return playback to itsnormal mode.
PlaybackBuilt-in Shuttle Control SystemThe shuttle system lets you control all the basic playback functions using just the shuttle ring.Fast Forward and Rewind (During STOP Mode)!Turn the ring either to the right or the left and release it. (Theshuttle ring will return to center.)@Press STOP to halt fast forward or rewind.Video Search (During PLAY [or STILL] Mode)•The shuttle ring does not rotate 3607.•Turn the ring to the left or the right to enter VSF (Video SearchForward), or VSR (Video Search Rewind) mode. Select from twospeeds by turning the ring. Release the ring (the shuttle ring re-turns to center) to return to playback.•Turning the ring all the way to the left or right holds the VCR inVSF (Video Search Forward), or VSR (Video Search Rewind)mode. Press PLAY to return to normal playback.TAPE SPEEDSP/LPEPVSF /VSR2325VSF /VSR25215TURBOWIND (360 2 Rewind Speed) to Fast Forward and Rewind!When the VCR is in stop mode, press FF or REW to fast forward or rewind the cassette. (The picture cannotbe viewed in this mode.)@Press STOP to halt fast forward or rewind.•The FF and REW speeds may be slower for cassette tapes other than T-60, T-90, or T-120.•After rewinding the T-120 cassette tape for about 60 seconds, you can fast forward the cassette tape.Video SearchUse the following procedure to quickly find the section you want, while viewing the picture.!During playback, press FF for forward video search, or REW for reverse video search.There are 2 search speeds in each direction. The VCR switches between them each time the button ispressed.@Press PLAY to resume normal playback.(Rewind) (Fast  forward)(VSR1)(VSR2)(VSR2  hold)(VSF1)(VSF2)(VSF2  hold)BasicOperations
Slow Motion Playback (only with the remote control)!Press SLOW during playback.@Press SLOW j/k (to the right of SLOW) to vary the slow motion playback speed between 1⁄5 and 1⁄30 of thenormal playback speed.If noise bars appear on the screen, use CH ∂/ƒ.#Press PLAY to resume normal playback.Still Picture and Frame Advance!Press PAUSE/STILL during playback. This will freeze the picture on your TV.@If the picture vibrates vertically during still mode, use CH ∂/ƒ to adjust for minimum distortion. If noise barsappear on the screen during still mode, set your VCR to the slow mode and press CH ∂/ƒ to make thenoise disappear. Then press PAUSE/ STILL again.#Press PAUSE/STILL during still mode for frame advance.$Press PLAY again to resume normal playback.•Sound is muted during still picture, video search, frame advance, and variable slow motion.•The picture quality in still picture, video search, frame advance, and variable slow motion is best with tapes recorded in SPor EP mode.Automatic Tracking Control SystemThis function automatically adjusts the tracking to match therecorded tape. Auto tracking engages in the following cases:•When you insert the cassette and begin playback.•When you press CH ∂/ƒ at the same time.•When the VCR has been playing back an unrecordedsection of tape, and then reaches a recorded tape segment.When auto tracking engages, “PLAY” on the TV screen flashes for a few seconds.•When a poorly recorded tape is played back or the VCR is near an electrical or magnetic field, auto tracking may notoperate normally. In this event, manually adjust the tracking with CH ∂/ƒ to make any noise disappear.Blue Screen Noise EliminationSet the BLUE SCREEN mode to ON on the SET UP–selection screen. (See Mode Selection.) This functioneliminates monitor noise and mutes sound during playback of unrecorded portions of a tape, and whenreceiving a non-broadcasting channel. Blue Screen will also appear if the VCR is set to the Auxiliary mode butno video signal is fed to the VCR. (The BLUE SCREEN mode is set to ON at the factory.)•Blue Screen does not function during still picture, variable slow motion and video search.•Blue Screen may not function properly if the broadcast signal is too strong or too weak.•Blue Screen does not function during playback of a tape with noise recorded.•If the antenna signal is weak while recording a TV program, or if the input signal is weak while tape dubbing, the monitorscreen may turn blue since the unit may not recognize whether or not a proper signal is being received. In this event, set theBLUE SCREEN mode to OFF.PlaybackgPoor Tracking Normal Picture
Quick Start with Full Loading MechanismYour VCR has a standby function (Full Loading Mechanism) to allow immediate recording and playback.After pressing REC or PLAY, it takes about 2 seconds until recording or playback is engaged when in thestandby mode.Full Automatic PlaybackThe Full Automatic Playback lets you enjoy playback with ease. When you insert a cassette with the erasureprotection tab removed, your VCR automatically turns on the power and plays back the tape. When the tapereaches its end, the VCR automatically rewinds the tape, ejects it and turns off the power.•If the erasure protection hole is covered, press PLAY after the power turns on automatically.Automatic Head Cleaning SystemWhen the tape is inserted, or ejected, this system automatically cleans the drum and heads with a specialroller before recording or playback begins, protecting the heads and drum from dirt and preserving beautifulsound and picture quality.Audio Output ModeYour VCR has 3 channels for audio recording (2 on the Hi-Fi track and 1 on the linear track). You can select theaudio output channels in playback mode on the SET UP–selection screen. The following shows which audiochannels will be heard when a stereo Hi-Fi video cassette is played back while a stereo system is properlyconnected to the VCR.(See Mode Selection.)Hi-Fi  ` mode: Normally, select Hi-Fi  ` mode on the SET UP–selection screen: both the left (L) and right (R) audiochannels will be taken from the Hi-Fi audio track.Normally you will not have to change to anothermode.(See Recording MTS (Multi-channel TV Sound)Broadcasts.)Hi-Fi  mode: The left channel of the Hi-Fi audio track will be playedback through both speakers.Hi-Fi   mode: The right channel of the Hi-Fi audio track will be played back through both speakers.Linear mode: The audio signal recorded on the linear audio track will be played back through both speakers.•When video cassettes recorded on a non-Hi-Fi VCR are played back or the Hi-Fi audio output level is poor, the audio signalrecorded on the linear audio track will automatically be played back regardless of the audio output mode.PlaybackHi-FiL+RmodeHi-FiLmodeLRLRLinear modeMONOHi-FiRmodeSELECT :     CHANGE: BLUE SCREEN    ON  OFF AUTO REPEAT    ON  OFFENTER  :SET  EXIT  :MENU AUDIO OUTPUT SAP            ON  OFF            MONO LR L R R/C CALL     ON  OFF
•Turn on the TV and select the video channel. (See Setting the 3 ↔ 4 Output Channel Selector.)•Press POWER and then TV/VCR to select “VCR” (“VCR” will light on the multi-function display).•If necessary, set “SAP” on the SET UP-selection screen. (See Mode Selection.)!Insert the cassette, with the erasure protection tab covered. (See Cassette Erase Protection below.)@Press TAPE SPEED on the remote control to set the recording speed (SP or EP). (See Recording Speedsbelow.)SP or EP will appear on the display.#Select the desired channel with CH ∂/ƒ or the numbered buttons on the remote control.$Press REC. (If the erasure protection tab has been removed, the cassette will be ejected.)%To stop recording, press STOP.* To pause recording during the REC mode, press PAUSE/STILL on the remote control. To resume recording, press PAUSE/STILL or REC. (Pause disengages automatically after about 5 minutes to avoid damage to the tape and the VCR, and stopmode is engaged.)•It is not necessary to set the clock to use this recording operation.•“PAUSE” will flash on the TV screen if PAUSE/STILL is pressed in stop mode. Press STOP to disengage the pause mode orpress REC to enter the record standby mode.•The VCR can record a TV program even with the TV turned off.To Watch Another TV Program While RecordingAfter steps ! to $ have been completed, press TV/VCR to select “TV” (the “VCR” indicator will disappear),then select the program you wish to view using the TV tuner.At the end of the tape, your VCR will automatically stop recording, rewind the tape, eject it and turn off thepower.Cassette Erase ProtectionA   cassette has a removable tab to prevent accidental erasure ofrecorded material. Removing the tab prevents recording. To record on avideo cassette with the tab removed, place adhesive tape over the tabopening.Recording SpeedsThis VCR lets you select a recording speed (SP or EP). SP providesa better picture, although the recording time is shorter. Select thetape speed that best suits your needs.•This VCR can play back tapes recorded in LP (Long Play) mode.Recording a TV ProgramERASURE PROTECTION TABT-60T-120T-160CASSETTEMODE SP(Standard Play)1 hr.2 hrs.2 hrs. & 40 min.EP(Extended Play)3 hrs.6 hrs.8 hrs.
Recording a TV ProgramRecording Hi-Fi Stereo SoundYour VCR records AUDIO signals on two types of audio tracks.Hi-Fi:Using specialized rotary heads, audio signals are recorded on the video track in FM format.Multi-sound broadcasts (Stereo or SAP [Separate Audio Program]) are recorded on two channels.Linear:All audio signals are recorded in mono on the linear audio track.•Video cassettes recorded on a non-Hi-Fi VCR can also be played back. However, if the audio signals are recorded on twolinear channels, stereo programs will be played back in monaural and SAP (Separate Audio Program) will be played backwith both the MAIN and SAP audio mixed together.•Video cassettes recorded on this VCR can be played back on a non-Hi-Fi VCR. However, only the linear track will be playedback.Recording MTS (Multi-channel TV Sound) BroadcastsYour VCR can record stereo or SAP (Separate AudioProgram) broadcasts, where available.If the broadcast is in stereo, the VCR automaticallyrecords the stereo sound in dynamic Hi-Fi. If the broad-cast is in SAP, you can record both the MAIN and theSAP sound by using the SET UP–selection screen to setthe SAP mode to ON. If the broadcast is in stereo/SAP,you can record either the SAP sound by using the SETUP–selection screen to set the SAP mode to ON, or stereosound by setting the SAP mode to OFF. (See ModeSelection.)MTS/SAP RECORDING* The monitor output listed in the table showsthat the audio output mode is in the Hi-Fi`  mode.*Monitor Output RecordingBroad-cast Re-ceivedSAPMode Posi-tionL-Speaker R-Speaker Hi-FiL-CH Hi-FiR-CH LinearTrackStereoSAPStereo/SAPOFFOFFOFFONONONLRLRMAINMAINMAINSAPLRL   R SAPLLMAINMAINLL   RRRMAINSAPRSAPMAINSAPL   RSAPL   RL   ROn the TV screen    33STEREOSAPSAP   L RShown while receivingSAP broadcast.Shown while receivingstereo broadcast.Shown when SAPmode is on.Monitor Output When Receiving a SAP BroadcastWhen receiving a SAP broadcast, if the SAP position is set to ON, change the audio output mode to selectMonitor Output (MAIN or SAP) with the SET UP–selection screen.(See Mode Selection.)When enjoying a TV program with MAIN sound:Select   on the SET UP–selection screen.(See Audio Output Mode.)When enjoying a TV program with SAP sound:Select   or   on the SET UP–selection screen.(See Audio Output Mode.)Recording
The Simple Recording Timer (SRT) enables you to set the recording stop time. The SRT can be set on the TVscreen by using the remote control.The SRT cannot be set if the clock has not been set. Make sure the clock is set before setting the SRT.•Turn on the TV and select the video channel. (See Setting the 3 ↔ 4 Output Channel Selector.)•Insert a cassette with the erasure protection tab opening covered. Power will turn on automatically.•Press TV/VCR to select “VCR” (“VCR” will light on the multi-function display).•If necessary, set “SAP” on the SET UP–selection screen. (See Mode Selection.)SIMPLE RECORDING TIMERSimple Recording TimerExample: Recording a TV program in the SP mode. The program is on Channel 2, ending at 9:50 AM. Thepresent time is 8:43 AM.!Select the desired channel with the numbered buttons orCH ∂/ƒ.Ex.: Channel → 02@Set the recording speed (SP or EP) with TAPE SPEED onthe remote control.Ex.: SP#Press REC to enter the recording mode.Then, press REC again to enter the simple recordingtimer mode. The recording stop time is displayed.Ex.: 8:50 AM$Each press of REC increases the stop time by 10minutes.Ex.: 9:50 AM%When the stop time comes, recording is finished, and the power turns off.                      02Recording SpeedSPSP  STOP   8:50AM                      02                      02SP  STOP   9:50AM•The Simple Recording Timer has priority over otherrecordings.•Ordinary timer programs will not be recorded when portions ofthe time setting of the simple recording timer and of the timesetting of the ordinary timer recording overlap.Changing the Contents of the Simple Recording Timer!Press REC. The stop time flashes on the TV screen.@Change the stop time as desired using REC.Cancelling the Simple Recording Timer!Press STOP.Example:9:00 10:00Ordinary timer recording(9:30 AM to 10:30 AM)Simple Recording Timer(9:00 AM to 10:00 AM)NOTrecorded Record-edRecorded11:00
Procedure for Setting a Timer with the VCR Plus+ System•Before using the VCR Plus+ programming system, read the Cable Box Set-up Function section.•Turn on the TV and select the video channel.•Insert a cassette with the erasure protection tab opening covered. Power will turn on automatically.•Press TV/VCR to select “VCR” (“VCR” will light on the multi-function display).•Check that the clock is displaying the correct time.•If necessary, set “SAP” on the SET UP-selection screen. (See Mode Selection.)Timer Recording with VCR Plus+ System*The VCR Plus+ Programming SystemThe VCR Plus` Programming System allows you to program your VCR for timer recording simply by inputtingthe PlusCode Programming number.The PlusCode numbers are listed in most newspaper, TV Guide®, and local cable TV listings. Simply by in-putting this PlusCode number, you can program your VCR for timer recording, eliminating the need to inputprogram start time, stop time, channel, date, and other information necessary for timer recording.•If PlusCode numbers are not published in the listings for your area, they are sure to be introduced in the near future, soplease contact your local newspaper or cable TV station for further details.•*VCR Plus` C3 and PlusCode are trademarks of Gemstar Development Corporation. The VCR Plus` system is manufac-tured under license from Gemstar Development Corporation.!Press VCR PLUS+.The VCR PLUS+ system setting screen will appear.@Enter the PlusCode number shown in your TV listings withthe numbered buttons.Ex.: PlusCode number is 882• If you make a mistake in entering the numbers, pressCANCEL to erase the PlusCode numbers one by one,then re-enter the correct PlusCode numbers.#If you want to record only once, press SET and go toStep $.Otherwise, press ƒ and select “WEEKLY” or “DAILY” withß/©. Then press SET to enter.• ONCE: To record only once.• WEEKLY: To record every week at the same time.• DAILY: To record everyday at the same time.[ONCE][WEEKLY/DAILY]gStep $ PLUSCODE      -USE NUMBER KEYS  ONCE     WEEKLY DAILY  SELECT :ENTER  :SET  EXIT  :MENUg PLUSCODE      882  ONCE     WEEKLY DAILYSELECT :     CHANGE:ENTER  :SET  EXIT  :MENUƒgß© PLUSCODE      882USE NUMBER KEYS  ONCE     WEEKLY DAILYSELECT :ENTER  :SET  EXIT  :MENUSETSET
Timer Recording with VCR Plus+ SystemSELECT :     CHANGE: 8/01  02  12:00A12:30EP                     1/2ENTER  :SET  EXIT  :MENU -/-- ---  --:-- --:---- -/-- ---  --:-- --:---- -/-- ---  --:-- --:---- DATE  CH  START STOP   TURN VCR POWER OFF   FOR TIMER RECORDING. 8/01  02  12:00A12:30SP                     1/2 -/-- ---  --:-- --:---- -/-- ---  --:-- --:---- -/-- ---  --:-- --:---- DATE  CH  START STOP∂ƒ$The timer program information is shown on the TV screen.Check the contents.• If the channel displayed is incorrect, select the CHposition with ß/© and correct it with ∂/ƒ.• When recording a program on a channel for the firsttime, you must enter the correct channel number on thescreen, otherwise the PlusCode number will not besuccessfully decoded.%Select the tape speed with ∂/ƒ if necessary.Ex.: SP^Press SET. To program additional timer settings, repeatSteps @ to ^.&Press MENU.The display shown to the left appears on the screen for 5seconds, then the normal screen returns.*Press POWER to enter the timer standby mode.Be sure that “TIMER” is lit up on the multi-function display. PLUSCODE      -  ONCE     WEEKLY DAILY  gNormalScreeng•If you select “DAILY” in Step #, the VCR will record the program Monday–Sunday at the same time.If you want to record Monday–Friday or Monday–Saturday, select “DATE” with ß/© and change it to “MO-FR” or “MO-SA”with ∂/ƒ in Step $.•In Step $, input the channel number you want to record. Once the preset channel has been input, you will not need to setthe preset channel for that station again.•In Step #, if the VCR cannot decode the PlusCode number, or if the combination of PlusCode number and Program modedoes not exist, then “ERROR” will appear as shown below. To correct, press CANCEL and re-enter the PlusCode number.Reasons for Error Message1: PlusCode number entered is invalid.2: Channel number is invalid.(Used in cases when, even though the VCR TV mode on the CHANNEL PRESET screen isset to AIR, the decoded channel number is greater than 69.)3: PlusCode number entered for a program that has already been shown.•You can also enter the VCR Plus+ system setting screen by selecting “VCR PLUS+” onMENU  screen.•If you press VCR PLUS+ or select “VCR PLUS+” on MENU screen when the VCR clockhas not been set, the CLOCK screen will initially appear.•If you press VCR PLUS+ when operating MENU screen for the first time or after a power failure of more than20 seconds, the LANGUAGE screen will initially appear.Checking/Cancelling the VCR Plus+ Programs SystemUse the method described in Confirming/Cancelling Timer Programs to confirm or cancel program data. PLUSCODE      123USE NUMBER KEYS  ONCE     WEEKLY DAILYSELECT :ENTER  :SET  EXIT  :MENU               ERRORMENUgSETgTIMER
•Before using the Timer Recording, read the Cable Box Set-up Function and Digital Satellite Set-upFunction sections.•Turn on the TV and select the video channel.•Insert a cassette with the erasure protection tab opening covered. Power will turn on automatically.•Press TV/VCR to select “VCR” (“VCR” will light on the multi-function display).•Check that the clock is displaying the correct time.•If necessary, set “SAP” on the SET UP–selection screen. (See Mode Selection.)Timer Recording (without VCR Plus+ System)Example: Recording a TV program in the SP mode: the TV program is on channel 120 (CATV) starting at9:05 PM and stopping at 10:35 PM on August 10th. The present time is 6:35 PM on August 10th.SET UP          MENUENTER  :SET  EXIT  :MENUCHANNELSSELECT :CLOCKLANGUAGETIMERVCR PLUS+gg∂ƒg©∂ƒ   2/2                     1/2ENTER  :SET  EXIT  :MENU -/-- ---  --:-- --:----SELECT : -/-- ---  --:-- --:---- -/-- ---  --:-- --:---- DATE  CH  START STOPCLEAR  :CANCEL -/-- ---  --:-- --:----                     1/2 8/10 120C --:-- --:--SP -/-- ---  --:-- --:---- DATE  CH  START STOP -/-- ---  --:-- --:---- -/-- ---  --:-- --:----g©∂ƒg!Press MENU.@Select “TIMER” with ∂/ƒ and then press SET.#Press SET.$Select the desired month/day (DATE) with ∂/ƒ and thenpress ©. The cursor will move to the next column.Ex.: August 10th• If you want to record every day or week at the same time, holdƒ when you select the date.%Select the desired channel with ∂/ƒ and then press ©.Ex.: Channel 120 (CATV)•If you receive both cable TV and satellite broadcasts,you will need to specify for channels 100 to 125 whetherit is a cable or satellite channel. After selecting thechannel, select “C” for a cable channel or “S” for asatellite channel with ∂/ƒ and then press ©.Ex.: CWhen pressing:    The recording date changes in this sequence:8/10  MO-FR  MO-SA  DAILY  SAT  SUN  8/9  8/88/10        8/11       8/12    8/8    8/9    SUN    SAT(next year)(next year)(present)(tomorrow)                     1/2 8/10 120C --:-- --:--SP -/-- ---  --:-- --:---- DATE  CH  START STOP -/-- ---  --:-- --:---- -/-- ---  --:-- --:----g©∂ƒSELECT :     CHANGE: 8/10 ---  --:-- --:--SP                     1/2ENTER  :SET  EXIT  :MENU -/-- ---  --:-- --:---- -/-- ---  --:-- --:---- -/-- ---  --:-- --:---- DATE  CH  START STOPMENU SETSET
RECORDING WITH THE TIMERTimer Recording (without VCR Plus+ System)(Press SET.•To program the additional timer settings, press SET andrepeat steps #–(.)Press MENU to finish settings.The display shown to the left appears on the screen for 5seconds, after which the normal screen returns.QPress POWER to enter the timer standby mode. Be surethat “TIMER” is lit up on the multi-function display.   TURN VCR POWER OFF   FOR TIMER RECORDING.gNormalScreeng                     1/2 8/10 120C  9:05P10:35SP -/-- ---  --:-- --:---- DATE  CH  START STOP -/-- ---  --:-- --:---- -/-- ---  --:-- --:----∂ƒ                     1/2 8/10 120C  9:05P10:35SP -/-- ---  --:-- --:---- DATE  CH  START STOP -/-- ---  --:-- --:---- -/-- ---  --:-- --:---- g©∂ƒ&Set the recording stop time with ∂/ƒ and then press ©.Ex.: 10:35 PM*Select the tape speed with ∂/ƒ.Ex.: SP                     1/2 8/10 120C  9:05P--:--SP -/-- ---  --:-- --:---- DATE  CH  START STOP -/-- ---  --:-- --:---- -/-- ---  --:-- --:----g∂ƒ^Set the recording start time (hour digits and minute digits)with ∂/ƒ and then press ©.Ex.: 9:05 PMg©•If the power is interrupted for more than 20 seconds (power failure, etc.) during timer recording, the Auto Clock Setting willreset the time after the power is returned (the timer indicator on the multi-function display will flash.) but the timer settings willbe cancelled.•Press ENT. /AM/PM (100) to select AM or PM during start time setting.•Numbered buttons can be used instead of ∂/ƒ to set the data.•If the cassette ends before recording all the programs, the VCR will stop, eject the cassette, and turn the power offautomatically.•In Step Q, if POWER is pressed with no cassette inserted, the TIMER indicator flashes for 5 seconds indicating that timerrecording is not possible.•In Step Q, if the inserted cassette is without the erasure protection tab, TIMER indicator flashes and the cassette is ejected.•To stop timer recording, press STOP.•If a button is not pressed within 3 minutes during the setting procedure, the screen will return to the normal screen.•There are two timer setting screens (1/2, 2/2).                     1/2 8/10 120C  9:05P10:35SP -/-- ---  --:-- --:---- -/-- ---  --:-- --:---- DATE  CH  START STOP -/-- ---  --:-- --:----gTIMERSETMENU
∂ƒConfirming Timer ProgramsYou can see on the Timer setting screen a list of all timer programs that are already set.•Turn on the TV and select the video channel.•Press POWER and then TV/VCR to select “VCR” (“VCR” will light on the multi-function display).!Press MENU.@Select “TIMER” with ∂/ƒ and then press SET.#TIMER screen will appear.•Check the information displayed.•If you want to correct the data, select the data to bechanged with ∂/ƒ and then press SET. Correct thedata as desired using ∂/ƒ/ß / ©. Then press SET.See 2/2 screen also.$Pressing MENU will clear the screen.The display shown to the left appears for 5 seconds, afterwhich the normal screen returns.•After checking or correcting the program contents, pressPOWER to enter the Timer Standby mode.Timer Recording (without VCR Plus+ System)g∂ƒSET UP          MENUENTER  :SET  EXIT  :MENUCHANNELSSELECT :CLOCKLANGUAGETIMERVCR PLUS+gg   TURN VCR POWER OFF   FOR TIMER RECORDING.g   2/2SELECT : 8/01 125C 12:00A12:30EP                     1/2ENTER  :SET  EXIT  :MENU 8/10  07   9:05P10:35SPDAILY  88  10:03P10:30EP -/-- ---  --:-- --:---- DATE  CH  START STOPCLEAR  :CANCEL∂/ƒandß/©g   2/2SELECT : 8/01 125C 12:00A12:30EP                     1/2ENTER  :SET  EXIT  :MENU 8/10  07   9:05P10:35SPDAILY  88  10:03P10:30EP -/-- ---  --:-- --:---- DATE  CH  START STOPCLEAR  :CANCEL∂ƒ   2/2SELECT : -/-- ---  --:-- --:----                     1/2ENTER  :SET  EXIT  :MENU 8/10  07   9:05P10:35SPDAILY  88  10:03P10:30EP -/-- ---  --:-- --:---- DATE  CH  START STOPCLEAR  :CANCEL   TURN VCR POWER OFF   FOR TIMER RECORDING.ggg@TIMER screen will appear.•Select the program you wish to cancel with ∂/ƒ.#Double-check that it is the program you wish to cancel,and press CANCEL. It will be cleared on the screen.$Pressing MENU will clear the screen.The display shown to the left appears for 5 seconds, afterwhich the normal screen returns.• If there are still some programs set, press POWER to enter theTimer Standby mode.•If you press MENU when all of the timer programs arecancelled, the screen will return to normal.!Follow the same procedure in Confirming Timer Programs ! @ above.gCancelling Timer ProgramsPerform the following procedure to cancel timer programs that have already been set.•Turn on the TV and select the video channel.•Press POWER and then TV/VCR to select “VCR” (“VCR” will light on the multi-function display).MENU SETSETSETMENUMENUCANCEL
Remote PagerRecorded Section Auto RepeatPress S. PICTURE on the VCR.“S.PICTURE ON (or OFF)” will appear on the TV screen for a few seconds. Each time thebutton is pressed, the mode switches between ON and OFF. (The Sharp Super Picture ispreset to ON at the factory.)ON:Normally leave the mode set to ON. This high picture quality function will create a clearer image duringplayback.OFF:Set to OFF when playing back a tape on the VCR while editing or when strong noise appears on the screen.•This function only operates during playback. It will not operate when recording or watching a TV program with the VCRtuner.•The ON/OFF status of the Sharp Super Picture can be checked when ON SCREEN is pressed to display OSD.•This function can not be set to ON/OFF with the MENU screen displayed. First close the MENU screen before operating thisfunction.•When the VCR power is turned off, the Sharp Super Picture setting is retained in memory.•If power is interrupted for more than 20 seconds (power failure, etc.), the setting will return to ON.This function creates clearer picture quality only during playback.S. PICTURE ONSharp Super PictureThis function is handy for finding the remote control if it is misplaced. Press REMOTE PAGER on the VCR, andthe remote control will beep to reveal its location.!Turn OFF the power on the VCR.@Press REMOTE PAGER on the VCR.The remote control will soon begin beeping for about 20 seconds, or until a button on theremote control is pressed.•If you do not wish to use the Remote Pager function, set the R/C CALL mode to OFF on the SET UP selection screen. (The R/C CALL mode is preset to ON at the factory.) (See Mode Selection.)•The Remote Pager function operates on radio waves.  The effective range of radio waves sent from the VCR is a radius of 7meters (in a straight unobstructed line), however, this may vary depending on the surrounding environment.•The remote control may not beep in the following situations.- When the remote control is in a different room from the VCR.- When the remote control is placed on a metal surface.- When the remote control is obstructed by a large object (i.e. wall, furniture).•After REMOTE PAGER is pressed, it may take up to five seconds before the remote control beeps.PLAYWith this feature, if the recorded portion has finished and non-recorded portion has continued for 15 seconds, the tape willautomatically stop, rewind to the beginning and repeatplayback.!Press AUTO REPEAT on the remote control. The “ ” mark will appear on the screen for 3 seconds.@When a non-recorded portion has continued for 15 seconds after the recorded portion has finished, thetape will stop and begin rewinding.#The tape will rewind to the beginning and repeat playback.$To turn off the Recorded Section Auto Repeat function, press AUTO REPEAT once more.•You can also set the Recorded Section Auto Repeat mode by selecting “ON” on the SET-UP-selection screen. (The AUTOREPEAT mode is preset to OFF at the factory.)•The ON/OFF status of the Recorded Section Auto Repeat can be checked when ON SCREEN is pressed to display OSD.(The “ ” mark lights when the Recorded Section Auto Repeat is on.)•If the Recorded Section Auto Repeat is on and the tape is rewound to the beginning with rewind or reverse video search, thetape will automatically start playback.
DPSS (Digital Program Search System)You can quickly locate a desired section of the tape with thisfeature.Index SignalAn index signal is automatically recorded on the tape at the startof ordinary recording, simple recording timer and timerrecording.Rewind Fast forward 1–1  2  3Index signalsCurrent tape position!Insert a tape containing index signals.@Select the index number of the desired program with DPSS k/j on the remotecontrol.•With each press of the button, the number changes. One of 19 programs can beselected in either direction (one of up to 38 programs).(Ex.: DPSS 3=Third program after the current one.)#Search starts immediately when you press DPSS k/j. (When a signal is located, the displayed numberdecreases.)$When the selected section is found, playback begins automatically.• DPSS may not work if recordings are too close (within 3 minutes of each other).• Press PLAY or STOP to cancel DPSS.• If the tape reaches its end or beginning before locating the desired point, DPSS is cancelled.• DPSS may not function for damaged or worn tapes.• DPSS cannot be used with tapes that contain no index signals.• The starting point of a program may vary slightly.• DPSS does not operate during the slow, record, timer stand-by, and timer recording modes, or when there is no cassette loaded.• Index signals for DPSS cannot be entered manually.On the TV screeng                 DPSS  3                 DPSS  2With this feature, you can set a forward video search time to approx. 30, 60, 90 or 120 seconds ofrecorded material. After searching, normal playback will resume automatically.•Press SKIP SEARCH on the remote control during playback (ex. during commercials).Skip SearchNumber of Times Pressed 1 Time 2 Times 3 Times 4 TimesVideo Search Time Approx. 30 sec. Approx. 60 sec. Approx. 90 sec. Approx. 120 sec.With this feature, you can set a reverse video search time to approx. 20, 40, 60, or 80 seconds ofrecorded material. After searching, normal playback will resume automatically.•Press REPLAY on the remote control during playback.Instant ReplayNumber of Times Pressed 1 Time 2 Times 3 Times 4 TimesVideo Search Time Approx. 20 sec. Approx. 40 sec. Approx. 60 sec. Approx. 80 sec.SpecialFunctions
•During auto zero back, if the VCR rewinds (or fast forwards) the tape all the way without finding the “0:00.00” point, it willstop at the beginning (or end) of the tape.•The counter start point “0:00.00” may differ slightly from the starting point on the tape.•This function is not operable during recording, recording pause, simple recording timer or timer recording.Auto Zero BackThis function automatically forwards or rewinds the cassette to the “0:00.00” point. Use this function to return toa recording start point.!Reset the counter to “0:00.00” with CANCEL before recording.@Press REC to start recording.#After recording the desired program, press STOP to stop recording.$Press ZERO BACK to return to the recording start point (0:00.00).Tamper ProofWith this feature, you can lock all VCR modes to prevent accidental change.This function works even when the VCR power is off, thus preventing children from operatingthe VCR or viewing select programs while you are away from home.Tamper Proof!Press TAMPER PROOF on the remote control for about 2 seconds.“ ” flashes and “ ” lights on the multi-function display.@Press TAMPER PROOF again.“ ” remains lit on the multi-function display confirming that Tamper Proof has been activated.#Now regardless of what other operating buttons are touched, the VCR will continue to operate in the presentmode.(If Tamper Proof is activated during playback, once the tape reaches its end, the VCR automaticallyrewinds the tape, ejects it, and turns the power off.)Disengaging Tamper Proof•Press TAMPER PROOF for about 2 seconds.“” starts flashing and then disappears. Now, Tamper Proof is disengaged.Advanced Tamper Proof!Press TAMPER PROOF on the remote control for about 2 seconds.“ ” flashes and “ ” lights on the multi-function display.@Input the personal code number (4 digit code) with the numbered buttons. The personal code number youhave input is displayed on the multi-function display.#Press TAMPER PROOF again.“ ” remains lit on the multi-function display confirming that Tamper Proof has been activated.$Now regardless of what other operating buttons are touched, the VCR will continue to operate in the presentmode.(If Tamper Proof is activated during playback, once the tape reaches its end, the VCR automaticallyrewinds the tape, ejects it, and turns the power off.)Disengaging Advanced Tamper Proof!Press TAMPER PROOF for about 2 seconds.“ ” flashes and “ ” lights on the multi-function display.@Input the personal code number (4 digit code) you used to activate Advanced Tamper Proof with thenumbered buttons. The personal code number you have input is displayed on the multi-function display.#Press TAMPER PROOF again.“” disappears. Now, Tamper Proof is disengaged. If the code number is wrong, “ ” is displayed onthe multi-function display. Retry to input the right code number. Press TAMPER PROOF again.•If power is interrupted for more than 20 seconds (power failure, etc.), Tamper Proof may disengage.•If, while Tamper Proof is on, you attempt to change modes by pressing another button, the “ ” indicator will flash on themulti-function display.
SpecificationsFormat: VHS NTSC StandardVideo Recording System: Rotary Two-Head Helical ScanningNumber of Video Heads: 4Video Signal Standard: NTSC Color SystemAudio Recording System: 1 Stationary Head for Linear Audio2 Rotary Heads for Hi-Fi stereoTape Width: 12.7 mm (1/2 inch)Tape Speed: (SP) 33.35 mm/sec (1.31 i.p.s.)(LP) 16.67 mm/sec (0.66 i.p.s.) (playback only)(EP) 11.12 mm/sec (0.44 i.p.s.)Maximum Recording Time: (SP) 160 min (T-160)(EP) 480 min (T-160)Channel Coverage: VHF 2–13UHF 14–69CATV 1–125Antenna Input: 75 OhmVideo Input: 0.5 to 2.0 Vp-p, 75 Ohm unbalancedVideo Output: 1.0 Vp-p, 75 Ohm unbalancedAudio Input: 18 dBs, 47 kOhm unbalanced (0 dBs 4 0.775 Vrms)Audio Output: 18 dBs, 1 kOhm unbalanced (0 dBs 4 0.775 Vrms)Hi-Fi Audio:Dynamic Range: 90 dBFrequency Response: 20 Hz–20 kHzMemory Backup: 20 secondsOperating Temperature: 5&C to 40&C (41&F to 104&F)Storage Temperature: 120&C to 60&C (14&F to 140&F)Power Source: 120 V AC, 60 HzPower Consumption: 20 WDimensions: 360 (W) 2 92 (H) 2 256 (D) mm(14-3/16( 2 3-5/8( 2 10-5/64()Weight: 2.7 kg (6.0 lbs)•Specifications are subject to change without notice.HelpfulHints
Check this list before calling for service.Possible Cause/Solutions• MAKE SURE THAT THE “TAMPER PROOF” MODE IS NOT ENGAGED.• If you forget the personal code number you have input with Advanced TamperProof, input “0000” (four zeros) to disengage it.• Make sure the power cord is plugged in.• Check the outlet, fuse or circuit breaker.• Use the CHANNEL PRESET screen to change from AIR mode to CATV. (SeeSetting the Channels.)• Turn on the power.• Press EJECT several times.• Safety device in VCR is functioning. Unplug VCR and plug it in again after a fewminutes.• Cassette erasure protection tab is removed. Use a different cassette or placeadhesive tape over the tab opening.• Check for a cassette loaded in the unit.• Make sure the “TV” has been selected by pressing TV/VCR.• Make sure all cables are connected properly.• Make sure the VCR is not in PAUSE/STILL mode.• Make sure the tape has not reached the end or beginning.• Make sure the TV is set to the same channel as the VCR’s 3 ↔ 4 OUTPUTCHANNEL selector.• Check all connecting cables.• Make sure there is no other cassette inside.• Make sure the cassette is properly positioned and reinsert.• Make sure the “TAMPER PROOF” mode is not engaged.• Power failure may have occurred.• If the clock display is blinking, set the clock and try again.• Adjust the tracking manually by pressing CH ∂/ƒ.• In some cases, with a worn or damaged tape, noise cannot be eliminatedcompletely.• The VCR may not be set to external input mode.Press INPUT to set the VCR to external input mode. (See Tape Dubbing.)• Keep your VCR away from electrical and magnetic appliances. Be sure toposition your VCR at least 89 away from your TV or video monitor.• Use RCA pin type connection cables (not the supplied coaxial cable) to connectthe TV to the VCR, and set the TV to external video input mode.• Adjust the tracking, or try another Hi-Fi stereo cassette.• Make sure the sound was recorded in Hi-Fi stereo. (Any stereo signals recordedon the linear track will not be played back in stereo.)Pre–Service Call ChecklistProblem• NO OPERATION WHEN ANY BUTTON ISPRESSED.• No power. (Nothing on the multi-functiondisplay.)• VCR does not receive CATV channels.• VCR does not operate.• VCR does not record.• No color or poor TV picture during normalviewing.• No tape movement.• No picture appears during playback.• Cassette cannot be loaded.• Timer recording does not work.• Noise appears on the screen when theautomatic tracking control system is oper-ating.• Cannot record a signal through the rearexternal input jack.•Picture or sound is not stable duringplayback.• Stereo TV puts out monaural sound only,even when cassettes recorded in Hi-Fistereo are played back.• Cassettes recorded in stereo mode arenot played back in stereo.For the location of the nearest Sharp Authorized Service Center, or to obtain product literature, accessories,supplies or customer assistance, please call 1-800-BE SHARP (1-800-237-4277).Service InformationThis unit is equipped with a microprocessor. Its performance could be adversely affected by externalelectrical noise or interference. If this should happen, unplug the VCR and plug it in again after a fewminutes and reset EZ Set Up for AIR/CATV operation.
Cable TV ConnectionsYour VCR is capable of receiving the following non-scrambled channels.•Scrambled channels can be received with the cable box supplied by your cable TV company.Set the 3 ↔ 4 OUTPUT CHANNEL selector on the rear of the VCR to 3 or 4. (Factory preset: 3)Tune the TV to this channel and press the TV/VCR button to watch the VCR.First check your TV/CATV system    Step QDoes your CATV operator require use of cable box?•YES →Go to Step W•NO →Go to     Step WDoes your CATV system have some or all channels scrambled?•YES →Go to   or •NO →Go to Connection without a cable box•Connect as shown. Then go to “After the Connection”.ANT/CABLEVCR RearTV RearFrom CATV systemCoaxial cable(Supplied)Connection with cable box•Connect as shown. With this connection, it is possible to record descrambled CATV signals. Then go to “Afterthe Connection”.•If your cable box is remote-controllable, see Cable Box Set-up Function.ANT/CABLEVCR RearCable BoxTV RearOUTINFromCATVsystemCoaxialcable(Supplied)Coaxial cable(Not supplied)•If the cable box is turned off, it will not output any signals, thus making it impossible to record or view a program from theCATV system.•In the case of the above connections, it is not possible to change channels using the VCR remote control. Only the cablebox can be used to change channels.•Only one channel at a time can be programmed for recording programs with the timer. It is not possible to watch a TVprogram different from the one being recorded.•Depending on which terminals the TV has, a separate combiner (mixer) or separator (splitter) may be necessary.
Cable TV ConnectionsOUTINANT/CABLEABConnection with cable box, A/B switch and splitterIf the cable box is needed only for some of the channels of your CATV operator, connect the cable box to yourVCR as shown below. This type of connection requires a cable box set-up. For more details, see Cable BoxSet-up Function.•Connect as shown. Then go to “After the Connection”.•This connection allows you to watch a channel that does not require the cable box, while recording from a different channel.Note, however, that you cannot view other broadcast TV channels while recording a CATV program through the cable box.TV RearVCR RearUsing the A/B switch!Set the A/B switch to the ‘A’ position in the following situations.Set USE CABLE BOX to “NO” on the CABLE BOX SET UP screen. (See Cable Box Set-up Function.)a) To record and watch an unscrambled TV program (without the signal passing through the cable box).b) To watch an unscrambled TV program when the VCR is recording another program.c) To watch an unscrambled TV program when the VCR is turned off.@Set the A/B switch to position B in the following situations:When the A/B switch is set to B, the cable box requires a set-up to receive the remote control codes sentfrom your VCR, which control the cable box channel.  For details on the cable box set-up, see Cable BoxSet-up Function.Set USE CABLE BOX to “YES” on the CABLE BOX SET UP screen.a) To record and watch a scrambled or unscrambled TV program through the cable box.b) To watch a scrambled or unscrambled TV program through the cable box when the VCR is turned off.•If the power on the cable box is turned off, it will not output any signals, thus making it impossible torecord or view a program from the CATV system.•If you turn off the cable box, you cannot record or view a CATV program.•If you have questions regarding any connection procedure, please contact your cable company.After the ConnectionPlug in the power cords of the VCR, TV and cable box. Then go to the SETTING UP section.Coaxial cable(Supplied)A/B switch(Not supplied)Coaxial cable(Not supplied)Coaxial cable(Not supplied)Splitter(Not supplied) Cable BoxFromCATVsystem
Esta es una breve guía de operación rápida preparada para ayudarle a utilizar las funciones básicas de su videograbadora.Después de prender su videograbadora a la antena apropiada, televisor o caja de televisón por cable, utilícela siguiendo lasexplicaciones dadas a continuación.Para ver en la pantalla de su televisor lo que su videograbadora está reproduciendo o grabando, ajuste el selector 3 ↔ 4OUTPUT CHANNEL y el canal de TV siguiendo el método descrito a continuación.Guía de operación rápida en españolAjuste del selector 3 ↔ 4 Output ChannelEl selector 3 ↔ 4 OUTPUT CHANNEL de la parte trasera de su videograbadora cambia la salidade la videograbadora a las señales estándar de emisión de TV. Su televisor y su videograbadoradeben estar ajustados al mismo canal (por ejemplo, el televisor en el canal 3 y el selectorOUTPUT CHANNEL de la videograbadora en el canal 3).Parte trasera desu videograbadoraPreparación del EZIMPORTANTE (Precaución durante EZ Set Up):• No pulse el botón POWER de la videograbadora ni del control remoto.• No inserte un videocasete en la videograbadora.La función de EZ Set Up ajusta automáticamente el canal del sintonizador y el reloj cuando el cable de la antena estáconectado al panel trasero de la videograbadora y la clavija de alimentación se conecta luego a una toma de CA.IMPORTANTECuando se utilice un sintonizador de TV por cable:• Consulte Conexiones de TV por cable.• Deje conectada la alimentación del sintonizador de TV por cable.!Asegúrese de que el cable de la antena esté conectado. Para conocer laconfiguración de la conexión, consulte Conexión del vídeo.@Conecte la clavija del cable de alimentación del vídeo a una toma de CA.#El canal del sintonizador y el reloj se ajustarán automáticamente.• Esta videograbadora puede monitorear y utilizar señales de tiempo(señales EDS), proporcionadas por algunas emisoras de TV, para ajustarautomáticamente el reloj de la videograbadora. Esta videograbadorabusca automáticamente las señales EDS, pero si usted tiene prisa parautilizar la grabación con temporizador o conocer el canal de la portadorade señal EDS en su área, siga el procedimiento de Ajuste automáticodel reloj o Ajuste manual del reloj.Durante el ajuste automático de canales•Si se suministra alimentación a la videograbadora nates de conectar el cable EZ Set Up no podrá preajustar canales en lamemoria. Si ocure esto, desenchufe la videograbadora de la toma e corriente y espere unos pocos minutos. Compruebe laconexión del cable/antena y suministre alimentación a la videograbadora. EZ Set Up empezara de nuevo automáticamente.•Si se conecta la alimentación durante EZ Set Up, el ajuste automático de los canales se interrumpirá y los canales delsintonizador no podrán ser preajustados.•El ajuste automático del reloj puede tardar varios minutos.•Si el ajuste automático del reloj no se completa antes de 30 minutos, puede que no haya canales con señales EDS. En estecaso, ajuste el reloj manualmente. (Consulte Ajuste manual del reloj.)•Si la señal de la antena es débil, la función del ajuste automático del reloj no funcionará.•Durante el ajuste inicial de los canales, éstos se ajustarán en el canal AIR. Para ver un canal de TV por cable, seleccione“CATV” en la pantalla PREAJ. CANAL. (Consulte Adjuste de canales.)Cuando utilice la videograbadora por primera vez, o después deproducirse un fallo en la alimentación de más de 20 segundos,tendrá que ajustar el idioma que vaya a utilizar en la pantalla devisualización.!Conecte la alimentación de su televisor y seleccione elcanal de vídeo.(Consulte Ajuste del selector 3 ↔ 4 Output Channel.)@Pulse POWER y luego TV/VCR para seleccionar “VCR”.(“VCR” se encenderá en el visualizador multifuncional.)Ajuste de idiomaSelector 3 ↔ 4OUTPUT CHANNELMENUß©SET∂ƒEspañolTIMERRECVCRSPEPffPuesta en hora automático del relojEZ Set Up completo
Guía de operación rápida en españolAjuste del reloj#Pulse MENU.$Seleccione el idioma con los botones ∂/ƒ y pulse SET.La pantalla volverá al modo normal.Ejemplo:  ESPAÑOLEN LA PANTALLA DEL TELEVISOR OPERACION(PANTALLA EN INGLES)ESPANOL        LANGUAGEFRANÇAISENGLISHESPANOL        IDIOMAFRANÇAISENGLISH∂ƒg(PANTALLA EN ESPAÑOL)Deberá poner en hora el reloj si desea utilizar las funciones del temporizador. De otra forma, este ajuste no será necesario.Cuando la videograbadora se enchufe por primera vez a una toma de corriente, el reloj del visualizador multifuncional (--:--)parpadeará. Lo mismo ocurrirá si la alimentación se interrumpe durante más de 20 segundos (fallo en la alimentación, etc.).!Conecte la alimentación de su televisor y seleccione el canal de vídeo.(Consulte Ajuste del selector 3 ↔ 4 Output Channel.)@Pulse POWER y luego TV/VCR para seleccionar “VCR”.(“VCR” se encenderá en el visualizador multifuncional.)#Pulse MENU. Seleccione el item “RELOJ” con los botones∂/ƒ y pulse SET.$Siga las instrucciones mostradas en la pantalla eintroduzca los datos del calendario y del reloj utilizando losbotones ∂/ƒ/ß/© del control remoto.%Si los datos introducidos son correctos, pulse SET delcontrol remoto para volver a la pantalla normal, y luego elreloj empezará a funcionar.EN LA PANTALLA DEL TELEVISOR OPERACIONPREPARAR          MENUENTRAR :SET  SALIR :MENUCANALESSELEC. :RELOJIDIOMATEMPVCR PLUS+g∂ƒgSELEC. :     CAMBIO:10:28AM  7/04SAB 98  ENC         RELOJENTRAR :SET  SALIR :MENUHORA     FECHA  ANO  DST∂/ƒfß/© g    PANTALLA NORMALReproducción!Conecte la alimentación de su televisor y seleccione el canal de vídeo. (Consulte Ajuste del selector 3 ↔ 4 OutputChannel.)@Pulse POWER para conectar la alimentación de la videograbadora.#Insertando un casete, pulse PLAY.$Para parar la reproducción, pulse STOP.Grabación de un programa de TV!Conecte la alimentación de su televisor y seleccione el canal de vídeo. (Consulte Ajuste del selector 3 ↔ 4 OutputChannel.)@Pulse POWER y luego TV/VCR para seleccionar “VCR”.(“VCR” se encenderá en el visualizador multifuncional.)#Inserte el casete con lengüeta de protección contra borrado intacta.$Pulse TAPE SPEED del control remoto para ajustar la velocidad de grabación (SP o EP).%Seleccione el canal deseado con CH ∂ o ƒ, o con los botones numéricos del control remoto.^Pulse REC.•En el paso #, si pulsa MENU cuando opere la pantalla de visualización por primera vez, o después de producirse un falloen la alimentación de más de 20 segundos, la pantalla del idioma aparecerá.•Si no se pulsa un botón antes de que pasen 3 minutos durante el procedimiento de ajuste, la pantalla volverá a la pantallanormal.MENUgSETSETMENUSET
Guía de operación rápida en españolPara ver un programa de TV mientras se graba otro!Siga los pasos ! a ^ de arriba.@Pulse TV/VCR para seleccionar “TV” (el indicador “VCR” se apagará).#Sintonice el canal de TV deseado.%Pulse MENU del control remoto.^Seleccione el modo de ajuste TEMP con los botones ∂/ƒy pulse SET.&Pulse SET.*Siga las instrucciones mostradas en la pantalla eintroduzca los datos utilizando los botones ∂/ƒ/ß/© delcontrol remoto.(Pulse SET del control remoto.Todos los datos introducidos aparecerán en la pantalla deltelevisor.EN LA PANTALLA DEL TELEVISOR OPERACIONPREPARAR          MENUENTRAR :SET  SALIR :MENUCANALESSELEC. :RELOJIDIOMATEMPVCR PLUS+g∂ƒg                     1/2 8/10  07   9:05P 10:35SPFECHA  CA INICIO PARADA -/-- ---  --:-- --:----∂/ƒfß/©                     1/2FECHA  CA INICIO PARADA 8/10  07   9:05P10:35SP -/-- ---  --:-- --:----g)Pulse MENU para terminar de hacer los ajustes.QPulse POWER para entrar en el modo de espera del temporizador. Asegurese de que “TIMER” estéencendido en el visualizador multifuncional.!Conecte la alimentación de su televisor y seleccione el canal de vídeo.@Inserte un casete con la abertura de la lengüeta de protección contra borrado tapada. La alimentación seconectará automáticamente.#Pulse TV/VCR para seleccionar “VCR”.  (“VCR” se encenderá en el visualizador multifuncional.)$Seleccione el canal deseado con los botones numéricos o con CH ∂ o ƒ.%Ajuste la velocidad de grabación (SP o EP) con TAPE SPEED del control remoto.^Pulse REC para entrar en el modo de grabación.&Luego, pulse REC para entrar en el modo de grabación sencilla con temporizador. La hora de parada degrabación se visualiza.*Cada vez que pulsa REC, la hora de parada aumenta en 10 minutos. Si fuese necesario, pulse CH ∂ o ƒ paracambiar el ajuste de los minutos.(Cuando llegue la hora de parada, la grabación terminará y la alimentación se desconectará.!Conecte la alimentación de su televisor y seleccione el canal de vídeo.@Inserte un casete con la abertura de la lengüeta de protección contra borrado tapada. La alimentación se conectaráautomáticamente.#Pulse TV/VCR para seleccionar “VCR”.  (“VCR” se encenderá en el visualizador multifuncional.)$Compruebe si el reloj muestra la hora correcta.gAjuste de la grabación con temporizadorAjuste del temporizador de grabación sencilla                     1/2 -/-- ---  --:-- --:----FECHA  CA INICIO PARADA -/-- ---  --:-- --:----/MENU SETSETSET
SHARP ELECTRONICS CORPORATION warrants to the first consumer purchaser that thisSharp brand product (the “Product”), when shipped in its original container, will be free fromdefective workmanship and materials, and agrees that it will, at its option, either repair thedefect or replace the defective Product or part thereof with a new or remanufactured equivalentat no charge to the purchaser for parts or labor for the period(s) set forth below.This warranty does not apply to any appearance items of the Product nor to the additionalexcluded item(s) set forth below nor to any Product the exterior of which has been damaged ordefaced, which has been subjected to improper voltage or other misuse, abnormal service orhandling, or which has been altered or modified in design or construction.In order to enforce the rights under this limited warranty, the purchaser should follow the stepsset forth below and provide proof of purchase to the servicer.The limited warranty described herein is in addition to whatever implied warranties may begranted to purchasers by law. ALL IMPLIED WARRANTIES INCLUDING THE WARRANTIES OFMERCHANTABILITY AND FITNESS FOR USE ARE LIMITED TO THE PERIOD(S) FROM THEDATE OF PURCHASE SET FORTH BELOW. Some states do not allow limitations on how longan implied warranty lasts, so the above limitation may not apply to you.Neither the sales personnel of the seller nor any other person is authorized to make anywarranties other than those described herein, or to extend the duration of any warrantiesbeyond the time period described herein on behalf of Sharp.The warranties described herein shall be the sole and exclusive warranties granted by Sharpand shall be the sole and exclusive remedy available to the purchaser. Correction of defects, inthe manner and for the period of time described herein, shall constitute complete fulfillment ofall liabilities and responsibilities of Sharp to the purchaser with respect to the Product, and shallconstitute full satisfaction of all claims, whether based on contract, negligence, strict liability orotherwise. In no event shall Sharp be liable, or in any way responsible, for any damages ordefects in the Product which were caused by repairs or attempted repairs performed byanyone other than an authorized servicer. Nor shall Sharp be liable or in any way responsiblefor any incidental or consequential economic or property damage. Some states do not allow theexclusion of incidental or consequential damages, so the above exclusion may not apply toyou.THIS WARRANTY GIVES YOU SPECIFIC LEGAL RIGHTS. YOU MAY ALSO HAVE OTHERRIGHTS WHICH VARY FROM STATE TO STATE.Warranty Period for this Product: 90 days Parts and Labor. The warranty period continues fora total of one year from the date of purchase for parts.Additional Items Excluded from Warranty Coverage: Non-Rechargeable Batteries.Where to Obtain Service: For location of the nearest Sharp Authorized Service, or to obtainproduct literature, accessories, supplies or customer assistance, please call 1-800-BESHARP.What to Do to Obtain Service: Ship or carry in your Product to an Authorized Service Dealeror Station. Be sure to have Proof of Purchase available; if you ship the Product, be sure it ispackaged carefully.SHARP ELECTRONICS CORPORATIONSharp Plaza, Mahwah, New Jersey 07430-2135SHARP CORPORATIONOsaka, Japan Printed in MalaysiaTINS-3227AJZZT1749-A8P03-MSG

Navigation menu